

Page 1
PROFESSIONAL C OMBI OVEN
U SER MANUAL MYC HEF EVO LU TION
Page 2

Index
1. INTRODUCTION ............................................................................................................. 7
2. MYCHEF EVOLUTION .................................................................................................... 7
2.1 Switching on the equipment.................................................................................. 8
2.1.1 Rotary knob LED indicator ............................................................................. 8
2.2 First use .................................................................................................................. 9
2.3 Main menu .............................................................................................................. 9
2.4 Mychef evolution main functions ....................................................................... 11
2.5 Navigation ............................................................................................................ 13
3. CHEF ............................................................................................................................. 13
Cooking options: .......................................................................................................... 14
3.1 Menu CHEF ........................................................................................................... 16
3.1.1 Temperature cooking and time control ...................................................... 17
3.1.2 Editing cycles ................................................................................................ 22
3.1.3 End of cooking .............................................................................................. 24
4. SMARTCOOKING ......................................................................................................... 25
4.1 SMARTCOOKING Mode ....................................................................................... 25
4.1.1 Go & Cook ..................................................................................................... 28
4.1.2 Saving cooking or recipe set up or creating a recipe ........................................ 29
5. COOKING PLANNER .................................................................................................... 31
5.1 Save Cooking planner .......................................................................................... 34
6. REGENERATE ............................................................................................................... 34
7. MYCARE ....................................................................................................................... 35
8. RECIPES ....................................................................................................................... 39
8.1 Managing recipes from MyChef Cloud............................................................... 42
9. SETTINGS .................................................................................................................... 42
9.1 Date/ Time ............................................................................................................ 43
9.2 Language .............................................................................................................. 43
9.3 Volume .................................................................................................................. 43
9.4 Lighting ................................................................................................................. 44
9.5 Smart Assistant.................................................................................................... 44
9.6 Maintenance ......................................................................................................... 45
9.7 Probe ..................................................................................................................... 47
9.8 System Analysis ................................................................................................... 47
5
Page 3

9.9 System .................................................................................................................. 48
9.10 Restore factory default values. ........................................................................... 48
9.11 Accounts ............................................................................................................... 48
9.12 USB ........................................................................................................................ 49
9.13 Consumption ........................................................................................................ 50
9.14 Measurement system .......................................................................................... 50
9.15 Advanced settings ............................................................................................... 51
9.16 NightWatch ........................................................................................................... 52
9.17 Error and alarms................................................................................................... 52
6
Page 4

Before carrying out any intervention or use of the equipment, it is necessary
to read this manual carefully and completely.
The manufacturer shall disclaim any liability for problems caused by
improper installation, modification, use or improper maintenance.
1. INTRODUCTION
This manual has been carefully prepared and checked in order to provide reliable and
helpful information for proper installation, use and maintenance that will make the
oven function properly and prolong its life. This manual is divided into two parts, the
first part dedicated to the installation of the equipment at the working point, and the
second part focuses on cleaning and maintenance of the oven.
The manufacturer disclaims any implied or explicit liability for any errors or omissions
it may contain.
- The oven cannot be used by personnel who have not received any kind of training,
who do not have the skills or experience necessary for the correct operation of the
equipment. Do not allow children to use or play with the equipment.
- The owner of the equipment has the responsibility to have this manual be read by
the personnel in charge of its use and maintenance, and to keep this manual in a
safe place so that it can be used by all users of the equipment and for future
reference. If the equipment is sold to other people, this manual must be given to
them.
- This oven may only be used for the purpose intended, i. e. cooking, heating,
regenerating or dehydrating food. Any other use may be hazardous and may result
in personal injury and damage to property.
- The equipment is shipped from the factory once it has been calibrated and
passed rigorous quality and safety tests to ensure its correct operation.
2. MYCHEF EVOLUTION
This section provides an overview of the basic functions and all the information
necessary for the correct use of the user interface of the mychef evolution combi
steamer.
For a description of more specific functions, refer to the help available on each screen..
7
Page 5
In order to protect the oven from overtemperature, it is possible that some
protective elements may work even if the oven is switched off. When the
oven is at a safe temperature, they will turn off automatically.
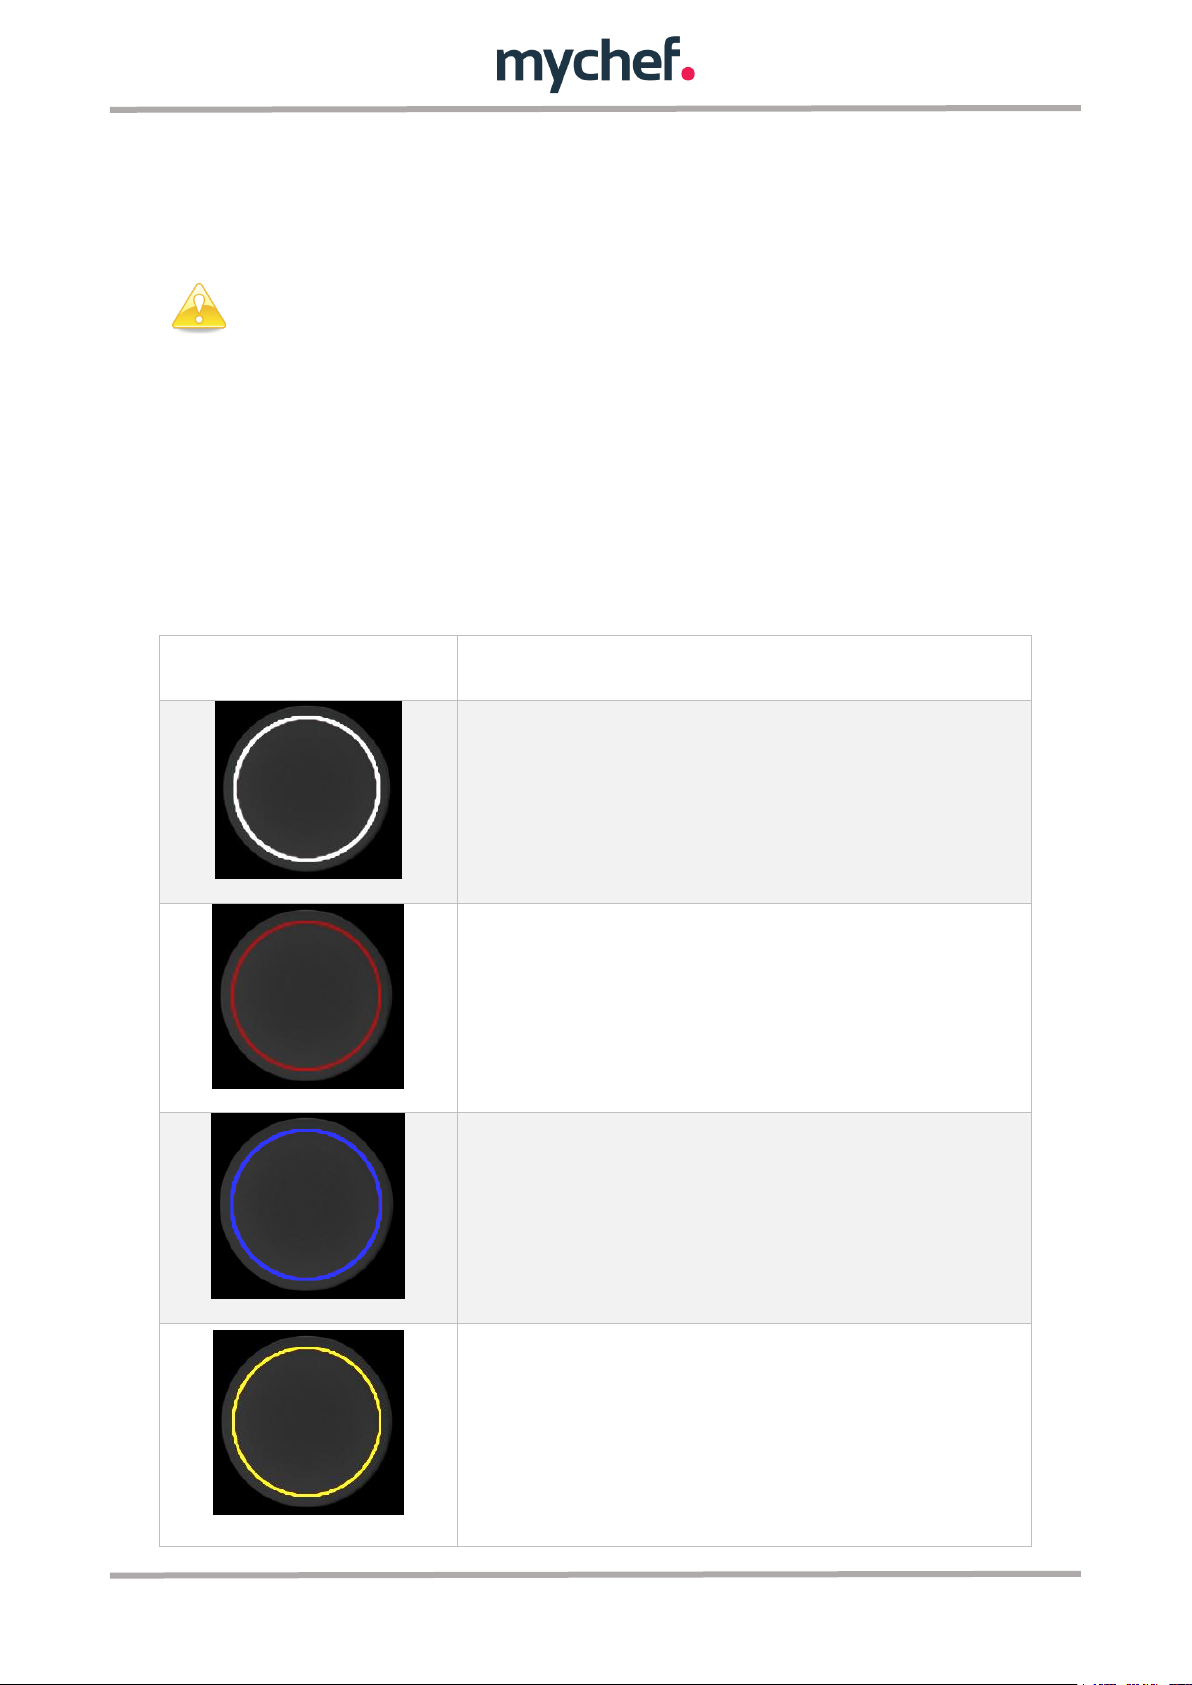
Mode
Temperature
This color indicates that the oven is not cooking or
cleaning. The oven's not working.
This color indicates that the oven is cooking.
This color indicates that a cleaning or rinsing process is
in progress.
This color has three different meanings.
If the oven is cooking or washing, it indicates that
cooking is about to end. If 1 minute is left to finish a
time cooking or cleaning process. If a probe cooking is
being carried out, it will light up when 5ºC are missing
for final temperature.
2.1 Switching on the equipment
The equipment is switched on or off using a switch on the control panel to the left of
the panel.
2.1.1 Rotary knob LED indicator
The rotary knob has an illuminated circle indicating the operating status of the oven.
This indicator changes colour depending on the state of the oven, allowing the user to
check easily and quickly and even while at a certain distance from the oven if a process
has been completed, etc.
The possible colours of the indicator and their meaning are given below:
8
Page 6
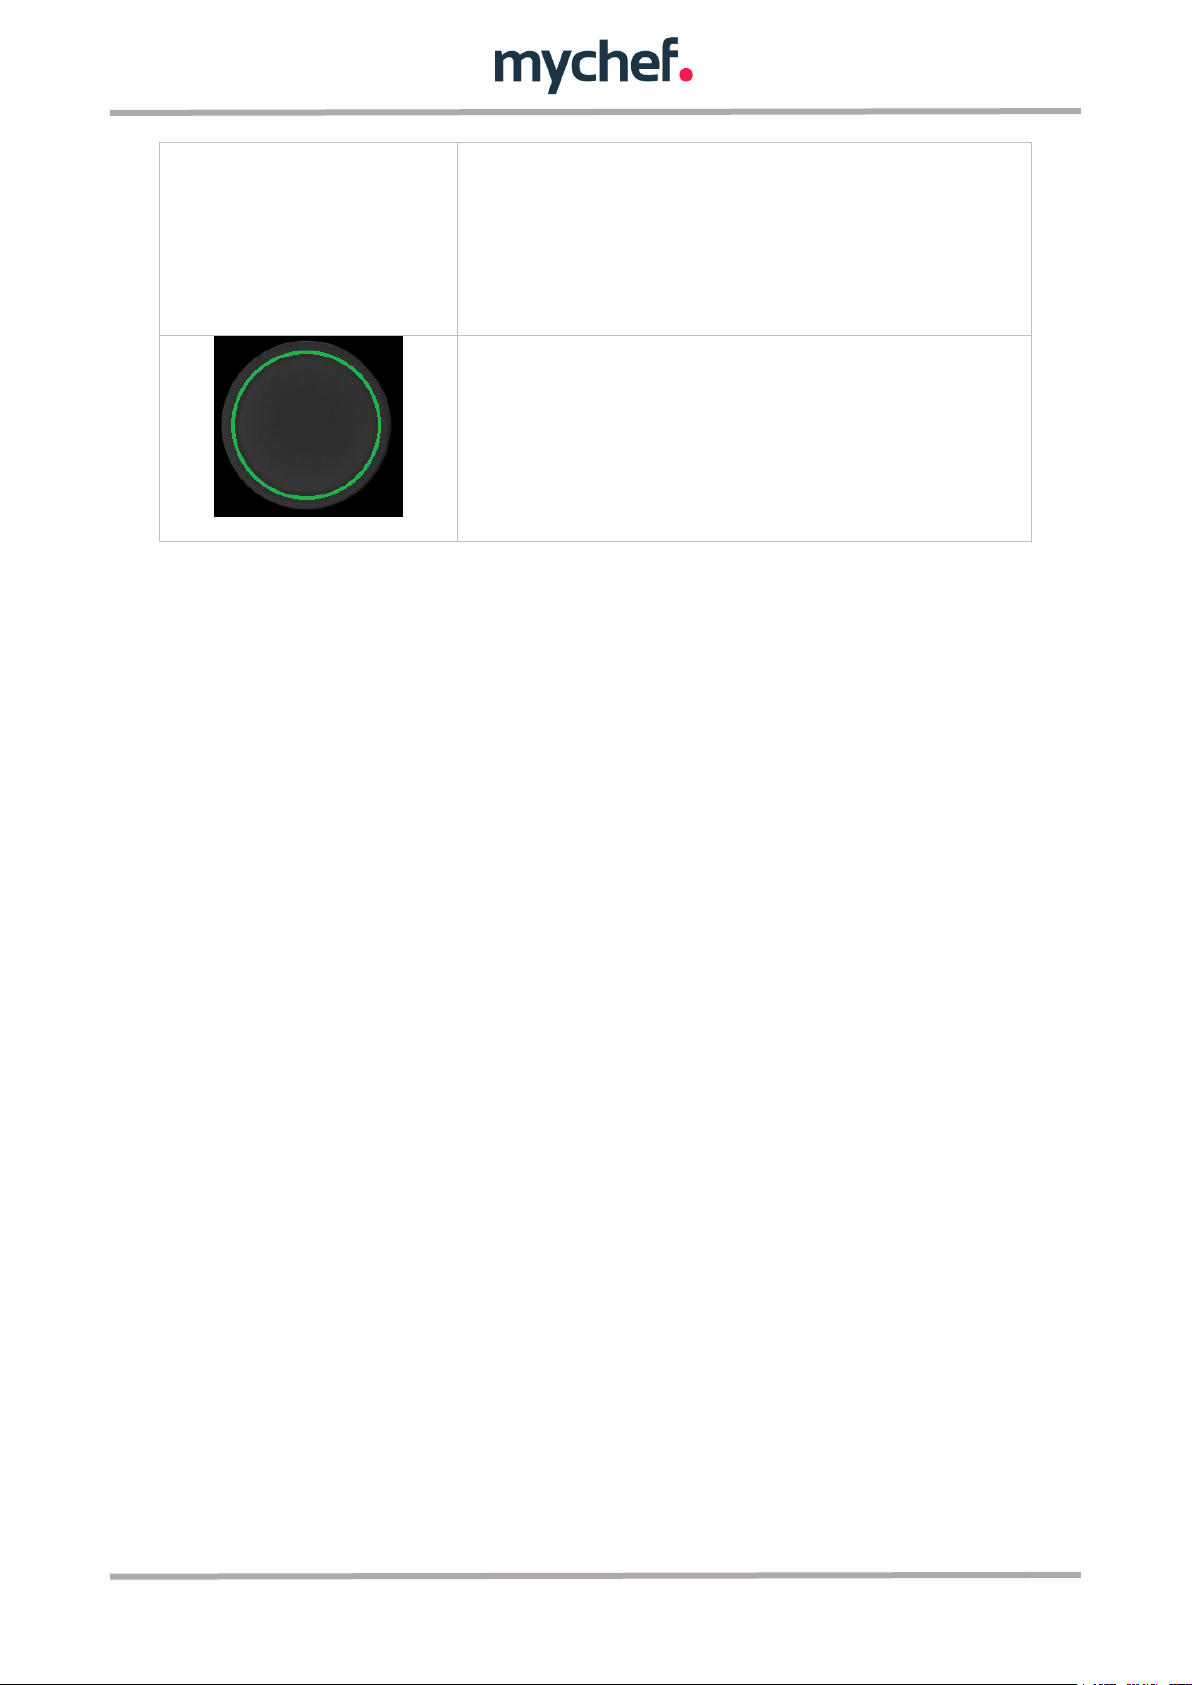
It also indicates whether the oven is performing a
temperature setting process, both preheating and
cooling.
Finally, it is also used to indicate that the oven is in
setup mode.
This color indicates that a cooking or cleaning process
has been completed.
Table1: Colour description of the rotary knob.
2.2 First use
Once you have connected your mychef oven for the first time, you will need to access
the WiFi or Ethernet network to synchronize with the cloud. A check on available
software updates and if necessary the download and update of the system will then be
executed.
After the software has been checked, the user interface will guide you through the
"User Mode" option for registering the oven, so that you can receive personalised
assistance from the mychef service department.
In order to start using the oven, it will also be necessary for the installer to register and
verify the functionalities of the oven and ensure that the installation has been carried
out correctly. To do this, the installer must select the "Installer Mode" option and follow
the steps marked by the user interface.
2.3 Main menu
Each time you start the oven after initial setup, you will be taken directly to the main
menu shown in the picture below.
9
Page 7
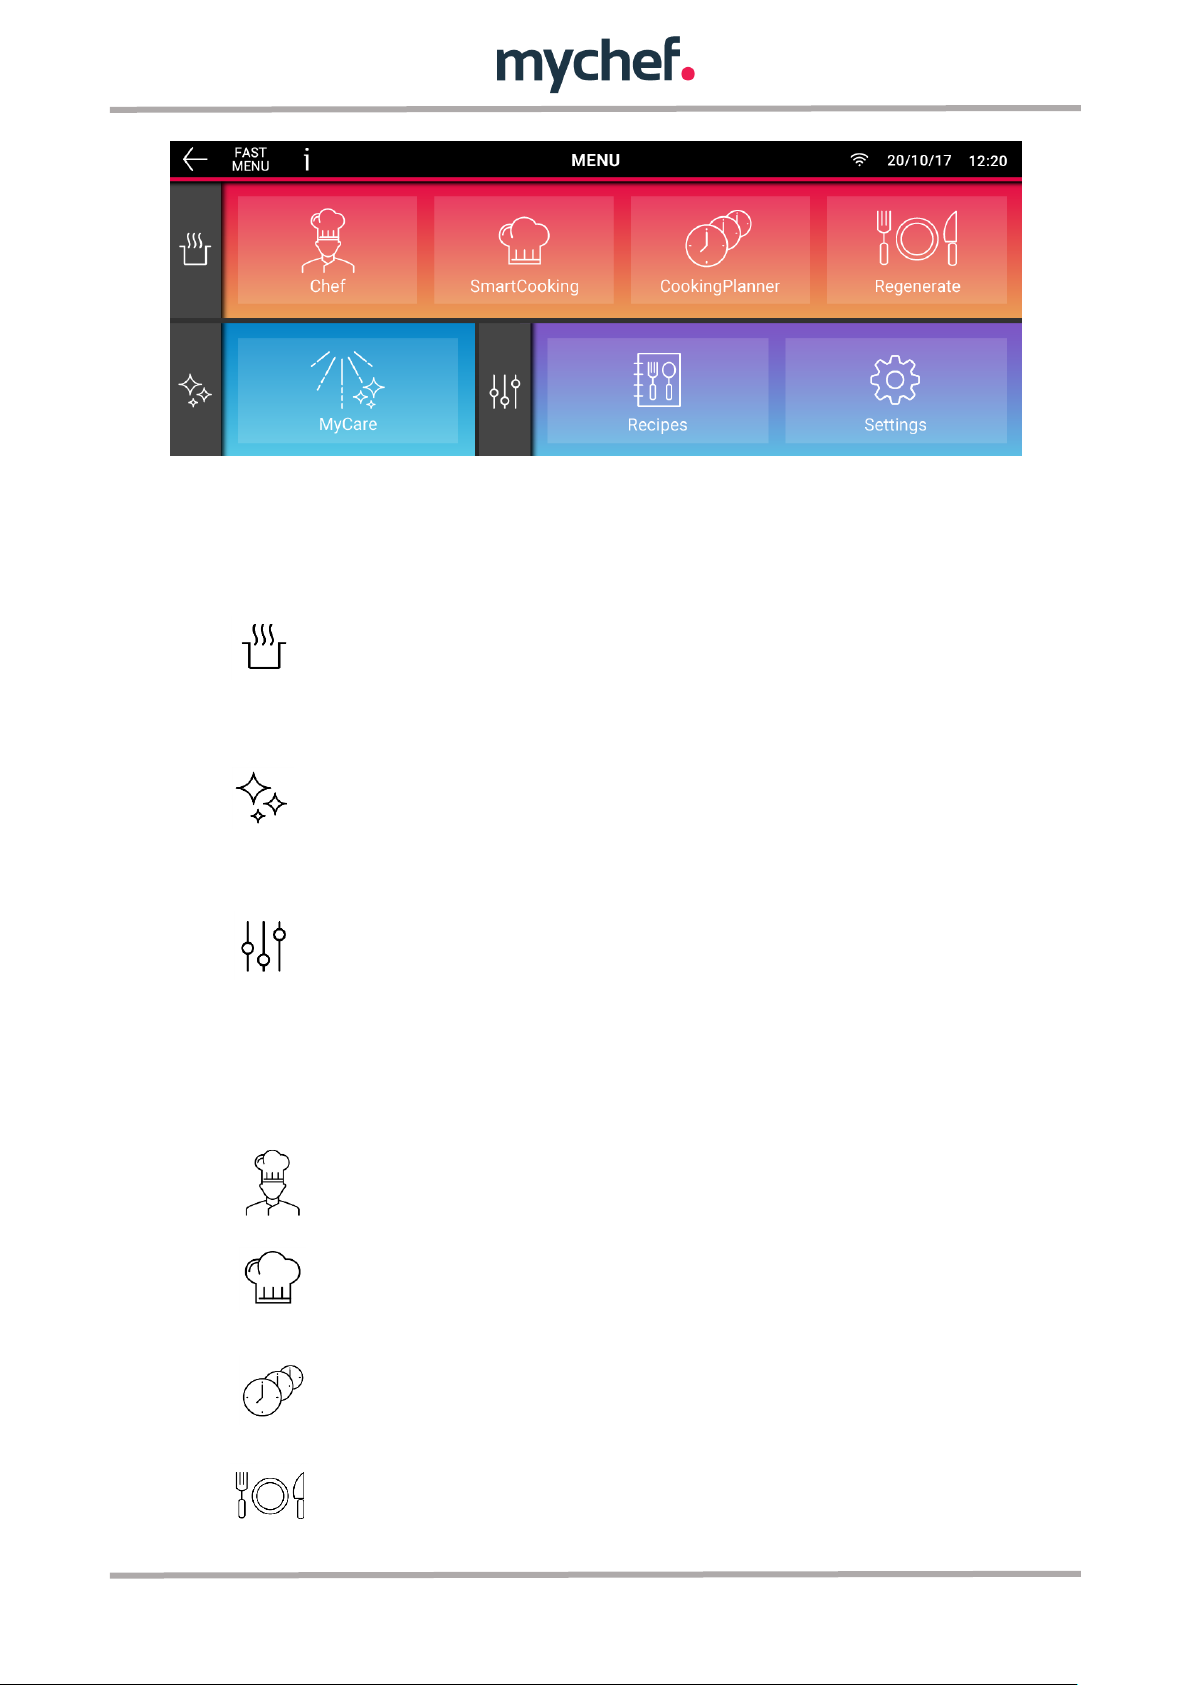
Cooking (Chef, SmartCooking, CookingPlanner, Regenerate)
Self-cleaning (Mycare)
Recipes and Settings
Chef - Cooking with manual mode parameter settings.
SmartCooking - Food selection assisted cooking
CookingPlanner – Assistant for planned cooking
Regenerate – Cooked Food Regeneration Assistant
This menu is structured in three main sections:
The main functions shown in the menu are as follows:
10
Page 8

MyCare – Self-cleaning programs
Recipes – Access to user and Mychef recipe books
Settings – Access to oven settings
- Chef
2.4 Mychef evolution main functions
The Chef cooking mode allows cooking by manual parameter adjustment:
Convection
Mixed
Steaming
By setting additional functions to the cooking modes, it is possible:
Cooking with/without probe
ΔT Cooking
Night Cooking
Programming cooking cycles and adding standby cookings
Programming cooking cycles and adding queued cooking cycles
Save cooking settings in the recipe book hosted in the cloud.
- SmartCooking
The SmartCooking cooking mode assists the cooking in an easy and intuitive
way. By quickly selecting foods classified by category, it enables intelligent
cooking using predefined parameters that are adapted to the type of
preparation of each food.
This cooking mode allows you to obtain cookings with constant results.
Each food category has the Cook&Go option, a quick and direct access to
settings of cooking parameters.
- Regenerate
This mode allows access to two regeneration functions:
11
Page 9

Chef: Allows you to set regeneration parameters manually
- SmartCooking: Regeneration by fast selection of foods and adjustment of
predefined parameters to ensure correct regeneration.
- MyCare
MyCare allows cleaning the chamber by selecting one of the different selfcleaning programs available.
Rinse
Eco
Short
Medium
Long
- Recipes
There are three different options available for managing recipes in the mychef
ovens:
Recipes: This recipe book offers recipes prepared by mychef, guided step
by step and with suggestions for optimum results.
My Recipes: With this recipe book you can create your own recipes in a
simple and intuitive way, from your mychef oven or from the mobile phone
or tablet application "mychef cloud". Up to 400 different recipes can be
cooked and administered.
By Ingredients: The search for recipes by ingredients will allow you to
make the most of the resources available in your kitchen. This mode
suggests possible recipes that can be cooked after selecting one or more
ingredients.
- Settings
In this menu, all settings of the mychef oven can be set.
- Help
- The "i" icon in the heading gives access to the help screen, it is present on all
screens. Provides a full description of the current screen and user interface
usage.
- Fast Menu
This option gives access to a customized menu according to the needs of each
user, allowing you to improve the user experience by facilitating access to those
12
Page 10
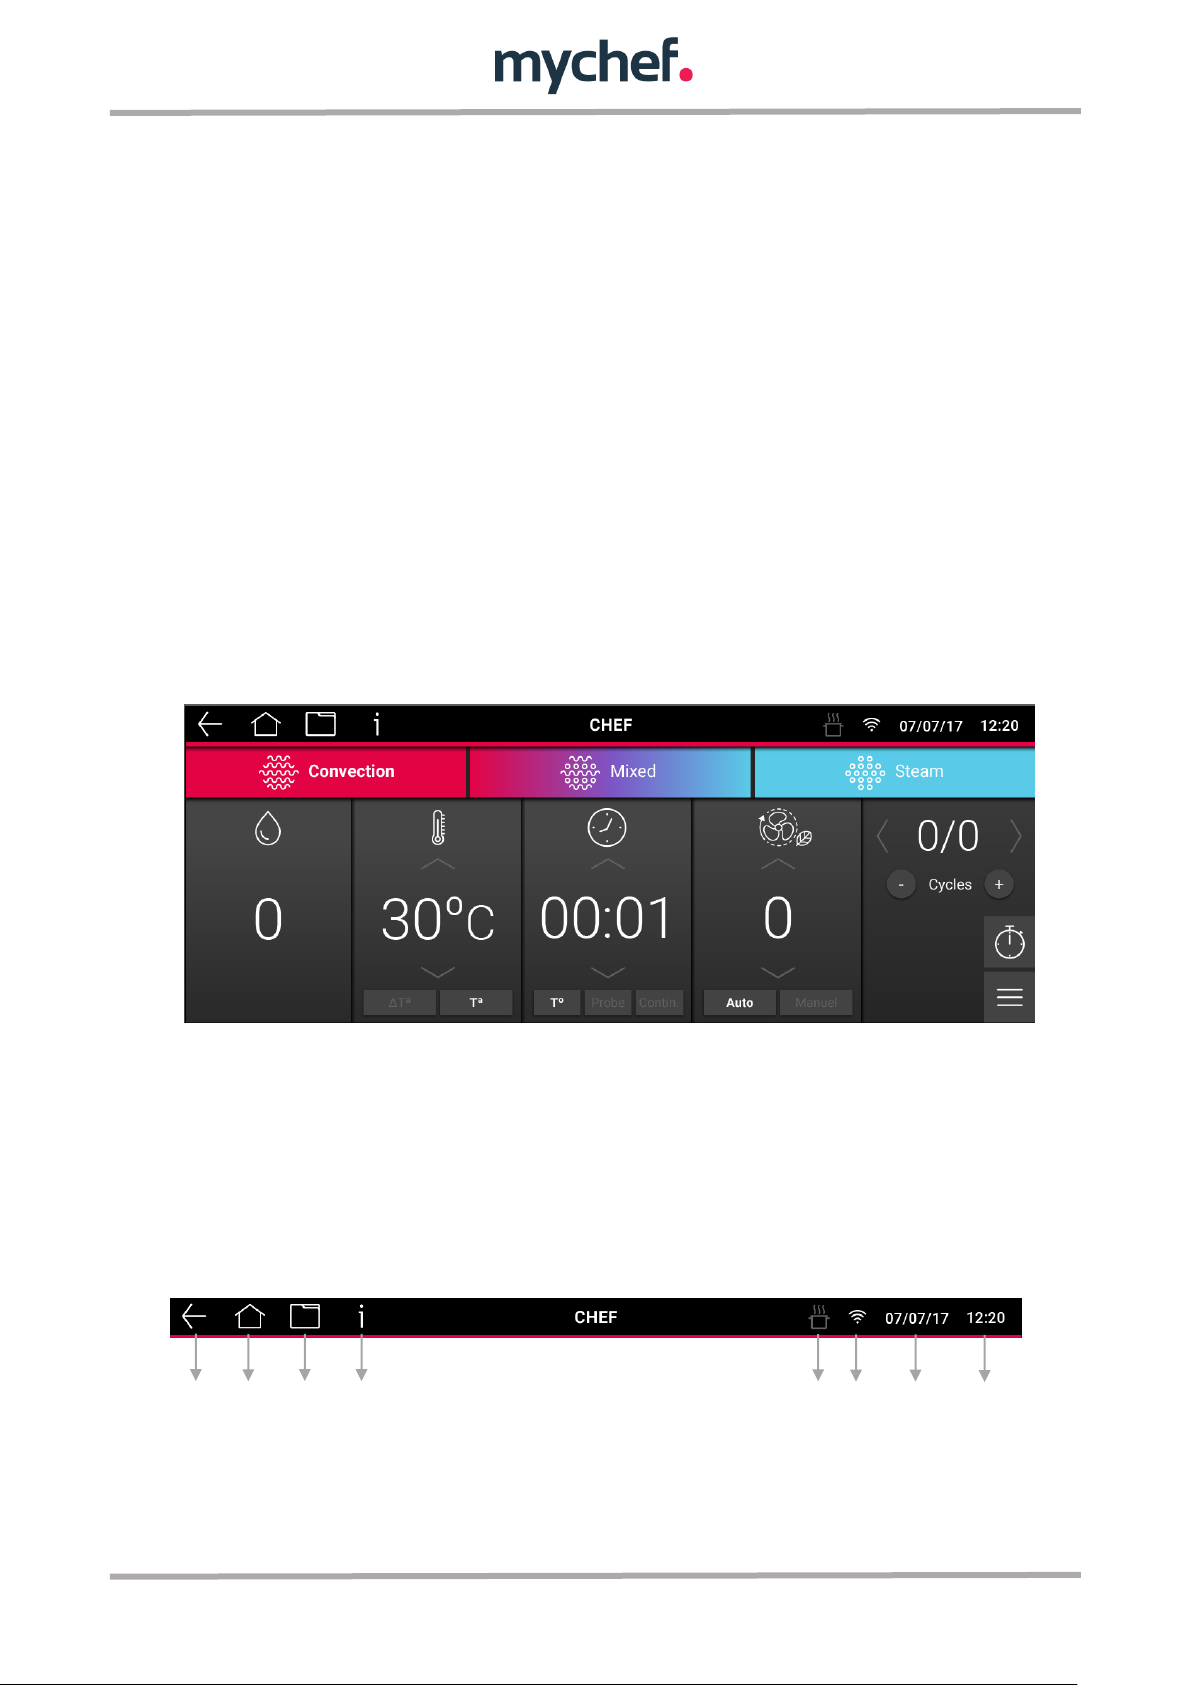
A B C D E F G H
A
Get back. To return to the previous screen.
B
Home. Main screen.
functions that you use frequently. It will be possible to add the most frequently
used functions or configure a custom menu. Using this menu restricts the use of
the main menu and its functions.
2.5 Navigation
You can access any function of the oven by navigating from the main menu, tactile
mode or by using the rotating knob.
3. CHEF
The "manual" setting of the CHEF cooking mode parameters allows cooking with the
following profiles:
- Convection
- Mixed
- Steaming
- Smoking mode (available with the use of the MySmoker accessory)
After selecting and adjusting one of the profiles, it is possible to combine several
cooking profiles by adding one or more cycles up to a maximum of 9. It will be
possible to save the settings made in the recipe booklet "My Recipes" for future use.
It is also possible to add a description of the steps required for cooking. By using the
"MyChef Cloud" application or the USB, it will be possible to add images of the plating
procedure and suggestion.
Header functions:
13
Page 11
C
Save. Allows you to save a recipe setting in the recipe book. (See Page 27)
D
Info. Provides information and help on the current screen.
E
Cooking Indicator
F
WiFi/Ethernet connection indicator
G
Displays the current date
H
Hour
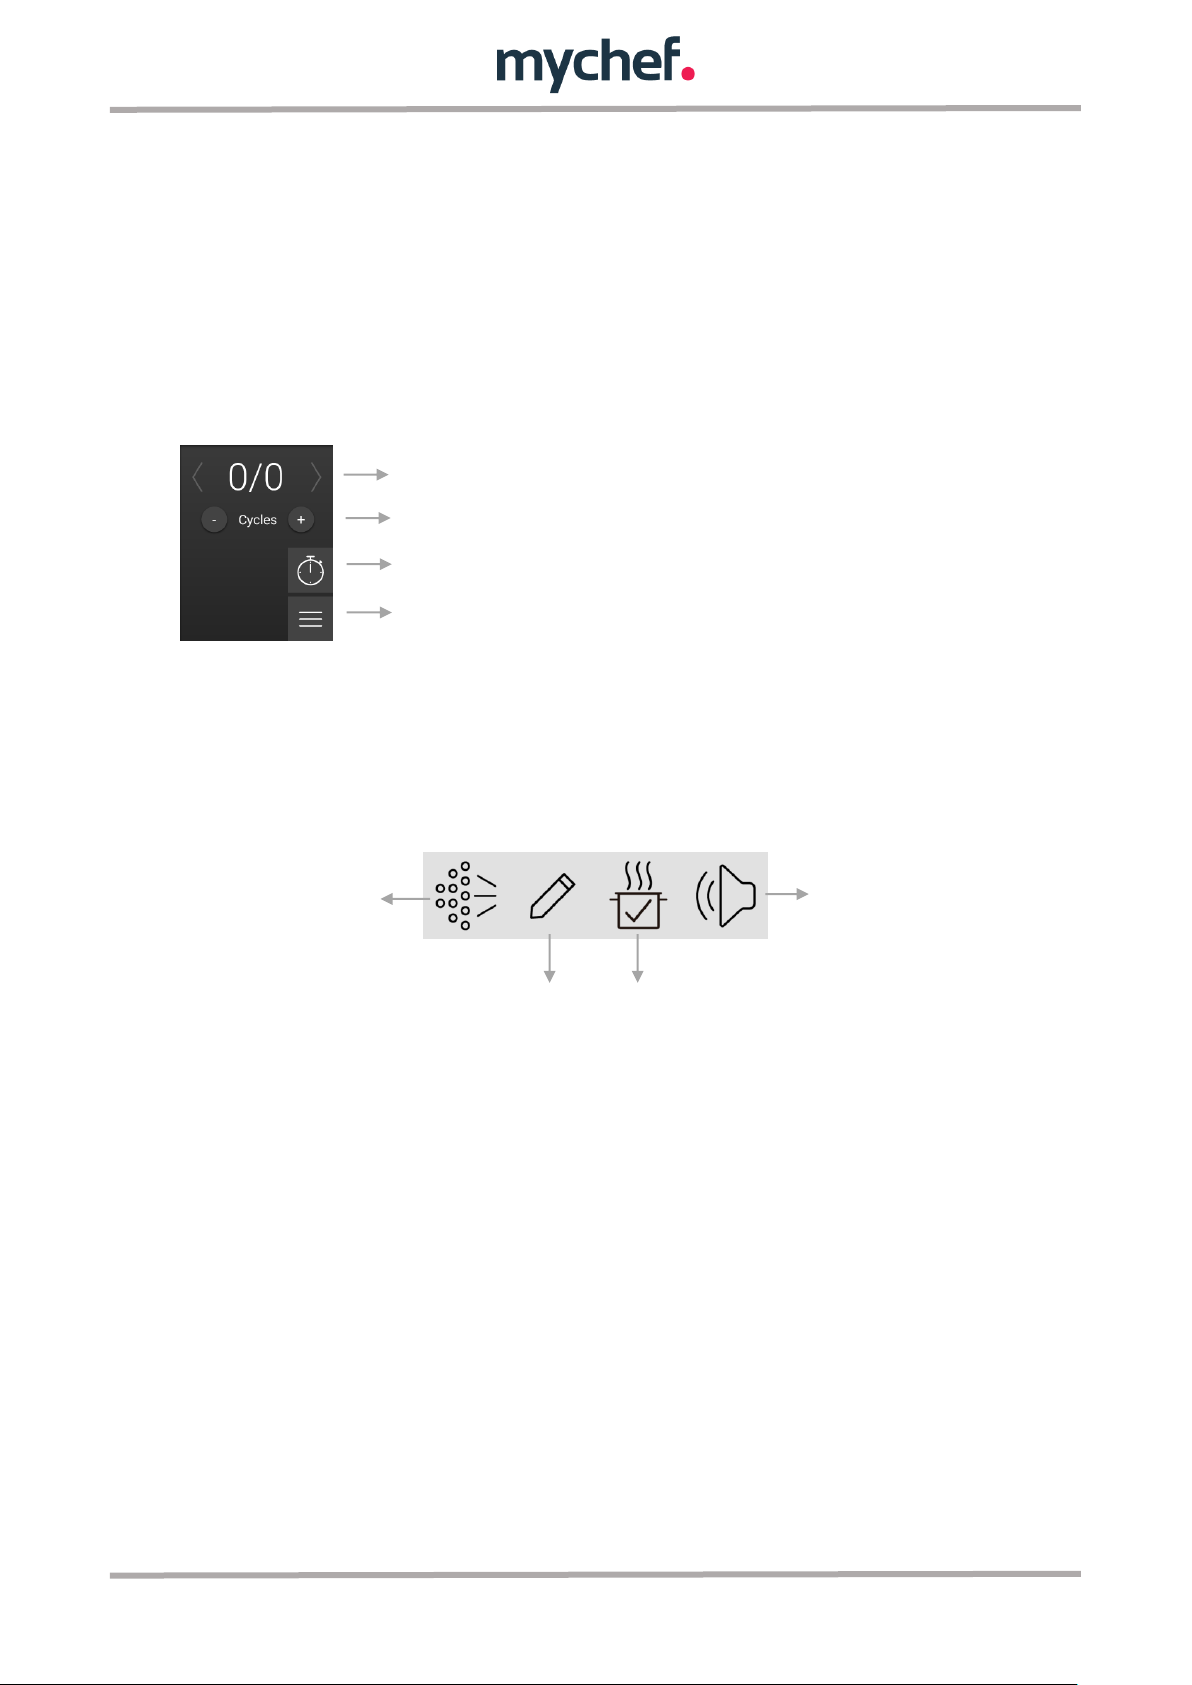
Cycles indicator
Add/ Delete Cycles
Cooking on Hold
Cooking options
Direct
steam
injection
Adjustment of
parameters.
Cooking Check
Sound settings
Cooking options:
During the course of a cooking in progress, it is possible to perform the following
actions:
Direct steam injection allows the user to increase the humidity of the chamber at
specific moments during cooking. The duration of the injection is related to the time
this button is pressed.
During cooking, it will also be possible to change the parameter settings. By selecting
this option, the display will show again the cooking parameters and the user will be
able to refine the recipe according to his needs. To continue press START/STOP.
For precise control of the cooking, the oven has the "Cook Check" option. This option
shows the corresponding values for time, temperature, energy consumption and
water.
To adjust the volume of the audible signals, press the Sounds Adjust icon and select
loud, medium or disable audible signal.
The cooking profiles allow the following cookings to be carried out:
14
Page 12
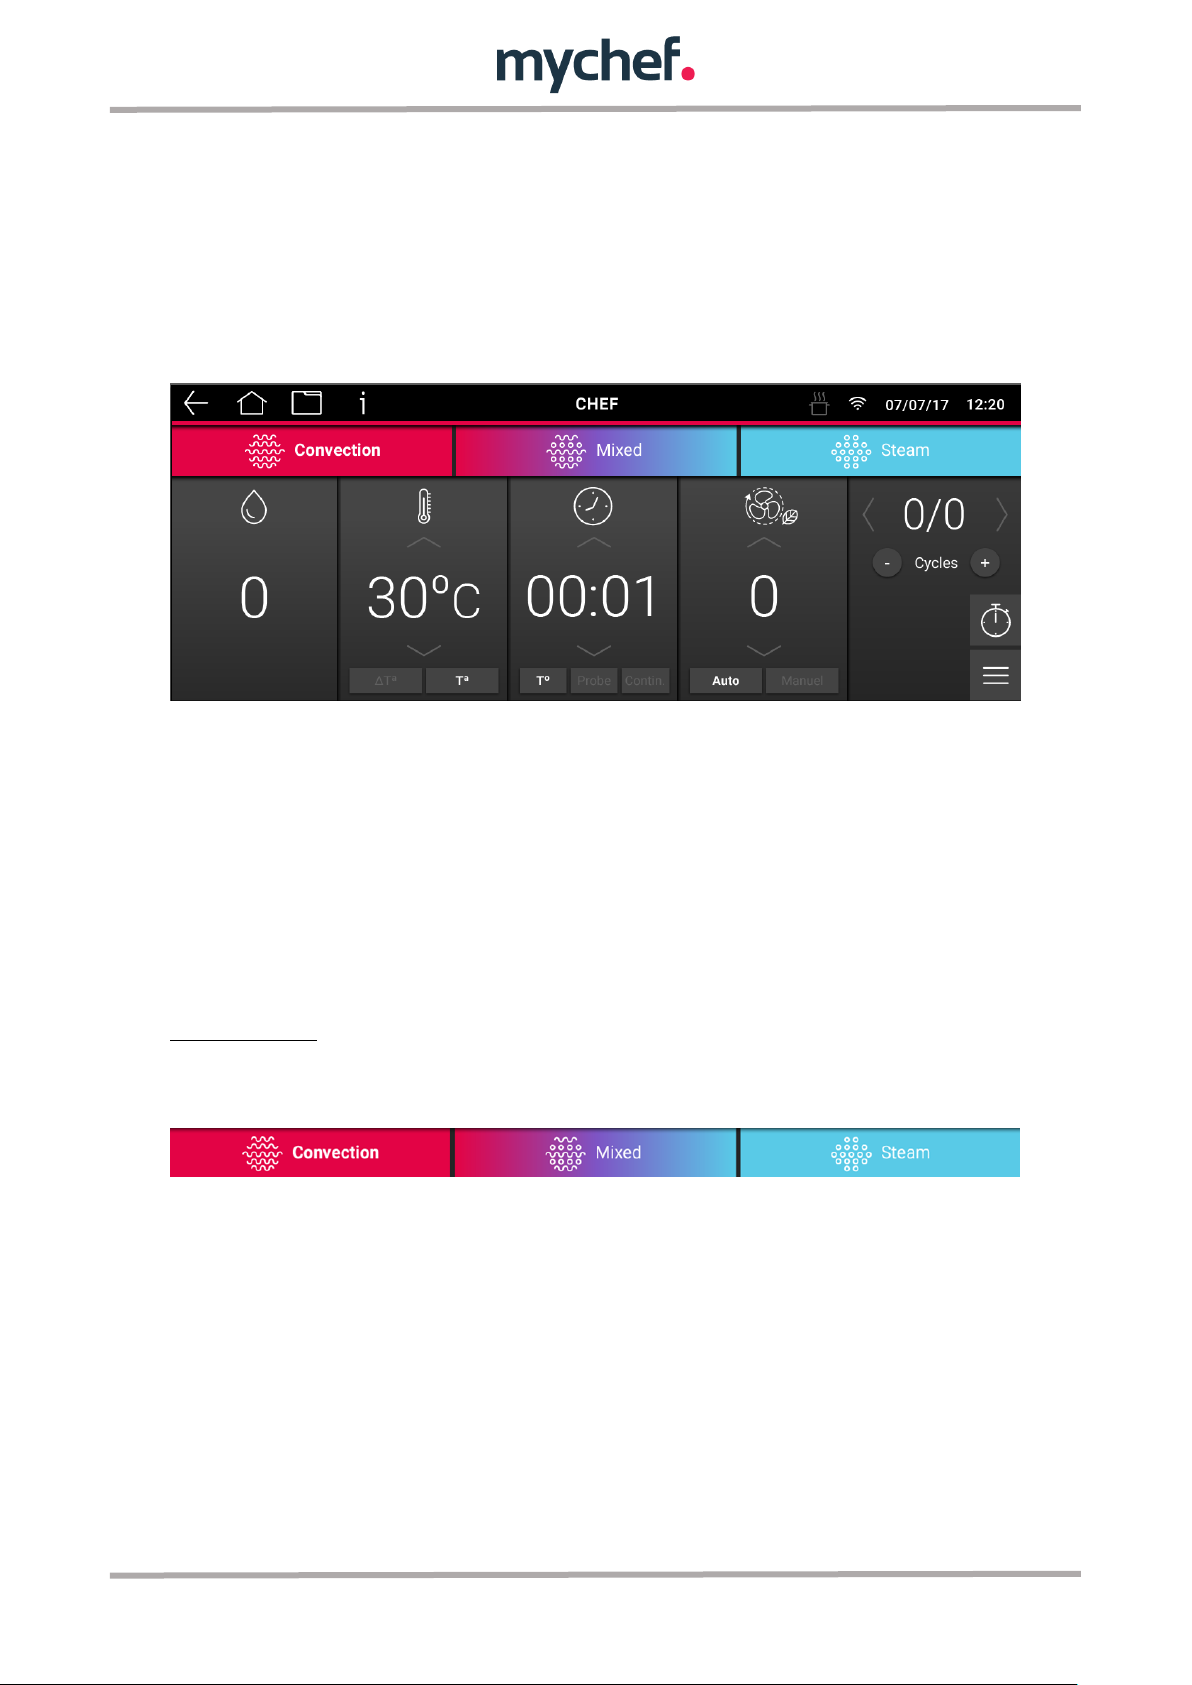
Convection (30ºC-300ºC)
Mixed (30ºC-300ºC)
Steaming (30ºC-130ºC)
Roasting
Roasting
Steam cooking
Baking
Gratine
Sous-Vide
Grill
Braising
Boiling
Fry
Sauté
Griddle
Fogging
Smoked
Ferment
Convection
Mixed
Steaming
6 Fan speeds
6 fan speeds
6 fan speeds
Dryout
SmartClima
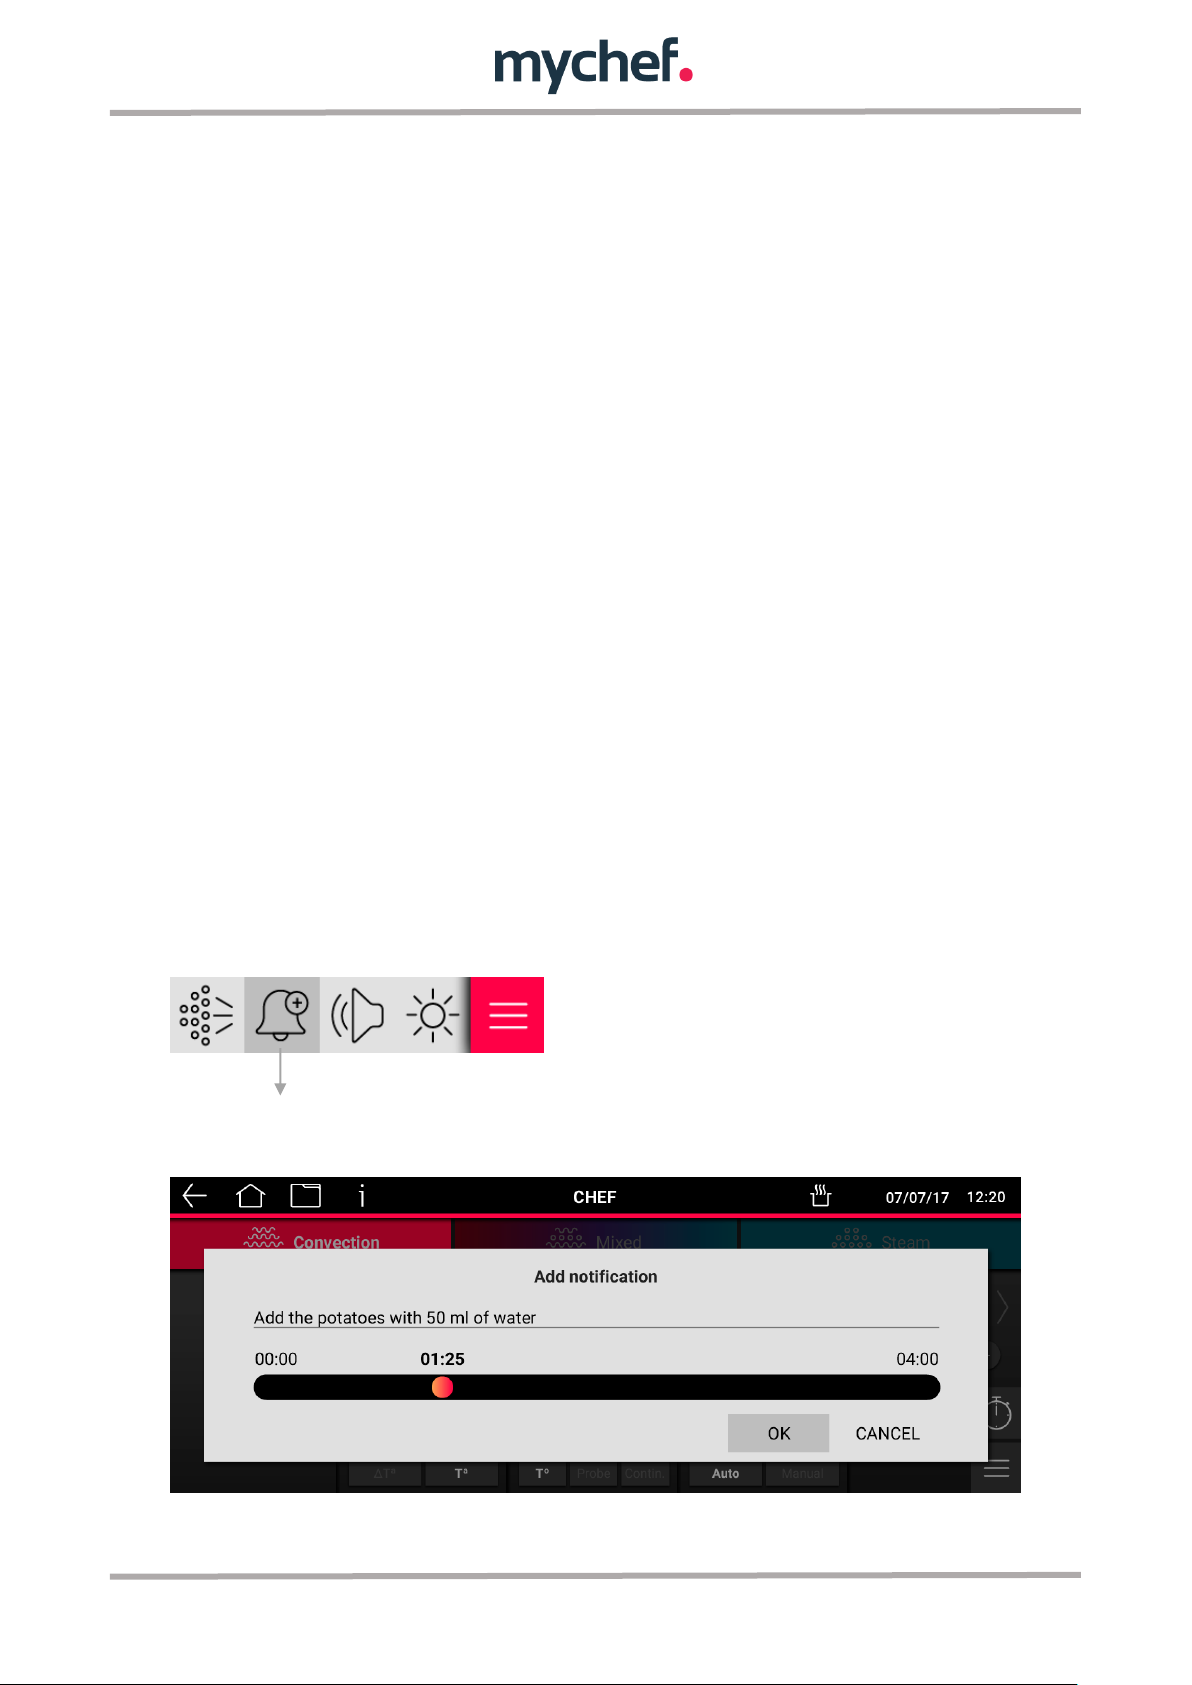
Add notification
Aditional functions:
In each cooking cycle it is possible to add a warning at a specific time. This way, it is
possible to have a more exhaustive control of the cooking process by carrying out the
necessary actions to improve the result. During cooking, an on-screen notification and
on the mobile device will prompt the operator to take action. For example, add a broth
after 15 minutes from the start of cooking.
15
Page 13
When you press add alert, you are prompted to enter a text message and select the
time when the message will be displayed. When the cooking starts and the indicated
time has elapsed, the message will notify.
3.1 Menu CHEF
There are 400 programs that can be edited and retrieved at the user's request. All of
them can have up to 9 cooking cycles. To start a cooking, it is necessary to define at
least one cycle.
In user programs, it is possible to change any cooking parameters (temperature,
humidity, time, cooking mode, etc.). To do this, you must select the button
corresponding to the parameter to be modified and adjust the parameter value.
There are several safety measures that prevent abnormal operation of the equipment,
of which the user must be aware during use.
In case of any error, the unit will stop and display the error code (see chapter 16).
The oven will not operate if the door is open.
Cooking mode:
There are three cooking modes: convection, mixed and steam. To select a particular
mode, click on the corresponding button.
The convection mode acts as a forced convection oven without adding or removing
moisture from the cooking chamber.
The combi mode allows intelligent and controlled regulation of the removal or supply of
moisture in the cooking chamber. To do this, press the humidity button and set the
desired value.
16
Page 14
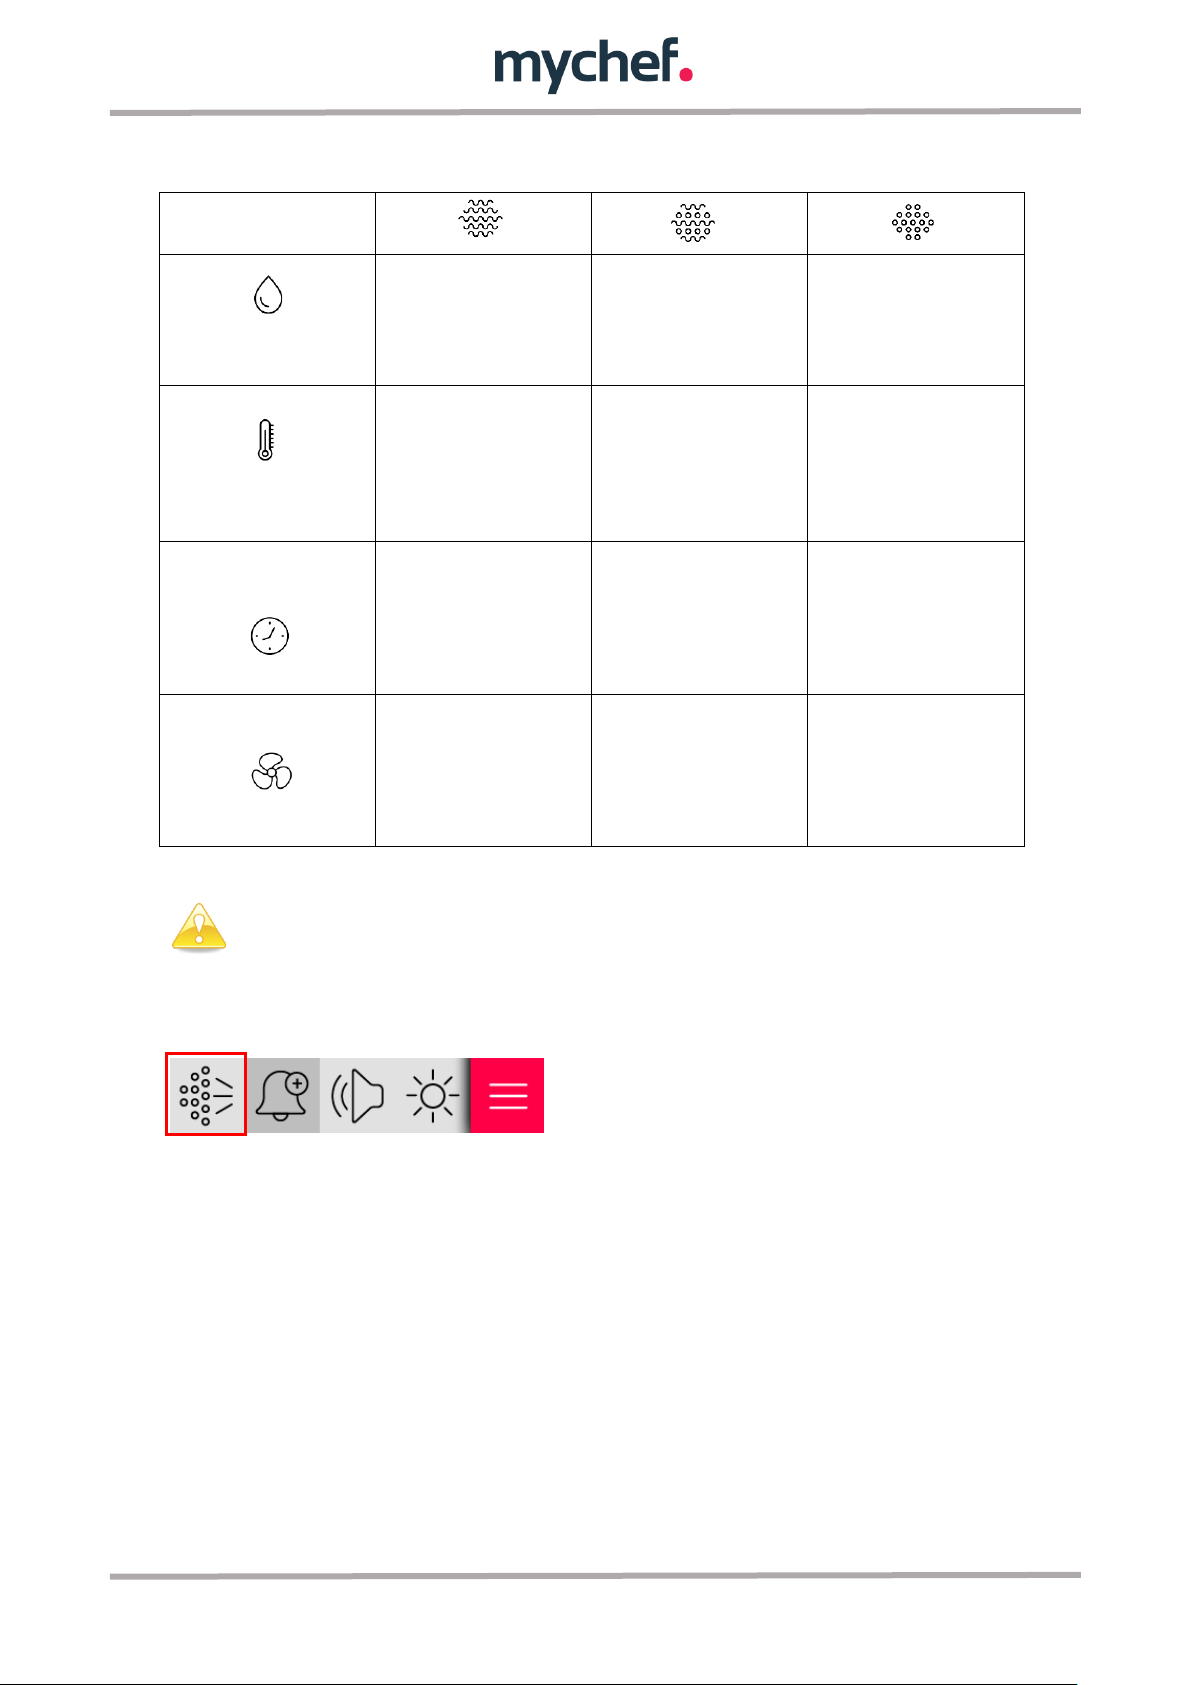
Humidity
0%
-100 % <-> 100 %
100%
Temperature
ΔT
Tª
Time
Tº
Probe
Continuous
Fan
Auto
Manual
In order to prolong the life of your oven, it may automatically reduce the
maximum cooking chamber temperature.
The steam mode saturates the cooking chamber with moisture.
In all cooking modes, the chamber can be humidified at will via direct steam injection
using the cooking options button:
3.1.1 Temperature cooking and time control
The temperature and time control mode is the simplest, we simply choose a
temperature and time by pressing the display or rotating the circular knob after
pressing the TEMPERATURE and TIME buttons respectively.
When the START/STOP button is pressed, the oven will start heating the chamber and
stop after the set time has elapsed.
Example of cooking at 90ºC for 10 min:
17
Page 15
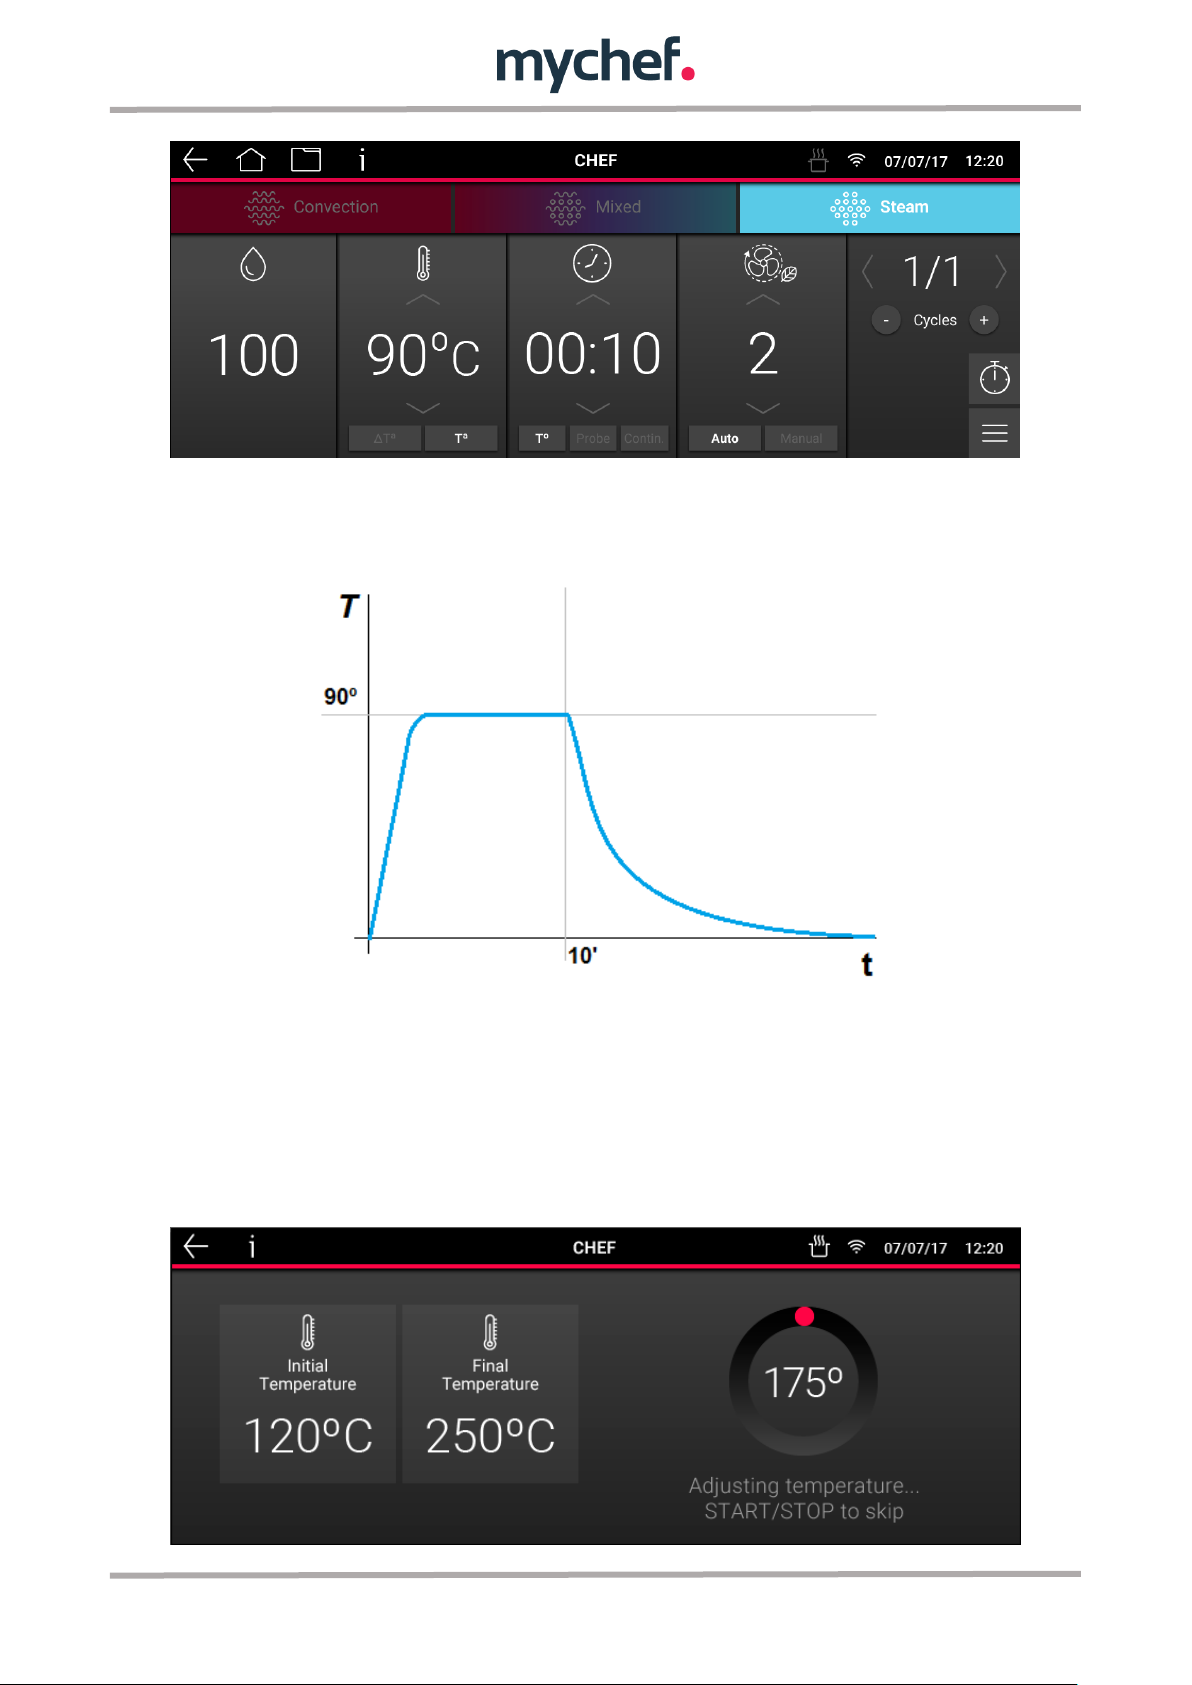
Figure: Example. Cooking 90ºC in steam mode for 10 minutes.
3.1.1.1 Automatic temperature adjustment
Whenever cooking is started by pressing START/STOP, the oven automatically
calculates the room temperature in the chamber and decides whether a heating or
cooling process should be carried out depending on the desired value.
If necessary, the following display for the temperature adjustment process will be
displayed before cooking begins, indicating the chamber temperature.
18
Page 16
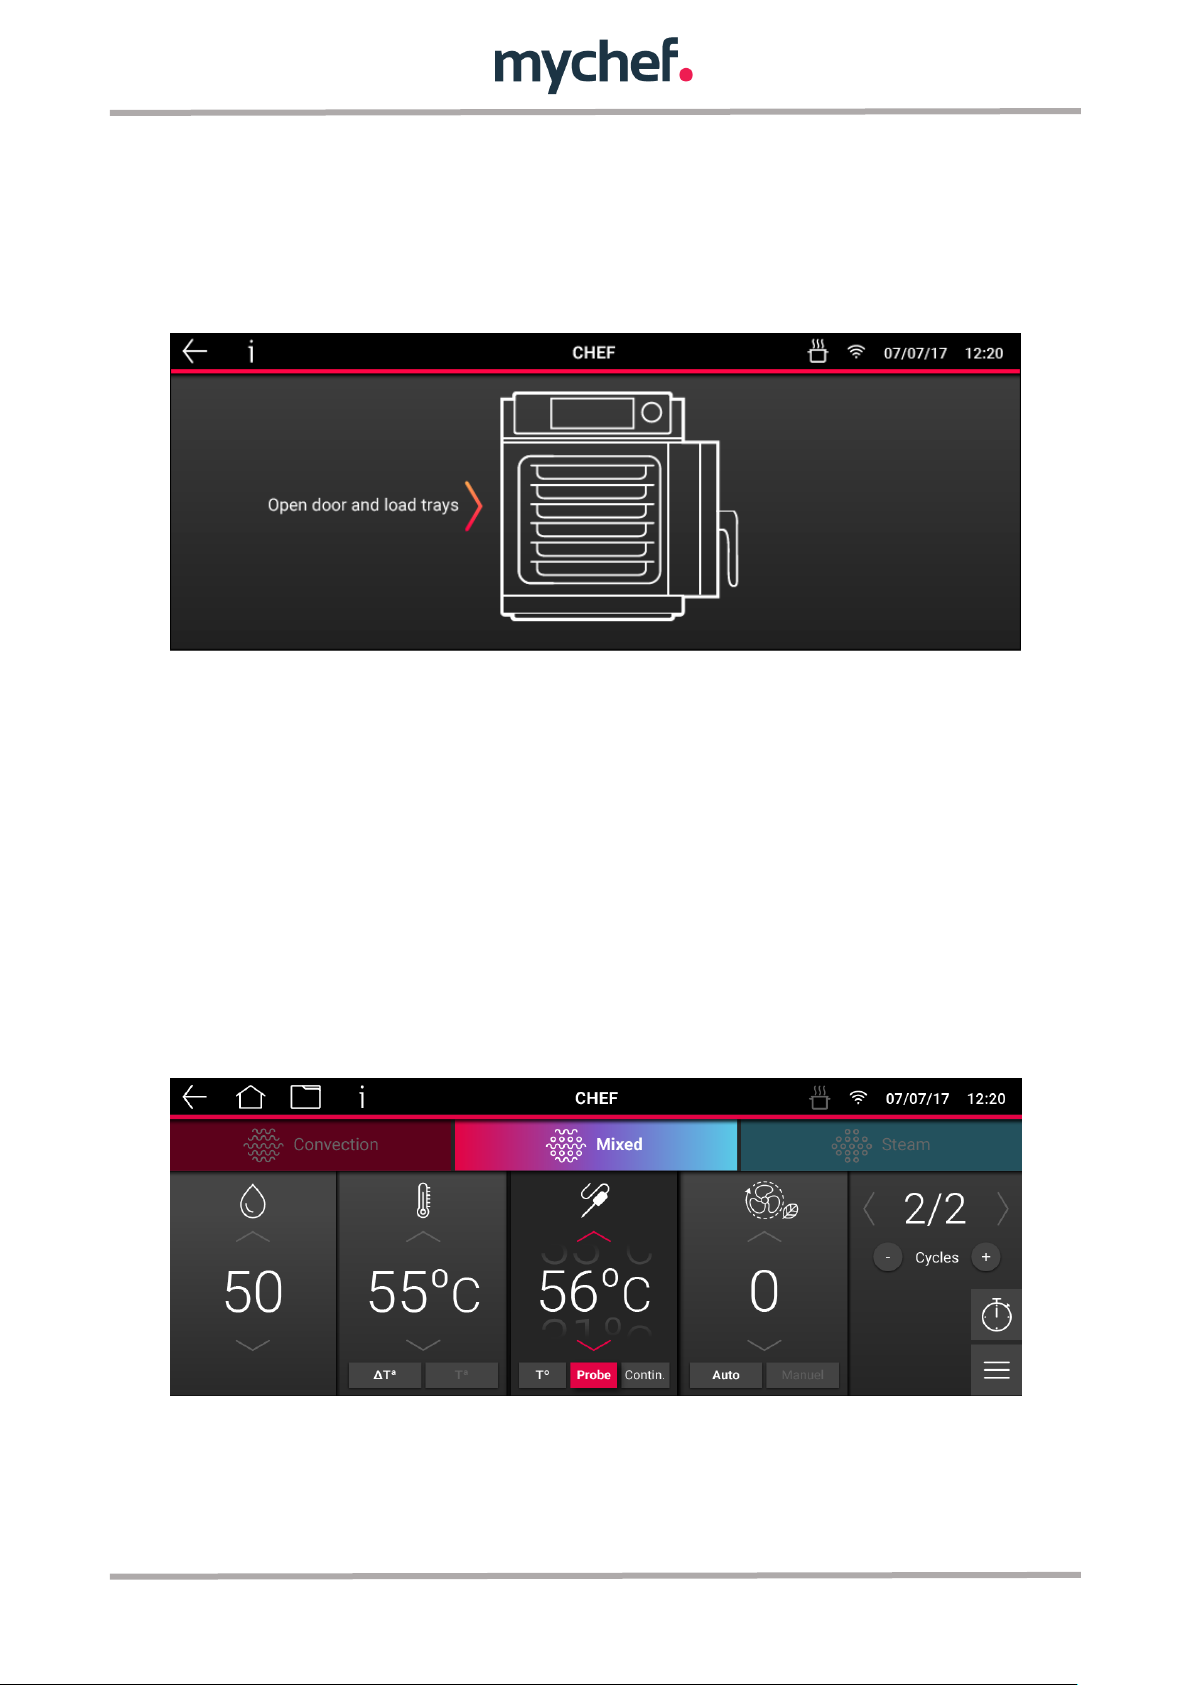
If the user wishes, he or she can interrupt this process and start directly with cooking.
Pressing the START/STOP button omits preheating and starts cooking.
Once the oven reaches the preheating temperature, the user will be told that the oven
can be charged by means of an acoustic and visual warning: an animation will be
shown on the screen as in the picture.
When you open the door and load the oven, cooking starts automatically.
To avoid excessive overheating, this state is maintained for a maximum of ten minutes.
3.1.1.2 Temperature cooking and core probe control
The core probe controlled temperature control mode terminates cooking when the
temperature in the food core is equal to the selected temperature. The chamber
temperature is kept constant and equal to the selected temperature value.
To use this mode, we choose a chamber temperature and a desired temperature at the
heart of the food by pressing the TEMPERATURE and PROBE buttons respectively and
adjusting them. Pressing the START/STOP button will start the oven to warm up and
stop when the core probe temperature is equal to the probe set point temperature.
19
Page 17
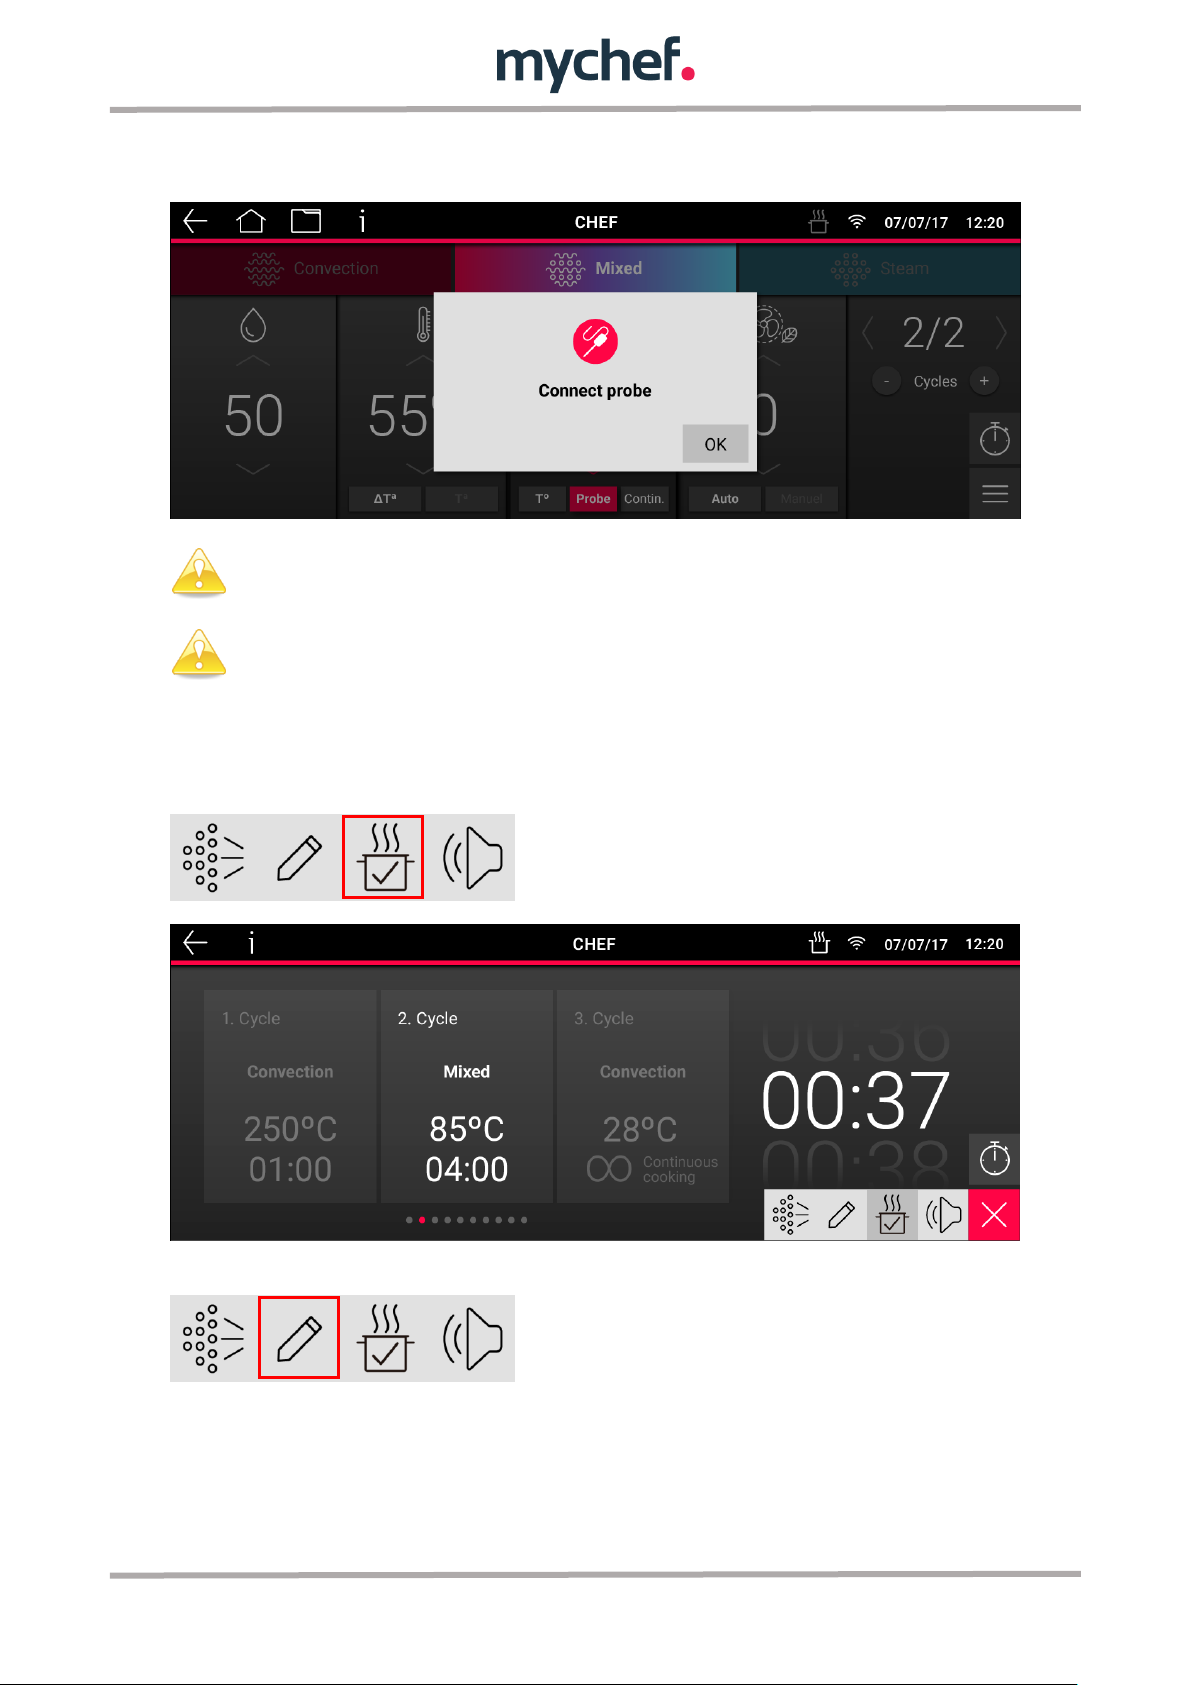
For this cooking mode, the multipoint probe or the sous-vide probe must be
connected.
If we try to start a core-probe-controlled program, and it is not connected,
the oven will sound and visual warning and the program will not start.
If the probe is not connected, the oven will indicate this by means of the displayed
message and an acoustic signal. In this case, connect the probe and press OK.
If we are performing a core probe controlled cooking cycle, the time/sound display will
indicate the actual probe temperature. By pressing the Cooking options button we can
control the temperature of the probe through the "Cooking Check" option:
If you wish to adjust any of the cooking parameters, press:
20
Page 18
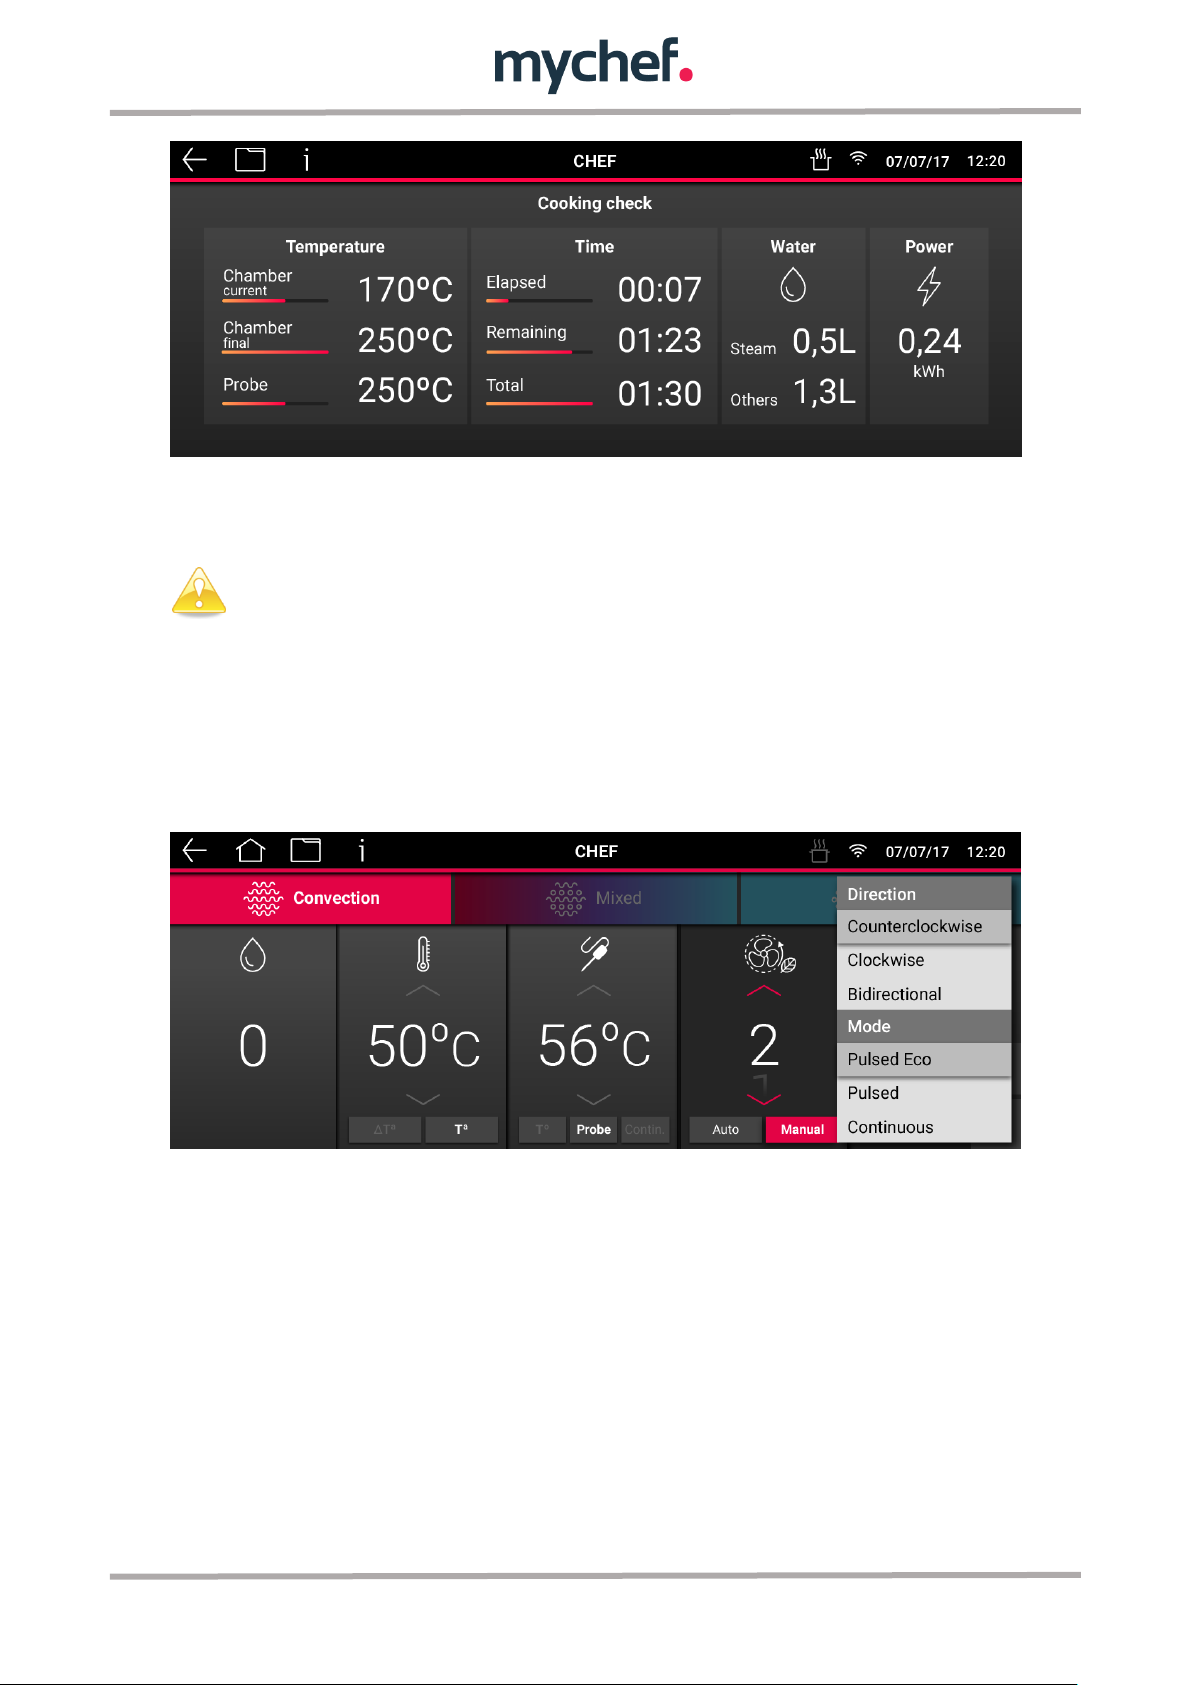
When the oven is in the process of cooking controlled by means of a core
probe, the chamber temperature display shows the temperature to be
reached in the chamber, and the core probe display shows the actual
temperature of the food.
3.1.1.3 Fan speed selection
In any cooking mode, the user can select the fan speed that best suits his needs. To do
this, press the fan speed parameter where it will be possible to select from several
options:
Auto mode: The fan speed will be adjusted automatically according to the type of
cooking being carried out, optimizing the cooking result.
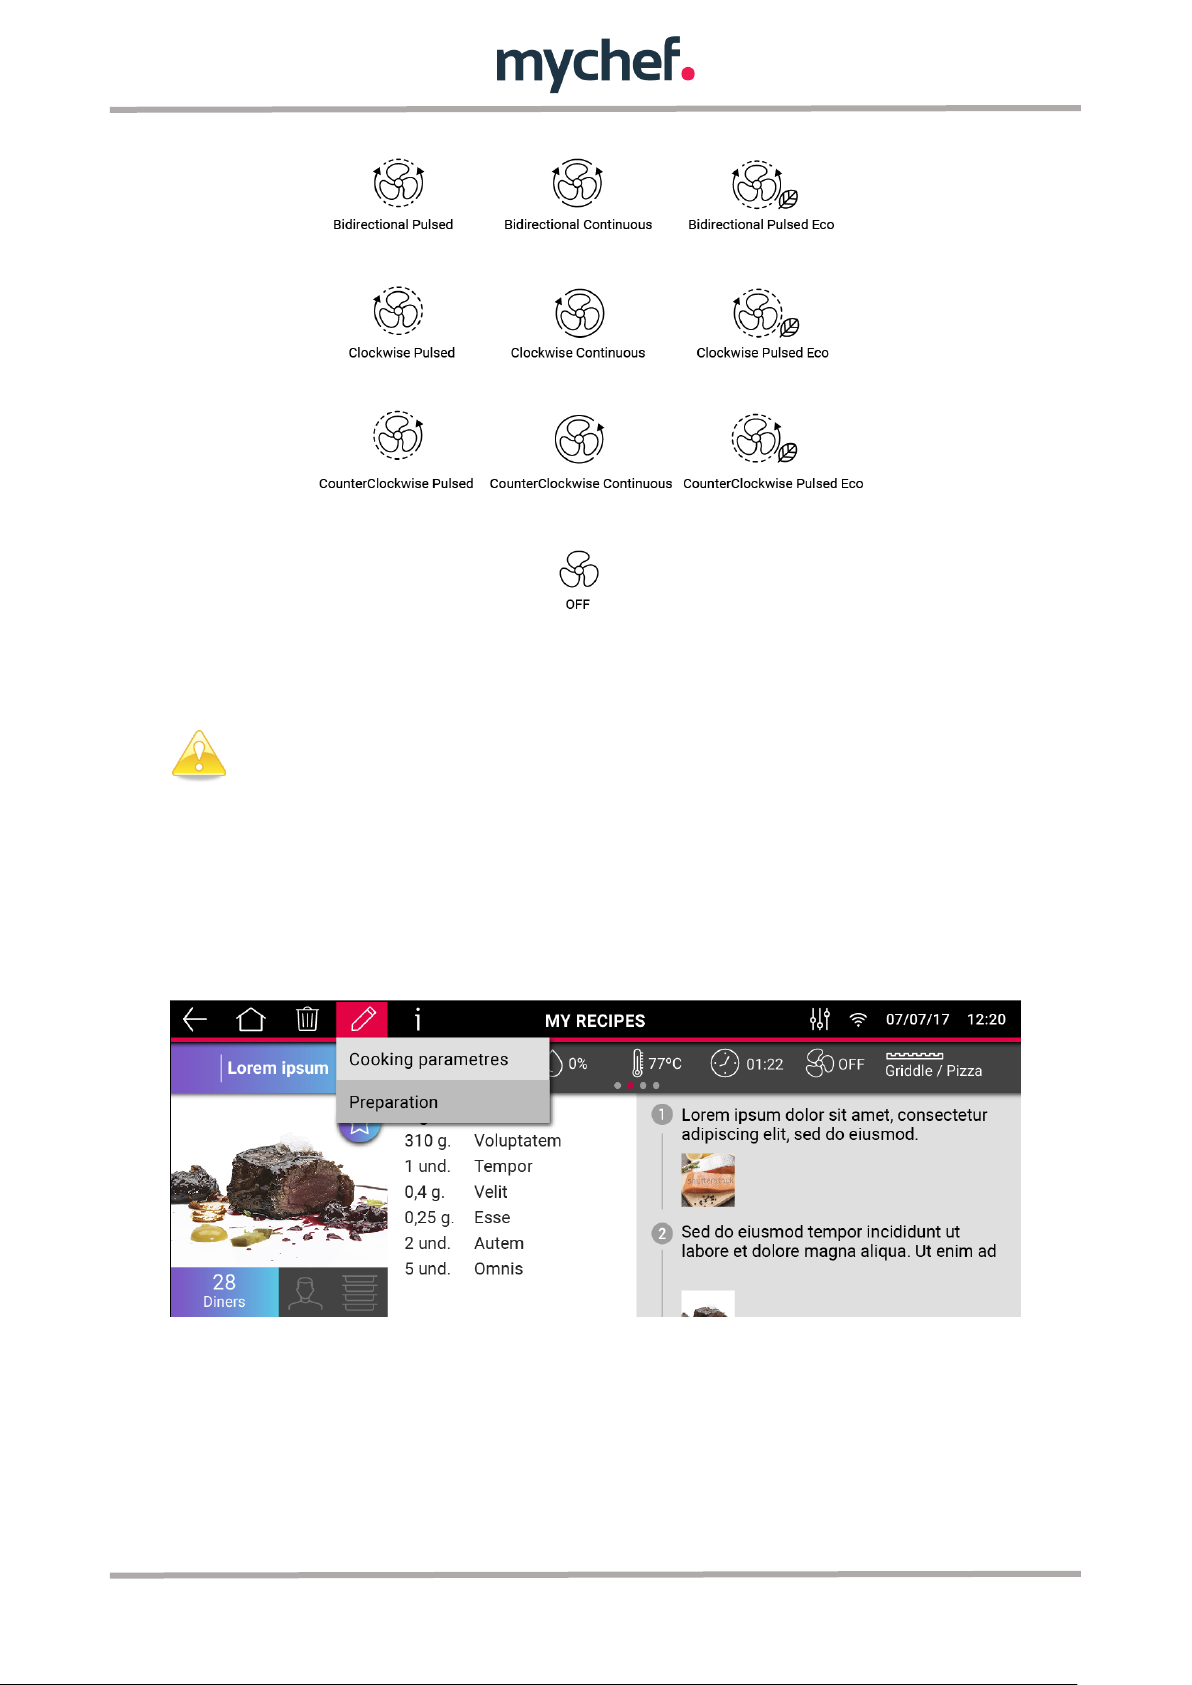
Manual Mode: This mode allows you to select several options, first select the fan
speed from a range of 6 speeds. Pressing the "Manual" button will also allow you to
select the fan direction and fan mode that allows you to select the operating continuity.
The possible selections are shown below:
21
Page 19
In order to be able to regulate the temperature in the chamber correctly, in
certain situations (low temperature, etc.) the oven can automatically select
the reduced convection speed.
Figure 1: Fan combinations manual mode
3.1.2 Editing cycles
The editing of the cycles can be done directly by navigating through the cycle indicator
or you can add phases to the user programs. You can also change a cooking cycle via
"My Recipes" in a previously saved cooking cycle.
22
Page 20
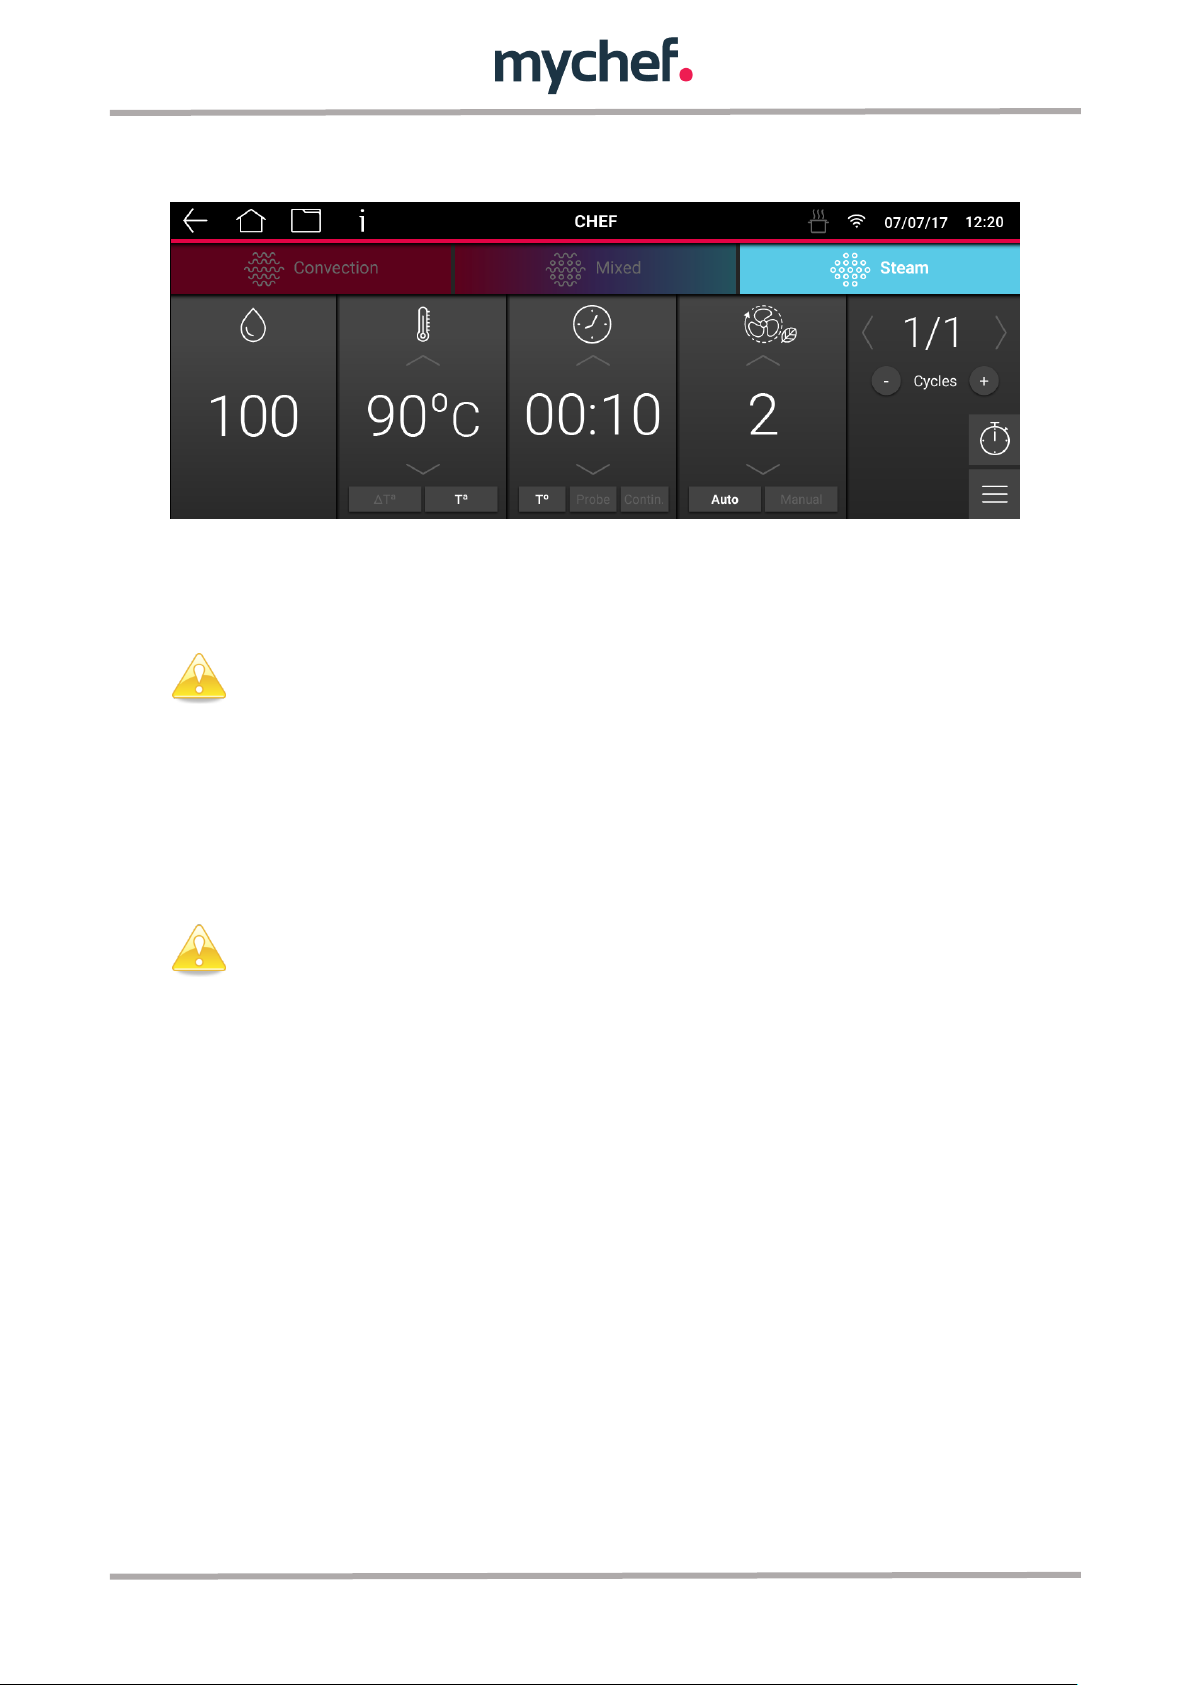
The first number in the cycle indicator indicates the current cycle and the
second number indicates the total of existing cycles.
To add or remove phases in programs 1 to 400 before you must enter the
program edit mode.
By accessing the edit option of the header by selecting "Cooking parameters", you can
access the editing of the parameters.
By selecting "Elaboration", it will also be possible to edit the other fields of the recipe.
3.1.2.1 Navigate between different cycles
To navigate between the different cycles, click on the arrows of the cycle indicator
<1/2>.
3.1.2.2 Add a cycle
To add a cycle to a cooking, press the (+) button. The mode must then be selected and
the cooking parameters set.
Once a cycle has been added, the cooking parameters of the cycle can be modified,
just select the cycle you want to modify and adjust the parameters.
3.1.2.3 Delete a cycle
Press the (-) button to delete a cooking cycle.
3.1.2.4 Initiate cooking
Once the cooking parameters have been selected, either manually or in a specific
program, we can start the process.
To do this, press the START/STOP key, and the following screen will appear:
23
Page 21
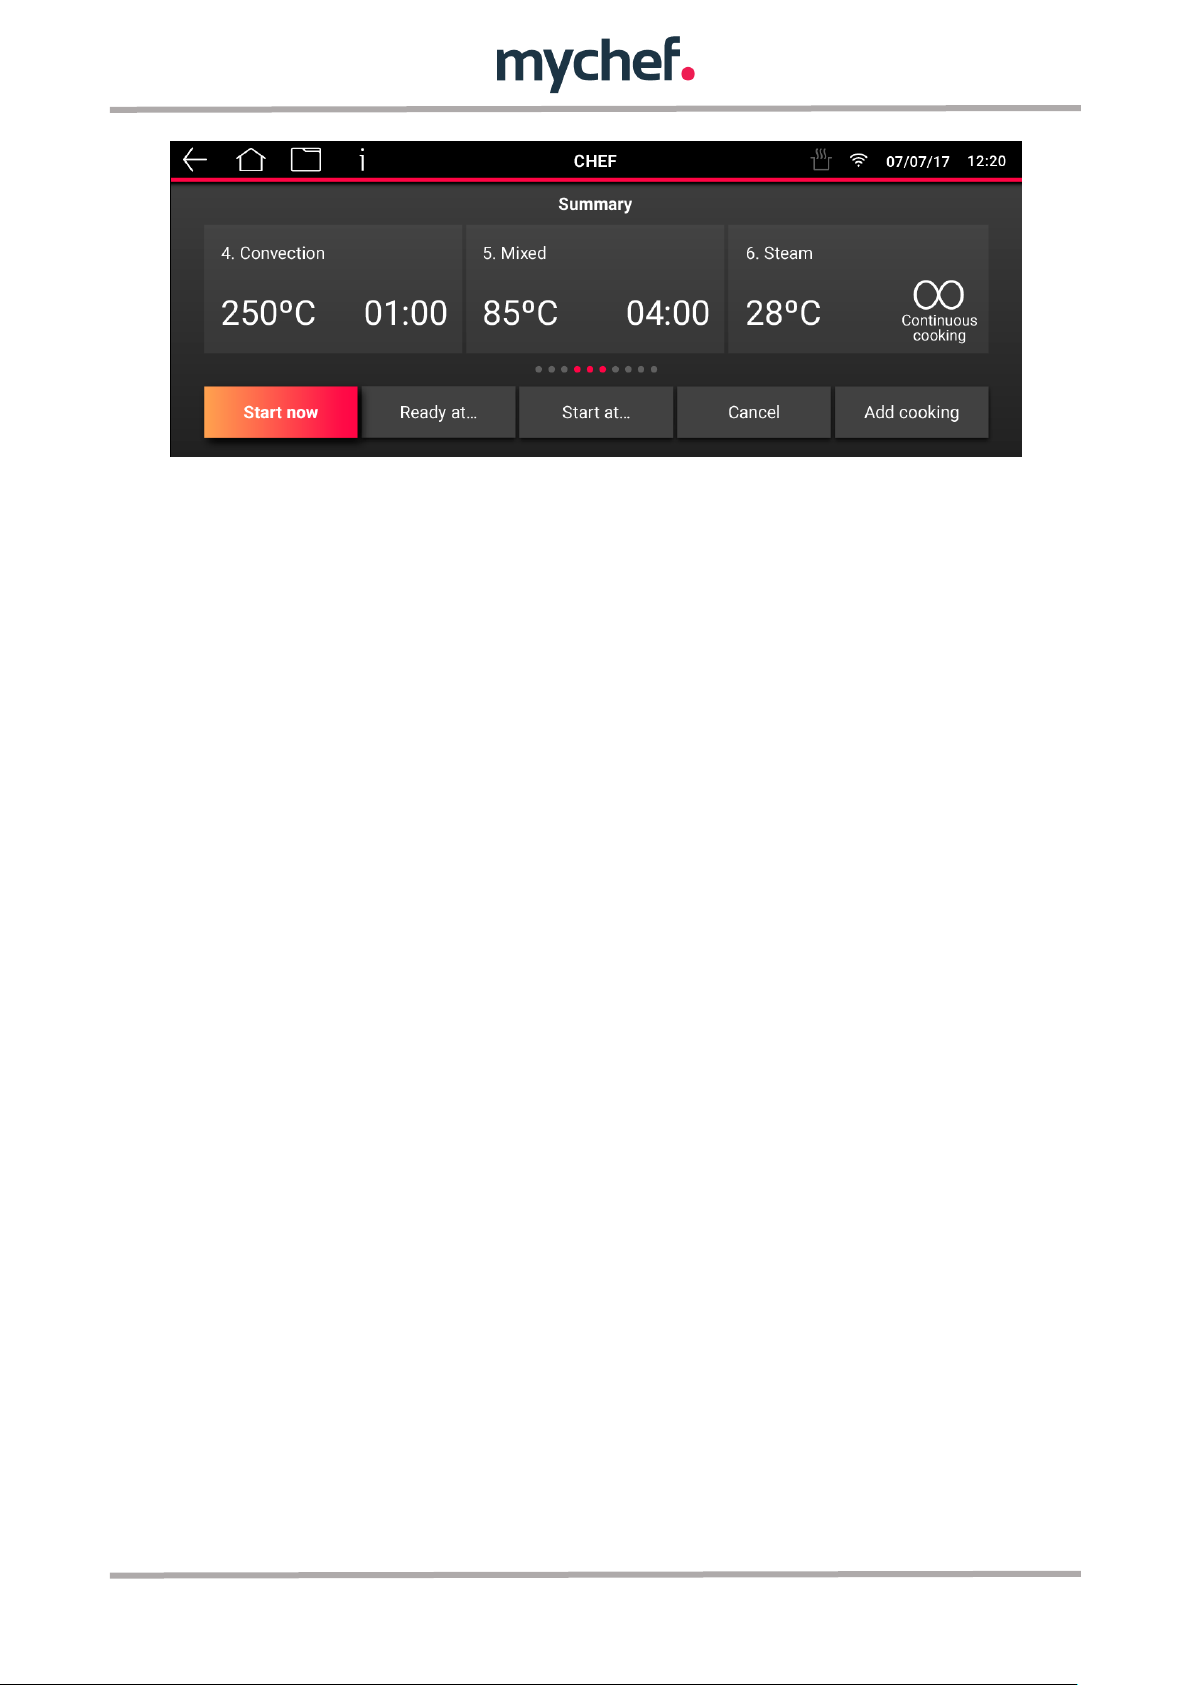
This screen shows a summary of the programmed cooking cycles and allows you to
view and navigate between them to see the parameters in detail. Each time a cycle
ends or automatically moves to the next cycle, an acoustic signal is emitted.
If cooking is to be started, selecting "Start now" will start cooking, the LED will
illuminate and the cooking indicator in the header will activate.
If you want to program the start, i. e. set a time later than the current one for its start,
you can program it in two modes. First, with the "Ready to cook..." option, you can set a
time of one hour after cooking has finished, so that the oven automatically calculates
the end of cooking according to the cooking time. With the "Start at..." option, you can
program the start of cooking at any given time.
This screen also allows you to cancel the cooking and also add a standby cooking. In
the latter case, the cooking will remain in standby and a new cooking can be
configured. Once the programming of the next program has been completed, the
cooking can be started.
3.1.3 End of cooking
A cooking ends when time is up or the temperature at the heart of the food is reached.
At the end of a cooking cycle, the equipment indicates this state visually and
acoustically. Specifically:
- The visual indicator on the rotary knob lights up in green
- 3 beeps of 2 seconds are emitted, with an interval of 10 seconds.
- The cooking message is displayed.
24
Page 22
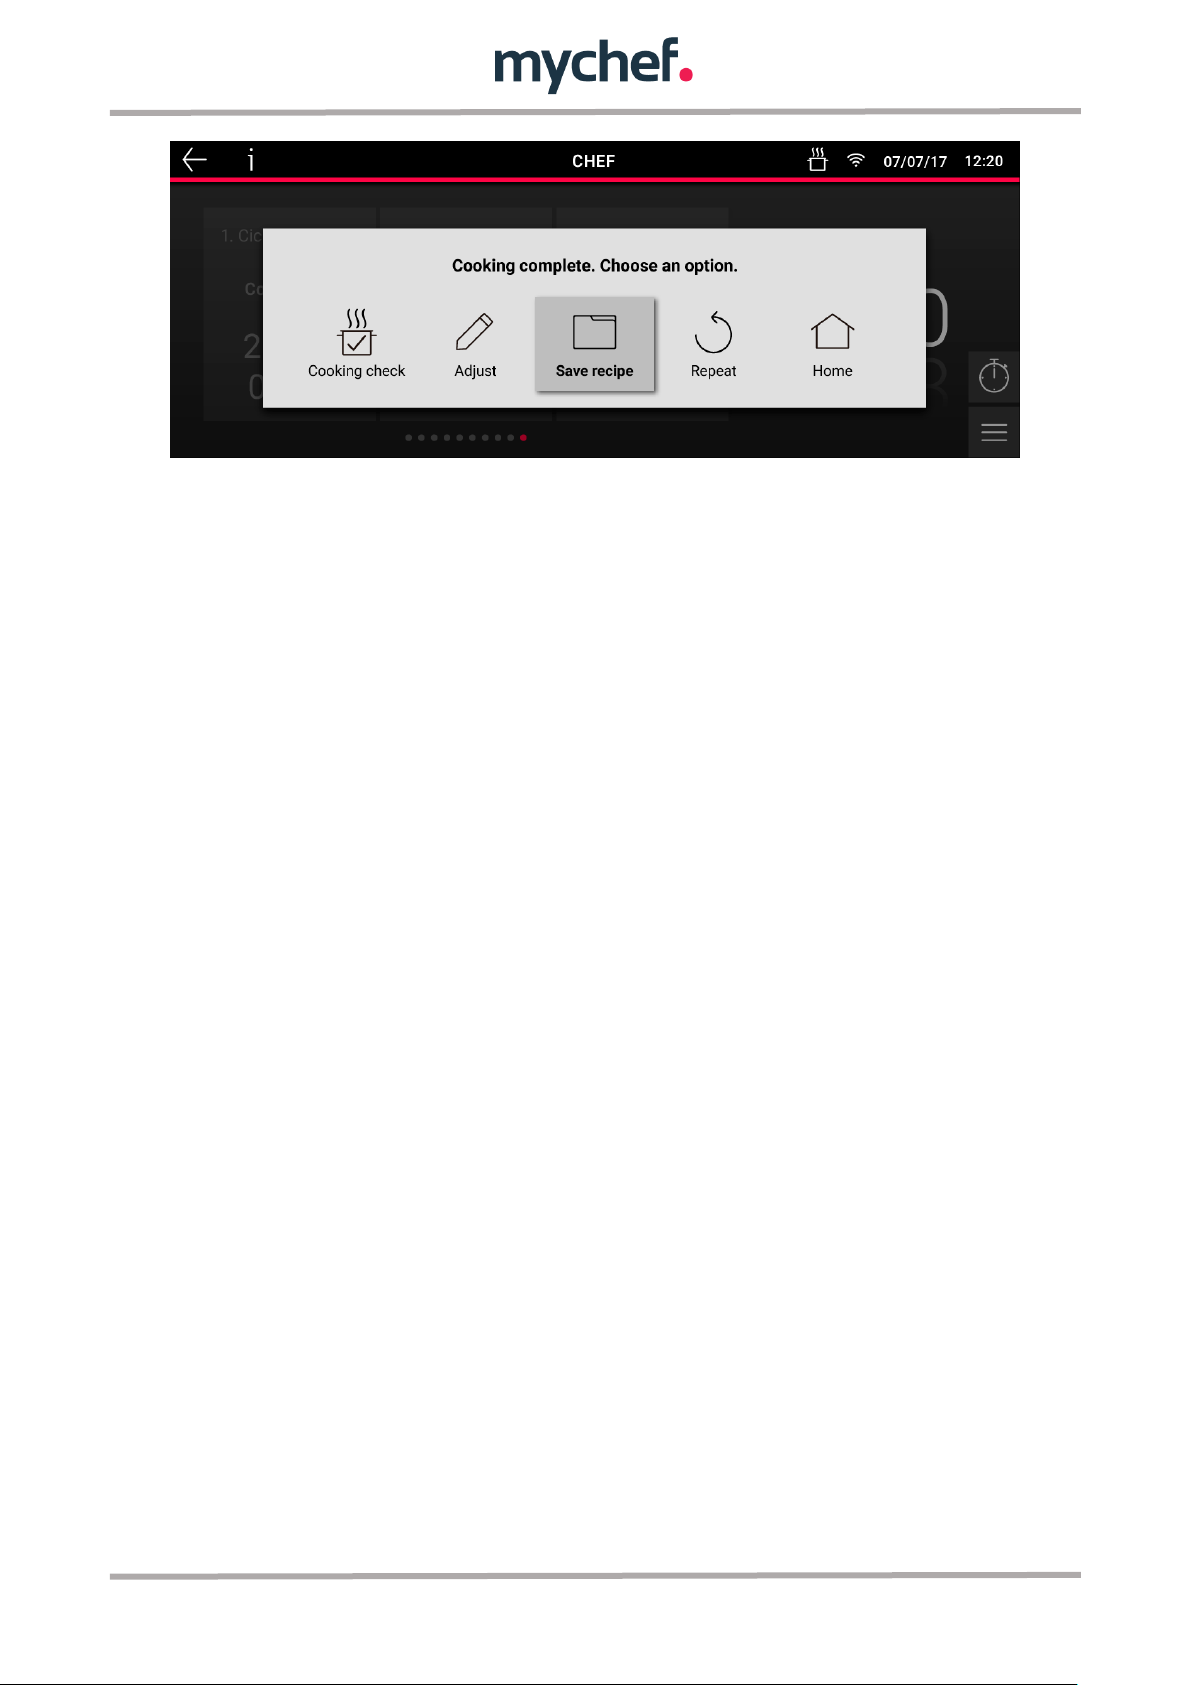
Once the cooking message is finished, you must choose one of the options shown.
Cooking check: Display of resources used during cooking, temperature, time, water and
energy.
Adjust: Sometimes it is necessary to add time to a cooking. This option allows you to
fine-tune the result by adjusting the time.
Save: With this option, it will be possible to save the parameters in the recipe book by
creating a recipe book and reuse it in the future. Parameter settings do not need to be
reset. It is possible to save a recipe before or after cooking.
Repeat: Run the same cooking program again.
Home: Return to the Home screen.
You can also exit the displayed screen by pressing START/STOP.
You can also interrupt the cooking process at any time by pressing START/STOP to
stop cooking.
4. SMARTCOOKING
After selecting the SMARTCOOKING cooking mode in the main menu, you access the
following screen where a series of foods are displayed. This mode allows you to select
the food by category and choose from the preparation procedures that each food
allows. For example: Meat Beef Sirloin Grill set cooking parameters and
START/STOP.
4.1 SMARTCOOKING Mode
The SmartCooking mode makes certain cooking profiles available, where it will be
possible to select and modify the cooking parameters, starting cooking immediately to
obtain an optimal result.
25
Page 23
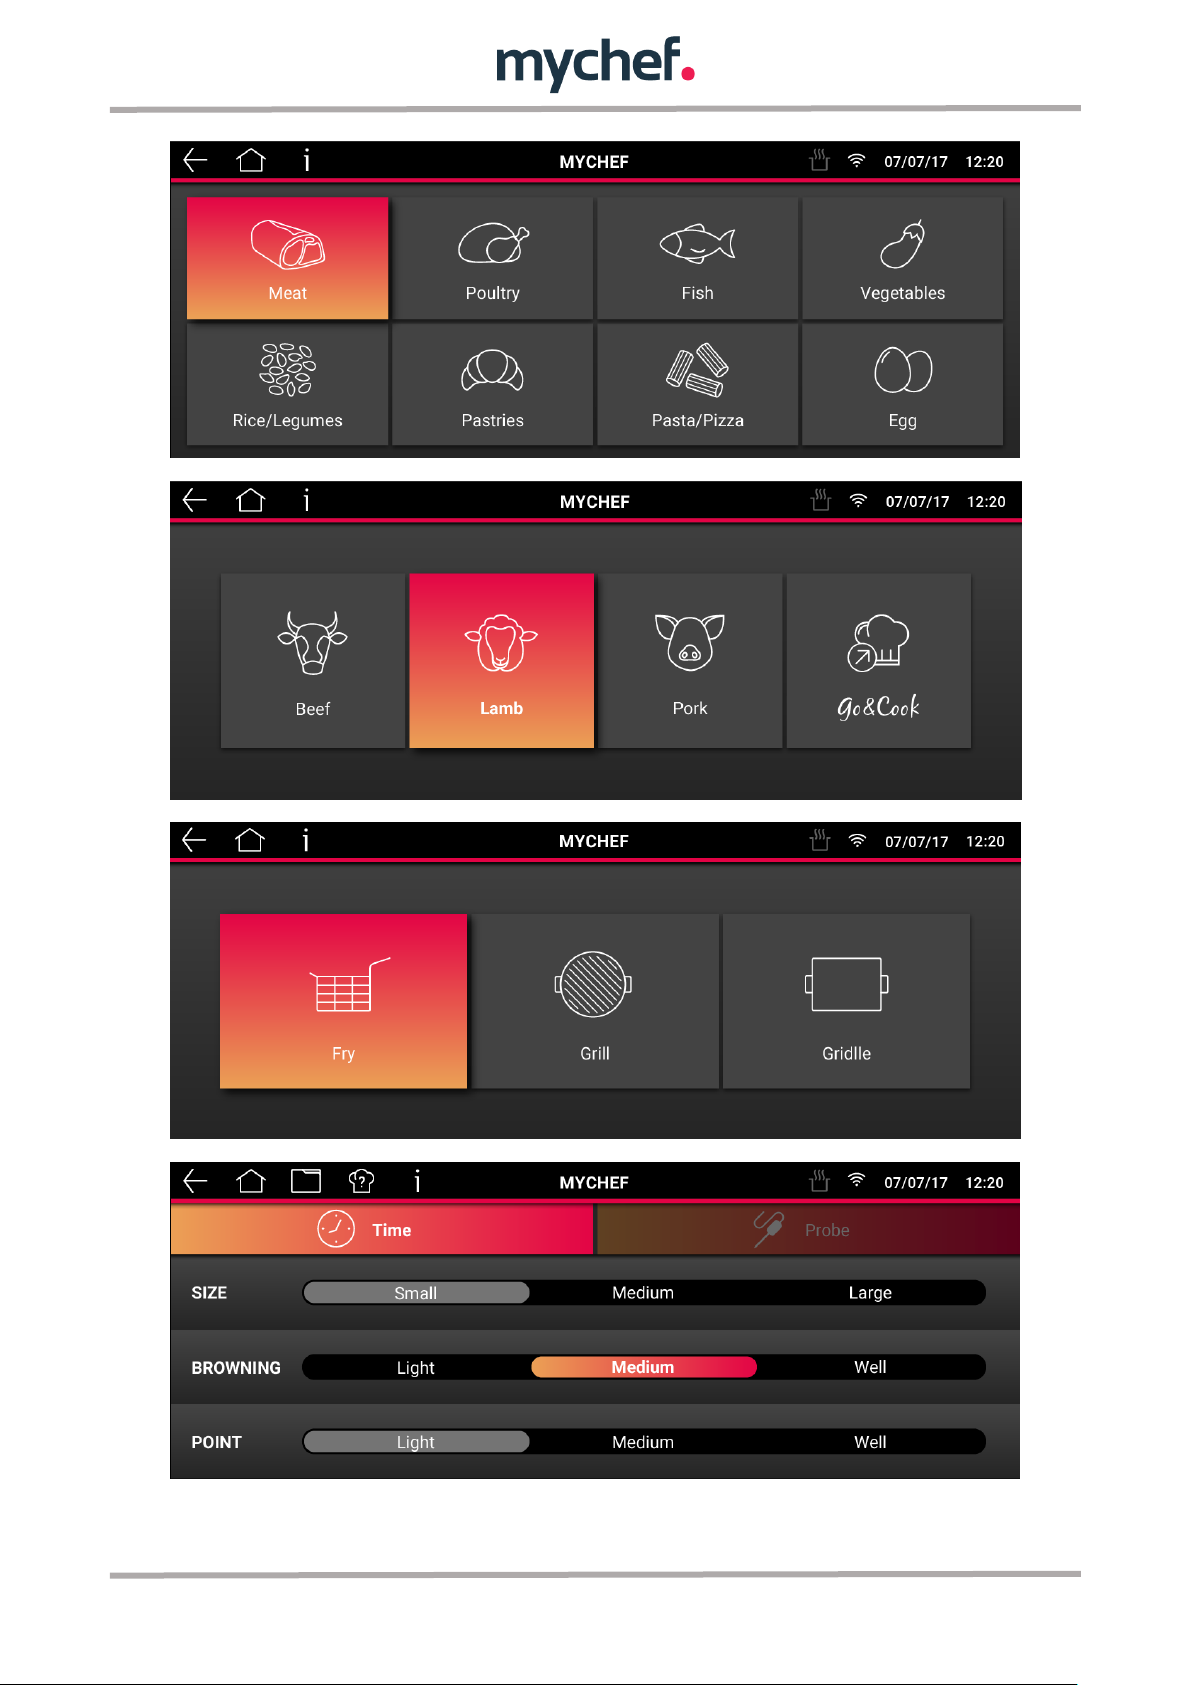
Some foods allow probe cooking, this option can be selected when compatible. It will
be possible to carry out cooking by probe and sous vide.
26
Page 24
1 2 3
4
The sous vide or low temperature cooking is especially suitable for meats, poultry or
fish and some vegetable preparations. This cooking allows the food to be cooked more
gently, lose less juice and preserve its qualities.
It is possible to stop the cooking at any time by pressing START/STOP.
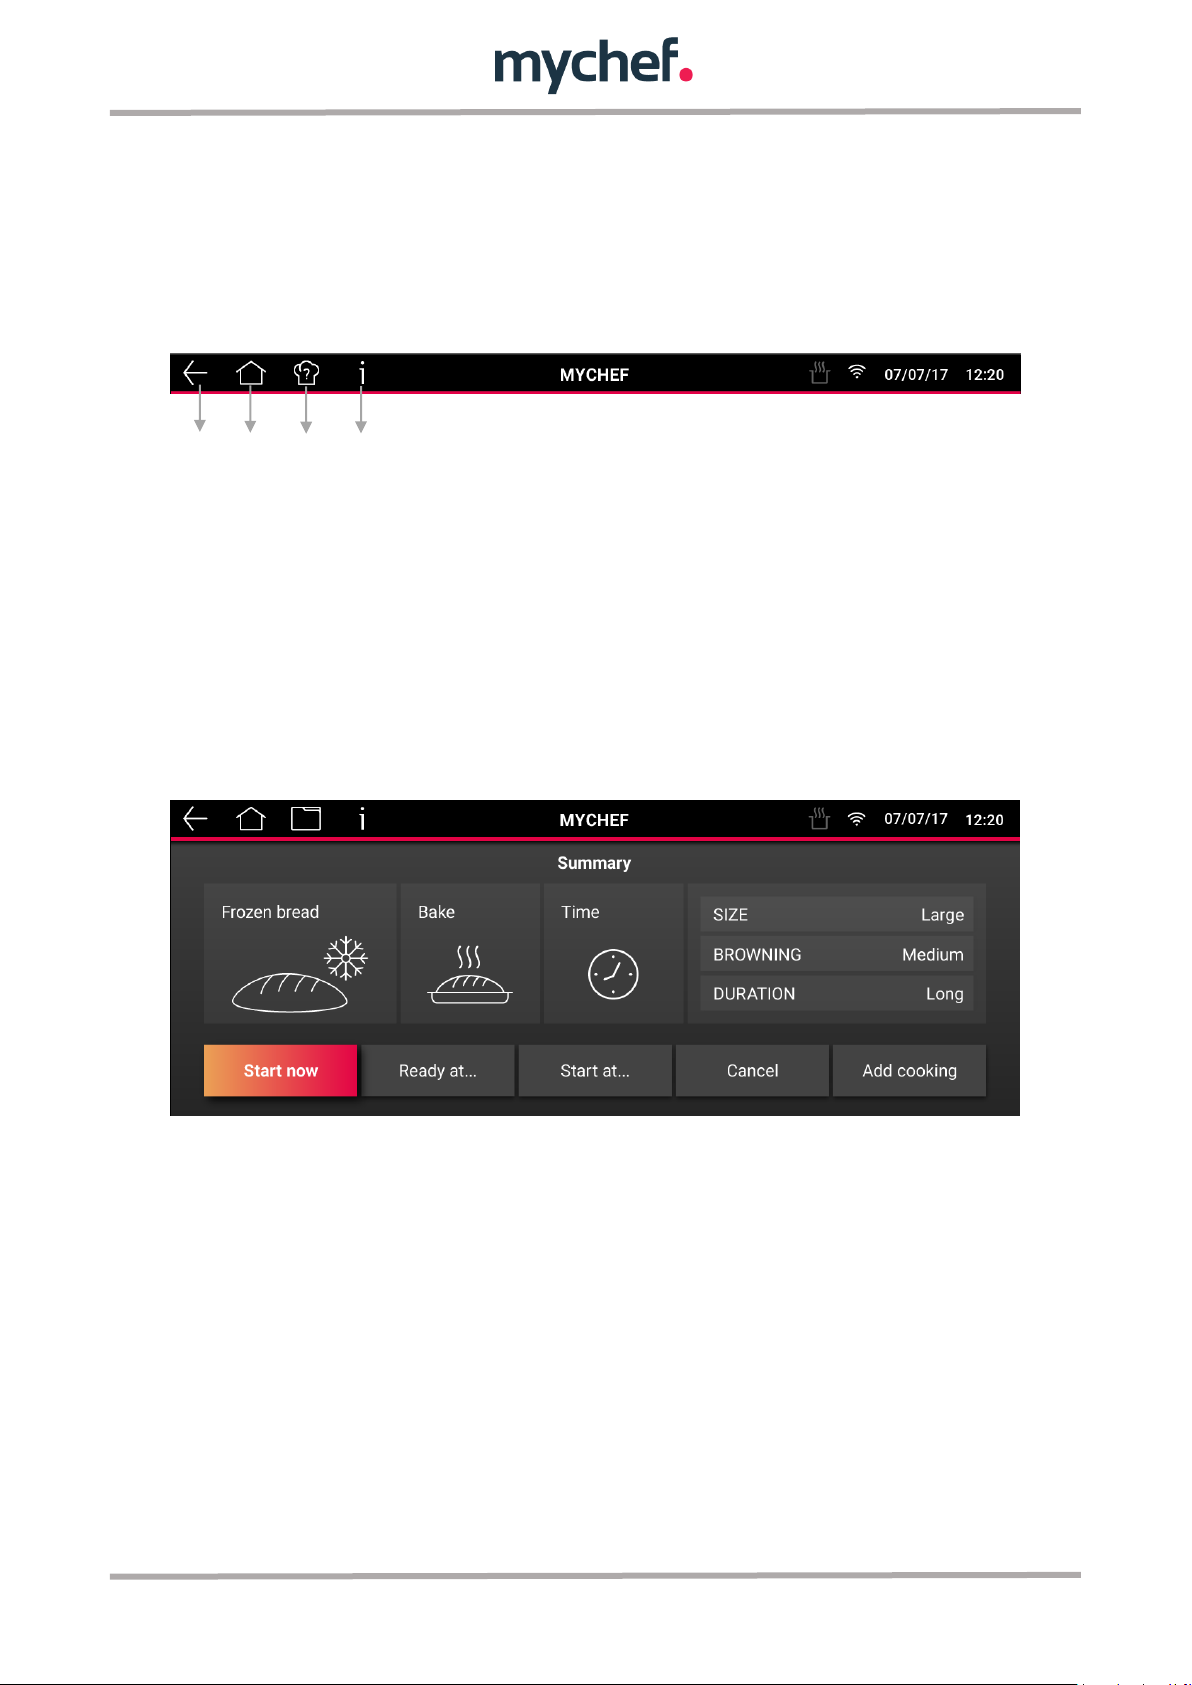
The MYCHEF menu header displays the following options:
1. Back
2. Home
3. Cooking aid: This option will display hints and tips for optimizing cooking results.
4. Display information and help
To start cooking, once all parameters have been set, press START/STOP. A summary
of the selected cooking is shown below.
If cooking is to be started, selecting "Start now" will start cooking, the LED will
illuminate and the cooking indicator in the header will activate.
If you want to program the start of the cooking, you can program it in two modes. First,
with the option "Ready at...” you can set the time when the cooking need to be ready.
With the "Start at..." option, you can program the start of cooking.
This screen also allows you to cancel the cooking and also add a standby cooking. In
the latter case, the cooking will remain in standby and a new cooking can be
configured. Once the programming of the next program has been completed, the
cooking can be started.
It is also possible to save the recipe with the settings selected in the recipe booklet "My
Recipes", so that the user can create his or her own profile of assisted cooking and
have a faster access in future occasions from the recipe book.
27
Page 25
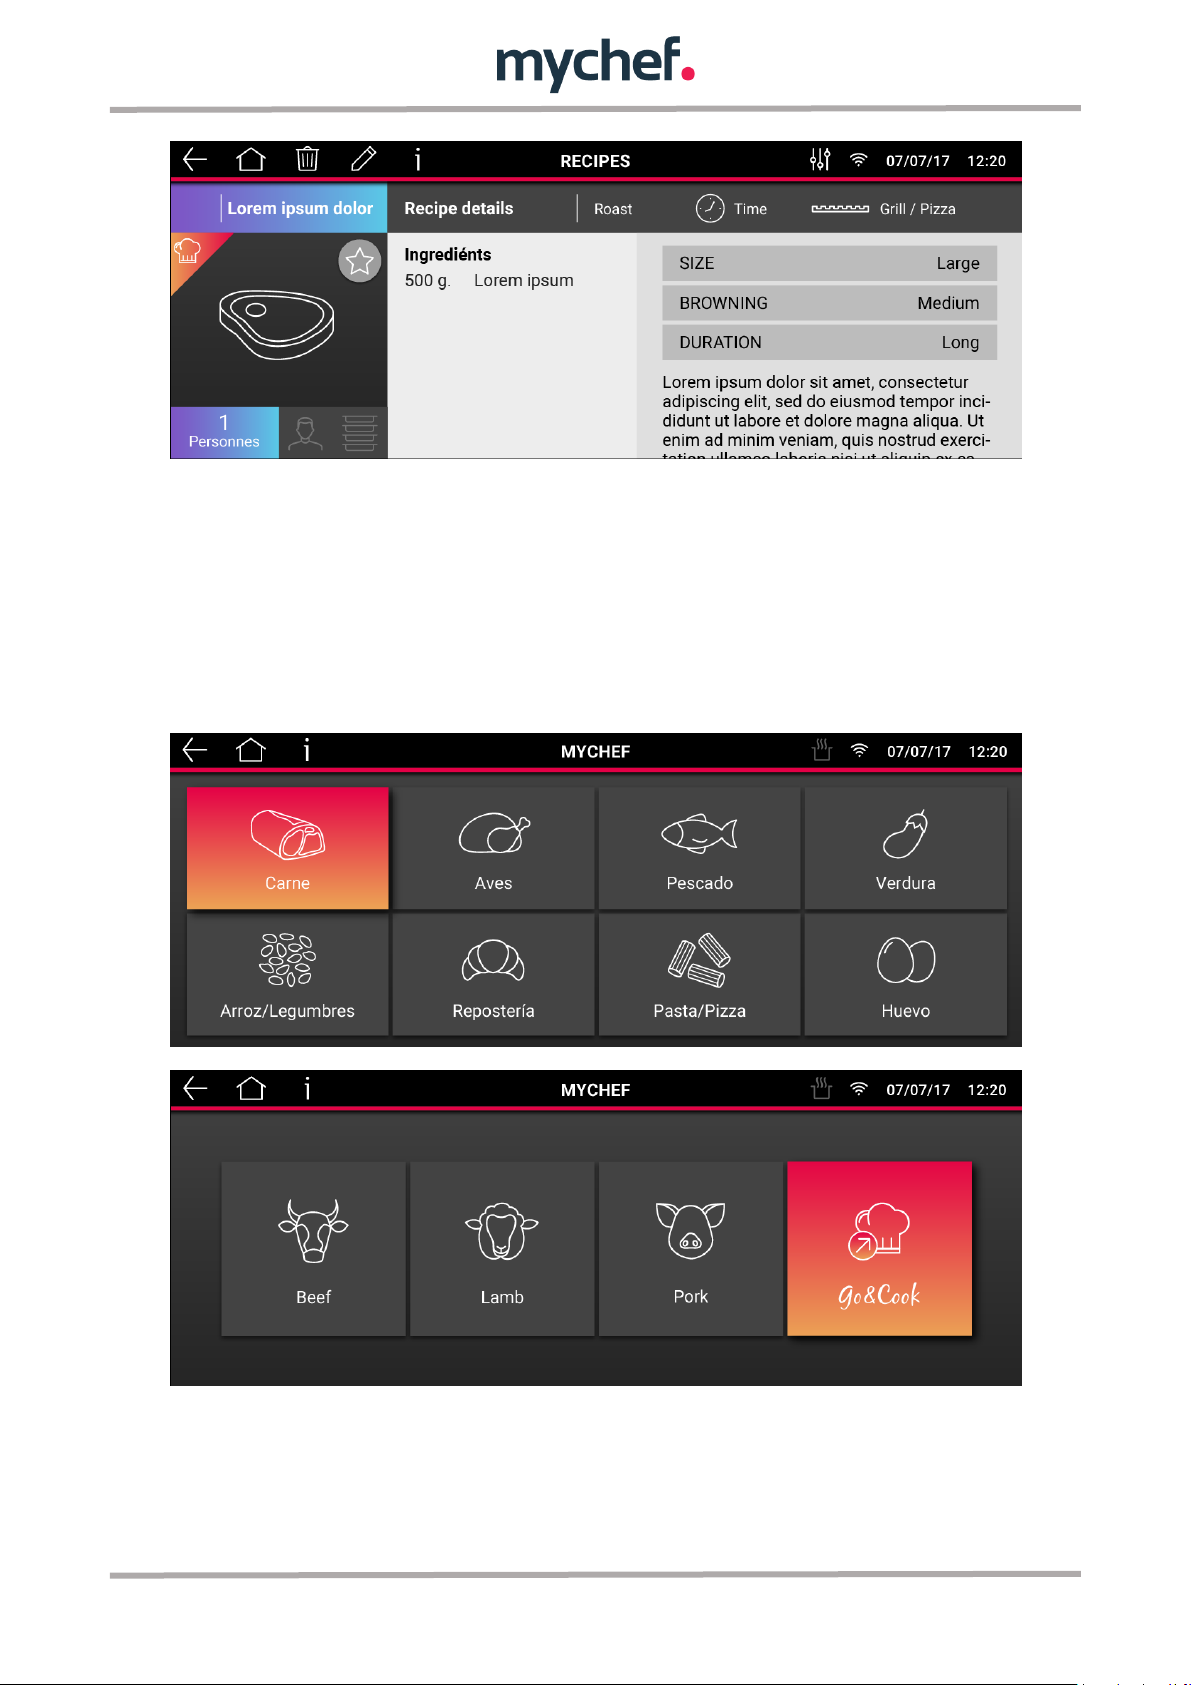
4.1.1 Go & Cook
The Go&Cook cooking mode is a direct cooking method, suitable for each food
category. Once the category has been selected, for example: “Meat", the Go&Cook
option will show us directly the available preparations for meats: Fry, Grill, Grill, Grill,
Grill, Roast, Stew, Steam, Sous video and MySmoker. When you select the preparation
mode, for example: Frying, you access the cooking parameters screen. In this case it is
possible to select Fry by Time or by Probe, as shown below:
28
Page 26
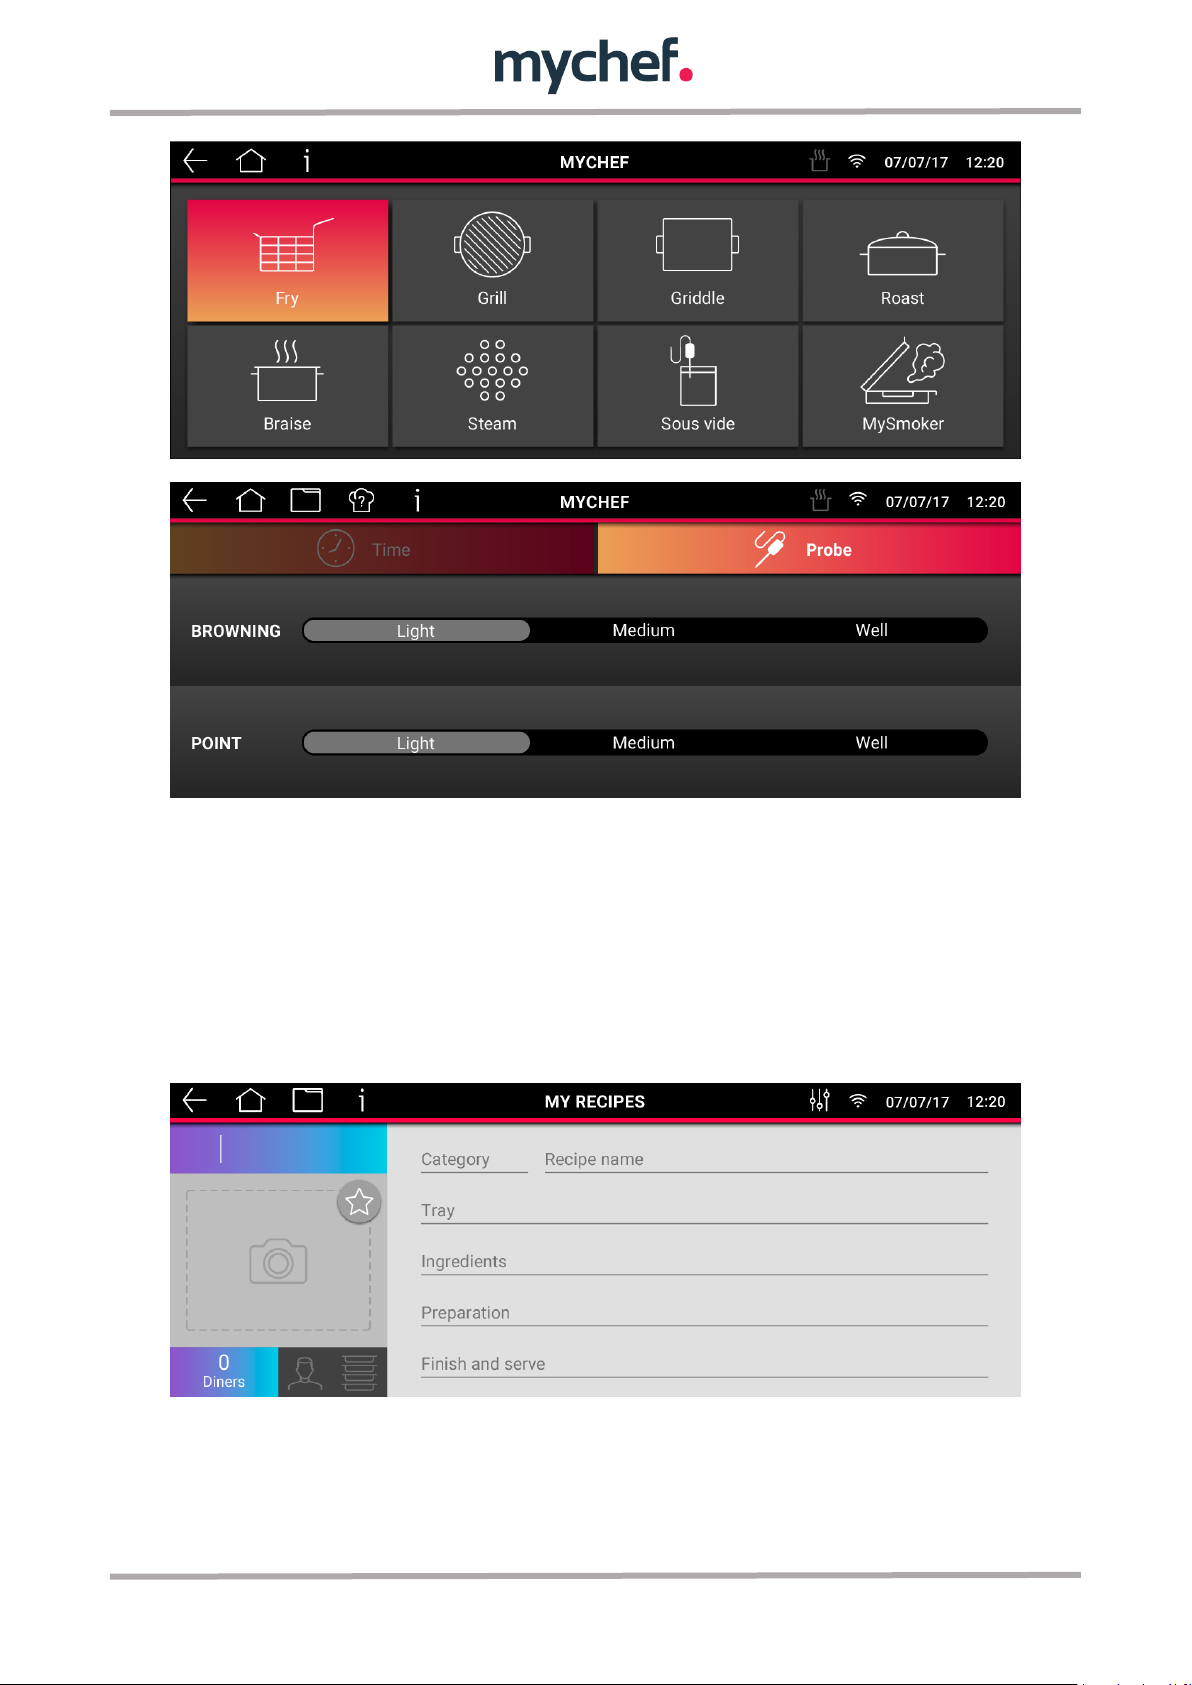
4.1.2 Saving cooking or recipe set up or creating a recipe
It is considered that it is previously on the CHEF screen, and the cooking parameters
have been adjusted or a recipe has been created from the "MyChef Cloud" application.
- After selecting the Save button, the following screen appears where you must
enter the necessary data to correctly describe the recipe you want to save.
Category: Establishing a category will allow a better management of recipes, the
categories are as follows:
29
Page 27
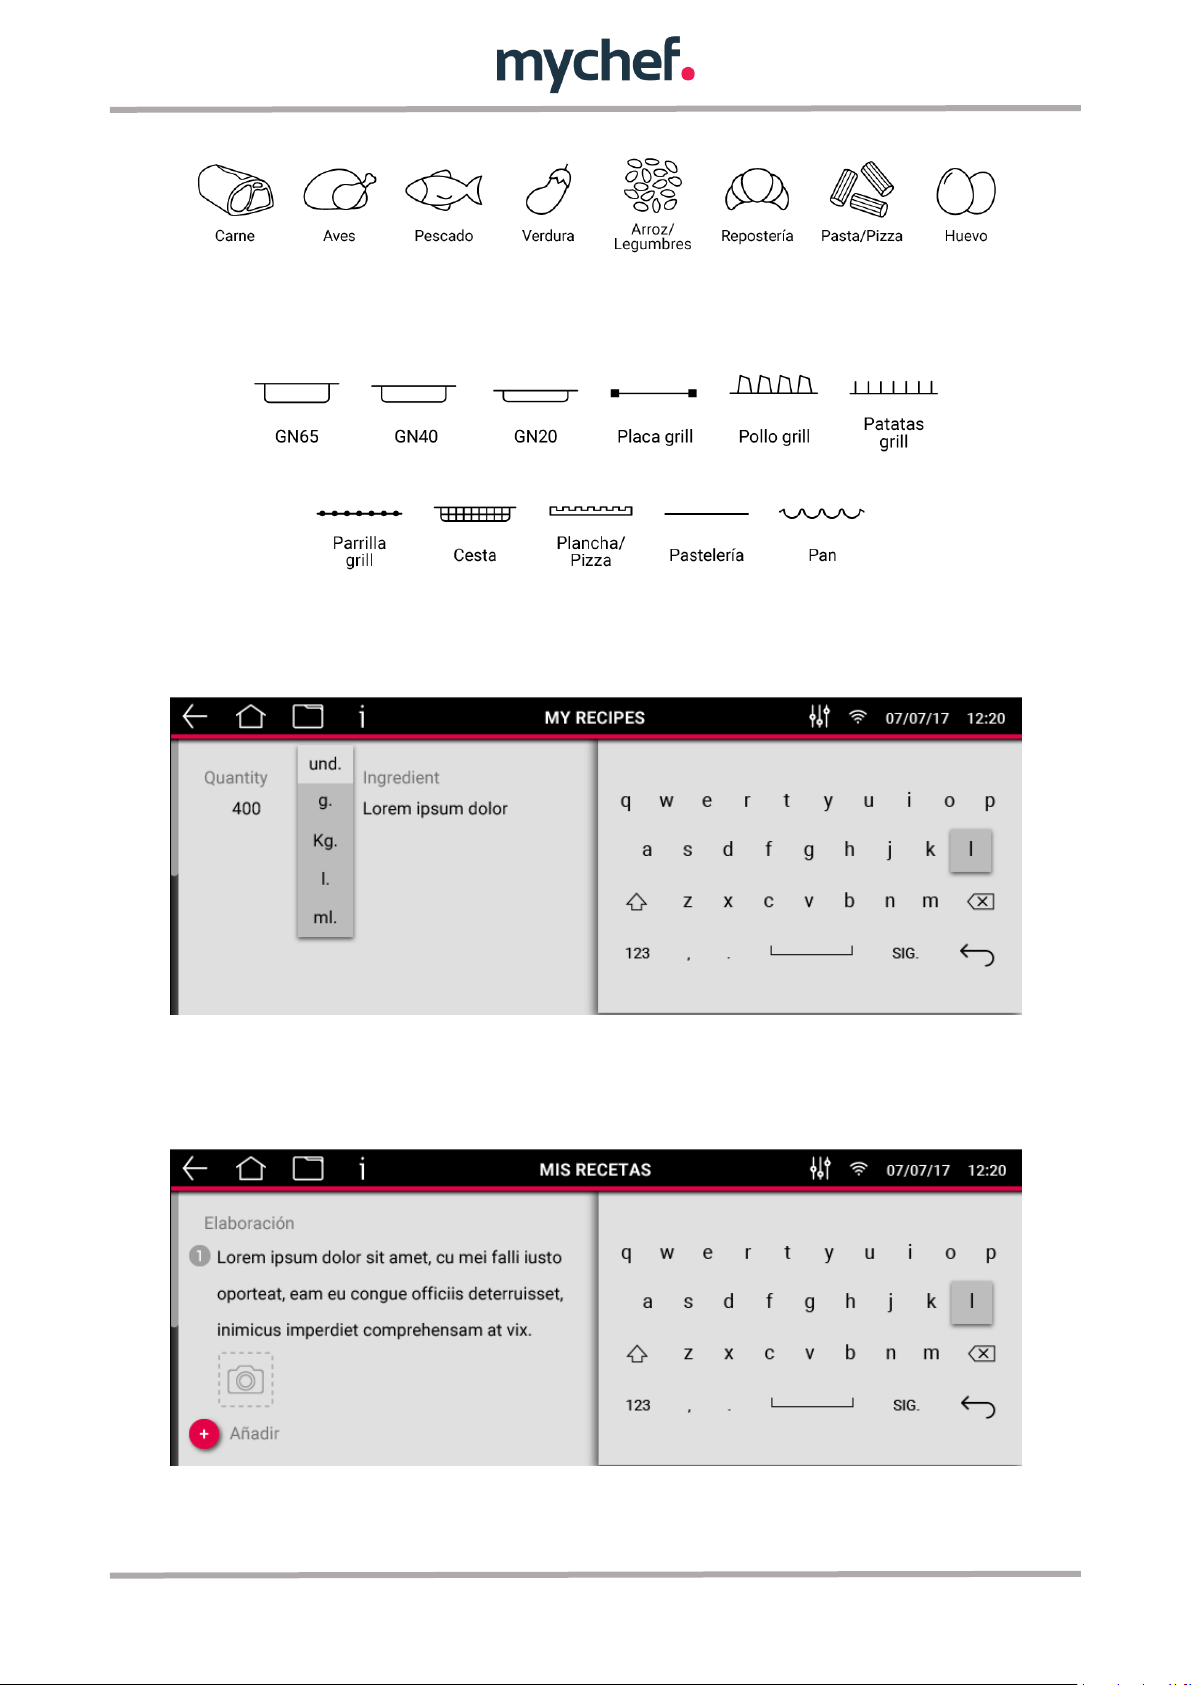
After selecting a category and entering a name with which to save the recipe, you must
choose the type of tray that is recommended for cooking:
Selecting the ingredients field will open a new window in which you can enter the
ingredients that make up the recipe.
Next, we ask you to add the different steps that make up the preparation of the recipe.
At each step it will be possible to upload an image to illustrate the preparation
procedure.
Similarly, it will be possible to add hints of plating in the final step and add an image.
30
Page 28
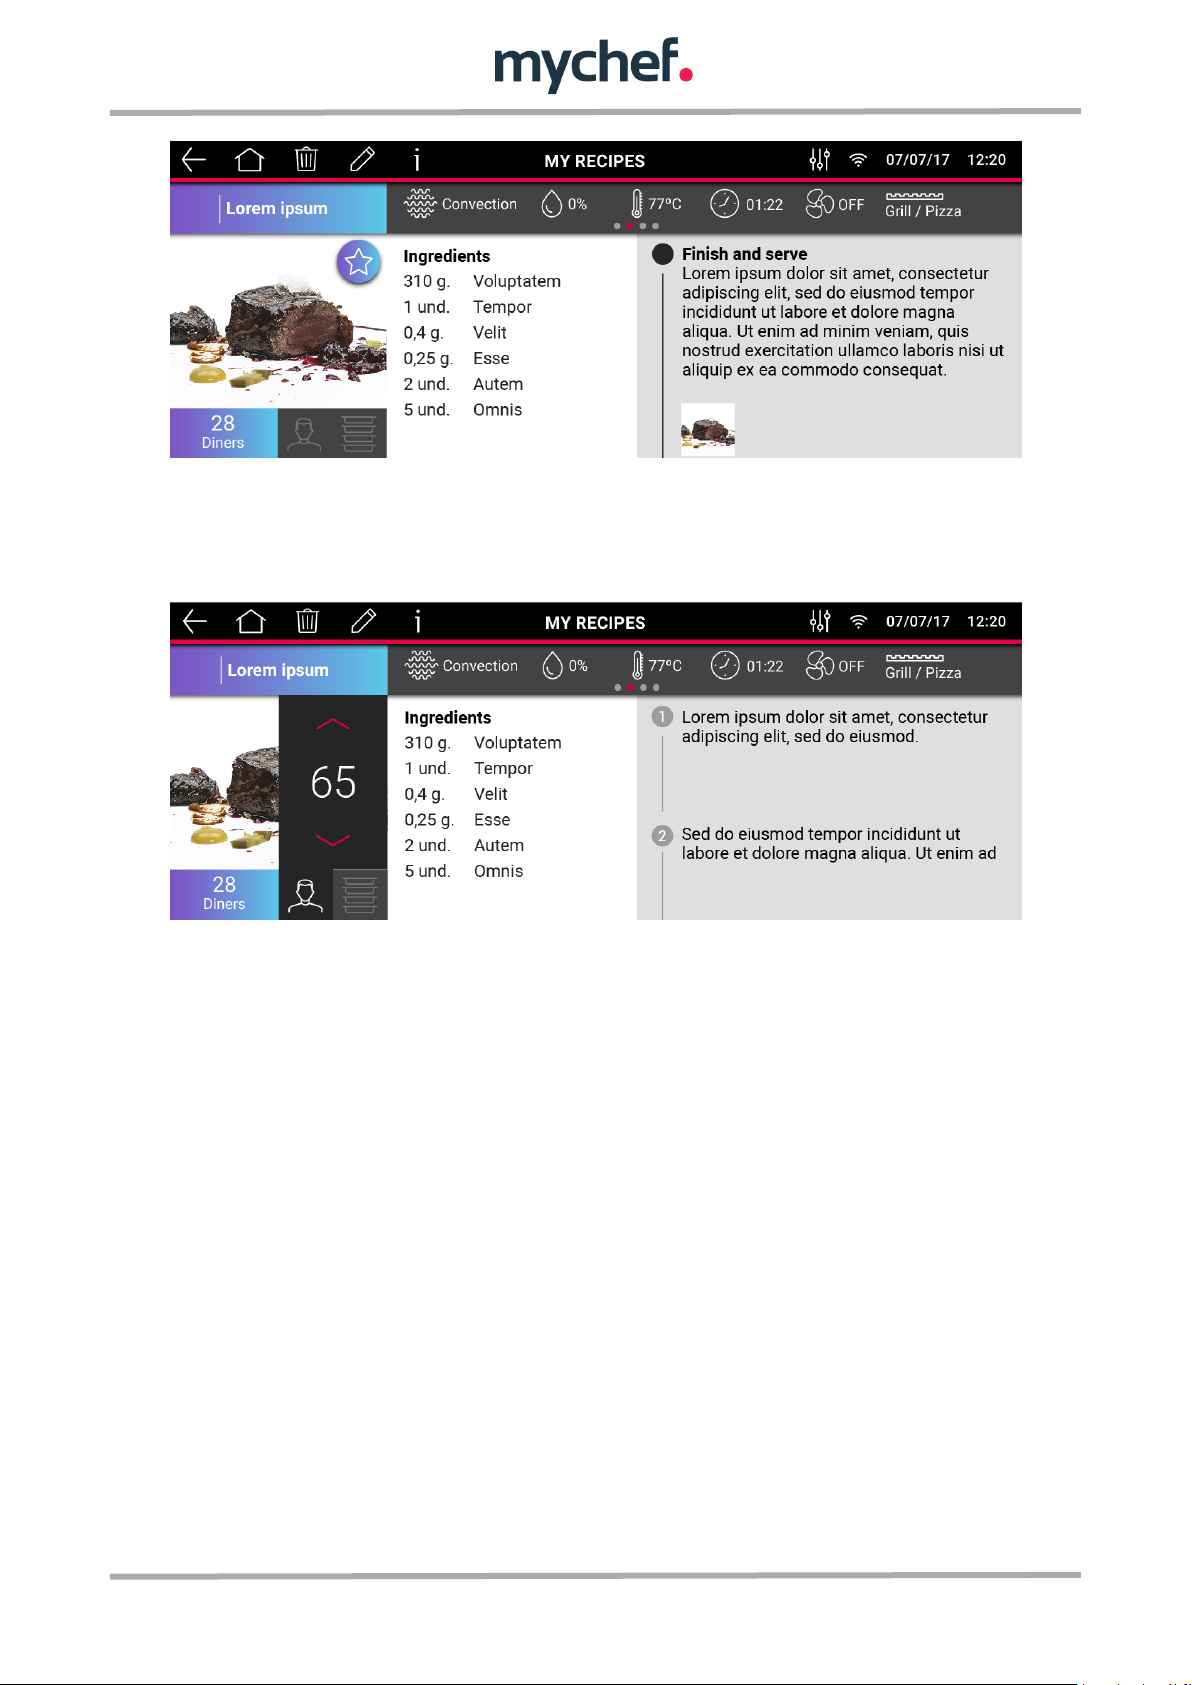
It is possible to adjust the number of diners or trays to know exactly the quantities of
ingredients to be used in each case. By means of the parametric calculation, the
ingredients section will show the new quantities required for the preparation of the
recipe.
5. COOKING PLANNER
Cooking planner mode allows you to cook several trays of the same food or different
foods or recipes that require different cooking times in different levels.
For simultaneous cooking, only preparations with similar cooking profiles can be
selected from Chef, SmartCooking or Recipes mode, which are the same in terms of
temperature and humidity. Therefore, it will be possible to combine a cooking in this
cooking mode when the parameters are similar and only the cooking time varies. In
order to load SmartCooking cookings in Cooking planner mode, it will be necessary to
save them in the recipe book with the desired parameters. A clock icon at the top left
will indicate that the recipe is compatible with cooking planner mode. These cooking
do not allow cooking cycles.
31
Page 29
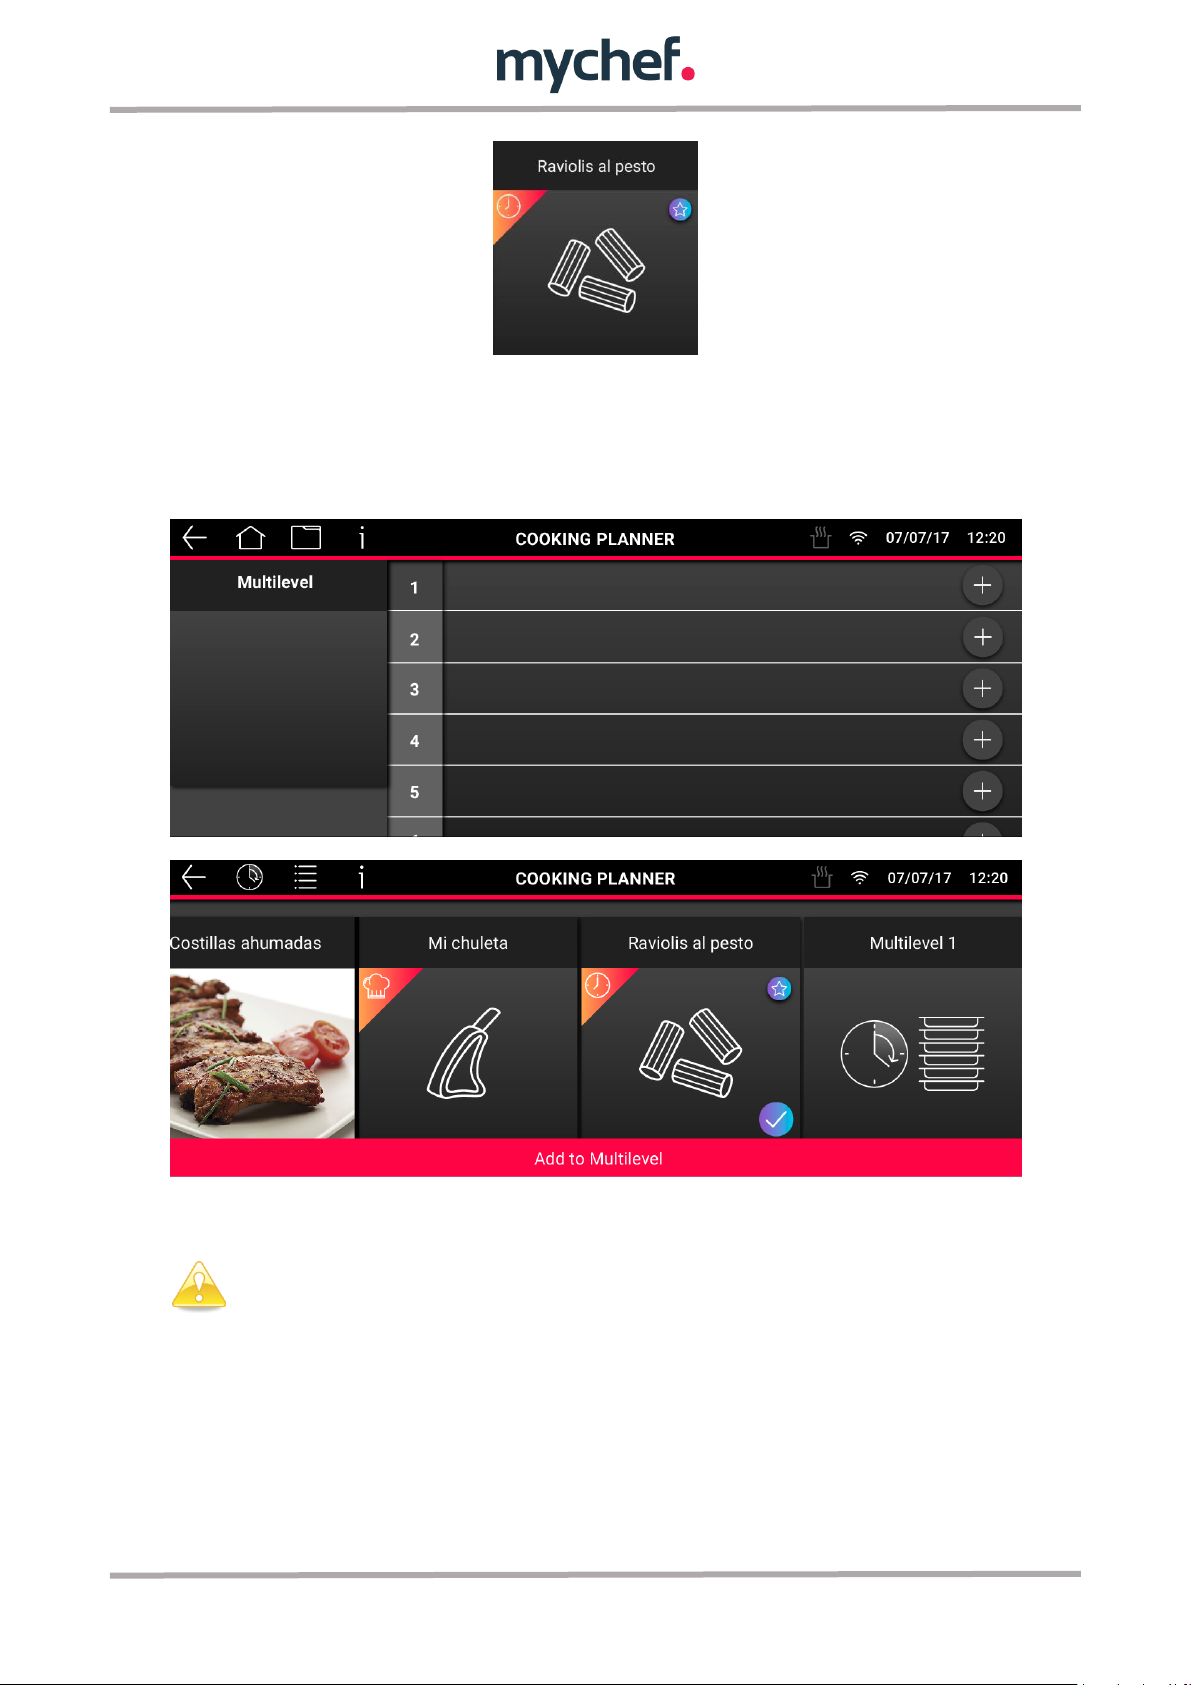
The recipe names are given as an example.
To load a cooking planner, select Multilevel or JustInTime and press the (+) button at
the desired level, then access the recipe book where the recipes compatible with this
cooking mode appear. Then select a first recipe and click "Add to Multilevel" or "Add to
JustInTime".
The Cooking planner mode has two different profiles from which you can choose:
- Multilevel: for cooking that starts at the same time, under a single cooking cycle
and different finishing times depending on the recipe of each tray. The system
will notify the user via the display and on the mobile device via a notification
32
Page 30
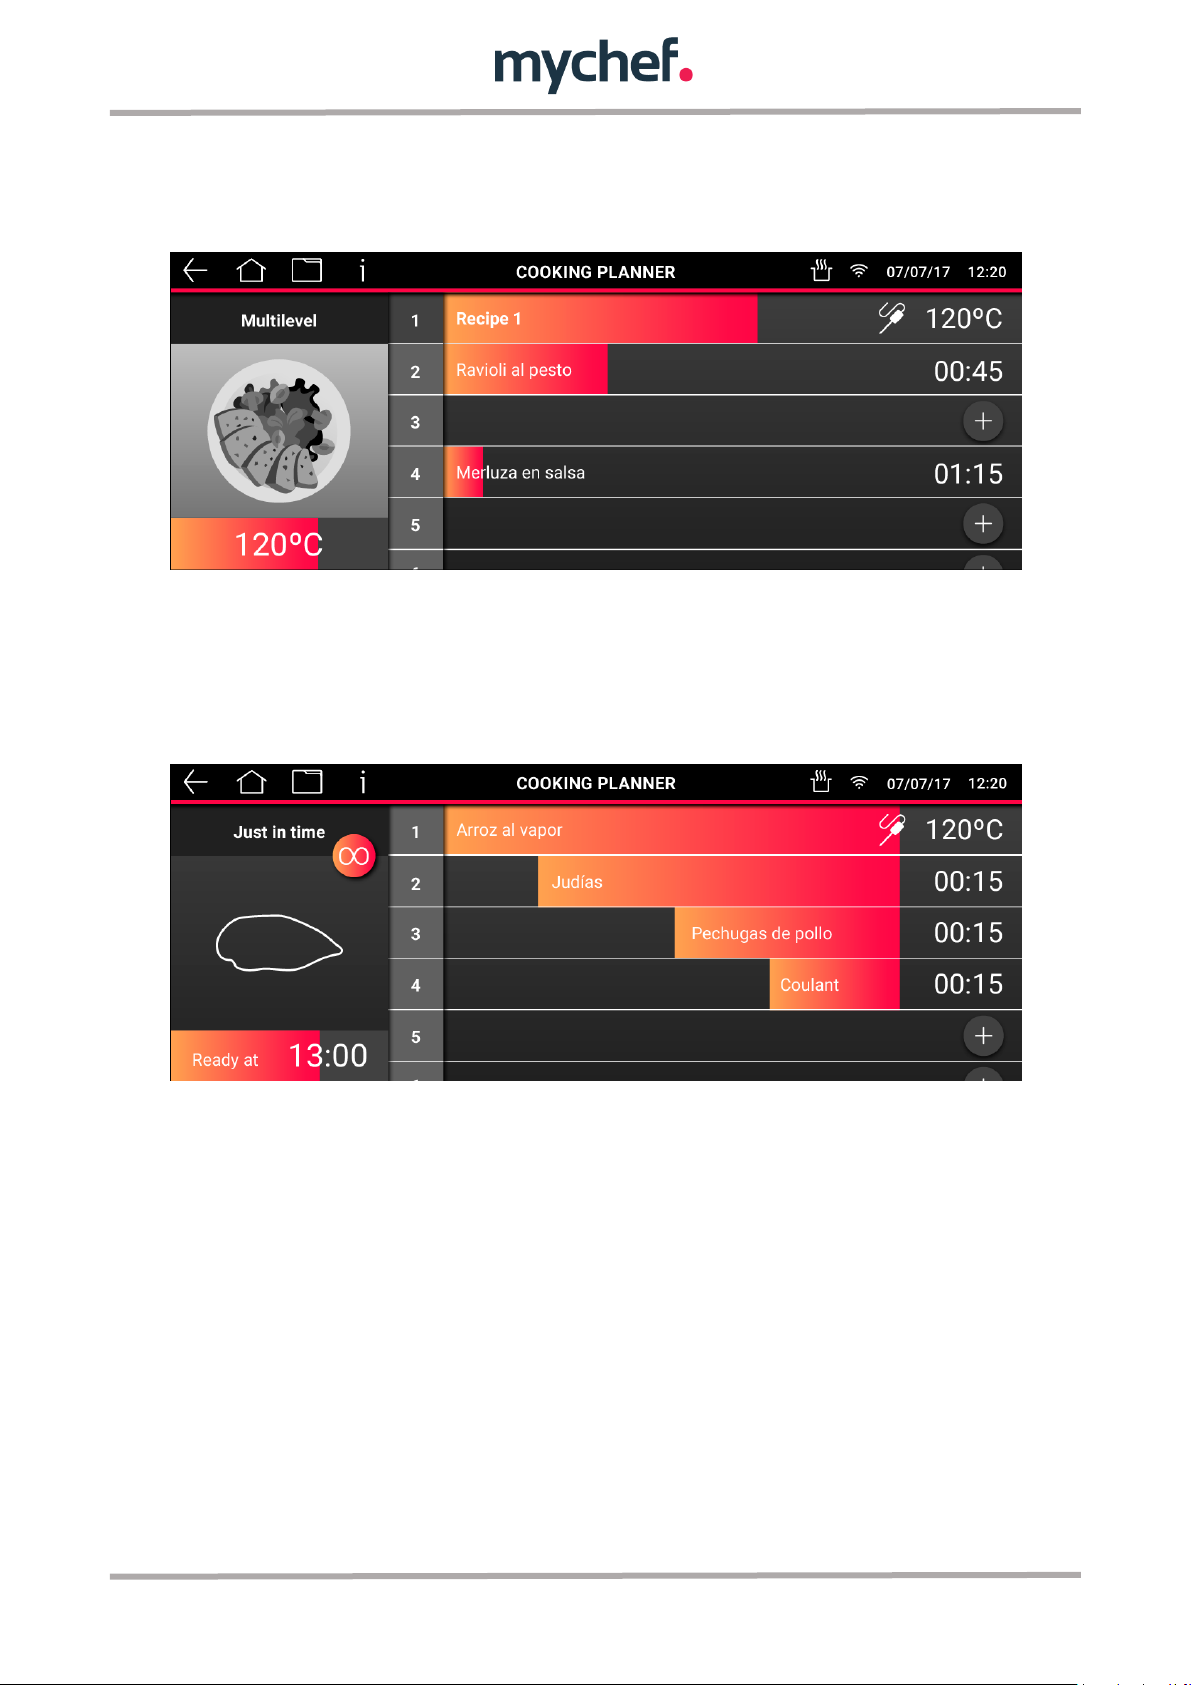
when each tray must be removed at the end of cooking. Additional products
can be loaded, cooking stops when the door is opened. When the door closes,
the process will resume.
- JustInTime: for recipes that we want to be ready at the same time, notifying you
when to load the trays at different times. In this case, the system will notify
when trays need to be introduced based on cooking time to allow all food to be
cooked at a particular time. This cooking mode maintains the set temperature
and humidity.
Any cooking process can be interrupted without interfering with the other loads.
At the end of a cooking process, both in Multilevel and JustInTime, the screen will
show in green which of the trays is to be extracted, in order to continue cooking.
Performing the action of opening the door, pulling out the tray and closing the door.
Probe cooking is permitted only on one of the trays. In this case, the cooking of this
tray will end when the temperature set for the probe is reached.
To display the total number of trays, it is possible to slide by pressing on screen or
using the rotary knob.
33
Page 31
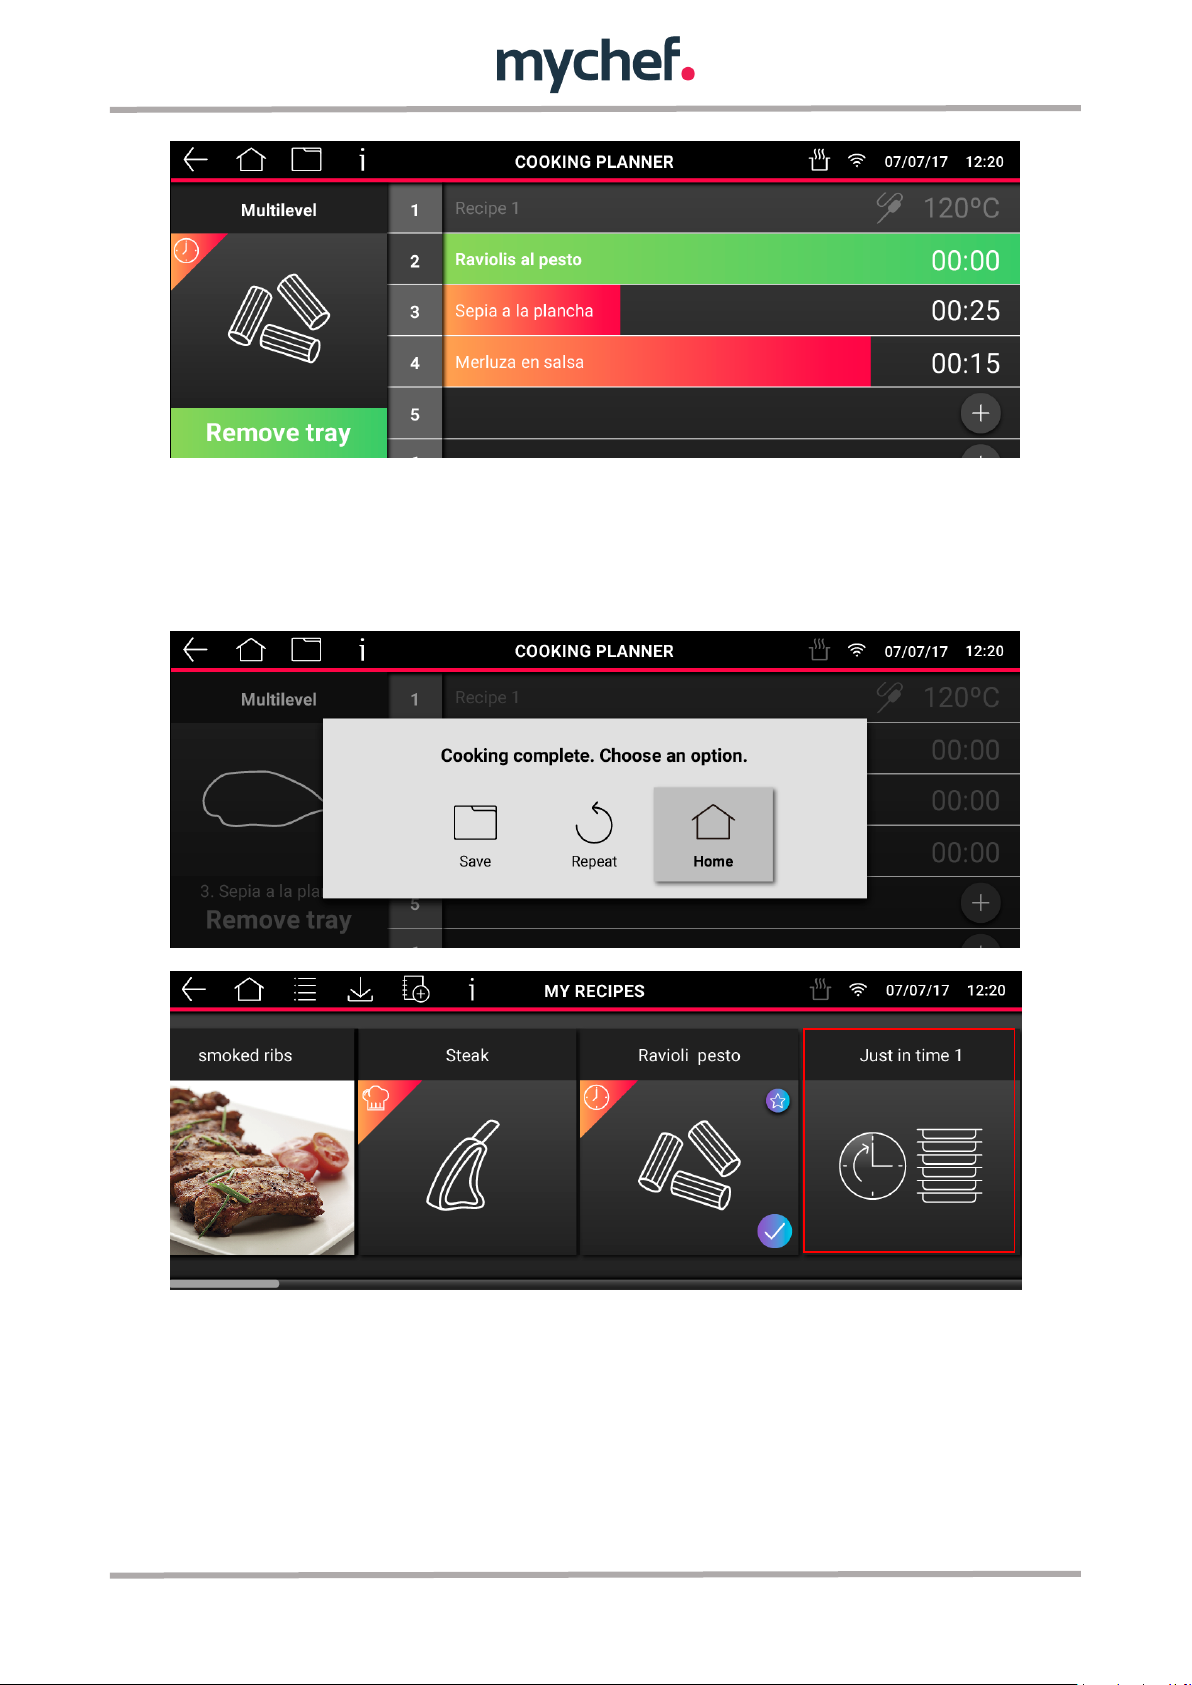
5.1 Save Cooking planner
You can save a list of recipes in Multilevel or JustInTime under "My Recipes", either
after loading all the recipes you want to cook, through the save option in the header, or
once the process is finished, as shown below:
6. REGENERATE
The regenerating mode allows the regeneration of almost all types of previously
cooked foods, where they are finished cooking and prepared to be served, for this
purpose the foods can be already arranged in plates or containers. You can select to
regenerate manually with the "Chef Mode" or assisted "SmartCooking Mode".
34
Page 32
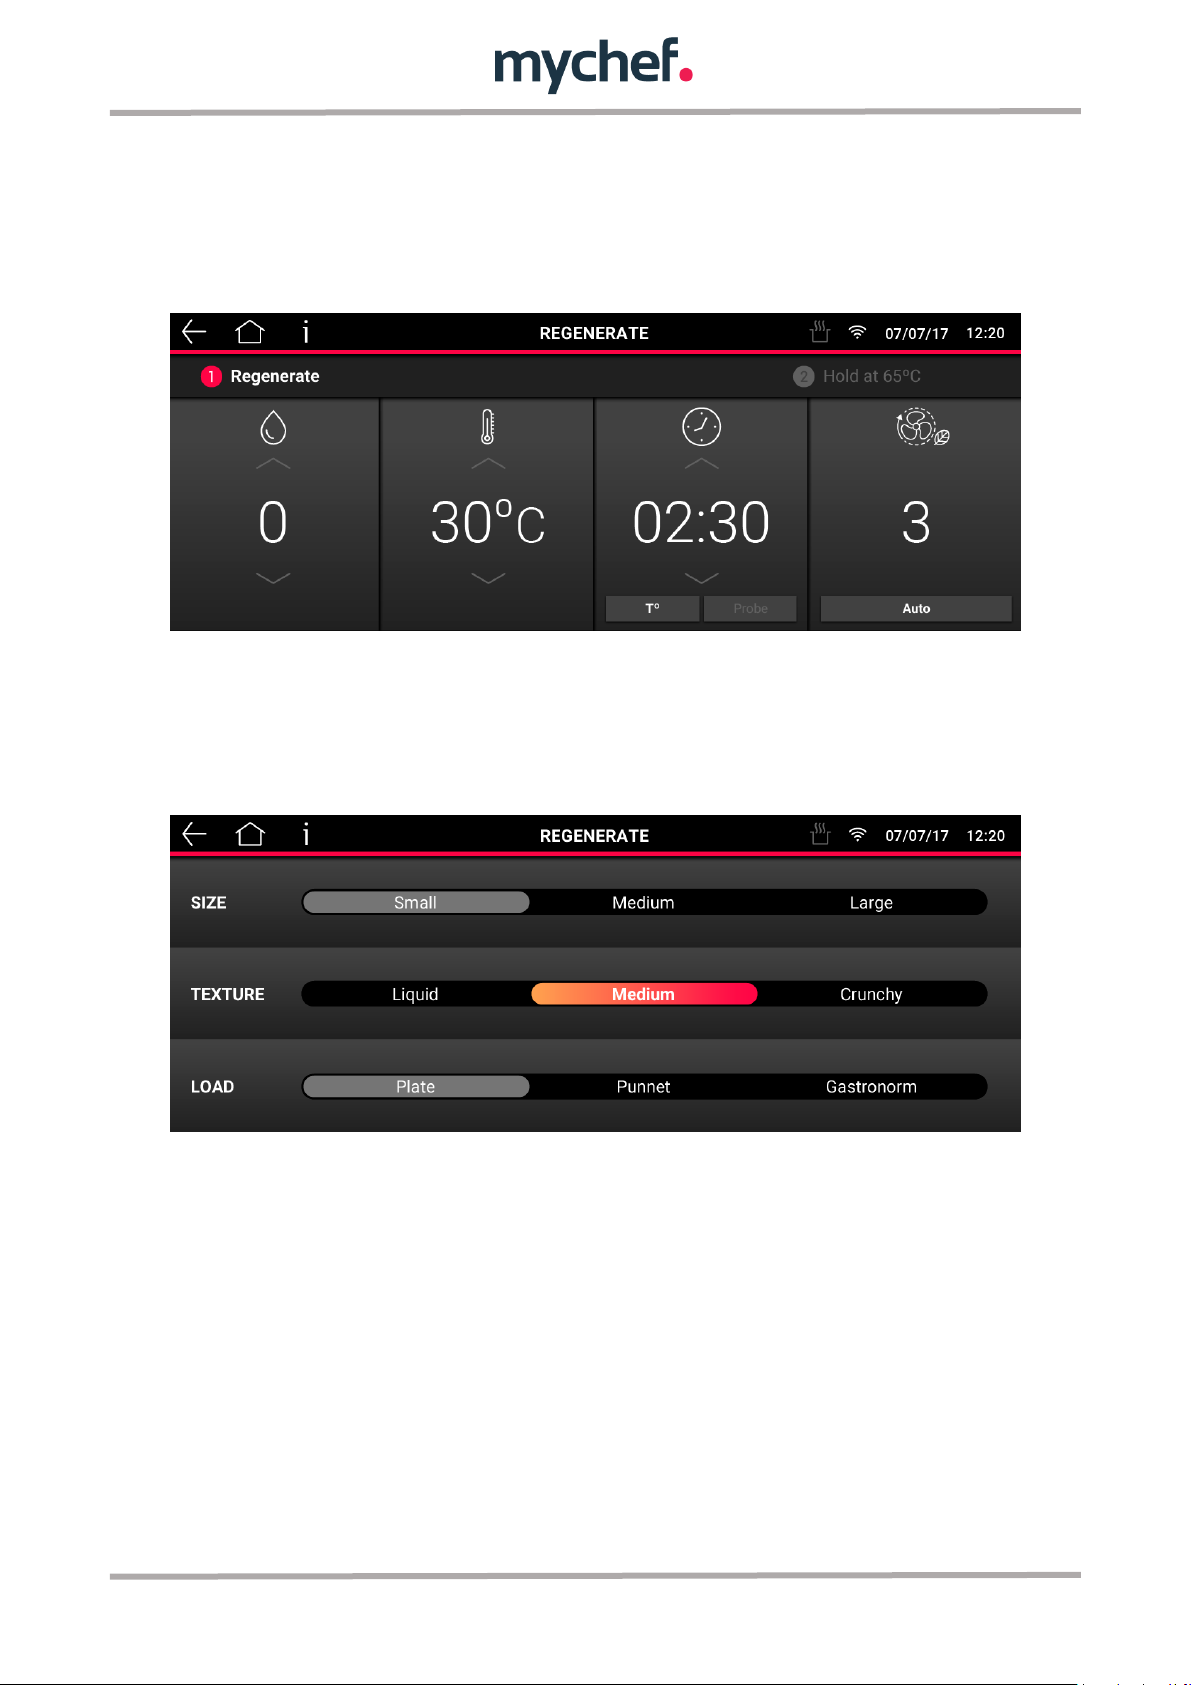
- Chef Mode: To start this mode it is necessary to adjust the Humidity,
Temperature and Time parameters and press START/STOP. The fan speed will
be adjusted automatically. Once regeneration is complete, a maintenance cycle
starts at 65°C, which will end only when START/STOP is pressed.
Note: For temperature settings below 160°C the use of probe is recommended.
- SmartCooking Mode: This regeneration mode allows you to regenerate food by
category, with assistance. Simply select the type of feed and adjust the
parameters shown in the following screen and press START/STOP.
7. MYCARE
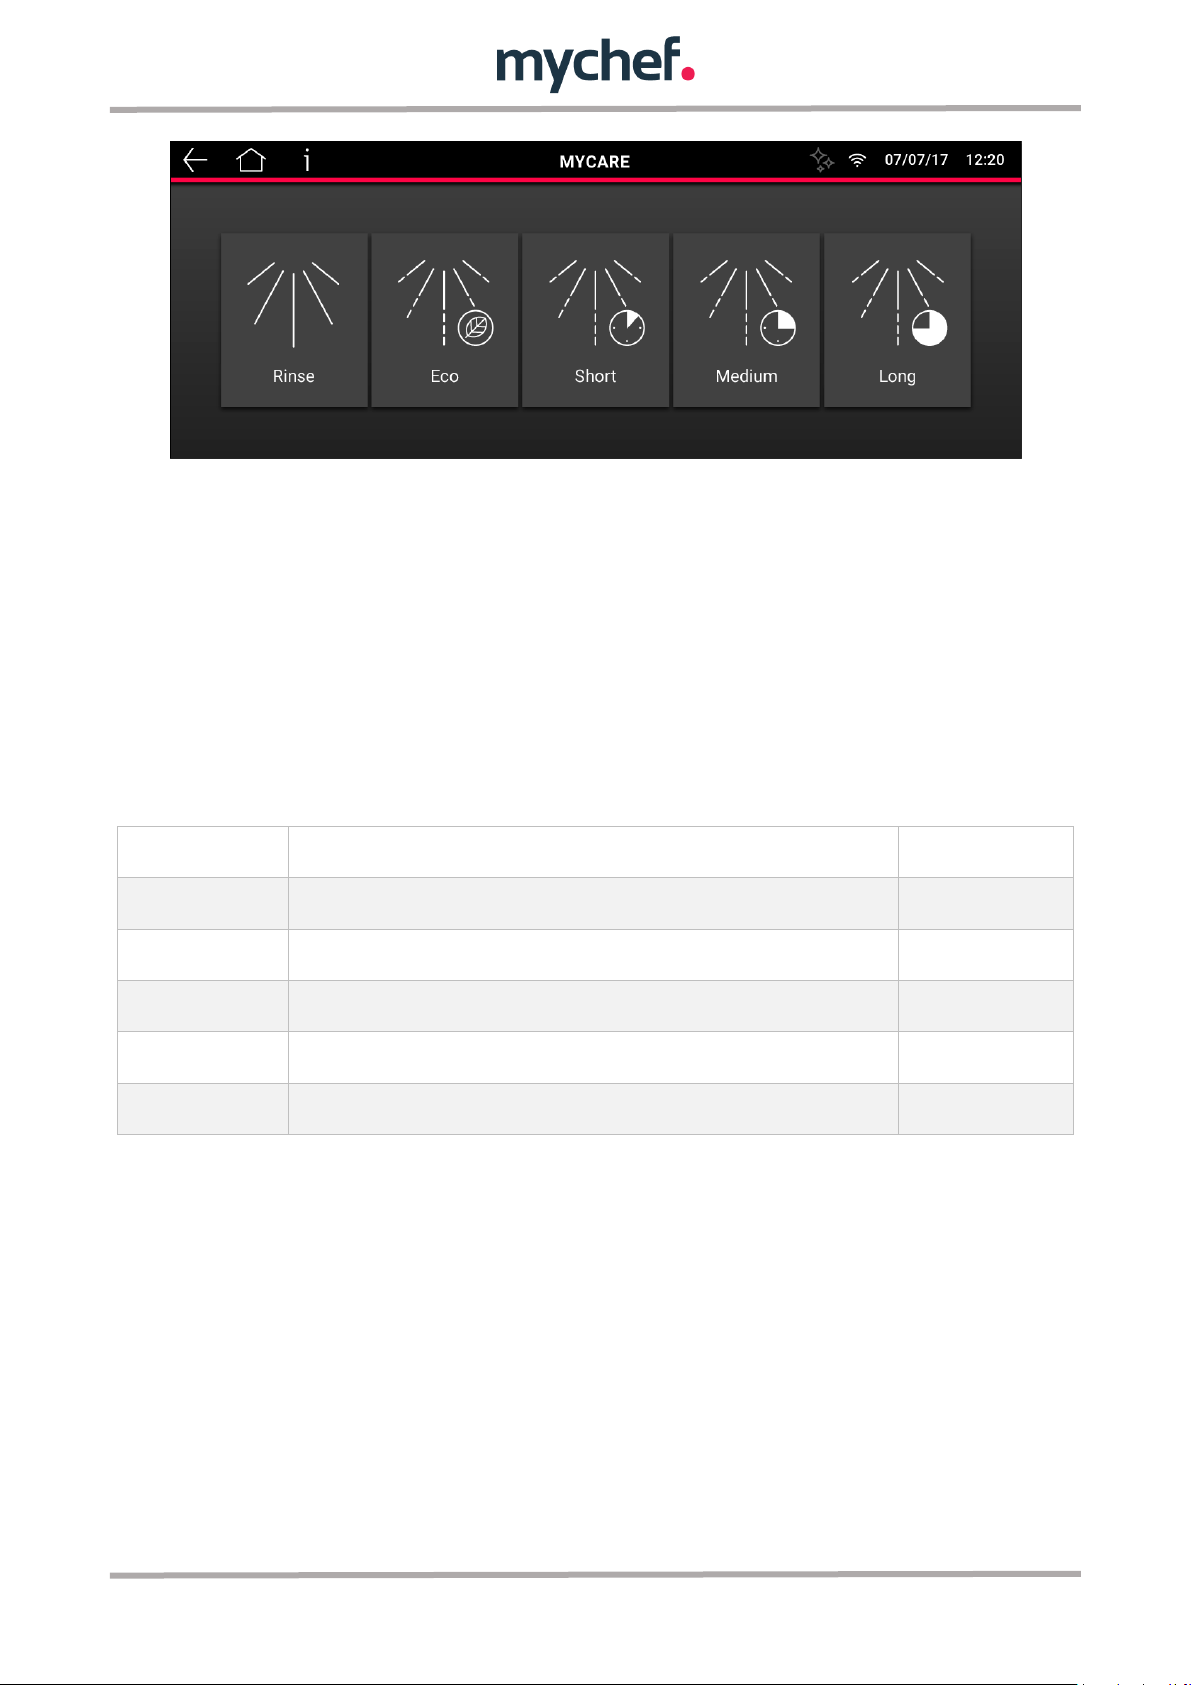
Using the MyChef cleaning system allows automatic cleaning of the cooking chamber.
This option includes several self-cleaning profiles available, as shown below:
35
Page 33
Program
Description
Duration
Eco
ECO self-cleaning program
63 min
Short
Self-cleaning program for low dirt level
103 min
Medium
Self-cleaning program for medium dirt level
143 min
Large
Self-cleaning program for high dirt level
183 min
Rinse
Rinse program.
10 min
- Rinse: Program of rinsing the chamber with water.
- Eco Washing: This program allows an efficient washing with optimization of
resources.
- Short wash: Short wash cycle - Short wash cycle
- Medium Wash: Medium duration washing program.
- Long Wash: Long lasting wash program The necessary time to complete each
program and the use and usefulness of each program are listed in the table
below:
Table 1: Self-cleaning and rinsing programmes
When starting a washing program, it is necessary to know the instructions for use and
warnings of danger that appear on the Mycare "cleanduo" washing tablets.
Before the self-cleaning cycle, remove any solid food scraps/rests that may be inside
the chamber manually. To remove food scraps from the cooking chamber, remove
them before hand and prevent them from coming out of the drain. Do not place trays or
grills during the washing process. It should always be carried out without load, to
ensure proper cleaning of the equipment.
36
Page 34
For the use of the washing processes in as much as for the handling of the
products used in the process, appropriate protections must be used.
Cleaning programs are specifically designed to use MyCare cleanduo detergent. The
special formulation of this product stands out for having twice the concentration of
active product than that of most similar products available on the market. It also
includes a polishing additive for a perfect all-in-one finish. This allows you to use only
one MyCare cleanduo tablet per wash, with the consequent savings and ease of use.
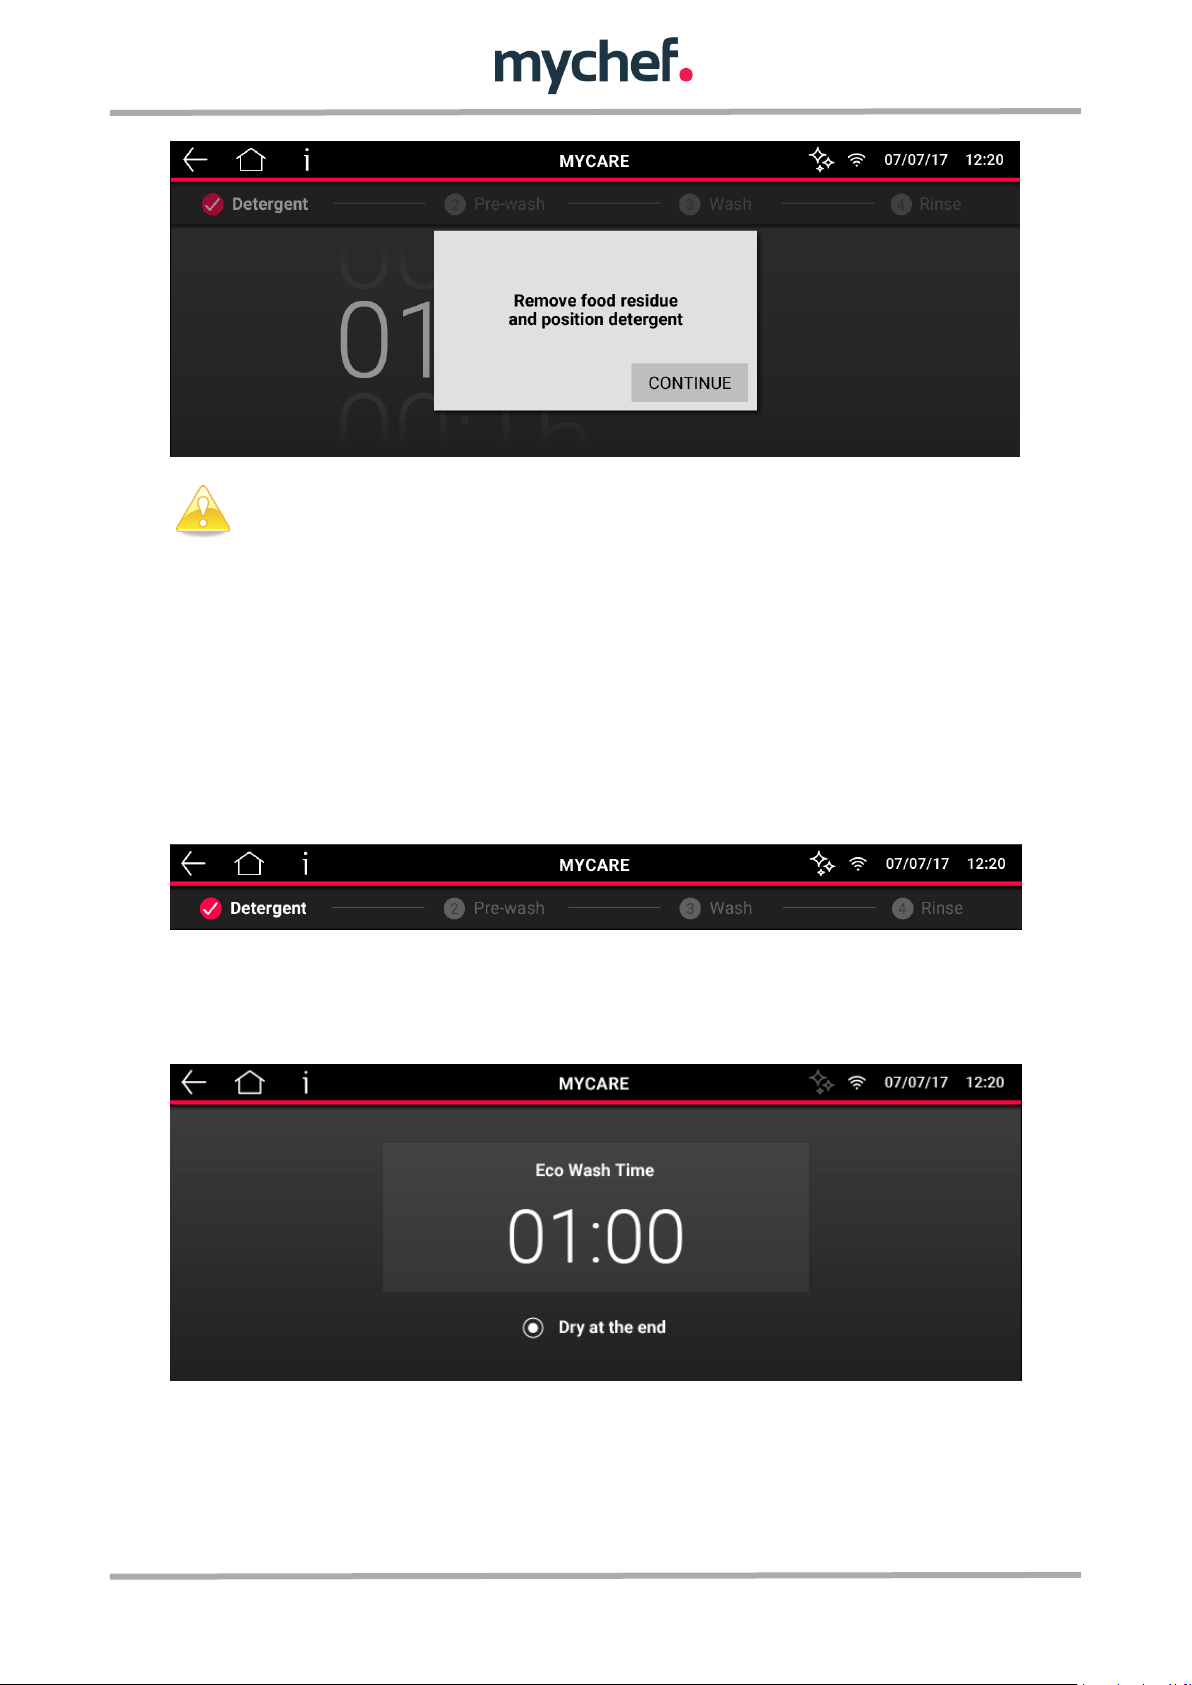
Once the selected washing program has been started, the display will show the oven
user the progress and ask him/her to perform the necessary actions to carry out the
task correctly.
At the end of a washing program, the chamber may be dried. To do this, it is necessary
to select the option "Dry at the end of the camera", at the beginning of the program,
prior to selecting START/STOP.
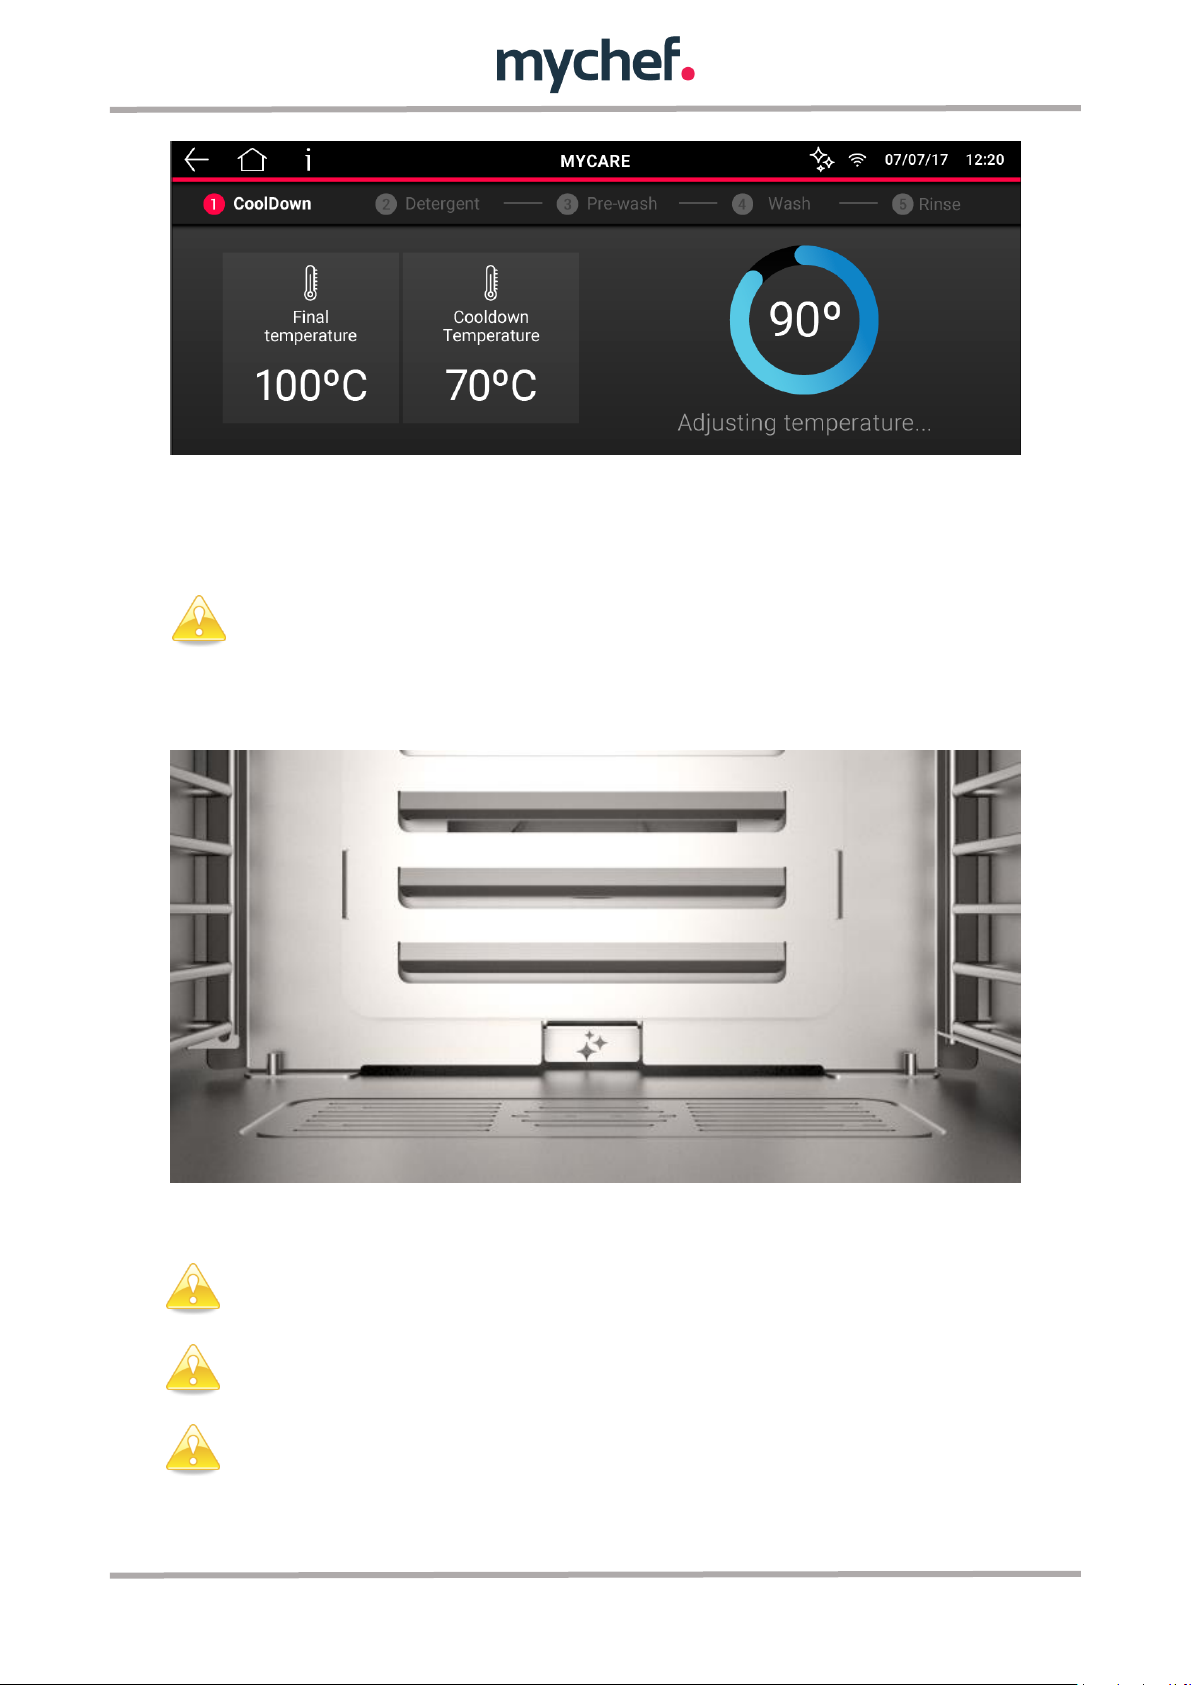
Before inserting the MyCare CleanDuo tablet, check that the cooking chamber
temperature is not too high. In certain cases, before the start of the washing program, it
will be necessary to cool the chamber by means of the Cooldown action in order to
ensure that the washing is carried out correctly. The oven will begin a cooling process
that can be done with the door open to make it faster.
37
Page 35
Before starting any cleaning process, make sure that the water flow to the
unit is open.
Before starting any cleaning or rinsing process, check that a temperature
adjustment of the cooking chamber is not necessary.
Before starting any cleaning process other than rinsing, make sure that the
detergent tablet has been placed in the oven.
To insert the detergent tablet into the chamber, it is essential to stop the fan.
It is important not to introduce the detergent while it is running in order to
prevent the detergent from being drawn into the air stream and endangering
At this point it is important to stop the fan using the START/STOP button, open the
door and insert the detergent into the dedicated housing. Once entered, close the door
again to start the cleaning program.
If cooling is not required, you can place the MyCare detergent directly in its assigned
space and start the cleaning or rinsing cycle by pressing the START/STOP.
Figure 2: Housing for MyCare detergent.
38
Page 36
the health of the user.
The duration of the self-cleaning programs specified does not take into
account any cooling time of the chamber.
Never open the door of the cooking chamber during an automatic cleaning
process.
If the cleaning process has been stopped without the cleaning process being
completed automatically, it is mandatory to remove all undissolved pieces of
detergent tablet from the chamber before proceeding with the final rinse.
Always run a self-cleaning or rinsing program when error 26 occurs.
Once you have started the automatic process do not open the door under any
circumstances, as chemicals used for cleaning and steam may escape. This situation
would pose a significant risk of corrosion and burns.
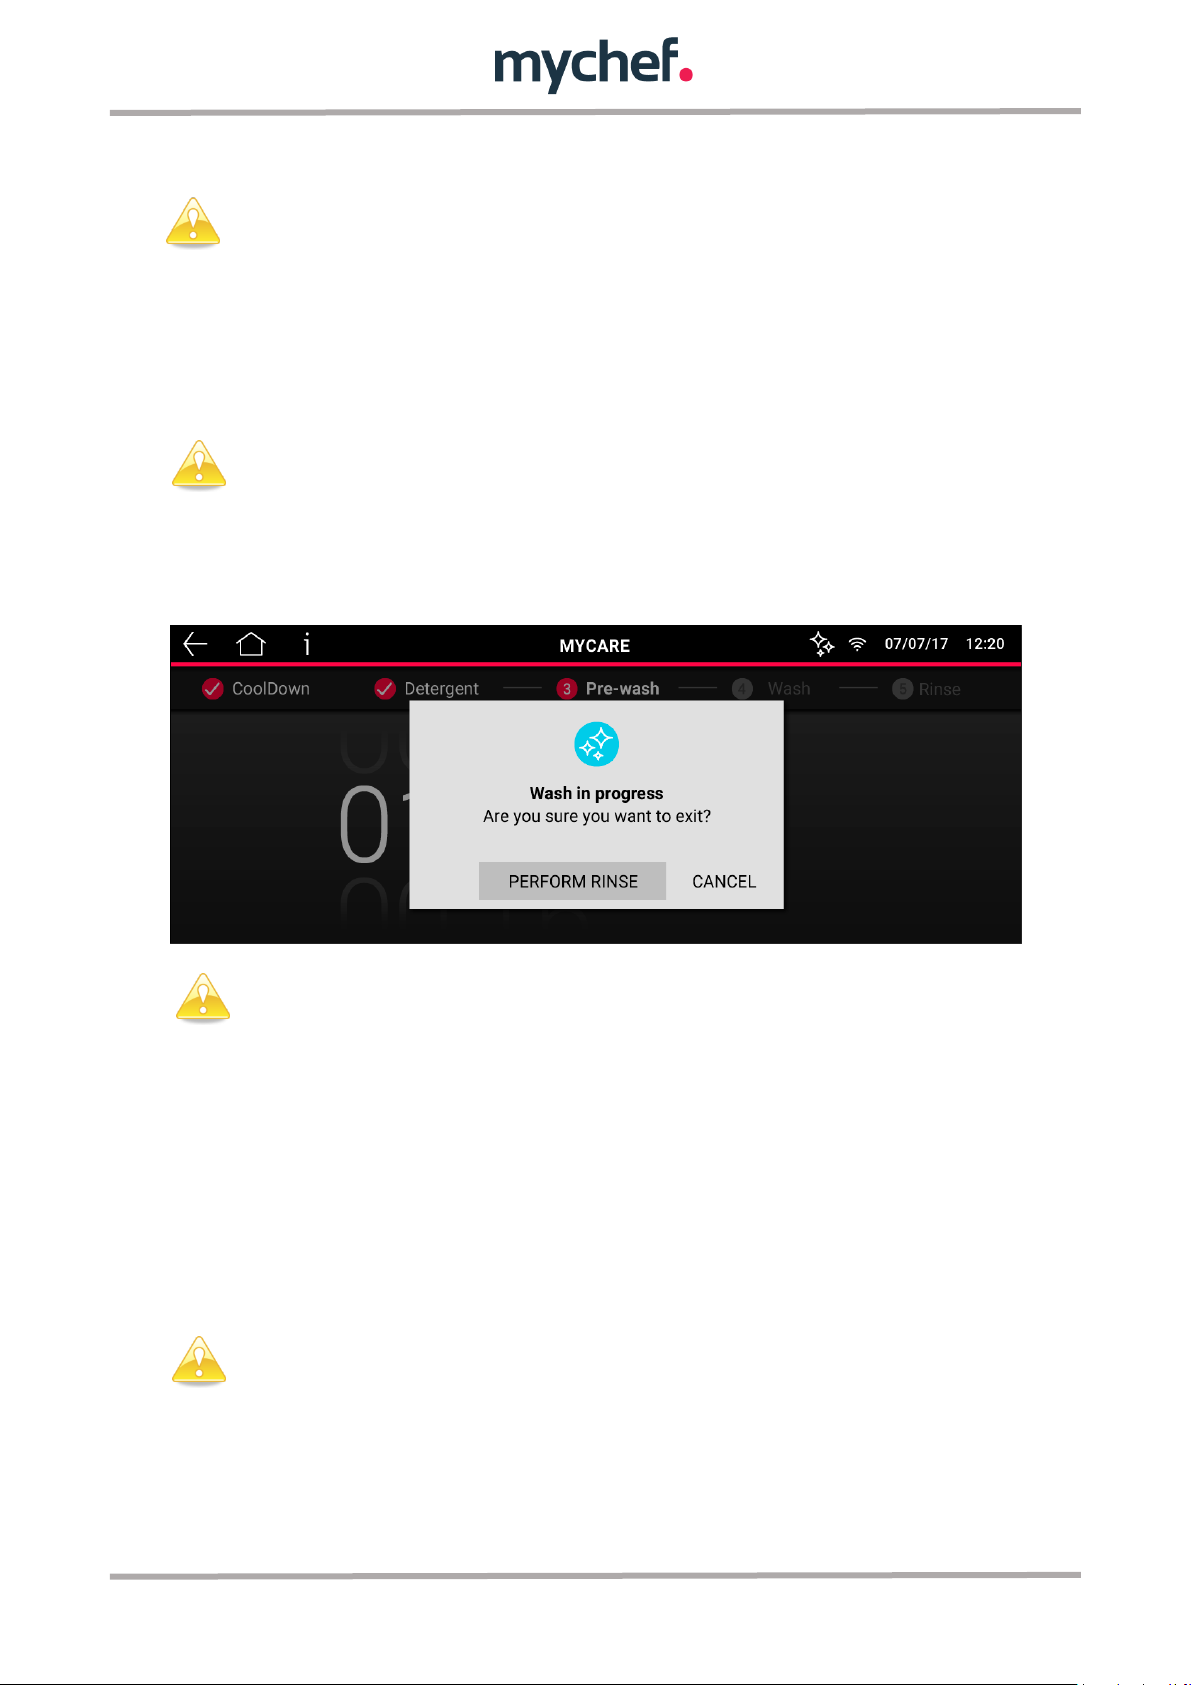
During the execution of a washing program, it may be necessary to interrupt it due to
an emergency. In this case, pressing START/STOP will stop the program and rinse to
remove all detergent from the camera.
If any of the automatic cleaning processes are completed and you detect that there is
any detergent residue in the chamber (even behind the fan cover plate), perform a
rinsing program or perform a thorough manual rinsing of the cooking chamber.
If there is a power failure during the cleaning process, an error message will be
displayed on the control panel (error 26) when the oven is turned on again. In this case,
and in order to prevent detergent and brightener residue from remaining in the
chamber, run a rinse program.
8. RECIPES
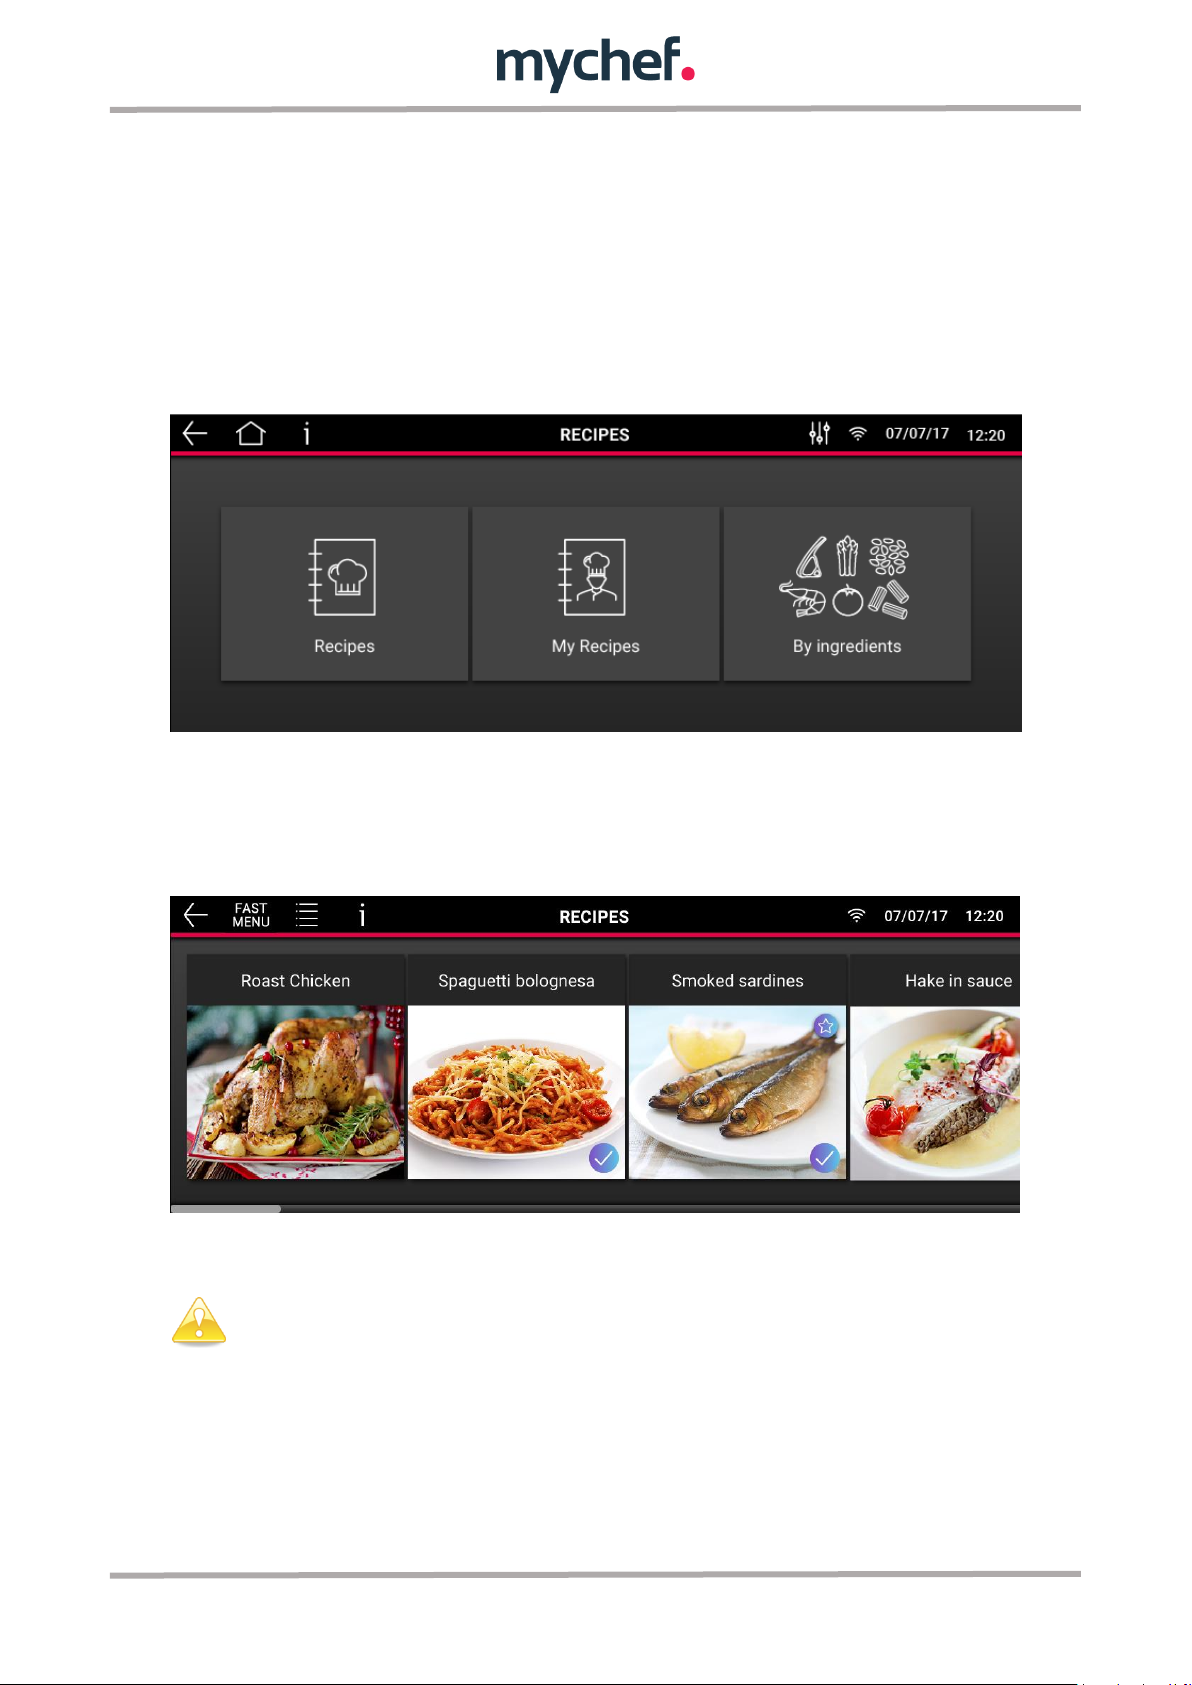
The Mychef combi steamer allows recipe management as follows:
39
Page 37
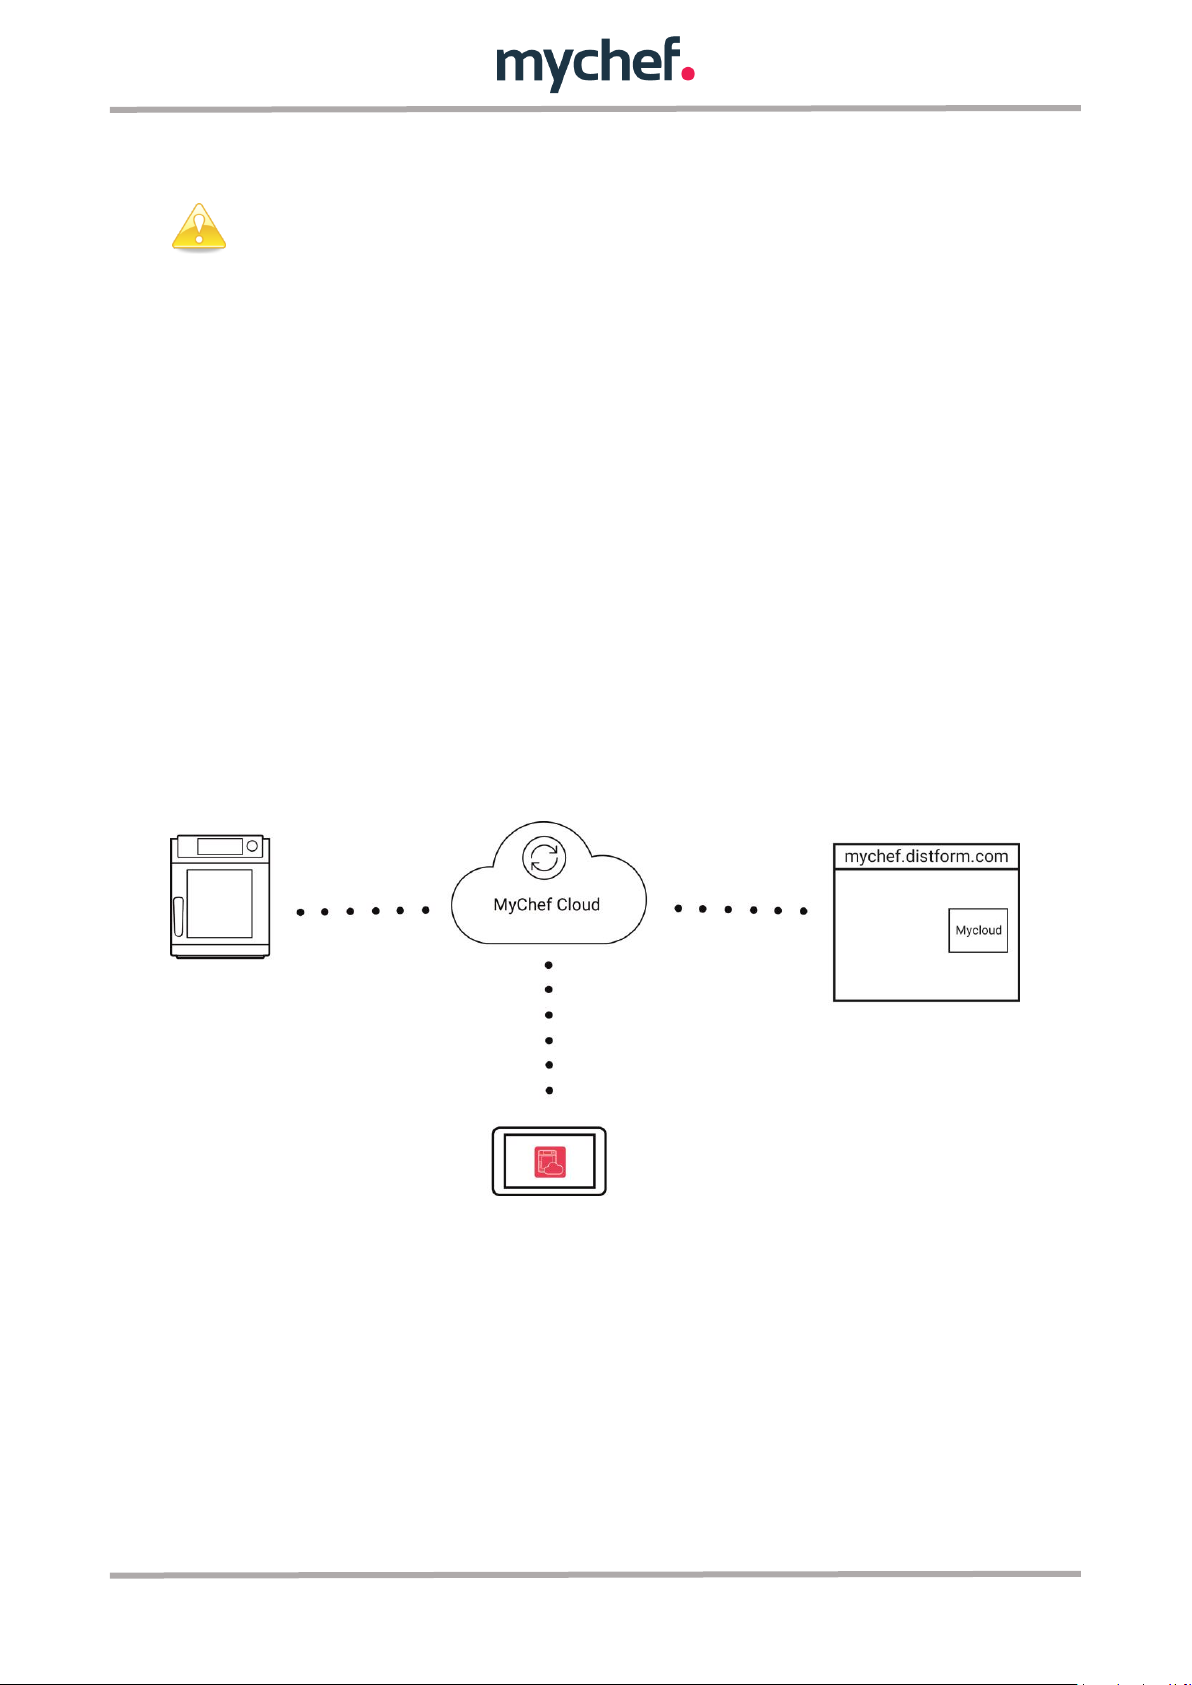
The names of the recipes are given as examples.
- Recipes: recipes created and managed by Mychef in which recipes are
periodically uploaded through the cloud.
- My Recipes: in this recipe booklet you will find you can create and change your
own recipes.
- By Ingredients: the search for recipes by ingredients allows to visualize between
recipes containing the selected ingredients.
- Recipes: When you access this recipe booklet, by scrolling horizontally you will
be able to see all the recipes available in the mychef cloud. This recipe booklet
will be updated every time new recipes are made available in the cloud, as long
as the oven has an Internet connection.
Recipes can be sorted according to the drop-down menu below:
40
Page 38
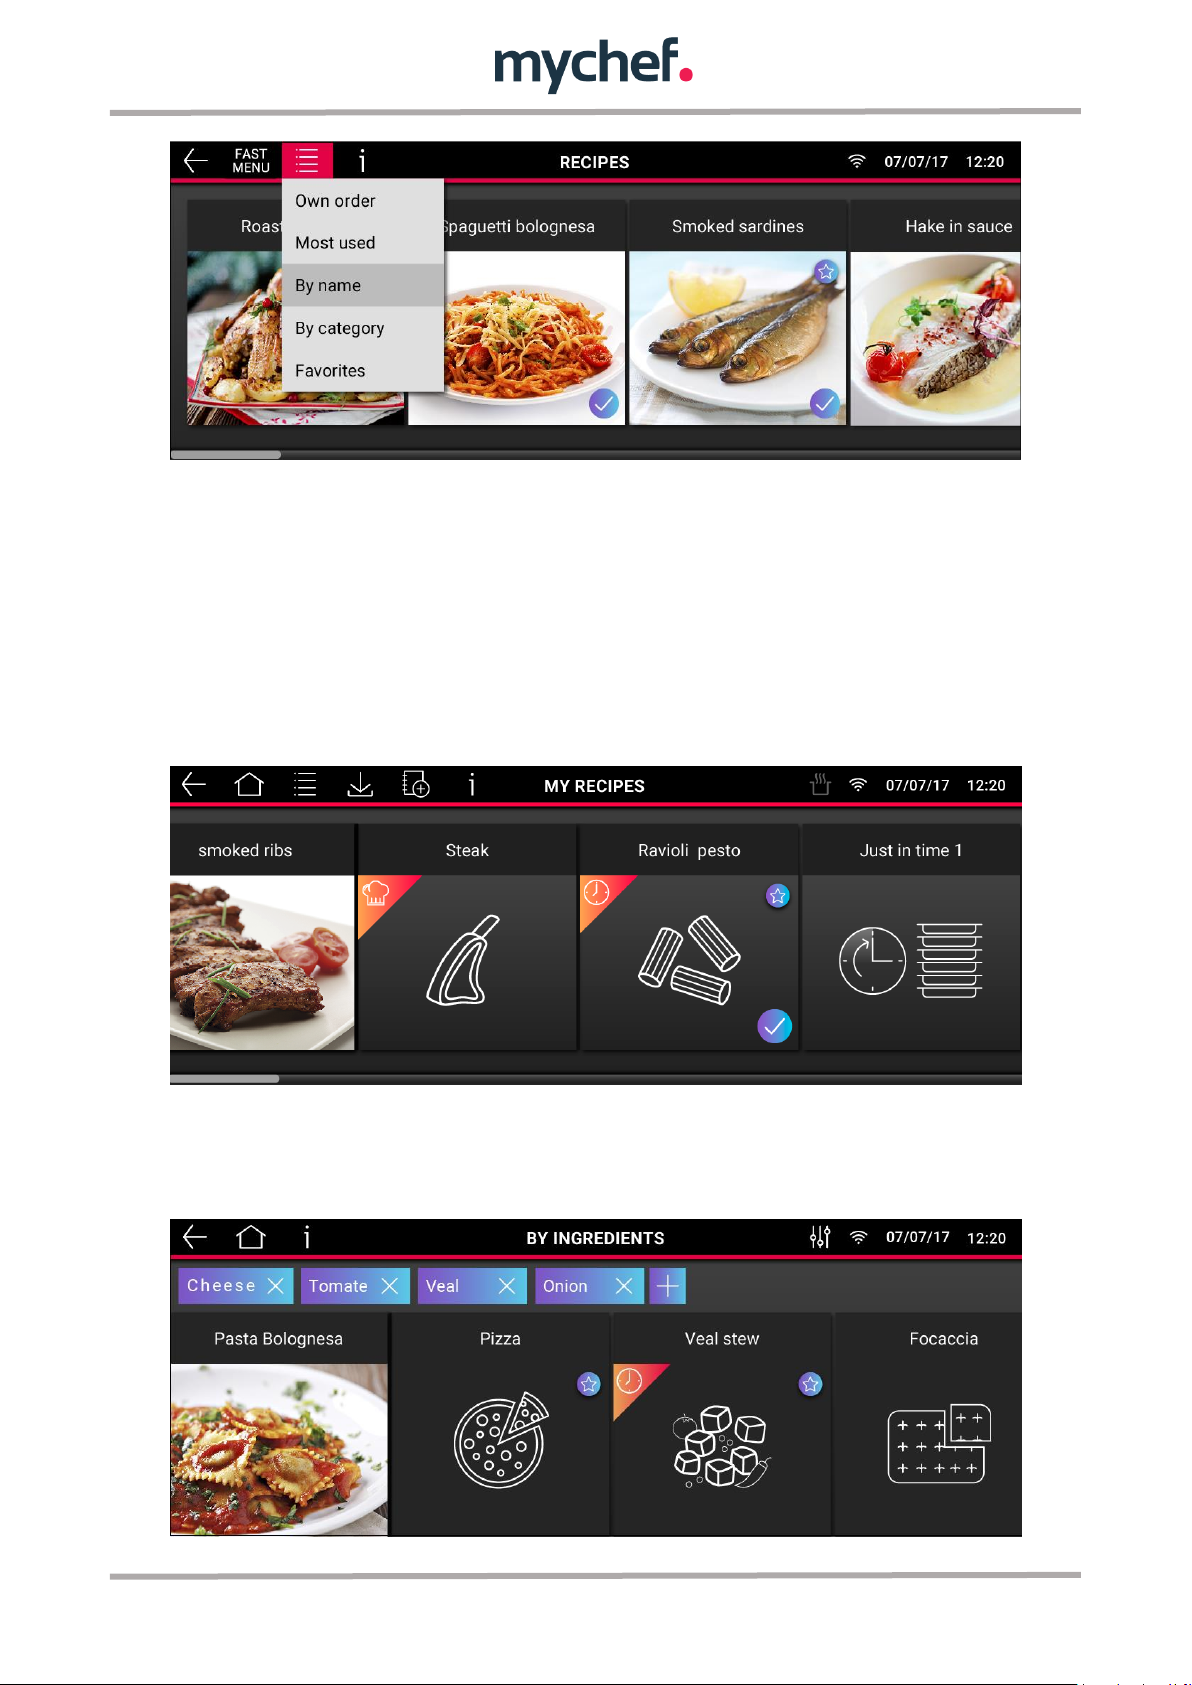
When you select a recipe, the recipe display corresponds to the structure shown in
section 4.1.2.
- My recipes: this recipe book offers the possibility of displaying the recipes you
have created and managing them according to your needs. The recipes listed
here can be created from Chef, SmartCooking or Cooking planner mode. When
the recipe is created in SmartCooking or Cooking planner mode, the
corresponding icon will appear in the top left corner of the preview. You can
download recipes from USB devices as well as save them.
- By ingredients: by searching for one or more ingredients, the user interface will
display the recipes available containing those ingredients, from among all the
recipes available, both in Recipes and My Recipes.
41
Page 39
The names of the recipes are given as examples.
8.1 Managing recipes from MyChef Cloud
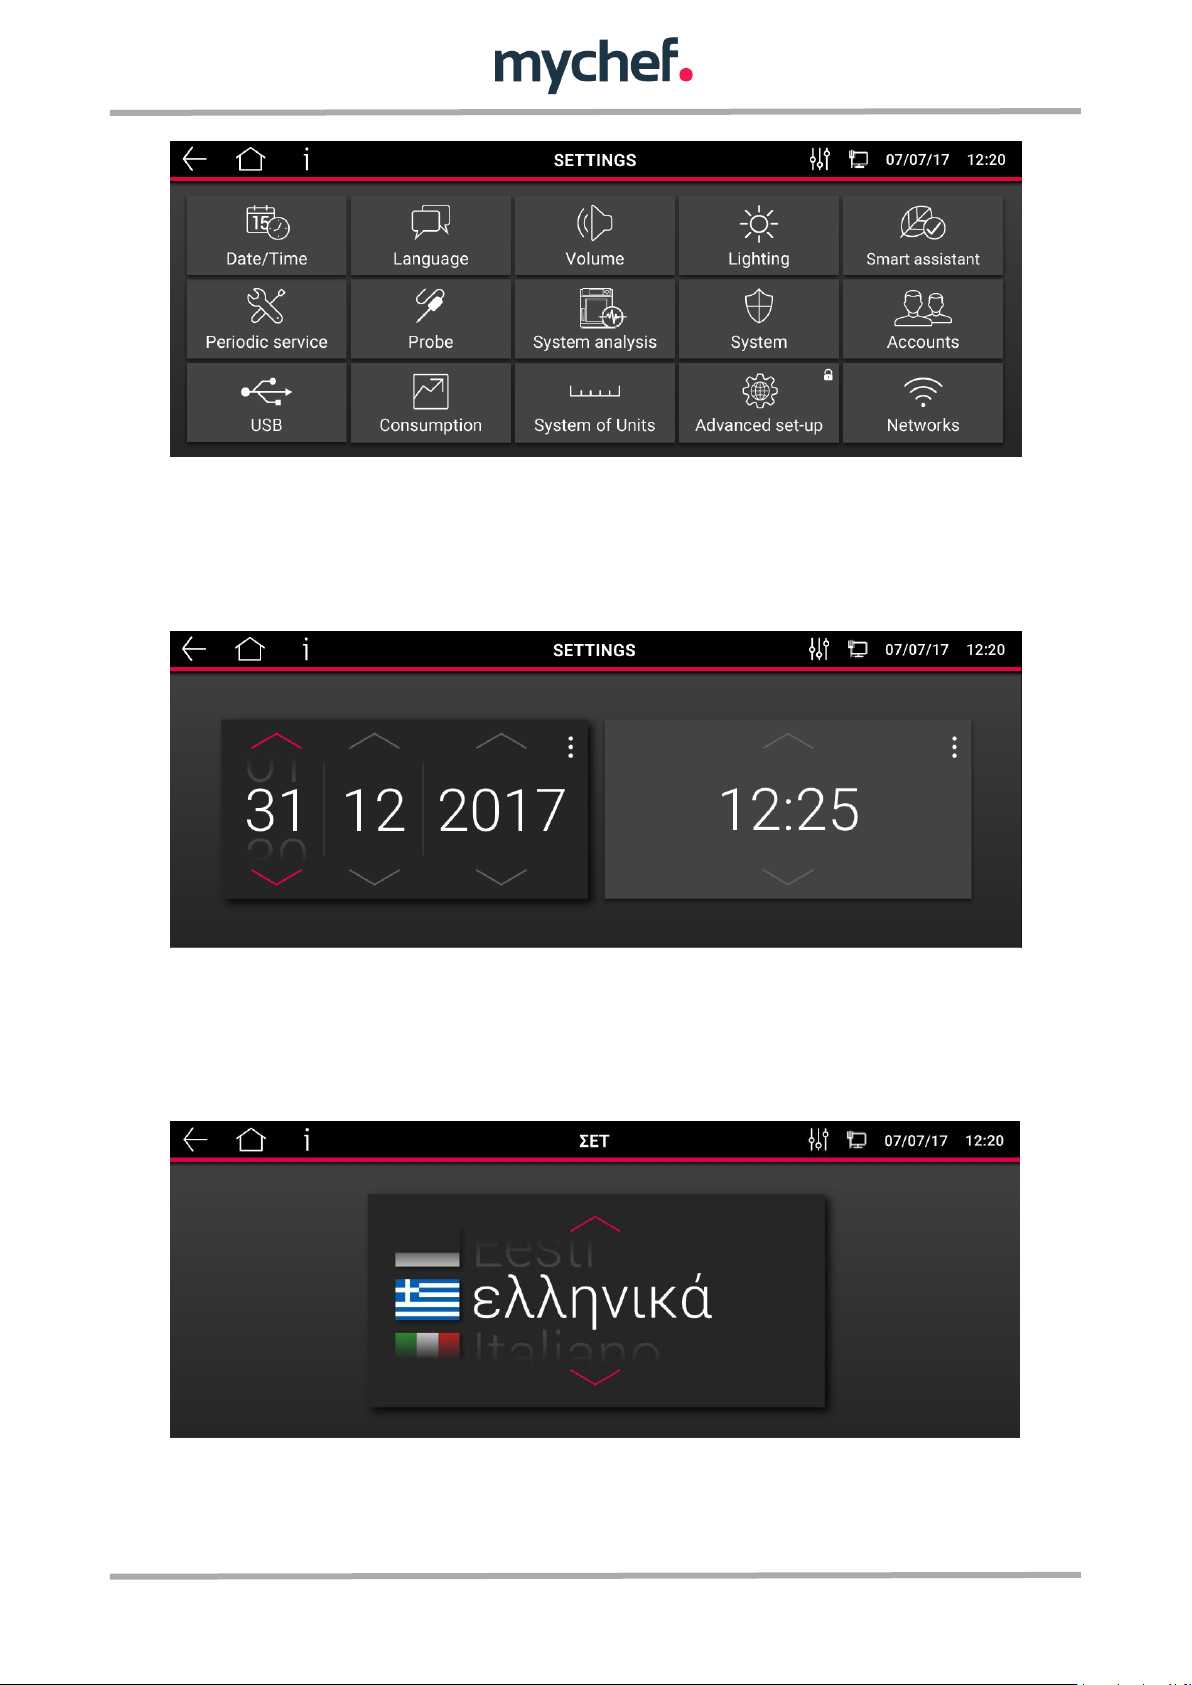
The MyChef Cloud app allows you to manage recipes from the "Recipes" mode. The
operation is similar to that of the user interface of the combi steamer, as indicated in
the previous sections.
The application allows the user to create recipes without having to be in the presence
of the oven. Once the cooking profiles have been created, they are uploaded to the
cloud where they are shared with the oven. This way it will always be possible to
manage the recipes both from the application and from the oven.
It also allows the monitoring of the oven screen at all times, so that it will be possible
to know what actions the oven is skinning, as well as start a cooking and know its
status.
Operation and management via mobile and web devices can be found in the Mychef
Cloud manual.
9. SETTINGS
This section describes the operations required for the correct configuration of the
mychef combi steamer. Some of the functions have access rights, so it will only be
possible to access them by entering a password.
For more detailed information, refer to the help available on the screen.
42
Page 40
9.1 Date/ Time
To set the date and time, press or select with the rotary control on the buttons and
adjust. To exit, press the back arrow and the setting will be saved.
9.2 Language
To change the language, navigate between the available languages by pressing the
arrows or using the rotary control, and select the desired language. To exit, press the
back arrow and the setting will be saved.
9.3 Volume
The volume setting allows you to select from three different sound options. Warning
tone, corresponding to the acoustic signals emitted by the oven when performing
43
Page 41
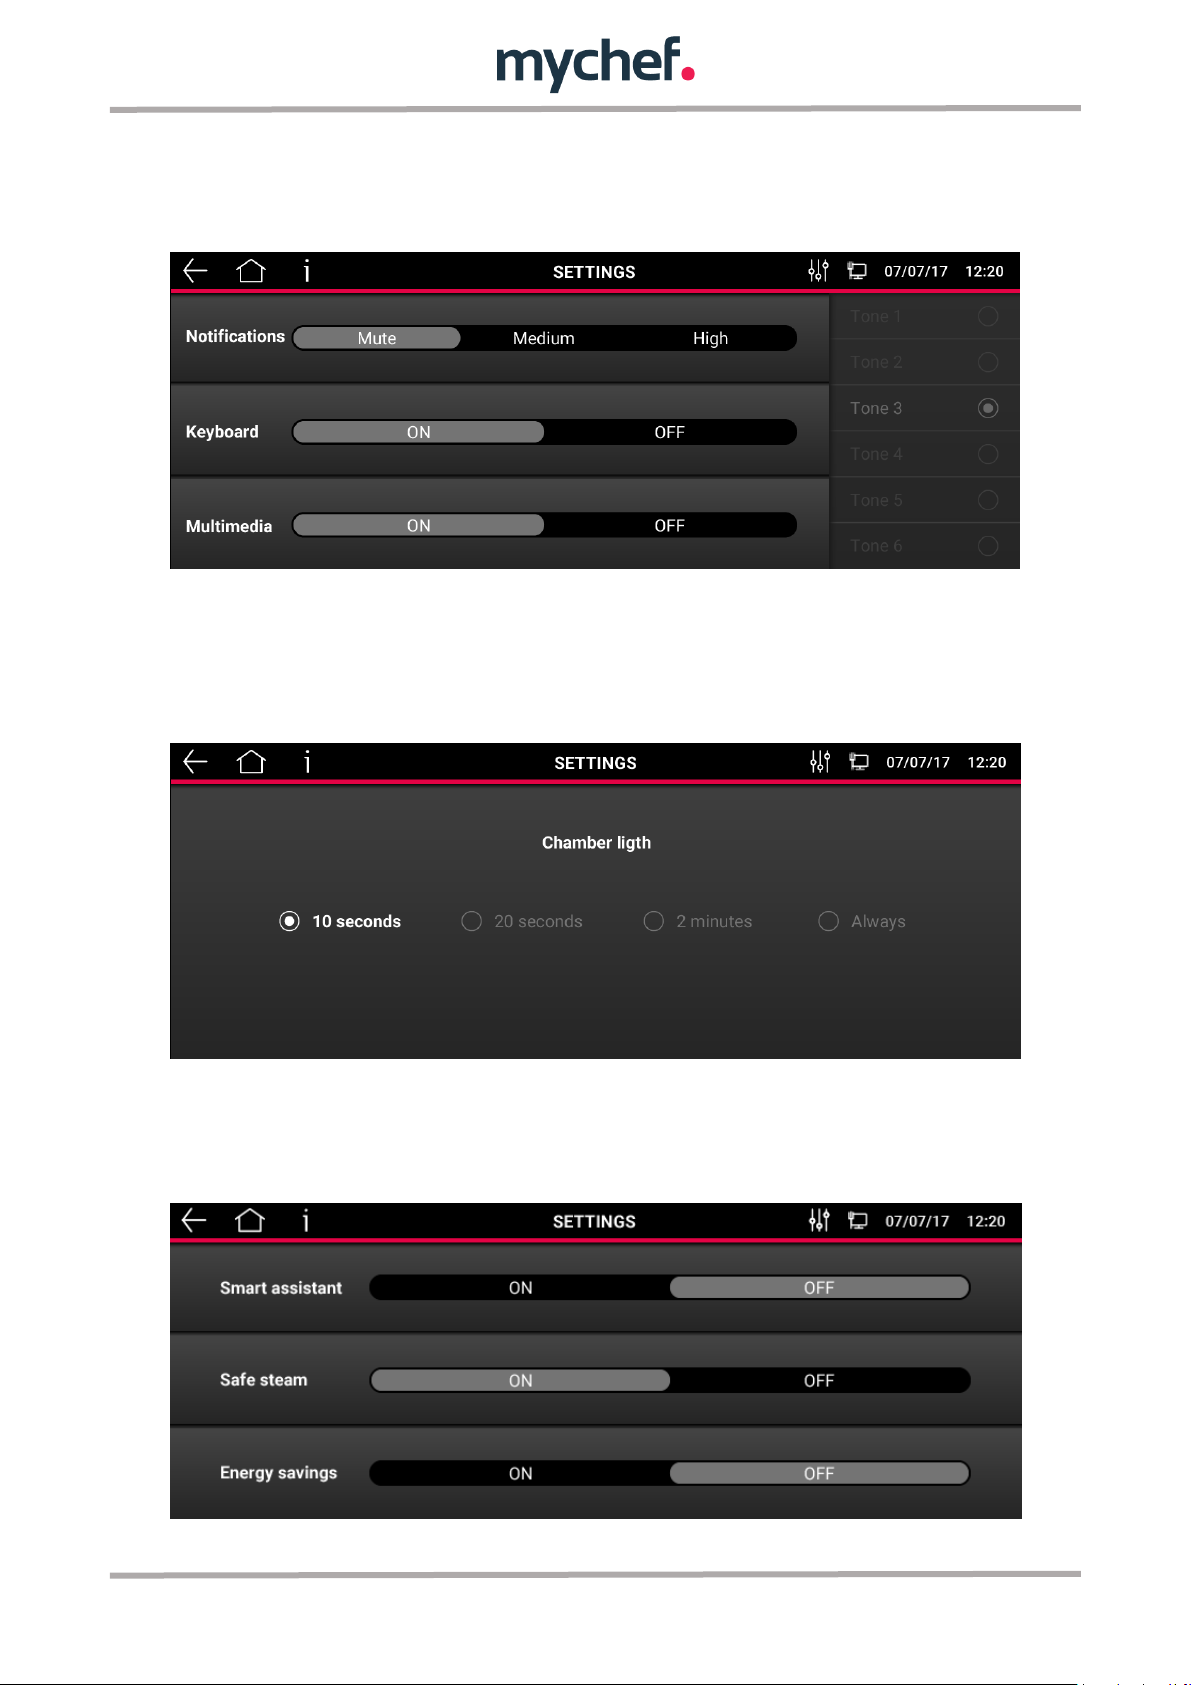
certain functions. For example, the end of a cooking or an alarm. In this case, it is
possible to select by pressing the intensities entirely between Silence, Medium or High.
In addition, the warning tone can be selected from different options in the side menu.
9.4 Lighting
The duration of the camera lighting can be adjusted between the options displayed on
the screen. Select the desired option and press back and the configuration will be
saved.
9.5 Smart Assistant
The options in this submenu allow you to optimize the operation of your combi
steamer.
44
Page 42
Please note that steam extraction only works in the final moments of
cooking. Therefore, this action does not occur when the oven door is opened
during cooking.
This function will only be activated in time-controlled cooking.
- The intelligent wizard will show usage optimization options, for example in the
configuration of the cookings to improve performance. You can suggest, when
necessary, changes to user settings.
- Safe Steam, if activated, removes steam from the chamber during the last
moments of cooking. In order to avoid burns or steam discomfort when
opening the door, MyChef ovens can remove steam from the chamber at the
end of the cooking process. Even when in convection mode, this extraction can
be useful to eliminate the steam that may be released from food in the cooking
chamber.
When the oven enters the steam extraction process, a large amount of steam can
escape through the chimney, depending on the saturation level. The use of a
condensing hood is recommended for MyChef ovens.
The energy-saving option optimizes certain functions and improves the energy
efficiency of the oven.
9.6 Maintenance
The mychef combi steamer has a preventive maintenance plan that will allow the life of
the oven to be extended and its operation in optimum conditions. Depending on the
hours of use, the user interface will show which maintenance plan to follow and the
service contact you should contact.
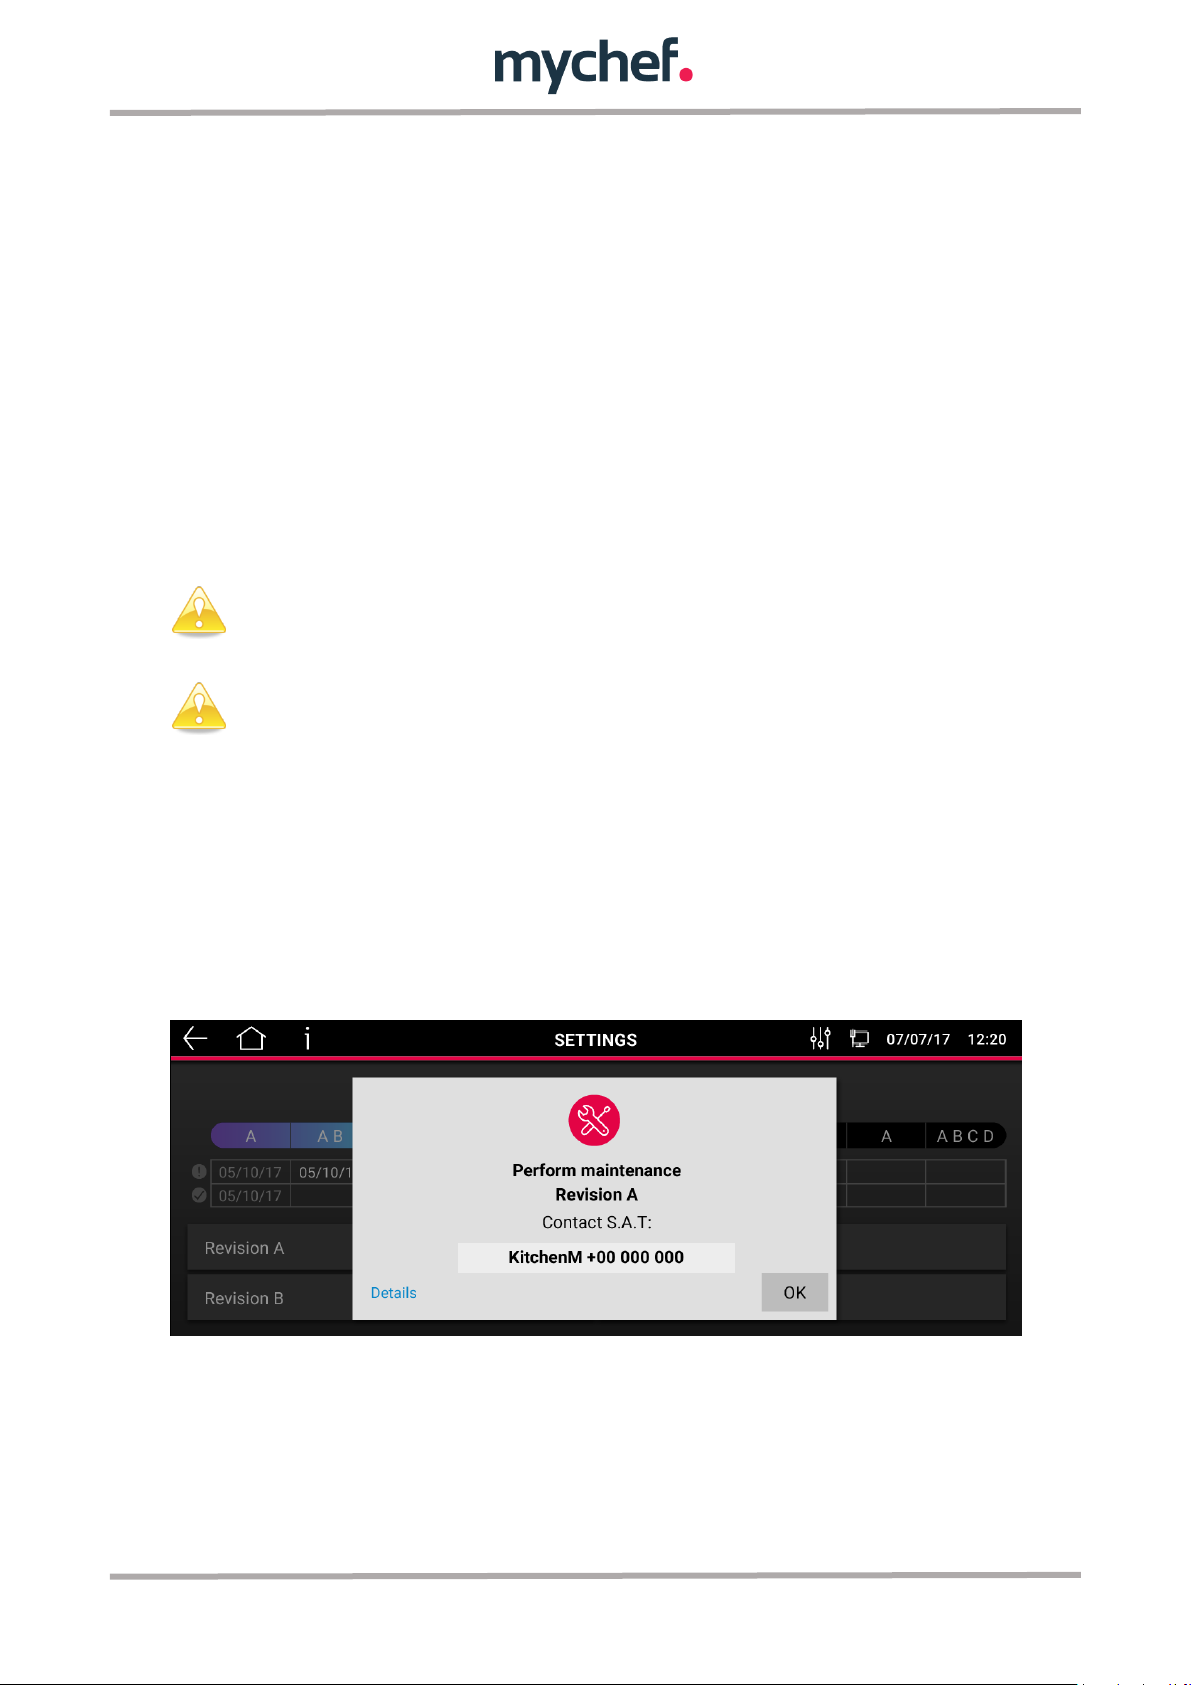
The next screen shows the maintenance plans, pressing the review buttons displays
the required activities to be performed.
45
Page 43
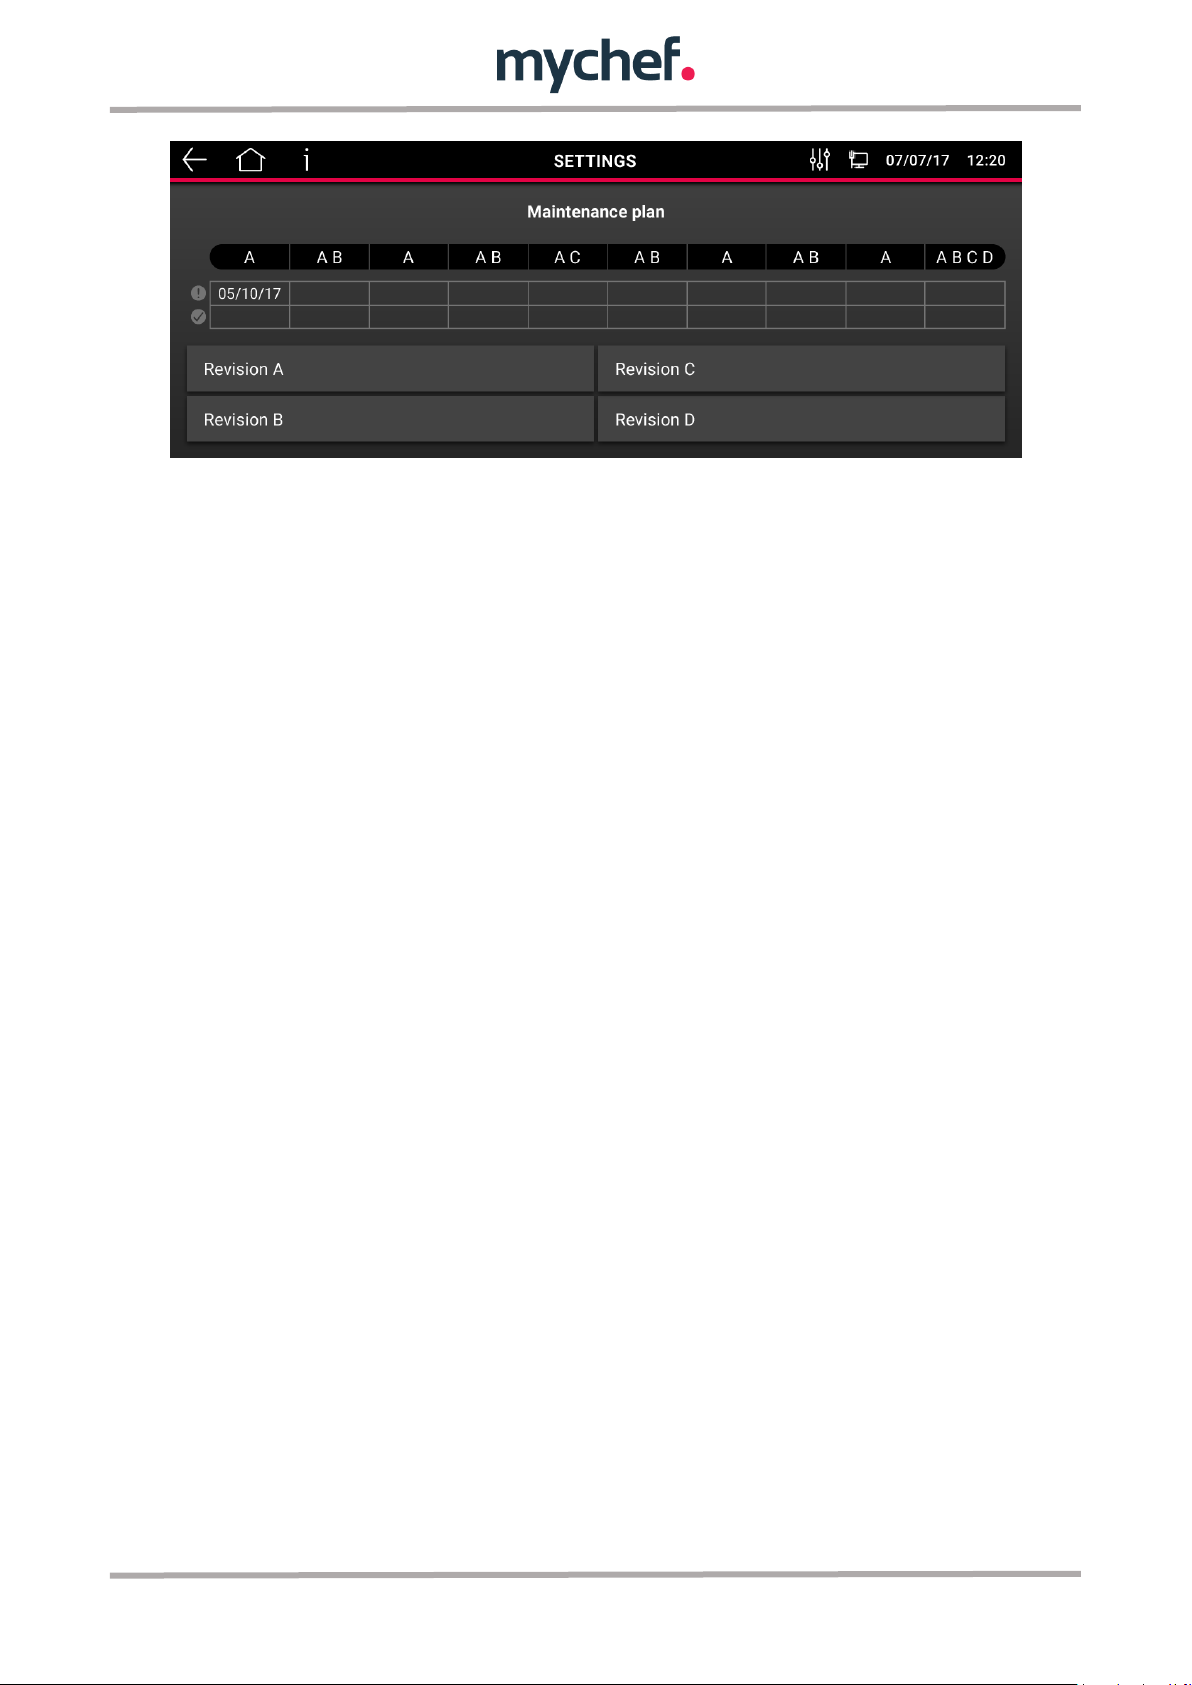
The top bar shows the progress in operating hours associated with servicing. Once the
revision has been carried out, the date on which it was carried out will be indicated as
shown in the image above.
Check A:
- Water hardness testing
- Cleaning of cooling fans
- Electronic cleaning
- Cleaning of the drain tray
- Change of weatherseal and door adjustment
Check B:
- Temperature calibration
- Adjustment of the internal screws and bolts
Check C:
- Encoder changeover and rotary control
- Changing chimney pipes and drain pipes
- Change of solenoid valve for water injection
- Resistor contactor changeover
Check D:
- Engine change
- Resistance and seal changeover
- Water injection pipe gasket replacement
46
Page 44
Register
Name
Parameter
Editable
00
Probe 1
Multipoint probe 1
Yes
01
Probe 2
Multipoint probe 2
Yes
02
Probe 3
Multipoint probe 3
Yes
03
Probe 4
Multipoint probe 4
Yes
04
Probe 5
Not used
Yes
05
Probe 6
Chimney Probe
Yes
06
Probe 7
Probe Chamber
Yes
07
Probe 8
Internal electronics temperature
Yes
08
Probe 9
Inverter temperature
Yes
09
Probe 10
Not used
Yes
If the temperature of a sensor is higher than 350ºC or lower than -50ºC it
means that the sensor is not connected.
9.7 Probe
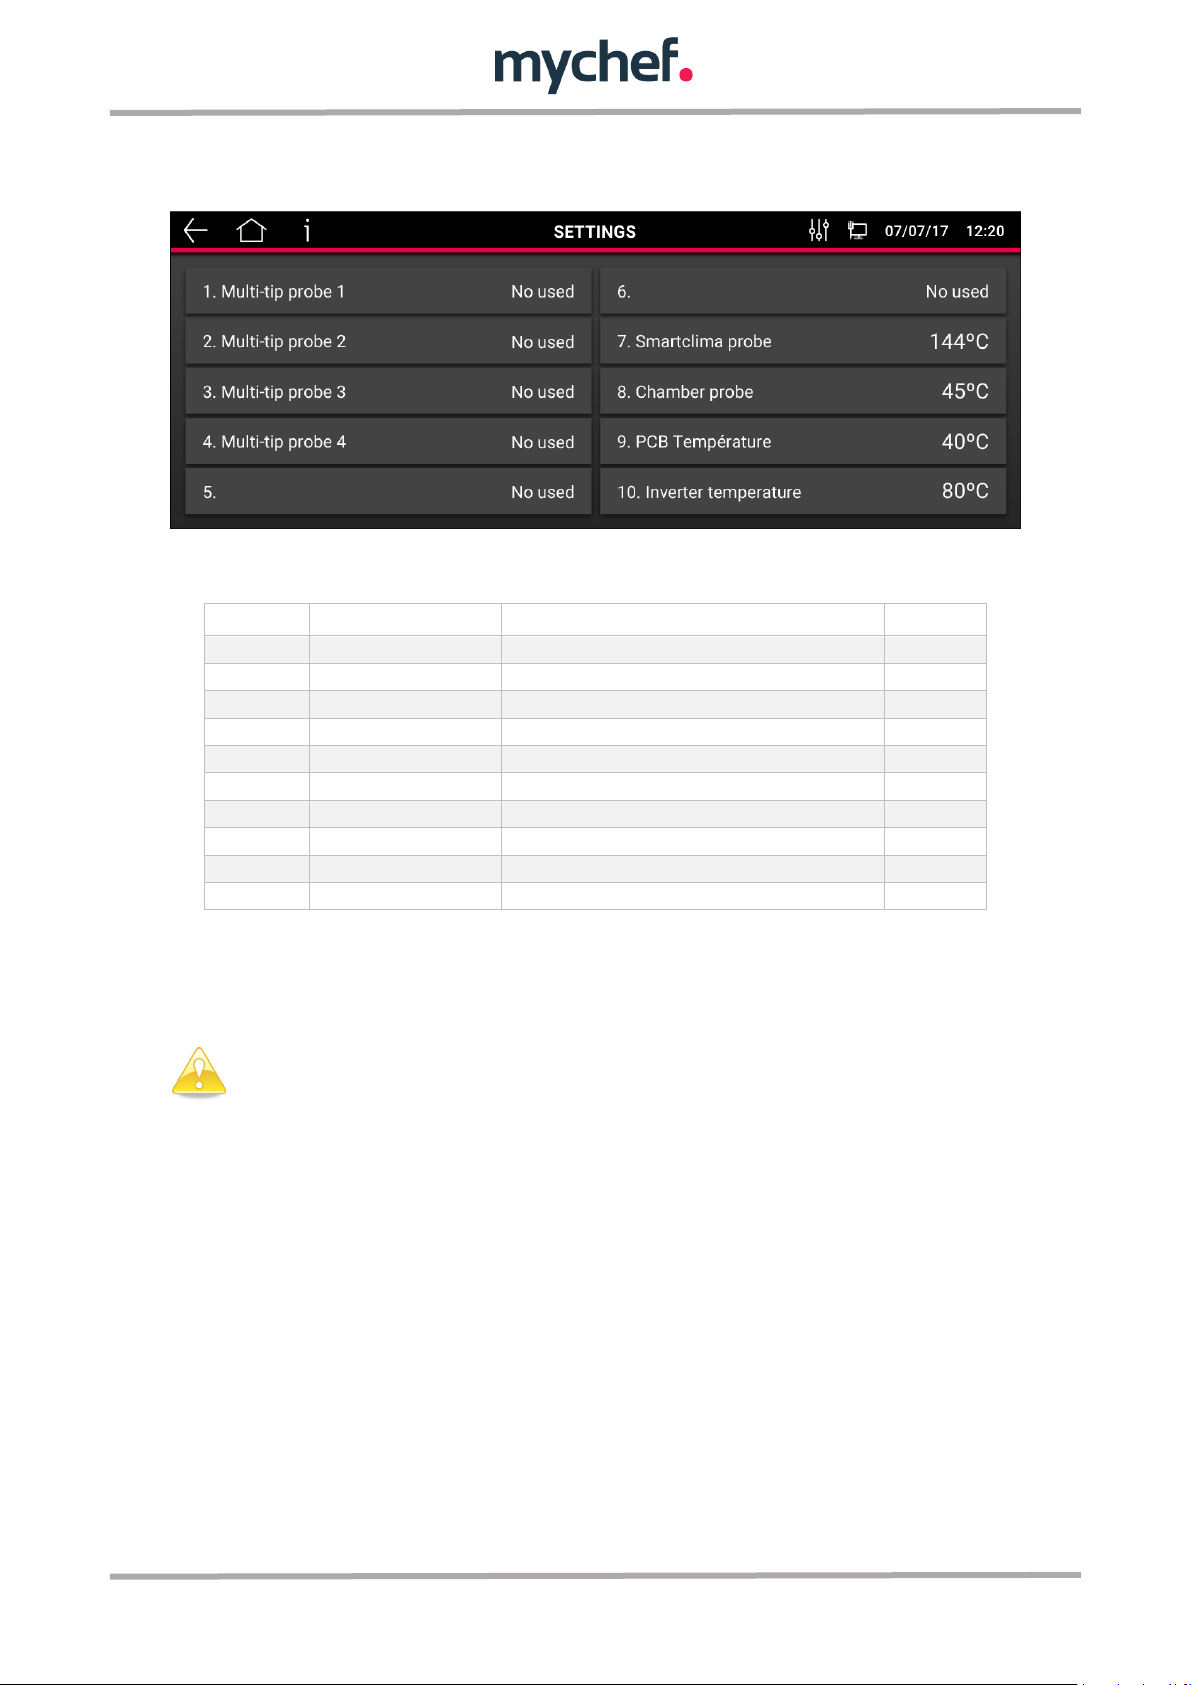
This section allows you to display the oven temperature readings at different points.
By clicking on each probe, it is possible to edit the values.
Table 2: Section P4, Probes.
Each register is associated to a temperature reading point of the oven, allowing to
control different critical points of the oven.
9.8 System Analysis
This submenu allows you to set up the oven by checking the basic points for correct
operation.
The user or the SAT (in the case of the first use and start-up of the oven) is guided
through six steps to carry out the following checks:
- Illumination: check that the camera is correctly illuminated and rotate control.
- Rotary knob: The knob must be rotated and pressed to check that the sensitivity
and operation is correct.
- Temperature: The system will preheat to detect possible anomalies.
47
Page 45
- Water connection: Check that the connections of the hydraulic system have
been made correctly to avoid any type of leakage.
- Door: by opening and closing the door, a problem will be detected in the sensor
that controls the door.
The existence of any anomaly in any of the previous points will prevent the operation of
the oven. Therefore, it will be necessary to carry out the necessary actions and repeat
the check until the system analysis is satisfactory to continue.
9.9 System
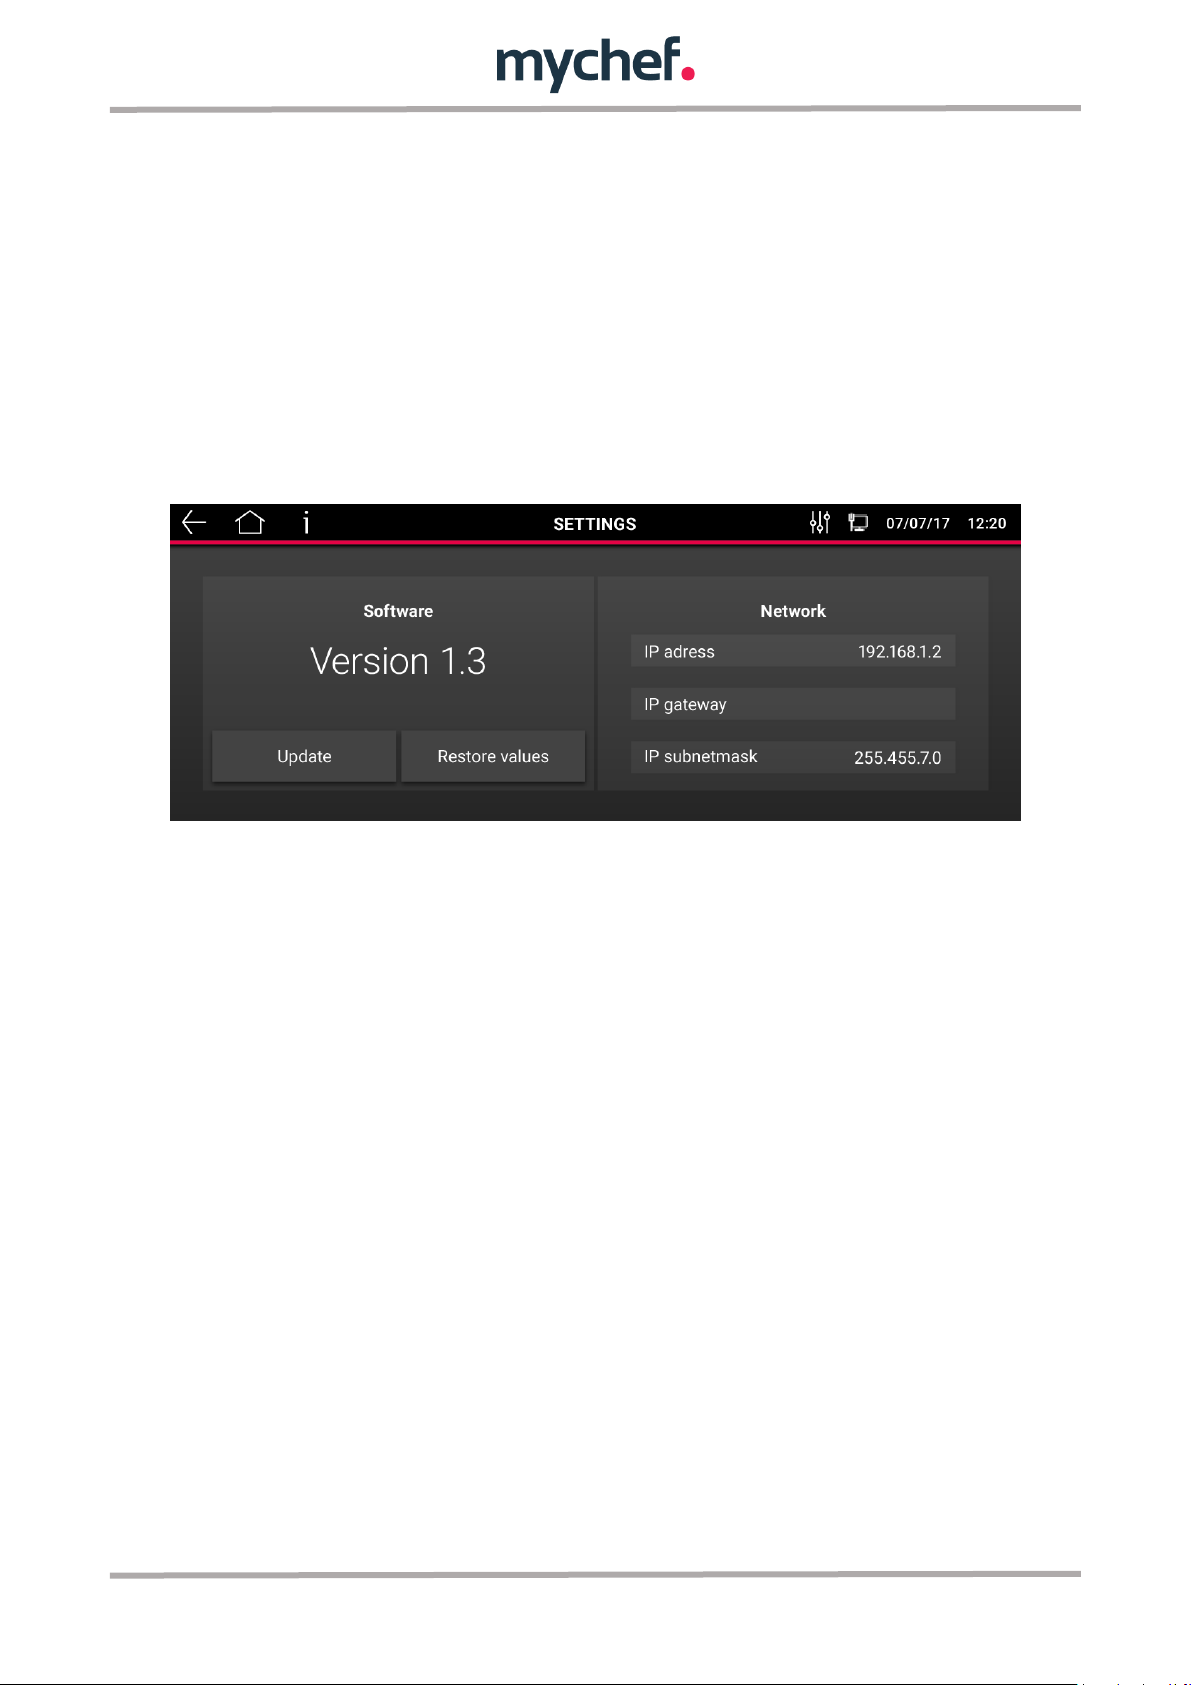
System displays the software version of the device and the IP addresses.
The software can also be updated here. To do this, click on the Update button, and
whenever there is an Internet connection, the system will be updated with the latest
software version.
9.10 Restore factory default values.
To do this, click on the Restore Values button. The restoration will start automatically.
All values shall be restored except for the oven type, the number of TSC channels, the
self-cleaning type, the fan type and the statistical values of the oven.
9.11 Accounts
This option allows you to consult the data corresponding to the serial number of the
oven and the Technical Support Service.
48
Page 46
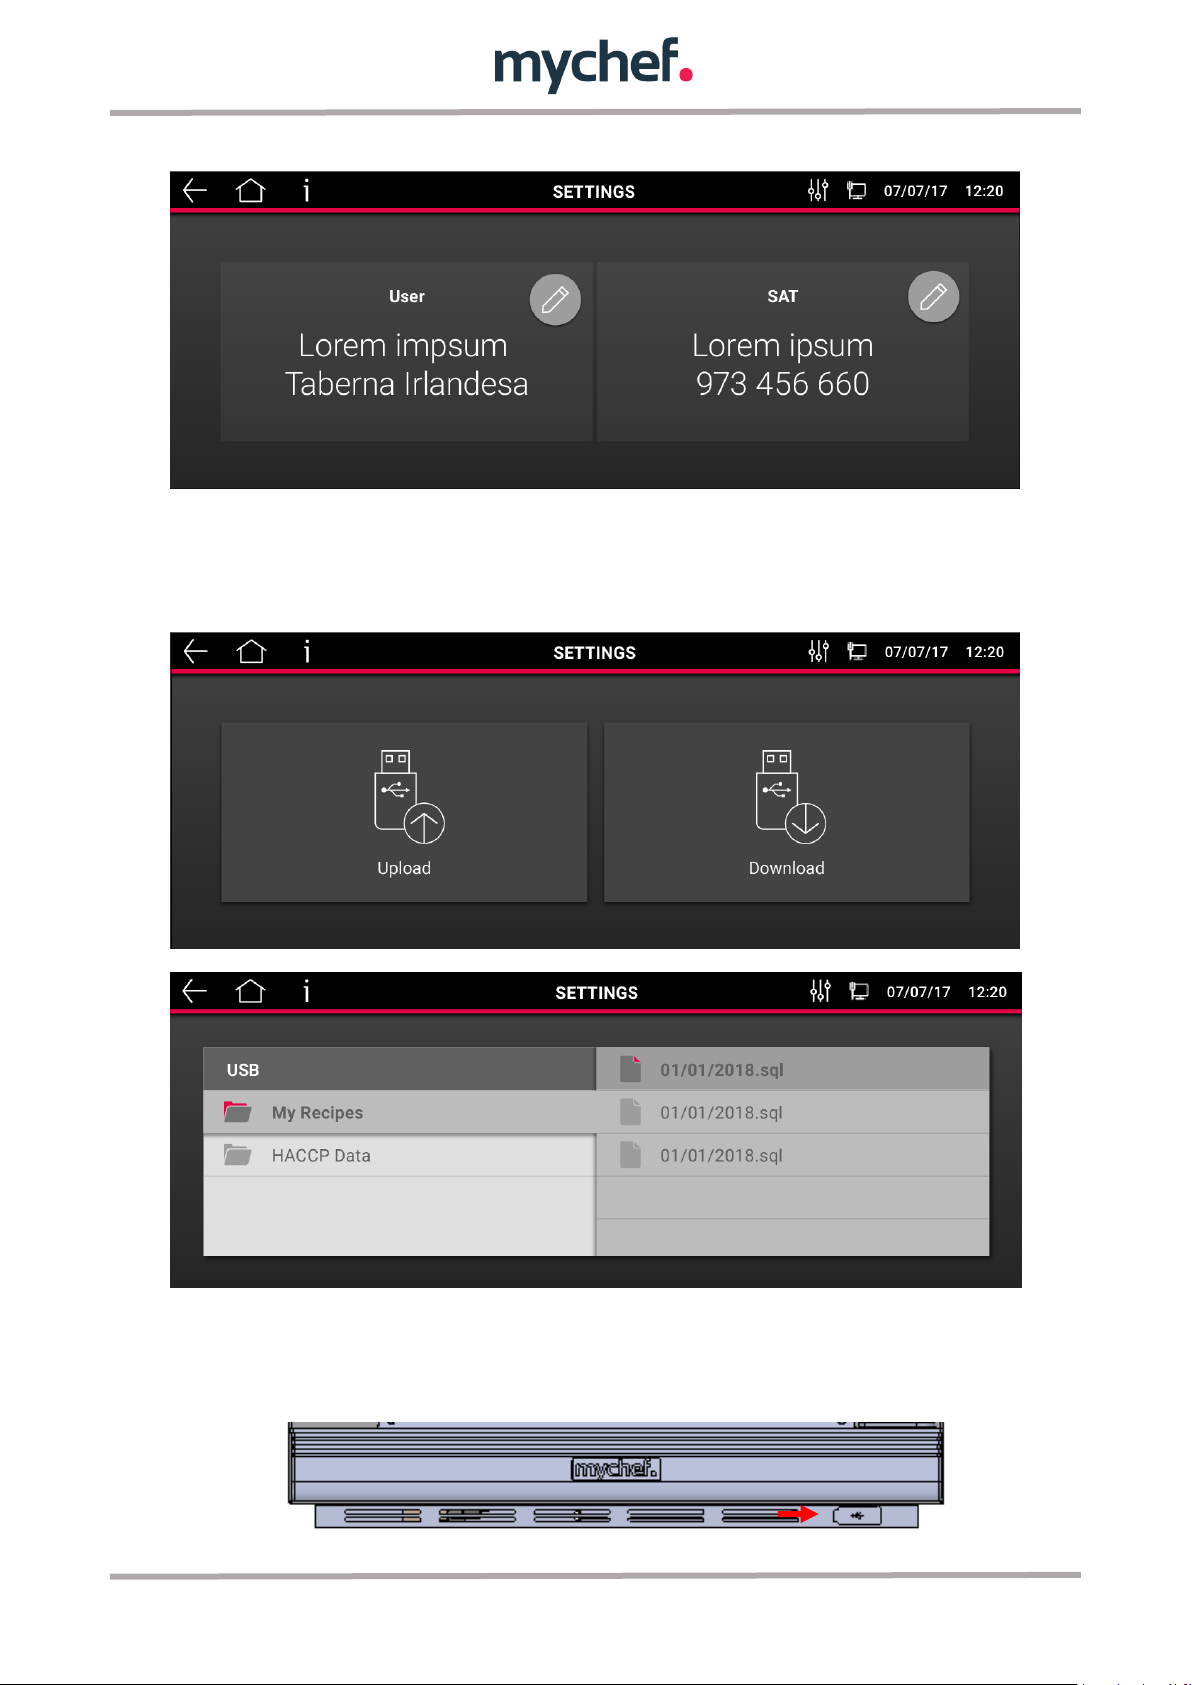
9.12 USB
The equipment allows the loading and unloading of recipes and images in addition to
HACCP data.
The equipment allows the recording of temperatures and events occurring during
normal use. To record data, insert a memory into the USB connector in the lower right
corner of the oven.
49
Page 47
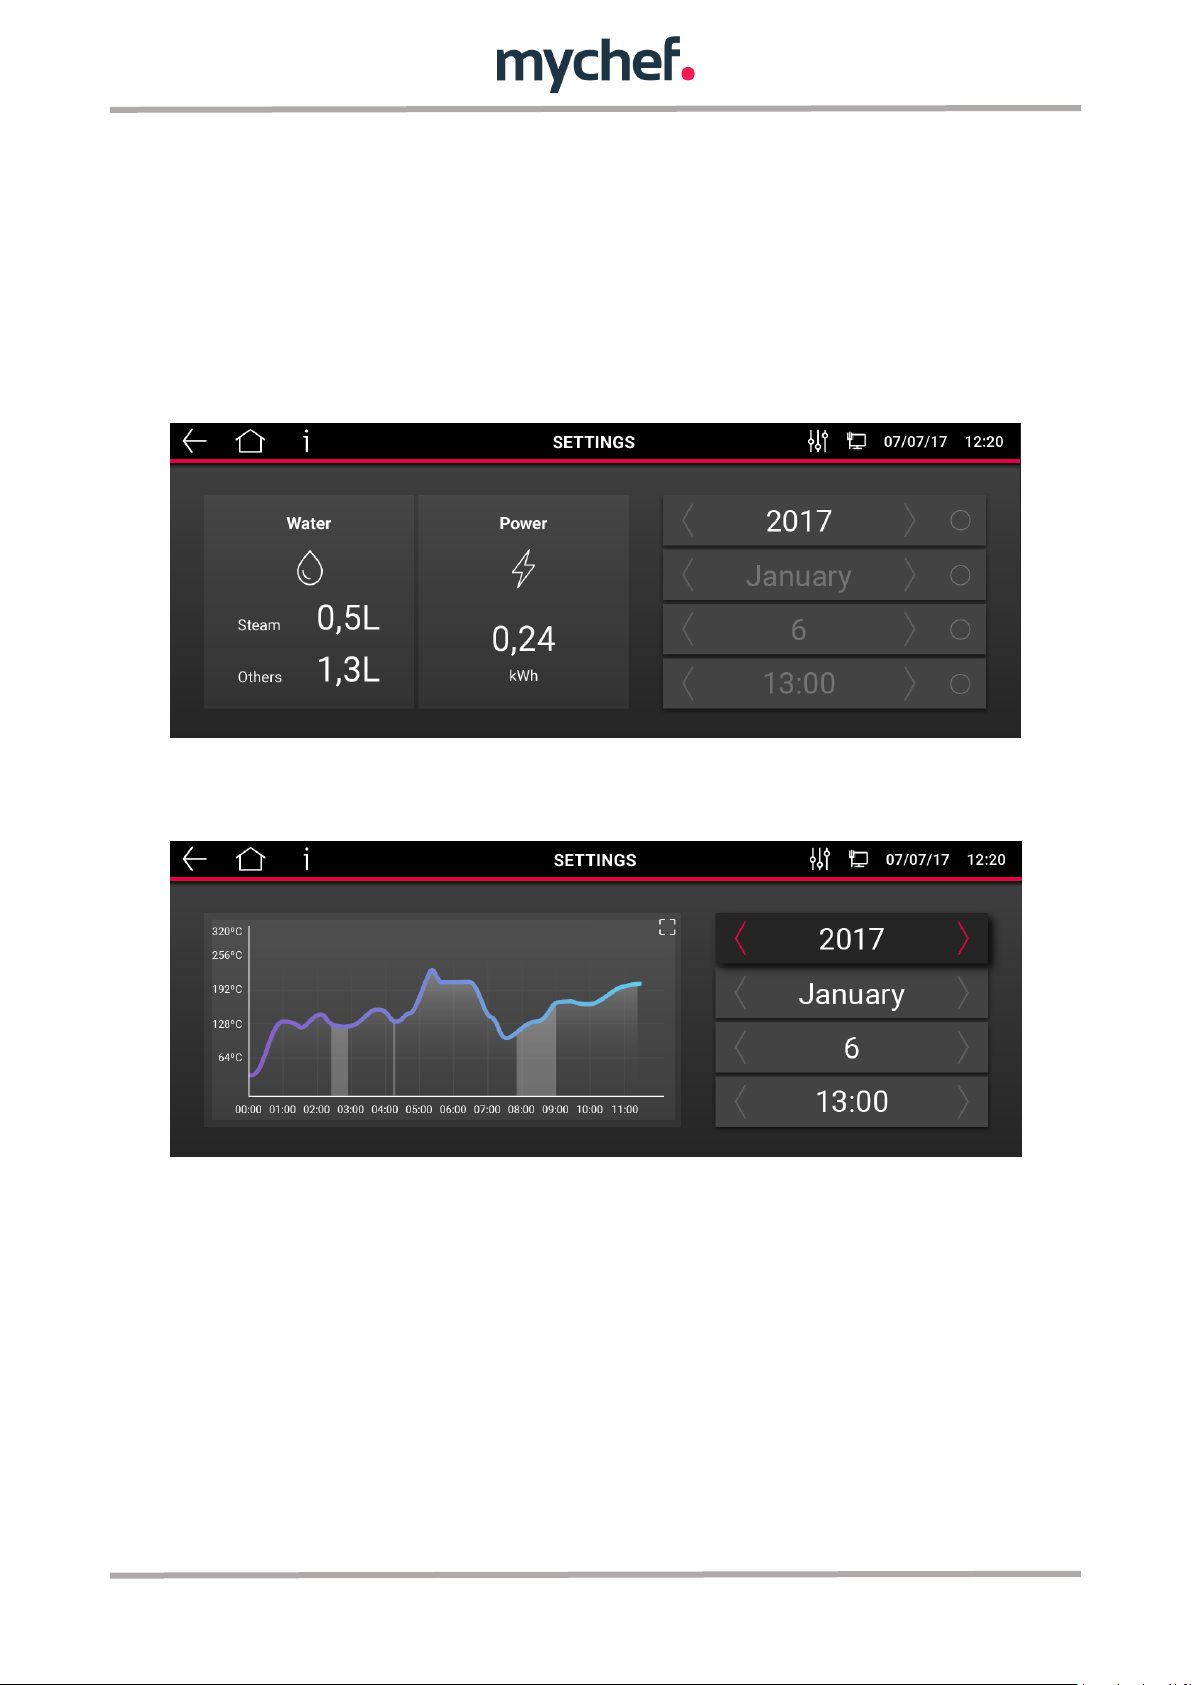
Figure 3: USB connector housing.
They can be viewed from a computer to read text files.
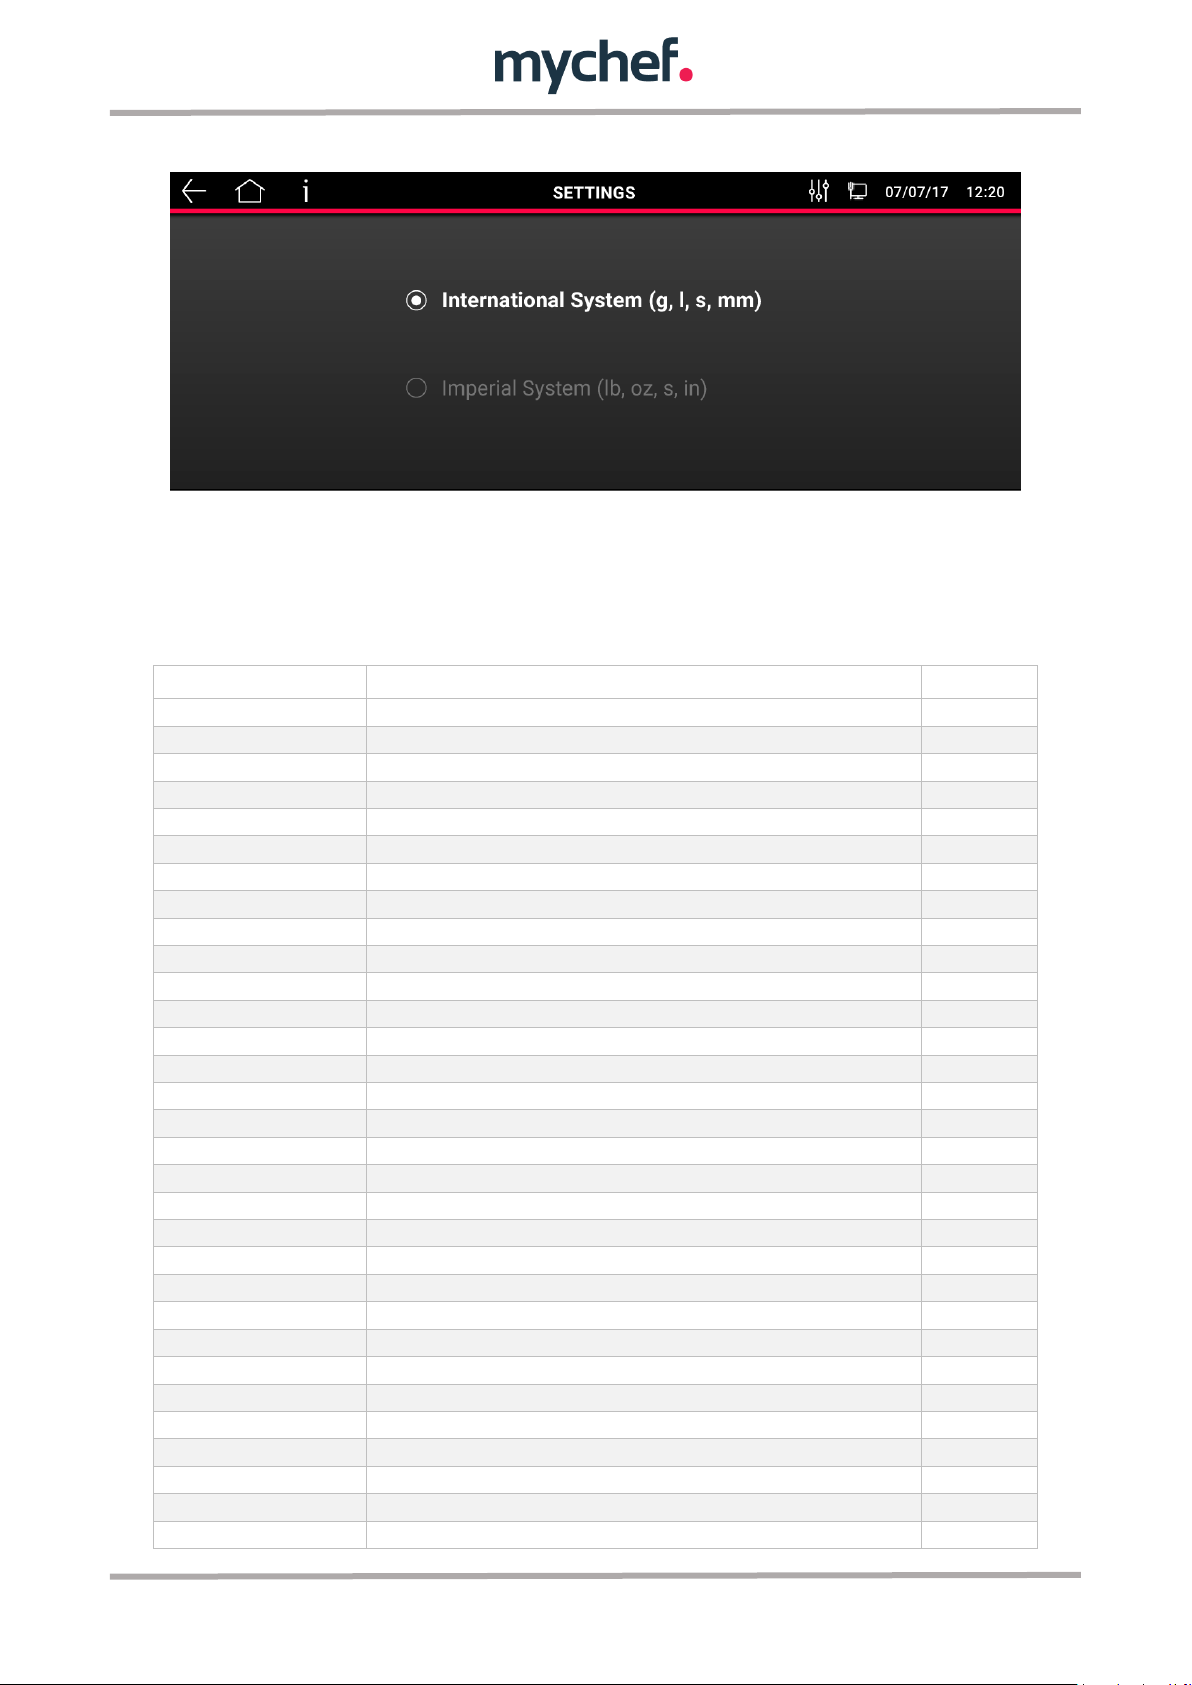
9.13 Consumption
In this section you can consult the data corresponding to the energy consumption of
the oven and HACCP.
In order to know the water and energy consumption, it is possible to delimit the desired
range, be it annual, monthly, daily or hourly.
Similarly, by accessing the HACCP Data option and setting the desired range, it will be
possible to display the graph corresponding to the HACCP data record.
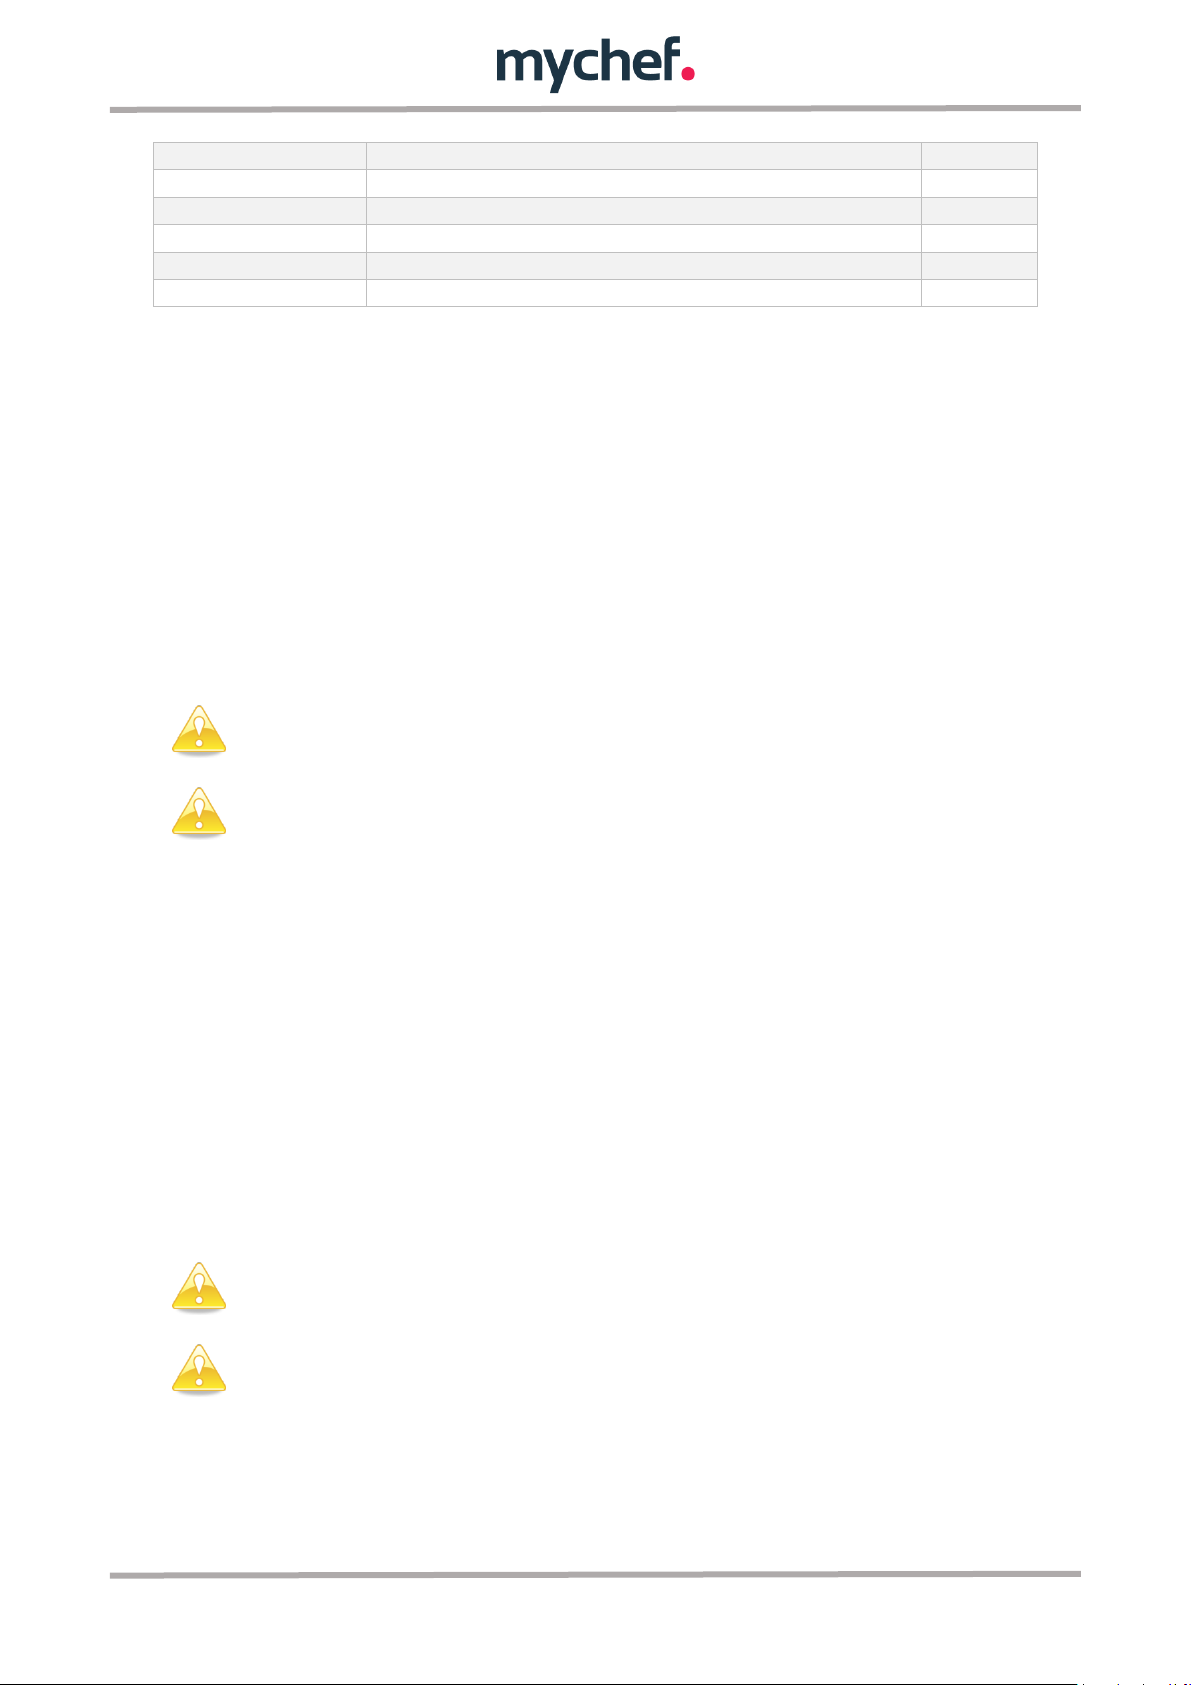
9.14 Measurement system
The oven configuration allows working both in the international measurement system
and in the Anglo-Saxon system. By selecting one of the two options and pressing the
back button, the configuration will be saved and the system restored.
50
Page 48
Name
Parameter
Editable
Type
Oven type
No(SAT)
Tsc
Number of TSC channels (0 - 4)
No(SAT)
Autoclean
MyCare
No(SAT)
FanConfig
Fan and inverter type
No(SAT)
RelayTest
Relay test relays 1 to 15
No(SAT)
GPIOTest
Test GPIOs
No(SAT)
TSCTest
Test TSC
No(SAT)
InverterTest
Test inverter
No(SAT)
AutoReverseTemp
Auto-reverse activation temperature
No(SAT)
HysteresisHeating
Temperature hysteresis
No(SAT)
LogPeriod
Period between HACCP, in seconds
No(SAT)
AutomaticRecovery
NightWatch
No(SAT)
EncoderSensibility
Encoder sensitivity
No(SAT)
SmartClimaSetting
Humidity control settings
No(SAT)
RelayRemap
Free relay remapping
No(SAT)
ProbeRemap
Probe for temperature control in chamber
No(SAT)
ErrorInhibit
Disable error control
No(SAT)
T_000_050
Working hours between 0ºC y 50ºC
No(SAT)
T_050_100
Working hours between 50ºC y 100ºC
No(SAT)
T_100_150
Working hours between 100ºC y 150ºC
No(SAT)
T_150_200
Working hours between 150ºC y 200ºC
No(SAT)
T_200_250
Working hours between 200ºC y 250ºC
No(SAT)
T_250_300
Working hours between 250ºC y 300ºC
No(SAT)
Rinse
Number of rinses
No(SAT)
Clean1
Number of cleanings level 1
No(SAT)
Clean2
Number of cleanings level 2
No(SAT)
Clean3
Number of cleanings level 3
No(SAT)
Clean4
Number of cleanings level 4
No(SAT)
Door
Door opening statistics divided by 10
No(SAT)
Error 0
Last error occurred
No(SAT)
Error 1
Penultimate error occurred
No(SAT)
9.15 Advanced settings
This Section allows to consult the internal configuration parameters of the oven and
facilitates the diagnosis of faults and malfunctions as well as its solution to the
technical assistance service.
51
Page 49
Error 2
First to last mistake made
No(SAT)
Error 3
Previous to the error 2
No(SAT)
Error 4
Previous to the error 3
No(SAT)
Error 5
Previous to the error 4
No(SAT)
Error 6
Previous to the error 5
No(SAT)
Error 7
Previous to the error 6
No(SAT)
This function will only continue with cooking in the event of a power failure
and subsequent recovery of the power supply.
This function can be disabled by your dealer. Make sure that you fully
understand the risks involved in using it.
To minimize risks, analyze the food after such a low temperature warning
when it is automatically recovered from cooking, or discard it (Error 28).
Use the HACCP data record to always check cookings. See section 7.
Table 3: Advanced Settings.
The parameters report a very wide range of features ranging from the type of oven to
fan configuration, etc. and also allow the technical service to perform tests and tests to
ensure perfect operation.
Statistical logs primarily store runtime, cycle repetition, and wear and tear values of
certain elements to monitor the life cycle and maximize the efficiency of all oven
components.
9.16 NightWatch
NightWatch allows the oven to automatically continue cooking after a power failure.
This functionality is especially useful for unattended cooking.
When a cut occurs and the power supply is subsequently restored, the oven recovers
the current cooking (if any) and continues it with the same parameters prior to cutting.
The following figure shows the oven display when the power is restored and just before
starting NightWatch functionality. Pressing the START/STOP key in this state will
cancel automatic recovery.
If it is not cancelled, the MyChef oven automatically checks the temperature of the
cooking chamber. If the temperature is below 56°C there may be a risk of bacterial
contamination. In this case, the oven will continue cooking but will display error 28
when pressing the START/STOP button to end the cooking cycle. In this case, the final
user shall decide the fate of the food, taking into account the risks of possible bacterial
contamination.
9.17 Error and alarms
During the preparation and execution of any of the programs available in the oven,
errors may occur due to equipment failures. If an error occurs in the system during use,
it will be displayed in the error list.
52
Page 50

Error
Internal definition
Explanation
0
NO ERROR
No Error
1
ERROR GENERAL PURPOSE INPUT
General error entry. Not used.
2
ERROR OVERTEMPERATURE
General error entry. Not used.
3
ERROR OVERTEMPERATURE PCB
Over temperature PCB. Check that the cooling fans of the
electronics are working properly, that there is sufficient space
between the rear and the wall, and that the ambient temperature
is not excessive.
4
ERROR COMMUNICATION
Plate communication is not responding. Check the cable
connecting the power board and control board
5
ERROR EEPROM
Communication processor and EEPROM does not work. Check
the control board
6
ERROR MOTOR
Motor/inverter error. Check motor wiring.
7
ALARM WATER
No water detected. Make sure that the water supply is connected
correctly.
8
ERROR WASHING
No detergent/brightener detected. Not used.
9
ERROR PROBE1 TEMP SENSOR NOT
CONNECTED
External probe not connected. Check the external probe and
connector.
10
ERROR PROBE1 TEMP SENSOR SHORTED
External short-circuited probe. Check the external probe and
connector.
11
ERROR PROBE2 TEMP SENSOR NOT
CONNECTED
External probe not connected. Check the external probe and
connector.
12
ERROR PROBE2 TEMP SENSOR SHORTED
External short-circuited probe. Check the external probe and
connector.
13
ERROR PROBE3 TEMP SENSOR NOT
CONNECTED
External probe not connected. Check the external probe and
connector.
14
ERROR PROBE3 TEMP SENSOR SHORTED
External short-circuited probe. Check the external probe and
connector.
15
ERROR PROBE4 TEMP SENSOR NOT
CONNECTED
Restricted. Not used.
16
ERROR PROBE4 TEMP SENSOR SHORTED
Restricted. Not used.
17
ERROR PROBE5 TEMP SENSOR NOT
CONNECTED
Restricted. Not used.
18
ERROR PROBE5 TEMP SENSOR SHORTED
Restricted. Not used.
19
ERROR PROBE6 TEMP SENSOR NOT
CONNECTED
Restricted. Not used.
20
ERROR PROBE6 TEMP SENSOR SHORTED
Restricted. Not used.
21
ERROR PROBE7 TEMP SENSOR NOT
Restricted. Not used.
The table below shows the different errors and alarms, as well as possible solutions to
them.
53
Page 51
CONNECTED
22
ERROR PROBE7 TEMP SENSOR SHORTED
Restricted. Not used.
23
ERROR PROBE8 TEMP SENSOR NOT
CONNECTED
Camera probe not connected. Check probe and wiring.
24
ERROR PROBE8 TEMP SENSOR SHORTED
External short-circuited probe. Check the external probe and
connector.
25
ERROR PROGRAM NOT TERMINATED
Reserved. Not used.
26
ERROR CLEANING PROGRAM NOT
TERMINATED
The oven has been switched off by running a self-cleaning
program. Make a rinse.
27
ERROR CLEANING TEMPERATURE TOO
HOT
The temperature of the oven during a self-cleaning program has
risen above a maximum temperature.
28
ALARM RECOVERY TEMP TOO LOW
The oven has recovered from a power outage, and the
temperature in the chamber was below 56ºC. Risk of bacterial
contamination. Discard or test the product.
Always run a self-cleaning or rinsing program when Error 26 occurs.
Table 4: Errors, alarms and possible solutions.
Check whether errors can be removed by your own means, or if not, contact your
service representative.
54
 Loading...