

MyBox – NV300T User Guide Page 1 of 35
TM
NV300T
HD Media Player / Recorder
With Tuner
User Guide

MyBox – NV300T User Guide Page 2 of 35
Table Of Contents
1 MyBox NV300T Layout.......................................................................................................................... 5
1.1 Front Panel .................................................................................................................................. 5
1.2 Back Panel................................................................................................................................... 5
2 Installation Guide................................................................................................................................... 6
2.1 Output .......................................................................................................................................... 6
2.2 Input............................................................................................................................................. 6
3 How to Connect ?.................................................................................................................................. 7
3.1 To TV ........................................................................................................................................... 7
3.2 To STB / DVD Player ................................................................................................................... 8
3.3 To AV Receiver............................................................................................................................ 9
4 Remote Layout .....................................................................................................................................10
5 Screen Layout ......................................................................................................................................11
5.1 Info Bar .......................................................................................................................................11
5.2 Status Bar ...................................................................................................................................11
6 Play Video ............................................................................................................................................12
6.1 Supported video formats.............................................................................................................13
7 Play Audio ............................................................................................................................................14
7.1 Supported Audio formats ............................................................................................................15
8 View Photo ...........................................................................................................................................16
8.1 Supported Image formats ...........................................................................................................17
9 Video Recording...................................................................................................................................18
9.1 Instant Recording........................................................................................................................18
9.2 Scheduled Recording..................................................................................................................18
9.3 View Recorded Files ...................................................................................................................19
10 Internet Browsing .................................................................................................................................20
10.1 My Web.......................................................................................................................................20
10.1.1 GoTo URL .........................................................................................................................20
10.1.2 Search...............................................................................................................................21
10.1.3 Favorites............................................................................................................................21
10.2 Downloads ..................................................................................................................................21
10.2.1 Torrent Search ..................................................................................................................22
10.2.2 View Files..........................................................................................................................22
10.2.3 Status................................................................................................................................22
10.3 Internet Radio .............................................................................................................................23
11 My Files ................................................................................................................................................24
12 Settings ................................................................................................................................................26
12.1 Changing TV settings..................................................................................................................26
12.2 Changing Date & Time................................................................................................................27
12.3 Setting up wired network.............................................................................................................27
12.4 Setting up wireless network ........................................................................................................28
12.5 Configuring PC with MyBox ........................................................................................................28
12.6 Change Video Recording Settings..............................................................................................30
12.7 Using MyBox remote to control your STB ...................................................................................31
12.8 Changing MyBox General Settings.............................................................................................32
12.9 Advanced Options.......................................................................................................................33
12.10 Restore Default...........................................................................................................................33
12.11 Software Update.........................................................................................................................33
12.12 Change PIN Code.......................................................................................................................34

MyBox – NV300T User Guide Page 3 of 35
Welcome to the World of MyBox !
NV300T is a powerful High Definition (HD) Media Player and Recorder with Internet capabilities. A few of
them are listed below:
• Playback all popular Audio, Video formats (up to 720p HD videos).
• Record your favorite programs and watch whenever you want. Record instantly or Schedule your
records to start when you are away.
• Record media for device specific formats like PC, Sony PSP, iPod, Smart Phones etc.
• Use your TV as a Picture Viewer to View / Run slideshows from your Camera’s Photos.
• Connect your PC over LAN / WiFi and Play shared media directly on your TV.
• Store and Catalogue media on your USB Sticks, USB Hard Disks, PC etc.
• Use your TV to Browse Internet, Check mails, Search the Web, Access Multi-lingual sites etc.
• Watch videos and View Photos from Internet.
• Use the power of Torrents to Search and Download files from the Internet.
• Listen to your favorite music from 100s of Radio stations on the Internet.
Experience the power of convergence with MyBox !
Safety Instructions
MyBox NV300T has been designed to operate reliably in a well-ventilated household environment. Slots and
openings in the unit cabinet are provided for ventilation. These openings should not be blocked by placing
the product on a bed, sofa, rug, or similar surface
• Position NV300T with at least 2 inches of space above and on all sides.
• Do not block the slots and openings in NV300T.
• Do not place anything on top of NV300T.
• Do not position NV300T in an enclosed space that would restrict airflow around the unit.
• Do not position NV300T near any external heat source that could raise the temperature around the
unit.
• Do not expose to rain or moisture.
• To avoid electrical shock, do not open the cabinet.
MyBox – NV300T User Guide Page 4 of 35
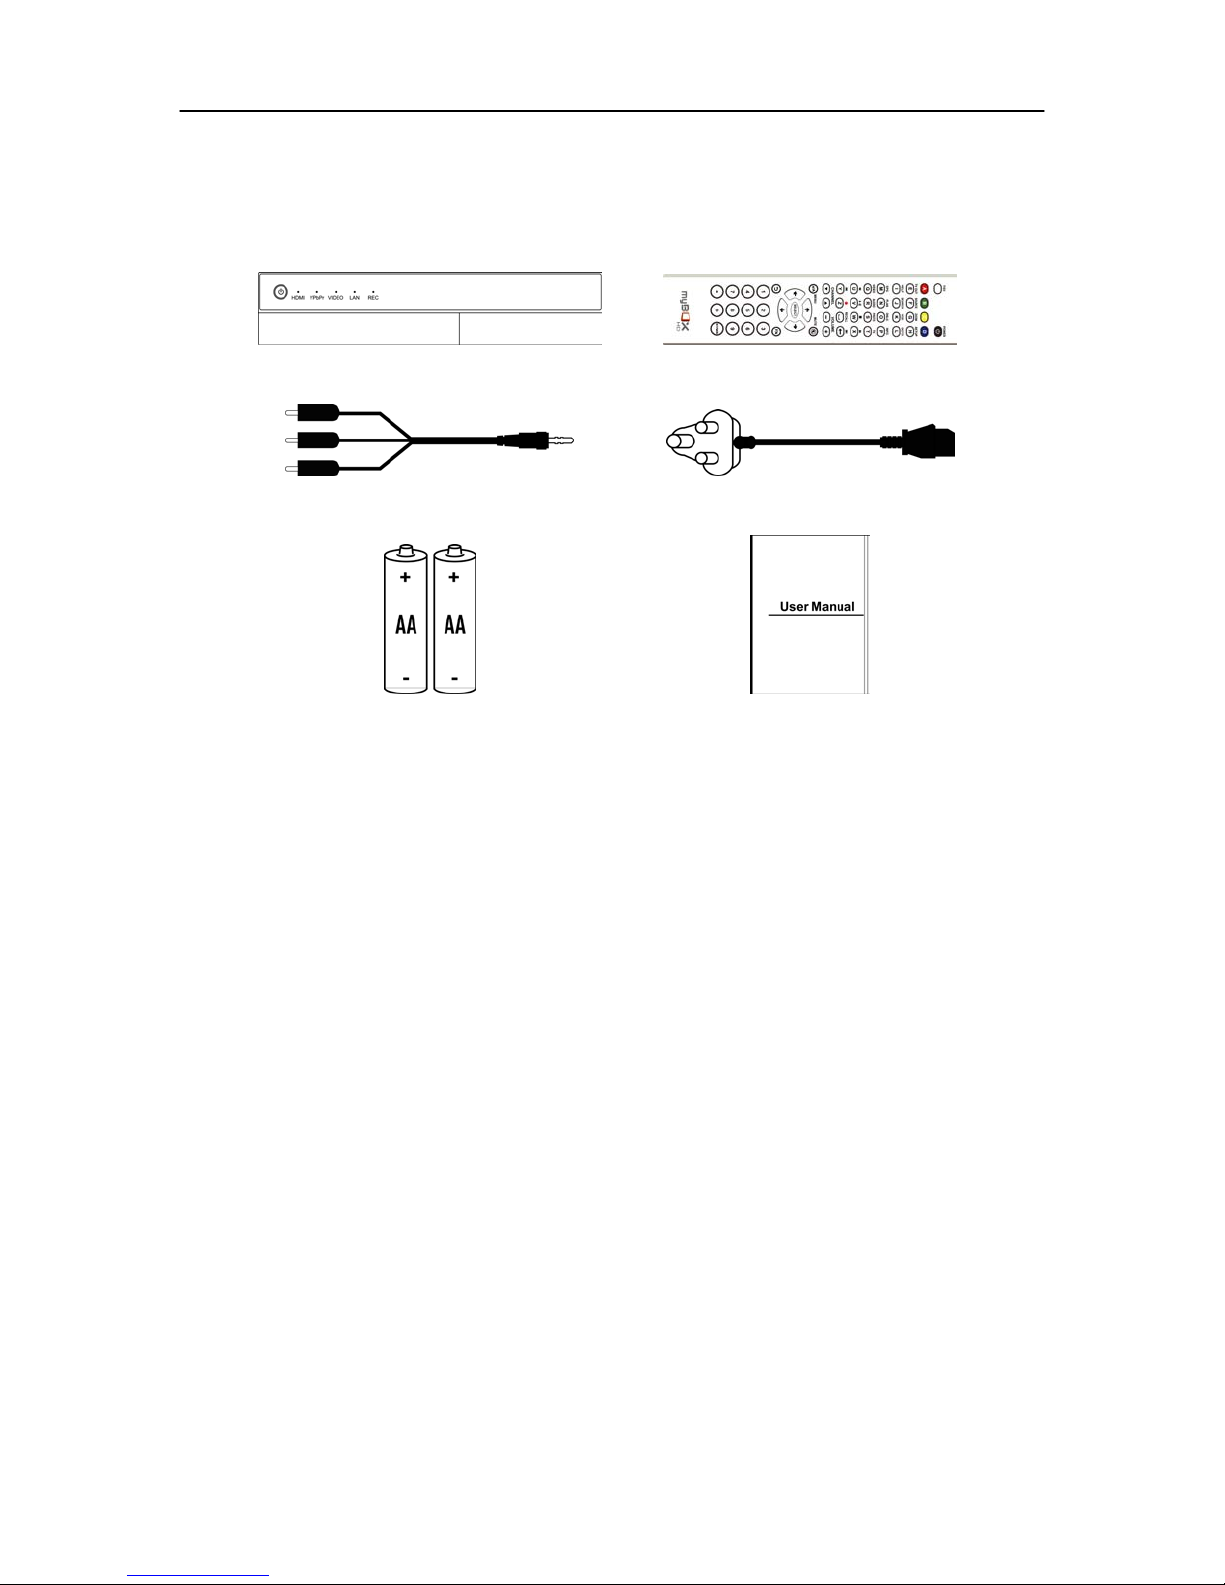
Package Contents
Your package contains the following items
MyBox NV300T Remote
AV Cable Power Adapter
2 Nos. Battery (AA) User Guide
Note : The items supplied with your MyBox may be different depending on the country / model.
In addition, the following accessories can be bought separately:
• HDMI Cable
• Component Cable
• Optical Cable
• eSata Device with Cable
• USB WiFi Dongle
• USB Card Reader
• USB Storage
MyBox – NV300T User Guide Page 5 of 35
1 MyBox NV300T Layout
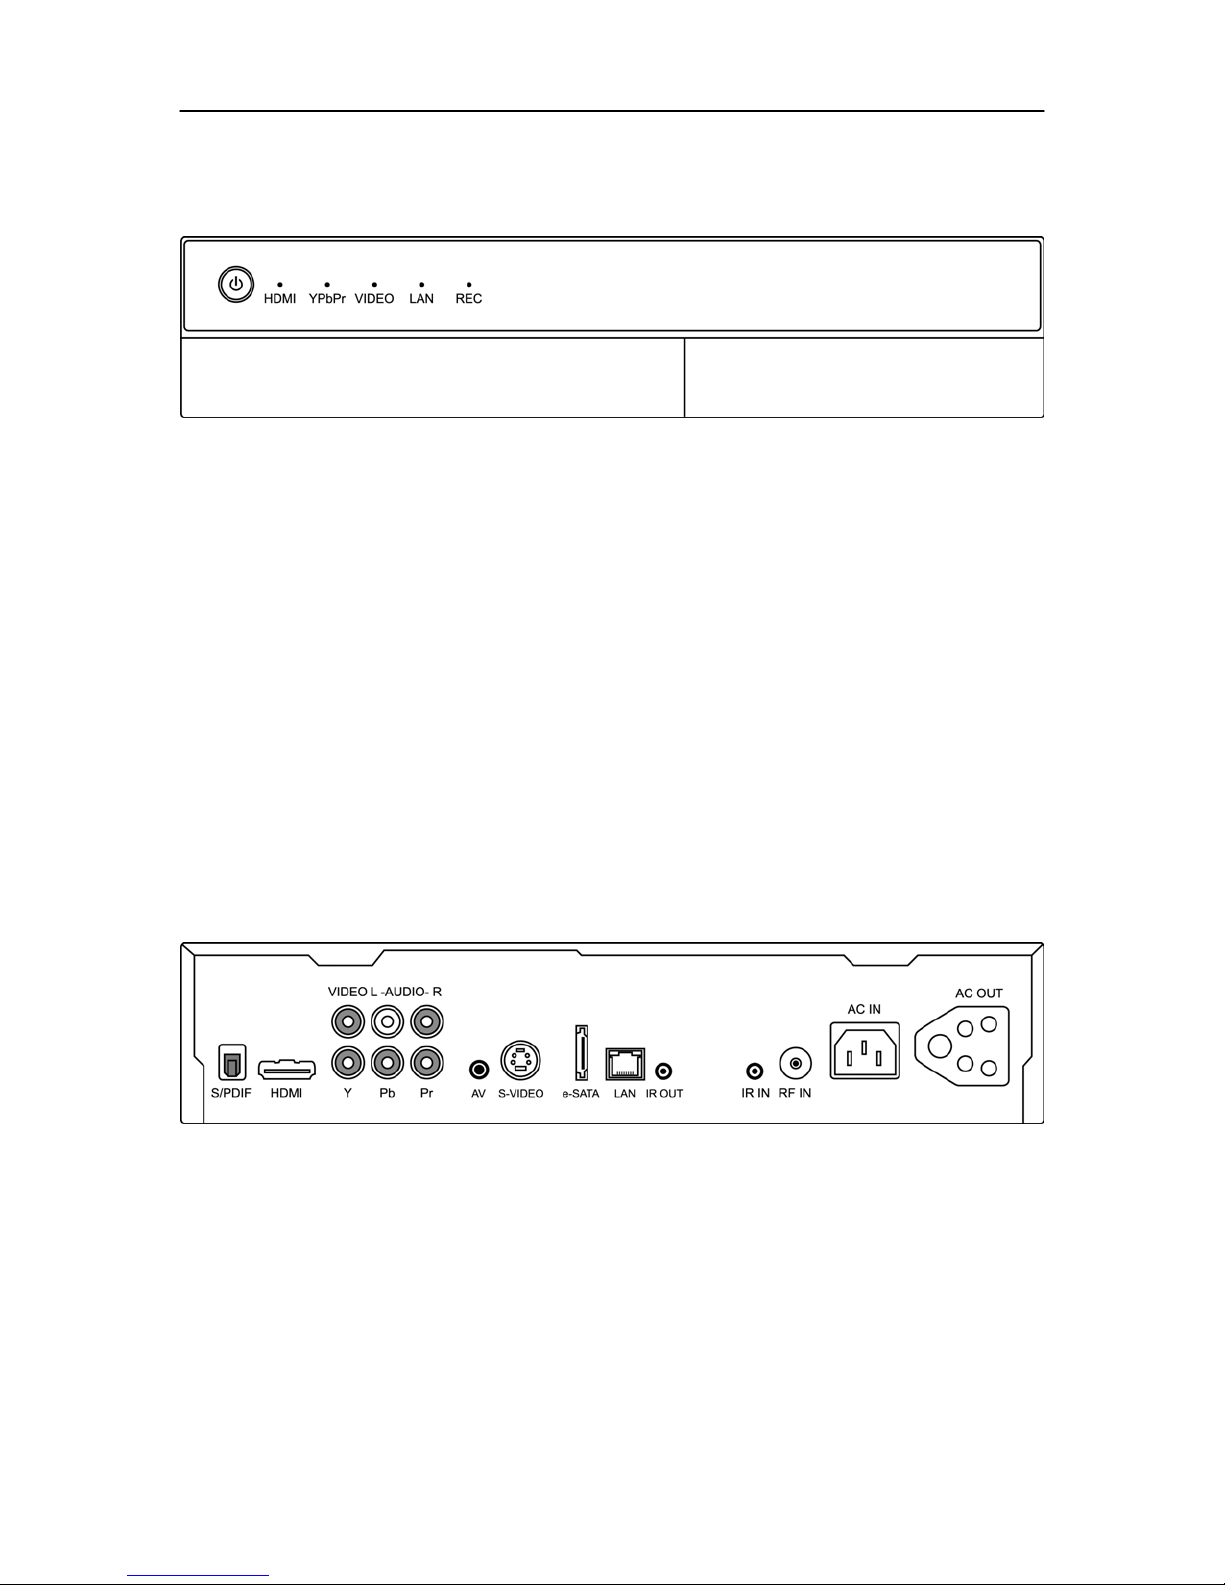
1.1 Front Panel
Fig. 1.1
REC Red light indicates that a video recording is in progress
LAN Green light indicates that a PC is connected to MyBox
VIDEO Green light indicates that TV output source is in ‘CVBS’ Mode.
YPbPy Green light indicates that TV output source is in ‘Component’ Mode. You have to manually
change the TV settings to ‘YPbPr’
HDMI Green light indicates that TV output source is in ‘HDMI’ Mode. You have to manually change
the TV settings to ‘HDMI’
POWER Red light indicates that MyBox is in stand-by mode. Press the ‘Power’ button to boot up
MyBox.
Blue light indicates that MyBox is powered on.
Flashing Red indicates a remote activity.
1.2 Back Panel
Fig. 1.2
MyBox – NV300T User Guide Page 6 of 35
2 Installation Guide
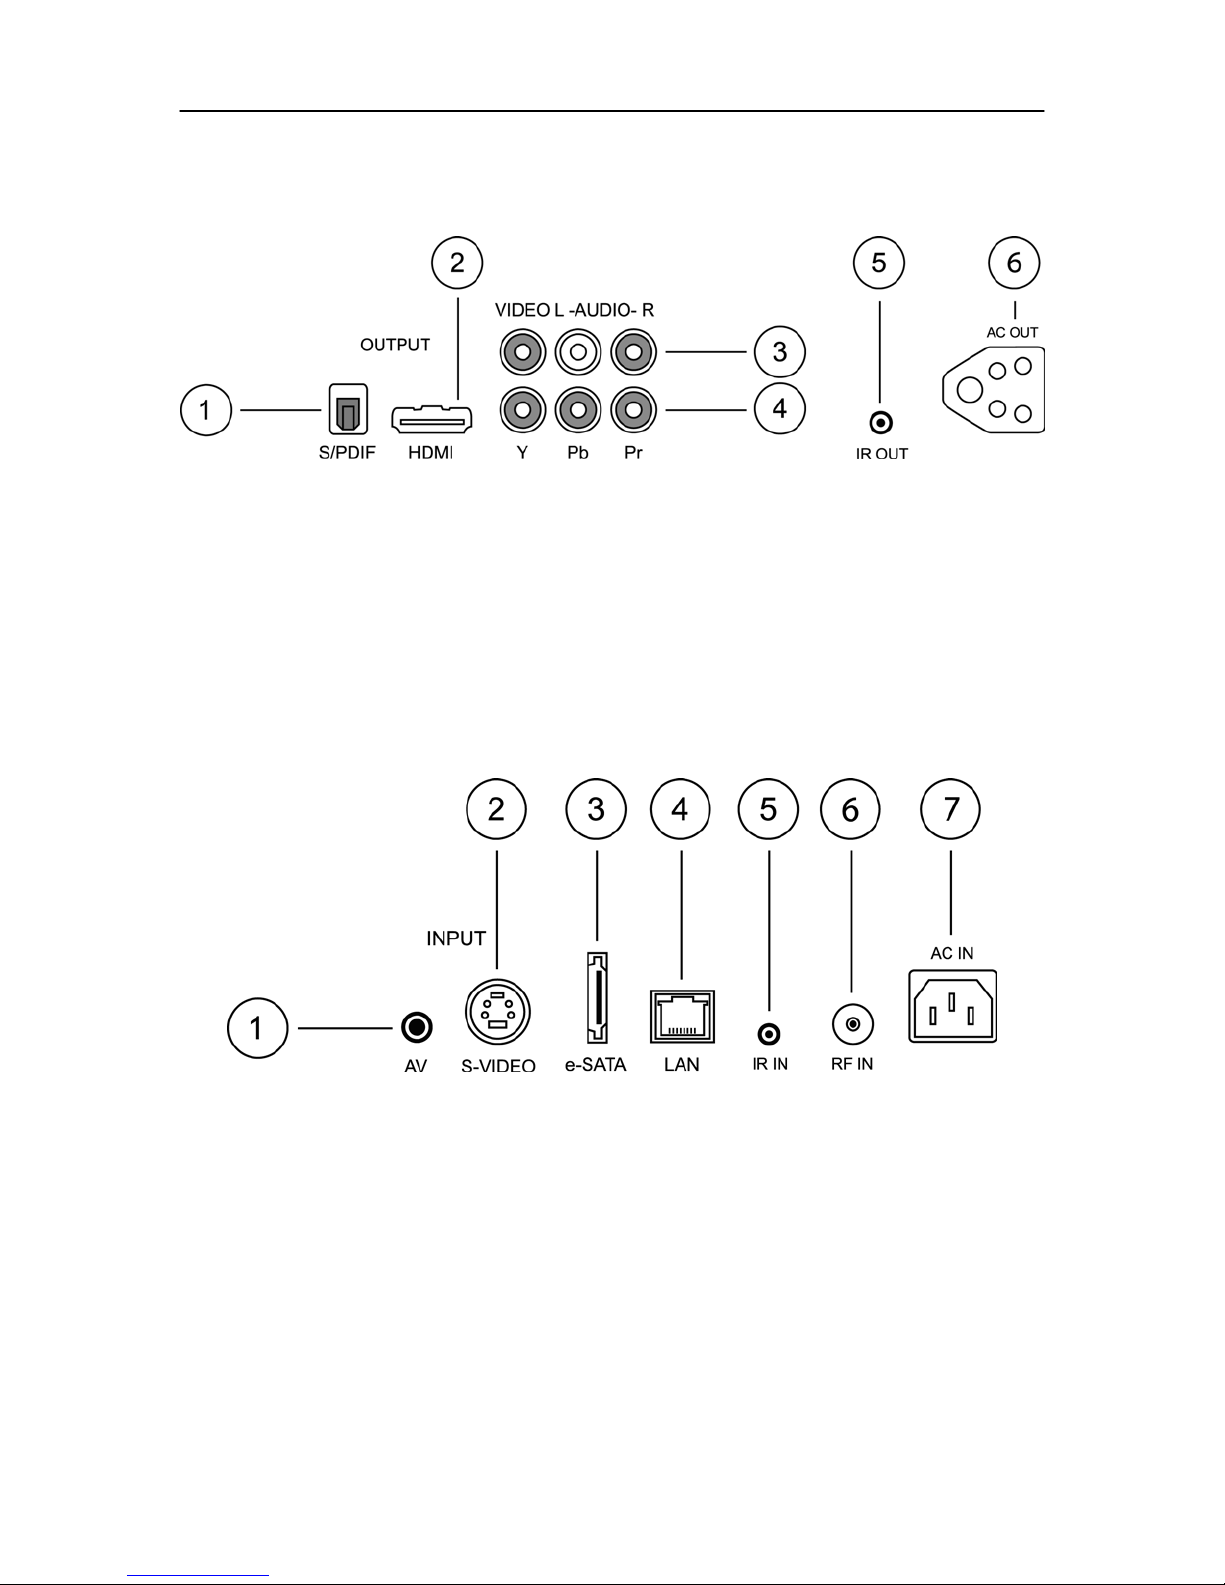
2.1 Output
Fig. 2.1
1. Optical output to Dolby® Digital Surround Sound Devices.
2. HDMI output to TV.
3. AV output to TV.
4. Component output to TV.
5. IR Blaster output to STB.
6. 250 Volt, 6 Amps Power Output.
2.2 Input
1. AV input from STB / DVD player / other video devices.
2. S-Video input from STB / DVD player / other video devices.
3. e-SATA hard drive interface.
4. RJ-45 LAN interface.
5. IR input cable.
6. RF input cable.
7. 250 Volt, 6 Amps Power input.
Fig. 2.2
MyBox – NV300T User Guide Page 7 of 35
3 How to Connect ?
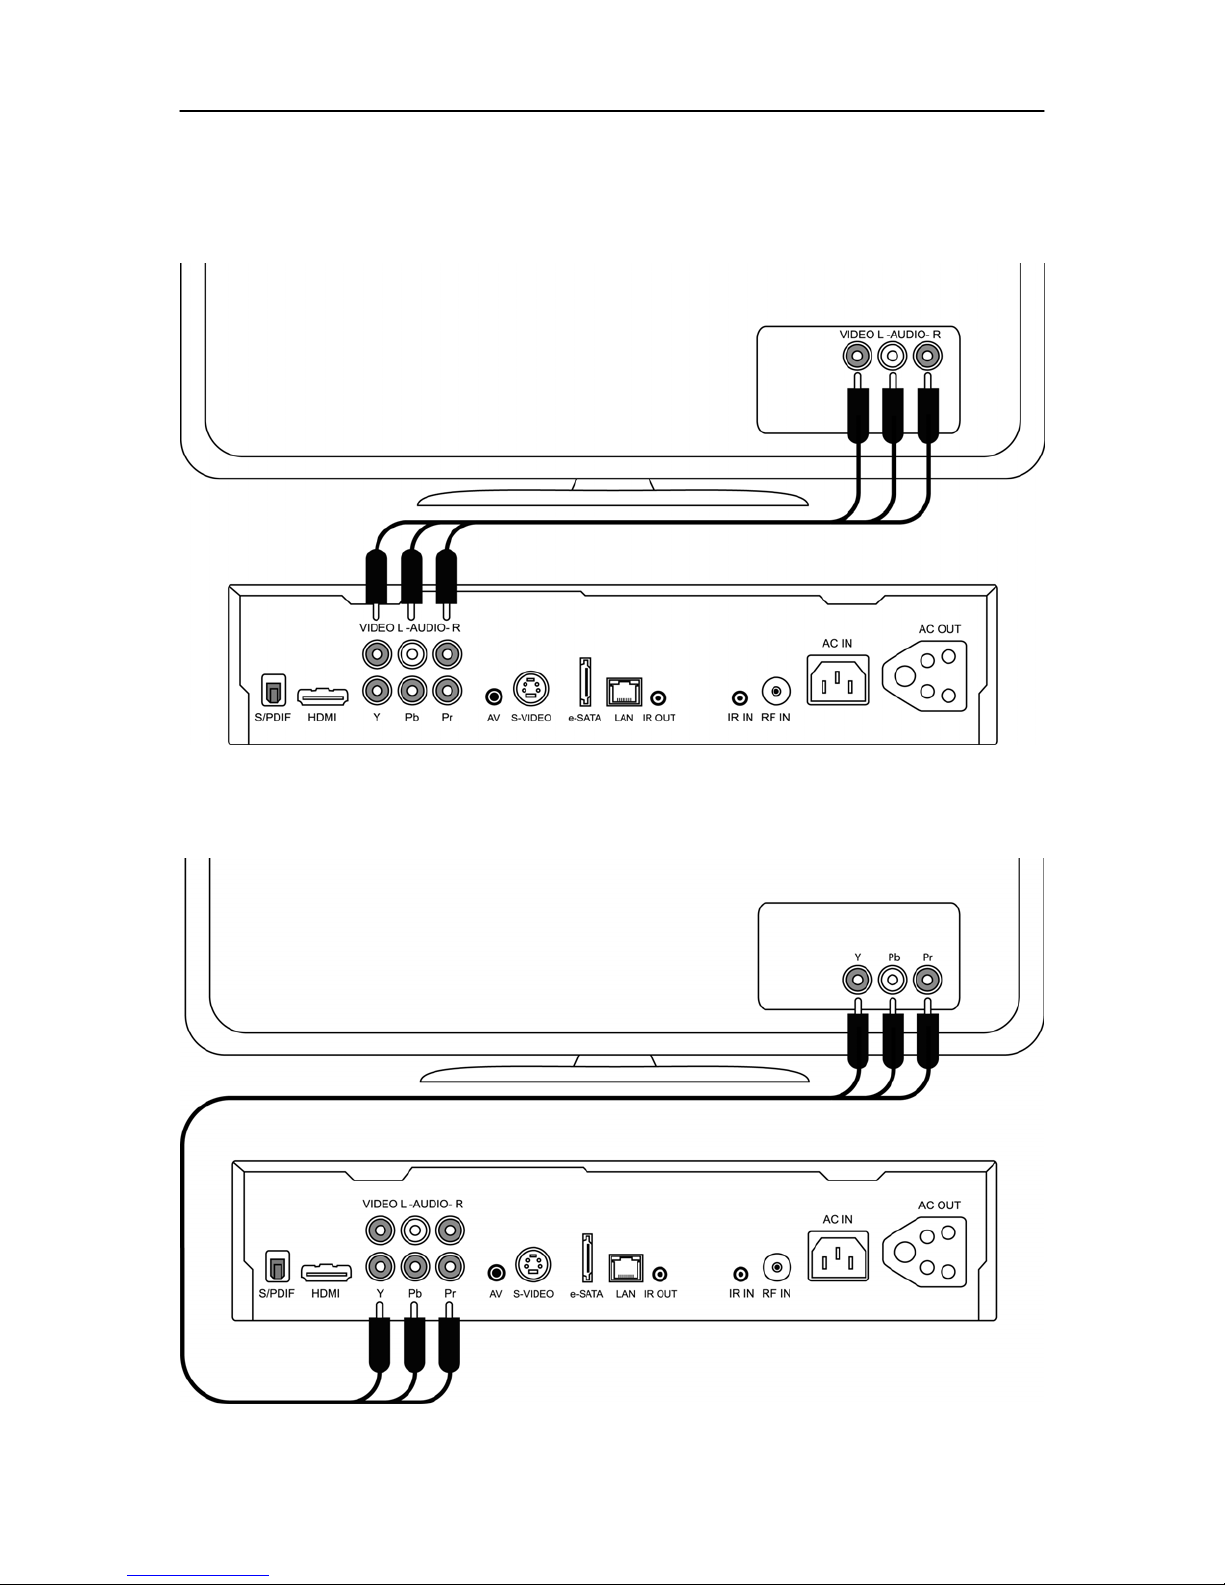
3.1 To TV
Connect AV output to TV as shown in Fig. 3.1
Fig. 3.1
Connect Component output to TV as shown in Fig. 3.2
Fig. 3.2
MyBox – NV300T User Guide Page 8 of 35
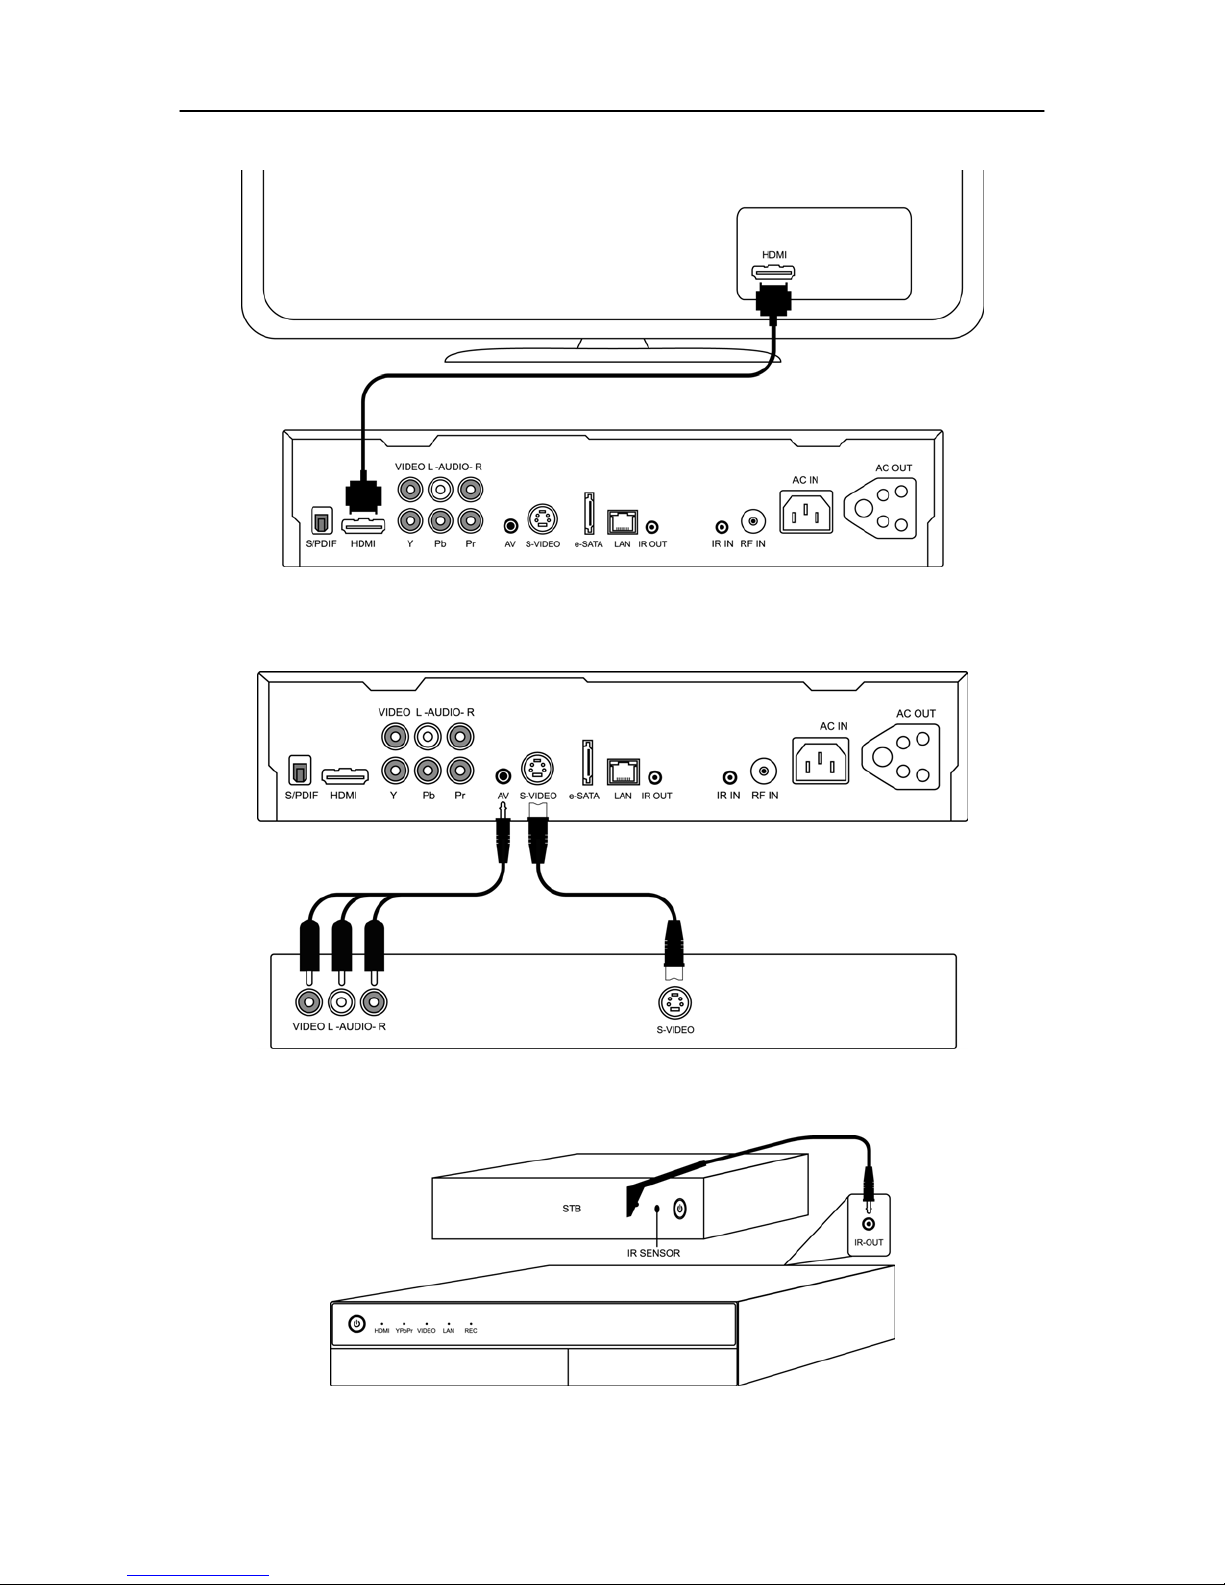
Connect HDMI output to TV as shown in Fig. 3.3
Fig. 3.3
3.2 To STB / DVD Player
Connect AV/S-VIDEO device input as shown in Fig. 3.4
Use MyBox remote to control DTH set-top box using IR Blaster cable as show in Fig. 3.5
Fig. 3.4
Fig. 3.5
MyBox – NV300T User Guide Page 9 of 35
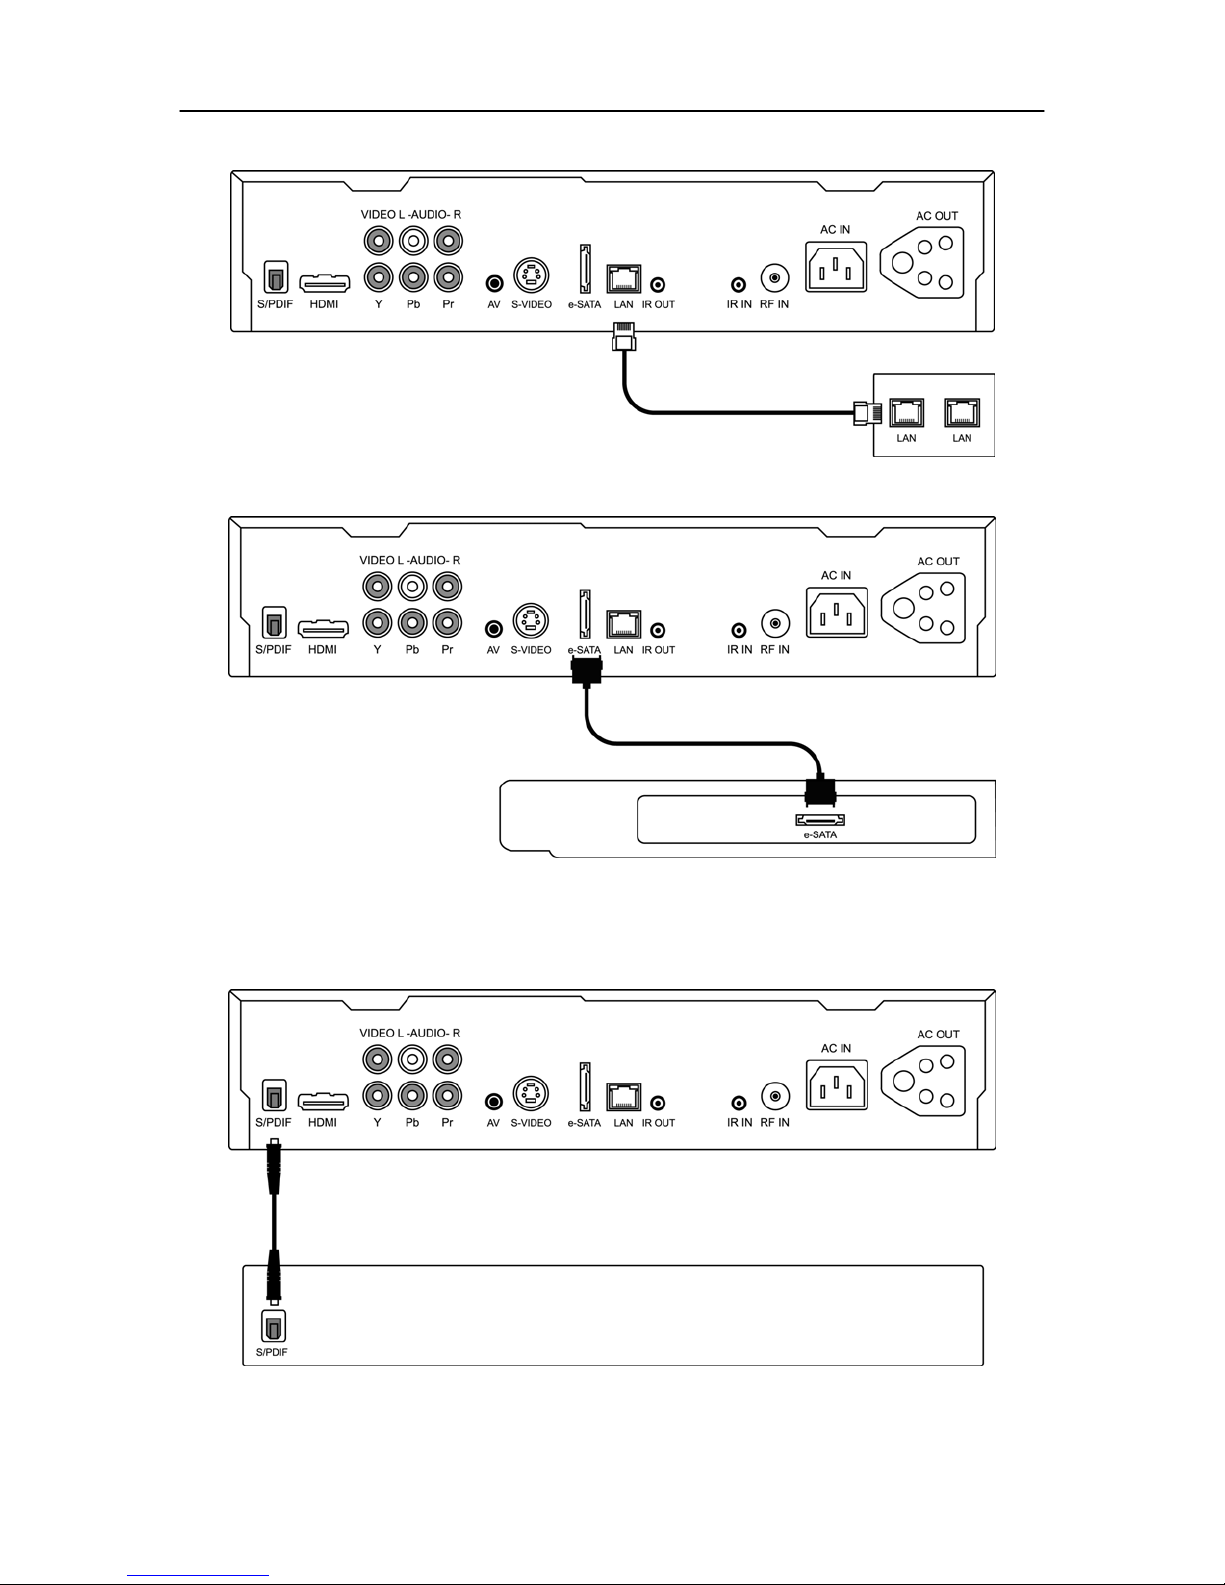
Connect your LAN as in Fig. 3.6
Fig. 3.6
Fig 3.7 shows eSATA Hard Drive connection
Fig. 3.7
3.3 To AV Receiver
Connect your Optical cable to AV Receiver to achieve Dolby® Digital DTS Surround Sound.as shown in fig
3.8 below
Fig. 3.8
MyBox – NV300T User Guide Page 10 of 35
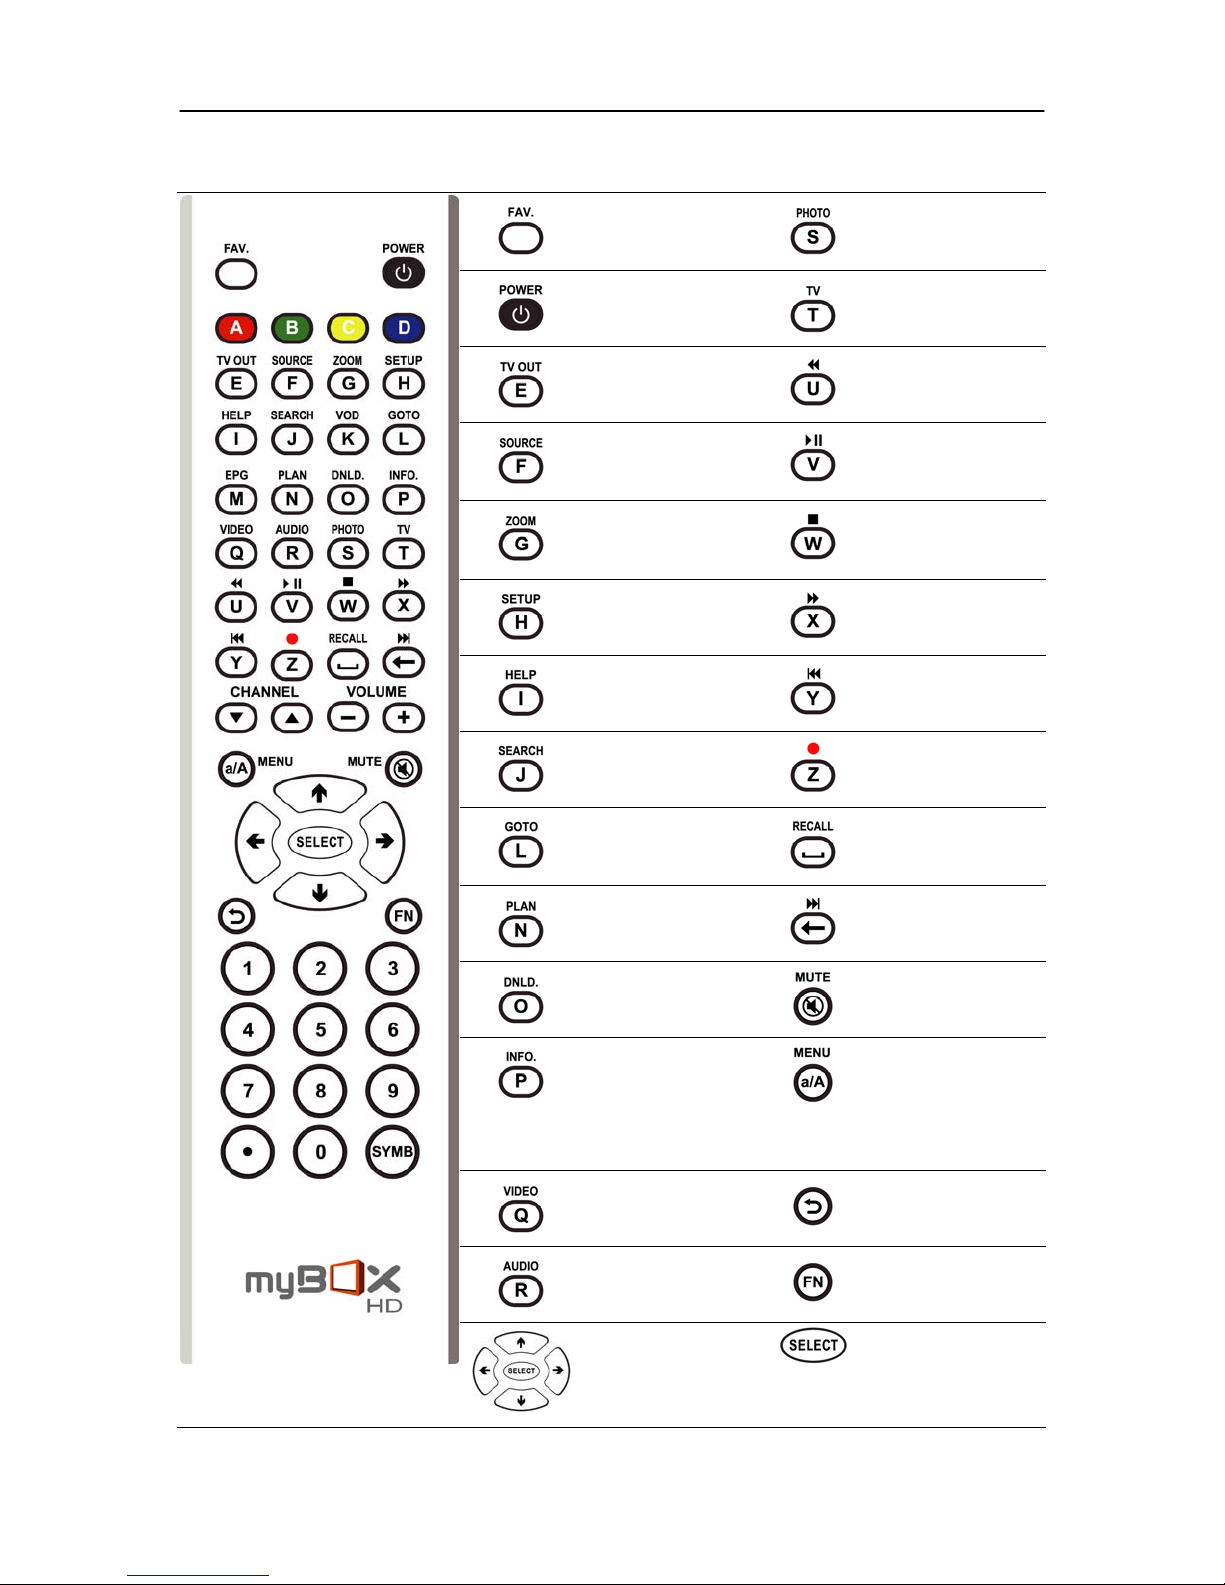
4 Remote Layout
Fig. 4.1
Hot key to save your
favorite website for quick
access
Switch On / Off Power
Select between CVBS /
Component / HDMI mode
Select between Tuner /
S-Video / CVBS input
source
Select between Default /
Full / Cinema Video
aspect modes
Hot key to My Setup
Shows Context sensitive
help
Hot key for Torrent
Search
Hot key to jump by time /
chapter while playing
video
Hot key to set / view
video record schedules
Hot key to go to Torrent
download interface
Provides information
about a file while in File
Explorer Mode.
Shows the Info Seek bar
while playing video /
audio
Hot Key to My Video
Hot key to My Audio
Navigation Keys Executes the selected
Hot key to My Photos
Hot key to watch TV
Rewind
Play / Pause
Stop Play / Record
Fast Forward
Plays the previous audio /
video file.
Start video recording
Hot key to view recorded
video folder
Plays the next audio /
video file from the source
Mutes volume
Hot key to MyBox’s Main
Menu.
Select between small and
caps while in keyboard
mode.
Exit / Back to previous
menu
Shows File options in My
Files
action
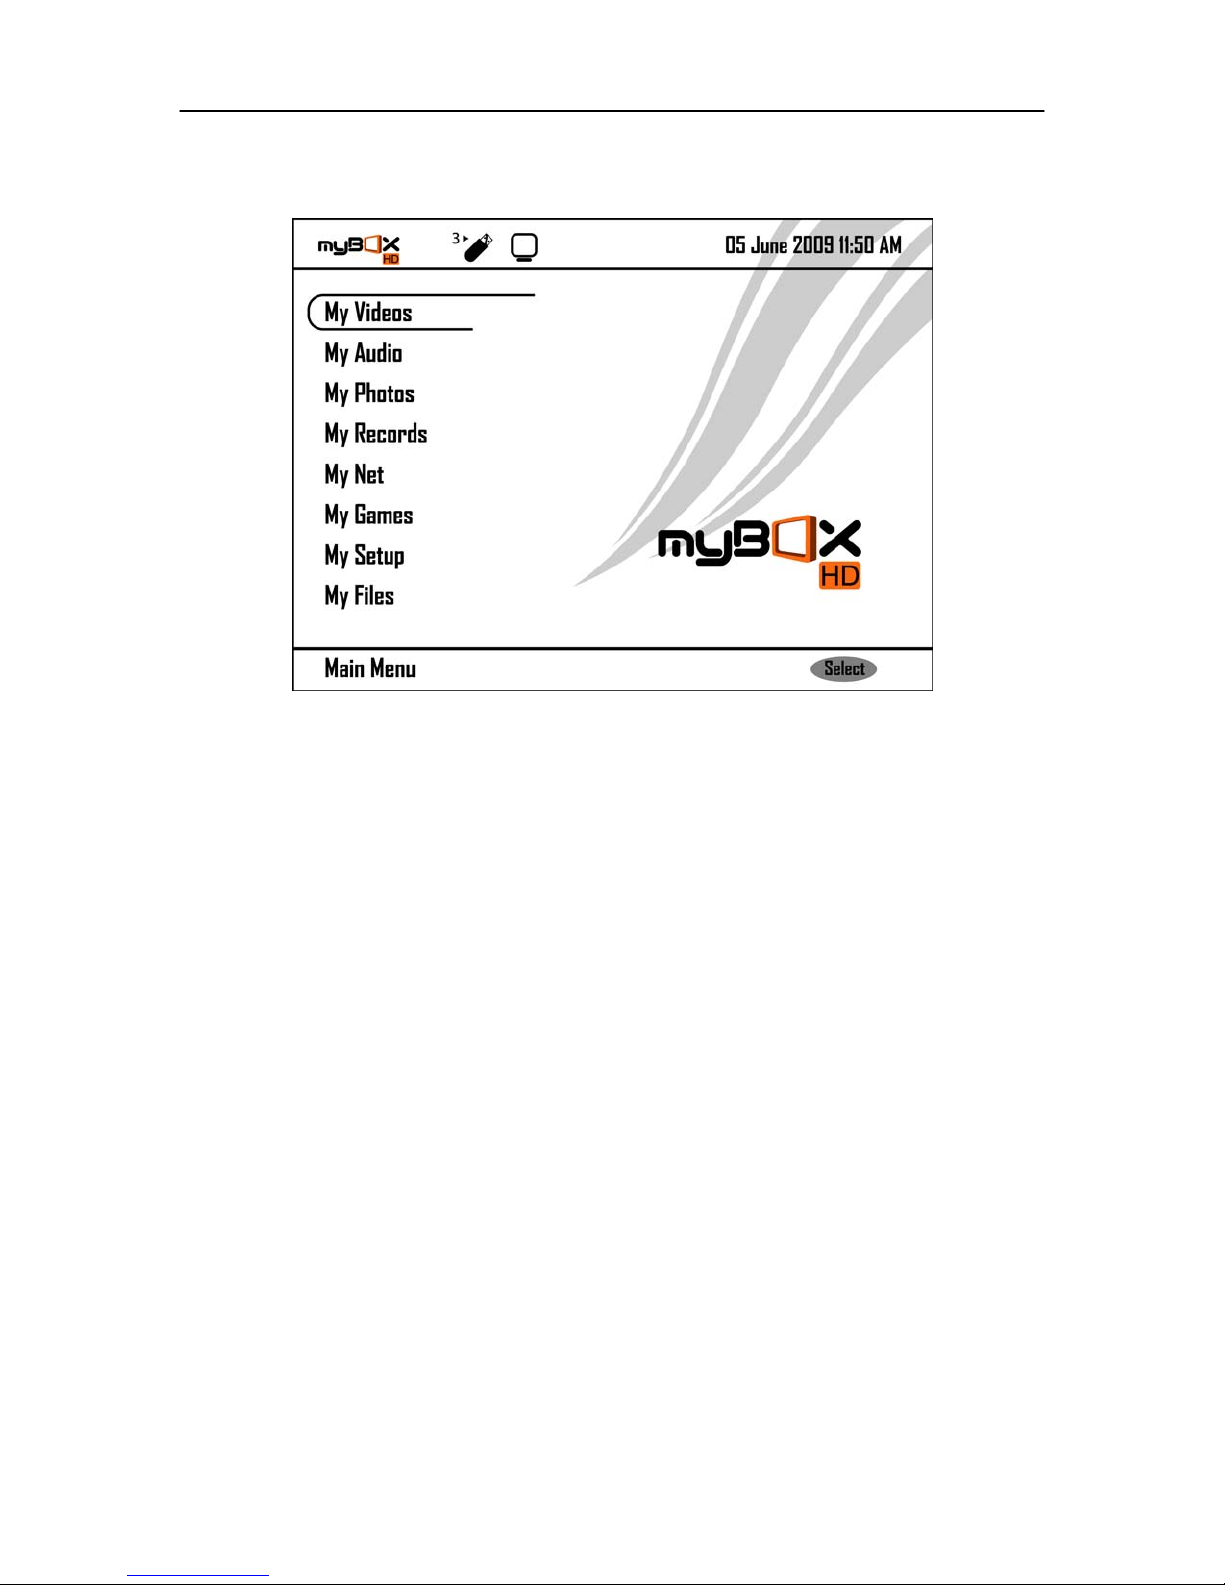
MyBox – NV300T User Guide Page 11 of 35
5 Screen Layout
Fig. 5.1
5.1 Info Bar
1. Indicates connection to a USB mass storage device. The number besides the USB icon
specifies the count of such USB devices connected.
2. Indicates that a Network PC is connected to MyBox.
3. Indicates the date and time as set in MyBox. This can be reconfigured through My Setup.
5.2 Status Bar
4. Indicates the root path of the current screen.
5. Indicates the actions allowed in the current screen.

MyBox – NV300T User Guide Page 12 of 35
6 Play Video
MyBox can play various video formats [Refer Supported video formats]. To play videos from the USB
mass storage devices, select ‘My Videos’ tab and choose the device name from the list. Select the video file.
You can further drill down to the folder where the video files are kept.
Fig. 6.1 Fig. 6.2
MyBox, by default, checks for a folder ‘Video’ in all the connected devices and loads this folder. Otherwise, it
creates a new folder in the above name and takes the user to the folder.
You can press button and choose the video directory of your choice. Only the supported video file formats
are displayed. Select a video file and press button to play it.
An Info Bar shows the list of controls that can be used while viewing a video. The controls include Play /
Pause, Stop, Rewind and Fast forward.
The Info Bar is displayed for the first 5 seconds of video play. It can be re-invoked by pressing the button in
the MyBox remote.
Play / Pause Switches between Play and Pause.
Stop Stops playing the current video file and takes the user back to the directory from where
the video file was being played.
Rewind Rewinds the current video file being played. Press the button up to 4 times to increase the
rewind speed from 2x till 32x.
Fig. 6.3
Fast Forward Forwards the current video file being played. Press the button up to 4 times to increase
the forward speed from 2x till 32x.
Next Plays the next video file from the current directory.
Previous Plays the previous video file from the current directory.

MyBox – NV300T User Guide Page 13 of 35
MyBox can play video in its default aspect ratio of 4:3 or ‘Full’ mode in 16: 9 or in ‘Cinema’ mode of 2.35:1.
Press button to select between the three aspect modes.
You can jump to a specific time slot / chapter while playing a video file. Press
hour, minute and seconds of the video’s time frame.
Fig. 6.4
MyBox can play a file, play all video files in a folder or repeat playing a video file or the repeat a folder.
Pressing
modes.
Resuming Video from the last left point
You can resume watching a video from its last left point. This works only if the last viewed video is same as
the current one. You can turn off / on this feature through My Setup ==> General ==> Resume Playback. By
default, this feature is turned ‘on’.
button switches between ‘Play File’ (Default), ‘Play Folder’, ‘Repeat File’ or ‘Repeat Folder’
button and specify the
6.1 Supported video formats
MP4 MPEG4/MP4
MPG Motion Picture Experts Group.
WMV Windows Media Video (WMV) is a compressed video file format.
TS Transport stream.
FLV (Flash Video) is a Macromedia video format.
AVI Audio Video Interleave, known by its acronym AVI, is a multimedia container format.
MKV The Matroska Multimedia Container is an open standard free Container format.
RMVB RealMedia Variable Bit rate (RMVB) is a variable bit rate extension of the RealMedia multimedia
container format.
ASF Advanced Systems Format is Microsoft’s proprietary digital audio/digital format.
RM Container format created by Real Net works.
VOB Container format used in DVD-Video media.
DIVX A compressed video format developed by DivX Inc.
DAT VCD video file format

MyBox – NV300T User Guide Page 14 of 35
7 Play Audio
MyBox can play various audio formats [Refer Supported audio formats]. To play audios from the USB
mass storage devices, select ‘My Audio’ tab and choose the device name from the list. Select the audio file
or you can further drill down to the folder where the audio files are kept.
Fig. 7.1 Fig. 7.2
MyBox, by default, checks for a folder ‘Audio’ in all the connected USB devices and loads this folder.
Otherwise, it creates a new folder in the above name and takes the user to the folder.
You can press
formats are displayed. Select a audio file and press button to play it.
‘Now Playing’ Screen shows the album information about the selected music file.
button and choose the audio directory of your choice. Only the supported audio file
Fig. 7.3

MyBox – NV300T User Guide Page 15 of 35
Following playback controls can be used while playing music.
Play / Pause
Switches between Play and Pause.
Stop
Fast Forward
Next
Previous
Apart from the above controls, Users can browse through the audio files in the current directory one by one
by pressing the
Pressing button starts playing the chosen audio file.
Stops playing the current audio file and takes the user back to the directory from
where the audio file was being played
Forwards the current video file being played. Press the button up to 4 times to
increase the forward speed from 2x till 32x.
Plays the next audio file from the current directory
Plays the previous audio file from the current directory
or arrow keys. Album information of the audio file selected shall be displayed.
7.1 Supported Audio formats
MP3 MPEG-1 Audio Layer 3, a common audio format for consumer audio storage.
WAV Short for Waveform Audio Format is a Microsoft and IBM audio file format.
AAC Advanced Audio Coding is a standardized, compression and encoding scheme for digital audio.
RA Real Audio is a proprietary format developed by Real Networks.
WMA Windows Media Audio is an audio data compression technology developed by Microsoft.
AC3 Dolby Digital Audio format.
DTS Digital Theatre System Audio format.
OGG Bit stream container file format for audio, video and other multimedia content.

MyBox – NV300T User Guide Page 16 of 35
8 View Photo
MyBox can show photos from the USB mass storage devices [Refer Supported image formats]. Select ‘My
Photo’ tab and choose the device name from the list. Select the image file or you can further drill down to
the folder where the image files are kept.
Fig. 8.1 Fig. 8.2
MyBox, by default, checks for a folder ‘Photo’ in all the connected USB devices and loads this folder.
Otherwise, it creates a new folder in the above name and takes the user to the folder.
You can press
are displayed. Select an image file and press button to view it in full screen mode.
button and choose the directory of your choice. Only the supported image file formats
Fig. 8.3

MyBox – NV300T User Guide Page 17 of 35
Play / Pause
Start / Pause Slide show.
Stop
Audio
Next
Previous
Stops slide show and takes the user back to the current directory
Play / Pause background music.*
Shows the next image file from the current directory
Shows the previous image file from the current directory
* You can add audio files to photo folders and play as background music for slideshows. Make sure that the
audio file is present in the same directory where the photos are present.
You can customize the Slide show time in My Setup. Go to My Setup ==> General Tab and change the
second’s value in the ‘Slideshow’ option. Default slide show time is fixed at 5 seconds.
Likewise, you can turn on / off the background music for slide show through My Setup ==> General Tab
under the option ‘Slideshow Music’.
8.1 Supported Image formats
JPG Joint Photographic Expert Group - commonly used image format.
GIF Graphics Interchange Format.
BMP Bitmap file format.
PNG Portable Network Graphics, a bitmap image format that employs lossless data
compression.

MyBox – NV300T User Guide Page 18 of 35
9 Video Recording
One of the core features of MyBox is that it allows to record video streams from TV channels as well as from
other sources like Camcorder, DVD player, etc. You would require an USB drive with FAT32 partition
connected to MyBox to record the video stream. Video recording cannot be started without this. MyBox
supports two modes of recording - Instant Recording and Scheduled Recording.
9.1 Instant Recording
Video recording can be initiated immediately by pressing the button in MyBox remote.
Fig. 9.1
By default, maximum record time is set at 30 minutes. This setting can be changed from My Records ==>
Instant ==> Max Rec Time
Recorded video is stored in the USB device connected to MyBox. You can view and change the video
recording settings from My Setup ==> Record ==> Settings.
9.2 Scheduled Recording
Video Recording can also be scheduled to take place automatically at a future period of time.
Fig. 9.2

MyBox – NV300T User Guide Page 19 of 35
Go to My Records ==> Schedule ==> Add channel, frequency, and date & time and duration details.
Fig. 9.3
You can add, edit and delete schedules. Frequency can be set as Once, Daily or Weekly. First 8 schedule
entries are shown and a maximum of 200 entries are allowed. If there are more than 8 schedules, use
and keys to navigate between pages. Use and arrow keys to
select schedules.
MyBox automatically kick starts scheduled recording. Make sure to leave your STB and MyBox turned on.
Record Schedules shall be executed even if the TV is switched off.
If you are watching any other Programme, MyBox automatically tunes to the scheduled channel using IR
blaster and starts the recording.
9.3 View Recorded Files
You can also view recorded videos manually from My Records ==> View Files. Alternately, press the hotkey
to open the folder where the last recorded video is stored.

MyBox – NV300T User Guide Page 20 of 35
10 Internet Browsing
MyBox brings Internet to the TV. Connect your Internet cable to MyBox LAN slot and experience the power
of Internet on TV.
10.1 My Web
You can do normal surfing in the Internet through the ‘My Web’ option under the menu ‘My Net’.
Fig. 10.1 Fig. 10.2
10.1.1 GoTo URL
You can go to a specific website through the option ‘Goto URL’.
Fig. 10.3
Text Entry
Enter the web address using MyBox remote’s alphabet / numeric keys. History of sites accessed
previously will be listed down. Press
and key for quick access of site
history. Press
Use key to delete part of web address typed. You can switch between capital / small
letters by pressing the
key to load the web site typed
key. You can note the mode ‘abc’ / ‘ABC’ in the input box.

MyBox – NV300T User Guide Page 21 of 35
Another feature worth noting is the Mobile Browse mode. When turned on, Mybox tries to load the
mobile version of the website being accessed. If the website does not have a mobile version, the
normal website is loaded. Press
key to switch on / off mobile browse mode.
10.1.2 Search
While GoTo URL allows the user to access a specific website, the search module allows to browse
through popular Search Engines.
Fig. 10.4 Fig. 10.5
Enter the search string using MyBox remote (text entry is as mentioned in the previous section).
10.1.3 Favorites
MyBox can maintain the list of favorite websites that you frequently access. While browsing your favorite
web site, press key to save the exact page in Favorites. Next time, directly access the page from the
Favorites.
10.2 Downloads
MyBox has the provision to search and download torrent files from Internet directly. MyBox requires a USB
device with NTFS partition to download torrent files. Torrent downloads can resume from the point it was left
last time. Ensure to use the same USB device.
Fig. 10.6 Fig. 10.7

MyBox – NV300T User Guide Page 22 of 35
Using MyBox, you can Search for torrent files, View torrent files and Check download status.
10.2.1 Torrent Search
Enter the torrent search string and press key. You can select from a list of Torrent sites to
download. Press
MyBox remote (text entry is as mentioned in the previous section).
Browse through the torrent web site and download torrent files. Note that to download torrent files you would
require a USB device with NTFS partition. Download shall not start without that.
key again to load the selected torrent website. Enter the search string using
Fig. 10.8
10.2.2 View Files
You can access the torrent files stored in your USB device and start downloading it. MyBox checks for a
connected USB device with NTFS partition.
Fig. 10.9 Fig. 10.10
Use arrow keys to select the ‘.Torrent’ file and press
10.2.3 Status
You can see the status of various torrent files in the download queue through this interface.
key to add the file to the download queue.
Fig. 10.11

MyBox – NV300T User Guide Page 23 of 35
Use
Indicates download is initializing.
Indicates download is complete.
Indicates download link is broken and hence cannot be continued.
and key to select from the queue.
Pause / Resume
Delete
Rewind
Fast Forward
Pauses or Resumes downloading of the selected torrent.
Deletes the selected torrent.
Decreases the download priority and moves it to the bottom row.
Increases the download priority and moves it to the top row.
Indicates download is in progress.
Indicates download is paused.
Previous
Next
Go to previous page.
Go to next page.
10.3 Internet Radio
You can listen to radio channels in Internet through MyBox
Fig. 10.12
To Launch Internet Radio, go to My Net ==> Internet Radio, choose the music genre and select a channel
from the list.

MyBox – NV300T User Guide Page 24 of 35
11 My Files
You can access your files in MyBox through this ‘My Files’ menu. MyBox prompts for a PIN code to access
your files in the USB device(s). By default, the PIN code is set as ‘0000’. However, you can change this by
going to My Setup ==> Advanced ==> Change Pin ==> My Files.
Enter the PIN code and press ‘Select’ key to choose your USB device. Select the USB device to browse
your files.
Fig. 11.1
Fig. 11.2

MyBox – NV300T User Guide Page 25 of 35
You can perform file related actions like rename delete, cut, copy and paste. MyBox can also open audio,
video and image files from here. Mark the file on which you want to perform actions. To mark, select the file
and press
marked files.
MyBox can play only video, audio and image files. Other file formats are not recognized [Refer to supported
formats in previous sections].
key. This way you can mark multiple files. Press key to perform action(s) on all

MyBox – NV300T User Guide Page 26 of 35
12 Settings
You can modify TV, date & time, network, video recording and general settings of MyBox through this
interface.
Fig. 12.1
12.1 Changing TV settings
Go to My Setup ==> System
TV Output
TV system
TV Aspect Ratio
TV Resolution
576p 480p 576p 480p
720p 720p
HDMI Audio Out
De-Interlace
Aspect mode
CVBS*
PAL*
CVBS HDMI Component
4:3*
PAL NTSC PAL NTSC PAL NTSC
576i* 480i* 720p* 720p 576i* 480i
Surround*
On*
Default*
16:9 4:3
HDMI Component
NTSC
16:9* 4:3*
Stereo
Off
Full Cinema
16:9

MyBox – NV300T User Guide Page 27 of 35
12.2 Changing Date & Time
The date and time displayed in MyBox Main Menu can be configured through this interface. To change
MyBox’s date and time, Go to My Setup ==> Date and Time
Fig. 12.2
Use the arrow keys in MyBox remote to change the date and time. Time can be expressed either in 12 hours
or in 24 hours format. Press key to save changes made.
Fig. 12.3
12.3 Setting up wired network
To configure your wired settings, connect your Internet cable to MyBox, go to My Setup ==> Network ==>
Wired / Wireless and choose Type as ‘’Wired’ and press
You can also configure for Static IP. Choose the Configuration as ‘Static IP’ instead of DHCP. Fill out the
below listed static IP details
• IP address
• Subnet mask
• Gateway
• DNS
Press
key to save the Static IP settings.
to save the settings.

MyBox – NV300T User Guide Page 28 of 35
12.4 Setting up wireless network
MyBox supports accessing Internet through wired as well as wireless network. To configure your wireless
settings, connect your wireless dongle to USB port, go to My Setup ==> Network ==> choose Type as
‘Wireless’. MyBox checks for wireless device and asks the following information:
Wireless Network Select the applicable network name (SSID) from the list
Network Authentication Choose between Open, Shared, WPA-PSK / WPA2-PSK
Encryption If the Network Authentication is Open or Shared, choose Encryption as WEP or
Disable it.
Key Enter the passkey to access the selected domain.
Press to save the settings.
You can also configure for Static IP. Choose the Configuration as ‘StaticIP’ instead of DHCP. Fill out the the
below listed static IP details
• IP address
• Subnet mask
• Gateway
• DNS
12.5 Configuring PC with MyBox
MyBox can access files from PC through the network. To configure a PC with MyBox, go to My Setup ==>
My PC
Enter the User name, password to access the PC resource, PC’s IP address.
If you want MyBox to recognize and connect to PC while boot up, set Auto Connect option to ‘ON’.
If the PC icon is displayed in the main menu, it means that the PC is connected, else check your PC
settings.
Fig. 12.4

MyBox – NV300T User Guide Page 29 of 35
If you have problem finding your PC’s IP address, go to My Setup ==> Network ==> Search PC. This
automatically searches for PCs connected to MyBox and displays the list. Select the PC from the list.
Fig. 12.5
How to connect PC/Laptop to MyBox via your existing Hub/Router?
• Connect the straight Ethernet cables between PC to Hub/Router and Hub/Router to MyBox.
• In PC, Click My Computer ==> Tools ==> Folder Option ==> View ==> Enable the ‘Use Simple File
Sharing’ option.
• In PC, Click Start ==> Control Panel ==> Network connections ==> Right Click (Local Area
Connection) ==> properties ==> Select Internet Protocol (TCP/IP) == > properties ==> Enable the
‘obtain an IP address automatically’ option
• Share the drive or required folders in PC.
• In MyBox, go to My Setup ==> Network ==> Wired/Wireless ==> Select Type as ‘Wired’ and
Configuration as ‘DHCP’.
• In MyBox, go to My Setup ==> Network ==> Search PC and select the PC name to connect.
How to connect PC/Laptop directly to MyBox without a Hub/Router?
Note: You would need an Ethernet cross cable for this.
• Connect the Ethernet Cross cable between PC and MyBox.
• In PC, Click My Computer ==> Tools ==> Folder Option ==> View ==> Enable the (Use Simple File
Sharing) option.
• In PC, Click Start ==> Control Panel ==> Network connections ==> Right Click (Local Area
Connection) ==> properties ==> Select Internet Protocol (TCP/IP) == > properties ==> Set the IP
address e.g.: (192.168.0.1)
• Share the drive or required folders in PC.
• In MyBox, go to My Setup ==> Network ==> Wired/Wireless ==> Select Type as ‘Wired’ and
Configuration as ‘StaticIP’. Set the IP address eg : (192.168.0.2).
• Make Sure PC and MyBox IP address’s first three part are the same (eg : 192.168.0.__ ). Last part
should be different.
• In MyBox, go to My Setup ==> Network ==> Search PC and select the PC’s name to connect.

MyBox – NV300T User Guide Page 30 of 35
How to store recorded videos directly to PC/Laptop?
• Create the Folder name as “Record” in the PC.
• Share this folder with full permissions.
• In MyBox, go to My Setup ==> Record ==> Settings ==> Select the “Save To” option as PC name.
12.6 Change Video Recording Settings
Fig. 12.6
Input Source
You can specify the source for the video recording. By default, source is set to CVBS mode. Set to S-Video
if the input source is from S-Video slot.
Save to
If there are multiple USB devices connected to MyBox, you can specify the USB device in which the video
recording has to be saved. Use Save to option and select the USB device name from the list
Playback Device
You can specify in which format you want the record output to be stored. By default, MyBox saves the
recorded contents in MP4 format. Options are available to save the video in AVI format also. Apart from TV,
the video output can be customized for other playback devices like Play Stations, IPODs, Smart Phones
also.
Video recording settings can be accessed through My Setup ==> Record ==> Settings. Change to required
playback device.

MyBox – NV300T User Guide Page 31 of 35
Default settings for various playback device(s)
Attributes TV – AVI TV – MP4 PSP IPOD Smart Phones
Video Resolution 640x480 640x480 320x240 320x240 320x240
Video Bit Rate 2500 2500 1500 1500 768
Audio format MP3 AAC AAC AAC AAC
Audio Bit rate 128 128 128 96 96
The above playback settings are fixed. However, you can custom define your playback video attributes by
choosing ‘Custom’ as Playback Device. The playback video output shall be in MP4 only.
Video Video Audio Audio
Resolution Bit Rate Format Bit Rate
Custom Attribute 720 x 576 2500 AAC 64
720 x 480 2000 96
672 x 488 1500 128
640 x 480 1200
512 x 384 768
352 x 288 512
320 x 240 256
12.7 Using MyBox remote to control your STB
You can use MyBox remote to control your STB through IR blaster. As a prerequisite, connect the IR blaster
cable to the IR out of MyBox and place the other end near the IR receiver of STB.
Fig. 12.7
Go to My Setup ==> Records ==> IR Blaster; select your Set Top Box provider from the list under the option
IR device. If your provider is not listed choose User 1, User 2 or User 3. You have to manually configure
and make MyBox remote to ‘learn’ the keys of your Set Top Box remote.

MyBox – NV300T User Guide Page 32 of 35
Select a key and follow the instructions shown in the interface to ‘Learn’. Repeat this process for all
Fig. 12.8
the listed keys (0-9, CH+, CH-, UP, DOWN, LEFT, RIGHT, ENTER, EXIT, EPG, FAV).
12.8 Changing MyBox General Settings
You can access the general settings through My Setup ==> General
Attributes Default values
Slide show 5 seconds. You can select any values from 1 – 10 seconds.
Resume Playback On If turned off, video shall not be resumed from the point
it was left last.
OSD language English OSD Language can be changed to other languages.
Slide show music On If turned off, background music will not be played while
viewing photos.
Enable Chapters Yes Shows chapters while MKV video formats.
Clear Favorites No If set to ‘Yes’, clears the favorites saved.
Clear URL History No If set to ‘yes’ clears the website history accessed.

MyBox – NV300T User Guide Page 33 of 35
12.9 Advanced Options
Through MyBox advanced settings, you change Pin and restore to factory settings.
To access this advanced settings you would require a pin. By default, MyBox uses 0000 as its factory
settings pin for access. Enter this number as the Pin.
Fig. 12.9 Fig. 12.10
12.10 Restore Default
Choose My Setup ==> Advanced ==> Restore Default option if you want to reset to the factory settings.
Select ‘Save’ and press
key in the MyBox remote to restore factory settings.
Fig. 12.11
12.11 Software Update
We update MyBox software from time to time, which include improvisations, new widgets, etc. You can keep
your MyBox updated with the latest software to get the best experience.
Model Choose your model. This would be mentioned on the backside of the box.
Mode • Choose between Online / USB
• online mode is automatic and requires Internet connection.
USB mode is manual and requires you to download the new files from
http://www.myboxhd.com/downloads.html, and update via an USB drive. Follow the
steps in the website.
Update Choose between Application / Firmware
• Update Application means updating the MyBox application, Widgets, Improvements etc.
• Update Firmware means updating underlying drivers, codecs, and kernel.
After making the selections above, please click on Update to initiate the software update.

MyBox – NV300T User Guide Page 34 of 35
Software updates are to be performed only by expert users. In case of issues, please retry the steps as
mentioned in Troubleshooting at MyBox website.
12.12 Change PIN Code
You can set different pin for accessing My Files and Advance Settings. Enter old password, enter your new
password and press
Fig. 12.12 Fig. 12.13
key to save. You can enter only numeric values as pin.

MyBox – NV300T User Guide Page 35 of 35
Specification
SECTION SPEC. DETAILS
OPERATING ENVIRONMENT
CPU 200 MIPS C2 Microsystems processor
Memory 512 MB ROM and 128 MB RAM
Size 340 x 220 x 55 mm
Weight 1600 Grams (box without power adaptor)
Power Usage Up to 40W
EXTERNAL INTERFACE
Audio / Video output
• 3-RCA (CVBS)
• Component Video (Y / Pb / Pr) up to 720p
• HDMI 1.1 (720p)
• S/PDIF (optical) Audio Out
Audio / Video Input
• S-Video
• 3 to 1 RCA
• RF IN
Video Standard PAL BG (India), NTSC
Aspect Ratio 4:3 / 16:9
Extension
• 2 x (USB 2.0 Port)
• Connector for external IR-transmitter
USB Interface
• USB Based Flash Storage/Pen Drive Support
• USB WiFi Support (Optional AW-GU210 WiFi Dongle)
Ethernet 10/100Mbps RJ-45 Port
MEDIA SUPPORT
Audio / Video formats AAC, AC3, ASF, AVI, DAT, DIVX, FLAC, FLV, M3U, M4A, MKV, MP3, MP4,
MPG, OGG, RA, RM, RMVB, TS, VOB, WAV, WMA, WMV
Picture formats JPEG, GIF, BMP, PNG
 Loading...