


Instruction Manual
Provided By
http://www.MyBinding.com
http://www.MyBindingBlog.com
DFG TitanCoil
Heavy Duty
Binding Machine
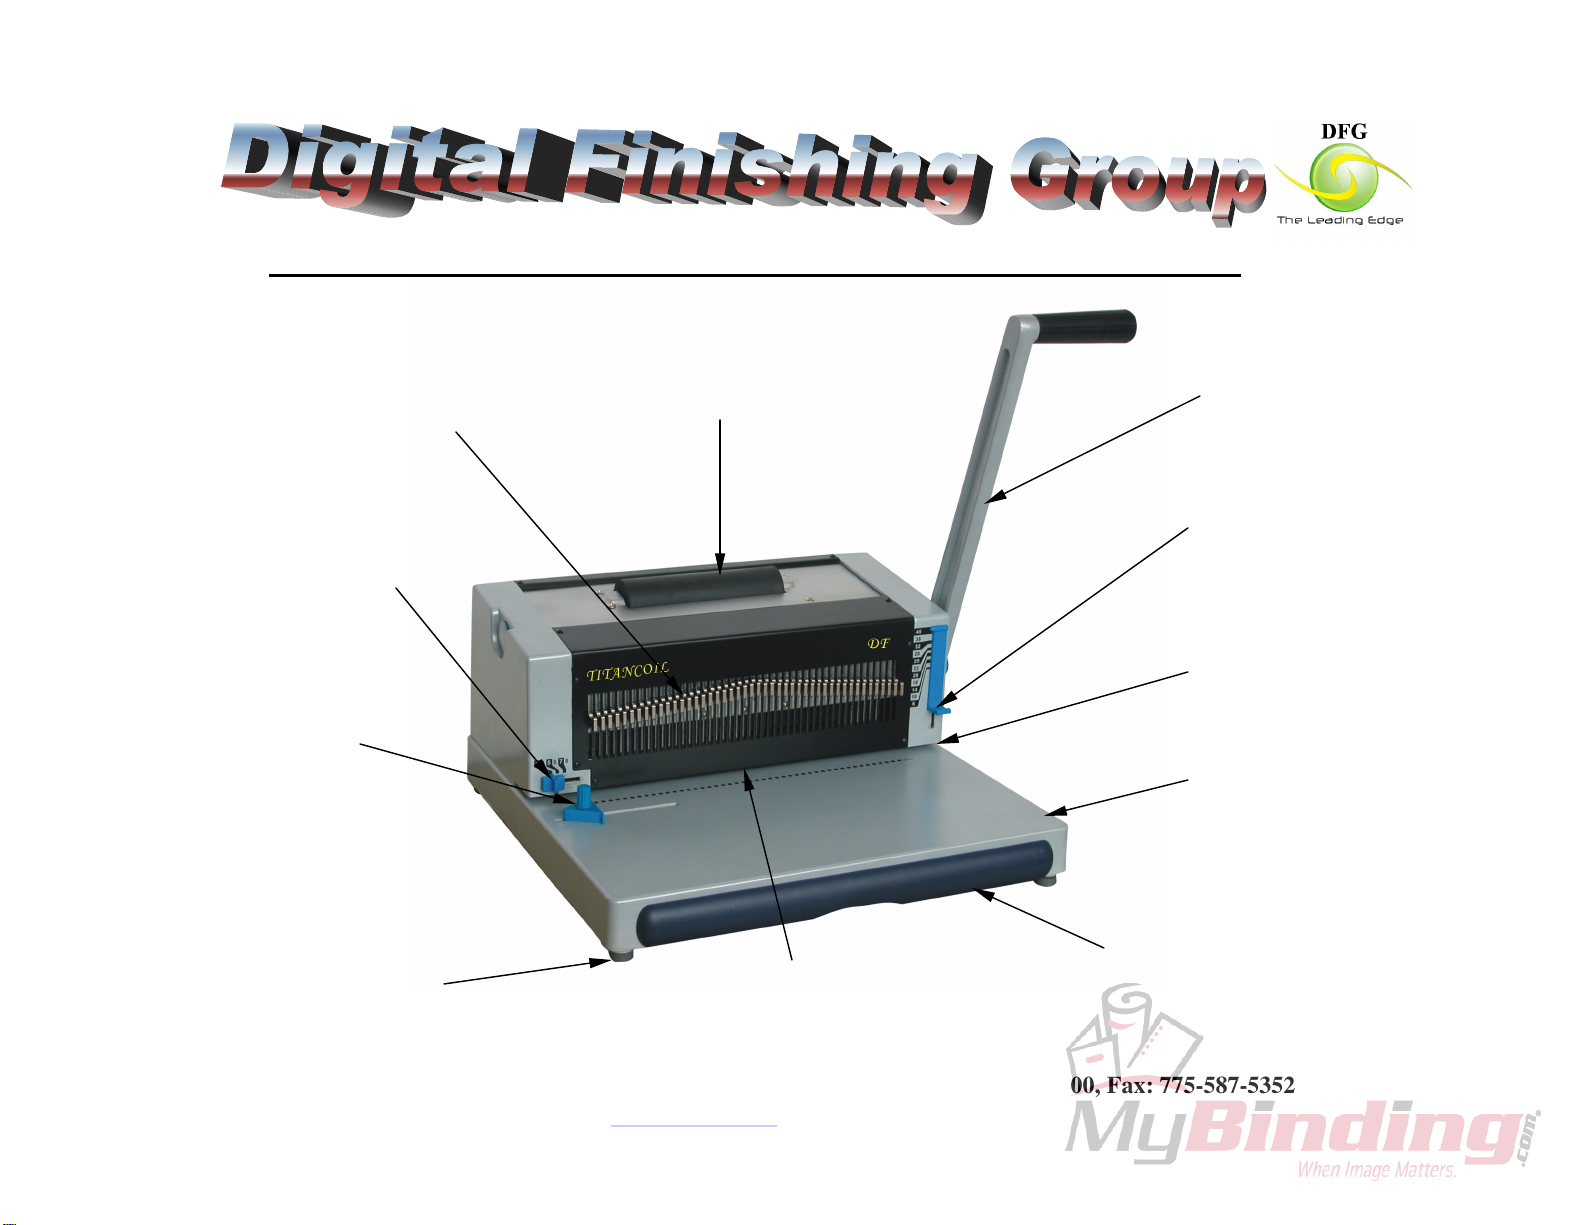
TitanCoil - Heavy Duty Punch and Electric Binding Machine
Full Die Disengagement Pins
Full Die Disengagement Pins
For clean and complete punching
For clean and complete punching
wi
th different paper sizes
with different paper sizes
Punch Margin Control
Maximizes the tear resistance
of all documents
Side Margin Control
For evenly centered
do
cument punch
Electrical Power Roller Binding
Features extra DURABLE roller
Punch Handle
For punching up to
25 sheets (20 lbs)
Coil Size Selector
For professional appearance of
all finished documents
Open Punch Throat
For punching larger
document sizes
Sturdy Die Cast
Meta
For many years of worry
l Construction
free operation
Non Skid Feet
1260 Kempar, Madison Heights, MI, 48071, U.S.A. Phone:248-733-0400, Fax: 775-587-5352
Punch Capacity
Up to 25 sheets (20 lbs)
Digital Finishing Group
Email: info@dfgus.com Website: www.dfgus.com
Large Trash Drawer

Warning:
Do not connect this product to electrical power or attempt to operate it before you
read these operating instructions and have been fully trained to operate this product.
1. Indoor use only. Do not expose to rain.
2. Keep hands, long hair, neckties, necklaces and other loose articles away from
roller.
3. Do not place this product on an unstable stand, cart, or surface. The product may
fall and hurt you. If you use a cart, move the product and cart carefully.
4. Do not insert objects or spill liquids into the product. They may short out
components that may result in fire.
5. The power outlet shall be installed near this product and shall be easily accessible.
6. Unplug the product before moving it. Unplug the power supplier when it will not
be in use for an extended period of time.
7. Do not attempt to service this product. Contact your DFG or your dealer if you
need service.
8. In case you need to replace fuse, please use 3.0 A fuse.
9. Do not operate the machine when the cover is not on the machine.
This machine should only plug into 110 V single-phase power outlets. When
using the roller, some motor and roller noises are normal. Roller is tested to last
10,000+ binding. We provide one-year part and labor warranty for this machine.
1260 Kempar, Madison Heights, MI, 48071, U.S.A. Phone:248-733-0400, Fax: 775-587-5352
Email: info@dfgus.com Website: www.dfgus.com

Dear Customer,
Thank you for purchasing TitanCoil machine. The following are basic installation and
operation instruction. For advanced punching and binding, please contact DFG.
Installation
Remove the black knob from machine. Install the punch handle. Install the black knob
back to machine. Connect power cord and connect the foot pedal.
Remove the
black knob
How to Punch
Install the punch handle
and black knob
1. Set the side guide to center the
sheet for punching
2. Select the punch margin (tip – the
thicker the book, the larger the punch
margin can be. However, you can use
a small punch margin for any book)
Connect foot pedal and
power cord (not shown)
3. Make sure your sheets are all the
1260 Kempar, Madison Heights, MI, 48071, U.S.A. Phone:248-733-0400, Fax: 775-587-5352
Email: info@dfgus.com Website: www.dfgus.com
way inside, against the back wall, and
then move sheets to the left side
against the side guide. Pull the
punching handle to punch.

How to Bind Books with Power Roller (up to 7/8”)
1. Manually turn the spiral coil into
the first 4 or 5 holes
2. Press the foot pedal. Touch the
coils against the moving roller to spin
the coil through the book. (You can
speed up binding by moving the book
to the right side while the roller is
spinning the coil through the book)
1260 Kempar, Madison Heights, MI, 48071 U.S.A. Phone:248-733-0400, Fax: 775-587-5352
Email: info@dfgus.com Website: www.dfgus.com

3. Cut and crimp the ends of the
spiral coil.
Right handed
A. Hold pliers with red dot up,
with the coil near you.
B. Place pliers with jaws inside
the coil, near the center.
C. Close the pliers to cut the coil
and keep them closed
D. Optionally twist pliers to bend
crimp more before releasing
E. Release coil, flip the book
over sideways and crimp the
other side using the same
procedure (coils still near
you)
Left handed
Use pliers as described above but
hold them in your left hand and put
the red dot down.
1260 Kempar, Madison Heights, MI, 480871 U.S.A. Phone:248-733-0400, Fax: 775-587-5352
Email: info@dfgus.com Website: www.dfgus.com

How to Make Books Manually (any thickness)
Manually turn your coil into the
book. This is a very easy process.
(Tip: It will be much easier to twist
the front end of coils)
Cut and crimp the coils (see #3 of
power roller binding)
How to Determine Appropriate Coil Size
There are three ways you can choose an appropriate coil size:
1. Use any size coil you like, as long as the coils size is larger than book thickness
2. Use coil that is 2 – 6 mm (1/8” to ¼”) larger than book thickness
3. Use our coil size selector. See following picture:
Put book on machine base, under the
“Size Selector”.
Move the “Size Selector” down until
its bottom touches the top sheets of
the book.
The top of the “Size Selector” will
point to a size you can use on the
scale
Specification:
Punch: Max. 25 sheets of paper (20 lbs), 15-20 Normal
Punch size: Any size
Binding Size: Electric power binding up to 7/8". Manually binding to any size.
Full 46 Disengagement Pins: center punching with any size paper without "half-moons"
Electrical Coil Binding: up to 7/8”
Side Margin Control: Lets you center holes quickly and easily for perfect alignment
Coil Size Selector: Built-in selector takes the guesswork out of choosing the proper size
element
Punch margin control: Provide strongest binding for any book size
Open Throat and Easy Punch Support: Easily punch any book length
1260 Kempar, Madison Heights, MI, 48071, U.S.A. Phone:248-733-0400, Fax: 775-587-5352
Email: info@dfgus.com Website: www.dfgus.com
 Loading...