


info@my3dbase.com
instagram.com/my3dbase/
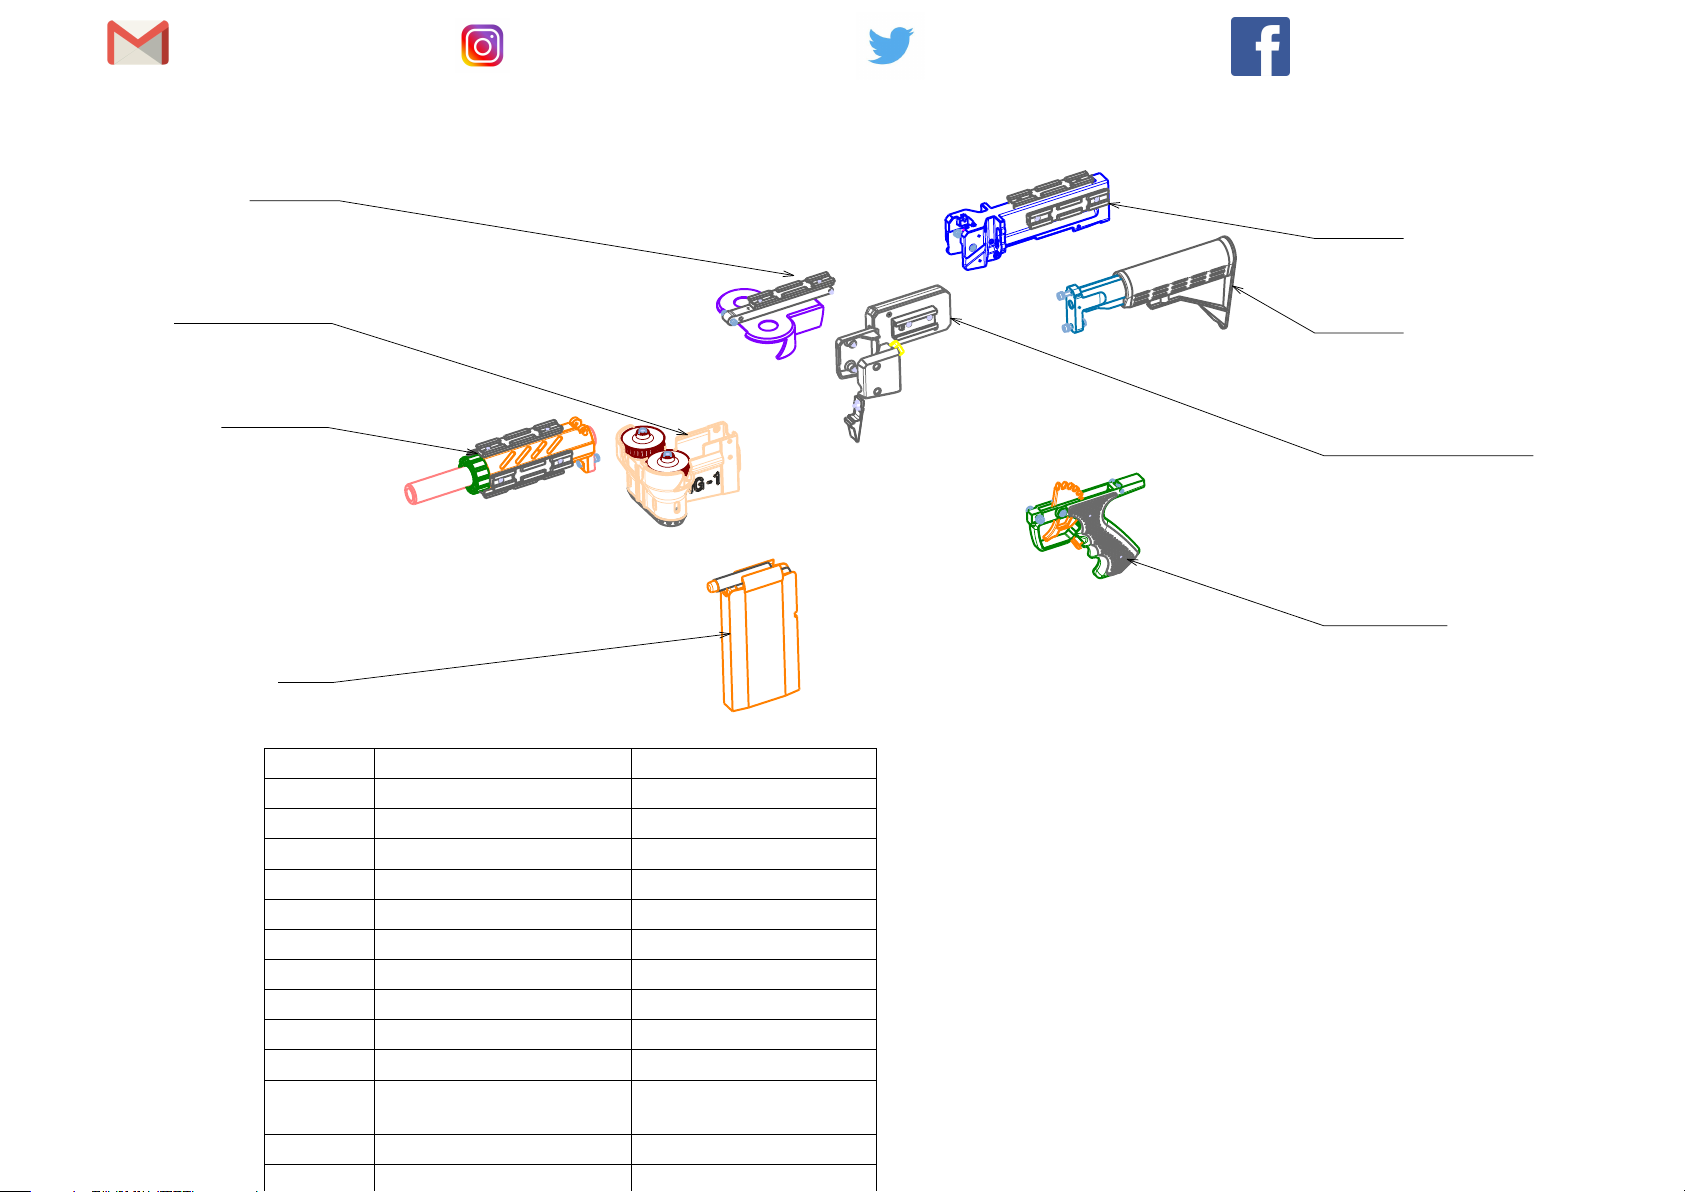
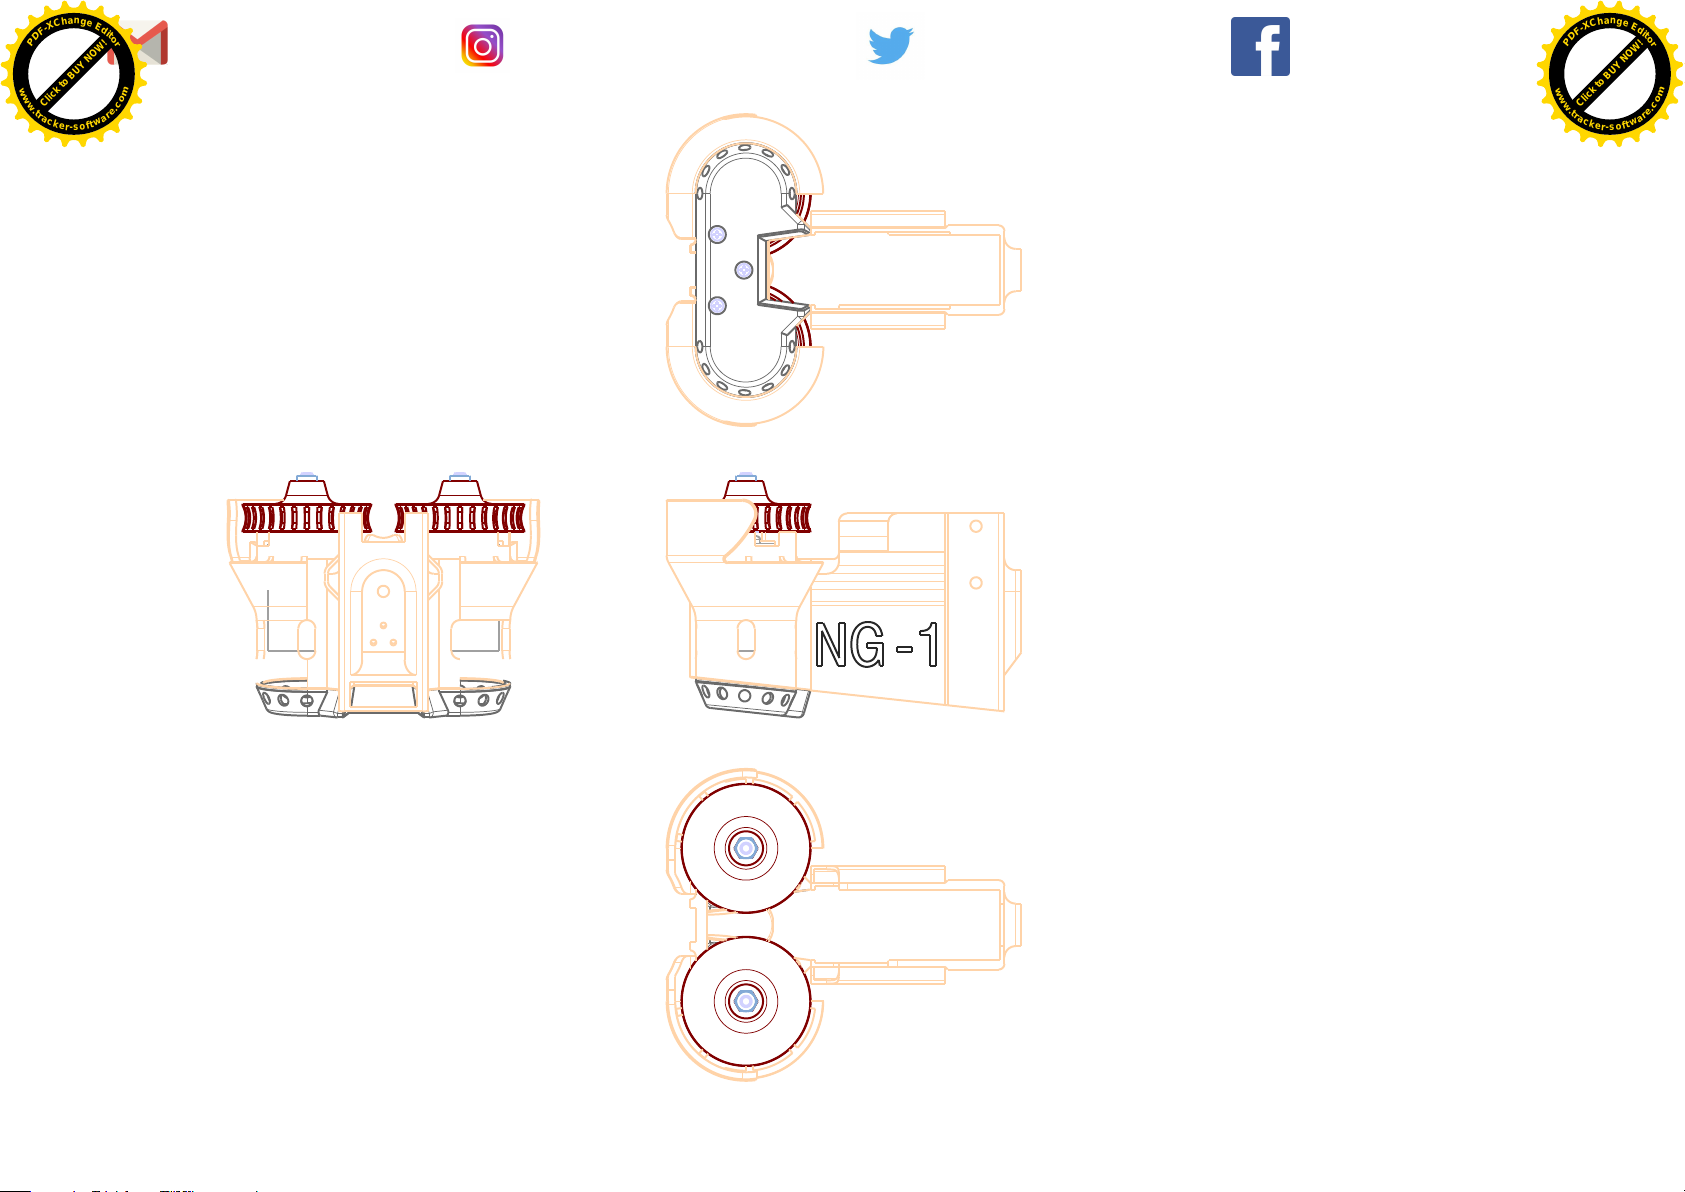
NG-1 v6 assembly guide (v.1.1)
The NG-1 v6 is a semi automatic 'Nerf' type toy gun.
It is developed around 380 class brushed motors and
optimized entirely for 3D printing.
For questions, feel free to contact us.
twitter.com/my3dbase
facebook.com/my3dbase/
© my3dbase GmbH 2018doc. v1.2
info@my3dbase.com
cover
instagram.com/my3dbase/
twitter.com/my3dbase
facebook.com/my3dbase/
guide
back bone
barrel
mag
Bill of Material: nerf_v6
Quantity Part Number Definition
1 cover_product
1 bat_pack
1 guide_assembly
1 handle_assembly
1 back_bone_assembly
1 stock_assembly
1 barrel_assembly
1 mag_assembly
1 mag_lock_assembly
1 kabel_cover_assembly
1 XT60
1 XT60 Connectors_male
1 cables
stock
battery pack
handle
Connectors_female
© my3dbase GmbH 2018doc. v1.2
info@my3dbase.com
instagram.com/my3dbase/
twitter.com/my3dbase
facebook.com/my3dbase/
guide
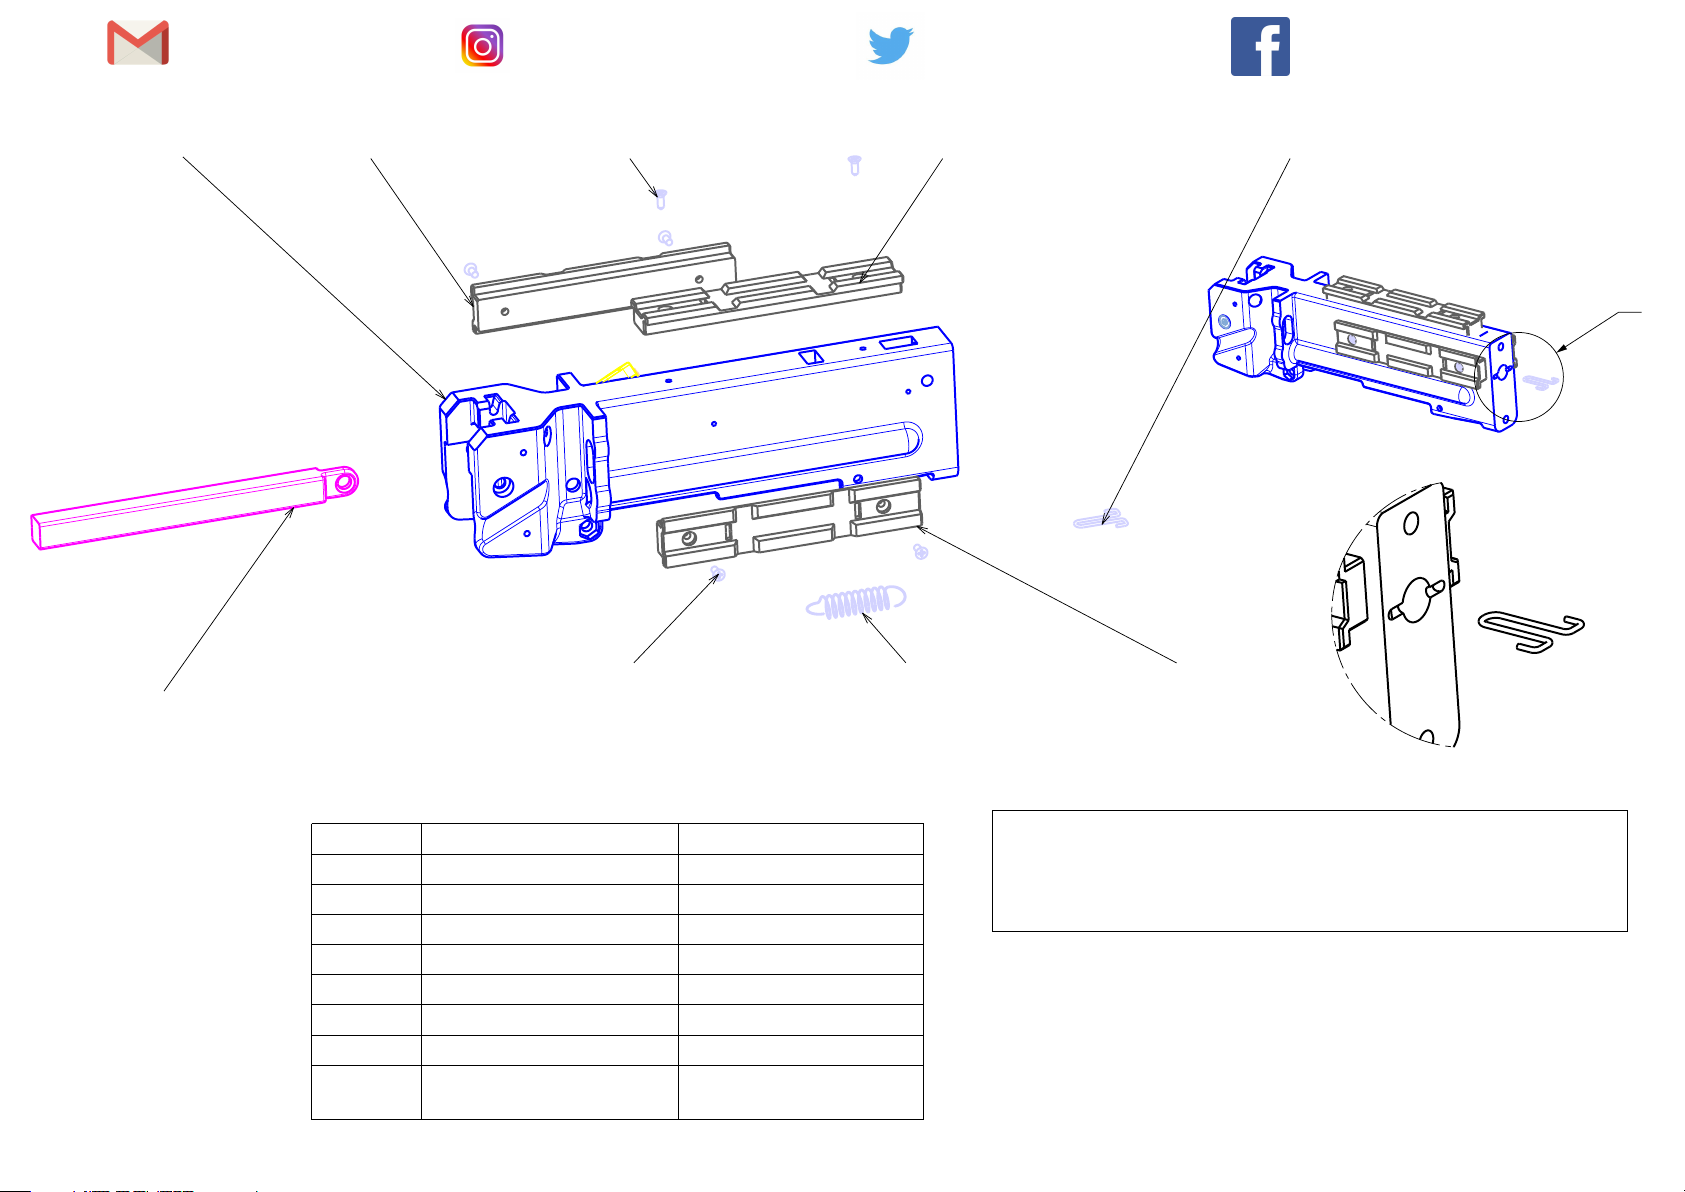
plunger
top_rail
DIN7982_2.2x6.5
top_rail
plunger_spring_attachment
F
plunger_springDIN7982_2.2x6.5
top_rail
Bill of Material: guide_assembly
Quantity Part Number Definition
1 guide 3D printed
1 plunger 3D printed
3 top_rail 3D printed
6 DIN7982_2.2x6.5 Off the shelf
3 SCREW M4x6 Off the shelf
3 NUT M4 Off the shelf
1 plunger_spring Off the shelf
1 plunger_spring_attac
hment
Off the shelf
Detail F
Attach the rails to the body of the guide. Fasten
the spring to the lug of the plunger, secure the
other side of the spring with the wire (see
detail F).
© my3dbase GmbH 2018doc. v1.2
info@my3dbase.com
instagram.com/my3dbase/
twitter.com/my3dbase
facebook.com/my3dbase/
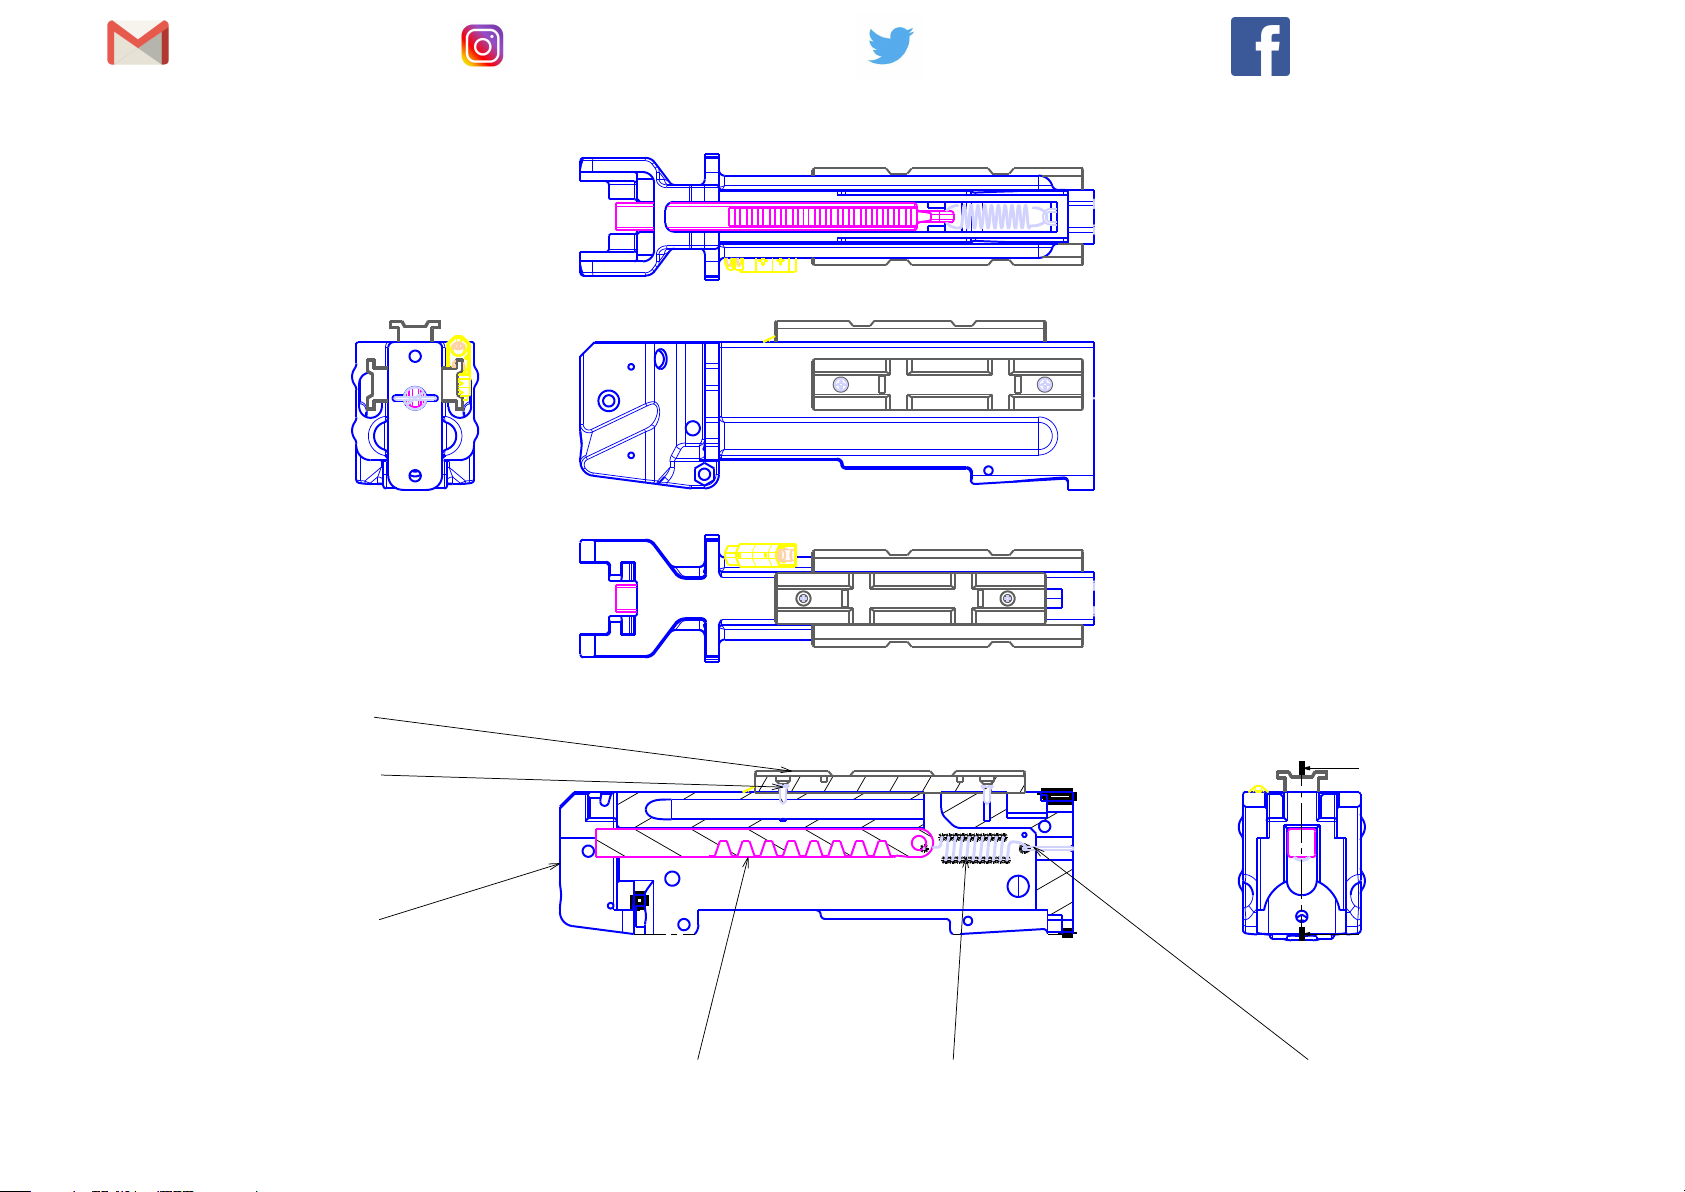
top_rail
DIN7982_2.2x6.5
guide
A
A
plunger plunger_spring plunger_spring_attachment
© my3dbase GmbH 2018doc. v1.2
info@my3dbase.com
instagram.com/my3dbase/
twitter.com/my3dbase
facebook.com/my3dbase/
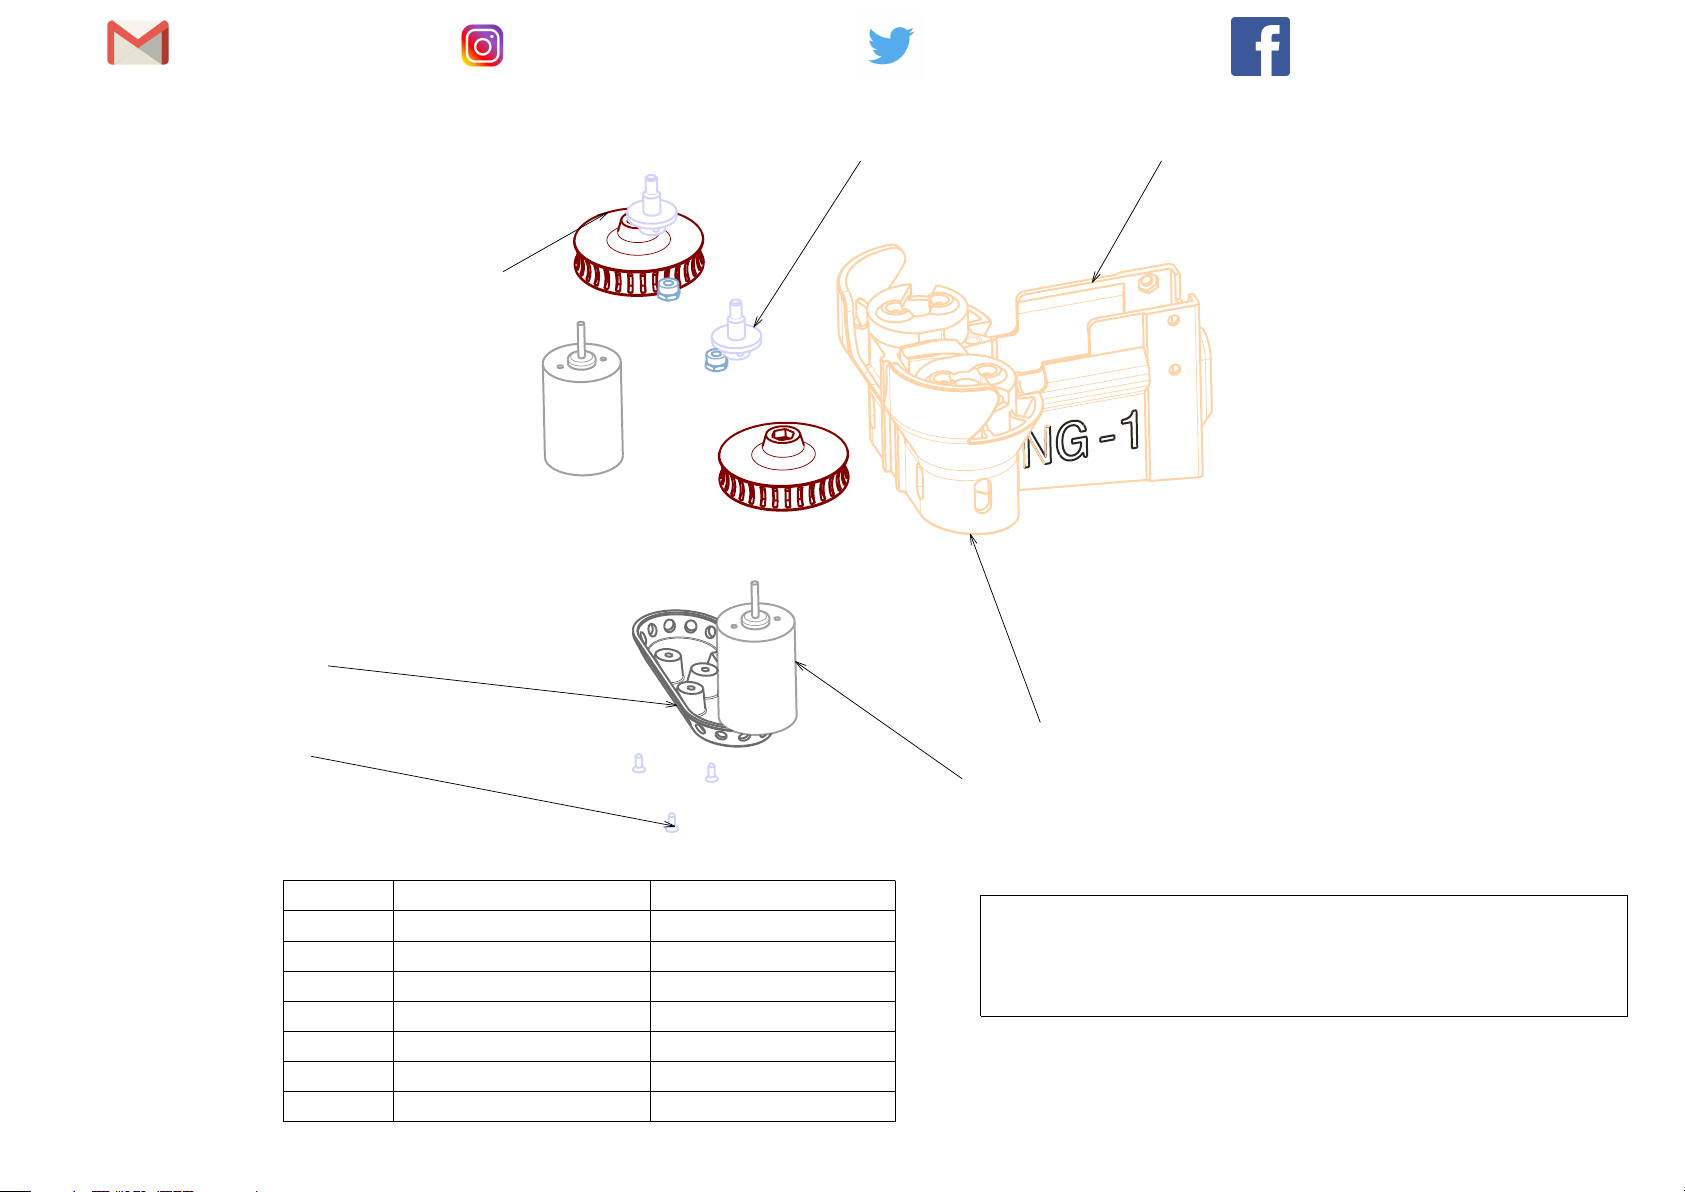
bottom_cover
spinning_wheel
Propellermitnehmer
clip_guide
DIN7982_2.2x6.5
Bill of Material: back_bone_assembly
Quantity Part Number Definition
2 speed400 Off the shelf
1 bottom_cover 3D printed
3 DIN7982_2.2x6.5 Off the shelf
2 spinning_wheel_v2 3D printed
2 Propellermitnehmer Off the shelf
2 NUT M4 Off the shelf
1 motor_mag_assembly 3D printed
engine_mount
motor
Slide motors into engine mount and secure with
screws. The fly wheels are attached with their
mounts to the enginde shaft. The front and bottom
covers can now be screwed onto the engine mount.
© my3dbase GmbH 2018doc. v1.2
info@my3dbase.com
Click to BUY NOW!
P
D
F
-
X
C
h
a
n
g
e
E
d
i
t
o
r
w
w
w
.
t
r
a
c
k
e
r
-
s
o
f
t
w
a
r
e
.
c
o
m
Click to BUY NOW!
P
D
F
-
X
C
h
a
n
g
e
E
d
i
t
o
r
w
w
w
.
t
r
a
c
k
e
r
-
s
o
f
t
w
a
r
e
.
c
o
m
instagram.com/my3dbase/
twitter.com/my3dbase
facebook.com/my3dbase/
© my3dbase GmbH 2018doc. v1.2

info@my3dbase.com
instagram.com/my3dbase/
NUT M4
twitter.com/my3dbase
SCREW M4x6
facebook.com/my3dbase/
Attach 'guide' to 'backbone' using
three M4x6 screws.
NUT M4
NUT M4NUT M4
SCREW M4x6
SCREW M4x6 SCREW M4x6
© my3dbase GmbH 2018doc. v1.2

info@my3dbase.com
instagram.com/my3dbase/
twitter.com/my3dbase
facebook.com/my3dbase/
© my3dbase GmbH 2018doc. v1.2

info@my3dbase.com
instagram.com/my3dbase/
twitter.com/my3dbase
SCREW M4x20
Stock Shaft Stock ExteriorNUT M4
facebook.com/my3dbase/
Bill of Material: stock_assembly
Quantity Part Number Definition
1 Stock Exterior 3D printed
1 Stock Shaft 3D printed
3 SCREW M4x20 Off the shelf
2 NUT M4 Off the shelf
Attach stock using two M4x20
screws and M4 nuts.
© my3dbase GmbH 2018doc. v1.2

info@my3dbase.com
front_barrel
instagram.com/my3dbase/
front_rail
twitter.com/my3dbase
facebook.com/my3dbase/
barrel
DIN7982_2.2x6.5 top_rail
Bill of Material: barrel_assembly
Quantity Part Number Definition
1 barrel 3D printed
1 front_rail 3D printed
1 front_barrel 3D printed
1 NUT M4 Off the shelf
1 SCREW M4x20 Off the shelf
4 top_rail 3D printed
8 DIN7982_2.2x6.5 Off the shelf
NUT M4
Slide 'front_rail' onto 'barrel'. Screw supressor onto
front rail.
© my3dbase GmbH 2018doc. v1.2

info@my3dbase.com
instagram.com/my3dbase/
SCREW M4x20
twitter.com/my3dbase
facebook.com/my3dbase/
SCREW M4x20
Use M4x20 screw and M4 to secure barrel assembly
with main back bone.
© my3dbase GmbH 2018doc. v1.2

info@my3dbase.com
instagram.com/my3dbase/
mag_lock
twitter.com/my3dbase
B
facebook.com/my3dbase/
The mag lock is attached to the backbone with
three countersunk screws.
Bill of Material: mag_lock_assembly
Quantity Part Number Definition
1 mag_lock 3D printed
3 DIN7982_2.2x6.5 Off the shelf
© my3dbase GmbH 2018doc. v1.2

info@my3dbase.com
instagram.com/my3dbase/
twitter.com/my3dbase
NUT M4trigger NUT M4 dc2c-l1lc
facebook.com/my3dbase/
DIN7982_2.2x6.5
rev_up_triggerSCREW M4x20
Bill of Material: handle_assembly
Quantity Part Number Definition
1 new_handle 3D printed
1 trigger 3D printed
1 rev_up_trigger 3D printed
1 dc2c-l1lc Off the shelf
2 SCREW M4x20 Off the shelf
2 NUT M4 Off the shelf
5 DIN7982_2.2x6.5 Off the shelf
1 grip 3D printed
1 Symmetry of grip 3D printed
1 SCREW M3x20 Off the shelf
new_handle
grip
Insert dc2c-l1lc trigger switch into handle.
Insert inner part of 'rev'up_trigger' and
connect with front part using a countersunk
screw. Insert main trigger and attach with
M4x20 screw and M4 nut.
© my3dbase GmbH 2018doc. v1.2

info@my3dbase.com
instagram.com/my3dbase/
twitter.com/my3dbase
Attach handle to guide using one
M4x20 and one M3x20 screw. Make
facebook.com/my3dbase/
Detail D
D
forward position, as shown on
the drawings.
SCREW M4x20SCREW M3x20
E
sure the trigger is in its
Detail ENUT M4
© my3dbase GmbH 2018doc. v1.2

info@my3dbase.com
instagram.com/my3dbase/
twitter.com/my3dbase
facebook.com/my3dbase/
NUT M3
DIN7982_2.2x6.5
top_rail
nerf_rail.1 (optional)
Attach 'rail' to 'bridge' using two countersunk screws.
Attach cover to bridge from bottom using three
countersunk screws. Insert hinge pin (secure with glue
if desired).
SCREW M3x20
DIN7982_2.2x6.5cover
Bill of Material: cover_product
Quantity Part Number Definition
1 cover 3D printed
1 bridge 3D printed
1 top_rail 3D printed
1 SCREW M3x20 Off the shelf
1 NUT M3 Off the shelf
5 DIN7982_2.2x6.5 Off the shelf
1 hinge_pin Off the shelf
hinge_pin
bridge
© my3dbase GmbH 2018doc. v1.2

info@my3dbase.com
instagram.com/my3dbase/
NUT M3
twitter.com/my3dbase
facebook.com/my3dbase/
SCREW M3x20
Attach cover assembly to main gun using a M3x20
screw and nut.
© my3dbase GmbH 2018doc. v1.2

info@my3dbase.com
instagram.com/my3dbase/
twitter.com/my3dbase
kabel_cover
facebook.com/my3dbase/
DIN7982_2.2x6.5
Attach side covers using two countersunk screws per
side.
kabel_cover
© my3dbase GmbH 2018doc. v1.2

info@my3dbase.com
instagram.com/my3dbase/
twitter.com/my3dbase
facebook.com/my3dbase/
© my3dbase GmbH 2018doc. v1.2

info@my3dbase.com
instagram.com/my3dbase/
twitter.com/my3dbase
facebook.com/my3dbase/
Legal disclaimer
Do not aim at eyes or face. Do not modify darts or dart blaster.
This product is only intended to be used as outlined in the
accompanying instruction manual. This item is not a toy, keep away
from children.
In no event, regardless of cause, shall my3dbase GmbH be liable for
any indirect, special, incidental, punitive or consequential damages
of any kind as a result of this product, whether arising under
breach of contract, tort (including negligence), strict liability or
otherwise, and whether based on this agreement or otherwise, even if
advised of the possibility of such damages.
© my3dbase GmbH 2018doc. v1.2
 Loading...