

Page 1
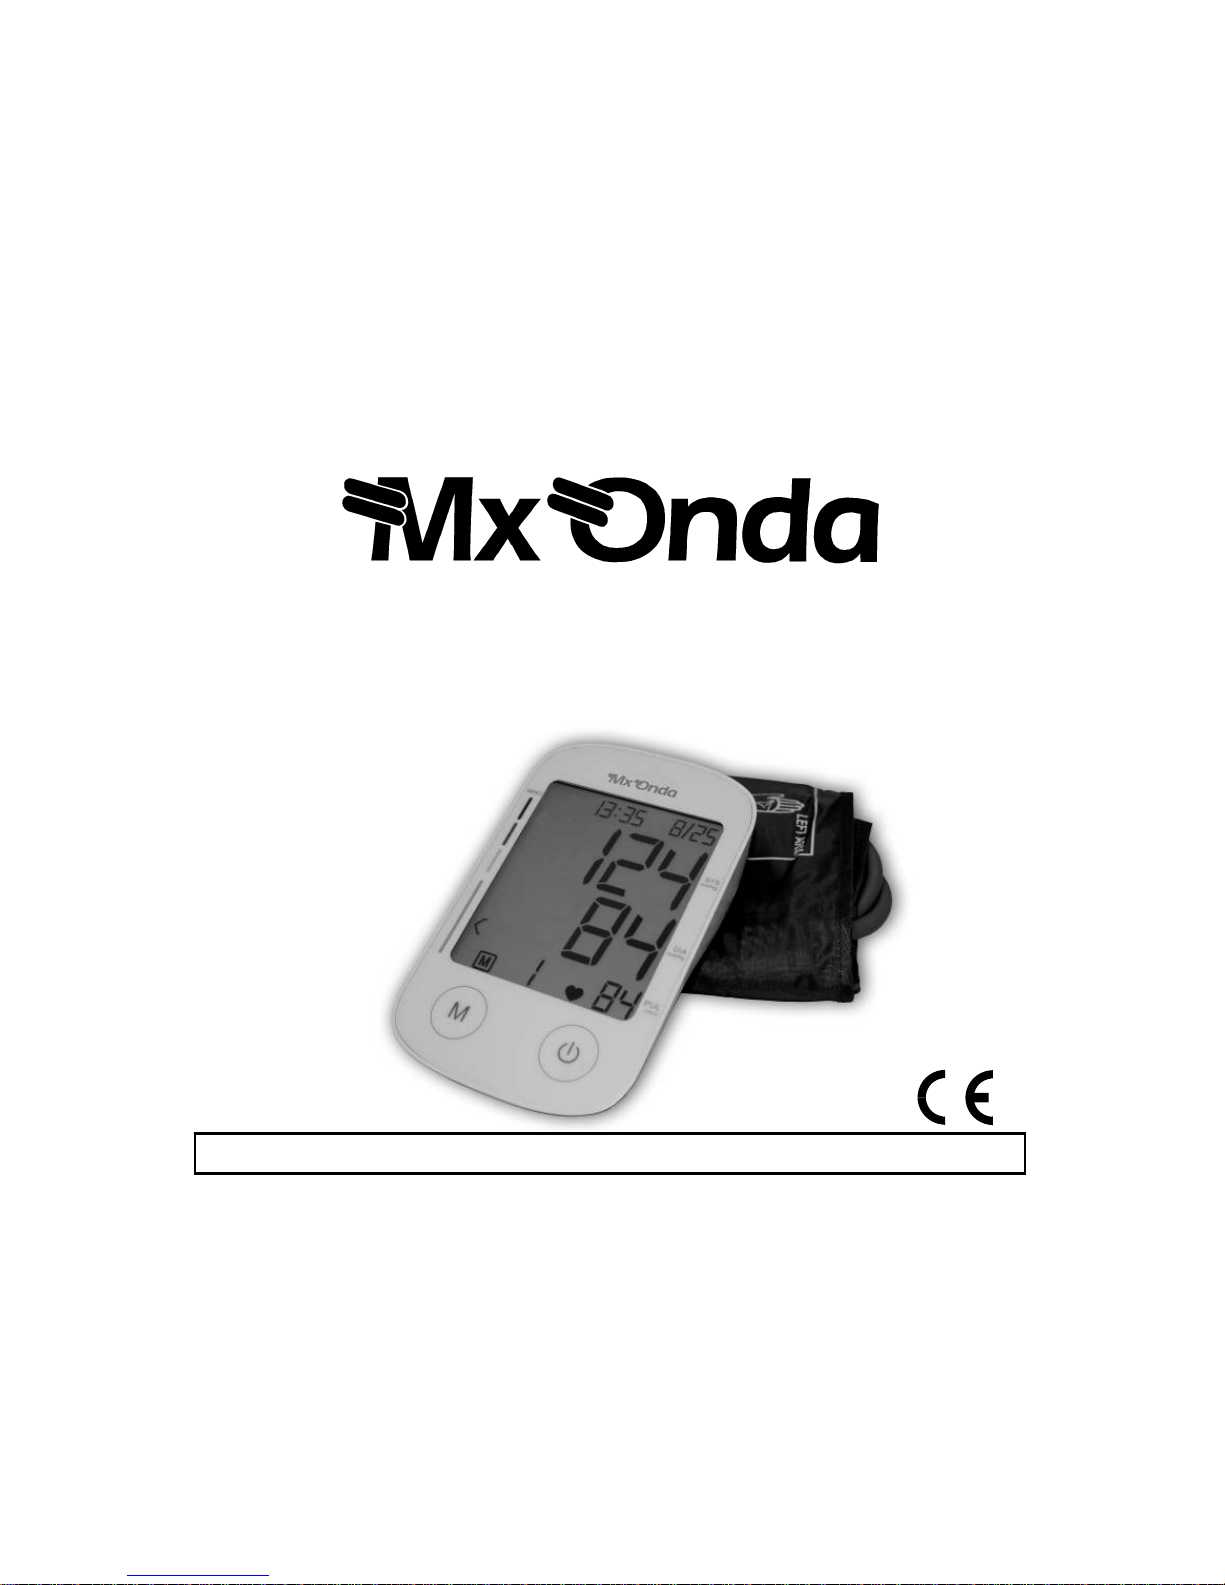
INSTRUCTION MANUAL
FULLY AUTOMATIC ELECTRONIC BLOOD
PRESSURE MONITOR WITH SPEECH MESSAGE
MODELO: MX-CP2395
PLEASE READ THIS MANUAL BEFORE USE
0197
Page 2
2
BEFORE USING THE TENSIOMETER
• Read these instructions carefully and keep them for future use.
• After removing the packaging, check that the appliance is not damaged. If in doubt, do
not use the appliance; Contact technical support personnel.
• Packaging materials (plastic bags, polystyrene foam, etc.) should not be left out of the
reach of children, as they are a potential source of danger.
• The manufacturer declines all responsibility for damages arising from improper,
incorrect or reckless use of the appliance.
• This equipment has no part that can be repaired by you, in case of a malfunction,
contact an Official MX ONDA Service Center.
• This appliance is designed for home use ONLY. In case of professional use, improper
use or failure to follow the instructions, the manufacturer declines all responsibility,
accepts no responsibility and the warranty will be invalid.
• Use only the supplied cuff, otherwise it may cause damage to the unit and errors in
measurements.
• If the appliance has been dropped or if it does not work properly, refrain from using it
and do not attempt to disassemble or repair it. Contact your dealer or nearest MX
ONDA Service Center.
ATTENTION
THIS PRESSURE MONITOR MUST BE USED ONLY BY ADULTS
Page 3
3
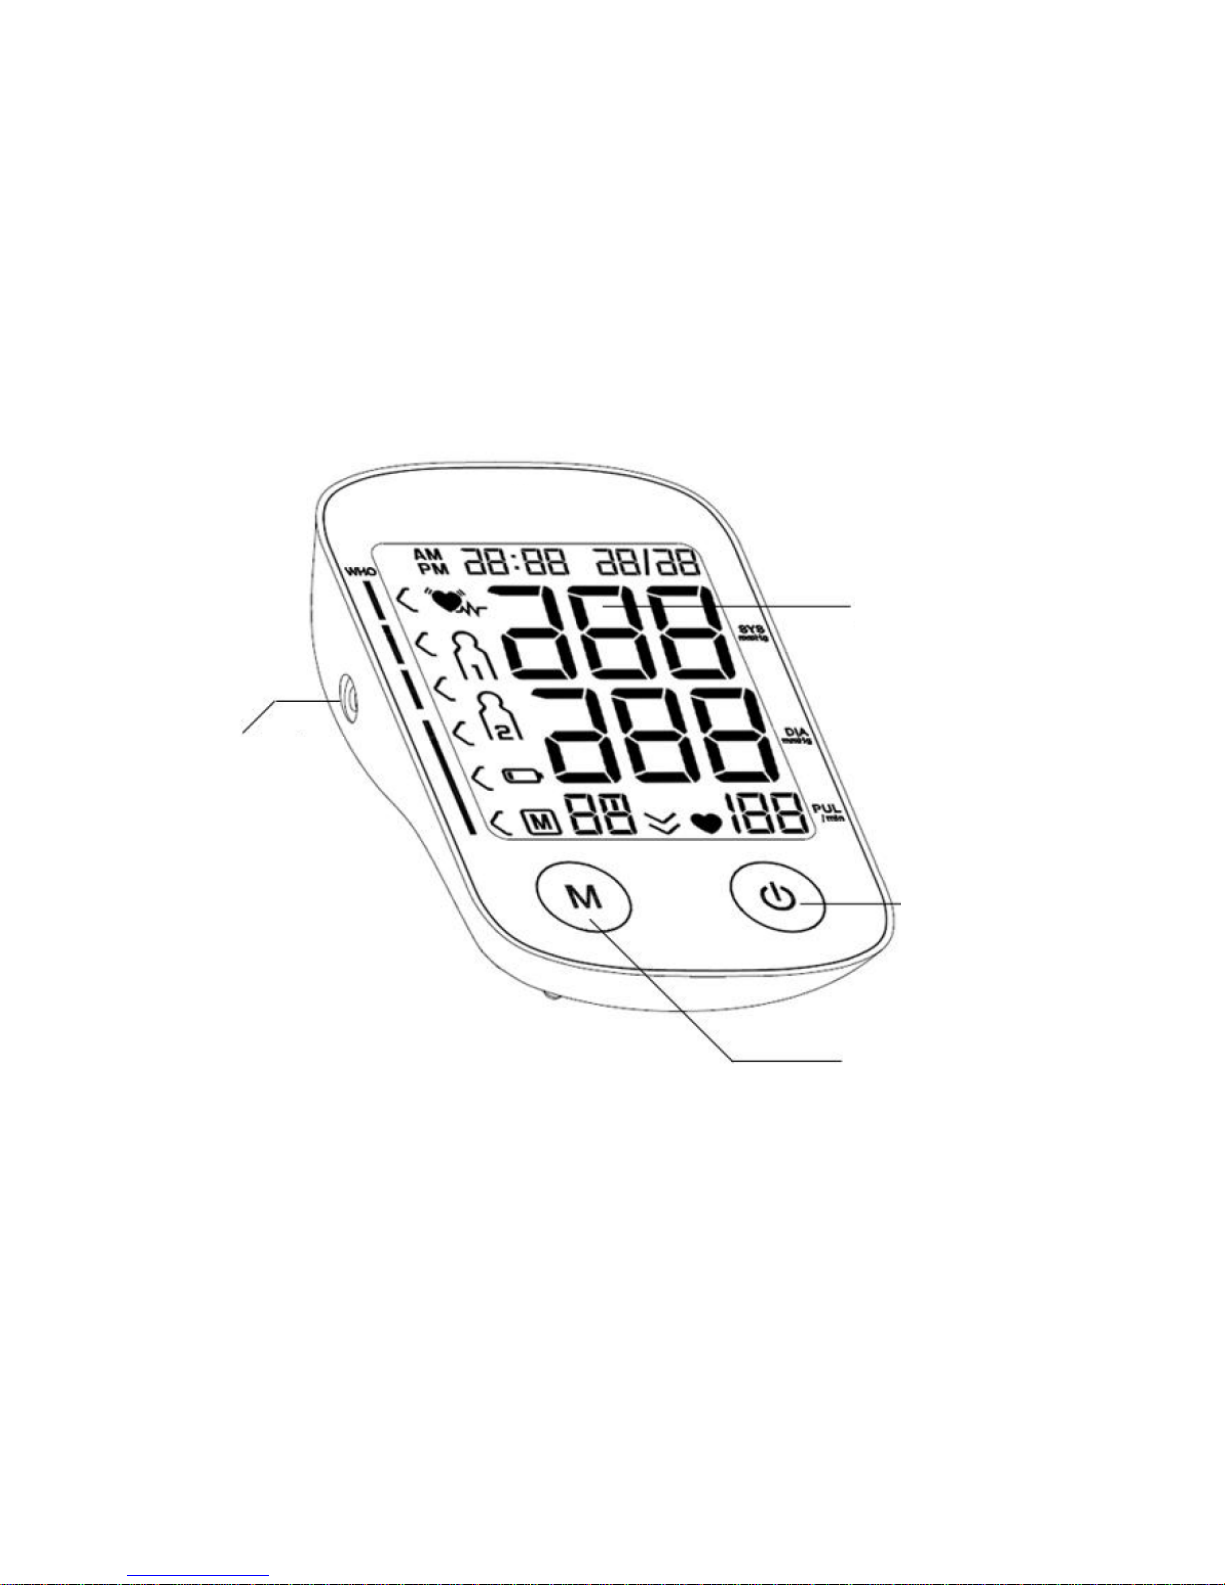
NAME OF EACH PART
Air tube socket
LCD Display
On/Off button
Memory
Page 4
4
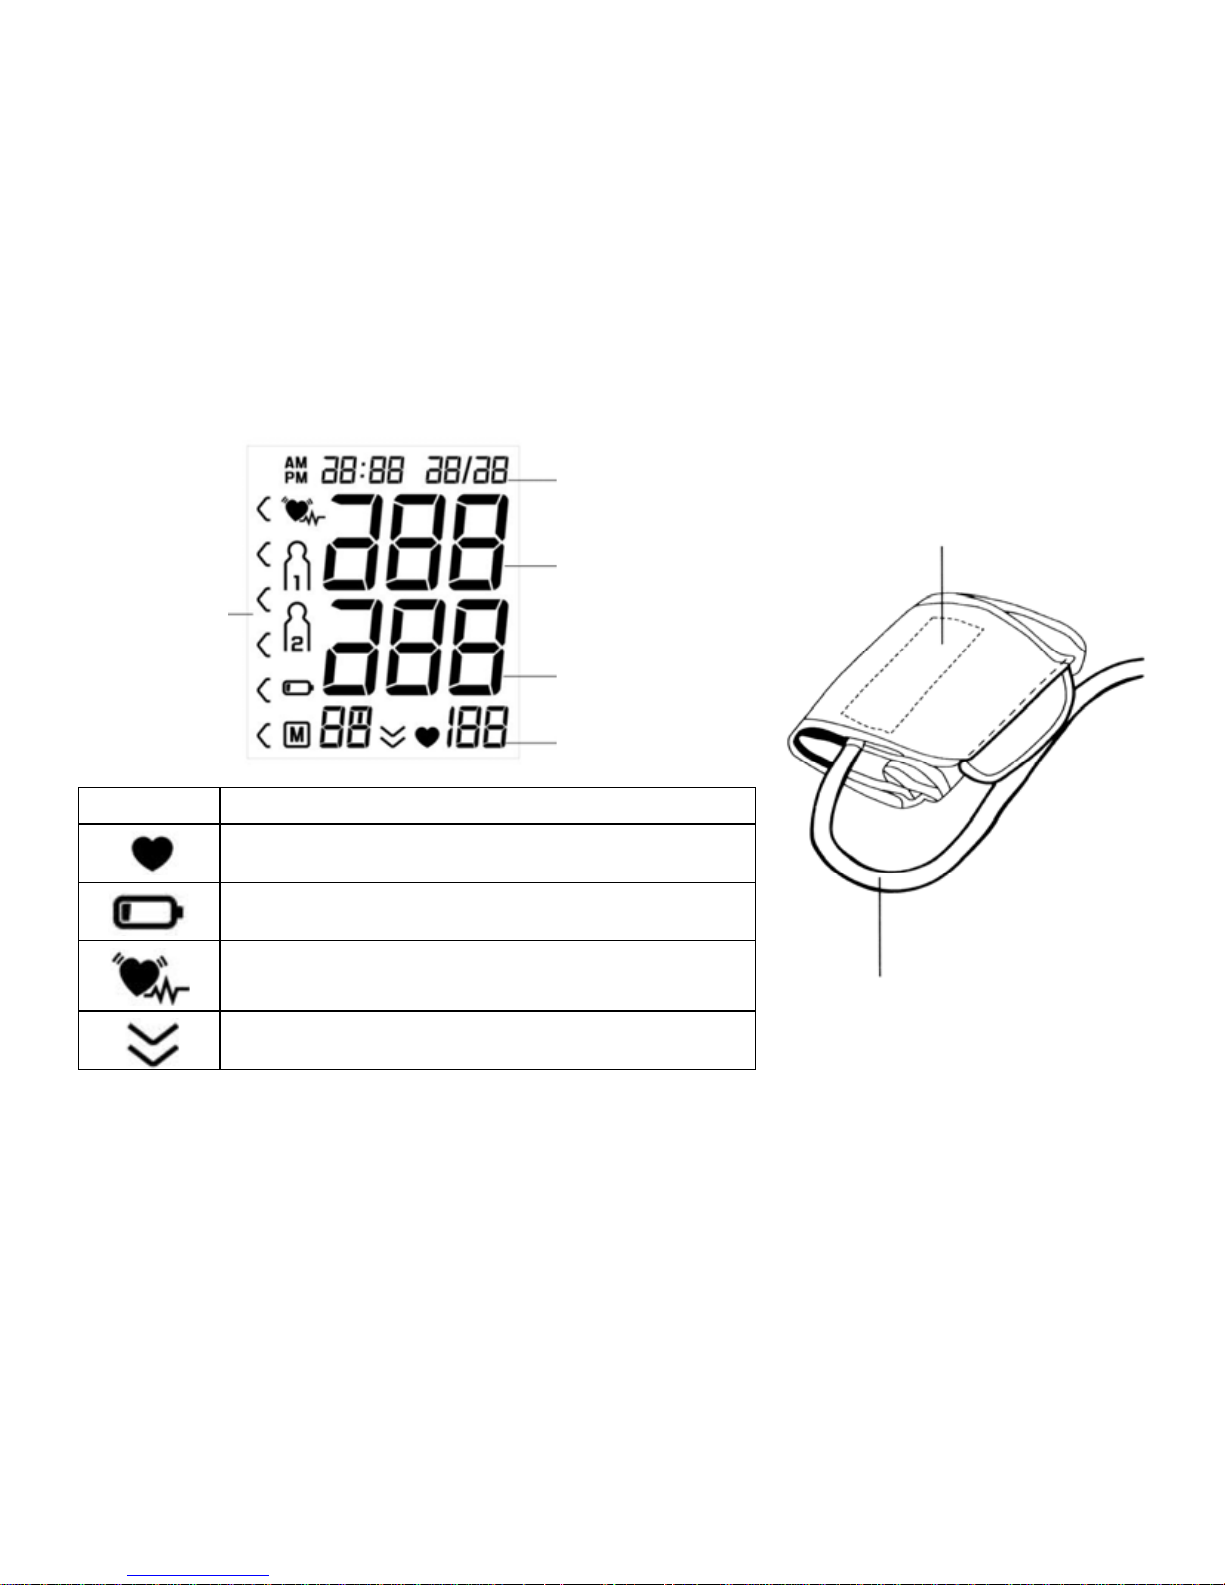
DISPLAY INDICATIONS AND CUFF
Symbol Condition / cause
This symbol appears when the pulse has been
found.
This symbol appears when the batteries are
exhausted and must be replaced.
The display shows this indication when there
are alterations in the heart rhythm.
The bracelet contains air, and it is expelled
from it.
CUFF
AIR TUBE
Date and Time
Systolic
Pressure and
pressure
indicator
arrows
Diastolic
Pulse
Page 5

5
BATTERY LOADING
To insert or change the batteries follow the next steps:
• Open battery cover at the back of the machine.
• Load four “AAA” size batteries. Please pay attention to the polarity.
• Close the battery cover.
Notes:
• When replace the batteries the date and the hour will erase.
• The batteries contain polluting materials of environment, for that reason once
exhausted the batteries, does not throw them to the sweepings, disposed in adapted
for their recycled one.
• If it does not use the apparatus for a long period of time, extracts the batteries and
keep in a dry place.
• Does not use 1.2 V rechargeable batteries.
When is necessary to change the batteries?
When in the apparatus sound a locution and the screen shows the symbol . it indicates
that the batteries are exhausted and must be replaced by other new ones.
SETTING THE CLOCK AND ADJUSTING TH E DATE
The clock of this device is designed to indicate the hours in 12 or 24 hour format and the
date in "month / day" mode. To set the date and time, proceed as follows:
Page 6
6
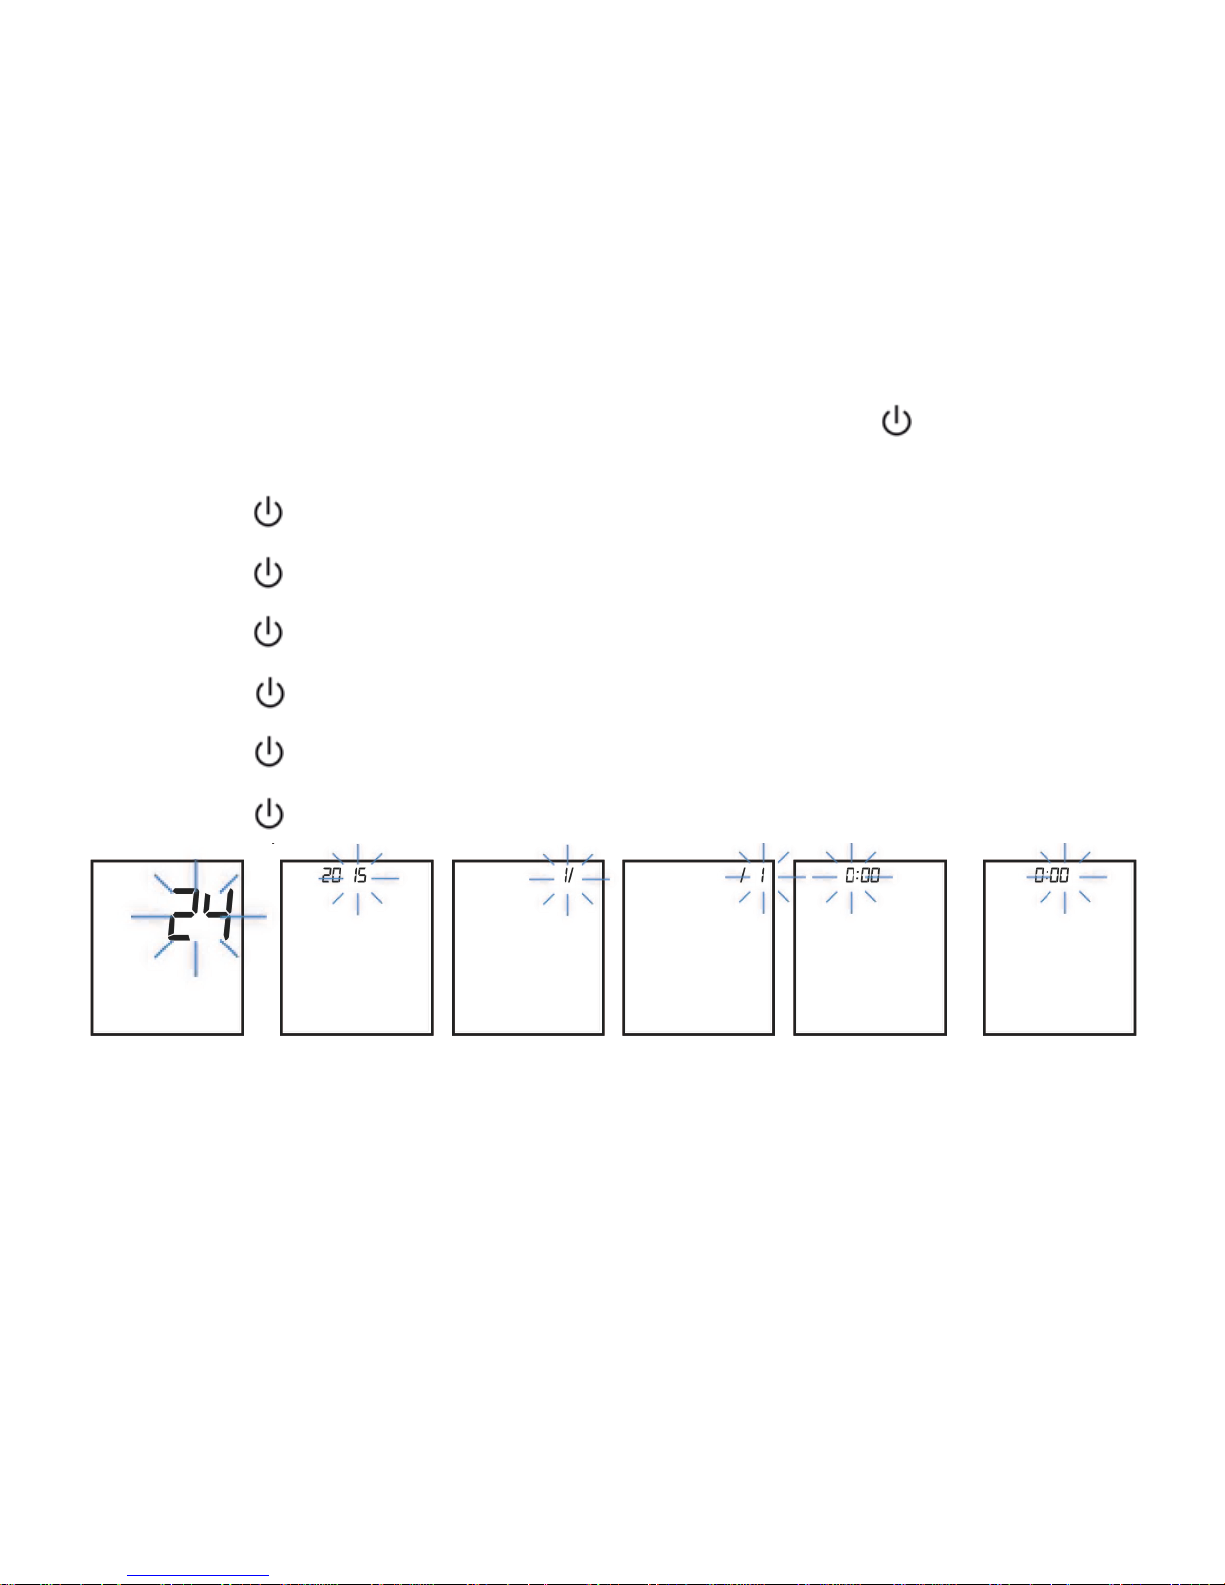
1. With the blood pressure monitor turned off, press and hold the " " and M buttons for
three seconds at a time. The digits of the time format will blink (Fig. 1).
2. Press the M button successively and select the time format.
3. Press the " " button and the corresponding year digits will blink (Fig. 2),
4. Press the M button to select the year.
5. Press the " " button and the month digits will blink (Fig. 3).
6. Press the M button repeatedly and select the month.
7. Press the " " button and the corresponding digits for the day will flash (Fig. 4).
8. Press the M button to set the day.
9. Press the " " button and the corresponding hour digits will blink (Fig. 5).
10. Press the M button to set the hour.
11. Press the " " button and the minute digits will blink (Fig. 6)
12. Press the M button to set the minutes.
13. Press the " " button again to store the data.
Fig. 1 Fig. 2 Fig. 3 Fig. 4 Fig. 5 Fig. 6
Page 7

7
Notes:
• It is very important to keep the date and time updated as these are stored together with
the measured values.
• When replacing the batteries, the date and time will be erased, and the display will show
the menu for setting the date and time.
• During the setting of the clock and setting the date, if a minute passes without touching
any buttons, the tensiometer will turn off and will not store the entered data.
INDICATIONS BY MEANS OF LOCUTION
Before initiating the measurement a locution will inform the basic advice for the correct use
of blood measurement. Finalised the measurement a locution will inform the values
obtained, systolic pressure, diastolic pressure, the pulse as well as the state according to
WHO standard classification. Also will warn by means of a locution if an error takes place
during the measurement or when the batteries are low.
Selecting the language and adjusting the locution volume
The blood pressure monitor has six languages for the locution (Spanish, English,
Portuguese, Italian, French and German), as well as the possibility to deactivate it. To
select the language, deactivate the speech or adjust the volume level follow the steps
below:
Page 8
8
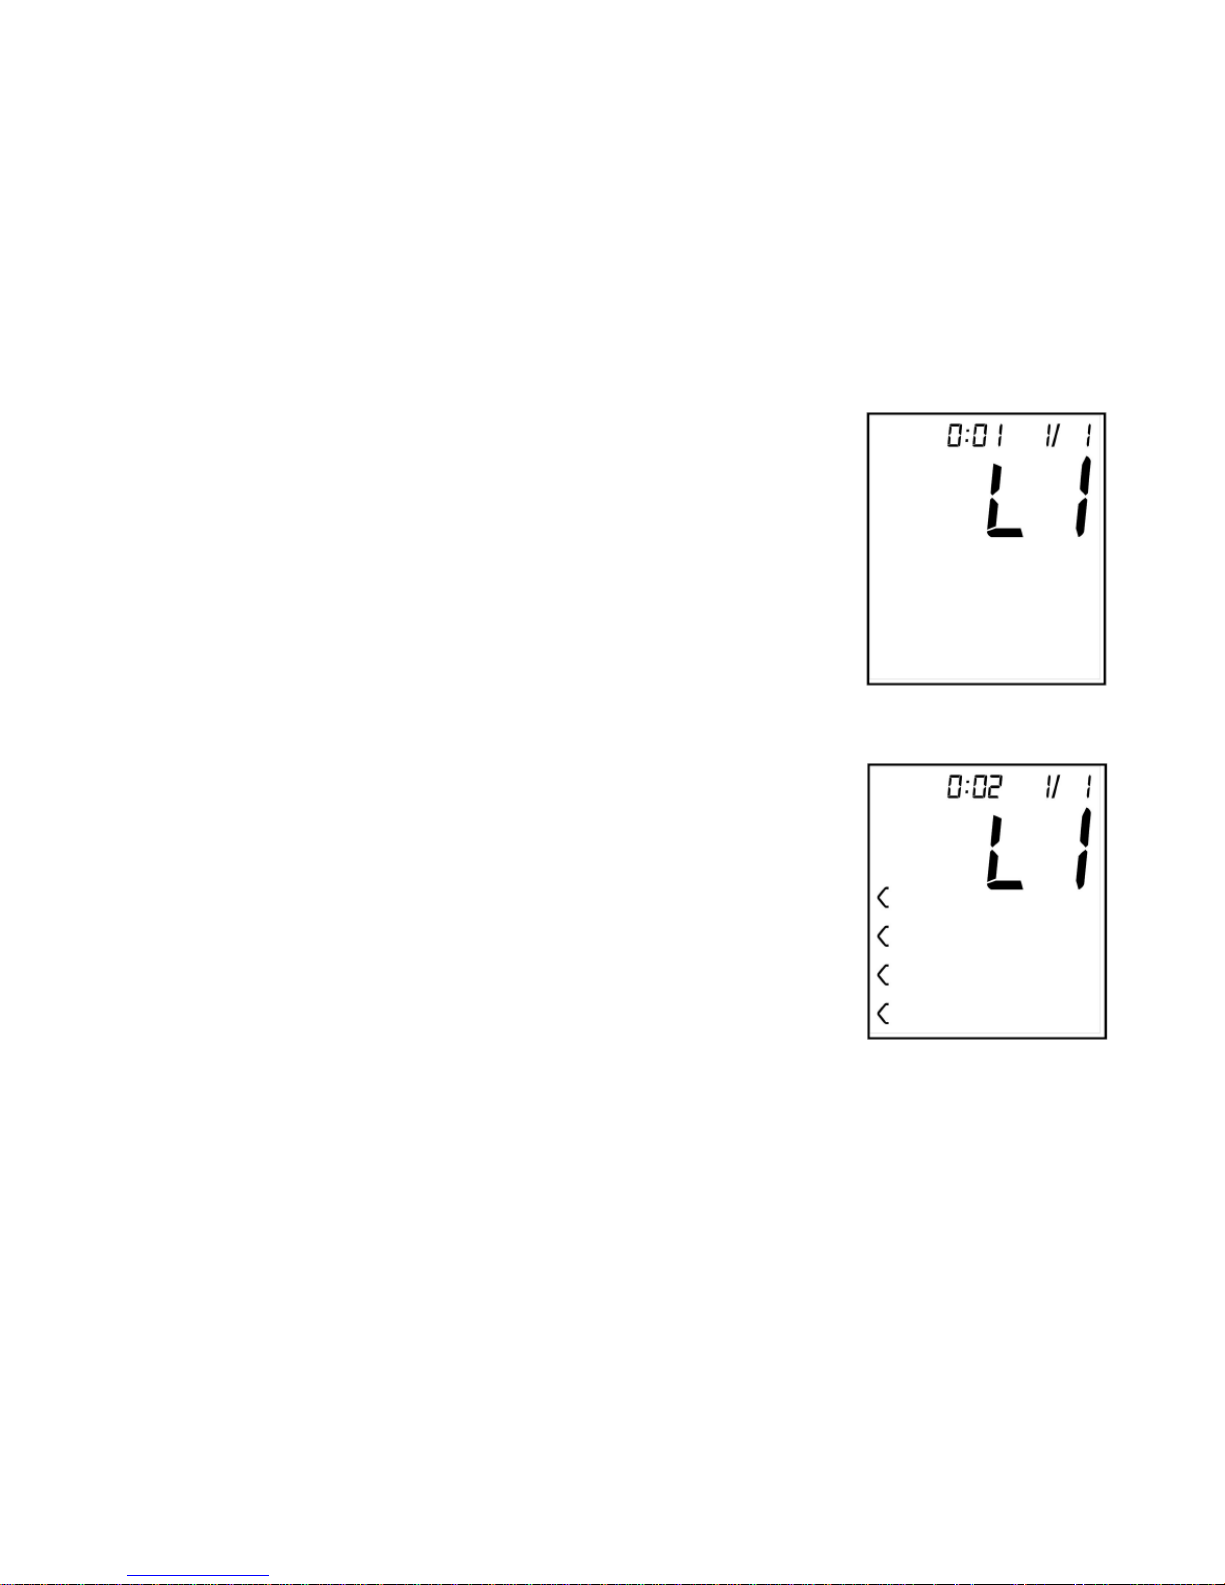
1. With the blood pressure monitor turned off, press and hold
the memory button M, a voice as well as the display (Fig. 7)
will consecutively display the available languages L0
(locution deactivated), L1 (Spanish), L2 (English), L3
(Portuguese), L4 (Italian), L5 (French) and L6 (German).
2. When the screen shows you the desired language (along
with its locution), stop pressing the memory button M.
3. The display will show the selected language (L0 ... L6) and
the pressure indicator arrows blinking (Fig. 8).
The volume level is determined by the number of pressure
indicating arrows, an arrow is the minimum volume level
and six arrows is the maximum volume level.
4. Press and hold the memory button M, the pressure indicator
arrows will increase by one unit until you reach the
maximum (6 arrows), and if you continue to press this
button the arrows will return to the minimum level (1 arrow).
Each time you increase the volume level you will hear an
acoustic warning that will serve as a reference.
5. Once the volume level is selected, stop pressing the M
memory button.
Fig. 7
Fig. 8
Page 9

9
BASIC TIPS FOR CORRECT USE OF BLOOD PRESSURE MONITOR
• Measure in a quiet environment and in a relaxed position. Performing the measurement
in situations of stress, causes changes in blood pressure.
• Do not use the tensiometer when you have an injury to the arm and never share it when
you or someone else has an infectious disease
• The measured values may vary (inaccurate reading), depending on the position of the
bracelet. This should be placed on the inside of the arm and at the heart.
• Try to always measure blood pressure at the same time of day.
• Avoid moving the arm and do not talk during the measurement, as it may cause errors
in reading.
• Place the cuff so that it sticks tightly to the arm but never over tighten (remember that
the cuff is inflated during operation).
• Do not place the cuff on clothing (shirt, sweater, blouse, etc.) as the device can not
measure through textiles.
• Loosen the cuff immediately after prolonged measurement.
• Do not switch on the appliance if the cuff is not attached to the tensiometer or is not
attached to the arm.
• After performing the blood pressure measurement, if you want to perform a new
measurement you should wait for 3 to 5 minutes, so that the blood circulation returns to
normal. This time varies according to each person.
Page 10

10
• Keep in mind that during daily blood pressure measurements, daily values depend on
many factors. Thus, consumption of tobacco, alcohol, drugs or body effort, influence the
values taken to a large extent. Stay relaxed and in a quiet environment at least 30
minutes before taking measurements.
• The blood pressure values should be interpreted by a physician or A.T.S. Who is
familiar with the patient's history. By regularly measuring blood pressure the physician
or A.T.S can carry out a more thorough follow-up of the patient.
• In exceptional cases it may happen that an irregular or very weak pulse does not allow
to carry out the measurements. If so, talk to your doctor or A.T.S.
• Using this apparatus correctly, the measured blood pressure corresponds to that
obtained by the stethoscope auscultation method.
• The blood pressure of the left arm relative to the right arm or viceversa, can vary
approximately 40 mmHg so it is recommended to always carry out the measurements in
the same arm.
• The cuff size is designed for adult use only.
• Do not use this appliance with people who have arrhythmias.
• Avoid measurements near appliances that generate strong magnetic fields, or
electrostatic interference such as mobile phones, microwave ovens, etc.
• If you do not intend to use the appliance for a long period of time, remove the batteries
and store them in a cool place.
Page 11
11
CONNECTING THE CUFF TO THE MONITOR
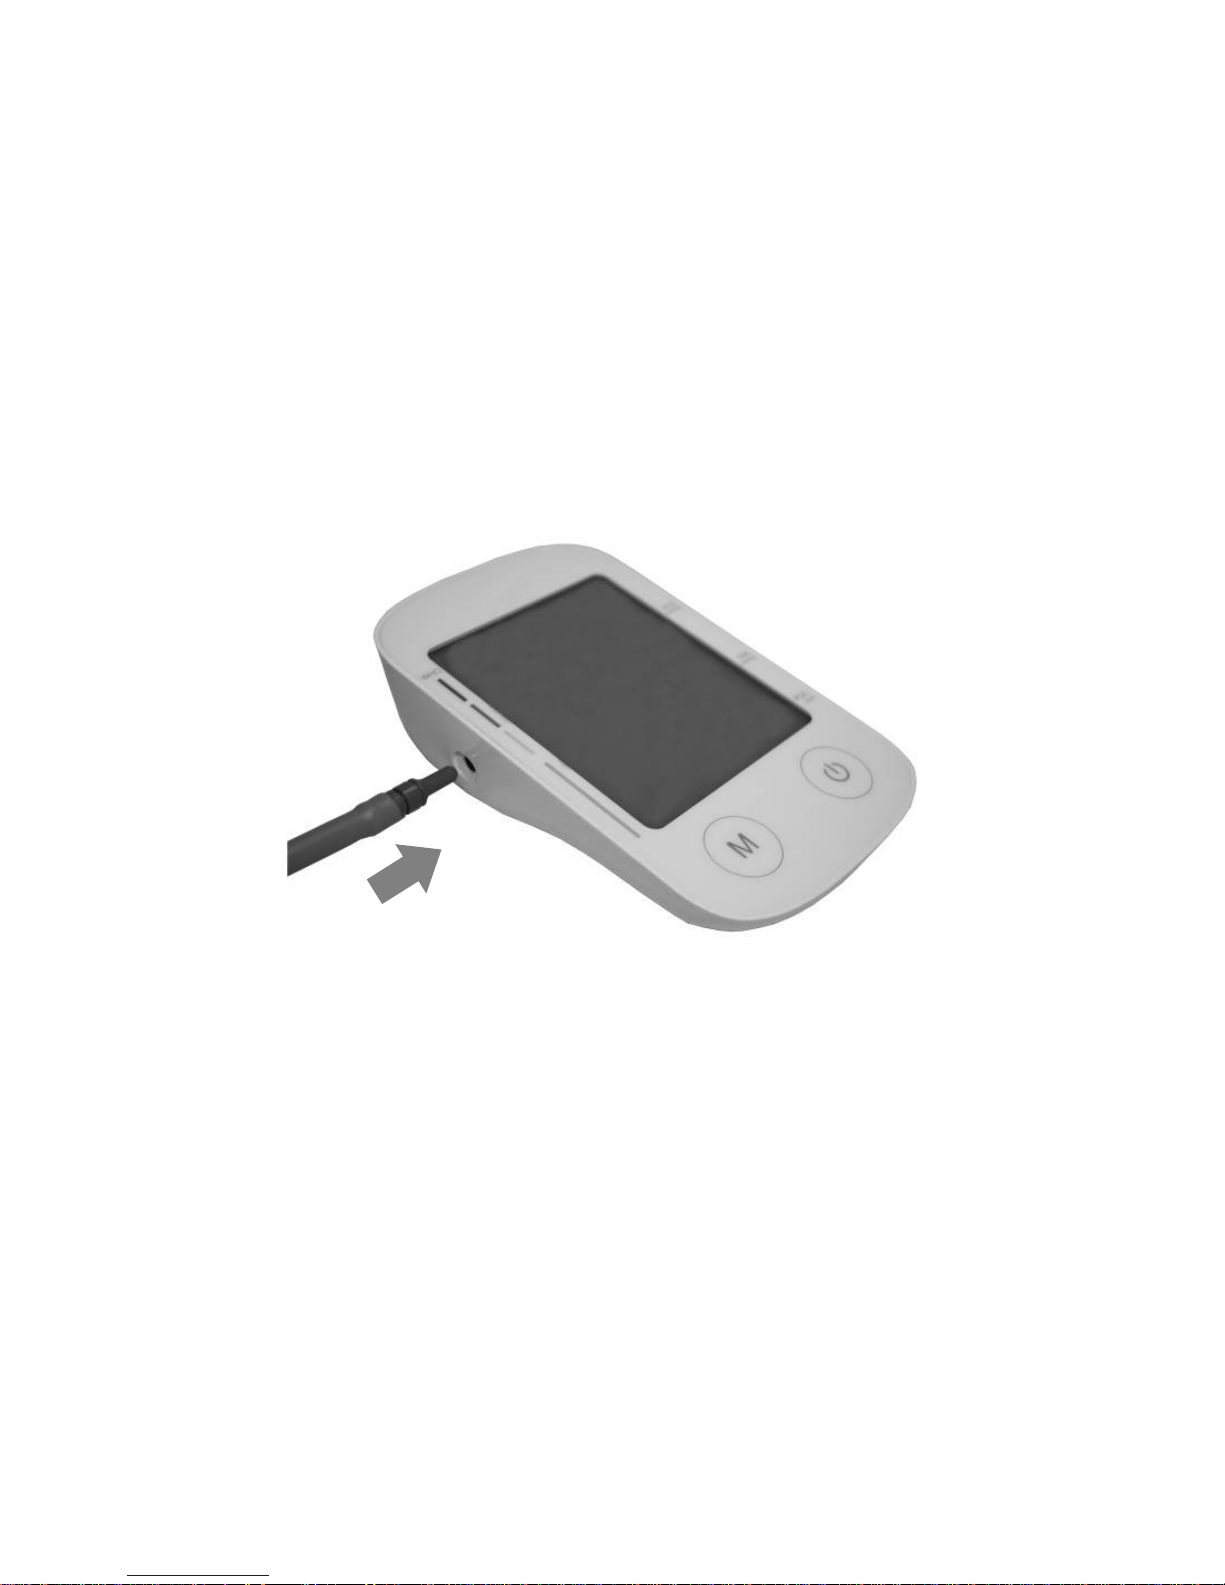
Insert the end of the rubber tube from the cuff into the hole on the left side of the blood pressure
monitor. Make sure it is properly attached (to the end).
Note:
During the measurement process, avoid pressing or pinching the rubber connecting tube
between the cuff and the blood pressure monitor, as this may cause measurement errors or
injuries due to the excess pressure of the cuff.
Page 12
12
CUFF SWATHING
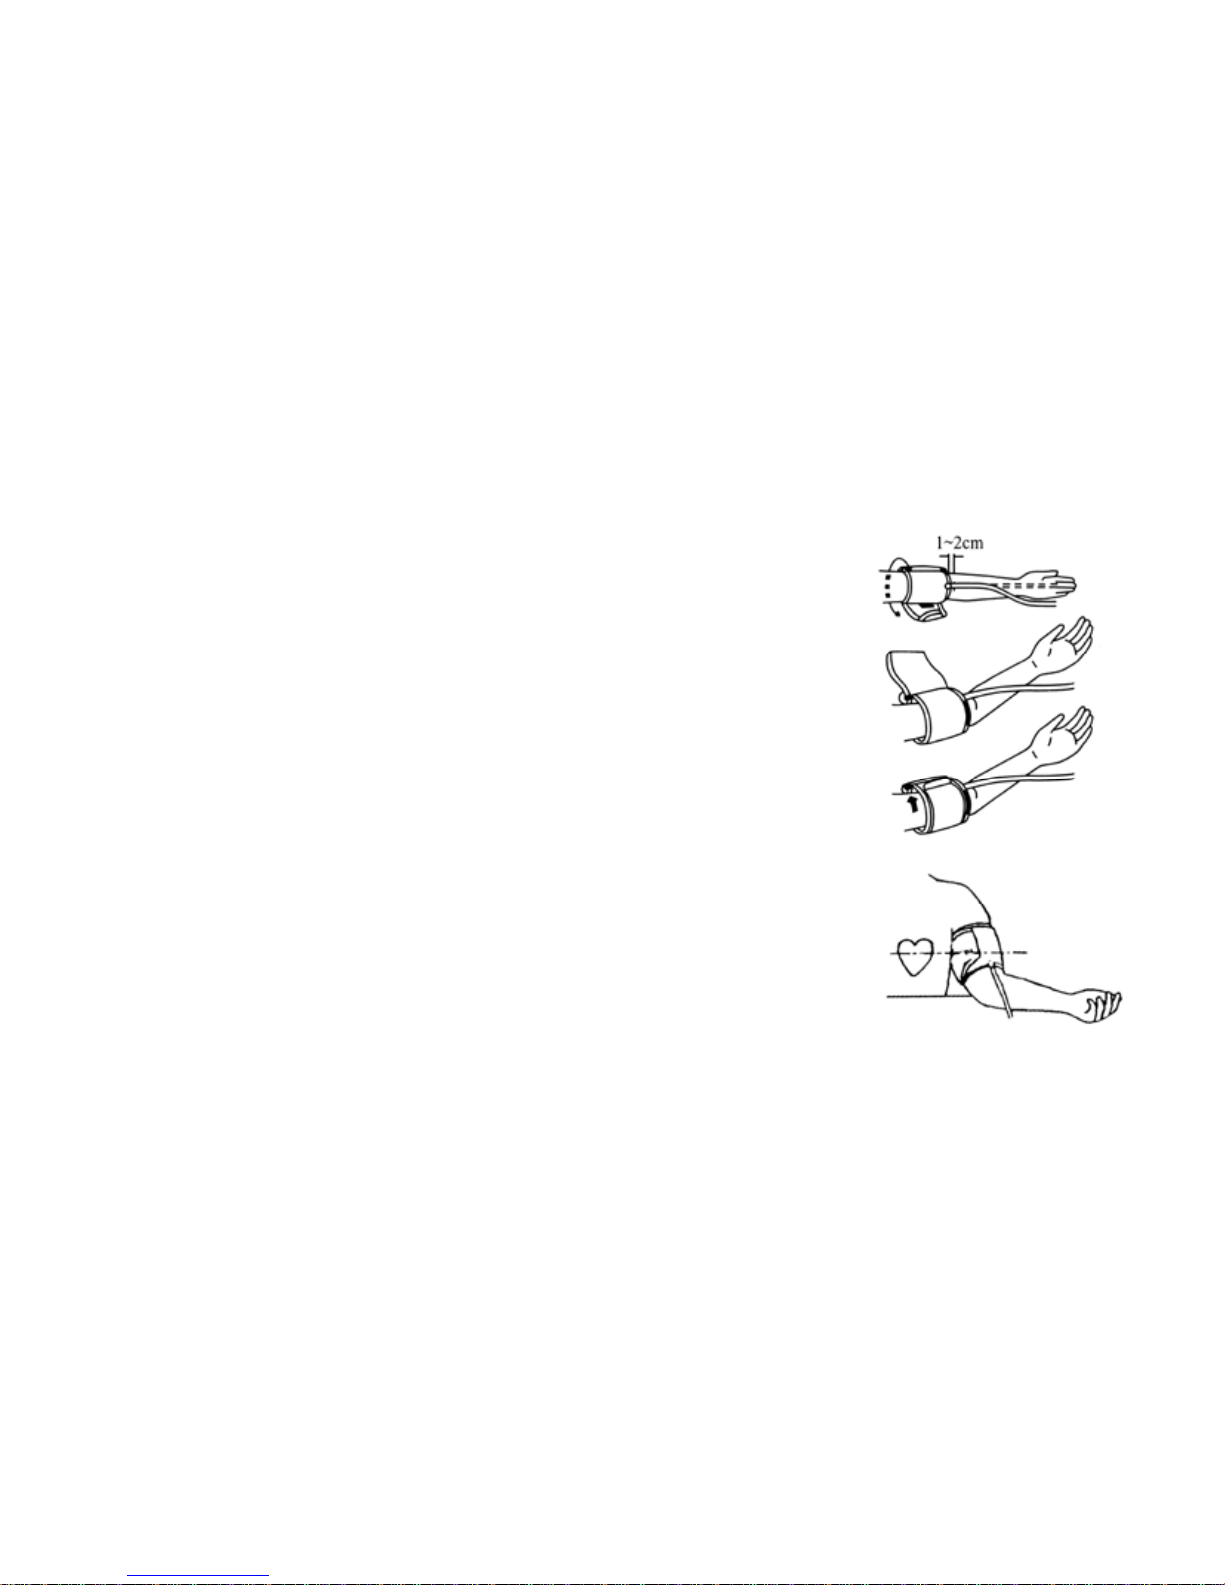
1. Place cuff 1-2cm above elbow joint.
- Place palm upside and let it be parallel with rubber tube
- Measuring at the same arm each time
- Measuring on the bare arm, especially for the feeble pulse. If
measuring of clothing should be thin and smooth
- When the cuff is dirty, detach it from the equipment, wash
the cuff by hand with proper detergent and resin it in the
enough cold water. Dry in air. Never iron it.
2. Turn the cuff end outward and tighten it by pulling through the
metal loop. Then press the loop onto the surface of cuff.
3. To make the cuff more firmly, use the free hand to move and
press it.
- Do not place the cuff too loose or too tight; spacing of a
finger is appreciated.
- If the arm is very thin, please raise elbow joint slight when
winding cuff.
Sitting Measurement
1. Sit upright.
2. Place arm horizontally on the chair or table with the palm upside.
3. Cuff position should be at the same level as the heart.
Page 13

13
HOW TO MEASURE BLOOD PRESSURE?
Measure blood pressure always in a sitting position, place your elbow on a table or similar
surface and arm so that the bracelet is at the level of the heart, the hand should be open.
Relax the arm and position it so that it can see its inner side.
Very important: The blood pressure monitor has four independent memories (U1, U2, U3 and
U4) for four different users. In each memory, up to 30 measurements are automatically
stored, and the corresponding memory position must be selected before measuring.
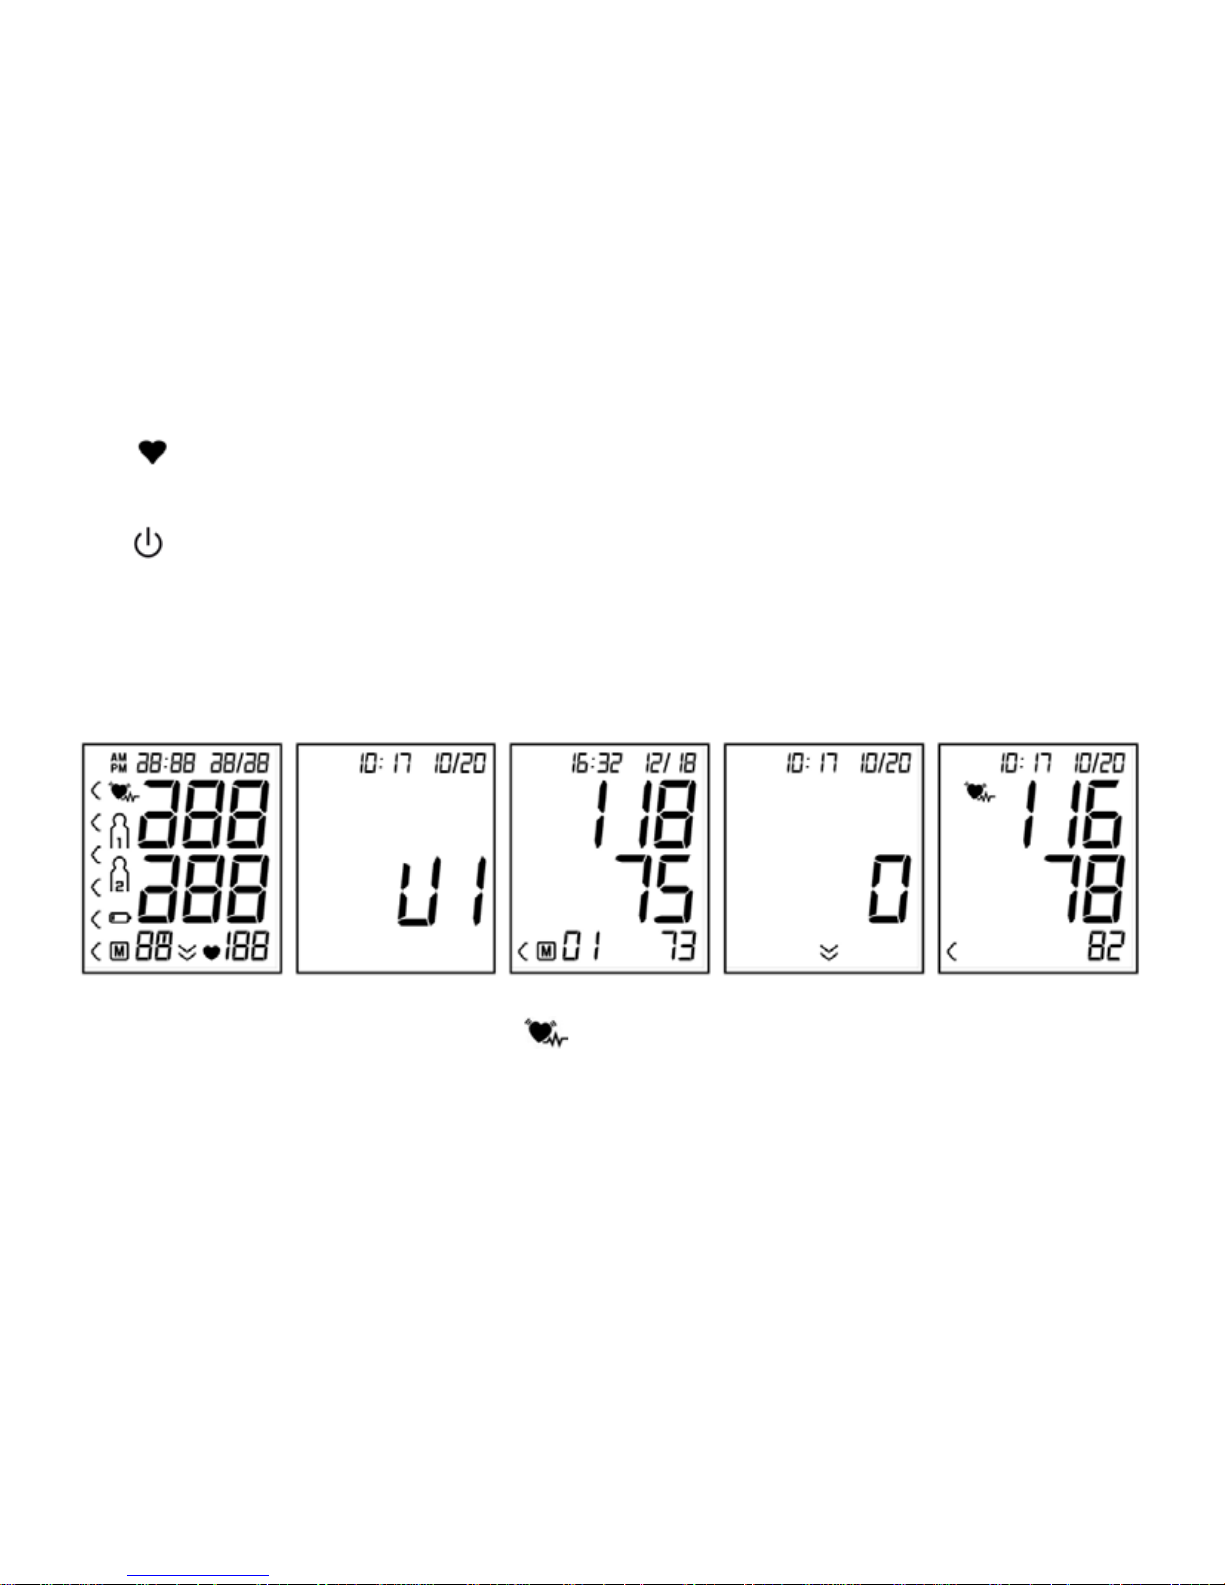
1. Once the cuff has been inserted, press the on / off button " " and the display will show
all the characters (Fig. 9).
2. It will then show the number of the last user who used the appliance (Fig. 10).
3. If you want to change the user, press the M button successively and select the desired
user "U1, U2, U3 or U4". If not, wait a few seconds and the instrument will start the
measurement process.
4. The blood pressure monitor will show the last measurement of the selected user (Fig.
11) and a voice will inform you how to carry out the measurement.
5. If the display shows the symbol " " indicates that the bracelet contains air and it will
be ejected, then the bracelet will automatically inflate (Fig. 12).
6. During the inflation of the cuff, the device will automatically select a pressure level
depending on the blood pressure of each person.
Page 14
14
7. Once the inflation of the bracelet is completed and when the pulse is located the symbol
" " will begin to flash at the pulse rate, the bracelet will begin to deflate at constant
speed and the display will show the pressure value decreasing.
8. During the measurement, you can switch off the appliance by pressing the on/off button
“ ”.
9. At the end of the measurement, a locution will inform you of the measured values and
the display will show the value of systolic pressure (SYS), diastolic pressure (DIA) in
millimeters of mercury (mmHg) and pulses per minute (PUL / Min).
In Figure 13 the systolic pressure was 116 mmHg, the diastolic pressure was 78 mmHg
and the pulse rate was 82 beats per minute. The measured values together with the
date and time are automatically stored in memory.
Fig. 9 Fig. 10 Fig. 11 Fig. 12 Fig. 13
10. If the display shows the symbol " " indicates that there is a possible change in the
heart rate.
Page 15

15
A normal heart of a resting body beats between 60 and 100 palpitations per minute with
a paced rhythm. This rhythm can be increased with physical exercise, with emotions,
with stress or with some diseases. Other causes that can produce alterations in the
heart rhythm can be cholesterol, diabetes, obesity and certain medicines or drugs, like
caffeine, tobacco, etc.
11. On the left side of the screen is the pressure indicator according to the classification
criteria of the World Health Organization (WHO).
This indicator consists of four marks or colors: green (normal tension), yellow
(prehypertension), orange (high tension) and red (hypertension). At the end of the
measurement next to this indicator will appear an arrow indicating the pressure, a
locution will inform you of the state according to the classification criteria of the World
Health Organization. This information is generic, serves only as a quick reference.
12. If you wish to perform a new blood pressure measurement, you must switch the device
off and on again, but keep in mind the following suggestions:
After performing the measurement, if you want to perform a new measurement in the
same person you should wait for 3 to 5 minutes, so that the blood circulation returns to
normal. This time varies according to each person.
The blood pressure values depend on a multitude of factors, so that it is not possible to
provide a valid diagnosis by virtue of a single measurement. For this reason regularly
measuring blood pressure can lead to a more thorough follow-up of the patient.
Page 16

16
TURN OFF THE BLOOD PRTESSURE MONITOR
• To turn off the blood pressure monitor, press the on / off button " ". However, once
the measurement is complete, the device will turn off automatically after 1 minute.
• When checking the memory, if no button is pressed, the blood pressure monitor
automatically turns off after 2 minutes.
USE OF MEMORY
This device has four independent memories (U1, U2, U3 and U4) for four different users and up
to 30 measurements are stored in each memory.
The storage in memory (previously selected) is performed automatically, the last
measurement is recorded in position 1 by moving the penultimate measurement to position
2 and so on. When the selected memory capacity (U1, U2, U3 or U4) is complete (30
measurements), the first memory position is deleted when a new measurement is made.
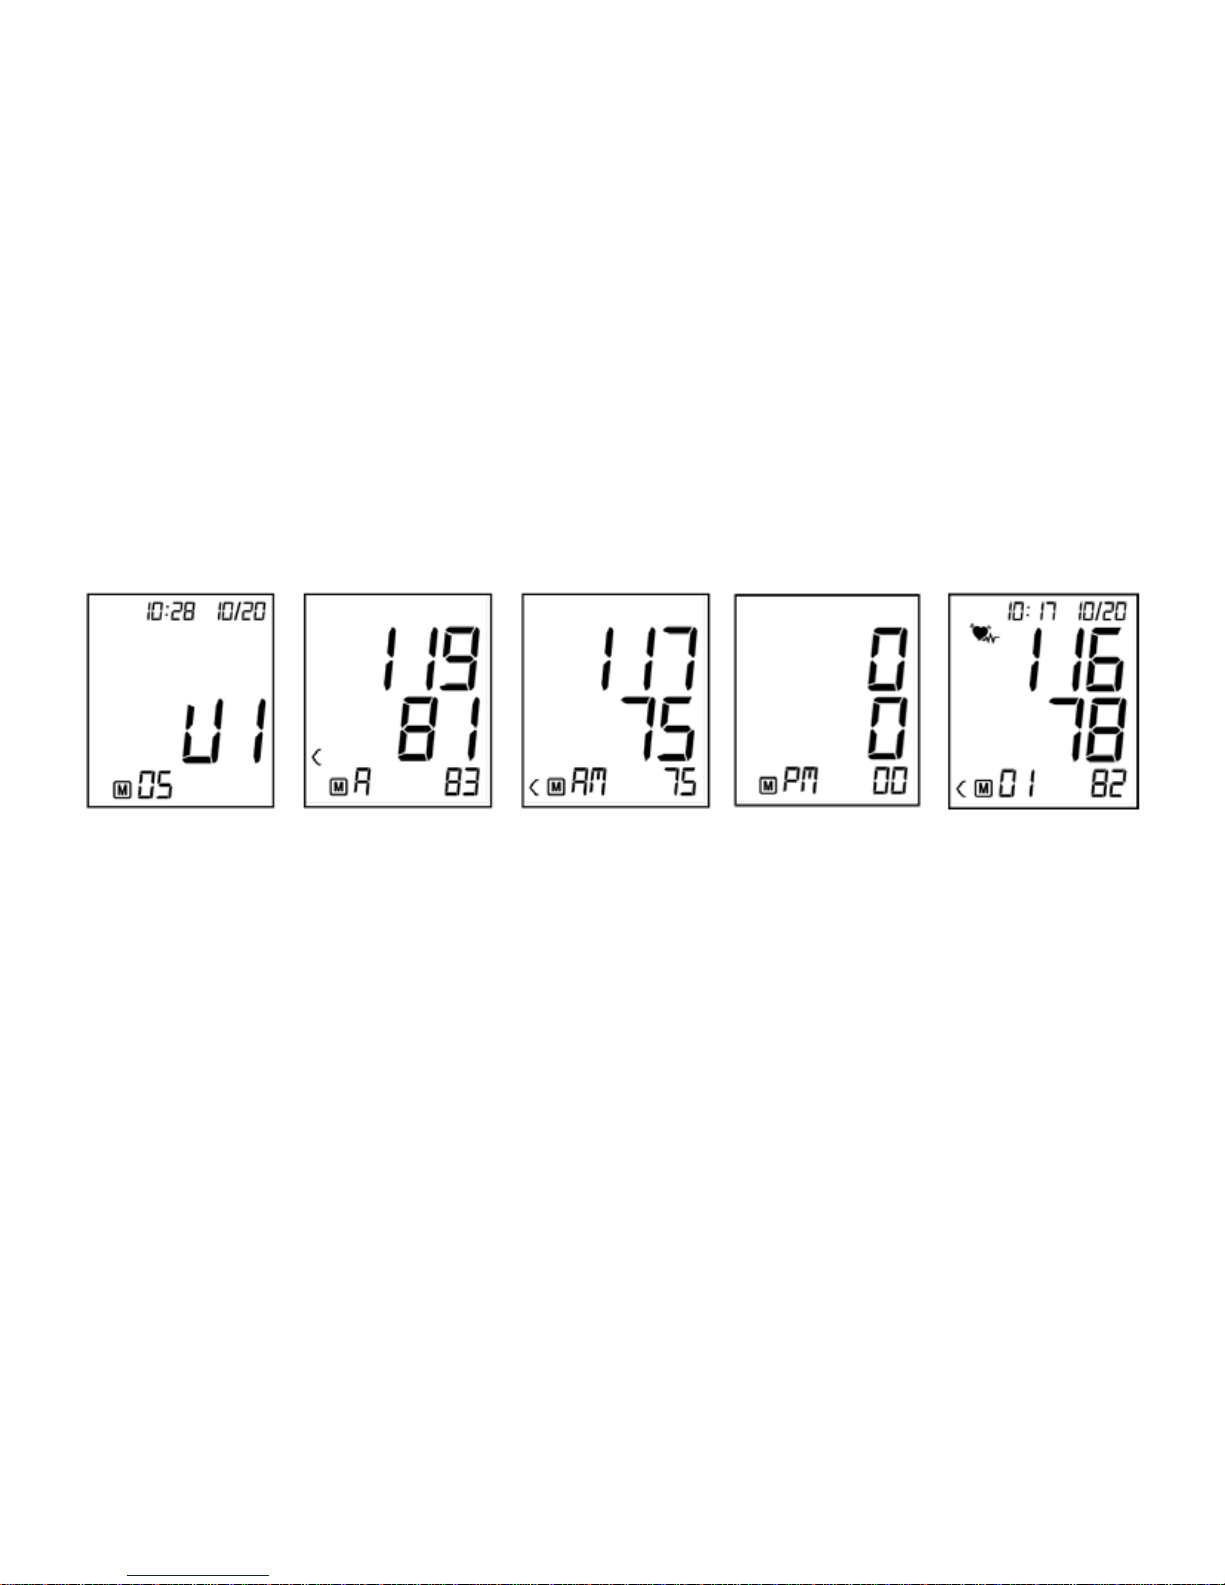
To access the memory press the M button and the display will show the last selected user
number. To change the user press the " " button and the screen will show the selected
user as well as the total number of measurements (fig 14).
The Blood pressure monitor will analyze the last three stored measurements and average
them, displaying them on the screen and using the locution (Fig. 15).
Page 17
17
If you press the M button again, the device will analyze the last three measurements taken
before noon (AM) and display the average of the last three stored measurements (Fig. 16).
When the M button is pressed again, the device will analyze the last three measurements taken after
midday (PM) and display the average of the last three stored measurements (Fig. 17).
Fig. 14 Fig. 15 Fig. 16 Fig. 17 Fig. 18
If you press the M button again, the device will display the various memory locations,
repeatedly pressing the M button, the display will show the stored data.
In any of the above cases, a locution will inform you of the selected memory location as well
as the stored values; (Systolic), minimum (diastolic) tension, pulse and state according to
the classification criteria of the World Health Organization.
Page 18
18
The measurement of figure 18 corresponds to memory position 1 and was performed on
October 20 at 10:17, systolic pressure was 116 mmHg, diastolic pressure was 78 mmHg
and pulse was 82 beats per minute.
Notes:
• The memories will remain stored even if the batteries are not installed. However, the
analysis of the last three measurements will be erased.
• If there are no stored measurements, the display will show the digits " 0 ".
• At any time, you can exit the memory mode by pressing the " " button, or leave 2
minutes without pressing any buttons.
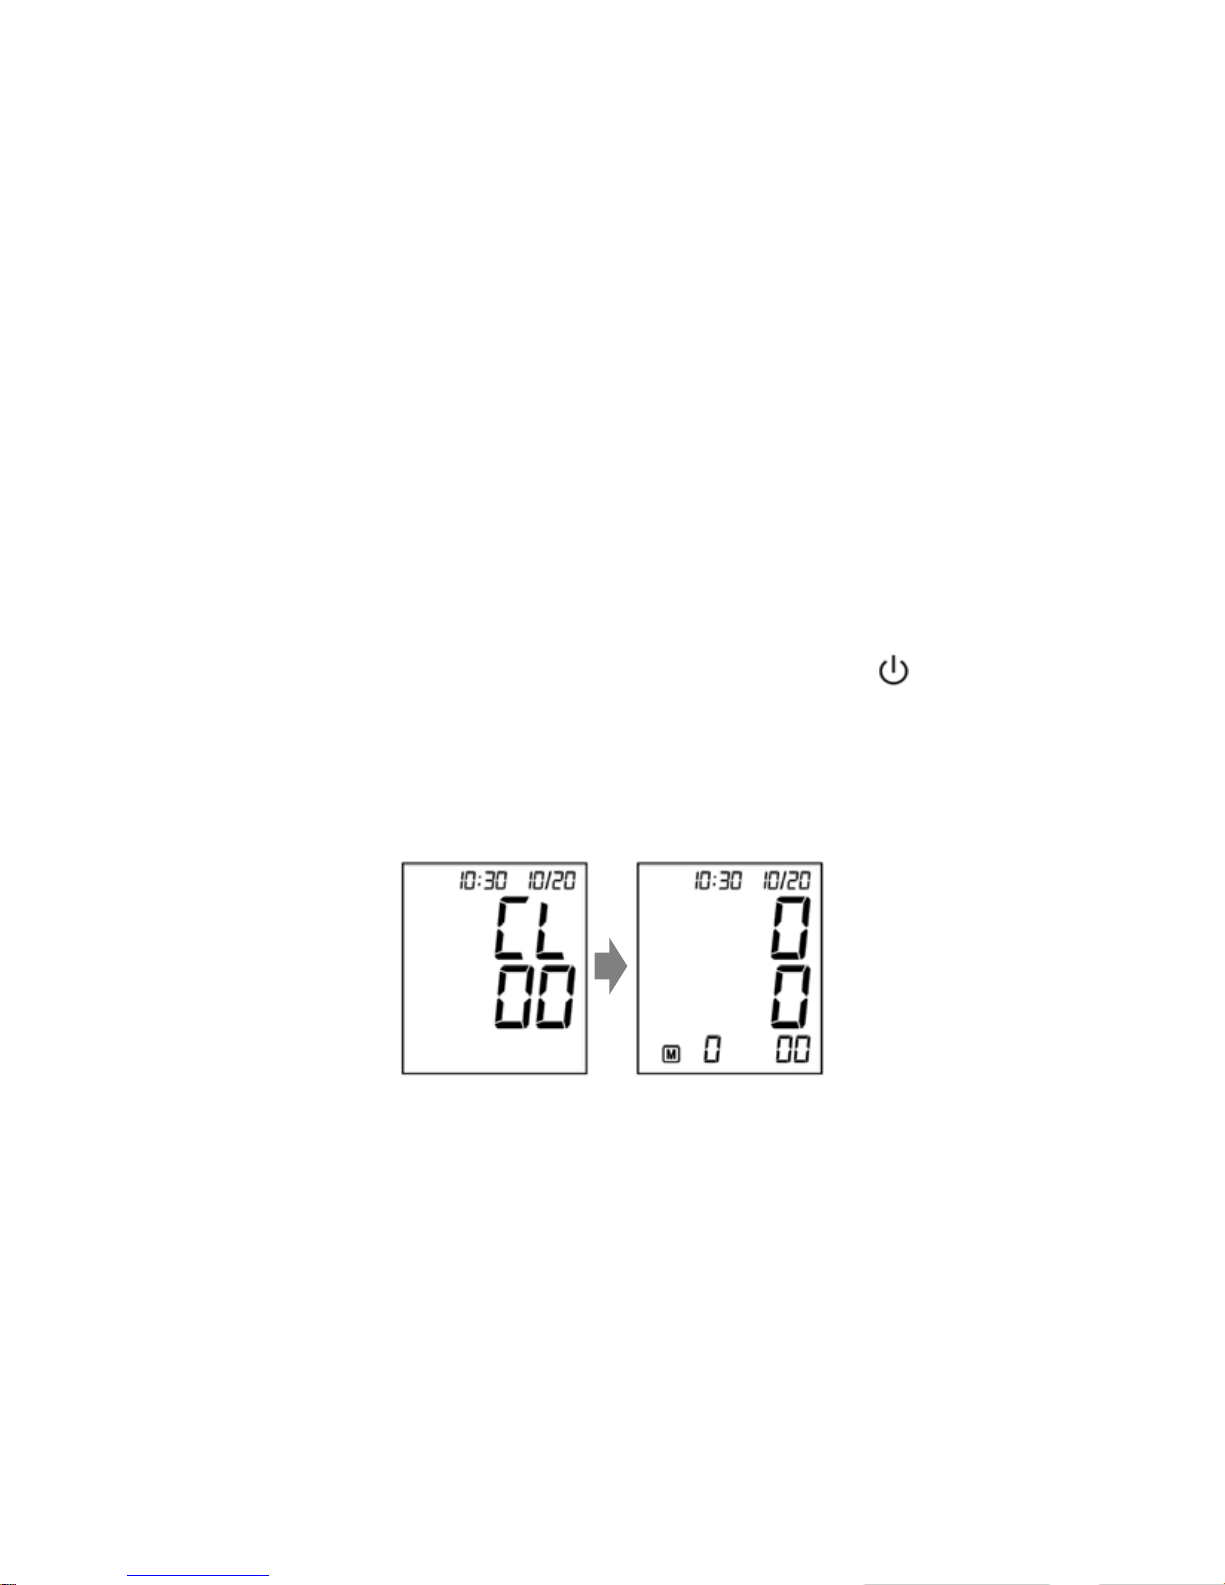
CLEAR MEMORY
To erase all the memory locations of the four users (U1, U2, U3 and U4) access the memory
and then press and hold the M button for 3 seconds.
Page 19

19
WHAT IS BLOOD PRES SURE?
Blood is pumped through the heart and distributed through the arteries and veins, this
causes fluctuations in pressure in our arteries during each heartbeat.
As the vascular walls of the arteries are elastic dilate each time the heart beats, this effect
can be used to measure blood pressure fluctuations. The maximum value of the blood
pressure is denominated systolic pressure and the minimum value diastolic pressure.
Both pressure values inform the physician about the patient's blood pressure situation.
BLOOD PRESSURE FLUCT UA TI O NS
Blood pressure values are constantly fluctuating and these fluctuations are particularly
pronounced in patients with hypertension. Normally blood pressure has a maximum value
during bodywork and a minimum value at night while sleeping. The following table describes
a number of factors that influence measured blood pressure.
Page 20

20
WHY IS IT MEASURING THE BLOOD PRESSURE AT HOME?
When blood pressure is measured in a clinic, office or hospital, nervousness and
excitement can occur in the patient. This situation causes the blood pressure values to be
too high. Among physicians this phenomenon is known as the "white coat effect". The blood
pressure values depend on a multitude of factors, so that it is not possible to provide a valid
diagnosis by virtue of a single measurement.
Blood pressure measured in the mornings
directly after getting up and before breakfast
is the most important, this is also considered
as "basic value". In practice it is very difficult
to measure this value, but by carrying out the
measurement in a usual environment (at
home for example) you can get a
measurement quite close to the basic value.
This is why it is advisable to measure your
blood pressure at home.
The table below shows the typical blood
pressure according to age and sex.
AGE
(years)
MENS WOMEN
SYSTOLIC DIASTÓLIC SYSTOLIC DIASTOLIC
11 - 15 114 72 109 70
16 - 20 115 73 110 70
21 - 25 115 73 110 71
26 - 30 115 75 112 73
31 - 35 117 76 114 74
36 - 40 120 80 116 77
41 - 45 124 81 122 78
46 - 50 128 82 128 79
51 - 55 134 84 134 80
56 - 60 137 84 139 82
61 - 65 148 86 145 83
Page 21

21
CLASSIFICATION OF BLOOD PRESSURE ACCORDING TO WHO
The following graph shows the limits for high and low blood pressure regardless of age.
These values were set by the World Health Organization (WHO).
Notas:
• The World Health Organization (WHO) does not define the minimum of blood pressure,
in the graph the area of minimum diastolic pressure is less than 90 mmHg.
• As blood pressure increases with age, this graph serves as a reference for certain ages.
Sistolic pressure
(mmHg)
180
160
140
130
120
80 85
90 100 110 Diastolic pressure
(mmHg)
NORMAL TENSION
HIGH TENSION
MILD HYPERTENSIÓN
MODERATE HYPERTENSIÓN
SEVERE HYPERTENSIÓN
Page 22
22
WHAT IS HYPERTENSION?
Hypertension is a pathological condition characterized by an
increase in blood pressure above normal values. The
diagnosis of arterial hypertension should not be based on
high figures measured once or occasionally. The diagnosis
of arterial hypertension should be made after several blood
pressure readings, including some at the patient's home or
in his / her usual environment outside the medical
consultation.
Hypertension is one of the diseases of the present
civilization and its pathology is uncertain. To prevent
hypertension prevention is best. For example; Decrease the
amount of salt in meals, eat more fruits and vegetables, not
smoke, etc.
WHAT IS HYPOTENSION?
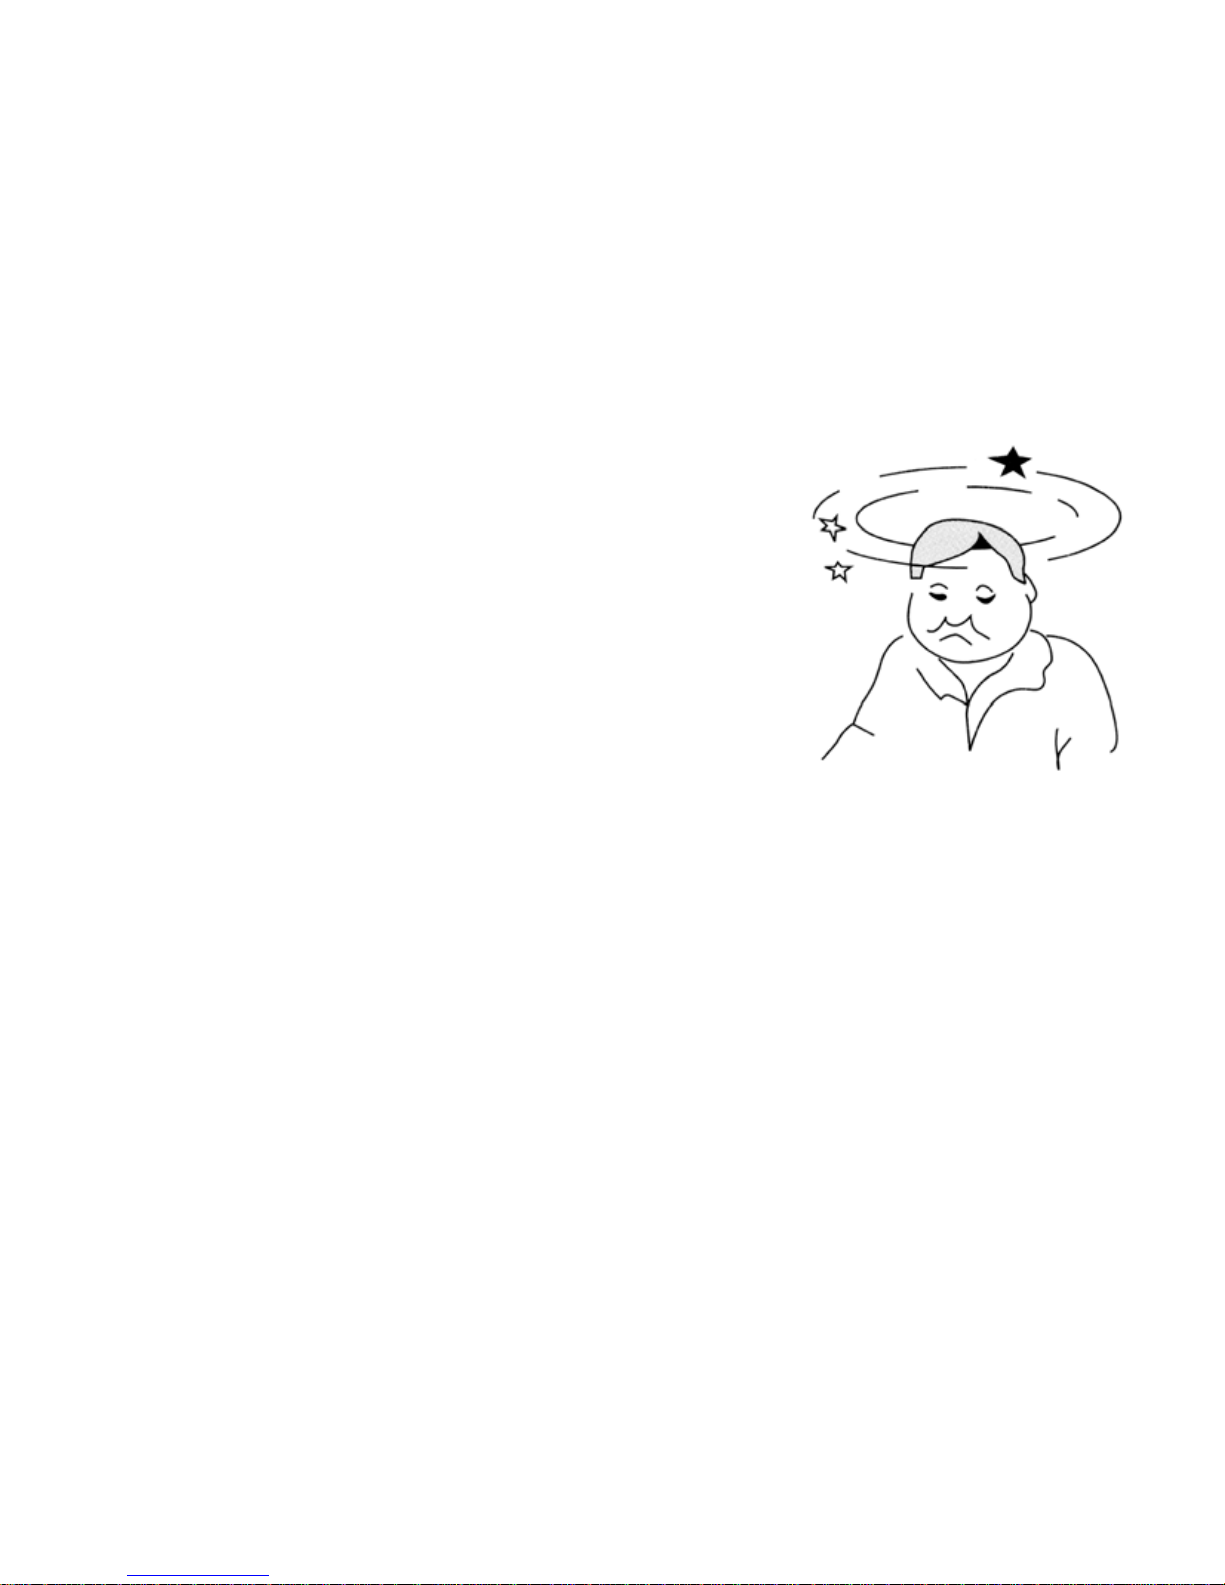
Hypotension or low blood pressure causes symptoms such as dizziness, lightheadedness,
dizziness, blurred vision, muscle weakness, fatigue, and even fainting.
The most common form is the so-called postural hypotension, which occurs when you get
up quickly from the bed or a chair. The sudden change of position causes, as a reflex act, a
contraction of the blood vessels with the consequent lack of irrigation of the brain.
Page 23
23
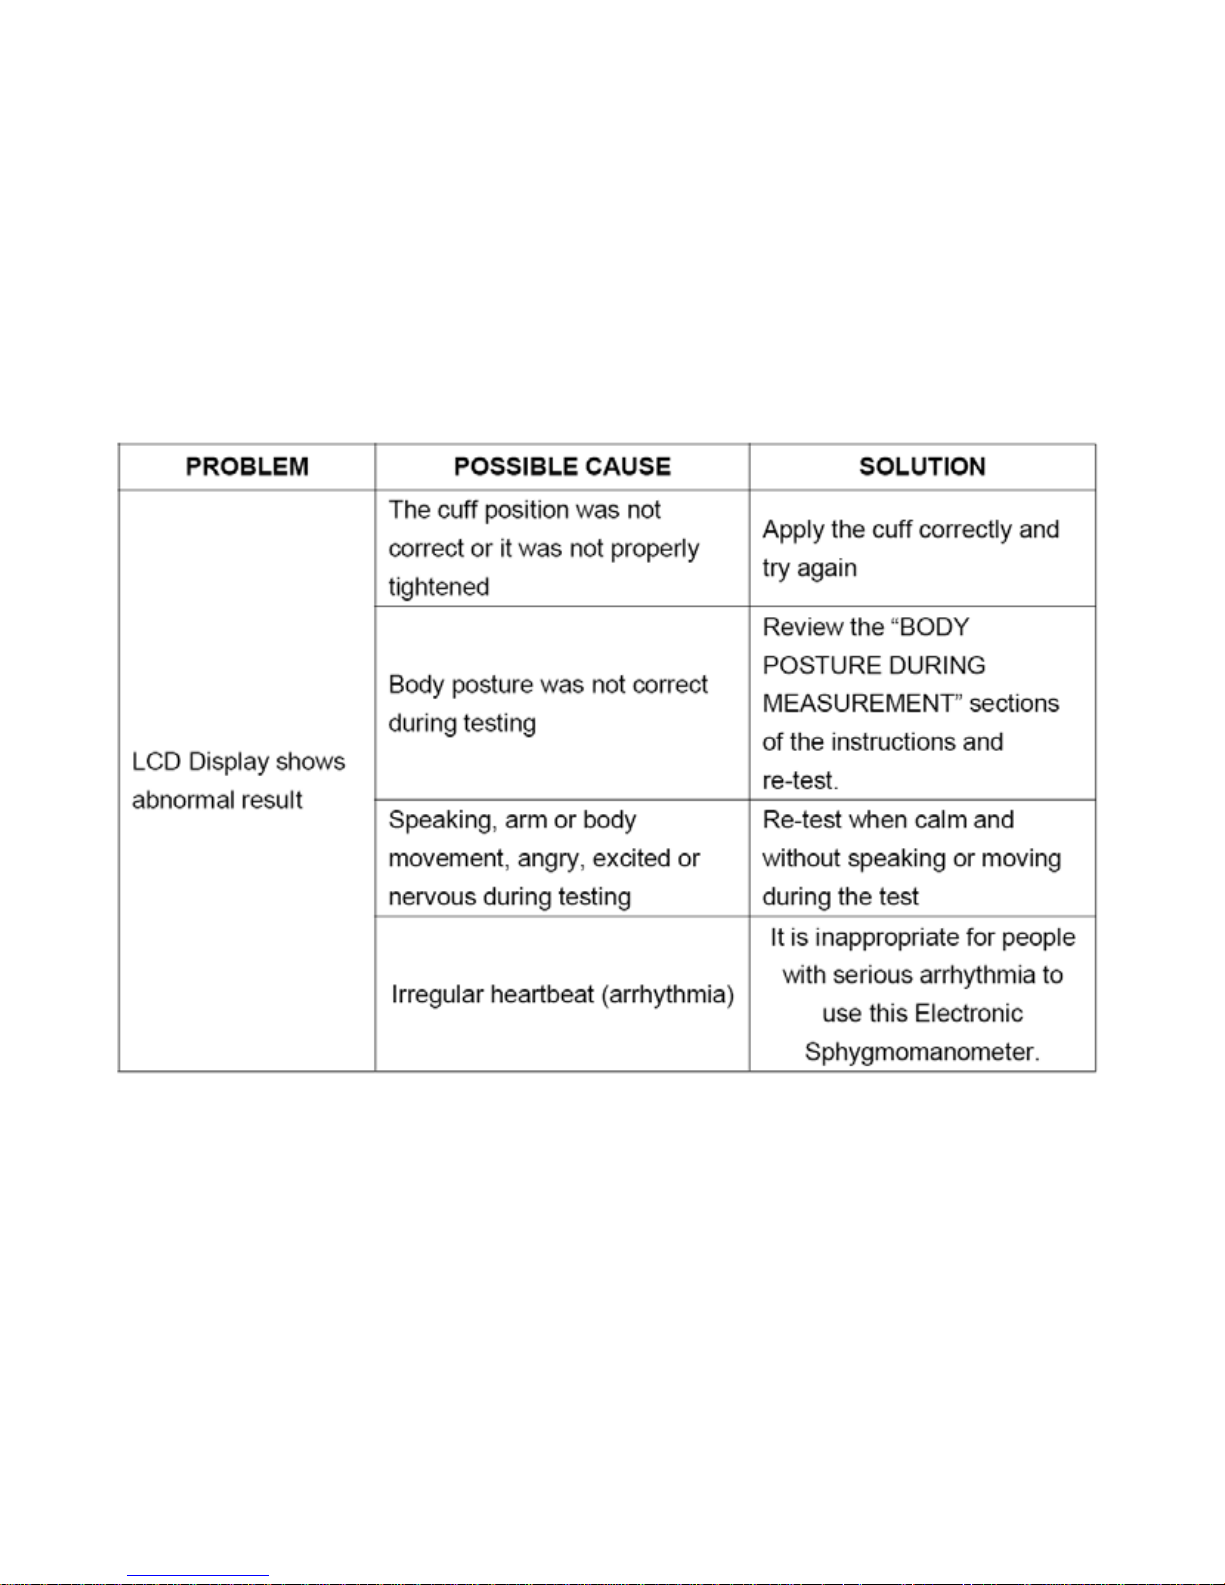
ABNORMALITY & TROUBLESHOOTING (I)
Page 24
24
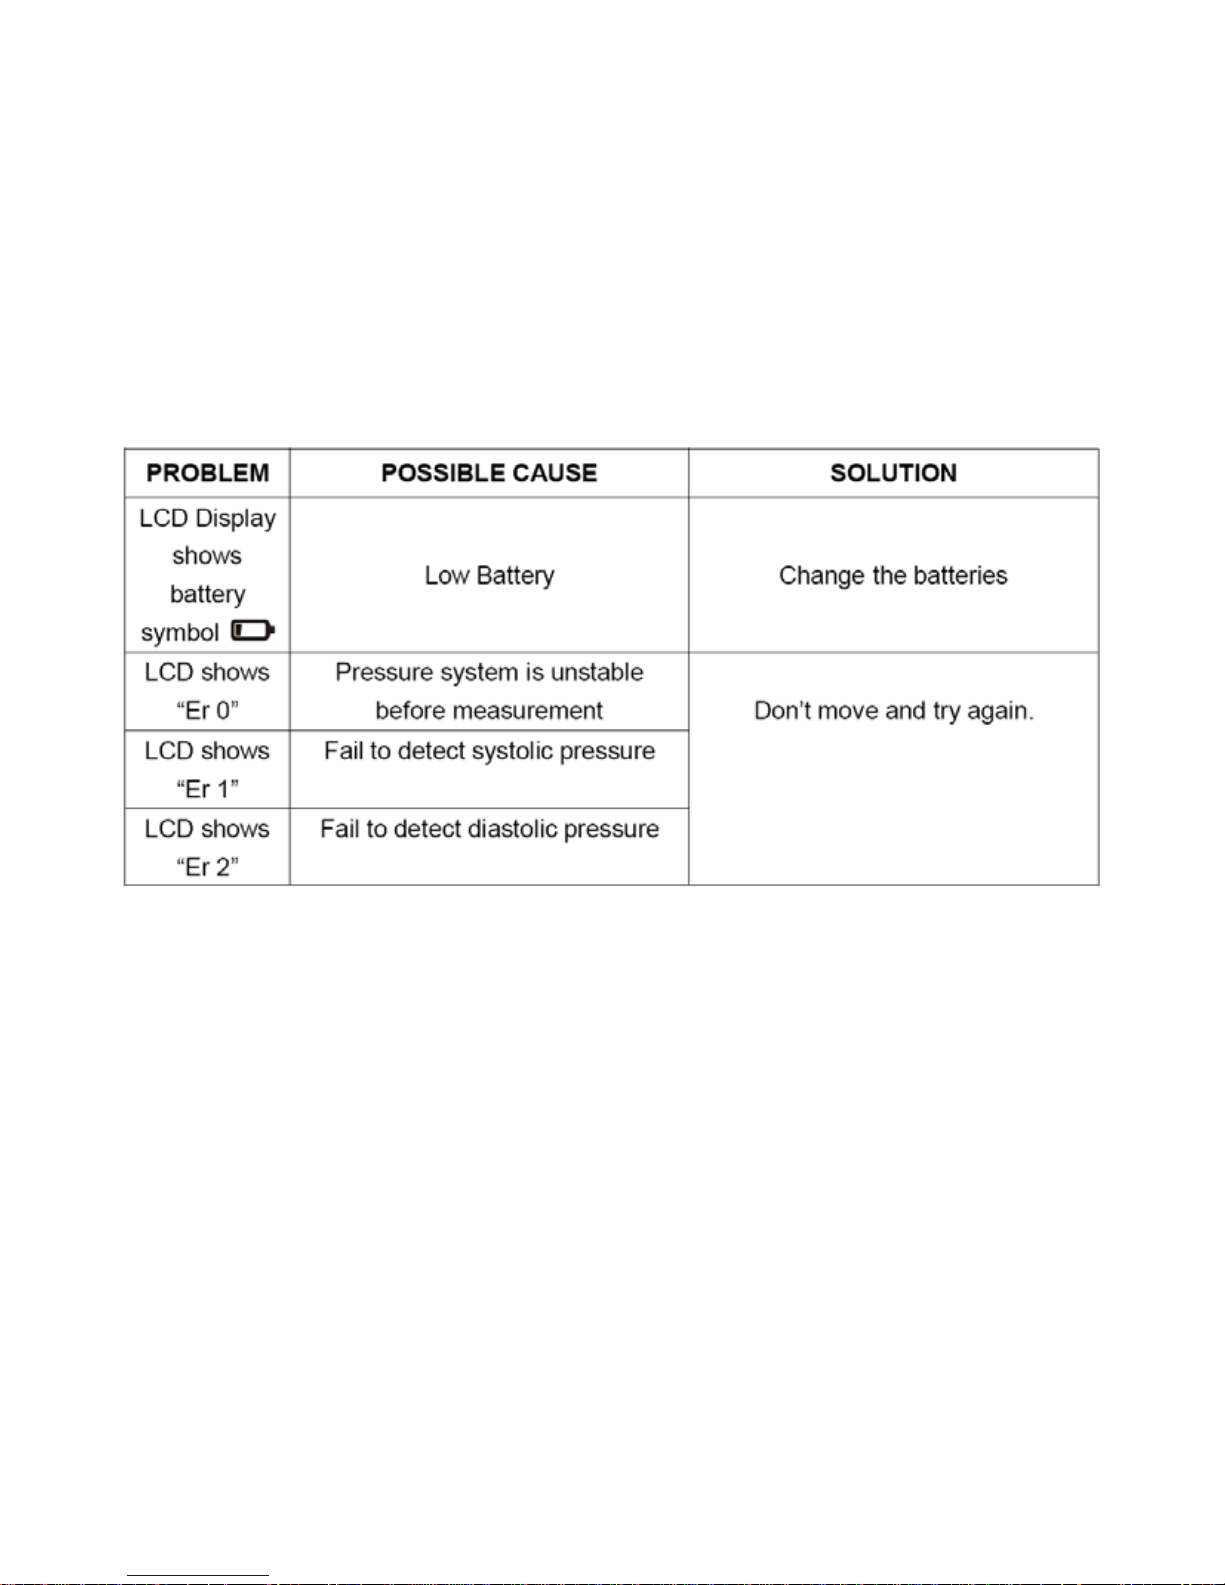
ABNORMALITY & TROUBLESHOOTING (II)
Page 25
25
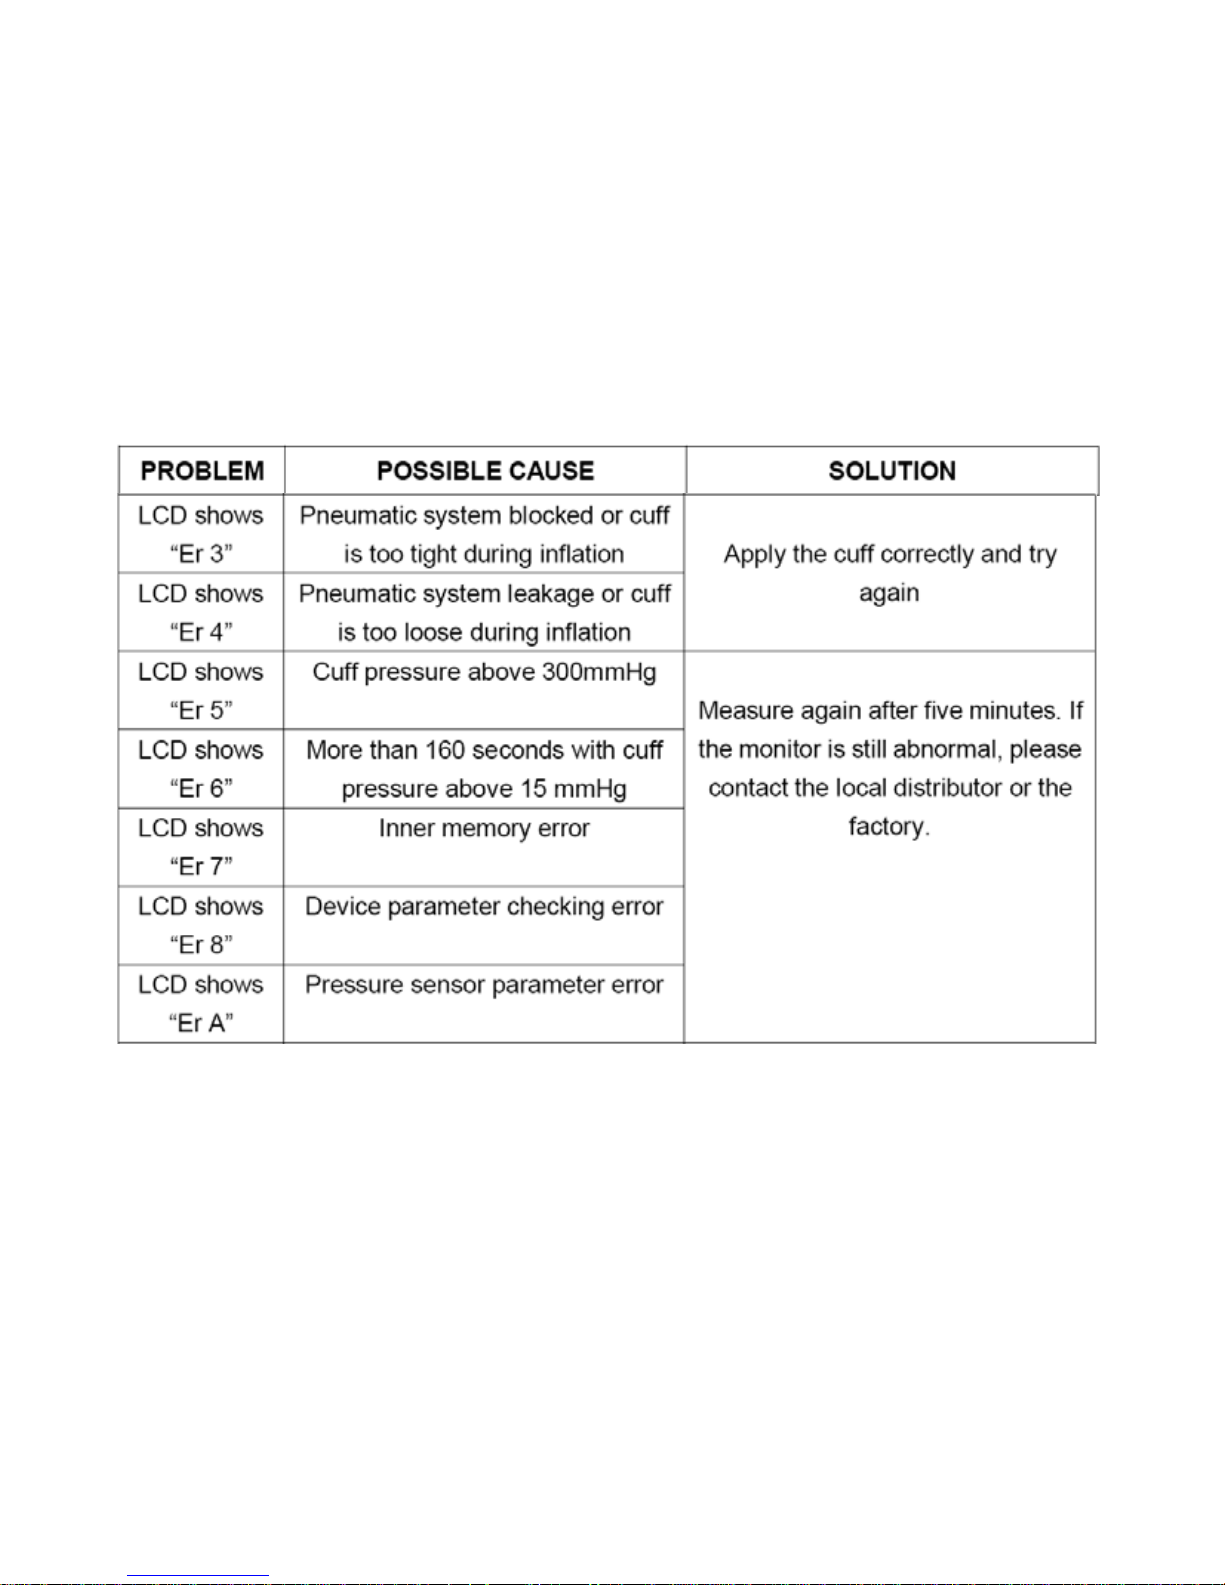
ABNORMALITY & TROUBLESHOOTING (III)
Page 26
26
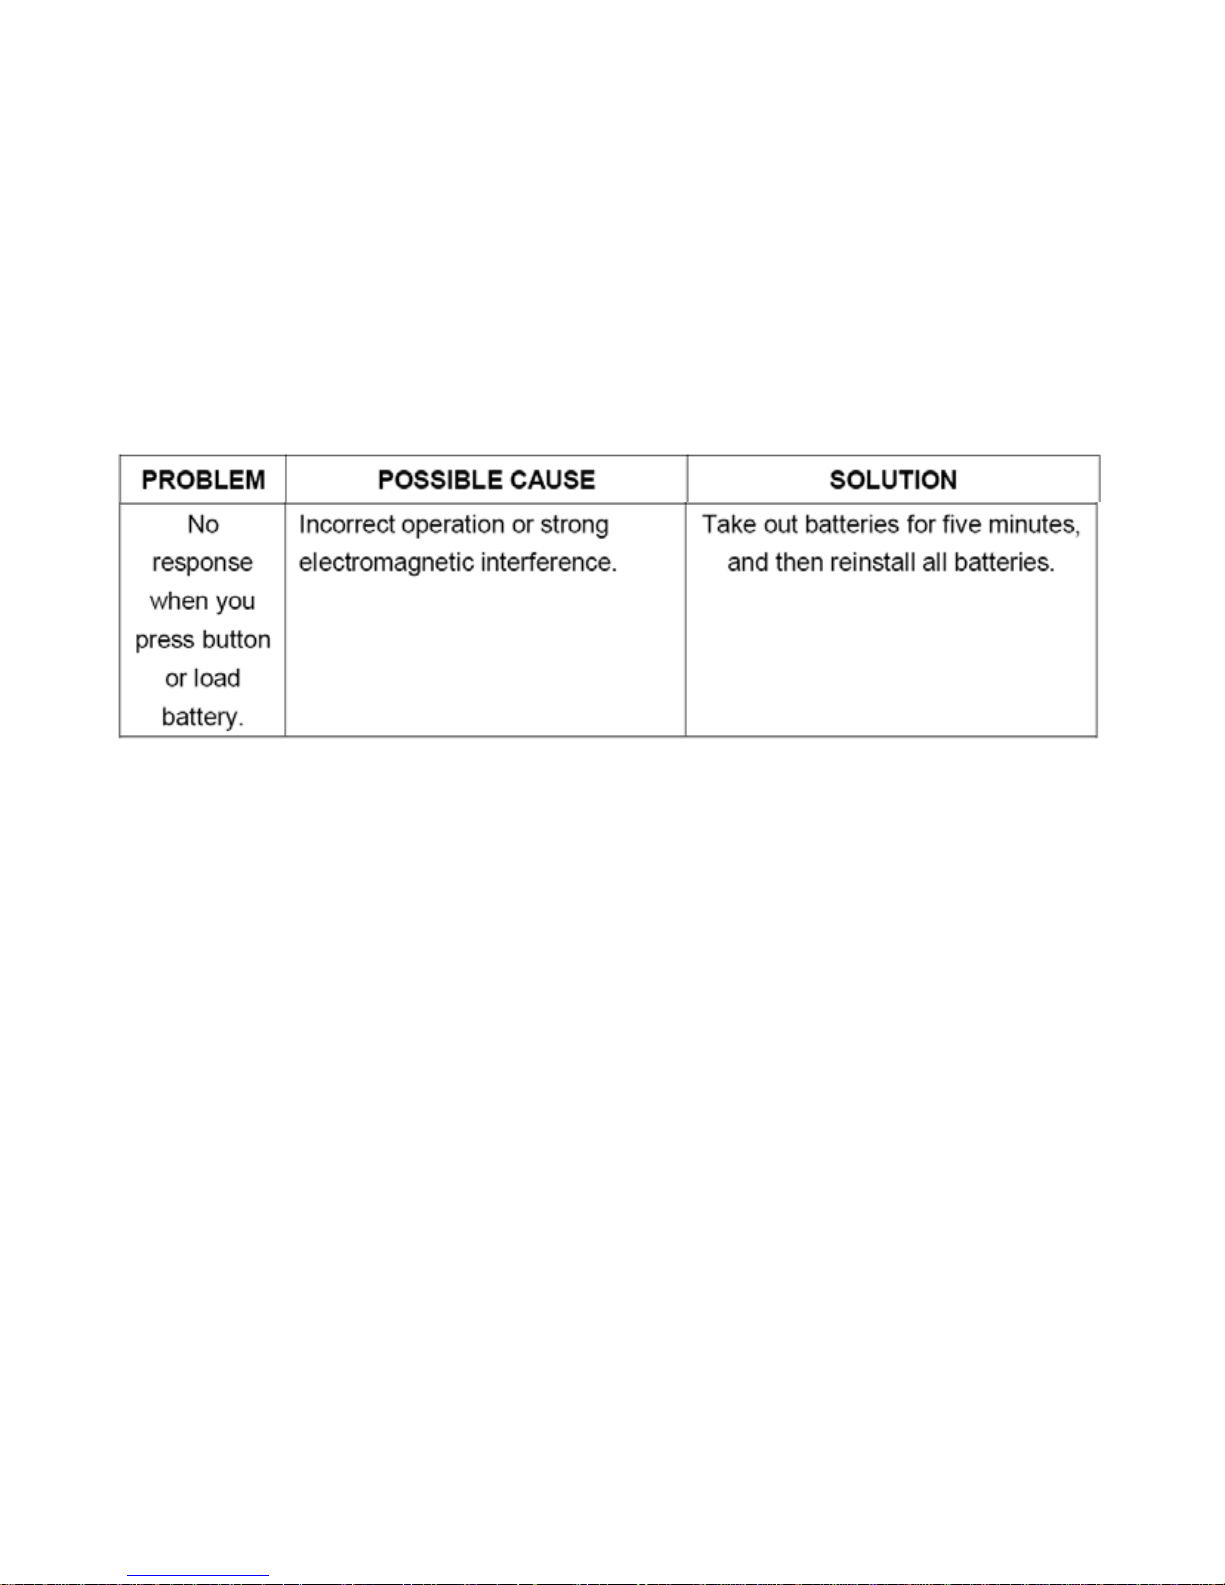
ABNORMALITY & TROUBLESHOOTING (IV)
Page 27

27
This product complies with European Directives RoHS (2011/65/UE), on
the restriction of use of certain dangerous substances in electrical and
electronic appliances.
CLEANI NG A ND MAINTENA NC E
• Clean the plastic surface of the unit with a humid cloth and dries it with another dry one. It
does not use abrasive products like gasoline, dissolvent, etc.
• Do not mix used and new batteries, or different types.
• When not in use, place it in its protective case and prevent it from coming in direct contact
with water, expose it to direct sunlight, be in places with high temperatures, excessive dust,
humidity or near equipment that generates heat.
• It is recommended the cuff should be disinfected 2 times every week if needed (for
example, in hospital/clinique). Wipe the inner side (the side contact skin) of the cuff by a soft
cloth squeezed moistened with Ethyl alcohol (75-90%), then dry the cuff by airing.
• It is recommended the performance should be checked every 2 years or after repair. Please
contact the service center.
• The monitor can mantain the safety and performance characteristics for a minimum of
10,000 measurements or three years.
• The cuff integrity is maintained after 1,000 open-close cycles of the closure.
• Avoid high temperature and solarization.
Page 28
28
SPECIFICATION
Measuring method Oscillometric
Measuring range 0 – 300 mmHg (pressure)
40 – 180 pulses/min (pulse)
Measuring accuracy ± 3 mmHg (pressure)
± 5% (pulse)
Power source batteries 4 x 1.5 V type AAA, etc.
Battery life Approx. 100 times
Pressurisation Automatic air pump
Deflation Automatic
Operating environment +10 °C to +40 °C, ≤ 85 % RH
Storage environment -20 °C to +50 °C, ≤ 85 % RH
Cuff size 22 – 30 cm
Unit size and weight 150 x 95 x 41 mm (L, W, H) / 235 gr.
“MX, MX ONDA” and his logos, are trademarks of MX ONDA, S.A.
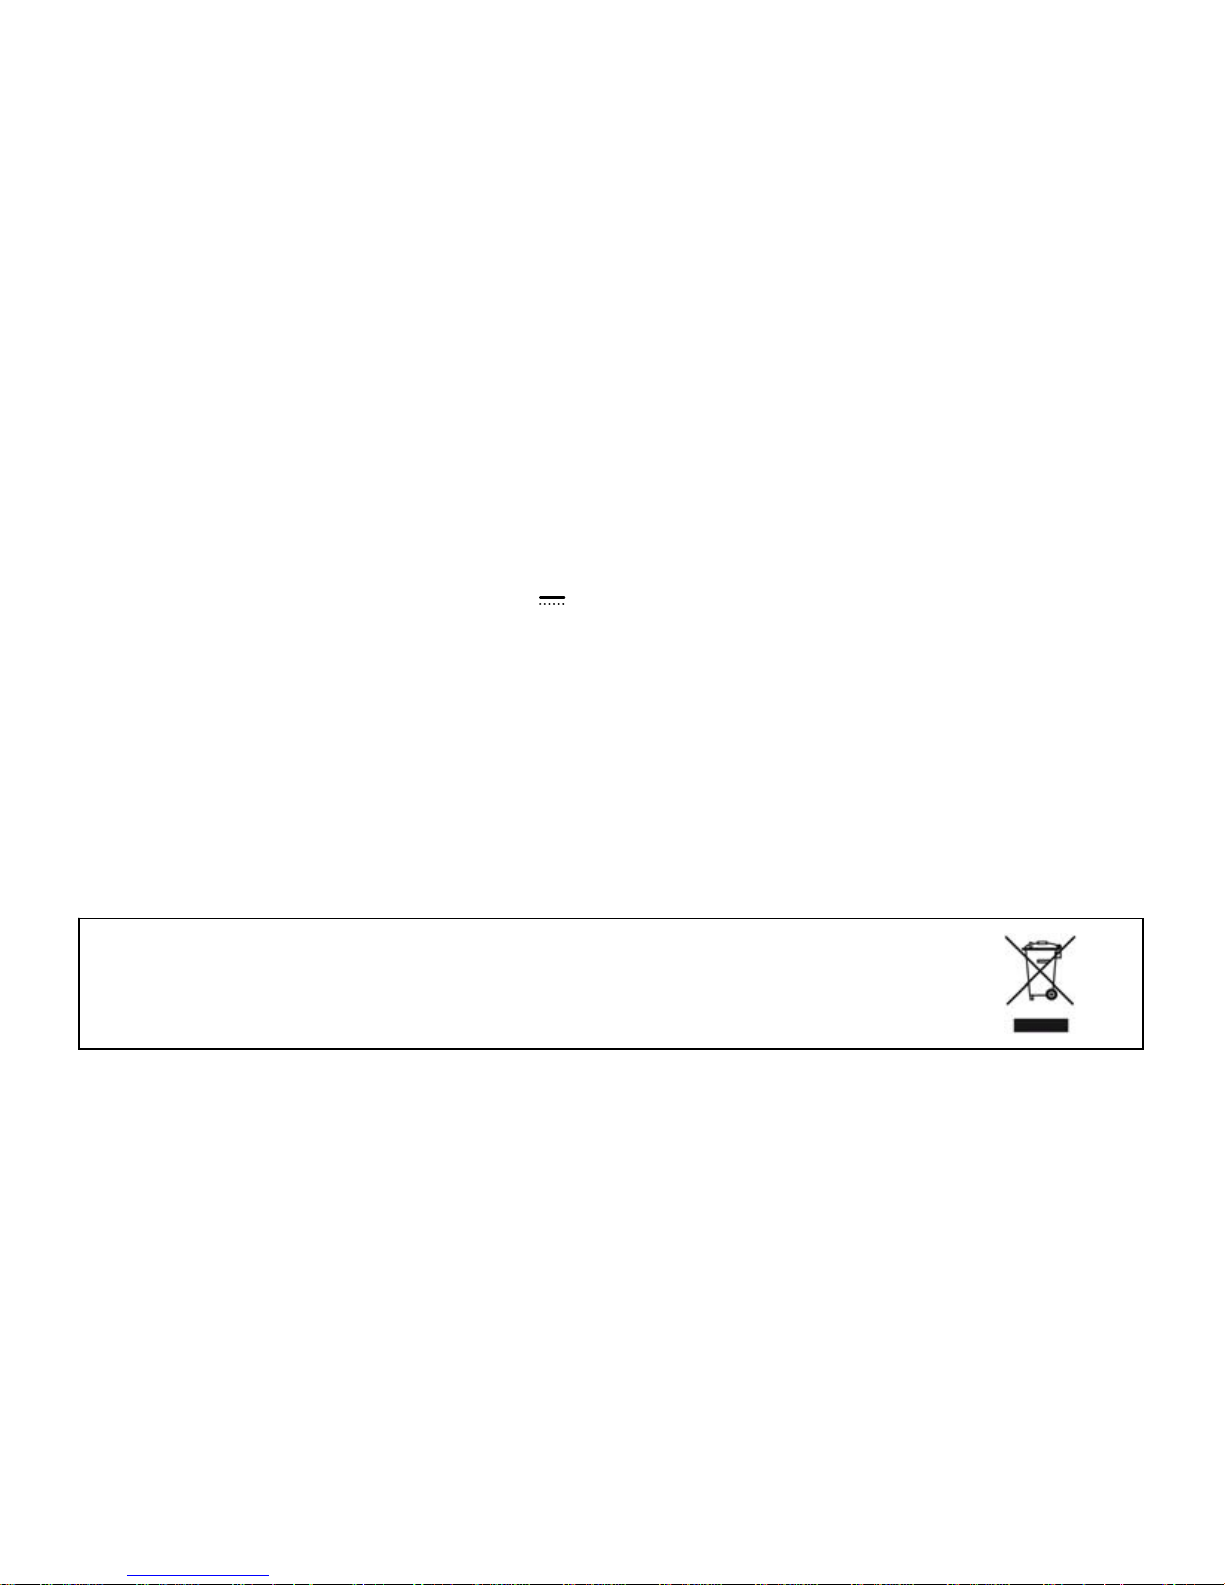
Waste electrical products must not be disposed of with household waste.
This equipment should be taken to your local recycling centre for safe
treatment.
Before discarding the product, remove the batteries from the product
Page 29
29
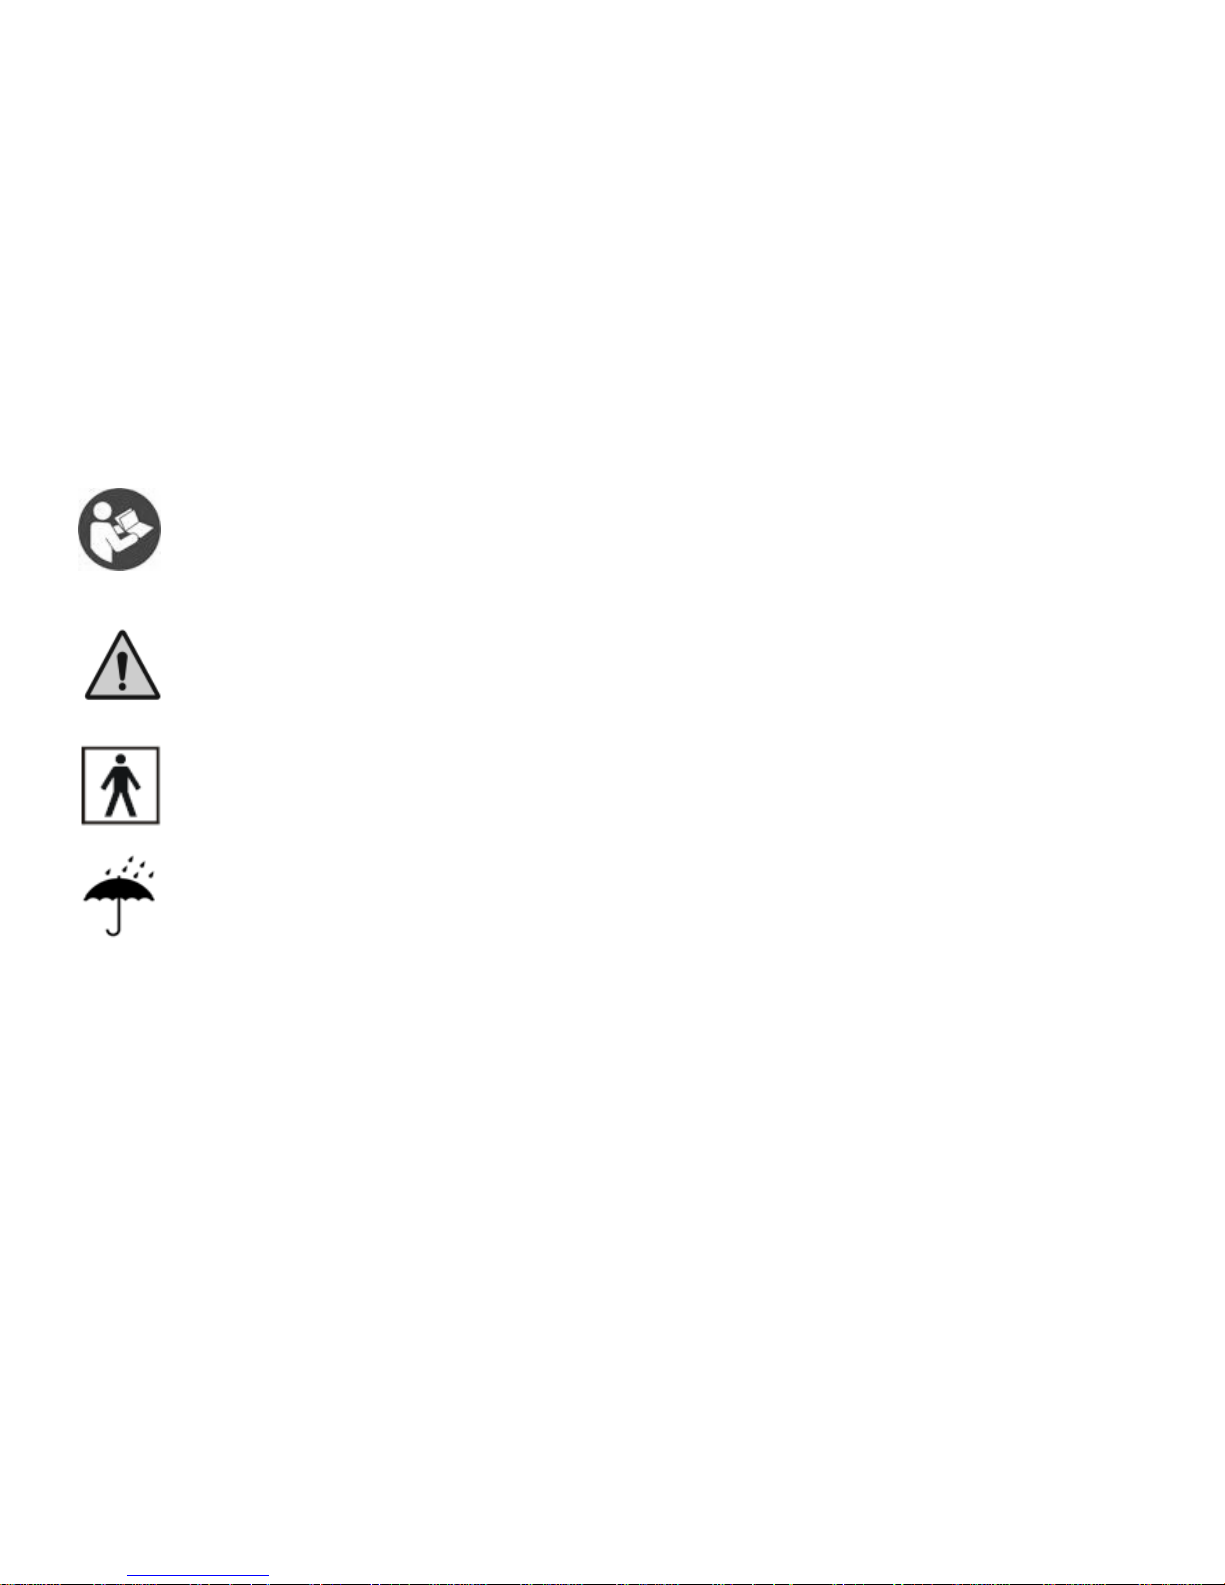
EXPLANATION OF SYMBOLS ON UNIT
Symbol for” THE OPERATION GUIDE MUST BE READ”(The sign background
colour: blue.The sign graphical symbol: white)
Symbol for “WARNING”
Symbol for “TYPE BF APPLIED PARTS” (The cuff is type BF applied part)
Symbol for “KEEP DRY”
Page 30
30
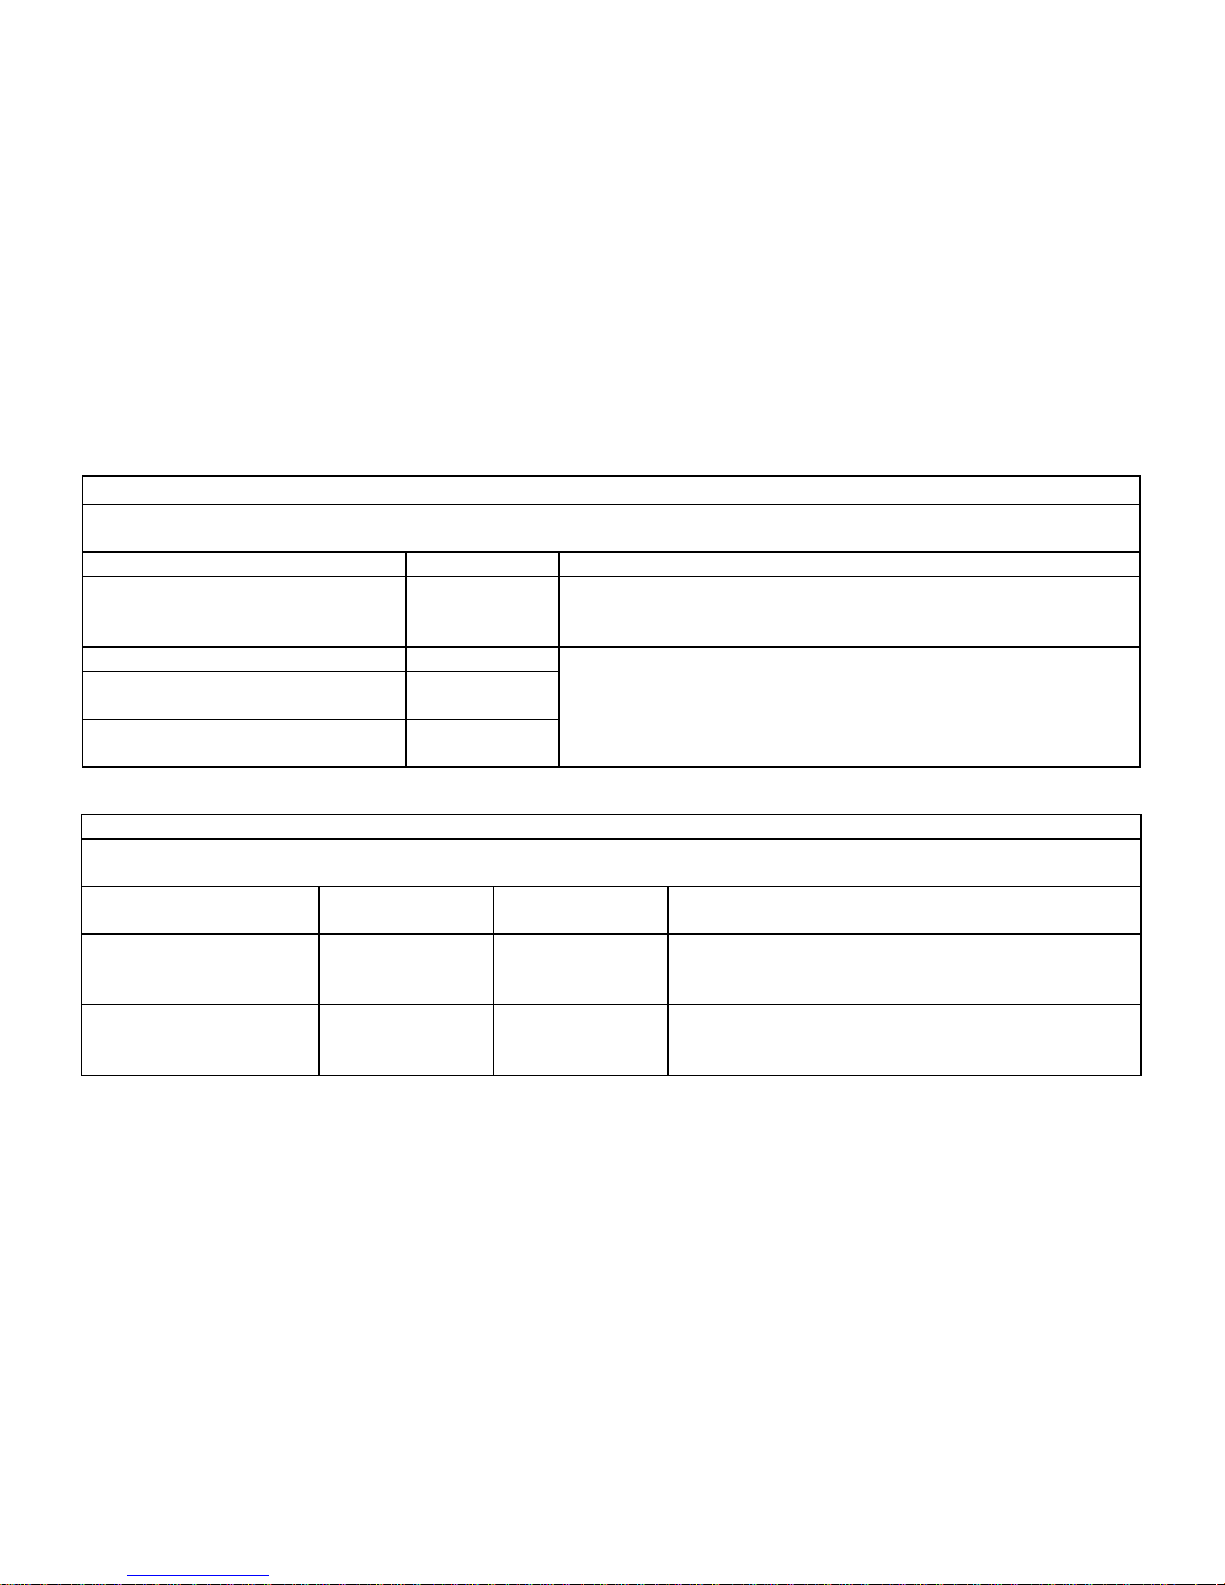
ELECTROMAGNETIC COMPATIBILITY INFORMATION
Table 1: For all ME EQUIPMENT and ME SYSTEMS
Guidance and manufacture’s declaration - electromagnetic emissions
The MX-CP2395 is intended for use in the electromagnetic environment specified below.
The customer or the user of the MX-CP2395 should assure that it is used in such an environment.
Emissions test Compliance Electromagnetic environment - guidance
RF emissions CISPR 11 Group 1
The MX-CP2395 uses RF energy only for its internal function.
Therefore, its RF emissions are very low and are not likely to
cause any interference in nearby electronic equipment.
RF emissions CISPR 11 Class B The MX-CP2395 is suitable for use in all establishments other
than domestic and those directly connected to the public lowvoltage power supply network that supplies buildings used for
domestic purposes.
Harmonic emissions
IEC 61000-3-2
Not
applicable
Voltage fluctuations/ flicker
emissions IEC 61000-3-3
Not
applicable
Table 2: For all ME EQUIPMENT and ME SYSTEMS
Guidance and manufacturer’s declaration - electromagnetic immunity
The MX-CP2395 is intended for use in the electromagnetic environment specified below. The customer or the user
of the MX-CP2395 should assure that it is used in such an environment.
IMMUNITY test
IEC 60601test
level
Compliance
level
Electromagnetic environment - guidance
Electrostatic discharge
(ESD) IEC 61000-4-2
± 6 kV contact
± 8 kV air
± 6 kV contact
± 8 kV air
Floors should be wood, concrete or ceramic tile.
If floors are covered with synthetic material, the
relative humidity should be at least 30 %.
Power frequency
(50/60 Hz) magnetic
Field IEC 61000-4-8
3 A/m 3 A/m Power frequency magnetic fields should be at
levels characteristic of a typical location in a
typical commercial or hospital environment.
Page 31
31
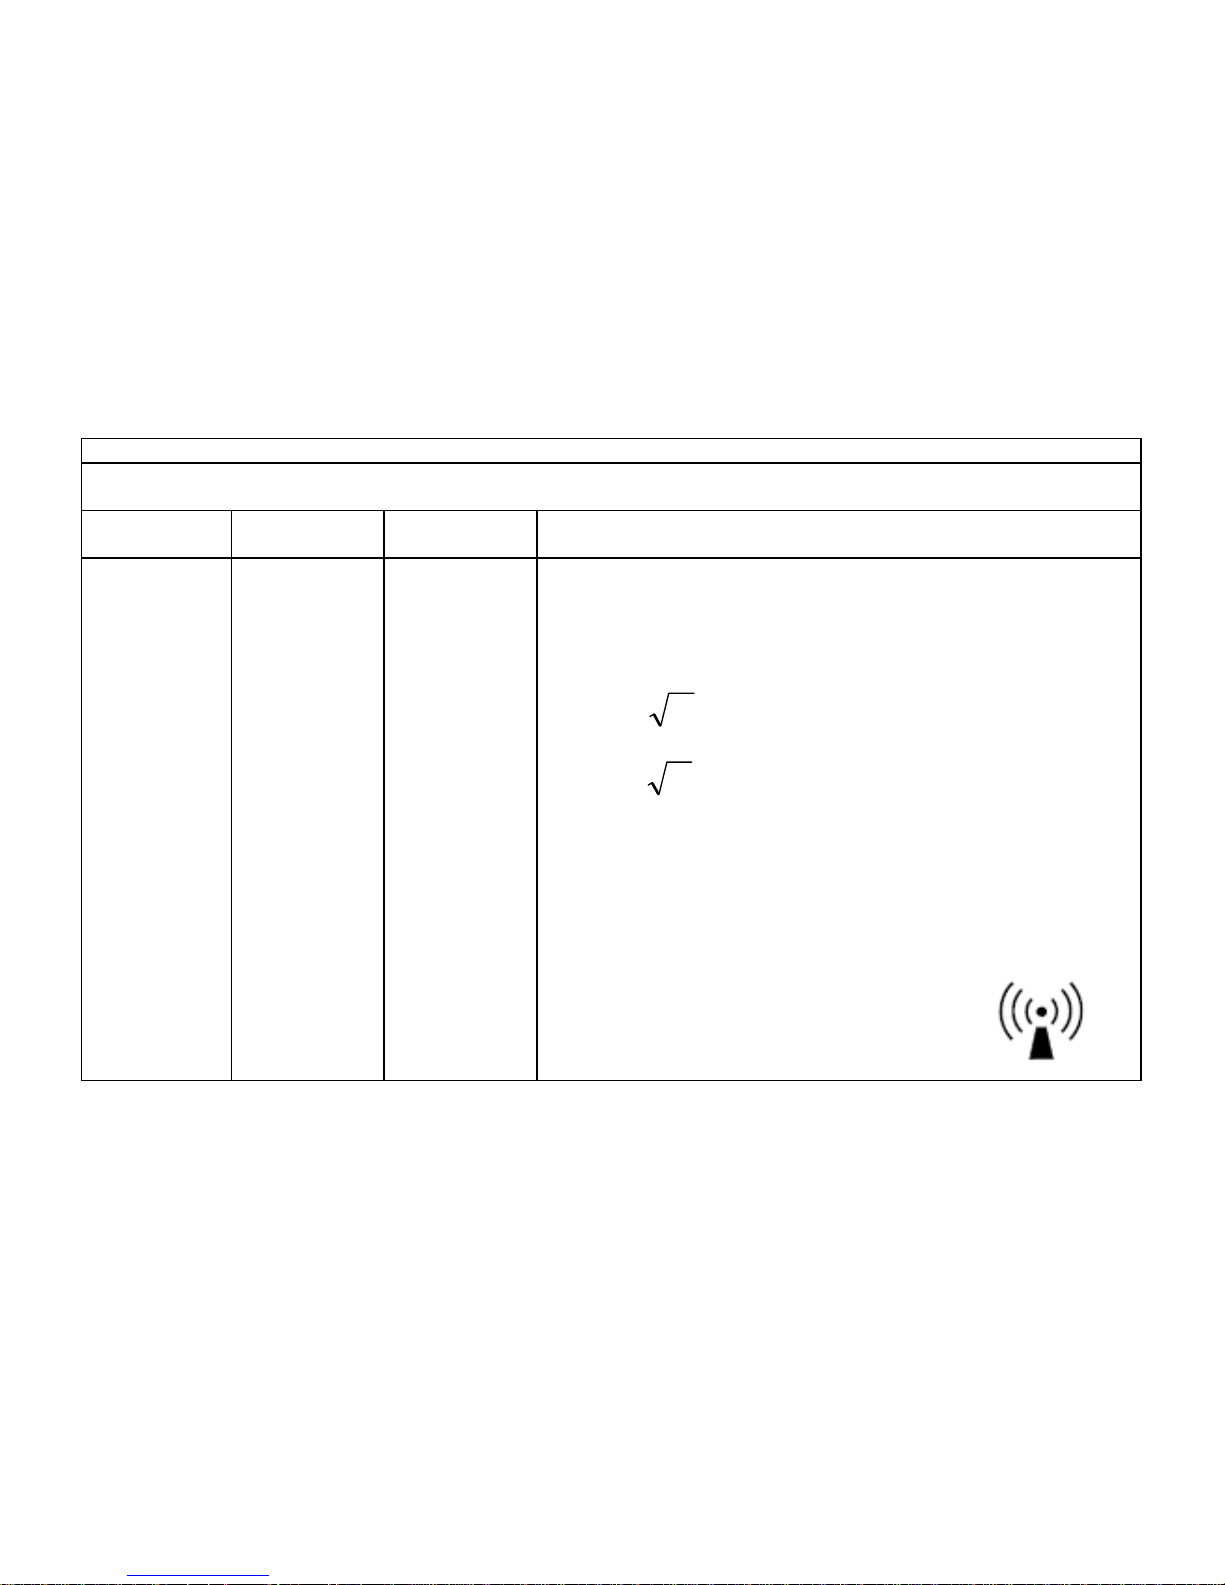
Pd 2.1=
Pd 3.2=
Table 3: For ME EQUIPMENT and ME SYSTEMS that are not LIFE-SUPPORTING
Guidance and manufacturer’s declaration - electromagnetic immunity
The MX-CP2395 is intended for use in the electromagnetic environment specified below. The customer or the user
of the MX-CP2395 should assure that it is used in such an environment.
IMMUNITY
test
IEC 60601test
level
Compliance
level
Electromagnetic environment - guidance
Radiated RF
IEC 61000-4-3
3 V/m 80
MHz to 2.5
GHz
3 V/m
Portable and mobile RF communications equipment should be
used no closer to any part of the MX-CP2395, including cables,
than the recommended separation distance calculated from the
equation applicable to the frequency of the transmitter.
Recommended separation distance =
80 MHz to 800 MHz
800 MHz to 2,5 GHz
Where P is the maximum output power rating of the transmitter
in watts (W) according to the transmitter manufacturer and d is
the recommended separation distance in meters (m).
Field strengths from fixed RF transmitters, as determined by an
electromagnetic site survey,
a
should be less than the
compliance level in each frequency range.
b
Interference may occur in the vicinity of
equipment
marked with the following symbol:
Page 32

32
NOTE 1: At 80 MHz and 800 MHz, the higher frequency range applies.
NOTE 2: These guidelines may not apply in all situations. Electromagnetic propagation is affected by absorption
and reflection from structures, objects and people.
a) Field strengths from fixed transmitters, such as base stations for radio (cellular/cordless) telephones and land
mobile radios, amateur radio, AM and FM radio broadcast and TV broadcast cannot be predicted theoretically
with accuracy. To assess the electromagnetic environment due to fixed RF transmitters, an electromagnetic site
survey should be considered. If the measured field strength in the location in which the MX-CP2395 is used
exceeds the applicable RF compliance level above, the MX-CP2395 should be observed to verify normal
operation. If abnormal performance is observed, additional measures may be necessary, such as re-orienting or
relocating the MX-CP2395.
b) Over the frequency range 150 kHz to 80 MHz, field strengths should be less than 3 V/m.
Page 33
33
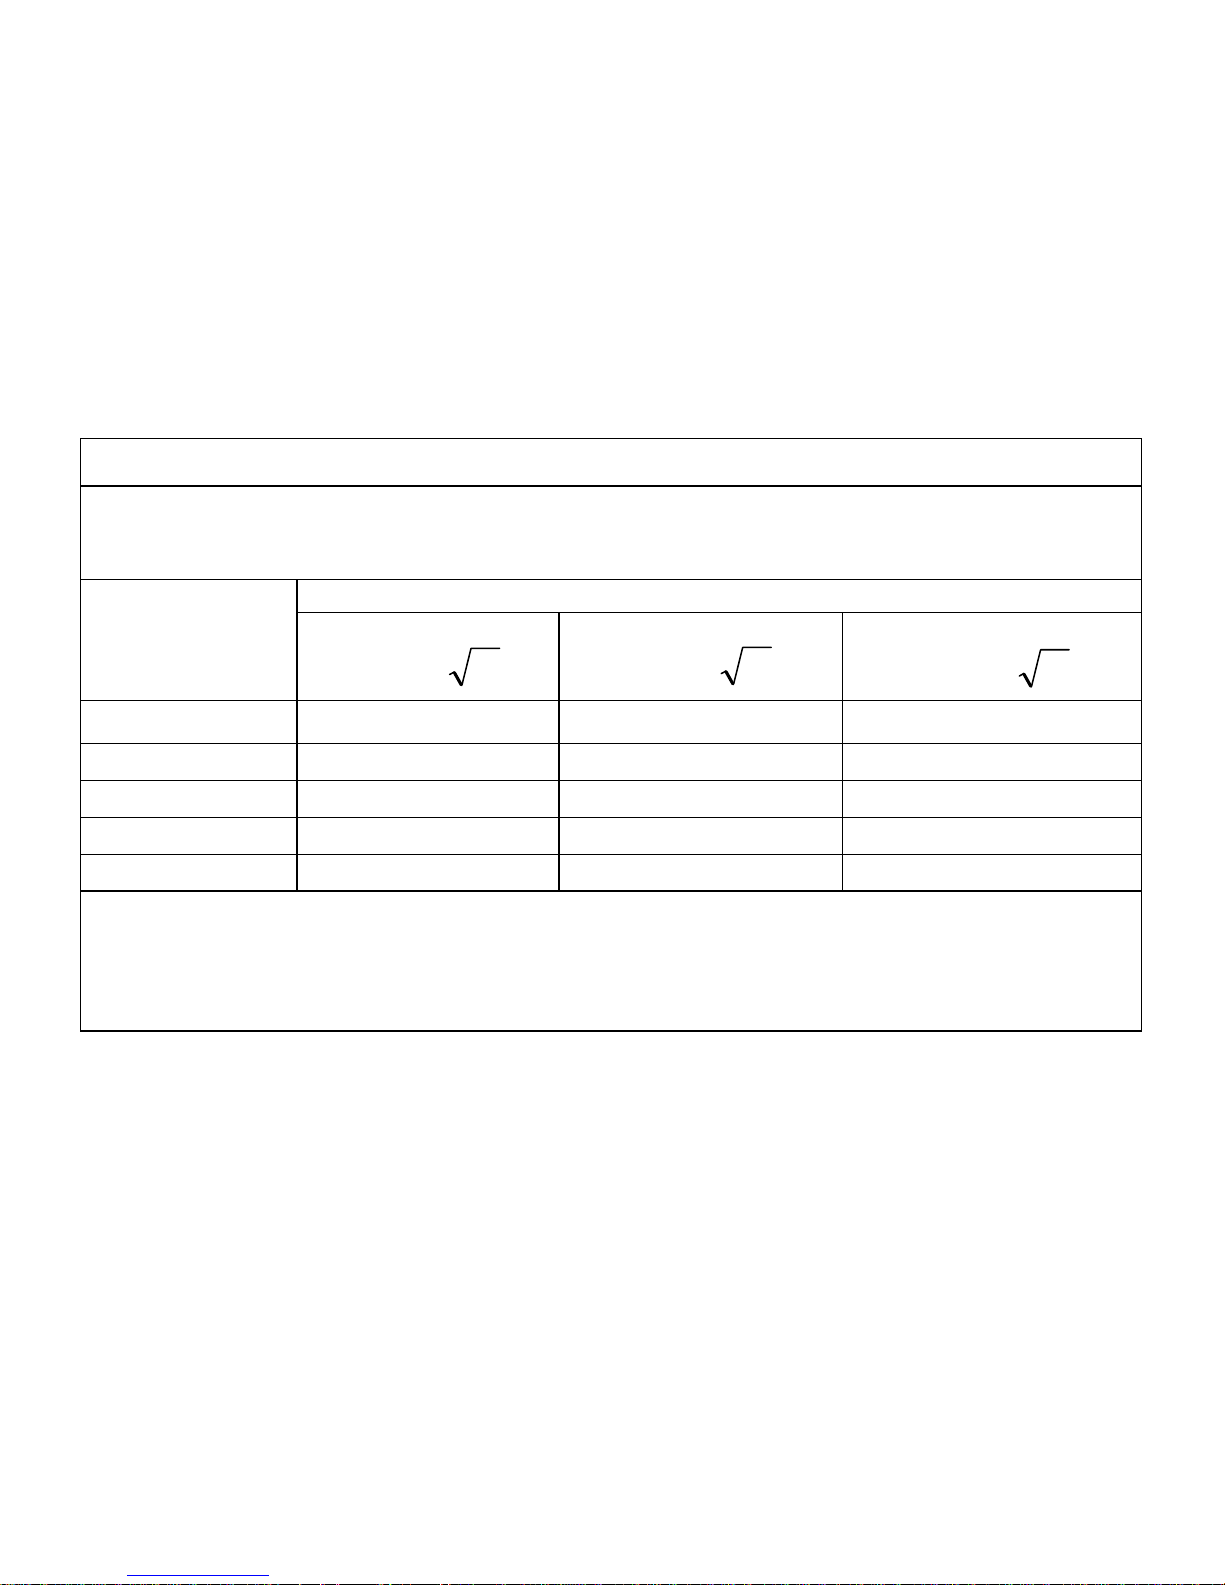
Pd 2.1=
Pd 2.1=
Pd 3.2=
Table 4: For ME EQUIPMENT and ME SYSTEMS that are not LIFE-SUPPORTING
Recommended separation distances between
portable and mobile RF communications equipment and the MX-CP2395
The MX-CP2395 is intended for use in an electromagnetic environment in which radiated RF disturbances are
controlled. The customer or the user of the MX-CP2395 can help prevent electromagnetic interference by maintaining
a minimum distance between portable and mobile RF communications equipment (transmitters) and the MX-CP2395
as recommended below, according to the maximum output power of the communications equipment.
Rated maximum
output power of
transmitter (W)
Separation distance according to frequency of transmitter (m)
150 kHz to 80 MHz 80 MHz to 800 MHz 800 MHz to 2,5 GHz
0,01 0.12 0.12 0.23
0,1 0.38 0.38 0.73
1 1.2 1.2 2.3
10 3.8 3.8 7.3
100 12 12 23
For transmitters rated at a maximum output power not listed above, the recommended separation distance d in
meters (m) can be determined using the equation applicable to the frequency of the transmitter, where P is the
maximum output power rating of the transmitter in watts (W) according to the transmitter manufacturer.
NOTE 1: At 80 MHz and 800 MHz, the separation distance for the higher frequency range applies.
NOTE 2: These guidelines may not apply in all situations. Electromagnetic propagation is affected by absorption
and reflection from structures, objects and people.
Page 34

34
This product complies with the dispositions of the Directive of the Council on sanitary products
93/42/EEC, of the European Parliament, and has been proven and tried in agreement the
norms EN 1060-3, EN1060-1.
Mark CE 0197 indicates that this product complies the European Directives. All components to
the pressure measuring system, including accessories: Pump, Valve, LCD, Cuff, Sensor.
Made by: Authorized representative in the EU:
Andon Health Co., Ltd. Lotus Global Co., Ltd.
No.3 Jinping Street, Ya An Road, 1 Four Seasons Terrace West
Nankai District, Tianjin, Drayton, Middlesex London, UB7 9GG
300190, China United Kingdom
Imported by:
MX ONDA, S.A.
Isla de Java, 37 28034 – MADRID (SPAIN)
Telephone of information and Technical Service: 902 551 501
 Loading...