

Page 1
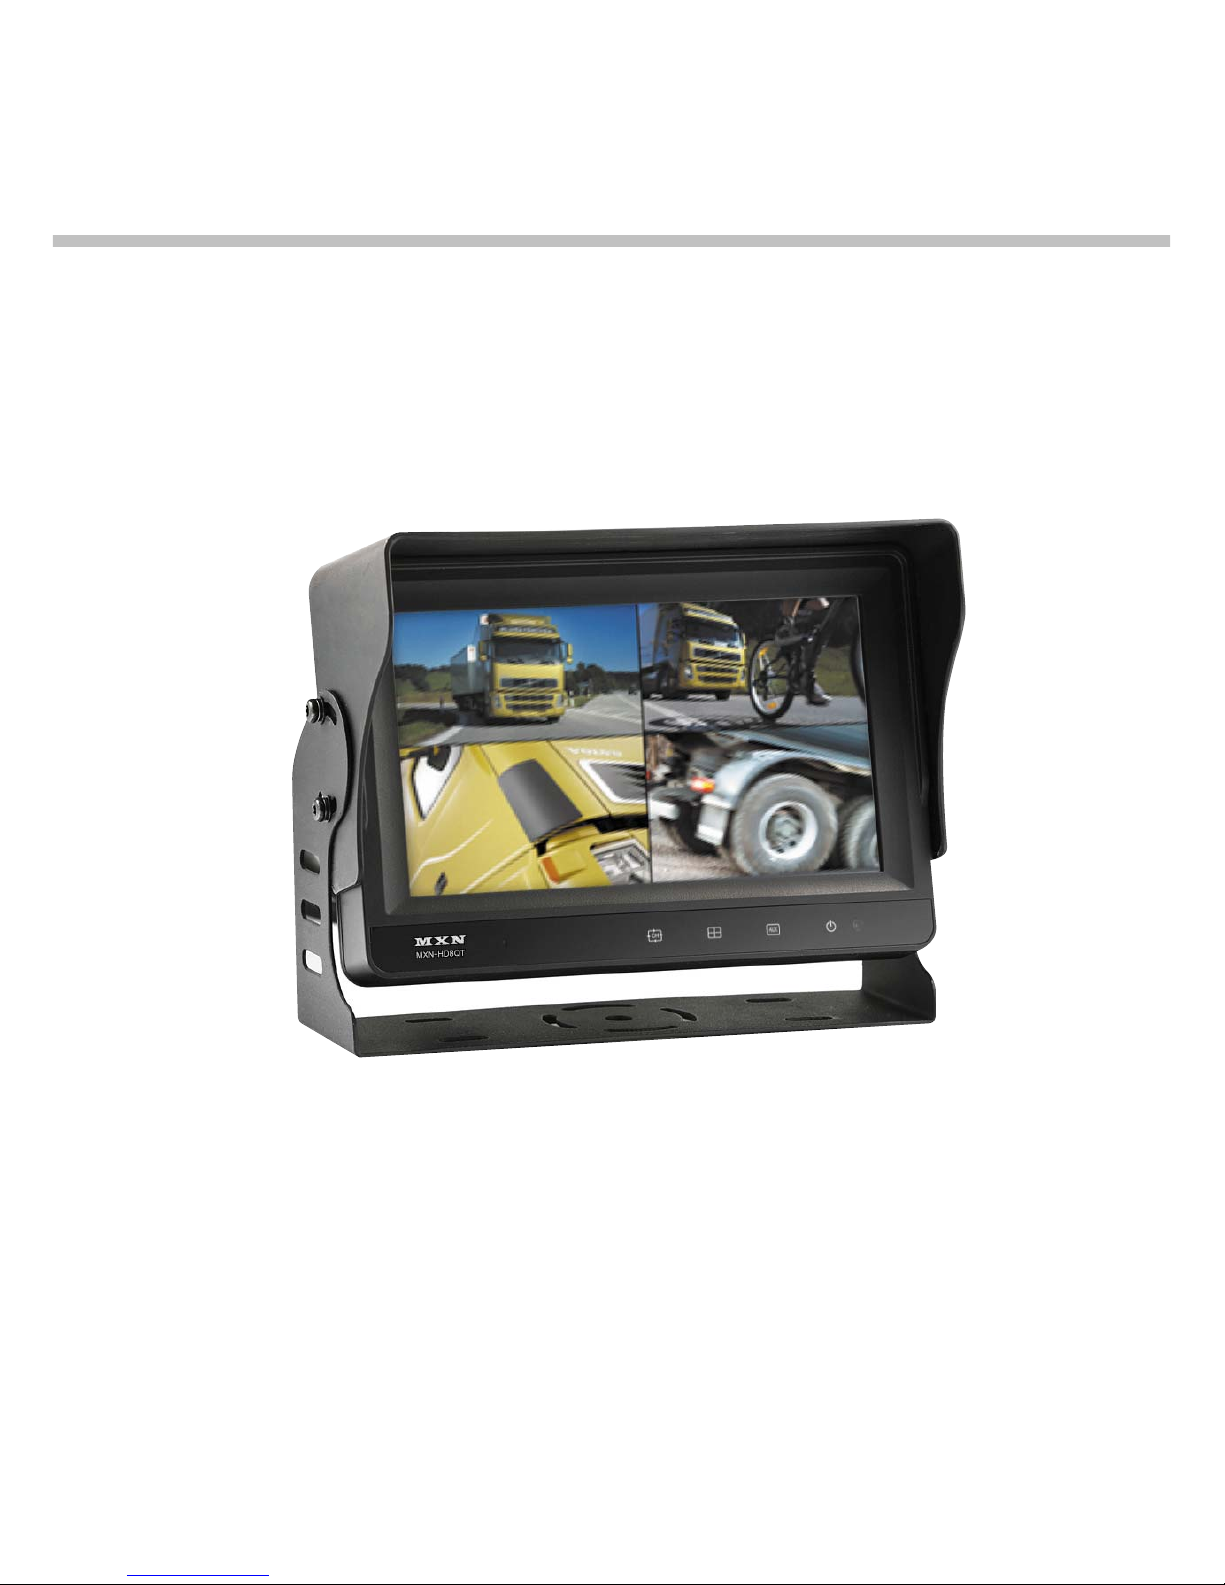
Mount 8"
Touch screen vehicle monitor
for allround vision
Model : MXN-HD8QT
Design and Specifications are subject to change without notice.
Instruction Manual(Ver. 1.0)
Page 2
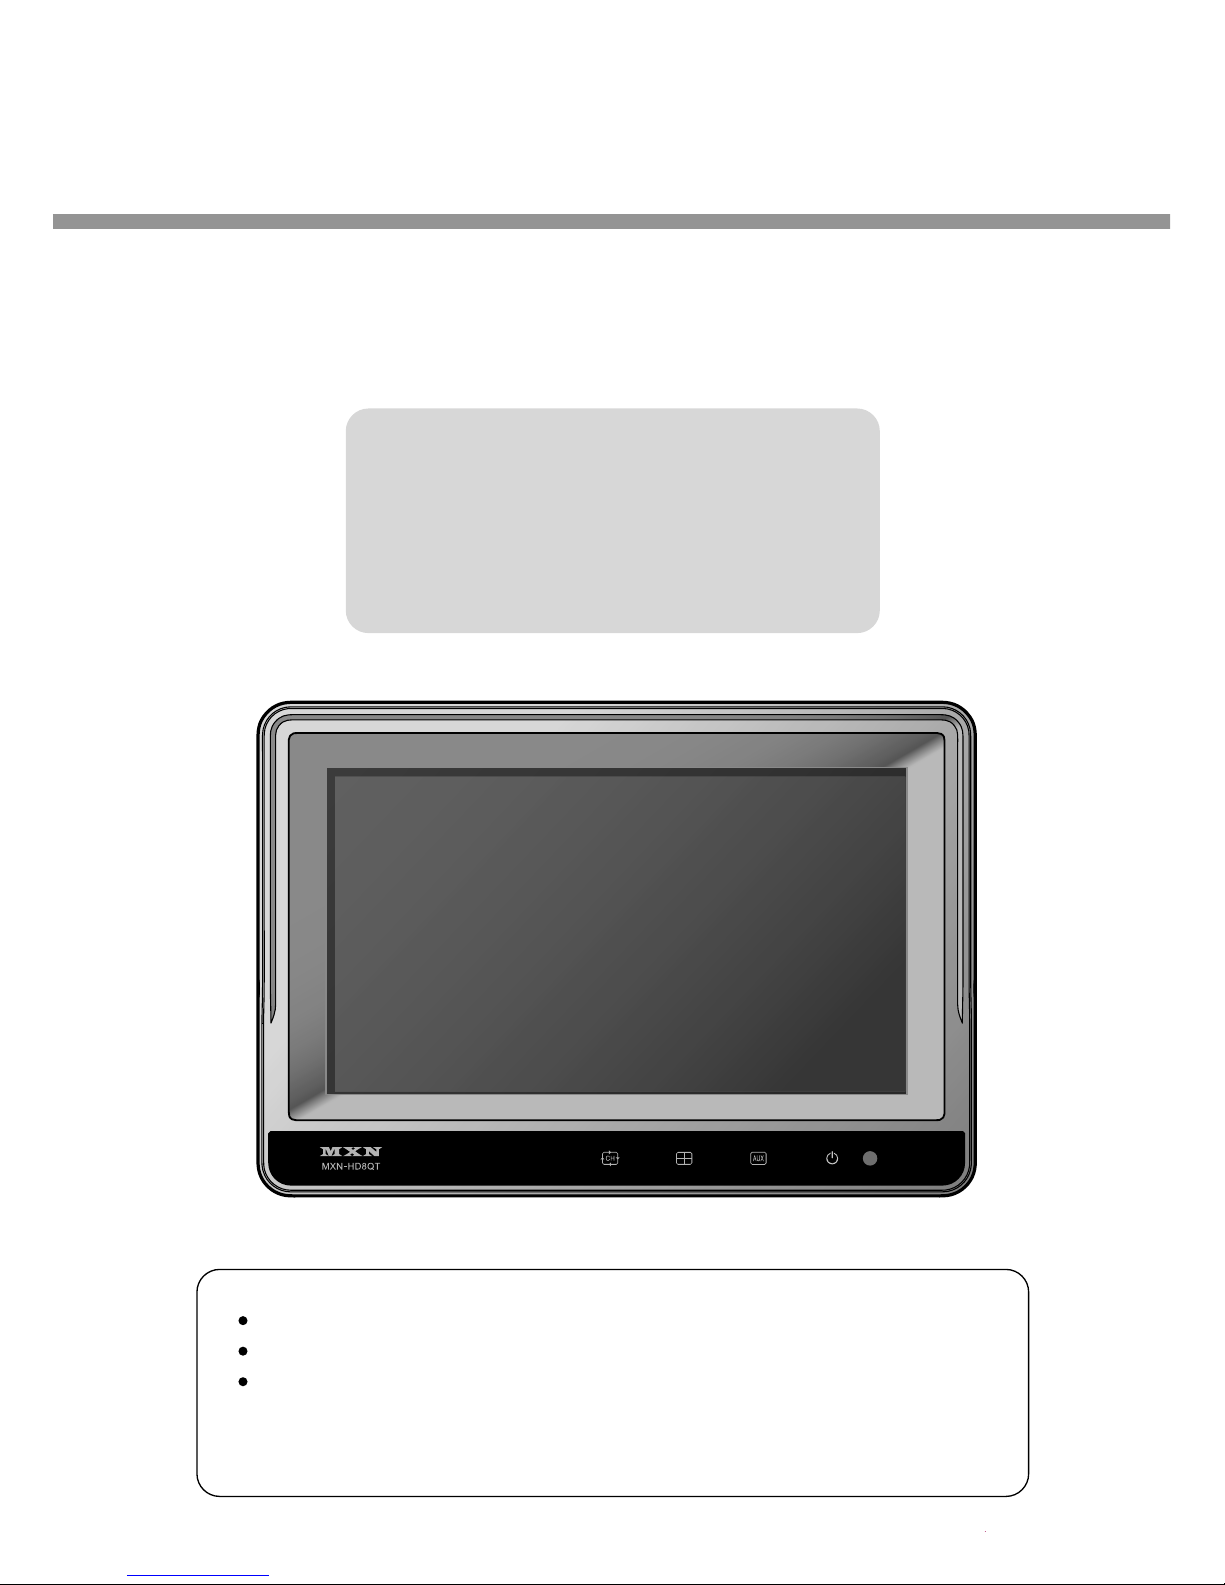
8" Touch screen Monitor
Model : MXN-HD8QT
Instruction Manual (Ver 1.0)
Index
1. Caution
2. Components of the product
3. How to use the product
4. How to install the product
5. Specification
Thank you for purchasing our touchscreen vehicle monitor.
Please read this manual before you use the product.
The product may be different than described in the manual;
depending on renewal and/or upgrade of S/W version and
performance it can be altered without notice.
Page 3

Caution
3
For your safe operation, please read this manual before you start to use
the product. We inform you that our company shall not be responsible for
failures and troubles that are occurred due to misuse or neglection of the
cautions written on this manual.
Operating this equipment when driving a vehicle might cause an accident.
Use the equipment after parking or stopping the vehicle in a safe area.
When wiping off the dust, use a soft fabric instead of liquid solvents (thinner,
benzene etc.) solution or a wet rag.
Do not press the liquid crystal screen hard. It might be damaged by hard
pressure.
Do not drop or give shock. It might cause breakdown or damage.
Do not dismantle the product arbitrarily. We do not supply free after service
for an arbitrarily dismantled product.
Touching the power with a wet hand causes electric shock. Caution
required.
For accessories or cables to connect with the product, it is recommended
to use proper goods from our company. We are not responsible for any
problems caused by wrong articles.
Do not disconnect the power cable during using the product. It might
cause damage to the product.
Amplified explanation is as follows.
-Caution: This part informs what to keep in mind or understand and what
caution is required to use the product.
-Ref (reference): Reference is about functional explanation.
Page 4
Components of the product
4
1
2
3
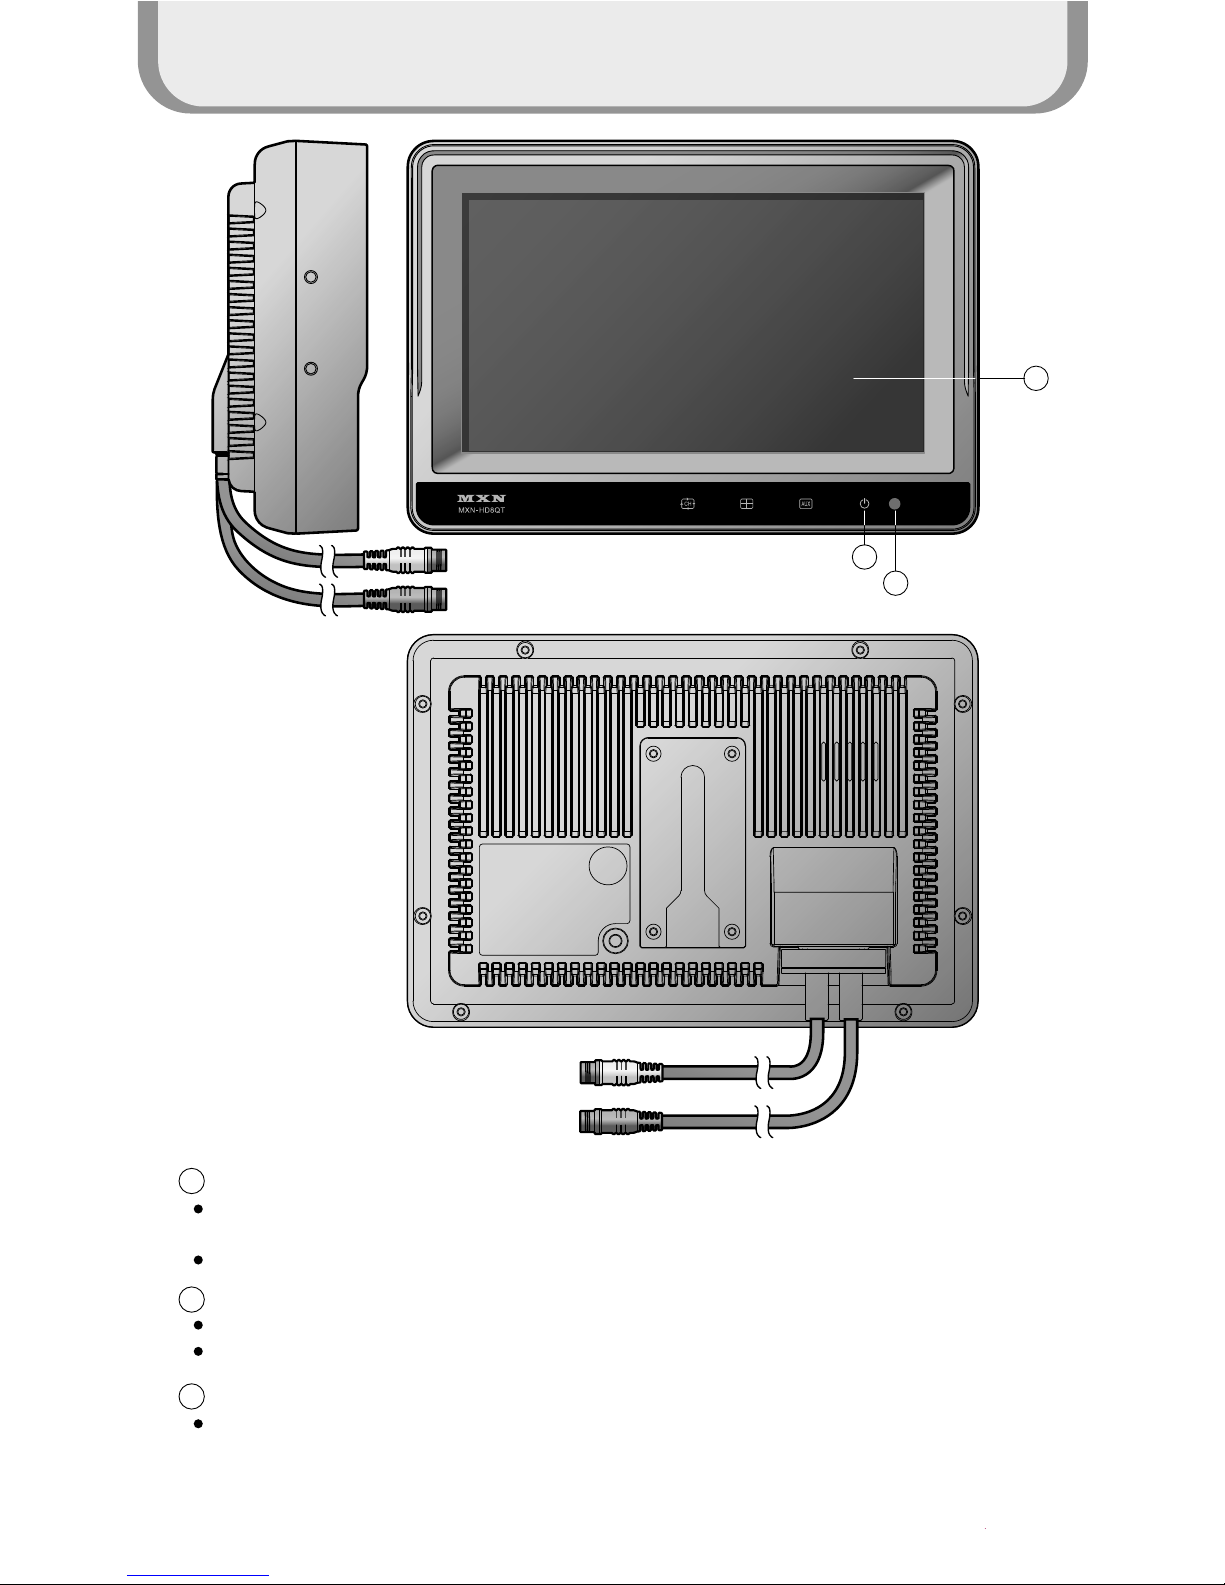
Touch Screen
By touching one of the small pictures during multi screen mode, the concerning small picture
will be enlarged into Full Screen mode.
By touching the screen it is possible to control the equipment or to change the settings.
Power On/Off
Press the Power button for 0.5 seconds to turn on the screen.
Press the Power button for 0.5 seconds to turn off the screen when it is tuned on.
illuminance Sensor
Behind this window a sensor detects the actual light conditions in the area around the screen.
When activated via the menu settings, this sensor automatically controls the brightness of the
screen.(Day/Night control)
1
Blue
Black
2
3
Page 5
Components of the product
5
4
5
6
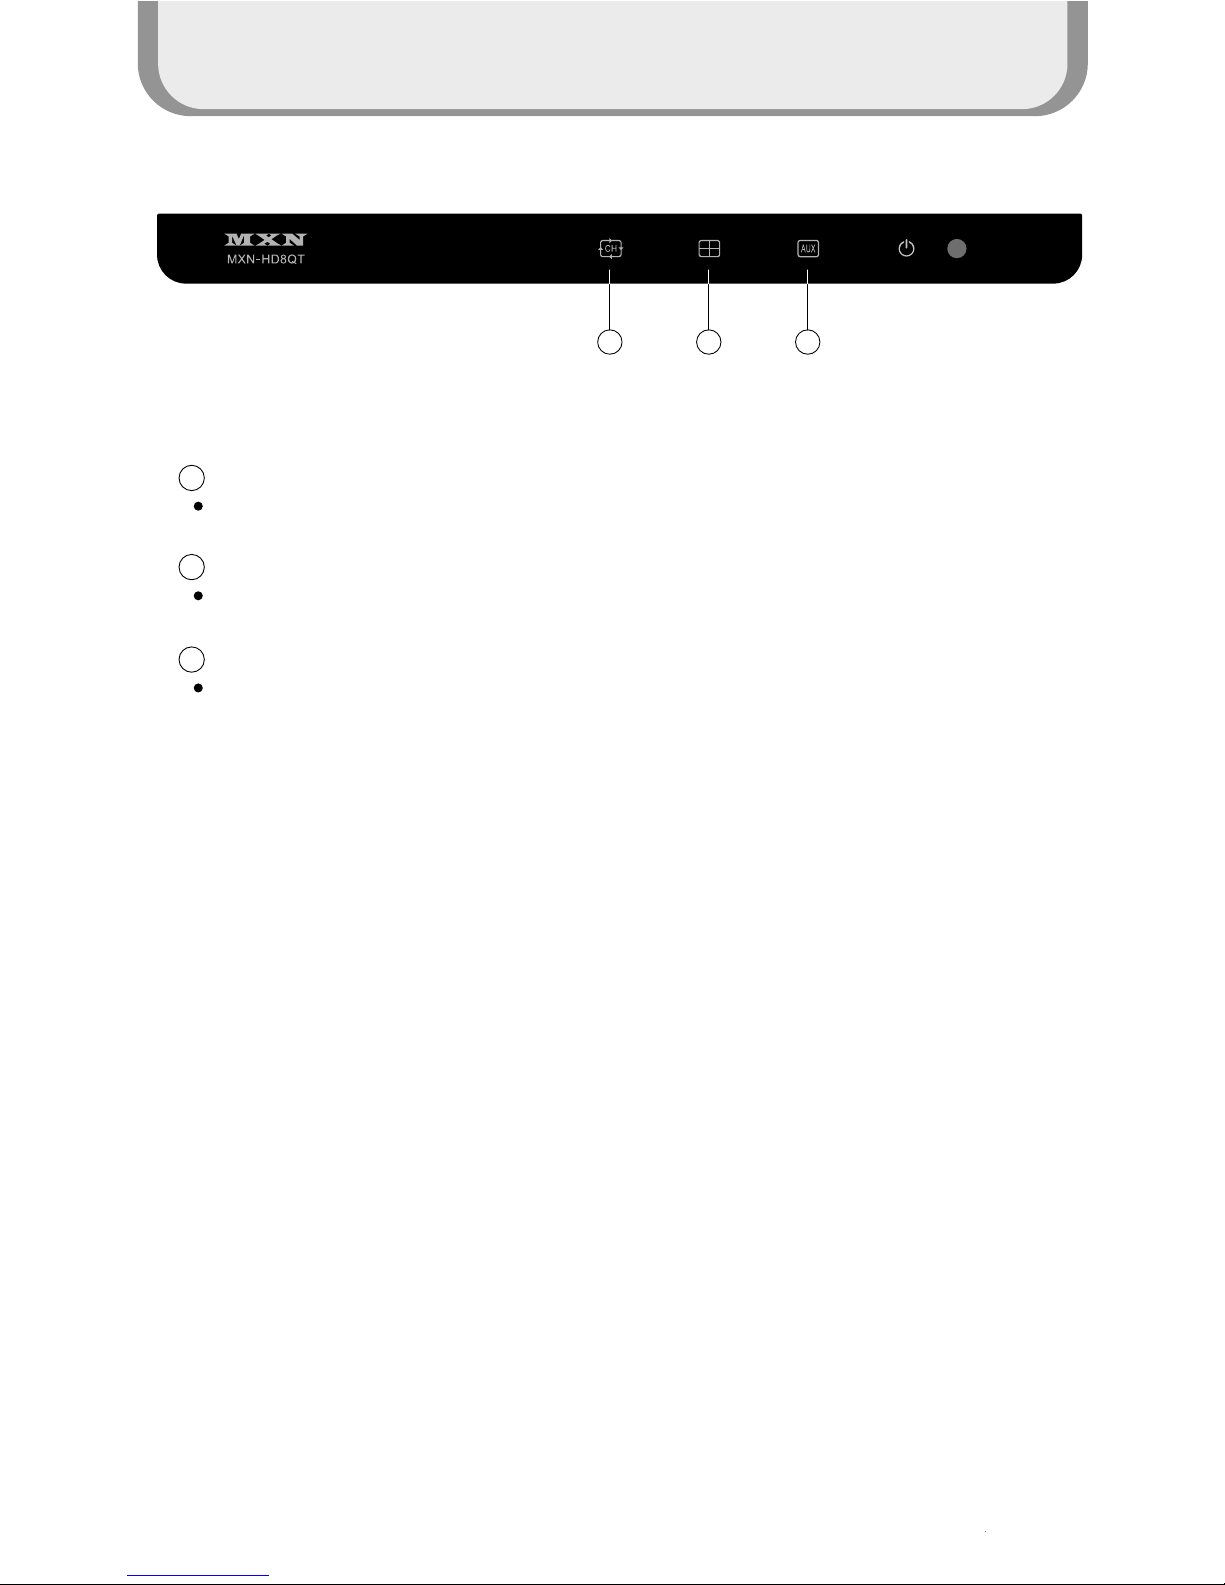
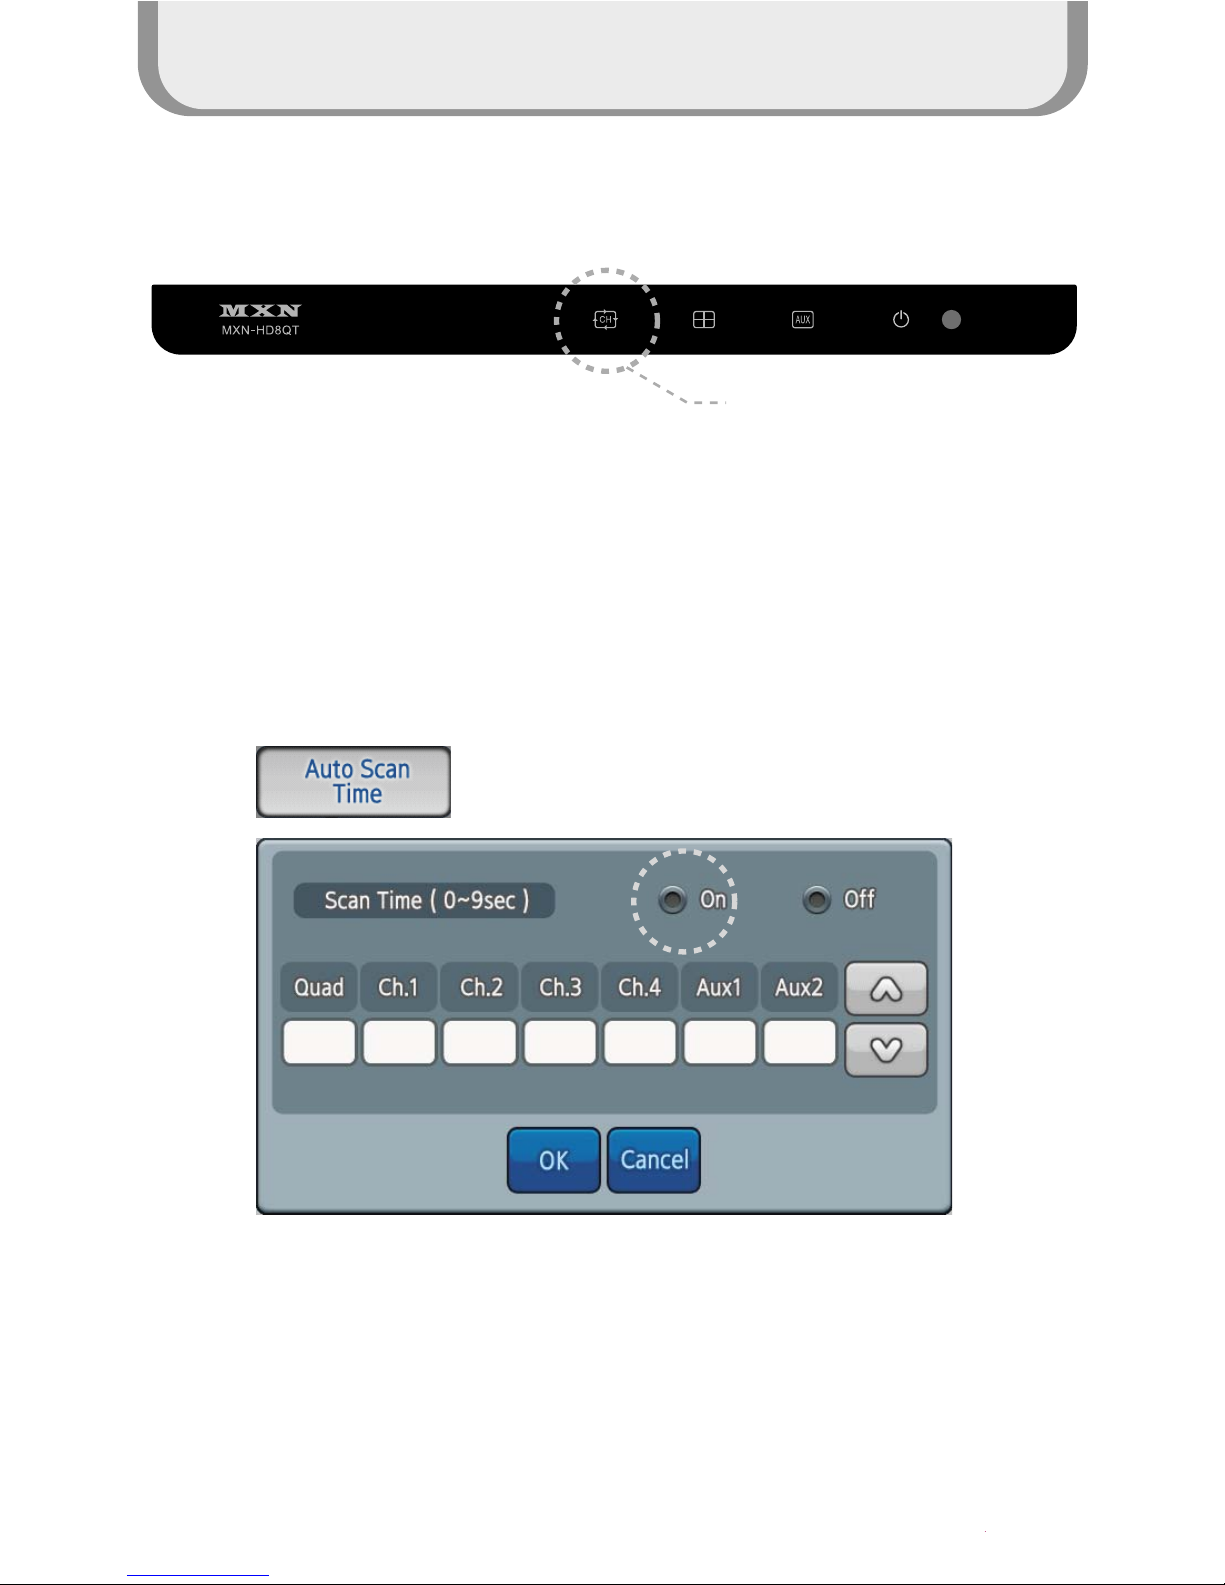
CH Auto scan
Display the full screen according to each Channel setup when setting up On
Split Screen
A split screen appears.
AUX Button
Press the Input button to change Input.
4 5 6
Page 6
7
1
2
3
4
5
6
7
8
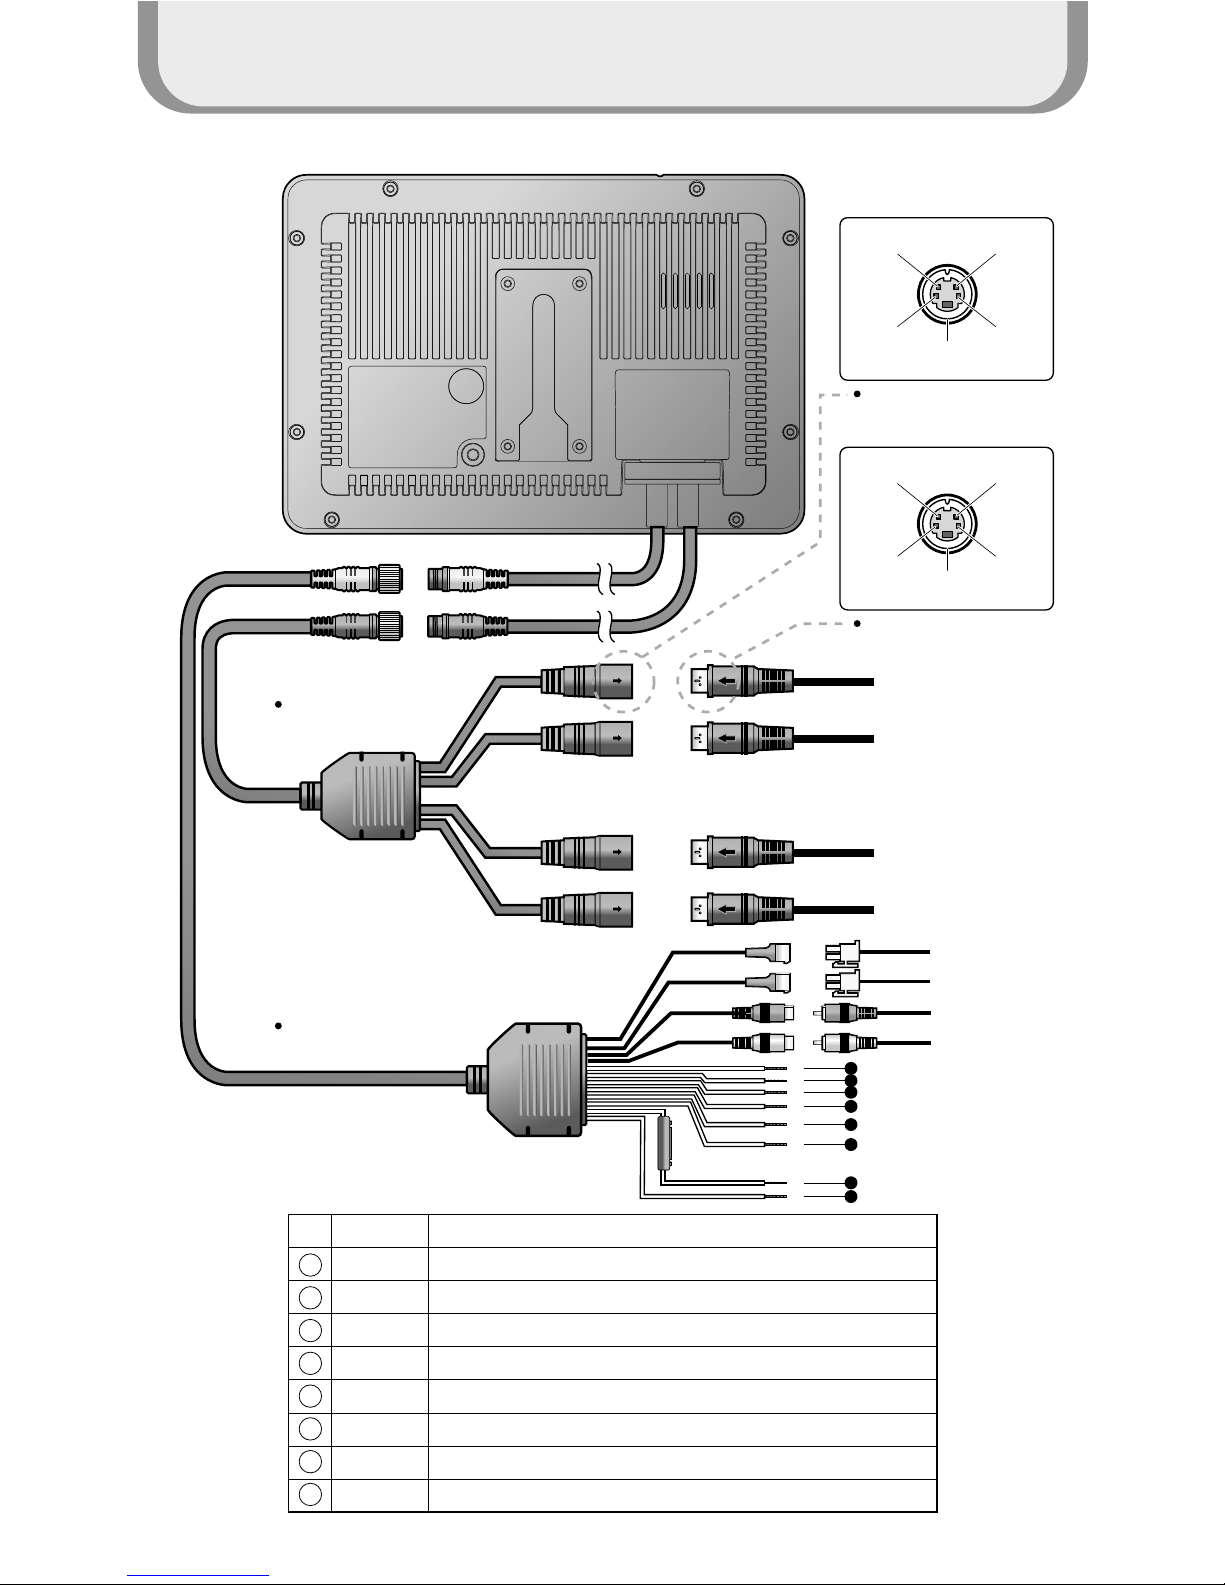
AUX VIDEO IN
EXT.MIC
EXT.SPK
AUX AUDIO IN
5
4
3
2
1
6
8
AUDIO in
DC 12VVIDEO in
NC
(Optional : Heater/Shutter)
GROUND
Camera connection
Camera Cable
Blue
Black
Blue
Black
Red
Power Cable
Camera 1
Camera 2
Camera 3
Camera 4
Yellow
NO. Wire Color Label
GRAY Trigger 3 ( 9 ~ 30V DC, via direction light, etc. )
BLUE Trigger 4 ( 9 ~ 30V DC, via direction light, etc. )
GREEN Trigger 2 ( 9 ~ 30V DC, via direction light, etc. )
ORANGE Trigger 1 ( 9 ~ 30V DC, via direction light, etc. )
Trigger 5 ( 9 ~ 30V DC, via direction light, etc. )
BROWN
WHITE Speed Pulse (via tachograph, 10 ~ 999 Hz )
RED Power (12 ~ 36V DC, via ingition )
BLACK Ground
AUDIO in
DC 12V VIDEO in
NC
(Optional : Heater/Shutter)
GROUND
Monitor connection
System Connection
6
Components of the product
Page 7
Components of the product
7
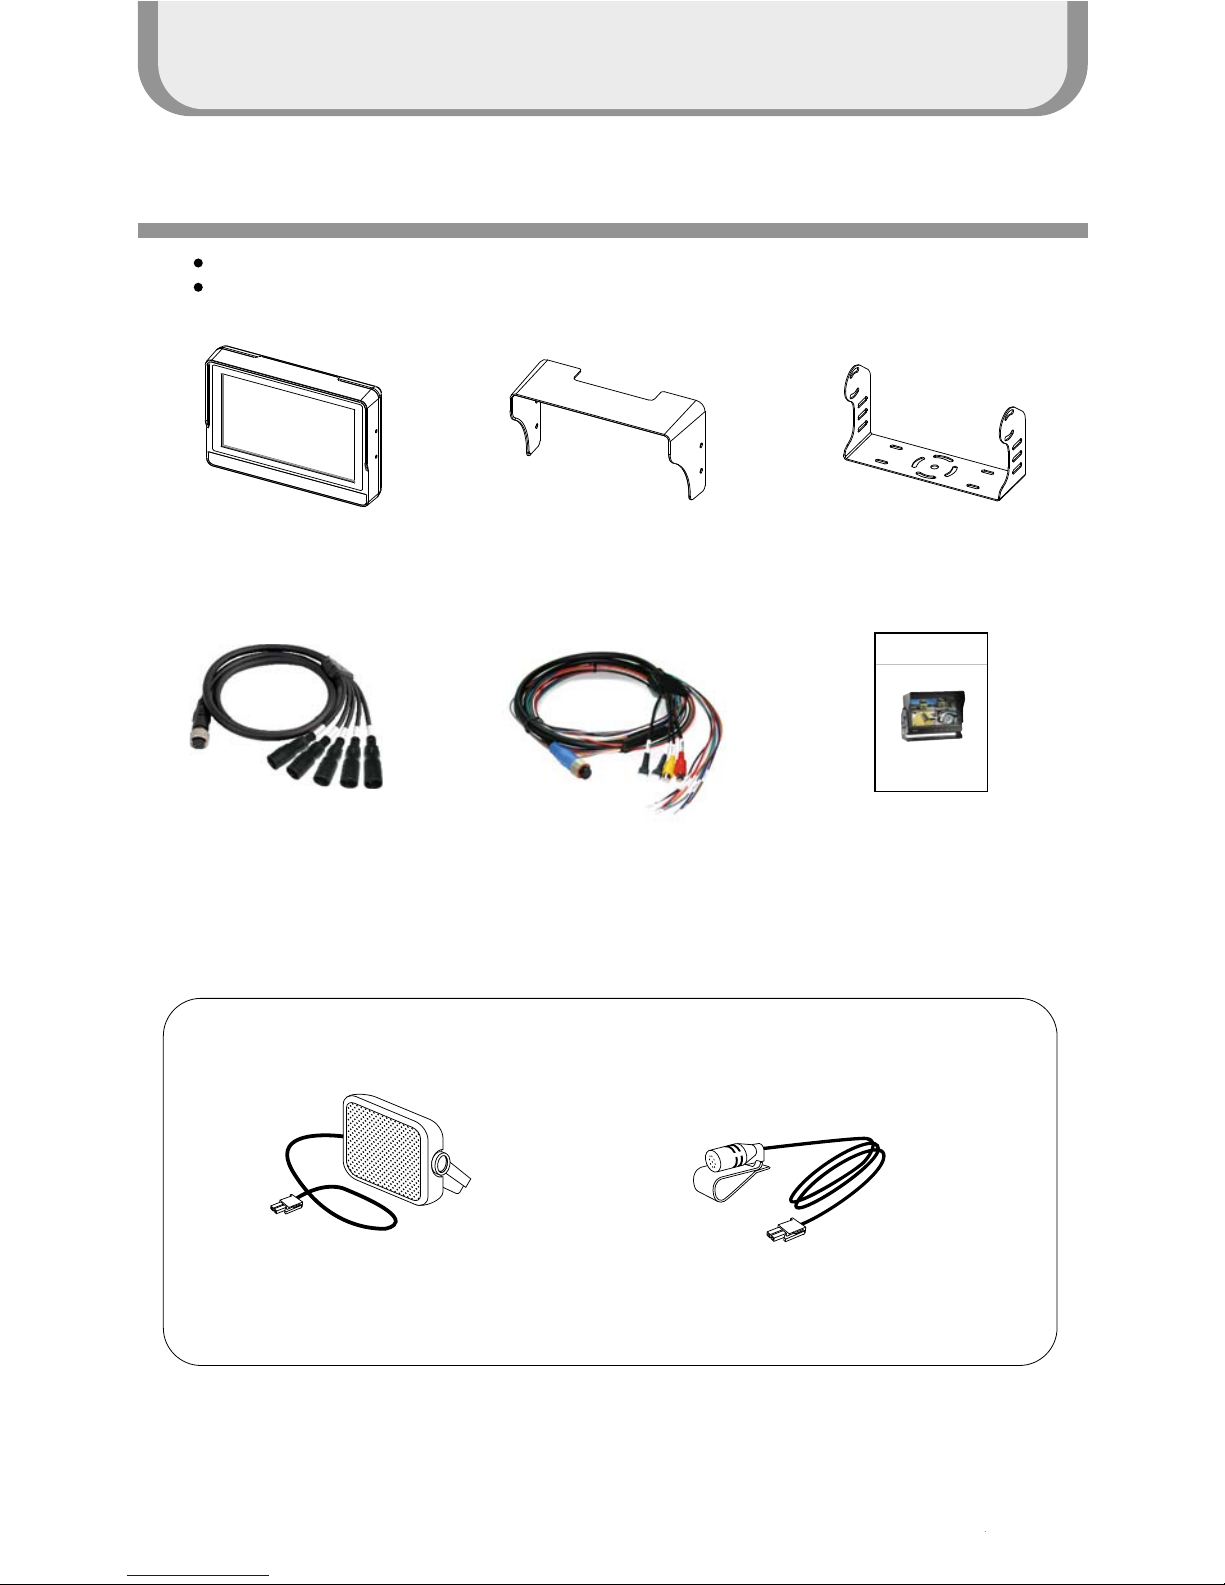
Please check that you have the correct contents before using this product.
If any items are missing, please contact your dealer.
Package Contents
Monitor Sunvisor Bracket
Camera Cable Manual
EXT, Speaker EXT,MIC
Option
Mount 8"
Touch screen vehicle monitor
for allround vision
Model : MXN-HD8QT
Design and Specifications are subject to change without notice.
Instruction Manual(Ver. 1.0)
Power Cable
Page 8
How to use the product
8
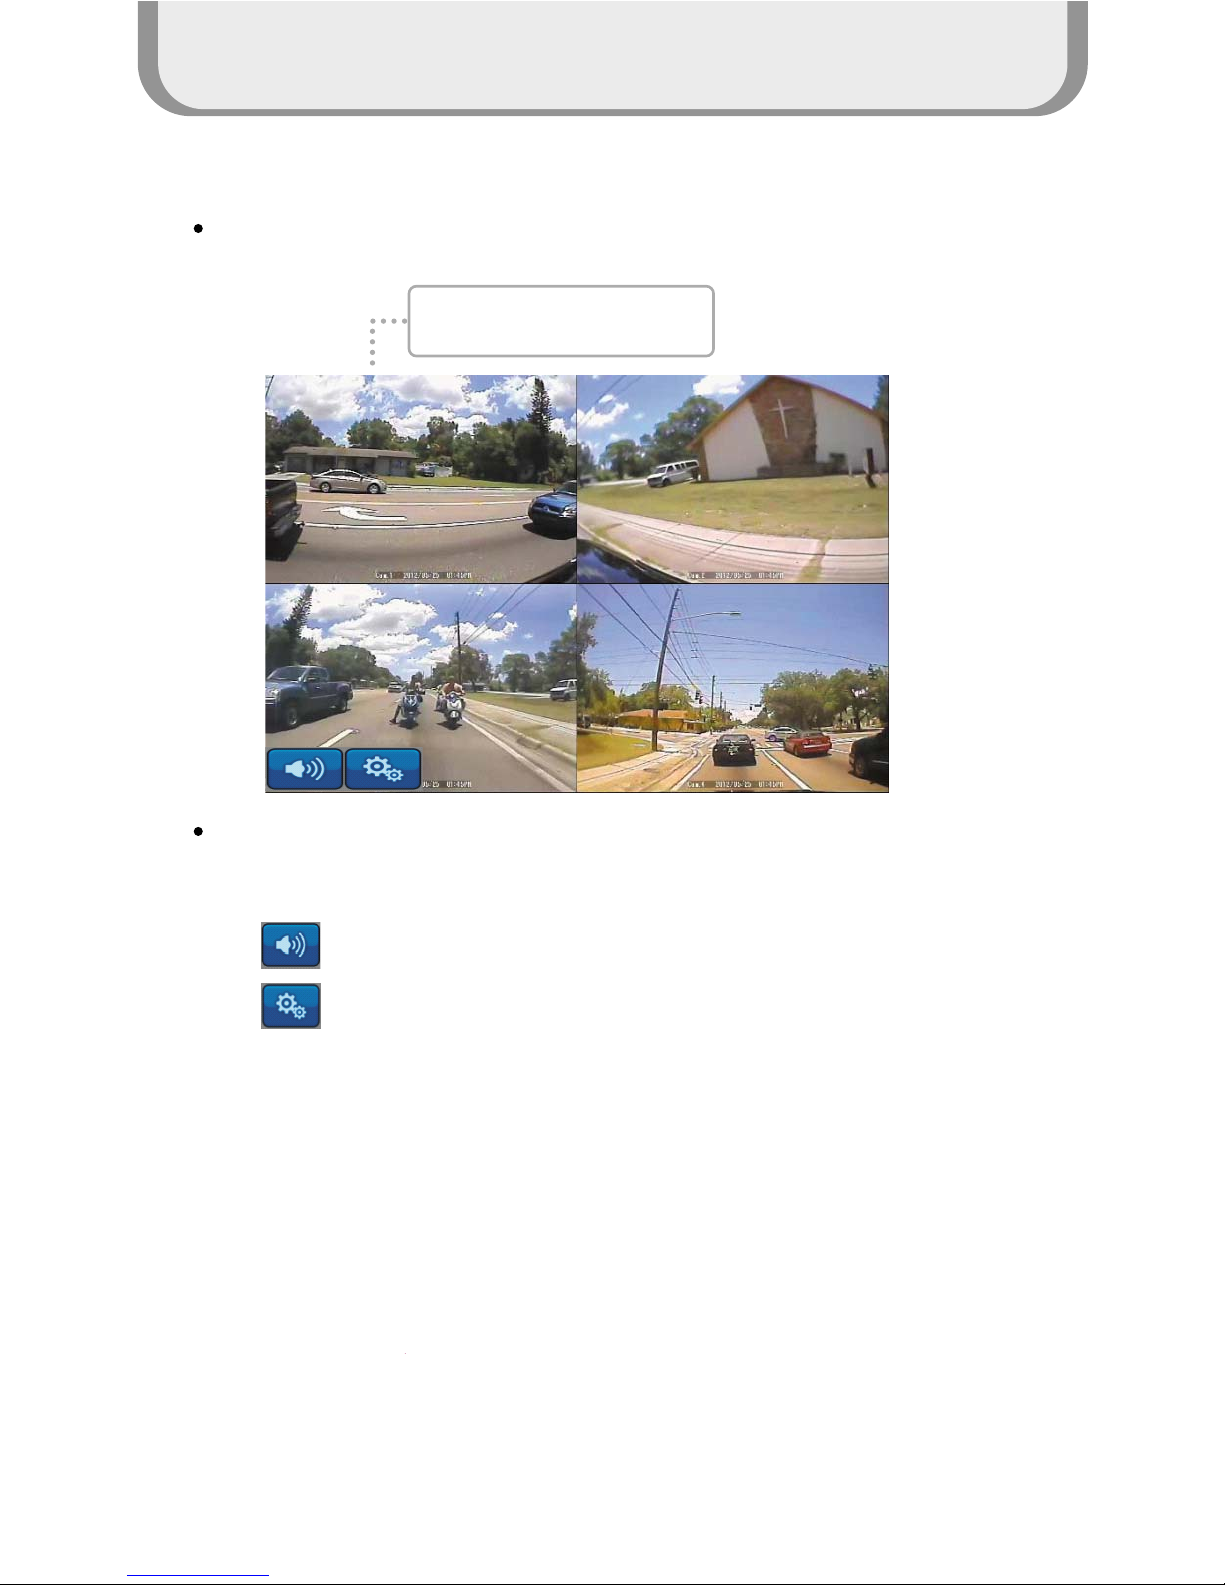
Start Screen
When the booting is ready, the multi screen as below will be displayed
When the small windows on the multi screen are touched, the channel is enlarged into full
screen mode. One more touch returns it back to the multi screen mode.
: Controls volume of the speaker
: Settings menu
When the small window is
touched, it is enlarged.
Page 9
How to use the product
9
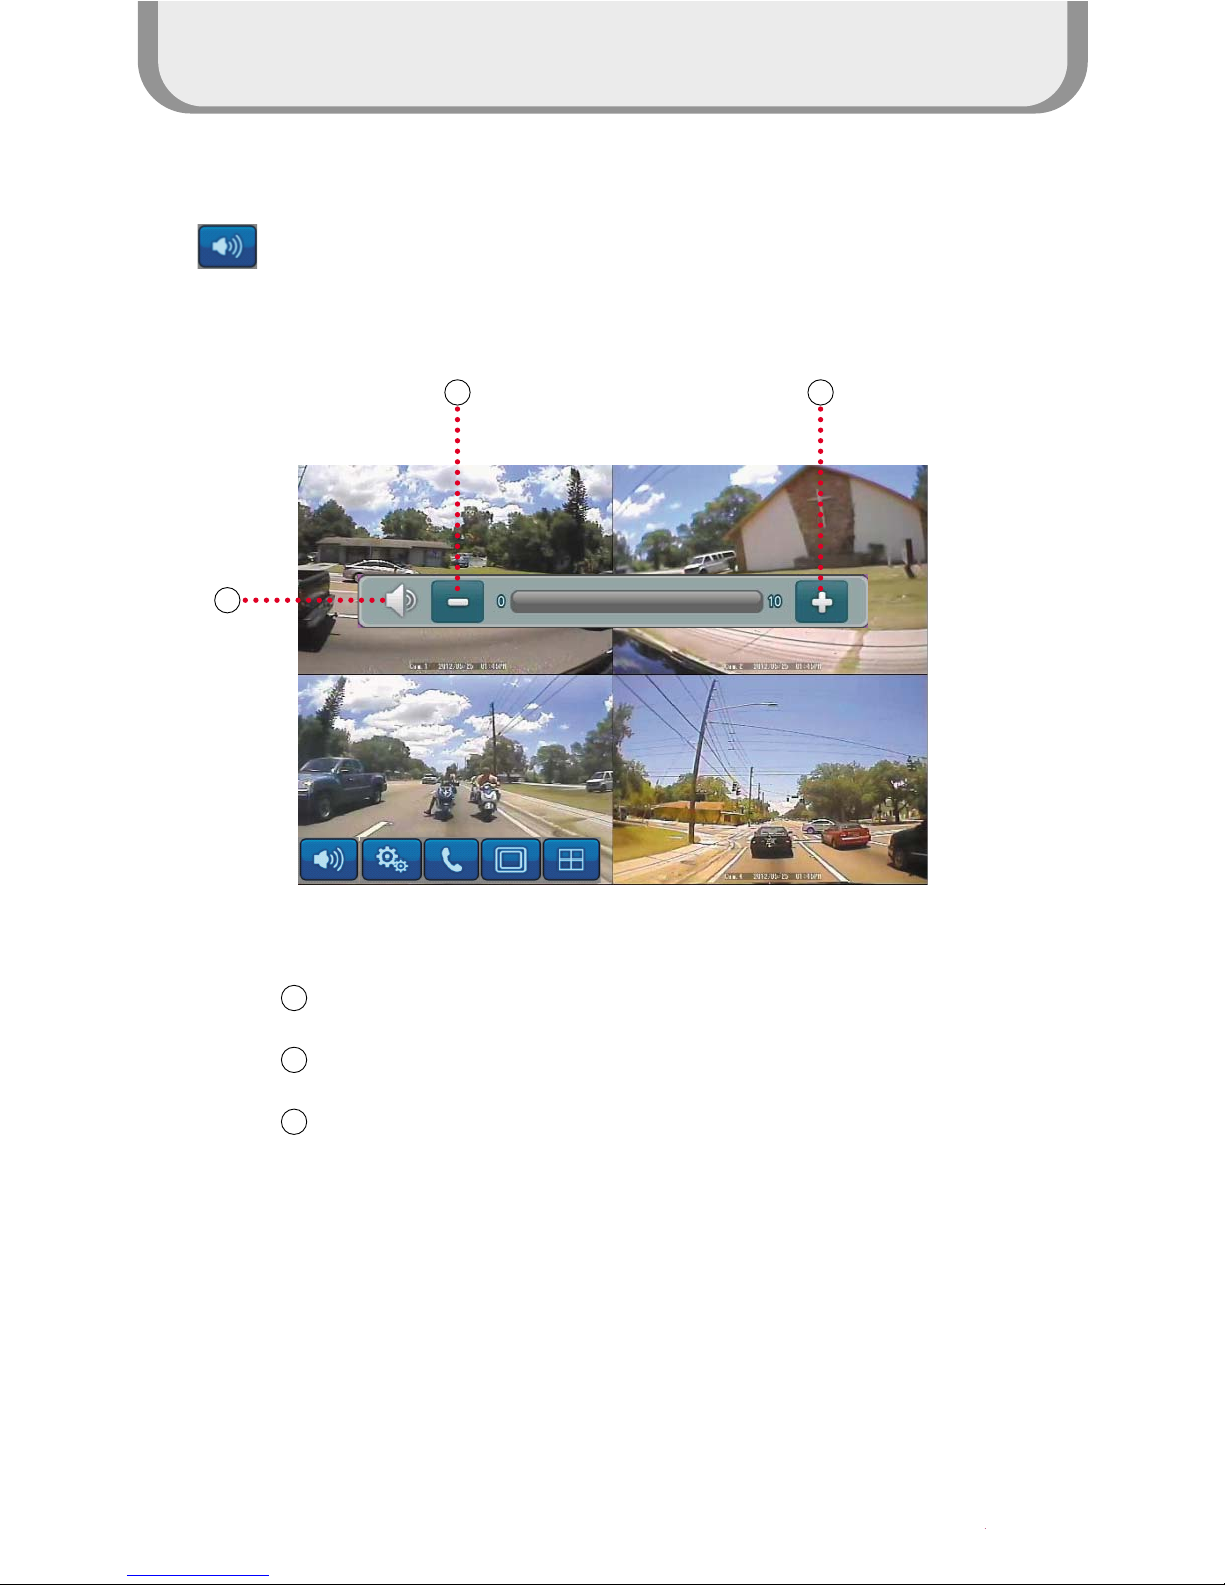
Volume Control
Press the button to display Volume Pop-up.
1
1
2
3
2 3
Press the button to mute
Press the button to increase the volume
Press the button to decrease the volume
Page 10
How to use the product
10
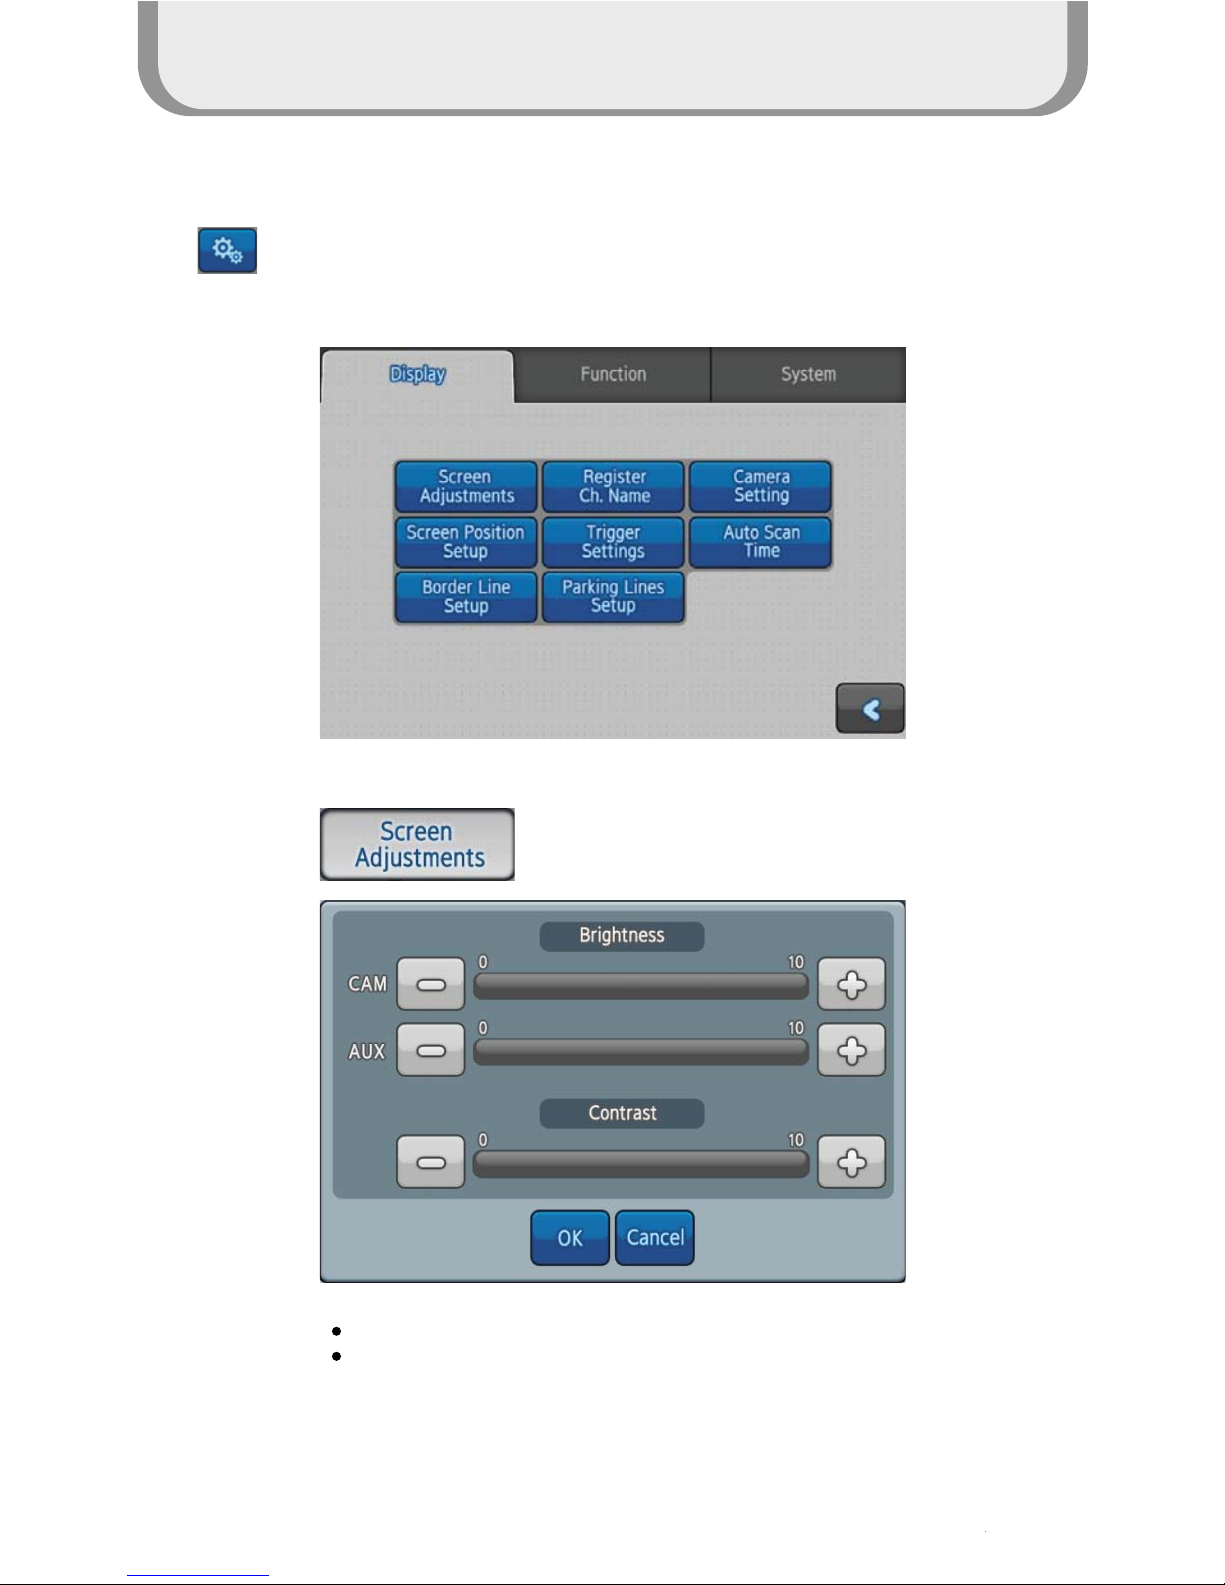
Setting Mode
Press the setting menu button to open the Setting screen.
CAM : Adjust brightness of Camera input screen
AUX : Adjust brightness of AUX screen
Page 11
How to use the product
11
Auto scan
Press the Auto scan button : Full screen will be displayed sequentially. Auto Scan will be set
on the action.
Touch here
Page 12
12
How to use the product
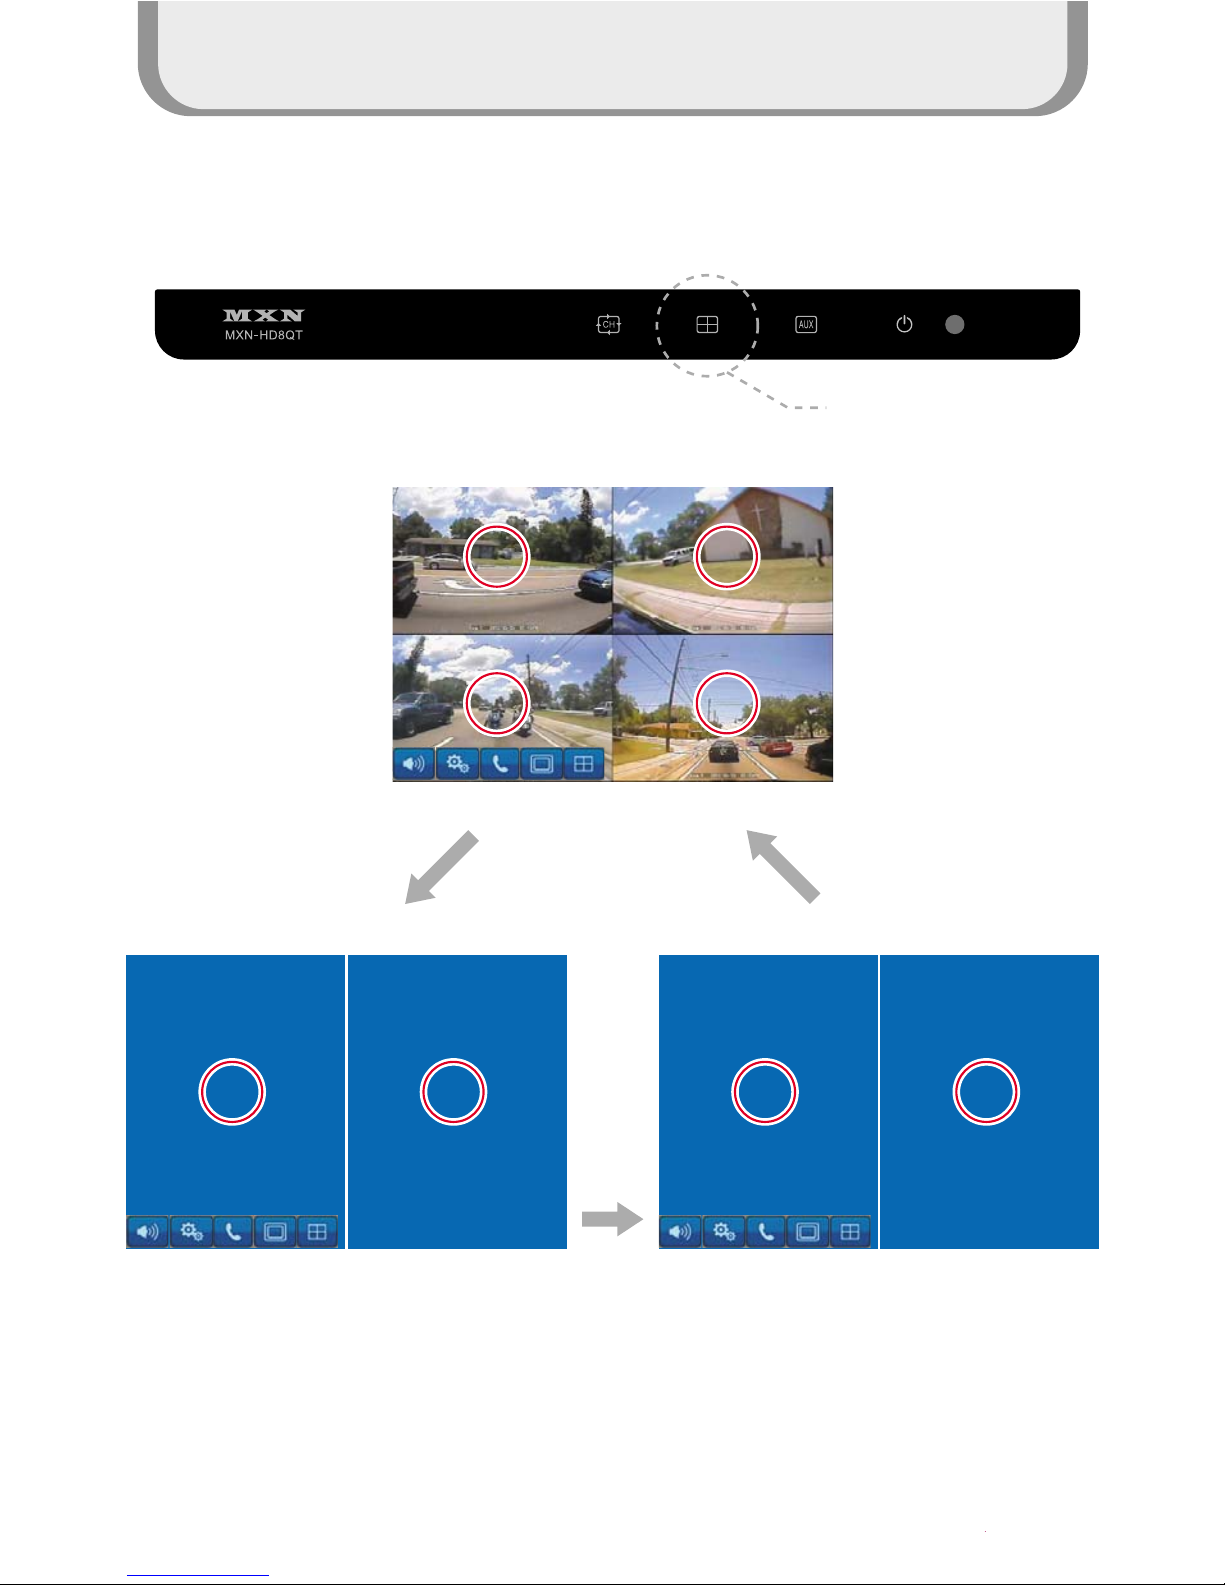
Multi screen
Press multi screen
button once:
Cam1,Cam2
Press multi screen button twice: Cam3,Cam4
Press multi screen
button 3 times:
Cam1,2,3,4
1
1
2
2
3
3
4
4
1
1
2
2
3
3
4
4
Press the multi screen button to divide the screen.
Touch here
Page 13
How to use the product
13
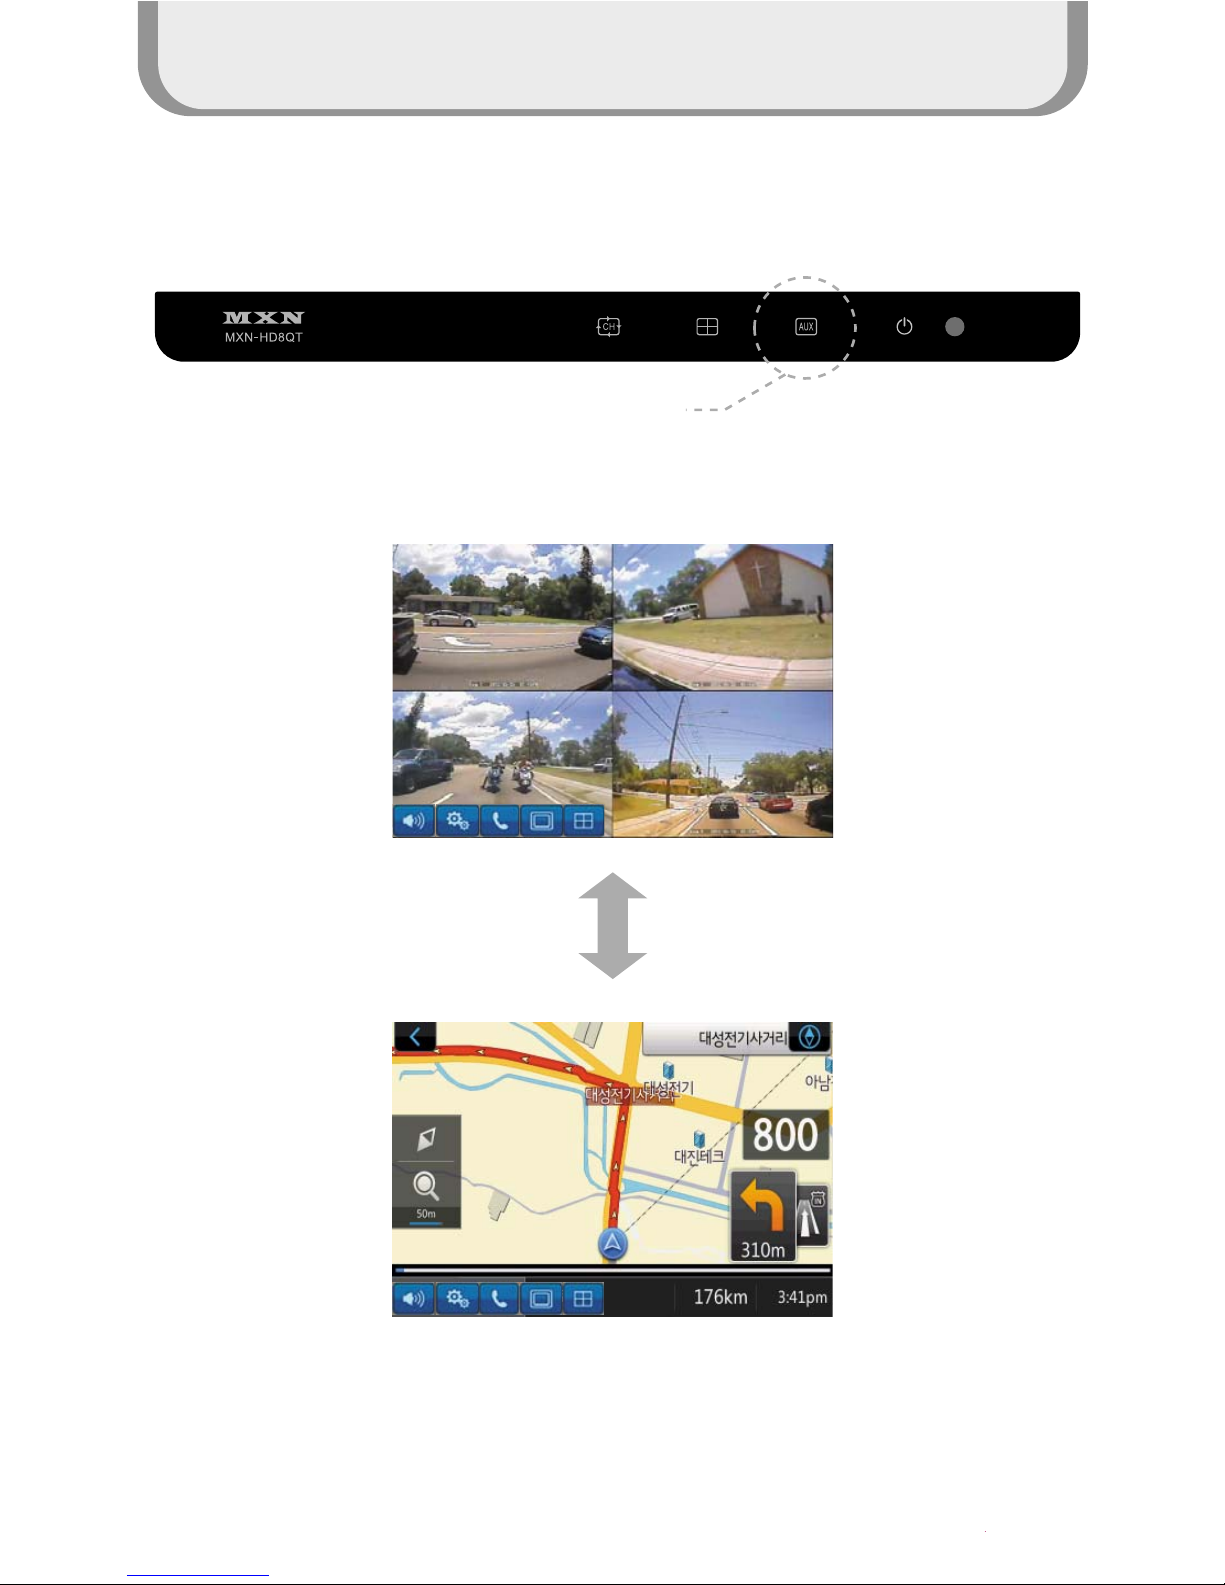
Input selection
Press the Input button to change Input
Press input button
once: AUX1
Press input button
twice: AUX2
Touch here
Page 14
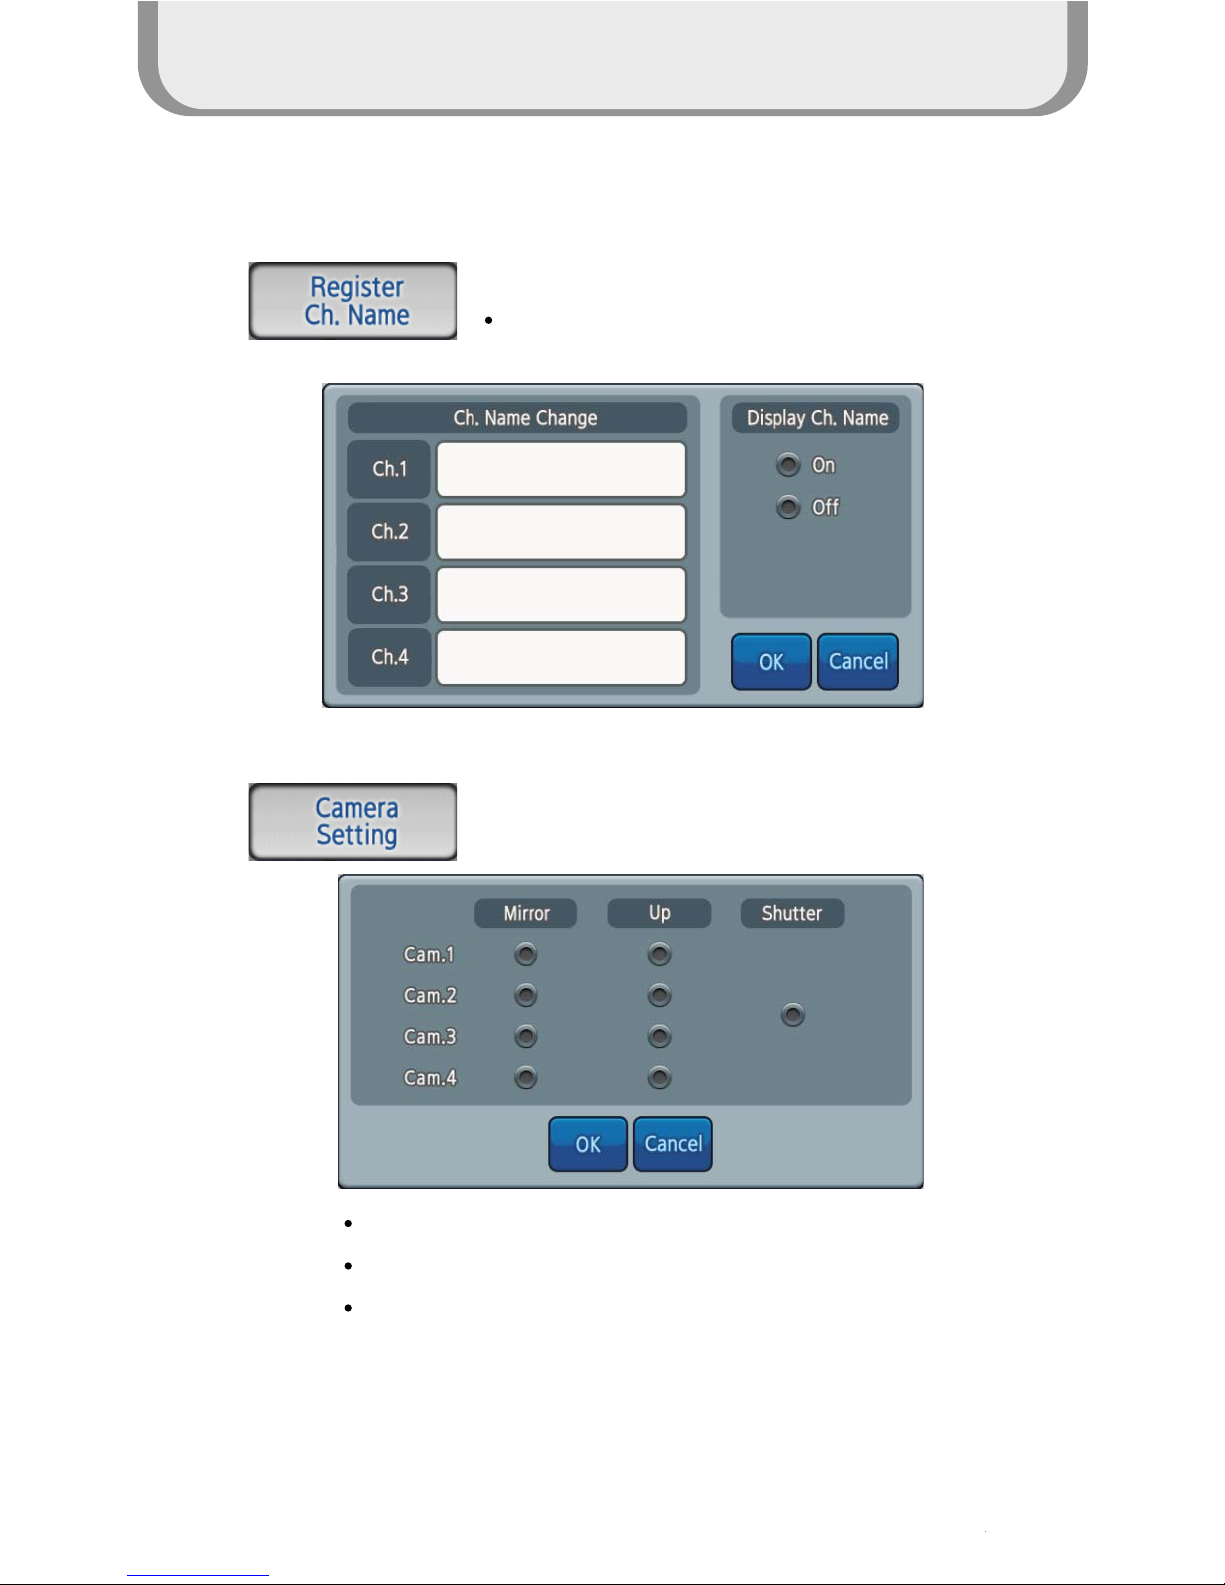
How to use the product
14
Display
Input the name into each channel.
Mirror : Mirror image or normal image
Up : Mirror image or reverse image
Shutter : Enable to operate Shutter/Heater Camera
Page 15
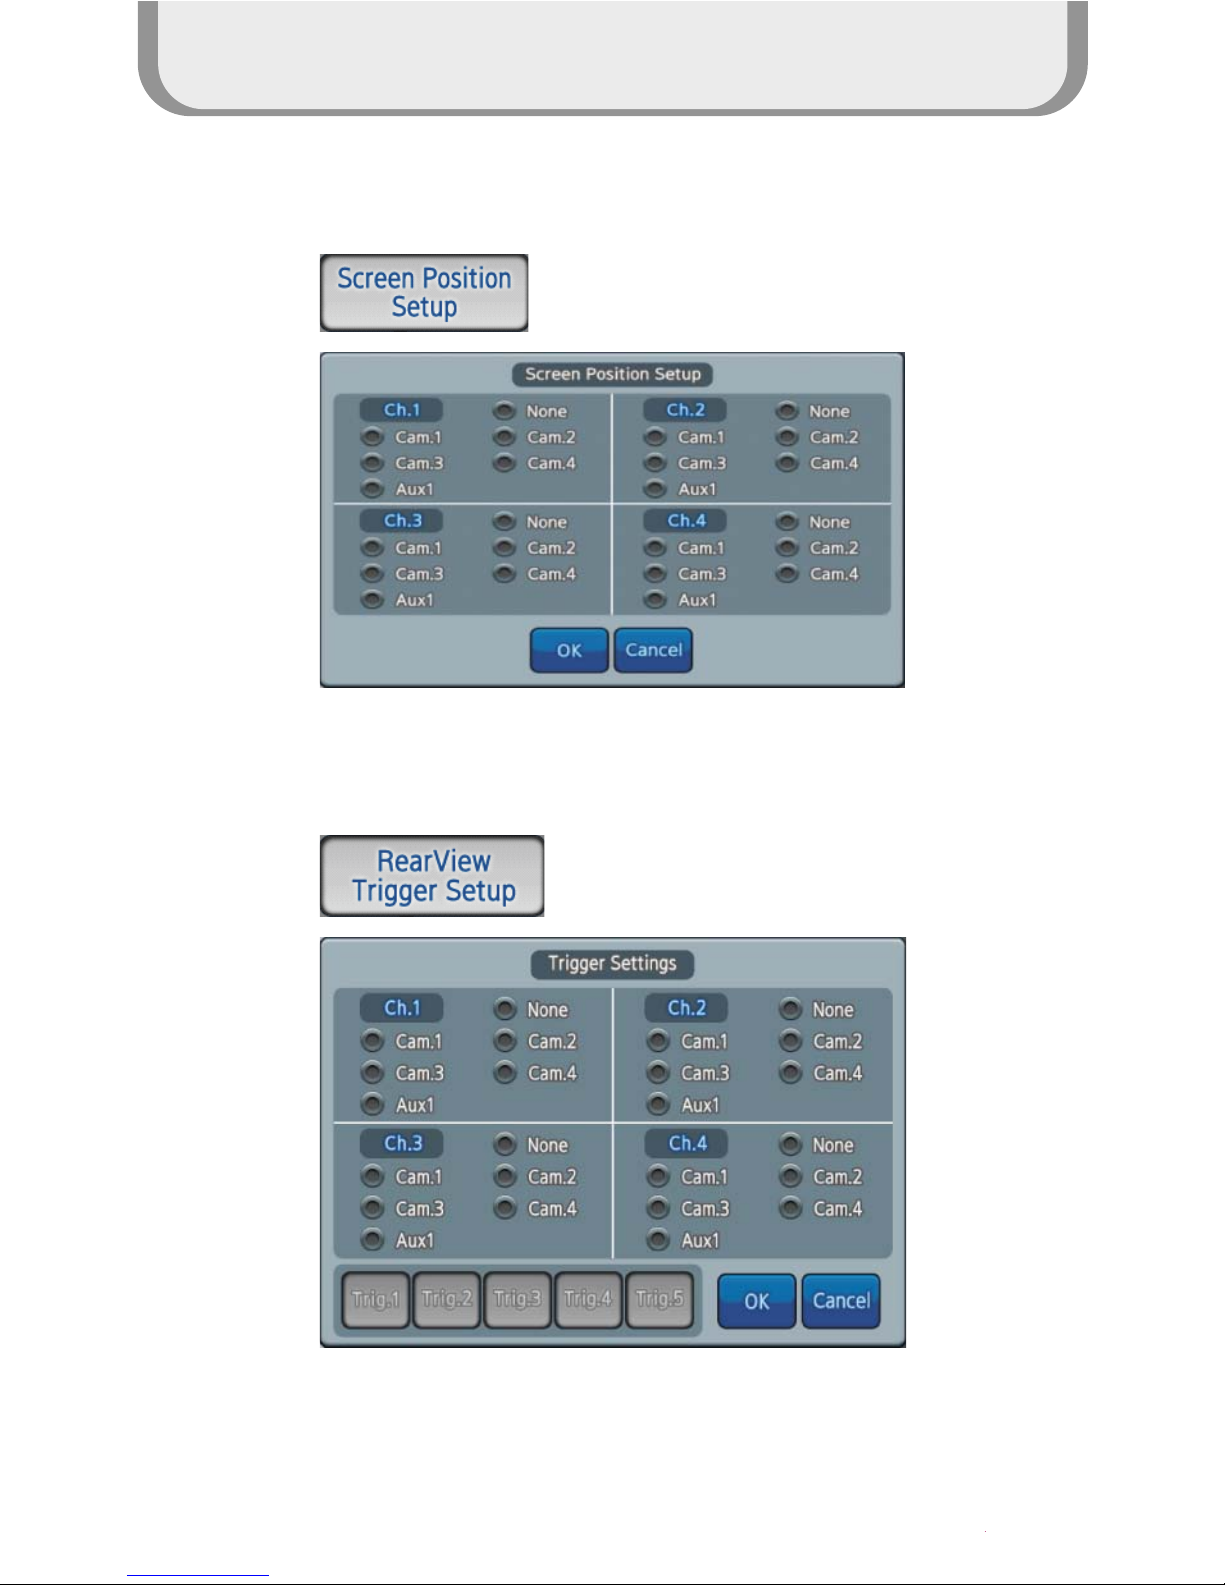
How to use the product
15
Display
Setup screen position of each channel
Setup the screen on each trigger.
Mirror : Mirror image or normal image
Up : Change up and down of the screen
Shutter : Enable to operate Shutter/Heater Camera
Caution: Cam1 and AUX1 cannot be setup at the same time.
Page 16
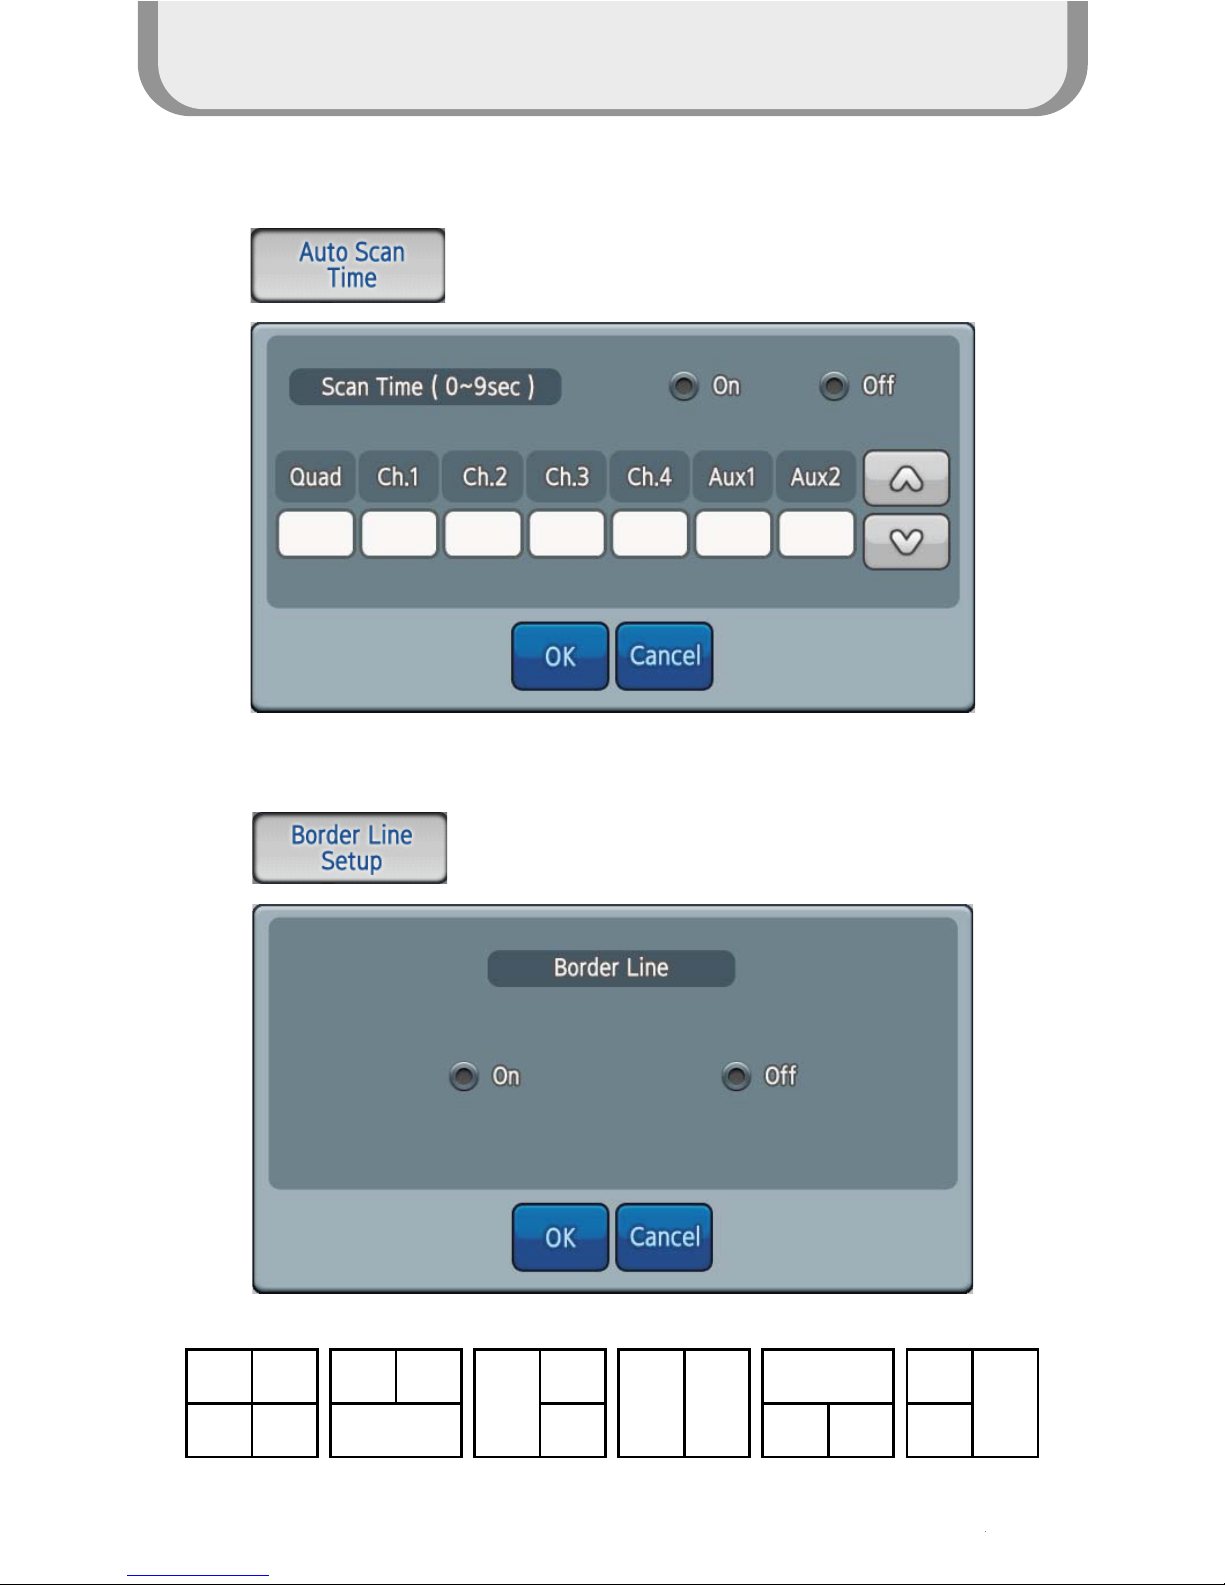
How to use the product
16
Display
Display the full screen according to each channel
setup when setting up On
Display the dividing lines of the screen
* AUX1 input RVM-704M and RVM-804 is one.
Page 17
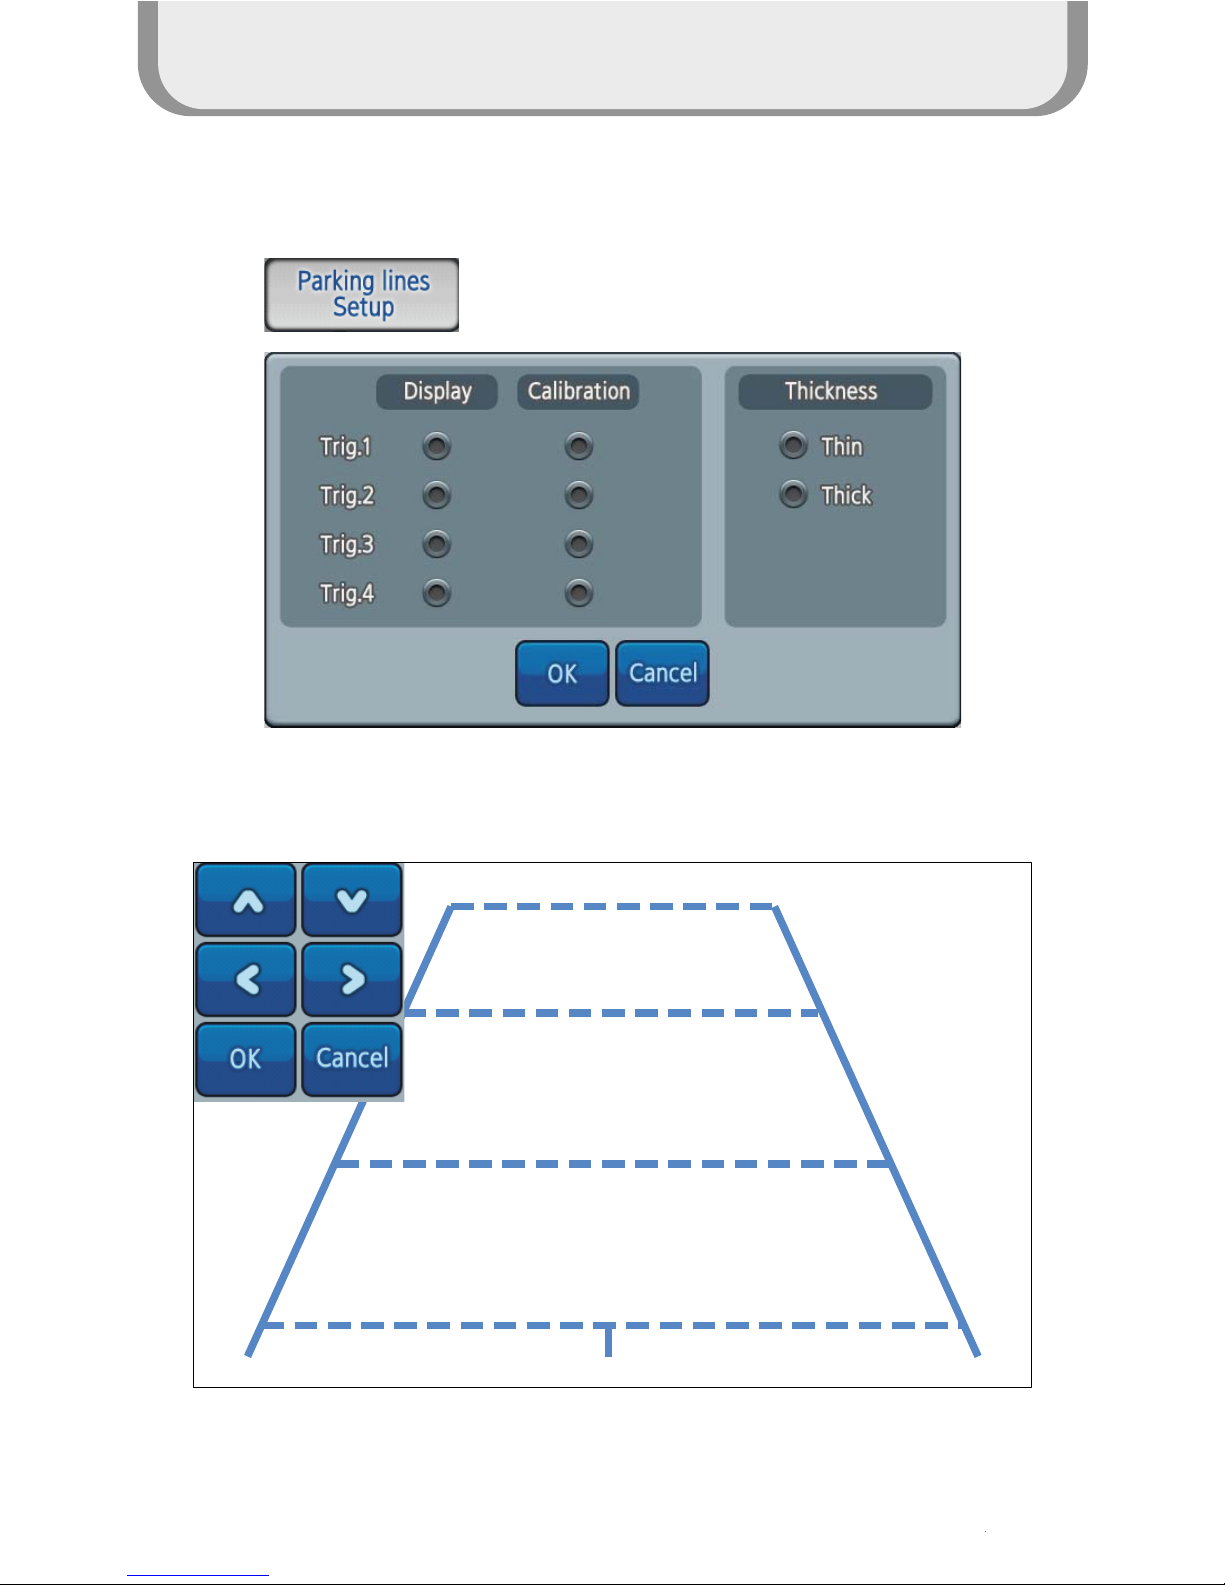
How to use the product
17
Display
Adjust Parking line of each Trigger
Trig.1
Calibration Front & Rear
Page 18
How to use the product
18
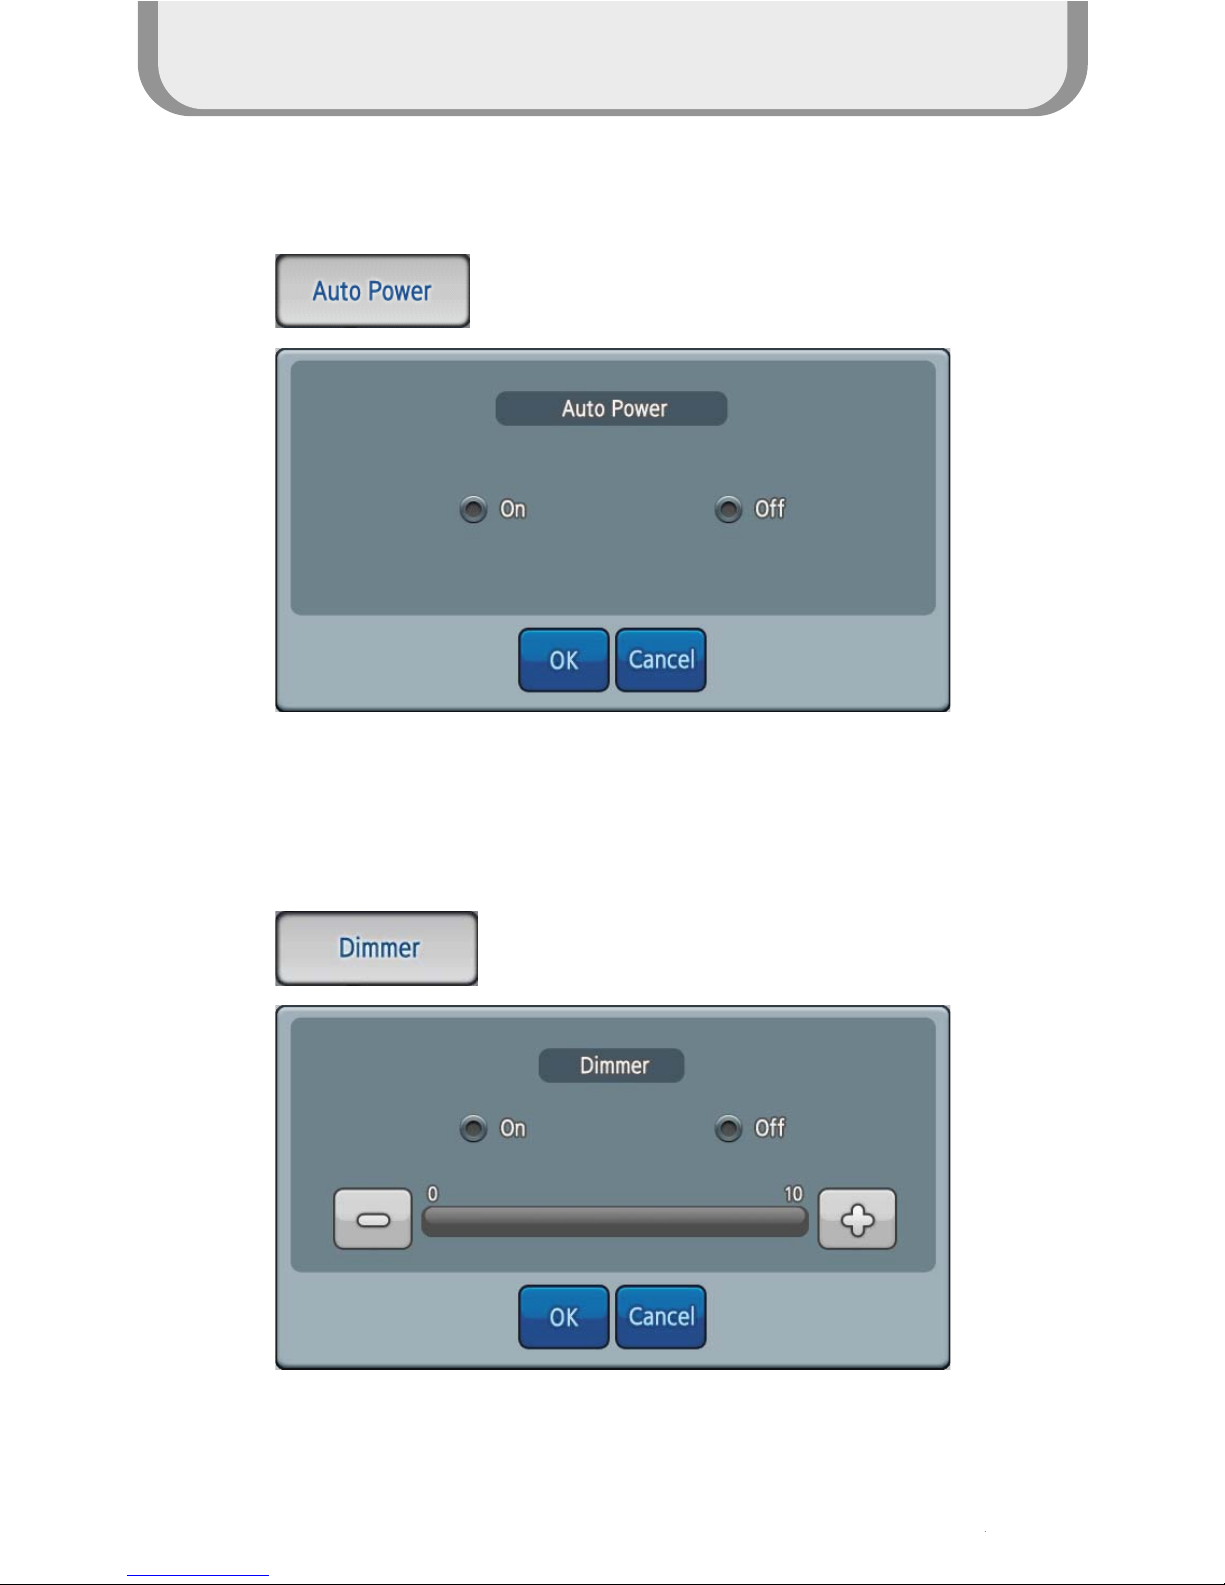
Function
The screen is turned ON automatically
when starting the vehicle
Sensitivity of automatic brightness adjustment, level 0 to 10 controlled
by actual light conditions (Day/Night)
Automatic brightness adjustment by sensor
in the front housing
ON : power on mode -> Power on
Standby mode -> Power on
Off : Power on mode -> Power on
Standby mode -> Standby
Page 19
How to use the product
19
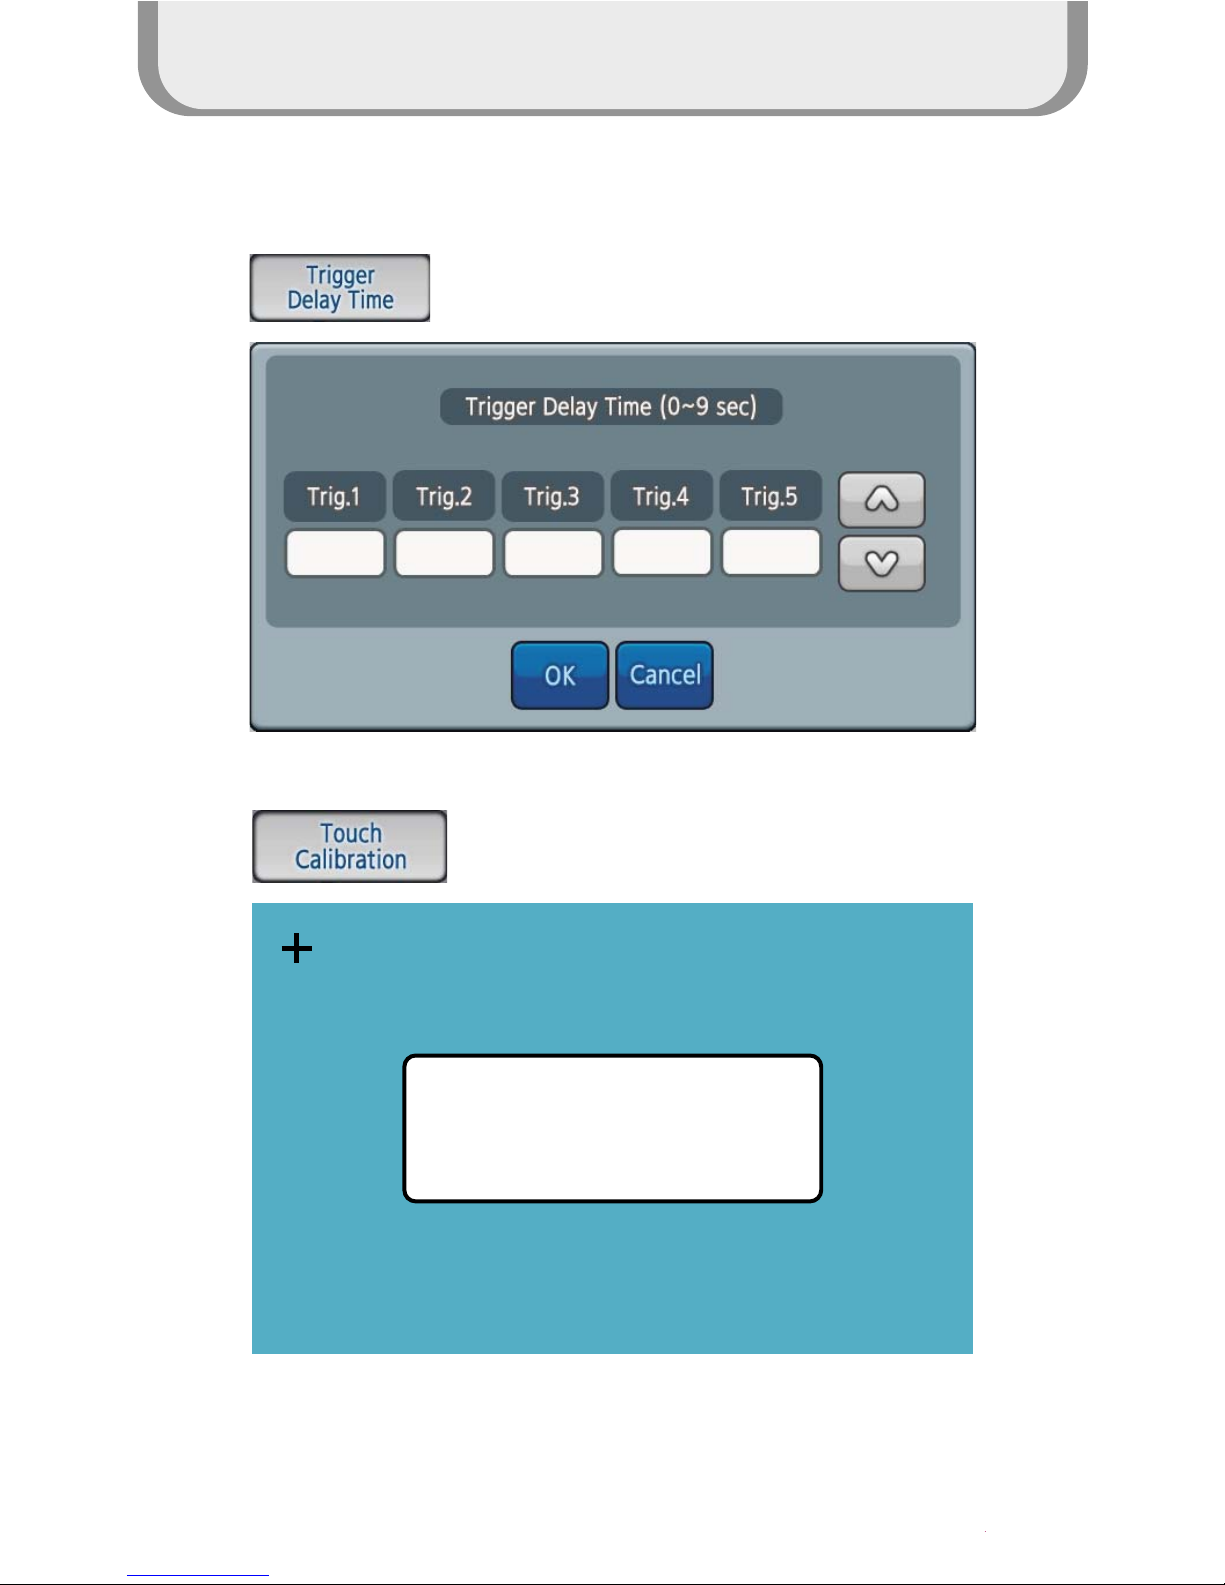
Function
Keep Trigger activated during setup time after Trigger off
in order to bridge temporary powerloss, e.g. from vehicle's
turnlight signal
Re-adjust center Point of Touch panel
STEP 1 of 3
Click on center of '+' icon
for Touch screen calibration.
Page 20
How to use the product
20
Function
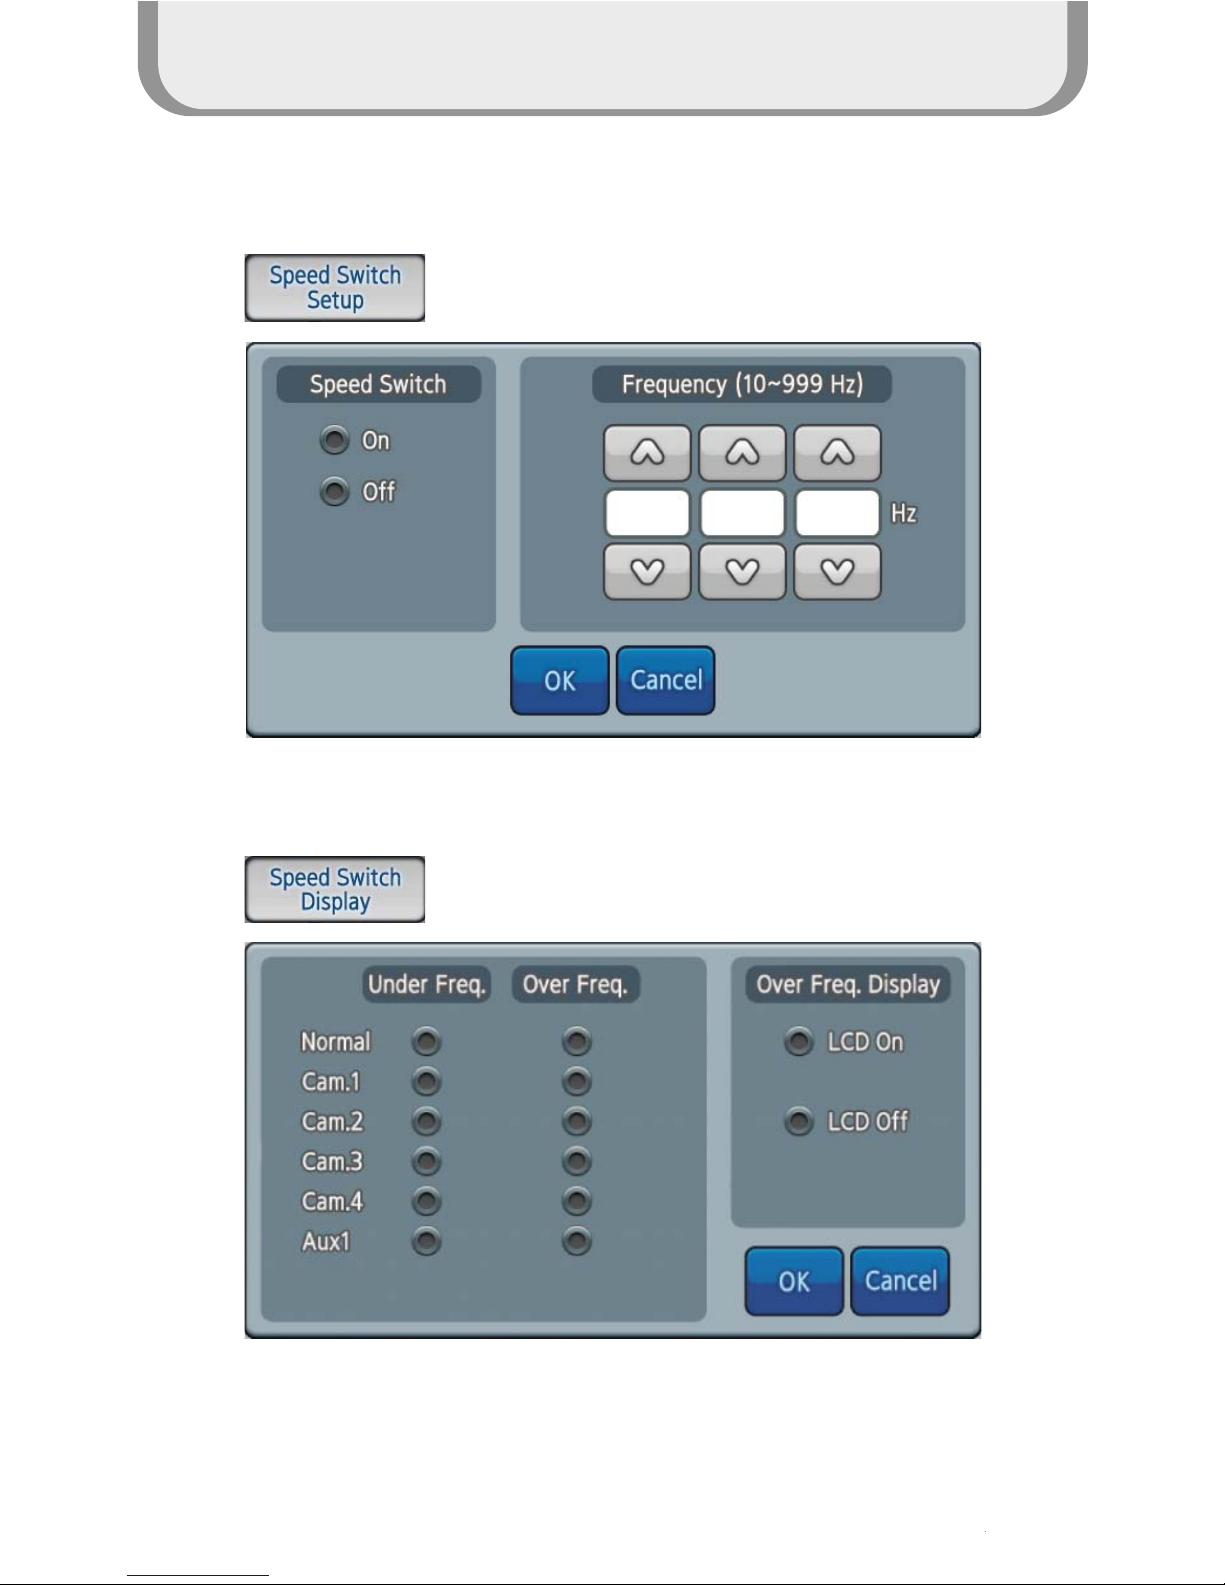
Detect speed of a vehicle from 10 to 999 Hz
To switch automatically into the screen ON mode,
by detecting a speed signal (tacho signal)
Page 21
How to use the product
21
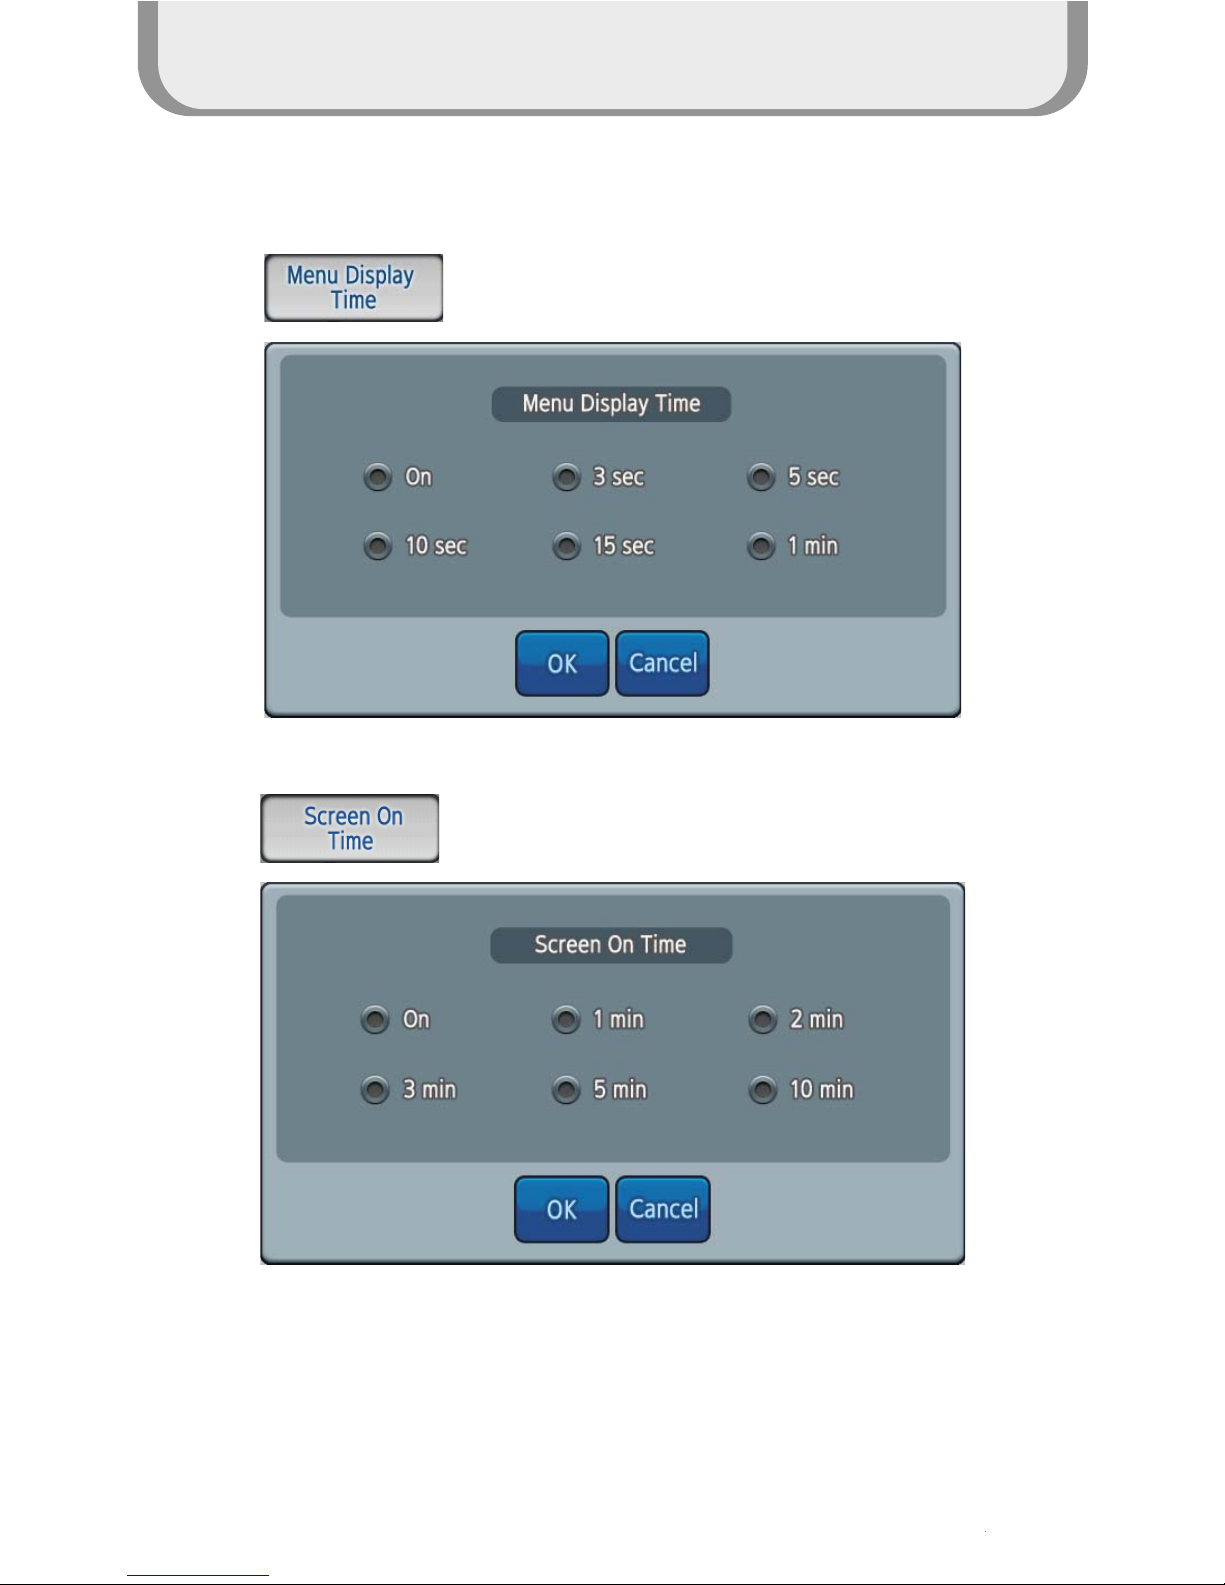
System
Set time displaying the Menu screen
Set time displayed on the screen
The screen is turned off when there is no input like touching it or so during
setting up time
Page 22
How to use the product
22
System
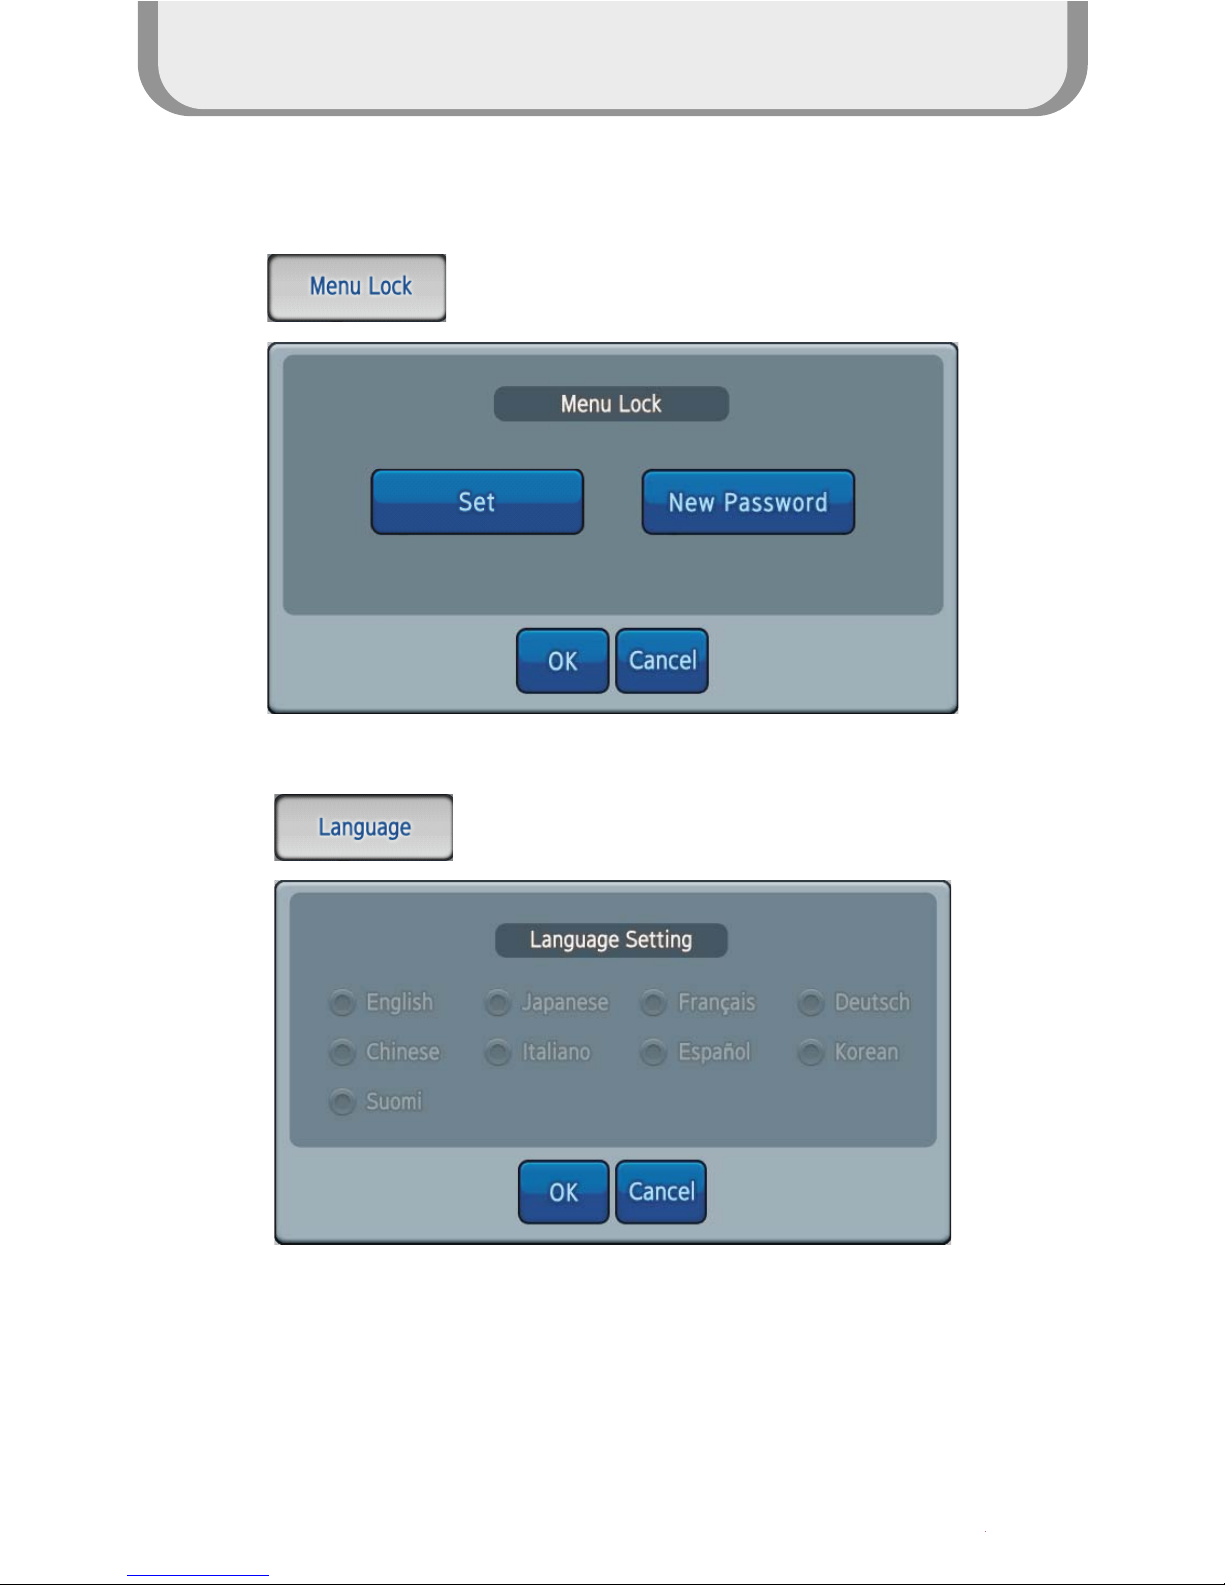
Set a password to lock the Menu button
Support languages for each country ( Option )
Page 23
How to use the product
23
System
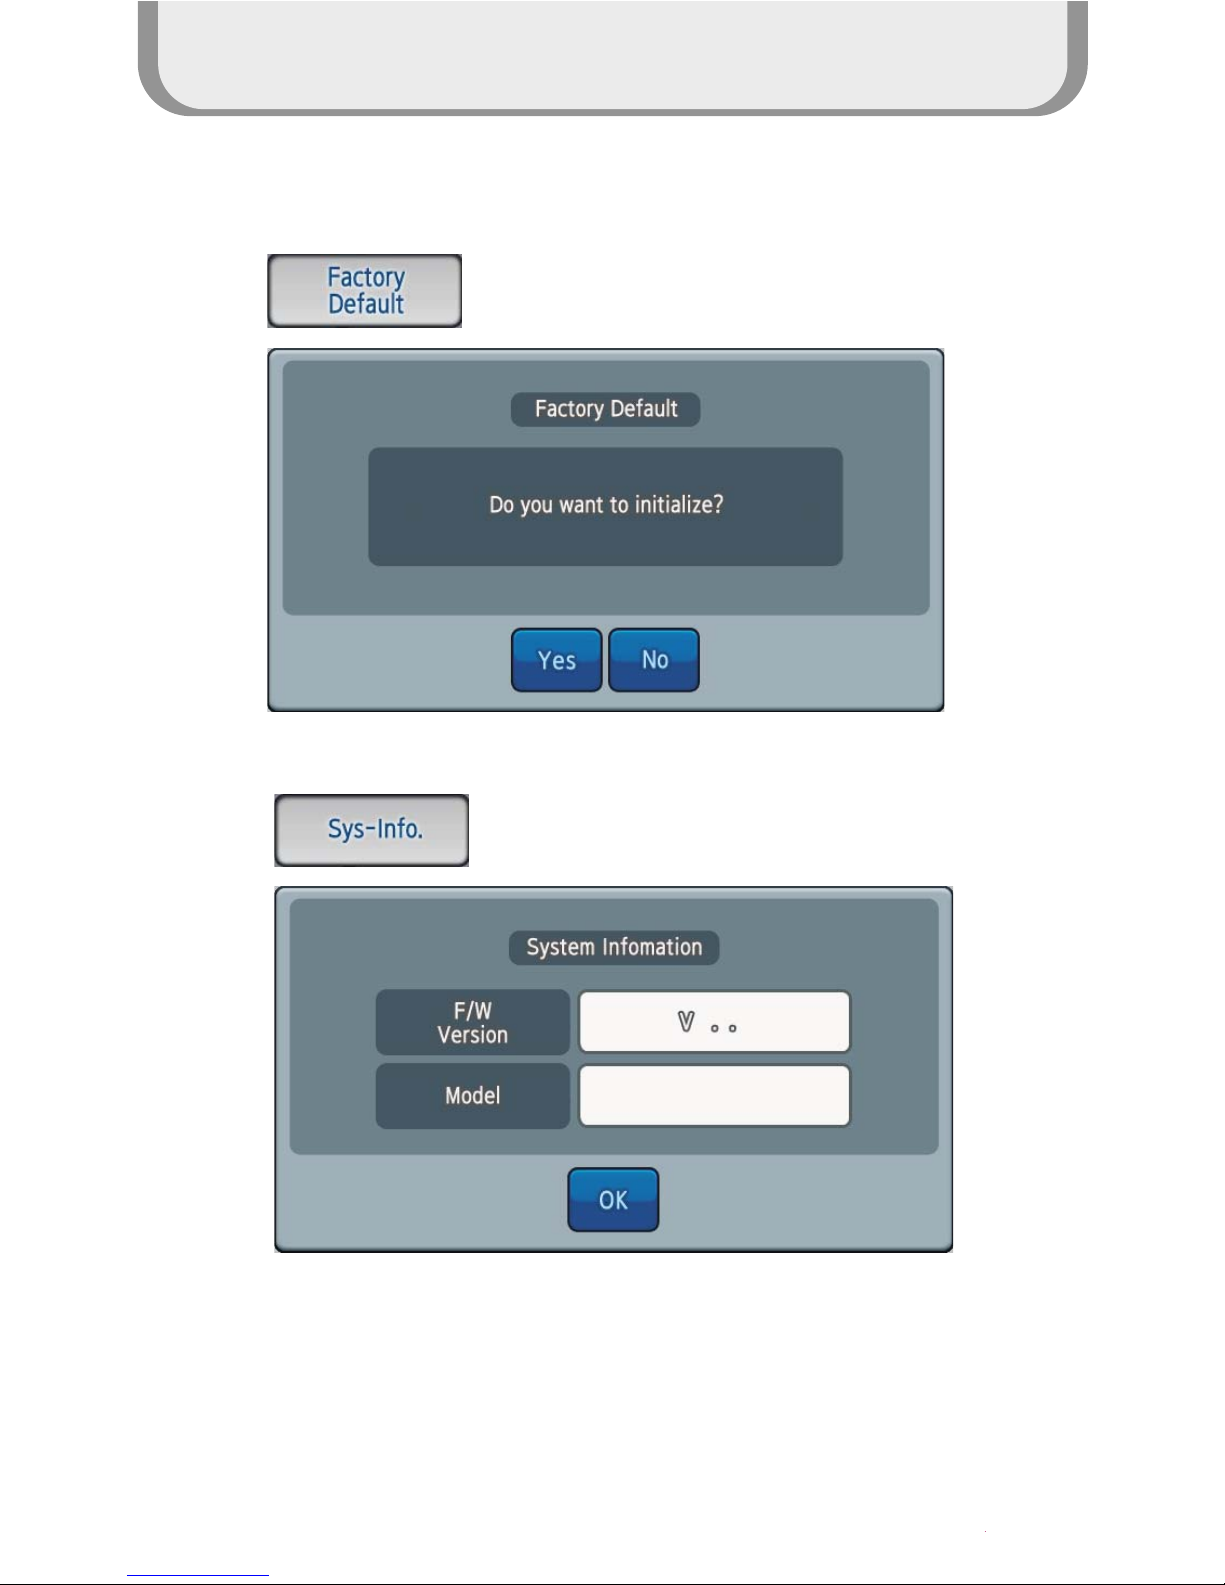
Initializing set points of Menu
Display Firmware Version and Model name
Page 24
Installation
24
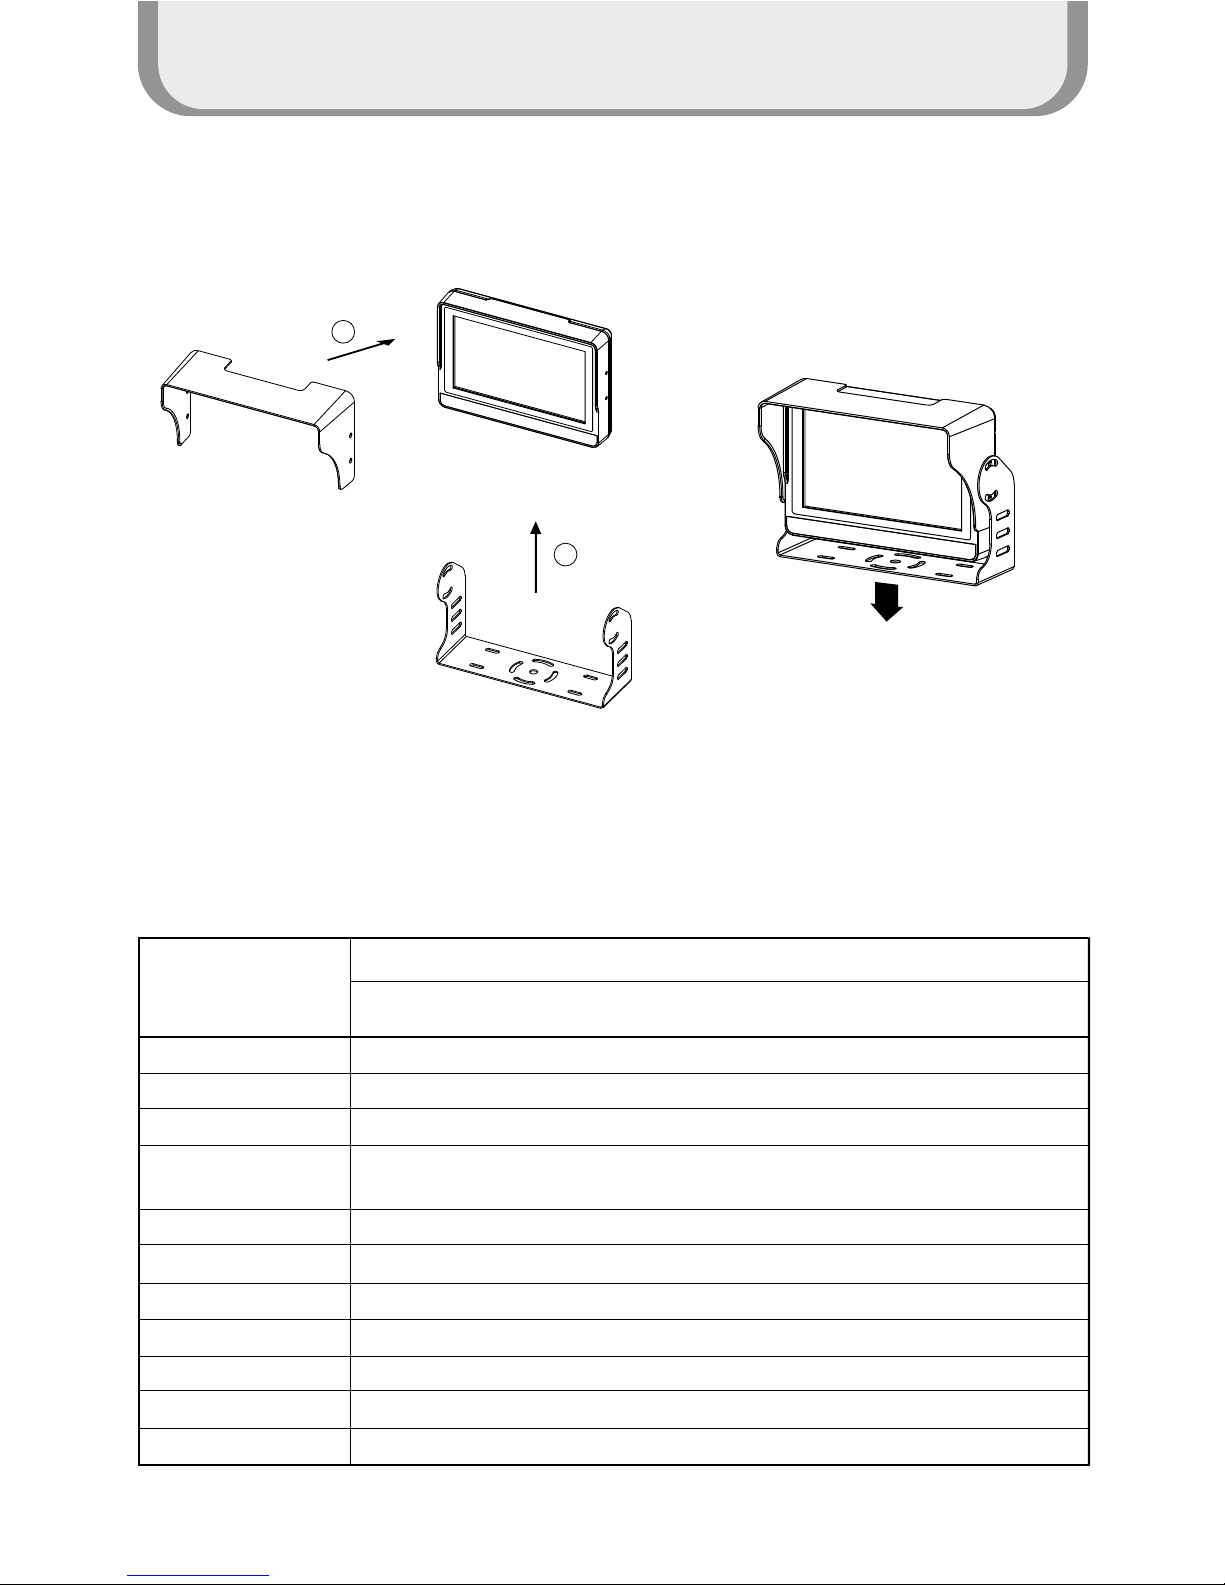
Installation
Sunvisor
Monitor
Bractet
1
2
Dashboard
8" On-dash mounting
(RVM-804)
Camera Input
4 Ch input (1Vp-p 75Ω) / NTSC,PAL(Video & Audio)
AV i n p u t
AUX (1 CH RCA / 1Vp-p 75Ω / Composite, Audio )
AV output
N/S
LCD Dis pla y
8" TFT LCD
(800x480,with Tou ch P ane l)
Auto Bright Control
ALS Sensor (Night & Daytime Brightness detection)
Power
12~36Vdc (12Vdc 1.3A)
Dimensions
218(W)mmⅹ 150(H)mmⅹ50(D)mm
We i g h t
a pp x. 1, 800 g
Operating Temperature
-20' C - +60' C
Storage Temperature
-30' C - +85' C
ITEM
DESCR IPTION
Triggers input
5 Trigger input (Cable Input : 12 ~ 36V)
Specification
Page 25

MEMO
 Loading...