

Page 1
Stealth™ Key M200
Quick Start Guide
Page 2
Copyright © 2011 MXI Security. All rights reserved. This document may not be reproduced or transmitted in any form
(whether now known or hereinafter discovered or developed), in whole or in part, without the express prior written
consent of MXI Security.
Windows is a registered trademark of Microsoft Corporation in the United States and other countries.
All products and company names are trademarks or registered trademarks of their respective owners.
Stealth Key M200 Quick Start Guide
Document Number: MSW1027-M-QSG10-39
Date of Publication: March 17, 2011
Support: [email protected] or http://mxisecurity.com/support
Web site: http://www.mxisecurity.com
The following information applies to only EU-member states:
The equipment that you bought required the extraction and use of natural resources for its production. It
may contain hazardous substances that could impact human health and the environment. The crossedout wheeled bin symbol indicates that this product may not be treated as household waste. By disposing
of this product using the appropriate take-back systems, you will help prevent the spread of hazardous
substances to our environment and reduce the impact on natural resources. Those systems will reuse or
recycle most of the materials of your end-life equipment in a sound way. If you need more information on
the collection, reuse and recycling systems, please contact your local or regional waste administration. You can also
contact us for more information on the environmental performance of our products.
Page 3

Contents
1: Introducing Stealth Key M200 ................................................................................. 4
Minimum System Requirements ........................................................................................................4
MXI Documentation .............................................................................................................................5
2: Getting Started .......................................................................................................... 6
Opening and closing a device ...........................................................................................................6
Attaching the lanyard loop .................................................................................................................6
Personalizing a device ........................................................................................................................8
3: Accessing data on the device ............................................................................... 10
Logging into and out of the device .................................................................................................10
Saving and opening files ..................................................................................................................11
Disconnecting the device .................................................................................................................11
4: Warranty Information ............................................................................................. 12
5: Troubleshooting ..................................................................................................... 13
Difficulty closing device cap ..........................................................................................................13
Stealth Key M200 Quick Start Guide 3
Page 4
1
Introducing Stealth Key M200
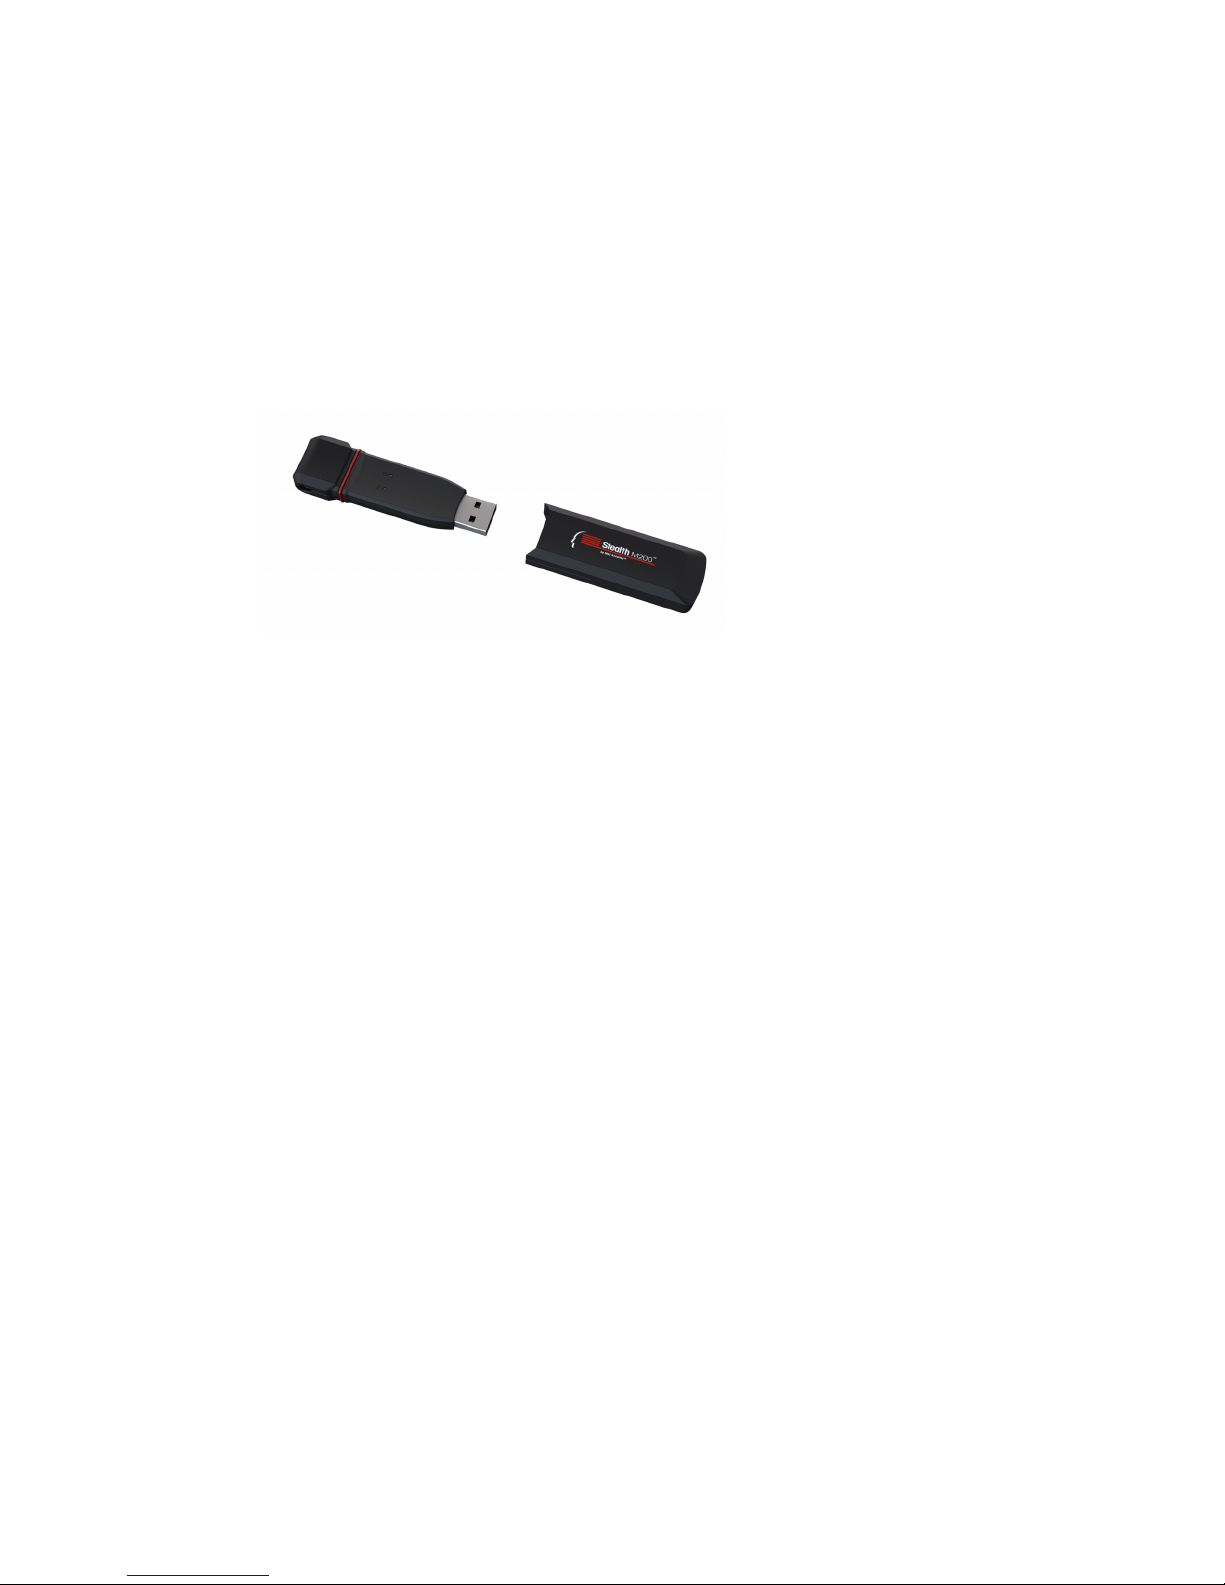
Stealth™ Key M200 is a USB (Universal Serial Bus) portable flash drive with built-in password
security and data encryption.
This guide is designed to help you set up your Stealth Key M200 device with minimal effort.
Figure 1-1: Stealth Key M200 device
Note Stealth Key M200 cannot be used with ACCESS Enterprise.
Minimum System Requirements
Stealth Key M200 comes with built-in ACCESS Standard™ software on its application partition.
The following list describes the requirements you need to use your device with ACCESS
Standard.
• A USB port (Type A)
• An operating system that supports USB 2.0 or 1.1 Mass Storage Devices
Operating systems
• Microsoft Windows 7 Pro
• Windows XP Professional SP3
• Windows XP Professional SP2
• Windows XP Home SP3
• Windows Vista (Home, Business and Enterprise editions SP2)
• Mac OS X 10.5 and 10.6
Stealth Key M200 Quick Start Guide 4
Page 5

MXI Documentation
You can find detailed instructions about using and managing Stealth Key M200 in the ACCESS
Standard User Guide.
Topics include:
• Information about MXI Portable Security Devices
• Personalizing the device
• Accessing the device
• Managing users
• Managing devices
• Protecting the device from viruses
• Troubleshooting
Online Help is also available with ACCESS Standard software.
To view the ACCESS Standard User Guide
• From the root directory of the application partition, double-click the UserGuide.pdf file.
Note You need Adobe
®
Reader® (http://www.adobe.com/acrobat) to view the documentation.
MXI Documentation
To view online Help
• When ACCESS Standard is open, click Help on the page for which you want more
information.
Stealth Key M200 Quick Start Guide 5
Page 6
2
Getting Started
This product must be directly connected to the host computer, and must only be connected
using the provided cable or cables, as applicable. Connection through intermediate hardware or
with alternate cables may cause electrical emissions outside the product's original design and
certification.
Opening and closing a device
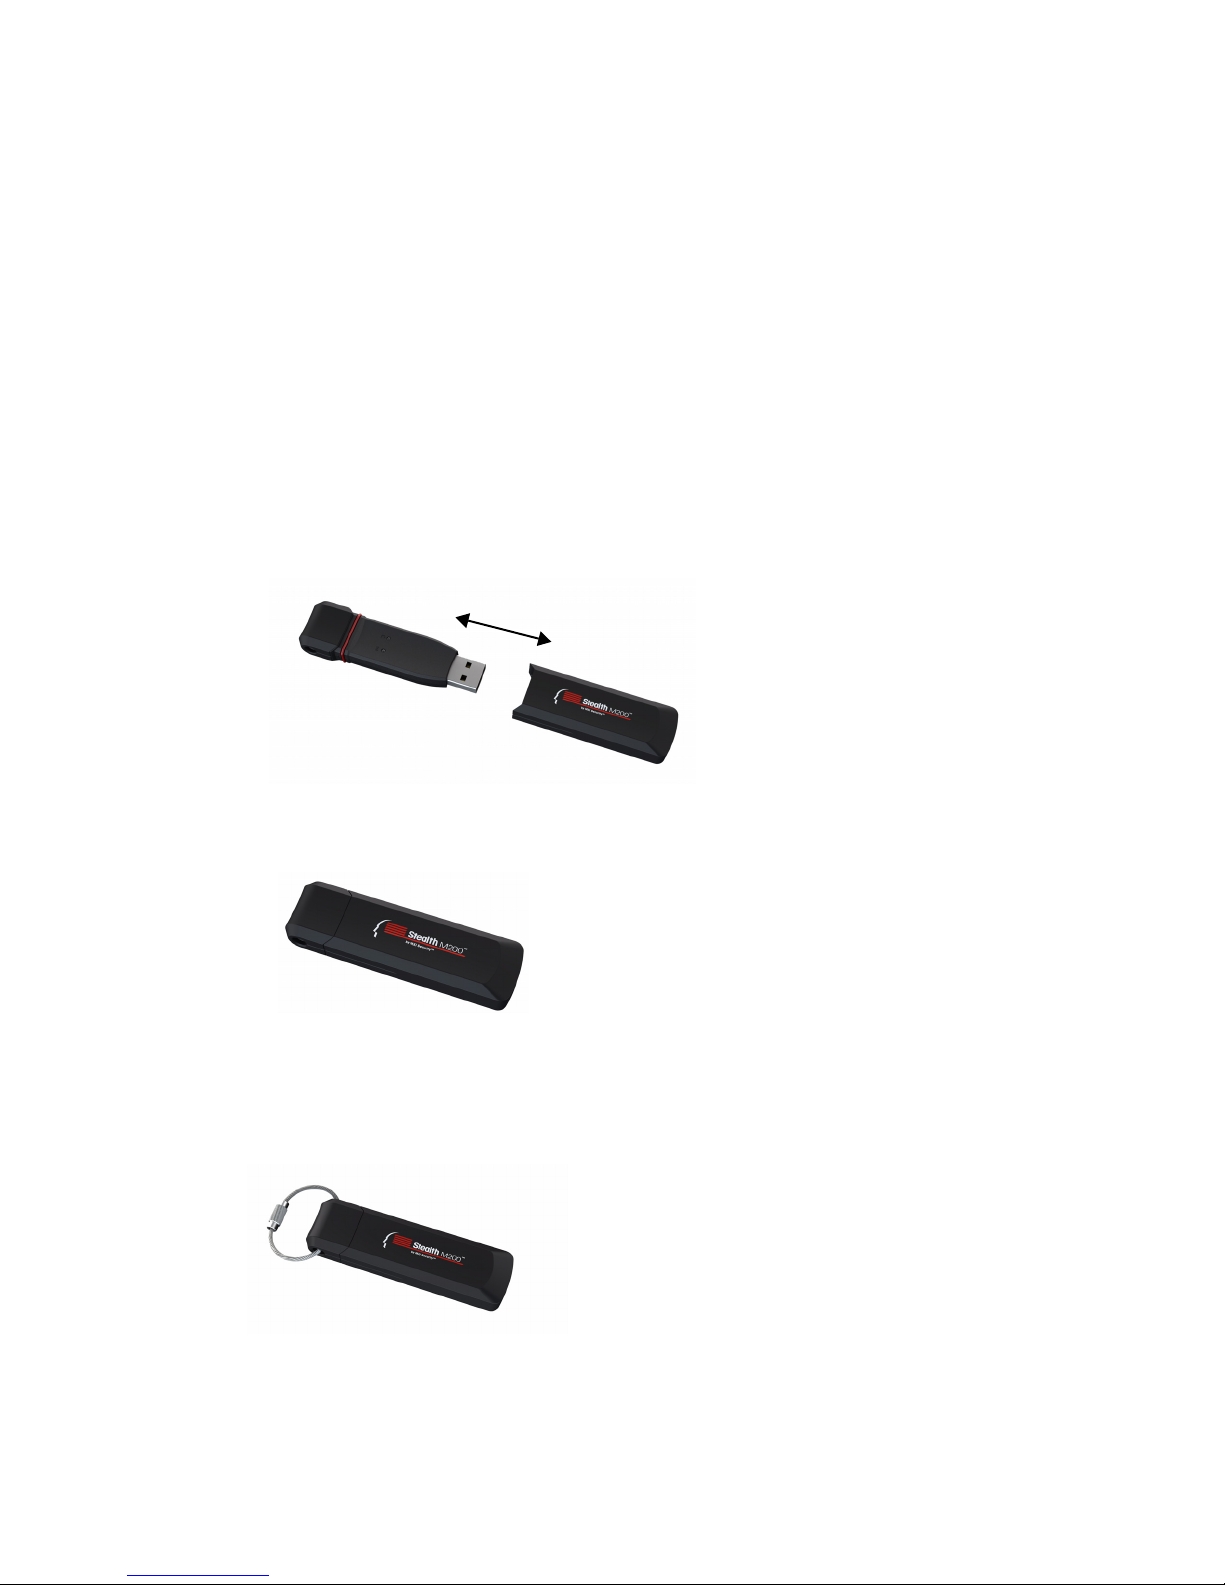
Stealth Key M200 devices have an integral case that opens by removing a large front cap.
To open the device
• Grasp the front and rear caps and pull apart.
To close the device
• Slide the device into the front cap and squeeze the caps together.
Attaching the lanyard loop
Stealth Key M200 comes with a lanyard loop that allows you to attach it to lanyards or other
objects.
Stealth Key M200 Quick Start Guide 6
Page 7
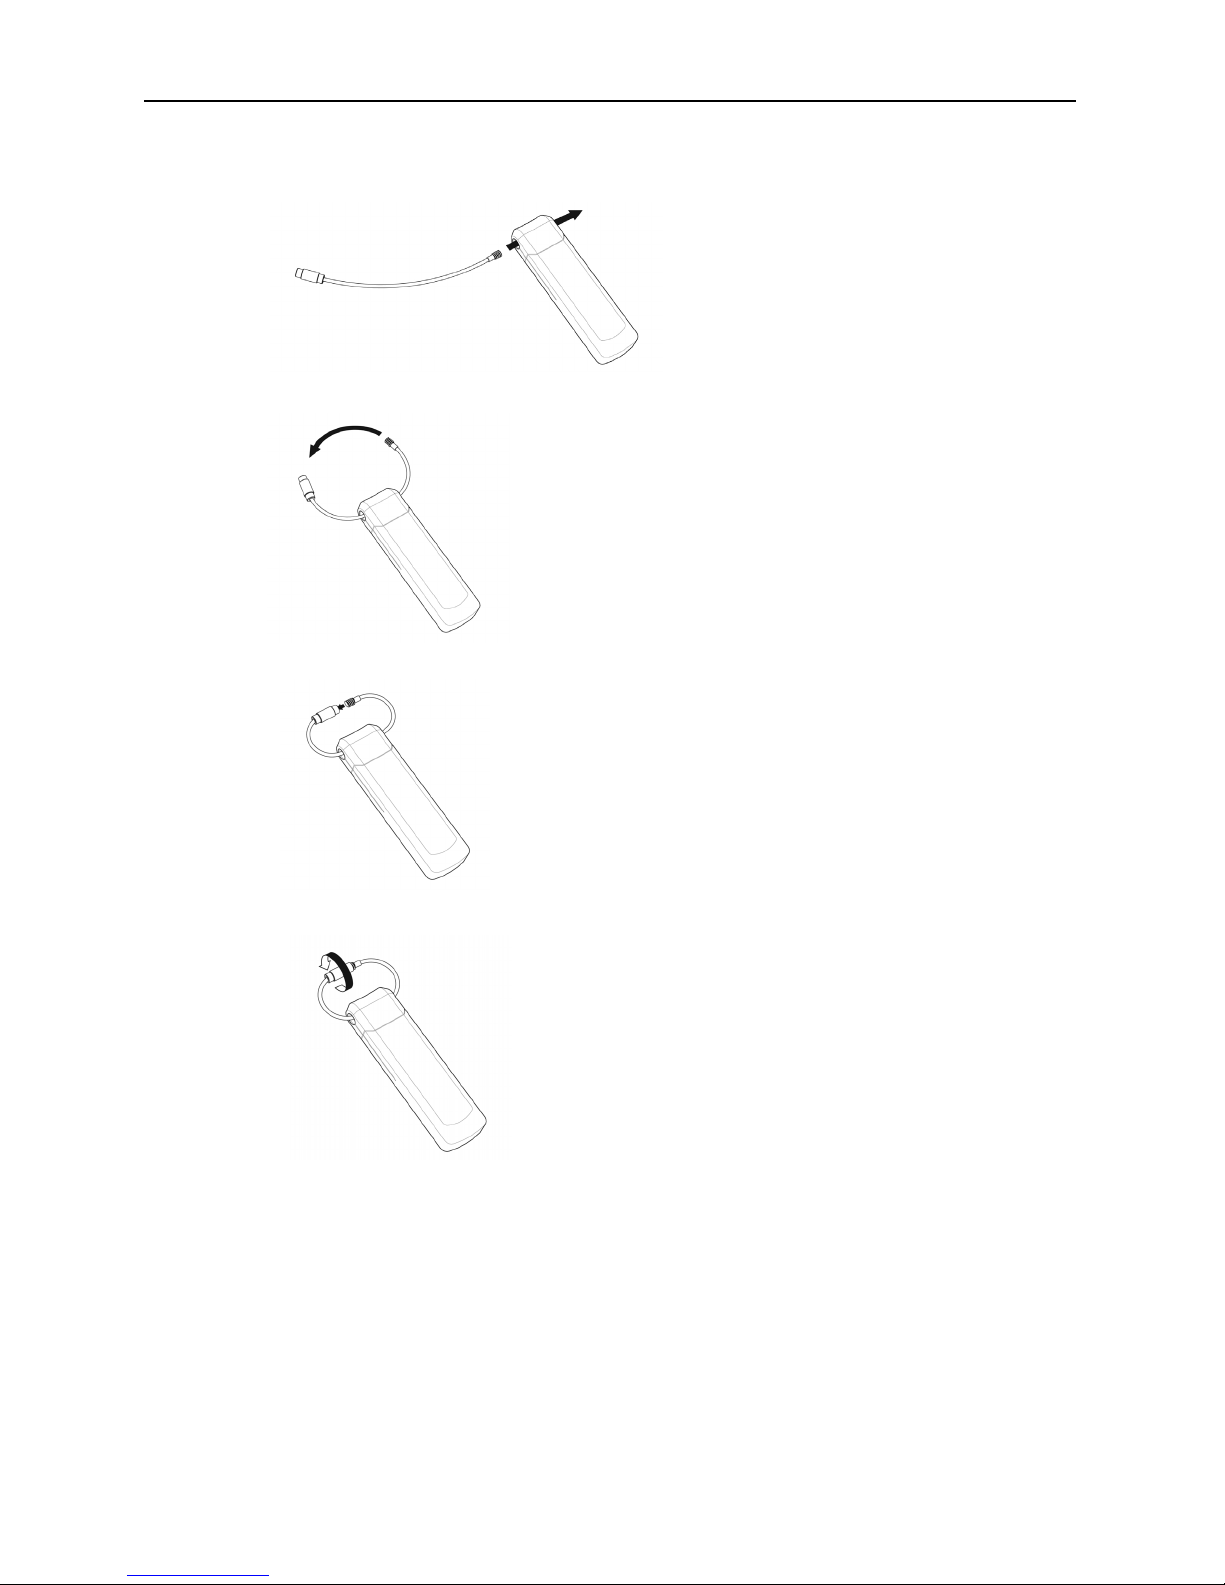
Attaching the lanyard loop
To attach the lanyard loop (optional)
1 Insert the small bullet end of the lanyard through the hole in the main part of the device.
2 Grip both ends of the lanyard loop and bend the ends towards each other in a circle.
3 Insert the small end into the larger barrel.
4 Turn the larger barrel to thread the parts together.
Stealth Key M200 Quick Start Guide 7
Page 8

Getting Started
5 When the small bullet is completely inside the larger barrel, the loop is secure and ready for
use.
To remove the lanyard loop
1 Turn the barrel (counter-clockwise) to loosen the small bullet.
2 When the small bullet is completely separated from the larger barrel, pull the lanyard loop
apart.
Personalizing a device
When you plug in a new device, you must personalize it before you can use the authentication
and private partition features. The device uses pre-installed ACCESS Standard software to
guide you through the personalization process. ACCESS Standard starts automatically when
you plug in a new (or recycled) device. If autorun is not configured for your computer, you can
start ACCESS Standard from the application partition on the device.
Personalizing a device involves three main steps:
1 Applying a device profile—The profile sets default preferences for the device. You can
choose the Typical profile, with preconfigured device settings, or the Custom profile that
allows you to configure device settings. The Typical profile contains the following device set
tings:
• Authentication method: password authentication
• Number of device users: 1 (not including the Administrator)
• Private partition uses the total available disk space
• Minimum password length: 6
• Password Retry Limit: 10
• Password Re-use Threshold: 3
• User Rescue: Enabled
• Data Destruction: Off
• Administrator Account: Enabled
2 Creating the Administrator account—Only the Administrator can perform certain opera-
tions on a device, such as adding, removing, and rescuing users. During the personalization
process, the Administrator account is created automatically when you set the Administrator
password. If you choose a Custom profile and disable the Administrator account, you will not
-
Stealth Key M200 Quick Start Guide 8
Page 9
Personalizing a device
be prompted to provide an Administrator password. In this case, you cannot create the
account at a later time.
It is very important that you memorize the Administrator password or store it in a safe place.
3 Creating users—Depending on the device profile, you can create one or more general users
on the device.
To personalize the device
1 Plug the device into the USB port of the computer.
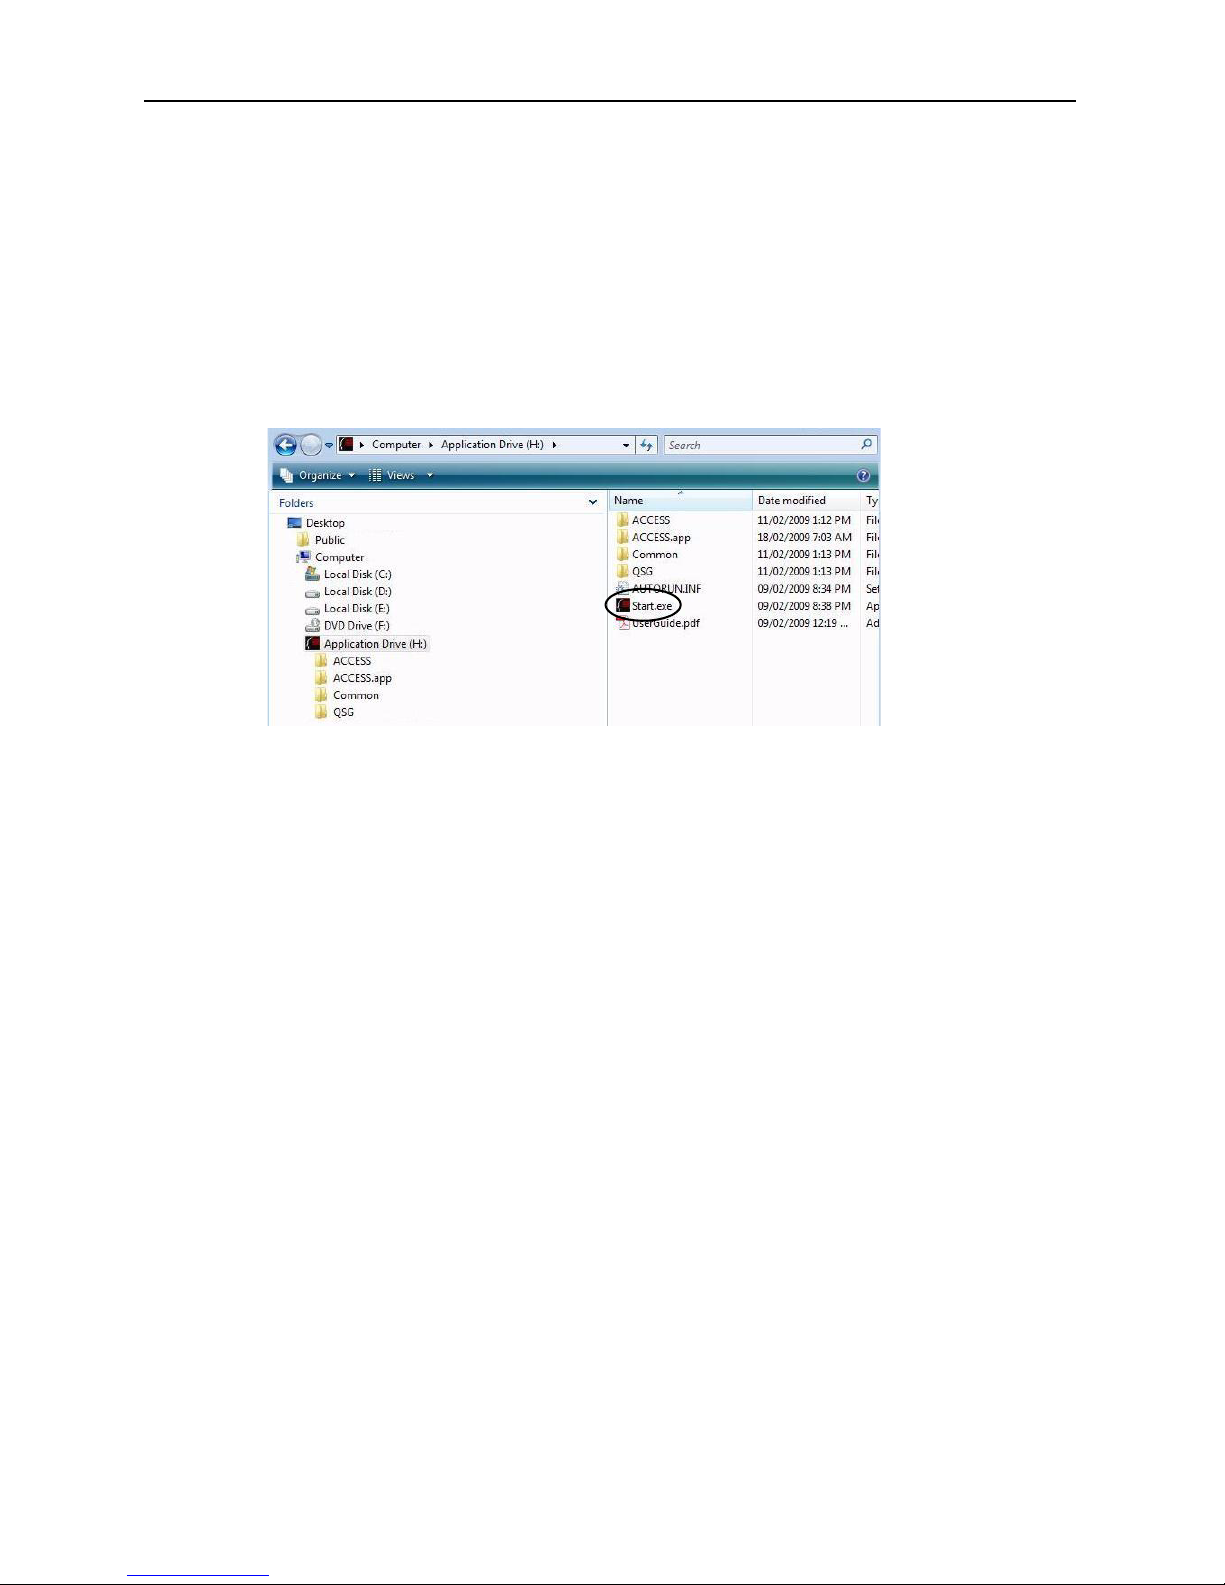
If Autorun does not automatically start ACCESS Standard, double-click the Start.exe file from
the root directory on the application partition. (If necessary, in the notification area at the far
right of the taskbar, click the MXI icon, and then click Personalize from the menu.)
2 On the main page of ACCESS Standard, click Personalize Device.
3 On the Device Personalization page, click one of the device profile options.
4 Complete the instructions on the pages that follow to set the Administrator password (if appli-
cable) and create a user.
Note 1 If you do not complete the personalization process you may have to repeat some of the
above steps the next time you connect the device. For more information about the
personalization process, see the ACCESS Standard User Guide.
Note 2 After you successfully complete the Personalization process, you can access your
private partition using a file manager. For more information about logging in and saving files to or
opening files from the private partition, see
“Accessing data on the device” on page 10.
Stealth Key M200 Quick Start Guide 9
Page 10

3
Accessing data on the device
After you personalize a device, only registered users can authenticate to it. Authentication
involves logging into the device using a password.
After you successfully log in, you can save files to, and open files from, your private partition. It is
recommended that you log out of your device if you must leave it connected while you are away
from your computer. Otherwise, another user could access your private partition while you are
absent. You can also disconnect the device completely to bring the data with you.
This chapter provides information about the following topics:
• Logging into and out of the device
• Saving and opening files
• Disconnecting the device
Logging into and out of the device
To log into the device
1 From the notification area, at the far right of the taskbar, right-click the MXI icon and click
Login.
2 If you are using a computer running Mac OS X, open a file manager and click the application
drive for the device. Double-click the ACCESS Standard application.
3 On the main page of ACCESS Standard, under Manage Device, click Login. Follow the
prompts in the authentication wizard until the device successfully authenticates you.
To log out of the device
1 From the notification area, at the far right of the taskbar, right-click the MXI icon and click
Logout.
2 If you are using a computer running Mac OS X, open a file manager and click the application
drive for the device. Double-click the ACCESS Standard application.
3 On the main page of ACCESS Standard, under Manage Device, click Logout.
Tip You can also log out of your device by right-clicking the MXI icon, and then clicking Eject
Device.
Stealth Key M200 Quick Start Guide 10
Page 11

Saving and opening files
Private
partition
Application
drive
Saving and opening files
When you plug in your device both the application drive and the private partition display in a file
manager, such as Windows
Once you log into the device, you can open files on your private partition using the appropriate
program or a file manager. When you save data to your private partition, the device encrypts the
data using hardware-based AES 256-bit encryption. Data is automatically decrypted when you
open the file.
®
Explorer, with an associated drive letter for each partition.
Note You cannot save data to the application partition.
Disconnecting the device
To disconnect the device
• From the notification area at the far right of the taskbar, right-click the MXI icon and click
Eject Device.
If you are using a computer running Mac OS X, drag the device drive on the desktop to the
Tra sh. Release the mouse button when you see the Eject prompt.
Tip You can also disconnect the device by clicking the Safely Remove Hardware icon in the
notification area at the far right of the taskbar. Click the message “Safely remove USB Mass
Storage Device - Drive (F:); where F is the letter of the drive in the file manager that is
associated with the device. Disconnect the device when the following message displays, “The
USB Mass Storage Device can now be safely removed from the system”.
Caution Disconnecting the device either accidentally or on purpose, without properly ejecting it,
could corrupt the data on the device.
Stealth Key M200 Quick Start Guide 11
Page 12

4
Warranty Information
MXI One-Year Limited Hardware Warranty Terms
There are special terms that apply to your hardware warranty and various services that you can
use during the one-year warranty period. You can contact an MXI Customer Service
Representative at 1-888-422-6726 to receive a Return Materials Authorization (RMA) number.
Stealth Key M200 Quick Start Guide 12
Page 13
5
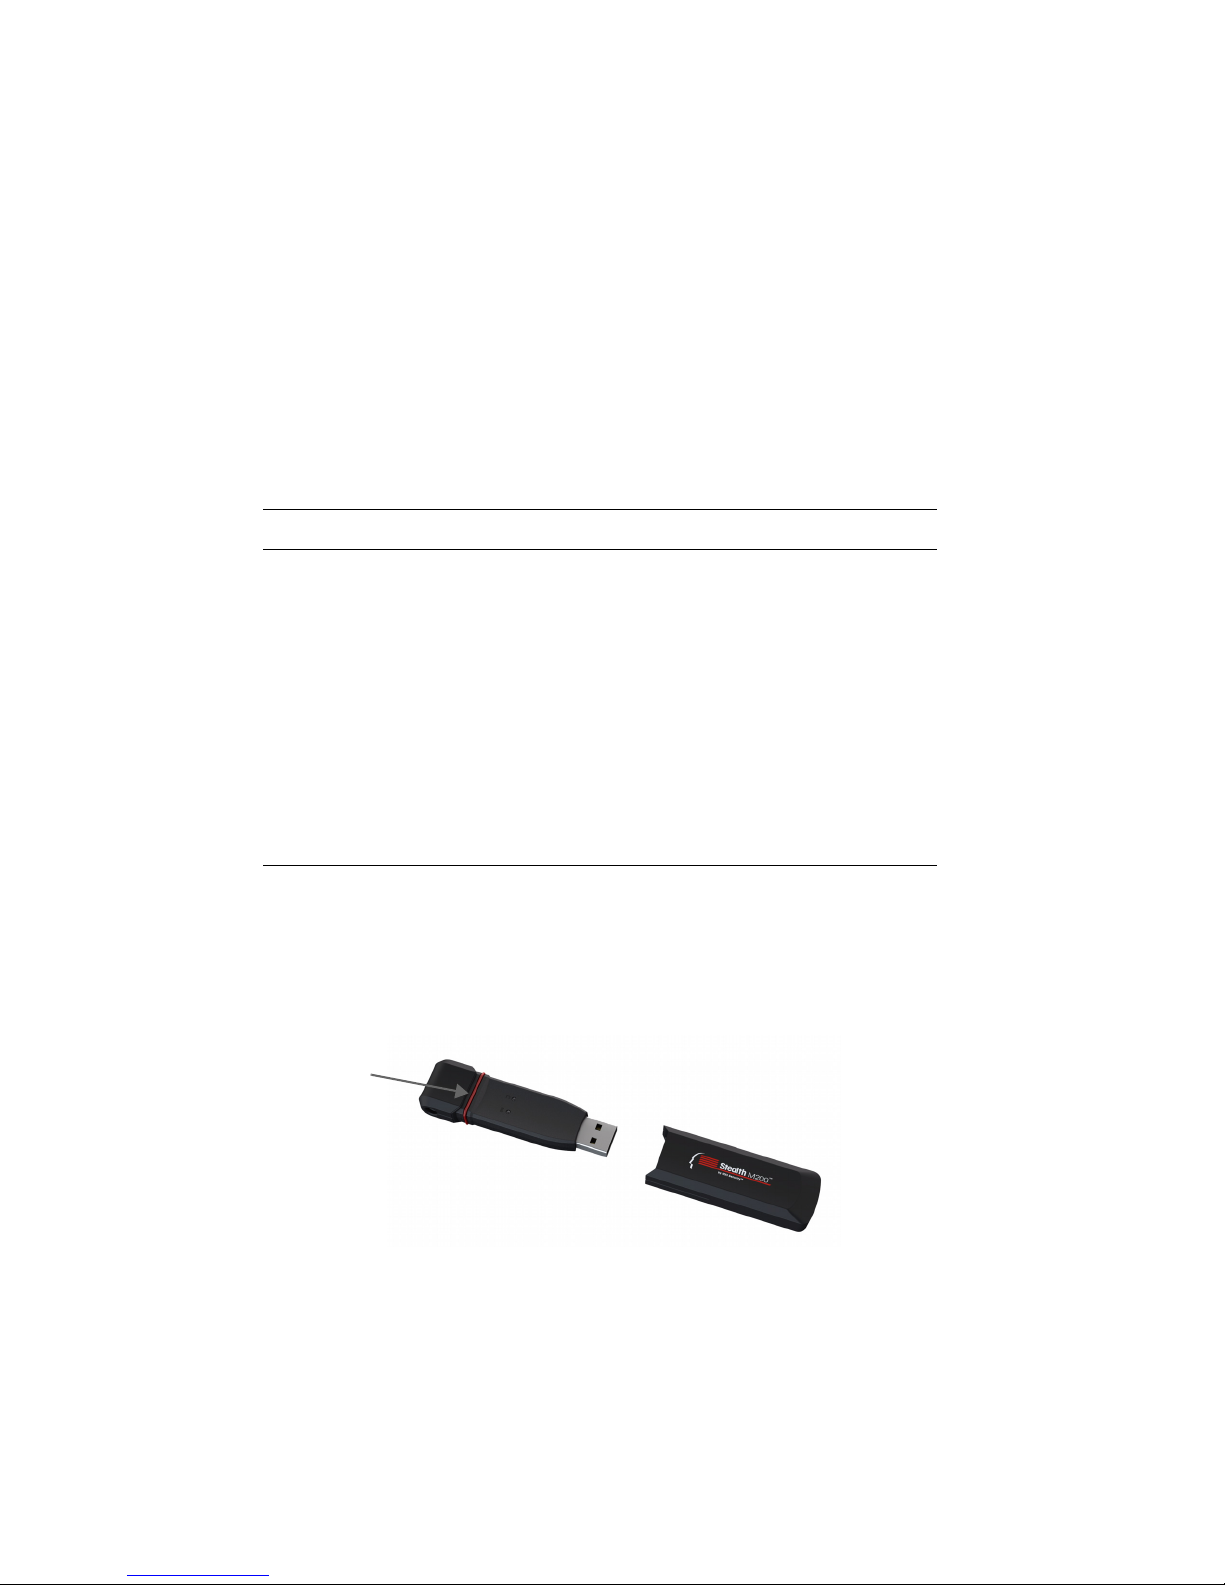
Rubber sealing ring
Troubleshooting
If you experience difficulty using Stealth Key M200 after following the instructions in this Quick
Start Guide, read the following troubleshooting information.
• Check to make sure the device is plugged in properly.
• Check the light emitting diode (LED) status of Stealth Key M200.
• Check the Frequently Asked Questions (FAQ) section on the MXI Web site at
http://www.mxisecurity.com/faq
Table 5-1: LED states
State Description of state
Solid green Open—if no authentication mechanisms are set, any user
can use the device.
User has logged into the device—if users exist, it indicates
that the device has authenticated you as a valid user.
Flashing red The device is either powering up or is totally blocked. When
totally blocked, no authentication methods are available to
unlock the device; this indicates that the device needs to be
recycled.
Solid red The device is locked.
Blue LED Indicates a data transfer activity.
Flashing red and blue
LED
Indicates that a fatal internal error has occurred.
Difficulty closing device cap
If the device cap is difficult to close, check the red rubber sealing ring on the main part of the
device. If the ring is slightly twisted, use your fingernail to gently lift the ring and roll it out of the
groove towards the USB connector—about as far as the LEDs. Then, roll the ring back into the
groove. Repeat if necessary.
Stealth Key M200 Quick Start Guide 13
 Loading...