

Gebrauchsanweisung 4
Operating Manual 16
Mode d’emploi 26
Istruzioni per l’uso 36
Instrucciones de uso 46
de
en
fr
it
es
nl
da
sv
fi
no
Gebruiksaanwijzing 56
Brugsanvisning 66
Användarguide 76
Käyttöohje 86
Bruksanvisning 96
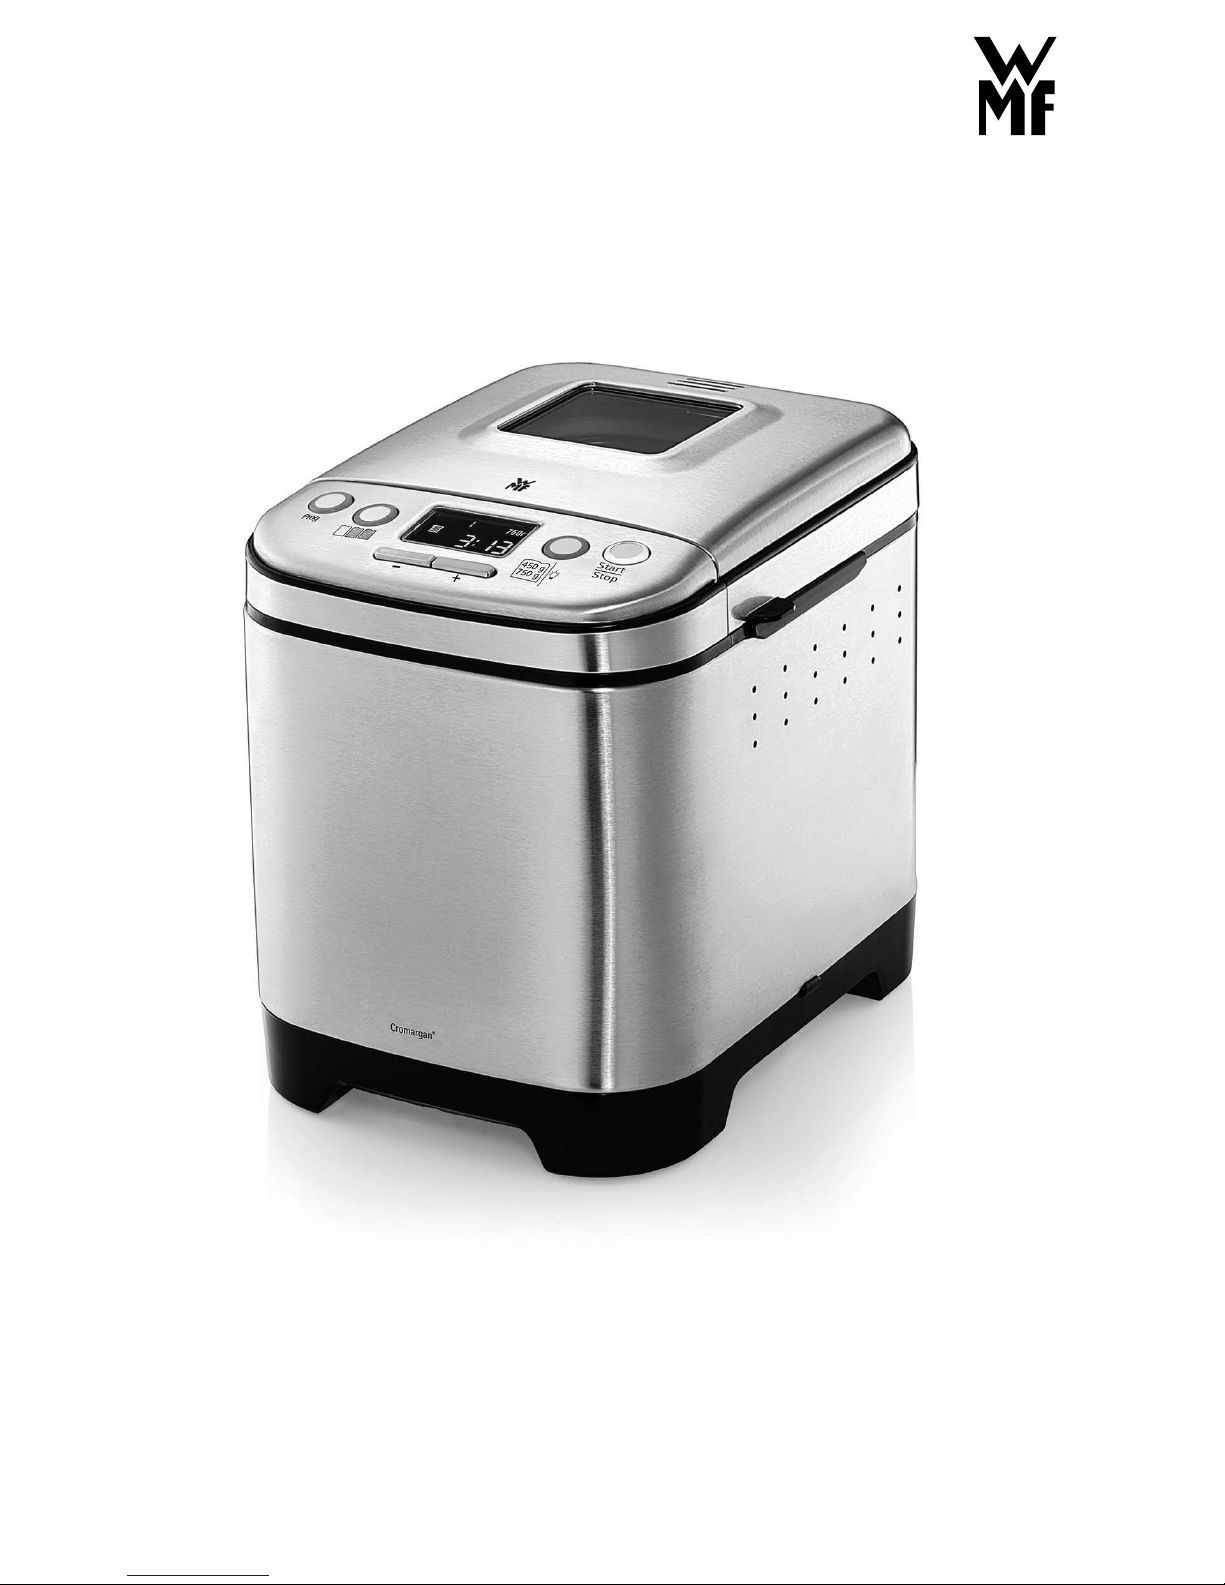
Brotbackautomat
KULT X

Aufbau Brotbackautomat
1 Deckel
2 Bedieneinheit mit Display
3 Brotbackform
4 Knethaken
5 Messbecher
6 Messlöffel
7 Knethakenentferner
8 Backraumbeleuchtung
Assembling the bread maker
1 Lid
2 Control unit with display
3 Baking pan
4 Kneading hook
5 Measuring cup
6 Measuring spoon
7 Dough hook remover
8 Baking chamber lighting
Structure de la machine à pain
1 Couvercle
2 Unité de commande avec écran
3 Moule à pain
4 Crochets malaxeurs
5 Pot gradué
6 Cuillère doseuse
7 Organe de retrait du crochet malaxeur
8 Éclairage de l‘espace de cuisson
Composizione del prodotto
1 Coperchio
2 Unità di comando con display
3 Teglia
4 Paletta impastatrice
5 Misurino
6 Cucchiaio dosatore
7 Gancio per estrarre la paletta impastatrice
8 Illuminazione del vano di cottura
Estructura de la panificadora
1 Tapa
2 Unidad de mando con pantalla
3 Molde para pan
4 Amasador
5 Recipiente medidor
6 Cuchara medidora
7 Gancho para quitar el amasador
8 Iluminación del compartimiento de panificación
Onderdelen -broodbakmachine
1 Deksel
2 Bedieningseenheid met display
3 Bakblik broodbakmachine
4 Kneedhaak
5 Maatbeker
6 Maatlepel
7 Kneedhaakverwijderaar
8 Verlichting bakruimte
Produktoversigt bagemaskine
1 Låg
2 Betjeningsenhed med display
3 Bageform
4 Dejkrog
5 Målebæger
6 Måleske
7 Dejkrogsfjerner
8 Belysning i bagemaskinen
Bakmaskinens delar
1 Lock
2 Manöverpanel
3 Bakform
4 Knådare
5 Mätglas
6 Mätsked
7 Knådaravtagare
8 Bakutrymmesbelysning
Leipäkoneen rakenne
1 Kansi
2 Näytöllinen ohjausyksikkö
3 Leipävuoka
4 Taikinakoukku
5 Mitta-astia
6 Mittalusikka
7 Taikinakoukun irrotin
8 Leivontatilan valaistus
Oppbygging brødbakemaskin
1 Lokk
2 Betjeningsenhet med display
3 Brødform
4 Eltekrok
5 Målebeger
6 Måleskje
7 Eltekrokfjerner
8 Ovnsrombelysning
1
2
3
4
5
6
7
8

4 5
de
de
Gebrauchsanweisung
▪ Vorsicht, Verbrennungsgefahr: Die Temperatur der berührbaren
Oberflächen kann sehr heiß werden. Auch nach dem Ausschalten
des Gerätes, bleiben die Heizflächen noch einige Zeit heiß.
▪ Schalten Sie das Gerät aus und ziehen Sie immer den Netzstecker
bevor Sie Zubehörteile wechseln oder sich Teilen nähern, die sich
beim Gebrauch bewegen.
Vor dem Benutzen
Das Gerät darf nur für den vorgesehenen Zweck gemäß dieser Gebrauchsanweisung verwendet
werden. Lesen Sie die Gebrauchsanweisung deshalb vor der Inbetriebnahme sorgfältig. Sie gibt
Anweisungen für den Gebrauch, die Reinigung und die Pflege des Gerätes. Bei Nichtbeachtung
übernehmen wir keine Haftung für eventuelle Schäden. Bewahren Sie die Gebrauchsanweisung
sorgfältig auf und geben Sie diese gemeinsam mit dem Gerät an Nachbenutzer weiter. Beachten Sie
auch die Garantiehinweise am Ende. Das Gerät ist nicht für den gewerblichen Gebrauch bestimmt,
sondern nur für die Zubereitung von Lebensmitteln in haushaltsüblichen Mengen.
Beim Gebrauch die Sicherheitshinweise beachten.
Technische Daten
Nennspannung: 220 – 240 V~ 50-60 Hz
Leistungsaufnahme: 450 W
Schutzklasse: I
Sicherheitshinweise
▪ Der Netzstecker ist zu ziehen:
⋅ Bei Störungen während des Betriebs
⋅ Vor jeder Reinigung
⋅ Nach dem Gebrauch.
▪ Gerät nur an eine vorschriftsmäßig installierte Schutzkontaktsteckdose anschließen. Zuleitung und
Stecker müssen trocken sein.
▪ Die Anschlussleitung nicht über scharfe Kanten ziehen oder einklemmen, nicht herunterhängen
lassen sowie vor Hitze und Öl schützen.
▪ Ein Verlängerungskabel nur in einwandfreiem Zustand einsetzen.
▪ Den Netzstecker nicht an der Leitung oder mit nassen Händen aus der Steckdose ziehen.
▪ Das Gerät nicht an der Zuleitung tragen.
▪ Das Gerät nicht auf heiße Oberflächen z.B. Herdplatten o.Ä. oder in der Nähe der offenen
Gasflamme abstellen, das Gehäuse könnte dabei anschmelzen.
▪ Verwenden Sie das Gerät nur, wenn alle abnehmbaren Teile korrekt angebracht sind.
▪ Wenn das Gerät längere Zeit nicht benutzt wird, den Netzstecker ziehen.
▪ Das Gerät nicht in Betrieb nehmen bzw. sofort Netzstecker ziehen, wenn:
⋅ das Gerät oder Netzkabel beschädigt ist
⋅ der Verdacht auf einen Defekt nach einem Sturz oder Ähnlichem besteht.
In diesen Fällen das Gerät zur Reparatur geben.
▪ Das Gerät nur unter Aufsicht betreiben.
▪ Heiße Oberflächen nicht berühren.
▪ Die Verwendung von Zubehör, welches nicht durch den Hersteller empfohlen wird kann zu
Verletzungen führen.
Wichtige Sicherheitshinweise
▪ Dieses Gerät kann von Kindern ab 8 Jahren sowie von Personen mit
reduzierten physischen, sensorischen oder mentalen Fähigkeiten
oder Mangel an Erfahrung und/oder Wissen benutzt werden, wenn
sie beaufsichtigt oder bezüglich des sicheren Gebrauchs des Gerätes
unterwiesen wurden und die daraus resultierenden Gefahren
verstanden haben.
▪ Kinder dürfen nicht mit dem Gerät spielen.
▪ Reinigung und Benutzerwartung dürfen nicht durch Kinder
durchgeführt werden, es sei denn, sie sind älter als 8 Jahre und
beaufsichtigt.
▪ Kinder jünger als 8 Jahre sind vom Gerät und der Anschlussleitung
fernzuhalten.
▪ Das Gerät darf nicht über eine externe Zeitschaltuhr oder
Fernbedienung betrieben werden.
▪ Dieses Gerät ist dazu bestimmt, im Haushalt und ähnlichen
Anwendungen verwendet zu werden, wie beispielsweise:
⋅ in Küchen für Mitarbeiter in Läden, Büros und anderen
gewerblichen Bereichen;
⋅ in landwirtschaftlichen Anwesen;
⋅ von Kunden in Hotels, Motels und anderen Wohneinrichtungen;
⋅ in Frühstückspensionen.
▪ Wenn die Netzanschlussleitung dieses Gerätes beschädigt wird,
muss sie durch den Hersteller oder seinen Kundendienst oder eine
ähnlich qualifizierte Person ersetzt werden, um Gefährdungen zu
vermeiden.
▪ Reinigen Sie nach Verwendung des Zubehöres und des Gerätes alle
Flächen/Teile, die mit Nahrungsmitteln in Berührung gekommen
sind. Bitte befolgen Sie die Hinweise im Kapitel „Reinigung und
Pflege“.
▪ Das Gerät nur gemäß dieser Anleitung verwenden. Unsachgemäßer
Gebrauch kann Stromschlag oder andere Gefahrenmomente zur Folge
haben.
6 7
de
Verwendung
Mit dem WMF KULT X Brotbackautomaten können Sie Ihr Brot ganz einfach selber machen.
Alles was Sie dafür brauchen sind die entsprechenden Zutaten, der Rest wird vom WMF KULT X
Brotbackautomaten erledigt. Mit 12 zur Verfügung stehenden Backprogrammen ist für jeden
Geschmack das Richtige dabei. Im Lieferumfang befindet sich eine Programmkarte für die einfache
Zuordnung der Programmnummern. Diese kann platzsparend in der Brotbackform aufbewahrt werden.
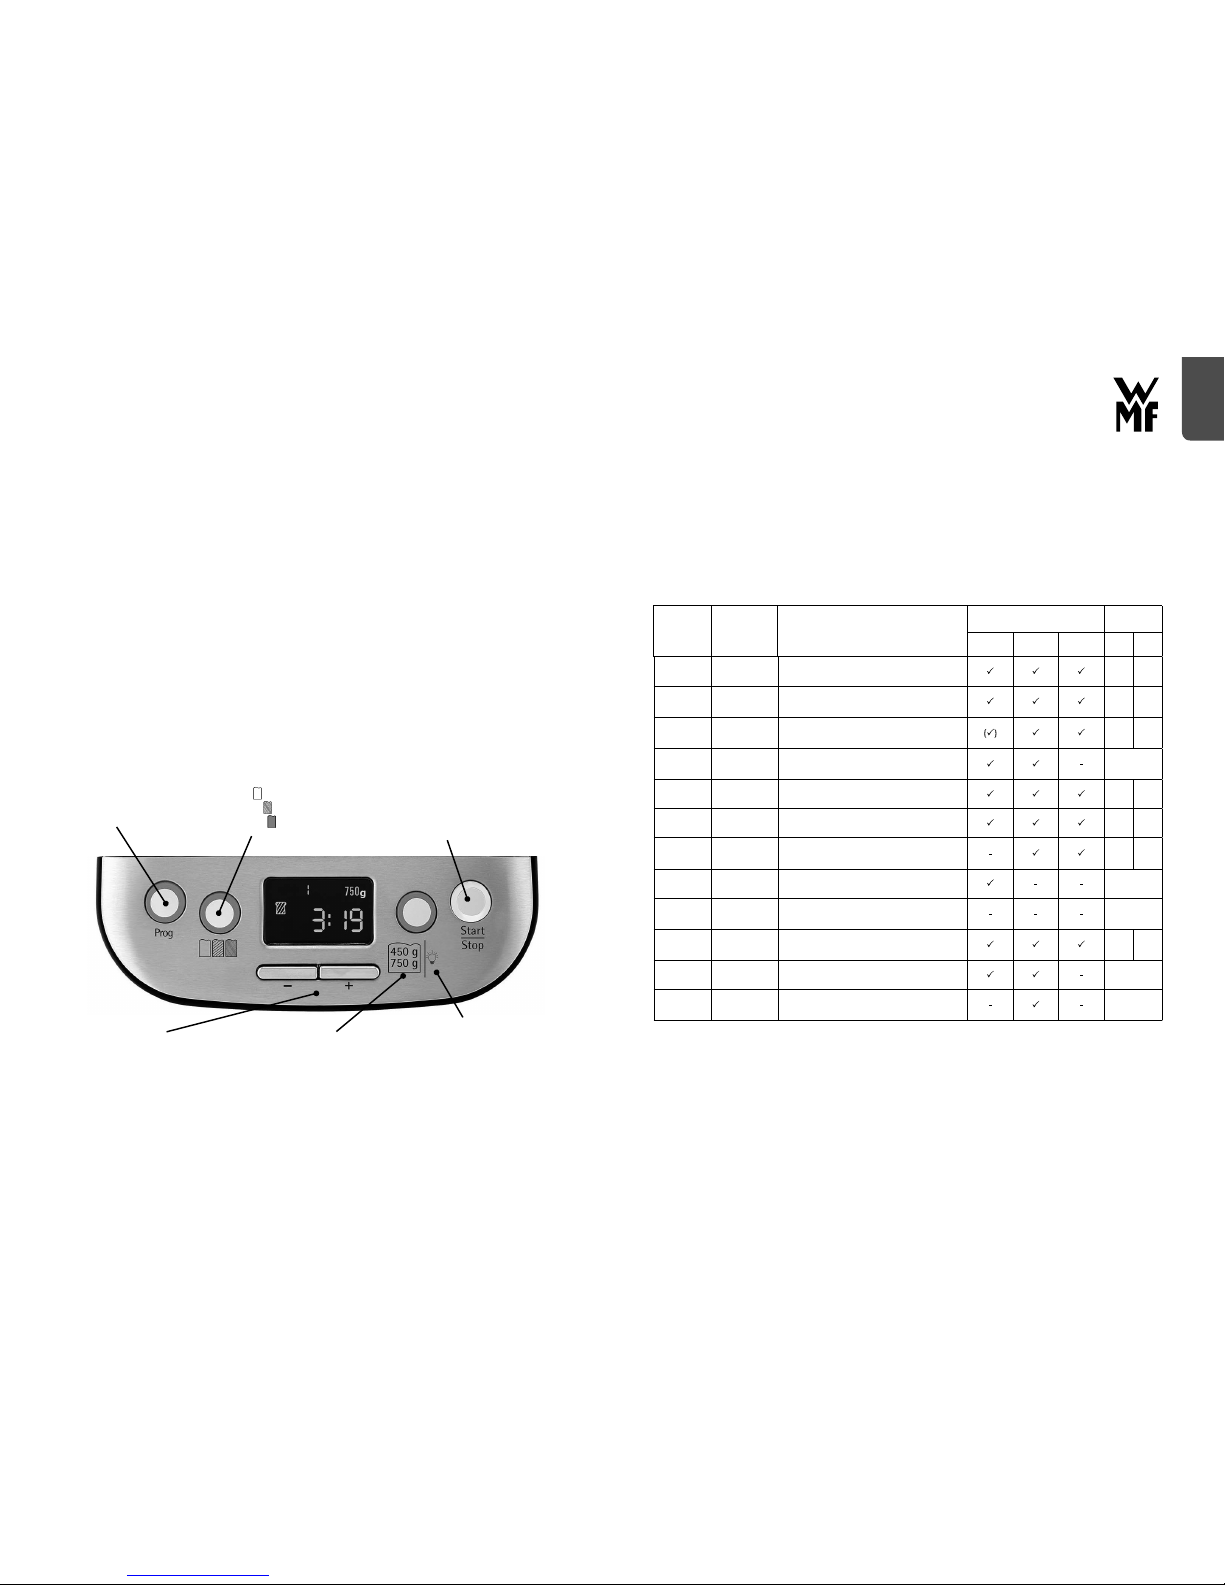
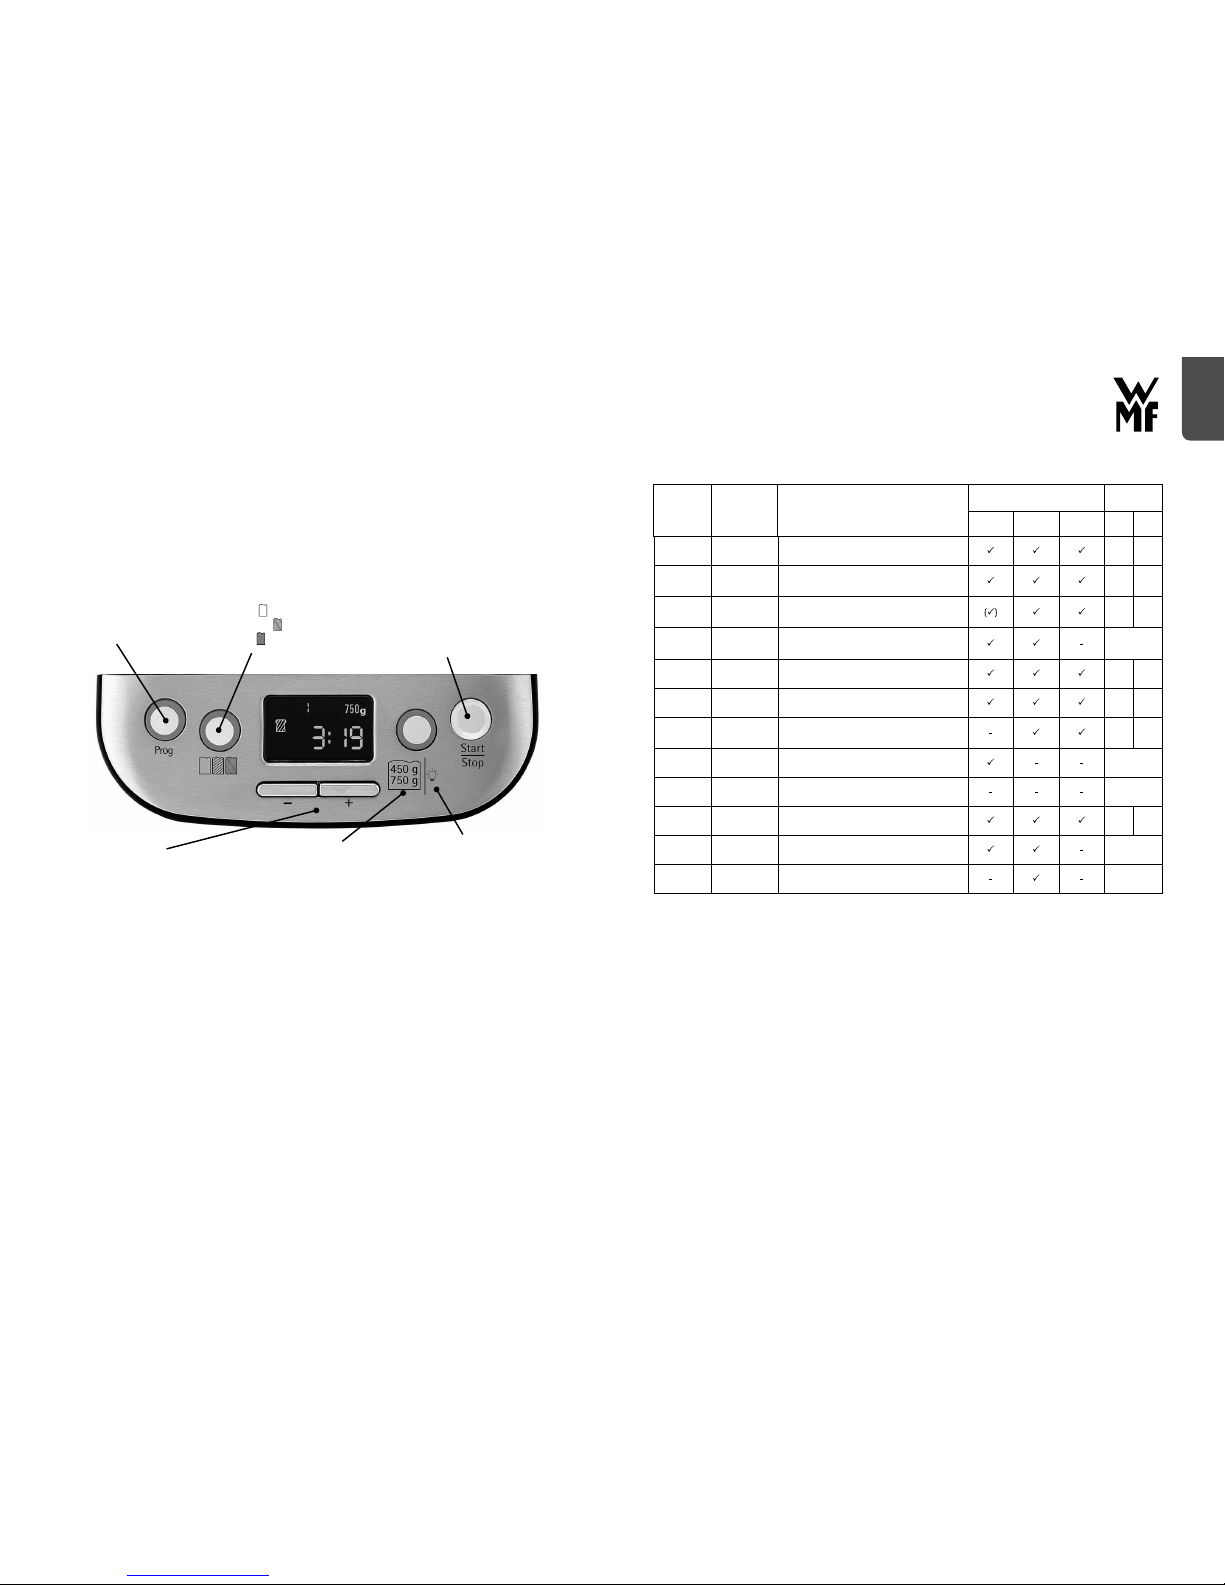
Übersicht Programme
Programm
Nr.
Bezeichnung Beschreibung
Zur Verfügung stehende
Optionen
Dauer [h]
Timer-
Funktion
Bräunung Größe 450 g 750 g
1 Klassisches Brot
Kneten, gehen und backen von Mischbrot. Weitere
Zutaten können hinzugefügt werden.
03:08 03:15
2 Weißbrot
Kneten, gehen und backen über einen längeren
Zeitraum. Das Brot hat in der Regel eine knusprige
Kruste und eine leichte Konsistenz.
03:55 04:05
3 Vollkornbrot
Kneten, gehen und backen von Vollkornbrot. Es wird
nicht empfohlen, die Timer-Funktion zu verwenden,
da dies das Backergebnis verschlechtern kann.
03:47 03:55
4
Schnell-
Programm*
Kneten, gehen und backen von Brot in kürzerer Zeit
als Programm Nr. 1. Das Brot ist in der Regel kleiner
mit einer festeren Konsistenz.
02:25
5 Süßes Brot
Kneten, gehen und backen von süßem Brot. Weitere
Zutaten können hinzugefügt werden.
03:05 03:10
6 Glutenfrei
Kneten, gehen und backen von gluten freiem Brot.
Weitere Zutaten können hinzugefügt werden.
03:05 03:10
7
Ultra-Schnell-
Programm**
Kneten, gehen und backen von Brot in kürzester Zeit.
Das Brot ist in der Regel kleiner und rauer als das im
Programm Nr. 4 gebackene Brot.
01:43 01:53
8 Teig-Programm
Kneten und gehen von Teig, ohne Backen. Der Teig
kann für Brötchen, Pizza etc. verwendet werden.
01:30
9 Konfitüre***
Kochen von Konfitüre und Marmelade. Obst muss
vor dem Einfüllen in die Brotbackform geschnitten
werden.
01:20
10 Toastbrot
Kneten, gehen und backen von Toastbrot. Das Brot
hat in der Regel eine dünnere Kruste und eine leichte
Konsistenz.
03:10 03:15
11 Kuchen
Kneten, gehen und backen unter Verwendung von
Backpulver.
02:00
12 Backen
Nur Backen, kein kneten und gehen. Kann auch
verwendet werden um die Backzeit anderer
Programme zu verlängern.
01:00
* Für ein optimales Backergebnis müssen zuerst alle flüssigen Zutaten in die Brotbackform gefüllt werden. Anschließend
werden alle trockenen Zutaten hinzu gegeben.
** Mit dem Ultra-Schnell-Programm kann ein Brot in kürzester Zeit gebacken werden. Die Wassertemperatur ist hierfür besonders
wichtig, da diese den Gärvorgang beeinflusst. Ein optimales Backergebnis entsteht bei Verwendung von warmem Wasser.
*** Für die Zubereitung von Konfitüre empfiehlt es sich eine separate Backform zu verwenden.
▪ Während dem Gebrauch keine sich bewegenden Teile berühren.
▪ Die Brotbackform nie gegen Gegenstände schlagen um das Brot zu entnehmen, da dies die
Brotbackform beschädigen kann.
▪ Metallfolien und ähnliche Materialien dürfen nicht in den Brotbackautomaten eingesetzt werden,
dies erhöht das Risiko eines Brandes oder Kurzschlusses.
▪ Der Brotbackautomat darf nie mit einem Tuch oder anderem abgedeckt werden. Hitze und Dampf
müssen zu jeder Zeit entweichen können. Wenn der Brotbackautomat mit brennbaren Materialien
abgedeckt wird oder in Berührung kommt, kann ein Feuer entstehen.
▪ Um Schäden zu vermeiden darf der Brotbackautomat nicht ohne die Brotbackform in Betrieb
genommen werden.
▪ Stellen Sie das Gerät so auf, dass es nicht von der Arbeitsplatte rutscht, z.B. beim Kneten eines
schweren Teiges.
▪ Bei Zweckentfremdung, falscher Bedienung oder nicht fachgerechter Reparatur wird keine
Haftung für eventuelle Schäden übernommen. Ebenso sind Garantieleistungen in solchen Fällen
ausgeschlossen.
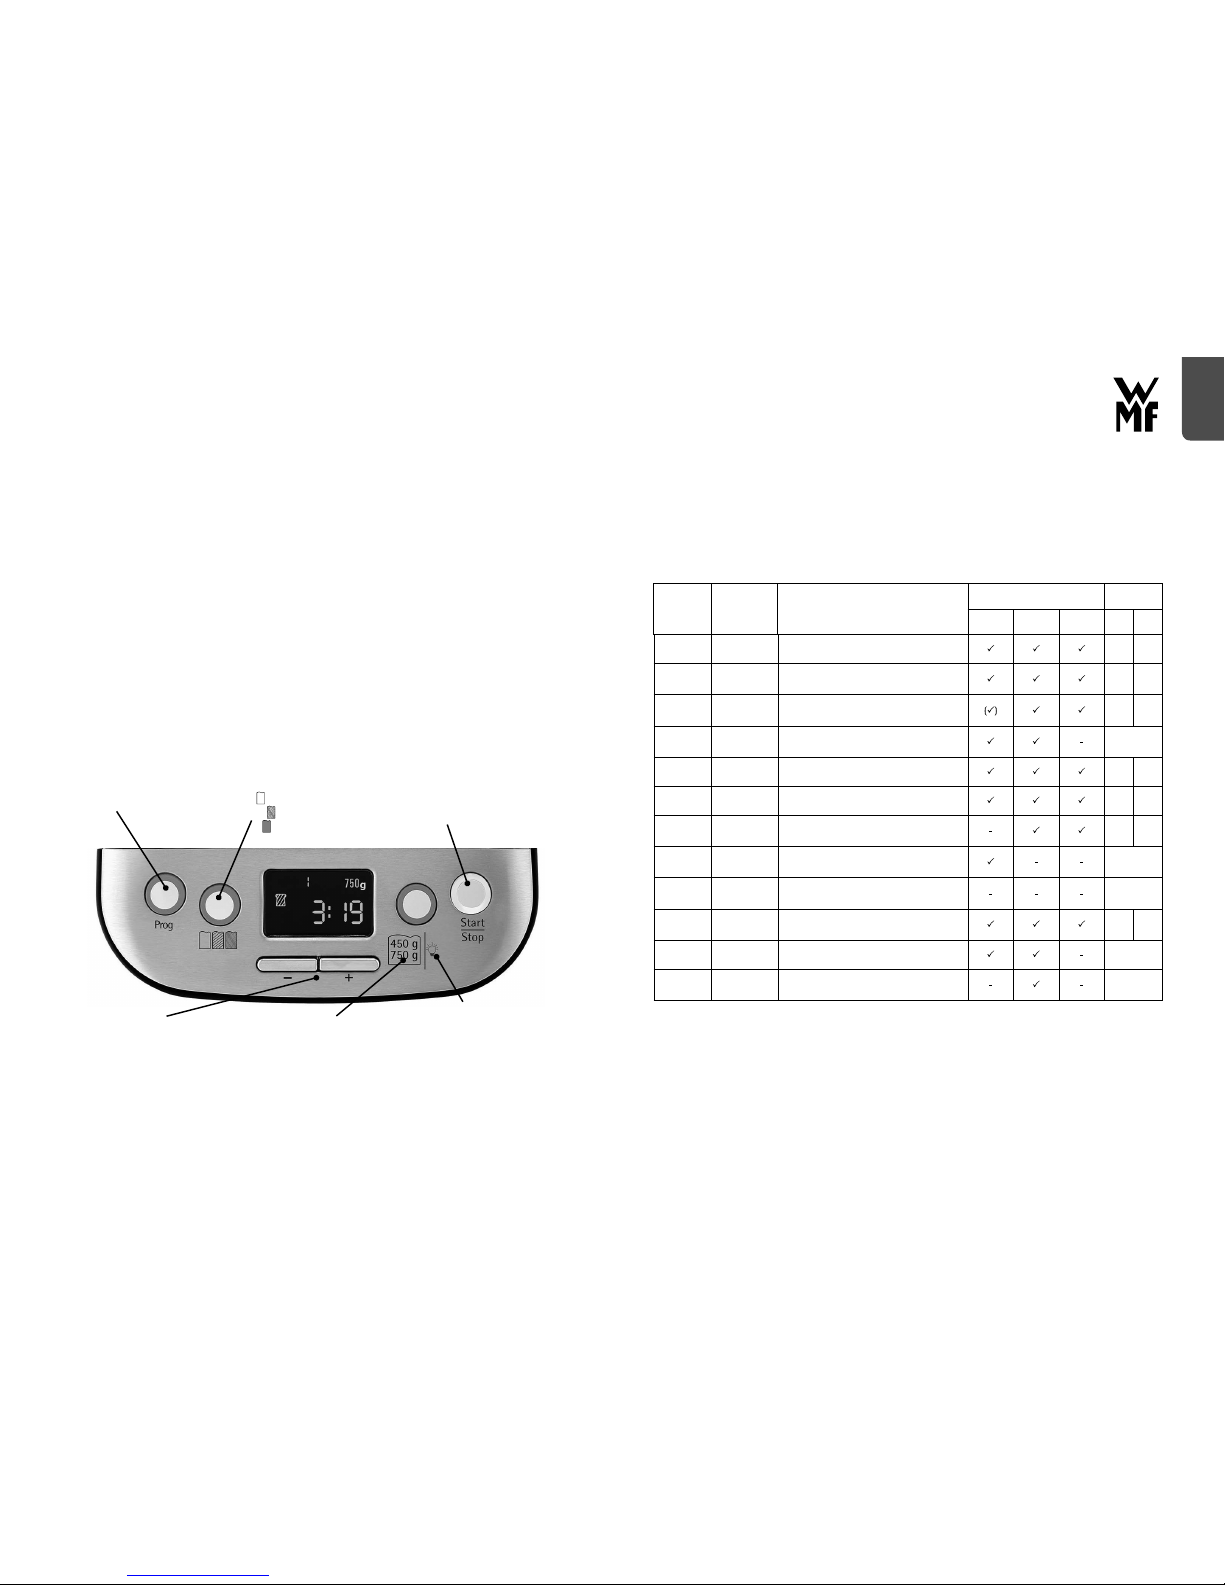
Bedieneinheit
Auswahl Programm
Mit dieser Taste lässt sich
das gewünschte Programm
auswählen. Die gewählte
Programmnummer wird im
Display angezeigt.
Auswahl Bräunungsgrad
Mit dieser Taste lässt sich der
gewünschte Bräunungsgrad
auswählen. Dieser wird im Display
wie folgt angezeigt:
- Hell
- Mittel
- Dunkel
Start/Pause
Mit dieser Taste wird der Backvorgang
gestartet und kann durch erneutes
Drücken unterbrochen werden.
Stopp
Durch längeres Drücken dieser Taste
kann das Backprogramm beendet
werden.
Einstellung Timer
Mit den Tasten – und +
lässt sich die Timerfunktion
programmieren. Die angepasste
Endzeit wird im Display
dargestellt.
Auswahl Brotgröße
Mit dieser Taste lässt sich
die gewünschte Brotgröße
auswählen. Je nach gewählter
Größe wird im Display 450 g oder
750 g angezeigt.
Backraumbeleuchtung
Durch längeres Drücken dieser Taste
lässt sich die Backraumbeleuchtung
aktivieren. Diese schaltet sich nach ca.
30 Sekunden automatisch ab, kann
aber durch erneutes, längeres Drücken
abgeschaltet werden.

8 9
de
Inbetriebnahme
▪ Überprüfen Sie beim Auspacken des Gerätes, ob alle Teile vollständig und unbeschädigt vorhanden
sind.
▪ Reinigen Sie vor der Verwendung alle abnehmbaren Teile wie im Kapitel „Reinigung und Pflege“
beschrieben.
▪ Da bei dem ersten Aufheizvorgang Rauch entstehen kann, empfehlen wir das Gerät einmal mit
eingesetzter leerer Brotbackform (ohne Knethaken) im Programm Backen (Nr. 12) in Betrieb zu
nehmen.
▪ Lassen Sie den Brotbackautomaten auskühlen und reinigen ihn erneut wie im Kapitel „Reinigung
und Pflege“ beschrieben.
Zubereitung von Brot, Kuchen und Teig
▪ Öffnen Sie den Deckel des KULT X Brotbackautomaten und entnehmen Sie die Brotbackform durch
eine Drehung gegen den Uhrzeigersinn.
▪ Um ein Festbacken des Teiges im Hohlraum zwischen Knethaken und Brotbackform zu vermeiden,
empfehlen wir das Loch des Knethakens mit hitzebeständiger Margarine zu bestreichen.
▪ Platzieren Sie den Knethaken mit der breiten Seite nach unten auf der Antriebswelle der
Brotbackform.
▪ Geben Sie anschließend alle gewünschten Zutaten wie im Rezept angegeben in die Brotbackform.
Üblicherweise werden zuerst die flüssigen Zutaten wie Wasser oder Öl eingefüllt. Es folgen Zucker,
Salz und Mehl und zuletzt wird Hefe in die Brotbackform gegeben.
Achtung: Die Maximalmenge an Mehl beträgt 500 g und 7g Trockenhefe.
Hinweis: Vorsicht, bei einer zu großen Mehlmenge kann der Teig überlaufen und festbrennen.
▪ Setzen Sie die Brotbackform in den Brotbackautomaten und Verriegeln Sie diese mit einer Drehung
im Uhrzeigersinn.
▪ Schließen Sie den Deckel des Brotbackautomaten.
▪ Stecken Sie nun den Netzstecker in die Steckdose.
▪ Wählen Sie mit der Programmtaste
das entsprechende Programm aus. Weiterführende
Hinweise zu den einzelnen Programmen finden Sie auf Seite 7.
▪ Wählen Sie mit der Bräunungsgradtaste
den gewünschten Bräunungsgrad aus (hell, mittel,
dunkel)
▪ Wählen Sie mit der Brotgrößetaste
die gewünschte Brotgröße (450 g oder 750 g). Bei dem
Schnellprogramm (Nr. 4) ist keine zusätzliche Auswahl der Brotgrößen erforderlich.
▪ Mithilfe der Tasten – und + kann der Timer programmiert werden (weitere Infos S. 9. Dieser Schritt
kann übersprungen werden wenn der Backvorgang direkt starten soll.
▪ Wenn alle gewünschten Einstellungen getätigt wurden können Sie den Backvorgang mit der
START/STOPP-Taste
Start
Stop
beginnen. Öffnen Sie den Deckel nach Möglichkeit nicht vor dem Ende der
Backzeit, denn dies wirkt sich negativ auf das Backergebnis aus.
▪ Während dem zweiten Knetvorgang ertönt je nach gewähltem Programm (Nr.1, 2, 3, 4, 5, 7, 10
und 11) ein mehrmaliger Piepton. Jetzt können Sie je nach Belieben den Deckel öffnen um weitere
Zutaten wie zum Beispiel Rosinen oder Nüsse hinzugeben. Schließen Sie den Deckel sofort wieder
um ein gutes Backergebnis zu erzielen.
▪ Nach Beendigung des Backvorgangs ertönt ein mehrmaliger Piepton. Sie können das Brot direkt
entnehmen und den Backvorgang durch ein längeres Drücken der START/STOPP-Taste
Start
Stop
beenden
oder die Warmhaltefunktion schaltet sich für max. 60 Minuten ein.
▪ Entnehmen Sie die Brotbackform mithilfe eines Topflappens durch eine leichte Drehung gegen den
Uhrzeigersinn. Kippen Sie die Brotbackform, damit das Brot zum Auskühlen auf ein Kuchengitter
fallen kann.
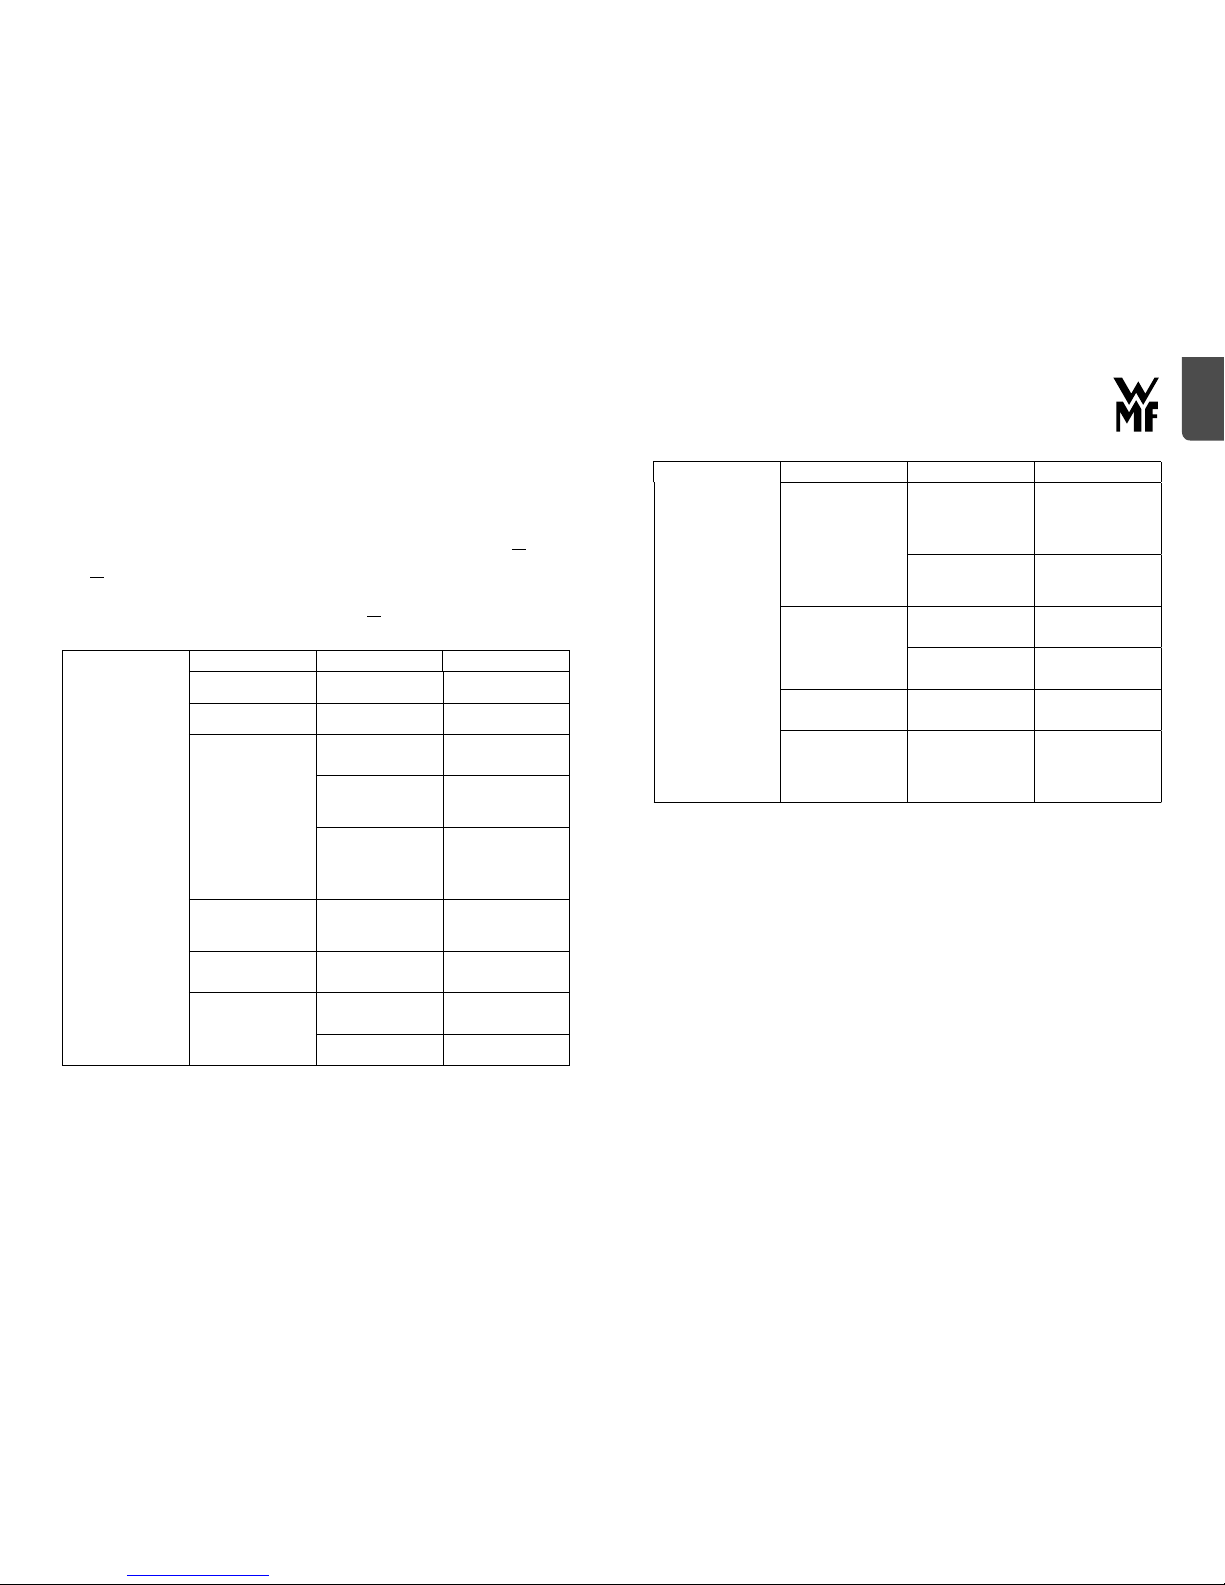
Programmablauf im Detail
Programm
Nr.
Bezeichnung Menge Gesamtdauer Kneten 1 Gehen 1 Kneten 2 Gehen 2 Gehen 3 Backen
Warmhalten
1 Klassisches Brot
450 g 03:08 h 11 min. 20 min. 17 min. 25 min. 35 min. 80 min. 60 min.
750 g 03:15 h 12 min. 20 min. 18 min. 25 min. 35 min. 85 min. 60 min.
2 Weißbrot
450 g 03:55 h 18 min. 40 min. 22 min. 30 min. 40 min. 85 min. 60 min.
750 g 04:05 h 20 min. 40 min. 25 min. 30 min. 40 min. 90 min. 60 min.
3 Vollkornbrot
450 g 03:47 h 11 min. 25 min. 21 min. 35 min. 55 min. 80 min. 60 min.
750 g 03:55 h 12 min. 25 min. 23 min. 35 min. 55 min. 85 min. 60 min.
4
Schnell-
Programm*
02:25 h 12 min. 10 min. 13 min. / 25 min. 85 min. 60 min.
5 Süßes Brot
450 g 03:05 h 12 min. 5 min. 23 min. 30 min. 35 min. 80 min. 60 min.
750 g 03:10 h 12 min. 5 min. 23 min. 30 min. 35 min. 85 min. 60 min.
6 Glutenfrei
450 g 03:05 h 12 min. 5 min. 13 min. 30 min. 35 min. 90 min. 60 min.
750 g 03:10 h 12 min. 10 min. 13 min. 30 min. 35 min. 90 min. 60 min.
7
Ultra-Schnell-
Programm**
450 g 01:43 h 13 min. / 5 min. 25 min. / 60 min. 60 min.
750 g 01:53 h 13 min. / 5 min. 30 min. / 65 min. 60 min.
8 Teig-Programm 01:30 h 25 min. / / 30 min. 35 min. / /
9 Konfitüre*** 01:20 h / 15 min. / / 45 min. 20 min. /
10 Toastbrot
450 g 03:10 h 17 min. 35 min. 8 min. 25 min. 35 min. 70 min. 60 min.
750 g 03:15 h 17 min. 35 min. 8 min. 25 min. 35 min. 75 min. 60 min.
11 Kuchen 02:00 h 7 min. 4 min. 10 min. 9 min. / 90 min. 60 min.
12 Backen 01:00 h / / / / /
10-60
min.
60 min.
* Für ein optimales Backergebnis müssen zuerst alle flüssigen Zutaten in die Brotbackform gefüllt werden. Anschließend
werden alle trockenen Zutaten hinzu gegeben.
** Mit dem Ultra-Schnell-Programm kann ein Brot in kürzester Zeit gebacken werden. Die Wassertemperatur ist hierfür besonders
wichtig, da diese den Gärvorgang beeinflusst. Ein optimales Backergebnis entsteht bei Verwendung von warmem Wasser.
*** Für die Zubereitung von Konfitüre empfiehlt es sich eine separate Backform zu verwenden.

10 11
de
▪ Falls sich der Knethaken nicht automatisch löst, können Sie diesen mithilfe des Hakenentferners
lösen. Dazu führen Sie diesen in die Öffnung der Knethakens ein und verhaken ihn am unteren
Rand des Knethakens. Ziehen Sie den Knethaken nun vorsichtig heraus.
▪ Lassen Sie das Brot, soweit nicht abweichend im Rezept beschrieben, auf dem Kuchengitter für ca.
eine Stunde auskühlen bevor Sie es anschneiden.
Timer-Einstellung
Wenn der Backvorgang nicht sofort gestartet werden soll, ist es möglich die Timer-Funktion zu nützen.
Mithilfe der – und + Tasten lässt sich in 10-Minuten-Schritten der Zeitpunkt einstellen, an dem das
Brot fertig gebacken sein soll, die Backzeit ist also mit inbegriffen. Die maximale Verzögerungszeit
beträgt 13 Stunden.
Hinweis: Diese Funktion gibt es bei den folgenden Programmen nicht: Ultra-Schnell-Programm,
Konfitüre und Backen.
Hinweis: Verwenden Sie keine leicht verderblichen Lebensmittel wie zum Beispiel Eier oder Frischmilch
wenn Sie die Timer-Funktion verwenden möchten.
Warmhalte-Funktion
Nach Beendigung der Backzeit schaltet sich automatisch die 60-minütige Warmhaltezeit ein. Falls Sie
das Brot direkt nach dem Backen entnehmen möchten, schalten Sie den Backvorgang durch längeres
Drücken der START/STOP-Taste
Start
Stop
aus.
Memory-Funktion
Wenn die Stromversorgung während dem Backvorgang kurzzeitig verloren geht, wird dieser innerhalb
von 10 Minuten wieder gestartet, auch ohne drücken der START/STOPP-Taste
Start
Stop
. Falls der Stromausfall
allerdings länger als 10 Minuten andauert muss der Brotbackautomat neu gestartet werden.
Nützliche Hinweise
▪ Schwere Teige: Bei schweren Teigen empfiehlt es sich die Reihenfolge zu ändern. Geben Sie zuerst
die trockenen und anschließend die flüssigen Zutaten in die Brotbackform. Falls Sie allerdings die
Timer-Funktion verwenden möchten, achten Sie bitte darauf, dass die Hefe nicht vorzeitig in Kontakt
mit den Flüssigkeiten kommt.
▪ Backmischungen: Für Backmischungen eignet sich in der Regel und soweit im Rezept nicht anders
vorgegeben, das Programm für klassisches Brot (Nr.1). Geben Sie bei Brotbackmischungen max. die im
Rezept angegebene Menge Wasser hinzu. Je nach Rezept empfiehlt es sich aber die Menge um bis zu
50 ml zu reduzieren.
▪ Bräunung: Da der Brotbackautomat vorschriftsgemäß nicht über eine Heizung im Deckelbereich
verfügt, empfiehlt es sich die stärkste Bräunungsstufe zu verwenden, wenn Sie auf eine knusprige
Konsistenz Wert legen.
▪ Eier: Bei der zusätzlichen Verwendung von Eiern muss die Flüssigkeitsmenge proportional angepasst
werden. Außerdem empfiehlt es sich die Eier zu schlagen bevor sie in die Brotbackform gegeben werden.
▪ Backraumbeleuchtung: Zum Austauschen der Glühbirne können Sie die Glasabdeckung mit einer
Münze entfernen. Bitte verwenden Sie eine Backofenglühlampe mit den folgenden Eigenschaften:
⋅ E14
⋅ Gesamtlänge 49 mm
⋅ Durchmesser Glas 22 mm
⋅ 220-240 V
⋅ 15 Watt
⋅ 300°C
Reinigung und Pflege
Nach Gebrauch Netzstecker ziehen. Lassen Sie den Brotbackautomaten vor der Reinigung abkühlen.
Entnehmen Sie die Brotbackform indem Sie diese am Henkel fassen und gegen den Uhrzeigersinn
drehen. Entfernen Sie anschließend den Knethaken. Falls sich dieser nicht einfach entfernen lässt,
füllen Sie die Brotbackform für ca. 30 Minuten mit lauwarmem Wasser und lassen Sie den Knethaken
darin einweichen. Nun lässt sich der Knethaken einfach entfernen. Reinigen Sie die Brotbackform
und den Knethaken mit einem feuchten Tuch, verwenden Sie keine scharfen oder scheuernden
Reinigungsmittel um die Antihaftbeschichtung nicht zu beschädigen. Bevor die Brotbackform erneut
verwendet werden kann muss sie vollständig getrocknet sein. Der Brotbackautomat, der Deckel bzw.
das Sichtfenster lassen sich ebenfalls am besten mit einem feuchten Tuch reinigen. Verwenden Sie
auch hierfür keine scheuernden Reinigungsmittel, da diese die Oberflächenstruktur angreifen können.
Tauchen Sie das Gehäuse niemals in Wasser. Zur einfachen Reinigung können Sie den Messbecher, den
Messlöffel und den Knethakenentferner in die Spülmaschine
geben.
spülmaschinen-
geeignet
unter fließendem
Wasser abspülbar
feucht abwischen
Brotbackform
Knethaken
Messbecher
Messlöffel
Hakenentferner
Gehäuse
12 13
de
Problembehebung
Display zeigt „HHH“ (begleitet von 5 Pieptönen)
Die Temperatur im Inneren ist zu hoch. Das aktuelle Programm muss angehalten werden. Öffnen Sie
den Deckel und lassen Sie den Brotbackautomaten für 10 bis 20 Minuten abkühlen.
Display zeigt „LLL“ (begleitet von 5 Pieptönen) nach Drücken der START/STOPP-Taste
Start
Stop
Die Temperatur im Inneren ist zu niedrig. Stoppen Sie den Piepton durch Drücken der START/STOPPTaste
Start
Stop
und öffnen Sie den Deckel. Warten Sie 10 bis 20 Minuten bis das Gerät Raumtemperatur
erreicht hat.
Display zeigt „EE0“ nach Drücken der START/STOPP-Taste
Start
Stop
Der Temperatursensor ist nicht richtig angeschlossen, geben Sie das Gerät zur Reparatur.
Problem Ursache Lösung
Rauch kommt aus dem Backraum
bzw. den Lüftungsschlitzen.
Die Zutaten befinden sich im
Backraum oder kleben an der
Außenseite der Brotbackform.
Ziehen Sie den Stecker heraus und
reinigen Sie die Außenseite der
Brotbackform oder den Backraum.
Das Brot fällt in der Mitte ein und
ist am Boden feucht.
Das Brot wurde nach dem backen
zu lange in der Brotbackform
gelassen.
Entnehmen Sie das Brot aus
der Brotbackform bevor die
Warmhaltefunktion abschaltet.
Die Zutaten werden nicht richtig
vermischt bzw. das Brot wird nicht
richtig gebacken.
Falsche Programmeinstellungen
gewählt.
Prüfen Sie das gewählte
Programm sowie die Einstellungen
zur Brotgröße und dem
Bräunungsgrad
Tipps und Antworten
Der Deckel wurde häufig während
des Backvorgangs geöffnet.
Der Deckel darf nicht geöffnet
werden, außer um weitere Zutaten
einzufüllen. Anschließend muss der
Deckel sofort wieder geschlossen
werden.
Der Knethaken konnte sich nicht
drehen.
Überprüfen Sie, ob der Knethaken
durch Körner etc. blockiert wird.
Entnehmen Sie die Brotbackform
und prüfen Sie, ob sich der
Knethaken drehen lässt. Ist dies
nicht der Fall, geben Sie das Gerät
zur Reparatur.
Der Brotbackautomat startet nicht,
das Display zeigt “HHH”
Die Temperatur im Inneren ist
zu hoch.
Das aktuelle Programm muss
angehalten werden. Öffnen Sie
den Deckel und lassen Sie den
Brotbackautomaten für 10 bis 20
Minuten abkühlen.
Das Brot geht zu sehr auf
Zu viel Hefe, zu viel Mehl oder zu
wenig Salz
Prüfen Sie die Zutatenmenge,
passen Sie die Dosierung wenn
notwendig an und prüfen Sie, ob
alle Zutaten hinzugefügt wurden.
Das Brot geht gar nicht auf oder
nur etwas
Keine oder zu wenig Hefe bzw.
falsche Wassermenge
Prüfen Sie die Zutatenmenge,
passen Sie die Dosierung wenn
notwendig an und prüfen Sie, ob
alle Zutaten hinzugefügt wurden.
Hefe ist zu früh mit Flüssigkeit in
Kontakt gekommen
Achten Sie auf die angegebene
Reihenfolge bei der Befüllung der
Brotbackform.
Problem Ursache Lösung
Das Brot fällt in der Mitte ein
Das Teigvolumen ist größer als die
Brotbackform
Prüfen Sie die Zutatenmenge und
passen Sie die Dosierung wenn
notwendig an. Wenn Zutaten
die Wasser enthalten verwendet
werden, muss die Flüssigkeit
dementsprechend reduziert
werden.
Hefe ist zu früh mit Flüssigkeit in
Kontakt gekommen
Machen Sie eine kleine Mulde im
Mehl und geben die Trockenhefe
hinein, vermeiden Sie einen
direkten Kontakt von Flüssigkeit
und Trockenhefe.
Tipps und Antworten
Schwere, klumpige Konsistenz
Zu viel Mehl oder zu wenig
Flüssigkeit
Prüfen Sie die Zutatenmenge,
passen Sie die Dosierung wenn
notwendig an und prüfen Sie, ob
alle Zutaten hinzugefügt wurden.
Nicht genug Hefe oder Zucker
Prüfen Sie die Zutatenmenge,
passen Sie die Dosierung wenn
notwendig an und prüfen Sie, ob
alle Zutaten hinzugefügt wurden.
Brot ist in der Mitte nicht
gebacken
Zu viel Wasser
Prüfen Sie die Zutatenmenge,
passen Sie die Dosierung wenn
notwendig an und prüfen Sie, ob
alle Zutaten hinzugefügt wurden.
Brot/Kruste ist zu hell Bräunungsgrad falsch ausgewählt
Da der Brotbackautomat
vorschriftsgemäß nicht über eine
Heizung im Deckelbereich verfügt,
empfiehlt es sich die stärkste
Bräunungsstufe zu verwenden,
wenn Sie auf eine knusprige
Konsistenz Wert legen.

14 15
de
Garantie-Information
Für unsere Geräte übernehmen wir gegenüber dem Endkunden eine 24-monatige
Haltbarkeitsgarantie. Sie beginnt mit dem Kauf des Gerätes durch den Endkunden
und gilt im Gebiet der Bundesrepublik Deutschland.
Ansprüche aus dieser Garantie sind unter Vorlage des Kaufbelegs direkt
gegenüber unserem zentralen Kundendienst geltend zu machen.
Von der Garantie ausgeschlossen sind Schäden durch normalen Verschleiß,
unsachgemäßen Gebrauch sowie unterbliebene Pflege.
Der Endkunde besitzt zusätzlich zu den Ansprüchen aus dieser Garantie
gesetzliche Ansprüche wegen Mängeln des Gerätes gegenüber seinem direkten
Verkäufer/Händler, die durch diese Garantie nicht eingeschränkt werden.
Das Gerät entspricht den Europäischen Richtlinien 2014/35/EU, 2014/30/EU und
2009/125/EU.
Dieses Produkt darf am Ende seiner Lebensdauer nicht über den normalen
Haushaltsabfall entsorgt werden, sondern muss an einem Sammelpunkt für das
Recycling von elektrischen und elektronischen Geräten abgegeben werden.
Die Werkstoffe sind gemäß ihrer Kennzeichnung wiederverwertbar. Mit der
Wiederverwendung, der stofflichen Verwertung oder anderen Formen der
Verwertung von Altgeräten leisten Sie einen wichtigen Beitrag zum Schutze
unserer Umwelt.
Bitte erfragen Sie bei der Gemeindeverwaltung die zuständige Entsorgungsstelle.
Änderungen vorbehalten

16 17
en
en
Operating Manual
Important safety information
▪ This appliance can be used by children older than eight years
of age as well as by people with limited physical, sensory or
mental capabilities and persons lacking experience and/or lacking
knowledge, if they are supervised or have received instructions on
how to use the appliance safely and have understood the resulting
risks.
▪ Children must not play with the appliance.
▪ Children must not clean or maintain the appliance unless they are
older than eight years of age and are supervised.
▪ Keep the appliance and its connection cable out of reach of
children under eight years of age.
▪ The appliance must not be operated via an external timer or remote
control.
▪ This appliance is designed for use in households and similar
environments, such as:
⋅ Staff kitchen areas in shops, offices and other working
environments;
⋅ Farm houses;
⋅ By guests at hotels, motels or other residential facilities;
⋅ Bed-and-breakfast establishments.
▪ If the supply cord is damaged, it must be replaced by the
manufacturer, its service agent or a similarly qualified person in
order to avoid hazards.
▪ After using the appliance and attachments, clean all surfaces/parts
that have come into contact with food. Follow the instructions in
the “Cleaning and care” section.
▪ Always use the appliance in accordance with these instructions.
Improper use can result in electric shocks and other hazards.
▪ Caution! Risk of burns! The temperature of accessible surfaces can
become very hot. The heating surfaces remain hot for some time
after the appliance has been switched off.
▪ Switch off the appliance and disconnect from the mains supply
before changing accessories or approaching parts that move in use.
Before use
The appliance may only be used for the intended purpose according to these instructions for use.
Therefore, carefully read the instructions for use before operating the appliance. They contain
instructions for using, cleaning and caring for the appliance. We accept no liability for any damage
caused if the instructions in this manual are not followed. Keep this instruction manual in a safe place
and pass it on to any subsequent user together with the appliance. Please also note the warranty
information at the end. The appliance is not intended for commercial use, but only for the preparation
of household quantities of food.
Observe the safety precautions when using the appliance.
Technical data
Rated voltage: 220–240 V~ 50-60 Hz
Power consumption: 450 W
Protection class: I
Safety information
▪ Pull the mains plug:
⋅ If malfunctions occur during use
⋅ Before cleaning
⋅ After use.
▪ Only connect the appliance to earthed wall sockets that have been installed pursuant to
regulations. The supply cable and plug must be dry.
▪ Do not pull or clamp the connection cable over sharp edges. Do not leave it dangling. Protect it
from heat and oil.
▪ Only use an extension cable that is in perfect condition.
▪ Never pull the mains plug out of the socket by the cable or with wet hands.
▪ Do not carry the appliance by the cable.
▪ Do not place the appliance on hot surfaces such as hotplates or near open flames because this
could melt the casing.
▪ Only use the appliance when all removable parts have been attached correctly.
▪ If the appliance will not be used for a long time, pull out the mains plug.
▪ Stop using the appliance and/or pull the mains plug out of the socket immediately if:
⋅ The appliance or power cord is damaged.
⋅ You suspect that there is a defect after the appliance has fallen or following a similar incident.
In such cases, arrange for the appliance to be repaired.
▪ The appliance must be supervised when in use.
▪ Do not touch hot surfaces.
▪ The use of accessories that have not been recommended by the manufacturer may result in injury.
▪ Do not touch any moving parts while using the appliance.
▪ Never hit the baking pan against other objects to remove the bread, because this may damage it.
▪ Metal foil and similar materials must not be used in the bread maker as this increases the risk of
fire or of the appliance short-circuiting.
▪ The bread maker should never be covered with a towel or anything similar. Heat and dampness
must be able to escape at all times. If the bread maker is covered with flammable materials or
otherwise comes into contact with them it may result in fire.
▪ In order to avoid any damage to the bread maker, it must not be operated without the baking pan
in place.
▪ Place the appliance in such a way that it does not slip from the work surface, e.g. when kneading
heavy dough.
18 19
en
▪ We accept no liability for any damages caused as a result of misuse, incorrect operation or
improper repairs. Claims under warranty are likewise excluded in such cases.
Control unit
Choosing the programme
You press this button to select
the required programme. The
number of the chosen programme is shown in the display.
Choosing the browning level
You press this button to select
the required browning level. The
different levels are shown on the
display as follows:
- Light
- Medium
- Dark
Start/Pause
This button is used to start the baking
process, which can also be interrupted
by pressing the button again.
Stop
You can end the baking process by
holding down this button.
Setting the timer
The timer function can be
programmed using the – and +
buttons. The adjusted end time is
shown on the display.
Choosing the bread size
Press this button to select the
required bread size. Either 450 g
or 750 g is shown on the display
depending on the size chosen.
Baking chamber lighting
To activate the baking chamber
lighting, hold down this button. It
automatically switches off after about
30 seconds but can be switched off by
holding down the button again.
Use
You can make bread yourself the easy way with the WMF KULT X bread maker. All you need are the
right ingredients and the WMF KULT X bread maker will do the rest. With a choice of 12 baking
programmes there is something to suit all tastes. A simple-to-use programme chart explaining the
programme numbers is included in the delivery. This can be stored in the baking pan to save space.
Overview of programmes
Programme
no.
Designation Description
Options available
Length of
time [h]
Timer
function
Browning Size 450 g 750 g
1 Classic loaf
Kneading and baking wheat and rye bread. Other
ingredients can also be added.
03:08 03:15
2 White bread
Kneading and baking bread over a longer period of
time. The bread generally has a crispy crust and a
light texture.
03:55 04:05
3 Wholemeal bread
Kneading and baking wholemeal bread. It is not
recommended to use the timer function as this can
impair the quality of the bread.
03:47 03:55
4 Fast programme*
Kneading and baking bread in a shorter time than
programme no. 1. The bread is generally smaller with
a firmer consistency.
02:25
5 Sweet bread
Kneading and baking sweet bread. Other ingredients
can also be added.
03:05 03:10
6 Gluten-free
Kneading and baking gluten-free bread. Other
ingredients can also be added.
03:05 03:10
7
Ultra-fast
programme*
Kneading and baking bread in the shortest time. The
bread is generally smaller and rougher than bread
baked under programme no. 4.
01:43 01:53
8
Dough pro-
gramme
Kneading dough without baking it. The dough can be
used for bread rolls, pizza etc.
01:30
9 Preserves***
For making preserves and jam. Fruit must first be cut
into pieces before being placed into the baking pan.
01:20
10 Toast
Kneading and baking bread for toasting. The bread
generally has a thinner crust and a light texture.
03:10 03:15
11 Cake Kneading and baking using baking powder.
02:00
12 Baking
Just baking, no kneading. Can also be used to
prolong the baking time of other programmes.
01:00
* All liquid ingredients must be poured into the baking pan first to ensure the best results. Only afterwards should the dry
ingredients be added to the mix.
** The quickest way to bake bread is on the ultra-fast programme. The water temperature is especially important here as it
influences the cooking process. Using warm water produces the best baking results.
*** It is recommended that you use a separate baking pan for the preparation of preserves.

20 21
en
Before using for the first time
▪ When unpacking the appliance check that all parts have been included and are undamaged.
▪ Clean all removable parts before use as described in the chapter on “Cleaning and Care”.
▪ Because smoke may form when the appliance is heated up for the first time, we recommend
operating the appliance once with an empty baking pan in place (without dough hook) on the
baking programme (no. 12).
▪ Allow the bread maker to cool down and clean it again as described in the “Cleaning and Care”
chapter.
Preparing bread, cakes and dough
▪ Open the lid of the KULT X bread maker and remove the baking pan by turning it anti-clockwise.
▪ To prevent the dough from sticking in the space between the dough hook and the baking pan we
recommend coating the hole of the dough hook with heat-resistant margarine.
▪ Place the dough hook on the drive shaft of the baking pan with the broad side facing downwards.
▪ Then add all the required ingredients to the baking pan as per the recipe. Normally you add the
liquid ingredients such as water or oil first. Sugar, salt and flour are added to the baking pan next
followed by the yeast.
Caution: The maximum quantity of flour is 500 g and of dry yeast 7g.
Note: Note that if you use too much flour the dough can overflow and burn onto the pan.
▪ Place the baking pan in the bread maker and lock it in place by turning it clockwise.
▪ Close the lid of the bread maker.
▪ Now insert the mains plug into the socket.
▪ Use the programme button
to select the appropriate programme. Additional information on
the individual programmes can be found on Page 17.
▪ Use the browning level button
to select the required browning level (bright, medium, dark).
▪ Use the bread size button
to select the required bread size (450 g or 750 g). When using the fast
programme (no. 4), you do not have to select the bread size.
▪ The timer can be programmed using the – and + buttons (further information on using the time is
included on page 19). This step can be skipped if the baking process is to be started straight away.
▪ Once you have entered the required settings, click on the Start/Stop button
Start
Stop
to begin the baking
process. If possible do not open the lid before the baking time is finished as this has a negative
effect on the baking result.
▪ During the second kneading process you will hear a repeated beeping tone, depending on the
chosen programme (numbers. 1, 2, 3, 4, 5, 7, 10 and 11). Now you can open the lid as required to
add extra ingredients such as raisins or nuts. Close the lid again immediately afterwards to obtain a
good baking result.
▪ A repeated beeping tone will sound when the baking process is finished. You can take the bread
out straight away and end the baking process by holding down the Start/Stop button
Start
Stop
or the
keep-warm function turns itself on for a maximum of 60 minutes.
▪ Use a pan holder to remove the baking pan and gently twist the pan anti-clockwise. Tilt the baking
pan so that the bread can fall out onto a cake rack to cool down.
▪ If the dough hook does not automatically come loose you can use the hook remover to loosen it. To
do this, insert it into the opening of the dough hook and connect it to the underside of the dough
hook. Now carefully pull the dough hook out.
▪ Leave the bread on the cake rack for about an hour to cool down before cutting it, unless indicated
otherwise in the recipe.
The programme sequences in detail
Programme
No.
Description Volume
Total
duration
Knead-
ing 1
Rising 1
Knead-
ing 2
Rising 2 Rising 3 Baking
Keeping
warm
1 Classic loaf
450g 03:08 h 11 mins. 20 mins. 17 mins. 25 mins. 35 mins. 80 mins. 60 mins.
750g 03:15 h 12 mins. 20 mins. 18 mins. 25 mins. 35 mins. 85 mins. 60 mins.
2 White bread
450g 03:55 h 18 mins. 40 mins. 22 mins. 30 mins. 40 mins. 85 mins. 60 mins.
750g 04:05 h 20 mins. 40 mins. 25 mins. 30 mins. 40 mins. 90 mins. 60 mins.
3
Wholemeal
bread
450g 03:47 h 11 mins. 25 mins. 21 mins. 35 mins. 55 mins. 80 mins. 60 mins.
750 g 03:55 h 12 mins. 25 mins. 23 mins. 35 mins. 55 mins. 85 mins. 60 mins.
4 Fast programme* 02:25 h 12 mins. 10 mins. 13 mins. / 25 mins. 85 mins. 60 mins.
5 Sweet bread
450g 03:05 h 12 mins. 5 mins. 23 mins. 30 mins. 35 mins. 80 mins. 60 mins.
750 g 03:10 h 12 mins. 5 mins. 23 mins. 30 mins. 35 mins. 85 mins. 60 mins.
6 Gluten-free
450g 03:05 h 12 mins. 5 mins. 13 mins. 30 mins. 35 mins. 90 mins. 60 mins.
750g 03:10 h 12 mins. 10 mins. 13 mins. 30 mins. 35 mins. 90 mins. 60 mins.
7
Ultra-fast
programme*
450g 01:43 h 13 mins. / 5 mins. 25 mins. / 60 mins. 60 mins.
750g 01:53 h 13 mins. / 5 mins. 30 mins. / 65 mins. 60 mins.
8
Dough
programme
01:30 h 25 mins. / / 30 mins. 35 mins. / /
9 Preserves*** 01:20 h / 15 mins. / / 45 mins. 20 mins. /
10 Toast
450g 03:10 h 17 mins. 35 mins. 8 mins. 25 mins. 35 mins. 70 mins. 60 mins.
750g 03:15 h 17 mins. 35 mins. 8 mins. 25 mins. 35 mins. 75 mins. 60 mins.
11 Cakes 02:00 h 7 mins. 4 mins. 10 mins. 9 mins. / 90 mins. 60 mins.
12 Baking 01:00 h / / / / /
10-60
mins.
60 mins.
* All liquid ingredients must be poured into the baking pan first to ensure the best results. Only afterwards should the dry
ingredients be added to the mix.
** The quickest way to bake bread is on the ultra-fast programme. The water temperature is especially important here as it
influences the cooking process. Using warm water produces the best baking results.
*** It is recommended that you use a separate baking pan for the preparation of preserves.

22 23
en
Setting the timer
If you do not want to start the baking process straight away you can use the timer function. You can
set the time when you want your bread to finish baking in 10-minute increments by using the – and +
buttons, and the baking time is taken into account. The maximum delay cycle is 13 hours.
Note: This function is not available with the following programmes: ultra-fast programme, preserves
and baking.
Note: Do not use any perishable foodstuffs such as eggs or fresh milk when using the timer function.
Keep-warm function
After the baking time has finished, the 60-minute keep-warm period starts automatically. If you want
to remove the bread immediately after baking, hold down the Start/Stop button
Start
Stop
to stop the baking
process.
Memory function
If the power supply is temporarily interrupted during the baking process, the process will automatically
restart within 10 minutes without needing to press the Start/Stop button
Start
Stop
. If the power cut lasts
longer than 10 minutes, you must restart the bread maker.
Useful tips
▪ Heavy dough: For heavy dough it is recommended that you change the sequence. Add the dry
ingredients to the baking pan first followed by the liquid ingredients. If you want to use the timer
function however, make sure that the yeast does not come into contact with the liquid prematurely.
▪ Baking mixtures: The programme for the classic loaf (no. 1) is generally suitable for baking mixtures,
unless specified otherwise in the recipe. Do not add any more water to the baking mixture than
the amount specified in the recipe. Depending on the recipe, it may be recommended to reduce the
amount of water by up to 50 ml.
▪ Browning: Since the bread maker does not have a heat source around the lid, it is recommended
that you use the maximum browning level if you want your bread to have a crispy texture.
▪ Eggs: If you are using extra eggs then the amount of liquid must be adjusted accordingly. It is also
recommended that you beat the eggs before adding them to the baking pan.
▪ Backing chamber lighting: To replace the light bulb you can remove the glass cover with a coin.
Please use an oven light bulb with the following characteristics:
⋅ E14
⋅ Total length 49 mm
⋅ Glass diameter 22 mm
⋅ 220-240V
⋅ 15W
⋅ 300°C
Cleaning and care
Remove the mains plug after use. Allow the bread maker to cool down before cleaning it. Remove
the baking pan by holding the handle and twisting it in an anti-clockwise direction. Then remove
the dough hook. If the dough hook is difficult to remove, fill the baking pan with lukewarm water
for around 30 minutes and leave the dough hook to soak in it. Now it should be easier to remove.
Clean the baking pan and the dough hook with a damp cloth, and avoid using sharp or abrasive
cleaning agents that could otherwise damage the non-stick coating. The baking pan must be dried out
completely before it can be used again. Use a damp cloth to clean the bread maker, the lid and the
window. Do not use any abrasive cleaning agents as this could damage the surface. Never submerge
the casing in water. You can put the measure, the measuring spoon and the dough hook remover in
the dishwasher to make cleaning simple.
Dishwasher safe
Can be rinsed
under running
water
Wipe with a damp
cloth
Baking pan
Kneading hook
Measuring cup
Measuring spoon
Hook remover
Casing
Troubleshooting
The display shows “HHH” (accompanied by 5 beeps)
The internal temperature is too high. You must stay on the current programme. Open the lid and leave
the bread maker to cool down for 10 to 20 minutes.
The display shows “LLL” (accompanied by 5 beeps) after pressing the Start/Stop button
Start
Stop
The internal temperature is too low. Stop the beeps by pressing the Start/Stop button
Start
Stop
and open the
lid. Wait 10 to 20 minutes until the appliance has reached room temperature.
The display shows “EE0” after pressing the Start/Stop button
Start
Stop
The temperature sensor is not properly connected; send the appliance for repair.

24 25
en
Problem Cause Solution
Smoke is coming out of the baking
chamber or the air vents.
The ingredients are in the baking
chamber or are sticking to the
outside of the baking pan.
Pull out the plug and clean the
outside of the baking pan or the
baking chamber.
The bread collapses in the middle
and is moist at the base.
The bread has been left in the baking pan too long after baking.
Remove the bread from the baking
pan before the keep-warm function turns off.
The ingredients were not mixed
correctly or the bread did not bake
properly.
Wrong programme settings
chosen.
Check the chosen programme as
well as the settings for the bread
size and browning level
The lid was regularly opened
during the baking process.
The lid should not be opened other
than to add extra ingredients.
The lid must then be closed
immediately afterwards.
The dough hook will not twist.
Check to see if the dough hook
is blocked by peppercorns etc.
Remove the baking pan and check
if the dough hook can be twisted.
If this is not the case, send the
appliance for repair.
The baking machine will not start
and the display shows "HHH"
The internal temperature is too
high.
You must stay on the current
programme. Open the lid and leave
the bread maker to cool down for
10 to 20 minutes.
The bread rises too quickly
Too much yeast, too much flour or
too little salt
Check the amounts of ingredients
used, adjust if necessary and check
that all ingredients have been
added to the mix.
Tips and answers
The bread does not rise at all or
hardly rises
No yeast or too little yeast or the
wrong amount of water
Check the amounts of ingredients
used, adjust if necessary and check
that all ingredients have been
added to the mix.
The yeast came into contact with
the liquid too soon
Make sure that you fill the baking
pan in the correct order.
The bread collapses in the middle
There is too much dough for the
size of the baking pan
Check the ingredient quantities
used and adjust if necessary. If
ingredients that contain liquid are
used, the amount of water must
be reduced accordingly.
The yeast came into contact with
the liquid too soon
Make a little hollow in the flour
and add the dry yeast, avoiding
any direct contact between the
water and the dry yeast.
Heavy, lumpy texture
Too much flour or too little water
Check the amounts of ingredients
used, adjust if necessary and check
that all ingredients have been
added to the mix.
Not enough yeast or sugar
Check the amounts of ingredients
used, adjust if necessary and check
that all ingredients have been
added to the mix.
Bread is not baked in the middle Too much water
Check the amounts of ingredients
used, adjust if necessary and check
that all ingredients have been
added to the mix.
Bread/crust is too light Wrong browning level chosen
Since the bread maker does not
have a heat source around the
lid, it is recommended that you
use the maximum browning level
if you want your bread to have a
crispy texture.
For UK use only
▪ This product is supplied with a 13 A plug conforming to BS 1363 fitted to the mains lead. If the
plug is unsuitable for your socket outlets or needs to be replaced, please note the following. If the
plug is a non-rewireable one, cut it from the mains lead and immediately dispose of it. Never insert
it into a socket outlet as there is a very great risk of an electric shock
▪ The replacement of the plug at the mains lead has to be done according to the following
instructions:
Important: The wires in this mains lead are coloured in accordance with the following code:
blue Neutral
brown Live
As the colours of the wires in the mains lead of this appliance may not correspond with the
coloured markings identifying the terminals in your plug, proceed as follows
⋅ the wire which is coloured blue must be connected to the terminal which is marked with the
letter N or coloured black,
⋅ the wire which is coloured brown must be connected to the terminal which is marked with
the letter L or coloured red.
Do not connect any wire to the terminal which is marked with the letter E or by the earth
symbol
, or coloured green or green and yellow.
▪ If a 13 A (BS 1363) plug is used it must be fitted with a 3 A fuse conforming to BS 1362 and be
ASTA approved. If any other type of plug is used, the appliance must be protected by a 5 A fuse
either in the plug or adapter or at the distribution board.
If in doubt - consult a qualified electrician.
▪ Never use the plug without closing the fuse cover.
The device complies with the European Directives 2014/35/EU, 2014/30/EU and
2009/125/EU.
At the end of its service life, this product may not be disposed of in the normal
household waste, but rather must be disposed of at a collection point for
recycling electrical and electronic devices. The materials are recyclable according
to their labelling. You make an important contribution to protecting our
environment by reusing, recycling or utilising old devices in other ways. Please ask
the municipal administration where the appropriate disposal facility is located.
Subject to change.

26 27
fr
Mode d’emploi
Consignes de sécurité importantes
▪ Les enfants à partir de 8 ans ainsi que les personnes ayant des
capacités physiques, sensorielles ou mentales restreintes ou ayant
un manque d’expérience et/ou de connaissances peuvent utiliser
cet appareil sous surveillance ou s’ils ont été formés pour utiliser
cet appareil en toute sécurité et ont compris les dangers pouvant
résulter de son utilisation.
▪ Ne pas laisser les enfants jouer avec cet appareil.
▪ Ne pas laisser les enfants effectuer le nettoyage et la maintenance
sauf s’ils sont âgés de plus de 8 ans et sous surveillance.
▪ Les enfants de moins de 8 ans doivent être maintenus à l’écart de
l’appareil et de son câble de raccordement.
▪ L’appareil ne doit pas être mis en service à l’aide d’une minuterie
externe ou d’une commande à distance.
▪ L’appareil est conçu pour un usage domestique ou pour des
applications similaires telles que:
⋅ dans des cuisines réservées au personnel dans des boutiques, des
bureaux ou d’autres secteurs professionnels;
⋅ dans des exploitations agricoles;
⋅ par des clients dans des hôtels, des motels et autres
établissements résidentiels;
⋅ dans des chambres d’hôtes.
▪ Si le câble d’alimentation de l’appareil est endommagé, il doit
être remplacé par le fabricant ou son SAV ou par une personne
qualifiée, afin d’éviter toute mise en danger.
▪ Après avoir utilisé les accessoires et l’appareil, nettoyez toutes
les surfaces/pièces qui sont entrées en contact avec les aliments.
Veuillez suivre les instructions du chapitre «Nettoyage et
entretien».
▪ N’utilisez l’appareil que conformément aux présentes instructions.
Une utilisation non conforme peut entraîner une électrocution ou
d’autres dangers.
▪ Attention, risque de brûlure : La température des surfaces de
contact peut devenir extrêmement brûlante. Même après la mise
hors tension de l’appareil, les surfaces de chauffe restent brûlantes
pendant un certain temps.
▪ Eteignez l’appareil et débranchez-le toujours avant de changer
d’accessoire ou de vous approcher de pièces qui sont en
mouvement lors du fonctionnement.
Avant l’utilisation
L’appareil ne doit être utilisé que pour l’usage prévu conformément à ce mode d’emploi. En
conséquence, veuillez lire attentivement le manuel d’utilisation avant la mise en service. Il contient des
consignes importantes pour l’utilisation, le nettoyage et l’entretien de l’appareil. Nous déclinons toute
responsabilité en cas de dommage découlant du non-respect des consignes. Conservez soigneusement
ce mode d’emploi et transmettez-le avec l’appareil en cas de remise à une tierce personne. Consultez
également les informations de garantie à la fin de ce manuel d’utilisation. L’appareil ne doit pas
faire l’objet d’un usage professionnel, car il se prête uniquement à la préparation d’aliments dans des
quantités domestiques.
Respectez les consignes de sécurité lors de l’utilisation.
Caractéristiques techniques
Tension nominale: 220 – 240 V~ 50-60 Hz
Puissance: 450 W
Catégorie de protection: I
Consignes de sécurité
▪ Il faut débrancher la fiche secteur:
⋅ en cas de dysfonctionnements durant l’utilisation
⋅ avant chaque nettoyage
⋅ après l’utilisation
▪ Brancher l’appareil uniquement dans une prise de courant de sécurité, installée conformément aux
prescriptions. Le câble d’alimentation et la prise doivent être secs.
▪ Ne pas tirer le câble d’alimentation sur des bords tranchants, ne pas le coincer, ne pas le laisser
pendre et le protéger de la chaleur et de l’huile.
▪ Utiliser uniquement une rallonge en bon état.
▪ Ne pas débrancher l’appareil en tirant sur le câble ou avec les mains mouillées.
▪ Ne pas porter l’appareil par le câble d’alimentation.
▪ Ne pas poser l’appareil sur des surfaces chaudes, par ex. plaques de cuisson ou équivalent ou à
proximité d’une flamme de gaz, car le boîtier pourrait fondre.
▪ N’utilisez l’appareil que si toutes les parties amovibles sont correctement installées.
▪ Débrancher l’appareil s’il reste inutilisé pendant une longue période.
▪ Ne pas mettre l’appareil en marche ou le débrancher immédiatement si:
⋅ l’appareil ou le câble d’alimentation sont endommagés
⋅ l’appareil a été endommagé suite à une chute ou équivalent.
Dans ces cas, porter l’appareil en réparation.
▪ Faire fonctionner l’appareil uniquement sous surveillance.
▪ Ne pas toucher les surfaces chaudes.
fr
28 29
fr
▪ L’utilisation d’accessoires non recommandés par le fabricant peut entraîner des blessures.
▪ Pendant l’utilisation, ne pas toucher les pièces mobiles.
▪ Ne jamais cogner le moule à pain avec des objets pour en sortir le pain, cela pourrait endommager
le moule à pain.
▪ Ne pas placer de feuille métallique ou de matériaux similaires dans la machine à pain, cela
augmente les risques d’incendie ou de court-circuit.
▪ Ne jamais recouvrir la machine à pain avec un chiffon ou autre. La chaleur et la vapeur doivent
pouvoir s’échapper en permanence. Si la machine à pain est recouverte d’un matériau inflammable
ou en contact avec celui-ci, cela peut entraîner un incendie.
▪ Afin d’éviter les dégâts, la machine à pain ne doit pas être mise en marche sans le moule à pain.
▪ Placer l’appareil de manière à ce qu’il ne puisse pas basculer du plan de travail, par ex. lors du
pétrissage d’une pâte lourde.
▪ Nous déclinons toute responsabilité en cas de dommage découlant de l’utilisation détournée, de la
mauvaise utilisation ou de la réparation inappropriée de l’appareil. Toute intervention sous garantie
est également exclue dans de tels cas.
Unité de commande
Choix du programme
Cette touche permet de choisir le
programme souhaité. Le numéro
du programme souhaité est
affiché sur l’écran.
Choix du niveau de
brunissement
Cette touche permet de choisir le
niveau de brunissement souhaité.
Celui-ci est affiché sur l’écran
comme suit:
- Clair
- Moyen
- Foncé
Start/pause
Il est possible de lancer le processus de
cuisson en appuyant sur cette touche,
puis de l’interrompre en appuyant de
nouveau.
Arrêt
Il est possible d’arrêter le programme
de cuisson en appuyant longuement
sur cette touche.
Réglage de la minuterie
Les touches – et + permettent
de programmer la fonction
minuterie. L’heure de fin adaptée
est affichée sur l’écran.
Choix de la taille du pain
Cette touche permet de choisir
la taille souhaitée du pain. Selon
la taille, 450g ou 750g s’affiche
sur l’écran.
Éclairage de l’espace de cuisson
Activez l’éclairage de l’espace de
cuisson en appuyant longuement
sur cette touche. L’éclairage s’éteint
automatiquement après env.
30secondes. Il peut également être
éteint en appuyant de nouveau
longuement sur cette touche.
Utilisation
Grâce à votre machine à pain KULT X de WMF, vous pouvez préparer très facilement votre pain
vous-même. Vous n’aurez besoin que des ingrédients correspondants, la machine à pain KULT X de
WMF s’occupe du reste. Avec 12 programmes de cuisson disponibles, il y en aura pour tous les goûts.
L’emballage contient une carte de programmation qui vous permet d’attribuer facilement les numéros
de programme. Vous pouvez la ranger dans le moule à pain pour gagner de la place.
Aperçu des programmes
Programme
N°
Désignation Description
Options disponibles
Durée [h]
Fonction
minuterie
Brunisse-
ment
Taille 450 g 750 g
1 Pain classique
Pétrissage, levée et cuisson de pain bis. D'autres
ingrédients peuvent être ajoutés.
03:08 03:15
2 Pain blanc
Pétrissage, levée et cuisson pendant une durée
prolongée. Le pain possède de manière générale une
croûte croustillante et une consistance légère.
03:55 04:05
3 Pain complet
Pétrissage, levée et cuisson de pain complet. Il n'est
pas recommandé d'utiliser la fonction minuterie, car
cela peut détériorer le résultat de cuisson.
03:47 03:55
4
Programme
rapide*
Pétrissage, levée et cuisson de pain plus rapides que
pour le programme n° 1. Le pain est de manière
générale plus petit, avec une consistance plus ferme.
02:25
5 Pain sucré
Pétrissage, levée et cuisson de pain sucré. D'autres
ingrédients peuvent être ajoutés.
03:05 03:10
6 Sans gluten
Pétrissage, levée et cuisson de pain sans gluten.
D'autres ingrédients peuvent être ajoutés.
03:05 03:10
7
Programme ultra
rapide**
Pétrissage, levée et cuisson de pain plus rapides. Le
pain est de manière générale plus petit et moins cuit
que le pain cuit avec le programme n°4.
01:43 01:53
8 Programme pâte
Pétrissage et levée de la pâte, sans cuisson. La pâte
peut être utilisée pour des petits pains, de la pizza,
etc.
01:30
9 Confiture***
Cuisson et confiture et de marmelade. Les fruits
doivent être coupés avant de les placer dans le
moule à pain.
01:20
10 Pain de mie
Pétrissage, levée et cuisson de pain de mie. Le pain
possède de manière générale une croûte plus fine et
une consistance légère.
03:10 03:15
11 Gâteaux
Pétrissage, levée et cuisson avec utilisation de levure
chimique.
02:00
12 Cuisson
Cuisson uniquement, pas de pétrissage ni de levée.
Peut également être utilisé pour prolonger la durée
de cuisson d'autres programmes.
01:00
* Pour un résultat de cuisson optimal, tous les ingrédients liquides doivent être placés en premier dans le moule à pain.
Ajouter ensuite les ingrédients secs.
** Avec le programme Ultra Rapide, vous pourrez préparer du pain en un temps record. La température de l’eau est pour ce faire
très importante, car elle influence le processus de cuisson. Vous obtiendrez un résultat optimal en utilisant de l’eau chaude.
*** Pour la préparation de confitures, nous vous recommandons d’utiliser un moule séparé.

30 31
fr
Les programmes en détail
Programme
N°
Désignation Quantité Durée totale
Pétrissage
1
Levée 1
Pétrissage
2
Levée 2 Levée 3 Cuisson
Conservation
au chaud
1 Pain classique
450 g 03:08 h 11 min. 20 min. 17 min. 25 min. 35 min. 80 min. 60 min.
750 g 03:15 h 12 min. 20 min. 18 min. 25 min. 35 min. 85 min. 60 min.
2 Pain blanc
450 g 03:55 h 18 min. 40 min. 22 min. 30 min. 40 min. 85 min. 60 min.
750 g 04:05 h 20 min. 40 min. 25 min. 30 min. 40 min. 90 min. 60 min.
3 Pain complet
450 g 03:47 h 11 min. 25 min. 21 min. 35 min. 55 min. 80 min. 60 min.
750 g 03:55 h 12 min. 25 min. 23 min. 35 min. 55 min. 85 min. 60 min.
4
Programme
rapide*
02:25 h 12 min. 10 min. 13 min. / 25 min. 85 min. 60 min.
5 Pain sucré
450 g 03:05 h 12 min. 5 min. 23 min. 30 min. 35 min. 80 min. 60 min.
750 g 03:10 h 12 min. 5 min. 23 min. 30 min. 35 min. 85 min. 60 min.
6 Sans gluten
450 g 03:05 h 12 min. 5 min. 13 min. 30 min. 35 min. 90 min. 60 min.
750 g 03:10 h 12 min. 10 min. 13 min. 30 min. 35 min. 90 min. 60 min.
7
Programme
ultra rapide**
450 g 01:43 h 13 min. / 5 min. 25 min. / 60 min. 60 min.
750 g 01:53 h 13 min. / 5 min. 30 min. / 65 min. 60 min.
8
Programme
pâte
01:30 h 25 min. / / 30 min. 35 min. / /
9 Confiture*** 01:20 h / 15 min. / / 45 min. 20 min. /
10 Pain de mie
450 g 03:10 h 17 min. 35 min. 8 min. 25 min. 35 min. 70 min. 60 min.
750 g 03:15 h 17 min. 35 min. 8 min. 25 min. 35 min. 75 min. 60 min.
11 Gâteaux 02:00 h 7 min. 4 min. 10 min. 9 min. / 90 min. 60 min.
12 Cuisson 01:00 h / / / / /
10-60
min.
60 min.
* Pour un résultat de cuisson optimal, tous les ingrédients liquides doivent être placés en premier dans le moule à pain.
Ajouter ensuite les ingrédients secs.
** Avec le programme Ultra Rapide, vous pourrez préparer du pain en un temps record. La température de l’eau est pour ce faire
très importante, car elle influence le processus de cuisson. Vous obtiendrez un résultat optimal en utilisant de l’eau chaude.
*** Pour la préparation de confitures, nous vous recommandons d’utiliser un moule séparé.
Mise en service
▪ En déballant l’appareil, vérifiez que toutes les pièces sont présentes et intactes.
▪ Avant d’utiliser l’appareil, nettoyez toutes les pièces amovibles comme décrit dans le chapitre
«Nettoyage et entretien».
▪ De la fumée peut se former lors du premier préchauffage, nous vous recommandons donc de
mettre l’appareil en marche une fois avec le moule à pain vide introduit (sans crochet malaxeur) sur
le programme Cuisson (n°12).
▪ Laissez la machine à pain refroidir et nettoyez-la de nouveau comme décrit dans le chapitre
«Nettoyage et entretien».
Préparation de pain, gâteaux et pâte
▪ Ouvrez le couvercle de la machine à pain KULT X et retirez le moule à pain en tournant une fois
dans le sens inverse des aiguilles d’une montre.
▪ Pour éviter que la pâte attache dans l’espace creux entre le crochet malaxeur et le moule à pain,
nous vous recommandons de badigeonner le trou du crochet malaxeur avec de la margarine
résistant à la chaleur.
▪ Placez le crochet malaxeur avec le grand côté vers le bas sur l’arbre d’entraînement du moule à
pain.
▪ Placez ensuite l’ensemble des ingrédients souhaités comme indiqué dans la recette, dans le moule
à pain. Habituellement, les ingrédients liquides, tels que l’eau et l’huile, sont placés en premier.
Ajoutez ensuite le sucre, le sel et la farine, en terminant par la levure, dans le moule à pain.
Attention: La quantité maximale de farine est de 500g et 7 g de levure sèche.
Remarque: Attention, si la quantité de farine est trop importante, la pâte peut déborder et
coller.
▪ Placez le moule à pain dans la machine à pain et verrouillez-le en tournant une fois dans le sens
des aiguilles d’une montre.
▪ Fermez le couvercle de la machine à pain.
▪ Vous pouvez maintenant brancher l’appareil.
▪ Avec la touche des programmes
choisissez le programme correspondant. Vous trouverez
d’autres informations sur les programmes individuels en page27.
▪ Avec la touche de brunissement
choisissez le degré de brunissement souhaité (clair, moyen,
foncé)
▪ Avec la touche de taille du pain
choisissez la taille souhaitée du pain (450g ou 750g). Il n’est
pas nécessaire de choisir la taille du pain pour le programme rapide (n°4).
▪ Les touches – et + permettent de programmer la minuterie (vous trouverez plus d’informations
en page9). Vous pouvez sauter cette étape si vous souhaitez lancer le processus de cuisson
directement.
▪ Lorsque vous avez confirmé les réglages souhaités, vous pouvez lancer le processus de cuisson
avec la touche MARCHE/ARRÊT
Start
Stop
. Si possible, n’ouvrez pas le couvercle avant la fin du temps de
cuisson, car cela peut détériorer le résultat.
▪ Pendant le deuxième processus de pétrissage, selon le programme choisi (n°1, 2, 3, 4, 5, 7, 10 et 11), un
bip retentit. Vous pouvez alors si vous le souhaitez ouvrir le couvercle pour ajouter d’autres ingrédients,
comme des raisins secs. Refermez tout de suite le couvercle pour obtenir un bon résultat de cuisson.
▪ À la fin du processus de cuisson, plusieurs bips sonores retentissent. Vous pouvez sortir le pain
directement et arrêter le processus de cuisson en appuyant de façon prolongée sur la touche
MARCHE/ARRÊT
Start
Stop
. Sinon, la fonction de maintien au chaud s’allume pendant max. 60minutes.
▪ Retirez le moule à pain à l’aide d’une manique en tournant légèrement dans le sens inverse des
aiguilles d’une montre. Basculez le moule à pain pour faire tomber le pain sur une grille pour
gâteaux pour le refroidir.

32 33
fr
▪ Si le crochet malaxeur ne s’enlève pas automatiquement, vous pouvez le déverrouiller à l’aide de
l’organe de retrait du crochet. Pour ce faire, faites-le pénétrer dans l’ouverture du crochet malaxeur
et accrochez-le sur le bord inférieur du crochet. Retirez le crochet malaxeur avec précaution.
▪ Laissez le pain refroidir pendant env. une heure sur la grille pour gâteaux, sauf indication contraire
dans la recette, avant de le couper.
Réglage de la minuterie
Lorsque vous ne souhaitez pas lancer le processus de cuisson immédiatement, il est possible d’utiliser
la fonction minuterie. Les touches – et + permettent de régler l’heure à laquelle le pain doit être prêt,
par tranches de 10 minutes. La durée de cuisson est comprise dans la durée affichée. La temporisation
maximale est de 13heures.
Remarque: Cette fonction n’est pas disponible pour les programmes suivants: programme ultra
rapide, confiture et cuisson.
Remarque: N’utilisez pas de denrées facilement périssables, comme des œufs ou du lait frais, lorsque
vous souhaitez utiliser la fonction minuterie.
Fonction de maintien au chaud
À la fin du temps de cuisson, une durée de maintien au chaud de 60 minutes se déclenche
automatiquement. Si vous souhaitez sortir le pain directement après la cuisson, arrêtez le processus de
cuisson en appuyant de manière prolongée sur la touche MARCHE/ARRÊT
Start
Stop
.
Fonction mémoire
Si l’alimentation électrique est brièvement interrompue pendant le processus de cuisson, celui-ci sera
redémarré dans les 10minutes, sans appuyer sur la touche MARCHE/ARRÊT
Start
Stop
. Si la panne de courant
dure plus longtemps que 10minutes, la machine à pain doit être redémarrée.
Remarques utiles
▪ Pâtes lourdes: Pour les pâtes lourdes, il est recommandé de modifier la séquence d’étapes.
Introduisez d’abord les ingrédients secs, puis les ingrédients liquides dans le moule à pain. Cependant,
si vous souhaitez utiliser la fonction minuterie, nous vous demandons de veiller à ce que la levure ne
doit pas en contact avec les liquides avant que le processus ne démarre.
▪ Mélanges pour cuisson: Pour les mélanges déjà prêts, il convient généralement d’utiliser le
programme pour pain classique (n°1), sauf indication contraire dans la recette. N’ajoutez que la
quantité d’eau indiquée dans la recette pour les mélanges pour cuisson. Selon la recette, il est
cependant recommandé de réduire la quantité de jusqu’à 50ml.
▪ Brunissement: Conformément aux règlements, la machine à pain ne dispose pas de chauffage dans
la zone du couvercle, il est donc recommandé d’utiliser le niveau de brunissement le plus élevé si vous
souhaitez obtenir une consistance croustillante.
▪ Œufs: Lors de l’utilisation supplémentaire d’œufs, la quantité de liquide doit être adaptée de façon
proportionnelle. En outre, il est recommandé de battre les œufs avant de les placer dans le moule à pain.
▪ Éclairage de l’espace de cuisson: Pour changer l’ampoule, vous pouvez retirer le couvercle en verre
avec une pièce de monnaie. Veuillez utiliser une ampoule spéciale four dotée des propriétés suivantes:
⋅ E14
⋅ Longueur totale 49mm
⋅ Diamètre du verre 22mm
⋅ 220-240 V
⋅ 15 Watts
⋅ 300°C
Nettoyage et entretien
Débrancher l’appareil après l’utilisation. Laissez la machine à pain refroidir avant le nettoyage. Retirez
le moule à pain en le saisissant par son anse et en tournant dans le sens inverse des aiguilles d’une
montre. Retirez ensuite le crochet malaxeur. Si le crochet ne se détache pas facilement, remplissez le
moule à pain pendant env. 30minutes avec de l’eau tiède, puis laissez le crochet malaxeur tremper.
Le crochet malaxeur doit maintenant pouvoir être retiré facilement. Nettoyez le moule à pain et
le crochet malaxeur avec un chiffon humide, n’utilisez pas de produits de nettoyage agressifs ou
abrasifs afin de ne pas abîmer le revêtement anti-adhésif. Avant de pouvoir utiliser de nouveau le
moule à pain, celui-ci doit être totalement sec. Un chiffon humide est également idéal pour nettoyer
la machine à pain, le couvercle et la fenêtre d’observation. N’utilisez pas non plus de produits de
nettoyages abrasifs, car ils pourraient rayer la structure de la surface. Ne jamais plonger l’appareil dans
l’eau. Pour un nettoyage facile, vous pouvez mettre le pot gradué, la cuillère doseuse et l’organe de
retrait du crochet dans le lave-vaisselle.
compatible avec le
lave-vaisselle
rinçable à l’eau
courante
essuyer avec un
chiffon humide
Moule à pain
Crochets malaxeurs
Pot gradué
Cuillère doseuse
Organe de retrait du crochet
Boîtier

34 35
fr
Dépannage
L’écran affiche «HHH» (accompagné de 5 bips sonores)
La température intérieure est trop élevée. Le programme actuel doit être arrêté. Ouvrez le couvercle et
laissez la machine à pain refroidir pendant 10 à 20minutes.
L’écran affiche «LLL» (accompagné de 5 bips sonores) après avoir appuyé sur la touche
MARCHE/ARRÊT
Start
Stop
La température intérieure est trop faible. Arrêtez les bips en appuyant sur la touche MARCHE/ARRÊT
Start
Stop
puis ouvrez le couvercle. Attendez 10 à 20minutes que l’appareil ait atteint la température
ambiante.
L’écran affiche «EE0» après avoir appuyé sur la touche MARCHE/ARRÊT
Start
Stop
Le capteur de température n’est pas correctement raccordé, portez votre appareil à réparer.
Problème Cause Solution
De la fumée s'échappe de
l'espace de cuisson ou des fentes
d'aération.
Des ingrédients se trouvent dans
l'espace de cuisson ou sont collés
sur l'extérieur du moule à pain.
Débranchez la prise et nettoyez le
côté extérieur du moule à pain ou
l'espace de cuisson.
Le pain retombe au milieu et le
dessous est humide.
Le pain a été laissé trop longtemps
dans le moule à pain après la
cuisson.
Retirez le pain du moule à pain
avant l'arrêt de la fonction de
maintien au chaud.
Les ingrédients ne sont pas bien
mélangés ou le pain n'est pas
bien cuit.
Les réglages du programme ont été
mal choisis.
Vérifiez le programme choisi, ainsi
que les réglages de la taille du pain
et du niveau de brunissement
Conseils et Réponses
Le couvercle est souvent ouvert
pendant le processus de cuisson.
Le couvercle ne doit pas être
ouvert, sauf pour ajouter d'autres
ingrédients. Le couvercle doit
ensuite être immédiatement
refermé.
Impossible de faire tourner le
crochet malaxeur.
Vérifiez que le crochet malaxeur
n'est pas bloqué par des grains ou
autres. Retirez le moule à pain et
vérifiez que le crochet malaxeur
tourne. Si cela n'est pas le cas,
portez votre appareil à réparer.
La machine à pain ne démarre pas,
l'écran affiche «HHH»
La température intérieure est trop
élevée.
Le programme actuel doit être
arrêté. Ouvrez le couvercle et
laissez la machine à pain refroidir
pendant 10 à 20minutes.
Le pain lève trop
Trop de levure, trop de farine ou
pas assez de sel
Vérifiez les quantités des
ingrédients, adaptez le dosage si
nécessaire et vérifiez si tous les
ingrédients ont été introduits.
Le pain ne lève pas du tout ou peu
Pas de levure ou pas assez,
quantité d'eau erronée
Vérifiez les quantités des
ingrédients, adaptez le dosage si
nécessaire et vérifiez si tous les
ingrédients ont été introduits.
La levure a été trop vite en contact
avec les liquides
Veillez à bien suivre la séquence
des étapes indiquée lors du
remplissage.
Problème Cause Solution
Le pain retombe au milieu
Le volume de la pâte est plus gros
que le moule à pain
Vérifiez les quantités des
ingrédients et adaptez le dosage
si nécessaire. Lorsque vous utilisez
des ingrédients contenant de l'eau,
la quantité des liquides doit être
réduite en conséquence.
La levure a été trop vite en contact
avec les liquides
Faites un puits dans la farine et
placez-y la levure sèche, évitez un
contact direct entre les liquides et
la levure sèche.
Consistance lourde et grumeleuse
Trop de farine ou pas assez de
liquides
Vérifiez les quantités des
ingrédients, adaptez le dosage si
nécessaire et vérifiez si tous les
ingrédients ont été introduits.
Conseils et Réponses
Pas assez de levure ou de sucre
Vérifiez les quantités des
ingrédients, adaptez le dosage si
nécessaire et vérifiez si tous les
ingrédients ont été introduits.
Le pain n'est pas cuit au milieu Trop d'eau
Vérifiez les quantités des
ingrédients, adaptez le dosage si
nécessaire et vérifiez si tous les
ingrédients ont été introduits.
Le pain/la croûte est trop clair(e)
Le niveau de brunissement n'est
pas choisi correctement
Conformément aux règlements,
la machine à pain ne dispose
pas de chauffage dans la
zone du couvercle, il est donc
recommandé d'utiliser le niveau de
brunissement le plus élevé si vous
souhaitez obtenir une consistance
croustillante.
L’appareil est conforme aux Directives Européennes 2014/35/EU, 2014/30/EU et
2009/125/EU.
Au terme de son utilisation ce produit ne doit pas être éliminé avec les déchets
ménagers habituels, mais il doit être déposé dans un point de collecte pour le
recyclage d’appareils électriques et électroniques.
Les matériaux sont recyclables conformément à leur identification. Grâce à la
réutilisation, le recyclage de matériaux ou d’autres formes de recyclage des
vieux appareils vous contribuez de manière significative à la protection de notre
environnement.
Veuillez contacter votre municipalité pour connaître le centre de traitement
compétent.
Sous réserve de modifications

36 37
it
it
Istruzioni per l’uso
Importanti indicazioni per la sicurezza
▪ Questo apparecchio può essere utilizzato da bambini a partire dagli
8 anni di età e da persone con ridotte capacità fisiche, sensoriali
o mentali oppure prive di esperienza e/o conoscenza, solo se sono
sorvegliate o se sono state istruite in merito all’impiego sicuro
dell’apparecchio e se ne hanno compreso i pericoli risultanti.
▪ I bambini non devono giocare con l’apparecchio.
▪ La pulizia e la manutenzione a carico dell’utente non devono essere
eseguite da bambini, tranne nel caso in cui essi abbiano più di 8
anni e siano sorvegliati.
▪ Tenere l’apparecchio e il cavo di collegamento lontani dalla portata
dei bambini con meno di 8 anni.
▪ L’apparecchio non deve essere azionato da un timer esterno o da un
telecomando.
▪ Questo apparecchio può essere utilizzato solo in ambito domestico e
in contesti applicativi analoghi, come ad esempio:
⋅ in cucine per i collaboratori di negozi, uffici e altre realtà
commerciali;
⋅ in tenute agricole;
⋅ in hotel, motel e altre strutture ricettive;
⋅ in bed & breakfast.
▪ Se il cavo di allacciamento alla rete è danneggiato, richiederne la
sostituzione al produttore, al relativo servizio clienti o a un’altra
persona competente del settore, onde evitare pericoli.
▪ Dopo aver utilizzato gli accessori e l’apparecchio, pulire tutte le
superfici/parti che sono state a contatto con gli alimenti. Seguire le
indicazioni contenute nel capitolo “Pulizia e manutenzione”.
▪ Usare l’apparecchio solo conformemente alle presenti istruzioni.
L’uso improprio può provocare shock elettrici o altri rischi.
▪ Attenzione, pericolo di ustioni: la temperatura delle superfici
di contatto può essere molto elevata. Dopo lo spegnimento
dell’apparecchio, la temperatura delle superfici riscaldanti rimane
molto alta ancora per qualche tempo.
▪ Spegnere l’apparecchio e staccare sempre la spina prima di sostituire
gli accessori o di avvicinarsi alle parti che si muovono durante
l’utilizzo.
Prima dell’uso
L’apparecchio deve essere impiegato solo per l’uso previsto, nel rispetto delle presenti istruzioni. A
tal fine, leggere accuratamente le istruzioni per l’uso prima della messa in servizio. Esse forniscono
indicazioni per l’utilizzo, la pulizia e la cura dell’apparecchio. In caso di inosservanza, non ci si assume
alcuna responsabilità per eventuali danni. Conservare accuratamente le istruzioni per l’uso e, in caso
di cessione dell’apparecchio, consegnarle all’utente successivo insieme all’apparecchio. Rispettare
anche le istruzioni di garanzia riportate alla fine. Questo apparecchio non è concepito per un uso
commerciale, ma solo per la preparazione di alimenti in quantità consuete per un utilizzo in ambito
domestico.
Durante l’uso osservare scrupolosamente le istruzioni per la sicurezza.
Dati tecnici
Tensione nominale: 220 – 240 V~ 50-60 Hz
Potenza assorbita: 450 W
Classe di protezione: I
Istruzioni per la sicurezza
▪ Staccare la spina:
⋅ in caso di anomalia di funzionamento;
⋅ prima di ogni pulizia;
⋅ dopo l’uso.
▪ Collegare l’apparecchio soltanto a una presa schuko installata a norma. Il cavo di alimentazione e la
spina devono essere asciutti.
▪ Non tirare o incastrare il cavo di collegamento contro spigoli taglienti, non lasciarlo sospeso e
proteggerlo dal calore e dall’olio.
▪ Usare solo una prolunga in perfette condizioni.
▪ Non staccare la spina dalla presa tirandola per il cavo o con le mani bagnate.
▪ Non trascinare l’apparecchio mediante il cavo di alimentazione.
▪ Non posizionare l’apparecchio su superfici calde, ad esempio su piastre elettriche o simili oppure in
prossimità di fiamme libere, perché l’alloggiamento potrebbe fondersi.
▪ Utilizzare l’apparecchio solo se tutte le parti rimovibili sono posizionate correttamente.
▪ Se l’apparecchio non viene utilizzato per un periodo prolungato, staccare la spina.
▪ Non mettere in funzione l’apparecchio e staccare subito la spina, se:
⋅ l’apparecchio o il cavo di alimentazione sono danneggiati;
⋅ si sospetta un difetto dopo una caduta o un evento simile.
In questi casi far riparare l’apparecchio.
▪ Mettere in funzione l’apparecchio solo se supervisionato.
▪ Non toccare le superfici calde.
▪ L’utilizzo di accessori non consigliati dal produttore può provocare lesioni.
▪ Non toccare parti mobili durante l’utilizzo.
▪ Per estrarre il pane non sbattere la teglia contro altri oggetti, in quanto si potrebbe danneggiare.
▪ Non inserire pellicole di metallo o materiali simili nella macchina per il pane, poiché ciò aumenta il
rischio di incendio o corto circuito.

38 39
it
▪ Non coprire mai la macchina per il pane con un panno o altro. Il calore e il vapore devono sempre
poter fuoriuscire. Se la macchina per il pane viene coperta o entra in contatto con materiale
infiammabile, può verificarsi un incendio.
▪ Per evitare danneggiamenti non mettere mai in funzione la macchina per il pane senza l’apposita
teglia.
▪ Posizionare l’apparecchio in modo che non scivoli dal piano di lavoro, ad esempio durante la
lavorazione di un impasto duro.
▪ Non ci si assume alcuna responsabilità per eventuali danni causati da un utilizzo per scopi diversi
da quelli previsti, da un uso errato oppure da riparazione non professionale. In questi casi la
garanzia è esclusa.
Unità di comando
Selezione dei programmi
Con questo pulsante è possibile
scegliere il programma
desiderato. Il numero di
programma selezionato viene
visualizzato sul display.
Selezione del livello di doratura
Con questo pulsante è possibile
selezionare il livello di doratura
desiderato. Viene visualizzato sul
display come segue:
- Crosta chiara
- Crosta media
- Crosta scura
Start/Pausa
Con questo pulsante viene avviato
il processo di cottura; può essere
interrotto premendo nuovamente il
pulsante.
Stop
Premendo questo pulsante per
qualche secondo è possibile terminare
il programma di cottura.
Regolazione timer
Con i tasti – e + è possibile
programmare la funzione
“Timer”. L’orario di fine cottura
corrispondente viene visualizzato
sul display.
Selezione del formato pagnotta
Con questo pulsante è possibile
selezionare il formato della
pagnotta desiderato. A seconda
del formato scelto sul display
viene visualizzato 450 g o 750 g.
Illuminazione del vano di cottura
Premendo per qualche secondo questo
pulsante si accende l’illuminazione
del vano di cottura. Lo spegnimento è
automatico dopo circa 30 secondi. Per
riaccenderla basta premere di nuovo il
pulsante per qualche secondo.
Utilizzo
Con la macchina per il pane KULT X di WMF preparare il pane in casa è facilissimo. Basta solo
aggiungere gli ingredienti - al resto pensa la macchina. Grazie ai 12 diversi programmi di cottura
c’è sicuramente quello adatto ad ogni gusto. Nella fornitura è inclusa una scheda per programmi
che consente di assegnare i numeri di programma in tutta semplicità. Si può conservare nella teglia
occupando poco spazio.
Panoramica dei programmi
N.
programma
Denomina-
zione
Descrizione
Opzioni a disposizione Durata [h]
Funzione
"Timer"
Doratura Formato 450 g 750 g
1 Pane classico
Impasto, lievitazione e cottura di pane misto. Si
possono aggiungere altri ingredienti.
03:08 03:15
2 Pane bianco
Tempi più lunghi per impasto, lievitazione e cottura.
Il pane ha normalmente una crosta croccante e una
consistenza leggera.
03:55 04:05
3 Pane integrale
Impasto, lievitazione e cottura di pane integrale. Si
consiglia di non utilizzare la funzione "Timer", in
quanto può peggiorare i risultati di cottura.
03:47 03:55
4 Veloce*
Tempi più brevi per impasto, lievitazione e cottura
rispetto al programma n. 1. Il pane è normalmente
più piccolo e con una consistenza più compatta.
02:25
5 Pane dolce
Impasto, lievitazione e cottura di pane dolce. Si
possono aggiungere altri ingredienti.
03:05 03:10
6 Senza glutine
Impasto, lievitazione e cottura di pane senza glutine.
Si possono aggiungere altri ingredienti.
03:05 03:10
7 Ultra-Veloce**
I tempi più brevi in assoluto per impasto, lievitazione
e cottura del pane. Il pane è normalmente più
piccolo e ruvido rispetto a quello del programma
n. 4.
01:43 01:53
8 Impasto
Impasto e lievitazione senza cottura. L’impasto può
essere utilizzato per panini, pizza, ecc.
01:30
9 Marmellata***
Cottura di confetture e marmellate. Tagliare la frutta
prima di metterla nella teglia.
01:20
10 Pane da toast
Impasto, lievitazione e cottura di pane da toast. Il
pane ha normalmente una crosta più sottile e una
consistenza leggera.
03:10 03:15
11 Dolci
Impasto, lievitazione e cottura con utilizzo di lievito
in polvere.
02:00
12 Cottura
Solo cottura, senza impasto e lievitazione. Può anche
essere utilizzato per prolungare il tempo di cottura di
altri programmi.
01:00
* Per un risultato di cottura ottimale per prima cosa bisogna mettere nella teglia tutti gli ingredienti liquidi. Successivamente
si aggiungono gli ingredienti secchi.
** Con il programma Ultra-Veloce è possibile preparare il pane in pochissimo tempo. La temperatura dell’acqua è
particolarmente importante per questo programma, in quanto influisce sul processo di cottura. I migliori risultati si
ottengono utilizzando acqua calda.
*** Per la preparazione di marmellate si consiglia di impiegare una teglia separata.

40 41
it
Programmi nel dettaglio
Program-
ma n.
Denomina-
zione
Quantità
Durata
totale
Impasto 1
Lievitazione 1
Impasto 2Lievita-
zione 2
Lievitazione 3
Cottura
Mante-
nimento
del calore
1 Pane classico
450 g 03:08 h 11 min. 20 min. 17 min. 25 min. 35 min. 80 min. 60 min.
750 g 03:15 h 12 min. 20 min. 18 min. 25 min. 35 min. 85 min. 60 min.
2 Pane bianco
450 g 03:55 h 18 min. 40 min. 22 min. 30 min. 40 min. 85 min. 60 min.
750 g 04:05 h 20 min. 40 min. 25 min. 30 min. 40 min. 90 min. 60 min.
3 Pane integrale
450 g 03:47 h 11 min. 25 min. 21 min. 35 min. 55 min. 80 min. 60 min.
750 g 03:55 h 12 min. 25 min. 23 min. 35 min. 55 min. 85 min. 60 min.
4 Veloce* 02:25 h 12 min. 10 min. 13 min. / 25 min. 85 min. 60 min.
5 Pane dolce
450 g 03:05 h 12 min. 5 min. 23 min. 30 min. 35 min. 80 min. 60 min.
750 g 03:10 h 12 min. 5 min. 23 min. 30 min. 35 min. 85 min. 60 min.
6 Senza glutine
450 g 03:05 h 12 min. 5 min. 13 min. 30 min. 35 min. 90 min. 60 min.
750 g 03:10 h 12 min. 10 min. 13 min. 30 min. 35 min. 90 min. 60 min.
7 Ultra-Veloce**
450 g 01:43 h 13 min. / 5 min. 25 min. / 60 min. 60 min.
750 g 01:53 h 13 min. / 5 min. 30 min. / 65 min. 60 min.
8 Impasto 01:30 h 25 min. / / 30 min. 35 min. / /
9 Marmellata*** 01:20 h / 15 min. / / 45 min. 20 min. /
10 Pane da toast
450 g 03:10 h 17 min. 35 min. 8 min. 25 min. 35 min. 70 min. 60 min.
750 g 03:15 h 17 min. 35 min. 8 min. 25 min. 35 min. 75 min. 60 min.
11 Dolci 02:00 h 7 min. 4 min. 10 min. 9 min. / 90 min. 60 min.
12 Cottura 01:00 h / / / / /
10-60
min.
60 min.
* Per un risultato di cottura ottimale per prima cosa bisogna mettere nella teglia tutti gli ingredienti liquidi. Successivamente
si aggiungono gli ingredienti secchi.
** Con il programma Ultra-Veloce è possibile preparare il pane in pochissimo tempo. La temperatura dell’acqua è
particolarmente importante per questo programma, in quanto influisce sul processo di cottura. I migliori risultati si
ottengono utilizzando acqua calda.
*** Per la preparazione di marmellate si consiglia di impiegare una teglia separata.
Messa in servizio
▪ All’apertura dell’imballaggio verificare che tutti i pezzi dell’apparecchio siano integri e non
danneggiati.
▪ Prima dell’uso pulire tutti i pezzi rimovibili, come descritto nel capitolo “Pulizia e manutenzione”.
▪ In occasione del primo processo di riscaldamento potrebbe fuoriuscire del fumo, pertanto si
consiglia di mettere in funzione l’apparecchio per la prima volta con la teglia vuota (senza paletta
impastatrice) e con il programma Cottura (n. 12).
▪ Lasciare raffreddare la macchina per il pane e pulirla nuovamente come descritto nel capitolo
“Pulizia e manutenzione”.
Preparazione di pane, dolci e impasti
▪ Aprire il coperchio della macchina per il pane KULT X ed estrarre la teglia, ruotandola in senso
antiorario.
▪ Per evitare che l’impasto rimanga attaccato nella cavità tra la paletta impastatrice e la teglia, si
consiglia di ungere il buco della paletta impastatrice con un tipo di margarina resistente alle alte
temperature.
▪ Posizionare la paletta impastatrice con la parte più larga in basso, sull’albero motore della teglia.
▪ Successivamente mettere nella teglia gli ingredienti desiderati, secondo la ricetta. Di solito si
mettono prima gli ingredienti liquidi come acqua o olio, quindi si aggiungono zucchero, sale, farina
e, per ultimo, il lievito.
Attenzione: la quantità massima di farina è 500 g e 7g di lievito in polvere.
Avvertenza: con una quantità di farina eccessiva l’impasto può traboccare e incrostarsi.
▪ Inserire la teglia nella macchina per il pane e bloccarla tramite rotazione in senso orario.
▪ Chiudere il coperchio della macchina per il pane.
▪ A questo punto inserire la spina nella presa.
▪ Scegliere il programma desiderato premendo l’apposito pulsante
. Ulteriori informazioni sui
singoli programmi sono disponibili a pag. 37.
▪ Con l’apposito pulsante di doratura
è possibile scegliere il livello desiderato per la doratura
(crosta chiara, media, scura).
▪ Con il pulsante “Formato pagnotta”
scegliere il formato desiderato per la pagnotta (450 g o 750
g). Nel programma Veloce (n. 4) non è necessaria un’ulteriore scelta del formato della pagnotta.
▪ Con i tasti – e + è possibile programmare il timer (ulteriori informazioni a pag. 39). Questo
passaggio può essere saltato se si vuole iniziare subito con il processo di cottura.
▪ Una volta selezionate tutte le impostazioni desiderate, avviare il processo di cottura premendo il
pulsante START/STOP
Start
Stop
. Se possibile, evitare di aprire il coperchio prima della fine del processo di
cottura, in quanto ciò potrebbe compromettere il risultato finale.
▪ Durante la seconda fase di lievitazione viene emesso più volte un segnale acustico a seconda
del programma selezionato (n. 1, 2, 3,4, 5, 7, 10 e 11). A questo punto è eventualmente possibile
aprire il coperchio e aggiungere ulteriori ingredienti, ad esempio uvetta o nocciole. Richiudere il
coperchio subito dopo per ottenere un buon risultato di cottura.
▪ Dopo la fine del processo di cottura viene emesso più volte un segnale acustico. È possibile estrarre
subito il pane e terminare il processo di cottura mantenendo premuto il pulsante START/STOP
Start
Stop
per qualche secondo; in caso contrario la funzione di mantenimento in caldo si attiva per un
massimo di 60 minuti.
▪ Estrarre la teglia aiutandosi con una presina e ruotandola leggermente in senso antiorario.
Capovolgere la teglia e lasciare cadere il pane su una griglia da dolci per farlo raffreddare.
▪ Se la paletta impastatrice non dovesse sganciarsi automaticamente, è possibile rimuoverla
aiutandosi con l’apposito gancio. Inserirlo nell’apertura della paletta impastatrice e fissarlo al bordo
inferiore della stessa. Estrarre quindi delicatamente la paletta impastatrice.

42 43
it
▪ Lasciare raffreddare il pane sulla griglia da dolci per circa un’ora prima di tagliarlo, salvo se
diversamente indicato nella ricetta.
Regolazione del timer
È possibile utilizzare la funzione “Timer” nel caso in cui non si voglia iniziare subito con il processo di
cottura. Mediante i tasti – e + è possibile impostare, a intervalli di 10 minuti, l’orario in cui si desidera
che il pane sia pronto (il tempo di cottura è quindi incluso). Il tempo di ritardo massimo della cottura
è di 13 ore.
Avvertenza: questa funzione non è disponibile con i seguenti programmi: Ultra-Veloce, Marmellata e
Cottura.
Avvertenza: con l’opzione “Timer” non utilizzare ingredienti che deperiscono facilmente, quali uova o
latte fresco.
Funzione di mantenimento in caldo
Al termine del tempo di cottura si attiva automaticamente la funzione di mantenimento in caldo
per 60 minuti. Se si desidera estrarre il pane subito dopo la cottura, terminare il processo di cottura
mantenendo premuto il pulsante START/STOP
Start
Stop
per qualche secondo.
Funzione „Memoria“
In caso di breve interruzione dell’alimentazione elettrica durante il processo di cottura, questo
riprenderà automaticamente entro 10 minuti senza necessità di premere il pulsante START/STOP
Start
Stop
.
Se l’interruzione dell’alimentazione dovesse durare più di 10 minuti occorre invece avviare di nuovo la
macchina per il pane.
Informazioni utili
▪ Impasti duri: per gli impasti duri si consiglia di cambiare l’ordine di aggiunta degli ingredienti.
Mettere nella teglia prima gli ingredienti secchi, poi quelli liquidi. Quando si utilizza la funzione
“Timer”, evitare che il lievito entri in contatto con gli ingredienti liquidi prima del tempo.
▪ Preparati per pane: per i preparati per pane (miscele pronte), il programma adatto, salvo se
diversamente indicato nella ricetta, è quello per il pane classico (n. 1). Non superare mai la quantità di
acqua da aggiungere ai preparati indicata nella ricetta. A seconda della ricetta è tuttavia consigliabile
ridurre tale quantità di circa 50 ml.
▪ Doratura: l’apparecchio, conformemente alla normativa in materia, non è dotato di funzione di
riscaldamento nell’area del coperchio; si consiglia quindi di optare per il massimo livello di doratura se
si desidera una consistenza croccante.
▪ Uova: in caso di aggiunta di uova, adeguare la quantità di liquidi in proporzione. Si consiglia inoltre
di sbattere le uova prima di metterle nella teglia.
▪ Illuminazione del vano di cottura: Per la sostituzione della lampadina è possibile rimuovere la
copertura in vetro con una moneta. Utilizzare una lampadina da forno con le caratteristiche seguenti:
⋅ E14
⋅ Lunghezza totale 49 mm
⋅ Diametro vetro 22 mm
⋅ 220-240 V
⋅ 15 Watt
⋅ 300°C
Pulizia e manutenzione
Estrarre la spina dopo l’uso. Lasciare che la macchina si raffreddi prima di procedere con la pulizia.
Estrarre la teglia tenendola per il manico e ruotandola in senso antiorario. Successivamente estrarre
la paletta impastatrice. Se la rimozione dovesse risultare difficoltosa, riempire la teglia con acqua
tiepida e lasciare in ammollo per 30 minuti. A questo punto la paletta può essere estratta facilmente.
Pulire la teglia e la paletta impastatrice con un panno umido, non utilizzare detersivi troppo aggressivi
o abrasivi per non danneggiare il rivestimento antiaderente. Prima di poter riutilizzare la teglia è
necessario lasciarla asciugare completamente. Per la pulizia della macchina per il pane, del coperchio
e dell’oblò di controllo si consiglia di utilizzare un panno umido. Anche in questo caso non utilizzare
detersivi abrasivi, in quanto potrebbero intaccare la superficie. Non immergere mai il corpo macchina
nell’acqua. Per una facile pulizia è possibile lavare il misurino, il cucchiaio misuratore e il gancio per
estrarre la paletta impastatrice nella lavastoviglie.
idoneità alla
lavastoviglie
lavabile con acqua
corrente
pulire con un
panno umido
Teglia
Paletta impastatrice
Misurino
Cucchiaio dosatore
Gancio per estrarre la paletta
impastatrice
Corpo macchina

44 45
it
Risoluzione dei problemi
Sul display compare la scritta “HHH” (accompagnata da 5 segnali acustici)
La temperatura all’interno è troppo alta. Il programma corrente deve essere arrestato. Aprire il
coperchio e lasciare raffreddare la macchina per 10-20 minuti.
Sul display compare la scritta “LLL” (accompagnata da 5 segnali acustici) dopo che è stato
premuto il pulsante START/STOP
Start
Stop
La temperatura all’interno è troppo bassa. Per arrestare il segnale acustico premere il pulsante START/
STOP
Start
Stop
e aprire il coperchio. Attendere che la macchina raggiunga la temperatura ambiente (da 10 a
20 minuti).
Sul display compare la scritta “EE0” dopo che è stato premuto il pulsante START/STOP
Start
Stop
Il sensore della temperatura non è collegato correttamente; l’apparecchio deve essere riparato.
Problema Causa Soluzione
Fuoriuscita di fumo dal vano di
cottura o dalle griglie di aerazione.
Alcuni ingredienti sono rimasti
all'interno del vano di cottura o
si sono attaccati all’esterno della
teglia.
Staccare la spina e pulire l’esterno
della teglia o il vano di cottura.
Il pane si affossa nel mezzo e
rimane umido sul fondo.
Il pane è stato lasciato troppo a
lungo nella teglia dopo la fine
della cottura.
Estrarre il pane dalla teglia prima
che si disattivi la funzione di
mantenimento in caldo.
Gli ingredienti non vengono
mescolati in modo adeguato
o il pane non viene cotto
correttamente.
È stato selezionato il programma
sbagliato.
Verificare il programma
selezionato, le impostazioni di
formato della pagnotta e il livello
di doratura.
Consigli e risposte
Il coperchio è stato aperto diverse
volte durante il processo di
cottura.
Il coperchio deve essere aperto
soltanto per aggiungere
ingredienti, quindi richiuso
immediatamente.
La paletta impastatrice non gira.
Verificare se la paletta impastatrice
viene bloccata, ad esempio, da
semi o altro. Estrarre la teglia e
verificare se la paletta impastatrice
gira. In caso contrario far riparare
l'apparecchio.
La macchina per il pane non si
avvia, sul display compare "HHH".
La temperatura all’interno è
troppo alta.
Il programma corrente deve essere
arrestato. Aprire il coperchio e
lasciare raffreddare la macchina
per 10-20 minuti.
Il pane lievita troppo.
Troppo lievito, troppa farina o
troppo poco sale.
Verificare la quantità degli
ingredienti, adattare le dosi se
necessario e verificare che tutti gli
ingredienti siano stati aggiunti.
Il pane lievita troppo poco o non
lievita affatto.
Lievito insufficiente o assente
oppure quantità di acqua non
corretta.
Verificare la quantità degli
ingredienti, adattare le dosi se
necessario e verificare che tutti gli
ingredienti siano stati aggiunti.
Il lievito è entrato in contatto
troppo presto con gli ingredienti
liquidi.
Rispettare la sequenza di aggiunta
degli ingredienti nella teglia.
Problema Causa Soluzione
Consigli e risposte
Il pane si affossa nel mezzo.
Il volume dell’impasto è eccessivo
per la teglia.
Verificare la quantità di ingredienti
e adattare le dosi se necessario. Se
vengono aggiunti ingredienti che
contengono acqua, la quantità
di liquidi deve essere ridotta di
conseguenza.
Il lievito è entrato in contatto
troppo presto con gli ingredienti
liquidi.
Formare un piccolo incavo al
centro della farina per il lievito
secco, per proteggerlo dal contatto
diretto con i liquidi.
Consistenza pesante, grumosa.
Troppa farina o troppi pochi
liquidi.
Verificare la quantità degli
ingredienti, adattare le dosi se
necessario e verificare che tutti gli
ingredienti siano stati aggiunti.
La quantità di lievito o di zucchero
non è sufficiente.
Verificare la quantità degli
ingredienti, adattare le dosi se
necessario e verificare che tutti gli
ingredienti siano stati aggiunti.
Il pane non è cotto al centro. Troppa acqua.
Verificare la quantità degli
ingredienti, adattare le dosi se
necessario e verificare che tutti gli
ingredienti siano stati aggiunti.
Il pane/la crosta è troppo chiaro/a.
Non è stato scelto il grado giusto
di doratura.
l’apparecchio, conformemente alla
normativa in materia, non è dotato
di funzione di riscaldamento
nell’area del coperchio; si consiglia
quindi di optare per il massimo
livello di doratura se si desidera
una consistenza croccante.
L’apparecchio è conforme alle direttive europee 2014/35/EU, 2014/30/EU e
2009/125/EU.
Alla fine del suo ciclo di vita non buttare il prodotto nella spazzatura domestica,
ma consegnarlo in un centro di riciclaggio di apparecchi elettrici o elettronici.
I materiali possono essere riciclati in conformità con la loro etichettatura. Grazie
al riciclaggio, al recupero e ad altre forme di recupero di vecchi apparecchi, si
riesce a contribuire in modo significativo alla protezione dell’ambiente.
Per informazioni relative al centro di smaltimento, si prega di contattare
l’amministrazione comunale.
Con riserva di modifiche

46 47
es
es
Instrucciones de uso
Advertencias de seguridad importantes
▪ Este aparato puede ser utilizado por niños mayores de 8 años y por
personas con discapacidades físicas, psíquicas o sensoriales o que
carezcan de la experiencia y/o conocimientos necesarios para usarlo
solamente si lo utilizan bajo vigilancia o si reciben las instrucciones
necesarias para utilizarlo con seguridad y comprenden los peligros
relacionados con su uso.
▪ Los niños no deben jugar con el aparato.
▪ Los niños tampoco deben realizar su limpieza ni mantenimiento, a
menos que sean mayores de 8 años y lo hagan bajo la vigilancia de
adultos.
▪ El aparato y el cable de conexión deben mantenerse fuera del
alcance de los niños menores de 8 años.
▪ No ponga el aparato a funcionar con un temporizador externo o
mando a distancia.
▪ Este aparato está diseñado para el uso doméstico u otras
aplicaciones similares, tales como:
⋅ en cocinas para el personal de tiendas, oficinas y otros ámbitos
comerciales;
⋅ en fincas agrícolas;
⋅ para clientes de hoteles, moteles y otros establecimientos de
hospedaje;
⋅ en pensiones con desayuno.
▪ Si el cable de alimentación de red de este aparato está estropeado,
deberá ser sustituido por uno nuevo por el fabricante, por el
servicio de atención al cliente o por personal cualificado, para evitar
cualquier peligro.
▪ Luego de la utilización, limpie todas las superficies y piezas
del aparato y los accesorios que hayan estado en contacto con
alimentos. Siga las indicaciones contenidas en el capítulo “Limpieza
y cuidados”.
▪ Utilice el aparato solo de conformidad con estas instrucciones de
uso. El uso incorrecto puede tener como consecuencia una descarga
eléctrica u otro tipo de peligros.
▪ Cuidado, peligro de quemaduras: Las superficies de contacto pueden
calentarse mucho. Las superficies calientes mantienen durante un
tiempo su temperatura incluso después de apagarse el aparato.
▪ Apague el aparato y desconecte siempre el enchufe de la red antes
de cambiar los accesorios o de acercarse a piezas que se mueven
durante el funcionamiento.
Antes de usarlo
Utilice el aparato solo para el fin para el que se ha diseñado y siempre siguiendo las instrucciones de
uso de este manual. Lea atentamente estas instrucciones antes de poner el aparato en funcionamiento.
En ellas encontrará indicaciones para el uso, la limpieza y el mantenimiento correctos del mismo. No
nos responsabilizamos de los daños que puedan producirse por un uso no conforme al previsto. Guarde
bien estas instrucciones y entréguelas al siguiente usuario junto con el aparato. Tenga en cuenta
también las advertencias de la garantía contenidas al final de las instrucciones de uso. El aparato no es
apto para el uso industrial, sino solo para preparar alimentos en cantidades usuales en el hogar.
Respete siempre las indicaciones de seguridad durante el uso.
Datos técnicos
Tensión nominal: 220 – 240 V~ 50-60 Hz
Consumo de energía: 450 W
Clase de protección: I
Indicaciones de seguridad
▪ Desenchufe el cable de red:
⋅ En caso de fallo durante el uso
⋅ Antes de cada limpieza
⋅ Después de usarlo.
▪ Enchufe el aparato solamente a una toma de corriente con puesta a tierra que esté instalada
correctamente según las normativas correspondientes. El cable y el enchufe deben estar secos.
▪ No tire del cable de conexión cuando éste se encuentre sobre bordes afilados ni lo aprisione, no
deje que cuelgue y protéjalo del calor y del aceite.
▪ Utilice exclusivamente un cable alargador en perfecto estado.
▪ No desenchufe nunca el aparato tirando del cable o con las manos mojadas.
▪ No trasporte el aparato agarrado por el cable.
▪ No coloque el aparato sobre superficies calientes, como fuegos de cocina y similares, ni cerca de
llamas de gas abierto, la carcasa podría derretirse.
▪ Utilice el aparato únicamente si todas las piezas extraíbles están colocadas correctamente.
▪ Si no va a utilizar el aparato durante un largo tiempo, desconéctelo del enchufe de red.
▪ No ponga en funcionamiento el aparato y desconéctelo inmediatamente de la red si:
⋅ el aparato o el cable de red están dañados
⋅ tiene la sospecha de que se haya podido producir algún fallo después de una caída del aparato
o similar.
En estos casos, envíe el aparato para que sea reparado.
▪ No ponga el aparato a funcionar sin vigilancia.
▪ No toque las superficies calientes.
▪ El uso de accesorios que no sean recomendados por el fabricante puede dar lugar a lesiones.

48 49
es
▪ Durante el uso no se debe tocar ninguna pieza en movimiento.
▪ Nunca golpee el molde contra otros objetos para quitar el pan, debido a que esto podría provocar
daños en el molde para pan.
▪ Nunca se deben utilizar láminas de metal ni materiales similares en las máquinas panificadoras
debido a que esto aumenta el riesgo de incendio o cortocircuito.
▪ La panificadora nunca debe cubrirse con un paño u otro elemento. El calor y el vapor deben poder
escapar en todo momento. Si la panificadora se cubre o entra en contacto con materiales inflama-
bles puede producirse un incendio.
▪ Para evitar daños, la panificadora no debe ponerse nunca en funcionamiento sin el molde para pan.
▪ Coloque la máquina de manera que no puede resbalar y caer de la encimera, por ejemplo, durante
el amasado de una masa compacta.
▪ No asumiremos ninguna responsabilidad por posibles daños en caso de un uso diferente al previsto,
un manejo incorrecto o una reparación que no haya sido realizada por profesionales. En esos casos
están excluidas también las prestaciones de garantía.
Unidad de mando
Selección de programa
Con esta tecla se puede seleccionar el programa deseado. El
número de programa seleccionado se muestra en la pantalla.
Selección de grado de tostado
Con esta tecla se puede seleccionar el grado de tostado deseado.
Este se muestra en la pantalla de
la siguiente manera:
- Claro
- Medio
- Oscuro
Inicio/pausa
Con esta tecla se inicia el proceso de
horneado, que puede interrumpirse
pulsándola nuevamente.
Parada
Al pulsar de manera prolongada esta
tecla se puede finalizar el programa de
horneado.
Ajuste de temporizador
Con las teclas – y + se puede
programar la función de
temporizador. El tiempo de
finalización ajustado se muestra
en la pantalla.
Selección de tamaño de pan
Con esta tecla se puede seleccionar el tamaño de pan deseado.
Según el tamaño seleccionado
se muestra en la pantalla 450 g
o 750 g.
Iluminación del compartimiento de
panificación
Al pulsar de manera prolongada esta
tecla se puede activar la iluminación
del compartimiento de panificación.
Esta se apaga automáticamente
después de aprox. 30 segundos, pero
puede volver a encenderse si se pulsa
nuevamente de manera prolongada.
Utilización
Con la panificadora KULT X de WMF, usted puede preparar su propio pan muy fácilmente . Todo lo
que necesita son los ingredientes adecuados, del resto se ocupa la panificadora Kult X de WMF. Con
12 programas de horneado disponibles, la máquina cuenta con algo adecuado para cada gusto. En el
volumen de suministro se incluye una tarjeta de programas para facilitar la asignación de los números
de programas. Para ahorrar espacio, esta puede guardarse en el molde para pan.
Vista general de programas
Programa
N.º
Denominación Descripción
Opciones disponibles
Duración [h]
Función de
tempori-
zador
Tostado Tamaño 450 g 750 g
1 Pan clásico
Amasado, reposo y horneado de pan mixto. Se
pueden añadir otros ingredientes.
03:08 03:15
2 Pan blanco
Amasado, reposo y horneado durante un período de
tiempo más prolongado. El pan tiene por lo general
una corteza crocante y una consistencia ligera.
03:55 04:05
3 Pan integral
Amasado, reposo y horneado de pan integral. No
se recomienda utilizar la función de temporizador
debido a que esta puede empeorar el resultado de
horneado.
03:47 03:55
4 Programa rápido*
Amasado, reposo y horneado de pan en menos
tiempo que el programa n.º 1. El pan es por lo general más pequeño con una consistencia más firme.
02:25
5 Pan dulce
Amasado, reposo y horneado de pan dulce. Se
pueden añadir otros ingredientes.
03:05 03:10
6 Sin gluten
Amasado, reposo y horneado de pan sin gluten. Se
pueden añadir otros ingredientes.
03:05 03:10
7
Programa ultra
rápido**
Amasado, reposo y horneado de pan en el menor
tiempo posible. El pan es por lo general más pequeño
y más áspero que el pan horneado con el programa
n.º 4.
01:43 01:53
8
Programa de
masa
Amasado y reposo de masa, sin horneado. La masa
puede usarse para panecillos, pizza, etc.
01:30
9 Confitura***
Cocción de confituras y mermeladas. Primero hay
que cortar la fruta antes de introducirla en el molde
para pan.
01:20
10 Pan para tostadas
Amasado, reposo y horneado de pan para tostadas. El
pan tiene por lo general una corteza más fina y una
consistencia ligera.
03:10 03:15
11 Pastel
Amasado, reposo y horneado utilizando polvo para
hornear.
02:00
12 Horneado
Solo horneado, sin amasado ni reposo. También
puede utilizarse para prolongar el tiempo de
horneado de otros programas.
01:00
* Para un resultado de horneado óptimo, primero se deben introducir todos los ingredientes líquidos en el molde para pan. A
continuación se añaden todos los ingredientes secos.
** Con el programa ultra rápido se puede hornear un pan en el menor tiempo posible. En este caso es especialmente
importante la temperatura del agua, ya que esta influye en el proceso de fermentación. El uso de agua caliente garantiza un
resultado de horneado óptimo.
*** Para la preparación de confituras se recomienda utilizar un molde de hornear separado.

50 51
es
Les programas en detalle
Programa
N.º
Denomina-
ción
Cantidad
Duración
total
Amasado
1
Reposo 1
Amasado
2
Reposo 2
Reposo 3Hor-
neado
Mantener
caliente
1 Pan clásico
450 g 03:08 h 11 min. 20 min. 17 min. 25 min. 35 min. 80 min. 60 min.
750 g 03:15 h 12 min. 20 min. 18 min. 25 min. 35 min. 85 min. 60 min.
2 Pan blanco
450 g 03:55 h 18 min. 40 min. 22 min. 30 min. 40 min. 85 min. 60 min.
750 g 04:05 h 20 min. 40 min. 25 min. 30 min. 40 min. 90 min. 60 min.
3 Pan integral
450 g 03:47 h 11 min. 25 min. 21 min. 35 min. 55 min. 80 min. 60 min.
750 g 03:55 h 12 min. 25 min. 23 min. 35 min. 55 min. 85 min. 60 min.
4
Programa
rápido*
02:25 h 12 min. 10 min. 13 min. / 25 min. 85 min. 60 min.
5 Pan dulce
450 g 03:05 h 12 min. 5 min. 23 min. 30 min. 35 min. 80 min. 60 min.
750 g 03:10 h 12 min. 5 min. 23 min. 30 min. 35 min. 85 min. 60 min.
6 Sin gluten
450 g 03:05 h 12 min. 5 min. 13 min. 30 min. 35 min. 90 min. 60 min.
750 g 03:10 h 12 min. 10 min. 13 min. 30 min. 35 min. 90 min. 60 min.
7
Programa ultra
rápido**
450 g 01:43 h 13 min. / 5 min. 25 min. / 60 min. 60 min.
750 g 01:53 h 13 min. / 5 min. 30 min. / 65 min. 60 min.
8
Programa de
masa
01:30 h 25 min. / / 30 min. 35 min. / /
9 Confitura*** 01:20 h / 15 min. / / 45 min. 20 min. /
10
Pan para
tostadas
450 g 03:10 h 17 min. 35 min. 8 min. 25 min. 35 min. 70 min. 60 min.
750 g 03:15 h 17 min. 35 min. 8 min. 25 min. 35 min. 75 min. 60 min.
11 Pastel 02:00 h 7 min. 4 min. 10 min. 9 min. / 90 min. 60 min.
12 Horneado 01:00 h / / / / /
10-60
min.
60 min.
* Para un resultado de horneado óptimo, primero se deben introducir todos los ingredientes líquidos en el molde para pan. A
continuación se añaden todos los ingredientes secos.
** Con el programa ultra rápido se puede hornear un pan en el menor tiempo posible. En este caso es especialmente
importante la temperatura del agua, ya que esta influye en el proceso de fermentación. El uso de agua caliente garantiza un
resultado de horneado óptimo.
*** Para la preparación de confituras se recomienda utilizar un molde de hornear separado.
Puesta en funcionamiento
▪ Cuando desembale el aparato compruebe que todas las piezas estén disponibles y que no presenten
daños.
▪ Antes del uso limpie todas las piezas extraíbles según se describe en el capítulo “Limpieza y cuida-
dos”.
▪ Debido a que durante el primer procedimiento de calentamiento puede producirse humo, recomen-
damos poner la máquina en funcionamiento por primera vez con el molde para pan colocado (sin
amasador) con el programa Horneado (n.º 12).
▪ Deje que la máquina panificadora se enfríe y límpiela nuevamente como se describe en el capítulo
“Limpieza y cuidados”.
Preparación de pan, pastel y masa
▪ Abra la tapa de la panificadora KULT X y quite el molde para pan haciéndolo girar en el sentido
contrario a las agujas del reloj.
▪ Para evita que la masa se quede pegada en el hueco situado entre el amasador y el molde para pan
recomendamos pintar el orificio del amasador con margarina resistente al calor.
▪ Coloque el amasador con el lado ancho hacia abajo en el eje de accionamiento del molde para pan.
▪ Introduzca a continuación todos los ingredientes deseados conforme a la receta en el molde para
pan. Por lo general se introducen primero los ingredientes líquidos como agua o aceite. A continua-
ción se añade azúcar, sal, harina y por último levadura.
Atención: la cantidad máxima de harina es 500 g y 7g de levadura seca.
Indicación: cuidado, si la cantidad de harina es demasiado grande la masa puede desbordarse
y quedarse pegada.
▪ Coloque el molde para pan en la panificadora y ciérrela haciéndolo girar en el sentido de las agujas
del reloj.
▪ Cierre la tapa de la panificadora.
▪ Ahora inserte el enchufe en la toma de corriente.
▪ Seleccione el programa correspondiente con la tecla de programa
. En la página 47 encontrará
más indicaciones acerca de cada programa.
▪ Seleccione el grado de tostado deseado (claro, medio, oscuro) con la tecla de grado de tostado
.
▪ Seleccione el tamaño de pan deseado (450 g o 750 g) con la tecla de tamaño de pan
. En el caso
del programa rápido (n.º 4) no es necesario realizar ninguna selección adicional del tamaño del pan.
▪ Con ayuda de las teclas – y + se puede programar el temporizador (más información pág. 49.) Este
paso se puede pasar por alto si se desea comenzar directamente con el proceso de horneado.
▪ Una vez que se han realizado todos los ajustes deseados, puede comenzar el proceso de horneado
con la tecla INICIO/PARADA
Start
Stop
. Dentro de lo posible no abra la tapa antes de que finalice el tiempo
de horneado, ya que esto puede afectar negativamente el resultado del horneado.
▪ Después del segundo proceso de amasado se escucha una señal acústica repetidas veces según
el programa seleccionado (n.º 1, 2, 3,4, 5, 7, 10 y 11) Ahora puede abrir la tapa cuando guste y
añadir más ingredientes como por ejemplo uvas pasas o frutos secos. Cierre nuevamente la tapa de
inmediato para lograr un buen resultado de horneado.
▪ Una vez terminado el proceso de horneado se escucha repetidas veces una señal acústica. Puede
retirar directamente el pan y finalizar el proceso de horneado pulsando de manera prolongada la
tecla de INICIO/PARADA
Start
Stop
o la función de mantenimiento del calor se activa durante un máx. de
60 minutos.

52 53
es
▪ Quite el molde para pan con ayuda de una manopla haciéndolo girar ligeramente en el sentido
contrario a las agujas del reloj. Descargue el molde para hornear para que el pan pueda caer sobre
una rejilla de cocina para enfriarse.
▪ En caso de que el amasador no se suelte automáticamente, puede soltarlo con ayuda del gancho.
Para ello insértelo en la abertura del amasador y engánchelo en el borde inferior del amasador.
Ahora extraiga cuidadosamente el amasador.
▪ Siempre y cuando la receta no indique lo contrario, deje que el pan se enfríe durante aproximada-
mente una hora sobre una rejilla de cocina antes de cortarlo.
Ajuste del temporizador
Si no se desea comenzar de inmediato con el proceso de horneado es posible utilizar la función de
temporizador. Con ayuda de las teclas – y + se puede ajustar a intervalos de 10 minutos el momento
en que se desea que el pan esté listo, lo cual también incluye el tiempo de horneado. El tiempo de
retardo máximo es 13 horas.
Indicación: Esta función no está disponible para los siguientes programas: programa ultra rápido,
confitura y horneado.
Indicación: no utilice ingredientes fácilmente perecederos como por ejemplo huevos o leche fresca
cuando desee usar la función de temporizador.
Función de mantenimiento del calor
Una vez finalizado el tiempo de horneado se activa automáticamente durante 60 minutos el tiempo de
mantenimiento del calor. Si desea sacar el pan directamente después del horneado, detenga el proceso
de horneado pulsando de manera prolongada la tecla de INICIO/PARADA
Start
Stop
.
Función de memoria
Si la alimentación eléctrica se interrumpe brevemente durante el proceso de horneado, este se reiniciará después de 10 minutos incluso sin que se pulse la tecla de INICIO/PARADA
Start
Stop
. No obstante, si el
corte de corriente dura más de 10 minutos será necesario reiniciar la máquina panificadora.
Indicaciones útiles
▪ Masas compactas: En caso de masas compactas se recomienda cambiar el orden. Introduzca primero
los ingredientes secos y a continuación los líquidos en el molde para pan. Si desea utilizar la función de
temporizador, preste atención a que la levadura no entre en contacto antes de tiempo con los líquidos.
▪ Mezclas preparadas: Por lo general, lo más adecuado para las mezclas preparadas siempre y cuando
la receta no indique lo contrario es el programa para pan clásico (n.º 1). En el caso de mezclas preparadas, añada como máximo la cantidad de agua indicada en la receta. Sin embargo, según cada receta se
recomienda reducir la cantidad hasta 50 ml.
▪ Tostado: Debido a que conforme a lo dispuesto la panificadora no cuenta con un radiador en el área
de la tapa, se recomienda usar el nivel de tostado más alto si se tiene preferencia por una consistencia
crocante.
▪ Huevos: En caso de uso adicional de huevos se debe ajustar proporcionalmente la cantidad de
líquido. Además se recomienda batir los huevos antes de introducirlos en el molde para pan.
▪ Iluminación del compartimiento de panificación: Para cambiar la bombilla puede quitar la cobertura de cristal con una moneda. Utilice una bombilla para horno con las siguientes características:
⋅ E14
⋅ Longitud 49 mm
⋅ Diámetro del cristal 22 mm
⋅ 220-240 V
⋅ 15 vatios
⋅ 300°C
Limpieza y cuidados
Retire el enchufe después del uso. Deje que la panificadora se enfríe antes de limpiarla. Quite el molde
para pan sujetándolo por el asa y haciéndolo girar en el sentido contrario a las agujas del reloj. A
continuación quite el amasador. En caso de que este no pueda quitarse fácilmente, llene el molde para
pan con agua templada y deje el amasador en remojo durante aprox. 30 minutos. Ahora el amasador
puede quitarse con facilidad. Limpie el molde para hornear y el amasador con un paño humedecido y
no utilice ningún producto de limpieza corrosivo ni abrasivo para no dañar el revestimiento antiadherente. Antes de poder usar nuevamente el molde para pan, este debe estar completamente seco. Para
la limpieza de la máquina panificadora, de la tapa y de la mirilla, un paño humedecido es también lo
más apropiado. Aquí tampoco utilice ningún producto de limpieza abrasivo ya que pueden atacar la
estructura de las superficies. Nunca introduzca la carcasa en agua. Para una limpieza sencilla, puede
introducir la taza de medir, la cuchara de medir y el gancho para quitar el amasador en el lavavajillas.
apto para lavava-
jillas
se puede limpiar
con agua corriente
limpieza con paño
húmedo
Molde para pan
Amasador
Recipiente medidor
Cuchara medidora
Gancho para quitar el amasador
Carcasa

54 55
es
Resolución de problemas
La pantalla muestra «HHH» (junto con 5 tonos audibles)
La temperatura en el interior es demasiado alta. El programa actual debe detenerse. Abra la tapa y deje
que la panificadora se enfríe entre 10 y 20 minutos.
La pantalla muestra «LLL» (junto con 5 tonos audibles) después de que se pulsa la tecla de
INICIO/PARADA
Start
Stop
La temperatura en el interior es demasiado baja. Detenga el tono audible pulsando la tecla de INICIO/
PARADA
Start
Stop
y abra la tapa. Espere entre 10 y 20 minutos hasta que la máquina haya alcanzado la
temperatura ambiente.
La pantalla muestra «EE0» después de que se pulsa la tecla de INICIO/PARADA
Start
Stop
El sensor de temperatura no está conectado correctamente, entregue la máquina para su reparación.
Problema Causa Solución
Sale humo del compartimiento de
panificación o de las ranuras de
ventilación.
Los ingredientes se encuentran en
el compartimiento de panificación
o están pegados en la parte
exterior del molde para pan.
Desenchufe la máquina y limpie
la parte exterior del molde para
pan o el compartimiento de
panificación.
El pan se hunde en el centro y está
húmedo en la base.
El pan se dejó demasiado tiempo
en el molde después del horneado.
Retire el pan del molde para pan
antes de que se desactive la función de mantenimiento del calor.
Los ingredientes no se mezclaron
correctamente o el pan no se
horneó correctamente.
Se seleccionaron ajustes de
programación erróneos.
Verifique tanto el programa
seleccionado como los ajustes en
cuanto a tamaño del pan y grado
de tostado.
La tapa se abrió demasiado a
menudo durante el proceso de
horneado.
La tapa no debe abrirse a
excepción de para añadir más
ingredientes. A continuación se
debe cerrar nuevamente la tapa de
inmediato.
Consejos y respuestas
El amasador no podía girar.
Verifique si el amasador no está
bloqueado por granos, etc. Quite el
molde para hornear y compruebe
si se puede hacer girar el amasador. Si esto no es posible, entregue
la máquina para su reparación.
La máquina panificadora no se
enciende, la pantalla muestra
«HHH»
La temperatura en el interior es
demasiado alta.
El programa actual debe detenerse.
Abra la tapa y deje que la
panificadora se enfríe entre 10 y
20 minutos.
El pan leuda en exceso
Demasiada levadura, demasiada
harina o demasiada poca sal
Verifique la cantidad de
ingredientes, ajuste las dosis según
sea necesario y compruebe si se
añadieron todos los ingredientes.
El pan no leuda en lo más mínimo
o solo un poco
Muy poca o nada de levadura, o
una cantidad incorrecta de agua
Verifique la cantidad de
ingredientes, ajuste las dosis según
sea necesario y compruebe si se
añadieron todos los ingredientes.
La levadura entró demasiado
pronto en contacto con el líquido
Asegúrese de seguir el orden indi-
cado al llenar el molde para pan.
Problema Causa Solución
El pan se hunde en el centro
El volumen de la masa es mayor
que el del molde para pan
Verifique la cantidad de ingredientes y ajuste las dosis según sea
necesario. Si se utilizan ingredientes que contengan agua se debe
reducir la cantidad de líquido de
manera correspondiente.
La levadura entró demasiado
pronto en contacto con el líquido
Haga un pequeño hoyo en la
harina y añada la levadura seca,
evitando que entre en contacto
directo con el líquido.
Consistencia compacta y grumosa
Demasiada harina o demasiado
poco líquido
Verifique la cantidad de
ingredientes, ajuste las dosis según
sea necesario y compruebe si se
añadieron todos los ingredientes.
Consejos y respuestas
No hay suficiente levadura o
azúcar
Verifique la cantidad de
ingredientes, ajuste las dosis según
sea necesario y compruebe si se
añadieron todos los ingredientes.
El pan no está horneado en el
centro
Demasiada agua
Verifique la cantidad de
ingredientes, ajuste las dosis según
sea necesario y compruebe si se
añadieron todos los ingredientes.
El pan/la corteza está demasiado/a
claro/a
Grado de tostado seleccionado
incorrectamente
Debido a que conforme a lo dispuesto la panificadora no cuenta
con un radiador en el área de la
tapa, se recomienda usar el nivel
de tostado más alto si se tiene
preferencia por una consistencia
crocante.
El aparato cumple las directivas europeas 2014/35/EU, 2014/30/EU y
2009/125/EU.
No tire este aparato a un contenedor normal; llévelo a un punto de
recogida de material eléctrico y electrónico. Según su identificación,
los materiales podrán volver a utilizarse. Al reutilizar, aprovechar los
materiales o reciclar de otro modo los electrodomésticos usados está
ayudando a proteger el medio ambiente. Consulte la ubicación de los
puntos de recogida disponibles con su autoridad legal.
Sujeto a modificaciones

56 57
nl
nl
Gebruiksaanwijzing
Belangrijke veiligheidsinstructies
▪ Dit apparaat mag door kinderen vanaf 8 jaar en door personen met
verminderde fysieke, sensorische of mentale vaardigheden of gebrek
aan ervaring en/of kennis worden gebruikt, wanneer ze onder
toezicht staan of over het veilige gebruik van het apparaat zijn
geïnstrueerd en de daaruit resulterende risico’s hebben begrepen.
▪ Kinderen mogen niet met het apparaat spelen.
▪ Reiniging en onderhoud mogen niet door kinderen worden
uitgevoerd, behalve wanneer ze ouder zijn dan 8 jaar en onder
toezicht staan.
▪ Kinderen jonger dan 8 jaar dienen uit de buurt van het apparaat en
de stroomkabel gehouden te worden.
▪ Het apparaat mag niet via een externe timer of afstandsbediening
worden geactiveerd.
▪ Dit apparaat is bedoeld voor huishoudelijk en vergelijkbaar gebruik,
zoals:
⋅ in keukens voor medewerkers van winkels, kantoren en andere
zakelijke omgevingen;
⋅ bij agrarische bedrijven;
⋅ door klanten van hotels, motels en andere verblijfsaccomodatie;
⋅ in bed and breakfasts.
▪ Wanneer de stroomkabel van dit apparaat beschadigd is, mag
deze alleen door de fabrikant, diens klantenservice of door een
vergelijkbaar gekwalificeerde persoon worden vervangen, dit om
enig risico op gevaar te voorkomen.
▪ Reinig na het gebruik van de accessoires en het apparaat alle
oppervlakken en onderdelen die met levensmiddelen in aanraking
zijn gekomen. Volgt u alstublieft de instructies in het hoofdstuk
‘Reiniging en onderhoud’.
▪ Het apparaat mag uitsluitend volgens deze handleiding worden
gebruikt. Ondeskundig gebruik kan een elektrische schok of andere
risicofactoren tot gevolg hebben.
▪ Opgelet, gevaar voor brandwonden: de contactvlakken kunnen zeer
heet worden. Ook na het uitschakelen van het apparaat blijven de
verwarmingsvlakken nog enige tijd heet.
▪ Het apparaat uitschakelen en de stekker altijd uit het stopcontact
trekken, voordat u de accessoires wisselt of onderdelen zou kunnen
aanraken die tijdens het gebruik bewegen.
Vóór het gebruik
Het apparaat mag alleen voor het beoogde doel en overeenkomstig deze gebruiksaanwijzing worden
gebruikt. Leest u deze gebruiksaanwijzing daarom zorgvuldig door voordat u het apparaat in gebruik
neemt. De gebruiksaanwijzing bevat aanwijzingen voor het gebruik, de reiniging en het onderhoud
van het apparaat. Wanneer u de gebruiksaanwijzing niet in acht neemt, zijn wij niet aansprakelijk voor
eventuele schade. Bewaar de gebruiksaanwijzing goed en geef deze samen met het apparaat aan een
volgende gebruiker. Let u ook op de garantie-instructies aan het einde van dit document. Het apparaat
is niet bestemd voor commercieel gebruik, maar alleen voor de bereiding van levensmiddelen in voor
huishoudens gebruikelijke hoeveelheden.
Neem bij het gebruik de veiligheidsinstructies in acht.
Technische gegevens
Nominale spanning: 220 – 240 V~ 50-60 Hz
Vermogen: 450 W
Elektrische veiligheidsklasse: I
Veiligheidsinstructies
▪ U moet de stekker uit het stopcontact trekken:
⋅ als storingen tijdens de werking optreden
⋅ vóór elke reiniging
⋅ na het gebruik.
▪ U mag het apparaat alleen op een volgens de voorschriften geplaatst en geaard stopcontact
aansluiten. Kabel en stekker moeten droog zijn.
▪ Zorg ervoor dat de stroomkabel niet langs scherpe randen loopt of beklemd raakt, laat de kabel niet
naar beneden hangen en bescherm de kabel tegen hitte en olie.
▪ Gebruik alleen verlengkabels die volledig intact zijn.
▪ U mag de stekker niet aan de kabel of met natte handen uit het stopcontact trekken.
▪ Draag het apparaat niet aan de stroomkabel.
▪ Plaats het apparaat niet op hete oppervlakken zoals fornuizen of in de buurt van de open gasvlam.
De behuizing kan daardoor smelten.
▪ Gebruik het apparaat alleen als alle afneembare onderdelen correct zijn aangebracht.
▪ Trek de stekker uit het stopcontact wanneer u het apparaat langere tijd niet gebruikt.
▪ Neem het apparaat niet in gebruik of trek direct de stekker uit het stopcontact wanneer:
⋅ het apparaat of de stroomkabel beschadigd is
⋅ na een val enz. het vermoeden bestaat dat het apparaat defect is.
In dat geval moet u het apparaat ter reparatie afgeven.
▪ Gebruik het apparaat alleen onder toezicht.
▪ Geen hete oppervlakken aanraken.
▪ Het gebruik van niet door de fabrikant aanbevolen accessoires kan tot verwondingen leiden.
▪ Tijdens het gebruik nooit bewegende onderdelen aanraken.
▪ Het bakblik van de broodbakmachine nooit tegen voorwerpen aanslaan om het brood eruit te
nemen, omdat dit het bakblik kan beschadigen.
▪ Metaalfolie of soortgelijk materiaal mag niet in de broodbakmachine worden gebruikt, omdat
hierdoor het risico op brand of kortsluiting wordt vergroot.

58 59
nl
▪ De broodbakmachine mag nooit door een doek of andere voorwerpen worden afgedekt. Hitte en
damp moeten te allen tijde kunnen ontsnappen. Als de broodbakmachine met brandbaar materiaal
wordt afgedekt of hiermee in contact komt, kan er brand ontstaan.
▪ Om schade te voorkomen, mag de broodbakmachine niet zonder het bakblik van de
broodbakmachine worden gebruikt.
▪ Plaats het apparaat zodanig dat het niet van de werkplek kan glijden, bijv. tijdens het kneden van
zwaar deeg.
▪ Bij oneigenlijk gebruik, verkeerde bediening of onvakkundige reparatie accepteren wij geen
aansprakelijkheid voor eventuele schade. In dergelijke gevallen zijn garantievergoedingen ook
uitgesloten.
Bedieningseenheid
Programmakeuze
Met deze toets kan het
gewenste programma worden
gekozen. Het geselecteerde
programmanummer wordt in het
display weergegeven.
Keuze van het bruiningsniveau
Met deze toets kan het gewenste
bruiningsniveau worden gekozen.
Dat wordt in het display als volgt
weergegeven:
- Licht
- Gemiddeld
- Donker
Start/Pauze
Met deze toets wordt het bakproces
gestart. Door het nogmaals indrukken
van deze toets kan het bakproces
worden onderbroken.
Stop
Door het langer indrukken van deze
toets kan het bakprogramma worden
beëindigd.
Instellen van de timer
Met de toetsen – en + kan
de timerfunctie worden
geprogrammeerd. De aangepaste
eindtijd wordt op het display
weergegeven.
Keuze van de broodgrootte
Met deze toets kan de gewenste
broodgrootte worden gekozen.
Afhankelijk van de geselecteerde
grootte wordt op het display 450
g of 750 g weergegeven.
Verlichting bakruimte
Door lang op deze toets te drukken,
kan de verlichting van de bakruimte
worden geactiveerd. Deze schakelt
zich na ca. 30 seconden automatisch
uit, maar kan ook worden
uitgeschakeld door nogmaals lang op
de toets te drukken.
Gebruik
Met de WMF KULT X broodbakmachine kunt u heel gemakkelijk zelf uw brood maken. Alles
wat u daarvoor nodig hebt zijn de betreffende ingrediënten, de rest wordt door de WMF KULT
X broodbakmachine gedaan. Met 12 bakprogramma’s kan voor elke smaak het juiste brood
worden gemaakt. Er wordt een handige programmakaart meegeleverd met een overzicht van alle
programmanummers. Deze kan ruimtebesparend in de broodbakvorm worden opgeborgen.
Overzicht van de programma’s
Programma
Nr.
Benaming Beschrijving
Beschikbare opties Tijdsduur [u]
Timer-
functie
Bruining Grootte 450 g 750 g
1 Klassiek brood
Kneden, rijzen en bakken van rogge-tarwebrood.
Overige ingrediënten kunnen worden toegevoegd.
3:08 3:15
2 Wit brood
Kneden, rijzen en bakken gedurende een langere tijd.
Het brood heeft in het algemeen een knapperige
korst en een lichte consistentie.
3:55 4:05
3 Volkorenbrood
Kneden, rijzen en bakken van volkorenbrood. Het
gebruik van de timerfunctie wordt niet aanbevolen,
omdat dit een negatief effect op het bakresultaat
kan hebben.
3:47 3:55
4 Snel programma*
Kneden, rijzen en bakken van brood in een kortere
tijd dan met programma nr. 1. Het brood is in het
algemeen kleiner en heeft een vastere consistentie.
2:25
5 Zoet brood
Kneden, rijzen en bakken van zoet brood. Overige
ingrediënten kunnen worden toegevoegd.
3:05 3:10
6 Glutenvrij
Kneden, rijzen en bakken van glutenvrij brood.
Overige ingrediënten kunnen worden toegevoegd.
3:05 3:10
7
Ultrasnel
programma**
Kneden, rijzen en bakken van brood in zeer korte tijd.
Het brood is in het algemeen kleiner en heeft een
grovere structuur dan brood dat met programma nr.
4 werd gebakken.
1:43 1:53
8 Deegprogramma
Kneden en rijzen van deeg, zonder bakken. Het deeg
kan voor broodjes, pizza enz. worden gebruikt.
1:30
9 Jam***
Het koken van jam en marmelade. Het fruit moet
worden gesneden voordat het in het bakblik wordt
gedaan.
1:20
10 Toastbrood
Kneden, rijzen en bakken van toastbrood. Het brood
heeft in het algemeen een dunnere korst en een
lichte consistentie.
3:10 3:15
11 Gebak Kneden, rijzen en bakken met gebruik van bakpoeder.
2:00
12 Bakken
Alleen bakken, zonder kneden en rijzen. Kan
ook worden gebruikt om de baktijd van andere
programma's te verlengen.
1:00
* Voor een optimaal bakresultaat doet u als eerste alle vloeibare ingrediënten in het bakblik van de broodbakmachine.
Vervolgens worden alle droge ingrediënten toegevoegd.
** Met het ultrasnelle programma kan het brood in zeer korte tijd worden gebakken. De watertemperatuur is hierbij van
groot belang, omdat deze van invloed is op het rijzen van het deeg. Een optimaal bakresultaat ontstaat door het gebruik van
warm water.
*** Voor de bereiding van jam wordt het gebruik van een apart bakblik aangeraden.

60 61
nl
Gedetailleerd programmaverloop
Pro-
gramma
Nr.
Benaming
Hoeveel-
heid
Totale duur
Kneden 1 Rijzen 1 Kneden 2 Rijzen 2 Rijzen 3 Bakken
Warm-
houden
1 Klassiek brood
450 g 03:08 u 11 min 20 min 17 min 25 min 35 min 80 min 60 min
750 g 03:15 u 12 min 20 min 18 min 25 min 35 min 85 min 60 min
2 Witbrood
450 g 03:55 u 18 min 40 min 22 min 30 min 40 min 85 min 60 min
750 g 04:05 u 20 min 40 min 25 min 30 min 40 min 90 min 60 min
3 Volkorenbrood
450 g 03:47 u 11 min 25 min 21 min 35 min 55 min 80 min 60 min
750 g 03:55 u 12 min 25 min 23 min 35 min 55 min 85 min 60 min
4
Snel
programma*
02:25 u 12 min 10 min 13 min / 25 min 85 min 60 min
5 Zoet brood
450 g 03:05 u 12 min 5 min 23 min 30 min 35 min 80 min 60 min
750 g 03:10 u 12 min 5 min 23 min 30 min 35 min 85 min 60 min
6 Glutenvrij
450 g 03:05 u 12 min 5 min 13 min 30 min 35 min 90 min 60 min
750 g 03:10 u 12 min 10 min 13 min 30 min 35 min 90 min 60 min
7
Ultrasnel
programma**
450 g 01:43 u 13 min / 5 min 25 min / 60 min 60 min
750 g 01:53 u 13 min / 5 min 30 min / 65 min 60 min
8 Deegprogramma 01:30 u 25 min / / 30 min 35 min / /
9 Jam*** 01:20 u / 15 min / / 45 min 20 min /
10 Toastbrood
450 g 03:10 u 17 min 35 min 8 min 25 min 35 min 70 min 60 min
750 g 03:15 u 17 min 35 min 8 min 25 min 35 min 75 min 60 min
11 Gebak 02:00 u 7 min 4 min 10 min 9 min / 90 min 60 min
12 Bakken 01:00 u / / / / /
10-60
min
60 min
* Voor een optimaal bakresultaat doet u als eerste alle vloeibare ingrediënten in het bakblik van de broodbakmachine.
Vervolgens worden alle droge ingrediënten toegevoegd.
** Met het ultrasnelle programma kan het brood in zeer korte tijd worden gebakken. De watertemperatuur is hierbij van
groot belang, omdat deze van invloed is op het rijzen van het deeg. Een optimaal bakresultaat ontstaat door het gebruik van
warm water.
*** Voor de bereiding van jam wordt het gebruik van een apart bakblik aangeraden.
In gebruik nemen
▪ Bij het uitpakken van het apparaat moet u controleren of de onderdelen alle aanwezig en
onbeschadigd zijn.
▪ Reinig vóór gebruik eerst alle afneembare onderdelen, zoals is beschreven in het hoofdstuk
‘Reiniging en onderhoud’.
▪ Omdat er rook kan ontstaan als het apparaat voor het eerst opwarmt, adviseren wij het apparaat
één keer met een geplaatst leeg bakblik (zonder kneedhaak) in werking te stellen op het
programma ‘bakken’ (nr. 12).
▪ Laat de broodbakmachine afkoelen en reinig het apparaat opnieuw zoals is beschreven in het
hoofdstuk ‘Reiniging en onderhoud’.
Bereiding van brood, gebak en deeg
▪ Open het deksel van de KULT X broodbakmachine en neem het bakblik eruit door het linksom,
tegen de wijzers van de klok in te draaien.
▪ Om het aanbakken van het deeg in de lege ruimte tussen de kneedhaak en het bakblik te
voorkomen, adviseren wij de opening voor de kneedhaak te bestrijken met hittebestendige
margarine.
▪ Plaats de kneedhaak met de brede zijde naar onderen gericht, op de aandrijfas van het bakblik.
▪ Doe vervolgens alle gewenste ingrediënten conform het recept in het bakblik. Meestal worden eerst
de vloeibare ingrediënten zoals water of olie in het bakblik gedaan. Daarna volgt het toevoegen
van suiker, zout en meel. Als laatste wordt gist toegevoegd.
Let op: de maximale hoeveelheid meel is 500 g en 7g droge gist.
Aanwijzing: voorzichtig, bij een te grote hoeveelheid meel kan het deeg overlopen en
aanbakken.
▪ Plaats het bakblik in de broodbakmachine en vergrendel het door het rechtsom, in de richting van
de wijzers van de klok te draaien.
▪ Sluit het deksel van de broodbakmachine.
▪ Steek vervolgens de stekker in het stopcontact.
▪ Gebruik de programmatoets
om het betreffende programma te selecteren. Meer aanwijzingen
voor de afzonderlijke programma’s kunt u op pagina 57 vinden.
▪ Met de toets Bruiningsniveau
kunt u het gewenste bruiningsniveau selecteren (licht,
gemiddeld, donker).
▪ Met de toets Broodgrootte
selecteert u de gewenste grootte van het brood (450 g of 750 g). Bij
het snelle programma (nr. 4) is het niet nodig om bijkomend de grootte van het brood in te stellen.
▪ Met behulp van de toetsen – en + kan de timer worden geprogrammeerd (voor meer informatie, zie
pagina 59). Deze stap kan worden overgeslagen als het bakproces direct moet worden gestart.
▪ Als alle gewenste instellingen zijn gekozen, kan het bakproces beginnen door op de START/STOP-
knop
Start
Stop
te drukken. Indien mogelijk het deksel niet vóór het einde van de baktijd openen, omdat
dit een negatieve invloed op het bakresultaat heeft.
▪ Tijdens het tweede kneedproces zal afhankelijk van het geselecteerde programma (nr. 1, 2, 3, 4, 5,
7, 10 en 11) meerdere keren een pieptoon hoorbaar zijn. Nu kunt u naar wens het deksel openen en
extra ingrediënten toevoegen, zoals rozijnen of noten. Sluit het deksel direct daarna om een goed
bakresultaat te realiseren.
▪ Na het beëindigen van het bakproces is meerdere keren een pieptoon hoorbaar. U kunt het brood
er direct uitnemen en het bakproces beëindigen door langer op de START/STOP-knop
Start
Stop
te drukken,
anders schakelt de Warmhoudfunctie zich voor max. 60 minuten in.

62 63
nl
▪ Haal het bakblik uit de machine met behulp van ovenhandschoenen, door iets tegen de wijzers van
de klok in te draaien. Draai het bakblik om zodat het brood op een taartrooster kan vallen om af te
koelen.
▪ Als de kneedhaak niet automatisch loskomt, kunt u deze met behulp van de haakverwijderaar
losmaken. Daarvoor steekt u de haakverwijderaar in de opening van de kneedhaak en haakt u hem
vast aan de onderste rand van de kneedhaak. Vervolgens trekt u de kneedhaak voorzichtig uit het
brood.
▪ Als het recept geen andere instructies heeft beschreven, laat u het brood ca. 1 uur op het
taartrooster afkoelen, voordat u het brood gaat snijden.
Instellen van de timer
Als het bakproces niet direct moet worden gestart, is het mogelijk om de timerfunctie te gebruiken.
Met behulp van de toetsen – en + kan het tijdstip waarop het brood klaar moet zijn, in stappen van
10 minuten worden ingesteld. Dat wil zeggen dat de baktijd in de ingestelde tijd is inbegrepen. De
maximale uitsteltijd is 13 uur.
Aanwijzing: deze functie kan bij de volgende programma’s niet worden gebruikt: ultrasnel programma,
jam en bakken.
Aanwijzing: als u de timerfunctie wilt gebruiken, is het beter dat u geen levensmiddelen gebruikt die
snel aan bederf onderhevig zijn, zoals eieren of verse melk.
Warmhoudfunctie
Na het beëindigen van de baktijd wordt automatisch de warmhoudtijd van 60 minuten ingeschakeld.
Als u het brood direct na het bakken uit de broodbakmachine wilt nemen, schakelt u het bakproces uit
door langer te drukken op de START/STOP-toets
Start
Stop
.
Memoryfunctie (geheugenfunctie)
Als de stroomvoorziening tijdens het bakproces kortstondig wordt onderbroken, wordt het bakproces
binnen 10 minuten opnieuw gestart, zelfs als niet op de START/STOP-knop
Start
Stop
wordt gedrukt. Als de
stroomuitval echter langer dan 10 minuten duurt, moet de broodbakmachine opnieuw worden gestart.
Praktische aanwijzingen
▪ Zwaar deeg: Bij zwaar deeg wordt het aanbevolen om de volgorde te wijzigen. Vul het bakblik eerst
met de droge en daarna met de vloeibare ingrediënten. Als u echter de timerfunctie wilt gebruiken, let
er dan op dat de gist niet voortijdig in contact komt met de vloeistoffen.
▪ Bakmengsels: Tenzij anders in het recept voorgeschreven, is het programma voor klassiek brood (nr.
1) in het algemeen geschikt voor bakmengsels. Voeg bij broodmengsels nooit meer water toe dan de in
het recept opgegeven max. hoeveelheid. Afhankelijk van het recept wordt het echter aanbevolen om
de hoeveelheid met max. 50 ml te verminderen.
▪ Bruining: Omdat de broodbakmachine volgens de voorschriften geen verwarming in de regio van het
deksel heeft, wordt het aanbevolen om het hoogste bruiningsniveau in te stellen als u een voorkeur
heeft voor een knapperige consistentie.
▪ Eieren: Als extra eieren worden toegevoegd, moet de hoeveelheid vloeistof proportioneel worden
aangepast. Bovendien adviseren wij de eieren eerst te kloppen voordat deze aan het bakblik worden
toegevoegd.
▪ Verlichting van de bakruimte: Voor het vervangen van de lamp kunt u de glazen afdekking met
behulp van een muntje verwijderen. Wij verzoeken u voor de bakoven een lamp te gebruiken die aan
de volgende eigenschappen voldoet:
⋅ E14
⋅ Totale lengte 49 mm
⋅ Diameter van het glas 22 mm
⋅ 220-240 V
⋅ 15 Watt
⋅ 300°C
Reiniging en onderhoud
Trek de stekker na gebruik uit het stopcontact. Laat uw broodbakmachine afkoelen voordat u ze
gaat schoonmaken. Neem het bakblik uit de machine door het aan het handvat vast te pakken en
vervolgens te draaien tegen de richting van de wijzers van de klok in. Aansluitend de kneedhaak
verwijderen. Als deze niet gemakkelijk kan worden verwijderd, vult u het bakblik gedurende ca. 30
minuten met lauwwarm water en laat u de kneedhaak daarin weken. Daarna kan de kneedhaak
gemakkelijk worden verwijderd. Reinig het bakblik en de kneedhaak met een vochtige doek. Gebruik
geen scherp of schurend reinigingsmiddel, zodat de antiaanbaklaag niet wordt beschadigd. Voordat
het bakblik opnieuw kan worden gebruikt, moet dit volledig droog zijn. De broodbakmachine, het
deksel en het kijkvenster kunnen ook het beste met een vochtige doek worden gereinigd. Ook hiervoor
geen schurend reinigingsmiddel gebruiken, omdat dit van invloed kan zijn op de structuur van het
oppervlak. Dompel de behuizing nooit onder in water. Voor een eenvoudige reiniging kunt u de
mengkom, maatlepel en haakverwijderaar in de vaatwasmachine plaatsen.
geschikt voor de
vaatwasmachine
onder stromend
water afspoelen
vochtig afvegen
Bakblik broodbakmachine
Kneedhaak
Maatbeker
Maatlepel
Haakverwijderaar
Behuizing

64 65
nl
Problemen oplossen
Op het display staat ‘HHH’ (tevens zijn 5 pieptonen hoorbaar)
De temperatuur in het apparaat is te hoog. Het huidige programma moet worden stopgezet. Open het
deksel en laat de broodbakmachine gedurende 10 tot 20 minuten afkoelen.
Op het display staat ‘LLL’ (tevens zijn 5 pieptonen hoorbaar), nadat op de START/STOP-knop
werd gedrukt
Start
Stop
De temperatuur in het apparaat is te laag. Stop de pieptoon door op de START/STOP-knop
Start
Stop
te
drukken en open het deksel. Wacht 10 tot 20 minuten tot het apparaat de omgevingstemperatuur
heeft bereikt.
Op het display staat ‘EE0’ nadat op de START/STOP-knop werd gedrukt
Start
Stop
De temperatuursensor is niet correct aangesloten, het apparaat moet ter reparatie worden
weggebracht.
Probleem Oorzaak Oplossing
Er komt rook uit de bakruimte of
ventilatiegleuven.
Er zijn ingrediënten in de
bakruimte of ze hebben zich aan
de buitenkant van het bakblik
vastgezet.
Neem de stekker uit het
stopcontact en reinig de
buitenkant van het bakblik of de
bakruimte.
Het brood zakt in het midden in en
is aan de onderkant vochtig.
Het brood heeft na het bakken te
lang in het bakblik gestaan.
Neem het brood uit het bakblik
voordat de Warmhoudfunctie
uitgeschakeld wordt.
De ingrediënten worden niet op
de juiste manier gemengd of het
brood wordt niet op de juiste
manier gebakken.
Er werd een verkeerd programma
geselecteerd.
Controleer het geselecteerde
programma, evenals de instelling
in relatie tot de grootte van het
brood en het bruiningsniveau.
Tips en antwoorden
Het deksel werd tijdens het
bakproces vaak geopend.
Het deksel mag niet worden
geopend, behalve voor het
toevoegen van additionele
ingrediënten. Daarna dient het
deksel direct weer gesloten te
worden.
De kneedhaak kon niet draaien.
Controleer of de kneedhaak door
korrels enz. werd geblokkeerd.
Neem het bakblik eruit en
controleer of u de kneedhaak kunt
doen draaien. Als dat niet het
geval is, moet het apparaat ter
reparatie worden weggebracht.
De broodbakmachine start niet en
op het display staat 'HHH'
De temperatuur in het apparaat
is te hoog.
Het huidige programma moet
worden stopgezet. Open het deksel
en laat de broodbakmachine
gedurende 10 tot 20 minuten
afkoelen.
Het brood komt te veel omhoog
Te veel gist, te veel meel of te
weinig zout
Controleer de hoeveelheid van
de ingrediënten, pas de dosering
indien nodig aan en controleer
of alle ingrediënten werden
toegevoegd.
Het brood komt helemaal niet
omhoog of slechts een klein beetje
Geen gist of te weinig gist, of
verkeerde hoeveelheid water
Controleer de hoeveelheid van
de ingrediënten, pas de dosering
indien nodig aan en controleer
of alle ingrediënten werden
toegevoegd.
De gist is te vroeg in contact
gekomen met de vloeistoffen
Let op de volgorde bij het
toevoegen van de ingrediënten in
het bakblik.
Probleem Oorzaak Oplossing
Het brood zakt in het midden in
De hoeveelheid deeg is groter dan
het formaat van het bakblik
Controleer de hoeveelheid van de
ingrediënten en pas de dosering
indien nodig aan. Als ingrediënten
worden toegevoegd die water
bevatten, dient de hoeveelheid
toe te voegen vloeistof in
overeenkomst hiermee aangepast
te worden.
De gist is te vroeg in contact
gekomen met de vloeistoffen
Maak een klein kuiltje in het
meel en doe hier de droge gist
in, voorkom direct contact van
vloeistoffen en droge gist.
Tips en antwoorden
Zware, klonterige consistentie
Te veel meel of te weinig
vloeistoffen
Controleer de hoeveelheid van
de ingrediënten, pas de dosering
indien nodig aan en controleer
of alle ingrediënten werden
toegevoegd.
Onvoldoende gist of suiker
Controleer de hoeveelheid van
de ingrediënten, pas de dosering
indien nodig aan en controleer
of alle ingrediënten werden
toegevoegd.
Het brood is in het midden niet
gebakken
Te veel water
Controleer de hoeveelheid van
de ingrediënten, pas de dosering
indien nodig aan en controleer
of alle ingrediënten werden
toegevoegd.
Het brood/de korst is te licht
Het bruiningsniveau is niet goed
geselecteerd
Omdat de broodbakmachine
volgens de voorschriften geen
verwarming in de regio van het
deksel heeft, wordt het aanbevolen
om het hoogste bruiningsniveau in
te stellen als u een voorkeur heeft
voor een knapperige consistentie.
Het toestel is overeenkomstig de Europese richtlijnen 2014/35/EU ,
2014/30/EU en 2009/125/EU.
Dit product mag op het einde van zijn levensduur niet bij het normale
huishoudafval gezet worden, maar moet naar een verzamelpunt voor
het recycleren van elektrische en elektronische toestellen gebracht
worden. De materialen zijn conform hun typeplaatje recycleerbaar.
Door het recycleren, het hergebruiken van onderdelen of andere
vormen van recyclage van versleten toestellen levert u een belangrijke
bijdrage tot de bescherming van ons milieu. Vraag bij het
gemeentebestuur naar de bevoegde containerparken.
Wijzigingen voorbehouden

66 67
da
da
Brugsanvisning
Vigtige sikkerhedsanvisninger
▪ Dette apparat kan bruges af børn over 8 år og personer med
reducerede fysiske, åndelige og sensoriske færdigheder eller
manglende erfaring og/eller viden, hvis de er under opsyn af en
voksen eller er blevet sat ind i, hvordan apparatet skal anvendes og
har forstået de farer, som er forbundet med anvendelsen.
▪ Børn må ikke lege med apparatet.
▪ Børn må kun udføre rengørings- og vedligeholdelsesarbejder på
apparatet, hvis de er over 8 år og er under opsyn af en voksen.
▪ Børn under 8 år skal holdes væk fra apparatet og
tilslutningsledningen.
▪ Apparatet må ikke betjenes via en ekstern timer eller fjernbetjening.
▪ Dette apparat er beregnet til at blive brugt i husholdningen og
lignende former for anvendelse som for eksempel:
⋅ i køkkener for ansatte i butikker, kontorer og andre
erhvervsvirksomheder;
⋅ på landbrugsbedrifter;
⋅ af kunder i hoteller, moteller og andre former for beboelse;
⋅ i Bed & Breakfast-pensionater.
▪ Hvis apparatets strømledning bliver beskadiget, skal den udskiftes
af producenten, producentens kundeservice eller en tilsvarende
kvalificeret person for at undgå fare.
▪ Efter anvendelse af apparatet og dets tilbehør rengøres alle
flader og dele, der har været i berøring med fødevarerne. Følg
anvisningerne i afsnittet ”Rengøring og pleje”.
▪ Brug kun apparatet i overensstemmelse med denne vejledning.
Ukorrekt brug kan medføre elektrisk stød eller andre farlige
situationer.
▪ Forsigtigt, risiko for forbrænding: Overfladen kan blive meget varm.
Også når apparatet er slukket, forbliver varmefladerne varme i lang
tid.
▪ Sluk apparatet, og træk altid stikket ud, før tilbehørsdele udskiftes,
eller før du nærmer dig dele, som bevæger sig ved brug.
Inden ibrugtagning
Apparatet må kun anvendes til det tiltænkte formål i henhold til denne brugsanvisning. Læs
brugsanvisningen grundigt, inden apparatet tages i brug. Brugsanvisningen indeholder anvisninger
om brug, rengøring og pleje af apparatet. Ved manglende overholdelse påtager vi os intet ansvar for
eventuelle skader. Opbevar brugsanvisningen omhyggeligt, og videregiv den sammen med apparatet til
efterfølgende brugere. Bemærk også garantioplysningerne sidst i brugsanvisningen. Apparatet er ikke
til professionel brug, men er tiltænkt til tilberedning af fødevarer i private husholdninger.
Overhold sikkerhedsanvisningerne ved brug af apparatet.
Tekniske data
Mærkespænding: 220 – 240 V ~ 50-60 Hz
Effektforbrug: 450 W
Beskyttelsesklasse: I
Sikkerhedshenvisninger
▪ Træk stikket ud af stikkontakten:
⋅ Ved driftsforstyrrelser
⋅ Inden rengøring
⋅ Efter endt brug.
▪ Apparatet må kun tilsluttes en stikkontakt, der er installeret i henhold til forskrifterne. Ledningen
og stikket skal være tørre.
▪ Ledningen må ikke trækkes over skarpe kanter eller klemmes eller hænge løst ned. Beskyt ledningen
imod varmekilder og olie.
▪ Brug kun en forlængerledning, der er i perfekt stand.
▪ Træk ikke i ledningen, og berør ikke ledningen eller stikket med våde hænder, når stikket trækkes
ud af stikkontakten.
▪ Apparatet må ikke bæres i ledningen.
▪ Stil ikke apparatet på en varm overflade, såsom kogeplader eller lignende eller i nærheden af åben
gasflamme, da det kan smelte.
▪ Brug kun apparatet, når alle aftagelige dele er monteret korrekt.
▪ Træk stikket ud, når apparatet ikke er i brug i længere tid.
▪ Apparatet må ikke anvendes, og stikket skal straks tages ud af stikkontakten, hvis:
⋅ Apparatet eller strømledningen er beskadiget.
⋅ Der er mistanke om en defekt efter fald eller lignende.
I disse tilfælde skal apparatet indleveres til reparation.
▪ Apparatet må ikke anvendes uden opsyn.
▪ Berør ikke varme overflader.
▪ Anvendelse af tilbehør, der ikke anbefales af producenten, kan medføre personskader.
▪ Rør ikke maskinens bevægelige dele, når den kører.
▪ Slå aldrig bageformen ned mod noget for at få brødet ud, da det kan beskadige bageformen.
▪ Læg ikke metalfolie eller lignende materialer ned i bagemaskinen, da det øger risikoen for brand
eller kortslutning.
▪ Bagemaskinen må ikke tildækkes med et viskestykke eller lignende. Varme og damp skal til enhver
tid kunne slippe ud. Hvis bagemaskinen tildækkes med eller kommer i kontakt med brændbare
materialer, kan der opstå brand.
▪ For at undgå skader på bagemaskinen må den ikke tages i brug uden bageformen.
▪ Placer maskinen, så den ikke kan glide ned af bordpladen, f.eks. ved æltning af tung dej.
▪ Ved anvendelse til andre formål end det tilsigtede, forkert betjening eller ukorrekt reparation
påtager producenten sig intet ansvar for eventuelle skader. Garantiydelser bortfalder ligeledes i
disse tilfælde.

68 69
da
Betjeningsenhed
Valg af program
Tryk på denne tast for at vælge
det ønskede program. Det
valgte programnummer vises på
displayet.
Valg af bruningsgrad
Tryk på denne tast for at vælge
den ønskede bruningsgrad. Den
vises på displayet på følgende
måde:
- Lys
- Mellem
- Mørk
Start/pause
Tryk på denne tast for at starte
bagningen, og tryk igen på den for at
afbryde bagningen.
Stop
Tryk i længere tid på denne tast for at
afslutte bageprogrammet.
Indstilling af timer
Timer-funktionen kan
programmeres med tasterne – og
+. Den indstillede sluttid vises på
displayet.
Valg af brødstørrelse
Tryk på denne tast for at vælge
den ønskede brødstørrelse.
Afhængigt af den valgte størrelse
vises 450 g eller 750 g på
displayet.
Belysning i bagemaskinen
Tryk på denne tast i længere tid
for at tænde lyset i bagemaskinen.
Lyset slukkes automatisk efter ca. 30
sekunder, men kan også slukkes ved at
trykke på tasten igen i længere tid.
Anvendelse
Det er dejlig nemt at bage sit daglige brød med bagemaskinen WMF KULT X. Du skal bare tilsætte
ingredienserne, så klarer bagemaskinen WMF KULT X resten. Med 12 bageprogrammer er der noget
for enhver smag. Der medfølger et programkort, så det er nemt at vælge det rigtige programnummer.
Programkortet passer ned i bageformen, så det ikke optager unødvendig plads.
Programoversigt
Program
Nr.
Betegnelse Beskrivelse
Valgmuligheder
Tilbered-
ningstid [t]
Timer-
funktion
Bruning Størrelse 450 g 750 g
1 Klassisk brød
Æltning, hævning og bagning af sigtebrød. Der kan
tilsættes yderligere ingredienser.
03:08 03:15
2 Franskbrød
Æltning, hævning og bagning over en længere
periode. Brødet får generelt sprød skorpe og let
krumme.
03:55 04:05
3 Fuldkornsbrød
Æltning, hævning og bagning af fuldkornsbrød. Det
anbefales ikke at anvende timer-funktionen, da det
kan give et ringere resultat.
03:47 03:55
4 Lynprogram*
Æltning, hævning og bagning af brød på kortere tid
end med program nr. 1. Brødet får generelt mere
kompakt krumme.
02:25
5 Sødt brød
Æltning, hævning og bagning af sødt brød. Der kan
tilsættes yderligere ingredienser.
03:05 03:10
6 Glutenfrit brød
Æltning, hævning og bagning af glutenfrit brød. Der
kan tilsættes yderligere ingredienser.
03:05 03:10
7
Superlynpro-
gram**
Æltning, hævning og bagning af brød på kortest
mulig tid. Brødet bliver generelt mindre og mere
rustikt end brød bagt på program nr. 4.
01:43 01:53
8 Dejprogram
Æltning og hævning af dej, uden bagning. Dejen kan
bruges til boller, pizza osv.
01:30
9 Marmelade***
Marmeladekogning. Frugten skal skæres i mindre
stykker, før den hældes i bageformen.
01:20
10 Toastbrød
Æltning, hævning og bagning af toastbrød. Brødet
får generelt tyndere skorpe og let krumme.
03:10 03:15
11 Kage Æltning, hævning og bagning af dej med bagepulver.
02:00
12 Bagning
Kun bagning, ikke æltning og hævning. Kan også
bruges til at forlænge andre programmers bagetid.
01:00
* For at opnå et optimalt resultat skal alle de flydende ingredienser hældes i bageformen først. Derefter tilsættes alle de tørre
ingredienser.
** Med superlynprogrammet kan du lynhurtigt bage et brød. Her er vandtemperaturen meget vigtig, da den er afgørende for
gærens udvikling. Du opnår et optimalt resultat ved at anvende lunkent vand.
*** Ved marmeladekogning anbefales det at bruge en separat bageform.

70 71
da
Programforløb i detaljer
Program
Nr.
Betegnelse Mængde
Varighed
i alt
Æltning 1
Hævning 1Æltning 2Hævning 2Hæv-
ning 3
Bagning
Varm-
holdning
1 Klassisk brød
450 g 03:08 t 11 min. 20 min. 17 min. 25 min. 35 min. 80 min. 60 min.
750 g 03:15 t 12 min. 20 min. 18 min. 25 min. 35 min. 85 min. 60 min.
2 Franskbrød
450 g 03:55 t 18 min. 40 min. 22 min. 30 min. 40 min. 85 min. 60 min.
750 g 04:05 t 20 min. 40 min. 25 min. 30 min. 40 min. 90 min. 60 min.
3 Fuldkornsbrød
450 g 03:47 t 11 min. 25 min. 21 min. 35 min. 55 min. 80 min. 60 min.
750 g 03:55 t 12 min. 25 min. 23 min. 35 min. 55 min. 85 min. 60 min.
4 Lynprogram* 02:25 t 12 min. 10 min. 13 min. / 25 min. 85 min. 60 min.
5 Sødt brød
450 g 03:05 t 12 min. 5 min. 23 min. 30 min. 35 min. 80 min. 60 min.
750 g 03:10 t 12 min. 5 min. 23 min. 30 min. 35 min. 85 min. 60 min.
6 Glutenfri
450 g 03:05 t 12 min. 5 min. 13 min. 30 min. 35 min. 90 min. 60 min.
750 g 03:10 t 12 min. 10 min. 13 min. 30 min. 35 min. 90 min. 60 min.
7
Superlynpro-
gram**
450 g 01:43 t 13 min. / 5 min. 25 min. / 60 min. 60 min.
750 g 01:53 t 13 min. / 5 min. 30 min. / 65 min. 60 min.
8 Dejprogram 01:30 t 25 min. / / 30 min. 35 min. / /
9 Marmelade*** 01:20 t / 15 min. / / 45 min. 20 min. /
10 Toastbrød
450 g 03:10 t 17 min. 35 min. 8 min. 25 min. 35 min. 70 min. 60 min.
750 g 03:15 t 17 min. 35 min. 8 min. 25 min. 35 min. 75 min. 60 min.
11 Kage 02:00 t 7 min. 4 min. 10 min. 9 min. / 90 min. 60 min.
12 Bagning 01:00 t / / / / /
10-60
min.
60 min.
* For at opnå et optimalt resultat skal alle de flydende ingredienser hældes i bageformen først. Derefter tilsættes alle de tørre
ingredienser.
** Med superlynprogrammet kan du lynhurtigt bage et brød. Her er vandtemperaturen meget vigtig, da den er afgørende for
gærens udvikling. Du opnår et optimalt resultat ved at anvende lunkent vand.
*** Ved marmeladekogning anbefales det at bruge en separat bageform.
Ibrugtagning
▪ Kontroller ved udpakning af apparatet, om alle delene forefindes og er ubeskadigede.
▪ Før brug rengøres alle apparatets aftagelige dele, som beskrevet i afsnittet ”Rengøring og pleje”.
▪ Da der kan opstå røg, første gang apparatet opvarmes, anbefales det at tage apparatet i drift ved
at køre bageprogram nr. 12 en gang med isat tom bageform (uden dejkrog).
▪ Lad bagemaskinen køle af, og rengør den igen som beskrevet i afsnittet ”Rengøring og pleje”.
Tilberedning af brød, kager og dej
▪ Åbn låget på bagemaskinen KULT X, og tag bageformen ud ved at dreje den mod uret.
▪ For at undgå at dejen sætter sig fast i hulrummet mellem dejkrogen og bageformen ved bagning,
anbefales det at smøre hullet til dejkrogen med varmebestandig margarine.
▪ Sæt dejkrogen på bageformens drivaksel med den brede side nedad.
▪ Hæld derefter alle opskriftens ingredienser ned i bageformen. Normalt tilsættes flydende
ingredienser først, f.eks. vand og olie. Derefter tilsættes sukker, salt og mel og til sidst gæren i
bageformen.
Vigtigt: Den maksimale mængde mel er 500 g og 7g tøgær.
Bemærk: Vær forsigtig, da dejen kan løbe over og brænde fast, hvis der tilsættes for meget
mel.
▪ Sæt bageformen tilbage i bagemaskinen, og lås formen fast ved at dreje den en omgang med uret.
▪ Luk bagemaskinens låg.
▪ Sæt nu stikket i stikkontakten.
▪ Vælg det ønskede program med programtasten
. Yderligere anvisninger om de enkelte
programmer findes på side 67.
▪ Vælg den ønskede bruningsgrad (lys, mellem, mørk) med bruningstasten
.
▪ Vælg den ønskede brødstørrelse (450 g eller 750 g) med brødstørrelsestasten
. Ved brug af
lynprogrammet (nr. 4) er det ikke nødvendigt at vælge brødstørrelse.
▪ Timeren kan programmeres med tasterne – og + (yderligere oplysninger s. 69). Dette punkt kan
springes over, hvis bagningen skal startes med det samme.
▪ Når alle de ønskede indstillinger er foretaget, kan bagningen startes med START/STOP-tasten
Start
Stop
.
Åbn så vidt muligt ikke låget, før bagetiden er ovre, da det kan påvirke resultatet negativt.
▪ Under æltningen lyder der en biplyd afhængigt af det valgte program (nr. 1, 2, 3, 4, 5, 7, 10 og 11).
Nu kan du åbne låget og tilsætte yderligere ingredienser, som f.eks. rosiner og nødder. Luk låget
hurtigt igen for at få et godt resultat.
▪ Når brødet er bagt færdigt, lyder der en biplyd. Du kan tage brødet direkte ud af maskinen
og afslutte bagningen ved at trykke lidt længere på START/STOP-tasten
Start
Stop
, ellers aktiveres
varmholdningsfunktionen automatisk i maks. 60 minutter.
▪ Tag bageformen ud af maskinen med en grydelap ved at dreje den let mod uret. Vend brødet ud af
bageformen, så det kan køle af på en bagerist.
▪ Hvis dejkrogen ikke udløses automatisk, kan du løsne den med dejkrogsfjerneren. Den føres ind i
dejkrogens åbning, så den hægter sig fast i den nederste kant på dejkrogen. Træk derefter forsigtigt
dejkrogen ud.
▪ Lad brødet køle af på bageristen i ca. 1 time, før du skærer i det, medmindre der står andet i
opskriften.

72 73
da
Indstilling af timer
Hvis bagningen ikke skal starte med det samme, kan du bruge timer-funktionen. Du kan indstille det
tidspunkt, hvor brødet skal være bagt færdigt med tasterne – og + i trin af 10 minutter, dvs. bagetiden
er iberegnet. Den maksimalt indstillelige periode er 13 timer.
Bemærk: Denne funktion kan ikke anvendes til følgende programmer: marmeladekogning og bagning.
Bemærk: Brug ikke letfordærvelige madvarer som æg eller mælk, når du bruger timer-funktionen.
Varmholdningsfunktion
Når bagetiden er afsluttet, starter varmholdningsfunktionen på 60 minutter automatisk. Du kan tage
det nybagte brød direkte ud af maskinen og afslutte bagningen ved at trykke lidt længere på START/
STOP-tasten
Start
Stop
.
Memory-funktion
I tilfælde af en kortvarig strømafbrydelse under bagningen genstartes bagningen i løbet af 10
minutter, også uden at der trykkes på START/STOP-tasten
Start
Stop
. Men hvis strømafbrydelsen varer længere
end 10 minutter, skal bagemaskinen genstartes.
Nyttige henvisninger
▪ Tung dej: Ved bagning af tung dej anbefales det at ændre rækkefølgen. Hæld først de tørre og
derefter de flydende ingredienser ned i bageformen. Hvis du vil bruge timer-funktion, er det dog
vigtigt, at gæren ikke kommer for tidligt i kontakt med væsken.
▪ Bageblandinger: Normalt er programmet til klassisk brød (nr. 1) velegnet til bageblandinger, hvis der
ikke er angivet andet i opskriften. Til brødblandinger må der maksimalt tilsættes den mængde vand,
der er angivet i opskriften. Afhængigt af opskriften anbefales det dog at reducere mængden med op
til 50 ml.
▪ Bruning: Da bagemaskinen ifølge gældende regler ikke må have varmelegeme i låget, anbefales det
at vælge det højeste bruningstrin, hvis du foretrækker en sprød krumme.
▪ Æg: Hvis dejen også indeholder æg, skal mængden af væske tilpasses proportionalt. Det anbefales
desuden at piske æggene sammen, før de hældes i bageformen.
▪ Belysning i bagemaskinen: Pæren udskiftes ved at fjerne glasskærmen med en mønt. Den nye pære
til bagemaskinen skal være af følgende type:
⋅ E14
⋅ Længde i alt 49 mm
⋅ Diameter glas 22 mm
⋅ 220-240 V
⋅ 15 watt
⋅ 300 °C
Rengøring og pleje
Træk stikket ud af stikkontakten efter brug. Lad bagemaskinen køle af, før den rengøres. Tag
bageformen ud af maskinen ved at gribe fat i hanken og dreje den mod uret. Fjern derefter dejkrogen.
Hvis dejkrogen er svær at fjerne, fyldes bageformen med lunkent vand. Lad den derefter stå i ca. 30
minutter for at opbløde dejkrogen. Nu skulle dejkrogen være let at fjerne. Rengør bageformen og
dejkrogen med en fugtig klud. Brug aldrig aggressive rengøringsmidler eller skuremidler, da det vil
beskadige slip-let-belægningen. Lad bageformen tørre helt, før du bruger den igen. Bagemaskinen,
maskinens låg og vinduet skal også helst rengøres med en fugtig klud. Her må der heller ikke anvendes
skuremidler, da de kan ridse overfladerne. Dyp ikke selve huset i vand. Målebæger, måleske og
dejkrogfjerner tåler opvaskemaskine.
Tåler
opvaskemaskine
Kan skylles under
rindende vand
Aftørres med
fugtig klud
Bageform
Dejkrog
Målebæger
Måleske
Dejkrogsfjerner
Hus

74 75
da
Problemafhjælpning
Displayet viser ”HHH” (og der lyder 5 bip)
Temperaturen inde i maskinen er for høj. Det aktuelle program skal stoppes. Åbn låget, og lad
bagemaskinen køle af i 10 til 20 minutter.
Displayet viser ”LLL” (og der lyder 5 bip), når der trykkes på START/STOP-tasten
Start
Stop
Temperaturen inde i maskinen er for lav. Stop biplyden ved at trykke på START/STOP-tasten
Start
Stop
, og åbn
låget. Vent 10 til 20 minutter, indtil maskinen har opnået stuetemperatur.
Displayet viser ”EE0”, når der trykkes på START/STOP-tasten
Start
Stop
Temperatursensoren er ikke tilsluttet korrekt. Maskinen skal indleveres til reparation.
Problem Årsag Løsning
Der kommer røg ud af maskinen
eller ventilationsspalterne.
Ingredienserne er kommet ud
i maskinen eller klæber fast på
ydersiden af bageformen.
Træk stikket ud, og rengør
bageformen udvendig og maskinen
indvendig.
Brødet falder sammen på midten
og er fugtigt forneden.
Brødet har stået for længe i
bageformen efter bagning.
Tag brødet ud af bageformen, før
varmholdningsfunktionen slukker.
Ingredienserne bliver ikke blandet
rigtigt, eller brødet bliver ikke
rigtig bagt.
Der er valgt forkerte
programindstillinger.
Kontroller det valgte program og
indstillingerne af brødstørrelse og
bruningsgrad
Låget er blevet åbnet flere gange
under bagningen.
Låget må ikke åbnes, medmindre
der skal tilsættes flere ingredienser.
Derefter skal låget straks lukkes
igen.
Dejkrogen kunne ikke dreje rundt.
Kontroller, om dejkrogen er
blokeret af kerner eller lignende.
Tag bageformen ud, og kontroller,
om dejkrogen kan drejes. Hvis
den ikke kan drejes, skal maskinen
indleveres til reparation.
Bagemaskinen starter ikke, og
displayet viser "HHH"
Temperaturen inde i maskinen er
for høj.
Det aktuelle program skal stoppes.
Åbn låget, og lad bagemaskinen
køle af i 10 til 20 minutter.
Brødet hæver for meget
For meget gær, for meget mel eller
for lidt salt
Kontroller mængden af
ingredienser, tilpas om nødvendigt
doseringen, og kontroller, om alle
ingredienserne er tilsat.
Tip og svar
Brødet hæver ikke eller kun lidt
Ingen eller for lidt gær eller
forkert mængde vand
Kontroller mængden af
ingredienser, tilpas om nødvendigt
doseringen, og kontroller, om alle
ingredienserne er tilsat.
Gæren er kommet for tidligt i
kontakt med væsken
Vær opmærksom på den angivne
rækkefølge, når du hælder
ingredienserne i bageformen.
Brødet falder sammen på midten
Dejen er større end bageformen
Kontroller mængden af
ingredienser, og tilpas om
nødvendigt doseringen. Når
der tilsættes ingredienser,
der indeholder vand, skal
væskemængden reduceres
tilsvarende.
Gæren er kommet for tidligt i
kontakt med væsken
Lav en lille fordybning i melet, og
hæld tørgæren derned, så den ikke
kommer i direkte kontakt med
væsken.
Problem Årsag Løsning
Tung og klumpet konsistens
For meget mel eller for lidt væske
Kontroller mængden af
ingredienser, tilpas om nødvendigt
doseringen, og kontroller, om alle
ingredienserne er tilsat.
Ikke nok gær eller sukker
Kontroller mængden af
ingredienser, tilpas om nødvendigt
doseringen, og kontroller, om alle
ingredienserne er tilsat.
Brødet er ikke bagt i midten For meget vand
Kontroller mængden af
ingredienser, tilpas om nødvendigt
doseringen, og kontroller, om alle
ingredienserne er tilsat.
Brødet/skorpen er for lyst/lys Der er valgt forkert bruningsgrad
Da bagemaskinen ifølge gældende
regler ikke må have varmelegeme
i låget, anbefales det at vælge
det højeste bruningstrin, hvis du
foretrækker en sprød konsistens.
Apparatet opfylder de europæiske retningslinjer 2014/35/EU, 2014/30/EU og
2009/125/EU.
Dette produkt må ved slutningen af dets levetid ikke bortskaffes i
almindeligt husholdningsaffald, men skal afgives på et opsamlingssted
for genbrug af elektriske og elektroniske apparater. Materialerne kan
genanvendes ifølge deres typebetegnelse. Ved aflevering af brugte
apparater på et genbrugssted
bidrager du til beskyttelse af miljøet. Spørg din kommune om det
nærmeste genbrugssted.
Ret til ændringer forbeholdes

76 77
sv
sv
Användarguide
Viktiga säkerhetsanvisningar
▪ Denna produkt får endast användas av barn över 8 år eller personer
med nedsatt fysisk, psykisk eller sensorisk förmåga eller som saknar
erforderliga kunskaper eller erfarenhet, om dessa personer först fått
instruktioner om hur man använder produkten på ett säkert sätt
och förstår de risker som finns.
▪ Barn får inte leka med apparaten.
▪ Rengöring och underhåll får inte utföras av barn, såvida de inte
övervakas och är över 8 år.
▪ Apparaten och anslutningskabeln ska hållas borta från barn som är
yngre än 8 år.
▪ Apparaten får inte användas via extern timer eller fjärrkontroll.
▪ Apparaten är avsedd att användas i hushåll och liknande
tillämpningar som:
⋅ kök för personal i butiker, kontor och på andra arbetsplatser;
⋅ jord- och lantbruksmiljö;
⋅ hotell, motell och liknande anläggningar;
⋅ Bed & Breakfast.
▪ Om sladden skulle skadas ska den bytas ut genom tillverkarens
centrala kundtjänst eller en person som tillverkaren godkänt.
▪ Efter användning av tillbehören och apparaten ska alla ytor/delar
som kommit i beröring med livsmedel rengöras. Följ anvisningarna i
kapitlet ”Rengöring och skötsel”.
▪ Apparaten får endast användas i enlighet med denna
användarguide. Otillåten användning kan leda till elektriska stötar
eller annan fara.
▪ Obs! Risk för brännskador: Yttemperaturen kan bli mycket hög.
Även efter att apparaten stängts av, är värmeytorna varma
ytterligare en stund.
▪ Stäng av apparaten och dra alltid ur kontakten innan du byter
tillbehör eller närmar dig roterande delar under drift.
Före användning
Apparaten får användas endast för det ändamål som beskrivs i den här användarguiden. Läs därför
noga igenom användarguiden innan du börjar använda apparaten. Guiden innehåller anvisningar för
användning, rengöring och skötsel av apparaten. Om du inte följer instruktioner och anvisningar, tar
vi inget ansvar för eventuella skador. Förvara instruktionerna på ett säkert ställe så att du vid behov
kan lämna över dem till nästa ägare. Notera också garantiupplysningarna på slutet. Apparaten är inte
avsedd att användas i kommersiellt syfte, utan enbart för beredning av livsmedel i mängder som är
vanliga för hushåll.
Följ säkerhetsanvisningarna för hur apparaten ska användas.
Tekniska data
Nominell spänning: 220-240 V ~ 50-60 Hz
Effekt: 450 W
Skyddsklass: I
Säkerhetsanvisningar
▪ Dra ur kontakten:
⋅ om det uppstår problem under drift
⋅ före varje rengöring
⋅ efter användning.
▪ Apparaten får endast anslutas till ett korrekt installerat, jordat vägguttag. Sladd och kontakt måste
vara torra.
▪ Dra inte och kläm inte anslutningssladden mot skarpa kanter. Låt den inte hänga fritt och skydda
den från värme och olja.
▪ Använd enbart hela förlängningssladdar.
▪ Dra inte ur nätkontakten från vägguttaget om du har våta händer och inte heller genom att dra
direkt i sladden.
▪ Lyft inte apparaten med hjälp av anslutningssladden.
▪ Maskinen får inte ställas på heta ytor såsom spisplattor och liknande och ej heller i närheten av
öppna gaslågor eftersom höljet då kan smälta.
▪ Använd endast apparaten när alla löstagbara delar är korrekt monterade.
▪ Dra ur nätsladden ur kontakten om apparaten inte ska användas inom den närmaste tiden.
▪ Om följande skulle inträffa, ska du inte använda apparaten och genast dra ur kontakten:
⋅ apparaten eller sladden är skadad
⋅ du misstänker att apparaten kan ha tagit skada på grund av att den fallit i golvet eller
liknande.
I så fall ska apparaten lämnas in för reparation.
▪ Apparaten får endast användas under uppsikt.
▪ Rör inte varma ytor.
▪ Användningen av tillbehör som inte rekommenderats av tillverkaren kan leda till skador.
▪ Rör inga roterande delar under drift.
▪ Slå aldrig bakformen mot något föremål för att få loss brödet, då detta kan leda till att formen
skadas.
▪ Aluminiumfolie och liknande material får inte användas i bakmaskinen, då dessa ökar risken för
brand eller kortslutning.
▪ Bakmaskinen får aldrig täckas över med duk eller liknande. Värme och ånga måste alltid ha
möjlighet att avdunsta. Om bakmaskinen täcks över eller kommer i beröring med något brännbart
material, kan brand uppstå.

78 79
sv
▪ För att undvika skador får bakmaskinen inte tas i drift utan bakformen.
▪ Placera apparaten så att den inte kan glida ner från arbetsbänken, t.ex. vid knådning av tjock deg.
▪ I händelse av missbruk, felaktig användning eller reparation tas inget ansvar för eventuella skador.
Om sådan skada skulle uppstå omfattas den inte av tillverkarens produktgaranti.
Manöverpanel
Programväljare
Med denna knapp väljer du
önskat program. Det valda
programmets nummer visas i
displayen.
Gräddningsväljare
Med denna knapp väljer du
önskad gräddningsgrad. Denna
visas i displayen såhär:
- Ljus
- Mellan
- Mörk
Start/Paus
Med denna knapp startar du
bakprocessen, och avbryter den
genom att trycka på knappen en gång
till.
Stopp
Genom att trycka och hålla
inne denna knapp avslutar du
bakprogrammet.
Inställning timer
Med knapparna - och + kan du
programmera timerfunktionen.
Den justerade sluttiden visas i
displayen.
Brödstorleksväljare
Med denna knapp väljer du
önskad brödstorlek. Beroende på
vald storlek visas 450 g eller 750
g i displayen.
Bakutrymmesbelysning
Genom att trycka och hålla
inne denna knapp aktiverar du
bakutrymmesbelysningen. Denna
släcks automatiskt efter ca 30
sekunder, men går också att släcka
genom att trycka och hålla inne
knappen en gång till.
Användning
Med WMF KULT X bakmaskin kan du väldigt enkelt själv baka ditt bröd. Allt du behöver för att göra
detta är ingredienserna, resten tar WMF KULT X bakmaskin hand om. Med 12 tillgängliga bakprogram
finns det något för alla smaker. En programkarta medföljer som på ett enkelt sätt beskriver
programmen. Denna kan förvaras smidigt i bakformen.
Programöversikt
Program
nr.
Beteckning Beskrivning
Tillgängliga alternativ
Varaktighet
[tim]
Timer-
funktion
Gräddning Storlek 450 g 750 g
1 Klassiskt bröd
Knådning, jäsning och bakning av rågbröd.
Ytterligare ingredienser kan tillsättas.
03:08 03:15
2 Ljust bröd
Knådning, jäsning och bakning under längre tid.
Brödet har som regel en knaprig skorpa och lättare
konsistens.
03:55 04:05
3 Fullkornsbröd
Knådning, jäsning och bakning av fullkornsbröd.
Användning av timerfunktionen rekommenderas
inte, då denna kan försämra bakresultatet.
03:47 03:55
4 Snabbprogram*
Knådning, jäsning och bakning av bröd på kortare tid
än med program nr. 1. Brödet är som regel mindre
med fastare konsistens.
02:25
5 Sött bröd
Knådning, jäsning och bakning av sött bröd.
Ytterligare ingredienser kan tillsättas.
03:05 03:10
6 Glutenfritt
Knådning, jäsning och bakning av glutenfritt bröd.
Ytterligare ingredienser kan tillsättas.
03:05 03:10
7
Ultra-
snabbprogram**
Knådning, jäsning och bakning av bröd på kortast
möjliga tid. Brödet blir som regel mindre och grövre
än bröd som bakas med program nr. 4.
01:43 01:53
8 Degprogram
Knådning och jäsning av deg, utan bakning. Degen
kan användas till bullar, pizza etc.
01:30
9 Sylt***
Kokning av sylt och marmelad. Frukt måste delas
innan den läggs i bakformen.
01:20
10 Rostbröd
Knådning, jäsning och bakning av rostbröd. Brödet
har som regel en tunnare skorpa och lättare
konsistens.
03:10 03:15
11 Kakor
Knådning, jäsning och bakning vid användning av
bakpulver.
02:00
12 Bakning
Endast bakning, ingen knådning eller jäsning. Kan
också användas för att förlänga baktiden på andra
program.
01:00
* För ett optimalt bakresultat måste först alla flytande ingredienser hällas i bakformen. Därefter kan alla torra ingredienser tillsättas.
** Med ultra-snabbprogrammet kan ett bröd bakas på kortast möjliga tid. I detta fall, är vattentemperaturen särskilt viktig,
då den påverkar jäsningsprocessen. Ett optimalt bakresultat uppstår vid användning av varmt vatten.
*** För beredning av sylt rekommenderas att använda en separat bakform.

80 81
sv
Programförlopp i detalj
Program
nr.
Beteckning Mängd Total tid
Knådning
1
Jäsning 1
Knådning
2
Jäsning 2 Jäsning 3 Bakning
Varmhåll-
ning
1 Klassiskt bröd
450 g 03:08 tim 11 min. 20 min. 17 min. 25 min. 35 min. 80 min. 60 min.
750 g 03:15 tim 12 min. 20 min. 18 min. 25 min. 35 min. 85 min. 60 min.
2 Ljust bröd
450 g 03:55 tim 18 min. 40 min. 22 min. 30 min. 40 min. 85 min. 60 min.
750 g 04:05 tim 20 min. 40 min. 25 min. 30 min. 40 min. 90 min. 60 min.
3 Fullkornsbröd
450 g 03:47 tim 11 min. 25 min. 21 min. 35 min. 55 min. 80 min. 60 min.
750 g 03:55 tim 12 min. 25 min. 23 min. 35 min. 55 min. 85 min. 60 min.
4 Snabbprogram* 02:25 tim 12 min. 10 min. 13 min. / 25 min. 85 min. 60 min.
5 Sött bröd
450 g 03:05 tim 12 min. 5 min. 23 min. 30 min. 35 min. 80 min. 60 min.
750 g 03:10 tim 12 min. 5 min. 23 min. 30 min. 35 min. 85 min. 60 min.
6 Glutenfritt bröd
450 g 03:05 tim 12 min. 5 min. 13 min. 30 min. 35 min. 90 min. 60 min.
750 g 03:10 tim 12 min. 10 min. 13 min. 30 min. 35 min. 90 min. 60 min.
7
Ultra-
snabbprogram**
450 g 01:43 tim 13 min. / 5 min. 25 min. / 60 min. 60 min.
750 g 01:53 tim 13 min. / 5 min. 30 min. / 65 min. 60 min.
8 Degprogram 01:30 tim 25 min. / / 30 min. 35 min. / /
9 Sylt*** 01:20 tim / 15 min. / / 45 min. 20 min. /
10 Rostbröd
450 g 03:10 tim 17 min. 35 min. 8 min. 25 min. 35 min. 70 min. 60 min.
750 g 03:15 tim 17 min. 35 min. 8 min. 25 min. 35 min. 75 min. 60 min.
11 Kakor 02:00 tim 7 min. 4 min. 10 min. 9 min. / 90 min. 60 min.
12 Bakning 01:00 tim / / / / /
10–60
min.
60 min.
* För ett optimalt bakresultat måste först alla flytande ingredienser hällas i bakformen. Därefter kan alla torra ingredienser tillsättas.
** Med ultra-snabbprogrammet kan ett bröd bakas på kortast möjliga tid. I detta fall, är vattentemperaturen särskilt viktig,
då den påverkar jäsningsprocessen. Ett optimalt bakresultat uppstår vid användning av varmt vatten.
*** För beredning av sylt rekommenderas att använda en separat bakform.
Användning
▪ Kontrollera vid uppackningen av din apparat, så att alla delar finns med och att inget är skadat.
▪ Rengör alla löstagbara delar enligt beskrivningen i ”Rengöring och skötsel”, innan du använder
apparaten för första gången.
▪ Eftersom rök kan uppstå vid den första uppvärmningen, rekommenderar vi att du först använder
apparaten med en tom bakform (utan knådare) på programmet Bakning (nr. 12).
▪ Låt bakmaskinen svalna och rengör den igen enligt beskrivningen i kapitlet ”Rengöring och skötsel”.
Beredning av bröd, kakor och deg
▪ Öppna locket på din KULT X bakmaskin och ta ut bakformen genom att vrida den moturs.
▪ För att undvika att deg fastnar i hålrummet mellan knådaren och bakformen, rekommenderar vi att
du stryker värmebeständigt margarin i knådarens hål.
▪ Placera knådaren med den breda sidan neråt på drivaxeln av bakformen.
▪ Häll därefter i alla de ingredienser som du önskar använda enligt receptet i bakformen. Vanligtvis
ska de flytande ingredienserna, som vatten eller olja, hällas i först. Därefter häller du i socker, salt
och mjöl, och till sist jäst, i bakformen.
Varning: Maximal mängd för mjöl är 500 g och för torrjäst 7g.
OBS: Varning. Vid en alltför stor mängd mjöl kan degen jäsa över och bränna fast.
▪ Placera bakformen i bakmaskinen och lås fast den genom att vrida den en gång medsols.
▪ Stäng bakmaskinens lock.
▪ Anslut sedan kontakten till ett vägguttag.
▪ Välj önskat program med programknappen
. Ytterligare instruktioner om de olika programmen
hittar du på sidan 77.
▪ Välj önskad gräddningsgrad (ljus, mellan eller mörk skorpa) med gräddningsknappen
▪ Välj önskad brödstorlek (450 g eller 750 g) med brödstorleksknappen . Med snabbprogrammet
(nr. 4) går det inte att göra några extra val av brödstorlek.
▪ Med hjälp av knapparna - och + kan timern programmeras (mer info. s. 79. Detta steg kan hoppas
över om du vill starta bakprocessen).
▪ När alla önskade inställningar har gjorts, kan du starta bakprocessen med START/STOPP-
knappen
Start
Stop
. Öppna inte locket förrän så nära slutet av baktiden som möjligt, då detta påverkar
bakresultatet negativt.
▪ Under den andra knådningen hörs, beroende på valt program (nr. 1, 2, 3, 4, 5, 7, 10 och 11), ett pip-
ljud upprepade gånger. Nu kan du öppna locket när du vill för att tillsätta ytterligare ingredienser,
som t.ex. russin eller nötter. Stäng locket genast igen för att uppnå ett bra bakresultat.
▪ Efter avslutad bakprocess, hörs ett pip-ljud upprepade gånger. Du kan ta ut brödet direkt och
avsluta bakprocessen genom att trycka och hålla inne START/STOPP-knappen
Start
Stop
, annars startar
varmhållningsfunktionen som går i max. 60 minuter.
▪ Ta ut bakformen genom att vrida den lätt moturs. Använd grytlappar. Tippa ut brödet ur bakformen
på ett bakgaller, så att brödet får svalna.
▪ Om knådaren inte lossnar automatiskt, kan du lossa den med hjälp av knådaravtagaren. För då in
avtagaren i knådarens öppning och haka fast den under kanten på knådaren. Dra nu försiktigt loss
knådaren.
▪ Låt brödet få svalna på bakgallret i ungefär en timme innan du skär i det, om inte receptet anger
något annat.

82 83
sv
Inställning av timer
Om bakprocessen inte ska starta direkt, kan du använda timerfunktionen. Med hjälp av knapparna
- och + går det att ställa in tiden i 10-minuterssteg för att få brödet färdigbakat, med baktiden
inberäknad. Maximal timerinställning är 13 timmar.
OBS: Denna funktion ingår inte i följande program: ultra-snabbprogram, sylt och bakning.
OBS: Använd inte några känsliga livsmedel, som exempelvis ägg eller färsk mjölk, när du vill använda
timerfunktionen.
Varmhållningsfunktion
Efter avslutad baktid startar den 60 minuter långa varmhållningsfunktionen automatiskt. Om du vill ta
ut brödet direkt, stäng av bakprocessen genom att trycka och hålla inne START/STOP-knappen
Start
Stop
.
Minnesfunktion
Om strömförsörjningen skulle brytas under en kortare tid under bakprocessen, startas den igen inom
10 minuter, även utan att du trycker på START/STOPP-knappen
Start
Stop
. Om strömavbrottet däremot varar
längre än 10 minuter, måste bakmaskinen startas på nytt.
Användbara tips
▪ Tunga degar: Vid tunga degar är det lämpligt att ändra på ingrediensordningen. Fyll då bakformen
först med de torra, och därefter med de flytande, ingredienserna. Om du samtidigt vill använda
timerfunktionen, var uppmärksam så att jästen inte kommer i kontakt med någon vätska.
▪ Bakmixer: Vid bakmixer passar som regel, om inte receptet anger något annat, programmet för
klassiskt bröd (nr. 1). Vid brödmixer, tillsätt max. den mängd vatten som anges i receptet. Beroende på
recept, rekommenderas dock att minska mängden med upp till 50 ml.
▪ Gräddning: Då bakmaskinen i enlighet med bestämmelserna inte har något värmeelement i locket,
är det lämpligt att använda den högsta gräddningsnivån, om du vill få en knaprigare konsistens på ditt
bröd.
▪ Ägg: Vid användning av ägg som tillsats, måste vätskemängden anpassas proportionellt. Dessutom är
det lämpligt att vispa igenom äggen lätt innan de hälls över i bakformen.
▪ Bakutrymmesbelysning: För att byta glödlampan kan du ta loss glaslocket med ett mynt. Använd en
ugnsglödlampa som har följande egenskaper:
⋅ E14
⋅ Total längd 49 mm
⋅ Glasets diameter 22 mm
⋅ 220–240V
⋅ 15Watt
⋅ 300°C
Rengöring och skötsel
Dra ur kontakten efter användning. Låt bakmaskinen svalna innan rengöring. Bakformen lossar du
genom att hålla i handtaget och vrida formen moturs. Lossa därefter knådaren. Om det inte går
lätt att få loss den, fyll brödformen med ljummet vatten och låt stå i ca 30 minuter med blötlagd
knådare. Nu går det enkelt att lossa knådaren. Rengör bakformen och knådaren med en fuktig trasa.
Använd inga skarpa eller slipande rengöringsmedel, då dessa kan skada nonstick-beläggningen. Innan
bakformen kan användas igen, måste den vara fullständigt torr. Bakmaskinen, locket eller siktfönstret
lämpar sig också bäst för att rengöras med en fuktig trasa. Använd inte heller här några slipande
rengöringsmedel, då dessa kan skada ytstrukturen. Doppa aldrig apparatens hölje i vatten. För att
underlätta rengöringen kan mätglaset, mätskeden och knådaravtagaren diskas i diskmaskin.
Kan diskas i
diskmaskin
Kan diskas under
rinnande vatten
Torkas med fuktig
trasa
Bakform
Knådare
Mätglas
Mätsked
Knådaravtagare
Hölje

84 85
sv
Felsökning
Displayen visar ”HHH” (följt av 5 pip-ljud)
Innertemperaturen är för hög. Det aktuella programmet måste stoppas. Öppna locket och låt
bakmaskinen svalna i 10 till 20 minuter.
Displayen visar ”LLL” (följt av 5 pip-ljud) efter att du tryckt på START/STOPP-knappen
Start
Stop
Innertemperaturen är för låg. Stoppa pip-ljudet genom att trycka på START/STOPP-knappen
Start
Stop
och
öppna locket. Vänta i 10 till 20 minuter tills apparaten har uppnått rumstemperatur.
Displayen visar ”EE0” efter att du tryckt på START/STOPP-knappen
Start
Stop
Temperatursensorn är inte rätt ansluten, lämna apparaten för reparation.
Problem Orsak Lösning
Rök kommer ut ur bakutrymmet
eller ventilationsspåren.
Ingredienserna fastnar i
bakutrymmet eller klibbar fast på
bakformens utsida.
Dra ur kontakten och rengör
utsidan av bakformen eller
bakutrymmet.
Brödet sjunker ihop i mitten och är
fuktigt på undersidan.
Brödet har lämnats kvar i
bakformen för länge efter
bakningen.
Ta ur brödet ur bakformen
innan varmhållningsfunktionen
stängs av.
Ingredienserna blandas inte riktigt
eller brödet bakas inte riktigt.
Fel programinställningar har valts.
Kontrollera det valda programmet
samt inställningarna för
brödstorlek och gräddningsgraden
Locket har öppnats ofta under
bakprocessen.
Locket får inte öppnas, utom
för att tillsätta fler ingredienser.
Därefter måste locket genast
stängas igen.
Knådaren kunde inte vrida sig.
Kontrollera ifall knådaren har
blockerats av korn etc. Ta loss
bakformen och kontrollera om
knådaren går att vrida. Om så inte
är fallet, lämna in apparaten för
reparation.
Bakmaskinen startar inte,
displayen visar ”HHH”
Innertemperaturen är för hög.
Det aktuella programmet måste
stoppas. Öppna locket och låt
bakmaskinen svalna i 10 till 20
minuter.
Brödet jäser för mycket
För mycket jäst, för mycket mjöl
eller för lite salt
Kontrollera ingrediensernas
mängd, anpassa doseringen om
nödvändigt och kontrollera om alla
ingredienser har tillsatts.
Tips och svar
Brödet jäser inte alls eller jäser
bara något
Ingen eller för lite jäst alt. fel
mängd vatten
Kontrollera ingrediensernas
mängd, anpassa doseringen om
nödvändigt och kontrollera om alla
ingredienser har tillsatts.
Jästen har kommit kontakt med
vätska för tidigt
Var noga med fylla bakformen
med ingredienserna i rätt ordning.
Problem Orsak Lösning
Brödet sjunker ihop i mitten
Degvolymen är större än
bakformen
Kontrollera ingrediensernas
mängd och anpassa doseringen
om nödvändigt. Om ingredienser
har använts som innehåller
vatten, måste vätskan reduceras i
motsvarande grad.
Jästen har kommit kontakt med
vätska för tidigt
Gör en liten grop i mjölet och häll i
torrjäst i den. Undvik direktkontakt
mellan västska och torrjäst.
Tung, klumpig konsistens
För mycket mjöl eller för lite
vätska
Kontrollera ingrediensernas
mängd, anpassa doseringen om
nödvändigt och kontrollera om alla
ingredienser har tillsatts.
Inte tillräckligt med jäst eller
socker
Kontrollera ingrediensernas
mängd, anpassa doseringen om
nödvändigt och kontrollera om alla
ingredienser har tillsatts.
Brödet är inte bakat i mitten För mycket vatten
Kontrollera ingrediensernas
mängd, anpassa doseringen om
nödvändigt och kontrollera om alla
ingredienser har tillsatts.
Brödet/skorpan är för ljus Fel val av gräddningsgrad
Då bakmaskinen i enlighet med
bestämmelserna inte har något
värmeelement i locket, är det
lämpligt att använda den högsta
gräddningsnivån, om du vill få en
knaprigare konsistens på ditt bröd.
Apparaten följer de europeiska reglerna 2014/35/EU, 2014/30/EU och
2009/125/EU.
Denna apparat får inte efter slutet på sin livstid kastas i normalt hushållsavfall,
utan måste ges till en insamlingsplats för återanvändning
av elektriska och elektroniska produkter.
Materialen kan återvinnas enligt sin märkning. Med återanvändning,
återvinning av material och andra former av användning av gammal
utrustning ger du ett viktigt bidrag till skydd av vår miljö.
Var god fråga din lokala myndighet om tillgänglig avfallshanteringsplats.
Ändringar förbehållna

86 87
fi
fi
Käyttöohje
Tärkeitä turvallisuusohjeita
▪ Yli 8-vuotiaat lapset sekä fyysisiltä, aistillisilta tai henkisiltä
kyvyiltään rajoittuneet tai kokemattomat ja/tai taitamattomat
henkilöt saavat käyttää laitetta vain siinä tapauksessa, että käyttöä
valvotaan tai heitä on opastettu käyttämään laitetta turvallisesti ja
he ovat ymmärtäneet laitteen käyttöön liittyvät vaarat.
▪ Lapset eivät saa leikkiä laitteella.
▪ Lapset eivät saa puhdistaa eivätkä huoltaa laitetta, elleivät he ole yli
8-vuotiaita ja aikuisen valvonnassa.
▪ Laite ja sen liitäntäjohto on pidettävä poissa alle 8-vuotiaiden
lasten ulottuvilta.
▪ Laitetta ei saa käyttää ulkoisen ajastimen avulla eikä kauko-
ohjauksella.
▪ Laite on tarkoitettu käytettäväksi kotitalouksissa ja muissa
vastaavissa käyttötilanteissa, kuten:
⋅ työpaikkakeittiöissä myymälöissä, toimistoissa ja muissa
kaupallisissa ympäristöissä
⋅ maatiloilla
⋅ asiakastiloissa hotelleissa, motelleissa ja muissa
majoituspaikoissa
⋅ aamiaismajoitusta tarjoavissa majataloissa.
▪ Jos laitteen verkkojohto vahingoittuu, on sen vaihtaminen
annettava valmistajan, valmistajan asiakaspalvelun tai vastaavan
ammattitaitoisen henkilön tehtäväksi vaarojen välttämiseksi.
▪ Puhdista lisäosan ja laitteen käytön jälkeen kaikki pinnat/osat, jotka
ovat olleet kosketuksissa ruoka-aineiden kanssa. Noudata kappaleen
”Puhdistus ja huolto” ohjeita.
▪ Laitetta saa käyttää vain tämän oppaan mukaisesti. Virheellisestä
käytöstä voi aiheutua sähköisku tai muita vaaroja.
▪ Varo, palovammojen vaara: Laitteen ulkopinnat voivat kuumentua
hyvin kuumiksi. Kuumennuspinnat pysyvät kuumina vielä jonkin
aikaa sen jälkeen, kun laite on sammutettu.
▪ Kytke laite pois päältä ja irrota pistoke aina pistorasiasta ennen
lisäosien vaihtoa tai ennen käytön aikana liikkuvien osien
lähestymistä.
Ennen käyttöä
Käytä laitetta vain tässä käyttöohjeessa kuvatulla tavalla ja vain siihen tarkoitukseen, johon se on
suunniteltu. Lue sen vuoksi käyttöohje huolellisesti ennen laitteen käyttöönottoa. Se sisältää tietoa
laitteen käytöstä, puhdistamisesta ja huollosta. Valmistaja ei vastaa mahdollisista vahingoista,
jotka syntyvät käyttöohjeessa annettujen ohjeiden noudattamatta jättämisestä. Säilytä käyttöohje
huolellisesti ja anna se laitteen mukana eteenpäin seuraavalle käyttäjälle. Huomioi myös käyttöohjeen
lopussa olevat takuuta koskevat ohjeet. Laitetta ei ole tarkoitettu kaupalliseen käyttöön, vaan
ainoastaan elintarvikkeiden valmistamiseen kotitalouksissa.
Noudata laitteen käytössä turvallisuusohjeita.
Tekniset tiedot
Nimellisjännite: 220–240 V~ 50-60 Hz
Tehonkulutus: 450 W
Suojaluokka: I
Turvallisuusohjeet
▪ Irrota pistoke pistorasiasta aina:
⋅ jos laitteessa on käyttöhäiriöitä
⋅ ennen puhdistusta
⋅ käytön jälkeen.
▪ Kytke laite vain määräysten mukaisesti asennettuun, maadoitettuun pistorasiaan. Virtajohdon ja
pistokkeen on oltava kuivia.
▪ Älä vedä liitäntäjohtoa terävien reunojen yli tai ympäri äläkä anna johdon roikkua reunan yli.
Suojaa johto kuumuudelta ja öljyltä.
▪ Käytä vain moitteettomassa kunnossa olevaa jatkojohtoa.
▪ Älä irrota pistoketta pistorasiasta johdosta vetämällä tai märin käsin.
▪ Älä kanna laitetta roikottamalla sitä virtajohdosta.
▪ Älä aseta laitetta kuumille pinnoille, kuten liedelle tai avoimen kaasuliekin lähettyville, koska kotelo
voi sulaa.
▪ Käytä laitetta vain, kun kaikki irrotettavat osat ovat oikein asennettuina.
▪ Jos laite on pitkään käyttämättä, irrota pistoke pistorasiasta.
▪ Älä käytä laitetta ja irrota pistoke heti pistorasiasta, jos:
⋅ laite tai liitäntäjohto on vahingoittunut.
⋅ on syytä epäillä laitteen vioittuneen putoamisen tms. jälkeen.
Näissä tapauksissa laite on toimitettava korjattavaksi.
▪ Laitetta saa käyttää vain valvottuna.
▪ Kuumia pintoja ei saa koskettaa.
▪ Sellaisten lisälaitteiden käyttö, joita valmistaja ei suosittele, voi aiheuttaa vammoja.
▪ Käytön aikana ei saa koskettaa liikkuvia osia.
▪ Leipävuokaa ei saa koskaan lyödä esineitä vasten leivän irrottamiseksi, koska leipävuoka voi
vaurioitua.
▪ Leipäkoneessa ei saa käyttää metallikalvoja tai sen kaltaisia materiaaleja, koska se lisää tulipalon tai
oikosulun vaaraa.

88 89
fi
▪ Leipäkonetta ei saa koskaan peittää liinalla tai muulla esineellä. Kuumuuden ja höyryn täytyy voida
poistua koko ajan. Jos leipäkone peitetään syttyvillä materiaaleilla tai se joutuu niiden kanssa
kosketuksiin, seurauksena voi olla tulipalo
▪ Leipäkonetta ei saa käyttää ilman leipämuottia, sillä muuten leipäkone voi vaurioitua
▪ Sijoita laite siten, ettei se voi luisua pois työtasolta esim. raskasta taikinaa vaivattaessa.
▪ Jos laitetta käytetään käyttötarkoituksen vastaisesti tai väärin tai sille suoritetaan epäasianmukaisia
korjauksia, valmistaja ei vastaa mahdollisista vahingoista. Myöskään laitteen takuu ei kata tällaisia
tapauksia.
Ohjausyksikkö
Ohjelman valinta
Tällä painikkeella valitaan haluttu
ohjelma. Valittu ohjelma tulee
näkyviin näyttöön.
Paahtoasteen valinta
Tällä painikkeella valitaan haluttu
paahtoaste. Se näkyy näytössä
seuraavasti:
- Vaalea
- Keskitaso
- Tumma
Käynnistys/tauko
Leivontatoimenpide käynnistetään
tällä painikkeella ja voidaan
keskeyttää painamalla sitä uudelleen.
Seis
Leivontaohjelma voidaan päättää
tämän painikkeen pitkällä
painalluksella.
Ajastimen asetus
Ajastintoiminto ohjelmoidaan
painikkeilla – ja +. Mukautettu
päättymisaika näkyy näytössä.
Leipäkoon valinta
Tällä painikkeella valitaan haluttu
leipäkoko. Näytössä näkyy valitun
koon mukaan joko 450 g tai
750 g.
Leivontatilan valaistus
Leivontatilan valaistus aktivoidaan
tämän painikkeen pitkällä
painalluksella. Valaistus sammuu
automaattisesti noin 30 sekunnin
kuluttua, mutta voidaan sammuttaa
myös pitkällä uudelleenpainalluksella.
Käyttö
WMF KULT X -leipäkoneilla voidaan valmistaa leipää helposti itse. Tarvitset siihen vain sopivat ainekset,
ja WMF KULT X -leipäkone huolehtii lopusta. 12 eri leipäohjelmaa takaa jokaisen makuun sopivan
leivän. Toimitus sisältää ohjelmakortin, joka helpottaa ohjelmien numeroiden tunnistamista. Sitä
voidaan säilyttää tilaa säästävästi leipävuoassa.
Ohjelmien esittely
Ohjelman
nro
Nimi Kuvaus
Käytettävissä olevat
vaihtoehdot
Kesto [h]
Ajastintoi-
minto
Paahtoaste Koko 450 g 750 g
1 Normaali leipä
Sekaleivän vaivaus, kohottaminen ja leivonta. Muita
aineksia voidaan lisätä.
03:08 03:15
2 Valkoinen leipä
Pidempikestoinen vaivaus, kohottaminen ja leivonta.
Leivällä on yleensä rapea kuori ja kevyt koostumus.
03:55 04:05
3 Täysjyväleipä
Täysjyväleivän vaivaus, kohottaminen ja leivonta.
Ajastintoiminnon käyttö ei ole suositeltavaa, sillä se
voi huonontaa leivontatulosta.
03:47 03:55
4 Pikaohjelma*
Leivän vaivaus, kohottaminen ja leivonta
lyhyemmässä ajassa kuin ohjelmalla 1. Leivästä tulee
yleensä pienempi ja koostumukseltaan tiiviimpi.
02:25
5 Makea leipä
Makean leivän vaivaus, kohottaminen ja leivonta.
Muita aineksia voidaan lisätä.
03:05 03:10
6 Gluteeniton
Gluteenittoman leivän vaivaus, kohottaminen ja
leivonta. Muita aineksia voidaan lisätä.
03:05 03:10
7
Ultrapikaoh-
jelma**
Leivän vaivaus, kohottaminen ja leivonta erittäin
nopeasti. Leivästä tulee yleensä pienempi ja
rosoisempi kuin ohjelmalla 4 leivottu leipä.
01:43 01:53
8 Taikinaohjelma
Taikinan vaivaus ja kohottaminen ilman leivontaa.
Taikinaa voidaan käyttää sämpylöihin, pitsaan jne.
01:30
9 Hillo***
Marmeladien ja hillojen keittäminen. Hedelmät
täytyy pilkkoa ennen niiden laittamista leipävuokaan.
01:20
10 Paahtoleipä
Paahtoleivän vaivaus, kohottaminen ja leivonta.
Leivällä on yleensä ohuempi kuori ja kevyt
koostumus.
03:10 03:15
11 Kakut
Vaivaus, kohottaminen ja leivonta leivinjauhetta
käyttämällä.
02:00
12 Leivonta
Vain leivonta, ilman vaivausta ja kohottamista.
Voidaan käyttää myös muiden ohjelmien leivontaajan pidentämiseen.
01:00
* Optimaalista leivontatulosta varten kaikki nestemäiset ainekset on lisättävä leipävuokaan ensin. Sen jälkeen lisätään kaikki
kuivat ainekset.
** Ultrapikaohjelmalla leipä voidaan leipoa ennätysajassa. Veden lämpötila on tuolloin erityisen tärkeää, sillä se vaikuttaa
leivän kohoamiseen. Optimaalinen leivontatulos saadaan käyttämällä lämmintä vettä.
*** Hillojen valmistukseen suositellaan erillisen leipävuoan käyttöä.

90 91
fi
Ohjelman vaiheet yksityiskohtaisesti
Ohjelma
nro
Nimi Määrä Kesto yht.
Vaivaus 1
Kohotus 1Vaivaus 2Kohotus 2Kohotus 3Lei-
vonta
Lämpi-
mänäpito
1 Normaali leipä
450 g 03:08 h 11 min. 20 min. 17 min. 25 min. 35 min. 80 min. 60 min.
750 g 03:15 h 12 min. 20 min. 18 min. 25 min. 35 min. 85 min. 60 min.
2 Valkoinen leipä
450 g 03:55 h 18 min. 40 min. 22 min. 30 min. 40 min. 85 min. 60 min.
750 g 04:05 h 20 min. 40 min. 25 min. 30 min. 40 min. 90 min. 60 min.
3 Täysjyväleipä
450 g 03:47 h 11 min. 25 min. 21 min. 35 min. 55 min. 80 min. 60 min.
750 g 03:55 h 12 min. 25 min. 23 min. 35 min. 55 min. 85 min. 60 min.
4 Pikaohjelma* 02:25 h 12 min. 10 min. 13 min. / 25 min. 85 min. 60 min.
5 Makea leipä
450 g 03:05 h 12 min. 5 min. 23 min. 30 min. 35 min. 80 min. 60 min.
750 g 03:10 h 12 min. 5 min. 23 min. 30 min. 35 min. 85 min. 60 min.
6 Gluteiiniton
450 g 03:05 h 12 min. 5 min. 13 min. 30 min. 35 min. 90 min. 60 min.
750 g 03:10 h 12 min. 10 min. 13 min. 30 min. 35 min. 90 min. 60 min.
7
Ultrapikaoh-
jelma**
450 g 01:43 h 13 min. / 5 min. 25 min. / 60 min. 60 min.
750 g 01:53 h 13 min. / 5 min. 30 min. / 65 min. 60 min.
8 Taikinaohjelma 01:30 h 25 min. / / 30 min. 35 min. / /
9 Hillo*** 01:20 h / 15 min. / / 45 min. 20 min. /
10 Paahtoleipä
450 g 03:10 h 17 min. 35 min. 8 min. 25 min. 35 min. 70 min. 60 min.
750 g 03:15 h 17 min. 35 min. 8 min. 25 min. 35 min. 75 min. 60 min.
11 Kakut 02:00 h 7 min. 4 min. 10 min. 9 min. / 90 min. 60 min.
12 Leivonta 01:00 h / / / / /
10−60
min
60 min.
* Optimaalista leivontatulosta varten kaikki nestemäiset ainekset on lisättävä leipävuokaan ensin. Sen jälkeen lisätään kaikki
kuivat ainekset.
** Ultrapikaohjelmalla leipä voidaan leipoa ennätysajassa. Veden lämpötila on tuolloin erityisen tärkeää, sillä se vaikuttaa
leivän kohoamiseen. Optimaalinen leivontatulos saadaan käyttämällä lämmintä vettä.
*** Hillojen valmistukseen suositellaan erillisen leipävuoan käyttöä.
Käyttöönotto
▪ Kun purat laitteen pakkauksesta, tarkista, ettei osia puutu ja että kaikki osat ovat täydellisiä ja
vauriottomia.
▪ Puhdista kaikki irrotettavat osat ennen käyttöä kappaleessa ”Puhdistus ja huolto” kuvatulla tavalla.
▪ Koska ensimmäisen kuumennuskerran aikana voi syntyä savua, suosittelemme laitteen ensimmäistä
käyttöönottoa tyhjän leipävuoan kanssa (ilman taikinakoukkua) ohjelmalla ”Leivonta” (nro 12).
▪ Anna leipäkoneen jäähtyä ja puhdista se jälleen kappaleessa ”Puhdistus ja huolto” kuvatulla tavalla.
Leivän, kakun ja taikinan valmistus
▪ Avaa KULT X -leipäkoneen kansi ja irrota leipävuoka vastapäivään kääntämällä.
▪ Suosittelemme taikinakoukun reiän voitelemista kuumuuden kestävällä margariinilla, jotta
vältetään taikinan juuttuminen kiinni taikinakoukun ja leipävuoan väliseen onttoon tilaan.
▪ Sijoita taikinakoukun leveä puoli alaspäin leipävuoan käyttöakselille.
▪ Lisää sitten kaikki reseptin mukaiset ainekset leipävuokaan. Yleensä nestemäiset ainekset, kuten vesi
tai öljy, lisätään ensimmäisenä. Sen jälkeen vuokaan lisätään sokeri, suola ja jauhot ja lopuksi hiiva.
Huomio: Jauhojen enimmäismäärä on 500 g ja 7g kuivahiivaa.
Vinkki: Ole varovainen, sillä liian suuri jauhomäärä voi aiheuttaa taikinan kohoamisen yli ja
kiinnipalamisen.
▪ Laita leipävuoka leipäkoneeseen ja lukitse se myötäpäivään kiertämällä.
▪ Sulje leipäkoneen kansi.
▪ Kytke pistoke pistorasiaan.
▪ Valitse ohjelmapainikkeella
haluamasi ohjelma. Tarkempia tietoja yksittäisistä ohjelmista on
sivulla 87.
▪ Valitse paahtoastepainikkeella
haluamasi paahtoaste (vaalea, keskitaso, tumma)
▪ Valitse leipäkokopainikkeella
haluamasi leipäkoko (450 g tai 750 g). Pikaohjelmalla (nro 4)
leipäkokoa ei tarvitse valita erikseen.
▪ Ajastin voidaan ohjelmoida painikkeilla – ja + (lisätietoa s. 89). Tämän vaiheen voi ohittaa, jos
leivonta halutaan käynnistää heti.
▪ Kun kaikki halutut asetukset on tehty, leivonta voidaan aloittaa KÄYNNISTYS/SAMMUTUS-
painikkeella
Start
Stop
. Jos mahdollista, älä avaa kantta ennen leivonta-ajan päättymistä, sillä se heikentää
leivontatulosta.
▪ Toisen vaivauskerran aikana kuuluu valitun ohjelman mukainen (nro 1, 2, 3,4, 5, 7, 10 ja 11)
moninkertainen merkkiääni. Sen jälkeen kansi voidaan tarvittaessa avata lisäainesten, esimerkiksi
rusinoiden tai pähkinöiden lisäämiseksi. Sulje kansi heti uudelleen hyvän leivontatuloksen
saavuttamiseksi.
▪ Leivontatoimenpiteen päätyttyä kuuluu moninkertainen merkkiääni. Voit poistaa leivän heti ja
päättää leivontatoimenpiteen KÄYNNISTYS/SAMMUTUS-painikkeen
Start
Stop
pitkällä painalluksella, tai
lämpimänäpitotoiminto käynnistyy enintään 60 minuutin ajaksi.
▪ Poista leipävuoka patalapun avulla kääntämällä vuokaa kevyesti vastapäivään. Kaada leipävuoka,
jotta leipä voi pudota jäähtymään keittiöritilän päälle.
▪ Ellei taikinakoukku irtoa automaattisesti, voit irrottaa sen taikinakoukun irrottimen avulla. Työnnä
se taikinakoukun aukkoon ja koukkaa se taikinakoukun alareunaan. Vedä taikinakoukku sitten
varovasti ulos.
▪ Jätä leipä jäähtymään keittiöritilälle noin tunniksi ennen sen leikkaamista, ellei reseptissä mainita
muuta.

92 93
fi
Ajastinasetus
Jos leivontatoimenpidettä ei käynnistetä heti, voidaan käyttää ajastintoimintoa. Leivonnan
päättymisajankohta voidaan asettaa painikkeilla – ja + 10 minuutin askelin. Se sisältää siis leivontaajan. Enimmäisviiveaika on 13 tuntia.
Vinkki: Tätä toimintoa ei ole seuraavissa ohjelmissa: ultrapikaohjelma, hillot ja leivonta.
Vinkki: Älä käytä ajastintoiminnon yhteydessä mitään helposti pilaantuvia elintarvikkeita, kuten
munia tai tuoretta maitoa.
Lämpimänäpitotoiminto
60 minuutin lämpimänäpitoaika kytkeytyy automaattisesti leivonta-ajan päättymisen jälkeen. Jos
haluat poistaa leivän koneesta heti leivonnan jälkeen, kytke leivontatoiminto pois päältä KÄYNNISTYS/
SAMMUTUS-painikkeen
Start
Stop
pitkällä painalluksella.
Muistitoiminto
Jos virransyöttö katkeaa hetkellisesti leivontatoimenpiteen aikana, leivonta käynnistyy jälleen 10
minuutin kuluessa, myös KÄYNNISTYS/SAMMUTUS-painiketta
Start
Stop
painamatta. Mikäli sähkökatko
kestää kuitenkin yli 10 minuuttia, leipäkone on käynnistettävä uudelleen.
Hyödyllisiä vinkkejä
▪ Raskaat taikinat: Raskaiden taikinoiden yhteydessä täytyy muuttaa järjestystä. Lisää leipävuokaan
ensin kuivat ja sitten nestemäiset ainekset. Jos haluat kuitenkin käyttää ajastintoimintoa, varmista,
ettei hiiva pääse ennenaikaisesti kosketuksiin nesteiden kanssa.
▪ Leivontasekoitukset: Leivontasekoituksille sopii yleensä, ellei reseptissä mainita muuta, normaalin
leivän ohjelma (nro 1). Lisää enintään reseptissä mainittu vesimäärä leivontasekoituksia käytettäessä.
Reseptistä riippuen suositellaan määrän vähentämistä kuitenkin enintään 50 ml:llä.
▪ Paahtoaste: Koska leipäkoneessa ei määräysten mukaisesti ole lämmitystä kansialueella, suositellaan
voimakkaimman paahtoasteen käyttöä, jos pidät rapeasta koostumuksesta.
▪ Munat: Munia käytettäessä nestemäärää täytyy mukauttaa suhteessa niihin. Lisäksi on suositeltavaa
vatkata munat ennen niiden laittamista leipävuokaan.
▪ Leivontatilan valaistus: Polttimon vaihtamiseksi lasikansi on avattava kolikolla. Käytä uunissa
polttimoa, jolla on seuraavat ominaisuudet:
⋅ E14
⋅ Kokonaispituus 49 mm
⋅ Lasin halkaisija 22 mm
⋅ 220-240 V
⋅ 15 W
⋅ 300 °C
Puhdistus ja huolto
Irrota verkkopistoke pistorasiasta käytön jälkeen. Anna leipäkoneen jäähtyä ennen puhdistusta. Poista
leipävuoka ottamalla rivasta kiinni ja kääntämällä vastapäivään. Irrota sitten taikinakoukku. Jos se ei
irtoa helposti, lisää leipävuokaan noin 30 minuutiksi haaleaa vettä ja anna taikinakoukun pehmetä
siinä. Sen jälkeen taikinakoukun irrottaminen on helppoa. Puhdista leipävuoka ja taikinakoukku
kostealla liinalla. Älä käytä teräviä tai hankaavia puhdistusaineita/-välineitä, jottei tarttumaton
pinnoite vaurioidu. Leipävuoan on kuivuttava täysin, ennen kuin sitä voidaan käyttää uudelleen.
Kostea liina sopii parhaiten myös leipäkoneen, kannen ja näkölasin puhdistukseen. Älä käytä niihin
hankaavia puhdistusaineita, sillä ne voivat vahingoittaa pintarakennetta. Koteloa ei saa koskaan
upottaa veteen. Puhdistamisen helpottamiseksi voit pestä mitta-astian, mittalusikan ja taikinakoukun
irrottimen astianpesukoneessa.
konepesun kestävä
huuhtele
juoksevalla vedellä
pyyhi kostealla
Leipävuoka
Taikinakoukku
Mitta-astia
Mittalusikka
Koukunirrotin
Kotelo

94 95
fi
Vianmääritys
Näytössä näkyy ”HHH” (ja kuuluu 5 merkkiääntä)
Laitteen sisäinen lämpötila on liian korkea. Nykyinen ohjelma täytyy pysäyttää. Avaa kansi ja anna
leipäkoneen jäähtyä 10−20 minuuttia.
Näytössä näkyy ”LLL” (ja kuuluu 5 merkkiääntä) KÄYNNISTYS/PYSÄYTYS-painikkeen painamisen
jälkeen
Start
Stop
Laitteen sisäinen lämpötila on liian alhainen. Pysäytä merkkiääni KÄYNNISTYS/PYSÄYTYS-painiketta
Start
Stop
painamalla ja avaa kansi. Odota 10−20 minuuttia, kunnes laite on saavuttanut huonelämpötilan.
Näytössä näkyy ”EE0” KÄYNNISTYS/PYSÄYTYS-painikkeen painamisen jälkeen
Start
Stop
Lämpötila-anturi ei ole oikein liitetty, toimita laite korjaukseen.
Ongelma Syy Ratkaisu
Leivontatilasta ja/tai
tuuletusaukoista tulee savua.
Ainekset ovat leivontatilassa
tai liimautuvat leipävuoan
ulkoreunaan.
Irrota pistoke pistorasiasta ja
puhdista leipävuoan ulkopuoli tai
leivontatila.
Leipä luhistuu keskeltä ja on
pohjasta kostea.
Leipä on jätetty leipävuokaan liian
pitkäksi aikaa leipomisen jälkeen.
Poista leipä leipävuoasta ennen
lämpimänäpitotoiminnon
kytkeytymistä pois päältä.
Aineksia ei ole sekoitettu oikein ja/
tai leipää ei leivota oikein.
On valittu väärät ohjelmaasetukset.
Tarkista valittu ohjelma sekä
leipäkoon ja paahtoasteen
asetukset.
Kansi on avattu usein
leivontatoimenpiteen aikana.
Kantta ei saa avata kuin
lisäainesten lisäämistä varten. Sen
jälkeen kansi on suljettava heti.
Taikinakoukku ei voinut kääntyä.
Tarkista, estävätkö esim. suurimot
taikinakoukun liikkeen. Poista
leipävuoka ja tarkista, kääntyykö
taikinakoukku. Ellei näin ole,
toimita laite korjaukseen.
Leipäkone ei käynnisty, näytössä
näkyy ”HHH”.
Laitteen sisäinen lämpötila on
liian korkea.
Nykyinen ohjelma täytyy
pysäyttää. Avaa kansi ja anna
leipäkoneen jäähtyä 10−20
minuuttia.
Leipä kohoaa liikaa.
Liikaa hiivaa, liikaa jauhoja tai liian
vähän suolaa.
Tarkista ainesten määrät, muuta
annostelua tarvittaessa ja tarkista,
onko kaikki ainekset lisätty.
Vinkkejä ja vastauksia
Leipä ei kohoa lainkaan tai kohoaa
vain hieman.
Ei lainkaan tai liian vähän hiivaa
ja/tai väärä vesimäärä.
Tarkista ainesten määrät, muuta
annostelua tarvittaessa ja tarkista,
onko kaikki ainekset lisätty.
Hiiva on päässyt liian aikaisin
kosketuksiin nesteen kanssa.
Noudata annettua järjestystä
leipävuokaa täytettäessä.
Leipä luhistuu keskeltä.
Taikinan tilavuus on leipävuokaa
suurempi.
Tarkista ainesten määrät ja muuta
annostelua tarvittaessa. Jos
käytetään vettä sisältäviä aineksia,
nestemäärää on vähennettävä sen
mukaan.
Hiiva on päässyt liian aikaisin
kosketuksiin nesteen kanssa.
Tee jauhoihin pieni syvennys
ja laita kuivahiiva siihen. Vältä
nesteen ja kuivahiivan suoraa
kosketusta.
Ongelma Syy Ratkaisu
Raskas, paakkuinen koostumus.
Liikaa jauhoja tai liian vähän
nestettä.
Tarkista ainesten määrät, muuta
annostelua tarvittaessa ja tarkista,
onko kaikki ainekset lisätty.
Liian vähän hiivaa tai sokeria.
Tarkista ainesten määrät, muuta
annostelua tarvittaessa ja tarkista,
onko kaikki ainekset lisätty.
Leipä ei ole kypsä keskeltä. Liikaa vettä.
Tarkista ainesten määrät, muuta
annostelua tarvittaessa ja tarkista,
onko kaikki ainekset lisätty.
Leipä/kuori on liian vaalea. On valittu väärä paahtoaste.
Koska leipäkoneessa ei määräysten
mukaisesti ole lämmitystä
kansialueella, suositellaan
voimakkaimman paahtoasteen
käyttöä, jos pidät rapeasta
koostumuksesta.
Apparatet opfylder de europæiske retningslinjer 2014/35/EU,
2014/30/EU og 2009/125/EU.
Dette produkt må ved slutningen af dets levetid ikke bortskaffes i
almindeligt husholdningsaffald, men skal afgives på et opsamlingssted
for genbrug af elektriske og elektroniske apparater. Materialerne kan
genanvendes ifølge deres typebetegnelse. Ved aflevering af brugte
apparater på et genbrugssted
bidrager du til beskyttelse af miljøet. Spørg din kommune om det
nærmeste genbrugssted.
Oikeudet muutoksiin pidätetään

96 97
no
no
Bruksanvisning
Viktige sikkerhetsanvisninger
▪ Dette apparatet kan brukes av barn fra 8 år og oppover og av
personer som har begrensede fysiske, sensoriske eller mentale
evner, eller som mangler erfaring og/eller kunnskap, så fremt de er
under tilsyn eller har fått opplæring i sikker bruk av apparatet og
forstår farene knyttet til slik bruk.
▪ Barn må ikke leke med apparatet.
▪ Rengjøring og vedlikehold må ikke utføres av barn, med mindre de
er over 8 år og under tilsyn.
▪ Barn under 8 år skal holdes borte fra apparatet og strømledningen.
▪ Apparatet må ikke betjenes via et eksternt tidsur eller en
fjernkontroll.
▪ Dette apparatet er beregnet på bruk i husholdninger og lignende
bruksområder, for eksempel:
⋅ på personalkjøkkenet i butikker, kontorer og andre
næringsområder
⋅ i landbruksvirksomhet
⋅ av kunder på hoteller, moteller, samt andre boenheter
⋅ i frokostpensjonater
▪ Hvis apparatets strømledning blir skadet, må den byttes av
produsenten eller produsentens kundeserviceavdeling eller av en
person med tilsvarende kvalifikasjoner for å unngå farer.
▪ Rengjør alle områder/deler som kommer i kontakt med mat på
tilbehøret og apparatet etter hver gangs bruk. Følg rådene i
kapittelet ”Rengjøring og vedlikehold”.
▪ Apparatet skal bare brukes slik det er beskrevet i denne
bruksanvisningen. Ukyndig bruk kan forårsake elektrisk støt eller
andre risikomomenter.
▪ Forsiktig, fare for forbrenning: Temperaturen på overflatene kan bli
svært høy. Varmeflatene forblir varme en stund etter at apparatet
er slått av.
▪ Slå av apparatet og trekk alltid ut støpselet før du bytter
tilbehørsdeler eller nærmer deg deler som beveger seg under bruk.
Før bruk
Apparatet må bare brukes til de beregnede formålene og i samsvar med denne bruksanvisningen. Les
derfor bruksanvisningen nøye før du tar apparatet i bruk. Den gir informasjon om bruk, sikkerhet og
vedlikehold av apparatet. Hvis denne informasjonen ikke følges, bortfaller vårt ansvar for eventuelle
skader. Ta godt vare på bruksanvisningen og gi den videre til neste eier sammen med apparatet. Vær
også oppmerksom på garantivilkårene på slutten. Apparatet er ikke beregnet til næringsbruk, men til
tilberedning av mat i vanlige mengder i privathusholdninger.
Følg sikkerhetsanvisningene når du bruker apparatet.
Tekniske data
Nominell spenning: 220–240 V~ 50-60 Hz
Strømforbruk: 450 W
Beskyttelsesklasse: I
Sikkerhetsanvisninger
▪ Støpselet må trekkes ut:
⋅ Hvis det oppstår feil under bruk
⋅ Før hver rengjøring
⋅ Etter bruk
▪ Apparatet må kun kobles til en forskriftsmessig installert stikkontakt. Strømledning og støpsel må
være tørre.
▪ Strømledningen må ikke dras eller klemmes over skarpe kanter. Den må heller ikke henge løst, og
den må være beskyttet mot varme og olje.
▪ Pass ved bruk av skjøteledning på at den er feilfri.
▪ Støpselet må ikke trekkes ut av stikkontakten etter strømledningen eller med våte hender.
▪ Ikke bruk ledningen til å bære apparatet.
▪ Apparatet må ikke benyttes på varme overflater, f.eks. kokeplater o.l., og ikke i nærheten av åpen
ild, fordi apparathuset kan smelte.
▪ Bruk bare apparatet når alle løse deler er korrekt satt på.
▪ Dra ut støpselet hvis apparatet ikke skal brukes over lengre tid.
▪ Apparatet må ikke tas i bruk og støpselet skal trekkes ut umiddelbart dersom:
⋅ apparatet eller strømledningen er skadet
⋅ det foreligger mistanke om feil etter fall eller lignende
I slike tilfeller må apparatet leveres inn til reparasjon.
▪ Apparatet skal kun brukes under tilsyn.
▪ Ikke ta på de varme overflatene.
▪ Bruk av tilbehør som ikke anbefales av produsenten kan føre til personskader.
▪ Ta ikke på bevegelige deler under bruk.
▪ Slå aldri brødformen mot noe for å få ut brødet, fordi brødformen da kan bli skadet.
▪ Bruk ikke aluminiumsfolie eller lignende materialer i brødbakemaskinen, fordi dette øker risikoen
for brann eller kortslutning.
▪ Ikke dekk brødbakemaskinen med kopphåndkle eller lignende. Varme og damp må kunne slippe ut
når som helst. Dersom brødbakemaskinen dekkes eller kommer i berøring med brennbart materiale,
kan det ta fyr.
▪ Bruk aldri brødbakemaskinen uten brødformen, ellers kan det oppstå skader.
▪ Sett apparatet slik at det ikke sklir av arbeidsplaten, f.eks. under elting av tunge deiger.
▪ Ved feil bruk av apparatet, feil betjening eller ikke fagmessig reparasjon, påtar vi oss ikke noe
ansvar for eventuelle skader. I slike tilfeller bortfaller også garantien.

98 99
no
Betjeningsenhet
Program-tast
Med denne tasten velger
du program. Det valgte
programnummeret vises i
displayet.
Stekegrad-tast
Med denne tasten velger du
ønsket stekegrad. Den vises som
følger i displayet:
- Lys
- Middels
- Mørk
Start/Pause
Med denne tasten starter du
bakeprosessen, og avbryter den
dersom du trykker en gang til.
Stopp
Hold inne denne tasten for å avslutte
bakeprogrammet.
Innstilling tidsur
Du kan programmere tidsurfunksjonen med tastene – og
+. Den innstilte sluttiden vises i
displayet.
Brødstørrelse-tast
Med denne tasten velger du
ønsket brødstørrelse. Avhengig
av valgt størrelse vises 450 g eller
750 g i displayet.
Ovnsrombelysning
Hold inne denne tasten for å aktivere
ovnsrombelysningen. Denne slår seg
automatisk av etter 30 sekunder,
men kan osgå slås av før med et nytt,
lengre trykk på tasten.
Bruksområde
Med WMF KULT X brødbakemaskinen kan du enkelt bake brød selv. Alt du trenger, er ingrediensene,
resten ordner WMF KULT X brødbakemaskin. 12 forskjellige bakeprogrammer sørger for noe for en hver
smak. I leveransen finner du et programkort for en enkel tilordning av programnumrene. Dette kan
gjerne oppbevares i brødformen på en plassbesparende måte.
Oversikt programmer
Program
nr.
Betegnelse Beskrivelse
Tilgjengelige alternativer Varighet [t]
Tidsur-
funksjon
Stekegrad Størrelse 450 g 750 g
1 Klassisk brød
Elting, heving og steking av blandingsbrød. Du kan
tilsette flere ingredienser.
03:08 03:15
2 Loff
Elting, heving og steking over et lengre tidsrom.
Brødet får som regel en sprø skorpe og en luftig
konsistens.
03:55 04:05
3 Fullkornsbrød
Elting, heving og steking av fullkornsbrød. Det
anbefales ikke å bruke tidsur-funksjonen, fordi dette
kan forringe stekeresultatet.
03:47 03:55
4 Hurtigprogram*
Elting, heving og steking av brød på kortere tid enn
programnr. 1. Brødet blir som regel mindre, og mer
kompakt i konsistensen.
02:25
5 Søtt brød
Elting, heving og steking av søtt brød. Du kan tilsette
flere ingredienser.
03:05 03:10
6 Glutenfritt
Elting, heving og steking av glutenfritt brød. Du kan
tilsette flere ingredienser.
03:05 03:10
7
Ultra-
hurtigprogram**
Elting, heving og steking av brød på kort tid. Brødet
blir som regel mindre og råere enn brød stekt i
programnr. 4.
01:43 01:53
8 Deigprogram
Elting og heving av deig, uten steking. Deigen kan
brukes til rundstykker, pizza osv.
01:30
9 Syltetøy***
Koking av syltetøy og marmelade. Frukt må snittes
før den has i brødformen.
01:20
10 Toastbrød
Elting, heving og steking av toastbrød. Brødet får
som regel en tynnere skorpe og en luftig konsistens.
03:10 03:15
11 Kake Elting, heving og steking ved bruk av bakepulver.
02:00
12 Steking
Bare steking, ingen elting eller heving. Kan
også brukes for å forlenge steketiden til andre
programmer.
01:00
* Fyll først alle flytende ingredienser i brødformen for å oppnå et optimalt bakeresultat. Deretter tilsettes alle tørre ingredienser.
** Med ultra-hurtigprogrammet kan du bake brød på minimal tid. Vanntemperaturen er spesielt viktig, fordi den påvirker
hevingen. Best resultat blir det med varmt vann.
*** Ved tilberedning av syltetøy anbefales det å bruke en separat stekeform.

100 101
no
Oversikt over programforløpet
Program
nr.
Betegnelse Mengde
Samlet
varighet
Elting 1 Heving 1 Elting 2 Heving 2
Heving
3
Steking
Varmhol-
ding
1 Klassisk brød
450 g 03:08 t 11 min 20 min 17 min 25 min 35 min 80 min 60 min
750 g 03:15 t 12 min 20 min 18 min 25 min 35 min 85 min 60 min
2 Loff
450 g 03:55 t 18 min 40 min 22 min 30 min 40 min 85 min 60 min
750 g 04:05 t 20 min 40 min 25 min 30 min 40 min 90 min 60 min
3 Fullkornsbrød
450 g 03:47 t 11 min 25 min 21 min 35 min 55 min 80 min 60 min
750 g 03:55 t 12 min 25 min 23 min 35 min 55 min 85 min 60 min
4 Hurtigprogram* 02:25 t 12 min 10 min 13 min / 25 min 85 min 60 min
5 Søtt brød
450 g 03:05 t 12 min 5 min 23 min 30 min 35 min 80 min 60 min
750 g 03:10 t 12 min 5 min 23 min 30 min 35 min 85 min 60 min
6 Glutenfri
450 g 03:05 t 12 min 5 min 13 min 30 min 35 min 90 min 60 min
750 g 03:10 t 12 min 10 min 13 min 30 min 35 min 90 min 60 min
7
Ultra-
hurtigprogram**
450 g 01:43 t 13 min / 5 min 25 min / 60 min 60 min
750 g 01:53 t 13 min / 5 min 30 min / 65 min 60 min
8 Deigprogram 01:30 t 25 min / / 30 min 35 min / /
9 Syltetøy*** 01:20 t / 15 min / / 45 min 20 min /
10 Toastbrød
450 g 03:10 t 17 min 35 min 8 min 25 min 35 min 70 min 60 min
750 g 03:15 t 17 min 35 min 8 min 25 min 35 min 75 min 60 min
11 Kake 02:00 t 7 min 4 min 10 min 9 min / 90 min 60 min
12 Steking 01:00 t / / / / /
10-60
min.
60 min
* Fyll først alle flytende ingredienser i brødformen for å oppnå et optimalt bakeresultat. Deretter tilsettes alle tørre ingredienser.
** Med ultra-hurtigprogrammet kan du bake brød på minimal tid. Vanntemperaturen er spesielt viktig, fordi den påvirker
hevingen. Best resultat blir det med varmt vann.
*** Ved tilberedning av syltetøy anbefales det å bruke en separat stekeform.
Ta i bruk enheten
▪ Kontroller at apparatet og alle deler er komplette og uskadet når du pakker det ut.
▪ Rengjør alle deler som kan tas av som beskrevet i kapittelet ”Rengjøring og pleie” før du tar
apparatet i bruk.
▪ Siden det kan oppstå røyk første gang apparatet varmes opp, anbefaler vi å starte apparatet med
tom, innsatt brødform (uten eltekrok) i programmet steking (nr. 12).
▪ La brødbakemaskinen avkjøles og rengjør den på nytt som beskrevet i kapittelet ”Rengjøring og
pleie”.
Tilberedning av brød, kake og deig
▪ Åpne lokket på KULT X brødbakemaskinen og ta ut brødformen ved å dreie den mot klokken.
▪ Vi anbefaler å pensle hullet i eltekroken med varmebestandig margarin for å unngå at deigen fester
seg i hulrommet mellom eltekrok og brødform.
▪ Sett eltekroken på drivakselen til brødformen med den brede siden nedover.
▪ Ha deretter alle ønskelige ingredienser i brødformen som angitt i oppskriften. Vanligvis tilsettes
først de flytende ingrediensene som vann eller olje. Så følger sukker, salt og mel, og til slutt gjær.
OBS: Fyll aldri på mer enn maks. 500 g mel og 7g tørrgjær.
Merk: Forsiktig; ved for stor melmengde kan deigen overheve og svi seg.
▪ Sett brødformen inn i brødbakemaskinen og vri med klokken for å låse.
▪ Lukk lokket til brødbakemaskinen.
▪ Sett så støpselet i stikkontakten.
▪ Velg ønsket program med programtasten
. Du finner nærmere informasjon om de enkelte
programmene på side 97.
▪ Velg ønsket stekegrad (lys, middels, mørk) med stekegradstasten
.
▪ Velg brødstørrelse (450 g eller 750 g) med brødstørrelsestasten
. Ved valg av hurtigprogrammet
(nr. 4) er det ikke nødvendig å velge brødstørrelse.
▪ Du kan programmere tidsuret med tastene – og + (nærmere informasjon på side 99). Hopp over
dette trinnet hvis bakeprosessen skal starte med en gang.
▪ Når du har foretatt alle nødvendige innstillinger, kan du starte bakeprosessen med START/STOPP-
tasten
Start
Stop
. Unngå å åpne lokket før bakeprosessen er ferdig, fordi det ellers vil påvirke resultatet
negativt.
▪ Under andre elting hører du en gjentatt pipetone i noen programmer (nr. 1, 2, 3, 4, 7, 10 og 11). Da
kan du åpne lokket og tilsette flere ingredienser som f.eks. rosiner eller nøtter. Lukk deretter lokket
så fort som mulig igjen for å få best mulig bakst.
▪ Når baksten er ferdig, hører du en gjentatt pipetone. Du kan da ta ut brødet og avslutt med et
langt trykk på START/STOPP-tasten
Start
Stop
, ellers kobles varmholdefunksjonen automatisk inn i maks. 60
minutter.
▪ Bruk grytekluter og ta brødformen ut ved å dreie den lett mot klokken. Velv brødformen slik at
brødet kan avkjøles på rist.
▪ Dersom eltekroken ikke løsner automatisk, kan du løsne den med krokfjerneren. Før den inn i
åpningen på eltekroken og hekt den fast langs nedre kant på eltekroken. Trekk så eltekroken
forsiktig ut.
▪ La brødet avkjøles ca. en time på risten før du skjærer det opp dersom det ikke står oppgitt noe
annet i oppskriften.

102 103
no
Innstilling av tidsuret
Dersom du ikke ønsker å starte bakeprosessen med en gang, kan du bruke tidsur-funksjonen. Du kan
stille inn tidspunktet for når brødet skal være ferdig i trinn på 10 minutter med tastene – og +. Du kan
maksimalt utsette sluttiden med 13 timer.
Merk: Denne funksjonen er ikke tilgjengelig for følgende programmer: Ultra-hurtigprogram, syltetøy
og steking.
Merk: Unngå lett bedervelige ingredienser som f.eks. egg eller melk når du skal bruke tidsurfunksjonen.
Varmholdingsfunksjon
Når bakeprosessen er ferdig, kobles automatisk varmholdingsfunksjonen inn i 60 minutter. Dersom du
ønsker å ta brødet rett ut etter steking, avslutter du bakeprosessen ved å holde inne START/STOPPtasten
Start
Stop
.
Minnefunksjon
Dersom det oppstår forbigående strømbrudd (under 10 minutter) under bakeprosessen, gjenopptas
prosessen også uten at man trykker på START/STOPP-tasten
Start
Stop
. Dersom strømbruddet varer over 10
minutter, må brødbakemaskinen startes på nytt.
Nyttige merknader
▪ Tykke deiger: Det anbefales å endre rekkefølgen ved tykke deiger. Tilsett først de tørre ingrediensene
og deretter de flytende i brødformen. Pass på at gjæren ikke kommer i kontakt med væsken før tiden
dersom du ønsker å bruke tidsurfunksjonen.
▪ Brødblandinger: Dersom ikke annet er angitt i oppskriften, er programmet for klassisk brød (nr.
1) best egnet for brødblandinger. Tilsett ikke mer vann enn det som står angitt i oppskriften til
brødblandingen. Avhengig av oppskrift anbefales det å redusere væskemengden med inntil 50 ml.
▪ Stekegrad: Siden brødbakemaskinen forskriftsmessig ikke er utstyrt med varmeelement i lokket,
anbefaler vi å velge høyeste stekegrad dersom du ønsker sprø konsistens.
▪ Egg: Dersom du tilsetter ekstra egg, må væskemengden tilpasses proposjonelt. I tillegg anbefales det
å vispe eggene sammen før de has i brødformen.
▪ Ovnsrombelysning: Når du skal skifte lyspære, kan du ta av glassdekselet med en mynt. Bruk en
stekeovnslampe med følgende egenskaper:
⋅ E14
⋅ Samlet lengde 49 mm
⋅ Diameter glass 22 mm
⋅ 220-240 V
⋅ 15 watt
⋅ 300°C
Rengjøring og vedlikehold
Trekk ut støpselet etter bruk. La brødbakemaskinen avkjøles før rengjøring. Ta ut brødbakeformen etter
hanken og vri den mot klokken. Fjern deretter eltekroken. Dersom den er vanskelig å få ut, kan du fylle
brødbakeformen med lunkent vann og la eltekroken stå oppi og bløtgjøres i 30 minutter. Deretter vil
den lett kunne fjernes. Rengjør brødformen og eltekroken med en fuktig klut. Ikke bruk etsende eller
skurende rengjøringsmidler, fordi disse skader slippbelegget. La brødformen tørke helt før den tas i
bruk igjen. Brødbakemaskinen, lokket eller glasslokket rengjøres også med en fuktig klut. Ikke bruk
skurende rengjøringsmidler, fordi disse kan skade overflatestrukturen. Senk aldri apparatet ned i vann.
Målebegeret, måleskjeen og eltekrokfjerneren kan vaskes i oppvaskmaskinen for å sørge for enkel
rengjøring.
Egnet for
oppvaskmaskin
Kan skylles under
rennende vann
Tørkes av med
fuktig klut
Brødform
Eltekrok
Målebeger
Måleskje
Krokfjerner
Hus

104 105
no
Problemløsing
I displayet vises ”HHH” (fulgt av fem pipetoner)
For høy temperatur inni apparatet. Programmet må avbrytes. Åpne lokket og la brødbakemaskinen
avkjøles i 10 til 20 minutter.
I displayet vises ”LLL” (fulgt av fem pipetoner) når du trykker START/STOPP-tasten
Start
Stop
For lav temperatur inni apparatet. Stopp pipetonen ved å trykke på START/STOPP-tasten
Start
Stop
og åpne
lokket. Vent i 10 til 20 minutter til apparatet har nådd romtemperatur.
I displayet vises ”EE0” når du trykker START/STOPP-tasten
Start
Stop
Temperatursensoren er ikke riktig tilkoblet, lever apparatet til reparasjon.
Problem Årsak Løsning
Det kommer røyk ut av
stekerommet eller lufteåpningene.
Det er kommet ingredienser i
stekerommet eller på utsiden av
brødformen.
Trekk ut støpselet og rengjør
yttersiden av brødformen eller
stekerommet.
Brødet faller sammen i midten og
er fuktig i bunnen.
Brødet har lagt for lenge i
brødformen etter steking.
Ta brødet ut av brødformen før
varmholdefunksjonen kobler ut.
Ingrediensene blandes ikke eller
brødet blir ikke ordentlig stekt.
Det er valgt feil
programinnstillinger.
Kontroller valgt program og
innstillingene for brødstørrelse og
stekegrad.
Lokket ble åpnet hyppig under
stekingen.
Ikke åpne lokket annet enn når
du skal tilsette flere ingredienser.
Lukk deretter lokket så fort som
mulig igjen.
Eltekroken roterte ikke.
Kontroller om eltekroken blokkeres
av korn e.l. Ta ut brødformen
og kontroller om eltekroken kan
rotere. Hvis ikke må du levere
apparatet til reparasjon.
Brødbakemaskinen starter ikke, i
displayet vises "HHH"
For høy temperatur inni apparatet.
Programmet må avbrytes. Åpne
lokket og la brødbakemaskinen
avkjøles i 10 til 20 minutter.
Brødet hever for mye
For mye gjær, for mye mel eller
for lite salt
Kontroller ingrediensmengdene,
tilpass om nødvendig mengden
og kontroller at alle ingrediensene
er tilsatt.
Tips og svar
Brødet hever ikke eller bare litt
Lite eller ingen gjær, eller feil
vannmengde
Kontroller ingrediensmengdene,
tilpass om nødvendig mengden
og kontroller at alle ingrediensene
er tilsatt.
Gjæren kom for tidlig i kontakt
med væsken
Vær oppmerksom på angitt
rekkefølge når du fyller
brødformen.
Problem Årsak Løsning
Brødet faller sammen i midten
Brødvolumet er større enn
brødformen
Kontroller ingrendiensmengden
og tilpass om nødvendig. Ved bruk
av ingredienser som inneholder
vann, må væskemengden reduseres
tilsvarende.
Gjæren kom for tidlig i kontakt
med væsken
Lag en liten grop i melet og ha
tørrgjæren oppi, unngå direkte
kontakt mellom væske og tørrgjær.
Tung, klumpete konsistens
For mye mel eller for lite væske
Kontroller ingrediensmengdene,
tilpass om nødvendig mengden
og kontroller at alle ingrediensene
er tilsatt.
For lite gjær eller sukker
Kontroller ingrediensmengdene,
tilpass om nødvendig mengden
og kontroller at alle ingrediensene
er tilsatt.
Brødet er ikke stekt i midten For mye vann
Kontroller ingrediensmengdene,
tilpass om nødvendig mengden
og kontroller at alle ingrediensene
er tilsatt.
Brødet/skorpen er for lys Det er valgt feil stekegrad
Siden brødbakemaskinen
forskriftsmessig ikke er utstyrt med
varmeelement i lokket, anbefaler vi
å velge høyeste stekegrad dersom
du ønsker sprø konsistens.
Apparatet er i samsvar med EU-direktivene 2014/35/EU, 201/30/EU og
2009/125/EU.
Dette produktet må ikke kastes sammen med vanlig husholdningsavfall på
slutten av levetiden, men leveres til et returpunkt for gjenvinning av elektrisk og
elektronisk utstyr.
Materialene kan resirkuleres i samsvar med merkingen. Med gjenbruk,
resirkulering eller andre former for gjenvinning av utrangerte apparater yter du
et viktig bidrag til å beskytte miljøet.
Du kan undersøke med kommunen du bor i, hvor du finner det ansvarlige
returpunktet.
Med forbehold om endringer

106 107

Kundendienst-Adresse:
WMF consumer electric GmbH
Standort Trepesch
Steinstraße 19
D-90419 Nürnberg
Germany
Tel.: +49 (0) 7331 256 256
eMail: service-wmf@wmf-ce.de
Hersteller:
WMF consumer electric GmbH
Messerschmittstraße 4
D-89343 Jettingen-Scheppach
Germany
www.wmf-ce.de
Änderungen vorbehalten IB-15140011-07-1703
type: 0415140011
 Loading...