

MV Sports & Leisure Postman Pat 12 inch Assembly Manual
12" Bicycle
Please retain this leaflet for reference to the manufacturer.
Made in China to European Safety Standards.
Conforms to ISO8098
This mark denotes compliance with the standards
laid down by the EC (European Community).
CUSTOMER HELPLINE
We make every effort to ensure that this product reaches
you in satisfactory condition.
However if you have any queries, need assistance, or find
this product defective, please call our Customer Helpline:
0870 8404255 (UK ONLY)
MV SPORTS & LEISURE LTD
35 Tameside Drive • Castle Bromwich
Birmingham • B35 7AG • UK
Email: info@mvsports.com • www.mvsports.com
DISTRIBUTED BY
Product No. MO4072
PLEASE READ BEFORE ASSEMBLY
03.04 - ISSUE 1
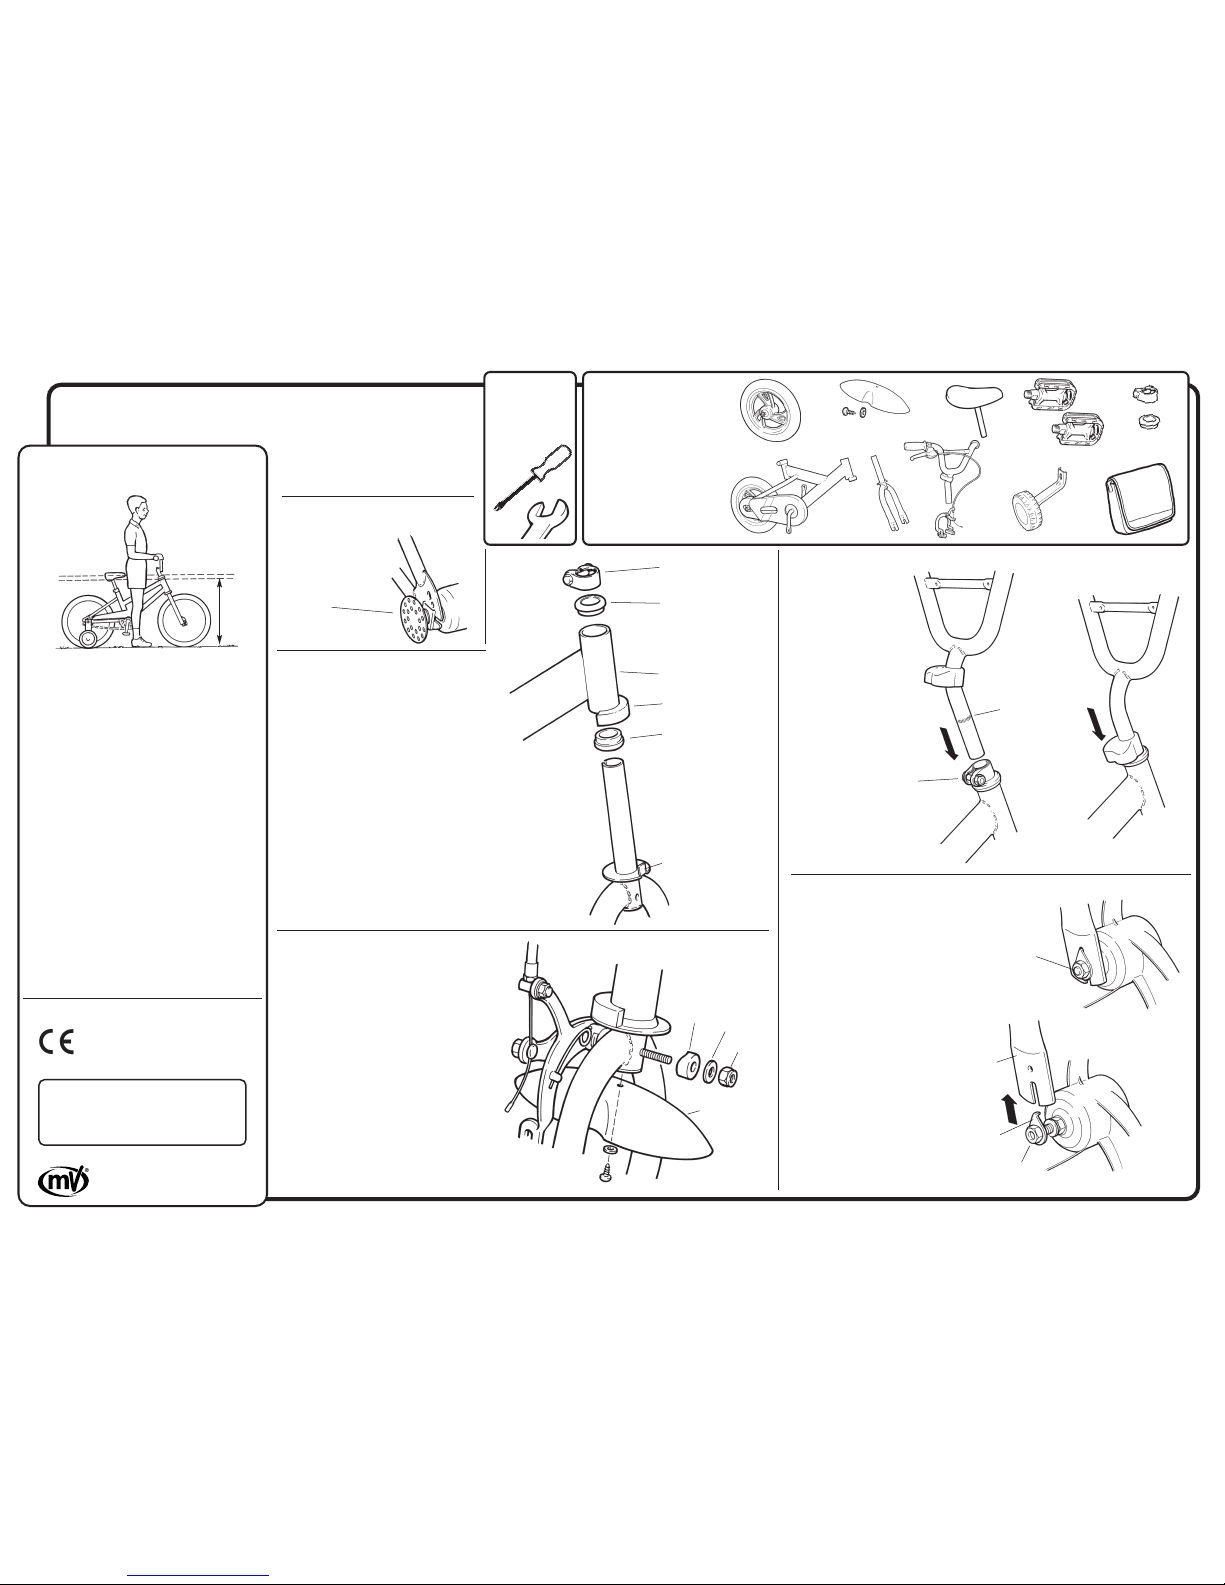
CONTENTS:TOOLS
1. Frame assembly
2. Front wheel
3. Mudguard, screw and washer
4. Front forks
5. Handle and brake assembly
6. Saddle and saddle pillar assembly
7. Stabiliser arm and wheel assembly (x2)
8. Pedals (x2)
9. Handlebar bag
10. Handlebar clamp
11. Head bearing inserts (x2)
Spanner sizes:
13mm for saddle
14mm for stabilisers
15mm for pedals
Screwdriver
Important owner’s information
Please read this before allowing your child to ride the bicycle.
CORRECT BICYCLE SIZE
Make sure the bicycle you
have bought is the correct size
for the child.
The minimum crotch
measurement of the rider,
with feet flat on the ground,
should be 1” (25mm) more
than the height of the bike.
BICYCLE SET-UP
It is essential that, before moving off, the rider is comfortably seated
on the bicycle and not stretching forward to reach the handlebars.
Re-check the instructions given for the installation of the saddle.
FOR YOUR CHILD’S SAFETY
Recheck that all screws, nuts and bolts are firmly tightened.
Make sure that your child is capable of riding this bicycle.
Do not allow your child to ride without supervision.
BASIC MAINTENANCE
To adjust the tension of the chain drive, loosen the two rear wheel
retaining nuts and move the back wheel either forwards or backwards
to adjust tension. Re-tighten nuts once correct tension is achieved.
Brake blocks must be checked by an adult at regular intervals. It is
recommended that the brake blocks are replaced if they become less
than 3mm on the shortest side.
Lubricate moving parts with light machine oil at regular intervals or
when necessary.
Any ware on tyres must be checked by an adult. Please note helpline
number for replacement parts.
RECOMMENDED TORQUE TOLERANCES
Handlebar clamp 15 nm
Seat Post 15 nm
Wheels 20 nm
WARNING! A PROTECTIVE HELMET SHOULD BE WORN
WHEN RIDING.
Check and tighten all bolts regularly. Failure to do so
could result in injury.
Check for wear or damage regularly. Repair if wear or
damage is found.
Not suitable for use on a public highway.
NOT SUITABLE FOR CHILDREN UNDER 3 YEARS DUE
TO SMALL PARTS
Crotch
measurement
This bicycle is to be assembled by an adult
Check the contents and only remove the
protective packaging from each item as
and when it is to be fitted
Please keep the packaging until you have
completely assembled the bicycle.
FITTING THE
HANDLEBARS
1. Slide the
handlebars into the
fork stem at least as
far as the minimum
insertion mark.
2. Align the
handlebars with the
front wheel and
tighten the
handlebar clamp.
3. Slide the clamp
cover down over the
clamp.
6
5
7
Clamp
Minimum
insertion
mark
Transit
protector
Handlebar clamp
Head bearing insert
Head bearing insert
Steering lock tab
Steering lock
Head tube
8
9
TRANSIT PROTECTORS
Remove frame protectors
and dispose of safely.
R
L
FRONT WHEEL
1. Loosen the front wheel nuts
sufficiently to allow the
tabbed locating washers to fit
outside the fork end.
2. Insert the front wheel into the
front forks, sliding the
wheelspindle into the slots in
the fork end.
3. Ensure that the locating
washer tabs are inserted into
the holes in the fork end.
4. Check that the wheel rim is
central between the forks
and tighten the wheel nuts.
Wheel spindle
Forked
plate
Tabbed
locating
washer
Wheel
nut
2
4
3
1
FITTING THE BRAKE CALLIPER
1. Remove the nut, washer and saddle
washer from the brake calliper assembly.
2. Insert the calliper assembly bolt through
the hole in frame fork tube.
3. Replace saddle washer, washer and nut
and tighten.
4. Adjust brake if necessary. (see “adjusting
the brake” overleaf)
FITTING THE MUDGUARD
1. Position the mudguard inbetween the
frame forks, lining up the hole in the
mudguard with the hole in the end of the
frame fork tube.
2. Secure in position with the screw and
washer.
Saddle
washer
Washer
Nut
Mudguard
10
11
FRONT FORK ASSEMBLY
1 Push the 2 head bearing inserts firmly into
the top and bottom of the head tube.
3 Insert front fork stem through the frame
head bearings with the steering lock tab
facing forwards. Ensure the steering lock
tab engages into the steering lock
4 Slide the handlebar clamp onto the fork
stem with clamping at the back
5 DO NOT TIGHTEN THE CLAMP AT THIS
STAGE
ADJUSTING THE BRAKE
1. On the front brake arm, loosen the anchor nut and bolt.
2. Squeeze the brake shoes together and using a pair of pliers,
pull the inner brake cable tight.
3. Re-tighten the cable anchor nut and bolt.
4. Using the cable adjuster, adjust the brakes to give 1/16”
clearance between the brake blocks and the wheel rim
5. Tighten the cable adjuster lock nut.
6. Check the brake blocks make contact with the wheel rim and
not the tyre.
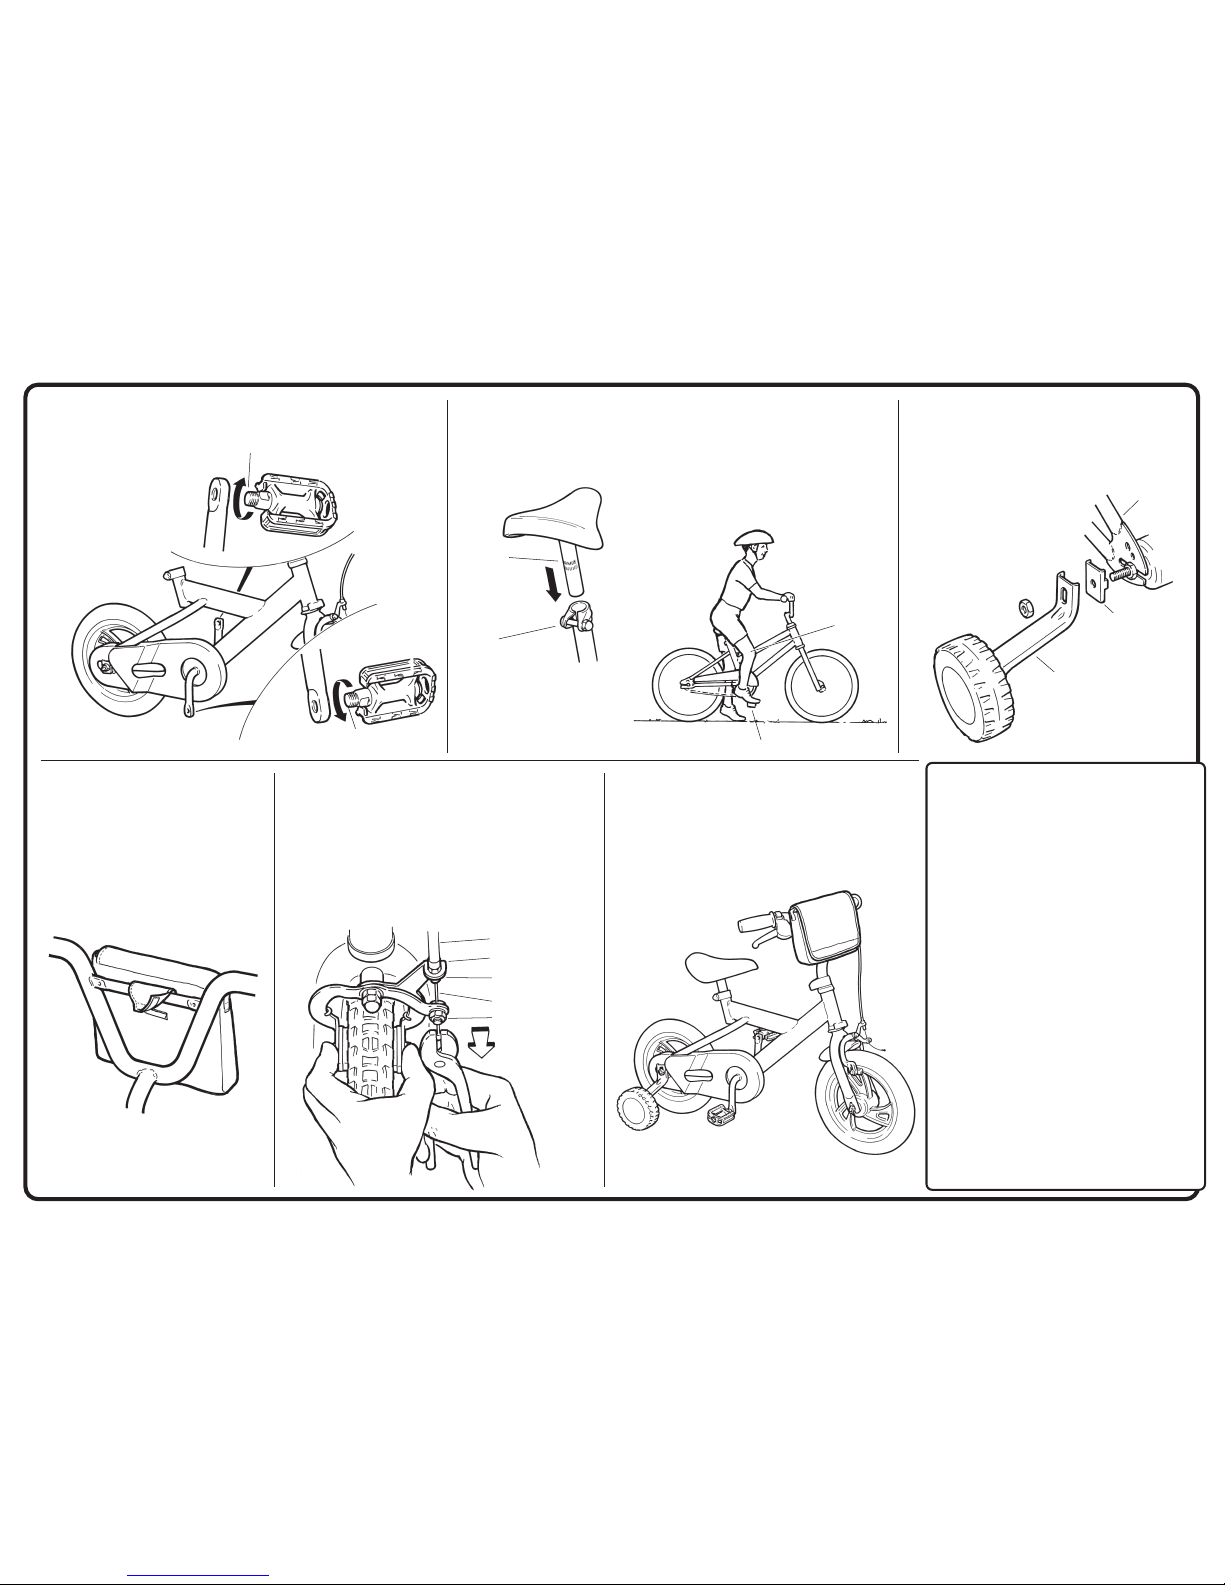
FITTING THE STABILISERS
1. Remove the nut from the rear axle
frame assembly leaving the stabiliser
frame bracket in position.
2. Slide the stabiliser over the threaded
axle spindle end.
3. Replace nut and tighten.
4. To adjust the stabiliser wheel height,
loosen the nut, slide the stabilisers
up or down to adjust the wheel
height and retighten the nut.
ATTACHING HANDLEBAR BAG
1. Fasten the velcro straps around the horizontal
tube on the handlbar as illustrated.
ASSEMBLED BIKE
A GUIDE TO SAFE CYCLING
1. We recommend this bike is for pavement use only.
2. Do not ride at night. Visibility is often limited at dawn
and dusk.
3. Always give pedestrians right-of-way, and don’t ride to
close to them. Never park your bicycle where it can
cause a nuisance.
4. Avoid hazards that may cause you to lose control of
your bicycle such as pot holes, uneven pavements and
manhole covers.
5. Leave plenty of room when passing parked vehicles and
watch out for doors being opened in your path.
6. Remember that braking distance should be increased in
wet weather, and regular checks of brakes, steering and
lighting should be made.
7. Never carry passengers on your bicycle. Never carry
packages in your hands while riding, or fix anything to
your bicycle that could obstruct your visibility or control.
8. Don't wear anything that restricts your hearing.
9. Always ride with both hands on the handlebars.
10. Don’t wear very loose clothing, which could hang down
and become caught in the wheels of your bicycle. Wear
cuff bands or trouser clips to keep your trousers from
getting caught in the chainwheel.
11. We recommend that light-coloured or fluorescent
clothing be worn which helps others to see you in
daylight and poor light.
12. Always wear proper safety equipment. We recommend
a helmet, long-sleeve shirt, long trousers, shoes and
elbow and knee pads. Gloves and eye protection also
make good sense. Cover your handlebars, stem and top
tube with safety pads for extra protection.
13. Don't ride your bicycle if the chain cover is not attached.
PLEASE REFER TO THE HIGHWAY CODE REGARDING
RULES FOR CYCLISTS.
Brake cable
Cable adjuster screw
Cable adjuster lock nut
Brake cable wire
Anchor bolt and nut
Frame
Stabiliser
Stabiliser frame
bracket
Pedal in lowest position
Knee
slightly
bent
FITTING THE SADDLE
1. Push the saddle pillar into the down tube at
least as far as the Minimum insertion mark.
3. Align the saddle with the bike frame and
tighten the clamp with the spanner provided.
Clamp
Minimum
insertion
mark
PROPER SEAT HEIGHT
FITTING THE PEDALS
NOTE: The pedals are identified
as right hand or left hand by an 'R'
or 'L' on the spindle end.
1. Screw the pedal marked 'R'
clockwise into the right hand
chain wheel crank (side with
chainguard) and tighten
securely.
2. Screw the pedal marked 'L'
anti-clockwise into left hand
crank and tighten securely.
'L'
'R'
 Loading...