

Page 1

Page 2

1
GENERAL SAFETY 2
GENERAL INFORMATION 3
I. UNPACKING 3
II. FEATURES 3
III. REMOTE CONTROL UNIT (RCU) 4
IV. HOW TO SETTING RCU FOR TV 6
V. FRONT PANEL 8
VI. REAR PANEL 9
INSTALLING EQUIPMENT 10
CHANNEL LIST GUIDE 11
MENU GUIDE 13
MAIN PAGE 13
I. CHANNEL MANAGER 13
II. INSTALLATION 15
III. OPTIONS 20
IV. UTILITY 22
V. ACCESSORY 23
PVR Guide 24
TROUBLESHOOTING 31
SPECIFICATIONS 32
BRAND LIST 178
TABLE OF CONTENTS
To disconnect the apparatus from the mains, the plug must be pulled out
from the mains socket, therefore the mains plug shall be readily operable.
Page 3

2 3
GENERAL INFORMATION
Please ensure that the following items are included with the receiver in your pack-
ing.
1) Remote Control Unit (RCU)
2) Batteries (2EA)
3) User’s Manual
4) A/V Cable
Supports MPEG-2, MPEG-4, H.264 and fully DVB compliant.
Satellite receiver.
2 Slots common interface for Viaccess, Irdeto, Cryptoworks, Nagravision, Conax,
Mediaguard and etc.
1 Slot smart card.
DiSEqC 1.0, 1.1, 1.2 and USALS.
Aspect ratio adjustment 4:3 (16/9 crop), 4:3 (16/9 letterbox), 16:9 (4/3 pillar box).
User friendly OSD and operation.
Total 8,000 Channels Programmable.
Multi-language audio support
Multi-language menu text support.
Favorite channel selections.
Parental Guide and rating control.
EPG(Provider Electronic Program Guide) for On Screen Channel Information.
On-Screen Display with 16 bit Color.
Zoom Function in Pause.
Dolby Digital Bitstream Out through S/PDIF(Optical & Coaxal).
Seletable output for 1080i, 720P, 576P and 576i format.
Multiple Video Outputs “HDMI, Component(YPbPr), SCART(RGB, CVBS)”.
USB 2.0 Host (Access to HDD, USB memory, Others etc).
Upgrade Software & Update Channel Database through USB 2.0 Port.
I. UNPACKING
II. FEATURES
GENERAL SAFETY
Please read the following recommended instructions carefully to avoid the risk of
your physical Injury before the product is operated.
Do not cover the receiver and keep clear space around the receiver for sufficient.
Check the receiver’s operation voltage 90~250V, 50Hz~60Hz Max, 40W Keep liquid
away from the receiver.
The receiver shall not be exposed to dripping or splashing and no objects that filled
with liquid shall not be placed on the receiver.
Unplug the receiver from the wall outlet before cleaning.
Use a soft cloth and a mild solution of washing-up liquid to clean the casing.
Do not block the receiver’s ventilation slots which are provided for ventilation and
protection from overheating.
Please maintain the receiver in a free airflow.
Do not allow the receiver to be exposed to hot, cold or humid condition.
Do not use any cable and attachment that are not recommended as these may
damage your equipment.
Please unplug the receiver from the wall outlet and disconnect the cable between
the receiver and the antenna when you will not use it for long time.
Do not remove the cover to reduce the risk of electric shock.
Do not attempt to service the receiver yourself.
Refer all serving to qualified service personnel.
Manual may be updated as new features.
WARNING
Page 4
4 5
GENERAL INFORMATION
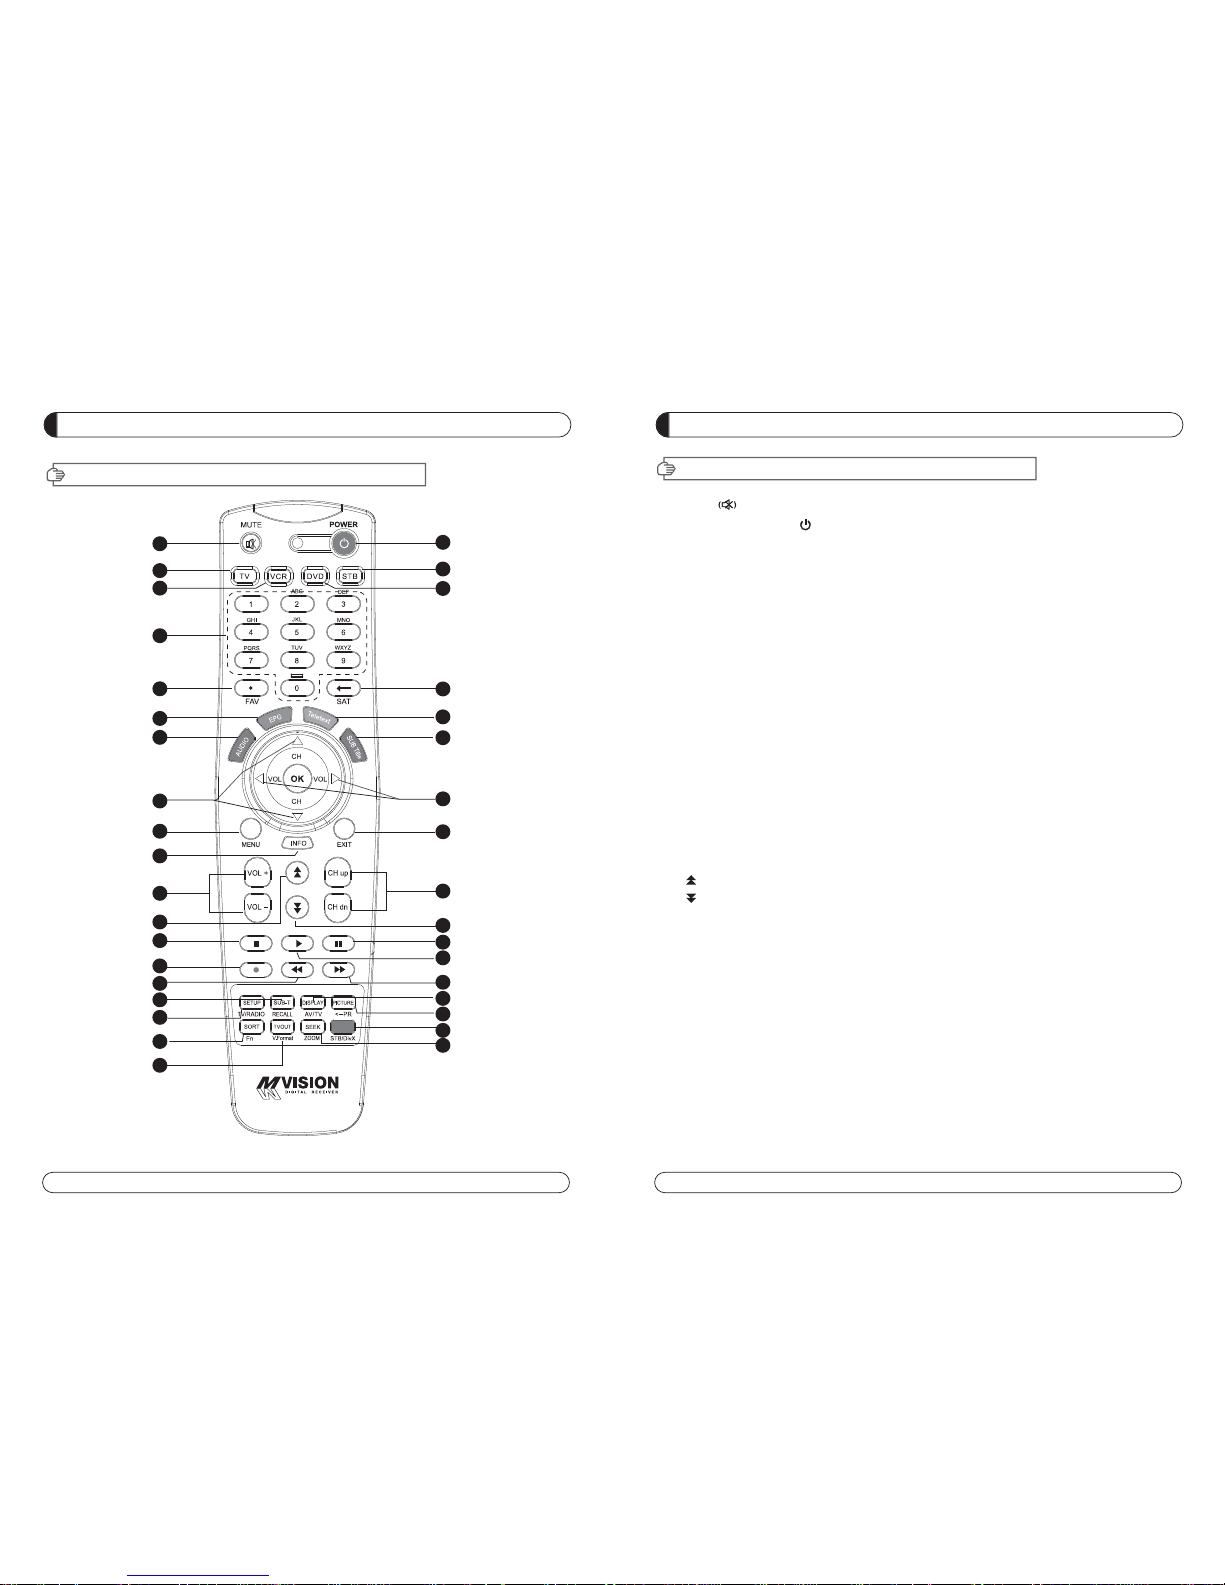
III. REMOTE CONTROL UNIT (RCU)
1. MUTE Enables or disables the audio.
2. POWER Swithches the receiver between operation and standby mode.
3. TV TV mode.
4. STB STB mode.
5. VCR VCR mode.
6. DVD DVD mode.
7. Numeric buttons Selects the TV or Radio service channels and individual menu.
8. FAV Toggles the selected favorite mode.
9. SAT Toggles the selected Satellite list.
10. EPG Displays the TV or Radio program guide.
(Electronic Program Guide)
11. Teletext Enables teletext mode.
12. Audio Changes the audio languages.
13. Subtitle Enables subtitle mode.
14. Changes channels or moves to the item in the menu.
15. Adjusts the volume or moves to left or move item in the menu.
16. MENU Displays the main menu on screen.
17. EXIT Returns to the previous menu or normal viewing mode from a menu.
18. INFO Displays the program information box on the screen and edit the name of favorite channel list.
19. V+/V- Turns volume up or down.
20. P+/P- Changes channels up or down on normal mode.
21. Moves up a page in the channel list.
22. Moves down a page in the channel list.
23. STOP Stops recording or playing.
24. PAUSE Pauses the playing picture or go to normal mode.
25. Record Records the program.
26. Play Displays file lists and plays slow/normal.
27. Rewind Stars reverse playback and changes the speed of reverse playback.
28. F/F States fast forward or fast motion playback and changes the speed of forward playback.
29. RECALL Selects the previously viewed channel.
30. AV/TV Selects the TV or AV mode.
31. TV/RADIO Switches between TV and Radio.
32. PR Reserved.
33. Fn Reserved.
34. STB/DivX Reserved.
35. ZOOM Selects ZOOM IN/ OUT.
36. V.Format Switches to HD Type.
GENERAL INFORMATION
III. REMOTE CONTROL UNIT (RCU)
1
2
3
4
5
6
8
7
9
10
11
12
13
14
15
16
18
19
21
23
25
27
29
31
33
17
20
22
24
26
28
30
32
34
35
36
Page 5
6 7
1
2
3
4
5
6
1
3
6
4
2 5
GENERAL INFORMATION
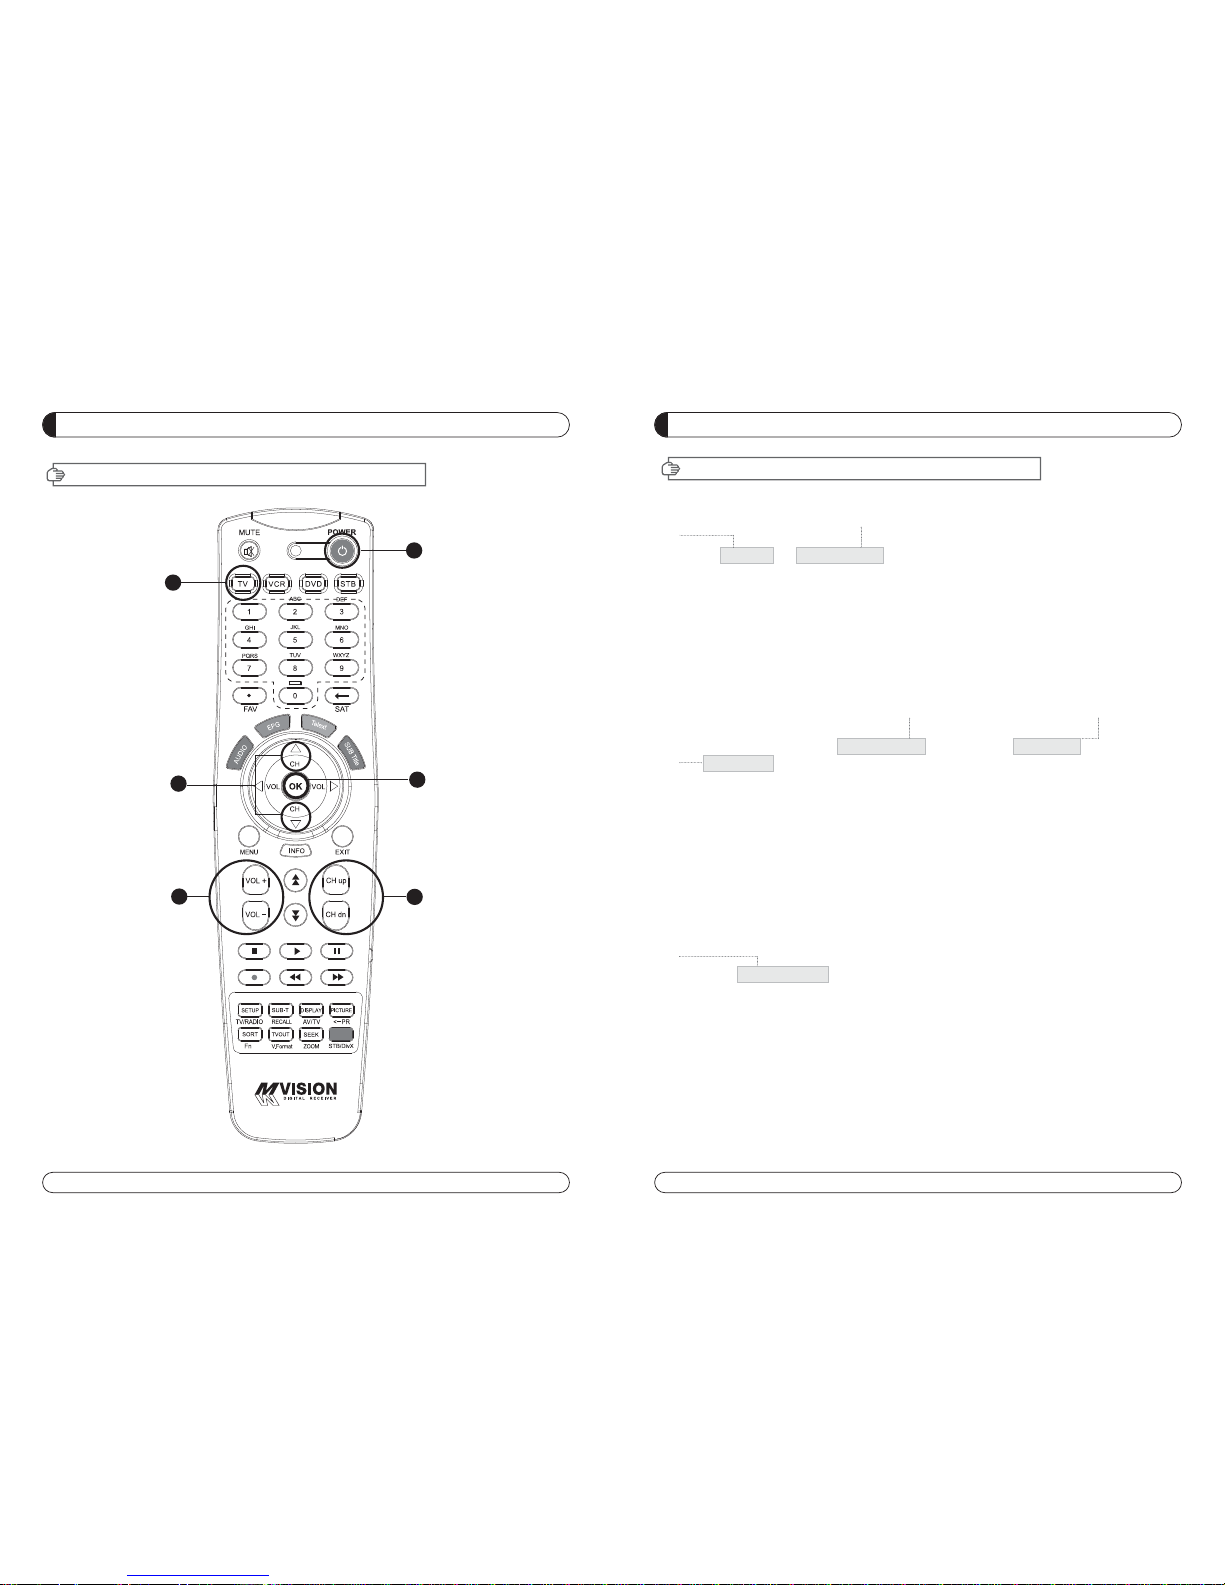
IV. HOW TO SETTING RCU FOR TV
1. Manual Search
At first, Turn on the TV
1) Press "OK" key and "TV LED Lamp" in RCU at the same time for more than 2 or 3 seconds.
Then the "TV LED Lamp" will turn on/off 2 times ( will be twinkled 2 times ).
2) Find the the TV code in Brand List ( the code is composed of 4 digits ) and insert the 4 digits.
( If the 4 digits were inserted correctly,
"TV LED Lamp" will be twinkled 2 times and TV will
be turn off ==> go to 3)-1.
but if the codes were inserted wrong the "TV LED Lamp" will be twinkled long only 1 time and
TV will be kept turning on ) ==> go to 3)-2.
==> In this step, you should insert 4 digits of code with 10 seconds. If not this setting process
will be failed.
3) - 1 If TV turns off, press "OK" Key and TV LED Lamp will be twinkled 2 times again.
Please turn on the TV using "Power button" in RCU and check volume key and
channel Key or any other keys of RCU whether they working properly If the power buttons
works but other keys does not work, it means the code was not inserted correctly.
Please start again from the step 1) and insert other code of the TV Brand. Normally TV brand
has several codes, not unique.
3) -2 Please start again from the step 1) and insert other code of the TV Brand. Normally TV brand
has several codes not unique.
2. Auto Search
At first, Turn on the TV
1) Press "OK" key and "TV LED Lamp" in RCU at the same time for more than 2 or 3 seconds.
Then the "TV LED Lamp" will turn on/off 2 times ( will be twinkled 2 times ).
2) Press the
UP or Down Key until the TV turns off.
3) When the TV turns off, press the OK key and the TV LED Lamp will be twinked 2 times.
4) Please turn on the TV using "Power button" in RCU and check volume key and channel
Key
or any other keys of RCU whether they working properly.
5) If the power buttons works but other keys does not work, it means the auto serching was not
done properly Pleaes start again from step 1) to step 4) until all keys of RCU works well.
GENERAL INFORMATION
IV. HOW TO SETTING RCU FOR TV
Page 6
8 9
GENERAL INFORMATION
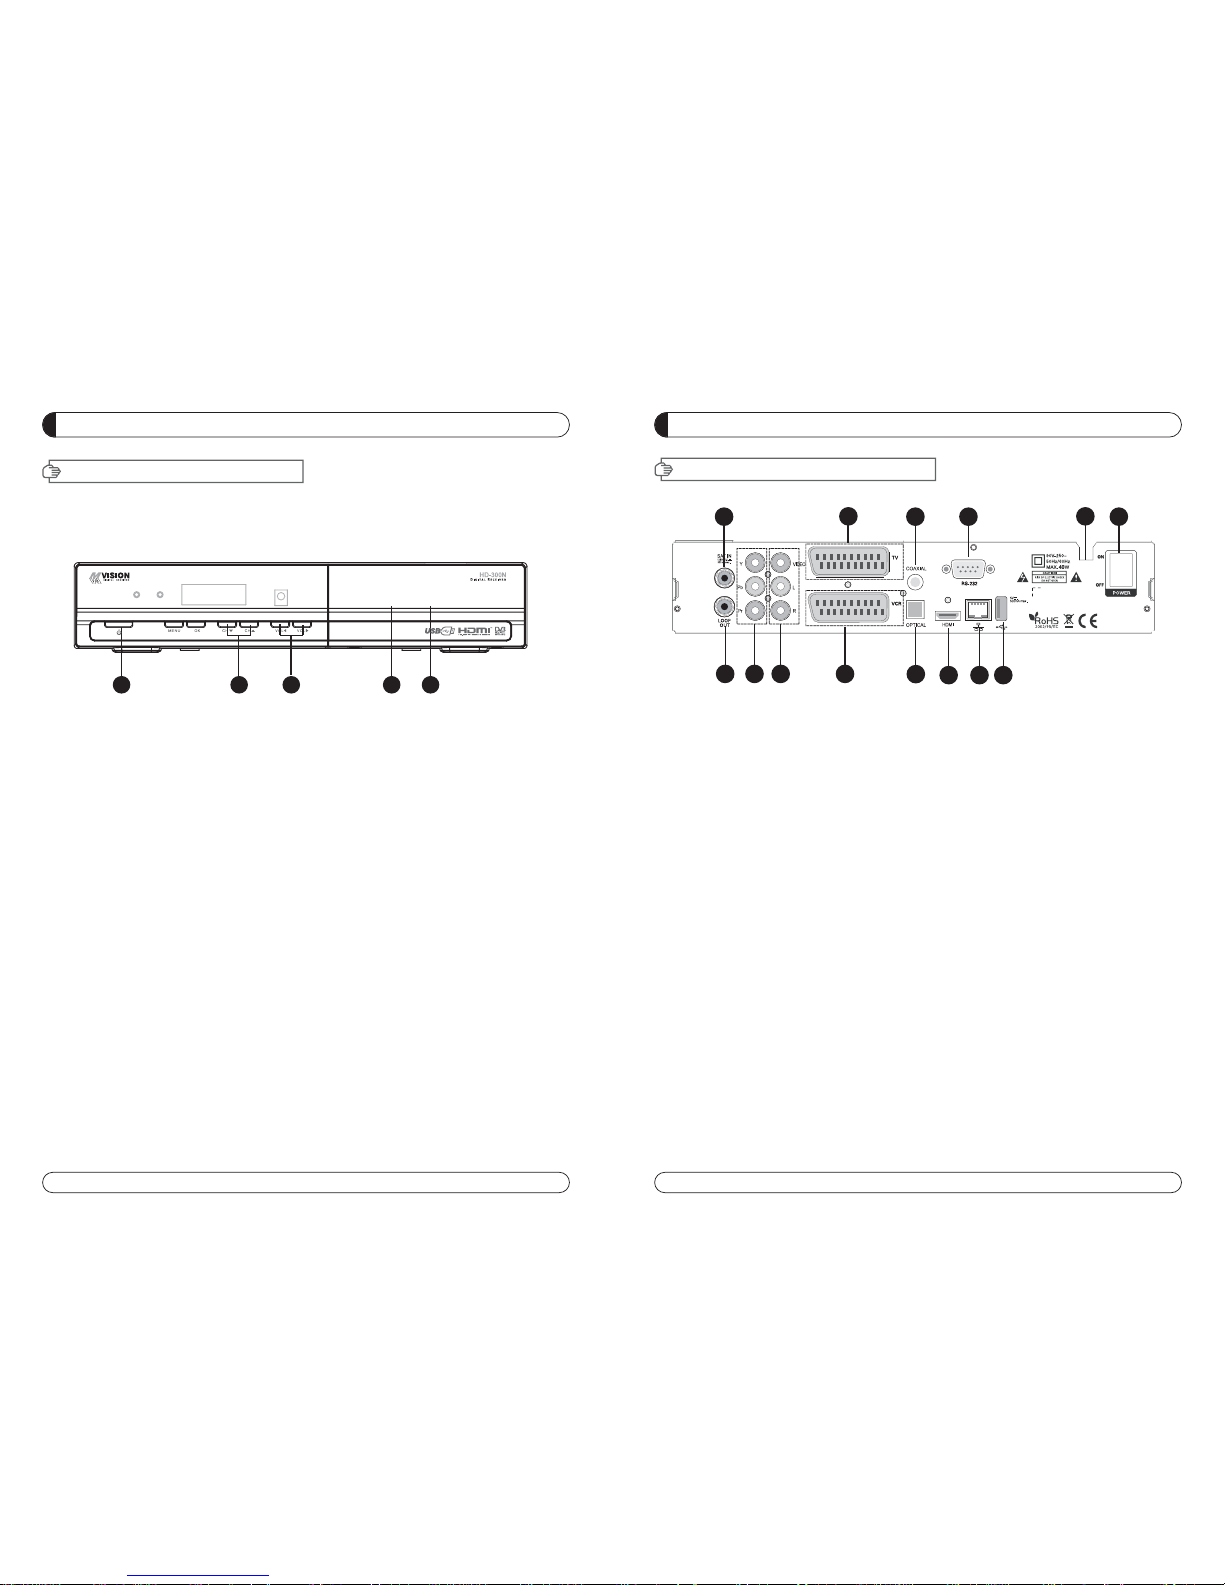
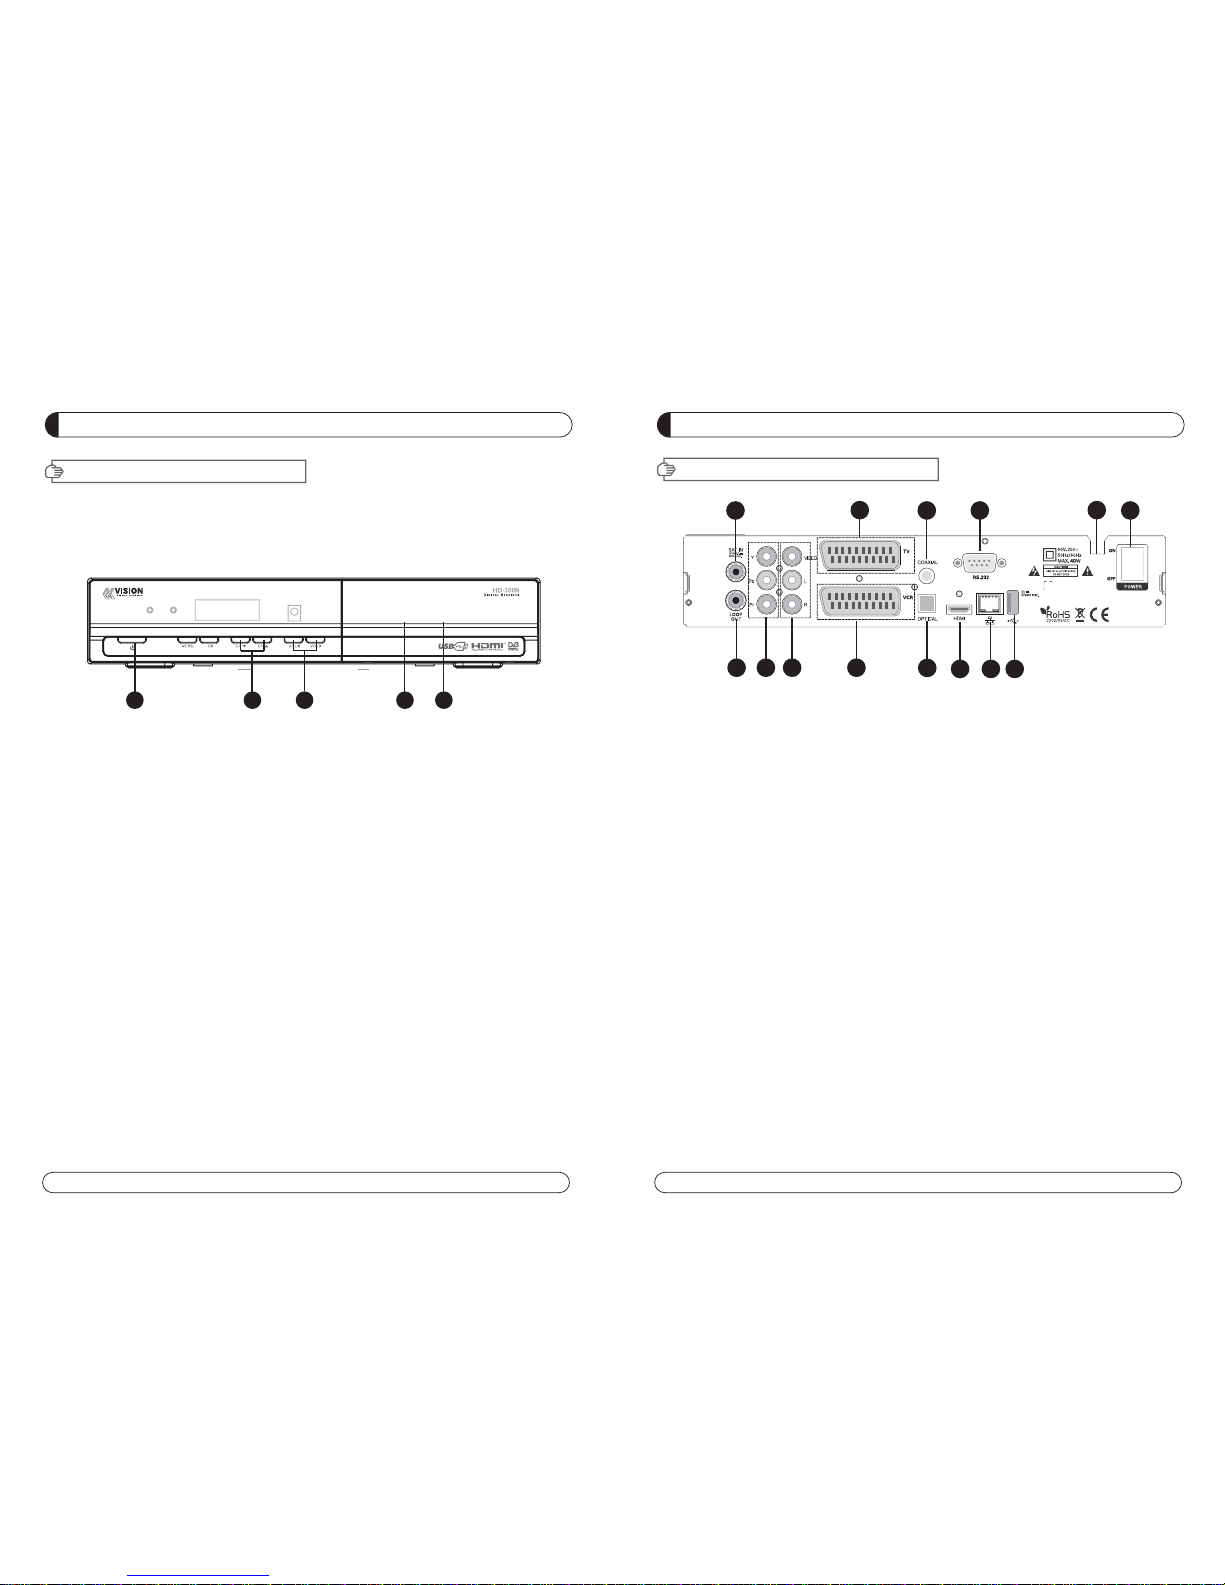
VI. REAR PANEL
1
2 3 4
6
5
7
8
91011
13
14
12
GENERAL INFORMATION
V. FRONT PANEL
NOTE: All USB 2.0 flash drive may not be compatible with the product.
1. POWER Switches the receiver power On and Standby.
2. CH Up/Down Channel up / down or selects the item of Menu.
3. VOL Up/Down Volume up/down or selects the item of Menu.
4. SMART SLOT Insert Smart Card.
5. CI SLOT Insert CAM.
1 2 3 4 5
1. SAT IN Connects to Satellite antenna cable.
2. LOOP OUT Connects to another STB.
3. YPbPr Connects to Component jack of TV.
4. VIDEO Connects VIDEO to the TV or other eguipment.
5. TV SCART Connects to TV SCART cable.
6. VCR SCART Connects to VCR SCART cable.
7. COAXIAL Output for connecting to a amplifier.
8. OPTICAL Output for connecting to a amplifier.
9. HDMI Connects to HDMI jack of TV.
10. RS 232 Connects to personal computer for software upgrade.
11. Ethernet Connects to Lan cable.
12. USB Connects to USB device.
13. POWER SUPPLY 90~250V AC, 50/60Hz, 40W.
14. POWER BUTTON Turns On/Off.
Page 7
10 11
CHANNEL LIST GUIDE
1. Normal Live Mode
a) When you select one channel, information bar appears
automatically on the screen for few seconds. This bar
provides you the current channel information.
b) Press INFO button to see the information during normal
live mode.
2. Simple Channel List
a) Press OK on the normal live mode to go to the channel
list.
b) When detail channel list is displayed on screen press
RED button to go to simple channel list.
3. Detail Channel List
a) Press OK on the normal live mode to go to the channel
list.
b) When simple channel list is displayed on screen press
RED button to go to detail channel list.
c) Press and to sort by Alphabet.
d) Press SAT button to sort by Satellite and FAV
button for Favorite 1~8.
e) Press GREEN button to return to All Channel or EXIT to
return to the current live channel.
f) Press the SAT key to show Satellite Pop-UP Window then
select satellite. Channel list of selected satellite will be
displayed.
g) Press the FAV key to show Favorite Pop-UP Window then
select FAV list. Channel list of selected FAV will be displayed.
h) Press the Green key then all searched channel list will
be displayed.
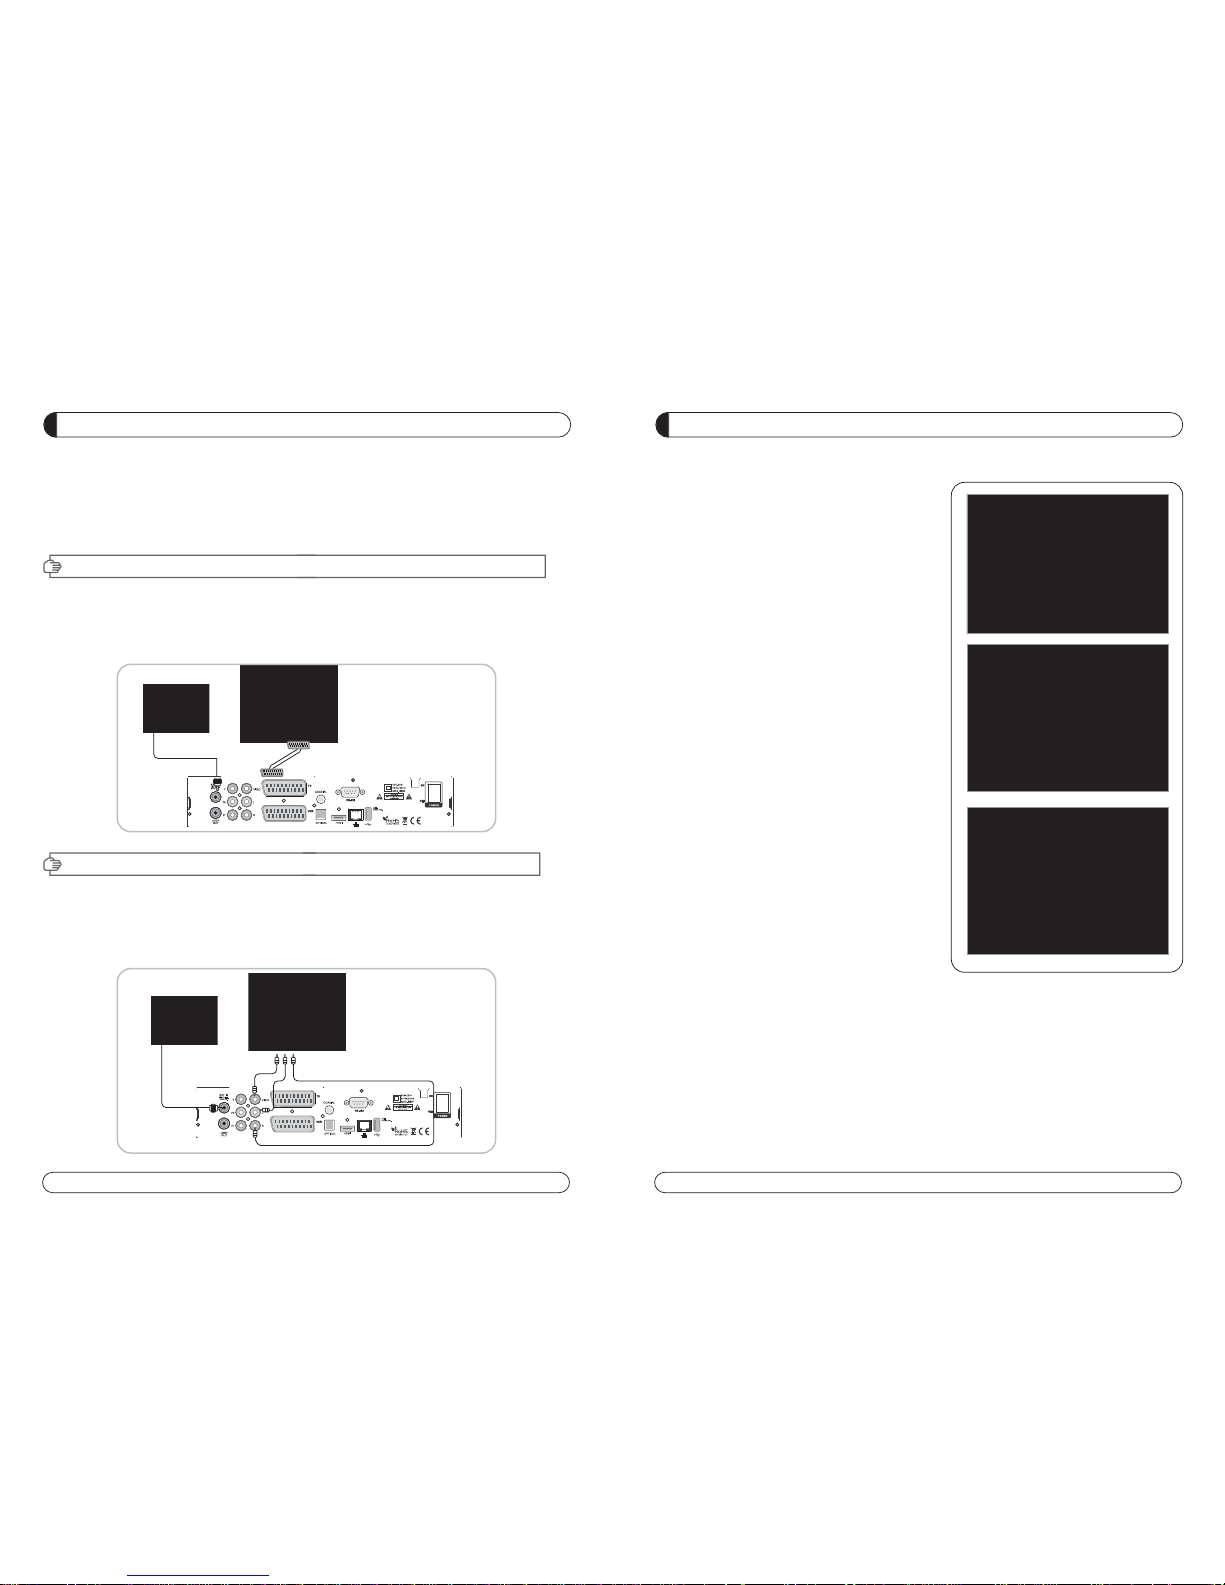
INSTALLING EQUIPMENT
This section explains several ways of connecting the receiver to your existing
TV, VCR and Hi-Fi system.
You can choose one of the following setups that we recommend.
If you have any problem or need help, consult your dealer or service provider.
Please ensure that the following items are included with the receiver in your packing.
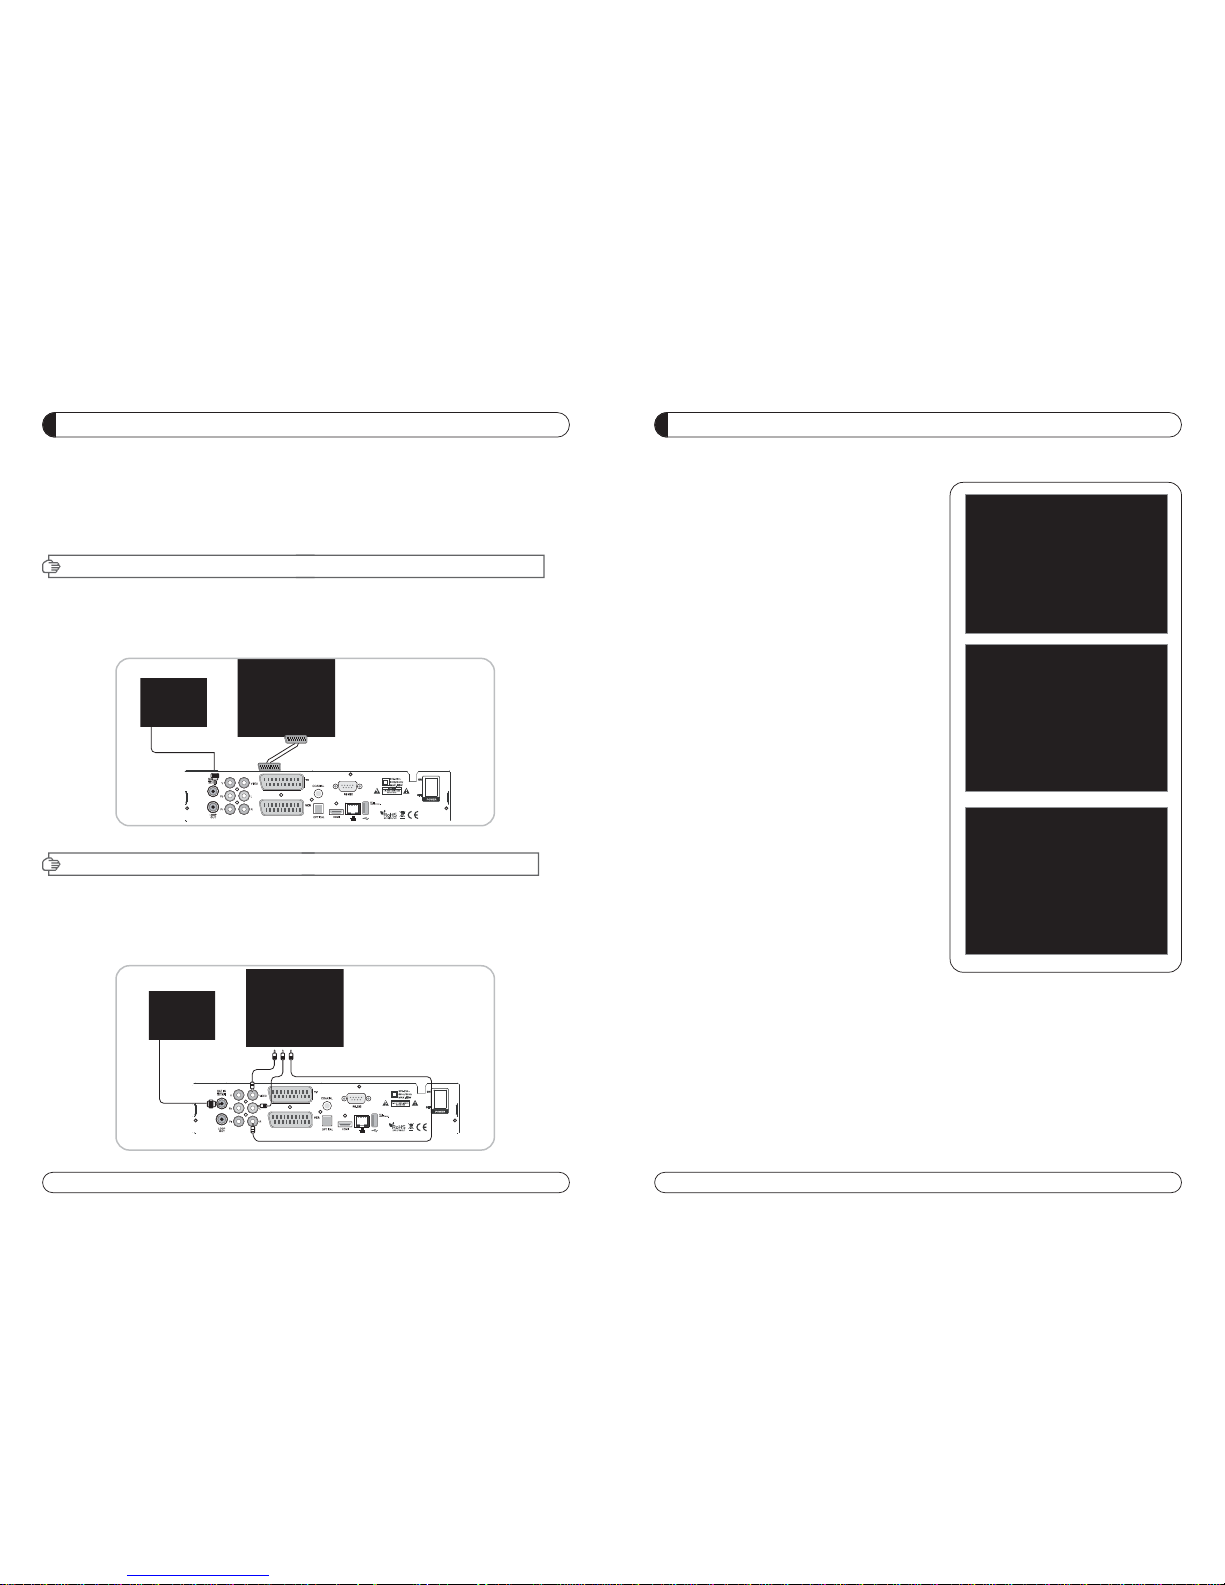
I-1. Connecting the receiver to TV with the SCART cable
Connect one end of the SCRAT cable to the TV SCRAT cocket on the rear panel of the
receiver and the other end to a SCRAT socket on the TV.
II-1.Connecting the receiver to TV with the CINCH cable
Connect one end of the CINCH cable to the Audio-R(Red), the Audio-L(White)and the Video (Yellow) socket on
the rear panel of the receiver and and other end to the Audio-R(Red), the Audio-L(White) and the
VIDEO(Yellow) socket on the TV.
I. CONNECTING THE RECEIVER TO TV
II. CONNECTING THE RECEIVER TO TV WITH CINCH CABLE
Page 8

12 13
MAIN PAGE
MENU GUIDE
I. CHANNEL MANAGER
Press the MENU button on the RCU to open Main
Page on the screen. Main Page will be displayed.
1. You can move into the main page using
on the RCU.
2. Press OK to confirm your selection.
3. Press EXIT to return to the previous menu or press
MENU to go to the current live channel.
I. Channel Manager
II. Installations
III. Options
This section may help you to organize channels according to your preference.
1. Select Channel Manager in the Main Page with and press OK.
2. TV Channel Manager Page displays on the screen.
3. Select the mode that you want using .
4. To see the channel that you choose, go to the channel and then press RED botton.
5. Press EXIT to return to the previous menu or press MENU to go to the current live channel.
I-1. Favorite
I-2. Rename
I-3. Move
I-4. Lock
I-5. Delete
I-1. Favorite
1. Using go to the Favorite mode then press
YELLOW button to choose Favorite 1~8.
2. Press OK on the channel that you want to add
or delete.
3. will be marked at the end of selected channel
name bar. To delete press OK again.
4. Selected channels will be automatically saved.
5. If you want to check the saved Favorite Channel List
go to other mode(Rename~Delete) except Favorite
and then press FAV button to check Favorite 1~8.
6. Press EXIT to return to the previous menu or press
MENU to go to the current live channel.
7. Press BLUE button to rename Favorite.
IV. Utility
V. Accessory
CHANNEL LIST GUIDE
4.EPG (Electronic Program Guide)
a) Press EPG button on the live mode.
b) EPG of the current channel appears on the screen.
c) Select the channel that you want to watch program.
d) It will be appear like rightside picture.
5. ZOOM IN/OUT
a) By pressing ZOOM key in a normal live mode, you
can use Zoom In/Out fuction.
b) You can select zoom size with RED/GREEN key.
c) You can select the start position with key.
d) After select Zoom size and pisition, you can start
zoom function with OK key.
e) With key, you can move zooming screen.
Page 9

14 15
I. CHANNEL MANAGER
MENU GUIDE
This section may help you to set up antenna and
scan satellite or transponder, etc. Select Installations
in Main Page using
and press OK.
Press EXIT to return to the previous menu or press
MENU to go to the current live channel.
II-1. Satellite Search
II-2. DiSEqC Switch
II-3. Motor Setup
II-4. Home Streaming
II-5. Factory Default
II-1 Satellite Search
1.You can move the cursor using and press OK
when you select the value that you want.
a) Satellite
- Press OK to display the Satellite List Box.
- Select the proper Satellite and then press OK.
b) DiSEqC
- Press OK to display the DiSEqC Port List.
- Select the proper DiSEqC port and then press OK.
c) LNB
- Press OK to display the LNB Frequency List.
- Select the proper LNB Frequency and then
press OK.
- You can also input directly the numbers using
NUMBER KEY on the RCU.
d) 22KHz Tone
- Select the one among None, 0 KHz or 22 KHz
depending on the user’s antenna switch box.
e) Search Option
- Press OK to display the Search Option list.
- Select the Search Option that you want and then
press OK.
II. INSTALLATION
MENU GUIDE
I-2. Rename
1. Usinggo to the Rename mode.
2. Select the channel that you want to rename using
and
then press OK.
3. Keypad Dialog displays on the screen.
4. Edit the name entering NUMBERS and / or WORDS in the
Keypad Dialog.
5. Press EXIT to return to the previous menu or press MENU to
go to the current live channel.
I-3. Move
1. Usinggo to the Move mode.
2. Select channels which you want to move by pressing OK key.
3. Move cursor that you want to place on than press GREEN button.
4. Press EXIT to return to the previous menu or press MENU to
go to the current live channel.
I-4. Lock
1. Using go to the Lock mode.
2. Select the channel that you want to lock and then press OK.
will be marked at the end of the selected channel name bar.
To delete press OK again.
3. Press EXIT to go to Main Page or press MENU to go to the
current live channel.
I-5. Delete
1. Usinggo to the Delete mode.
2. Select the channel that you want to delete and then press OK.
will be marked on the selected channel number.
To delete press Blue button again.
3. Press YELLOW button to delete TP. Select one channel and
press Blue button.
All channels of that TP will be automatically selected.
4. Press YELLOW button to delete Satellite. Select one channel
and press Blue button. All channels of that the Satellite will
be automatically selected.
5. Press EXIT to return to the previous menu or press MENU to
go to the current live channel.
6. Message Box displays on the screen.
7. Select OK on the Message Box and then press OK to delete
the markedchannels.
f) Search
- Press Search to start scan channels.
- SAT Rename : To rename SAT, Press the
Green button on the RCU.
TP EDIT : To Edit TP, Press the RED
button on the RCU.
Page 10

16 17
II. INSTALLATION
MENU GUIDE
f) Motor Control
Select the position using and then press OK.
Message box displays on the screen.
- Store Sat position : Stores the current position
of the motor for the selected satellite.
- Goto Sat Position : Moves the motor to the stored posi-
tion of the selected satellite.
- Goto Center : Goes to the center of the motor.
- Limit off : disable East, West limit.
- Set East Limit : Set current position as East Limit.
- Set West Limit : Set current position as
West Limit.
- Recaluation Position.
- Reset Position : Resets all stored position
of the motor.
g) Satellite Position
- Input directly the position using NUMBER KEY on
the RCU
- Select the direction using (WEST / EAST).
h) Search Option
- Press OK to display the Search Option list.
- Select the Search Option that you want and then
press OK.
i) Search
- Press Search to start scan channels.
- Press OK to start scanning.
TP EDIT : To Edit TP Press the RED button on
the RCU.
2. Edit my local position
- Press Green Button to edit local Position.
a) Longitude
- Input directly the Longitude using NUMBER KEY on the RCU.
- Select the direction using (WEST / EAST).
b) Latitude
- Input directly the Latitude using UNMBER KEY on the RCU.
- Select the direction using (NORTH/SOUTHd).
3. Press EXIT to return to the previous menu or press MENU to go to the current live channel.
MENU GUIDE
II-2. DiSEqC Switch
1. Select Channel Search in Installation using
and press OK.
a) If you select DiSEqC Switch and press OK on the
menu will be, DiSEqC Switch Page will be displayed.
b) Select the proper Satellite of each DiSEqC port
(A~D) using and and press SEARCH.
Selected Satellites will be searched automatically.
II-3 Motor Setup
1. You can move the cursor using and press OK
when you select the value that you want.
a) Motor Type : DiSEqC 1.2, USAL
- Press OK to display Motor Type
- Select the proper Motor Type and then press OK.
b) Satellite
- Press OK to Display the Satellite List Box
- Select the proper Satellite and then press OK.
c) Drive & Driver Step
- Select the direction using .
d) Frequency
- Press OK to Display the Frequency List.
- Select the proper Frequency and then press OK.
e) Motor Movement
- Search the appropriate position of the selected
Satellite using.
II. INSTALLATION
Page 11

18 19
MENU GUIDE
MENU GUIDE
II. INSTALLATION
II-5. Factory Default
Use Factory Default function only when you want
to return the receiver to the condition of factory
default. All settings and channels will be deleted.
1. Select Factory Default in Installations using and press
OK.
2. Message box displays on the screen.
3. Select OK to return the receiver to the condition of factory
default and then press OK.
4. Press EXIT to return to the previous menu or press MENU
to go to the current live channel.
II-4. Home Streaming
1. PC setting
***Execute 'Home Streaming' program.
a) Go to ‘Preference’ Tab.
b) Select ‘Default URL’ check-box and assign the
download folder by using “Browse” button It is
assigned to “c:\download” but must specify the
destination folder personally to be able to receive
movie files in PC.
Note: Only default server available currently.
2. STB setting
a) Go to Home streaming menu ( Menu
Accessory Network Home streaming ) and
Click Home Streaming.
b) IP-Name Edit Pad will appear & Input Server IP
by numeric buttons of RCU.
c) The IP address must be same as IP address
shown in preference tap of Home Streaming program.
3. Playing the Movie File by Home Streaming
a) Press “Fn” key of RCU in normal view of STB and
then the movie file list in PC will be appeared in
TV Screen.
b) Select the file which you want to see by using
navigation keys of RCU and press “OK” buttons to
play the movie file.
Please see the right picture for better
understanding.
II. INSTALLATION
Page 12

20 21
MENU GUIDE
III. OPTIONS
III-2. Control Panel
1. Select TV Setup in Options using and press OK.
a) HD Type
- Select HD video Output.
b) TV Type
- Select your TV type.
c) Aspect Ratio
- Select screen ratio.
d) Screen Control
- Select screen display modes.
e) Brightness
- Adjustment of screen brightness.
f) Contrast
- Adjustment of screen contrast.
g) Saturation
- Adjustment of screen Saturation.
2. Press EXIT to return to the previous menu or press MENU to
go to the current live channel.
III-3. Time Adjust
Set your local time according to your location.
1. Select Time Setup in Options usingand press OK.
2. Time Adjust page displays on the screen.
3. Move the cursor using, and press OK when you
select the value that you want. (Input Hour directly using
number keys on the RCU)
4. Press EXIT to return to the previous menu or press MENU to
go to the current live channel.
III-4. Parental Lock Setup
1. Select Parental Lock Setup in Options usingand press OK.
2. Parental Lock Page displays on the screen.
3. You can lock and unlock Parental Lock selecting ON or OFF
using (For Channels).
4. You can lock and unlock Install Lock selecting ON or OFF
using (For Installation Settings).
5. Enter new password if you want to change the current password.
6. Confirm your new password entering new password again.
7. Press EXIT to return to the previous menu or press MENU to go to the current live channel.
Note. DEFAULT PASSWORD IS 0000
This section may help you to set up OSD language,
time, etc. Select Options in Main Page using
and press OK.
Press EXIT to return to the previous menu or
press MENU to go to the current live channel.
III-1. OSD Setup
III-2. Control Panel
III-3. Time Adjust
III-4. Parental Lock
III-1. OSD Setup
1. Select OSD Setup in Options using and
press OK.
a) OSD Language
- Press OK to display OSD Language list.
- Select the language that you want and then
press OK.
b) Audio Language
- Press OK to display Audio Language list.
- Select the language that you want and then press OK.
c) Subtitle Language
- Press OK to display Subtitle.
- Select the language that on want and then press OK.
d) Display Info Bar
- Press OK to display Display Info Bar time list.
- Select the second that you want to display and then press OK.
e) Transparency
- Adjustment of transparency level.
2. Press EXIT to return to the previous menu or press MENU to go to the current live channel.
III. OPTIONS
MENU GUIDE
Page 13

22 23
MENU GUIDE
V
. ACCESSORY
This section may help you to use USB, etc.
Select Utility in Main Page using and press OK.
V -1. USB
V -2. Common Interface
-1 USB
The receiver is equipped with host.
1. Select USB in Utility with and press OK.
2. If you want to save Sofware or Database, press Green
button on the RCU.
3. Select the file which you want to save using and OK
button.
4. After downloading the selected file, the receiver will
reboot automatically.
-2 Common Interface
The receiver is equipped with one slot of Common
Interface which have access to the scrambled the pay per
view services with various conditional access modules
and a valid smart card.
The programs that can be descrambled are determined
by the conditional access module and smart card that you
use.
1. Select Common Interface in utility with and press OK.
2. Common Interface displays on the screen.
(The phrase ‘No Module’ is indicated when the
conditional access module is not istalled)
3. Insert the conditional access module into Slot 1.
4. The name of the Slot differs according to each inserted
conditional access module.
5. Press EXIT to return to the previous menu or press
MENU to go to current live channel.
MENU GUIDE
IV
. UTILITY
This section may help you to use USB, etc.
Select Utility in Main Page using and press OK.
IV -1. System Information
IV -2. Timer
IV -3. Calendar
IV
-1.
System Information
This option help you to know the current S/W and
H/W version. Also provides you the product name.
1. Select System Information in Options using and
pres OK.
2. Press EXIT to return to the previous menu.
IV
-2.
Timer
The Unit(Set top box) will be turned off/on automatically
after a specified time
IV
-3.
Calendar
Page 14

24 25
PVR GUIDE
PVR GUIDE
II. Record Function
II-2 Instant Recording
- Press “RECORD button” on RCU to start recoding program.
- While Recoding program
- Press “PAUSE” key to execute “Time Shift”
- You can use “LEFT/RIGHT button” to view desired time while
recoding program.
- Press “OK button” on RCU to display Recording file list
During Recording you can watch also other channels which
are located in same TP. In case of watching other channels
during recording, You should come back to the recording
channels in channel list to stop recording.
- If you press “STOP button” on RCU, current program you are
watching will stop and Live TV will be stored in USB memory
space.
PVR GUIDE
PVR GUIDE
This section may help you how to use PVR function on
this STB.
I.
Recommended Devices
If you want to use PVR function, you need to prepare
equipment as below.
- External USB Hard Disk Drive.
- Flash memory stick
- Format Type: FAT16/32 (System does not support NTFS
and other file system)
II. Record Function
II-1 Reserved Recording
1. Time Reserved Recording
: Set desired recording time- in “Utility -> Timer” to
record at set time.
N
NOOTTEE :: HHooww ttoo sseett uupp bbeeffoorree yyoouu ssttaarrtt ““TTiimmee RReeccoorrdd””
- STB set up in default.
- Please change “OFF” to “Recording” in Active menu.
- Once you set “Recording” in Active menu, you will see
the detail menu for PVR. ( Cycle, Channel Type, Channel
name, Start Time, Duration).
- Press the “Ok” button to select Channel Name.
2. EPG Reserved Recording
: Used to record a selected event from EPG.
- Press the EPG button to go into EPG menu while watching a program on screen.
- To select event play on time: Move from the EPG to
select the event and press the “RECORD button” on RCU.
- If you want cancellation, press more “RECORD button”
once.
- If you want several reserved recording, move and press
the “RECORD button” on RCU.
Page 15

26 27
PVR GUIDE
PVR GUIDE
V. Time Shift Function
- If you want to execute “Time Shift” in Live mode You should
set “On” of Time Shift In PVR Option (Accessory -> PVR ->
TimeShift “ON”).
- To star Time Shift in Live mode, press “PAUSE” to start.
- Time shift will played during 30 minutes in Live Mode.
- To start “Play back” during Timeshift press “PLAY” key.
- You can move “play position” using LEFT/RIGHT button during Time Shift.
VI. Format
- You can do FAT32 Format the HDD formatted by FAT32 and
NTFS also.
- You can do Format also the multi partitioned HDD.
- When NTFS formatted HDD is inserted, POPUP message
will appear.
- Press “OK” button to move to “C:, D:, E:, F: NEXT°” in case
of Multi partitioned HDD.
- In case of NTFS multi partitioned HDD, you must format by
FAT 32.
PVR GUIDE
PVR GUIDE
III. Playback Function
- To play previously recorded program, press “Play button”on
RCU.
- Use the arrow buttons to select the file which you want to
play and press “OK button” to play.
- While Playing program.
- If you press “LEFT/RIGHT button” on RCU button while
recoding live TV or recorded file play, current program you
ware watching will stop and picture will re-restart from
where it was moved by “LEFT/RIGHT button” on RCU.
IV. Trick Mode Function
- If you want to play other recorded file during Playback,
press “Play” button.
- If you press “FF(Fast Forward) button” during Timeshift or
Playback, the file will be played at 2X speed and if you press
the “FF button” one more time, the file will be played to 8X
speed.
- If you press the “REW(Rewind) button” during Timeshift or
Playback, the file will rewind at 2X speed and if you press
the “REW button” one more time, the file will rewind to 8x
speed.
- FF/REW function will back to normal play if you press "PLAY
button”.
Page 16
28 29
PVR GUIDE
PVR GUIDE
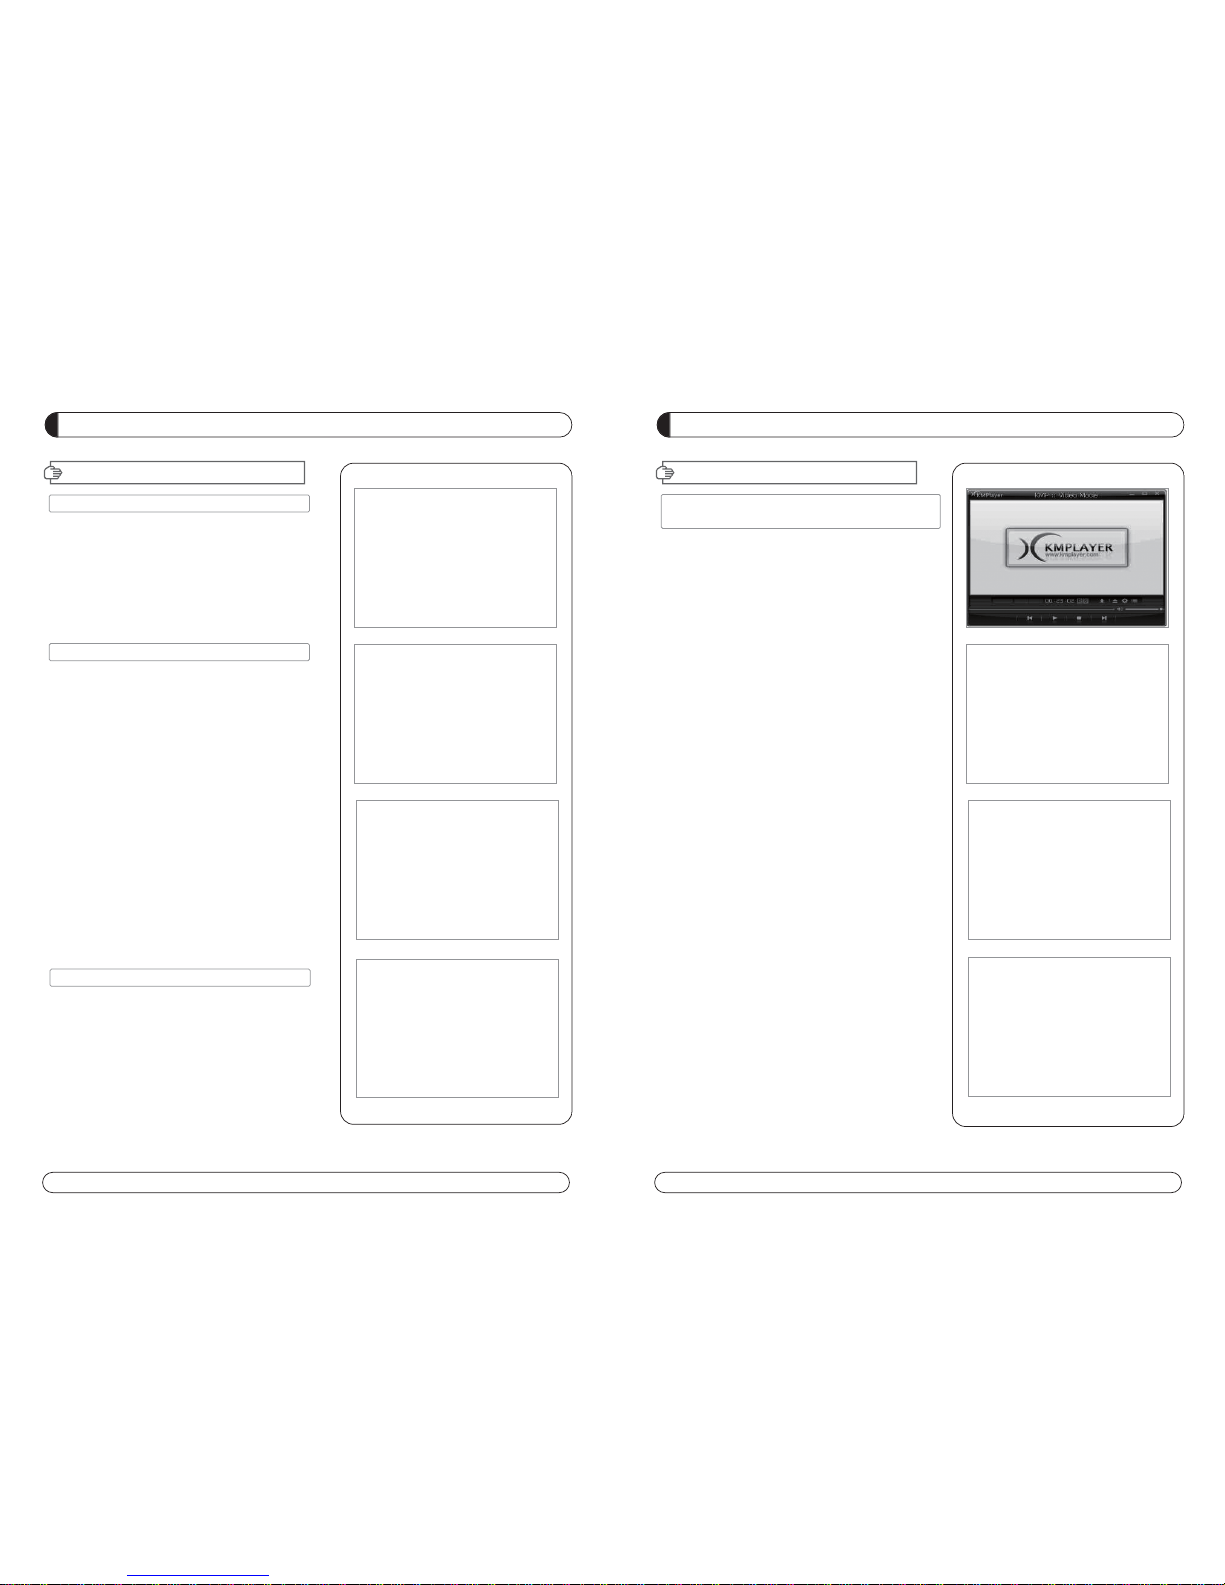
X. How to play the record by PVR of 'HD-XXX' in
PC or Divx Player
X-1 How to play in PC
A) Play KM Player.
B) Select Language.
1) Click right button of Mouse -> Language >
your language.
C) Change the extension name of the recorded file to
*.mpg”.
Example : Welcome to A_131821 -> Welcome to
A_131821.mpg
D) Select the file which you want to play.
1) Click right button of Mouse -> Open Files(S) > Select.
X-2 How to Play in “Divx Player”
A) The file format must be changed to “.avi” format to play in
DivX Player.
B) Select a destination folder where to be saved the file which
will be changed to *.avi.
1) Click right button of Mouse -> Capture -> Select
Capture Folder.
C) Repeat A) -> B) -> C) -> D) of No.1 how to play in PC.
D) Capture the fie which is being played currently to convert
into *.avi.
1) Click right button of Mouse ->Capture -> Video Quick
Capture.
2) Then the playing file is saved in designated folder by *.avi
format.
E) If the playing file is STB SD channel, it is saved by SD and If
the file is HD or H.264 it saved by HD or H.264. If user does
not have DivX player which can play HD or H.264 (at least
CPU sigma8634), he must convert the file SD so that the
general SD DivX player (CPU sigma8511) can play the file.
PVR GUIDE
PVR GUIDE
VII. MP3 Play
- Select MP3 file which you want to play in USB menu.
- After you select MP3 file, MP3 play window will be executed.
VIII. JPG View
- Select JPG file which you want to see in USB menu.
- Press OK to see the JPG which you want to.
- You can rotate the image by using LEFT/RIGHT button.
IX. Software Upgrade
- Select * UAD file which you want to upgrade in USB menu.
Page 17
30 31
Check that the power cable is plugged into the power sock-
et.
Check the dish and adjust it.
Check the cable connection and correct it.
Check channel and video output.
Check the volume level of the TV and receiver.
Check the mute status of TV and receiver.
Check the cable connection and correct.
Replace batteries.
Aim the remote control unit directly to the receiver.
Checking that nothing blocks the front panel.
Check the Conditional Access Module and smart card are
appropriate for the selected service.
Check the Conditional Access Module and smart card are
correctly inserted or not.
Check the signal strength and the signal quality in the
menu.
Check the LNB and replace the LNB if necessary.
Check the LNB cable.
Check the Dish and adjust it.
Go to the Option and select System Information.
Contact your Service Provider.
Problem
Nothing appears on the Front
Panel or No power supply
No Picture
No Sound
Remote Control Unit dose not
work
Service is not running or
scrambled
“No Signal” on the screen
Tuner Defective Check
You have forgotten your
secret PIN Code
Solution
TROUBLESHOOTING
PVR GUIDE
PVR GUIDE
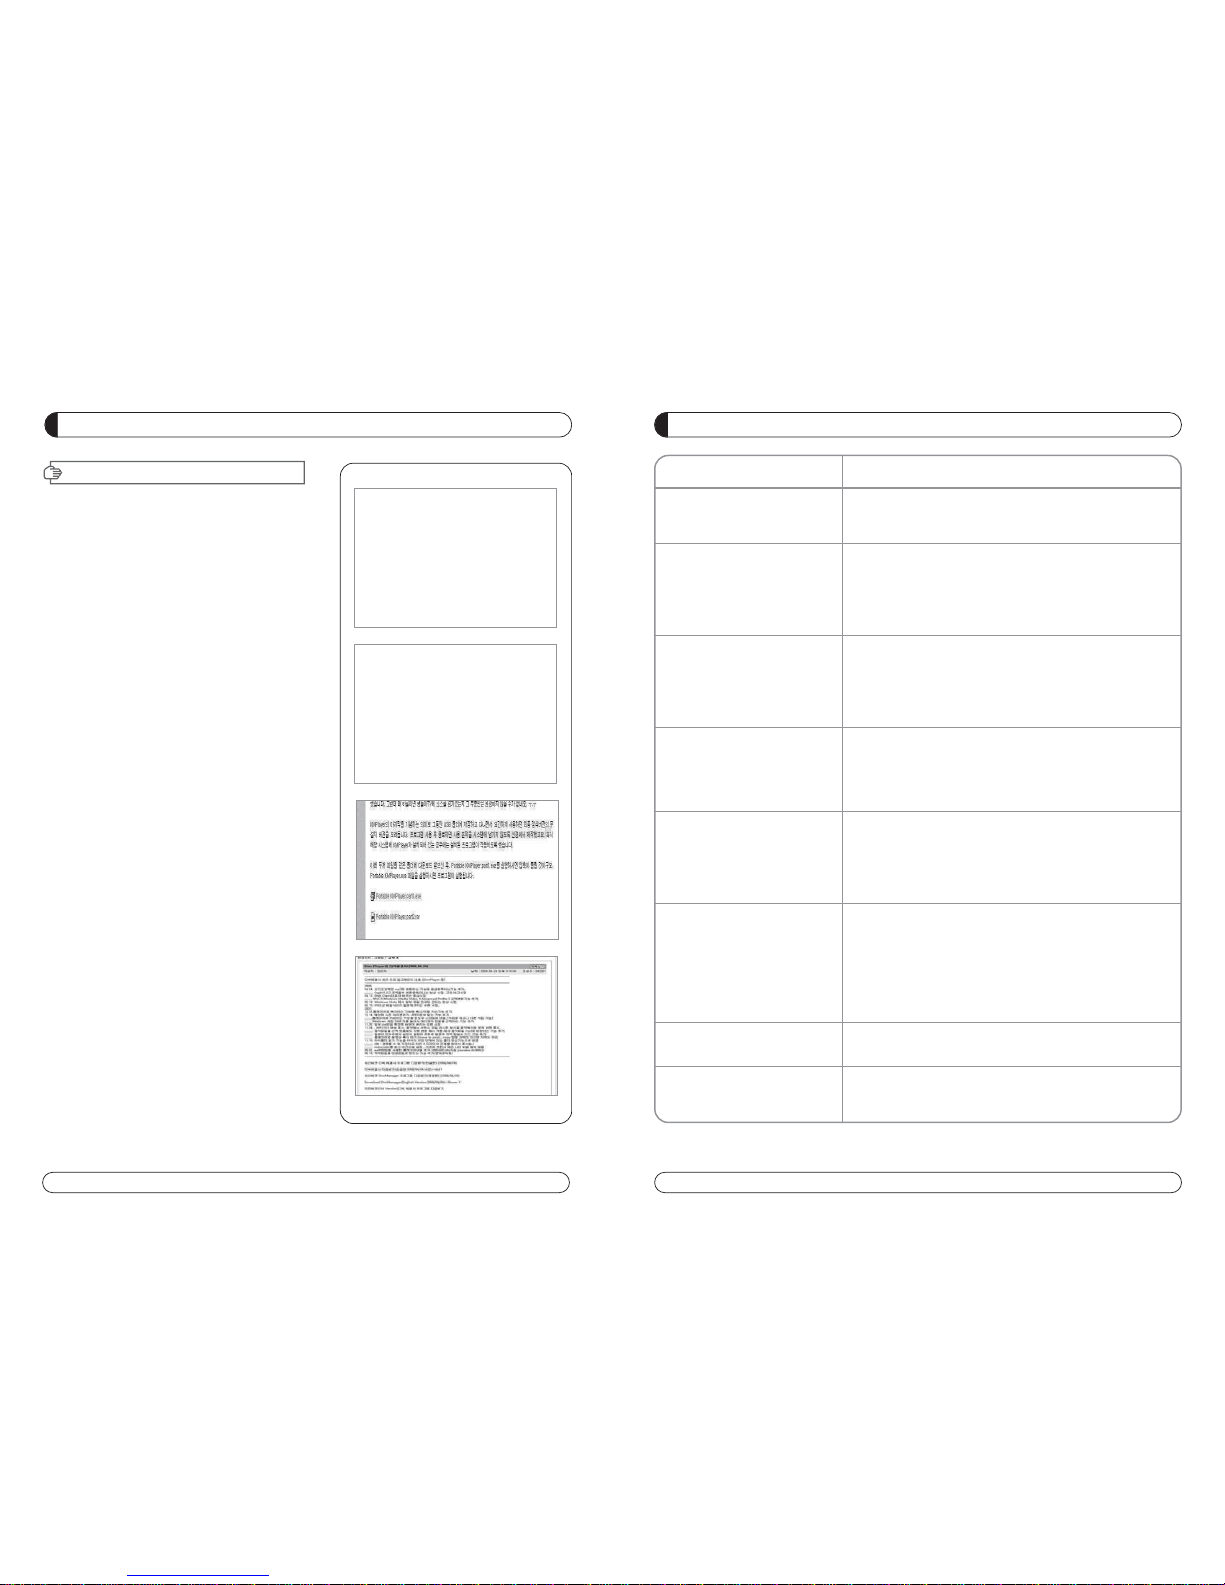
X-3 How to Convert the file by Divx Manager
A) Play Divx Manager.
1) Setting -> Model ->Rapsody RSH-250/350
B) Select the folder where the file that you want to convert is.
Then the file's information will appear.
C) And select the file which you want to convert and select
“Convert”.
D) Select “Encoding Start” -> It starts “Converting”.
NOTE: Web site for downloading
1. Kmplayer
1) Enter this site : http://2bwithu.tistory.com/245.
2) Download 2 files to 1 folder and unzip the archived file.
After unzip, you can install only click exe file.
2. Divx Manger
1) Enter this site :
http://www.modix4u.co.kr/upboard/view.asp?fcprimkey=44
2) Click below for English version.
Page 18

32 33
SPECIFICATIONS
Item
HDMI HD Video/Audio Output
TV SCART Output RGB, CVBS, L, R Output with Volume control
VCR Scart In/Out RGB, CVBS, L, R In
CVBS, L, R Out
RCA Output
CVBS, L, R Output(Yellow, White, Red Jack) with Volume Control
Component Video(YPbPr) Out
SPDIF Dolby Digital Bitstream Out(Coaxal, Optical)
- RS-232, Bit Rate : 115,200baud
Data Interface Connector : 9-pin D-sub Male type
- USB : USB 2.0, Type A Connector
Specification
. A/V & Date In/Out
Item
Input Voltage AC 90V ~ 250V, 50Hz ~ 60Hz
Power Consumption Max 40W
Protection
Separate Internal Fuse
The input shall the lighting protection
Specification
. Power Supply
Item
Size(WxHxD) 290mm x 50mm x220mm
Weight 1.5 KG
Specification
. Physical Specification
Item
Operating Temperature 0 °C ~ 40 °C
Storage Temperature -10 °C ~ 50 °C
Operating Humidity Range 10~85% RH, Non-condensing
Storage Humidity Range 5~90% RH, Non-condensing
Specification
. Environmental Condition
Item
Transport Stream 13818-1 MPEG-2, H.264/AVC Transport stream Specification
Profile Level MPEG-2 MP@ML, MP@HL, MPEG-4 H.264/AVC
Input Rate Max. 90Mbit/s
Aspect Ratio 4:3, 16:9, Letter Box
Frame Rate 25Hz for PAL, 30Hz for NTSC
Video Resolution 576i, 576p, 720p, 1080i
Teletext Through VBI or BSD
Audio Decoding MPEG-1 Layer 1 & 2, Dolby Downmix
Audio Mode Single Channel/Dual Channel Joint Stereo/Stereo
Frequency Response 20~20kHz, <+/-2dB
Specification
. MPEG Transport Stream & A/V Decoding
SPECIFICATIONS
Item
Specification
SMART CARD 1 SLOT, ISO 7816, GSM11.11 and EMV (payment systems) compatibility
2 SLOTS
PCMCIA DVB Common Interface Standard
(Viaccess, Irdeto, Nagra Vision, Conax, Crytoworks, AlpahCrypt..)
.Conditional Access Module Interface
Item
Type 1 F Type, IEC169-24, Female
Frequency Rage 950MHz to 2150MHz
RF Impedance 75 Ohm unbanlanced
Signal Level -65 to -25 dBm
LNB Power 13.5/18.5Vdc +/- 5%, 0.5Amax, Overload Protected
22KHz Tone Frequency : 22KHz +/- 2KHz, 0.6Vpp +/- 0.2V
DiSEqC Control Version1.0, 1.2, Tone burst A/B
Demodulation QPSK, 8PSK
Input Symbol Rate
DVB-S QPSK : 2~45 Msps
DVB-S2 8PSK/QPSK : 10~30Msps
FEC Decoder
1/2, 2/3, 3/4, 3/5, 4/5, 5/6, 8/9, 9/10 in DVB-S2 mode.
1/2, 2/3, 3/4, 5/6 and 7/8 in DVB-S mode.
Specification
. Tuner & Channel
Item
Specification
. System & Memory
Main Processor STi7101
Flash Memory 8 Mbytes
System Memory 128 Mbytes
A/V Memory 64 Mbytes
Channel Capacity Digital Channel : 8,000
Front 7-Keys, 7-SEGMENT DISPLAY
Page 19

Page 20

37
SEGURIDAD GENERAL 38
INFORMACIÓN GENERAL 39
I. DESEMBALAJE 39
II. CARACTERISTICAS 39
III. MANDO A DISTANCIA(RCU) 40
IV. COMO CONFIGURAR EL MANDO A DISTANCIA CON LA TV 42
V. PANEL FRONTAL 44
VI. PANEL TRASERO 45
INSTALACIÓN DEL EQUIPO 46
GUÍA LISTA DE CANALES 47
GUÍA MENÚ 49
MENÚ PRINCIPAL 49
I . GESTOR DE CANALES 49
I I. INSTALACIÓN 51
III. OPCIONES 56
IV. UTILIDAD 58
V. ACCESORIOS 59
PVR Guide 60
SOLUCIÓN DE PROBLEMAS 67
ESPECIFICACIONES 68
Lista de Marca 178
INDICE
Para desconectar el receptor, la toma de corriente debe ser retirada del
enchufe principal.
Page 21

38 39
INFORMACIÓN GENERAL
Por favor, asegurarse de que los siguientes articulos están incluidos con el receptor.
1) Mando a distancia (RCU)
2) Pilas (2EA)
3) Manula de instrucciones
4) Cable de A/V
Soporta MPEG-2, MPEG-4, H.264 y toda la norma DVB.
Receptor Satélite.
2 Ranura Interfaz común para PCMCIA´s Viaccess, Irdeto, Cryptoworks, Nagravisión,
Conax, Mediaguard y etc.
1 Lector de Tarjetas.
DiSEqC 1.0, 1.1, 1.2 y USALS.
Ajuste de relación de aspecto 4:3 (16/9 crop), 4:3 (16/9 letterbox), 16:9 (4/3 pillar box).
Fácil manejo y sencillo OSD.
8,000 canales programables.
Soporta Audio Multi-Idioma
Soporta texto de menú Multi-Idioma.
Selección de canales Favoritos.
Guía Parental y control de edad.
EPG (Guía Electrónica de Programa) para información del Canal en pantalla.
Display en pantalla con 16 bit Color.
Función Zoom en Pausa.
Salida Dolby Digital Bitstream a través de la entrada S/PDIF ( Óptica & Coaxial).
Salida seleccionable para formatos 1080i, 720P, 576P y 576i.
Salida Multiple de Video HDMI, Componentes (YPbPr), EUROCONECTOR (RGB, CVBS).
Puerto USB 2.0 (Acceso a HDD, memoria USB, Otros etc).
Actualización de Software y Base de Datos de Canales a través del puerto USB 2.0.
I.DESEMBALAJE
II. CARATERISTICAS
SEGURIDAD GENERAL
Por favor, leer las siguientes recomendaciones atentamente para evitar el riesgo de posibles daños del equipo.
No cubrir el receptor y mantener limpio el espacio alrededor del equipo.
Comprobar la tensión de entrada al receptor AC 90~240V, 50Hz~60Hz Max, 30W
Mantener los lÍquidos lejos del receptor.
El receptor no debe ser expuesto a goteos o salpicaduras, ni colocar objetos llenos de lÍquido
en el receptor.
Utilizar un trapo blando y un jabón de limpieza suave para limpiar la carcasa.
No bloquear las salidas de ventilación del receptor, las cuales le
protegen de calentamientos.
Por favor, mantener el receptor en un espacio abierto.
No permitir que el receptor sea expuesto a condiciones de mucho calor,
frio ó humedad.
No usar ningún cable ni accesorios no recomenados. Estos podrían dañar su equipo.
Por favor, desconectar el receptor del enchufe y el cable de antena, cuando no se vaya a
usar durante un largo tiempo.
No quitar la tapadera para reducir el riesgo de descargas eléctrica.
No intentar reparar equipo por Ud. mismo.
Llevarlo a un servicio técnico autorizado.
El Manual puede ser actualizado por las versiones.
AVISO
Page 22

40 41
INFORMACIÓN GENERAL
III MANDO A DISTANCIA (RCU)
1. MUTE Habilita o deshabilita el audio.
2. POWER Conmuta al receptor entre operativo y en modo stand by.
3. TV Modo de TV.
4. STB Modo de STB.
5. VCR Modo de VCR.
6. DVD ModoÄ de DVD.
7. Numeric buttons Selects the TV or Radio service channels and individual menu.
8. FAV Cambia la lista de favoritos seleccionados.
9. SAT Cambia a la lista de satélites seleccionados.
10. EPG Muestra la guía de programas de TV ó Rad.
(Guia Electronica de Programas)
11. Teletext Habilita el modo subtitulos y teletexto.
12. Audio Cambia el idioma del audio.
13. SUB Title Habilita el modo subtitulos.
14. Cambia canales o mueve las opciones en el menú.
15. Ajusta el volumen ó mueve para la izda. Y dcha. en las del menú.
16. MENU Muestra el menú principal en la pantalla.
17. EXIT Regresa al menu anterior ó a la vista del modo normal desde un menú.
18. INFO Muestra la caja de información del progarama en la pantalla y
editar el nombre de lista de canal favorito.
19. V+/V- Sintoniza el volume arriba o abajo.
20. P+/P- Cambia canales arriba o abajo en el modo normal de canales.
21. Mueve arriba un página en la lista de canales (Selecciona el zoom in/out).
22. Mueve abajo una página en la lista de canales.
23. STOP Para la grabación ó la reproducción.
24. PAUSE Hacer Pausa en la imagen ó volver a imagen norma.
25. Record Grabar los programas.
26. Play Visualiza la lista de ficheros y reproduce a velocidad normal.
27. Rewind Se usa para rebobinar.
28. F/F Se usa para avanzar rápidamente
29. RELLAMADA Selecciona el canal visto anteriormente.
30. AV/TV Selecciona el modo TV ó Radio.
31. TV/RADIO Conmuta entre canales de TV y Radio.
32. PR Selecciona el canal que estabamos viendo anteriormente.
33. Fn Reservado.
34. STB/DivX para cambiar STB <-> DivX .
35. ZOOM Selecciona la opción ZOOM IN/OUT.
36. V.Format Cambia a tipo HD.
INFORMACIÓN GENERAL
III MANDO A DISTANCIA (RCU)
1
2
3
4
5
6
8
7
9
10
11
12
13
14
15
16
18
19
21
23
25
27
29
31
33
17
20
22
24
26
28
30
32
34
35
36
Page 23

42 43
4
INFORMACIÓN GENERAL
IV. COMO CONFIGURAR EL MANDO A DISTANCIA A LA TV
INFORMACIÓN GENERAL
1.Búsqueda Manual
Primero, Encender el TV
1) Presionar la tecla
““OOKK”” y
y
el
““LLEEDD TTVV”
”
en el mando a distancia a la misma vez durante 2 ó 3 segundos.
Entonces el
““LLEEDD TTVV””
se encenderá / apagará 2 veces (parpadeará 2 veces).
2) Buscar el código del TV en la lista de marcas ( el código está compuesto
de 4 dígitos) e insertar los 4 dígitos.
Si los 4 dígitos fueron insertados correctamente, el
“
“LLEEDD TTVV””
parpadeará 2 veces y la TV se
aappaaggaarrá
á
==>
iirr aall ppaassoo 33 –– 11..
Pero si el código fue insertado incorrectamente el
““LLEEDD TTVV”
”
parpadeará solamente 1 vez y el TV per-
manecerá encendido.==>
i
irr aall ppaassoo 33 –– 22..
==>En este paso, se deberá insertar los 4 dígitos del código en 10 segundos. Si no es así, el proceso de
configuración finalizará incorrectamente.
3) - 1 Si la TV se apaga, presionar la tecla “OK” y el LED TV parpadeará 2 veces otra vez. Por favor,
encender el TV usando la tecla de
“
“PPOOWWEERR””
en el mando a distancia y comprobar
llaass tteeccllaass ddeevvoolluummeenn yy ccaannaalleess ó
ó
cualquier otra para comprobar si el mando a distancia funciona
correctamente. Si la tecla de “POWER” funciona correctamente pero las otras teclas no, significa
que el código no ha sido insertado correctamente.
Por favor, empezar otra vez desde el paso 1- e insertar otro código de la
lista de marcas de TV. Normalmente las marcas de TV tienen varios códigos.
3) -2 Por favor, empezar otra vez desde el paso 1- e insertar otro código de la lista de marcas de TV.
Normalmente las marcas de TV tienen varios códigos.
2. Búsqueda Automática
Primero encender el TV
1) Presionar la tecla
““OOKK”” y
y
el
““LLEEDD TTVV”
”
en el mando a distancia a la misma vez durante 2 ó 3 segundos.
Entonces el
“
“LLEEDD TTVV””
se encenderá / apagará 2 veces (parpadeará 2 veces).
2) Presionar la tecla
UUPP ((aarrrriibbaa)) óó DDOOWWNN ((aabbaajjoo))
hasta que el TV se apague.
3) Cuando el TV se apague, presionar la tecla
O
OKK
y el
LLEEDD TTV
V
parpadeará 2 veces.
4) Por favor, encender el TV usando la tecla de
“
“PPOOWWEERR””
en el mando a distancia y comprobar las
tteeccllaass ddee vvoolluummeenn yyccaannaalleess ó
ó
cualquier otra para comprobar si el mando a distancia funciona cor-
rectamente.
5) Si la tecla de POWER funciona correctamente pero el resto de teclas no lo hacen, ello significa que la
búsqueda automática no ha sido hecho correctamente. Por favor, empezar otra vez desde el paso 1hasta el 4-, y comprobar que funcionan todas las teclas correctamente.
1
3
2
6
5
IV. COMO CONFIGURAR EL MANDO A DISTANCIA A LA TV
Page 24
44 45
INFORMACIÓN GENERAL
VI. PANEL TRASERO
INFORMACIÓN GENERAL
V. PANEL FRONTAL
Nota: No todas las “memorias USB 2.0” son compatibles con nuestro producto.
1. POWER Conmuta el receptor entre encendido y Standby.
2. CH Up/Down Canal arriba / abajo o selecciona las opciones del menú.
3. VOL Up/Down Volumen arriba / abajo o selecciona las opciones del menú.
4. LECTOR DE TARJETAS Insertar Tarjeta.
5. RANURA CI Insertar CAM.
1. SAT IN Conectar al cable de antenna de Satélite.
2. LOOP OUT Conectar a otro STB (receptor).
3. YPbPr Conectar a la entrada de Componentes del TV.
4. VIDEO Conectar a la entrada de VIDEO del TV u otro equipo.
5. TV SCART Conectar al cable EUROCONECTOR TV.
6. VCR SCART Conectar al cable EUROCONECTOR VCR.
7. COAXIAL Salida para conectar a un amplificador.
8. OPTICA Salida para conectar a un amplificador.
9. HDMI Conectar a la entrada HDMI del TV.
10. RS 232 Conectar al ordenador personal para actualizaciones de software.
11. Ethernet Conectar al cable LAN.
12. USB Conectar al Puerto USB.
13 . FUENTE DE ALIMENTACIÓN 90~250V AC, 50/60Hz, 40W.
14. BOTÓN DE ALIMENTACIÓN Encendido / Apagado.
1 2 3 4 5
1
2 3 4
6
5
7
8
91011
13
14
12
Page 25
46 47
GUÍA LISTA DE CANALES
1. Modo de vista normal
a) Cuando se selecciona un canal, la barra de información
aparece automáticamente en la pantalla por unos pocos
segundos. Esta barra proporciona la información del
canal actua.
b) Presionar la tecla INFO para ver la información durante
el modo de vista normal.
2. Lista sencilla de canales
a) Presionar la tecla OK en el modo de vista mormal para ir
a la lista de canales.
b) Cuando es visualizado “detalles”en la lista de canales,
presionar la recla ROJA para ir a la lista simple de
canales.
3. Lista de canales de Detalles
a) Presionar la tecla OK en el modo de vista normal para ir
a la lista de canales.
b) Cuando la lista sencilla de canales es visualizada en la
pantalla, presionar la tecia ROJA para ir a la lista de
canales de Detalles.
c) Presionar y para ordenar alfabéticamente.
d) Presionar la tecla SAT para ordenar por satélite y la
tecla FAV para favoritos 1-8.
e) Presionar la tecla VERDE para volver a Todos los
Canales ó SALIR (EXIT) para visualizar nuevamente el
canal.
f) Presionar la tecla SAT para mostrar la Ventana de
Satélites y seleccionar un satélite. Será visualizada la
Lista de Canales del satélite seleccionado.
g) Presionar la tecla FAV para mostrar la Ventana de
Favoritos y seleccionar una lista de FAV. Será visualizada la Lista de FAV seleccionada.
h) Presionar la tecla Verde, entonces todos los canales
encontrados serán visualizados.
INSTALACIÓN DEL EQUIPO
Esta sección explica varias maneras de conectar el receptor a tu TV, VCR
y sistema HI-FI.
Se puede elegir una de las siguientes configuraciones que recomendamos.
Si tiene algún problema ó necesita ayuda, consulte a su distribidor ó punto de venta.
Por favor comprobar que los siguientes articulos están incluidos con el receptor en su caja.
I-1.Conectar el receptor al TV con cable euroconector
Conectar un extremo del cable euroconector al conector TV SCART del panel trasero
del receptor y el otro extremo al conector SCART del TV.
II-1.Conectar el receptor al TV con un cable RCA (CINCH)
Conectar el cable RCA Rojo al conector Audio-R, el Blanco al Audio-L y el Amarillo al Video del panel trasero
del receptor y el otro extremo del cable a los mismos conectores colores del VCR.
I. CONECTAR EL RECEPTOR AL TV CON CABLE EUROCONECTOR
II. CONECTAR EL RECEPTOR AL TV Y VCR CON CABLE RCA (CINCH)
Page 26

48 49
MENÚ PRINCIPAL
GUÍA MENÚ
Presionar la tecla MENU del mando a distancia para abrir la
pantalla de la página principal La página principal será
mostrado.
1. Puede moverse dentro del menú principal presionando
del mando a distancia.
2. Presionar OK para confirmar la selección.
3. Presionar EXIT ó MENÚ para volver al menú anterior.
I. Gestor de Canales
II. Instalación
III. Opciones
Esta sección ayuda a organizar canales acorde a las preferencia.
1. Seleccionar Gestor de Canales en el menú principal con y presionar OK.
2. Aparacerá en la pantalla la página de gestor de canales T.
3. Seleccionar el modo que se quiere uilizar .
4. Para ver el canal que se quiere elegir, ir al canal y presionar la tecla ROJA.
5. Presionar EXIT para volver al menú anterior ó presionar MENU para ir al canal actual que se estaba viendo.
I-1. Favorito
I-2. Renombrar
I-3.Mover
I-4. Bloquear
I-5. Borrar
I-1. Favorito
1. Utilizando las teclas ir al modo favorito y
presionar la tecla AMARILLA para elegir entre
Favorito 1....8.
2. Presionar OK en el canal que se quiere añadir ó borra.
3. Una marca aparecerá al final del nombre del canal
seleccionado. Para borrar presionar OK otra vez.
4. Los canales seleccionados serán memorizados
automáticamente.
5. Si se quiere comprobar la Lista de Favoritos
memorizada ir al otro modo (Renombrar-Borrar)
excepto Favoritos y presionar la tecla FAV para
comprobar Favoritos 1…8.
6. Presionar EXIT para volver al menu anterior ó presionar MENU
para volver al canal actual que se estaba viendo.
7. Presionar la tecla AZUL para renombrar Favorito.
IV. Utility
V. Accessory
GUÍA LISTA DE CANALES
4.EPG (Guía Electrónica de Programas)
a) Presionar la tecla EPG en el modo de vista normal.
b) Aparecerá la EPG del canal actual en la pantalla.
c) Seleccionar el canal deseado para ver la EPG.
d) Aparecerá como la foto que esta en la derecha.
5. ZOOM IN/OUT
a) Presionando la tecla página arriba ( ) desde la
vista normal de un canal, se puede usar la función
Zoom In/Out.
b) Se puede seleccionar el tamaño del zoom con las
teclas ROJA / VERDE.
c) Se puede seleccionar la posición de comienzo con la
tecla .
d) Después de seleccionar el tamaño del Zoom y posi-
ción, se puede empezar la función zoom con la tecla
OK.
e) Con la tecla se puede mover la pantalla del
zoom.
I. Gestor de Canales
Page 27

50 51
I. GESTOR DE CANALES
GUÍA MENÚ
Esta sección ayuda a configurar la antena y buscar satélite
ó transpondedores, etc…Seleccionar instalación en el
menú principal y presionar OK. Presionar EXIT para ir al
menú principal ó presionar MENU para volver al
canal actual que se estaba viendo.
II-1.
Satélite
Buscar
II-2. Conmutador DiSEqC
II-3. Configuración de Motor
II-4. Home Streaming
II-5. Configuración de Fábrica
II-1 Satélite Buscar
1. Se puede mover el cursor utilizando presionando
Ok, cunado se seleccione el valor deseado.
a) Satélite
- Presionar OK para visualizar la lista de satélites.
- Seleccionar el satélite deseado y presionar OK.
b) DiSEqC
- Presionar OK para visualizar la lista de los puertos de
DiSEqC.
- Seleccionar el DiSEqC deseado y presionar OK.
c) LNB
- Presionar OK para visualizar la lista de
frecuencias de LNB.
- Selecionar el LNB deseado y presionar OK.
- Se puede también introducir directamente los números uti-
lizando el teclado numérico en el mando a distancia.
d) 22KHz ToneTono 22KHz
- Seleccionar entre Ninguno, 0 KHz ó 22 KHz
dependiendo de la conmutación de antena.
e) Opción Búsqueda
- Presionar OK para visualizar la lista de Opciones de
Búsqued.
- Selecionar la opción Búsqueda deseada y presionar OK.
f) Buscar
- Presionar Buscar para empezar la búsqueda de canales.
- Renombrar SAT: Para renombrar un SAT, presionar la tecla
Verde en el mando a distancia.
II. INSTALACIÓN
GUÍA MENÚ
I-2. Renombrar
1. Utilizando las teclas ir al modo de Renombrar.
2. Seleccionar el canal que se quiere renombrar utilizando
presionar OK.
3. Se visulaizará un teclado en la pantalla.
4. Editar el nombre utilizando el teclado NÚMERICO y /
ó
PALABRAS .
5. Presionar la tecla AMARILLA para renombrar Favorito 1..8 y presionar la tecla AZUL para renombrar el Satélite.
6. Presionar EXIT para volver al menu anterior ó presionar MENU
para ir al canal actual que se estaba viendo.
I-3. Mover
1. Utilizando las teclas ir al modo Mover.
2. Seleccionar los canales que se quieren mover presionando la tecla OK .
3. Mover el cursor al lugar donde se quiere mover y presionar
la tecla VERDE.
4. Presionar EXIT para volver al
menú
anterior ó presionar MENU
para ir al canal actual que se estaba viendo.
I-4. Bloquear
1. Utilizando las teclas ir al modo Bloquear.
2. Seleccionar los canales que se quiere bloquear y presionar OK.
Aparecerá al final del nombre del canal seleccionado Para
borrar presionar OK otra vez.
3. Precionar EXIT para ir al
menú
principal ó presionar MENU para
ir al canal actual que se estaba viendo.
I-5. Borrar
1. Utilizando las teclas ir al modo Borrar.
2. Seleccionar el canal que se quiere Borrar y presionar OK.
Aparecerá una ( ) en el número de canal seleccionado. Para
borrar presionar la tecla AZUL otra vez
.
3. Presionar la tecla AMARILLA para borrar TP. Seleccionar un canal y presionar la tecla AZUL. Todos los canales
de ese TP serán seleccionados automáticamente.
4. Presionar la tecla AMARILLA para borrar un Satélite. Seleccionar un canal y presionar la tecla AZUL. Todos los
canales de ese
satélite
serán seleccionados automáticamente.
5. Presionar EXIT par air al
menú
anterior ó presionar MENU para ir al canal actual que se estaba viendo.
6. Aparecerá en el display una caja con un mensaje.
7. Seleccionar OK en la caja del mensaje y presionar OK para borrar los canales marcados.
Editar : Para Editar un TP, presionar
la tecla ROJA en el mando a
distancia.
Page 28

52 53
II. INSTALACIÓN
GUÍA MENÚ
f) Control de Motor
Seleccionar la posición utilizando y presionar OK.
Aparecerá en la pantalla una caja de mensaje.
- Memorizar la Posición del motor para el satélite
seleccionado.
- Ir a Posición Satélite : Mover el motor a la posición
memorizada del satélite seleccionado.
- Ir al centro: Ir al centro del motor.
- Limit off: Eliminar los límites Este y Oeste.
- Configurar Límite Este: Configurar la actual posición
como Límite Este.
- Configurar Límite Oeste: Configurar la actual posición
como Límite Oeste.
- Recalcular Posición.
-
Resetear Posición : Resetea todas la posiciones
memorizadas del motor
g) Posición de satélite
- Introducir directamente la posición utilizando el
teclado NUMéRICO en el mando a distancia.
- Seleccionar la dirección utilizando ( Oeste /
Este).
h) Opción Búsqueda
- Presionar OK para visualizar la lista de Busqueda de
canales.
- Presionar la Opción de Búsqueda que se quiera y
presionar OK.
i) Buscar
- Presionar Buscar para empezar la búsqueda de
canales.
- Presionar OK para empezar la búsqueda.
2. Editar la posición local
- Presionar el teclado VERDE para editar la posición local.
a) Longitud
- Introducir directamente la longitud utilizando el teclado numérico del mando.
- Seleccionar la dirección utilizando (Oeste/Este).
b) Latitud
- Introducir directamente la latitud utilizando el teclado numérico del mando.
- Seleccionar la dirección (Norte/ Sur).
3. Presionar EXIT para regresar al menú anterior ó presionar MENU para ir al canal que se
estaba viendo.
GUÍA MENÚ
II-2. Conmutador DiSEqC
1. Selecionar buscar canales en el modo de instalación
utilizando y presionar OK.
a) Si se presionar DiSEqC Switch y presionar OK en el
menu y aparecerá la página de Conmutación de DiSEqC
en la pantalla.
b) Selecionar el puerto de DiSEqC (A~D) de satélite desea-
do utilizando y y precionar BUSCAR. Se bus-
cará el satélite deseado automáticamente.
II-3 Conficuración del Motor
1.Se puede mover el cursor utilizando y presionar OK
cuando se seleciona el valor deseado.
a) Tipo de Motor : DiSEqC 1.2, USAL
- Presionar OK para visualizar el Tipo de Motor.
- Seleccionar el Tipo de Motor deseado y presionar OK.
b) Satélite
- Presionar OK para visualizar la lista de Satélites.
- Seleccionar el satélite deseasdo y presionar OK.
c) Conmutación y LNB
- Presionar OK para visualizar la lista de las Frecuencias y
Configuración de Conmutación
-Seleccionar LNB & Conmutación desado.
d) Frecuencia
- Presionar OK para visualizar la lista de las Frecuencias.
- Seleccionar frecuencia deseada y presionar OK.
e)Movimiento de Motor
- Buscar la posición apropiada del satélite seleccionando.
II. INSTALACIÓN
TP EDIT : Para Editar TP, presionar el
teclado ROJA en el mando a
distancia.
Page 29

54 55
GUÍA MENÚ
II. INSTALACIÓN
II-5. Confuguración de Fábrica
Usar la función de Configuración de Fábrica
solamente cuando se quiera volover al receptor
a la condición de configuración de fábrica. Todas
las configuraciones y canales serán borrados.
1. Seleccionar Configuración de Fábrica en
Instalación utilizando y presionar OK.
2. Aparecerá en la pantalla una caja de mensaj.
3. Seleccionar OK para volver al receptor a la
condición de configuración de fábrica y presionar OK.
4. Presionar EXIT para volver al menú anterior ó
presionar MENU para ir al canal actual que se estaba viendo.
GUIA MENU
II-4. Home Streaming
1. Ajustes del PC
***Ejecutar el programa “home streaming”.
a) Ir a ‘Preference”.
b) Seleccionar ‘Default URL’ y asignar la carpeta
del PC usando la tecla “Browse” Por defecto está
asignada la carpeta C:\download, pero debe
especificar la carpeta de destino para poder
recibir archivos de película en su PC.
Nota: solo está disponible el servidor por
defecto.
2. Ajustes del STB
a) Ir a Home streaming menu ( Menu Accesorios
red Home streaming ) y click Home
streaming.
b) Aparece ventana para editar el nombre de la IP &
el servidor de entrada IP con las teclas
numéricas del mando a distancia.
c) La dirección IP deberá ser igual a la IP de la car-
peta preference en el programa home streaming.
3. Reproduzca la película con home streaming.
a) Pulse la tecla “Fn” y la lista de películas de su PC
aparecerá en la pantalla de su televisor.
b) Seleccione el archivo que usted desea ver y pre-
sione “OK” para reproducirlo.
Por favor, mire la siguiente pantalla para entenderlo mejor.
II. INSTALACION
Page 30

56 57
Esta sección ayuda a confugurar el idioma del
OSD, hora, etc. Seleccionar Opciones en el menu
principal y presionar OK.
Presionar EXIT para volver al menú anterio ó presionar
MENU para ir al canal actual que se
estaba viendo
III-1. Configuración OSD
III-2. Configuración TV
III-3. Configuración Hora
III-4. Configuración Bloqueo Patern
III-1.Configuración OSD
1. Seleccionar configuración OSD en Opciones
utilizando y presionar OK .
a) Idioma OSD
- Presionar OK para visualizar la list de idiomas
de OSD.
- Seleccionar el idioma que se quiera y presionar OK.
b) Idioma de Audio
- Presionar OK para visualizar la list de idiomas de Audio.
- Seleccionar el idioma que se quiera y presionar OK.
c)Idioma subtítulos
- Presionar OK para visualizar Subtítulos.
- Seleccionar el idioma deseado y presionar OK.
c) Barra de información del Display
- Presionar OK para visualizar la lista de tiempo de barra de Información del display.
- Selecciona los segundos que se quiere visualizar y pulsar OK.
e) Transparencia
- Ajuste de nivel de transparencia.
2. Presionar EXIT para volver al menú anterior ó precionar MENU para volver al
canal actual que se estaba viendo.
III. OPCIONES
GUÍA MENÚ
GUÍA MENÚ
III. OPCIONES
III-2. Configuración de TV
1. Seleccionar Configuración de TV en Opciones utilizando las
teclas (arriba / abajo), y presionar OK.
a) Tipo HD
- Seleccionar la salida de video HD.
b) Tipo TV
- Seleccionar el tipo de TV.
c) Relación de aspecto de pantalla
- Seleccionar el ratio de pantalla.
d) Control de Pantalla
- Seleccionar el modo de visualización de pantalla.
e) Brillo
- Ajuste del brillo de pantalla.
f) Contraste
- Ajuste del contraste de pantalla.
g) Saturación
- Ajuste de la Saturación de la pantalla.
2. Presionar EXIT para volver al menú anterior ó presionar
MENU para volver al canal actual que se estaba viendo.
III-3. Configuración de la Hora
Configurar la hora local acorde a la localización donde estemos.
1. Seleccionar Configuración Hora en Opciones y presionar OK.
2. Aparecerá en la pantalla la página del Ajuste de Hor.
3. Mover el cursor utilizando
, y preionar OK cunado
se haya seleccionado el valor adecuado (Introducir la hora
directamente utilizando el tecaldo num
é
rico del mando a distancia)
4. Presionar EXIT para volver al menú anterior ó presionar
MENU para volver al canal actual que se estaba viendo
III-4. Configuración de Bloqueo Patern
1. Seleccionar Configuración Bloqueo Paterno en Opciones y
presionar OK.
2. Aparecerá en la pantalla la página de Configuración
Bloqueo Patern
3. Se puede bloquear y desbloquear el Bloqueo Paterno
seleccionando ON ó OFF utilizando
.
4. Se puede bloquear y desbloquear el Bloqueo de Instalación
seleccionando ON ó OFF utilizando
(para las configuraciones instaladas)
5. Introducir la nueva contraseña (password), si se quiere cambiar la catual contraseña.
6. Confirmar la nueva contraseña introduciendo la misma otra vez.
7. Presionar EXIT para volver al menu para vlover al canal actual que se estaba viendo.
Nota : CONTRASEñA POR DEFECTO ES 0000
Page 31

58 59
GUÍA MENÚ
IV
. UTILIDAD
Esta sección ayuda a usar USB etc. Seleccionar
Utilidades en la Página Pricipal utilisando
IV -1. Información de Sistema
IV -2. Programador
IV -3. Calendario
IV
-1.
INFORMACIóN DE SISTEMA
Esta opcion ayuda a saber la actual versión de S/W y H/W.
También se le informa del nombre del producto.
1. Seleccionar Información de sistema en Opciones y presionar OK.
2. Presionar EXIT para volver al menú anterio.
IV
-2.
Programador
El receptor se apagará / encenderá automáticamente
después de una hora especificada.
IV
-3.
Calendario
GUÍA MENÚ
V
. ACCESORIOS
Esta sección ayuda a usar USB etc. Seleccionar
Utilidades en la Página Pricipal utilisando
V -1. USB
V -2. INTEFAZ COMÚN
-1 USB
Este receptor esta equipado con Puerto USB.
1. Seleccionar USB en Utilidades uitilisando y presionar OK.
2. Si desea cambiar de modo (S/W upgrade, BootLoader
Upgrade), presionar el teclado ROJA del mando a distancia.
3. Seleccionar el fichero que desea “upgrade” utilizando
y presionar OK.
4. Una vez que haya “upgrade” el fichero seleccionado el
receptor reiniciará automáticament.
-2 INTEFAZ COMÚN
El receptor está equipado con un spot de Interfaz Común,
el cual tiene acceso a los servicios de pago por visión codificados mediante varios módulos de acceso y una tarjeta
válida oficial.
El canal puede ser descodificado por el módulo de acceso
condicional y la tarjeta.
1. Seleccionar Interfaz Común en Utilidades con y pre-
sionar OK.
2. Intefaz Común se visualizará en la pantalla. (La frase
“No Modulo” es indicado cuando el módulo de acceso
condicional no está instalado).
3. Insertar el módulo de acceso condicional dentro del
Slot.
4. El nombre del Slot depende de cada módulo de acceso
condicional insertado.
5. Presionar EXIT para volver al menú anterior ó presionar
MENÚ para volver al canal en vivo.
Page 32

60 61
PVR GUIDE
PVR GUIDE
II. Función de Grabación
II-2 Grabación inm ediata
- Presionar la “tecla RECORD” en el mando a distancia para
empezar la grabación.
- Mientras se está grabando el programa.
- Presionar la tecla “PAUSE” para ejecutar la opción de “Time
Shift”.
- Se puede usar las teclas “IZDA / DCHA” para ver el momento deseado al que se quiere volver de la grabación del programa.
- Presionar la tecla “ OK ” en el mando a distancia para
mostrar la lista de canales de la misma frecuencia que se
pueden visualizar mientras se está grabando.
Durante la Grabación se pueden ver otros canales, los cuales
están situados en la misma frecuencia. En caso de ver otros
canales durante la grabación. Se debe volver al canal que se
está grabando si se desea parar la grabación.
- Si se presiona la tecla “STOP” en el mando a distancia,
parará la grabación y se almacenará en el dispositivo USB.
PVR GUIDE
PVR GUIDE
I. Dispositivos Recomendados
- Unidad de Disco Duro Externo USB.
- Flash memory stick.
- Tipo de Formato: FAT16/32 (el sistema no soporta NTFS,
ni otros ficheros desistema).
II. Función de Grabación
II-1 Programar Grabación
1. Programar la Hora de Grabación
: Configurar la hora de grabación en ” Utilidades ->
Temporizador ” para grabar a la hora deseada.
N
NOOTTAA :: CCoonnffiigguurraacciióónn ddee llaa ““HHoorraa ddee GGrraabbaacciióónn””
- El receptor está configurado por defecto como se mues-
tra en la figura de abajo.
- Cambiar “Apagado” a “Grabación” en la opción Activo.
- Una vez está configurado en el menú Activo como
“Recording”, se mostrará los detalles del menú para
PVR (Modo, Tipo de Canal, Nombre de Canal, Hora de
Comienzo, Duración).
- Presionar la tecla “Ok”” para seleccionar el Nombre del
Canal.
2. Programar una Grabación a través de la EPG
: Utilizar la EPG para grabar un evento determinado.
- Presionar la tecla EPG para ir al menú de EPG mientras
se está viendo un programa en la pantalla.
- Para seleccionar la hora de un evento: Mover dentro de
la EPG al evento a seleccionar y presionar ”tecla
RECORD” en el mando a distancia.
- Si se quiere cancelar, presionar una vez mas la tecla
“RECORD”.
- Si se quiere programar varias grabaciones, mover y presionar la tecla “RECORD” en el mando a distancia.
Page 33

62 63
PVR GUIDE
PVR GUIDE
V. Función TimeShift
- Si se quiere ejecutar “Time Shift” en modo en vivo se debe
configurar en “Encendido (On)” en la Opción PVR del Time
Shift (Accesorios -> PVR -> TimeShift “ON”).
- Para empezar el Time Shift en modo en vivo, presionar
“PAUSE” para empezar.
- El Time shift será reproducido durante 30 minutos en el
Modo en Vivo.
- Para empezar la “Reproducción” durante el Timeshift, presionar la tecla “PLAY”.
- Se puede mover la “posición de reproducción” utilizando las
teclas ” IZDA / DCHA “ durante el Time Shift.
VI. Formatear
- Se puede hacer un formato FAT32 al dispositivo USB,
estando formateado anteriormente tanto en FAT32 como en
NTFS.
- Tambien se puede Formatear estando en multi-partición el
dispositivo USB.
- Cuando es insertado un dispositivo formateado en NTFS,
aparecerá un mensaje como el mostrado en la figura de
abajo.
- Presionar la tecla “OK” para mover a “C:, D:, E:, F: NEXT” en
caso de tener Multi partición.
- En caso de haber una multi partición NTFS, se debe formatear a FAT 32
PVR GUIDE
PVR GUIDE
III. Función Reproducción
- Para reproducir los programas grabados previamente, presionar la tecla “Play” en el mando a distancia.
- Utilizar las teclas cursores (arriba / abajo) para seleccionar
el fichero que se desea reproduciry presionar la tecla “OK”.
- Mientras se está reproduciendo un programa.
- Si se presiona las teclas “IZDA / DCHA” en el mando a distancia mientras se está reproduciendo un fichero, la imagen
se parará y empezará la reproducción desde el momento al
que se ha movido con los cursores del mando a distancia.
Si se quiere reproducir otro fichero grabado durante una
reproducción, presionar la tecla “Play”.
IV. Función de avance y retroceso
- Si se presiona la tecla “FF(avance rapido hacia adelante)”
durante el Timeshift ó una reproducción, el fichero será
reproducido a una velocidad de X2, y si se presiona una vez
mas, el fichero será reproducido a una velocidad de X8.
- Si se presiona la tecla “REW(Rebobinar)” durante el Time
shift ó una reproducción, el fichero será rebobinado a una
velocidad de X2 y si se presiona una vez mas, el fichero será
rebobinado a una velocidad de X8.
- Las funciones FF/REW volverán a su reproducción normal al
presionar la tecla ”PLAY”.
Page 34

64 65
PVR GUIDE
PVR GUIDE
PVR GUIDE
PVR GUIDE
VII. Reproducció n MP3
- Seleccionar el fichero MP3 que se desea reproducir dentro
del menú USB.
- Después de seleccionar el fichero MP3, aparecerá una ven
tana de reproducción de ficheros MP3.
VIII. Reproducir ficheros JPG
- Seleccionar el fichero JPG que se desea ver dentro del
menú USB.
- Presionar la tecla OK para ver el fichero .JPG que se
deseaver.
- Se puede rotar la imagen utilizando las teclas IZDA / DCHA.
IX. Software Upgrade
- Seleccionar el fichero * UAD con el que se quiere actualizar
en el menú USB
X. Como reproducir “el fichero grabado en la
opció n PVR del HD-200” en el PC ó DivX
Player
X-1 Como Reproducir desde el PC
A) Abrir el reproductor KM Player.
B) Seleccionar el Idioma.
1) Pulsar el botón derecho del ratón -> Idioma>elegir idioma
C) Cambiar la extension del nombre del fichero
grabado a “.mpg”.
Ejemplo: Welcome to A_131821 -> Welcome to
A_131821.mpg
D) Seleccionar el fichero que se desea reproducir.
1) Pulsar el botón derecho del ratón -> Open
Files(S) -> Abrir Fichero(S) -> Seleccionar.
X-2 Com o R epro du cir co n el programa “DivX
Player”
A) El formato del fichero debe ser cambiado al formato “.avi”
para reproducirlo en el DivX Player.
B) Seleccionar una carpeta de destino donde será alma cena-
do el fichero, el cual fue cambiado a “.avi”.
1) Pulsar el botón derecho del Ratón -> Capture -> Select
Capture Folder.
C) Repetir los puntos A) -> B) -> C) -> D) del No.1 en como
reproducir en el PC.
D) Capturar el fichero el cual está siendo reproducido actual-
mente para convertir a *.avi.
1) Pulsar el botón derecho del Ratón-> Capture -> Video
Quick Capture.
2) Entonces el fichero es memorizado en la carpeta designada en el formato *.avi.
E) Si el fichero de reproducción es un canal SD del receptor,
es memorizado en SD y si el fichero es HD ó H.264 y el
usuario no tiene el programa DivX player, el cual no puede
reproducir HD ó H.264 (al menos CPU sigma8634), se debe
convertir el fichero a SD para que el DivX player general SD
(CPU sigma8511) pueda reproducir el fichero.
Page 35

66 67
Comprobar la conexión del cable de alimentación con el
enchufe de la pared.
Comprobar la antena y ajustarla.
Comprobar la conexión del cable y corregirlo.
Comprobar el canal y la salida de Vídeo.
Comprobar el volumen del TV y del receptor.
Comprobar el estado del mute del TV y del receptor.
Comprobar la conexión del cable y corregirla.
Cambiar las pilas.
Apuntar directamente el mando a distancia al receptor.
Comprobar que nada bloquea el panel frontal.
Comprobar que el Módulo de Acceso Condicional y la
tarjeta son las adecuadas para ver el canal seleccionado.
Comprobar que el Módulo de Acceso Condicional y la
tarjeta están correctamente insertados.
Comprobar la fuerza y la calidad de la señal en el menú.
Comprobar el LNB y cambiarlo si fuese necesario.
Comprobar el cable del LNB.
Comprobar la antena y ajustarla.
Ir a Opción y seleccionar información de Sistema.
Contactar con el distribuidor.
Problema
Nada aparece en el display
frontal ó no enciende la
fuente de alimentación
No hay imagen
No hay sonido
El mando a distancia no funciona
El canal no opera ó está codificado
Aparece “ No señal” en la
pantalla
Comprobar, Tuner defectuoso
Se ha olvidado la contraseña
Solución
SOLUCIÓN DE PROBLEMAS
PVR GUIDE
PVR GUIDE
X-3 Com o c onvertir el f iche ro en el Divx
Manager
A) Abrir el programa Divx Manager.
1) Setting -> Model -> Rapsody RSH-250/350
B) Seleccionar la carpeta donde se encuentra el fichero que
se desea convertir. Entonces aparecerá la información del
fichero.
C) Seleccionar el fichero que se desea convertir y seleccionar
“Convert”.
D) Seleccionar “Encoding Start” -> Empezará “Converting”.
NOTE: Página Web para descargar
1. Kmplayer
1) Enter this site : http://2bwithu.tistory.com/245.
2) Descargar los 2 ficheros a una carpeta y descomprimir el
fichero. Después de la descomprensión, se puede instalar
pulsando el fichero .exe.
2. Divx Manger
1) Entrar en la web :
http://www.modix4u.co.kr/upboard/view.asp?fcprimkey=44
2) Pulsar para version Inglés.
Page 36

68 69
ESPECIFICACIONES
Item
HDMI HD Video/Audio Output
TV SCART Output RGB, CVBS, L, R Output with Volume control
VCR Scart In/Out RGB, CVBS, L, R In
CVBS, L, R Out
RCA Output
CVBS, L, R Output(Yellow, White, Red Jack) with Volume Control
Component Video(YPbPr) Out
SPDIF Dolby Digital Bitstream Out(Coaxal, Optical)
- RS-232, Bit Rate : 115,200baud
Data Interface Connector : 9-pin D-sub Male type
- USB : USB 2.0, Type A Connector
Specification
. A/V & Date In/Out
Item
Input Voltage AC 90V ~ 250V, 50Hz ~ 60Hz
Power Consumption Max 40W
Protection
Separate Internal Fuse
The input shall the lighting protection
Specification
. Power Supply
Item
Size(WxHxD) 290mm x 50mm x220mm
Weight 1.5 KG
Specification
. Physical Specification
Item
Operating Temperature 0 °C ~ 40 °C
Storage Temperature -10 °C ~ 50 °C
Operating Humidity Range 10~85% RH, Non-condensing
Storage Humidity Range 5~90% RH, Non-condensing
Specification
. Environmental Condition
Item
Transport Stream 13818-1 MPEG-2, H.264/AVC Transport stream Specification
Profile Level MPEG-2 MP@ML, MP@HL, MPEG-4 H.264/AVC
Input Rate Max. 90Mbit/s
Aspect Ratio 4:3, 16:9, Letter Box
Frame Rate 25Hz for PAL, 30Hz for NTSC
Video Resolution 576i, 576p, 720p, 1080i
Teletext Through VBI or BSD
Audio Decoding MPEG-1 Layer 1 & 2, Dolby Downmix
Audio Mode Single Channel/Dual Channel Joint Stereo/Stereo
Frequency Response 20~20kHz, <+/-2dB
Specification
. MPEG Transport Stream & A/V Decoding
ESPECIFICACIONES
Item
Specification
SMART CARD 1 SLOT, ISO 7816, GSM11.11 and EMV (payment systems) compatibility
2 SLOTS
PCMCIA DVB Common Interface Standard
(Viaccess, Irdeto, Nagra Vision, Conax, Crytoworks, AlpahCrypt..)
.Conditional Access Module Interface
Item
Type 1 F Type, IEC169-24, Female
Frequency Rage 950MHz to 2150MHz
RF Impedance 75 Ohm unbanlanced
Signal Level -65 to -25 dBm
LNB Power 13.5/18.5Vdc +/- 5%, 0.5Amax, Overload Protected
22KHz Tone Frequency : 22KHz +/- 2KHz, 0.6Vpp +/- 0.2V
DiSEqC Control Version1.0, 1.2, Tone burst A/B
Demodulation QPSK, 8PSK
Input Symbol Rate
DVB-S QPSK : 2~45 Msps
DVB-S2 8PSK/QPSK : 10~30Msps
FEC Decoder
1/2, 2/3, 3/4, 3/5, 4/5, 5/6, 8/9, 9/10 in DVB-S2 mode.
1/2, 2/3, 3/4, 5/6 and 7/8 in DVB-S mode.
Specification
. Tuner & Channel
Item
Specification
. System & Memory
Main Processor STi7101
Flash Memory 8 Mbytes
System Memory 128 Mbytes
A/V Memory 64 Mbytes
Channel Capacity Digital Channel : 8,000
Front 7-Keys, 7-SEGMENT DISPLAY
Page 37

Page 38

ALGEMENE VEILIGHEID 74
ALGEMENE INFORMATIE 75
I. INHOUD PAKKET 75
I I. SPECIFICATIES 75
III. AFSTANDSBEDIENING (RCU) 76
IV. AFSTANDSBEDIENING INSTELLEN VOOR TV 78
V. VOORKANT PANEEL 80
VI. ACHTERKANT PANEEL 81
INSTALLATIE 82
KANALENLIJST 83
MENU 85
HOOFDMENU 85
I. KANALENLIJST 85
II. INSTALLATIE 87
III. OPTIES 92
IV. UTILITY 94
V. ACCESSOIRES 95
PVR Guide 96
PROBLEMEN OPLOSSEN 103
SPECIFICATIES 104
MERKEN LIJST 178
73
INDEX
Om het apparaat volledig uit te schakelen dient men de stekker uit het
stopcontact te verwijderen.
Page 39

75
ALGEMENE INFORMATIE
Verzeker u zelf dat de volgende voorwerpen in de verpakking zitten.
1) Afstandsbediening (RCU)
2) Batterijen (2EA)
3) Handleiding
4) A/V Kabel
Ondersteunt MPEG-2, MPEG-4, H.264 en volledig DVB ondersteuning.
Satelliet receiver.
2 Common Interface slot voor Viacces, Irdetto, Cryptoworks, Nagravision, Conax, Mediaguard etc.
1 Kaartlezer slot.
DiSEqC 1.0, 1.1, 1.2 en USALS
Aspect ratio afstelling 4:3 ( 16/9 crop), 4:3 (16/9 letterbox), 16/9 (4/3 pillar box).
Gebruiksvriendelijk OSD en werking.
Totaal 8,000 te programmeren kanalen.
Meertalige audio ondersteuning.
Meertalige menu tekst ondersteuning.
Favorieten kanalen selectie.
Parental Gids en rating controle.
EPG(Electronische Programma Gids) for In-Beeld kanalen informatie.
In-Beeld Display met 16 bit Color.
Zoom functie in Pauze.
Dolby Digital Bitstream Uit via S/PDIF (Optisch en Coaxiaal).
Selecteerbare output voor 1080i, 720P, 576P en 576i format.
Multi Video Uitgangen HDMI, Component (YPbPr), SCART(RGB,CVBS).
USB 2.0 Host (Toegang tot HDD, USB memory, anderen etc).
Upgrade Software & Update Kanalen Database via USB 2.0 poort.
I. INHOUD PAKKET
II. SPECIFICATIES
74
ALGEMENE VEILIGHEID
Lees eerst de veiligheidsvoorschriften om eventuele schade aan u of uw installatie te
voorkomen.
Bedek de ontvanger niet en houd de omringende omgeving schoon.
Controleer de ingangsspanning AC 90~240V, 50Hz~60Hz Max, 40W
Houd vloeistoffen op afstand van uw ontvanger.
De ontvanger mag niet worden blootgesteld aan druppels of spetters, plaats ook geen
voorwerpen met vloeistoffen op de ontvanger.
Verwijder allereerst de stekker uit het stopcontact voordat u de ontvanger gaat reinigen.
Gebruik een licht vochtige, zachte doek om de behuizing te reinigen.
Blokkeer de ventilatie openingen van de ontvanger niet en houdt deze vrij.
Plaats de ontvanger niet in een gesloten ruimte maar een goed geventileerde ruimte.
Voorkom blootstelling van de ontvanger aan extreme hitte, kou en vochtigheid.
Gebruik geen kabels of accessoires die niet aanbevolen zijn. Deze kunnen de installatie
beschadigen.
Bij lange tijd geen gebruik, verwijder stekker uit het stopcontact en haal de antennekabel uit
de ontvanger.
Verwijder nooit het deksel van de ontvanger in verband met mogelijke elektrische schokken.
Repareer nooit zelf de ontvanger.
Breng het naar een erkende reparateur.
De handleiding kan aangepast worden in verband met nieuwe specificaties.
WAARSCHUWING
Page 40

77
ALGEMENE INFORMATIE
III. AFSTANDSBEDIENING (RCU)
1. MUTE Geluid AAN of UIT.
2. POWER Ontvanger AAN of UIT.
3. TV TV mode.
4. STB STB mode.
5. VCR VCR mode.
6. DVD DVD mode.
7.
Numerieke knoppen
Selecteren de kanalen en menu opties.
8. FAV Toont de gewenste favorieten lijst.
9. SAT Toont de geselecteerde satelliet lijst.
10. EPG Toont de TV of Radio programma gids.
(Electronic Program Guide)
11. Teletext Activeert ondertiteling en teletekst.
12. Audio Veranderd de audio taal.
13. Subtitle Selecteert het geluid type (LINKS/RECHTS/STEREO).
14. Veranderd kanalen of beweegt naar een item in het menu.
15. Stelt het volume of beweegt naar links of beweegt naar item in het menu.
16. MENU Hoofdmenu in beeld.
17. EXIT Gaat terug naar vorig menu of om terug naar huidig kanaal.
18. INFO Toont programma informatie in beelden kan de naam van de favorieten lijst veranderen.
19. V+/V- Volume harder of zachter.
20. P+/P- Kanaal op of neer.
21. Pagina omhoog in kanalenlijst. (Selecteert zoom in/uit).
22. Pagina omlaag in kanalenlijst.
23. STOP Stopt opname of afspelen.
24. PAUSE Pauzeert afspelen.
25. Record Opname programma.
26. Play Opname lijst oproepen of afspelen/slow motion.
27. Rewind Terugspoelen in verschillende snelheden.
28. F/F Vooruitspoelen in verschillende snelheden.
29. RECALL Selecteert het vorig bekeken kanaal.
30. AV/TV Selecteert TV of AV.
31. TV/RADIO Schakelt tussen TV en Radio.
32. PR Selecteert vorige bekeken kanaal.
33. Fn Gereserveerd.
34. STB/DivX Schakelt STB of DivX.
35. ZOOM Selecteert ZOOM IN/OUT
36. V.Format Schakelt naar HD type.
ALGEMENE INFORMATIE
76
III. AFSTANDSBEDIENING (RCU)
1
2
3
4
5
6
8
7
9
10
11
12
13
14
15
16
18
19
21
23
25
27
29
31
33
17
20
22
24
26
28
30
32
34
35
36
Page 41

1
3
6
4
78 79
ALGEMENE INFORMATIE
1. Handmatig Zoeken
Schakel allereerst de TV aan.
1) Kies "OK" knop en "TV LED Lamp" op de afstandsbediening tegelijkertijd gedurende meer
dan 3 seconden. De “TV LED Lamp” zal 2 x Aan/Uit knipperen. .
2) Kies de juiste TV code in de Merken Lijst (de code bestaat uit 4 cijfers) en voer deze 4 cijfers in.
( Indien de 4 cijfers correct zijn ingevoerd zal de “TV LED Lamp” 2 x knipperen en de TV zal
uitschakelen
==>ga naar 3) -1
Indien de code verkeerd ingevoerd is zal de “TV LED Lamp” 1 x langdurig Aan/Uit gaan en de TV
zal aan blijven staan è ==>ga naar 3) -2
==> è In deze stap, dient u binnen 10 seconden de 4 cijfers invoeren. Zo niet, dan zal het
instellen opheffen.
3) - 1 Indien de TV uitschakelt, druk op
"OK" knop en de TV LED Lamp zal 2 x knipperen.
Schakel de TV aan met de Aan/Uit van de afstandsbediening en controleer de volume knop en
kanalen knop of ieder ander knop van uw afstandsbediening. Indien de Aan/Uit knop goed
werkt maar de rest van de knoppen niet, dan heeft u de verkeerde code ingevoerd.
Herhaalt u dan stap 1) en voer een andere code behorende bij dezelfde merk. Meestal heeft 1
merk meerdere codes.
3) -2 Herhaal stap 1) en voer een andere code behorende bij dezelfde merk. Meestal heeft 1 merk
meerdere codes.
2. Automatisch Zoeken
Allereerst, Schakel de TV aan.
1) Kies "OK" knop en “TV LED Lamp” op de afstandsbediening tegelijkertijd gedurende meer
dan 3 seconden. De “TV LED Lamp” zal 2 x Aan/Uit knipperen.
2) Kies de Op of NEER knop totdat de TV uit gaat.
3) Indien de TV uit gaat, druk op
"OK" knop en de TV LED Lamp zal 2 x knipperen.
4) Schakel de TV aan door middel van de Aan/Uit schakelaar van uw afstandsbediening en
controleer de Volume knop en Kanalen knop van uw afstandsbediening voor de goede
werking..
5) Indien de Aan/Uit knop werkt, maar de andere knoppen doen het niet, dan is het automatisch
zoeken niet goed gegaan. Herhaal stap 1 t/m 4 totdat alle knoppen wel goed werken.
ALGEMENE INFORMATIE
IV. AFSTANDSBEDIENING INSTELLEN VOOR TV IV. AFSTANDSBEDIENING INSTELLEN VOOR TV
52
Page 42

ALGEMENE INFORMATIE
81
VI.
ACHTERKANT PANEEL
80
ALGEMENE INFORMATIE
V. VOORKANT PANEEL
NOOT: Niet alle “USB 2.0 geheugens” zijn geschikt voor ons product.
1. POWER Schakelt de ontvanger tussen Aan en Stand By.
2. CH Up/Down Kanaal opwaarts / neerwaarts of selecteert de opties van het menu.
3. VOL Up/Down Volume opwaarts / neerwaarts of selecteert de opties van het menu.
4. Kaartlezer Slot Voer smartcard in.
5. CI slot Voer CAM in.
1. SAT IN Verbinding met satellite antennekabel.
2. LOOP OUT Verbinding met andere ontvanger.
3. YPbPr Verbind Componenten kabel met TV.
4. VIDEO Verbinding VIDEO van TV of ander apparaat.
5. TV SCART Verbinding naar TV SCART kabel.
6. VCR SCART Verbinding naar VCR SCART kabel.
7. COAXIAAL Uitgang voor versterker.
8. OPTISCH Uitgang voor versterker.
9. HDMI Verbind HDMI kabel met TV.
10. RS 232 Verbinding naar personal computer for software upgrade.
11. Ethernet Verbinding naar LAN kabel.
12. USB Verbinding voor USB Memory.
13. POWER SUPPLY 90~250V AC, 50/60Hz, 40W.
14. POWER BUTTON Schakelt AAN/UIT.
1 2 3 4 5
1
2 3 4 6
5
7
8
91011
13
14
12
Page 43

KANALENLIJST
1. Normaal Beeld
a) Als u een kanaal kiest verschijnt automatisch
een informatiebalk in beeld gedurende een aantal
seconden. Deze balk geeft informatie over het
betreffende kanaal.
b) Selecteer de INFO knop voor informatie tijdens
normaal gebruik.
2. Eenvoudige kanalenlijst
a) Druk op de OK knop tijdens normaal gebruik om naar de
kanalenlijst te gaan.
b) Als de uitgebreide kanalenlijst verschijnt, kunt u via het
selecteren van de RODE knop overgaan op eenvoudige
kanalenlijst weergave.
3. Uitgebreide Kanalenlijst
a) Druk op de OK knop tijdens normaal gebruik om naar de
Kanalenlijst te gaan.
b) Als de eenvoudige kanalenlijst verschijnt, kunt u via het
selecteren van de RODE knop overgaan op uitgebreide
Kanalenlijst weergave.
c) Selecteer en om alfabetisch te ordenen.
d) Druk op de groene knop om terug te gaan naar Alle
Kanalen of EXIT om terug te gaan naar het kijken van het
kanaal.
e) Druk de SAT knop in om het Satellieten Scherm op te
roepen en kiest u dan de gewenste satelliet.
De kanalenlijst van de bewuste satelliet zal dan in beeld
komen.
f) Druk de FAV knop in om het Favorieten scherm op te
roepen en kiest u dan de gewenste Favorieten lijst. De
kanalenlijst van de bewuste satelliet zal dan in beeld
komen.
g) Druk op de groene knop dan zullen all gevonden kanalen
getoond worden.
8382
INSTALLATIE
Dit hoofdstuk beschrijft verschillende mogelijkheden voor het aansluiten van de ontvanger met een
TV, VCR en HI-FI systeem.
U kunt kiezen uit de volgende configuraties die wij beschrijven.
Mocht u toch problemen ondervinden dan verwijzen wij u voor eventuele hulp naar de distributeur of
verkooppunt.
Controleer dat de volgende onderdelen in de verpakking samen met de ontvanger zitten.
I-1. Aansluiten van de ontvanger naar de TV via een Scart kabel
Sluit het ene uiteinde van de Scart kabel aan de TV scart aansluiting aan de achterkant van uw ontvanger en
het andere uiteinde aan de Scart aansluiting achter op uw TV
II-1. Aansluiten van de ontvanger met de TV via een RCA kabel
Sluit de RCA-rood plug aan de Audio-R connector, de witte aan de Audio-L en de gele aan de Video-Connector
aan de achterkant van de ontvanger met dezelfde connectors aan de achterkant van uw TV of VCR toestel.
I. AANSLUITEN ONTVANGER MET TV
II. AANSLUITEN ONTVANGER MET TV VIA RCA KABEL
Page 44

HOOFDMENU
85
MENU
I. KANALENLIJST
Druk op de MENU knop om het scherm van het
hoofdmenu te activeren Het hoofdmenu scherm verschijnt.
1. U kunt door het hoofdmenu schuiven door op de knoppen
te drukken van uw afstandsbediening.
2. Druk op OK om uw selectie te activeren.
3. Druk op EXIT om terug te keren naar het vorige menuscherm
of op MENU om terug te keren naar het kanaal dat u aan het
kijken was.
I. KANALENLIJST
II. INSTALLATIE
III. OPTIES
Deze selectie helpt u de kanalenlijst te wijzigen naar uw wensen.
1. Kies kanalenlijst in het hoofdmenu en druk op OK.
2. Er verschijnt een scherm waarin u de lijst kan wijzigen.
3. Selecteer de gewenste wijzigingsvorm .
4. Om het gewenste kanaal te tonen selecteert u het en drukt u op de rode knop.
5. Druk op EXIT om terug te keren naar het vorige menuscherm of op MENU om
terug te keren naar het kanaal dat u aan het kijken wasl.
I-1. FAVORIETEN
I-2. HERBENOEMEN
I-3. SCHUIVEN
I-4. BLOKKEREN
I-5. VERWIJDEREN
I-1. FAVORIETEN
1. Door gebruik te maken van de knoppen gaat u
naar Favorieten en drukt u op de GELE knop om te
kunnen kiezen tussen Favorieten 1~8.
2. Druk op OK op het kanaal dat u wilt toevoegen of verwijderen.
3. Een markering komt tevoorschijn achter gekozen
kanaal. Om te verwijderen drukt u nogmaals op OK.
4. De gekozen kanalen zullen automatisch opgeslagen worden.
5. Als u de opgeslagen Favorietenlijst wilt bekijken gaat u
via de andere optie (Herbenoemen-Verwijderen) behalve
favorieten en drukt u op de FAV knop voor het inzien van
Favorieten 1~8.
6. Druk op EXIT om terug te keren naar het vorige menuscherm
of op MENU om terug te keren naar het kanaal dat u aan het kijken was.
7. Druk op de BLAUWE knop om de Favorieten te herbenoemen.
IV. UTILITY
V. ACCESSOIRES
84
KANALENLIJST
4. EPG (Elektronische Programma Gids)
a) Druk op de EPG knop tijdens normaal gebruik.
b) Er verschijnt een scherm met de EPG van het
bewuste kanaal.
c) Selecteer het gewenste kanaal om de EPG te tonen.
e) Verschijnt net als de foto rechts.
5. ZOOM IN/OUT
a) Door op de knop pagina opwaarts te drukken vanuit
normaal gebruik kunt u in en uit zoomen.
b) U kunt de gewenst vergroting kiezen met de
ROOD/GROENE knop.
c) U kunt de start positie kiezen met de knop.
d) Na het kiezen van de Zoom grootte en positie kunt u
de ZOOM functie starten met de “OK” knop.
e) Met de knop kunt het ZOOM beeld
verschuiven.
Page 45

I. KANALENLIJST
MENU
87
Hier kunt u de antenne configureren en zoeken naar
satellieten of transponders, etc. Selecteer installatie
in het hoofdmenu en druk op OK.
Druk op EXIT om terug te keren naar het vorige
menuscherm of druk op MENU om terug te keren naar
het kanaal dat u aan het bekijken was.
II-1.
SATELLIET
ZOEKEN
II-2. DISEQC SWITCH
II-3. MOTOR SETUP
II-4. HOME STREAMING
II-5. FABRIEKSINSTELLINGEN
II-1
SATELLIET
ZOEKEN
1.U kunt de cursor bewegen naar u keuze door gebruik te
maken van en op OK te drukken.
a) Satelliet
- Druk op OK om de lijst met poorten van de
DiSEqC te tonen.
- Selecteer de gewenste satelliet en druk op OK.
b) DiSEqC
- Druk op OK om de lijst met poorten van de DiSEqC te tonen.
- Kies de gewenste DiSEqC en druk op OK.
c) LNB
- Druk op OK om de lijst met frequenties te tonen.
- Selecteer de gewenste frequentie en druk op OK.
- U kunt ook rechtstreeks de frequentie waarden invoeren
met behulp van uw afstandsbediening.
d) 22KHz Tone
- Kies uit Geen, 0 KHz ó 22 KHz afhankelijk van de Antenne
instellingen.
e) ZOEKEN
- Druk op OK om de lijst met Zoek Opties te tonen.
- Kies de gewenste zoekvorm en druk op OK.
f) Search
- Druk op ZOEKEN om de Zoekactie te beginnen.
- SAT Herbenoemen: Om de SAT te herbenoemen,
druk op de GROENE knop van
uw afstandsbediening.
II. INSTALLATIE
86
MENU
I-2. HERBENOEMEN
1. Door gebruik te maken van de knoppen kunt u naar
Herbenoemen gaan.
2. Selecteer het kanaal dat u wilt herbenoemen door gebruik te
maken van
en druk op OK.
3. Er verschijnt een toetsenbord op het scherm.
4. Wijzig de naam door gebruik te maken van de cijfers en/of
letters in beeld.
5. Druk op de GELE knop om Favorieten 1..8 te herbenoemen en
druk op de BLAUWE knop om de satelliet te herbenoemen.
6. Druk op EXIT om terug te keren naar het vorige menuscherm
of druk op MENU om terug te keren naar het kanaal dat u aan
het bekijken was.
I-3. VERPLAATSEN
1. Door gebruik te maken van de knoppengaat u naar
de optie verplaatsen.
2. Selecteer de kanalen die u wilt verschuiven door op de
knop OK te drukken.
3. Schuif de cursor naar de plek waar u het heen wilt verplaatsen
en druk dan op de GROENE knop.
4. Druk op EXIT om terug te keren naar het vorige menuscherm
of druk op MENU om terug te keren naar het kanaal dat u aan
het bekijken was.
I-4. BLOKKEREN
1. Door gebruik te maken van de knoppen kunt u naar de
functie Blokkeren gaan.
2. Selecteer de kanalen die u wilt blokkeren en druk dan op OK.
Er verschijnt dan achter het geselecteerde kanaal. Om te
verwijderen drukt u wederom op OK.
3. Druk op EXIT om terug te keren naar het vorige menuscherm of druk
op MENU om terug te keren naar het kanaal dat u aan het bekijken was.
I-5. VERWIJDEREN
1. Door gebruik te maken van de knoppen gaat u naar de
functie VERWIJDEREN.
2. Selecteer het kanaal dat u wilt verwijderen en druk op OK. Er verschijnt dan ( ) op het nummer van het gekozen
kanaal. Om te verwijderen drukt u op de BLAUWE toets .
3. Door op de GELE knop te drukken verwijderd u een TP. Kies een kanaal en druk op de BLAUWE knop.
Alle kanalen van die bewuste TP zullen automatisch geselecteerd worden.
4. Druk op de GELE knop om een satelliet te verwijderen. Selecteer een kanaal en druk dan op de BLAUWE knop. Alle
kanalen van die bewuste satelliet zulle automatisch geselecteert worden.
5. Druk op EXIT om terug te keren naar het vorige menuscherm of druk op MENU om terug te keren naar het kanaal
dat u aan het bekijken was.
6. Op het scherm verschijnt het volgende bericht.
7. Kies OK in het verschenen bericht in het scherm en druk op OK om alle geselecteerde kanalen te verwijderen.
TP WIJZIGEN
Om een TP te WIJZIGEN, druk op de
RODE knop van uw afstandsbediening.
Page 46

II.
INSTALLATIE
89
MENU GUIDE
f) Motor Controle
Selecteer de positie door gebruik te maken van en druk
op OK. Er verschijnt een scherm met een bericht in beeld.
- Opslaan sat positie : Sla de positie van de motor voor de
gewenste satelliet op.
- Ga naar Satelliet Positie : Beweeg de motor naar de opgesla
gen positie van de gewenste satelliet.
- Ga naar 0 : Ga naar het middelpunt van de motor.
- Limit off: Schakelt Oost, WEST limiet uit.
- SET EAST limiet: Instellen huidige positie als OOST
limiet.
- SET WEST limiet: Instellen huidige positie
als WEST limiet.
- Herbepalen Positie
- RESET Positie : Reset alle opgeslagen posities
van de motor.
g) Satelliet Positie
- Voer rechtstreeks de positie in door gebruik te
maken van de nummers op uw afstandsbediening.
- Selecteer de richting door gebruik te maken van
(WEST / OOST).
h) Zoek Optie
- Druk op OK om de lijst met Zoek Kanalen te tonen.
- Selecteer de gewenste Zoek Optie en druk op OK.
i) Zoeken
- Druk op zoeken om kanalen zoeken te starten.
- Druk op OK om het zoeken te starten.
2. Wijzig de lokale positie
- Druk op de GROENE knop om de lokale positie te wijzigen.
a) Longitude
- Voer rechtstreeks de longitude in door gebruik te maken van de nummers op uw afstandsbediening.
- Selecteer de richting door gebruik te maken van de knoppen
(West / Oost).
b) Latitude
- Voer rechtstreeks de latitude in door gebruik te maken van de nummers op uw afstandsbediening.
- Selecteer de richting door gebruik te maken van de knoppen
(Noord / Zuid).
3. Druk op EXIT om terug te keren naar het vorige menuscherm of druk op MENU om terug te keren naar het
kanaal dat u aan het bekijken was.
MENU
88
II-2. DISEQC SWITCH
1. Selecteer de optie kanalen zoeken door gebruik te
maken van en druk op OK.
a) Als u DiSEqC Switch kiest en op OK drukt, verschijnt er
een scherm met DiSEqC opties in beeld.
b) Selecteer de poorten (A~D) van elke gewenste satelliet
door gebruik te maken van y en druk op
ZOEKEN. De gewenste satellieten zullen dan
automatisch gezocht worden.
II-3 MOTOR SETUP
1. U kunt de cursor verplaatsen door gebruik te
maken van en door op OK te drukken bij de
gewenste selectie.
a) Motor Type: DiSEqC 1.2, USALS
- Druk op OK om het Motor Type te tonen.
- Selecteer gewenste Motor Type en druk op OK.
b) Satelliet
- Druk op OK om de lijst met satellieten te tonen.
- Selecteer gewenste satelliet en druk op OK.
c) Switch en LNB
- Druk op OK om de lijst met frequenties en configuratie te
tonen.
- Selecteer de gewenste LNB en configuratie.
d) Frequentie
- Druk op OK om de lijst met frequenties te tonen.
- Selecteer de gewenste frequentie en druk op OK.
e) Motor beweging
- Zoek de gewenste positie van de gewenste satelliet door
gebruik te maken van.
II.
INSTALLATIE
TP EDIT : Voor het wijzigen van de TP,
druk op de RODE knop van de
afstandsbediening
Page 47

MENU
II.
INSTALLATIE
90
II-5. FABRIEKSINSTELLINGEN
Gebruik Fabrieksinstellingen alleen als u de ontvanger in
de oorspronkelijke staat van aankoop wilt brengen.
Alle instellingen en kanalenlijsten zullen worden verwijderd.
1. Selecteer Fabrieksinstellingen door gebruik te maken
van de knoppen en op OK te drukken.
2. Er verschijnt een bericht in beeld.
3. Selecteer OK om de ontvanger naar de oorspronkelijke
staat van aankoop te brengen en druk dan op OK.
4. Druk op EXIT om terug te keren naar het vorige
menuscherm of druk op MENU om terug te keren naar het
kanaal dat u aan het bekijken was.
91
MENU
II-4. HOME STREAMING
1. PC-instelling
***Eerst op de PC het Home streaming
programma uitvoeren.
a) Gaat u naar "Preferentie" Tabblad.
b) Selecteer "standaard URL "selectie vakje en druk
op de "Browse"knop. Standaard is toegewezen
"c:\download", maar u kunt ook zelf een folder
toewijzen.
Opmerking: momenteel is alleen de standaard
server beschikbaar.
2. STB-instelling
a) Ga naar de introductie pagina Streaming menu
(menu Accessoire Network Home
streaming) en klik op Home streaming.
b) IP-name Bewerken zal worden weergegeven en
invoer server IP door numerieke knoppen via
RCU.
c) Het IP adres moet hetzelfde zijn als IP-adres
weergegeven wordt in Home Streaming
streaming-programma.
3. Het film bestand afspelen via Home
Streaming
a) Druk de "Fn" knop van afstandsbedieing in
selecteer “normale weergave” vervolgens zal er
een film bestands lijst verschijnen.
b) Selecteren het bestand dat u wilt zien van
navigatie toetsen op de afstandsbediening en
druk op "OK" knop om het filmbestand af te
spelen.
Neem Zie de onderstaande afbeelding.
II. INSTALLATIE
Page 48

Deze optie helpt u bij het instellen van de menutaal, tijd,
etc. Selecteer Opties in het hoofdmenu en druk op OK.
Druk op EXIT om terug te keren naar het vorige
menuscherm of druk op MENU om terug te keren
naar het kanaal dat u aan het bekijken was.
III-1. OSD CONFIGURATIE
III-2. TV CONFIGURATIE
III-3. TIJD INSTELLING
III-4. KINDERSLOT
III-1. OSD CONFIGURATIE
1. Selecteer OSD Configuratie in Opties door
gebruik te maken van en op OK te drukken
a) OSD Taal
- Druk op OK om de lijst met talen voor het OSD
menu te tonen.
- Selecteer de gewenste taal en druk op OK.
b) Audio Taal
- Druk op OK om de lijst met talen voor Audio te tonen.
- Selecteer de gewenste taal en druk op OK.
c) Taal ondertiteling
- Kies OK om de ondertiteling te tonen.
- Kies de gewenste taal en druk op OK.
d) Informatiebalk in beeld
- Druk op OK om de informatiebalk in beeld te tonen.
- Selecteer het aantal seconden dat u de informatiebalk in beeld wilt hebben en druk op OK.
e) transparantie
- Instelling transparantie niveau.
2. Druk op EXIT om terug te keren naar het vorige menuscherm of druk op MENU om terug te keren naar
het kanaal dat u aan het bekijken was.
III. OPTIES
92
MENU
MENU
III. OPTIES
III-2. TV CONFIGURATIE
1. Selecteer de TV configuratie in Opties door gebruik te maken
van en druk op OK.
a) HD Type
- Selecteer HD video Uitgang.
b) TV Type
- Selecteer uw TV type.
c) Aspect Ratio
- Selecteer screen ratio.
d) Screen Control
- Select screen display modes.
e) Brightness
- Instellen van screen brightness.
f) Contrast
- Instellen van screen contrast.
g) Saturation
- Instellen van screen Saturation.
2. Druk op EXIT om terug te keren naar het vorige menuscherm
of druk op MENU om terug te keren naar het kanaal dat u
aan het bekijken was.
III-3. TIJD INSTELLING
Stel de juiste lokale tijd in waar u zich bevindt.
1. Selecteer Tijd Instellen in Opties en druk op OK.
2. Het scherm Tijd Instellen zal tevoorschijn komen.
3. Verschuif de cursor met behulp van , en druk op OK
nadat u de gewenste waarde heeft geselecteerd. (Voer het
juiste tijdstip in met behulp van de nummers op uw
afstandsbediening).
4. Druk op EXIT om terug te keren naar het vorige menuscherm
of druk op MENU om terug te keren naar het kanaal dat u
aan het bekijken was.
III-4. KINDERSLOT INSTELLING
1. Selecteer Kinderslot in Opties en druk op OK.
2. Er verschijnt een scherm met Kinderslot Instellingen.
3. U kunt Kinderslot In- of Uitschakelen door Aan of UIT te
selecteren met behulp van .
4. U kunt het blokkeren van de installatie In- of Uitschakelen
door AAN of UIT te selecteren met behulp van (Voor de
Installatie Instellingen).
5. Voer het nieuwe paswoord in, als u het actuele paswoord wil wijzigen.
6. Bevestig het nieuwe paswoord door het opnieuw in te voeren.
7. Druk op EXIT om terug te keren naar het vorige menuscherm of druk op MENU om
terug te keren naar het kanaal dat u aan het bekijken was.
Noot : Het standaard paswoord is 0000
93
Page 49

MENU
V
. ACCESSOIRES
Hier kunt u hulp krijgen om de USB te gebruiken etc.
Selecteer Utility in het hoofdmenu met behulp van en
druk op OK.
V -1. USB
V -2. COMMON INTERFACE
-1 USB
Deze ontvanger is voorzien van een USB poort.
1. Selecteer USB en Utility door gebruik te maken van
en druk op OK.
2. Als u van laadinstelling wilt veranderen (S/W upgrade,
BootLoader Upgrade), drukt u op de RODE toets van uw
afstandsbediening.
3. Selecteer het bestand dat u wilt upgraden door gebruik
te maken van en druk op OK.
4. Als u eenmaal de upgrade heeft uitgevoerd zal de
ontvanger automatisch eenmaal UIT en weer AAN gaan.
-2 COMMON INTERFACE
De ontvanger is voorzien van 1 slot Common Interface,
waarmee u betaal televisie kunt kijken door middel van
daarvoor geschikte modules en Smart Cards.
De kanalen die vrijgegeven zijn, worden bepaald door de
Conditional Acces Module en de Smart Card die u gebruikt.
1. Selecteer Common Interface in utility met en druk op OK.
2. Common Interface word in beeld weergegeven.
(De zin “No Module” geeft aan dat er geen module is ingevoerd.)
3. Voer de Conditional Acces Module in Slot 1.
4. De naam van het slot verschilt door middel van elk
willekeurig gebruikte module.
5. Druk op EXIT om terug te gaan naar vorig menu of
MENU om naar het huidig kanaal terug te gaan.
95
MENU
IV
.UTILITY
Hier kunt u hulp krijgen om de USB te gebruiken etc.
Selecteer Utility in het hoofdmenu met behulp van en
druk op OK.
IV - 1. SYSTEEM INFORMATIE
IV -2. TIMER
IV -3. KALENDER
IV
-1.
SYSTEM INFORMATION
Met behulp van deze optie kunt u zien wat de actuele S/W
en H/W is. Ook vind u hier de naam van het product.
1. Selecteer Systeem Informatie in Opties en druk op OK.
2. Druk op EXIT om naar het vorige menuscherm terug te
keren.
IV
-2.
TIMER
De ontvanger (Set Top Box) zal automatisch na een
bepaalde tijd uitschakelen.
IV
-3.
KALENDER
94
Page 50

PVR GUIDE
PVR GUIDE
II. Opname Functies
II-2 Onmiddelijke Opname
- Selecteer de rode opname knop om de opname te starten.
- Terwijl u opneemt.
- Selecteer de “PAUSE” knop om “Time Shift” op te starten.
- U kunt de “links/rechts” knop gebruiken tijdens de opname.
Selecteer “OK knop” op uw afstandsbeciening om de
opname lijst te tonen.
Tijdens de opname kunt u ook naar andere kanalen kijken
met dezelfde frequentie. Ingeval van kijken naar een andere
kanaal tijdens opname, moet u terug naar de opnamelijst om
de opname te stoppen.
- Indien u de “stop knop” selecteerd word de huidige opname
gestopt en opgeslagen op uw USB schijf.
97
PVR GUIDE
PVR GUIDE
I. Aanbevolen Medium
- Externe USB Harde Schijf.
- Flash memory stick.
- Format Type: FAT16/32 (Systeem accepteerd geen NTFS
en andere file systemen.
II. Opname Functies
II-1 Geprogrammeerde opnames
1. Tijd Opnames
: Stel gewenste opname tijd in in “Utility -> Timer” om
opeen gewenste tijd op te nemen.
N
NOOOOTT :: IInnsstteelllliinnggeenn vvoooorrddaatt uu ““TTiimmee RReeccoorrdd”” ssttaarrtt..
- STB menu start op standaard net als hieronder.
- Verander “Uit” naar “Opname” in Actie menu.
- Als u eenmaal “Opname” ingesteld heeft in Actie menu,
ziet u het gedetailleerde menu voor PVR. (Functie,
Kanaal Type, Kanaal naam, Start Tijd, Tijdsduur).
- Selecteer “Ok” knop om kanaal naam te kiezen.
2. EPG Opnames
: Om op te nemen via EPG.
- Selecteer de EPG knop terwijl u TV kijkt.
- Om opname te selecteren: Beweeg de cursor naar het
gewenste programma en druk op derode opname knop
vanuw afstandsbediening.
- Om de gewenste opname te verwijderen drukt u
nogmaals op de opname knop van uwafstandsbediening.
- Indien u meerdere opnames wil selecteren beweegt u de
cursor verder en selecteert u degewenste programma’s
door de rode opname knop te selecteren op uw
afstandsbediening.
96
Page 51

PVR GUIDE
PVR GUIDE
V. TimeShift Functie
- Indien u de timeshift wil inschakelen moet u in onderstaand
menu de timeshift op AAN zetten. (Accessoires -> PVR ->
TimeShift “AAN”).
- Om de Time Shift te starten tijdens kijken selecteert u de
“PAUZE” knop.
- Time shift zal gedurende 30 minuten afspelen.
- Voor het afspelen tijdens Timeshift selecteert u de Play
knop.
- U kunt de links/rechts knop gebruiken tijdens de Time Shift.
VI. Format
- U kunt FAT32 gebruiken en NTFS.
- U kunt ook de multi partitie format gebruiken.
- Als u NTFS gebruikt ziet u onderstaand bericht tevoorschijn
komen.
- Selecteer “OK” knop om naar “C:, D:, E:, F: te gaan en
NEXT” in geval van Multi Partitie.
- In geval van NTFS Multi partitie, moet u formateren naar
FAT32.
99
PVR GUIDE
PVR GUIDE
III. Playback Functie
- Om de eerdere opnames af te spleen selecteer “Play knop”
van uw afstandsbediening.
- Gebruik de pijlen om de gewenste opname te selecteren
door middel van de OK knop.
- Tijdens het kijken.
- Indien u de links/rechts knop selecteert tijdens opname of
afspelen zal het huidige program waar u naar kijkt stoppen
en de opname zal beginnen met afspelen op de gewenste
positie die u met links/rechts knop heft geselecteerd. Indien
u een andere opname will afspelen selecteert u die met de
play knop op uwafstandsbediening.
IV. Terug/Door-spoelen Functie
- Indien u de doorspoelen knop selecteert tijdens timeshift of
afspelen, zal de file 2X sneller afgespeeld worden en als u
nogmaals de knop indrukt dan zal hij 8X sneller gaan.
- Indien u de terugspoelen knop selecteert tijdens timeshift of
afspelen, zal de file 2X zo snelterug afspelen en als u nog
maals de knop indrukt dan zal hij 8X sneller gaan.
- Het vooruit/terugspoelen zal eindigen zodra u de play knop
selecteert.
98
Page 52

PVR GUIDE
PVR GUIDE
VII. MP3 Play
- Selecteer MP3 file die u af wilt spelen.
- Na het afspelen van de MP3 file, zal de MP3 scherm tevoor
schijn komen.
VIII. JPG Play
- Selecteer JPG file die u wilt bekijken in het USB menu.
- Selecteer “OK” om de JPG te bekijken.
U kunt de afbeeldingen ook roteren indien gewenst met beh
ulp van de links/rechts knoppen.
IX. Software Upgrade
- Selecteer UAD file die u in de STB wilt upgraden via het USB
menu.
100
PVR GUIDE
PVR GUIDE
101
X. Opgenomen files afspelen op uw PC of DIVX
speler.
X-1 Afsp ele n op PC.
A) Afspelen KM Player.
B) Selecteer Taal.
1) Selecteer rechter muis knop -> Language ->
uw taal.
C) Verander de extensie van de opname in “*.mpg”.
Voorbeeld : Welcome to A_131821 -> Welcome
to A_131821.mpg
D) Selecteer de file die u wilt afspelen.
1) Selecteer rechter muis knop-> Open Files(S)
>Select
X-2 Afspelen op DIVX player.
A) The file format moet “.avi” format zijn om te kunne
afspelen.
B) Selecteer een folderwaar u de files opslaat in *.avi.
1) Selecteer rechter muis knop -> Capture -> Selecteer
Capture Folder.
C) Herhaal A) -> B) -> C) -> D) of No.1 afspelen op PC.
D) Selecteer de file die u wilt converteren in *.avi.
1) Selecteer rechter muis knop -> Capture -> Video Quick
Capture.
2) De file word opgeslagen in de eerder gekozen folder in
*.avi format.
E) Indien de file een STB SD kanaal is, is het opgeslagen in
SD, indien de file HD of H.264 is word het opgeslagen in die
desbetreffende vorm. Indien u een DIVX player heeft die die
bestanden niet kan afspelen dient u de bestanden te
converteren naar SD bestanden.
Page 53

103
PROBLEMEN OPLOSSEN
Controleer of de stekker in het stopcontact zit.
Controleer de schotel en stel deze juist af.
Controleer de kabel aansluiting.
Controleer kanaal en Video uitgang.
Controleer het volume niveau van de TV en de ontvanger.
Controleer de MUTE status van de TV en de ontvanger.
Controleer de kabel aansluiting.
Vervang de batterijen.
Richt de afstandbediening juist naar de ontvanger.
Controleer dat er geen obstakels tussen zitten.
Controleer de CAM en Smartcard.
Deze moeten juist ingevoerd zijn.
Controleer de signaalsterkte en signaalkwaliteit in het menu.
Controleer de LNB en vervang deze indien nodig.
Controleer de LNB kabel.
Controleer de schotel en stel deze indien nodig af.
Ga naar Opties en selecteer Systeem Informatie.
Neem contact op met uw service dienst.
Probleem
Er verschijnt niets op de
display
Geen beeld
Geen geluid
Afstandbediening doet het
niet
Service doet het niet of
gecodeerd
“Geen signaal” in beeld
Tuner defect
U bent u pincode vergeten
Oplossing
PVR GUIDE
PVR GUIDE
X-3 Converteren met DIVX manager.
A) Afspelen Divx Manager
1) Setting -> Model -> Rapsody RSH-250/350
B) Selecteer de bestemmingsfolder waar u de geconver
teerde files wilt opslaan.
C) Selecteer de files die u wilt converteren en selecteer
“Convert”.
D) Selecteer “Encoding Start” -> Converteren “start”.
NOTE: Web site voor downloading
1. Kmplayer
1) Enter this site : http://2bwithu.tistory.com/245.
2) Download 2 files naar 1 folder en unzip de gearchiveerde
file. Na UNZIP kunt u installeren dmv de EXE file.
2. Divx Manger
1) Enter deze site :
http://www.modix4u.co.kr/upboard/view.asp?fcprimkey=44
2) Selecteer onderaan voor de engelse versie.
102
Page 54

105
SPECIFICATIES
104
SPECIFICATIES
Item
HDMI HD Video/Audio Output
TV SCART Output RGB, CVBS, L, R Output with Volume control
VCR Scart In/Out RGB, CVBS, L, R In
CVBS, L, R Out
RCA Output
CVBS, L, R Output(Yellow, White, Red Jack) with Volume Control
Component Video(YPbPr) Out
SPDIF Dolby Digital Bitstream Out(Coaxal, Optical)
- RS-232, Bit Rate : 115,200baud
Data Interface Connector : 9-pin D-sub Male type
- USB : USB 2.0, Type A Connector
Specification
. A/V & Date In/Out
Item
Input Voltage AC 90V ~ 250V, 50Hz ~ 60Hz
Power Consumption Max 40W
Protection
Separate Internal Fuse
The input shall the lighting protection
Specification
. Power Supply
Item
Size(WxHxD) 290mm x 50mm x220mm
Weight 1.5 KG
Specification
. Physical Specification
Item
Operating Temperature 0 °C ~ 40 °C
Storage Temperature -10 °C ~ 50 °C
Operating Humidity Range 10~85% RH, Non-condensing
Storage Humidity Range 5~90% RH, Non-condensing
Specification
. Environmental Condition
Item
Transport Stream 13818-1 MPEG-2, H.264/AVC Transport stream Specification
Profile Level MPEG-2 MP@ML, MP@HL, MPEG-4 H.264/AVC
Input Rate Max. 90Mbit/s
Aspect Ratio 4:3, 16:9, Letter Box
Frame Rate 25Hz for PAL, 30Hz for NTSC
Video Resolution 576i, 576p, 720p, 1080i
Teletext Through VBI or BSD
Audio Decoding MPEG-1 Layer 1 & 2, Dolby Downmix
Audio Mode Single Channel/Dual Channel Joint Stereo/Stereo
Frequency Response 20~20kHz, <+/-2dB
Specification
. MPEG Transport Stream & A/V Decoding
Item
Specification
SMART CARD 1 SLOT, ISO 7816, GSM11.11 and EMV (payment systems) compatibility
2 SLOTS
PCMCIA DVB Common Interface Standard
(Viaccess, Irdeto, Nagra Vision, Conax, Crytoworks, AlpahCrypt..)
.Conditional Access Module Interface
Item
Type 1 F Type, IEC169-24, Female
Frequency Rage 950MHz to 2150MHz
RF Impedance 75 Ohm unbanlanced
Signal Level -65 to -25 dBm
LNB Power 13.5/18.5Vdc +/- 5%, 0.5Amax, Overload Protected
22KHz Tone Frequency : 22KHz +/- 2KHz, 0.6Vpp +/- 0.2V
DiSEqC Control Version1.0, 1.2, Tone burst A/B
Demodulation QPSK, 8PSK
Input Symbol Rate
DVB-S QPSK : 2~45 Msps
DVB-S2 8PSK/QPSK : 10~30Msps
FEC Decoder
1/2, 2/3, 3/4, 3/5, 4/5, 5/6, 8/9, 9/10 in DVB-S2 mode.
1/2, 2/3, 3/4, 5/6 and 7/8 in DVB-S mode.
Specification
. Tuner & Channel
Item
Specification
. System & Memory
Main Processor STi7101
Flash Memory 8 Mbytes
System Memory 128 Mbytes
A/V Memory 64 Mbytes
Channel Capacity Digital Channel : 8,000
Front 7-Keys, 7-SEGMENT DISPLAY
Page 55

Page 56

SEGURANÇA GERAL 110
INFORMAÇÕES GERAIS 111
I. DESEMBALAGEM 111
II. Características 111
III. Unidade de Telecomando (RCU) 112
IV. COMO SINTONIZAR O TELECOMANDO (RCU) PARA TV 114
V. PAINEL FRONTAL 116
VI. PAINEL TRASEIRO 117
INSTALAÇÃO DO EQUIPAMENTO 118
GUIA Lista Canal 119
GUIA do MENU 121
PÁGINA PRINCIPAL 121
I . Edição de canais 121
I I. INSTALAÇÃO 123
III. OPÇÕES 128
IV. UTILIDADES 130
V. Accessórios 131
PVR Guide 132
RESOLUÇÃO DE PROBLEMAS 139
ESPECIFICAÇÕES 140
LISTA Canais 178
109
TABELA DE CONTEÚDO
Para desligar o aparelho da corrente eléctrica, a ficha deve ser retirada da
tomada eléctrica, a ficha eléctrica deve ser retirada com facilidade.
Page 57

111
INFORMAÇÕES GERAIS
Verifique se os seguintes itens estão incluídos com o receptor em sua embalagem.
1) Unidade de Telecomando (RCU)
2) Baterias (2XLR3(AAA))
3) Manual do Utilizador
4) A/V RCA
1Suporta MPEG-2, MPEG-4, H.264 e totalmente compatível com °DVB, HD digital.
1Satélite Receptor.
1 &+) '%,% () !**)+'6)0(+'.')#*
)-!*!'&'&/! ,) +
11Entrada de cartão (smart card).
1DiSEqC 1.0, 1.1, 1.2 e USALS.
1",*+ % % *(+' )+!' ,$+,) $++)'/
(!$) !/
1Menu no ecrã OSD e funcionamento.
1Total 8.000 canais programáveis.
1Multi-linguagem áudio apoio
1Multi-língua menu Suporte de teletexto.
1Selecção de canais favoritos.
1Guia e classificação de controlo parental.
1Guia electrónico de programas EPG para OSD menu no ecrã. .
1OSD- Menu no ecrã(On-Screen Display) com cor de 16 bits.
1função zoom em Pausa.
1Saídas Dolby Digital Bitstream para fora através S / PDIF °(Óptica e de cabo coaxial).
1Saída, formatos a seleccionar para 1080i, 720p, 576p e 576i formato.
1Multíplas Saídas de Video "HDMI, Video Composto em °(YPbPr), S°CART (RGB, CVBS)".
1USB 2.0 Suporta (Acesso para HDD, memória USB, Outros, etc.)
1Actualização de Software(upgrade) e Update Canais Software através da porta USB 2.0.
I. DESEMBALAGEM
II. CARACTERISTICAS
110
GERAL DE SEGURANÇA
Por favor, leia as seguintes instruções cuidadosamente recomendado para evitar o risco de
danos físicos antes do seu produto é operado.
Não cubra o receptor e manter em torno de espaço livre suficiente para o receptor.
Verificar o funcionamento do receptor tensão 90 ~ 250V, 50Hz ~ 60Hz Max, 40W Mantenha l
íquidos longe do receptor.
O receptor não deve ser exposto a pingos ou salpicos e objectos cheios de líquidos, que não
devem ser colocados no receptor.
Desligue o receptor da tomada antes da limpeza.
Utilize um pano macio e uma solução suave de líquido próprio para limpar a caixa externa
do receptor.
próprio para limpar a caixa externa do receptor.
Não obstrua as ranhuras de ventilação do receptor, que são fornecidos para ventilação e
protecção contra sobreaquecimento.
Queira manter o receptor em um livre fluxo aéreo. Não permita que o receptor seja exposto
ao calor, frio ou humidade ou condições adversas.
Não utilize nenhum cabo que não seja recomendado, uma vez que estes podem danificar o
equipamento.
Por favor, desligue o receptor da tomada e desligue o cabo entre o receptor e na antena
quando você não vai usá-lo por muito tempo.
Não retire a tampa para reduzir o risco de choque eléctrico. Não tente reparar o receptor
por si.
Consulte todos os que servem para pessoal técnico qualificado.
Manual pode ser actualizado, conforme novas funcionalidades e alterações. .
AVISO
Page 58

113
INFORMAÇÕES GERAIS
III. Unidade de Telecomando = (RCU)
1. MUTE MUTE- Liga ou desliga o som do receptor.
2. POWER E DESLIGAR (STAND BY) pôr o receptor entre funcionamento e modo de espera.
3. TV TV /TV modo.
4. STB STB (Receptor) modo.
5. VCR Videogravador Videogravador modo.
6. DVD DVD DVD modo.
7. Teclas numéricas Selecciona o serviço de televisão ou de rádio e canais individuais menu.
8. FAV FAV Alterna o modo seleccionado favorito.
9. SAT SAT- Altera o Satélite seleccionado da lista.
10. EPG EPG Apresenta o guia de programas electrónico, de rádio ou TV.
(Electronic Program Guide)
11. Teletext TEX- Teletexto Activa o modo de teletexto.
12. Audio Áudio- Muda o áudio línguas.
13. SUB Title Subtítulo- subtítulos LIGA modo.
14. Mudanças canais ou move-se para o item do menu.
15. Ajusta o volume ou se desloca para a esquerda ou mover o item no menu.
16. MENU MENU Apresenta o menu principal no ecrã.
17. EXIT EXIT Retorna ao menu anterior ou modo de visualização normal de um menu.
18. INFO Apresenta o programa INFO caixa informação no ecrã e editar o nome do canal favorito
lista.
19. V+/V- Aumenta volume para cima ou para baixo.
20. P+/P- Muda canais para cima ou para baixo no modo normal.
21. Desloca-se em uma página a lista de canais.
22. Desloca para baixo em uma página a lista de canais.
23. STOP STOP Pára a gravação ou reprodução.
24. PAUSE Pausa Interrompe a reprodução da imagem ou vá para o modo normal.
25. Record Gravar Grava o programa.
26. Play Jogar (Play) Mostra arquivo listas e joga lento/normal.
27. Rewind Estrelas inverter a reprodução e muda a velocidade de reprodução reversa.
28. F/F Estados avançar ou movimento rápido reprodução e muda a velocidade do avanço reprodução.
29. Relembrar(recall) Selecciona o canal anteriormente vistos.
30. AV/TV Selecciona o modo TV ou AV.
31. TV/RADIO Comuta entre TV e Rádio.
32. PR reservados.
33. Fn reservados.
34. STB/DivX reservados.
35. ZOOM Selecciona ZOOM ZOOM IN / OUT.
36. V.Format V. Formato Muda para HD Tipo.
INFORMAÇÕES GERAIS
112
III. Unidade de Telecomando = (RCU)
1
2
3
4
5
6
8
7
9
10
11
12
13
14
15
16
18
19
21
23
25
27
29
31
33
17
20
22
24
26
28
30
32
34
35
36
Page 59

4
114 115
INFORMAÇÕES GERAIS
IV. Como (Sintonizar o telecomando) RCU para TV.
INFORMAÇÕES GERAIS
1
3
2
6
5
IV. Como (Sintonizar o telecomando) RCU para TV.
1. Manual de Pesquisa
Na primeira, Ligue a TV.
1) Prima
""OOKK"
"
e a tecla
""TTVV LLEEDD LLââmmppaaddaa"
"
no RCU=Telecomando ao mesmo tempo, há mais de 2 ou 3
segundos. Em seguida, a
""TTVV LLEEDD LLââmmppaaddaa"
"
irá ligar / desligar 2 vezes (piscara 2 vezes).
2) Localize o código de TV em lista de Marcas de TV.
(o código é composto de 4 dígitos) é inserir os 4 dígitos.
(Se a 4 dígitos foram inseridos correctamente, o LED do
T
TVV LLEEDD LLââmmppaaddaa
piscará 2 vezes e
TTVV ddeesslliiggaa-
-
sse
e
==>
iirr ppaarraa aa 33)) --11..
mas se os códigos foram inseridos errados o
LLEEDD ddoo TTVV aa LLââmmppaadda
a
" piscará 1 só uma vez e longo, a TV
mantêm-se ligada) ==>
i
irr ppaarraa aa 33)) --22..
==>Nesta etapa, você deverá inserir 4 dígitos do código com 10 segundos. Se não for este processo de
fixação terá falhado.
3) – Por favor use o Power do telecomando. O TV desliga-se, pressione "OK" Key e TV LED Lâmpada terá
que piscará 2 vezes novamente. Por favor, ligue a TV usando o
"
"bboottããoo PPoowweerr""
no telecomando e
verificar
vvoolluummee cchhaavve
e
e
cchhaavvee oouu qquuaallqquueerr oouuttrroo ccaannaal
l
de chaves telecomando quer funcionar
correctamente Se a potência botões funciona, mas outras teclas não funcionam, isso significa que o
código não foi inserido correctamente. Por favor, comece novamente a partir do passo 1) e insira outro
código da marca da TV. Normalmente a marca da TV tem vários códigos, que não são únicos.
3) -2 Comece novamente a partir do passo 1) e insira outro código da Marca da TV. Normalmente a
marca da TV tem vários códigos não são únicos.
2. Busca Automática
Na primeira, Ligue a TV.
1) Prima a tecla"
OOK
K
" " e o
LLEEDD ddaa TTVV ((LLââmmppaaddaa)
)
" no telecomando, ao mesmo tempo, mais de 2 ou 3
segundos. Em seguida, a "o
L
LEEDD ddaa TTVV ((LLââmmppaaddaa))
" irá ligar / desligar 2 vezes (será piscará 2 vezes).
2) Pressione a tecla
U
UPP ppaarraa cciimmaa oouu ppaarraa bbaaiixxoo DDOONNWW
até que o televisor se desligue.
3) Quando o televisor se desligar, pressione a tecla
O
OKK
"o
LLEEDD ddaa TTVV ((LLââmmppaaddaa)
)
" irá piscará 2 vezes.
4) 4) Por favor, ligue a TV usando o
""bboottããoo PPoowweerr"
"
no telecomando, e
v
veerriiffiiccaarr vvoolluummee cchhaavvee
e
c
caannaall--
cchhaavve
e
ou quaisquer outras teclas de RCU= telecomando se eles funcionam devidamente.
5) Se a tecla POWER botões funciona, mas outras teclas não funcionam, isso significa que a auto procura
não foi feito correctamente por favor comece novamente a partir do passo 1) para a etapa 4) até que
todas as chaves do Telecomando funcionem bem.
Page 60

INFORMAÇÕES GERAIS
117
VI. PAINEL TRASEIRO
116
INFORMAÇÕES GERAIS
V. PAINEL FRONTAL
NOTA: Todas as Memórias Pen Drive USB 2.0 podem não ser compatíveis com o
produto.
1. POWER receptor ligado On e/ desligado OFF vigília.
2. CH Up/Down canal para cima / baixo ou selecciona o item de menu.
3. VOL Up/Down Volume cima / baixo ou selecciona o item de menu.
4. LECTOR DE TARJETAS Entrada de cartão de acesso SMART SLOT
5. RANURA CI Entrada de CAM Slot CI Inserir CAM.
1. SAT IN Liga a cabo da antena via satélite.
2. LOOP OUT Liga a outro STB.
3. YPbPr Componente YPbPr, Liga a tomada da TV.
4. VIDEO VIDEO para ligar a TV, ou outros eguipamentos.
5. TV SCART Liga a TV cabo SCART.
6. VCR SCART VCR SCART Liga a cabo.
7. COAXIAL Saída de coaxial para ligação a um amplificador.
8. OPTICA Saída óptica para ligar a um amplificador.
9. HDMI Conecta conector HDMI para HDMI da TV.
10. RS 232 Ligação RS 232 para computadores pessoais para actualização do
software.
11. Ethernet Liga ao cabo LAN.
12. USB Liga a dispositivos USB.
13. ALIMENTAÇÃO 90 ~ 250V AC, 50/60Hz, 40W.
14. Botão POWER Liga / Desliga.
1
2 3 4
6
5
7
8
91011
13
14
12
1 2 3 4 5
Page 61

GUIA Lista de canais.
1. Ver Live Modo Normal
a) Quando você seleccionar um canal de informação barra
aparece automaticamente no ecrã durante alguns
segundos. Esta barra fornece o canal actual informação.
b) Pressione botão INFO para ver as informações ao vivo
durante o modo normal.
2. Lista Simples
a) Pressione OK quando está a ver os canais e a lista de
canais simples aparece no ecrã.
b) Quando lista de canais é exibida no ecrã é a simples e
quer mais detalhe pressione botão vermelho do
telecomando para ir para a lista detalhada de canais.
3. Lista de canais detalhada.
a) Pressione OK no modo normal de ver canais, para ir
para a lista de canais.
b) Quando a lista simples está no ecrã, para aceder à lista
detalhada é só pressionar botão vermelho para ir ao
pormenor do canal e sua lista detalhada.
c) Pressione e para classificar por Alfabeto.
d) Pressione o botão para sábado ordenar por Satélite e
FAV botão para o Favorito 1 ~ 8.
e) Pressione botão verde para retornar ao Tudo canais ou
EXIT para retornar ao vivo actual canal.
f) Pressione a tecla para mostrar sábado Satélite janela
pop-up, em seguida, seleccione satélite. Canal lista de
satélite seleccionado será apresentado. .
g) Pressione a tecla FAV para mostrar Favorita janela pop-
up, em seguida, seleccione FAV lista. Canal FAV lista de
seleccionados será exibido.
h) Pressione a tecla verde, em seguida, todos os
pesquisados canal lista será exibida.
119118
INSTALAÇÃO DO EQUIPAMENTO
Esta secção explica várias maneiras de conectar o receptor ao seu actual TV, videocassete e
sistema Hi-Fi.
Você pode escolher uma das seguintes configurações que recomendamos.
Se você tem algum problema ou precisa de ajuda, consulte o seu fornecedor ou prestador de
serviços.
Verifique se os seguintes itens estão incluídos com o receptor em sua embalagem.
I-1. Ligar o receptor ao televisor com o cabo SCART
Ligue uma extremidade do cabo SCART à TV SCART selo de alfândega no painel traseiro do receptor e a outra
extremidade a uma tomada SCART na TV.
II-1.Ligando o receptor de TV com o cabo RCA
Ligue uma extremidade do cabo RCA para o áudio-R (Vermelho), o Audio-L (branco) e de vídeo (amarela)
tomada no painel traseiro do receptor, e outra extremidade ao Audio-R (Vermelha), o Audio-L (branco) e o
vídeo (amarela) tomada na TV.
I. Ligar o receptor para TV
II. Ligar o receptor ao televisor com o cabo RCA
Page 62

Página principal
121
MENU GUIA
Pressione o botão MENU telecomando =RCU para abrir
principal Página no ecrã. Página principal onde será exibido.
1.Você pode mover para a página principal Utilizando,
sobre a RCU.
2. Pressione OK para confirmar a sua selecção.
3. Pressione EXIT para retornar ao menu anterior ou prima
MENU para ir viver para o actual canal.
I. Gestão de canais
II. Instalações
III. Opções
Esta secção pode ajudá-lo a organizar canais de acordo com sua preferência.
1. Seleccione Gestor de canais na página principal com e pressione OK.
2. TV Gestor de canais página exibe na ecrã.
3. Seleccione o modo que pretende utilizar .
4. Para ver o canal que você escolher, vá para o canal e, em seguida, prima RED( botão vermelho) BOTTON.
5. Pressione EXIT para retornar ao menu anterior ou prima MENU para ir ver para o actual canal.
I-1. Favorito
I-2. Renomeie
I-3.Mover
I-4. Bloquear
I-5. Excluir
I-1. Favorito
1. Usando vá para o modo favorito, em seguida, prima
Botão AMARELO para escolher Favorito 1 ~ 8.
2. Pressione OK no canal que pretende adicionar ou apagar.
3. será marcado no final do canal seleccionado Nome do bar.
Para apagar pressione OK novamente.
4. Seleccionado canais será automaticamente guardado.
5. Se quiser verificar o que salvou Favorito Lista de canais ir
para outro modo (Rename(renomear) ~ Delete(apagar))
excepto Favorito e, em seguida, pressione o botão para
verificar FAV Favorito 1 ~ 8.
6. Pressione EXIT para retornar ao menu anterior ou prima
MENU para ir ver para o actual canal.
7. Prima botão azul para mudar o nome favorito.
IV. Utilitário
V. Acessórios.
120
GUIA Lista de canais.
4.EPG (Electronic Program Guide)
a) Pressione o botão do EPG modo de viver.
b) EPG do canal actual aparece no ecrã.
c) Seleccione o canal que deseja assistir programa.
d) Será exibido na imagem ecrã como lado direito
(rightside).
5. ZOOM IN/OUT
a) Ao pressionar tecla ZOOM viver em um modo
normal, você pode usar Zoom In / Out função.
b) Você pode seleccionar o Zoom com tamanho, use as
teclas vermelho / verde.
c) Você pode seleccionar a posição inicial com 234 5
chave.
d) Após a escolha Zoom e tamanho posição, você pode
iniciar com a função zoom tecla OK.
e) Com 234 5 chave, você pode mover zoom ecrã.
I. Gestor de canais
Page 63

I. Gestor de canais
MENU GUIA
123
Esta secção pode ajudá-lo a criar e antena digitalizar ou
transponder de satélite, etc Escolha Instalações na página
principal utilizando e pressione OK. Pressione EXIT para
retornar ao menu anterior ou prima MENU para ir viver para
o actual canal.
II-1. Satélite Pesquisa
II-2. DiSEqC Switch
II-3. Motor Instalação
II-4. Home Streaming
II-5. Padrão de Fábrica
II-1 Satélite Pesquisa
1. É possível mover o cursor usando A e pressione OK
quando você seleccionar o valor que você deseja.
a) Satélite
- Pressione OK para exibir a lista de satélites.
- Escolha o bom Satélite e, em seguida, pressione OK.
b) DiSEqC
- Pressione OK para exibir a Lista de DiSEqC’s e suas Portas.
- Seleccione a porta DiSEqC que quer, em seguida ,pressione OK.
c) LNB
- Pressione OK para exibir o LNB e sua lista de frequências.
- Escolha o LNB frequência e, em seguida, pressione OK.
- Pode também introduzir directamente os números usando
tecla numérica sobre o telecomando RCU.
d) 22KHz Tone
- Escolha um entre os Nenhuma, 0 KHz ou 22 KHz,
dependendo do usuário alternar antena caixa.
e) Procurar Opção
- Pressione OK para exibir a opção Pesquisa lista.
- Seleccione a opção Pesquisa que pretende e, em seguida,
pressione OK.
f) Pesquisar
- Prima Procurar para iniciar a digitalização canais.
- SAT Renomear: Para renomear satélite, carregar no botão
verde no telecomando.
II. Instalação
122
MENU GUIA
I-2. Renomeie
1. Usando vá para o modo Renomear.
2. Escolha o canal que pretende renomear usando
e, em
seguida, pressione OK.
3. Diálogo teclado exibido na ecrã.
4. Edite o nome digitando números e / ou palavras no teclado
Diálogo.
5. Pressione EXIT para retornar ao menu anterior ou prima MENU
para ir ver para o actual canal.
I-3. Mover
1. Usando vá para o modo Mover.
2. Seleccione canais que pretende mover, premindo tecla OK.
3. Move o cursor que você deseja colocar no botão verde do que
prima.
4. Pressione EXIT para retornar ao menu anterior ou prima MENU
para ir viver para o actual canal.
I-4. Bloquear
1. Usando vá para o modo Lock(bloquear).
2. Escolha o canal que deseja bloquear e depois prima OK. será
marcado no final do nome do canal seleccionado bar. Para apagar
pressione OK novamente.
3. Prima Sair para ir para a página principal ou prima MENU para ir
para o canal actual viver.
I-5. Excluir
1. Usando vá para o modo Delete(apagar).
2. Escolha o canal que pretende eliminar e, em seguida, pressione
OK. será marcada no canal seleccionado número. Para apagar
pressione novamente o botão azul.
3. Pressione o botão para apagar AMARELO TP. Seleccione um canal e prima Azul botão. Todos os canais do TP
que será seleccionado automaticamente.
4. 4. Pressione o botão para apagar AMARELO Satélite. Seleccione um canal e prima Azul botão. Todos os canais
de que o satélite será automaticamente seleccionado.
5. Pressione EXIT para retornar ao menu anterior ou prima MENU para ir viver para o actual canal.
6. Caixa de mensagem exibe na tela.
7. Escolha OK na caixa de mensagem e, em seguida, pressione OK para apagar, os canais seleccionados.
TP Edit : Para Editar TP, pressione a
VERMELHO botão do
telecomando.
Page 64

II. Instalação
125
MENU GUIA
f) Controle motor
Seleccione a posição utilizando e, em seguida,
pressione OK. Caixa de mensagem exibe no ecrã.
- Memorizar posição de satélite: Armazena a posição
actual do motor para o satélite seleccionado.
- Goto sábado Posição: Move o motor para a posição de
armazenados satélite seleccionado.
- Goto Centro: Avança para o centro do motor.
- Limite off: desactivar Leste, Oeste limite.
- Fixação do Oriente Limite: Definir posição actual como
Oriente Limite.
- Fixação do Oeste Limite: Definir posição actual como
West Limite.
- Recalcular posição.
-
Redefinir Posição: Resets todos armazenados
posição do motor.
g) Localização de Satélites
- Entrada directa na posição usando tecla numérica
no RCU
- Seleccione a direcção usando (OESTE /ESTE).
h) Procurar Opção
- Pressione OK para exibir a opção Pesquisa lista.
- Seleccione a opção Pesquisa que pretende e, em
seguida, pressione OK.
i) Pesquisar
- Prima Procurar para iniciar a digitalização canais.
- Pressione OK para iniciar a pesquisa.
2. Editar a minha posição locais
- Pressione botão verde para editar locais posição.
a) Longitude
- Entrada directa na Longitude usando tecla numérica sobre o telecomando.
- Seleccione a direcção usando (ESTE / OESTE).
b) Latitude
- Entrada directa na Latitude UNMBER usando tecla do RCU.
- Seleccione a direcção usando (NORTE / SOUTH).
3. Pressione EXIT para retornar ao menu anterior ou prima MENU para ir viver para o actual
canal.
MENU GUIA
124
II-2. DiSEqC Switch
1. Seleccione Pesquisa de canal, em Instalação usando
e pressione OK.
a) Se você seleccionar DiSEqC Switch e pressione OK no
menu será, DiSEqC Switch página será exibida.
b) Seleccione o Satélite de cada porta DiSEqC (A ~ D),
usando e e prima Procurar. Satélites
seleccionados serão pesquisados automaticamente.
II-3 Motor Instalação
1.Você pode mover o cursor usando e pressione OK
quando você seleccionar o valor que você deseja.
a) Motor Tipo: DiSEqC 1.2, USAL
- Pressione OK para exibir Motor Tipo
- Seleccione o Tipo de bom motor e, em seguida, pressione
OK.
b) Satélite
- Pressione OK para exibir a lista de satélites
- Escolha o Satélite que quer e, em seguida, pressione OK.
c) Conduzindo Passo a passo (satélite a satélite)
- Seleccione a direcção usando (ESTE / OESTE).
d) Frequência
- Pressione OK para exibir a Lista Frequência.
- Seleccione a frequência adequada e, em seguida,
pressione OK.
e)Movimento do Motor
- Procurar a adequada posição dos satélites seleccionados
utilizando .
II. Instalação
TP EDIT edição de transponderes: Para
Editar TP Pressione o botão vermelho no
telecomando.
Page 65

MENU GUIA
II. Instalação
127
II-5. Padrão de Fábrica
Use Default Factory função somente quando você quiser de
devolver o receptor à condição de fábrica padrão. Todas as
definições e os canais serão apagados.
1. Seleccione fábrica em instalações usando e pressione
OK.
2. Caixa de mensagem exibe no ecrã.
3. Seleccione OK para voltar ao receptor à condição de
fábrica e, em seguida, pressione OK.
4. Pressione EXIT para retornar ao menu anterior ou prima
MENU para ir ver o actual canal.
MENU GUIDE
II. Instalação
126
II-4. Home Streaming
1. Definições no PC
***Execute o programa ‘Home Streaming’
a) Vá para o menu ‘Preference’
b) Escolha ‘Default URL’ para aceder á pasta
download usando o botão que diz “Browse” É
atribuído a "c: \ download", mas deve especificar
uma pasta de destino pessoal para ser capaz de
receber arquivos de filme no PC.
Nota: Servidor disponivel por defeito
2. Definições no STB
a) Vá ao menu Home streaming ( Menu
Accessory Network Home streaming ) e
clique em Home streaming.
b) IP-Name Edit Pad vai aparecer, depois coloque o
IP do servidor pelas teclas numéricas do
controle remoto.
c) O endereço de IP têm que ser o mesmo que o
endereço de IP que aparece no menu preference
no Home streaming.
3. Ver o filme pelo Home Streaming
a) Prima "Fn" no controle remoto no modo normal
do Receptor e, em seguida a lista de arquivos dos
filmes no PC aparecerá no ecrãn da TV.
b) Selecione o arquivo que você deseja reproduzir
usando as teclas de navegação do controle
remoto e pressione "OK" para ver o arquivo do
filme desejado.
Por favor, veja as imagens para melhor
compreensão.
Page 66

MENU GUIA
III. OPçõES
III-2. Painel de Controle.
1. 1. Seleccione Configuração na TV usando Opções 23e
pressione OK.
a) Tipo HD
- Escolha a saída de vídeo HD.
b) Tipo TV
- Seleccione o seu tipo de televisor.
c) Aspecto Ratio
- Seleccione tela ratio.
d) Ecrã Screen Controlo
- Escolha o ecrã modos.
e) Brilho
- Ajuste de tela brilho.
f) Contraste
- Ajuste de tela contraste.
g) Saturação
- Ajuste de tela Saturação.
2. Pressione EXIT para retornar ao menu anterior ou prima
MENU para ir viver para o actual canal.
III-3. Hora Ajuste
Defina o seu horário local, de acordo com sua localização.
1. Seleccione Configuração do Tempo em Opções usando
45
e pressione OK.
2. Hora Ajuste página exibe na tela.
3. Mova o cursor usando
45
, 23 e pressione OK quando você
seleccionar o valor que você deseja. (Entrada Hora directamente
usando as teclas numéricas sobre RCU)
4. Pressione EXIT para retornar ao menu anterior ou prima MENU
para ir viver para o actual canal.
III-4. Parental Lock(bloquear) Instalação código (000)
1. Seleccione Bloqueio Parental configuração em Options opções usando
45
e pressione OK.
2. Parental Lock página exibe na tela.
3. Você pode bloquear e desbloquear Parental Lock seleccionar ON
ou OFF utilizando
23 ()'*&!*
4. Você pode bloquear e desbloquear Instale Bloquear selecção ON ou OFF utilizando 45(para a instalação
Definições).
5. Digite uma nova senha se você quiser alterar a senha actual.
6. Confirme a sua nova senha entrando nova senha novamente.
7. Pressione EXIT para retornar ao menu anterior ou prima MENU para ir viver para o actual canal.
129
*Nota. Senha padrão é 0000.
Esta secção pode ajudá-lo a configurar OSD idioma,
tempo, etc Escolha Opções na Página principal utilizando
23 e pressione OK. Pressione EXIT para retornar ao
menu anterior ou prima MENU para ir para ver o canal
actual.
III-1. Configuração do OSD
III-2. Painel de Controle
III-3. Hora Ajuste
III-4. Bloqueio Parental.
III-1. Configuração do OSD
1. Seleccione Configuração do OSD em Opções e utilizando
23 pressione OK.
a) OSD Língua (Language) escolha da Língua
- Pressione OK para exibir OSD lista de Línguas.
- Seleccione o idioma que você deseja e então pressione OK.
b) Audio Línguas
- Pressione OK para exibir Audio lista de Língua.
- Seleccione o idioma que você deseja e, em seguida, pressione OK.
c)Subtítulos Língua
- Pressione OK para exibir legendas.
- Escolha o idioma em que deseja e, em seguida, pressione OK.
c) Apresentar Info Bar
- Pressione OK para exibir Display Info Bar tempo lista.
- Escolha a segunda que você deseja exibir e, em seguida, pressione OK.
e) Transparência
- Ajuste de transparência nível.
2. Pressione EXIT para retornar ao menu anterior ou prima MENU para ir viver para o actual
canal.
III. OPçõES
128
MENU GUIA
Page 67

MENU GUIA
V. ACESSóRIO
Esta secção pode ajudá-lo a usar USB, etc Seleccione
Utilitário na página principal utilizando
e
pressione OK.
1
V -1. USB
1V -2. Interface comum
-1 USB
O receptor é equipado com o anfitrião.
1. Seleccione USB na Utilitário com e pressione OK.
2. Se você quiser salvar Software ou Banco de Dados,
pressione o botão verde sobre RCU.
3. Seleccione o arquivo que você deseja salvar usando
e o botão OK.
4. Depois do download do arquivo seleccionado, o receptor
irá reiniciar automaticamente.
O receptor está equipado com um slot de interface comum
que tenham acesso ao codificados o pay per view serviços
de acesso condicional com vários módulos e um cartão
inteligente válido.
Os programas que podem ser descodificados ou canais
livres, são determinados pelo módulo de acesso
condicional e o cartão inteligente que você usa.
1. Seleccione Interface comum no utilitário com e
pressione OK.
2. Interface comum exibe no Ecrã. (A frase "Não Módulo 'é
indicada quando a módulo de acesso condicional não é
instalado)
3. Insira o módulo de acesso condicional em Slot 1.
4. O nome do Slot difere de acordo com cada módulo de
acesso condicional inserido.
5. Pressione EXIT para retornar ao menu anterior ou prima
MENU para ir ver os canais actuais.
131
MENU GUIA
IV. Utilitário
Esta secção pode ajudá-lo a usar USB, etc Seleccione
Utilitário na página principal utilizando
23 e
pressione OK.
IV -1. Sistema de Informação
1IV -2. Temporizador
1IV -3. Calendário
IV-1. Sistema de Informação
Esta opção ajuda-lo a conhecer a actual S / W e H / W
versão. Também fornece o nome do produto.
1. Seleccione Sistema de Informação em Options(opções9
usando
23
pressão e OK.
2. Pressione EXIT para retornar ao menu anterior.
IV-2. Temporizador
A Unidade (set top box) será desligado / sobre
automaticamente após um tempo especificado
IV-3. Calendário
130
Page 68

PVR GUIDE
PVR GUIDE
II. Função Gravação.
II-2 Gravação Instantânea
- Pressione o botão "RECORD(gravar)" no telecomando para
iniciar a gravação do programa.
- Enquanto grava o programa.
- Pressione o botão "PAUSE" chave para executar o "Time
Shift”.
- Você pode usar o botão "LEFT / RIGHT botão" para visualizar
tempo desejado enquanto recodificação programa.
- Pressione o botão"OK" para exibir no ecrã, no telecomando
para arquivo lista de Gravação.
Durante a gravação, é possível observar também outros
canais que estão localizados na mesmo TP(frequência). No
caso de quer assistir outros canais durante a gravação, Você
deve voltar a gravar o canal na lista de canais e parar a
gravação.
- Se você pressionar "STOP" no telecomando, actual
programa que você está assistindo TV Live irá parar e será
armazenada no espaço de memória usb.
133
PVR GUIDE
PVR GUIDE
I.
Dispositivo Recomendado
- Externa USB Disco rígido (Hard Disk Drive).
- Memória Flash (PEN memory stick)
- Tipo de formato: FAT16/32 (Sistema não dá suporte a
sistema de arquivos NTFS e outros).
II. Função Gravação.
II-1 Gravação Guardada.
1. Horário Reservado para Gravação.
: Defina desejada tempo de gravação em "Utilitário
Timer" para gravar na hora definida.
N
NOOTTAA :: CCoommoo ccoonnffiigguurraarr aanntteess ddee iinniicciiaarr ""TTeemmppoo //
GGrraavvaarr"".
.
- STB criado no padrão conforme abaixo.
- Por favor, altere "OFF" para "Gravação" no, Active menu.
- Uma vez que você defina "Gravação" no Active menu,
você verá o m de canal, Nome do canal, hora de início e
duração.
- Pressione o botão “OK” para seleccionar o nome do
canal.
2. EPG Gravação Reservado
: Usado para gravar um evento seleccionado a partir de
EPG.
- Pressione o botão para ir para info. EPG, EPG menu
enquanto vê um programa no ecrã.
- Para escolher ver um evento tempo: Mover a partir do
EPG para seleccionar o evento e pressione o botão
"RECORD " no telecomando.
- Se você quiser cancelar, prima mais uma vez o botão
"RECORD(gravação) " .
- Se você quiser vários a programar para gravação, mova
e pressione o "botão para gravar" no telecomando.
132
Page 69

PVR GUIDE
PVR GUIDE
V. Função TimeShift
- Se você quiser executar "Time Shift" no modo ver, Live ?
?Você deve definir "On" do Time Shift Na Opção PVR (PVR
Accessório TimeShift "ON").
- A estrela Time Shift no modo ver Live, prima "PAUSE" para
iniciar.
- Time Shift será visionado durante 30 minutos no modo ver
Live.
- Para começar a "Reprodução" durante TimeShift pressione
o botão "PLAY".
- Você pode mover-se "posição de ver" usando o botão
ESQUERDA / DIREITA durante Time Shift.
VI. Formato
- Você pode fazer o FAT32 Formato o disco rígido (HDD)
formatado por FAT32 e NTFS também.
- Você pode fazer também o formato multi partilhada HDD.
- Quando o NTFS formatado disco rígido é inserido, a seguir
mensagem aparecerá.
- Pressione o botão"OK" para mover para "C:, D:, E:, F:
NEXT", em caso de Multi partilhada HDD.
- No caso do NTFS multi partilhado no disco rígido(HDD), você
deve pelo formato FAT 32
135
PVR GUIDE
PVR GUIDE
III. Função Play = Ver.
- Para ver o programa previamente gravado, prima "botão
Play" no telecomando.
- Utilize as teclas de seta para seleccionar o ficheiro que
pretende reproduzir e prima "OK" para reproduzir.
- Enquanto estiver vendo o programa.
- Se você pressionar o botão "LEFT / RIGHT " no telecomando
voltará a ver a TV ao vivo ou ver o arquivo gravado, actual
programa ver assistindo você irá parar e voltar a imagem
será reiniciado a partir de onde foi transferido pressionar o
botão"LEFT / RIGHT " no telecomando. Se você quiser
reproduzir outro ficheiro gravado Durante a reprodução,
pressione o botão "Play".
IV. Função Trick Mode.
- Se você pressionar o botão "FF” (Fast Forward) " TimeShift
ou durante a reprodução, o ficheiro será reproduzido a uma
velocidade de 2x, e se você pressionar o botão "FF" mais
uma vez, o arquivo será visionado a uma velocidade 8X.
- Se você pressionar o botão"REW (Rewind)" TimeShift ou
durante a reprodução, o ficheiro irá voltar a uma velocidade
de 2x, e se você pressionar o "botão REW" mais uma vez, o
arquivo fará o rebobinar a uma velocidade 8x.
- FF / REW função irá voltar ao ver normal se você pressionar
"botão PLAY".
134
Page 70

PVR GUIDE
PVR GUIDE
X. Como ver o "o arquivo gravado pelo PVR de
HD-200" no PC ou DivX Player
X-1 Como ver no PC.
A) VER KM Player.
B) Seleccione o Idioma
1) Clique botão direito do mouse>Língua>
Língua do seu idioma.
C) Altere a extensão nome do arquivo gravado para
"*.mpg"
Exemplo: Bem-vindo ao A_131821 ao
A_131821.mpg
D) Seleccione o arquivo que você quer ver.
1) Clique botão direito do rato> Open files>
Seleccione
X-2 Como ver em "DivX Player".
A) O formato do arquivo deve ser alterado para ". Avi" para ver
em formato DivX Player.
B) Seleccione uma pasta de destino para onde se salvou o
arquivo que será alterado para *. avi.
1) Clique botão direito do rato e Seleccione> Capturar>
Captura Pasta.
C) Repetir A)> B)> C)D)> de No.1 de como ver no PC.
D) Capturar o ficheiro que é actualmente visto para o
converter info. em *. avi
1) Clique botão direito do rato> Captura> Captura de
video rápida.
2) Em seguida, o ficheiro é guardado para ver pasta
designada por *. avi
E) Se o arquivo está a ser visto no STB SD em canal, ele é
salvo por SD e HD. Se o arquivo é salvo por ele ou H.264 HD
ou H.264. Se o usuário não tem DivX ver se que pode ver ou
H.264 HD (pelo menos CPU sigma8634), ele deve converter
o arquivo de modo a que o SD SD geral DivX Player (CPU
sigma8511) podeecutar o arquivo.
137
PVR GUIDE
PVR GUIDE
VII. Ver MP3 Play
- Escolha um arquivo MP3 que você quiser ver no menu USB.
- FAT32.
- Depois de seleccionar um arquivo MP3,para ver o MP3 na
janela será executado.
VIII. Ver JPG Play
- Seleccionar arquivo JPG que você deseja ver no menu USB.
- Pressione OK para ver o JPG que você quiser.
- É possível rodar a imagem usando o botão LEFT / RIGHT.
IX. Actualização de
- Select * UAD arquivo que você deseja actualizar no menu
USB.(deixe o receptor acabar e passar sozinho ao menu
nesta operação os canais serão apagados e é necessário
repor toda a programação.
136
Page 71

139
1Check that the power cable is plugged into the power
socket.
1Check the dish and adjust it.
1Check the cable connection and correct it.
1Check channel and video output.
1Check the volume level of the TV and receiver.
1Check the mute status of TV and receiver.
1Check the cable connection and correct.
1Replace batteries.
1Aim the remote control unit directly to the receiver.
1Checking that nothing blocks the front panel.
1Check the Conditional Access Module and smart card are
appropriate for the selected service.
1Check the Conditional Access Module and smart card are
correctly inserted or not.
1Check the signal strength and the signal quality in the
menu.
1Check the LNB and replace the LNB if necessary.
1Check the LNB cable.
1Check the Dish and adjust it.
1Go to the Option and select System Information.
1Contact your Service Provider.
Problem
Nothing appears on the Front
Panel or No power supply
No Picture
No Sound
Remote Control Unit dose not
work
Service is not running or
scrambled
“No Signal” on the screen
Tuner Defective Check
You have forgotten your
secret PIN Code
Solution
TROUBLESHOOTING
PVR GUIDE
PVR GUIDE
X-3 Como converter o arquivo por Divx Manager
A) Ver em Divx Manager.
1) Defenir Acertos->Modelo -> Rapsody RSH-250/350
B) Seleccione a pasta onde o ficheiro que pretende é
convertido. Então o arquivo de informação será exibido.
C) e seleccione o arquivo que você deseja converter e
seleccione "Converter".
D) Seleccione “Codificação" "Iniciar Começar "> Conversão".
NOTA: Site para download.
1. Kmplayer
1) Enter this site : http://2bwithu.tistory.com/245.
2) Download 2 ficheiros para 1 pasta e descompacte o arquivo
armazenado. Após descompactar, você pode instalar
apenas clique exe.
2. Divx Manger
1) Indicar este site :
http://www.modix4u.co.kr/upboard/view.asp?fcprimkey=44
2) Clique abaixo para a versão Inglês.
138
Page 72

141
SPECIFICATIONS
140
SPECIFICATIONS
Item
HDMI HD Video/Audio Output
TV SCART Output RGB, CVBS, L, R Output with Volume control
VCR Scart In/Out RGB, CVBS, L, R In
CVBS, L, R Out
RCA Output
CVBS, L, R Output(Yellow, White, Red Jack) with Volume Control
Component Video(YPbPr) Out
SPDIF Dolby Digital Bitstream Out(Coaxal, Optical)
- RS-232, Bit Rate : 115,200baud
Data Interface Connector : 9-pin D-sub Male type
- USB : USB 2.0, Type A Connector
Specification
. A/V & Date In/Out
Item
Input Voltage AC 90V ~ 250V, 50Hz ~ 60Hz
Power Consumption Max 40W
Protection
Separate Internal Fuse
The input shall the lighting protection
Specification
. Power Supply
Item
Size(WxHxD) 290mm x 50mm x220mm
Weight 1.5 KG
Specification
. Physical Specification
Item
Operating Temperature 0 °C ~ 40 °C
Storage Temperature -10 °C ~ 50 °C
Operating Humidity Range 10~85% RH, Non-condensing
Storage Humidity Range 5~90% RH, Non-condensing
Specification
. Environmental Condition
Item
Transport Stream 13818-1 MPEG-2, H.264/AVC Transport stream Specification
Profile Level MPEG-2 MP@ML, MP@HL, MPEG-4 H.264/AVC
Input Rate Max. 90Mbit/s
Aspect Ratio 4:3, 16:9, Letter Box
Frame Rate 25Hz for PAL, 30Hz for NTSC
Video Resolution 576i, 576p, 720p, 1080i
Teletext Through VBI or BSD
Audio Decoding MPEG-1 Layer 1 & 2, Dolby Downmix
Audio Mode Single Channel/Dual Channel Joint Stereo/Stereo
Frequency Response 20~20kHz, <+/-2dB
Specification
. MPEG Transport Stream & A/V Decoding
Item
Specification
SMART CARD 1 SLOT, ISO 7816, GSM11.11 and EMV (payment systems) compatibility
2 SLOTS
PCMCIA DVB Common Interface Standard
(Viaccess, Irdeto, Nagra Vision, Conax, Crytoworks, AlpahCrypt..)
.Conditional Access Module Interface
Item
Type 1 F Type, IEC169-24, Female
Frequency Rage 950MHz to 2150MHz
RF Impedance 75 Ohm unbanlanced
Signal Level -65 to -25 dBm
LNB Power 13.5/18.5Vdc +/- 5%, 0.5Amax, Overload Protected
22KHz Tone Frequency : 22KHz +/- 2KHz, 0.6Vpp +/- 0.2V
DiSEqC Control Version1.0, 1.2, Tone burst A/B
Demodulation QPSK, 8PSK
Input Symbol Rate
DVB-S QPSK : 2~45 Msps
DVB-S2 8PSK/QPSK : 10~30Msps
FEC Decoder
1/2, 2/3, 3/4, 3/5, 4/5, 5/6, 8/9, 9/10 in DVB-S2 mode.
1/2, 2/3, 3/4, 5/6 and 7/8 in DVB-S mode.
Specification
. Tuner & Channel
Item
Specification
. System & Memory
Main Processor STi7101
Flash Memory 8 Mbytes
System Memory 128 Mbytes
A/V Memory 64 Mbytes
Channel Capacity Digital Channel : 8,000
Front 7-Keys, 7-SEGMENT DISPLAY
Page 73

Page 74

SICUREZZA IN GENERALE 146
INFORMAZIONI GENERALI 147
I. IMBALLAGGIO 147
II. CARATTERISTICHE 147
III. TELECOMANDO (RCU) 148
IV. COME IMPOSTARE IL TELECOMANDO PER LA TV 150
V. PANNELLO FRONTALE 152
VI. PANNELLO POSTERIORE 153
INSTALLAZIONE APPARECCHIATURE 154
GUIDA LISTA CANALI 155
GUIDA DEI MENU 157
PRIMA PAGINA 157
I . CANALE MANAGER 157
I I. INSTALLAZIONE 159
III. OPZIONI 164
IV. UTILITA’ 166
V. ACCESSORI 167
PVR Guide 168
RISOLUZIONE DEI PROBLEMI 175
SPECIFICHE 176
LISTA DELLE MARCHE 178
145
INDICE
Per poter scollegare l'apparecchio dalla rete elettrica, la spina deve essere
tolta dalla presa elettrica, pertanto, la spina di alimentazione deve essere
facilmente accessibile.
Page 75

147
INFORMAZIONI GENERALI
Si prega di assicurarsi che i sotto elencati elementi siano inclusi nell’imballaggio
contenente il ricevitore.
1) Telecomando (RCU)
2) Batterie (2EA)
3) Manuale d'uso
4) Cavo A / V
Supporto MPEG-2, MPEG-4, H.264 e DVB pienamente compatibile.
Ricevitore Satellitare.
2 Accessi per interfacce comuni : Viaccess, Irdeto, Cryptoworks, Nagravision, Conax,
Mediaguard, ecc
1 Accesso per smart card.
DiSEqC 1.0, 1.1, 1.2 e USALS.
Adeguamento rapporto 4:3 (16 / 9 crop), 4:3 (16 / 9 letterbox), 16:9 (4 / 3pilarbox ).
Facile utilizzo e funzionalità OSD
8,000 canali programmabili.
Supporto audio multi -lingua
Supporto multi-lingua del menu di testo .
Selezione canali preferiti.
Guida Parentale e controllo rating.
EPG ( Guida Elettronica dei Provider dei Programmi ) per informazioni dei canali sullo
schermo .
Display con 16 bit di colore.
Funzione Zoom in pausa.
Uscita Dolby Digital Bitstream attraverso S / PDIF (ottico & Coassiale).
Uscita Selezionabile per i formati 1080i, 720p, 576p e 576i .
Uscita Video Multipla "HDMI, Componenti (YPbPr), SCART (RGB, CVBS)".
Porta USB 2.0 (accesso a disco fisso, memoria USB, ecc.)
Aggiornamento Software & Database , aggiornamento canali tramite porta USB 2.0.
I. DISIMBALLAGGIO
II. CARATTERISTICHE
146
SICUREZZA IN GENERALE
Prima di mettere in funzione tale dispositivo si prega di leggere le seguenti istruzioni con
attenzione per evitare il rischio di compromettere la propria integrità fisica.
Non coprire il ricevitore e mantenere un sufficiente spazio libero attorno al ricevitore.
Verificare la tensione di funzionamento del ricevitore massimo 90 ~ 250V, 50Hz ~ 60Hz ,
40W, tenere le sostanze liquide a una sufficiente distanza di sicurezza dal ricevitore.
Il ricevitore non deve essere esposto a gocciolamenti o schizzi e nessun recipiente contenente liquidi deve essere posto sul ricevitore.
Scollegare il ricevitore dalla presa a muro prima di pulirlo.
Usare un panno morbido e una blanda soluzione detergente per pulire la custodia.
Non bloccare le fessure di areazione del ricevitore che servono a proteggere il ricevitore da
possibili surriscaldamenti.
Si prega di mantenere il ricevitore al riparo di eventuali correnti d’aria.
Non esporre il ricevitore a estreme condizioni di caldo, freddo o umidità.
Non utilizzare alcun cavo o attacco non raccomandati in quanto questi possono causare
danni alle apparecchiature.
Si prega di scollegare il ricevitore dalla presa a muro e scollegare il cavo di collegamento
del’antenna al ricevitore quando non usato per lungo tempo.
Non rimuovere la custodia al fine di r ridurre il rischio di scosse elettriche.
Non tentare di riparare il ricevitore voi stessi.
Rivolgersi sempre ed esclusivamente a personale qualificato.
Il manuale può essere aggiornato con nuove funzioni.
ATTENZIONE
Page 76

149
INFORMACIÓN GENERAL
III MANDO A DISTANCIA (RCU)
1. MUTE Attiva o disattiva l'audio.
2. POWER Commuta il ricevitore tra funzionamento e modalità standby.
3. TV modalità TV.
4. STB modalità STB.
5. VCR modalità VCR.
6. DVD modalità DVD.
7. Numeric buttons Pulsanti numerici per selezionare i canali TV o radio e singoli menu .
8. FAV Alterna la modalità preferita selezionata.
9. SAT Alterna la lista dei Satelliti selezionata.
10. EPG Visualizza la guida dei programmi TV o Radio.
(Guida Elettronica dei Programmi )
11. Teletext Attiva la modalità televideo.
12. Audio Cambia la lingua audio.
13. SUB Title Abilita la modalità sottotitoli.
14. Cambia i canali o permette di spostarsi a una voce nel menu.
15. Regola il volume o permette di spostarsi a sinistra o a una voce nel menu.
16. MENU Visualizza il menu principale sullo schermo.
17. EXIT Torna al menu precedente o alla modalità di visualizzazione normale di un menu.
18. INFO Visualizza la finestra delle informazioni del programma sullo schermo e modifica il
nome della lista dei canali preferiti.
19. V+/V- Modula il volume tra alto e basso.
20. P+/P- Cambia i canali in su o in giù in modalità normale.
21. Si muove su una pagina della lista dei canali in senso ascendente .
22. Si muove su una pagina della lista dei canali in senso discendente .
23. STOP ferma la registrazione o la riproduzione.
24. PAUSE mette in pausa la riproduzione delle immagini o passa in modalità normale.
25. Record Registra un dato programma.
26. Play mostra la lista dei file e riproduce in modalità lento / normale.
27. Rewind riproduce in senso inverso e modifica la velocità di riproduzione inversa.
28. F/F avanzamento rapido o riproduzione veloce e modifica la velocità di riproduzione in avanti.
29. RECALL seleziona il canale visualizzato in precedenza.
30. AV/TV Seleziona la modalità TV o AV.
31. TV/RADIO commuta tra TV e Radio.
32. PR riservato.
33. Fn riservato.
34. STB/DivX riservato
35. ZOOM Seleziona lo ZOOM IN / OUT.
36. V.Format Commuta le tipologie HD .
INFORMAZIONI GENERALI
148
III. TELECOMANDO (RCU)
1
2
3
4
5
6
8
7
9
10
11
12
13
14
15
16
18
19
21
23
25
27
29
31
33
17
20
22
24
26
28
30
32
34
35
36
Page 77

4
150 151
INFORMAZIONI GENERALI INFORMAZIONI GENERALI
1
3
2
6
IV. COME IMPOSTARE IL TELECOMANDO PER LA TV
2
1. Ricerca manuale
Per prima cosa, accendere la TV
1) Premere contemporaneamente i tasti "OK" e " LED TV " del telecomando per più di 2 o 3 secondi. quindi il "
LED TV " si accende e si spegne 2 volte (brilla 2 volte).
2) Trovare il codice del televisore nell’elenco delle marche (il codice è composto da 4 cifre) ed inserire
le 4 cifre. (Se le 4 cifre sono state inserite correttamente, il " LED TV " brilla 2 volte e il televisore si
disattiva ==>
a
annddaarree aa 33)) --11..
ma se i codici sono stati inseriti in modo erroneo, il " il LED TV" brillerà una sola volta e la TV resterà
accesa) ==>
aannddaarree aa 33)) --22..
==>In questo passaggio, si dovrebbero inserire le 4 cifre del codice in 10 secondi. In caso contrario
questo processo non andrà a buon fine.
3) - 1 Se la TV si spegne, premere il tasto "OK" e il tasto “ LED TV” brillerà ancora due 2 volte. Si prega
di accendere il televisore tramite il pulsante "Power" del telecomando e controllare il corretto
funzionamento del tasto volume e del tasto canali o qualsiasi altro tasto del telecomando. Se il
pulsante power funziona , ma gli altri tasti non funzionano, significa che il codice non è stato inserito correttamente. Si prega di ricominciare dal punto 1) e inserire un altro codice della Marca TV.
Normalmente le Marche TV dispongono di più codici .
3) -2 Si prega di ricominciare dal punto 1) e inserire un altro codice della Marca TV. Normalmente le
Marche TV dispongono di più codici .
2. Ricerca Automatica
Innanzitutto , accendere la TV
1) Premere il tasto "OK" e " LED TV " del telecomando contemporaneamente per almeno 2 o 3 secondi.
Quindi il " LED TV " si accende e si spegne 2 volte (brilla 2 volte).
2) Premere il tasto Up o Down fino a quando il televisore non si spegne.
3) Quando il televisore si spegne, premere il tasto OK e il “LED TV “ brillerà 2 volte.
4) Si prega di accendere la TV utilizzando il pulsante "Power" del telecomando e controllare il corretto
funzionamento del tasto volume e del tasto canali o qualsiasi altro tasto del telecomando.
5) Se il pulsante power funziona correttamente ma gli altri tasti no, significa che l’auto ricerca non è
stata eseguita correttamente , si prega quindi di ricominciare dal punto 1) al punto 4) fino a quando
tutti i tasti del telecomando non funzionino perfettamente .
IV. COME IMPOSTARE IL TELECOMANDO PER LA TV
Page 78

INFORMAZIONI GENERALI
153
VI. PANNELLO POSTERIORE
152
ININFORMAZIONI GENERALI
V. PANNELLO FRONTALE
Nota: Non tutti i flash drive USB 2.0 potrebbero essere compatibili con il prodotto
1. POWER commuta le modalità acceso e stand-by del ricevitore .
2. CH Up/Down Canali su e giù o selezione di voci di menu.
3. VOL Up/Down Volume su e giù o selezione di voce di menu.
4. LECTOR DE TARJETAS Accesso per la smart card.
5. RANURA CI Accesso per CAM.
1. SAT IN collegamento al cavo dell'antenna satellitare.
2. LOOP OUT Connessione a un altro STB.
3. YPbPr connessione a componenti jack della TV.
4. VIDEO connessione video per la TV o ad altri dispositivi.
5. TV SCART connessione alla TV tramite cavo SCART.
6. VCR SCART connessione al VCR tramite cavo SCART.
7. COAXIAL uscita per collegamento ad un amplificatore.
8. OPTICAL uscita per collegamento ad un amplificatore.
9. HDMI connessione per uno jack HDMI della TV.
10. RS 232 connessione per personal computer per aggiornamento software.
11. Ethernet connessione alla LAN cavo.
12. USB connessione per dispositivi USB.
13 . ALIMENTAZIONE 90~250V AC, 50/60Hz, 40W.
14. Pulsante di ALIMENTAZIONE Tasto di accensione On / Off.
1 2 3 4 5
1
2 3 4 6
5
7
8
91011
13
14
12
Page 79

GUIDA DELLA LISTA DEI CANALI
1. Modalità di visione standard
a) Quando si seleziona un canale,la barra delle infor-
mazioni appare automaticamente sullo schermo per
alcuni secondi. Questa barra fornisce tutte le informazioni del canale in visione.
b) Premere il tasto INFO per visualizzare le informazioni
durante la modalità di visione standard.
2. Lista ordinaria dei canali
a) Premere OK su modalità di visione standard per andare
alla lista dei canali.
b) Quando i dettagli della lista dei canali sono visualizzati
sullo schermo premere il tasto rosso per andare alla
lista ordinaria dei canali.
3. Lista dettagliata dei canali
a) Premere OK su modalità di visione standard per andare
alla lista dei canali.
b) Cuando la lista sencilla de canales es visualizada en la
pantalla, presionar la tecia ROJA para ir a la lista de
canales de Detalles.
c) Premere i tasti e per ordinare in ordine alfa-
betico.
d) Premere il tasto SAT per ordinare in ordine al satellite e
il tasto FAV peri favoriti 1 ~ 8.
e) Premere il tasto verde per tornare a tutti i canali o EXIT
per tornare al canale corrente .
f) Premere il tasto SAT per mostrare Satellite Pop-up ,
quindi selezionare il satellite. Verrà visualizzato l’elenco
dei canali del satellite selezionato.
g) Premere il tasto FAV per mostrare la finestra dei Pop-up
favoriti , quindi selezionare la lista FAV . Verrà visualizzata la lista dei canali FAV selezionata.
h) Premere il tasto verde, quindi sarà visualizzata la lista di
tutti i canali da ricercare.
155154
INSTALLAZIONE APPARECCHIATURE
Questa sezione spiega i vari modi per collegare il ricevitore a vari sistemi TV, VCR e Hi-Fi.
È possibile scegliere una delle seguenti configurazioni i consigliate. Se avete qualche problema o
bisogno di aiuto, rivolgersi al rivenditore o fornitore di servizi.
Si prega di assicurarsi che gli elementi elencati di seguito siano inclusi nella confezione del ricevitore.
I-1. Collegare il ricevitore al televisore con il cavo SCART
Collegare un'estremità del cavo SCART alla presa SCART TV sul pannello posteriore del ricevitore e l'altra
estremità a una presa SCART sul televisore.
II-1. Collegare il ricevitore al televisore con il cavo CINCH
Collegare un'estremità del cavo CINCH all’Audio-R (Rosso), all'Audio-L (bianco) e al video (giallo) sulla presa
posta sul pannello posteriore del ricevitore e l’altra estremità all'audio-R (Rosso), all'Audio-L (bianco) e al
VIDEO (giallo) della presa del televisore.
I. COLLEGAMENTO del ricevitore alla TV
II. COLLEGAMENTO DEL RICEVITORE ALLA TV CON CAVO CINCH
Page 80

PAGINA PRINCIPALE
157
GUIDA AI MENU
Premere il tasto MENU del telecomando per aprire la Pagina
Principale sullo schermo. La pagina principale sarà visualizzata.
1. È possibile spostarsi nella pagina principale con i tasti
del telecomando.
2. Premere OK per confermare la selezione.
3. Premere EXIT per tornare al menu precedente oppure pre-
mere MENU per passare al canale della visione corrente .
I. Canale Manager
II. Installazione
III. Opzioni
In questa sezione è possibile organizzare i canali in base alle proprie preferenze.
1. Selezionare Channel Manager nella pagina principale con i tasti e premere OK.
2. La pagina TV Channel Manager sarà visualizzata sullo schermo.
3. Selezionare la modalità che si desidera utilizzare con i tasti .
4. Per visualizzare il canale selezionato , andare sul canale e quindi premere il tasto ROSSO.
5. Premere EXIT per tornare al menu precedente oppure premere MENU per passare al canale corrente in
visione.
I-1. Favoriti
I-2. Rinominare
I-3. Spostare
I-4. Blocco
I-5. Eliminare
I-1. Favoriti
1. Utilizzando i tasti passare alla modalità preferita,
quindi premere il tasto giallo per scegliere preferito 1 ~ 8.
2. Premere OK sul canale che si desidera aggiungere o eliminare.
3. La barra del none sarà evidenziata alla fine del canale
selezionato . Per cancellare premere di nuovo OK.
4. I canali selezionati saranno salvati automaticamente.
5. Se si desidera controllare la lista dei canali preferiti
salvata andare in un'altra modalità (Rinomina ~ Elimina),
eccetto Favoriti e poi premere il tasto FAV per verificare i
preferiti 1 ~ 8.
6. Premere EXIT per tornare al menu precedente oppure
premere MENU per passare al canale corrente in visione.
7. Premere il tasto BLU per rinominare il preferito.
IV. Utility
V. Accessori
156
GUIDA DELLA LISTA DEI CANALI
4.EPG ( GUIDA ELETTRONICA DEI PROGRAMMI)
a) Premere il tasto EPG in modalità di visione standard.
b) Verrà visualizzata l’ EPG del canale corrente .
c) Selezionare il canale di cui si desidera visionare il pro-
gramma.
d) Apparirà una immagine sul lato destro .
5. ZOOM IN/OUT
a) Premendo il tasto ZOOM in modalità di visione stan-
dard , è possibile utilizzare la funzione Zoom In / Out.
b) È possibile selezionare le dimensioni dello zoom con
i tasti ROSSO / VERDE.
c) È possibile selezionare la posizione di partenza con i
tasti .
d) Dopo aver selezionato le dimensioni dello Zoom e la
relativa posizione , è possibile avviare la funzione
zoom con il tasto OK.
e) Con i tasti è possibile spostare lo zoom
sullo schermo.
I. Canale Manager
Page 81

I. CANALE MANAGER
GUIDA AI MENU
159
In questa sezione è possibile configurare l'antenna e la scansione satellitare o transponder, ecc . Selezionare Istallazione
nella pagina principale utilizzando i tastipremere OK.
Premere EXIT per tornare al menu precedente oppure premere MENU per passare al canale corrente in visione.
II-1.
Ricerca satellite
II-2. Modifica DiSEqC
II-3. Setup motore
II-4. Home Streaming
II-5. Default di fabbrica
II-1
Ricerca satellite
1. E’possibile spostare il cursore utilizzando i tasti e
premere OK una volta selezionato il valore desiderato.
a) Satélite
- Premere OK per visualizzare l'elenco del Box dei Satelliti.
- Selezionare il satellite più appropriato e premere OK.
b) DiSEqC
- Premere OK per visualizzare la lista DiSEqC Port.
- Selezionare l’appropriata porta DiSEqC e premere OK.
c) LNB
- Premere OK per visualizzare la lista delle Frequenze LNB.
- Selezionare la frequenza LNB più appropriata e quindi pre-
mere OK.
- È anche possibile inserire direttamente le cifre usando i
tasti numerici del telecomando.
d) 22KHz Tone
- Selezionare una delle opzioni None, 0KHz , 22 KHz a secon-
da della casella del commutatore d'antenna in uso .
e) opzione di ricerca
- Premere OK per visualizzare la lista Opzioni di ricerca .
- Selezionare l'opzione di ricerca desiderata e quindi pre-
mere OK.
f) Ricerca
- Premere ricerca per avviare la scansione dei canali.
- Rinomina del SAT : Per rinominare il SAT, premere il Tasto
verde del telecomando.
II. INSTALAZIONE
158
GUIDA AI MENU
I-2. Rinominare
1. Utilizzando i tasti passare alla modalità Rinomina.
2. Selezionare il canale che si desidera rinominare utilizzando i
tasti
presionar OK.
3. Una tastiera di dialogo sarà visualizzata sullo schermo.
4. Modificare il nome con l'immissione di cifre / o parole nel campo
della tastiera di dialogo.
5. Premere EXIT per tornare al menu precedente oppure premere
MENU per andare al corrente canale in visione .
I-3. Spostare
1. Utilizzando i tasti andare in modalità Move.
2. Selezionare i canali che si desidera spostare premendo il tasto OK.
3. Spostare il cursore che si desidera inserire e quindi premere il
tasto VERDE.
4. Premere EXIT per tornare al menu precedente oppure premere
MENU per andare al corrente canale in visione .
I-4. Blocco
1. Utilizzando i tasti passare alla modalità blocco.
2. Selezionare il canale che si desidera bloccare e premere OK. Sarà
evidenziato alla fine della barra del nome del canale selezionato.
Per cancellare premere di nuovo OK.
3. Premere EXIT per andare alla pagina principale o premere MENU
per andare al canale corrente in visione.
I-5. Eliminare
1. Utilizzando i tasti passare alla modalità Elimina.
2. Selezionare il canale che si desidera eliminare e quindi premere
OK. Sarà evidenziato ( ) il numero del canale selezionato. Per
cancellare premere di nuovo il tasto blu .
3. Premere il tasto GIALLO per eliminare TP. Selezionare un canale e Premere il pulsante blu. Si selezionerà automaticamente ,Tutti i canali TP .
4. Premere il tasto GIALLO per eliminare il Satellite. Selezionare un canale e premere il pulsante blu. Si selezionerà automaticamente tutti i canali del satellite .
5. Premere EXIT per tornare al menu precedente oppure premere MENU per andare al canale corrente in visione.
6. Visualizzazione sullo schermo del Box dei messaggi.
7. Selezionare OK nella finestra di messaggio e quindi premere OK per eliminare il canale evidenziato.
TP EDIT: Per modificare TP, Premere
il tasto ROSSO del telecomando.
Page 82

II. INSTALLAZIONE
161
GUIDA AI MENU
f) Motor Control
Selezionare la posizione utilizzando i tasti e premere
OK. Sarà visualizzata sullo schermo una finestra di messaggio.
- Memorizzazione della posizione Sat:
memorizzare la posizione corrente del motore per il
satellite selezionato.
- Goto Sat Position: sposta il motore alla posizione memorizzata
del satellite selezionato.
- Goto Center: va al centro del motore.
- Limite off: disabilita il limite Est, Ovest .
- Set East Limit: Imposta la posizione corrente come lim-
ite orientale.
- Set West Limit: Imposta la posizione corrente come lim-
ite occidentale.
- Recalcuation position.
- Reset Position: reimposta tutte le posizioni memorizzate del motore.
g) posizione satellitare
- Immettere direttamente la posizione utilizzando i
tasti numerici del telecomando.
- Selezionare la direzione utilizzando (ovest /
est).
h) Search Option
- Premere OK per visualizzare la lista delle opzioni di
ricerca .
- Selezionare l'opzione di ricerca che si desidera e poi
premere OK.
i) Ricerca
- Premere ricerca per avviare la scansione dei
canali.
- Premere OK per avviare la scansione.
2. Modifica della posizione locale
- Premere il bottone verde per modificare la posizione locale.
a) longitudine
- Immettere direttamente la Longitudine utilizzando i tasti numerici del telecomando.
- Selezionare la direzione utilizzando i tasti (ovest / est).
b) Latitudine
- Immettere direttamente la Latitudine utilizzando i tasti numerici del telecomando.
- Selezionare la direzione utilizzando (NORD / SUD).
3. Premere EXIT per tornare al menu precedente oppure premere MENU per passare al canale
corrente in visione.
GUIDA AI MENU
160
II-2. Switch DiSEqC
1. Selezionare Ricerca Canale in Installazione usando i
tasti e premere OK.
a) Se si seleziona Switch DiSEqC e si preme OK nel menu
sarà visualizzatala pagina DiSEqC Switch.
b) Selezionare il satellite più appropriato per ogni porta
DiSEqC (A ~ D) utilizzando i tasti e premere
ricerca. I satelliti selezionati saranno ricercati automaticamente.
II-3 Motor Setup
1. È possibile spostare il cursore utilizzando i tasti
premere OK una volta selezionato il valore desiderato.
a) Tipologia di motore : DiSEqC 1.2, USAL
- Premere OK per visualizzare Motor Type
- Selezionare il tipo di motore più appropriato e premere
OK.
b) Satellite
- Premere OK per visualizzare l'elenco del box Satelliti
- Selezionare il satellite più appropriato e premere OK.
c) Drive & Step Driver
- Selezionare la direzione utilizzando i tasti (ovest /
est).
d) Frequenza
- Premere OK per visualizzare l'elenco delle frequenze.
- Selezionare la frequenza più appropriata e quindi pre-
mere OK.
e) Motor Setup
- Ricercare la posizione più appropriata del satellite
selezionato utilizzando i tasti .
II. INSTALLAZIONE
TP EDIT : Per modificare TP premere il
pulsante rosso del telecomando.
Page 83

GUIDA AI MENU
II. INSTALLAZIONE
162
II-5. Default di fabbrica
Usare la funzione Default di fabrica solo quando si desidera
che il ricevitore ritorni alle impostazioni di fabbrica predefinite . Tutte le impostazioni dei canali saranno cancellate.
1. Selezionare Factory Default in istallazione con i tasti e
premere OK.
2. Sarà visualizzata una finestra di messaggio sullo schermo.
3. Selezionare OK per riportare il icevitore alle impostazioni
di fabbrica predefinite e premere OK.
4. Premere EXIT per tornare al menu precedente oppure premere MENU per andare al canale corrente in visione.
163
GUIDA AI MENU
II-4. Home Streaming
1. Configurazione PC
***Esecuzione del programma ‘Home Streaming’
a) Andare sulla sezione ‘Preference’
b) Selezionare ‘Default URL’ e assegnare la cartella
desiderata per il download tramite il pulsante
“Browse” La cartella preselezionata in automatico è “c:\download” ma può essere necessario
modificare la cartella per essere in grado di ricevere correttamente i filmati sul PC.
Nota: Il server predefinito è attualmente
disponibile.
2. Impostazione ricevitore
a) Andare sul menu “Home streaming” ( Menu
Accessori Rete Home streaming ) e clicca
su “Home streaming”.
b) Apparirà “IP-Name Edit” dove si dovrà immettere
l’ indirizzo corretto dell’ IP del server con i tasti
numerici del telecomando.
c) L'indirizzo IP dovrà essere lo stesso di quello
indicato nella casella di preferenza sul programma di Home Streaming alla cartella “Perference”.
3. Riproduzione del file video da Home
Streaming
a) Premendo il tasto “Fn” del telecomando nella
visualizzazione normale del ricevitore apparirà l’
elenco dei filmati del PC sul tuo TV.
b) Selezionando il file che si desidera visualizzare e
utilizzando i tasti di navigazione del telecomando,
premendo il pulsante "OK" verrà riprodotto il filmato.
II. INSTALLAZIONE
Si prega di visionare le immagini di
questa pagina per poter migliorare
la comprensione del testo.
Page 84

In questa sezione è possibile configurare la lingua OSD,
orario, ecc . Selezionare Opzioni nella pagina principale
utilizzando i tasti e premere OK. Premere EXIT per
tornare al menu precedente o premere MENU per passare
al canale corrente in visione.
III-1. OSD Setup
III-2. Pannello di controllo
III-3. Time Adjust
III-4. Parental Lock
III-1.OSD Setup
1. Selezionare Setup OSD in Opzioni con i tasti
e premere OK.
a) Lingua OSD
- Premere OK per visualizzare l'elenco delle Lingue OSD.
- Selezionare la lingua che si desidera e poi premere OK.
b) Lingua audio
- Premere OK per visualizzare l'elenco delle Lingue audio.
- Selezionare la lingua desiderata e premere OK.
c) Lingua dei sottotitoli
- Premere OK per la visualizzazione dei sottotitoli.
- Selezionare la lingua desiderata, quindi premere OK.
d) Visualizzazione della barra delle informazioni
- Premere OK per visualizzare il Display della barra delle informazioni dell’orario.
- Selezionare l’orario che si desidera visualizzare e premere OK.
e) Trasparenza
- Regolazione del livello di trasparenza.
2. Premere EXIT per tornare al menu precedente oppure premere MENU per passare al
canale corrente in visione.
III. OPZIONI
164
GUIDA AI MENU
GUIDA AI MENU
III. OPZIONI
III-2. Pannello di controllo
1. Selezionare Impostazione TV in Opzioni con i tasti e premere OK.
a) Tipo di HD
- Selezione dell’uscita video HD.
b) Tipo TV
- Selezione del tipo di TV.
c) Aspect Ratio
- Selezione del rapporto dello schermo.
d) schermata di controllo
- Selezione della modalità di visualizzazione dello schermo .
e) Luminosità
- Regolazione della luminosità dello schermo.
f) Contrasto
- Regolazione del contrasto dello schermo.
g) Saturazione
- Regolazione della saturazione dello schermo.
2. Premere EXIT per tornare al menu precedente oppure
premere MENU per andare al canale corrente in visione.
III-3. Time Adjust
Impostare l'ora locale in base alla propria posizione.
1. Selezionare time setup in Opzioni con i tasti e premere OK.
2. Appare sullo schermo la pagina per regolare l’ora.
3. Spostare il cursore utilizzando i tasti
e premere OK
una volta selezionato il valore desiderato. (Immettere l’ora deside
rata utilizzando direttamente i tasti numerici del telecomando).
4. Premere EXIT per tornare al menu precedente oppure premere
MENU per andare al canale corrente in visione.
III-4. Impostatizione del blocco parentale
1. Selezionare Parental Lock Setup in Opzioni con i tastie premere OK.
2. Sullo schermo apparirà la pagina Parental Lock .
3. È possibile bloccare e sbloccare il blocco parentale selezionando
ON oppure OFF utilizzando i tasti
4. È possibile bloccare e sbloccare Install Lock selezionando ON o
OFF utilizzando i tasti (per l'installazione delle impostazioni).
5. Inserire la nuova password, se si desidera modificare la password in uso.
6. Confermare la nuova password .
7. Premere EXIT per tornare al menu precedente oppure premere MENU per passare al canale corrente in visione.
Nota : IL DEFAULT DELLA PASSWORD DI è 0000.
165
Page 85

GUIDA AI MENU
IV
. UTILITY
In questa sezione è possibile utilizzare USB, ecc
Selezionare utility nella pagina principale utilizzando i
tasti
e premere OK.
IV -1. System Information
IV -2. Timer
IV -3. Calendario
IV
-1.
SYSTEM INFORMATION
Questa opzione permetterà di conoscere la corrente versione S / W e H / W. Fornisce anche il nome del prodotto.
1. Selezionare System Information in Opzioni con i tasti
e premere OK.
2. Premere EXIT per tornare al menu precedente.
IV
-2.
TIMER
L'Unità (set top box) si spegnerà / accenderà automaticamente dopo un periodo di tempo specificato.
IV
-3.
Calendario
166
GUIDA AI MENU
V
. ACCESSORI
In questa sezione è possibile utilizzare USB, ecc.
Selezionare utility nella pagina principale utilizzando i
tasti
e premere OK.
V -1. USB
V -2. Common Interface
-1 USB
Il ricevitore è dotato di porte.
1. Selezionare USB in Utility con i tasti e premere OK.
2. Se si desidera salvare il Software o il Database, premere
il pulsante verde del telecomando.
3. Selezionare il file che si desidera salvare utilizzando i
tasti e OK.
4. Dopo aver scaricato il file selezionato, il ricevitore si
riavvierà automaticamente.
-2 Common Interface
Il ricevitore è dotato di un accesso per Interfaccia standard
che permette l’ accesso ai vari programmi criptati delle
pay tv per i vari moduli di accesso condizionati e per una
smart card .
I programmi che possono essere decriptati sono determinati dal modulo di accesso condizionato e dalla smart card
in uso.
1. Selezionare Common Interface in utilità con i tasti e
premere OK.
2. Sullo schermo sarà visualizzato common Interface .
(Apparirà la frase 'No Module' quando il modulo di
accesso condizionato non è istallato)
3. Inserire il modulo di accesso condizionato nella slot 1.
4. Il nome della Slot varia a seconda di ogni modulo di
accesso condizionato inserito.
5. Premere EXIT per tornare al menu precedente oppure
premere MENU per andare al canale corrente in visione.
167
Page 86

PVR GUIDE
PVR GUIDE
II. Funzione di registrazione
II-2 Registrazione istantanea
- Premere il pulsante "RECORD" sul telecomando per avviare
la registrazione del programma.
- Durante la registrazione del programma
- Premere il tasto "PAUSE" per eseguire " Time Shift”
- È possibile utilizzare i tasti "Left / Right " per visualizzare il
tempo desiderato nel corso della registrazione del programma .
- Premere il tasto "OK" sul telecomando per visualizzare la
lista dei file registrati
Durante la registrazione è possibile visionare anche altri
canali che si trovano nella stessa TP. Nel caso si vogliano
visionare altri canali durante la registrazione, si dovrebbe
tornare ai canali di registrazione nella lista dei canali per
interrompere la registrazione.
- Se si preme il pulsante "STOP" del telecomando, il programma in corso di visione si fermerà e il programma in
visione della TV sarà memorizzato nello spazio di memoria
del telecomando .
169
PVR GUIDE
PVR GUIDE
I. Dispositivi Raccomandati
- External Hard Disk USB Drive.
- Flash memory stick.
- Formato Tipo: FAT16/32 (Il sistema non supporta NTFS e
altri sistemi di file )
II. Funzione di registrazione
II-1 Programmare una registrazione a tempo
1. Orario della registrazione programmata
: Impostare l’orario registrazione programmata in
"Utility -> Timer" per consentire la registrazione
all’orario impostato.
N
NOOTTAA :: CCoommee iimmppoossttaarree iill tteemmppoo ddii rreeggiissttrraazziioonnee
- impostare STB , come qui di seguito.
- Si prega di commutare "OFF" a "Registrazione" nel
menu Active.
- Dopo aver impostato "Registrazione" nel menu Active, è
possibile visualizzare i dettagli del menu PVR. (Ciclo, tipo
di canale, nome del canale, Ora d’inizio, Durata).
- Premere il pulsante "Ok" per selezionare il nome del
canale.
2. EPG - Registrazione Programmata
: Usato per registrare un evento selezionato da EPG.
- Premere il tasto EPG per entrare nel menu EPG durante
la visione di un programma sullo schermo.
- Per selezionare l’orario di riproduzione dell’evento :
selezionare all’interno dell’ EPG l'evento e premere il
tasto "RECORD" sul telecomando.
- Se si desidera cancellare, premere ancora una volta il
pulsante "RECORD".
- Se si desidera registrare più eventi programmati diversi ,
eseguire le varie selezioni e premere il tasto "RECORD"
sul telecomando.
168
Page 87

PVR GUIDE
PVR GUIDE
V. Funzione TimeShift
- Se si desidera eseguire il "Time Shift" in modalità in diretta
è necessario impostare Time Shift su "On" nelle opzioni PVR
(Accessory -> PVR -> TimeShift su "ON").
- Per la partenza del Time Shift in modalità in diretta , premere "PAUSE" per iniziare.
- Time shift sarà riprodotto per 30 minuti in modalità in diretta.
- Per avviare la "riproduzione" nel corso del Timeshift premere il tasto "Play".
- È possibile spostarsi sulla posizione "play" con il pulsante
left/ right durante il Time Shift.
VI. Formato
- Si può usare il formato FAT32 per la formattazione del disco
rigido tramite FAT32 e NTFS.
- Si può usare anche il formato multi partizionato del disco
rigido.
- Quando è inserita la formattazione NTFS del disco rigido ,
appariranno i seguenti messaggi.
- Premere il tasto "OK" per passare a "C:, D:, E:, F: ° NEXT" in
caso di disco rigido Multi partizionato.
- In caso di disco rigido multi partizionato con NTFS, è necessario il formato FAT 32.
171
PVR GUIDE
PVR GUIDE
III. Funzione di riproduzione
- Per riprodurre il programma registrato in precedenza, premere il tasto "Play" sul telecomando.
- Utilizzare i tasti freccia per selezionare il file che si desidera
riprodurre e premere "OK" per la riproduzione.
- Durante la riproduzione del programma .
- Se si premono i tasti "Left / Right" del telecomando, mentre
si registra direttamente dalla TV in diretta o si riproduce un
file registrato, il programma in visione si ferma, e le immagini ripartono da dove è stato spostato il tasto "left / right "
del telecomando Se si desidera riprodurre altri file registrati
durante la riproduzione, premere il pulsante "play".
IV. Funzione della modalità Trick
- Se si preme il tasto "FF” (Avanzamento veloce) durante il
Time shift o la riproduzione, il file verrà riprodotto a velocità
2X e se si premere il tasto "FF" ancora una volta, il file verrà
riprodotto a 8x.
- Se si preme il tasto "REW”(Riavvolgimento) durante il Time
shift o la riproduzione, il file verrà riavvolto a velocità 2X e,
se si preme il pulsante “REW "ancora una volta, il file verrà
riavvolgimento a 8x.
- Durante le funzioni FF / REW per tornare alla riproduzione
normale, premere io tasto "PLAY".
170
Page 88

PVR GUIDE
PVR GUIDE
173
PVR GUIDE
PVR GUIDE
VII. Riproduzione MP3
- Selezionare il file MP3 che si desidera riprodurre nel menu
USB.
- Dopo aver selezionato il file MP3, si formerà la finestra di
riproduzione MP3.
VIII. Riproduzione JPG
- Selezionare il file JPG desiderato nel menu USB.
- Premere OK per visualizzare l’JPG desiderato.
- È possibile ruotare l'immagine utilizzando il pulsante left /
right.
IX. Aggiornamento S / W
- Selezionare il file UAD che si desidera aggiornare nel menu
USB.
172
X. Come riprodurre 'il file registrato da PVR del
HD-200 "tramite PC o DivX Player
X-1 Come riprodurre tramite PC
A) Riproduzione KM Player.
B) Selezione della lingua.
1) Pulsante destro del Mouse -> Lingua> la propria lingua.
C) Modificare l’estensione del nome del file registra-
to in “mpg ".
Esempio: Benvenuti a A_131821 -> Benvenuti
A_131821.mpg
D) Selezionare il file che si desidera riprodurre.
1) Pulsante destro del Mouse -> Open files(S) ->
Selezionare.
X-2 Come riprodurre tramite "DivX Player"
A) Il formato del file deve essere modificato in formato ". avi"
per poterlo riprodurre tramite DivX Player.
B) Selezionare una cartella di destinazione dove salvare il file
che sarà modificato in ".avi".
1) Pulsante destro del Mouse -> Capture -> Seleziona
Acquisizione delle cartelle.
C) Ripetere A) -> B) -> C) -> D) del n.1 come per la ripro-
duzione tramite PC.
D) Acquisizione del file, che si sta correntemente riproducen-
do da convertire in ".avi".
1) Pulsante destro del Mouse -> Capture -> Video
Acquisizione rapida.
2) Quindi salvare la riproduzione dei file nella cartella designata per il formato ".avi".
E) Se il file in riproduzione fa parte di un canale STB SD, è da
salvare in SD e se il file è HD oppure H.26 è da salvare in
HD oppure H.264. Se l’utente non dispone di un DivX player
in grado di riprodurre HD o H.264 (almeno CPU
sigma8634), si deve convertire il file SD in modo che il
generico SD DivX Player (CPU sigma8511) possa riprodurre
il file.
Page 89

PVR GUIDE
PVR GUIDE
X-3 Come convertire i file Divx Manager
A) Riproduzione Divx Manager.
1) Impostare -> Modello -> Rapsody RSH-250/350
B) Selezionare la cartella in cui è posizionato il file che si
desidera convertire. Quindi appariranno le informazioni del
file.
C) selezionare il file che si desidera convertire e Selezionare
"Converti".
D) Selezionare "Start Encoding" -> Inizia "Conversione".
NOTE: Il sito Web per il trasferimento
1. Kmplayer
1) entrare in questo sito: http://2bwithu.tistory.com/245.
2) Scaricare 2 file in 1 cartella e decomprimere il file archiviato. Dopo unzip, è possibile installare solo il file clic exe .
2. Divx Manger
1) entrare in questo sito:
http://www.modix4u.co.kr/upboard/view.asp?fcprimkey=44
2) Clicca qui sotto per la versione in lingua inglese.
174
Check that the power cable is plugged into the power sock-
et.
Check the dish and adjust it.
Check the cable connection and correct it.
Check channel and video output.
Check the volume level of the TV and receiver.
Check the mute status of TV and receiver.
Check the cable connection and correct.
Replace batteries.
Aim the remote control unit directly to the receiver.
Checking that nothing blocks the front panel.
Check the Conditional Access Module and smart card are
appropriate for the selected service.
Check the Conditional Access Module and smart card are
correctly inserted or not.
Check the signal strength and the signal quality in the
menu.
Check the LNB and replace the LNB if necessary.
Check the LNB cable.
Check the Dish and adjust it.
Go to the Option and select System Information.
Contact your Service Provider.
Problem
Nothing appears on the Front
Panel or No power supply
No Picture
No Sound
Remote Control Unit dose not
work
Service is not running or
scrambled
“No Signal” on the screen
Tuner Defective Check
You have forgotten your
secret PIN Code
Solution
175
TROUBLESHOOTING
Page 90

177
SPECIFICATIONS
176
SPECIFICATIONS
Item
HDMI HD Video/Audio Output
TV SCART Output RGB, CVBS, L, R Output with Volume control
VCR Scart In/Out RGB, CVBS, L, R In
CVBS, L, R Out
RCA Output
CVBS, L, R Output(Yellow, White, Red Jack) with Volume Control
Component Video(YPbPr) Out
SPDIF Dolby Digital Bitstream Out(Coaxal, Optical)
- RS-232, Bit Rate : 115,200baud
Data Interface Connector : 9-pin D-sub Male type
- USB : USB 2.0, Type A Connector
Specification
. A/V & Date In/Out
Item
Input Voltage AC 90V ~ 250V, 50Hz ~ 60Hz
Power Consumption Max 40W
Protection
Separate Internal Fuse
The input shall the lighting protection
Specification
. Power Supply
Item
Size(WxHxD) 290mm x 50mm x220mm
Weight 1.5 KG
Specification
. Physical Specification
Item
Operating Temperature 0 °C ~ 40 °C
Storage Temperature -10 °C ~ 50 °C
Operating Humidity Range 10~85% RH, Non-condensing
Storage Humidity Range 5~90% RH, Non-condensing
Specification
. Environmental Condition
Item
Transport Stream 13818-1 MPEG-2, H.264/AVC Transport stream Specification
Profile Level MPEG-2 MP@ML, MP@HL, MPEG-4 H.264/AVC
Input Rate Max. 90Mbit/s
Aspect Ratio 4:3, 16:9, Letter Box
Frame Rate 25Hz for PAL, 30Hz for NTSC
Video Resolution 576i, 576p, 720p, 1080i
Teletext Through VBI or BSD
Audio Decoding MPEG-1 Layer 1 & 2, Dolby Downmix
Audio Mode Single Channel/Dual Channel Joint Stereo/Stereo
Frequency Response 20~20kHz, <+/-2dB
Specification
. MPEG Transport Stream & A/V Decoding
Item
Specification
SMART CARD 1 SLOT, ISO 7816, GSM11.11 and EMV (payment systems) compatibility
2 SLOTS
PCMCIA DVB Common Interface Standard
(Viaccess, Irdeto, Nagra Vision, Conax, Crytoworks, AlpahCrypt..)
.Conditional Access Module Interface
Item
Type 1 F Type, IEC169-24, Female
Frequency Rage 950MHz to 2150MHz
RF Impedance 75 Ohm unbanlanced
Signal Level -65 to -25 dBm
LNB Power 13.5/18.5Vdc +/- 5%, 0.5Amax, Overload Protected
22KHz Tone Frequency : 22KHz +/- 2KHz, 0.6Vpp +/- 0.2V
DiSEqC Control Version1.0, 1.2, Tone burst A/B
Demodulation QPSK, 8PSK
Input Symbol Rate
DVB-S QPSK : 2~45 Msps
DVB-S2 8PSK/QPSK : 10~30Msps
FEC Decoder
1/2, 2/3, 3/4, 3/5, 4/5, 5/6, 8/9, 9/10 in DVB-S2 mode.
1/2, 2/3, 3/4, 5/6 and 7/8 in DVB-S mode.
Specification
. Tuner & Channel
Item
Specification
. System & Memory
Main Processor STi7101
Flash Memory 8 Mbytes
System Memory 128 Mbytes
A/V Memory 64 Mbytes
Channel Capacity Digital Channel : 8,000
Front 7-Keys, 7-SEGMENT DISPLAY
Page 91

BRAND LIST
179
Audiosonic 0011 0051 0201 0351 0361 0451 0561
0681 0701 0861 1001 1391 1401
Audioton 0351 0451 0681 0861
Audioworld 1331
Aumark 0081
Autovox 0141 0321 0351 0421 0591
AVP 2521 2541
AWA 0011 0021 0041 0051 0191 0211 0341
0351 0451 0701 0751 1001 1061
Axxent 0011
Axxon 1391
B&D 2171
Baird 0101 0111 0201 0331 0351 2521
Bang&Olufsen 0141 1021
Barco 0221
Basic Line 0011 0051 0221 0351 0361 0461 0571
0701 0811 1001 1271 1981
Bastide 0351
Baur 0011 0051 0271 0301 0591 0641 0931
0951 0981 1001 1971 2381
Bazin 0351
Beaumark 0261
Beko 0031 0051 0681 0761 0861 1001 1391
1401 1711 1981 1061
Belson 2081
Bemmett 0051 1001
BenQ 2491
Beon 0051 0761 1001
Berthen 1271
Best 0561 0681
Bestar 0051 0681 0701 1001
Bestar-Daewoo 0701
Binatone 0351
Black Diamond 1001 1091 1731 1741 1981
Black Panther 0161
Black Star 0421
Black Strip 0031
Blacktron 0461
Blackway 0361 0461
Blaupunkt 0041 0241 0271 03010711 0951 0981
Blue Sky 0051 0361 0461 0811 0871 1001 1271
1391 1401 1981 2081 2521 2541 2551
2571
Blue Star 0461
Bondstec 0421
Boots 0011 0351
Bosch 0511
Boxlight 1491
BPL 0051 0461 1001
Brandt 0201 0471 0551 1011 1131
Brandt Electronique
0471 0551
Brinkmann 0051 0761 0861 1001 1271
Brionvega 0051 0141 0651 1001
Britannia 0341 0351
Brother 0451
Bruns 0141
BSR 0221 0641
BTC 0361
Bush "0011 0041 0051 0221 0331 0351 0361
0451 0461 0591 0621 0641 0661 0691
0701 0871 1001 1091 1101 1251 1271
1331 1391 1621 1981 2211 2261 2411
2501 2521 2541 2561"
Canton 0361
Capsonic 0451
Carad 0051 1001 1081 1271 1981
BRAND LIST
TV
178
A.R.Systems 0051 0601 1001 0701 0811
Accent 0011 0051 1001
Accuphase 1001 2551
Adcom 1131
ADL 2171
Admiral 0141 0151 0221 0451 0661 0761
Adyson 0341 0351
AEA 0051 1001
AEG 1061 2411
Agashi 0341 0351 0451
AGB 0941
Agef 0141
Aiko 0011 0031 0051 0101 0271 0341 0351
0451 0641 0691 0771 1001
Aim 0051 0101 0331 0751 1001 1371 1551
1701
Aiwa 1341 1361 2521 2541 2561
Akai 0011 0031 0051 0101 0261 0271 0331
0341 0351 0361 0451 0641 0691 0711
0821 0831 0941 0961 1001 1051 1061
1161 1211 1281 1311 1391 1401 1461
1521 1981 2261
Akashi 0011 1861
Akiba 0051 0361 0461 0811 1001
Akito 0051 1001
Akura 0011 0051 0361 0451 0461 0751 1001
1271 1391 2621
Alaron 0341
Alba 0011 0041 0051 0221 0341 0361 0421
0621 0681 0691 0761 0781 0871 1001
1271 1391 1981 2521 2541
Alkos 0031
Allorgan 0321 0351
Allstar 0051 1001
All-Tel 1881
Ambassador 0251
Amplivision 0351 0511 0681
Amstrad 0011 0051 0251 0361 0451 0651 0691
0751 0771 0941 1001 1211 1981 2521
Anam 0011 0051 1001
Anam National 0051 1001 1221
Andersson 2041
Anglo 0011 0451
Anitech 0011 0051 0161 0451 0461 1001
Ansonic 0011 0051 0161 0171 0221 0421 0441
0501 0681 0701 0741 1001 1271 2361
2521
Apollo 0821
Arcam 0341 0351
Arcen Ciel 0201
Ardem 0051 0861 1001 1171 1391
Aristona 0051 1001
Arthur Martin 0221
ASA 0091 0141 0171 0181 0581
Asberg 0051 0161 1001
Asora 0011
Astra 0051 1001
Asuka 0341 0351 0361 0451 0461 2521
ATD 1331
Atlantic 0051 0321 0341 0441 0511 1001
Atori 0011
Auchan 0221
BRAND CODE NO. BRAND CODE NO.
Page 92

BRAND LIST
181
Diamant 0051 1001
Diamond 0011 0341 0451 0691 1311 1331 1691
1731 1751 1861
Digatron 0051 1001
Digiline 0051 0181 1001 1271
Digitex 1731
Digitor 0051 1001 1871 1931
Digivision 0641
DigiX 1921
DiK 0051 1001
Dixi 0011 0051 0141 0351 0421 1001
DL 0051 1041 1641 1831 1951
Domland 0731
Doric 0591
Dream Vision 2461
DSE 1871 1931 2411
DTS 0011
Dual 0051 0221 0351 0441 0591 0601 0731
1001 1161 2001 2521
Dumont 0091 0101 0141 0161 0171 0351 2521
Dunai 0221
Durabrand 0051 1001 2361
Dux 0051 1001
D-Vision 0051 1001
DVX 1951
Dynatron 0051 1001
Easy Leaving 2661
Easy Living 2661
Ecco 1371 1611
Edison-Minerva 0871
E-Elite 0361
Eiki 1481
Elbe 0051 0221 0271 0351 0361 0391 0441
0501 0641 0651 0681 0741 0781 0941
1001 1081 1151
Elbe-Sharp 0941
Elcit 0141 0161 0221 0421 0941
Elekta 0011 0051 0451 0461 1001
Elfunk 2121
ELG 0051 1001
Elin 0011 0051 0171 0181 0221 0341 0591
0641 0961 1001
Elite 0051 0361 0511 1001
Elman 0161
Elta 0011 0341 0451
Emco 0421
Emerson 0051 0091 0141 0221 0251 0261 0421
0461 0511 0521 0641 0681 0691 0861
1001 1391 2521 2551
Emperor 0461
Enzer 1311 1551
Epson 1811
Erres 0051 1001
ESC 0051 0351 1001
Est_le 0221
Etron 0001 0011 0051 0221 1001
Eurofeel 0351 0451
EuroLine 0051
Euroman 0051 0341 0351 0451 0681 1001
Europa 0051 1001
Europhon 0051 0161 0221 0341 0351 0421 0941
1001
Excel 0051 1001
Expert 0221 0321 0441
Exquisit 0051 0421 1001
Fagor 0051 1001
BRAND LIST
180
Carena 0051 0811 1001
Carrefour 0041 0051 0091 1001
Carver 0241
Cascade 0011 0051 1001
Casio 0051 0221 0591 1001 2521
Cathay 0051 1001
CCE 0051 0351 1001
Celestial 1721 1731 1741
Centrex 1641 1761
Centrum 1981
Centurion 0051 1001
Century 0141 0391 0421
CGE 0221 0421 0681 0761 2521
Cimline 0011 0361
Cinex 1211 2411
Citizen 0081
City 0011
Clarivox 0051 0091 0161 0761 1001
Clatronic 0011 0051 0161 0351 0361 0421 0451
0511 0681 0691 1001 1061 1211 1391
2521
Clayton 1981
CMS 0341
CMS hightec 0351
Combitech 2541
Concorde 0011
Condor 0011 0051 0161 0221 0341 0421 0451
0461 0511 0681 0741 0751 1001
Conia 1561 1741
Conrad 0051 1001
Contec 0011 0021 0041 0051 0211 0341 0451
1001
Continental Edison
0201 0471 0871
Cosmel 0011 0051 0561 1001
Crosley 0141 0421 0221
Crown 0011 0051 0331 0571 0681 0761 0861
0871 1001 1061 1281 1381 1391 1401
1981 2571
CS Electronics 0341 0361 0421
CTC 0421
Curtis Mathes 0151 0231 0361
Cybertron 0361
Cytronix 2311
Daewoo 0011 0051 0341 0351 0361 0701 0911
1001 1181 1261 1821 1921 2001 2511
2541 2551
Dainichi 0341 0361
Dansai 0011 0031 0041 0051 0331 0341 0351
0451 1001
Dansette 0751
Dantax 0681 0861 1061 1391 1401 2541
Datsura 0331
Davis 1491
Dawa 0011 0051 1001
Daytek 1331 1371 2111
Dayton 2111
Daytron 0011 0051 0701 1001
de Graaf 0061 0221 0331 0661 0961
DEC 1661 1861
Decca 0051 0101 0351 0941 1001 1121 2001
2521 2541
Deitron 0051 0361 0701 1001
Dell 2271
Denko 0451
Denver 0051 1001 1041 1061 2071 2631
Desmet 0011 0051 0141 0511 1001
Page 93

BRAND LIST
183
GPM 0361
Gradiente 0051 0241 1001
Graetz 0051 0221 0571 0641 0691 1001 1391
Gran Prix 1211
Granada 0041 0051 0071 0101 0191 0221 0331
0351 0371 0381 0551 0571 0631 0661
0821 0941 0961 1001 1011
Grandin 0011 0051 0221 0361 0461 0511 0701
0811 1001 1081 1271 1391 1401 1881
1981 2081
Gronic 0161 0221 0351
Grundig 0011 0041 0051 0091 0261 0271 0301
0681 0781 0871 0921 0951 0981 1001
1041 1151 1371 1501 2181 2321 2541
2561 2581
Grunkel 2041
H&B 1711
H_her 1391 2411 1881
Haaz 1371
Haier 0451 1331
Halifax 0341 0351 0451
Hammerstein 0081 0451
Hampton 0341 0351
Hanimex 0361 2541
Hanseatic 0011 0051 0141 0221 0351 0461 0501
0511 0591 0641 0681 0711 0731 0911
1001 1181 1261 1391 1711
Hantarex 0011 0051 0161 0391 0941 1001 1771
Hantor 0051 1001
Harsper 1881
Harwa 1611 2101 2291
Harwood 0011 0051 0751 0871 1001
Hauppauge 0051 1001
HCM 0011 0051 0351 0361 0451 0461 0751
0761 1001
Hedzon 0051 1001
Hema 0011 0351
Hemmermann 0591
Hifivox 0201
Higashi 0341
Highline 0051 0451 1001
Hikona 0361
Hinari 0011 0041 0051 0221 0331 0361 0451
0621 0781 0871 1001 2541
Hisawa 0361 0461 0811 1081 1391 2541
HISense 0331 1831
Hit 0141
Hitachi 0041 0051 0061 0101 0181 0191 0201
0221 0261 0291 0351 0371 0591 0631
0641 0661 0821 0831 0841 0891 0911
0931 0941 0961 1001 1031 1141 1181
1421 1511 1671 1981 1991 2001 2031
2191 2371 2421
Hitachi Fujian 0191 0371
Hitsu 0011 0361 0811 1081
HMV 0141
Home Electronics
1061
Homyphon 0051 1001
Hoshai 0361 0461 0811
Huanyu 0341 0701
Hugoson 1941 2171
Hygashi 0341 0351
Hyper 0011 0341 0351 0421
Hypersonic 0641
Hypson 0051 0351 0391 0451 0461 0811 1001
1271 1391 1401 2541 2571
BRAND LIST
182
Family Life 0051 1001
Fenner 0011 0701
Ferguson 0031 0051 0111 0171 0191 0201 0391
0471 0551 0641 0781 0961 1001 1011
1131 1981 2521
Fidelity 0051 0221 0341 0451 0641 0661 0691
0751 0931 1001 2521 2531 2541
Filsai 0351
Finlandia 0071 0101 0221 0331 0471 0581 0641
0661 0961
Finlux 0051 0091 0101 0141 0161 0171 0181
0221 0351 0581 0741 0761 0821 0831
0891 0941 1001 1061 1121 1141 1161
1391 1401 2411
Firstline 0011 0051 0101 0161 0221 0331 0341
0351 0391 0421 0521 0591 0641 0701
0741 1001 1271 1391 1711 1981 2041
2081 2551
Fisher 0041 0071 0101 0141 0171 0211 0221
0331 0351 0591 0641 0681 0991
Flint 0051 0101 0361 0451 0811 1001 1081
FNR 0161
Force 2031
Formenti 0051 0141 0221 0341 0511 0861 1001
Formenti-Phoenix
0341 0511
Fortress 0141 0151
Fraba 0051 0681 1001
Friac 0011 0051 0161 0681 0911 1001 1081
1241
Frontech 0011 0221 0351 0421 0451 0591 0661
Fujimaro 1881
Fujitsu 0011 0051 0101 0161 0221 0321 0351
0441 0601 0641 1001 1301 1851
Fujitsu General 0011 0221 0321 0351
Fujitsu Siemens 2311
Funai 0451 0751 1271
Furichi 1861
Futronic 0451 1661 1861
Future 0051 1001
Galaxi 0161 0051 1001 0641 0221
Galaxis 0681 0761 1001 0161 0051
Galeria 0011
GBC 0011 0221 0361 0661 0701
GE 0201 0261 0461 0471 0551 1011 1131
1481
Geant Casino 0221
GEC 0051 0101 0221 0351 0591 0641 0941
1001
Geloso 0011 0221 0421 0661 0701
General 0201 0471
General Electric 0471
General Technic 0011
Genesis 0011 0051 1001
Genexxa 0011 0051 0221 0361 0751 1001
Gericom 1881 2171 1921 2311
Giant 0351
Goldfunk 1271
Goldhand 0341
Goldline 0561
GoldStar (LG) 0001 0011 0051 0061 0201 0221 0261
0341 0351 0421 0481 0641 0661 0681
0711 1001 1061 1391 1401 2571
Gooding 0871
Goodmans 0011 0031 0041 0051 0101 0351 0361
0451 0481 0551 0691 0701 0831 0871
0911 0941 1001 1011 1151 1181 1261
1271 1921 1981 2261 2501 2541 2551
Gorenje 0681
Page 94

BRAND LIST
185
Kolster 0051 0161 0421 0591 1001
Konichi 0011
Konka 0051 0361 0691 0761 1001 1041 1191
1391 1561 1631
Kontakt 0871
Korpel 0051 1001
Korting 0141 0511 0681
Kosmos 0051 1001
Kotron 0451 0751
Koyoda 0011
Kraking 0391
KTV 0351
Kuba 0221 0591
Kuba Electronic
0221 0591
Kyoshu 0451 0751 0761
Kyoto 0221 0341 0351
L&S Electronic 1391 1881
LaSAT 0681 0861
Leader 0011
Lecson 0051 1001
Legend 0011 0561
Lemair 0741
Lenco 0011 0051 0171 0221 0701 1001 1431
Lenoir 0011
Lesa 0421
Levis Austria 0051 1001
Leyco 0051 0101 0451 1001
LG 0001 0011 0051 0201 0221 0261 0341
0351 0481 0681 0711 1001 1061 1331
1391 1401 1771 2011 2021 2081 2431
2571
Liesenk & Tter 0051 1001
Liesenkotter 0051 1001
Lifetec 0011 0051 0361 0451 0701 0931 1001
1241 1271 1301 1981 2001
liyama 2171
Lloyd's 0001 0011
Lodos 1981
Loewe 0051 0141 0501 0651 0681 0931 0941
1001 1171 1241 1651
Logik 0001 0011 0021 0081 0451 0691 1331
1611 1921 2171
Logix 1271
Luker 2621
Luma 0011 0051 0221 0321 0441 0651 0661
0701 0741 1001
Lumatron 0051 0111 0221 0321 0351 0441 0451
0641 0651 0661 1001
Lux May 0011 0051 1001
Luxor 0221 0291 0331 0351 0481 0591 0631
0641 0661 0821 0931 0891 0961 1161
1981 2041 0831
LXI 0261
Madison 0051 1001
Magnadyne 0141 0161 0221 0421 0941
Magnafon 0111 0161 0341 0941
Magnavox 0041 0051 1001 1641
Magnum 0051 1001 1211 1391 1401 2301
Mandor 0451
Manesth 0031 0051 0221 0351 0451 0511 0661
1001
Manhattan 0051 0221 1001 1271 1621 1981
Marantz 0051 0751 1001
Marelli 0141
Mark 0011 0051 0341 0351 0701 1001 1391
1401
BRAND LIST
184
Hyundai 0051 1001 1371 1551 1861 1881 1891
2221
Iberia 0051 1001
ICE 0011 0051 0341 0351 0361 0451 0691
1001
Ices 0341 0361
Ict 0051 1001 2001
Imperial 0051 0221 0421 0591 0641 0681 0741
0761 1001 1151
Indiana 0051 1001
InFocus 1491 1541 2051
Ingelen 0221 0641 0871 1081 1391 2341
Ingersoll 0011
Inno Hit 0011 0051 0101 0161 0351 0361 0451
0461 0481 0941 1001 2041
Innovation 0051 1001
Innowert 1881 2311
Interactive 0051 0141 0201 0221 0641 0681 0741
0931 1001
Interbuy 0011 0051 0421 0451 0931 1001
Interfunk 0051 0141 0201 0221 0421 0591 0641
0681 0931 1001
Internal 0051 0701 0911 1001 2551
International 0341
Intervision 0011 0051 0161 0221 0351 0361 0421
0451 0461 0681 0691 0711 1731 0811
0861 0871 1001
Irradio 0011 0051 0361 0421 0481 0691 1001
Isukai 0051 0361 0461 0811 1001
ITC 0351 0511
ITS 0011 0051 0341 0361 0451 0461 0691
1001
ITT 0221 0331 0571 0581 0591 0641 0821
0831 0961 1081
ITT Nokia 0221 0331 0571 0581 0591 0641 0661
0821 0831 0961 1061 1081 1161
ITV 0051 0421 0451 0701 1001
JDV 2621
Jean 0041
JEC 0031
JMB 0051 0701 0781 0911 1001 1181 2541
Jocel 1381
Jubilee 1001
JVC 0041 0151 0361 0691 0761 1061 1231
1301 1471
Kaisui 0011 0051 0341 0351 0361 0461 0811
1001
Kambrook 0711
Kamp 0341
Kapsch 0171 0221 0321 0441 0641
Karcher 0051 0161 0221 0451 0461 0681 1001
1061 1081 1391 1621 2411
Kathrein 0051 1001
Kawa 0691
Kawasho 0341
KB Aristocrat 0221
Kendo 0051 0161 0221 0421 0651 0661 0681
0711 0741 0931 1001 1081
Kennedy 0221 0321 0781
Kennex 1981
Kenwood 0181
KIC 0351
Kingsley 0341
Kiota 0001
Kiton 0051 1001 1271
Kneissel 0051 0391 0441 0501 0651 0681 0701
0741 0781 0911 1001 1081 2541
Page 95

BRAND LIST
187
NEI 0051 0221 0561 0691 1001
Neovia 1881
Nesco 0421 2541
Netsat 0051 1001
Network 0561
Neufunk 0011 0051 0361 0461 1001 1081 1391
New Tech 0011 0051 0351 1001
New World 0361
Nfren 1681
Nicamagic 0341
Nikkai 0011 0031 0041 0051 0101 0341 0351
0361 0451 0561 1001
Nikko 0261
Nishi 0851
Nobliko 0091 0161 0341
Nogamatic 0201
Nokia 0201 0221 0331 0511 0571 0581 0591
0641 0701 0821 0831 0891 0961 1061
1081 1161
Nordic 0351
Nordmende 0051 0201 0221 0301 0471 0551 1001
1011 1391
Norfolk 0221
Normerel 0051 1001
Novak 0051 1001
Novatronic 0051 0181 0701 1001
Nurnberg 0221 0641
NU-TEC 0811 1331
Oceanic 0221 0331 0641 0821 0831 0961
Odeon 0451
Okano 0011 0051 0101 0451 0681 1001
Omega 0451
Omni 1331 1641 1761 1951
Onwa 0161 0361 0691 0771 1051
Opera 0051 1001
Optimus 0231 1221
Optonica 0151
Orbit 0051 1001
Orion 0011 0021 0051 0161 0251 0451 0511
0521 0621 0751 0781 0941 1001 1241
1391 1921 2541 2561 2611
Orline 0051 0361 1001
Ormond 0051 1001 1271 1981
Orsowe 0941
Osaki 0051 0101 0351 0361 0451 0621 0701
0751 1001
Osio 0051 0481 1001
Oso 0361
Osume 0041 0051 0101 0211 0361 1001
Otto Versand 0011 0041 0051 0151 0201 0271 0301
0351 0381 0421 0461 0511 0591 0641
0931 0941 0951 0981 1001 1971 2381
Pace 2541
Pacific 0051 0781 1001 1391 1981 2001
Pael 0341
Palladium 0051 0141 0221 0271 0351 0421 0591
0661 0681 0741 0761 0981 1001 1151
1241 1391 1971 2001 2381
Palsonic 0001 0051 0351 0361 0451 0711 0751
0761 1001 1331 1611 1631
Panama 0011 0051 0341 0351 0421 0451 1001
Panashiba 0001
Panasonic 0001 0051 0191 0221 0381 0641 0671
0941 0961 1001 1221 1841 1851 2331
2441
Panavision 0051 0741 1001
BRAND LIST
186
Master's 0911
Masuda 0011 0051 0351 0361 0451 0691 1001
Matsui 0011 0021 0031 0041 0051 0071 0101
0221 0251 0271 0301 0331 0351 0551
0591 0621 0661 0691 0771 0781 0811
0871 0941 1001 1141 1391 1981 2541
Matsushita 1221
Matsuvisma 1041
Maxam 0451
Maxdorf 1611
Maxim 2411 2621
MCE 0011
Mediator 0051 1001
Medion 0051 0411 0931 1001 1271 1331 1391
1711 1921 1981 2001 2241 2301 2361
2501 2541
Megas 1081
Megatron 0261
MEI 0051 1001 1981
Melectronic 0011 0051 0171 0181 0201 0221 0271
0301 0341 0351 0421 0471 0581 0591
0641 0701 0741 0831 0891 0931 1001
1181 1261
Memorex 0011 0081 0261
Memphis 0011 0051 0101
Mercury 0001 0011 0051 1001
Merritt 0221 0641 0961
Metz 0051 0141 0271 0301 0671 0721 0801
0951 0981 1001 1041 1271 1531 1981
MGA 0051 0171 0261 0361 1001
Micromaxx 0051 1001 1151 1271 1711 1981
Microstar 1711
Mikomi 2031
Minato 0051 1001
Minerva 0091 0191 0271 0301 0871 0941 0951
0981
Minoka 0051 0751 1001
Mirror 2501
Mitsubishi 0041 0141 0151 0191 0261 0331 0951
1001 1981 2571 0931 0051
Mitsuri General 0221
Mivar 0341 0351 0481 0491 0501 0681 0941
1071
Monaco 0011
Morgan's 0051 1001
Motorola 0151
MTC 0081 0221 0341 0591 0641 0681 0931
MTlogic 1391
Multistandard 0161
Multitec 0051 0861 1001 1271 1981 2411
Multitech 0011 0051 0161 0341 0351 0421 0451
0591 0661 0681 0861 1001
Murphy 0101 0171 0221 0341
Musikland 0051 0361 0421 1001
Myryad 0051 1001
NAD 0221 0231 0261 0641
Naiko 0051 1001 1061 2621
Nakimura 0051 0701 1001
Naonis 0221 0661
NAT 0381
National 0381
NEC 0011 0021 0041 0051 0241 0351 0411
0511 0701 0811 0911 1001 1041 1261
1351 1591 2061 2461
Neckermann 0051 0141 0221 0271 0351 0421 0511
0591 0661 0681 0741 0751 0931 0981
1971 2381 1001
Page 96

BRAND LIST
189
RBM 0091
RCA 0151 0551 1011 1131 1551
Realistic 0261
Recor 0051 0761 1001
Rectiligne 0051 1001
Rediffusion 0041 0581 0641 0961
Redstar 0051 1001
Reflex 0051 1001 1271 1981
Relisys 1881 1981 1901 1911 2111 2131 2141
2151 2161 2281 2311
Reoc 1181 1391 2551
Revox 0051 0681 1001
Rex 0221 0321 0421 0441 0451 0661 0741
RFT 0051 0101 0141 0451 0501 0681 1001
Rhapsody 0341
Ricoh 0051 1001
Rinex 0761 1611
Roadstar 0011 0051 0361 0451 0461 0761 1001
1271 1981 2071 2341 2561
Robotron 0141
Rodex 0051 1001
Rover 0041 1901
Rowa 0011 0341 0351 0451 1041 1331 1381
Royal Lux 0551 0681 0751
Rukopir 0051 1001
Saba 0141 0201 0221 0471 0551 0641 0901
0941 0961 1011 1131 1391
Saccs 0391
Sagem 0461 0811 1081 1781
Saisho 0011 0021 0221 0251 0351 0451 0941
Saivod 0051 1001 1271 1381 2621 1981
Saka_ 0221
Sakyno 0811
Salora 0221 0291 0331 0481 0571 0591 0631
0641 0661 0831 0941 0961 1121
Salsa 0551
Sambers 0161 0941
Samsung 0011 0051 0081 0101 0151 0221 0261
0331 0341 0351 0451 0481 0681 0851
1001 1041 1111 1131 1201 2201 2251
Sandra 0341 0351
Sanela 0391
Sansui 0051 0691 0811 1001 1051 1241 1371
1451 1461 1871 1931
Santon 0011
Sanyo 0011 0021 0041 0051 0071 0101 0171
0191 0211 0221 0241 0331 0341 0351
0501 0571 0681 0861 0991 1001 1351
1431 1481 2121
Save 0051 1001
Saville 2541
SBR 0051 1001
Schaub Lorenz
0591 0641 0701 0861 0961 1061 1391
2081
Schneider 0051 0221 0351 0361 0421 0441 0591
0601 0641 0691 0731 1001 1211 1271
1391 1981 2001 2541 2551
Scotland 0221
Scott 0261
Sears 0261
Seaway 1181
Seelver 0051 1001 1981
SEG 0011 0041 0051 0161 0221 0341 0651
0361 0421 0451 0591 0651 0871 1001
1181 1271 1981 2041 2341 2361 2551
SEI 0051 0141 0161 0221 0251 0321 0591
0941 1001 1971 2381
BRAND LIST
188
Papouw 0051 1001
Pathe Cinema 0221 0341 0391 0501 0511 0591 0681
Pathe Marconi 0201
Pausa 0011
Perdio 0051 0101 0221 0341 0461 0511 1001
Perfekt 0051 1001
Philco 0051 0141 0221 0421 0681 0761 1001
Philex 0221
Philharmonic 0351
Philips 0011 0051 0141 0271 0391 0701 0981
1001 1431 1441 1601 2231 2491
Phocus 2301 2321
Phoenix 0051 0101 0141 0221 0341 0511 0681
0861 1001
Phonola 0051 0141 0341 1001
Pilot 0051 1001 1371 1381
Pioneer 0021 0051 0201 0221 0231 0241 0471
0641 0681 0861 0931 1001 1291 1581
Pioner 0681 0861
Plantron 0011 0051 0451 1001
Playsonic 0051 0351 0571 1391 1401
Plus 1591
Policom 0091 0141 0161 0201 0221 0321 0391
0641 0951
Polytron 0461 1321
Poppy 0011
Portland 0701 2551
Powerpoint 0051 0871 1001 1331
Prandoni-Prince
0421 0641 0661 0941
Precision 0351
Premier 0011 0451
President 1861
Prima 0011 0451 0751
Princess 1331
Prinston 1981
Prinz 0101 0291 0591 0641
Profex 0011 0221 0641 0661
Profi 0011
Profitronic 0051 0161 1001
Proline 0051 0101 0521 0741 1001 1121 1131
1151 1181
Prosonic 0051 0341 0351 0681 0691 0701 1001
1271 1391
Protech 0011 0051 0161 0221 0351 0421 0451
0461 0561 0591 0761 0861 1001 1271
1981
Proton 0261
Provision 0051 0911 1001 1391 1981
Pye 0051 0141 0591 0701 0751 0981 1001
Pymi 0011
Quadral 0361
Quasar 0011 0421 1221 1881
Quelle 0011 0021 0041 0051 0091 0171 0181
0201 0211 0271 0301 0351 0421 0451
0481 0581 0591 0641 0931 0951 0981
1001 1271 1971 1981 2381
Questa 0041
R_Line 0051 0221 1001
Radialva 0051 0201 0221 0361 0471 0561 1001
Radiola 0051 0351 1001
Radiomarelli 0051 0141 0421 0941 1001
RadioShack 0051 0261 1001
Radiotone 0011 0051 0451 0681 0751 0761 1001
1211 1271 1981
Rank 0091
Rank Arena 0041 0211 1051 1551
Page 97

BRAND LIST
191
Supersonic 0331 0451 1001 1331 1701
SuperTech 0011 0051 0341 0361 1001
Supra 0011 0261 0701
Susumu 0361 0471 0551
Sutron 0011
Svasa 1701
Swissline 0421
Sydney 0341 0351
Symphonic 2521
Sysline 0051 1001
Sytong 0341
T+A 0801
Tandberg 0201 0221 0561 0641 0651 0671 0741
Tandy 0101 0151 0221 0351 0361 0421
Tashiko 0041 0221 0241 0341 0351 0661
Tatung 0021 0051 0101 0351 0941 1001 1121
1141 2411 1291 2541
TCM 1391
Teac 0011 0051 0241 0261 0351 0451 0461
0591 0751 0761 0811 0931 1001 1271
1331 1371 1381 1391 1431 1571 1981
2031 2361 2481 2551 2601
TEC 0011 0051 0221 0351 0421 0441 0551
0561 0641 1001
Tech Line 0051 1001 1271 2361
Techica 0361
Technema 0511
TechniSat 0051 0221 1001 1241
Technisson 1391 2301
Technosonic 0051 1001
Techwood 2041
Tecnimagen 1001
Tedelex 0011 0051 0331 0351 0761 1001 1041
1061 1331 1371 1951 2401
Teiron 0011
Teknika 0081
Teleavia 0201 0471
Telecor 0051 0221 0351 0361 0441 0731 1001
Telefunken 0051 0111 0201 0471 0551 0861 0901
1001 1011 1041 1131 1381 1391 1731
1961 1331
Telefusion 0051 1001
Telegazi 0051 0221 0361 0441 0451 1001
Telemeister 0051 0511 1001
Telesonic 0051 1001
Telestar 0011 0051 0751 1001
Telesystem 1891
Teletech 0011 0051 0421 0561 1001 1271 1981
Teleton 0041 0221 0321 0351 0441 0591 0661
Televideon 0221 0341 0511
Teleview 0051 1001
Telexa 0161
Tempest 0011 0051 0451 1001
Tennessee 0051 1001
Tensai 0011 0051 0171 0181 0221 0351 0361
0421 0511 0691 0701 0711 1001 1401
1981
Tenson 0011 0511
Tesla 0051
Tevion 0051 1001 1211 1271 1391 1981 2001
2241 2301 2311
Texet 0011 0341 0351 0361 0701
Thomas 2521
Thomson 0051 0201 0471 0551 0591 1001 1011
1131
Thorn 0021 0031 0041 0051 0071 0091 0101
0111 0171 0191 0201 0371 0391 0551
0631 0641 0701 0911 0931 0951 0971
1001 1971 2381
BRAND LIST
190
Sei-Sinudyne 0051 0141 0161 0321 0941 1001 1971
2381
Seleco 0041 0221 0321 0441 0451 0581 0651
0661 0691 0741 0781
Sencora 0011
Sentra 0011 0031 0361 0591
Serino 0151 0341 0811 1081
Sharp 0041 0151 0211 0431 0881 0941 1231
1581 2041 2091 2351
Shintoshi 0051 1001
Shivaki 0051 0261 0701 0781 1001
Show 0011 0101 0761
Siarem 0141 0161 0221 0941
Siemens 0051 0211 0271 0301 0641 0951 0981
1001
Siera 0051 1001 1041
Siesta 0681
Silva 0051 0341 0641 1001 1211
Silva Schneider
2411
Silver 0041 0051 0221 0641 0811 1001 1401
SilverCrest 0051 1001 1981
Singer 0011 0051 0141 0161 0221 0421 0551
0781 1001 2401
Sinotec 1611
Sinudyne 0051 0141 0161 0221 0251 0321 0591
0641 0941 1001 1971 2381 2541
Skantic 0631
Sky 0051 0261 0461 1001 1921
Skymaster 018
Skysonic 1311 1551
Sliding 1881
SLX 1271
Smaragd 0871
Soemtron 1881 2311
Sogera 0511
Solavox 0051 0101 0221 0641 0961 1001
Sonawa 0361
Soniko 0051 1001
Sonitron 0331 0351 0571 0681
Sonneclair 0051 1001
Sonoko 0011 0051 0351 0451 0461 1001
Sonolor 0221 0331 0461 0641 0961 1971 2381
Sontec 0011 0051 0681 1001
Sony 0021 0041 0051 0161 0211 0611 1001
1801 1971 2381 2451 2471
Sound & Vision
0051 0161 0361 0701 1001
Soundesign 0261
Soundwave 0051 0511 0761 1001 1401
Spectra 0011
Ssangyong 0011
Staksonic 0011
Standard 0011 0051 0351 0361 0511 0701 1001
1981
Starlite 0011 0051 0221 0451 0751 1001
Stenway 0361 0461
Stern 0221 0321 0441 0451 0661 0741 0781
Stevison 2411 2621
Strato 0011 0051 0451 1001
Strong 0051 1001 1981 2031 2041
Stylandia 0351
Sunic Line 0051 1001
Sunkai 0051 0361 0521 0621 0811 0871 1001
1081 1881
Sunstar 0011 0051 0451 0691 1001
Sunwood 0011 0051 1001
Superla 0341 0351 0941
Page 98

BRAND LIST
193
Wega 0041 0051 0141 1001
Wegavox 0011 0051 1001
Welltech 1391
Weltblick 0051 0351 0511 1001
Weston 0051 1001
Wharfedale 0051 1001 1871 1961 2411
White Wwatinghouse
0051 0341 0511 0561 1001 2551
Windsor 1271 1981
Windstar 0461 0561
Windy Sam 1001
Wintel 1391
World-of-Vision 1881 1901 1921 1941 2301 2311
Worldview 0071 0811
Xenius 1181
Xlogic 1331 1861
Xoro 2101 2171 2211
Xrypton 0051 1001
X-View 2081
Yamaha 1221 1671
Yamishi 0051 0351 0361 0461 0811 1001
Yokan 0051 1001
Yoko 0011 0051 0341 0351 0361 0421 0451
0571 0681 1001
Yorx 0361
Zanela 0391
Zanussi 0321 0351 0661
Zenith 2551
Zenor 0571
ZX 2541
VCR
Accent 0132
Accuphase 0342
Adyson 0132
Aim 0202 0262 0352
Aiwa 0002 0012 0032 0062 0212 0262 0272
0362 0372 0402 0412
Akai 0032 0062 0162 0192 0222 0262 0272
0352
Akashi 0132
Akiba 0132
Akura 0062 0132
Alba 0002 0132 0142 0202 0222 0262 0272
Allorgan 0192
Allstar 0142
Amstrad 0002 0132 0202
Anitech 0132
Ansonic 0002
Aristona 0142
ASA 0032 0142
Asuka 0002 0032 0042 0132 0142
Audiosonic 0202
AVP 0002 0272
AWA 0032 0082 0202 0352
Baird 0002 0062 0152 0162 0202
Basic Line 0132 0152 0202
Beko 0152
Bestar 0202
Black Diamond 0202 0352
Black Panther 0202
Blaupunkt 0022 0142 0182 0462
Blue Sky 0002 0032 0132 0202 0262 0272 0292
0352 0412
Bondstec 0132
Brandt 0062 0232 0242
BrandtElectronique
0062
BRAND LIST
192
Thorn-Ferguson 0031 0111 0171 0191 0201 0391 0551
0641 0911
Tiny 2101 2291
Tiny Digital 1251
TMK 0251 0361
Tobishi 0361
Tokai 0011 0051 0101 0221 0351 0561 0701
1001 1271 1981
Tokaido 1981
Tokyo 0031 0341
Tomashi 0361 0461
Tongtel 1041 1641
Toshiba 0011 0031 0041 0051 0081 0091 0161
0201 021 2301 2541 2561 2591
Towada 0161 0351 0591
Toyoda 0011 0451 0691
Trakton 0011 0351 0451
Trans Continens
0051 0351 0861 1001 1271 1981
TRANS-continents
1121
Transonic 0011 0051 0451 0761 0811 0931 1001
1041 1331 1381
Transtec 0341
Triad 0051 0361 1001
Trical 0211
Trident 0351 0941
Tristar 0361 0451
Trumph 0051 0251 0581 0941 1001
Tsoschi 0461
TVTEXT 95 1001
Uher 0051 0321 0441 0511 0681 0701 0761
0831 0861 1001
Uitravox 0051 0161 0221 0341 0421 0701 1001
Unic Line 0051 0591 0811 0821 1001
United 0051 1001 1391 1401 2541 2561
Universal 0051 1001
Universum 0011 0021 0041 0051 0091 0171 0181
0201 0211 0221 0241 0251 0301 0351
0421 0451 0481 0561 0581 0591 0641
0651 0681 0741 0761 0821 0831 0891
0931 0951 0981 1001 1161 1271 1971
1981 2041 2341 2361 2381
Univox 0051 0141 0221 0391 0561 1001
Utax 0221
V7Videoseven 2481 0261 1921
Vestel 0051 0221 0351 1001 1271 1981 2041
Vexa 0011 0051 1001
Videologic 0341 0361
Videologique 0341 0351 0361
Videosat 0421 1
VideoSystem 0051 1001
Videotechnic 0341 0351 0511 0701
Videoton 0221 0631
Vidikron 0161 1481
Vidtech 0041 0261
Viewpia 1891
Viper 0561
Visiola 0341
Vision 0051 0351 0451 0511 1001
Vistar 0321 0641
Vortec 0051 1001
Voxson 0051 0141 0221 0261 0661 0761 1001
Waltham 0051 0201 0351 0471 0631 0761 1001
1271 1981
Watson 0011 0051 0221 0361 0511 0731 1001
1981 2361 2541 1271
Watt Radio 0161 0221 0341 0591
Page 99

BRAND LIST
195
Hanimex 0272
Hanseatic 0032 0042 0142 0202
Hanwood 0132
HCM 0132
Hinari 0062 0132 0192 0202 0272
Hisawa 0272
Hischito 0092
Hitachi 0002 0062 0072 0142 0152 0172 0192
0322
Hornyphon 0142
Hypson 0002 0032 0132 0202 0272 0292
Imperial 0002 0192
Ingersoll 0192
Inno Hit 0132 0192 0202
Interbuy 0032 0132
Interfunk 0142 0152
Internal 0202 0342
International 0032 0202
Intervision 0002 0032 0202 0262
Irradio 0032 0132 0142
ITT 0062 0152 0162 0192
ITT Nokia 0112
ITV 0032 0202
JMB 0262 0272
Joyce 0002
JVC 0062 0122 0302
Kaisui 0132
Kambrook 0032
Karcher 0202
Kendo 0032 0132 0162 0202 0222 0262
Kenwood 0042 0062
KIC 0002
Kimari 0102
Kneissel 0032 0202 0262 0272
Kolster 0262
Korpel 0132
Kuba 0102
Kuba Electronic
0102
Kuwa 0182
Kyoto 0132
Lenco 0202
Leyco 0132
LG 0002 0032 0202 0292 0412
Lifetec 0262
Loewe 0032 0142 0182 0462
Logik 0132 0162 0192
Lumatron 0202 0322
Lux May 0132
Luxor 0082 0102 0112 0132 0152 0162 0222
Magnavox 0142 0352
Magnum 0352
Manesth 0092 0132 0142
Marantz 0042 0142
Mark 0002 0202
Mastec 0352
Master's 0202
Matsui 0002 0322 0192 0262 0272 0372
Mediator 0142
Medion 0262 0272
Melectronic 0002 0032 0042
Memorex 0002 0032 0102 0112 0152
Memphis 0132
Metronic 0142
Metz 0032 0142 0182 0382 0462
Micormay 0262
Micromaxx 0262
BRAND LIST
194
Brinkmann 0262
Bush 0002 0132 0142 0202 0222 0262 0272
0352 0372
Carena 0142
Carrefour 0092
Casio 0002
Cathay 0202
CGE 0002 0062
Cimline 0132
Clatronic 0002 0132
Combitech 0272
Condor 0202
Crown 0032 0132 0202 0292
Cyrus 0142
Daewoo 0092 0202 0262 0272 0342 0352
Dansai 0132 0202
Dantax 0272
Daytron 0202
de Graaf 0072 0112 0142 0152 0172
Decca 0002 0062 0122 0142 0262 0272
Deitron 0202
Denko 0132
Diamant 0032
DSE 0352
Dual 0002 0062 0142 0202 0262
Dumont 0002 0142 0152
Elbe 0042 0202
Elcatech 0132
Elin 0192
Elsay 0132
Elta 0132 0202
Emerson 0002 0092 0132
ESC 0192 0202
Etzuko 0132
EuroLine 0262
Ferguson 0002 0062 0202 0232 0242
Fidelity 0002 0132 0192 0272 0282
Finlandia 0002 0072 0142 0152 0172
Finlux 0002 0072 0142 0152
Firstline 0032 0072 0082 0092 0132 0202 0262
0412
Fisher 0042 0102 0152
Flint 0262
Frontech 0132
Fujitsu 0002
Fujitsu General
0032
Funai 0002
Galaxi 0002
Galaxis 0202
GE 0232
GEC 0142
General Technic
0262
Genexxa 0152
Goldhand 0132
GoldStar 0002 0032 0292
Goodmans 0002 0032 0132 0142 0192 0202 0262
0272 0342 0352
GPX 0032
Graetz 0062 0152 0192
Granada 0002 0032 0072 0112 0142 0152 0182
0192
Grandin 0002 0032 0132 0202
Grundig 0022 0132 0142 0182 0232 0262 0272
0372
H_her 0202 0352
Haaz 0262
Page 100

BRAND LIST
197
Samsung 0192 0282 0332
Sansui 0062 0122 0132 0162 0262
Sanyo 0102 0112 0122 0152
Saville 0192 0202 0272
SBR 0142
ScanSonic 0192
Schaub Lorenz 0002 0062 0152 0162 0222
Schneider 0002 0032 0072 0132 0142 0192 0202
0272 0352
Seaway 0202
SEG 0132 0142 0192 0202 0342 0352 0392
SEI 0142
Sei-Sinudyne 0142
Seleco 0032 0062
Sentra 0132
Setron 0132
Sharp 0032 0112 0312
Shintom 0132 0152
Shivaki 0032
Siemens 0032 0142 0152 0232
Siera 0142
Silva 0032
Silver 0202
Singer 0092 0262
Sinudyne 0142 0272
Smaragd 0262
Sonitron 0102
Sonneclair 0132
Sonoko 0202
Sonolor 0112
Sontec 0032 0202
Sonwa 0352
Sony 0012 0022 0162 0402
Soundwave 0032 0262
Ssangyong 0132
Standard 0202
Starlite 0032 0152
Stern 0202
Sunkai 0202 0262
Sunstar 0002
Suntronic 0002
Sunwood 0132
Supra 0032 0192 0262
Symphonic 0002 0132
T+A 0182
Tandberg 0202
Tashiko 0002 0032 0112 0142 0192
Tatung 0002 0062 0082 0112 0142 0262 0272
Tchibo 0262
TCM 0262
Teac 0002 0032 0062 0132 0142 0202 0212
0322 0342 0352
TEC 0132 0202
Tech Line 0132
Technics 0182
TechniSat 0262
Tedelex 0032 0262 0352
Teleavia 0062
Telefunken 0062 0202 0232 0242 0352
Telestar 0032
Teletech 0002 0132 0202
Tenosal 0132
Tensai 0002 0032 0132 0202
Tevion 0262 0352
Texet 0202
Thomson 0062 0122 0202 0232 0242
BRAND LIST
196
Migros 0002
Mitsubishi 0002 0082 0122 0142 0292 0352
Multitec 0032
Multitech 0002 0132 0152
Murphy 0002
Myryad 0142
NAD 0152
Naiko 0262 0352
National 0182 0462
NEC 0032 0042 0052 0062 0122 0152 0202
0412
Neckermann 0062 0142
Nesco 0002 0132 0272
Neufunk 0032
Nikkai 0132 0202
Nokia 0062 0072 0112 0142 0152 0162 0192
0202 0222
Nordmende 0062 0122 0232 0242
NU-TEC 0262
Oceanic 0002 0062 0112 0142 0152 0162
Okano 0132 0202 0222 0262
Onimax 0352
Orbit 0132
Orion 0262 0272 0372 0452
Orson 0002
Osaki 0002 0032 0132
Osume 0132
Otto Versand 0142
Pace 0272
Pacific 0002
Palladium 0032 0062 0132 0192 0222 0262 0282
Palsonic 0002 0132 0352
Panasonic 0182 0382 0422 0462
Pathe Cinema 0082
Pathe Marconi 0062
Perdio 0002
Philco 0042 0132
Philips 0142 0322 0432 0442
Phoenix 0202
Phonola 0142
Pioneer 0072 0122 142 0472
Portland 0202 0342
Prinz 0002
Profitronic 0142 0192
Proline 0002 0202 0232 0242 0352
Prosco 0202
Prosonic 0002 0222
Protech 0142 0202
Provision 0202
Pye 0002 0142
Quasar 0202
Quelle 0142
Radialva 0032 0112 0132 0142
Radiola 0142
Radionette 0032 0412
Rank 0062
Rank Arena 0062
RCA 0232
Reoc 0202 0262 0342
Rex 0062
RFT 0132
Roadstar 0032 0132 0142 0192 0202 0372
Royal 0132
Saba 0062 0202 0232 0242
Saisho 0262
Salora 0082 0152 0162
 Loading...