

Page 1

© MuxLab Inc. 2017
Luxul Ethernet Switch Quick Setup Guide
For MuxLab AV over IP Devices
Page 2

Luxul Ethernet Switch Quick Setup Guide
© MuxLab Inc. 2017 2
Contents
Introduction ............................................................................................................... 3 1.
MuxLab Ethernet Switch Setup Requirements .......................................................... 3 2.
Ethernet Switch Setup ............................................................................................... 4 3.
3.1. Enabling IGMP ............................................................................................... 4
3.2. Enabling Jumbo Frames ................................................................................ 5
Preparing for System Installation .............................................................................. 6 4.
Page 3

Luxul Ethernet Switch Quick Setup Guide
© MuxLab Inc. 2017 3
Introduction 1.
This document covers the basic setup requirements for a Luxul Ethernet Switch. The
setup examples and screen shots shown are for the Luxul model AMS-1208P, but these
instructions are similar and applicable to other Luxul Ethernet Switch models.
MuxLab Ethernet Switch Setup Requirements 2.
All MuxLab AV over IP Transmitters and Receivers require IGMP support to be enabled
on the Ethernet Switch, and a select number of MuxLab units also require Jumbo
Frames to be enabled.
Also note that all models below work on a 1G Ethernet Switch, except for the 500760,
which requires a 10G Ethernet Switch.
The below table specifies the IGMP and Jumbo Frames requirement per MuxLab AV
over IP Transmitter / Receiver model.
AV over IP
Model
Ethernet Switch
BW Required
IGMP
Required
Jumbo Frame
Required
500752
1G X
500753
1G X
500754
1G X
500755
1G X
500755-AMP
1G X
500756
1G X
500757
1G X
500758
1G X X
500759
1G X X
500760
10G X
500762
1G X
500770
1G X X
500771
1G X X
Page 4
Luxul Ethernet Switch Quick Setup Guide
© MuxLab Inc. 2017 4
Ethernet Switch Setup 3.
3.1. Enabling IGMP
Follow the steps below to enable the IGMP feature on the Ethernet Switch. For further
details on navigating through the Ethernet Switch web server menus, please refer to the
Ethernet Switch manual.
Step 1: Access the Ethernet Switch web server
- Locate the Ethernet Switch default IP address
- Make sure your computer is on the same subnet as the Ethernet Switch
(your network administration can assist you with this, if required)
- Enter the Ethernet Switch IP address into a browser
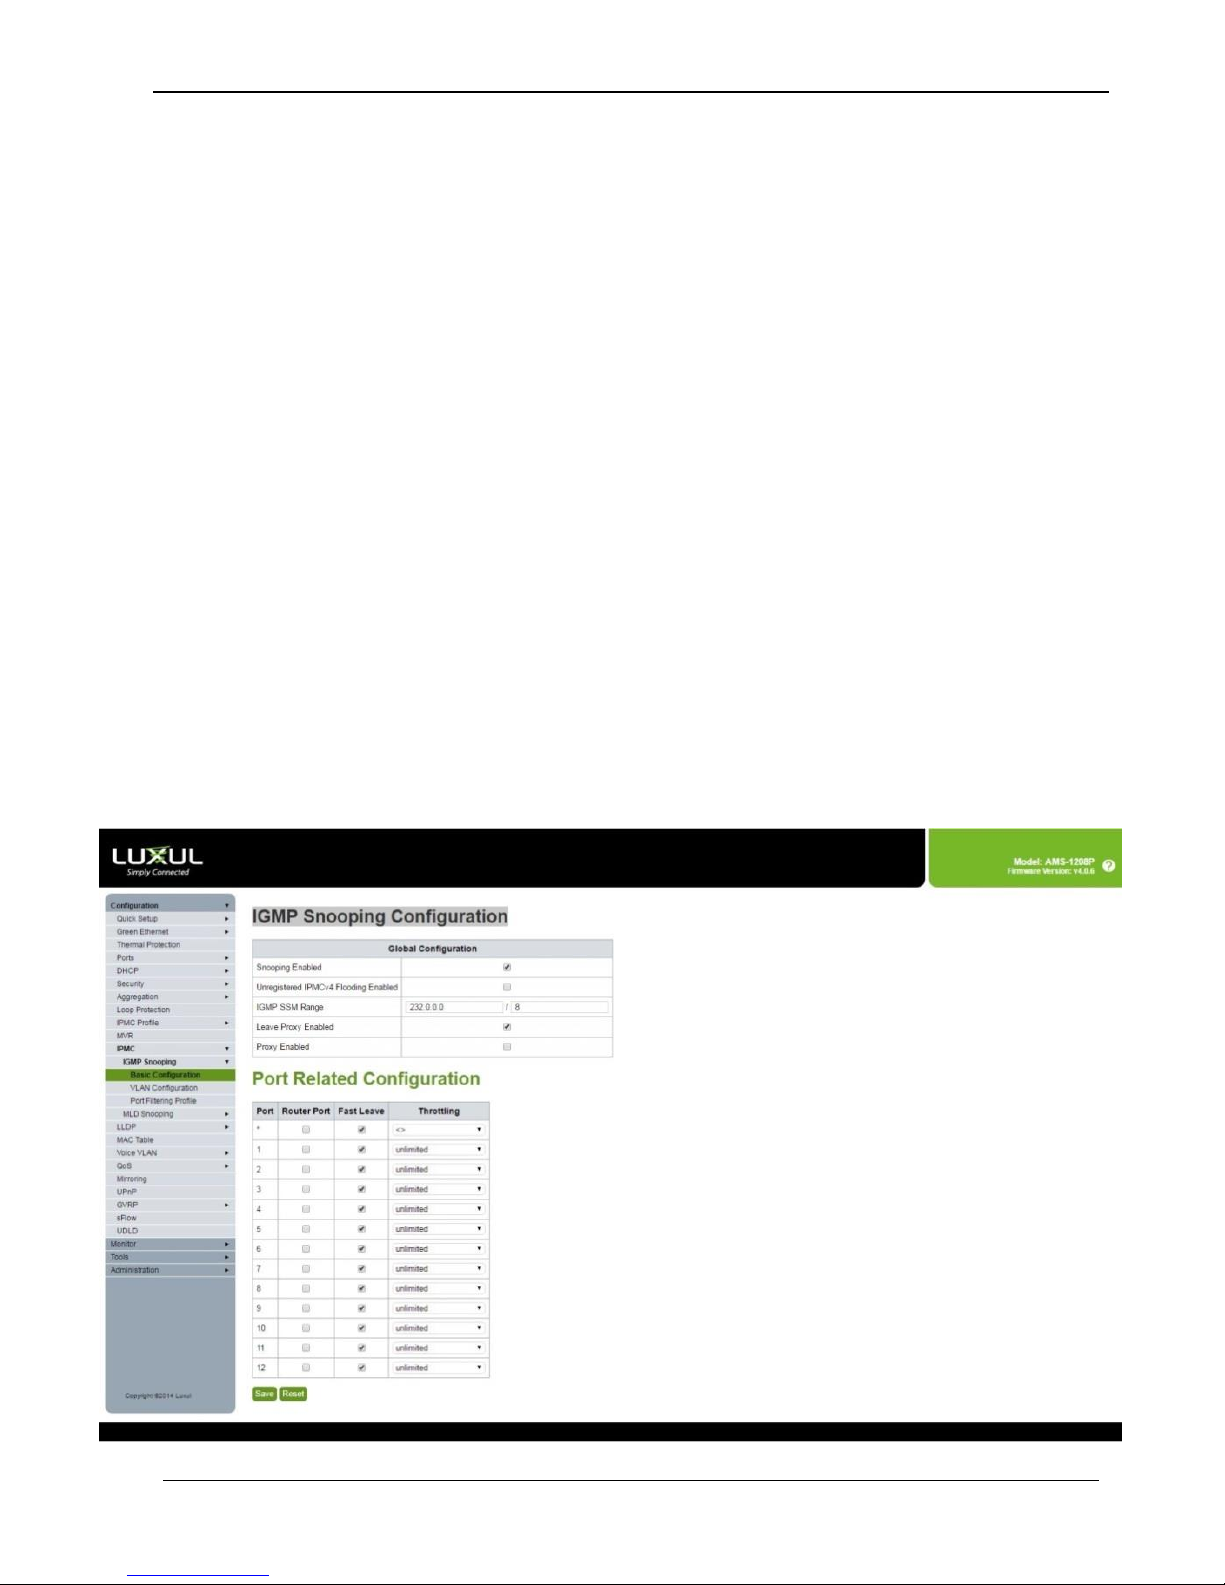
Step 2: IGMP Snooping Configuration
- Navigate to the menu:
[Configuration → IPMC → IGMP Snooping → Basic Configuration]
- Set the configuration as shown below, and then click [Save]
Page 5
Luxul Ethernet Switch Quick Setup Guide
© MuxLab Inc. 2017 5
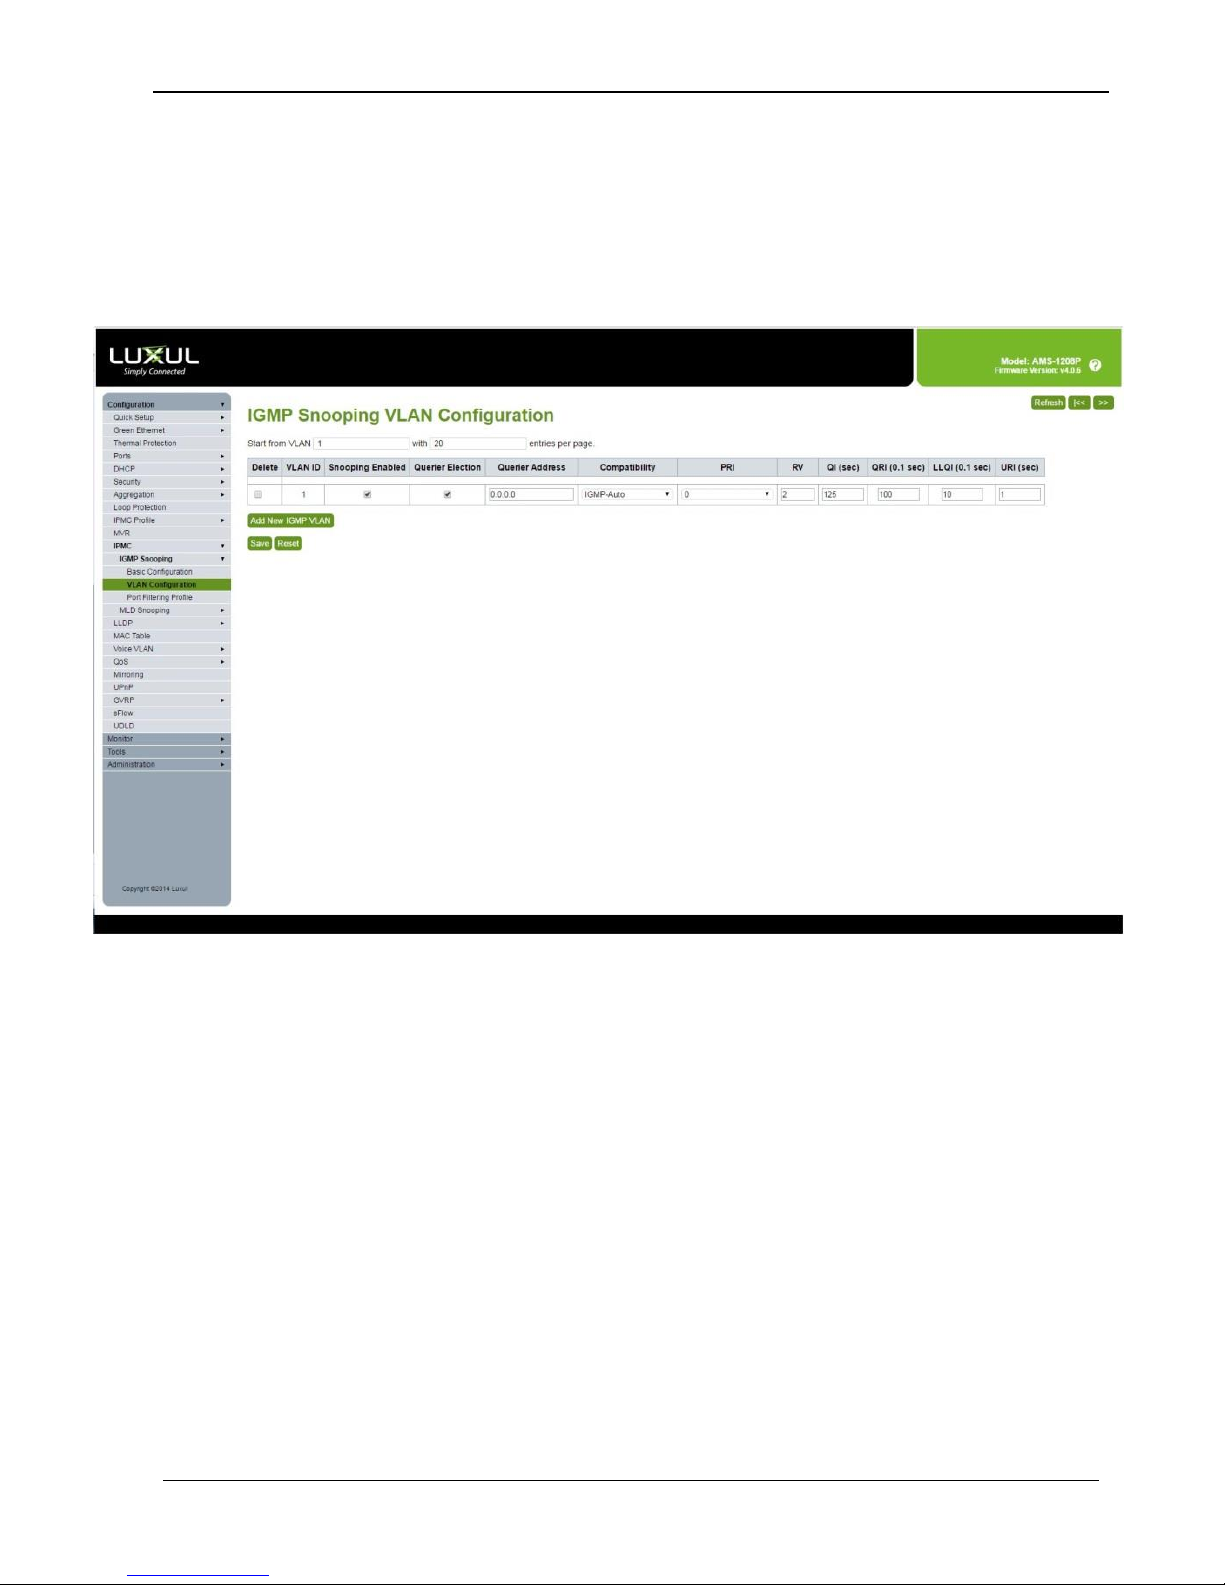
- Navigate to the menu:
[Configuration → IPMC → IGMP Snooping → VLAN Configuration]
- Click [Add New IGMP VLAN]
Enter the settings shown below, and then click [Save]
Step 3: Save the above configuration changes
- Navigate to the menu:
[Administration → Configuration → Save startup-config]
- Click on [Save Configuration]
3.2. Enabling Jumbo Frames
Follow the steps below to enable the Jumbo Frames feature on the Ethernet Switch. For
further details on navigating through the Ethernet Switch web server menus, please
refer to the Ethernet Switch manual.
Take note that by default, the jumbo frames feature may already be enabled.
Page 6

Luxul Ethernet Switch Quick Setup Guide
© MuxLab Inc. 2017 6
Step 1: Enable Jumbo Frames
- Navigate to the menu:
[Configuration → Ports → Ports]
- For each port, set the “Maximum Frame Size” allowed, which in this case is the
value “9600”, and then click [SAVE]
Step 2: Save the above configuration changes
- Navigate to the menu:
[Administration → Configuration → Save startup-config]
- Click on [Save Configuration]
Preparing for System Installation 4.
The Ethernet Switch is now properly configured to support MuxLab AV over IP devices
with respect to IGMP and Jumbo Frames.
Note that MuxLab AV over IP Transmitters and Receivers are set by default with DHCP
enabled, and the MuxLab 500811 ProDigital Network Controller has DHCP disabled by
default and is set to a Static IP address of 192.168.168.50. It is recommended that you
operate your system with the Transmitters and Receivers with DHCP enable and the
500811 Network Controller with DHCP disabled.
If however you intend to disable the DHCP on the Transmitters and Receivers, then
please take note that the default Static IP address for the Transmitters is
192.168.168.55, and for the Receivers is 192.168.168.56.
Note that in order for the entire system to operate correctly, the Ethernet Switch,
MuxLab Transmitters and Receivers, and the MuxLab ProDigital Network Controller
must all be on the same subnet. Devices with DHCP enabled will adjust automatically to
the correct subnet, while devices with DHCP disabled, may need to be set by the user to
the correct subnet, if not already set correctly. Your network administrator can assist with
this configuration if you are not familiar with how to accomplish this task.
If you are having issues which require further assistance, please contact the respective
device manufacturer for the device in question. For MuxLab device related questions,
please contact MuxLab Customer Technical Support at 877-689-5228 (toll-free in North
America) or (+1) 514-905-0588 (International).
Page 7

Luxul Ethernet Switch Quick Setup Guide
© MuxLab Inc. 2017 7
8495 Dalton Road, Mount Royal, Quebec, Canada. H4T 1V5
Tel: (514) 905-0588
Fax: (514) 905-0589
Toll Free (North America): (877) 689-5228
 Loading...