

1
User Guide
For Windows
(Application version 5.3)
99 Medinat Hayehudim, Herzliya, 4676677, Israel Phone: +972 72 220 2042 MUVInteractive.com

2
THE INFORMATION IN THIS DOCUMENT IS PROVIDED IN CONNECTION WITH MUV INTERACTIVE
(“MUV”) PRODUCTS.
THE SPECIFICATIONS AND INFORMATION REGARDING THE PRODUCTS IN THIS MANUAL ARE SUBJECT TO
CHANGE WITHOUT NOTICE. ALL STATEMENTS, INFORMATION, AND RECOMMENDATIONS IN THIS
MANUAL ARE BELIEVED TO BE ACCURATE BUT ARE PRESENTED WITHOUT WARRANTY OF ANY KIND,
EXPRESS OR IMPLIED. USERS MUST TAKE FULL RESPONSIBILITY FOR THEIR APPLICATION OF ANY
PRODUCTS.
NO LICENSE, EXPRESS OR IMPLIED, BY ESTOPPEL OR OTHERWISE, TO ANY INTELLECTUAL PROPERTY
RIGHTS IS GRANTED BY THIS DOCUMENT. EXCEPT AS PROVIDED IN MUV’s TERMS AND CONDITIONS OF
SALE FOR SUCH PRODUCTS, MUV ASSUMES NO LIABILITY WHATSOEVER, AND MUV DISCLAIMS ANY
EXPRESS OR IMPLIED WARRANTY, RELATING TO SALE AND/OR USE OF MUV PRODUCTS INCLUDING
LIABILITY OR WARRANTIES RELATING TO FITNESS FOR A PARTICULAR PURPOSE, MERCHANTABILITY, OR
INFRINGEMENT OF ANY PATENT, COPYRIGHT OR OTHER INTELLECTUAL PROPERTY RIGHT. MUV
PRODUCTS ARE NOT INTENDED FOR USE IN MEDICAL, LIFESAVING OR SUSTAINING APPLICATIONS.
MUV may make changes to specifications and product descriptions at any time, without notice.
The information in this manual is furnished for informational use only, is subject to change without
notice, and should not be construed as a commitment by MUV. MUV assumes no responsibility or
liability for any errors or inaccuracies that may appear in this document or any software that may be
provided in association with this document.
Except as permitted by such license, no part of this document may be reproduced, stored in a retrieval
system, or transmitted in any form or by any means without express written consent of MUV.
Copyright © 2016, MUV Interactive
BIRD is a trademark or registered trademark of MUV Interactive or its subsidiaries in the United States
and other countries.
* Other names and brands may be claimed as the property of others.
Publication Date: November 2016
Revision number: 0001
MUV Interactive ltd., 99 Medinat Hayehudim blvd., Herzliya, Israel
MUV Interactive Inc., 1230 Midas Way, Suite 150, Sunnyvale, CA 94085 , USA
99 Medinat Hayehudim, Herzliya, 4676677, Israel Phone: +972 72 220 2042 MUVInteractive.com

3
I. Table of Contents – User guide
I. Table of Contents – User guide ........................................................................................................ 3
1. Bird at a glance ................................................................................................................................ 4
2. Accessories: ..................................................................................................................................... 5
3. Getting started ................................................................................................................................ 6
4. Key Interaction Methods ................................................................................................................. 7
a.
a. Remote Touch ............................................................................................................................. 7
a.a.
b.
b. Swipe / Tap (Using the touch pad)................................................................................................ 8
b.b.
c.
c. Touch ........................................................................................................................................... 9
c.c.
d.
d. Gestures .................................................................................................................................... 10
d.d.
5. Working with multiple Birds ........................................................................................................... 11
6. Bird Working modes ...................................................................................................................... 12
a.
a. Air-Mouse .................................................................................................................................. 13
a.a.
b.
b. Multi Bird ................................................................................................................................... 13
b.b.
c.
c. Standard .................................................................................................................................... 14
c.c.
7. Bird Application ............................................................................................................................. 15
a.
a. Status bar (The status bar stays fixed on the top of the application) ....................................... 15
a.a.
b.
b. Main dashboard ..................................................................................................................... 16
b.b.
c.
c. Advanced Settings .................................................................................................................. 17
c.c.
d.
d. Connection ............................................................................................................................ 19
d.d.
e.
e. Calibration ............................................................................................................................. 21
e.e.
f.
f. Performance .......................................................................................................................... 23
f.f.
g.
g. About tab ............................................................................................................................... 24
g.g.
Appendix 1: Radio Frequency Scanning.................................................................................................. 25
Appendix 2: Personalize Bird ................................................................................................................. 26
Appendix 3: Pre-programmed gestures for PowerPoint ......................................................................... 29
Appendix 4: Troubleshooting ................................................................................................................. 30
Safety Information ................................................................................................................................ 34
FCC Radio frequency interference statement......................................................................................... 37
99 Medinat Hayehudim, Herzliya, 4676677, Israel Phone: +972 72 220 2042 MUVInteractive.com
4
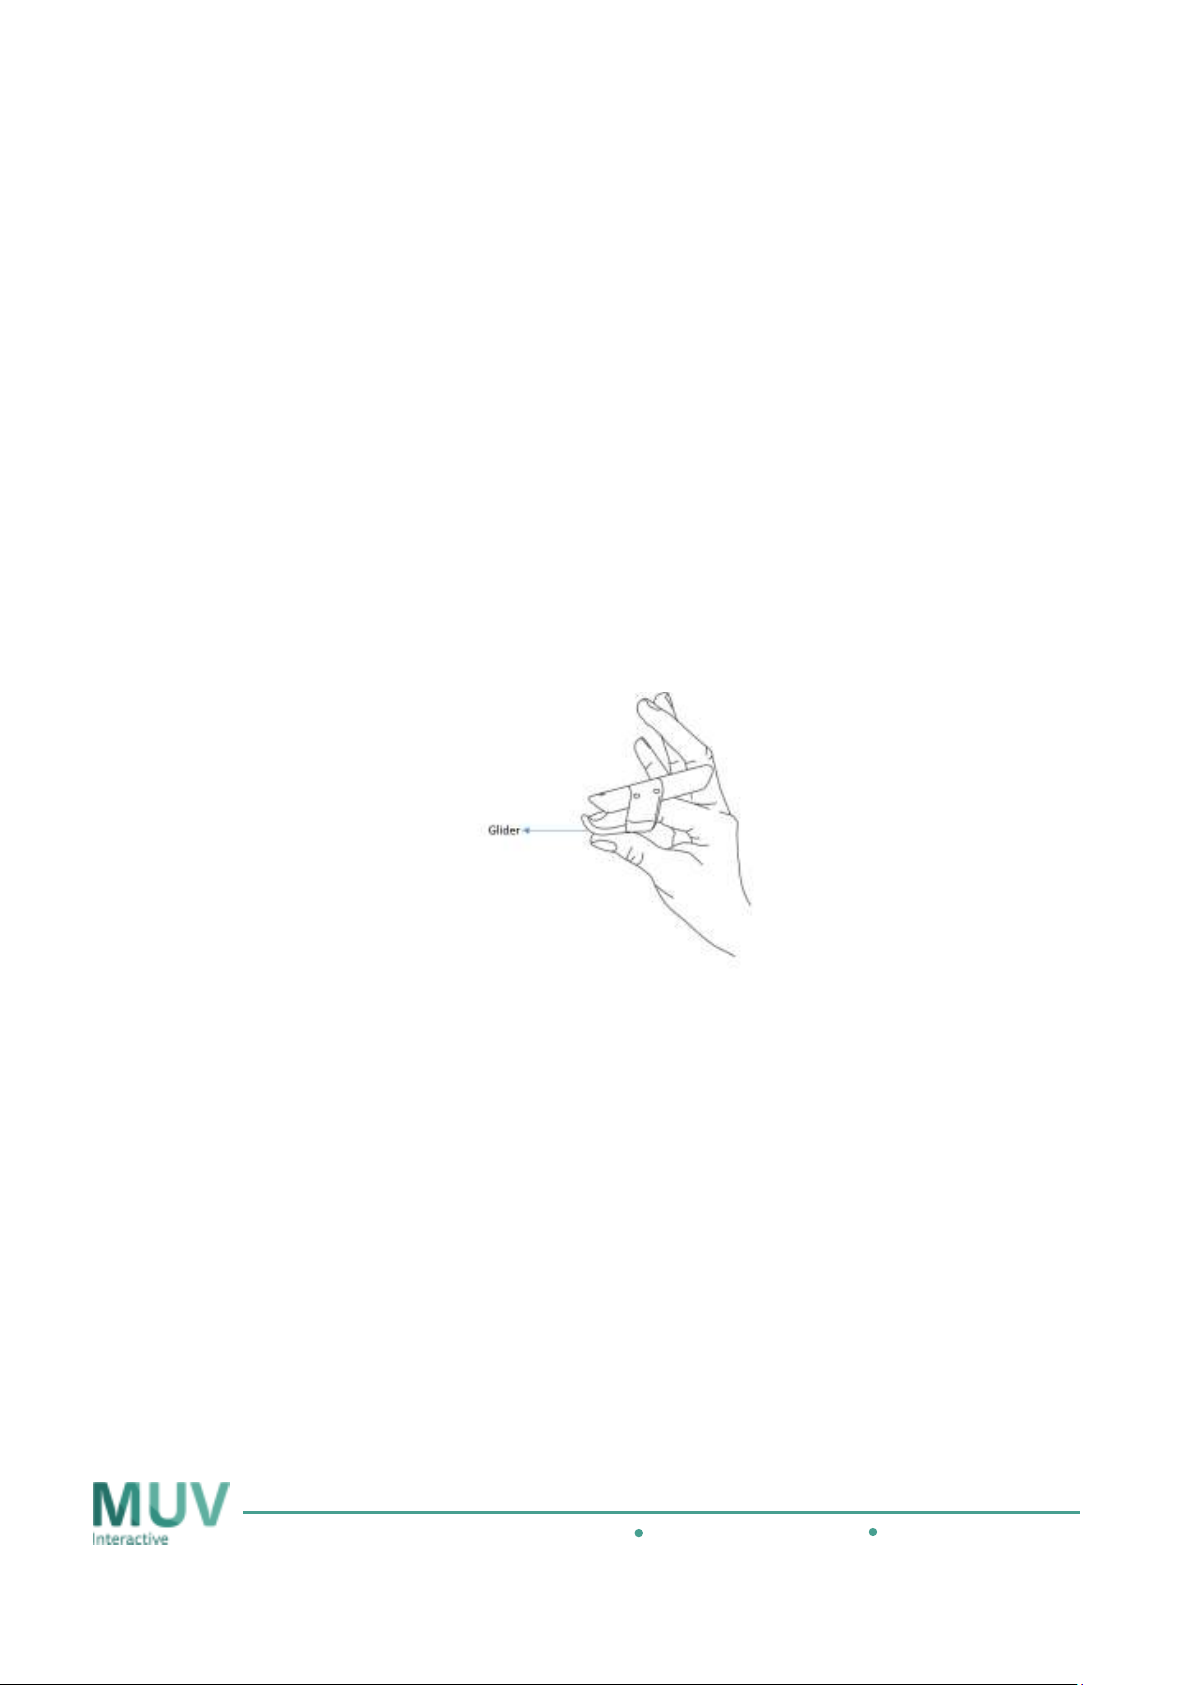
Indicator LEDs
Indicator LEDsIndicator LEDs
Indicator LEDs
•
Glider
GliderGlider
Glider
•
Touch Pad
Touch PadTouch Pad
Touch Pad
•
Home Button
Home ButtonHome Button
Home Button
•
Laser pointer
Laser pointer Laser pointer
Laser pointer
The Laser Pointer is used to highlight the place you are pointing at on the
1. Bird at a glance
The
• When working with more than one Bird – the active Bird will have 2
The bottom of the Bird’s Glider is used when touching the display
• When using remote touch, soft touch of the thumb on the Glider will
The Touch Pad is used for scrolling by gently swiping the thumb up,
• Tap on the touch pad will perform as right click on the mouse
One click on the home button to Esc
• Double click on the home button to display open applications on a split
• Long press on the home button to display the desktop
• If Bird is not connected, click on the home button for 5 seconds to
display area with a red laser beam.
The laser pointer is used only during the remote calibration process
The laser pointer is used only during the remote calibration process.
The laser pointer is used only during the remote calibration processThe laser pointer is used only during the remote calibration process
The 5 LED lights
5 LED lights on the
TheThe
5 LED lights5 LED lights
Bird
Bird.... (Full: all are lit. 1
(Full: all are lit. 1 light
BirdBird
(Full: all are lit. 1 (Full: all are lit. 1
on the upper
upper----side
side of Bird
on the on the
upperupper
light ---- Must charge immediately)
lightlight
of Bird indicate the battery status of
sideside
of Birdof Bird
Must charge immediately)
Must charge immediately)Must charge immediately)
indicate the battery status of
indicate the battery status of indicate the battery status of
indication LEDS on
move the cursor, while clicking on the Glider will select an object
down, left or right on the touchpad surface.
screen (Win logo + tab)
connect it
99 Medinat Hayehudim, Herzliya, 4676677, Israel Phone: +972 72 220 2042 MUVInteractive.com
5
2. Accessories:
Charging cradle
Used to store Bird when not in use and to charge it. (The cradle does not have to be connected to
a power outlet to charge Bird).
Base-unit
Used to gather information from Bird, analyzing its location and providing interactive commands
to the software or application you are controlling.
99 Medinat Hayehudim, Herzliya, 4676677, Israel Phone: +972 72 220 2042 MUVInteractive.com
6
3. Getting started
Bird communicates directly with your devices and acts as their controlling device. It enables rich
interaction with digital content and media as it is displayed on a screen, wall, table or any other
surface. With Bird on your finger, you will now be able to control your content naturally and
instinctively, from anywhere in the room, away from your PC.
This user guide will walk you through the different interaction methods that Bird supports; including
touch, remote touch and gesture control.
Before you start using Bird for the first time, you have to download the Bird’s application from the
following link: https://www.muvinteractive.com/birdapp and install it on your PC.
Once the application is installed, you should connect the Bird's base unit to any 5V power source via
USB. You will know that the Base unit is connected, by a ‘v’ sign next to the word Base unit in the Bird
application
(for detailed instructions about Bird's installation process, please read the installation guide).
Get ready to fly
Get ready to fly ---- wwwwear the Bird on your index finger:
Get ready to fly Get ready to fly
Insert your Right Hand index finger delicately into Bird as per the drawing. Make sure that the tip of
your finger sits comfortably against the Glider. Bird should feel comfortably snug around your finger.
ear the Bird on your index finger:
ear the Bird on your index finger:ear the Bird on your index finger:
The Bird's application and the Base-unit will automatically recognize that Bird is ready for use. You will
know that your Bird is connected by the circle next to the words “Bird unit” at the top of the Bird
application.
When using Bird for the first time you should click on the 'Home button' for 5 seconds until you see
the following message: 'Bird with ID xxxxx tries to connect. Allow". Click on 'Yes' to pair the Bird.
99 Medinat Hayehudim, Herzliya, 4676677, Israel Phone: +972 72 220 2042 MUVInteractive.com
4. Key Interaction Methods
Bird Supports 4 key interactive methods:
• Remote Touch
Remote Touch is used to precisely control content remotely (from hovering closely over
Remote TouchRemote Touch
the display area to standing 10m away from it)
• Swipe*
Swipe* is used for scrolling up, down, left and right
Swipe* Swipe*
• TTTTouch
ouch is used for physically touching the display surface
ouch ouch
• Gestures
Gestures* are used to control content using large hand movements
GesturesGestures
* Gestures and swipe can be defined by the user to produce different desired actions
a.
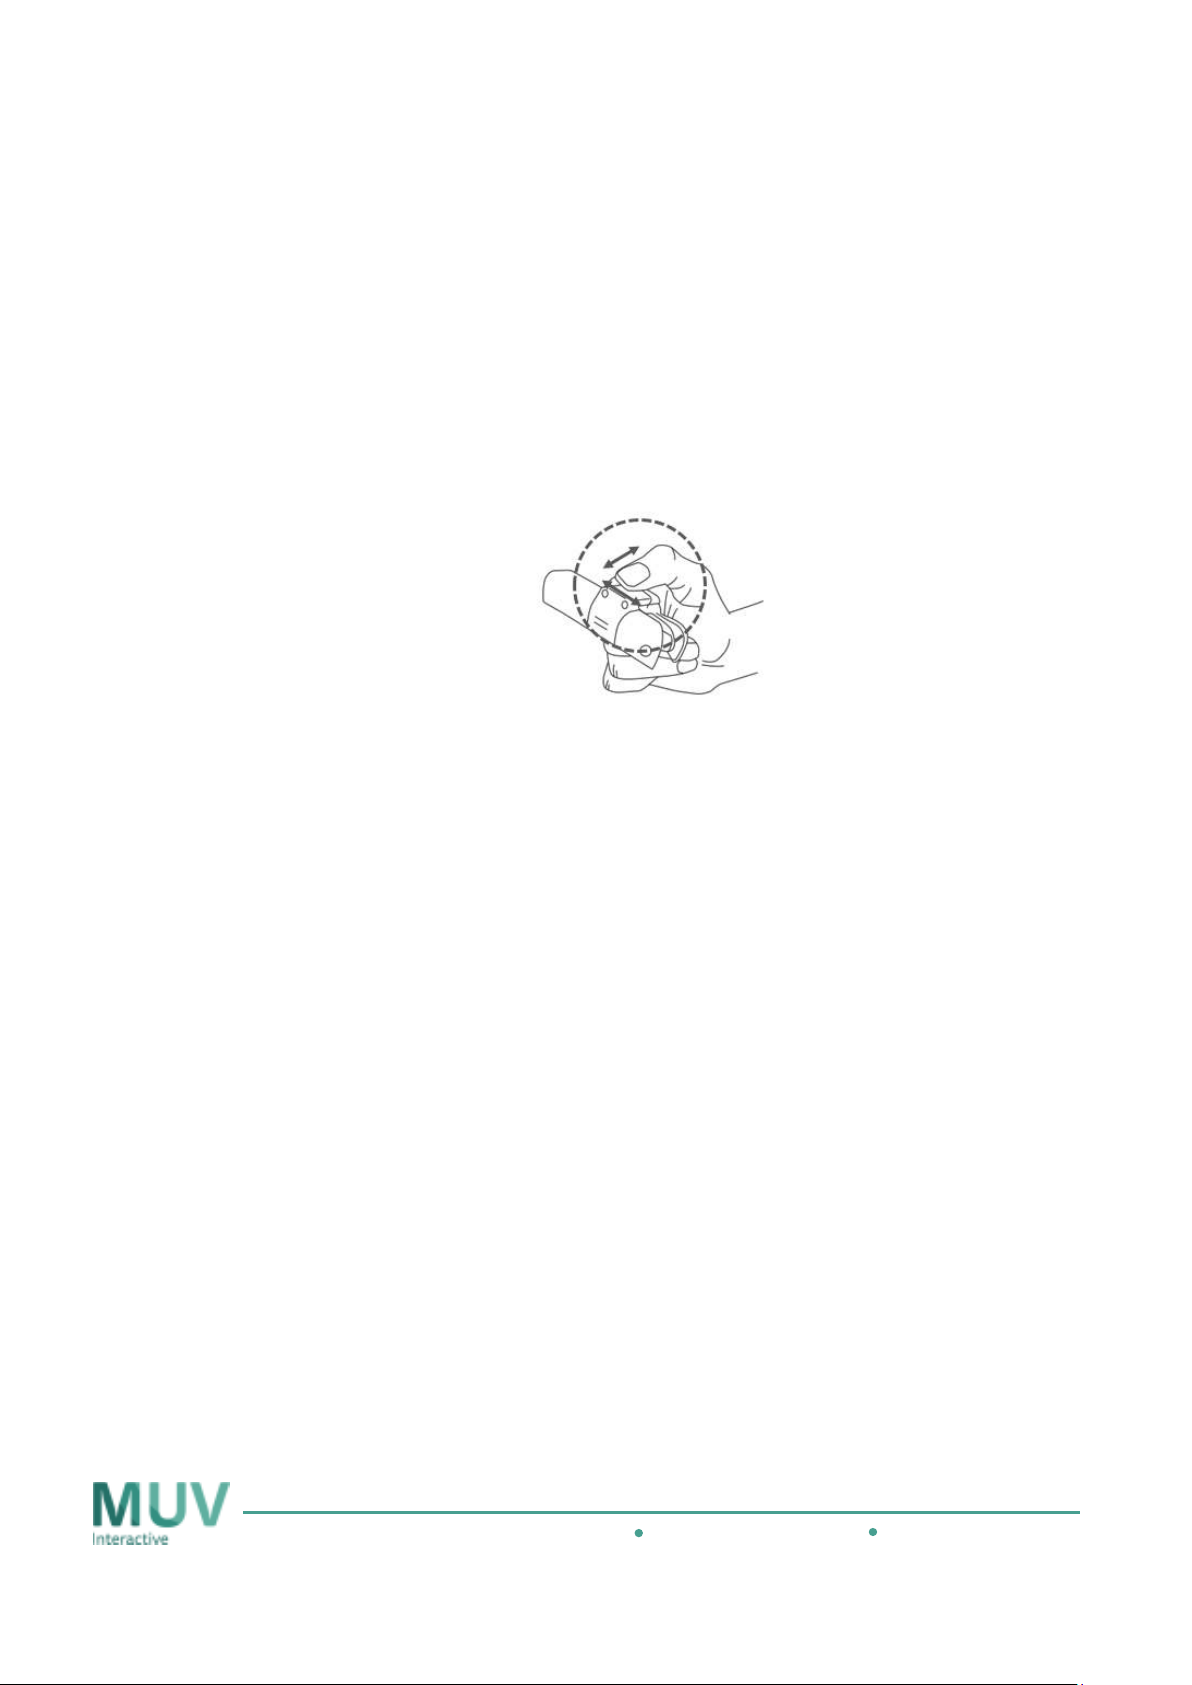
a. Remote Touch
a.a.
Control content from any place in the room by pointing your index finger to the display
area, while touching the Glider surface with your thumb.
7
• Pinch
Pinch - Gently touch the glider with your thumb and point the front of Bird to aim the
PinchPinch
cursor to any desired spot on the screen
• CCCClick
lick - Press your thumb against the glider to select an object
licklick
• Double
Double click
Double Double
• Click and
Click and drag
Click and Click and
99 Medinat Hayehudim, Herzliya, 4676677, Israel Phone: +972 72 220 2042 MUVInteractive.com
click to activate applications
clickclick
drag to move an object (or paint, annotate, write etc.)
dragdrag
8
b.
b. Swipe / Tap (Using the touch pad)
b.b.
Bird’s touch pad can be used for scrolling, if applicable in the application.
Gently move your thumb over the touch pad and swipe it in the direction you wish to
scroll (Up/Down/Left/Right).
You may also customize swiping to produce different desired actions. The customization
is set specifically for each software application you control with Bird. Please read
Appendix 4 for further explanation about this feature.
• SSSSwipe
wipe up/down
up/down:::: Move your thumb up/down on the touchpad to scroll (if applicable
wipewipe
up/downup/down
in the application)
• SSSSwipe
wipe left/right
left/right: Move your thumb left/right on the touch pad
wipewipe
left/rightleft/right
This action is application dependent (e.g. in Chrome browser – it will move between
open tabs; In power point it will move to the next/previous slide)
• Tap and hold
Tap and hold: Tap and hold your thumb on the touchpad – to presents options
Tap and holdTap and hold
related to what you’re doing (like right-clicking with a mouse)
99 Medinat Hayehudim, Herzliya, 4676677, Israel Phone: +972 72 220 2042 MUVInteractive.com
c.
c. Touch
c.c.
Bird's touch functionality turns any surface into a touch screen. With Bird on your finger
you can annotate
objects and perform precise and gentle actions on the big screen.
To use touch with Bird, press the Glider against the display surface as shown in the
drawing below.
9
annotate on the projected surface, paint
annotateannotate
paint on it, drag and drop
paintpaint
drag and drop objects, clic
drag and dropdrag and drop
clickkkk on
clicclic
• Touch
Touch to select object
TouchTouch
• Double tap
Double tap to activate applications
Double tapDouble tap
• Touch and drag
Touch and drag to move objects (or paint, annotate, write etc.)
Touch and dragTouch and drag
99 Medinat Hayehudim, Herzliya, 4676677, Israel Phone: +972 72 220 2042 MUVInteractive.com

10
d.
d. Gestures
d.d.
Using the Gestures feature of Bird will give you the ultimate freedom of movement when
delivering your message in front of presented visual content.
Currently the system supports 4 hand gestures – Waving your hand up, down, left and right.
When performing gestures, you need to swing the palm of your hand to the desired direction,
while bending your wrist inwards.
TIP
TIP:::: To switch between positions: Relax your arm at your side for a few seconds. You can then
TIPTIP
proceed to your next desired gesture choice
Activate Gestures
Activate Gestures::::
Activate GesturesActivate Gestures
Open the Bird application and click on Gestures detection
Gestures detection
Gestures detectionGestures detection
Set up gestures sensitivity
Set up gestures sensitivity::::
Set up gestures sensitivitySet up gestures sensitivity
→ Click on SSSSettings
slider next to each gesture to set up its’ sensitivity
You may deactivate one or more of the gestures and keep only the gestures you need activated
ettings at the bottom of the application → Select Gestures sensitivity
ettingsettings
Gestures sensitivity → Move the
Gestures sensitivity Gestures sensitivity
TIP: To practice gestures, go to Gestures sensitivity and look at Detected gestures to see
whether your gestures were recognized. If the system does not recognize your gestures, try
slower movements.
99 Medinat Hayehudim, Herzliya, 4676677, Israel Phone: +972 72 220 2042 MUVInteractive.com

11
5. Working with multiple Birds
The Bird system takes social interaction to a whole new level, by allowing up to 5 users to
interact with the same content.
Connect a new Bird
Connect a new Bird
Connect a new BirdConnect a new Bird
To connect a new Bird to the system, put it on your finger click on the 'Home' button for 5
seconds until you see the following message: 'Bird with ID xxxxx tries to connect. Allow'. Click
on 'Yes' to connect the Bird.
You can see the connected Birds in the status bar at the top of the Bird application. Each Bird is
represented by a circle in a different color.
Activating / Deactivating Bird
Activating / Deactivating Bird (in standard and Air
Activating / Deactivating BirdActivating / Deactivating Bird
At any given moment, only one Bird can be active and control the content. To activate a Bird,
you should touch the Glider by pinching your index finger and thumb together. When you want
another Bird to take control you should “release” the session by lowering the palm of your
hand in a 90 degrees’ angle. The next user can now activate Bird and take control.
To help you recognize the active Bird, every Bird has a feedback point in a different color. This
way you can easily learn who is controlling the session at the moment.
In Multi Bird mode all the connected Birds can be active simultaneously.
(in standard and Air----Mouse mode)
(in standard and Air(in standard and Air
Mouse mode)
Mouse mode)Mouse mode)
Manage connected devices
Manage connected devices
Manage connected devicesManage connected devices
To view and manage your connected Birds, click on the ‘Bird units’ area on the status bar. This
will open the connected Birds menu
Bird’s battery and the strength of its’ signal. You will also be able to disconnect a Bird.
Please note that the system supports up to 5 Birds, if a 6th Bird attempts to connect, you will
be asked to disconnect one of the Birds.
99 Medinat Hayehudim, Herzliya, 4676677, Israel Phone: +972 72 220 2042 MUVInteractive.com
connected Birds menu. From the menu you will be able to see the status of each
connected Birds menuconnected Birds menu
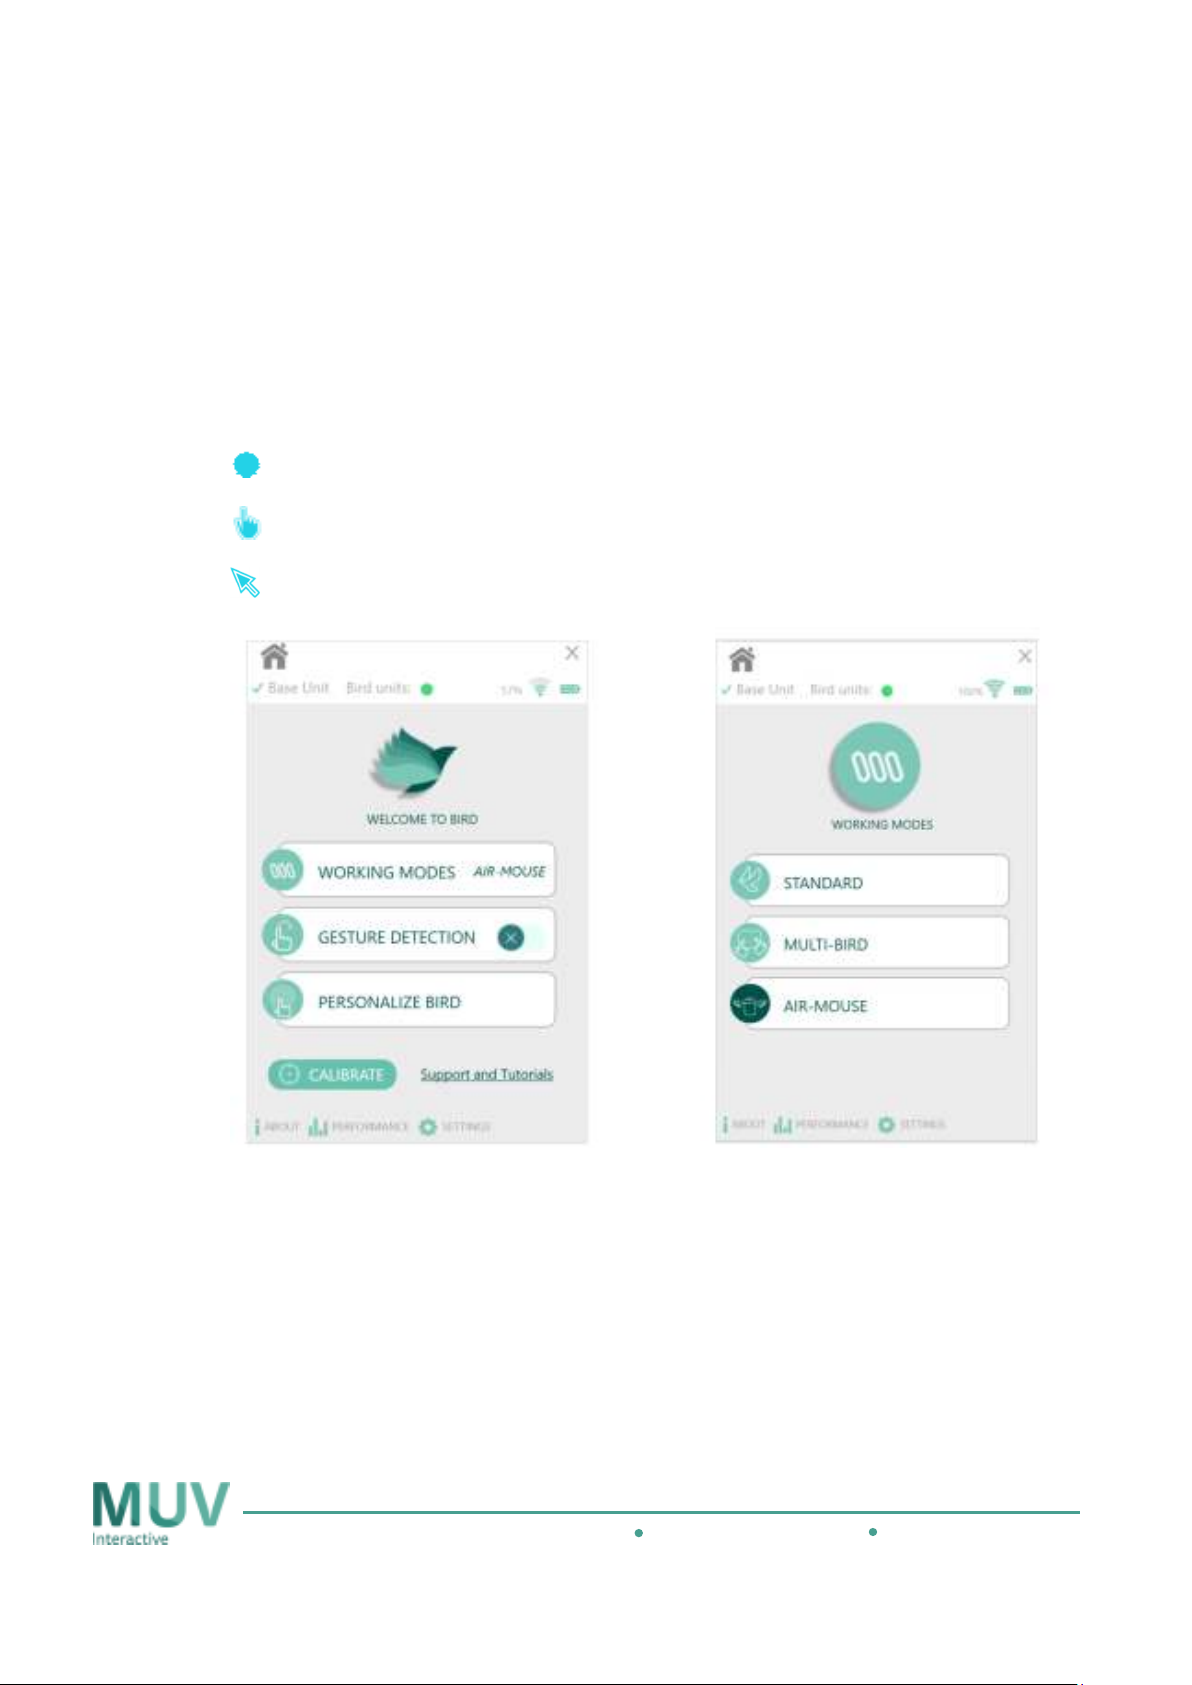
6. Bird Working modes
12
The Bird system offers 3 working modes: Air Mouse
your working mode by clicking on ''''Working modes
Air Mouse,
Air MouseAir Mouse
Working modes'''' in the main dashboard of the Bird
Working modesWorking modes
, Multi
Multi----Bird
, ,
MultiMulti
Bird and Standard
BirdBird
Standard. You can select
StandardStandard
application. To make it easier for you to identify the working mode you are using, each mode
has a different cursor:
Standard mode cursor
Multi-Bird mode cursor
Air-Mouse mode cursor
99 Medinat Hayehudim, Herzliya, 4676677, Israel Phone: +972 72 220 2042 MUVInteractive.com

a.
a. Air-Mouse
a.a.
Air-Mouse is the default mode of the Bird system and it is a perfect mode for you to get
familiar with the Bird system or when you need a quick setup. It is a simple and intuitive
plug and play mode, which allows you to control any type of display. All you need to do is
connect the Base unit and put Bird on your finger. Make sure they are both connected by
looking at the status bar at the top of the Bird application.
Air-Mouse mode is the best mode for working with TV’s or in cases the light conditions
does not allow you to work in standard mode. In addition, it is the best working mode for
cases when you need to setup the system quickly and with minimum effort.
13
You may also use touch in Air-Mouse mode, however, keep in mind that in order to use
touch, you will be required to aim the base unit to the projected area and perform
Geometric calibration.
TIP
TIP: In takeoff mode you should only move the palm of your hand (and not your wrist) to
TIPTIP
control the content.
b.
b. Multi Bird
b.b.
In Multi Bird mode up to 5 users can interact with the same content simultaneously.
Every user that has Bird on his finger can control the content from anywhere in the room,
using his favorite interaction method. For example, a few users can paint or annotate
together on the display (using touch or remote touch), play multiplayer games or interact
with the content together in a meeting.
Please note that Multi touch is only available in standard mode.
Tip: Multi Bird mode uses Windows Touch features
available features: https://www.microsoft.com/surface/en-us/support/touch-mouse-and-
search/using-touch-gestures-tap-swipe-and-beyond?os=windows-8.1-rt-update3&=undefined
Windows Touch features –––– use this link to learn more about
Windows Touch featuresWindows Touch features
99 Medinat Hayehudim, Herzliya, 4676677, Israel Phone: +972 72 220 2042 MUVInteractive.com

c.
c. Standard
c.c.
Standard mode lets you take advantage of all the benefits that system offers. In this
mode the system knows the exact position of your hand at any moment and therefore it
provides you with pixel perfect precision and with the smoothest interaction. Every small
movement of you hand will be recognized by the system and it will always know exactly
where you’re pointing at.
Standard mode is recommended when working with projectors and in cases the setup of
the room does not change, therefore it is the optimal mode for meeting rooms,
classrooms, large venues, etc.
Please note that working when you start working in standard mode, you will be asked to
calibrate the system. The calibration process helps the Base Unit study the conditions in
the room in order to ensure the optimal functionality of Bird. The process comprises of 2
parts: adopting the system to light conditions in the room (Optical Calibration) and
setting the area you are interacting with (Geometric Calibration)
14
Once you switch to Standard mode
calibration process. Follow the instructions to calibrate the Bird system.
(for detailed instructions about Bird's installation process, please read the installation
guide).
Standard mode, the Bird application will automatically launch the
Standard modeStandard mode
99 Medinat Hayehudim, Herzliya, 4676677, Israel Phone: +972 72 220 2042 MUVInteractive.com

7. Bird Application
∗
∗
∗
∗
∗
∗
The Bird application is your control panel for Bird. from activating predefined applications such as
controlling drones or IoT devices to personalizing the sensitivity of the gestures.
At the top of the application, you will always see the status bar which indicates whether the baseunit and Bird are connected and as well as the battery status of Bird.
a.
a.
Status bar (The status bar stays fixed on the top of the application)
a.a.
Base
Base unit
unit
Base Base
unitunit
Bird Units
Bird Units
Bird UnitsBird Units
Home icon
Home icon
Home iconHome icon
Minimize icon
Minimize icon
Minimize iconMinimize icon
15
Green "
Green "V" sign next to the word base unit indicates that
Green "Green "
the base unit is connected
the base unit is connected
the base unit is connected the base unit is connected
∗ Red "circle" indicates that the base unit is disconnected
Red "circle" indicates that the base unit is disconnected
Red "circle" indicates that the base unit is disconnectedRed "circle" indicates that the base unit is disconnected
∗ When the base unit is disconnected, click on the word
When the base unit is disconnected, click on the word
When the base unit is disconnected, click on the word When the base unit is disconnected, click on the word
““““Base unit” to go to the connection tab and
Base unit.
Base unit.
Base unit.Base unit.
Each connected Bird is presented on the status bar with
its’ own color
∗ A colored circle represents the active Bird at the moment
∗ An empty circle represents connected Birds that are not
active at the moment
∗ The red battery icon indicates that a Bird has low battery
The signal icon shows the quality of the Bird’s system
communication (in percentages). When the
communication level is low it is recommended to switch
to a different communication channel to improve the
system’s performance. To do that, click on the settin
icon; select ‘Radio Frequencies
Scan
Scan’
ScanScan
The battery icon shows the status of the battery of the
active Bird
Click on the home button to go to the app’s main
dashboard
Click on the ‘XXXX’ icon to minimize the Bird application. You
may also do that
" sign next to the word base unit indicates that
" sign next to the word base unit indicates that " sign next to the word base unit indicates that
” to go to the connection tab and connect the
” to go to the connection tab and ” to go to the connection tab and
Radio Frequencies’; and then click on ‘Auto
Radio FrequenciesRadio Frequencies
connect the
connect the connect the
settings
gs
settinsettin
gsgs
Auto
Auto Auto
99 Medinat Hayehudim, Herzliya, 4676677, Israel Phone: +972 72 220 2042 MUVInteractive.com

b.
The Bird system offers 3 working modes: Standard
The Bird system offers 3 working modes: StandardThe Bird system offers 3 working modes: Standard
The Bird system offers 3 working modes: Standard
,
, ,
,
Air mouse and
Air mouse and Air mouse and
Air mouse and
Click on
Gesture detection
Gesture detectionGesture detection
Gesture detection
to enable gestures functionality. Click
Click on ‘
Personalize Bird
Personalize BirdPersonalize Bird
Personalize Bird
’ to set specific interaction methods that
Click on ‘
Calibrate
CalibrateCalibrate
Calibrate
’
to go to the Calibration
settings menu
b.
Main dashboard
b.b.
16
Working mode
Working mode
Working modeWorking mode
Gestures
Gestures
GesturesGestures
Personalize Bird
Personalize Bird
Personalize BirdPersonalize Bird
Calibrate
Calibrate
CalibrateCalibrate
Multi touch. The default mode of the system is standard.
Multi touch. The default mode of the system is standard.
Multi touch. The default mode of the system is standard.Multi touch. The default mode of the system is standard.
Click on Working modes to open the
Click on Working modes to open the working modes dashboard
Click on Working modes to open the Click on Working modes to open the
and select a different working mode.
and select a different working mode.
and select a different working mode.and select a different working mode.
For more information about working modes please read
For more information about working modes please read section
For more information about working modes please read For more information about working modes please read
on it again to deactivate it.
You may click on 'Settings'
modify the sensitivity of your gestures, and enable or disable a
specific gesture.
produce different desired actions. The interaction methods can
be personalized for each software application you control with
Bird. Please read Appendix 4 for further explanation about this
feature.
'Settings' at the bottom of the application to
'Settings''Settings'
working modes dashboard
working modes dashboard working modes dashboard
section 6666
section section
99 Medinat Hayehudim, Herzliya, 4676677, Israel Phone: +972 72 220 2042 MUVInteractive.com

17
Click o
Click oClick o
Click o
n Connection to ope
n Connection to open Connection to ope
n Connection to ope
n the
Connection dashboard
Connection dashboardConnection dashboard
Connection dashboard
.
Click
on
Calibration
Calibration Calibration
Calibration
to calibrate the Bird’s system.
For more information
Click on Birds settings to set
the sensitivity the following parameters:
∗
c.
c.
Advanced Settings
c.c.
In Settings you can set advanced options for optimizing the use of Bird and customizing it
to your own specific preferences.
Connection
Connection
ConnectionConnection
Calibration
Calibration
CalibrationCalibration
Birds setting
Birds setting
Birds setting Birds setting
Gestures settings
Gestures settings
Gestures settingsGestures settings
99 Medinat Hayehudim, Herzliya, 4676677, Israel Phone: +972 72 220 2042 MUVInteractive.com
In this dashboard you can manage the connection of your Base unit / Base
units if it doesn’t connect automatically or if you wish to connect a
different Base unit, and the connection of you Birds. For more information
about the connection dashboard please refer to section c in the Bird
application description
about the calibration process please refer to section d in the Bird
application description
o Gestures
o Movements in Air mouse mode
o Scroll sensitivity (when using the touch pad for scrolling)
To Enable Gestures, click on the 'Gestures' button until the ‘XXXX’ sign turns to
‘VVVV’ sign.
∗ Personalize the sensitivity of your gestures when using Bird. Slide the
gestures sensitivity to the left to reduce sensitivity or to the right to
increase sensitivity.
∗ Click on the ‘VVVV’ sign next to each specific gesture to activate/deactivate it.
∗ When you perform gestures using Bird, the gesture will be detected and
the type of gesture you perform (left/right/up/down) will be displayed
next to the words "detected gestures"

Scroll Sensitivity
The Debug options are advanced system options that will usually be handled
MUV Interactive
MUV InteractiveMUV Interactive
MUV Interactive
supports a variety of applications you can control with Bird.
Air Mouse Sensitivity
18
In ‘Air mo
Air mouse
use mode sensitivity
Air moAir mo
movements when using Bird in this mode
left to reduce sensitivity or to the right to increase sensitivity.
mode sensitivity’ you may personalize the sensitivity of your
useuse
mode sensitivitymode sensitivity
mode. Slide the gestures sensitivity to the
modemode
Radio Frequencies
Radio Frequencies
Radio Frequencies Radio Frequencies
SSSSoftware Upgrades
oftware Upgrades
oftware Upgradesoftware Upgrades
In ‘scroll
scroll sensitivity
sensitivity’ you may adjust the sensitivity of the touchpad when using
scroll scroll
sensitivitysensitivity
it for scrolling up and down. Slide the scroll sensitivity to the left to reduce
sensitivity or to the right to increase sensitivity.
The Radio Frequencies
Radio Frequencies feature allows you to scan several RF channels and
Radio FrequenciesRadio Frequencies
choose the best one your location. We recommend to perform this action as
part of the installation of the Bird system. Click on Start Auto Scan
the channels the system supports or on Start Man
range of channels.
In the case of new software versions, the system will inform you to upgrade
the software automatically. (The automatic process is done once in 24 hours)
∗ Click on the Firmware upgrade
∗ Click on Check online
Firmware upgrade button to upgrade manually
Firmware upgradeFirmware upgrade
Check online to check whether a newer version is available
Check online Check online
Start Manual Scan
Start ManStart Man
Start Auto Scan to scan all
Start Auto Scan Start Auto Scan
ual Scan to scan a specific
ual Scan ual Scan
Open Debug Options
Open Debug Options
Open Debug OptionsOpen Debug Options
MUV Applications
MUV Applications
MUV ApplicationsMUV Applications
99 Medinat Hayehudim, Herzliya, 4676677, Israel Phone: +972 72 220 2042 MUVInteractive.com
by the system’s administrator with the guidance of MUV’s support team.
Please note: a password is required to access this part of the application
Please note: a password is required to access this part of the application
Please note: a password is required to access this part of the applicationPlease note: a password is required to access this part of the application
Current applications include: Drones control, Phillips Hue lamp and Flash
animations. (More to be added)
Please note: a password is required to access this part of the application
Please note: a password is required to access this part of the application
Please note: a password is required to access this part of the application Please note: a password is required to access this part of the application

d.
∗
Untick the ‘
Auto connect
Auto connectAuto connect
Auto connect
’ check box, if you do not want the Base unit to
Click on
Find Base units
Find Base unitsFind Base units
Find Base units
if the Base unit does not connect automatically
In case the Bird app fails to connect to the Base unit, perform BT pairing
d.
Connection
d.d.
19
Base
Base unit connection
unit connection
Base Base
unit connectionunit connection
Auto Connect
Auto Connect
Auto ConnectAuto Connect
Find Base unit
Find Base unit
Find Base unitFind Base unit
Show COM ports
Show COM ports
Show COM portsShow COM ports
Each Base unit has a unique serial number. The serial
number can be found on a sticker on the side of the Base
unit and will show up in the application as the Base unit ID
∗
When there is only one Base unit in the area, the Bird
application will automatically recognize it and connect to it.
∗ When there are more than one Base unit, the application
will display the list of Base units it recognizes and let you
choose which one to use.
∗ Click on the Connect/Disconnect button to connect or
disconnect from a Base unit.
∗ If you don't want the Base-unit to connect automatically –
uncheck the box Auto Connect
connect automatically
or if you wish to connect to another Base unit.
via Windows Bluetooth settings and use this option to connect to the
Base. For further details, please read paragraph #4 in the 'Trouble
shooting' section (Appendix 5)
99 Medinat Hayehudim, Herzliya, 4676677, Israel Phone: +972 72 220 2042 MUVInteractive.com

20
∗
Bird connection
Bird connection
Bird connectionBird connection
On the first time using Bird, you will need to pair Bird to the
system. Click on the 'Home' button for 5 seconds until you
see the following message: 'Bird with ID xxxxx tries to
connect'. Allow?'. Click on 'Yes' to pair the Bird. (The ID
number of Bird can be found on the sticker on the Bird's
glider)
∗ From now on, Bird will connect automatically once you
place it on your finger. If it does not connect automatically,
repeat the process of pairing Bird for the first time.
∗ Click on the Disconnect button to disconnect Bird
∗ Below the Disconnected button, you can see the ID of all
the Birds that are connected to the Base units
∗ You will be notified when the system identifies another Bird
in the area and asked if you wish to connect it.
∗ Check Reject new connections if you do not want to be
notified about new Bird units in the area.
99 Medinat Hayehudim, Herzliya, 4676677, Israel Phone: +972 72 220 2042 MUVInteractive.com

e.
Each working mode of
the Bird system requires calibration, every
Click on
‘Adopt to Light Conditions’
‘Adopt to Light Conditions’‘Adopt to Light Conditions’
‘Adopt to Light Conditions’
to start a process that will help the
Click on
Start
StartStart
Start
Geometric
GeometricGeometric
Geometric
Calibration
CalibrationCalibration
Calibration
to start a process that will help the
Check the
Remote
RemoteRemote
Remote
box only in cases you cannot touch all the corners of
Click on the '
Show fie
Show fieShow fie
Show fie
ld of view
ld of viewld of view
ld of view
' button
to activate a laser grid that will
Th
is
onetime calibration process calibrates the Bird’s
sensors. This
e.
Calibration
e.e.
21
System
System Calibration
SystemSystem
Adopt to Light
Adopt to Light
Adopt to Light Adopt to Light
Conditi
Conditions
ConditiConditi
Start Geometric
Start Geometric
Start Geometric Start Geometric
Calibration
Calibration
CalibrationCalibration
Remot
Remoteeee
RemotRemot
Show field of view
Show field of view
Show field of viewShow field of view
Bird Calibration
Bird Calibration
Bird CalibrationBird Calibration
Calibration
CalibrationCalibration
ons
onsons
calibration is performed once, or if one of the following scenarios
occurs:
∗ The cursor is not synced with the position of your touch
∗ Bird is operating on its own without interactive input
Bird system learn and analyze the light conditions in the room. This will
ensure the optimal functionality of Bird. For full details about the
process, please read the installation guide
Bird system learn the boundaries of the interactive area. For full details
about the process, please read the installation guide –––– This calibration is
required for Touch mode
the interactive area in order to perform the geometric calibration – for
full details about the process, please read the installation guide
show you the boundaries of the area you will be able to interact with
calibration is not required for Air Mouse
Touch mode
Touch modeTouch mode
Air Mouse mode
Air MouseAir Mouse
mode.
modemode
99 Medinat Hayehudim, Herzliya, 4676677, Israel Phone: +972 72 220 2042 MUVInteractive.com

System Calibration – advanced options
Use this option to manually increase/decrease the Gain or Threshold of
Use this
option when there are certain
spots
on the interactive area that
Calibration
Calibration Calibration
Calibration
If you use Bird as a controller for virtual reality applications, click on
‘Start
‘Start ‘Start
‘Start
Bird Activation View
Bird Activation View
Bird Activation ViewBird Activation View
Light sensitivity
Light sensitivity
Light sensitivity Light sensitivity
22
The shape inside this area represents the interactive area of Bird. When
you point Bird to the interactive area, you should see a dot inside the
frame. If you do not see this dot it means that the infrared signal of Bird is
not detected by the base unit.
If more than one Bird is used at the same time, you should see more dots
in different colors – each of the dot represents a Bird.
If you see more dots than the number of active Birds, it means that the
Base unit is receiving signals from other sources other than Bird.
the Base-unit.
During the calibration process, the system learns the Bird optics spot size
and will ignore any lights with a spot size larger than the one specified in
Max Spot Size. Use this option to manually increase/decrease the value.
For further details, please read the installation guide.
Noise Cancellation
Noise Cancellation
Noise CancellationNoise Cancellation
Start Bird Inertial
Start Bird Inertial
Start Bird Inertial Start Bird Inertial
the base unit recognizes as the Bird interaction, even though it may not
be the case. (You can view those spots on the calibration monitor.)
∗ Click on Start
ignore (this means that those points will not be active for
interaction with Bird)
∗ Click on Clear
Bird Inertial Calibration’
Bird Inertial Calibration’ and follow the instructions on the application.
Bird Inertial Calibration’Bird Inertial Calibration’
Start to identify the spots you wish the Base unit to
Start Start
Clear to remove the spots that the system recognized
ClearClear
99 Medinat Hayehudim, Herzliya, 4676677, Israel Phone: +972 72 220 2042 MUVInteractive.com

f.
f.
Performance
f.f.
23
The information in the statistics tab is used to provide MUV Interactive's support team with
technical information about the functionality of Bird.
The log files on the bottom of the tab will enable you to view a detailed report of every action
related to the system or to send the Log File to MUV.
99 Medinat Hayehudim, Herzliya, 4676677, Israel Phone: +972 72 220 2042 MUVInteractive.com

g.
Check the
ID and
version number of each one of the Bird system components
Online support
Online supportOnline support
Online support
Click on the
Online Support
Online SupportOnline Support
Online Support
button to contact our support team by email
g.
g.g.
24
About tab
Bird
Bird SSSSystem
ystem
Bird Bird
ystem ystem
IIIInformation
nformation
nformationnformation
99 Medinat Hayehudim, Herzliya, 4676677, Israel Phone: +972 72 220 2042 MUVInteractive.com

25
Appendix 1: Radio Frequency Scanning
Introduction
Bird communicates with the base unit over RF (Radio Frequencies) of 2.4 GHz. Since this band is
also used by Wi-Fi, BT and additional RF technologies, it might cause interference in certain
locations. The frequency scanning feature allows the administrator to scan several RF channels
and choose the best one for his or her location.
1. Click on the Settings
Settings icon in the Bird application and select 'Radio Frequencies
SettingsSettings
Radio Frequencies'
Radio FrequenciesRadio Frequencies
2. Make sure that the Base unit and Bird are connected. Place Bird on your finger before
you start scanning and keep it on throughout the entire process.
3. Click on Auto scan to start the scanning process – the system will start scanning all
available channels and will stop once it finds a good channel (From 11 to 26).
4. Click on the ''''Start Manual
* Please note that the test duration is quite long (~5 minutes), but it should only need to be
performed one time as part of the system installation.
99 Medinat Hayehudim, Herzliya, 4676677, Israel Phone: +972 72 220 2042 MUVInteractive.com
Start Manual Sca
Start Manual Start Manual
Scannnn'''' button to scan a specific range of channels.
ScaSca

26
Appendix 2: Personalize Bird
Introduction
The 'Personalize Bird'
'Personalize Bird' function enables you to customize different methods of interaction of Bird
'Personalize Bird' 'Personalize Bird'
for different applications. You can either set a specific event (for example right click on the
mouse) or a sequence of events (for example, Ctrl+S and then Ctrl+N).
1. Click on ‘Personalize
Personalize Bird
Personalize Personalize
Bird’ in the main dashboard of the Bird application
BirdBird
2. A pop-up window will appear listing all the applications (apps) found on your personal
computer. Select the application for which you wish to customize the methods of
interaction. [Note: An application that has a Bird logo next to it on the right will already
have pre-set interaction methods. These methods can still be modified to your
specifications.]
99 Medinat Hayehudim, Herzliya, 4676677, Israel Phone: +972 72 220 2042 MUVInteractive.com

27
3. Once you select the app you wish to customize a method for, you will see a window
listing all the interactive methods. To customize an interactive method, click 'Select
application event' to the right of your chosen method. A dropdown menu will then
appear with a list of options. If you cannot find the option you wish to set the method to,
simply select 'Map a key.'
For example, if you select the PowerPoint app, you can choose the interaction method
you wish to define for a specific action (such as selecting the gesture 'Wave Left').
Following this, select a method from the provided list or, to customize your own
sequence for an interaction method, click on 'Map a key.'
Choose the “Clear” option on the dropdown menu to revert back to default.
99 Medinat Hayehudim, Herzliya, 4676677, Israel Phone: +972 72 220 2042 MUVInteractive.com

28
4. If you select the option 'Map a key,' choose any key on the keyboard or even more than
one key (for example: 'Ctrl+S') to designate it to an interaction method and click on
'activate.'
5. You also have the option of choosing a sequence of events if you wish to have more than
one sequence for a method. Simply click on 'Add a key' to set the next action.
6. To cancel a sequence, select the chosen sequence and click 'Clear.'
7. Click on 'Activate' to keep a chosen sequence and continue on to the next interaction
method.
99 Medinat Hayehudim, Herzliya, 4676677, Israel Phone: +972 72 220 2042 MUVInteractive.com

29
Appendix 3: Pre-programmed gestures for PowerPoint
• Move to the next slide
Move to the next slide ---- Bring your palm to the right and swing to the left while bending your
Move to the next slide Move to the next slide
wrist inwards.
• Move to the previous slide
Move to the previous slide ---- Bring your palm to the left and swing to the right while bending
Move to the previous slide Move to the previous slide
your wrist inwards.
• Open the presentation in a "slide show" mode
Open the presentation in a "slide show" mode - Extend your hand down and slowly bring up
Open the presentation in a "slide show" modeOpen the presentation in a "slide show" mode
the palm of your hand while bending your wrist inwards.
• Change the presentation from a "slide show" mode to "Normal" view
Change the presentation from a "slide show" mode to "Normal" view ---- Open up your palm and
Change the presentation from a "slide show" mode to "Normal" view Change the presentation from a "slide show" mode to "Normal" view
slowly bring your wrist down.
99 Medinat Hayehudim, Herzliya, 4676677, Israel Phone: +972 72 220 2042 MUVInteractive.com

30
Appendix 4: Troubleshooting
This troubleshooting appendix includes basic instructions to help you fix some common issues on
the Bird system. Most issues can be fixed by following the steps below.
1.
1. I am trying to interact with Bird, but none of the interaction methods seems to be working.
I am trying to interact with Bird, but none of the interaction methods seems to be working.
1.1.
I am trying to interact with Bird, but none of the interaction methods seems to be working.I am trying to interact with Bird, but none of the interaction methods seems to be working.
a. Open the Bird application. Look at the status bar, make sure that the Base Unit
and Bird are connected.
If one or both are not connected, click on the Connection tab on the top of the
application and click on 'Connect.'
b. If Bird is still not working, make sure there is nothing blocking the view of the
sensor.
c. If Bird is partially working, make sure your shadow is not blocking Bird's view.
In general, it is recommended to stand in a point where your shadow is not
blocking the field of view of Bird.
99 Medinat Hayehudim, Herzliya, 4676677, Israel Phone: +972 72 220 2042 MUVInteractive.com

31
2.
2. I touched the wall (table, etc.) and the cursor is not aligned with the position where I am
I touched the wall (table, etc.) and the cursor is not aligned with the position where I am
2.2.
I touched the wall (table, etc.) and the cursor is not aligned with the position where I am I touched the wall (table, etc.) and the cursor is not aligned with the position where I am
touching.
touching.
touching. touching.
Repeat the calibration process in the installation guide. (pages 8-12)
3.
3. Bird seems to be operating “on its own” without my interactive input
Bird seems to be operating “on its own” without my interactive input....
3.3.
Bird seems to be operating “on its own” without my interactive inputBird seems to be operating “on its own” without my interactive input
Repeat the calibration process.
4.
4. When I try to connect to the
When I try to connect to the bbbbase
4.4.
When I try to connect to the When I try to connect to the
on this PC or is disabled
on this PC or is disabled....''''
on this PC or is disabledon this PC or is disabled
ase unit
unit,,,, I get a message that 'Bl
asease
I get a message that 'Bluetooth radio is not present
unitunit
I get a message that 'BlI get a message that 'Bl
uetooth radio is not present
uetooth radio is not present uetooth radio is not present
Follow the instructions to turn on
Bluetooth on your PC (For Windows 10)
a. Go to Settings by selecting the
Start button, and then
select Settings
Settings.
SettingsSettings
b. Tap or click PC and devices
PC and devices and
PC and devicesPC and devices
verify you have Bluetooth. If you
do not see Bluetooth, please skip
ahead to #5.
c. Select Bluetooth and
turn Bluetooth
Bluetooth on.
BluetoothBluetooth
5.
5. Bird app fails to connect
Bird app fails to connect to the Base Unit
5.5.
Bird app fails to connect Bird app fails to connect
to the Base Unit
to the Base Unitto the Base Unit
a. Try to power off and back on again the Base unit by taking it out of the USB
socket/ 5V power adapter
b. If it still does not work, perform BT pairing via Windows Bluetooth settings
(default pairing code is 1234).
c. After paring the Base unit via Windows Bluetooth settings, open the Bird
application in the connection tab, check the “Show COM ports
on the “Find Bas
Find Baseeee Unit
Find BasFind Bas
Unit” button to connect to the Base Unit.
UnitUnit
Show COM ports” checkbox and click
Show COM portsShow COM ports
99 Medinat Hayehudim, Herzliya, 4676677, Israel Phone: +972 72 220 2042 MUVInteractive.com

32
6.
6. When I click on "Find Base
When I click on "Find Base units
6.6.
When I click on "Find Base When I click on "Find Base
does not find any
does not find any bbbbase unit
does not find any does not find any
ase unit....
ase unitase unit
units" in the Bird application's
" in the Bird application's CCCConn
unitsunits
" in the Bird application's " in the Bird application's
onnection tab, the application
ection tab, the application
onnonn
ection tab, the application ection tab, the application
Make sure that the Base unit is connected correctly to the power source. To verify, press
the Laser Activation button on the Base unit and verify that the grid laser turns on.
The Bird system is working with Bluetooth devices that support Bluetooth 2.1 and above.
If you have an earlier version on your laptop/PC, you should get a Bluetooth dongle that
supports Bluetooth 2.1 and follow the instructions.
*
Please note that you should connect the Bluetooth dongle to your PC only after you
complete the next following steps:
a.
Press the Windows button ( ) + R.
b.
In the popup window on the text box type devmgmt.msc
*
The following Bluetooth dongle was tested successfully: Dynamode Bluetooth 4.0
Available for purchase at:
Available for purchase at:
Available for purchase at:Available for purchase at:
• http://www.ebay.com/sch/i.html?_from=R40&_trksid=p2050601.m570.l1313.TR0.TRC0.H0.Xbt-usb-m5.TRS0&_nkw=bt-
usb-m5&_sacat=0
• http://www.lambda-tek.com/Dynamode-BT-USB-M5~sh/B1939925
• http://www.amazon.co.uk/ADAPTER-BLUETOOTH-SMART-BT-USB-M5-DYNAMODE/dp/B0118JN81O
devmgmt.msc and then click OK.
devmgmt.msc devmgmt.msc
Dynamode Bluetooth 4.0 Smart Ready Low Energy USB Adapter
Dynamode Bluetooth 4.0 Dynamode Bluetooth 4.0
Smart Ready Low Energy USB Adapter –––– BT
Smart Ready Low Energy USB Adapter Smart Ready Low Energy USB Adapter
BT----USB
USB----M5
BTBT
USBUSB
M5
M5M5
99 Medinat Hayehudim, Herzliya, 4676677, Israel Phone: +972 72 220 2042 MUVInteractive.com

33
c.
In the Device Manager Dialog window, open the Bluetooth "arrow." You should see
one Bluetooth device (except for the Microsoft devices which you should ignore).
If there is more than one, make sure that there is no BT dongle connected.
d.
Disable the computer's Bluetooth device (make sure none are from Microsoft).
e.
Plug in the BT dongle (version 2.1 and above) and verify that the new BT device appears in
the device manager.
f.
Go back to the Bird application's Connection tab and click on "Find Base units" until you see
your Base unit appear in the window.
99 Medinat Hayehudim, Herzliya, 4676677, Israel Phone: +972 72 220 2042 MUVInteractive.com

34
Safety Information
This symbol identifies safety and health messages in the Product Guide and other product
manuals.
Read this guide for important safety and health information that apply to the Bird system that you have
purchased.
Warning:
Failure to properly set up, use, and care for this product can increase the risk of serious injury, or damage
to the device or devices.
Read this guide and keep all printed guides for future reference.
Important Safety Information Battery-Powered Devices
The Bird and the cradle devices use rechargeable batteries. Improper use of batteries may result in
battery fluid leakage, overheating, or explosion. Released battery fluid is corrosive and may be toxic. It
can cause skin and eye burns, and is harmful if swallowed.
To reduce the risk of injury:
• Do not heat, open, puncture, mutilate, or dispose of batteries in fire.
• Do not allow metal objects to touch the cradle's 3 charging pins on the device; they can become
hot and cause burns.
• Do not attempt to replace the batteries on any of the Bird units as they are rechargeable. If there
is to be any replacement, please contact MUV Interactive. CAUTION – Risk of explosive if battery
is replaced by an incorrect type.
Health Warning
Use of Bird or other electronic input devices may be linked to serious injuries or disorders.
When using Bird, as with many activities, you may experience occasional discomfort in your hands, arms,
shoulders, neck, or other parts of your body. However, if you experience symptoms such as persistent or
recurring discomfort, pain, throbbing, aching, tingling, numbness, burning sensation, or stiffness, DO NOT
IGNORE THESE WARNING SIGNS. PROMPTLY SEE A QUALIFIED HEALTH PROFESSIONAL
IGNORE THESE WARNING SIGNS. PROMPTLY SEE A QUALIFIED HEALTH PROFESSIONAL, even if symptoms
IGNORE THESE WARNING SIGNS. PROMPTLY SEE A QUALIFIED HEALTH PROFESSIONALIGNORE THESE WARNING SIGNS. PROMPTLY SEE A QUALIFIED HEALTH PROFESSIONAL
occur when you are not working at your Bird. Symptoms like these can be associated with painful and
sometimes permanently disabling injuries or disorders of the nerves, muscles, tendons, or other parts of
the body. These musculoskeletal disorders (MSDs) include carpal tunnel syndrome, tendonitis,
tenosynovitis, and other conditions.
Do Not Attempt Repairs
Do not attempt to take apart, open, service, or modify the hardware devices. Doing so could present the
risk of electric shock or other hazard. Any evidence of any attempt to open and/or modify the device,
including any peeling, puncturing, or removal of any of the labels, will void the Limited Warranty.
DO NOT
DO NOT DO NOT
99 Medinat Hayehudim, Herzliya, 4676677, Israel Phone: +972 72 220 2042 MUVInteractive.com

35
CLASS 1
Choking Hazard
This device may contain small parts which may be a choking hazard to children under 3. Keep small parts
away from children.
Usage and Cleaning
Use in accordance with these instructions:
• Do not use near any heat sources
• Only use attachments/accessories specified by MUV Interactive.
• Clean only with dry cloth.
• Do not allow this product to become wet. To reduce the risk of fire or shock, do not expose this
product to rain or other types of moisture.
Adhesive Mounting
Bird's components may use adhesive tape to mount components in your workspace. DO NOT mount on
antiques, heirlooms, or other valuable or irreplaceable items. After mounting, removing the adhesive may
damage the cosmetic coating and/or leave an adhesive residue.
Laser and LED Specifications
Use caution with controls or adjustments or performance of procedures other than those specified herein
as this may result in hazardous radiation exposure.
Laser
This device complies with International Standard IEC 60825
device also complies with 21 CFR 1040.10 and 1040.11
21 CFR 1040.10 and 1040.11 except for deviations pursuant to Laser Notice No.
21 CFR 1040.10 and 1040.11 21 CFR 1040.10 and 1040.11
IEC 60825----1:2007
IEC 60825IEC 60825
1:2007----03
1:20071:2007
03 for a Class 1 laser product. This
03 03
50, dated June 24, 2007.
LASER PRODUCT
IEC 60825-1:2007-03
LEDs
This product has been evaluated to comply with International Standard (IEC 60825-1:2001-08) and IEC
62471 (2006-07).
This product uses LEDs that are considered Class 1 (IEC 60825-1:2001-08).
Class 1 LED
product
99 Medinat Hayehudim, Herzliya, 4676677, Israel Phone: +972 72 220 2042 MUVInteractive.com

36
Regulatory Information
Not intended for use in machinery, medical or industrial applications.
Any changes or modifications not expressly approved by MUV Interactive could void the user’s authority
to operate this device.
No serviceable parts included.
This device is rated as a commercial product for operation at +15ºC (+41ºF) to +40ºC (+104ºF).
Operation is subject to the following two conditions:
(1) This device may not cause interference, and (2) this device must accept any interference received,
including interference that may cause undesired operation.
To comply with RF exposure requirements, the following operating configurations must be satisfied: the
antenna has been installed by the manufacturer and no changes can be made.
99 Medinat Hayehudim, Herzliya, 4676677, Israel Phone: +972 72 220 2042 MUVInteractive.com

37
FCC Radio frequency interference statement
This equipment has been tested and found to comply with the limits for a Class B digital device, pursuant to part 15
of the FCC Rules. These limits are designed to provide reasonable protection against harmful interference in a
residential installation. This equipment generates uses and can radiate radio frequency energy and, if not installed
and used in accordance with the instructions, may cause harmful interference to radio communications. However,
there is no guarantee that interference will not occur in a particular installation. If this equipment does cause
harmful interference to radio or television reception, which can be determined by turning the equipment off and
on, the user is encouraged to try to correct the interference by one or more of the following measures:
Reorient or relocate the receiving antenna.
Increase the separation between the equipment and receiver.
Connect the equipment into an outlet on a circuit different from that to which the receiver is connected.
Consult the dealer or an experienced radio/TV technician for help.
MUV Interactive Ltd. is not responsible for any radio or communication interference caused by using other than
specified or recommended cables and battery or by unauthorized changes or modifications to this equipment.
Changes or modifications not expressly approved by the manufacturer could void the user’s authority to operate the
equipment.
This device complies with part 15 of the FCC Rules. Operation is subject to the following two conditions:
1. This device may not cause harmful interference, and
2. This device must accept any interference received, including interference that may cause undesired operation.
99 Medinat Hayehudim, Herzliya, 4676677, Israel Phone: +972 72 220 2042 MUVInteractive.com
 Loading...