

USER GUIDE

CONTENT
CHAPTER 1
Getting Started
Page
Introduction 3
System Requirements 3
Supported input formats 4
Supported saving formats 4
Installation 5
The interface 6/7
CHAPTER 2
Using autoProducer
Adding videos and pictures 8
Using expandable media panel 8
Selecting videos with magicMoments™ 9
Selecting pictures with magicSpot™ 10
Adding captions 11
IPTC for pictures 12
Adding music 12
Selecting style 12/13
Working with superStyles™ 13
Adding Title/Credit 13
Video and picture sequence/bias options 14
Audio options 15
Setting muvee duration 15
Making muvee 15
tweak muvee interface 16
Sequential edits to muvee clips with tweak muvee 17
Voiceovers with tweak muvee 18
Saving with muveeShare 19
2

Introduction
Home movies made easy!
muvee autoProducer is easy-to-use software that works in a few quick steps to
let you automatically create professional-looking videos and slideshows that are
ready to be shared.
Simply add in your video, pictures and favorite music, select a ready-to-use style
and click 'make muvee'. muvee intelligently picks out footage highlights and
adds visual effects and transitions that are synchronized to the beat of your
music. Different muvee styles give your video and pictures a new look, then save
your muvees in a variety of formats for email, online sharing or burning to
CD/DVD.
muvee autoProducer 6 introduces powerful new personalization features that let
you control style and muvee-making settings, add captions and voiceovers, and
much more.
Get started now!
System Requirements
Processor: Intel Pentium III 1 GHz, AMD Athlon, or equivalent with MMX
support
Memory: 512MB RAM
Video Memory: 16MB RAM & above
Operating System: Microsoft Windows 2000, XP and Vista
Other Requirements: Microsoft DirectX 9.0 or higher, Apple QuickTime (for
MOV files)
3

Supported input formats
Video formats
•
•
•
•
•
•
•
•
•
ASF
AVI
DV-AVI
MPEG-1
MPEG-2
3GP
MP4
WMV
*MOV (QuickTime)
Picture formats
•
•
•
•
•
JPEG
BMP
GIF
TIF
PNG
Music formats
•
•
•
•
MP3
WAV
WMA
M4A (Unprotected AAC)
Note: * Apple QuickTime is required to support MOV files.
Supported saving formats
•
•
•
•
•
•
•
AVI (DV and MJPEG)
DV-AVI
*MOV (QuickTime)
MPEG-1
MPEG-2
WMV
WMV-HD
Note: * Apple QuickTime is required to support MOV file.
4

Installation
To install:
1. Click on muvee autoProducer’s installer, aP6_xxx.exe file.
2. Follow the steps stated in the installer.
3. Finish the installation.
4.
*
Restart your computer.
5. Launch muvee autoProducer.
6. Enter product key (with dashes included) as prompted.
Your product key should look like this (12345-ABCDE-54321-...).
Note:
a)
b) Installing a refresh version of muvee autoProducer (e.g. version 6.0 to version 6.1) does
c) For installation errors and technical support, please go to www.muvee.com/support.
*
Launching muvee autoProducer for the first time before a restart will cause the
application to not function properly.
not require a re-entering of product key. To check your version, launch muvee
autoProducer Help About muvee autoProducer.
5
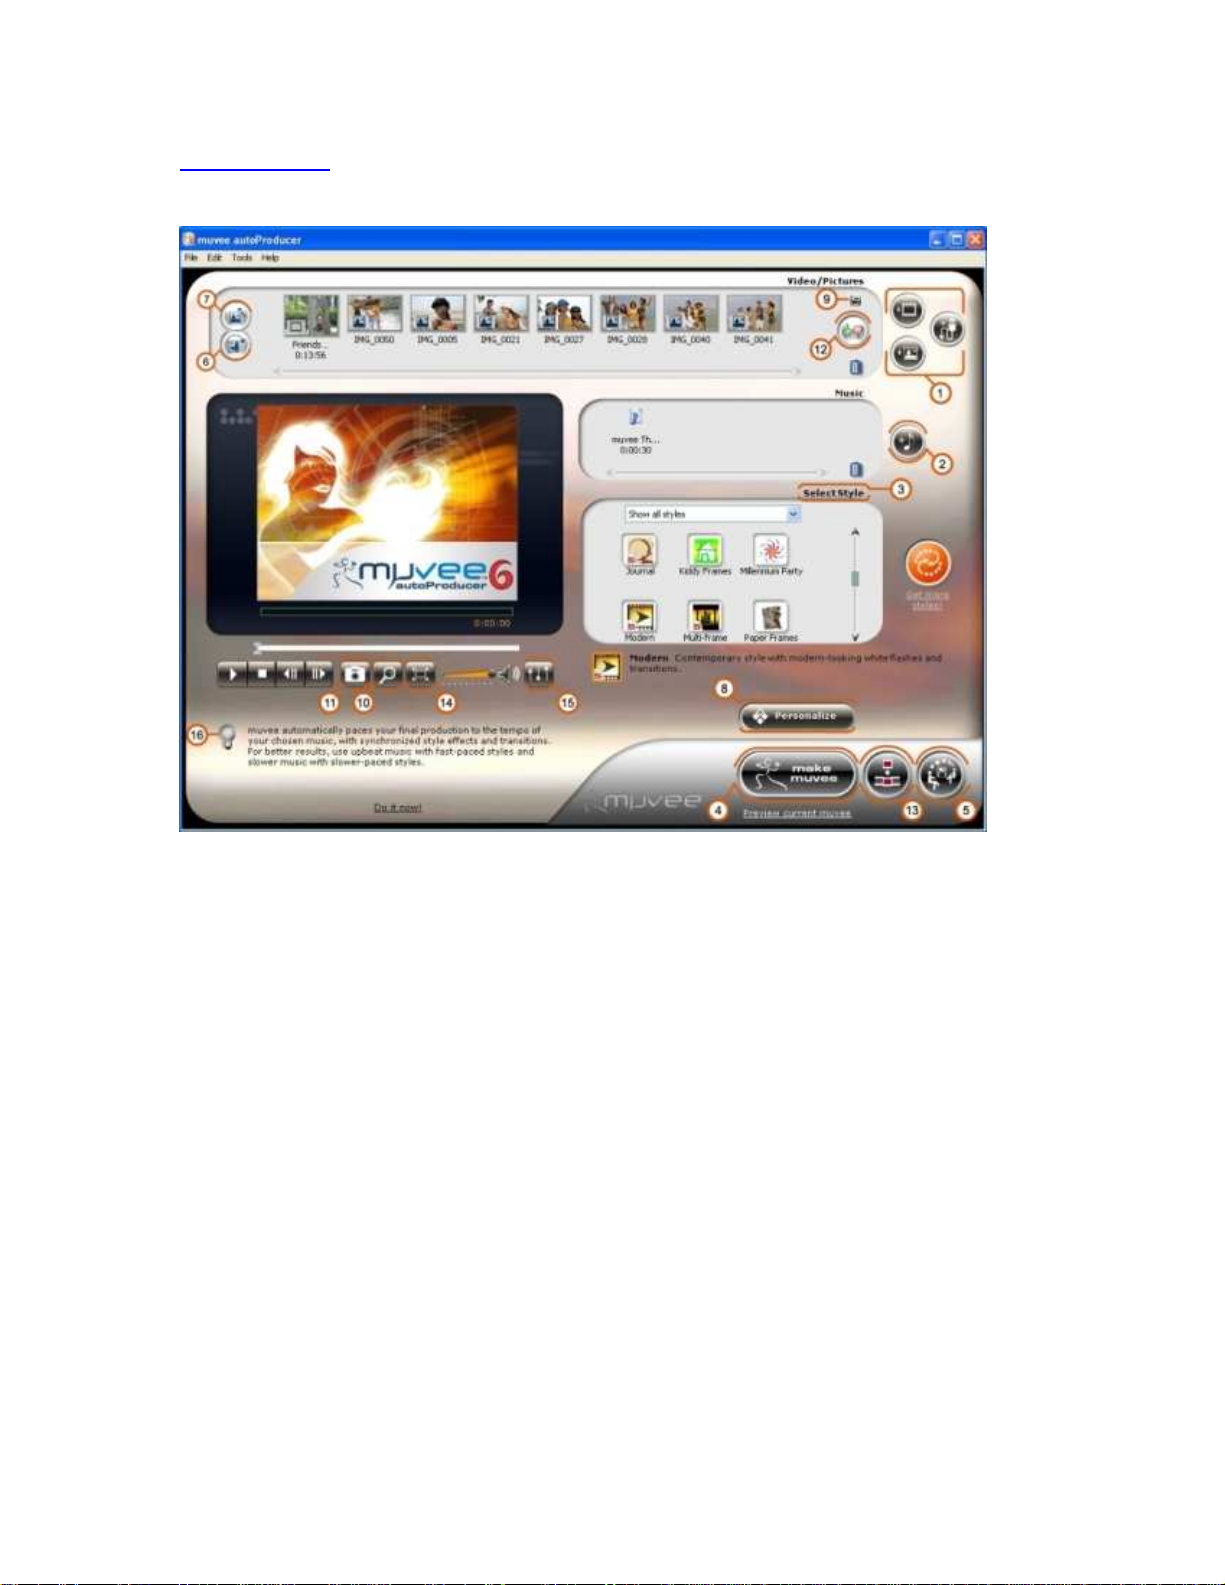
The interface
Basic Features
• [1] Media import area: ‘Add video’, ‘Add pictures’ and ‘Import from
video/pictures from a device’ buttons
• [2] ‘Add music’ button
• [3] ‘Select style’ panel
• [4] 'make muvee' button
• [5] ‘muveeShare’ button
More Features
• [6] ‘Rotate pictures’ button
• [7] ‘magicSpot™’ button
• [8] ‘Personalize’ button
• [9] Expandable media panel
6

• [10] ‘Locate in source’ button
• [11] ‘Snapshot’ tool
• [12] ‘magicMoments™’ button
• [13] ‘tweak muvee’ button
• [14] ‘Full-screen mode’ button
• [15] ‘Audio mix controls’ button
• [16] Tips area
7

Adding videos and pictures
You can add videos and pictures from your computer, or import them directly into
muvee autoProducer from a DV camcorder, digital camera or other devices.
1. Click the ‘Add video’ and/or ‘Add pictures’ buttons to import
media from your computer.
2. Click the ‘Import from video/pictures from a device’ to import
from a DV camcorder, digital camera or other devices.
3. You will see thumbnails of your video and picture files in the media
panel after addition.
Note: Connect and power on your device to your computer prior to launching.
Video and pictures Tips
Have the videos and pictures you wish to use for the muvee organized in
folders before starting your muvee autoProducer.
Check ‘Auto-correct red-eye’, ‘Auto-enhance’ and ‘Auto-remove
noise’ options at the bottom of the pop-up window to improve your video
and picture quality.
Always have more videos and pictures than the desired length of your final
muvee. For example, it is ideal to have at least 3 minutes of video when
you are making a 1 minute muvee.
Using the expandable media panel
The expandable media panel lets you view and organize all your video/pictures in
a larger window. You can do the following in this panel:
• Zoom in/out of thumbnails using the bottom slider option
• Reorder your pictures by dragging and dropping
• Rotate pictures
• Launch the magicMoments or magicSpot features
8

Selecting videos with magicMoments™
magicMoments is an advanced feature that gives you more control over the
video content in your muvee. The magicMoments button will be enabled when
you select a video file in the media panel.
1. Select the video you wish to use magicMoments with (in the media
panel).
2. Click the ‘magicMoments™’ button.
3. *Mark highlights you want to include in your muvee by clicking and
holding Green 'thumbs-up' button.
4. *Mark unwanted sections with Red 'thumbs-down' button.
5. Click the 'OK’ button.
magicMoments™ Tips
*Do not mark segments that cross shot boundaries (the white vertical
lines), as this might cause an awkward transition in some styles.
You need to click the ‘make muvee' button on the main screen for your
changes to take effect.
Mark only the most important sections of your video. muvee will
automatically mix in other highlights from the unmarked sections of your
video to create the final production.
Do not try to mark every section of video using magicMoments™, as this
might affect how well muvee responds to your selected style and music.
Keep each highlight short (5-10 seconds in duration or less).
To remove all highlights/exclusions for a video, go to magicMoments™
Edit Remove all highlights and exclusions.
These magicMoments™ settings can be retained. You can subsequently
use the same video to make other muvees without having to mark your
highlights/exclusions or enter video captions over again. Simply select to
import magicMoments™ settings when prompted during your next muvee
project.
9

Selecting pictures with magicSpot™
magicSpot is an advanced feature that gives you more control over the pan/zoom
motion that is applied to your pictures. The magicSpot button will be enabled
when you select a picture in the media panel.
1. Select the picture you wish to use magicSpot with (in the media
panel).
2. Click the ‘magicSpot™’ button.
3. Click the ‘Manual’ button.
4. *Move, drag and resize the 2 overlapping frames.
5. Click the ‘OK’ button.
*magicSpot™ Tips
The default setting for pan/zoom is ‘Automatic’ and depends on the style
you have chosen, if you do not edit them manually.
You need to click the ‘make muvee' button on the main screen for your
changes to take effect.
Direction of motion (panning) is indicated by the arrow in the frames.
Size of frames indicates the area of focus.
Placing one frame within another lets you crop a picture or control the
zoom in/out motion, depending on how you resize the frames.
10

Adding captions
You can add captions to your video and pictures, with the magicMoments™ and
magicSpot™ features respectively.
Adding captions to video:
1. Select the video you wish to add captions to (in the media panel).
2. Click the ‘magicMoments™’ button.
3. Select the section to insert your caption using the slider.
4. Type caption as desired and video section will be highlighted
automatically.
5.
*
Click the ‘OK’ button.
Adding captions to picture:
1. Select picture in media panel.
2. Click ‘magicSpot™’ button.
3. Type caption for picture.
4.
*
Click the ‘OK’ button.
*Note: Video and picture captions will appear centered at the bottom of your muvee.
Caption tips
Click 'make muvee' button on the main screen for your changes to take
effect.
You can type captions to multiple segments to your video before clicking
the ‘OK’ button instead of keying and saving individually for them to take
effect.
Deleting a caption does not automatically unmark a highlighted section of
video.
To remove all captions for a video, go to magicMoments™ Edit
Remove all captions.
11

IPTC for pictures
IPTC refers to a standard set of metadata attributes that can be applied to
pictures. If you created any picture descriptions in other image editing software
(for example 'Description' in Adobe Photoshop or 'Caption' in Irfanview), you can
import them as captions in muvee autoProducer by clicking the 'IPTC' button.
1. Select picture in media panel.
2. Click the ‘magicSpot’™ button.
3. Click the ‘IPTC’ button.
4. *Make edits to captions as desired.
*Note: Any changes that you make to these descriptions in muvee autoProducer will not affect the
original descriptions.
Adding music
1. Click the ‘Add music’ button.
2. Select music file.
Note: Music files that are protected by Digital Rights Management are generally not supported.
However, the music file can be supported if it can be played on Windows Media Player
version 7 or later.
Selecting style
Styles are templates for making your muvee. Each style contains its own set of
unique traits that determine the way material is selected from your video/pictures,
the visual effects and transitions that are used, the pacing of your muvee, and
the way the final production is put together.
1. Simply click on a style icon.
2. View style preview in player screen.
3. Click the 'make muvee' button to make and preview your
production.
Style Tips
A short description of the style chosen will be found under the ‘Select
Style’ panel.
12

You must select a style before you can make a muvee. For simple effects,
try using the Classic style.
Use appropriate music with styles. For example, styles with slow effects or
transitions work best with slow sentimental music.
Get more variety in your muvees by clicking on 'Get more styles!' to
purchase and download additional plug-in styles.
Working with superStyles™
superStyles have parameters that you can customize (using simple sliders) for
greater control over style behaviors such as pacing to music, playback speed
and color.
1. Click the ‘Personalize’ button.
2. Go to the ‘superStyle’ tab.
3. Select the 'Customize' option.
4. Adjust the parameters accordingly.
superStyles Tips
You need to click the 'make muvee' button to make and preview your
customized production.
Adding Title/Credits
You can give your muvee a title, end credits, select text animations and
customize the background screens using colors or pictures.
1. Click the ‘Personalize’ button.
2. Go to the ‘Title’ or ‘Credits’ tab.
3. Make the changes accordingly.
Title/Credits Tips
You need to click the 'make muvee' button to make and preview your
customized production.
13

Video and picture sequence/bias options
The options listed under this tab allow you to select how you want your videos
and pictures to be selected and sequenced in your final muvee.
1. Click ‘Personalize’ button.
2. Go to ‘Video/Pictures’ tab.
3. Change shuffle settings to either 1‘Style Default’, 2‘Keep shots in
sequence’ or 3‘Shuffle shots’.
4. Select your preference: 4 ‘Use every picture once’ and/or
5
‘Interleave pictures’.
5. Select ‘Let the style choose material for your muvee’ for an
automatic solution or ‘Select material using the following bias’
for manual adjustments.
6. Adjust video/picture selection using 6‘Face bias’, 7‘Video motion
bias’ and 8‘Brightness bias’, if the latter option is selected in step 5.
Explanation of settings
Shuffle Settings
1) Style default: Let the default style settings determine how your video/pictures are
sequenced.
2) Keep shots in sequence: Sequence your video/pictures according to how you have
arranged them in the media panel.
3) Shuffle shots: Use the slider to control how much your video/pictures are shuffled.
Selecting more shuffling makes the pictures appear in random sequence as opposed to
the arrangement in the media panel. More shuffling will increase the frequency of pictures
appearing in between video segments in the final muvee too.
Picture Settings
4) Check 'Use every picture once' to have each picture appear only once in your muvee.
Otherwise, pictures will appear twice or more if your total input of pictures and video is
shorter than the duration of the completed muvee.
5) Check 'Interleave pictures' to automatically mix your pictures (in sequence as placed in
the media panel) with video at intervals spaced evenly throughout the whole muvee.
Video/Pictures Selection Settings
6) Face bias: Select video/pictures based on the presence/absence of human faces
(people vs scenery).
7) Video motion bias: Select video highlights based on the camera motion
(panning/zooming vs static footage).
8) Brightness bias: Select video/pictures based on the amount of light detected (day scene
vs night scene).
14

Audio options
Audio options let you customize the way multiple audio tracks are used in your
muvee.
1. Click ‘Personalize’ button.
2. Go to ‘Audio’ tab.
3. Make selection accordingly.
Note: Some personalization settings are dependent on others and may not be applied in favor of
creating a better overall production.
Setting muvee duration
Duration options let you customize the duration of your muvee as well as display
duration for each picture.
1. Click ‘Personalize’ button.
2. Go to ‘Duration’ tab.
3. Make selection accordingly.
Note: Pictures and videos may be repeated if music duration is longer than total input and vice
versa.
Making muvee
When you click 'make muvee', muvee autoProducer will check to see if your
videos, pictures and music have been analyzed before. If they have not, muvee
autoProducer will first analyze them before creating your muvee.
muvee autoProducer analyzes your video to automatically detect shot
boundaries and pick out footage highlights to use in the final production. Your
music is also analyzed to determine its tempo and mood.
muvee autoProducer then takes the media you’ve imported, applies style effects
and transitions and intelligently synchronizes everything to the beat of your music
to give you a professional-looking production, automatically.
15

tweak muvee interface
• [a] Preview window
• [b] ‘Playback control’ button
• [c] Video shot boundaries (white vertical lines)
• [d] ‘Undo/redo’ buttons
• [e] ‘Auto-replace the selected segment with something different’
button
• [f] ‘Manually replace the selected segment’ button
• [g] ‘Auto-replace the selected segment with something similar’ button
• [h] ‘Start/stop recording voiceover’ button
• [i] ‘Remove voiceover’ button
• [j] Microphone level indicator
16

Sequential edits to muvee clips with tweak muvee
'tweak muvee' is an advanced feature that gives you more control over the final
content of your muvee by letting you make quick touch-ups before saving. The
'tweak muvee' button will be enabled after you have made a muvee.
1. *Click ‘tweak muvee’ button after your muvee is made.
2. Click on the segment you want to replace. (highlighted in blue)
3. Select ‘auto-replace the selected segment with something
similar’, ‘auto-replace the selected segment with something
different’ or ‘manually replace the selected segment’ for your
video segment replacement.
4. For manual replacement, select the replacement segment
(highlighted in blue) in the new window. The segment to be
replaced will be highligted in red.
*Note:
a) *It is advisable to tweak your muvee only after you have confirmed your media, style,
voiceover and personalization options. If these options are altered, ‘make muvee’ button
will have to be clicked before the changes can be incorporated and will result in the loss
of tweak muvee segment replacement effects.
b) You do not have to make muvee again for the segment replacement effects to be
processed. Clicking the ‘make muvee’ button will cause the segment replacement
effects to be lost.
c) You can only replace a section of video with another of the same duration from your
source footage. Similarly, a picture can only be replaced with another picture.
17

Voiceovers with tweak muvee
Add a voiceover with the 'tweak muvee' feature in muvee autoProducer.
1. Click ‘tweak muvee’ button.
2. Place cursor at section of video where you want the voiceover to
begin.
3. Click ‘Start recording voiceover’ button.
4. Do your voiceover while the muvee plays. (Recorded segment will
be highlighted in yellow)
5. Click ‘Stop recording voiceover’ button.
6. Click ‘OK’ button to save voiceover.
7. Click 'make muvee' button on the main screen for your changes to
take effect.
Voiceover Tips
Before recording your voiceover, test your microphone. If it is working
properly, the mic level indicator will light up when you speak.
Recording against a high playback volume will result in an echo in your
muvee. To reduce the echo, use headphones while recording or turn the
volume level down on your speakers.
Use the audio mix controls (located below the playing screen) to adjust the
voiceover level in your muvee.
If you have multiple sound input devices installed on your computer and
have problems recording your voiceover (for example, if the mic level
indicator does not light up), go to Control Panel > Sound and Audio
Devices on your computer and make sure that you select the correct
sound input device for your voiceover.
18

Saving with muveeShare
muveeShare lets you save multiple muvees in a batch and share them via email,
web streaming, mobile devices, burning to CD/DVD or computer.
1. Click ‘muveeShare’ button.
2. Select the muvees you want to save in the muvee list. (on the left of
the window)
3. *Select saving option.
Saving Tips
Every muvee that you make is retained in the muvee list as a muvee
project until you delete it. Keeping these projects allows you to save or
burn in the various available formats whenever you need them.
Selecting multiple muvee projects in your muvee list allows batch saving
or batch burning into 1 CD simultaneously.
Saved muvees cannot be burned to CD/DVD if any of the muvee projects
are removed from your computer.
*Note: Saving your muvees may take some time depending on the format that you have
chosen. Formats that use video compression (for example WMV-HD and MPEG-2)
will take longer to save. Saving in WMV-HD format is not supported on Windows
2000.
19
 Loading...