

Page 1
PJ-162-FE
TOUCAN HYBRID
USER’S GUIDE
PRELIMINARY
Important :
Please check the ink status while printing in flatbed. When error
message “Ink not filled” is displayed, IR lamp will power on, this
can cause burning hazard.
With firmware versions, older than V 3.02 L, continually check ink
level. Because there will not be a message when bottles are almost
empty.
MUTOH EUROPE N.V.
Part N°: AP-750, Rev. 1.1. – 23/04/04
Page 2

User’s Guide – Toucan Hybrid
2
AP-750, Rev. 1.1 –- 23/04/04
Page 3

User’s Guide – Toucan Hybrid
3
AP-750, Rev. 1.1 –- 23/04/04
COPYRIGHT NOTICE
COPYRIGHT © 2004 Mutoh Europe N.V. All rights reserved.
This document may not be reproduced by any means, in whole or in part, without written
permission of the copyright owner.
This document is furnished to support the Mutoh Toucan Hybrid (PJ-162-FE) Inkjet printer.
In consideration of the furnishing of the information contained in this document, the party
to whom it is given assumes its custody and control and agrees to the following:
The information herein contained is given in confidence, and any part thereof shall not be
copied or reproduced without written consent of Mutoh Europe N.V.
This document or the contents herein under no circumstances shall be used in the
manufacture or reproduction of the article shown and the delivery of this document shall
not constitute any right or license to do so.
April 2004
Published: Mutoh Europe N.V., Archimedesstraat 13, B-8400 Oostende, BELGIUM
Page 4

User’s Guide – Toucan Hybrid
4
AP-750, Rev. 1.1 –- 23/04/04
Page 5
User’s Guide – Toucan Hybrid
5
AP-750, Rev. 1.1 –- 23/04/04
Important Notice
This product has been tested and found to comply with the limits of a Class A digital device, pursuant to Part
15 of the FCC Rules. These limits are designed to provide reasonable protection against harmful
interference when the product is operated in a commercial environment.
This product generates, uses, and can radiate radio frequency energy and if not installed and used in
accordance with this manual, may cause harmful interference to radio communications. Operation of this
product in a residential area is likely to cause harmful interference in which case the user will be required to
correct the interference at his own expense.
1. Radio interference
Product generates weak radio signals and may interfere with television reception and utilities. If a product
does interfere with radio or TV reception, try the following:
Change the direction of your radio and TV reception antenna or feeder.
Change the direction of the product.
Move either the product or the receiving antenna so there is more distance between them.
Be sure the product and the receiving antenna are on separate power lines.
2. Trademarks mentioned in this manual.
MUTOH, PJ-162-FE, Toucan Hybrid, MH-RTL are registered trademarks or product names of MUTOH
INDUSTRIES LTD.
Centronics and Bitronics are registered trademarks or product names of Centronics Data Computer
Corporation.
Windows95, Windows98, Windows NT4.0, Windows2000, and MS-DOS are registered trademarks o r
product names of Microsoft Corporation.
DOS/V is registered trademark and product name of International Business Machine Corpor ation (IBM).
Other company and product names may be registered trademarks or product names.
Caution :
No part of this product or publication may be reproduced, copied, or transmitted in any
form or by any means, except for personal use, without the permission of MUTOH
INDUSTRIES LTD.
The product and the contents of this publication may be changed without prior
notification.
MUTOH INDUSTRIES LTD. has made the best efforts to keep this publication free from
error, but if you find any uncertainties or misprints, please call us or the shop where you
bought this equipment.
MUTOH INDUSTRIES LTD. shall not be liable for any damages or troubles resulting
from the use of this equipment or this manual.
Page 6
User’s Guide – Toucan Hybrid
6
AP-750, Rev. 1.1 –- 23/04/04
Warranty Limitations
1. MUTOH INDUSTRIES LTD. warrants part repair or replacement as a sole measure only if a failure is
found in the system or in the materials and workmanship of the product the seller produced.
However, if the cause of failure is uncertain, action is decided after due mutual consultation.
2. The warranty shall not apply to any direct or indirect loss, or compensation for the loss when the product
that has been subject to misuse, neglect, or improper alternation.
About This Manual
1. Purpose and target readers
This manual explains preparations needed before using and procedures for o perations for MUTOH
INDUSTRIAL LTD. Grand Format Inkjet Printer (PJ-162-FE Toucan Hybrid)
This manual is prepared for the owners and operators of this printer.
Before using this printer, first understand the contents and directions in this manual.
2. Manual configuration
Section Contents
1 Safety Instructions Explains cautions and warnings labeled on the printer for the both
operators of the printer and maintenance personnel.
2 Product Overview Explains the features, part names, and functions of the printer.
3 Installation Explains how to install the printer
3 Preparing for a job Explains the procedures needed to prepare for a job
4 Handling the printer Explains how to handle the printer.
5 Maintenance Explains daily maintenance of the printer.
6 Troubleshooting Explains troubles that may occur when using the printer and how to solve
them.
7 Appendix Explains the specifications, optional parts and supplies, installation
procedures for optional parts, and user support for this printer.
Notes :
"Safety Instructions" through "Basic Installation" must be read before using the printer.
Read "Handling the printer" through “Appendix" as necessary.
Page 7

User’s Guide – Toucan Hybrid
7
AP-750, Rev. 1.1 –- 23/04/04
TABLE OF CONTENTS
1 SAFETY INSTRUCTIONS........................................................................................................................................13
1.1 INTRODUCTION ....................................................................................................................................................... 13
1.2 WARNINGS, CAUTIONS, AND NOTES.......................................................................................................................13
1.3 IMPORTANT SAFETY INSTRUCTIONS ........................................................................................................................14
1.4 WARNING LABELS...................................................................................................................................................18
1.4.1 Handling the warning labels...........................................................................................................................18
1.4.2 Locations and types of warning labels...........................................................................................................18
1.4.3 Other safety issues..........................................................................................................................................24
2. PRODUCT OVERVIEW...........................................................................................................................................27
2.1 INTRODUCTION ....................................................................................................................................................... 27
2.2 FEATURES...............................................................................................................................................................27
2.3 PART NAMES AND FUNCTIONS.................................................................................................................................28
2.3.1 Front...............................................................................................................................................................28
2.3.2 Rear section.................................................................................................................................................... 30
2.3.3 Flat stand........................................................................................................................................................31
2.3.4 Operation panel..............................................................................................................................................32
2.4 PRINTER STATUS.....................................................................................................................................................34
2.4.1 Normal ...........................................................................................................................................................34
2.4.2 Setup menu display........................................................................................................................................34
2.4.3 Changing the printer status.............................................................................................................................35
3 INSTALLATION.........................................................................................................................................................37
3.1 INTRODUCTION ....................................................................................................................................................... 37
3.2 UNPACKING ............................................................................................................................................................ 37
3.2.1 Unpacking procedure.....................................................................................................................................37
3.2.2 Verification of packaged items.......................................................................................................................39
3.3 ASSEMBLY..............................................................................................................................................................42
3.3.1 Removal of protective packaging material.....................................................................................................42
3.3.2 Installing panel sheet and panel cover............................................................................................................43
3.3.3 Installing the media sticking prevention screen ............................................................................................. 44
3.3.4 Installing the power cable clamp.................................................................................................................... 45
3.3.5 Assembling the flat stand...............................................................................................................................46
3.4 INSTALLATION ........................................................................................................................................................49
3.4.1 Choosing a place for the printer.....................................................................................................................49
3.4.2 Installing the printer.......................................................................................................................................51
3.4.3 Installing the flat stand...................................................................................................................................51
4 PREPARING FOR A JOB..........................................................................................................................................55
4.1 INTRODUCTION ....................................................................................................................................................... 55
4.2 CONNECTING THE POWER CABLE ............................................................................................................................ 55
4.3 CONNECTING THE FOOT SWITCH .............................................................................................................................58
4.4 SELECTION ROLL-TO-ROLL OR RIGID MATERIALS....................................................................................................60
4.5 TURNING THE POWER ON/OFF...............................................................................................................................61
4.5.1 Turning the power ON...................................................................................................................................61
4.5.2 Turning the power OFF..................................................................................................................................66
4.5.3 An emergency power OFF.............................................................................................................................71
4.6 REFILLING THE INK - JETWASH FLUID...................................................................................................................... 72
4.7 MEDIA HANDLING...................................................................................................................................................77
4.7.1 Setting of the rigid media...............................................................................................................................78
4.7.2 Removing the flat stand..................................................................................................................................82
4.7.3 Placement of the roll media............................................................................................................................84
4.7.4 Loading roll media.........................................................................................................................................88
4.7.5 Setting winding unit.......................................................................................................................................94
4.8 HEAD CLEANING BEFORE PRINTING.........................................................................................................................97
4.9 TESTPRINTING.......................................................................................................................................................101
4.9.1 Setup List ..................................................................................................................................................... 102
Page 8

User’s Guide – Toucan Hybrid
8
AP-750, Rev. 1.1 –- 23/04/04
4.9.2 Nozzle Check...............................................................................................................................................103
4.9.3 Alignment.....................................................................................................................................................103
4.9.4 Palette........................................................................................................................................................... 105
4.10 CONNECTING THE PRINTER TO YOUR PC.............................................................................................................106
4.10.1 System requirements..................................................................................................................................106
4.10.2 Selecting cables..........................................................................................................................................106
4.10.3 Connecting the interface cable...................................................................................................................107
5. HANDLING THE PRINTER..................................................................................................................................109
5.1 INTRODUCTION ..................................................................................................................................................... 109
5.2 DRAWING FLOW....................................................................................................................................................109
5.3 USING MEDIA........................................................................................................................................................111
5.3.1 Media type....................................................................................................................................................111
5.3.2 Cautions on handling media......................................................................................................................... 112
5.3.3 Precaution on storing media.........................................................................................................................113
5.3.4 The printing area..........................................................................................................................................113
5.3.5 Criteria for the media feed ........................................................................................................................... 114
5.3.6 Media feed compensation.............................................................................................................................115
5.3.7 Installing media holder plate........................................................................................................................118
5.4 MENU SETUP ON THE OPERATION PANEL - ROLL-TO-ROLL ....................................................................................120
5.4.1 Setup menu...................................................................................................................................................121
5.4.2 Origin setup menu ........................................................................................................................................ 123
5.4.3 Test print menu ............................................................................................................................................ 124
5.4.4 Media setup menu........................................................................................................................................124
5.4.5 Media type menu..........................................................................................................................................125
5.4.6 User media menu..........................................................................................................................................125
5.4.7 Ink Dry menu............................................................................................................................................... 126
5.4.8 Head Height menu........................................................................................................................................127
5.4.9 Stiff menu.....................................................................................................................................................127
5.4.10 Thickness menu..........................................................................................................................................127
5.4.11 Platen heater menu.....................................................................................................................................128
5.4.12 Dryer menu.................................................................................................................................................128
5.4.13 Prevention stick menu................................................................................................................................129
5.4.14 Media feed compensation menu.................................................................................................................129
5.4.15 Printing by Media feed compensation menu.............................................................................................. 130
5.4.16 Change media feed compensation value menu...........................................................................................130
5.4.17 Print unit menu........................................................................................................................................... 131
5.4.18 Print depth menu........................................................................................................................................131
5.4.19 Data size menu...........................................................................................................................................132
5.4.20 PF size menu..............................................................................................................................................132
5.4.21 CR size menu.............................................................................................................................................133
5.4.22 Idle heat menu............................................................................................................................................133
5.4.23 Idle timeout menu ......................................................................................................................................134
5.4.24 Media cut menu..........................................................................................................................................134
5.4.25 Printing mode menu...................................................................................................................................135
5.4.26 Printing mode setup menu..........................................................................................................................135
5.4.27 Printing quality menu.................................................................................................................................135
5.4.28 Inter Lace Setup menu................................................................................................................................136
5.4.29 Printing direction menu.............................................................................................................................. 136
5.4.30 Repeat printing menu.................................................................................................................................136
5.4.31 Repeat times menu.....................................................................................................................................137
5.4.32 Interval time menu..................................................................................................................................... 137
5.4.33 Command setup menu................................................................................................................................ 138
5.4.34 Image resolution menu............................................................................................................................... 138
5.4.35 Online time out menu.................................................................................................................................139
5.4.36 Layout setup menu.....................................................................................................................................139
5.4.37 Joint printing menu .................................................................................................................................... 139
5.4.38 Joint margin menu......................................................................................................................................140
5.4.39 Function setup menu..................................................................................................................................140
5.4.40 CMY → K menu........................................................................................................................................ 141
5.4.41 Mirror menu...............................................................................................................................................141
Page 9

User’s Guide – Toucan Hybrid
9
AP-750, Rev. 1.1 –- 23/04/04
5.4.42 Centronics menu.........................................................................................................................................142
5.4.43 Network menu............................................................................................................................................ 142
5.4.44 Utility menu ...............................................................................................................................................142
5.4.45 Error Display menu....................................................................................................................................143
5.4.46 Media detection menu................................................................................................................................143
5.4.47 Take-up mechanism menu ......................................................................................................................... 143
5.4.48 Load unit menu .......................................................................................................................................... 144
5.4.49 Negative pressure pump menu...................................................................................................................144
5.4.50 Skew check menu.......................................................................................................................................145
5.4.51 Version Check Menu..................................................................................................................................145
5.4.52 Idle management setup menu..................................................................................................................... 145
5.4.53 Write mode menu....................................................................................................................................... 146
5.4.54 Reprint menu.............................................................................................................................................. 147
5.4.55 File delete menu.........................................................................................................................................148
5.4.56 Re-name menu ........................................................................................................................................... 148
5.4.57 Format menu..............................................................................................................................................149
5.4.58 Free area menu...........................................................................................................................................150
5.4.59 Initialize setup menu .................................................................................................................................. 151
5.4.60 All initialize menu...................................................................................................................................... 152
5.4.61 Media setup Initialize menu.......................................................................................................................152
5.4.62 Printing mode initialize menu.................................................................................................................... 152
5.4.63 Command setup initialize menu.................................................................................................................153
5.4.64 Layout setup initialize menu ...................................................................................................................... 153
5.4.65 Function setup initialize menu ..................................................................................................................153
5.4.66 Roll media setup initialize menu................................................................................................................154
5.4.67 Centronics initialize menu..........................................................................................................................154
5.4.68 Network initialize menu.............................................................................................................................154
5.4.69 Utility initialize menu.................................................................................................................................155
5.4.70 File management initialize menu .............................................................................................................. 155
5.4.71 Data dump menu........................................................................................................................................155
5.4.72 Head wash menu........................................................................................................................................156
5.4.73 Long term storage cleaning menu..............................................................................................................157
5.4.74 Maintenance setup menu............................................................................................................................ 158
5.4.75 Set Review Menu.......................................................................................................................................159
5.5 MENU SETUP ON THE OPERATION PANEL - RIGID MATERIAL.................................................................................. 160
5.5.1 Setup menu...................................................................................................................................................161
5.5.2 Origin setup menu ........................................................................................................................................ 162
5.5.3 Test print menu ............................................................................................................................................ 165
5.5.4 Media setup menu........................................................................................................................................165
5.5.5 Media type menu..........................................................................................................................................165
5.5.6 User media menu..........................................................................................................................................166
5.5.7 Ink Dry menu............................................................................................................................................... 167
5.5.8 Head Height menu........................................................................................................................................167
5.5.9 Dist Adj menu..............................................................................................................................................168
5.5.10 Printing by Media feed compensation menu.............................................................................................. 168
5.5.11 Change media feed compensation value menu...........................................................................................169
5.5.12 Print unit menu........................................................................................................................................... 169
5.5.13 Print depth menu........................................................................................................................................170
5.5.14 Data size menu...........................................................................................................................................170
5.5.15 Printing mode menu...................................................................................................................................171
5.5.16 Printing mode setup menu..........................................................................................................................171
5.5.17 Printing quality menu.................................................................................................................................172
5.5.18 Inter Lace Setup menu................................................................................................................................172
5.5.19 Printing direction menu.............................................................................................................................. 172
5.5.20 Repeat printing menu.................................................................................................................................173
5.5.21 Repeat times menu.....................................................................................................................................173
5.5.22 Interval time menu..................................................................................................................................... 173
5.5.23 Commend setup menu................................................................................................................................ 174
5.5.24 Image resolution menu............................................................................................................................... 174
5.5.25 Online time out menu.................................................................................................................................175
5.5.26 Layout setup menu.....................................................................................................................................175
Page 10

User’s Guide – Toucan Hybrid
10
AP-750, Rev. 1.1 –- 23/04/04
5.5.27 Joint printing menu .................................................................................................................................... 175
5.5.28 Joint margin menu......................................................................................................................................176
5.5.29 Function setup menu..................................................................................................................................176
5.5.30 CMY → K menu........................................................................................................................................ 177
5.5.31 Mirror menu...............................................................................................................................................177
5.5.32 Centronics menu.........................................................................................................................................178
5.5.33 Utility menu ...............................................................................................................................................178
5.5.34 Error Display menu....................................................................................................................................179
5.5.36 Media width menu......................................................................................................................................179
5.5.37 Negative pressure pump menu...................................................................................................................180
5.5.38 Infrared lamp menu....................................................................................................................................180
5.5.39 Vacuum menu............................................................................................................................................180
5.5.40 Version Check Menu..................................................................................................................................181
5.5.41 File management setup menu..................................................................................................................... 181
5.5.42 Write mode menu....................................................................................................................................... 182
5.5.43 Reprint menu.............................................................................................................................................. 182
5.5.44 File delete menu.........................................................................................................................................183
5.5.45 Re-name menu ........................................................................................................................................... 184
5.5.46 Format menu..............................................................................................................................................185
5.5.47 Free area menu...........................................................................................................................................186
5.5.48 Initialize setup menu .................................................................................................................................. 186
5.5.49 All initialize menu...................................................................................................................................... 187
5.5.50 Media setup Initialize menu.......................................................................................................................188
5.5.51 Printing mode initialize menu.................................................................................................................... 188
5.5.52 Command setup initialize menu.................................................................................................................188
5.5.53 Layout setup initialize menu ...................................................................................................................... 189
5.5.54 Function setup initialize menu ..................................................................................................................189
5.5.55 Roll media setup initialize menu................................................................................................................189
5.5.56 Centronics initialize menu..........................................................................................................................190
5.5.57 Utility initialize menu.................................................................................................................................190
5.5.58 File management initialize menu ............................................................................................................... 190
5.5.59 Data dump menu........................................................................................................................................191
5.5.60 Head wash menu........................................................................................................................................191
5.5.61 Long term storage cleaning menu..............................................................................................................192
5.5.62 Maintenance setup menu............................................................................................................................ 193
5.5.63 Set Review Menu.......................................................................................................................................194
5.6 OPERATING FORM THE OPERATION PANEL ............................................................................................................ 195
5.6.1 To stop printing operation............................................................................................................................195
5.6.2 Operating the pressure rollers.......................................................................................................................196
5.6.3 Moving the Rigid Media..............................................................................................................................197
5.6.5 “Manual” becomes “Adjust”........................................................................................................................ 198
5.6.6 infrared lamp settings................................................................................................................................... 198
5.6.7 Vacuum settings...........................................................................................................................................198
5.6.8 Winding the roll media.................................................................................................................................199
5.6.9 Head cleaning............................................................................................................................................... 201
5.6.10 Checking printing mode............................................................................................................................. 202
5.7 OPERATIONS AFTER PRINTING...............................................................................................................................203
5.7.1 Removing the rigid media............................................................................................................................ 203
5.7.2 Roll media cutting procedure.......................................................................................................................205
5.7.3 Disposal of waste fluids...............................................................................................................................206
5.8 MEDIA TOUCHING THE CARRIAGE OR INFRARED LAMP .........................................................................................207
Page 11

User’s Guide – Toucan Hybrid
11
AP-750, Rev. 1.1 –- 23/04/04
6 MAINTENANCE.......................................................................................................................................................209
6.1 INTRODUCTION ..................................................................................................................................................... 209
6.2 REPLACING CONSUMABLES................................................................................................................................... 209
6.2.1 Refilling the ink and jetwash liquid .............................................................................................................209
6.2.2 Replacing roll media.................................................................................................................................... 211
6.2.3 Replacement of the ink filter........................................................................................................................213
6.2.4 Replacement of the print head and CR motor..............................................................................................214
6.2.5 Replacement of the infrared lamp................................................................................................................215
6.3 CLEANING THE PRINTER........................................................................................................................................216
6.3.1 Cleaning the outer case ................................................................................................................................ 216
6.3.2 Cleaning inside the printer...........................................................................................................................217
6.3.3 Cleaning of the print head surface................................................................................................................218
6.3.4 Washing print head ......................................................................................................................................220
6.4 LONG-TERM STORAGE CLEANING.......................................................................................................................... 224
6.5 TRANSFER AND TRANSPORTATION........................................................................................................................228
6.5.1 Transferring the printer................................................................................................................................228
6.5.2 Transporting the printer................................................................................................................................230
7 TROUBLESHOOTING............................................................................................................................................231
7.1 INTRODUCTION ..................................................................................................................................................... 231
7.2 FAILURES AND MALFUNCTIONS OF THE PRINTER...................................................................................................231
7.3 ERROR MESSAGES.................................................................................................................................................237
7.3.1 Status messages............................................................................................................................................ 237
7.3.2 Message type error display and solutions.....................................................................................................239
7.3.3 Data error display and solutions................................................................................................................... 241
7.3.4 Command error display and solutions..........................................................................................................241
7.3.5 Error requiring a restart................................................................................................................................ 242
7.4 WHEN MEDIA JAMS OCCUR ...................................................................................................................................243
7.4.1 Removing the rigid media............................................................................................................................ 243
7.4.2 How to remove the roll media.....................................................................................................................243
8 APPENDIX.................................................................................................................................................................245
8.1 INTRODUCTION ..................................................................................................................................................... 245
8.2 PRODUCT SPECIFICATIONS....................................................................................................................................245
8.2.1 TOUCAN HYBRID Unit specification........................................................................................................245
8.3 INTERFACE SPECIFICATIONS .................................................................................................................................247
8.3.1 Centronics Bidirectional Parallel Interface: IEEE1284)...............................................................................247
8.4 OPTIONS/SUPPLY LIST ...........................................................................................................................................248
8.4.1 Options.........................................................................................................................................................248
8.4.2 Supply..........................................................................................................................................................248
8.5 INSTALLING OPTIONS............................................................................................................................................ 249
8.5.1 Installation of the hard disk..........................................................................................................................249
Page 12

User’s Guide – Toucan Hybrid
12
AP-750, Rev. 1.1 –- 23/04/04
Page 13
User’s Guide – Toucan Hybrid
13
AP-750, Rev. 1.1 –- 23/04/04
1 SAFETY INSTRUCTIONS
1.1 INTRODUCTION
This chapter explains the meaning of safety terms for personnel who operates this equipment, important
safety instructions, and the positions of the warning labels.
Important :
Be sure to follow all instructions and warnings in this manual when using the
equipment.
1.2 WARNINGS, CAUTIONS, AND NOTES
Safety terms in this manual and the contents of warning labels attached to the printer are categorized into
the following three types depending on the degree of risk (or the scale of accident ).
Read the following explanations carefully, and follow the instructions in this manual.
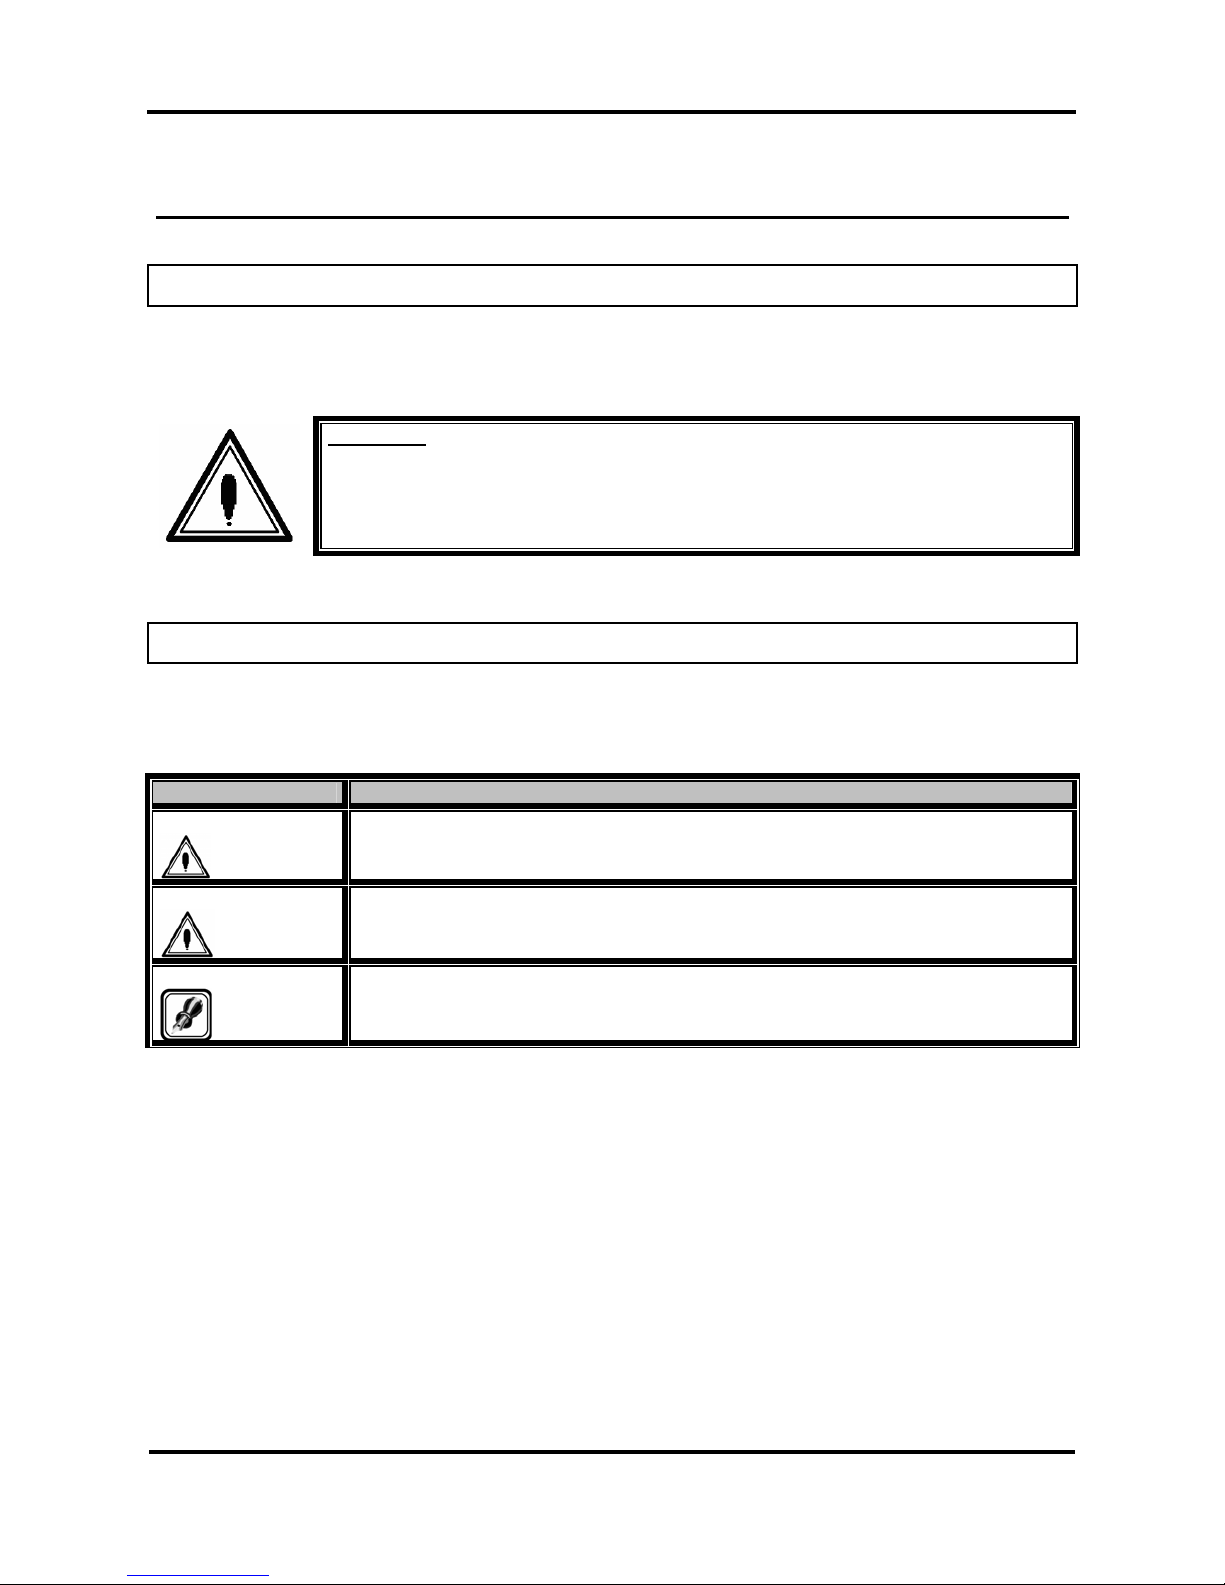
Safety terms Details
Important
Must be followed carefully to avoid death or serious bodily injury.
Caution
Must be observed to avoid bodily injury (moderately or lightly) or damage to your
equipment.
Note
Contains important information and useful tips on the operation of your printer.
Page 14

User’s Guide – Toucan Hybrid
14
AP-750, Rev. 1.1 –- 23/04/04
1.3 IMPORTANT SAFETY INSTRUCTIONS
General safety instructions that must be observed to use the equipment safely are explained below.
Always wear protective goggles. Operators as well as technicians and visitors have to wear protective
goggles whenever the infrared lamp is active. It is obligated to wear them to avoid eye damage.
Do not touch the infrared lamp or infrared lamp house after or during operation. Doing so could result in
burns.
Please note that after operating the infrared lamp and infrared lamp house will remain hot for several
minutes. Let it cool off. Not doing so could result in burns.
In case the carriage or infrared lamp touches the media, power the unit OFF and ON. Do not touch the
carriage or infrared lamp.
Be careful not to pinch your fingers when lowering or lifting the media guide by using the lifting grip.
During printing on rigid materials, the fans will cool off the infrared lamp. Please note there is no
detection. Regularly check if the fans are working. You can do this by holding a sheet of paper between
the fan and lamp house.
When installing or removing the front stand 1, please make sure not to touch the carriage or the infrared
lamp. Doing so could cause permanent damage.
Do not place the printer in the following areas. Doing so may result in the printer tipping or falling over
and causing injury.
• Unstable surfaces
• Inclined surface
• Areas subject to vibration by other equipment
Do not stand on or place heavy objects on your printer. Doing so may result in the printer tipping or
falling over and may cause injury.
Do not cover the ventilation hole of your printer with cloth, such as a blanket or table cloth. Doing so
could obstruct ventilation and cause fire.
Do not place the printer in humid and dusty areas. Doing so may result in electrical shock or fire.
Do not use a damaged power cable. Doing so may result in electrical shock.
Do not attempt to plug in electrical plugs with wet hands. Doing so may result in electrical shock.
Do not connect earth cables in the following areas.
• Gas pipes → Doing so may cause fire or an explosion.
• Earth terminals for telephone line or lightning rod → Doing so may cause a large flow of
voltage if lightning occurs.
• Water pipes or faucets → If there is a plastic part in the pipe, the earth will not work properly.
The ink used in the product contains an organic solvent (CYCLOHEXANONE). It is flammable so open
flame is prohibited in the area. In a dry environment, static electricity can cause ignition, so before
handling the ink, jetwash liquid or waste liquids, touch a metallic object first to remove static electricity
from your body.
Do not insert or drop metal or inflammable objects into openings, such as ventilation outlets. Doing so
may result in electrical shock and fire.
Stop using your printer if a liquid is spilled into it. This may cause electrical shock or fire. Turn the
printer off as soon as possible, unplug the power cord, contact MUTOH local dealer.
Page 15

User’s Guide – Toucan Hybrid
15
AP-750, Rev. 1.1 –- 23/04/04
Be sure to use the attached cable. Otherwise, electrical shock or fire may occur.
Be sure to use the specified voltage (AC 100 V- 120 V or AC 220 V - 240 V). Otherwise, electrical shock
or fire may occur.
Use electricity directly from a power outlet (AC 100 V- 120 V or AC 220 V - 240 V). Do not put many
loads on one electrical output. Otherwise, heat may be generated and cause fire.
Be sure to use an outlet with an earth terminal and use the terminal correctly. Otherwise, electrical
shock or fire may occur.
The ink used in this product contains an organic solvent (CYCLOHEXANONE). Make sure to follow the
industrial waste disposal laws and ordinances of your local governments. It is necessary to install a local
ventilation unit, a push/pull type ventilation unit, or a total ventilation unit to perform adequate ventilation.
If ink or jetwash liquid is swallowed, do not make the person throw up, but immediately call a doctor and
a poison management centre. If there is contact with eyes or inhalation, it may cause irritation. Follow
the cautions and procedures labeled on the ink and jetwash bottles, and take action immediately.
Follow the instructions below when handling the power cable.
• Do not modify the cable
• Do not put heavy objects on the cable
• Do not bend, twist, or pull the cord
• Do not wire the cable near equipment that generates heat
Follow the instructions below when handling the power plug. Otherwise, fire may occur.
• Wipe away dust and any other residue before inserting the plug.
• Ensure that the plug is firmly inserted as far as it will go.
When handling the foot switch, be wary of the following:
• Do not place anything heavy on the foot switch
• Do not bend the cable of the foot switch with force, and do not pull.
• Do not place the foot switch near thermal devices.
When opening/closing the maintenance cover, be careful not to get fingers caught in the lid.
Be careful not to pinch your fingers between rigid media and the media tray
When moving the media, be careful not to pinch your fingers between the flat stand roller and the media
tray
The refilled ink or jetwash liquid must not exceed the upper limit (about 2 liters) of the main tank. If it
exceeds the upper limit, the ink will leak out and will cause printer problems.
When filling the main tank with ink, make sure not to make a mistake with the ink colour and the ink tube
colours. Filling the tank with wrong colour ink can make the print head useless.
During printing in roll mode, do not touch the media guide. The media guide is hot, and may cause burns
if touched.
During the winding operation, make sure to keep hands and fingers clear of moving parts.
Take extreme caution not to have your fingers pinched in the drive when moving the media.
When cutting the roll media, be careful of the following. Incorrect handling can result in injury to hands
and fingers from the blade.
• When holding the media, do not place fingers over the media cut groove.
• Move the blade slowly along the media cut groove.
Page 16

User’s Guide – Toucan Hybrid
16
AP-750, Rev. 1.1 –- 23/04/04
Do not use thinner, Benzene, alcohol or other active agents except for following parts. Doing so may
result in malfunction of the product.
• Inside the maintenance cover
• Print head surface
Be careful not to spill water inside the printer. Doing so may result in a short circuit.
Never open the covers fixed with screws. Doing so may result in electrical shock or a malfunction in the
printer.
When cleaning the print head, be careful of the following. Incorrect cleaning may result in clogging of the
nozzles.
• Do not touch the print head surface with bare hands.
• Clean the print head wiper every time when ink is adhered to it or soak it in jetwash.
Do not tilt the printer, place it against a wall, or turn it upside down. Doing so may cause ink to leak
inside the printer. Also, movement after transportation is not covered by the warranty.
Have four or more people unpack and transport the printer.
When lifting the printer out of the packing box, be sure to remove the vinyl cover first, then grab the
holding sides of the printer. Lifting the printer with the vinyl cover on may cause your hands to slip and
drop or damage the printer.
Ensure that the plug has been disconnected from the power socket when it is not used for a long time.
Earth wires must be connected to wires or terminals which fulfil the conditions below.
• Earth terminals of power socket
• Earth wires with copper morsel that is at least 650 mm under ground
When refilling ink or jetwash fluid, always wear the protective gloves supplied with the unit.
Be sure to close the lid of the main tank tightly. If the lid is not tightly closed or loose, it will cause a
defect when purging, loading or unloading the ink.
Always perform the following work with 2 people.
• Placement of the roll media / rigid media
• Setting of the roll media / rigid media
• Setting of the winding unit
• Moving of media tray
When performing a head cleaning:
• Put on the gloves supplied with the printer on both hands.
• Use the print head wiper or polynit wipes supplied with the printer to clean printhead.
Otherwise the nozzle may become clogged.
Immediately after printing in roll mode, the media guide and the platen is very hot. Perform work after
the media guide and the platen have cooled down.
When changing the ink filter, always perform the following:
• Turn the unit OFF.
• Unplug the electrical power cord
• Remove all cables connected with the unit
• If any of these are connected while replacing the filter, the unit may be damaged.
When changing the ink filter, always wear the gloves supplied with the unit on both hands.
When cleaning the waste fluid tray, always wear the protective gloves supplied with the unit.
When cleaning the print head surface, always wear the protective gloves supplied with the unit.
Page 17

User’s Guide – Toucan Hybrid
17
AP-750, Rev. 1.1 –- 23/04/04
When performing cleaning for long-term storage, always wear the protective gloves supplied with the
unit.
Be sure to turn the printer off and unplug the power cord before cleaning.
Keep the printer horizontal during transportation.
Be sure to do the following before attaching expansion memories.
• Turn the printer off
• Unplug the power cord from the socket
Unplug cables connected to the printer.
• Otherwise, damage to the printer or your computer may occur.
• Remove electrostatic charge form your clothes and body when touching the metal parts of
the printer.
• Electronic components such as the memory may malfunction if exposed to an electrostatic
charge.
Before installation of options, always perform the following.
• Remove the power source plug from the outlet.
• Remove all cables connected to the printer.
• Failure to do so could result in damage to the printer or your computer.
• Touch a metallic section of the product, to remove any static electricity in your body. The
electronic components can be damaged from static electricity.
When installing options, do not touch the elements on the circuit board. The elements on the boards
can be very hot, and can cause burns.
This equipment contains a Sealed Lead Acid Battery.
Dispose of in accordance with all applicable governmental regulations.
Page 18
User’s Guide – Toucan Hybrid
18
AP-750, Rev. 1.1 –- 23/04/04
1.4 WARNING LABELS
The handling, attachment locations, and types of warning labels are explained below.
Warning labels are attached to areas where care should be taken. Read and understand the positions and
contents thoroughly before performing your work.
1.4.1 Handling the warning labels
Be sure to note the following when handling the labels.
Notes :
Make sure that all labels can be recognized. If text or illustrations cannot be seen
clearly, either clean or replace the label.
When cleaning labels, use a cloth with water or neutral detergent. Do not use a solvent
or gasoline.
If a warning label is damaged, lost, or cannot be recognized, replace the label. When
replacing warning labels, contact MUTOH local dealer.
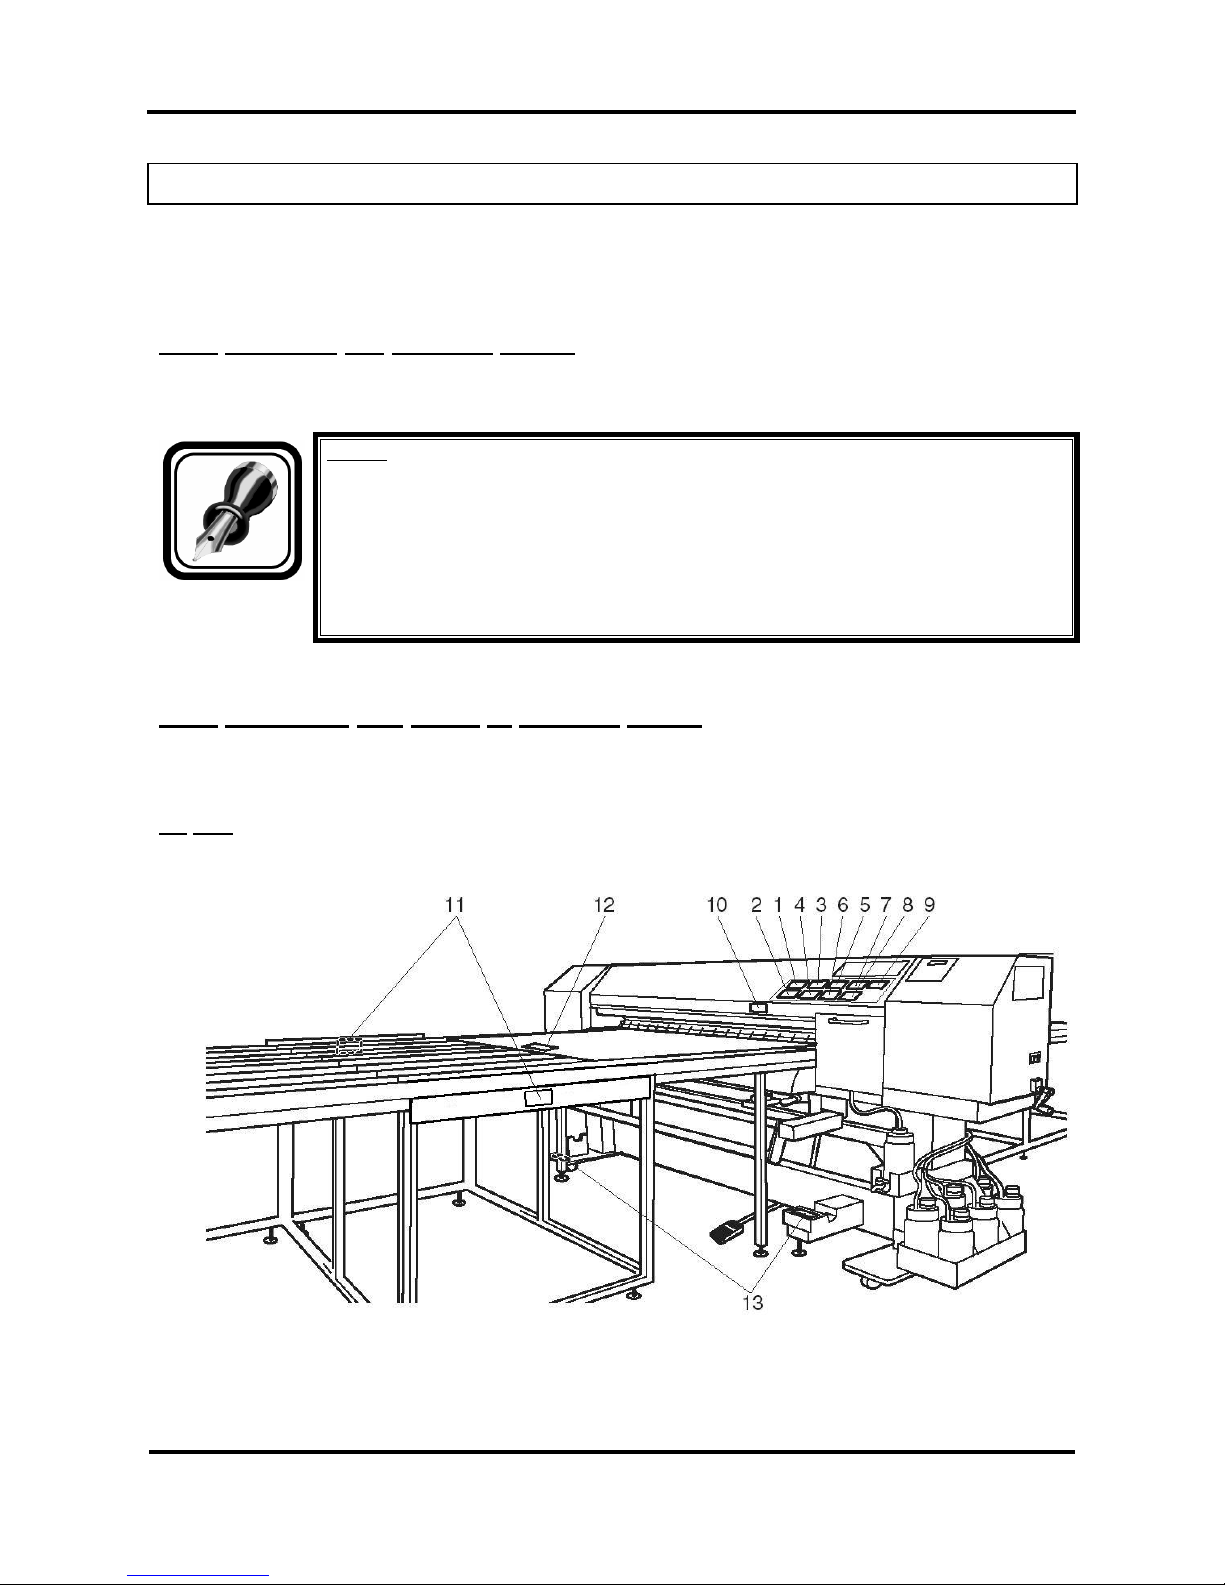
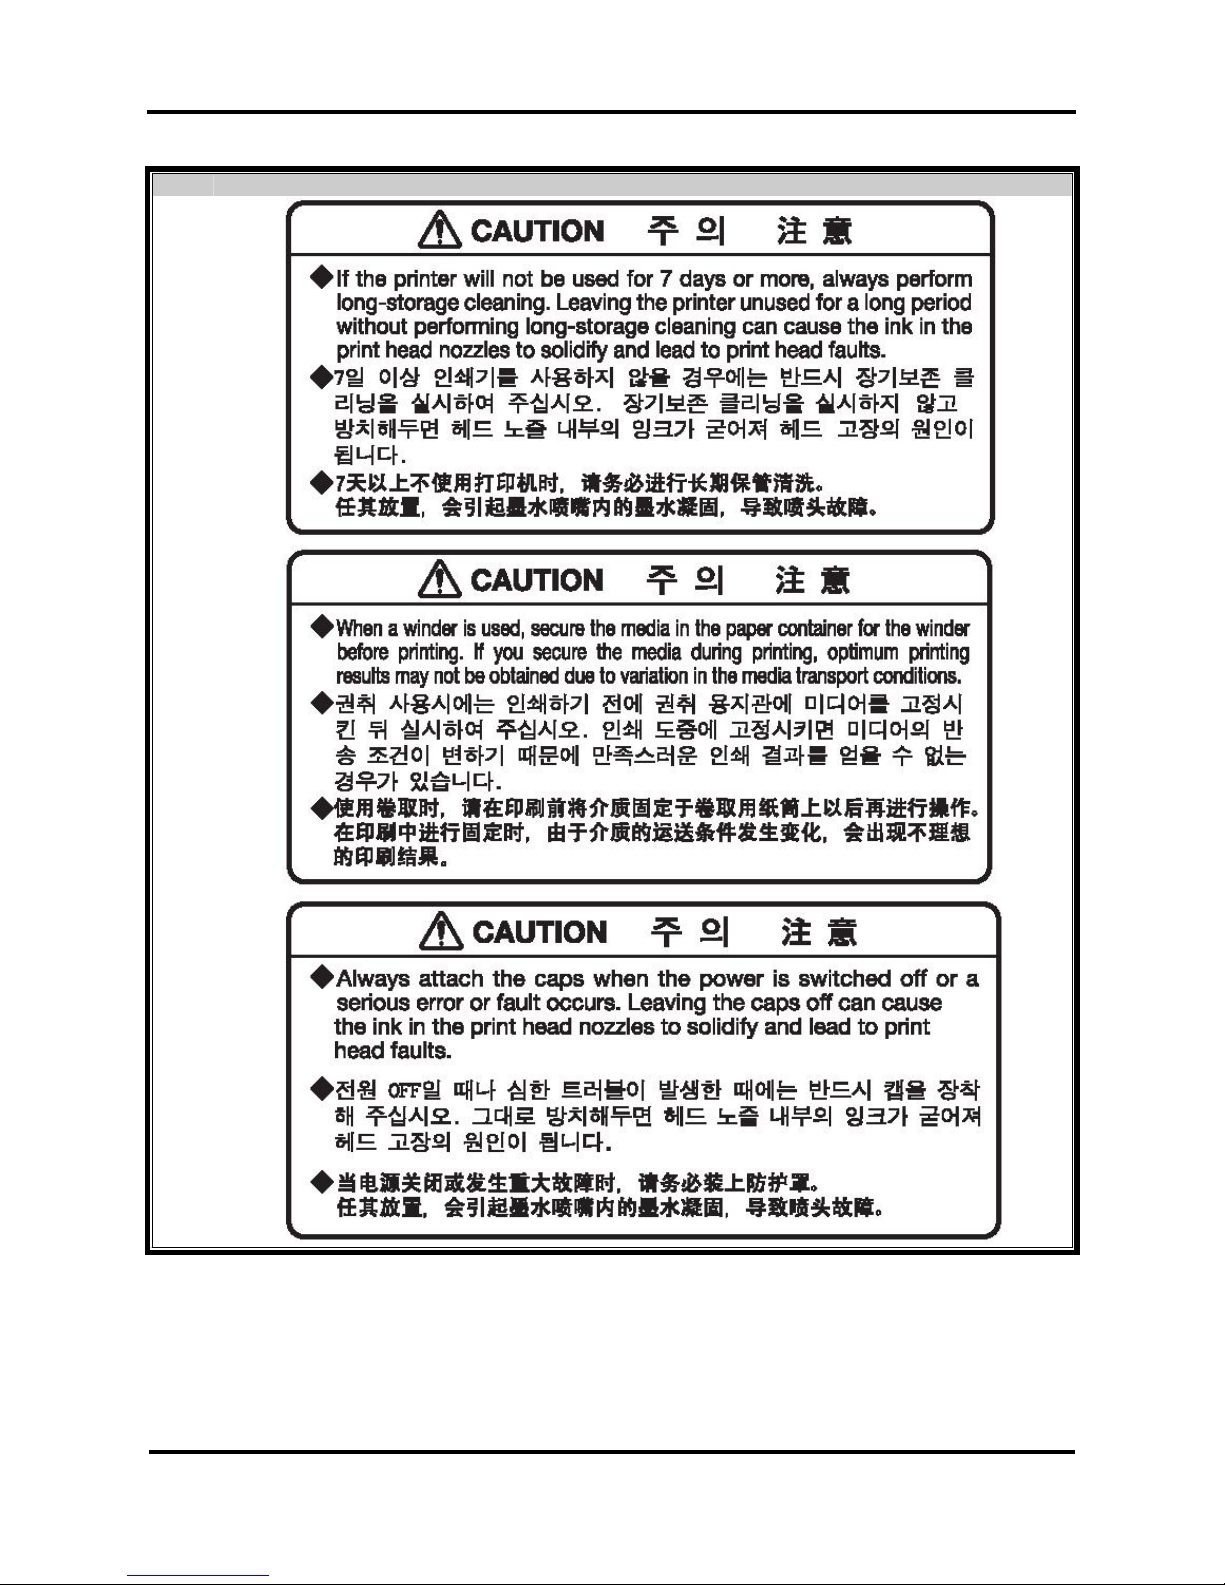
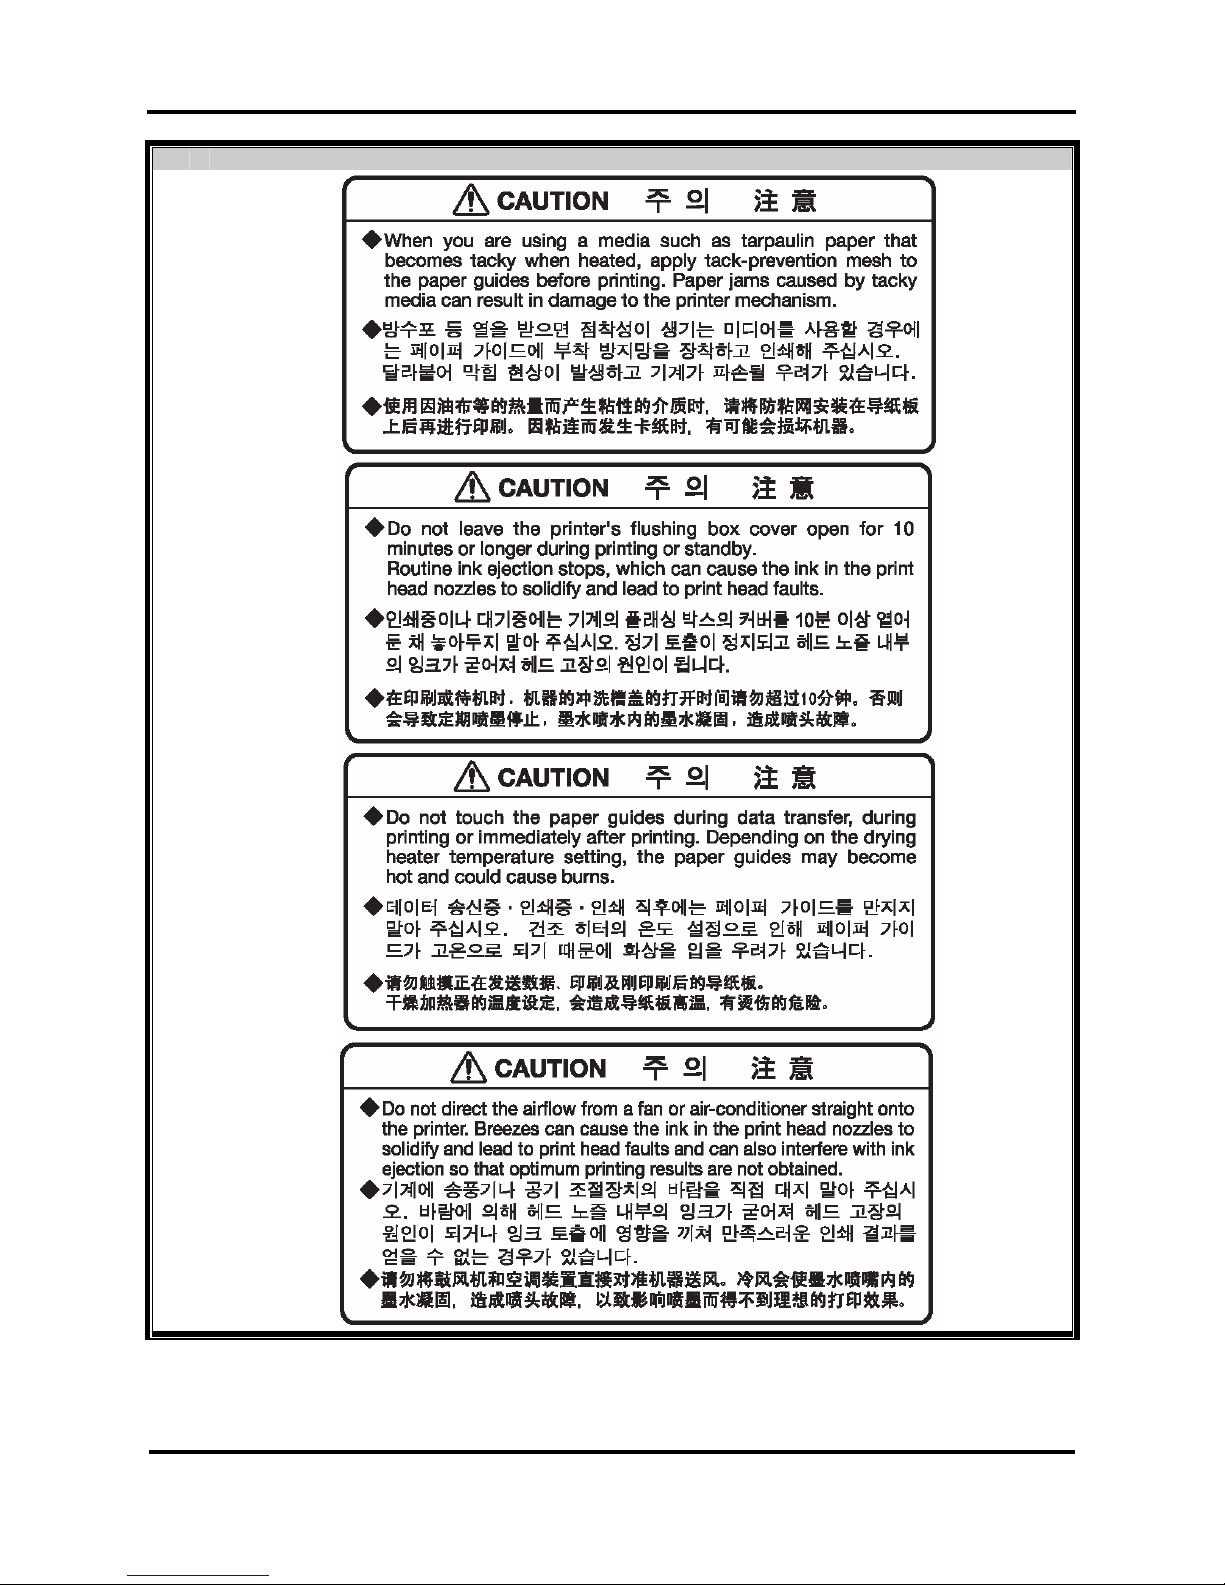
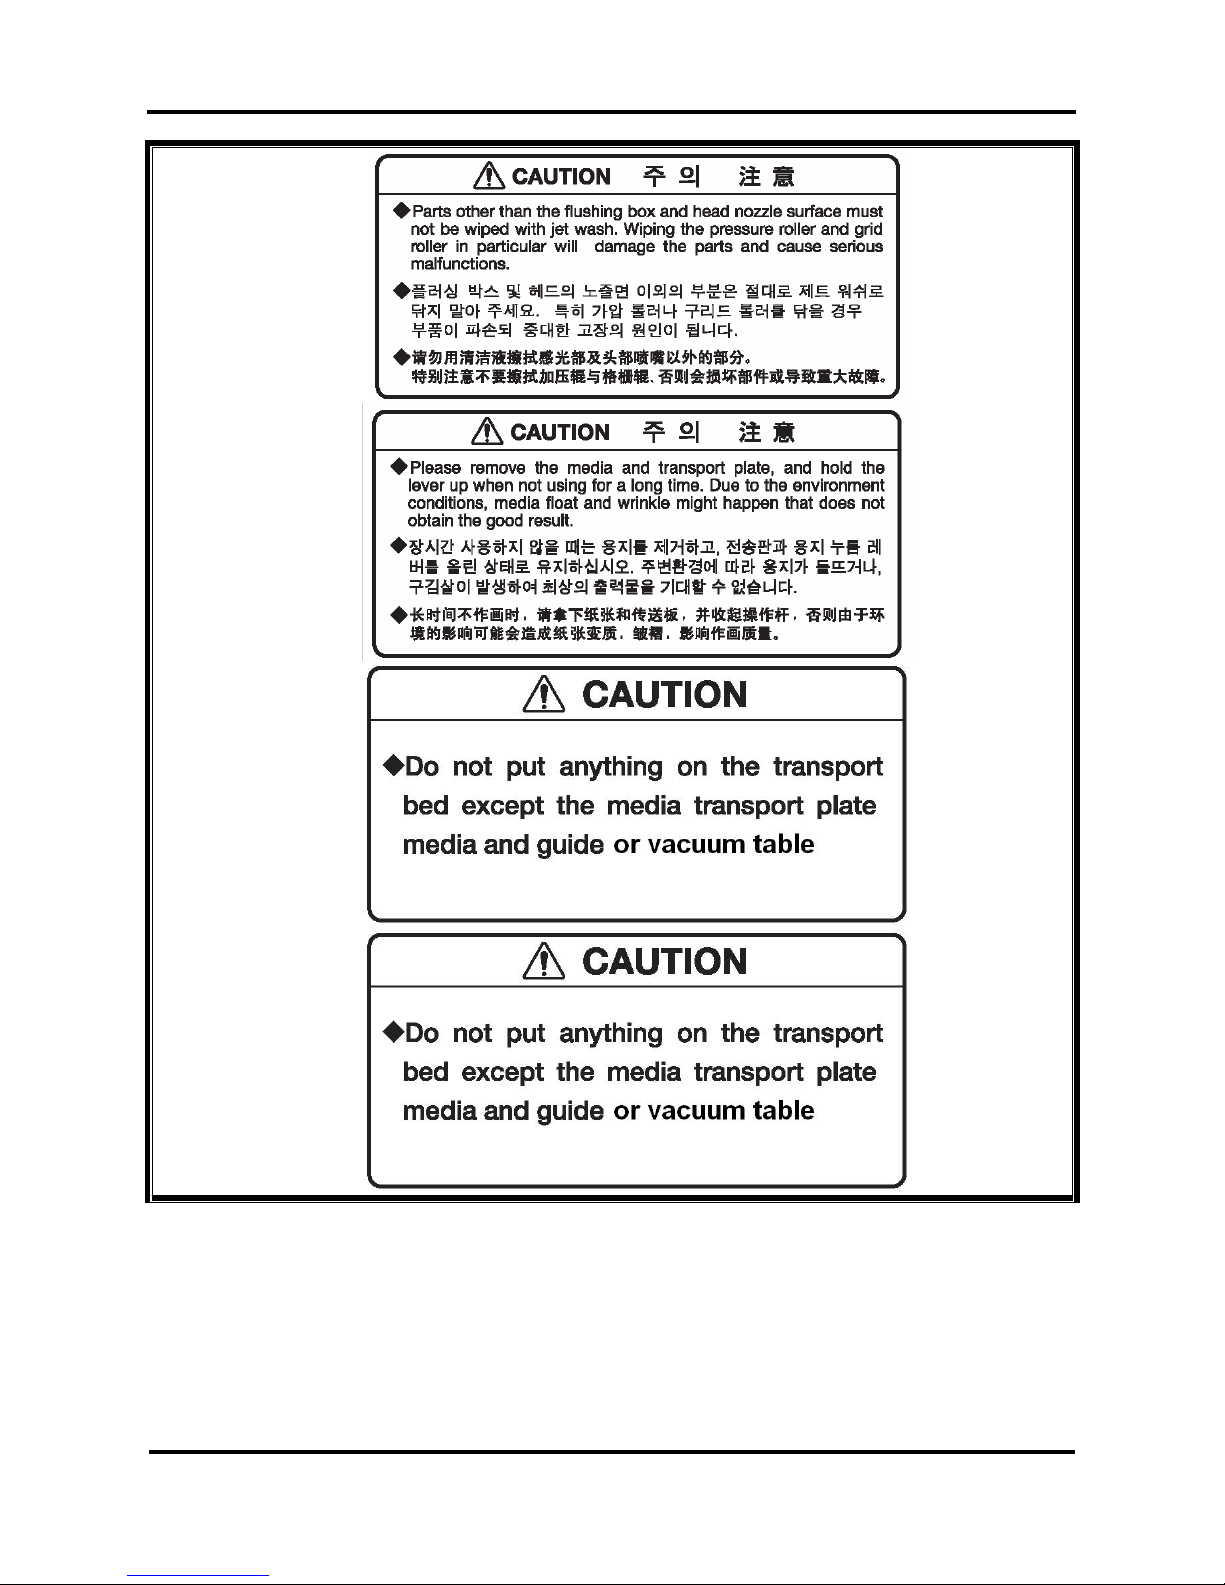
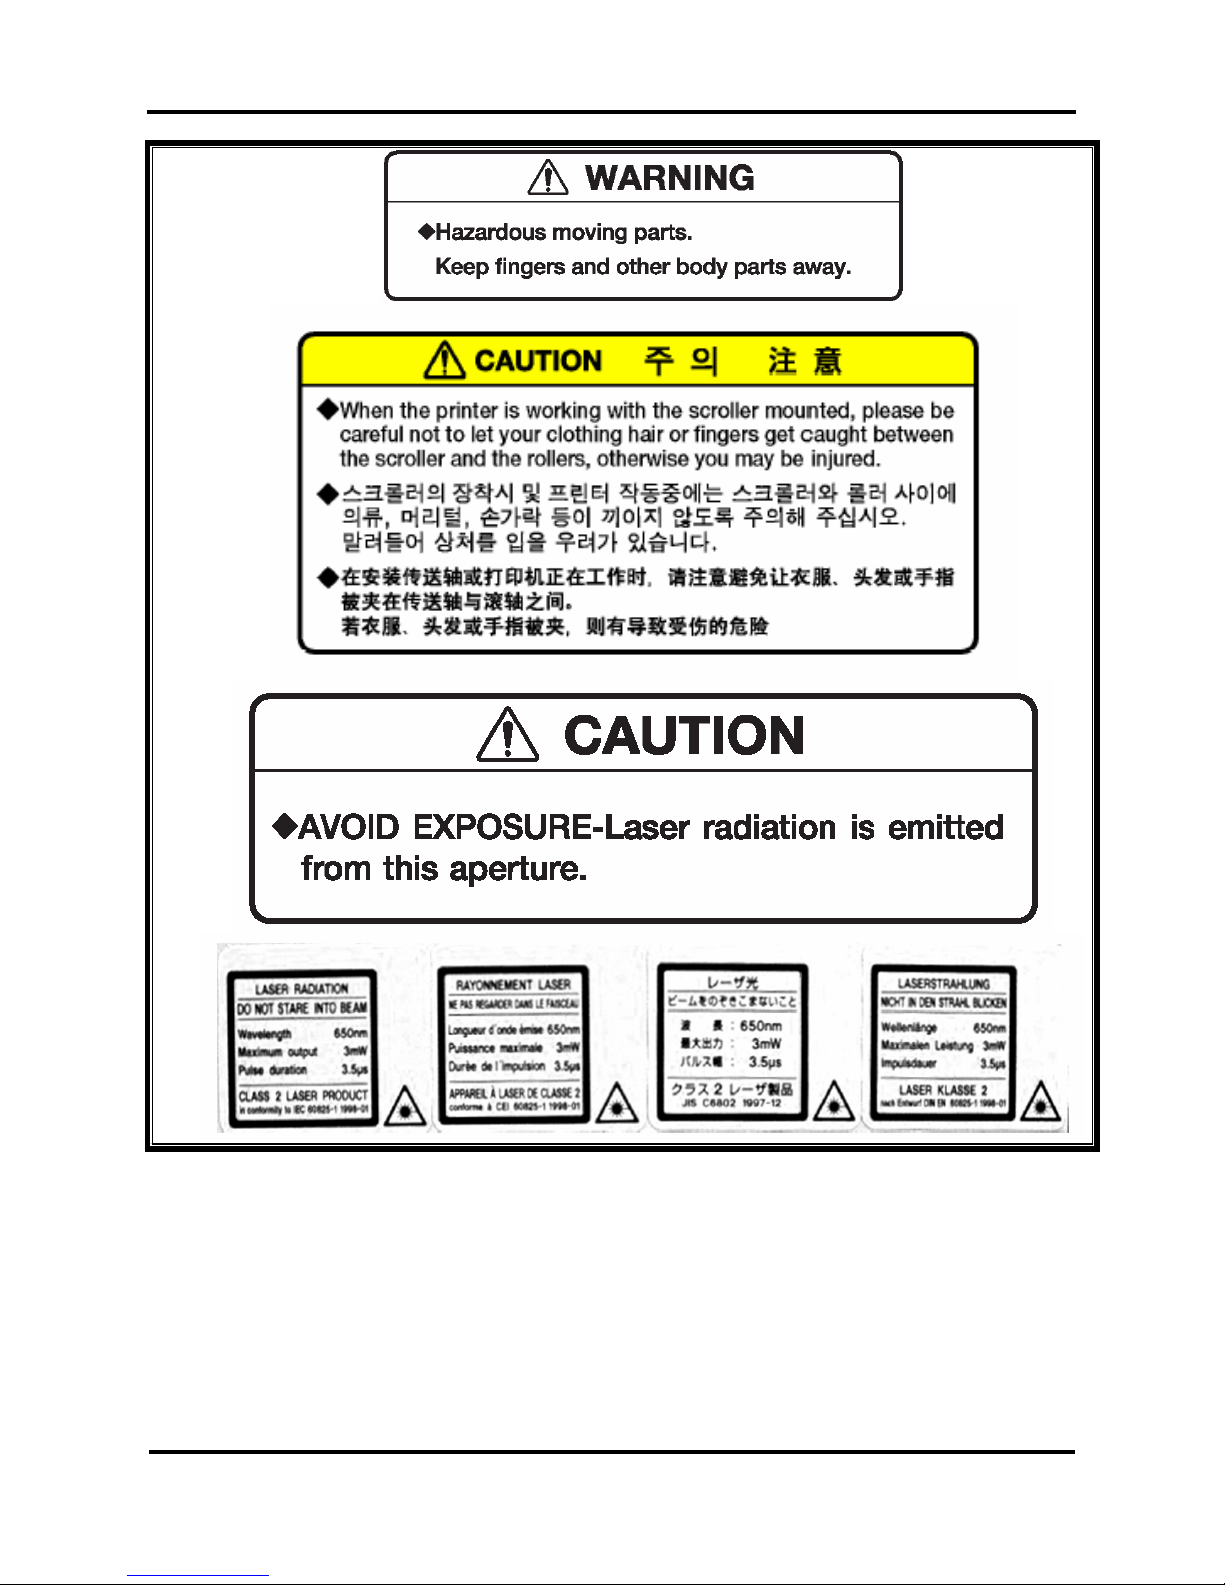
1.4.2 Locations and types of warning labels
The locations of warning labels are shown below.
(1) Unit
Page 19
User’s Guide – Toucan Hybrid
19
AP-750, Rev. 1.1 –- 23/04/04
No. Type
1
2
3
Page 20
User’s Guide – Toucan Hybrid
20
AP-750, Rev. 1.1 –- 23/04/04
No. Type
4
5
6
7
Page 21
User’s Guide – Toucan Hybrid
21
AP-750, Rev. 1.1 –- 23/04/04
8
9
10
11
Page 22
User’s Guide – Toucan Hybrid
22
AP-750, Rev. 1.1 –- 23/04/04
12
13
14
15
Page 23
User’s Guide – Toucan Hybrid
23
AP-750, Rev. 1.1 –- 23/04/04
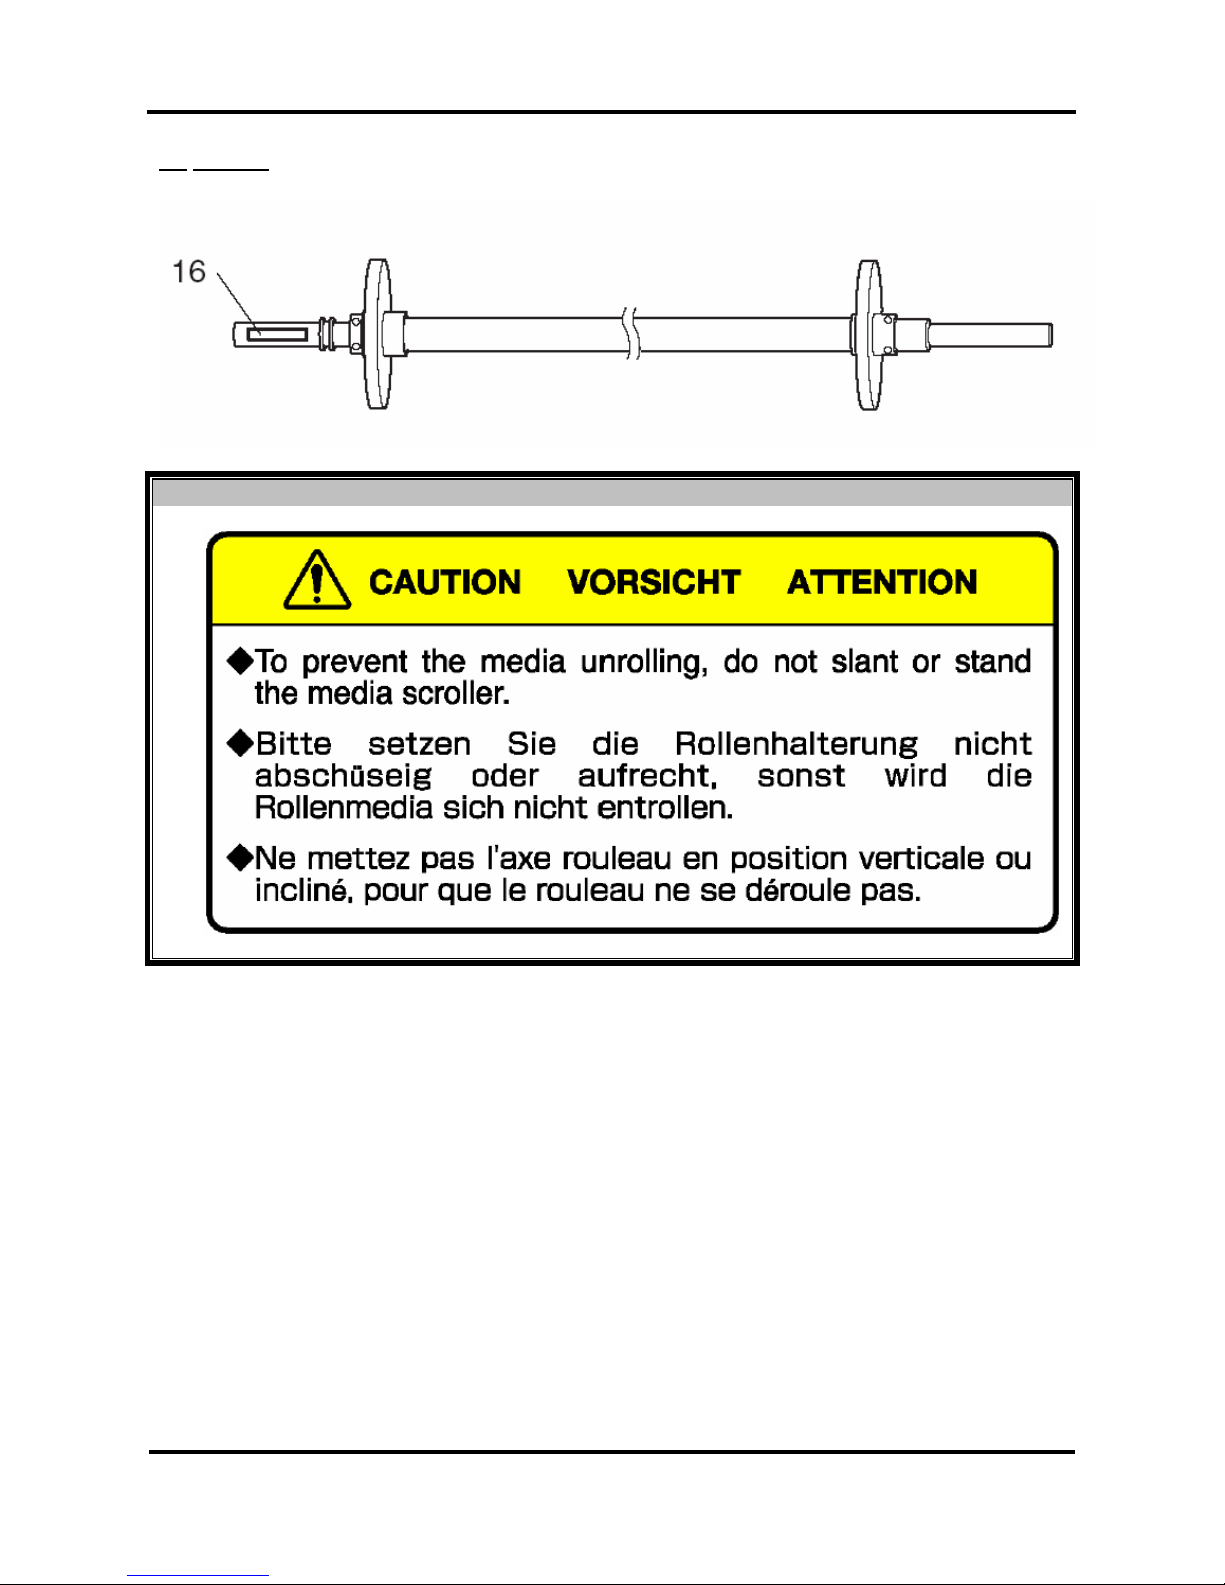
(2) Scroller
N°
Type
16
Page 24

User’s Guide – Toucan Hybrid
24
AP-750, Rev. 1.1 –- 23/04/04
1.4.3 Other safety issues
Infrared-radiation due to infrared-lamp
Obligation to wear protective goggles
Caution
Infrared light
1,2 – 1,4 µm
It is obligated to wear them to avoid eye damage. Operators as well as technicians and visitors have to wear
protective goggles whenever the infrared lamp is active.
Due to the reflection of the infrared-radiation on the media or the media media tray or vacuum table, it is
necessary to wear protective goggles, specific for this spectrum range.
The lamp has its peak wavelength at 1.2 µm – 1.4 µm.
Two safety goggles are delivered with your Toucan Hybrid. They offer 100% block protection from 0.8 µm
up to 1.6 µm
Touching the infrared lamp and/or infrared lamp house
Caution:
Hot surface
People can get hurt due to the hot surface of the infrared lamp itself and the infrared lamp house. This label
warns for hot accessible parts on the equipment.
The lamp house heats up to 150 °C (302 F), touching it could cause severe burns.
The lamp house or / and the print head should NEVER be TOUCHED when the infrared lamp is on or has
been on in the last 15 minutes.
Caution :
By using an infrared temperature gun, measuring the temperature is done safely.
You can buy this infrared temperature gun in any local technical shop.
Holding still of the infrared lamp
If the carriage stands still, the media under it can get overheated due to remaining heat of the infrared lamp.
This leads to a possible searing, melting and/or cockling of the media.
Due to the remaining heat, media can melt and / or cockle.
Please perform a power off and a power on so the carriage moves back to the capping station automatically.
The lamp house heats up to 150 °C (302F), touching it will cause severe burns.
The lamp house or / and the print head should NEVER be TOUCHED when the infrared lamp is on or has
been on in the last 15 minutes.
Page 25
User’s Guide – Toucan Hybrid
25
AP-750, Rev. 1.1 –- 23/04/04
Do not leave unattended when operating
A label on the machine should also warn operators and technicians that the machine should not operate
when not attended.
DO NOT LEAVE UNATTENDED
In case media touches the infrared lamp and / or the lamp house
Due to the high temperature of the lamp house and the lamp, the media may melt or sear when it is in
contact with the lamp or lamp house for some time. When the head stops due to a media crash the Toucan
Hybrid should be shut down.
DO NOT TOUCH THE CARRIAGE, NOR THE LAMP HOUSE. The lamp house heats up to 150 °C (302F),
touching it could cause severe burns.
When a media crash occurs, the lamp will hold still above the media which can melt or sear. Please perform
a power off and a power on so the carriage moves back to the capping station automatically.
Use the Toucan Hybrid in a well ventilated area
Be aware that poisonous fumes may be released in little concentrations when media gets seared. Due to the
infrared lamp, solvents evaporate much faster, so it is highly recommended to use an air purification system.
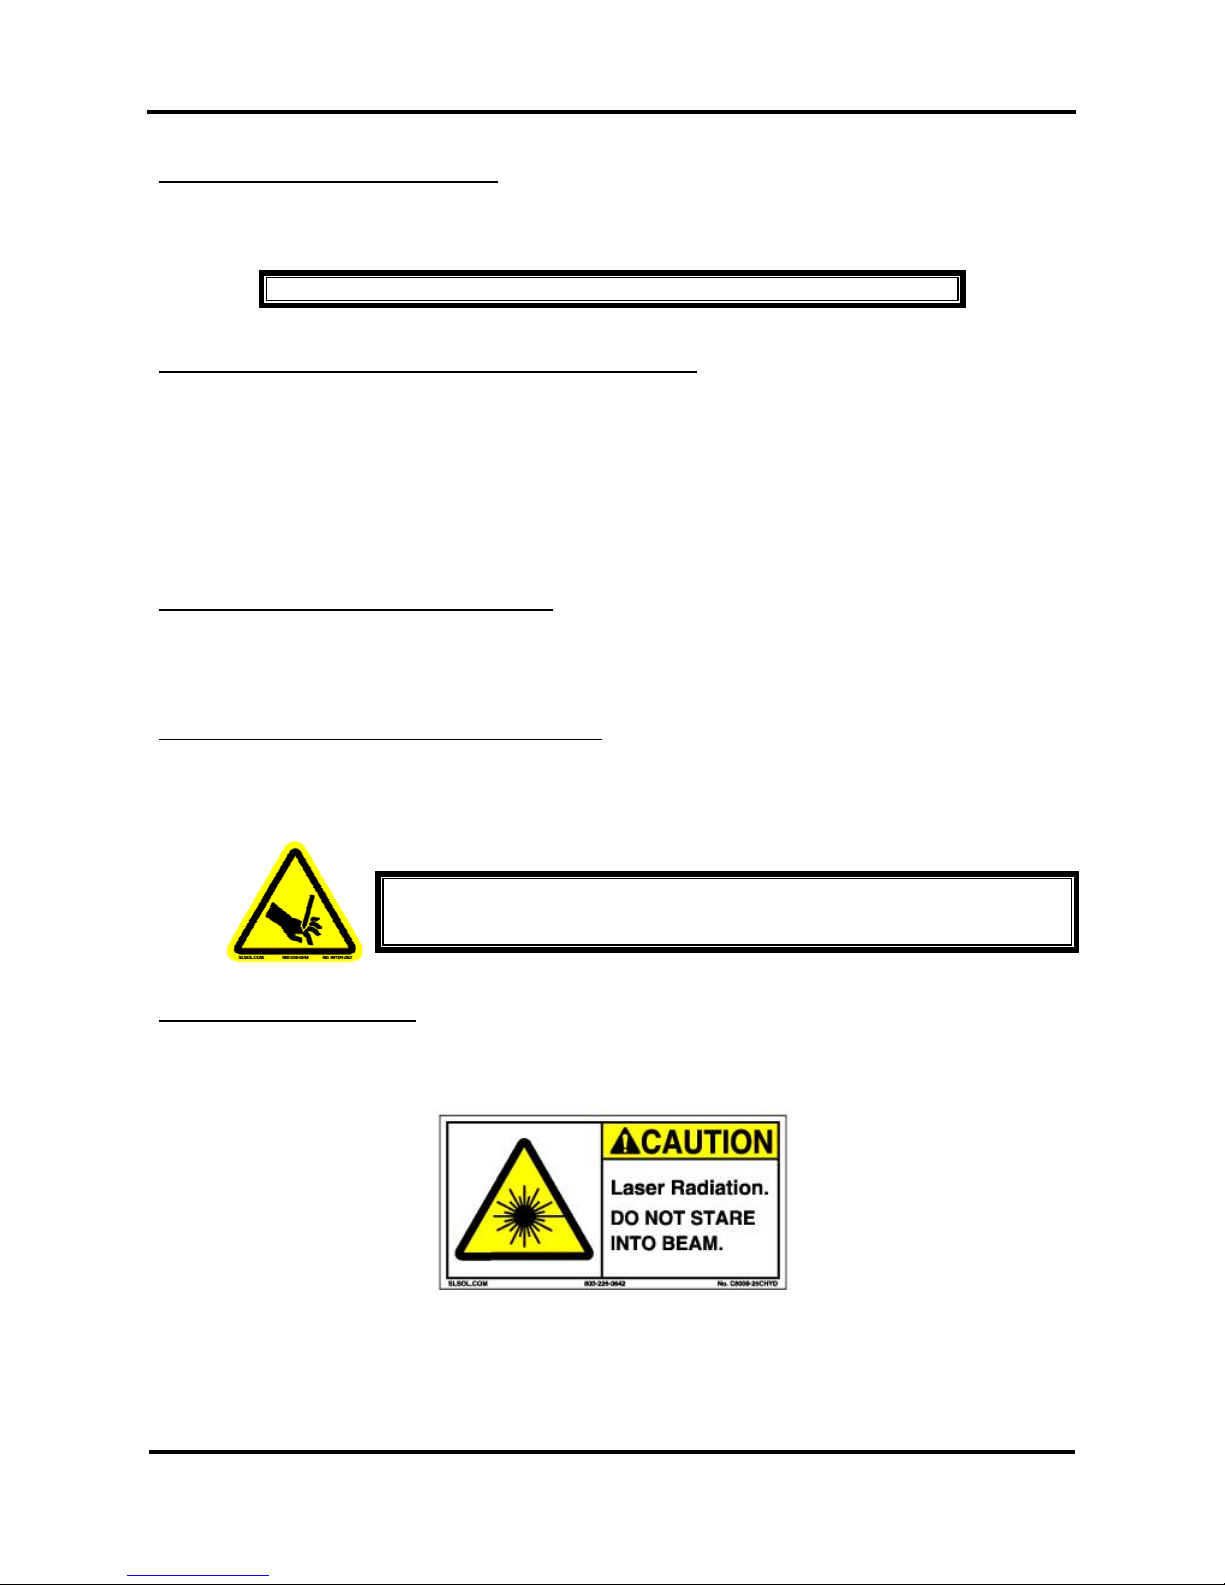
Mechanical hazard due to moving print head carriage
You can get hurt due to the movement of the carriage. Do not touch the lamp house or the carriage while it is
moving.
Do not stare in the laser beam.
A label on the machine should also warn operators and technicians not to stare in the laser beam without
wearing protective goggles.
WARNING
HAZARDOUS MOVING PARTS
KEEP FINGERS AND OTHER BODY PARTS AWAY
Page 26

User’s Guide – Toucan Hybrid
26
AP-750, Rev. 1.1 –- 23/04/04
Page 27

User’s Guide – Toucan Hybrid
27
AP-750, Rev. 1.1 –- 23/04/04
2. PRODUCT OVERVIEW
2.1 INTRODUCTION
This chapter explains the features, part names, and functions of the printer.
2.2 FEATURES
The features of the printer are explained below.
(1) High speed output
The Toucan Hybrid large-format printer delivers high speed and top image quality for your large produ ction
jobs. The TOUCAN HYBRID can print up to a maximum width of 1575mm (62”) in roll mode. The TOUCAN
HYBRID offers you the ability to print roll-to-roll as well as printing onto rigid material.
(2) E weather resistance
With the specially developed solvent-type ink, the output product can last up to 3 years for roll media and 3
years for rigid materials even without lamination. Not only is delivery time reduced, but total cost is reduced
as well.
(3) Wide variety of compatible media
This machine is applicable to various uncoated media rolls, sheets and rigid material up to the thickness of
70 mm as the height of head is adjustable.
(4) Vibrant Colour Reproduction
To reproduce clear and vibrant colours, the Toucan Hybrid uses 6 colours. Both models use 2000cc ink
tanks, allowing continuous operation, and raising productivity.
(5) Effective usage of media
A JOG feature is provided to allow setting of the printing position as required. Because printing can be
performed on media that has already been printed on, excess space can be used effectively.
→ Specifications are liable to changes without prior notice. All trademarks mentioned are property of their
respective owners.
Page 28

User’s Guide – Toucan Hybrid
28
AP-750, Rev. 1.1 –- 23/04/04
2.3 PART NAMES AND FUNCTIONS
Part names and functions are explained below.
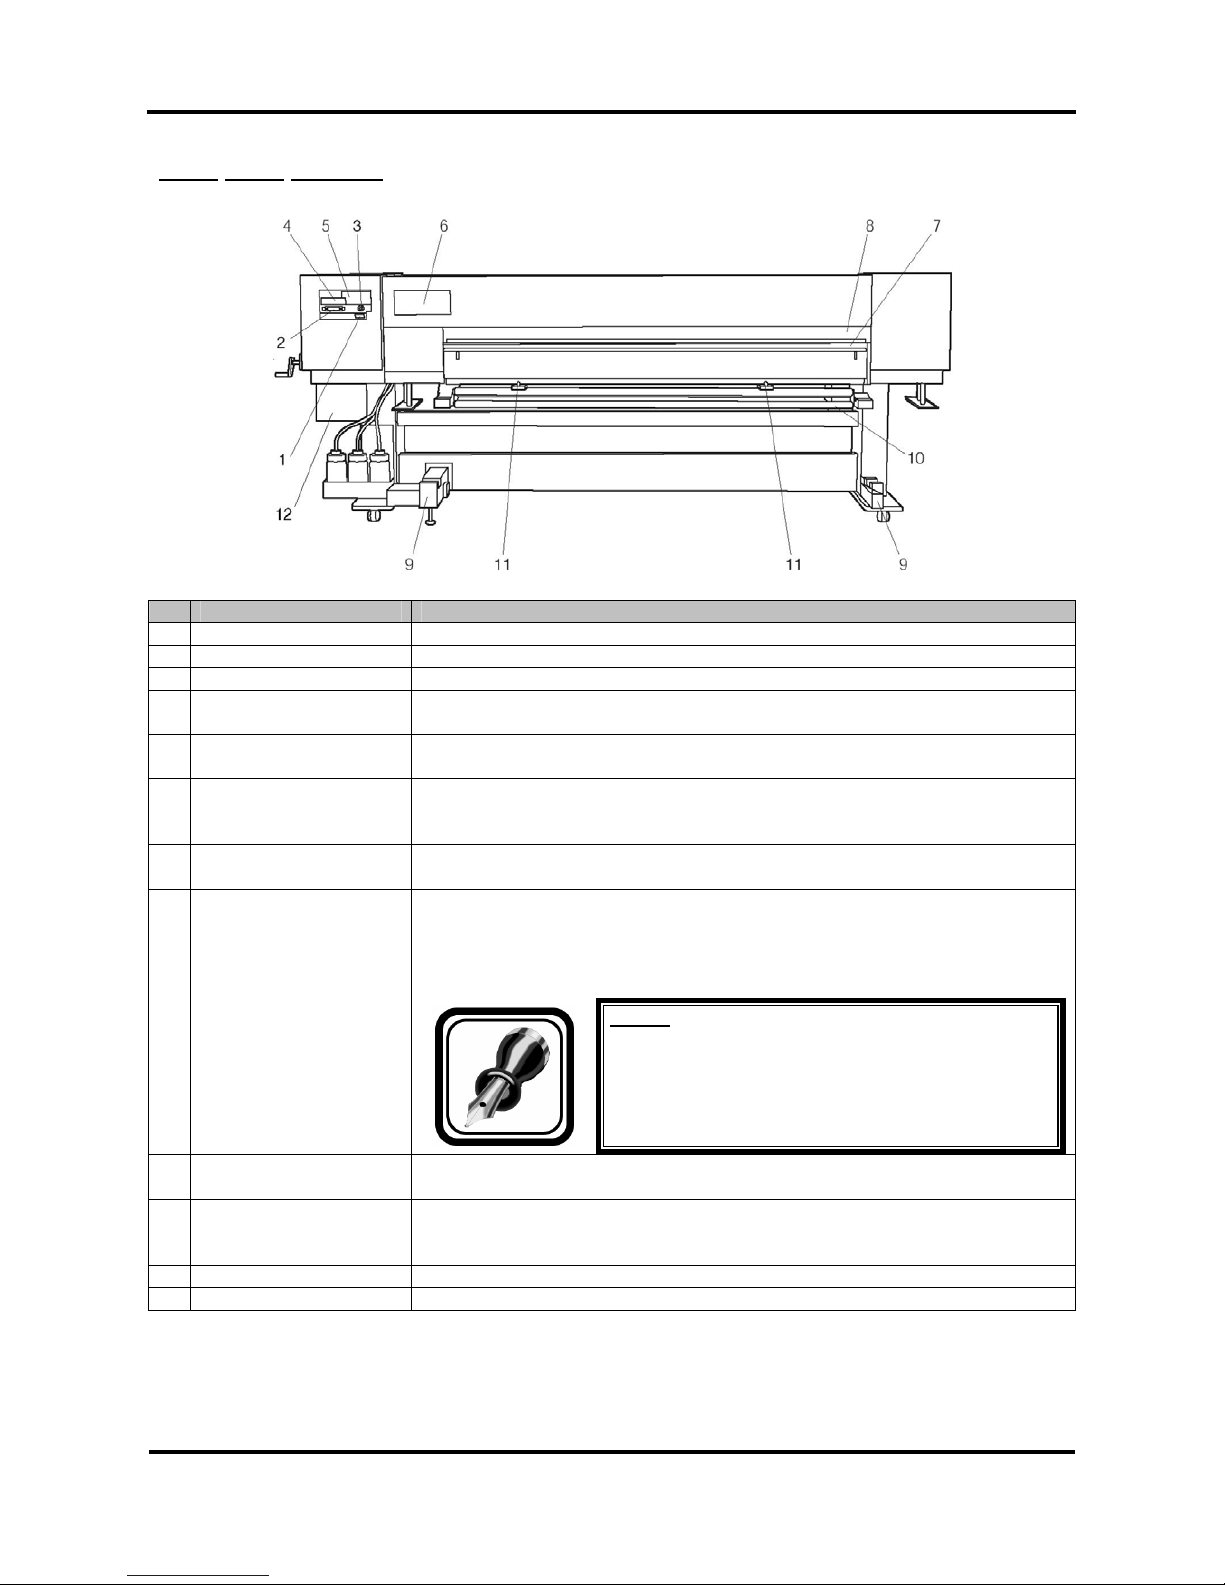
2.3.1 Front
N° Name Function
1 Operation panel This panel is used to set operational conditions, the status of the printer, and
other functions.
2 Main tank Container for holding the ink and the jetwash fluid.
3 Tank tray Used to attach the main tanks to the product.
4 Pressurizing roller This roller is used to press the media from above and keep it flat when
printing.
5 Platen There is an ink drying device (up to 45°C) built in. On the surface, there is a
cutter groove for paper cutting.
6 Media guide This is used to feed the media smoothly when setting the media and when
printing. Used for drying (up to 70°C)
7 Foot switch This switch is used to raise and lower the pressure roller.
8 Valve cover This is a cover to protect the use r from the internal components of the
product. It is opened when cleaning the print head or the sub-tank, and is
normally closed.
Page 29

User’s Guide – Toucan Hybrid
29
AP-750, Rev. 1.1 –- 23/04/04
9 Maintenance cover This is a cover to protect the user from the internal components of the
product. This is opened during the following conditions:
When turning the unit ON or OFF
When cleaning the print head surface.
When cleaning the print head inside the cover, there is a waste fluid tray
to collect waste fluid from the print head.
10 Waste fluid tank A tank for storing waste fluids discharged from the product.
11 Waste fluid valve Opened when discharging waste fluid from the waste fluid tank. This is
normally closed.
12 Stand This stand is used to install the printer on a flat surface.
13 Winding unit Winds and co llects the printed media.
14 Memory cover This is a cover to protect the user from the internal components of the
product. The cover is opened when changing the expansion memory. This
is normally closed.
15 Cushioning roller Use to guide the printed media to the take-up mechanism.
16 Front stand fixing block This is used to fix the front stand 1 on the printer body.
17 Lifting grip This is used to lift or lower the media guide.
18 Head gap adjusting
handle
This is used to lift or lower the print head.
19 Head gap counter This indicates the head gap between the print head and grid roller.
20 Head gap sensor lamp This is used when adjusting the head gap. If the print head touches the
media due to narrower head gap, this lamp (green) lights up.
21 infrared lamp The infrared lamp is connected with the carriage. During printing on rigid
materials it assists to fix ink onto the material. (up to 150°C)
22 Emergency stop Only to be used in case of great malfunction and danger.
23 PCB Contains the IR board
Page 30
User’s Guide – Toucan Hybrid
30
AP-750, Rev. 1.1 –- 23/04/04
2.3.2 Rear section
N° Name Function
1 AC inlet The power cable plug is inserted here.
2 Interface connector A connector to connect the Centronics interface.
3 Foot switch connector A connector to attach the foot switch cable.
4 Interface slot The network interface board attaches here. When not using the network
interface, keep the cover closed.
5 Hard disk slot The expansion hard disk attaches here. When not using an expansion hard
disk, keep the cover closed.
6 Ink filter cover This cover protects the user from the internal components of the product.
There is an ink filter inside the cover.
The cover is opened when changing the ink filter. This is normally closed.
7 Media feed slot This is the media feed slot for placing the media during the media setting
procedure.
8 Infeed slot cover This cover protects the user from the mechanism inside the printer. Head
gap sensor is located inside the cover.
This cover automatically opens/closes according to the lifting/lowering of the
print head.
Notes :
Do not look inside at the media feed slot cover. You
may get injured as the head gap sensor uses laser
beam.
9 Feed Unit This is the device which sets the media, and feeds it to the printing start
position
10 Tension roller Set the printing intervals when perform printing by media feed compensation.
When the tension roller is lifted up, the feeding device feeds the media
automatically.
11 Rear stand fixing This is used to fix the rear stand 1 or the conveyer table on the printer body.
12 PCB Contains IR board
Page 31

User’s Guide – Toucan Hybrid
31
AP-750, Rev. 1.1 –- 23/04/04
2.3.3 Flat stand
No. Name Function
1 Front stand 1
2 Front stand 2
3 Front stand 3
4 Rear stand 1
5 Rear stand 2
6 Rear stand 3
These are used for printing on the rigid media.
Both the front stand 1 and the rear stand 1 can be removed when using
the roll media.
7 Media tray
This is the tray for placing the rigid media. This is used to feed the rigid
media frontward or backward.
Page 32

User’s Guide – Toucan Hybrid
32
AP-750, Rev. 1.1 –- 23/04/04
2.3.4 Operation panel
The operation panel is used to set operational conditions, display the status of the printer, and set other
functions.
The names and functions of the operation keys and status lamps are explained below.
Notes :
See the sections below for using the operation panel.
When setup menus using the operation panel: → “Menu setup on the operation panel”
When setting functions using the operation panel: → “Operating from the operation”
panel.
(1) Operation keys
Notes :
Some keys have multiple functions depending on the printer status (normal or setup
menu display). Refer to “Printer status” for more details.
Page 33

User’s Guide – Toucan Hybrid
33
AP-750, Rev. 1.1 –- 23/04/04
N° Name
Normal
Setup menu display
1. [POWER] key Turn the p rod uct ON and OFF. Turn the product ON and OFF.
2. [F1] key Executes the function assigned to F1. Executes the function assigned to F1.
3. [F2] key Executes the function assigned to F2. Executes the function assigned to F2.
4. [F3] key Executes the function assigned to F3. Executes the function assigned to F3.
5. [F4] key Executes the function assigned to F4. Executes the function assigned to F4.
6.
[MENU ⇑ ] key
Changes the LCD monitor display to
setup menu status.
Changes the menu in reverse order.
7.
[MENU ⇓ ] key
Changes the LCD monitor display to
setup menu status.
Changes the menu in forward order.
8. [ENTER] key Changes the LCD monitor display to
print mode display.
Determines the new parameter value
changes the LCD monitor display to
the next and menu. Sets the parameter
value and changes the LCD monitor
display to the next menu.
9. [CANCEL] key - Cancels the new parameter value and
changes the LCD monitor display to
the next menu.
Clears the parameter value and
changes the LCD monitor display to
the next menu.
(2) LCD monitor and status lamps
N° Name Colour Status Function
10. LCD monitor - - This monitor displays the operation status
and error messages of the product.
On The product is ON. 11. POWER lamp Green
Off The product is OFF.
Flashing An error has occurred. The contents will be
displayed on the LCD monitor.
12. ERROR lamp Red
Off Either there is no error in the product or the
power is OFF.
On The product is receiving the print data.
Flashing The product is analyzing received data.
13. DATA lamp Orange
Off The product is waiting to receive print data.
On The pressure roller is in the release
position.
The media is not set.
14. MEDIA SET
lamp
Orange
Off The pressure roller is in the secured
position.
The media is set.
15. ROLL lamp - - Disuse
16. SHEET lamp - - Disuse
Page 34

User’s Guide – Toucan Hybrid
34
AP-750, Rev. 1.1 –- 23/04/04
2.4 PRINTER STATUS
The status of the printer is explained below.
2.4.1 Normal
Indicates that the printer can draw print data when media is loaded.
You can also make settings concerning printing using the operation panel.
The contents displayed on the LCD monitor of the operation panel are as follows.
Roll - to - Roll Rigid Material
1 → Ready to print 1 → Ready to print
2 → Cancel Lever up ← 3 2 → Cancel Lever up ← 3
4 → Feed & Reel Purge ← 5 4 → Manual Purge ← 5
6 →
User 1
6 →
User 1
N° Position Description
1 1st line Displays the current status of the printer. Depending on the status, the
contents may be displayed in the 2nd to 4th lines.
2 Left of 2nd line Displays the function assigned to [F1] key.
3 Right of 2nd line Displays the function assigned to [F2] key.
4 Left of 3rd line Displays the function assigned to [F3] key.
5 Right of 3rd line Displays the function assigned to [F4] key.
6 Left of 4th line Displays the currently set media type.
2.4.2 Setup menu display
Indicates that you can make settings concerning printing using the operation panel.
Operations for plotting can be conducted with the operation panel.
The contents displayed on the LCD monitor of the operation panel are as follows.
1 →
* SetupMenu *
2 →
InkStatus OriginSet
← 3
4 →
TestPrint MediaSet
← 5
(1/5)
← 6
N° Position Description
1 1st line Displays the setup menu name set currently.
2 Left of 2nd line Displays the function assigned to [F1] key.
3 Right of 2nd line Displays the function assigned to [F2] key.
4 Left of 3rd line Displays the function assigned to [F3] key.
5 Right of 3rd line Displays the function assigned to [F4] key.
6 4th line Displays the currently available functions of [F1] key to [F4] key.
Displays the page status if there are multiple pages for the currently
displayed setup menu.
Displays the parameter that is currently set.
Page 35

User’s Guide – Toucan Hybrid
35
AP-750, Rev. 1.1 –- 23/04/04
2.4.3 Changing the printer status
To change the printer status, follow the steps below.
(1) Changing the status from normal to the setup menu display
Press either [MENU ↑] key or [MENU ↓] key on the operation panel when the printer is in normal status.
The display of the operation panel changes to the setup menu display.
Notes :
Refer to "Menu setup on the operation panel" for details of the setup menu.
(2) Changing the status from the setup menu display to normal
Take one of the following actions when the printer is in the setup menu display to change the operation pan el
display to normal one.
• Press the [CANCEL] key on the operation panel.
• Leave the printer as it is for 3 minutes when the status is in the setup menu display.
Roll – to – Roll Rigid Material
Notes :
Refer to "Status messages" for details of displaying the printer status.
Page 36

User’s Guide – Toucan Hybrid
36
AP-750, Rev. 1.1 –- 23/04/04
Page 37

User’s Guide – Toucan Hybrid
37
AP-750, Rev. 1.1 –- 23/04/04
3 INSTALLATION
3.1 INTRODUCTION
This chapter explains the installation of the Toucan Hybrid.
3.2 UNPACKING
The unpacking procedure and contents of the package are described below.
3.2.1 Unpacking procedure
Unpack the package according to the following procedure.
Caution :
When unpacking or moving this product, always work with 4 people or more.
When removing this product from the packaging box, always remove the vinyl plastic,
and hold on the side of the product. Holding the unit over the vinyl plastic wrapping can
result in slippage and dropping the unit, resulting in damage.
3.2.1.1 Unpacking packaging box of the main unit
Step 1 : Move the packaging to the location to
unpack.
Step 2 : Remove the restraining bands.
Step 3 : Remove the top board, and take out the
packaging material (right upper side and
left upper side)
No. Name
1 Top board
2 Packaging material (right upper side)
3 Packaging material (left upper side)
Page 38

User’s Guide – Toucan Hybrid
38
AP-750, Rev. 1.1 –- 23/04/04
Step 4 : Remove the outer boards, and take out
the accessories packaging box, and the
slope packaging box.
No. Name
1 Outer board
2 Accessories packaging box
3 Slope packaging box
Step 5 : Lift the unit by holding by the side of the product.
Step 6 : Remove the packaging material (lower right side, lower side).
Step 7 : Remove tape from all the casters (right
side).
Step 8 : Remove the packaging material (lower
left side) by using the same procedure
as in 5-7.
No. Name
1 Packaging material (lower right side)
2 Packaging material (lower side)
3 Packaging material (lower left side)
Step 9 : Open the slope packaging box and take
out the two slopes.
Step 10 : Attach the slope to the front side or the
back side of the palette.
Step 11 : Using the slope, lower the product from
the palette.
No. Name
1 Slope
2 Palette
Page 39

User’s Guide – Toucan Hybrid
39
AP-750, Rev. 1.1 –- 23/04/04
3.2.1.2 Unpacking packaging box of the flat stand
Step 1 : Move the packaging to the location to unpack.
Step 2 : Remove the restraining bands.
Step 3 : Open the package, and take out the packaged items.
3.2.2 Verification of packaged items
After unpacking the packaging box, inspect to make sure that the unit is not damaged, and that all necessary
parts are present.
Notes :
If any part is missing or broken, contact either of the following;
The shop where you bought your MUTOH printer.
Nearest MUTOH local dealer.
3.2.2.1 Contents of packaged items
(1) Packaging box of the main unit
No. Name Q’ty No. Name Q’ty
1 Main unit, stand, winding unit 1 set 3 Media tube (for winding unit) 1
2 Scroller (for 64 inches) 2 4 Media sticking prevention screen 1
Page 40

User’s Guide – Toucan Hybrid
40
AP-750, Rev. 1.1 –- 23/04/04
(2) Accessories packaging box
No. Name Q’ty No. Name Qty
1 Power cable 2 14 Cap Sponge 12
2 Power cable clamp 1 15 Syringe 3
3 CD with Adjustment file 1 16 Hexagon wrench (4 mm) 1
4 Foot switch 1 17 Screwdriver 1
5 Media holder plate 2 18
Screw (for Media sticking prevention
screen)
7
6 Gloves 1 box 19
Spring (for Media sticking prevention
screen)
3
7 Funnel 6 20 Panel Sheet 1 set
8 Polynit wiper 1 box 21 --------------------------------------------------- -----9 Print head wiper 1 22 Accessories box 1
10 Magnet sheet (white) 1 23 --------------------------------------------------- -----11 Panel Cover 10 24 --------------------------------------------------- -----12 Magnet sheet (black) 1 25 User’s Guide 1
13 Hand pump 1 26 Quick Start Manual 1
Page 41

User’s Guide – Toucan Hybrid
41
AP-750, Rev. 1.1 –- 23/04/04
(3) Packaging box of the flat stand
No. Name Q’ty No. Name Qty
1 Base frame 4 8 Adjuster 16
2 Foot (Centre) 8 9 Hexagon socket head cap screw (M8) 16
3 Foot unit (F1, B1) Each 2 10 Hexagon socket head cap screw (M6) 84
4 Foot unit (F2, B2) Each 2 11 T nut 4
5 Foot unit (F3, B3) Each 2 12 T nut support 4
6 Top frame (F1, B1) Each 1 13 Hexagon wrench (5mm) 1
7 Top frame (F2, F3, B2, B3) Each 1 14 Single-ended Wrench 1
Page 42

User’s Guide – Toucan Hybrid
42
AP-750, Rev. 1.1 –- 23/04/04
3.3 ASSEMBLY
The assembly of this product is described below.
3.3.1 Removal of protective packaging material
Protective packaging material is attached in the following locations of this product.
Remove all protective packaging material according to the following procedure.
Step 1 : Remove tape from all parts of the product.
Caution
:
Be careful not to pinch your fingers when opening and closing the maintenance cover.
Step 2 : Open the maintenance cover.
Step 3 : Remove the two packaging materials
from inside the front cover.
Step 4 : Remove the tape on the head unit.
No. Name
1 Packaging material
2 Head unit
Notes :
Make sure that the Y-bare cable inside the front cover is as follows when the product is
tilted to carry in:
The Y-bare cable is not fallen down or is not out of position.
The Y-rail cover is not interfered by the Y-bare cable
Step 5 : Close the maintenance cover.
Page 43

User’s Guide – Toucan Hybrid
43
AP-750, Rev. 1.1 –- 23/04/04
Step 6 : Using the screwdriver attached to the
product, remove the following parts to
fix both side of the cushioning roller:
• Screw (2)
• Skirted collar (2)
No. Name
1 Cushioning roller
2 Skirted collar
3 Screw Packaging material
3.3.2 Installing panel sheet and
panel
cover
Install the following items on the operation panel before operating this product:
Panel sheet: install to choose the operation languages among English, Chinese, and Korean.
Panel cover: install to protect the operation panel with the ink or the JetWash fluid
Install the panel sheet and panel cover according to the following procedure.
Step 1 : Install the panel sheet on the operation panel.
Step 2 : Install the following parts on the operation panel one over the other:
• Magnet sheet (black)
• Panel cover
• Magnet sheet (white)
No. Name
1 Operation panel
2 Panel sheet
3 Magnet sheet (black)
4 Panel cover
5 Magnet sheet (white)
Notes
:
When the panel cover has ink or jetwash fluid stains, change the panel cover with new
ones.
Page 44

User’s Guide – Toucan Hybrid
44
AP-750, Rev. 1.1 –- 23/04/04
3.3.3 Installing the media sticking prevention screen
Install the media sticking prevention screen, when roll media such as Terpolin, that is likely to stick to the
product during transportation is used as the primary media.
Install the screen according to the following procedure.
Step 1 : Install the screen to the media guide as shown below.
Step 2 : Using the screwdriver attached to the product,
tighten the seven screws (for Media sticking
prevention screen) shown below to fix the
screen to the product.
No. Name
1 Media guide
2 Media sticking prevention screen
3 Screw
Step 3 : Attach the three springs (for Media sticking
prevention screen) shown below to the
screen.
Step 4 : Install the springs to the brackets on the
product.
No. Name
1 Media sticking prevention screen
2 Spring
3 Bracket
Note
:
If any part is missing or broken, contact either of the following;
The shop where you bought your MUTOH printer.
Nearest MUTOH local dealer.
Page 45

User’s Guide – Toucan Hybrid
45
AP-750, Rev. 1.1 –- 23/04/04
3.3.4 Installing the power cable clamp
Install the power cable clamp on the rear face of the product.
Install the clamp according to the following procedure.
Step 1 : Using the screwdriver attached to the
product, remove the screw on the rear
face of the product.
No. Name
1 Screw
Step 2 : Install the power cable clamp and screw to
the rear face of the product.
Step 3 : Tighten the thumbscrew to fix the power
cable clamp on the product.
No. Name
1 Power cable clamp
2 Thumbscrew
Page 46

User’s Guide – Toucan Hybrid
46
AP-750, Rev. 1.1 –- 23/04/04
3.3.5 Assembling the flat stand
Assemble the flat stand to feed the rigid media.
3.5.1 Checking the assembly position
Please refer to the next 5 digit numbers on stickers for the stand assembly.
1. Unit position
F:Media-Out side B:Media-In side
2. Placement order
1:Unit side 2:Centre 3:Outside
3. Top and bottom position
U:Upper tray side D:Bottom frame side
4. Right and left position (from front)
R:Right M:Centre L:Left
5. Back and forth position
1:Unit side 2:Outside
(Packing details of stand parts)
1.Stand F1 unit, Stand B1 unit :1 set
2.Upper and bottom frames of F2, F3, B2, B3 :1 per unit (total 8)
3.Back and forth of legs of F2, F3, B2, B3 (1,2) :6 per unit (total 24 )
4.Hexagon M 6 screw :20 per unit(total 80)
5.Hexagon M 8screw :4 per unit (4 unit, total 16)
- -
1 2 3 4 5
Sticker No.
Page 47

User’s Guide – Toucan Hybrid
47
AP-750, Rev. 1.1 –- 23/04/04
3.3.5.2 Assembly procedure of flat stand
Please follow the steps below to assemble the flat stand.
Step 1 :
Assemble the front stand 2,3 and rear stand 2,3, a total of 4 sets.
Step 2 : Mount the stand on the base frame. Adjust the centre stand referring to the mark on the base
frame. Mount with hexagon M6 screws (4pcs). You can find a sticker on each frame. Make sure
they match.
Step 3 : Mount the right and left stand units. Use 4 hexagon M8 screws for the bottom and 8 hexagon M6
screws for the frame.
Page 48

User’s Guide – Toucan Hybrid
48
AP-750, Rev. 1.1 –- 23/04/04
Step 4 : Mount the frame with 8 hexagon M6 screws.
Step 5 : Assemble each unit of front and back (4 unit) in the same way.
Notes:
There are stickers at the screw positions. Please refer to the sticker No. carefully.
Page 49

User’s Guide – Toucan Hybrid
49
AP-750, Rev. 1.1 –- 23/04/04
3.4 INSTALLATION
Printer installation is explained below.
3.4.1 Choosing a place for the printer
Install the printer in a proper location referring to the following.
Caution
:
The ink and jetwash fluid used for this printer contains an organic solvent
(CYCLOHEXANONE). Make sure to follow the industrial waste disposal laws and
ordinances of your local government. It is necessary to install a local ventilation unit,
push/pull type ventilation unit, or a total ventilation unit to perform adequate
ventilation.
The ink and jetwash fluid used for this printer contains an organic solvent
(CYCLOHEXANONE). It is flammable so open flame is prohibited in the area. In a
dry environment, static electricity can cause ignition, so before handling the ink,
jetwash fluid, or waist fluid, touch a metallic object first to remove static electricity
from your body. Do not near materials having static, and take an appropriate
measures against static electricity.
Do not place the printer in a location under the following conditions. Doing so may
cause the product to fall, become damaged, or cause injury.
• Unstable surfaces
• Slanted surfaces
• Locations that are subject to vibration from other product
Do not stand on the printer or place any heavy objects on it. Doing so may cause it
to fall over, become damaged, or cause injury.
Do not cover the ventilation hole of the printer with cloth, such as a blanket or table
cloth. Doing so could prevent the printer from ventilating and cause fire.
Keep the printer away from humid and dusty areas. Failure to do so may result in
electrical shock or fire.
3.4.1.1 Installation environment Requirements
Area 12.6m² (146ft²) or larger. Frontage of 4.7m(15.7ft) or greater
Floor loading capability 2490Pa (300kg/m²) or over
Voltage AC100V – 120V / AC220V – 240V ± 10%
Frequency 50/60 Hz ± 1 Hz
Electrical
Capacity
AC100V – 120V: 15 A or more
AC220V – 240V: 7.5 A or more
Operational
conditions
Recommended operation environment
Temperature : between 23 and 30 °C
Humidity : between 35 and 70 %
Use operation environment
Temperature : between 20 and 32 °C
Humidity : between 30 and 70 %
Recommended environment for rigid material
Temperature: + 25°C
Humidity: + 38 %
Environmental
Storage
environment
Temperature: -10°C (14F) to 60°C (140F)
Humidity: 20% to 80% without condensation
Page 50

User’s Guide – Toucan Hybrid
50
AP-750, Rev. 1.1 –- 23/04/04
Note
:
Avoid the following temperature and humidity conditions. Otherwise, printed images
may appear differently from what you expect.
• Places where sudden changes in temperature and humidity are expected, even
though the condition is within the range written above.
• Places where direct sunlight or excessive lighting are expected.
• Places where air conditioners blow directly.
MUTOH recommends that the printer should be installed where air conditioning can
be adjusted easily.
3.4.1.2 Required space (roll-to-roll)
Install the printer on a flat surface that fulfils the following conditions.
3.4.1.2 Required space (flatbed)
Install the printer on a flat surface that fulfils the following conditions.
Page 51

User’s Guide – Toucan Hybrid
51
AP-750, Rev. 1.1 –- 23/04/04
3.4.2 Installing the printer
To install the printer, follow the steps below.
Step 1 : Move the printer to where it will be
installed.
Step 2 : Rotate the adjusters in the direction
shown below to make the printer stable.
• Stand: 4
• Winding unit: 1
• Feed unit: 1
Step 3 : Jiggle the printer to make sure that it
stable.
No. Name
1 Adjuster
2 Stand
3 Winding unit
4 Feed unit
3.4.3 Installing the flat stand
Please follow the steps below to install and adjust the flat stand assembly.
Step 1 : The front stand 1 is to be mounted with the printer. Mount the hole of the installation plate of the
front stand unit 1 according to the guide-pin of the printer. This is only possible when stand 2 and
3 are assembled. Because stand 1 is hooked to stand 2.
Step 2 : When the front stand unit is installed with the main body of the printer, height is adjusted with a
wrench (1)
Page 52

User’s Guide – Toucan Hybrid
52
AP-750, Rev. 1.1 –- 23/04/04
Step 3 : The head gap adjustment lever of the printer is turned UP and the gap is expanded. Next, put the
spirit level on the roller side of front stand one unit and Grid roller of the main body. Adjust the
screw with a wrench.
Step 4 : The installation of the front stand 1 unit ends when it is adjusted parallel. Remove the spirit level
Step 5 : Place the front stand 1 and 2 next to each other. Adjust the height with a wrench and level. When
the adjustment is correct, lock the metal fittings.
Step 6 : Adjust stand 2 and 3 in the same way.
• Level
• Wrench
• Adjust
• Lock
Notes:
Each stand unit must be horizontal.
Page 53

User’s Guide – Toucan Hybrid
53
AP-750, Rev. 1.1 –- 23/04/04
Step 7 : Rear stand unit 1-3 are to be installed and adjusted in the same way. Everything must be
horizontal.
Notes:
In the last step, the height of only the front stand 1 unit should be lowered by 2 mm
with a wrench.
Step 8 : Load media tray parallel with the grid rollers.
Notes:
Be careful not to damage the backing when loading the media tray.
Step 9 : Check if the media tray is well clamped between the sides of the conveyor table, if not proceed to
step 10. If it everything fits well, please proceed to the adjustment of the rear flat stand.
Step 10 : There is only one side of the conveyor table adjustable. The one on the side of the spitting box is
locked. Push the media tray against the locked side and adjust the other side until the media tray
is well fitted.
Locked side (with a hole instead of a hexagon screw)
Page 54

User’s Guide – Toucan Hybrid
54
AP-750, Rev. 1.1 –- 23/04/04
Step 11 : Loosen the hexagon screw with a wrench. Move it as close as possible to the media tray an
tighten the screw again.
Adjustable side (with hexagon screw)
No. Description
1 Wrench
2 Hexagon screw
3 Media tray
Step 12 : Follow the steps below to adjust the rear flat stand.
Step 1:
Print the “table-alignment” fle
in 180 dpi/ uni / 1 pass which
you can find on the CD in the
box.
Step 2:
Push the media tray and
pattern to the back
Step 3:
Measure the distances A and B between rolls and
line. If it is not the same, adjust the stand and
repeat step 1 to 3 until adjustment is correct.
Page 55

User’s Guide – Toucan Hybrid
55
AP-750, Rev. 1.1 –- 23/04/04
4 PREPARING FOR A JOB
Important :
Please check the ink status while printing in flatbed. When error message “Ink
not filled” is displayed, IR lamp will power on, this can cause burning hazard.
With firmware versions, older than V 3.02 L, continually check ink level.
Because there will not be a message when bottles are almost empty.
4.1 INTRODUCTION
The procedures needed before using the printer are explained below.
4.2 CONNECTING THE POWER CABLE
The connection procedure for the power cable is explained below.
Important :
Make sure that the distributed power cable is used. Using a different cable
may result in electric shock or fire.
Do not use a damaged power cable. Doing so may result in electric shock or
fire.
The disconnect device is the plug on the power supply cord.
Caution :
Be careful of the following when handling the power cable:
Do not make any modifications to the power cable.
Do not place anything heavy on the power cable.
Do not bend, twist, or pull the cable.
Do not wire the cable near equipment that generates heat.
Notes :
If the power cable is damaged, contact one of the following locations.
The shop where you bought your MUTOH printer
Nearest MUTOH local dealer
Page 56

User’s Guide – Toucan Hybrid
56
AP-750, Rev. 1.1 –- 23/04/04
To connect the power cable, follow the steps below.
Step 1 : Plug the power cable to the AC inlet on the back of the printer.
No. Name
1 Power cable clamp
2 Screw
Step 2 : Plug the power cable to the AC inlet.
No. Name
1 AC inlet
2 Power cable
Step 3 : Attach the power cable clamp on the power cable as shown below, and tighten the screw.
No. Name
1 Power cable
2 Power cable clamp
3 Screw
Step 4 : Plug the cable to the outlet correctly.
Page 57

User’s Guide – Toucan Hybrid
57
AP-750, Rev. 1.1 –- 23/04/04
Important :
Do not attempt to plug in electrical plugs with wet hands. Doing so may result
in electrical shock.
Be sure to use the specified voltage (AC 100V-120V/220V-240V). Otherwise,
electrical shock or fire may occur.
Use electricity directly from a power outlet (AC 100V-120V/220V-240V). Do not
put many loads on one electrical output. Otherwise, heat may be generated
and cause fire.
Be sure to use an outlet with an earth terminal, and use the terminal correctly.
Otherwise, electrical shock or fire may occur.
Do not connect earth cables in the following areas.
• Gas pipes → Doing so may cause fire or an explosion.
• Earth terminals for telephone lines or lightening rods → Doing so
may cause a large flow of voltage if lightening occurs.
• Water pipes or faucets → If there is a plastic part in the pipe, the
earth will not work correctly.
Caution :
Follow the instructions below when handling the power plug. Otherwise, fire may
occur.
• Wipe away dust and any other residue before inserting the plug.
• Ensure that the plug is firmly inserted as far as it will go.
Ensure that the plug has been disconnected from the power socket when it is not to
be used for a long time.
Earth wires must be connected to wires or terminals that fulfill the conditions below.
• Earth terminals of power socket
• Earth wires with copper morsel which at least 650 mm under ground
Notes :
If you cannot use earth terminals or find any of them, contact the shop where you
bought your printer.
Do not unplug the power cable when the printer is on. If power cable is unplugged,
leave the printer for at least 1 minute before plugging the cable in again.
No. Name
1 Power cable
Page 58

User’s Guide – Toucan Hybrid
58
AP-750, Rev. 1.1 –- 23/04/04
4.3 CONNECTING THE FOOT SWITCH
The connection procedure for the foot switch is described below.
If the pressure roller needs to be raised or lowered, it is possible to control this motion from the foot switch,
instead doing so at the operation panel.
Caution :
When handling the foot switch, be aware of the following:
• Do not place anything heavy on the foot switch
• Do not bend the cable of the foot switch with force, and do not pull.
• Do not place the foot switch near thermal devices.
Install the foot switch according to the following procedure.
Step 1 : Make sure that the power of the unit is OFF.
Notes :
The power is ON if the operation panel displays the following conditions:
The [POWER] key is in the pushed in condition
The POWER lamp is lit (red).
Press the [POWER] key again to turn the power OFF.
Step 2 : Connect the foot switch cable connector to the foot switch connector on the rear face of the unit,
and fix into place with a screw.
No. Name
1 Foot switch connector
2 Foot switch cable
Page 59

User’s Guide – Toucan Hybrid
59
AP-750, Rev. 1.1 –- 23/04/04
Step 3 : Place the foot switch on the floor under the stand.
No. Name
1 Foot switch
Page 60

User’s Guide – Toucan Hybrid
60
AP-750, Rev. 1.1 –- 23/04/04
4.4 SELECTION ROLL-TO-ROLL OR RIGID MATERIALS
Step 1 : After powering ON the unit, following message is shown on the display
*Mode*
F1 →
Roll Plate
← F2
Step 2 : Select the appropriate key.
Step 3 : In case the unit was installed as roll-to-roll and “plate” is selected (or the other way around) an
error message is displayed:
Change
to same mode
Step 4 : Press the [CANCEL] key.
Step 5 : Reselect the configuration.
You can also change from roll-to-roll, to plate while the printer is powered on.
Step 1 : Change the handle
Step 2 : Reselect in the menu roll or plate.
Page 61

User’s Guide – Toucan Hybrid
61
AP-750, Rev. 1.1 –- 23/04/04
4.5 TURNING THE POWER ON/OFF
The method to turn the power ON or OFF is described below.
Important :
Always wear protective goggles. Operators as well as technicians and visitors
have to wear protective goggles whenever the infrared lamp is active. It is
obligated to wear them to avoid eye damage on long term.
Do not touch the infrared lamp or infrared lamp house after or during
operation. Doing so could result in burns.
Please note that after operating the infrared lamp and infrared lamp house will
keep their temperature for several minutes. Let it cool off. Not doing so could
result in burns.
In case the carriage touches the media, power OFF and ON the unit. Do not
touch the carriage or infrared lamp
Caution :
During printing on rigid materials, the fans will cool off the infrared lamp. Please note
there is no detection. Regularly check if the fans are working. You can do this by using a
sheet of paper holding between fans and lamp house.
4.5.1 Turning the power ON
Turn the power of the unit ON according to the following procedure.
Step 1 : Open the maintenance cover.
Caution :
When opening/closing the maintenance cover, be careful not to get fingers caught in
the lid.
Page 62

User’s Guide – Toucan Hybrid
62
AP-750, Rev. 1.1 –- 23/04/04
No. Name
1 Maintenance cover
Step 2 : Remove the print head cap, according to the following procedure.
a. Remove the fixing tape on the print head cap from the print head.
b. Hold the print head cap at the bottom, then remove the hook while pulling the print head cap
toward near side.
c. Remove the print head by moving it backward and then downward.
No. Name
1 Print head cap
2 Fixing tape
3 Hook
4 Print head
Page 63

User’s Guide – Toucan Hybrid
63
AP-750, Rev. 1.1 –- 23/04/04
Step 3 : Put the purge plate on the purge stand.
Notes:
The purge plate must be placed on the purge stand whenever the power is on, except
in the case when head cleaning is performed.
→ refer to “Head cleaning”
If waste fluid comes into contact with the inside of the product, the product may
malfunction.
When setting the purge plate, make sure not to contact to the print head surface.
No. Name
1 Purge stand
2 Purge plate
Step 4 : Close the maintenance cover.
• Close firmly until the cover is fixed into place.
No. Name
1 Maintenance cover
Page 64

User’s Guide – Toucan Hybrid
64
AP-750, Rev. 1.1 –- 23/04/04
Step 5 : Press the [POWER] key of the operation panel, to turn the unit ON.
• The POWER lamp of the operation panel will light (red).
Step 6 : After powering ON the unit, following message is shown on the display
*Mode*
F1 →
Roll Plate
← F2
Select the appropriate key.
In case the unit was installed as roll-to-roll and “plate” is selected (or the other way around) an error
message is displayed:
Change
to same mode
Press the [CANCEL] key.
Reselect the configuration.
*Mode*
F1 →
Roll Plate
← F2
Step 7 : The unit will initial startup operations.
• Following message is displayed on the operation panel.
* Capping Out
Remover Head Cap
And Press ENTER
Notes :
In case that the parts’ life becomes end, when turning the power of the unit ON, the
following messages are displayed alternately on the operation panel every 2
seconds. →refer to “Replacement of the print head and CR motor”
* Capping Out
Remover Head Cap
And Press ENTER
Page 65

User’s Guide – Toucan Hybrid
65
AP-750, Rev. 1.1 –- 23/04/04
*Check maintenance
Motor [CR PF LV UD]
Motor [Takeup Send]
Head [KCcMmY]
Step 8 : After confirming the removal of the print head cap, push the [ENTER] key on the operation panel.
Notes :
The initialization of the hard disk which is installed to the unit is performed for about
10 seconds after 3 seconds from the launch of the initial start-up operation. Durin g
this operation :
• The operation panel will not work even if pushing [ENTER] key.
• The display will not change even if the parts’ life cycle is displayed.
Step 9 : After finishing initial startup operations, the unit will enter the normal operating condition.
Notes :
If there are any problems during the initial startup operation, the unit will display a
message on the operation panel, and the operation may stop. If the operation stops,
refer to "Troubleshooting", and take the appropriate measures.
Step 10 : Keep the print head cap in the accessories box an close to the lid.
No. Name
1 Print head cap
2 Accessories box
3 Lid
Page 66

User’s Guide – Toucan Hybrid
66
AP-750, Rev. 1.1 –- 23/04/04
4.5.2 Turning the power OFF
Turn the power of the unit OFF according to the following procedure.
Important :
Do not touch the infrared lamp or infrared lamp house after or during operation.
Doing so could result in burns.
Please note that after operating the infrared lamp and infrared lamp house will
keep their temperature for several minutes. Let it cool off. Not doing so could
result in burns.
Step 1 : Follow “Test printing”, and perform nozzle check printing.
Step 2 : Verify if there is any clogging of nozzles, missing dots, or faint printing.
Notes :
If printing quality declines, or if missing dots are evident after the nozzle check, the
print heads need to be cleaned. → Refer to "Head cleaning" to perform head
cleaning. If turning the power OFF without head cleaning, the clogged nozzle may
not restore.
Step 3 : Verify the following regarding the operational condition of the product.
• There is no printing operation being performed.
• The operation panel is in a normal status.
Step 4 : Using the enclosed syringe, soak enough the sponges of the print head cap with the jetwa sh
fluid.
No. Name
1 Print head cap
2 Sponge
3 Pipette
Step 5 : Push the [POWER] key of the operation panel, to turn the unit OFF.
Page 67

User’s Guide – Toucan Hybrid
67
AP-750, Rev. 1.1 –- 23/04/04
Notes :
The power is ON if the operation panel displays the following conditions:
• The [POWER] key is in the pushed in condition
• The POWER lamp is lit (green).
Press the [POWER] key again to turn the power OFF.
Step 6 : Following message is displayed on the operation panel for 3 seconds.
Notes :
If pushing [POWER] key on the operation panel by mistake, push [POWER] key
again while the following message is displayed.
Power Off
Step 7 : The product will perform the power OFF operation.
• The following message is displayed on the operation panel.
* CapCover Set*
Put Head Cap on
and Press ENTER
Page 68

User’s Guide – Toucan Hybrid
68
AP-750, Rev. 1.1 –- 23/04/04
Step 8 : Open the maintenance cover.
Caution :
When opening/closing the maintenance cover, be careful not to get fingers caught in
the lid.
No. Name
1 Maintenance cover
Step 9 : Put the purge plate down from the purge stand.
No. Name
1 Purge stand
2 Purge plate
Page 69

User’s Guide – Toucan Hybrid
69
AP-750, Rev. 1.1 –- 23/04/04
Step 10 : Install the print head cap to the print head.
No. Name
1 Print head cap
2 Print head
Step 11 : Close the maintenance cover.
• Close firmly until the cover is fixed into place.
No. Name
1 Maintenance cover
Step 12 : After confirming the installation of print head cap, push the [ENTER] key on the operation panel.
Caution :
When turning the power OFF, always install the print head cap. Otherwise the
nozzle may become clogged.
• The following message is displayed on the operation panel.
* MediaFeed Select*
Need media feed?
Yes → ENTER
No → CANCEL (none)
Page 70

User’s Guide – Toucan Hybrid
70
AP-750, Rev. 1.1 –- 23/04/04
Notes :
Only displayed when operating in roll-to-roll mode.
Step 13 : When the media is set, performs following operation
a. When feeding the media, press the [ENTER] key on the operation panel.
b. When not feeding the media, press the [CANCEL] key on the operation panel or wait 10 seconds.
Notes :
If the pressure lever is up, the media will not feed even if the [ENTER] key on the
operation panel is pressed.
Step 14 : The product will finish the power OFF operation.
• The following message is displayed on the operation panel.
• If the [ENTER] key is pressed in Step 13, the product will send the media for 0.8m (2.6ft.).
• The pressure roller raise.
• The POWER lamp of the operation panel will turn OFF.
• The product will automatically turn the power OFF.
Notes :
If there are any problems during the power OFF operation, the unit will display a
message on the operation panel, and the operation may stop. If the operation stops,
refer to “Troubleshooting", and take the appropriate measures
********************
* Power Off *
* Please Wait *
********************
Page 71

User’s Guide – Toucan Hybrid
71
AP-750, Rev. 1.1 –- 23/04/04
4.5.3 An emergency power OFF
There are two emergency stops onto the Toucan Hybrid.
Caution :
Only to be used when a great malfunction occurs.
To perform an emergency stop, please follow the instructions below.
Step 1 : Push the emergency stop. The carriage will move to one of the corners.
Step 2 : Press the [POWER] key to power off the unit.
Step 3 : Remove the cause of the malfunctioning.
Step 4 : Make sure the machine can be operated safely again.
Step 5 : Pull out the emergency stop by turning it counterclockwisely.
Step 6 : Press the [POWER] key to power on the unit.
• The display will mention “Confirm Safety”
Step 7 : Press the [ENTER] key to confirm safety.
Caution :
Make sure the printer is checked for clogged nozzles and cap the heads even whe n
the printer connot be used for printing after a malfunctioning occurs.
Caution :
Do not touch the carriage!
Page 72

User’s Guide – Toucan Hybrid
72
AP-750, Rev. 1.1 –- 23/04/04
4.6 REFILLING THE INK - JETWASH FLUID
The refilling of the ink and jetwash fluids is described below.
Warning :
The ink used in this product contains an organic solvent (CYCLOHEXANONE).
Make sure to follow the industrial waste disposal laws and ordinances of your
local governments. It is necessary to install a local ventilation unit, push/pull
type ventilation unit, or a total ventilation unit to perform adequate ventilation.
If ink or jetwash liquid is swallowed, do not make the person throw up, but
immediately call a doctor and a poison management center. If there is contact
in eyes or inhalation, it may cause irritation. Follow the cautions and
procedures labeled on the ink and jetwash bottles, and take action
immediately.
The ink used in the product contains an organic solvent (CYCLOHEXANONE).
It is flammable so open flame is prohibited in the area. In a dry environment,
static electricity can cause ignition, so before handling the ink, jetwash liquid
or waste liquids, touch a metallic object first to remove static electricity from
your body. Do not near materials having static, and take appropriate measures
against static electricity.
Caution :
When refilling ink or jetwash fluid, always wear the protective gloves supplied with
the unit.
The ink and jetwash liquid are hazardous. If skin contact occurs, wash with soap
water and rinse well.
Notes :
When filling the ink, use MUTOH recommended ink only. If you do not use this ink.
• Printouts may become faint and the printer will not be able to detect the end of the
ink.
• Problems caused by using ink other than the recommended will void the warranty.
Refer to the following for the ink type and the details. → refer to “Options/Supply list”
Notes :
In order to perform verification of printing operations, ink is passed through the ink
routing of the unit once, so there will be some colouration of the ink passages, waste
fluid tubes and filters.
Page 73

User’s Guide – Toucan Hybrid
73
AP-750, Rev. 1.1 –- 23/04/04
Refill the ink and jetwash fluid of the unit according to the following procedure:
Step 1 : Open the lid of the main tank.
No. Name
1 Main tank
Step 2 : Turn or roll the ink supply bottle a few times, without letting the ink bubble into the bottle.
Step 3 : Refill the ink and jetwash fluid of the main tank according to the following procedure:
Caution :
The refilled ink or jetwash liquid must not exceed the upper limit (about 2 liters) of
the main tank. If it exceeds the upper limit, the ink will leak out and cause printer
problems.
When filling the main tank with ink, make sure not to make a mistake with the ink
colour and the ink tube colours. Filling the tank with wrong colour ink can make the
print head useless.
Notes :
The colour of the ink to fill in the main tank is labeled on the tank tray according to the
following codes:
K: Black
C: Cyan
M: Magenta
Y: Yellow
Lc: Light Cyan
Lm: Light Magenta
JW: Jetwash fluid
Page 74

User’s Guide – Toucan Hybrid
74
AP-750, Rev. 1.1 –- 23/04/04
a. When filling the ink:
Place the clean funnel into the main tank, and refill the main tank with the ink from the supply ink
bottle.
No. Name
1 Main tank
2 Funnel
3 Supply ink bottle
b. When filling the jetwash fluid:
Using the hand pump, refill the main tank with the jetwash fluid from the container.
No. Name
1 Main tank
2 Hand pump
3 Container
Page 75

User’s Guide – Toucan Hybrid
75
AP-750, Rev. 1.1 –- 23/04/04
Step 4 : Remove the funnel from the main tank, and close the lid securely.
Caution :
Be sure to close the lid of the main tank tightly. If the lid is not tightly closed or
loose, it will cause a defect when purging, loading or unloading the ink.
Notes :
When filling the main tank with ink, always change the funnel for every colour.
After using the funnels, clean the ink off with jetwash fluid well before storing.
No. Name
1 Main tank
Step 5 : After filling 1 tank of ink, fill the next colour main tank.
Step 6 : After filling all main tanks with ink, make sure that the discharge valve is closed securely.
No. Name
1 Waste fluid valve
Page 76

User’s Guide – Toucan Hybrid
76
AP-750, Rev. 1.1 –- 23/04/04
Step 7 : Turn the unit ON.
Step 8 : The printer starts initial filling.
• Following message is displayed on the operation pane l .
Filling Ink
Wait for a while
Notes :
During ink replenishment, note the following.
• Do not turn the printer off.
• Do not unplug the power cable.
• Do not open the maintenance cover.
Step 9 : When the initial filling finishes, following message up is displayed on the operation panel.
Roll - to - Roll Rigid Material
→
Paper End
→
Plate
Cancel Lever Up Cancel Lever up
Feed&Reel Purge Manual Purge
User 1 User 1
Notes :
Printing the first time after ink replenishment may lead to the following phenomena.
• Printed line grazes
• White lines
If any of the above occurs, perform head cleaning 2 or 3 times before printing by
following the procedures of "Head cleaning before printing", then check the printing
result.
If your image is still different from what you expected, leave the printer for at least 1
hour, execute head cleaning, print your image, then check it.
If you still want to make improvements, contact MUTOH local dealer.
Page 77

User’s Guide – Toucan Hybrid
77
AP-750, Rev. 1.1 –- 23/04/04
4.7 MEDIA HANDLING
The following describes the procedures for installing and setting the media and how to use the take-up
mechanism.
The procedures required for media installation is shown in the following flow diagram.
Refer to the following items according to the model to be used before performing the operations.
(1) Using the rigid media
(2) Using the roll media
Remove the flat stand
→ Removing the flat stand
Install the roll media to the scroller
→ Placement of the roll media
Set the roll media to the product
→ Loading roll media
When the take-up mechanism is used, set the roll medial to
the take-up mechanism
→ Setting winding unit
Set the media type
→ Setting media type
Caution :
When performing the following work, always perform work with 2 people.
• Setting of the rigid media
• Removal of flat stand
• Placement of the roll media
• Setting of the roll media
• Setting of the winding unit
Install Flat Stand
Make sure to use clean media tray (clean with Isopropanol)
Set head height in the highest position
Set the rigid media on the printer
→ Setting of the rigid media
Page 78

User’s Guide – Toucan Hybrid
78
AP-750, Rev. 1.1 –- 23/04/04
4.7.1 Setting of the rigid media
The procedure for loading the rigid media is explained below.
Set the media according to the following procedure.
Caution :
Make sure to use a clean media tray. If not clean, clean with Isopropanol.
Step 1 : Turn ON the power of printer.
Step 2 : Printer starts the initializing operation.
• The following message is displayed on the operation panel.
Plate
Cancel Lever Up
Manual Purge
User 1 43 m
Step 3 : Set Media detection ON. The media tray is detected. → Origin Point is set.
Step 4 : Press the [F2] key to raise the pressure rollers.
Step 5 : Turn the head height adjusting handle in the UP direction (clockwise). Then, lift the print head
until the gap between the print head and the grid roller is wide enough to allow the media to pass
freely.
• The gap (head gap) between the print head and the g rid roller is indicated on the head gap
counter.
No. Name
1 Head gap adjusting handle
2 Grid roller
3 Print head
4 Head gap counter
Page 79

User’s Guide – Toucan Hybrid
79
AP-750, Rev. 1.1 –- 23/04/04
Caution :
Make sure the gap is big enough. Please not that the media tray is already 4 mm. In
case the gap is not big enough, the print head could crash onto the media, causing
permanent damage
For example:
• Media tray : 4 mm (40 on display)
• Media : 3 mm
→ so the display must show at least 70.
Step 6 : Place a printing media on the media tray of the flat stand so that it can be parallel to the media
feeding direction.
Caution :
Be careful not to pinch your fingers between the rigid media and the media tray.
No. Name
1 Media
2 Flat stand
3 Media tray
Caution :
When moving the media, be careful not to pinch your fingers between the flat stand
roller and the media tray
Page 80

User’s Guide – Toucan Hybrid
80
AP-750, Rev. 1.1 –- 23/04/04
No. Name
1 Media
2 Media tray
3 Media feed slot
Step 7 : Press the [F2] key to lower the pressure rollers.
Step 8 : Adjust the head gap according to the following procedure.
Caution :
Do not look inside at the media feed slot cover.
• You may get injured as the head gap sensor uses laser beam.
a. Lower the print head by turning the head gap adjusting handle in the DOWN direction (counter
clockwise) until the head gap sensor lamp lights up.
No. Name
1 Head gap adjusting handle
2 Head gap sensor lamp
Page 81

User’s Guide – Toucan Hybrid
81
AP-750, Rev. 1.1 –- 23/04/04
b. Lift the print head by slowly turning the head gap adjusting handle in the UP direction (clockwise)
until the head gap sensor lamp goes OFF again.
• Keep a record of the head gap counter value at this time.
No. Name
1 Head gap adjusting handle
2 Head gap sensor bump
3 Head gap counter
c. Finish the head gap adjustment.
Step 9 : The media initial menu is displayed on the operation panel.
Step 10 : Set the media width.
Caution :
Make sure the gap is big enough. Please not that the media tray is already 4 mm. In
case the gap is not big enough, the print head could crash onto the media, causing
permanent damage.
For example:
• Media tray : 4 mm (40 on display)
• Media : 3 mm (30 on display)
→ so the display must show at least 70.
Caution :
During printing on rigid materials, the fans will cool off the infrared lamp. Please note there
is no detection. Regularly check if the fans are working. You can do this by using a sheet of
paper holding between the fans and lamp housing.
Page 82

User’s Guide – Toucan Hybrid
82
AP-750, Rev. 1.1 –- 23/04/04
4.7.2 Removing the flat stand
The removal method of the flat stand is explained below.
When using the roll media, the flat stand installed on the printer must be removed.
Remove the flat stand according to the following procedure.
Important:
Make sure the power of the machine is OFF.
Caution :
When installing or removing the front stand 1, please make sure not to touch the
carriage or infrared lamp. Doing so may cause permanent damage.
Step 1 : Please raise the front stand 1 unit with two persons until the guide pin comes off.
Step 2 : Put the front stand 1 unit on the front stand 2 unit when guide pins come off. Please latch the
metal fittings on the side of the stand leg.
Step 3 : The pushing-up-grip under the transportation stand is to be lowered (to be rotated right), and the
paper guide is pushed up. In this step, please operate carefully from injury.
Page 83

User’s Guide – Toucan Hybrid
83
AP-750, Rev. 1.1 –- 23/04/04
Caution :
Be careful not to pinch your fingers or get.
Step 4 : Please raise the transportation stand-fixation-block.
Caution :
Be careful not to pinch your fingers or get stuck.
Step 5 : Please turn the steering wheel so the head height is raised by 50 mm or more. Then, please lift
the rear stand 1 with two persons until the guide pin comes off.
Step 6 : When guide pin comes off, please put the rear stand 1 on the rear stand 2. Please fix the metal
fittings of the side of the stand leg.
Page 84

User’s Guide – Toucan Hybrid
84
AP-750, Rev. 1.1 –- 23/04/04
4.7.3 Placement of the roll media
The procedure for installing roll media to the printer is explained below.
To install roll media, use the scroller that comes with your printer.
Notes :
The following roll media can be attached to the scroller supplied with this unit.
• Media tube: diameter 3 inches, length 1626mm (64.0in.) or less
• Width: 1626mm (64in.) or less
• External diameter: 250mm (9.8in.) or less
• Weight: 100kg (220Lbs.) or less
Problems that occur due to usage of media such as printable side with inside are not
guaranteed.
To install roll media, follow the steps below.
Step 1 : Using the attached hexagon wrench, loosen the two screws for the flange on the opposite side of
the positioning ring, and remove the flange from the scroller.
No. Name
1 Scroller
2 Flange
3 Screw
4 Positioning ring
Step 2 : To load roll media, follow the steps below.
Notes :
Set the roll media on a flat surface, such as on a desk.
a. When using roll media of which the printable side is outside:
Insert the flange into the roll media. Note that the end of media is on the left side, viewed
from the positioning ring side.
Page 85

User’s Guide – Toucan Hybrid
85
AP-750, Rev. 1.1 –- 23/04/04
No. Name
1 Flange
2 Roll media
3 Positioning ring
b. When using roll media of which the printable side is inside:
Insert the flange into the roll media. Note that the end of media on the right side, viewed
from the flange side.
Step 3 : Insert the flange until the right end meets the media tube of the roll media.
No. Name
1 Flange
2 Roll media
3 Positioning ring
Step 4 : Attach the flange to the other end of the media to fix the media firmly.
No. Name
1 Flange
2 Roll media
Step 5 : Using the attached hexagon wrench, loosen the two screws for the flange on the side of the
positioning ring.
Page 86

User’s Guide – Toucan Hybrid
86
AP-750, Rev. 1.1 –- 23/04/04
No. Name
1 Flange
2 Screw
3 Positioning ring
Step 6 : Adjust the position of the flanges so that the dimension "a" and "b" shown below becomes equal
by referring the positioning holes on the scroller.
No. Name
1 Flange
2 Positioning hole
Step 7 : After adjusting the position of the scroller, tighten the bolt (x 2) back in their original positions.
No. Name
1 Flange
2 Screw
3 Positioning ring
Step 8 : Attach both ends of the scroller to the feed unit of the product with the positioning ring to the left.
Caution :
Be careful not to pinch clothes, hair, and fingers between the scroller and the feed
unit when performing the following work:
• When attaching the scroller to the product.
• During printing.
Page 87

User’s Guide – Toucan Hybrid
87
AP-750, Rev. 1.1 –- 23/04/04
Notes :
Set the scroller onto the printer correctly by referring to the figure below.
• If the scroller direction is wrong, the printer cannot feed the media correctly.
No. Name
1 Load Unit
2 Scroller
3 Positioning ring
Page 88

User’s Guide – Toucan Hybrid
88
AP-750, Rev. 1.1 –- 23/04/04
4.7.4 Loading roll media
The procedure for loading roll media is explained below.
To load roll media, follow the steps below.
Step 1 : Set headgap to “0”, select roll
Step 2 : Turn the unit ON.
Step 3 : The printer starts the initializing operation.
• The following message is displayed on the operation panel.
→
Paper End
Cancel Lever up
Feed&Reel Purge
User 1
Notes :
In the following conditions, follow "Menu setup on the operation panel" and set
individual settings.
• When using the winding unit: Set the winding unit setting to "ON"
→ Refer to “Take-up mechanism menu”
• When not performing media detection during media initialization: Set media
detection to "OFF"
→ Refer to “Media detection menu”
• When using roll media of which the printable side is outside: Set the feed unit
item to "Outside"
→ Refer to “Feed unit menu”
• When using roll media of which the printable side is inside:
• Set the feed unit item to "Inside".
→ Refer to “Feed unit menu”
• Set media detection to "OFF".
→ Refer to “Media detection menu”
• When not performing media detection during media initialization: Set media
detection to "OFF"
Step 4 : Verify that the MEDIA SET lamp of the operation panel is unlit.
Step 5 : Press [F2] key to raise the pressure roller.
• The MEDIA SET lamp will light (orange).
• The following message is displayed on the operation panel.
Set Media
Cancel Lever Down
Feed&Reel Purge
User 1
Page 89

User’s Guide – Toucan Hybrid
89
AP-750, Rev. 1.1 –- 23/04/04
Notes :
When raising or lowering the pressure roller, you can use the foot switch instead of
the operation panel.
No. Name
1 Foot switch
Step 6 : Lift up the tension roller at the backside of the product with your hand.
• The roll media is fed.
No. Name
1 Roll media
2 Tension roller
Page 90

User’s Guide – Toucan Hybrid
90
AP-750, Rev. 1.1 –- 23/04/04
Step 7 : After passing the roll media through the tension roller, place in the media feed slot from the top of
the damper.
Notes :
If there is a part not wounded tightly on the end of the roll media, wind it tightly again,
then load it.
a. When using roll media of which the printable side is outside:
No. Name
1 Roll media
2 Tension roller
3 Guide roller
4 Media feed slot
b. When using the roll media of which the printable side is inside:
No. Name
1 Roll media
2 Tension roller
3 Guide roller
4 Media feed slot
Step 8 : Pull the roll media out about 1m from the front media feed slot.
Page 91

User’s Guide – Toucan Hybrid
91
AP-750, Rev. 1.1 –- 23/04/04
No. Name
1 Media feed slot
2 Roll media
Step 9 : Press the [F3] key of the operation panel.
• The following message is displayed on the operation panel.
*Feed&Reel*
F1 →
F. Order F. Reverse
← F2
F3 →
Forward Backward
← F4
1/2
*Feed&Reel*
F1 →
R. Reverse
2/2
Step 10 : Rewind the roll media a little by pressing [F4] key on the operation panel while holding the edge
of the media, and eliminate any loose or slant.
Notes :
If you set the roll media free while rewinding, the roll media will fall out from the
media feed slot to the rear side of the product.
Make sure not to set the right edge of the media over the media setting position. If
doing so, it may affect the printing quality.
Page 92

User’s Guide – Toucan Hybrid
92
AP-750, Rev. 1.1 –- 23/04/04
No. Name
1 Roll media
2 Media loading position
Notes :
When setting the roll media, set the both side of the media at least 5mm apart from
the edge of the pressure roller.
• The slippage or creases may occur during printing.
No. Name
1 Roll media
2 Pressurizing roller
Page 93

User’s Guide – Toucan Hybrid
93
AP-750, Rev. 1.1 –- 23/04/04
Step 11 : If the edge of the roll media is set apart 5mm or less. From the edge of the pressure roller, adjust
the position of the roll media according to the following procedure:
a. Using the attached hexagon wrench, loosen the screws (each 2) for both flanges to move the roll
media right and left.
b. After adjusting the position of the roll media, tighten the screws back in their original positions.
No. Name
1 Flange
2 Screw
3 Roll media
Step 12 : Press the [CANCEL] key on the operation panel.
The operation panel returns to the normal condition.
Notes:
When using a winding unit, follow "Setting winding unit" and set the roll media to the
winding unit.
Step 13 : Press the [F2] key on the operation panel to lower the pressure roller.
• The MEDIA SET lamp goes off.
Notes :
If you load a new tube of roll media, the media end may not be straight. If so, cut the
end of the roll media.
→ Refer to "Roll media cutting procedure" to cut the roll media.
Notes:
When using a winding unit, follow "Setting winding unit" and set the roll media to the
winding unit.
Step 14 : The media initial menu is displayed on the operation panel.
Page 94

User’s Guide – Toucan Hybrid
94
AP-750, Rev. 1.1 –- 23/04/04
4.7.5 Setting winding unit
The setup for the winding unit is described below.
When using the winding unit, set up the winding unit according to the following procedure.
Notes :
When using the winding unit, always load the media before printing.
Step 1 : Make sure the levers are up.
Step 2 : Attach the media tube to the scroller for the winding unit
• Refer to “Placement of the roll media”
Notes :
When using the winding unit, always use the media tube attached to the product.
Step 3 : Hold the scroller so that the flange on the side of the positioning ring is on the right, and attach
both ends of the scroller to the winding unit.
Notes :
Set the scroller onto the printer correctly by referring to the figure below. If the
direction of the attachment is wrong, the media will not be wound correctly.
No. Name
1 Winding unit
2 Scroller
3 Positioning ring
Step 4 : Pull out the roll media from the feed slot, and fix into place with tape so that the leading edge is
parallel with the media tube.
Page 95

User’s Guide – Toucan Hybrid
95
AP-750, Rev. 1.1 –- 23/04/04
No. Name
1 Roll media
2 Media tube
3 Cushioning roller
Notes :
When setting the roll media to the winding unit,
Check the front and back of the product and make sure the media is free of wrinkles
or slack.
Install the media on the media tube so that the printing side faces outside. The
media cannot be wound if the printable side faces inside.
• Front section
Page 96

User’s Guide – Toucan Hybrid
96
AP-750, Rev. 1.1 –- 23/04/04
• Rear section
Step 5 : Rotate the scroller by hand, and wind the roll media to the media tube about one and a half turns.
No. Name
1 Scroller
Step 6 : Set the roll media according to the following procedures:
• Referring to “Loading roll media”
Step 7 : If media is set correctly, lever down.
Page 97

User’s Guide – Toucan Hybrid
97
AP-750, Rev. 1.1 –- 23/04/04
4.8 HEAD CLEANING BEFORE PRINTING
Before printing, perform purge and head cleaning to clean the print head surface and the nozzle. Follow the
steps below for the head cleaning.
Caution :
When performing a head cleaning:
• Put the gloves supplied with the printer on both hands.
• Only use the print head wiper or polynit wipers supplied with the printer.
Otherwise nozzles may become clogged.
The ink and jetwash liquid are hazardous. If skin contact occurs, wash with soap
water and rinse well.
Step 1 : Turn the unit power ON.
Step 2 : Verify that the unit is in a normal status.
Roll - to - Roll Rigid Material
Ready to Print Ready to print
Cancel Lever Up Cancel Lever up
Feed&Reel Purge ← F4 Manual Purge ← F4
User 1 43 m User 1 43 m
Step 3 : Press the [F4] key of the operation panel.
• Go on to the Purge menu.
*Purge*
F1 →
ALL Normal
← F2
F1, F2 → ENTER
Step 4 : Press the following keys on the operation panel to change the settings.
• When changing the ink colour: [F1] key
• When changing the purge mode (Normal, little, powerful, continuous): [F2] key
Notes:
The factory default settings (initial values) are set as follows. Normally, there is no
need to change the settings.
• Ink Colour: All
• Purge mode: Normal
For details on the settings, refer to "Head cleaning".
Page 98

User’s Guide – Toucan Hybrid
98
AP-750, Rev. 1.1 –- 23/04/04
Step 5 : Press the [ENTER] key of the operation panel.
• The settings are confirmed.
• The unit will start the purge process.
Notes :
In the purge menu, if the following operation is performed, the unit will return to
normal status without performing the purge process.
• When the [CANCEL] key of the operation panel is pressed.
Purging
Wait for a while
Step 6 : When purge is completed for all print heads, the operation panel returns to the normal status.
Roll - to - Roll Rigid Material
Ready to Print Ready to print
Cancel Lever Up Cancel Lever up
Feed&Reel Purge Manual Purge
User 1 User 1
Step 7 : Open the maintenance cover.
Caution :
When opening and closing the maintenance cover, be careful not to get fingers
caught on the lid.
No. Name
1 Maintenance cover
Step 8 : Put the purge plate down from the purge stand.
Page 99

User’s Guide – Toucan Hybrid
99
AP-750, Rev. 1.1 –- 23/04/04
No. Name
1 Purge stand
2 Purge plate
Step 9 : Using the attached print head wiper or polynit wipes, lightly wipe off the ink accumulated on the
print head. Wipe from the back of the printer toward yourself.
Caution :
When cleaning the print head, be careful of the following. Incorrect cleaning may
result in clogging of the nozzles.
• Do not touch the print head surface with bare hands.
• Wipe out ink on the print head wiper every time when ink is adhered to it.
• Make sure that the printhead wiper is not hard due to ink drying because
that can damage the printheads.
o Soak wiper in ink or jetwash before using on the printhead.
No. Name
1 Print head
2 Print head wiper
Step 10 : Put the purge plate on the purge stand.
Page 100

User’s Guide – Toucan Hybrid
100
AP-750, Rev. 1.1 –- 23/04/04
No. Name
1 Purge stand
2 Purge plate
Step 11 : Close the maintenance cover.
• Close firmly until the cover is fixed into place
No. Name
1 Maintenance cover
Step 12 : Cleaning operation is ended
 Loading...