

Page 1
User’s Guide
Sign Cutting Plotter
Page 2

User’s Guide SC-PRO Cutting Plotter
2 AP-75280 – Rev. 1.1
Page 3

User’s Guide SC-PRO Cutting Plotter
3 AP-75280 – Rev. 1.1
COPYRIGHT NOTICE
COPYRIGHT 2008 Mutoh Europe N.V. All rights reserved.
Mutoh reserves the right to modify the information contained in this manual at any time without prior notice.
This document may not be reproduced by any means, in whole or in part, without written permission of the
copyright owner.
This document is furnished to support the Mutoh CutServer in combination with the MUTOH SC-Pro cutting
plotter. In consideration of the furnishing of the information contained in this document, the party to whom it
is given assumes its custody and control and agrees to the following:
The information herein contained is given in confidence, and any part thereof shall not be copied or
reproduced without written consent of Mutoh Europe N.V.
This document or the contents herein under no circumstances shall be used in the manufacture or
reproduction of the article shown and the delivery of this document shall not constitute any right or license to
do so.
05 September 2008
Published: Mutoh Europe N.V., Archimedesstraat 13, B-8400 Oostende, BELGIUM
Page 4

User’s Guide SC-PRO Cutting Plotter
4 AP-75280 – Rev. 1.1
Page 5

User’s Guide SC-PRO Cutting Plotter
5 AP-75280 – Rev. 1.1
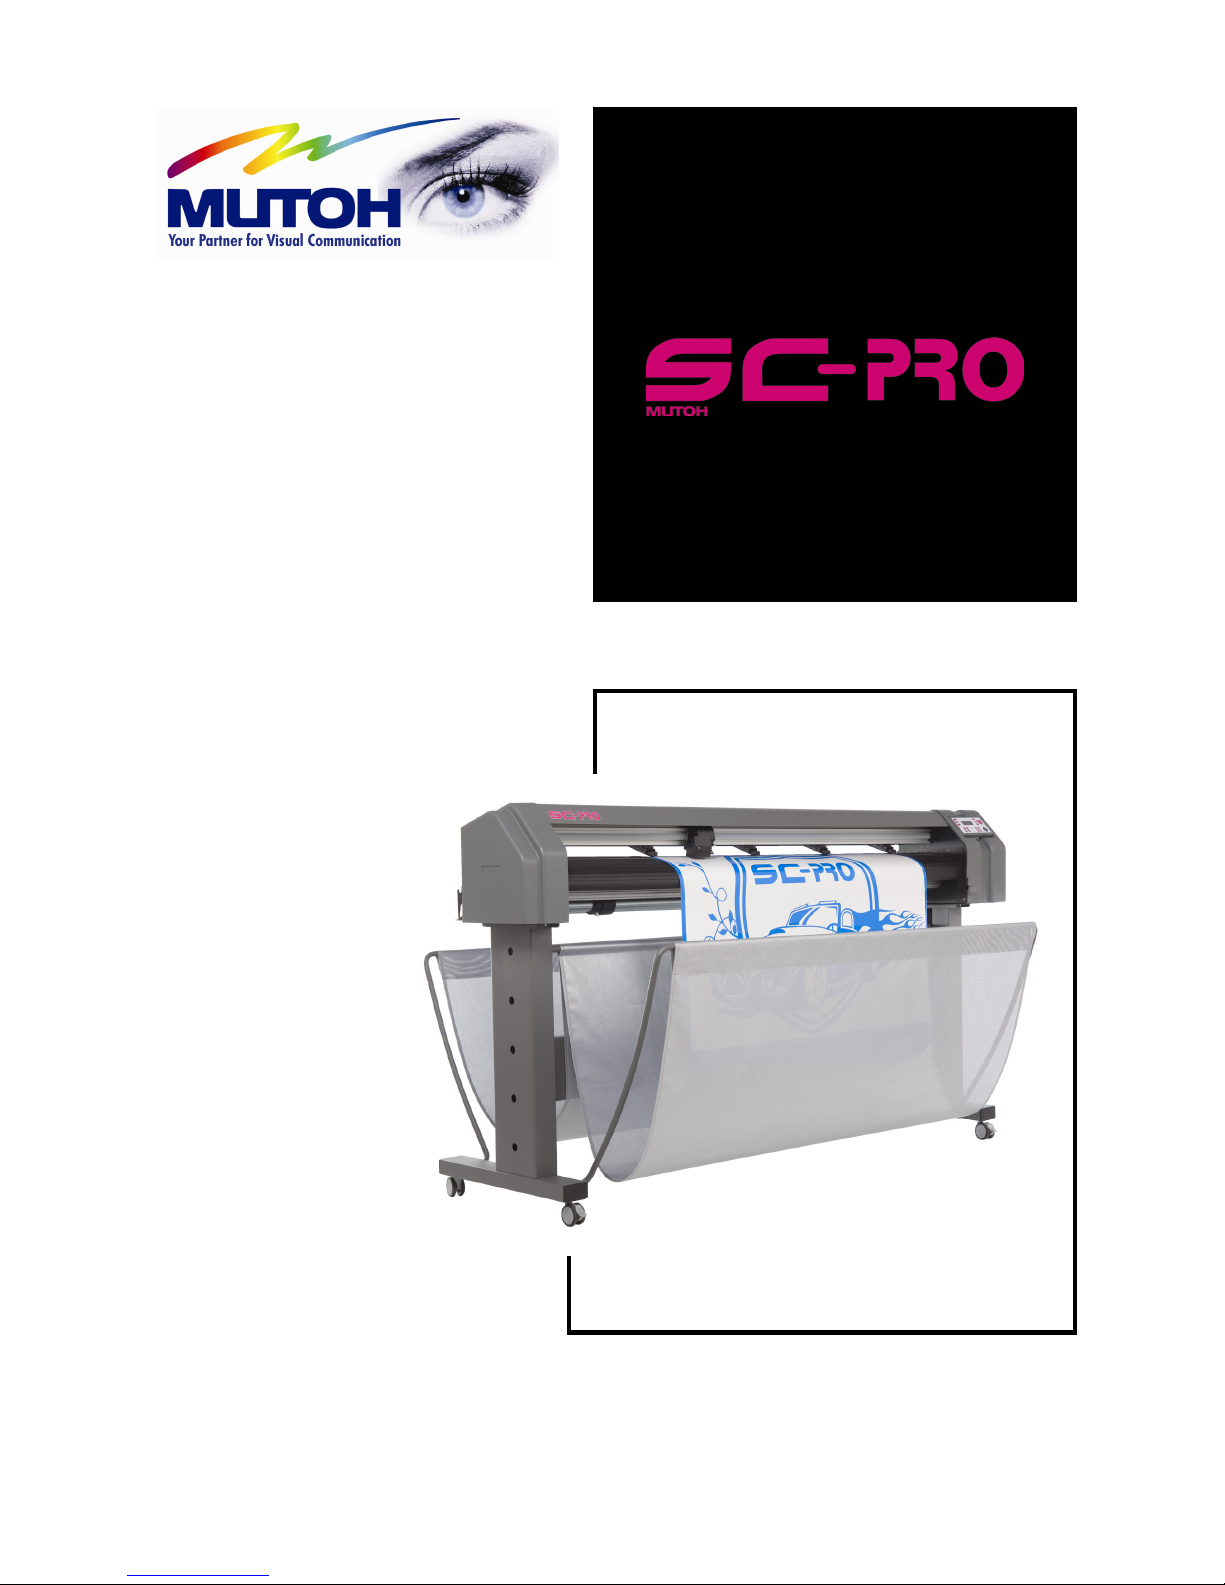
Dear Customer,
Thank you for choosing a Mutoh SC-Pro series sign cutting plotter. The Mutoh SC-Pro drag knife cutting
plotter has been designed to be one of the most user-friendly and versatile cutting plotters in the market.
As a stand-alone cutting plotter, the SC-Pro can cut and plot designs onto PVC or paper as required.
In combination with an inkjet printer, the SC-Pro cutting plotter is ready for contour-cutting of pre-printed
signs made with any printer capable of printing onto cutting plotter compatible media. Contour-cutting is
made possible via the integrated EPOS (electronic positioning) technology and the in-the-box software.
But even more important, it is easy to use, as the following guide will show you.
Page 6

User’s Guide SC-PRO Cutting Plotter
6 AP-75280 – Rev. 1.1
Page 7

User’s Guide SC-PRO Cutting Plotter
7 AP-75280 – Rev. 1.1
TABLE OF CONTENTS
1 Regularisationandsafetyinformation.......................11
1.1Complywithfollowingregulations....................................................................11
1.2 Important notes .................................................................................................12
1.3 Safety Labels ......................................................................................................12
2 Product overview ...................................................... 15
2.1 Dimensions ........................................................................................................15
2.2 Installation environment requirements .............................................................15
2.3 Part names and functions ..................................................................................17
2.3.1 Front of the SC-PRO ....................................................................................17
2.3.2 Rear of the SC-PRO ......................................................................................18
2.3.3 Operation panel ..........................................................................................19
2.4 In-the-box contents ...........................................................................................20
3 Basics ........................................................................ 21
3.1 Installing and replacing tools .............................................................................21
3.1.1 Installing tools .............................................................................................21
3.1.2 Replace cutter blade ...................................................................................22
3.1.3 Replace auto sheet-off knife .......................................................................23
3.1.4 Replacing the cutting mat ...........................................................................24
3.2 Handling and storing media ...............................................................................25
3.2.1 Handling media ...........................................................................................25
3.2.2 Precaution on storing media .......................................................................25
3.3 Loading media ....................................................................................................26
3.3.1 Loading roll media .......................................................................................26
3.3.1.1 Loading cut vinyl ....................................................................................26
3.3.1.2 Loading pre-printed vinyl .......................................................................29
3.3.2 Loading sheet media ...................................................................................32
4 Walkthrough the operation panel ............................. 35
4.1 Direct key access ................................................................................................35
4.1.1 SHEET OFF key .............................................................................................36
4.1.2 ORIGIN key ..................................................................................................37
4.1.3 TEST key ......................................................................................................37
4.1.4 CONTOUR CUTTING key ..............................................................................38
4.1.5 SPEED key ....................................................................................................39
4.1.6 FORCE key ...................................................................................................40
4.1.7 OFFSET key ..................................................................................................41
Page 8

User’s Guide SC-PRO Cutting Plotter
8 AP-75280 – Rev. 1.1
4.1.8 TOOL key .....................................................................................................42
4.2 Menu overview ..................................................................................................43
4.2.1 Sheet off mode............................................................................................46
4.2.2 Sheet off margin ..........................................................................................46
4.2.3 Auto Shuffle ................................................................................................46
4.2.4 Pre-Feed length ...........................................................................................47
4.2.5 Max Sheet length ........................................................................................48
4.2.6 Page mode ..................................................................................................49
4.2.7 Origin ..........................................................................................................50
4.2.8 Laser speed .................................................................................................50
4.2.9 Tool-up speed .............................................................................................51
4.2.10 Job focus ................................................................................................51
4.2.11 Smoothing ..............................................................................................51
4.2.12 Factory default .......................................................................................52
4.2.13 Copies ....................................................................................................52
4.2.14 Bezier .....................................................................................................53
4.2.15 Language ................................................................................................53
4.2.16 Emulation ...............................................................................................53
4.2.17 Program step ..........................................................................................54
4.2.18 VS/ZF/AS ................................................................................................54
4.2.19 LCD contrast ...........................................................................................54
4.2.20 Keyboard beep .......................................................................................55
4.2.21 Versions .................................................................................................55
4.2.22 Basic / Full menu ....................................................................................55
4.2.23 Serial communication ............................................................................56
4.2.24 Network communication .......................................................................57
4.2.24.1 TCP/IP Address ...................................................................................57
4.2.24.2 SubnetMask ........................................................................................57
4.3 Special key combinations ...................................................................................58
4.3.1 EPOS laser ON .............................................................................................58
4.3.2 EPOS laser OFF ............................................................................................59
4.3.3 Bar code verification ...................................................................................59
4.3.4 Updating the keyboard ...............................................................................60
4.3.5 Reset the keyboard .....................................................................................60
4.3.6 Activate Sheet off knife ...............................................................................61
4.3.7 Factory default ............................................................................................61
4.4 Keys accessible during a cutting job ..................................................................62
4.4.1 While cutting ...............................................................................................62
4.4.2 While pausing a cutting job .........................................................................62
Page 9

User’s Guide SC-PRO Cutting Plotter
9 AP-75280 – Rev. 1.1
5 Fine-tuning your cutter .............................................. 63
5.1 Adjusting the knife depth ..................................................................................63
5.2 Setting the tool force .........................................................................................66
5.3 Offset principle ..................................................................................................66
5.4 EPOS test cuts ....................................................................................................67
5.4.1 EPOS alignment ...........................................................................................67
5.4.1.1 Tools necessary: .....................................................................................67
5.4.1.2 Alignment procedure .............................................................................67
5.4.1.3 Adjustments if necessary .......................................................................68
5.4.2 EPOS readout ..............................................................................................69
5.4.3 EPOS calibration ..........................................................................................70
5.5 XY-Distance Accuracy .........................................................................................73
6 Contour cutting ......................................................... 75
6.1 Different alignment methods ............................................................................75
6.2 Which Aligning Method should I use? ...............................................................76
6.3 Square details ....................................................................................................77
6.3.1 Hints – tips – recommendations .................................................................77
6.3.2 Automatic alignment without barcode .......................................................78
6.3.3 Automatic alignment with barcode – single frame .....................................79
6.3.4 Automatic alignment with barcode – multi frame ......................................80
6.4 Cut area measurement ......................................................................................81
7 Maintenance ............................................................. 83
7.1 Cleaning & Daily maintenance ...........................................................................83
7.1.1 Cleaning the grid rolls .................................................................................83
7.1.2 Cleaning the cutter blade ............................................................................84
7.1.3 Cleaning the cutting plotter ........................................................................84
8 Troubleshooting ........................................................ 85
8.1 Checking the communication settings ...............................................................86
8.1.1 For serial cable connections ........................................................................86
8.1.2 For network connections ............................................................................87
8.2 Error messages ..................................................................................................88
8.2.1 Recoverable errors messages .....................................................................88
8.2.2 Unrecoverable system errors ......................................................................91
9 Consumables ............................................................. 95
Page 10

User’s Guide SC-PRO Cutting Plotter
10 AP-75280 – Rev. 1.1
Page 11
User’s Guide SC-PRO Cutting Plotter
CHAPTER 1 : SAFETY INSTRUCTIONS
11 AP-75280 – Rev. 1.1
1 REGULARISATION AND SAFETY
INFORMATION
Safety terms in this manual are categorized into following three types, depending on the degree of the risk
(or the scale of accident)
Safety Terms Details
WARNING
Must be followed carefully to avoid death or serious bodily injury.
CAUTION
Must be observed to avoid bodily injury (moderately or lightly) or damage to your product
NOTES
Contains important information and useful tips on the operation of your product
1.1 COMPLY WITH FOLLOWING REGULATIONS
The CE marking is a mandatory European marking for certain product groups to
indicate conformity with the essential health and safety requirements set out in
European Directives.
By affixing the CE marking, the manufacturer, his authorized representative, or the
person placing the product on the market or putting it into service ensures that the item
meets all the essential requirements of all applicable EU directives and that the
applicable conformity assessment procedures have been applied.
This product is tested and approved by the Canadian Standards Association (CSA),
this to provide increased assurance of quality and safety.
The product is tested according to IEC60950.
This standard tries to cover all safety aspects.
Mechanical, electrical
Choice of components
Choice of materials: flammability!
Connectors, cables …
Fire enclosure
…
This means the product is safe for users, service personnel and production personnel.
CSA International certification is not a legal commitment but it assures the quality and
safety of the machine.
Your product is designed and manufactured with high-quality materials and
components, which can be recycled and reused.
When this crossed-out wheeled bin symbol is attached to a product, it means the
product is covered by the European Directive 2002/96/EC – WEEE regulation.
Please inform yourself about the local separate collection system for electrical and
electronic products.
Please act according to local rules and do not dispose of your old products with your
normal household waste. The correct disposal of your old product will help prevent
potential negative consequences for the environment and human health.
Page 12
User’s Guide SC-PRO Cutting Plotter
CHAPTER 1 : SAFETY INSTRUCTIONS
12 AP-75280 – Rev. 1.1
1.2 IMPORTANT NOTES
Technical problems and maintenance, which require the cutter to be opened, can only be done by
qualified personnel who were trained to repair this type of machine.
Unauthorized removing of covers and/or overruling safety locks can be dangerous and will result in
your guarantee becoming void.
After powering OFF the machine, wait at least 10 seconds before powering ON again. Not respecting
this time interval could damage the machine.
1.3 SAFETY LABELS
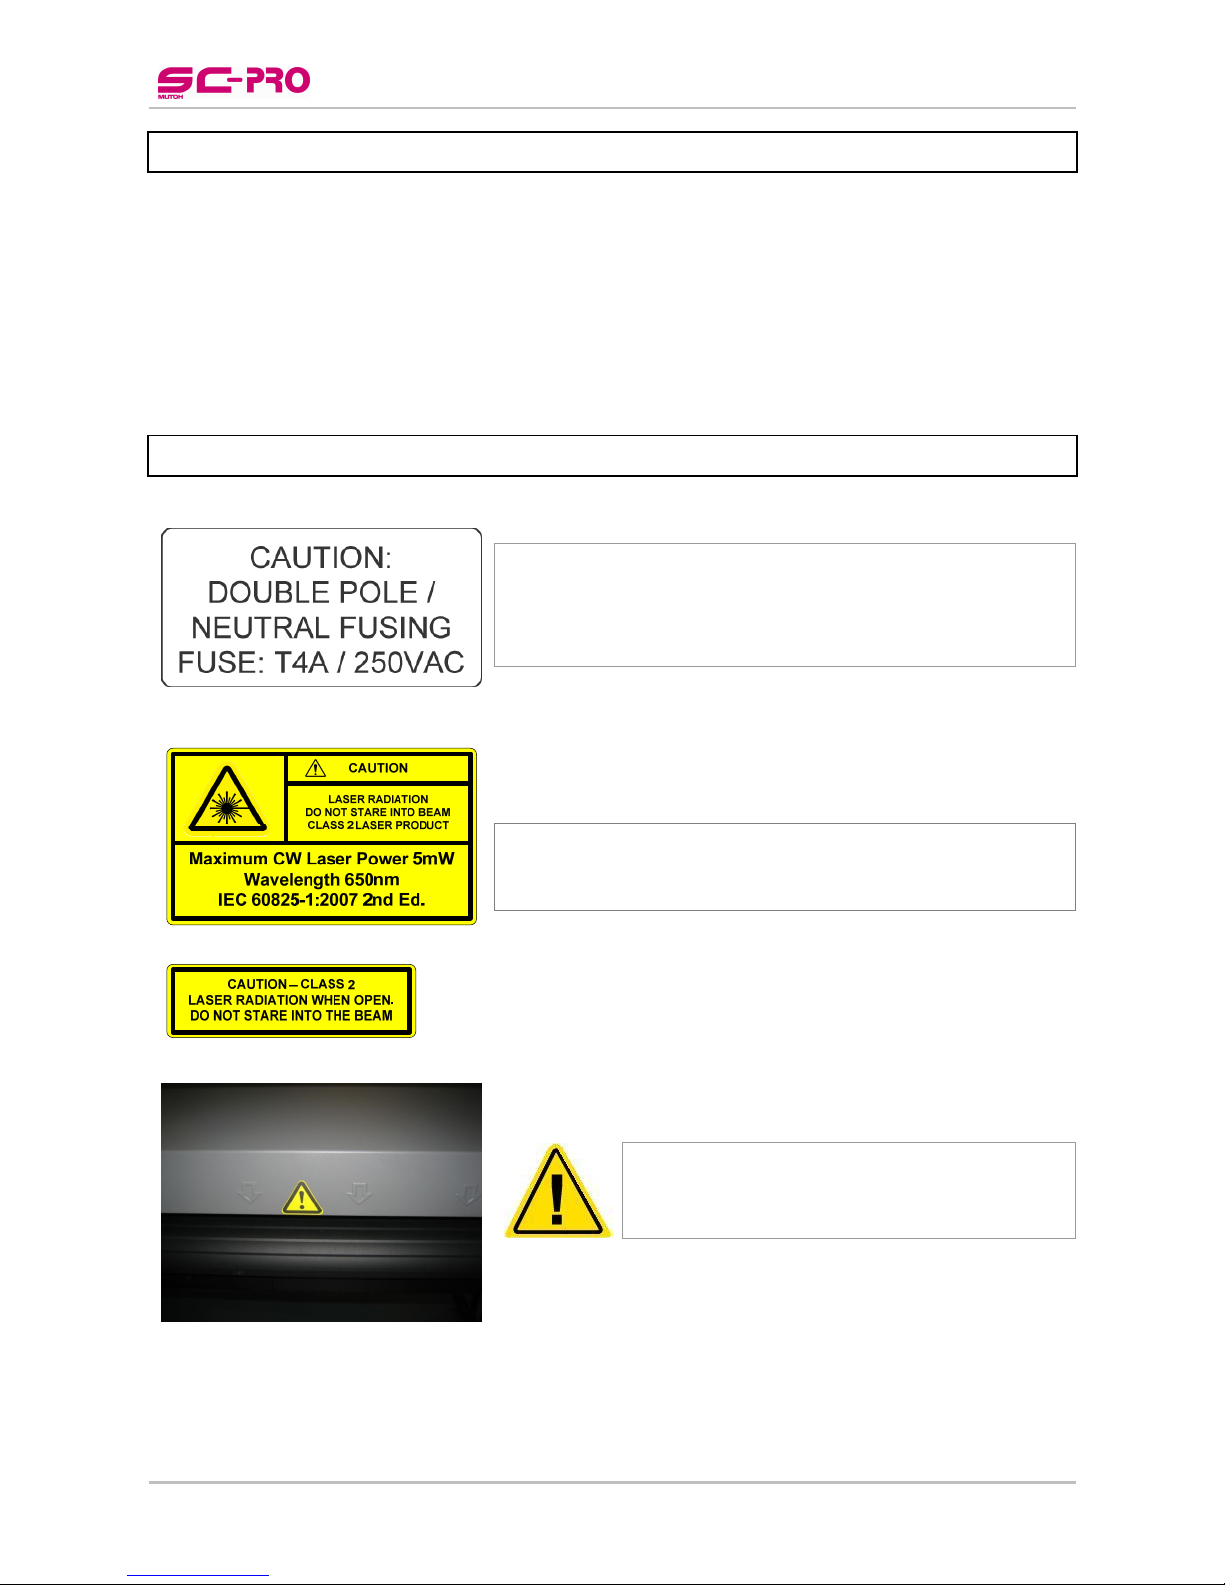
Be careful when servicing this machine. The cutter has two fuses.
One neutral and one in phase.
After operation of the fuse, parts of the equipment that remain
energized might represent a hazard during servicing.
Be sure not to stare in the laser mounted on the cutting head.
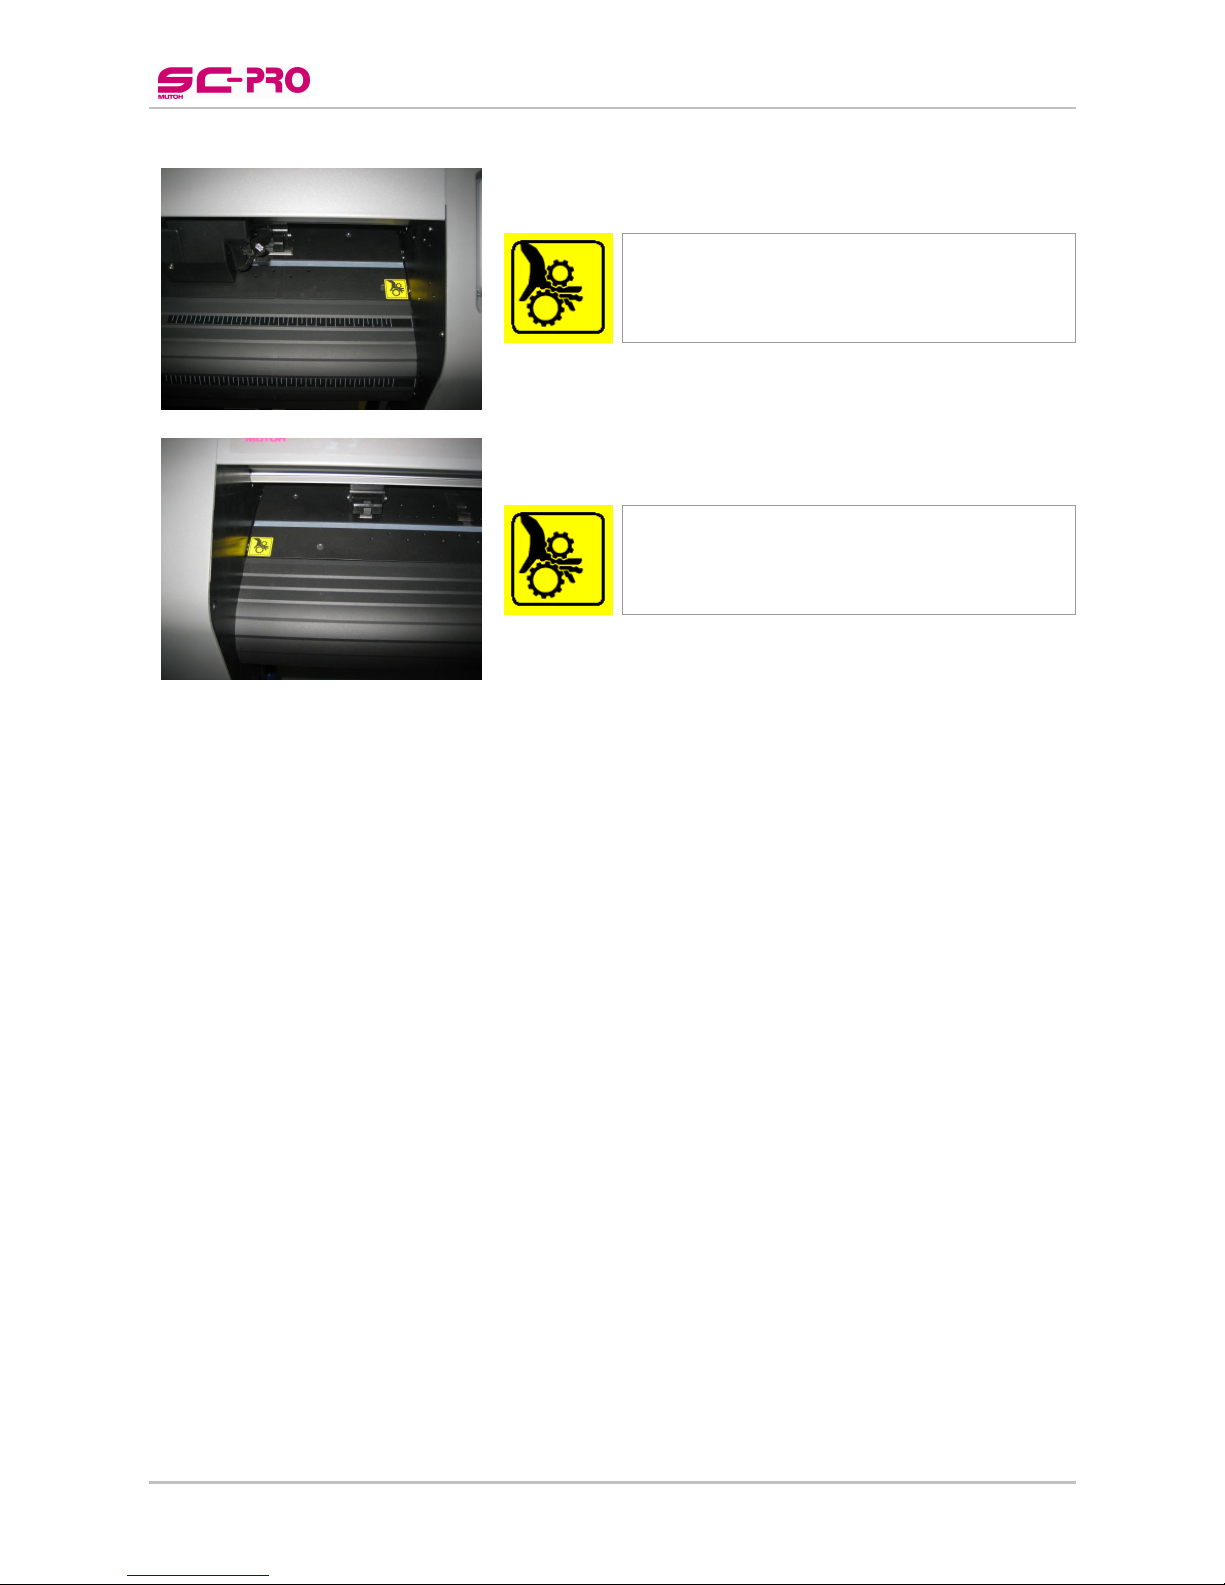
Be careful not to pinch your fingers between the
pressure rollers and grid rollers when loading media
for example.
Page 13
User’s Guide SC-PRO Cutting Plotter
CHAPTER 1 : SAFETY INSTRUCTIONS
13 AP-75280 – Rev. 1.1
Be careful not to get stuck between the following
moving parts:
► Cutting head
► Grid rollers
Be careful not to get stuck between the following
moving parts:
► Cutting head
► Grid rollers
Page 14

User’s Guide SC-PRO Cutting Plotter
CHAPTER 1 : SAFETY INSTRUCTIONS
14 AP-75280 – Rev. 1.1
Page 15
User’s Guide SC-PRO Cutting Plotter
CHAPTER 2 : PRODUCT OVERVIEW
15 AP-75280 – Rev. 1.1
2 PRODUCT OVERVIEW
2.1 DIMENSIONS
Please find below the sizes of the SC Pro cutter with all dimensions in millimeters.
2305 1062
1259
662
2.2 INSTALLATION ENVIRONMENT REQUIREMENTS
The location where you set up your equipment is very important. Please see to it that it meets following
conditions:
Power supply
100 - 240 VAC
50 - 60 Hz
Max. 1.5 A
Ambient Conditions:
Operating environment
Temperature 5 °C to 30 °C
Humidity 35 % - 75 % non-condensing
Recommended environment (dark area)
Temperature 16 °C to 25 °C
Humidity 50 % to 65 % non-condensing
Variation rate
Temperature 2 °C per hour
Humidity 5 % per hour
Storage environment
Temperature 0 °C to 50 °C
Page 16
User’s Guide SC-PRO Cutting Plotter
CHAPTER 2 : PRODUCT OVERVIEW
16 AP-75280 – Rev. 1.1
Room conditions
Please protect your cutter from moisture, dust, draughts and direct sunlight (to prevent possible
media detection and epos readout issues). It is best to keep your machine away from open
windows and air-conditioners.
See to it that there is an adequate space around the cutter so that ventilation is not obstructed.
Avoid unnecessary vibrations and set up your cutter on a level surface.
Be sure to have some free space on each side of the SC-Pro to ease the operating of it.
a
b
c
d
a = at least 1 meter
b = at least 1 meter
c = at least 1 meter
d = at least 0,1 meter
This means that you need the following room space in total: 3,20m x 2,66m (W x D)
Page 17
User’s Guide SC-PRO Cutting Plotter
CHAPTER 2 : PRODUCT OVERVIEW
17 AP-75280 – Rev. 1.1
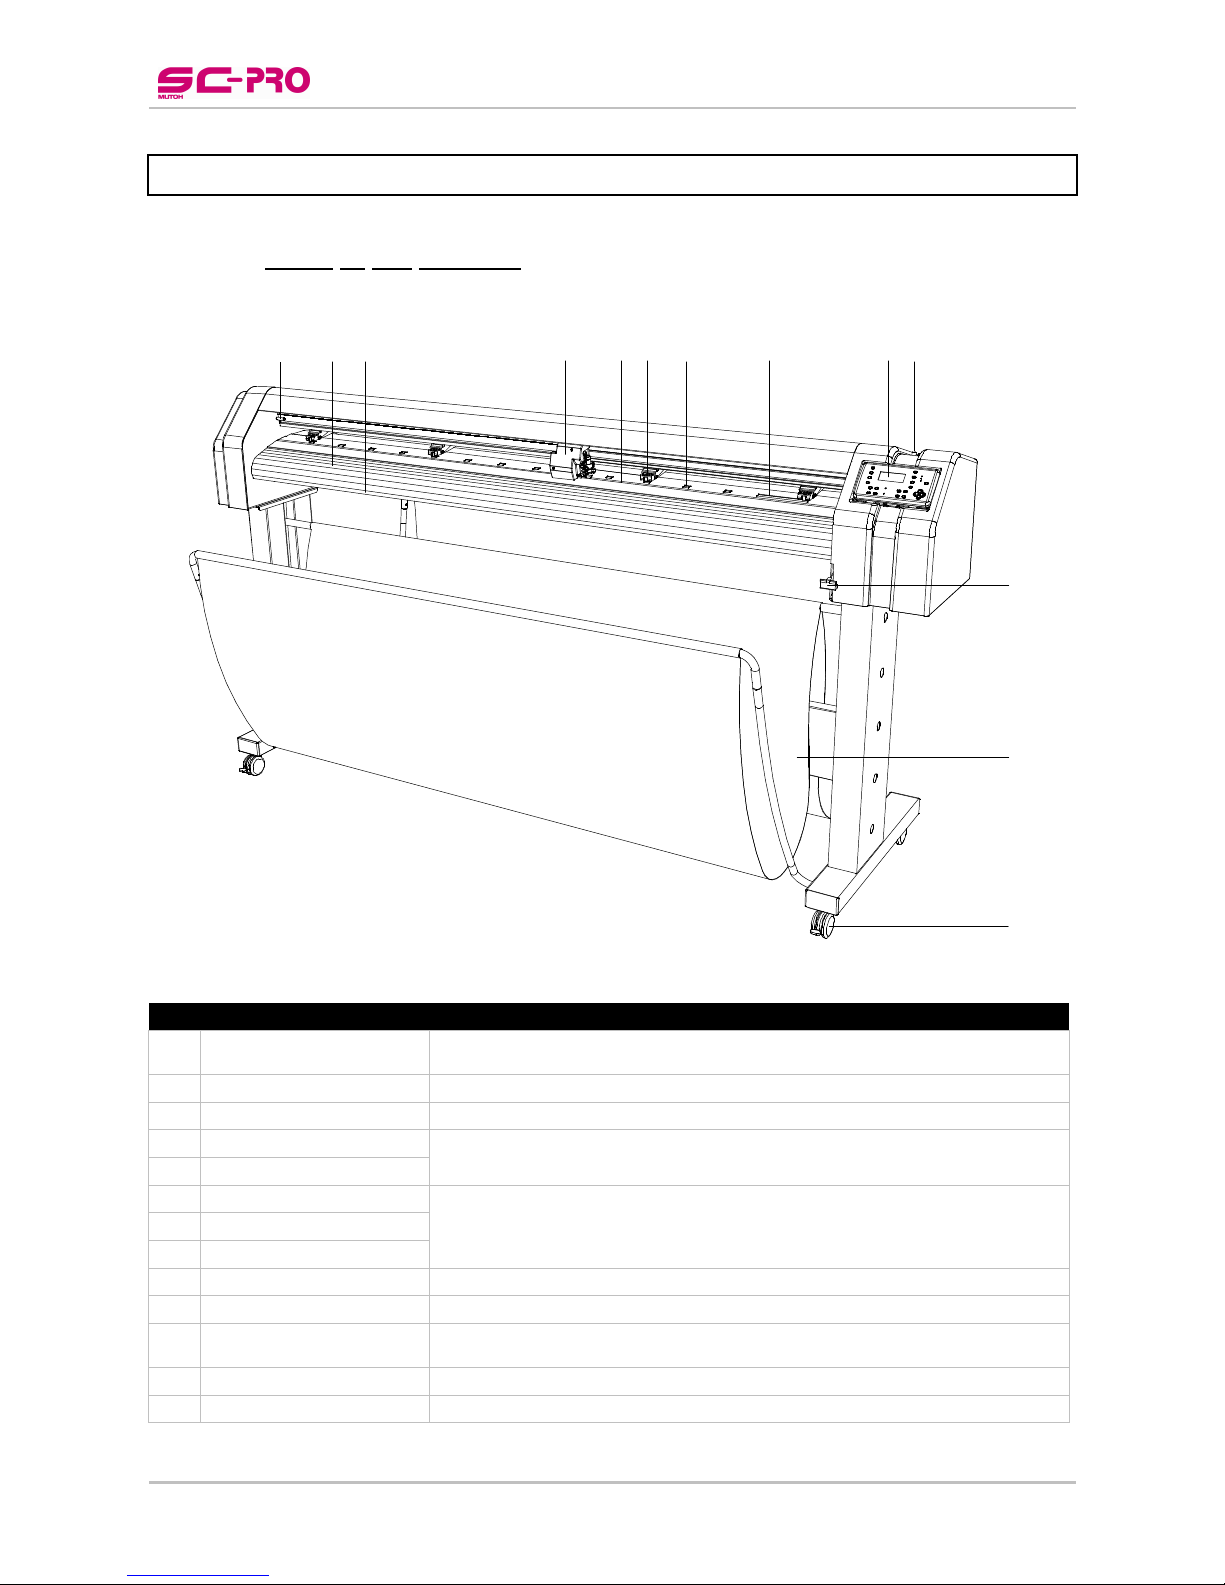
2.3 PART NAMES AND FUNCTIONS
2.3.1 Front of the SC-PRO
1
23
4
56
7
89
10
12
13
11
N° Part Function
1
Bumper
To avoid the head crashing against the side and to measure the width of
the machine during initialization.
2
Media guide To guide the media when moving front and backwards.
3
Cutting groove A groove to guide a knife to sheet of the media manually.
4
Cutting head Assembly of cutting knife, sheet-off knife and EPOS sensor.
5
Cutting mat Provides a reliable cutting surface and minimizes damage to the knife tip.
6
Pressure rollers To hold the media against the grid rollers.
7
Small grid rollers
Rollers with a lot of grip to move the media along front and backwards
There is 1 large one and 13 small ones.
8
Large grid roller
9
Control panel Removable panel with LCD display and control keys.
10
Tool storage holes Holes in the right cover to store 3 tools.
11
Pressure roller lever
To lower or raise the pressure rollers. Note that all sent data will be
removed out of the buffers when raising the lever.
12
Media collection bag Bag to collect the media when sheeted-off.
13
Caster wheels To move the cutter easily or to fix the stand using the brakes.
Page 18
User’s Guide SC-PRO Cutting Plotter
CHAPTER 2 : PRODUCT OVERVIEW
18 AP-75280 – Rev. 1.1
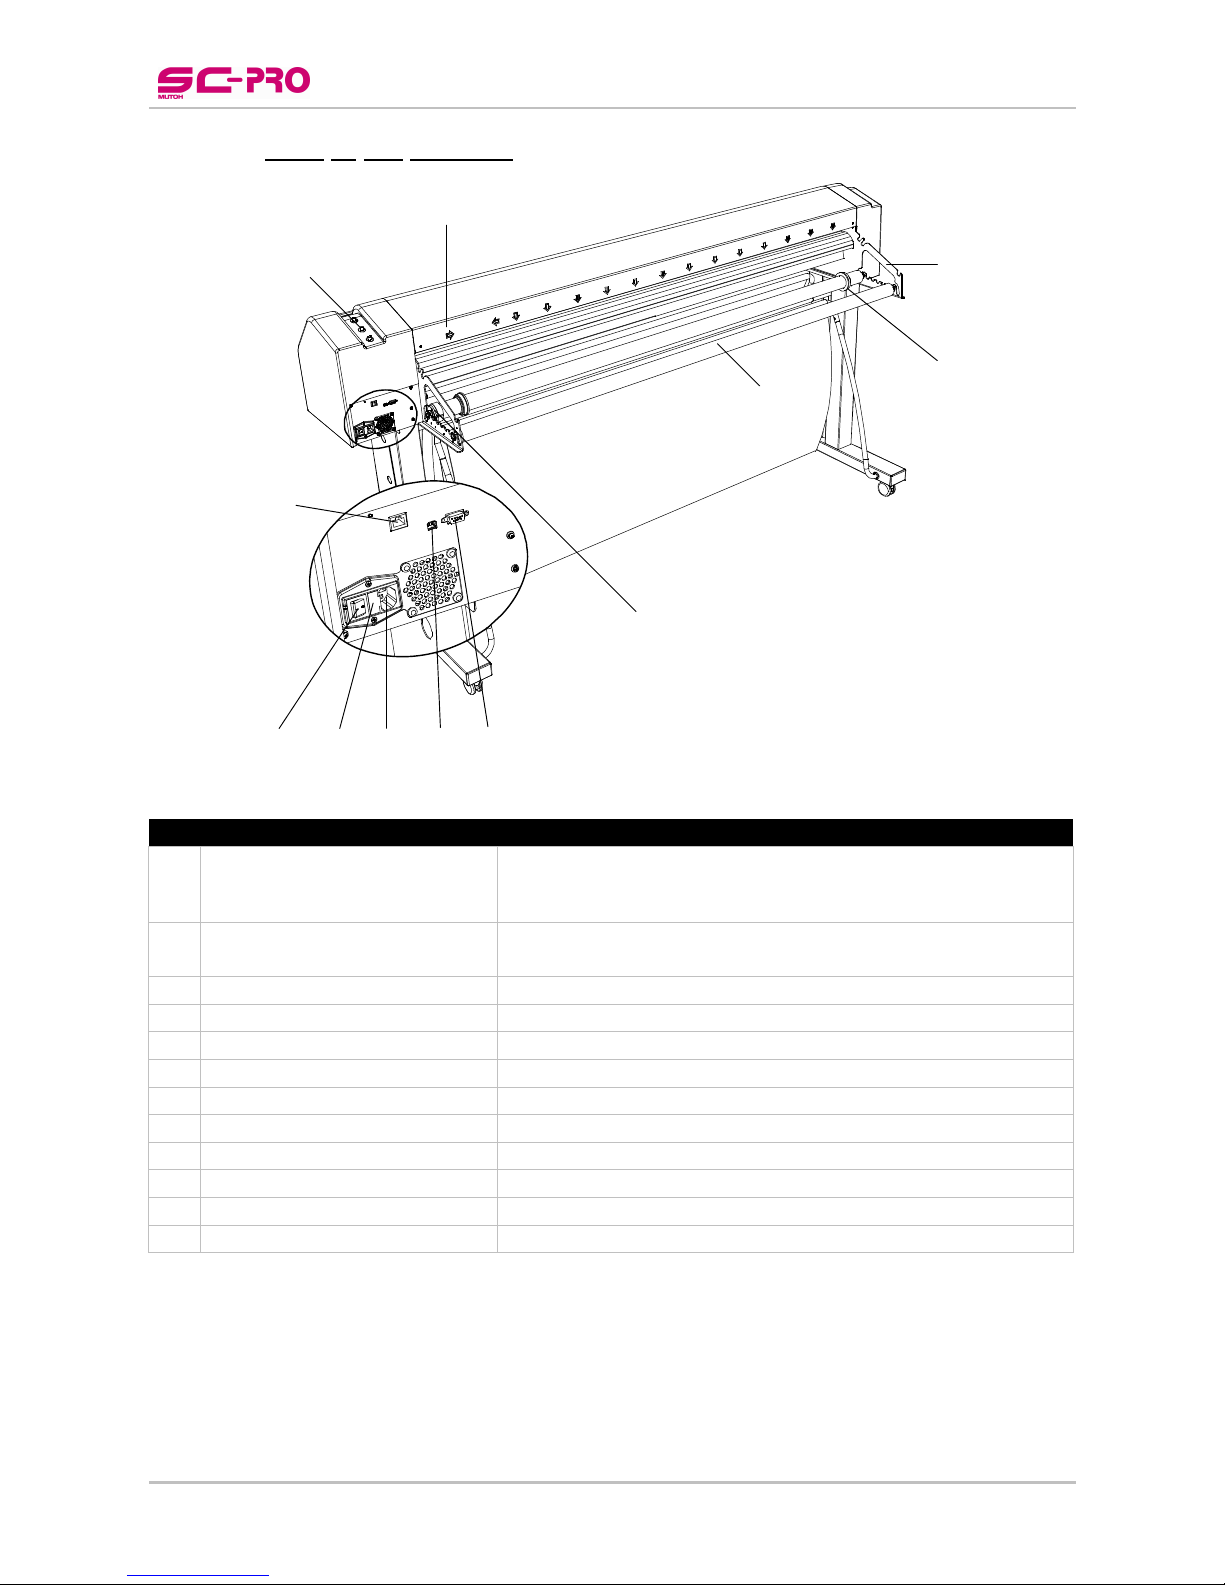
2.3.2 Rear of the SC-PRO
1
2
3
4
5
6789
11
12
10
N° Part Function
1
Grid roller marks
To mark the position of the grid rollers.
The pressure rollers should always be positioned on top of a grid
roller, if not, it will be impossible to start cutting.
2
Conveyor roll support brackets
To support the conveyor rolls. Multiple stands possible for the
conveyor rolls.
3
Conveyor roll guiding flanges To keep the loaded roll media in its position.
4
Conveyor roll To support and roll off the load media roll.
5
Conveyer roll brake To prevent that the loaded media keeps unwinding.
6
Serial interface connector To connect the serial interface cable.
7
USB interface connector To connect the USB cable.
8
Power cable connector To connect the power cable.
9
Fuse cover To easily access the two fuses.
10
Power switch To power ON/OFF the cutter.
11
Network interface connector To connect the network cable.
12
Tool storage place To store the pens and knifes.
Page 19
User’s Guide SC-PRO Cutting Plotter
CHAPTER 2 : PRODUCT OVERVIEW
19 AP-75280 – Rev. 1.1
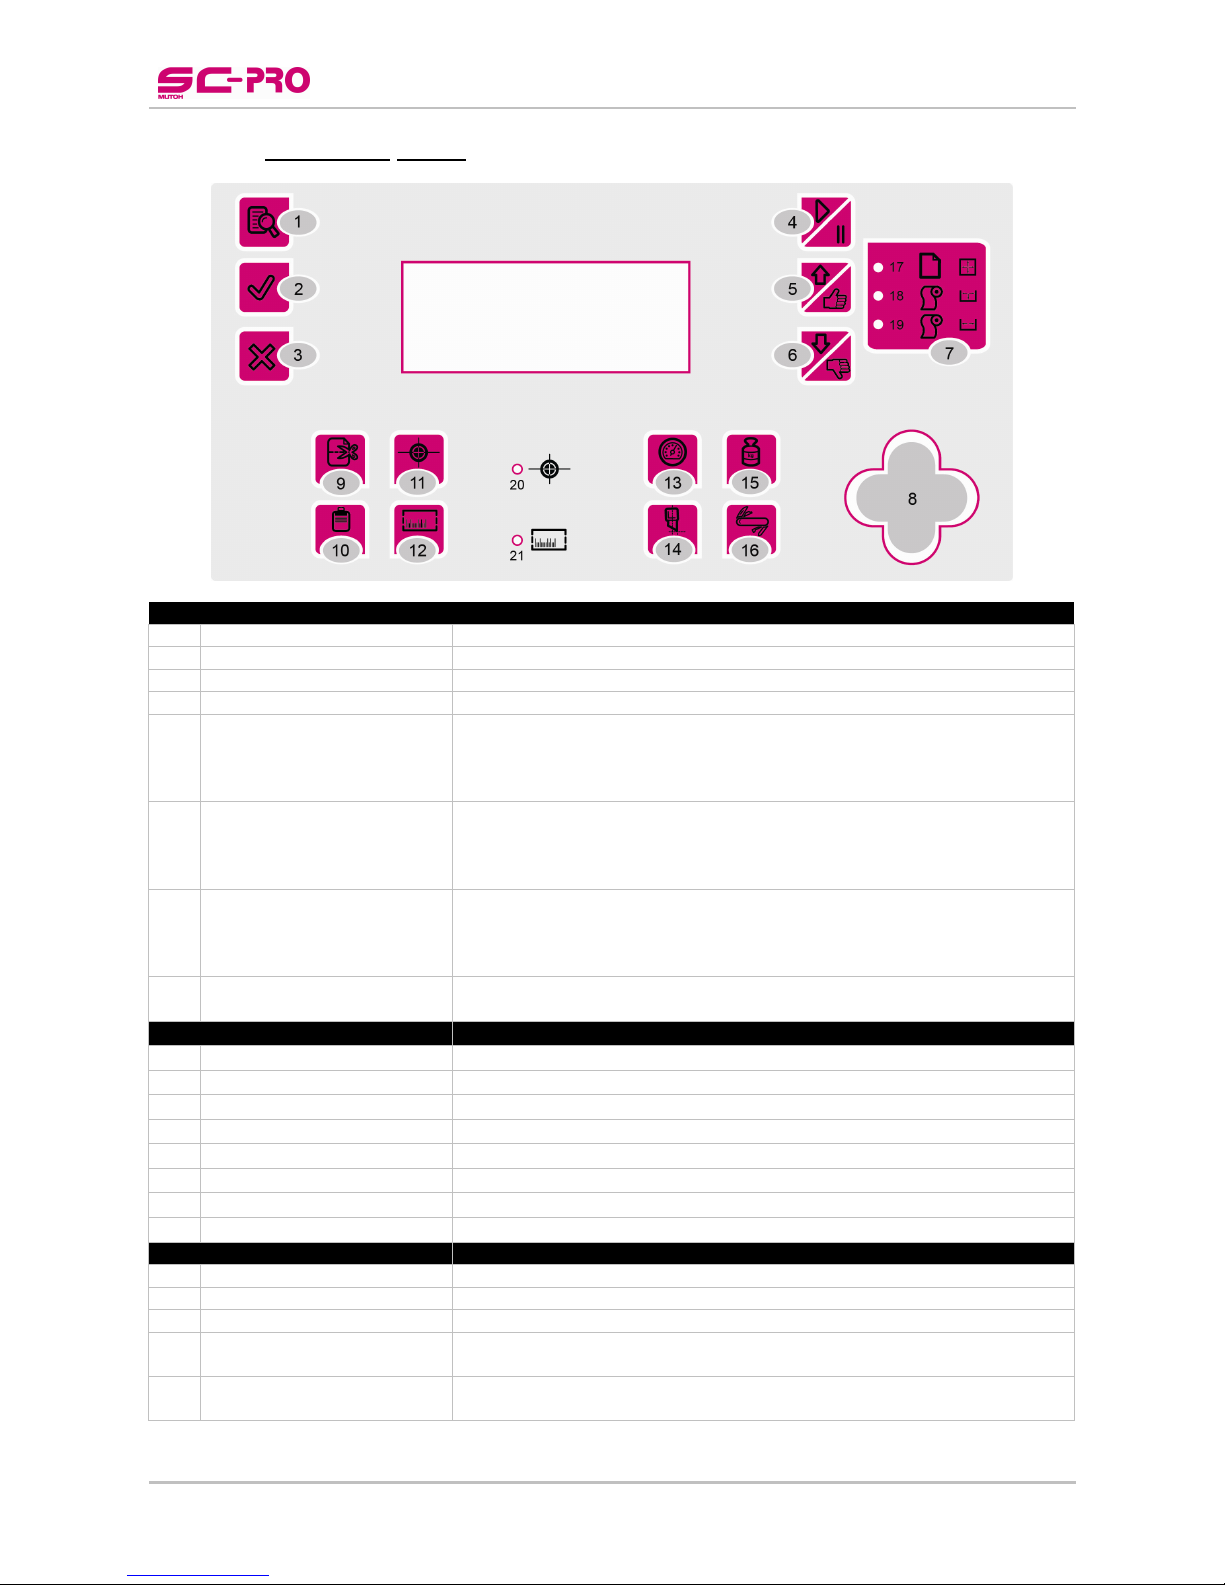
2.3.3 Operation panel
BASIC KEYS
1
MENU key To enter the main menu of the cutter
2
ENTER key To open a menu item or to confirm a setting
3
EXIT/CANCEL key To exit a menu item, to decline a setting or to cancel a cutting job.
4
RESUME / PAUSE key To interrupt or resume a cutting job
5
UP / YES key
This key has multiple functions
o Browse through the main menu
o Increase a value
o Confirm a setting
6
DOWN / NO key
This key has multiple functions
o Browse through the main menu
o Decrease a value
o Decline a setting
7
MEDIA TYPE key
To select the media type
o Sheet media initialization: front – rear – left – right
o Roll front media initialization: front – left – right
o Roll media initialization: left - right
8
ARROW key
To move the media forwards and backwards
To move the cutter head to the left or right
DIRECT KEYS
9
SHEET OFF key To enter the sheet off mode
10
TEST key To enter the test menu
11
ORIGIN key To enter the origin menu
12
CONTOUR CUTTING key To enter the contour cutting menu
13
SPEED key To enter the speed menu
14
OFFSET key To enter the offset menu
15
FORCE key To enter the force menu
16
TOOL key To enter the tool menu
LED’s
17
SHEET LED Lights up when selecting SHEET with the [MEDIA TYPE]-key.
18
ROLL FRONT LED Lights up when selecting ROLL FRONT with the [MEDIA TYPE]-key.
19
ROLL LED Lights up when selecting ROLL with the [MEDIA TYPE]-key.
20
ORIGIN LED
Lights up when an origin is set by the user.
Blinks when you are busy setting the origin.
21
CONTOUR CUTTING LED
Light up while contour cutting.
Blinks when the cutter is measuring the reference box.
Page 20
User’s Guide SC-PRO Cutting Plotter
CHAPTER 2 : PRODUCT OVERVIEW
20 AP-75280 – Rev. 1.1
2.4 IN-THE-BOX CONTENTS
After unpacking each box, inspect if there are no damaged parts and that all necessary parts are present.
NOTES
THE CONTENTS OF THE PACKAGES MAY BE DIFFERENT DEPENDING ON THE MARKET WHERE THEY ARE USED.
CONTACT YOUR LOCAL MUTOH DEALER OR DISTRIBUTOR FOR DETAILS.
I
F ANY PART IS MISSING OR BROKEN, CONTACT EITHER OF THE FOLLOWING:
o T
HE SHOP WHERE YOU BOUGHT YOUR MUTOH CUTTER
o YOUR LOCAL MUTOH DISTRIBUTOR.
(*)
When ordered as a bundle together with a Mutoh Printer, the in-the-box software may be replaced with one software which handles cutting, printing and contour cutting.
Description Qty
Cutter unit
1
Stand assembly
1
Media bag assembly
1
Conveyor system
1
Commercial kit
1
Tools
1
Knife holder and blade 1
Cutter blade 45° 1
Blade for auto sheet-off 1
Pressurized BallPoint Pen 1
Spare cutting mat 1
Mutoh knife 1
Core support 3” 2
Set of wing screws 1
Cables
1
Power cable EU 1
Power cable UK 1
Power cable US 1
USB cable 1
Adapter cable (9 – 25 pin) 1
Interface (RS-232) cable 1
Documentation
1
User’s Guide 1
Application Guide 1
Installation Guide 1
Installation Sheet 1
Installation CD 1
CD with manuals of all Mutoh machines 1
In-The-Box WEEE regularisation 1
Starter software kit (*)
1
Quality test sheet of this machine
1
Page 21

User’s Guide SC-PRO Cutting Plotter
CHAPTER 3 : BASICS
21 AP-75280 – Rev. 1.1
3 BASICS
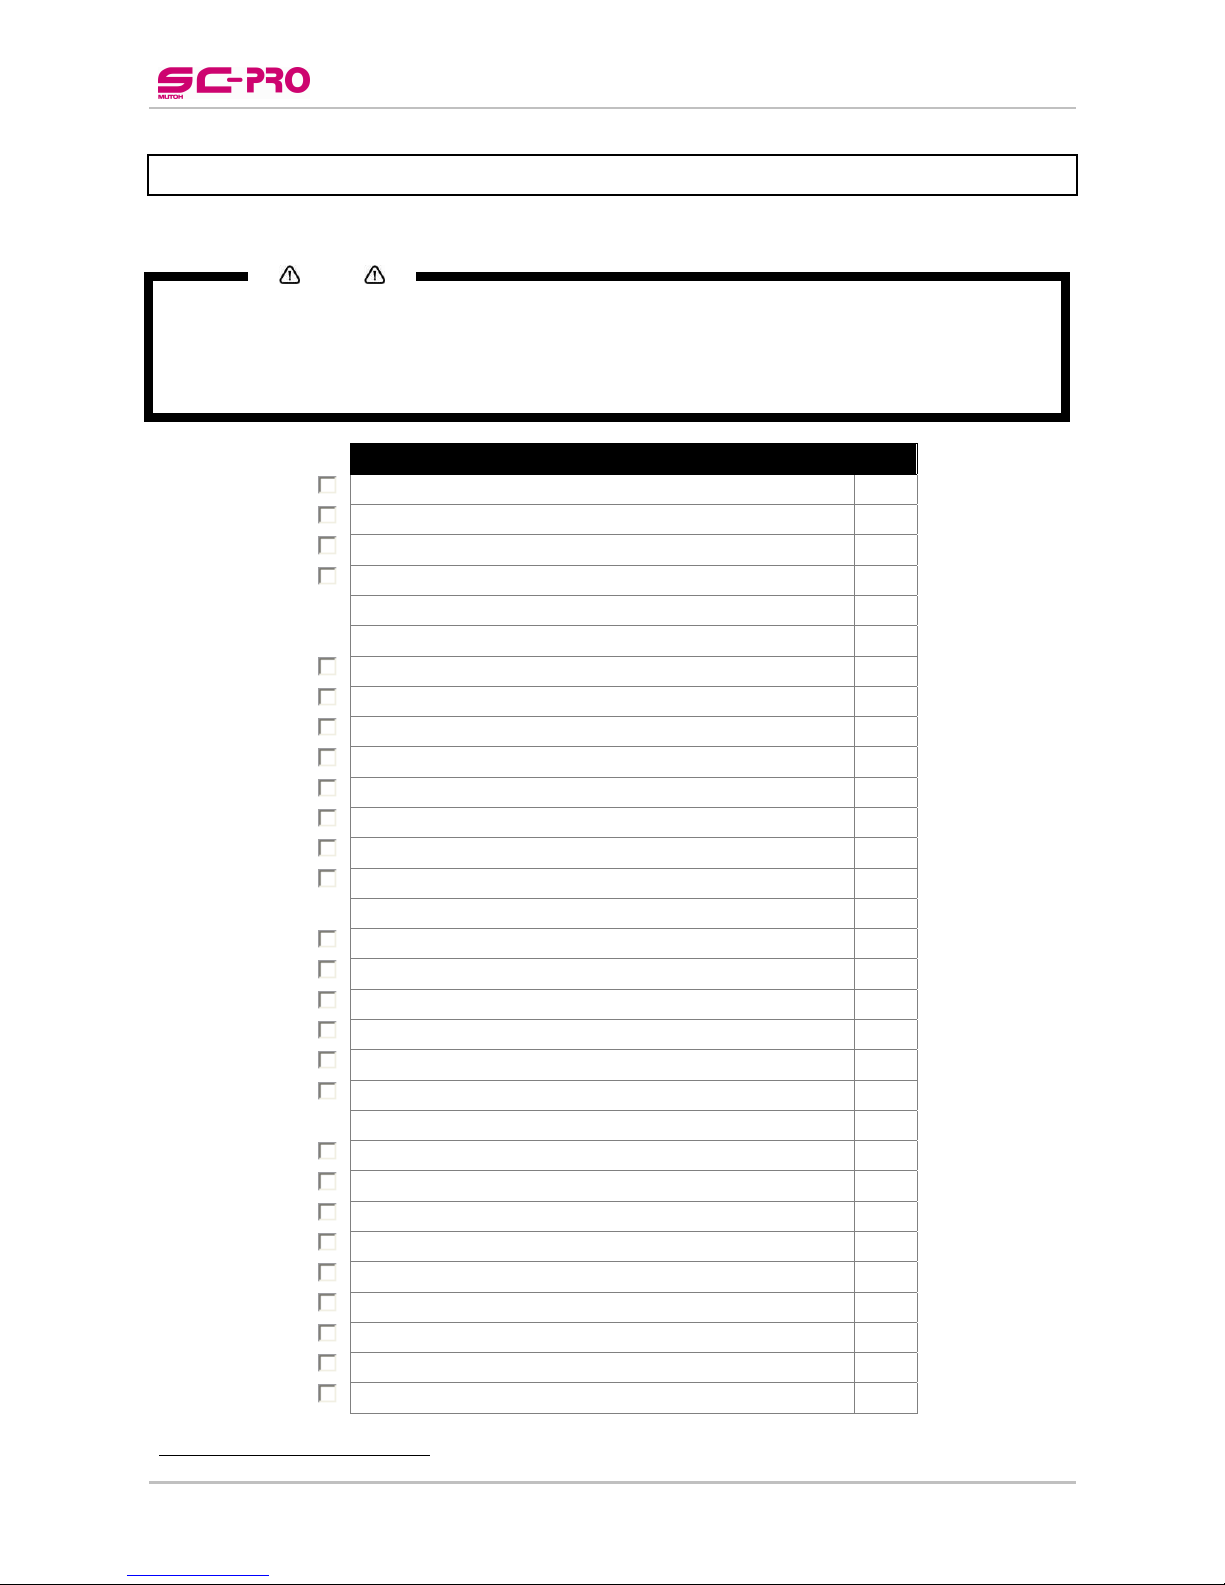
3.1 INSTALLING AND REPLACING TOOLS
3.1.1 Installing tools
At the right-hand side of the cutter head, you will find a pivoting mounting bracket. Opening this bracket will
enable you to install a full range of cutting and drawing tools.
To do so, please follow the instructions mentioned below.
Step 1 : Open the screw (1) to unlock the tool head-mounting bracket.
Step 2 : Hold back the clip (2) of the tool head and slide the tool into position, making sure the tool collar
fits into the groove just beneath the locking screw (3).
Step 3 : Fasten the screw to secure the tool into position.
Page 22
User’s Guide SC-PRO Cutting Plotter
CHAPTER 3 : BASICS
22 AP-75280 – Rev. 1.1
3.1.2 Replace cutter blade
To replace a blade, please proceed as follows:
STANDARD KNIFE HOLDER
Step 1 : Hold the body (2) into one hand and
unscrew the base part (1)
Step 2 : Remove the spring (3) and the cutting
blade (4).
Step 3 : Slide the spring over the new cutting
blade
Step 4 : Place the new blade with its spring into
the base part and screw the whole
assembly onto the body.
KNIFE HOLDER WITH NONIUS
Step 1 : Take the body into one hand and remove
the base part
Step 2 : Pull the old blade out of the holder and
insert a new one
Step 3 : Place the base part on top of the holder
assembly and twist it tightly.
Page 23

User’s Guide SC-PRO Cutting Plotter
CHAPTER 3 : BASICS
23 AP-75280 – Rev. 1.1
3.1.3 Replace auto sheet-off knife
When you frequently use the auto-sheet-off utility, it is a good practice to regularly clean the knife and to
replace it when it starts to wear.
To replace the auto sheet-off knife, please follow the instructions mentioned below.
Step 1 : Power OFF the unit and remove the power cable.
Step 2 : Remove the 2 screws fixing the head cover.
Step 3 : Higher the cutter cap (1) and swing it away (2). Do not loosen the spring.
Step 4 : Remove the sheet-off knife (3).
Step 5 : Clean the sheet-off knife, removing any material residues that might be clogged to the blade. In
case the blade is worn, reinstall a new knife.
Step 6 : Place the (new) knife into the auto sheet-off assembly (4). Make sure the knife is correctly
oriented.
Step 7 : Reinstall the cutter cap onto the auto sheet-off knife.
Step 8 : Reinstall the head cover.
Page 24

User’s Guide SC-PRO Cutting Plotter
CHAPTER 3 : BASICS
24 AP-75280 – Rev. 1.1
3.1.4 Replacing the cutting mat
To replace the cutting mat, proceed as follows:
Step 1 : First of all, remove the worn cutting mat (1) by pulling it out, together with the underlying strip of
vinyl (2).
Step 2 : Depending on the type of grid roll cover, the cutting mat should be installed differently. You can
recognize the type of cover by the amount of holes at the left side (refer to picture below).
T
YPE 1
T
YPE 2
Step 3 : Install the new cutting mat.
a. For TYPE 1
Stick the cutting mat as close as possible to the rear of the machine.
REAR FRON
T
b. For TYPE 2
Stick the vinyl as close as possible to the front of the machine.
REAR FRON
T
Step 4 : Please contact an Authorized Mutoh technician to perform a Y-Z profile measurement and
sheeting-off knife adjustment.
Page 25

User’s Guide SC-PRO Cutting Plotter
CHAPTER 3 : BASICS
25 AP-75280 – Rev. 1.1
3.2 HANDLING AND STORING MEDIA
Before you will be able to cut a job, it is necessary to know which media to use.
3.2.1 Handling media
When you handle media, please pay attention to the following:
Use recommended media in an appropriate environment. Following are the appropriate temperature
and humidity ranges for printing.
Temperature Humidity
Recommended working environment 20-30°C 40% to 65%
Rate of change Within 2°C per hour Within 5% per hour
Do not use creased, damaged, torn, curled, or wrapped media.
Temperature changes will influence the size of media that is used. Before using sheet media, place the
sheet in the working environment to have it match to the temperature of the working area.
Printing before the media has been able to accommodate to the printing environment may cause media
jams due to slippage or creases. This also adversely affects the quality of printing.
Media has a printable side and a non-printable side. If you print on a not printable side, blurring or slight
touching may occur.
Do not touch the printable side of media. Moisture or oil from hands affects the printing quality.
Do not leave the printer for a long time with media loaded. The media may curl, resulting in
misalignment, media jams, or decreased printing quality. In particular, avoid this in winter, dry seasons,
or during final printing.
Do not throw away the box or wrapping bag for storing media.
3.2.2 Precaution on storing media
When storing media, pay attention to the following:
Do not store media in high temperatures, high humidity, or direct sunlight.
Store sheet media in the original bag after unpacking.
Unused roll media must be removed from the scroller, rewound tightly, and stored in the original
wrapping bag and the box.
Do not wet media.
Page 26
User’s Guide SC-PRO Cutting Plotter
CHAPTER 3 : BASICS
26 AP-75280 – Rev. 1.1
3.3 LOADING MEDIA
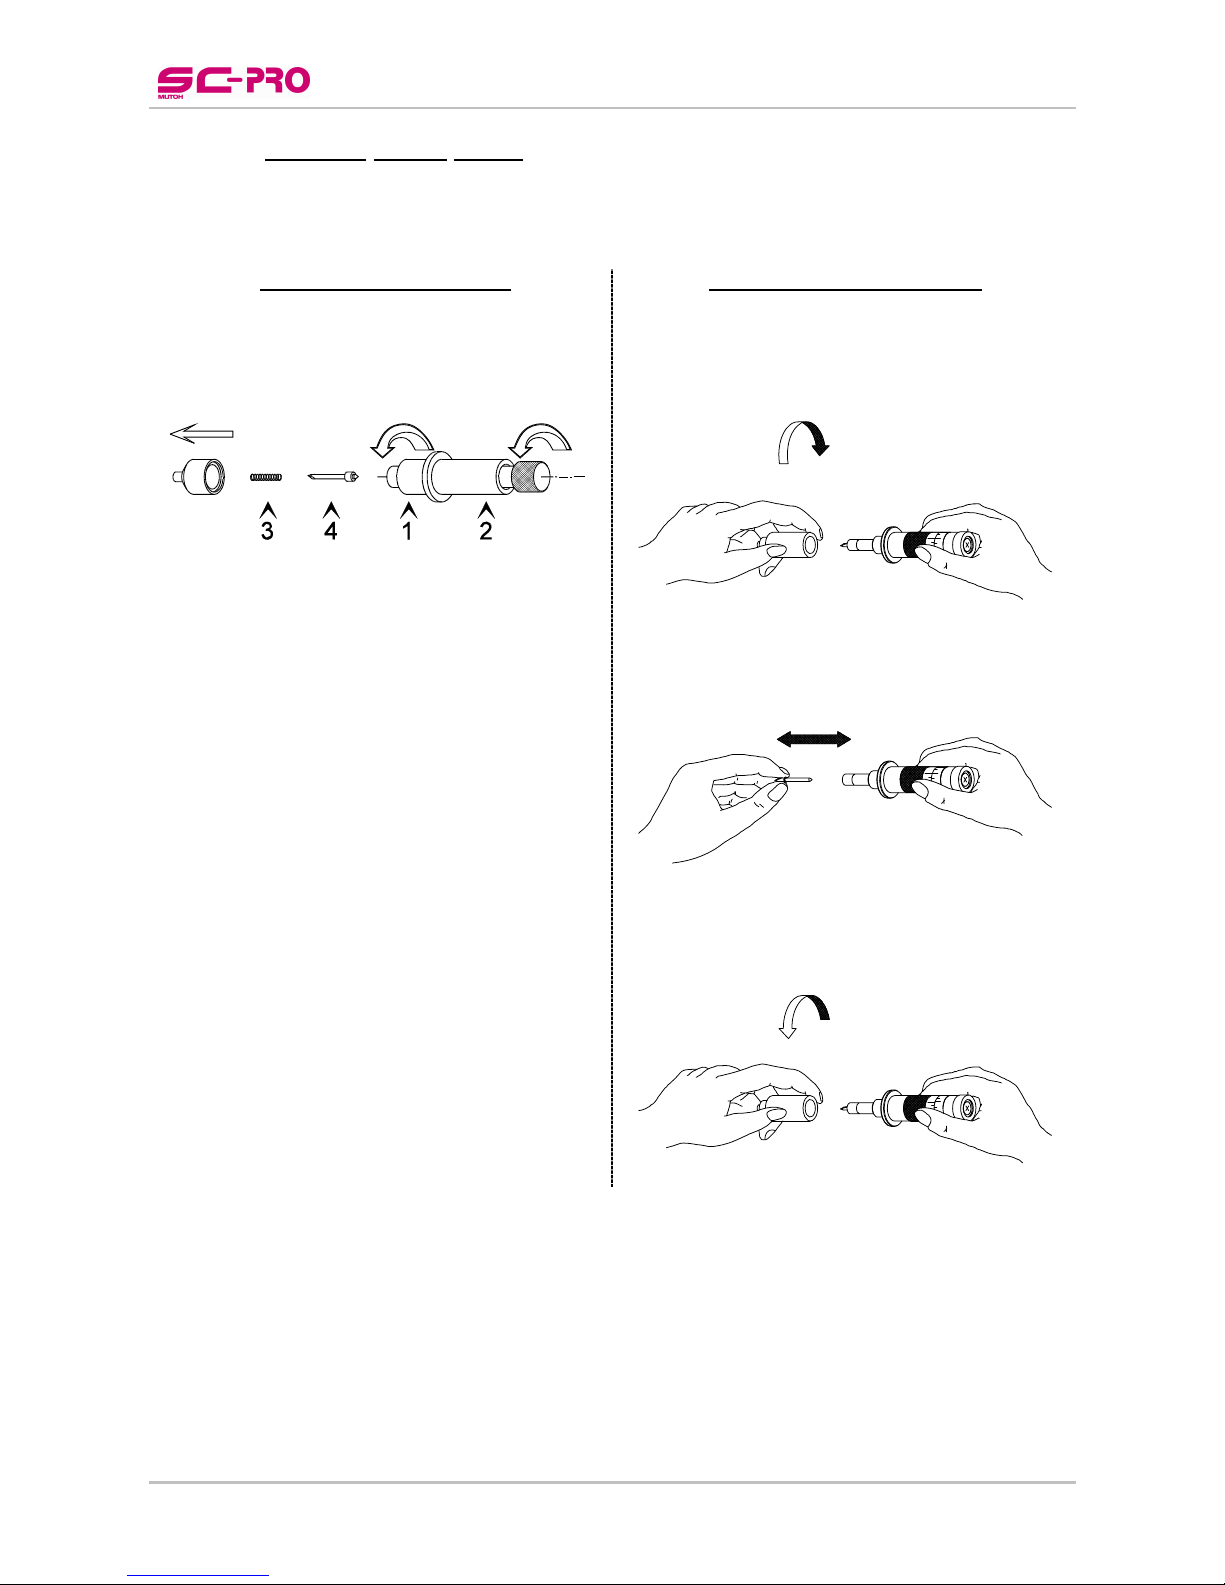
3.3.1 Loading roll media
Please follow the procedure below to load roll media properly.
Be aware that there is a loading cycle difference between loading cut vinyl and pre-printed vinyl meant for
contour cutting.
3.3.1.1 Loading
cut vinyl
Configuration to start from:
► Raised pressure rollers.
► Rear media collection bag open and EMPTY.
► Front media collection bag open when the cutting job is smaller than 4m.
Front media collection bag closed when the cutting job is larger than 4 m.
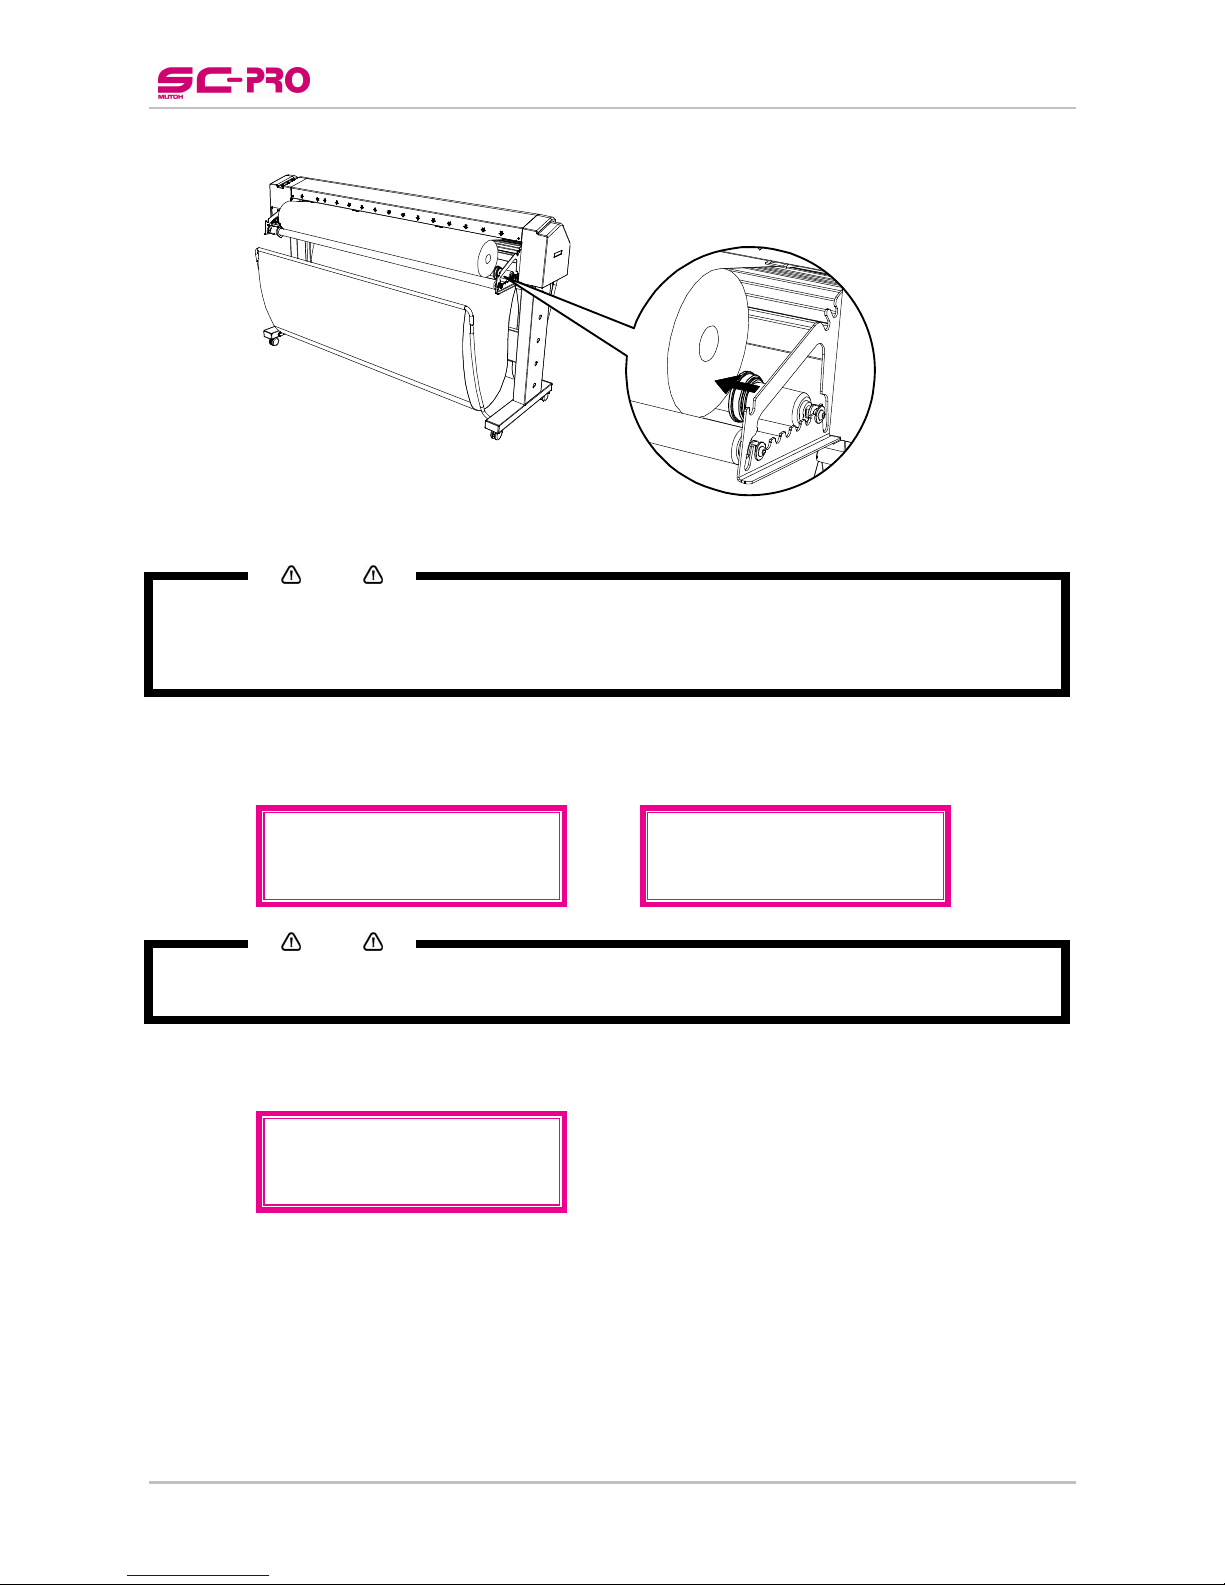
► Install the brake and two flanges on the conveyor roll closest to the cutter.
Step 1 : Place the vinyl on the conveyor rolls (2 & 4).
Pay attention to the following:
► Position the conveyor rolls so that the space (6) between them is
maximum the core diameter (5). Otherwise the core will fall
through when the roll is (almost) empty.
► Be sure that the slip ring obstructer (1) is positioned at the left
side of the rear conveyor roll (2). It is recommended to install the
rear conveyor roll in the following position ► ► ►
Step 2 : Position the media roll on the two conveyor rolls.
Pay attention to the following:
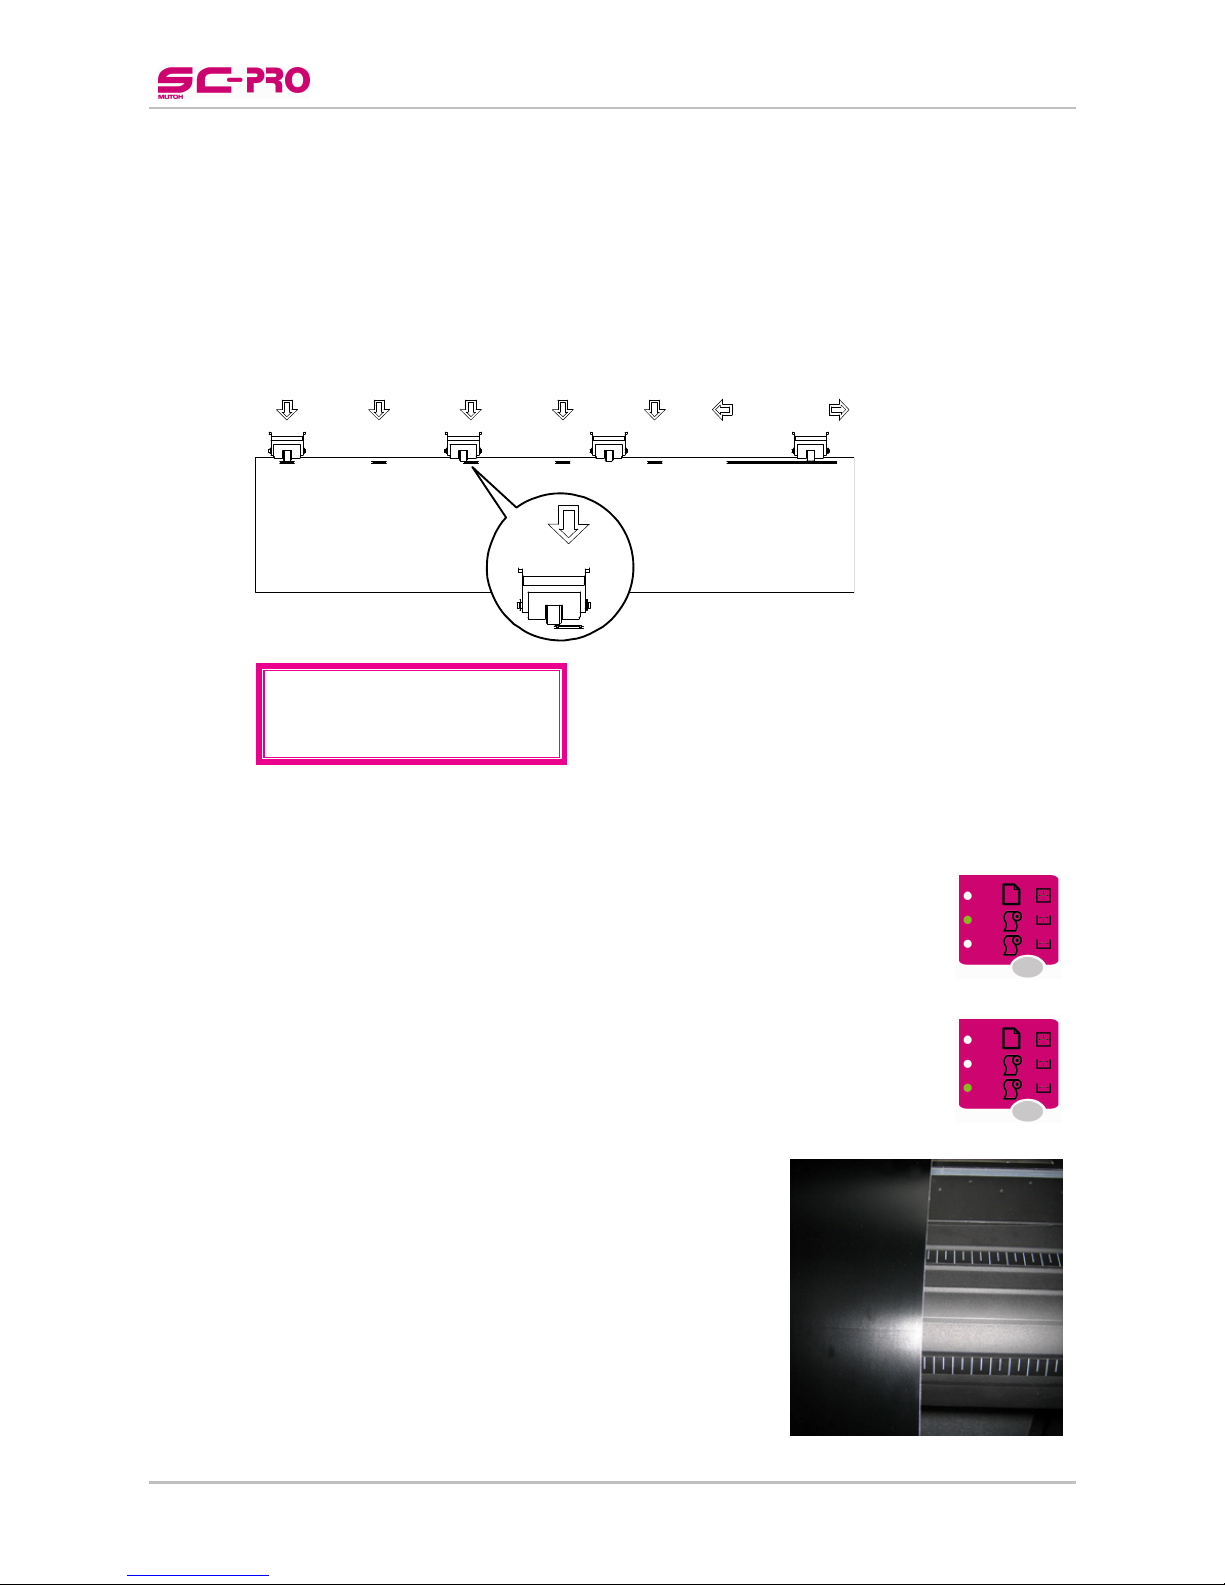
► The outer left and the outer right pressure rollers always have to be used. The middle rollers
2 and 3 (half of the pressure as roller 1 and 4) can be used, but they may also be disabled (in
between two arrows (as number 2 on the picture below). This to eliminate roller marks on
vulnerable vinyl for example. The left pressure roller can only move between the two flat
arrows.
► On the rear cover, arrows are marked. These arrows represent the possible position of the
pressure rollers. The left pressure roller can have a various position; the other three have a
fixed position.
► The cutter will cut between the centres of the outer pressure rollers, regardless of the width
of the cut vinyl. Therefore, it is recommended to position the outer pressure rollers about 1cm
inside the media. It is not recommended that the rollers run on the very edge of the material.
REAR of the machine
1234
Page 27
User’s Guide SC-PRO Cutting Plotter
CHAPTER 3 : BASICS
27 AP-75280 – Rev. 1.1
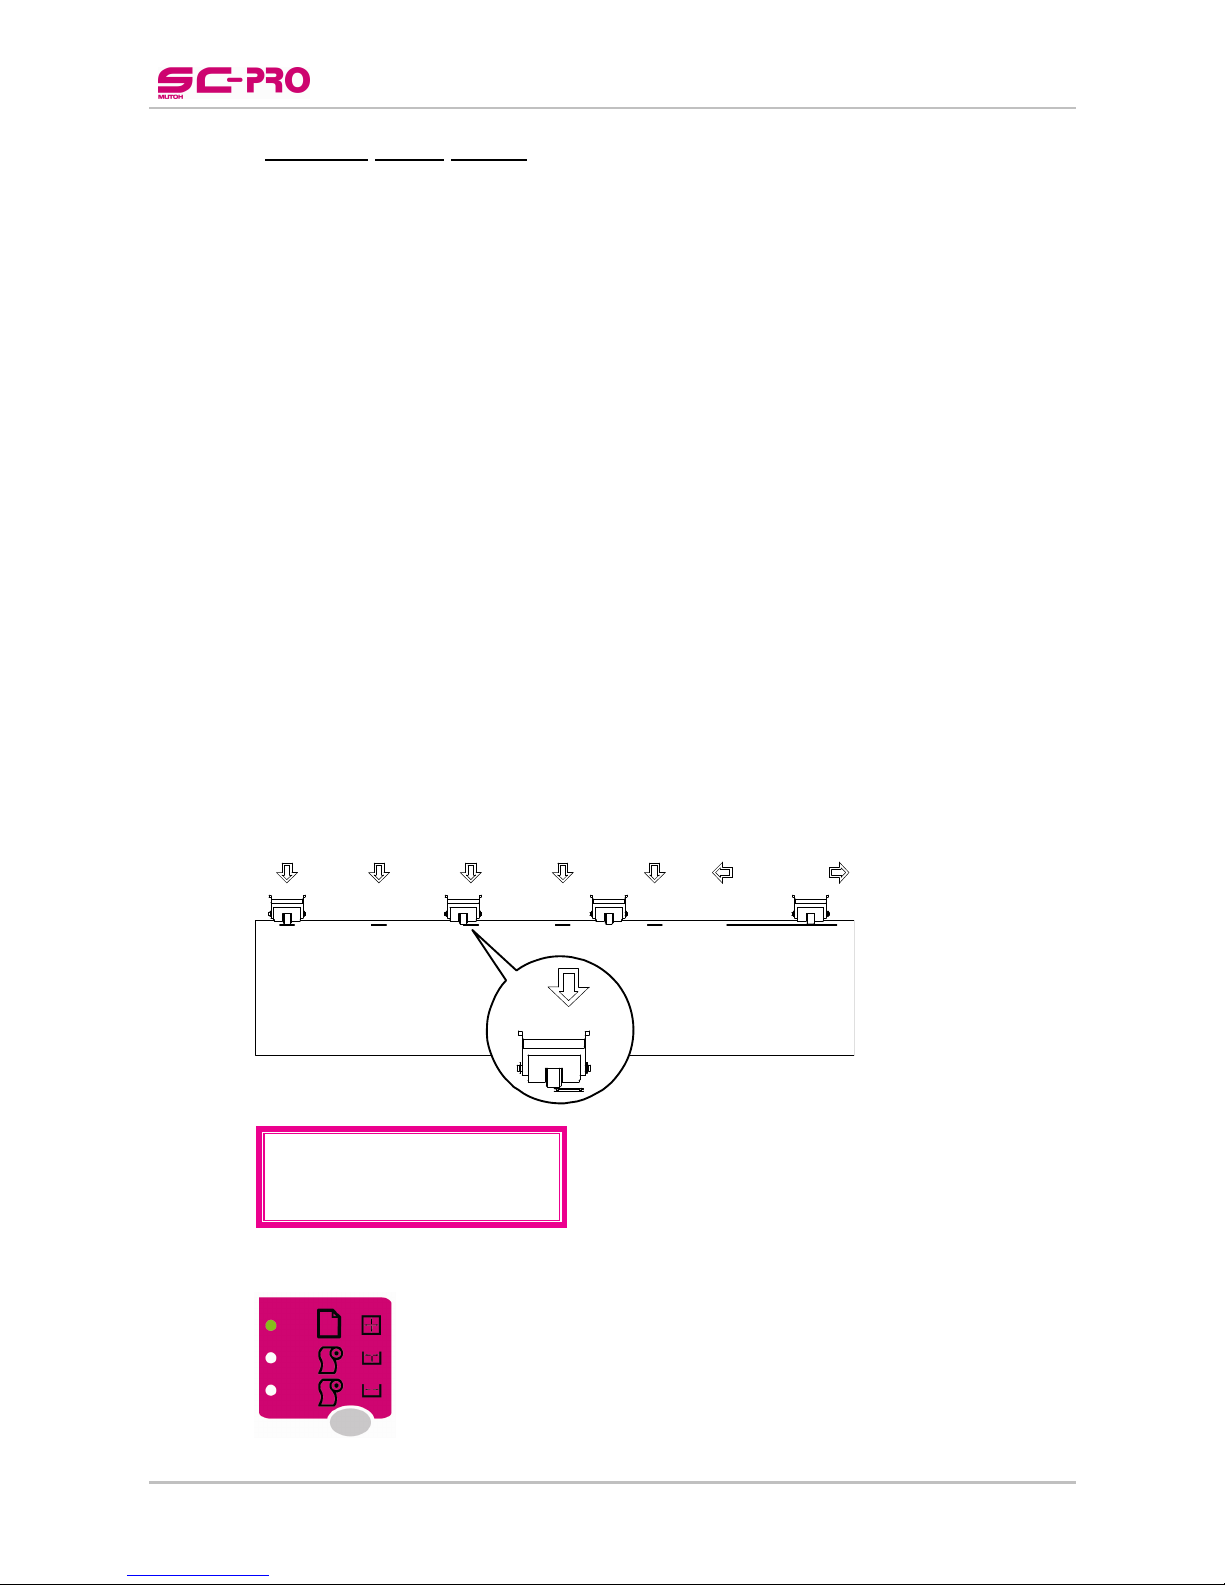
Step 3 : Guide the media under the pressure rollers to the front of the cutter.
Step 4 : Position the pressure rollers as you have decided in step 2. Pressure rollers 2-3-4 have a tactile
and audible click system which makes it easier to position them correctly. The right pressure
roller (1) can never be malpositioned.
If one of the others is malpositioned, a message will be displayed after media initialization.
Please refer to the picture.
FRONT of the machine
1234
P
ressure roll
3
malpositioned!
Step 5 : Set the media load type prior to loading media. Select if you want the cutting plotter to look for the
front edge of the vinyl.
► ROLL front The cutter will measure the left, right and front of the media.
The origin will be defined from the front of the roll.
There will be a shuffle of the set Pre-Feed length.
► ROLL The cutter will measure the left and right side of the media.
The origin will be defined from the position of the roll when
lowering the lever.
There will be a shuffle of the set Pre-Feed length.
Step 6 : Load the media properly:
It is best that you hold the front edge of the media in the
middle with one hand and with the other hand the roll itself.
As you are holding the roll firmly into position, pull the front
edge of the media forward so that there is an even tension
across the whole width of the roll (= equal tension method)
Do NOT use the rulers to align a roll of media! They are for
use with sheets only. Rolls can only be correctly installed
using the equal tension method.
The rulers will help you monitoring if the media is not
meandering too much.
Page 28
User’s Guide SC-PRO Cutting Plotter
CHAPTER 3 : BASICS
28 AP-75280 – Rev. 1.1
Step 7 : Push the guiding flanges against the left and right side of roll to be sure it does not drift.
Step 8 : Be sure that the media is cut off straight at the front to avoid media initialization mismatches.
Notes
Before lowering the pressure rollers, be sure that there is a knife or pen installed in the head. This because
during the media initialization, the penhead will also be initialized. If you insert a pen/knife afterwards, the
machine will not know how to wind the coil of the penhead. This could result in cutting lines across the
complete print.
Step 9 : Pull the lever down. This action will initialize the media loading sequence, during which the cutter
will shuffle a pre-set distance of vinyl (Pre-Feed Length). The following messages can be
displayed:
Roll Front Roll
Pl
ease wait
Pl
ease wait
Notes
The head will move fast over the media. Be careful not to pinch your fingers during this action.
Please refer to “chapter 4 - Pre-feed Length” to understand the important function of this feature.
Step 10 : After a successful measurement, the main screen will appear. The width of the media will be
displayed:
*READY*
X Roll Y 500
D
rag Knife Too
l
60 cm/s
100
g
Step 11 : The SC-Pro is ready to receive data from the host computer.
Page 29
User’s Guide SC-PRO Cutting Plotter
CHAPTER 3 : BASICS
29 AP-75280 – Rev. 1.1
3.3.1.2 Loading pre-printed vinyl
Configuration to start from:
► Raised pressure rollers.
► Rear media collection bag open and EMPTY.
► Front media collection bag open when the cutting job is smaller than 4m.
Front media collection bag closed when the cutting job is larger than 4 m.
► Install the brake and two 3” cones on the conveyor roll closest to the cutter.
Step 1 : Install the vinyl between the two 3” cones but do not fix the cones already.
Step 2 : Position the pre-printed vinyl on the conveyor roll.
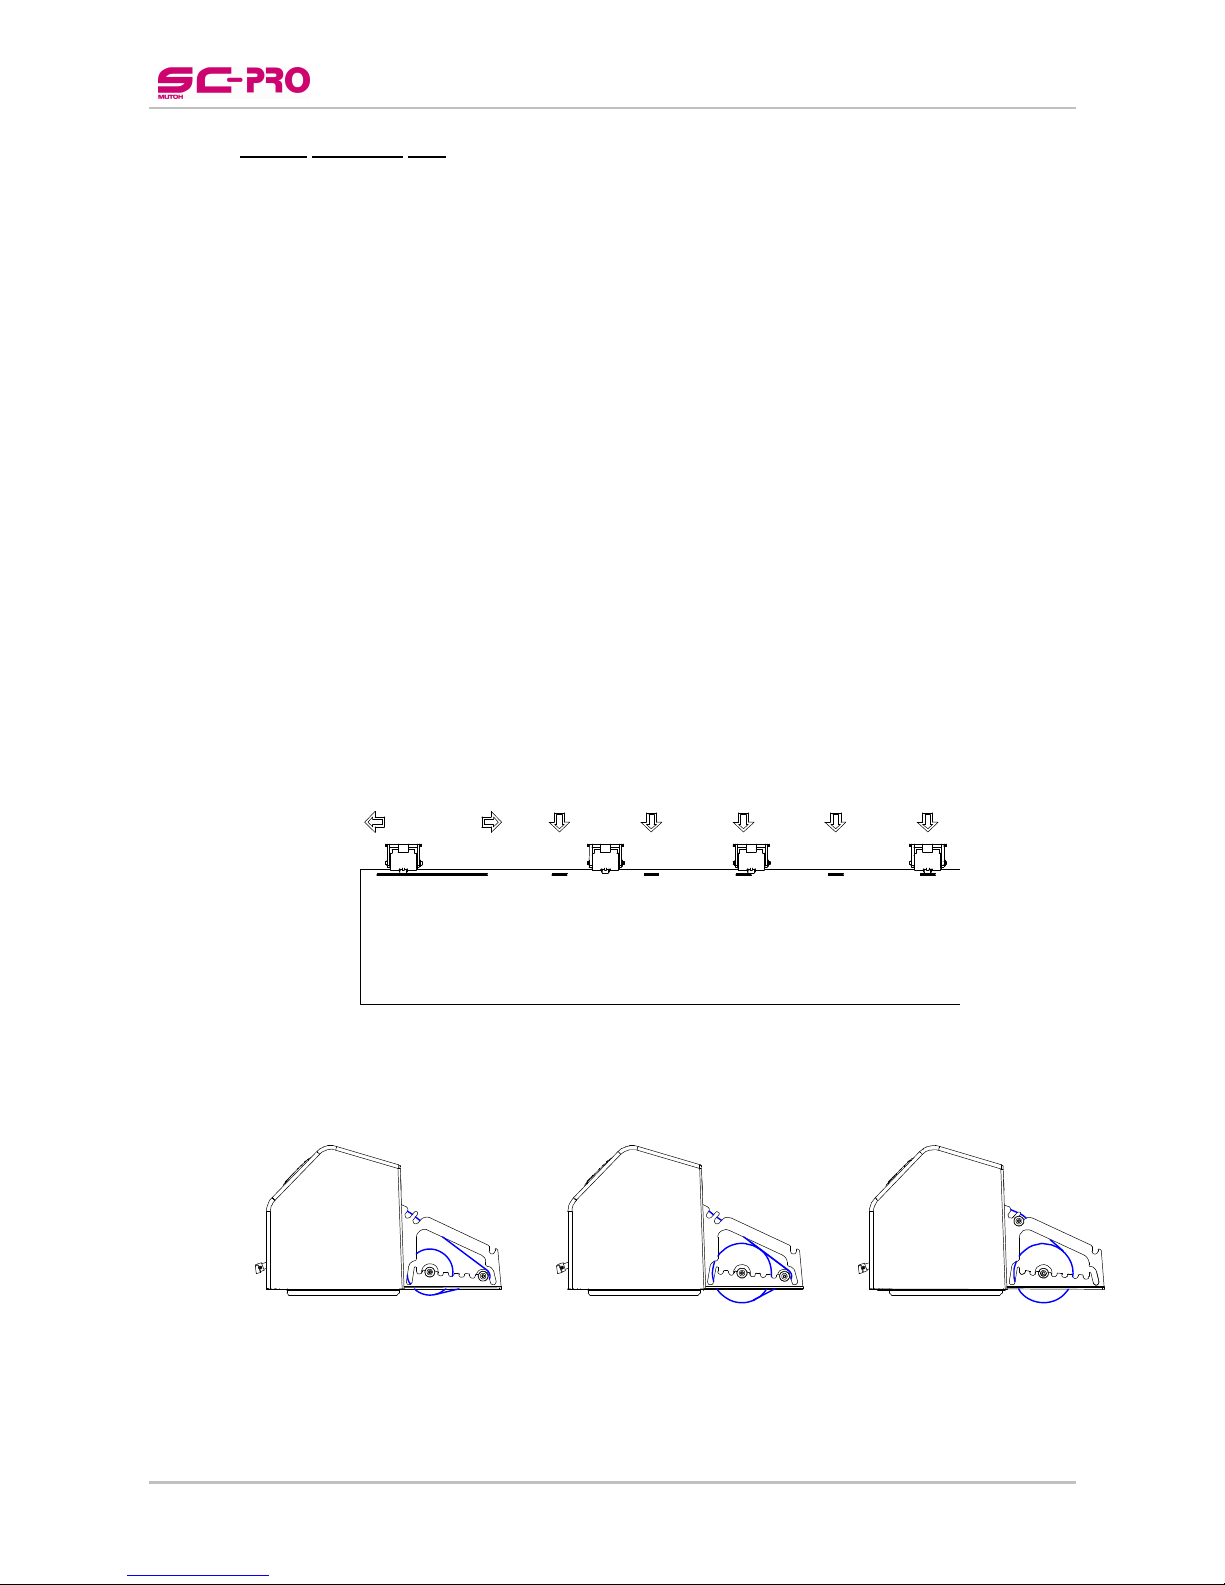
Pay attention to the following:
► The outer left and the outer right pressure rollers always have to be used. The middle rollers
2 and 3 (half of the pressure as roller 1 and 4) can be used, but they may also be disabled (in
between two arrows (as number 2 on the picture below). This to eliminate roller marks on
vulnerable vinyl for example. The left pressure roller can only move between the two flat
arrows.
► On the rear cover, arrows are marked. These arrows represent the possible position of the
pressure rollers. The left pressure roller can have a various position; the other three have a
fixed position.
► The cutter will cut between the centres of the outer pressure rollers, regardless of the width
of the cut vinyl. Therefore, it is recommended to position the outer pressure rollers about 1cm
inside the media. It is not recommended that the rollers run on the very edge of the material.
REAR of the machine
Step 3 : Lock the 3” cones with one screw each.
Step 4 : Guide the media under the pressure rollers to the front of the cutter on one of the two following
possibilities:
123
It is recommended to load the media as shown on picture 1. If the vinyl touches the core as on
picture 2, load the media as on picture 3.
1234
Page 30
User’s Guide SC-PRO Cutting Plotter
CHAPTER 3 : BASICS
30 AP-75280 – Rev. 1.1
Step 5 : Position the pressure rollers as you have decided in step 2. Pressure rollers 2-3-4 have a tactile
and audible click system which makes it easier to position them correctly. The right pressure
roller (1) can never be malpositioned.
If one of the others is malpositioned, a message will be displayed after media initialization.
Please refer to the picture.
FRONT of the machine
1234
P
ressure roll
3
malpositioned!
Step 6 : Set the media load type prior to loading media. Select if you want the cutting plotter to look for the
front edge of the vinyl.
► ROLL front The cutter will measure the left, right and front of the media.
The origin will be defined from the front of the roll.
There will be a shuffle of the set Pre-Feed length.
► ROLL The cutter will measure the left and right side of the media.
The origin will be defined from the position of the roll when
lowering the lever.
There will be a shuffle of the set Pre-Feed length.
Step 7 : Load the media properly:
It is best that you hold the front edge of the media
in the middle with one hand and with the other
hand the roll itself.
As you are holding the roll firmly into position, pull
the front edge of the media forward so that there is
an even tension across the whole width of the roll
(= equal tension method)
Do NOT use the rulers to align a roll of media!
They are for use with sheets only. Rolls can only
be correctly installed using the equal tension
method.
The rulers will help you monitoring if the media is
not meandering too much.
Page 31

User’s Guide SC-PRO Cutting Plotter
CHAPTER 3 : BASICS
31 AP-75280 – Rev. 1.1
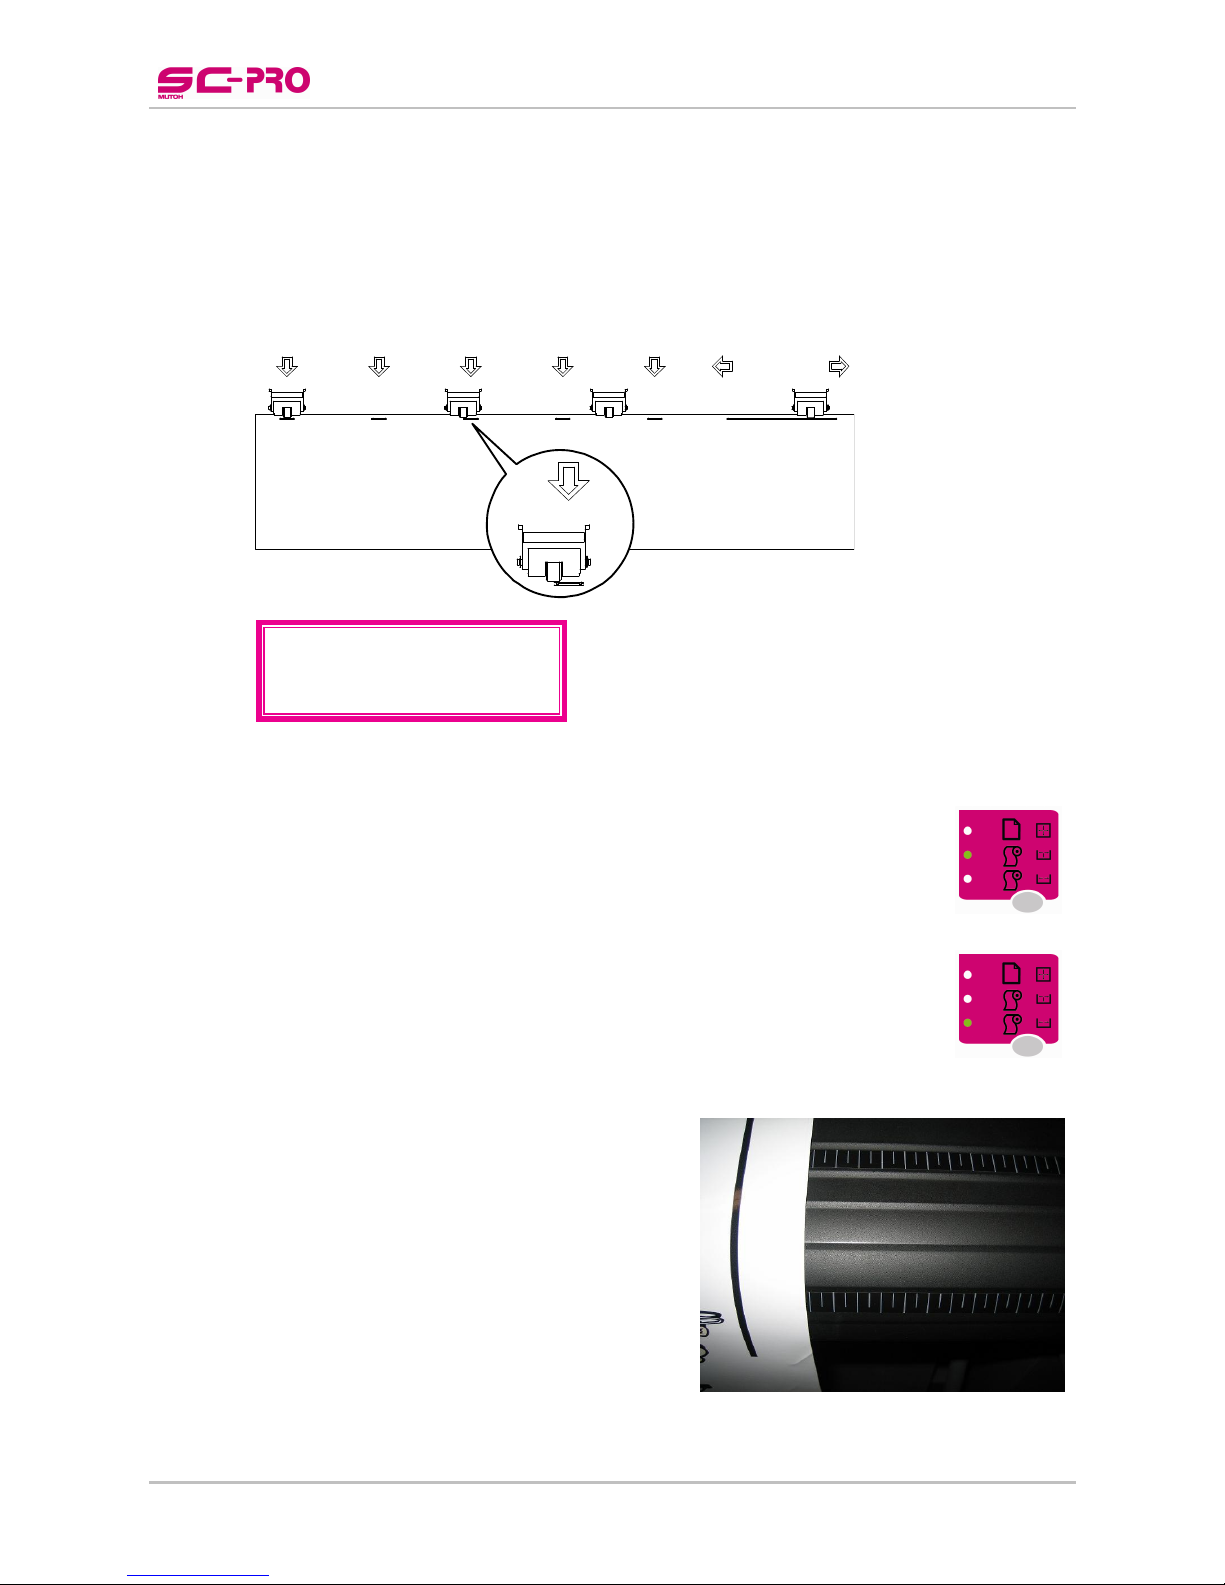
Step 8 : Be sure that the media is cut off straight at the front to avoid media initialization mismatches.
Notes
Before lowering the pressure rollers, be sure that there is a knife or pen installed in the head. This because
during the media initialization, the penhead will also be initialized. If you insert a pen/knife afterwards, the
machine will not know how to wind the coil of the penhead. This could result in cutting lines across the
complete print.
Step 9 : Pull the lever down. This action will initialize the media loading sequence, during which the cutter
will shuffle a pre-set distance of vinyl (Pre-Feed Length). The following messages can be
displayed:
Roll front Roll
Pl
ease wait
Pl
ease wait
Notes
The head will move fast over the media. Be careful not to pinch your fingers during this action.
Please refer to “chapter 4 - Pre-feed Length” to understand the important function of this feature.
Step 10 : After a successful measurement, the main screen will appear. The width of the media will be
displayed:
*READY*
X Roll Y 500
D
rag Knife Too
l
60 cm/s
100
g
Step 11 : The SC-Pro is ready to receive data from the host computer or Mutoh CutServer.
Page 32
User’s Guide SC-PRO Cutting Plotter
CHAPTER 3 : BASICS
32 AP-75280 – Rev. 1.1
3.3.2 Loading sheet media
Configuration to start from:
► Raised pressure rollers.
► Remove conveyor rolls.
► Rear media collection bag open and EMPTY.
► Front media collection bag open when the cutting job is smaller than 4m.
Front media collection bag closed when the cutting job is larger than 4m.
Step 1 : Guide the media under the pressure rollers at the front of the cutter.
Step 2 : Position the sheet paying attention to the following:
► The outer left and the outer right pressure rollers always have to be used. The middle rollers
2 and 3 (half of the pressure as roller 1 and 4) can be used, but they may also be disabled (in
between two arrows (as number 2 on the picture below). This to eliminate roller marks on
vulnerable vinyl for example. The left pressure roller can only move between the two flat
arrows.
► The cutter will cut between the centres of the outer pressure rollers, regardless of the width
of the cut vinyl. Therefore, it is recommended to position the outer pressure rollers about 1cm
inside the media. It is not recommended that the rollers run on the very edge of the material.
Step 3 : Position the pressure rollers as you have decided in step 2. Pressure rollers 2-3-4 have a tactile
and audible click system which makes it easier to position them correctly. The right pressure
roller (1) can never be malpositioned.
If one of the others is malpositioned, a message will be displayed after media initialization.
Please refer to the picture.
FRONT of the machine
1234
P
ressure roll
3
malpositioned!
Step 4 : Set the media type to sheet:
Page 33

User’s Guide SC-PRO Cutting Plotter
CHAPTER 3 : BASICS
33 AP-75280 – Rev. 1.1
Step 5 : Make sure that about half of the sheet hangs in front of the machine and half hangs at the back.
This will make it easier to align the media correctly.
Step 6 : Load the media straight. To help you, two rulers are attached to the front platen.
Step 7 : Be sure that the media is cut off straight at the front to avoid media initialization mismatches.
Step 8 : Be sure that the set maximum sheet length is smaller than the actual length of the loaded sheet.
If not, the cutter will automatically swap from sheet to roll front mode.
M
ax Sheet Leng
th
2000
[mm]
Save: Exit:
Notes
Before lowering the pressure rollers, be sure that there is a knife or pen installed in the head. This because
during the media initialization, the penhead will also be initialized. If you insert a pen/knife afterwards, the
machine will not know how to wind the coil of the penhead. This could result in cutting lines across the
complete print.
Step 9 : Lower the lever.
Notes
the head will move fastly over the media. Be careful not to pinch your fingers during this action.
Step 10 : The cutter will measure the paper. The following message will be displayed:
Sheet
Pl
ease wait
Notes
Please refer to “chapter 4 - Pre-feed Length” to understand the important function of this feature.
Step 11 : When no problems occur, the main screen will appear. The measured width of the media will be
displayed:
*READY*
X 950 Y 500
X = Media length in mm
Drag Knife Tool
Y = Media width in mm
60 cm/s
100
g
Step 12 : You are ready to cut.
Page 34

User’s Guide SC-PRO Cutting Plotter
CHAPTER 3 : BASICS
34 AP-75280 – Rev. 1.1
Page 35

User’s Guide SC-PRO Cutting Plotter
CHAPTER 4 : WALKTHROUGH THE OPERATION PANEL
35 AP-75280 – Rev. 1.1
4 WALKTHROUGH THE OPERATION
PANEL
The operation panel has been build up out of different keys as described in Chapter 2: “Product Overview Operation Panel”.
o Direct access keys
With these keys, it is possible to enter the frequently used menu items directly without the necessity
to go via the main menu.
o Basic keys
With these keys, you can enter the main menu, move media and cutter head…
o Special key combinations
With these combinations of keys, some features can be activated or de-activated.
Please find in the next coming chapters all information about these keys, menus, features…
This chapter is based on firmware version SP1.2.0 and keyboard version KB1.0.0
4.1 DIRECT KEY ACCESS
The following functions are directly accessible on the keyboard via the direct keys.
Note that these keys are only accessible when the display is in its start screen.
SHEET-OFF KEY To perform a sheet-off of the loaded media.
ORIGIN SET KEY To set the origin.
TEST KEY To calibrate, align and test the EPOS system.
COUNTOUR
CUTTING KEY
To set and start contour cutting.
SPEED KEY To set the cutting speed (in cm/s).
FORCE KEY To set the cutting force (in grams).
OFFSET KEY To set the offset of the knife.
TOOL KEY To select a tool.
Page 36

User’s Guide SC-PRO Cutting Plotter
CHAPTER 4 : WALKTHROUGH THE OPERATION PANEL
36 AP-75280 – Rev. 1.1
4.1.1 SHEET OFF key
When a job has been finished and the media has to be sheeted off, this function can be used.
Notes
Please refer also to the “sheet off mode” and “sheet off margin” menu.
Step 1 : Feed the media using the
keys to the desired position.
Step 2 : Press the [SHEET OFF] key.
Step 3 : Press the [ ] key to start to sheet-off sequence or the [ ] key to cancel.
AUTOMATIC
SHEET-OFF?
Yes :
or
No :
or
Step 4 : When selecting YES, the cutter will perform one of the following actions, depending on the sheet-
off settings.
a. When Sheet off mode is set to automatic, the media will be sheeted off near to the pressure
rollers.
b. When Sheet off mode is set to manual, the media will be fed toward the cutting groove.
The following message will be displayed:
Pl
ease
manually cut off
and
press
a k
ey when ready
c. When Sheet off mode is set to disable, the media can not be sheeted off.
The following message will be displayed:
SHEET-OFF
IS DISABLED !
P
ress any key
Step 5 : The main screen will automatically be displayed when the sheeting off sequence has been
finished correctly.
Step 6 : If the media has not been sheet-off (completely), the following message will be displayed:
Sheet
off
problem
detected
press any key
t
o continue
Page 37

User’s Guide SC-PRO Cutting Plotter
CHAPTER 4 : WALKTHROUGH THE OPERATION PANEL
37 AP-75280 – Rev. 1.1
4.1.2 ORIGIN key
Please follow the instructions below to change / control the origin.
Notes
Please make sure media is loaded. If not, the SC-Pro positioning calculation is based on previously
installed media.
Step 1 : Press the [ORIGIN] key.
Step 2 : The EPOS laser will be activated automatically. The display will show following message:
Origi
n
Set new:
Move to:
Move with ◄►▲▼
Step 3 : Press the [
] key to move to the actual origin and/or use the keys to move the laser to the
desired origin position and press the [
] key to set the new origin.
Step 4 : The main screen will automatically be displayed again.
4.1.3 TEST key
To be able to contour cut, an Epos® feature has been incorporated. This feature will search for the black
reference box and measure the position of the design(s). When you see some deviation during contour
cutting, it is recommended to perform the test cuts described below.
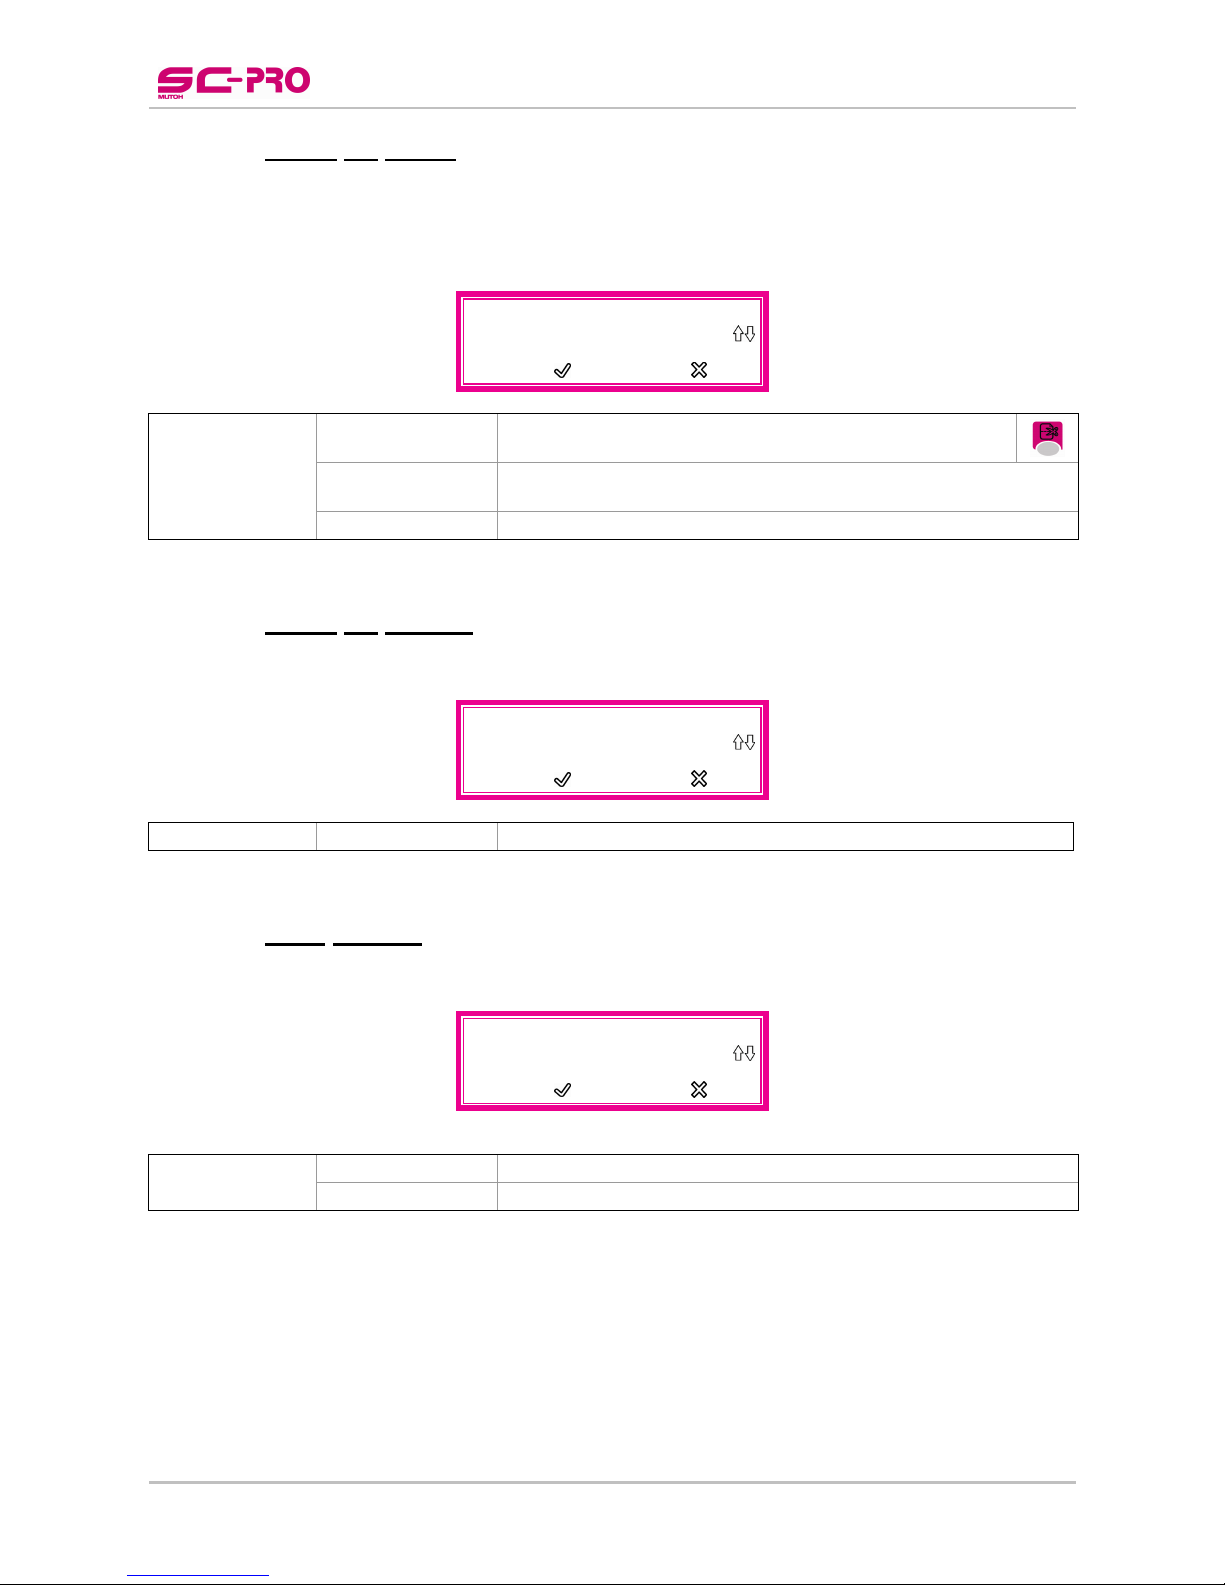
Step 1 : Press the [TEST] key.
Step 2 : Select one of the tests with the - keys.
Test
Test
EPOS readout EPOS calibrate
60
cm/s
100
g
METHOD: <TEST>
T
o start:
T
o start:
Notes
Please refer to “chapter 5: Fine-tuning your cutter” for all details about these tests.
Page 38

User’s Guide SC-PRO Cutting Plotter
CHAPTER 4 : WALKTHROUGH THE OPERATION PANEL
38 AP-75280 – Rev. 1.1
4.1.4 CONTOUR CUTTING key
Please follow the instructions below to select an alignment method, to set parameters and to start contour
cutting.
F
OR MORE INFORMATION ON HOW TO CONTOUR CUT, PLEASE REFER TO:
► THE APPLICATION GUIDE DESCRIBING ALL DETAILS ABOUT CONTOUR CUTTING.
► CHAPTER 6 OF THIS MANUAL
Step 1 : Press the [CONTOUR CUTTING] key.
Step 2 : Select the alignment method with the
- keys and confirm with the - key.
Cont
ourcu
tti
ng
Manua
l
Barcode Single
Barcode Multi
Start
:
Next
:
Step 3 : Press the [CONTOUR CUTTING]-key to make a selection and continue to the next setting.
Step 4 : The next screen depends on the previous selection.
a. When you have selected “Manual”, the following can be set.
Cont
ourcu
tti
ng
X Length (mm)
Y
Width (mm)
Roll direction
Start
: Next:
► Press the [CONTOUR CUTTING]-key to set the X-length. Use the keys to change
the value. Press the [
]-key to go to the previous screen.
Adjust the Y-width and roll direction in the same way.
Cont
ourcu
tti
ng
X Length (mm
)
500
Start: Exit:
Cont
ourcu
tti
ng
Y
Width
(mm
)
500
Start: Exit:
Cont
ourcu
tti
ng
Roll direction
(Non)Reverse
Start: Exit:
Page 39

User’s Guide SC-PRO Cutting Plotter
CHAPTER 4 : WALKTHROUGH THE OPERATION PANEL
39 AP-75280 – Rev. 1.1
b. When you have selected “Barcode Single” or “Barcode Multi”, you have to decide if the job
has to be performed only once (“Single Scan”) or multiple times (“Repeat Mode”).
Cont
ourcu
tti
ng
Single scan
Repeat Mode
Start: Exit:
Step 5 : When all settings have been made, press the [
]-key to start contour cutting.
Notes
Please refer to the application guide to know how to transfer cut data to your cutter.
4.1.5 SPEED key
Please follow the instructions below to change / control the cutting speed.
Step 1 : Press the [SPEED] key.
Step 2 : The current speed (in cm/s) will be displayed. Change the value with the - keys.
S
peed
60
[cm/s
]
Start: Exit:
Step 3 : Press the [
] key to change the current value or the [ ] key to abort.
Notes
The speed can be viewed / changed in following modes:
o READY mode
o BUSY mode
o PAUSE mode
Notes
The cutting speed, tool up or laser speed are independent and different settings.
Page 40

User’s Guide SC-PRO Cutting Plotter
CHAPTER 4 : WALKTHROUGH THE OPERATION PANEL
40 AP-75280 – Rev. 1.1
4.1.6 FORCE key
Please follow the instructions below to change / control the tool force.
Tool force is the amount of downward pressure that the cutter applies on the knife / pen.
We merely want to point out that you have to try to cut your design with the lowest possible pressure that
gives no trouble to weed. Some cast media require only 20 grams to be cut completely through. In that case
there is no need to apply 100 grams of pressure. Too much pressure can cause a decrease of quality.
Be sure that the knife depth has been set correctly. Otherwise, this setting is useless.
Step 1 : Press the [FORCE] key.
Step 2 : The current force (in gram) will be displayed. Change the value with the
- keys.
F
orce
100
[g]
Start
: Test:
Step 3 : Press the [FORCE] key once again to make a test cut to verify the new force.
Step 4 : Weed out the pattern
Step 5 : Check if the top layer is cut completely and that you can see a slight scratch on the backing.
Step 6 : Press the [
] key to accept the new value.
Page 41

User’s Guide SC-PRO Cutting Plotter
CHAPTER 4 : WALKTHROUGH THE OPERATION PANEL
41 AP-75280 – Rev. 1.1
4.1.7 OFFSET key
Please follow the instructions below to change / control the offset.
Step 1 : Press the [OFFSET] key.
Step 2 : The current offset (in mm) will be displayed. Change the value with the
- keys.
Offset
0.50
[mm]
Start: Exit:
Step 3 : Press the [ ] key to change/test the current value or the [ ] key to abort.
Step 4 : The following message will be displayed when you have changed the value:
Test offset
Test : or
No test : or
Step 5 : The following pattern will be cut:
Each square will be cut with a different offset.
0,45 0,46 0,47 0,48 0,49 0,50 0,51 0,52 0,53 0,54
Step 6 : Use the
keys to forward the media.
Step 7 : Weed out the boxes as
and check the patterns and determine which of them gives best quality.
Especially look for good quality of the corners and easy weeding.
Step 8 : Select one of the offsets with the left-right arrow keys. The EPOS laser will point to the selected
offset / test pattern.
Step 9 : Press the [
] key to accept the new offset.
Page 42
User’s Guide SC-PRO Cutting Plotter
CHAPTER 4 : WALKTHROUGH THE OPERATION PANEL
42 AP-75280 – Rev. 1.1
4.1.8 TOOL key
Please follow the instructions below to change the tool.
Step 1 : Press the [TOOL] key.
Step 2 : The current selected tool will be displayed. Switch between knife or pen with the
- keys.
Tool
Pen
Start: Exit:
Step 3 : Press the [
] key to change the current value or the [ ] key to abort.
Page 43

User’s Guide SC-PRO Cutting Plotter
CHAPTER 4 : WALKTHROUGH THE OPERATION PANEL
43 AP-75280 – Rev. 1.1
4.2 MENU OVERVIEW
Before to be able to browse through the menu,
be sure that the cutter is in normal conditions.
▼
*READY*
X Roll Y 1181
D
rag Knife Tool
60
cm/s
100
g
▼
Press the [MENU]-key to open the menu.
▼
▼
Use the
- keys to browse through
all the different menus.
▼
Sheetoff Mode
Sheetoff M
argin
Pre-
Feed L
ength
M
ax Sheetlength
▼
Press the [
] key to open the requested menu
▼
▼
Sheetoff Mod
e
AUTOMATIC
Save: Exit:
▼
▼
▼
▼
Press the [
] key to go back to the menu overview
▼
▼
Sheetoff Mode
Sheetoff M
argin
Pre-
Feed L
ength
M
ax Sheetlength
▼
Press the [
] key to go back to the main menu
▼
▼
*READY*
X Roll Y 1181
D
rag Knife Tool
60
cm/s
100
g
Page 44

User’s Guide SC-PRO Cutting Plotter
CHAPTER 4 : WALKTHROUGH THE OPERATION PANEL
44 AP-75280 – Rev. 1.1
PLEASE FIND BELOW A COMPLETE OVERVIEW OF THE EXISTING MENUS. THE DEFAULT VALUES ARE MARKED IN BOLD.
Note that it is possible to view the full or basic menu. The items shown in the basic menu are marked in grey.
Sheetoff Mode AUTOMATIC
DISABLE
MANUAL
Sheetoff Margin
1 – 5 – 250 [mm]
Auto Shuffle Enabled
Disabled
PRE-FEED LENGTH
0 – 1000 - 10000 [mm]
Max Sheetlength
0 – 2000 - 10000 [mm]
Page Mode
0
1
2
Origin L RIGHT
CENTER
U RIGHT
U LEFT
L LEFT
Laser Speed
2 – 15 – 100 [cm/s]
TOOL-UP SPEED
2 -100 [cm/s]
JOB FOCUS
Speed
Accuracy
Smoothing Enabled
Disabled
Factory default No
Yes
Copies
0 – 1 – 100
Bezier
1.0 – 10.0
LANGUAGE
ENGLISH
JAPANESE
ESPANOL
DEUTSCH
FRANCAIS
NEDERLANDS
ITALIANO
Page 45
User’s Guide SC-PRO Cutting Plotter
CHAPTER 4 : WALKTHROUGH THE OPERATION PANEL
45 AP-75280 – Rev. 1.1
Emulation HPGL2
MHGL
MHGL2
HPGL
Program Step 0,010mm
0,025mm
VS / ZF / AS ACCEPT
IGNORE
LCD contrast
0 – 16 – 32
Keyboard beep No
Yes
VERSIONS
Application ► SP x.x.x
X port ► XP x.x.x
FPGA ► FPGA x.x.x
Keyboard ► KB x.x.x
Serial comm.
Baudrate 1200
2400
4800
9600
19200
28800
38400
57600
115200
Databits 7
8
Parity
NONE
EVEN
ODD
StopBits 0
1
2
FlowControl
Software
Hardware
RS232/USB/ETH
Auto
USB
RS232
ETHERNET
Network comm.
TCP/IP Address 192.168.001.199
Subnet mask 255.255.255.0
BASIC/FULL MENU
FULL
BASIC
Page 46
User’s Guide SC-PRO Cutting Plotter
CHAPTER 4 : WALKTHROUGH THE OPERATION PANEL
46 AP-75280 – Rev. 1.1
4.2.1 Sheet off mode
The auto-sheet-off mechanism of your cutter can be very easily used to cut the front edge of a new roll of
vinyl straight as well as to cut off a sheet of vinyl from a roll, to be used as a separate sheet.
With the sheet-off mode, you can select “AUTOMATIC”, “MANUAL” or “DISABLE”.
Sheetoff Mod
e
AUTOMATIC
Save: Exit:
Sheetoff Mode AUTOMATIC
A sheet-off will be done automatically when pressing the
sheet-off key.
MANUAL
A sheet-off can be done with a snap-off blade knife; the media will
feed towards the cut groove after a job is done.
DISABLE No sheet-off possible.
4.2.2 Sheet off margin
It is sometimes useful that the media is fed an amount of millimetres after a job, before sheeting off.
Sheetoff M
argin
5
[mm
]
Save: Exit:
Sheetoff Margin
1 – 5 – 250 [mm] The media will be fed 5 mm extra before sheeting off.
4.2.3 Auto Shuffle
Set if it is necessary to perform an automatic media shuffle after a sheet-off procedure.
Sheetoff Mod
e
AUTOMATIC
Save: Exit:
Auto Shuffle ENABLED
An automatic shuffle will be executed after a sheet-off
Disabled No automatic shuffle will be executed after a sheet-off
Page 47
User’s Guide SC-PRO Cutting Plotter
CHAPTER 4 : WALKTHROUGH THE OPERATION PANEL
47 AP-75280 – Rev. 1.1
4.2.4 Pre-Feed length
This parameter is directly related to the loading of ROLL FRONT / ROLL media. The Pre-Feed length or
SHUFFLE length has to be set before a roll is loaded.
There are three reasons for using a Pre-Feed Length:
1.
The length of media set for the Pre-Feed length parameter will be pulled off the roll, before the cutting
job starts. This will prevent media from being pulled off the roll at high speed and acceleration. High
speed can only be properly used on condition that the media can move freely, without having to be
pulled off the roll during a job.
2.
Before actually cutting starts the complete length of the media is shuffled back and forth through the
cutter, ensuring that the pressure rollers have a discrete path while the user has the time to verify if
the vinyl transport goes well.
3.
Your SC-Pro cutter has been equipped with MUTOH’s unique AUTO-SHEET-OFF feature, to
automatically cut off media at the end of a cutting sequence. Following an automatic PAGE command
or a manual PAGE command initiated via the control panel, the cutter will shuffle through the pre-set
Pre-Feed length of media, to ensure that there is enough media left for a possible replot. If there is
not enough media left, the cutter will stop before the end of the assigned media length and switches to
SHEET mode. The cutter will not initiate the media again in between two contour cutting jobs.
Pre-
Feed L
eng
th
1000
[mm
]
Save: Exit:
Pre-Feed Length
0 – 1000 - 10000 [mm] The media will be fed 1 meter before the cutting job will start.
Notes
Please note that the use of the PRE-FEED LENGTH should not be regarded as a loss of time. If the
shuffle movement is executed without difficulty, the user can be convinced that the sign to be cut will be
executed with very little risk of media tracking problems. As such, it will result in a time-saving
operation, preventing that the user will have to re-cut a very complex design because of bad media
alignment.
Notes
Please note that the cutting range is not limited by the Pre-Feed Length which you have set. In case a
design, which exceeds the shuffle length, is sent to the cutting plotter, the cutter will react as follows:
o The first vector, which exceeds the limit, will be cut using reduced speed for the distance exceeding
the limit.
o The cutter will continue at the requested speed until the new limit is exceeded.
o However, this should not be a reason for you not to change the pre-feed length at all, as by omitting
to change it; you will be inhibited to check the full vinyl transport before the job is launched
o When there is an end of roll detection during the pre-feed, the cutter will automatically switch to
SHEET mode.
Page 48
User’s Guide SC-PRO Cutting Plotter
CHAPTER 4 : WALKTHROUGH THE OPERATION PANEL
48 AP-75280 – Rev. 1.1
4.2.5 Max Sheet length
After installation of a sheet and sheet being selected in the menu, the cutting plotter will measure the width
and length of the sheet.
To avoid unrolling a full roll of media when a roll is loaded while the media type is set to sheet, you can
define a maximum allowed sheet length.
In case sheet is selected in the menu, the SC-Pro will not measure more than the length in the Max. Sheet
Length menu, preventing the roll media to be rolled off completely.
M
ax Sheet Leng
th
2
000
[mm
]
Save: Exit:
Max Sheet length
0 – 2000 - 10000 [mm] The maximum sheet length / maximum feeding will be 2 m.
Notes
When there is NO end of roll detection during the sheet measurement, the cutter will automatically
switch to ROLL mode.
Page 49

User’s Guide SC-PRO Cutting Plotter
CHAPTER 4 : WALKTHROUGH THE OPERATION PANEL
49 AP-75280 – Rev. 1.1
4.2.6 Page mode
P
age Mode
1
Save: Exit:
The page mode determines the cutter’s reaction to a PAGE command sent by the cutting software. The
PAGE command is a command, which is used to relocate the origin after a job is finished and which can take
control remotely of the cutter’s automatic sheet-off feature. Sheeting-off automatically, without user
intervention, is a feature which is unique to Mutoh cutting-plotters and which enhances the cutter’s versatility
and overall performance enormously.
A page-command looks like this: “PG;” or “PGN;” with “n” a number in millimetres.
If the PAGE command “PG;” is sent, the cutter will automatically sheet of regardless of the Page mode,
minimizing the loss of vinyl.
If the PAGE command “PGN;” is sent, the number mentioned after the PG command will be interpreted
differently, depending on the page mode you have chosen:
Page Mode 0 :
The number after the page command is ignored. The media will be cut 5 mm (0.2”) after the latest downvector. The new cutting limit will be located 0.5 (0.2”) from the lower media border.
Page Mode 1 :
The new origin is located “n” millimetres beyond the last down-vector that was sent.
Page Mode 2 :
The new origin is located “n” millimetres beyond the previous origin position.
“PGN” is sent (n is a number in mm).
A : Original origin
B : End point last vector
C : New origin with Page Mode 1
D : New origin with Page Mode 2
Page 50

User’s Guide SC-PRO Cutting Plotter
CHAPTER 4 : WALKTHROUGH THE OPERATION PANEL
50 AP-75280 – Rev. 1.1
4.2.7 Origin
Change / control the default origin after a media load sequence.
Notes
Please make sure media is loaded. If this is not the case, the SC-Pro positioning calculation is based on
previously installed media.
Origi
n
L
RIGHT
Save: Exit:
Pre-Feed Length
MediaWidth
REAR
FRONT
U LEFT U RIGHT
L LEFT L RIGHT
CENTER
Origin L RIGHT
The origin will be set in the lower right corner.
CENTER The origin will be set in the centre.
U RIGHT The origin will be set in the upper right corner.
U LEFT The origin will be set in the upper left corner.
L LEFT The origin will be set in the lower left corner.
4.2.8 Laser speed
It is possible to perform a test contour cutting with the SC-Pro cutting plotter. Contour lines will be indicated
by the EPOS laser beam. In case the speed of the test contour cutting is not acceptable, you can decrease
or increase the speed.
L
aser Spee
d
15
[cm/s
]
Save: Exit:
Laser Speed
2 – 15 – 100 [cm/s] Laser speed can be set between 2 and 100 cm / s
Notes
The laser speed has nothing to do with the speed of measuring a frame.
Page 51

User’s Guide SC-PRO Cutting Plotter
CHAPTER 4 : WALKTHROUGH THE OPERATION PANEL
51 AP-75280 – Rev. 1.1
4.2.9 Tool-up speed
Tool-up movements are mostly long movements (which reach their maximum speed) between the short tooldown movements. These movements could cause abrupt media transport (which could cause tracking
problems). Therefore, it is recommended to select a tool-up speed lower than the speed selection in the
menu.
Tool
-
up S
pee
d
100
[cm/s
]
Save: Exit:
Tool-up Speed
2 -100 [cm/s] Tool-up speed can be set between 2 and 100 cm / s
4.2.10 Job focus
A lot of advanced cutting settings will be made in the background without any need of intervention by the
end-user. Select by means of the table below the correct job settings (focus)
Job F
ocus
Accuracy
Save: Exit:
Job Focus Accuracy
Give in some speed, gain quality.
Speed Give in some quality, gain speed.
4.2.11 Smoothing
Smoothing can be ENABLED or DISABLED. Depending on your choice, cutting of obtuse angles will be
dealt differently by the cutter.
If the complementary angle between two consecutive vectors A & B is larger than the smoothing angle, the
cutter will slow down and cut a sharp corner (1). If the angle is smaller, the cutter will maintain its speed and
cut a rounded corner (2). The optimum smoothing angle is calculated internally.
When smoothing is DISABLED all corners will be cut sharply.
S
moo
thi
ng
ENABLED
Save: Exit:
Smoothing ENABLED
Smoothing has been enabled (recommended)
DISABLED Smoothing has been disabled
= 30°
Page 52

User’s Guide SC-PRO Cutting Plotter
CHAPTER 4 : WALKTHROUGH THE OPERATION PANEL
52 AP-75280 – Rev. 1.1
4.2.12 Factory default
Restore the factory defaults as follows
Fact
ory defau
lt
YES
Save: Exit:
Fact
ory defau
lt
Pl
ease wa
it
w
hil
e machine
i
s restarting
!
Wait until the main screen appears to perform further actions
*READY*
X Roll Y 1181
D
rag Knife Too
l
60
cm/s
100
g
4.2.13 Copies
In case multiple outputs of a specific design are needed, you can use the copies function. This function will
replot the last set of data, which was sent to the cutting plotter. That is, all data that was sent since the last
INITIALISATION command (“IN”).
Copi
es
1
Save: Exit:
Copies
0 – 1 -100 Set number of copies between 0 and 100
Notes
When you want to make copies, make sure that the ‘Sheet Off’ mode is enabled. Otherwise you’ll
perform a multi-cut. The cutter will cut continuously on the same place.
In case of identical frames without barcode, copying contour cutting tasks can be done via the COPY
menu option as well as from roll and sheet.
When you perform a lever up action during a job, all data will be cleared out of the buffers, which
means, no copies can be made anymore of the job.
Page 53

User’s Guide SC-PRO Cutting Plotter
CHAPTER 4 : WALKTHROUGH THE OPERATION PANEL
53 AP-75280 – Rev. 1.1
4.2.14 Bezier
This is the calculation accuracy factor for the incorporated Bézier curve generation. The value can be set
between 1 and 10.
Bezi
er
1.
0
Save: Exit:
Bezier
1.0 – 10.0 Bezier can be set between 1.0 and 10.0
4.2.15 Language
Select in the language of the user interface.
L
anguage
ENGLISH
Save: Exit:
Language ENGLISH
JAPANESE
ESPANOL
DEUTSCH
FRANCAIS
NEDERLANDS
ITALIANO
4.2.16 Emulation
Your cutter is able to understand different graphic languages. It is highly recommended to leave this setting
unchanged.
Emulati
on
HPGL2
Save: Exit:
Emulation HPGL2
Default graphic language
MHGL For internal use only
MHGL2 For internal use only
HPGL For internal use only
Page 54

User’s Guide SC-PRO Cutting Plotter
CHAPTER 4 : WALKTHROUGH THE OPERATION PANEL
54 AP-75280 – Rev. 1.1
4.2.17 Program step
Please note that some software packages use the “step per mm” terminology, in which case a program step
of 0.025 mm corresponds with 40 steps per mm and a program step of 0.010 mm with 100 steps per mm.
Contour cutting supports only 0.010 mm program step.
Notes
If the plot unit is not set correctly, all your cutting jobs will be cut 2.5 times too large or too small.
P
rogram step
0.
010
[mm
]
Save: Exit:
Program Step 0,010mm
Set the step to 0.010 mm
0,025mm Set the step to 0.025 mm
4.2.18 VS/ZF/AS
Several cutting software packages enable the user to send speed, force and acceleration commands to the
cutter. The cutter can be set up to ACCEPT or IGNORE these commands.
VS/ZF
/AS
ACCEPT
Save: Exit:
VS / ZF / AS ACCEPT
IGNORE
Notes
When VS and ZF commands are sent and accepted, they will override the speed, force and acceleration
settings the user may have set from the cutter operation panel.
When the VS and ZF commands are ignored, the cutter will always use the settings, which are set-up from
the cutter operation panel.
4.2.19 LCD contrast
Change the LCD contrast as you wish.
LCD
contras
t
16
Save: Exit:
LCD contrast
0 – 16 – 32
Set LCD contrast between 0 and 32
0 = bright
32 = dark
Page 55

User’s Guide SC-PRO Cutting Plotter
CHAPTER 4 : WALKTHROUGH THE OPERATION PANEL
55 AP-75280 – Rev. 1.1
4.2.20 Keyboard beep
Decide whether the keyboard should beep every time you strike a key or not.
Keyb
oard beep
NO
Save: Exit:
Keyboard beep No
No keyboard beeps will sound
Yes A keyboard beep will sound after pushing a key.
4.2.21 Versions
Check which versions are installed on the SC-Pro cutter.
V
ersions
SP x.x.x
Save: Exit:
Versions
SP x.x.x Application firmware version
XP x.x.x Ethernet module firmware version
FPGA x.x.x On board chip firmware version
KB x.x.x Keyboard firmware version
4.2.22 Basic / Full menu
You do not need all menu items every day or time you want to cut. Therefore, it is possible to hide some
functions when you select “Basic”-menu. When you select “Full”- menu, all menus will be visible.
Basic/Full
menu
FULL
Save: Exit:
Basic/Full menu
Basic Only the most frequently used menus will be viewed
► Pre-Feed Length
► Tool Up Speed
► Job Focus
► Language
► Versions
► Basic/Full menu
Full
All menus will be visible
Page 56

User’s Guide SC-PRO Cutting Plotter
CHAPTER 4 : WALKTHROUGH THE OPERATION PANEL
56 AP-75280 – Rev. 1.1
4.2.23 Serial communication
In order for your plotter to be able to communicate well with your host computer, the communication settings
on both machines have to match exactly. Please refer to the manual of your software to determine which
communication setting will be used by your software. Your cutter can be set up to use any settings
necessary.
To change the communication selection, please follow the instructions mentioned below:
Step 1 : Select with the
- keys the setting you want to change.
Baudrate
DataBit
s
Parit
y
StopBit
s
FlowControl
RS232/USB/ETH
Step 2 : Press the [
] – key to confirm your selection.
Step 3 : Change the value with the
- keys and confirm once again with the [ ] – key.
Step 4 : Return to the main menu of the serial communication settings and change all the other settings if
necessary.
The following settings can be made.
Baudrate 1200, 2400, 4800, 9600, 19200, 28800, 38400, 57600 or 115200
DataBits 7 or 8
Parity None, even or odd
StopBits 0, 1 or 2
FlowControl Software or hardware
RS232/USB/ETH Auto, Serial, USB or Ethernet connection
Page 57

User’s Guide SC-PRO Cutting Plotter
CHAPTER 4 : WALKTHROUGH THE OPERATION PANEL
57 AP-75280 – Rev. 1.1
4.2.24 Network communication
In order for your plotter to be able to communicate well with your local network, some settings have to be
made. Please contact your system administrator for all necessary information.
4.2.24.1 TCP/IP
Address
Set the IP address of the cutter.
TCP/IP Add
ress
192
.162
.001.199
<->
Save: Change:
TCP/IP Address
192.162.001.199
Set the IP address of the cutter. The IP address should be
chosen in between the following range:
xxx.yyy.zzz.www
x: 1-223
y: 0-255
z: 0-255
w: 0-254
How to change the IP address
Step 1 : Select the number you want to change with the
keys.
Step 2 : Change the number with the up down keys.
Step 3 : Press the [
] key to accept the change.
4.2.24.2 SubnetMask
Set the SubnetMask of the cutter.
SubnetMask
255.255.255.0
<->
Save: Change:
SubnetMask
255.255.255.0
Set the SubnetMask of the cutter between
000.000.000.000 - 255.255.255.252
How to change the SubnetMask
Step 1 : Select the number you want to change with the
keys.
Step 2 : Change the number with the up down keys.
Step 3 : Press the [
] key to accept the change.
Page 58

User’s Guide SC-PRO Cutting Plotter
CHAPTER 4 : WALKTHROUGH THE OPERATION PANEL
58 AP-75280 – Rev. 1.1
4.3 SPECIAL KEY COMBINATIONS
Shortcut description Special Key combination
EPOS Laser ON
+
EPOS Laser OFF
+
Bar code verification
+
+
Updating the keyboard
+
+
+
Reset the keyboard
+
+
+
Activate Sheet off knife
+
Factory defaults
+
+
+
4.3.1 EPOS laser ON
Activate the EPOS laser as follows
Step 1 : Power ON the cutter.
Step 2 : Press the following keys simultaneously:
+
Step 3 : The EPOS laser will light up.
Page 59

User’s Guide SC-PRO Cutting Plotter
CHAPTER 4 : WALKTHROUGH THE OPERATION PANEL
59 AP-75280 – Rev. 1.1
4.3.2 EPOS laser OFF
Deactivate the EPOS laser as follows
Step 1 : Power ON the cutter.
Step 2 : Press the following keys simultaneously:
+
Step 3 : The EPOS laser will go out.
4.3.3 Bar code verification
This function makes it possible to check if the scanned barcode corresponds with the real barcode number.
How to verify a barcode:
Step 1 : Load a vinyl with a barcode on.
Step 2 : Activate the EPOS laser as described above.
Step 3 : Position the EPOS laser in front (left side) of the barcode using the arrow keys.
52000310804
Step 4 : Press the special key combination to start the barcode verification scan.
+
+
Step 5 : The cutter will scan the barcode. Following messages can appear:
BARCODE OK
-
> NON
-
MIRRORED
-
> CODE
:
52000310804
BARCODE
RECOGNITION
ERROR
RETRY
Step 6 : If the barcode number displayed (52000310804) corresponds with the number under the
barcode, everything is all right. If not, a print mismatch could be the problem.
Page 60
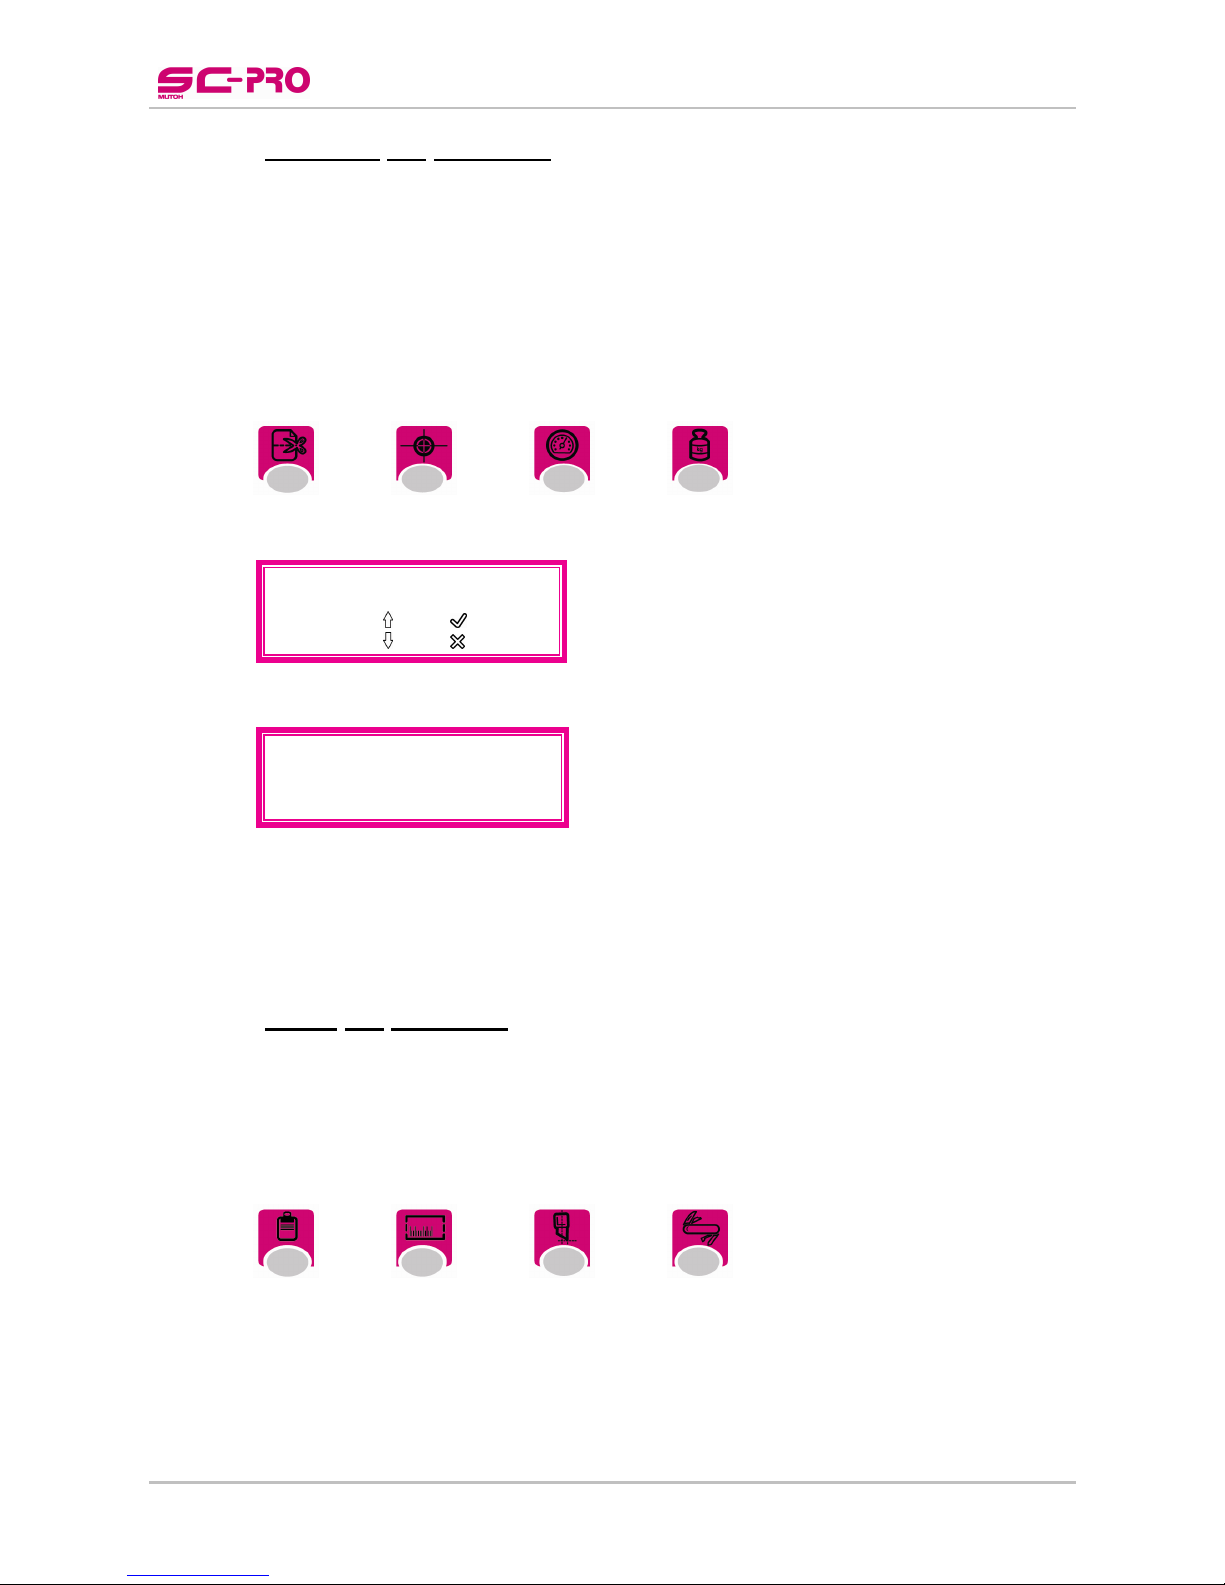
User’s Guide SC-PRO Cutting Plotter
CHAPTER 4 : WALKTHROUGH THE OPERATION PANEL
60 AP-75280 – Rev. 1.1
4.3.4 Updating the keyboard
After installation of a new cutter firmware, it is highly recommended to update the keyboard firmware as
described below:
Step 1 : Power ON the cutter.
Step 2 : Install the new firmware.
Step 3 : Press the special key combination to start the installation.
+
+
+
Step 4 : Confirm that you want to update the keyboard firmware.
Updat
e
Keyboard?
Yes :
or
No :
or
Step 5 : The following message will be displayed:
Keyb
oard update
!
Pl
ease wait...
DO NOT SHUTDOWN!
The installation will take approximately 1 minute.
Step 6 : After installation, a beep will sound and the main screen will be displayed again.
4.3.5 Reset the keyboard
It might be possible that the keyboard does not correspond anymore. To avoid to reboot the cutter; a special
key combination is made available to reset the keyboard.
Step 1 : Press the special key combination to start the installation.
+
+
+
Step 2 : The keyboard will reset and the main screen will be displayed again.
Step 3 : If the keyboard does not respond still, you have to reboot the cutter.
Page 61
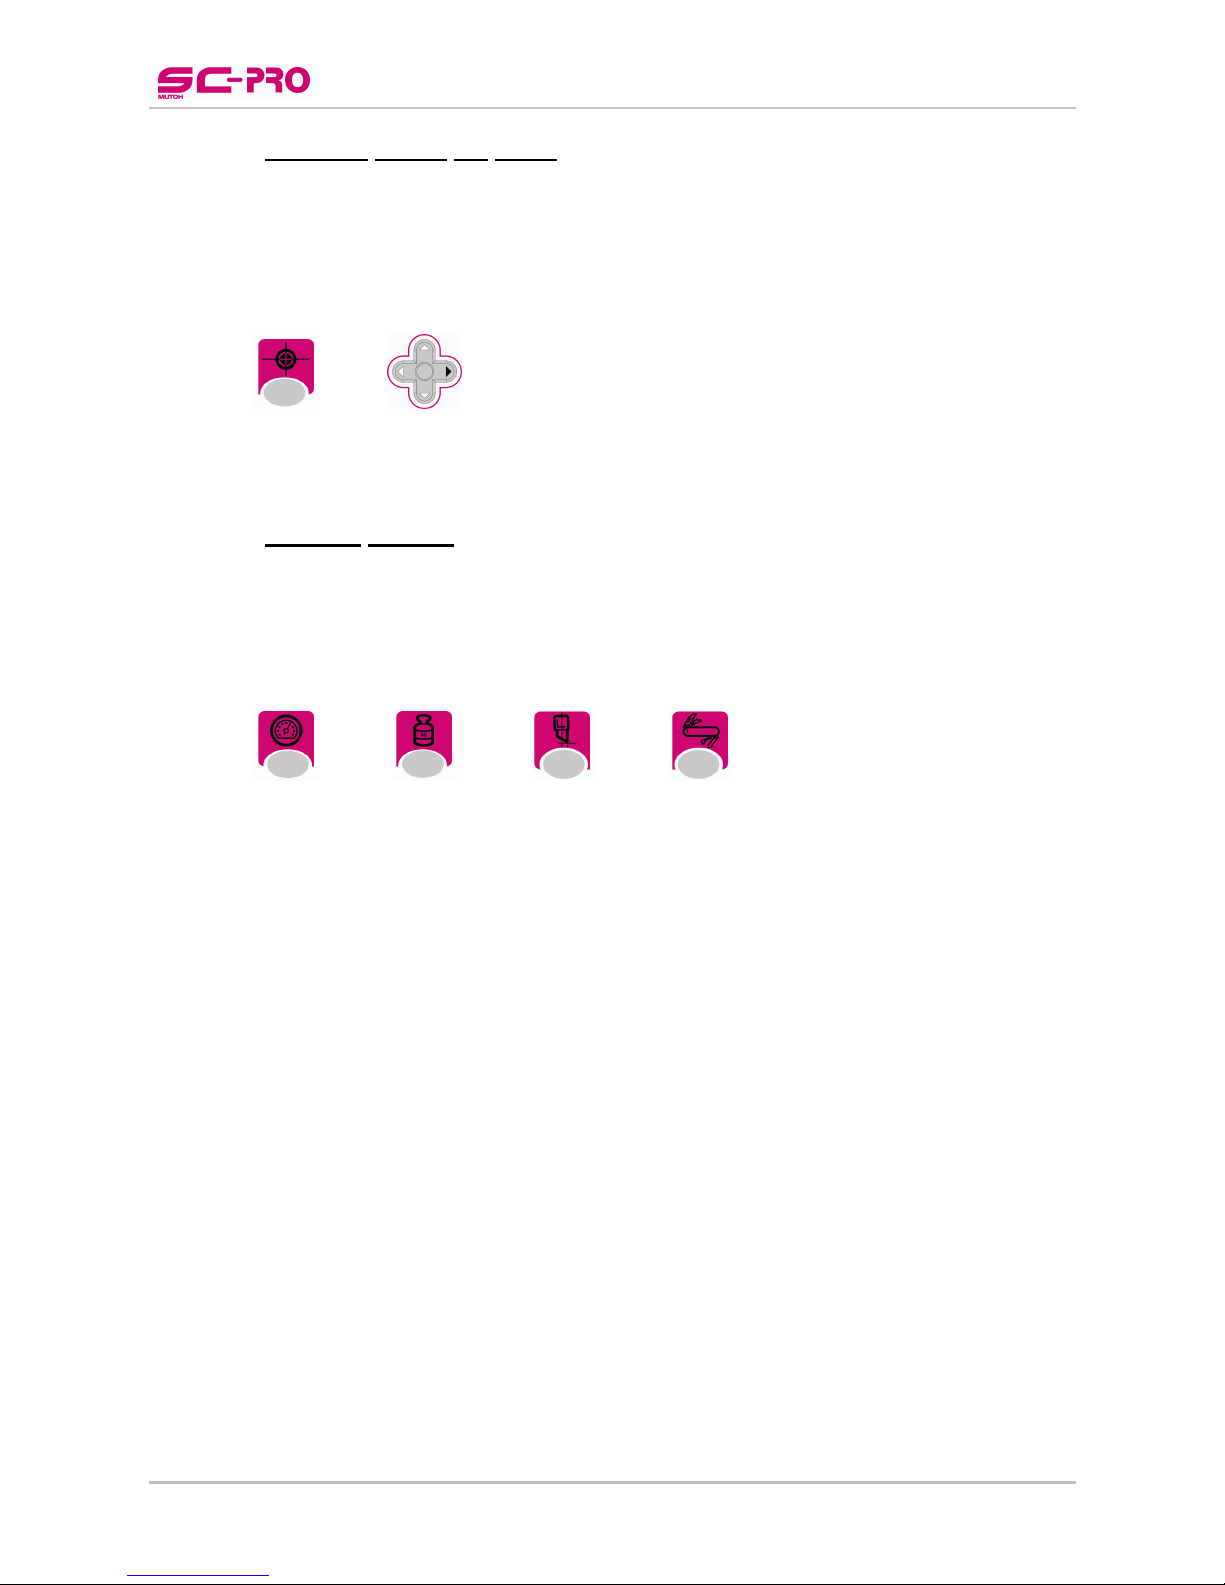
User’s Guide SC-PRO Cutting Plotter
CHAPTER 4 : WALKTHROUGH THE OPERATION PANEL
61 AP-75280 – Rev. 1.1
4.3.6 Activate Sheet off knife
This function is made to check if the up down knife movement still works. Do NOT try to sheet off your media
with this function, this to avoid damaging the media, head and knife.
Step 1 : Power ON the cutter.
Step 2 : Press the following keys simultaneously:
+
Step 3 : The sheet off knife will come down.
4.3.7 Factory default
Please follow the steps below to restore factory settings.
Step 1 : Power ON the cutter.
Step 2 : Press the following keys simultaneously:
+
+
+
Step 3 : The cutter will restart automatically.
Step 4 : The main screen will be displayed again when the factory defaults have been restored.
Page 62

User’s Guide SC-PRO Cutting Plotter
CHAPTER 4 : WALKTHROUGH THE OPERATION PANEL
62 AP-75280 – Rev. 1.1
4.4 KEYS ACCESSIBLE DURING A CUTTING JOB
During or while pausing a cutting job, a lot of keys are locked.
Please find below an overview.
4.4.1 While cutting
Key Description Function
READY/PAUSE key Pause a cutting job
EXIT key Cancel a cutting job
SPEED key Adjust the speed settings
Force key Adjust the force settings
4.4.2 While pausing a cutting job
Key Description Function
READY/PAUSE key Resume a cutting job
EXIT key Cancel a cutting job
Page 63

User’s Guide SC-PRO Cutting Plotter
CHAPTER 4 : WALKTHROUGH THE OPERATION PANEL
63 AP-75280 – Rev. 1.1
5 FINE-TUNING YOUR CUTTER
In order to help you to obtain perfect quality our engineers have developed a step-by-step method for the
beginning user. Once you have more experience with your cutter, you will be able to fine-tune your cutter in
a trice.
There are several knife types available, each of them meant for specific cutting media.
Cutting Blade 1 Cutting Blade 2 Cutting Blade 3
Top Angle
45º (Red cap) 30º (Yellow cap) 60º (Blue cap)
Typical Offset
0.50 mm 0.50 mm 0.50 mm
Default Speed
60 cm/s (20 inch/s) 60 cm/s (20 inch/s) 60 cm/s (20 inch/s)
Default Force
100 g 100 g 100 g
There are three factors that have to be taken into account when setting up your cutter to execute a
demanding cutting job:
► The knife depth
► The cutting pressure
► The offset
5.1 ADJUSTING THE KNIFE DEPTH
Adjusting the knife depth is a very important parameter when it comes to making high quality outputs.
Always make sure that the knife blade protrudes enough out of the knife holder, but not too much.
1
2
3
4
1
1
No. Description
1 Knife holder
2 Vinyl
3 Adhesive film
4 Backing
Page 64
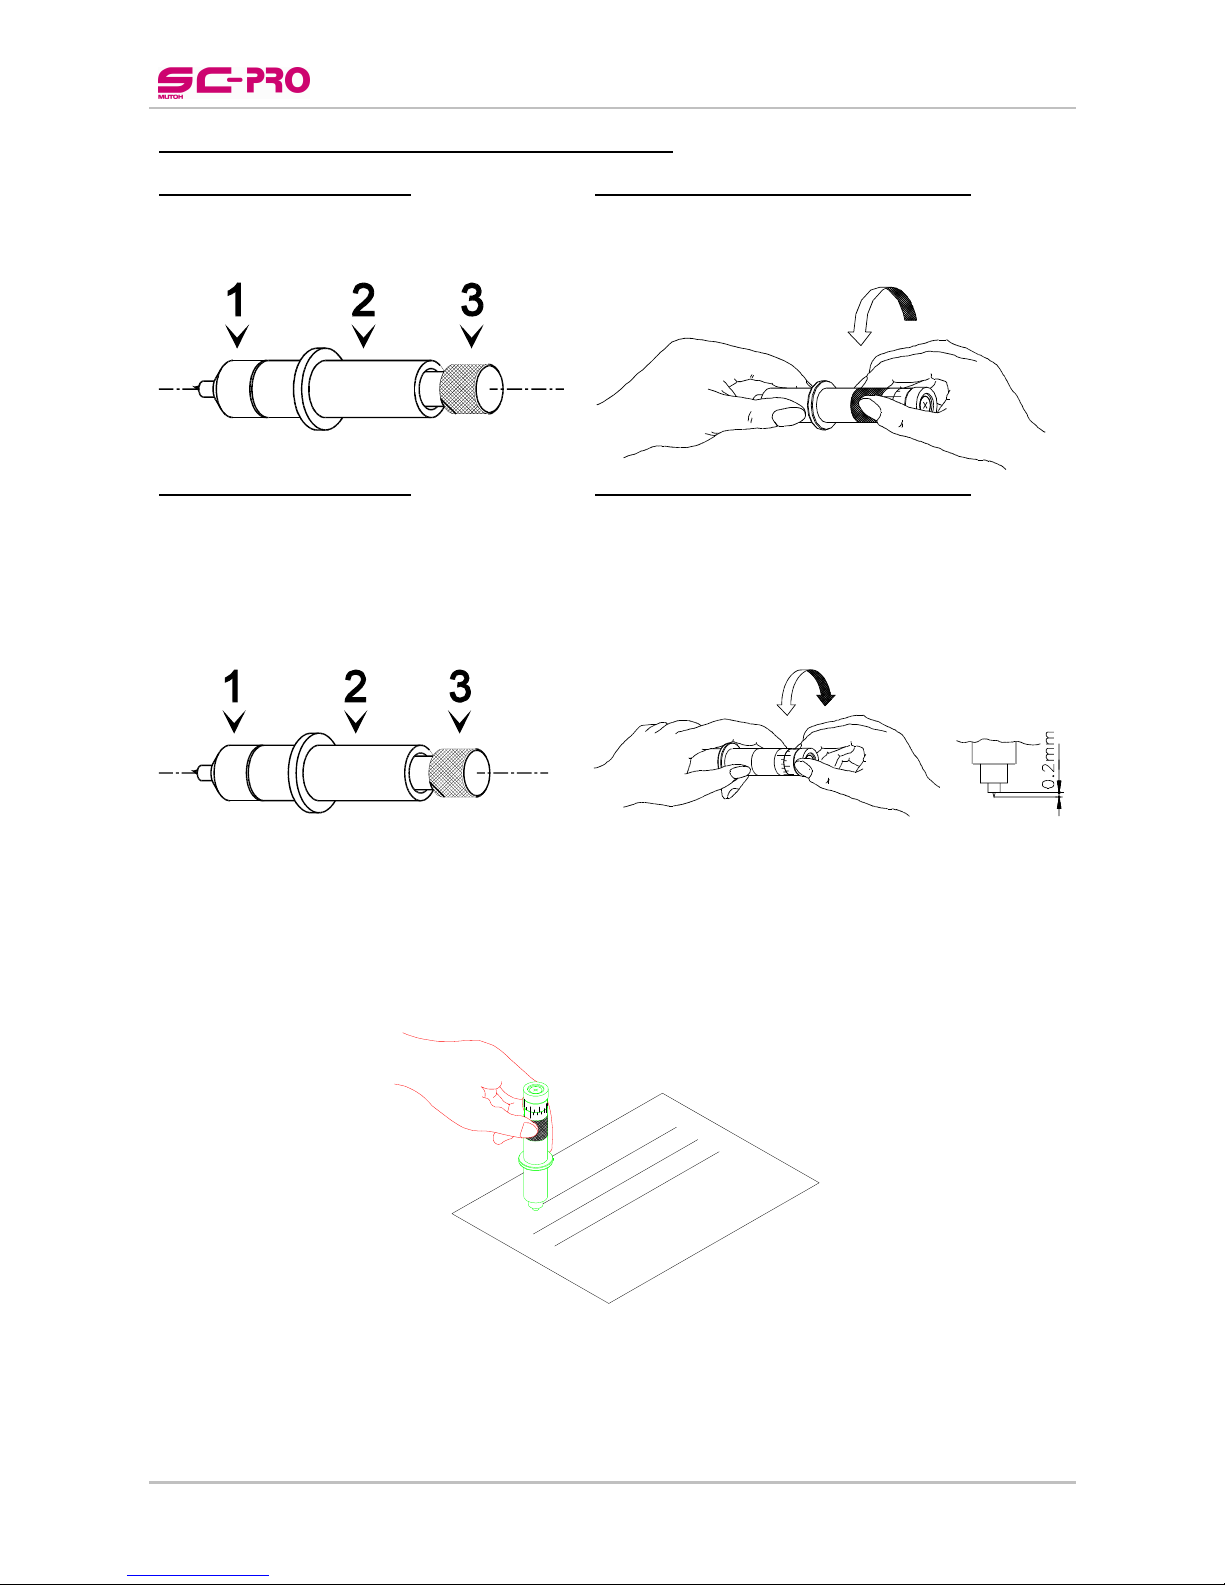
User’s Guide SC-PRO Cutting Plotter
CHAPTER 4 : WALKTHROUGH THE OPERATION PANEL
64 AP-75280 – Rev. 1.1
TO ADJUST THE KNIFE DEPTH, PROCEED AS FOLLOWS:
STANDARD KNIFE HOLDER
OPTIONAL KNIFE HOLDER WITH NONIUS
Hold the body (2) in one hand and adjust the
depth by using the set screw (3).
Loosen the base part of the cutting knife. To do this,
take the base part in your left hand and twist the ring
slightly.
STANDARD KNIFE HOLDER
OPTIONAL KNIFE HOLDER WITH NONIUS
Turning the set screw (3) clockwise will make the
blade protrude out of the edge of the base part
(1). Turning the set screw (3) counter clockwise,
will retract the blade.
For a first test, turn out the blade until it protrudes
about 0.2mm (0.008”) out of the base part
Take the base part and the ring in your left hand and
twist the shaft until the knife point protrudes about 0.2
mm (0.008”) out of the edge of the base part.
Tighten the ring firmly against the base part. This will
prevent the cutting blade from coming loose during
cutting.
Make a manual test-cut on a small piece of media, of the same type that you will be using. Adjust the depth
until the top layer is cut completely and that you can see a slight scratch on the backing when peeling off.
At no times you should be able to see a scratch at the back side of the media.
Repeat steps 2 and 3 until the correct depth is obtained.
Page 65

User’s Guide SC-PRO Cutting Plotter
CHAPTER 4 : WALKTHROUGH THE OPERATION PANEL
65 AP-75280 – Rev. 1.1
FEATURES OF THE OPTIONAL KNIFEHOLDER
For some applications it might be convenient to be able to very accurately change the depth of the cutting
blade. For those applications, MUTOH can provide you with an optional knife holder, featuring a nonius
(vernier) with which it is possible to adjust the depth of the knife in increments of 0.01 millimetre (0.0004”)
The upper scale lines make it possible to change the knife depth over 0.05 mm (0.002”).
The lower scale (nonius) makes it possible to change the knife depth over 0.01 mm (0.0004”).
-0,05mm
+0,05mm
-0,01mm
+0,01mm
Page 66

User’s Guide SC-PRO Cutting Plotter
CHAPTER 4 : WALKTHROUGH THE OPERATION PANEL
66 AP-75280 – Rev. 1.1
5.2 SETTING THE TOOL FORCE
Tool force (cutting pressure) is the amount of downward pressure that the cutter applies on the knife / pen.
We merely want to point out that you have to try to cut your design with the lowest possible pressure that
gives no trouble to weed. Some cast media require only 20 grams to be cut completely through. In that case
there is no need to apply 100 grams of pressure. Too much pressure can cause a decrease of quality.
Notes
Please refer to the chapter “Direct key access” to know how to change the tool force.
5.3 OFFSET PRINCIPLE
One of the most important factors to obtain good quality, but unfortunately also one of the factors that is
easily forgotten, is the offset.
As you can see in the figure below, the knife offset (2) is the distance between the knife centre and the knife
tip.
1: Cutter blade
2: Theoretical Offset
Accurate measurement of the OFFSET to be used is very difficult and requires specialized equipment. You
should therefore adjust the offset (2) by checking real cutting results on the media you will use. MUTOH
helps you doing this by way of a semi-automatic offset adjustment routine, which has been integrated into
your cutter.
The selected Offset value is LARGER than the
optimum knife offset.
The selected Offset value is SMALLER than the
optimum knife offset.
In this case, a square corner will be cut as follows : In this case, a square corner will be cut as follows :
The cutting direction is indicated by the arrow. The
corners are not well formed. The cutter cuts too far in
the angular points.
The cutting direction is indicated by the arrow. The
corners are not well formed. The cutter did not cut
far enough in the angular points.
Notes
Please refer to the chapter “Direct key access” to know how to change / test the offset value.
1
= 30°
2
Page 67
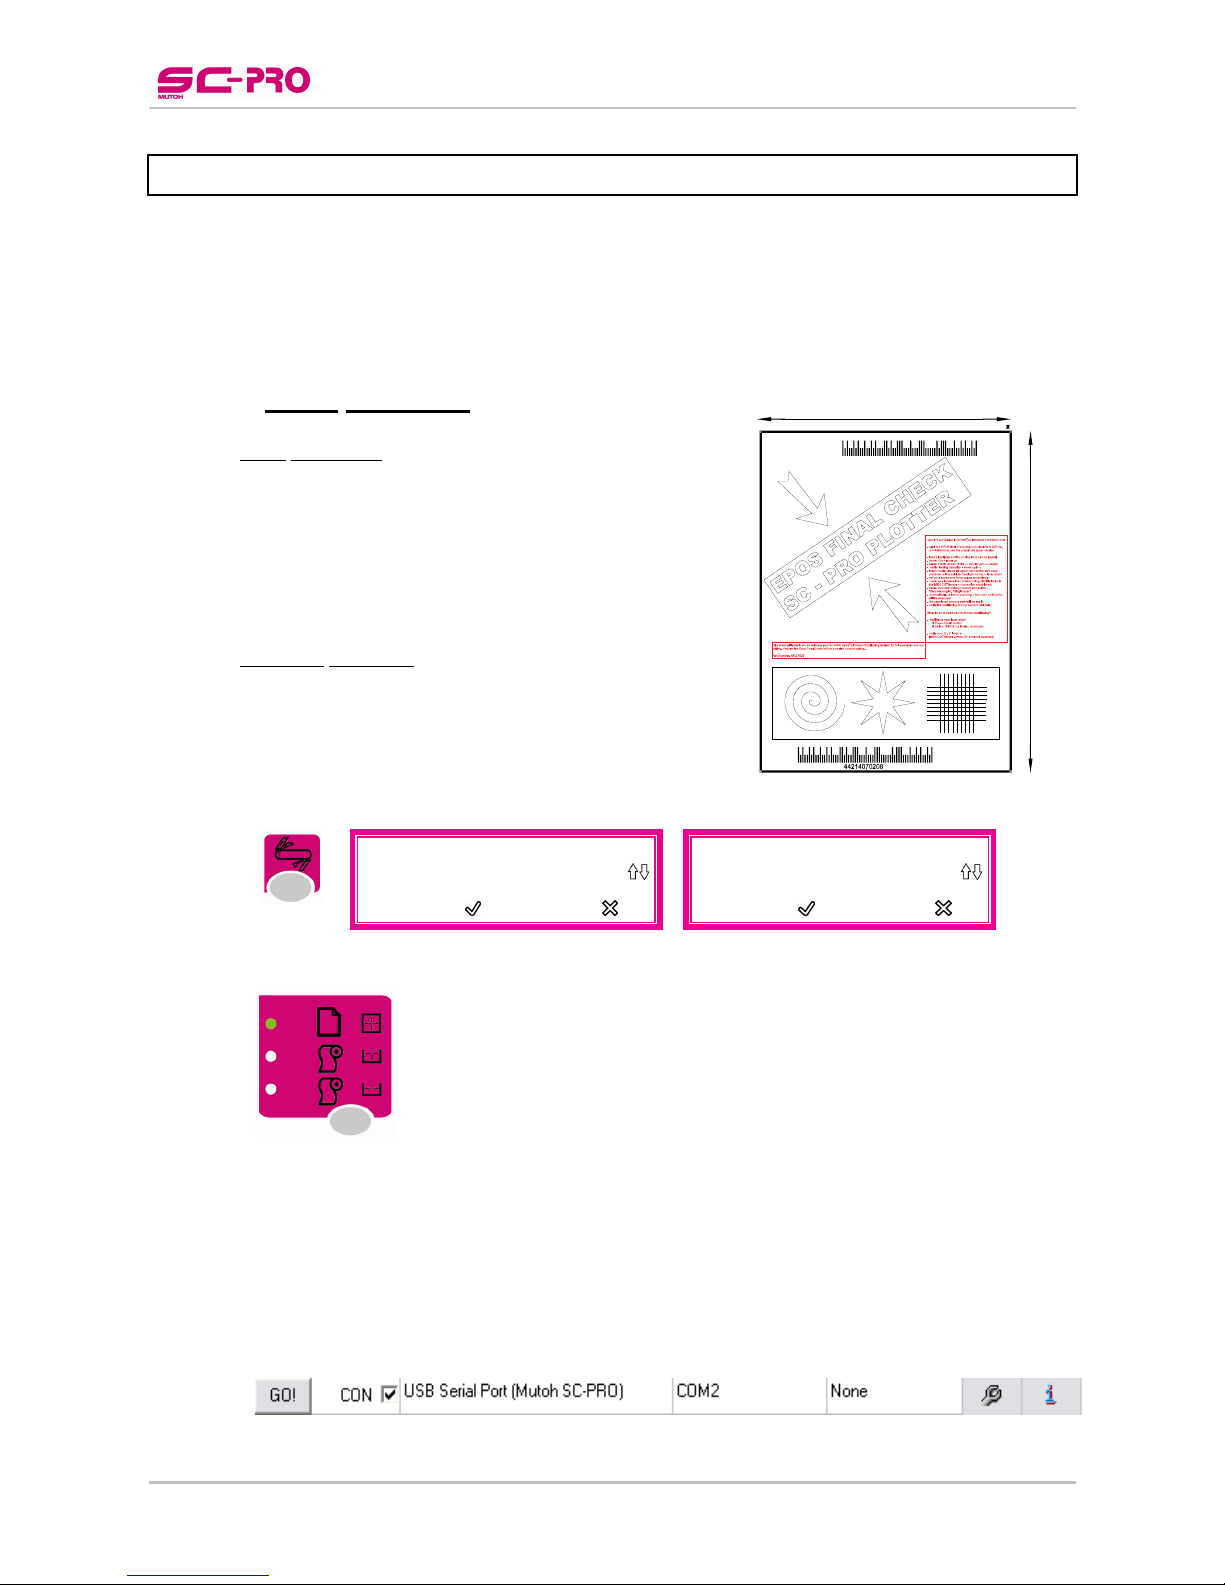
User’s Guide SC-PRO Cutting Plotter
CHAPTER 4 : WALKTHROUGH THE OPERATION PANEL
67 AP-75280 – Rev. 1.1
325 mm
445 mm
5.4 EPOS TEST CUTS
To be able to contour cut, an Epos® feature has been incorporated. This feature will search for the
Reference box and measure the position of the design(s).
When you establish some miscalculations during contour cutting, it is recommended to perform the test cuts
described below.
After these test, everything should be all right. If not, please contact an Authorized Mutoh Technician.
5.4.1 EPOS alignment
5.4.1.1 Tools
necessary:
► SC-Pro.
► Host Computer with the Mutoh CutServer installed on.
► EPOS final check chart pre-printed on vinyl or paper.
► Drag knife when testing on vinyl.
► Pressurized ballpoint pen when testing on paper.
5.4.1.2 Alignment
procedure
Step 1 : Load the appropriate tool (a knife on vinyl and a pen on
paper).
Step 2 : Power ON the cutter and be sure that the lever is raised.
Step 3 : Press the [TOOL] button and set the tool you are using.
Tool
Pen
Start: Exit:
Tool
Knif
e
Start: Exit:
Step 4 : Set the media type to “Sheet”.
Step 5 : Insert the test sheet as described in the chapter “Loading sheet media” with the arrow in the top
right corner and the outer pressure rollers outside the reference box. The middle pressure rollers
may be disabled.
Step 6 : Pull the lever down.
Step 7 : Set your speed and force values accordingly.
Step 8 : Make sure there is a connection between the Mutoh CutServer and the cutter by selecting the
checkbox near to the requested cutter.
Page 68

User’s Guide SC-PRO Cutting Plotter
CHAPTER 4 : WALKTHROUGH THE OPERATION PANEL
68 AP-75280 – Rev. 1.1
Step 9 : Launch the job in one of the two possible ways:
a. Directly from the SC-Pro keyboard
1. Press the contour button key and select BarCode Single – Single Scan.
Cont
ourcu
tti
ng
Barcode Single
Barcode Mu
lti
Start
Next:
Cont
ourcu
tti
ng
Singl
e scan
Multi
scan
Start: Exit:
2. Press the [ ]-key to start the test.
b. Using the Mutoh CutServer
1. Make following settings: Single Scan – Single Frame Mode and Save Settings.
2. Press the [GO] button to start the test.
Step 10 : The reference box will be automatically measured and the barcode verification will be executed.
When the plot file is not listed in the Mutoh CutServer, the internal embedded Epos Final Check
plot file will be used.
Step 11 : The pre-printed contour data will be replot.
Step 12 : Verify the positioning of you contour plot data.
5.4.1.3 Adjustments
if necessary
It might be possible that the contour positioning is not correctly.
Please perform the following extra tests to optimize it:
1. Recalibrate your laser beam by means of the Epos Calibration test as described in the next chapter.
2. Verify your X-Y lengths via the Mutoh CutServer (SC-Pro Tests menu)
Page 69

User’s Guide SC-PRO Cutting Plotter
CHAPTER 4 : WALKTHROUGH THE OPERATION PANEL
69 AP-75280 – Rev. 1.1
5.4.2 EPOS readout
This function is made to test if the EPOS sensor still recognizes the difference between coloured and white
media.
Test
EPOS readout
60
cm/s
100
g
T
o start:
Step 1 : Press the [ ] key to start the test.
Step 2 : The EPOS laser will light up and the following message will be displayed:
EPOS
readout
COLOUR
Verif
y media
Step 3 : Hold a white paper under the EPOS laser and check if the display message changes to WHITE.
If not, the sensor is broken or badly positioned. Contact an Authorized Mutoh Technician to
replace or calibrate the EPOS sensor.
Step 4 : Press the [
] key to end the test and to go back to the main screen.
Page 70

User’s Guide SC-PRO Cutting Plotter
CHAPTER 4 : WALKTHROUGH THE OPERATION PANEL
70 AP-75280 – Rev. 1.1
5.4.3 EPOS calibration
This test will fine-tune the position of the cutting knife compared to the EPOS laser firmware wisely. This test
can be done manually and automatically. It is recommended however, to let the SC-Pro adjust the values
automatically.
Step 1 : Install and set a knife.
Step 2 : Install a dark (black) vinyl. Check with the EPOS readout function if it is dark enough as
described in the previous chapter.
Step 3 : Press the [TEST]-key.
Step 4 : Select “EPOS calibration” with the
- keys.
Test
EPOS calibrate
METHOD: <TEST>
T
o start:
Step 5 : Press the [TEST]-key once again to decide whether to perform the test automatically or manually.
EPOS
ca
librat
e
Manual
30
cm/s
120
g
T
o start:
Step 6 : Move the cutter head with the arrow keys to the centre of the media and feed it a bit to be sure
you have enough space (10 cm x 10 cm) for the test.
Step 7 : Press the [
] key to start the calibration.
► MANUAL CALIBRATION
o Be sure that you have set an origin.
o Following pattern will be cut:
Page 71

User’s Guide SC-PRO Cutting Plotter
CHAPTER 4 : WALKTHROUGH THE OPERATION PANEL
71 AP-75280 – Rev. 1.1
o Press the [ ] key.
o The following message will be displayed:
Please weed out
t
h
e square
(s)&p
ress any key
o Weed out the two rectangles.
o Press any key.
o The EPOS laser will move to the centre of the cross while following message is
displayed:
*EPOS CALIBRAT.*
Move laser
pointer to cross
and
press
o Move the EPOS laser using the
– keys to the centre (if necessary) and press the
[
] key to confirm.
Page 72
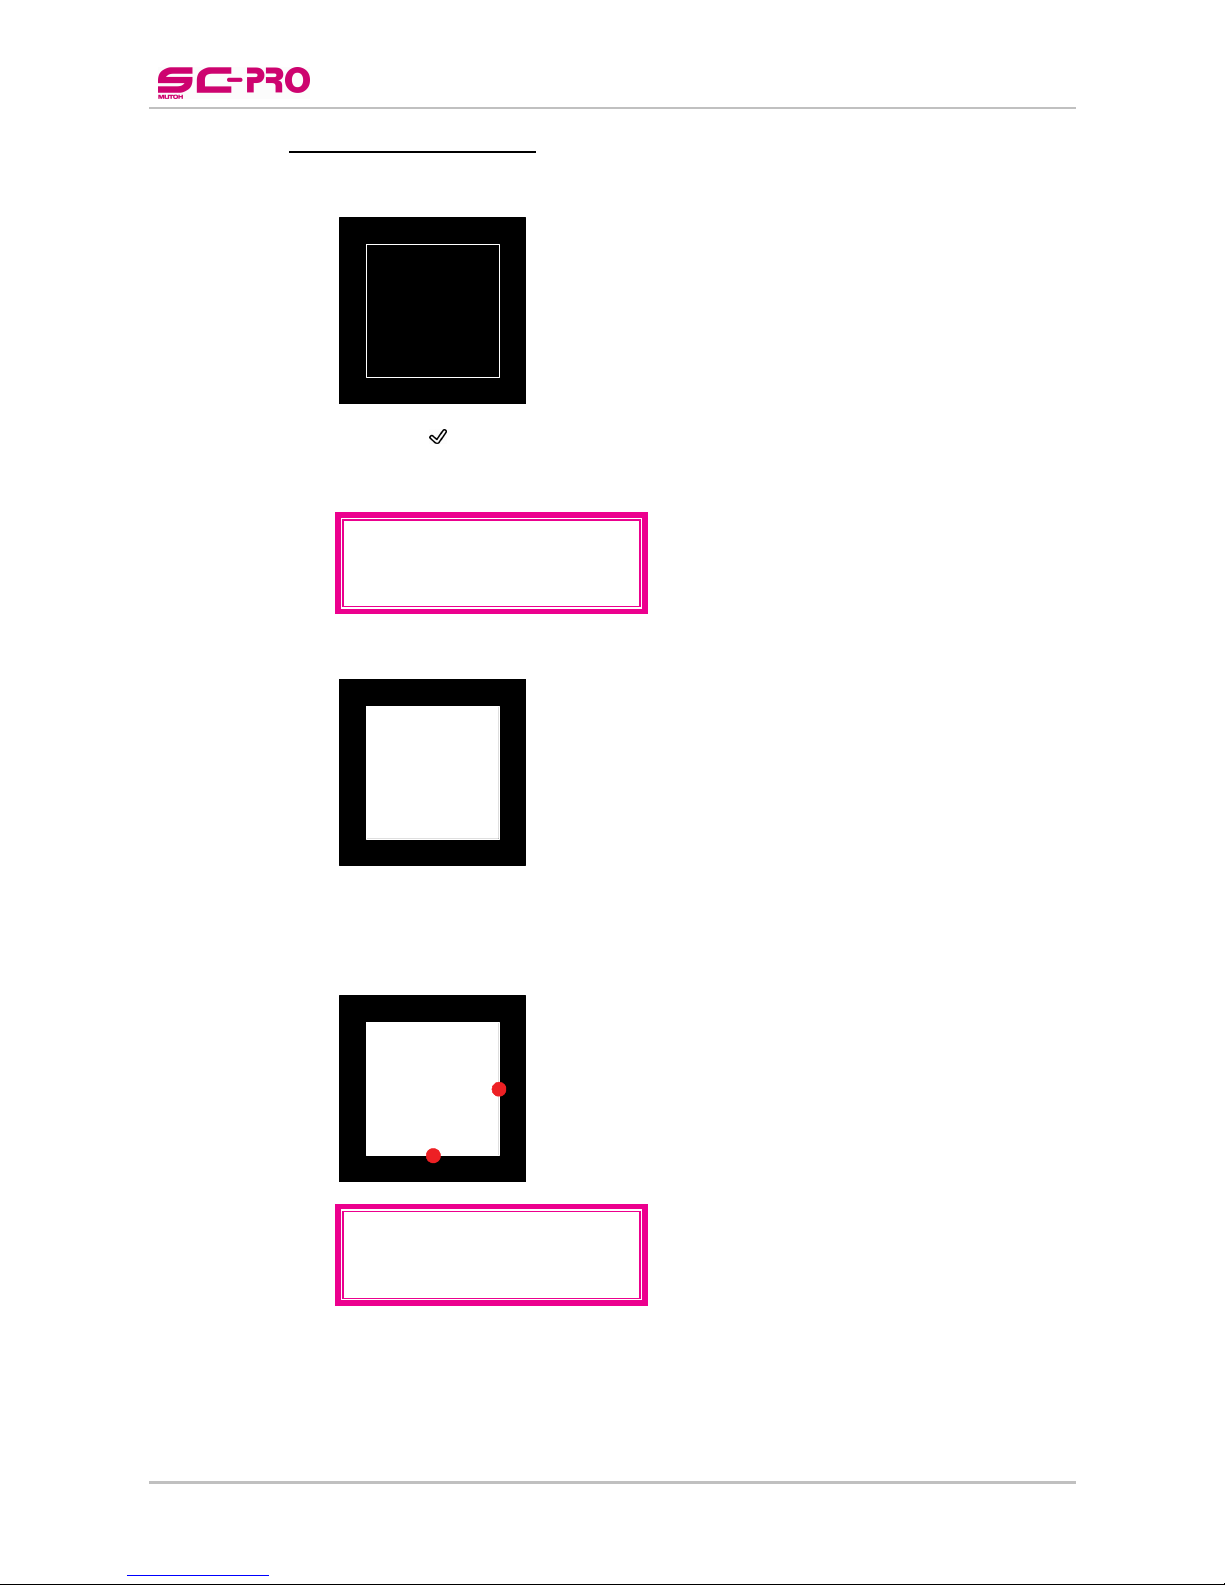
User’s Guide SC-PRO Cutting Plotter
CHAPTER 4 : WALKTHROUGH THE OPERATION PANEL
72 AP-75280 – Rev. 1.1
► AUTOMATIC CALIBRATION
o Following pattern will be cut:
o Press the [
] key.
o The following message will be displayed:
Please weed out
t
h
e square(s
)
&
p
ress any key
o Weed out the rectangle.
o Press any key.
o The cutter will automatically measure the bottom and right side of the box, this to know
the position of the knife compared to the EPOS laser.
EPOS
Calibration
D
ONE
Step 8 : The EPOS calibration has finished.
Page 73
User’s Guide SC-PRO Cutting Plotter
CHAPTER 4 : WALKTHROUGH THE OPERATION PANEL
73 AP-75280 – Rev. 1.1
5.5 XY-DISTANCE ACCURACY
The XY - Distance Accuracy tests are developed to check the actual X-Y cutting distance with the sent
vector data.
Please follow the procedure below to make the test:
Step 1 : Open Mutoh’s CutServer
Step 2 : Select which test to perform.
Step 3 : Select the appropriate COM-port and double-click.
Step 4 : Load a roll or sheet with at least the measurements indicated in the dropdown menu.
Step 5 : Load a knife.
Step 6 : A box will be cut.
Step 7 : Peel out the box.
Step 8 : Measure the X length and Y width and enter them. Be sure to enter the values in mm!
Step 9 : If the correct values have been entered, the following message will appear and the test will be
done.
Page 74

User’s Guide SC-PRO Cutting Plotter
CHAPTER 5 : FINETUNING YOUR CUTTER
74 AP-75280 – Rev. 1.1
Page 75

User’s Guide SC-PRO Cutting Plotter
CHAPTER 6 : CONTOURCUTTING
75 AP-75280 – Rev. 1.1
6 CONTOUR CUTTING
CONTOUR CUTTING is a very popular feature of the SC PRO cutter.
This feature is made to cut pre-printed signs on vinyl for sticker
production as shown on this picture ► ► ► ► ► ►
Please read this chapter carefully. Because of the importance of this
feature, almost a complete manual is written about it. So please refer to
the Application Guide for all necessary information.
The information below is some basic information about the different
alignment methods …
6.1 DIFFERENT ALIGNMENT METHODS
There are some different approaches to cut your signs which also implicate a different alignment method.
1. Manual
Manual alignment method.
o
Manually set the size of the paper and 4 corners of the box.
2. Auto No BC
Automatic alignment method without barcode
(only selectable via
o
Automatic measurement of the reference box (job data).
the cut software)
o
Only 1 box
3. Barcode Single
Automatic alignment with barcode and single frame
o
Automatic measurement of the reference box and barcode (job data).
o
Only 1 reference box
4. Barcode Multi
Automatic alignment with barcode and multi-segment frame.
o
Automatic measurement of the reference box and barcode (job data).
o
Multiple segments in 1 reference box (for long files to guarantee precision).
Manual Auto No BC BCode Single BCode Multi
P4 P2
P3 P1
0000000000000
0000000000000
Page 76

User’s Guide SC-PRO Cutting Plotter
CHAPTER 6 : CONTOURCUTTING
76 AP-75280 – Rev. 1.1
6.2 WHICH ALIGNING METHOD SHOULD I USE?
The Mutoh Manual Align Method is the non-automatic method.
Its advantage is that the cropmark system is very small (for small sized jobs), and that this method can be
used in case of vinyl that do not reflect the EPOS laser light (meaning, the laser would not be capable of
measuring the cropmarks automatically).
The user has to use the jog keys on the keyboard to measure each cross manually before contourcutting can
start.
The Mutoh Auto Align without Barcode is the first fully-automated alignment system.
Just place the sign in the cutter, click on PLOT in the cutting software, and the cutter will automatic align the
sign by use of the black reference box, no user intervention is needed.
This method is ideal for use of single signs, one at the time.
We do not advise to use this method for signs over 2 meter of length, although there is no real limit to the
length that can be used.
The Mutoh Auto Align Barcode is a fully-automated alignment system, with a barcode printed on the
sign.
YOU SHOULD USE THIS METHOD IN COMBINATION WITH THE MUTOH CUTSERVER!
This method can be used in case you are creating multiple different contour signs. It allows you to make all
your prints at once (overnight printing for example), and then load the roll with images in the SC-Pro.
If each sign on the roll has a barcode and if all plot files are in the Mutoh CutServer, just click on GO in the
Mutoh CutServer (make sure that the Mutoh CutServer properties are set to SINGLE FRAME, and REPEAT
MODE) and every sign on the roll will be cut, without the need for user intervention (make sure you’ve
enabled auto-sheet-off in EasySIGN for each contour-sign)
The reason for the two barcodes is to make it possible for the SC-Pro to auto-detect if the image is loaded
upside-down or correctly.
There is no need for you to search the plot file for each image; the SC-Pro and the Mutoh CutServer will do
this fully-automatically, until the complete roll with signs is finished.
We do not recommend this method over 2 m job length, although there is no real limit to the length that can
be used.
The Mutoh Auto Align Multiframe offers all advantages of the previous one but it will split the image
in multiple segments. (This is to enhance precision over long length).
YOU SHOULD USE THIS METHOD IN COMBINATION WITH THE MUTOH CUTSERVER!
With this method, it is possible to make signs of 10m or longer, and the SC-Pro will measure segment per
segment, and cut segment per segment. This method gives you more accuracy than the previous method.
We do not recommend this method for signs smaller than 1,5m
You should use the Mutoh CutServer for this method, and make sure the Mutoh CutServer properties are set
to MULTI- FRAME MODE.
Difference between AL5 and AL6
These alignment methods appear to be the same and they are, up to the part where the segments are split.
In an AL5 alignment method, the segments are split in the cut software, which means there is only one block
of date. In AL6, the segments are split by the Mutoh CutServer. The prefix of an AL6 command is _NC (n
ot
clipped)
Notes
For more details about the Print & Cut workflow and Mutoh’s CutServer, please refer to the Application
Guide.
Page 77

User’s Guide SC-PRO Cutting Plotter
CHAPTER 6 : CONTOURCUTTING
77 AP-75280 – Rev. 1.1
6.3 SQUARE DETAILS
6.3.1 Hints – tips – recommendations
To use the automatic alignment procedure, the pre-printed sheet contains a reference box around the design
to be cut.
Note that the reference box around your design(s) will be printed. Before contour-cutting the EPOS
technology will search for the reference box and measure the position of the design(s).
Be sure that there is 5 mm of white space between the image and the reference box.
Be sure that the reference box has a dark colour (recommended: black) in order to have enough contrast
with the vinyl.
Make sure that the reference box fits within the margins of the maximum cutting width of your cutting
plotter.
Be sure that the media has been sheeted off straight. If not, the cutter will have problems
measuring the media.
Notes
o The position of the design with the reference box compared to the page edges is defined in the print-
software.
o The creation of an image should be done in a graphics application software (e.g. CorelDraw, Adobe
Illustrator, Adobe Photoshop or Macromedia Freehand) or in origin software with design functionalities
(EasySIGN Power Pack Pro Mutoh Edition or Scanvec Amiable PhotoPRINT DX Mutoh Edition)
o Do not forget to create the cutting line around your image. The default cutting line is a “magenta
hairline” or “spotcolor” with <CutContour> swatch name (in the CMYK pallet).
Thickness line = hairline (or 0.25)
Colour = 100% magenta
For more details, please refer to the Application Guide.
Page 78

User’s Guide SC-PRO Cutting Plotter
CHAPTER 6 : CONTOURCUTTING
78 AP-75280 – Rev. 1.1
6.3.2 Automatic alignment without barcode
The frame reference box printed or generated around the contour cut data should respect the following
guidelines:
1
2
3
4
5
6
7
P1
P2
P3
P4
N° Description Minimum Maximum Recommended
1
White edge at the right side 10 mm unlimited /
2
White edge at the left side 10 mm unlimited /
3
White edge at the rear side
Sheet
Between 2 boxes
60 mm
30 mm
250 mm
250 mm
75 mm
50 mm
4
White edge at the front side 10 mm 250 mm /
5
Reference box thickness 2 mm 30 mm 3 mm
6
Reference box width 210 mm unlimited /
7
Reference box height 300 mm unlimited /
Page 79

User’s Guide SC-PRO Cutting Plotter
CHAPTER 6 : CONTOURCUTTING
79 AP-75280 – Rev. 1.1
6.3.3 Automatic alignment with barcode – single frame
The frame reference box printed or generated around the contour cut data should respect the following
guidelines:
1
2
3
4
5
6
7
P1
P2
P3
P4
N° Description Minimum Maximum Recommended
1
White edge at the right side 10 mm unlimited /
2
White edge at the left side 10 mm unlimited /
3
White edge at the rear side
Sheet
Between 2 boxes
60 mm
30 mm
250 mm
250 mm
75 mm
50 mm
4
White edge at the front side 10 mm 250 mm /
5
Reference box thickness 2 mm 30 mm 3 mm
6
Reference box width 210 mm unlimited /
7
Reference box height 300 mm unlimited /
Page 80

User’s Guide SC-PRO Cutting Plotter
CHAPTER 6 : CONTOURCUTTING
80 AP-75280 – Rev. 1.1
6.3.4 Automatic alignment with barcode – multi frame
The frame reference box printed or generated around the contour cut data should respect the following
guidelines:
1
2
3
4
5
6
7
P1
P2
P3
P4
8
9
N° Description Minimum Maximum Recommended
1
White edge at the right side 10 mm unlimited /
2
White edge at the left side 10 mm unlimited /
3
White edge at the rear side
Sheet
Between 2 boxes
60 mm
30 mm
250 mm
250 mm
75 mm
50 mm
4
White edge at the front side 10 mm 250 mm /
5
Reference box thickness 2 mm 30 mm 3 mm
6
Reference box width 210 mm unlimited /
7
Reference box height 300 mm unlimited /
8
Segment start/end 300 mm Unlimited 300 mm
9
Segment marker height 10 mm 60 mm /
Page 81

User’s Guide SC-PRO Cutting Plotter
CHAPTER 6 : CONTOURCUTTING
81 AP-75280 – Rev. 1.1
6.4 CUT AREA MEASUREMENT
As explained above, different alignment methods can be chosen. Each method has a different measurement
method.
Step 1 : Press the [CONTOUR CUTTING] key.
Step 2 : Select the alignment method with the
- keys.
Cont
ourcu
tti
ng
Manual
Barcode Single
Barcode Multi
Start: Next:
Step 3 : Press the [CONTOUR CUTTING]-key to make a selection and continue to the next setting.
Step 4 : The next screen depends on the previous selection.
b. When you have selected “Barcode Single or Multi”, the following can be set.
Cont
ourcu
tti
ng
X Length (mm)
Y
Width (mm)
Roll direction
Start: Next:
► Press the [CONTOUR CUTTING]-key to set the X-length. Use the keys to change the
value. Press the [
]-key to go to the previous screen.
Adjust the Y-width and roll direction in the same way.
Cont
ourcu
tti
ng
X Length (mm
)
500
Start: Exit:
Cont
ourcu
tti
ng
Y
Width
(mm
)
300
Start: Exit:
Cont
ourcu
tti
ng
Roll direction
(Non)Reverse
Start: Exit:
Page 82

User’s Guide SC-PRO Cutting Plotter
CHAPTER 6 : CONTOURCUTTING
82 AP-75280 – Rev. 1.1
c. When you have selected “Barcode Single” or “Barcode Multi”, you have to decide if the job
has to be performed only once (“Single Scan”) or multiple times (“Multi Scan”).
Notes
> Single Scan: The command will be given to start scanning the bar code of the first / next
reference box ONLY, from roll or sheet. After finishing this single job, the SC-Pro returns
into the Ready status.
> Repeat Mode: AUTOMATICALLY all succeeding frames will be scanned and contour cut
as well, until the end of roll is reached.
Cont
ourcu
tti
ng
Single scan
Multi scan
Start: Exit:
Step 5 : When all settings have been made, press the [
]-key to start measuring the frame.
a. In case you have selected Barcode Single or Barcode Multi, the cutter will automatically
measure the complete reference box.
b. In case you have selected Manual alignment, you will have to manually select the alignment
points (corners) of the frame.
► The EPOS laser will light up.
► The laser moves to the first corner (P1). Use the
arrow keys to position the laser exactly in the
centre of the cross and press the [ENTER]-key.
► The laser will move automatically to point 2, than
point 4 and finally point 3. Position the laser each
time in the centre of the cross and press the
[ENTER]-key.
P4 P2
P3 P1
Notes
When measuring the four points of the reference box and the cutter establishes a distortion
(this means the reference box is not a perfect rectangle due to print deformation, or not
between the margins), the cutter will beep and shows following message:
Much
prin
t
distorti
on
T
o continue:
To stop:
The cutter will cut a little cross in the lower right corner to remind you to its bad print quality
in case of bad contour cutting.
Step 6 : The alignment has been done.
Page 83

User’s Guide SC-PRO Cutting Plotter
CHAPTER 7 : MAINTENANCE
83 AP-75280 – Rev. 1.1
7 MAINTENANCE
In this chapter, you will learn:
How to keep your cutter in good shape and prevent problems by regularly performing some easy, daily
maintenance. How to pinpoint and check out problems that might occur.
7.1 CLEANING & DAILY MAINTENANCE
Your cutting plotter, knives and pens will work better and last longer if you keep them clean and perform a
few simple daily maintenance tasks.
Notes
Before performing cleaning and daily maintenance, please power OFF the unit and remove the power
cable.
7.1.1 Cleaning the grid rolls
The figure below shows you this part of the plotter that might require your attention.
The pressure rollers (2) press the vinyl firmly against
the friction drive rolls (5). For this reason it is
possible that, after some time, the friction drive rolls
(5) become clogged with accumulated residue from
cutting media. This can cause slippage of the
material, resulting in inaccurate cuts or incorrect vinyl
transport.
Therefore it is a good habit to clean the drive rolls
regularly.
To do this you can use a brush and rotate the rolls
manually to make sure that they are thoroughly
cleaned.
Page 84

User’s Guide SC-PRO Cutting Plotter
CHAPTER 7 : MAINTENANCE
84 AP-75280 – Rev. 1.1
7.1.2 Cleaning the cutter blade
Use following procedure to remove small vinyl particles in the base part of the cutting blade holder.
STANDARD KNIFE HOLDER
Step 1 : Hold the body (2) into one hand and
unscrew the base part (1).
Step 2 : Remove the spring (3) and the cutting
blade (4).
Step 3 : Blow away vinyl particles accumulated
in the top of the base part.
Step 4 : Remove the spring from the cutting
blade and remove any residual material
from the blade tip
Step 5 : Place the spring back over the cutting
blade and tightly screw the base part on
the holder.
KNIFE HOLDER WITH NONIUS
Step 1 : Take the body into one hand and remove
the base part.
Step 2 : Blow away the vinyl particles
accumulated in the top of the base part
Step 3 : Remove any residual material from the
blade tip
Step 4 : Place the base part on top of the holder
assembly and twist it tightly.
7.1.3 Cleaning the cutting plotter
Use a soft cloth to clean paper dust and particles off the platen, the grid cover the cutting mat and the
carriage cover.
Use a cotton swab to clean the media sensors and EPOS laser.
Page 85

User’s Guide SC-PRO Cutting Plotter
CHAPTER 8: TROUBLESHOOTING
85 AP-75280 – Rev. 1.1
8 TROUBLESHOOTING
In this section you will find a summary of problems that might occur during day-to-day use of your cutter and
some hints how to determine the cause of the problem.
1. Power switch is turned ON, but the cutter does not operate.
► Is the power cable connected to the cutter?
2. Media is loaded, but the cutter does not operate.
► Is the media hold lever lowered?
► Is the media properly loaded?
► Are the paper sensors clean?
► Is the cutter in an error state?
► Is the cutter protected against direct sunlight which could disorder the media sensors?
3. Data is being sent from the computer, but the cutter does not react.
► Is there a proper interface cable connected?
► Do the interface conditions on the host computer match those set on the cutter?
► Are you in the pause state?
► Is there media loaded?
4. Data is sent from the computer but errors occur on the cutter’s side.
► Are the output settings correct on the host computer and in the cutting software?
► Do the interface conditions on the host computer match those set on the cutter?
► Does the command mode on the host computer match the command mode on the cutter?
5. Some parts of the design are not well cut.
► Check whether the knife tip is not clogged with material residues.
► Examine the knife blade with a magnifier to see if the tip is not damaged or broken.
► Perform the offset adjustment routine to check cutting quality.
► Perform the test cut and check its quality.
6. The output is 2,5 x too large or 2,5 x too small
► The cutter is using the wrong step adjust. Please refer to chapter 4 “Program Step”, to correct the
step adjust and try again.
As an alternative solution, you can also choose to change the step adjust in your software. Both
settings should be matched to each other.
Page 86
User’s Guide SC-PRO Cutting Plotter
CHAPTER 8: TROUBLESHOOTING
86 AP-75280 – Rev. 1.1
8.1 CHECKING THE COMMUNICATION SETTINGS
Communication problems are the most frequent errors, which occur. Therefore we have included a step-
by-step procedure to check out your configuration’s communication settings and assure that your cutter is
working fine.
8.1.1 For serial cable connections
Step 1 : Boot-up your computer.
Step 2 : Switch on the cutter.
Step 3 : After the initialization routine is finished, install a knife or pen in the head, select the proper tool
and load a sheet of media, which is at least 12 x 12 centimetres.
Step 4 : Make sure that the cutter shuffles the media and verify that the cutter is ready.
Step 5 : On the host computer go to the DOS-prompt (c:\> ).
If another environment (for example: windows) is automatically loaded after booting up, reboot.
Step 6 : Check with which of the host computer’s communication ports your cutter is connected (COM1,
COM2, LPT1,) to.
Step 7 : If your computer and cutter are linked with a serial interface (COMx) or USB interface (COMx) or
Ethernet (COMx) type following command.
MODE COMx: 96,n,8,1,p then press <ENTER>
Notes
► The command above will change your computer’s serial communication settings to match the cutter’s
factory default communication settings.
► These settings are: 9600 BAUD, NONE parity, 8 data-bits, and 1 stop bit.
► Be sure that the program step is set to 0.010 mm.
Step 8 : Using any text editor, create a file called TEST.PLT with the following contents:
(To start the DOS editor you can type: edit TEST.PLT <ENTER>)
IN;
PA0,0;
PD0,10000,10000,10000,10000,0,0,0;
PU5000,5000;
CI5000;
Step 9 : Save this file on your hard-disk.
Step 10 : Exit the text editor and return to the DOS-prompt.
Step 11 : Make sure you are in the directory where the file is located.
Step 12 : Type following command :
copy TEST.PLT COMx ( If your cutter is connected to COMx )
copy TEST.PLT LPT1 ( If your cutter is connected with the parallel printer port )
Step 13 : Then press <ENTER>.
The file you have created will now be sent to the cutter, causing it to cut/draw a square of 10 by
10 cm. And a circle with a radius of 5 cm.
Page 87

User’s Guide SC-PRO Cutting Plotter
CHAPTER 8: TROUBLESHOOTING
87 AP-75280 – Rev. 1.1
8.1.2 For network connections
Step 1 : Boot-up your computer.
Step 2 : Switch on the cutter.
Step 3 : After the initialization routine is finished, install a knife or pen in the head, select the proper tool
and load a sheet of media, which is at least 12 x 12 centimetres.
Step 4 : Open a text editor and type the following:
Step 5 : Save the file to your hard disk with the name and extension: “TEST.plt”.
Step 6 : Open “HyperTerminal”
(Accessories > Communications)
Step 7 : Type a name for the new connection, for example: SC-Pro and press [OK].
Step 8 : Switch the “Connect using:“ choice to TCP/IP (Winsock).
Step 9 : Type the IP-address of the cutter in the “Host address” field and 10001 as “Port number”.
Step 10 : Send the plot file via: Transfer > Send text file.
Step 11 : The file you have created will now be sent to the cutter, causing it to cut/draw a square of 10 by
10 cm and a circle with a radius of 5 cm.
Page 88

User’s Guide SC-PRO Cutting Plotter
CHAPTER 8: TROUBLESHOOTING
88 AP-75280 – Rev. 1.1
8.2 ERROR MESSAGES
8.2.1 Recoverable errors messages
During a cutting, measuring or other sequence, it might be possible that one of the below errors occur. Please find an alphabetical list below with all the possible
errors which can be solved yourself, without any need of an intervention by an Authorized Mutoh Technician.
Error Cause Solution Refer to chapter in manual
EPOS calibration error
<RETRY>
► EPOS sensor goes in error during the EPOS
calibration.
1. Try again or reboot and try again.
2. Contact an Authorized Mutoh
Technician if the error remains.
EPOS problem:
Media problem occured
► The distance between the reference box and
end of roll is too short
1. Reprint the job with the correct
specifications.
2. Stick a piece of white vinyl to the end
of the roll
► Contourcutting ► Square details
Much print distortion.
To continue: V
To abort: X
► When measuring the four points of a reference
box and the cutter establishes a distortion (this
means the box is not a perfect rectangle due
to print deformation, or not between the
margins), the cutter will beep and displays an
error message (Much print distortion)
► The cutter will cut a little cross in the lower
right corner to remind you to its bad print
quality in case of bad contour cutting.
You can
continue or abort the job.
1. Reprint the job.
EPOS problem:
PG problem occurred
When there has been executed a PG command
between 2 segments or at the start of a new job,
this error can occur. This can be caused by:
► Media is too short
► Job has been interrupted by the user
► A movement cannot be performed because of
mechanical failures.
1. Check the media size.
2. Reboot the machine.
Page 89

User’s Guide SC-PRO Cutting Plotter
CHAPTER 8: TROUBLESHOOTING
89 AP-75280 – Rev. 1.1
EPOS problem:
No EPOS reference
found
► It might also be possible that the reference box
cannot be found.
► The EPOS sensor is broken
1. Select the correct file in the Mutoh
CutServer and start the job manually
(send EPOS job)
2. Make sure that the printed reference
box is made within the specifications.
3. Be sure that the contour cutting box
is located in between the two outer
pressure rollers.
4. Be sure that the media is loaded
straight.
5. Contact an Authorized Mutoh
Technician to replace the sensor
► Application Guide Print&Cut
► Contourcutting ► Square details
EPOS problem:
Movement failed
► A movement cannot be performed because of
mechanical failures.
1. Reboot the machine.
EPOS problem:
Barcode problem
occured
► The barcode cannot be read/found by the
EPOS sensor on the machine
1. Is the barcode well positioned
according to the specifications?
2. The printed barcode is blurry, too big
or too small.
EPOS problem:
EPOS aligning aborted
► The user has cancelled the EPOS job
Not enough pressure
rolls detected
► One of the pressure rollers is not used or is
pushed to the far left.
► The pressure roller sensor is broken
1. Always use pressure roller 1 and 4. Be
sure you hear a click when positioning
them above the loaded media.
Pressure roller 2 and 3 can be used
but may also be disabled (in between
two clicks).
2. Contact an Authorized Mutoh
Technician to replace the sensor
► Basics ► Loading media
Page 90

User’s Guide SC-PRO Cutting Plotter
CHAPTER 8: TROUBLESHOOTING
90 AP-75280 – Rev. 1.1
Pressure roll ##
malpositioned
► One of the pressure rollers is not detected by
the cutter.
1. When you want to disable a pressure
roller, be sure that it is in between two
clicks, not at the edge.
2. Only pressure roller 2 and 3 may be
disabled. Pressure roller 1 and 4
should always be used.
► Basics ► Loading media
Sheetoff problem
detected
► When performing an automatic or manual
sheet-off, the machine will check if the vinyl is
actually cut off. If not, this message will
appear.
1. Press any key if you want to continue
anyway.
2. Sheet off the vinyl manually using the
cutting groove.
3. Replace the sheet-off knife
► Product overview ► Part names
► Basics ► Replace sheet-off knife
The plot data has been
lost
► There is interference with other electrical
machines.
► The USB cable is too long.
► There is a hardware problem.
► Ethernet settings incorrect (e.g. 2 equal IP
addresses in the same network)
1. Remove all kind of machines emitting
heavy electrical waves.
2. Install a USB cable shorter than 5 m.
3. Contact an Authorized Mutoh
Technician.
4. Check interface settings (baudrate…)
The plot data is out of
limit and is clipped to
hardclip region
► The data sent to the cutter is larger than the
position between the first and fourth pressure
roller.
1. Load appropriate media.
2. Reposition pressure rollers.
3. Redesign your job.
► Basics ► Loading media
Unable to show point
► There is an error during the switch from the
cutter knife to the laser or vice versa.
► If the cutting head is located at the end of a
paper during the switch, this error can occur
also.
1. Try again or reboot and try again.
2. Contact an Authorized Mutoh
Technician if the error remains.
Page 91

User’s Guide SC-PRO Cutting Plotter
CHAPTER 8: TROUBLESHOOTING
91 AP-75280 – Rev. 1.1
8.2.2 Unrecoverable system errors
Unrecoverable errors may be caused by some part of the cutting plotter, which is malfunctioning. In case
of an unrecoverable error, most of the time the cutter will be completely blocked and the buzzer will be
beeping until you strike a key. The error id, number and description will appear on the keyboard display, and
will be cleared when entering a key. It is recommended to contact an authorized Mutoh service technician. It
is also possible that the error disappears after rebooting the cutter.
Each error has an ID number. Please refer to the table below to know which ID corresponds with which error.
-1 / 0: The reasons why these errors occur are software related.
Check for a more recent SC-PRO firmware.
1000-3999: The reasons why these errors occur are mostly hardware/software related.
The mainboard may be mal-functioning, call service.
The mechanical parts may be mal-functioning, call service.
Check for a more recent SC-PRO firmware.
4000-4999: The reasons why these errors occur are mostly related with data loss.
Check cable connections. Keep USB cables shorter than 5m. Network problems.
5000-5999: The reasons why these errors occur are mostly related with data loss.
Check cable connections. Keep USB cables shorter than 5m. Network problems.
Check the RS232 settings.
6000-6049: The reasons why these errors occur are mostly hardware related.
Check the flatcables between mainboard and head board.
The headboard may be mal-functioning, call service.
6050-6069: The reasons why these errors occur are mostly hardware related.
Check the flexible cable between keyboard and mainboard.
The keyboard may be mal-functioning, call service.
There can be a firmware incompatibility between keyboard and SC-PRO, please update
both SC-PRO and Keyboard version to any last known functioning version.
6070-6089: The reasons why these errors occur are mostly software related.
Check for a more recent SC-PRO firmware.
6090-6099: The reasons why these errors occur are mostly hardware/software related.
Check for a more recent SC-PRO firmware.
6100-6110: The reasons why these errors occur are mostly user manipulation/mechanical related.
Check if media is properly loaded, if there are no mechanical obstructions in the head
movement or media movement path.
6111-6114: The reasons why these errors occur are mostly hardware/software related.
The mainboard may be mal-functioning, call service.
Check for a more recent SC-PRO firmware.
Page 92

User’s Guide SC-PRO Cutting Plotter
CHAPTER 8: TROUBLESHOOTING
92 AP-75280 – Rev. 1.1
-1 Undefined Error
0 No Error Found
--------------------------------------------------------------------------
1009 Y position error PWM switched off
1010 X position error PWM switched off
1012 12V detection failure PWM switched off
1013 48V detection failure PWM switched off
1014 X fuse failure PWM switched off
1015 Y fuse failure PWM switched off
1049 Y PWM_MAX error PWM switched off
1050 X PWM_MAX error PWM switched off
1052 Y DELTAPWM error PWM switched off
1053 X DELTAPWM error PWM switched off
1055 Y VELOCITY error PWM switched off
1056 X VELOCITY error PWM switched off
2000 PG error : Media too short to perform a 'PG;'
3005 VECTOR module caused an error
3010 Sheetoff problem
--------------------------------------------------------------------------
4001 IN caused an error
4002 IW caused an error
4003 IP caused an error
4004 IR caused an error
4005 SC caused an error
4006 PA caused an error
4007 PU caused an error
4008 PD caused an error
4009 PR caused an error
4010 SP caused an error
4011 LB caused an error
4012 DT caused an error
4013 SI caused an error
4014 ES caused an error
4015 AD caused an error
4016 SA caused an error
4018 CP caused an error
4019 DI caused an error
4020 DR caused an error
4021 DV caused an error
4022 LO caused an error
4024 SL caused an error
4025 SR caused an error
4028 SM caused an error
4029 LT caused an error
4030 UL caused an error
4031 CI caused an error
4032 AA caused an error
4033 AR caused an error
4034 AT caused an error
4035 RT caused an error
4036 ER caused an error
4037 EA caused an error
4038 BZ caused an error
4039 SO caused an error
4040 PG caused an error
4041 RP caused an error
4042 OH caused an error
4043 OI caused an error
4044 OP caused an error
4045 OE caused an error
4046 OS caused an error
4047 EW caused an error
4048 FP caused an error
4049 PM caused an error
4050 RA caused an error
4051 RR caused an error
4052 WG caused an error
4053 EP caused an error
Page 93

User’s Guide SC-PRO Cutting Plotter
CHAPTER 8: TROUBLESHOOTING
93 AP-75280 – Rev. 1.1
4055 RO caused an error
4056 PE caused an error
4060 PW caused an error
4062 WU caused an error
4064 CT caused an error
4072 PS caused an error
4075 VS caused an error
4086 DC caused an error
4087 DP caused an error
4088 OD caused an error
4089 AS caused an error
4090 ZF caused an error
4091 ZO caused an error
4092 OF caused an error
4093 OA caused an error
4094 MP caused an error
4095 AL caused an error
4096 ZZ caused an error
4097 LS caused an error
4098 EO caused an error
--------------------------------------------------------------------------
5000 LASTERROR caused an error
5001 POUNCEGAP caused an error
5002 SETORIGIN caused an error
5003 ACCURACY caused an error
5004 PROGSTEP caused an error
5005 PAGEMODE caused an error
5006 TOOLKIND caused an error
5007 FIRMWARE caused an error
5008 SERIALNO caused an error
5009 DEFAULT caused an error
5010 SETACCU caused an error
5011 ENCODER caused an error
5012 MACHINE caused an error
5013 SHUFFLE caused an error
5014 SENDEP caused an error
5015 NORMAL caused an error
5016 SENSOR caused an error
5017 ORIGIN caused an error
5018 OFFSET caused an error
5019 AGING caused an error
5020 NVRAM caused an error
5021 MEDIA caused an error
5023 VSZF caused an error
5024 COMM caused an error
5025 DIAG caused an error
5026 BEEP caused an error
5027 PIDX caused an error
5028 PIDY caused an error
5029 PIDZ caused an error
5030 STPZ caused an error
5031 SETD caused an error
5034 GETD caused an error
5040 MEMORY caused an error
5041 JOGDIR caused an error
5042 SMOOTH caused an error
5044 DEBUG caused an error
5047 FMSTEST caused an error
5048 MOVD caused an error
5049 FILTER caused an error
5050 REMDLG caused an error
5051 PORT caused an error
5052 SHEET caused an error
5053 JOG caused an error
5054 SINT caused an error
5056 JOGSPEED caused an error
5057 HPGLPARS caused an error
5058 MOVE caused an error
5059 GPOS caused an error
Page 94

User’s Guide SC-PRO Cutting Plotter
CHAPTER 8: TROUBLESHOOTING
94 AP-75280 – Rev. 1.1
5060 HCLIP caused an error
5061 LASER caused an error
5066 KNIFE caused an error
5067 EPOSSEDGE caused an error
5068 EPOSPARS caused an error
5069 EPOSCALIB caused an error
5070 EPOSDIST caused an error
5071 EPOSALIGN caused an error
5072 EPOSSCAN caused an error
5073 ESOSSPEED caused an error
5076 PIOS caused an error
5077 DPSERV caused an error
5078 DPVECT caused an error
5079 CLSERV caused an error
5080 CLVECT caused an error
5088 PENUPSPEED caused an error
5089 ENDPLOT caused an error
5090 HPGLM caused an error
--------------------------------------------------------------------------
6000 I2C SW BUSY timeout
6001 I2C SW RECEIVE timeout
6002 I2C HW MBB timeout
6003 I2C HW MIF timeout
6004 I2C Stop command failed
6006 I2C HW RXAK no ack from slave in adr cycle
6015 I2C SetData command failed
6016 I2C GetData command failed
6017 I2C PIOSet command failed
6018 I2C Read command failed
6019 I2C GETDATA IN SEARCHSENSOR
6021 I2CSTOP IN SEARCHSENSOR
6023 PROBLEM IN SETKNIFE
6024 PROBLEM IN SETLASER
--------------------------------------------------------------------------
6050 KEYB communic. checksum problem
6060 KEYB COMM error
6061 KEYB sendtokeybproblem
--------------------------------------------------------------------------
6070 SFWT delay_ctf problem
6071 SFWT match_intu problem
6072 SFWT delay problem
6073 SFWT release error
--------------------------------------------------------------------------
6080 Moveabsmc problem
6090 EPOS Mbus read blocks
6091 EPOS Mbus stop blocks
6092 EPOS calc pen to led search edge blocks
6093 EPOS auto calibrate search edge blocks
6094 CALIBRATE PROBLEM IN AUTOCALIBRATE 1
6095 CALIBRATE PROBLEM IN AUTOCALIBRATE 2
6096 EPOS calibrate get data blocks
6097 EPOS calibrate pen to led blocks
--------------------------------------------------------------------------
6100 BUMP PROBLEM MACHINE WIDTH
6105 X MEASUREMENT PROBLEM RELOAD MEDIA
6106 SHUFFLE PROBLEM2
6107 SHUFFLE PROBLEM3
6108 SHUFFLE PROBLEM4
6109 SHUFFLE PROBLEM5
6110 SHUFFLE PROBLEM TEST
--------------------------------------------------------------------------
6111 DRAM overrun error
6112 SRAM overrun error
6114 Wrong firmware on this mainboard
Page 95

User’s Guide SC-PRO Cutting Plotter
CHAPTER 9 : CONSUMABLES
95 AP-75280 – Rev. 1.1
9 CONSUMABLES
Please find below a list of all the available consumables for the Mutoh SC-Pro cutter.
Part number Description
ZMY-10050B
Knife holder without depth indication.
Contains the following extra items:
► One cutting knife blade
Angle: 45°
Offset: 0,5 mm
ZME-20034A
ZME-20034B
ZME-20034C
Set of two cutting knife blades (Tungsten Carbide)
for knife holder without depth indication:
Angle: 30° Offset: 0,50 mm
Angle: 45° Offset: 0,50 mm
Angle: 60° Offset: 0,50 mm
ZMY-10034B
Knife holder without depth indication.
Contains the following extra items:
► One cutting knife blade
Angle: 45°
Offset: 0,5 mm
ZME-10034A
ZME-10034B
ZME-10034C
Set of two cutting knife blades (Tungsten Carbide)
for knife holder with depth indication:
Angle: 30° Offset: 0,50 mm
Angle: 45° Offset: 0,50 mm
Angle: 60° Offset: 0,50 mm
Page 96

User’s Guide SC-PRO Cutting Plotter
CHAPTER 9 : CONSUMABLES
96 AP-75280 – Rev. 1.1
Part number Description
PSGBBK
Pressurized ballpoint pen.
RJ8-CBS
Long life tungsten carbide cutting blade for
automatic sheet-off.
ZME-23310
Set of 3 spare cutting mats.
ZME-23132
Set of 3 spare cutting mats designed for punching
applications.
MY-23035
Conveyor flange assy
Page 97

User’s Guide SC-PRO Cutting Plotter
CHAPTER 9 : CONSUMABLES
97 AP-75280 – Rev. 1.1
Part number Description
MY-10168
Set of two 3” core supports
BM-9005-005015
Screw to tighten the 3” core supports
ME-15088
One conveyor roll brake
ZMY-10047
Set of two conveyor flanges
Page 98

 Loading...