

Page 1
Application
Guide
Mutoh CutServer and
Print and cut
Page 2

Page 3
Application Guide Kona / Kona apparel
Copyright notice
COPYRIGHT © 20/6/11 Mutoh Belgium nv. All rights reserved.
Mutoh Belgium nv reserves the right to modify the information contained in this manual at any
time without prior notice.
This document may not be reproduced by any means, in whole or in part, without written
permission of the copyright owner.
This document is furnished to support the Mutoh CutServer in combination with the Mutoh
cutting plotter. In consideration of the furnishing of the information contained in this document,
the party to whom it is given, assumes its custody and control and agrees to the following:
The information herein contained is given in confidence, and any part thereof shall not be
copied or reproduced without written consent of Mutoh Belgium nv.
This document or the contents herein under no circumstances shall be used in the
manufacture or reproduction of the article shown and the delivery of this document shall not
constitute any right or license to do so.
20 June 2011
Published: Mutoh Belgium nv, Archimedesstraat 13, B-8400 Oostende, BELGIUM
www.Mutoh.eu
AP-75381 - Revision 1.3 3
Page 4
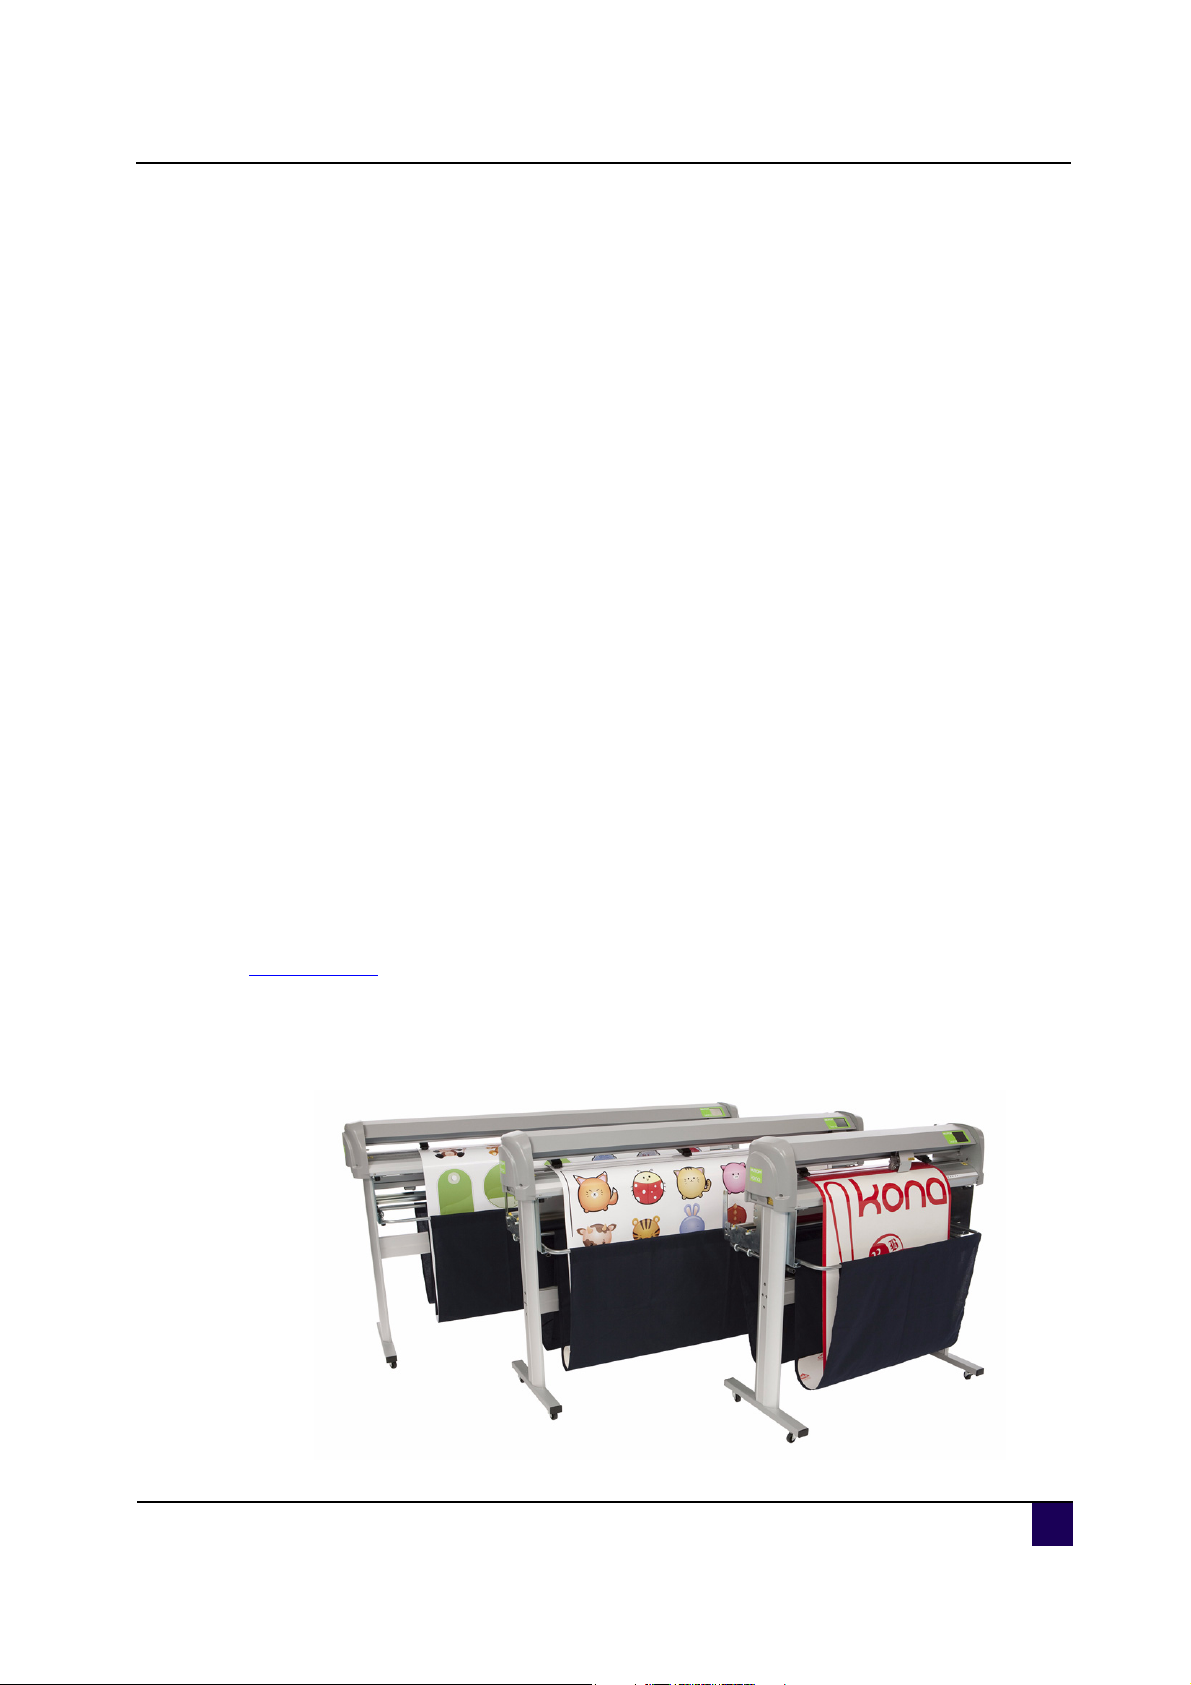
Application Guide Kona / Kona apparel
Dear Customer,
The Mutoh Kona / Kona apparel drag knife cutting plotter is designed to be one of the most
user-friendly and versatile cutting plotters in the market.
As a stand-alone cutting plotter, the Kona / Kona apparel can cut and plot designs onto vinyl
and paper as required.
In combination with an inkjet printer, the Kona / Kona apparel cutting plotter is ready for
contour-cutting of pre-printed signs made with any printer capable of printing onto cutting
plotter compatible media. Contour-cutting is made possible via the integrated EPOS
(electronic positioning) technology and the in-the-box software.
On the one hand Mutoh offers “flagship” solutions, in which the complete workflow is
integrated in one software package: designing, ripping, printing, contour cutting and
stand-alone cutting. These flagship solutions are the latest Mutoh editions of EasySIGN
Power Pack and Scanvec-Amiable PhotoPRINT DX.
On the other hand, Mutoh also offers a “Workflow Integrity Solution” that keeps an existing
workflow largely intact but still introduces the flawless bar code option that behaves as a
unique job ticket along the print & cut process and minimizes errors. The workflow integrity
solution allows that the jobs are still designed, ripped and printed with the customer's existing
software packages. The sticker layout, bar code generation, cutting and contour cutting are in
that case handled with the standard Kona / Kona apparel in-the-box EasySIGN Power Pack
and the Mutoh CutServer.
In the following pages of this application guide the installation of the CutServer, the print and
cut workflow and some hints and tricks are captured.
Note
Please find the Kona / Kona apparel Installation CD as support for this manual
in-the-box.
4 AP-75381 - Revision 1.3
Page 5

Application Guide Kona / Kona apparel
Table of contents
Chapter 1 Compatibility overview. . . . . . . . . . . . . . . . . . . . . . . . 9
1.1 Cutter drivers and Mutoh software . . . . . . . . . . . . . . . . . . . . . . 9
1.2 RIP software . . . . . . . . . . . . . . . . . . . . . . . . . . . . . . . . . . . . . . . 10
Chapter 2 Installing CutServer . . . . . . . . . . . . . . . . . . . . . . . . . 11
2.1 Introduction . . . . . . . . . . . . . . . . . . . . . . . . . . . . . . . . . . . . . . . . 11
2.2 Installing Mutoh CutServer . . . . . . . . . . . . . . . . . . . . . . . . . . . 12
Install the CutServer . . . . . . . . . . . . . . . . . . . . . . . . . . . . . . . . . . . . . . 12
Create and set a hot folder . . . . . . . . . . . . . . . . . . . . . . . . . . . . . . . . 12
Backup the machine settings . . . . . . . . . . . . . . . . . . . . . . . . . . . . . . 13
2.3 Details about Mutoh’s CutServer. . . . . . . . . . . . . . . . . . . . . . . 15
Main window . . . . . . . . . . . . . . . . . . . . . . . . . . . . . . . . . . . . . . . . . . . . 15
Menu items. . . . . . . . . . . . . . . . . . . . . . . . . . . . . . . . . . . . . . . . . . . . . . 15
Toolbar icons . . . . . . . . . . . . . . . . . . . . . . . . . . . . . . . . . . . . . . . . . . . . 28
Available connections. . . . . . . . . . . . . . . . . . . . . . . . . . . . . . . . . . . . . 34
Chapter 3 Setting up your print and cut software. . . . . . . . . . 37
3.1 EasySIGN. . . . . . . . . . . . . . . . . . . . . . . . . . . . . . . . . . . . . . . . . . 37
Update EasySIGN. . . . . . . . . . . . . . . . . . . . . . . . . . . . . . . . . . . . . . . . 37
EasySIGN driver installation . . . . . . . . . . . . . . . . . . . . . . . . . . . . . . . 37
Configuring EasySIGN for the CutServer . . . . . . . . . . . . . . . . . . . . 40
Synchronise your CutServer hotfolder in EasySIGN . . . . . . . . . . . 41
3.2 Scanvec Amiable . . . . . . . . . . . . . . . . . . . . . . . . . . . . . . . . . . . 42
Configuring Scanvec Amiable . . . . . . . . . . . . . . . . . . . . . . . . . . . . . . 42
3.3 Mutoh Grip + . . . . . . . . . . . . . . . . . . . . . . . . . . . . . . . . . . . . . . . 44
Installing a Kona driver. . . . . . . . . . . . . . . . . . . . . . . . . . . . . . . . . . . . 44
AP-75381 - Revision 1.3 5
Page 6

Application Guide Kona / Kona apparel
Chapter 4 Contourcutting . . . . . . . . . . . . . . . . . . . . . . . . . . . . . 47
4.1 Introduction . . . . . . . . . . . . . . . . . . . . . . . . . . . . . . . . . . . . . . . . 47
4.2 Different alignment methods . . . . . . . . . . . . . . . . . . . . . . . . . . 48
4.3 Which alignment method to use? . . . . . . . . . . . . . . . . . . . . . . 49
Automatic alignment method . . . . . . . . . . . . . . . . . . . . . . . . . . . . . . . 49
Manual alignment method. . . . . . . . . . . . . . . . . . . . . . . . . . . . . . . . . . 51
4.4 Bounding box details . . . . . . . . . . . . . . . . . . . . . . . . . . . . . . . . 53
Hints, tips and recommendations. . . . . . . . . . . . . . . . . . . . . . . . . . . . 53
Bounding box specifications
(without bar code, no cutserver application required) 54
4.5 Scanning routing of bounding box . . . . . . . . . . . . . . . . . . . . . 59
4.6 Kona / Kona apparel keyboard features . . . . . . . . . . . . . . . . . 61
Automatic. . . . . . . . . . . . . . . . . . . . . . . . . . . . . . . . . . . . . . . . . . . . . . . . 61
Manual . . . . . . . . . . . . . . . . . . . . . . . . . . . . . . . . . . . . . . . . . . . . . . . . . . 63
4.7 Print and cut with EasySIGN . . . . . . . . . . . . . . . . . . . . . . . . . . 67
4.8 Print and cut with Mutoh Grip (+). . . . . . . . . . . . . . . . . . . . . . . 71
4.9 Print and cut with Scanvec Amiable . . . . . . . . . . . . . . . . . . . . 75
Chapter 5 Cutting through. . . . . . . . . . . . . . . . . . . . . . . . . . . . . 79
5.1 Introduction . . . . . . . . . . . . . . . . . . . . . . . . . . . . . . . . . . . . . . . . 79
5.2 Setting up your cutter . . . . . . . . . . . . . . . . . . . . . . . . . . . . . . . . 80
Tools necessary on a Kona . . . . . . . . . . . . . . . . . . . . . . . . . . . . . . . . 80
Tools necessary on a Kona apparel . . . . . . . . . . . . . . . . . . . . . . . . . 80
Toolswap settings . . . . . . . . . . . . . . . . . . . . . . . . . . . . . . . . . . . . . . . . 81
Through cut settings . . . . . . . . . . . . . . . . . . . . . . . . . . . . . . . . . . . . . . 82
5.3 Through cutting workflow . . . . . . . . . . . . . . . . . . . . . . . . . . . . 84
5.4 Through cutting with EasySIGN. . . . . . . . . . . . . . . . . . . . . . . . 85
6 AP-75381 - Revision 1.3
Page 7

Application Guide Kona / Kona apparel
Convert shapes to cutthrough lines . . . . . . . . . . . . . . . . . . . . . . . . . 85
How to plot and setup your design . . . . . . . . . . . . . . . . . . . . . . . . . . 86
5.5 Through cutting with Mutoh Grip (+). . . . . . . . . . . . . . . . . . . . 88
Convert shapes to cutthrough lines . . . . . . . . . . . . . . . . . . . . . . . . . 88
Verify automatic detection . . . . . . . . . . . . . . . . . . . . . . . . . . . . . . . . . 88
Cutthrough tool configuration . . . . . . . . . . . . . . . . . . . . . . . . . . . . . . 89
5.6 Throughcutting with Scanvec Amiable. . . . . . . . . . . . . . . . . . 90
5.7 Poster trimming workflow . . . . . . . . . . . . . . . . . . . . . . . . . . . . 92
Chapter 6 Handling curled media . . . . . . . . . . . . . . . . . . . . . . . 95
Chapter 7 Hints, tips and tricks . . . . . . . . . . . . . . . . . . . . . . . . 99
7.1 How to create a cut contour around your images . . . . . . . . 101
For vector images . . . . . . . . . . . . . . . . . . . . . . . . . . . . . . . . . . . . . . . 101
For bitmap images . . . . . . . . . . . . . . . . . . . . . . . . . . . . . . . . . . . . . . 109
7.2 How to connect your Kona / Kona apparel to your network 116
Introduction . . . . . . . . . . . . . . . . . . . . . . . . . . . . . . . . . . . . . . . . . . . . 116
USB to network sharing box . . . . . . . . . . . . . . . . . . . . . . . . . . . . . . 116
Quick installation procedure . . . . . . . . . . . . . . . . . . . . . . . . . . . . . . 117
Make the following connections . . . . . . . . . . . . . . . . . . . . . . . . . . . 117
Software and driver installation. . . . . . . . . . . . . . . . . . . . . . . . . . . . 117
Configuration . . . . . . . . . . . . . . . . . . . . . . . . . . . . . . . . . . . . . . . . . . . 120
Connecting your Kona / Kona apparel . . . . . . . . . . . . . . . . . . . . . . 121
Verify the new connection in your cut software / CutServer . . . . 121
Troubleshooting. . . . . . . . . . . . . . . . . . . . . . . . . . . . . . . . . . . . . . . . . 121
7.3 Did you know. . . . . . . . . . . . . . . . . . . . . . . . . . . . . . . . . . . . . . 122
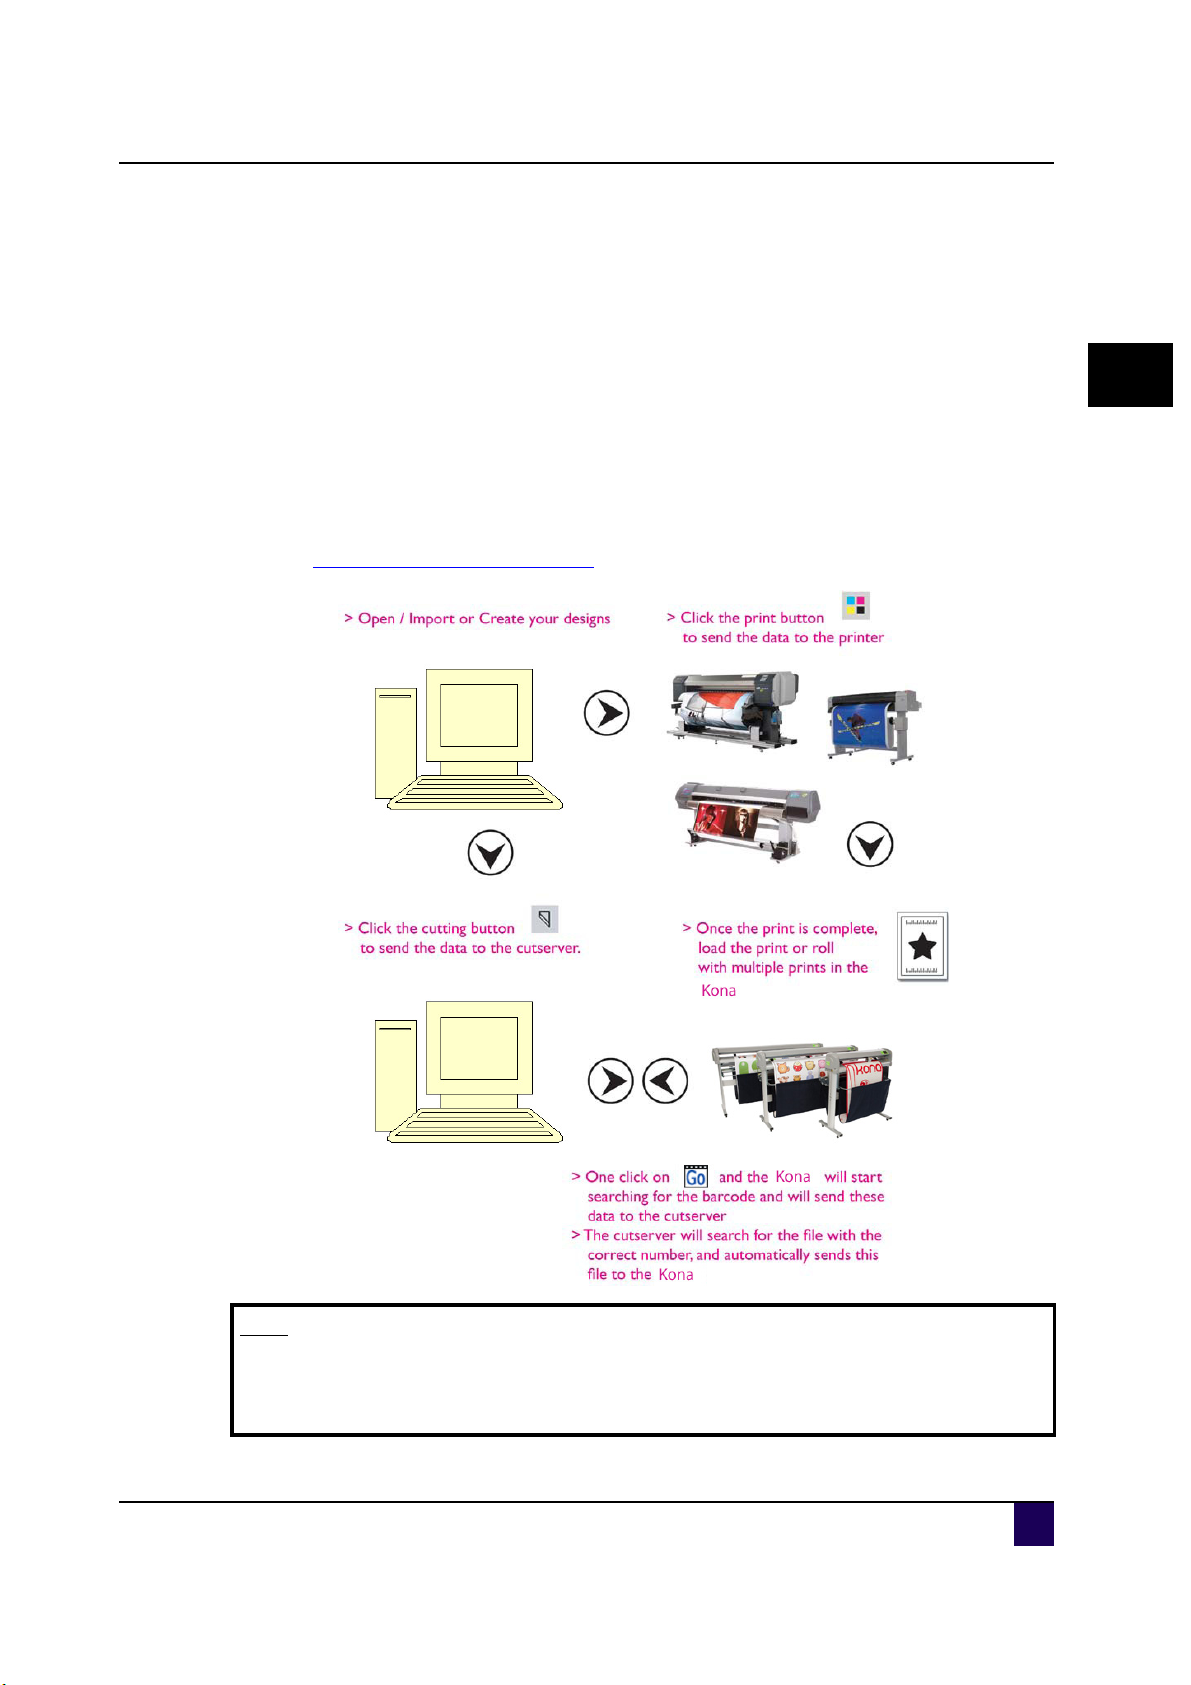
Print and cut workflow . . . . . . . . . . . . . . . . . . . . . . . . . . . . . . . . . . . 122
7.4 Frequently asked questions. . . . . . . . . . . . . . . . . . . . . . . . . . 130
Mutoh CutServer related FAQ. . . . . . . . . . . . . . . . . . . . . . . . . . . . . 130
AP-75381 - Revision 1.3 7
Page 8

Application Guide Kona / Kona apparel
8 AP-75381 - Revision 1.3
Page 9
Application Guide Kona / Kona apparel
Compatibility overview
Chapter 1 Compatibility overview
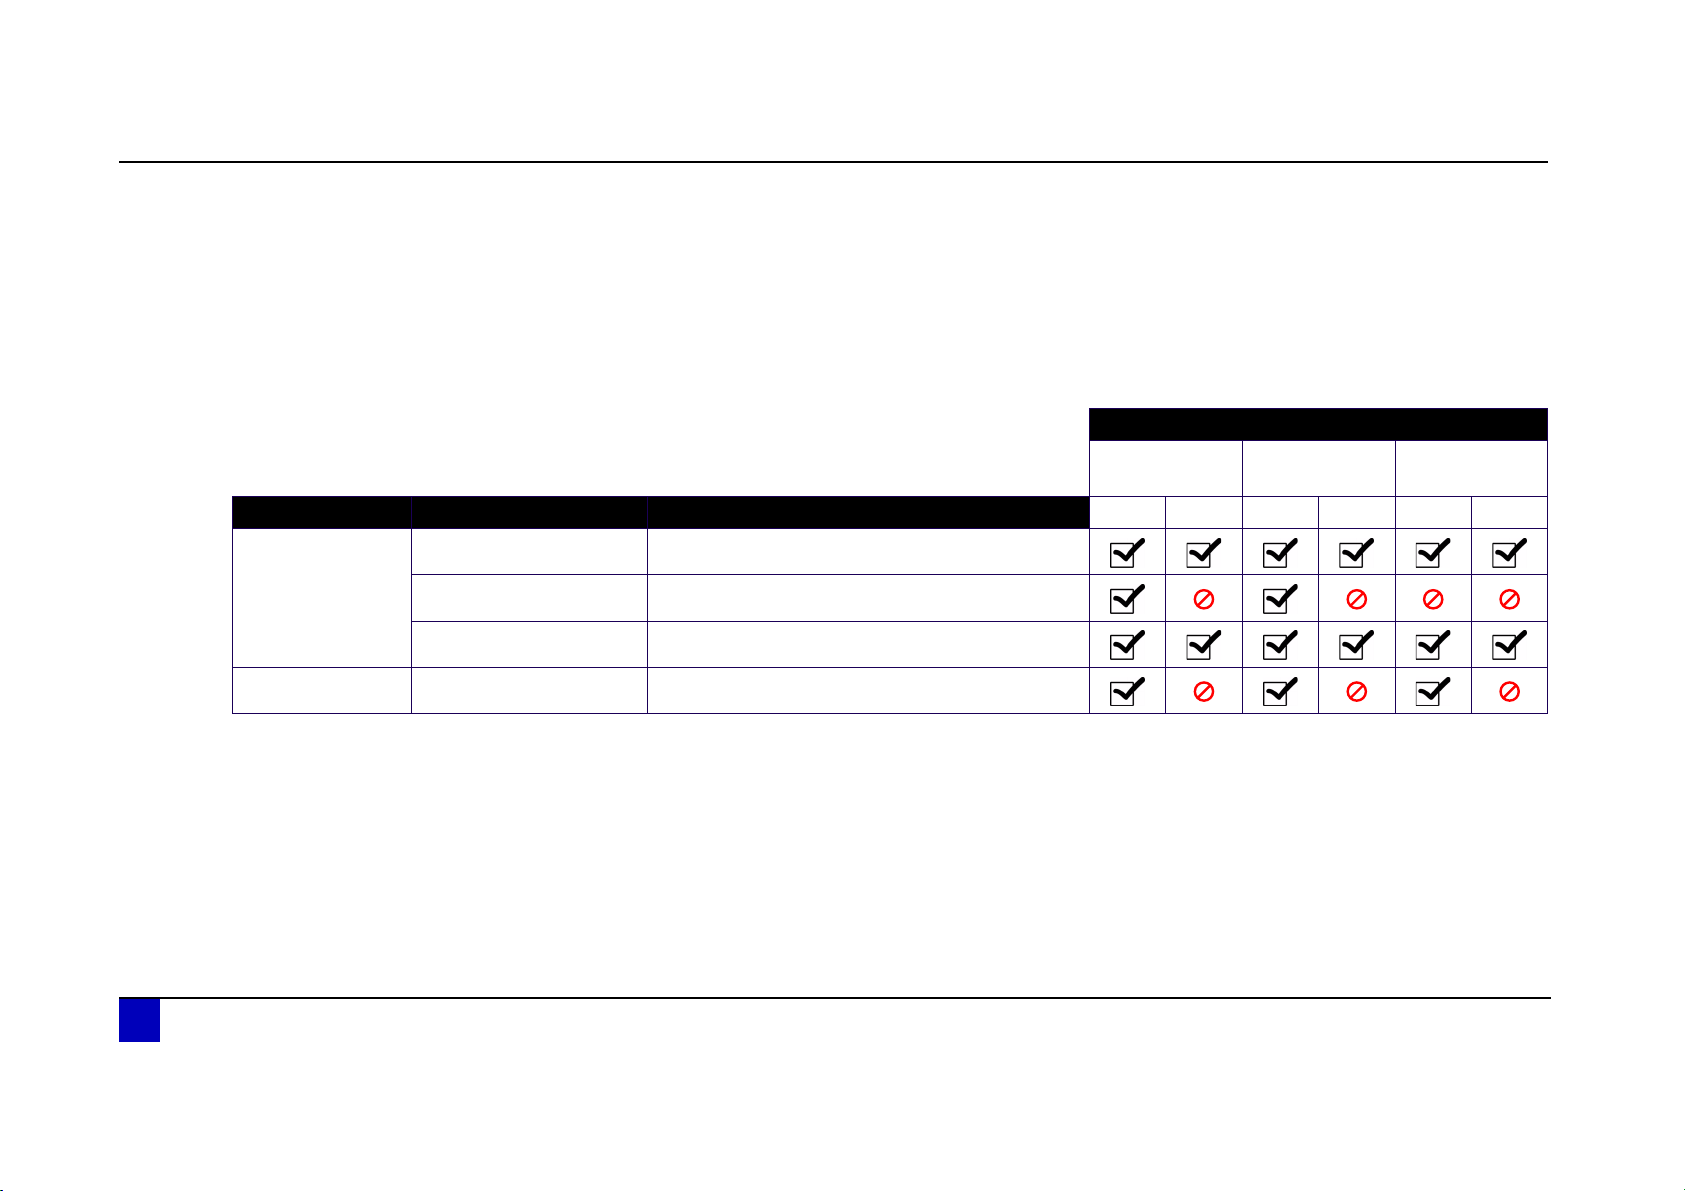
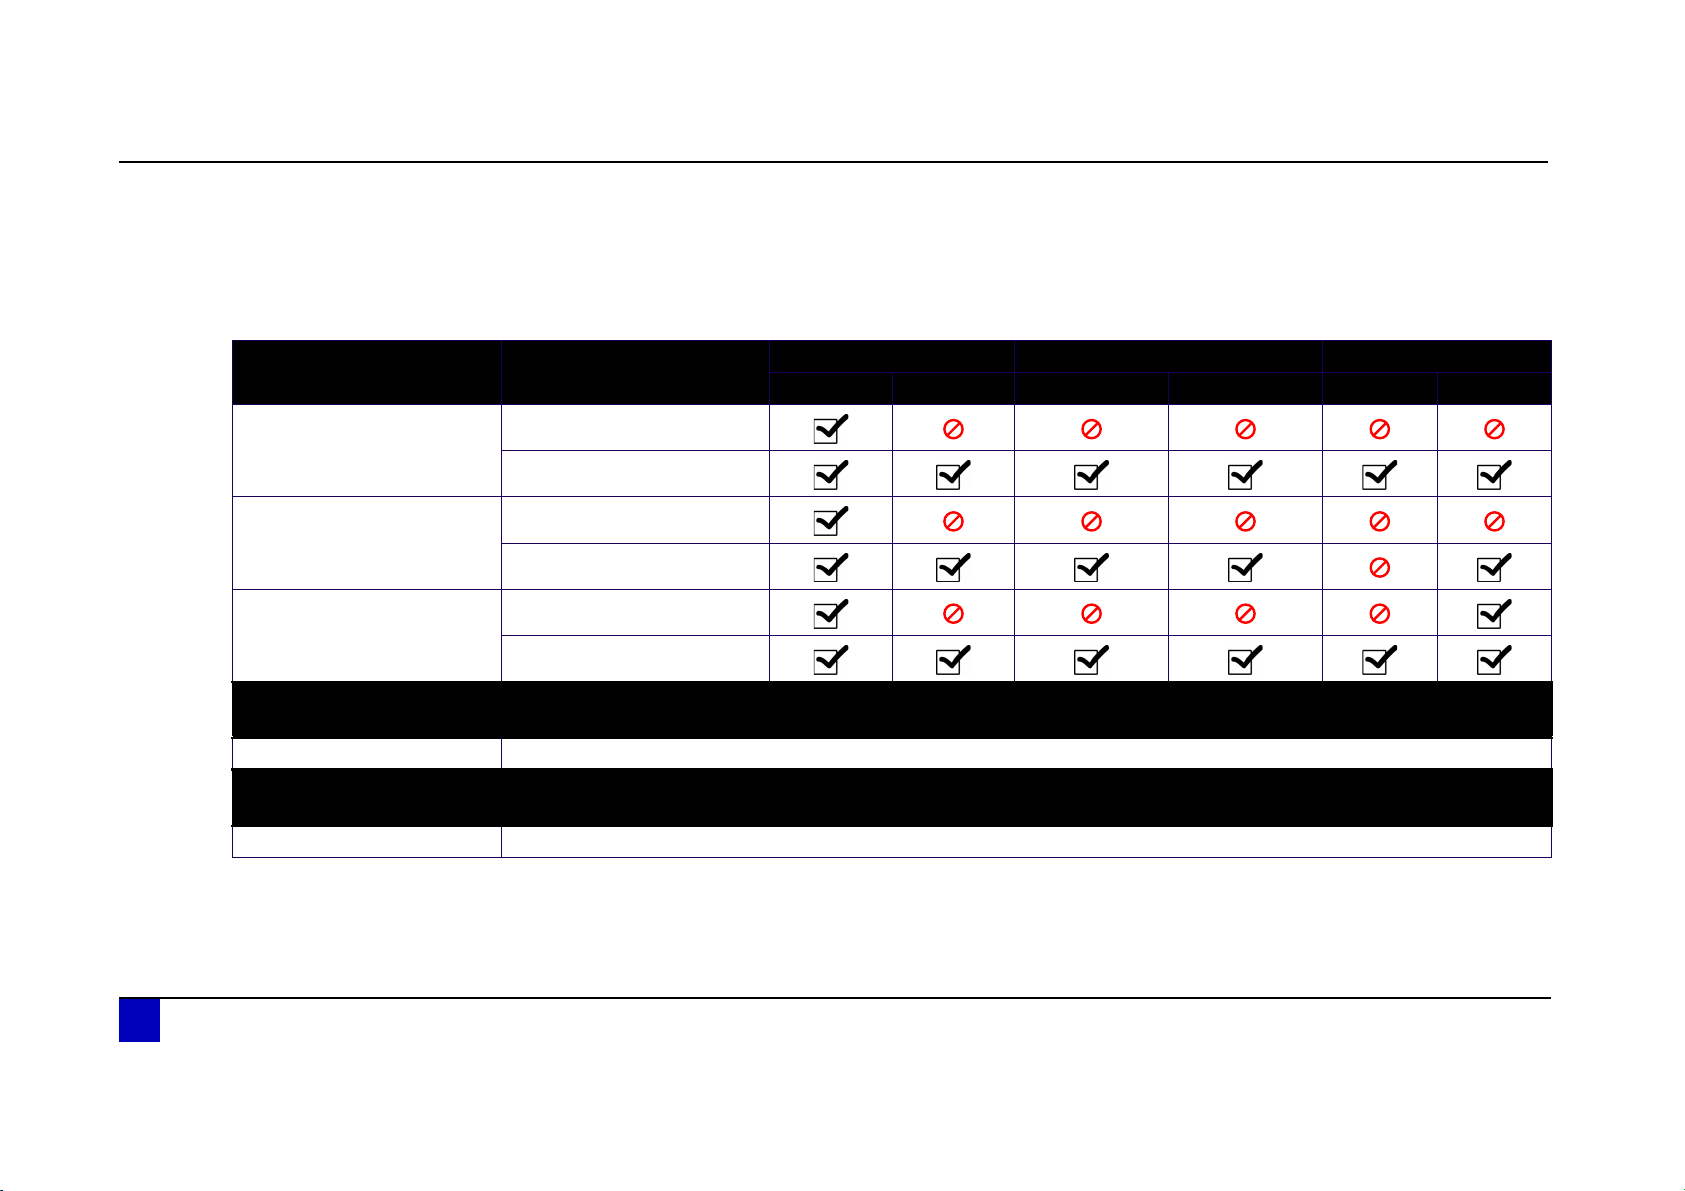
1.1 Cutter drivers and Mutoh software
Please find below an overview of the available drivers and software packages for the Kona cutter.
Windows XP
with SP2
Device Tool Driver / Software 32 bit 64 bit 32 bit 64 bit 32 bit 64 bit
USB driver USB_Drivers_2_0_0.zip
Kona
and
Kona apparel
CutServer 1.0.5 CutServer_setup_v1.0.5.exe
CutServer 4.1.0 -
Operating system
Windows Vista Windows 7
Kona EasySign 5.16 driver Mutoh.drv
9 AP-75381 - Revision 1.3
Page 10
Application Guide Kona / Kona apparel
Compatibility overview
1.2 RIP software
Please find below an overview of the most common RIP software used in combination with Mutoh printers and their compatibility with Windows, Linux
or Mac.
RIP software compatible
with Windows
version 6 or lower
Onyx
version 7 / Onyx X
EasySign
version 5 with SP 15
Scanvec Amiable
RIP software compatible
with Mac
Scanvec Amiable
RIP software compatible
with Linux
Grip (+)
Bold = current version is sold by Mutoh
Version
version 4
version 5
version 6
Version
Windows XP Windows Vista Windows 7
32 bit 64 bit 32 bit 64 bit 32 bit 64 bit
10 AP-75381 - Revision 1.3
Page 11
Application Guide Kona / Kona apparel
Chapter 2 Installing
CutServer
Installing CutServer
2.1 Introduction
In order to use the Automated Barcode workflow, an exclusive CutServer tool is developed by
Mutoh to pass on all generated alignment plot files from your software to the Kona / Kona
apparel. All print and cut plot files are gathered into a hot folder, linked to the CutServer
queue, in which the scanning command can be given to read the ID number of your printout.
Refer to
Compatibility overview on page9
2
Note
Rather than using the “Go” CutServer button, an alternative bar code scanning
sequence can be started as well. Press the Contour Cutting button on the LCD
and select your appropriate alignment system.
AP-75381 - Revision 1.3 11
Page 12

Application Guide Kona / Kona apparel
Installing CutServer
2.2 Installing Mutoh CutServer
In order to use the Automated Barcode workflow, an exclusive CutServer tool is
developed by Mutoh to pass on all generated alignment plot files from your software to the
cutter.
All print and cut plot files are gathered into a hot folder, linked to the CutServer queue,
in which the scanning command can be given to read the ID number of your printout.
2.2.1 Install the CutServer
Step 1: Download the CutServer from Mutoh’s member Site
Step 2: Install the Mutoh CutServer by double clicking on the exe installation file.
Step 3: Follow the instructions of the program.
Select Destination Location.
Select Start Menu Folder.
Decide whether to create a desktop icon or not.
Install the software.
Step 4: Open the Mutoh CutServer and set a hot folder.
Refer to Create and set a hot folder on page12
2.2.2 Create and set a hot folder
To be able to display all the jobs in the queue of the CutServer, a folder need to be made on
your local hard disk. This folder should be linked to the CutServer.
Step 1: Using your windows explorer, create a new empty folder on your Hard disk. (Any
name will do, for the example we will call the folder CutServer and place it directly
under C:\) or use the default folder C:\Program Files\Mutoh Europe Nv\CutServer
Step 2: Start the Mutoh CutServer.
Step 3:
Step 4: Browse to your hot folder and click OK.
Step 5: All the plotfiles gathered in this folder will now be displayed.
³Go to file and choose set directory.
.
12 AP-75381 - Revision 1.3
Page 13
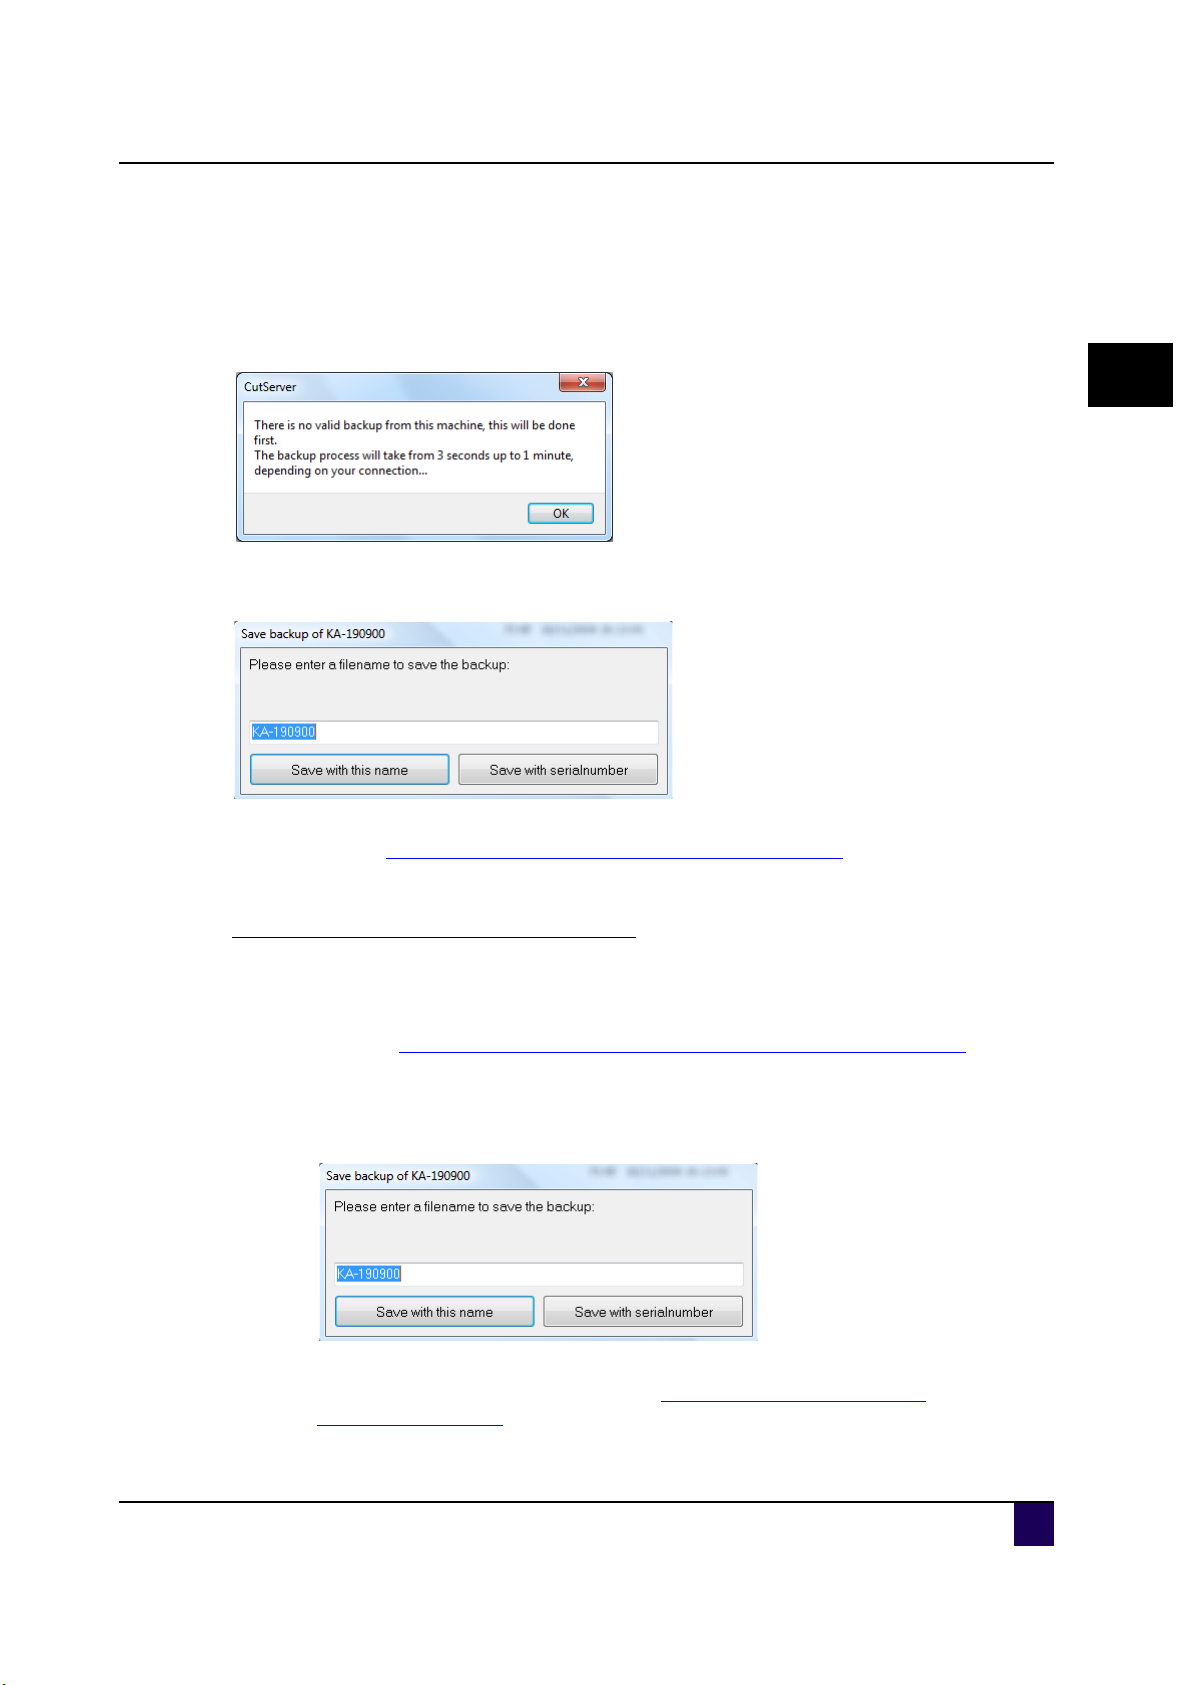
2.2.3 Backup the machine settings
When establishing problems with your cutter, it is very useful to be able to restore previous
settings and parameters. Therefore, when a machine is connected and starting up the
CutServer for the first time, an automatic back-up will be taken from the parameters.
After clicking OK, the CutServer will show a new window. This window enables you to save
the backup with a specific name or with the serial number.
Application Guide Kona / Kona apparel
Installing CutServer
2
It is recommended to store your parameters frequently. All back-ups are stored in the
following folder: C:\Program Files\Mutoh Europe NV\CutServer\backup
back up a recognizable name, including the serial number of the machine.
. Be sure to give your
Backup the settings manually as follows:
Step 1: Be sure that the cutter is connected via the CutServer and there are no cutting
operations busy.
Refer to Details about Mutoh’s CutServer > Available connections on page 34
Step 2: Right-click on a connection and choose to take a backup.
Step 3: The “Save Backup window” opens. Here you are able give the backup a specific
name or to save the backup using the serial number.
Step 4: The CutServer automatically creates a backup file and stores it in the installation
folder of the Mutoh Europe CutServer: C:\Program Files\Mutoh Europe
NV\CutServer\backup.
AP-75381 - Revision 1.3 13
Page 14
Application Guide Kona / Kona apparel
Installing CutServer
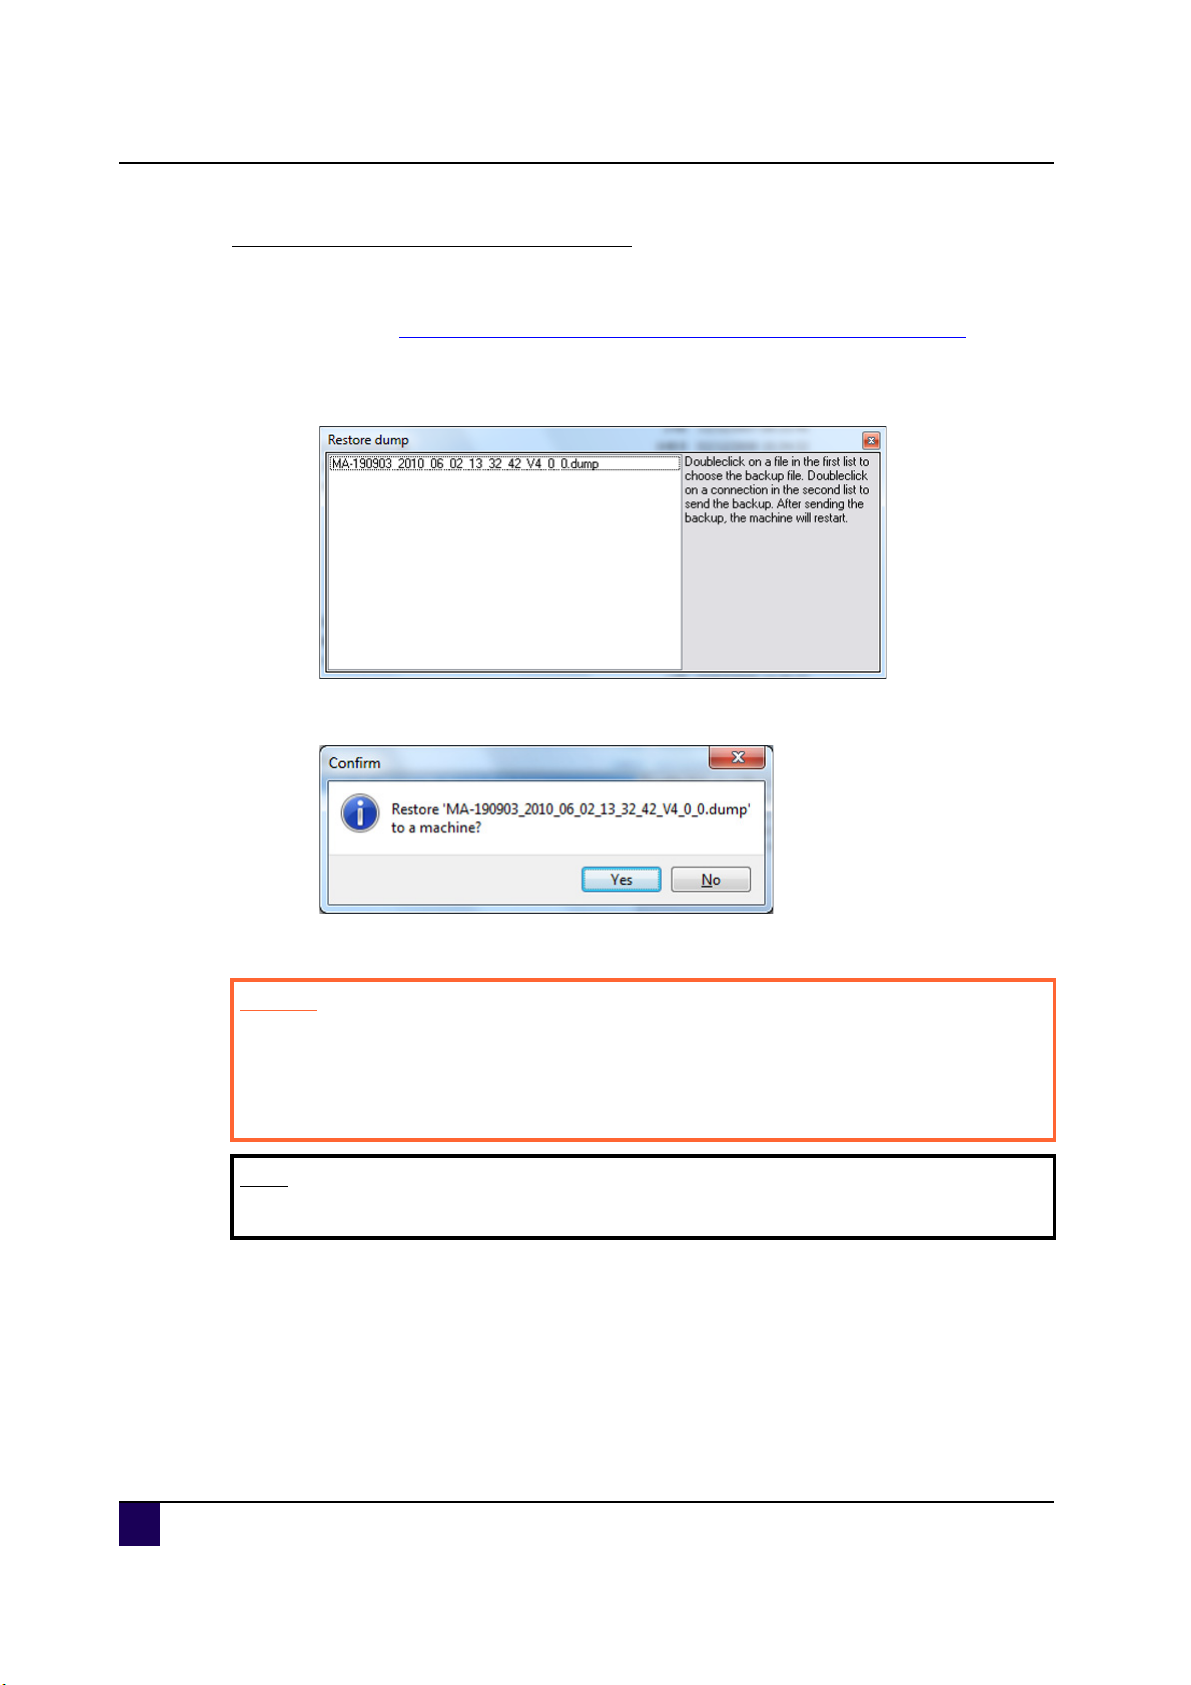
Restore the settings manually as follows
Step 1: Be sure that the cutter is connected via the CutServer
Refer to Details about Mutoh’s CutServer > Available connections on page 34
Step 2: Right-click on a connection and choose to restore a backup.
Step 3: Double-click on the backup you wish to restore.
Step 4: The CutServer asks for confirmation to restore the backup.
Step 5: The machine will reboot automatically after sending the backup.
Caution
Never restore a parameter backup from another cutter because there are some
machine dependant parameters such as the Y-Z profile.
When you do not have a parameter back-up, please contact our Mutoh Service
Department
Note
It is not advised to install an old parameter backup when using new firmware.
14 AP-75381 - Revision 1.3
Page 15
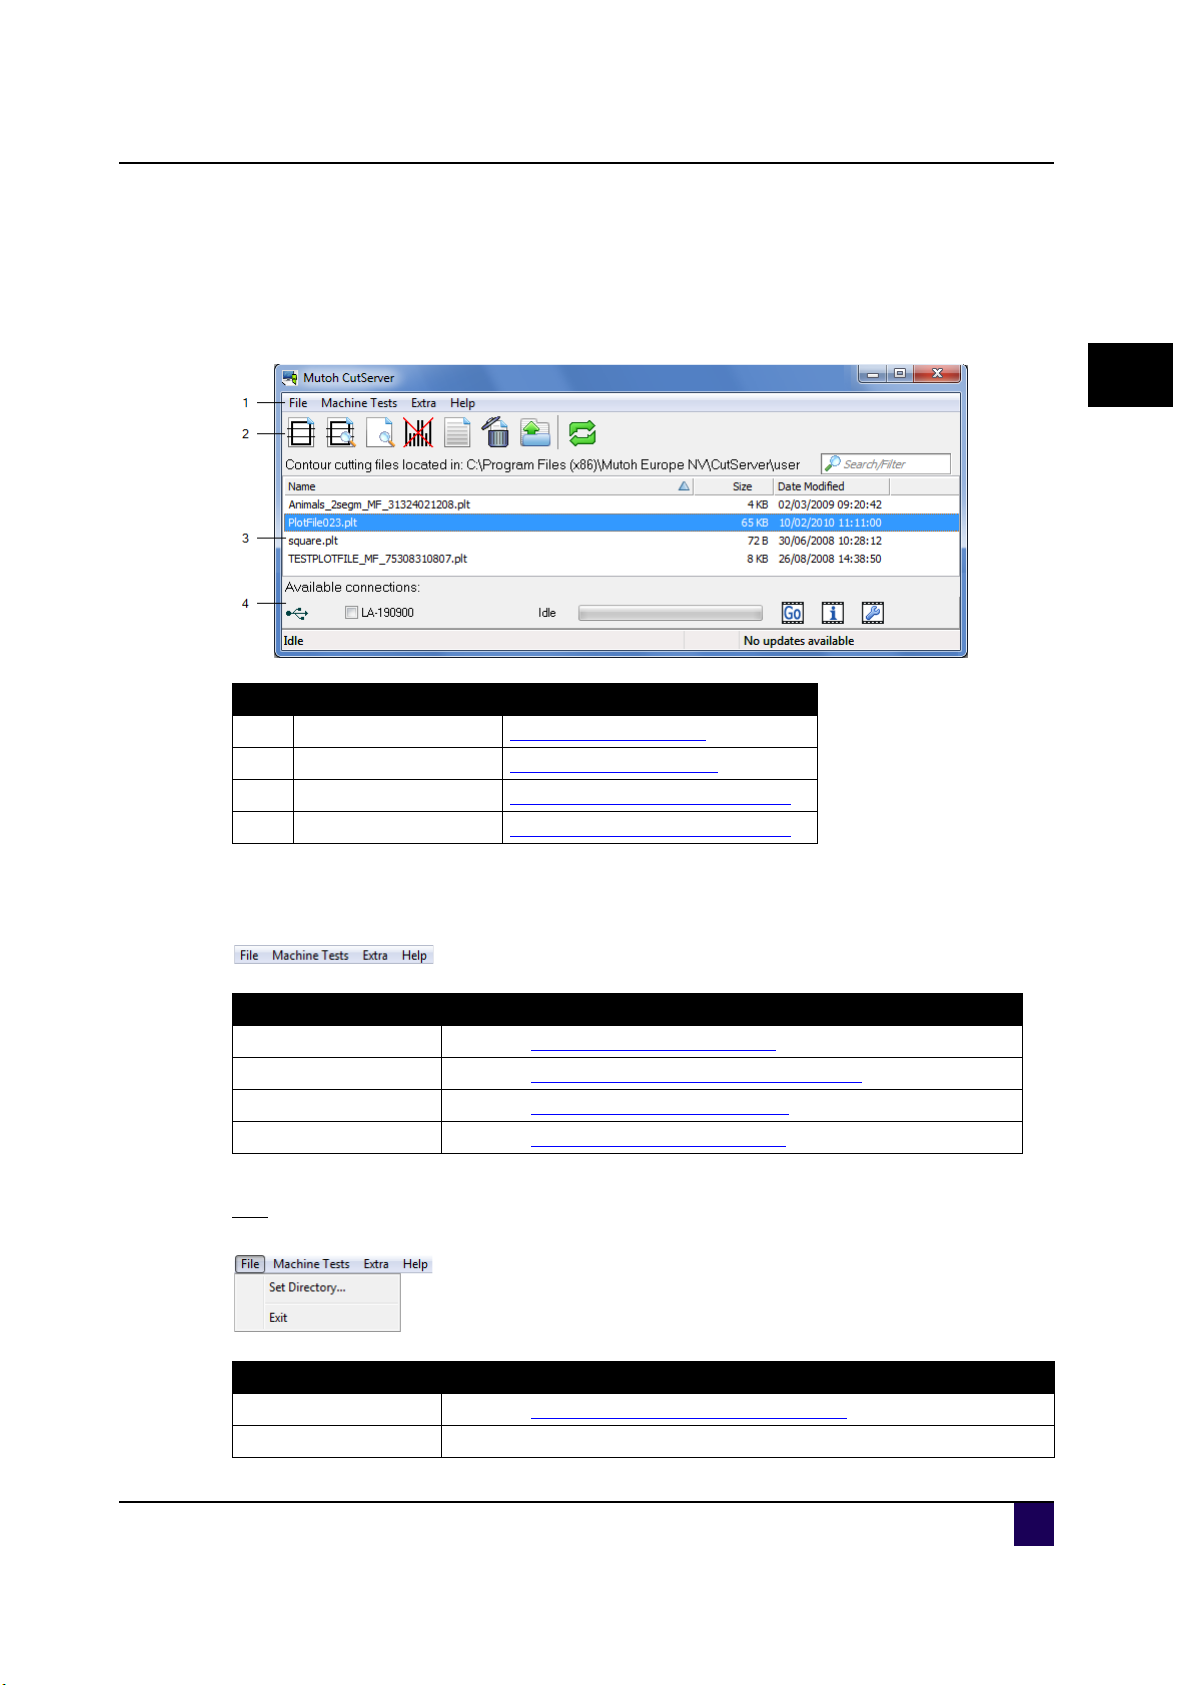
2.3 Details about Mutoh’s CutServer
2.3.1 Main window
Application Guide Kona / Kona apparel
Installing CutServer
2
N° Description More info
1 Menu items Menu items on page15
2 Toolbar icons Toolbar icons on page28
3 Contour cutting files Available connections on page34
4 Available connections Available connections on page34
2.3.2 Menu items
Menu item More info
File Refer to Menu items > File on page 15
Machine test Refer to Menu items > Machine tests on page 16
Extra Refer to Menu items > Extra on page 18
Help Refer to Menu items > Help on page 25
File
Menu item More info
Set Directory... Refer to Create and set a hot folder on page12
Exit Close the application
AP-75381 - Revision 1.3 15
Page 16
Application Guide Kona / Kona apparel
Installing CutServer
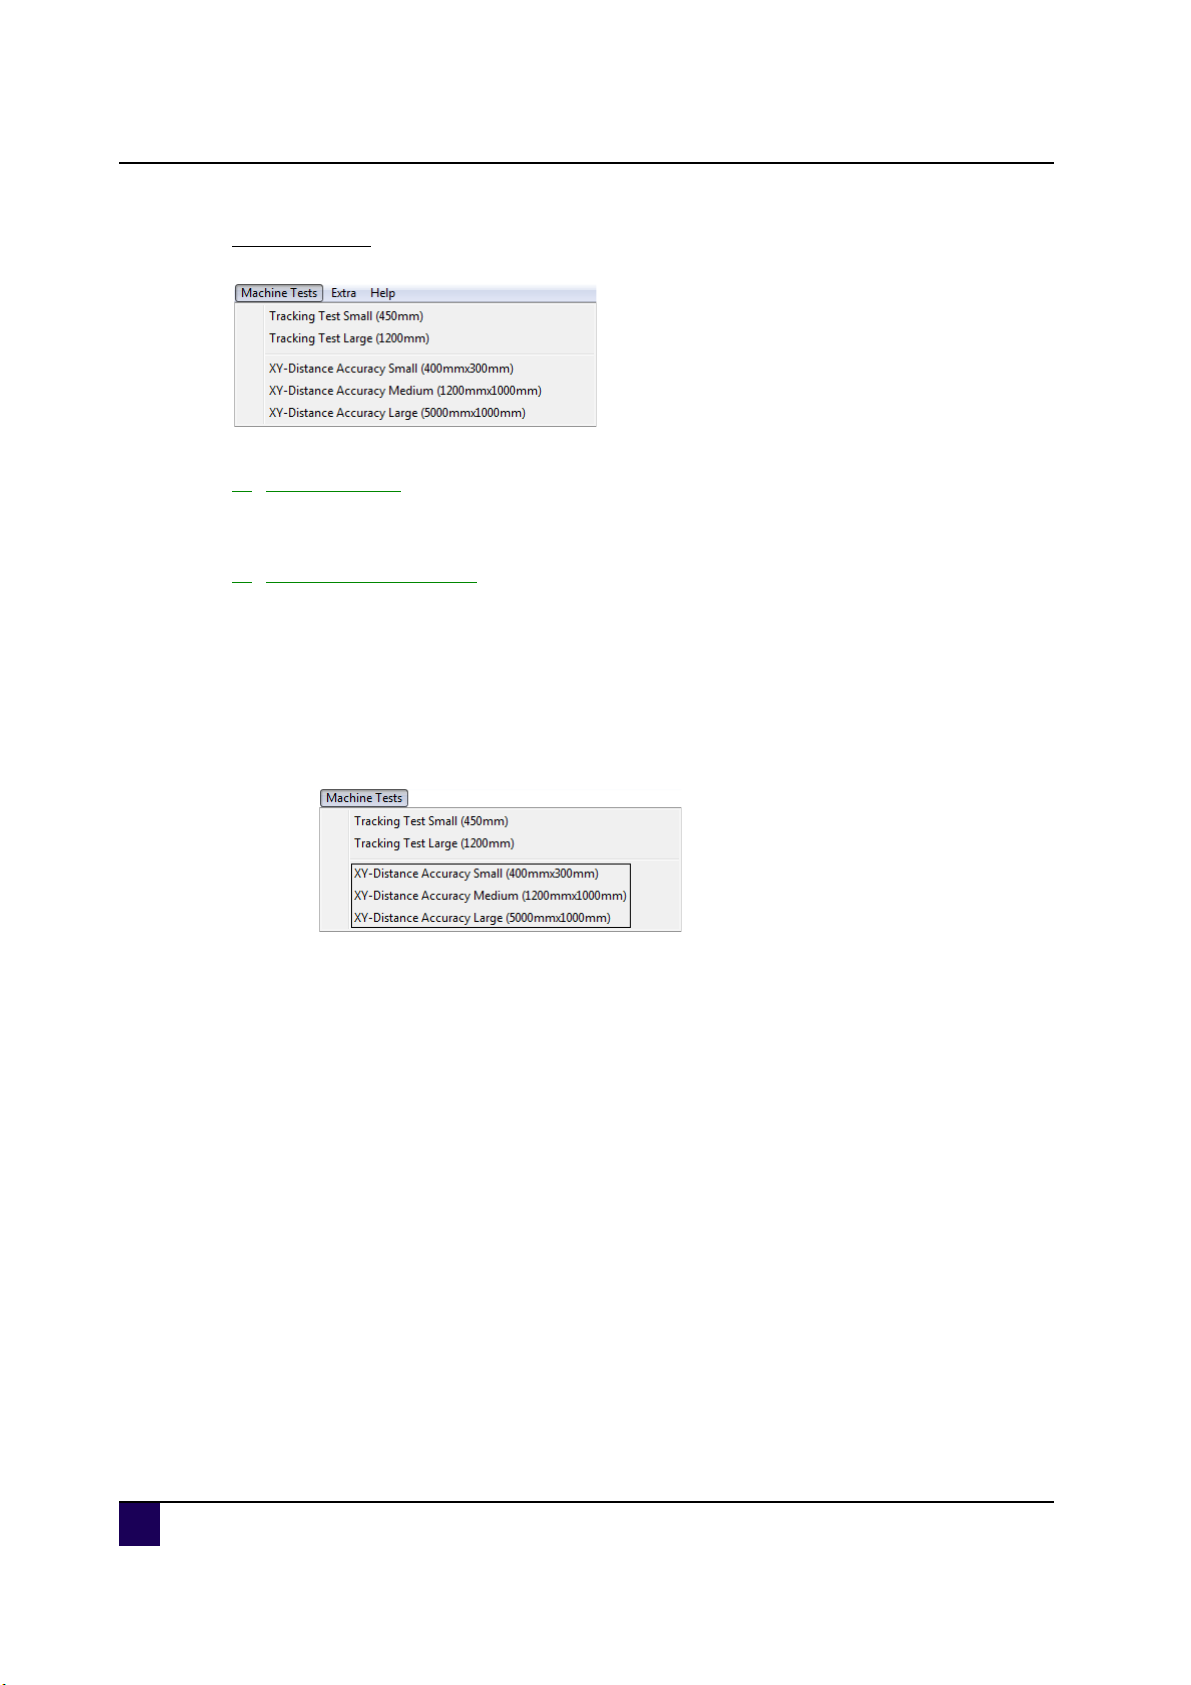
Machine tests
1) Tracking tests
Reserved for authorized Mutoh technicians only.
2) XY-distance accuracy
The XY - Distance Accuracy tests are developed to check the actual X-Y cutting distance with
the sent vector data.
Please follow the procedure below to make the test:
Step 1: Launch Mutoh’s CutServer.
Step 2: Be sure that the cutter is connected with the Mutoh CutServer.
Step 3: Select which test to perform.
16 AP-75381 - Revision 1.3
Page 17
Application Guide Kona / Kona apparel
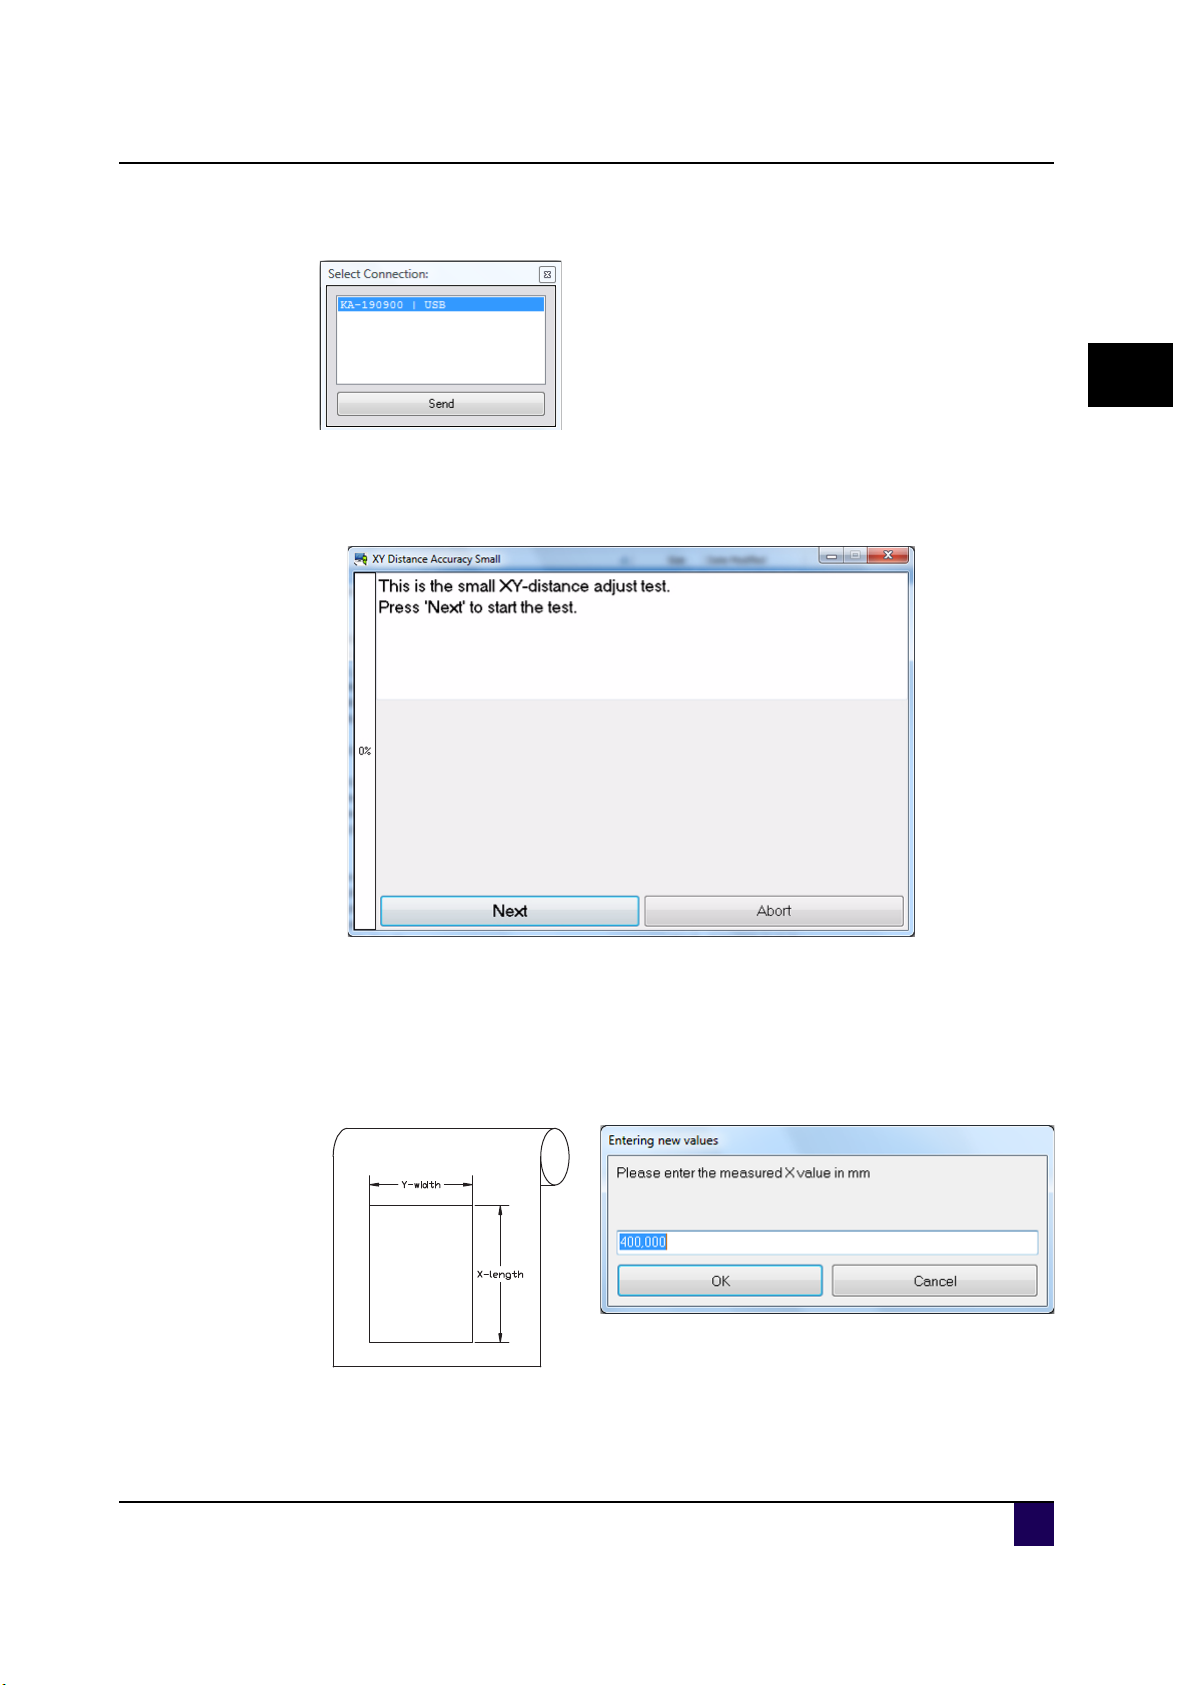
Step 4: Select the appropriate connection and click on it.
A new window appears. Do not press Next before:
media is loaded
a knife is loaded.
Installing CutServer
2
Step 5: If m
Step 6: Peel out the box.
Step 7: Measure the X length and Y width and enter them. Be sure to enter the values in
AP-75381 - Revision 1.3 17
edia and a knife are loaded, click Next.
A box is cut.
mm!
Page 18
Application Guide Kona / Kona apparel
Installing CutServer
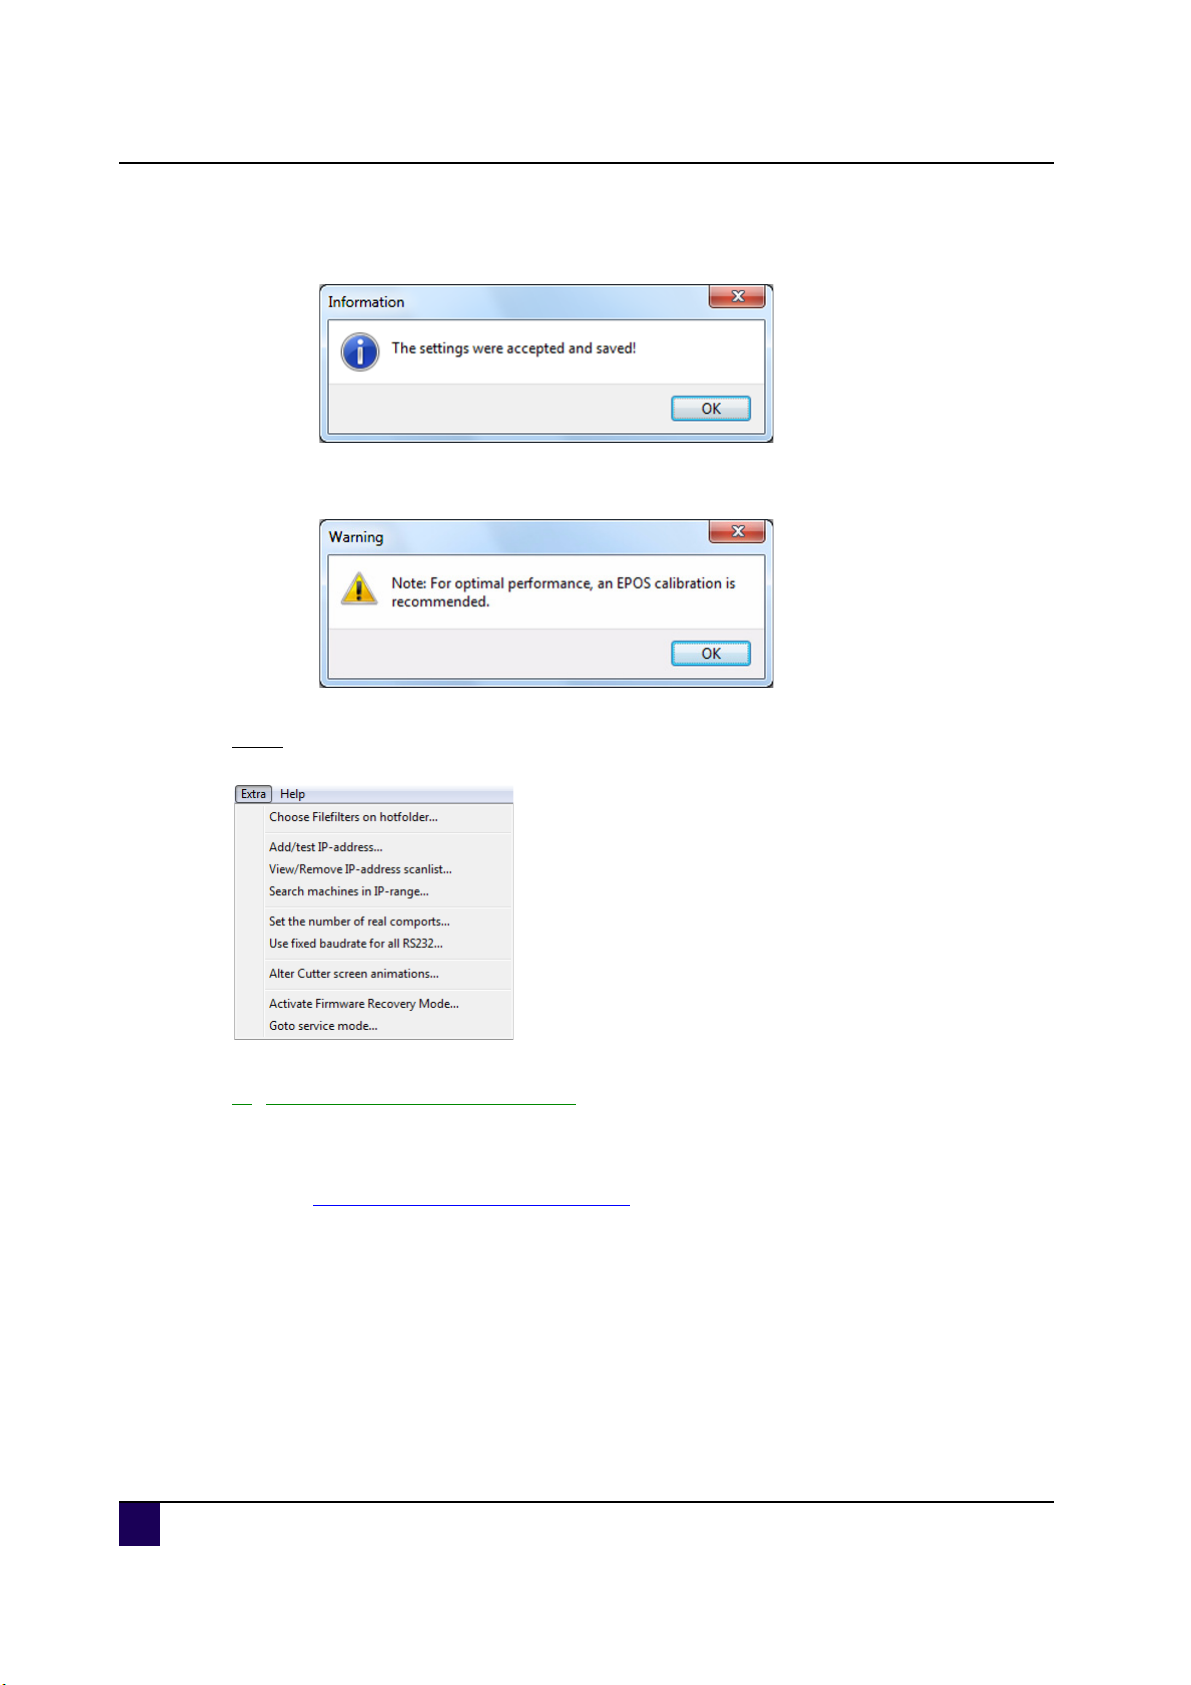
Step 8: If the correct values are entered, the following message appears and the test is
done.
A new message appears warning you that an EPOS calibration is recom-
mended.
Extra
1) Choose File filters and hotfolder
As described earlier, the files in the hot folder are displayed in a queue. This folder can
include different kind of files.
Refer to
Standard, only PLT files are displayed in the queue. However, it is possible to create cut files
via the RIP for example with another extension (e.g. CUT). These file types will not automatically be displayed and should be added to the filter list as described below.
Note that the file name should be build up similar to the PLT files, which means:
Name_alignment method_barcode.extension
Step 1: Select extra > Choose Filefilters and hotfolder.
Create and set a hot folder on page12
e.g. Job1_MF_14587652131.cut
18 AP-75381 - Revision 1.3
Page 19
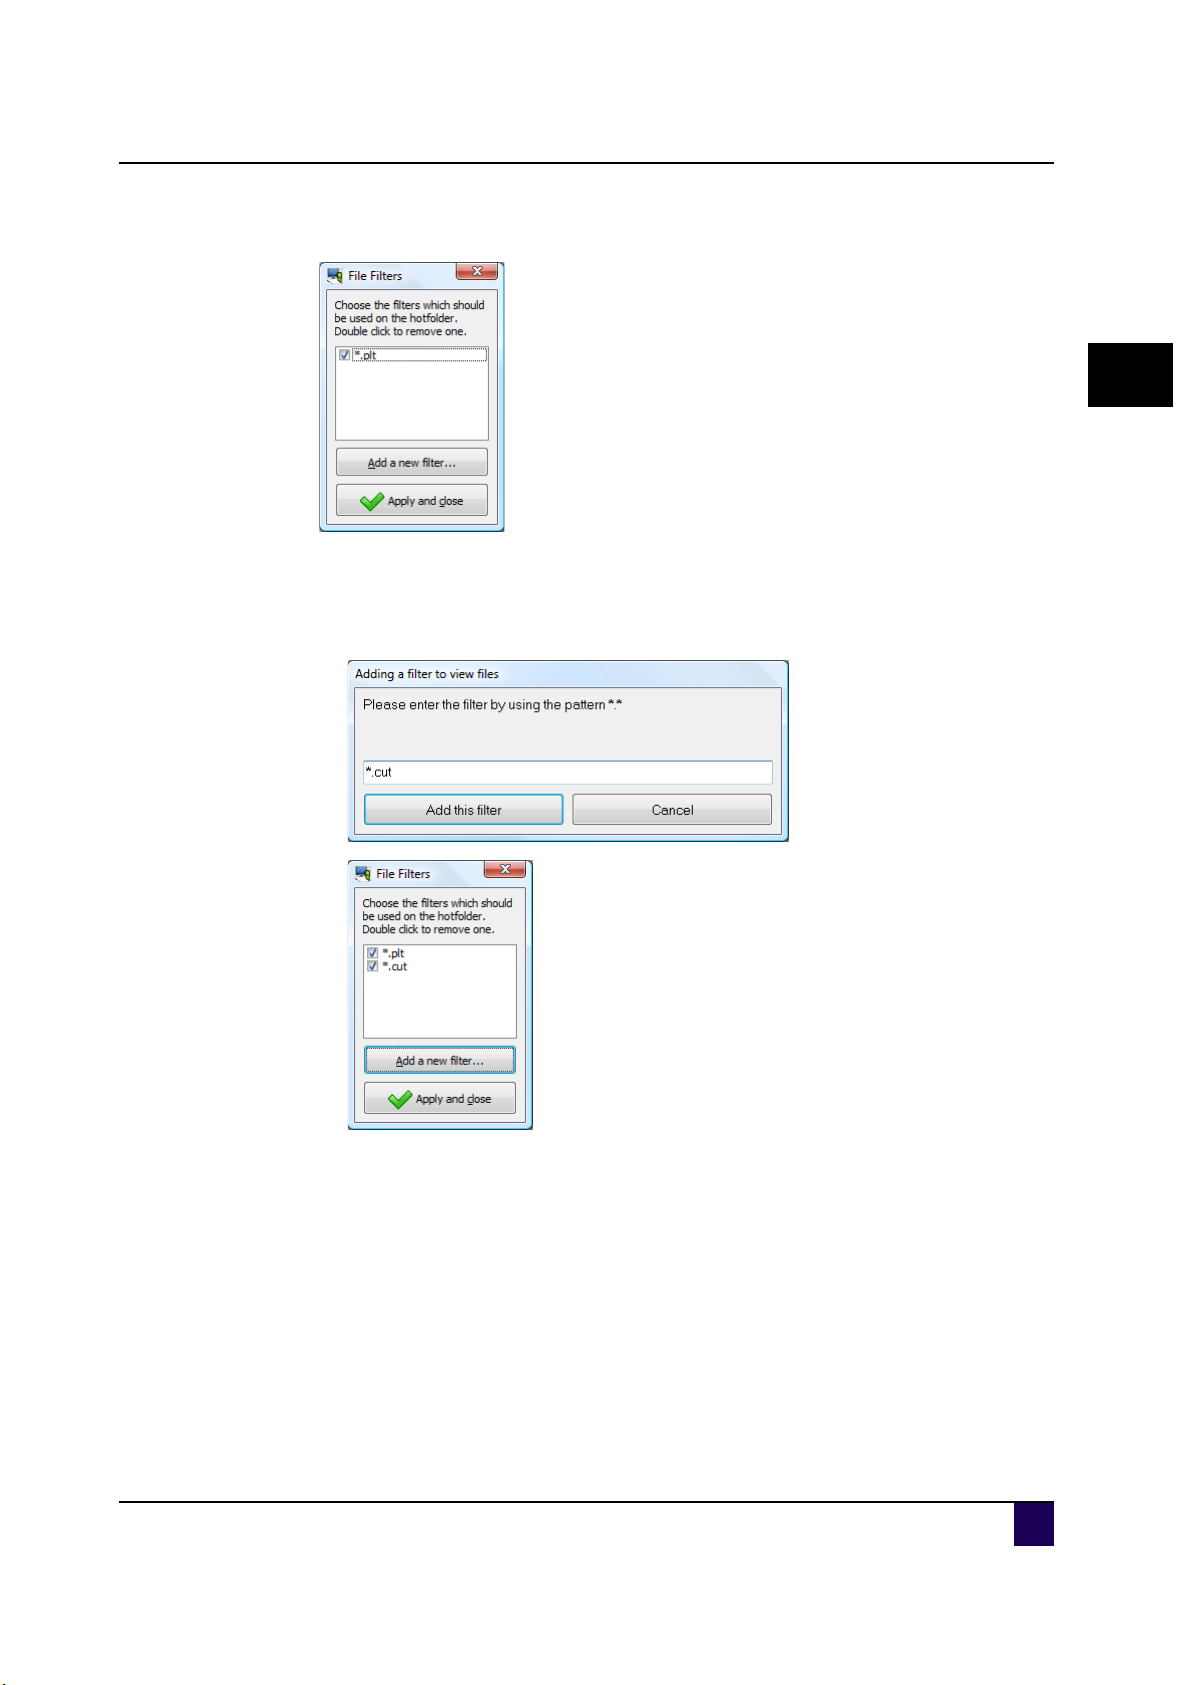
Step 2: The following screen is displayed:
Step 3: Now you can do one of the following actions:
Select the checkbox of the file type which should be displayed.
Add a new file type (filter), e.g. *.cut.
Application Guide Kona / Kona apparel
Installing CutServer
2
Remove a filetype by double clicking on it.
Apply your changes and close this screen.
Step 4: The filter is applied to the queue.
AP-75381 - Revision 1.3 19
Page 20
Application Guide Kona / Kona apparel
Installing CutServer
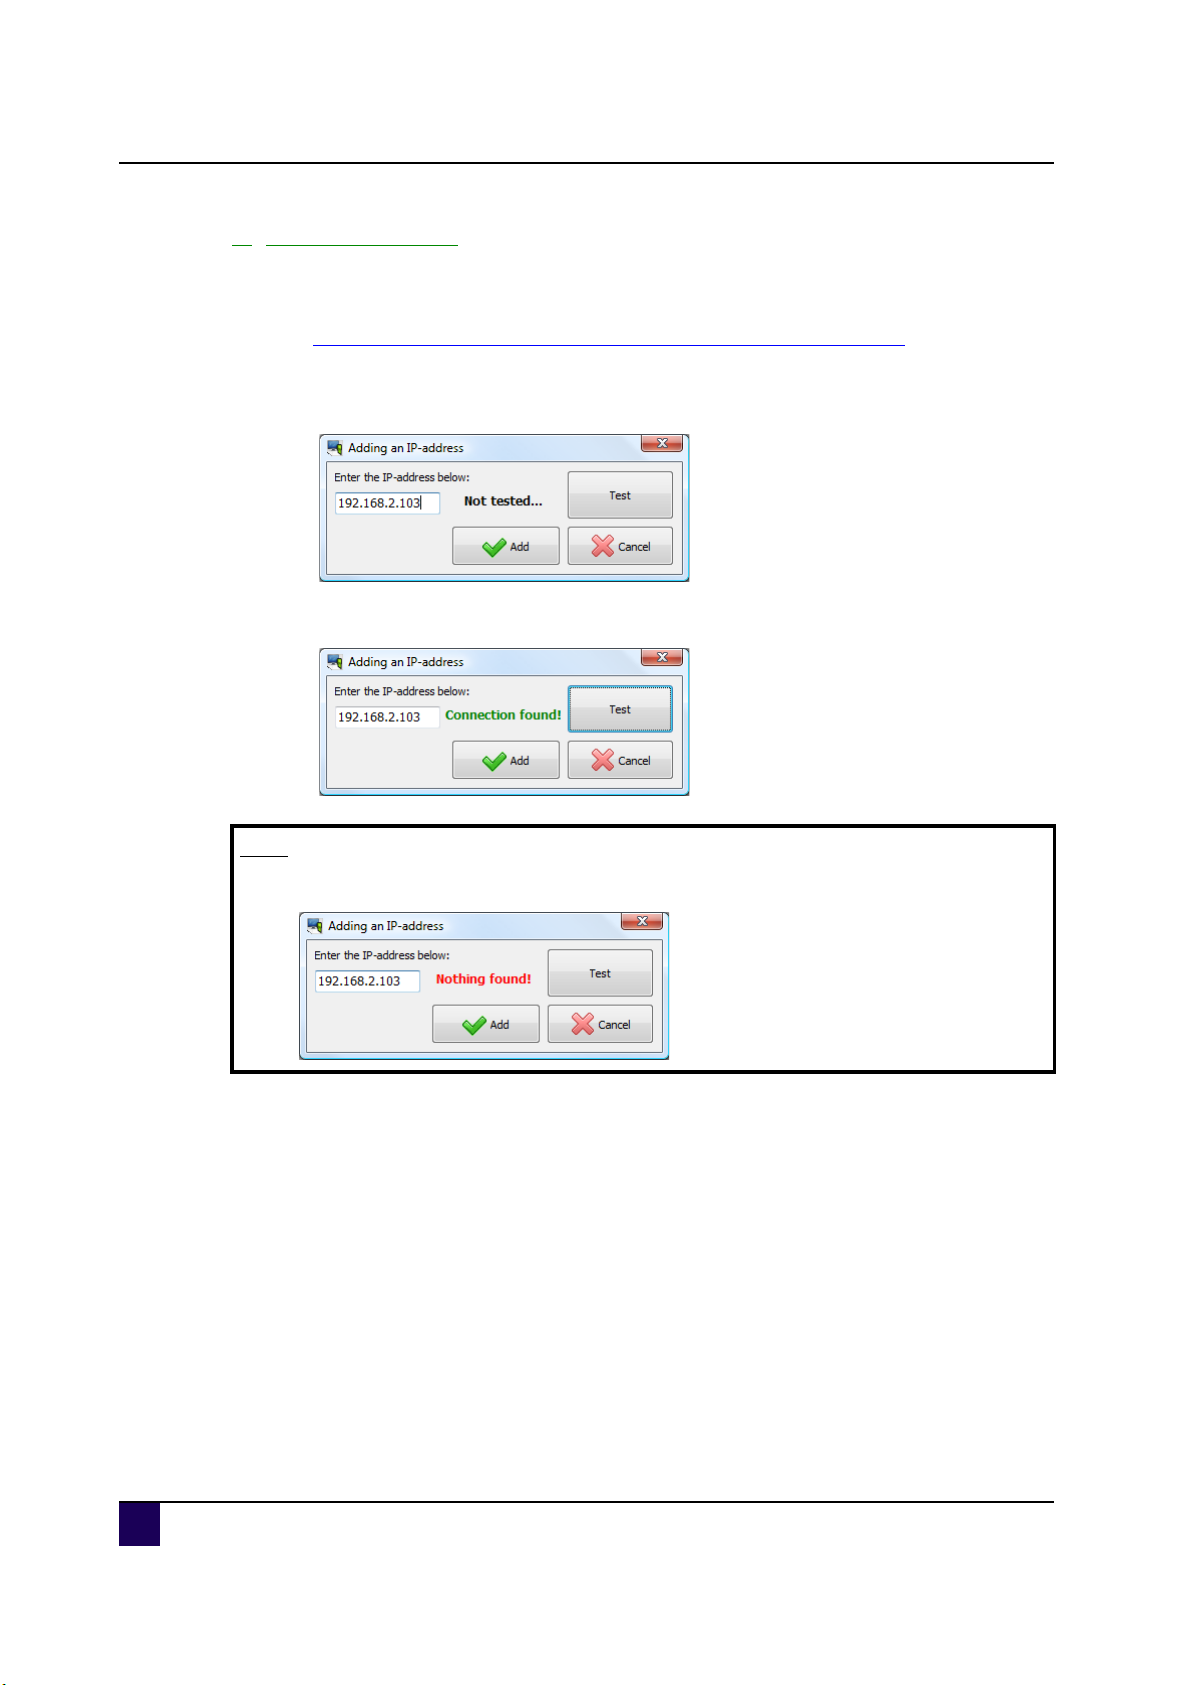
2) Add/test IP address
When your cutter is connected to your local area network it is possible to add your cutter by
providing the IP address of the cutter.
Refer to How to connect your Kona / Kona apparel to your network on page116
Step 1: Select extra > Add/test IP address.
Step 2: Fill in the IP address of the cutter.
Step 3: Click on test to check the connection. Make sure that the cutter is powered ON.
Note
In case the IP address is not found, following message is displayed:
Step 4: Click on add to verify the IP address or cancel this action.
20 AP-75381 - Revision 1.3
Page 21
Application Guide Kona / Kona apparel
Installing CutServer
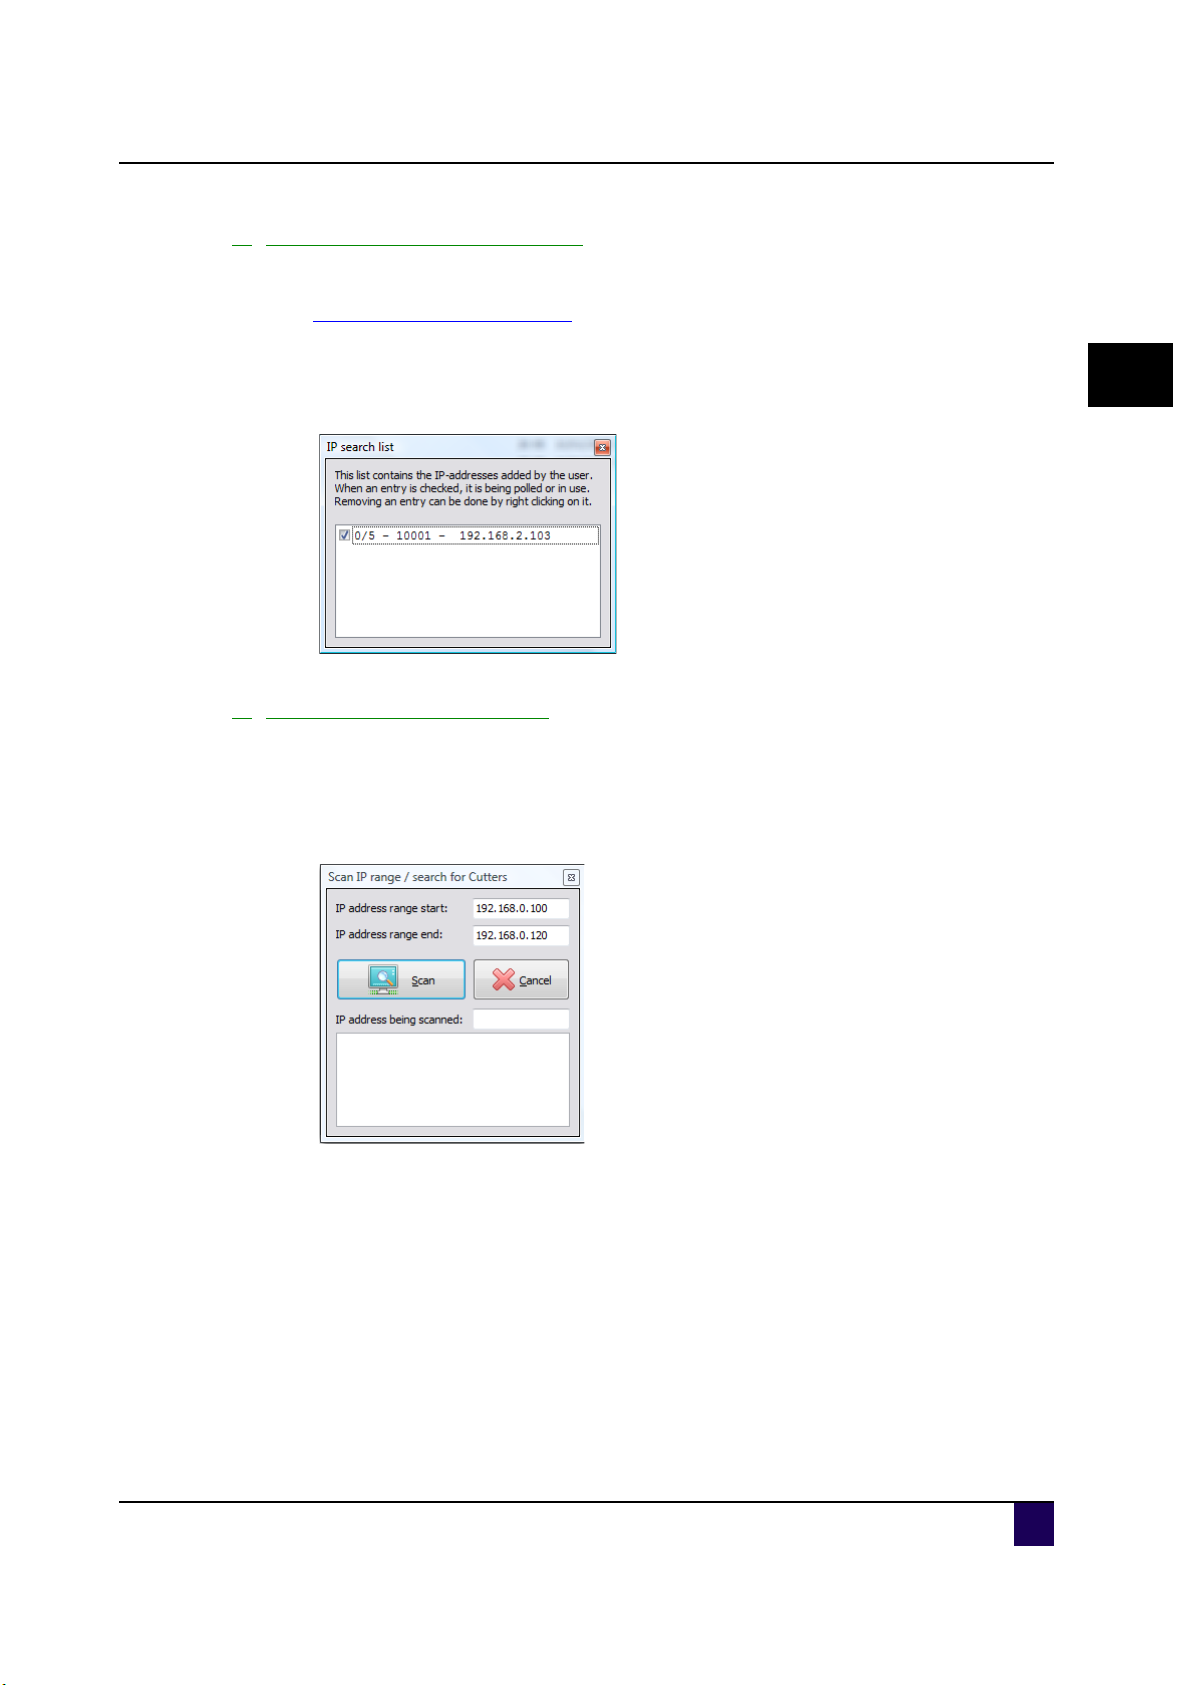
3) View/remove IP address scanlist
The list will display the IP-address added by the user.
Refer to Add/test IP address on page20
When checking an entry, it is being polled or in use. Removing an entry is done by
right-clicking on it.
Step 1: Select extra > View/remove IP address scanlist.
2
4) Search machines in IP range
Use this function when you do not know the exact IP address of the cutter but you know in
which range it should be.
Step 1: Select extra > Search machines in IP range.
Step 2: Fill in the range start and end.
Step 3: Click on scan.
AP-75381 - Revision 1.3 21
Page 22

Application Guide Kona / Kona apparel
Installing CutServer
Step 4: All the devices connected to your network within this range are displayed:
Step 5: Select the IP address of your demand and copy it.
Step 6: Follow the procedure mentioned below to add this IP address to your list.
Refer to
Add/test IP address on page20
5) Set the number of real com ports
If you want to use a virtual com port (e.g. COM3) you can change the settings here. However,
it is recommended to use the USB connection.
6) Use fixed baudrate for all RS232
This function has no effect on a Kona / Kona apparel cutter, because the baudrate is irrelevant if you use a virtual com port.
7) Alter cutter screen animations
This function enables you to store images onto your Kona / Kona apparel so that you can
modify the screen saver as you whishes.
Step 1: Select Alter cutter screen animation.
Step 2: Select the connection and press Change screen animation.
22 AP-75381 - Revision 1.3
Page 23
Application Guide Kona / Kona apparel
Installing CutServer
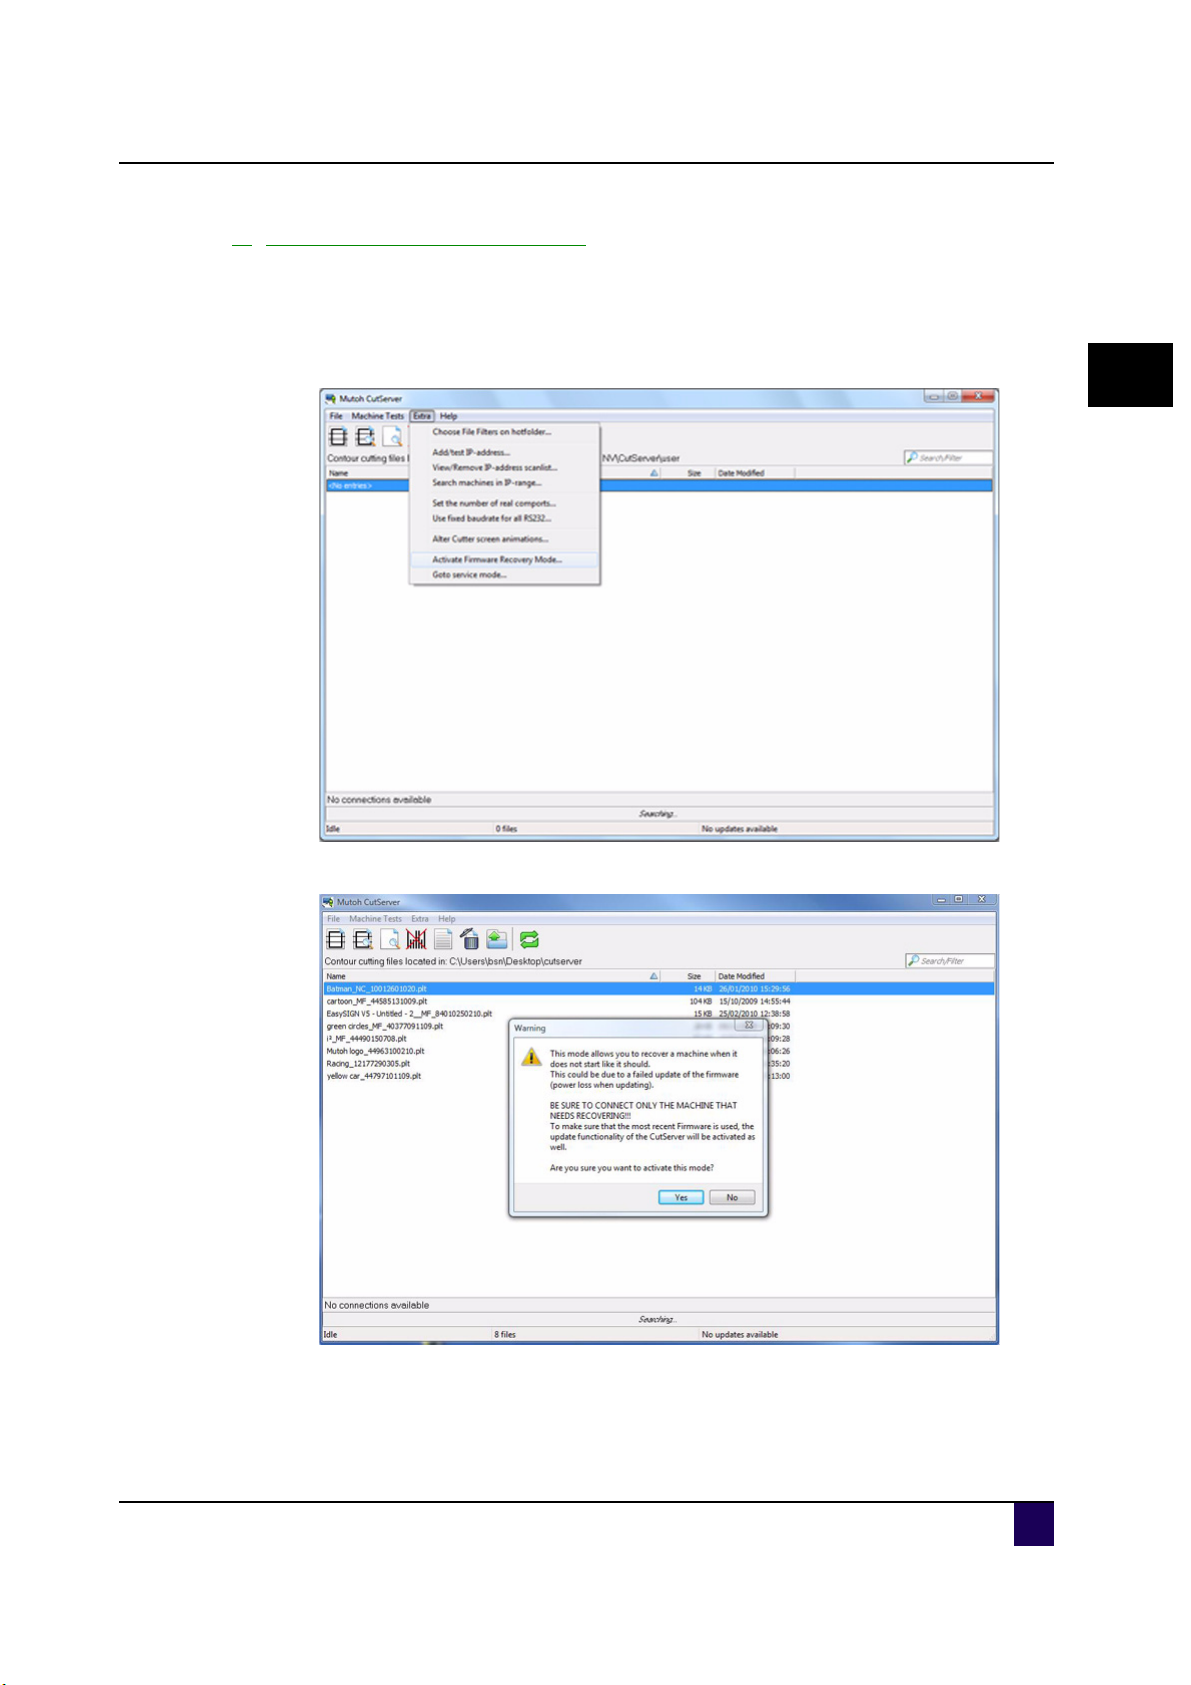
8) Activate firmware recovery mode
Step 1: It might happen that a firmware update is not performed correctly. In that case, you
are able to recover the firmware update. To do so, proceed as follows.
Step 2: Start the CutServer.
Step 3: In the CutServer, click the Extra tab and select Activate Firmware Recovery Mode.
2
Step 4: A ne
w screen appears asking if you are sure. Select Yes.
AP-75381 - Revision 1.3 23
Page 24
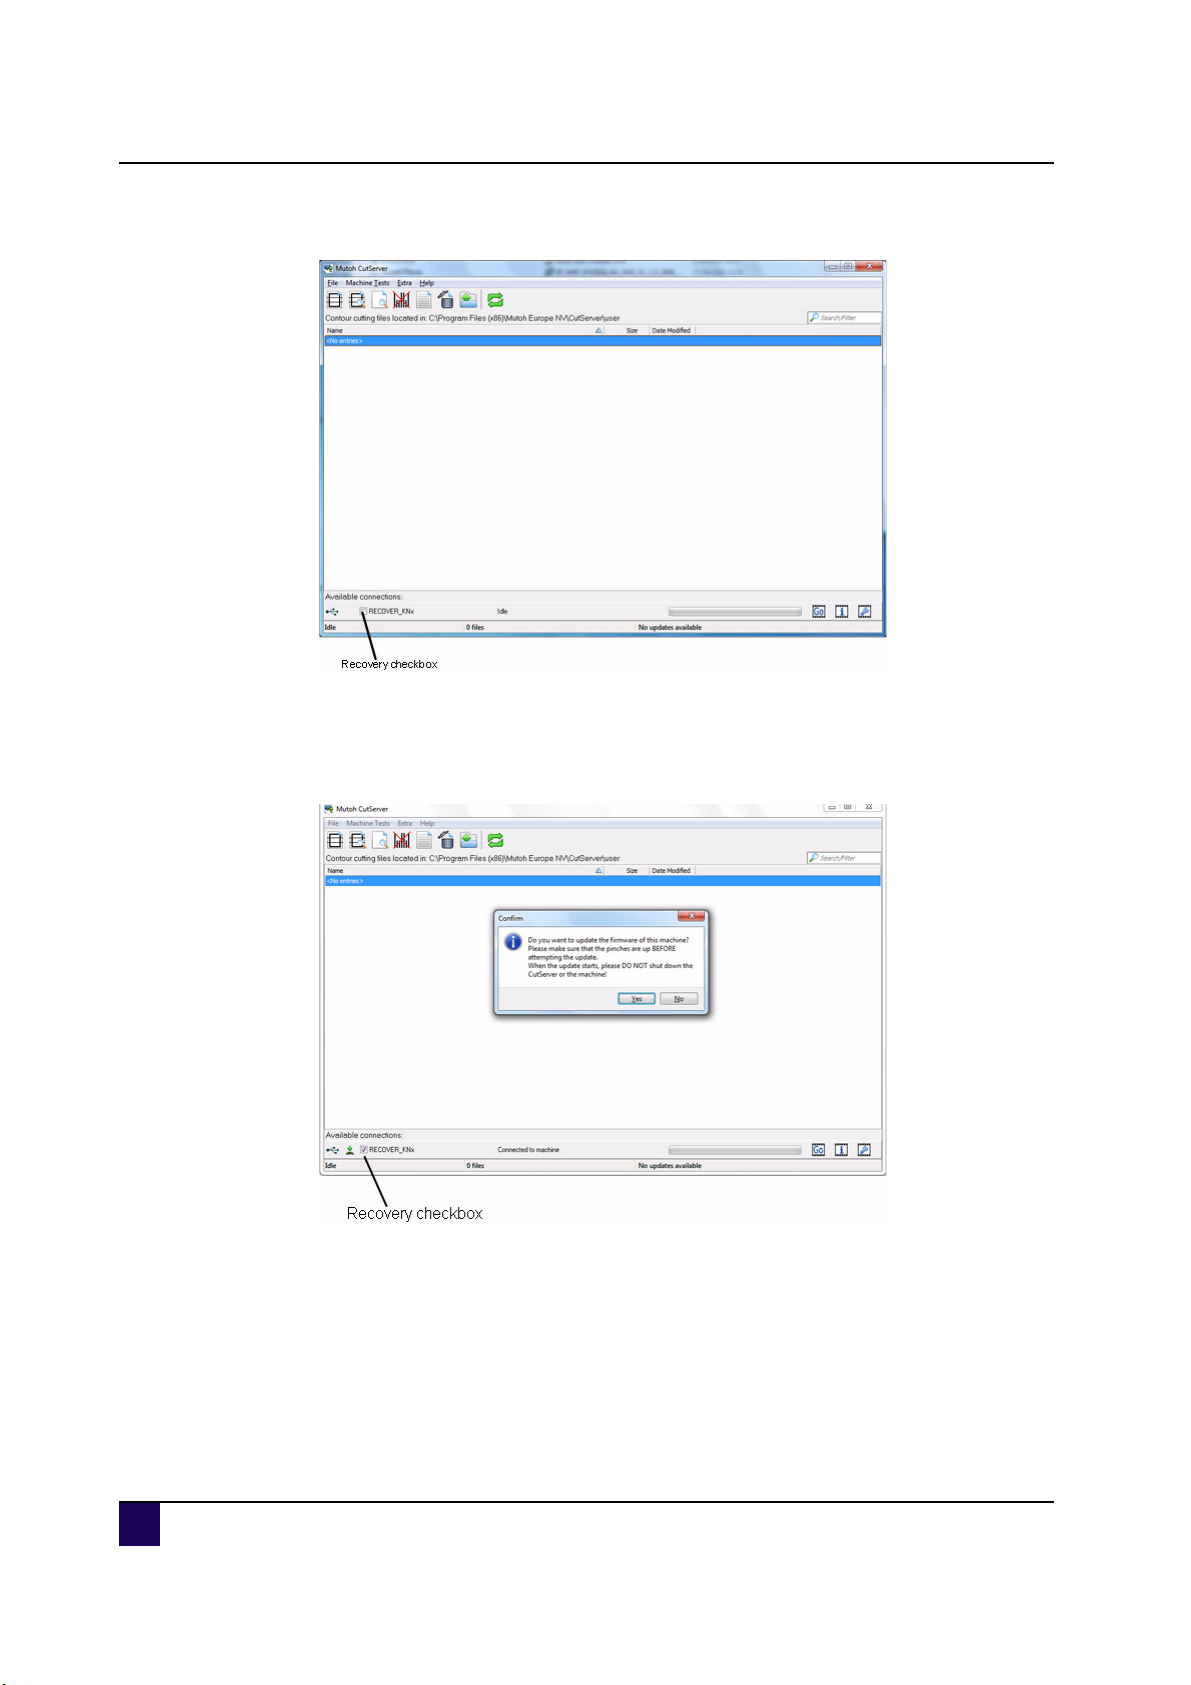
Application Guide Kona / Kona apparel
Installing CutServer
Step 5: In the statusbar, a recover connection becomes available.
Step 6: Se
Step 7: The recovery button appears next to the checkbox. When selecting this button, a
Step 8: T
Step 9: After the recovery, restart the CutServer or restart the cutter.
lect this recover connection.
confirmation window appears asking if you are sure you want to proceed. Select
yes.
he firmware is being recovered.
24 AP-75381 - Revision 1.3
Page 25
Application Guide Kona / Kona apparel
Installing CutServer
9) Go to service mode
For authorized Mutoh technicians only.
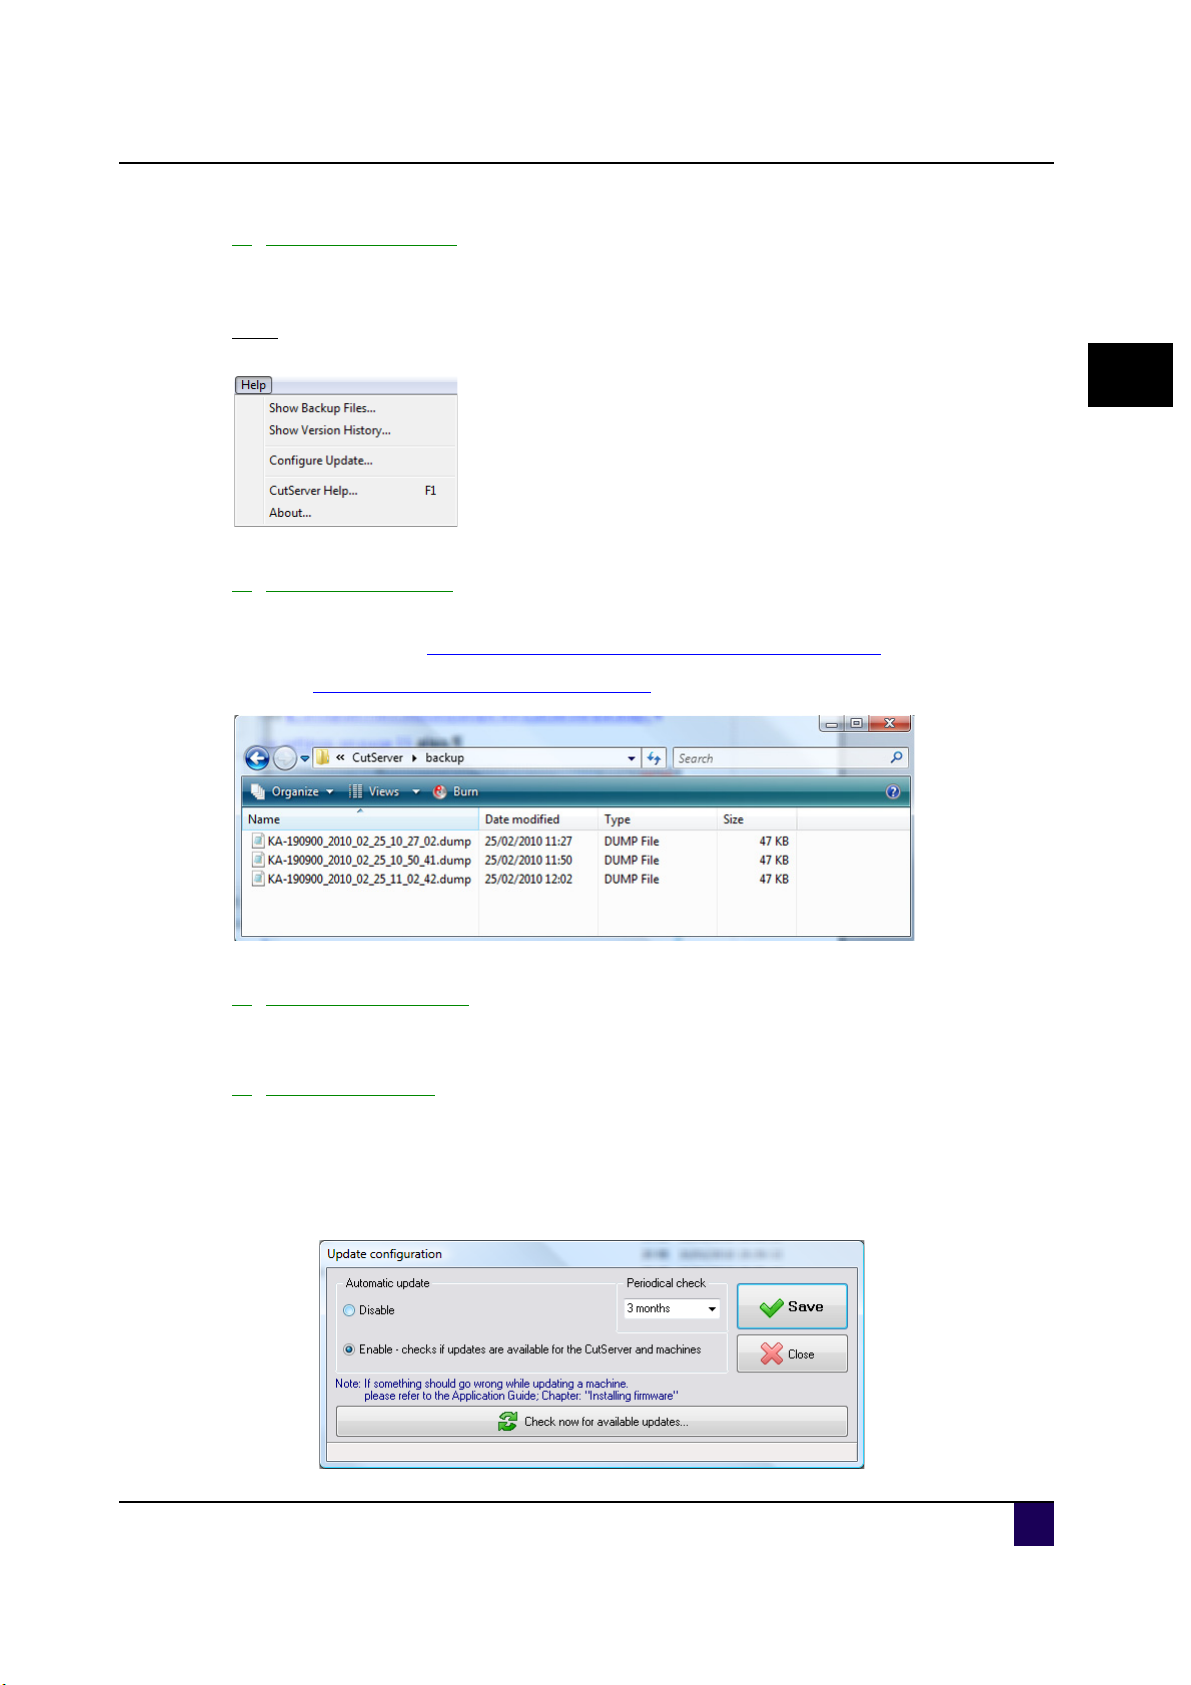
Help
1) Show Backup Files
When taking a backup of your parameters, a dump file is created. Use this function to browse
to the following folder C:\Program Files\Mutoh Europe NV\CutServer\backup/
2
Refer to Backup the machine settings on page13 also.
2) Show version history
This menu allows the user to get know-how about the CutServer history topics.
3) Configure update
It is possible to check for new updates using the Mutoh CutServer. Please follow the procedure below to configure the update function.
Step 1: Select help > configure update.
Step 2: The following screen will pop-up.
AP-75381 - Revision 1.3 25
Page 26
Application Guide Kona / Kona apparel
Installing CutServer
Step 3: Here you can set the following update options:
Item Option Description
Automatic
update
Periodical
check
Disable Never check if there are updates available
Enable Check if there are updates available
At start-up Check for updates every time you start-up the CutServer
Every 3 months Check for updates every 3 months
Check now Immediately check for updates
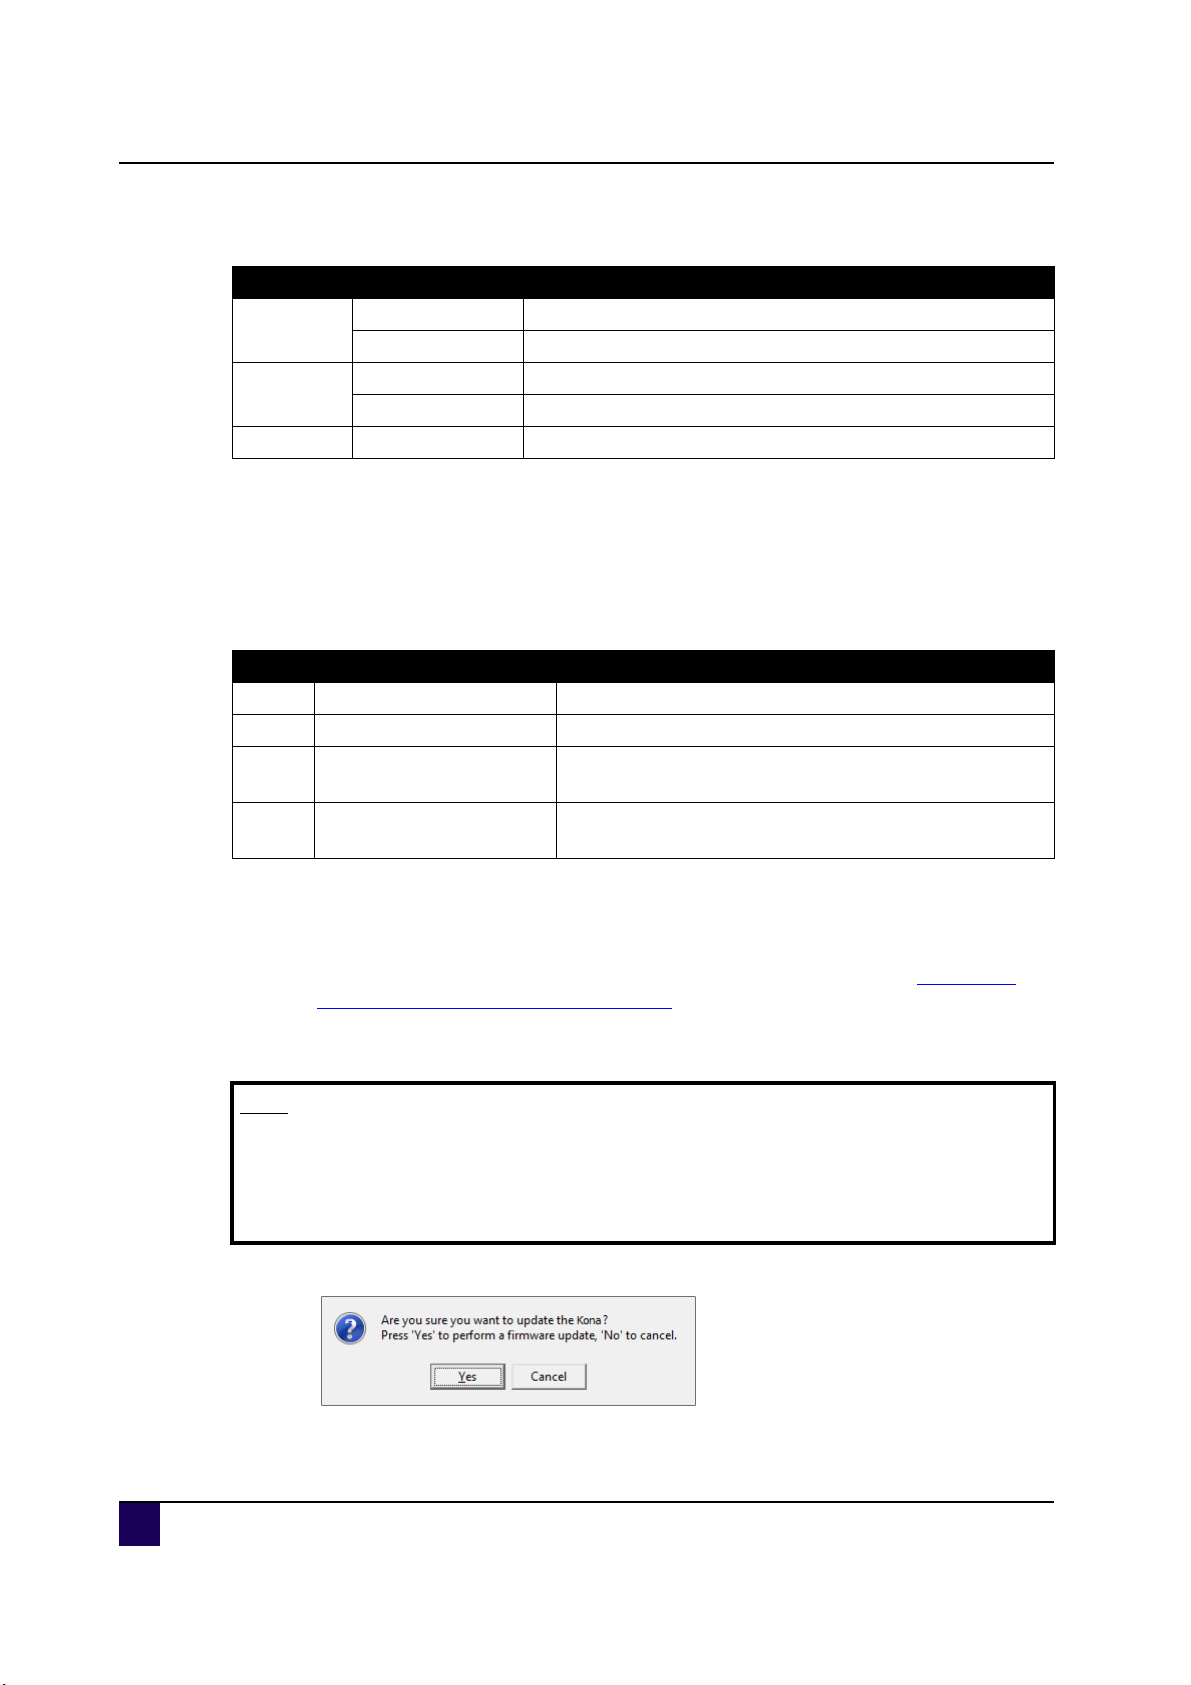
Follow the procedure below to download and install the updates (if available).
Step 1: Run the Mutoh CutServer.
Step 2: Be sure that the automatic updates are enabled.
Step 3: Check the status of the updates in the lower right corner.
Option Status Description
A Nothing available You have the latest version of firmware and software.
B Updates available There are new updates available.
Updates & Installs /
C
Upgrades available
Installs / Upgrades
D
available
You have downloaded an update which can be
installed and there are still updates available.
You have downloaded the upgrades, but not yet
installed.
Step 4: Double click on the status if there are upgrades or installs available (option B-C-D)
Step 5: Select the checkbox of the upgrade you want to download.
Step 6: When your computer is connected to the internet, the file(s) are automatically
downloaded. The downloaded files can be found in following folder: C:\Program
Files\Mutoh Europe NV\CutServer\updates
Step 7: When displaying the message "Installs/Upgrades" available, you can install the
upgrades by selecting the checkbox ones again.
Note
Be sure that there are no running jobs when installing the new CutServer
version.
Be sure that there is a connection between the CutServer and Kona / Kona
apparel when you want to install the new firmware.
Step 8: An installation window will pop-up.
26 AP-75381 - Revision 1.3
Page 27

Application Guide Kona / Kona apparel
Step 9: Press yes and continue the installation procedure.
Refer to Installing firmware>Normal procedure on page17
Refer to Installing Mutoh CutServer on page12
Installing CutServer
Important
Do NOT power OFF the cutter and computer during installation.
If the installation fails, follow the procedure here
Refer to Installing firmware>Recovery procedure on page18
4) CutServer Help
Press F1 to open this manual in a help format.
5) About
Shows you can see the CutServer version, the build and the loaded libraries.
2
AP-75381 - Revision 1.3 27
Page 28
Application Guide Kona / Kona apparel
Installing CutServer
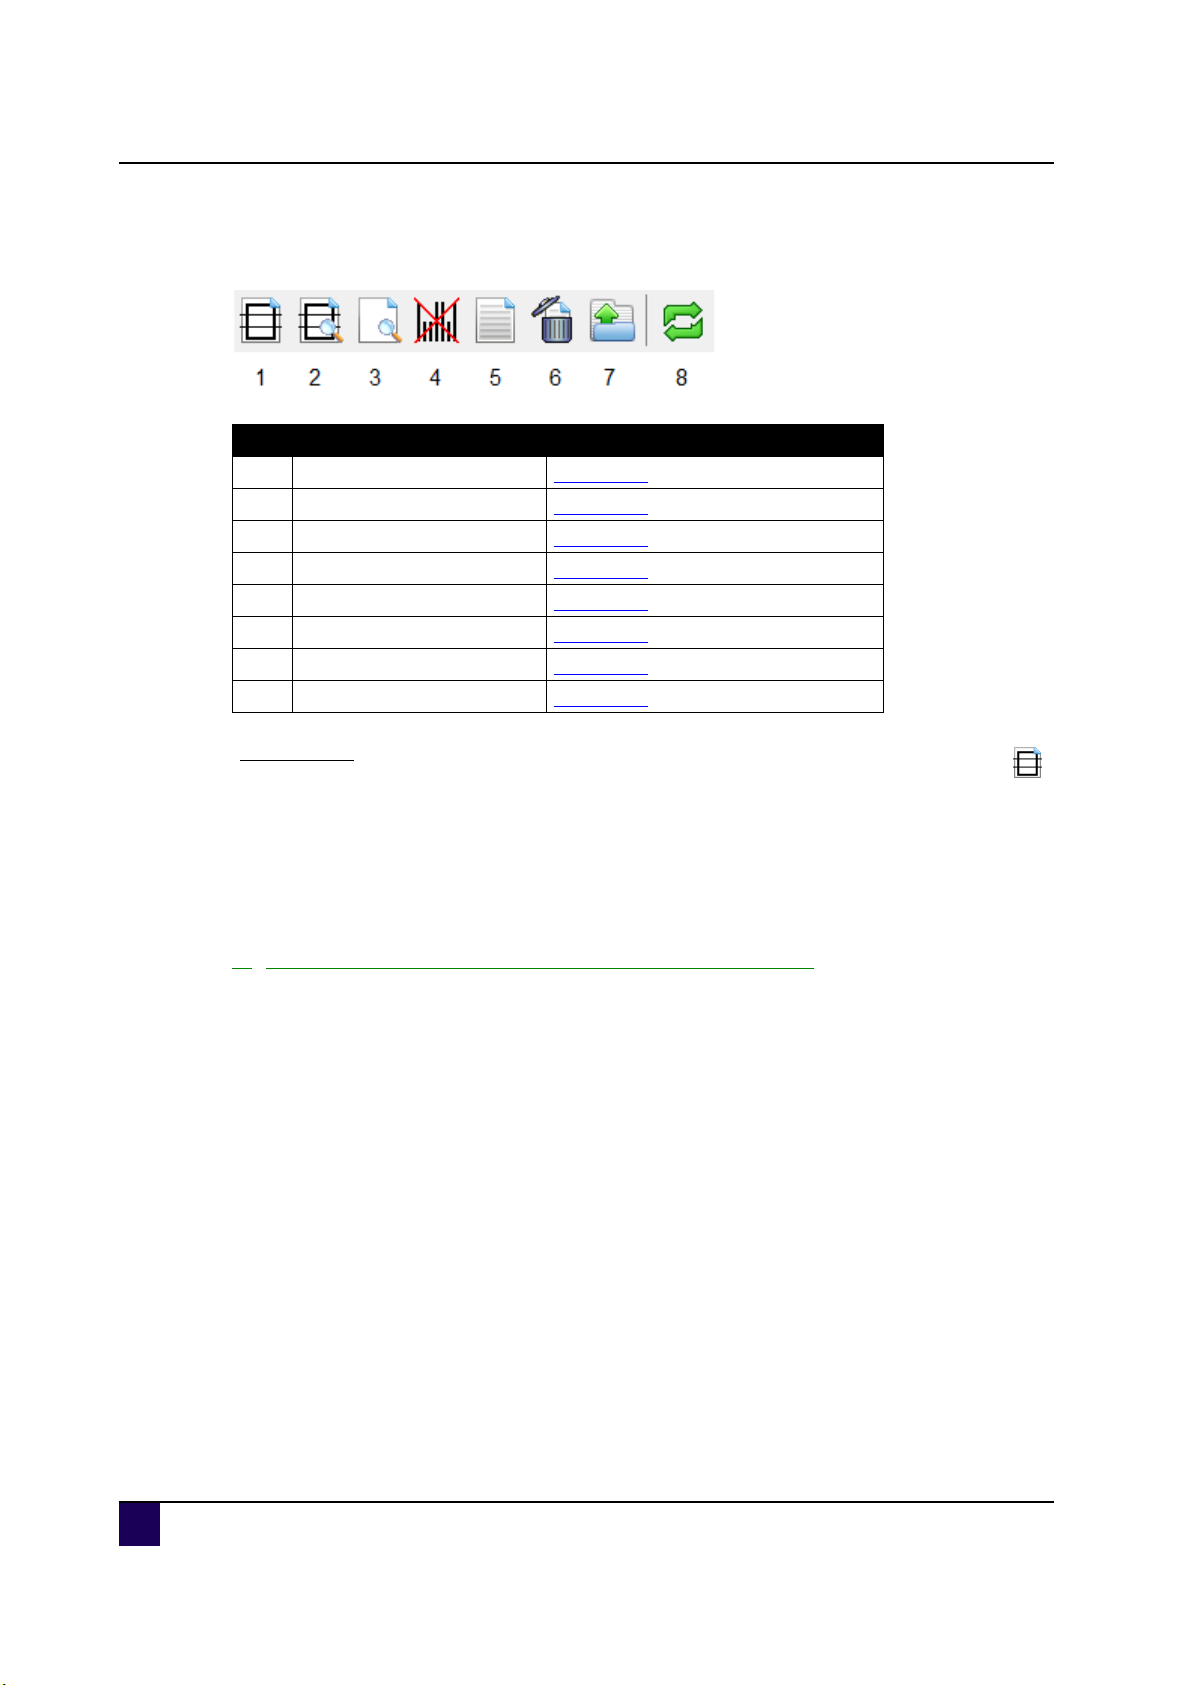
2.3.3 Toolbar icons
N° Icon More info
1 Clip the file on page 28
2 View/clip the selected file on page 30
3 View file data on page 31
4 Send EPOS job on page 32
5 View file info on page 32
6 Delete file on page 33
7 Set CutServer directory on page 33
8 Refresh the file list on page 33
Clip the file
Some software manufacturers do not divide or clip the standard multi frame contour data into
separated segments. In general, they will generate unsegmented contour data, carrying a NC
label (Not Clipped) in its file name. The CutServer will then be responsible to convert the
contour data into numerous segments. There are 2 possibilities:
1) Full automatic approach - DEFAULT - RECOMMENDED
The CutServer build offers the user the ability to fully convert the clipping of the unsegmented
contour data (NC file) ON THE FLY, without any user intervention. Only one condition should
be suffered from: the presence of the NC file in the CutServer Queue.
Step 1: NC file in CutServer Queue?
Step 2: Check your CutServer settings for the appropriate multipoint mode (multi frame).
Step 3: Press Go → bar code scanning → CutServer receives the ID number detected by
the Kona / Kona apparel.
Step 4: Searches for the proper bar code ID, and notifies a non-clipped ID number.
28 AP-75381 - Revision 1.3
Page 29
Application Guide Kona / Kona apparel
Installing CutServer
Step 5: Automatically, the NC → MF conversion will take place and the CutServer will only
respond with the clipped MF file
Filename_NC_41010220205.plt
Filename_MF_41010220205.plt
2
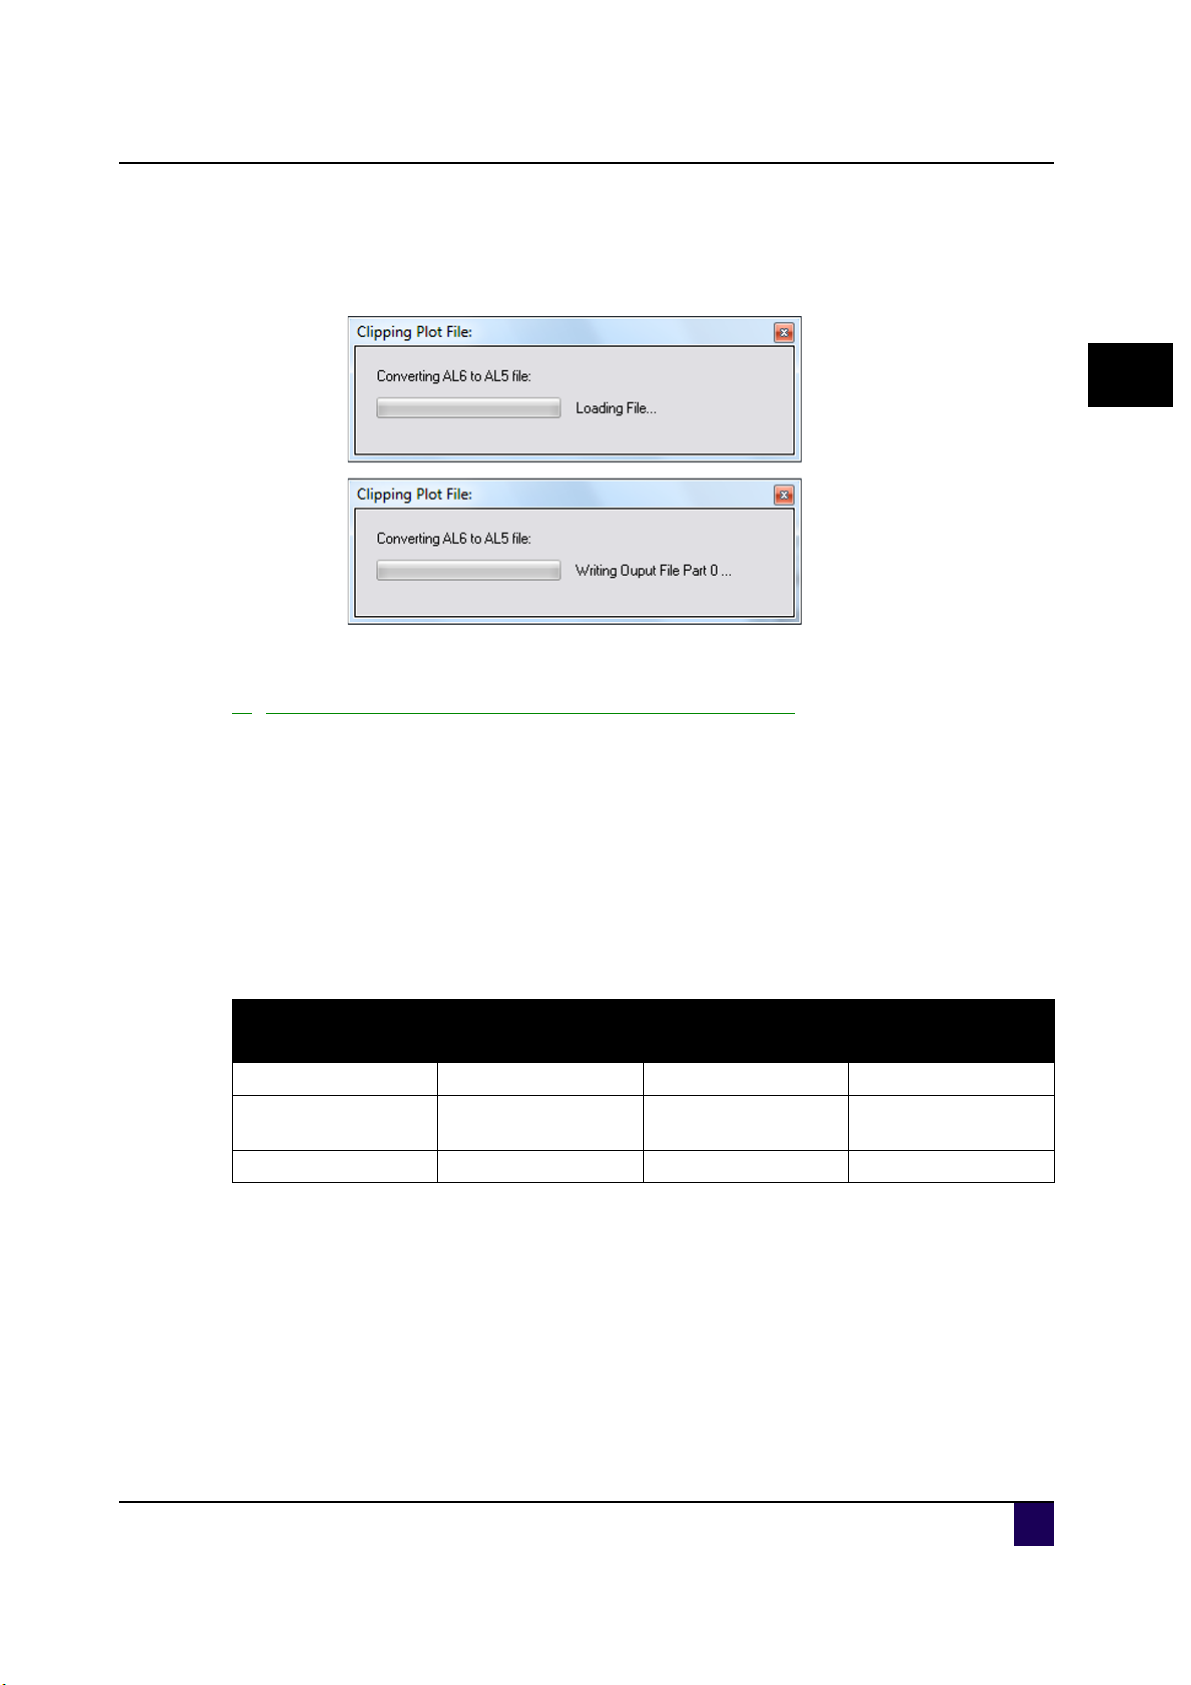
2) A manual approach - Click the Clip the file toolbar icon
Step 1: Search and select the appropriate ID file (NC label) in the Mutoh CutServer Queue.
Step 2: Press the Clip the file toolbar icon.
Step 3: Converting busy.
Step 4: The end of the CutServer clipping will result in a similar filename with MF extension.
Step 5: Check your CutServer settings for the appropriate multipoint mode (multi frame).
Step 6: Press Go → Bar code scanning → CutServer receives the ID number.
Step 7: CutServer selects the MF extension and replies with the segmented plot file.
Step 8: Segment plotting on Kona / Kona apparel.
Software manufac-
turer
EasySIGN EasySIGN NO YES
Scanvec Amiable
Caldera Grip + NO NO
(*) NC: not clipped
(**) MF: multi frame
Software bundle
PhotoPRINT SE or
DX Mutoh Edition
NC compatible (*) MF compatible (**)
Clipping method
NO YES
AP-75381 - Revision 1.3 29
Page 30
Application Guide Kona / Kona apparel
Installing CutServer
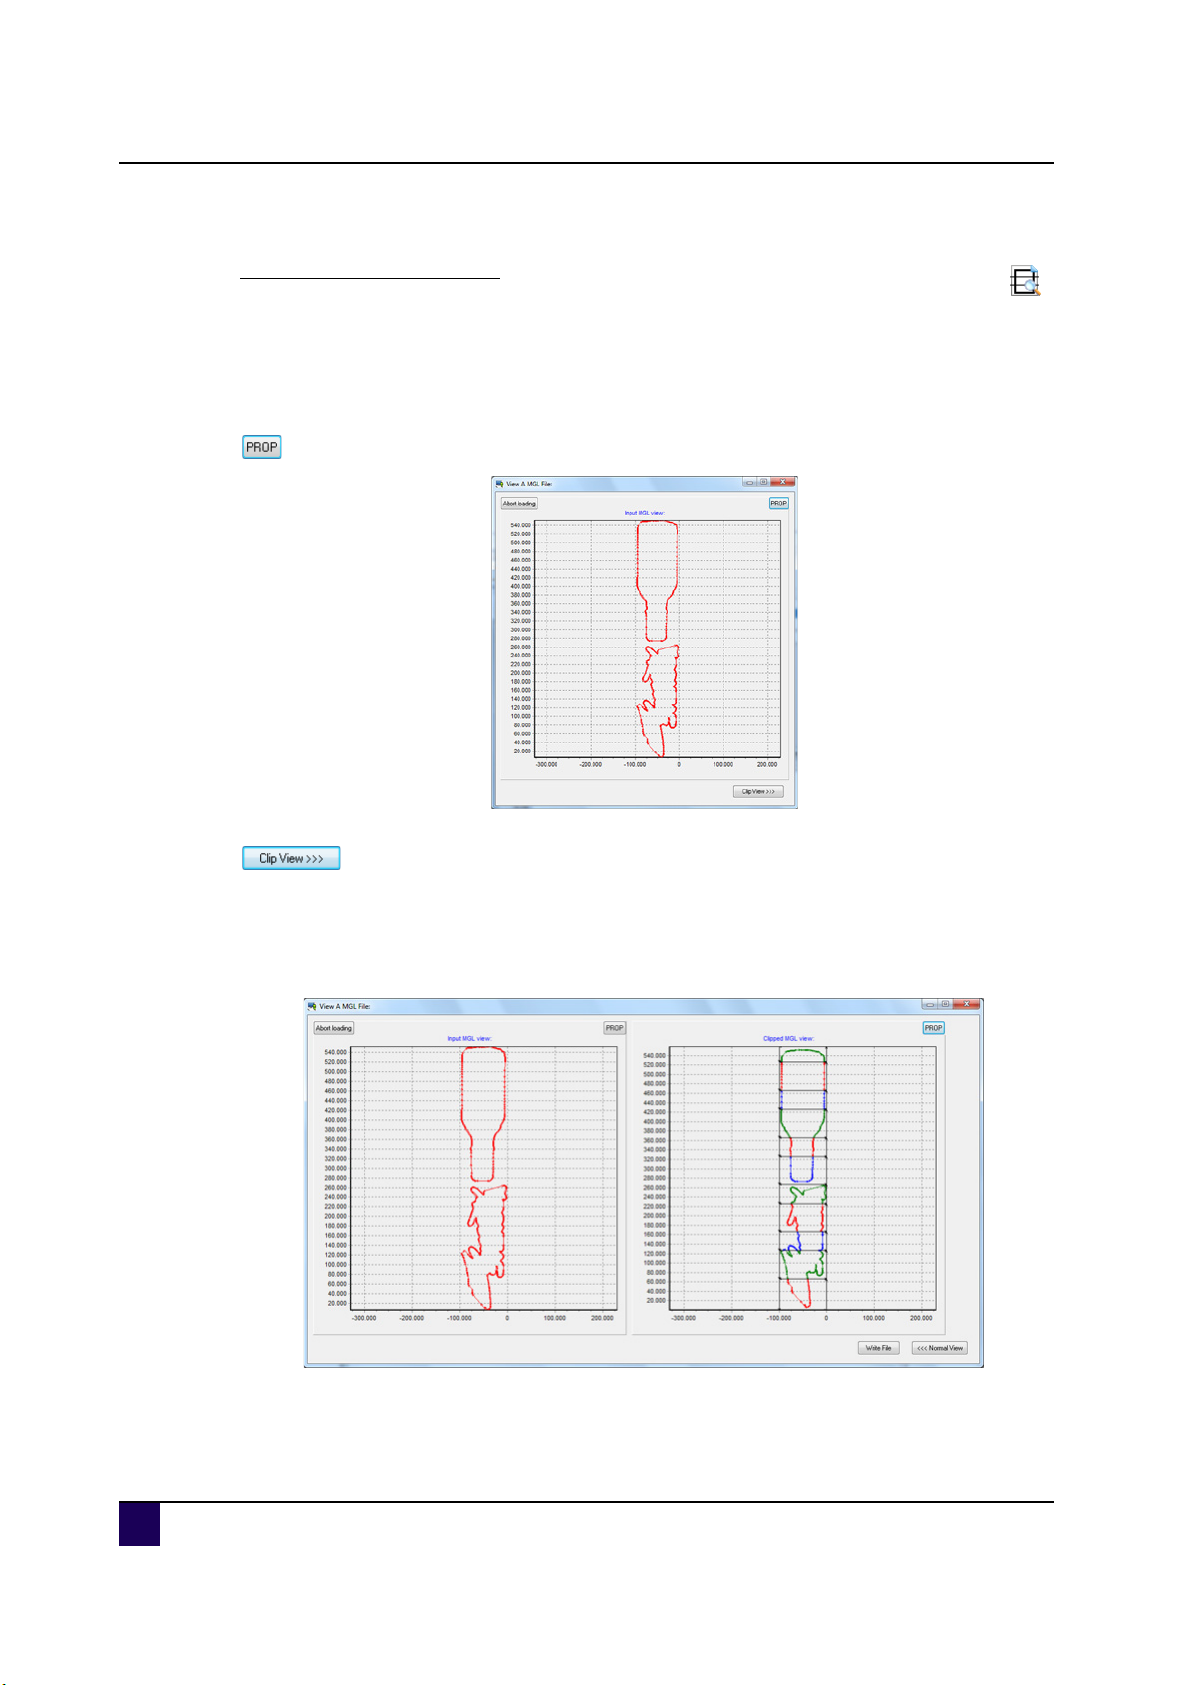
View/clip the selected file
Identical like previous clip icon, however a graphical interface will represent both NC and MF
files. For a large amount of data, it is not recommended to use this time consuming viewing
method. Nevertheless, it is always possible to abort.
Uses proportional window scaling
Views your clipping result - extend your window
Left: Input MGL view
Right: Clipped MGL view
Each colour represents a clipped segment of the entire contour alignment
file - type multi frame mode.
The files above do not show the contour boxes because they come together with the sides
of the diagram.
30 AP-75381 - Revision 1.3
Page 31

Application Guide Kona / Kona apparel
Installing CutServer
Writes a clipping file by one single click (manual method)
Before: Filename_NC_41010220205.plt (NC: Not Clipped)
After: Filename_MF_41010220205.plt (MF: Multi Frame)
Switches back to the classic normal input view
Note
Both MF and NC files will still be present in your Mutoh CutServer queue list
after completing the segment dividing / clipping.
View file data
To view the MGL plot data, the file contents can be displayed (no editing possible).
To edit the file, browse for the hot folder and correct the file as required.
2
AP-75381 - Revision 1.3 31
Page 32

Application Guide Kona / Kona apparel
Installing CutServer
Send EPOS job
In case reading errors occur during the Kona / Kona apparel's bar code detection sequence, a
manual workaround for damaged bar code strings or faulty readings is available. Search for
the correct alignment file in Mutoh's CutServer Queue, and press the Send Epos Job button.
To directly send the EPOS file without reading the bar code, the media load direction needs
to be provided (0° or 180° degrees rotated?).
As soon as a confirmation is given, the frame scanning command is adapted to bypass the
bar code reading, and immediately the registration marks of the bounding box and the vector
data are broadcasted.
View file info
In order to get know-how of certain file properties, additional information can be obtained by
double clicking each contour cutting file listed in the CutServer Queue. Furthermore, rather
than using the quick shortcut icons from the toolbar, a number of relevant file functionalities
were reproduced once more by means of an extra set of buttons.
Clip only Refer to Clip the file on page28
View/clip Refer to View/clip the selected file on page30
Start EPOS Refer to Send EPOS job on page32
32 AP-75381 - Revision 1.3
Page 33

Application Guide Kona / Kona apparel
Installing CutServer
It might be possible that you only want to cut the first segment of a
multi frame job. Via this option you can choose which segment(s) to
cut by selecting or clearing the checkboxes.
Be ware that all segments will be measured.
Choose Segments
Send Raw Data Sends out the cutting file, after asking the target communication port.
View Data Refer to View file data on page31
Close Close the window
Delete file
The recycle bin icon removes the selected file from the CutServer Queue and its hot folder!
Set CutServer directory
2
Refer to Installing Mutoh CutServer > Create and set a hot folder on page 12
Refresh the file list
The hotfolder should auto refresh automatically. However, it might be possible that the job list
is not up-to-date after adding a plot file in the CutServer hot folder. If you notice this, press the
Refresh button.
Note
In case refreshing the list does not work, restart the cutserver.
AP-75381 - Revision 1.3 33
Page 34

Application Guide Kona / Kona apparel
Installing CutServer
2.3.4 Available connections
All the cutters installed earlier are displayed in a list. The CutServer can be connected with
each cutter listed below.
Refer to Install USB drivers on page11 to know how to install your cutter properly.
Right-click on one of the connections to backup or restore parameters
Refer to Machine tests on page16
Refer to Restore the settings manually as follows on page14
N° Description Extended description
Connection type
USB
1
LAN
Serial
on page 34
2 Connection checkbox on page 35
Serial number Kona / Kona apparel /
3
machine type
on page 35
4 Status connection on page 35
5 Progress bar on page 35
6 Go button on page 35
7 Machine info button on page 35
8 Settings button on page 36
Connection type
Depending on the type of the connection, another icon is visualised.
USB connection
Network connection
Serial connection
34 AP-75381 - Revision 1.3
Page 35

Application Guide Kona / Kona apparel
Installing CutServer
Connection checkbox
Select the checkbox to make a connection with the cutter.
Clear the connection checkbox before rebooting the machine. Select the box once again
when the cutter is rebooted successfully.
Note
The connection between the PC and cutter does not disappear due to a reset. It
only disappears if the power is off.
Serial number Kona / Kona apparel
The serial number and the machine type are displayed here.
Status connection
Displays the status of varies connections e.g.
Idle
Connected to the machine
Updating firmware
...
Progress bar
Displays the progress of the sent data.
2
Go button
To identify the loaded contour job, pressing Go will start a bar code scanning sequence.
If selecting the checkbox “Show this window when I click Go”, the communication & machine
settings window opens.
Refer to Settings button on page36
Machine info button
Supplementary, a list of machine information can be obtained.
AP-75381 - Revision 1.3 35
Page 36

Application Guide Kona / Kona apparel
Installing CutServer
Settings button
When clicking this button, the following window will pop-up.
1) EPOS mode
After clicking Go, these settings are used. You can set the following:
Number of jobs to perform in 1 run
Sheeting off settings
Perform a sheet-off after the complete run is done
Perform a sheet-off between every job during this run
Note
Be sure to have the latest firmware version installed to be able to benefit from
these settings. Firmware version KN 3.0.0 is the first one supporting this
feature.
2) Terminal properties
A DOS look-alike terminal window allows you to get knowledge of certain command interactions (MGL commands) between the Kona / Kona apparel and CutServer. Every time making
a new port connection, a new corresponding terminal window is created. Selecting the relevant checkbox in the bottom section of the CutServer to activate / deactivate the plotter, will
also open such a terminal, if set to ON. As an end-user, you will normally not need to set this
option. It can be useful, however during installation or when a problem occurs, in order to test
and / or debug communication issues between the plotter and the software.
3) Autoshow settings
It might be interesting that this setup window pops-up when clicking on Go to point you on the
settings which are used during this run.
36 AP-75381 - Revision 1.3
Page 37

Application Guide Kona / Kona apparel
Setting up your print and cut software
Chapter 3 Setting up your
print and cut
software
Note
Please be aware that this chapter is for Kona only.
3
3.1 EasySIGN
3.1.1 Update EasySIGN
Please be sure to always have the latest service pack of EasySIGN installed on your
computer.
Refer to Compatibility overview on page9 to know which versions of EasySIGN are
compatible with the Kona / Kona apparel and CutServer.
There is a special driver update required when working with the Kona / Kona apparel series
cutters. This file ( Mutoh.drv ) can be found on Mutoh’s FTP
existing Mutoh.drv.
3.1.2 EasySIGN driver installation
When installing the cutter, you might need to install the driver twice. Once for the CutServer
and once for direct cutting (com port).
Once via the CutServer (to be used with the auto-align barcode workflow) and once via the
virtual com port (created by the Kona / Kona apparel USB driver) for normal sign cutting jobs.
Step 1: Start EasySIGN.
and should be copied over the
AP-75381 - Revision 1.3 37
Page 38

Application Guide Kona / Kona apparel
Setting up your print and cut software
Step 2: Go to file, device setup and click on the 'Add Plotter' Wizard. The “add plotter” window
appears. Choose Mutoh Kona and click on next,
Step 3: The Select Port window appears. Choose the virtual com port (in this case, COM3)
and click on next.
Refer to (Un)Install USB drivers>Check COM port used on page14
38 AP-75381 - Revision 1.3
Page 39

Application Guide Kona / Kona apparel
Setting up your print and cut software
Step 4: The port settings window appears, leave it on windows defaults, and click on next.
Step 5: Click on finish.The driver is now being installed.
3
AP-75381 - Revision 1.3 39
Page 40

Application Guide Kona / Kona apparel
Setting up your print and cut software
3.1.3 Configuring EasySIGN for the CutServer
Before you are able to print and cut, the software needs to be configured as follows:
Step 1: Start EasySIGN
Step 2: Go to file, device setup and click on the 'Add Plotter' Wizard. The add plotter window
appears. Choose Mutoh Kona and click on next.
Step 3: The Select Port window appears. Choose the Mutoh CutServer.
Step 4: Click on finish.The driver is now being installed.
40 AP-75381 - Revision 1.3
Page 41

Application Guide Kona / Kona apparel
Setting up your print and cut software
3.1.4 Synchronise your CutServer hotfolder in EasySIGN
EasySIGN should automatically find the directory that is used by the CutServer via the
windows registry. In case this does not happen, start via windows the production manager of
EasySIGN, go to spooler settings and change the directory.
3
Note that the directory of the CutServer is automatically changed when changing it in the
Mutoh CutServer itself after restarting EasySIGN.
AP-75381 - Revision 1.3 41
Page 42

Application Guide Kona / Kona apparel
Setting up your print and cut software
3.2 Scanvec Amiable
3.2.1 Configuring Scanvec Amiable
Before you are able to print and cut, the software needs to be configured as follows:
Step 1: Click on Setup > Add Setup or ctrl+N
Step 2: Select
Vinyl Cutters
Mutoh
Kona
Step 3: Click next
42 AP-75381 - Revision 1.3
Page 43

Application Guide Kona / Kona apparel
Setting up your print and cut software
Step 4: Choose a name and COM port and finish the setup.
Refer to (Un)Install USB drivers>Check COM port used on page14
3
AP-75381 - Revision 1.3 43
Page 44

Application Guide Kona / Kona apparel
Setting up your print and cut software
3.3 Mutoh Grip +
3.3.1 Installing a Kona driver
Step 1: Select the settings tab and press config.
Step 2: In th
Step 3: A
new application window appears. Select cutter in the type drop down list, enter a
name + press the configure button.
e applications bar, press new.
44 AP-75381 - Revision 1.3
Page 45

Application Guide Kona / Kona apparel
Setting up your print and cut software
Step 4: The cutters configuration window appears. Press new.
Step 5: In the Cutter parameters window select the correct model and press OK.
3
Step 6: In the sof
tware configuration window press restart.
AP-75381 - Revision 1.3 45
Page 46

Application Guide Kona / Kona apparel
Setting up your print and cut software
46 AP-75381 - Revision 1.3
Page 47

Application Guide Kona / Kona apparel
Chapter 4 Contourcutting
4.1 Introduction
Contour cutting is a very popular feature of the Mutoh cutters.
This feature is made to cut pre-printed signs on vinyl for sticker production as shown on this
picture:
Contourcutting
4
Please read this chapter carefully.
AP-75381 - Revision 1.3 47
Page 48

P4 P2
P3 P1
00000000000
00000000000
Application Guide Kona / Kona apparel
Contourcutting
4.2 Different alignment methods
There are some different approaches to cut your signs which also implicate a different
alignment method.
Manual alignment Single frame alignment Multi frame alignment
N° Description Info
1 Manual
2 Single Frame
3 Multi Frame
Manual alignment method
Manually set the size of the paper and 4 corners of the box
Alignment with barcode and single frame
Only 1 bounding box
Alignment with barcode and multi-segment frame.
Multiple segments in 1 bounding box
(for long files to guarantee precision).
48 AP-75381 - Revision 1.3
Software Manual Single frame
EasySIGN
Scanvec
Amiable
Mutoh Grip (+)
Mutoh
CutServer
Multi frame
(clipped)
Multi frame
(not clipped)
Page 49

Application Guide Kona / Kona apparel
4.3 Which alignment method to use?
4.3.1 Automatic alignment method
Single frame alignment method
This is a fully-automated alignment system, with a barcode printed on the sign. This method
should be used in combination with Mutoh’s CutServer.
This method can be used in case you are creating multiple different contour signs. It allows
you to make all your prints at once (overnight printing for example), and then load the roll with
images in the CutServer.
If each sign on the roll has a barcode and if all plot files are in the Mutoh CutServer, set the
amount of jobs and click on Go in the Mutoh CutServer and every sign on the roll will be cut,
without the need for user intervention (make sure you’ve enabled auto-sheet-off in EasySIGN
for each contour-sign).
The reason for the two barcodes is to make it possible for the CutServer to auto-detect if the
image is loaded upside-down or correctly. There is no need for you to search the plot file for
each image; the CutServer and the Mutoh CutServer will do this fully-automatically, until the
complete roll with signs is finished.
We do not recommend this method over 2 m job length, although there is no real limit to the
length that can be used.
Contourcutting
4
Refer to the CutServer application guide for all details about Mutoh’s CutServer and
the Print&Cut workflow.
Multi frame alignment method
The Mutoh Multi frame alignment method offers all advantages of the previous one but it will
split the image in multiple segments. This is to enhance precision over long length. This
method should be used in combination with Mutoh’s CutServer. With this method, it is
possible to make signs of 10m or longer, and the CutServer will measure segment per
segment, and cut segment per segment. This method gives you more accuracy than the
previous method.
Refer to the CutServer application guide for all details about Mutoh’s CutServer and
the Print&Cut workflow.
AP-75381 - Revision 1.3 49
Page 50

Application Guide Kona / Kona apparel
Contourcutting
Note
When working with EasySign, check the corners to see if you are using a
Single frame or multi frame alignment box.
Single Frame alignment box
Multi Frame alignment box
50 AP-75381 - Revision 1.3
Page 51

4.3.2 Manual alignment method
Single frame alignment method
This is a manually alignment system, with a barcode printed on the sign. This method should
be used in combination with Mutoh’s CutServer.
This method can be used in case the bounding box cannot be read by the cutter. In this case,
user intervention is necessary. This means the user needs to fill in the barcode number, how
the print job is loaded in the cutter and if a sheet off action is necessary once the job is done.
Once all these parameters are set, you need to jog the knife tip to some predetermined
coordinates. As soon as the cutter knows these coordinates, the cutting procedure starts
(make sure you’ve enabled auto-sheet-off in EasySIGN for each contour-sign).
We do not recommend this method over 2 m job length, although there is no real limit to the
length that can be used.
Multi frame alignment method
Application Guide Kona / Kona apparel
Contourcutting
4
Is the same as the single frame alignment method but for multi frame jobs.
This method should be used in combination with Mutoh’s CutServer. With this method, it is
possible to make signs of 10m or longer.
Once you have set all parameters and positioned the knife tip over the predetermined
coordinates, the CutServer will start and cut segment per segment. This method gives you
more accuracy than the previous method. We do not recommend this method for signs
smaller than 1,2m.
Refer to the CutServer application guide for all details about Mutoh’s CutServer and
the Print&Cut workflow.
Manual alignment method
The Mutoh Manual Alignment Method is a non-automatic method.
Its advantage is that the cropmark system is very small (for small sized jobs), and that this
method can be used in case of vinyl that do not reflect the EPOS laser light (meaning, the
laser would not be capable of measuring the cropmarks automatically).
Refer to EPOS read on page138
The user has to use the jog keys on the keyboard to measure each cross manually before
contour cutting can start.
Refer to the CutServer application guide for all details about Mutoh’s CutServer and
the Print&Cut workflow.
AP-75381 - Revision 1.3 51
Page 52

Application Guide Kona / Kona apparel
Contourcutting
Note
When working with EasySign, check the corners to see if you are using a
Single frame or multi frame alignment box.
Single Frame alignment box
Multi Frame alignment box
52 AP-75381 - Revision 1.3
Page 53

Indicates the max
working width when
working with a
Kona Apparel
4.4 Bounding box details
4.4.1 Hints, tips and recommendations
To use the automatic alignment procedure, the pre-printed sheet contains a bounding box
around the design to be cut.
Note that the bounding box around your design(s) is printed. Before contour-cutting the
EPOS technology will search for the bounding box and measure the position of the
design(s).
Be sure that there is 5 mm of white space between the image and the bounding box.
Be sure that the bounding box has a dark colour (recommended: black) in order to have
enough contrast with the vinyl.
The minimum thickness of the bounding box is 3 mm. However, when printing the
print&cut file on an Osprey or Toucan, it is recommended to raise this value to at least 5
mm.
Make sure that the bounding box fits within the margins of the maximum cutting width of
your cutting plotter.
On a Kona apparel the maximum width is marked by the 2 extra holes at both the left and
right side of the platform.
Application Guide Kona / Kona apparel
Contourcutting
4
Be sure that the media has been sheeted off straight. If not, the cutter will have
problems measuring the media.
Note
The position of the design with the bounding box compared to the page edges
is defined in the print-software.
The creation of an image should be done in a graphics application software
(e.g. CorelDraw, Adobe Illustrator, Adobe Photoshop or Macromedia Freehand)
or in origin software with design functionalities (EasySIGN Power Pack Pro
Mutoh Edition or Scanvec Amiable PhotoPRINT DX Mutoh Edition)
Do not forget to create the cutting line around your image. The default cutting
line is a “magenta hairline” or “spotcolor” with <CutContour> swatch name (in
the CMYK pallet).
Thickness line = hairline (or 0.25)
Colour = 100% magenta
For more details, please refer to the CutServer Application Guide.
AP-75381 - Revision 1.3 53
Page 54

1
2
3
4
5
6
7
Sheet
Bounding box
Pressure roller
Application Guide Kona / Kona apparel
Contourcutting
4.4.2 Bounding box specifications (without bar code, no cutserver application required)
For automatic alignment Type 1
The frame bounding box printed or generated around the contour cut data should respect the
guidelines below.
N° Description Minimum Maximum
White edge at the rear side
Sheet
1
Between 2 boxes
75 mm
50 mm
-
1200 mm
Add extra space (50mm) when working with curled
media
White edge at the front side
2
Add extra space (50mm) when working with curled
media
3 bounding box thickness 3 mm 20 mm
25 mm 1200 mm
4 bounding box width 250 mm -
5 bounding box height 250 mm 10 m
6 Margin between image and bounding box 6 mm -
7 Distance between pressure roller and bounding box 1 mm -
54 AP-75381 - Revision 1.3
Page 55

1
2
3
4
5
6
11
Sheet
Bounding box
Pressure roller
7
10
9
93908130410
93908130410
8
Application Guide Kona / Kona apparel
Contourcutting
For automatic alignment Type 2
(With barcode & with CutServer)
The frame bounding box printed or generated around the contour cut data should respect the
guidelines below.
4
N° Description Minimum Maximum
White edge at the rear side
Sheet
1
Between 2 boxes
75 mm
50 mm
250 mm
250 mm
Add extra space (50 mm) when working with curled
media
White edge at the front side
2
Add extra space (50 mm) when working with curled
20 mm 300 mm
media
3 bounding box thickness 3 mm 20 mm
4 bounding box width 250 mm -
5 bounding box height 250 mm 10 m
6
7
8
Vertical distance between image (or bottom part of
your ID number) and bounding box edge
Horizontal distance between bottom part of your
bar code and bounding box edge
Vertical distance between bottom part of your bar
code and bounding box edge
2 mm 6 mm
40 mm 100 mm
6 mm 12 mm
AP-75381 - Revision 1.3 55
Page 56

Application Guide Kona / Kona apparel
Contourcutting
N° Description Minimum Maximum
9 Bar code height 20 mm 20 mm
10 Bar code width 246 mm -
Distance between pressure roller and bounding
11
box
Note
Upper and lower postnet barcodes do have an identical margin setup
Make sure to respect the minimum margin setup (6) when adding your postnet
ID number too
1 mm -
56 AP-75381 - Revision 1.3
Page 57

1
2
3
5
6
13
Sheet
Bounding box
Pressure roller
4
9
7
12
11
93908130410
93908130410
8
10
Application Guide Kona / Kona apparel
Contourcutting
For automatic alignment Type 3
(With barcode & with CutServer)
The frame bounding box printed or generated around the contour cut data should respect the
guidelines below.
4
N° Description Minimum Maximum
White edge at the rear side
Sheet
1
Between 2 boxes
75 mm
50 mm
250 mm
250 mm
Add extra space (50mm) when working with curled
media
White edge at the front side
2
Add extra space (50mm) when working with curled
20 mm 300 mm
media
3 bounding box thickness 3 mm 20 mm
4 In between marker length 10 mm 60 mm
5 bounding box width 250 mm -
6 bounding box height 250 mm 10 m
7 Start / stop bounding box height 125 mm 125 mm
Vertical distance between image (or bottom part of
8
your ID number) and bounding box edge
Horizontal distance between bottom part of your
9
bar code and bounding box edge
2 mm 6 mm
6 mm 12 mm
AP-75381 - Revision 1.3 57
Page 58

Application Guide Kona / Kona apparel
Contourcutting
N° Description Minimum Maximum
Vertical distance between bottom part of your bar
10
code and bounding box edge
11 Bar code height 20 mm 20 mm
12 Bar code width 246 mm -
Distance between pressure roller and bounding
13
box
Note
Upper and lower postnet barcodes do have an identical margin setup
Make sure to respect the minimum margin setup (8) when adding your postnet
ID number too
40 mm 100 mm
1 mm -
58 AP-75381 - Revision 1.3
Page 59

1
2
3
4
Application Guide Kona / Kona apparel
1
2
34
scan 1
4.5 Scanning routing of bounding box
The bounding box is measured by the Epos sensor during a fast scan routine. It is interesting
to know the principle behind this innovative scanning method.
The scanning routine will go through the following steps:
Contourcutting
4
1 The laser will be activated to detect the background colour. This value will be used to
recognize the difference between background and box during the scanning procedure.
2 A diagonal scan will be executed at the set cutting speed in the firmware (user controlled).
3 A horizontal scan will be executed at maximum speed.
4 The head goes back over the scanned path to verify.
As from the moment the scan cycle detects 4 points, the position of the barcode is known
(situation 1 and 2). When there are less than 4 points detected, an intelligent feed of media
will be done and the same type of scan will be performed a second time (situation 3).
Situation 1 = Bottom and side of frame detected (4 points)
AP-75381 - Revision 1.3 59
Page 60

Application Guide Kona / Kona apparel
1
2
3
4
scan 1
scan 2
scan 1
1’
2’
3’
4’
1
2
Contourcutting
Situation 2 = Both sides detected (4 points)
2nd scan > bottom and side of frame detected (4 points)
Situation 3
1st scan > both sides detected (2 points)
feed of media to start second fast scan
When the cutter establishes a slight difference between the thickness of the frame in one or
more corners, a re-measuring will be performed at the respective side of the frame but slightly
higher or lower. If there is still a dissimilarity, a warning message will be displayed on the
panel and a cross will be cut in the lower right corner.
Afterwards, the cutter starts reading out the barcode. As from the moment the barcode is
recognized, the corresponding job is launched from the Mutoh CutServer.
Note
The same principle of scanning is also used on the top and centre of the
bounding box. Due to the use of this measurement system it is possible to
measure bounding boxes with a small print step error.
60 AP-75381 - Revision 1.3
Page 61

Application Guide Kona / Kona apparel
4.6 Kona / Kona apparel keyboard features
4.6.1 Automatic
When performing a single or multi-frame contour cut job, start the job via the Go button on
Mutoh’s CutServer. It is also possible to launch the job directly from the cutter itself, only on
the condition that the cutter is connected with Mutoh’s CutServer. In fact, this function
replaces the Go button.
Start a single or multi-frame contour cutting job as follows:
Step 1: Press the following buttons in order:
Actions
Contour Cut
Contourcutting
4
Automatic
Step 2: Sele
ct whether the job loaded is a single or multi-frame contour cut.
AP-75381 - Revision 1.3 61
Page 62

Application Guide Kona / Kona apparel
Contourcutting
Step 3: Set the number of jobs to perform
Press Jobs
Fill in the number of jobs.
Step 4: Press
p 5: Press the Sheet off between button.
Ste
Decide if you want to perform a sheet off action between two jobs or not.
Step 6: Press the Sheet off afterwards button.
Decide if you want to perform a sheet off action after the jobs or not.
Step 7: Press the start key.
Step 8: The cutter
will start scanning the bounding box and reading out the barcode.
Step 9: As from the moment the barcode is recognized, the corresponding job is launched
from the Mutoh CutServer.
62 AP-75381 - Revision 1.3
Page 63

4.6.2 Manual
When you want to start a contour cut job of which for example the bounding box is not printed
clearly, the automatic alignment option will not work. In this case the manual mode needs to
be chosen.
Start a manual contour cutting job as follows:
Step 1: Press the following buttons in order:
Application Guide Kona / Kona apparel
Contourcutting
Actions
Contour Cut
4
Manual
Step 2: De
cide whether the job loaded is a single or multi-frame contour cut.
AP-75381 - Revision 1.3 63
Page 64

Application Guide Kona / Kona apparel
Contourcutting
Step 3: Fill in the bar code number
Press Barcode
Fill in the barcode.
Step 4: Press
p 5: Fill in how the job is loaded
Ste
Press Direction
Set whether the media is loaded Reverse or Non Reverse.
Step 6: Press
64 AP-75381 - Revision 1.3
Page 65

Application Guide Kona / Kona apparel
Step 7: Decide if a sheet off operation is necessary once the job is done.
Press ShtOff Aft.
Select Yes or NO.
Contourcutting
4
Step 8: Press st
The CutServer will now look in the CutServer queue for the correct file. Once the
art.
file is received, the cutter asks to move the knife tip to predefined coordinates.
Step 9: Once all coordinates are determined, the cutter will start the job.
When you want to start a contour cutting job without using the automatic alignment option, or
if no automatic detection is possible, the manual mode needs to be chosen. This could be
useful when you have loaded very reflective media which cannot be detected by the cutter.
Start a manual contour cutting job as follows:
Step 1: Press the following buttons in order:
Actions
Contour Cut
Manual
Manual
Step 2: Se
t the exact length and width of the bounding box.
AP-75381 - Revision 1.3 65
Page 66

Application Guide Kona / Kona apparel
X Length
Y Width
P1
P3
P2
P4
Contourcutting
Step 3: Set the roll direction.
Non-reverse: When standing in front of the cutter, the data sent should not be
rotated.
Reverse: When standing in front of the cutter, the data sent should be rotated.
Step 4: Press start.
Step 5: M
ove the penhead using the jog keys until the knife point is positioned above P1
and press OK when done. Then select P2 - P3 - P4.
Step 6: The knife will pause near point P1
Step 7: Send the relative (NOT absolute) plot data to the cutter to start the job.
66 AP-75381 - Revision 1.3
Page 67

4.7 Print and cut with EasySIGN
Please follow the steps below to perform a print and cut workflow with NCD EasySIGN.
Step 1: Create your contour design with hairline identification.
Application Guide Kona / Kona apparel
Contourcutting
4
Step 2: Set your import settings in EasySIGN.
Step 3: Import your designs.
AP-75381 - Revision 1.3 67
Page 68

Application Guide Kona / Kona apparel
Contourcutting
Step 4: Enable cropmark settings in the menu which comes on the screen when pushing the
right mouse button.
Step 5: Select appropriate alignment system:
Mutoh Manual Align
Mutoh Auto Align
Mutoh Auto Align (barcode)
Mutoh Auto Align (Multiframe)
Set number of segments or select “0” if you want to make EasySIGN decide
itself.
Refer to Different alignment methods on page48
Step 6: Do you have EasySIGN Power Pack Pro?
Yes >> Print via EasySIGN
No >> Export and import into your rip bundle
Step 7: Do you want a barcode?
No >> [A] Direct plotting (Mutoh Manual Align, Mutoh Auto Align)
Yes >> [B] Plot file via Mutoh CutServer (Mutoh Auto Align (barcode), Mutoh
Auto Align (Multiframe))
68 AP-75381 - Revision 1.3
Page 69

Application Guide Kona / Kona apparel
Step 8: [A] Direct Plotting (Mutoh Manual Align, Mutoh Auto Align)
Contourcutting
4
AP-75381 - Revision 1.3 69
Page 70

Application Guide Kona / Kona apparel
Contourcutting
Step 9: [B] Plot file via Mutoh CutServer (Mutoh Auto Align (barcode), Mutoh Auto Align
(Multiframe))
Set EasySIGN link with Mutoh CutServer and verify the location of the hot folder
(Spooler Production Manager) and match with the CutServer.
Refer to EasySIGN > Configuring EasySIGN for the CutServer on page 40
Refer to EasySIGN > Synchronise your CutServer hotfolder in EasySIGN on page 41
Plot Print & Cut lines to Mutoh CutServer
Step 10: Send plot job via Mutoh CutServer to Kona / Kona apparel
Press the Go Button in the Mutoh CutServer or launch the job directly via the
Kona / Kona apparel
Refer to Available connections > Go button on page 35
Refer to Kona / Kona apparel keyboard features on page61
70 AP-75381 - Revision 1.3
Page 71

Application Guide Kona / Kona apparel
4.8 Print and cut with Mutoh Grip (+)
Please follow the steps below to perform a print and cut workflow with Mutoh's Grip(+).
Step 1: Create your contour design in Illustrator. Be sure that
The Swatch Name is CutContour
It is a spotcolor
ColorMode is CMYK
The colour is 100% magenta
The swatch has a thickness of 0.1 mm
Contourcutting
4
Step 2: Import the job in Grip(+). If everything is correct, a scissor is displayed in the
preview pane.
Step 3: Drag your file to the desired printer.
Step 4: Click the following button to open the preferences.
AP-75381 - Revision 1.3 71
Page 72

Application Guide Kona / Kona apparel
Contourcutting
Step 5: Go to the Cutting tab and enable Cutting Contour and Print registration marks.
Note
It is not recommended to mark the “Print bar code” and “Print Identification
number” box. This is NOT the Postnet barcode and job number which the
CutServer uses, but only the Grip(+). The original barcode will automatically be
printed.
Step 6: After making the above settings, close the screen and print the job.
Step 7: As soon the job is printed, it is queued in the Grip(+) CutServer.
Step 8: Double click on your Kona / Kona apparel cutter and press the Configure… key.
72 AP-75381 - Revision 1.3
Page 73

Application Guide Kona / Kona apparel
Contourcutting
Step 9: Fill in the link type (USB) and verify if your cutter is well connected by pressing on
the detect cutter key.
4
Step 10: Set positioning, sheeting off mode and cutter step as you wish.
Note
Be sure to set the cutter step in Grip(+) the same as the program step on the
cutter. If not, the image will be cut 2,5 time bigger or smaller.
Alignment
method
Full Automatic
Single
Full Automatic
Repeat
Blind cut
None
More info
The Postnet barcode printed is scanned to identify the job. The cutter will
stop once the job is finished.
The Postnet barcode printed is scanned to identify the job. The cutter will
continue with the next box until the complete roll is finished.
You need to select the job you want to cut in the software and manually
align the bounding box. Once the bounding box is determined, the cut
job will start without reading the bar code.
Means there will be no positioning, the job will be cut immediately (useful
for cutting in coloured vinyl for example).
AP-75381 - Revision 1.3 73
Page 74

Application Guide Kona / Kona apparel
Contourcutting
Step 11: For each contour type, a tool setup should be available. Add or edit the knife
settings accordingly.
Step 12: Press the OK button.
Step 13: Press the Cut key to start cutting sequence.
74 AP-75381 - Revision 1.3
Page 75

Application Guide Kona / Kona apparel
4.9 Print and cut with Scanvec Amiable
Please follow the steps below to perform a print and cut workflow with Scanvec Amiable.
Step 1: Create your contour design in Illustrator. Be sure that:
The Swatch Name is CutContour
It is a spotcolor
ColorMode is CMYK
The colour is 100% magenta
The swatch has a thickness of 0.1 mm
Contourcutting
4
Step 2: Click on the printer TAB and add your design.
Step 3: Double click on the job in the hold list to see the job properties.
AP-75381 - Revision 1.3 75
Page 76

Application Guide Kona / Kona apparel
Contourcutting
Step 4: Click on the workflow tab and be sure to select the "Send cut job" checkbox!
76 AP-75381 - Revision 1.3
Page 77

Application Guide Kona / Kona apparel
Contourcutting
Step 5: Click on the labels and marks tab and select the requested alignment method.
Mutoh Mark: Single frame
Mutoh Single segment: Multi frame with only 1 segment
Mutoh Multiple segments: Multi frame with multiple segments
4
Step 6: Rip and Print the contour job.
Step 7: After printing the job, the plot data will automatically be added to CutServer (Mutoh
or Scanvec, depending on your settings).
Refer to Configuring Scanvec Amiable on page42
Step 8: Now you can cut the job.
AP-75381 - Revision 1.3 77
Page 78

Application Guide Kona / Kona apparel
Contourcutting
78 AP-75381 - Revision 1.3
Page 79

Application Guide Kona / Kona apparel
1
2
Cutting through
Chapter 5 Cutting through
5.1 Introduction
Working with the through cut setting consists out of two major parts.
The first part is when working with the Kona.
When the contour of your file is completed, single sticker samples (basic shapes) are often to
be isolated (e.g. if making 100 stickers, you want to be able to get out every sticker
separately).
The second part is when working with the Kona apparel.
When you have written the text you want, or drawn the design you wanted, you are able to cut
out the design using the through cut setting.
5
AP-75381 - Revision 1.3 79
Page 80

Application Guide Kona / Kona apparel
Cutting through
5.2 Setting up your cutter
5.2.1 Tools necessary on a Kona
Through cutting is a combination of firmware and software features, the correct settings and
tools. Be sure to have the following firmware, software and tool(s) to perform a through cut.
Firmware - program - tool To have at least ...
Kona / Kona apparel cutter
firmware
EasySIGN
Mutoh Grip (+) 8.00
Standard knife Angle = 45° and offset = 0,50 mm
Cut through knife
Spare cutting mat Partnumber: KY-15305
KN 1.0.0 or higher
service pack v 5.12
There is a special driver update required when working with
the Kona / Kona apparel series cutters. This file ( Mutoh.drv )
can be found on Mutoh’s FTP
existing Mutoh.drv
Angle = 45° and offset = 0,50 mm
Depending on the material you are using, the angle might be
different.
and should be copied over the
5.2.2 Tools necessary on a Kona apparel
Through cutting is a combination of firmware and software features, the correct settings and
tools. Be sure to have the following firmware, software and tool(s) to perform a through cut.
Firmware - program - tool To have at least ...
Kona / Kona apparel cutter
firmware
Standard knife Angle = 60°
Spare cutting mat Partnumber: KY-15305
KN 1.0.0
80 AP-75381 - Revision 1.3
Page 81

5.2.3 Toolswap settings
Step 1: Press the following buttons in order:
Settings
Tool
next page
Swap alert
Application Guide Kona / Kona apparel
Cutting through
5
Step 2: M
On or Off, if swap alerts is set to off, an automatic switch between tools is
ake your preferred choice:
performed without tool swap notifications.
AP-75381 - Revision 1.3 81
Page 82

Application Guide Kona / Kona apparel
Cutting through
5.2.4 Through cut settings
It is however not easy to match an ideal tool configuration setup in which the media weakness
suffers not radically from the multiple cut through samples accomplished. Therefore a perfect
harmony between your tool down force and tool up distance needs to be synchronised.
Via this menu, you can set the desired cut through parameters.
Parameter Description
Tool Select the tool you want to use for the cut through operation.
Vel ocity
Force
Tool Down Distance (1)
Tool Up Distance (2)
The speed of which the cut through routine is cut.
Default: 10 cm/s
The force on the tool during the cut through routine.
Default: 250 gram
The distance of cutting through the vinyl.
Default: 10 cm
The quantity of vinyl left uncut to hold the sticker fixed to the
media. Default: 0,1 cm
Note
Be aware that Software such as EasySign overrules your settings. Therefore it
is best to verify the settings in the used software as well.
Note
EasySign uses always SP2 and its own Cut Through parameters.
The user can define his own tool in the user interface (default tool 2) however,
these settings are overruled by the EasySign settings.
After setting these values, it is also possible to test if they match your needs
Follow the procedure below to the velocity and force:
82 AP-75381 - Revision 1.3
Page 83

Step 1: Press the following buttons in order:
Settings
Cut through
Click tool
Select the tool you want to use and confirm with
Set the values for the velocity and force.
Application Guide Kona / Kona apparel
Cutting through
Step 2: Enter the desired values and confirm with
Step 3: Press the test key to verify the quality of the through cutting settings.
Step 4: Se
t the values for the tool up and tool down distance.
Go to the next sub page
Select Up Dist. and/or Down. Dist.
Step 5: Enter the desired values and confirm with
Step 6: Press the test key to verify the quality of the through cutting settings.
Step 7: Check
if it is easy to push out the cut patterns. If not, try to increase the force and
knife depth or to decrease the tool down distance.
Step 8: Be sure to perform a sheet-off after the test because the pushed-out squares/circles
will uncover the paper sensor which could lead to an error.
5
Refer to
Toolswap settings on page81
AP-75381 - Revision 1.3 83
Page 84

Application Guide Kona / Kona apparel
Cutting through
5.3 Through cutting workflow
Basically, 4 cut through parameters are required:
Cut through speed
Cut through force
Tool down & tool up distance
Cut the vectors in following order:
1st Standard cut lines
2nd Print and cut lines
3rd Cut through lines
Cut through specifications:
reduce your speed to 10 cm/s
increase your force to 250 g
use all pressure rollers
On a Kona 760 ==> 2 pressure
rollers
On a Kona 1400 and Kona 1650 ==> 3 pressure rollers.
lower your cut through media width dimension
choose your in between margins for cut through stickers sufficient enough
minimal vinyl movement
plot order important (first > contour data, second > cut through data)
VS/ZF/AS menu = accept (new header per line type)
When accepting you will use the software settings and not the parameters you set.
Therefore you need to set your preferred settings in the software.
easy cut through shapes (rectangles, circles, squares)
NO multi-frame alignment systems advised (multi-segment)
NO repeat mode recommend
For cut through reasons, it is better to have this dashing technique configured at the end of
your vector data group. The sorting routine of your software should therefore automatically
configure these vector paths at the end of your file output.
Cut Through compatible alignments are:
Manual Alignment
Automatic Alignment
Automatic Alignment with bar code
Automatic multi - frame alignment with bar code (# segments)
Cut Through incompatible alignments are:
Multi - frame splitting done by the CutServer
Refer to Tools necessary on a Kona on page80 to know which software are compatible.
84 AP-75381 - Revision 1.3
Page 85

5.4 Through cutting with EasySIGN
5.4.1 Convert shapes to cutthrough lines
After importing your design into EasySign, it is possible to convert your lines to cutthrough
lines as follows:
Step 1: Select the lines, right-click and select Convert to > Line type > Cut through line.
Application Guide Kona / Kona apparel
Cutting through
5
Step 2: The basic shape is converted to a dashed blue line.
AP-75381 - Revision 1.3 85
Page 86

Application Guide Kona / Kona apparel
Cutting through
5.4.2 How to plot and setup your design
Step 1: Press the plot button.
Step 2: Select the cut through-line checkbox in the special lines box.
Step 3: Press the edit... button.
Step 4: Double-click the device specific settings.
86 AP-75381 - Revision 1.3
Page 87

Application Guide Kona / Kona apparel
Cutting through
Step 5: Set cut through parameters (recommended values are displayed here).
These parameters should be the same as in the Kona / Kona apparel User
Interface.
5
Step 6: Now you can send the file to the CutServer or directly to the plotter.
AP-75381 - Revision 1.3 87
Page 88

Application Guide Kona / Kona apparel
Cutting through
5.5 Through cutting with Mutoh Grip (+)
5.5.1 Convert shapes to cutthrough lines
By loading a swatch library (downloadable from http://usernet.caldera.eu) in Adobe Illustrator,
one can define certain vector paths to be recognized automatically during your import
operation in your Grip / Grip+ environment.
Select the throughcut line in your design and convert it to a CutContourFullCut swatch from the
library.
5.5.2 Verify automatic detection
Step 1: Import your design in Mutoh Grip (+).
Step 2: Drag the design on the info button and click on the contour tab.
Step 3: Verify the automatic detections of each line style specified.
88 AP-75381 - Revision 1.3
Page 89

5.5.3 Cutthrough tool configuration
Automatically, at the end of your print task, a plot file is generated in the visual cut window.
Application Guide Kona / Kona apparel
Cutting through
5
Make sure to have your tool configurations set accordingly to your chosen vector paths during
layout setup.
The sorting order can be configured as above by selecting the Cut at last check box.
It is highly recommended to cut through at the last stage!
AP-75381 - Revision 1.3 89
Page 90

Application Guide Kona / Kona apparel
Cutting through
5.6 Throughcutting with Scanvec Amiable
After importing or creating your design in PhotoPRINT editor, it is necessary to assign for
each contour type (cut contour or cut through) a different colour. This way, during the RIP and
PRINT routine, the software will be able to trace the contour lines by their colour.
Make for each line type the appropriate settings during the RIP and PRINT routine as follows:
Step 1: Go to the contour tab in the RIP and PRINT window.
Step 2: In the box Driver Options, the different line types are listed.
Step 3: Be sure to clear the checkbox Use same driver options for all colours if you have a
contour line and cut through line.
90 AP-75381 - Revision 1.3
Page 91

Application Guide Kona / Kona apparel
Step 4: Double click on one of the line types to make the necessary settings.
Select the appropriate predefined contour line type
For contour lines choose cut fast or cut slow
For cut through lines choose Cut through logically.
Cutting through
5
As you could read previously, through cut lines should be cut intermittent. To
change the settings of the tool up and tool down distance, change the
commands in the UL8 window.
10 = tool down length
0.1 = tool up length
10.1 = sum of tool up and tool down length
Only adjust these values. Leave other characters unchanged!
AP-75381 - Revision 1.3 91
Page 92

Application Guide Kona / Kona apparel
P1
P2
P4
P3
X Length
Y Width
Cutting through
5.7 Poster trimming workflow
After printing posters, it is possible to use the Kona / Kona apparel to trim the posters
afterwards. Do this as follows:
Step 1: Load the poster in the cutter.
Step 2: Install a knife at through cut depth.
Step 3: Make your personal settings regarding the cut through feature.
To ol
Velocit y
Force
Tool up distance
Tool down distance
Refer to
Through cut settings on page82 for all details on how to change the
parameters.
Step 4: Press the following buttons in order:
Actions
Cut Through
Trim poster
Step 5: Set
the approximate length and width of the poster.
Step 6: Press the next key.
Step 7: Move the penhead using the jog keys until the knife point is positioned above P1
and press OK when done.
92 AP-75381 - Revision 1.3
Page 93

1
23
465
Application Guide Kona / Kona apparel
Cutting through
Step 8: The cutter automatically feeds the media the length set previously. Use the jog keys
to set the second corner more precisely if necessary.
Step 9: Do this until you have selected all 4 corners in correct order (P1 – P2 – P3 – P4).
Step 10: Insert the through cut tool when asked and press OK when done.
Note
This message is only displayed when the swap alert setting is set to ON.
Otherwise, the poster is cut through with the same tool without this
notification.
Refer to Toolswap settings on page81
Step 11: The poster is trimmed according to the routine shown below:
5
Note
This message is only displayed when the swap alert setting is set to ON.
Refer to Toolswap settings on page81
AP-75381 - Revision 1.3 93
Page 94

Application Guide Kona / Kona apparel
Cutting through
Step 12: Gently push out the poster.
94 AP-75381 - Revision 1.3
Page 95

Application Guide Kona / Kona apparel
1
2
Chapter 6 Handling curled
media
Next to multiple kinds of media, the Kona is also able to load curled media.
However, to perform this action, there are some extra items you need to keep in mind.
Please follow the procedure below to load curled media properly.
Step 1: Determine the type of media e.g. sheet media and install the correct configuration.
Step 2: Guide the media under the pressure rollers at the front of the cutter.
Verify that the front edge of the media is loaded at least 7 cm past the cutting
head.
Make sure that the rear of the media is still covering the sensors when the cutter
measures the cutfile. We advise a rear safety margin of at least 30 cm.
Step 3: Position the pressure rollers (1) so that every pressure roller faces a grit roll (2).
Each pressure roller has a tactile and audible click system which makes it easier to
position them correctly.
6
Refer to pressure roller positioning in the User’s Guide
z
AP-75381 - Revision 1.3 95
Page 96

Application Guide Kona / Kona apparel
Note
When working on a Kona / Kona apparel 1400 / 1650 with sensitive media files it
is possible to disable the middle pressure roller (on a Kona) or to change the
pressure of all pressure rollers (on a Kona apparel).
Kona
Move the middle pressure roller to the docking station. The pressure roller will
be disabled as soon as you lower them.
Kona apparel
Move the lever upwards or downwards to adjust the pressure.
higher pressure is for thicker media, lower pressure is for thinner materials.
Be aware that the cutter may have less tracking when doing this.
96 AP-75381 - Revision 1.3
Page 97

Indicates the max
working width when
working with a
Kona Apparel
Application Guide Kona / Kona apparel
Step 4: Choose the appropriate media measure method:
With front Uneven media
Without front Uneven Media
Step 5: Load the media straight. To help you, rulers are drilled in the front platen.
Step 6: Verify the media is cut off straight at the front to avoid media initialization
mismatches.
Step 7: Lower the pressure rollers.
Note
Make sure not to get stuck on the pressure roller lever, this could damage your
clothes.
Note
The head will move fast over the media. Be careful not to pinch your fingers
during this action.
Step 8: The cutter will measure the paper and displays a message:
6
AP-75381 - Revision 1.3 97
Page 98

Application Guide Kona / Kona apparel
Step 9: When no problems occur, the main screen will appear. The home window displays
the usable width of media:
Note
In some cases, the cutter gives a warning screen for example if there is no tool
installed, the media is too thick ...
Select ignore in case you want to proceed with an undetected tool.
In case you forgot to install a tool, install the tool of your choice and select retry.
The cutter will measure the tool height and proceed as normal.
Step 10: T
he media is now properly loaded and you are ready to cut.
Note
Cut files are clipped in case the cut file is larger than the media width.
98 AP-75381 - Revision 1.3
Page 99

Application Guide Kona / Kona apparel
Hints, tips and tricks
Chapter 7 Hints, tips and
tricks
How to create a cut contour around your images. . . . . . . . . . . . . . . . . 101
For vector images . . . . . . . . . . . . . . . . . . . . . . . . . . . . . . . . . . . . . . . . . . . . . 101
For bitmap images . . . . . . . . . . . . . . . . . . . . . . . . . . . . . . . . . . . . . . . . . . . . . 109
How to connect your Kona / Kona apparel to your network . . . . . . . . 116
Introduction . . . . . . . . . . . . . . . . . . . . . . . . . . . . . . . . . . . . . . . . . . . . . . . . . . 116
USB to network sharing box . . . . . . . . . . . . . . . . . . . . . . . . . . . . . . . . . . . . . 116
General info . . . . . . . . . . . . . . . . . . . . . . . . . . . . . . . . . . . . . . . . . . . . . . 116
Product code . . . . . . . . . . . . . . . . . . . . . . . . . . . . . . . . . . . . . . . . . . . . . 116
Price . . . . . . . . . . . . . . . . . . . . . . . . . . . . . . . . . . . . . . . . . . . . . . . . . . . . 116
Possible order locations . . . . . . . . . . . . . . . . . . . . . . . . . . . . . . . . . . . . . 116
Compatible with . . . . . . . . . . . . . . . . . . . . . . . . . . . . . . . . . . . . . . . . . . . 116
Quick installation procedure. . . . . . . . . . . . . . . . . . . . . . . . . . . . . . . . . . . . . . 117
Make the following connections . . . . . . . . . . . . . . . . . . . . . . . . . . . . . . . . . . . 117
Software and driver installation . . . . . . . . . . . . . . . . . . . . . . . . . . . . . . . . . . . 117
Software installation . . . . . . . . . . . . . . . . . . . . . . . . . . . . . . . . . . . . . . . . 117
Drivers . . . . . . . . . . . . . . . . . . . . . . . . . . . . . . . . . . . . . . . . . . . . . . . . . . 118
Configuration . . . . . . . . . . . . . . . . . . . . . . . . . . . . . . . . . . . . . . . . . . . . . . . . . 120
Configuring IP-address and subnetmask directly . . . . . . . . . . . . . . . . . . 120
Connecting your Kona / Kona apparel . . . . . . . . . . . . . . . . . . . . . . . . . . . . . . 121
Verify the new connection in your cut software / CutServer . . . . . . . . . . . . . 121
Troubleshooting . . . . . . . . . . . . . . . . . . . . . . . . . . . . . . . . . . . . . . . . . . . . . . . 121
Did you know . . . . . . . . . . . . . . . . . . . . . . . . . . . . . . . . . . . . . . . . . . . . . . 122
Print and cut workflow . . . . . . . . . . . . . . . . . . . . . . . . . . . . . . . . . . . . . . . . . . 122
7
You can easily RIP and print your POSTNET bar code contour job with a 3rd
party RIP and contour cut it with EasySIGN.122
Frequently asked questions . . . . . . . . . . . . . . . . . . . . . . . . . . . . . . . . . . 130
Mutoh CutServer related FAQ . . . . . . . . . . . . . . . . . . . . . . . . . . . . . . . . . . . . 130
Where is my CutServer . . . . . . . . . . . . . . . . . . . . . . . . . . . . . . . . . . . . . 130
Which CutServer version do I have? . . . . . . . . . . . . . . . . . . . . . . . . . . . 130
AP-75381 - Revision 1.3 99
Page 100

Application Guide Kona / Kona apparel
Hints, tips and tricks
Where to find the latest version? . . . . . . . . . . . . . . . . . . . . . . . . . . . . . . 130
My cutting files are not in the queue of the CutServer . . . . . . . . . . . . . . 130
When I press the Go button, nothing happens?. . . . . . . . . . . . . . . . . . . 130
When I update some files in the hot folder, should I re-copy them into the
CutServer?131
The Kona / Kona apparel is cutting the wrong contour file?. . . . . . . . . . 131
Should I select my file before pressing the "Go" button? . . . . . . . . . . . . 131
What can I do in case of unrecoverable errors or strange Kona / Kona appar-
el behaviours?131
100 AP-75381 - Revision 1.3
 Loading...