

MUTOH Falcon Outdoor 46, Falcon Outdoor 62 User Manual
USER'S
GUIDE
AP-75046
Eco-Solvent Inkjet Printer
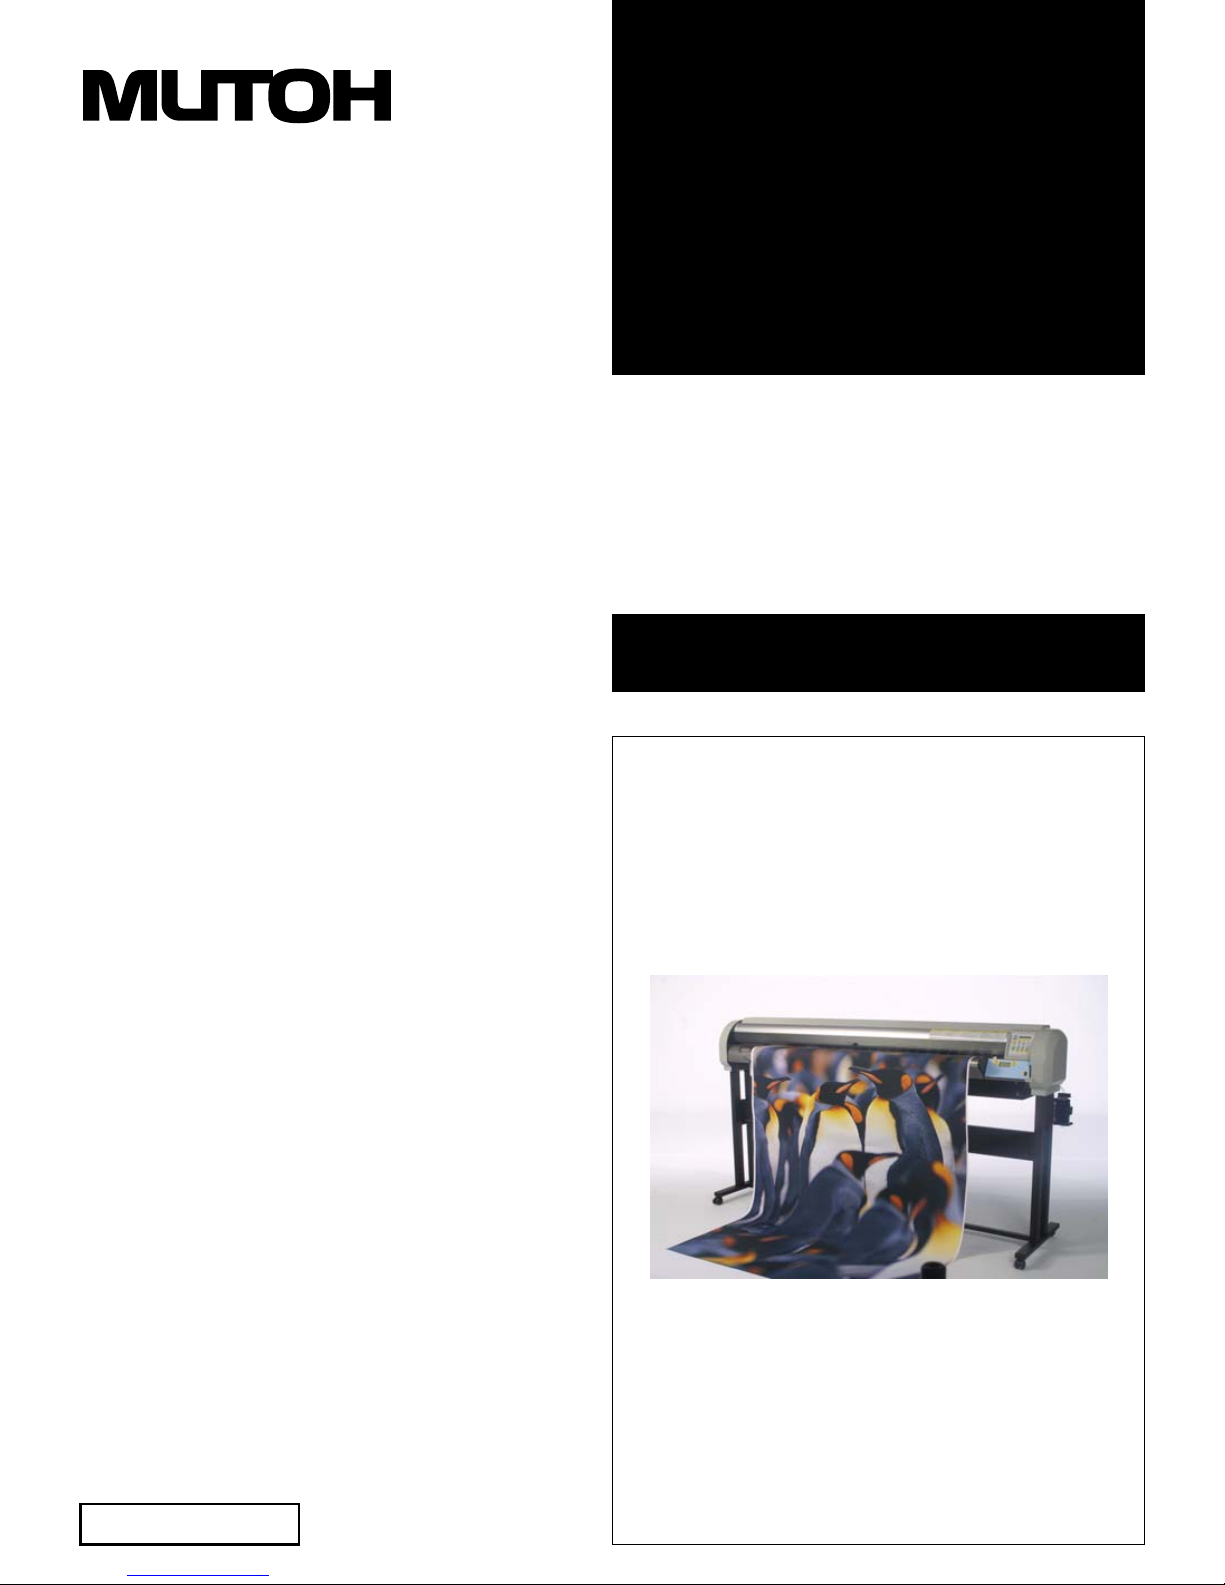
Falcon Outdoor 46/62


3
Falcon Outdoor 46/62 USER GUIDE (AP-75046)
USER GUIDE
Falcon Outdoor46/62
Eco-Solvent Inkjet Printer
Mutoh America Inc.
2507 W. Erie Dr. Suite 103
Tempe, AZ 85282
United States

4
Falcon Outdoor 46/62 USER GUIDE (AP-75046)

This equipment complies with radio interference regulations for data processing devices. When used in a residential area, this equipment may
cause radio interference, in which case the user may be required to take
appropriate corrective measures.
#Concerning radio interference
This product generates weak radio signals and may interfere with radio and
television reception if not installed and used correctly. If you suspect that it is
causing interference with radio and television reception, try one or more of the
following measures:
• Change the direction of your reception antennae and feeders
• Change the direction of this product
• Change the distance between your receiver and this product
• Use separate power supply circuits for your receiver and this product
#Trademarks mentioned in this manual
• MUTOH, Falcon Outdoor, MH-GL, MH-GL/2, MH-RTL and RTL-PASS are trademarks
or product names of MUTOH Industries Ltd.
• HP, HP-GL, HP-GL/2, HP-RTL are trademarks or product names of HewlettPackard Inc.
• Centronics, Bitronics are trademarks or product names of Centronics Data
Computer Corp.
• Windows 95, Windows 98, Windows NT 4.0 are trademarks or product
names of Microsoft Corp.
• DOS-V, PC-DOS are trademarks or product names of IBM (International
Business Machines Inc.)
• NetWare is a trademark or product name of Nobel Inc.
• EtherTalk is a trademark or product name of Apple Computer Inc.
• Other names of companies or products are trademarks or product names of
the respective companies.
• Details of this product and this manual are protected by copyright held by this company and except for legitimate use by
individuals, may not be copied, reproduced or distributed in
whole or in part.
• Details contained in this manual may be subject to future alteration without notice.
• Details contained in this manual are believed to be correct but
please contact this company or your dealer if you suspect an
error or a point is not clear.
• In no event will this company be responsible for the consequences of using this product or this manual.
August 2002
Published: Mutoh Europe NV, Archimedesstraat 13, 8400 Oostende, Belgium
Copyright © August 2002, Mutoh Europe NV. All rights reserved.
IMPORTANT
Falcon Outdoor 46/62 USER GUIDE (AP-75046) 5

6
Falcon Outdoor 46/62 USER GUIDE (AP-75046)
Dear Customer,
Mutoh's new Falcon Outdoor high-resolution drop-on-demand piezo electric outdoor
inkjet printer series consists of two models.
The printer use a newly developed eco-solvent ink. Inks are offered in six colours.
This User Guide deals with printer installation and operation methods as well
as usage precautions. In order to use the printer safely and effectively, please
read the User Guide carefully before you use the printer and then use it correctly.
Keep the manual beside the printer. It is sure to be useful in case something
that you are not sure about should occur while you are using the printer.
• Because the Falcon Outdoor is an inkjet printer, it needs to be
cleaned and inspected periodically. User registration and a
service contract are recommended for detecting trouble
promptly and maintaining printing quality in top condition. For
details, contact your local Mutoh dealer.
For Safe Usage
Introducing the safety symbol that is used in this manual.
The following warning indicator is used in this manual to prevent injury to the
user and damage to property.
• Applies to a case where ignoring this instruction or incorrect
action may lead to serious injury and may cause physical damage to the printer. You must read this and work correctly.
Introduction
Precautions & Introduction
IMPORTANT
CAUTION
Falcon Outdoor 46/62 USER GUIDE (AP-75046) 7
Introducing the Note and Reference symbols that are used in this manual.
• An explanation of a matter that is very important for proper use
of the printer. You must read this and work appropriately.
• An explanation of a matter that is useful for you to know or that
may affect the printing result. You should read this and bear it
in mind.
• A reference to where further useful detailed information is
available. Refer to this if necessary.
Introduction
For Safe Usage
IMPORTANT
NOTE
REFERENCE
8
Falcon Outdoor 46/62 USER GUIDE (AP-75046)

Falcon Outdoor is a precision device. When you use it, be careful
of the following.
• Do not use the printer in extreme heat, cold or humidity.
• Covers secured by screws must not be opened other than parts
noted in this manual.
• Don't have a radio or television nearby as the printer may
cause interference.
• Don't connect the printer cable to the same power source as an
appliance that generates electrical noise.
• This printer uses 100 to 120 V, or 200 to 240 V AC power. Don't
use it with power other than 100 to 120 V, or 200 to 240 V AC.
• Be sure to use a power source with an earth connection.
• Avoid placing objects on top of the printer or subjecting it to
severe vibration or impact.
• Don't tilt or shake the printer when you move it. This may
cause the ink to spill or the mechanism to malfunction. If tilting
is unavoidable, contact your local Mutoh dealer.
• Don't wipe the printer with thinners or benzene.
• Be sure to use the Falcon Outdoor special cartridges (the printer
will be damaged if an ink other than a special cartridge is
used.)
• If the printer makes a strange noise or acts abnormally, refer to
"When trouble strikes" on page 202 and contact your local
Mutoh dealer.
• There is no question about the safety of the ink but since it is
mildly toxic it should be kept out of the reach of children.
Using the Printer
Precautions & Introduction
CAUTION
Falcon Outdoor 46/62 USER GUIDE (AP-75046) 9

• Ink cartridges should be kept in a cool dark place. However, the
ink will freeze if it is stored for a long period below -10˚C for
black ink and below -10˚C for colored ink so storage under
these conditions should be avoided. If the ink becomes frozen,
it should be thawed for at least three hours at room temperature (25˚C) before use.
• Don't put the hold lever in the up position while the head is
moving (during printing, media size detection, media cutting
and cleaning, etc.). The head and media keeper blade will
touch, causing damage or faulty printing.
• When the hold lever is to be put in the up position for loading
media, etc., make sure that the head is in a position where it
will not touch the media keeper blade.
• Don't move the head while the hold lever is up. The head may
touch the media keeper blade.
Using the Printer
CAUTION
10
Falcon Outdoor 46/62 USER GUIDE (AP-75046)

Contents
Introduction
7
For Safe Usage
7
Using the Printer
9
Contents
11
Before Using the Printer
17
Usage Environment 18
Names of Parts 19
Control Panel Names 20
Preparing for Printing
27
What’s in the Box 28
Assembling the Stand 29
Assembling the Printer 33
Connecting the Power Cable / Disconnect Device 37
Ink Cartridge Precautions 38
Loading the Ink Cartridges 40
Specify the Type of Media 46
Loading the Media 48
Loading Cut Media 49
Loading Roll Media 52
Loading media in combination with the Roll Take-Up System 58
Using Pre- and Post-Heater 65
Making a Test Print 66
Connecting the Interface Cable 67
To Receive Data from the Computer 68
Input Port 68
Online Set-up 68
Command Set-up (User Settings) 69
Printing the Setup Lists 70
Making a Manual Cut 71
Contents
Falcon Outdoor 46/62 USER GUIDE (AP-75046) 11

Contents
Direct Access Keys
73
Specifying the Media to be Used 74
Specifying the Resolution 75
High Quality Printing, Normal Printing, High Speed Printing 77
Head Cleaning 78
Cutting the Media 79
Making a Test Print and a Setup List Print 80
Media Feed 81
Reverse Media Feed 82
Fine Adjustment of Print Quality 83
Menus 87
Menu Mode Operation 88
Menu Levels 90
When You Want to do This
93
To use roll media efficiently 94
To speed up printing time 94
To improve printing quality 95
To connect with Centronics 95
To connect with network (Ethernet) 95
To cut roll media 95
To place printed output is a specified position 96
To use colour effectively 97
To check the status of the printer 97
To use another type of ink 97
To check printer set-up 98
Explanation of Functions
99
Understanding the Functions 100
Command Settings 100
Function Settings 103
Centronics Settings 107
Network Settings 107
Utility Settings 108
12
Falcon Outdoor 46/62 USER GUIDE (AP-75046)

Contents
Contents
How to set Parameters 111
Command Settings 113
Command 113
Plot Area 114
Position 115
Terminator 116
Resolution 117
Online Timer 118
Overwrite 120
Origin Reset 121
Function Settings 122
Ink Dry Time 122
Halftone 124
CMY à Black 125
Scale 126
Mirror 127
Direction 128
Cut Position 129
Media Cut 130
Copy 131
Ink Density 132
Distance Adjustment 133
Centronics Settings 136
Mode 136
Timing 137
Network Settings 138
IP Address 138
Utility Settings 140
Error Display 140
Initial : All 141
Initial : Command 143
Initial : Function 145
Initial : Centronics 147
Initial : Network 149
Dump 151
Falcon Outdoor 46/62 USER GUIDE (AP-75046) 13

Contents
Wash 153
Clean 156
Fill 157
Ink Change 159
Accuracy Adjustment Plot 162
Installation of Options
165
Network Interface Board Installation 166
Memory Extension 168
Details of the Display
171
Printer Status Display 172
Messaged Errors and Countermeasures 174
Data Error Display and Countermeasures 177
Command Error Display and Countermeasures 178
Errors Requiring a Restart 180
Errors Requiring Restart that Involve the Mechanical
System
180
Errors Requiring Restart that Involve the CPU System 182
Errors Requiring Restart that Involve the Heater System 184
Daily Maintenance
187
Cleaning the Printer 188
Replacing Ink Cartridges 191
Switching Inks 192
Replacing the Cutter 196
Replacing Waste Liquid Absorbent Sheet ( Waste Ink
Bottle)
198
Cleaning the Cleaning Wiper 200
When Trouble Strikes 202
Nothing happens after power is switched on 202
Nothing happens after media is loaded 202
Nothing happens after the computer sends data 203
When printer sends data, the printer shows an error and
does not print
203
Parts of the print are dirty or missing 203
It prints but the position is not right
(There are places that cannot be printed)
204
Media jams occur frequently 204
Roll paper is not cut cleanly 204
Ink initial filling fails 205
Ink does not appear even after initial filling 205
14
Falcon Outdoor 46/62 USER GUIDE (AP-75046)

Contents
Contents
Media comes off or is torn during media initialisation 205
Media wrinkles during media initialisation 206
Thin media is not detected 207
Wrong media size in media initialisation 207
Media is skewed during printing 207
Cannot install printer driver 208
Cannot go online with Centronics 208
Printed line is blurred 209
White and black bands appear in printing 209
Printed lines do not join 209
Appendix
211
Printer Specifications 212
Interface Specifications 213
Centronics Interface Specifications
(Bi-directional Parallel Interface : IEEE1284 Compatible)
213
Network Interface (option) Specifications 215
List of Optional and supply Items 216
Falcon Outdoor 46/62 USER GUIDE (AP-75046)
15
Periodical Maintenance 210

16
Falcon Outdoor 46/62 USER GUIDE (AP-75046)

This section lists matters that must be attended to before the printer is used.
Usage Environment PAGE 18
Names of Parts PAGE 19
Control Panel Names PAGE 20
Before Using the Printer
Before Using the Printer
Falcon Outdoor 46/62 USER GUIDE (AP-75046)
17
An appropriate location for installing the printer should be selected after referring to the following conditions for the installation site and installation space.
• Always use a separate, earthed power outlet.
• Avoid places subject to sudden change of temperature or
humidity, dust, or the direct rays of the sun.
• The Falcon Outdoor printer should not be in the direct draft
from an air conditioner.
• Don't block the ventilation holes of the Falcon Outdoor printer.
• The floor should be level and free from vibration.
• Avoid places near a device that produces heat, such as a stove
or heater.
• Avoid using the printer under strong light globes or halogen
lamps.
Environmental Conditions for the Installation Site
We recommend setting up the printer in a place that conforms to the conditions in the following table.
With regard to temperature and humidity in particular, even if the conditions
fall within the ranges indicated, places subject to sudden changes should be
avoided.
We recommend setting up in a place that can be air conditioned in order to
maintain constant temperature and humidity.
Area for Installation At least 3 m
2
with a doorway of 1.5 m
Floor Strength At least 2490 Pa (300 kg/m2)
Power Supply Voltage 100 V to 120 V AC 10% or
200 V to 240 V AC 10%
Frequency 50/60 Hz 1%
Capacity Use a power outlet rated for at least 10 A
Temperature 10˚C to 35˚C (16˚C to 25˚C for assured
printing accuracy)
Variation rate: Not more than 2˚C per hour)
Humidity 35% to 80% (50% to 60% for assured
printing accuracy) with no condensation
Variation rate: Not more than 5˚C per hour)
Usage Environment
CAUTION
Leave at least 1 m in front, at the rear and at the sides.
18
Falcon Outdoor 46/62 USER GUIDE (AP-75046)
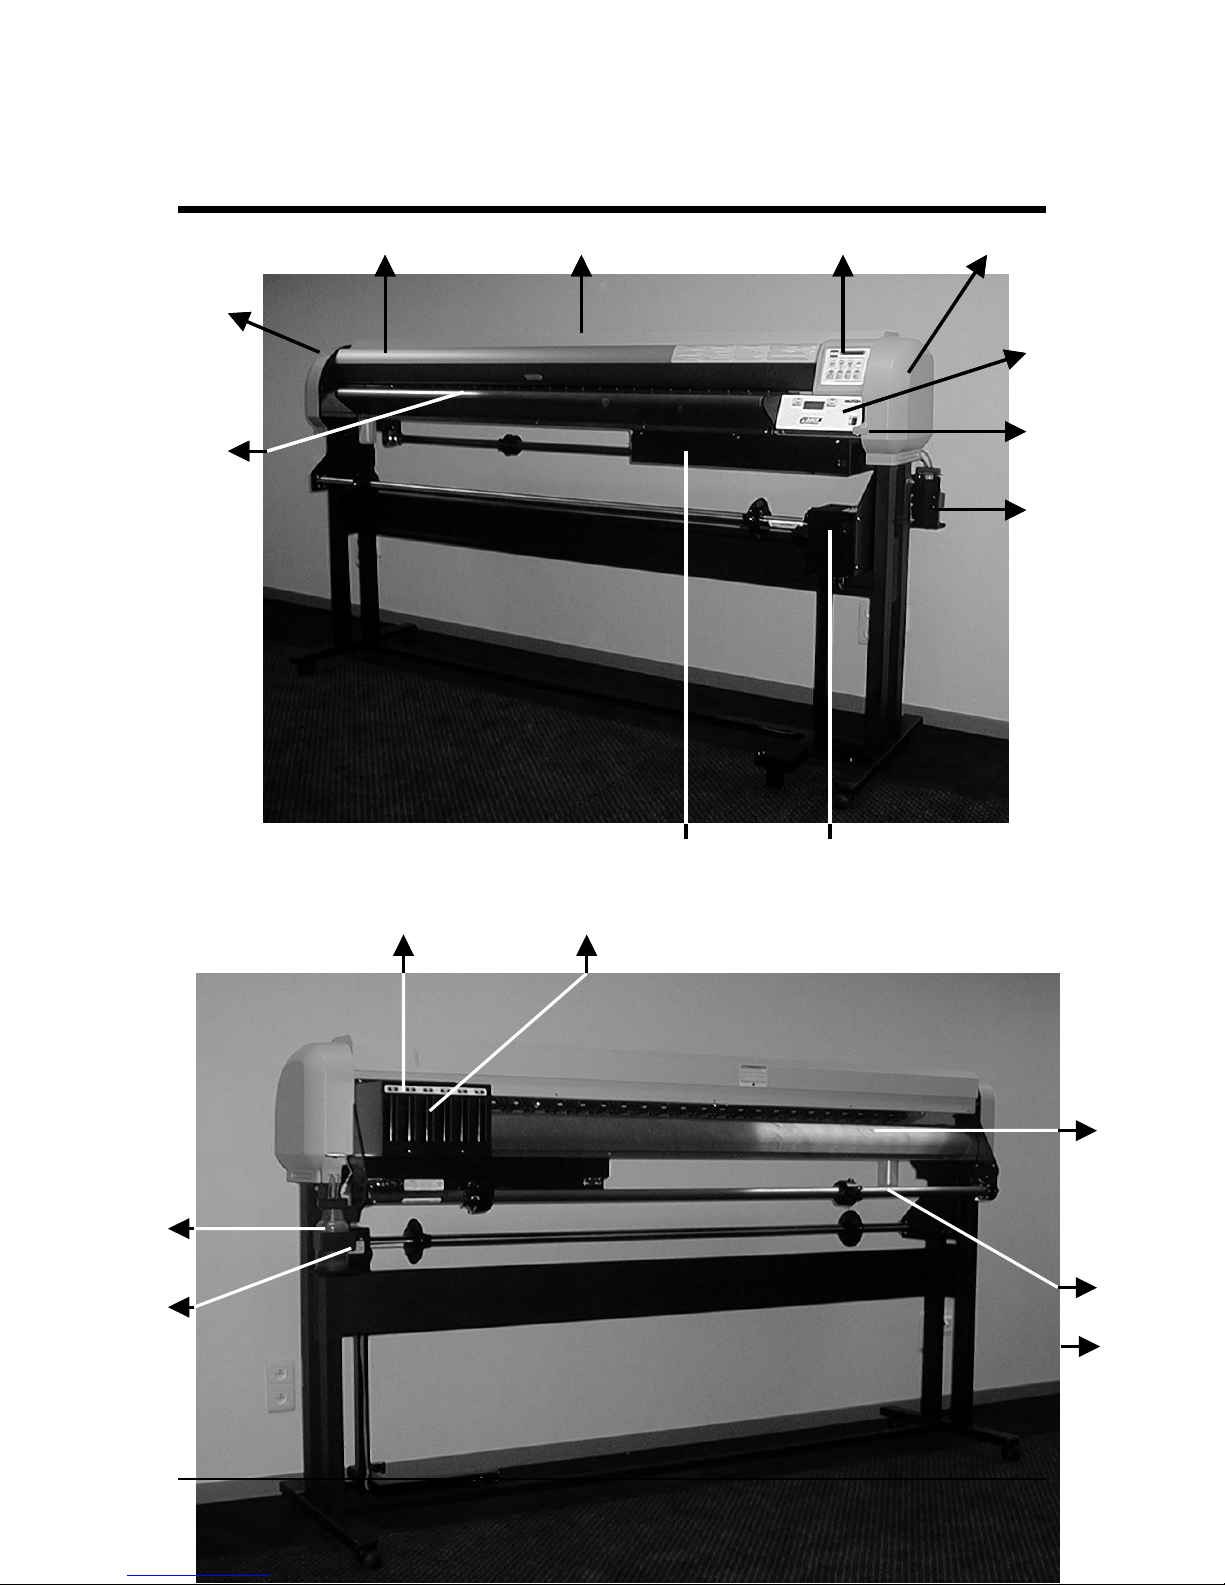
Names of Parts
Left Cover
Front Paper
Guide
Front Cover Y-rail Cover Operating Panel Right Cover
Heater Panel
Pressure Lever
Waste Bottle
Control Box Take-up System
Left Cover
Front Paper
Guide
Front Cover Y-rail Cover Operating Panel Right Cover
Heater Panel
Pressure Lever
Waste Bottle
Control Box Take-up System
Cartridge Cover 6 Ink Slots
Rear Paper
Guide
Scroller
Waste
Bottle
Scroller
A
djusting
Screw
Falcon Outdoor 46/62 USER GUIDE (AP-75046)
3
Scroller
Slip
Ring
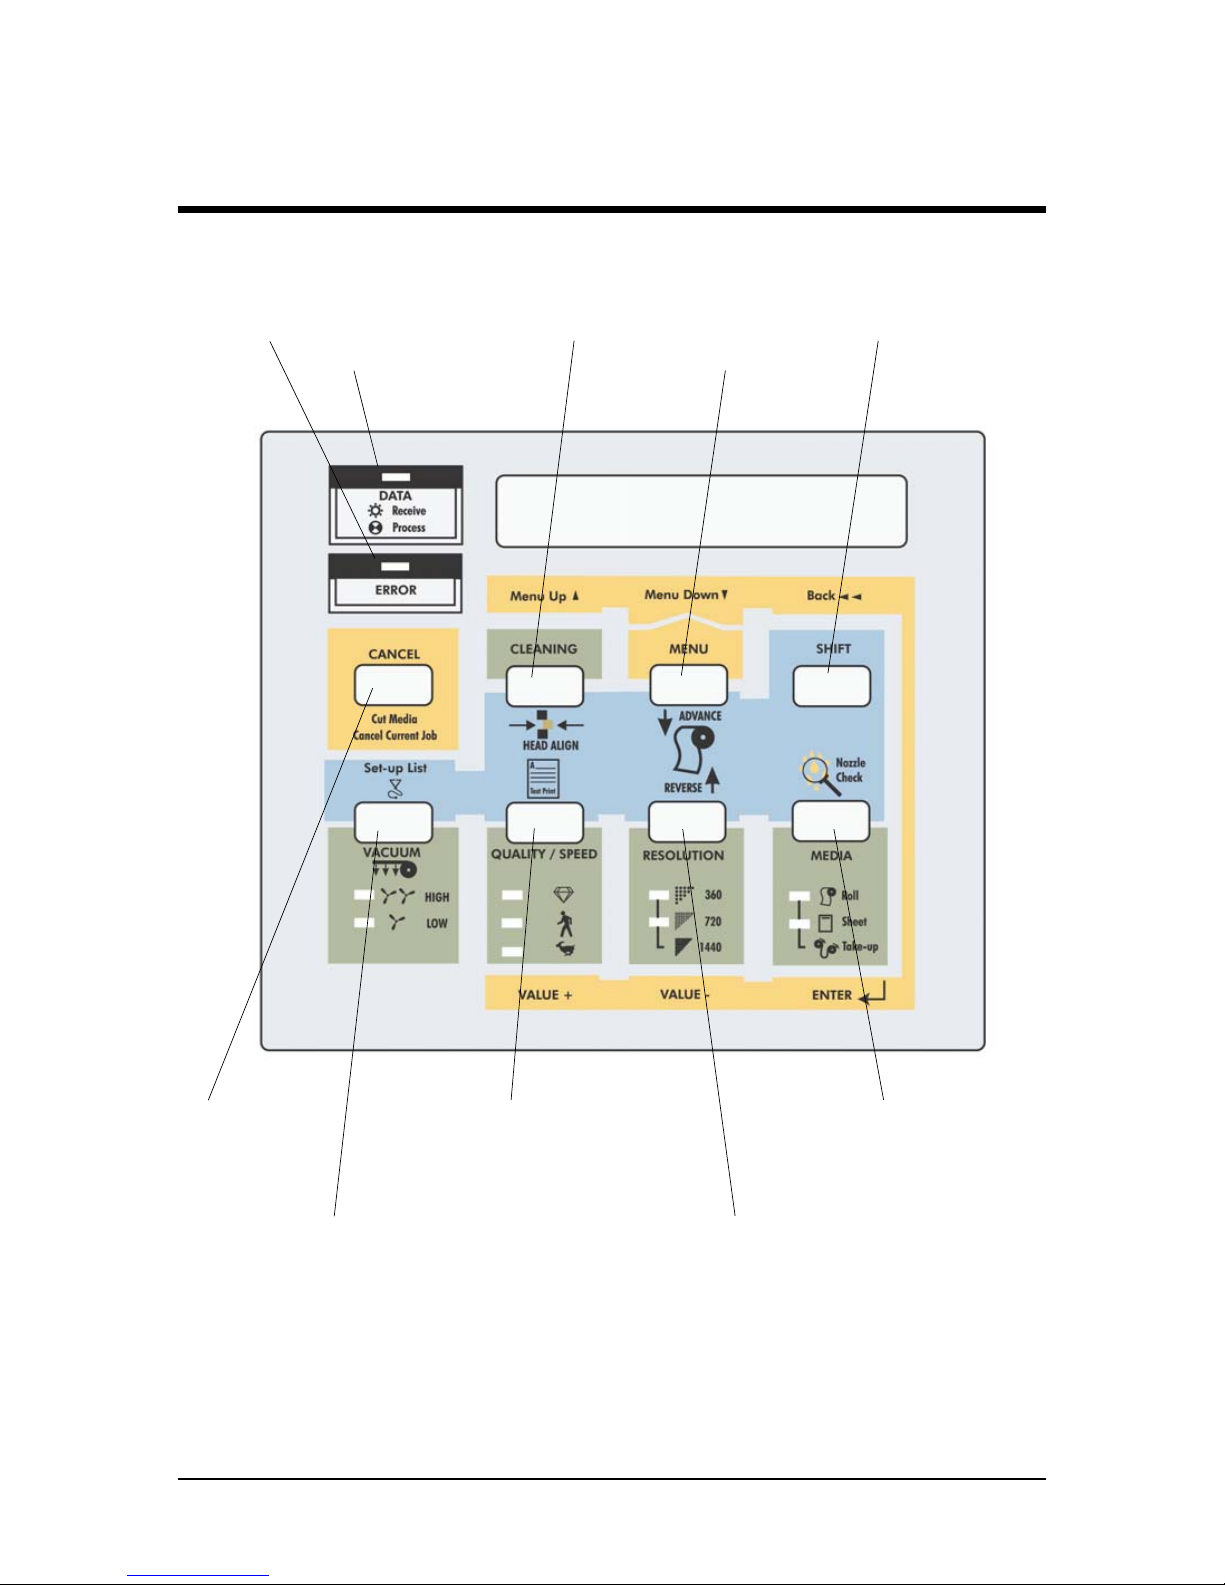
The control panel is for setting operating conditions, displaying printer conditions and making settings for various functions.
Control Panel Names
DATA LED (Green)
ERROR LED (Red) CLEANING key
MENU key
Shift key
CANCEL key
MEDIA WEIGHT key
Standard LED (Orange)
Thin LED (Green)
QUALITY / SPEED key
High Quality LED (Green)
Normal LED (Green)
High Speed LED (Green)
RESOLUTION key
Low LED (Green)
High LED (Green)
MEDIA key
Roll Media LED (Green)
Sheet Media LED (Green)
20
Falcon Outdoor 46/62 USER GUIDE (AP-75046)
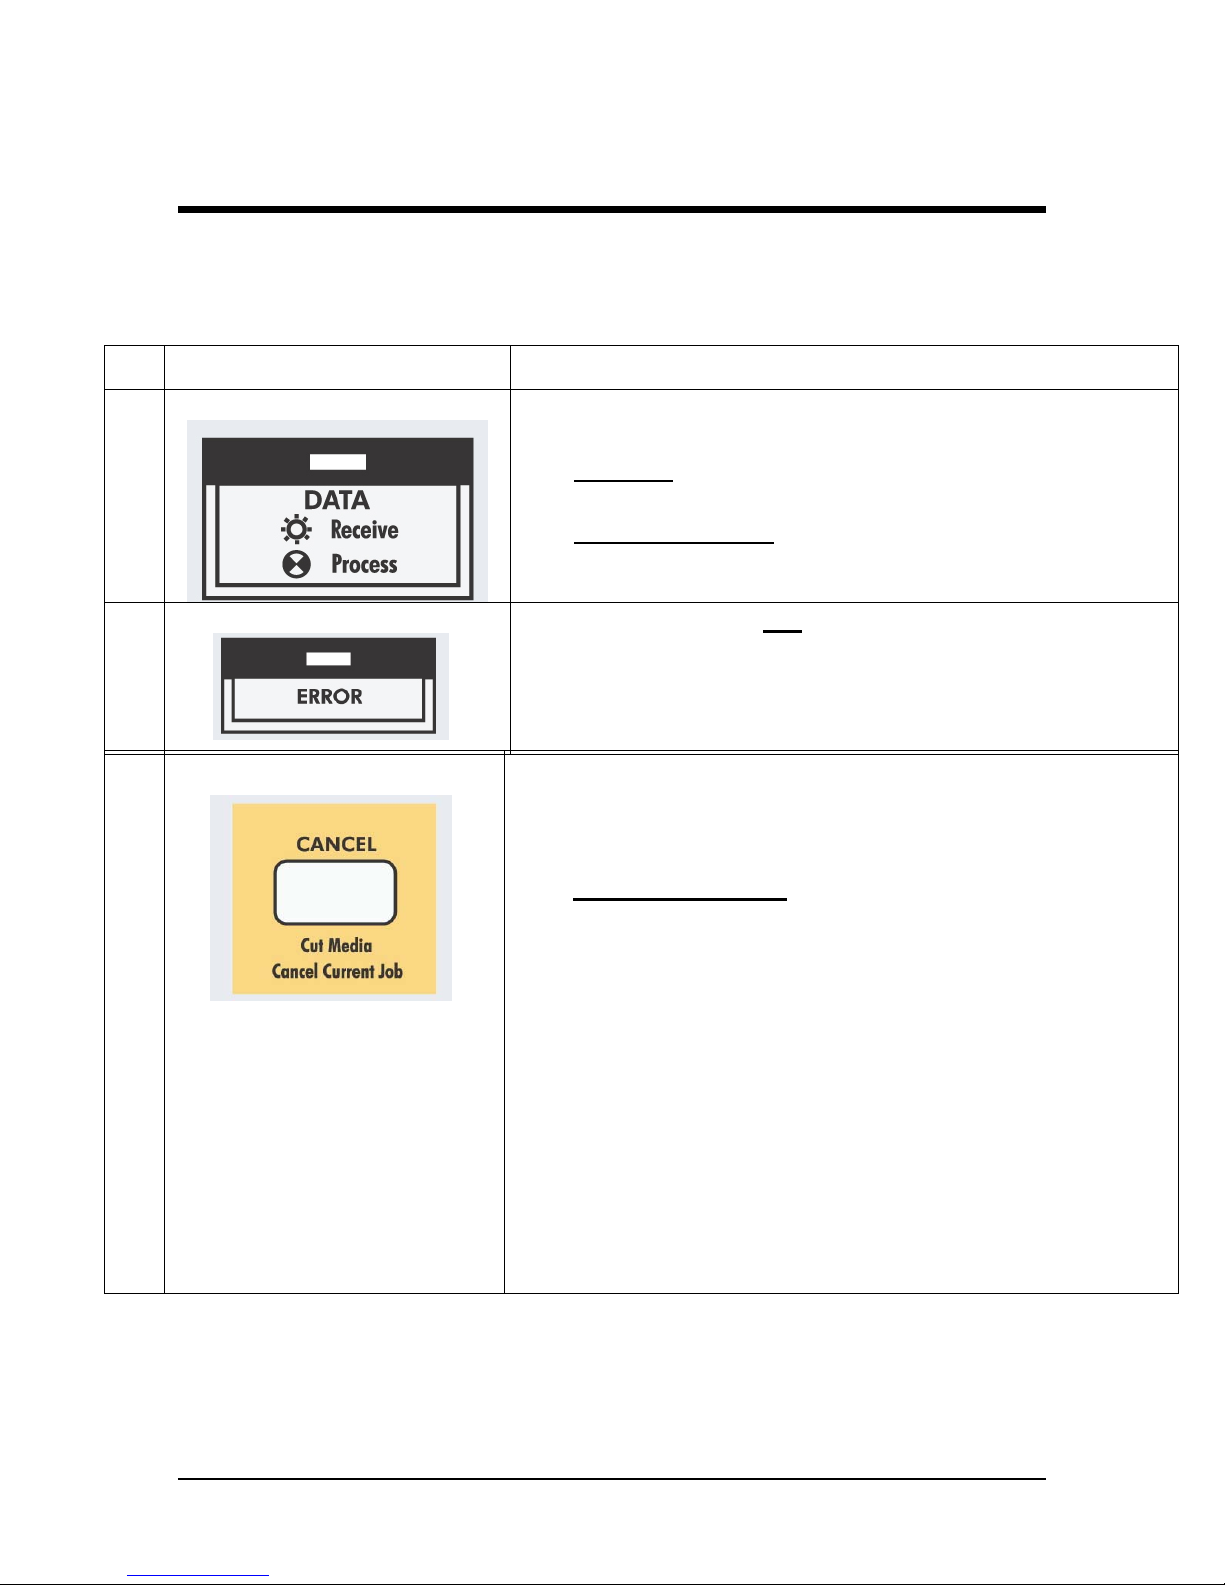
Control Panel Names
Nr.
Key Description
1. Data LED :
The
DATA LED
monitors DATA status :
· LED ON
indicates
data is being received.
· LED FLASHING
means
data is being processed.
2. Error LED :
The
ERROR LED
is
ON
after an
ERROR has
occurred, to indicate a possible hazardous situation.
The LED will go out if the error is corrected or after
pressing the [CANCEL] key.
The
[CANCEL] key
is a special key, controlling both the
CANCEL FUNCTION
as well as the
ROLL MEDIA
sheet-off function.
Printer Condition
Result by pressing
CANCEL
Idle Status
Roll media is cut at the
current position
Receiving Status
Process stops
Process Status
Buffer is cleared
Printing Status
Print is cancelled, buffer
is cleared, printed part is
cut-off.
To request a sheet-off, press cancel for 2 seconds
and confirm with
[ENTER].
3. Cancel :
Falcon Outdoor 46/62 USER GUIDE (AP-75046)
21
Control Panel Names
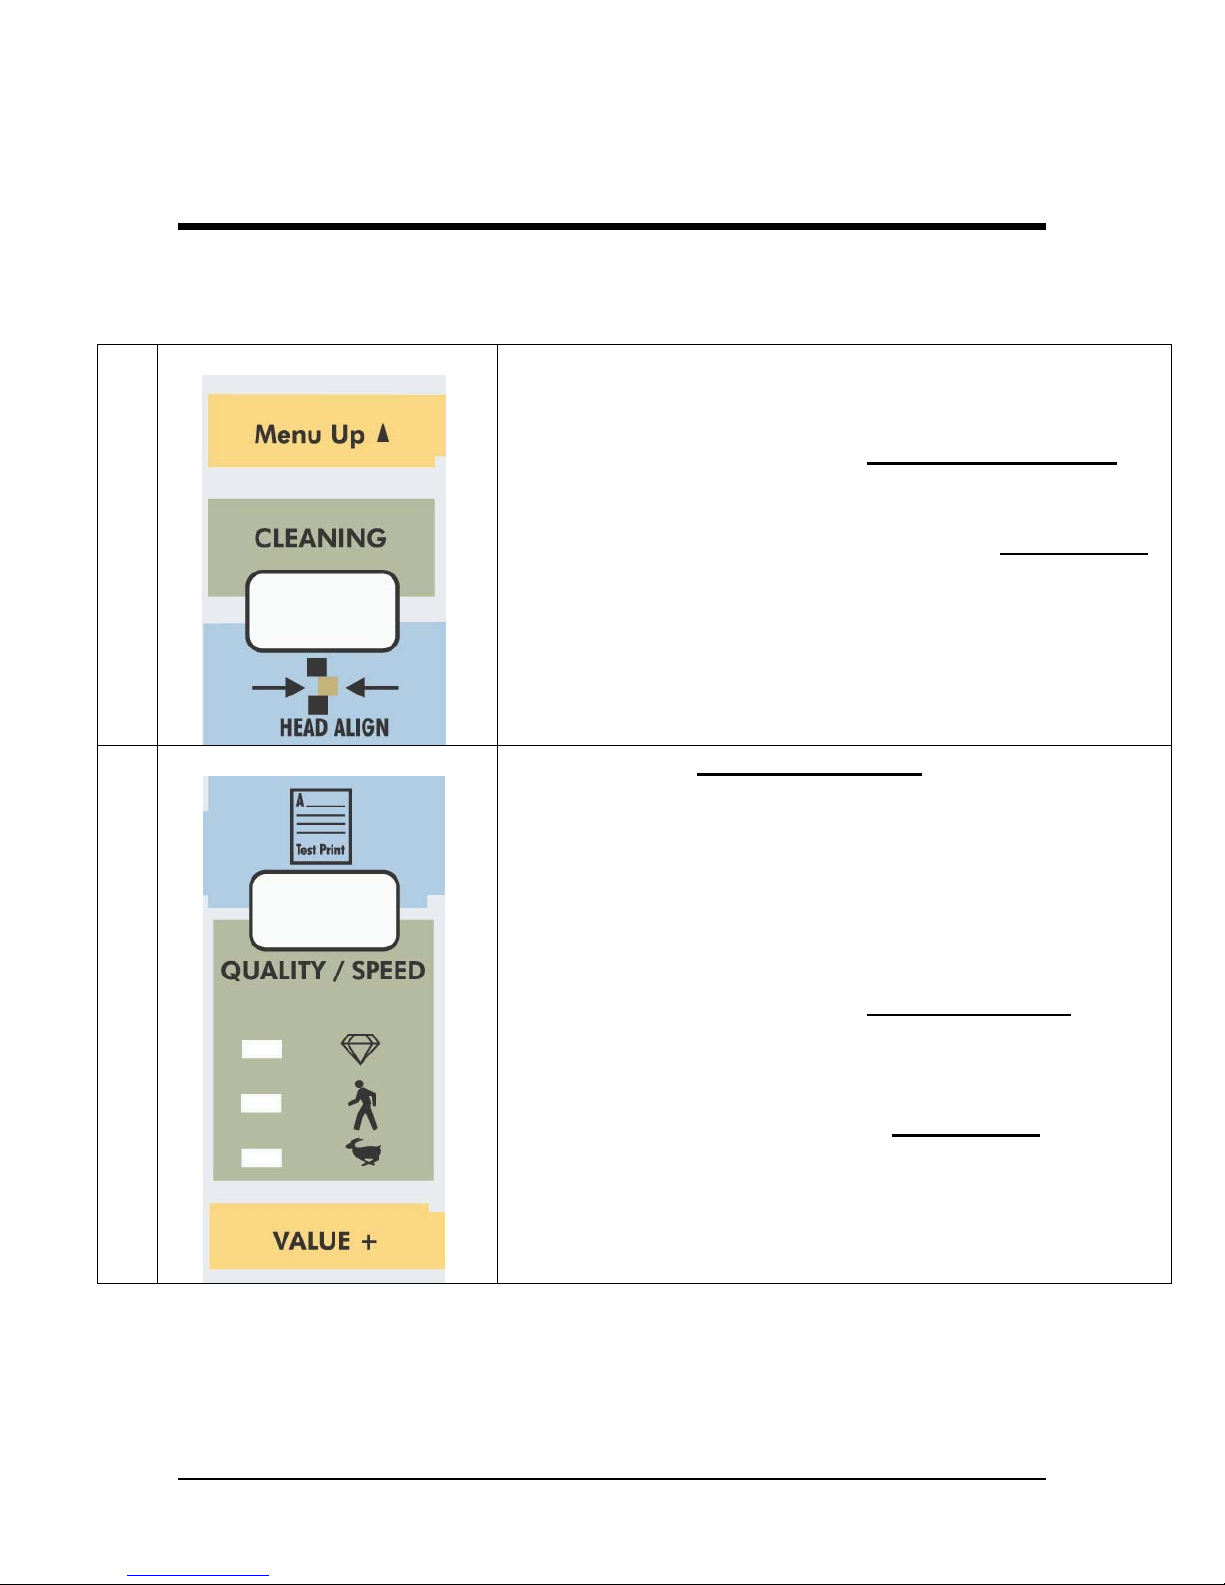
4. Cleaning :
- Pressing for 2 seconds initiates the cleaning
procedure.
- When pressed together
with the [SHIFT] key
,
(9) it initiates the
head adjustment procedure.
- Go to the
Previous Menu
, when in
menu-mode
operation.
- For advanced Cleaning Control, enter the menu
system and select submenu [Utility] – option
[Clean].
5. Quality / Speed :
- Pressing
QUALITY / SPEED
will change the
output quality and speed. Each time the key is
pressed you will notice the LED indicator
showing the current status :
High quality,
Normal
and
High Speed.
- The set-up can only be changed in idle status.
- When pressed together with [SHIFT] key
(9)
outputs the Test Print.
- Go to the
Next menu option
, or
increase a
parameter value
when in
menu-mode
operation.
- The LED indication is also influenced by data
coming from the RIP/driver software.
22
Falcon Outdoor 46/62 USER GUIDE (AP-75046)
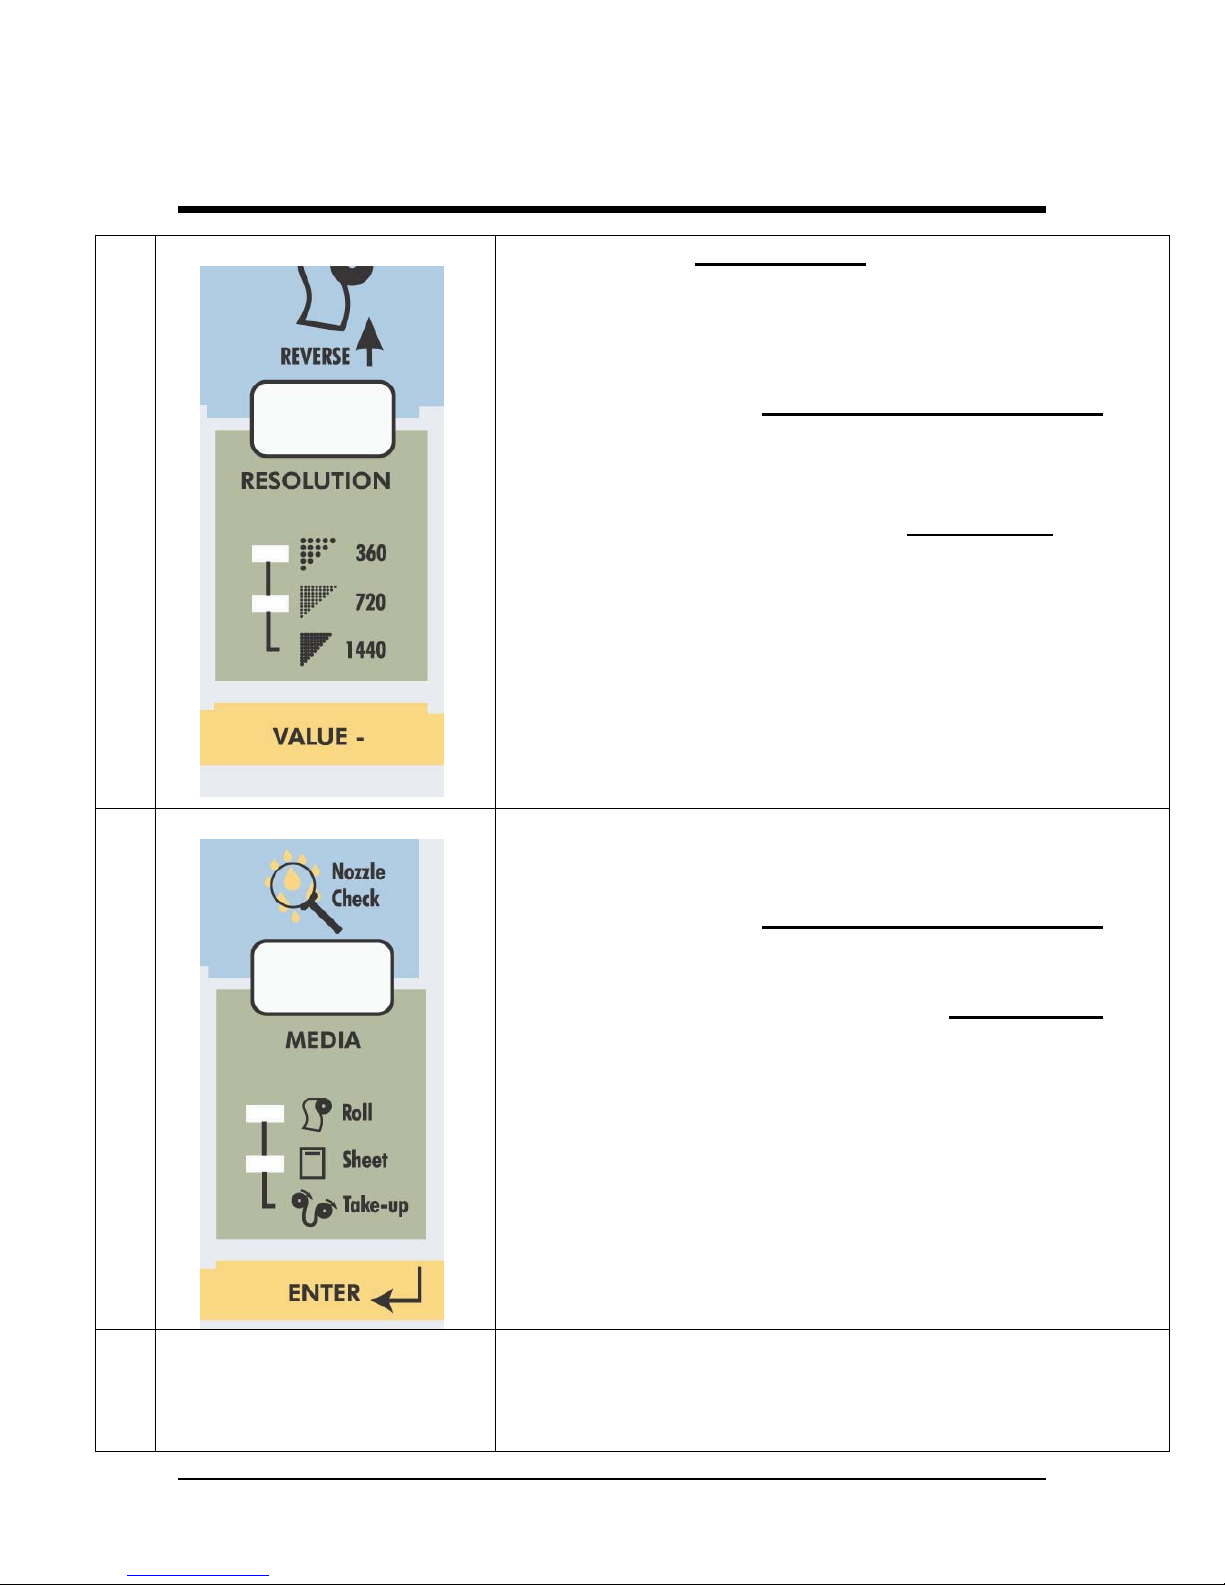
Control Panel Names
- Pressing
RESOLUTION
will change the output
resolution between
360 DPI, 720 DPI or 1440
DPI.
The set-up can only be changed in idle
status.
- When pressed together with the [shift] key
(9)
it
allows reverse manual roll feed.
- Select the
previous menu option
and
decrease
a parameter
value when in
menu mode
operation.
- If
both LEDs are ON simultaneously
the plotter
operates in
one of the 3 available 1440 dpi
modes (horizontal, vertical or diagonal).
- The LED indication is also changed by data
coming from the RIP software.
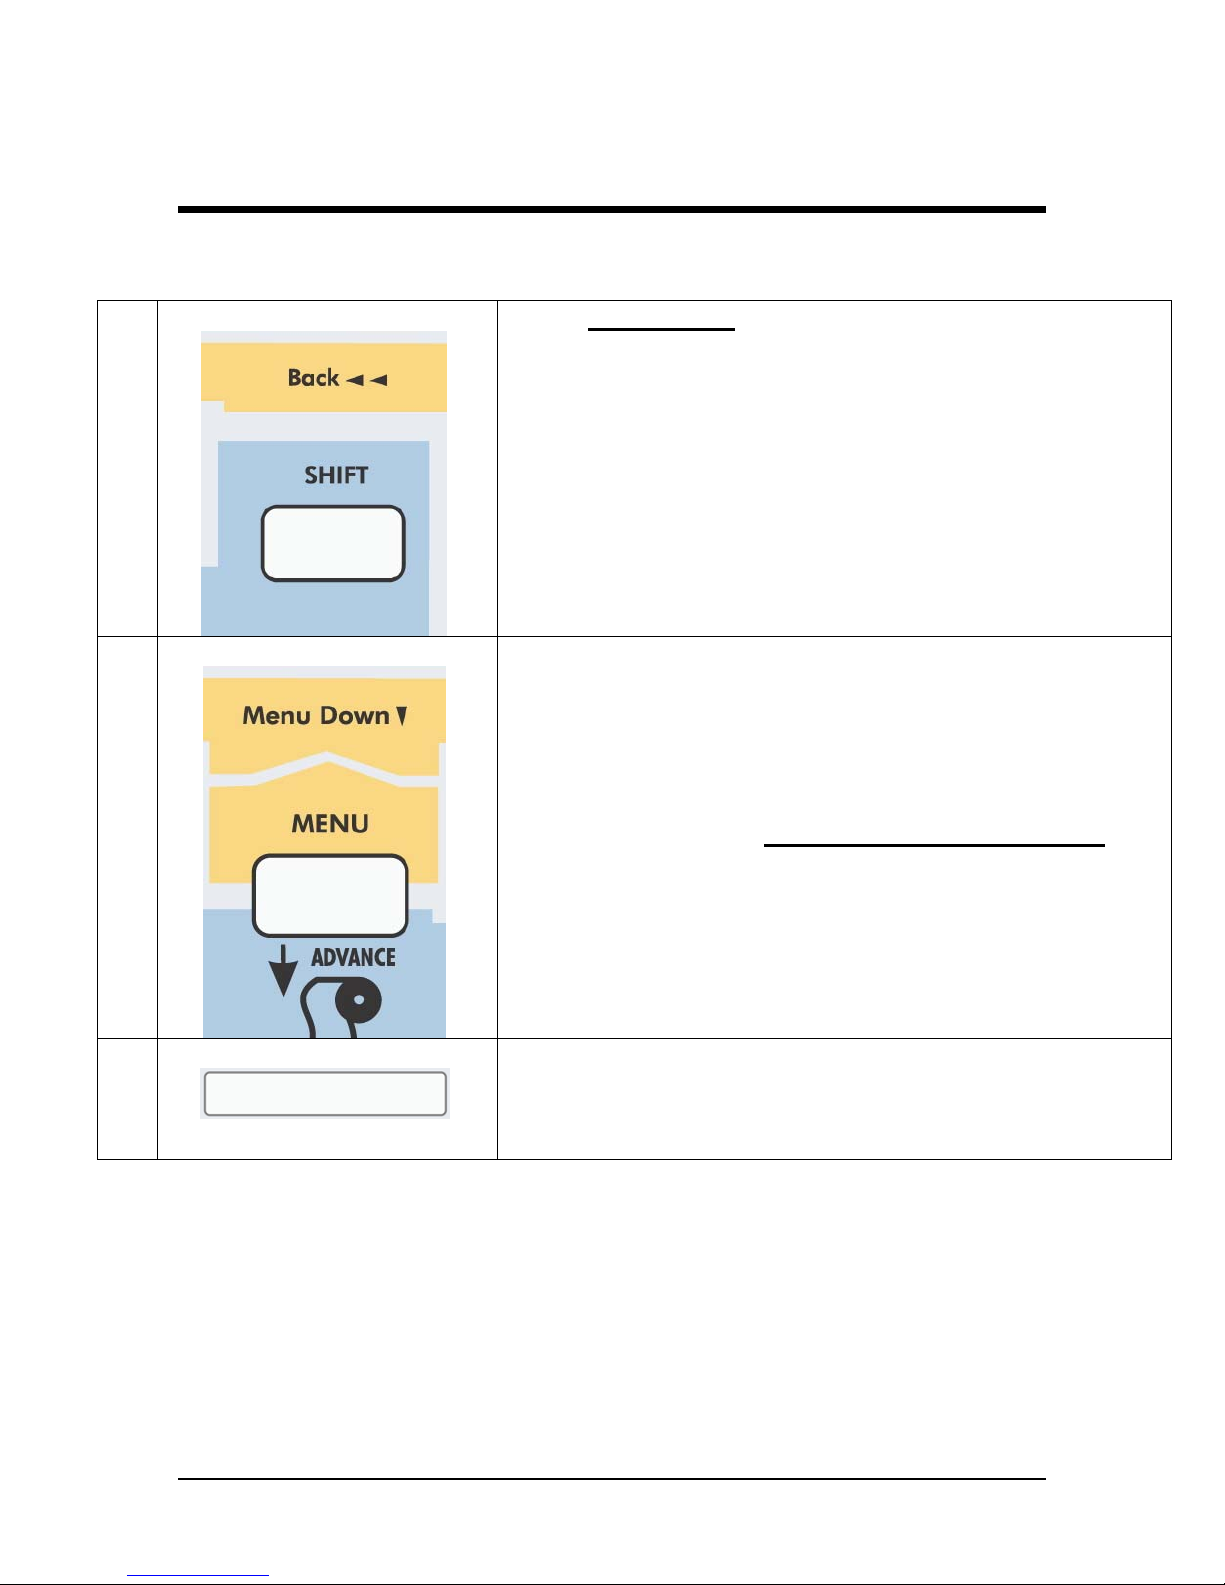
7. Media :
- Allows
selection among roll, cut-sheet or
media take-up system support.
- When pressed
together with the [shift] key
(9),
generates a
nozzle check print.
-
Accept a new setting
when in
menu mode
or
enter a lower menu level.
8. Menu Mode Operation :
The
Menu Mode Operation
is used to change printer
settings and parameters. Menu Mode related buttons
are enclosed in the yellow area.
6. Resolution :
Falcon Outdoor 46/62 USER GUIDE (AP-75046)
23
Control Panel Names
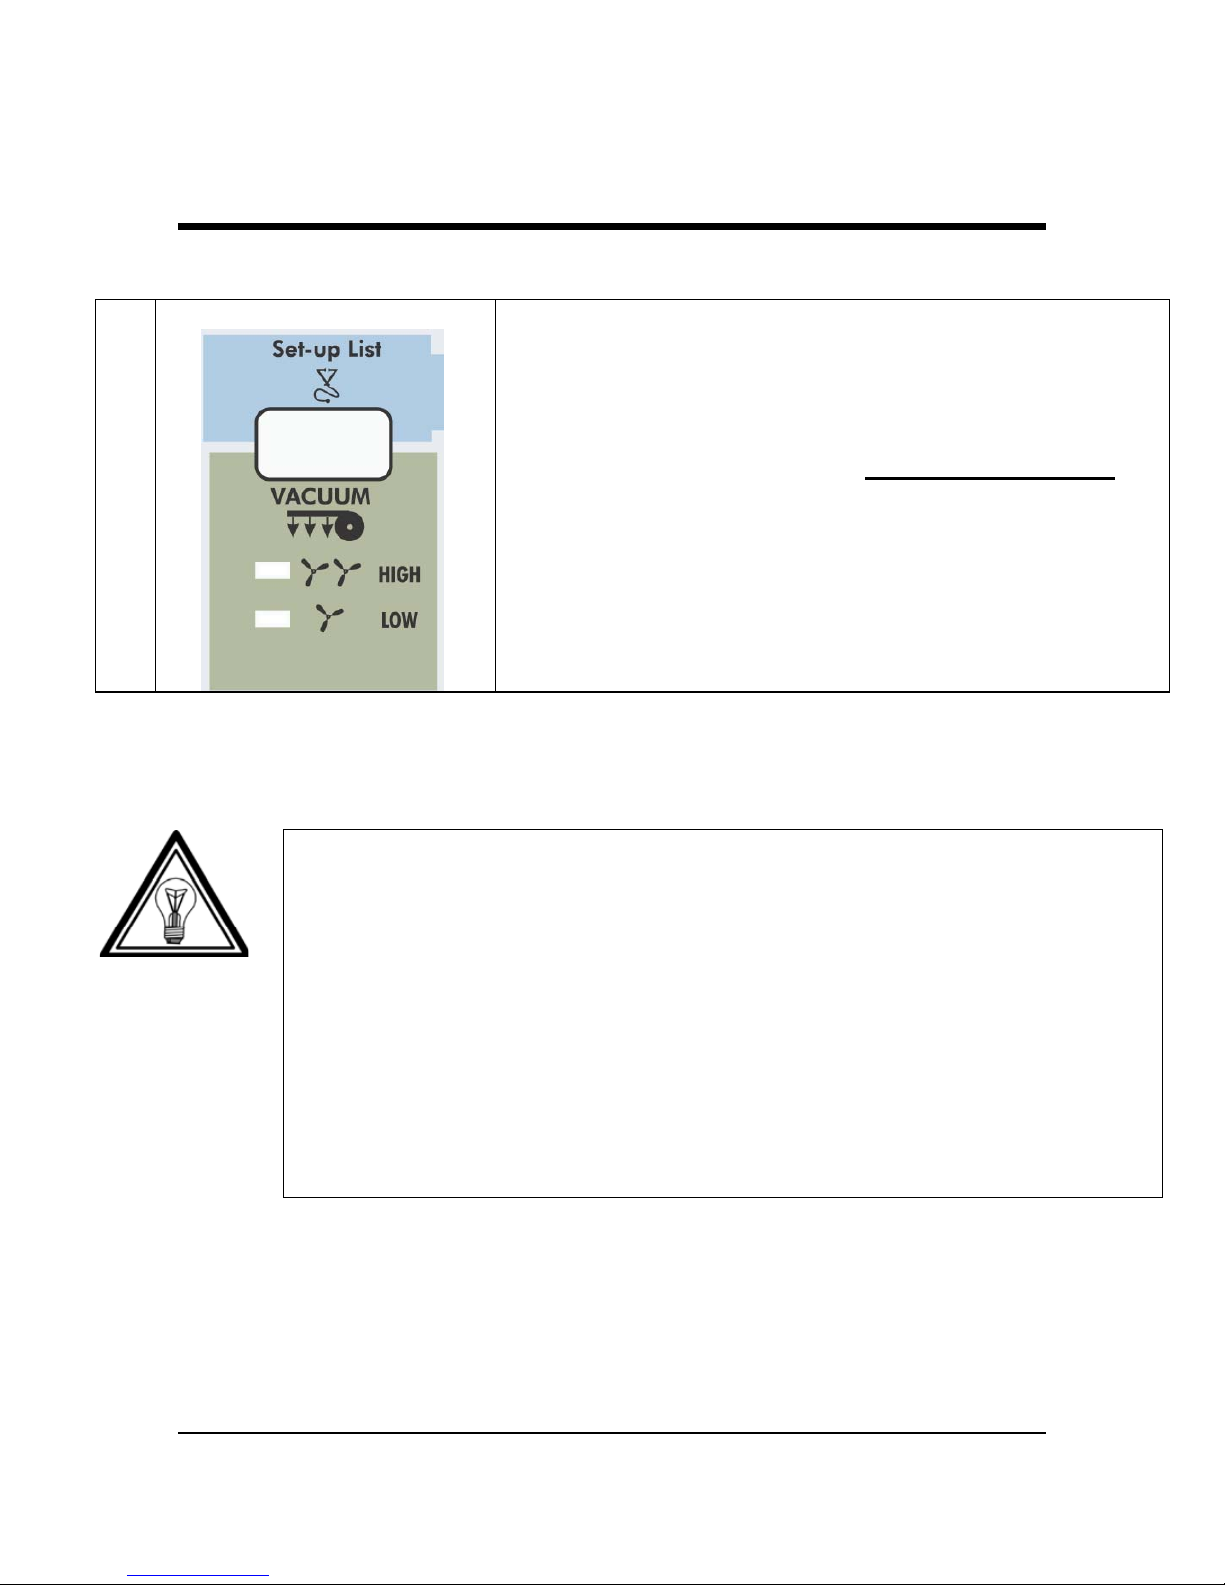
-
Shift button
to activate
Head Adjustment,
manual roll feed (forward or reverse), Nozzle
check print, Test print or Set-Up List.
- Back out of menu levels or switch back to
ONLINE level from top level (Menu mode
operation).
10. Menu :
- The
Menu Mode Operation
is used to change
printer settings and parameters.
- Press the
[MENU] key
to
switch from ONLINE
status to menu mode operation.
- When pressed
together with the [shift] key
(9)
it
allows forward manual roll feed.
11. Liquid Cristal Display :
16 characters LCD display which
displays messages,
shows settings / values
and
allows menu-wise
control.
9. Shift-button :
24
Falcon Outdoor 46/62 USER GUIDE (AP-75046)
Control Panel Names
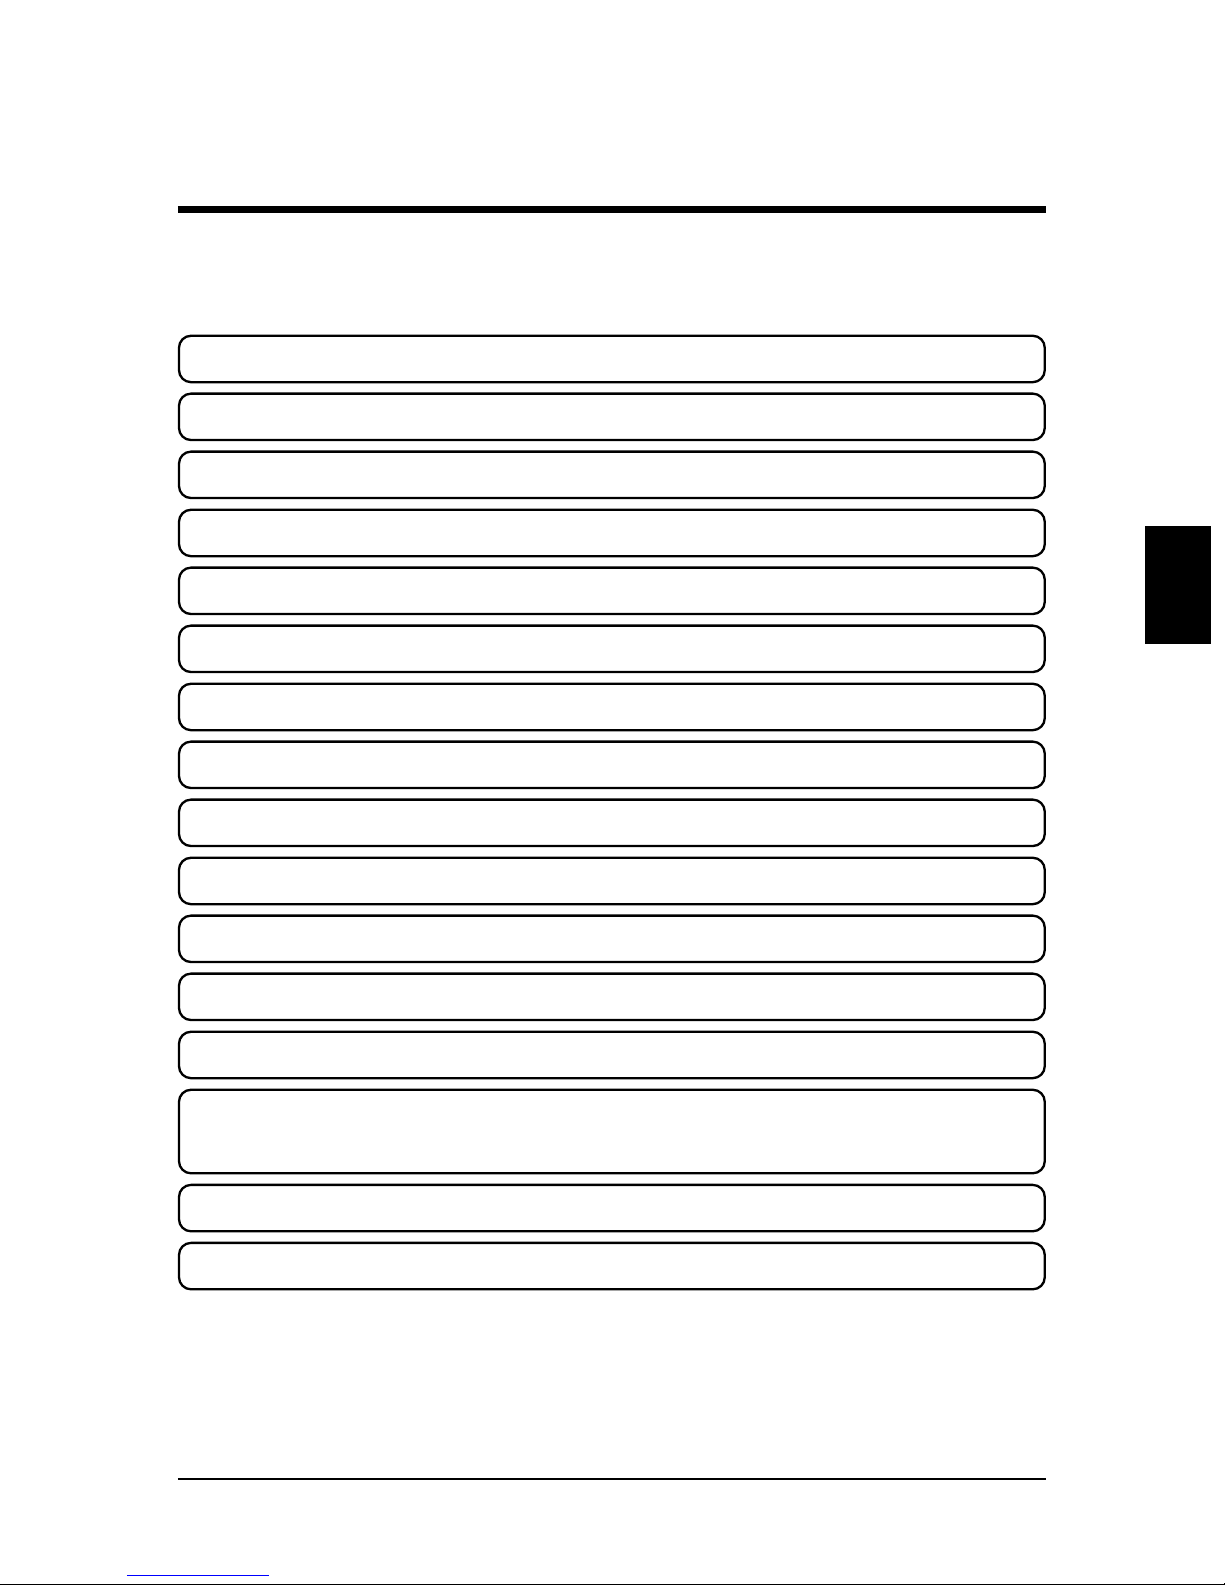
12. Vacuum :
- The Vacuum key allows you to reduce the fan
power when using very light media such as
synthetic paper or uncoated paper lighter than 70
g/m².
- When pressed together with the [SHIFT] key
,
(9) it initiates a
Set-up List
and an
adjustment
parameter plot.
Note :
·
When the data light is ON (receiving) or blinking (processing), all the
keys are disabled, except the head
cleaning key.
The keys will be operational in case of receiving data while you are in
the setup menu. The settings changes, however, will then only be
valid for the next printing job.
· Panel set up from the printer is only possible when no printing data or
processing data is sent to the printer.
·
In menu mode operation, the
shift key
functions are not available.
Falcon Outdoor 46/62 USER GUIDE (AP-75046)
25

Control Panel Names
1 = Controls Front Heater
2 = Controls Rear Heater
3 = Power Switch
Power Switch:
Control for power ON or OFF the Heater System.
Controls Front Heater:
Set temperature for the front heater. Real (RT) and set (ST) temperature are displayed on the LCD screen.
The maximum temperature is 50 °C. By pushing the buttons you can select an appropriate temperature.
Controls Rear Heater:
Set temperature for the rear heater. Real (RT) and set (ST) temperature are displayed on the LCD screen.
The maximum temperature is 50 °C. By pushing the buttons you can select an appropriate temperature.
26
Falcon Outdoor 46/62 USER GUIDE (AP-75046)
This section deals with preparations for using the printer.
What's in the Box PAGE 28
Assembling the Stand PAGE 29
Assembling the Printer PAGE 33
Ink Cartridge Precautions PAGE 38
Loading the Ink Cartridges
PAGE 40
Specify the Type of Media PAGE 46
Loading the Media
PAGE 48
Using Pre- and Post heater
PAGE 65
Making a Test Print
PAGE 66
Connecting the Interface Cable
PAGE 67
To Receive Data from the Computer PAGE 68
Printing the Setup List
PAGE 70
Making a Manual Cut
PAGE 71
Preparing for Printing
Preparing for Printing
Power Cable / Disconnect device page 37
Falcon Outdoor 46/62 USER GUIDE (AP-75046)
27
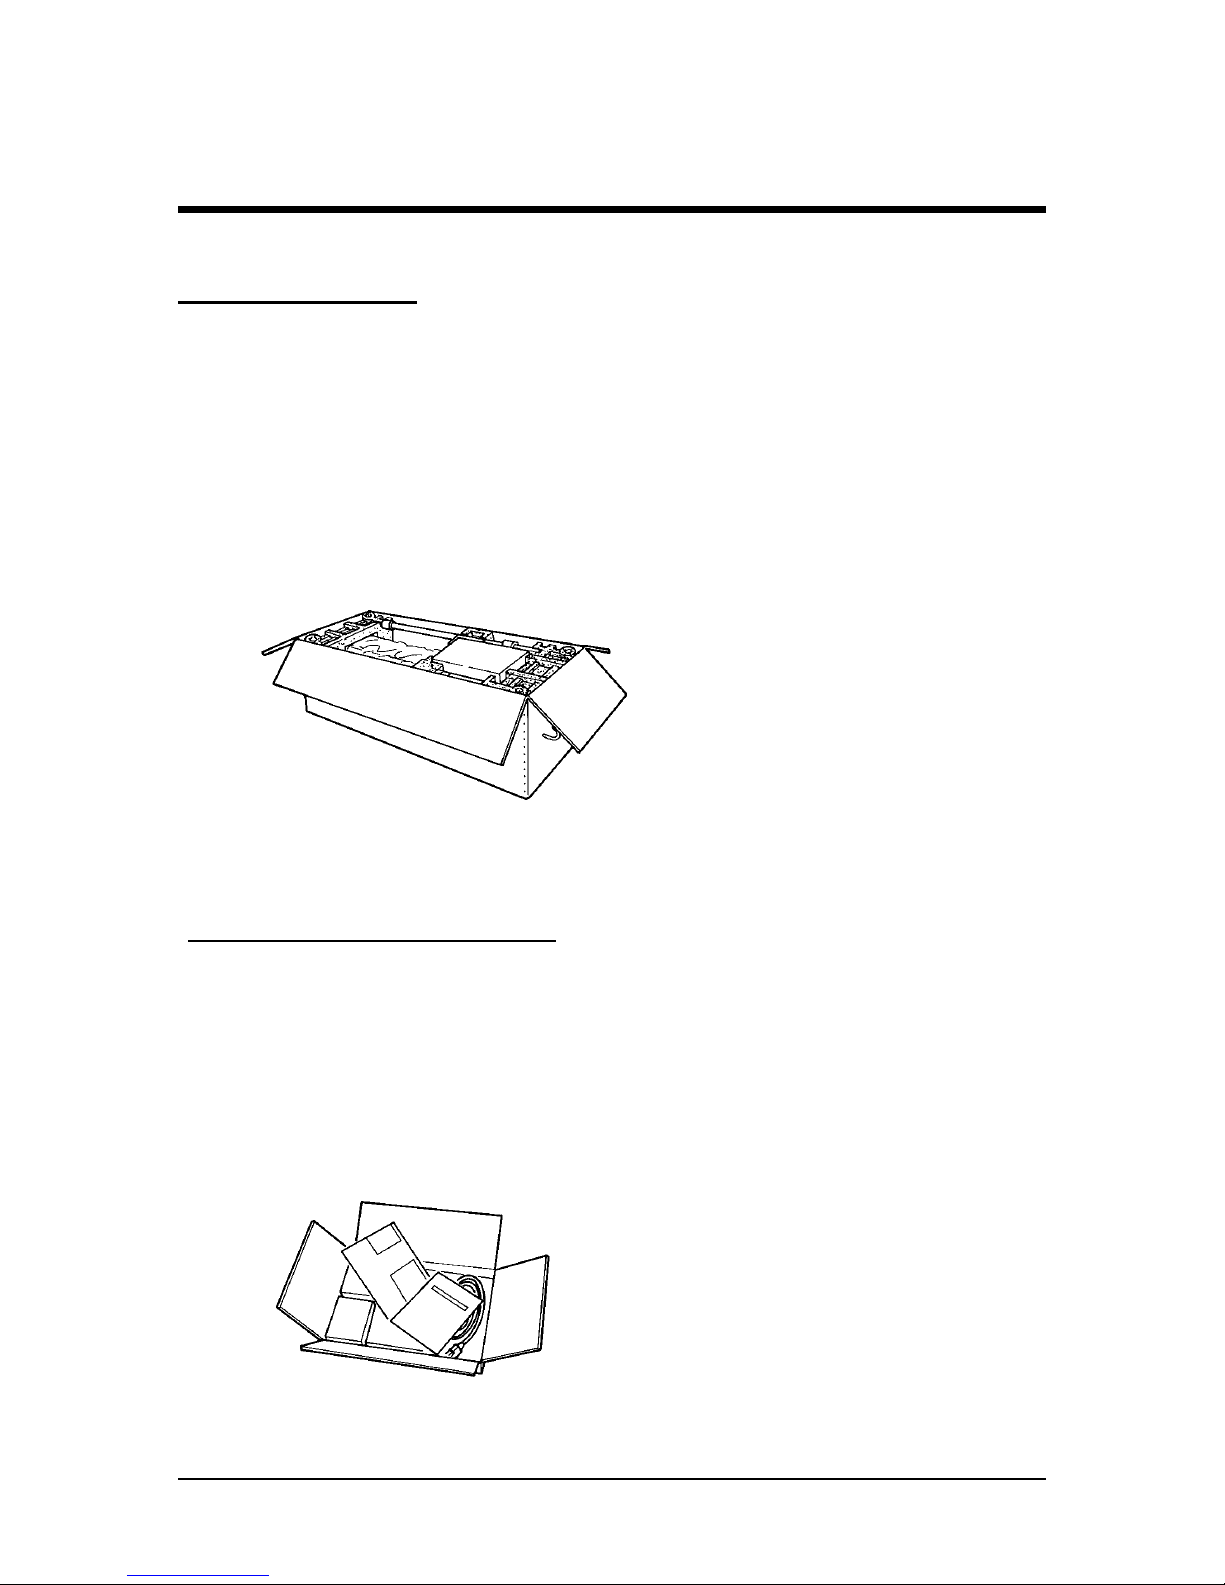
What's in the Box
What’s in the box ?
· Falcon Outdoor printer unit
·
Printer stand
· 2 media scrollers (2” / 3”) including plastic
flanges
· 1 Sheet-off knife, pre-installed in head
·
In-the-box RIP software
Accessories kit consisting of:
·
Power cable
· User’s Guide
· Extra Box with Roll Take-Up System
28
Falcon Outdoor 46/62 USER GUIDE (AP-75046)
· Scroller Slip Ring

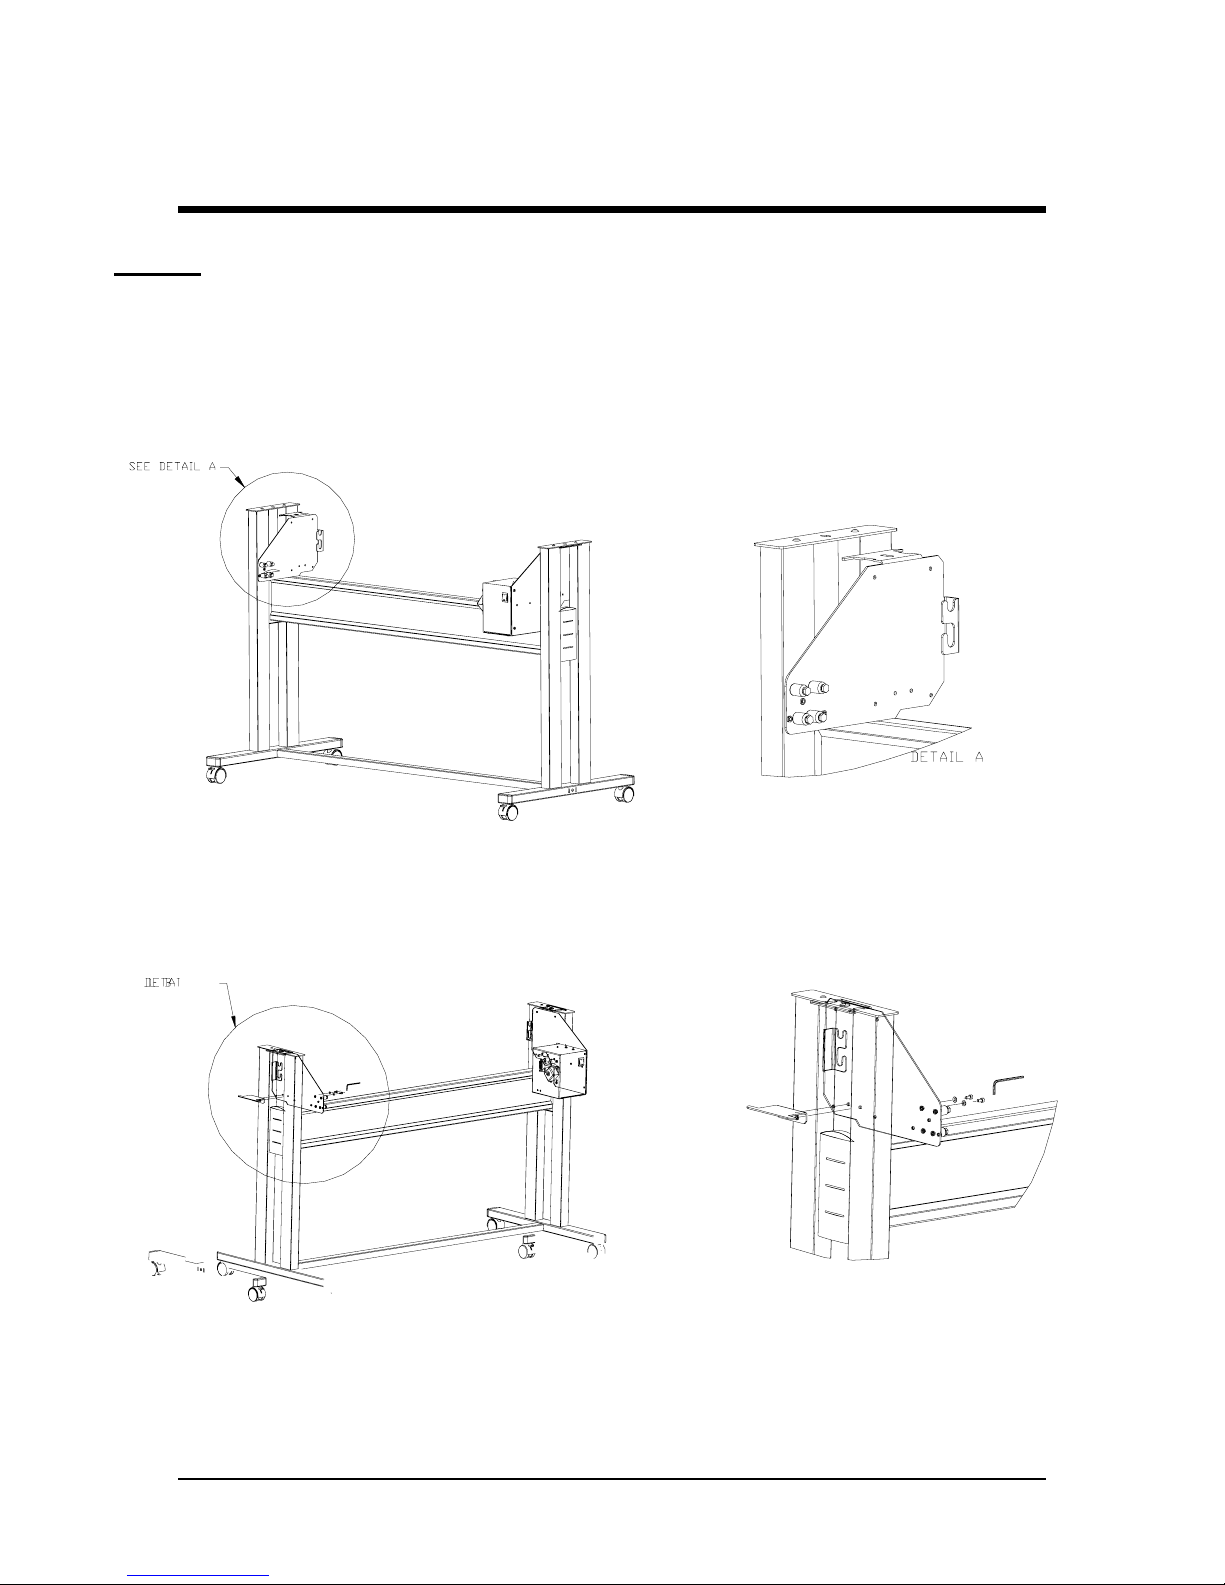
Assembling the Stand
Preparing for Printing
Caution:
· Before lifting the printer body out of the box, make sure to remove all
plastic wrapping materials first, in order to avoid that the machine slips
from your hands.
Step 1:
Unpack the stand and assemble it by screwing the left and right stand legs to the cross
beam (upper bar)
(1)
and to the cross bar (lower bar)
(2)
. To do this, use the 4 long
hexagon bolts and the large hex wrench provided to secure the cross beam
(1)
, and 2 long
hexagon bolts to secure the cross bar
(2)
. Make sure the caster wheels are on the front.
After securing the bolts permanently, put on the two plastic side covers.
Falcon Outdoor 46/62 USER GUIDE (AP-75046)
29
Assembling the Stand
Step 2 :
First make sure to mount the left end plate (plate without motor box) to the left leg of the
stand.
Hook the left end plate between the leg assembly. Turn the left end plate diagonally, so
that you can put it in-between the left leg and then turn it right to fix it into place by means
of the hooks.
Fasten the left end plate temporarily with 2 bolts + washers (use a 3 mm hex key) onto the
bracket.
Push the endplate as much as possible to the upper side of the leg assembly, so you can
easily screw the printer body onto the stand.
30
Falcon Outdoor 46/62 USER GUIDE (AP-75046)
 Loading...