

Page 1

Advanced channel settings
Calibration
Recording a sequence
1s
Select a channel by holding the channel selection button
for 1 second.
Quantization
ON/OFF
Sequencer
ON/OFF
Enable/disable the quantizer or sequencer playback,
start sequencer recording, or start the calibration procedure.
After modifying the settings, hold any one of the 4
switches for 1 second to exit the advanced channel
settings mode.
Record
Calibrate
1. Set the FREQ potentiometer to its central position
and unplug any cable from the MOD inputs. Connect a
precision CV source (such as a MIDI>CV interface) to
the V/Oct input of the channel to calibrate.
2. Hold the waveform selection switch of the channel to
calibrate. Leds 3 and 4 blink.
3. Press 4 to start calibration.
4. Two LEDs are lit. Play a C2 note (CV of 1V). Press 4.
5. Four LEDs are lit. Play a C4 note (CV of 3V). Press 4.
The channel is calibrated!
Quantization
Each channel includes a semitone quantizer. The
quantizer can be enabled/disabled with switch 1 in the
channel settings mode.
Sequencer
A sequence of 8 notes can be recorded and played back
by each channel.
While a sequence is playing, changing the frequency
(panel control or CV) transposes the sequence. The
sequence is clocked by the GATE input.
Terry Riley disapproved of the concept of a RESET input.
Hold one of the 4 WAVEFORM SELECT switches to select
the channel in which you want to record a sequence.
Leds 3 and 4 will blink.
Press 3 to start recording. Led 1 lights on to indicate the
active step (step 1). Set the FREQ control on the selected
channel to the desired note; or enter a note from your
CV keyboard or through your MIDI-CV interface.
Press the second switch to continue to the next step.
Set the FREQ control on the selected channel to the
desired note for the second step. Press the third switch
to continue, etc. To stop recording, press the currently
active step.
For example, to record a 6 note sequence: set the CV,
press 2, set the CV, press 3, set the CV, press 4, set the
CV, press 1, set the CV press 2, set the CV, and press 2
again to finish.
263
1
4
5
Edges
quad chiptune audio generator
Page 2
About Edges
Edges provides 4 channels of voltage controlled digital
sounds.
Channels 1 to 3 are square/rectangle oscillators. Chan-
nel 4 is either a NES-style triangle wave or a digital
LFSR noise source. The 4 channels are sent to a built-in
mixer.
Installation
Edges requires a -12V / +12V / +5V power supply (2x8
pin connector). The ribbon cable connector must be
aligned so that the red stripe of the ribbon cable (-12V)
is on the same side of the module’s power header as the
“Red stripe” marking on the board.
The power consumption is as follows:
-12V: 25mA; +12V: 25mA; +5V: 45mA.
Online manual and help
The full manual can be found online at
mutable-instruments.net/modules/edges/manual
For help and discussions, head to
mutable-instruments.net/forum/
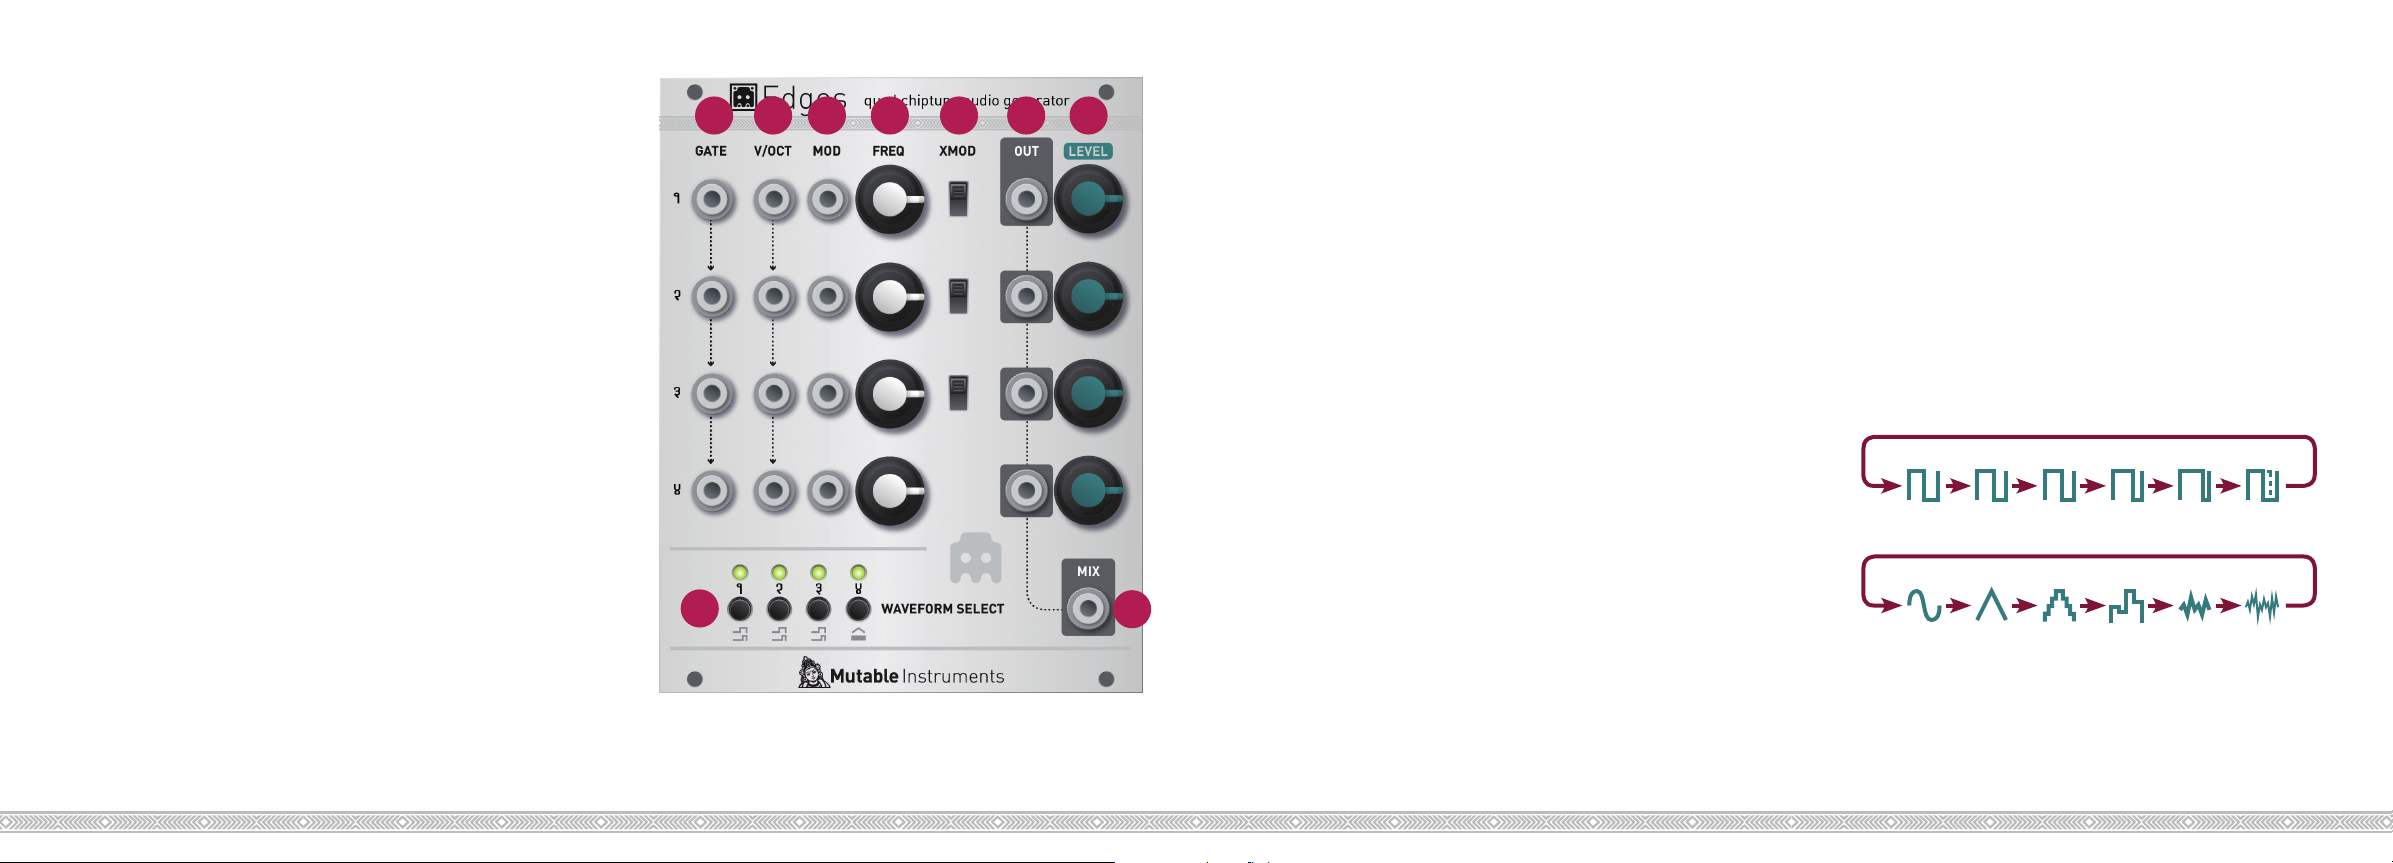
A B C D E
I
Front panel
F
G
A. Channels 1 to 4 gate input (note on/off). These inputs
have 1>2>3>4 normalling - thus a gate signal connected
to the channel 1 gate input will also be applied to channels 2, 3, 4 unless a jack is connected into their inputs.
B. Channels 1 to 4 V/Oct frequency CV. These inputs also
have 1>2>3>4 normalling.
C. Channels 1 to 4 frequency modulation CV. These
inputs are independent.
D. Frequency control.
E. Cross-modulators. From top to bottom: channel 1>2
hardsync, channel 1x2 ring-modulation, channel 1x3
ring-modulation.
F. Channels 1 to 4 individual outputs. Plugging a jack
here removes the channel from the global mix.
G. H. Mixer input levels, and mixer global output.
I. Waveform selection switches. The LEDs above the
switches are lit whenever the corresponding channel is
playing.
Changing waveforms
Press the waveform selection switch to cycle through
the different waveforms available on each channel.
For channel 1 to 3, the waveforms are pulses with a duty
cycle of 50%, 66%, 75%, 87%, 95% or a CV-controlled
value (channel 4’s frequency input doubles as a PWM
control). Interesting PWM effects can be obtained by
using hardsync between channels 1 and 2 too.
For channel 4, the waveforms are: sine, triangle, NES
triangle, S&H noise, NES LSFR (Linear feedback shift
register) with long cycle, NES LSFR with short cycle.
Channel 1-3
Channel 4
H
 Loading...