

Page 1
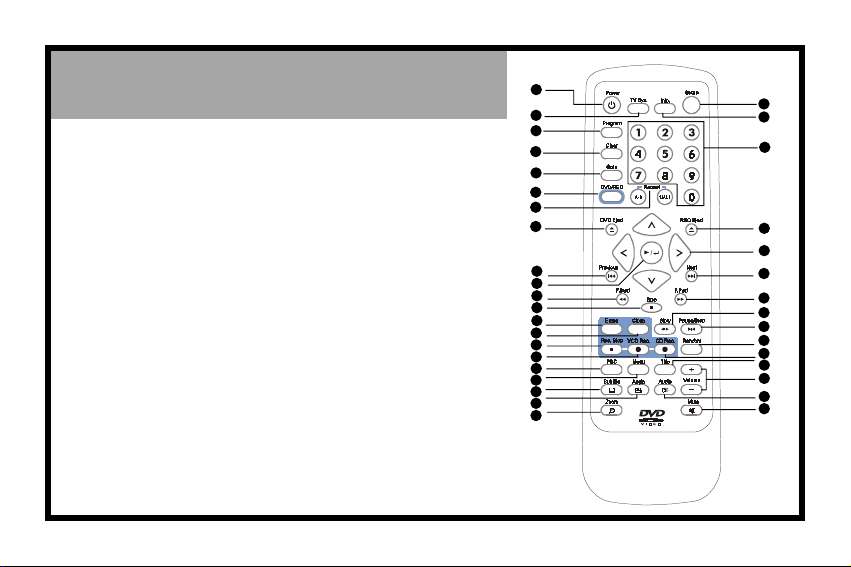
>> DVD Remote Control
1. POWER button
2. TV SYS. button
3. PROGRAM button
4. CLEAR button
5. GOTO button
6. DVD/REC button
7. A-B REPEAT button;
REPEAT (1/ALL) button
8. DVD EJECT button
9. PREVIOUS button
10. PLAY/ENTER button
11. F.BWD button
12. STOP button
13. ERASE button
14. CLOSE button
15. REC. STOP button
16. VCD REC. button
17. PBC button
18. MENU button
19. SUBTITLE button
20. ANGLE button
21. ZOOM button
22. SETUP button
23. INFO. button
24. Number buttons
25. REC EJECT button
26. Cursor buttons
27. NEXT button
28. F.FWD button
29. SLOW button
30. PAUSE/STEP button
31. RANDOM button
32. CD REC. button
33. TITLE button
34. VOLUME buttons
35. AUDIO button
36. MUTE button
*Data is subject to change
without further notice.
1
2
3
4
5
6
7
8
9
10
11
12
13
14
15
16
17
18
19
20
21
22
23
24
25
26
27
28
29
30
31
32
33
34
35
36
82-128-00060
Page 2
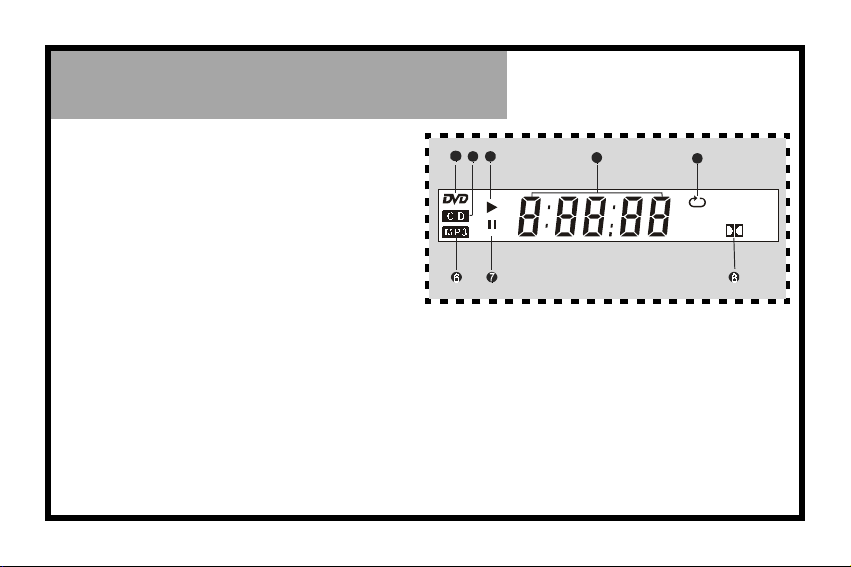
>> LED Display
1. DVD indicator
Lights when a DVD is loaded.
2. CD indicator
Lights when a CD is loaded.
3. PLAYBACK indicator
Lights when playing back any disc.
4. Counter display
Displays the type of disc and playback time, etc.
5. Repeat playback indicator
Indicates the entire disc, the same title, chapter/
track, or a specific segament is being played back
repeatedly.
6. MP3 disc indicator
Lights when a MP3 disc is loaded.
7. PAUSE indicator
Lights when PLAYBACK is paused.
8. Dolby Digital indicator
Indicates Dolby digital sound playback.
1
2 3
* Data is subject to change without further notice.
4
5
Page 3

Recording Function
This recordable DVD player has two kinds
of recording functions.
1.One is disc copy (duplication) internally.
2.The other is recording from external signals.
English
En 1
Page 4
Disc Copy
11
1 Press DVD EJECT on the remote control and insert the disc you wish to record
11
into the DVD playing side.
The disc will play back automatically. Press STOP, the DVD playing side stops.
22
2 Press REC EJECT on the remote control and insert blank CD-R, CD-RW disc or
22
discs which are not fully recorded and not closed yet into the recording side.
33
3 Press to play the original disc to choose the preferred segment for
33
recording.
NOTE:
Make sure to switch to DVD-PLAY mode by pressing Mode button on the front panel.
44
4 Press VCD REC or CD REC and you’ll be able to record in that format.
44
NOTE:
z The CD-RW disc will automatically eject when fully recorded if the DVDR EJECT Setting is on.The playback will
temporarily stop at the same time. Insert another recordable disc into the recording side and repeat the
process to record.
z While recording, a red REC indicator will blink on the display panel. The display panel only shows the left time
for recording.
55
5 Press REC STOP to stop recording.
55
NOTE:
z The minimum recording time is 30 seconds.
z Under recording, only REC STOP works; other buttons don’t work.
z You could check the information of the recordable disc by pressing INFO. a number of times, the information
of the recordable disc will show on the top left corner of the screen.
66
6 Press CLOSE to close the disc which takes 2 to 3 minutes.
66
NOTE:
z CD-RW could only be played on other machines after being closed.
Recording Editing
NOTE: This editing function only works when recording DVD, VCD, CD and MP3.
While recording DVD/VCD
1. Press Mode button on the front panel to switch to DVD PLAY mode.
2. Press PBC.
“NAVIGATE OFF” appear on the screen.
3. Press PROGRAM.
4. Press number button(s) and / / / to select the preferred item.
5. Press , then press VCD REC immediately to start to record.
While recording CD/MP3
1. Press Mode button on the front panel to switch to DVD PLAY mode.
2. Press PROGRAM in the stop mode.
3. Press number button(s) and / / / to select the preferred item.
4. Press CD REC to start to record.
En 2
Page 5

Recording From External Signals
11
1 Please check source and machine is properly connected.
11
22
2 Press Mode button on the front panel to switch to CD-RW PLAY mode, now you
22
can see and hear the external source.
33
3 Press REC EJECT on the remote control and insert blank CD-R, CD-RW disc or
33
discs which are not fully recorded and not closed yet into the recording side.
“DVDR READY” will appear on the top left corner of the screen.
44
4 Press VCD REC or CD REC and you’ll be able to record in that format.
44
NOTE:
z When disc is full it automatically ejects but the external signal must be stopped on your own before you put
in another recording disc.
z While recording, a red REC indicator will blink on the display panel. The display panel only shows the record-
ing time for recording.
55
5 Press REC STOP to stop recording.
55
66
6 Press CLOSE to close the disc which takes 2 to 3 minutes.
66
NOTE:
z Under CD-RW mode, this recordable DVD player will detect external signals rather than the disc inside. If you
want to check the disc after recording, you have to turn off the external signals. You could check the
information of the disc by pressing INFO.
After Recording
CLOSE
In the stop mode, press CLOSE after recording.
NOTE:
z CD-RW could only be played on other machines after being closed.
z After closing, CD-R discs may not be recorded again.
z After closing, CD-RW discs may be recorded again after erasing it.
z You could close disc under DVD PLAY and CD-RW mode. A red indicator on the display panel blinks while
closing is being processed. When the red indicator stop blinking, the closing is completed.
ERASE
In the stop mode, press ERASE to clear information on disc for future recording.
NOTE:
z Please confirm that the CD-RW is in REC already, as this command may not be paused or cancelled, please
reconsider the necessity of such acts.
z You could erase disc under DVD PLAY mode and CD-RW mode. A red indicator on the display panel blinks while
erasing is being processed. When the red indicator stop blinking, the erasing is completed.
z When erasing begins, all REC functions are locked; please do not turn off the power at this time lest loss of
information.
z It usually takes 2-3 minutes to erase disc.
En 3
Page 6

Recording Format
11
1 Please choose the same formats which this machine supports.
11
22
2 One may edit VCD or CD to produce multiple track effects.
22
(1) Formats must be matching.
(2) With enough space, up to 98 tracks are allowed.
33
3 You may not record VCD and CD formats on the same disc.
33
Recording Notice
11
1 This recordable DVD player allows simultaneous viewing and recording and also
11
reading from TV/Cable TV/VCR/Satellite TV and recording them to VCD.
22
2 When recording begins, “Disc REC” will appear on screen, but the numbers on
22
display panel will not start moving yet; at this time recording hasn’t begun. You
must wait until the “Disc REC” to disappear and numbers start to run for recording
to actually begin. This usually takes less than 7 seconds.
33
3 If you record from MP3 disc, this recordable DVD player will record MP3 disc into
33
CD format instead of MP3 format.
Recording Troubleshooting
Please check the following if recording doesn’t happen.
(1) Correct placement of disc.
(2) Compatible disc formats.
(3) Recording room on disc.
(4) Please place disc in player again if all fails.
En 4
 Loading...