

Page 1

VDC-300
USER’S MANUAL
Getting Started
Camera Operation
Getting Connected
Software Applications
ViewFun
Appendices
82-055-00010
Page 2

Copyright Information
All rights reserved. No part of this publication may be reproduced,
transmitted, stored in a retrieval system, or translated into any
language in any form by any means, mechanical, optical, electronic,
recording, or otherwise, without the written permission of the
Manufacturer
The Manufacturer reserves the right to revise this manual and to
make changes to any or all parts at any time, without obligation to
notify any person or entity of such revisions and changes.
All other brand or product names mentioned in this manual are
trademarks or registered trademarks of their respective owners.
Copyright © 1998
Printed in Taiwan, July, 1998.
2
• Reorient the receiving antenna
• Increase the distance between the equipment and the
receiver
• Connect the equipment into an outlet on a circuit different
from that to which the receiver is connected
• Consult the dealer or an experienced radio/TV technician
for help
This device complies with part 15 of the FCC rules. Operation is
subject to the following two conditions: (1) This device may not
cause harmful interference, and (2) This device must accept any
interference received, including interference that may cause
undesired operation.
NOTE
FCC Statement
This digital equipment has been tested and found to comply with
the limits for a Class B digital device, pursuant to Part 15 of the
FCC Rules. These limits are designed to provide reasonable
protection against harmful interference when the equipment is
operated in a residential installation. This equipment generates,
uses, and can radiate radio frequency energy and if it is not
installed and used according to the instruction manual, it may
cause harmful interference to radio communications. However,
there is no guarantee that interference will not occur in a particular
installation. If this equipment causes harmful interference to radio
or television reception, which can be determined by turning the
equipment off or on, try to correct the interference by one or more
of the following measures:
1. The changes or modifications not expressly approved by the
party responsible for compliance could void the user’s authority
to operate the equipment.
2. Shielded interface cables and AC power cord, if any, must be
used in order to comply with the emission limits.
Page 3

Contents
3
Chapter 1: Getting Started
Supported Computer Systems ...........................................7
Package Contents ............................................................. 7
Your Video Digital Camera .................................................7
Power Supply ................................................................... 9
Installing the Batteries.................................................9
Using an AC Adapter.................................................. 9
Low-Battery Indicator..................................................9
Compact Flash Card........................................................ 10
Installing the Compact Flash Card.............................. 10
Removing the Compact Flash Card ............................ 10
Chapter 2: Camera Operation
The LCD Menu- Camera Mode ...................................... 12
Functions ................................................................. 12
Flash ................................................................... 13
Quality ................................................................ 13
White Balance ..................................................... 13
Exposure ............................................................. 13
Self-timer ............................................................. 13
Auto-Off ............................................................. 14
LCD Brightness ................................................... 14
TV System Type .................................................. 14
Information Display ............................................. 14
Language ............................................................ 14
Capturing Images .................................................... 15
Processing........................................................... 15
The LCD Menu- Playback Mode .................................... 16
Functions ................................................................. 16
Four Picture Mode ............................................... 16
Delete Menu........................................................ 16
Delete All ............................................................ 17
Protecting/Unprotecting Images ........................... 17
Viewing Images ....................................................... 17
On the Camera LCD ..........................................................17
On the TV...........................................................................17
On the PC ...........................................................................17
Page 4

4
Chapter 3: Getting Connected
Connecting to the TV ..................................................... 19
Viewing Images ......................................................... 19
Real-time Display ...................................................... 19
Connecting to the VCR ................................................... 20
Recording Real-time Video ......................................... 20
Connecting to the PC .................................................... 20
Chapter 4: Software Applications
Software Installation ..................................................... 22
Windows 95/NT 4.0/98 .............................................. 22
Transferring Images to the PC (Importing) ................... 23
The Photo Album ........................................................... 24
The Setting Functions ............................................... 25
Selecting Images ....................................................... 25
Protecting Images ..................................................... 26
Deleting Images ........................................................ 26
The Control Panel ..................................................... 26
Camera Mode ..................................................... 26
Capturing Images ......................................... 26
Playback Mode .................................................... 27
Viewing Images ............................................ 27
Transferring Images ............................................... 27
To the PC (Import)............................................... 27
To an image editing application (Transfer) ........... 27
To the camera (Upload) ........................................ 27
The Help System ............................................................ 28
Chapter 5: ViewFun
Hardware Installation...................................................... 30
Starting ViewFun ............................................................ 30
Functions....................................................................... 31
View Window ................................................................. 31
The Video Album............................................................ 31
The Photo Album ........................................................... 32
Settings.......................................................................... 33
The Advanced Settings .................................................. 33
The Video Folder ....................................................... 34
The Picture Folder ..................................................... 35
The E-mail Folder ...................................................... 35
The Language Folder ................................................ 35
Recording a Video Clip ................................................. 36
Taking a Picture ........................................................... 36
E-mailing a Video Clip or Picture .................................. 36
Appendices
Trouble Shooting ........................................................... 38
Specifications ................................................................. 40
Glossary......................................................................... 41
Technical Support........................................................... 43
Page 5

Preface
Thank you for your purchase of the VDC-300. This guide covers all
of the features and functions of the camera.
In this user guide you will find the following topics:
Chapter 1: Getting Started
This chapter explains how to make your camera operational.
Chapter 2: Camera Operation
This chapter gives you step-by-step instructions on how to operate
the various functions of the camera.
Chapter 3: Getting Connected
This chapter gives you detailed instructions on how to connect and
use the camera with the TV, VCR, and computer.
Chapter 4: Software Applications
This chapter describes in detail how to use the camera’s software
(The Photo Album).
Chapter 5: ViewFun
This chapter explains the features and functions of the included
multi-function software.
Appendices
Provides troubleshooting information and specifications for the
camera along with a manual index and technical support information.
5
Page 6

Chapter
Supported Computer Systems ................................. 7
Package Contents ................................................... 7
Your Video Digital Camera ..................................... 7
Power Supply .......................................................... 9
Installing the Batteries.........................................9
Using an AC Adapter..........................................9
Low-Battery Indicator..........................................9
Compact Flash Card .............................................. 10
Installing the Compact Flash Card...................... 10
Removing the Compact Flash Card .................... 10
1
Getting Started
Page 7
7
Supported Computer Systems
This camera complies with the TWAIN standards, the industry
standard for imaging hardware and software. TWAIN eliminates
compatibility problems with software and input devices from
different vendors. The following are the minimum system
requirements for optimum performance with color images:
• Pentium/486 PC or notebook computer
• Windows 95/NT 4.0/98
• 16 MB RAM
• 20 MB available hard disk space for software installation
• VGA or Super VGA color monitor
Package Contents
• VDC-300 camera including 4 AA batteries
• USB and RS232 connection cables
• NTSC and PAL video output cable
• 7.5V DC, 2A Power Adapter
• Camera strap and carrying bag
• Installation CD (TWAIN Driver, iPhoto)
• User's Manuals
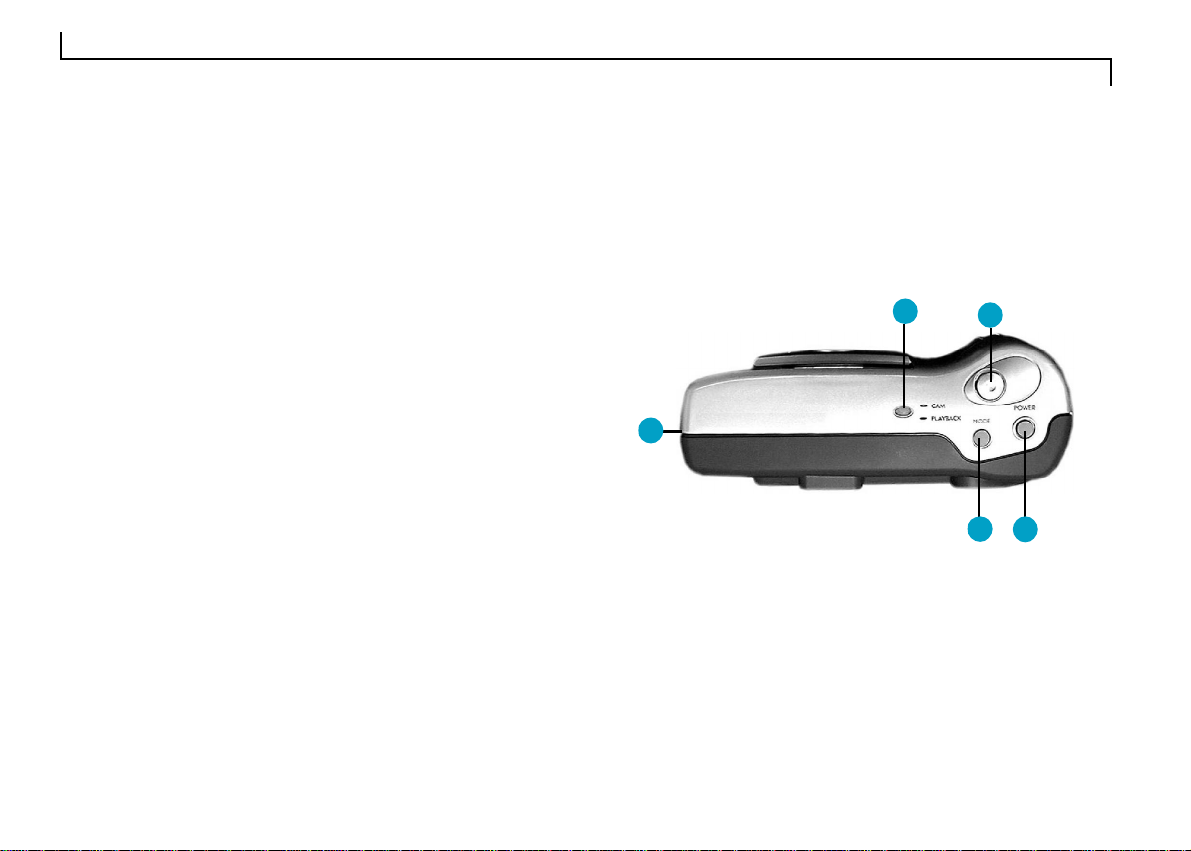
Your Video Digital Camera
The camera is equipped with a number of different features and
functions. To better understand and familiarize yourself with these
features and functions, please refer to the following pages before
using the camera.
3
5
1. Power Button: Turns the camera on/off.
2. Shutter button: Captures the image into the camera.
3. LED Indicator: Displays the current camera mode
(green=camera, orange = playback).
4. Mode Button: Switches between the two camera
modes (capturing images and displaying them).
5. Cable Panel: Contains the AC Power Adapter,
USB, Video, and RS232 connection terminals.
2
1
4
Page 8

8
7
12
6
8
9
10
11
16
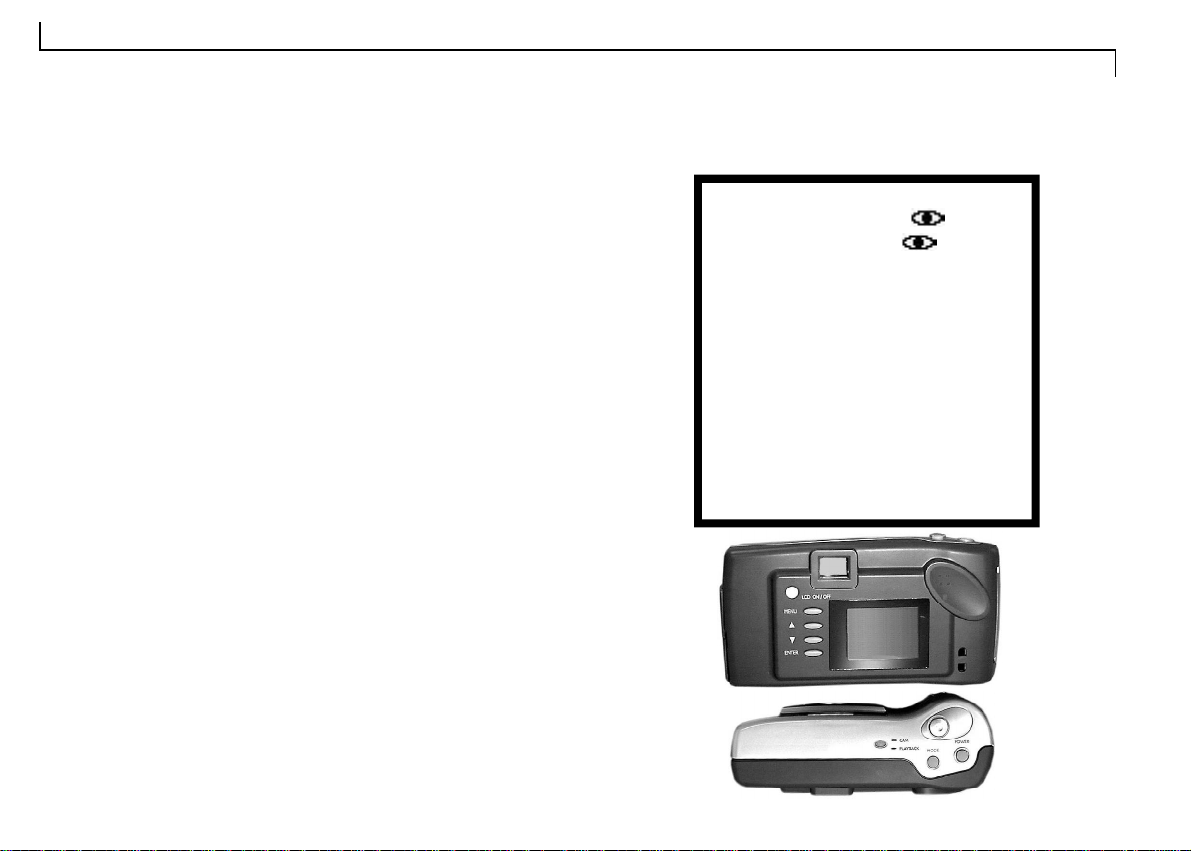
6. LCD Panel: The Liquid Crystal Display panel allows you to
view real-time display, the menu functions, and image playback.
7. LCD On/Off: Turns the LCD on or off.
8. Menu Button: Displays the camera’s function menu in the LCD.
9. Select (Up): Scrolls up/backward through the function menu or
captured images.
10.Select (Down): Scrolls down/forward through the function
menu or captured images.
11.Enter Button: Selects the options from the function menu.
12.Viewfinder: Allows for viewing of the subject.
13 Compact Flash Card Panel: Allows for insertion or removal
of the optional CF card.
14 Strap Holder: Allows the camera strap to connect to the
camera for easy and safe carrying.
15 Battery Compartment: Allows for loading or unloading of the
batteries.
16.Tripod Holder: Allows a tripod to be secured to the bottom of
the camera.
15
13
14
14
2
1. Viewfinder: Allows you to position the subject in the image
that will be captured.
2. Lens: Allows the camera to focus on the subject and to capture
the image once the shutter button has been pressed.
3. Iris Selector: Allows for the adjustment of light levels
entering the camera.
4. LED Indicator: Alerts you when the self-timer is about to take
the picture.
1. AC Power Adapter Terminal:
Allows the camera to be connected
to an AC power supply.
2. USB Terminal: Allows the camera
to be connected to a computer via a
USB interface.
3. RS232 Terminal: Allows the
camera to be connected to a
computer via a serial interface.
4. Video Terminal: Allows the
camera to be connected to a
television or VCR.
1
2
3
4
3
Page 9
9
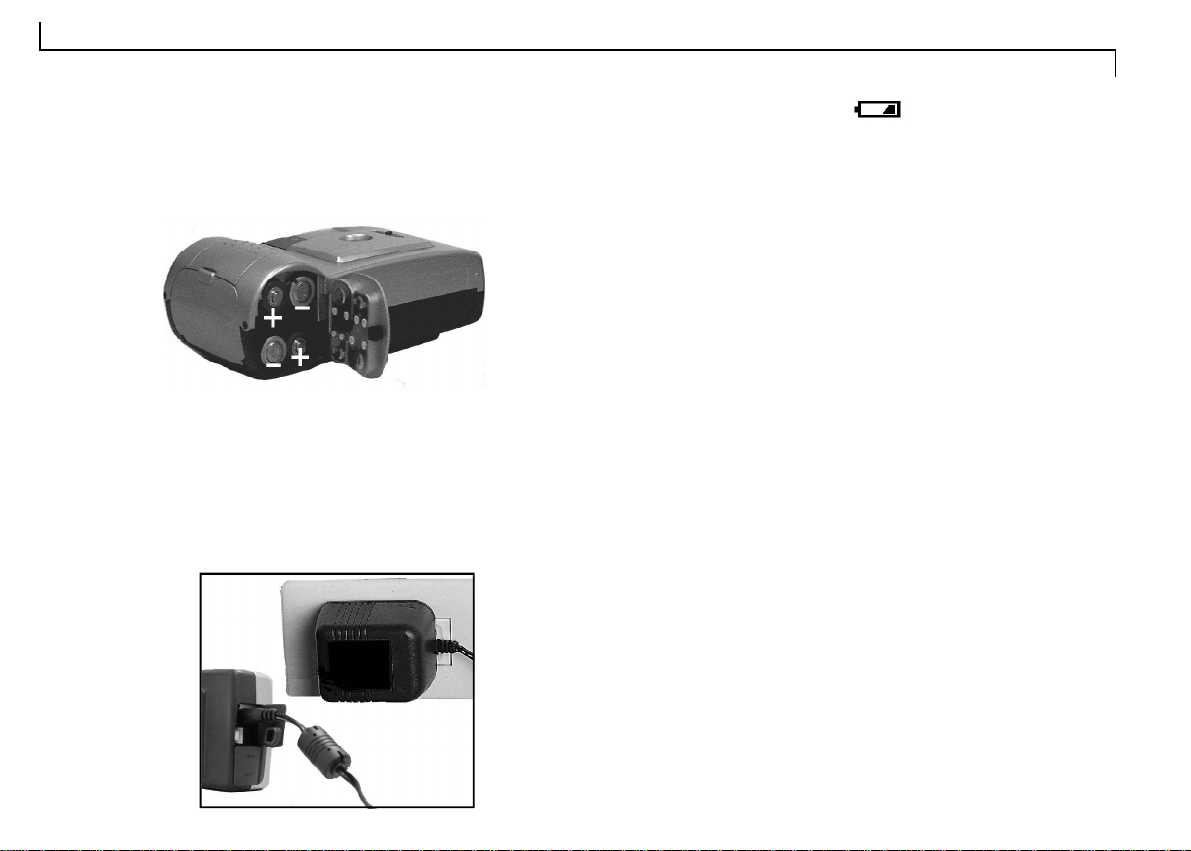
Power Supply
Installing the Batteries
The camera comes with 4 AA alkaline batteries. Please refer to the
inside of the battery compartment lid or the following illustration to
properly install the batteries.
Using an AC Adapter
To save battery power, you may also use a standard (7.5v/2 amp)
AC power adapter.
To connect an AC power adapter:
• Plug the adapter into an appropriate AC outlet.
• Open the panel and insert the power adapter into the top slot as
shown.
Low-Battery Indicator
When the battery power becomes low, the battery icon will display and blink in your LCD. To continue to use the camera, either
replace the batteries or connect the AC power adapter. The images
will remain in the camera’s memory for an indefinite period of time.
Note: Extended use of the LCD causes rapid battery usage. Therefore, we recommend using rechargeable batteries or the AC power
adapter whenever possible.
Page 10
10
Compact Flash Card
The camera is equipped with a built-in Compact Flash Memory
Card port that allows you to use an optional, DOS compatible,
compact flash card (CF card) to store images. Using a CF card
overrides the internal memory of the camera enabling you to capture
more images if the internal memory is full.
You may use the optional CF card to store your images. Each MB
of memory can store approximately 4 High, 10 Standard, or 23
Economic quality images, or any combination of the three.
Note: Do not use a CF card with a memory capacity over 32 MB or
you will render the camera inoperable.
Note: Installing a new CF card requires a small amount of the CF
card’s memory capacity to create a directory for storing images.
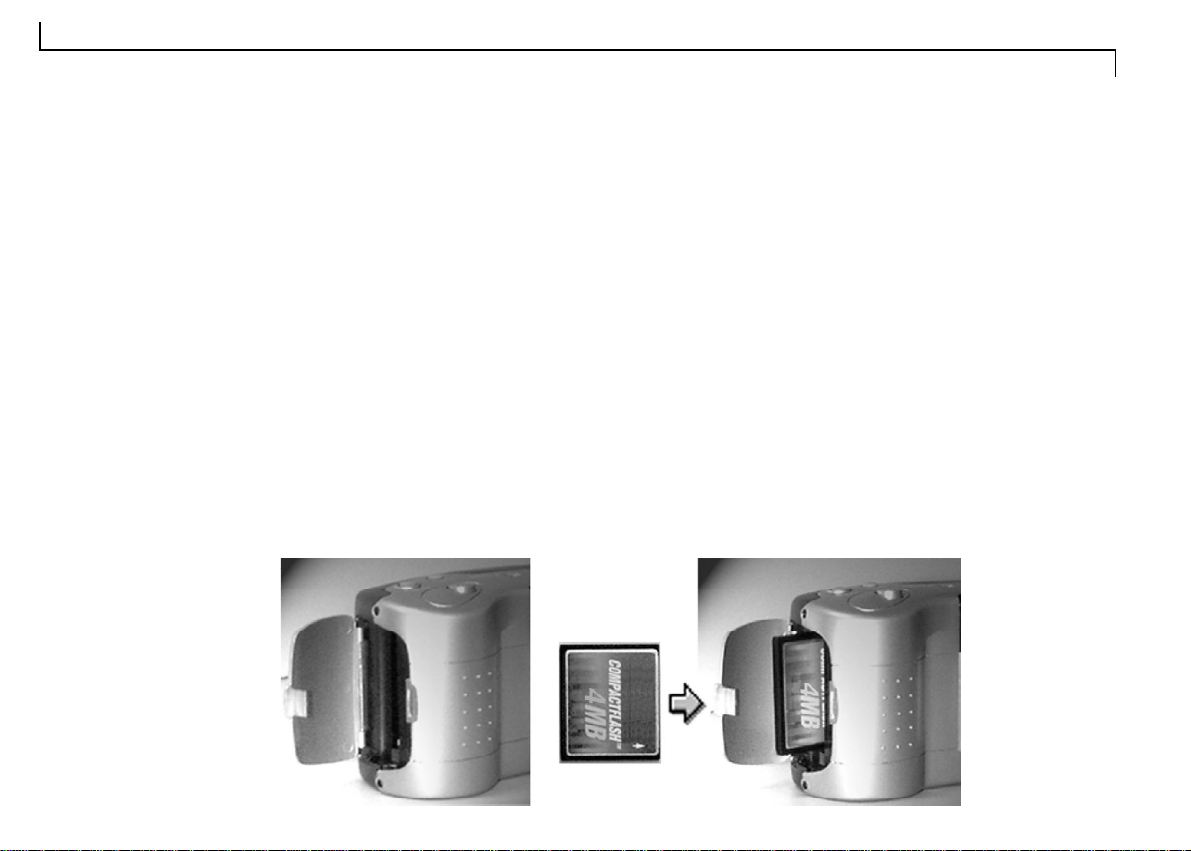
Installing the Compact Flash Card
• Open the CF card panel (shown below).
• Slide the CF card firmly into the slot (shown below).
• Close the CF card panel.
Once a CF card is installed it automatically becomes the main
memory of the camera, and all functions of the camera (quality,
protect, etc.) refer to the images on or being captured to the card and
not images in the internal memory. To return the function reference
to the camera’s internal memory, simply remove the CF card.
Removing the Compact Flash Card
Open the CF card panel and pull the CF card out of the slot.
Note: The camera will signal you with two short beeps every time
you insert or remove the CF card, as well as every time you turn the
camera’s power on.
Page 11

Chapter
The LCD Menu- Camera Mode .............................. 12
Functions ........................................................ 12
Flash .......................................................... 13
Quality ....................................................... 13
White Balance ............................................ 13
Exposure .................................................... 13
Self-timer .................................................... 13
Auto-Off .................................................... 14
LCD Brightness .......................................... 14
TV System Type ......................................... 14
Information Display .................................... 14
Language ................................................... 14
Capturing Images ............................................ 15
Processing.................................................. 15
The LCD Menu- Playback Mode ............................ 16
Functions ........................................................ 16
Four Picture Mode ...................................... 16
Delete Menu............................................... 16
Delete All ................................................... 17
Protecting/Unprotecting Images.................. 17
Viewing Images ............................................... 17
On the Camera LCD .................................... 17
On the TV................................................... 17
On the PC ................................................... 17
2
Camera Operation
Page 12
12
Camera Operation
This chapter explains the camera’s operation features and settings
in detail.
The camera has two modes, Camera and Playback. Both modes
offer various functions specific to that particular mode. The LED on
the top of the camera will display the current mode you are in (Green
= Camera, Orange = Playback). In order to use the individual functions of each mode, you must first display and select them using the
appropriate LCD menu.
The LCD Menu- Camera Mode
• Power on the camera.
• Press the Menu button. The camera mode functions are dis-
played on the LCD.
Selecting a Camera Function:
1. Use the Up/Down buttons to scroll through the list of options.
2. Press Enter to select or toggle an option.
3. A red up or down arrow indicates there are additional menu selec-
tions available.
4. Press the menu button to exit the menu screen.
5. The selected function’s icon is displayed on the LCD panel.
Functions
The following menu lists the functions available in Camera mode.
MENU
FLASH: ON/ON /AUTO/
AUTO /OFF
QUALITY: ECON/STD/HIGH
W.B.: AUTO/OUTDOOR
INDOOR+/INDOOREXPOSURE: -2/-1/0/+1/+2
SELF-TIMER: YES/NO
AUTO-OFF: YES/NO
LCD BRIGHT: -2/-1/0/+1/+2
TV: NTSC/PAL
INFO DISP: YES/NO
LANGUAGE: ENG,GER,FRE,
SPA,ITA,DUT,POR
Page 13

13
(1) FLASH:
The camera is equipped with five flash modes:
ON: the flash will fire with every image capture.
ON : the same as ON, preceded by a flash which reduces
red-eye.
AUTO: whenever there is insufficient light, the camera
automatically detects and fires the flash.
AUTO : the same as AUTO, preceded by a flash
which reduces red-eye.
OFF: no flash is fired.
Note: The flash will need to be charged prior to, and right after being
used. The flash icon will blink in the LCD and stops once the flash is
ready for use.
(2) QUALITY:
Quality determines the file size and the effect of the captured
image that is displayed or printed and is based on the amount of
compression. High quality images appear sharp since the camera is
not compressing the information as much, but also require more
space for storage.
There are three quality modes:
• Economic- 40 KB of memory space per image.
• Standard- 92 KB of memory space per image.
• High- 232 KB of memory space per image.
Note: The camera’s internal 2 MB memory can store up to 46 Economic, 20 Standard, or 8 High quality images (depending on the
compression ratio), or any combination of the three.
(3) White Balance:
White Balance adjusts the camera's color sensitivity to match the
prevailing color of white outdoor light, yellow indoor light, or (sometimes) greenish fluorescent light. The camera is equipped with four
white balance modes. Select the white balance mode that most closely
matches the light in which you're using the camera.
Auto: automatically adjusts according to surrounding light (default)
Outdoor: for natural light
Indoor +: for fluorescent lighting
Indoor -: for incandescent lighting (bulb light)
Note: If the image color is not accurate when using the Auto mode,
try moving the camera to acclimate the Auto white balance sensor.
(4) Exposure:
Exposure controls the amount of light (brightness) that appears in
a captured image. The LCD menu has five exposure settings, ranging
from -2 to +2 (darker to lighter), allowing you to control the amount
of light in your images.
If your images are too:
• bright, decrease (-) the exposure value to darken them.
• dark, increase (+) the exposure value to lighten them.
(5) The Self-Timer:
This feature allows you to delay the capturing of an image
for ten seconds giving you time to get into some of your
own pictures.
To activate this function:
1. Select Self-Timer from the LCD menu.
2. Position the camera on a flat stationary surface or mount it on a
tripod.
3. Center the image to be captured using the viewfinder or LCD.
4. Press the Shutter button and get in the picture.
Page 14

How will I know when the image will be captured?
The LED indicator at the front of the camera blinks, increasing in
speed to alert you when the image will be captured. (Blinking rate =
7x @ 1 second + 6x @ 1/2 second)
(6) Auto-Off:
• Selecting No allows you to continuously use the camera without
interruption of power. If you do not perform a camera operation
for 10 minutes the LCD automatically shuts off, not the camera.
• Selecting Yes allows the camera to automatically power off when-
ever you do not perform a camera operation for 90 seconds. To
restore power to the camera once it has been turned off, simply
press the Power On/Off button.
Note: When the camera is powered off, the following settings and
functions will automatically reset to their defaults:
• White Balance: AUTO • Auto-off: YES
• Self-timer: NO • Information Display: YES
• Exposure: 0
(7) LCD Brightness Control:
Allows you to adjust the brightness of the LCD panel to accommodate for interior or exterior lighting fluctuations.
There are three LCD settings ranging from -2 (least bright) to +2
(most bright).
• From the Camera menu, select LCD Bright.
• Press Enter until the desired brightness level is selected.
(8) TV:
When the camera is connected to the TV, this function allows you
to select the type of system used by the TV.
14
Note: If the image on a color television appears in black and white,
try changing the TV setting on the Camera Mode LCD menu.
(9) Information Display:
This feature uses icons (e.g. flash, counter, etc.) to display camera
information and settings on the camera LCD.
The information displayed is from one of two sources.
1. If you are not using a CF Card, the information displayed
refers to the status of the camera’s internal memory.
2. If you are using a CF Card, the information displayed refers
to the status of the card.
In Camera mode the number that appears reflects how many images it is possible to capture before the memory is full. This number
will vary depending on the quality mode you are using to capture
images. For example, high quality images require more memory, thus
less images can be captured and stored.
Note: Using a CF card overrides the camera’s internal memory (making it non-accessible), diverting all storage to the CF card. To reenable the camera’s internal memory as the main storage area, simply remove the CF card from the camera.
To Disable or Enable the information display:
• From the camera mode menu, select Information Display.
• Press Enter to turn the display off or on.
(10) Language:
This menu option allows you to select the language the LCD menu
will appear in.
Page 15

Capturing Images
There are several factors that should be considered when capturing quality images. Proper positioning, distance, lighting, even holding the camera in just the right way can make all of the difference
when capturing quality images.
To capture an image:
1. Power on the camera and ensure that you are in Camera mode
(Green LED) by pressing the Mode button.
2. Set the Iris Selector based on the lighting conditions surrounding
the subject.
• Use the (F8.0) setting for brightly lit subjects or for close
range shots. This setting reduces the exposure of light.
• Use the (F2.8) setting for indoor, backlit images, or long
range shots. This setting increases the exposure of light.
3. From the LCD Menu, select the White Balance and Quality as
described earlier in this chapter.
4. Position the subject in the viewfinder or the LCD (if activated).
5. Gently press the Shutter button, holding the camera steady to
obtain a crisp image.
15
Note: When using the flash on an object at or closer than 1.2 meters
(4 feet), set the Iris Selector to the setting. However, if the object
is further than 1.2 meters (4 feet) set the Iris Selector to the setting.
Processing
When the camera is in Camera Mode and the Shutter button has
been pressed, the green/orange LED Indicator will flash on and off
and a processing bar will be displayed on the LCD screen (if
powered on) until the camera is ready to capture another image.
Note: If the memory full indicator is lit when set on high or standard
quality it may be possible to capture one or two more economic
quality images; because economic quality images take up less memory
than high or standard quality images.
Page 16

16
The LCD Menu- Playback Mode
This mode offers functions specific to captured images and allows
you to view your captured images on the LCD or TV. When you
switch to this mode, the LCD automatically turns on in single picture mode and the last image captured appears.
Selecting a Playback Function:
1. Press the Menu button.
2. Use the Up/Down buttons to scroll through the list of options.
3. Press Enter to select or toggle an option.
4. Press the Menu button to exit the menu screen.
5. The selected function’s icon is displayed on the LCD panel.
The following menu lists the functions available in Playback mode.
4 PIC MODEDELETE MENU- HOME/UP/DOWN/DELETE
DELETE ALL- DELETE ALL? YES/NO
PROTECT: YES/NO
LCD
Functions
(1) Four Picture Mode
This function allows you to view four images at once in order to
speed up the search process.
Note: You can not access the playback menu while in four picture
mode.
Selecting an image from Four Picture Mode
• Using the Up/Down buttons, highlight the image you wish to
select.
• Press the Enter button. The image will automatically appear in
single picture mode.
(2) Delete Menu:
This function allows you to selectively delete any image in the
camera’s memory.
To delete an image:
1. From the Playback menu, select Delete Menu.
2. The Delete Menu screen will appear showing a thumbnail of
the image you selected and giving you four options.
Page 17

17
Note: When you delete an image, if there are any other images that
are in the camera’s memory after that image, they will move up in
place.
1 3
2 4
before
1
after
To delete a protected image:
1. Select the protected image that you wish to Delete.
2. From the Playback menu, select Protect and press Enter to
unlock the image.
3. Continue to delete the image as described earlier.
2 4
3
blank
(3) Delete All
This feature enables you to simultaneously delete all of the im-
ages, excluding the protected images, from the camera’s memory.
1. From the Playback menu, select Delete All.
2. In order to avoid accidental deletion, a pop-up box will display asking you if you want to delete all of the images.
(4) Protecting or Unprotecting Images:
This feature protects images from accidental deletion or
Unprotects images for deletion.
Viewing Images
On the Camera LCD
1. Power on the camera and press the mode button to select Playback (Orange LED).
2. Press the Up/Down buttons to scroll through and preview the
images.
3. Press Menu to view the Playback LCD menu and use four picture mode, delete, protect, and more.
On the TV
The camera has the ability to display previously captured images
on a standard NTSC or PAL television system.
In order to view images on the TV it is essential to connect the
camera to the TV. Please refer to the next section, Getting Con-
nected: Connecting to the TV, for further instructions.
On the PC
The camera can also display images on the PC through TWAIN
compliant image editing software, such as iPhoto Plus 4. To use the
camera with the PC, please refer to the Software Applications
chapter.
To Protect or Unprotect an image:
1. Select the image that you wish to Protect or Unprotect.
2. From the Playback menu, select Protect and press Enter to
lock or unlock the image.
Page 18

Chapter
Connecting to the TV ............................................ 19
Viewing Images ................................................ 19
Viewing Real-time Video.................................... 19
Connecting to the VCR ......................................... 19
Recording Real-time Video ................................ 20
Connecting to the PC ............................................ 20
3
Getting Connected
Page 19

19
Connecting to the TV
1. Plug one end of the included video
cable into the VIDEO IN terminal of your television.
2. Open the cable panel and plug
the other end of the cable into
the camera’s VIDEO terminal.
Viewing Images
In order to view images on the TV after connecting, please refer to
the following:
1. Turn on the TV and change the TV to the VIDEO mode (the same
settings you would select when using your VCR).
2. Turn on the camera and select the Playback mode.
The last image captured will appear on the television screen.
3. Press the Up/Down buttons to scroll through the images until
you reach the desired image.
Press the Menu button to see the Playback options.
Viewing images with the Up Button
The viewing order of the images will count down through the list
to the first image then return to the last image and countdown through
the list again.
4
23
1
Viewing images with the Down Button
The viewing order of the images will count up through the list to
the last image then return to the first image and count up through the
list again.
Viewing Real-time Video
In order to view real-time video on the TV after connecting, please
refer to the following:
1. Turn on the TV and change the TV to the VIDEO mode (the same
2. Power on the camera and select Camera mode.
Note: If the image appears on a color television in black and white,
try changing the TV setting on the Camera Mode LCD menu.
1
settings you would select when using your VCR).
The real-time video being captured by the camera will be displayed on the TV.
2 3
4
Page 20

20
Connecting to the VCR
1. Plug one end of the included video cable into the VIDEO IN
terminal at the back of your VCR.
2. Plug the other end of the cable into the camera’s VIDEO terminal.
Note: Ensure that your TV and VCR are properly connected.
Recording Real-time Video
In order to record video after connecting to the VCR, please refer
to the following:
1. Power on the VCR, TV, and the camera.
2. Change the TV to the Video mode. The object in front of the
camera will appear on the TV.
Note: From the camera mode LCD menu, disable the information
display function.
3. Aim the camera at the desired subject.
4. When you are ready press the VCR’s Record button.
Note: All recording functions are controlled using the VCR.
Note: To continuously view or record real-time video ensure the
camera menu’s AUTO-OFF function is set to NO.
With ViewFun (Chapter 5),
the camera can display real-time video on the PC!
Connecting to the PC
1. Plug one end of the cable into the RS232 or USB port at the back
of your computer.
RS232
Connection
2. Plug the other end of the cable into the camera’s RS232 or USB
Terminal.
3. Turn the camera on.
RS232
Connection
Note: In order to use the USB connection you must be running Windows 98.
USB
Connection
USB
Connection
After connecting you can transfer images from the camera to your
PC by referring to the next section.
Page 21

Chapter
Software Installation ............................................. 22
Windows 95/NT 4.0/98 ...................................... 22
Transferring Images to the PC (Importing) ........... 23
The Photo Album ................................................... 24
The Setting Functions ....................................... 25
Selecting Images ............................................... 25
Protecting Images ............................................. 26
Deleting Images ................................................ 26
The Control Panel ............................................. 26
Camera Mode..............................................26
Capturing Images ................................. 26
Playback Mode ............................................ 27
Viewing Images .................................... 27
Transferring Images ....................................... 27
To the PC (Import)....................................... 27
To an image editing application (Transfer) ... 27
To the camera (Upload) ................................ 27
The Help System .................................................... 28
4
Software Applications
Page 22

Software Installation
Windows 95/NT 4.0/98
1. Insert the installation CD into
your CD-ROM drive.
2. Click on Start and select Run.
3. In the Run dialog box,
type “drive:\run.exe”
where drive is your CDROM drive and click
OK.
4. Click Install on the Tutorial screen and follow the on-screen
instructions.
Windows 98 User’s Note: For Plug n’ Play installation, please refer
to the following:
22
1. After connecting the camera to the PC using the USB cable, a
warning will appear.
2. Insert the Installation CD when prompted (asked for a driver),
and continue to follow all on-screen instructions.
Page 23

23
Transferring Images to the PC (Importing)
Once you have installed all of the required software (described in
the previous chapter) and have captured images, you will want to
connect your camera to the PC so that you can transfer your images
for editing or storing.
Note: Connecting the camera to the computer renders the camera
buttons inoperable. However, several functions can be controlled
through the Control Panel as described later in this chapter.
Transferring Images to the PC
The images will be transferred (Imported) from one of three
sources:
1. The internal memory of the camera
2. The CF card
3. A PCMCIA CF card reader
To transfer images to the PC (Import):
1. Open an image-editing application. We will use iPhoto Plus 4 as
an example.
2. From the File menu, choose Acquire and click Select Source.
The Select Source dialog box appears.
3. Choose Mustek VDC-300 and click Select.
4. Return to the File menu, select Acquire and click Image.
The Acquire Image dialog box appears.
5. Select New Image and click Acquire.
The Select image source dialog box appears requesting you to
select the source of the images.
Note: If the Photo Album is
already open, select Import from
the Camera menu or click the
Select Image Source icon.
6. Check the Preview Thumbnail box if you want to view image
thumbnails in the Photo Album, otherwise, only image information will be displayed.
7. Click on the source (Internal memory, CF card, or CF card reader)
of the images you want to import. The Photo Album opens with
the source images.
Note: Clicking the Cancel button allows you access to the Photo
Album without importing any images.
If you were already in the Photo Album, clicking the Cancel button
will exit you from this function.
Note: When importing images from a PCMCIA CF card reader, it is not
necessary to have the camera connected to the computer, as the
card reader acts as an independent source. The PCMCIA card reader
is used with a CF card connector and is installed into your main
computer housing unit as a CD-ROM would be. These CF card readers are also very popular when using notebook or laptop computers, and many of them are often equipped with a CF card reader.
Page 24

The Photo Album
24
Import: Allows you
to move images from
the CF card, card
reader, or internal flash
memory into the computer.
Menu Bar: Contains all of
the functions of the software.
Control: Allows you to control the functions of the camera from inside the computer.
Protected Image: Has a
locked symbol displayed.
Upload: (from the camera
menu) Allows you to transfer
images from the computer to
the camera or to the CF card
from the menu bar.
Setting: (from the camera
menu) Allows you to input
the baud rate, select the language, and displays the com
port setting.
Transfer: Allows
you to transfer the
selected image(s) to
an application (e.g.
iPhoto Plus 4).
Selected Image:
A displayed image
in a light green box.
Preview: Allows
you to view selected image(s) in
the Photo Album.
Select All: Allows
you to select all of
the images to delete,
protect/unprotect or
transfer.
Page Index: Lists the number of images in the folder as
well as the current page.
Unselect: Allows
you to unselect the
selected images.
Delete All: Allows you to delete all
of the unprotected images.
About: Contains the current driver
version and the copyright notice.
Help: Allows you to enter the
camera’s complete on-line help system.
ViewFun (Windows 98): Opens the
camera’s image capturing software
allowing you to record video clips
and capture images.
Photo-Page: Displays the captured
images.
Displayed Image: An image transferred to the Photo Album displayed
with it’s image number and resolution.
Next Page Arrow: Allows you to
turn the page by clicking.
Source Icon: Displays the original source
(Internal Memory, CF card or PCMCIA
card) of the images displayed.
Delete: Allows you
to delete the selected
image (unprotected).
Page 25

25
The Photo Album
The Setting Functions
This feature displays or allows
you to adjust the settings used to
communicate with the camera.
Baud Rate
This is the rate at which the camera and computer communicate
with each other through the serial port.
The USB baud rate is automatically determined, whereas, the RS232
baud rate has four possible settings.
RS232 Baud rates
1. 19200 bps (bits/second) 3. 115200 bps
2. 57600 bps 4. Auto Detect
The computer will auto-detect the baud rate and communicate
with the camera using the highest setting. Some high quality images
cannot be transferred at this rate and therefore, you must manually
select a slower baud rate.
Com Port (RS232 Serial Connection only)
This is the PC port that you connect the RS232 cable into. This
setting function automatically detects the Com Port and displays
this location in the settings function, so that you are able to properly
communicate between the camera and PC.
Selecting Images
Images must be selected prior to being transferred, downloaded, or
deleted.
Note: • Unselected images have no colored box around them.
• Selected images have a green box around them.
• Protected images have a lock icon below them.
Selecting individual or multiple images
You can manually select an image by clicking on it with your
mouse.
There are three ways to select multiple images:
1. Click the Select All icon and all of the images currently in
Photo Album are automatically selected.
2. Hold down the keyboard Ctrl key, and then click each image
you want to select.
3. Right-click on an image and a pop-up box will display, choose
Select. Each image that you do this for will remain selected.
To select a series of images:
Language
This setting allows you to change the language that is used for
displaying the camera settings and functions. Choose from English,
German, French, Spanish, Italian, Dutch, and Portuguese.
• Hold down the keyboard Shift key, and click both the first
and the last image you wish to select. All of the images
between those two selections will also be selected.
Page 26

26
Protecting Images
To Protect/Unprotect an image in the Photo Album:
• right-click on the image and a pop-up box will display.
• select Protect/Unprotect to engage or disengage the lock function.
Deleting Images
To delete an image:
• select an image by clicking on it.
• ensure that it is unprotected (see above).
• click the Delete icon or select Delete from the Camera menu.
To delete all the images:
• ensure that all unwanted images are unprotected (see above).
• click the Delete All icon or select Delete All from the Camera
menu.
The Control Panel
This panel allows you to control certain camera functions while
the camera is hooked up to the computer. Click on the Control icon
to access the Control Panel.
Camera Mode:
This mode allows you to control the following image capturing
features:
1. White Balance
2. Exposure
3. Quality
4. Flash Mode (Red-eye)
5. The Shutter Button
6. LCD On/Off
Control Panel: Camera Mode
Exit
LCD On/Off
Display
Picture
Window
Information
Display
Camera Mode
(displayed)
Playback Mode
(not active)
Shutter Button
White Balance
Exposure
Quality
Flash Mode
Red-eye
Capturing Images using the camera software:
1. Connect the camera to the PC as described in the previous chapter and open the Photo Album.
2. Click the Control icon or from the Camera menu
select Control. The Control Panel will appear in Camera mode.
3. Position the subject in the Display Picture Window and make the
necessary adjustments to the Control Panel settings (quality, flash,
etc.).
4. From the Control Panel, click the Shutter button.
• A beep will sound
• The orange/green LED will blink
• The captured image will remain frozen in the Display Picture
Window until the camera is finished processing the image.
• The Display Picture Window returns to live video and it is
possible to capture another image.
Page 27

27
Control Panel: Playback Mode
Exit
LCD
On/Off
Display
Picture
Window
GoTo
Info
Display
Camera Mode
(not active)
Playback Mode
(active)
Single Picture
Mode
4 Picture
Mode
Preview
Up/Down
Playback Mode:
This mode allows you to preview your images in either single
picture or 4 picture mode before transferring them to the computer.
1. Select the display type (single or 4 picture mode).
2. Use the Up/Down buttons to scroll through the pictures.
3. Using the GoTo button allows you to immediately view a speci-
fied image by typing in its image number and clicking Enter.
Transferring Images
• To the PC (Import)
This function allows you to import images into the PC from the
camera’s internal memory, CF card, or a CF card reader.
To import images:
1. Click on the Import icon . The Select Image Source dia-
log box appears (shown earlier in this chapter).
2. Click on the source of the images. The selected images are imported into the Photo Album.
• To an image editing application (Transfer)
This function allows you to transfer selected images to an image
editing application.
To transfer images:
1. Select the images you want to transfer (refer to Selecting Images).
2. Click the Transfer icon .
The images automatically transfer into the image editing software
that you used to open the Photo Album.
• To the camera (Upload)
With the digital camera,
you can upload an image
from your PC to the camera for storage or transportation. The image will be
scaled to 640 x 480 pixels
when uploaded to the camera.
Page 28

28
To upload an image:
1. Open the Photo Album.
2. From the Camera menu, select Upload. The Upload dialog box
appears.
3. Select the image file to send to your camera.
4. Select the Upload destination. You have two choices: the camera’s
internal memory or the CF card (if installed).
5. Select the image quality (Economic, Standard, or High) to determine the quality of the images after they are uploaded.
6. Click the Upload button to initiate the transfer.
When the transfer is complete, the uploaded image becomes the
last, or most recent image in the upload destination.
Note: Most common image file types (e.g. .jpg, .bmp, .tif) can be
uploaded to the camera. However, all uploaded images automaically
resize to 640x480 pixels.
The Help System
This easy-to-use system contains detailed information about the
camera topics and procedures, enabling you to use and understand
your camera and its functions.
There are a couple ways to use help:
• Simply point to a function on the Photo Album or ViewFun user
interface and a help tag (tool tip) will tell you what it is.
• Clicking on Help, as an icon or from the menu bar, will bring up
an on-line help system. Simply click on the topic you wish to view
and the help system will guide you through to the desired outcome.
OR select search and individually select the topic heading that you
would like assistance with.
Page 29

Chapter
Hardware Installation......................................................... 30
Starting ViewFun ............................................................... 30
Functions.......................................................................... 31
View Window .................................................................... 31
The Video Album............................................................... 31
The Photo Album .............................................................. 32
Settings............................................................................. 33
The Advanced Settings ..................................................... 33
The Video Folder.......................................................... 34
The Picture Folder........................................................ 35
The E-mail Folder ......................................................... 35
The Language Folder ................................................... 35
Recording a Video Clip .....................................................36
Taking a Picture ............................................................... 36
E-mailing a Video Clip or Picture ...................................... 36
5
ViewFun
Page 30

30
ViewFun for Windows 98
ViewFun is specially designed software
that makes the camera’s image and video
capabilities simple to use.
Hardware Installation
• Connect the USB cable to the USB port
at the back of the computer.
• Connect the USB cable to the camera’s
USB terminal.
Video Album Tab Photo Album Tab
Video Album
Video Thumbnail
Exit
Starting ViewFun
Note: If no video appears in the View Window, make sure the cam-
era is powered on and is correctly connected to the USB port.
View Window
View
Mode
Ensure that you have installed the bundled software.
1. Power on your computer and camera.
2. From the Windows 98 Start menu, choose Programs/VDC-
300/ViewFun OR click the ViewFun icon while in
the Photo Album.
ViewFun appears displaying the current camera view.
Photo Album
Photo Thumbnail
Print
Take a Picture
Record
Stop
Help
Reset
Exposure
Brightness
Contrast
White Balance
Advanced Settings
Page 31

Functions View Window
31
The most important part of ViewFun are the controls. These
buttons allow you to control ViewFun’s functions.
Record Video
Clicking here starts the recording of a video clip (.AVI file).
Stop
Clicking this button stops the recording of a video clip and stores
it in the Video Album as a numbered Thumbnail.
Note: This button also stops the capturing of images if Auto Snap
(Advanced Settings Photo Tab) has been executed.
Take a Picture
Clicking this button captures an image (1 frame) and sends it to the
Photo Album as a numbered Thumbnail.
Note: If Auto snap has been selected, clicking this button will take a
series of images and store them in a predetermined destination.
Print
Clicking this button captures whatever image is in the View Win-
dow and prints it directly to the printer.
Note: This function does not work with a video clip.
Help
Clicking this button accesses the complete ViewFun on-line help
system.
Exit
Clicking this button exits ViewFun.
The View Window is capable of displaying the live video in a
number of different ways.
View
Full View allows the user to view a larger image (320x240 pixels)
but slows the frames per second (fps). Small View provides the user
with a smaller image (160x120 pixels) but increases the fps for a
smoother looking video.
Mode
This button allows you to choose the display mode, Color or
Black and White (B/W). Color captures images in 16.7 million colors
and B/W captures images in 256 shades of gray, therefore, files captured using the color mode require more memory.
The Video Album
Once you have located the Video Thumbnail that you would like
to view, simply double-click it and it will automatically open in the
video displaying software, Media Player.
Video Album Tab
Clicking here opens the Video Album. A green light indicates that
the Video Album contains Video clips. An unlit light indicates that
the Video Album is empty.
Page 32

32
Video Thumbnail
To Open (View), Save, E-mail, or Delete your cap-
tured video clips right-click the desired video thumbnail. A pop-up menu appears with the following options:
Open: opens the selected video thumbnail into the video display-
ing software, Media Player.
Save: opens a Save As dialog box allowing you to rename and save
the video clip within your computer system.
E-mail: opens the E-mail setting box and automatically attaches
the selected video thumbnail (.AVI file) to the e-mail. The E-mail
setting box enables you to enter the destination e-mail address and
type an attachment. Clicking the To: button opens the Address
book, allowing you to store addresses and add additional destination
addresses to your e-mail.
Note: This function is subject to Internet service provider
limitations
Note: in order to enable this function it is first necessary to setup
your e-mailing parameters in the Advanced Settings, E-mail Folder,
described later in this chapter.
Delete: deletes the selected video thumbnail.
Video Album Scroll Arrows
These arrows allow you to scroll through all the Video Thumbnails in the Video Album. A lit arrow means that there are more
Video Thumbnails in the direction indicated. An unlit arrow means
that there are no Video Thumbnails in the direction indicated.
Close
Clicking this tab closes the Video Album.
The Photo Album
Once you have located the Photo Thumbnail that you would like
to view or edit, double-click it and it will open in the image editing
software, iPhoto Plus 4.
Photo Album Tab
Clicking here opens the Photo Album. A green light indicates that
the Photo Album contains images. An unlit light indicates that the
Photo Album is empty.
Photo Thumbnail
To Open (View), Save, E-mail, Print, or Delete your captured
video clips right-click the desired Photo Thumbnail. A popup menu
appears with the following options:
Open: opens the selected Photo Thumbnail into the default image
editing software, iPhoto Plus.
Save: opens a Save As dialog box allowing you to rename and save
the photo (.JPG file) within your computer system.
E-mail: opens the E-mail setting box and automatically attaches
the selected Photo Thumbnail (.JPG file) to the e-mail.
The E-mail setting box enables you to enter the destination e-mail address and type an attachment. Clicking
the To: button opens the Address book, allowing you
to store addresses and add additional destination addresses to your e-mail.
Note: Subject to Internet service provider limitations
Note: in order to enable this function it is first necessary to setup
your e-mailing parameters in the Advanced Settings, E-mail Folder,
found later in this chapter.
Print: prints the selected Photo Thumbnail to the default printer.
Delete: deletes the selected Photo Thumbnail.
Page 33

Photo Album Scroll Arrows
These arrows allow you to scroll through all the Photo Thumbnails in the Photo Album. A lit arrow means that there are more
Photo Thumbnails in the direction indicated. An unlit arrow means
that there are no Photo Thumbnails in the direction indicated.
Close
Clicking this tab closes the Photo Album.
Settings
The settings are accessed by clicking the tab on the left side of the
Settings panel. These settings are used to alter the images or the
video that you capture. They must be set before capturing an image
or video to have an effect.
Exposure
Brightness
Contrast
Exposure
This setting allows you to control the amount of light captured
with images. In bright conditions it is preferable to capture less light
(-), whereas, in darker conditions it is preferable to capture more
light (+).
Brightness
This setting allows you to adjust the overall amount of light displayed in an image, making it appear bright ( ) or dark ( ).
33
Contrast
This setting allows you to adjust the disparity in tone between the
dark and light areas of an image. Positive values ( ) create greater
differences between dark and light areas of the image, whereas, negative values ( ) create greater similarities between the dark and light
areas of the image.
White Balance
Clicking this button adjusts the camera's color sensitivity to match
the prevailing color of white outdoor light, yellow indoor light, or
(sometimes) greenish fluorescent light. Select the white balance mode
that most closely matches the light in which you're using the camera.
Outdoor : for natural light
Indoor : for incandescent lighting (bulb light)
Indoor : for fluorescent lighting
Reset
Clicking this button causes all the control settings to return to
their original default settings.
Advanced Settings
The Advanced Settings provide advanced controls for video or
image capturing along with setting folders for both e-mail and language. Simply open the Advanced Settings and click on the appropriate folder.
Page 34

34
The Advanced Settings
The Advanced Settings contains four folders: Video, Picture, E-
mail, and Language.
To return to the main screen after making changes to a particular
folder, click OK to accept the changes, or Cancel to ignore the
changes.
The Video Folder
Size
This setting controls the frame size (160x120, 320x240) of the
video clip you are going to capture.
Note: The small frame size can capture more frames per second.
Continuous
Select this setting to continuously capture video. The recording
will automatically stop after the period of time (seconds, minutes)
specified in the Stop Recording After box or it can be stopped by
clicking the Stop button.
Time Lapse
This feature controls the image capturing rate (per second or minute)
of the camera. The recording will automatically stop after the period
of time (seconds, minutes) specified in the Stop Recording After box
or it can be stopped by clicking the Stop button.
Manual Mode
This feature allows you to manually control the video capturing
rate by clicking the Record button to capture images in video format.
Each click will capture one image in AVI video format.
Record Sound
If your computer has audio recording capabilities (microphone),
selecting this feature enables you to record sound and video simultaneously on the same AVI file. The better the audio quality (CD) that
you select, the more memory space needed to store it.
If you do not have or use audio recording capabilities the No Sound icon
will automatically appear.
Page 35

35
The Picture Folder
Size
This setting controls the
frame size (160x120,
320x240, 640x480) of the
image you are going to
capture. Smaller image
frame sizes require less
memory space to store the
image.
Auto Snap
Checking this box enables the user to automatically capture images at regular intervals (e.g. Auto snap ever: 5 seconds) over a
specified period of time (e.g. Total time: 20 seconds).
For example, Auto snap every 5 seconds for a Total time of 20
seconds will capture 4 images starting 5 seconds after you click the
Take a Picture button on the main screen.
Note: Auto snap images do not appear in the Photo Album. They
are saved to a predetermined destination (see below).
Save Snap Series to file:
Using the Browse button you can determine where to save the
series of images that are going to be captured while using the Auto
Snap function.
The E-mail Folder
This folder allows you to
enter required information
that enables you to send
captured video clips or images to the Internet using
your SMTP address/account.
Note: Subject to internet
service provider limitations
Only after the E-mail folder setup has been completed is it possible to use the Mail command found by right-clicking the desired
video or image thumbnail.
Mail Server: enter your SMTP address (e.g. Mailserver.com).
Your E-mail Address: enter your full e-mail address
(e.g. YourID@Mailserver.com).
Video/Picture file:
• Compression Level: select the desired compression level.
Compression level and file quality have an inverse relationship. For
example, higher file compression levels produce lower file quality
and smaller file size.
Note: Smaller files are faster to send over and download from the
internet.
• Attach File Name: to change the default (Video# or Pic#) file
name click Change and enter the desired new default file name.
Note: It is not necessary to add the file extension (.AVI or .PIC).
Note: The default destination for all captured Auto snap images is
C:\ViewFun\AUTOSNAP where they appear as snap bitmap files
(e.g. snap1.bmp, snap2.bmp, etc.).
The Language Folder
This folder provides you with seven different language options.
Select the language you want your ViewFun application to appear in.
Page 36

36
Recording a Video Clip
1. Aim the camera at the subject.
2. Click the Record button.
3. Click the Stop button when you want to finish recording, or it
will automatically stop. A numbered Video Thumbnail will
appear in the Video Album.
NOTE: Longer recordings occupy more memory space.
4. Open the Video Album by clicking the Video Album Tab.
5. Double-click the Video Thumbnail to view it in a video displaying software.
Taking a Picture
1. Aim the camera at the subject.
2. Click the Take a Picture button. A numbered Photo Thumb-
nail will appear in the Photo Album.
NOTE: Larger Images occupy more memory space.
3. Click the Photo Album Tab to open the Photo Album.
E-mailing a Video Clip or Picture
Note: In order to enable this function it is first necessary to setup
your e-mailing parameters in the Advanced Settings, E-mail Folder,
found earlier in this chapter.
1. From the Video or Photo Album, right-click the desired Thumb-
nail. A popup menu will appear.
2. Click on E-Mail. The E-Mail setting box opens with the selected
Thumbnail automatically attached to the e-mail.
3. Enter the destination e-mail
address and type an attachment if desired.
4. Click OK to e-mail your message and the attached Video or Photo
Thumbnail file.
Note: Subject to Internet service provider limitations.
4. Double-click the Photo Thumbnail to view it in iPhoto Plus 4.
Page 37

Appendices
37
Trouble Shooting 38
Specifications 40
Glossary 41
Technical Support 43
Appendices
Page 38

Symptom Cause Solution
38
No Power
Sudden power failure
Power Supply
No capture when
shutter is pressed
Inaccurate color
capture
Image is too dark
Image is too bright
Blurry or out of focus
Redeye
1. Batteries not loaded correctly
2. Dead batteries
3. Wrong AC adapter
1. Low battery power
2. Auto Power Off function engaged
1. Operation Mode Selector set to
Playback mode.
2. Memory is full.
1. Indoor fluorescent lighting
2. Indoor incandescent lighting
3. Outdoor natural lighting
Not enough light
1. Strong direct or reflected light
2. Subject is too close to use flash and
large (F2.8) iris setting
Distance from subject is not correct.
Reflection of light (flash) off the retina of
the human eye
1. Reinstall batteries
2. Replace batteries
3. Use only recommended AC adapter
1. Replace batteries
2. Turn power back on
1. Set Operation Mode Selector to Camera mode.
2. Delete images.
1. Change White balance to Indoor+ setting.
2. Change White balance to Indoor- setting.
3. Change White balance to Outdoor setting.
** We recommend using Auto White Balance**
1. Change Iris setting to (F2.8)
2. Use the flash (see Chapter 2)
1. Change Iris setting to (F8.0)
2. Change Iris setting to (F8.0)
** If using flash and subject is further than 1.2
meters set Iris to (F2.8) **
Refer to the Specifications/Focus Range for
details.
Change the Flash to 1 of 2 Redeye settings
*On*Auto-
Page 39

39
Symptom
No Image is present
Playback
Cannot open the
Photo Album
Cannot transfer data
Transfer
CF Card error
Cannot delete image
“Device not ready”
OR
Connection Failure
Cause
1. Operation Mode Selector is set to
camera mode
2. If using a TV, wrong channel is selected
3. Not connected properly
4. Wrong TV system
1. Software is not installed
2. Not using Windows 98 with USB
connection
1. Incorrect cable connection
2. Camera is not turned on
1. CF Card is not formatted
2. Card memory exceeds 32 MB
1. Operation Mode Selector is in Camera
mode
2. The image is protected
3. There are no images to delete
1. Camera is not powered on
2. USB not connected properly
3. USB host controller problem
4. USB data transfer error
5. Hardware compatibility problem
Solution
1. Set selector to Playback mode
2. Set TV to correct channel for video
playback
3. Reconnect the cables
4. Use NTSC or PAL TV system only.
1. Install the software (see chapter 4)
2-1. Use Windows 98 as your Operating
system
2-2. Use RS-232 connection (see chapter 3)
1. Reconnect the cables
2. Turn on the camera
1. Reformat through DOS using CF Adapter
and PCMCIA slot.
2. Replace card with lower memory capacity.
1. Select Playback mode/Delete Menu
2. From Playback mode, unprotect the image
3. Have fun. Take pictures.
1. Power on the camera
2. Ensure USB cable is properly connected
3. Refer to the Control Panel/Systems/Device
Manager for more details
4. Unplug and reconnect the USB cable
5. Contact your computer vendor for help
Page 40

Specifications
40
CCD 1/4 inch 350K pixels progressive color
LCD 1.8” color video
Resolution 640 x 480
(Three compression rates: ECON, STD or High)
Memory 2MB built-in
(max 46 ECON, 20 STD or 8 High Images)
CF memory card interface
Operating Modes Dual Mode
(Camera and Playback)
Optics Optical Viewfinder
Flash (on, on red-eye, off, auto, auto red-eye)
Compression Standard JPEG file YUV (4:2:2)
24 bit color
Digital Output
(1) USB-baud rate 12 M bps
(2) RS-232-baud rate115200, 57600, The following represents
terms used throughout the manual, and are defined here for your convenience.
Baud rate: Is the speed at which the computer and camera commu-
nicate with each other. It is sometimes necessary to decrease the baud
rate because the computer cannot process image information at high
speed.
Com port: Is the physical port in the back of the computer where
you can connect external devices such as digital cameras and modems.
Dialog box: An on-screen box that conveys or requires information
from the user.
Exposure: controls the amount of light (brightness) that appears in
a captured image.
Flash card: Is an optional external device that can be inserted into the
camera and allows you to store images.
(available in 2MB~32MB formats).
Fluorescent light: What makes this type of lighting different is
that it does not contain all the colors of the visible spectrum and
it flickers which causes it to appear greenish.
Icon: Is a graphic (picture form) representation of a particular fea-
ture/function or program/file.
Incandescent light: These tungsten-halogen lights (household
light bulbs) shine at a constant brightness and create a warmer,
yellowish caste.
Iris: A feature that allows varying degrees of light into the camera by
adjusting the size of the lens opening, increasing or decreasing the amount
of entering light.
Page 41

Glossary
41
The following represents terms used throughout the manual, and
are defined here for your convenience.
Baud rate: Is the speed at which the computer and camera com-
municate with each other. It is sometimes necessary to decrease the
baud rate because the computer cannot process image information at
high speed.
Com port: Is the physical port in the back of the computer where
you can connect external devices such as digital cameras and modems.
Dialog box: An on-screen box that conveys or requires information from the user.
Exposure: controls the amount of light (brightness) that appears
in a captured image.
Flash card: Is an optional external device that can be inserted into
the camera and allows you to store images.
(available in 2MB~32MB formats).
Fluorescent light: What makes this type of lighting differ-
ent is that it does not contain all the colors of the visible
spectrum and it flickers which causes it to appear greenish.
Icon: Is a graphic (picture form) representation of a particular
feature/function or program/file.
Incandescent light: These tungsten-halogen lights (house-
hold light bulbs) shine at a constant brightness and create a
warmer, yellowish caste.
Iris: A feature that allows varying degrees of light into the camera
by adjusting the size of the lens opening, increasing or decreasing the
amount of entering light.
LCD: A Liquid Crystal Display is a low-powered display that
uses rod shaped crystal molecules that change their orientation when
an electrical current passes through them. This allows you to display
and view your images.
LED: A Light Emitting Diode is a small electronic device that
emits light when a current flows through it. It signals you of a particular feature or function.
NTSC: A National Television Standards Committee television is
one that uses 525-line frames and displays full frames at 30 frames /
second.
Page 42

PAL: A Phase Alternative Line television is one that uses 625-line
frames and displays full frames at 25 frames/second. PAL is the
common system used in most European countries.
Pixels: The smallest element that a device can display on-screen
or out of which the displayed image is constructed.
RS232: Is the terminal port inside the camera that is used to
connect the camera to the computer.
TWAIN: Technology Without An Interesting Name is the indus-
try standard protocol that allows external devices to communicate
with your computer.
Upload: Is the transfer of information from your computer to an
outside source, such as your camera.
USB: Universal Serial Bus is a peripheral bus specification that
eliminates the need to install cards and reconfigure the system. USB
equipped PCs allow computer peripherals to be automatically configured as soon as they are physically attached - without the need to
reboot or run setup.
White Balance: White Balance adapts the camera’s color sensi-
tivity to simulate the prevailing color of white outdoor light, yellow
indoor light, or greenish fluorescent light. It can be controlled either
automatically or manually.
42
Page 43

Technical Support
43
If you need help installing or using the digital camera,
please call Technical Support.
Mustek, Inc.
121 Waterworks Way, Suite #100
Irvine, CA 92618, USA
TEL: 1-949-788-3600
FAX: 1-949-788-3670
http://www.mustek.com
Mustek Computer GMBH
Hellersbergstr. 2a
41460 Neuss, Germany
TEL: 49-2131-162840
FAX: 49-2131-103830
BBS:49-2131-167104
BBS:49-2131-130052
http://www.mustek-europe.com
Mustek Systems, Inc.
No. 25 R&D Road 2
Science-Based Ind'l Park
Hsinchu, Taiwan, R.O.C.
TEL: 886-3-5779373
FAX: 886-3-5784139
http://www.mustek.com.tw
Product Repairs
For Product repairs please follow these steps:
1. Call the technical support department for a
Return Material Authorization (RMA) number
and refer to this number in all future calls.
2. Consult your dealer regarding proper repair
procedure.
3. For repairs being shipped to the manufacturer,
please write the RMA number clearly on the
outside of the package and send it postage
paid, prepared and packaged appropriately for
safe shipment.
Product Returns
• Users must return the products to their point of
purchase for a refund or credit, according to
the dealer's policy.
 Loading...