

Page 1

SCANNER
USER’S GUIDE
The Scan Dialog Box
The TWAIN Dialog Box
Appendices
Page 2

2
Copyright Information
All rights reserved. No part of this publication may be reproduced,
transmitted, stored in a retrieval system, or translated into any
language in any form by any means, mechanical, optical, electronic,
recording, or otherwise, without the our written permission.
We reserve the right to revise this manual and to make changes to
any or all parts at any time, without obligation to notify any person
or entity of such revisions and changes.
All other brand or product names mentioned in this manual are
trademarks or registered trademarks of their respective owners.
Copyright © 1999.
Printed in Taiwan, January 1999.
FCC Statement
This digital equipment has been tested and found to comply with the
limits for a Class B digital device, pursuant to Part 15 of the FCC Rules.
These limits are designed to provide reasonable protection against
harmful interference when the equipment is operated in a residential
installation. This equipment generates, uses, and can radiate radio
frequency energy and if it is not installed and used according to the
instruction manual, it may cause harmful interference to radio
communications. However, there is no guarantee that interference will
not occur in a particular installation. If this equipment causes harmful
interference to radio or television reception, which can be determined
by turning the equipment off or on, you are encouraged to try to correct
the interference by one or more of the following measures:
• Reorient the receiving antenna
• Increase the distance between the equipment and the receiver
• Connect the equipment into an outlet on a circuit different from that
to which the receiver is connected
• Consult the dealer or an experienced radio/TV technician for help
NOTE:
1. The changes or modifications not expressly approved by the party
responsible for compliance could void the user’s authority to operate
the equipment.
2. Shielded interface cables and AC power cord, if any, must be used in
order to comply with the emission limits.
Page 3

Table of Contents
3
Scanning Methods ............................................................4
The Scan Dialog Box ........................................................5
To Acquire the Scan Dialog Box ...............................6
Function Buttons ........................................................7
Menu Pages .................................................................7
Scan Page ...............................................................7
Copy Page ..............................................................7
Fax Page..................................................................8
OCR Page ...............................................................8
E-Mail Page ............................................................8
The TWAIN Dialog Box ...................................................9
To Acquire the TWAIN Dialog Box .......................10
Performing a Simple Scan .........................................11
(1) Position the Document .................................11
(2) Preview the Image .........................................11
(3) Select the Scan Size.......................................12
(4) Use the Crop Frame.......................................12
(5) Set the Scan Mode ........................................12
(6) Set the Resolution ........................................12
(7) Execute the Scan............................................12
The TWAIN Dialog Box (Details) ............................... 13`
The Preview Window and Buttons .........................14
The Image Setting Buttons ......................................16
Scan Settings..............................................................17
The Main Tab.......................................................17
The Enhance Tab.................................................20
The Filters Tab .....................................................23
About Tab ............................................................24
Using Batch Scan ......................................................25
Batch Scan Controls ...........................................25
Batch Scan Status ...............................................26
To Perform a Batch Scan ...................................26
Appendices
A: Scanning Tips .......................................................27
B: Troubleshooting ...................................................28
Page 4

4
Scanning Methods
There are two separate methods to scan an image. The Scan dialog box which is ideal for quick and simple scans and
the TWAIN dialog box which offers more control over the output. The following pages contain more details about
these different scanning methods.
Scan Dialog Box
TWAIN Dialog Box
Page 5
The Scan Dialog Box
5
The Scan dialog box allows you to perform several
functions using your scanner (e.g. scan, copy, and fax).
Simply select the function that you wish to use by clicking
Scan Page
Icon
Copy Page
Icon
Fax Page
Icon
E-Mail Page
Icon
OCR Page
Icon
on the appropriate page icon and the corresponding menu
page will appear. Be sure to make the proper adjustments
in regards to Paper Size, Scan Mode, and/or Resolution
before clicking on the Scan icon.
Scan Icon
Exit
Help
Information
Mailing Icon Menu Page
Page 6
6
To Acquire the Scan Dialog Box
The Scan Dialog Box Item:
Simply click on “Start” on your Windows desktop
and locate the name of your scanner model under
“Programs”. Then double-click the item “Scan Dialog
Box”.
OR
The Direct Scan Icon:
Double-click the Direct Scan icon located in your
Windows taskbar and the Scan dialog box opens.
Page 7
7
Function Buttons
Scan Icon:
Initializes the function of the Menu page currently
selected (e.g. Copy Page=Copy, Fax Page=Fax).
Exit:
Exits the Scan dialog box.
Help:
Enters the scanner’s on-line help system.
Information:
Shows product information.
Menu Pages
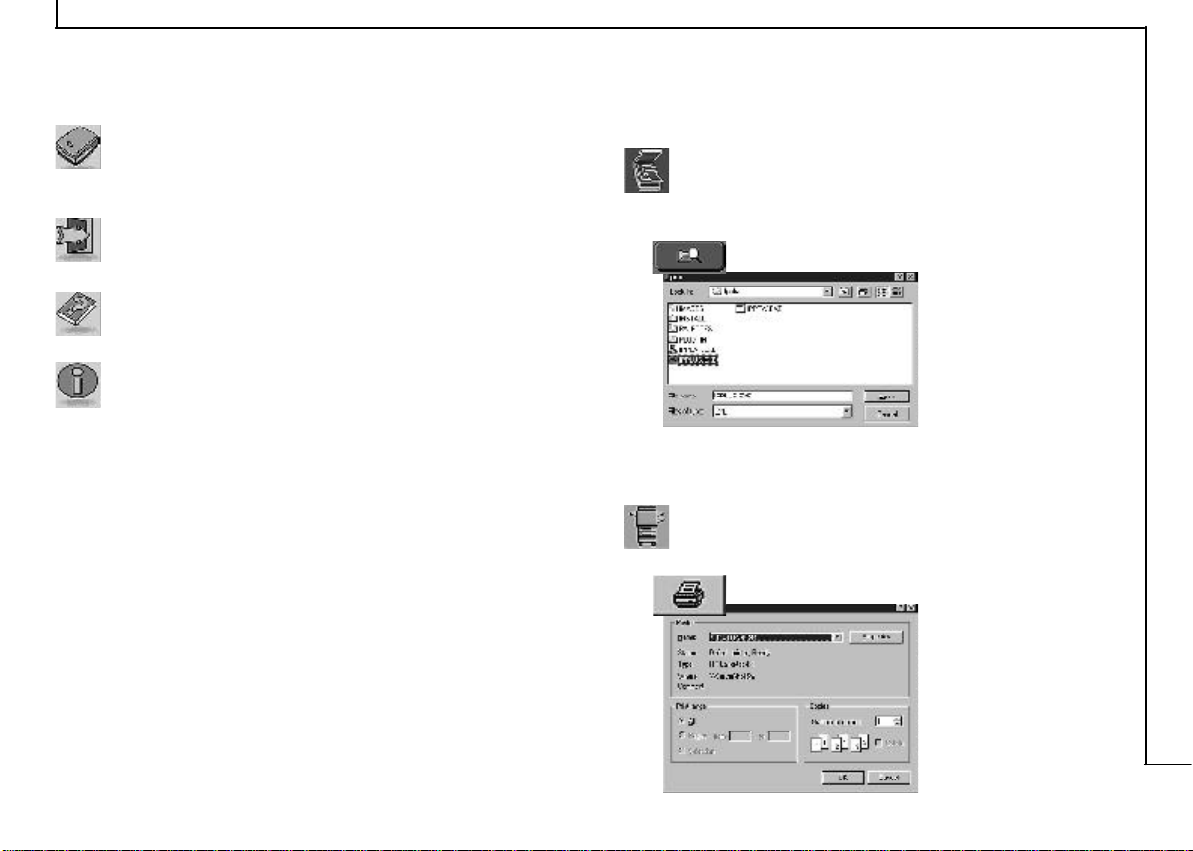
Scan Page:
Scan an image or document to the computer via any
image editing software.
Use the Browse icon to select the image-editing
software from your
computer. iPhoto
Plus is automatically
installed as your
default software
(i.e. IPPLUS.EXE).
Click the Scan icon to begin scanning!
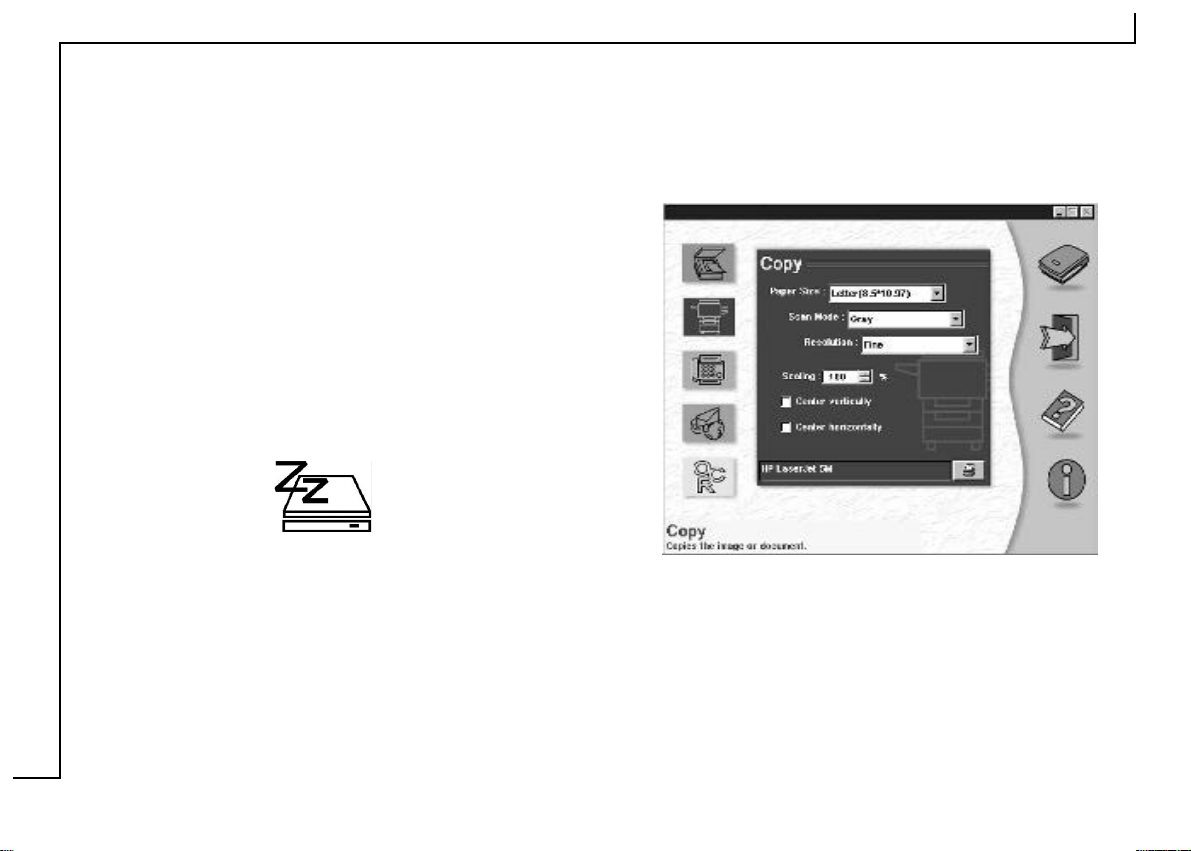
Copy Page:
Copy an image or document to your printer.
Prior to scanning, use the Print icon to select
the appropriate
printer from within
your computer.
Click the Scan icon
to begin copying!
Page 8

8
Fax Page:
Scan and fax an image or document via your fax
modem.
Prior to scanning, use the Print icon to select the
appropriate printer
(Fax driver) from your
computer.
Click the Scan icon
to begin faxing!
OCR Page:
Convert an image document to a text file using
TextBridge.
Click the Scan icon to execute the OCR function!
TextBridge will automatically open showing an image
thumbnail of the scanned document. Save the
document as desired, then open the document using
your word processing software.
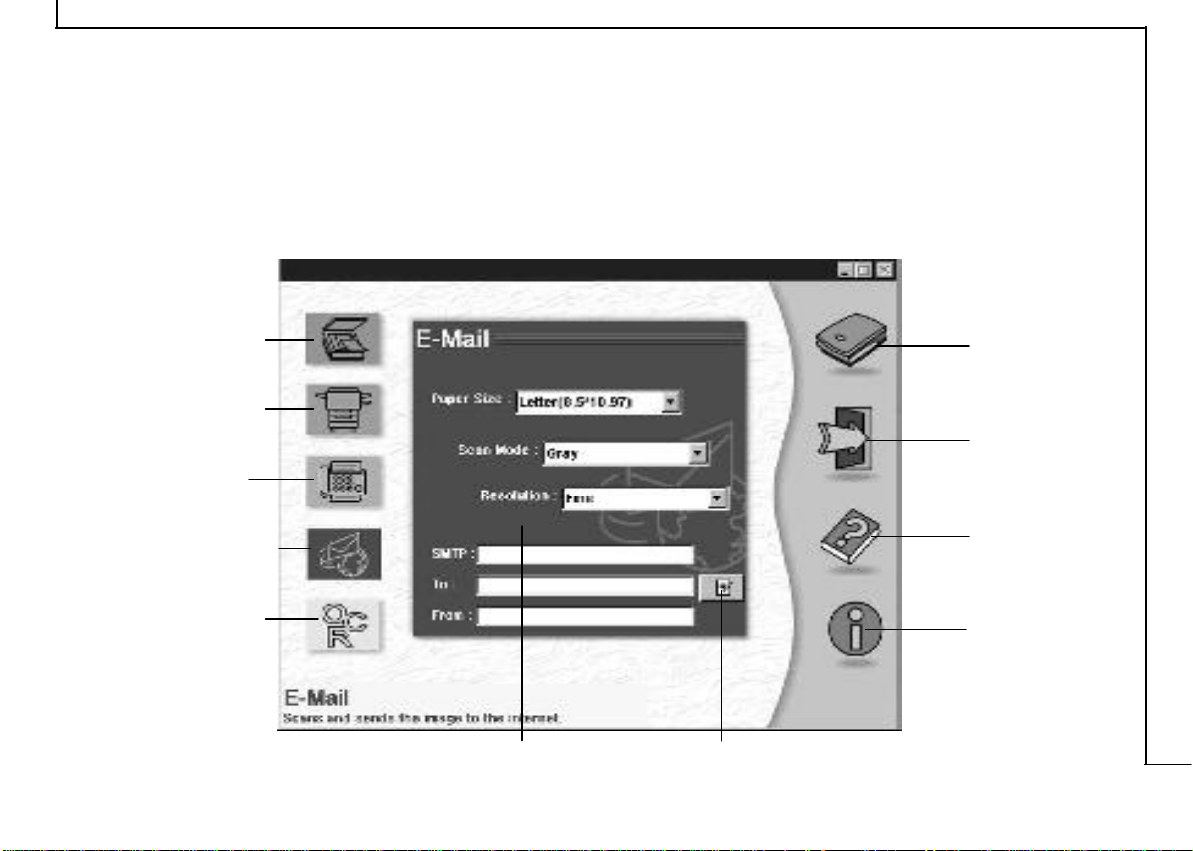
E-Mail Page:
Scan and send an image or document to the Internet
using your SMTP address/account.
Enter your SMTP address, the
destination address (To:), and
your full address (From:).
(For SMTP details, contact your Internet Service Provider)
Clicking the Mailing icon opens the Mailbox,
which allows you to
type an attachment.
Clicking the To:
button opens the
Address book, which
allows you to store
addresses and add
additional destination
addresses to your e-mail.
Click the Scan icon to begin sending your information
across the Internet!
Page 9
The TWAIN Dialog Box
9
The TWAIN dialog box is another scanning option
provided with your scanner. TWAIN is an industry
standard that allows scanning directly into any TWAINcompliant software. It eliminates most compatibility
problems associated with software and input devices
supplied by different vendors.
You can access the TWAIN dialog box from within most
image editing software such as the application software
bundled with the scanner (e.g. Photo Express).
Page 10

10
To Acquire the TWAIN Dialog Box
You can acquire the TWAIN dialog box from within any
TWAIN-compliant software (i.e. Photo Express). To
acquire the TWAIN dialog box, using Photo Express as
an example, the steps are:
1. Launch Windows.
2. Launch Photo Express (TWAIN-compliant program).
3. Under the File menu, open the Acquire command and
choose Scanner OR Click the Scanner icon. The
Select Data Source dialog box appears.
4. Choose your scanner in the Select Data Source dialog
box. If there is only one source available, it is
automatically selected.
5. Click the Acquire button.
The Select Data Source dialog box closes.
The TWAIN dialog box appears.
Page 11
Performing a Simple Scan
The steps for a simple scan are:
(1) Position the image or document to be scanned.
(2) Click Preview to see the image in the Preview Window.
(3) Select the scan size.
(4) Using the crop frame, outline the area to be scanned.
(5) Select the desired scan mode.
(6) Select the desired resolution.
11
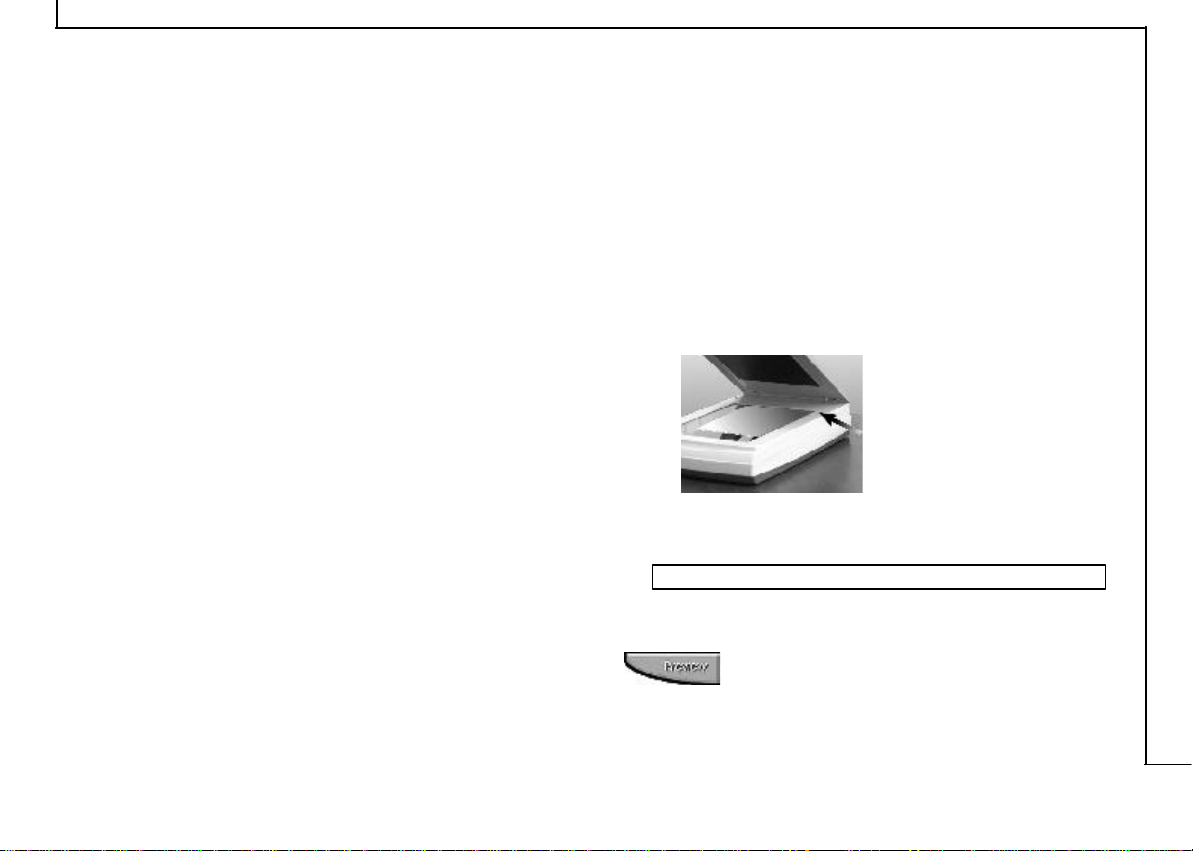
(1) Position the Document/Image
For the best possible image scans, it is important that
you position your documents correctly. Please follow
these steps:
a. Lift the document cover.
b. Place the document face down on the glass and in the
upper right corner where the alignment arrow is
located.
(7) Click the Scan button.
c. Slowly lower the document cover, making sure the
document remains in position.
Note: Remove the document after scanning is complete.
(2) Preview the Image
A Preview is a quick low-resolution scan of the
entire original image. From this low-resolution
scan you get a clearer idea of the image area
you want to include in your final scan.
Page 12

12
(3) Select the Scan Size
From the list of available paper sizes, select the size of
the document you wish to scan. Custom will
automatically be selected when you use the Crop Frame
to change the image area to be scanned.
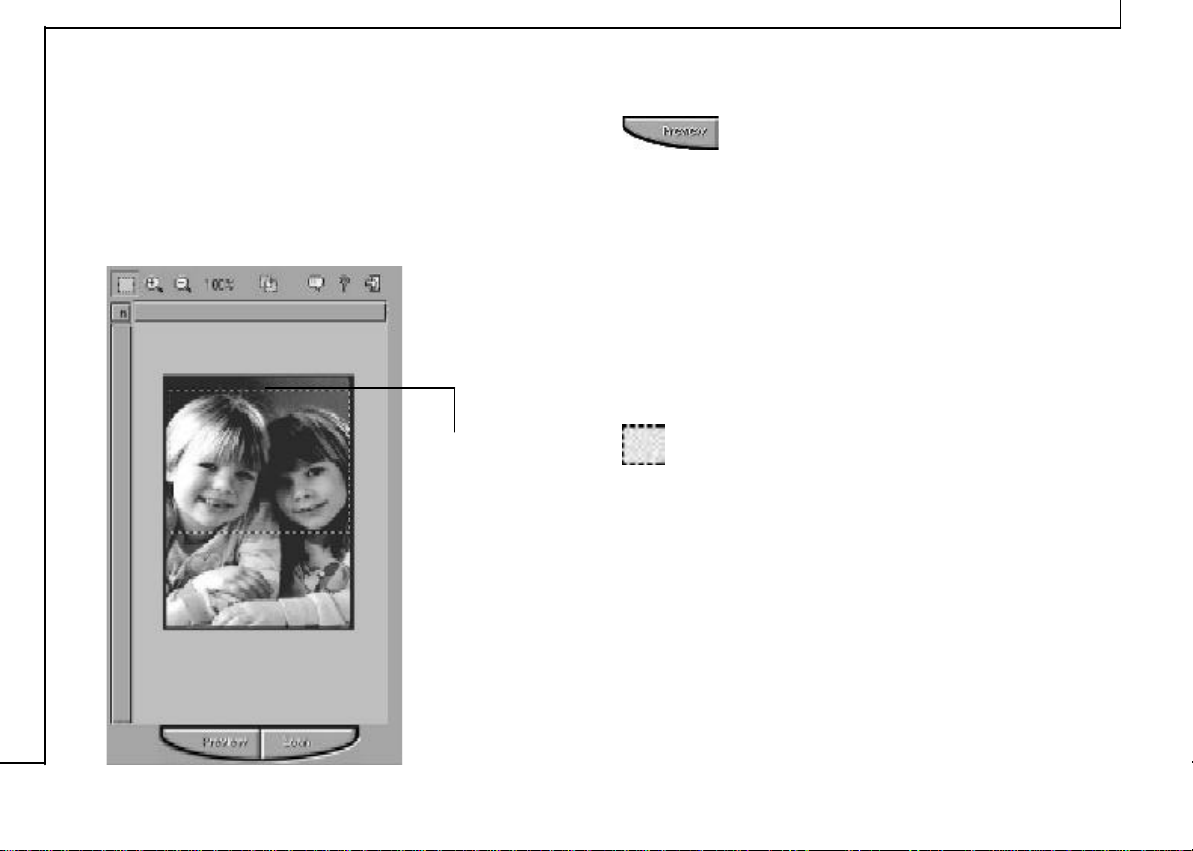
(4) Use the Crop Frame
Use the Crop Frame in the Preview Window to
outline the image area you wish to scan. Click one
of the sides or corners of the Crop Frame and drag it
to the desired length and width. To move the entire
Crop Frame, position the mouse cursor inside it and
drag with the (left) mouse button. Only the area
inside the Crop Frame will be included in the
resulting scanned image when you click on the Scan
button.
(5) Set the Scan Mode
The Scan Mode determines how the scanner will
view the image. Select Color to capture images
in color. Select Gray to capture images in shades
of gray. When you wish to scan line art or text for
OCR (Optical Character Recognition), select
Lineart.
(6) Set the Resolution
The Resolution, which is measured in dots per inch
(dpi), determines the effect of the image as it is
displayed or printed. Images scanned at a high
resolution capture more information. However, highresolution images require more memory.
See Scan Tips, Appendix A, (Pg. 27)
(7) Execute the Scan
The scan button is used once you have
completed the preview, determined the scan
region and have selected the final scan
settings to be used for the scan.
Page 13

The TWAIN Dialog Box (Details)
13
The TWAIN dialog box consists of two
sections- the left section where most of the
TWAIN control settings are found and the
right section, which is the Preview window.
For more detailed or additional
information regarding the features and
functions of your scanner software,
please refer to the on-line help system
by clicking on the Help icon.
Scan
Settings
Cropping Tool
Allows for Crop
Frame creation in
the Zoom mode.
Zoom
Magnifies or shrinks
the image in the
Preview Window.
Preview Button Scan Button
Batch Scan
Allows up to 10 scan
regions (or Crop Frames)
for multiple scanning.
Language Box
Selects the language.
Exit
Exits the program.
Help
Crop Frame
Outlines the image
area that will be
included in the final
scan.
Preview Window
Page 14
14
The Preview Window & Buttons
The Preview window is where the preview image appears.
It is recommended that you preview each document/image
before scanning. Using the preview image, you can
specify the final image area to be included in the scan
and/or apply the enhance and filters features (pg.20-24).
Crop Frame
Outlines the
scan area or
region that
will be
included in
the final scan.
• Preview
Preview (a quick low-resolution scan of the
entire original image) the image in order to get a clearer
idea of the image area you want to include in your
final scan. To preview, the steps are:
1. Place the document face down on the scan
window glass.
2. Click on the Preview button. After the scanner
has scanned the document, the scanned image will
appear in the Preview Window.
• Cropping Tool
Clicking this button creates a Crop Frame (dotted
rectangle) in the Preview window while in Zoom mode.
The Crop Frame outlines the image area you wish to
scan. Click one of the sides or corners of the Crop
Frame and drag it to the desired length and width. To
move the entire Crop Frame, position the mouse cursor
inside it and drag with the left mouse button. Use the
cropping tool with the zoom tools to set the exact
image area you wish to include in your final scan.
Page 15

15
• Zoom Tools
The Zoom In tool increases the magnification
(multiple levels ) of the image area. In magnified
view, you can drag the Crop Frame to the exact area
you want to scan. Use the Zoom Out tool to shrink the
image.
• Batch Scan Button
Clicking this button allows you to create multiple
scan areas using different scan settings on the image
shown in the Preview Window. For more details, please
refer to Using Batch Scan on page 25.
• Scan
After determining the exact image area you wish
to scan and selecting your desired scan settings, click
the Scan button to perform the scan. When scanning
is complete, the image will be displayed on the main
screen of the host software behind the TWAIN dialog
box.
• Help
Provides on-line help for the scanner and software
functions.
• Language Icon
Selects the language you would like to view the
TWAIN interface in.
• Exit Icon
Exits the program.
Page 16

16
The Image Setting Buttons
The Image Setting buttons allow you to create your own
convenient scan settings. Saving image settings allows you
to use the same settings again and again without resetting
the image options.
• Load Button
Loads previously saved settings.
• Save Button
Saves current image settings to a specified location.
• Previous Button
Reloads the last saved image settings.
• Reset Button
Returns the image settings to their default values.
• Information Button
Displays all the current control settings of the TWAIN
dialog box.
Page 17

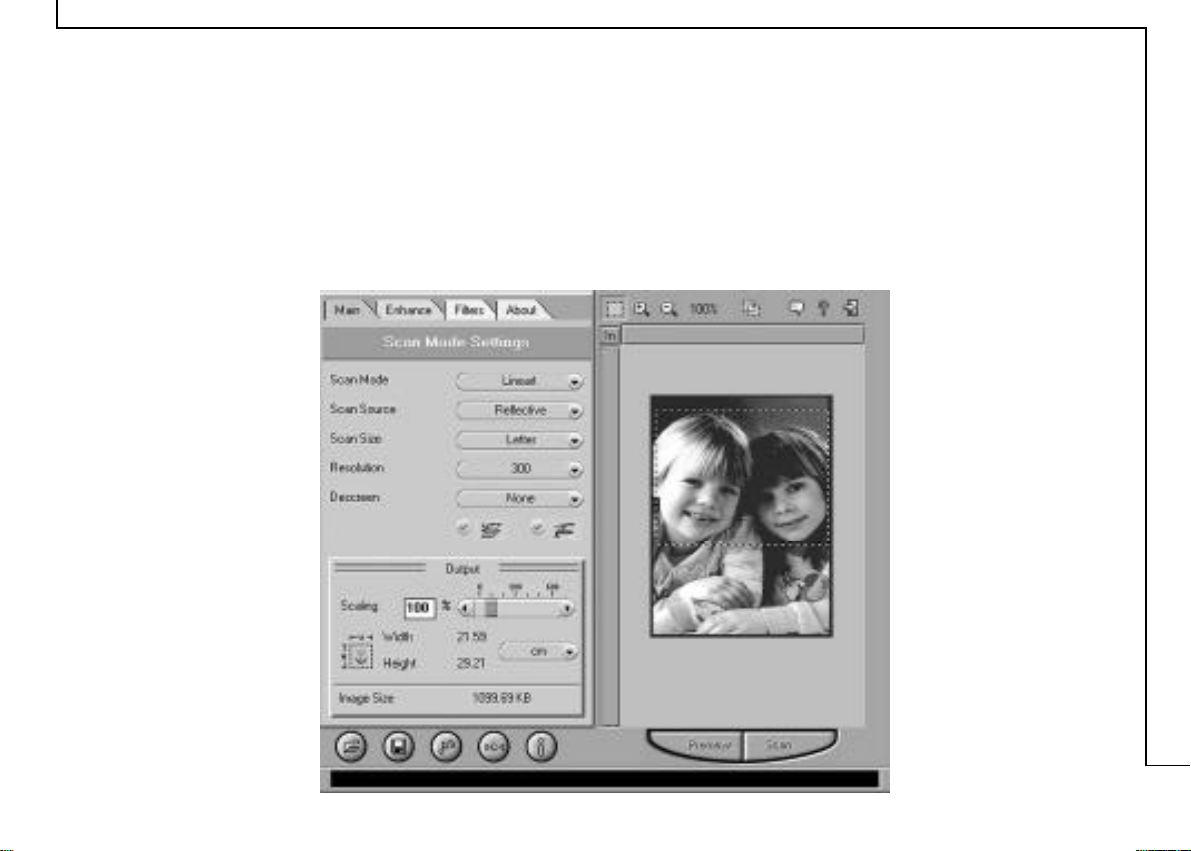
Scan Settings
The Main Tab
The Main tab allows you to control the scanning
parameters, such as scan mode, scan source, resolution,
etc. These parameters determine how the original image
or document will be scanned.
17
Scan Mode
The Scan Mode determines how the scanner reads
the original image or document. When choosing
a scan mode, it is recommended to consider what
purpose the resulting scanned image will be used
for.
• LineArt
Use this mode to scan text documents for use in OCR
(Optical Character Recognition) or when you wish to
scan black-and-white drawings.
• Gray
Select Gray to capture images in shades of gray.
• Color
Select Color to capture images in color.
Page 18

18
Scan Source
The Scan Source setting is used to select the type
of document you will be scanning.
• Reflective
Use Reflective when scanning paper-based
documents such as photographs or text.
With the optional Transparency Adapter, you can also
scan Positive and Negative transparencies.
• Positive
Select Positive when scanning slides or
transparencies.
• Negative
Select Negative when scanning film negatives or
similar negative transparencies.
Scan Size
From the list of available sizes, select the size of the
document you wish to scan. Custom will automatically
be selected when you use the Crop Frame to change the
image area to be scanned.
Resolution
The Resolution, which is measured in dots per inch (dpi),
determines the appearance of the image as it is displayed
or printed. Images scanned at a higher resolution capture
more information and therefore require more disk space
for storage. You can select from a wide range of preset
resolutions.
75 dpi 400 dpi
Descreen
A tool for reducing moiré patterns in
scanned images of originals that were
created by a halftone process. Moiré
patterns appear as unsightly interference
patterns.
• None
Choose None if you want to scan images of
photographic quality.
• Newspaper
Choose Newspaper when the image is made up of
coarse dot patterns commonly found in newspaper
photos.
Page 19

• Magazine
Choose Magazine when scanning images whose
quality is similar to images found in glossy or waxcoated magazines.
• Art Print
Choose Art Print when scanning images from very
high quality art prints that show only very fine dots.
Color Match
This is an effective tool for ensuring that the
colors captured by the scanner more accurately
reflect the actual colors of the original image.
Without color matching the scanner captures a
wider range of colors but these colors may not
accurately match the true colors of the original
image, making the scan appear different from
the original.
Color Balance
This tool balances the lightest and darkest areas
of an image so that they are equally distributed.
19
Output Scaling
Output scaling allows
you to enlarge/shrink
the size of the final output image. Adjust the scaling by
using the slide bar or typing the desired setting in the
Output Scaling box. For example, setting the Output
Scaling to 200% will double the amount of pixels contained
in the image.
Width and Height
The Width and Height values show the dimensions of the
image area inside the Crop Frame. You can change the
measurement unit to centimeters or inches.
Image Size
Image Size displays the amount of disk space needed to
display or save the image outlined by the Crop Frame in
the Preview window. The Image Size information is
automatically updated anytime you change any of the
scan settings or resize the Crop Frame.
Without Color Balance With Color Balance
Page 20

20
The Enhance Tab
The Enhance tab contains preprocessing controls that
can be applied to the image before making the final scan.
To access the Enhance tab, click Enhance.
The Enhance tab contains two picture thumbnails
(Original and Sample) of the preview image, several
control settings, and a histogram of the image.
Alterations made to the enhance settings appear in the
sample thumbnail.
Thumbnails
The image that appears in the thumbnails will
automatically be replaced with the Preview image.
If you wish to see the effects of your changes in the
Preview Window, click on the Preview button.
Channel Selector
Channel refers to the red, green, and blue
colors that make up a color image. You can
choose to change the channels individually
or choose Master to change all channels
equally and simultaneously. An image in Gray
Mode has one channel.
Histogram
The Histogram graph shows the distribution of brightness
levels in an image. Using the control settings (Brightness,
Contrast, Gamma) you can selectively adjust the
brightness levels in the shadows, midtones and the
highlights of the image.
A diagonal line extending from
the lower left corner to the upper
right corner indicates there is a
balance between brightness and
shadows.
Page 21

21
Using the Channel Selector allows the histogram to reflect
the distribution of brightness in an entire image or in
individual colors (Red, Green, and Blue).
Histogram Button
The Histogram Button allows you to view the
histogram as either a line graph or a bar graph.
As a bar graph, the horizontal axis represents
the brightness levels from darkest (left) to
brightest (right). The vertical axis represents
the amount of pixels with that brightness
level value. To adjust the display of the
histogram, click on the Histogram button
and then click on the + or - button.
Brightness Control
Using 255 steps, this tool allows you to adjust
the overall amount of light in the image. A
value of -127 will make the image appear very
dark, whereas, a value of +127 will make the
image appear very bright.
Brightness -50 Brightness 0 Brightness 50
Contrast Control
Using 255 steps, this tool controls the disparity
in tone between the dark and light areas of an
image. Positive values create greater differences
between dark and light areas of the image,
whereas, negative values create greater similarities
between the dark and light areas of the image.
Contrast -50 Contrast 0 Contrast 50
Gamma Control
The Gamma control is used for adjusting the
brightness level in the highlights, mid-tones, and
shadows of the image. Values of 0.1 to 2.0
primarily affect the shadow areas of the image.
Values of 2.1 to 6.0 primarily affect the midtone
areas, and values of 6.1 to 7.9 primarily affect the
highlight areas.
For Example: A gamma value of 1.9 will make the shadows
of an image appear brighter, whereas, a value of 0.2 would
darken these shadow areas (taking away brightness). The
histogram graph will display these gamma value effects
in the bottom right portion of the histogram graph
Page 22

22
(signifying shadows). A gamma value of 7.8 will add light to
the highlight areas of the image (making the image appear
bright), whereas, a value of 6.4 would subtract light from
these highlight areas. The histogram will display these
gamma value effects in the top left portion of the histogram
graph (signifying highlights).
Gamma 0.6 Gamma 1.5
Preview Button
Click the Preview button to see any changes made to the
image. The changes will appear in the Preview window.
Page 23

The Filters Tab
The Filters tab contains special effect controls that allow
you to alter the image before making your final scan. To
access the Filters tab, click Filters.
23
None
No filter is applied if None (default setting) is selected.
Blur
The Blur filter smoothes the image by lightening the
pixels that are in sharp contrast to their neighboring
pixels. The amount of blur applied is controlled with the
plus and minus buttons.
Sharpen
The Sharpen filter enhances the detail in blurry images
by improving the focus and increasing the contrast in
the image. The amount of sharpness applied is
controlled with the plus and minus buttons.
The Filters tab also contains two thumbnails of the
previewed image. Any filter you choose will immediately
show its effect in the sample thumbnail.
Page 24

24
Invert
The Invert filter transforms an image to its negative
by converting all color values to their opposites:
whites become black, blues become yellow, etc.
Flip
The Flip filter creates a mirror image of the original
by flipping the image horizontally.
Unsharp Mask
The Unsharp Mask filter detects sharp edges and color
boundaries and then emphasizes them.
Emboss
The Emboss filter makes the elements in an image
appear raised or sunken by reducing the color within
the image and tracing its edges with black.
About Tab
The About tab contains the current driver version
number, information about the interface device, and
the copyright notice. To access the About tab, click
About.
Page 25

25
Using Batch Scan
Batch scanning is an easy way to multi-scan any part of your
document using a variety of scan settings (Certain application
programs do not support this function). Using Batch Scan
you can specify up to 10 scan regions or scan a single region
several times using different scan modes, resolutions, filters,
and more.
Batch Scan Controls
Load Batch Scan: loads previously saved batch scan
settings.
Save Batch Scan: saves the current batch scan
settings.
Create Batch Scan: allows the user to create a new
batch scan.
Duplicate Batch Scan: duplicates the selected batch
scan settings.
Delete Batch Scan: deletes a batch scan.
Exit Batch Scan: exits the batch scan box.
Batch Ahead/Back: These arrows allow
you to scroll through your batch job list.
Page 26

26
The Batch Box contains the thumbnail image,
DPI, scan mode and image size of each batch
scan. The batch number (e.g. 1/10, number 1
out of ten) is always displayed at the top of
the batch box along with the Batch Scan
Status.
Batch Scan Status
Batch Scan Completed: The medium green light at
the top of the image means that the scanner has
completed the batch job.
Batch Scan in Progress: The bright green light at
the top of the image means that the scanner is
currently scanning the batch job.
Batch Scan Waiting: The dark green light at the top
of the image means that this particular batch job is
waiting to be scanned.
To Perform a Batch Scan
1. Click on the Batch Scan button. The Batch Scan
dialog box appears.
2. Create a scan region:
(a) Move the cursor inside the preview window.
(b) Hold down the Shift key, press the left mouse
button and drag the mouse to create a crop frame.
(c) Reposition or resize the crop frame if necessary.
3. In the TWAIN dialog box, set the desired scan mode
and resolution for the current scan region.
4. Repeat steps 2 and 3 if you wish to create
additional scan regions.
Note: Using the Batch Scan arrows allows you to view
the different batch jobs.
Click Scan. The scanner will begin to scan the batch
5.
jobs one after the other.
Page 27

Appendices
Appendix A: Scanning Tips
The following tables provide helpful information you
can use when setting the scan mode and/or resolution.
Recommended scanning resolutions for various output
devices are listed as follows:
27
Space requirements for different scan modes:
Page 28

28
Appendix B: Troubleshooting
Notes:
• It is not possible to print and scan at the same time.
• Do not disassemble the device to fix problems!
• When not using the scanner for long periods of time,
you should unplug the power adapter from the
wall socket.
1. The computer fails to recognize the scanner.
Check to ensure the scanner is correctly connected to
the computer. Power off your computer and the
scanner, and reconnect them by carefully following
our hardware installation instructions.
2. The scan command is not executed.
The scanner cable may be connected loosely. Check
to ensure the scanner is correctly connected to the
computer.
3. Why do my images look blotchy or blurry?
If your scans are looking bad on screen, but printing
out satisfactorily, it could be your video driver that is
causing the problem. Try changing the resolution and
color settings in the “Display“ portion of your
Windows control panel (after first making sure that
you have the proper driver disks to restore your
system to the original settings). You should be using
a driver that provides 16+million colors, and a resolution
of at least 800 x 600.
4. What resolution should I scan at?
a. You should scan at the resolution of your output device.
b. If you plan to display your scans on a computer monitor
(Intrenet), which has a resolution of 72DPI, we recommend
scanning at 72 DPI.
c. If your output device is an inkjet printer:
• For color images,
scan at 1/3 the allowable resolution of the printer.
• For Gray Mode or Lineart images,
scan at the full resolution of the printer.
5. The scanned picture is not clear.
We recommend that you keep the scan window glass and
the document cover clean. They should be cleaned on a
regular basis. The cleaning steps are:
a. Turn off the scanner and unplug the power cord.
b. Open the document cover and use a cloth dampened with
alcohol to clean the scan window glass and the cover
separately.
c. Use a lint-free dry cloth to dry the glass and cover.
Note: Please refer to one of our web sites for more
troubleshooting tips (F
requently Asked Questions).
 Loading...