

Page 1
Page 2

1
Table of Contents
Precaution…………………………………...……………….2
Preparation………………………………………………..…4
z Standard accessories……………...…………….4
z Parts Names & Functions…………………….....5
z System requirements……………..….…….....…6
z Technical Specifications…………………………6
Use on iOS/Android Device by Wifi……………………….7
z Download App……...…………………………..7
z Connect to iOS/Android Device……………....8
z Preview..………………………………………...11
z App Icon Definitions……………………………12
z Change Password………………………………13
z Setup Date/Time………………………………14
z Delete a Microscope……………………………15
Install the microscope to Stand..…..………….…………16
How to get focus…………………………………………19
Install Software on PC………….………………………….20
Start Microscope………………………………………….21
Software functions………………………………..………22
z Capture Photo……...…………………………22
z Capture Video………………….………………..22
z Timer……………………………………………..23
Calibration and Measurement…………………..………..24
z Calibration……………………………………..24
z Measurement……………………………………28
z Change Calibration…………………..………..28
z Draw and text……………………………………32
Software Interface Instructions………………...………..33
Page 3
2
z Main Interface Icons…………………………....33
z Main Menu……………………………………….34
z Options…………………………………………..35
z Capture………………………………….……….36
z Measurement Interface Instruction……………37
Welcome
Thank you for your choice of our product - it is a high-tech
while easy to use Wifi Digital Microscope. With this unit
you will see a unique and “bigger” worl d via iOS/Android
devices.
It’s easy to zoom in on stamps, coins, paper currency,
plants, insects, ski n, fabrics, rock s and minerals, and so
much more.
We recommend reading this manual first to get the best
out of this unit.
1. Precaution
Before using the Wifi Digital Microscope, please ensure
that you read and understand the safety precautions
described below. Always ensure that the Wifi Digital
Microscope is operated correctly.
z The Microscope is not waterproof, so keep it dry.
z Do not use it in a humid place like bathrooms. A dry
environment will maintain its life to maximum.
z Use the Microscope only at -5℃-50℃.
Page 4

3
z Sudden temperature change may form dew inside
the Microscope like entering a warm room in cold
winter. Put it inside a handbag or plastic bag to slow
down temperature changes.
z Do not point Microscope lens to the sun or strong
light for a long time. Powerful light may hurt the
light-sensitive electronics.
z Avoid touching the lens.
z The white LEDs which illuminate the Microscope
target field are very bright. Do not stare directly into
these LEDs as it may damage your eyes.
z The clear plastic distance shell sometimes pi cks up
dirt or toxic material from a microscopically observed
surface. Be careful that this doesn’t get in contact
with the human skin. Always wash carefully or
disinfect as needed.
Page 5
4
2. Preparation
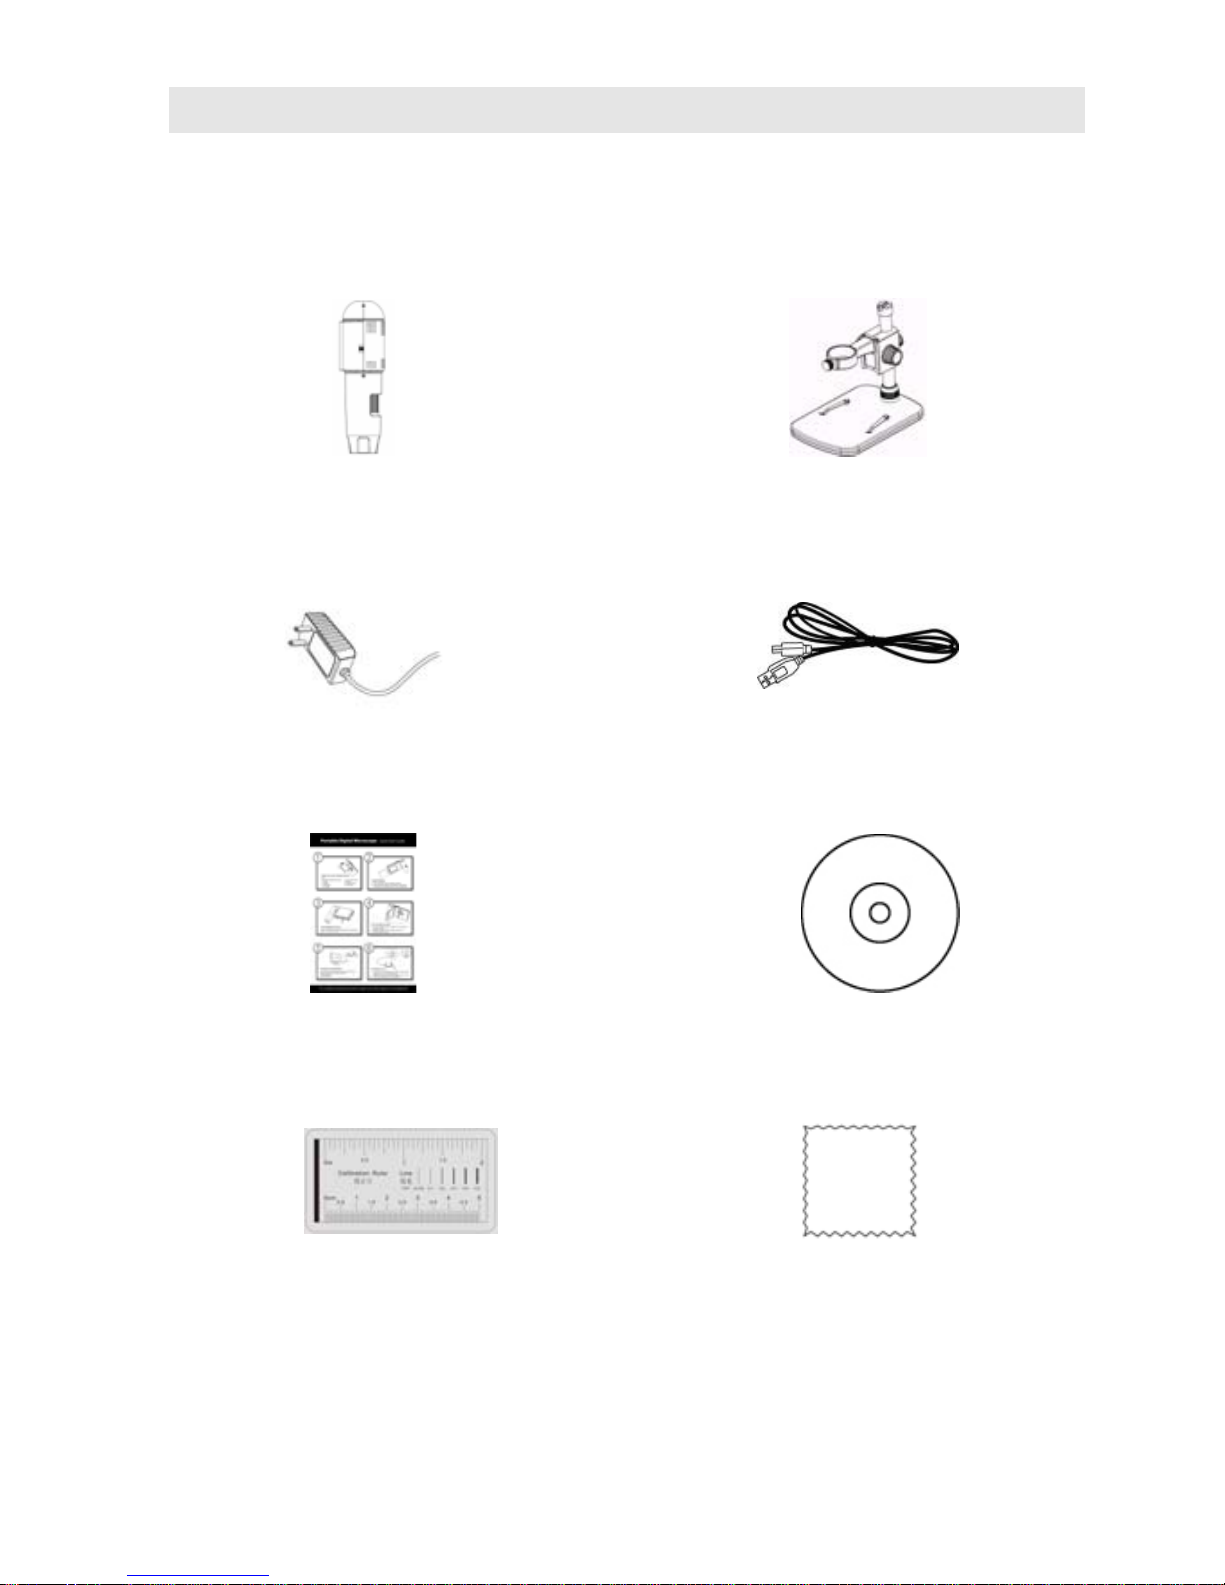
■ Standard accessories
Microscope Stand
AC adaptor USB cable
QSG
AC adaptor
Calibration Ruler Cleaning Fabric
Page 6
5
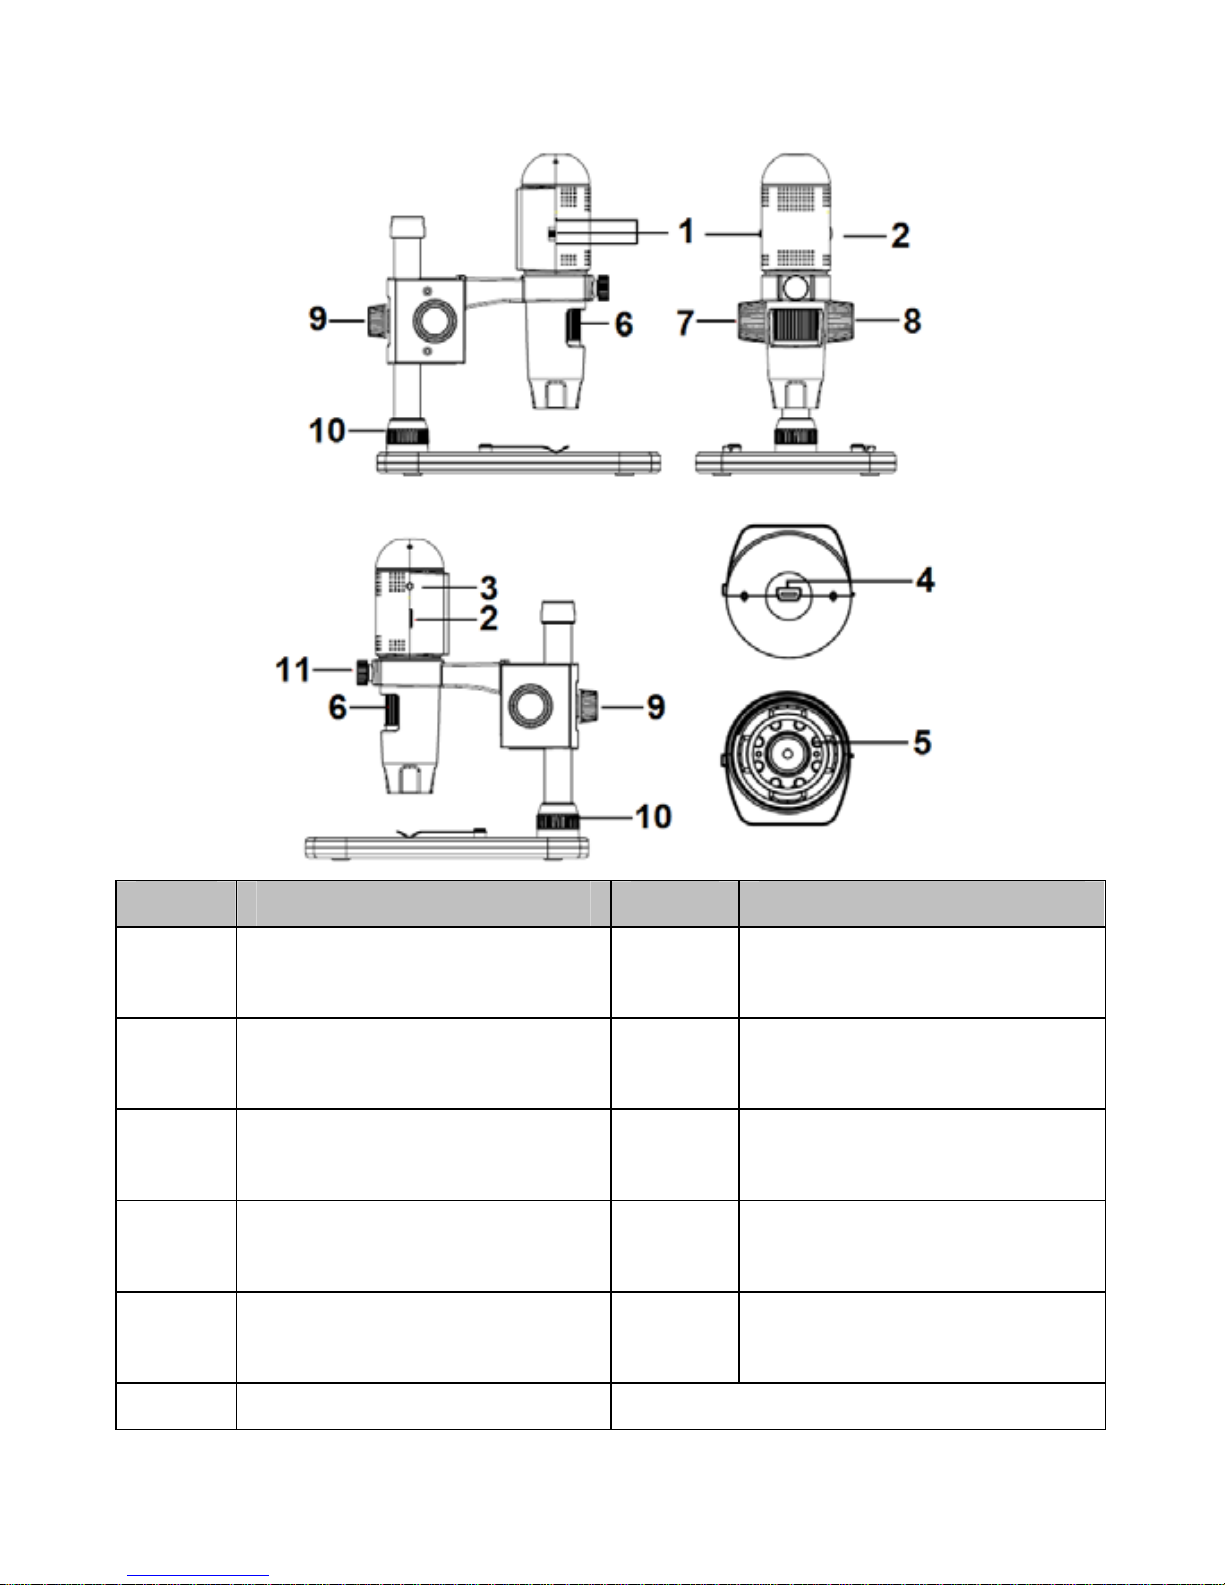
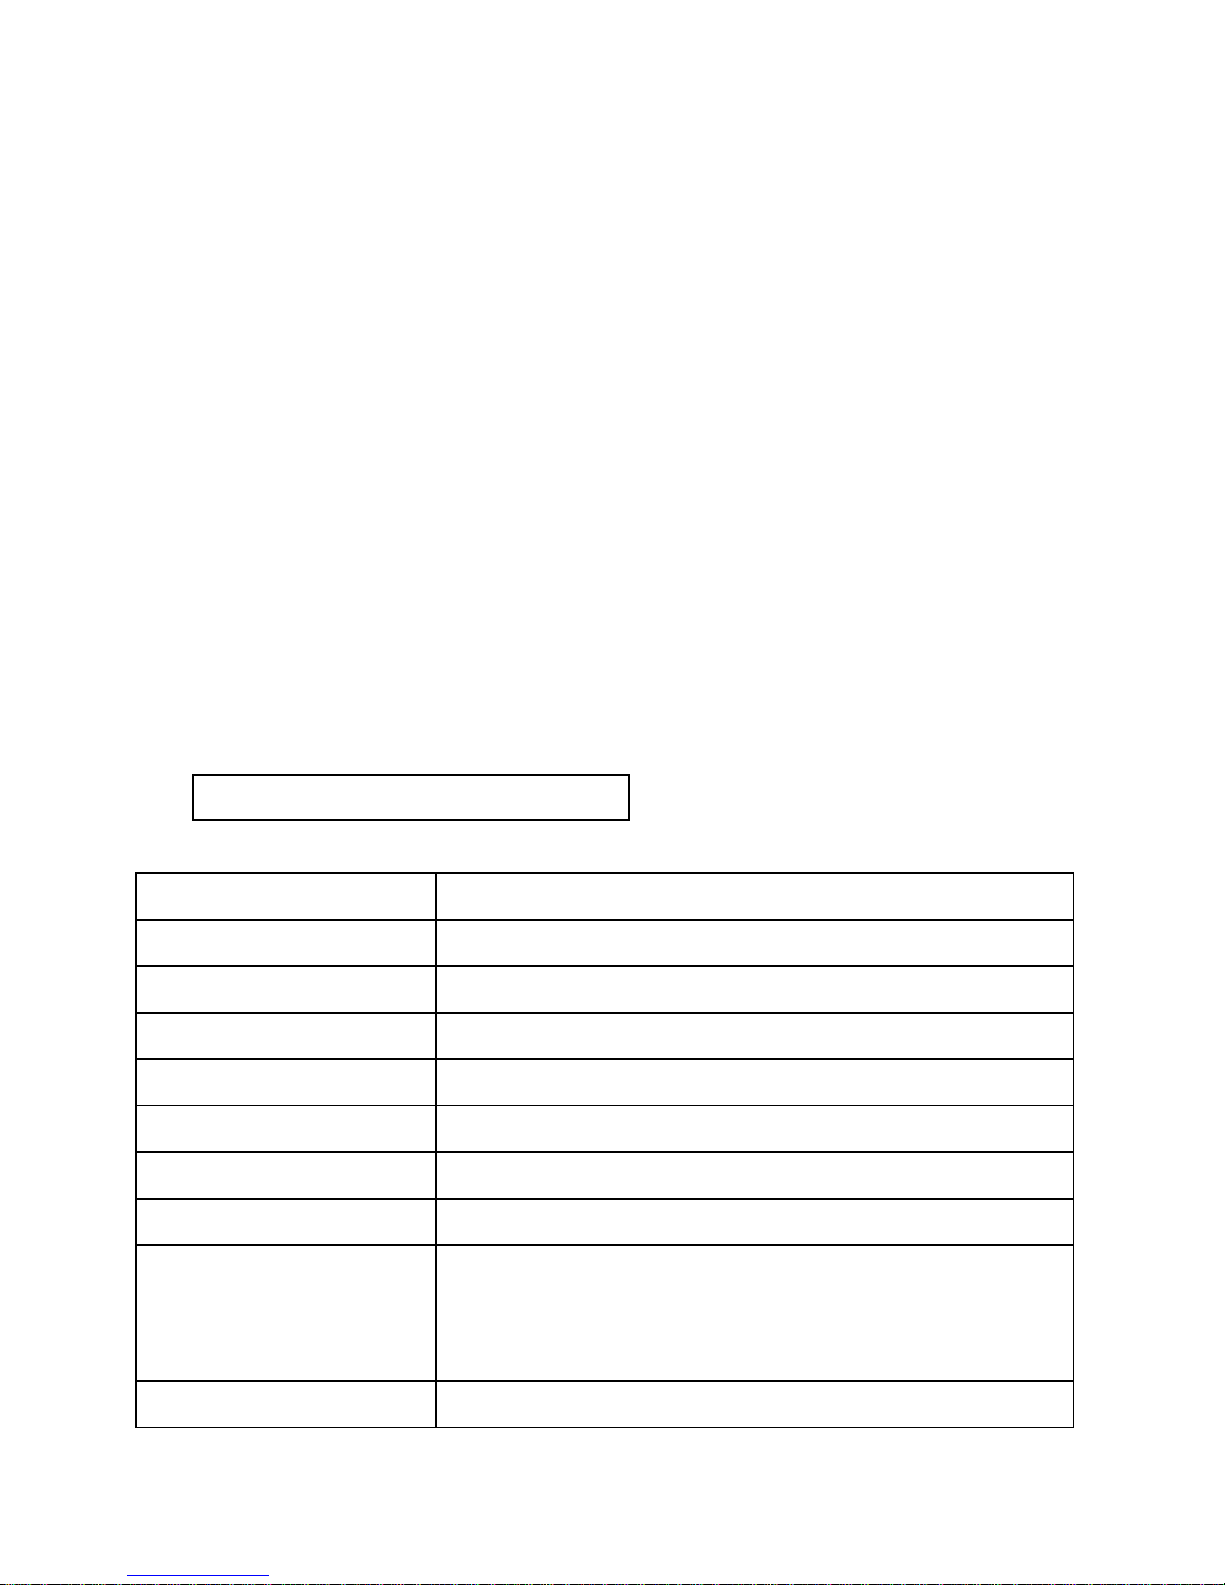
■ Parts Names & Functions
Part Meaning Part Meaning
1 Off/Wifi/USB 7
Wheel
(Fixing the movement)
2 LED Dimmer 8
Wheel
(for up/down)
3 Charging Indicator 9
Wheel
(fixing on the pole)
4
USB (PC and
Charge)
10
Wheel
(fixing on the stage)
5 LED 11
Wheel
(fixing the microscope)
6 Focus Wheel
Page 7
6
■ System Requirements
1. iOS/Android
* iOS 5.1 and later
* Android 4.3 and later
2. PC
* Windows XP / VISTA / WIN7 / WIN8
* P4 1.8 or above
* RAM: 512M
* Video Memory: 64M
* USB port: 2.0
* CD-ROM Drive
■ Technical Specifications
Image sensor 1 Mega Pixels (true resolution)
Still capture resolution 1280x720 (720P), 640x480 (VGA)
Video capture resolution 1280x720 (720P), 640x480 (VGA)
Magnification Ratio 10x~200x
Focus Range Manual focus from 0mm to 150mm
Video format H.264
Photo format JPEG
Light source 6 LED (adjustable by control wheel)
Power source
Rechargeable Li-ion battery
Working time: 90mins, Charging time: 100mins
Charging power: 5V DC
iOS/Android interface WiFi
Page 8
7
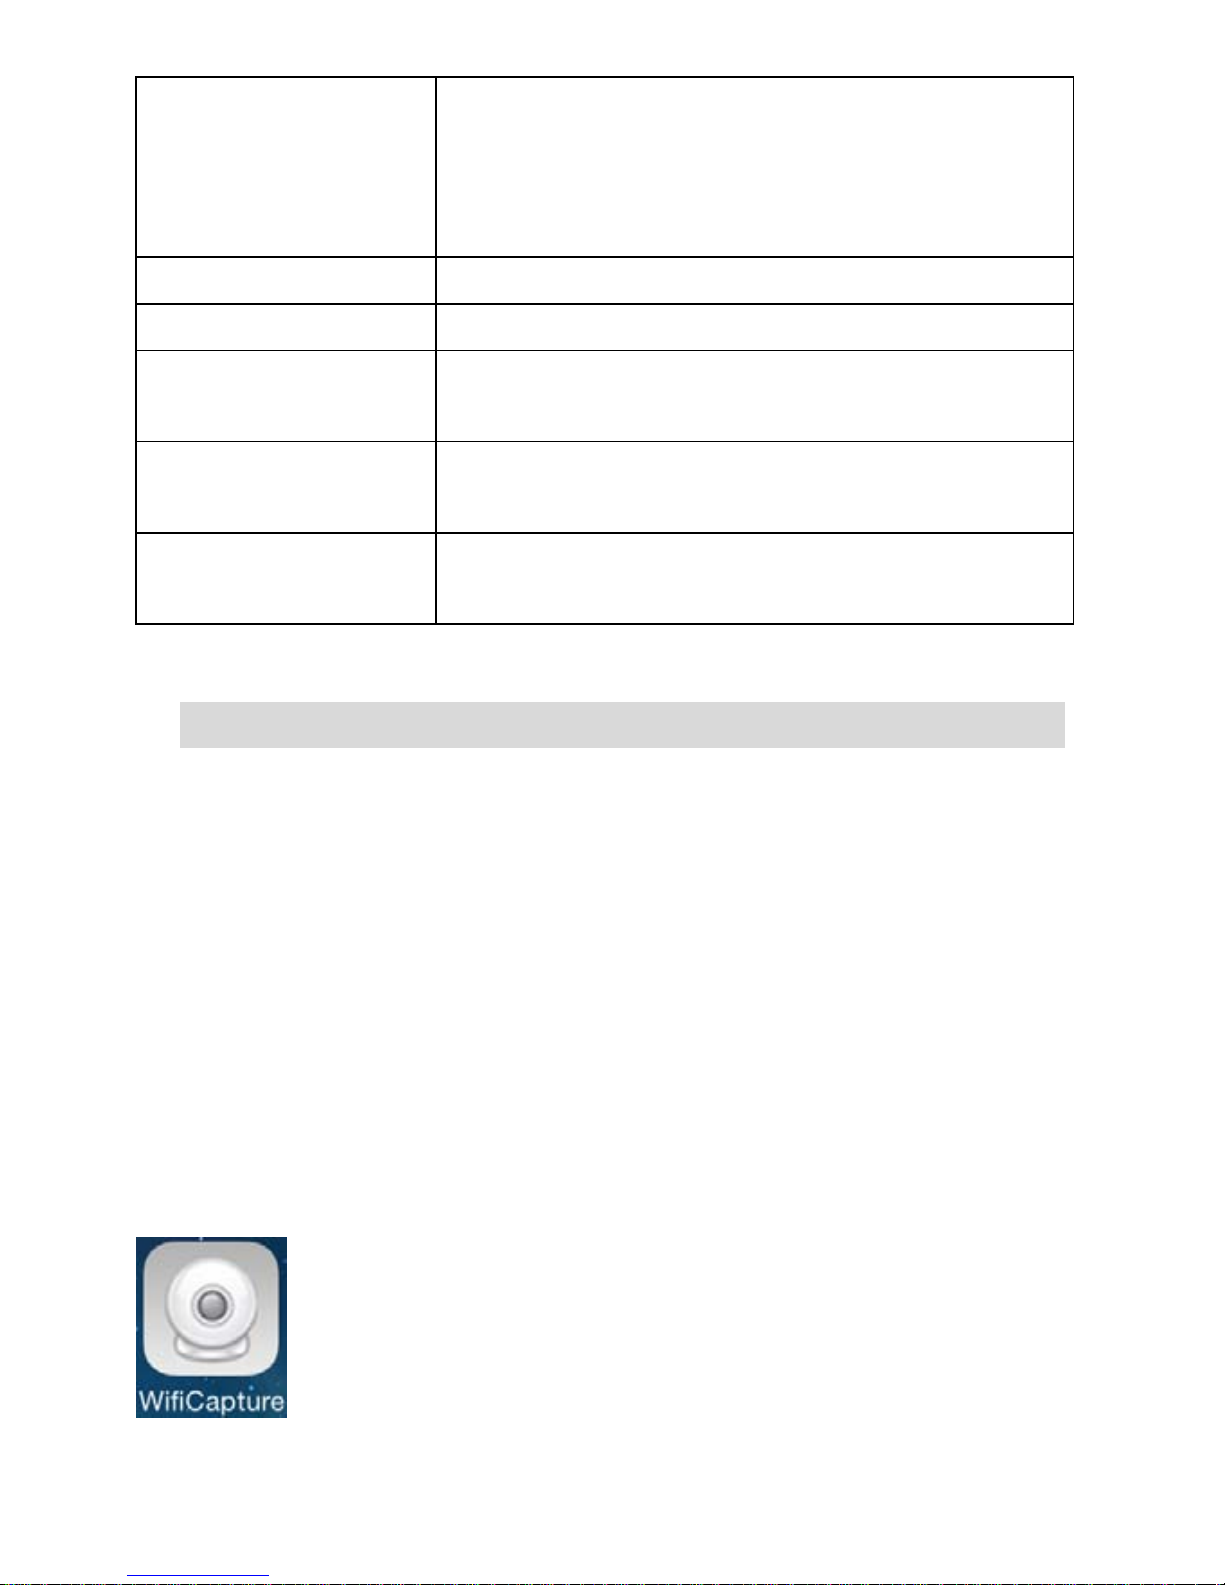
App
iOS (5.1 and later): WifiCapture
Search and download from App Store
Android: WifiCapture, Install from CD, or search and
Download from https://play.google.com/store
PC interface USB2.0
PC Software PortableCaptureHD (with measurement)
PC Software Language
English, Deutsch, Spanish, Russian, Italian, French,
Portuguese, Dutch, Polish, Japanese, Korean
PC Software OS
Supported
Windows XP/Vista/Win7/ Win8
Size
Microscope: 154mm (L) x 44mm (R)
Professional Stand: 165mm(L) x118mm(W )x12mm (H)
3. Use the Wifi Microscope on iOS/Android Device
1) Download App
iOS:
Search and install WifiCapture from App Store.
Android:
Search WifiCapture from play.google.com/store,
download and install it. Or install WifiCapture from the CD
that comes with the package.
Page 9
8
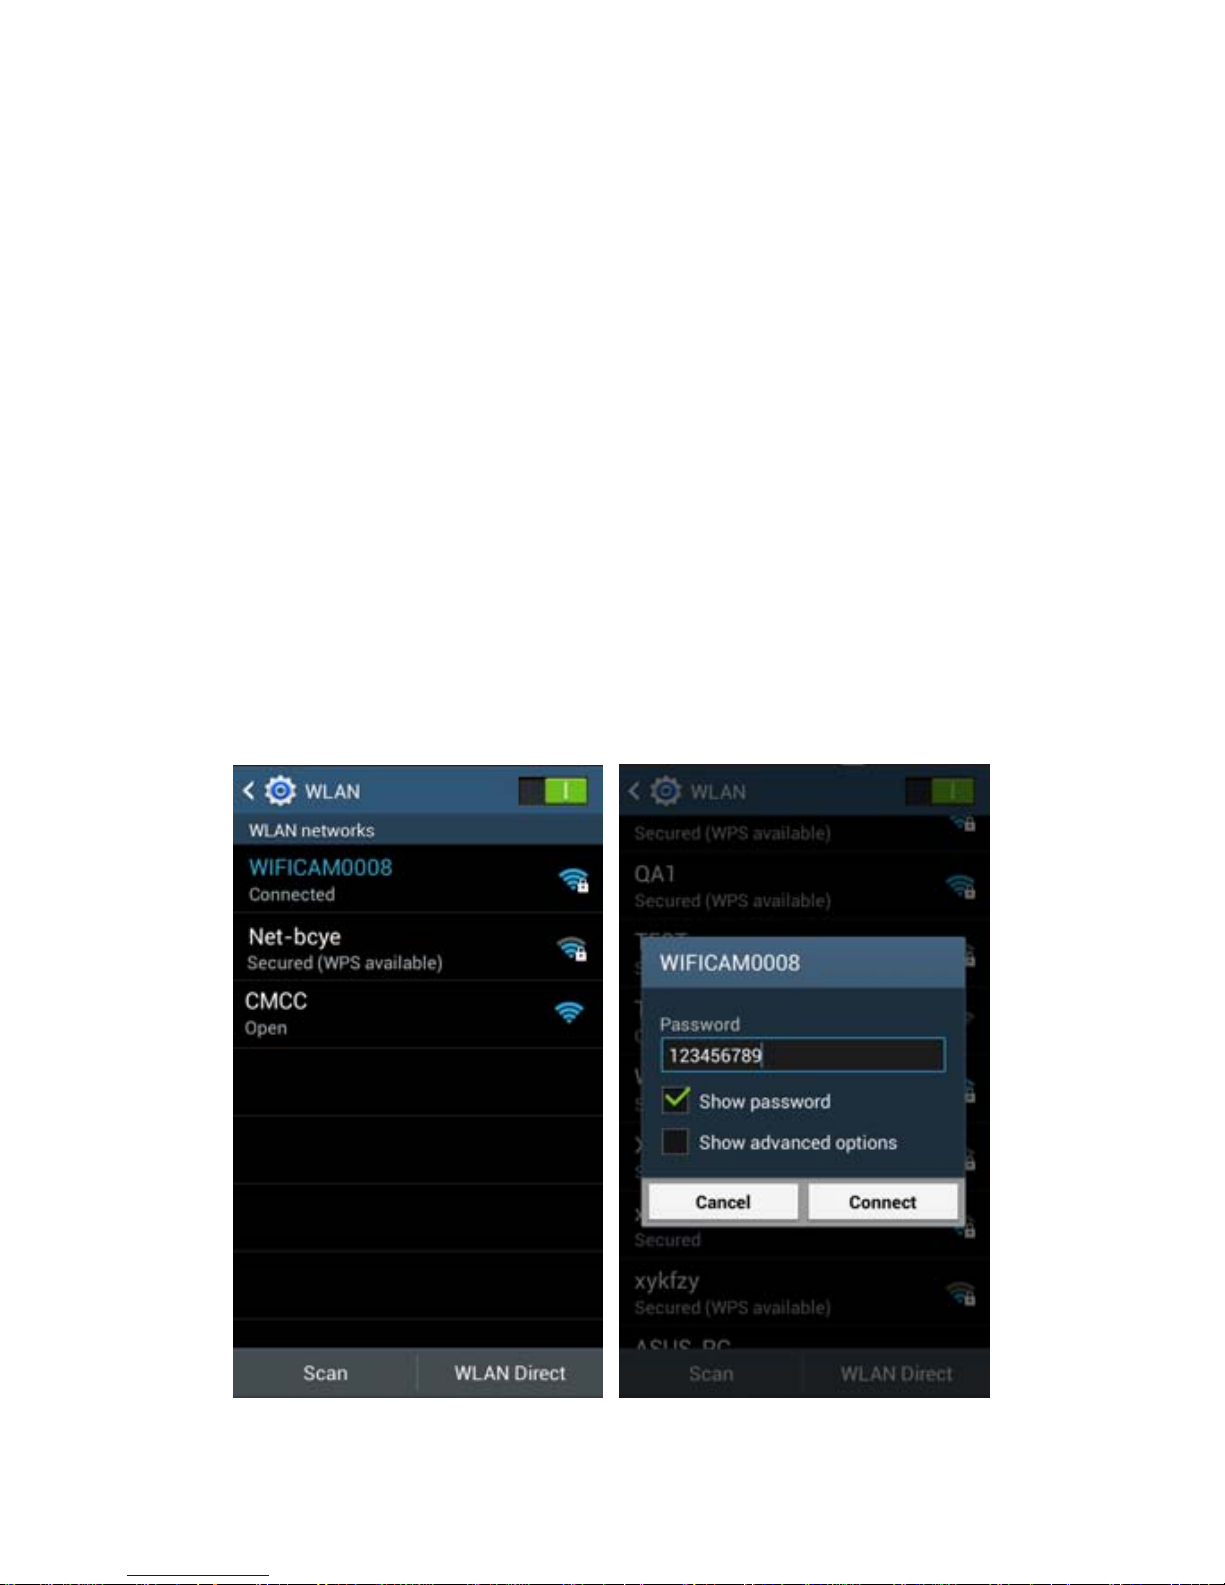
2) Connect the Wifi Microscope to iOS/Android
device. (here we take Android Smart Phone as an
example)
(1) Power on the microscope by sliding the Par1#1 to
WIFI position;
(2) Turn on the Wifi of your iOS/Android Device, search
the Wifi Digital Microscope from the Wifi Device list.
The Wifi Microscope name is WIFICAMxxxx (xxxx
stand for four-digit random number), as follows:
The password to connect the device is 123456789.
Page 10
9
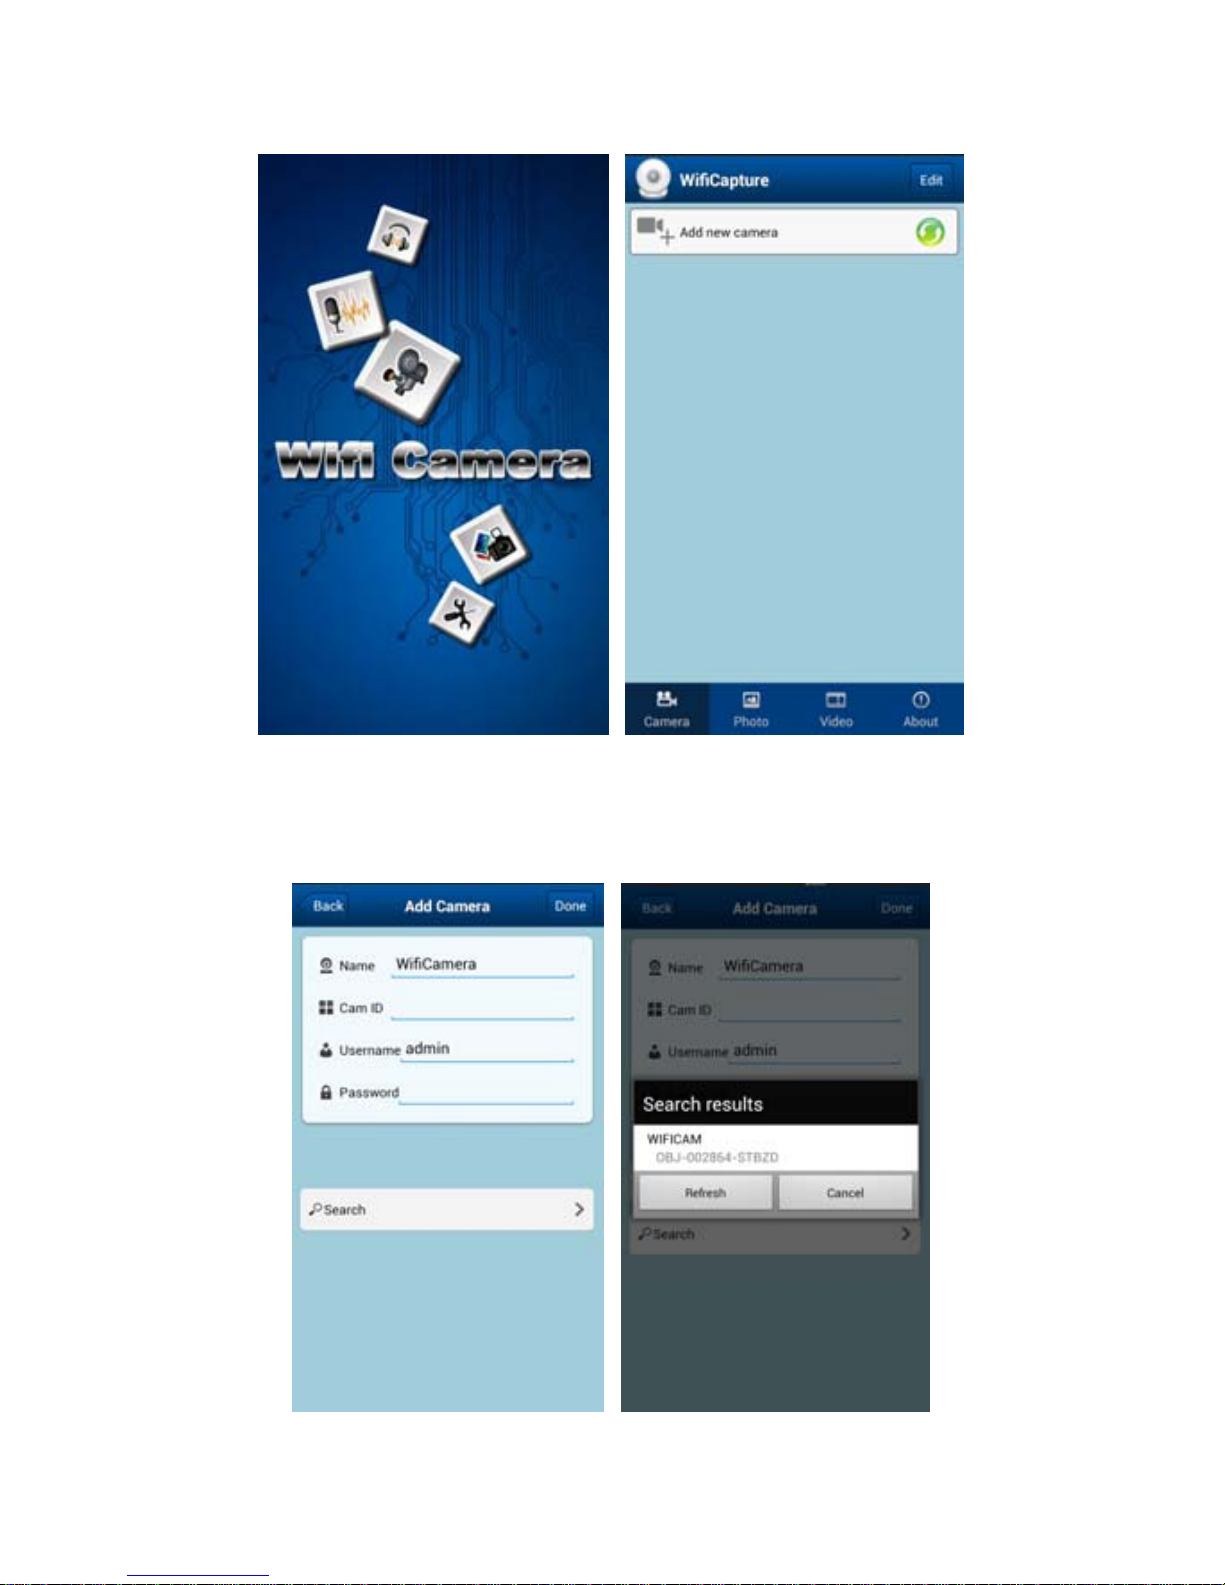
(3) Start the installed App, as follows:
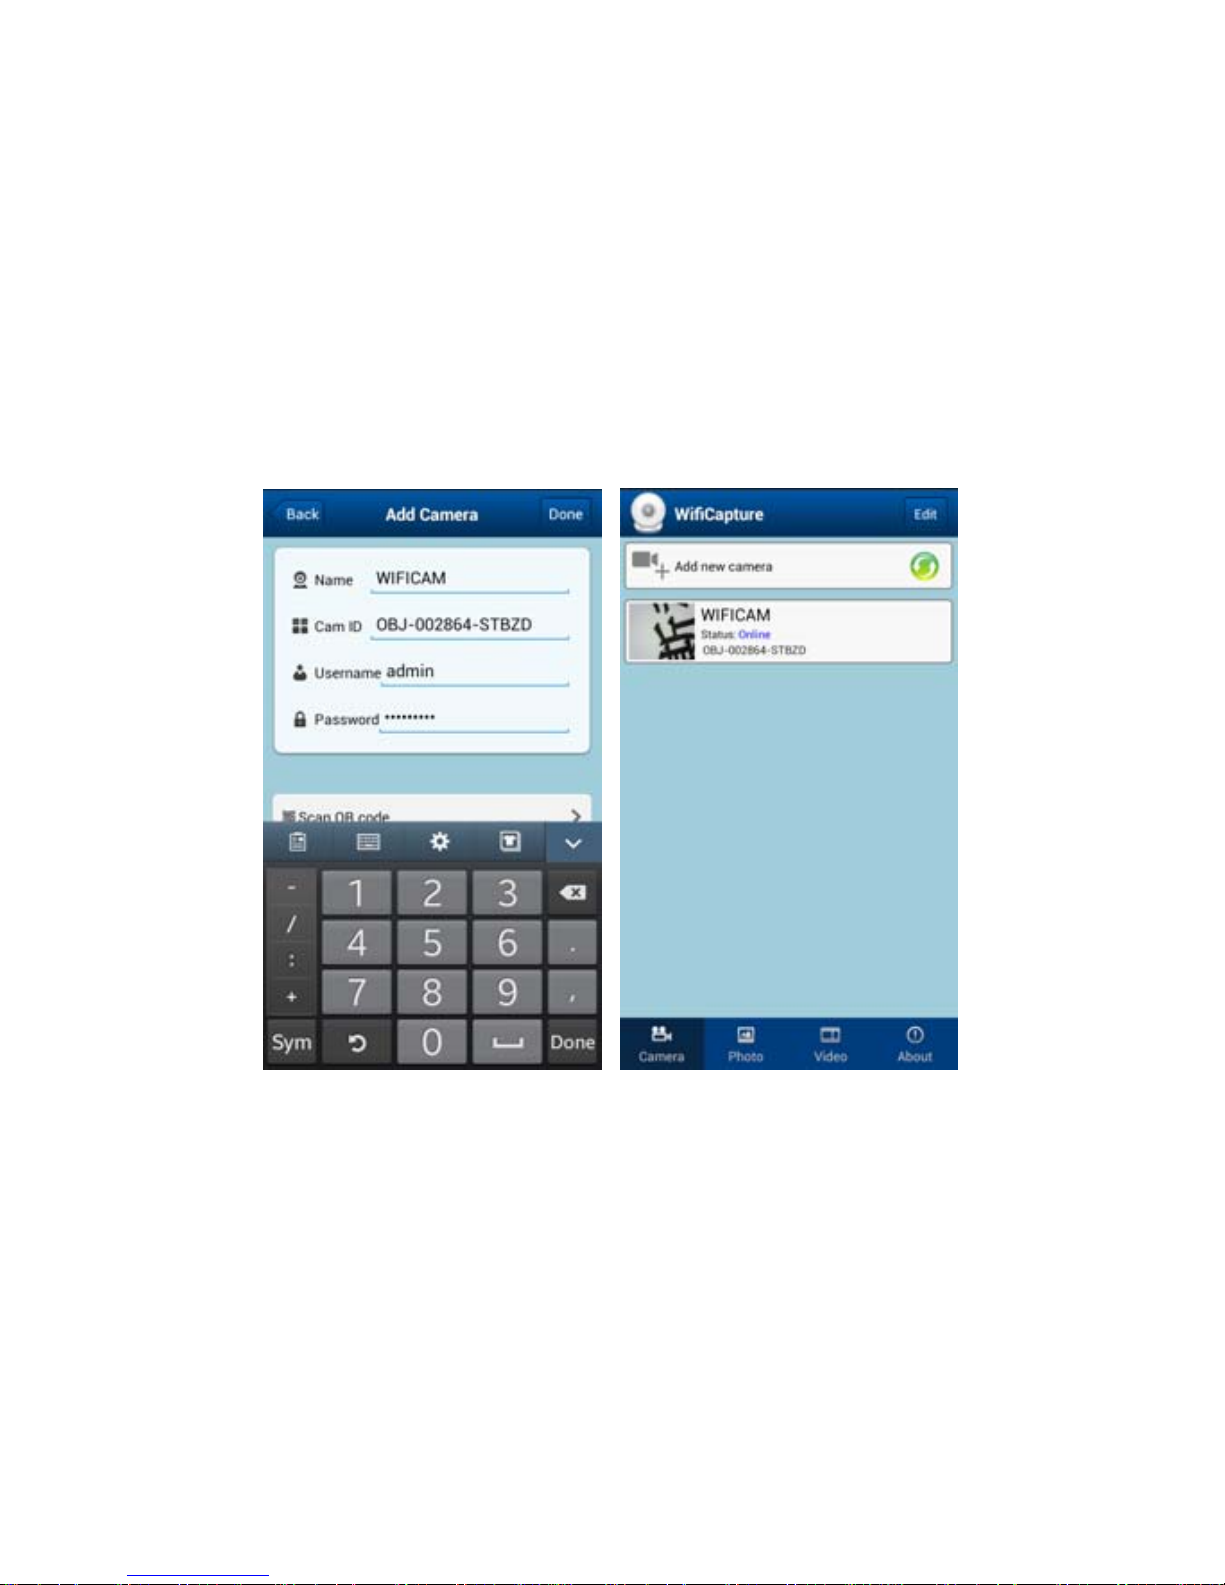
(4) Add Camera
Click Add new camera, th en click Search.
Page 11
10
The searched Wifi Camera will be shown on the Search
result list. Click the Device name (for example, WIFICAM
(OBJ-002864-STBZD).
(5) User name is admin, default password is 123456, and
then the online Wifi Camera is listed.
Page 12
11
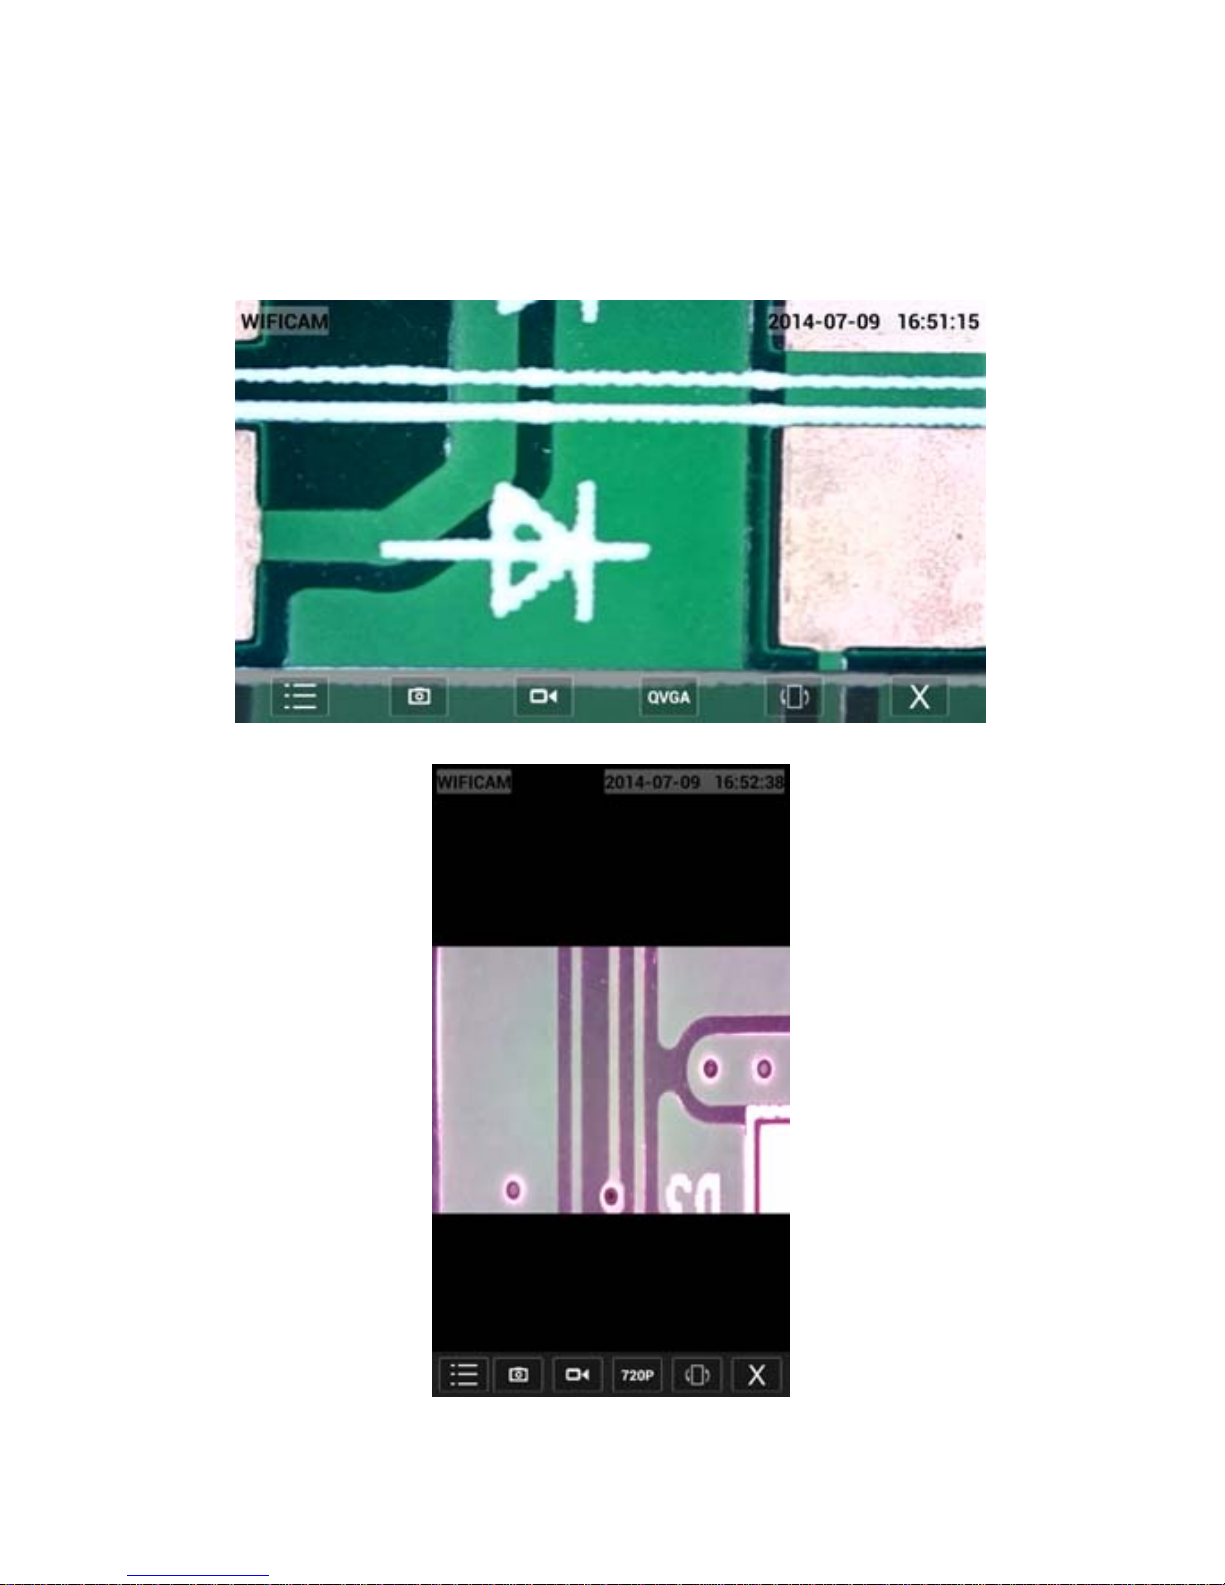
3) Preview
Click the listed Wifi Camera, it starts preview as follows.
The preview can be vertical or horizontal.
Page 13
12
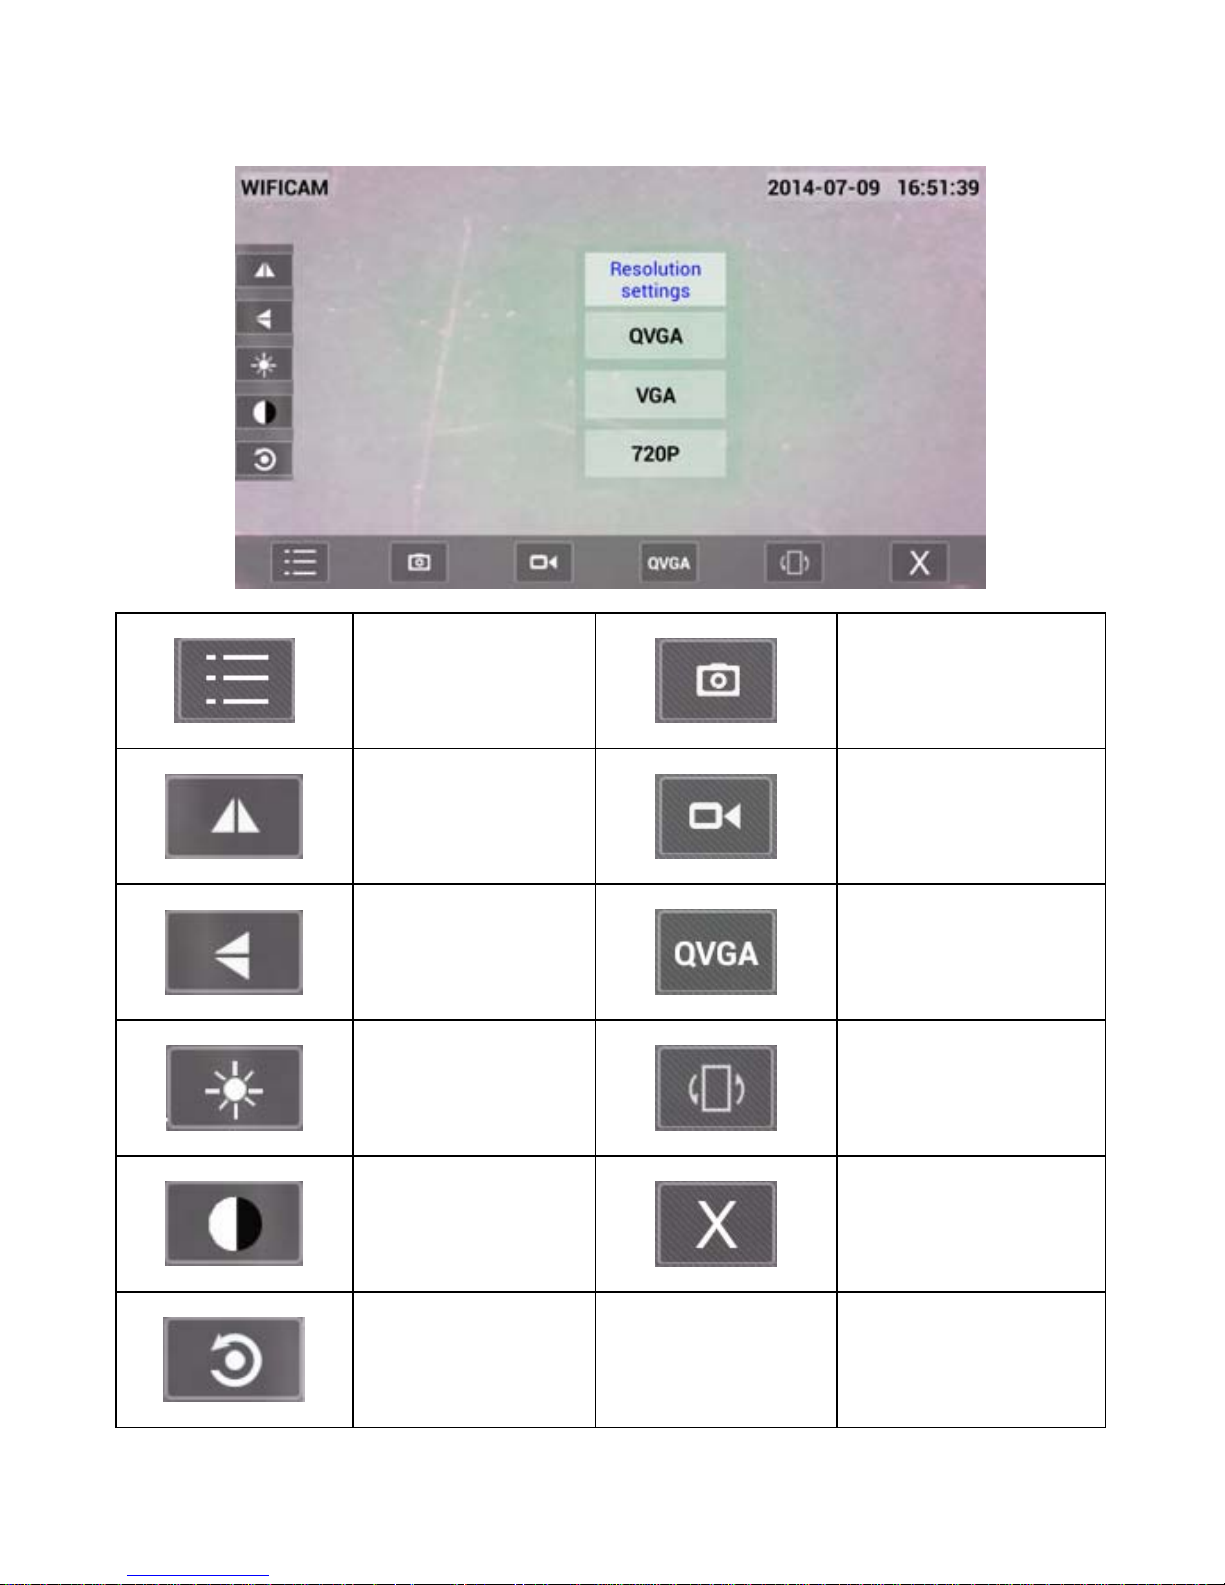
4) App Interface Icon Definition
IQ
Still Image
Capture
Flip
(Left/Right )
Video
Capture
Flip
(Up/Down)
Change resolution
720P/VGA/QCGA
Brightness
Screen Rotation
(Vertical/Horizontal)
Contrast
Exit
Back to
Default
Page 14
13
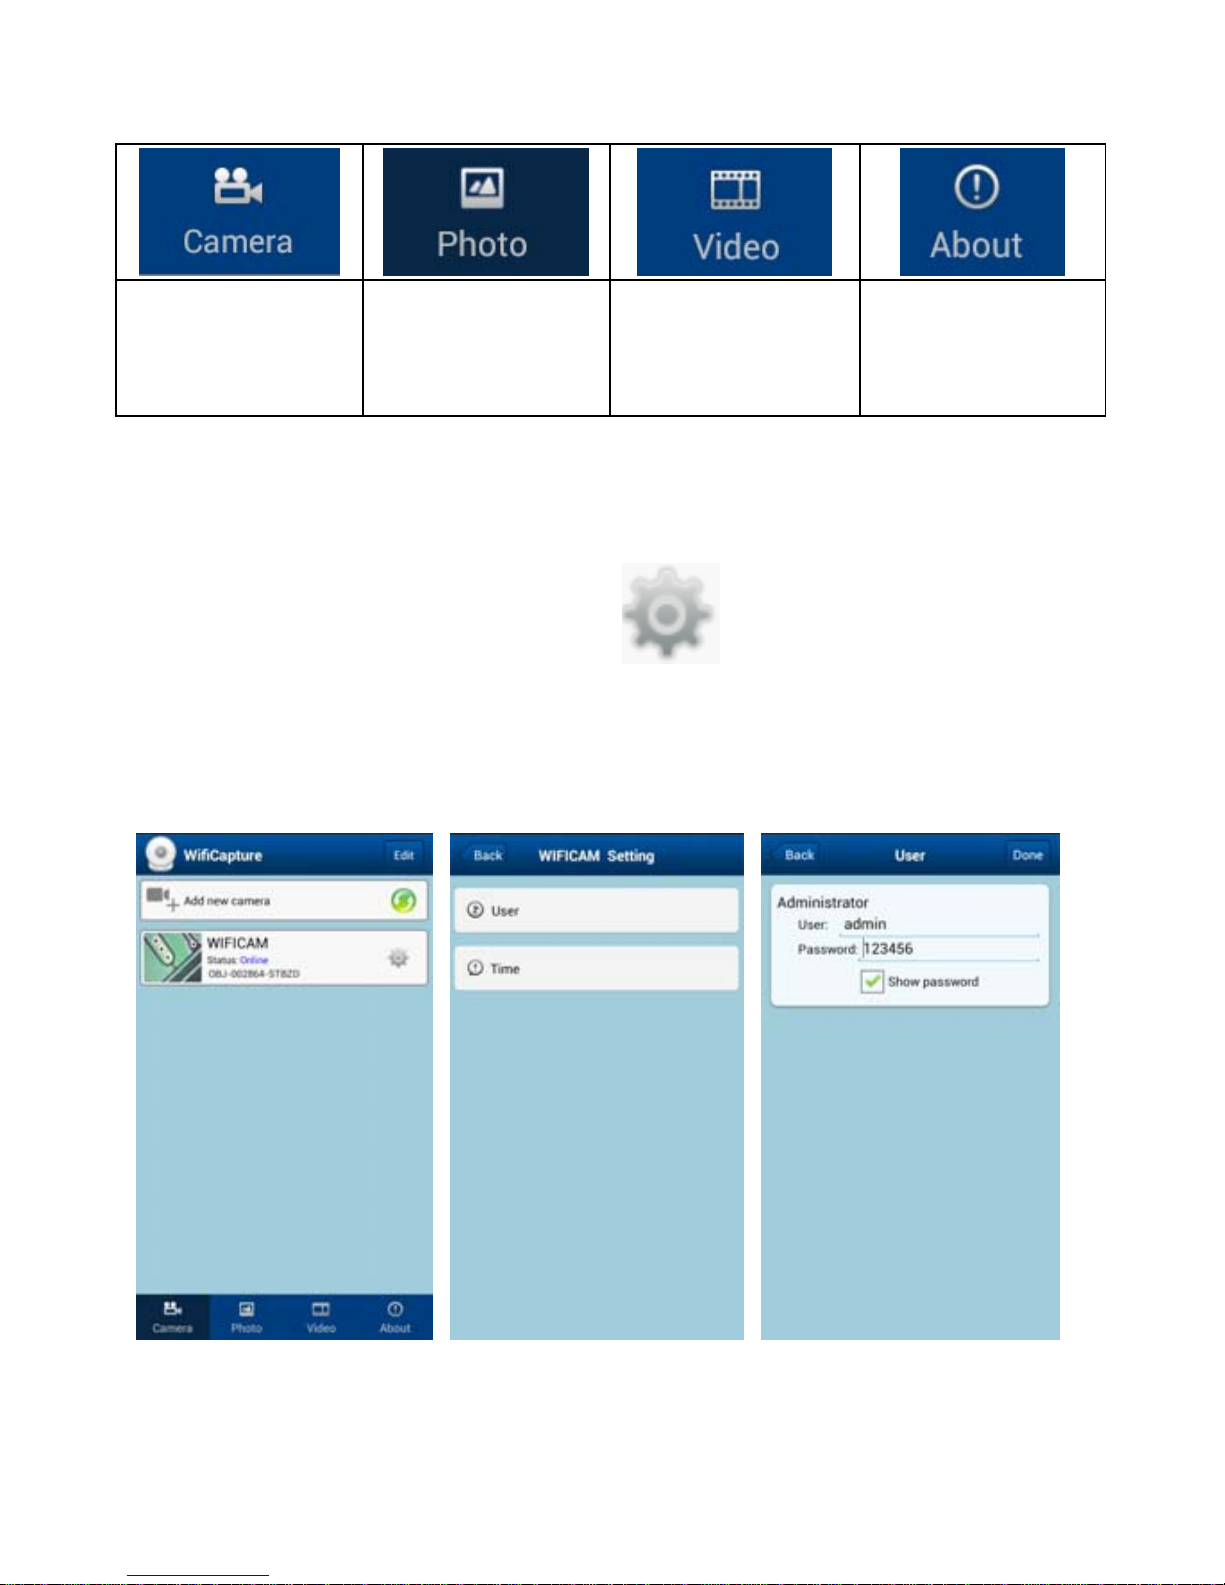
Main
Interface
Captured
Still Image
Captured
Video
Version info
5) Change Password
From the camera list, click
, choose User, and
then input new password. Click Done on the right
corner to confirm the setup.
Page 15
14
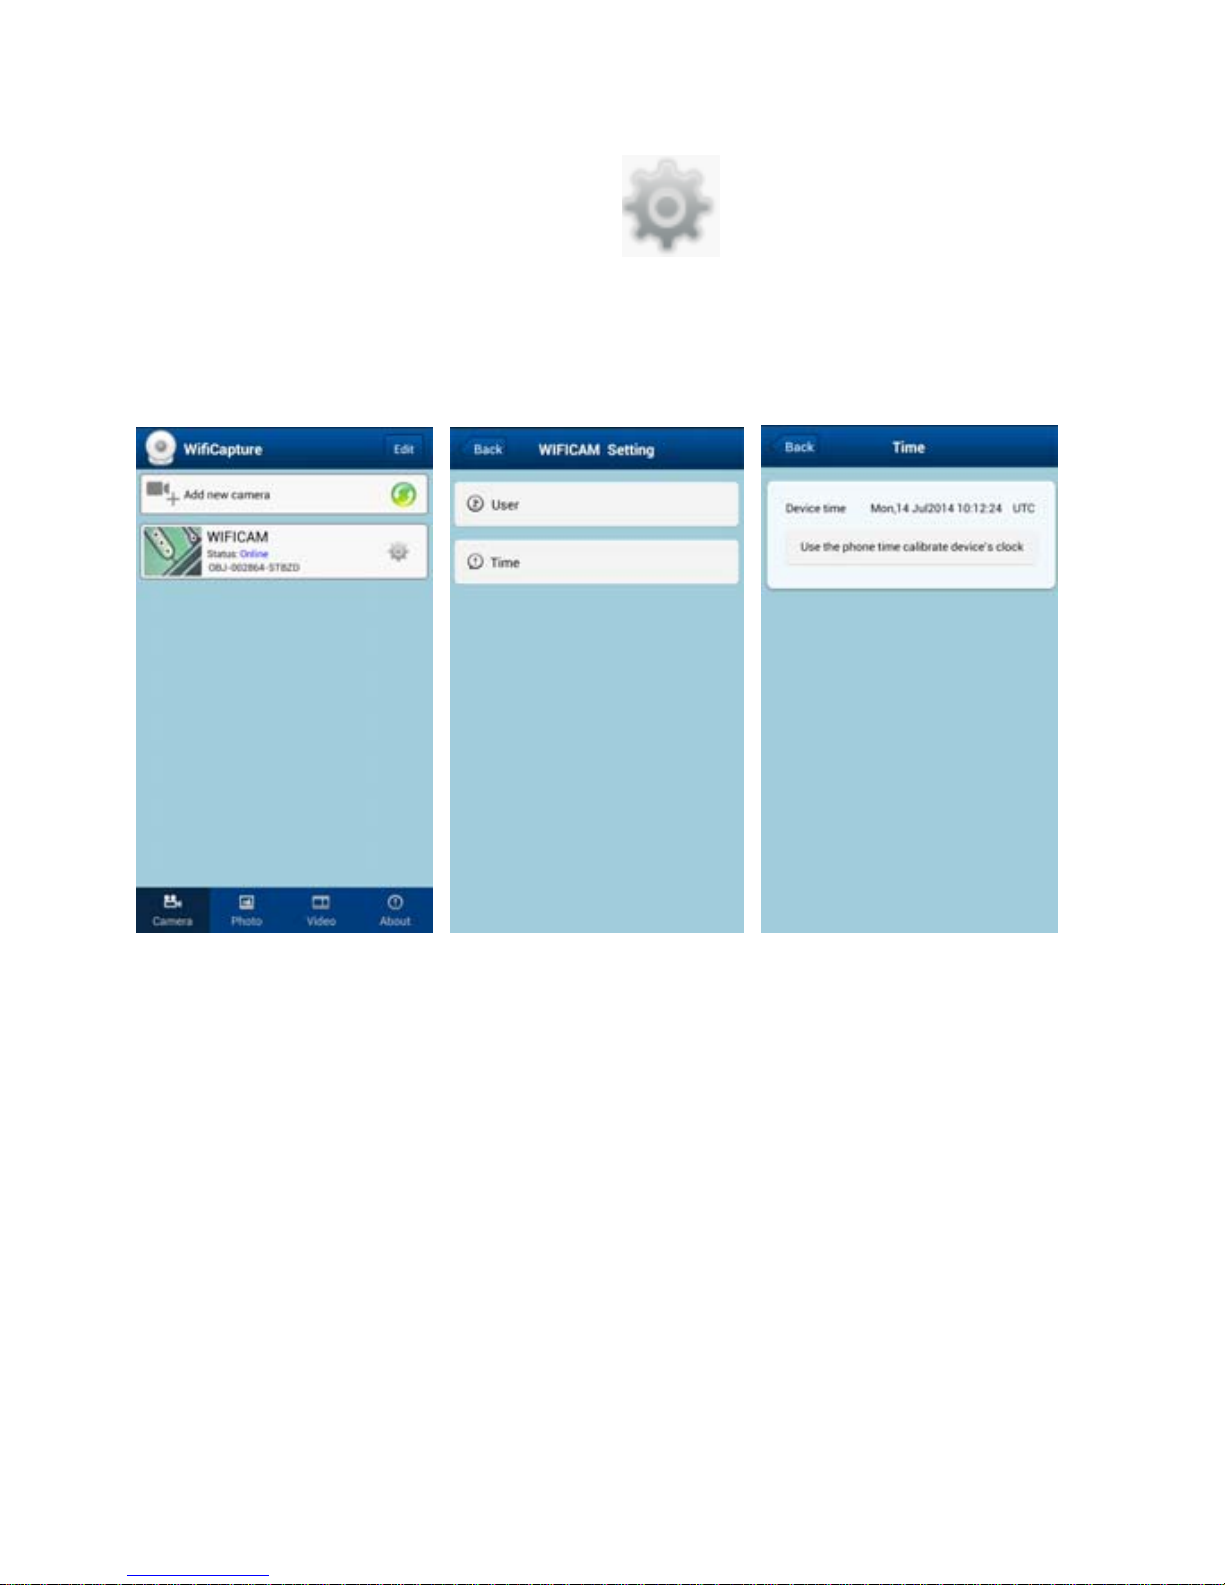
6) Setup Date/Time
From the camera list, click
, choose Time, and
then click use the phone time calibrate device’s
clock.
Page 16
15
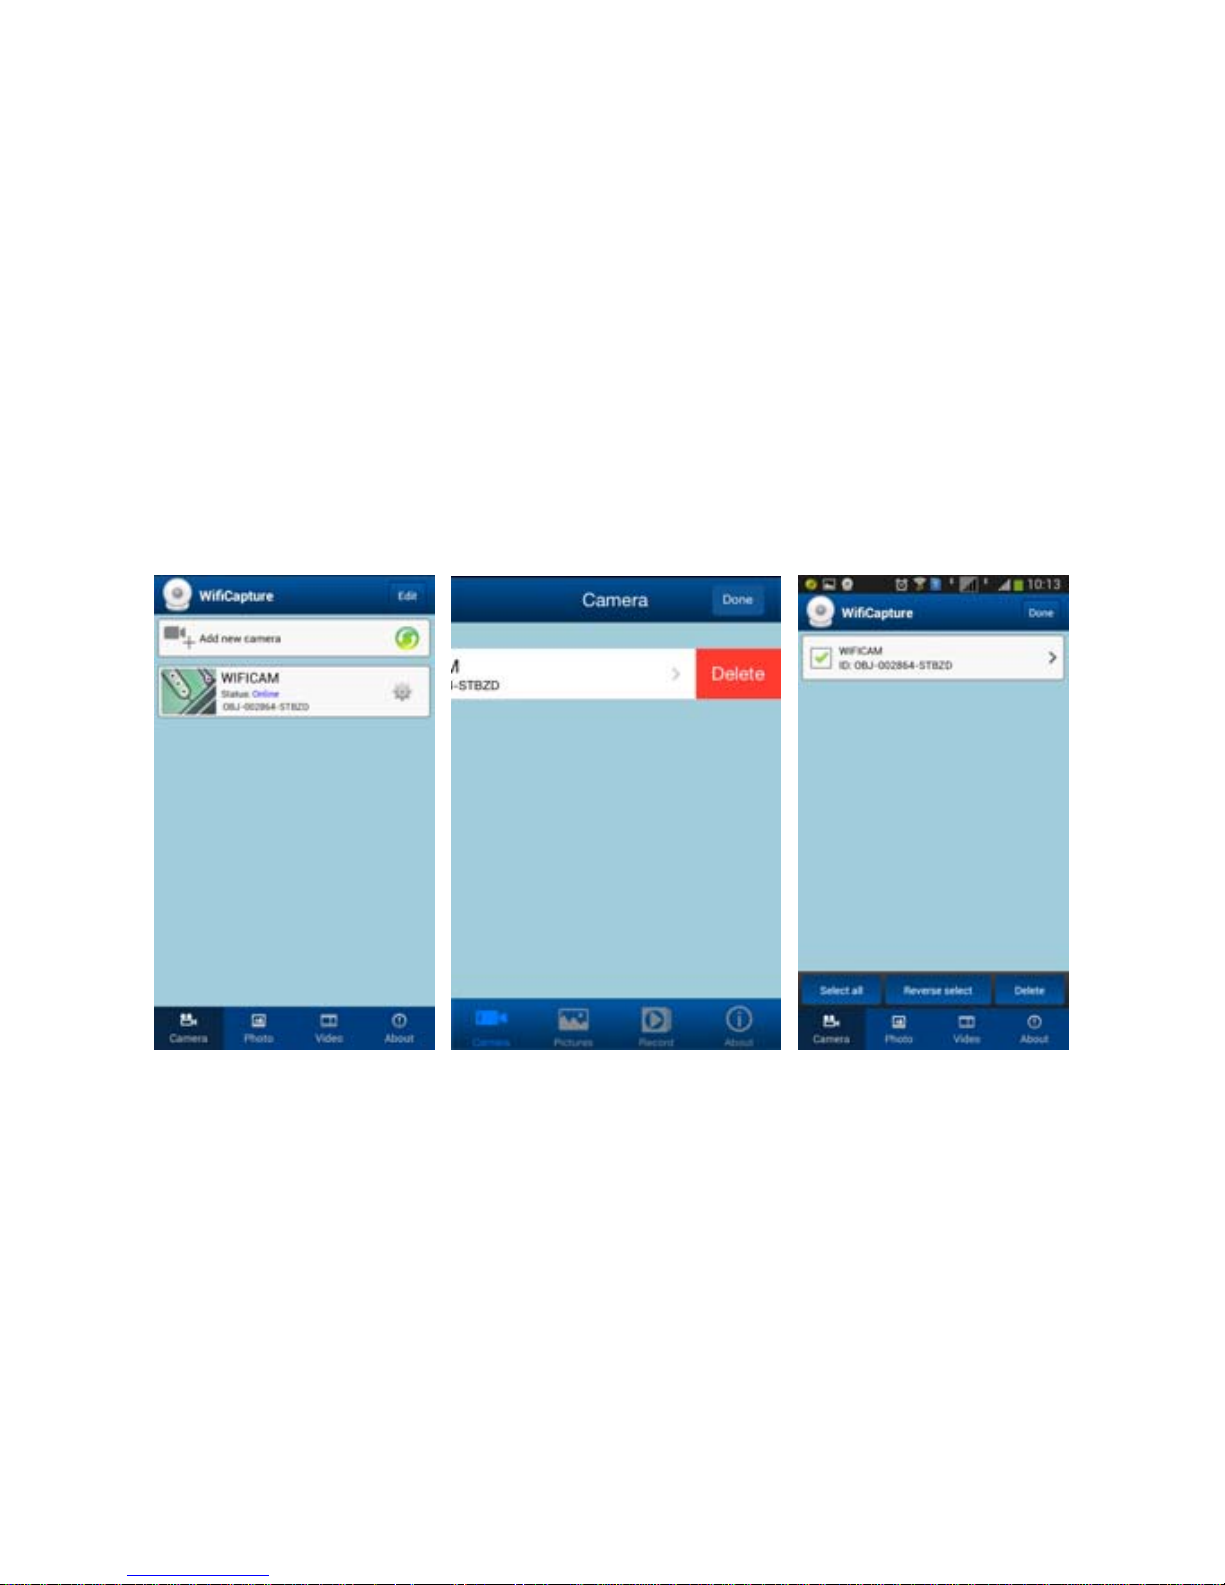
7) Delete a Wifi Camera
You can delete an existing Wifi Camera. Press Edit at the
right corner.
(1) For iOS, by sliding (left or right) a target Camera, then
confirm to delete it.
(2) For Android, tick to select a target camera, and then
choose Delete.
Page 17
16
4. Install the Microscope to the Stand
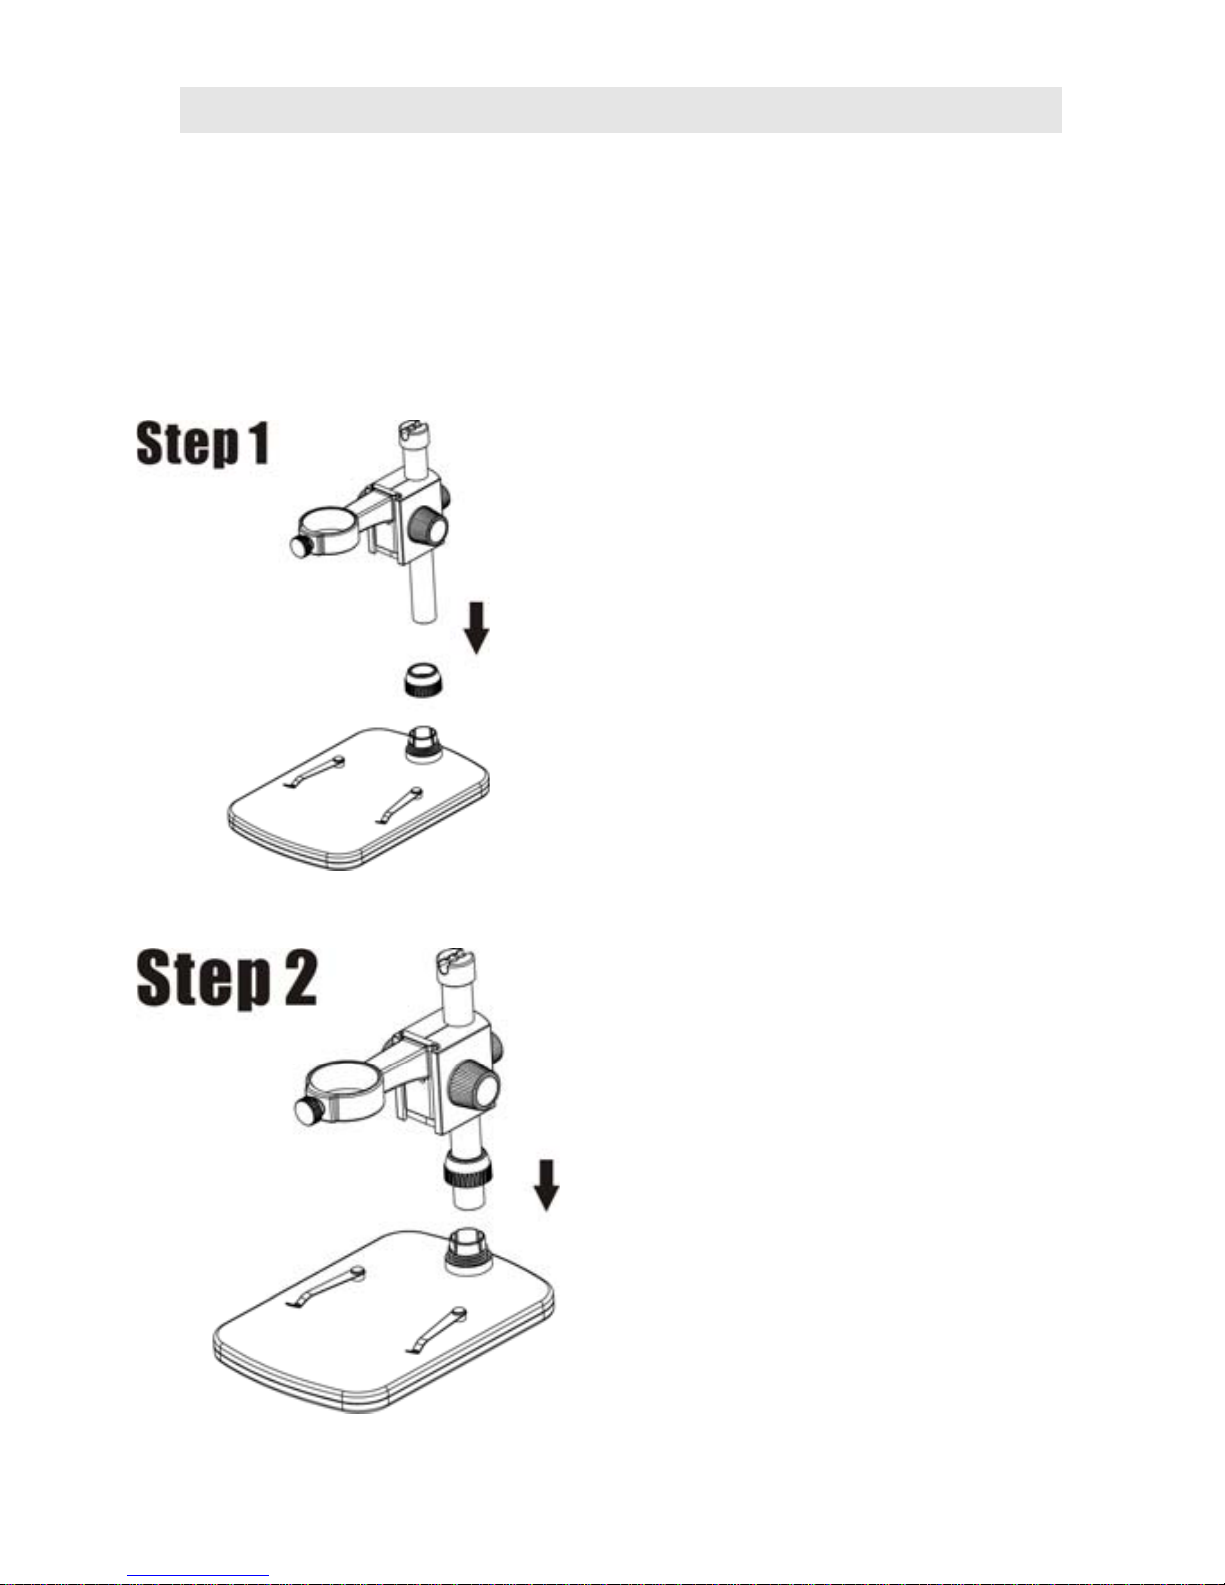
1) Take the microscope out from gift box gently; put the
carriage stage on a flat surface.
2) Follow the below steps:
Put the metal
pole through
Wheel 10!
Put the metal
pole into the
female part of
the stage!
Page 18
17
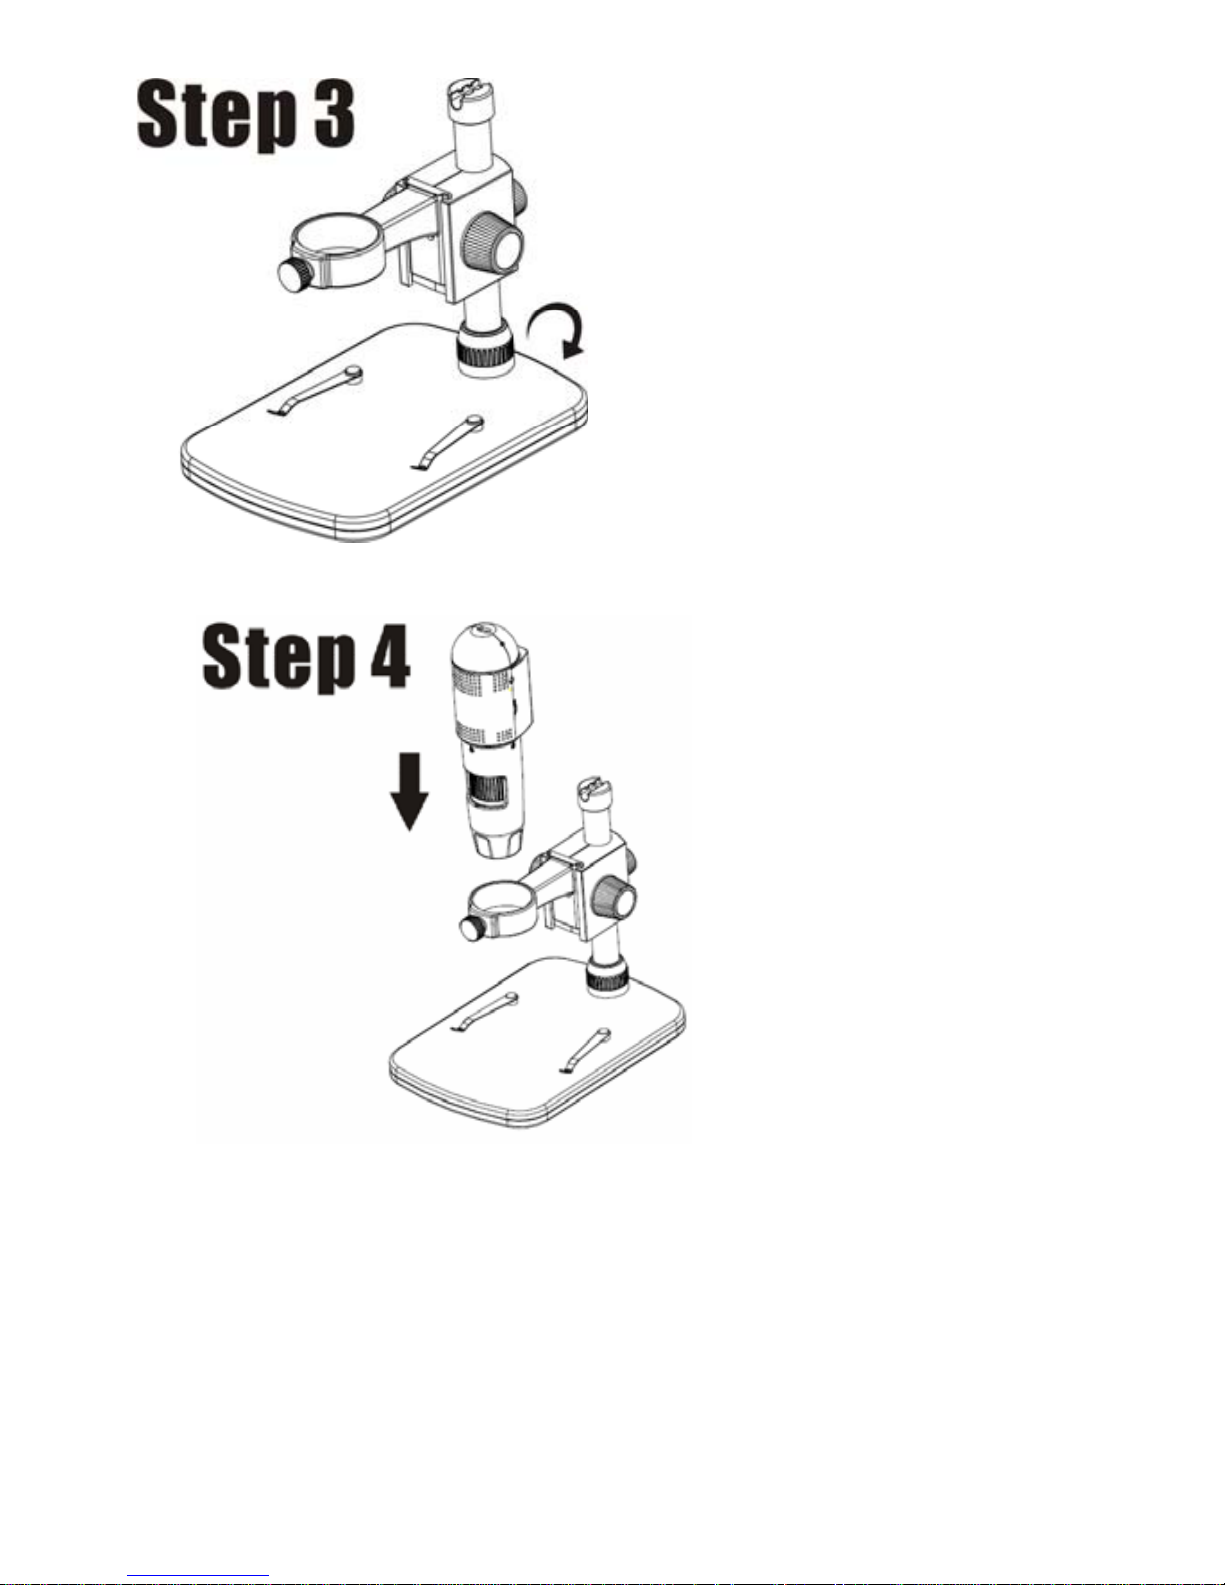
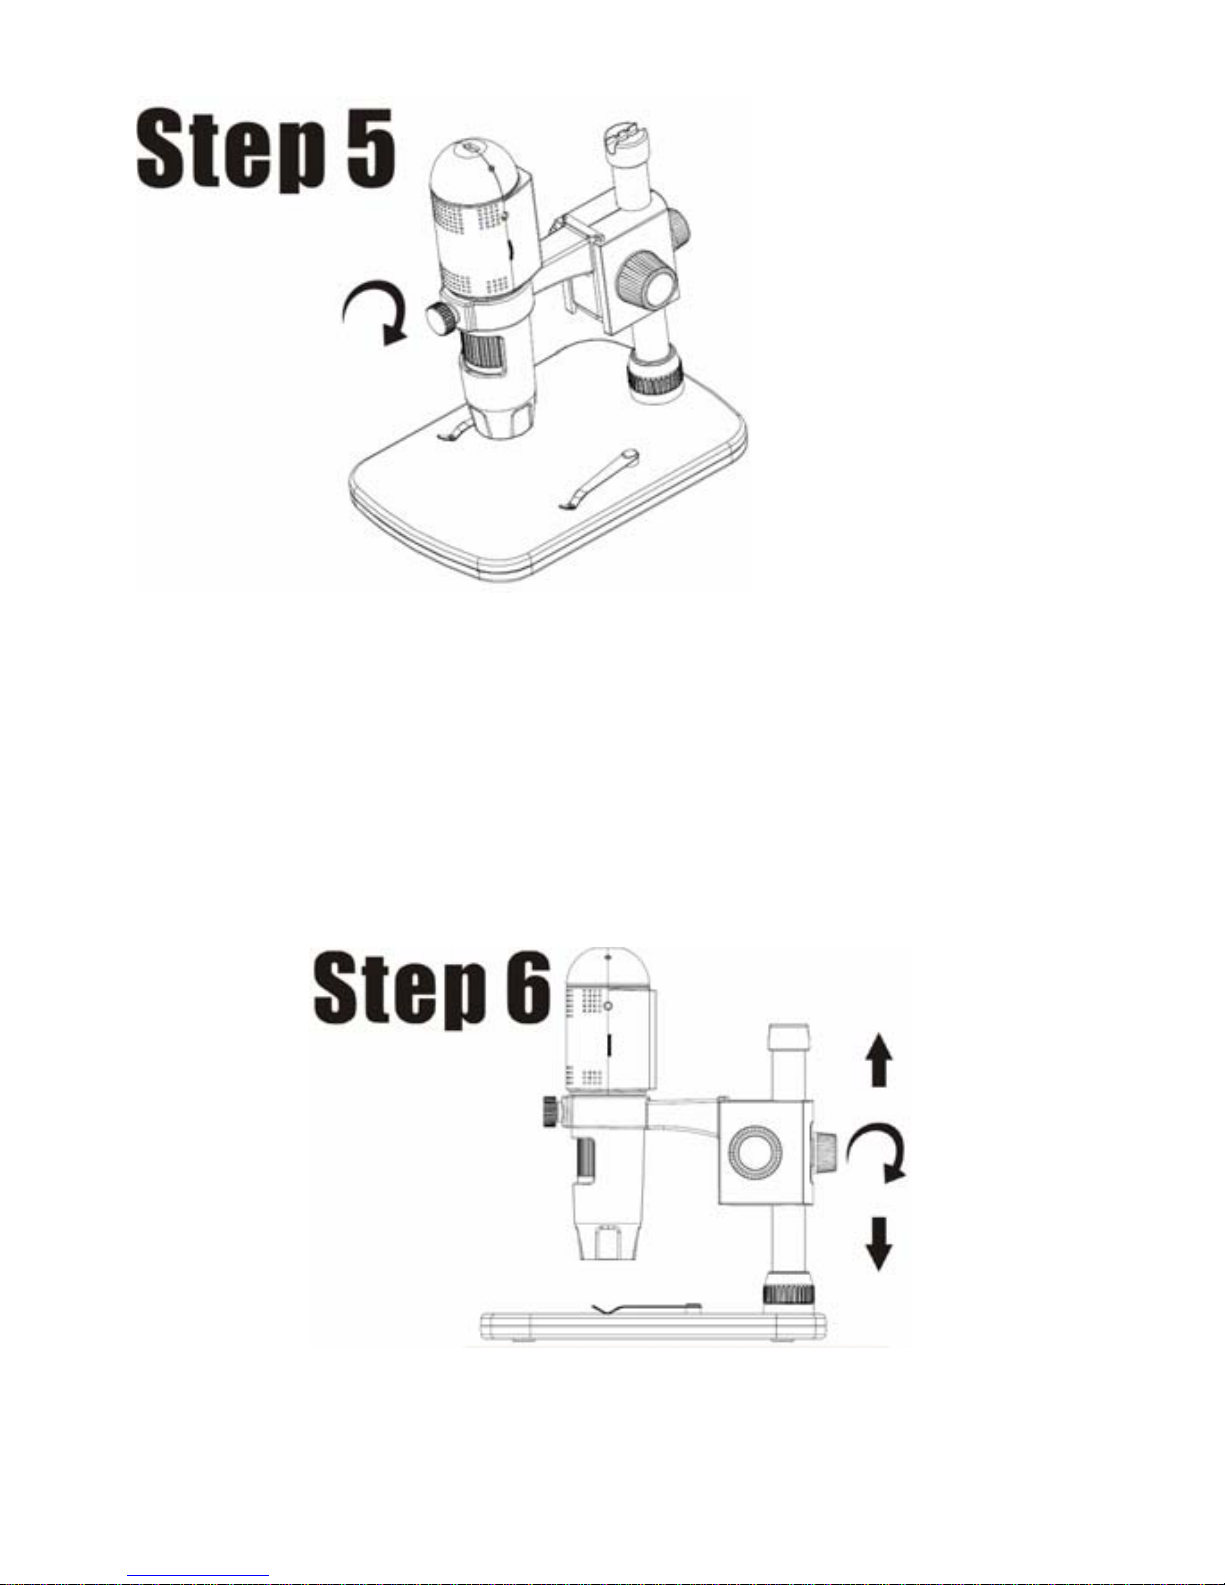
Rotate Wheel 10
to fix the pole
on the stage!
Put the
microscope into
the ring of the
stand!
Page 19
18
Rotate Wheel 11
clockwise to fix
the microscope
on the ring.
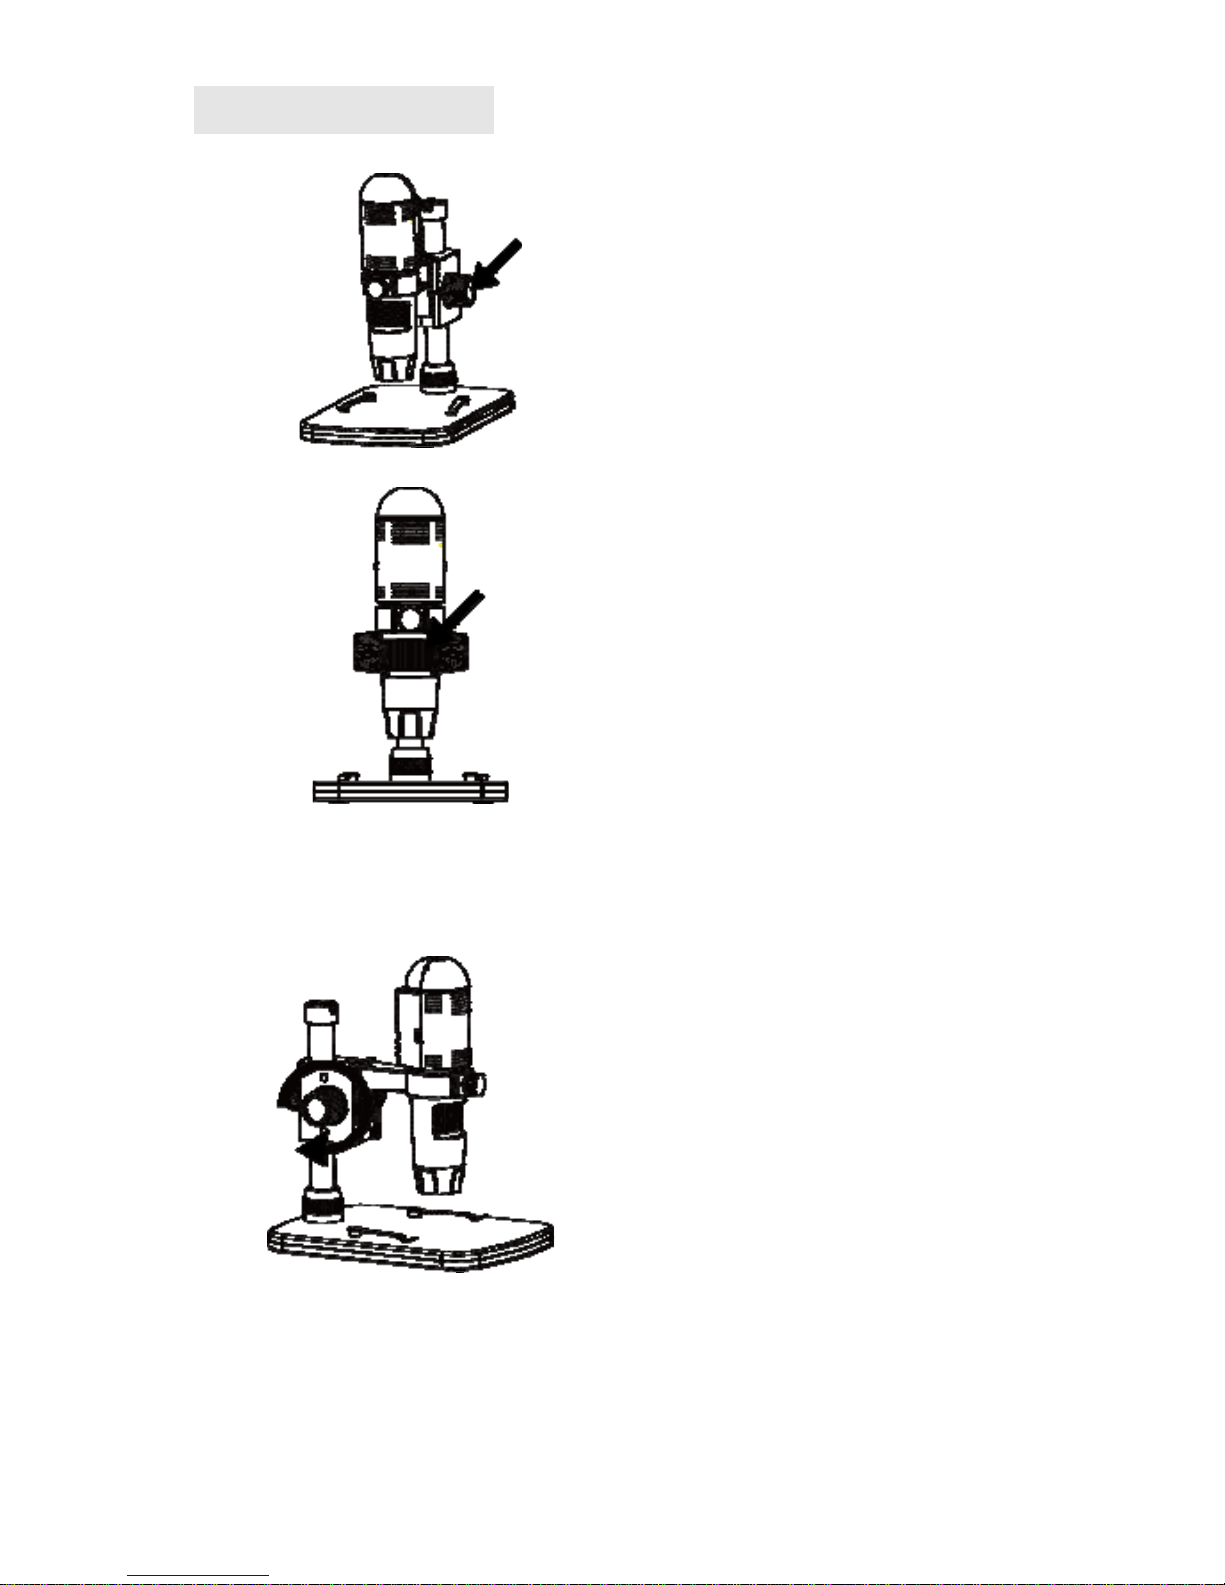
(1) Adjust the upper part of the stan d to get a proper
height.
(2) Rotate Wheel 9 clockwise to fix the upper part.
Page 20
19
4.How to get focus
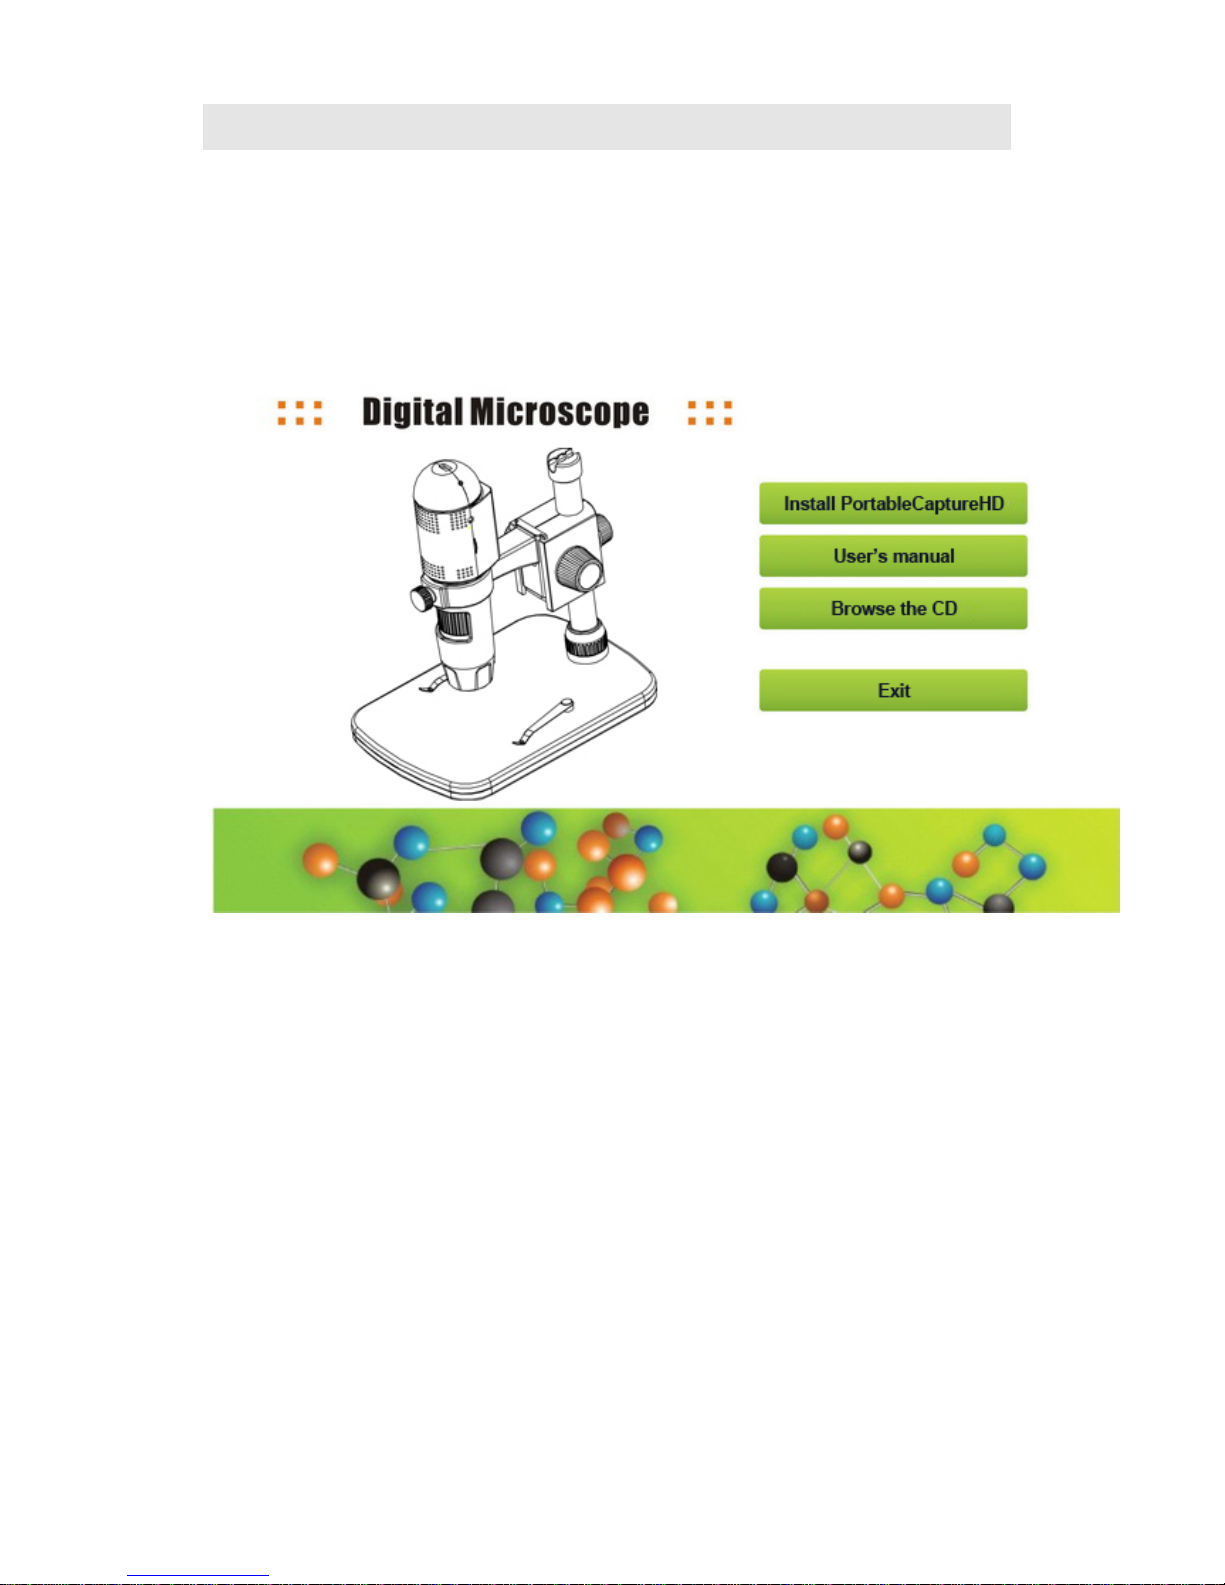
Rotate Wheel 8 to
get a rough focus!
Rotate Wheel 6 to
get a fine focus!
Rotate Wheel 7 to
lock or release the
movement!
Page 21
20
5. Install the Software on PC (Windows)
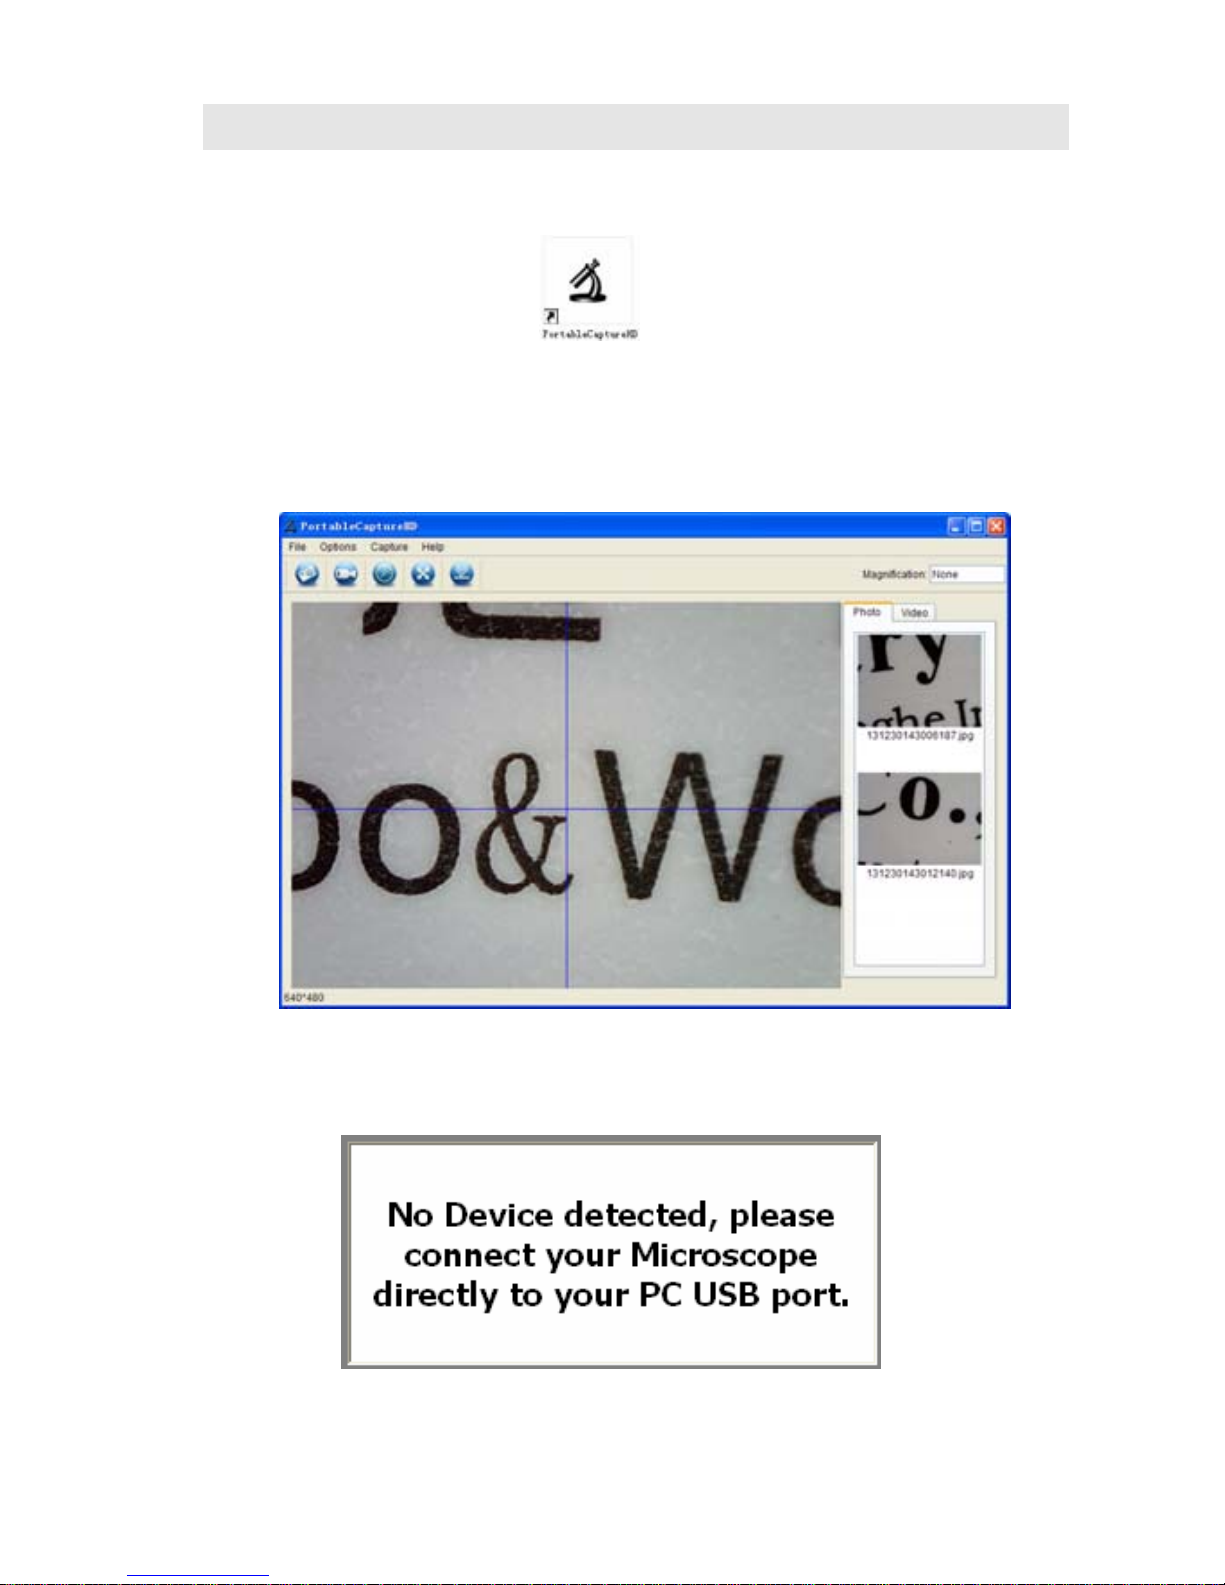
Insert the driver CD into CD-ROM Drive and this will
automatically display the following interface:
1) Install PortableCaptureHD
Click Install PortableCaptureHD and the installation
wizard will guide you through the whole process.
2) Full user’s manual can be viewed by clicking User’s
Manual.
Page 22
21
6. Start Microscope
Connect your Microscope to your PC USB port, start the
software by clicking the
icon generated on the
desktop after installation and you will see the following
screen pop up.
When the Microscope is disconnected from your PC
USB port, the following message will pop up.
Page 23
22
7. Software Functions
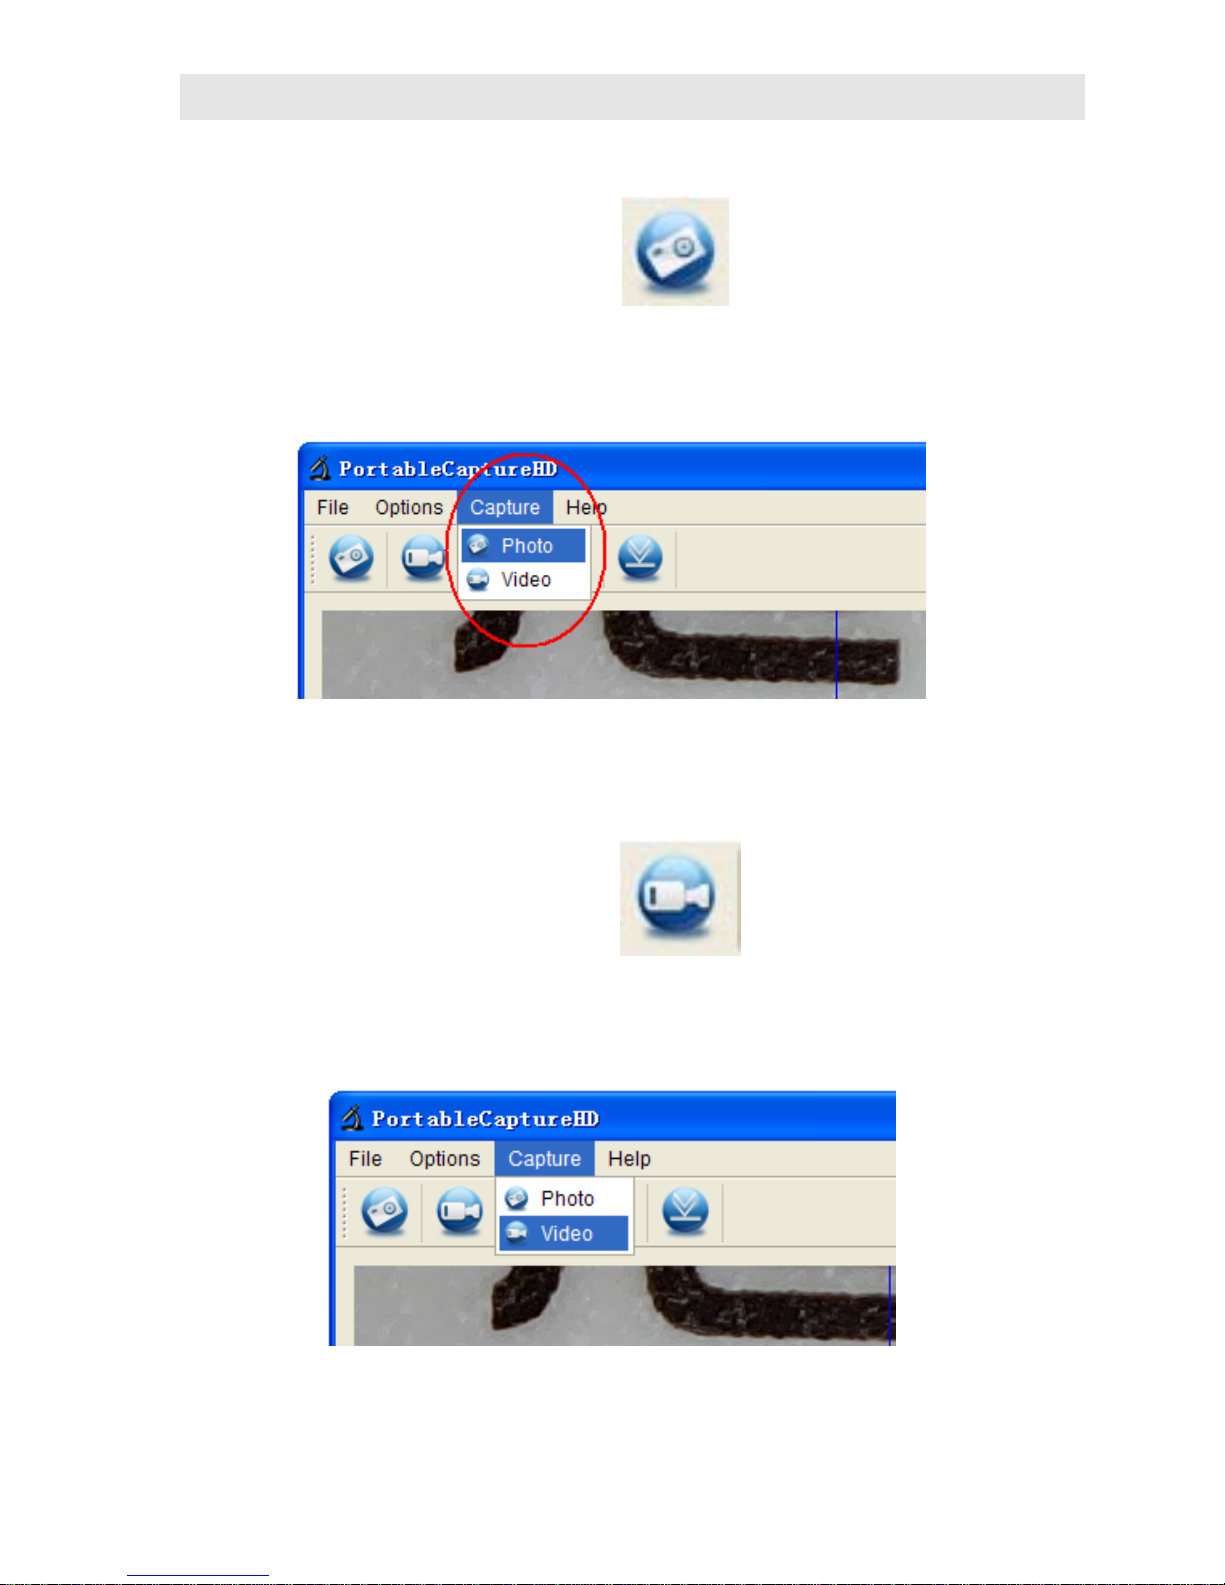
■ Capture Photo
a. Click ‘Photo’ shortcut icon
in the main menu
bar.
b. Click ‘Capture > Photo’.
■ Capture Video
a. Click ‘Video’ shortcut icon
in the main menu
bar.
b. Click ‘Capture > Video’.
Page 24
23
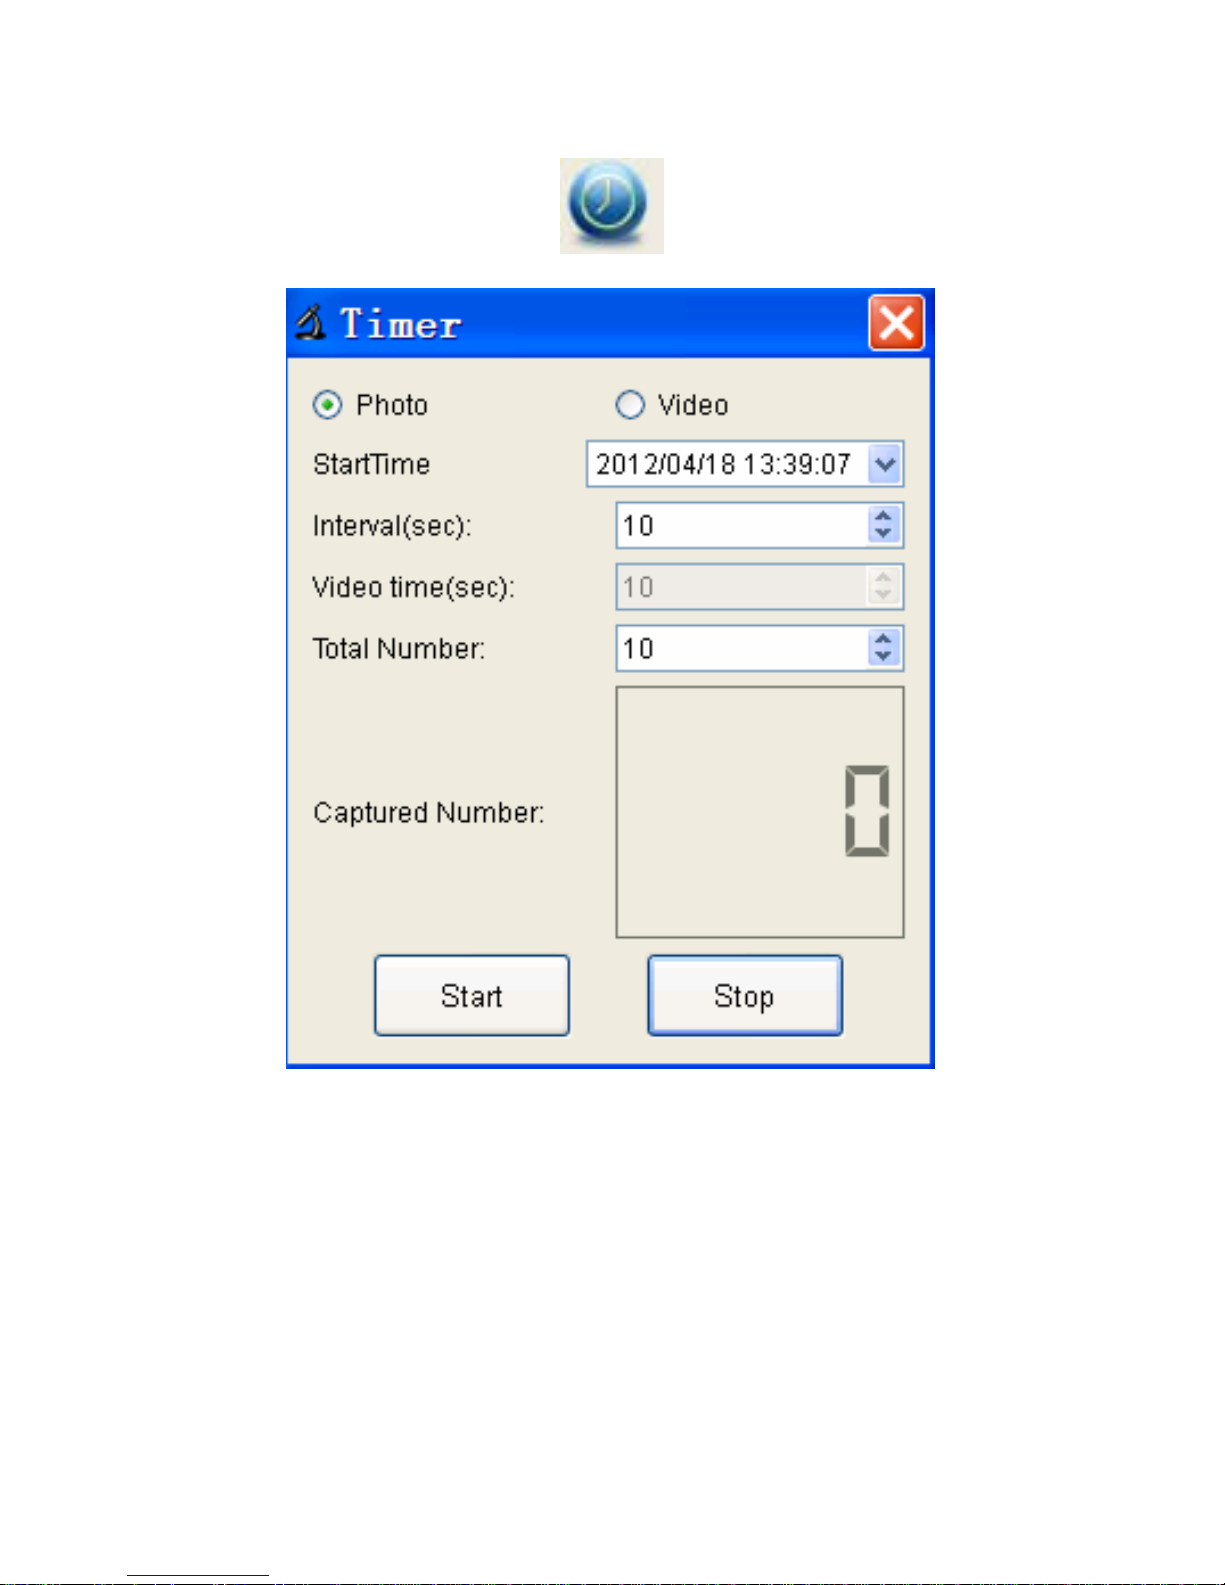
■ Timer (Photo / Video)
Click ‘Timer’ shortcut icon
in the main menu bar.
* Under Timer photo, you can set the start time, interval
time and total picture number.
* Under Timer video, you can set the start time, interval
time and total video number.
Page 25
24
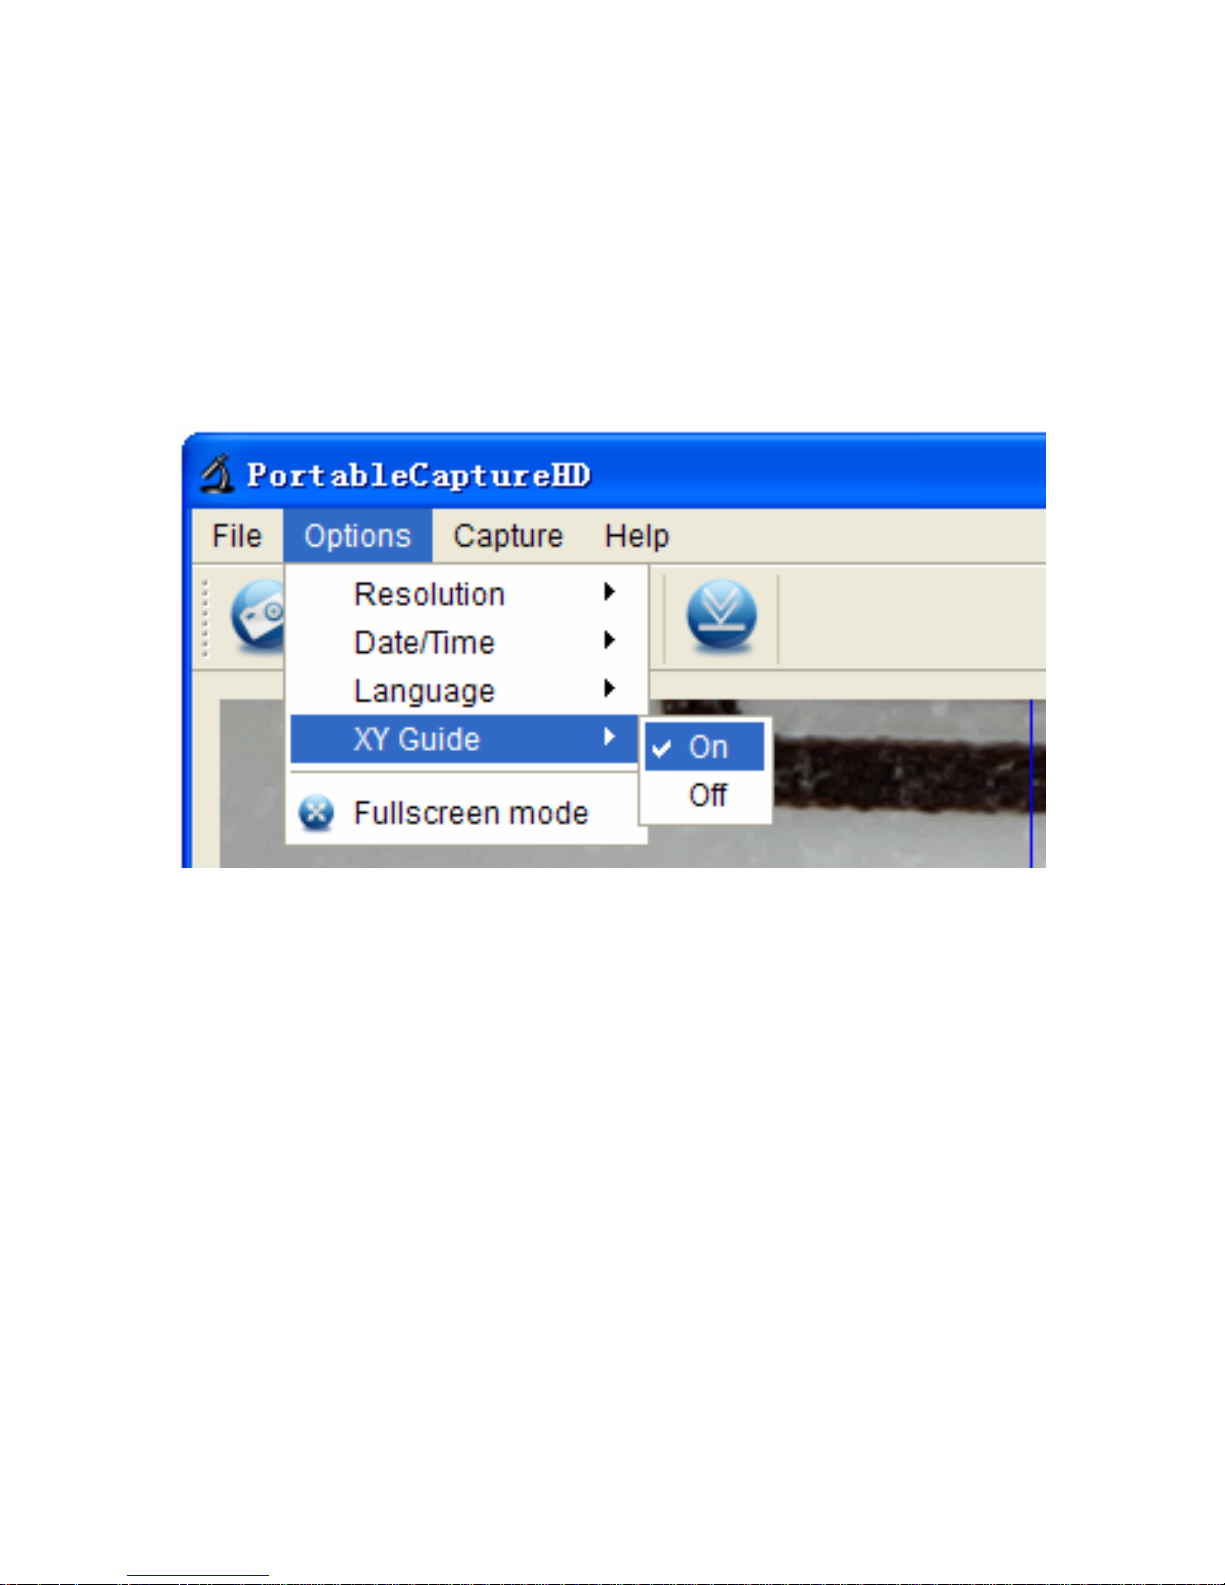
■ Calibration and Measure ment
Please make calibration before measurement.
Calibration
Display Crossing from ‘Options>Crossing’’.
Microscope default at crossing “on”
It’s used to check the dial on the calibration ruler.
Page 26
25
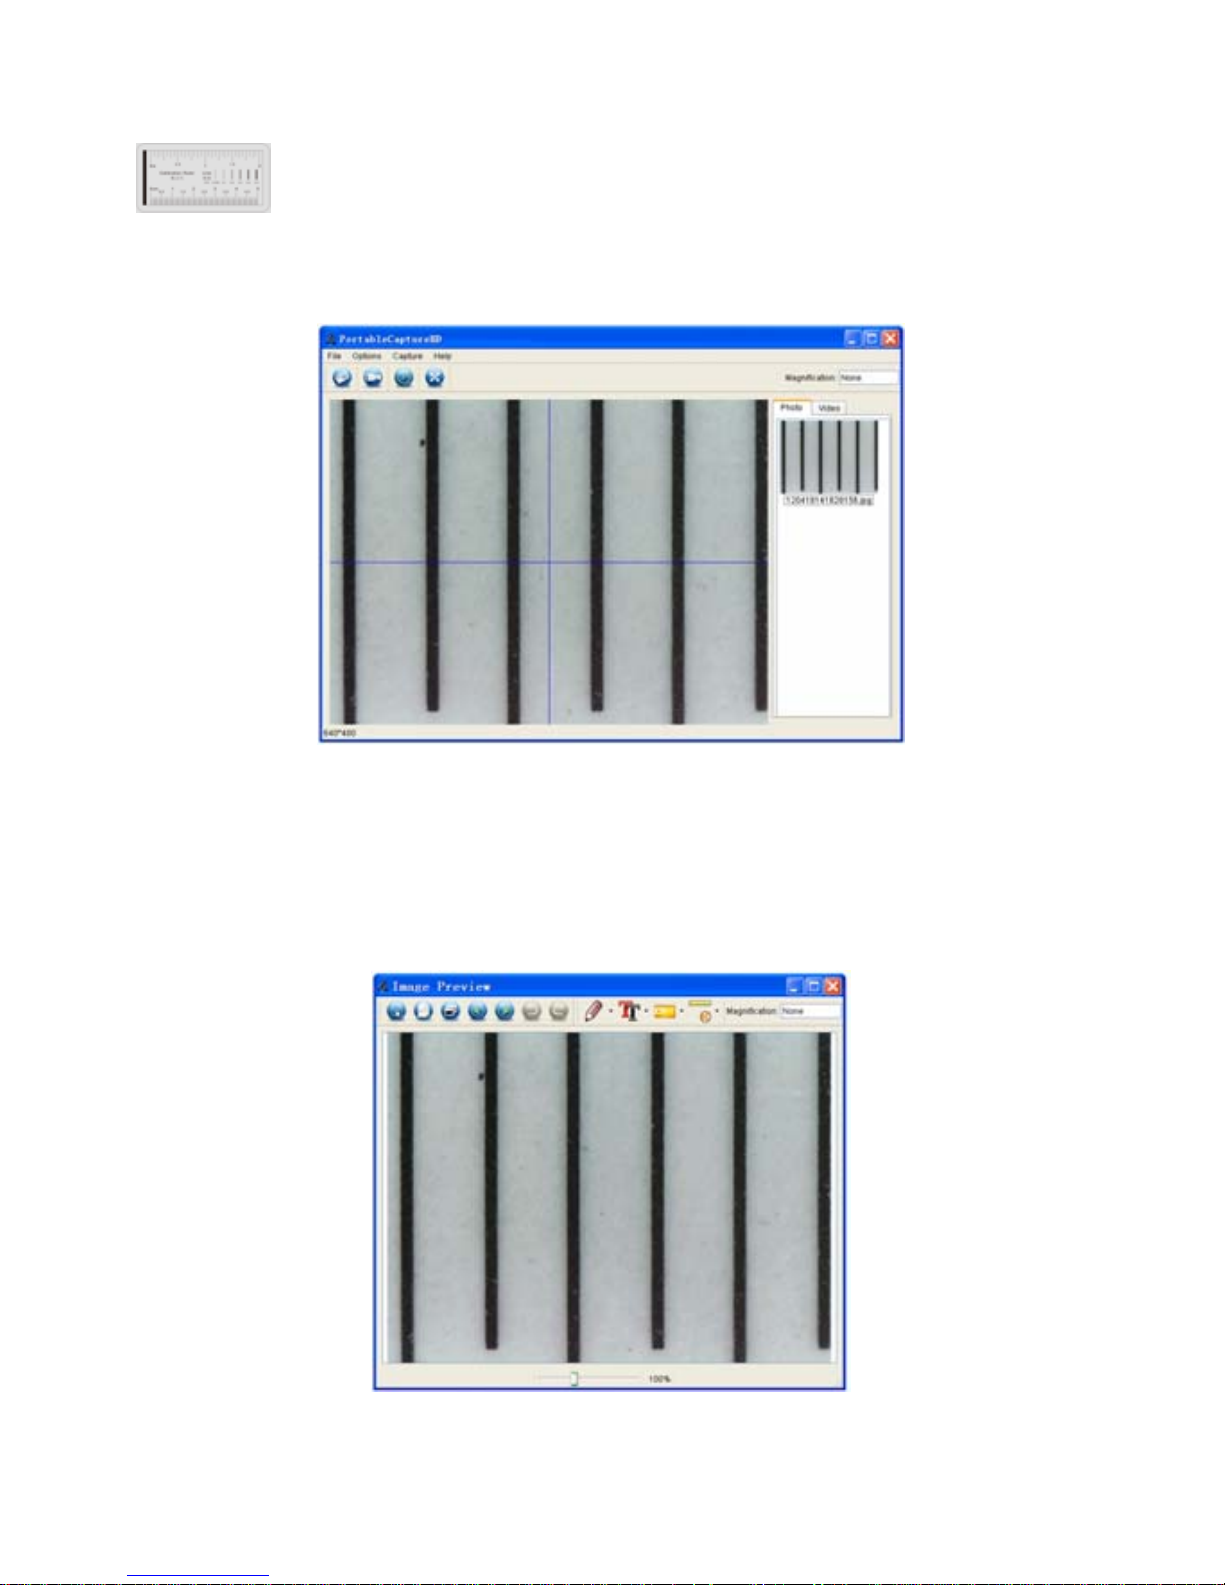
1. Focus microscope on the attached calibration rule r
and then adjust the magnification till the picture
is clear. Take a picture for the selected area when the
dial is parallel to the crossing as belo w.
2. Double-click on the picture to enter into measurement
interface as below.
Page 27
26
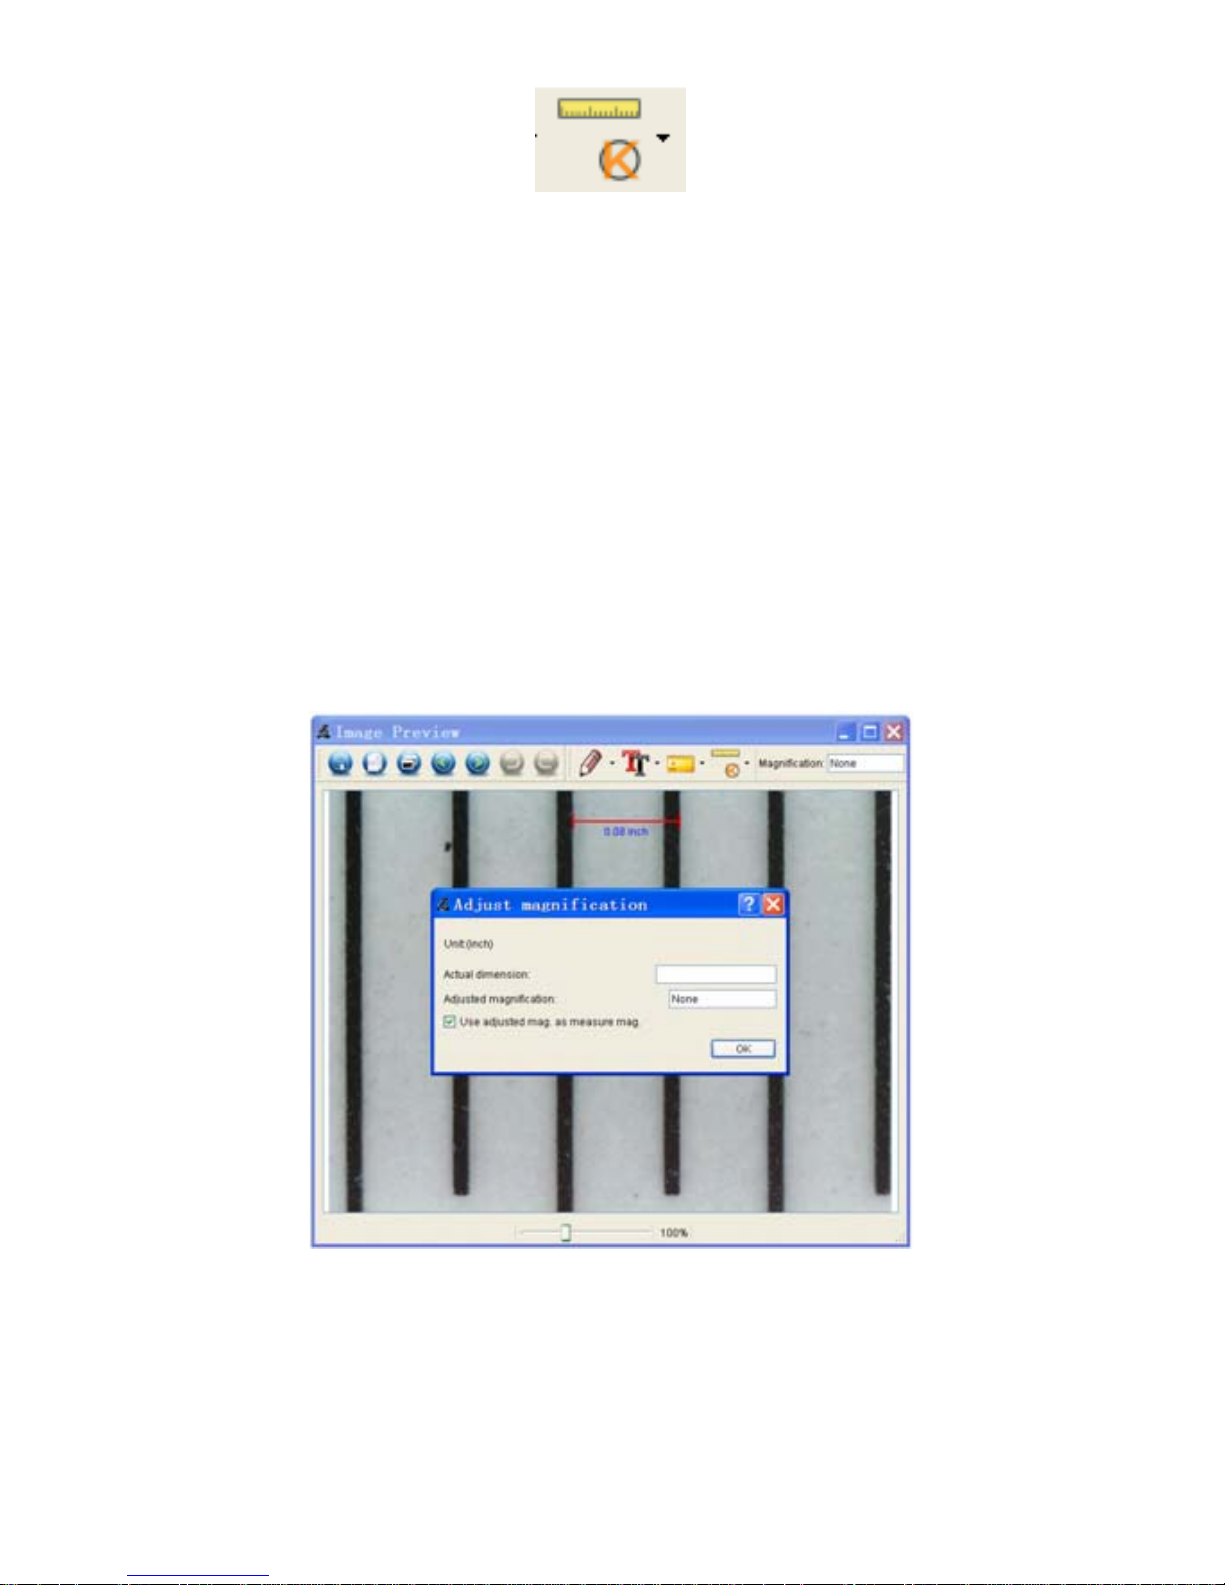
3. Click Calibration icon , and then move mouse
to the picture. Click on the beginning a nd ending points
across a known value. Now a dialog will popup as below
and you need to enter the exact value of the
measurement sample into ‘Actual dimension’.
Then the software will automatically calibrate the
magnification rate. Click ‘OK’ and the adjusted
magnification rate will show in the upper right corner.
* Remark: The measured line should be paralleled.
Page 28
27
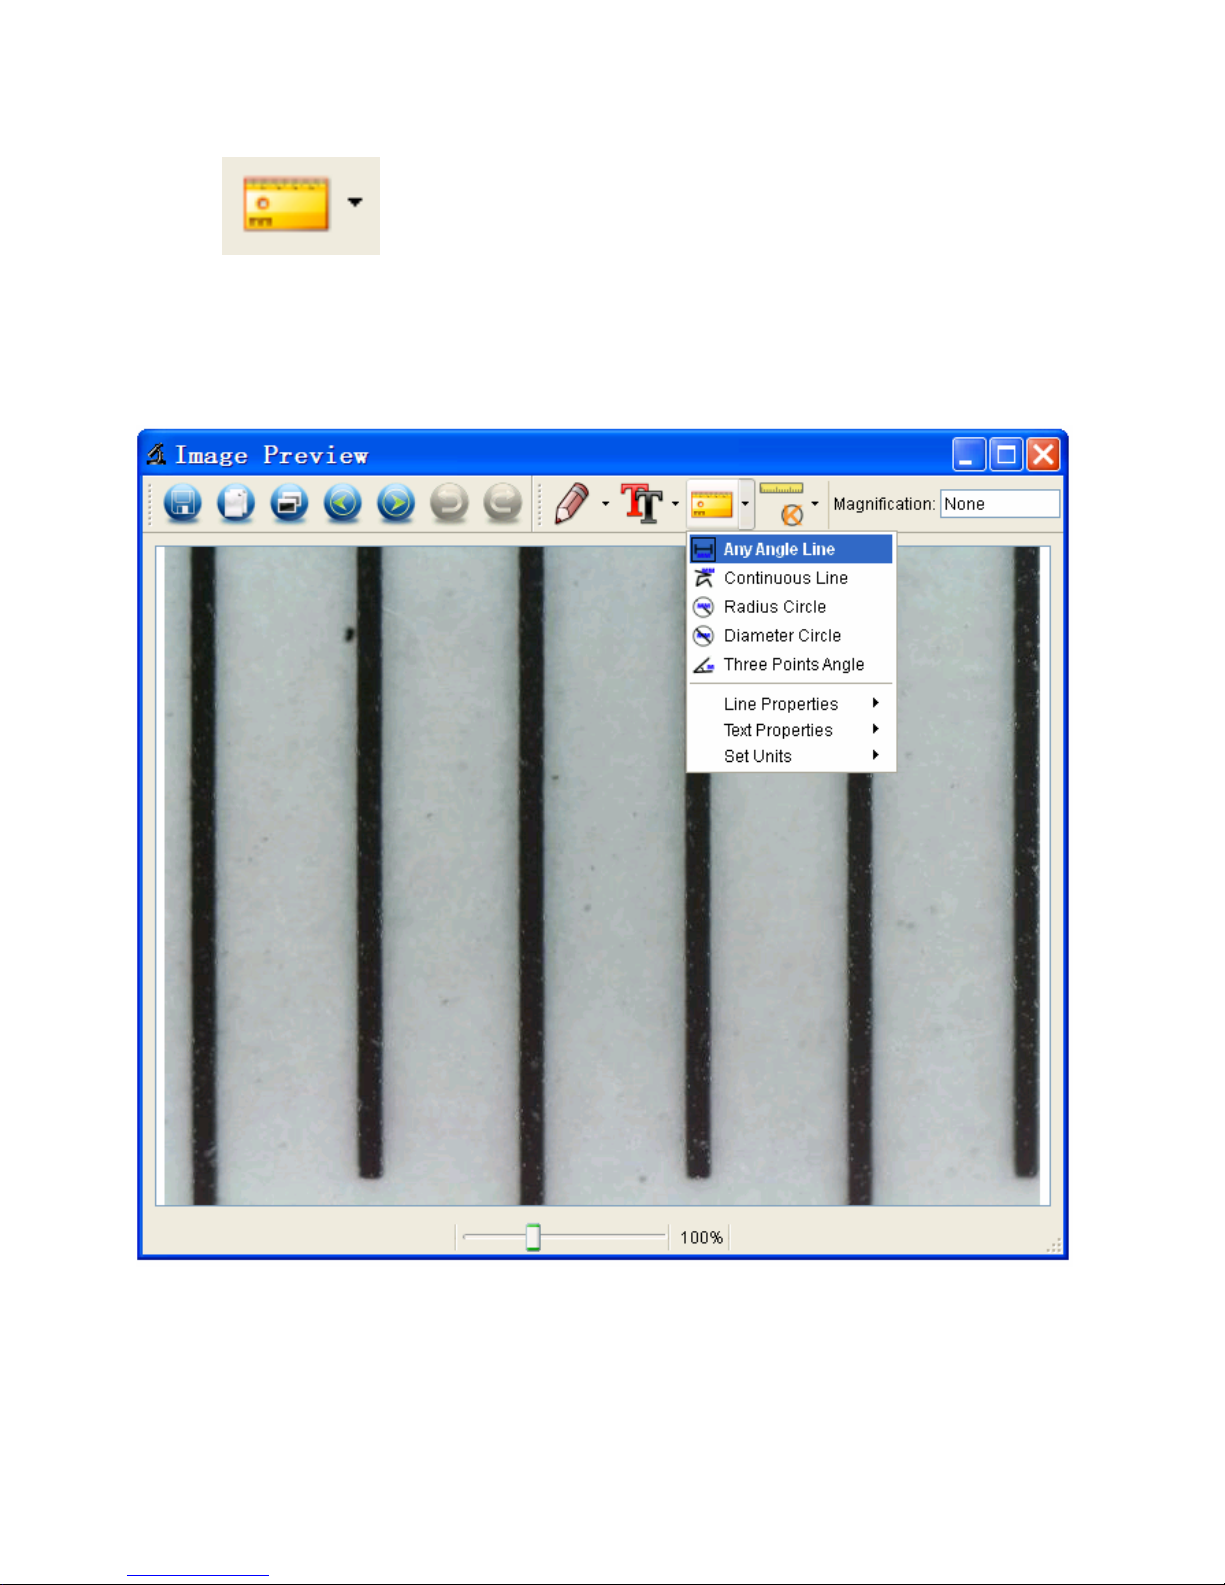
4. Now you can use ‘Any angle Line’ under Measurement
icon
to measure the value again. If the value
you measure by software is nearly the same as the exact
value of the dial means the calibration finish.
Page 29

28
Measurement
Double-click on the picture to enter into measurement
interface. Under the ‘Measurement’ icon
, you can
choose any desired options to measure.
1. Any Angle Line Measurement
Simply click from one point and drag to the next point, and
then release the click.
2. Continuous Line Measurement
The Continuous Line measurement allo ws you to
measure any continuous desired length.
Simply click and drag from one point to other desired
points, and then release the click.
3. Radius Circle Measurement
Simply click and extend out to the desired radius, the
radius, circumference and area of the circle will show up
accordingly.
4. Diameter Circle Measurement
Simply click and extend out to the desired diameter, the
diameter, circumference and area of the circle will show
up accordingly.
5. Three Points Angle Measurement
Simply define any three points angle and click, the angle
value will then display.
Page 30
29
Change Calibration
If you need to change the magnification rate and adjust
focus to capture picture, please calibrat e the
magnification rate again.
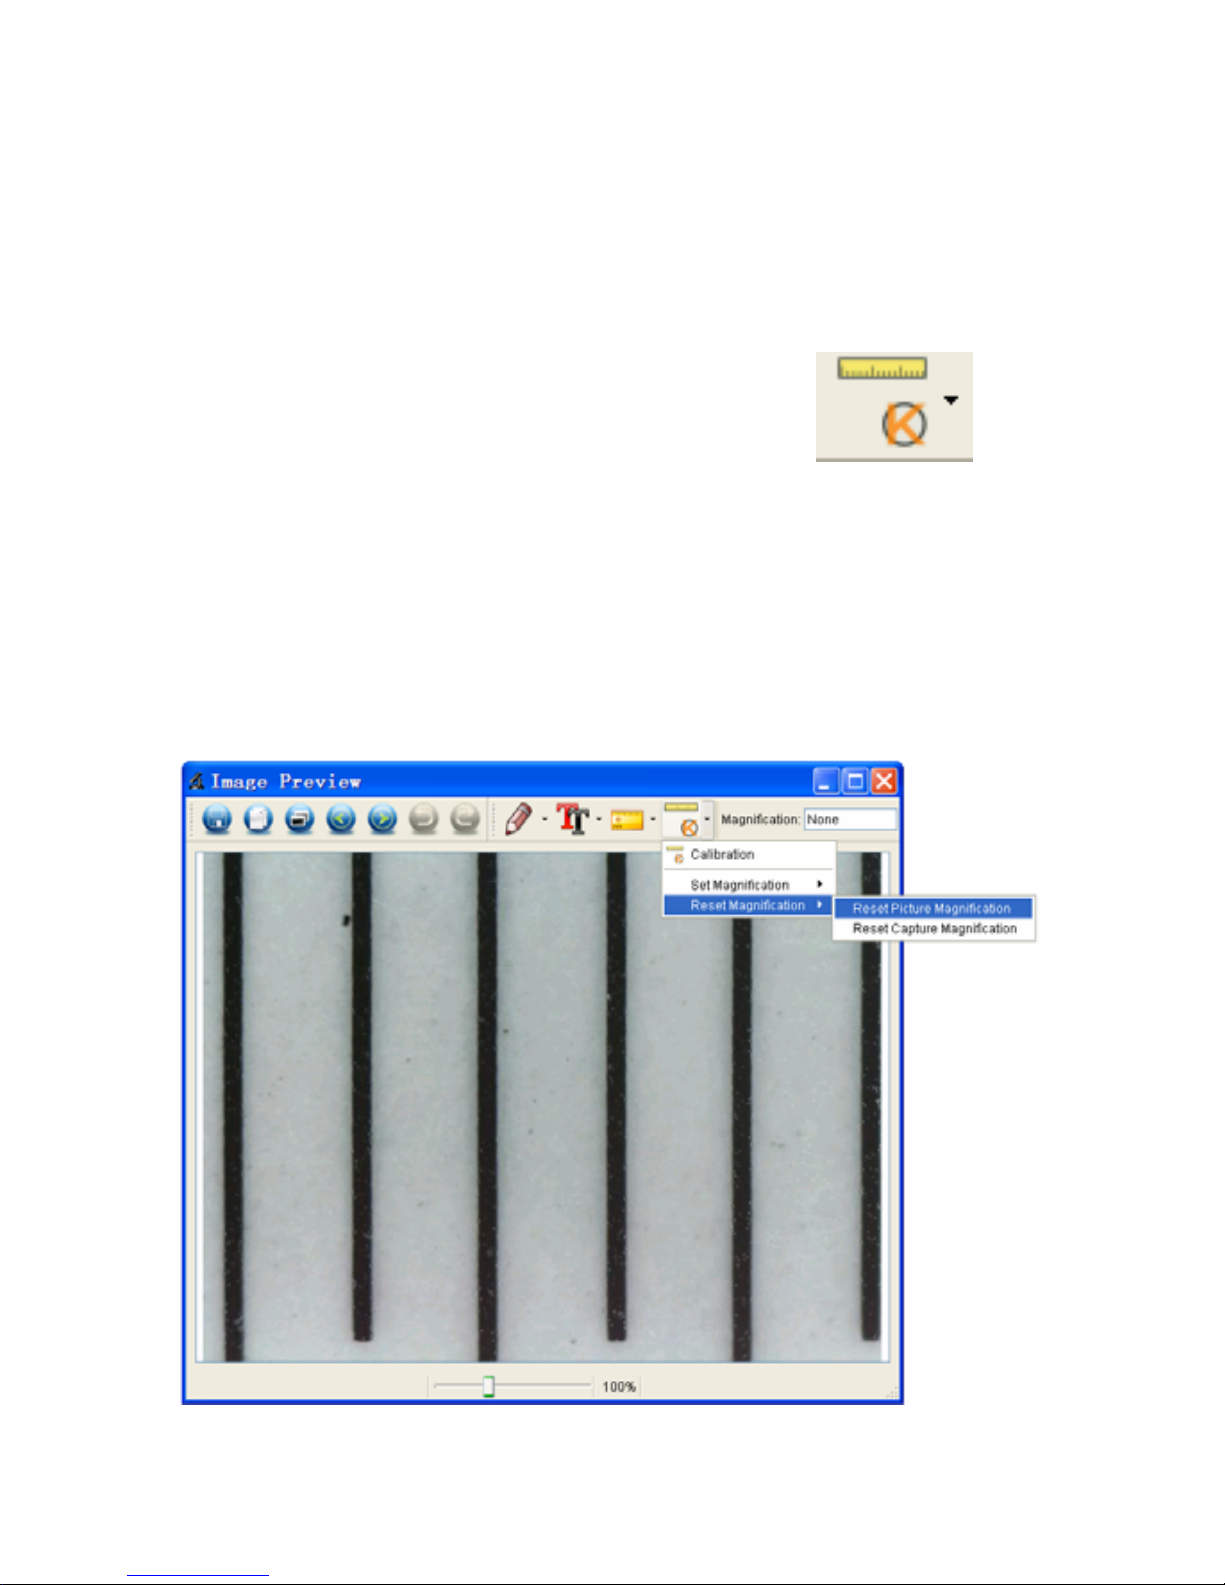
1. Double click to open the picture, Click ‘
>
Reset magnification > Reset picture magnification’ as
below. And then start calibration again (Calibration details
please refer to page37).
Page 31
30
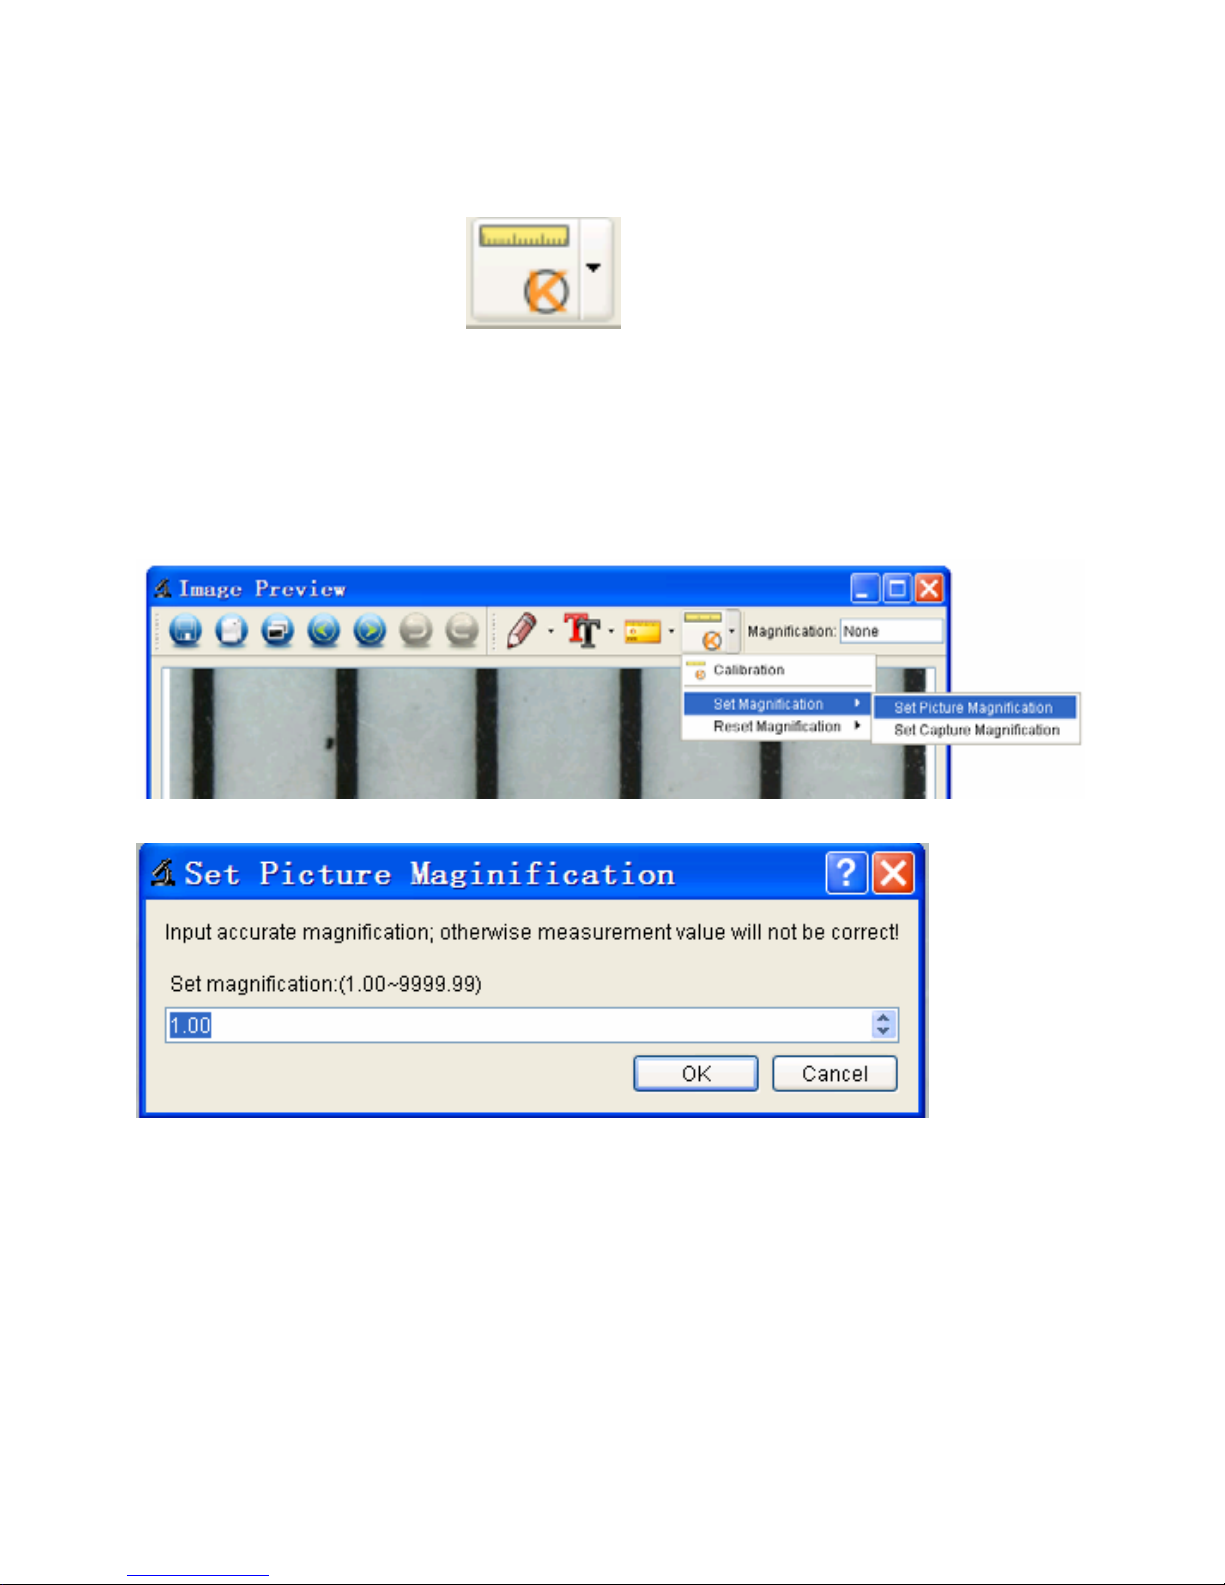
2. Change the magnification rate and capture several
pictures, click on the picture to enter into measurement
interface. And click ‘
> Set magnification > Set
picture magnification’, now a dialog will show up as below;
enter the magnification rate into the dialog and click ‘ OK’.
Page 32
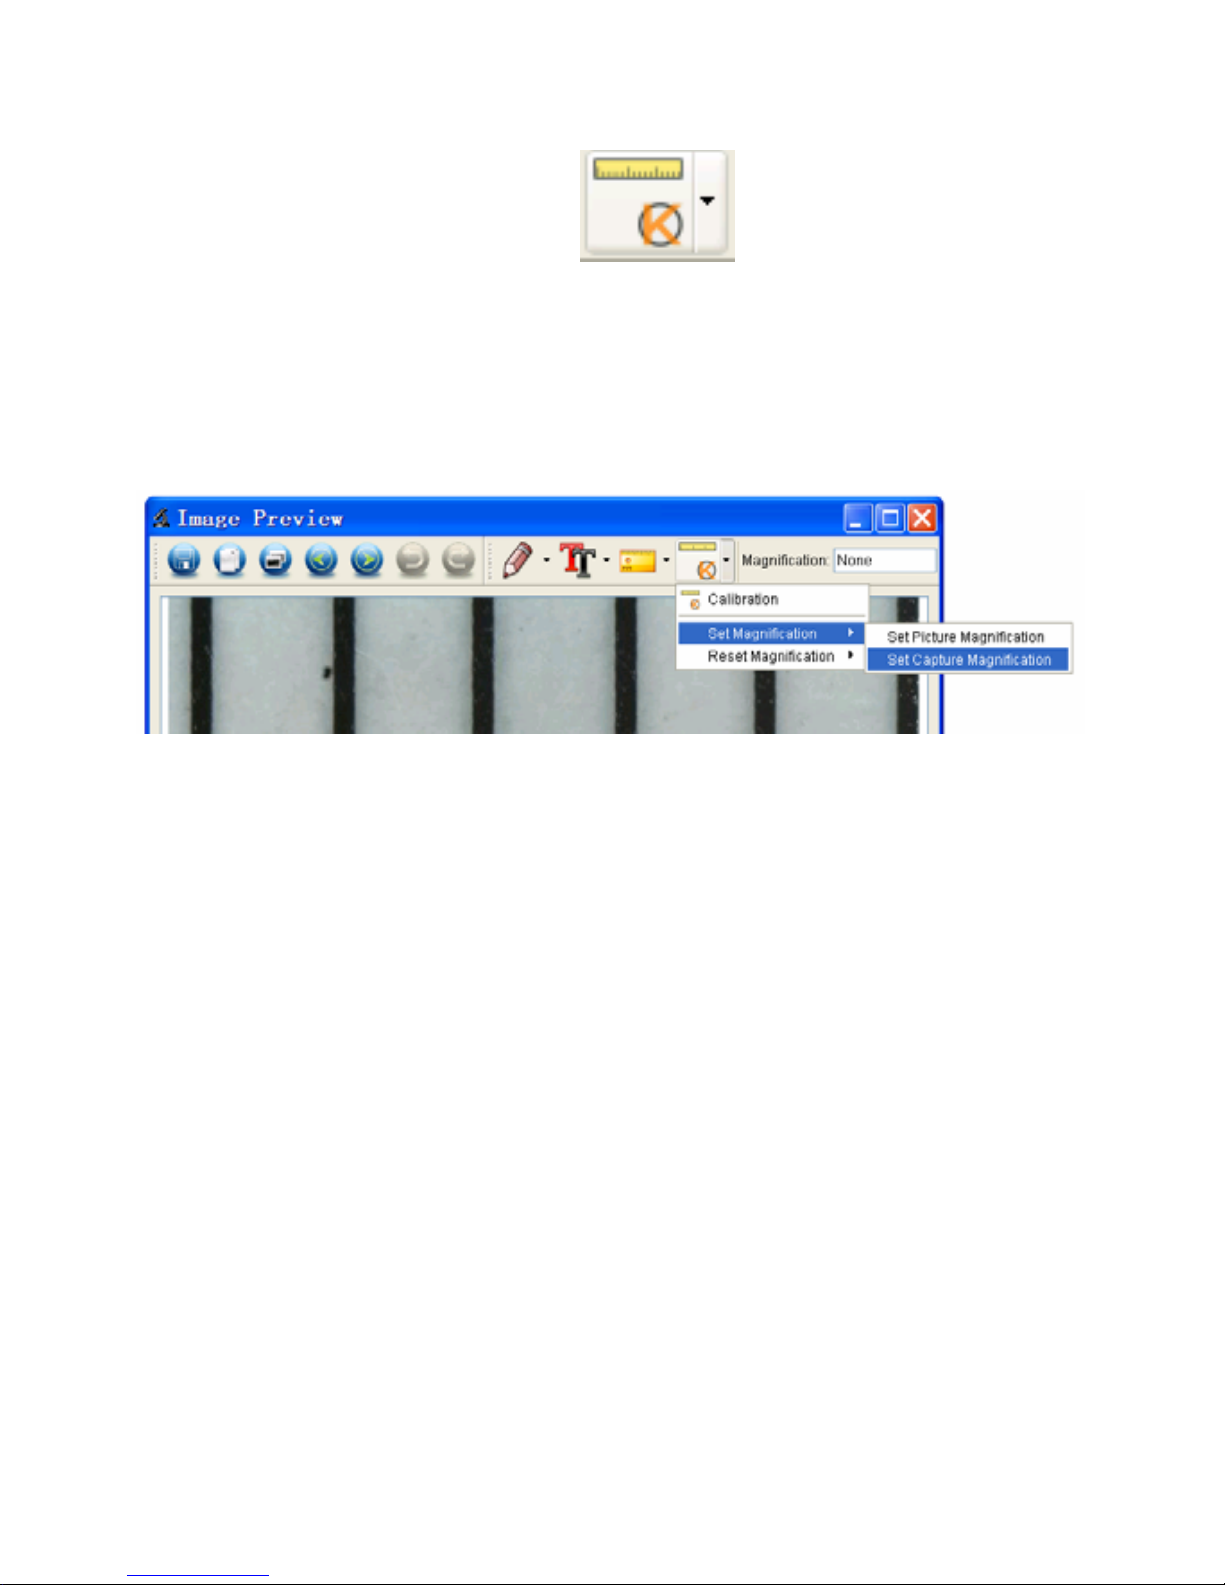
31
3. If you want to use the same magnification rate to
capture pictures, just click ‘
> Set magnification
>Set capture magnification’. Now all pictures will use the
same magnification rate and you can start measurement
directly.
Page 33
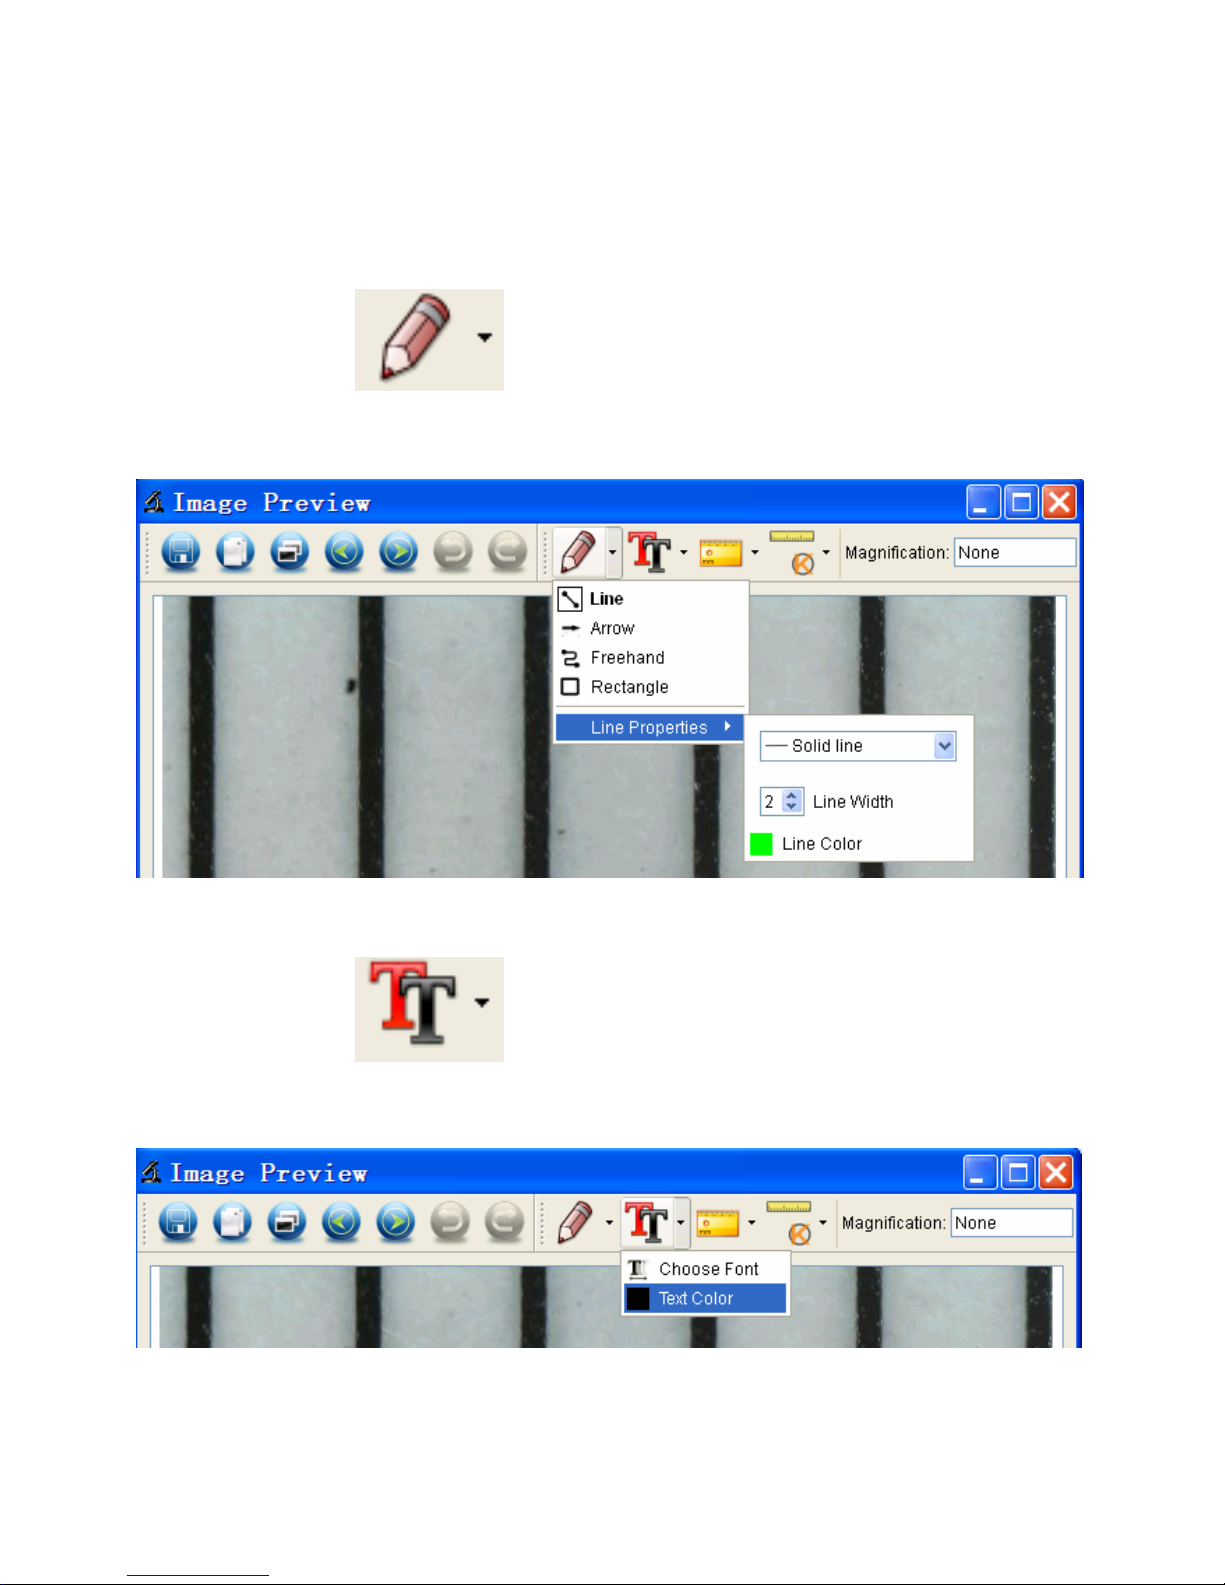
32
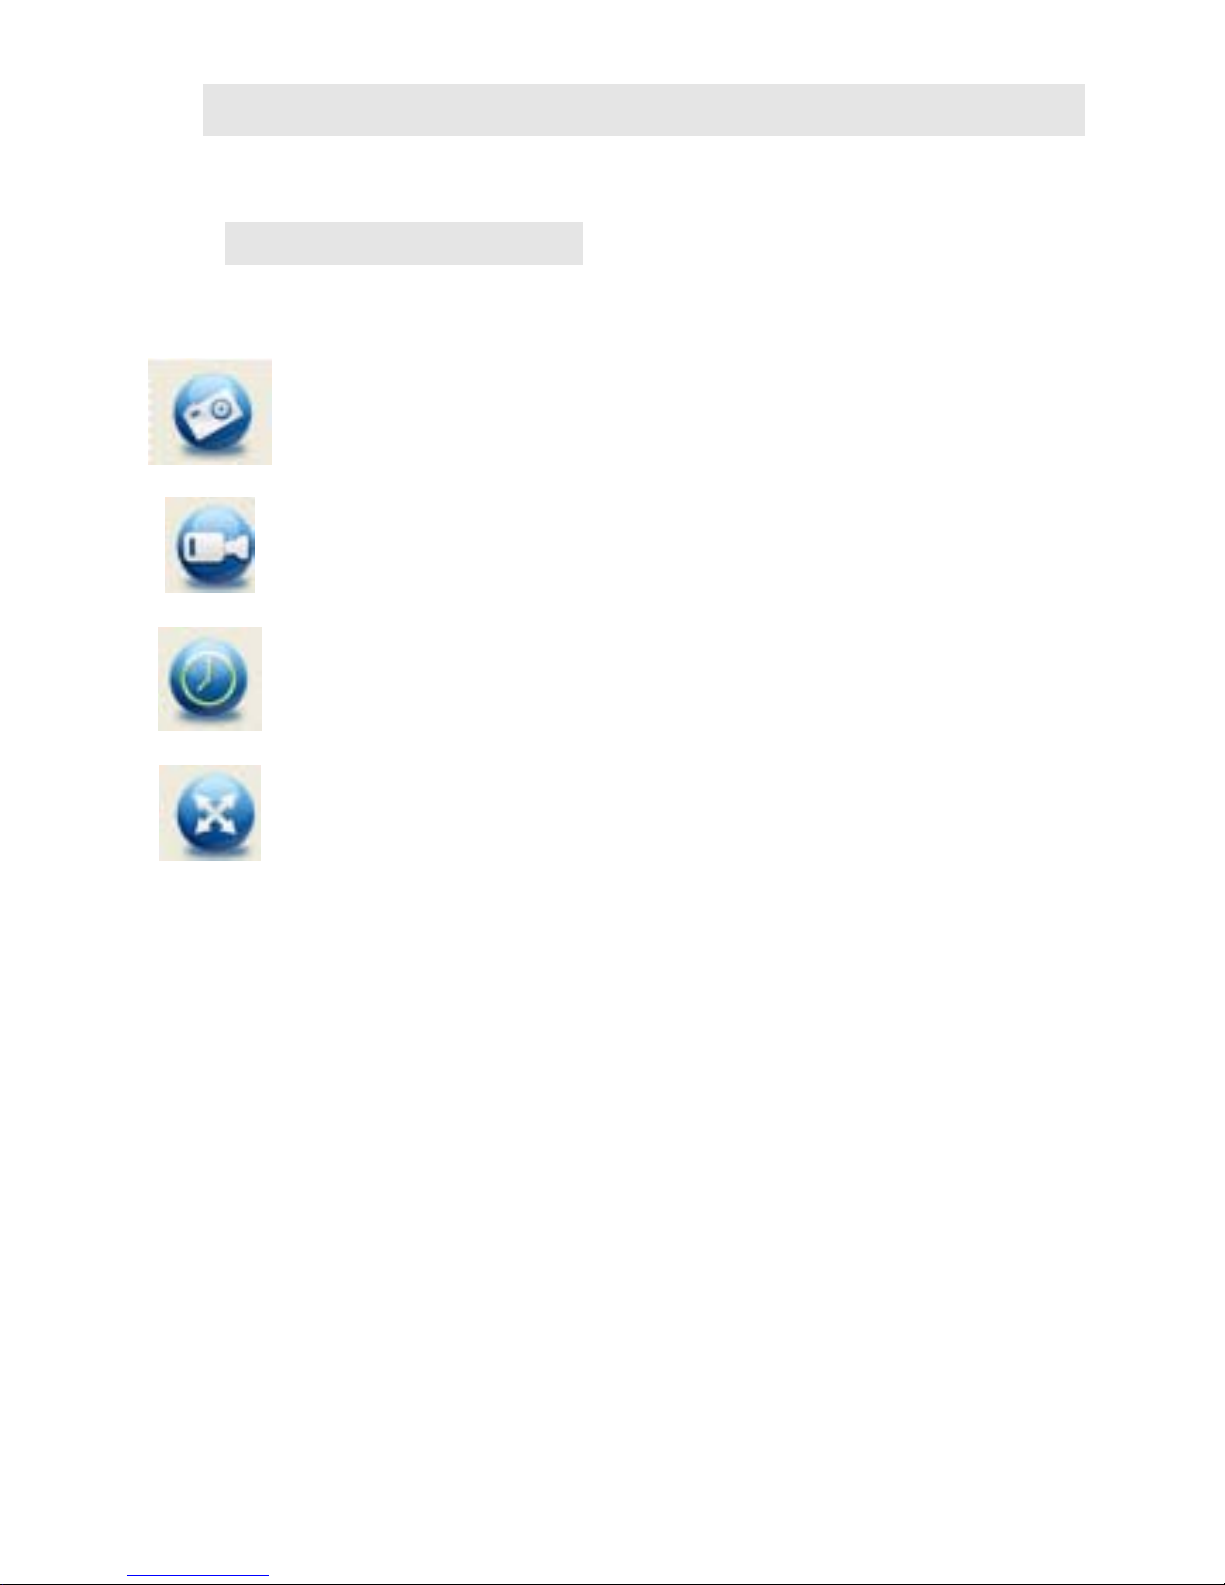
Draw and Text
You can draw or add a text on the picture and save for
later analysis.
1. Click icon
to choose any kinds of drawing
under the pull-down manual as below.
2. Click icon
and set the font for the text in the
popup dialogue as below.
Page 34
33
8. Software Interface Instructions
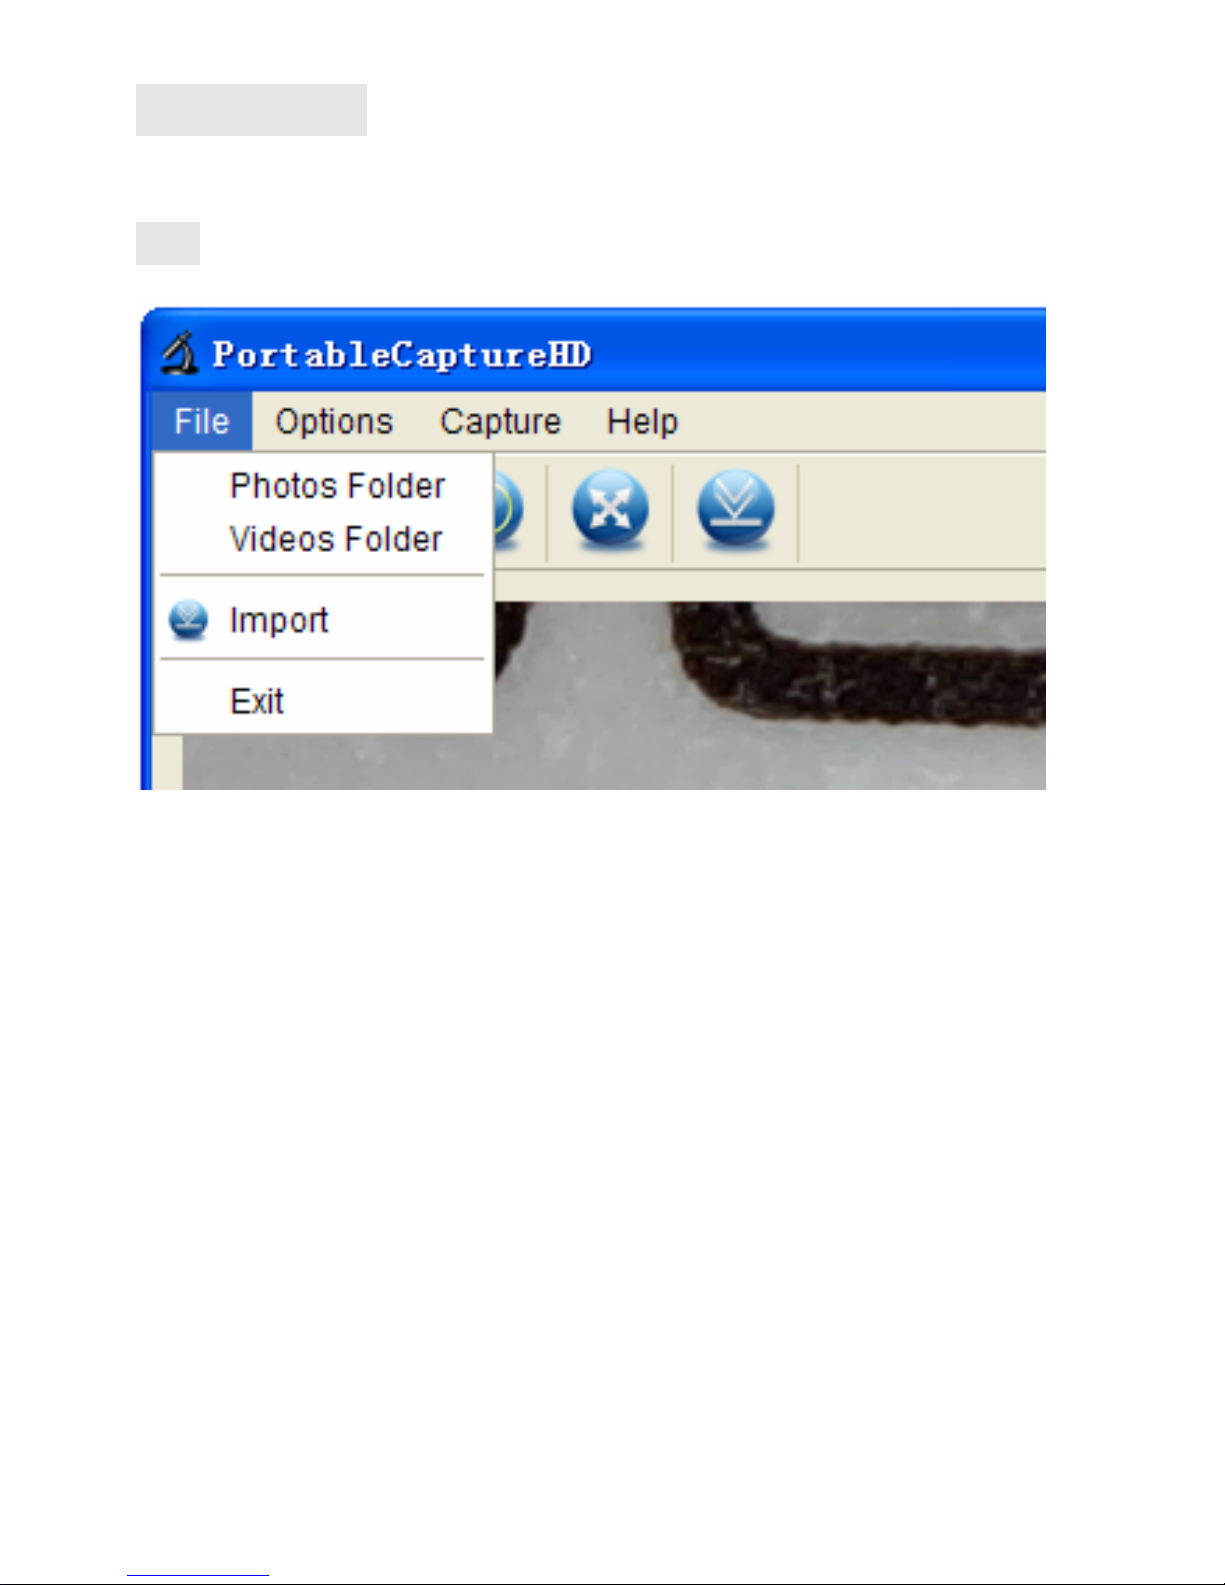
Main Interface Icons
Capture photo – It’s used to capture pho to one
by one.
Start / Stop record video.
Timer for photo / video – Set the start time,
interval time and total photo/video number.
Full screen mode,
Press ESC or double-click to exit.
Page 35
34
Main Menu
File
Photos Directory: set the directo ry to store photos
taken;
Videos Directory: set the directory to store video taken;
Page 36
35
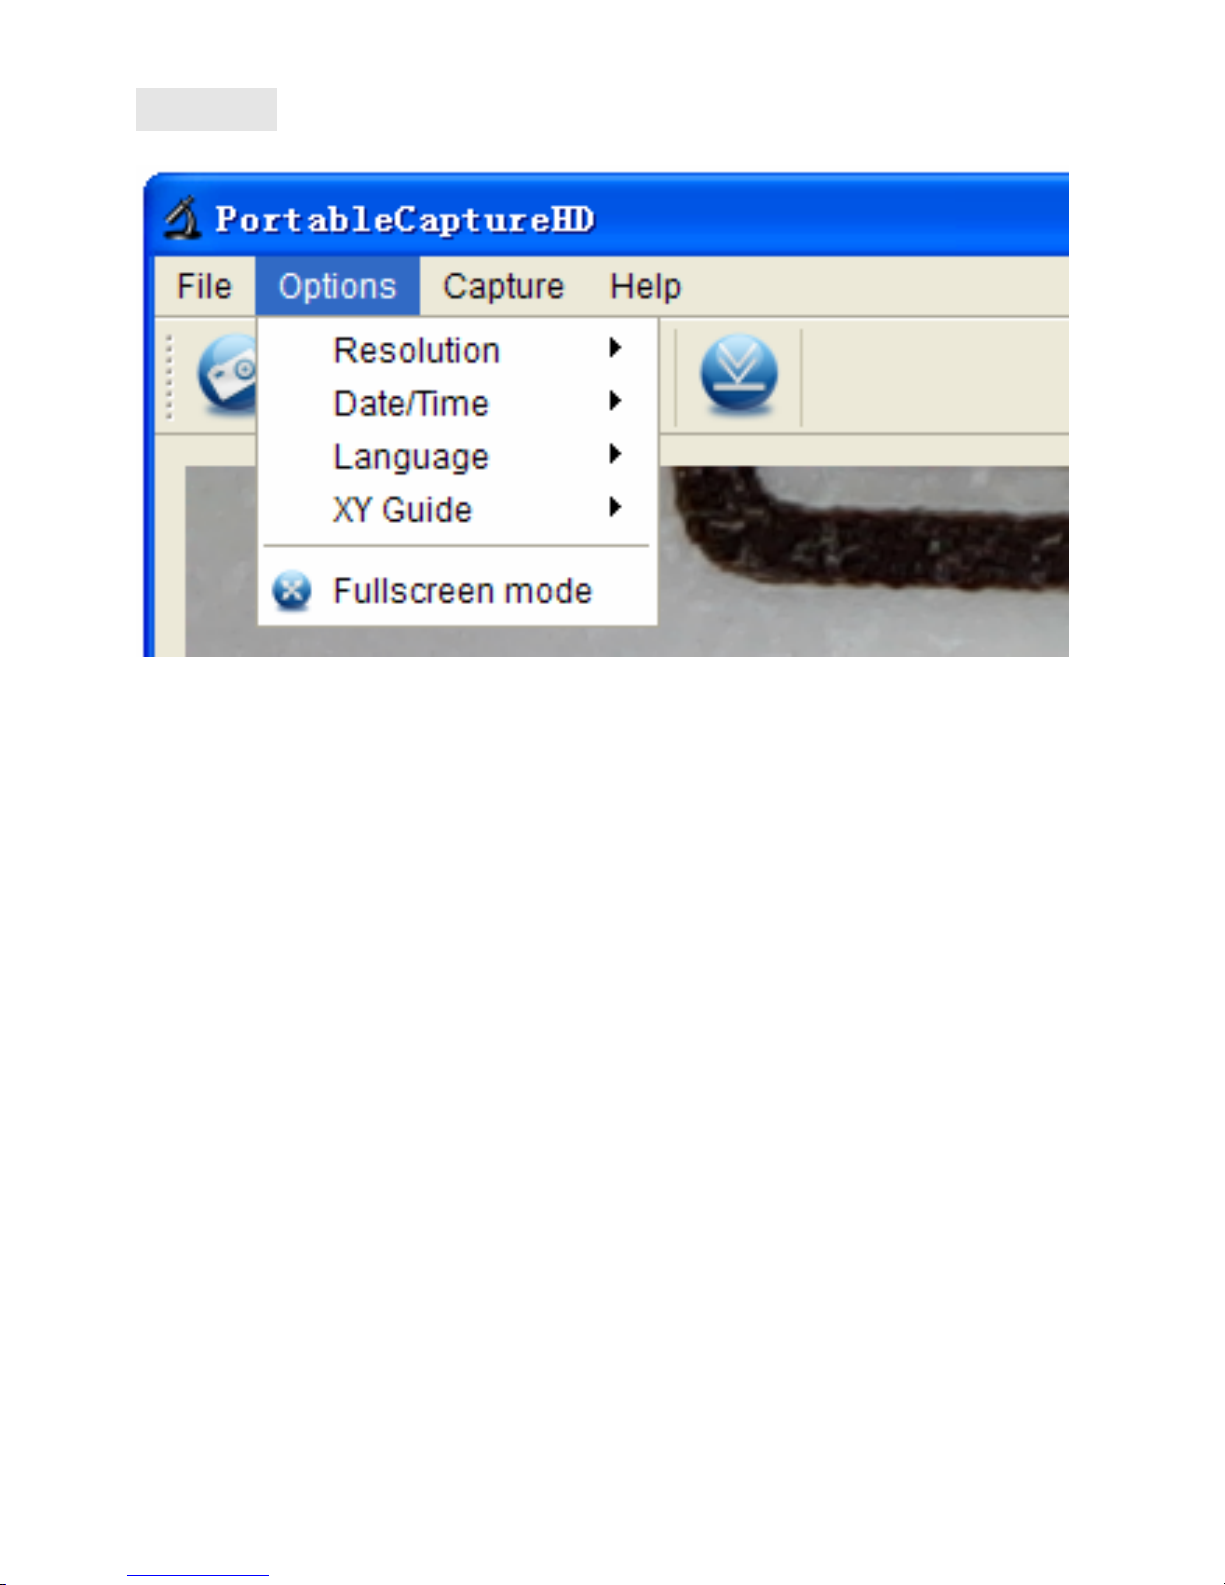
Options
Resolution: change preview size
Date/Time: set to display system date/time on preview
window
Language: choose different OSD language
Crossing: display cross on preview window
Full-screen mode: enter into full screen. Click ESC or
double click to exit
Page 37
36
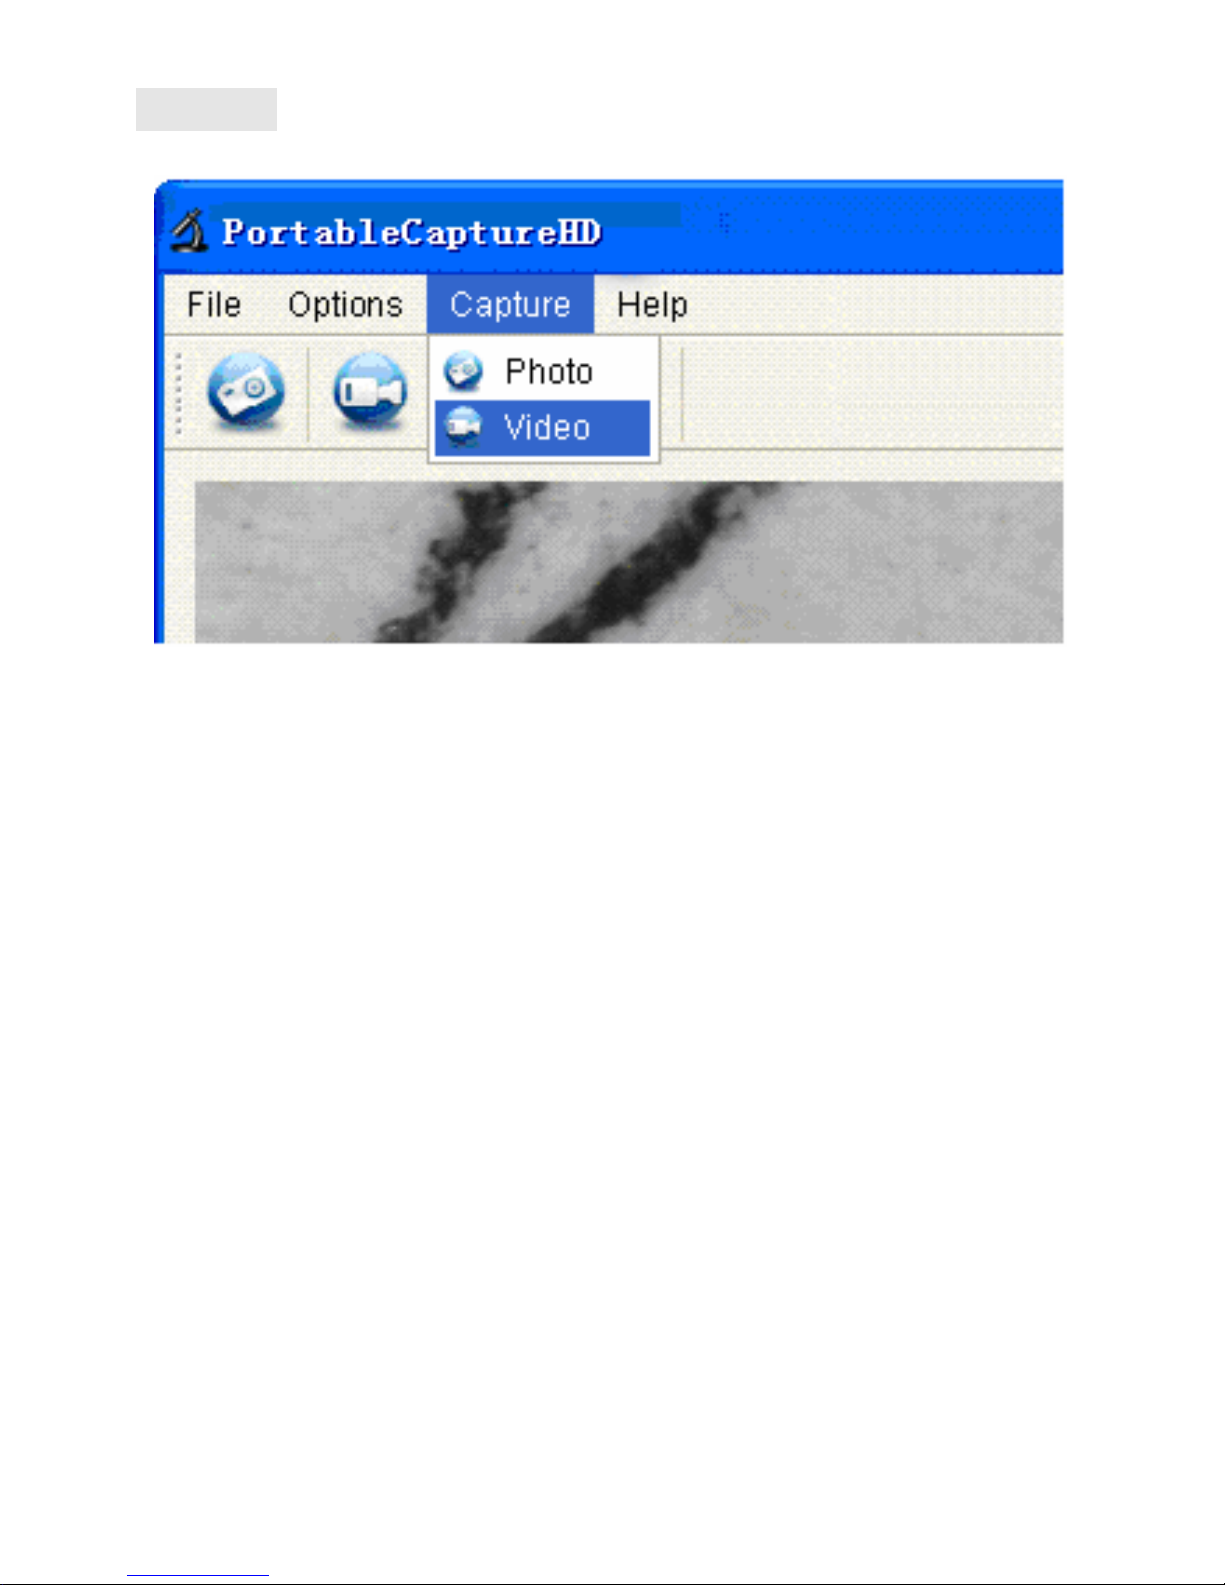
Capture
Photo: take a photo
Video: record a video clip
Page 38
37
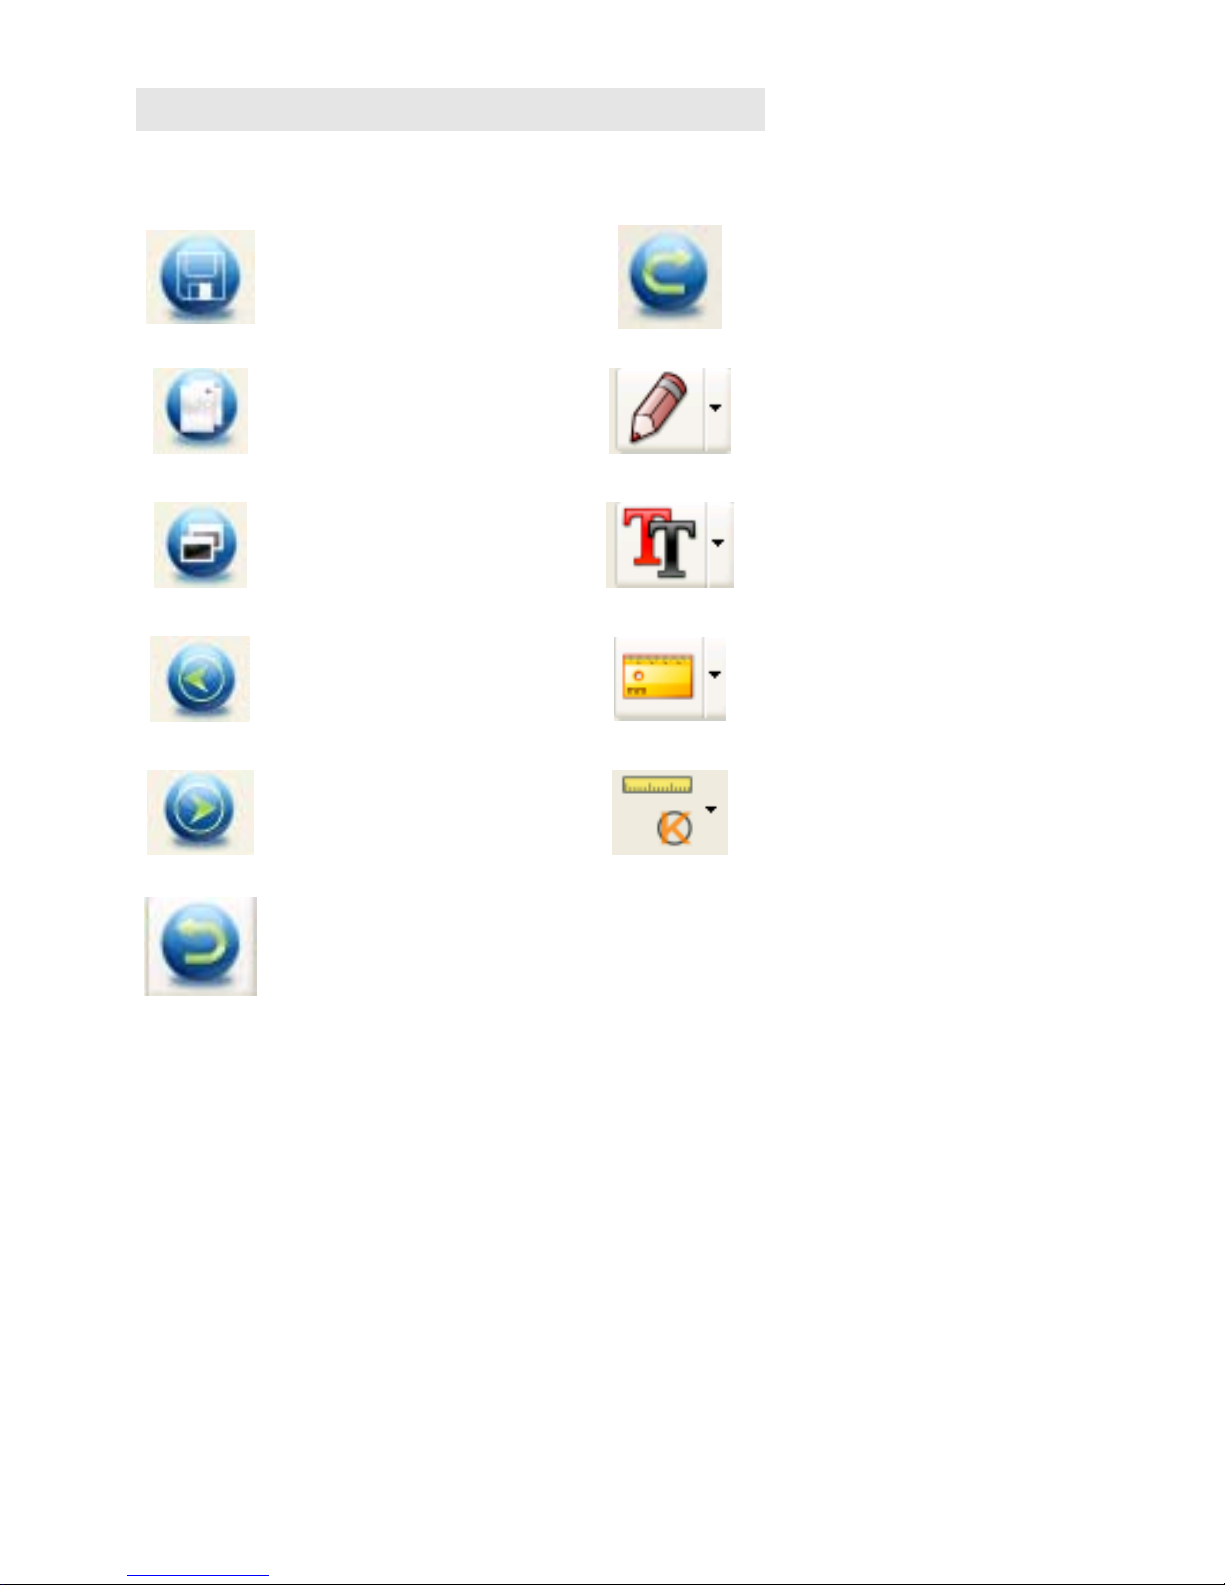
Measurement Interface Instructions
Save as
Redo
Copy to
clipboard
Draw
Copy file
Text note
Previous
Measurement
Next
Calibration
Undo
Page 39
38
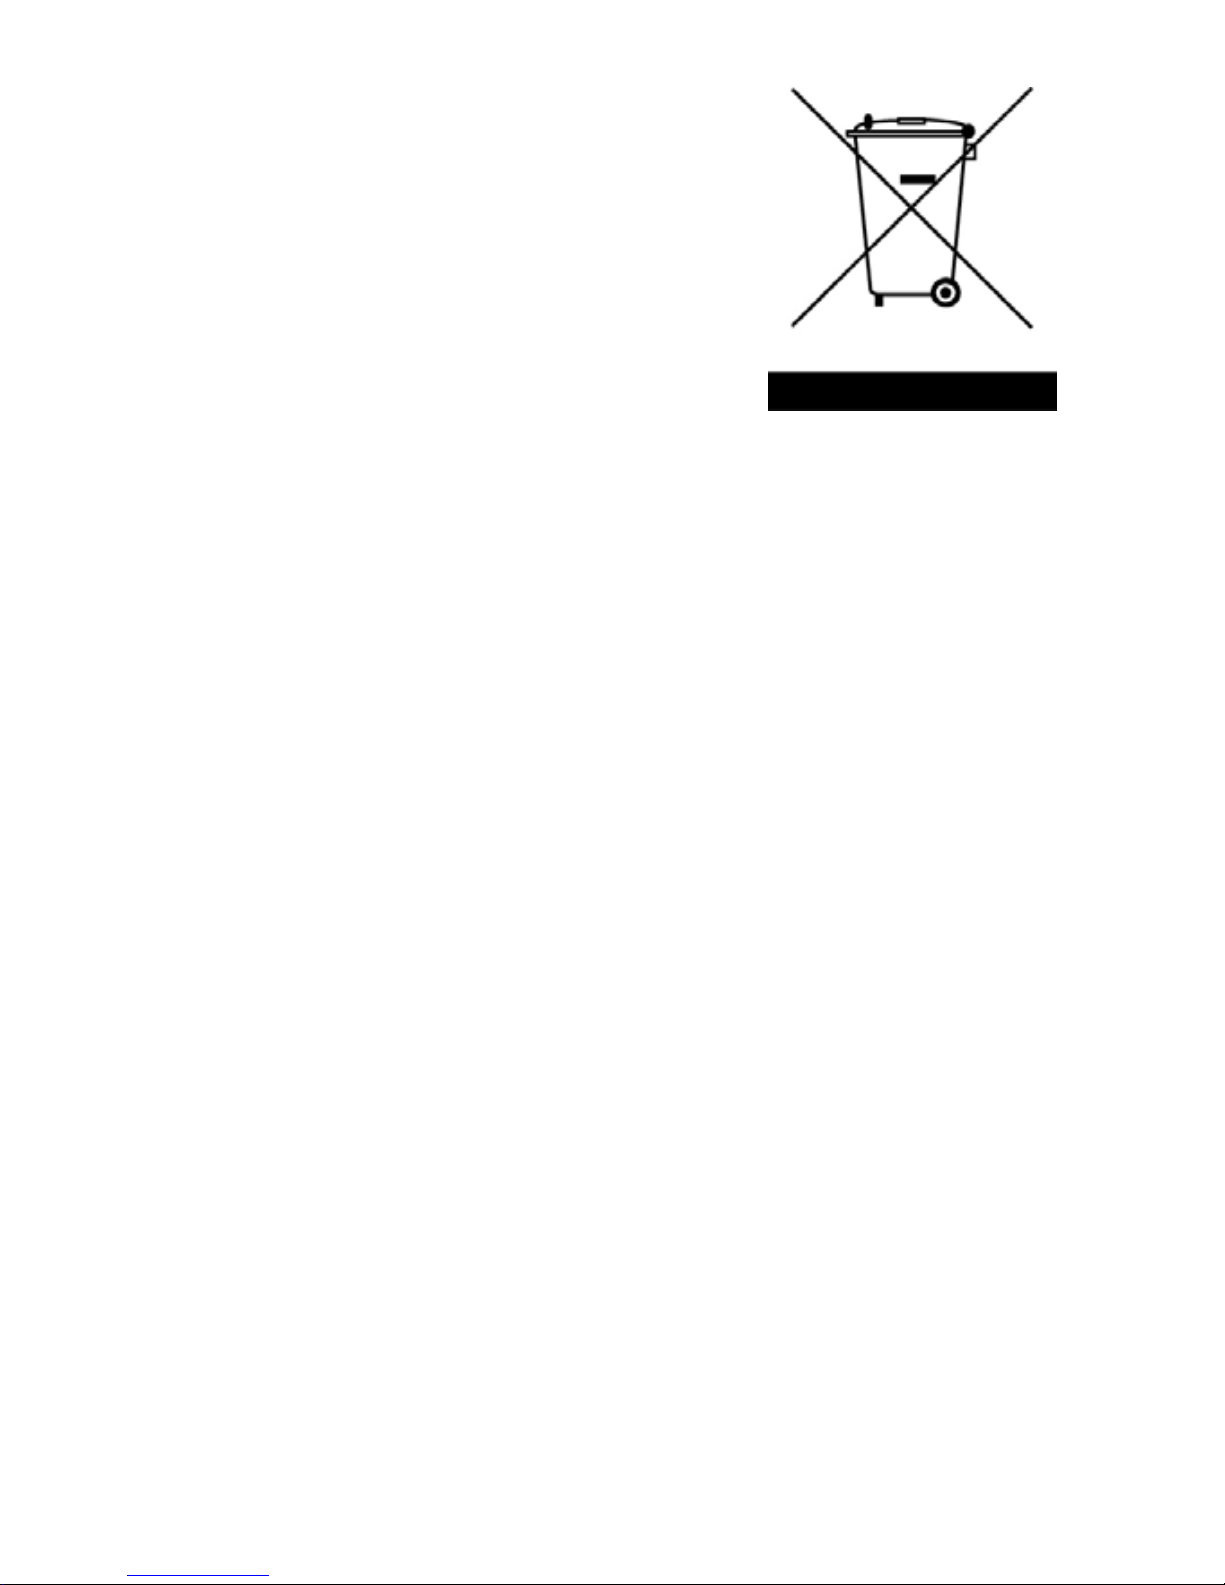
This symbol on the product or in the
instructions means that your
electrical and electronic equipment
should be disposed at the end of its
life separately from your household
waste. There are separate collection
systems for recycling in the EU.
For more information, please
contact the local authority or your retailer where you
purchased the product.
Page 40

Federal Communications Commission (FCC) Interference Statement
This equipment has been tested and found to comply with the limits for a Class B
digital device, pursuant to Part 15 of the FCC Rules.
These limits are designed to provide reasonable protection against harmful
interference in a residential installation. This equipment generate, uses and can
radiate radio frequency energy and, if not installed and used in accordance with the
instructions, may cause harmful interference to radio communications.
However, there is no guarantee that interference will not occur in a particular
installation. If this equipment does cause harmful interference to radio or television
reception, which can be determined by turning the equipment off and on, the user is
encouraged to try to correct the interference by one of the following measures:
Reorient or relocate the receiving antenna.
Increase the separation between the equipment and receiver.
Connect the equipment into an outlet on a circuit different from that to which the
receiver is connected.
Consult the dealer or an experienced radio/TV technician for help.
This device complies with Part 15 of the FCC Rules. Operation is subject to the
following two conditions:
(1)This device may not cause harmful interference, and (2) this device must accept
any interference received, including interference that may cause undesired operation.
FCC Caution: Any changes or modifications not expressly approved by the party
responsible for compliance could void the user’s authority to operate this equipment.
RF exposure warning
This equipment complies with FCC radiation exposure limits set forth for an
uncontrolled environment.
The equipment must not be co-located or operating in conjunction with any other
antenna or transmitter.
 Loading...