

Mustang Survival khimera MD7183 Owner's Manual

FOR MODEL NUMBER MD7183
OWNER'S MANUAL
KHIMERA™ PFD
LEVEL 70 BUOYANCY AID
DO NOT REMOVE PRIOR TO SALE
HT1184 REV 24NOV2017

TABLE OF CONTENTS
ABOUT THIS PRODUCT .........................................................................................2
WHAT IS AN INFLATABLE FLOTATION DEVICE? ........................................3
AIRLINE POLICY ON CARRIAGE OF INFLATABLE FLOTATION
DEVICES AND CO
2
CYLINDERS .........................................................................3
APPROVAL CONDITIONS AND CARRIAGE REGULATIONS ....................3
WHY “APPROVED ONLY WHEN WORN”? .................................................... 4
MANDATORY CARRIAGE REQUIREMENTS ................................................... 4
WHY ARE FLOTATION DEVICES REQUIRED
SAFETY EQUIPMENT? ...........................................................................................4
INSTRUCTIONS FOR USE
GETTING TO KNOW YOUR FLOTATION DEVICE ............................... 5
INSPECTING COMPONENTS .................................................................... 6-7
USE AT COLD TEMPERATURES...................................................................7
PUTTING IT ON (DONNING) .....................................................................8-9
TAKING IT OFF (DOFFING) ......................................................................... 10
INFLATING ........................................................................................................... 10
MANUALLY ..........................................................................................................10
CO
2
ESCAPES THROUGH THE MATERIAL OVER TIME ................... 11
OR AL LY ...................................................................................................................11
DEFLATING ...........................................................................................................11
RE-ARMING .................................................................................................... 12-13
IS YOUR FLOTATION DEVICE IN GOOD
AND SERVICEABLE CONDITION? .......................................................... 14

1
CARE AND MAINTENANCE INSTRUCTIONS ......................................... 14-16
MAINTENANCE SCHEDULE .........................................................................15
BEFORE EACH WEAR .................................................................................... 15
EVERY 2 MONTHS ............................................................................................ 15
LEAK TEST ...........................................................................................................15
THOROUGH VISUAL EXAMINATION ......................................................15
AFTER EACH INFLATION ............................................................................. 15
ANNUALLY ...........................................................................................................15
CLEANING AND STORING ...........................................................................16
HOW AND WHY TO TEST YOUR FLOTATION DEVICE ............................ 17
TRYING YOUR PFD ................................................................................................ 18
HOW DO YOU TEST YOUR FLOTATION DEVICE USING
THE MANUAL INFLATOR? .................................................................................. 19
HOW DO YOU TEST YOUR FLOTATION DEVICE USING THE ORAL
INFLATOR? ..............................................................................................................20
CHOOSE A FLOTATION DEVICE
THAT YOU WILL WANT TO WEAR ..................................................................21
COLD SHOCK ........................................................................................................... 21
HYPOTHERMIA.......................................................................................................22
ADDITIONAL INFORMATION ............................................................................ 23
DO NOT ATTACH FLOTATION DEVICES TO YOUR BOAT ...................... 23

2
ABOUT THIS PRODUCT
Your Mustang Survival MD7183 personal flotation device (PFD) is
designed for comfort and optimal mobility during paddling activities.
Oering more than just protection, this vest elevates performance
both in and out of the water. With enough foam flotation to provide
neutral buoyancy and a back-up manually activated inflation cell,
the Khimera PFD provides versatile function without compromising
safety.
Here are some of the features that set this product apart, and make
it particularly well suited to paddling activities:
- Dual flotation system blends the security of foam flotation with the
slim profile of inflatable technology
- Lightweight and low profile design oers greater comfort and range
of motion, both in and out of the water
- Adjustable shoulder straps and side adjusters create a close-tobody fit
- Reflective shoulder patches for visibility
- Discreet manual pull-handle prevents snags
- Lighter, more pliable membrane material: Our trademarked
Membrane Inflatable Technology™ (M.I.T™) reduces weight and
increases flexibility
- Ease of use - Stretch materials expand to inflate the vest, and
deflation is easy – simply squeeze out gas to deflate, with no
repacking required
- Shoulder attachment points
- Easy access front pocket for storing small items

3
WHAT IS AN INFLATABLE FLOTATION DEVICE?
While traditional flotation devices are inherently buoyant, this
inflatable flotation device has some inherent buoyancy, and relies
on inflation for additional buoyancy needed for proper product
performance. Uninflated, your device is a comfortable low-profile
vest with side and shoulder straps, and can be inflated at any time
with a 12-gram CO
2
gas cylinder. You can inflate your flotation
device manually by jerking a pull-handle, or orally by mouth. It is
recommended that you familiarize yourself with your device as
described in “Instructions for use”.
AIRLINE POLICY ON CARRIAGE OF INFLATABLE FLOTATION DEVICES
AND CO
2
CYLINDERS
Regulations may apply to the air transport of inflatable flotation
devices. Only with the approval of the aircraft operator may carbon
dioxide cylinder(s) be transported in checked or carry-on baggage.
Please consult airline operator policy. If your airline does not allow
transport, you may consider shipping your flotation device or its CO2
cylinder separately to your destination or purchasing a re-arm kit
once you arrive (check availability before you go).
APPROVAL CONDITIONS AND CARRIAGE REGULATIONS
This inflatable flotation device is approved by Transport Canada and
the U.S. Coast Guard. It is not approved for water skiing or other high
impact, high speed activities. This inflatable flotation device was
designed to be more comfortable and less restrictive to wear than
inherently buoyant flotation devices. When worn, used, and serviced
according to this owner’s manual, this flotation device can greatly
increase your chances of survival in the water. Not recommended for
non-swimmers or weak swimmers. Users of this inflatable flotation
device must be at least 16 years old.

4
WHY “APPROVED ONLY WHEN WORN”?
This flotation device requires more frequent checks than devices
with a cylinder seal indicator or fully inherently buoyant devices.
This approval condition lets users overcome its design trait that
would otherwise prevent approval. By wearing this flotation device:
1. It gets needed extra attention associated with use;
2. Users get to know the disadvantages it has; and
3. Safety increases enormously because user has it when needed
When this flotation device is not worn, it’s less likely to be in working
order and cannot be counted as an approved flotation device to meet
the carriage requirements on your boat.
MANDATORY CARRIAGE REQUIREMENTS
The U.S. Coast Guard and Transport Canada require you to carry
approved flotation devices of the correct size for each person on
board that are legibly marked with an approval number and are in
good and serviceable condition. To be considered serviceable, this
flotation device shall not exhibit deterioration that could diminish
its performance such as broken or deformed hardware, detached
webbing, rotted structural components, air leaks, or nonfunctional
oral inflation tube. Unless worn inflated, this flotation device must
also be properly armed with a full CO2 cylinder, inflation system status
indicator, and an accessible manual inflation lanyard. A flotation
device which is “approved only when worn” or “required to be worn”
must be worn under the specified conditions.
WHY ARE FLOTATION DEVICES REQUIRED SAFETY EQUIPMENT?
Drowning is the leading cause of fatalities involving recreational
boating. In over 80 percent of fatal incidents the person was not
wearing flotation and most of these occurred after falls overboard
or capsize of small boats. An approved flotation device, when worn,
helps raise your head above water in the first critical moments of
immersion. Some devices are designed to keep you to face up in the
water, and increase your chances for survival and rescue. Dierent
body types float dierently and some boating activities require
special features in a flotation device.
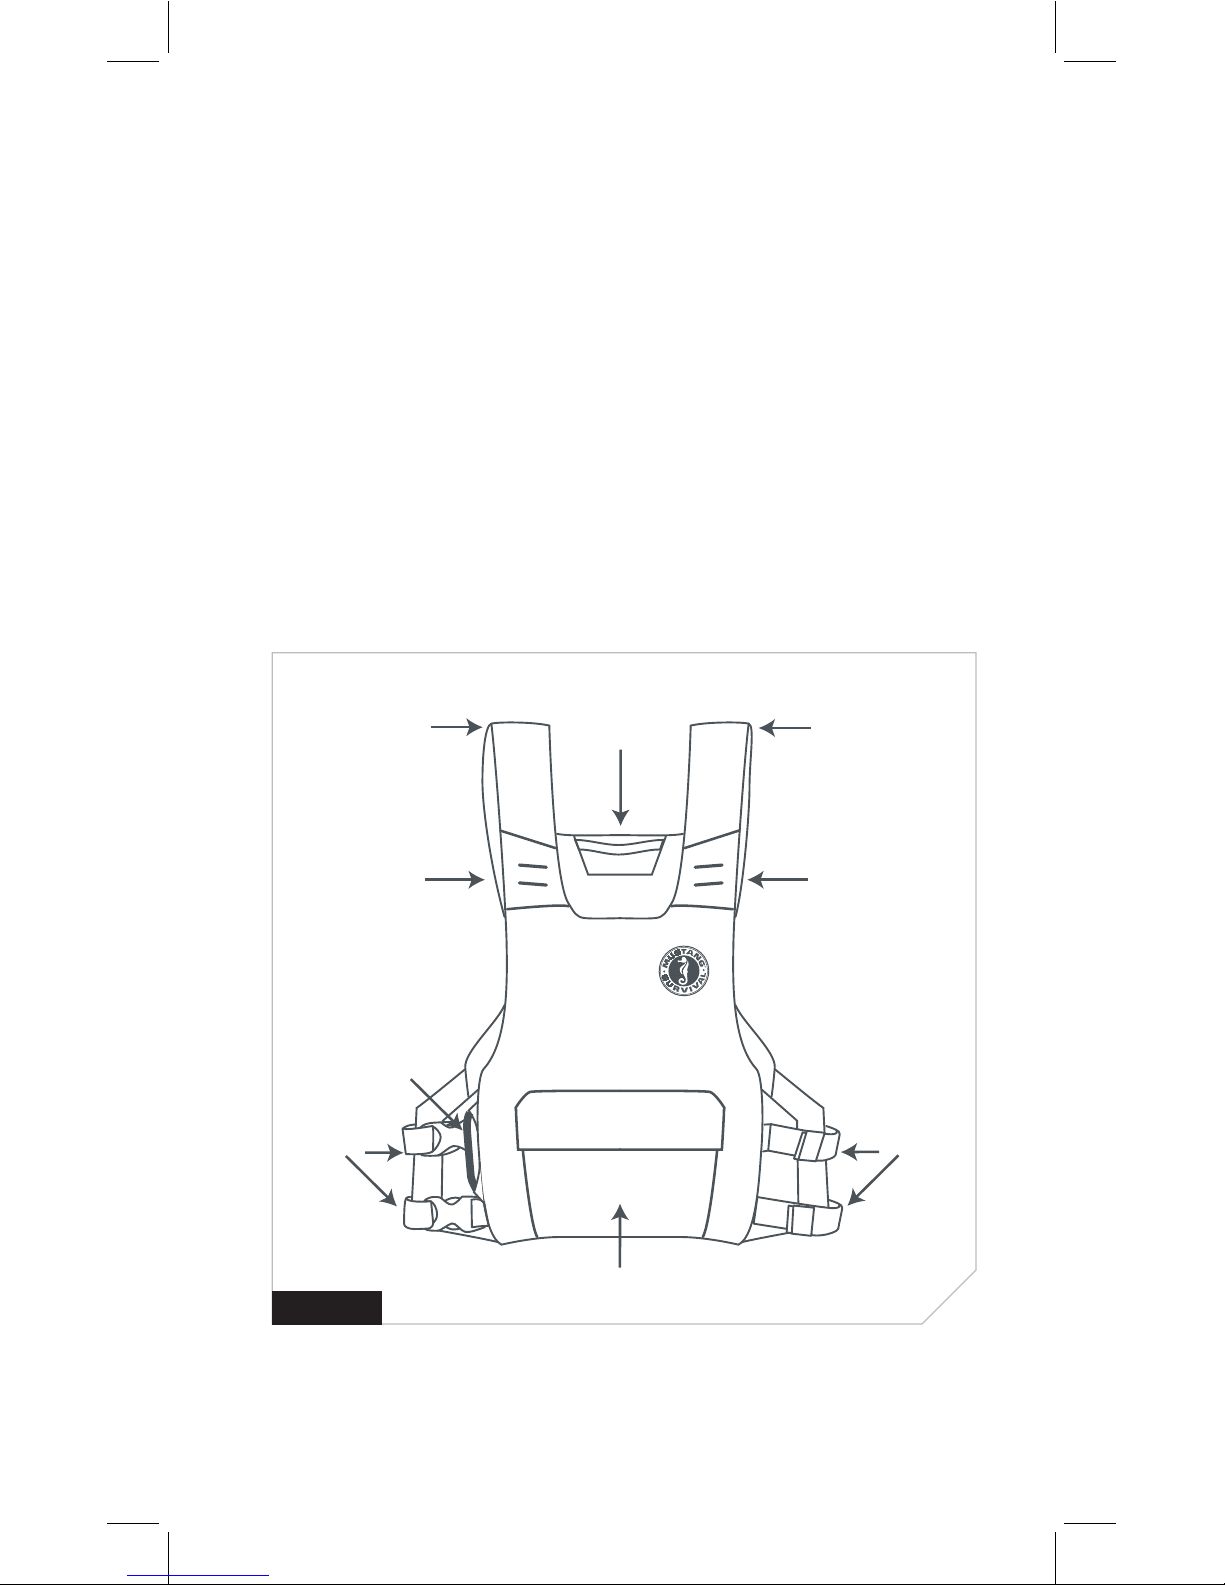
5
Reflective
shoulders
Shoulder
Adjuster
Shoulder
Adjuster
Hanging
loop
Storage pocket
Inflator
pull handle
Waist
Adjustment
Waist
Adjustment
Attachment
point
FIGURE 1
INSTRUCTIONS FOR USE
GETTING TO KNOW YOUR FLOTATION DEVICE
Because your flotation device is designed to save your life, you need
to be comfortable using it and thoroughly familiar with how it works.
If you just purchased or have not yet used your flotation device,
Transport Canada and United States Coast Guard recommend that
you immediately test it as described in How and Why to Test your
Flotation Device, (p. 17). This will not only ensure your device is in
good condition, it will give you experience using both methods of
inflation.
After initial testing, get in the habit of inspecting your flotation
device before each use, re-arming it after each use and, of course,
wearing it every time you go out on the water. This section provides
instructions, using terms from the diagram below.

Solid
Cylinder
Top
Pierced
Cylinder
Top
OK
OK STOP
6
FIGURE 2
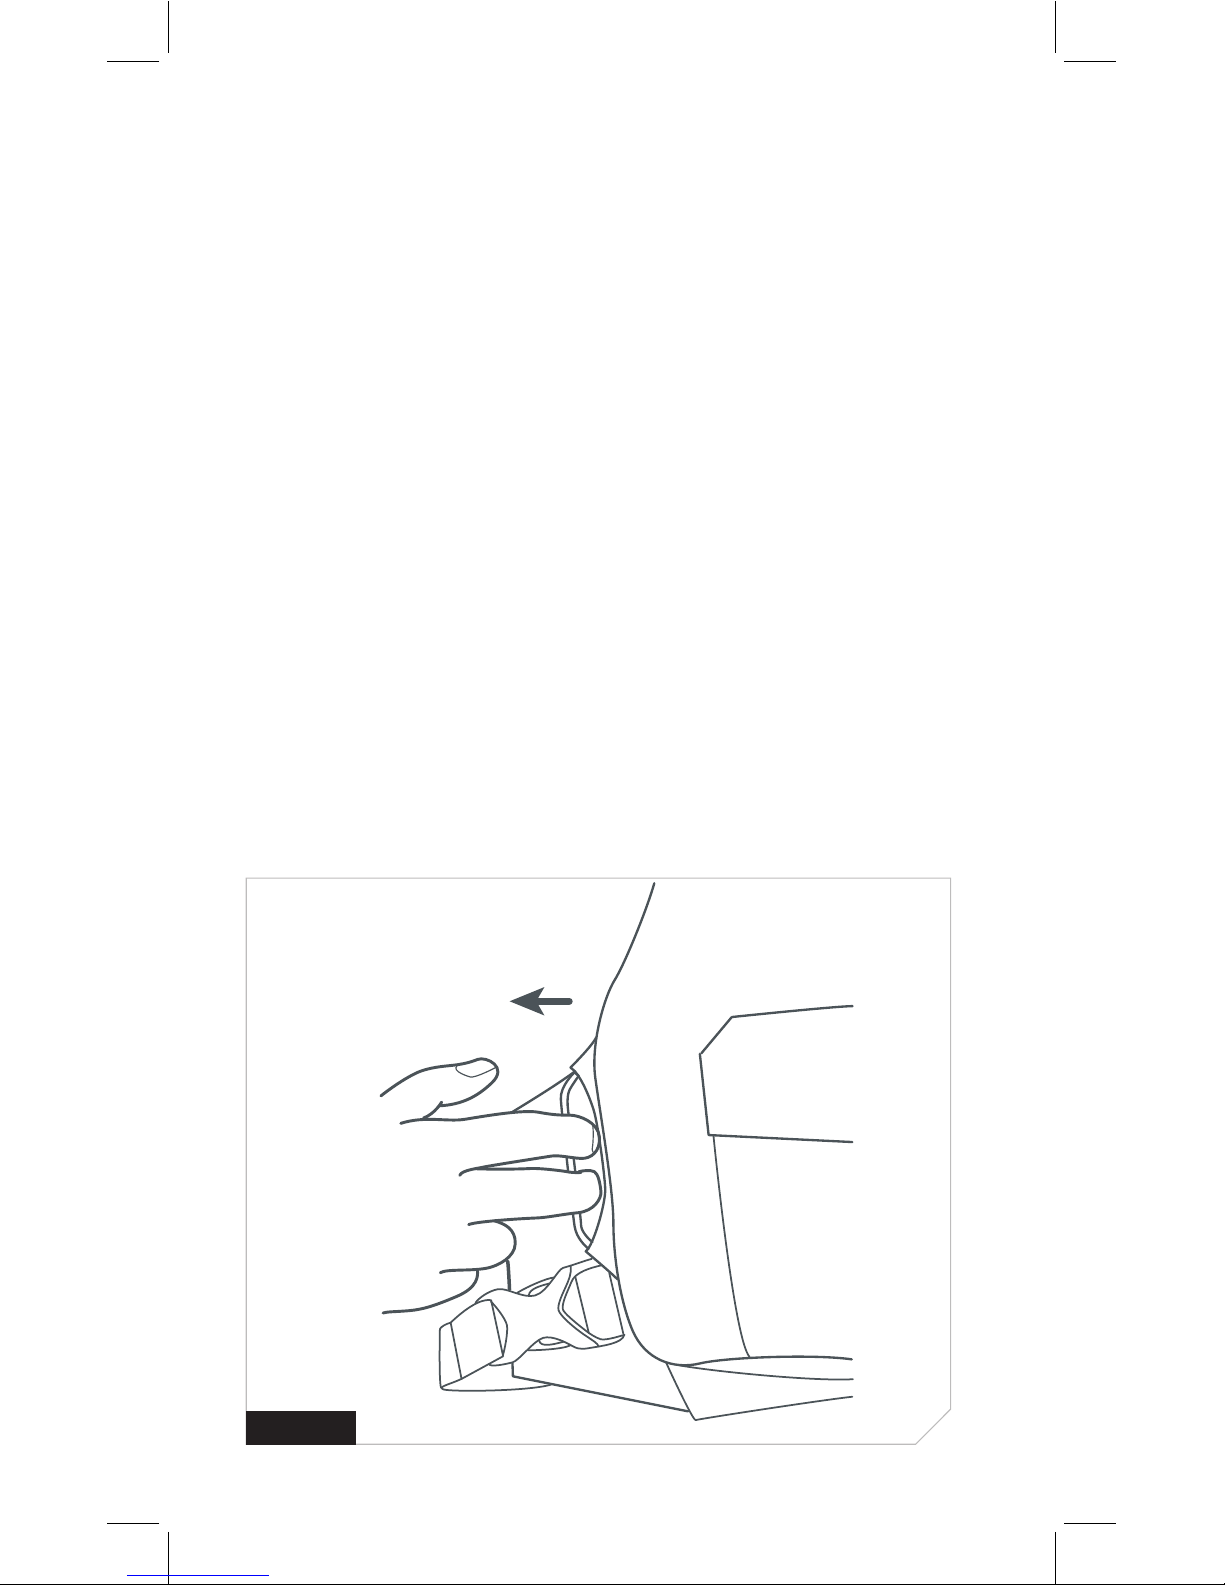
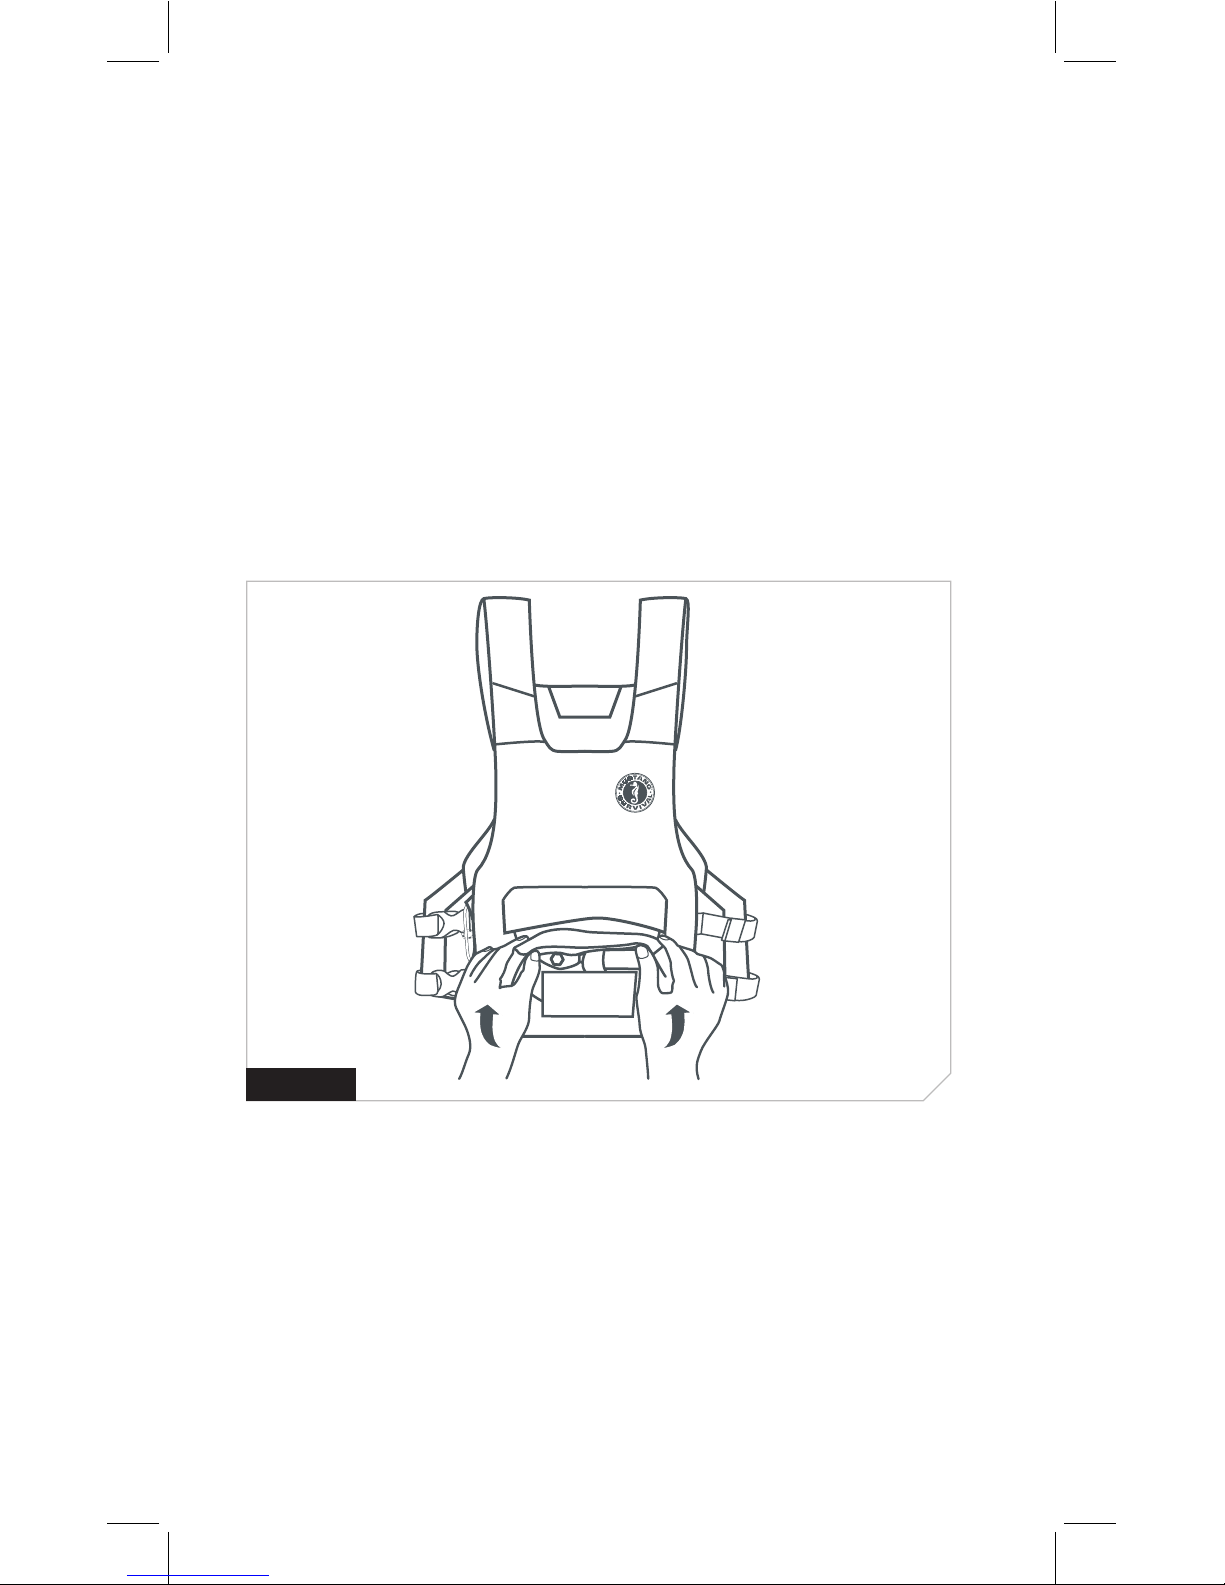
INSPECTING COMPONENTS
Before each use, check your flotation device for readiness:
FOLD UP
1. At the front
bottom of the
device, open the
Velcro™ fastener
tapes and expose
the inflator and
cylinder assembly
by flipping out the
labels.
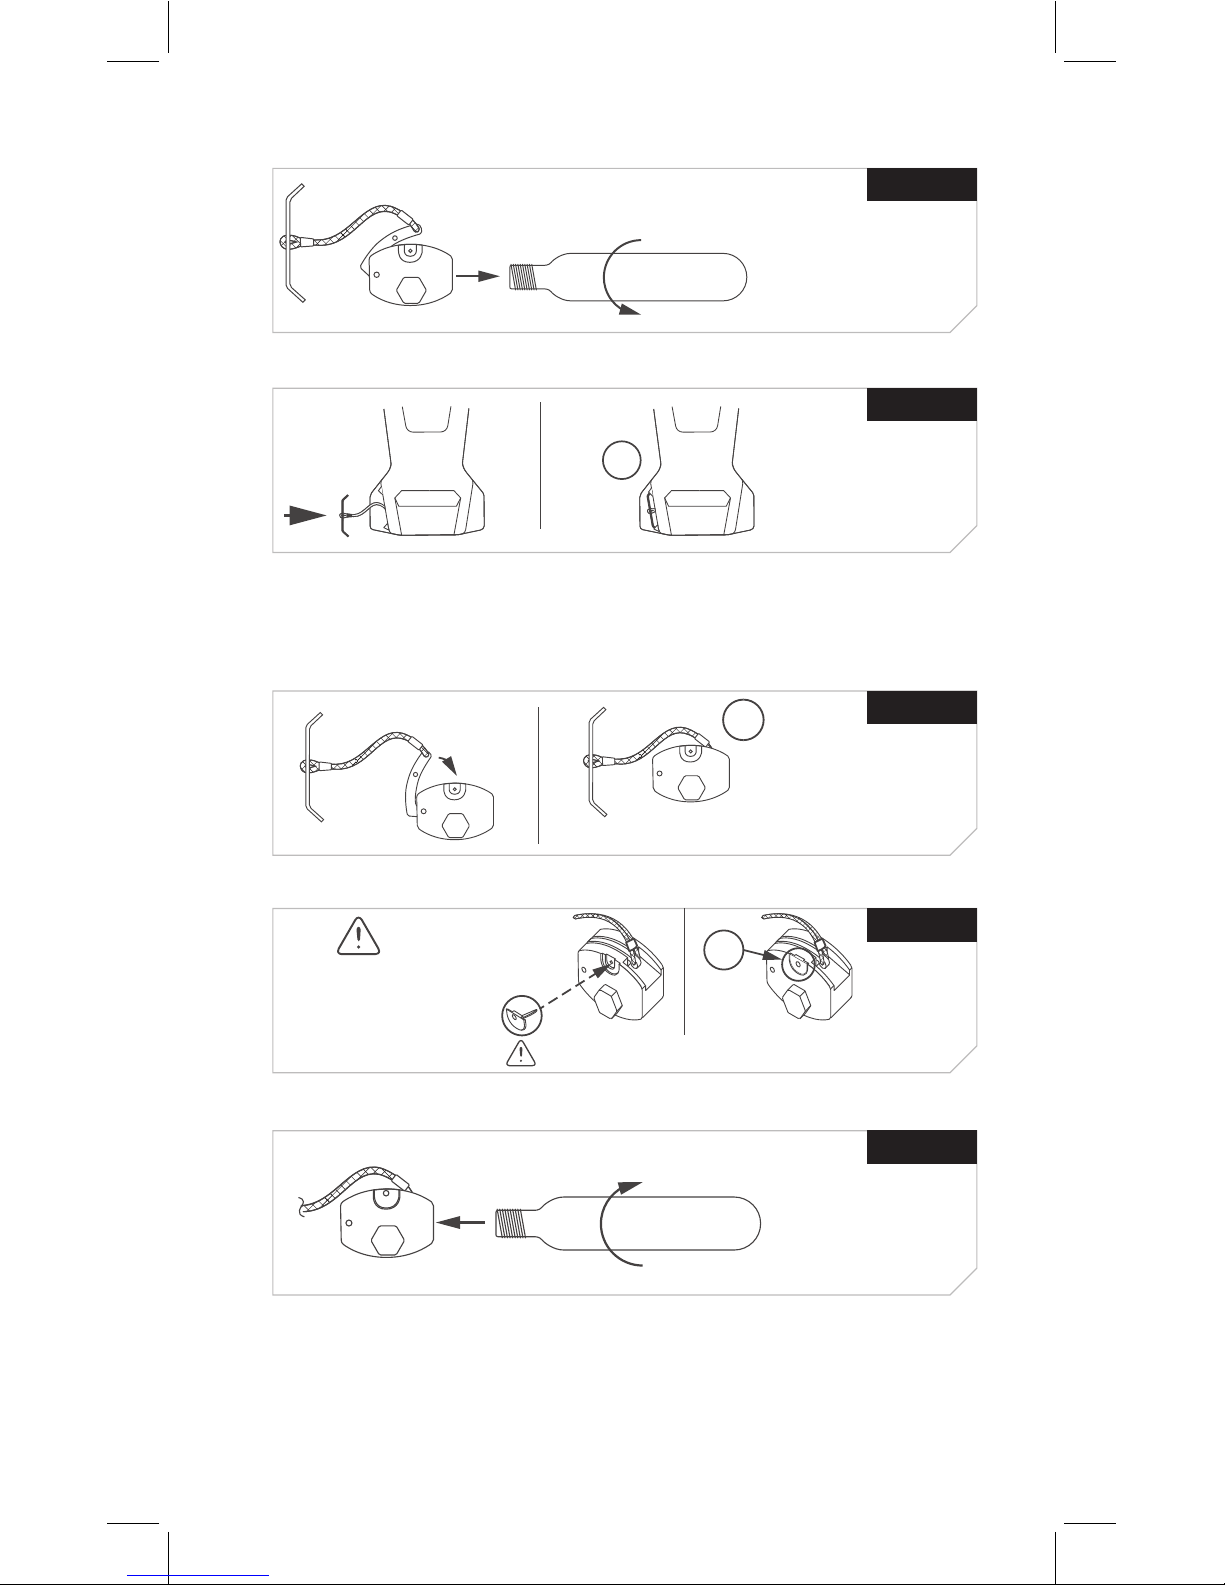
2. Unscrew and
remove the CO2
gas cylinder from
the inflator and
inspect its small
end. Is the cylinder
pierced?
3. Inspect the
inflator’s metallic
lever. Is the lever in
the up-and-ready
position with the
green indicator pin
in place over the
lever?
If your cylinder is pierced or your lever is not in the up-and-ready
position with the green indicator pin in place, you will need to re-arm
your flotation device (see Re-arming, p. 12) before continuing.
FIGURE 3
FIGURE 4

ORAL INFLATION TUBE
Dust cap in stowed
position
Dust cap in
deflation position
7
4. Tuck the labels back into the inflator pocket and refasten the
Velcro ™ fastener tapes at the bottom of the flotation device.
5. There is a silver pull-handle located on the wearer’s right-hand side.
Ensure the silver pull-handle, used for manual inflation, is stowed
between the two stretch tabs.
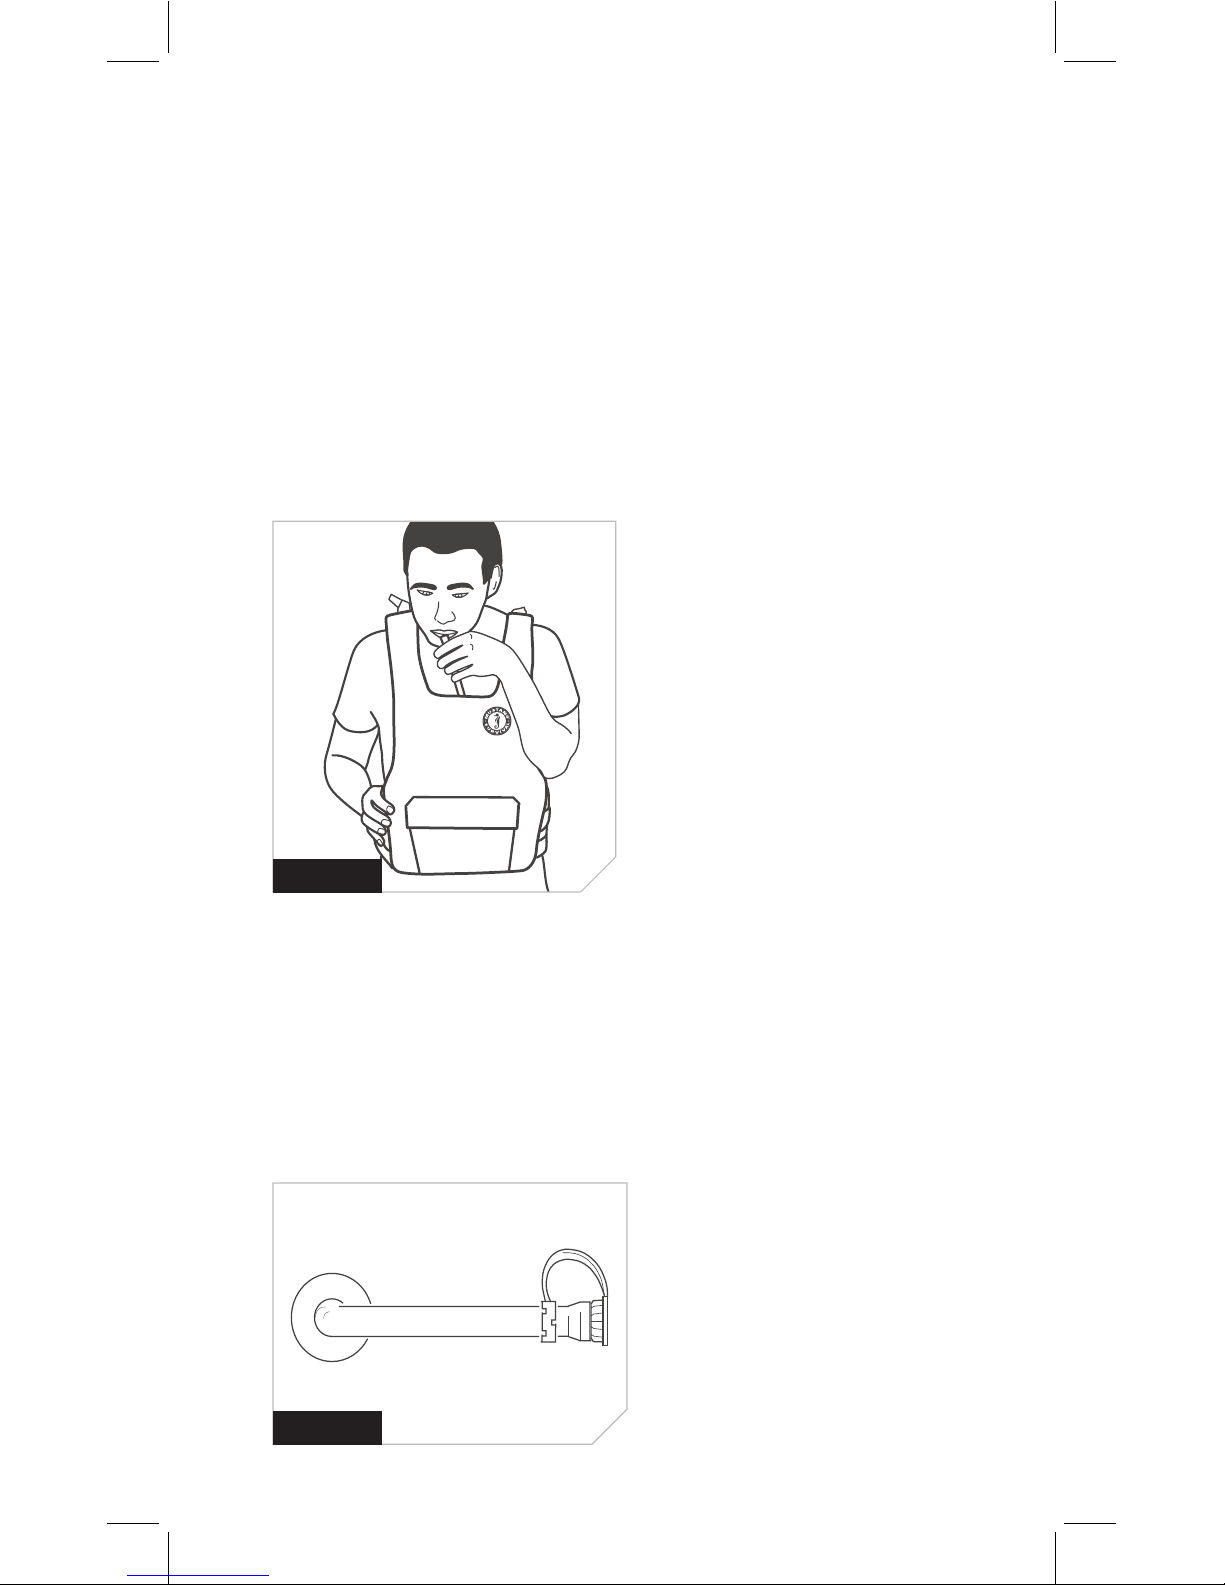
6. At the inside front neck area, examine the oral tube to ensure that
the oral-inflation dust cap is properly in the stowed position
7. Check for damage or excessive abrasion, wear, tear and/or any
visible foreign matter, such as mildew or oil stains. Check that all
seams are secure, and all straps and hardware are sound. If you see
any signs of damage, perform the “Every 2 months tests, described
in the Care and Maintenance section (p. 14).
FIGURE 5
USE AT COLD TEMPERATURES
As temperatures approach freezing the inflatable portion of your
flotation device will provide less buoyancy and will inflate more
slowly. The oral inflator can then be used to adequately top up the
flotation device after CO2 inflation.
CAUTION: DO NOT FULLY INFLATE THE DEVICE ORALLY AND THEN ACTIVATE THE CO
2
CYLINDER. THE RESULTING OVERPRESSURE COULD SERIOUSLY DAMAGE THE DEVICE
RESULTING IN LOSS OF FLOTATION.
Flotation devices including inflation are not recommended for use in
temperatures below freezing.
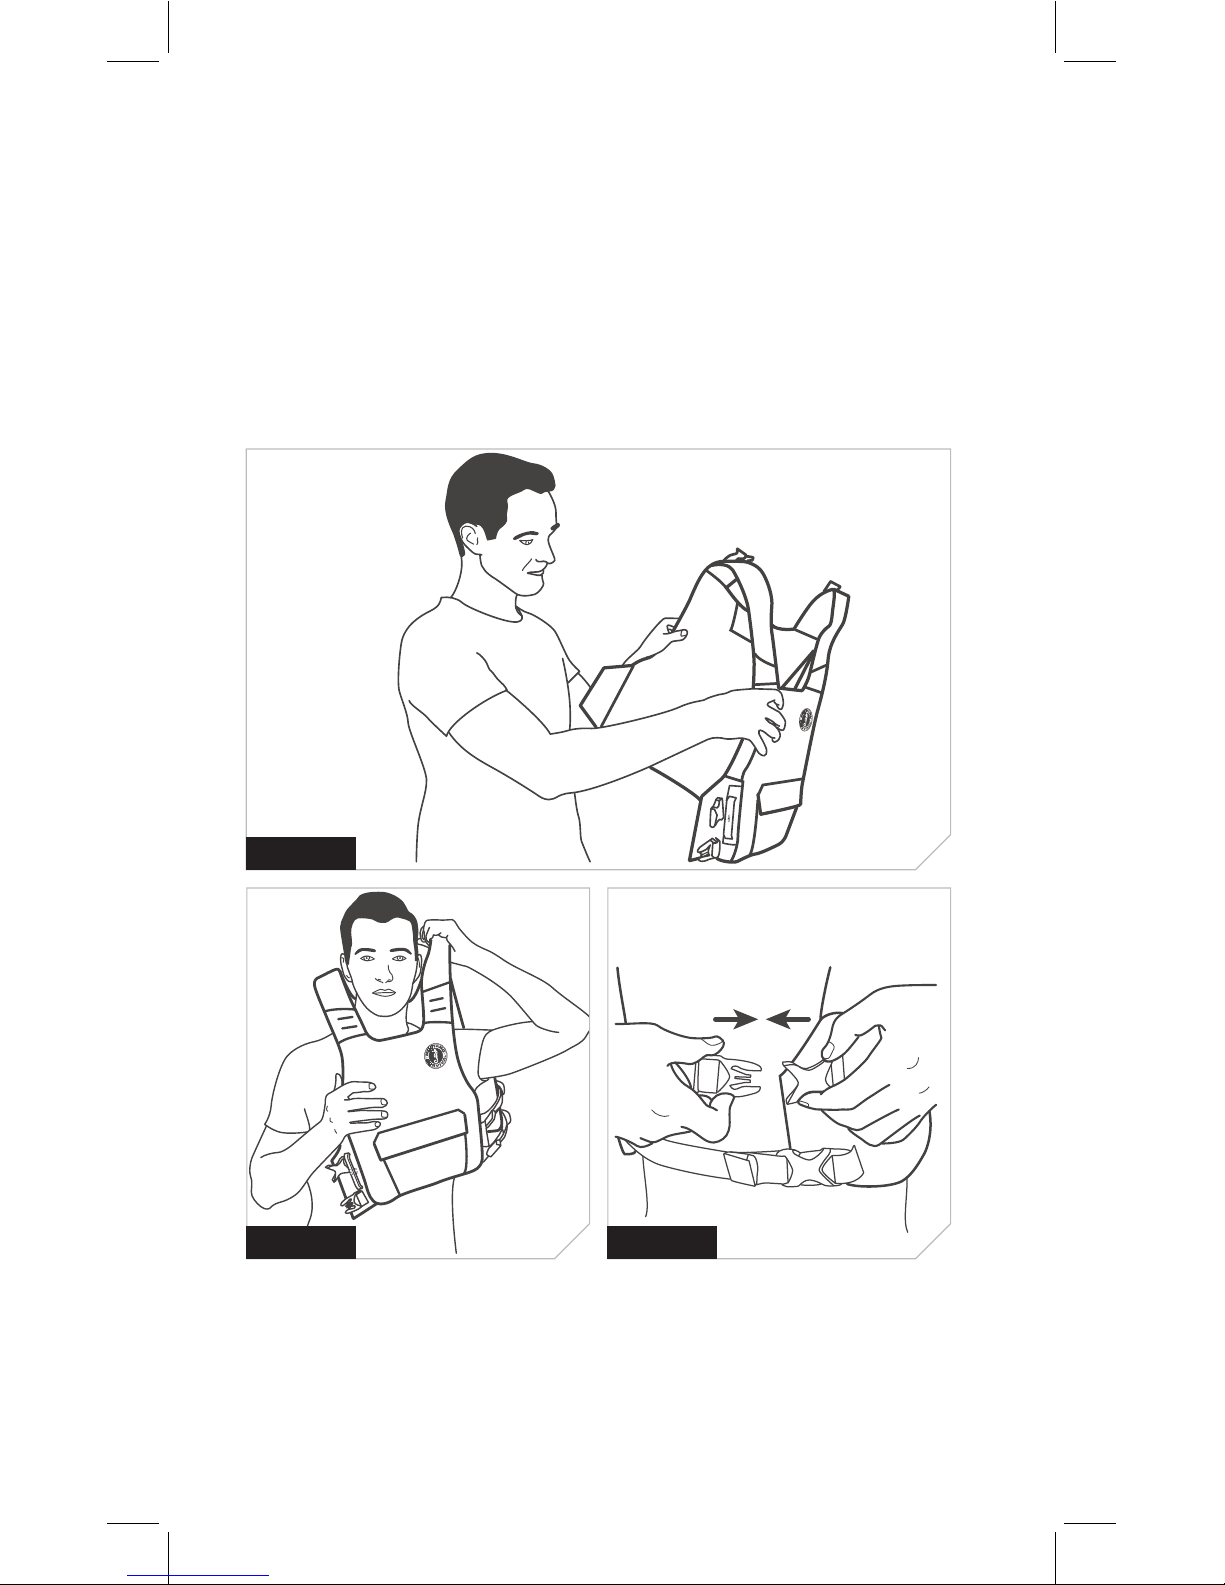
1. Unbuckle the two side buckles
and put the flotation device on
sideways, placing your head
between the shoulder straps,
and pushing your opposite arm
through to the other side of the
device, above the side straps.
2. Attach each buckle, taking care
to avoid twisting the belts. If
the straps aren’t long enough,
loosen the 4 side straps by
pushing backwards on the 4
adjusters located on the back
panel of the device.
8
FIGURE 8
PUTTING IT ON (DONNING)
The flotation device is designed for wearers with a chest range of
76-132 cm (30-52 inches) and weighing over 41 kg (90 lb).
It’s important that the flotation device is properly adjusted to fit
the person wearing it. It must be worn outside all other clothing as
restricted inflation could injure you or damage the flotation device.
To put the device on, see Figures 6-10.
FIGURE 6
FIGURE 7
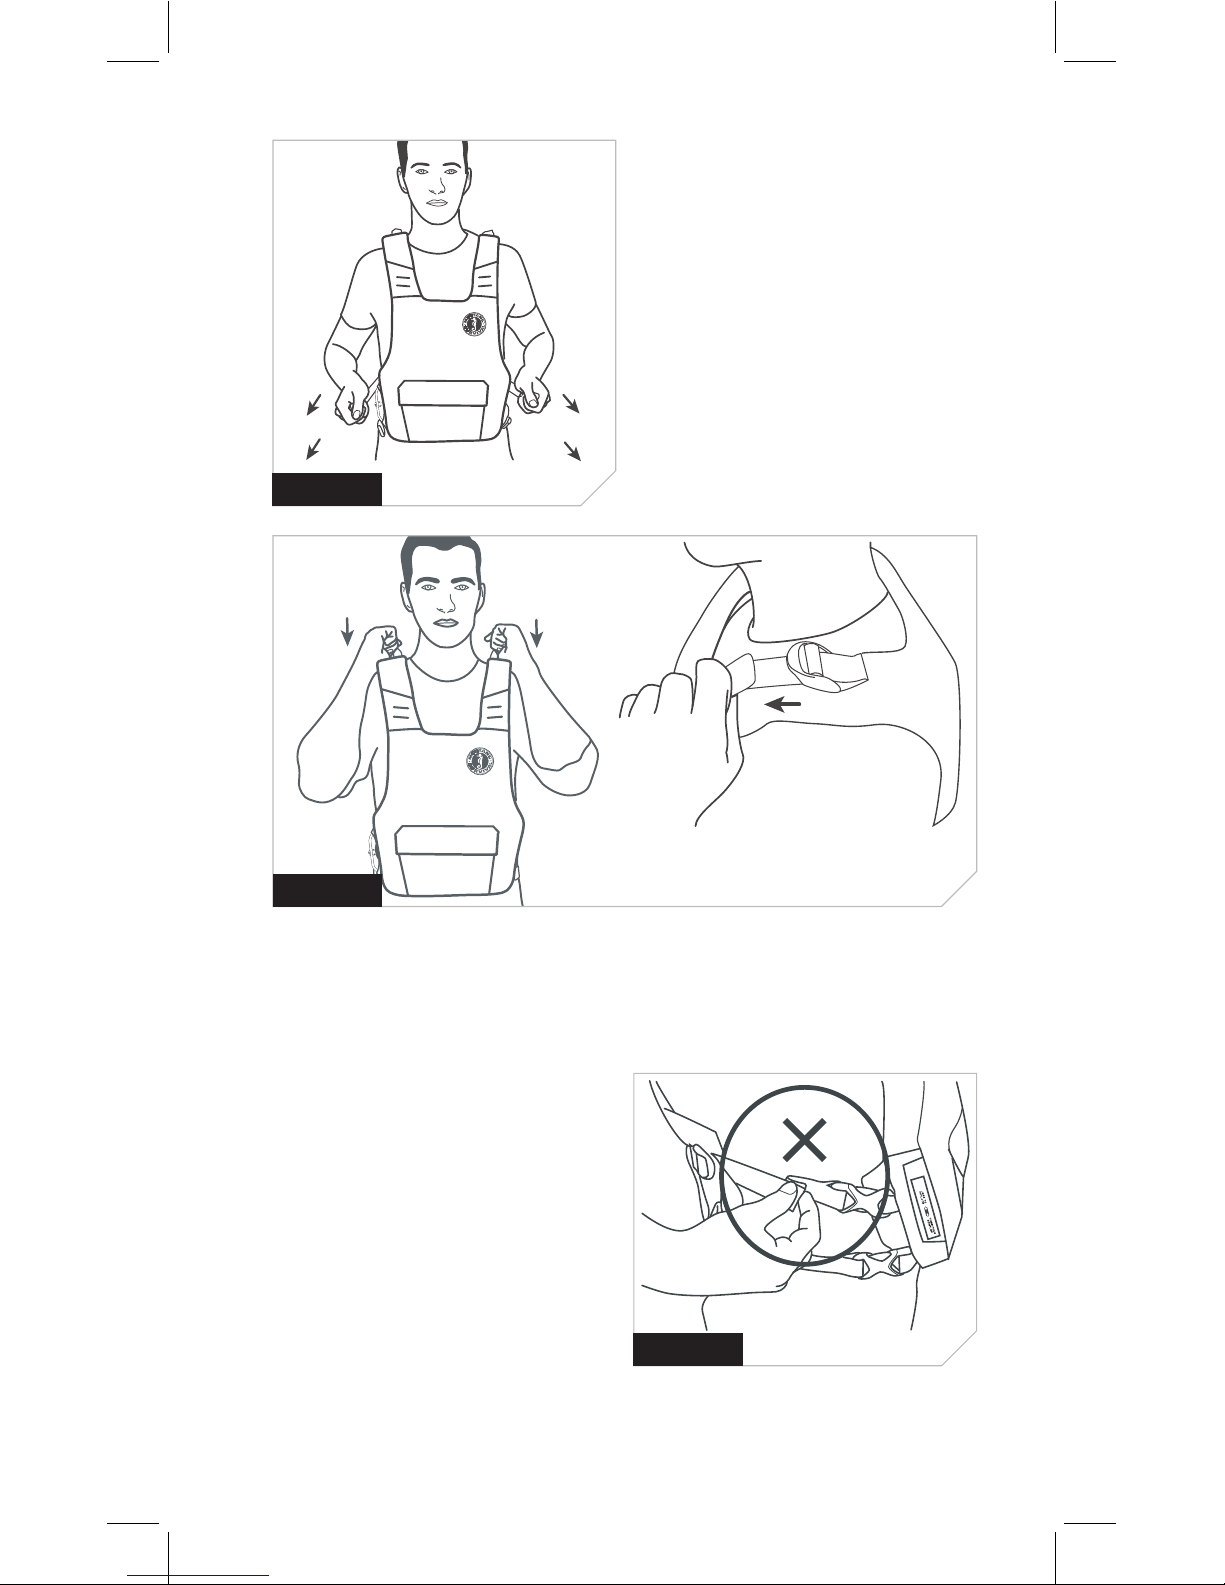
PULL PULL
PULL PULL
3. Each of the upper and lower
belts should be tightened.
Reach slightly backwards and
grasp both side straps of the
upper or lower belt, and pull
forward. Repeat with the other
belt.
4. Check fit by pinching each belt strap, just as you would a
waistband. If you can pinch the material together, tighten your
flotation device.
Do not tie or sew anything
to the outside of (or around)
your flotation device, as it may
compromise your device’s ability
to inflate.
9
PULL
PULL
FIGURE 9
FIGURE 10
FIGURE 11
PULL
10
TAKING IT OFF (DOFFING)
To make dong easier, partially deflate the flotation device
(See Deflating, p. 11).
1. Unbuckle the side buckles and lift the shoulder straps above your
head.
2. Shift the device sideways, passing your body through the open
buckles.
INFLATING
Your flotation device inflates in two ways: manually or orally. No
matter how your flotation device inflates, it can always be topped
up orally – extending its ability to keep you afloat. The inflation
instructions below use ‘left’ and ‘right’ assuming you are wearing
the flotation device during inflation – so your left or right is also the
flotation device’s.
MANUALLY
You trigger inflation by jerking the silver handle on the right side of
your flotation device. Grab the handle with your right hand (thumb
up) and pull outwards, away from your body. Your flotation device
inflates within 5 seconds.
PULL
FIGURE 12
11
Dust cap in
deflation position
CO2 ESCAPES THROUGH THE MATERIAL OVER TIME
Manual inflation uses carbon dioxide (CO2 gas) to fill your flotation
device. Over time, the CO2 gas will slowly escape through the fabric,
and you may feel that the flotation device is losing pressure. If you’re
in the water for a prolonged period, you may need to top up your
device using oral inflation.
ORALLY
The oral inflation tube is located inside the front neck area.
1. Lift the end of the oral inflation tube up towards your mouth.
2. Remove the dust cap and blow air into the tube.
FIGURE 13
FIGURE 14
The oral inflation dust cap is to
hold dirt out, not keep air in. The
oral tube has a one-way valve
opened by air pressure, which
means the cap is designed to keep
dirt and debris out of the tube
and valve, not to hold in pressure.
(When you flip the cap over and
press it into the tube, however, it
will let out pressure for deflation).
So while it is good practice to
keep the cap on the tube, it is not
necessary for maintaining your
flotation device’s pressure.
DEFLATING
Complete deflation is easiest when you are not wearing the flotation
device.
1. Place flotation device front facing up on a flat surface free of clutter.
2. Locate the oral tube and remove its cap.
3. Turn the cap over, using the pointed end to press into the valve. This
creates the outlet for pressure release.
4. Continue to press the cap end
into the valve (which keeps
your outlet open), and use
your other hand and forearms
to gently flatten the flotation
device as much as you can.
Release the oral tube cap and
replace the cap into its proper
stowed position.
12
RE-ARMING
To re-arm your flotation device, you will need Mustang Survival’s
Re-Arm Kit MA7116. The spent inflation parts will first be removed,
and replacement parts will be installed. The re-arm kit includes:
- 12g CO2 cylinder
- Green Indicator Pin
FOLD UP
FIGURE 15
1. Place your flotation device on a flat surface with the bottom of the
device facing you.
2. Pull apart the Velcro™ tapes at the bottom of the device. You will
see a few labels which should be flipped downwards over the
fastener tape in order to expose the inflation parts.
13
FIGURE 16
FIGURE 17
FIGURE 18
FIGURE 20
FIGURE 19
3. Remove the empty cylinder.
4. Re-install the pull handle.
OK
OK
OK
GREEN PIN
ENSURE LEVER ARM IS DOWN
AND HOLES ALIGNED
FRAGILE
5. Check the manual inflation system to determine that the lever arm
and piercing pin move freely when moving the lever (attached
to the pull tab) several times down and up. There should be no
binding of mechanical parts.
6. Position lever arm down. Insert green pin.
7. Install new cylinder. Hand-tighten.
There is a second elastic keeper in the inflator area, meant to hold a
second 12g CO2 cylinder (not supplied).
8. Tuck the labels back in, over the inflation assembly, and close the
Velcro ™ tapes at the bottom of the device.

14
IS YOUR FLOTATION DEVICE IN GOOD AND SERVICEABLE
CONDITION?
Check your flotation device between outings to be sure that it is:
- properly armed
- free of rips, tears or holes
- all seams are securely sewn
- the fabric, straps and hardware are still strong.
Inspect the inflatable portion of the flotation device in accordance
with the “CARE AND MAINTENANCE INSTRUCTIONS”.
CARE AND MAINTENANCE INSTRUCTIONS
To ensure your flotation device performs when you need it, you must
care for and maintain it in serviceable condition (see “Mandatory
carriage requirements,” p. 4). Failure to follow these instructions
rigorously could result in a non-functioning flotation device causing
injury or death. We suggest you keep a record of the inspections
performed on your flotation device – using permanent ink on the Care
and Storage label over the inflation assembly. If you are not confident
that you can care for and maintain your flotation device in accordance
with these instructions, contact Mustang Survival customer service.
You are required to check this flotation device:
- Before each wear (component inspection)
- Every 2 months (leak test, and thorough visual examination)
- After each inflation (perform re-arm)
- Annually (suggested at beginning of each boating season)
 Loading...