

Mustang Survival ELITE INFLATABLE PFD MD5153 Owner's Manual
MD5153
ELITE™ INFLATABLE PFD
Hydrostatic Inflation Model
Manual with Automatic Backup
APPROVED BY
TRANSPORT CANADA
DO NOT REMOVE PRIOR TO SALE
HT1173 (Rev. 17Sept2014)

TABLE OF CONTENTS
INFLATABLE PFD'S .............................................................................. 1
APPROVAL CONDITIONS AND CARRIAGE REQUIREMENTS ................. 1
Mandatory Carriage Requirements ................................................ 1
INSTRUCTIONS FOR USE .................................................................... 2
Getting to know your PFD ............................................................. 2
Is your PFD in good and serviceable condition ............................... 3
PUTTING ON YOUR INFLATABLE PFD .................................................. 4
INFLATING YOUR PFD ....................................................................... 5
Automatically inflating your PFD .................................................... 5
Manually inflating your PFD ........................................................... 5
Orally inflating your PFD ................................................................ 5
Deflating your PFD ........................................................................ 6
RE-ARMING YOUR INFLATABLE PFD ................................................... 7
RE-PACKING YOUR INFLATABLE PFD ................................................ 10
O
USAGE BELOW FREEZING [32
F / 0OC] ............................................. 13
CARE AND MAINTENANCE INSTRUCTIONS ...................................... 13
Inspecting your inflatable PFD ...................................................... 13
CLEANING AND STORING YOUR PFD ............................................... 14
HOW AND WHY TO TEST YOUR PFD ............................................... 14
How to test your PFD using the automatic inflator ...................... 15
How to test your PFD using the manual inflator .......................... 15
How to test your PFD using the oral inflation tube ...................... 16

WHY ARE PFDS REQUIRED SAFETY EQUIPMENT .............................. 17
WEAR YOUR PFD ............................................................................. 17
THESE DEVICES ARE INTENDED TO HELP SAVE YOUR LIFE ............... 17
HYPOTHERMIA ................................................................................ 18
DO NOT ATTACH PFD'S TO YOUR BOAT .......................................... 19
ADDITIONAL INFORMATION............................................................. 19
AIRLINE OPERATOR POLICY ON CARRIAGE OF
INFLATABLE PFDS AND CO
CARTRIDGES ........................................ 20
2

INFLATABLE PFDS
Inflatable PFDs are special devices in that the flotation of the wearer
is not derived from inherently buoyant materials. In order for them
to do their job, you, the wearer, must do yours! This means you have
the responsibility to ensure you are familiar with the operation and
maintenance requirements of your inflatable PFD! You must also
be aware of the limitations of the device and know that it is not
approved under the Small Vessel Regulations for certain boating
activities.
Read your owner's manual and the information labels
on your PFD! It could save your life!
APPROVAL CONDITIONS AND CARRIAGE
REQUIREMENTS
This inflatable PFD is approved by Transport Canada for use as a
Type III (MD5153) Personal Flotation Device (PFD). It is not approved
for water skiing or other high impact, high speed activities. This
inflatable PFD was designed to be more comfortable and less
restrictive to wear than inherently buoyant PFDs. When worn, used,
and serviced according to this owner’s manual, this PFD can greatly
increase your chances of survival in the water. Not recommended for
non-swimmers or weak swimmers. Users of inflatable PFDs must be at
least 16 years old.
MANDATORY CARRIAGE REQUIREMENTS:
The Small Vessel Regulations require that you carry on board a
Transport Canada approved personal flotation device, which bear
a mark or label indicating the approval and is of an appropriate
size for each person on board. To be considered serviceable, this
Inflatable PFD shall not exhibit deterioration that could diminish
its performance, such as broken or deformed hardware, detached
webbing, rotted structural components, air leaks, or nonfunctional
oral inflation tube. Unless worn inflated, this Inflatable PFD must also
be properly armed with a full CO
indicator, and an accessible manual inflation lanyard. A PFD which is
“approved only when worn” or “required to be worn” must be worn
under the specified conditions.
cylinder, inflation system status
2
1
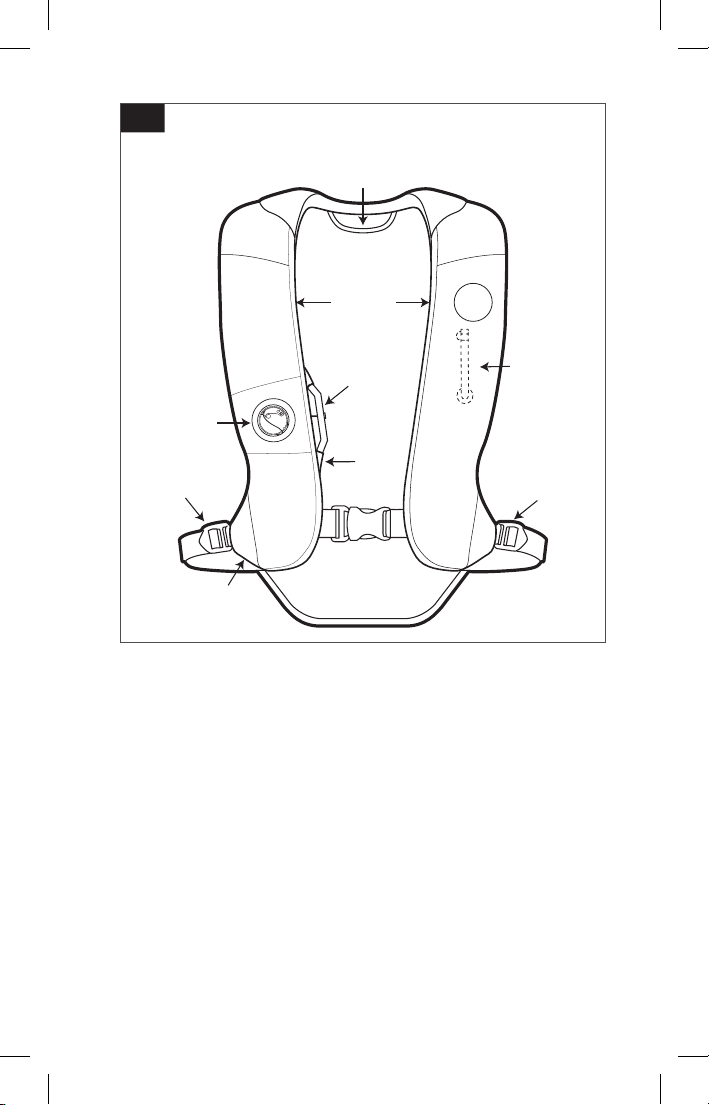
FIG. 1
ELITE INFLATABLE PFD
Hanging Loop
Back Panel
SecureZip
Closure
Oral Inflation
Tube (inside)
Side Adjuster
Hydrostatic
Inflator
Side Adjuster
Zipper Garage
Inflator Pull
Handle
Stretch
Tabs
Front Closure
INSTRUCTIONS FOR USE
GETTING TO KNOW YOUR PFD
As with any safety equipment, it is important to take the time to get
to know your new PFD. Practice putting on your PFD, familiarize
yourself with re-arming and repacking, and know how it will perform.
To create buoyancy in your PFD, it can be inflated with either CO
gas using the inflator, or can be inflated with air using the oral tube.
Inflating your PFD with CO
you fall into the water, or manually by using the pull handle. The
advantage of inflating with CO
a lot of effort from the wearer. The disadvantage is that you need to
re-arm your PFD before you can inflate it with CO
(see "Re-Arming your inflatable PFD" on page 7).
can happen either automatically when
2
is that it is quick and does not require
2
again
2
2
2
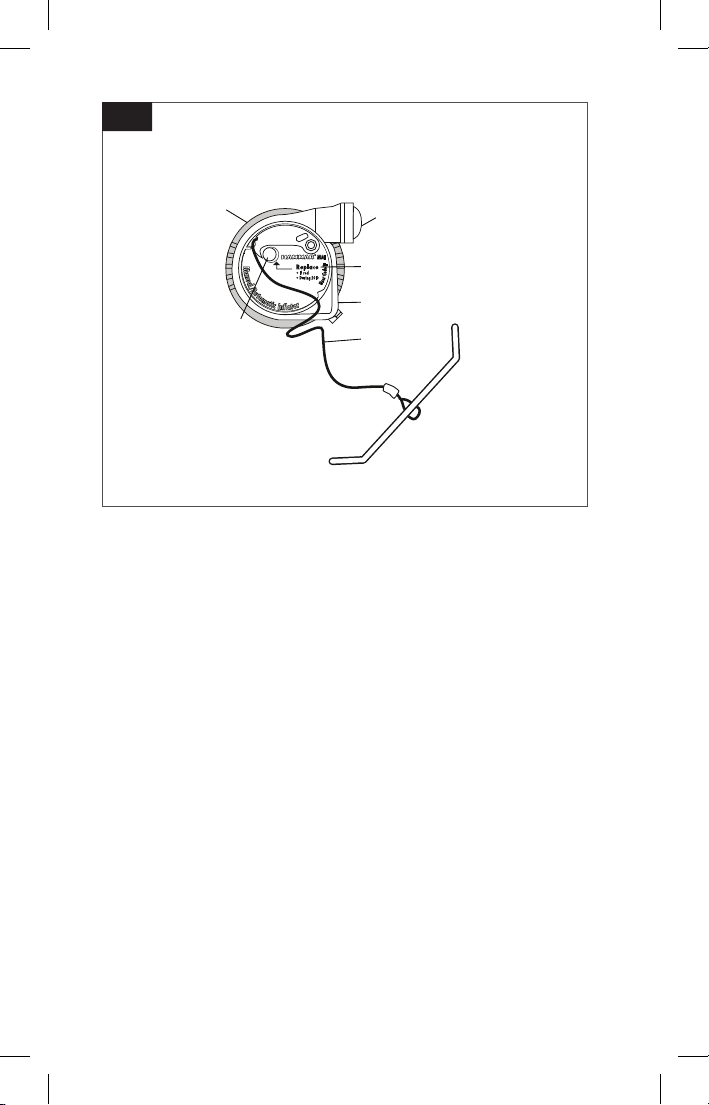
FIG. 2
HYDROSTATIC INFLATOR CAP
Black Locking
Ring
Single
Point
Status
Indicator
Water Inlet Valve
Inflator
Replacement Date
Yellow Inflator Cap
Lanyard
Inflator Pull
Handle
Inflating your PFD with air is done by blowing air into the oral
inflation tube. The advantage of inflating your PFD this way is that
you do not need to re-arm your PFD when you are finished using it.
The disadvantages are that it takes longer to inflate your PFD, and
you are at risk of double inflation. For details on double inflation see
page 5.
For instructions on inflating your PFD see "Inflating your PFD" on
page 5. It is important to check the inflator on your PFD on a
regular basis to make sure that it is ready to go in case you need it.
You can easily tell if the inflator is ready to go by checking the Status
Indicator (Fig. 2). If it’s green, your CO
is properly armed. If it’s red, the CO
needs to be re-armed (see "Re-Arming your inflatable PFD" on page
cylinder is full and your PFD
2
cylinder is empty and your PFD
2
7).
IS YOUR PFD IN GOOD AND SERVICEABLE CONDITION?
Check your PFD between outings to be sure that it is properly armed;
that it is free of rips, tears or holes; that all seams are securely sewn;
and that the fabric, straps and hardware are still strong. Inspect
the inflatable portion of your PFD in accordance with the Care and
Maintenance Instructions (see "Care and Maintenance Instructions"
on page 13).
3
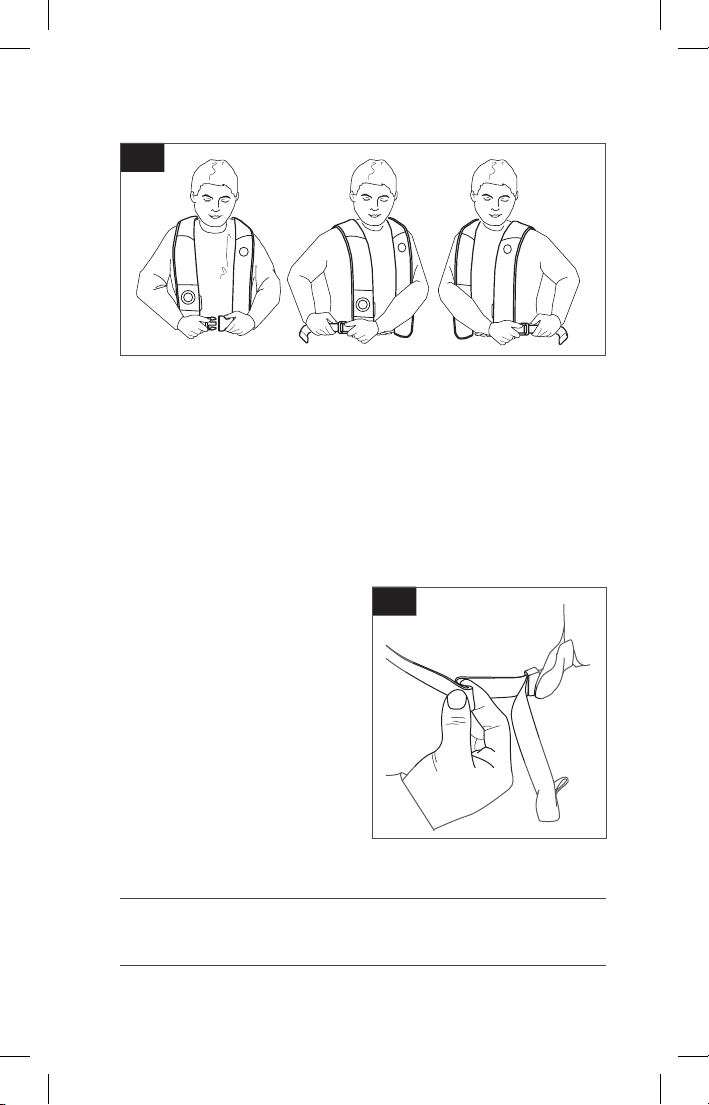
PUTTING ON YOUR INFLATABLE PFD
FIG. 3
It is important that your inflatable PFD is properly adjusted to fit your
body shape. An incorrect fit could result in poor performance. All
belts and straps are already threaded correctly and only need to be
adjusted to a tight personal fit.
1. Put the inflatable PFD on just like a jacket, and then fasten the
front buckle (Fig. 3).
2. Adjust the left and right waist belt one at a time by pulling the
free ends of the webbing upwards and towards your back.
3. Continue to equally adjust
the left and right waist belts
until there is no slack in the
webbing, and there is no
movement of the PFD on your
body.
4. To ensure your PFD is tight
enough, pinch each side of the
waist belt. If you can pinch
the waist belt together (Fig. 4),
it is not tight enough. Continue
to adjust the left and right
waist belts.
FIG. 4
IMPORTANT: Do not wear inflatable PFDs under
clothing as the inflation could be restricted or you
could be injured.
4
INFLATING YOUR PFD
AUTOMATICALLY INFLATING YOUR PFD
Automatic inflation will occur when the inflator is submerged in more
than 4 inches in the water.
MANUALLY INFLATING YOUR PFD
To manually activate the inflation system, firmly grasp the pull handle
(Fig. 5) and quickly pull away from the body until the inflator activates.
FIG. 5
FIG. 6
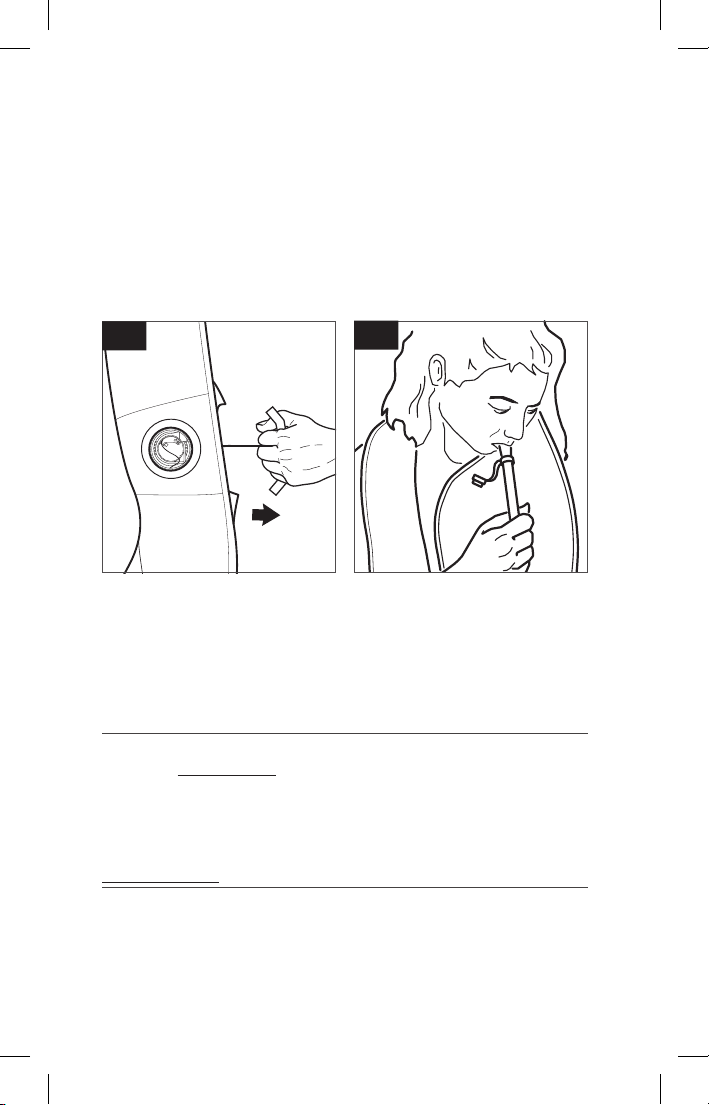
ORALLY INFLATING YOUR PFD
To orally inflate your PFD, first access the oral inflation tube by
opening the cover on your left side, starting at the top. Grasp the
tube, pull it towards your mouth, and blow into the tube to inflate
(Fig. 6). A valve will automatically open and close during inflation to
prevent air leakage
IMPORTANT: DOUBLE INFLATION
DO NOT MANUALLY ACTIVATE THE INFLATOR WHEN
YOUR PFD IS FILLED WITH AIR. Doing so will result in
excessively high pressure within the inflation chamber,
which may cause permanent damage. When your
PFD is completely filled with air, the inflator may not
automatically inflate when exposed to water.
5
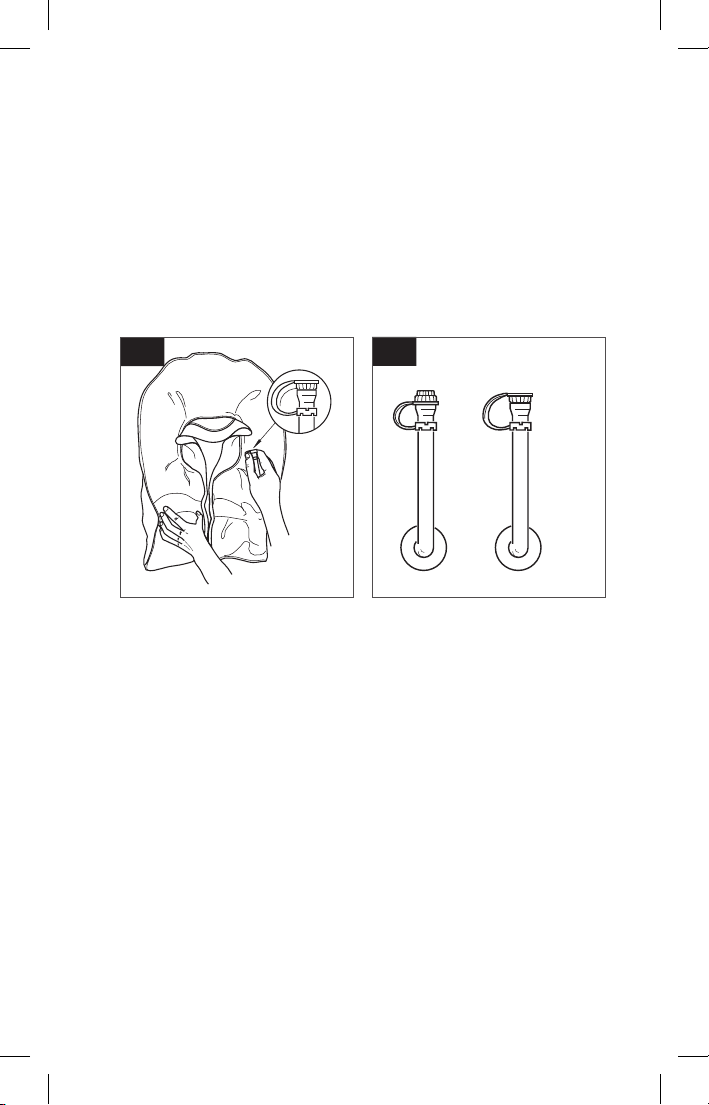
DEFLATING YOUR PFD
1. To deflate your inflatable PFD, reverse the oral inflation tube dust
cap and insert it into the valve (Fig. 7). The dust cap will not lock
the valve in the deflate position so it is necessary to hold it in
place.
2. Gently squeeze your inflatable PFD until all air or CO
expelled.
has been
2
3. Return the oral inflation tube dust cap to its stowed position on
the oral inflation tube (Fig. 8).
FIG. 7
Cap In
Deflate
Position
FIG. 8
Oral Inflation Tube
Dust cap
in stowed
position
Dust cap
in deflation
position
6
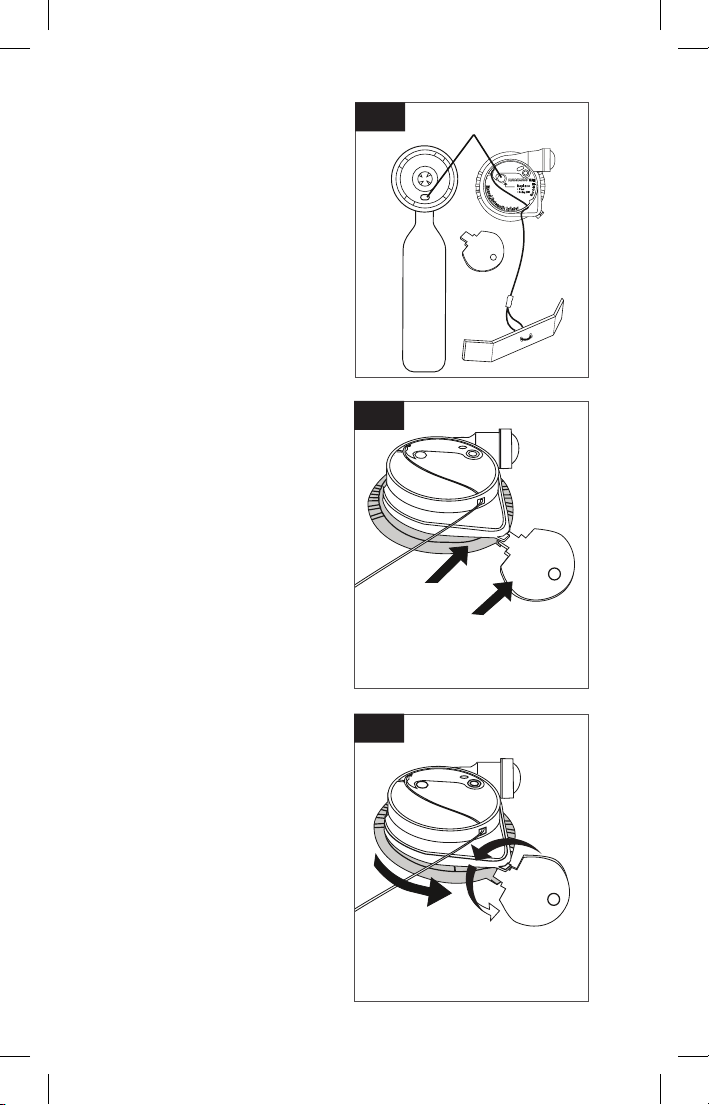
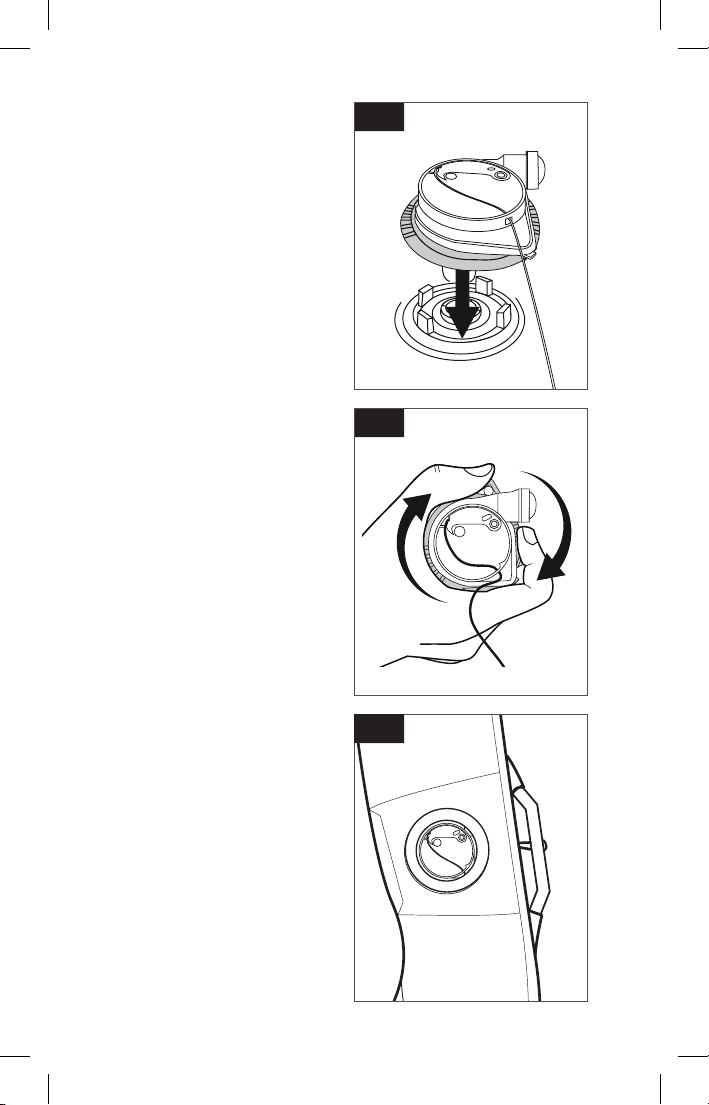
RE-ARMING YOUR
Status Indicator
INFLATABLE PFD
To re-arm your PFD, you will
need Mustang Survival's Re-Arm
Kit MA5183, which includes the
Inflator Removal Key (A), the
Inflator Body & Cylinder (B), and
the Inflator Cap & Pull Handle (C)
(Fig. 9).
1. Check that the status indicator
is green on both the cap and
body. If not green, you will be
unable to re-arm.
2. Place your PFD on a flat
surface so that the inflator is
facing up and wipe off any
water. Pass the pull handle
back through the button hole
so it is on the same side as the
inflator.
3. Insert the Inflator Removal Key
between the yellow inflator cap
and the black locking ring
(Fig. 10), and turn counter
clockwise. The black ring will
rotate counter clockwise behind
the yellow inflator cap (Fig. 11).
4. Turn the black locking ring
fully counter clockwise and
pull the inflator cap off the
bladder (Fig. 12, Fig. 13).
Discard.
5. Squeeze the sealing ring to
elongate and remove the black
inflator body and cylinder from
inside the bladder (Fig. 14).
Discard (Fig. 15).
FIG. 9
C
B
A
FIG. 10
Locking Ring
Key
FIG. 11
7
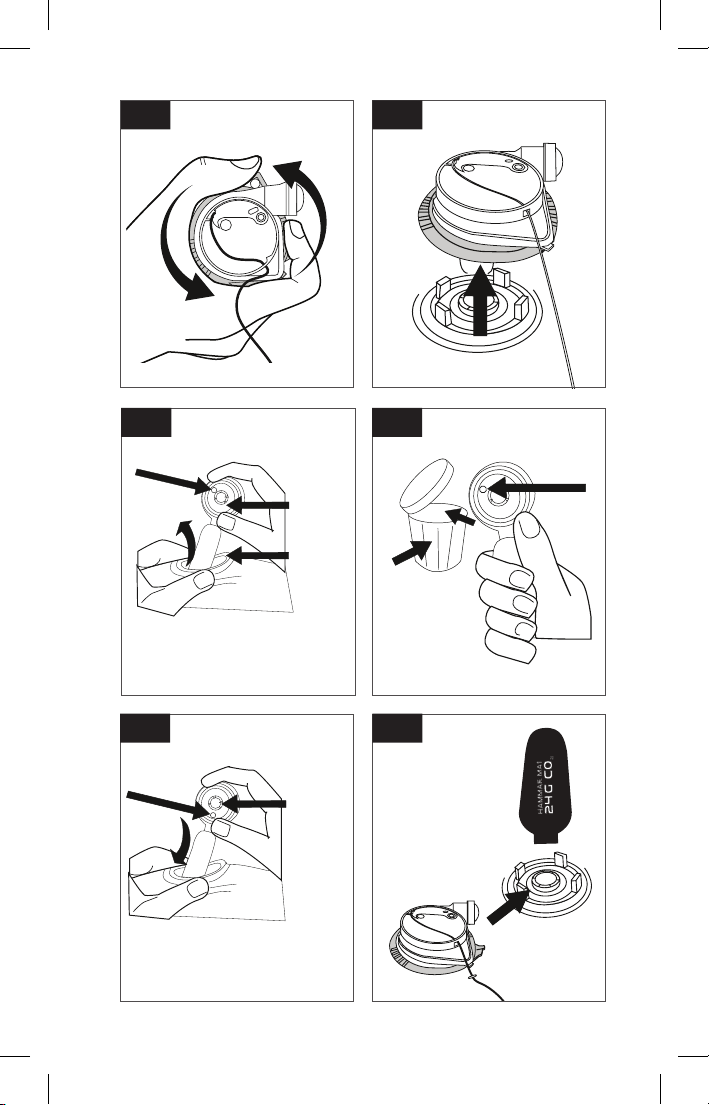
FIG. 12
FIG. 13
FIG. 14
Red Indicator
FIG. 16
Green Indicator
Inflator Body
Sealing Ring
CAUTION:
Do not turn the
center shaft
FIG. 15
Red Indicator
Trash
FIG. 17
8
6. Check that the new inflator
body indicator is green. Insert
the black inflator body and
cylinder into the bladder
(Fig. 16). Align the cylinder
with the outline printed on
the bladder (Fig. 17). Ensure
that the inflator body is evenly
contacting the sealing ring.
7. Check that the new inflator
cap has a green status
indicator and that the expiry
date is ok. If indicator is red
or expiry date is not ok, get a
new re-arm kit.
8. While holding the CO
through the bladder fabric,
cylinder
2
align the new inflator cap on
the inflator body (Fig. 18) with
the water inlet valve pointing
to the right, press down
FIRMLY, and rotate the BLACK
locking ring clockwise behind
the yellow inflator cap. The
black ring will click into place
(Fig. 19). Pull on the cap to
ensure that it is securely locked
into the inflator body.
9. Pass the inflator pull handle
through the button hole,
and secure the ends into the
stretch tabs (Fig. 20), taking
care not to pull the lanyard
and inadvertently inflate your
PFD.
10. Repack your PFD (see
"Re-Packing your inflatable
PFD" on page 10).
FIG. 18
FIG. 19
FIG. 20
9
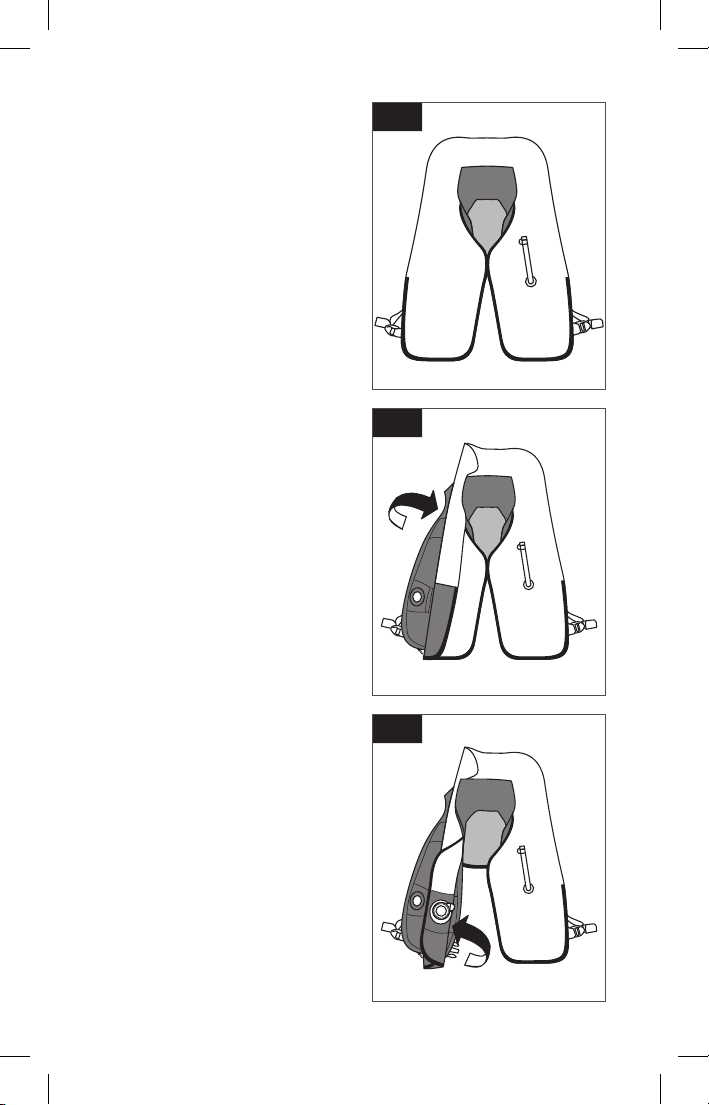
RE-PACKING YOUR
INFLATABLE PFD
Before repacking your PFD, and
especially after re-arming, make
sure there is no residual air in
the bladder. It is important that
all of the air has been removed
from the bladder, or you may have
difficulties properly packing your
PFD (see "Deflating your PFD"
on page 6). In extreme cases,
performance may be affected.
1. Extend both sides of the waist
belt to the maximum position,
and lay your PFD on a smooth,
flat surface (Fig. 21).
2. Starting on the side with the
inflator, fold the outside edge
in towards the middle so that
the curves at the neck meet
(Fig. 22).
3. Fold the inside edge back
towards the outside of the
PFD, so that the inflator is now
sitting on top (Fig. 23). Pass
the pull handle through the
button hole and secure the
ends in the stretch tabs.
4. Fold the outer cover over the
bladder, and secure the top
with the Velcro tabs (Fig. 24).
5. Fold the bottom edge of the
bladder up (Fig. 25).
FIG. 21
FIG. 22
FIG. 23
10
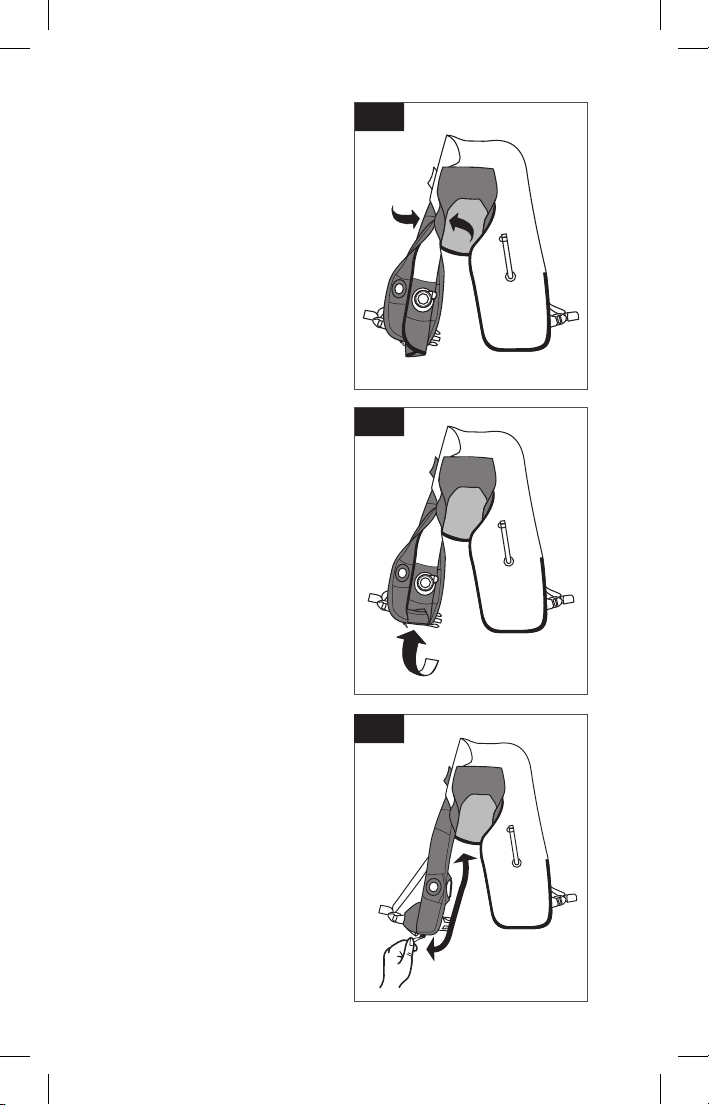
6. Reset the zipper by pulling the
slider from the zipper garage
to the top of the zipper, and
close the zipper by returning
the slider to the bottom and
tucking into the zipper garage
(Fig. 26).
7. Repeat steps 2-6 on the left
side (Fig. 27).
8. Fold the top edge of the
bladder down once (Fig. 28),
tuck corners under the cover,
and fold the sides over
(Fig. 29). Fold the cover flap
down and secure with Velcro
strip (Fig. 30).
9. Ensure pull handle ends are
secured into the stretch tabs
(Fig. 31), and ensure that the
single point status indicator
on the inflator cap is visible
through the window.
FIG. 24
FIG. 25
11
FIG. 26
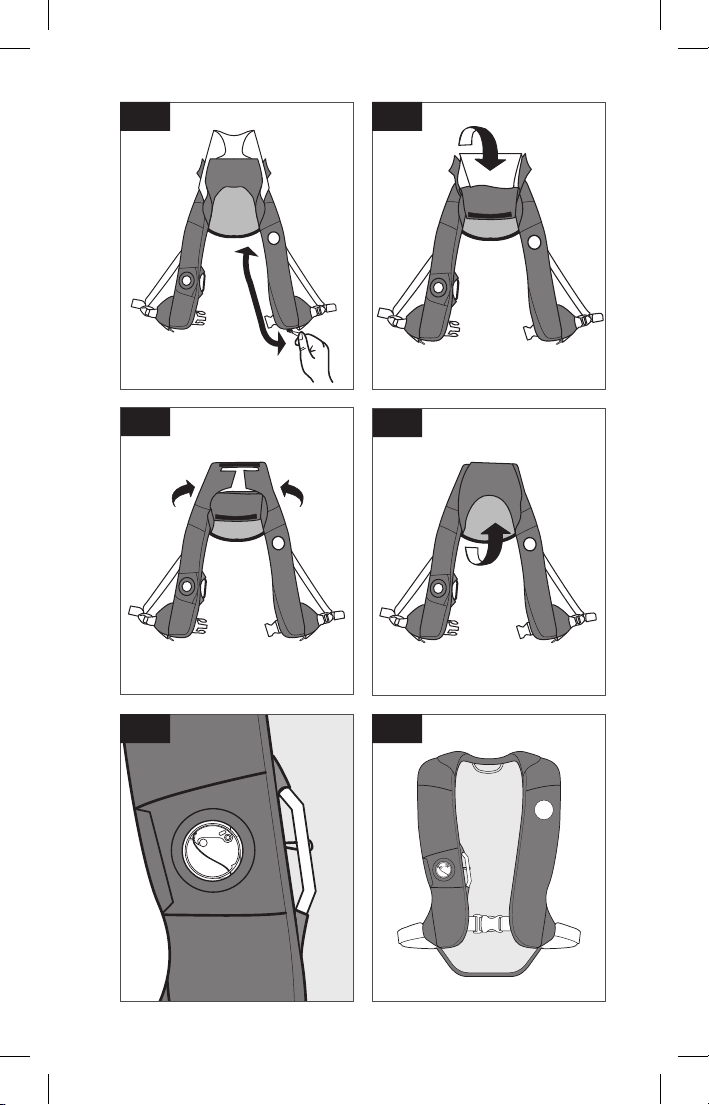
FIG. 27 FIG. 28
FIG. 29
FIG. 31
FIG. 30
FIG. 32
12

USAGE BELOW FREEZING [0OC / 32OF]
If you choose to use your PFD below freezing, performance will not
be as expected. Below freezing, a discharged cylinder may not fully
inflate your PFD to the intended pressure. You will need to rely on
your back up oral inflation system to adjust the internal pressure
to achieve adequate buoyancy (see "Orally inflating your PFD" on
page 5).
CARE AND MAINTENANCE INSTRUCTIONS
It is important to care for and maintain your inflatable PFD in order to
ensure it will perform as designed when you need it. To keep a record
of the inspections performed on your PFD, use the label provided
under the back flap. If you are not confident in the self-inspection and
servicing of your inflatable PFD in accordance with these instructions,
contact Mustang Survival customer service.
INSPECTING YOUR INFLATABLE PFD
Before Each Use:
o Examine the single point status indicator ensuring it is green.
If the indicator is red, your PFD needs to be re-armed (see
"Re-Arming your inflatable PFD" on page 7).
o Ensure the manual pull-handle is properly stowed in the
stretch tabs.
o Visually examine your inflatable PFD for damage or excessive
abrasion, wear, tear and/or contamination. If any item shows
signs of damage, perform tasks listed in "Every Six (6) Months"
inspection details.
Every Six (6) Months:
In addition to the inspections specified for before each use, perform
the following at least every 6 months, or more often if exposed to
potential damage or used in extreme conditions.
o Leak Test: Your Inflatable PFD should be tested for leakage by
inflating with air until firm and leaving it to stand for at least
2 hours in a temperature controlled environment. A leaking
Inflatable PFD will not remain firm and should be replaced. If
your Inflatable PFD leaks, contact Mustang Survival
customer service.
13
 Loading...