

Mustang MTB/Cross, Pedelec/E-bike Operating Instructions Manual
MTB / CROSS
PEDELEC / E-BIKE
ATTENTION!
Please read pages 13-18 before your first ride!
Please perform the functional check on pages 19-22 before every ride!
Please observe bike card!
Your MUSTANG bicycle and this translation of these original operating instructions comply with the
safety requirements laid down in the European standard EN 14766 mountain bike and EN 15194 are
referred to as pedelecs.
OPERATING INSTRUCTIONS
www.ridemustang.com
Rahmen:
a
Oberrohr
b
Unterrohr
c
Sitzrohr
d
Kettenstrebe
1 Sattel
2 Sattelstütze
3 Sattelstützenklemme
4 Bremse hinten
5 Bremsscheibe
6 Umwerfer
7 Zahnkranz
8 Schaltwerk
9 Kette
10 Kettenblatt
Frame:
a
Top tube
b
Down tube
c
Seat tube
d
Chainstay
1 Saddle
2 Seat post
3 Seat post clamp
4 Rear brake
5 Rotor
6 Front derailleur
7 Cassette sprockets
8 Rear derailleur
9 Chain
10 Chainring
Cadre :
a
Tube supérieure
b
Tube diagonale
c
Tube de selle
d
Base
1 Selle
2 Tige de selle
3 Collier de serrage
de selle
4 Frein arrière
5 Disque de frein
6 Dérailleur avant
7 Jeu de pignons
8 Dérailleur arrière
9 Chaîne
e
Sitzstrebe
f
Steuerrohr
g
Stoßdämpfer
e
Rear stay
f
Head tube
g
Rear Shock
e
Hauban
f
Tube de direction
g
Amortisseur
BAUTEILBESCHREIBUNG
Federgabel:
I
II
III
IV
11 Tretkurbel
12 Pedal
13 Vorbau
14 Lenker
15 Bremshebel
16 Schalthebel
17 Lenkungslager
18 Bremse vorne
19 Bremsscheibe
Gabelkopf
Standrohr
Tauchrohr
Ausfallende
A
B
C
Bedieneinheit
Laufrad:
20 Schnellspanner/
Steckachse
21 Speiche
22 Felge
23 Reifen
24 Nabe
COMPONENTS
11 Crankset
12 Pedal
13 Stem
14 Handlebar
15 Brake lever
16 Shifter
17 Headset
18 Front brake
19 Rotor
Suspension fork:
I
Fork crown
II
Stanchion tube
III
Lower leg
IV
Drop-out
A
B
C
control element
Wheel:
20 Quick-release/
thru axle
21 Spoke
22 Rim
23 Tyre
24 Hub
DESCRIPTION DES COMPOSANTS
Fourche suspendue :
I
Té de fourche
II
Plongeur
III
Fourreau
IV
Patte de fi xation
10 Plateau
11 Manivelle
12 Pédale
13 Potence
14 Cintre
15 Levier de frein
16 Manette de vitesse
17 Jeu de direction
18 Frein avant
19 Disque de frein
A
B
C
et visuel
Roue :
20 Attache rapide/
Axes traversants
21 Rayon
22 Jante
23 Pneumatique
24 Moyeu
Motor
Akku
Display und
Motor
Rechargeable battery
Display and
Moteur
Batterie
Unité de commande
10
11
12
4, 5
10
11
12
13
1
14
15
2
3
a
6
4
5
e
g
c
f
I
II
b
III
7
8
d
IV
9
16
17
18
19
20
21
22
23
24
13
1
C
2
3
f
a
c
6
7
A
8
e
d
B
b
I
II
III
IV
9
14
15
16
17
18
19
20
21
22
23
24

SOME NOTES ON THESE ORIGINAL
OPERATING INSTRUCTIONS
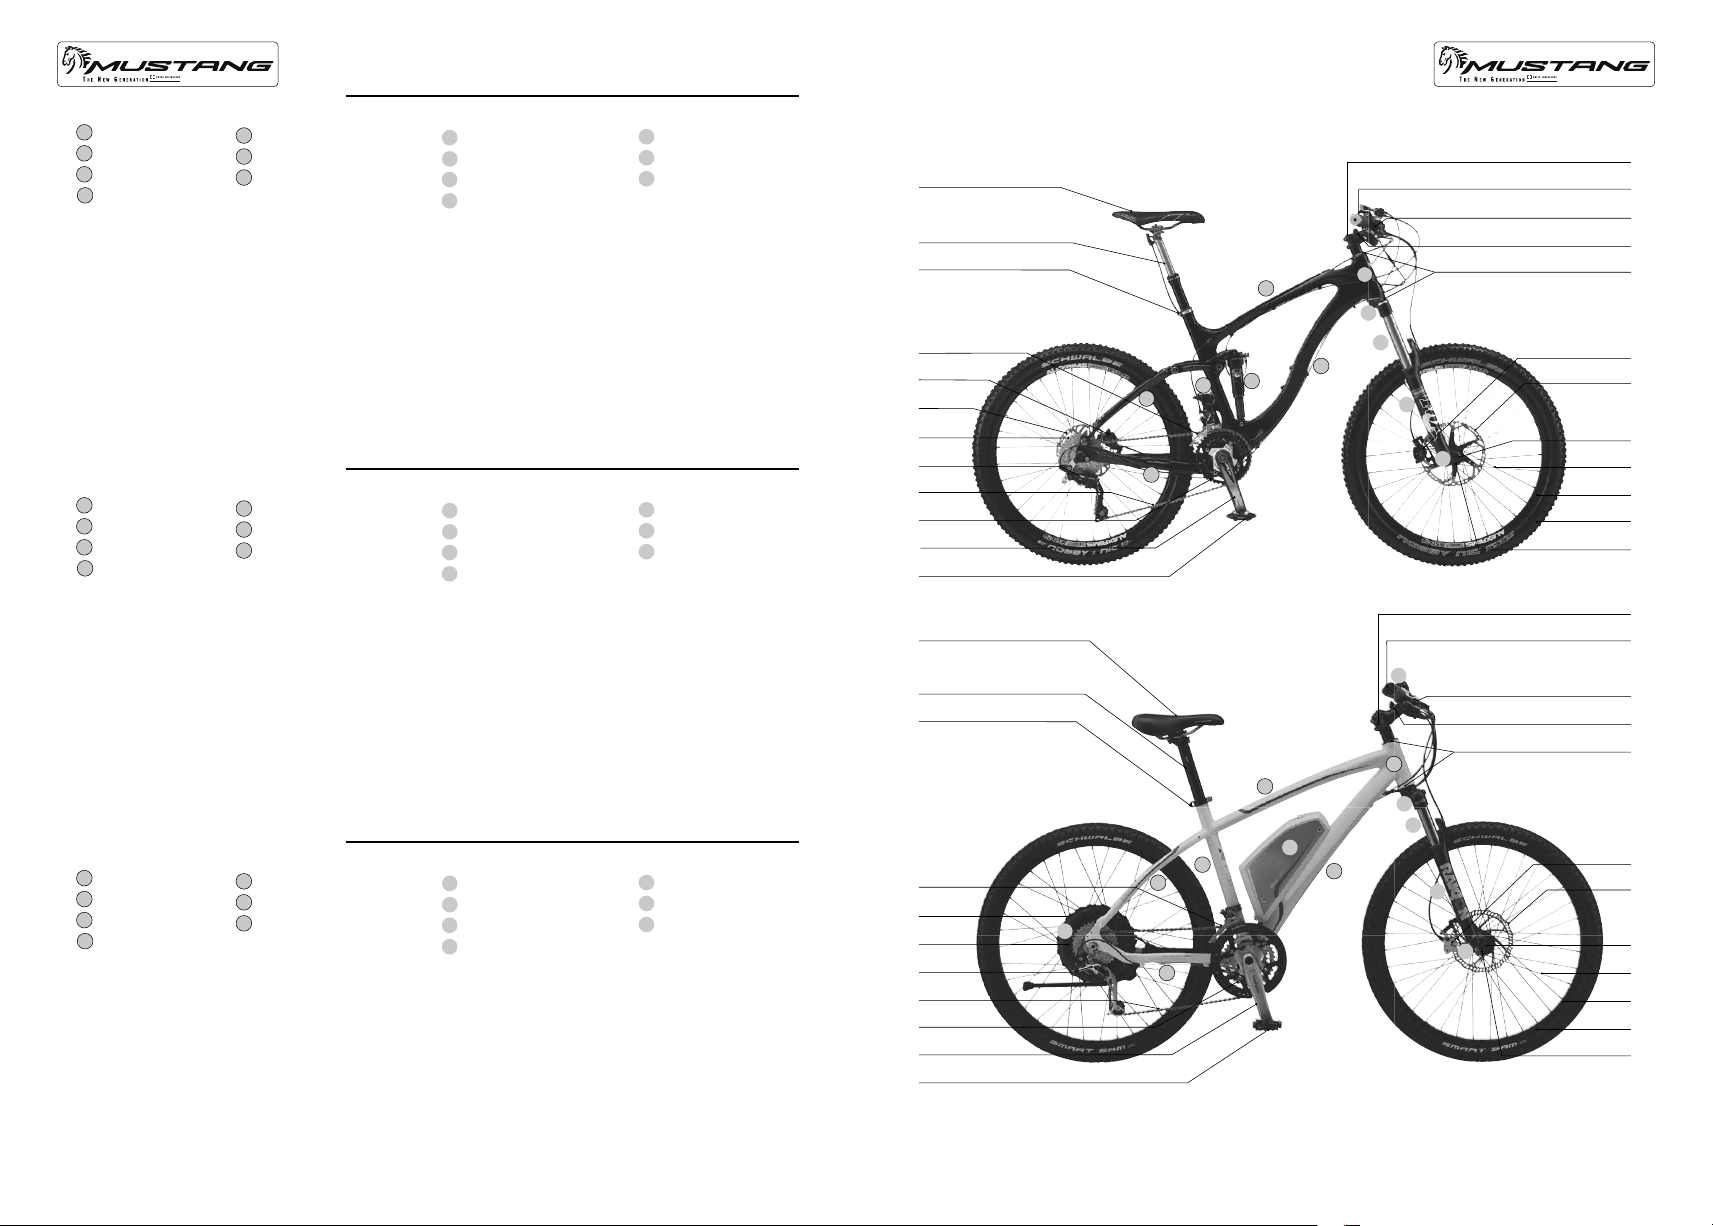
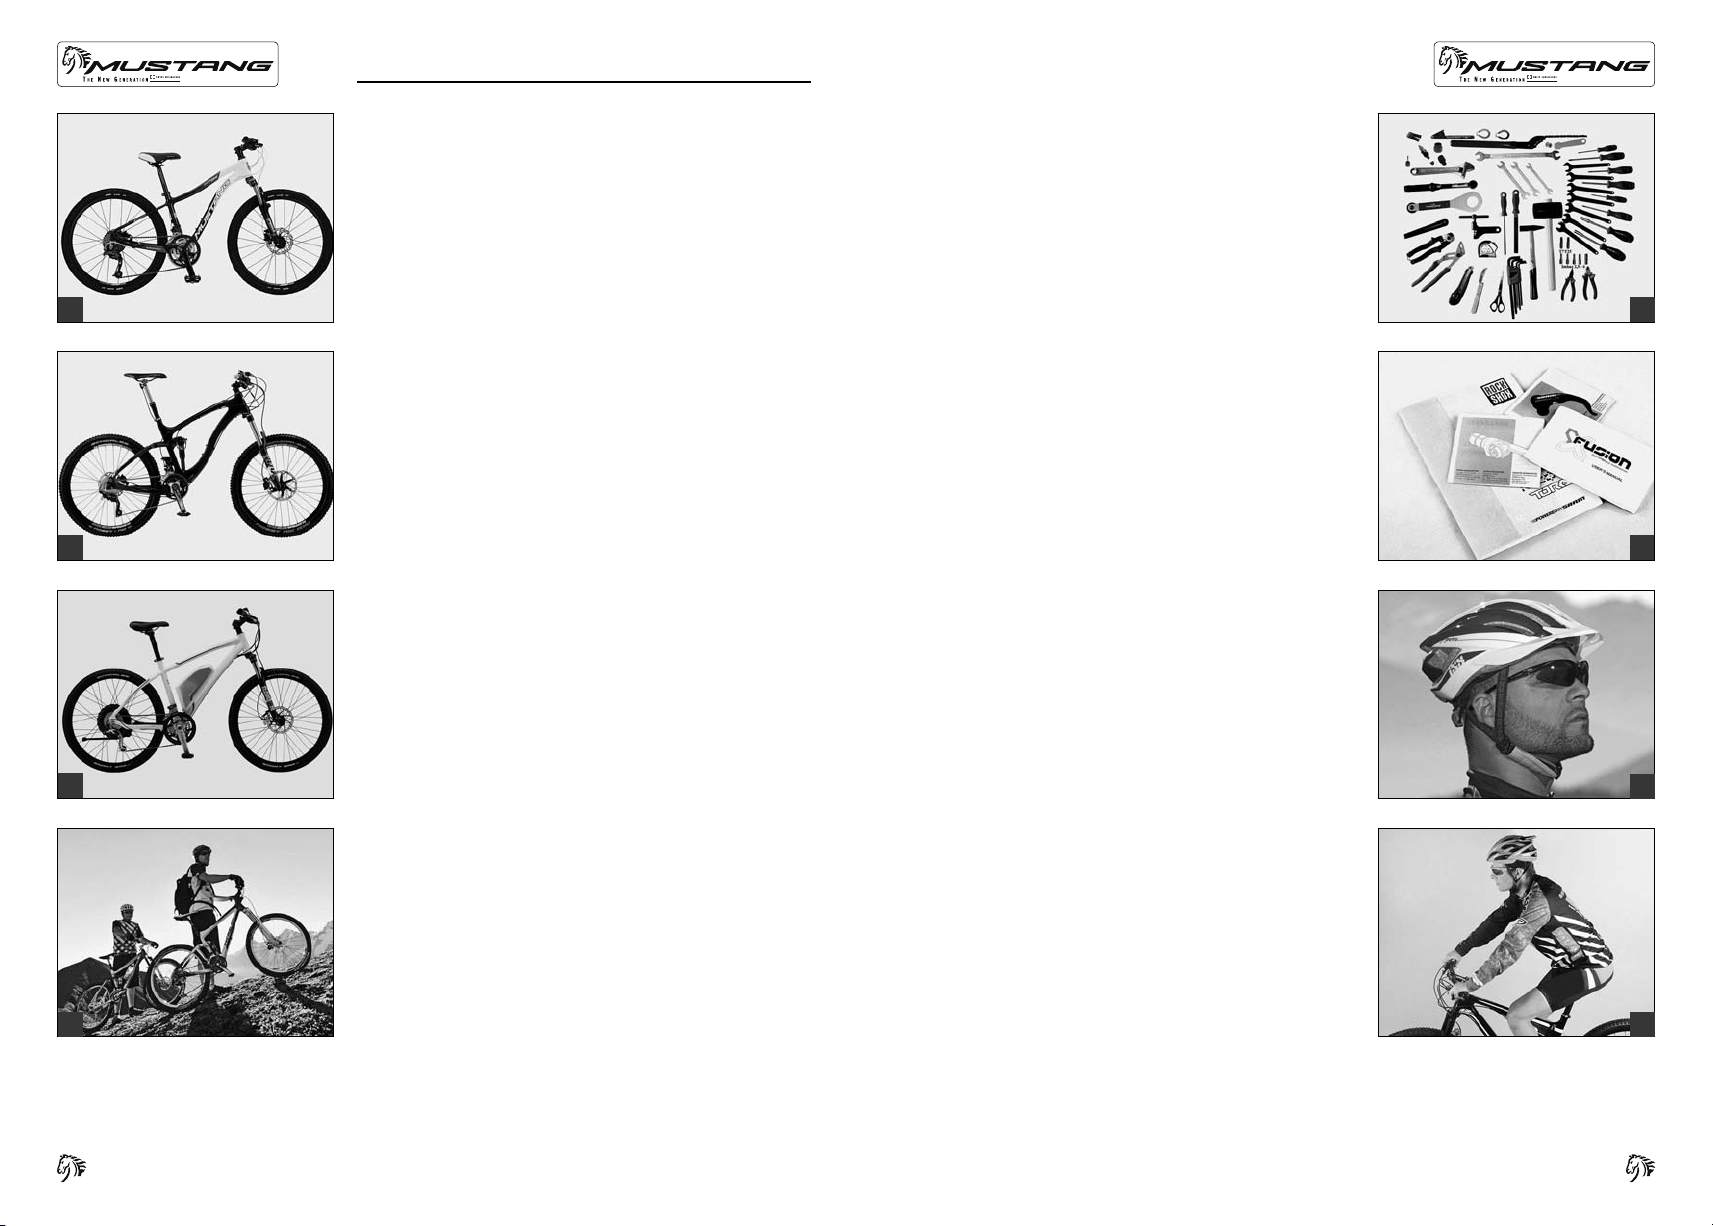
The illustration shows a typical mountain bike and an E-bike/pedelec –
this type corresponds to the MUSTANG bicycle or MUSTANG pedelec
that you have just purchased. Today’s bicycles and e-bikes/pedelecs
come in a great many types that are designed for specific uses and are
equipped accordingly.
In the present operating instructions bicycles with drive support and
described as EPACs in the European standard EN 15194 are referred to
as pedelecs. For a precise description of the different EPAC types see
the chapter “Intended Use”.
In these operating instructions the term “bicycle” will always be used
in general descriptions if this refers to mountain bikes and pedelecs. If
the warnings or information relate only to pedelecs then these will be
marked with a special symbol.
Pay particular attention to the following symbols:
e
This symbol indicates an imminent risk to your life or health
g
unless you comply with the corresponding handling in-
structions given or take preventive measures.
This symbol warns you of incorrect actions that could result
a
in damage to property and the environment.
This symbol provides you with information about how to
I
handle the product or refers to a passage in the operating
instructions that deserves your special attention.
The following symbols always appear if it is necessary to bring your
attention to special points concerning pedelecs. If you have purchased
a MUSTANG pedelec then you should pay special attention to this information and these warnings. Please note as well in all cases the general
warning information given in these operating instructions.
f
g
h
1
TABLE OF CONTENTS
This symbol indicates an imminent risk to your life or health
H
unless you comply with the corresponding handling instructions given or take preventive measures when using your
MUSTANG pedelec. Please note as well in all cases the general warning information given in these operating instructions.
This symbol warns you of incorrect actions that could re-
S
a
sult in damage to property and the environment when using
your MUSTANG pedelec. Please note as well in all cases
the general warning information given in these operating
instructions.
This symbol provides you with information about how to
u
handle the MUSTANG pedelec or refers to a passage in the
operating instructions that deserves your special attention.
Please note as well in all cases the general warning information given in these operating instructions.
The described possible consequences will not be repeated in these op-
b
erating instructions every time one of the symbols appears.
This translation of the operating instructions is not intended to help you
assemble a MUSTANG bicycle from individual components, to repair it
or to make a partly assembled bicycle ready for use.
These operating instructions are not applicable to any other than
the displayed bicycle types.
These operating instructions correspond to the requirements of the
European standards EN 14766 for mountain bikes and EN 15194 for
c
Cycles – Electrically power assisted cycles– EPAC bicycles and the
Machinery Directive 2006/42/EU.
Comply also with the instructions of the parts manufacturers, which you
can find on the enclosed CD.
The present operating instructions are subject to European law. If your
MUSTANG bicycle is to be delivered to countries outside Europe, supplementary information has to be provided by the bicycle manufacturer
as the case may be.
Technical details in the text and illustrations of these operating instruc-
d
tions are subject to change.
SOME NOTES ON THESE ORIGINAL OPER ATING INSTRUCTIONS 1
TABLE OF CONTENTS 3
GENER AL SAFETY NOTES 6
INTENDED USE 9
BEFORE YOUR FIRST RIDE 13
Additional information “Before Your First Ride” with your MUSTANG Pedelec .................................................. 17
BEFORE EVERY RIDE 19
Additional information “Before Ever y Ride” with your MUSTANG Pedelec .........................................................22
AFTER AN ACCIDENT 23
Additional information “After an Accident” with your MUSTANG Pedelec ..........................................................26
HOW TO USE QUICK-RELEASES AND THRU AXLES 27
Quick-releases ..................................................................................................................................................27
How to Fasten Components Securely with a Quick-Release
Thru Axles .........................................................................................................................................................30
Notes on How to Mount Front Wheels
Notes on How to Mount Rear Wheels
ADJUSTING THE MUSTANG BICYCLE TO THE RIDER 33
Setting the Saddle Height ..................................................................................................................................34
Adjusting the Height of the Handlebars .............................................................................................................36
Adjustable Stems ..............................................................................................................................................37
Stems for Threadless Systems, the Aheadset
Adjusting the Tilt of the Handlebars, Bar Ends and Brake Levers ......................................................................39
Adjusting the Brake Lever Reach....................................................................................................................... 41
Correcting the Fore-To-Af t Position and Tilt of the Saddle ................................................................................ 42
Adjusting Saddle Position and Tilt ....... ..... ..... ..... .... ... ..... ..... .... ... ..... ..... .... ... ..... ..... .... ... ..... ..... ....... ..... ..... ....... ..... ..... ..... 43
Patent clamping with one bolt or two parallel bolts ........................................................................................43
Clamping with t wo bolts in line ..................................................................................................................... 44
Single bolt system . ... ..... ..... .... ... ..... ..... .... ... ..... ..... .... ... ..... ..... .... ... ..... ..... ....... ..... ..... ....... ..... ..... ..... .... ... ..... ..... .... ... ..... 45
Ritchey “Mast Topper” . ... ..... .... ... ..... ..... ....... ..... ..... ....... ..... ..... ....... ..... ..... ..... .... ... ..... ..... .... ... ..... ..... .... ... ..... ..... ....... ..46
Seat post Monorail ... ..... .... ... ..... ..... .... ... ..... ..... ....... ..... ..... ....... ..... ..... ..... .... ... ..... ..... .... ... ..... ..... .... ... ..... ..... .... ... ..... ..... 46
CARBON – IMPORTANT INFORMATION 47
MUSTANG DIRT, FREERIDE, DOWNHILL BIKES – SPECIAL FEATURES 49
Adjusting the saddle to the correct height
BRAKE SYSTEM 51
General Information on Brakes .......................................................................................................................... 51
Rim Brakes........................................................................................................................................................ 53
V-Brakes
..... ..... ..... .... ... ..... ..... .... ... ..... ..... .... ... ..... ..... ....... ..... ..... ....... ..... ..... ....... ..... ..... ..... .... ... ..... ..... .... ... ..... ..... .... ... ..... .53
Operation and Wear . ..... ....... ..... ..... ....... ..... ..... ..... .... ... ..... ..... .... ... ..... ..... .... ... ..... ..... .... ... ..... ..... ....... ..... ..... ....... ..... ..... 53
Functional Check ... ..... ..... .... ... ..... ..... .... ... ..... ..... .... ... ..... ..... ....... ..... ..... ....... ..... ..... ....... ..... ..... ..... .... ... ..... ..... .... ... ..... .. 53
Synchronising and Readjusting ... ..... .... ... ..... ..... .... ... ..... ..... ....... ..... ..... ....... ..... ..... ....... ..... ..... ..... .... ... ..... ..... .... ... ..... .. 54
Disc Brakes ....................................................................................................................................................... 55
Operation and Wear . ..... .... ... ..... ..... ....... ..... ..... ....... ..... ..... ..... .... ... ..... ..... .... ... ..... ..... .... ... ..... ..... .... ... ..... ..... ....... ..... ..... 55
Hydraulic Disc Brakes ... ..... .... ... ..... ..... .... ... ..... ..... .... ... ..... ..... .... ... ..... ..... ....... ..... ..... ....... ..... ..... ..... .... ... ..... ..... .... ... ..... .... 56
Functional Check ... ..... ..... .... ... ..... ..... .... ... ..... ..... .... ... ..... ..... .... ... ..... ..... ....... ..... ..... ....... ..... ..... ..... .... ... ..... ..... .... ... ..... .. 56
Wear and Maintenance .. ..... .... ... ..... ..... .... ... ..... ..... .... ... ..... ..... ....... ..... ..... ....... ..... ..... ..... .... ... ..... ..... .... ... ..... ..... .... ... ... 56
Mechanical Disc Brakes ... ..... ....... ..... ..... ..... .... ... ..... ..... .... ... ..... ..... .... ... ..... ..... .... ... ..... ..... ....... ..... ..... ....... ..... ..... ..... .... ... 57
Functional Check ... ..... ..... .... ... ..... ..... .... ... ..... ..... .... ... ..... ..... ....... ..... ..... ....... ..... ..... ....... ..... ..... ..... .... ... ..... ..... .... ... ..... .. 57
Wear and Maintenance .. ..... .... ... ..... ..... .... ... ..... ..... ....... ..... ..... ....... ..... ..... ....... ..... ..... ..... .... ... ..... ..... .... ... ..... ..... .... ... ... 57
... ..... .... ... ..... ..... .... ... ..... ..... .... ... ..... ..... ....... ..... ..... ....... ..... ..... ....... ..... ..... ..... .... ... .30
... ..... .... ... ..... ..... ....... ..... ..... ....... ..... ..... ..... .... ... ..... ..... .... ... ..... ..... .... ... ..... ..... .... ... .32
®
System ..................................................................................... 37
.. ..... ..... ....... ..... ..... ....... ..... ..... ..... .... ... ..... ..... .... ... ..... ..... .... ... ..... ..... .... ... ..... .. 50
.... ..... ..... ..... .... ... ..... ..... .... ... ..... ..... .... ... ..... ..... ....... ..... ..... 28
2
3
GEARS 58
Derailleur Gears ................................................................................................................................................58
Operation and Control ..................................................................................................................................58
Checking and Readjusting
.... ..... ..... ....... ..... ..... ....... ..... ..... ..... .... ... ..... ..... .... ... ..... ..... .... ... ..... ..... ....... ..... ..... ....... ..... .... 60
Adjusting the Rear Derailleur ... ..... ....... ..... ..... ..... .... ... ..... ..... .... ... ..... ..... .... ... ..... ..... ....... ..... ..... ....... ..... ..... ....... ..... ..... 61
Adjusting the Limit Stops . .... ... ..... ..... .... ... ..... ..... .... ... ..... ..... ....... ..... ..... ....... ..... ..... ....... ..... ..... ..... .... ... ..... ..... .... ... ..... .61
Adjusting the Front Derailleur .. ... ..... ....... ..... ..... ....... ..... ..... ..... .... ... ..... ..... .... ... ..... ..... .... ... ..... ..... ....... ..... ..... ....... ..... ... 62
CHAIN – CARE AND WE AR 63
WHEELS AND T YRE EQUIPMENT 64
Tyres, Inner Tubes, Rim Tape, Inflation Pressure ............................................................................................... 64
Valves................................................................................................................................................................ 65
Rim Trueness and Spoke Tension ......................................................................................................................67
TYRE PUNCTURE 68
Wheel Removal .................................................................................................................................................68
Clincher and Folding Tyres ................................................................................................................................69
Tyre Removal
..... .... ... ..... ..... .... ... ..... ..... ....... ..... ..... ....... ..... ..... ....... ..... ..... ..... .... ... ..... ..... .... ... ..... ..... .... ... ..... ..... ....... ..... .... 69
Tyre Mounting ... ..... ..... .... ... ..... ..... .... ... ..... ..... ....... ..... ..... ....... ..... ..... ..... .... ... ..... ..... .... ... ..... ..... .... ... ..... ..... .... ... ..... ..... ....... 70
Tubeless/UST tyres ...........................................................................................................................................72
Tyre Removal
Repair
..... .... ... ..... ..... .... ... ..... ..... ....... ..... ..... ....... ..... ..... ....... ..... ..... ..... .... ... ..... ..... .... ... ..... ..... .... ... ..... ..... ....... ..... .... 72
.. ..... ....... ..... ..... ..... .... ... ..... ..... .... ... ..... ..... .... ... ..... ..... .... ... ..... ..... ....... ..... ..... ....... ..... ..... ..... .... ... ..... ..... .... ... ..... ..... .... 72
Tyre Mounting ... ..... ..... .... ... ..... ..... .... ... ..... ..... ....... ..... ..... ....... ..... ..... ..... .... ... ..... ..... .... ... ..... ..... .... ... ..... ..... .... ... ..... ..... ....... 72
Tubular Tyres ..................................................................................................................................................... 73
Tyre Removal .... ..... ....... ..... ..... ....... ..... ..... ....... ..... ..... ..... .... ... ..... ..... .... ... ..... ..... .... ... ..... ..... ....... ..... ..... ....... ..... ..... ....... ..... 73
Tyre Mounting
.... ..... ..... ....... ..... ..... ..... .... ... ..... ..... .... ... ..... ..... .... ... ..... ..... ....... ..... ..... ....... ..... ..... ....... ..... ..... ..... .... ... ..... ..... . 73
Wheel Mounting ................................................................................................................................................ 75
HEADSET 76
Checking and Readjusting .................................................................................................................................76
Threadless Headset – Aheadset
®
.................................................................................................................... 77
SUSPENSION 78
Glossary ............................................................................................................................................................ 78
Suspension Forks .............................................................................................................................................. 79
Adjusting the Spring Rate
.... ... ..... ....... ..... ..... ....... ..... ..... ..... .... ... ..... ..... .... ... ..... ..... .... ... ..... ..... .... ... ..... ..... ....... ..... ..... ...... 79
Damping and Lockout .... ... ..... ....... ..... ..... ....... ..... ..... ..... .... ... ..... ..... .... ... ..... ..... .... ... ..... ..... .... ... ..... ..... ....... ..... ..... ....... ..... 81
Maintenance . ..... .... ... ..... ..... .... ... ..... ..... ....... ..... ..... ....... ..... ..... ....... ..... ..... ..... .... ... ..... ..... .... ... ..... ..... .... ... ..... ..... ....... ..... .... 82
Rear Shock ........................................................................................................................................................ 83
What to Bear in Mind when Adjusting the Seating Position . ... ..... ..... ....... ..... ..... ....... ..... ..... ....... ..... ..... ..... .... ... ..... .. 83
Adjusting the Spring Rate .. ... ..... ..... .... ... ..... ..... ....... ..... ..... ....... ..... ..... ..... .... ... ..... ..... .... ... ..... ..... .... ... ..... ..... .... ... ..... ..... ... 84
Adjusting the Damping Control .... ..... ..... ....... ..... ..... ....... ..... ..... ..... .... ... ..... ..... .... ... ..... ..... .... ... ..... ..... ....... ..... ..... ....... ..... .86
Adjusting the Travel .. ..... ..... .... ... ..... ..... ....... ..... ..... ....... ..... ..... ....... ..... ..... ..... .... ... ..... ..... .... ... ..... ..... .... ... ..... ..... ....... ..... .... 87
Maintenance . ..... .... ... ..... ..... .... ... ..... ..... .... ... ..... ..... ....... ..... ..... ....... ..... ..... ..... .... ... ..... ..... .... ... ..... ..... .... ... ..... ..... .... ... ..... .... 87
PEDELECS 89
Useful Tips for Riding a MUSTANG Pedelec ....................................................................................................... 89
Riding with Drive Assistance
.... .... ... ..... ..... ....... ..... ..... ....... ..... ..... ....... ..... ..... ..... .... ... ..... ..... .... ... ..... ..... .... ... ..... ..... ....... .. 89
Range – Useful Information for a Long Ride .... ... ..... ....... ..... ..... ....... ..... ..... ....... ..... ..... ..... .... ... ..... ..... .... ... ..... ..... .... ... .... 91
Riding Without Drive Assistance . ..... ..... .... ... ..... ..... .... ... ..... ..... .... ... ..... ..... ....... ..... ..... ....... ..... ..... ..... .... ... ..... ..... .... ... ..... .92
Riding a MUSTANG Speed Pedelec – Special Features .....................................................................................93
Useful Information for Proper Handling of the Battery .......................................................................................95
LIGHTING SYSTEM 98
Battery-Powered Lighting .................................................................................................................................98
THINGS YOU NEED TO KNOW ABOUT BICYCLES AND CYCLING 99
Cycling Helmets and Glasses ............................................................................................................................99
Clothing ............................................................................................................................................................. 99
Pedals and Shoes ............................................................................................................................................ 100
Accessories ..................................................................................................................................................... 101
TRANSPORTING BAGGAGE 104
TAKING CHILDREN WITH YOU 105
Child-Carrier seats .......................................................................................................................................... 105
Child Trailers ...................................................................................................................................................105
Children’s bicycle Towing Devices / ................................................................................................................ 106
Towing Systems ..............................................................................................................................................106
TRANSPORTING YOUR MUSTANG BICYCLE 107
By Car .............................................................................................................................................................107
By Public Transpor t ......................................................................................................................................... 108
Special points concerning transpor t of your MUSTANG pedelec...................................................................... 109
By Car
.... ..... ..... ....... ..... ..... ....... ..... ..... ....... ..... ..... ..... .... ... ..... ..... .... ... ..... ..... .... ... ..... ..... ....... ..... ..... ....... ..... ..... ....... ..... .... 109
By Train / By Public Transport ... ..... .... ... ..... ..... .... ... ..... ..... .... ... ..... ..... .... ... ..... ..... ....... ..... ..... ....... ..... ..... ..... .... ... ..... ..... . 110
By Plane ..... ..... .... ... ..... ..... .... ... ..... ..... .... ... ..... ..... ....... ..... ..... ....... ..... ..... ....... ..... ..... ..... .... ... ..... ..... .... ... ..... ..... .... ... ..... ..... 110
GENER AL NOTES ON CARE AND SERVICING 111
Maintenance and Servicing ............................................................................................................................. 111
Cleaning and maintaining your MUSTANG bicycle or pedelec .......................................................................... 112
SERVICE AND MAINTENANCE SCHEDULE 114
RECOMMENDED TORQUE SETTINGS FOR COMPONENTS 116
Recommended Torque Settings for Disc Brakes.............................................................................................. 117
LEGA L REQUIREMENTS FOR RIDING ON PUBLIC ROADS 118
WARRANT Y AND GUARANTEE 120
A Note on Wear ............................................................................................................................................... 121
WARRANT Y / GUARANTEE FOR MUSTANG MODELS 122
DISTRIBUTOR - MUSTANG 123
SERVICE SCHEDULE (TO BE STAMPED) 124
BIKE CARD 130
HANDOVER REPORT 131
Edition 1, September 2012
© No part of this publication may be reprinted, translated, copied or transmitted in any form or by any means,
electronic, mechanical, by hand or otherwise for another business purpose without prior written permission of
Zedler – Institut für Fahrradtechnik und -Sicherheit GmbH.
© Text, concept, photos and graphic design
Zedler – Institut für Fahrradtechnik und -Sicherheit GmbH
www.zedler.de
4
5
GENERAL SAFETY NOTES
Dear Customer,
In purchasing this MUSTANG bicycle
of high quality and technology. Each component of your new MUSTANG
bicycle has been designed, manufactured and assembled with great
care and expertise. Your MUSTANG bicycle dealer gave the bicycle its
final assembly and adjustment to guarantee proper operation and many
enjoyable riding experiences with complete peace of mind from the very
first metres.
(a-d)
you have chosen a product
a
These operating instructions contain a wealth of information on the
proper use of your MUSTANG bicycle, its maintenance and operation
as well as interesting information on bicycle design and engineering.
Please read these instructions thoroughly. We are sure that even if you
have been cycling all your life you will find useful and detailed information. Bicycle and pedelec technology has developed at a very rapid
pace during recent years. Therefore, before setting off on your new
MUSTANG bicycle, be sure to read at least the chapter “Before Your
FIRST Ride” first.
b
c
To have as much fun as possible during cycling, be sure to carry out the
functional check described in chapter “Before EVERY Ride” before
setting off.
Even a manual as big as an encyclopaedia could not describe every
possible combination of bicycle models and components or parts on
the market. These operating instructions therefore focus on your newly
purchased MUSTANG bicycle and standard components and provide
useful information and warnings. In addition to this, your BionX system
operating instructions give important information and warnings on handling your new MUSTANG pedelec.
When doing any adjusting or servicing, be aware that the detailed instructions and information provided in these operating instructions only
refer to this MUSTANG mountain bike or MUSTANG pedelec.
The information included here is not applicable to any other bicycle
type. As bicycles and pedelecs come in a wide variety of designs with
frequent model changes, the routines described may require complementary information. Comply also with the instructions of the parts
manufacturers, which you can find on the enclosed CD.
Be aware that these instructions may require further explanation, depending on the experience and/or skills of the person doing the work.
(e)
For some jobs you may require additional (special) tools
(f)
plementary instructions
a bicycle mechanic.
Before you set off, let us point out a few things that are very important to
every cyclist: Never ride without a properly adjusted helmet and without
(g)
glasses
a minimum you should wear straight cut trousers and shoes fitting the
pedal system. Always ride carefully on public roads and observe the
traffic rules so as not to endanger yourself or others.
This manual cannot teach you how to ride. Please be aware that cycling
is a hazardous activity that requires the rider to stay in control of his or
her MUSTANG bicycle at all times.
Like any sport, cycling involves the risk of injury and damage. Keep this
in mind. When you decide to ride a bicycle or pedelec you need to accept the risk inherent to cycling. Please note that on a bicycle you have
no protection technique around you (e.g. bodywork, ABS, airbag) like
you have in a car. Therefore, always ride carefully and do respect the
other road users. Never ride under the influence of drugs, medication,
alcohol or when you are tired. Do not ride with a second person on your
MUSTANG bicycle and never ride without having both hands on the
handlebars
and take care to always wear suitable, bright clothing. As
(h)
.
. This manual cannot teach you the skills of
or sup-
e
f
g
d
6
h
7
INTENDED USE
13
14
15
16
17
18
19
20
21
22
23
24
a
b
d
e
f
I
II
1
2
3
6
4
5
7
8
9
10
11
12
c
III
IV
g
Observe the legal regulations concerning off-road cycling
pedelecs). These regulations may differ in each country. Please respect
nature when riding off-road. Only use your pedelec on signposted, well
maintained trails and hard-surface roads.
Always bear in mind that you travel rapidly and quietly when you are
(b)
riding a MUSTANG pedelec
. Do not startle pedestrians or other
cyclists. Always make others aware of your presence well ahead of
time and by ringing your bell or make use of the brakes so as to avoid
a
accidents. Familiarize yourself with your MUSTANG pedelec. You can
fi nd further information in the chapters “Useful Tips for Riding a
MUSTANG Pedelec“ and “Riding a MUSTANG Speed Pedelec –
Special Features”.
(a)
(also for
Keep in mind that every bicycle type is built for a specifi c intended use
(e-g)
. Be sure to use your MUSTANG bicycle only according to its intended use, as it may otherwise not withstand the stress and would fail
and cause an accident with unforeseeable consequences!
1. Cross bikes are equipped with 28”-wheels (inner diameter 622
mm) and intended for hard-surface roads. They are also suitable
for off-road cycling on gravel fi eld tracks, however, not for rough
terrain.
2. Cross-country, marathon and touring mountain bikes are also
suitable for off-road use, but not for extreme terrain, jumps, drops
and competitive use in the categories freeride, dual slalom, down-
e
hill-races, etc.
First of all, we would like to familiarize you with your MUSTANG bicycle
or pedelec. Please unfold the cover of this manual. A MUSTANG mountain bike
and a MUSTANG pedelec
(d)
are shown as examples in
(c)
which all the necessary components are described. Leave the page
3. Enduro and all-mountain bikes are suitable for off-road use (Alpcross etc.); they are, however, not designed for dual, dirt, downhill
and freeride cycling etc.
unfolded as you read so that you can easily locate the components as
they are referred to in the text.
b
For your own safety, never do work on your pedelec unless
g
you feel absolutely sure about it. If you are in doubt or if you
1
2
3
6
4
5
7
8
9
10
11
12
e
d
f
a
I
II
b
g
c
III
IV
13
14
15
16
17
18
19
20
21
22
23
24
have any questions, please contact your MUSTANG bicycle
dealer.
c
1
2
3
6
4, 5
7
8
9
10
11
12
d
c
e
A
d
C
f
a
I
II
B
b
III
13
14
15
16
17
18
19
20
IV
21
22
23
24
4. Dirt/fourcross, urban and dual slalom bikes are intended for
hard use on secured terrain. There are different types which are
either equipped for trick and show cycling, for jumps and freestyle
in special obstacle courses or for races.
5. Downhill bikes are designed for high level downhill races.
6. Freeride bikes are suitable for jumps and drops in most challenging terrains and in bicycle parks.
Be sure to use your bicycle only for its intended purpose,
g
as it may otherwise not withstand the stress and fail! Risk
of accident!
For your own safety, do not overestimate your cycling skills.
g
Please note that though looking easy the tricks of a profes-
sional are hazardous to your life and limb. Always protect
(h)
yourself with suitable clothing
.
f
g
h
8
9
7. Pedelecs (Pedal Electric Cycles)
Assisted Cycles) are bicycles with an auxiliary motor that only
switches on when the pedals are moved by the rider. When you
stop pedalling, the motor switches off.
A driving licence is not required for riding a pedelec
tor assistance switches off automatically at a speed of 25 kmh/15
mph. You do not need an operating licence and need not insure the
a
pedelec either. Please do not confuse your pedelec with a speed
pedelec (S-Pedelec) (see item 9).
All regulations that apply to bicycles, also apply to pedelecs, i.e.
they are allowed to or must use cycle paths without any restrictions. Wearing a helmet is recommended, but not compulsory.
Most pedelecs are designed for cycling exclusively on lanes and
roads with a smooth surface
bicycles. In general, typical pedelecs are not suitable for off-road
use. Using pedelecs off-road can result in crashes with unforeseeable consequences.
b
If your pedelec does not look like a typical mountain bike (see the
cover), then please read the chapter “Before Your First Ride”.
Please note that there are different types of pedelecs and
U
e-bikes which are subject to different overall legal conditions. Check the class of your MUSTANG pedelec or e-bike
in the bicycle card. Keep the specific regulations for your
pedelec/e-bike class in mind when riding on public roads
and also through the countryside.
(a)
or EPACs (Electrically Power
(b)
if the mo-
(c)
. Only use trails that are allowed for
The starting or pushing aid provides assistance during pushing or
when doing a hill start, even without pedalling, up to a speed of 6
kmh / 3.7 mph.
These MUSTANG pedelecs are not required to be insured for riding
on public roads.
If you were born after 1st April 1965 you will require a
U
moped driving licence (driving licence class M) or a driving
licence for motor vehicles according to the German Bicycle
Association (ZIV).
The laws and regulations concerning pedelecs, speed
U
pedelecs and e-bikes are currently being revised. Read the
daily press to keep yourself informed about current legislative changes.
The other regulations do not differ from those relating to pedelecs
(see item 7.).
9. Speed pedelecs are bicycles with an auxiliary motor which provide assistance to the rider even beyond a speed of 25 kmh / 15
mph, as long as you continue pedalling. Without pedalling a speed
pedelec provides assistance to a maximum speed of 20 kmh/12
mph.
Speed pedelecs are regarded as motor vehicles, have an operat-
ing licence or EU type approval, and are therefore subject to strict
guidelines regarding the replacement of components or making
any conversions.
e
f
(d+e)
c
8. Pedelecs
trically Power Assisted Cycles) with starting or pushing aid are
considered as motor vehicles with special authorization. Nevertheless, you do not need an operating licence and need not insure the
pedelec either. Wearing a cycle helmet is not compulsory either,
but highly recommended.
d
(Pedal Electric Cycles) as well as EPACs (Elec-
It is mandatory to wear a helmet
If you are riding a speed pedelec you may not use cycle paths
within built-up areas in Germany. The only exception to this is in
cases where the cycle path or lane has been approved for use
by mopeds (this is marked by an additional sign). Outside built-up
areas it is permissible to ride a speed pedelec on cycle paths and
(g+h)
lanes
These speed pedelecs are required to have an operating licence
and to be insured as motor vehicle when riding on public roads. If
you were born after 1st April 1965 you will require a moped license
(driving license class M) or a driving license for motor vehicles. You
can obtain a moped license if you are aged 15 or over. Enquire at
your driving license agency.
.
10
(f)
in Germany and Switzerland.
g
h
11
BEFORE YOUR FIRST RIDE
a
Manufacturer
Model
Bike-ID
Frame no.
Rear shock - Manufacturer/Model
Suspension fork - Manufacturer/Model
- Serial no
Frame type
Frame size
Size of wheels and tyres
Colour
Special features
Permissible overall load
(bicycle, rider and baggage) ____ kg
Pannier rack £ yes £ no
Permissible load ____ kg
Child carrier allowed £ yes £ no
Trailer allowed £ yes £ no
Permissible trailer load ____ kg
Dealer stamp
and signature
b
BIKE CARD
(Hint to the dealer: Please copy the bike card and the handover report
and keep one copy in your customer file. Send another copy to the
manufacturer.)
Brake levers
g
Brakes assignment
Right lever
£ front wheel brake
£ rear wheel brake
Left lever
£ front wheel brake
£ rear wheel brake
HANDOVER REPORT
The above-described bicycle was delivered to the customer ready for use, i. e. after completion of assembly, inspection, and operational checks as described below (additionally required routines in parentheses):
£ Lighting
£ Brakes rea r and front
£ Suspensio n fork, rear shock (adjusted to suit customer)
£ Wheels ( trueness/spoke tension/tyre pressure)
£ Handleba rs/stem (position/bolts checked wi th
torque wrench)
£ Pedals (adjustmen t of release force, if necessary)
£ Saddle /seat post (height and position of saddle
adjusted to suit customer, bolts checked with
torque wrench)
£ Gears ( limit stops!)
£ Acces sory fastenings (check with torque wrench)
£ Other ro utines performed
£ Test ride
Dealer name ____________________________
Street ___________________________
Town ____________________________
Delivery date, dealer stamp and signature
Customer name ____________________________
first name _________________________
Street ___________________________
ZIP code/town _____________________
Delivery date and signature
The customer confirms with his signature that he has received the bicycle in proper order along with the accompanying documents specified below and that he has been instructed on the proper use of the bicycle.
£ Manual/operating instructions
Additional instructions:
£ Brake system
£ Suspension seat post
£ Pedal system
£ Rear shock
£ Suspension fork
£ Seat post, stem
£ Gear system
£ System operating instructions BionX
£ Others
Phone ___________________________
Fax _____________________________
E-mail ___________________________
Phone ___________________________
Fax _____________________________
E-mail ___________________________
In Switzerland you may ride your speed pedelec on paths and
tracks where mopeds are not allowed if you ride without drive assistance to maximum 20 km/h (12 mph), with drive assistance to
maximum 25 km/h (15 mph) or with the motor switched off completely.
Be sure to also read the chapter “Riding a MUSTANG Speed Pedelec
– Special Features”.
(a)
Most of the speed pedelecs
are designed for cycling exclusively on
lanes and roads with a smooth surface. Only use trails that are allowed
for speed pedelecs / e-bikes. Typical speed pedelecs are generally not
suitable for off-road use. Using speed pedelecs off-road can result in
crashes with unforeseeable consequences.
Comply also with the instructions of the parts manufactur-
I
ers, which you can find on the enclosed CD.
For more information about the intended use of your
U
MUSTANG pedelec as well as the permitted overall weight
(rider, pedelec and baggage) see the BionX system operat-
(b)
ing instructions and the bicycle card
and read the chap-
ter “Before Your First Ride”.
For more information on approval for the use of trailers and
U
child-carrier seats on your MUSTANG pedelec please refer
to the BionX system operating instructions and the bicycle
card.
1. Your MUSTANG bicycle is designed for a maximum overall weight, including rider, baggage and MUSTANG bicycle
all together. The maximum overall weight is specified in the following table and in the bicycle card enclosed with
these operating instructions; if it is not, then contact your MUSTANG bicycle dealer.
Model name Frame Vehicle Rider’s Total Weight Child-carrier Trailer
weight weight weight guaranteed seat allowed allowed
MU Trackster HT Alloy 12-16 75 87-91 130 no no
c
d
12
13

2. If you want to use your pedelec on public roads, it has to comply
with the respective legal requirements. These requirements may
vary in each country. The fittings of your bicycle are, therefore,
not necessarily complete. Ask your MUSTANG bicycle dealer concerning the laws and regulations applicable in your country or in
the country you intend to use your MUSTANG bicycle. Have your
MUSTANG bicycle equipped accordingly before using it on public
roads.
a
We very strongly recommend you to take out private liability
i
insurance. Ensure that your insurance covers you for damage caused while riding the bicycle or pedelec. Contact an
insurance company or broker.
(a)
3. Are you familiar with the brake system
bicycle card and check whether the brake lever
brake is on the side you are used to (right or left). If it is not, ask
your MUSTANG bicycle dealer to switch the brake levers before you
set off for the first time.
? Have a look at the
(b)
of the front
5. Are both the saddle and handlebars properly adjusted? The saddle should be set to a height from which you can just reach the
(e)
pedal in its lowest position with your heel
toes reach to the floor when you are sitting on the saddle. Your
MUSTANG bicycle dealer will be pleased to help you if you are not
happy with your seating position.
For more information see the chapter “Adjusting the MUSTANG
Bicycle to the Rider”.
6. If your MUSTANG bicycle is equipped with clipless or step-in ped-
(f)
: Have you ever tried the shoes they go with? Do not set off
als
until you have practised engaging and disengaging the shoes from
the pedals when stationary. Ask your MUSTANG bicycle dealer to
explain the pedals to you.
You can find further information in the chapter “Pedals and
Shoes” and in the instructions from the parts manufacturers,
which you can find on the enclosed CD.
. Check whether your
e
(d)
(c)
? Ask
7. If you have bought a MUSTANG bicycle with suspension, you
should ask your MUSTANG bicycle dealer to adjust the suspension mechanism to your needs before delivery. Improperly adjusted
suspension components are liable to malfunction or damage. In
any case they will impair the performance of your bicycle as well as
your safety and pleasure whilst cycling.
You can find further information in the chapters “Suspension
(g)
Forks”
parts manufacturers, which you can find on the enclosed CD.
Be aware that the distance you need to stop your bicycle
G
and “Rear Shock”
increases if you are riding with your hands on the bar ends.
The brake levers are not always within easy reach.
(h)
and in the instructions from the
f
g
h
b
c
Your new MUSTANG bicycle is equipped with modern brakes
which may be far more powerful than those that you were used to
before. Be sure to first practise using the brakes on a level, non-slip
surface off public roads!
You can find further information in the chapter “Brake System”
and in the instructions from the parts manufacturers, which you
can find on the enclosed CD.
4. Are you familiar with the type and functioning of the gears
your MUSTANG bicycle dealer to explain you the gear system and
make yourself familiar with your new gears in an area free of traffic,
if necessary.
You can find further information in the chapter “Gears” and in the
instructions from the parts manufacturers, which you can find on
the enclosed CD.
d
14
15
Be sure to use your MUSTANG bicycle only for its intended
g
use, as it may otherwise not withstand the stress and fail!
Danger of an accident!
Make particularly sure there is enough space between your
g
Please note that in wet conditions the brake performance is
a
G
g
a
b
a
c
(a)
crotch
if you have to get off your pedelec quickly.
less effective and the tyre grip is reduced. Keep this fact in
mind in particular when riding on a wet road and do not ride
as fast as you would in dry conditions.
Due to the specific intended use, some dirt bikes
fitted with only one brake. Do not ride these bikes on public
roads, but only on signposted tracks and lanes.
A lack of practice when using clipless pedals or too much
spring tension in the mechanism can lead to a very firm
connection, from which you cannot quickly step out! Dan-
ger of an accident!
Before hitching a trailer
child-carrier seat
contact your MUSTANG bicycle dealer.
and the top tube so that you do not hurt yourself,
(b)
are
(c)
to your bicycle or mounting a
(d)
, have a look at the bicycle card and
ADDITIONAL INFORMATION “BEFORE YOUR FIRST RIDE”
WITH YOUR MUSTANG PEDELEC
1. Have you ridden a pedelec
characteristics of this revolutionary hybrid drive concept. Set off
for your first ride by selecting the lowest level of drive assistance!
Slowly approach the potential of your MUSTANG pedelec in an area
free of traffic.
You can find further information in the chapters “Useful Tips for
Riding a MUSTANG Pedelec” and “Riding a MUSTANG Speed
Pedelec – Special Features” and in your BionX system operating
instructions.
2. Your MUSTANG bicycle is designed for a maximum overall weight,
including rider, baggage and pedelec. The maximum overall weight
is specified in your BionX system operating instructions; if it is not,
then contact your MUSTANG bicycle dealer.
The weight distribution on pedelecs differs markedly from
H
the weight distribution on bicycles without drive assistance.
A pedelec is markedly heavier than a bicycle without drive
assistance. For this reason parking, pushing, lifting and
carrying the MUSTANG pedelec is more difficult. Bear this
in mind when loading your pedelec into a car and unloading
it or when mounting it on a bicycle carrier system.
3. The rechargeable battery
charged before you set off for the first time
iar with the handling and mounting of the rechargeable battery?
Before you set off for the first time, check whether the battery is
properly mounted, that it has engaged audibly and that it is locked.
You can find further information in the chapter “Inserting and Re-
moving the Battery” in your BionX system operating instructions.
(e)
yet? Please note the particular riding
(f)
of your MUSTANG pedelec must be
(g)
. Are you famil-
e
f
g
Please note that the system switches itself off automatically
U
after 10 minutes without any actuation
how to switch the system on again in the chapter “Operat-
ing the BionX Propulsion System” in your BionX system
operating instructions.
d
16
(h)
. You can find out
h
17
BEFORE EVERY RIDE
We recommend that you charge your battery
H
during the day and only in dry rooms which have a smoke
or a fire detector; but not in your bedroom. Place the battery during the charging process on a big, non-inflammable
plate made of ceramics or glass! Unplug the battery once it
has been charged up.
Charge your battery only with the supplied charger. Do not
H
a
b
c
use the charger of any other manufacturer, not even when
the connector of the charger matches your rechargeable
battery. The rechargeable battery can heat up, catch fire or
even explode!
Do not park your MUSTANG pedelec in strong sunshine.
H
4. The functions of your pedelec are operated with the buttons of the
(c)
control element
functions and displays?
Check whether you know the functions of all the buttons. You can
find further information in the chapter “Operating the BionX Pro-
pulsion System” in your BionX system operating instructions.
Be aware that the brakes of your MUSTANG pedelec are al-
H
ways more effective than the drive. If you face any problems
with your drive (e.g. because it pushes you forward before a
turn), slow down your MUSTANG pedelec carefully.
Pulling the brake lever of the rear brake stops the motor.
H
Emergency stop! However, if you have a front-mounted motor you must operate the front brake very carefully
When mounting your MUSTANG pedelec, make sure not to
H
step on the pedals until you sit in the saddle and grip the
handlebars tightly, and that one pedal is at the lowest position when you get on. The motor assistance might switch on
suddenly unexpectedly and result in an uncontrolled start of
your MUSTANG pedelec. Danger of an accident!
on the handlebars. Are you familiar with all the
(a+b)
(d)
only
.
Your MUSTANG bicycle has undergone numerous tests during production and a final check has been carried out by your MUSTANG bicycle
dealer. Nevertheless, be sure to check the following points before every
ride to exclude any malfunctioning that may be due to the transport of
your MUSTANG bicycle or to the work a third person may have performed on your MUSTANG bicycle before delivery:
(e)
1. Are the quick-release levers
rear wheel properly closed and the bolts of the seat post and other
components accurately tightened?
You can find further information in the chapter “How to Use
Quick-Releases and Thru Axles” and in the instructions from
the parts manufacturers, which you can find on the enclosed CD.
2. Are the tyres in good condition and do they have sufficient pressure? The minimum and maximum pressure (in bar or PSI)
indicated on the side of the tyre.
Note that the tyres of a MUSTANG pedelec typically require some-
what more pressure than you are generally used to with your
mountain bike.
You can find further information in the chapter “Wheels and Tyre
Equipment” and in the instructions from the parts manufacturers,
which you can find on the enclosed CD.
3. Spin the wheels to check for true running
tween rim and brake pad or, in the case of wheels with disc brakes,
between frame and rim or tyre. Wheels which do not run true can
be an indication of tyres with ruptured sides or broken axles or
spokes.
You can find further information in the chapter “Wheels and Tyre
Equipment” and in the instructions from the parts manufacturers,
which you can find on the enclosed CD.
and thru axles
(f)
of the front and
(h).
Watch the gap be-
(g)
e
is
f
g
Check with your insurers that the pedelec as well as the
U
storekeeping and the charging of lithium-ion batteries are
d
18
covered by your household and fire insurance. Read the
daily press to keep yourself informed about current legislative changes.
h
19
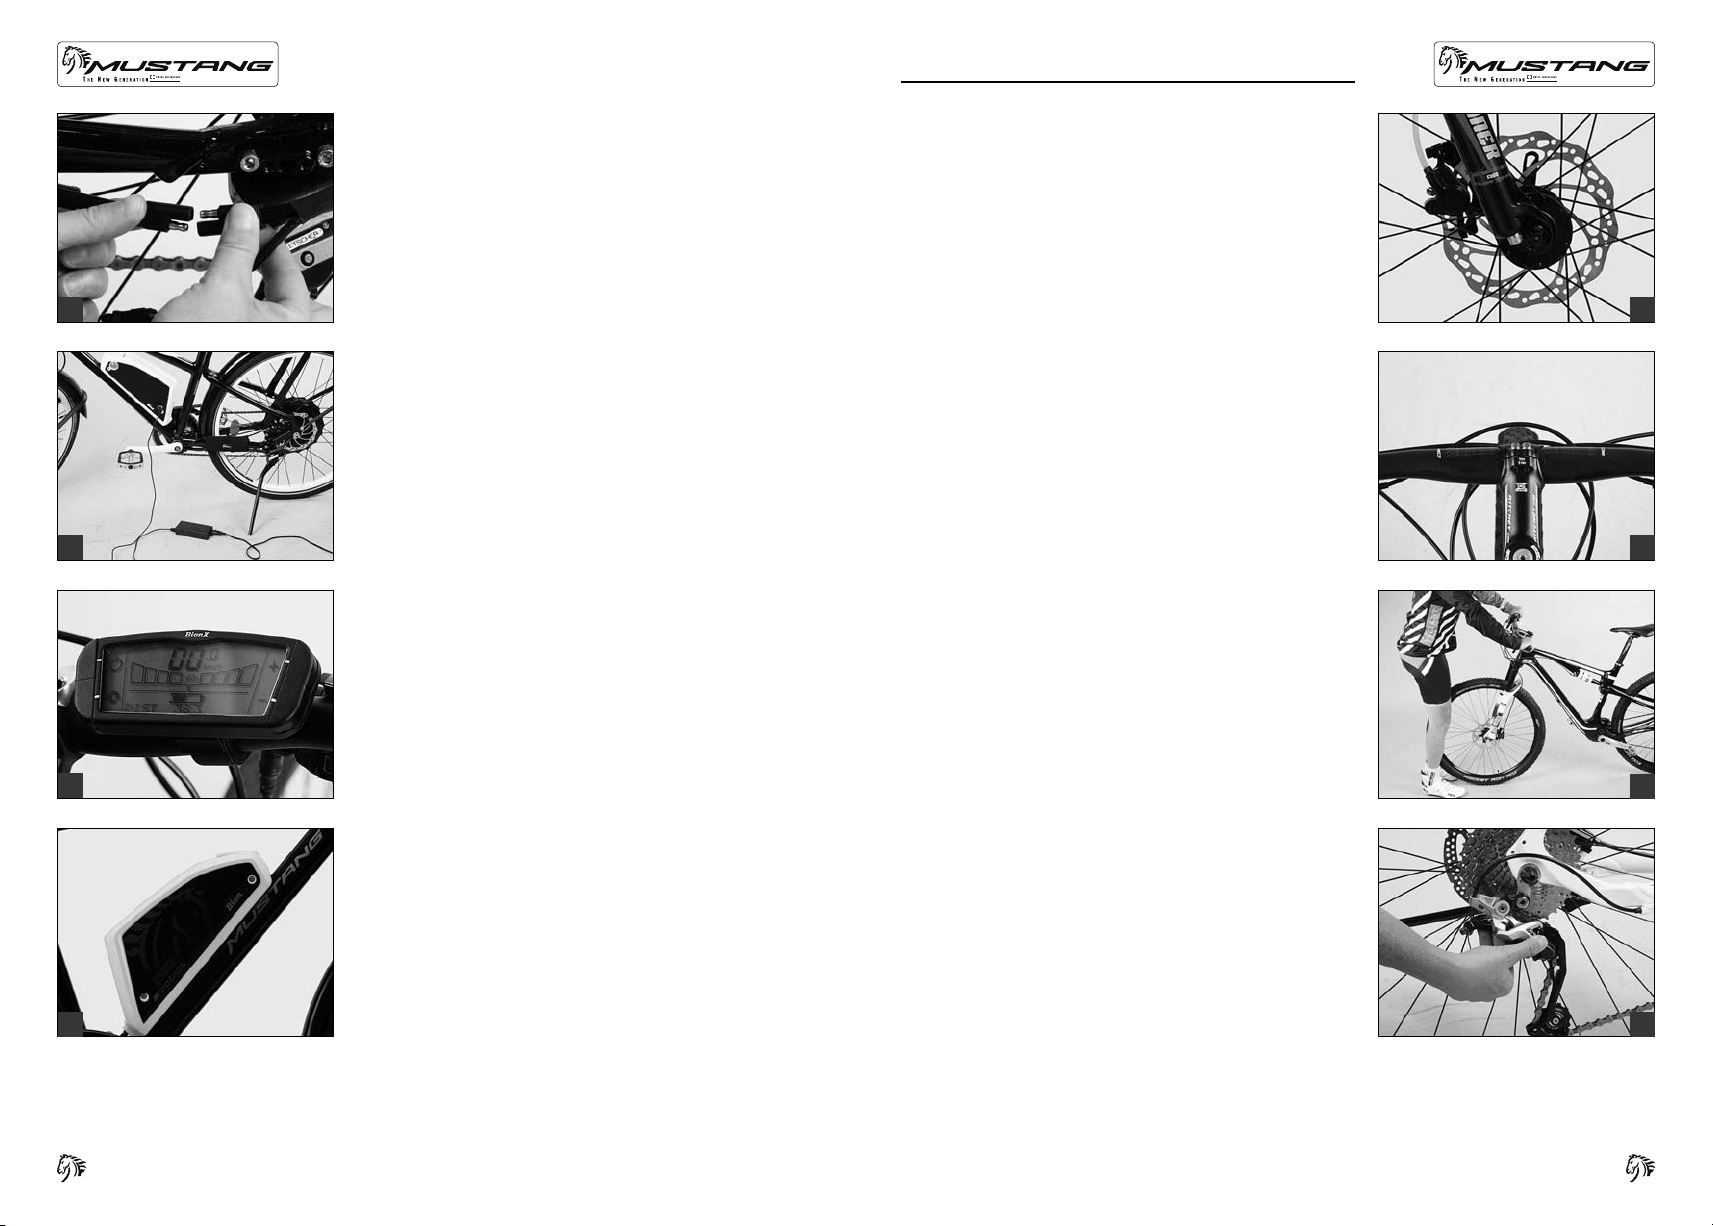
4. Test the brakes when stationary by firmly pulling the brake levers
(a)
towards the handlebars
hit the rim evenly with their entire surface
tyre during braking or in the open state or in between. Make sure
you cannot pull the brake levers all the way to the handlebars and
check the cables for leaks in the case of hydraulic brakes. Check
the thickness of the brake pads, as well.
a
With disc brakes
response. If you have to actuate the brake lever more than once
to get a positive braking response, have your MUSTANG bicycle
checked by your MUSTANG bicycle dealer.
You can find further information in the chapter “Brake System”
and in the instructions from the parts manufacturers, which you
can find on the enclosed CD.
5. Let your MUSTANG bicycle bounce on the ground from a small
height. If there is any rattling, see where it comes from. Check the
bearings and the bolts,
. The brake pads of rim brakes must
without touching the
(b)
you should directly get a positive braking
(c)
if necessary.
b
6. If you want to ride on public roads, make sure your MUSTANG
pedelec is equipped according to the applicable regulations of your
(d)
country
Riding without lights and reflectors in dark or dim conditions is very
dangerous. A lighting set that corresponds to the regulations is a
must on public roads. Turn on the lights as soon as dusk sets in.
For more information see the chapter “Legal Requirements for
Riding on Public Roads“.
.
c
7. If you have a MUSTANG bicycle with suspension, press down on
your bicycle and see whether the suspension components retract
(e+f)
and extend as usual
You can find further information in the chapters “Suspension
Forks” and “Rear Shock” and in the instructions from the parts
manufacturers, which you can find on the enclosed CD.
8. If your bicycle has a kick-stand
before you set off. Danger of an accident!
9. Do not forget to take a high-quality D-lock
you on your ride. The only way to effectively protect your MUSTANG
bicycle against theft is to lock it to an immovable object.
10. Remove the cycle computer when you park your MUSTANG bicycle
or pedelec.
Improperly closed fastenings can cause parts of your
G
MUSTANG pedelec to come loose and result in serious accidents!
Do not use your MUSTANG bicycle if it fails on any one of
G
these points! Riding a defective MUSTANG bicycle can result in serious accidents! If you are in doubt or if you have
any questions, please contact your MUSTANG bicycle dealer.
During use your MUSTANG bicycle or pedelec is undergoing
G
stress resulting from the surface of the road and through
the rider’s actions. Due to these dynamic loads, the different parts of your bicycle react with wear and fatigue. Please
check your MUSTANG bicycle or pedelec regularly for wear
marks, scratches, deformations, colour changes and any
indication of cracking. Components which have reached the
end of their service life may break without previous warning. Let your MUSTANG bicycle dealer maintain and service
your MUSTANG bicycle regularly and in cases of doubt it is
always best to replace components.
.
(g)
, make sure it is fully raised
(h)
or chain lock with
e
f
g
Be aware that the distance you need to stop your bicycle
G
increases if you are riding with your hands on the bar ends.
d
20
The brake levers are not always within easy reach.
h
21
AFTER AN ACCIDENT
ADDITIONAL INFORMATION “BEFORE EVERY RIDE” WITH
YOUR MUSTANG PEDELEC
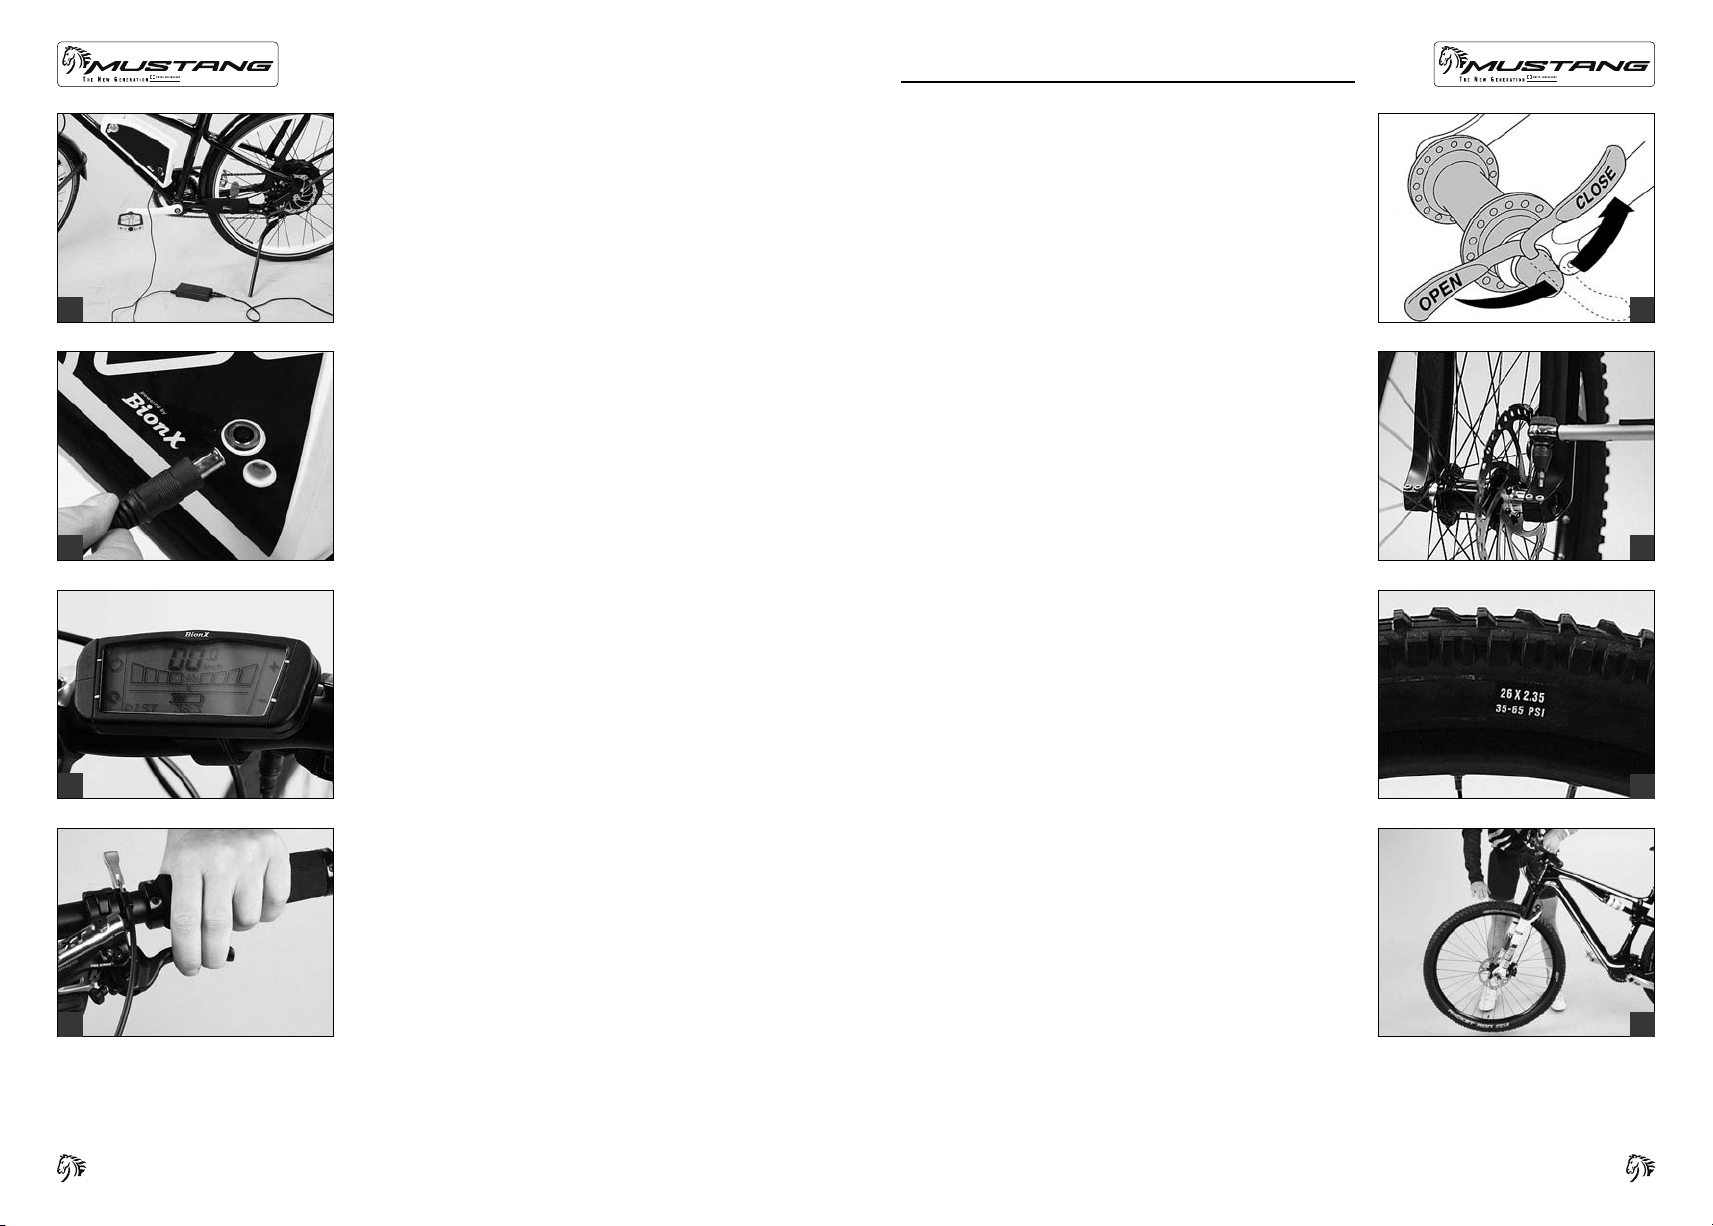
1. Are the connections of the rechargeable battery, the control element on the handlebars and the drive system properly plugged in
(a)
?
You can find further information in the chapters “Inserting and
a
b
c
Removing the Battery” and “Operating the BionX Propulsion
System” in your BionX system operating instructions.
2. Is your battery fully charged
Remember to fully recharge the battery after each longer ride
(e.g. less than 50% charged). Modern lithium-ion batteries have
no memory effect. However, it does not matter if your MUSTANG
pedelec is left as it is for a short time (e.g. overnight) when less
than 50% charged. However, you should not wait until the battery
is fully discharged!
For more information see the chapter “Useful Information for
Proper Handling of the Battery” and the chapter “Handling and
Charging the battery” in your BionX system operating instruc-
tions.
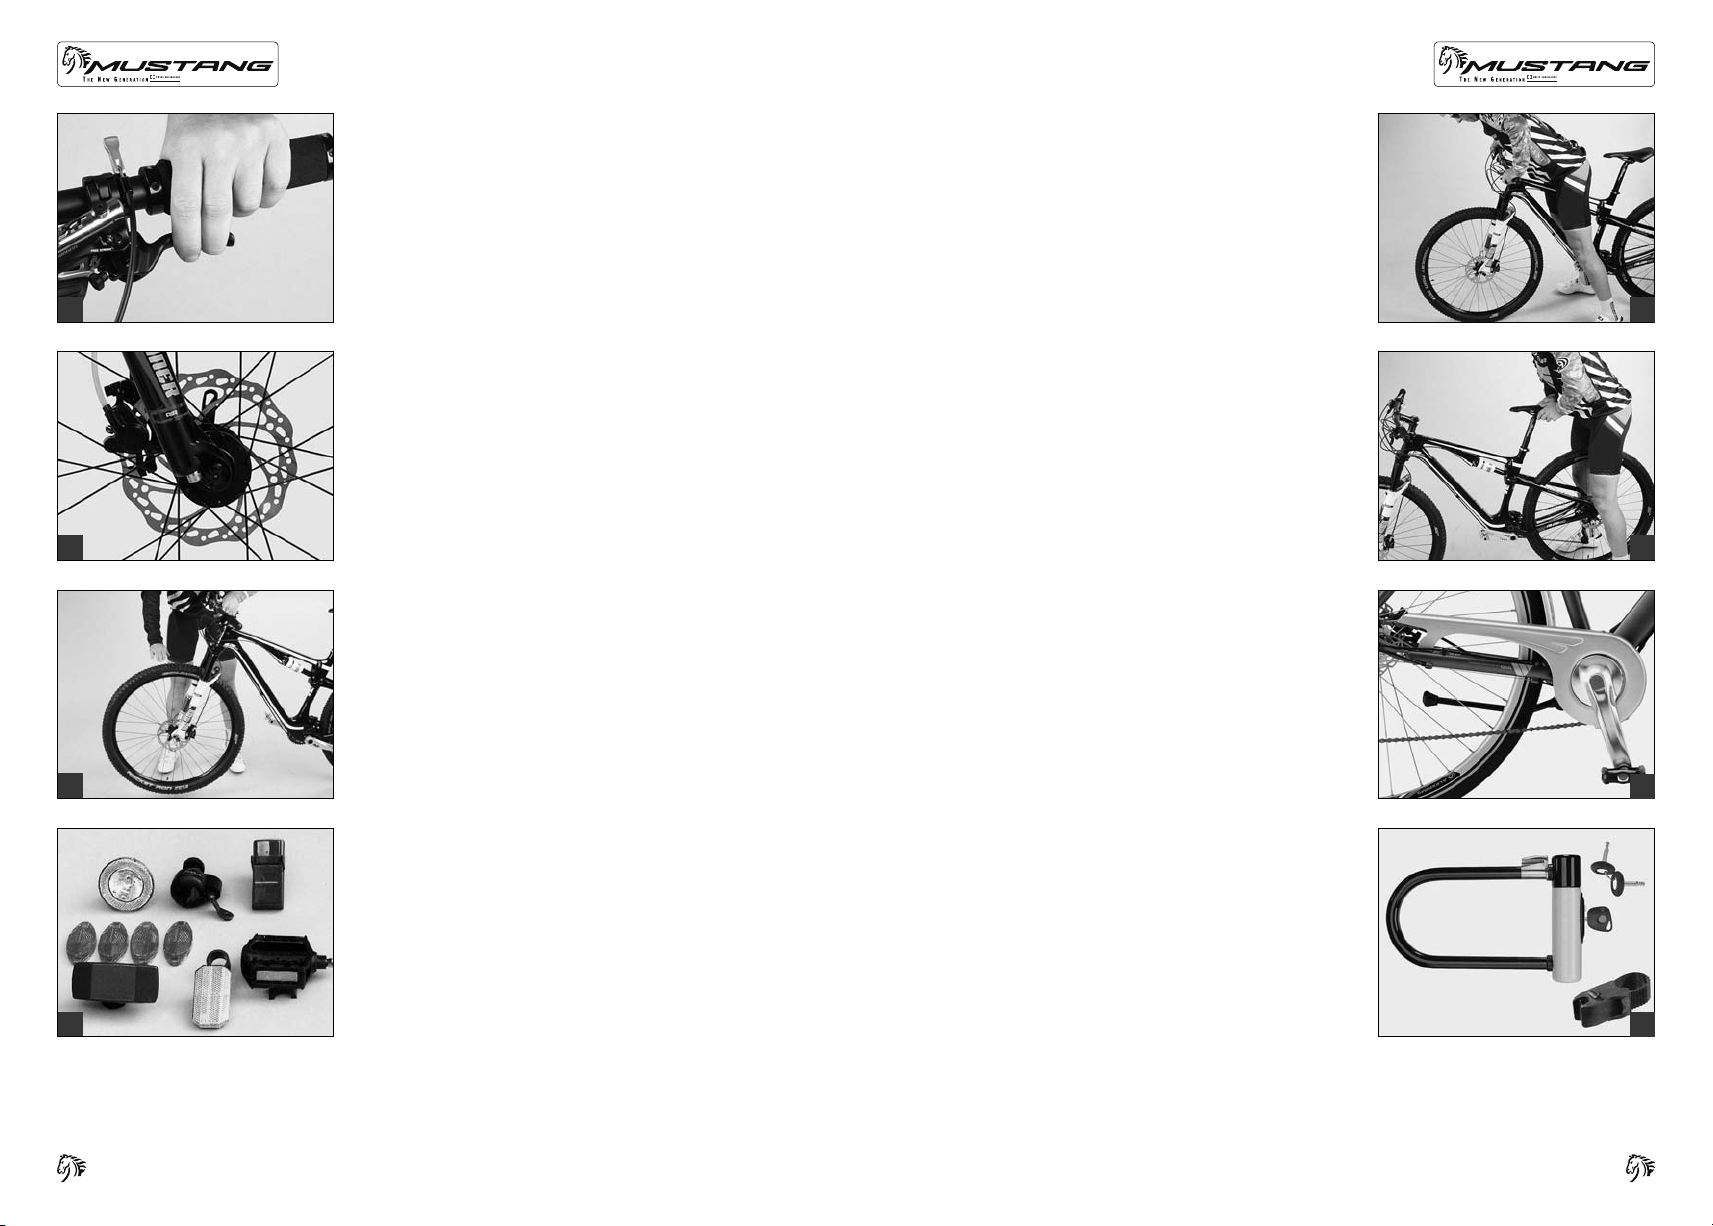
3. Does the display on the control element and the cycle computer on
the handlebars show all the values
Are there any error messages or warnings on the display? Check
the values are correct before every ride. Do not set off on your
MUSTANG pedelec under any circumstances if the control element
shows a warning.
You can find further information in the chapter “Operating the
BionX Propulsion System” in your BionX system operating instructions.
4. Is the battery tight in its holder and properly locked up
set off with a loose and unlocked battery.
You can find further information in the chapter “Inserting and Re-
moving the Battery” in your BionX system operating instructions.
(b)
?
(c)
?
(d)
? Never
1. Check whether the wheels are still firmly fixed in the drop-outs and
whether the rims are still centred with respect to the frame or fork
(e)
. Spin the wheels and observe the gap either between brake
pads and rim sides or between frame and tyre. If the width of the
gap changes markedly and you have no way to true the rim where
you are, you will need to open the rim brake a little so that the rim
can run between the brake pads without touching them. Please
note that in this case the brakes may not act as powerfully as you
are used to.
You can find further information in the chapters “Brake System”,
“How to Use Quick-Releases and Thru Axles” and “Wheels
and Tyre Equipment” and in the instructions from the parts man-
ufacturers, which you can find on the enclosed CD.
2. Check that handlebars and stem are neither bent nor broken and
(f)
that they are level and upright
fixed on the fork by trying to turn the handlebars relative to the front
wheel. Briefly lean on the brake levers to make sure the handlebars
are firmly fixed in the stem
sary, and carefully tighten the bolts to ensure reliable clamping of
the components. The maximum torque values are printed directly
on the components or specified in the enclosed operating instructions.
You can find further information in the chapters “Adjusting the
MUSTANG Bicycle to the Rider” and “Headset” and in the instructions from the parts manufacturers, which you can find on the
enclosed CD.
3. Check whether the chain still runs on the chainrings and the
sprockets. If your MUSTANG bicycle fell over to the chain side,
verify the proper functioning of the gears. Ask somebody to lift the
MUSTANG bicycle by the saddle and carefully shift through all the
gears. Pay particular attention when shifting to the small gears and
make sure the rear derailleur does not get too close to the spokes
as the chain climbs onto the larger sprockets
. Make sure the stem is firmly
(g)
. Realign the components, if neces-
(h)
.
e
f
g
d
22
h
23

If the rear derailleur or the drop-outs/derailleur hanger are bent,
the rear derailleur may collide with the spokes. This can result in
damage to the rear derailleur, the rear wheel and the frame. Check
the function of the front derailleur, as a displaced front derailleur
(a)
can throw off the chain, thus interrupting the drive train of your
MUSTANG bicycle.
Ride back very carefully by taking the shortest route possible, only if
your MUSTANG bicycle or MUSTANG pedelec went through this check
(e)
without any problems
ride your bicycle out of the saddle. If you are in doubt about the performance of your MUSTANG bicycle, have yourself picked up by car,
instead of taking any risks.
. Do not accelerate or brake hard and do not
You can find further information in the chapter “Gears” and in the
a
b
instructions from the parts manufacturers, which you can find on
the enclosed CD.
4. Make sure the saddle is not out of alignment, using the top tube
or the bottom bracket shell as a reference. If necessary, open the
clamp, realign the saddle and retighten the clamp.
You can find further information in the chapters “Adjusting the
MUSTANG Bicycle to the Rider” and “Headset” and in the instructions from the parts manufacturers, which you can find on the
enclosed CD.
5. Lift your MUSTANG bicycle up a few centimetres
(c)
onto the ground
loosened bolts or components. Retighten them, if necessary.
6. Finally, take a good look at the whole MUSTANG bicycle to detect
any deformations, colour changes or cracks
. If this causes any sort of noise, search for
and let it bounce
(d)
.
(b)
c
Back home you need to check your MUSTANG bicycle thoroughly once
again. The damaged parts must be repaired or replaced. Ask your
MUSTANG bicycle dealer for help.
For more information about carbon components see chapter “Carbon
– Important Information”.
Deformed components, especially those made of alumini-
G
um, can break without previous warning. They may not be
repaired, i.e. straightened, as the imminent risk of breakage
will remain. This applies in particular to the fork, the handlebars, the stem, the cranks, the seat post and the pedals.
When in doubt, it is always recommended that you have
these components replaced, as your safety comes first. Ask
your MUSTANG bicycle dealer for help.
If your MUSTANG bicycle is assembled with carbon com-
G
(f+g)
ponents
your MUSTANG bicycle dealer after an accident or similar
incident. Carbon is an extremely strong material which
combines high resistance with low weight. However, one of
the inherent properties of carbon is that possible overstress
may compromise the inner carbon-fibre structure without
showing any visible deformation, as is the case with steel or
aluminium. A damaged component can fail without previous
warning. Danger of an accident!
, it is imperative that you have it checked by
e
f
g
d
24
h
25
HOW TO USE QUICK-RELEASES AND
THRU AXLES
ADDITIONAL INFORMATION “AFTER AN ACCIDENT” WITH
YOUR MUSTANG PEDELEC
1. Check the rechargeable battery
no longer properly in its holder or shows any damage, do not use
your MUSTANG pedelec any longer, or at least, not in assistance
mode. Switch off the motor and the battery separately, if necessary. A damaged battery can lead to a short-circuit or a sudden
a
b
c
failure of your MUSTANG pedelec assistance right at the moment
when you need it.
Damage to the outer housing of the rechargeable battery can result
in the entry of water or moisture and that can lead to short circuits
or electric shocks. The rechargeable battery could catch fire or
even explode! In such a case contact your MUSTANG bicycle dealer
immediately.
(b)
2. Check the display
Do not use your MUSTANG pedelec if the display shows an error
message or a warning. If necessary, switch off the system completely and wait at least 10 seconds before checking it again.
Do not set off on your MUSTANG pedelec with drive assistance if
the control element shows a warning. In such a case contact your
MUSTANG bicycle dealer immediately.
You can find further information in the chapter “Operating the
BionX Propulsion System” in your BionX system operating instructions.
3. Let your MUSTANG pedelec bounce on the ground from a low
height. If there is any rattling, see where it comes from. Check the
bearings, the bolts and the proper seating of the battery and the
connectors
You can find further information in the chapter “Inserting and Re-
moving the Battery” in your BionX system operating instructions.
(c+d)
. Are all the values displayed as usual?
, as necessary.
(a)
. If the rechargeable battery is
QUICK-RELEASES
Most mountain bikes are fitted with quick-releases to ensure fast adjustments, assembly and disassembly. Be sure to check that all the
quick-releases are tight before you set off on your MUSTANG bicycle.
Quick-releases should be handled with the greatest care, as they directly affect your safety.
Practise the proper use of quick-releases to avoid any accidents.
Quick-release mechanisms essentially consist of two operative elements:
1. The hand lever on one side of the hub which creates a clamping
(e)
force via a cam when you close it
2. The tightening nut on the other side of the hub with which the initial
tension on the threaded rod (quick-release axle) is set
Make sure that the levers of both wheel quick-releases
G
are always on the side opposite the chain drive. This will
help you to avoid accidentally mounting the front wheel the
wrong way round. In the case of bicycles with disc brakes
and quick-releases having a 5-mm-axle, it may be reasonable to mount both quick-releases with the lever on the side
(g)
of the chain drive
contact with the rotor and prevent you from having your fingers burnt. If you are in doubt or if you have any questions,
then contact your MUSTANG bicycle dealer.
Never ride your MUSTANG bicycle without having checked
G
first whether the wheels are securely fastened
of an accident!
Do not touch the rotor directly after having stopped – you
G
may burn your fingers! Always let the rotor cool down before opening the quick-release!
. This would help you not to come into
.
(f)
.
(h)
. Danger
e
f
g
If your MUSTANG bicycle is equipped with quick-releases,
A
be sure to lock the wheels together with the frame to an
immovable object when you leave the bicycle outside.
d
26
h
27
How to Fasten Components Securely with a Quick-Release
Open the quick-release. The marking “Open“ on the lever should be-
(a)
come visible now
Make sure the component to be fastened is in the correct position.
.
If your seat post is equipped with a quick-release mechanism, check
whether the saddle is firmly fixed by trying to twist it relative to the
(f)
.
frame
With the DT Swiss RWS system
via a cam, but by tightening a bolted connection with a lever.
(g)
the clamping force is not created
You can find further information in the chapters “Wheels and Tyre
a
b
c
Equipment” and “Adjusting the MUSTANG Bicycle to the Rider”
and in the instructions from the parts manufacturers, which you can
find on the enclosed CD.
Move the lever back, as if to close it. Now you should be able to read
(b)
”Close“ on the outside of the lever
you should feel virtually no resistance with your hand until half way.
Over the second half of its travel the resistance you feel should increase
(c)
significantly
much strength to close the lever. Use the ball of your thumb to push it
in all the way while your fingers pull on an immovable part, such as the
fork or the rear stay, but not on a brake rotor or spoke.
In its end position, the lever should be at right angles to the quickrelease axle
lie close to the frame or the fork so that it cannot be opened accidentally. Make sure, however, that the lever is easy to handle for actual
quick use.
To check whether the lever is securely locked, apply pressure to the end
of the lever and try to turn it while it is closed. If you can turn the lever
around, open it and increase the preload. Screw the tightening nut on
the opposite side clockwise by half a turn. Close the quick-release lever
and check it again for tightness.
Finally lift the bicycle a few centimetres so that the wheel no longer
touches the ground and hit the tyre from above
fastened, the wheel will remain firmly fixed in the drop-outs of the frame
or fork without producing any rattling.
. Towards the end of its travel you should need very
(d)
, i.e. it should not stick out to the side. The lever should
. When you start closing the lever
(e)
. If it is properly
Tighten the system by turning the lever clockwise and by keeping the
clamping nut tight.
Depending on frame or fork the lever may touch either frame or fork
during tightening. If it does, remove the lever, release it, let it engage
again before you retighten it.
In its end position the lever should lie close to the frame or the fork so
that it cannot be opened accidentally.
Do not touch the rotor directly after having stopped – you
g
may burn your fingers! Always let the rotor cool down be-
fore opening the quick-release!
With an insufficiently closed quick-release the wheel can
g
come loose , thus creating a serious risk of accident!
If your bicycle is equipped with quick-releases, be sure to
a
lock it to an immovable object together with the wheels
when you leave it outside.
To be on the safe side you can replace the quick-releases
i
by special locks
with a special, coded key or an Allen key. If you are in doubt
or if you have any questions, contact your bicycle dealer.
(h)
. They can only be opened and closed
e
f
g
d
28
h
29

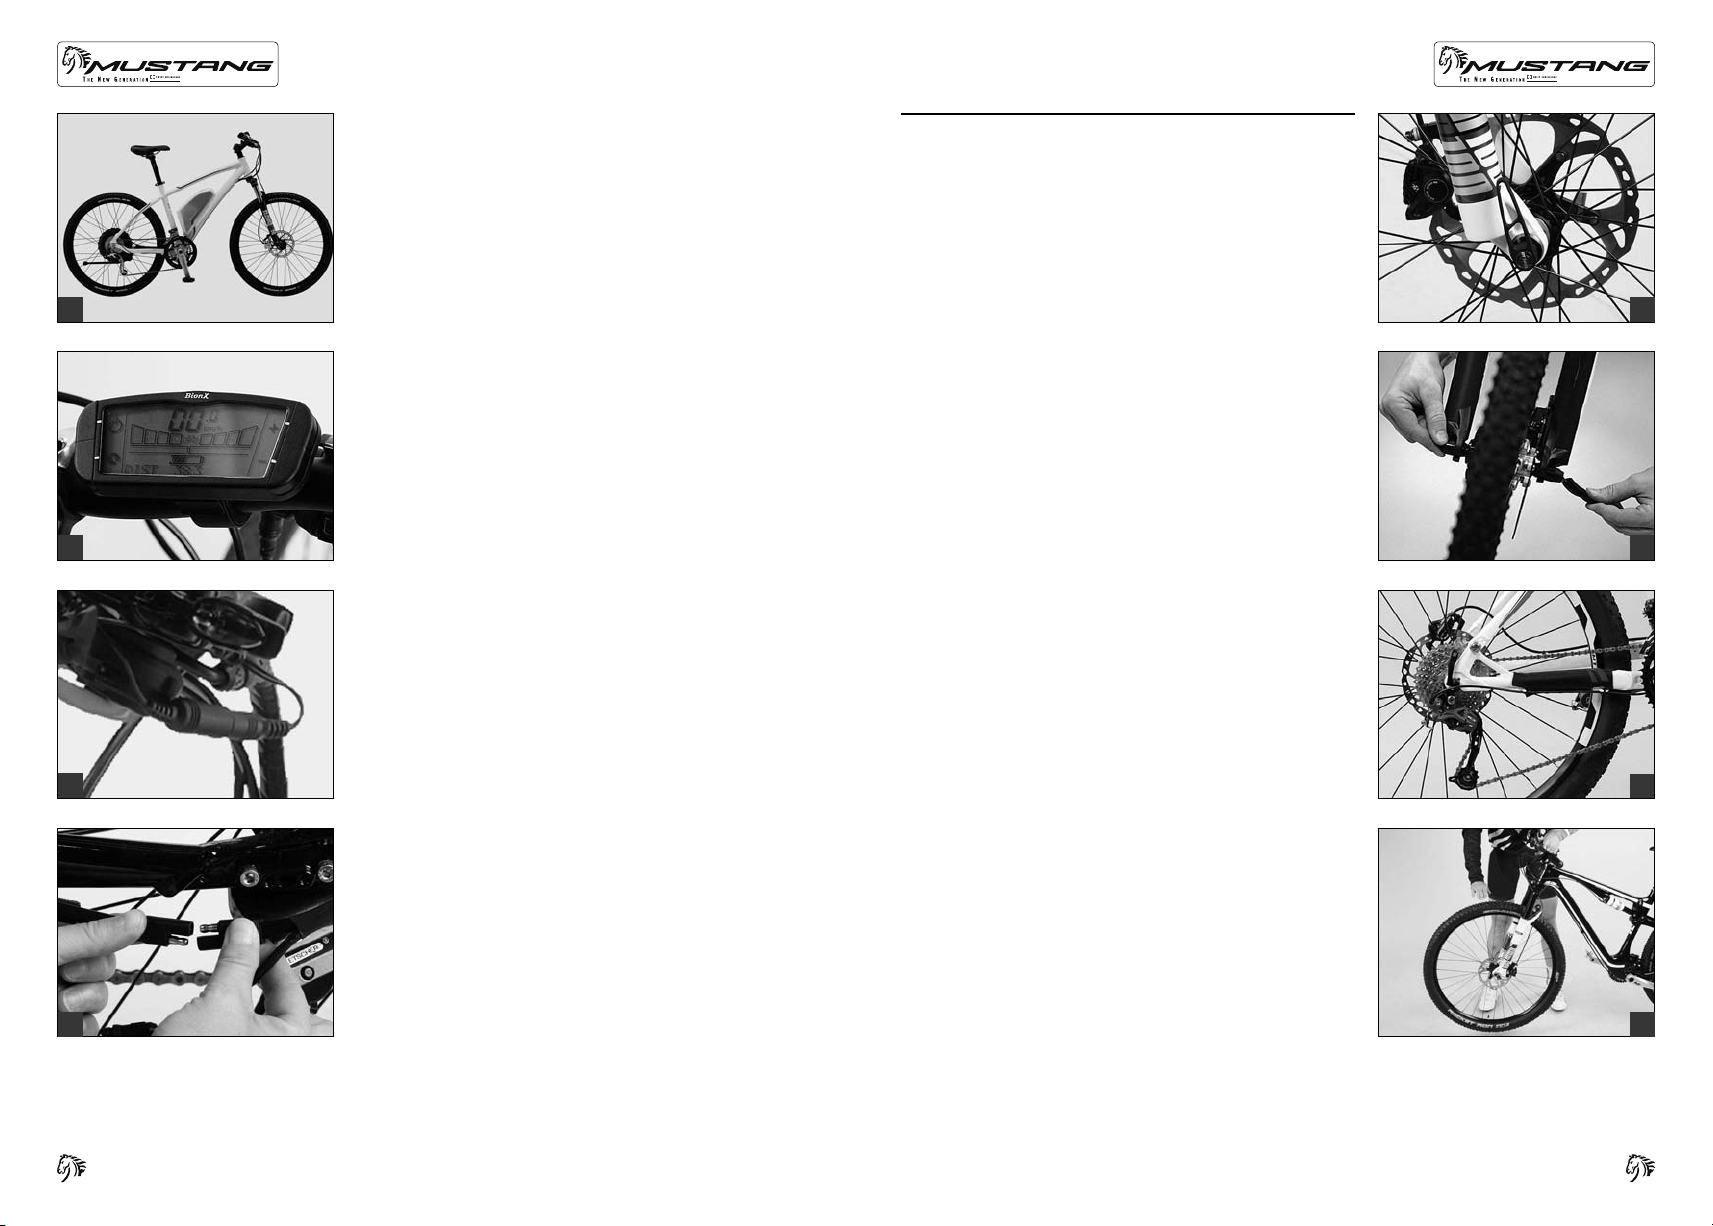
THRU A XLES
Thru axles
high stress occurring e.g. during freeriding, cross-country, downhill riding or jumps. They provide suspension forks with a suitable stiffness.
i
a
(a)
are mounted when MUSTANG bicycles have to withstand
Before mounting or replacing a fork/wheel combination
with thru axle system, be sure to read the operating instructions of the respective suspension fork or wheel manufacturer first.
The QR15 or E-Thru system
Shimano and Fox and is a 15 mm thru axle that optimises weight. It
is mounted like the Maxle system and also operated with a quickrelease lever. The special feature of the QR15/E-Thru compared to
usual quick-release systems is the firm, bolted connection of the tightening nut to the fork leg on the opposite side of the quick-release lever.
For dismounting the front wheel you may need tools
fork manufacturer and thru axle system. To dismount the wheel, loosen
the axle support at the fork and remove the axle completely from the
hub.
(f)
has been developed jointly by
(g)
according to
e
Notes on How to Mount Front Wheels
There is a wide range of thru axle systems available now. Some systems are tightened with quick-releases. Other systems may require
(b+c)
special tools for assembly or disassembly
With the conventional thru axle system slide the thru axle through
the fork and the hub in a way that the head of the Allen bolt comes to
b
c
a rest on the right side (the chain side of the bicycle). Once the axle is
mounted, gently let the fork deflect a few times
chance of the axle getting jammed. Screw the nut onto the axle and
tighten it according to the enclosed instructions of the suspension fork
manufacturer. To lock the axle, finish by tightening the Allen bolts at the
front of the fork, according to the enclosed instructions of the suspension fork manufacturer.
If you are in doubt or if you have any questions, contact your MUSTANG
bicycle dealer.
Check the reliable fit of the bolts after one to two hours in use and then
every 20 hours.
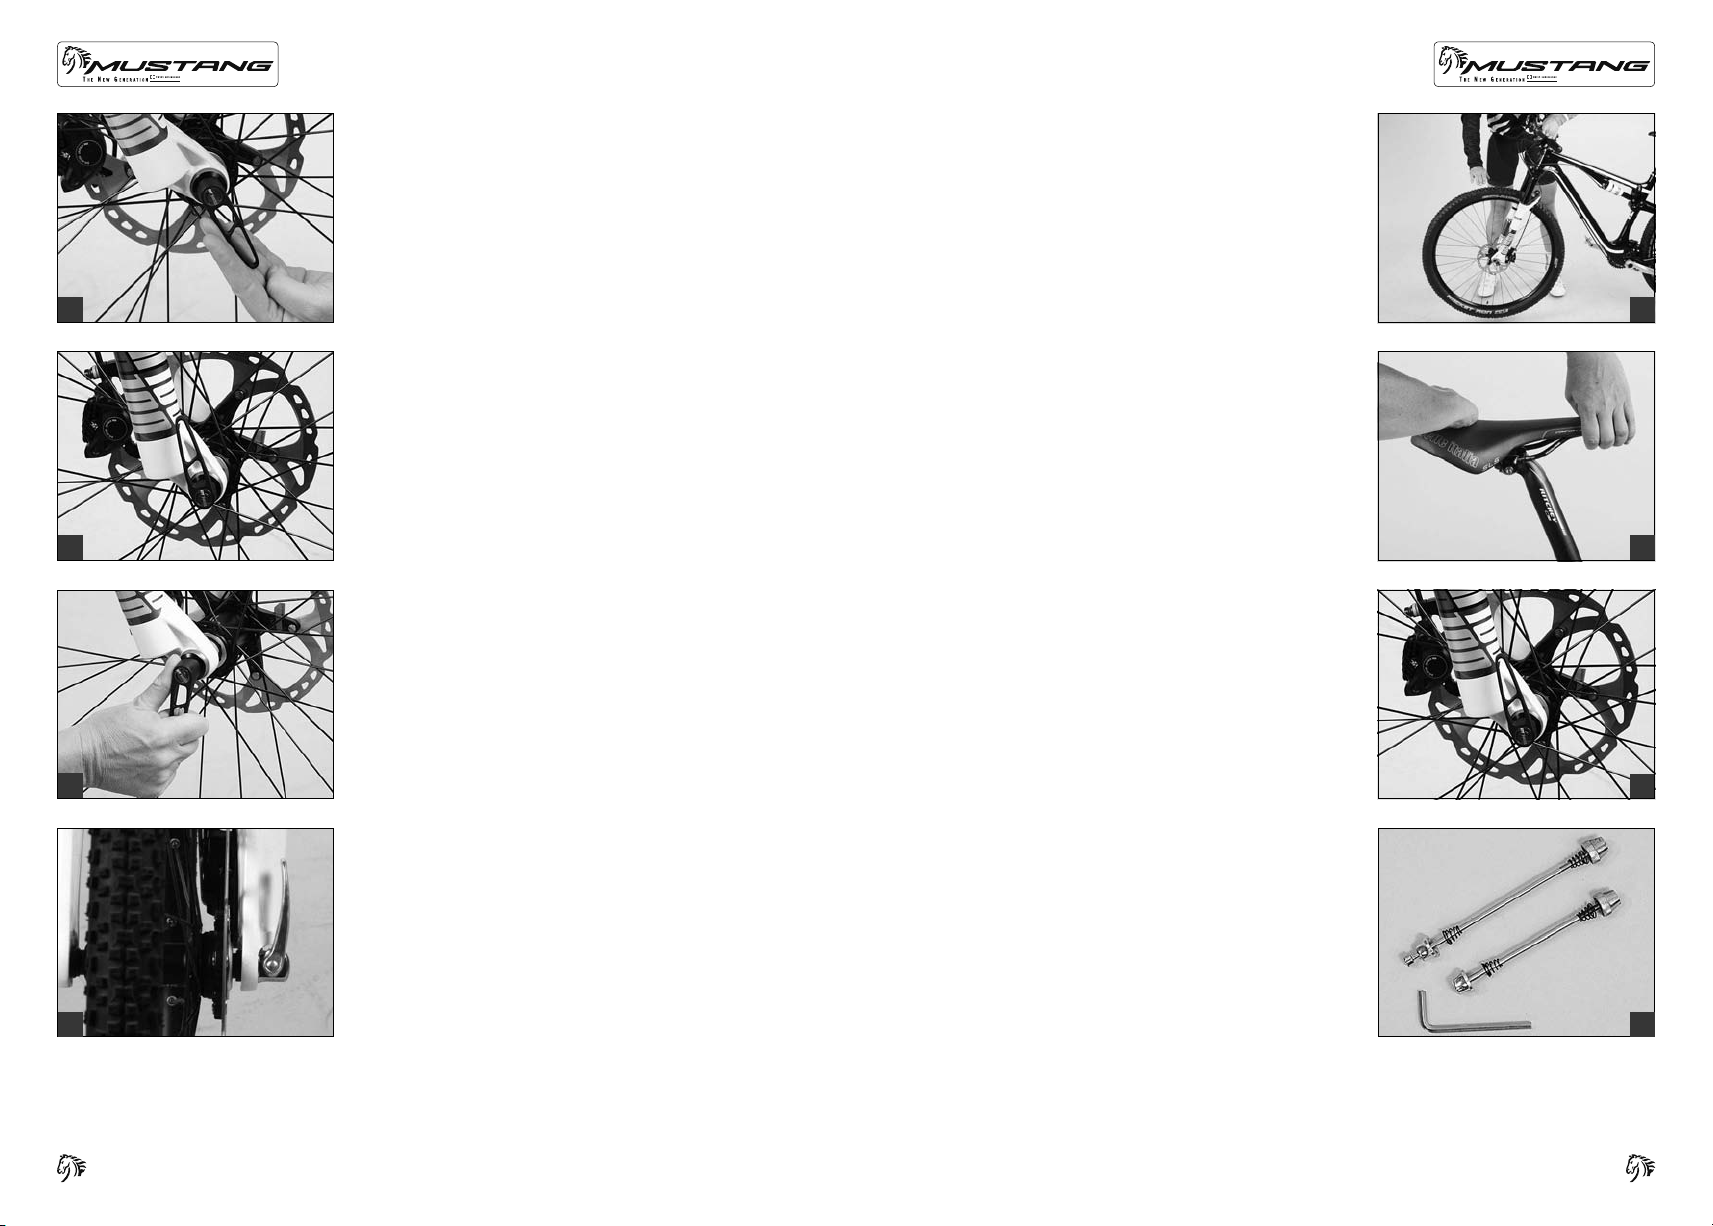
If your bicycle is equipped with a Maxle thru axle system
quick-release lever, put the wheel into the fork and mount the rotor in
the brake calliper. Bring the wheel into the correct position between the
drop-outs and slide the axle with the open Maxle quick-release lever
from the right side through the drop-out and the hub. As soon as the
axle thread engages with the thread of the left drop-out, tighten it by
turning the whole Maxle clockwise. Close the Maxle thru axle quickrelease lever like a usual quick-release lever (see above section “How
to Fasten Components Securely“).
.
(d)
, thus excluding the
(e)
with
d
To remount the front wheel proceed in the reverse order. Make sure all
bolts/quick-release systems are tightened properly.
Check the reliable fit of the bolts after one to two hours in use and then
every 20 hours in use.
Improperly mounted wheels may throw you off your bicycle
g
or result in serious accidents!
To mount the axle only use the tools recommended by the
a
manufacturer. Make it a rule to use a torque wrench
Tighten carefully by approaching the prescribed maximum
torque in small steps (0.5 Nm increments) and check in between the proper fit of the component. Never exceed the
maximum torque value indicated by the manufacturer! A too
tight fixing of the axle can damage the axle or the fork leg.
(h)
f
.
g
h
30
31

ADJUSTING THE MUSTANG BICYCLE TO THE
RIDER
Notes on How to Mount Rear Wheels
Besides the front thru axle systems, there are also rear thru axle sys-
(a)
. This system combines extreme stiffness with light weight.
tems
To dismount the rear wheel release the axle (with Allen key or RWS
quick-release, as provided by the system) and remove it, before dismounting the rear wheel as usually.
a
Make sure not to insert the axle
rear wheel.
Perform the rear wheel mounting as you are used to. Due to the axle
(c)
guides
requires no further adjustment. Once you have mounted the rear wheel,
insert and tighten the axle
i
the rear wheel is automatically in its correct position and
The manufacturers of thru axle systems deliver their prod-
ucts with detailed instructions. Read them carefully before
removing the wheel or doing any maintenance.
(d)
(b)
into the hub before mounting the
.
b
Your body height and proportions are decisive for the choice of the
frame size of your MUSTANG bicycle. Make particularly sure there is
enough space between your crotch and the top tube so that you do not
hurt yourself, if you have to get off your MUSTANG bicycle quickly
By choosing a specific type of bicycle you roughly determine the posture
you will be riding in
bicycle are especially designed so that you can adjust them to your body
proportions up to a certain degree
stem and the brake levers.
As these adjustments require know-how, experience, the appropriate
tools and a certain amount of skill, you should restrict yourself to a position control. Ask your MUSTANG bicycle dealer for the correct seating
position or if you want something changed. They will see to your wishes
the next time you leave your MUSTANG bicycle at the workshop, e.g.
for the first inspection.
After any adjustment/assembly work, be sure to make a short functional check as described in the chapter “Before Every Ride” and do
a test ride in an area free of traffic.
If you have a very small frame, there may be the danger of
G
your foot colliding with the front wheel. Therefore, make
sure your cleats are properly adjusted.
(f)
. However, some components of your MUSTANG
(g)
. These include the seat post, the
(e)
.
e
f
All tasks described in the following require the know-how of
G
a mechanic and appropriate tools. Make it a rule to tighten
the bolted connections always with greatest attention. Increase the torque values bit by bit, checking the fit of the
c
component in between. Use a torque wrench and never
exceed the maximum torque values! You can find these in
the chapter “Recommended Torque Settings for Compo-
nents”, on the components themselves and/or in the instructions from the parts manufacturers, which you can
find on the enclosed CD.
If sitting on the saddle causes you trouble, e.g. because
I
it numbs your crotch, this may be due to the saddle. Your
MUSTANG bicycle dealer has a very wide range of saddles
(h)
available and would be glad to offer advice
.
d
32
g
h
33

SETTING THE SADDLE HEIGHT
The correct saddle height for almost all bicycle types is the height which
gives maximum pedalling comfort and efficiency. When pedalling, the
ball of your foot should be positioned above the centre of the pedal axle.
With your feet in this position you should not be able to stretch your
legs completely straight at the lowest point, otherwise your pedalling
will become awkward.
a
b
c
d
Check the height of your saddle with flat-soled shoes. This is best done
with suitable cycling shoes.
Sit on the saddle and put your heel on the pedal at its lowest point
(a)
. Your leg should be fully stretched and your hips should remain
horizontal.
To adjust the saddle height loosen the quick-release lever
chapter “How to Use Quick-Releases and Thru Axles”) or the binder
bolt of the seat post clamp at the top of the seat tube.
The latter requires suitable tools, such as an Allen key, with which you
turn the bolt two to three turns anticlockwise. Now you can perform the
vertical adjustment of the seat post.
Be sure not to pull out the seat post too far – the mark on the seat post
(end, max., min., stop or the like) should always remain within the seat
(c)
– and always grease the part of an aluminium or titanium seat
tube
post that is inserted into a seat tube made of aluminium, titanium or
steel. Do not grease carbon seat posts and/or carbon seat tubes in the
clamping area! Use special carbon assembly paste instead.
Align the saddle with the frame by using the saddle nose and the bottom bracket shell or top tube as a reference point
Clamp the seat post tight again, by closing the quick-release, as described in chapter “How to Use Quick-Releases and Thru Axles” or
by turning the seat post binder bolt clockwise in half turns. You should
not need much strength in your hands to clamp the seat post sufficiently tight. Otherwise the seat post does not match the frame.
Verify in between that the seat post is sufficiently tight by taking hold
of the saddle at both ends and then trying to rotate the seat post inside
the seat tube. If it does rotate, gently retighten the clamping bolt by half
a turn and do the check again.
(d)
(b)
(see the
.
Does the leg stretch test now produce the right result
moving your foot and pedal to the lowest point. When the ball of your
foot is exactly above the pedal centre in the ideal pedalling position,
your knee should be slightly bent. If it is, you have adjusted the saddle
height correctly.
Check whether you can touch the ground safely while sitting on the
saddle by stretching your feet to the ground. If you cannot, you should
lower the saddle a little, at least to begin with.
Tighten carefully by approaching the prescribed maximum
A
torque in small steps (0.5 Nm increments) and check in between the proper fit of the component. Never exceed the
maximum torque value specified by the manufacturer!
Never ride your bike with the seat post drawn out beyond
G
the end, limit, maximum, or stop mark! The seat post might
break or cause severe damage to the frame. In the case
of frames with seat tubes that extend beyond the top of
the frame’s top tube, the seat post should be inserted into
the seat tube at least below the bottom of the top tube and
below the top of the seat stays! If the seat post and frame
require different minimum insertion depths, you should opt
for the deeper insertion depth.
Never apply grease or oil into a seat tube of a frame made
G
of carbon unless an alloy sleeve is inside the frame. If you
mount a carbon seat post, do not put any grease on it, even
if the frame is made of metal. Once greased, carbon components may never again ensure reliable clamping. Use
special carbon assembly paste instead
If the seat post does not move easily inside the seat tube
A
or if it cannot be tightened sufficiently, ask your MUSTANG
bicycle dealer for advice! Do not use brute force!
The notes refer to cross-country, marathon and touring
i
bikes. If you have a MUSTANG dirt, freeride, dual slalom,
fourcross or downhill bike, please observe the notes in
chapter “MUSTANG-Dirt, Freeride, Downhill Bikes – Spe-
(h)
cial Features”
.
(f+g)
(e)
? Check by
.
e
f
g
h
34
35
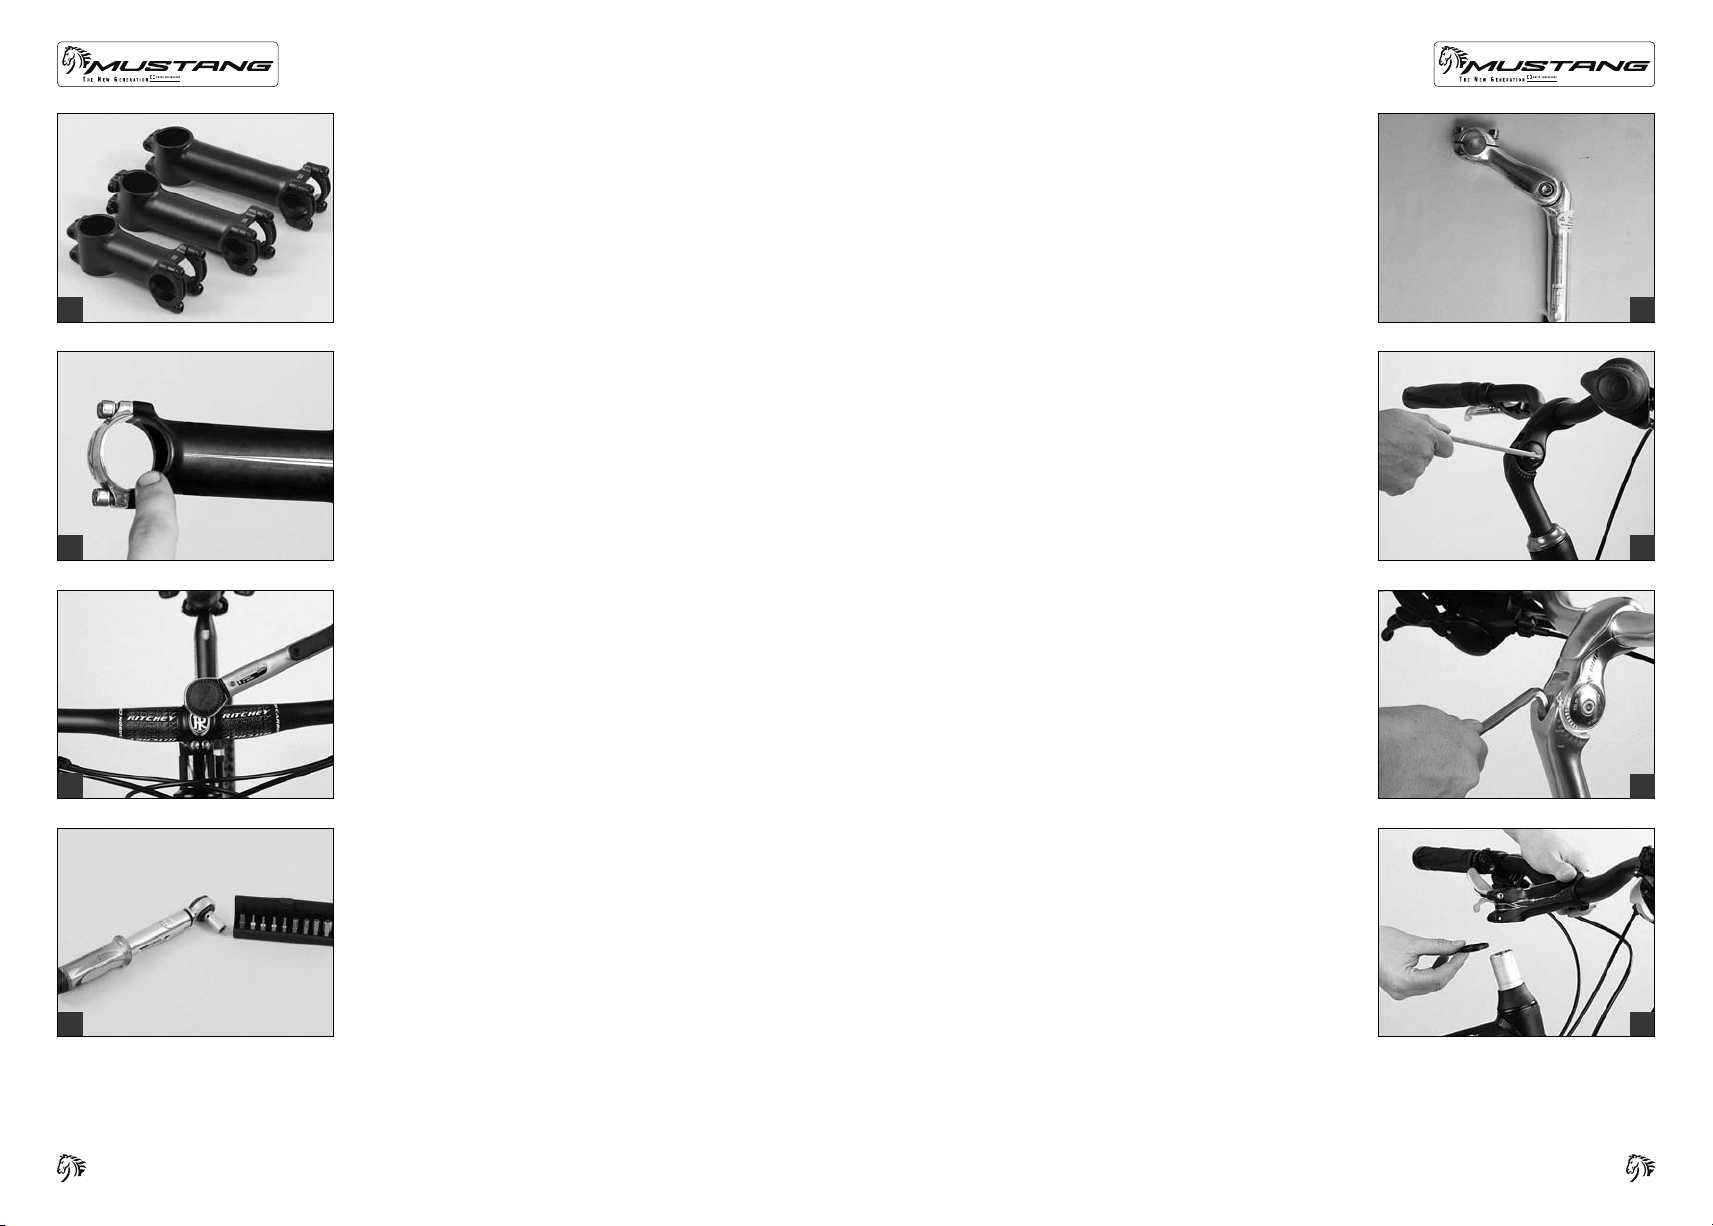
ADJUSTING THE HEIGHT OF THE HANDLEBARS
ADJUSTABLE STEMS
The height of the handlebars compared to the saddle and the distance
between saddle and handlebars determine how much your upper body
will be inclined forward. Lowering the handlebars gives you a streamlined position and brings more weight to bear on the front wheel. However, it also entails an extremely forward leaning posture which is tiring
and less comfortable, because it increases the strain on your wrists,
arms, back, upper body and neck.
a
There are two different stem systems that allow vertical adjustment of
the handlebars, i.e. the adjustable and the Aheadset
tems require special knowledge. In this regard, the descriptions hereafter may be incomplete. If you are in doubt or if you have any questions,
then contact your MUSTANG bicycle dealer.
The stem is one of the load bearing parts of your bicycle.
G
Changes to it can impair your safety. If you are in doubt
or if you have any questions, then contact your MUSTANG
bicycle dealer.
®
stem. These sys-
b
Stems come in varying lengths
G
binder tube diameters
sions can become a source of danger: Handlebars or stems
can break, resulting in an accident. When replacing any
parts be sure to only use parts that bear the appropriate
mark and, to be on the safe side, original spare parts. Your
MUSTANG bicycle dealer will be pleased to help you.
The bolted connections of stem and handlebars have to be
G
tightened to the prescribed torque values
c
d
regard the prescribed values, the handlebars or stem may
come loose or break. Use a torque wrench
exceed the maximum torque values! You can find these in
the chapter “Recommended Torque Settings for Compo-
nents”, on the components themselves and/or in the instructions from the parts manufacturers, which you can
find on the enclosed CD.
Make sure the handlebar-stem combination is approved by
A
the handlebar and/or stem manufacturer.
Check that the area of the stem where the handlebars are
A
clamped has no sharp edges.
(b)
(a)
as well as shaft and
. A stem of inappropriate dimen-
(c)
. If you dis-
(d)
and never
There are various solutions for adjusting the tilt of the front part of
(e)
adjustable stems
Some designs use bolts on the sides of the joint
coming from above or below
additional locking mechanisms or adjusting bolts.
Before adjusting read the enclosed operating instructions of the stem
manufacturer. Ask your MUSTANG bicycle dealer to explain to you both
the function and adjustment of your stem or else let him do that work.
Note that the bolted connections of adjustable stems and
G
handlebars have to be tightened to the specified torques.
Otherwise the handlebars or stem may come loose or
break. Use a torque wrench and observe the minimum and
maximum torque values! You can find these in the chapter
“Recommended Torque Settings for Components”, on the
components themselves and/or in the instructions from the
parts manufacturers, which you can find on the enclosed
CD.
Keep in mind that readjusting the position of the stem
a
changes the position of the handlebars, brake and shift levers. Readjust these components, as described in chapter
“Adjusting the Tilt of the Handlebars, Bar Ends and Brake
Levers”.
:
(f)
, others have bolts
(g)
, and other again are equipped with
STEMS FOR THREADLESS SYSTEMS,
THE AHEADSET® SYSTEM
(Aheadset® is a registered trade mark of Dia-Compe)
In the case of bicycles with Aheadset
to adjust the bearing preload. If you change the position of the stem you
have to readjust the bearing play (see the chapter “Headset”).
The vertical setting range is determined by the intermediate rings, also
(h)
referred to as spacers
can be mounted the other way round to achieve a different handlebar
height.
. In the case of flip-flop stem models the stem
®
headsets the stem also serves
e
f
g
h
36
37
 Loading...