

MUSITEL 742 User Manual

Musitel 742
Alarms and commands by SMS
Users Manual
Configuration of the alarm transmitter
Software version 1.20 and above
06-06-2011

Index
Preparing the Sim Card .................................................................................................. 3
“Module Status” Screen ................................................................................................... 4
Configuration of the Musitel 742 ...................................................................................... 5
Alarm Inputs ..................................................................................................................... 6
Events Screen .................................................................................................................. 7
“Phone numbers....” Screen .............................................................................................. 8
“Relay outputs” Screen ...................................................................................................... 10
“Alarm Settings” Screen ..................................................................................................... 12
Changing the password ..................................................................................................... 14
“Event list” Screen ............................................................................................................. 15
Recording a voice message by using a telephone call ..................................................... 16
Command and verify the status of the relays by a telephone call ..................................... 18
Arm - Disarm, the unit by using a telephone call ............................................................... 19
Save the telephone numbers by SMS ............................................................................... 20
Command and verify the status of the relays by SMS ...................................................... 23
Verify the current status of the Musitel unit by SMS ......................................................... 25
Connecting the Musitel ...................................................................................................... 26
Light signals ....................................................................................................................... 26
Commands by telephone calls ........................................................................................... 27
SMS Commands ................................................................................................................. 28
Technical Characteristics.................................................................................................... 30
Preparing the SIM card
a) Preparing the SIM card :
- Using an ordinary GSM, dial a number, for example a free of charge number. This will
empty the SIM card memory of sent SMS.
- Desactivate the PIN number; the GSM must go directly into operation and log on to the
network when turning it on, it must not ask for a PIN number.
- Desactivate the voice-mail functions. Caution: Usually, the voice-mail is activated for
all new SIM cards.
b) Insert the SIM card in the equipment.
The supply line and the USB cable MUST be unplugged before inserting the SIM card in
its place.
The same must be respected to take out the SIM card.
When the led indicator blinks alternating between red and green, the equipment has
logged onto the GSM network.
Caution :
If by distraction you have inserted or taken the SIM card out while the Musitel was
plugged into a power supply, you must, by using an ordinary GSM, make a phone call
where the person being called answers. This will unblock the SIM card..
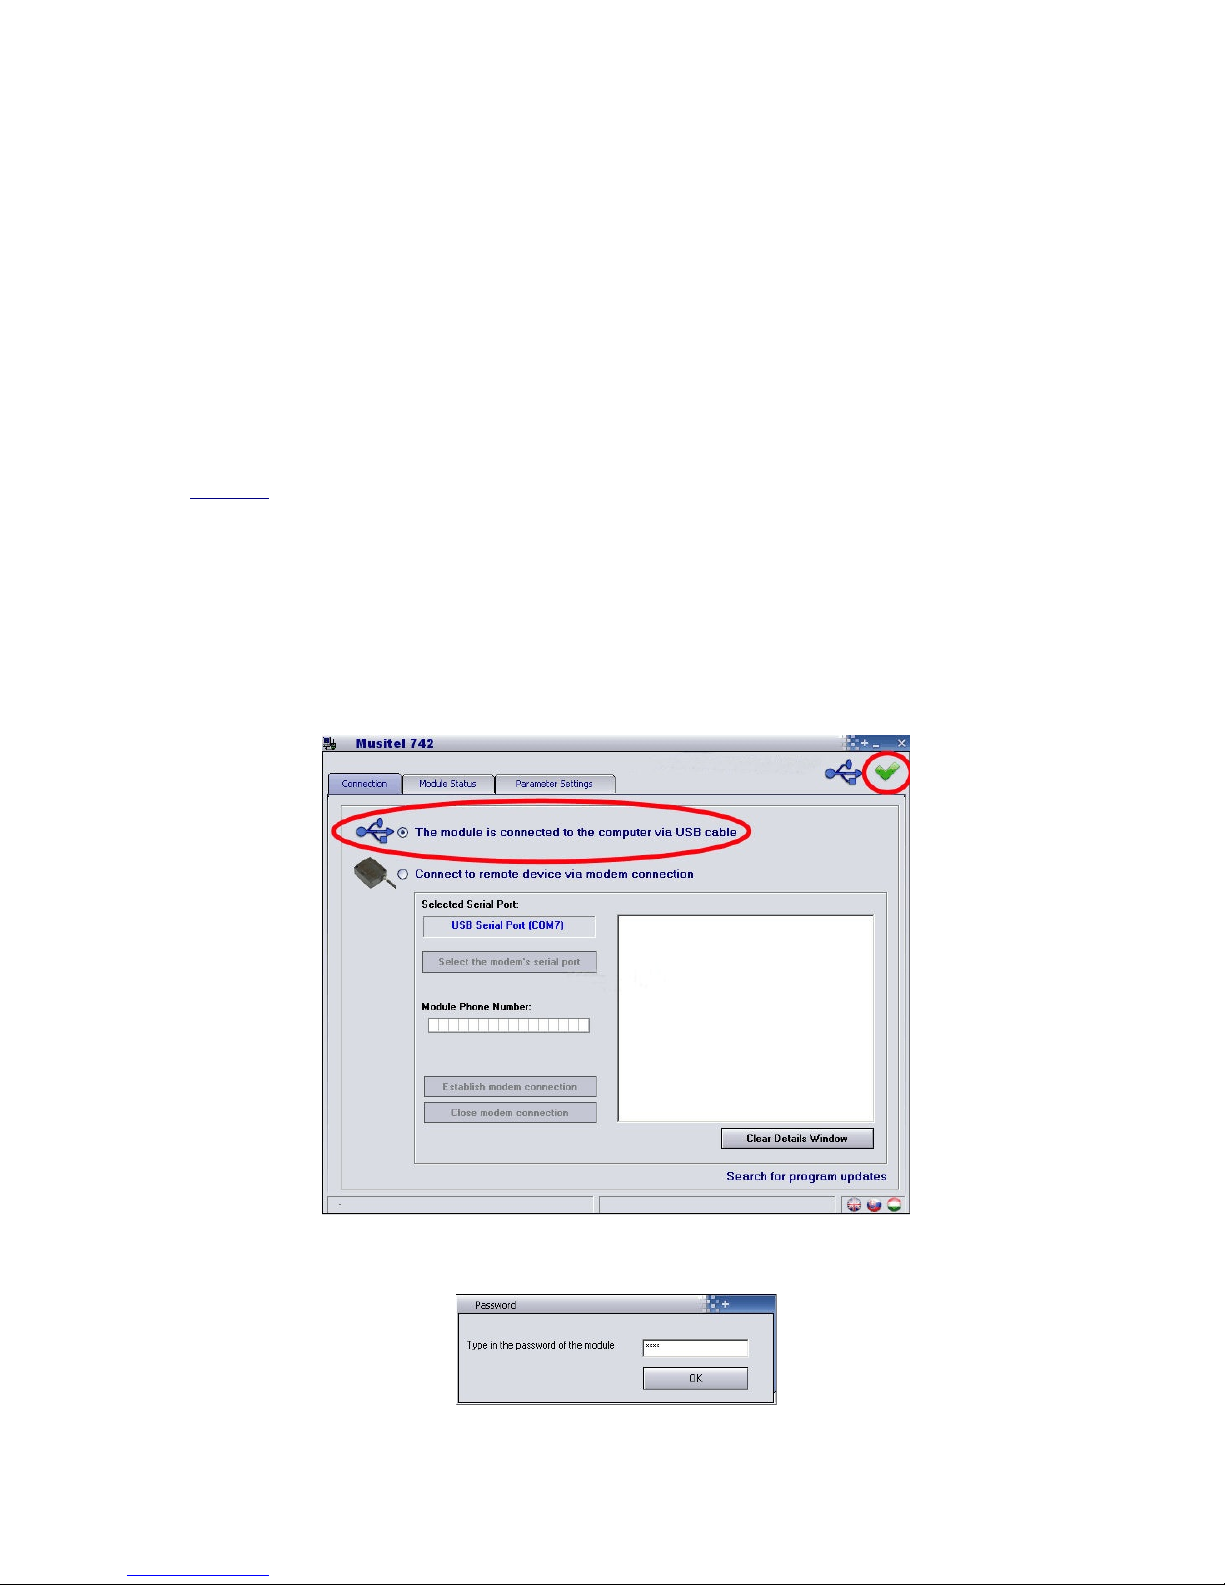
c) Connect the equipment to the PC by using the cable supplied in the package.
d) Click on “The module is connected to the computer via USB cable”
While the icon U appears, the Musitel 742 is connected.
e) Type in the password if needed. Default password: “1111"
f) Choose the « Module Status » tab”
Page 3
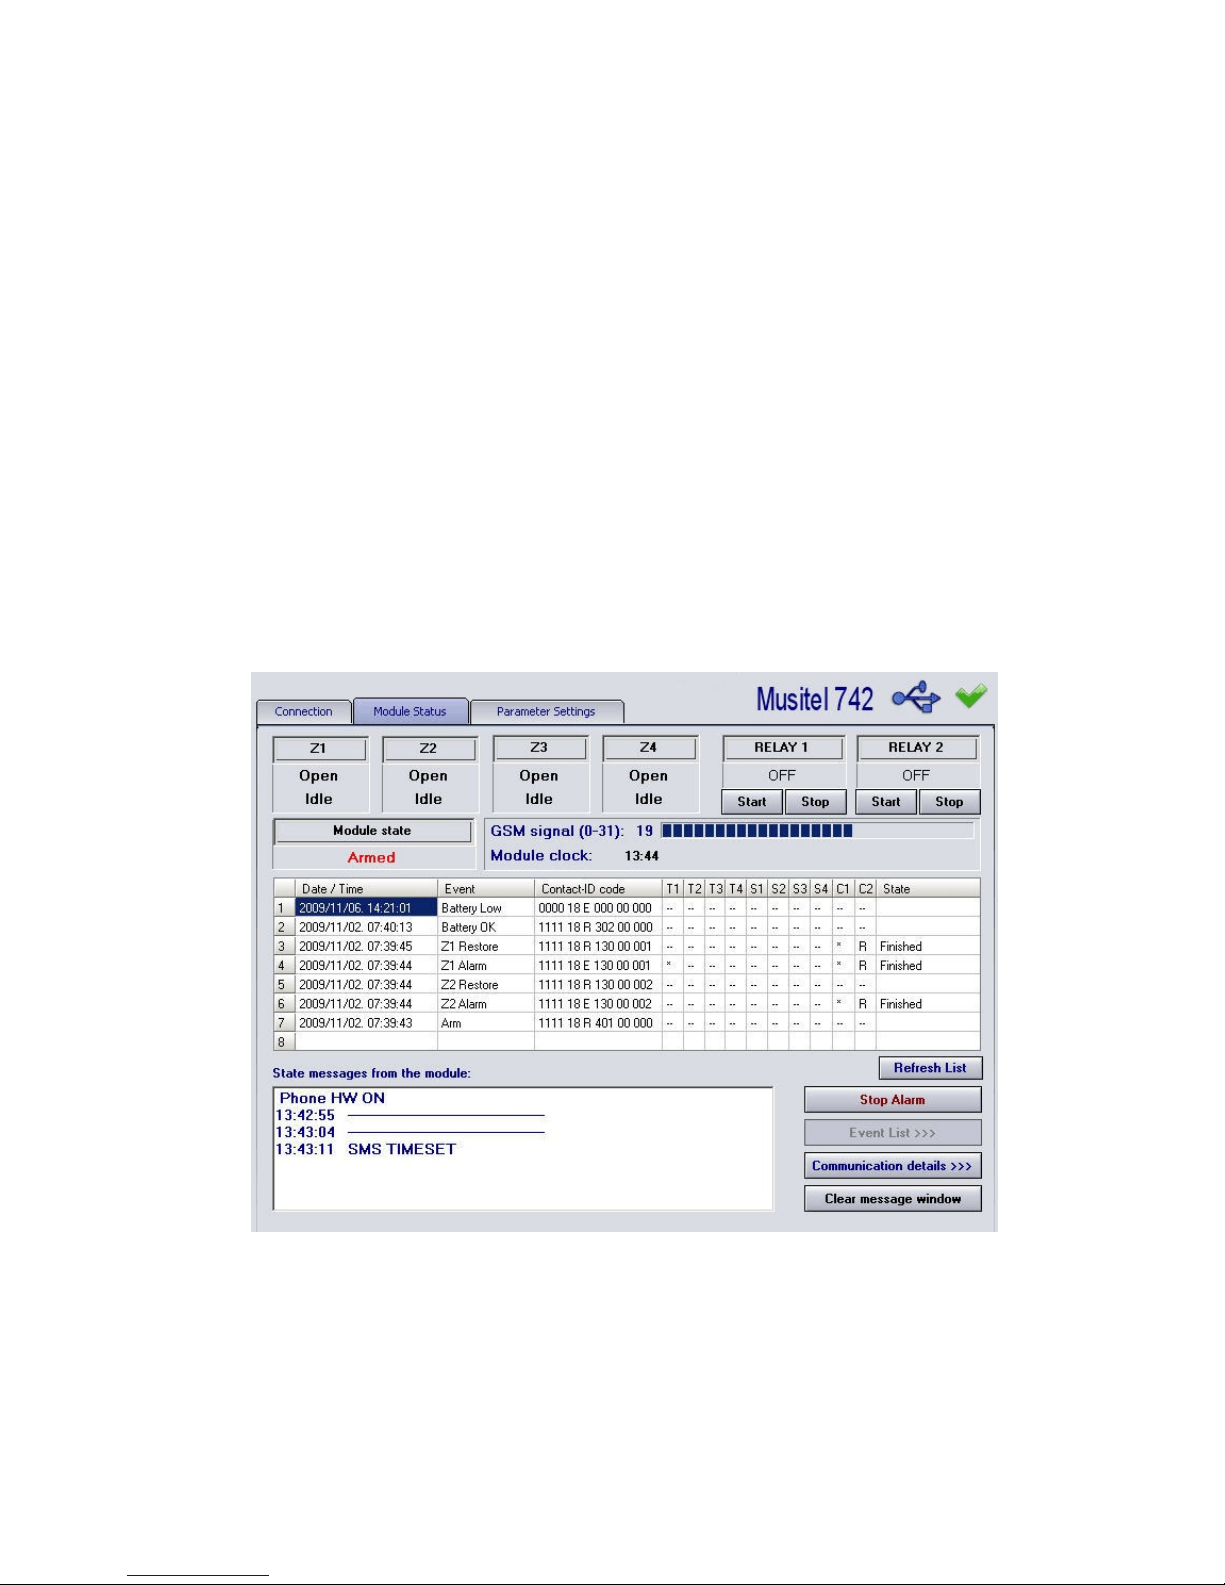
“Module Status” Screen
a) “GSM signal” : shows the quality of the GSM signal..
b) Z1 à Z4 are the inputs.
Idle = input is on idle (no alarm is present)
Alarm = an alarm has been detected at an input.
c) Relay 1 and 2 are the relays that can be activated at a distance.
ON = the relay is active
OFF = the relay is inactive.
d) “Last 8 events”: gives the last 8 status changes and/or actions.
e) “Module clock” :gives the actual time of the Musitel 742.
f) “Communication details” :
allows visualizing the internal commands of the
Musitel. This screen is used only for «Troubleshooting», for example to analyze
the events when faults have been detected.
As long as you are connected to the Musitel, either by USB cable or Modem, you can
follow in real time, the commands received and the messages sent by the
equipment.
You can see the actual status of the input alarms as well as the status of the relays.
g) Choose the “Parameter Settings” tab
Page 4
Configuration of the Musitel 742
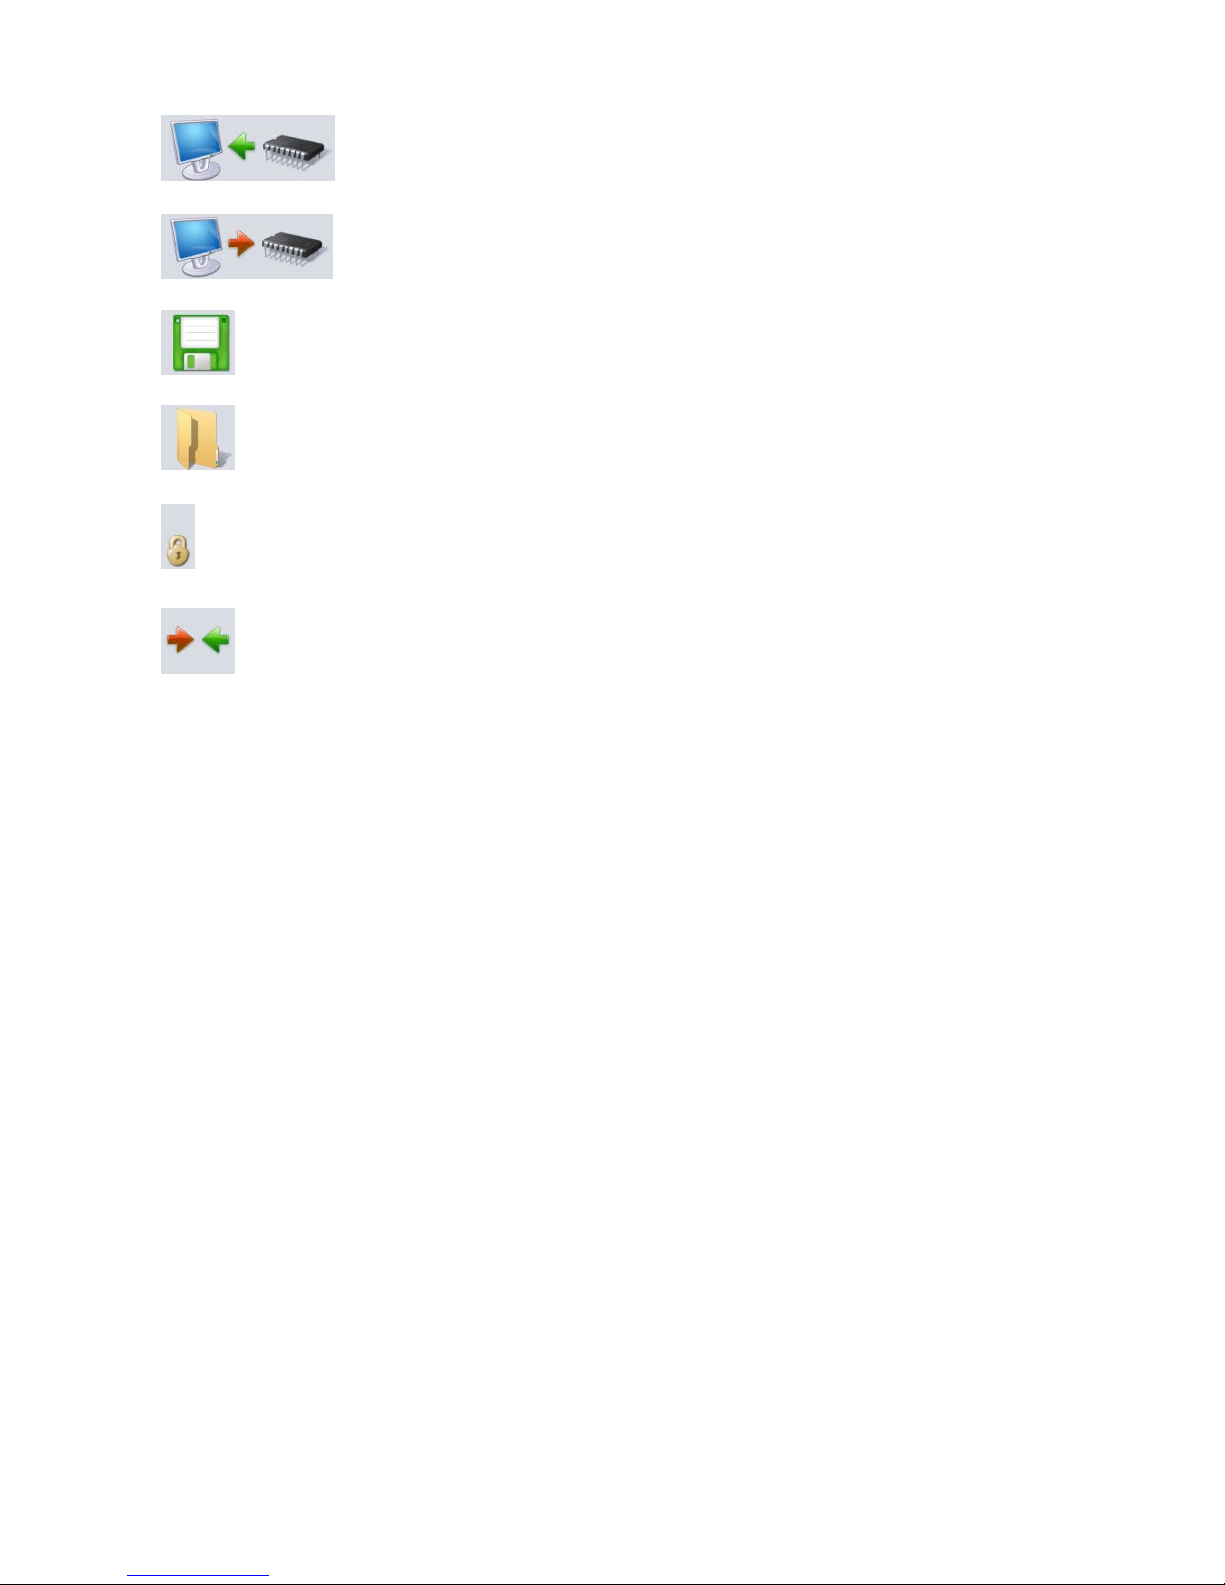
To read the existing configuration of the Musitel 742.
After reading, a green horizontal bar must appear underneath the
icone.
To write the new configuration for the Musitel 742
To save the existing configuration on a file on the PC.
To open a configuration file.
To change the password. Default password : 1111
To compare the parameters with those of the Musitel 742
Page 5
Alarm Inputs
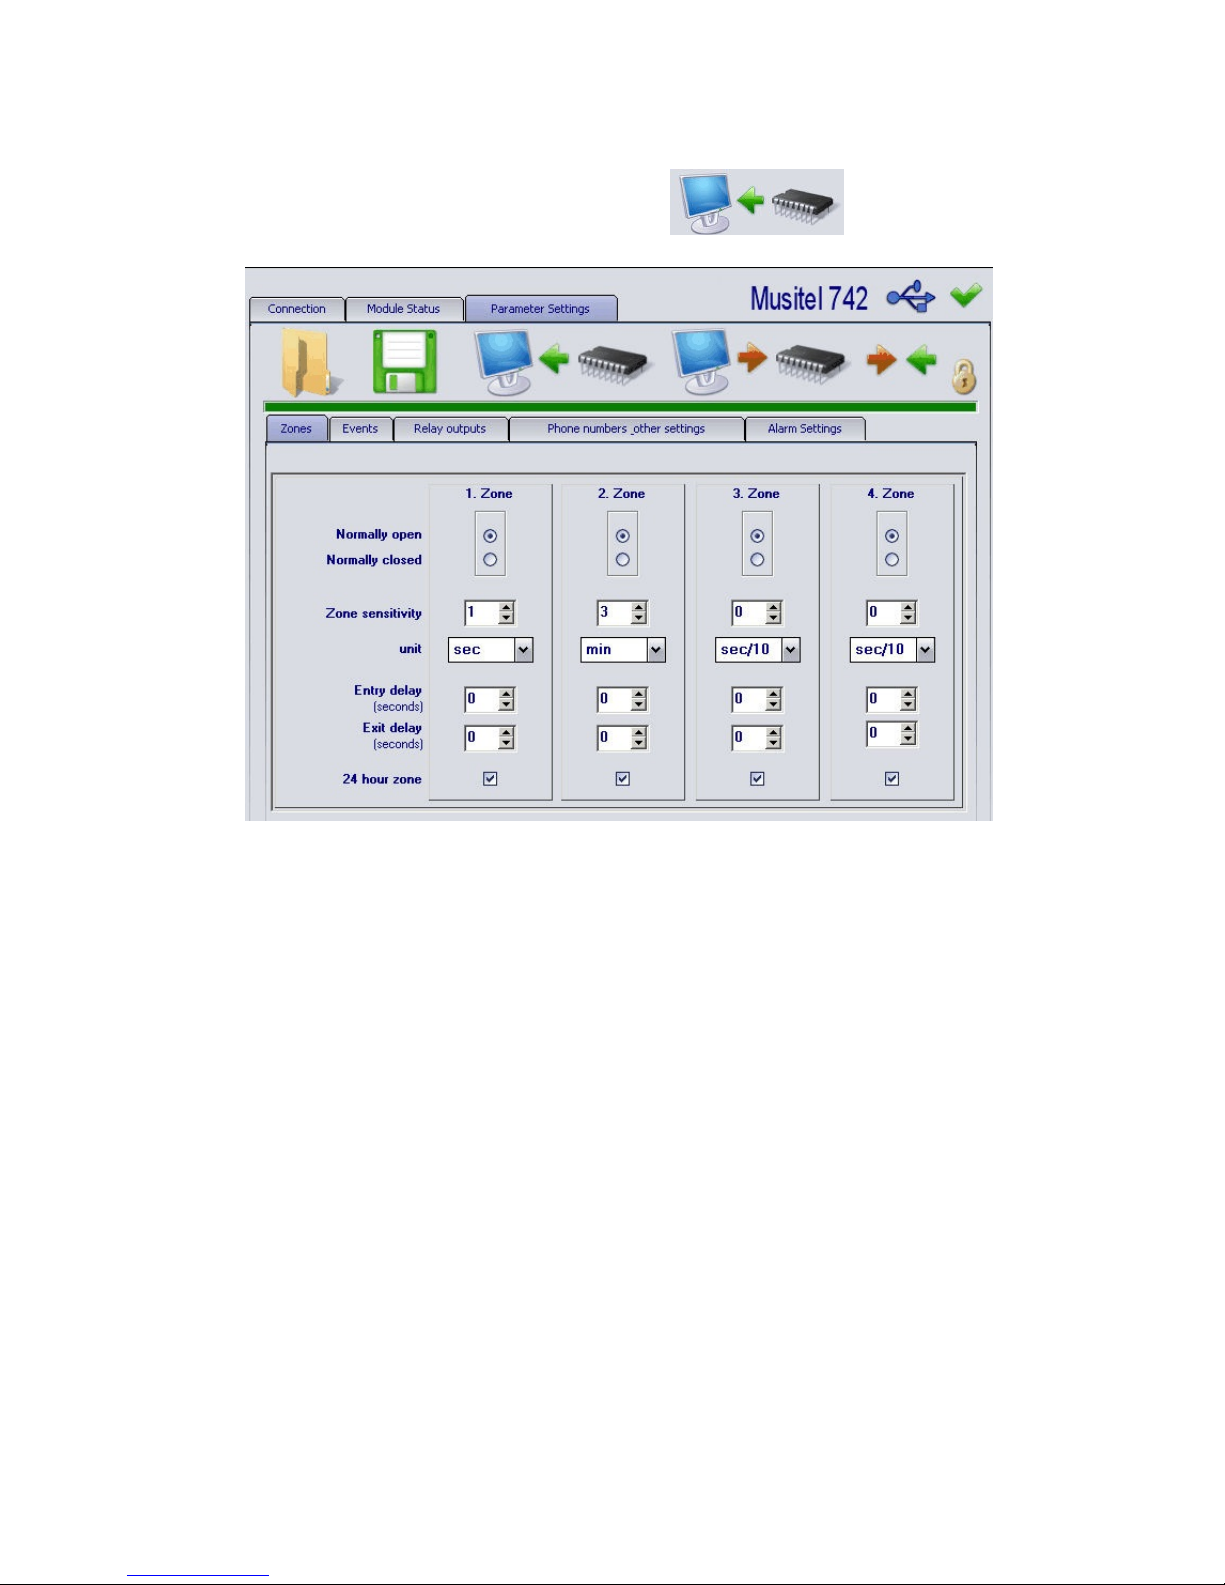
a) Choose the “Zones” tab
Before modifying the Musitel configuration, it is wise to start by reading the
existing configuration by using the icon
a) Zone
Normally Open = at the rest position, the input is “in the air”,
Normally closed = at the rest position, the input is linked to the ground.
The input is connected to the V- of the equipment
b) Zone sensitivity + unit = The alarm must be present for X seconds before
it is valid.
Default setting : 1 second. It can be modified between 1/10 of a
second and 254 minutes.
c) 24 hr zone = active 24h/24.
If this case is checked, the alarm inputs will be active 24h/7, no
matter if the equipment is Armed (Arm) or Disarmed (Disarm).
See Arm - Disarm.
d) Entry delay = 0 to 254 sec.
It is used when the “Arm – Disarm3 function is activated.
It allows a delay to activate the alarm, this will give some
flexibility in case the alarm is temporary, for example.
d) Exit delay = 0 to 254 sec.
It is used when the “Arm – Disarm3 function is activated.
It allows ignoring the alarm for X seconds before activating the
alarm (Arm).
Page 6
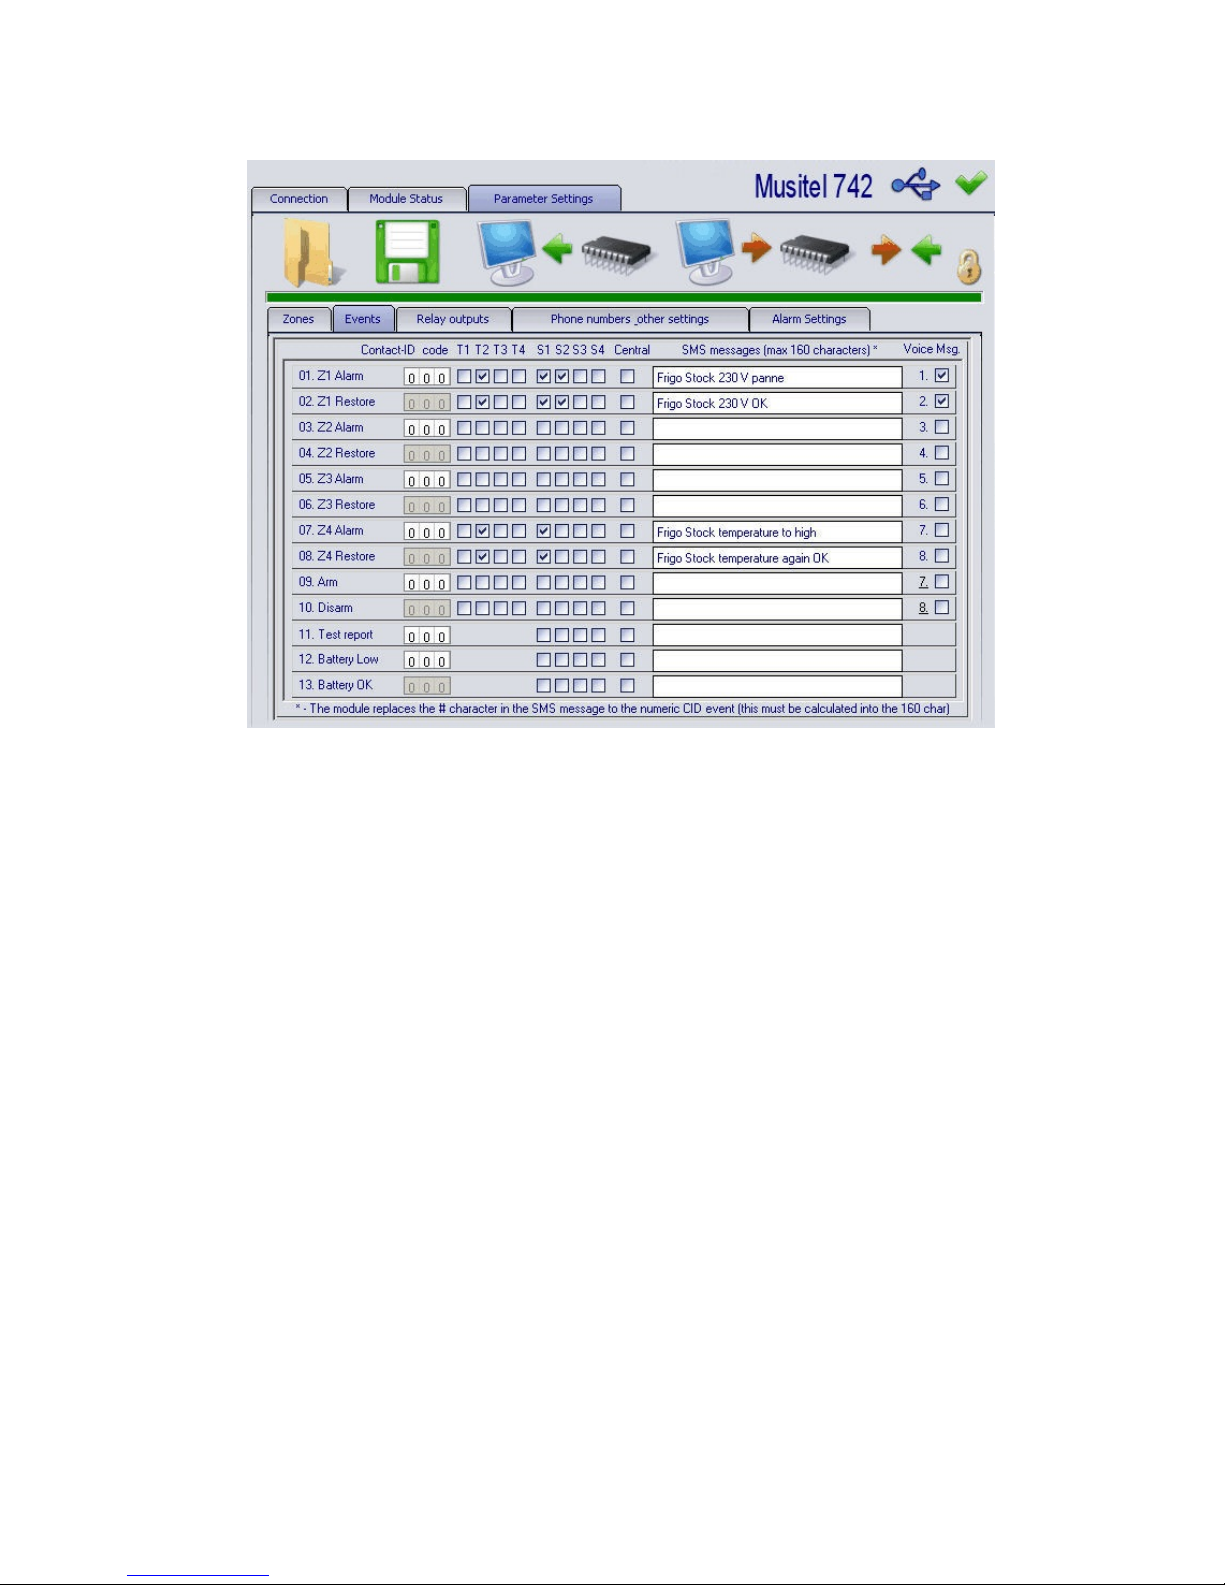
“Events” Screen
Actions to take in case of activation of one or more inputs.
a) T1, T2, T3 and T4 : Choose the numbers that should be called to send the voice
messages.
b) S1, S2, S3 and S4 : Choose the numbers to which an SMS should be sent.
c) “Z1 Alarm” : a message will be sent when there is an alarm.
“Z1 Restore” : a message will be sent when the alarm has been restored.
d) “Battery Low” : Sends an alarm when the battery voltage of the Musitel is
lower than 11.8 V or 23.6 V for more than 60 seconds.
“Battery OK” : Sends an alarm when the battery voltage of the Musitel is at
normal level, above 11.8 V or 23.6 V for more than 60
seconds.
This function is useful when a battery is used.
e) The “Voice msg” box :
if checked, it indicates that a voice message must be sent
(it must be recorded in advance) instead of the beep and
siren message..
f) “Contact ID code” and “Central”
must be activated when the Musitel is used in combination
with an Alarm Center..
Page 7
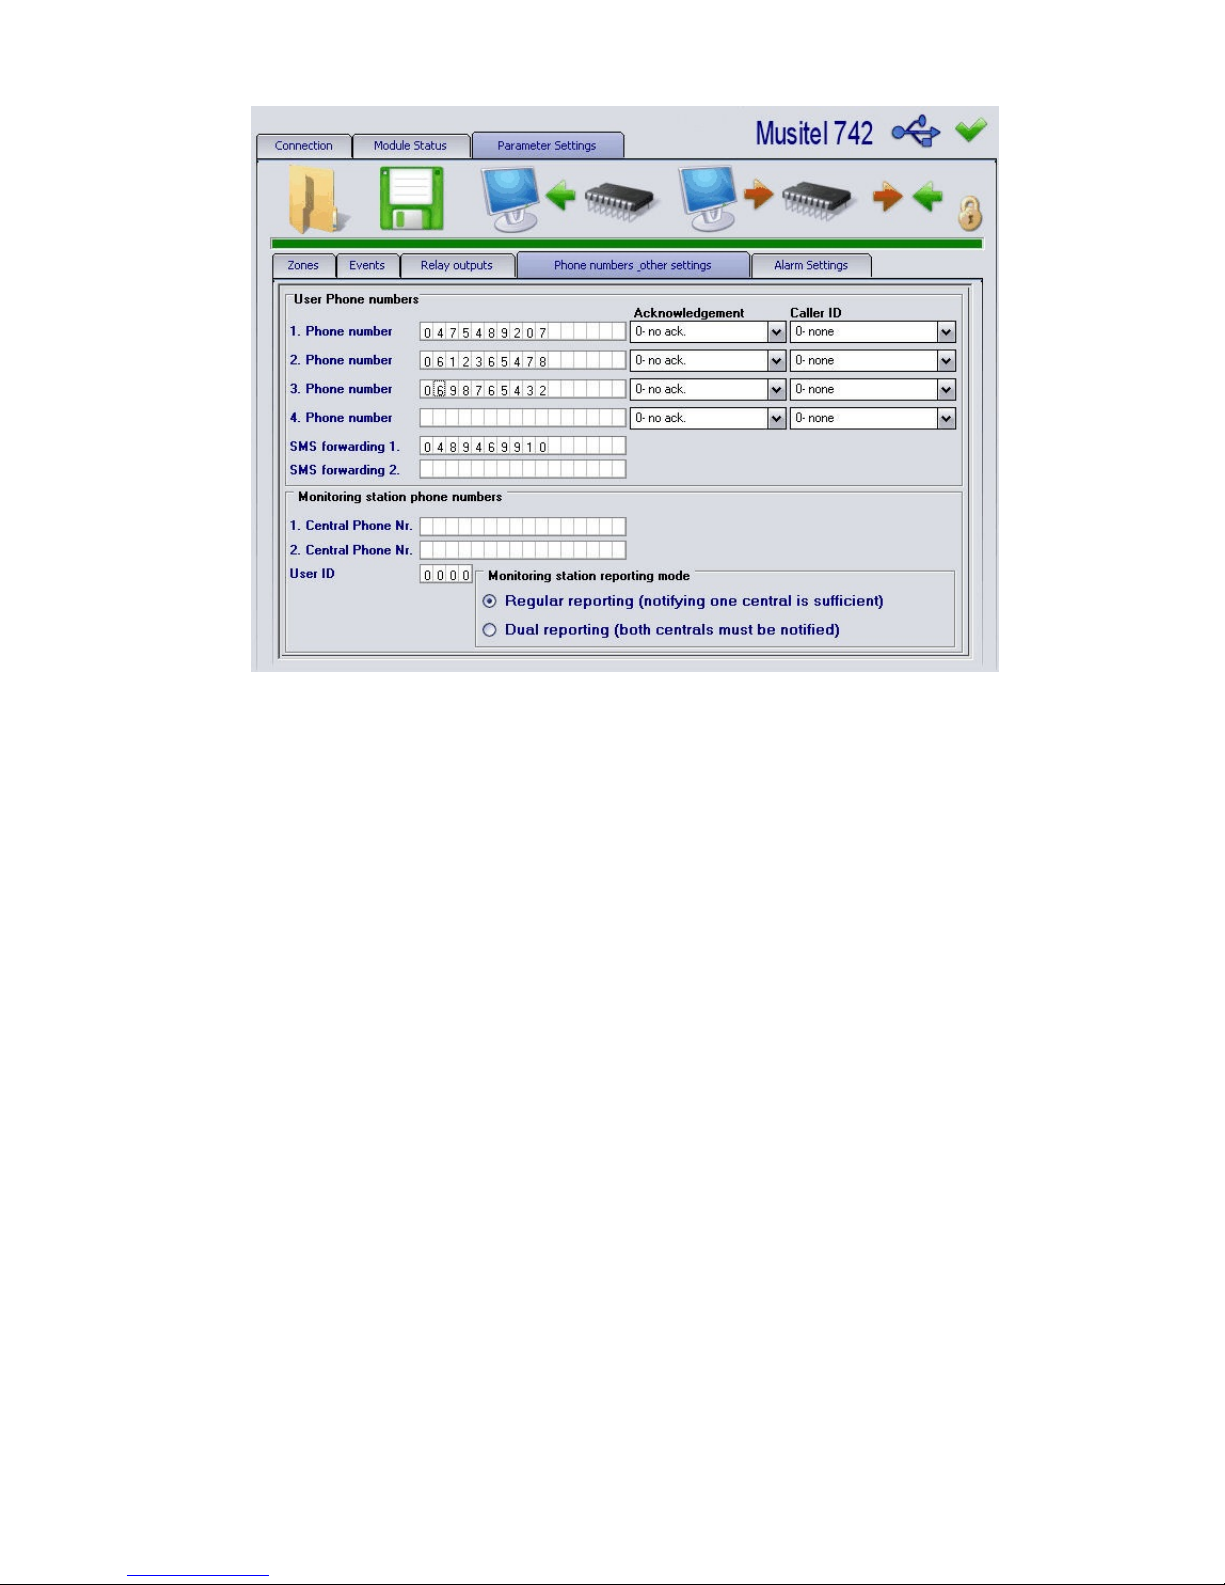
“Phone numbers....” screen
a) In case of alarm, the equipment can call 4 numbers to send either an SMS or a
voice mail.
b) Acknowledgement : requests the acknowledgment of the alarm, it concerns the
voice messages received. If there is no acknowledgment of the alarm, the
transmitter will continue to call.
0 - No ack. If this response is chosen, there is no action to be taken. The
equipment will continue to call the other numbers.
1 - r= ack When there is a call made by the equipment, you must answer and dial
r to stop the alarm. The other numbers will also be called. If you do
not acquit the alarm, you will be called until the alarm is acquitted
2 - r=ack., # = stop r to acquit the alarm
# to stop the calls to the other numbers
If you dial rpassword#, you will stop the transmission of all alarms that could
be present in the other inputs.
c) Caller ID : It applies when commands will be sent to the equipment in order
to activate or deactivate the relays, as well as to save voice messages.
0 - None: The password is required to access remote control and send
commands.
1 - No pwd req : The password is not required to access remote control and
send commands.
2 - Relay2 ON : Activates the relay 2 by recognizing the CLIP of the caller.
The call is free of charge.
3 - Relay2 On + pick up :
Activates the relay 2 and then it answers the call in
order to allow reception of other remote control commands.
Page 8

d) SMS forwarding : it is the number(s) to which the SMS received by the SIM card
will be transferred. It can be useful for the pre-paid cards which receive SMS's
with the available credit.
e) Monitoring station Phone numbers : It is useful when used with Alarm
Centers. Not used in this application.
Page 9
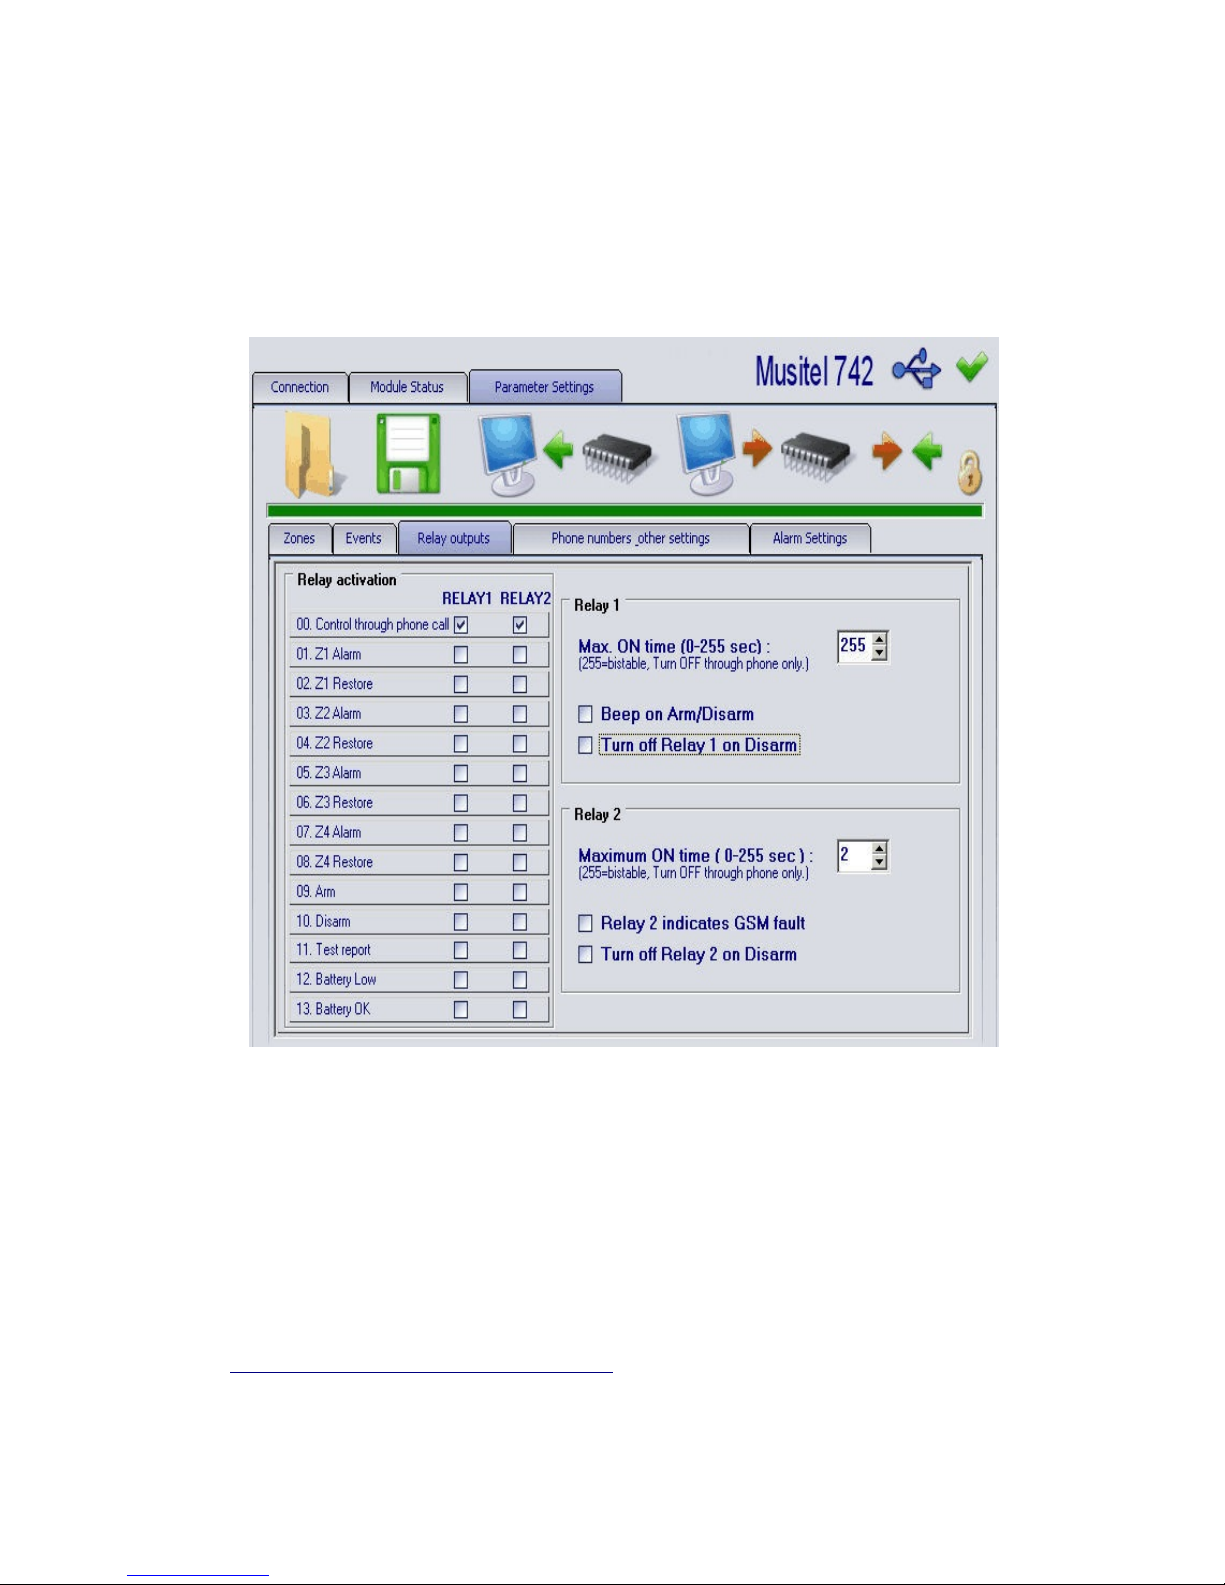
“Relay outputs” Screen
The relays can be commanded either
- by sending an SMS with or without an SMS confirmation in return;
- by a telephone call from one of the 4 numbers previously saved;
- by a telephone call from any phone number, protected by a password;
- by relationship to the status of one or several alarm inputs;
- by using the “Start” and “Stop” keys on the “Module Status” screens while
connected by a USB cable or by modem.
a) 00. Control through phone call
The relays 1, 2 or both of them can be on remote control by calling the unit.
If these cases are not checked, it is impossible to control the relays by using a
telephone call, but it can be done by SMS.
01. Z1 Alarm, 02 Z1 Restore, 03 Z2 Alarm, .......
The activation of one or several alarm inputs will activate one or more relays.
The same situation is valid when the inputs return to the normal status.
b) Max ON time (0-255 sec)
Timer function, from 1 to 254 seconds :
When the command is received, the relay will change position and hold the
position for the amount of time chosen and then it will return to its normal position.
Page 10
 Loading...