

Page 1
Quick Start Guide
FLOW 8
8-Input Digital Mixer with Bluetooth Audio and App Control,
60 mm Channel Faders, 2 FX Processors and USB/Audio Interface
V 1.0
A54-XXXXX-XXXXX
Page 2
1. Read these instructions.
15. The apparat us shall be connected
your coopera tion in the correct di sposal
more information about where you can
Important Safety
All trademar ks are the propert y
Atención
contacto s: dos polos y la puesta a
contacto, respectivamente, son los que
mesa especicados
tormentas o s i no va a utilizarlo durante
Instructions
Terminals marked with
this symbol carry
electr ical current of
sucient magnitude to constitute risk
of elect ric shock. Use only high- quality
professio nal speaker cables with ¼" TS
or twist-locking plugs pre -installed.
Allother installation or modication
should be per formed only by
qualiedper sonnel.
This symbo l, wherever it
appears, ale rts you to the
presence of uninsulated
dangerous voltage inside the enclosure
- voltage that may b e sucient to
constitu te a risk ofshock.
This symbo l, wherever it
appears, ale rts you to
important operating and
maintenance instructions in the
accompanying literature. Please read
themanual.
Caution
To reduce the risk of
electr ic shock, do not
remove the top cover (or the r ear
section). No user serviceable parts inside.
Refer servicing to qualiedpersonnel.
Caution
To reduce the risk of
re or elec tric shock, do
not expos e this appliance to rain and
moisture. Th eapparatus shall not
be expose d to dripping or splashing
liquids and no objects lled with
liquids, such as v ases, shall be placed
on the apparatus.
Caution
These service instruc tions
are for use by qua lied
service p ersonnel only. Toreduce
the risk of ele ctric shock do not
perform any servicing other than that
contained in the operation instructions.
Repairshave to b e performed by
qualied ser vicepersonnel.
2. Keep these instructions.
3. Heed all warnings.
4. Follow all instruc tions.
5. Do not use this apparatus
near water.
6. Clean only w ith dry cloth.
7. Do not bloc k any ventilation
openings. Install in accordance with the
manufacturer ’s instructions.
8. Do not ins tall near any heat
sources such a s radiators, heat regis ters,
stoves, or other apparatus (including
ampliers) that produce heat.
9. Do not defeat the sa fety purpose
of the polari zed or grounding-ty pe
plug. A polari zed plug has two blades
with one wider than the other.
A grounding -type plug has two blad es
and a third grounding prong. The wide
blade or the third prong are provided
for your saf ety. Ifthe provided plug
does not t int o your outlet, consult
an elect rician for replacement of th e
obsolete outlet.
10. Protect the power cord f rom being
walked on or pinc hed particularly
at plugs, convenience receptacles,
and the point wh ere they exit from
the apparatus.
11. Use only attachments/accessories
specied by themanufact urer.
12. Use only wit h
the cart , stand,
tripod, bracket, or
table spec ied by
the manufacturer,
orsold with
the apparat us. When a cart is used,
use caution when moving the cart/
apparatus combination to avoid injury
from tip -over.
13. Unplug this apparatus during
lightning storms or when unused for
long periods of time.
14. Refer all servicing to qualied
service personnel. Servicing is require d
when the appa ratus has been damaged
in any way, such as power suppl y cord
or plug is damage d, liquid has been
spilled or obje cts have fallen into the
apparatus, t he apparatus has been
expose d to rain or moisture, does not
operate nor mally, or has beendro pped.
to a MAINS socket ou tlet with a
protective earthing connection.
16. Wh ere the MAINS plug or an
appliance coup ler is used as the
disconnect device, the disconnect
device shall remain readily operable.
17. Corr ect disposal of
this product: This
symbol indicates that
this product must not
be disposed of with
household waste, according to the
WEEE Direc tive (2012/19/EU) and your
national law. This prod uct should be
taken to a collec tion center licensed for
the recyc ling of waste electr ical and
electronic equipment (EEE).
The mishandling o f this type of waste
could have a possib le negative impact
on the environment and human health
due to potentially hazardous
substances that are generally
associate d with EEE. At the same time,
of this produc t will contribute to th e
ecient use of natural resources. For
take your waste e quipment for
recycli ng, please contact your lo cal city
oce, or your household waste
collection se rvice.
18. Do n ot install in a conned space,
such as a book c ase or similar unit.
19. Do not place naked ame
sources, suc h as lighted candles,
on the apparatus.
20. Please keep the environmental
aspect s of battery dispo sal in mind.
Batteri es must be disposed- of at a
battery collection point.
21. Use this apparatus in tropical
and/or moderate climates.
LEGAL DISCLAIMER
Music Tribe accepts n o liability for
any loss which may b e suered by
any person who relies either wholly
or in part u pon any description,
photograph, or statement contained
herein. Technical specications,
appearances and other information
are subjec t to change without notice.
of their respective owners. Midas,
Klark Teknik, Lab G ruppen, Lake,
Tannoy, Turbosound, TC Electronic,
TC Helicon, Behringer, Bugera,
Auratone and Coolaudio are
trademarks or registered trademark s
of Music Tribe Global B rands Ltd.
© Music Tribe Global B rands Ltd.
2020 All rights re served.
LIMITED WARRANTY
For the applic able warranty terms a nd
conditions and additional information
regarding Music Tribe’s Limited
Warranty, please see complete details
online at musictribe.com/warranty.
Instrucciones de
seguridad
Las terminales marcadas
con este símb olo
transportan corr iente
eléctr ica de magnitud sucie nte como
para const ituir un riesgo de desc arga
eléctr ica. Utilicesolo cable s de altavoz
profesion ales y de alta calidad con
conecto res TS de 6,3 mm o de bayoneta
prejados. Cualquier otra instalación o
modicación debe ser realizada
únicamente p or un técnicocualicado.
Este símbolo, siempre que
aparece, leadv ierte de la
presencia de voltaje
peligroso si n aislar dentro de la caja;
estevoltaj e puede ser suciente par a
constitu ir un riesgo dedescarg a.
Este símbolo, siempre que
aparece, leadv ierte sobre
instrucciones operativas y
de mantenimiento que aparecen en la
documentación adjunta. Por favor,
leaelmanual.
Para reducir e l riesgo de
descarga e léctrica, no
quite la tapa (olapar te posterior).
Nohay piezas en el interior del equipo
que puedan ser r eparadas por el
usuario. Sies ne cesario, póngase en
contacto con pers onal cualicado.
Atención
Para reducir e l riesgo
de incendio o des carga
eléctr ica, no exponga este ap arato a la
lluvia, humeda d o alguna otra fuente
que pueda salpicar o derramar algún
líquido sobr e el aparato. Nocoloque
ningún tipo de recipiente para líquidos
sobre elapar ato.
Atención
Las instrucciones
de servicio deben
llevarlas a cabo exclusivamente
personal c ualicado. Paraevitar el
riesgo de una d escarga eléctr ica,
no realice reparaciones que no se
encuentre n descritas en el manual de
operaciones. Lasreparaciones deben
ser realizadas exclusivamente por
personalcualicado.
1. Lea las instrucciones.
2. Conserve e stas instruccione s.
3. Pres te atención a todas
las advertencias.
4. Siga todas las instrucciones.
5. No use e ste aparato cerca
del agua.
6. Limpie es te aparato con un
paño seco.
7. No bloquee las aberturas
de ventilación. Instale el equipo
de acuerdo con las instrucciones
del fabricante.
8. No instale este equipo cerca de
fuentes de c alor tales como radiador es,
acumuladore s de calor, estufas u otros
aparatos (incluyendo amplicadores)
que puedan producir calor.
9. No elimine o deshabilite nunca
la conexión a ti erra del aparato o del
cable de alimentación de corriente.
Unenchufe po larizado tiene dos polo s,
uno de los cuale s tiene un contacto
más ancho que el ot ro. Una clavija
con puest a a tierra dispone de tres
3Quick Start Guide2 FLOW 8
tierra. El con tacto ancho y el tercer
garantizan una mayor seguridad. Si el
enchufe suministrado con el equipo
no concuerda co n la toma de corriente,
consulte con un ele ctricista par a
cambiar la toma de c orriente obsoleta.
10. Coloque el cable de suminis tro de
energía de manera que no pueda ser
pisado y que es té protegido de objetos
alados. As egúrese de que el cable de
suministro de energía esté protegido,
especialme nte en la zona de la clavija y
en el punto dond e sale del aparato.
11. Use únicamente los dispositivos
o accesorio s especicados por
el fabricante.
12. Use
únicamente la
carretilla,
plataforma,
trípode, soporte o
por el fabricante o suministrados junto
con el equipo. Alt ransportar el equi po,
tenga cuidado para evitar daños y
caídas al tropezar con algún obstác ulo.
13. Desenchufe el equipo durante
un periodo largo.
14. Confíe las reparaciones
únicamente a servicios técnicos
cualicados. La unidad requiere
mantenimiento siempre que haya
sufrido al gún daño, si el cable de
suministro de energía o el enchufe
presentaran daños, sehubiera
derramado un líquido o hubieran caído
objetos dent ro del equipo, si el aparato
hubiera es tado expuesto a la hume dad
o la lluvia, si ha dejado d e funcionar de
manera normal o si ha sufrido algún
golpe o caída.
15. Al conect ar la unidad a la toma de
corriente el éctrica asegú rese de que
la conexión disponga de una unión
atierra.
16. Si el e nchufe o conector
de red sirve c omo único medio
de desconexión, éste debe ser
accesiblefácilmente.
Page 3
5Quick Start Guide4 FLOW 8
17. Cómo debe
Tannoy, Turbosound, TC Electronic,
L’intérieur de l’appareil ne possède
faites app el à un électricien po ur
17. Mise au r ebut
Lab Grupp en, Lake, Tannoy,
Global Bran ds Ltd. © Music Tribe Global
Pour connaîtr e les termes et condition s
deshacers e de este
aparato: Es te símbolo
indica que e ste aparato
no debe ser tratado
como basura or gánica, según lo
indicado en la D irectiva WEEE (2012/19/
EU) y a las normativa s aplicables en su
país. En lugar de e llo deberá llevarlo al
punto limpio más cercano para el
reciclaje de s us elementos eléctr icos/
electr ónicos (EEE). Al hacer esto estar á
ayudando a preve nir las posibles
consecuencias negativas para el medio
ambiente y la salu d que podrían ser
provocadas por una gestión inadecuada
de este tipo d e aparatos. Además,
el reciclaje d e materiales ayudará a
conservar los recursos naturales. Para
más informac ión acerca del reciclaje d e
este apara to, póngase en con tacto con
el Ayuntamiento d e su ciudad o con el
punto limpio local.
18. No instale es ta unidad en un
espacio muy r educido, tal como
encastrada en una librería o similar.
19. No coloque objetos con
llama, como una vela ence ndida,
sobre este aparato.
20. Tenga presente s todas las
advertenc ias relativas al reciclaj e
y correcta eliminación de las pilas.
Las pilas deben ser siempre eliminadas
en un punto limpio y n unca con el resto
de la basura org ánica.
21. Use este aparato en rangos d e
temperatura moderados y/o tropicales.
NEGACIÓN LEGAL
Music Tribe no admite ningún tipo
de responsabilidad por cualquier
daño o pérdida que pudiera sufrir
cualquier persona por conar total
o parcialmente en la descripciones,
fotografías o armaciones
contenidas en este documento.
Las especicaciones técnicas,
imágenes y otras informaciones
contenidas en este documento están
sujetas a modicaciones sin previo
aviso. Todas las marcas comerciales
que aparecen aquí son propiedad
de sus respectivos dueños. Midas,
Klark Teknik, Lab G ruppen, Lake,
TC Helicon, Behringer, Bugera,
Auratone y Coolaudio son marcas
comerciales o marcas registradas
de Music Tribe Global B rands Ltd.
© Music Tribe Global B rands Ltd.
2020 Reservados todos los derechos.
GARANTÍA LIMITADA
Si quiere conocer los detalles y
condiciones aplicables de la garantía
así como información adicional sobre
la Garantía limi tada de Music Tribe,
consulte online toda la información en
la web musictribe.com/warranty.
Consignes de sécurité
Les points r epérés par ce
symbole portent une
tension électrique
susante po ur constituer un risque
d’électrocution. Utilisez uniquement
des câbles d’enceintes professionnels
de haute qualité ave c ches Jack mono
6,35 mm ou ches à verr ouillages déjà
installée s. Touteautre ins tallation ou
modication doit être eectué e
uniquement par un personnel qualié.
Ce symbole aver tit de la
présence d’une tension
dangereuse e t non isolée à
l’intérieu r de l’appareil - elle p eut
provoquer des chocs électriques.
Attention
Ce symbol sig nale les
consignes d’utilisation
et d’entre ! Tienimp ortantes dans
la documentation fournie. Lisez les
consignes de sécurité du manuel
d’utilisatio n del’appareil.
Attention
Pour éviter tou t risque
de choc électrique,
ne pas ouvri r le capot de l’appareil
ni démonter le panneau arrière.
aucun élément réparable par
l’utilisateur. Lais sertoute réparation à
un professionnelqualié.
Attention
Pour réduire les risques
électrique, n’exposez pas cet appareil
de feu et de cho c
à la pluie, à la moisissu re, auxgouttes
ou aux éclabo ussures. Ne posez pas
de récipient contenant un liquide sur
l’appareil (unvase par e xemple).
Attention
Ces consignes de
sécurité et d’entretien
sont destinées à un personnel
qualié. Pour évi ter tout risque de
choc électrique, n’eectuez aucune
réparation sur l’appareil qui ne soit
décrite par le manuel d’utilisation.
Les éventuelle s réparations doivent
être eectuées uniquement par un
technicienspécialisé.
1. Lisez ces consignes.
2. Conserve z ces consignes.
3. Respe ctez tous les aver tissements.
4. Respectez toutes les
consignes d’utilisation.
5. N’utilisez jamais l’appareil à
proximité d’un liquide.
6. Nettoye z l’appareil avec u n
chion sec.
7. Veillez à ne pas empêcher la
bonne ventilat ion de l’appareil via ses
ouïes de ventila tion. Respectezles
consignes du fabricant concernant
l’install ation del’appareil.
8. Ne placez pas l ’appareil à
proximité d ’une source de chale ur telle
qu’un chauage, une cuisinière ou tout
appareil dégageant de la chaleur (y
compris un amp li depuissance).
9. Ne supprimez jamais la sécurité
des prises bipolaires ou des prises
terre. Les pri ses bipolaires possè dent
deux contacts de largeur diérente.
Leplus large es t le contact de sécur ité.
Les prises te rre possèdent deux
contact s plus une mise à la terre
servant d e sécurité. Si la prise du blo c
d’alimentation o u du cordon d’alimentation fourni ne correspond pas à
celles de votre i nstallation élect rique,
eect uer le changement de prise.
10. Installez le cordon d’alimentation
de telle façon qu e personne ne puisse
marcher dess us et qu’il soit protégé
d’arêtes coupantes. Assurez-vous
que le cordon d’alimentation est
sufsamment protégé, notamment
au niveau de sa pr ise électrique et
de l’endroit où il es t relié à l’appareil;
cela est égale ment valable pour une
éventuelle rallonge électriqu e.
11. Utilisez exclusivement
des accessoi res et des appareils
supplémentaires recommandés par
lefabricant.
12. Utilisez
exclusivement des
chariots, des
diables,
desprésentoirs,
despieds et d es
surfaces de travail recommand és par le
fabrica nt ou livrés avec le produit.
Déplacezprécautionneusement tout
chariot ou diab le chargé pour éviter
d’éventuelles bles sures en cas dechute.
13. Débranchez l’appareil de la
tension sec teur en cas d’orage ou si
l’appareil reste inutilisé pendant une
longue période de temps.
14. Les travaux d’entretien de
l’appareil doiven t être eectués
uniquement par du personnel qualié.
Aucunentret ien n’est nécess aire sauf si
l’appareil est endommagé de quelque
façon que ce soi t (dommagessur le
cordon d’aliment ation ou la prise par
exemple), siun liquide ou un objet
a pénétré à l’ intérieur du châssis, si
l’appareil a été ex posé à la pluie ou
à l’humidité, s’il ne fonctionne pas
correc tement ou à la suite d’une chute.
15. L’appareil doit ê tre connecté à une
prise secteur dotée d’une protection
par mise à la terr e.
16. L a prise électriqu e ou la prise
IEC de tout appar eil dénué de bouton
marche/arrêt doit rester accessible
enpermanence.
appropriée de ce
produit: Ce symbole
indique qu’en accord
avec la direc tive DEEE
(2012/19/EU) et les lois en vigu eur dans
votre pays, ce pro duit ne doit pas être
jeté avec les déc hets ménagers.
Ce produit doi t être déposé dans un
point de collec te agréé pour le
recyclage des déchets d’équipements
électriques et élect roniques (EEE).
Une mauvaise man ipulation de ce type
de déchets pourrait avoir un impact
négatif sur l’environnement et la santé
à cause des su bstances potentiellem ent
dangereuses généralement associées à
ces équipements. En même temps,
votre coopér ation dans la mise au rebut
de ce produit contribuera à l’utilisation
ecace des ressources naturelles.
Pour plus d’informations sur l’endroit
où vous pouvez d époser vos déchets
d’équipements pour le recyclage,
veuillez conta cter votre mairie ou votr e
centre loca l de collecte des déche ts.
18. N’ins tallez pas l’appareil dans un
espace conné tel qu’une bibliothèque
ou meuble similaire.
19. Ne placez jamais d’objets
enammés, tels que des bougies
allumées, sur l ’appareil.
20. Gardez à l ’esprit l’imp act
environnemental lorsque vous mettez
des piles au reb us. Les piles usées
doivent être d éposées dans un point de
collecte adapté.
21. Utilisez l’appareil dans un climat
tropical et/ou modéré.
DÉNI LÉGAL
Music Tribe ne peut êt re tenu pour
responsable pour toute perte pouvant
être subie pa r toute personne se
ant en part ie ou en totalité à
toute description, photographie
ou armation contenue dans ce
document. Les caractéristiques,
l’apparence et d’autres informations
peuvent faire l’objet de modications
sans notic ation. Toutes les marques
appartiennent à leurs propriétaires
respec tifs. Midas, Klark Teknik,
Turbosound, TC Elec tronic, TC Helicon,
Behringer, Bugera, Auratone et
Coolaudio sont des marques o u
marques dép osées de Music Tribe
Brands Ltd. 2020 Tous droit s réservés.
GARANTIE LIMITÉE
de garantie applicables, ainsi que
les informations supplémentaire s et
détaillée s sur la Garantie Limitée de
Music Tribe, consultez le s ite Internet
musictribe.com/warranty.
Wichtige
Sicherheitshinweise
Vorsicht
Die mit dem Symbo l
markierten Anschlüsse
führen so viel Spannung, dassdie
Gefahr eines Stromschlags besteht.
Verwenden Sie nur hochwertige,
professionelle Lautsprecherkabel
mit vorinstallierten 6,35 mm
MONO-Klinkensteckern oder
Lautsprecherstecker mit
Drehverriegelung. Alle anderen
Installationen oder Modikationen
sollten nur von qualiziertem
Fachpersonal ausgeführt werden.
Achtung
Um eine Gefährdung
durch Stromschlag
auszuschließen, darf die
Geräteabdeckung bzw.
Geräterückwandnicht abgenommen
werden. ImInnern des Geräts benden
sich keine vom Benutzer reparierbaren
Teile. Reparaturarbeiten dürfen
nur von qualiziertem Personal
ausgeführtwerden.
Page 4
Achtung
entsprechend ausgetauscht wird.
zusammen mit Ihren Haushaltsabf ällen
Stellen Sie keine Gegenstände mit
eingetragene Warenzeichen der
exposto à c huva nem à humidade.
Verique particularmente nas chas,
dispositivo para evitar danos provocados
terem caído pa ra dentro do dispositivo;
Direct iva REEE (2012/19/EU) e a legislação
para um centr o de recolha licenciado par a
7Quick Start Guide6 FLOW 8
Um eine Gefährdung
Stromschlag auszuschließen, darf
durch Feuer bzw.
dieses Gerät weder Regen oder
Feuchtigkeit ausgesetzt werden
noch sollten Spritzwasser oder
tropfende Flüssigkeiten in das Gerät
gelangen können. Stellen Sie keine
mit Flüssigkeit gefüllten Gegenstände,
wie z. B. Vasen, aufdasG erät.
Achtung
Die Service-Hinweise sind
nur durch qualiziertes
Personal zu be folgen. Umeine
Gefährdung durch Stromschlag zu
vermeiden, führen Sie bitte keinerlei
Reparatur en an dem Gerät durch,
dienicht in der Bedienungsanleitung
beschrieben sind. Reparaturen
sind nur von qualiziertem
Fachpersonaldurchzuführen.
1. Lesen Sie diese Hinweise.
2. Bewahren Sie diese Hinweise auf.
3. Beachten Sie alle Warnhinweise.
4. Befolgen Sie alle
Bedienungshinweise.
5. Bet reiben Sie das Gerät nicht in
der Nähe vonWasser.
6. Reinigen Sie das Gerät mit einem
trockenen Tuch.
7. Blockieren Sie nicht die
Belüftungsschlit ze. Beachten
Sie beim Einbau des Gerätes die
Herstellerhinweise.
8. Stellen Sie das Ger ät nicht in der
Nähe von Wärmequ ellen auf. Solche
Wärmequellen sind z. B. Heizkörper,
Herde oder andere Wärme erzeugende
Geräte (auch Verstärker).
9. Entfernen Sie in keinem Fall
die Sicherheitsvorrichtung von
Zweipol- oder geerdeten Steckern. Ein
Zweipolstecker hat zwei unterschiedlich
breite Steckko ntakte. Ein geerdeter
Stecker hat zwei Steckkontakte
und einen dritten Erdungskontakt.
Derbreitere Ste ckkontakt oder der
zusätzliche Erdungskontakt dient
Ihrer Sicherheit. Falls das mitgelieferte
Steckerformat nicht zu Ihrer Steckdose
passt, wend en Sie sich bitte an
einen Elektriker, damit die Steckdose
10. Verlegen Sie das N etzkabel so,
dass es vor Tritte n und scharfen Kanten
geschützt ist und nicht beschädigt
werden kann. Ach ten Sie bitte
insbesondere im Bereich der Stecker,
Verlängerungskabel und an der Stelle,
an der das Net zkabel das Gerät verläss t,
aufausreichendenSchutz.
11. Das Gerät muss jed erzeit mit
intaktem Schutzleiter an das Stromnetz
angeschlossen sein.
12. Sollte der Hauptnet zstecker
oder eine Gerätesteckdose die
Funktionseinheit zum Abschalten sein,
muss diese immer zugänglich sein.
13. Verwenden Sie nur Zusatzgeräte/
Zubehörteile, dielaut Hersteller
geeignet sind.
14. Verwenden
Sie nur Wagen,
Standvorrichtungen, Stative,
Halter oder Tische,
die vom Hersteller
benannt oder im Lieferumfang des
Geräts enthalten sind. Falls Sie einen
Wagen benutzen, seien Sie vorsichtig
beim Bewegen der
Wagen- Gerätkombination,
umVerletzungen durch Stolpern
zuvermeiden.
15. Ziehen Sie den Netzstecker bei
Gewitter oder wenn Sie das Gerät
längere Zeit nic ht benutzen.
16. La ssen Sie alle Wartungsarbeiten
nur von qualiziertem ServicePersonal ausführen. EineWartung
ist notwendig, wenn das Gerät in
irgendeiner Weise beschädigt wurde
(z. B. Beschädigung des Netzkabels
oder Steckers), Gegenstände oder
Flüssigkeit in das Geräteinnere gelangt
sind, das Gerät Regen oder Feuchtigkeit
ausgesetzt wurde, das Gerät nicht
ordnungsgemäß funktioniert oder auf
den Boden gefallen ist.
17. Korrekte
Entsorgung dieses
Produkts: Dieses Symbol
weist darauf h in, das
Produkt entsprechend
der WEEE Direk tive (2012/19/EU) und
der jeweiligen nationalen Gesetze nicht
zu entsorg en. DiesesProdukt s ollte bei
einer autorisierten Sammelstelle für
Recycling elektrischer und
elektronischer Geräte (EEE) abgegeben
werden. Wegen bedenklicher
Substanzen, diegenerell mit
elektrischen und elektronischen
Geräten in Verbindung stehen, könnte
eine unsachgemäße Behandlung dieser
Abfallart eine negative Auswirkung auf
Umwelt und Gesundheit haben.
Gleichzeitig gewährleistet Ihr Beitr ag
zur richtigen Entsorgung dieses
Produkt s die eektive Nut zung
natürliche r Ressourcen. Fürweitere
Informationen zur Entsorgung Ihrer
Geräte bei einer Recycling-Stelle
nehmen Sie bitte Kontakt zum
zuständigen städtischen Büro,
Entsorgungsamt oder zu Ihrem
Haushaltsabfallentsorgerauf.
18. Inst allieren Sie das Gerät nicht
in einer beengten Umgebung, zum
Beispiel Bücherregal oder ähnliches.
19.
oenen Flammen, etwa brennende
Kerzen, auf das Gerät.
20. Beachten Sie bei der Entsorgung
von Batterien den UmweltschutzAspekt. Batterien müssen bei einer
Batterie -Sammelstelle entsor gt
werden.
21. Verwenden Sie das Gerät in
tropischen und/oder gemäßigten
Klimazonen.
HAFTUNGSAUSSCHLUSS
Music Tribe übernimmt keine Haftung
für Verluste, die Personen entstanden
sind, die sich gan z oder teilweise auf
hier enthaltene Beschreibungen,
Fotos oder Aussagen verlassen haben.
Technische Daten, Erscheinungsbild
und andere Informationen können
ohne vorherige Ankündigung
geändert werden. Alle Warenzeichen
sind Eigentum der jeweiligen
Inhaber. Midas, Klark Teknik, Lab
Gruppen, L ake, Tannoy, Turbosound,
TC Electron ic, TC Helicon,
Behringer, Bugera
Coolaudio sind Warenzeichen oder
, Auratone
und
Music Tribe Global B rands Ltd.
© Music Tribe Global Br ands Ltd.
2020 Alle Rechte vorbehalten.
BESCHRÄNKTE GARANTIE
Die geltenden Garantiebedingungen
und zusätzliche Informationen
bezüglich der von Music Tribe
gewährten beschränkten
Garantie nden Sie online unter
musictribe.com/warranty.
Instruções de
Segurança Importantes
Aviso!
Terminais marcados
com o símbolo c arregam
corrente elétrica de magnitude
suciente para constituir um risco de
choque elétrico. Use apenas cabos
de alto-falantes de alta qualidade
com plugues TS de ¼" ou plugues
com trava de torção pré-instalados.
Todas as outras ins talações e
modicaçõ es devem ser efetuadas p or
pessoasqualicadas.
Este símbo lo, onde quer
que o encontre, ale rta-o
para a leitur a das
instruções de manuseamento que
acompanham o equipamento. Por favor
leia o manual deinstruções.
Atenção
De forma a diminuir
o risco de choq ue
eléctr ico, nãoremover a cobertur a
(ouasecção de trá s). Não existem peç as
substitu íveis por parte do utili zador no
seu interior. Para es se efeito recorrer a
um técnicoqualicado.
Atenção
Para reduzir o r isco de
incêndios ou choques
eléctr icos o aparelho não deve ser
Alémdisso, não deve s er sujeito a
salpicos, nem d evem ser colocados em
cima do aparel ho objectos contendo
líquidos, tai scomojarras.
Atenção
Estas ins truções de
operação devem ser
utilizada s, emexclusivo, por técnicos
de assistência qualicados. Para evitar
choques elé ctricos não proce da a
reparações ou intervenções, que
não as indicad as nas instruções
de operaçã o, salvo se poss uir as
quali-cações necessárias. Para evitar
choques elé ctricos não proce da a
reparações ou intervenções, que
não as indicad as nas instruções de
operação. S ó o deverá fazer se possuir
as qualicaçõesnecessárias.
1. Leia estas instruções.
2. Guarde estas instruções.
3. Pres te atenção a todos os avisos .
4. Siga todas as in struções.
5. Não utilize este dispositivo perto
de água.
6. Limpe ape nas com um pano seco.
7. Não obst rua as entradas de
ventilação. Ins tale de acordo com as
instruções do fabricante.
8. Não instale perto de quaisquer
fontes de cal or tais como radiadores,
bocas de ar qu ente, fogões de sala
ou outros aparelhos (incluindo
amplicadores) que produzam calor.
9. Não anule o object ivo de
seguranç a das chas polarizadas o u
do tipo de ligaç ão à terra. Uma cha
polariza da dispõe de duas palhetas
sendo uma mais lar ga do que a outra.
Uma cha do tipo li gação à terra dispõe
de duas palhet as e um terceiro dente
de ligação à ter ra. A palheta larga ou
o terceiro dente são fornecidos para
sua seguranç a. Se a cha fornecida
não encaixar na sua tomada, consulte
um elect ricista para a subst ituição da
tomada obsoleta.
10. Proteja o cabo de alimentaç ão de
pisadelas ou apertos, especialmente
nas chas, ex tensões, e no local de
saída da unidade. Certique-se de
que o cabo elé ctrico está prote gido.
nos receptá culos e no ponto em que o
cabo sai doap arelho.
11. O aparelho tem de es tar sempre
conect ado à rede eléctric a com o
condutor de pr otecção intacto.
12. Se utiliz ar uma cha de
rede princ ipal ou uma tomada de
aparelhos para desligar a unidade
de funciona mento, esta deve estar
sempre aces sível.
13. Utilize apenas ligações/acessórios
especic ados pelofabrican te.
14. Utilize apenas
com o carrin ho,
estrutura, tripé,
suporte, ou m esa
especicados pelo
fabricante ou
vendidos com o dis positivo.
Quandoutili zar um carrinho, tenha
cuidado ao mover o conjunto carrinho/
pela terpidação.
15. Desligue este dispositivo durante
as trovoadas ou q uando não for
utilizado durante longos períodos
detempo.
16. Qualquer tipo de reparação
deve ser sempr e efectuado por
pessoal qualicado. É necessár ia uma
reparação sempre que a unidade tiver
sido de alguma forma danicada,
como por exemp lo: no caso do cabo de
alimentação ou cha se encontrarem
danicado s; naeventualidad e de
líquido ter sido derramado ou objectos
no caso da unid ade ter estado expos ta
à chuva ou à humida de; seesta
não funcionar normalmente, ou se
tiver caído.
17. Correcta eliminação
deste pro duto: este
símbolo indica que o
produto não de ve ser
eliminado juntamente
com os resíduos domésticos, segundo a
nacional. Es te produto deverá ser leva do
a reciclage m de resíduos de
equipamentos eléctricos e elec trónicos
(EEE). O tratamento inc orrecto deste t ipo
de resíduos po de ter um eventual
Page 5

impacto negativo no ambiente e na
elettriche, non esporre questo
esclusivamente a personale qualic ato.
lame, una più larga del l'altra. Una spina
12. Utilizzare
eciente del le risorse naturali. Per
9Quick Start Guide8 FLOW 8
saúde humana devido a substâncias
potencialmente perigosas que estão
geralmente associadas aos EEE. Ao
mesmo tempo, a sua col aboração para a
eliminação co rrecta deste p roduto irá
contribuir para a utilização eciente dos
recursos naturais. Paramais infor mação
acerca dos lo cais onde poderá deix ar o
seu equipamento usado para reciclagem,
é favor contactar os serviços municip ais
locais, a enti dade de gestão de resíd uos
ou os serv iços de recolha de
resíduosdomésticos.
18. Não i nstale em lugares
connados, ta is como estantes ou
unidades similares.
19. Não coloque fontes de
chama, tais como ve las acesas,
sobre o aparelho.
20. Favor, obedecer os asp ectos
ambientais de d escarte de bateria .
Baterias deve m ser descartadas e m um
ponto de coletas de baterias.
21. Use este aparelho em climas
tropicais e/ou moderados.
LEGAL RENUNCIANTE
O Music Tribe não se resp onsabiliza
por perda algu ma que possa ser
sofrida por qualquer pessoa que
dependa, seja de maneira completa
ou parcial, de qual quer descrição,
fotograa, ou declaração aqui
contidas. Dados técnicos, aparências
e outras informações est ão sujeitas
a modicações sem aviso prévio.
Todas as marcas são p ropriedade
de seus respectivos donos. Midas,
Klark Teknik, Lab G ruppen, Lake,
Tannoy, Turbosound, TC Electronic,
TC Helicon, Behringer, Bugera
e Coolaudio são marcas ou marcas
registr adas do Music Tribe Global Brands
Ltd. © Music Tribe Global B rands Ltd.
2020 Todos direitos reservados.
GARANTIA LIMITADA
Para obter os ter mos de garantia
aplicáveis e cond ições e informações
adicionais a respeito da garantia
limitada do Mu sic Tribe, favor veri car
detalhes na í ntegra através do website
musictribe.com/warranty.
Informazioni importanti
una corrente el ettrica sucie nte a
costitui re un rischio di scossa el ettrica.
Usareunicamente cavi per altoparlanti
(Speaker) d’elevata qualità con
connetto ri jack TS da ¼"pre-installati.
Ognialtra ins tallazione o modic a deve
essere eettuat a esclusivamente da
personale tecnico qualicato.
presenza di una tensione pericolosa
non isolata all'i nterno dello chassis,
tensione che può essere suciente per
costitui re un rischio di scossa el ettrica.
importanti istruzioni operative e di
manutenzione nella documentazione
, Auratone
allegata. Si invita a leggere il manuale.
rimuovere il coperchio superiore (o la
sezione posteriore). All'interno non ci
sono par ti riparabili dall'utente. Per la
manutenzione rivolgersi a perso nale
qualicato.
Attenzione
I terminali contrassegnati
con il simbolo conducono
Attenzione
Questo simbolo, ovunque
appaia, avver te della
Attenzione
Questo simbolo,
ovunque appaia, segnala
Attenzione
Per ridurre il rischio di
scosse elettriche, non
Attenzione
Per ridurre il rischio
di incendi o scosse
apparecchio a pioggia e umidità.
L'apparecch io non deve essere espos to
a gocciolio o schizzi di liquidi e nessun
oggetto contenente liquidi, come vasi,
deve essere co llocato sull'apparecchio.
Attenzione
Queste istruzioni di
servizio sono destinate
Per ridurre il r ischio di scosse
elettriche non eseguire interventi
di manutenzione diversi da quelli
contenuti nel manuale di istruzioni. Le
riparazioni devono essere eseguite da
personale di assistenza qualic ato.
1. Leggere queste istruzioni.
2. Conservare queste istruzio ni.
3. Pres tare attenzione a tut ti gli
avvisi.
4. Applicare tutte le istru zioni.
5. Non utilizzare questo dispositivo
vicino l'acqua.
6. Pulire esclusivamente con un
panno asciutto.
7. Non blocc are le aperture di
ventilazione. Installare in conformità
con le istru zioni del produttor e.
8. Non insta llare vicino a fonti di
calore come radiatori, termoregolatori,
stufe o altri apparecchi (inclusi
amplicatori) che producono calore.
9. Non escludere la sic urezza fornit a
dalla spina polar izzata o con messa
a terra. Una spina p olarizzata ha due
con messa a ter ra ha due lame e un
terzo polo di m essa a terra. La lama
larga o il terzo p olo sono forniti per
la vostra sic urezza. Se la spina for nita
non si adatt a alla presa, consultare un
elettr icista per la sostit uzione della
presa obsoleta.
10. Proteggere il cavo di
alimentazione dal calpestio o essere
schiacciato in particolare alle spine,
prese di cor rente e il punto in cui esce
dall'apparecchio.
11. Utilizzare esclusivamente
dispositivi/accessori specic ati dal
produttore.
solo carrelli,
supporti, treppiedi,
stae o tavo li
indicati dal
produttore o
venduti con l'appar ecchio. Utilizzando
un carrello, prestare attenzione quando
si sposta la combinazione carrello/
apparecchio per evitare lesioni dovute
al ribaltamento.
13. Scollegare questo apparecchio
durante i tempo rali o se non è utilizzato
per lunghi periodi di tempo.
14. Per tutte le r iparazioni rivolger si a
personale qualicato. La manutenzione
è necessaria quando l'apparecchio
è danneggiato in qualsiasi modo,
come danneggiamento del cavo
di alimentazione o della spina,
versamento di liquido o oggetti caduti
nell'apparecchio, se l'apparecchio è
stato espo sto a pioggia o umidità, se
non funziona normalmente o è caduto.
15. L'apparecch io deve essere
collegato a una pr esa di corrente
elettr ica con messa a terra di
protezione.
16. e la sp ina o una presa del
dispositivo è utilizzata come dispositivo
di disconnessione, deve essere
facilmente utilizzabile.
17. Smaltimento
corretto di ques to
prodotto: questo
simbolo indica che
questo dispositivo non
deve essere sma ltito
insieme ai riuti domestici, secondo la
Dirett iva RAEE (2012/19 / UE) e la vostra
legislazione nazionale. Questo prodotto
deve essere p ortato in un centro di
raccolta autorizzato per il riciclaggio di
riuti di apparecchiature elettriche ed
elettroniche (RAEE). La cattiva gestione
di questo tip o di riuti potrebbe aver e
un possibile impatto negativo
sull'ambiente e sulla salute umana a
causa di sostanze potenzialmente
pericolose che sono generalmente
associate alle apparecchiature
elettriche ed elettroniche. Nello stesso
tempo la vostra collaborazione al
corretto smaltimen to di questo
prodotto contribuirà all'utilizzo
ulteriori informazioni su dove è
possibile trasportare le apparecchiature
per il ricic laggio vi invitiamo a
contattare l'ucio comunale locale o il
servizio di raccolta dei riuti domestici.
18. Non installare in uno spazio
ristret to, come in una libreria o in una
struttura simile.
19. Non collocare sul dispositivo fonti
di amme libere, com e candele accese.
20. Per lo smaltimento delle batterie,
tenere in considerazione gli aspetti
ambientali. Le batterie devono essere
smaltite in un pu nto di raccolta delle
batterie es auste.
21. Utilizzare questo apparecchio in
climi tropicali e/o moderati.
DISCLAIMER LEGALE
Music Tribe non si assum e alcuna
responsabilità per eventuali danni
che posson o essere subiti da chiunq ue
si adi in tut to o in parte a qualsiasi
descrizione, fotograa o dichiarazione
contenuta qui. Speciche tecniche,
aspetti e altre informazioni sono
soggette a modiche senza preavviso.
Tutti i marchi son o di proprietà dei
rispet tivi titolari. Midas, Kla rk Teknik,
Lab Grupp en, Lake, Tannoy, Turbosound,
TC Electron ic, TC Helicon, Behringer,
Bugera, Auratone e Coolaudio sono
marchi o marchi registrati di Music Tribe
Global Bran ds Ltd. © Music Tribe Global
Brands Ltd. 2020 Tutti i dir itti riserv ati .
GARANZIA LIMITATA
Per i termini e le cond izioni di garanzia
applicabili e le informazioni aggiuntive
relative alla gar anzia limitata di Music
Tribe, consultare online i dettagli
completi su musictribe.com/warranty.
Page 6

(1) (5)(2) (3) (4)
(7)
(15)
(20)
(11)
(18)
(6)
(8)
(9)
(10)
(19)(16) (22)(21) (23) (17) (24)
(14)
(13)
(12)
(25)
(26)
11Quick Start Guide10 FLOW 8
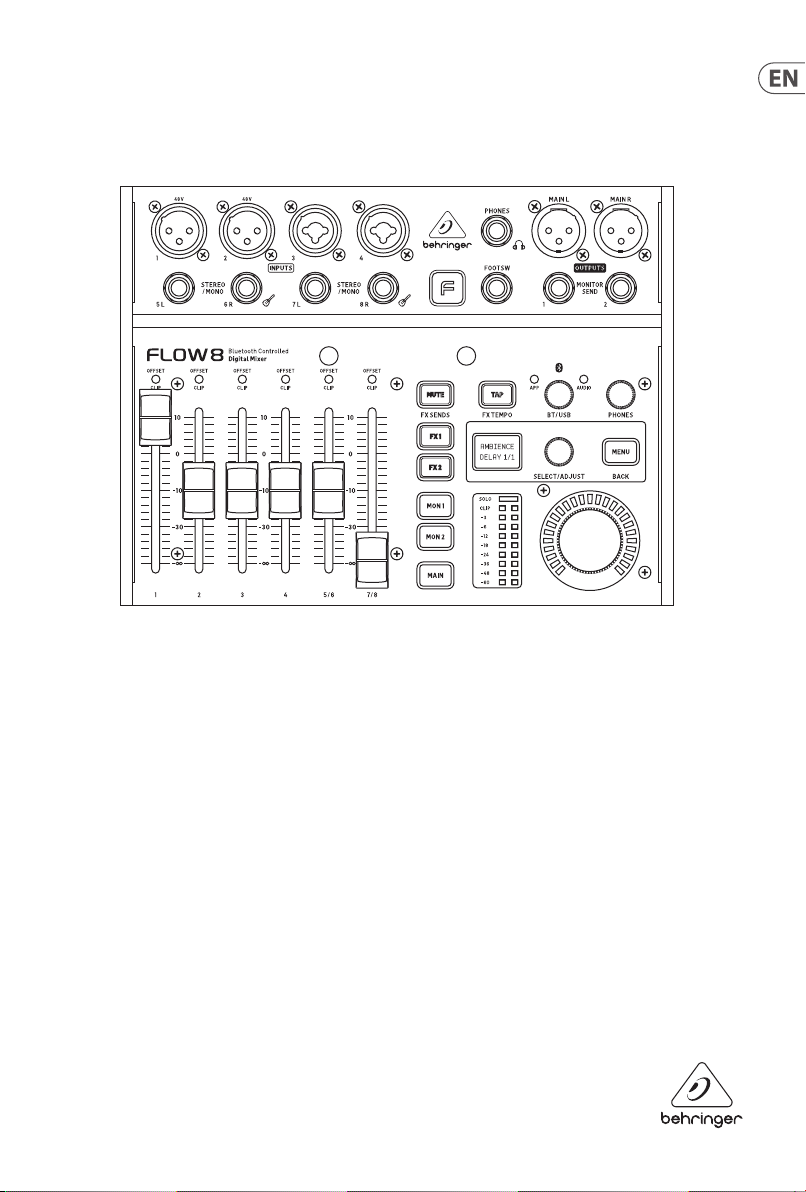
FLOW 8 Controls
(1) MIC 1/MIC 2 input s accept audio
signals over c ables using balan ced
XLR connec tors. Both XLR j acks
feature individually-selectable
phantom pow er for condenser
mics. Pha ntom power can be
activated in the control app.
(2) MIC3/MIC 4 comb o jacks accept
audio sign als from line-le vel
sources or dynamic microphones
over cable s with balanced XLR ,
balanced ¼" TRS o r unbalanced
¼" TS connecto rs. To run
condenser microphones with
these inp uts, you will need a n
exter nal preamp or phantom
power supply that provides
+48 V of pow er, such as the
Behringer PS400.
Note: The se inputs do NOT oe r
phantom power!
(3) FOOTSW jack con nects to an
exter nal single or dual cont rol
foots witch using a ¼" TRS
connector.
(4) PHONES jack c onnects to
headphones using a ¼" TRS
stereo plug.
(5) MA IN L/MAIN R connections send
out the nal s tereo mix over cab les
using balanced XLR connectors.
(6) STEREO/MONO i nputs can accept
either stereo line-level signals
(5/6 and 7/8 stereo pairs), or a
mono signa l (5L and 7L for mono
line-le vel sources, 6R and 8R f or
mono Hi-Z sig nals from guitar s
and basses.)
(7) MONITOR SEND
(MON 1/MON 2) jacks provide t wo
monitor outputs. These outputs
accept cab les with balanced
¼" TRS or unbalan ced ¼"
TS connectors.
(8) HOLDING POSTS allow yo u to
place your sm artphone dire ctly
onto the mix er for easy viewin g
of levels and s ettings on the
smartphone control app.
(9) CHANNEL FADERS set mi x levels
for their r espective cha nnels.
These fa ders can also be us ed
to control t he send levels to the
MON 1/MON 2 outpu t jacks or the
FX 1/FX 2 inter nal busses when
selec ted in the controlap p or by
pressin g the menu layer’s related
hardware b utton (see [16], [21]
and [ 22]).
(10) OFFS ET/CLIP LED s indicate when
the input gain is clipping the
channel headroom or when the
hardware f aders are in a di erent
positio n than the fader level
shown in the c ontrol app (the LEDs
will swit ch o when the hardwa re
faders a re returned to the l evel
shown in the c ontrol app).
(11) MENU but ton push opens Men u
Mode when t he MAIN, MON 1 or
MON 2 menu layer i s selected.
Pressing t he MENU button agai n
will exit f rom Menu Mode.
(12) APP LED starts blinking when
Bluetooth pairing is underway
for the con trol app. When pairi ng
is success ful, the LED lights
consistently. When the Bluetooth
connec tion fails or is deac tivated,
the LED will g o o. See the
Bluetooth instructions in
“Getting Started” fo r details.
(13) AUDIO LED lights u p to indicate
when Bluetooth pairing is active
for audio s treaming. See th e
Bluetooth instructions in
“Getting Started” for details.
(14) BT/USB knob sets volume f or
digital a udio routed into the
mixer via Bl uetooth or the rear
USB AUDIO connec tor.
(15) PHONES knob controls the
headphone volume.
(16) FX 1/FX 2 buttons switches
betwe en the two FX engine s for
patch selection and parameter
adjustm ent. When the FX 1 or
FX 2 menu bu ttons are selec ted,
the channe l faders are then u sed
to set Send l evels to the
FX engines.
(17) MENU SCREEN displays th e names
of the cur rently-active e ects for
the two F X engines, and allows
access to th e FX preset list wh en
the FX1 or FX 2 button is pres sed.
Press the M ENU button to open
and close M enu Mode. Rotate the
SELECT/ADJUST push enc oder to
navigate sub-menus and
then pres s to select spec ic
menu items.
(18) SELECT/ADJUST push enco der is
used to navi gate menus (turn) and
to enter/conrm (press).
(19) MUTE but ton switches o all
audio fr om the FX sectio n.
(20) TAP but ton allows you to tap in
a tempo for q uick adjustment o f
time-based eects.
(21) MON 1/MON 2 buttons se lects
either of t he monitor mixes
for direc t monitoring an d level
setti ng in place of the main mix .
To return to the m ain mix,
press the M AIN button.
(22) MAIN button s elects the mai n
mix for the nal output. Pres s the
MAIN but ton to return to the ma in
mix after selecting and checking
monitor mi xes with the MON 1 and
MON 2 buttons.
(23) VU METER shows level s for the
main mix, mo nitor mixes or FX
send signa ls. In SOLO mode,
this meter a llows more detaile d
gain setting on individual input
channels.
(24) MAIN knob cont rols the master
volume for t he currently sel ected
buss – FX 1, FX 2, MO N 1, M ON 2 or
MAIN. The na l volume setting i s
indicate d by the LED ring aroun d
the knob. When adjusting the
master vol ume setting of th e
current ly-selecte d bus from the
smartp hone app, the LED ring
will chang e to show the volume
setti ng selected fo r that bus in
the app.
(25) USB AUDI O jack enables
connec tion to a computer fo r
audio str eaming, rmware
updates an d MIDI control.
This USB conne ction also
allows FLOW 8 to be u sed as
multi-channel audio interface for
recording to computer.
(26) DC IN jack uses a Mi cro-USB
connec tion to provide powe r to
the unit. Pow er should come from
either the included external power
supply or a USB p ower bank with
a Micro- USB connection.
Page 7

FLOW 8 Getting Started
13Quick Start Guide12 FLOW 8
Bluetooth Connection: Streaming and Control
To stream audi o from a Bluetooth -enabled devic e, you will need a smar tphone, tablet or co mputer with
basic Bluetooth audio connect ivity.
The mixer c an only be controlle d and edited by Andro id or iOS control app. O nly one Bluetooth d evice at a time may be use d to control the
mixer via th e control app.
Audio may be s treamed from a se parate Bluetooth d evice or from the s ame device running t he control app, but a ma ximum of one audio
device and o ne device with the con trol app are allowed a t the same time.
NOTE: FLOW 8 uses t wo types of Blue tooth simultane ously: Bluetoot h Low Energy (BLE) for t he control app and re gular Bluetooth Aud io
for wireless audio streaming.
Bluetooth pairing for control app
To control FLOW 8 via ap p from your Blueto oth device, use the fo llowing procedu re:
1. Downlo ad and install the f ree FLOW control app f rom the Apple Store o r Google Play Store.
2. Enable Bluet ooth on your smart phone or tablet.
3. Press th e MENU button on the FLOW 8 m ixer hardware and se lect the BT PAIRING menu b y turning the SELEC T/ADJUST p ush encoder.
Press the e ncoder to enter this su b-menu.
4. Select PAIR RE MOTE with the SELECT/ADJUST push e ncoder, and then press th e encoder to star t the search for a Blu etooth device.
5. Start t he FLOW control app on you r Bluetooth devic e (within 6 0 seconds). The control a pp will automatica lly detect FLOW 8 and
connec t. When connecte d, the Bluetooth ic on in the control app w ill change color fr om gray (inactive) to blu e (active), and the blue
APP LED on the mi xer hardware will lig ht consistently.
6. When pair ing is successfu l, the menu on your smar tphone or tablet w ill indicate succe ss, and the blue AUDIO LED on t he
mixer hardware will light consistently.
7. Begin aud io playback on your sm artphone or tab let (e.g., a radio app or medi a player app). Audio will stre am wirelessly in st ereo to
your FLOW 8 mixer.
8. Make nal level ad justments. You can a djust the Bluetoo th playback level by f our dierent mean s:
• Lev el up/down hardware but tons on your smar tphone or tablet
• Lev el control inside yo ur audio playback ap p
• BT/USB lev el knob on the FLOW 8 mixer har dware
• Ins ide the FLOW control app a t the BT/USB stereo channe l on the mixer view
NOTE: Some sm artphone or tab let apps, such as YouTube, will stop a udio playback when y ou change screens (e.g., s witching to the FLOW
control ap p screen). To stream audio wi thout interrup tion, we recommend yo u use a “pure” audio app.
*iPhone a nd iPad are trad emarks of App le Inc. The Blue tooth word mar k and logos are r egistered t rademark s owned by Bluet ooth SIG, Inc. an d any use of
such mar ks is under lice nse. Android i s a trademark of G oogle Inc. Wi ndows is eithe r a registere d trademark o r trademark of M icrosof t Corporati on in the
United St ates and/or othe r countries .
Footswitch operation
By using a fo otswitch with t he FOOTSW jack, you c an mute eect s, tap in a tempo for tim e-based ee cts,
or select next or previous snapshot:
• Foots witch Mode “FX” (default mode):
Switch 1 = MUTE (b oth FX engines), Switch 2 = TAP TEMP O (both FX engines)
• Foots witch Mode “SNAPSHOT”:
Switch 1 = Snaps hot Up (next), Switch 2 = Snaps hot Down (previou s)
FX Menu Navigation
• Wh en the FX1 or FX2 menu laye r is selected on t he mixer hardware, you w ill see the curre ntly selected e ect preset .
This pres et can be changed by t urning and pressi ng the SELECT/ADJUST push encod er.
• Pr essing the MENU but ton while in the FX1 or F X2 layer opens the edi table paramete rs (two per eec t) for adjustment .
◊ Turning the SELE CT/ADJ UST push encoder allow s you to change the value o f the upper/rst p arameter.
◊ Pressing t he SELECT/ADJUST push encoder ac cesses the lower/seco nd parameter,
which will a llow you to toggle bet ween 2 possible va lues/states.
• Pr essing the MENU but ton again will retu rn you to the preset s elect page.
6. In case of uns uccessful conne ction, press t he RETRY button on t he app and follow the on -screen inst ructions.
Bluetooth pairing for audio streaming
To stream audi o to your FLOW 8 mixer from you r Bluetooth devic e, use the following p rocedure:
1. Enable B luetooth on your smar tphone or tabl et (if not already don e).
2. Press the M ENU button on the FLOW 8 mi xer hardware and sel ect the BT PAIRING menu by t urning the SELECT/ADJUST push e ncoder.
Press the e ncoder to enter this su b-menu.
3. Selec t PA IR AUDIO with the SELECT/ADJUST push e ncoder, and then press t he encoder to star t the search for a Bl uetooth device.
4. Go to the Bluet ooth menu of your smar tphone or table t.
5. Select “FLOW 8 (Audio)” on your smartp hone or tablet to pai r.
NOTE: Selec t “FLOW 8 Audio (Unnamed )” on your smartpho ne or tablet to pair.
(The indicated name might be slightly dierent, depending on your system.)
Page 8

15Quick Start Guide14 FLOW 8
MIDI Implementation
OVERVIEW
Input Channels
Section
Input Ch. 1 1 MAIN BUS 8 F X1 13
Input Ch. 2 2 MO N1 BUS 9 FX2 14
Input Ch. 3 3 MON2 BUS 10
Input Ch. 4 4 F X1 BUS 11
Input Ch. 5/6 5 FX2 BUS 12
Input Ch. 7/8 6
Input Ch. U SB/BT 7
MIDI
Ch.
Busses
Section
MIDI
Ch.
FX-Sl ots
Section
MIDI
Ch.
Globa l Control
Section
SNAPSHOT S -
whole mixer
FX1 / FX2 -
common ctrl.
[MIDI-C h. 15 =
not used ]
INPUT CHANNELS
Section
Input Ch. 1* 1* CC 7 0, 1 127
*Each Inp ut Channel is ass igned to one spe cific MIDI- Channel.
MIDI
Command
Ch.
" " CC 10 0 127
" " CC 5 0 1-12 7 MUTE NO MUTE MUTE
" " CC 6 0 1-12 7 S OLO NO SOLO SOLO
" " CC 1 0 127 EQ LOW -15 d B +15 dB
" " CC 2 " " EQ LOW MID " " "
" " CC 3 " " EQ H I MID " " "
" " CC 4 " " EQ HI " " "
" " CC 8 0 127 GAIN -20 d B +60 d B NOT on Ch. USB/ BT Continuous control
" " CC 9 0 127 LOW CUT 20 Hz 600 Hz NOT on Ch. USB/BT Continuous control
" " CC 11 0 100 -127 COMP 0% 100% NOT on Ch. USB/ BT
" " CC 12 0 1 -127 4 8 V O FF ON ONLY on Ch. 1 + 2
" " CC 13 0 1 -127 CHANNEL STATUS HIDDEN ACTIVE
" " CC 14 0, 1 12 7
" " CC 15 0, 1 127
" " CC 16 0, 1 12 7 SEND LE VEL to FX1 O FF, -70 dB +10 dB "
" " CC 17 0, 1 127 SEND LEVEL t oFX2 OFF, -70 d B +10 d B "
Min.
Value
Max.
Parameter Mi n. Value Max. Val ue. Notes Comment
Value
Channel L EVEL
(to MAIN)
Channel BALANCE
(to MAIN)
SEND LEVEL t o
MON1
SEND LEVEL t o
MON2
OFF, -70 dB +10 dB
1.0 LE FT 1.0 RI GHT Value 64 = "0.0 C ENTER"
OFF, -70 dB +10 dB
OFF, -70 dB +10 dB "
MIDI
Ch.
16
"
Value 0 = OFF, Value 1~127
= the act ual level contr ol
Switch; va lue 0 = "MUTE
OFF"; value 1-127 = "MUTE"
Switch; va lue 0 = "SOLO
OFF"; value 1-127 = "SOLO"
Continuous control; value
Continuous control; values
101-127 = identical to ma x.
Switch; va lue 0 = "48V
Switch; va lue 0 = "HIDDEN";
value 1-127 = "ACTIVE"
Value 0 = OFF, Value 1~127
= the act ual level contr ol
from -70 to +10 dB
64 = "0.0 dB" (cen ter
postion)
value = 100 %
OFF"; value 1-127 =
"48 V ON "
from -70 to +10 dB
BUSSES
Section
MAIN BU S** 8** CC 7 0, 1 127 BUS L EVEL OFF, -70 dB +1 0 dB
**Each B US is assigned to o ne specific M IDI-Channe l.
MIDI
Command
Ch.
" " CC 10 0 127 BUS BALANCE 1.0 L EFT 1.0 R IGHT ONLY on MAIN B US Value 64 = "0. 0 CENTER"
" " CC 8 0 127 BUS LIMITER -30 d B 0 dB N OT on FX1/2 BUS Continuous control
" " CC 11 0 127 9-BAND EQ 62 Hz -15 dB +15 dB NOT on FX1/2 BU S
" " CC 12 " " 9-BAND EQ 125 Hz " " " "
" " CC 13 " " 9-BAND EQ 250 Hz " " " "
" " CC 14 " " 9-BAND E Q 500 Hz " " " "
" " CC 15 " " 9-BAN D EQ 1 kHz " " " "
" " CC 16 " " 9-BAND EQ 2 k Hz " " " "
" " CC 17 " " 9-B AND EQ 4 kHz " " " "
" " CC 18 " " 9-BAND EQ 8 k Hz " " " "
" " CC 19 " " 9- BAND EQ 16 kHz " " " "
Min.
Value
Max.
Parameter Mi n. Value Max. Val ue. Notes Comment
Value
Value 0 = OFF, Value 1~127
= the act ual level contr ol
from -70 to +10 dB
Continuous control; value
(center postion)
FX CONTROL
Section
FX1 / FX2 13 / 14 Prog. Chg. 1 16 EFFEC T PRESET 1 16
> Each FX sl ot is assigned to o ne specifi c MIDI-Channe l.
MIDI
Command
Ch.
" " CC 1 0 10 0-12 7 PA RAME TER 1 0% 100%
" " CC 2 0 1-12 7 PARAM ETER 2 Val ue A Value B
Min.
Value
Max.
Parameter Mi n. Value Max. Val ue. Notes Comment
Value
Progra m Change 0 &
17-127 = ignored
Continuous control; values
101-127 = identical to
max. val ue = 100%
Switch; MID I value 0 = "Value A";
MIDI value 1-127 = "Value B "
GLOBAL CONTROL
Section
SNAPSHOT 16 Prog. Chg. 1 16
FX1 / FX2 " CC 1 0 1 -127 F X MUTE NO MUTE MUTE Mutes B OTH FX Sends
FX1 / FX2 " Note 0 (C -1) Velocity 1 Ve lo. 127 TAP TEMPO 50 BPM 2 50 BPM See below!
> ALL globa l controls oper ate on MIDI-Ch annel 16. Not es to TAP TEMPO:
MIDI
Ch.
Command
Min.
Value
Max.
Parameter Mi n. Value Max. Val ue. Notes Comment
Value
Load MIXER
SNAPSHOT
1.) Note On co mmand will be use d to control the F X tempo; Note Of f will be ignore d
2.) Any Note Vel ocity fro m 1-127 is OK for tri ggering, Veloc ity 0 will be ign ored
(becau se it's often m is-used as "No te off" com mand)
3.) Tempo calc ulation will be d one by measuring t he time inter val between r epetitive h it of MIDI-Note 0
(same logi c as for the hardw are MUTE butt on on the mixer)
4.) TAP TEMPO a ffect s generally bot h FX slots, so it 's a "global tempo"
(although a t the moment ONLY FX 2 slot makes use of th e TAP function)
5.) TAP TEMPO is o nly useable for d elay/echo eff ects which o ffer this p arameter (curre ntly: FX2 > Pre sets No. 1-12)
1 16 Loading #16 = RESET!
Progra m Change 0 & 17-127
= ignore d; Presets = 1-15;
RESET = Pr og. Chg. #16
Switch; va lue 0 = "MUTE
OFF"; value 1-127 = "MUTE"
Lowest MI DI note for temp o
tappin g; ignore Veloci ty 0,
any velo. bt w. 1-127 = OK
64 = "0.0 dB"
Page 9

Specications
17Quick Start Guide16 F LOW 8
Mic Inputs
Type
2 x XLR, balan ced
2 x XLR / 1/4"" TRS combo jac ks, balanced
Mic E.I.N. @ +60 dB gain (20 Hz to 20 kHz)
@ 0 Ω source re sistance -125 dB A-weighted
@ 50 Ω source re sistance -124 .5 dB A-weighted
@ 150 Ω source resi stance -124 d B A-weighted
Frequenc y response (-1 dB) 20 Hz to 20 kHz (-0.5 d B)
Gain range -20 dB to +60 dB
Max. input level +19.5 dB gain
Impedance 10 kΩ balance d, 5 kΩ unbalanced
Signal-to-noise ratio
"89 dB A-weigh ted
(0 dBu in @ +10 dB gain)"
Distortion (THD+N) 0.003%, A-weighted
Phantom power +48 V, switc hable
Line Inputs
Type 2 x 1/4" TRS connect or, balanced , channels 5L / 7L
Impedance 20 kΩ balanc ed, 10 kΩ unbalanced
Gain range -20 dB to +60 dB
Max. input level +19. 5 d Bu
Guitar (Hi-Z) Inputs
Type 2 x 1/4" TRS connect or, balanced , channels 6R / 8R
Impedance 2 MΩ balanced, 1 MΩ unbalanced
Max. input level +19. 5 d Bu
Channel EQ
Low ±14.6 dB @ 20 Hz, shelvin g
Low mid ±14.8 dB @ 300 Hz
High mid ±14.8 dB @ 1.5 kHz
High +14.1/-14.9 dB @ 20 kHz, shelving
Monitor Outputs
Type 2 x 1/4" TRS, balanced
Impedance 75 Ω, balanced
Max. output level +14 .4 d Bu
Main Outputs
Type 2 x XLR, balan ced
Impedance 150 Ω, balanced
Max. output level +14 .5 d Bu
Phones Output
Type 1 x 1/4" TRS connect or, balanced
Max. output level +18 dBm / 40 Ω
USB
Connector Type B
Bit depth 24-bit / 48 kHz
Channels 8 x 2
Bluetooth
Frequency range 2402 MHz ~ 2480 MHz
Channel number 79
Version Bluetoot h spec 4.0 compliant
Compatibility Suppor ts A2DP 1.2 prole
Max. communication range 30 m (without interference)
Max. output power 8 dBm
Main Mix Sy stem Data (No ise)
Main mix @ -∞, chan nel fader @ -∞ -95 dB A-weigh ted
Main mix @ 0 dB, ch annel fader @ -∞ -95 dB A-weigh ted
Main mix @ 0 dB, ch annel fader @ 0 dB -90 dB A-weig hted
Power Supply / Voltage
Power supply 5 VDC 2A po wer input
Power consumption 10 W Max.
Dimensions / Weight
Dimensio ns (H x W x D) 229 x 172 x 48 mm (9.0 x 6.8 x 1.9")
Weight 1.4 kg (3.1 lbs)
Page 10

Other important information
19Quick Start Guide18 FLO W 8
Important information Aspectos importantes
1. Register online.
Pleaseregister your new Music Tribe
equipment right after you purchase it by
visiting behringer. com. Registeringyour
purchase using our simple online
form helps us to process your repair
claims more quickly and eciently.
Also, read the terms and conditions of
our warranty, ifapplicable.
2. Malfunction. Should your
Music Tribe Authorized Reseller not be
located in your vicinity, you may contact
the Music Tribe Authorized Fulller for
your country listed under “Support” at
behringer. com. Shouldyour country not
be listed, pleasecheck if your problem
can be dealt with by our “OnlineSupport”
which may also be found under “Support”
at behringer. com. Alternatively, please
submit an online warranty claim at
behringer. com BEFORE returning
theproduct.
3. Power Connections.
Beforeplugging the unit into a power
socket, please make sure you are using the
correct mains voltage for your particular
model. Faulty fuses must be replaced
with fuses of the same type and rating
withoutexception.
1. Registro online.
Lerecomendamos que registre su nuevo
aparato Music Tribe justo después de
su compra accediendo a la página web
behringer. com. Elregistro de su compra
a través de nuestro sencillo sistema
online nos ayudará a resolver cualquier
incidencia que se presente a la mayor
brevedad posible. Además,aproveche
para leer los términos y condiciones
de nuestra garantía, siesaplicable en
sucaso.
2. Averías. En el caso de que no
exista un distribuidor Music Tribe en las
inmediaciones, puede ponerse en contacto
con el distribuidor Music Tribe de su
país, queencontrará dentro del apartado
“Support” de nuestra página web
behringer. com. En caso de que su país no
aparezca en ese listado, acceda a la sección
“Online Support” (quetambiénencontrará
dentro del apartado “Support” de nuestra
páginaweb) y compruebe si su problema
aparece descrito y solucionado allí.
Deforma alternativa, envíenos a través
de la página web una solicitud online de
soporte en periodo de garantía ANTES de
devolvernoselaparato.
3. Conexiones de corriente.
Antes de enchufar este aparato a una
salida de corriente, asegúrese de que
dicha salida sea del voltaje adecuado
para su modelo concreto. En caso de
que deba sustituir un fusible quemado,
deberáhacerlo por otro de idénticas
especicaciones, sinexcepción.
Informations importantes
1. Enregistrez-vous
enligne. Prenezle temps
d’enregistrer votre produit Music Tribe
aussi vite que possible sur le site Internet
behringer. com. Lefait d’enregistrer le
produit en ligne nous permet de gérer
les réparations plus rapidement et plus
ecacement. Prenezégalement le
temps de lire les termes et conditions de
notregarantie.
2. Dysfonctionnement. Si vous
n’avez pas de revendeur Music Tribe près
de chez vous, contactez le distributeur
Music Tribe de votre pays: consultez la
liste des distributeurs de votre pays dans
la page “Support” de notre site Internet
behringer. com. Si votre pays n’est pas
dans la liste, essayez de résoudre votre
problème avec notre “aideen ligne”
que vous trouverez également dans la
section “Support” du site behringer. com.
Vouspouvez également nous faire
parvenir directement votre demande de
réparation sous garantie par Internet sur
le site behringer. com AVANT de nous
renvoyer leproduit.
3. Raccordement au secteur.
Avant de relier cet équipement au secteur,
assurez-vous que la tension secteur
de votre région soit compatible avec
l’appareil. Veillez à remplacer les fusibles
uniquement par des modèles exactement
de même taille et de même valeur
électrique — sans aucuneexception.
Weitere wichtige
Informationen
1. Online registrieren.
Bitteregistrieren Sie Ihr neues
Music Tribe-Gerät direkt nach dem
Kauf auf der Website behringer. com.
WennSie Ihren Kauf mit unserem
einfachen online Formular registrieren,
könnenwir Ihre Reparaturansprüche
schneller und ezienter bearbeiten.
Lesen Sie bitte auch unsere
Garantiebedingungen, fallszutreend.
2. Funktionsfehler. Sollte sich
kein Music Tribe Händler in Ihrer Nähe
benden, können Sie den Music Tribe
Vertrieb Ihres Landes kontaktieren, der auf
behringer. com unter „Support“ aufgeführt
ist. Sollte Ihr Land nicht aufgelistet sein,
prüfen Sie bitte, ob Ihr Problem von
unserem „Online Support“ gelöst werden
kann, den Sie ebenfalls auf behringer. com
unter „Support“ nden. Alternativ reichen
Sie bitte Ihren Garantieanspruch online
auf behringer. com ein, BEVOR Sie das
Produktzurücksenden.
3. Stromanschluss. Bevor Sie das
Gerät an eine Netzsteckdose anschließen,
prüfen Sie bitte, obSie die korrekte
Netzspannung für Ihr spezielles Modell
verwenden. Fehlerhafte Sicherungen
müssen ausnahmslos durch Sicherungen
des gleichen Typs und Nennwerts
ersetztwerden.
Outras Informações
Importantes
1. Registre-se online. Porfavor,
registreseu novo equipamento
Music Tribe logo após a compra visitando
o site behringer. com Registrar sua
compra usando nosso simples formulário
online nos ajuda a processar seus
pedidos de reparos com maior rapidez
e eciência. Além disso, leia nossos
termos e condições de garantia,
caso sejanecessário.
2. Funcionamento
Defeituoso. Casoseufornecedor
Music Tribe não esteja localizado nas
proximidades, vocêpode contatar
um distribuidor Music Tribe para o
seu país listado abaixo de “Suporte”
embehringer. com. Se seu país não estiver
na lista, favor checar se seu problema pode
ser resolvido com o nosso “SuporteOnline”
que também pode ser achado abaixo
de “Suporte”em behringer. com.
Alternativamente, favorenviar uma
solicitação de garantia online em
behringer. com ANTES da devolução
doproduto.
3. Ligações. Antes de ligar a unidade
à tomada, assegure-se de que está a
utilizar a voltagem correcta para o modelo
em questão. Osfusíveis com defeito
terão de ser substituídos, sem qualquer
excepção, porfusíveis do mesmo tipo e
correntenominal.
Informazioni importanti
1. Registratevi online.
Vi invitiamo a registrare il nuovo
apparecchio Music Tribe subito dopo
averlo acquistato visitando behringer.
com. La registrazione dell'acquisto
tramite il nostro semplice modulo online
ci consente di elaborare le richieste
di riparazione in modo più rapido ed
eciente. Leggete anche i termini e
le condizioni della nostra garanzia,
qualora applicabile.
2. Malfunzionamento. Nel caso
in cui il rivenditore autorizzato Music
Tribe non si trovi nelle vostre vicinanze,
potete contattare il Music Tribe Authorized
Fulller per il vostro paese, elencato in
“Support” @ behringer.com. Se la vostra
nazione non è elencata, controllate se
il problema può essere risolto tramite
il nostro “Online Support”che può
anche essere trovato sotto “Support”
@ behringer.com. In alternativa,
inviate una richiesta di garanzia online
su behringer.com PRIMA di restituire
il prodotto.
3. Collegamento
all'alimentazione. Prima di
collegare l'unità a una presa di corrente,
assicuratevi di utilizzare la tensione di rete
corretta per il modello specico. I fusibili
guasti devono essere sostituiti, senza
eccezioni, con fusibili dello stesso tipo e
valore nominale.
Page 11

FEDERAL COMMUNICATIONS COMMISSION
COMPLIANCE INFORMATION
21Quick Start Guide20 FLOW 8
FLOW 8
Responsible Party Name: Mu sic Tribe Commerc ial NV Inc.
Address: 9 01 Grier Drive
Phone Number: +1 702 800 8290
FLOW 8
complies with the FCC rules as mentioned in the followingparagraph:
This equi pment has been test ed and found to compl y with the limits fo r a ClassB
digital d evice, pursuant to p art 15 of the FCC Rules. The selimits are desi gned to provide
reasonable protection against harmful interference in a residential installation.
Thisequipment generates, uses and can radiate radio frequency energy and, if not
install ed and used in accord ance with the instr uctions, may cau se harmful inter ference
to radio communications. However, t here is no guarantee that interference will not
occur in a pa rticular inst allation. Ifthis eq uipment does cau se harmful inter ference to
radio or tel evision recepti on, whichcan be dete rmined by turning t he equipment o
and on, theus er is encouraged to t ry to correct t he interferen ce by one or more of the
followingmeasures:
• Reorient or relocate the receiving antenna.
• Increase the separation between the equipment and receiver.
• Connec t the equipment in to an outlet on a circu it dierent fro m that to which the
receiver is connected.
• Consult t he dealer or an exper ienced radio/T V technician fo rhelp.
This devic e complies with Par t 15 of the FCC rules. Oper ation is subject t o the following
two conditions:
(1) this device may not c ause harmful inte rference, and
(2) this device mu st accept any inter ference received , includinginter ference that may
cause undesired operation.
Las Vegas, N V 89118
USA
Important information:
Changes or m odications to t he equipment not ex pressly approve d by Music Tribe can void
the user’s authority to use the equipment.
FCC Radiation Exposure Statement
This devic e complies with FCC rad iation exposur e limits set for th for an uncontro lled
environm ent and it also complie s with Part 15 of the FCC RF Ru les.
This equipment must not be co-located or operating in conjunction with any other antenna
or transmitter.
End-us ers and installe rs must be provide w ith antenna inst allation instru ctions and
consider removing the no-collocation statement.
Page 12

We Hear You
 Loading...