

Page 1
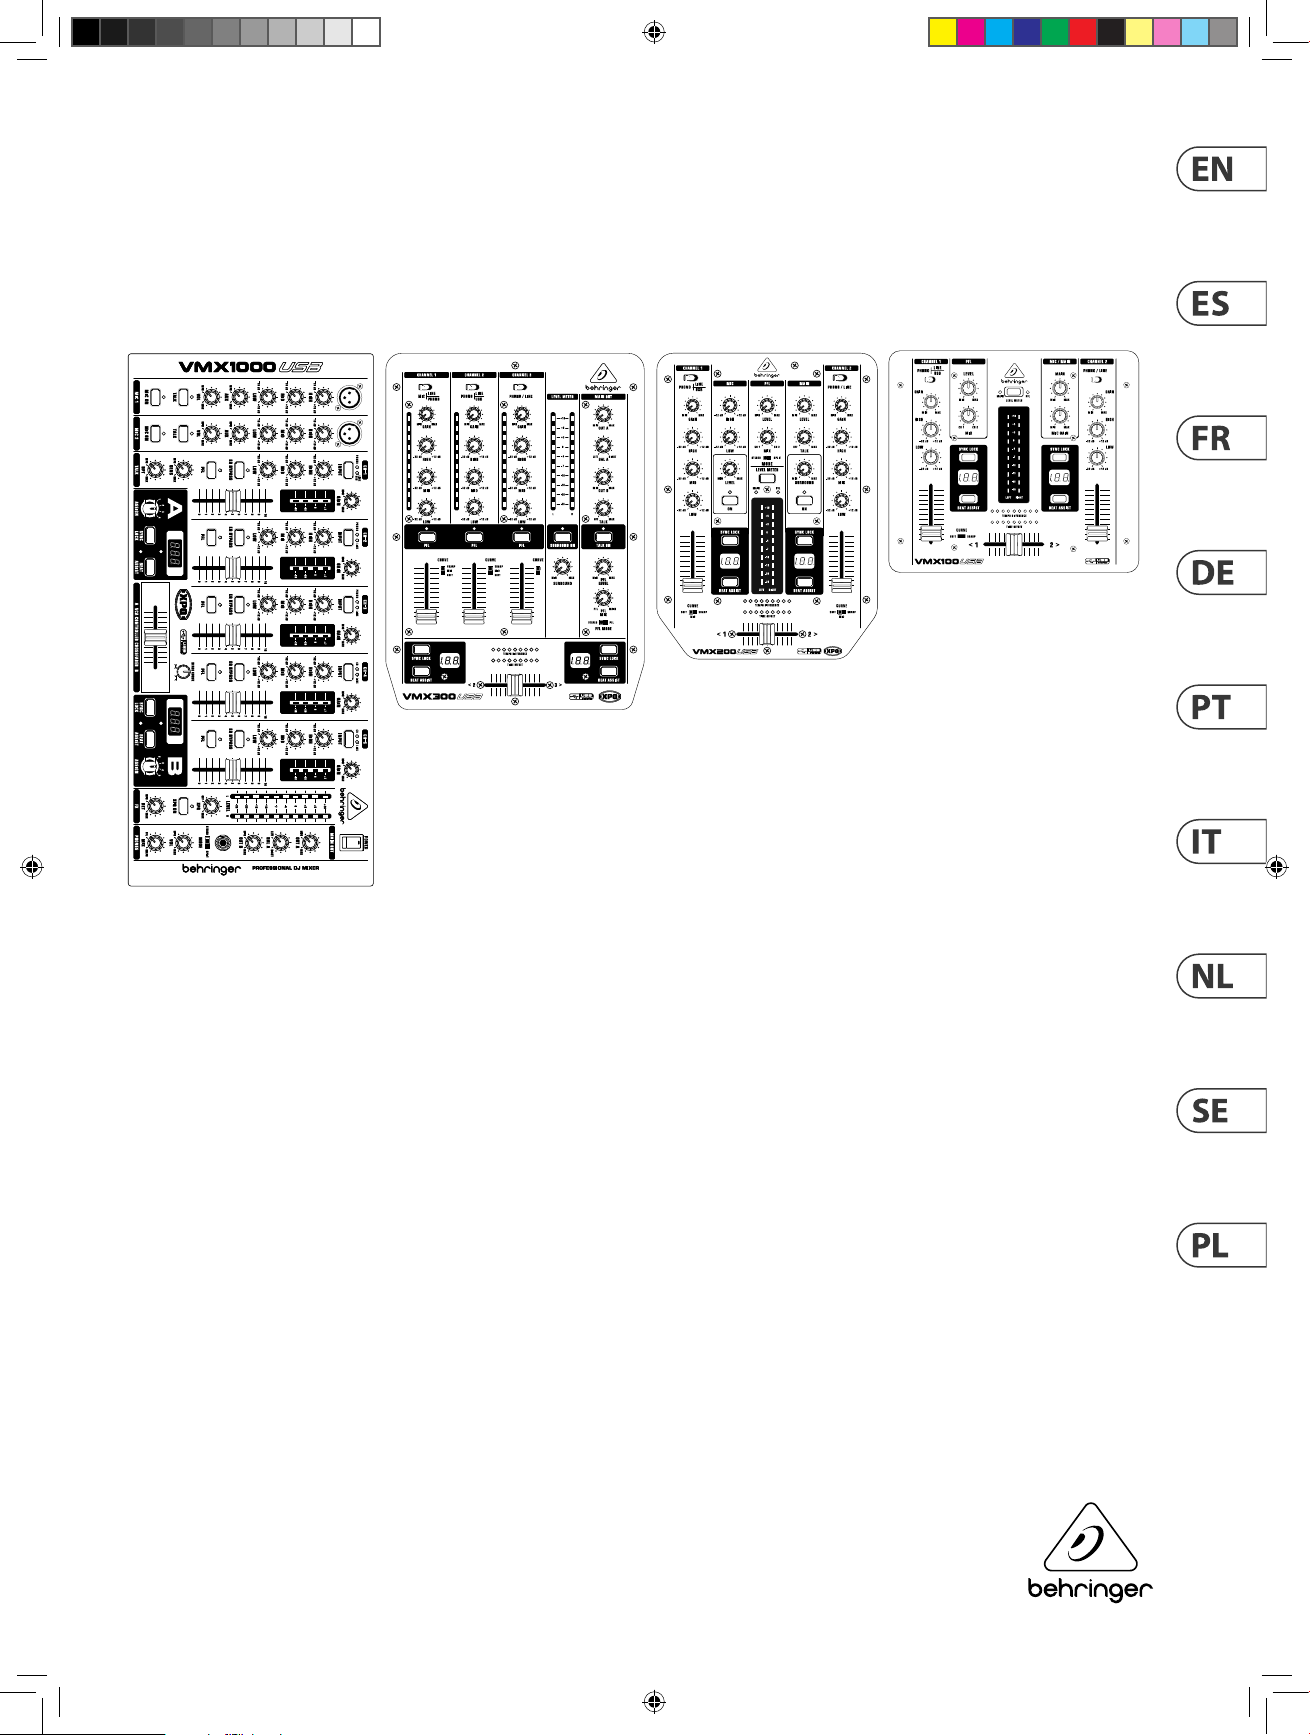
Quick Start Guide
PRO MIXER SERIES
VMX1000USB/VMX300USB/
VMX200USB/VMX100USB
Professional 2/3/7-Channel DJ Mixer with
USB/Audio Interface, BPM Counter and VCA Control
USB
INTERFACE
USB
V 9.0
A54-00002-77357
Page 2
2
PRO MIXER SERIES VMX1000USB/VMX300USB/VMX200USB/VMX100USB
9. Do not defeat the safety purpose of the polarized
20. Please keep the environmental aspects of battery
This apparatus may be used in tropical and moderate
Use only high-quality professional speaker cables with
¼" TS or twist-locking plugs pre-installed. Allother
installation or modication should be performed only
by qualiedpersonnel.
enclosure-voltage that may be sucient to constitute a
risk ofshock.
accompanying literature. Please read the manual.
No user serviceable parts inside. Refer servicing to
qualied personnel.
moisture. The apparatus shall not be exposed to dripping
or splashing liquids and no objects lled with liquids,
suchas vases, shall be placed on the apparatus.
Toreduce the risk of electric shock do not perform any
servicing other than that contained in the operation
instructions. Repairs have to be performed by qualied
servicepersonnel.
1. Read these instructions.
2. Keep these instructions.
3. Heed all warnings.
4. Follow all instructions.
5. Do not use this apparatus near water.
6. Clean only with dry cloth.
7. Do not block any ventilation openings. Install in
accordance with the manufacturer’s instructions.
8. Do not install near any heat sources such as
radiators, heat registers, stoves, or other apparatus
(including ampliers) that produce heat.
Important Safety
Instructions
Terminals marked with this symbol carry
electrical current of sucient magnitude
to constitute risk of electric shock.
This symbol, wherever it appears,
alertsyou to the presence of uninsulated
dangerous voltage inside the
This symbol, wherever it appears,
alertsyou to important operating and
maintenance instructions in the
Caution
To reduce the risk of electric shock, donot
remove the top cover (or the rear section).
Caution
To reduce the risk of re or electric shock,
do not expose this appliance to rain and
Caution
These service instructions are for use
by qualied service personnel only.
or grounding-type plug. A polarized plug has two blades
with one wider than the other. A grounding-type plug
has two blades and a third grounding prong. The wide
blade or the third prong are provided for your safety. Ifthe
provided plug does not t into your outlet, consult an
electrician for replacement of the obsolete outlet.
10. Protect the power cord from being walked on or
pinched particularly at plugs, convenience receptacles,
and the point where they exit from the apparatus.
11. Use only attachments/accessories specied by
themanufacturer.
injury from tip-over.
13. Unplug this apparatus during lightning storms or
when unused for long periods of time.
14. Refer all servicing to qualied service personnel.
Servicing is required when the apparatus has been
damaged in any way, such as power supply cord or plug
is damaged, liquid has been spilled or objects have fallen
into the apparatus, the apparatus has been exposed
to rain or moisture, does not operate normally, or has
beendropped.
15. The apparatus shall be connected to a MAINS socket
outlet with a protective earthing connection.
16. Where the MAINS plug or an appliance coupler is
used as the disconnect device, the disconnect device shall
remain readily operable.
17. Correct disposal of this
product: This symbol indicates
that this product must not be
disposed of with household
waste, according to the WEEE
Directive (2012/19/EU) and
your national law. This product
should be taken to a collection center licensed for the
recycling of waste electrical and electronic equipment
(EEE). The mishandling of this type of waste could have
a possible negative impact on the environment and
human health due to potentially hazardous substances
that are generally associated with EEE. At the same time,
your cooperation in the correct disposal of this product
will contribute to the ecient use of natural resources.
For more information about where you can take your
waste equipment for recycling, please contact your local
city oce, or your household waste collection service.
18. Do not install in a conned space, such as a book
case or similar unit.
19. Do not place naked ame sources, such as lighted
candles, on the apparatus.
disposal in mind. Batteries must be disposed-of at a
battery collection point.
21.
climates up to 45°C.
LEGAL DISCLAIMER
12. Use only with the
cart, stand, tripod, bracket,
or table specied by the
manufacturer, orsold with
the apparatus. When a cart
is used, use caution when
moving the cart/apparatus
combination to avoid
Music Tribe accepts no liability for any loss which may
be suered by any person who relies either wholly or in
part upon any description, photograph, or statement
contained herein. Technical specications, appearances
and other information are subject to change without
notice. All trademarks are the property of their
respective owners. Midas, Klark Teknik, Lab Gruppen,
Lake, Tannoy, Turbosound, TC Electronic, TC Helicon,
Behringer, Bugera, Oberheim, Auratone and Coolaudio
are trademarks or registered trademarks of Music
Tribe Global Brands Ltd. © Music Tribe Global Brands
Ltd. 2021 All rights reserved.
LIMITED WARRANTY
For the applicable warranty terms and conditions
and additional information regarding Music Tribe’s
Limited Warranty, please see complete details online at
musictribe.com/warranty.
Page 3
Quick Start Guide
3
8. No instale este equipo cerca de fuentes de calor
los recursos naturales. Para más información acerca del
deben ser siempre eliminadas en un punto limpio y nunca
este documento. Las especicaciones técnicas, imágenes
están sujetas a modicaciones sin previo aviso. Todas las
Instrucciones de
seguridad
Las terminales marcadas con este símbolo
transportan corriente eléctrica de
magnitud suciente como para constituir
un riesgo de descarga eléctrica. Utilice solo cables de
altavoz profesionales y de alta calidad con conectores
TS de 6,3 mm o de bayoneta prejados. Cualquier otra
instalación o modicación debe ser realizada únicamente
por un técnico cualicado.
Este símbolo, siempre que aparece,
leadvierte de la presencia de voltaje
peligroso sin aislar dentro de la caja;
estevoltaje puede ser suciente para constituir un riesgo
dedescarga.
Este símbolo, siempre que aparece,
leadvierte sobre instrucciones operativas
y de mantenimiento que aparecen en la
documentación adjunta. Por favor, lea el manual.
Atención
Para reducir el riesgo de descarga
eléctrica, no quite la tapa (o la parte
posterior). No hay piezas en el interior del equipo que
puedan ser reparadas por el usuario. Si es necesario,
póngase en contacto con personal cualicado.
Atención
Para reducir el riesgo de incendio o
descarga eléctrica, no exponga este
aparato a la lluvia, humedad o alguna otra fuente que
pueda salpicar o derramar algún líquido sobre el aparato.
Nocoloque ningún tipo de recipiente para líquidos sobre
el aparato.
Atención
Las instrucciones de servicio deben
llevarlas a cabo exclusivamente personal
cualicado. Para evitar el riesgo de una descarga eléctrica,
no realice reparaciones que no se encuentren descritas
en el manual de operaciones. Lasreparaciones deben ser
realizadas exclusivamente por personalcualicado.
1. Lea las instrucciones.
2. Conserve estas instrucciones.
3. Preste atención a todas las advertencias.
4. Siga todas las instrucciones.
5. No use este aparato cerca del agua.
6. Limpie este aparato con un paño seco.
7. No bloquee las aberturas de ventilación. Instale el
equipo de acuerdo con las instrucciones del fabricante.
tales como radiadores, acumuladores de calor, estufas u
otros aparatos (incluyendo amplicadores) que puedan
producir calor.
9. No elimine o deshabilite nunca la conexión a tierra
del aparato o del cable de alimentación de corriente.
Unenchufe polarizado tiene dos polos, uno de los cuales
tiene un contacto más ancho que el otro. Una clavija con
puesta a tierra dispone de tres contactos: dos polos y la
puesta a tierra. El contacto ancho y el tercer contacto,
respectivamente, son los que garantizan una mayor
seguridad. Si el enchufe suministrado con el equipo no
concuerda con la toma de corriente, consulte con un
electricista para cambiar la toma de corriente obsoleta.
10. Coloque el cable de suministro de energía de manera
que no pueda ser pisado y que esté protegido de objetos
alados. Asegúrese de que el cable de suministro de
energía esté protegido, especialmente en la zona de la
clavija y en el punto donde sale del aparato.
11. Use únicamente los dispositivos o accesorios
especicados por el fabricante.
12. Use únicamente la
carretilla, plataforma,
trípode, soporte o mesa
especicados por el
fabricante o suministrados
junto con el equipo.
Altransportar el equipo,
tenga cuidado para evitar
daños y caídas al tropezar con algún obstáculo.
13. Desenchufe el equipo durante tormentas o si no va a
utilizarlo durante un periodo largo.
14. Confíe las reparaciones únicamente a servicios
técnicos cualicados. La unidad requiere mantenimiento
siempre que haya sufrido algún daño, si el cable de
suministro de energía o el enchufe presentaran daños,
sehubiera derramado un líquido o hubieran caído objetos
dentro del equipo, si el aparato hubiera estado expuesto
a la humedad o la lluvia, si ha dejado de funcionar de
manera normal o si ha sufrido algún golpe o caída.
15. Al conectar la unidad a la toma de corriente eléctrica
asegúrese de que la conexión disponga de una unión
atierra.
16. Si el enchufe o conector de red sirve como único
medio de desconexión, éste debe ser accesiblefácilmente.
17. Cómo debe deshacerse de
este aparato: Este símbolo indica
que este aparato no debe ser
tratado como basura orgánica,
según lo indicado en la Directiva
WEEE (2012/19/EU) y a las
normativas aplicables en su país.
En lugar de ello deberá llevarlo al punto limpio más
cercano para el reciclaje de sus elementos eléctricos/
electrónicos (EEE). Al hacer esto estará ayudando a
prevenir las posibles consecuencias negativas para el
medio ambiente y la salud que podrían ser provocadas
por una gestión inadecuada de este tipo de aparatos.
Además, el reciclaje de materiales ayudará a conservar
reciclaje de este aparato, póngase en contacto con el
Ayuntamiento de su ciudad o con el punto limpio local.
18. No instale esta unidad en un espacio muy reducido,
tal como encastrada en una librería o similar.
19. No coloque objetos con llama, como una vela
encendida, sobre este aparato.
20. Tenga presentes todas las advertencias relativas
al reciclaje y correcta eliminación de las pilas. Las pilas
con el resto de la basura orgánica.
21. Puede usar este aparato en lugares con climas
tropicales y moderados que soporten temperaturas de
hasta 45°C.
NEGACIÓN LEGAL
Music Tribe no admite ningún tipo de responsabilidad
por cualquier daño o pérdida que pudiera sufrir
cualquier persona por conar total o parcialmente en la
descripciones, fotografías o armaciones contenidas en
y otras informaciones contenidas en este documento
marcas comerciales que aparecen aquí son propiedad
de sus respectivos dueños. Midas, Klark Teknik,
Lab Gruppen, Lake, Tannoy, Turbosound, TC Electronic,
TC Helicon, Behringer, Bugera, Oberheim, Auratone y
Coolaudio son marcas comerciales o marcas registradas
de Music Tribe Global Brands Ltd. © Music Tribe Global
Brands Ltd. 2021 Reservados todos los derechos.
GARANTÍA LIMITADA
Si quiere conocer los detalles y condiciones aplicables
de la garantía así como información adicional sobre la
Garantía limitada de Music Tribe, consulte online toda la
información en la web musictribe.com/warranty.
Page 4
4
PRO MIXER SERIES VMX1000USB/VMX300USB/VMX200USB/VMX100USB
8. Ne placez pas l’appareil à proximité d’une source
dangereuses généralement associées à ces équipements.
Consignes de sécurité
Les points repérés par ce symbole portent
une tension électrique susante pour
constituer un risque d’électrocution.
Utilisez uniquement des câbles d’enceintes professionnels
de haute qualité avec ches Jack mono 6,35 mm ou ches
à verrouillages déjà installées. Touteautre installation ou
modication doit être eectuée uniquement par un
personnel qualié.
Ce symbole avertit de la présence d’une
tension dangereuse et non isolée à
l’intérieur de l’appareil - elle peut
provoquer des chocs électriques.
Attention
Ce symbol signale les consignes
d’utilisation et d’entre ! Tien importantes
dans la documentation fournie. Lisez les consignes de
sécurité du manuel d’utilisation de l’appareil.
Attention
Pour éviter tout risque de choc électrique,
ne pas ouvrir le capot de l’appareil ni
démonter le panneau arrière. L’intérieur de l’appareil
ne possède aucun élément réparable par l’utilisateur.
Laissertoute réparation à un professionnel qualié.
Attention
Pour réduire les risques de feu et de choc
électrique, n’exposez pas cet appareil à la
pluie, à la moisissure, aux gouttes ou aux éclaboussures.
Ne posez pas de récipient contenant un liquide sur
l’appareil (un vase par exemple).
Attention
Ces consignes de sécurité et d’entretien
sont destinées à un personnel qualié.
Pouréviter tout risque de choc électrique, n’eectuez
aucune réparation sur l’appareil qui ne soit décrite par le
manuel d’utilisation. Les éventuelles réparations doivent
être eectuées uniquement par un technicien spécialisé.
1. Lisez ces consignes.
2. Conservez ces consignes.
3. Respectez tous les avertissements.
4. Respectez toutes les consignes d’utilisation.
5. N’utilisez jamais l’appareil à proximité d’un liquide.
6. Nettoyez l’appareil avec un chion sec.
7. Veillez à ne pas empêcher la bonne ventilation
de l’appareil via ses ouïes de ventilation. Respectezles
consignes du fabricant concernant l’installation
del’appareil.
de chaleur telle qu’un chauage, une cuisinière ou tout
appareil dégageant de la chaleur (y compris un ampli
depuissance).
9. Ne supprimez jamais la sécurité des prises bipolaires
ou des prises terre. Les prises bipolaires possèdent deux
contacts de largeur diérente. Leplus large est le contact
de sécurité. Les prises terre possèdent deux contacts plus
une mise à la terre servant de sécurité. Si la prise du bloc
d’alimentation ou du cordon d’ali-mentation fourni ne
correspond pas à celles de votre installation électrique,
faites appel à un électricien pour eectuer le changement
de prise.
10. Installez le cordon d’alimentation de telle façon
que personne ne puisse marcher dessus et qu’il soit
protégé d’arêtes coupantes. Assurez-vous que le cordon
d’alimentation est sufsamment protégé, notamment au
niveau de sa prise électrique et de l’endroit où il est relié à
l’appareil; cela est également valable pour une éventuelle
rallonge électrique.
11. Utilisez exclusivement des accessoires et des
appareils supplémentaires recommandés par lefabricant.
Déplacezprécautionneusement tout chariot ou diable
chargé pour éviter d’éventuelles blessures en cas dechute.
13. Débranchez l’appareil de la tension secteur en cas
d’orage ou si l’appareil reste inutilisé pendant une longue
période de temps.
14. Les travaux d’entretien de l’appareil doivent
être eectués uniquement par du personnel qualié.
Aucunentretien n’est nécessaire sauf si l’appareil est
endommagé de quelque façon que ce soit (dommagessur
le cordon d’alimentation ou la prise par exemple), siun
liquide ou un objet a pénétré à l’intérieur du châssis, si
l’appareil a été exposé à la pluie ou à l’humidité, s’il ne
fonctionne pas correctement ou à la suite d’une chute.
15. L’appareil doit être connecté à une prise secteur
dotée d’une protection par mise à la terre.
16. La prise électrique ou la prise IEC de tout appareil
dénué de bouton marche/arrêt doit rester accessible
enpermanence.
17. Mise au rebut appropriée de
ce produit: Ce symbole indique
qu’en accord avec la directive DEEE
(2012/19/EU) et les lois en vigueur
dans votre pays, ce produit ne
doit pas être jeté avec les déchets
ménagers. Ce produit doit être
déposé dans un point de collecte agréé pour le recyclage
des déchets d’équipements électriques et électroniques
(EEE). Une mauvaise manipulation de ce type de déchets
pourrait avoir un impact négatif sur l’environnement
et la santé à cause des substances potentiellement
En même temps, votre coopération dans la mise au
rebut de ce produit contribuera à l’utilisation ecace
des ressources naturelles. Pour plus d’informations
sur l’endroit où vous pouvez déposer vos déchets
d’équipements pour le recyclage, veuillez contacter votre
mairie ou votre centre local de collecte des déchets.
18. N’installez pas l’appareil dans un espace conné tel
qu’une bibliothèque ou meuble similaire.
19. Ne placez jamais d’objets enammés, tels que des
bougies allumées, sur l’appareil.
20. Gardez à l’esprit l’impact environnemental lorsque
vous mettez des piles au rebus. Les piles usées doivent
être déposées dans un point de collecte adapté.
21. Cet appareil peut être utilisé sous un climat tropical
ou modéré avec des températures de 45°C maximum.
DÉNI LÉGAL
Music Tribe ne peut être tenu pour responsable pour
toute perte pouvant être subie par toute personne
se ant en partie ou en totalité à toute description,
12. Utilisez
exclusivement des
chariots, des diables,
desprésentoirs, despieds
et des surfaces de
travail recommandés
par le fabricant ou
livrés avec le produit.
photographie ou armation contenue dans ce
document. Les caractéristiques, l’apparence et d’autres
informations peuvent faire l’objet de modications
sans notication. Toutes les marques appartiennent
à leurs propriétaires respectifs. Midas, Klark Teknik,
Lab Gruppen, Lake, Tannoy, Turbosound, TC Electronic,
TC Helicon, Behringer, Bugera, Oberheim, Auratone et
Coolaudio sont des marques ou marques déposées de
Music Tribe Global Brands Ltd. © Music Tribe Global
Brands Ltd. 2021 Tous droits réservés.
GARANTIE LIMITÉE
Pour connaître les termes et conditions de garantie
applicables, ainsi que les informations supplémentaires
et détaillées sur la Garantie Limitée de Music Tribe,
consultez le site Internet musictribe.com/warranty.
Page 5
Quick Start Guide
5
Erdungskontakt dient Ihrer Sicherheit. Falls das
19. Stellen Sie keine Gegenstände mit oenen
Fotos oder Aussagen verlassen haben. Technische Daten,
Turbosound, TC Electronic, TC Helicon, Behringer, Bugera,
oder eingetragene Warenzeichen der Music Tribe Global
Wichtige
Sicherheitshinweise
Vorsicht
Die mit dem Symbol markierten
Anschlüsse führen so viel Spannung,
dassdie Gefahr eines Stromschlags besteht.
Verwenden Sie nur hochwertige, professionelle
Lautsprecherkabel mit vorinstallierten 6,35 mm
MONO-Klinkensteckern oder Lautsprecherstecker
mit Drehverriegelung. Alle anderen Installationen
oder Modikationen sollten nur von qualiziertem
Fachpersonal ausgeführt werden.
Achtung
Um eine Gefährdung durch Stromschlag
auszuschließen, darf die Geräteabdeckung
bzw. Geräterückwand nicht abgenommen werden.
ImInnern des Geräts benden sich keine vom Benutzer
reparierbaren Teile. Reparaturarbeiten dürfen nur von
qualiziertem Personal ausgeführt werden.
Achtung
Um eine Gefährdung durch Feuer bzw.
Stromschlag auszuschließen, darf dieses
Gerät weder Regen oder Feuchtigkeit ausgesetzt werden
noch sollten Spritzwasser oder tropfende Flüssigkeiten
in das Gerät gelangen können. Stellen Sie keine mit
Flüssigkeit gefüllten Gegenstände, wie z. B. Vasen,
aufdasGerät.
Achtung
Die Service-Hinweise sind nur durch
qualiziertes Personal zu befolgen.
Umeine Gefährdung durch Stromschlag zu vermeiden,
führen Sie bitte keinerlei Reparaturen an dem Gerät
durch, die nicht in der Bedienungsanleitung beschrieben
sind. Reparaturen sind nur von qualiziertem
Fachpersonaldurchzuführen.
1. Lesen Sie diese Hinweise.
2. Bewahren Sie diese Hinweise auf.
3. Beachten Sie alle Warnhinweise.
4. Befolgen Sie alle Bedienungshinweise.
5. Betreiben Sie das Gerät nicht in der Nähe vonWasser.
6. Reinigen Sie das Gerät mit einem trockenen Tuch.
7. Blockieren Sie nicht die Belüftungsschlitze. Beachten
Sie beim Einbau des Gerätes die Herstellerhinweise.
8. Stellen Sie das Gerät nicht in der Nähe von
Wärmequellen auf. Solche Wärmequellen sind z. B.
Heizkörper, Herde oder andere Wärme erzeugende Geräte
(auch Verstärker).
9. Entfernen Sie in keinem Fall die
Sicherheitsvorrichtung von Zweipol- oder geerdeten
Steckern. Ein Zweipolstecker hat zwei unterschiedlich
breite Steckkontakte. Ein geerdeter Stecker hat zwei
Steckkontakte und einen dritten Erdungskontakt.
Derbreitere Steckkontakt oder der zusätzliche
mitgelieferte Steckerformat nicht zu Ihrer Steckdose
passt, wenden Sie sich bitte an einen Elektriker, damit die
Steckdose entsprechend ausgetauscht wird.
10. Verlegen Sie das Netzkabel so, dass es vor
Tritten und scharfen Kanten geschützt ist und nicht
beschädigt werden kann. Achten Sie bitte insbesondere
im Bereich der Stecker, Verlängerungskabel und an
der Stelle, an der das Netzkabel das Gerät verlässt,
aufausreichendenSchutz.
11. Das Gerät muss jederzeit mit intaktem Schutzleiter
an das Stromnetz angeschlossen sein.
12. Sollte der Hauptnetzstecker oder eine
Gerätesteckdose die Funktionseinheit zum Abschalten
sein, muss diese immer zugänglich sein.
13. Verwenden Sie nur Zusatzgeräte/Zubehörteile,
dielaut Hersteller geeignet sind.
14. Verwenden
Sie nur Wagen,
Standvorrichtungen,
Stative, Halter oder Tische,
die vom Hersteller benannt
oder im Lieferumfang
des Geräts enthalten
sind. Falls Sie einen
Wagen benutzen, seien Sie vorsichtig beim Bewegen
der Wagen- Gerätkombination, umVerletzungen durch
Stolpern zuvermeiden.
15. Ziehen Sie den Netzstecker bei Gewitter oder wenn
Sie das Gerät längere Zeit nicht benutzen.
16. Lassen Sie alle Wartungsarbeiten nur von
qualiziertem Service-Personal ausführen. EineWartung
ist notwendig, wenn das Gerät in irgendeiner Weise
beschädigt wurde (z. B. Beschädigung des Netzkabels oder
Steckers), Gegenstände oder Flüssigkeit in das Geräteinnere
gelangt sind, das Gerät Regen oder Feuchtigkeit ausgesetzt
wurde, das Gerät nicht ordnungsgemäß funktioniert oder
auf den Boden gefallen ist.
17. Korrekte Entsorgung
dieses Produkts: Dieses
Symbol weist darauf hin, das
Produkt entsprechend der
WEEE Direktive (2012/19/EU)
und der jeweiligen nationalen
Gesetze nicht zusammen mit
Ihren Haushaltsabfällen zu entsorgen. DiesesProdukt
sollte bei einer autorisierten Sammelstelle für
Recycling elektrischer und elektronischer Geräte (EEE)
abgegeben werden. Wegen bedenklicher Substanzen,
diegenerell mit elektrischen und elektronischen Geräten
in Verbindung stehen, könnte eine unsachgemäße
Behandlung dieser Abfallart eine negative Auswirkung
auf Umwelt und Gesundheit haben. Gleichzeitig
gewährleistet Ihr Beitrag zur richtigen Entsorgung dieses
Produkts die eektive Nutzung natürlicher Ressourcen.
Fürweitere Informationen zur Entsorgung Ihrer Geräte
bei einer Recycling-Stelle nehmen Sie bitte Kontakt zum
zuständigen städtischen Büro, Entsorgungsamt oder zu
Ihrem Haushaltsabfallentsorgerauf.
18. Installieren Sie das Gerät nicht in einer beengten
Umgebung, zum Beispiel Bücherregal oder ähnliches.
Flammen, etwa brennende Kerzen, auf das Gerät.
20. Beachten Sie bei der Entsorgung von Batterien
den Umweltschutz-Aspekt. Batterien müssen bei einer
Batterie-Sammelstelle entsorgt werden.
21. Dieses Gerät ist in tropischen und gemäßigten
Klimazonen bis 45° C einsetzbar.
HAFTUNGSAUSSCHLUSS
Music Tribe übernimmt keine Haftung für Verluste,
die Personen entstanden sind, die sich ganz oder
teilweise auf hier enthaltene Beschreibungen,
Erscheinungsbild und andere Informationen können
ohne vorherige Ankündigung geändert werden. Alle
Warenzeichen sind Eigentum der jeweiligen Inhaber.
Midas, Klark Teknik, Lab Gruppen, Lake, Tannoy,
Oberheim, Auratone und Coolaudio sind Warenzeichen
Brands Ltd. © Music Tribe Global Brands Ltd. 2021 Alle
Rechte vorbehalten.
BESCHRÄNKTE GARANTIE
Die geltenden Garantiebedingungen und zusätzliche
Informationen bezüglich der von Music Tribe gewährten
beschränkten Garantie nden Sie online unter
musictribe.com/warranty.
Page 6
6
PRO MIXER SERIES VMX1000USB/VMX300USB/VMX200USB/VMX100USB
de duas palhetas e um terceiro dente de ligação à terra.
19. Não coloque fontes de chama, tais como velas
suciente para constituir um risco de choque elétrico.
Use apenas cabos de alto-falantes de alta qualidade
com plugues TS de ¼" ou plugues com trava de torção
pré-instalados. Todas as outras instalações e modicações
devem ser efetuadas por pessoasqualicadas.
equipamento. Por favor leia o manual de instruções.
(ouasecção de trás). Não existem peças substituíveis por
parte do utilizador no seu interior. Para esse efeito recorrer
a um técnico qualicado.
exposto à chuva nem à humidade. Além disso, não deve
ser sujeito a salpicos, nem devem ser colocados em cima
do aparelho objectos contendo líquidos, tais como jarras.
assistência qualicados. Para evitar choques eléctricos
não proceda a reparações ou intervenções, que não as
indicadas nas instruções de operação, salvo se possuir as
quali-cações necessárias. Para evitar choques eléctricos
não proceda a reparações ou intervenções, que não as
indicadas nas instruções de operação. Só o deverá fazer se
possuir as qualicações necessárias.
1. Leia estas instruções.
2. Guarde estas instruções.
3. Preste atenção a todos os avisos.
4. Siga todas as instruções.
5. Não utilize este dispositivo perto de água.
6. Limpe apenas com um pano seco.
7. Não obstrua as entradas de ventilação. Instale de
acordo com as instruções do fabricante.
8. Não instale perto de quaisquer fontes de calor tais
como radiadores, bocas de ar quente, fogões de sala
ou outros aparelhos (incluindo amplicadores) que
produzam calor.
9. Não anule o objectivo de segurança das chas
polarizadas ou do tipo de ligação à terra. Uma cha
polarizada dispõe de duas palhetas sendo uma mais larga
do que a outra. Uma cha do tipo ligação à terra dispõe
Instruções de Segurança
Importantes
Aviso!
Terminais marcados com o símbolo
carregam corrente elétrica de magnitude
Este símbolo, onde quer que o encontre,
alerta-o para a leitura das instruções de
manuseamento que acompanham o
Atenção
De forma a diminuir o risco de choque
eléctrico, não remover a cobertura
Atenção
Para reduzir o risco de incêndios ou
choques eléctricos o aparelho não deve ser
Atenção
Estas instruções de operação devem ser
utilizadas, em exclusivo, por técnicos de
A palheta larga ou o terceiro dente são fornecidos para
sua segurança. Se a cha fornecida não encaixar na sua
tomada, consulte um electricista para a substituição da
tomada obsoleta.
10. Proteja o cabo de alimentação de pisadelas ou
apertos, especialmente nas chas, extensões, e no local
de saída da unidade. Certique-se de que o cabo eléctrico
está protegido. Verique particularmente nas chas, nos
receptáculos e no ponto em que o cabo sai doaparelho.
11. O aparelho tem de estar sempre conectado à rede
eléctrica com o condutor de protecção intacto.
12. Se utilizar uma cha de rede principal ou uma
tomada de aparelhos para desligar a unidade de
funcionamento, esta deve estar sempre acessível.
13. Utilize apenas ligações/acessórios especicados
pelofabricante.
mover o conjunto carrinho/dispositivo para evitar danos
provocados pela terpidação.
15. Desligue este dispositivo durante as trovoadas
ou quando não for utilizado durante longos períodos
detempo.
16. Qualquer tipo de reparação deve ser sempre
efectuado por pessoal qualicado. É necessária uma
reparação sempre que a unidade tiver sido de alguma
forma danicada, como por exemplo: no caso do cabo
de alimentação ou cha se encontrarem danicados;
naeventualidade de líquido ter sido derramado ou
objectos terem caído para dentro do dispositivo; no caso
da unidade ter estado exposta à chuva ou à humidade;
seesta não funcionar normalmente, ou se tiver caído.
17. Correcta eliminação deste
produto: este símbolo indica que
o produto não deve ser eliminado
juntamente com os resíduos
domésticos, segundo a Directiva
REEE (2012/19/EU) e a legislação
nacional. Este produto deverá
ser levado para um centro de recolha licenciado para a
reciclagem de resíduos de equipamentos eléctricos e
electrónicos (EEE). O tratamento incorrecto deste tipo
de resíduos pode ter um eventual impacto negativo
no ambiente e na saúde humana devido a substâncias
potencialmente perigosas que estão geralmente
associadas aos EEE. Ao mesmo tempo, a sua colaboração
para a eliminação correcta deste produto irá contribuir
para a utilização eciente dos recursos naturais. Paramais
informação acerca dos locais onde poderá deixar o seu
equipamento usado para reciclagem, é favor contactar
os serviços municipais locais, a entidade de gestão de
resíduos ou os serviços de recolha de resíduosdomésticos.
18. Não instale em lugares connados, tais como
estantes ou unidades similares.
acesas, sobre o aparelho.
20. Favor, obedecer os aspectos ambientais de descarte
de bateria. Baterias devem ser descartadas em um ponto
de coletas de baterias.
21. Esse aparelho pode ser usado em climas tropicais e
moderados até 45°C.
LEGAL RENUNCIANTE
O Music Tribe não se responsabiliza por perda
alguma que possa ser sofrida por qualquer pessoa
que dependa, seja de maneira completa ou parcial,
de qualquer descrição, fotograa, ou declaração
aqui contidas. Dados técnicos, aparências e outras
informações estão sujeitas a modicações sem aviso
prévio. Todas as marcas são propriedade de seus
14. Utilize apenas com
o carrinho, estrutura,
tripé, suporte, ou mesa
especicados pelo
fabricante ou vendidos
com o dispositivo.
Quandoutilizar um
carrinho, tenha cuidado ao
respectivos donos. Midas, Klark Teknik, Lab Gruppen,
Lake, Tannoy, Turbosound, TC Electronic, TC Helicon,
Behringer, Bugera, Oberheim, Auratone e Coolaudio
são marcas ou marcas registradas do Music Tribe
Global Brands Ltd. © Music Tribe Global Brands Ltd.
2021 Todos direitos reservados.
GARANTIA LIMITADA
Para obter os termos de garantia aplicáveis e condições e
informações adicionais a respeito da garantia limitada do
Music Tribe, favor vericar detalhes na íntegra através do
website musictribe.com/warranty.
Page 7
Quick Start Guide
9. Non escludere la sicurezza fornita dalla spina
20. Per lo smaltimento delle batterie, tenere in
Coolaudio sono marchi o marchi registrati di Music Tribe
Informazioni importanti
Attenzione
I terminali contrassegnati da questo
simbolo conducono una corrente elettrica
di magnitudine suciente a costituire un rischio di scossa
elettrica. Utilizzare solo cavi per altoparlanti professionali
di alta qualità con jack sbilanciati da 6,35mm. o connettori
con blocco a rotazione. Tutte le altre installazioni o
modiche devono essere eseguite esclusivamente da
personale qualicato.
Attenzione
Questo simbolo, ovunque appaia, avverte
della presenza di una tensione pericolosa
non isolata all'interno dello chassis, tensione che può
essere suciente per costituire un rischio di scossa
elettrica.
Attenzione
Questo simbolo, ovunque appaia, segnala
importanti istruzioni operative e di
manutenzione nella documentazione allegata. Si invita a
leggere il manuale.
Attenzione
Per ridurre il rischio di scosse elettriche,
non rimuovere il coperchio superiore
(o la sezione posteriore). All'interno non ci sono parti
riparabili dall'utente. Per la manutenzione rivolgersi a
personale qualicato.
Attenzione
Per ridurre il rischio di incendi o scosse
elettriche, non esporre questo apparecchio
a pioggia e umidità. L'apparecchio non deve essere
esposto a gocciolio o schizzi di liquidi e nessun oggetto
contenente liquidi, come vasi, deve essere collocato
sull'apparecchio.
Attenzione
Queste istruzioni di servizio sono destinate
esclusivamente a personale qualicato.
Per ridurre il rischio di scosse elettriche non eseguire
interventi di manutenzione diversi da quelli contenuti
nel manuale di istruzioni. Le riparazioni devono essere
eseguite da personale di assistenza qualicato.
1. Leggere queste istruzioni.
2. Conservare queste istruzioni.
3. Prestare attenzione a tutti gli avvisi.
4. Applicare tutte le istruzioni.
5. Non utilizzare questo dispositivo vicino l'acqua.
6. Pulire esclusivamente con un panno asciutto.
7. Non bloccare le aperture di ventilazione. Installare in
conformità con le istruzioni del produttore.
8. Non installare vicino a fonti di calore come
radiatori, termoregolatori, stufe o altri apparecchi
(inclusi amplicatori) che producono calore.
polarizzata o con messa a terra. Una spina polarizzata ha
due lame, una più larga dell'altra. Una spina con messa a
terra ha due lame e un terzo polo di messa a terra. La lama
larga o il terzo polo sono forniti per la vostra sicurezza.
Se la spina fornita non si adatta alla presa, consultare un
elettricista per la sostituzione della presa obsoleta.
10. Proteggere il cavo di alimentazione dal calpestio
o essere schiacciato in particolare alle spine, prese di
corrente e il punto in cui esce dall'apparecchio.
11. Utilizzare esclusivamente dispositivi/accessori
specicati dal produttore.
12. Utilizzare solo
carrelli, supporti, treppiedi,
stae o tavoli indicati dal
produttore o venduti con
l'apparecchio. Utilizzando
un carrello, prestare
attenzione quando si
sposta la combinazione
carrello/apparecchio per evitare lesioni dovute al
ribaltamento.
13. Scollegare questo apparecchio durante i temporali o
se non è utilizzato per lunghi periodi di tempo.
14. Per tutte le riparazioni rivolgersi a personale
qualicato. La manutenzione è necessaria quando
l'apparecchio è danneggiato in qualsiasi modo, come
danneggiamento del cavo di alimentazione o della spina,
versamento di liquido o oggetti caduti nell'apparecchio,
se l'apparecchio è stato esposto a pioggia o umidità, se
non funziona normalmente o è caduto.
15. L'apparecchio deve essere collegato a una presa di
corrente elettrica con messa a terra di protezione.
16. Se la spina o una presa del dispositivo è utilizzata
come dispositivo di disconnessione, deve essere
facilmente utilizzabile.
17. Smaltimento corretto di
questo prodotto: questo simbolo
indica che questo dispositivo non
deve essere smaltito insieme
ai riuti domestici, secondo
la Direttiva RAEE (2012/19 /
UE) e la vostra legislazione
nazionale. Questo prodotto deve essere portato in un
centro di raccolta autorizzato per il riciclaggio di riuti
di apparecchiature elettriche ed elettroniche (RAEE).
La cattiva gestione di questo tipo di riuti potrebbe avere
un possibile impatto negativo sull'ambiente e sulla salute
umana a causa di sostanze potenzialmente pericolose
che sono generalmente associate alle apparecchiature
elettriche ed elettroniche. Nello stesso tempo la vostra
collaborazione al corretto smaltimento di questo prodotto
contribuirà all'utilizzo eciente delle risorse naturali. Per
ulteriori informazioni su dove è possibile trasportare le
apparecchiature per il riciclaggio vi invitiamo a contattare
l'ucio comunale locale o il servizio di raccolta dei
riuti domestici.
18. Non installare in uno spazio ristretto, come in una
libreria o in una struttura simile.
19. Non collocare sul dispositivo fonti di amme libere,
come candele accese.
7
considerazione gli aspetti ambientali. Le batterie devono
essere smaltite in un punto di raccolta delle batterie
esauste.
21. Questo apparecchio può essere usato in climi
tropicali e temperati no a 45°C.
DISCLAIMER LEGALE
Music Tribe non si assume alcuna responsabilità per
eventuali danni che possono essere subiti da chiunque
si adi in tutto o in parte a qualsiasi descrizione,
fotograa o dichiarazione contenuta qui. Speciche
tecniche, aspetti e altre informazioni sono soggette
a modiche senza preavviso. Tutti i marchi sono di
proprietà dei rispettivi titolari. Midas, Klark Teknik,
Lab Gruppen, Lake, Tannoy, Turbosound, TC Electronic,
TC Helicon, Behringer, Bugera, Oberheim, Auratone e
Global Brands Ltd. © Music Tribe Global Brands Ltd.
2021 Tutti i diritti riservati .
GARANZIA LIMITATA
Per i termini e le condizioni di garanzia applicabili e le
informazioni aggiuntive relative alla garanzia limitata
di Music Tribe, consultare online i dettagli completi su
musictribe.com/warranty.
Page 8
8
PRO MIXER SERIES VMX1000USB/VMX300USB/VMX200USB/VMX100USB
9. Maak de veiligheid waarin door de polarisatie-
van de natuurlijke hulpbronnen. Voormeer informatie
spanning dat ze een risico vormen voor elektrische
schokken. Gebruik uitsluitend kwalitatief hoogwaardige,
in de handel verkrijgbare luidsprekerkabels die
voorzien zijn van ¼"TS stekkers. Laat uitsluitend
gekwaliceerd personeel alle overige installatie- of
modicatiehandelingen uitvoeren.
Wijvragen u dringend de handleiding te lezen.
anders bestaat er gevaar voor een elektrische schok.
Het apparaat bevat geen te onderhouden onderdelen.
Reparatiewerkzaamheden mogen uitsluitend door
gekwaliceerd personeel uitgevoerd worden.
voorkomen dat dit apparaat wordt blootgesteld aan regen
en vocht. Het apparaat mag niet worden blootgesteld aan
neerdruppelend of opspattend water en er mogen geen
met water gevulde voorwerpen – zoals een vaas – op het
apparaat worden gezet.
onderhoudspersoneel. Omelektrische schokken te
voorkomen, mag u geen andere onderhoudshandelingen
verrichten dan in de bedieningsinstructies vermeld staan.
Reparatiewerkzaamheden mogen alleen uitgevoerd
worden door gekwaliceerd onderhoudspersoneel.
1. Lees deze voorschriften.
2. Bewaar deze voorschriften.
3. Neem alle waarschuwingen in acht.
4. Volg alle voorschriften op.
5. Gebruik dit apparaat niet in de buurt van water.
6. Reinig het uitsluitend met een droge doek.
7. Let erop geen van de ventilatie-openingen
te bedekken. Plaats en installeer het volgens de
voor- schriften van de fabrikant.
8. Het apparaat mag niet worden geplaatst in de buurt
van radiatoren, warmte-uitlaten, kachels of andere zaken
(ook versterkers) die warmte afgeven.
Belangrijke
veiligheidsvoorschriften
Waarschuwing
Aansluitingen die gemerkt zijn met
het symbool voeren een zodanig hoge
Dit symbool wijst u altijd op belangrijke
bedienings - en onderhoudsvoorschriften
in de bijbehorende documenten.
Attentie
Verwijder in geen geval de bovenste
afdekking (van het achterste gedeelte)
Attentie
Om het risico op brand of elektrische
schokken te beperken, dient u te
Attentie
Deze onderhoudsinstructies zijn
uitsluitend bedoeld voor gekwaliceerd
of aardingsstekker wordt voorzien, niet ongedaan.
Eenpolarisatiestekker heeft twee bladen, waarvaner
een breder is dan het andere. Een aardingsstekker heeft
twee bladen en een derde uitsteeksel voor de aarding.
Het bredere blad of het derde uitsteeksel zijn er voor
uw veiligheid. Mocht de geleverde stekker niet in uw
stopcontact passen, laat het contact dan door een
elektricien vervangen.
10. Om beschadiging te voorkomen, moet de
stroomleiding zo gelegd worden dat er niet kan worden
over gelopen en dat ze beschermd is tegen scherpe
kanten. Zorg zeker voor voldoende bescherming aan de
stekkers, de verlengkabels en het punt waar het netsnoer
het apparaat verlaat.
11. Het toestel met altijd met een intacte aarddraad aan
het stroomnet aangesloten zijn.
12. Wanneer de stekker van het hoofdnetwerk of een
apparaatstopcontact de functionele eenheid voor het
uitschakelen is, dient deze altijd toegankelijk te zijn.
13. Gebruik uitsluitend door de producent
gespeci- ceerd toebehoren c.q. onderdelen.
Bij gebruik van een wagen dient men voorzichtig te zijn bij
het verrijden van de combinatie wagen/apparaat en letsel
door vallen te voorkomen.
15. Bij onweer en als u het apparaat langere tijd niet
gebruikt, haalt u de stekker uit het stopcontact.
16. Laat alle voorkomende reparaties door vakkundig en
bevoegd personeel uitvoeren. Reparatiewerk-zaamheden
zijn nodig als het toestel op enige wijze beschadigd is
geraakt, bijvoorbeeld als de hoofd-stroomkabel of -stekker
is beschadigd, als er vloeistof of voorwerpen in terecht
zijn gekomen, als het aan regen of vochtigheid heeft
bloot-gestaan, niet normaal functioneert of wanneer het
is gevallen.
17. Correcte afvoer van dit
product: dit symbool geeft aan
dat u dit product op grond van
de AEEA-richtlijn (2012/19/EU)
en de nationale wetgeving van
uw land niet met het gewone
huishoudelijke afval mag
weggooien. Dit product moet na aoop van de nuttige
levensduur naar een ociële inzamelpost voor afgedankte
elektrische en elektronische apparatuur (AEEA) worden
gebracht, zodat het kan worden gerecycleerd. Vanwege
de potentieel gevaarlijke stoen die in elektrische en
elektronische apparatuur kunnen voorkomen, kan een
onjuiste afvoer van afval van het onderhavige type
een negatieve invloed op het milieu en de menselijke
gezondheid hebben. Eenjuiste afvoer van dit product is
echter niet alleen beter voor het milieu en de gezondheid,
maar draagt tevens bij aan een doelmatiger gebruik
over de plaatsen waar u uw afgedankte apparatuur kunt
inleveren, kunt u contact opnemen met uw gemeente of
de plaatselijkereinigingsdienst.
18. Installeer niet in een kleine ruimte, zoals een
boekenkast of iets dergelijks.
19. Plaats geen open vlammen, zoals brandende
kaarsen, op het apparaat.
20. Houd rekening met de milieuaspecten van het
afvoeren van batterijen. Batterijen moeten bij een
inzamelpunt voor batterijen worden ingeleverd.
21. Dit apparaat kan worden gebruikt in tropische en
gematigde klimaten tot 45 ° C.
WETTELIJKE ONTKENNING
Music Tribe aanvaardt geen aansprakelijkheid voor enig
verlies dat kan worden geleden door een persoon die
geheel of gedeeltelijk vertrouwt op enige beschrijving,
foto of verklaring hierin. Technische specicaties,
verschijningen en andere informatie kunnen zonder
voorafgaande kennisgeving worden gewijzigd. Alle
14. Gebruik het apparaat
uitsluitend in combinatie
met de wagen, hetstatief,
de driepoot, de beugel of
tafel die door de producent
is aangegeven, of die
in combinatie met het
apparaat wordt verkocht.
handelsmerken zijn eigendom van hun respectievelijke
eigenaren. Midas, Klark Teknik, Lab Gruppen, Lake,
Tannoy, Turbosound, TC Electronic, TC Helicon, Behringer,
Bugera, Oberheim, Auratone en Coolaudio zijn
handelsmerken of gedeponeerde handelsmerken van
Music Tribe Global Brands Ltd. © Music Tribe Global
Brands Ltd. 2021 Alle rechten voorbehouden.
BEPERKTE GARANTIE
Voor de toepasselijke garantievoorwaarden en
aanvullende informatie met betrekking tot de beperkte
garantie van Music Tribe, zie de volledige details online
op musictribe.com/warranty.
Page 9
Quick Start Guide
9
10. Förlägg elkabeln så, att det inte är möjligt att
nns här. Tekniska specikationer, utseenden och annan
Auratone och Coolaudio är varumärken eller registrerade
För tillämpliga garantivillkor och ytterligare information
Viktiga
säkerhetsanvisningar
Varning
Uttag markerade med symbolen leder
elektrisk strömstyrka som är tillräckligt
stark för att utgöra en risk för elchock. Använd endast
högkvalitativa, kommersiellt tillgängliga högtalarkablar
med förhandsinstallerade ¼"TS-kontakter. All annan
installering eller modikation bör endast utföras av
kompetent personal.
Den här symbolen hänvisar till viktiga
punkter om användning och underhåll i
den medfölljande dokumentationen.
Varvänlig och läs bruksanvisningen.
Försiktighet
Minska risken för elektriska stötar genom
att aldrig ta av höljet upptill på apparaten
(eller ta av baksidan). Inuti apparaten nns det inga delar
som kan repareras av användaren. Endastkvalicerad
personal får genomföra reparationer.
Försiktighet
För att minska risken för brand och
elektriska stötar ska apparaten skyddas
mot regn och fukt. Apparaten går inte utsättas för
dropp eller spill och inga vattenbehållare som vaser etc.
fårplaceras på den.
Försiktighet
Serviceinstruktionen är enbart avsedd
för kvalicerad servicepersonal. Föratt
undvika risker genom elektriska stötar, genomför inga
reparationer på apparaten, vilka inte är beskrivna i
bruksanvisningen. Endast kvalicerad fackpersonal får
genomföra reparationerna.
1. Läs dessa anvisningar.
2. Spara dessa anvisningar.
3. Beakta alla varningar.
4. Följ alla anvisningar.
5. Använd inte apparaten i närheten av vatten.
6. Rengör endast med torr trasa.
7. Blockera inte ventilationsöppningarna.
Installeraenligt tillverkarens anvisningar.
8. Installera aldrig intill värmekällor som
värme- element, varmluftsintag, spisar eller annan
utrustning som avger värme (inklusive förstärkare).
9. Ändra aldrig en polariserad eller jordad kontakt.
Enpolariserad kontakt har två blad – det ena bredare än
det andra. En jordad kontakt har två blad och ett tredje
jordstift. Det breda bladet eller jordstiftet är till för din
säkerhet. Omden medföljande kontakten inte passar i ditt
uttag, skadu kontakta en elektriker för att få uttaget bytt.
trampa på den och att den är skyddad mot skarpa kanter
och inte kan skadas. Ge i synnerhet akt på områdena
omkring stickkontakterna, förlängningskablarna
och på det ställe, där elkabeln lämnar apparaten,
ärtillräckligtskyddade.
11. Apparaten måste alltid vara ansluten till elnätet
med intakt skyddsledare.
12. Om huvudkontakten, eller ett apparatuttag,
fungerar som avstängningsenhet måste denna alltid
varatillgänglig.
13. Använd endast tillkopplingar och tillbehör som
angetts av tillverkaren.
14. Använd endast
med vagn, stativ, trefot,
hållareeller bord som
angetts av tillverkaren,
ellersom sålts tillsammans med apparaten.
Om du använder en
vagn, var försiktig, när du
föryttar kombinationen vagn-apparat, för att förhindra
olycksfall genom snubbling.
15. Dra ur anslutningskontakten und åskväder eller när
apparaten inte ska användas under någon längre tid.
16. Låt kvalicerad personal utföra all service. Serviceär
nödvändig när apparaten har skadats, t.ex.när en elkabel
eller kontakt är skadad, vätska eller främmande föremål
har kommit in i apparaten, eller när den har fallit i golvet.
17. Kassera produkten på rätt
sätt: den här symbolen indikerar
att produkten inte ska kastas i
hushållssoporna, enligt WEEE
direktivet (2012/19/EU) och
gällande, nationell lagstiftning.
Produkten ska lämnas till ett
auktoriserat återvinningsställe för elektronisk och
elektrisk utrustning (EEE). Om den här sortens avfall
hanteras på fel sätt kan miljön, och människors hälsa,
påverkas negativt på grund av potentiella risksubstanser
som ofta associeras med EEE. Avfallshanteras produkten
däremot på rätt sätt bidrar detta till att naturens
resurser används på ett bra sätt. Kontakta kommun,
ansvarig förvaltning eller avfallshanteringsföretag för
mer information om återvinningscentral där produkten
kanlämnas
18. Installera inte i ett trångt utrymme,
t.ex. i en bokhylsa eller liknande enhet.
19. Placera inte källor med öppen eld, t.ex. tända ljus,
på apparaten.
20. Tänk på miljöaspekterna vid kassering av batterier.
Batterier måste kasseras på ett batteriuppsamlingsställe.
21. Denna apparat kan användas i tropiska och måttliga
klimat upp till 45 ° C.
FRISKRIVNINGSKLAUSUL
Music Tribe tar inget ansvar för någon förlust som kan
drabbas av någon person som helt eller delvis förlitar
sig på någon beskrivning, fotogra eller uttalande som
information kan ändras utan föregående meddelande.
Alla varumärken tillhör respektive ägare. Midas,
Klark Teknik, Lab Gruppen, Lake, Tannoy, Turbosound,
TC Electronic, TC Helicon, Behringer, Bugera, Oberheim,
varumärken som tillhör Music Tribe Global Brands Ltd.
© Music Tribe Global Brands Ltd. 2021 Alla Rättigheter
reserverade.
BEGRÄNSAD GARANTI
om Music Tribes begränsade garanti, se fullständig
information online på musictribe.com/warranty.
Page 10
10
PRO MIXER SERIES VMX1000USB/VMX300USB/VMX200USB/VMX100USB
8. Nie stawiać urządzenia w pobliżu źródeł ciepła
zdrowie człowieka z powodu potencjalnych substancji
prawidłową utylizację niniejszego produktu przyczynia się
napięcie elektryczne, aby stworzyć ryzyko porażenia
prądem. Używaj wyłącznie wysokiej jakości fabrycznie
przygotowanych kabli z zainstalowanymi wtyczkami
¼"TS. Wszystkie inne instalacje lub modykacje powinny
być wykonywane wyłącznie przez wykwalikowany
personel techniczny.
dokumentacji. Proszę przeczytać stosowne informacje w
instrukcji obsługi.
zdejmowania obudowy lub tylnej ścianki urządzenia.
Elementy znajdujące się we wnętrzu urządzenia nie mogą
być naprawiane przez użytkownika. Naprawy mogą być
wykonywane jedynie przez wykwalikowanypersonel.
urządzenia nie wolno wystawiać go na działanie deszczu
i wilgotności oraz dopuszczać do tego, aby do wnętrza
dostała się woda lub inna ciecz. Nie należy stawiać na
urządzeniu napełnionych cieczą przedmiotów takich jak
np. wazony lub szklanki.
W celu uniknięcia zagrożenia porażenia prądem nie należy
wykonywać żadnych manipulacji, które nie są opisane
w instrukcji obsługi. Naprawywykonywane mogą być
jedynie przez wykwalikowany personeltechniczny.
1. Proszę przeczytać poniższe wskazówki.
2. Proszę przechowywać niniejszą instrukcję.
3. Należy przestrzegać wszystkich wskazówek
ostrzegawczych.
4. Należy postępować zgodnie z instrukcją obsługi.
5. Urządzenia nie wolno używać w pobliżu wody.
6. Urządzenie można czyścić wyłącznie suchąszmatką.
7. Nie zasłaniać otworów wentylacyjnych.
Wczasie podłączania urządzenia należy przestrzegać
zaleceńproducenta.
Ważne informacje o
bezpieczeństwie
Uwaga
Terminale oznaczone symbolem
przenoszą wystarczająco wysokie
Ten symbol informuje o ważnych
wskazówkach dotyczących obsługi i
konserwacji urządzenia w dołączonej
Uwaga
W celu wyeliminowania zagrożenia
porażenia prądem zabrania się
Uwaga
W celu wyeliminowania zagrożenia
porażenia prądem lub zapalenia się
Uwaga
Prace serwisowe mogą być wykonywane
jedynie przez wykwalikowany personel.
takich, jak grzejniki, piece lub urządzenia produkujące
ciepło (np. wzmacniacze).
9. W żadnym wypadku nie należy usuwać
zabezpieczeń z wtyczek dwubiegunowych oraz wtyczek
z uziemieniem. Wtyczka dwubiegunowa posiada
dwa wtyki kontaktowe o różnej szerokości. Wtyczka z
uziemieniem ma dwa wtyki kontaktowe i trzeci wtyk
uziemienia. Szerszy wtyk kontaktowy lub dodatkowy
wtyk uziemienia służą do zapewnienia bezpieczeństwa
użytkownikowi. Jeśli format wtyczki urządzenia nie
odpowiada standardowi gniazdka, proszę zwrócić się do
elektryka z prośbą o wymienienie gniazda.
10. Kabel sieciowy należy ułożyć tak, aby nie był
narażony na deptanie i działanie ostrych krawędzi, co
mogłoby doprowadzić do jego uszkodzenia. Szczególną
uwagę zwrócić należy na odpowiednią ochronę miejsc w
pobliżu wtyczek i przedłużaczy oraz miejsce, w którym
kabel sieciowy przymocowany jest do urządzenia.
11. Urządzenie musi być zawsze podłączone do sieci
sprawnym przewodem z uziemieniem.
12. Jeżeli wtyk sieciowy lub gniazdo sieciowe w
urządzeniu pełnią funkcję wyłącznika, to muszą one być
zawsze łatwo dostępne.
13. Używać wyłącznie sprzętu dodatkowego i
akcesoriów zgodnie z zaleceniami producenta.
posługiwania się wózkiem należy zachować szczególną
ostrożność w trakcie przewożenia zestawu, aby uniknąć
niebezpieczeństwa potknięcia się i zranienia.
15. W trakcie burzy oraz na czas dłuższego nieużywania
urządzenia należy wyjąć wtyczkę z gniazdka sieciowego.
16. Wykonywanie wszelkich napraw należy zlecać
jedynie wykwalikowanym pracownikom serwisu.
Przeprowadzenie przeglądu technicznego staje się
konieczne, jeśli urządzenie zostało uszkodzone w
jakikolwiek sposób (dotyczy to także kabla sieciowego
lub wtyczki), jeśli do wnętrza urządzenia dostały się
przedmioty lub ciecz, jeśli urządzenie wystawione było
na działanie deszczu lub wilgoci, jeśli urządzenie nie
funkcjonuje poprawnie oraz kiedy spadło na podłogę.
17. Prawidłowa utylizacja
produktu: Ten symbol wskazuje,
że tego produktu nie należy
wyrzucać razem ze zwykłymi
odpadami domowymi,
tylko zgodnie z dyrektywą
w sprawie zużytego sprzętu
elektrycznego i elektronicznego (WEEE) (2012/19/EU)
oraz przepisami krajowymi. Niniejszy produkt należy
przekazać do autoryzowanego punktu zbiórki zużytego
sprzętu elektrycznego i elektronicznego. Niewłaściwe
postępowanie z tego typu odpadami może wywołać
szkodliwe działanie na środowisko naturalnej i
niebezpiecznych zaliczanych jako zużyty sprzęt
elektryczny i elektroniczny. Jednocześnie, Twój wkład w
do oszczędnego wykorzystywania zasobów naturalnych.
Szczegółowych informacji o miejscach, w których można
oddawać zużyty sprzęt do recyklingu, udzielają urzędy
miejskie, przedsiębiorstwa utylizacji odpadów lub
najbliższy zakład utylizacji odpadów.
18. Nie instaluj w ograniczonej przestrzeni, takiej jak
półka na książki lub podobny zestaw.
19. Nie stawiaj na urządzeniu źródeł otwartego ognia,
takich jak zapalone świece.
20. Należy pamiętać o środowiskowych aspektach
utylizacji baterii. Baterie należy utylizować w punkcie
zbiórki baterii.
21. To urządzenie może być używane w klimacie
tropikalnym i umiarkowanym do 45 ° C.
ZASTRZEŻENIA PRAWNE
Music Tribe nie ponosi odpowiedzialności za
jakiekolwiek straty, które mogą ponieść osoby, które
polegają w całości lub w części na jakimkolwiek opisie,
fotograi lub oświadczeniu zawartym w niniejszym
dokumencie. Specykacje techniczne, wygląd i inne
14. Używać
jedynie zalecanych
przez producenta
lub znajdujących
się w zestawie
wózków, stojaków,
statywów, uchwytów
i stołów. Wprzypadku
informacje mogą ulec zmianie bez powiadomienia.
Wszystkie znaki towarowe są własnością ich
odpowiednich właścicieli. Midas, Klark Teknik,
Lab Gruppen, Lake, Tannoy, Turbosound, TC Electronic,
TC Helicon, Behringer, Bugera, Oberheim, Auratone i
Coolaudio są znakami towarowymi lub zastrzeżonymi
znakami towarowymi rmy Music Tribe Global Brands
Ltd. © Music Tribe Global Brands Ltd. 2021 Wszystkie
prawa zastrzeżone.
OGRANICZONA GWARANCJA
Aby zapoznać się z obowiązującymi warunkami
gwarancji i dodatkowymi informacjami dotyczącymi
ograniczonej gwarancji Music Tribe, zapoznaj się ze
wszystkimi szczegółami w trybie online pod adresem
musictribe.com/warranty.
Page 11
Quick Start Guide
11
Page 12
12
PRO MIXER SERIES VMX1000USB/VMX300USB/VMX200USB/VMX100USB
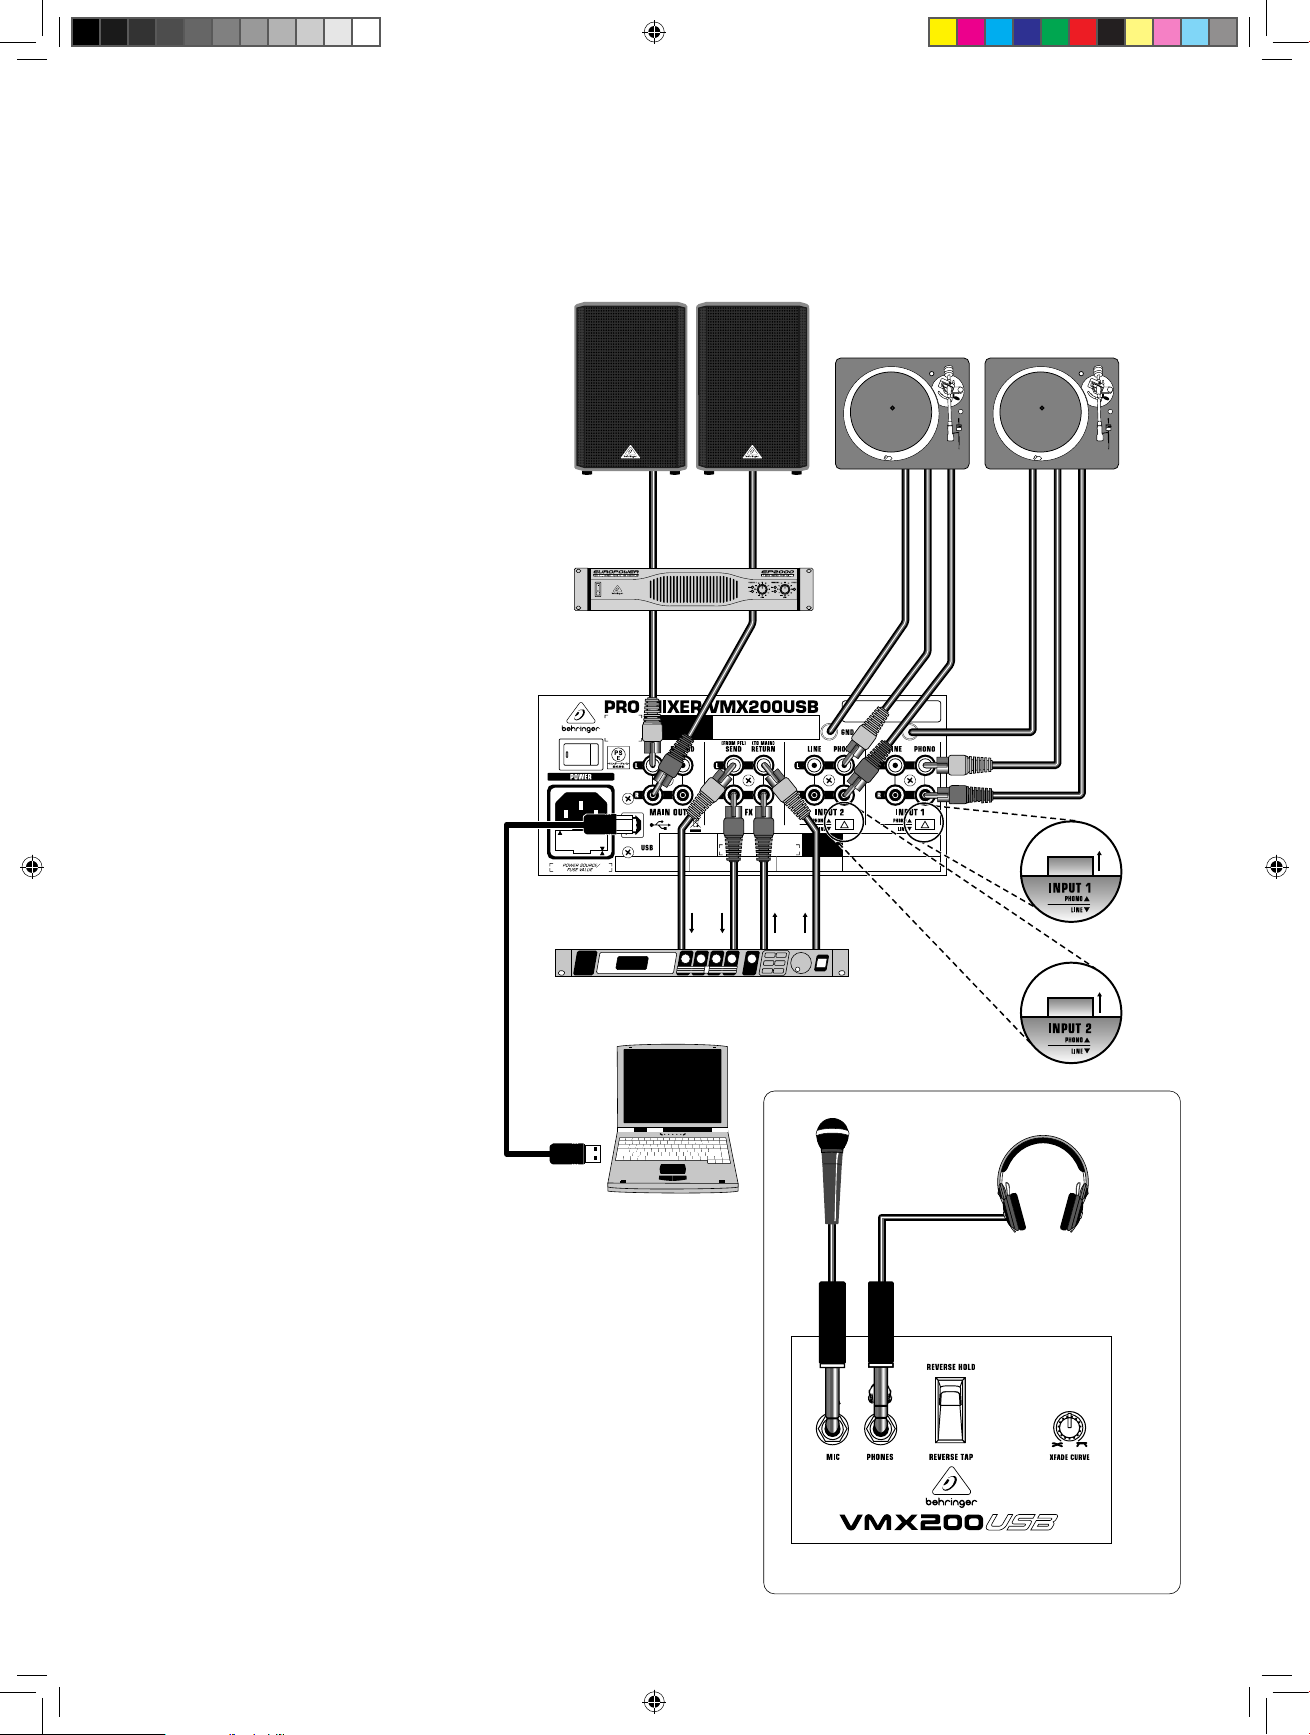
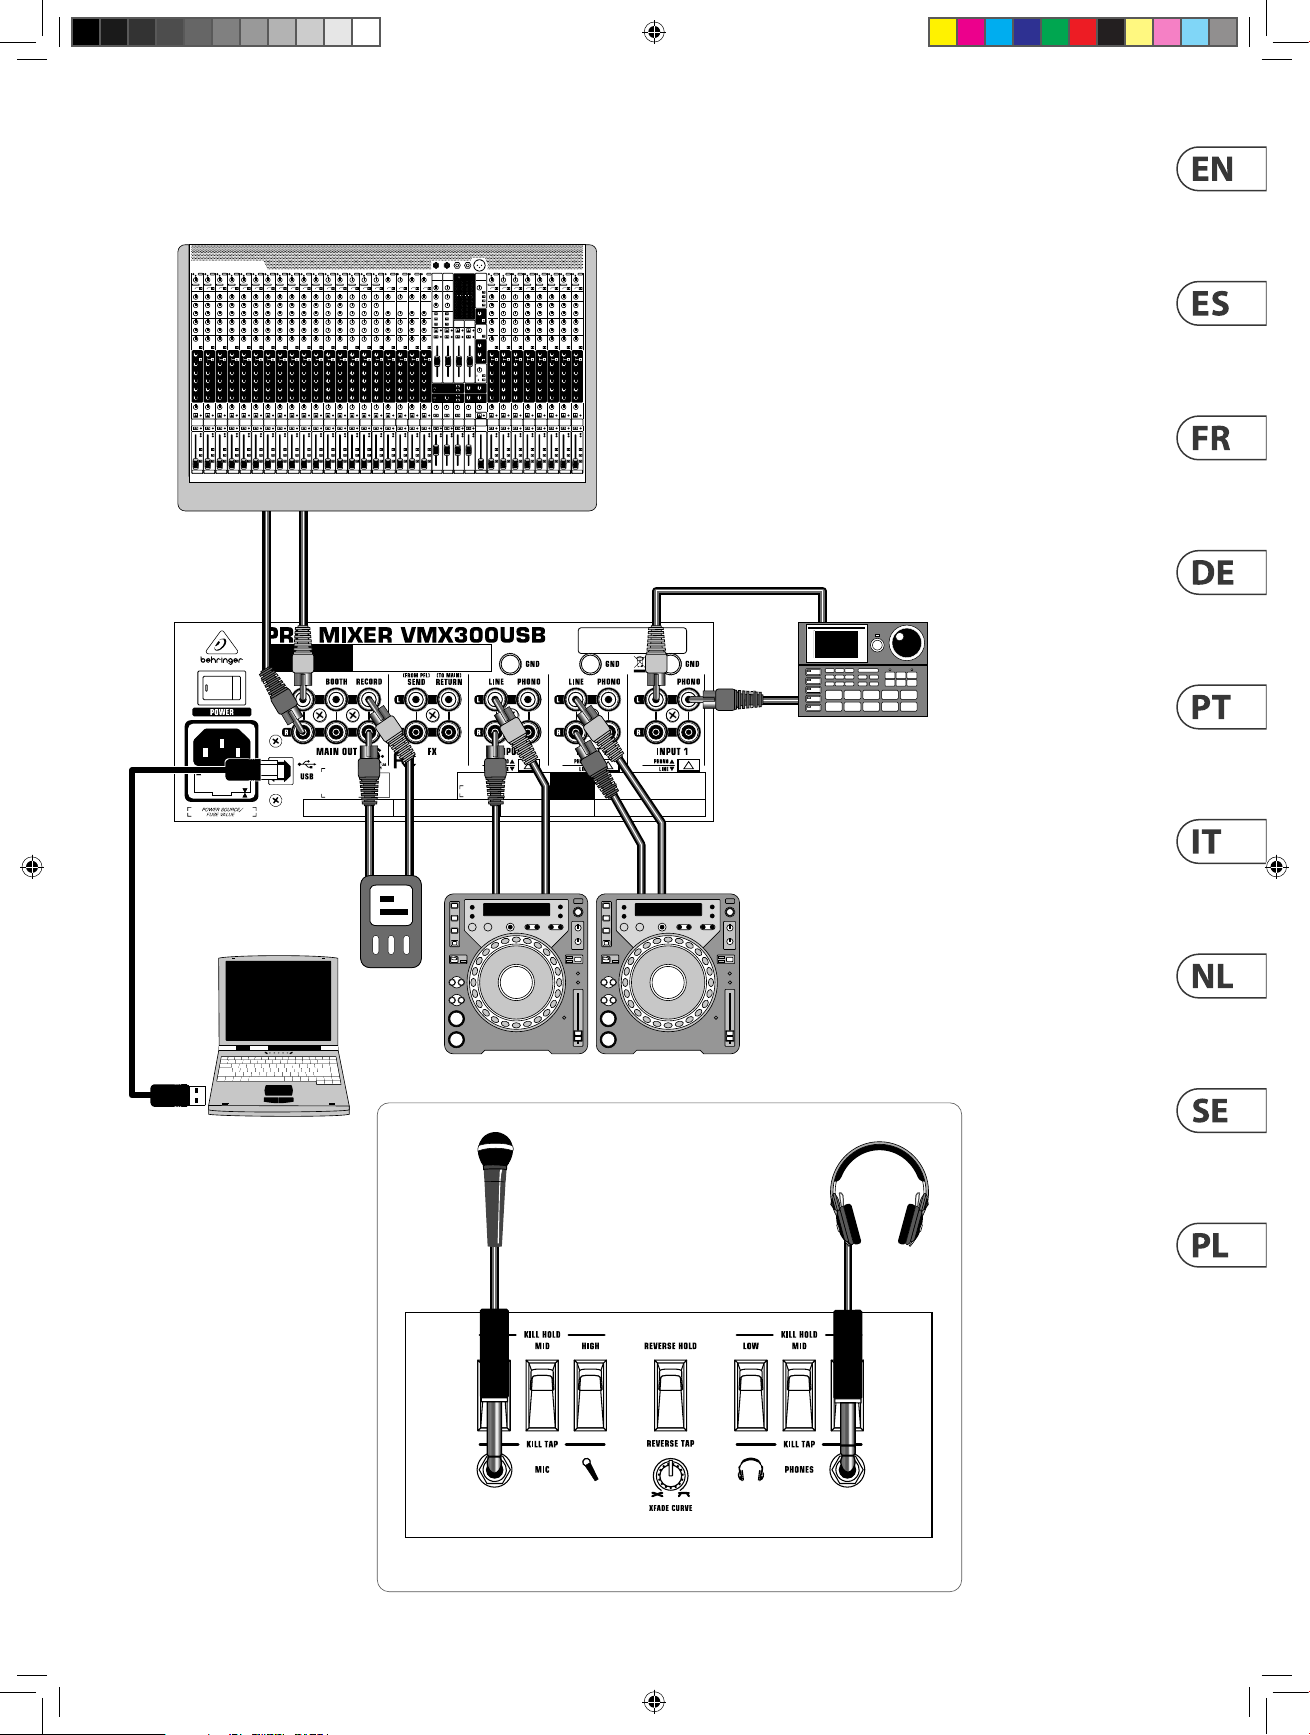
PRO MIXER SERIES VMX1000USB/VMX300USB/VMX200USB/VMX100USB Hook-up
Step 1: Hook-Up
(EN)
Paso 1: Conexión
(ES)
Etape 1 : Connexions
(FR)
Schritt 1: Verkabelung
(DE)
Passo 1: Conexões
(PT)
Passo 1: Collegamento
(IT)
Passo 1: Allacciare
(NL)
VP1520
EP2000
Turntable
VMX200USB
Steg.1: Anslutning
(SE)
Krok 1: Podłączeni
(PL)
VMX200USB
REAR Panel
FX2000
XM8500 HPX4000
Laptop
VMX200USB FRONT Panel
Page 13
Quick Start Guide
XL3200
13
VMX300USB
VMX 300USB
REAR Panel
Laptop
Drum
Machine
L
R
Club sound system
CDJ
XM8500
HPX4000
VMX300USB FRONT Panel
Page 14

14
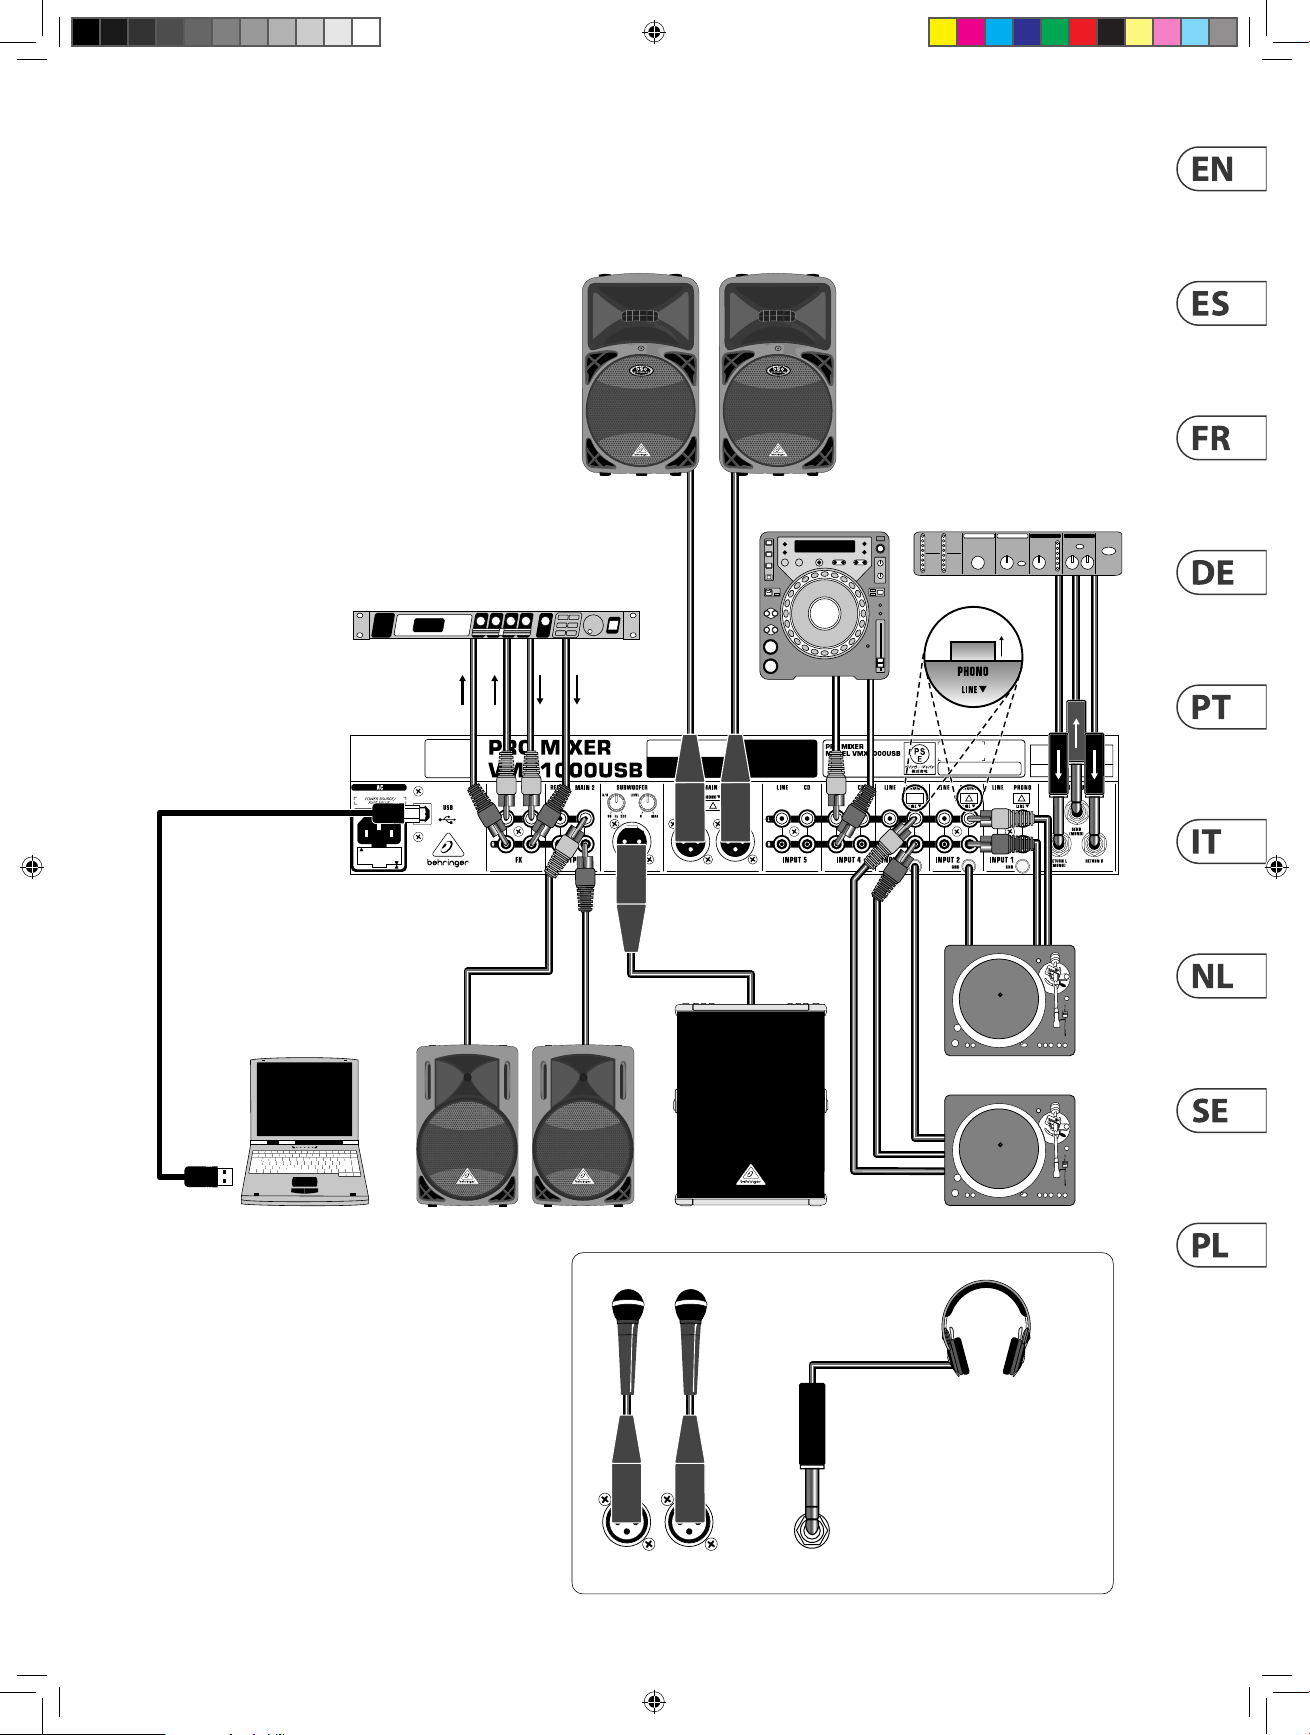
PRO MIXER SERIES VMX1000USB/VMX300USB/VMX200USB/VMX100USB
PRO MIXER SERIES VMX1000USB/VMX300USB/VMX200USB/VMX100USB Hook-up
Step 1: Hook-Up
(EN)
Paso 1: Conexión
(ES)
Etape 1 : Connexions
(FR)
Schritt 1: Verkabelung
(DE)
Passo 1: Conexões
(PT)
Passo 1: Collegamento
(IT)
Passo 1: Allacciare
(NL)
Steg.1: Anslutning
(SE)
Krok 1: Podłączeni
(PL)
Page 15
Quick Start Guide
B1800D-PRO
B212D
FX2000
Laptop
B315D
FEX800
CDJ
Turntable
PHONES
HPX4000
MIC 1 MIC 2
XM8500
VMX1000USB
15
Page 16
16
PRO MIXER SERIES VMX1000USB/VMX300USB/VMX200USB/VMX100USB
PRO MIXER SERIES VMX1000USB/VMX300USB/VMX200USB/VMX100USB Controls
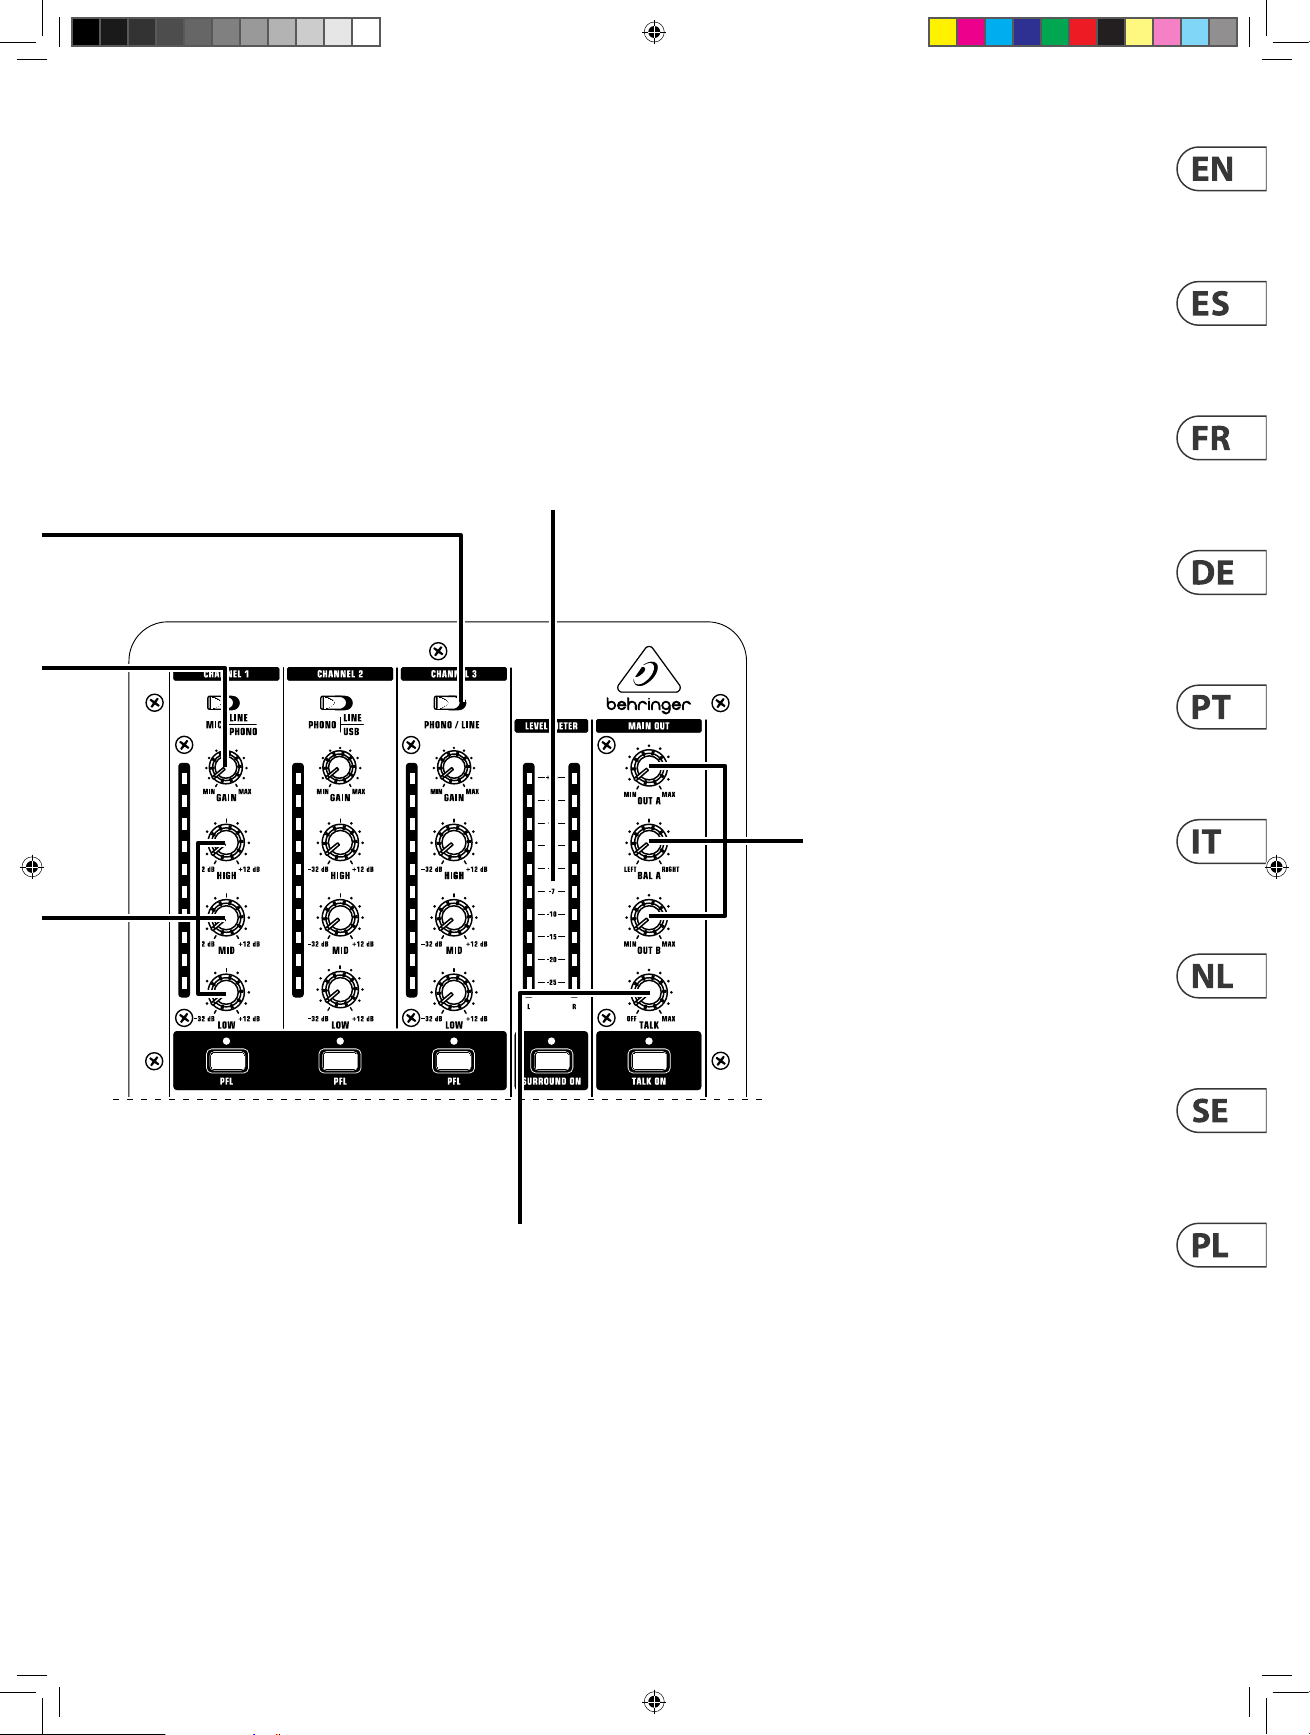
Step 2: Controls
(EN)
PHONO/LINE switch sele cts
Paso 2: Controles
(ES)
Etape 2 : Réglages
(FR)
Schritt 2:
(DE)
Bedienelemente
Passo 2: Controles
(PT)
the channe l’s audio source.
El interr uptor PHONO/LINE
elige la fu ente audio del canal.
Le sélec teur PHONO/LINE
vous perm et de choisir
l'entrée ligne ou phono.
Mit dem
PHONO/LINE-Schalter kann
die Audioq uelle des Kanals
ausgewählt werden.
O interru ptor PHONO/LINE
selecio na a fonte de áudio.
PHONO/LINE interruttore per
selezio nare la sorgente aud io
del canale.
PHONO / LIJN schakelaar
selec teert de audiob ron van
het kanaal.
PHONO / LINE välj kanalens
ljudkälla.
PHONO / LINE przełącznik
wybiera źródło dźwięku
kanału.
Passo 2: Controlli
(IT)
Stap 2: Bediening
(NL)
Steg 2: Kontrolle
(SE)
Krok 2: Sterowani
(PL)
GAIN knob adju sts the input
signal level.
El mando GAIN aj usta el nivel
de señal de en trada.
Le bouton de G AIN détermine
le niveau du signal d'entrée.
EQ knobs adju st the high, mid
(VMX30 0/VMX1000), and low
freque ncies of the channe l by
-32 dB or up to +12 dB.
Los mandos EQ aj ustan las
frecuencias agudas, medias
(VMX30 0/VMX1000) y graves
entre -32 dB y +12 dB.
Les bouto ns EQ
atténue nt de -32 dB et
accentuen t de +12 dB les
fréquences hautes, médiums
(VMX30 0/VMX1000),
et basse s de la voie.
Mit den EQ-D rehknöpfen
können die Ka nalpegel
der Hoch-, Mi ttel(VMX30 0/VMX1000) und
Niederfrequenzen im Bereich
zwisc hen -32 dB und +12 dB
justiert werden.
Mit dem GAIN-D rehknopf
kann der Eingangssignalpegel
justiert werden.
O botão giratório GAIN ajusta
o nível do sina l de saída.
GAIN - manopol a per regolare
il livello de l segnale in
ingresso.
O botão giratório EQ ajusta
as frequências alta, média
(VMX30 0/VMX1000) e baixa
do canal a -32 dB ou até
+12 dB.
EQ manopole p er regolare
le frequ enze alte, medie
(VMX30 0/VMX1000) e basse
del canale d a -32dB no a
+12 dB.
EQ knoppen p assen de
hoge, midd en- (VMX300 /
VMX1000) en lage f requenties
van het kana al aan met -32 dB
of tot +12 dB.
KRIJGEN knop pas t het
ingangssignaalniveau aan.
FÅ ratten justerar insignalens
nivå.
ZDOBYĆ Pokrętło reguluje
poziom sygnału wejściowego.
EQ knapparna justerar
kanalens höga, mitten
(VMX300 / VMX1000) och
låga frekvenser med -32 dB
eller upp till +12 dB.
EQ Pokrętła regulują wysokie,
średnie ( VMX300 / VMX1000) i
niskie c zęstotliwości k anału o
-32 dB lub do +12 dB.
Page 17
Quick Start Guide
17
LEVEL METER displays t he
MAIN OUT sign al level on the
VMX300/ VMX1000. Press
the MAIN/PF L button on the
VMX100/VMX 200 to select th e
displayed si gnal.
El medidor LEVEL METER le
muestr a el nivel de la señal
MAIN OUT del VM X300/
VMX1000. Pulse e l botón
MAIN/PFL en e l VMX100/
VMX200 p ara elegir la
señal que quiera que
sea visualizada.
L'acheur de niveau LEVEL
METER indique le n iveau
de la sor tie principale MA IN
OUT du VMX30 0/VMX1000.
Appuyez su r la touche MAIN/
PFL du VMX100/VM X200 pour
sélectionner le signal.
LEVEL METER zeigt den M AIN
OUT-Signalpege l bei VMX300/
VMX1000 an. Dr ücken Sie die
MAIN/PFL-Taste bei VMX100/
VMX200, um d as angezeigte
Signal zu wählen.
O LEVEL METER e xibe o
nível do sina l do MAIN OUT
no VMX300/ VMX1000.
Pressio ne o botão MAIN/PFL
no VMX100/VMX 200 para
selecio nar o sinal exibido.
LEVEL METER indicano il
livello del s egnale MAIN
OUT su VMX30 0/VMX1000.
Premete il t asto MAIN/PFL
su VMX100/VMX 200 per
selezio nare il segnale da
visualizzare.
HOOGTE METER g eeft het
MAIN OUT-signaalniveau weer
op de VMX30 0 / VMX1000.
Druk op de M AIN / PFL-knop
op de VMX100 / VMX 200 om
het weerg egeven signaal te
selecteren.
NIVÅ MÄTARE visar MAIN
OUT-signalnivån på
VMX300 / VMX1000. Tryck
på MAIN / PFL-knappen på
VMX100 / VMX200 för att
välja den visade signalen.
MIERNIK POZIOMU
wyśw ietla poziom sygna łu
MAIN OUT na VMX 300 /
VMX1000. Naciś nij przycisk
MAIN / PFL na VMX100
/ VMX200, aby w ybrać
wyświet lany sygnał.
MAIN OUT (LEVEL) k nob
adjust s the volume of
the main out puts. On the
VMX300/ VMX1000, OUT A and
B adjust th e level of the AMP
and BOOTH/M AIN 2 outputs
respec tively. BAL A adjust s
the stere o balance of the
OUT A signal.
El mando MAIN O UT (LEVEL)
le permit e ajustar el volumen
de las salid as principales .
En el VMX30 0/VMX1000, OUT
A y B ajustan e l nivel de las
salidas AM P y BOOTH/MAIN 2,
respec tivamente. BAL A ajus ta
el balance s tereo de la
señal OUT A .
Le bouton M AIN OUT
(LEVEL) détermine le volume
des sor ties générales . Sur
le VMX300/ VMX1000, les
boutons O UT A et B règlent
le niveau de s sorties AMP et
BOOTH/MAIN 2 . Le bouton
BAL A règle l'équ ilibre stéréo
du signal de la s ortie OUT A.
O botão giratório MAIN OUT
(LEVEL) aj usta o volume das
saídas do ma in. No VMX300/
VMX1000, a SAÍDA A e B
ajusta o ní vel do AMP e as
saídas do B OOTH/MAIN 2
respec tivamente. O BAL A
ajusta o e quilíbrio do es téreo
do sinal da SAÍDA A .
MAIN OUT (LEVEL) manopole
per regol are il volume delle
uscite pr incipali. In VMX30 0/
VMX1000, OUT A e B re golano
rispet tivamente il livel lo delle
uscite AM P e BOOTH/MAIN 2.
BAL A regola i l bilanciamento
stereo de l segnale OUT A.
MAIN OUT (NIVEAU) k nop
regelt he t volume van de
belangrijkste uitgangen.
Op de VMX30 0 / VMX1000
passen OU T A en B het
niveau van re spectievelij k
de AMP- en BOOT H / MAIN
2-uitgang en aan. BAL A past
de stereo balans van het OUT
A-signaal aan.
TALK knob adjusts the
volume red uction of the
music when yo u speak into
the microphone, allowing
your voice to b e heard clearly.
Press the TALK (ON) bu tton to
engage the eect.
El mando TAL K le permite
ajustar l a reducción de
volumen que s e producirá
en la música c uando hable o
cante en el mi crófono, lo que
hará que la voz s ea escuchada
con clarid ad. Pulse el botón
TALK (ON) si quiere ac tivar
este efe cto.
Le bouton TA LK détermine
la réduc tion du niveau de la
musique lo rsque vous parle z
dans le micr o, ce qui vous
permet d e vous faire entendr e
claireme nt. Appuyez sur le
bouton TALK (ON) pou r activer
la fonct ion.
Mit dem TALK-Drehknopf kann
die Lautstärkereduktion von
Musik justiert werden, wenn
Sie in das Mikrofon sprechen,
wodurch Ihre Stimme klar
gehört werden kann. Drücken
Sie die TALK (ON)-Taste, um
diesen Eekt zu aktivieren.
O botão giratório TALK ajusta a
redução de volume da música
quando você fala ao microfone,
permitindo que sua voz seja
ouvida claramente. Pressione
o botão TALK (ON) para
acionar o efeito.
TALK manopola per regolare
la riduzione del volume della
musica quando parlate nel
microfono, consentendo
alla voce di essere ascoltata
chiaramente. Premete il tasto
TALK (ON) per attivare l'eetto.
PRATEN regelaar past de
volumevermindering van de
muziek aan wanneer u in de
microfoon spreekt, zodat uw
stem duidelijk te horen is. Druk
op de TALK (ON) -knop om het
eect te activeren.
PRATA ratten juste rar
volymreduceringen av
musiken när du p ratar i
mikrofo nen, så att din rös t
hörs ty dligt. Tryck på TALK
(ON) -knappe n för att akti vera
eekten.
ROZMO WA Pokrętło reguluje
redukcję g łośności muz yki,
gdy mówis z do mikrofonu,
zapewni ając wyraźne
słyszenie głosu. Naciśnij
przyc isk TALK (ON), aby
włączyć efekt.
Mit dem MAIN OU T (LEVEL)Drehkno pf wird die Laut stärke
der Hauptausgänge justiert.
Bei VMX30 0/VMX1000 kann
mit OUT A und B de r Pegel
von AMP- bzw. BO OTH/
MAIN 2-Ausgängen justiert
werden. Mi t BAL A wird
die Stereo -Balance des
OUT A-Signals justiert.
MAIN OUT (NIVÅ) rat ten
justera r volymen på
huvudutgångarna. På
VMX300 / VM X1000 ju sterar
OUT A och B niv ån på AMP
respek tive BOOTH / MAIN 2
utgångar na. BAL A justerar
stereobalansen för OUT
A-signalen.
MAIN OUT (POZIOM)Pok rętło
reguluje głośność głównych
wyjść . W VMX300 / VMX1000,
OUT A i B dosto sowują
odpowiednio poziom wyjść
AMP i BOOTH / MA IN 2. BAL
A reguluje b alans stereo
sygnał u OUT A.
Page 18
18
PRO MIXER SERIES VMX1000USB/VMX300USB/VMX200USB/VMX100USB
PRO MIXER SERIES VMX1000USB/VMX300USB/VMX200USB/VMX100USB Controls
Step 2: Controls
(EN)
Paso 2: Controles
(ES)
Etape 2 : Réglages
(FR)
Schritt 2:
(DE)
Bedienelemente
Passo 2: Controles
(PT)
Passo 2: Controlli
(IT)
Stap 2: Bediening
(NL)
Steg 2: Kontrolle
(SE)
Krok 2: Sterowani
(PL)
TEMPO DIFFERENCE
and TIME OFFSET LEDs
(VMX100/VM X200/VMX30 0)
indicate the dierence
in tempo and b eat
synchronization between
audio sources.
Pilotos TE MPO
DIFFERENC E y TIME OFFSET
(VMX100/VM X200/VMX30 0)
le indica n la diferencia en
tempo y sinc ronización de
beats o tiempos musicales
entre las f uentes audio.
Les Leds TEMP O
DIFFERENC E et TIME OFFSET
(VMX100/VM X200/VMX30 0)
achent la d iérence de
tempo et de s ynchronisati on
entre les s ources audio.
CHANNEL fader adjusts
the channe l volume. The
CURVE switch determines
how abrupt t he change in
volume occurs.
El fader CHANNEL ajus ta
el volumen d el canal. El
interruptor CURVE determina
lo abrupto q ue será el
cambio del volumen.
Le Fader détermine le volume
de sort ie de la VOIE. Le
sélecteur CURVE détermine
la rapididé du changement
de volume.
Die TEMPO DIFFERENCE
und TIME OFFSET-LEDs
(VMX100/VM X200/VMX30 0)
geben die Tempo- und
BeatsynchronisationsDierenz zwischen
Audioquellen an.
O TEMPO DIFFERENCE eTIME
OFFSET LEDs (VMX100/
VMX200/ VMX300) indicam
a diferen ça em ritmo e
sincroni zação da batida en tre
as fontes d e áudio.
Mit dem CHANNEL-Fader
kann die Kan allautstärke
justiert werden. Mit dem
CURVE-Schalter wird
bestim mt, wie abrupt sich d ie
Lautstärke ändert.
O fader CHANNEL ajus ta o
volume do ca nal. O interrupto r
CURVE determina quão
abrupt a será a ocorrência n a
mudança n o volume.
Fader del canale regola
il volume de l canale.
L'interruttore CURVE stabilisce
la quantit à di variazione
delvolume.
TEMPO DIFFERENCE
e TIME OFFSET LEDs
(VMX100/VM X200/VMX30 0)
- indican o la dierenza
in tempo metronomico
sincronizzazione al quarto tra
le sorgen ti audio.
TEMPO VERSCHIL en TIME
OFFSET-leds ( VMX100 /
VMX200 / VM X300) geven
het verschil in tempo en
beat-synchronisatie tussen
audiobronnen aan.
KANAAL fa der past het
kanaalvolume aan. De CURVEschakelaar bepaalt hoe
abrupt de volumeverandering
optreedt.
KANAL fader justerar
kanalvolymen.
CURVE-omkopplaren
bestäm mer hur plötsligt
volymförändringensker.
KANAŁ fader reguluje
głośność kanału. Prze łącznik
CURVE okre śla, jak
gwał towna jest zmiana
głośności.
TEMPO SKILLNAD och
TIME OFFSET LE D (VMX100 /
VMX200 / VM X300) indikerar
skillnaden i tempo och
beat-synkronisering mellan
ljudkällor.
RÓŻNICA TEMPO i diody
LED TIME OFFSE T (VMX100 /
VMX200 / VM X300) wskazują
różnicę w synchronizacji
tempa i tak tu między
źródłami dźwięku.
BEAT COUNTER section
assist s in syncing up the
audio sou rces for smooth
crossf ades. See Get ting
Starte d step 7 for details .
La secci ón BEAT COUNTER
le ayuda a sinc ronizar las
fuentes a udio para crear uno s
fundido s suaves. Vea el paso
7 de la secci ón Puesta en
marcha para más detalles.
CROSSFADER fades bet ween
your sound s ources. Use the
CROSSFADER CURVE knob
to determi ne the slope of
the cros sfade.
El CROSSFADER le permite
realizar u n fundido entre
sus fuent es de sonido. Use
el mando CROSSFADER CURVE
para determinar la pendiente
o curva d e este fundido.
La sec tion BEAT COUNTER
vous aide à sy nchroniser
les sourc es audio pour vous
permet tre de réaliser de s
Crossf ades tout en douceu r.
Consultez l a section de Mis e
en œuvre, ét ape 7, pour de
plus amples détails.
Der BEAT COUNTERAbschnitt hilft dabei,
die Audioquellen für
glatte Überblendungen
zu synchronisieren.
Siehe Eins tieg, Schrit t 7
für Einzelheiten.
Le CROSSFADER eectue un
fondu pro gressif entre le s
sources s onores. Utilise z le
sélecteur CROSSFADER CURVE
pour séle ctionner la for me de
la courbe de f ondu sonore.
Mit dem CROSSFADER wird
zwischen Ihren Tonquellen
überblendet. Benutzen Sie
den CROSSFADER CURVERegler, um die Neigung des
Crossfades zu justieren.
A seção BEAT COUNTER
auxilia na s incronização d as
fontes de áu dio para suavizar
os cross fades. Para mais
detalhe s, consulte o passo
7 do Guia Rápi do.
BEAT COUNTER aiuta a
sincronizzare le sorgenti audio
per dissolvenze incrociate
uide. Per i de ttagli leggete l o
step 7 della G uida rapida.
BEAT TELLER secti e helpt bij
het sync hroniseren van de
audiobronnen voor soepele
crossf ades. Zie Aan de sla g
stap 7 voor d etails.
O CROSSFADER regula entre
as fontes d e som. Use o botão
giratório CROSSFADER CURVE
para determinar a inclinação
do cross fade.
CROSSFADER - sfuma fr a le
vostre s orgenti sonore. Per
stabili re la pendenza del
crossf ade, usate la manopo la
CROSSFADER CURVE.
CROSSFADER verdwijnt
tussen uw geluidsbronnen.
Gebruik d e CROSSFADER
CURVE-knop om de helling
van de cros sfade te bepalen .
SLAGRÄKNARE avsnittet
hjälper ti ll att synkroni sera
ljudkällorna för smidiga
tvär fader. Se Komma igång
steg 7 fö r mer information .
BEAT COUNTER Sekcja
pomaga w synchronizacji
źróde ł dźwięku w celu
pły nnego przejści a.
Szczegółowe informacje
można znale źć w kroku 7
Pierwsze kroki.
CROSSFADER bleknar mell an
dina ljudk ällor. Använd
CROSSFADER CURVE-ratten
för att b estämma lutni ngen
på tvärfaden.
CROSSFADER zanika
między ź ródłami dźw ięku.
Potencjometrem CROSSFADER
CURVE określ nachylenie
przejścia.
Page 19
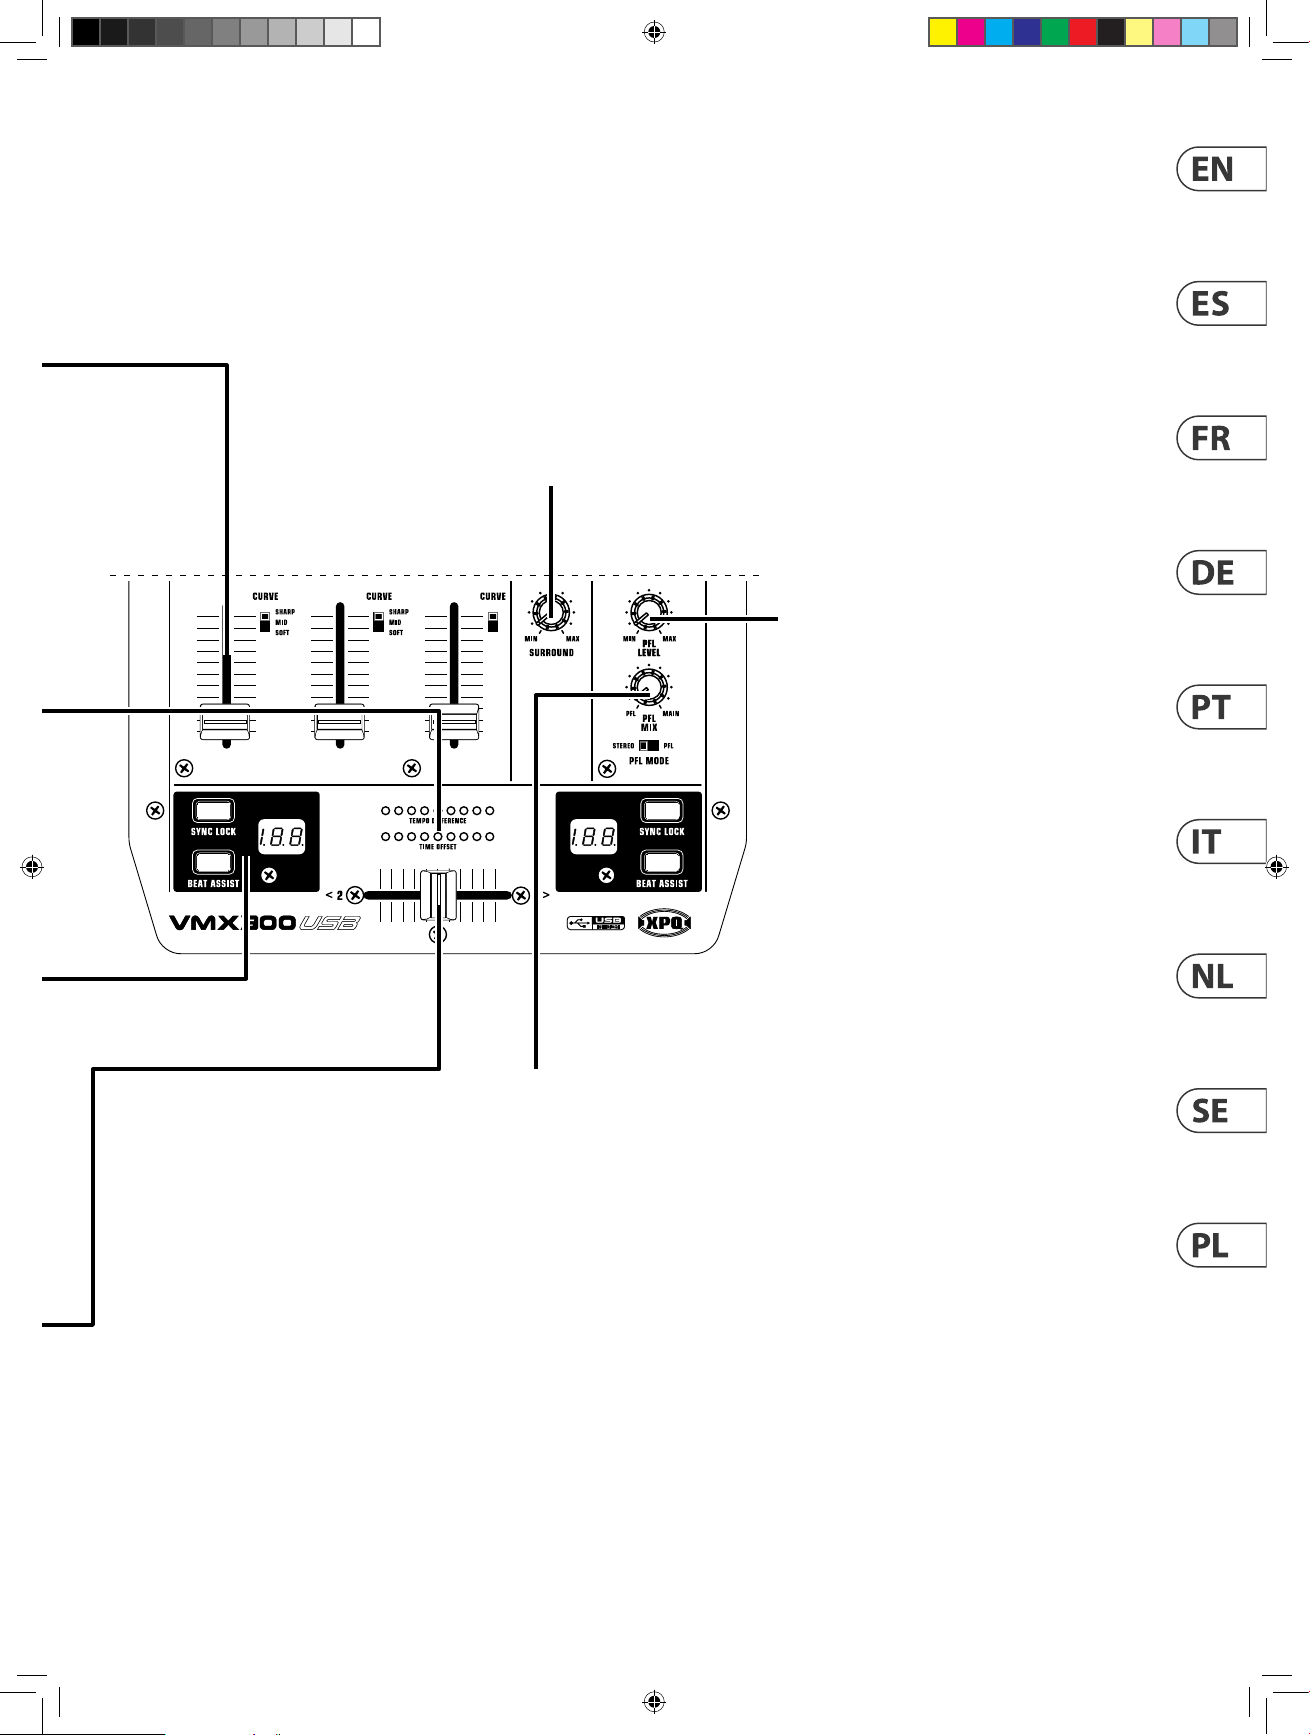
Quick Start Guide
(XPQ) SURROUND kno b
adjust s the amount of stere o
enhanceme nt on the mix.
Press the a djacent button to
activ ate the eect.
El mando (XP Q) SURROUND
ajusta la c antidad de realce
stereo de l a mezcla. Pulse
el botón ad yacente para
activ ar el efecto.
Le bouton ( XPQ) SURROUND
règle l'élargissement stéréo
du mixage. Ap puyez sur
la touche su périeure pour
activer l'eet.
Mit dem (XP Q) SURROUNDDrehkno pf kann der Anteil
der Stereoverstärkung im Mix
justiert werden. Drücken Sie
die benach barte Taste, um
diesen Eekt zu aktivieren.
O botão giratório (XPQ)
SURROUND ajusta a
quantidade da intensicação
do estére o no mix. Pression e o
botão adjacente para acionar
o efeito.
(XPQ) SURROUND mano pola
per regol are la quantità
dell'ampliamento stereo
del mix. Pr emete il tasto
adiacente p er attivare
l'eetto.
(XPQ) SURROUND regelaar
past de ho eveelheid
stereoversterking op
de mix aan. Dr uk op de
aangrenzende knop om het
eect te activeren.
(XPQ) SURROUND
ratten justerar mängden
stereoförbättring på mixen.
Tryck på inti lliggande knapp
för att a ktivera eek ten.
(XPQ) SURRO UND
Pokrętło reguluje stopień
wzmocn ienia stereo na
miksie. Na ciśnij sąsiedni
przyc isk, aby akty wować
efekt.
PFL LEVEL knob (pre-fader
listen) adjus ts the volume
of the headphone mix.
Press the PF L button
(VMX30 0/VMX1000) on each
channel th at you would like to
hear in the PFL m ix.
19
O botão giratório PFL LEVEL
(pre-f ader listen) ajusta
o volume do headphone
mix. Pres sione o botão PFL
(VMX30 0/VMX1000) em cada
Canal em que g ostaria de
ouvir no PFL mix.
PFL MIX kn ob fades betwe en
channels 1 an d 2 on the
VMX100/VMX 200 or between
the PFL and MAIN s ignal on
the VMX30 0/VMX1000. If the
VMX1000's MODE s witch is set
to SPLIT, the signals a re heard
separat ely in the left and
right ear.
El mando PFL MI X realiza un
fundido e ntre los canales 1
y 2 en el VMX100/VM X200 o
entre la señ al PFL y MAIN en el
caso del VM X300/VMX1000.
Si el interr uptor MODE está
ajustad o a la posición SPLIT,
podrá es cuchar las señales p or
separado en el lado izquierdo
y derecho d e los auriculares .
Le bouton PFL MIX opère un
fondu ent re les voies 1 et 2
sur le VMX100/VM X200 ou
entre le sig nal PFL et MAIN
sur le VMX30 0/VMX1000. Si le
sélec teur MODE est sur SPLIT,
les signau x sont séparés dans
les écout eurs gauche et dro it
du casque.
Mit dem PFL MI X-Drehknopf
wird zwischen den Kanälen
1 und 2 bei VMX100/
VMX200 o der zwischen dem
PFL- und dem MAIN-Signal
bei VMX30 0/VMX1000
überblendet. Falls der MODESchalter a uf SPLIT gesetz t
ist, werden die Signale im
linken und im rechten Ohr
getrennt gehört.
O botão giratório PFL MIX
regula ent re os canais 1 e 2 no
VMX100/VMX 200 ou entre o
sinal PFL e MAIN n o VMX300/
VMX1000. Se o inte rruptor
MODE esti ver ajustado par a
SPLIT, os sinais ser ão ouvidos
separadamente no ouvido
esquerd o e direito.
USB
INTERFACE
PFL MIX que sta manopola
sfuma t ra i canali 1 e 2 di
VMX100/VMX 200 o tra
il segnale P FL e MAIN di
VMX300/ VMX1000. Se
l'interru ttore MODE del
VMX1000 è impo stato su
SPLIT, i segnali so no ascoltati
separatamente nell'orecchio
di sinist ra e di destra.
PFL MIX kn op fades tussen
kanalen 1 en 2 o p de VMX100
/ VMX200 of t ussen het
PFL- en MAIN-signaal o p de
VMX300 / VM X1000. Al s de
MODE-sch akelaar van de
VMX1000 op SPLIT s taat,
zijn de signalen afzonderlijk
in het linker- en rechteroor
tehoren.
PFL MIX ratte n bleknar
mellan kana lerna 1 och 2
på VMX100 / VMX20 0 eller
mellan PFL- och MAINsignalen p å VMX300 /
VMX1000. Om VMX100 0s
MODE-omkopplare är inställd
på SPLIT hör s signalerna
separat i vänster och
högeröra .
PFL MIX pokrętło zmienia
się międz y kanałami 1 i 2 w
modelu VMX100 / VM X200
lub międz y sygnałem PFL i
MAIN w model u VMX300 /
VMX1000. Jeśl i przełączn ik
MODE w VMX1000 je st
ustawio ny w pozycji
SPLIT, sygnał y są słysza lne
oddziel nie w lewym i
prawymu chu.
El mando PFL LE VEL
(escucha pr e-fader) ajusta
el volumen d e la mezcla de
auricula res. Pulse el botón PF L
(VMX30 0/VMX1000) de cada
uno de los ca nales que quiera
escuch ar en la mezcla PFL.
Le bouton PFL LEVEL
(Pre-Fader L isten) règle le
volume du mi xage dans le
casque. Ap puyez sur la touche
PFL (VMX30 0/VMX1000)
de chaque vo ie que vous
souhaite z écouter dans le
mixage PFL.
Mit dem PFL LE VELDrehknopf (Pre-Fader-Listen)
kann die La utstärke des
Kopfhörer-Mixes justiert
werden. Drücken Sie die
PFL-Taste (VM X300/VMX1000)
auf jedem K anal, den Sie im
PFL-Mix hören möchten.
PFL LEVEL manopola per
regolar e (ascol to pre-fader)
il volume de l mix delle
cue. Prem ete il tasto PFL
(VMX30 0/VMX1000) di
ogni cana le che desiderate
ascolta re nel mix PFL.
PFL-N IVEAU k nop (pre-fader
luistere n) past het volume van
de koptele foonmix aan. Druk
op de PFL-knop (VMX 300 /
VMX1000) op elk ka naal dat u
in de PFL-mix wilt horen.
PFL-N IVÅ ratt (ly ssna före
fader) justerar volymen
på hörlur smixen. Tryck på
PFL-knappen (VM X300 /
VMX1000) på varj e kanal som
du vill höra i P FL-mixen.
POZIOM PFL Pokrętło
(słuchanie przed tłumikiem)
reguluje głośność miksu
słuchaw kowego. Naciśnij
przyc isk PFL (VMX300 /
VMX1000) na każd ym kanale,
któr y chcesz usły szeć w
miksie PFL.
Page 20

20
PRO MIXER SERIES VMX1000USB/VMX300USB/VMX200USB/VMX100USB
PRO MIXER SERIES VMX1000USB/VMX300USB/VMX200USB/VMX100USB Controls
Step 2: Controls
(EN)
Paso 2: Controles
(ES)
Mit den MIC AU X-
Etape 2 : Réglages
(FR)
Schritt 2:
(DE)
Bedienelemente
Passo 2: Controles
(PT)
Passo 2: Controlli
(IT)
MIC AUX kn obs adjust each
microphone’s signal level at
the MIC AUX SEND jac k.
Los mandos M IC AUX
ajustan e l nivel de señal
de cada mic rófono en la
toma MIC AUX SEND.
Les bouto ns MIC AUX
déterminent le niveau du
signal de ch aque signal micro
sur la sor tie MIC AUX SEND.
Drehknöpfen kann der
Signalpegel jedes Mikrofons
an der MIC AUX SEND -Buchse
justiert werden.
Os botões g iratórios MIC AUX
ajustam c ada nível do sinal do
microfo ne na tomada jack do
MIC AUX SEND.
MIC AUX man opole per
regolar e il livello del segnal e
di ciascu n microfono per la
mandata MIC AUX SEND.
MIC AUX knoppen passen
het signaa lniveau van elke
microfo on aan op de MIC AUX
SEND-aansluiting.
MIC AUX knapparna juster ar
varje mikrofons signalnivå vid
MIC AUX SEND-uttaget.
MIC AUX Pokrętła regulują
poziom sygnału każdego
mikrofo nu w gnieździe MIC
AUX SE ND.
Stap 2: Bediening
(NL)
Steg 2: Kontrolle
(SE)
Krok 2: Sterowani
(PL)
MIC INPUT knobs adj ust
the EQ and volu me of the
microphone input. The
ON butto n turns the mic
on and o.
Los mandos MI C INPUT
ajustan l a EQ y el volumen de
la entrada d e micrófono. El
botón ON ac tiva o desact iva
el micróf ono.
Les bouto ns MIC INPUT
déterminent l'égalisation et le
volume de l'ent rée micro. La
touche ON active/désactive
le micro.
Mit den MIC INPUTDrehknöpfen werden der
EQ und die La utstärke der
Mikrofoneingabe justiert.
Mit der ON-Taste wi rd
das Mikro fon ein- bzw.
ausgeschaltet.
Os botões g iratórios MIC
INPUT ajustam o E Q e
o volume da ent rada do
microfo ne. O botão ON liga e
desliga o mi crofone.
MIC INPUT manopol e per
regolar e EQ e il volume
dell'ingr esso del microfo no. Il
tasto ON ac cende e spegne il
microfono.
MIC-INGANG knoppen passen
de EQ en het vol ume van de
microfooningang aan. De
ON-kno p zet de microfoon
aan en uit.
MIC-INGÅNG knapparna
justerar mikrofoningångens
EQ och voly m. PÅ-kna ppen
slår på och av m ikrofonen.
WEJŚCIE MIKROFONOWE
pokrętła regulują korektor
i głośno ść wejścia
mikrofo nowego. Przyci sk ON
włącza i wyłącza mikrofon.
Page 21
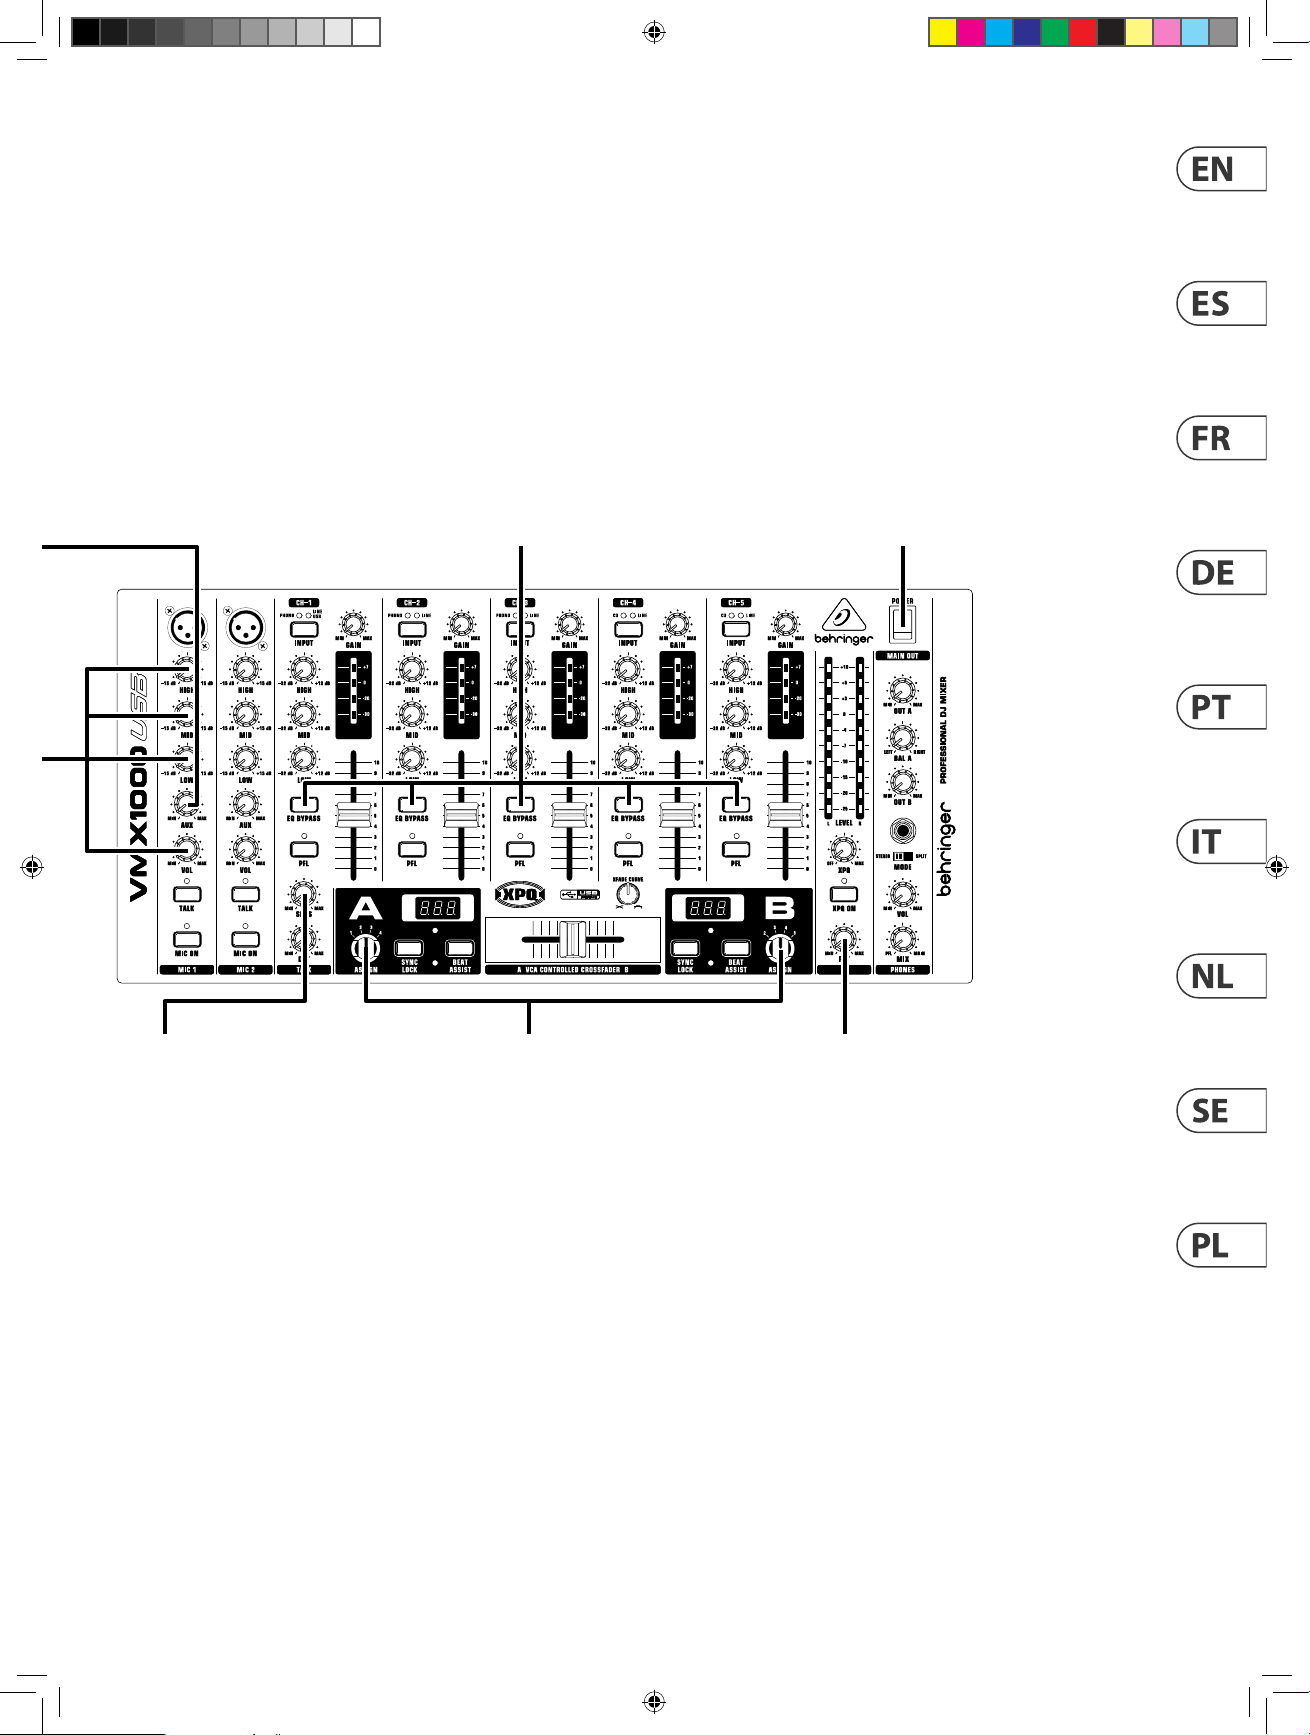
Quick Start Guide
USB
21
EQ BY PASS butt on
deacti vates the EQ knobs.
El botón EQ BYPASS
desac tiva los mandos EQ.
la touche E Q BYPASS
désac tive les boutons
d'égalisation.
Mit der EQ BYPASS -Taste
werden die EQ-Knöpfe
deaktiviert .
O botão EQ BYPASS desati va
os botões g iratórios EQ.
EQ BY PASS tasto p er
disattivare le manopole EQ.
EQ-BYPASS knop dea ctiveert
de EQ-knoppen.
EQ Bypas s knappen
inaktiverar EQ-knapparna.
EQ BYPASS Prz ycisk wyłąc za
pokrętła EQ.
POWER switc h turns the
power on and o. Th is switch
is locate d on the rear panel
of the VMX100/ VMX200/
VMX300.
El interr uptor POWER le
permite e ncender y apagar la
unidad. Este interruptor está
situado en e l panel trasero de l
VMX100/VMX 200/VMX300.
L'interrupteur POWER place
le mixeur so us/hors tensio n.
Il est situ é à l'arrière des
modèles VM X100/ VMX200/
VMX300.
Mit dem POWER-Schalter
wird der Str om ein- bzw.
ausgeschaltet. Dieser
Schalter bendet sich
an der Rück wand von
VMX100/200/300.
O dispositivo POWER desliga
e liga a forç a. O dispositivo c a
localiz ado na parte de tr ás do
painel do VM X100/20 0/300.
POWER interruttore per
accendere e spegnere l'unità.
Questo in terruttore si t rova
sul pannello posteriore
diVMX100/VM X200/VMX30 0.
VERMOGEN schakelaar zet
de stroo m aan en uit. Deze
schakelaa r bevindt zich op he t
achterp aneel van de VMX100 /
VMX200 / VM X300.
KRAFT st artar och st änger
av strömm en. Denna
omkopplar e nns på baksidan
av VMX100 / VMX20 0 /
VMX300.
MOC przełącznik włącza
i wyłąc za zasilanie. Ten
przeł ącznik znajduj e się na
tylnym p anelu VMX100 /
VMX200 / VM X300.
SENS knob adjus ts how
loud the mic rophone signal
must be to en gage the TALK
function. The nearby DPT
knob cont rols the volume
reduc tion of the music.
El mando SENS ajus ta
la potencia d e señal del
micrófono necesaria para
activ ar la función TALK. El
mando DPT qu e está al lado
controla l a reducción de
volumen de la m úsica para
dicha fun ción.
Le bouton SENS détermine
le niveau minimal du signal
du micro po ur qu'il active
la fonct ion TALK. Le bouton
DPT contr ôle la réduction d u
niveau de la mu sique.
Mit dem SENS-Drehknopf
wird justiert, wie hoch das
Mikrofonsignal sein soll,
damit die TALK-Funktion
aktiviert werden kann. Mit
dem DPT-Knopf wird die
Lautstärkereduktion von
Musik gesteuert.
O botão giratório SENS ajusta
quão alto o sin al do microfone
deve car p ara acionar
a função TALK . O botão
giratór io DPT ao lado control a
a reduçã o do do volume
da música.
SENS manopola p er regolare
il volume de l segnale del
microfo no per attivare l a
funzione TALK. La vicina
manopola D PT controlla la
riduzione del volume della
musica.
SENS regela ar regelt hoe luid
het microfoonsignaal moet
zijn om de TALK-func tie te
activeren. De nabijgelegen
DPT-knop re gelt de
volumevermindering van de
muziek.
Känner ratten jus terar
hur hög mikrofonsignalen
måste var a för att aktiv era
TALK-funktionen. Den
närliggande DPT-ratten
styr volymreduceringen av
musiken.
ASSIGN knobs A and B s elect
the audio s ource for each side
of the CROSSFADER .
Los mandos A SSIGN A y B
le permit en elegir la fuente
audio par a los dos lados
del CROSSFADER.
Les bouto ns ASSIGN A et
B sélec tionnent la source
audio de cha que côté
du CROSSFADER.
Mit den ASSIGN-D rehknöpfen
A und B wird di e Audioquelle
für jede S eite von
CROSSFADER ausgewählt.
SENS Pokrętło reguluje,
jak głośny m usi być sygnał
mikrofo nu, aby włączyć
funkcję ROZMOWA.
Znajdujące s ię w pobliżu
pokręt ło DPT steruje red ukcją
głośności muzyki.
Os botões g iratórios ASSIGN
A e B selecio nam a fonte
de áudio par a cada lado
do CROSSFADER.
ASSIGN manopol e A & B
per selez ionare la sorgente
audio per c iascun lato del
CROSSFADER.
TOEWIJZEN knopp en A en B
selecteren de audiobron voor
elke kant van de CROSSFADER.
TILLDELA knap parna A och B
väljer ljud källa för varje sid a
av CROSSFADER.
PRZY DZIELAĆ pokrę tła A i B
wybie rają źródło dźw ięku dla
każdej strony CROSSFADERA.
FX RET knob a djusts the
amount of si gnal from the
MIC AUX RETURN j acks that is
include d in the main mix.
El mando FX RE T ajusta la
cantida d de señal de las
tomas MIC AUX RE TURN
que es inclu ida en la
mezcla principal.
Le bouton F X RET détermine
le niveau du si gnal des retours
MIC AUX RETURN . Ce signal est
ajouté au mi xage général.
Mit dem FX RE T-Drehknopf
wird der Ant eil des Signals
von den MIC AUX RE TURNBuchsen justiert, das im
Haupt-Mix enthalten ist.
O botão giratório FX RET
ajusta o si nal das tomadas
Jack do MIC AUX RE TURN que
está inc luso no mix do main.
FX RET manop ola per
regolar e la quantità di segn ale
delle pre se MIC AUX RETURN
presente nel mix principale.
FX RET regelaar regelt
de hoeveelheid signaal
van de MIC AUX RET URNaansluitingen die in de
hoofdmix zijn opgenomen.
FX RET rat ten justerar
mängden si gnal från MIC AUX
RETURN-uttagen som ingår i
huvudmixen.
FX RET Pokrętło reguluje
ilość syg nału z gniazd MIC
AUX RETURN za wartego w
głównym m iksie.
Page 22
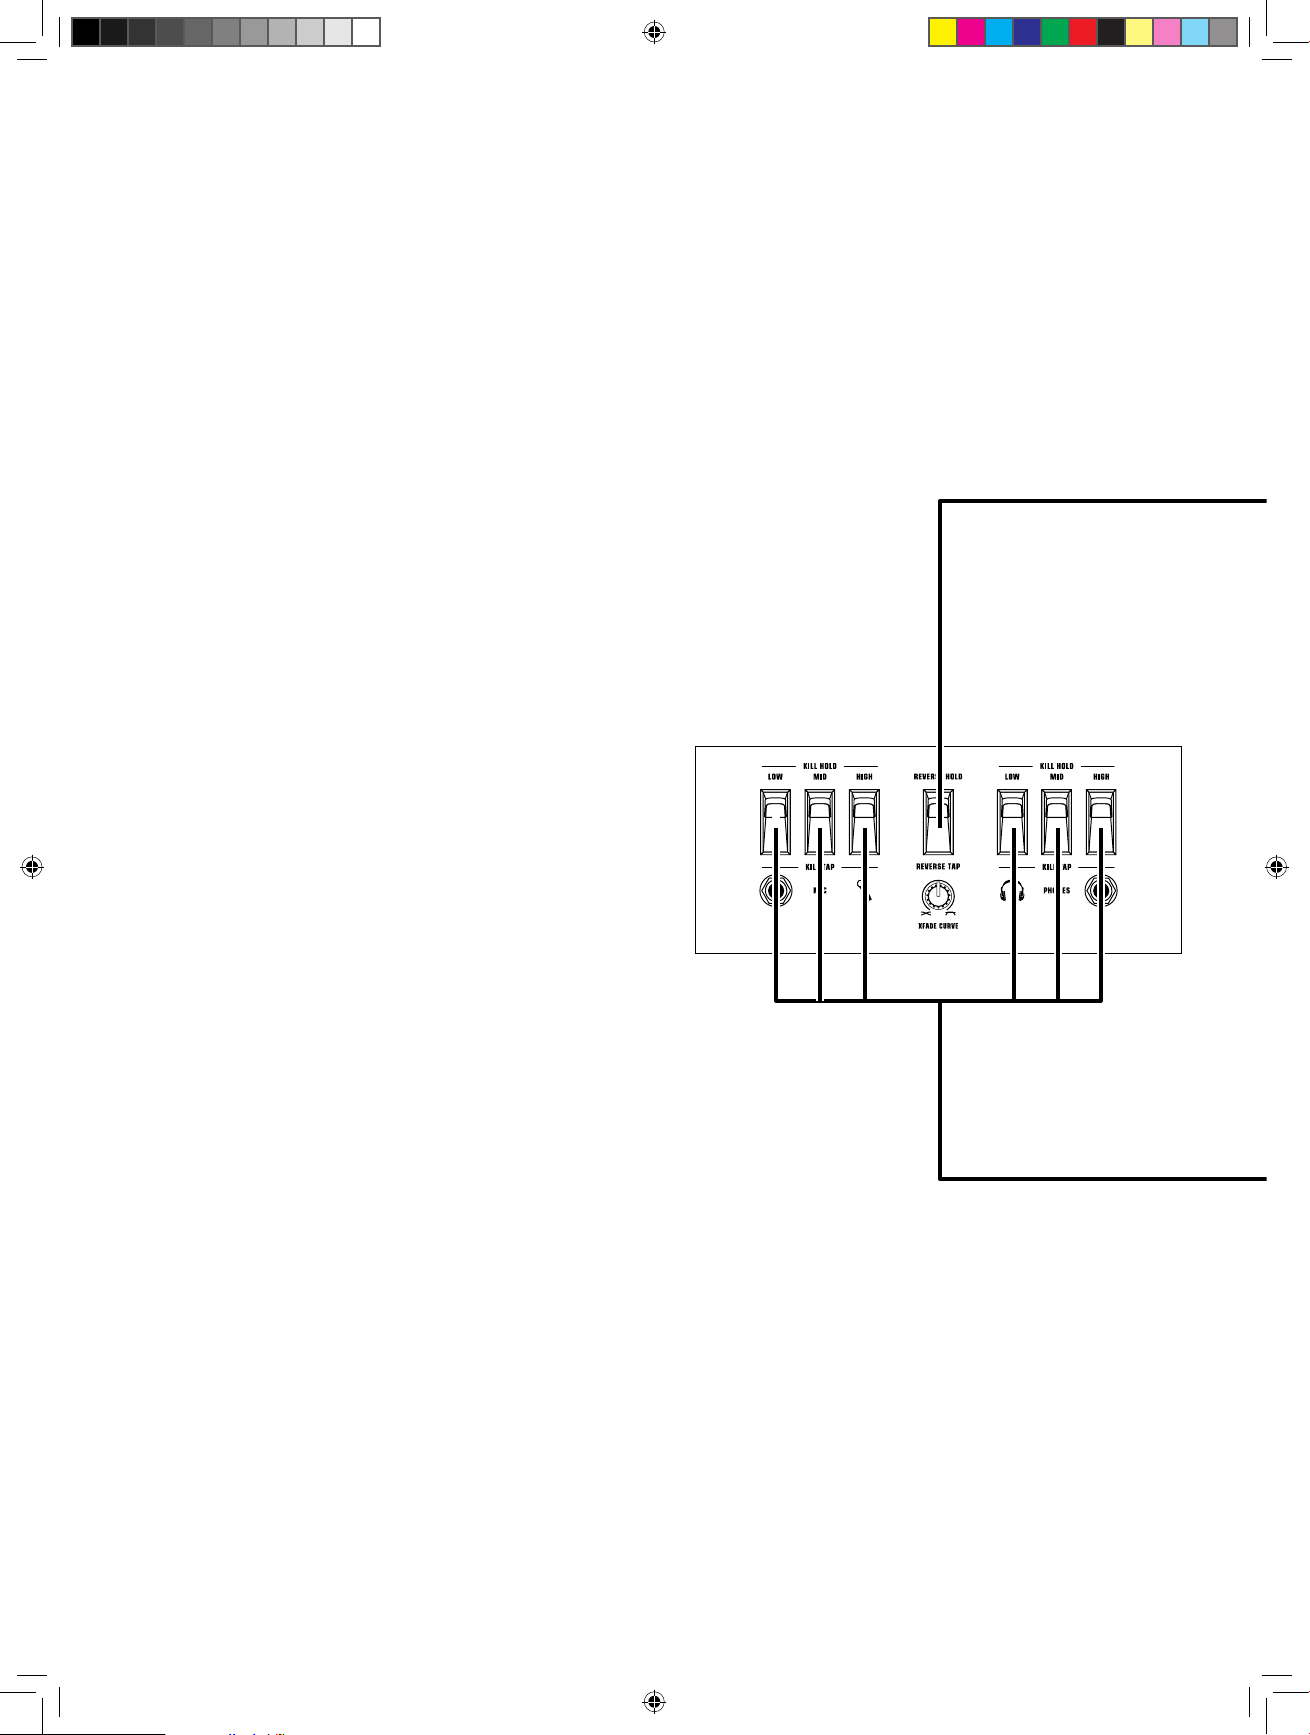
22
PRO MIXER SERIES VMX1000USB/VMX300USB/VMX200USB/VMX100USB
PRO MIXER SERIES VMX1000USB/VMX300USB/VMX200USB/VMX100USB Controls
Step 2: Controls
(EN)
Paso 2: Controles
(ES)
Etape 2 : Réglages
(FR)
Schritt 2:
(DE)
Bedienelemente
Passo 2: Controles
(PT)
Passo 2: Controlli
(IT)
Stap 2: Bediening
(NL)
Steg 2: Kontrolle
(SE)
Krok 2: Sterowani
(PL)
VMX300USB
Page 23
Quick Start Guide
23
REVERSE HOLD/TAP switch
inverts the direction of the
crossfader, allowing rapid
switching between audio
sources . Pressing the swi tch
down momentarily engages
the eec t until release d.
Flipping t he switch up lock s
the eec t until it is manuall y
release d back down.
El interr uptor REVERSE
HOLD/TAP invierte la
dirección del fundido, lo
que le perm ite un cambio
rápido ent re las fuentes
audio. Puls e este interrupto r
de forma momentánea
para que el e fecto quede
activo h asta que deje de
pulsarl o. El dejar pulsado es te
interru ptor hará que el efe cto
quede ac tivo hasta que lo
desac tive volviendo a pu lsar
el interr uptor.
La touche RE VERSE HOLD/
TAP inve rse la directi on du
Crossfader, vous permettant
de changer rapidement de
source so nore. Appuyez sur
le bas du cont acteur pour
active r l'eet jusqu'à ce que
vous relâc hiez la touche.
Placez le com mutateur vers
le haut pour v errouiller l'eet
sans avoir à ma intenir la
touche enf oncée.
Der REVERSE HOLD/
TAP-Schalter invertiert die
Richtung des Crossfaders,
wodurch ein schnelles
Umschalten zwischen
Audioquellen ermöglicht
wird. Dur ch Drücken des
Schalters nach unten wird
der Eekt momentan
aktiviert, bis der Schalter
losgelas sen wird. Durch
Hochschieben des Schalters
wird der E ekt gesperr t, bis
der Schalter manuell wieder
runtergeschoben wird.
O interru ptor REVERSE
HOLD/TAP inverte a direção
do crossfader, permitindo
a mudança r ápida entre as
fontes de áu dio. Pressionar
interru ptor para baixo, acio na
momentaneamente o efeito
até ser libe rado. Inverter o
interru ptor para cima trav a o
efeito até q ue ele volte para
baixo manualmente.
REVERSE HOLD/TAP
interruttore per invertire
la direzione del crossfader,
consentendo una rapida
commuta zione tra le
sorgent i audio. Premendo
l'interru ttore verso il b asso
si attiva momentaneamente
l'eetto nché non è
rilasci ato. Spostando
l'interru ttore verso l'alt o si
blocca l'e etto nché non è
rilasciato manualmente di
nuovo vers o il basso.
ACHTERUIT HOLD / TAP
schakelaar keert de richting
van de crossfader om, zodat u
snel tussen audiobronnen kunt
schakelen. Door de schakelaar
naar beneden te drukken,
wordt het eect tijdelijk
ingeschakeld totdat het wordt
losgelaten. Door de schakelaar
omhoog te klappen, wordt
het eect vergrendeld totdat
het handmatig weer wordt
losgelaten.
BAKÅT / TAP växlar inverterar
crossfaderns riktning, vilket
möjliggör snabb växling
mellan ljud källor. Genom att
tryck a ned strömbr ytaren
aktiveras tillf älligt eekten
tills den slä pps. Att vrida
omkopplaren låser eekten
tills den släpps manuellt igen.
REVERSE HOLD / TAP
Przełącznik odwraca kierunek
crossfadera, umożliwiając
szybkie przełączanie między
źródłami dźwięku. Krótkie
naciśnięcie przełącznika w dół
włącza efekt, aż do zwolnienia.
Odwrócenie przełącznika
w górę blokuje efekt do
momentu jego ręcznego
zwolnienia.
KILL HOLD/TAP switches
(VMX30 0 only) decrease
the high, mid a nd low
freque ncies by 32 dB.
Pressing t he switches down
momentarily engages the
eect until released. Flipping
the switc hes up locks the
eec t until they are manual ly
release d back down.
Los interr uptores KILL HOLD/
TAP (sol o VMX300) reducen
las frecuencias agudas,
medias y gr aves en 32 dB.
Pulse de fo rma momentánea
estos int erruptores par a hacer
que el efe cto quede acti vo
solo durante el intervalo en
que los mantenga pulsados.
Púlselos h asta que queden
bloquead os para que el efec to
continúe hasta que vuelva
a pulsar lo s interruptores
para desactivarlos.
Les touche s KILL HOLD/
TAP (VMX300 uniquement)
atténuent les fréquences
hautes, mé diums et basses
de 32 dB. Appuye z sur le bas
du contac teur pour acti ver
l'eet jusq u'à ce que vous
relâchie z la touche. Placez
le commutateur vers le
haut pour ve rrouiller l'eet
sans avoir à ma intenir la
touche enf oncée.
Die KILL HOLD/TAP-Schalter
(nur bei VMX30 0) verringern
die Hoch-, Mi ttel- und
Niederfrequenzen um
32 dB. Durch Dr ücken der
Schalter nach unten wird
der Eekt momentan
aktiviert, bis der Schalter
losgelas sen wird. Durch
Hochschieben der Schalter
wird der E ekt gesperr t, bis
die Schalter manuell wieder
runtergeschoben werden.
KILL HOLD/TAP Os
interruptores KILL HOLD/
TAP (VMX300 ap enas)
diminuem as frequências
alta, médi a e baixa em 32 dB.
Pressionar os interruptores
momentaneamente para
baixo, acio na o efeito
momentaneamente até
ser liberado. Inverter os
interruptores para cima trava
o efeito até q ue eles voltem
para baixo manualmente.
KILL HOLD/TAP interruttori
(solo VMX30 0) che riducono
le frequ enze alte, medie e
basse di 32dB. Pr emendo gli
interru ttori verso il b asso si
attiva momentaneamente
l'eetto nché non sono
rilasci ati. Alzando gli
interru ttori si blocca l'e etto
nché non sono rilasciati
manualmente.
KILL HOLD / TAP schakelaars
(alleen VMX300) verlagen
de hoge, midden- en lage
frequenties met 32 dB. Als u
de schakelaars omlaag drukt,
wordt het eect tijdelijk
ingeschakeld totdat het wordt
losgelaten. Door de schakelaars
omhoog te klappen, wordt het
eect vergrendeld totdat ze
handmatig weer naar beneden
worden losgelaten.
KILL HOLD / TAP switchar
(endast VMX 300) minskar
de höga, mell ersta och
låga frek venserna med 32
dB. Genom at t trycka ned
knapparna aktiveras tillfälligt
eekt en tills den släpps.
Att vrid a omkopplarna
låser ee kten tills de släpp s
manuellt igen.
KILL HOLD / TAP przełączniki
(tylko VMX300) zmniejszają
wysokie, średnie i niskie
częstotliwości o 32 dB. Krótkie
naciśnięcie przełączników
włącza efekt, aż do zwolnienia.
Odwrócenie przełączników w
górę blokuje efekt, dopóki nie
zostaną ręcznie zwolnione z
powrotem.
Page 24
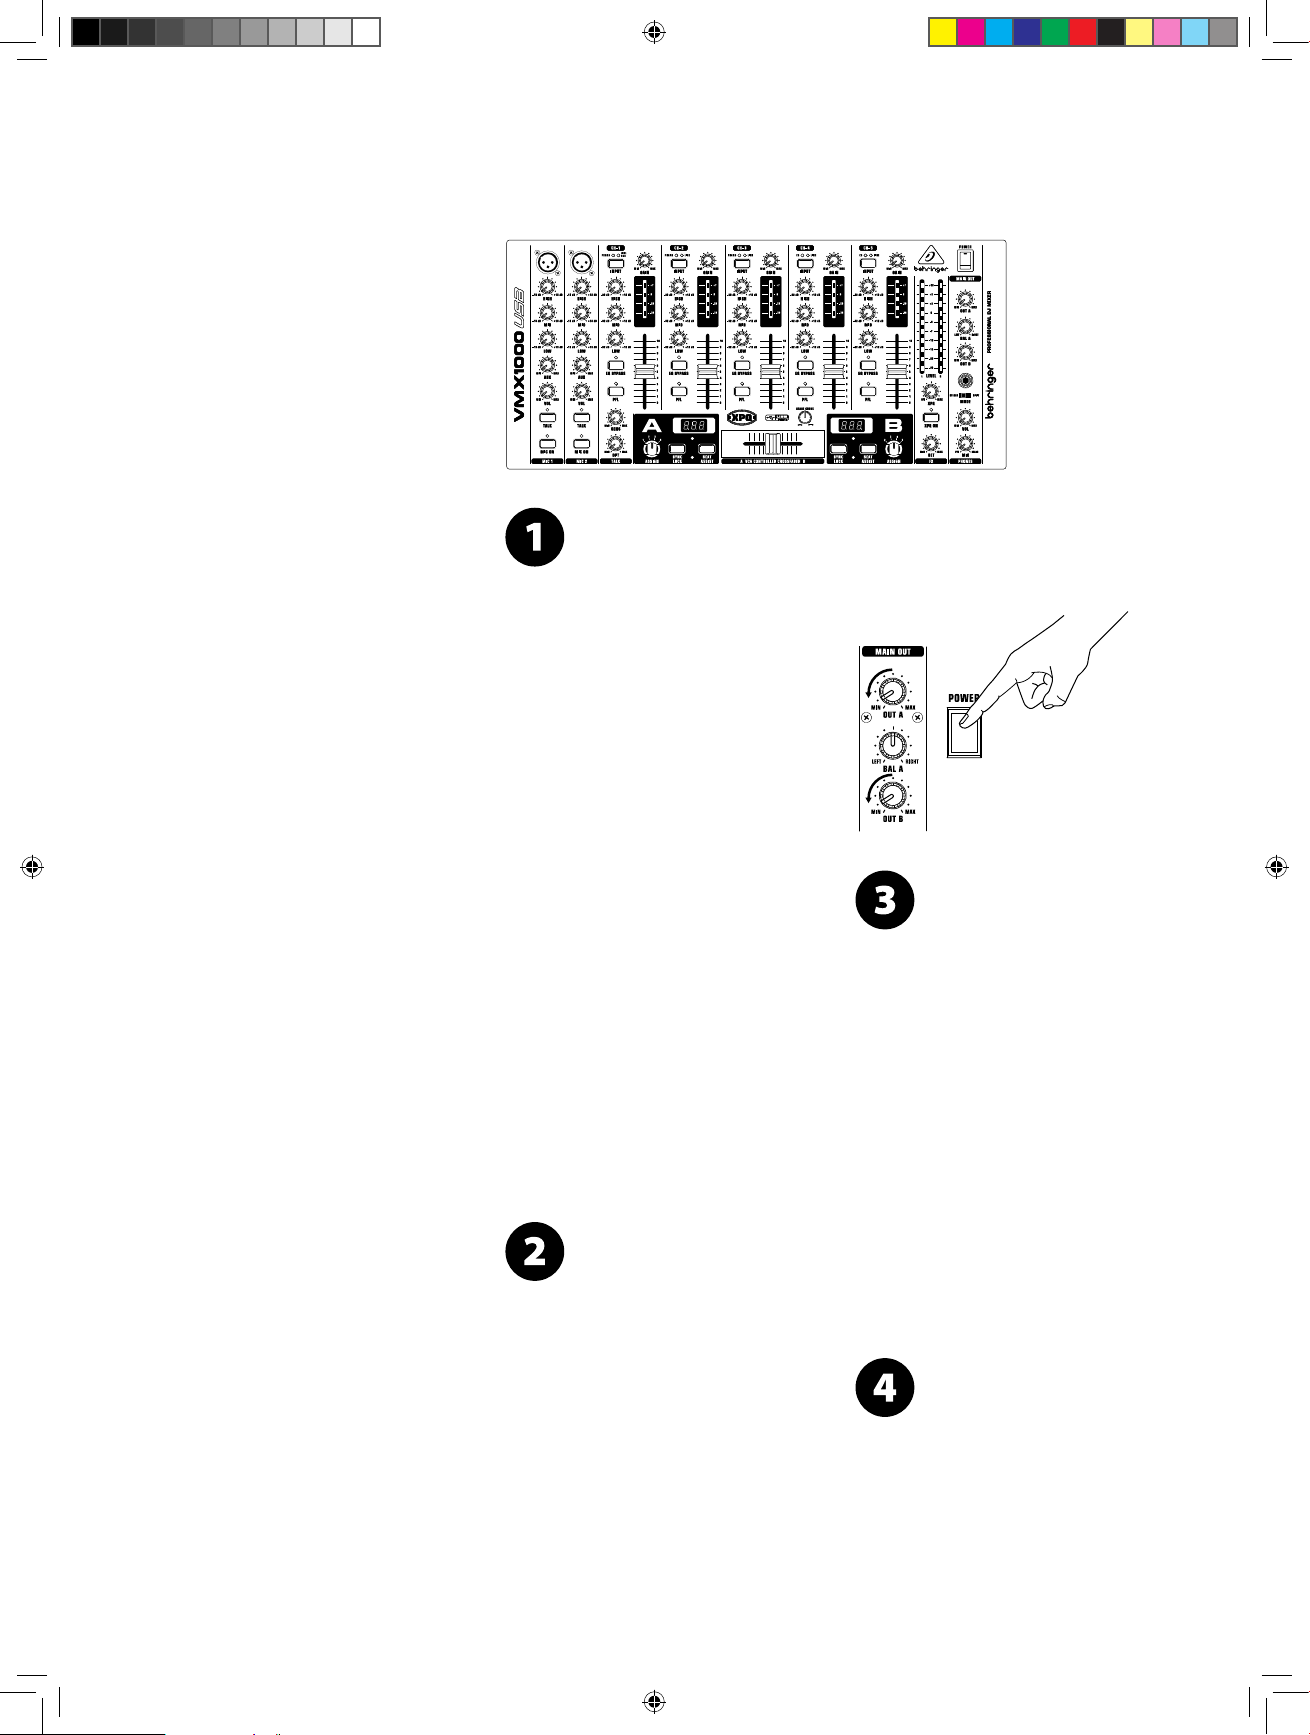
24
PRO MIXER SERIES VMX1000USB/VMX300USB/VMX200USB/VMX100USB
USB
PRO MIXER SERIES VMX1000USB/VMX300USB/VMX200USB/VMX100USB Getting started
Step 3: Getting
(EN)
started
Paso 3: Puesta en
(ES)
marcha
Etape 3 : Mise en
(FR)
oeuvre
Schritt 3: Erste
(DE)
Schritte
Passo 3: Primeiros
(PT)
Passos
Passo 3: Iniziare
(IT)
Stap 3: Aan de slag
(NL)
Steg 3: Komma
(SE)
igang
Make all the appropriate power, audio,
USB and speaker connections to the
mixer. Leave the power on all devices o!
Realice en la mesa de mezclas todas las conexiones
adecuadas de corriente, audio, USB y altavoces.
¡Deje todos los dispositivos apagados por
el momento!
Réalisez les connexions secteur, audio, USB et des
enceintes au mixeur. Laissez tous vos équipements
hors tension!
Schließen Sie alle vorgesehenen Strom-, Audio-,
USB- und Lautsprecherverbindungen an den Mischer
an. Lassen Sie den Strom aller Geräte ausgeschaltet!
Faça todas as conexões apropriadas da força, áudio,
USB e alto-falantes ao mixer.
Assicuratevi che tutti i dispositivi siano spenti!
Collegate al mixer tutti i cavi idonei per
alimentazione, audio e USB.
Slå på mixern med MAIN OUT-ratten (arna) helt.
Ustawiając pokrętło MAIN OUT do oporu, włącz
mikser.
Turn on your audio sources and begin
playing audio into the mixer.
Encienda las fuentes audio para que
comience a entrar señal en la mesa de mezclas.
Krok 3: Pierwsze
(PL)
kroki#
Maak alle juiste stroom-, audio-, USB- en
luidsprekeraansluitingen op de mixer. Laat alle
apparaten uitgeschakeld!
Gör alla lämpliga ström-, ljud-, USB- och
högtalaranslutningar till mixern. Lämna strömmen
på alla enheter avstängda!
Wykonaj odpowiednie podłączenia zasilania, audio,
USB i głośników do miksera. Zostaw zasilanie
włączone we wszystkich urządzeniach!
With the MAIN OUT knob(s) all the way
down, turn your mixer on.
Con los mandos MAIN OUT al mínimo
(abajo del todo), encienda la mesa de mezclas.
Réglez les boutons MAIN OUT au minimum, et placez
le mixeur sous tension.
Wenn alle MAIN OUT-Knöpfe in unterster Stellung
sind, schalten Sie Ihren Mischer ein.
Com o(s) botões giratório(s) MAIN OUT totalmente
para baixo, ligue o seu mixer.
Con le manopole MAIN OUT completamente
abbassate, accendete il mixer.
Zet de mixer aan met de MAIN OUT-knop (pen)
helemaal omlaag.
Activez toutes les sources audio en entrée du mixeur.
Schalten Sie Ihre Audioquellen ein und beginnen Sie
mit dem Spielen von Ton in den Mischer.
Ligue suas fontes de áudio e comece a tocar o áudio
no mixer.
Accendete le sorgenti audio e iniziate a riprodurre
audio nel mixer.
Schakel uw audiobronnen in en begin met het
afspelen van audio in de mixer.
Sätt på dina ljudkällor och börja spela upp ljud i
mixern.
Włącz źródła dźwięku i zacznij odtwarzać dźwięk w
mikserze.
Raise the MAIN OUT and PFL/PHONES
knobs to desired level.
Suba los mandos MAIN OUT y PF ES hasta
el nivel deseado.
Montez les niveaux MAIN OUT et PFL/PHONES en
fonction du niveau souhaité.
Schieben Sie die MAIN OUT- und PFL/PHONES-Regler
bis zum gewünschten Niveau hoch.
Page 25
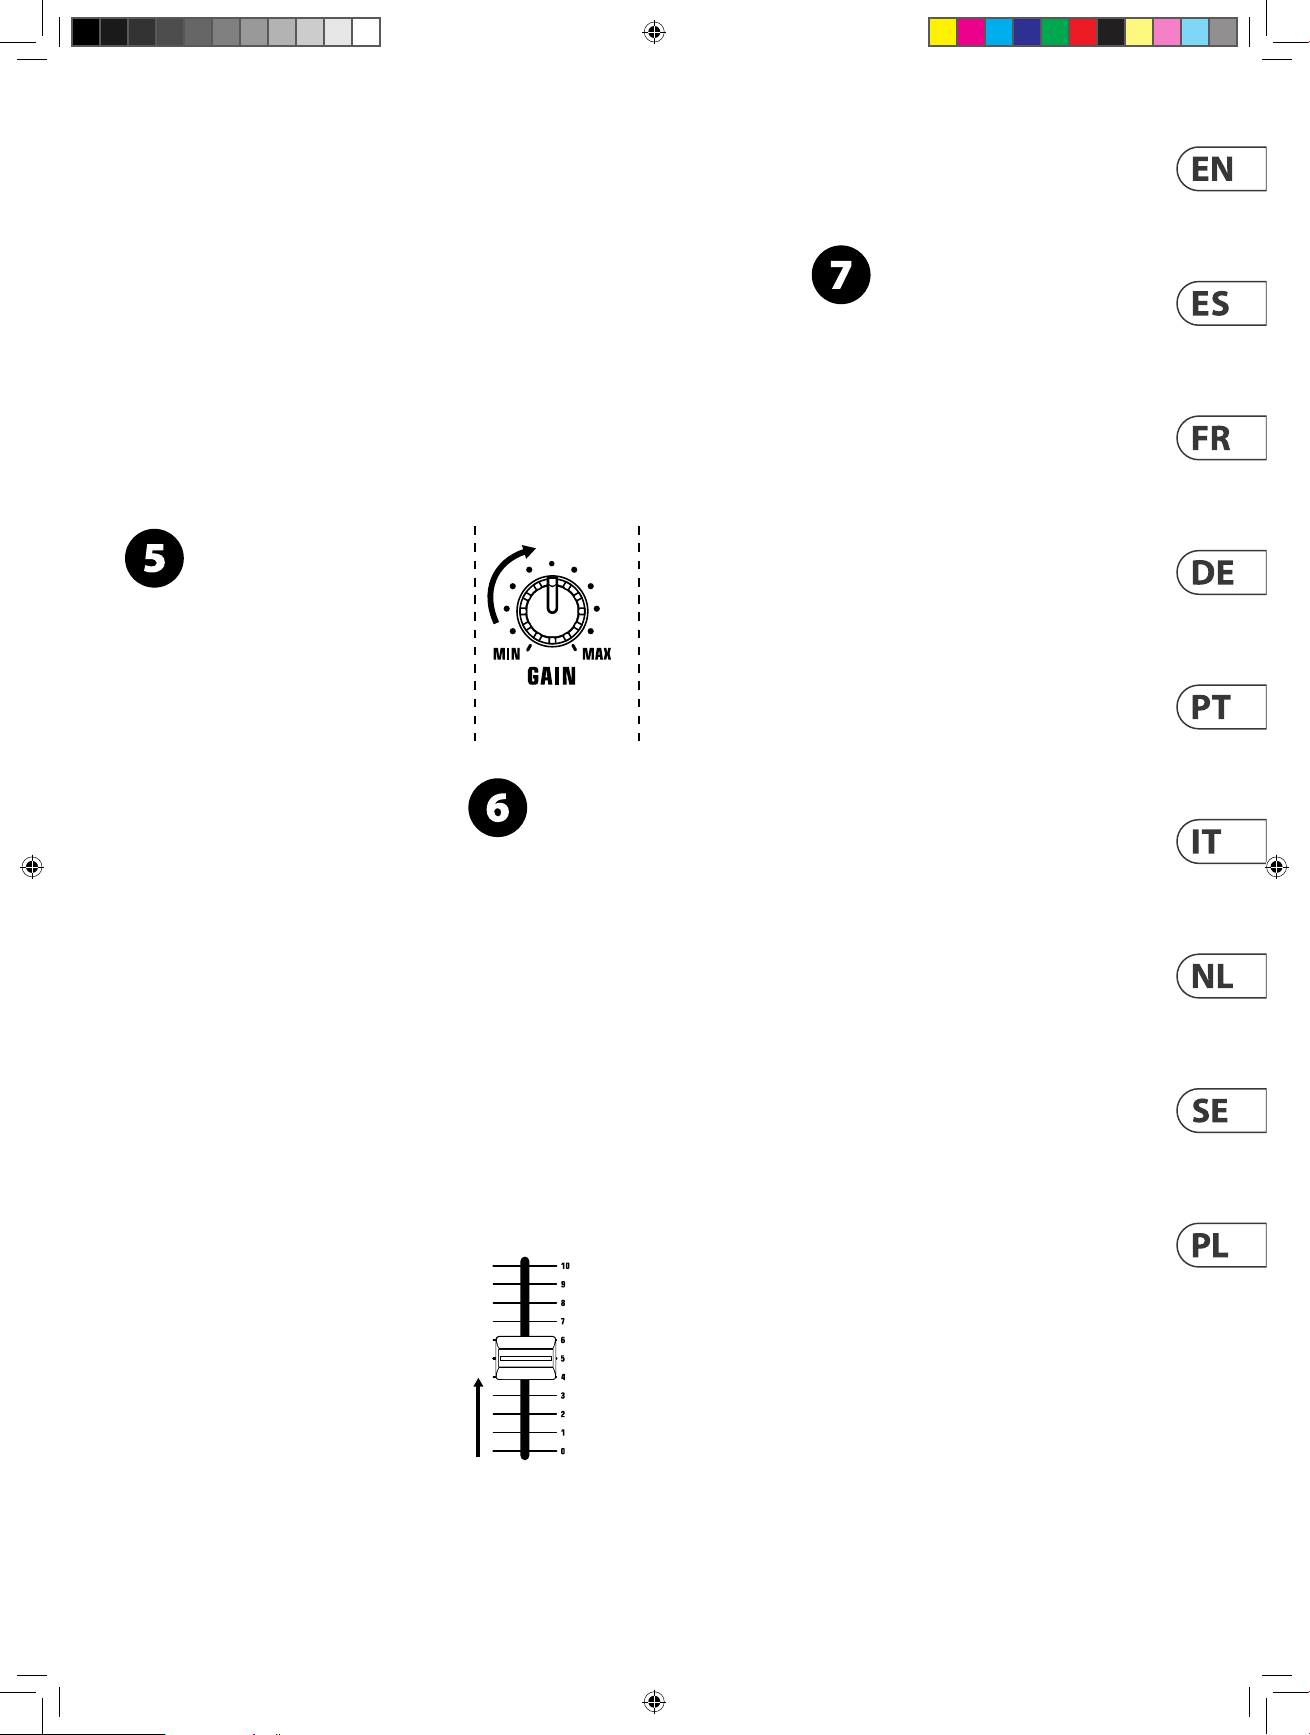
Quick Start Guide
25
Suba os botões giratórios MAIN OUT e PFL/PHONES
para o nível desejado.
Alzate le manopole MAIN OUT e PFL/PHONES al
livello desiderato.
Verhoog de MAIN OUT- en PFL / PHONES-knoppen
naar het gewenste niveau.
Höj knapparna MAIN OUT och PFL / PHONES till
önskad nivå.
Podnieś potencjometr y MAIN OUT i PFL / PHONES
do żądanego poziomu.
Raise the GAIN knob on each channel
that is receiving a signal. If the red clip
LED on any of the channel meters
(VMX300/VMX1000) lights up, lower the GAIN knob.
On the VMX100/VMX200, lower the GAIN knob if
you hear the audio distorting.
Suba el mando GAIN de cada uno de los canales
que reciba señal. Si se ilumina el piloto rojo
Clip de cualquiera de los medidores de canal
(VMX300/VMX1000), reduzca el mando GAIN. En
el VMX100/VMX200, reduzca el mando GAIN si
observa que el sonido distorsiona.
Montez le bouton de GAIN sur chaque voie recevant
un signal d'entrée. Si la Led rouge de l'acheur de
niveau d'une voie s'allume (VMX300/VMX1000),
réduisez le GAIN. Sur le VMX100/VMX200, baissez le
GAIN si le signal audio produit de la distorsion.
Schieben Sie den GAIN-Regler auf jedem Kanal,
der ein Signal empfängt, hoch. Falls die rote
Clip-LED auf irgendeinem der Kanalzähler
(VMX300/VMX1000) leuchtet, schieben Sie den
GAIN-Regler runter. Bei VMX100/VMX200 schieben
Sie den GAIN-Regler runter, wenn Sie den Ton
verzerrt hören.
Aumente o botão giratório GAIN em cada canal que
está recebendo um sinal. Se o clip LED vermelho em
qualquer um dos medidores (VMX300/VMX1000)
acender, abaixe o botão GAIN. No VMX100/VMX200,
abaixe o botão giratório GAIN caso ouça distorção
no áudio.
Alzate la manopola GAIN di ogni canale che riceve
un segnale. Se si accende il led rosso di clip su
uno degli indicatori di livello di canale (VMX300/
VMX1000), abbassate la manopola GAIN. Su
VMX100/VMX200 abbassate la manopola GAIN se
ascoltate audio distor to.
Verhoog de GAIN-knop op elk kanaal dat een
signaal ontvangt. Als de rode clip-LED op een van
de kanaalmeters (VMX300 / VMX1000) oplicht,
laat dan de GAIN-knop zakken. Verlaag op de
VMX100 / VMX200 de GAIN-knop als u het geluid
vervormdhoort.
Höj GAIN-ratten på varje kanal som tar emot en
signal. Om den röda klämlampan på någon av
kanalmätarna (VMX300 / VMX1000) tänds sänker
du GAIN-ratten. På VMX100 / VMX200 sänker du
GAIN-ratten om du hör ljudet förvrängt.
Podnieś pokrętło GAIN na każdym kanale, który
odbiera sygnał. Jeśli czerwona dioda LED na
którymkolwiek mierniku kanału (VMX300 /
VMX1000) zaświeci się, opuść pokrętło GAIN. W
przypadku VMX100 / VMX200 obniż gałkę GAIN,
jeśli słychać zniekształcenia dźwięku.
Adjust the relative level of the audio
sources by raising each CHANNEL fader.
Ajuste el nivel relativo de sus fuentes
audio subiendo de la forma adecuada los
faders CHANNEL.
Stellen Sie das relative Niveau von Audioquellen
durch Hochschieben jedes CHANNEL-Faders ein.
Ajuste o nível relativo das fontes de áudio por
elevar cada fader do CHANNEL.
Regolate il livello relativo delle sorgenti audio
alzando il fader di ogni canale.
Pas het relatieve niveau van de audiobronnen aan
door elke CHANNEL-fader te verhogen.
Justera den relativa nivån för ljudkällorna genom
att höja varje CHANNEL-fader.
Dostosuj względny poziom źródeł dźwięku,
podnosząc każdy suwak CHANNEL.
The tempos (BPM) of the selected audio
sources appear in the Beat Counter
display. Press the SYNC LOCK button to
avoid having the displayed tempo jump rapidly.
You may also press the BEAT ASSIST button in
rhythm to the music to manually enter the tempo
(i.e., “tap tempo”).
Los tempos (BPM) de las fuentes audio elegidas
aparecerán en la pantalla Beat Counter. Pulse el
botón SYNC LOCK si quiere evitar que el tempo
visualizado salte rápidamente. También puede
pulsar el botón BEAT ASSIST de forma rítmica con
la música para introducir manualmente el (es decir,
lo que vulgarmente se llama “marcar el tempo”).
Le tempo (BPM) des sources sélectionnées apparaît
à l'écran Beat Counter. Appuyez sur la touche
SYNC LOCK pour éviter le changement rapide
d'achage. Vous pouvez aussi appuyer sur la touche
BEAT ASSIST en rythme avec la musique pour saisir
le tempo (fonction “Tap tempo”).
De tempo's (BPM) van de geselecteerde
audiobronnen verschijnen in de Beat Counterdisplay. Druk op de SYNC LOCK-knop om te
voorkomen dat het weergegeven tempo snel
verspringt. U kunt ook op de BEAT ASSIST-knop
drukken in het ritme van de muziek om het tempo
handmatig in te voeren (dwz “tap tempo”).
Das Tempo (BPM) ausgewählter Audioquellen
erscheint in der Beat Counter-Anzeigen. Drücken Sie
die SYNC LOCK-Taste, um zu verhindern, dass sich
das angezeigte Tempo zu schnell ändert. Sie können
auch das Tempo manuell eingeben, indem Sie die
BEAT ASSIST-Taste im Rhytmus der Musik drücken.
Os ritmos (BPM) das fontes de áudio selecionadas
aparecem no visor Beat Counter. Pressione o botão
SYNC LOCK para evitar que o ritmo exibido salte
rapidamente. Poderá também pressionar o botão
BEAT ASSIST em ritmo da música para entrar o ritmo
manualmente (ou seja,“tap tempo”).
I tempi metronomici (BPM) delle sorgenti audio
scelte sono mostrati nel display Beat Counter.
Premete il tasto SYNC LOCK per evitare che il tempo
mostrato cambi rapidamente. È possibile premere
anche il tasto BEAT ASSIST a ritmo della musica
per inserire manualmente il tempo (il cosiddetto
“taptempo”).
Tempo (BPM) för de valda ljudkällorna visas i Beat
Counter-displayen. Tryck på SYNC LOCK-knappen
för att undvika att tempot hoppar snabbt. Du
kan också trycka på BEAT ASSIST-knappen i r ytm
till musiken för att manuellt gå in i tempot (dvs.
"trycktempo").
Page 26
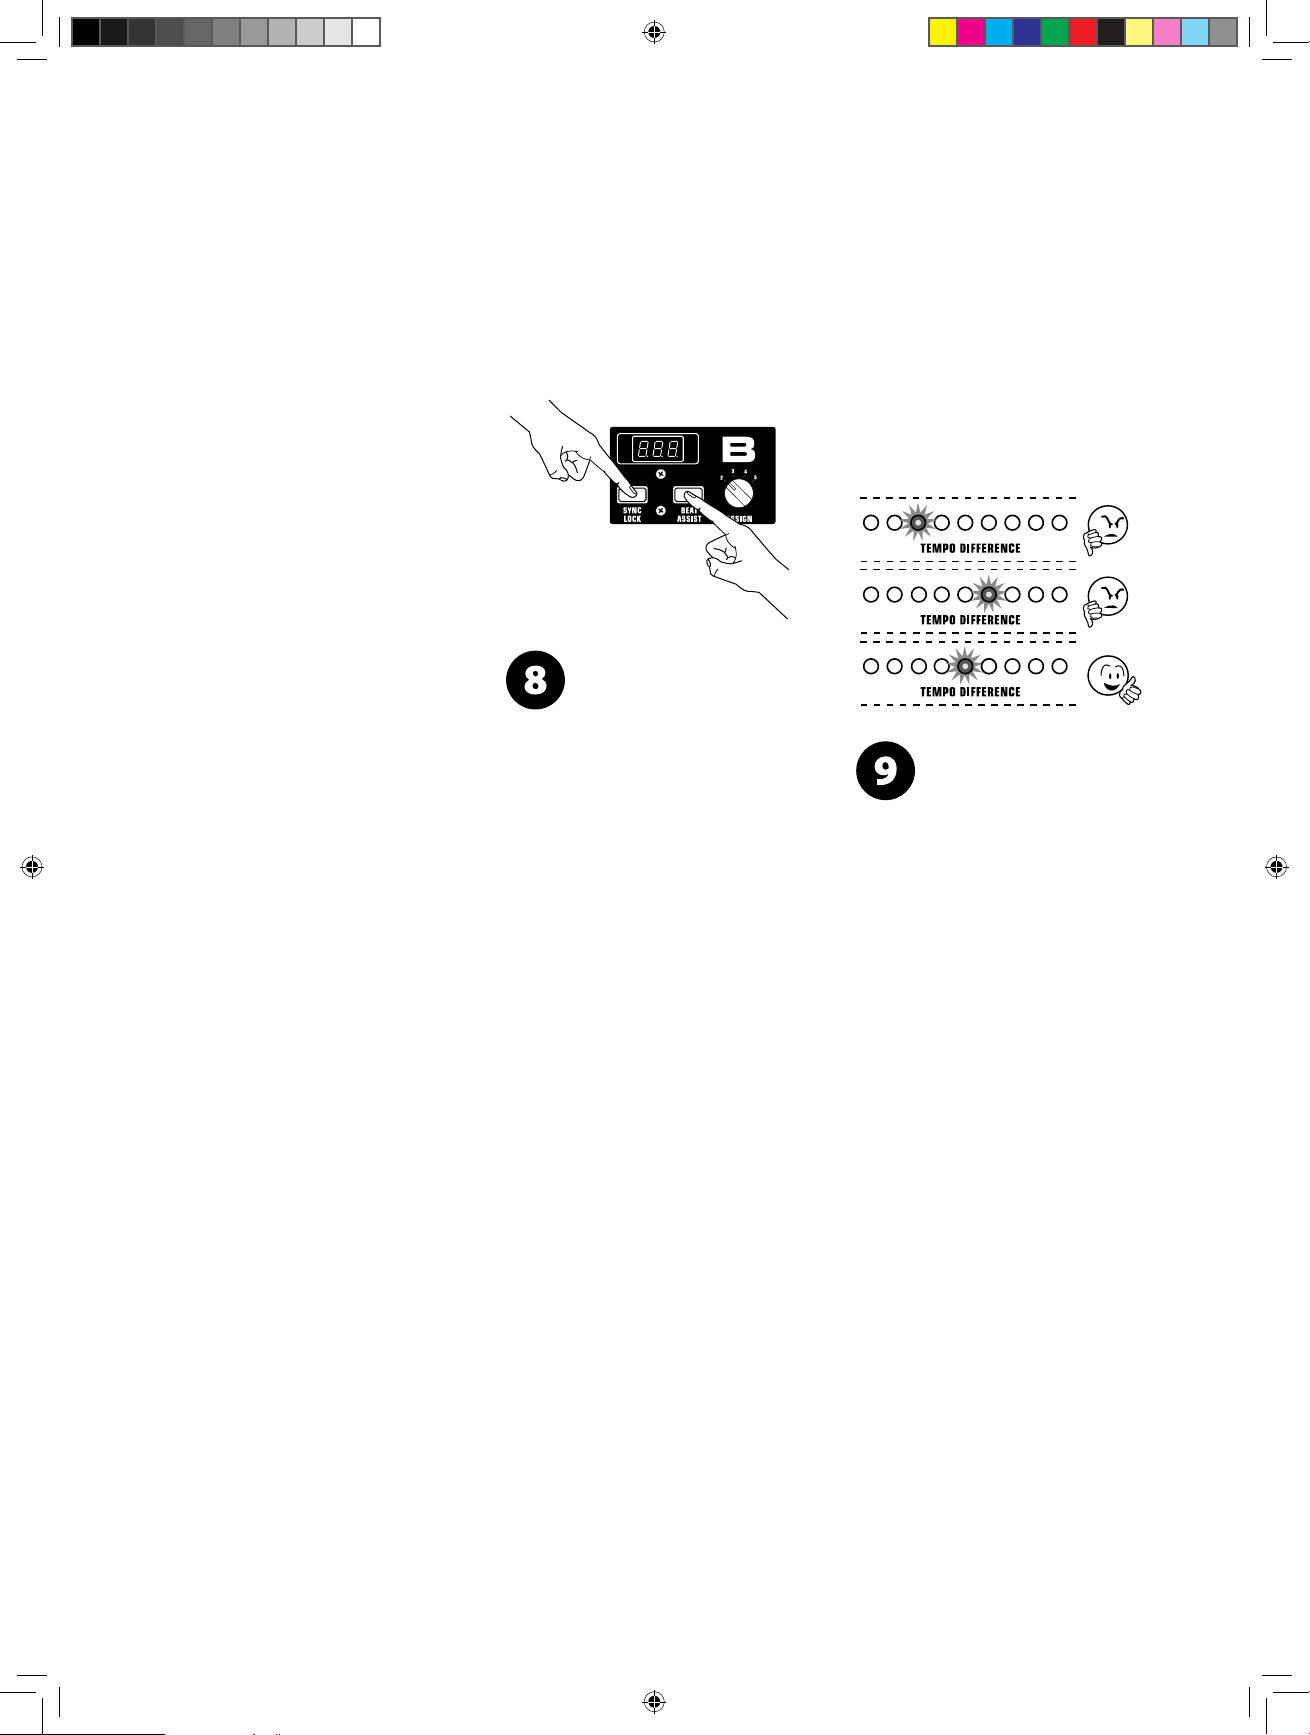
26
PRO MIXER SERIES VMX1000USB/VMX300USB/VMX200USB/VMX100USB
PRO MIXER SERIES VMX1000USB/VMX300USB/VMX200USB/VMX100USB Getting started
Step 3: Getting
(EN)
started
Paso 3: Puesta en
(ES)
marcha
Etape 3 : Mise en
(FR)
oeuvre
Schritt 3: Erste
(DE)
Schritte
Tempo (BPM) wybranych źródeł dźwięku pojawią się
na wyświetlaczu licznika rytmu. Naciśnij przycisk
SYNC LOCK, aby uniknąć gwałtownych skoków
wyświetlanego tempa. Możesz także nacisnąć
przycisk BEAT ASSIST w rytm muzyki, aby ręcznie
wprowadzić tempo (np. „Tap tempo”).
När varje källa har sitt respektive tempo låst kommer
TEMPO DIFFERENCE-lysdioderna att informera dig
om temperaturen matchar. Mätaren tänds i riktning
mot källan som är snabbare. När den gröna lysdioden
tänds matchar temperaturen.
Gdy każde źródło ma zablokowane tempo, diody LED
TEMPO DIFFERENCE poinformują Cię, czy tempo się
zgadza. Miernik będzie świecił w kierunku źródła,
które jest szybsze. Kiedy świeci się zielona dioda LED,
tempo się zgadza.
Passo 3: Primeiros
(PT)
Passos
Passo 3: Iniziare
(IT)
Stap 3: Aan de slag
(NL)
Steg 3: Komma
(SE)
igang
Krok 3: Pierwsze
(PL)
kroki#
Once each source has its respective
tempo locked, the TEMPO DIFFERENCE
LEDs will inform you if the tempos match.
The meter will light in the direction of the source
that is faster. When the green LED lights,
the tempos match.
Una vez que estén sincronizadas cada una de las
fuentes y su tempo respectivo, los pilotos TEMPO
DIFFERENCE LED le informarán si los tempos
coinciden o no. El medidor se iluminará en la
dirección de la fuente cuyo tempo sea más rápido.
Cuando los pilotos verdes se iluminen, eso indicarán
que ambos tempos coinciden.
Une fois le tempo de chaque source verrouillé,
les Leds TEMPO DIFFERENCE vous indiquent si les
tempos sont identiques. L'acheur s'allume dans la
direction de la source qui est la plus rapide. La Led
verte indique que les tempos sont identiques.
Sobald das Tempo jeder Quelle festgelegt wurde,
werden Sie durch die TEMPO DIFFERENCE LEDs
darüber informiert, ob die Tempos übereinstimmen.
Der Zähler wird in Richtung der Quelle leuchten, die
schneller ist. Wenn die grüne LED leuchtet, stimmen
die Tempos überein.
Assim que cada fonte tenha seu ritmo respectivo
travado, os LEDs do TEMPO DIFFERENCE lhe
informarão se os ritmos coincidem. O medidor
acenderá na direção da fonte que for mais rápida.
Quando o LED verde acender, os ritmos coincidem.
Una volta che ogni sorgente ha il suo tempo
bloccato, i led TEMPO DIFFERENCE vi informeranno se
i tempi corrispondono. L'indicatore si accenderà nella
direzione della sorgente più veloce. Quando il led
verde si accende, i tempi corrispondono.
Zodra elke bron zijn respec tieve tempo heeft
vergrendeld, zullen de TEMPO DIFFERENCE LED's u
informeren of de tempo's overeenkomen. De meter
licht op in de richting van de bron die sneller is. Als
de groene LED brandt, komen de tempo's overeen.
Even when the tempos match, the beats
may not be perfec tly synced up between
the sources. The TIME OFFSET LEDs will
light in the direction of the source whose audio is out
of sync. When the green LED lights, the audio
is in sync.
Incluso cuando los tempos coincidan, es posible que
los ritmos no estén perfectamente sincronizados
entre las fuentes. Los pilotos TIME OFFSET LED se
iluminarán en la dirección de la fuente cuya señal
audio esté desincronizada. Cuando el piloto verde
se ilumine, eso indicará que ya se ha producido la
sincronización del audio.
Même lorsque les tempos sont identiques, il se
peut que les temps ne soient pas parfaitement
synchronisés entre les deux sources. Les Leds
TIME OFFSET s'allument dans la direction de la source
dont le signal audio est désynchronisé. La Led ver te
indique que les signaux sont synchronisés.
Selbst wenn die Tempos übereinstimmen, können
die Beats möglicherweise nicht perfekt zwischen
den Quellen synchronisiert sein. Die TIME OFFSETLEDs werden in Richtung der Quelle leuchten, deren
Audio außer Synchronisation ist. Wenn die grüne LED
leuchtet, ist das Audio synchronisiert.
Mesmo quando os ritmos coincidem, as batidas
podem não estarem perfeitamente sincronizadas
entre as fontes. Os LEDs do TIME OFFSET acenderão
na direção da fonte do áudio que está fora da
sincronização. Quando o LED verde acender, o áudio
está em sincronização.
Page 27
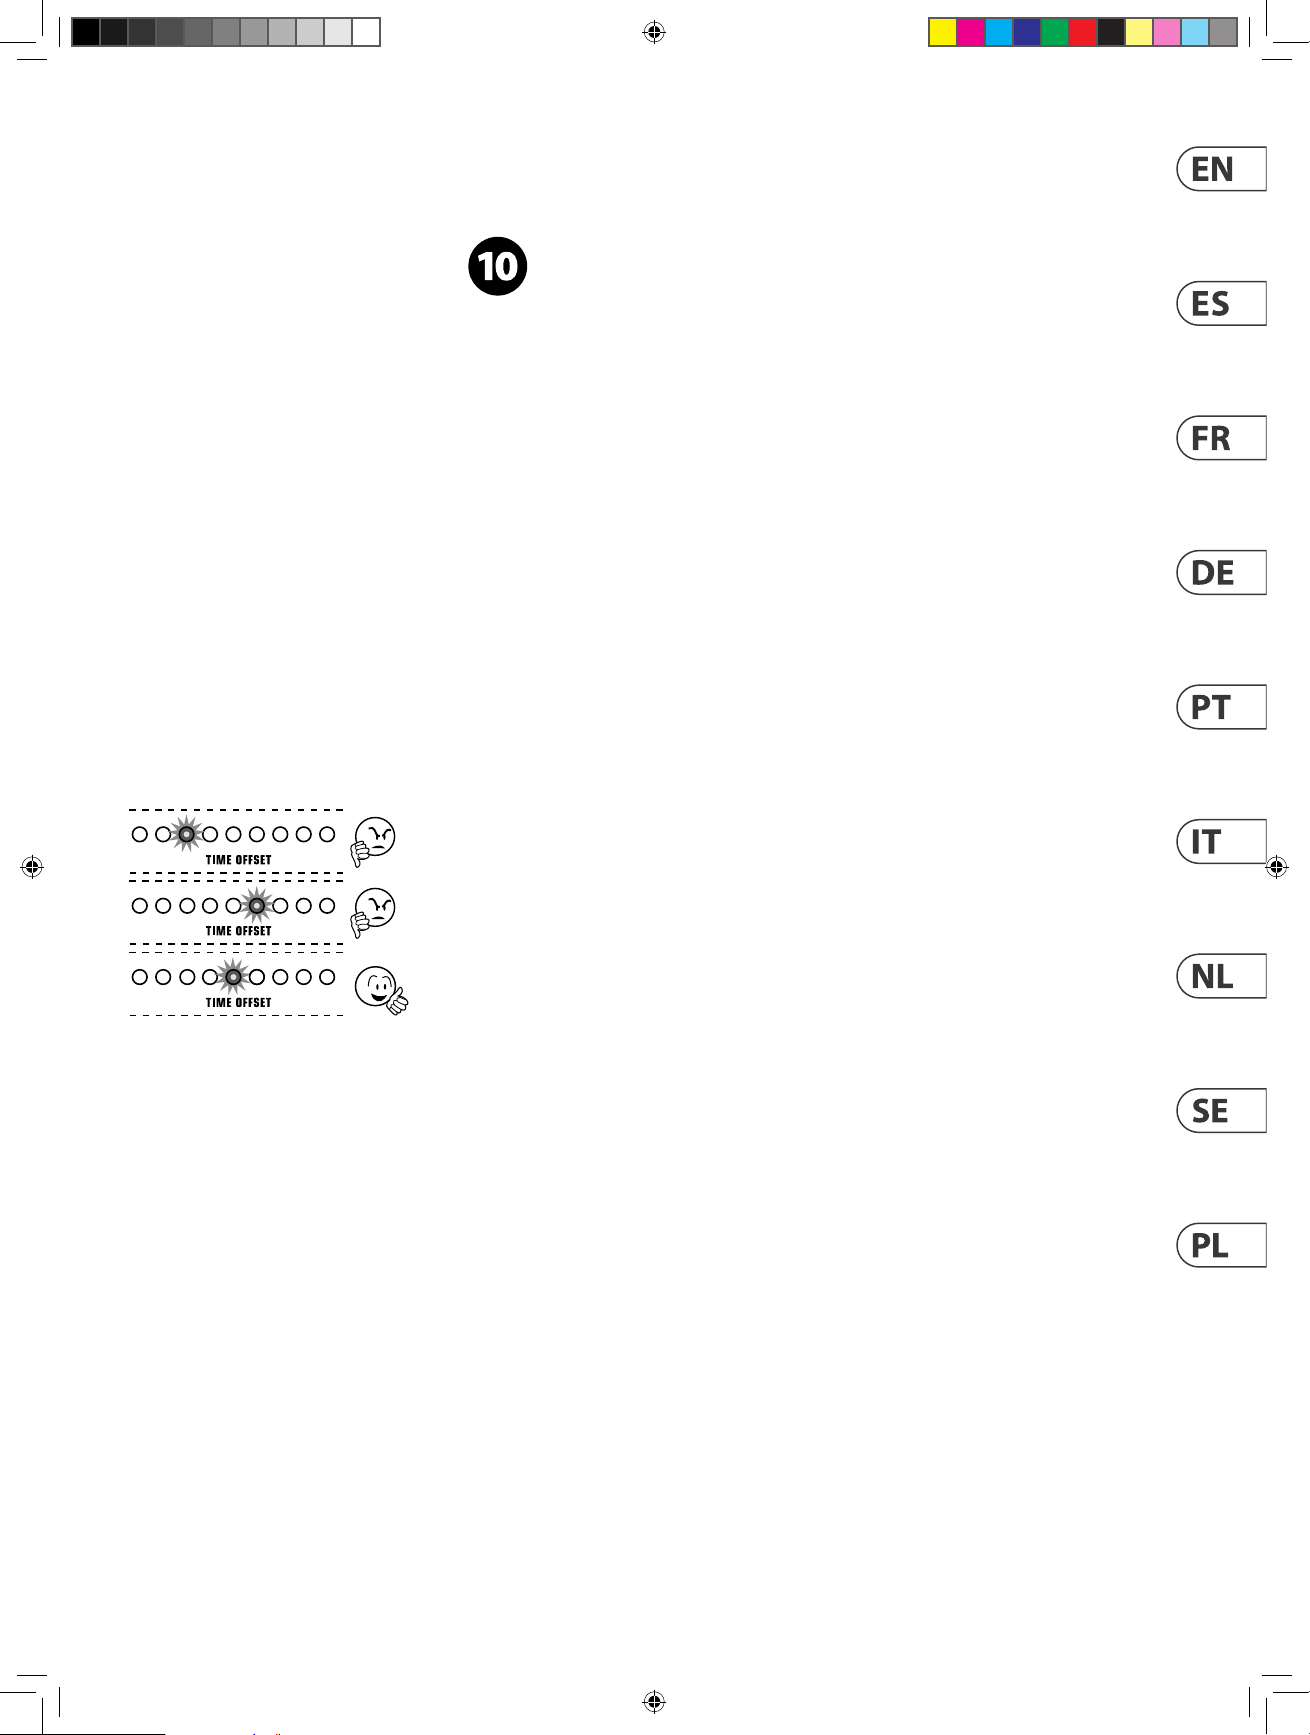
Quick Start Guide
27
Anche quando i tempi corrispondono, i beat
potrebbero non essere perfettamente sincronizzati
tra le sorgenti. I led TIME OFFSET si accenderanno
in direzione della sorgente il cui audio non è
sincronizzato. Quando si accende il led verde,
l'audio è sincronizzato.
Zelfs als de tempo's overeenkomen, zijn de beats
mogelijk niet perfect gesynchroniseerd tussen
de bronnen. De TIME OFFSET-leds lichten op in
de richting van de bron waar van de audio niet
synchroon is. Wanneer de groene LED brandt, is de
audio gesynchroniseerd.
Även när tempot matchar kanske beats kanske
inte synkroniseras perfekt mellan källorna. TIME
OFFSET-lysdioderna tänds i riktning mot källan vars
ljud är ur synk. När den gröna lysdioden tänds är
ljudet synkroniserat.
Nawet jeśli tempa się zgadzają, rytmy mogą nie być
idealnie zsynchronizowane między źródłami. Diody
LED TIME OFFSET zaświecą się w kierunku źródła,
którego dźwięk nie jest zsynchronizowany. Gdy
świeci się zielona dioda LED, dźwięk jest
zsynchronizowany.
To exit SYNC LOCK, press the SYNC LOCK
button for each source.
Para salir de esta función SYNC LOCK,
pulse el botón SYNC LOCK de cada fuente.
Pour quitter le mode SYNC LOCK, appuyez sur la
touche SYNC LOCK de chaque source.
Um SYNC LOCK zu verlassen, drücken Sie die SYNC
LOCK-Taste für jede Quelle.
Para sair do SYNC LOCK, pressione o botão SYNC
LOCK para cada fonte.
Per uscire da SYNC LOCK, premete il tasto SYNC
LOCK di ogni sorgente.
Om SYNC LOCK te verlaten, drukt u op de SYNC
LOCK-knop voor elke bron.
För att avsluta SYNC LOCK, tryck på SYNC LOCK-
knappen för varje källa.
Aby wyjść z funkcji SYNC LOCK, naciśnij przycisk
SYNC LOCK dla każdego źródła.
Page 28
28
PRO MIXER SERIES VMX1000USB/VMX300USB/VMX200USB/VMX100USB
Specications
VMX1000USB VMX300USB VMX200USB VMX100USB
Audio Inputs
Mic In Balanced X LR, 40 dB gain ¼" TRS, 46 dB gain ¼" TRS, 40 dB gain ¼" TRS, 53 dB gain
Phono In Unbalance d RCA, 40 dB gain
Line In Unbalance d RCA, 0 dB gain
Return Unbalance d RCA, 0 dB gain Unbalance d RCA, 0 dB gain Unbalance d RCA, 0 dB gain —
Mic Aux Return ¼" unbalanced, 3 dB g ain — — —
Audio Outputs
Main Out (A) max. 25 dBu, balanced XLR max. +21 dBu @ +5 dBu (line in) max. +21 dBu @ +10 dBu (line in) max. +21 dBu @ +15 dBu (line in)
Main Out B max. 21 dBu, unbalanced — — —
Booth — max. +13 dBu — —
Tape Out typically 0 dBu
Send — — —
Mic Aux Send -∞ to +6 dBu — — —
Phones Out max. 180 mW @ 75 Ω typic ally 125 mW @ 1% THD typic ally 125 mW @ 1% THD typic ally 125 mW @ 1% THD
Subwoofer
Subwoofer Out Balanced XLR — — —
X-Over Variable 30 - 20 0 Hz — — —
Level -∞ to 0 dBu @ 0 dB inp ut — — —
Equalizer
Stereo Low +12 dB/-32 dB @ 50 Hz
Stereo Mid +12 dB/-32 dB @ 1.2 kHz +12 dB/-32 dB @ 1.2 kHz +12 dB/-32 dB @ 1.2 kHz —
Stereo High +12 dB/-32 dB @ 10 kHz
Mic Low +15/-15 dB @ 80 Hz +12/-12 dB @ 50 Hz +12/-12 dB @ 50 Hz —
Mic Mid +15/-15 dB @ 2.5 kHz — — —
Mic High +15/-15 dB @ 12 kHz +15/-15 dB @ 12 kHz +15/-15 dB @ 12 kHz —
Kill Low — -54 dB @ 50 Hz — —
Kill Mid — -44 dB @ 1 kHz — —
Kill High — -26 dB @ 10 kHz — —
USB
Audio Stereo In/Ou t
Connector Type B
Converter 16-b it
Sample rate 48 kHz
System Specications
Signal-to-noise ratio >80 dB (line) >85 dB (line) >86 dB (line) >88 dB (line)
Crosstalk <-70 dB (line) >77 dB (line) >77 dB (line) >67 dB (line)
Distortion (THD) <0.05% <0.05% <0.06% <0.025%
Frequency response 20 Hz - 20 kHz
Input gain adjustment -20 dB - +9 dB
Power Supply
Mains voltage
USA/Canada 120 V~, 60 Hz
UK/EU/SAA/CCC 230 V~,50 Hz
Japan 100 V~, 50-60 Hz
Power consumption 22 W max. 22 W max. 13 W max. 10 W
Fuse
Mains connection Standard IEC receptacle
Dimensions/Weight
Dimensions (H x W x D)
Weight 3.7 kg (8.1 lbs) 3.4 kg (7.5 lbs) 2.7 kg (6.0 lbs) 2 kg (4.4 lbs)
100-120 V~: T 500 mA H 250 V
220-230 V~: T 250 mA H 250 V
107 x 223 x 483 mm
(4.2 x 8.8 x 19.0")
100-120 V~: T 500 mA L 250 V
220-230 V~: T 315 mA L 250 V
90 x 241 x 349 mm
(3.5 x 9.5 x 13.7")
100-120 V~: T 400 mA L 250 V
220-230 V~: T 250 mA L 250 V
90 x 203 x 298 mm
(3.5 x 8 x 11 .7")
100-120 V~: T 160 mA L 250 V
220-230 V~: T 80 mA L 250 V
72 x 203 x 229 mm
2.8 x 8 x 9.0"
Page 29
Quick Start Guide
Other important information
29
Important information
1. Register online. Please register your new
Music Tribe equipment right after you purchase it by
visiting musictribe.com. Registering your purchase using
our simple online form helps us to process your repair
claims more quickly and eciently. Also, read the terms
and conditions of our warranty, if applicable.
2. Malfunction. Should your Music Tribe
Authorized Reseller not be located in your vicinity,
you may contact the Music Tribe Authorized Fulller for
your country listed under “Support” at musictribe.com.
Should your country not be listed, please check if your
problem can be dealt with by our “Online Support” which
may also be found under “Support” at musictribe.com.
Alternatively, please submit an online warranty claim at
musictribe.com BEFORE returning the product.
3. Power Connections. Before plugging the
unit into a power socket, please make sure you are using
the correct mains voltage for your particular model.
Faulty fuses must be replaced with fuses of the same type
and rating without exception.
Informations importantes
1. Enregistrez-vous en ligne. Prenez le
temps d’enregistrer votre produit Music Tribe aussi vite
que possible sur le site Internet musictribe.com. Le fait
d’enregistrer le produit en ligne nous permet de gérer
les réparations plus rapidement et plus ecacement.
Prenez également le temps de lire les termes et conditions
de notre garantie.
2. Dysfonctionnement. Si vous n’avez pas
de revendeur Music Tribe près de chez vous, contactez le
distributeur Music Tribe de votre pays : consultez la liste
des distributeurs de votre pays dans la page “Support”
de notre site Internet musictribe.com. Si votre pays n’est
pas dans la liste, essayez de résoudre votre problème avec
notre “aide en ligne” que vous trouverez également dans
la section “Support” du site musictribe.com. Vous pouvez
également nous faire parvenir directement votre demande
de réparation sous garantie par Internet sur le site
musictribe.com AVANT de nous renvoyer le produit.
3. Raccordement au secteur. Avant de relier
cet équipement au secteur, assurez-vous que la tension
secteur de votre région soit compatible avec l’appareil.
Veillez à remplacer les fusibles uniquement par des
modèles exactement de même taille et de même valeur
électrique — sans aucune exception.
Outras Informações
Importantes
1. Registre-se online. Por favor, registre seu
novo equipamento Music Tribe logo após a compra
visitando o site musictribe.com Registrar sua compra
usando nosso simples formulário online nos ajuda a
processar seus pedidos de reparos com maior rapidez e
eciência. Além disso, leia nossos termos e condições de
garantia, caso seja necessário.
2. Funcionamento Defeituoso.
Caso seu fornecedor Music Tribe não esteja localizado
nas proximidades, você pode contatar um distribuidor
Music Tribe para o seu país listado abaixo de “Suporte”
em musictribe.com. Se seu país não estiver na lista,
favor checar se seu problema pode ser resolvido com o
nosso “Suporte Online” que também pode ser achado
abaixo de “Suporte”em musictribe.com. Alternativamente,
favor enviar uma solicitação de garantia online em
musictribe.com ANTES da devolução do produto.
3. Ligações. Antes de ligar a unidade à tomada,
assegure-se de que está a utilizar a voltagem correcta para
o modelo em questão. Os fusíveis com defeito terão de
ser substituídos, sem qualquer excepção, por fusíveis do
mesmo tipo e corrente nominal.
Aspectos importantes
1. Registro online. Le recomendamos que
registre su nuevo aparato Music Tribe justo después de
su compra accediendo a la página web musictribe.com.
El registro de su compra a través de nuestro sencillo
sistema online nos ayudará a resolver cualquier
incidencia que se presente a la mayor brevedad posible.
Además, aproveche para leer los términos y condiciones de
nuestra garantía, si es aplicable en su caso.
2. Averías. En el caso de que no exista un distribuidor
Music
Tribe en las inmediaciones, puede ponerse en
contacto con el distribuidor
que encontrará dentro del apartado “Support” de nuestra
página web musictribe.com. En caso de que su país no
aparezca en ese listado, acceda a la sección “Online Support”
(que también encontrará dentro del apartado “Support”
de nuestra página web) y compruebe si su problema aparece
descrito y solucionado allí. De forma alternativa, envíenos a
través de la página web una solicitud online de soporte en
periodo de garantía ANTES de devolvernos el aparato.
3. Conexiones de corriente. Antes de enchufar
este aparato a una salida de corriente, asegúrese de que dicha
salida sea del voltaje adecuado para su modelo concreto.
En caso de que deba sustituir un fusible quemado, deberá
hacerlo por otro de idénticas especicaciones, sin excepción.
Music
Tribe de su país,
Weitere wichtige
Informationen
1. Online registrieren. Bitte registrieren Sie
Ihr neues Music Tribe-Gerät direkt nach dem Kauf auf der
Website musictribe.com. Wenn Sie Ihren Kauf mit unserem
einfachen online Formular registrieren, können wir Ihre
Reparaturansprüche schneller und ezienter bearbeiten.
Lesen Sie bitte auch unsere Garantiebedingungen,
falls zutreend.
2. Funktionsfehler. Sollte sich kein Music Tribe
Händler in Ihrer Nähe benden, können Sie den
Music Tribe Vertrieb Ihres Landes kontaktieren, der auf
musictribe.com unter „Support“ aufgeführt ist. Sollte Ihr
Land nicht aufgelistet sein, prüfen Sie bitte, ob Ihr Problem
von unserem „Online Support“ gelöst werden kann, den
Sie ebenfalls auf musictribe.com unter „Support“ nden.
Alternativ reichen Sie bitte Ihren Garantieanspruch
online auf musictribe.com ein, BEVOR Sie das
Produkt zurücksenden.
3. Stromanschluss. Bevor Sie das Gerät an
eine Netzsteckdose anschließen, prüfen Sie bitte, ob Sie
die korrekte Netzspannung für Ihr spezielles Modell
verwenden. Fehlerhafte Sicherungen müssen ausnahmslos
durch Sicherungen des gleichen Typs und Nennwerts
ersetzt werden.
Informazioni importanti
1. Registratevi online. Vi invitiamo a registrare
il nuovo apparecchio Music Tribe subito dopo averlo
acquistato visitando musictribe.com. La registrazione
dell'acquisto tramite il nostro semplice modulo online ci
consente di elaborare le richieste di riparazione in modo
più rapido ed eciente. Leggete anche i termini e le
condizioni della nostra garanzia, qualora applicabile.
2. Malfunzionamento. Nel caso in cui il
rivenditore autorizzato Music Tribe non si trovi nelle vostre
vicinanze, potete contattare il Music Tribe Authorized
Fulller per il vostro paese, elencato in “Support”
@ musictribe.com. Se la vostra nazione non è elencata,
controllate se il problema può essere risolto tramite il
nostro “Online Support”che può anche essere trovato sotto
“Support” @ musictribe.com. In alternativa, inviate una
richiesta di garanzia online su musictribe.com PRIMA di
restituire il prodotto.
3. Collegamento all’alimentazione.
Prima di collegare l'unità a una presa di corrente,
assicuratevi di utilizzare la tensione di rete corretta
per il modello specico. I fusibili guasti devono essere
sostituiti, senza eccezioni, con fusibili dello stesso tipo e
valore nominale.
Page 30
30
PRO MIXER SERIES VMX1000USB/VMX300USB/VMX200USB/VMX100USB
Other important information
Belangrijke informatie
1. Registreer online. Registreer uw nieuwe
Music Tribe-apparatuur direct nadat u deze hebt gekocht
door naar musictribe.com te gaan. Door uw aankoop
te registreren via ons eenvoudige online formulier,
kunnen wij uw reparatieclaims sneller en eciënter
verwerken. Lees ook de voorwaarden van onze garantie,
indien van toepassing.
2. Storing. Mocht uw door Music Tribe
geautoriseerde wederverkoper niet bij u in de buurt zijn
gevestigd, dan kunt u contact opnemen met de door Music
Tribe Authorized Fulller voor uw land vermeld onder
“Support” op musictribe.com. Als uw land niet in de lijst
staat, controleer dan of uw probleem kan worden opgelost
door onze "Online Support", die u ook kunt vinden onder
"Support" op musictribe.com. U kunt ook een online
garantieclaim indienen op musictribe.com VOORDAT u het
product retourneert.
3. Stroomaansluitingen. Voordat u het
apparaat op een stopcontact aansluit, moet u ervoor
zorgen dat u de juiste netspanning voor uw specieke
model gebruikt. Defecte zekeringen moeten zonder
uitzondering worden vervangen door zekeringen van
hetzelfde type en dezelfde waarde.
Ważna informacja
1. Zarejestrować online. Zarejestruj swój
nowy sprzęt Music Tribe zaraz po zakupie na stronie
musictribe.com. Zarejestrowanie zakupu za pomocą
naszego prostego formularza online pomaga nam szybciej
i efektywniej rozpatrywać roszczenia dotyczące naprawy.
Przeczytaj również warunki naszej gwarancji, jeśli dotyczy.
2. Awaria. Jeśli Twój autoryzowany sprzedawca
Music Tribe nie znajduje się w pobliżu, możesz
skontaktować się z autoryzowanym dostawcą Music Tribe
dla swojego kraju, wymienionym w sekcji „Wsparcie” na
stronie musictribe.com. Jeśli Twojego kraju nie ma na
liście, sprawdź, czy Twój problem może zostać rozwiązany
przez nasze „Wsparcie online”, które można również
znaleźć w sekcji „Wsparcie” na stronie musictribe.com.
Alternatywnie, prześlij zgłoszenie gwarancyjne online na
musictribe.com PRZED zwrotem produktu.
3. Połączenia zasilania. Przed podłączeniem
urządzenia do gniazdka sieciowego upewnij się, że
używasz odpowiedniego napięcia sieciowego dla danego
modelu. Wadliwe bezpieczniki należy bez wyjątku
wymienić na bezpieczniki tego samego typu i wartości.
Viktig information
1. Registrera online. Registrera din nya Music
Tribe-utrustning direkt efter att du köpt den genom
att besöka musictribe.com. Att registrera ditt köp med
vårt enkla onlineformulär hjälper oss att behandla dina
reparationsanspråk snabbare och mer eektivt. Läs också
villkoren i vår garanti, om tillämpligt.
2. Fel. Om din Music Tribe-auktoriserade återförsäljare
inte nns i din närhet kan du kontakta Music Tribe
Authorized Fulller för ditt land listat under “Support” på
musictribe.com. Om ditt land inte är listat, kontrollera om
ditt problem kan hanteras av vår “Onlinesupport” som
också nns under “Support” på musictribe.com. Alternativt
kan du skicka in ett online-garantianspråk på musictribe.
com INNAN du returnerar produkten.
3. Strömanslutningar. Innan du ansluter
enheten till ett eluttag, se till att du använder rätt
nätspänning för just din modell. Felaktiga säkringar
måste bytas ut mot säkringar av samma typ och
märkning utan undantag.
Page 31
Quick Start Guide
31
•
•
•
•
FEDERAL COMMUNICATIONS
COMMISSION COMPLIANCE
INFORMATION
PRO MIXER SERIES VMX1000USB/VMX300USB/
VMX200USB/VMX100USB
Responsible Party Name: Music Tribe Commercial NV Inc.
Address: 5270 Procyon Street,
Las Vegas NV 89118,
United States
Phone Number: +1 702 800 8290
PRO MIXER SERIES VMX1000USB/VMX300USB/
VMX200USB/VMX100USB
This equipment has been tested and found to comply with the limits for a Class B
digital device, pur suant to part 15 of the FCC Rules. These limits are designed
to provide reasonable protection against harmful interference in a residential
installation. This equipment generates, uses and can radiate radio frequency
energy and, if not installed and used in accordance with the instruc tions, may cause
harmful interference to radio communications. However, there is no guarantee that
interference will not occur in a particular installation. If this equipment does cause
harmful interference to radio or television reception, which can be determined
by turning the equipment o and on, the user is encouraged to try to correct the
interference by one or more of the following measures:
• Reorient or relocate the receiving antenna.
• Increase the separation between the equipment and receiver.
• Connect the equipment into an outlet on a circuit dierent from that to which the
receiver is connected.
• Consult the dealer or an experienced radio/TV technician for help.
This device complies with Part 15 of the FCC rules. Operation is subject to the
following two conditions:
(1) this device may not cause harmful interference, and
(2) this device must accept any inter ference received, including inter ference that may
cause undesired operation.
Important information:
Changes or modications to the equipment not expressly approved by Music Tribe
can void the user’s authority to use the equipment.
Hereby, Music Tribe declares that this product is in compliance with Directive 2014/35/
EU,Directive 2014/30/EU, Directive 2011/65/EU and Amendment 2015/863/EU,
Directive2012/19/EU, Regulation 519/2012 REACH SVHC and Directive 1907/2006/EC.
Full text of EU DoC is available at https://communit y.musictribe.com/
EU Representative: Music Tribe Brands DK A/S
Address: Ib Spang Olsens Gade 17, DK - 8200 Aarhus N, Denmark
Page 32
We Hear You
 Loading...