

Music Service MS-8 Owner's Manual
1
LU940407
6. Mai 1992 @ 12:49 Uhr
OWNERS MANU AL
MS-8
THE SWITCH-SWITCHER
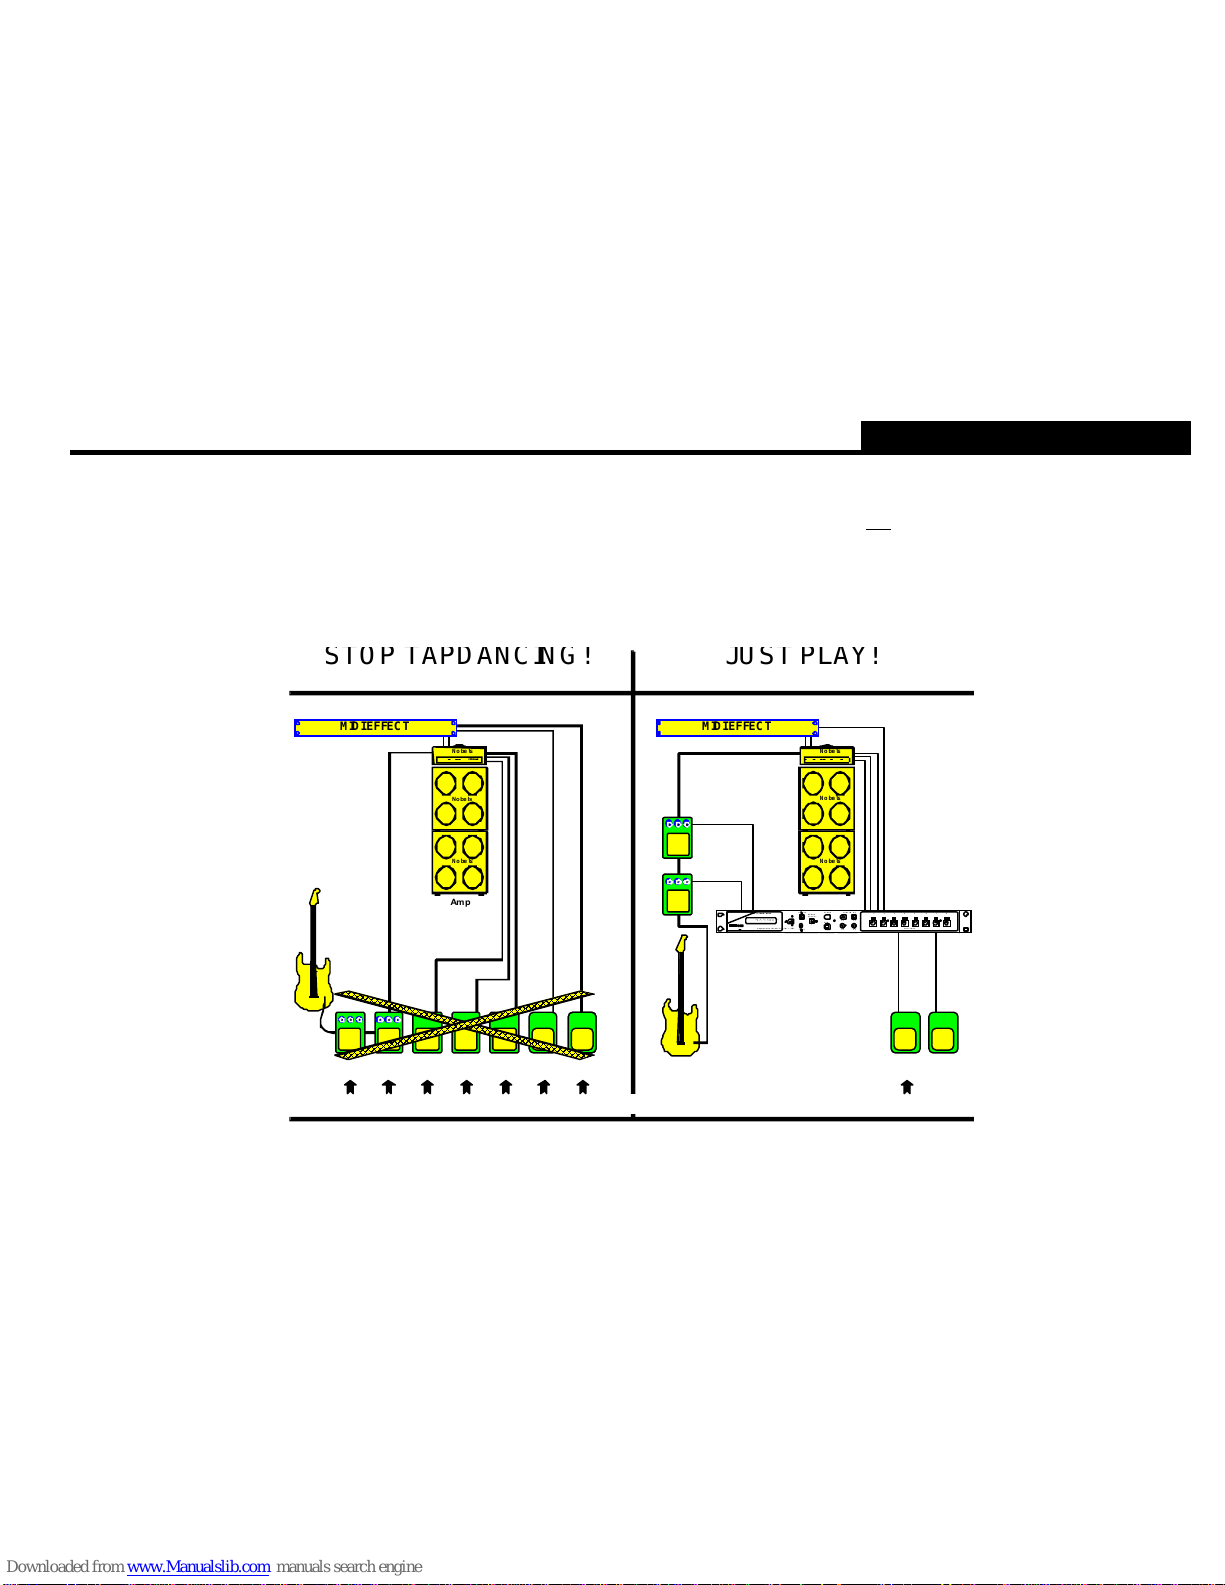
No T APDANCE anymore!
The MS-8 switches up to 17 units at the same time, conventional amps, effect-units, etc., whether if they understand MIDI or not.
The MS-8 is perfect on stage, for practicing and recording. Any self-created combination of switch settings can be recalled.
A musician can switch all components of his whole setup just by one stomp on one footswitch.
PROGRAMMABLE SWITCH CONTROLLER + MIDI
(C) 1991-1994 NOBELS A Nº1 -OF- HAMBURG CONCEPT
TM

2
LU940407
6. Mai 1992 @ 12:49 Uhr
Index
Index....................................................................................2
Introduction ........................................................................ 3
1 F ront of the MS-8 .............................................................4
2 Rear of the MS-8..............................................................5
3 Connections .....................................................................6
4 Controls............................................................................7
Internal memory .................................................................8
1 Store programs.................................................................8
2 Copy programs.................................................................8
3 Memory protection ...........................................................9
Switches / Relays ...............................................................10
1 The function .....................................................................10
2 Setup................................................................................11
Footswitches / "SONGS"...................................................12
1 The function .....................................................................12
2 Setup the footswitche s .....................................................13
3 The "SONG" mode ...........................................................14
4 How to program a "SONG"...............................................15
Title / naming the programs ..............................................16
"HELLO" message / sign your MS-8 ................................17
F-AMP / new generation ....................................................18
1 F-AMP setup .................................................................... 18
2 F-AMP list.........................................................................18
3 How to progr am the F- AMP..............................................19
MIDI...................................................................................... 20
1 MIDI IN - Select the MIDI RECEIVE CHANNEL ........ .. .. ..20
2 MIDI MAPPING programming..........................................21
3 MIDI OUT - TRANSMIT CHANNELS...............................22
4 MIDI initialise - MIDI setup! ..............................................22
F-AMP "Old generation" ....................................................23
1 How to connect................................................................. 23
2 F-AMP list.........................................................................23
Overview for adv anced us ers............................................24
1 The local parameter / stored in the programs ..................24
2 The global parameter / stored in the setup.......................24
Infor mat ion..........................................................................26
1 Overview of the programmable data ............................26
1.1 List of the global data ...................................................26
1.2 List of the the local data ...............................................26
1.3 Overview of the function keys (F1 - F4)........................26
1.4 Factory setup / or erase all...........................................27
1.5 Technical data ..............................................................27
Copy pages.........................................................................28
1 MIDI mapping...................................................................28
2 Songs and Steps..............................................................28
3 Programs..........................................................................30
(C) Copyright 1990, 1991, 1992 MS MUSIC SERVICE GmbH
All rights reserved. Copying only after written authorisation. - Authors: Bernhard Kurzke, Kai Tachibana
3
LU940407
6. Mai 1992 @ 12:49 Uhr
Introduction
Index / Introduction
You have to switch all these footswitches to change from one sound to another.................or just one of these
Some problems everybody is familar with:
You collect more and more small and big effect-units. To change from one sound to another means a wild tapdance on the various footswitches. As it is not possible (In time) to
switch all units, many musicians only use a small selection of their effect-units. Interesting and unique sounds could not be used in live performance. The MS-8 had been developed
to enable musicians to use all possible sound creations on stage, in rehearsal sessions and studios. With a simple stomp on one footswitch the MS-8 is capable of switching up
to eight conventional units, plus MIDI equipment.
The MS-8 is equipped to switch advanced models of several big brand names by offering special connectors.
How does it work? The following pages will tell you how you can simplify your setup and how you can use sound creations without any trouble - even if it is only for one note.
Time for music: Just play guitar and leave the switching work to the MS-8.
Your Nº1-OF-HAMBURG team.
EFFEC T- PEDALS
CHAN NEL
Select
REVERB
TRE MO LO DO W NUP
DOW N
UP
MS-8
AAAAAAAAAAAAAAAAAAAAAAAAAAAAAAAAAAAAAAAAAAAAA
AAAAAAAAAAAAAAAAAAAAAAAAAAAAAAAAAAAAAAAAAAAAA
AAAAAAAAAAAAAAAAAAAAAAAAAAAAAAAAAAAAAAAAAAAAA
AAAAAAAAAAAAAAAAAAAAAAAAAAAAAAAAAAAAAAAAAAAAA
AAAAAAAAAAAAAAAAAAAAAAAAAAAAAAAAAAAAAAAAAAAAA
AAAAAAAAAAAAAAAAAAAAAAAAAAAAAAAAAAAAAAAAAAAAA
AAAAAAAAAAAAAAAAAAAAAAAAAAAAAAAAAAAAAAAAAAAAA
AAAAAAAAAAAAAAAAAAAAAAAAAAAAAAAAAAAAAAAAAAAAA
AAAAAAAAAAAAAAAAAAAAAAAAAAAAAAAAAAAAAAAAAAAAA
AAAAAAAAAAAAAAAAAAAAAAAAAAAAAAAAAAAAAAAAAAAAA
AAAAAAAAAAAAAAAAAAAAAAAAAAAAAAAAAAAAAAAAAAAAA
AAAAAAAAAAAAAAAAAAAAAAAAAAAAAAAAAAAAAAAAAAAAA
AAAAAAAAAAAAAAAAAAAAAAAAAAAAAAAAAAAAAAAAAAAAA
BBBBBBBBBBBBBBBBBBBBBBBBBBBBBBBBBBBBBBBBBBBBB
BBBBBBBBBBBBBBBBBBBBBBBBBBBBBBBBBBBBBBBBBBBBB
BBBBBBBBBBBBBBBBBBBBBBBBBBBBBBBBBBBBBBBBBBBBB
BBBBBBBBBBBBBBBBBBBBBBBBBBBBBBBBBBBBBBBBBBBBB
BBBBBBBBBBBBBBBBBBBBBBBBBBBBBBBBBBBBBBBBBBBBB
BBBBBBBBBBBBBBBBBBBBBBBBBBBBBBBBBBBBBBBBBBBBB
BBBBBBBBBBBBBBBBBBBBBBBBBBBBBBBBBBBBBBBBBBBBB
BBBBBBBBBBBBBBBBBBBBBBBBBBBBBBBBBBBBBBBBBBBBB
BBBBBBBBBBBBBBBBBBBBBBBBBBBBBBBBBBBBBBBBBBBBB
BBBBBBBBBBBBBBBBBBBBBBBBBBBBBBBBBBBBBBBBBBBBB
BBBBBBBBBBBBBBBBBBBBBBBBBBBBBBBBBBBBBBBBBBBBB
BBBBBBBBBBBBBBBBBBBBBBBBBBBBBBBBBBBBBBBBBBBBB
BBBBBBBBBBBBBBBBBBBBBBBBBBBBBBBBBBBBBBBBBBBBB
MIDI EFF ECT MIDI EFF ECT
F1
12345 678
SWITCHES
+1-1YES
NO
EXIT
F4
A No . 1 - OF - HA MBUR G CONCEP TTM
F3
F2
STORE
MENUE
SELECT
FUNCTIONS
M S - 8 S w i t c h e r 2 E
H i , r u r e a d y ?
Programmable Switch Cont roll er + Midi
STOP TAPDANCI NG! JUST PLAY!
Am p
Nobels
Nobels
Nobels
zi ckezack
Nobels
Nobels
Nobels
zickezack
4
LU940407
6. Mai 1992 @ 12:49 Uhr
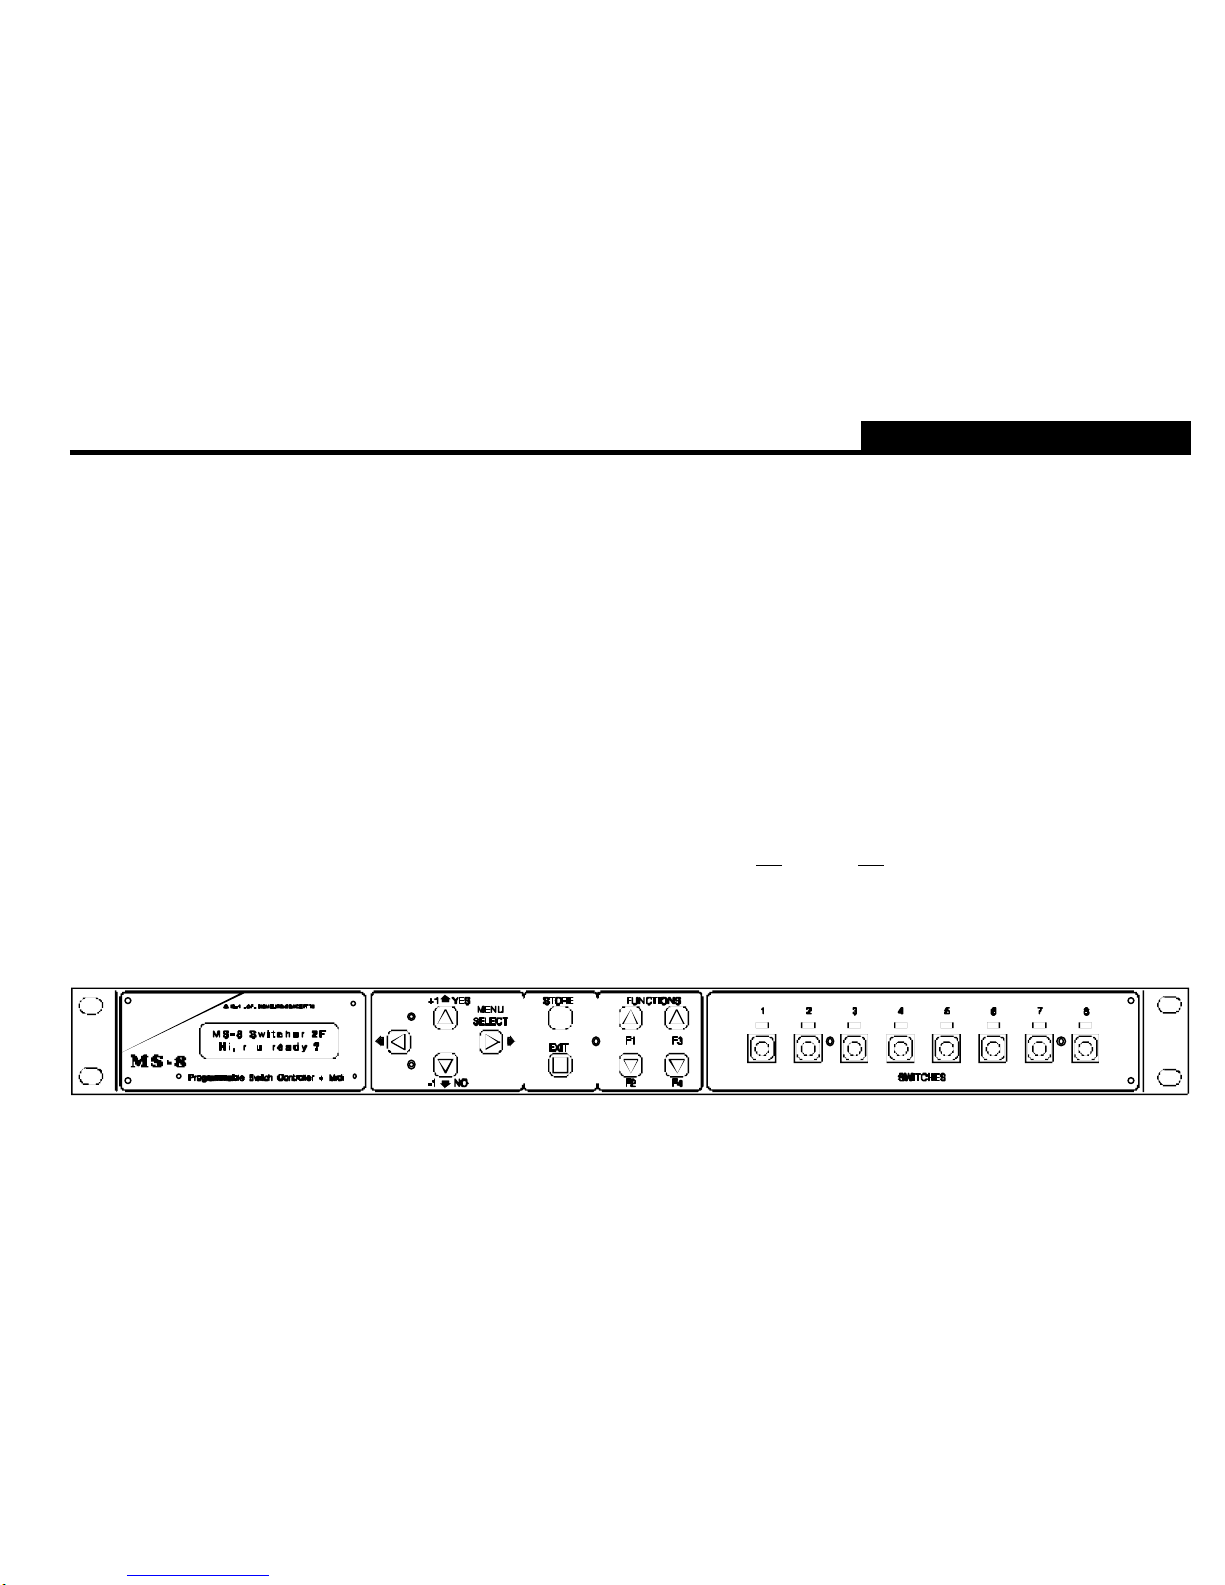
1 Front of the MS-8
7
123 65
4
1 Front of the MS-8
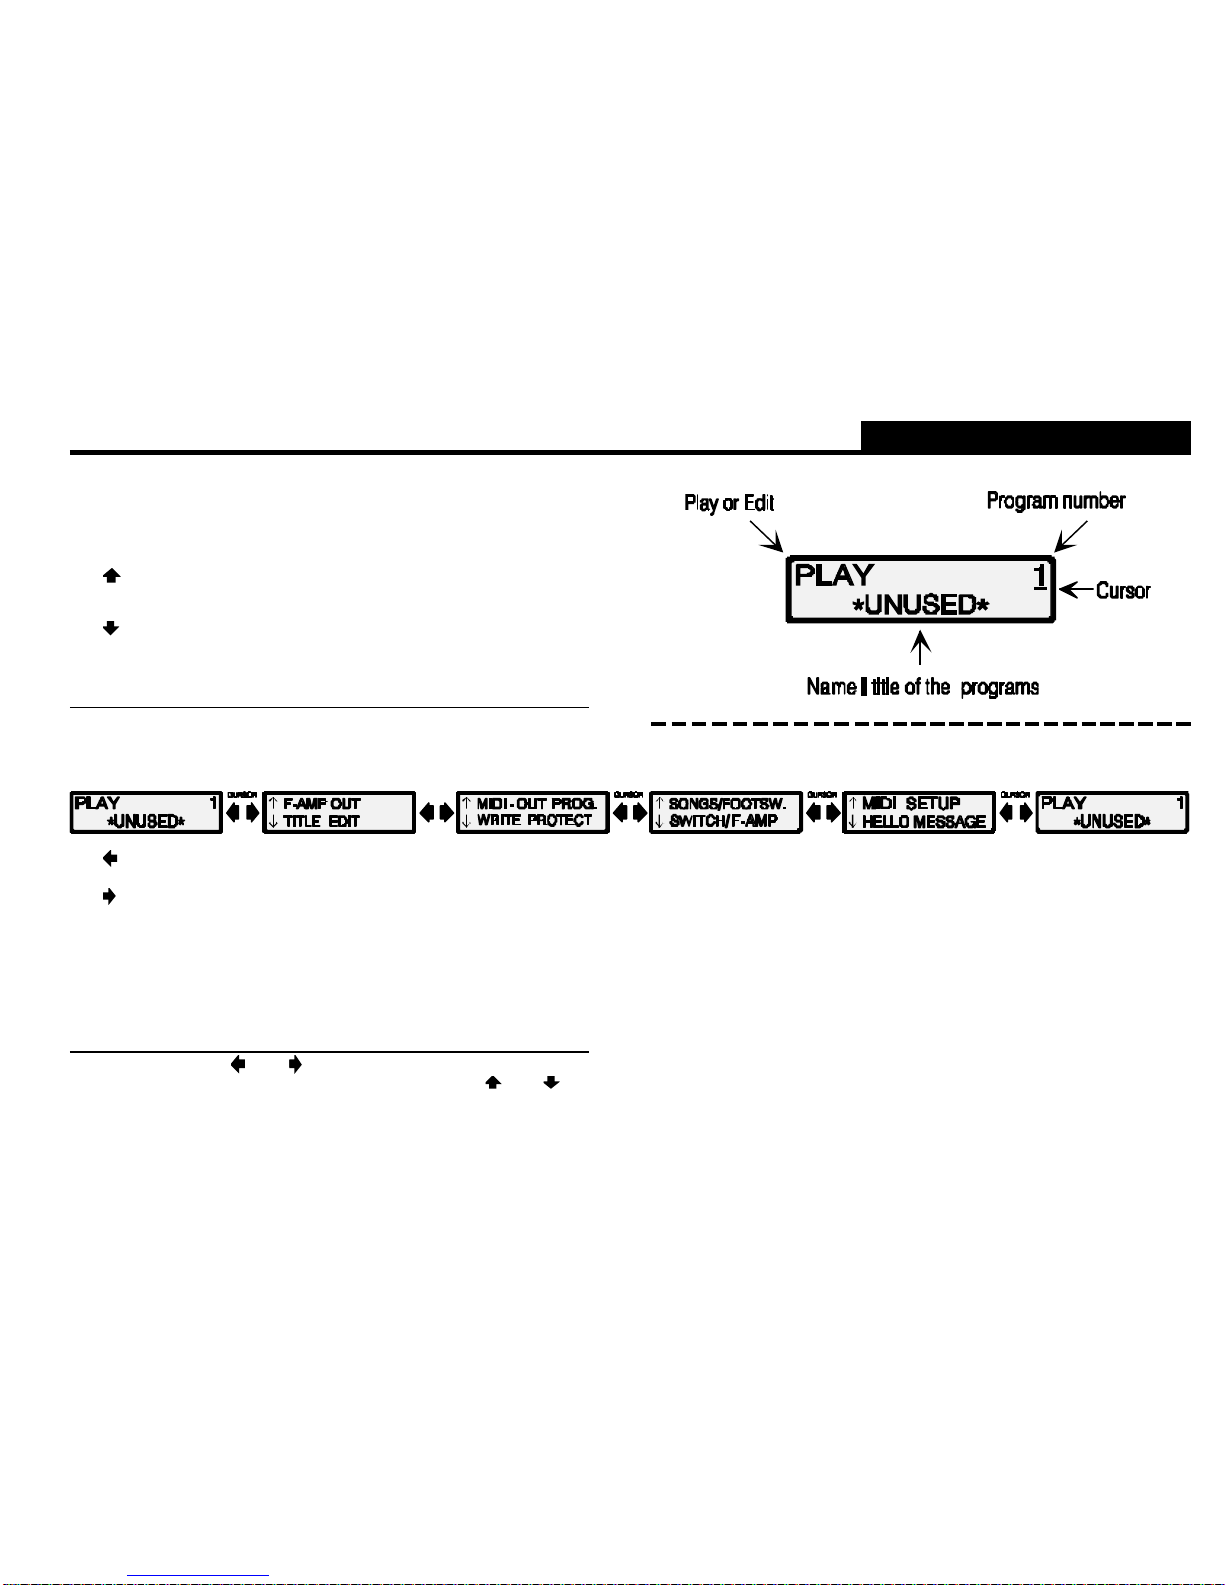
(1) The LC-DISPLAY
To communicate with the MS-8 please follow the instructions of the LC-DISPLAY (1).
The data in each menu shows data which can be changed by pressing one of the
CURSOR keys (2) [ ], [ ][ ] and [ ], or the functionkeys (F1 - F4) (5). The viewing
angle of the LC-DISPLAY is adjustable, by using the DISPLAY CONTRAST control
(16), located on the rear. This is very helpful if the MS-8 is mounted high in a rack or
low on a small amp.
(2) The CURSOR keys
With the CURSOR keys [ ] and [ ] you can select the functions or parameters of
the MS-8, and with the CURSOR keys [ ] and [ ] you can change the values of
those parameters.
(3) The "STORE" key
With this key you can store or copy programs. In some menus the "STORE" key is
used for special functions, to make handling easier. (see corresponding chapters)
(4) The "EXIT" key
With this key you can interupt a store or copy function without changing anything. With
the CURSOR keys (2) you select a menu ("Go into" a menu) and with the "EXIT" key
(4) you leave it ("Go out" of a menu).
(5) The FUNCTION keys (F1 - F4)
These four keys have the same functions as the connected FOOTSWITCHES (F1-F4)
(13) at the rear of the MS-8. (If the MS-8 is in the "PLAY") In some menus these keys are
used for special functions, to make handling easier. (see corresponding chapters)
(6) The LED-lamps above key "SWITCHES 1 - 8"
show whether a connected unit is activated or is not activated. In non activated state the
LEDS are dimmed so that you still can see them in the dark. Flashing of one LED indicates
special functions. (see corresponding chapters)
(7) The key "SWITCHES 1 - 8"
These keys control the switches / relays. Also you can select special functions for these
keys in some menus.
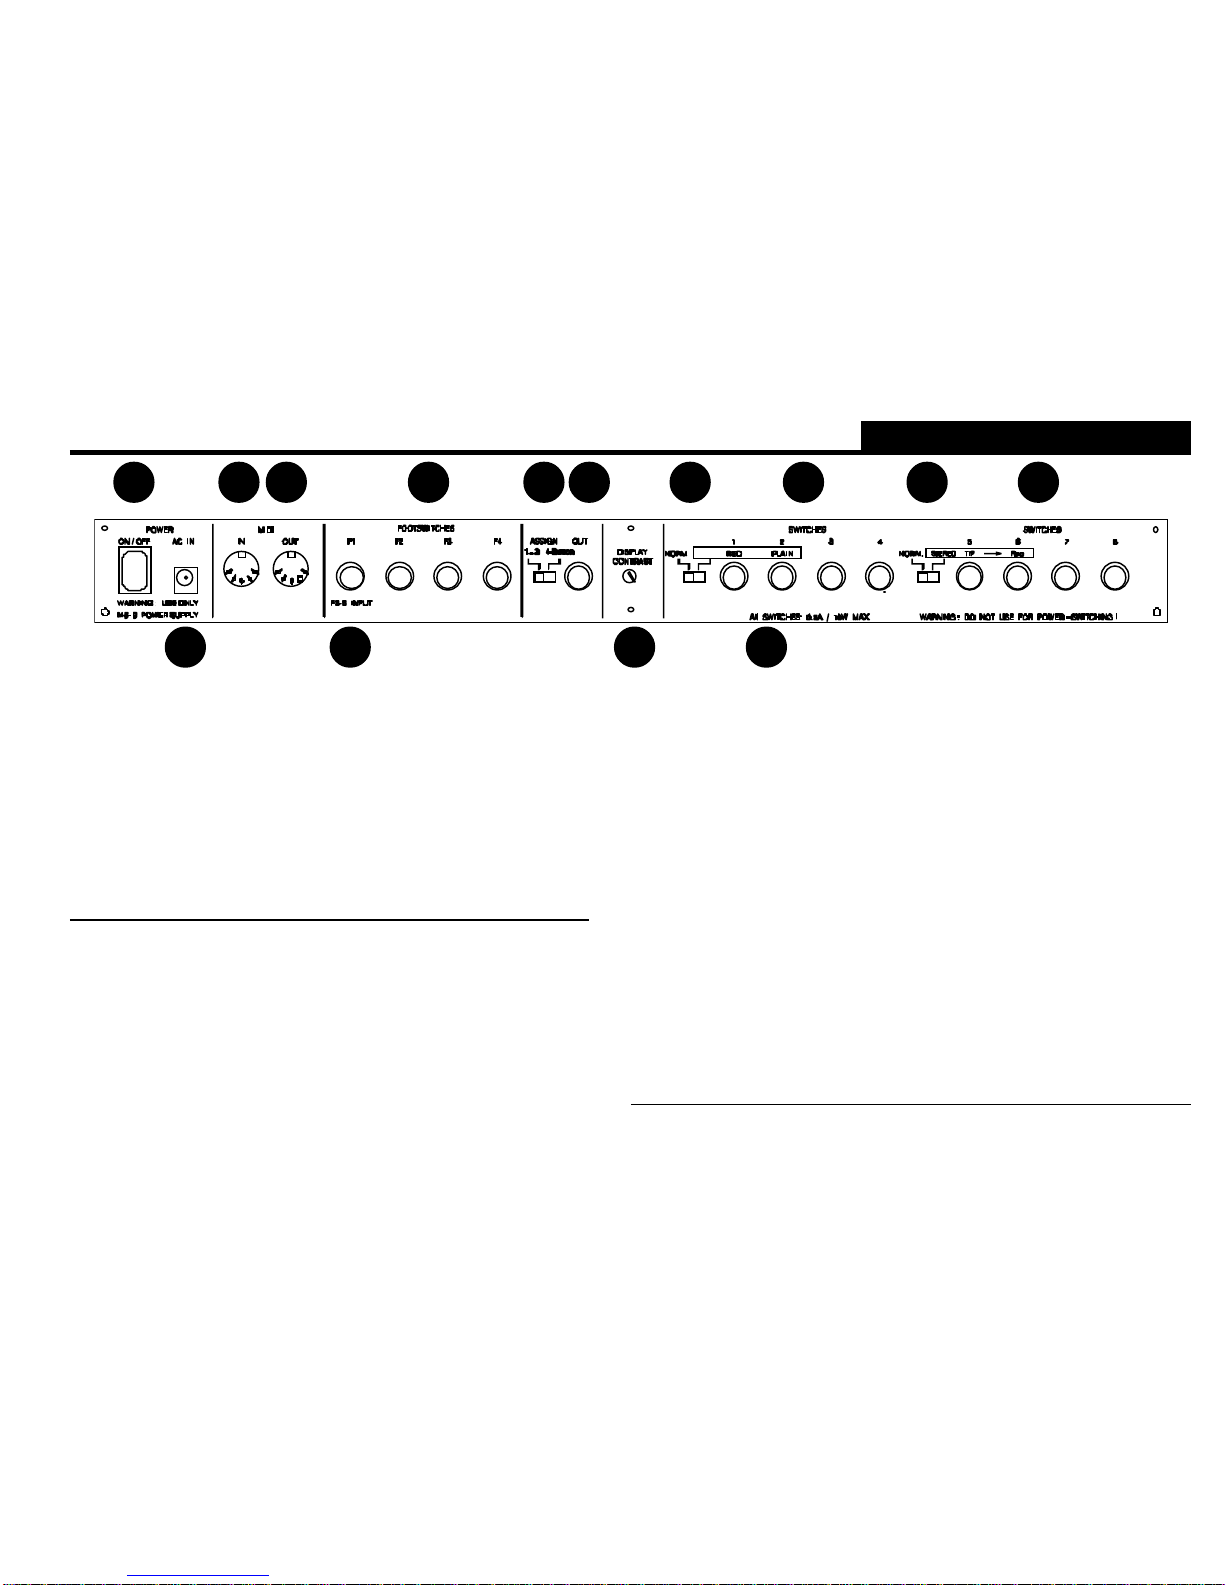
2 Rear of the MS-8
(8) The ON / OFF SWITCH
This key switches the MS-8 ON and OFF.
(9) The AC-IN jack
Connect the power supply unit (PSU) to this jack. You can use either a PSU with AC 7.5V
/ 1A or DC 10V / 1.2 A.
WARNIN G: Other PSU may not work properly or could damage the MS-8.
5
LU940407
6. Mai 1992 @ 12:49 Uhr
2 Rear of the MS-8
Front / Rear of the MS-8
8
9
10 11 13
12
14 15
16
17
18
19 20 19
(10) The MIDI IN jack
This jack connects units which can send MIDI PROGRAM CHANGE DATA.
E.g.: Sequencers, MIDI footcontrollers, keyboards, etc.
(11) MIDI OUT jack
This jack connects to any units which can receive MIDI PROGRAM CHANGE
DATA.
(12) RC-8 INPUT jack
The RC-8 remote controller can be connected to this jack with a standard stereo
cable. (The RC-8 is a optional footcontroller for the MS-8 with 8 footswitches and
a big 4 digit display).
NOTE: If you do not use a RC-8 controller you must use a standard mono cable!
(13) FOOTSWITCH Jacks F1 - F4
The MS-8 also can be controlled by inexpensive footswitches. Up to 4 remote
footswitches can be connected to the 4 FOOTSWITCHES jacks F1 - F4 on the back
panel. For correct functioning you must use momentary switches. The type which
has closed contact during pressing and open contact in released state.
(14) ASSIGN switch
This switch matches the MS-8 to various Fender (*1) amp models. (F-AMP)
(15) OUT jack
Fender amps of the new generations can be connected to this special jack.
(16) DISPLAY CONTRAST control
This control adjusts the viewing angle of the LC-DISPLAY (1).
(17) NORM. - RED / PLAIN slide switch
This switch matches the MS-8 to various Fender (*1) amp models of the old generation and
prepares the 2 jack SWITCHES 1 + 2 (18) for these amps.
(18) RED / PLAIN jacks
Fender amps of the old generation can be connected to these jacks with 2 standard stereo
cables.
(19) "SWITCHES 1 - 8" jacks
All amplifiers, effect-units, etc. which have an input for a remote footswitch can be
connected to these 8 jacks. All connected units can now be controlled by the "SWITCHES
1-8" on the front panel of the MS-8.
(20) NORM. - STEREO slide switch
This switch matches the MS-8 to various Marshall, Mesa Boogie (*1), etc. models. The jack
"SWITCHES 6" now works in stereo mode, controlling 2 functions (Like Channel switching
and Reverb)
(*1) Fender, Marshall and Mesa Boogie are registered trademarks.

6
LU940407
6. Mai 1992 @ 12:49 Uhr
3 Connections
MS-8 PROGRAM Amp-channel Distortion-pedal Reverb Send MIDI
1 Cl ean OFF ON PRG.Nº.: 30
2 Cl ean ON OFF PRG.Nº.: 92
3 Overdr ive OFF OFF PRG.Nº.: 12
......
128 . . . . etc.
Example for possible connections: All units can be connected and
controlled by the MS-8 at the same time.
Y ou ca n control with the MS-8:
- up to 8 units which have conventional switching
+ 1 Fender amp with up to 4 switching functions
+ up to 5 MIDI units with selectable MIDI TRANSMIT CHANNELS (1-16)
Y ou can control the MS-8:
-
by the 4 FUNCTION KEYS (F1-F4) on the front panel
- by inexpensive standard momentary footswitches
- by incoming MIDI signals
- by the optional RC-8 Remote Controller
You can create up to 128 user PROGRAMS.
Each PROGRAM is a combination of pre-selected switch settings.
For example:
FENDE R OUT
MS-8
Top View
F-amp
F-am p
7
LU940407
6. Mai 1992 @ 12:49 Uhr
4 Controls
Connections / Controls
The CURSOR keys:
1 In the "PLAY" mode
you can use the keys for selecting one of the 128 PROGRAMS or to select the
menus.
The [ ] key counts the PROGRAMS up to the next PROGRAM NUMBER each
time the key is pressed.
The [ ] key counts the PROGRAMS down to the previous PROGRAM NUMBER
each time the key is pressed .
If you hold one of these keys down the PROGRAM will scroll up and down (fast!).
ATTENTION: If you are in the "EDIT" mode the changed data will not be stored and
the changes will be lost!
The [ ] key select the menus each time the key is pressed.
The [ ] key also select the menus each time the key is pressed but from the other
direction
2 In the "EDIT" mode
or in the menus you can use the four CURSOR keys to change the parameter.
Mainl y: With the keys [ ] and [ ] you select the POSITION of the CURSORS
(CURSOR = Line under the display) and with the keys [
] and [ ] the
VALUE of the FUNCTION or confirm with: "YES" or "NO".
8
LU940407
6. Mai 1992 @ 12:49 Uhr
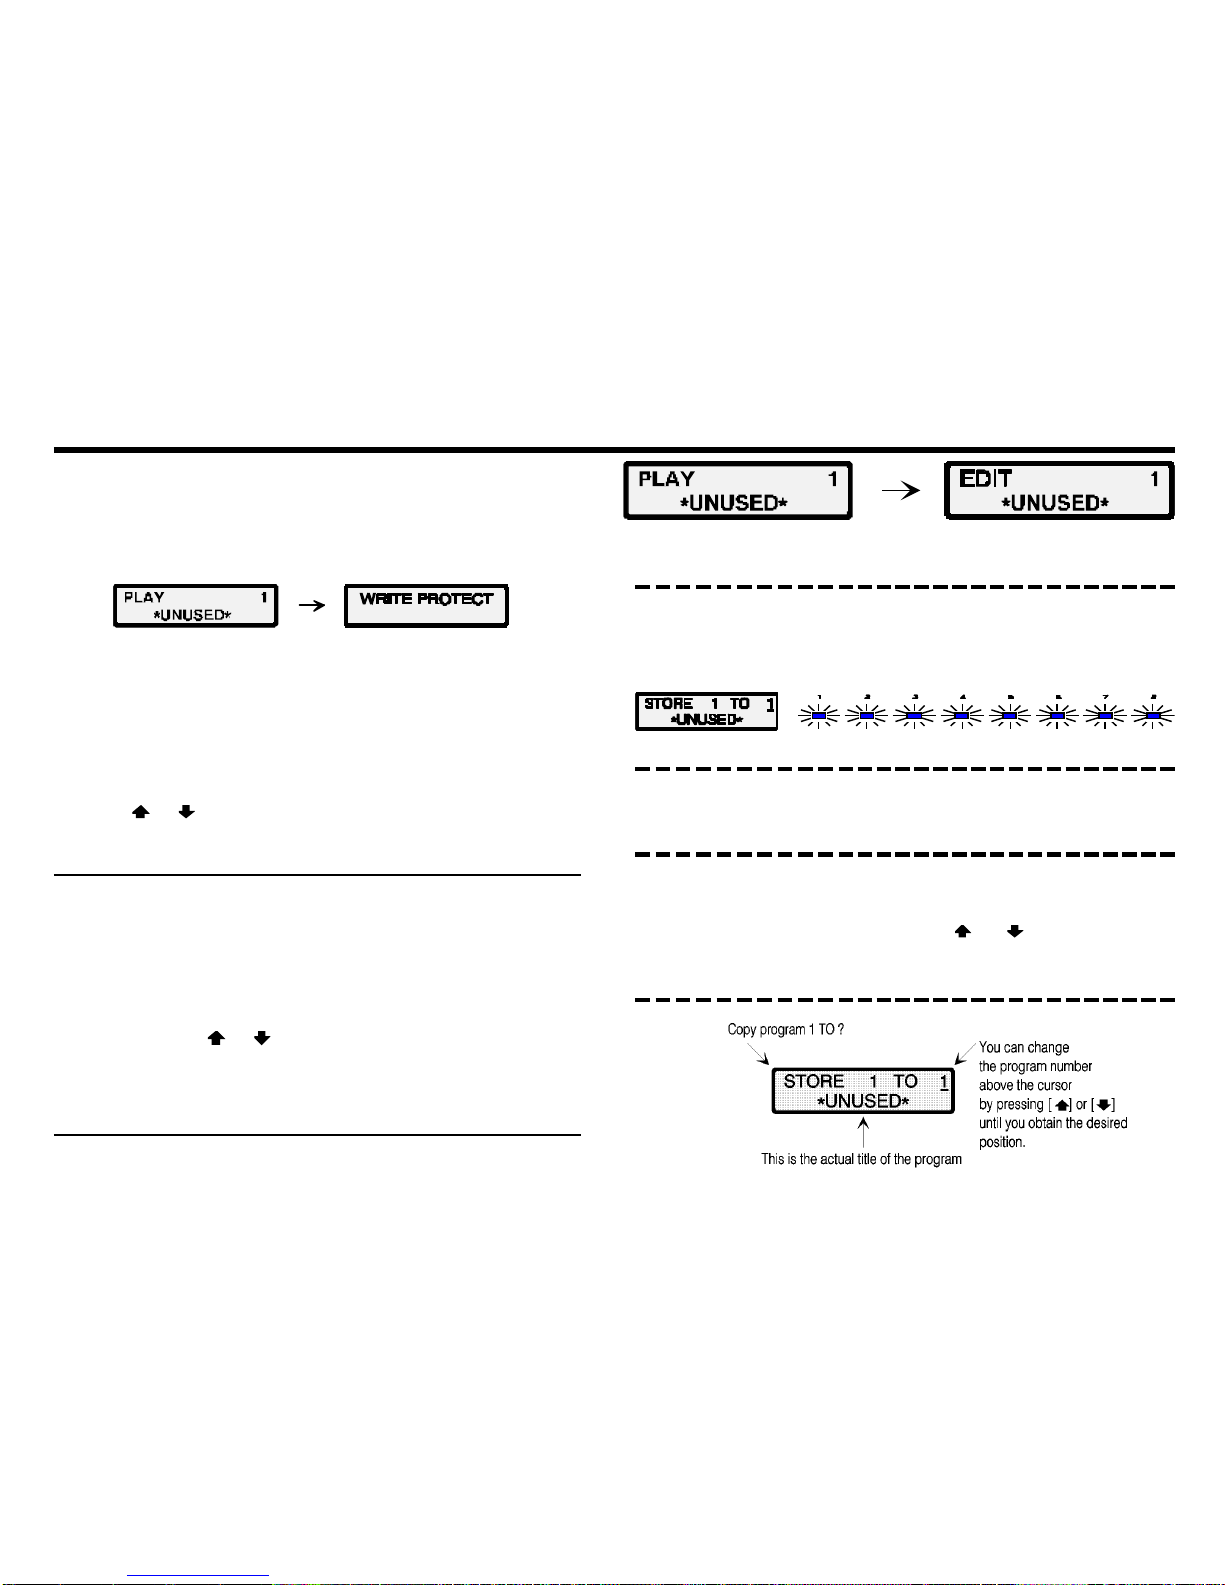
Internal memory
This is your last chance to leave the store process. You interupt it if you
press the "EXIT" key!
If you press the "STORE" key twice the actual program (Number after
"STORE") will be stored to the desired PROGRAM NUMBER (Number
after "TO"). This program can be changed to another location if you
change it with one of the CURSOR keys [
] or [ ].
After pressing the "STORE" key the LEDS "SWITCHES 1-8" are flashing
and the display shows: (E.g.) "STORE 1 TO 1"
1 "ST ORE" PROGRAMS (1-128)
If you change anything on a "PLAY" PROGRAM (1-128) the DISPLAY will change
from "PLAY" to "EDIT".
If the message "WRITE PROTECT" appears on the display instead of "EDIT"
you can not overwrite the data.
This is the memory protection feature. If you want to make any changes you have to
change the "WRITE PROTECT" to OFF. See also chapter "MEMORY PROTECTION".
If you want to store a PROGRAM (1-128) you have to press the "STORE" key once.
Now the LED of the key "SWITCHES 1-8" are flashing and the display shows:
If you want to move the actual PROGRAM (1-128) to another, you have to press one
of the keys [ ] or [ ] until you reached the desired PROGRAM NUMBER.
A second press on the "STORE" key finally stores the PROGRAM.
You can immediately interupt the "STORE" process by pressing the "EXIT" key.
2 "COPY" PROGRAMS (1-128)
To copy a PROGRAM (1-128) to another location you have to press the "STORE"
key once. Now the LEDS of the keys "SWITCHES 1-8" are flashing.
To move the actual PROGRAM (1-128) to the desired PROGRAM (1-128), you have
to press the one of the [ ] or [ ] keys until you reached the desired PROGRAM
NUMBER.
A second press on the "STORE" key stores the PROGRAM (1-128). The LED are
stop flashing.
You can immediately stop the store process by pressing the "EXIT" key.
The display shows "EDIT" if you change anything on the actual program!
9
LU940407
6. Mai 1992 @ 12:49 Uhr
Internal memory
Internal memory
Main menu:
3 Memory protection
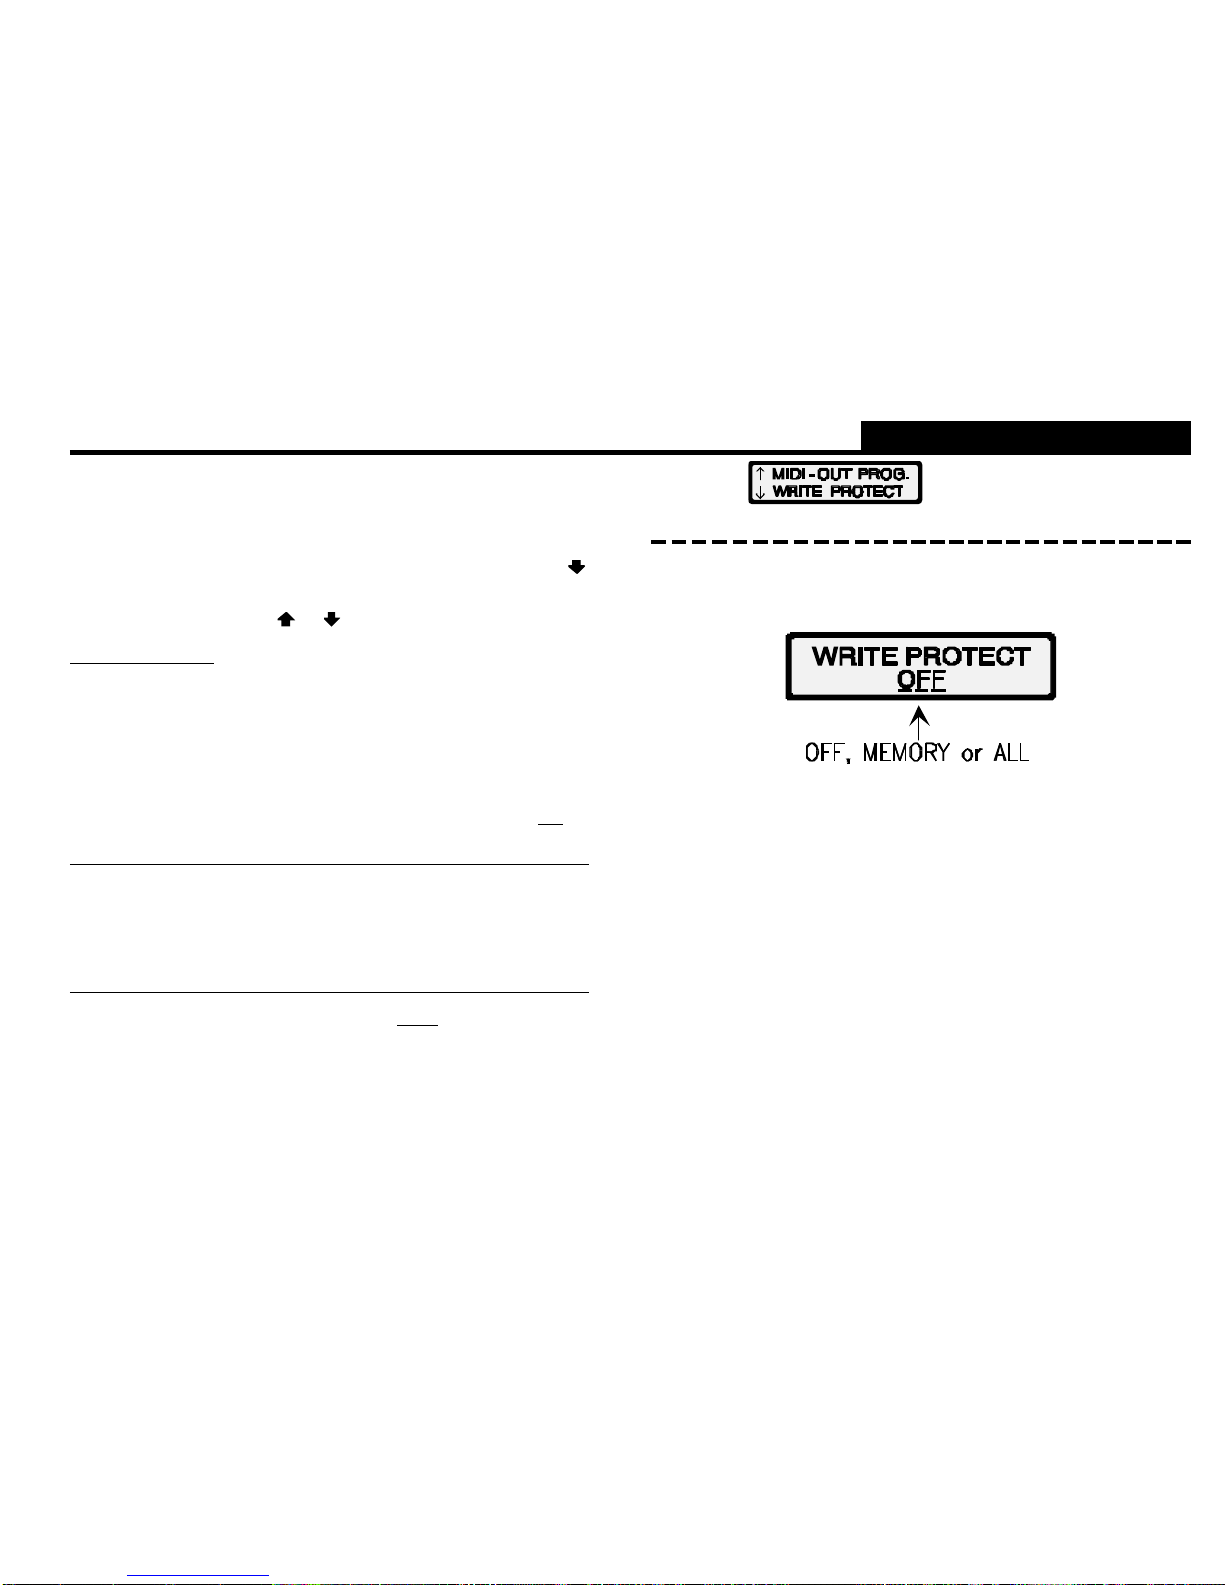
The internal memory of the MS-8 can be protected against accidental overwriting.
To activate or disable the memory protection you have to select the "WRITE
PROTECT" menu. To jump into this menu you have to press the CURSOR key [ ]
once.
With one of the CURSOR keys [ ] or [ ] you can change the actual state.
In the function:
"WRITE PROTECT OFF"
the memory protection is disabled.
"WRITE PROTECT MEMORY"
changing or overwriting the 128 PROGRAMS (1-128) is not possible.
"WRITE PROTECT ALL"
changing or overwriting the 128 PROGRAMS (1-128) is not possible and the
functions of the SWITCHES 1-8 on the front are protected.
Easy programming with the functionkeys (F1-F4) :
- F1 = WRITE PROTECT OFF F2 = WRITE PROTECT MEMORY - F3
= WRITE PROTECTALL - F4 =
No function
Note: Only using the"EXIT" key to leave the menu will store the changes into the
internal memory. If you switch the MS-8 off
before pressing the "EXIT" key
the MS-8 can not write into the internal memory and the data is lost.
 Loading...