

Page 1

REALLPC 5
USER'S MANUAL
COPYRIGHT © 2009-2019 BY MUSICLAB, INC.
Page 2

2
Table of Contents
ABOUT THE PROGRAM ........................................................................................................................ 5
WHAT’S NEW IN REALLPC 5 ................................................................................................................. 7
New RealLPC 5 guitar sample set.................................................................................................. 7
New Multi Performance mode ..................................................................................................... 7
New Usability Features ................................................................................................................. 7
And more… .................................................................................................................................... 7
INSTALLING REALLPC ............................................................................................................................ 8
Installing RealLPC PC version ........................................................................................................ 8
Installing RealLPC Mac version ..................................................................................................... 8
Launching RealLPC ........................................................................................................................ 8
Managing Sound Bank .................................................................................................................. 9
Virtual Fretboard ......................................................................................................................... 10
Virtual Keyboard ......................................................................................................................... 10
RealLPC Guitar Patches ............................................................................................................... 11
Guitar Tunings ............................................................................................................................. 11
Pickup Selections ........................................................................................................................ 12
REALLPC GLOBAL MODES .................................................................................................................. 13
MIDI KEYBOARD GLOBAL MODE ........................................................................................................ 14
User Keyboard Layout ................................................................................................................. 14
Performance Modes ................................................................................................................... 15
Solo Mode ................................................................................................................................... 16
Controls ................................................................................................................................ 16
Velocity Switch Effects ......................................................................................................... 16
Permanent Effects ............................................................................................................... 17
Pedal Switch Effects ............................................................................................................. 18
Modulation Switch Effects ................................................................................................... 19
Key Switch Effects ................................................................................................................ 20
MIDI Controller pane (Solo Mode) ...................................................................................... 21
Hold button in Solo mode .................................................................................................... 21
MIDI Guitar mode ................................................................................................................ 22
Harmony Mode ........................................................................................................................... 23
Chords Mode ............................................................................................................................... 24
Controls ................................................................................................................................ 25
Bass & Chord Mode .................................................................................................................... 26
Controls ................................................................................................................................ 26
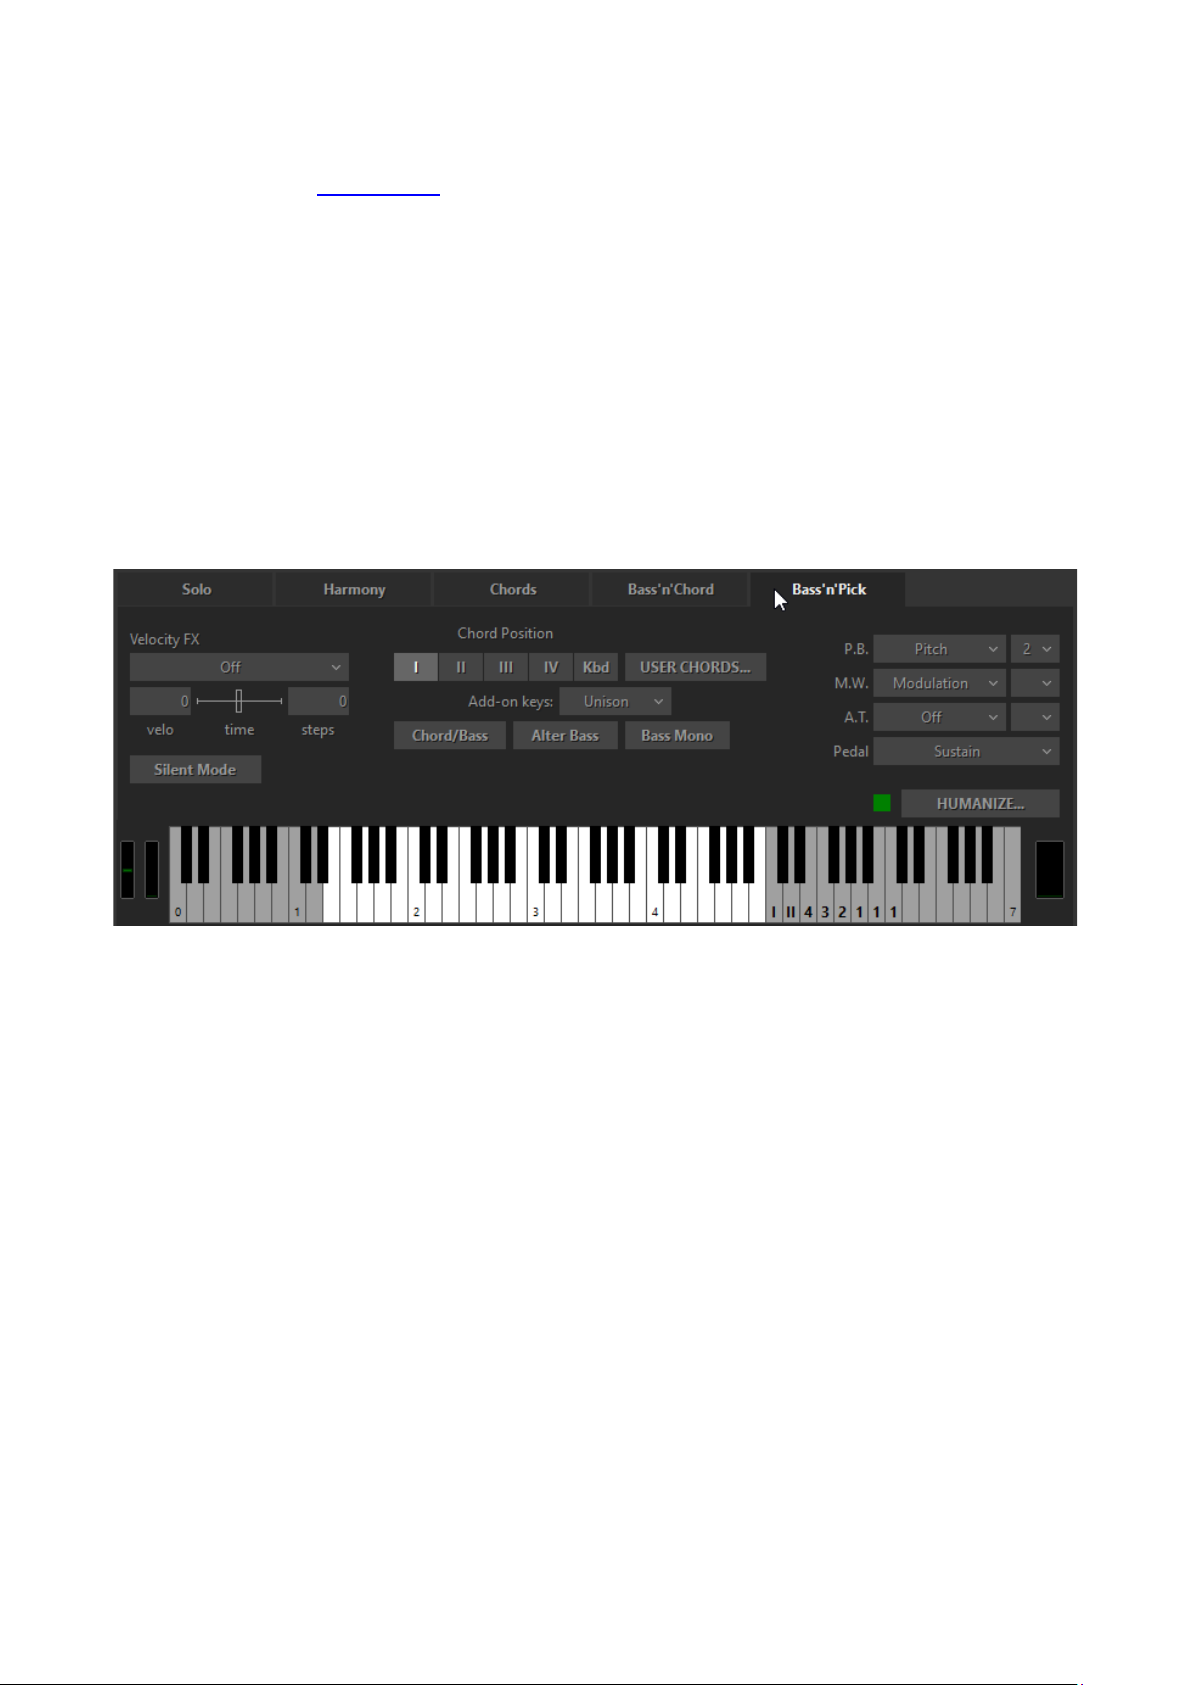
Bass & Pick Mode ........................................................................................................................ 27
Controls ................................................................................................................................ 29
Velocity Switch FX (Harmony, Chords, Bass&Chord, Bass&Pick) ............................................... 30
MIDI Controllers pane (Chords, Bass&Chord, Bass&Pick) .......................................................... 30
Silent mode (Chords, Bass&Chord, Bass&Pick) .......................................................................... 31
MULTI GLOBAL MODE ........................................................................................................................ 32
Performance Presets ............................................................................................................ 32
Layout Section ...................................................................................................................... 32
Page 3

3
Chord Section ....................................................................................................................... 36
Velocity FX Section ............................................................................................................... 39
Key Switch FX .............................................................................................................................. 45
MAIN CONTROLS ................................................................................................................................ 47
Left Menu bar ............................................................................................................................. 47
Output panel ........................................................................................................................ 47
Tune panel ........................................................................................................................... 47
Setup panel .......................................................................................................................... 48
Velo panel ............................................................................................................................ 49
Right Menu bar ........................................................................................................................... 50
Timing panel ......................................................................................................................... 50
Mixer 1 panel ....................................................................................................................... 50
Mixer 2 panel ....................................................................................................................... 51
Wah-Wah panel ................................................................................................................... 51
Common controls ........................................................................................................................ 52
RealLPC Effect Table and Description ......................................................................................... 53
MIDI controller additional FX ............................................................................................... 58
Additional FX found in Chordal modes ................................................................................ 58
CHORD MAP ....................................................................................................................................... 59
USER CHORDS .................................................................................................................................... 60
Chord Editor ................................................................................................................................ 61
Editing chords ............................................................................................................................. 61
Auditioning chords ...................................................................................................................... 62
Saving User Chord Bank .............................................................................................................. 62
User Chords view ........................................................................................................................ 62
Exporting/Importing User Chord Banks ...................................................................................... 62
PATTERN GLOBAL MODE ................................................................................................................... 63
Using MusicLab Rhythm Pattern Library and Pattern Manager ................................................. 63
Pattern Manager ......................................................................................................................... 63
Pattern Manager Window ................................................................................................... 63
Finding Pattern in MusicLab Pattern Library ....................................................................... 64
Selecting Category and Style ............................................................................................... 65
Selecting pattern .................................................................................................................. 65
Auditioning Pattern .............................................................................................................. 66
Controlling pattern playback ............................................................................................... 66
Transferring Pattern to host's MIDI Track ........................................................................... 67
Using Rhythm Patterns in a MIDI Track ...................................................................................... 68
Non real-time method ......................................................................................................... 68
Real-time method ................................................................................................................ 68
Controlling pattern playback ............................................................................................... 69
Creating Custom Styles for Pattern Library ................................................................................ 69
Organizing Existing Patterns in Custom Styles ..................................................................... 69
Creating Custom Patterns .................................................................................................... 70
RealLPC Stroke Map .................................................................................................................... 71
PARAMETER AUTOMATION MAP ...................................................................................................... 72
MIDI CC Automation, value to parameter map .......................................................................... 74
Page 4

4
SONG GLOBAL MODE ......................................................................................................................... 76
Working with Patterns ................................................................................................................ 77
Pattern Library Browser ....................................................................................................... 77
Style Filter ............................................................................................................................ 77
Pattern Track ........................................................................................................................ 78
Inserting Single Strum .......................................................................................................... 79
Working with Chords .................................................................................................................. 79
Chord Selector ..................................................................................................................... 79
Editing Chords ...................................................................................................................... 80
‘Favorites’ Section ................................................................................................................ 81
Importing chords from the WEB page ................................................................................. 81
Importing the chord set from a Text Document.................................................................. 83
Time Line ..................................................................................................................................... 84
Moving Song events to MIDI track.............................................................................................. 85
Controls ....................................................................................................................................... 85
Settings Panel .............................................................................................................................. 87
Keyboard Shortcuts ..................................................................................................................... 88
HUMANIZE ......................................................................................................................................... 89
Sound .......................................................................................................................................... 89
Timing .......................................................................................................................................... 90
Velocity ....................................................................................................................................... 90
Pitch ............................................................................................................................................ 90
Master section ............................................................................................................................ 90
DOUBLE-TRACKING ............................................................................................................................ 91
IMPORTING/EXPORTING GLOBAL SETTINGS ..................................................................................... 93
APPENDIX A. NRPN MAP .................................................................................................................... 94
CONTACTING MUSICLAB .................................................................................................................... 98
Page 5
5
ABOUT THE PROGRAM
Gibson's Les Paul® Custom, a higher end variation of the Gibson Les Paul guitar has been used by
the majority of world famous musicians, spanning generations and genres, such as Wes
Montgomery, Al Di Meola, Pat Metheny, Chuck Berry, Jeff Beck, Peter Frampton, The Beatles, The
Rolling Stones, Led Zeppelin, B.B. King, Bob Marley, Eric Clapton, Carlos Santana, Gary Moore,
Eddie Van Halen, Lenny Kravitz, and many others.
RealLPC is a sample-based virtual instrument with an innovative approach to guitar sound
modeling and guitar part performing on keyboard.
RealLPC provides incredible playability based on the unique performance modes and easy-to-use
keyboard layout as well as the advanced key/pedal/velocity switch system allowing a keyboardist
to perform guitar parts with a whole new level of realistic expression.
RealLPC covers practically all sounds, articulations, and techniques a professional guitarist can
produce on his Les Paul, including mute, bridge mute, harmonics, pinch harmonics, unison bend,
strumming, picking, chord choking, scraping, etc...
High quality dry samples recorded directly from Les Paul Custom pick-ups let you easily create any
desired guitar sound using your favorite amplifier simulator.
Page 6

6
The true power of RealLPC lies in brand new technologies incorporated in this innovative guitar
performance tool:
• Multi-channel layering technology, incorporating a custom library of specially recorded
samples taken from every fret of all 6 strings of a real guitar.
• Floating Fret Position technology, which imitates change of fret position of a guitarist's
hand on the neck. This gives you the possibility of playing on up to 140 guitar frets using
just 46 keys of a standard keyboard!
• Ready-to-use Double Tracking configuration with a single MIDI input.
• Our original Guitar Touch technology letting you easily imitate basic guitar techniques
(strumming, plucking, sliding, bending, muting, etc..), using standard MIDI keyboard and
MIDI controllers, such as Pitch Bender, Modulation Wheel, Sustain Pedal, Aftertouch.
• Advanced Humanize section allowing to easily add realism to the performance, both live
and step-recorded in a MIDI track, or automatic.
• Guitar Rhythm Pattern technology providing powerful Pattern Manager completed with
huge MusicLab Guitar Pattern Library for easily creating guitar accompaniment tracks. All
you have to do is to find the appropriate rhythm pattern(s) in the Pattern Manager tree
view, copy it to the needed number of measures, start your sequencer and use MIDI
keyboard to play chord changes, or alternatively add chords to a MIDI track via sequencer's
editor.
• Song Mode turning RealLPC 5 into a powerful and easy-to-use songwriting tool allowing
you in no time create perfect guitar backing tracks for your songs. Simply insert chord
symbols and rhythm patterns into the built-in Song Track - and your guitar part is ready!
These technologies allow to closely emulate live guitar sound and techniques, letting you perform
guitar parts with a whole new level of realistic expression.
Page 7

7
WHAT’S NEW IN REALLPC 5
NEW REALLPC 5 GUITAR SAMPLE SET
• High quality 24-bit samples, recorded directly from Neck and Bridge pickups individually.
• 3 realtime pickup selections (Key Switch FX) giving you the exiting tonal options.
• Standard and Baritone guitar tunings.
• Backward compatible with previous versions of RealLPC.
NEW MULTI PERFORMANCE MODE
• Combining various guitar techniques (strumming, soloing, string picking, etc.) in a single
performance layout.
• 25 new Key Switch FX.
• Velocity controllable number of strings in strummed chords.
• Live control of solo and strum techniques.
• Live control of chord inversions/positions.
• Free voices leading in strummed chords.
• Hammer-Ons and Pull-Offs in chords.
• Slider (Bottleneck) guitar technique emulation.
• Numerous performance options, effects, and their combinations.
NEW USABILITY FEATURES
• Advanced Velocity Curve control.
• Resizable GUI.
• Internal Loop in Song mode.
• Drag and Drop Song events (chords and patterns) to DAW MIDI track.
• Use of DAW MIDI track to edit and playback Song events directly to Song mode window.
• Hold Pedal on virtual keyboard.
• Pitch Wheel and Mod. Wheel MIDI activity indicators.
AND MORE…
Page 8

8
INSTALLING REALLPC
INSTALLING REALLPC PC VERSION
Double-click RealLPC Installer file and follow the on-screen instructions.
In case your VST/VST3 plugins folder is not registered correctly RealLPC installer will not
automatically install RealLPC.dll’s in the correct folder. There for, to let your VST host ‘find’
RealLPC you have to manually copy RealLPC.dll, RealLPC (2 mono).dll, RealLPC (2 stereo).dll, and
RealLPC.vst3 files from RealLPC installation folder to your VSTplugins/VST3 directory.
RealLPC default installation folders:
32bit: C:\Program Files (X86)\MusicLab\RealLPC 5
64bit: C:\Program Files\MusicLab\RealLPC 5
INSTALLING REALLPC MAC VERSION
Double-click RealLPC Installer icon and follow the on-screen instructions.
LAUNCHING REALLPC
Launching RealLPC as a VST/AU instrument:
1. Open your DAW (host application).
2. Create Software Instrument track.
3. Add RealLPC to the track.
4. Open the RealLPC window by double-clicking the RealLPC button/icon.
Launching RealLPC as a standalone version:
PC: In Start Menu go to Programs/MusicLab RealLPC 5 folder and click the RealLPC icon.
MAC: Run HD/Applications/RealLPC 5.
Page 9
9
MANAGING SOUND BANK
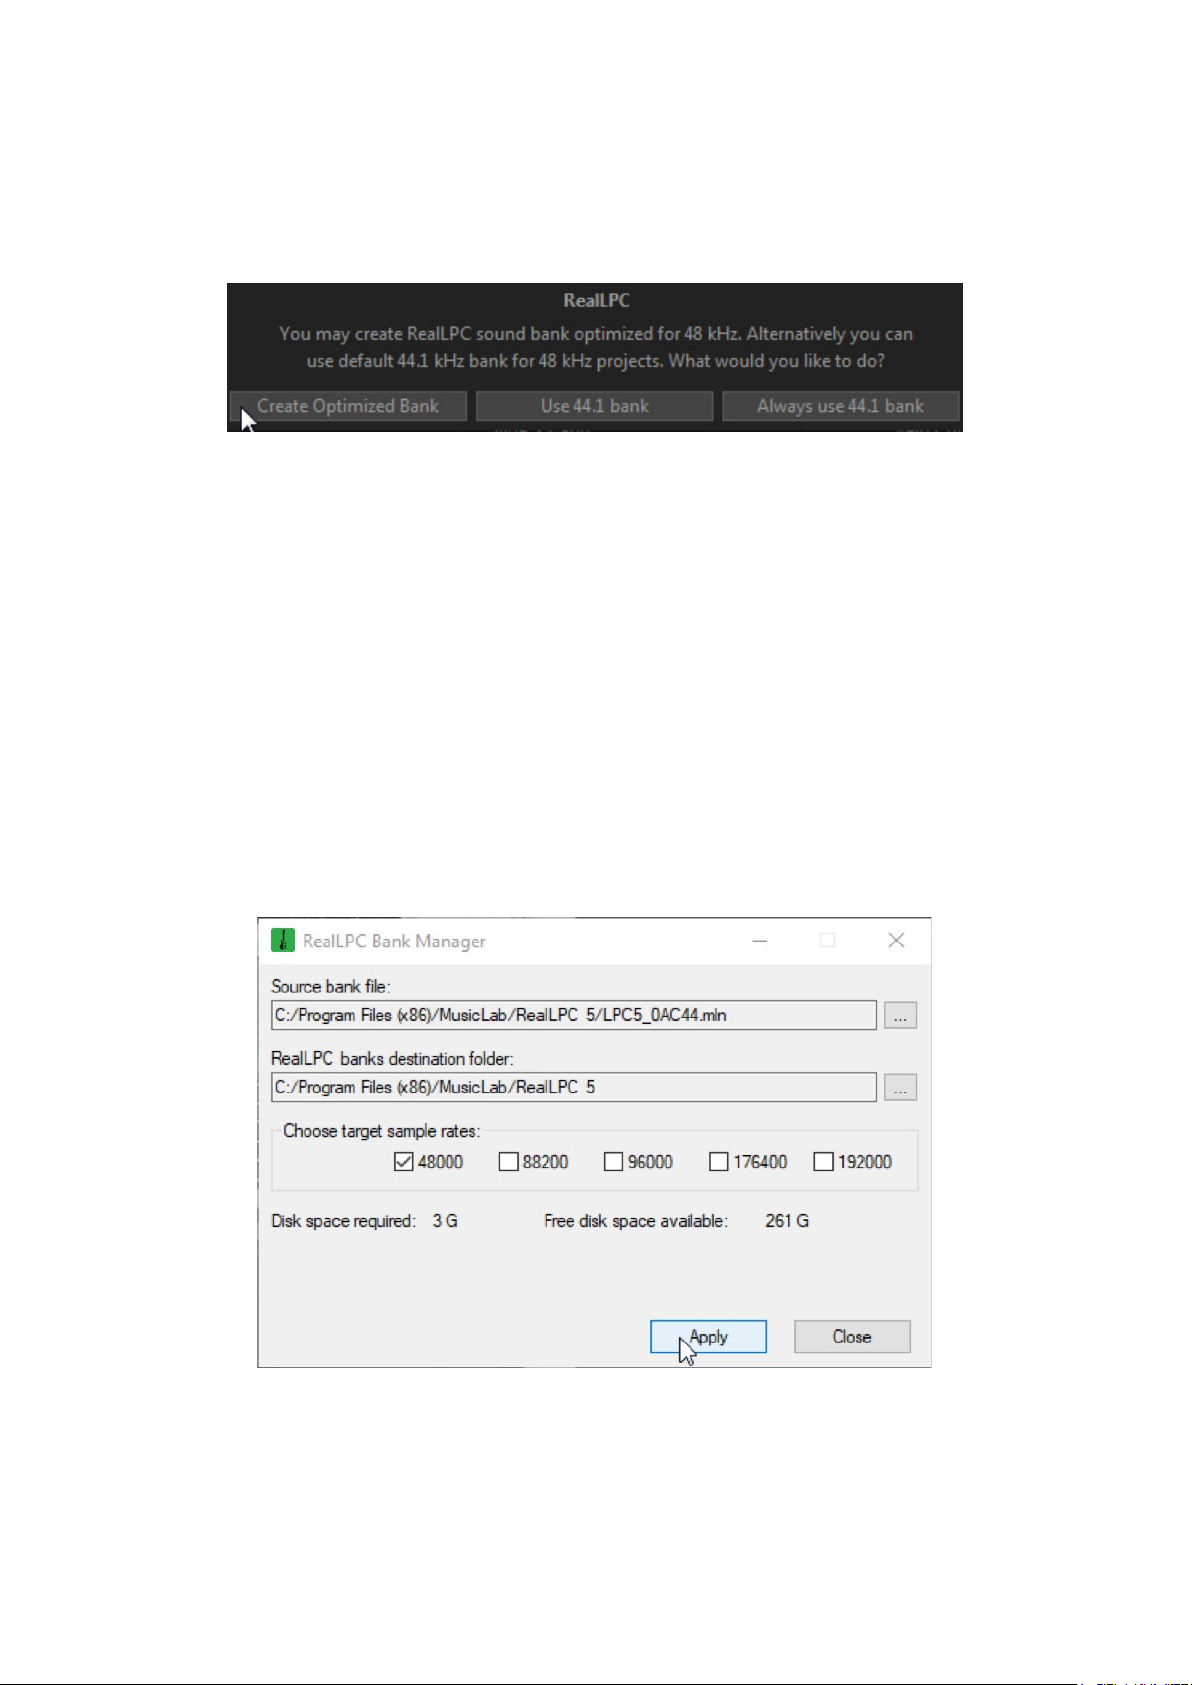
Note, that the installer will create 44.1 kHz sample rate sound bank. In case your audio settings
have other than 44.1 kHz sample rate, RealLPC on launching will ask if you want to optimize the
sound bank to match your audio settings.
Selecting ‘Create Optimized Bank’ button will bring up RealLPC Bank Manager, which will
automatically create the needed sample rate sound bank.
You can as well manually run Bank Manager to create sound bank(s) optimized for sample rate(s)
you normally use in your audio work.
To run Bank Manager:
PC: Go to Start menu->All Programs->MusicLab RealLPC 5->RealLPC Bank Manager, or alternatively
double-click the StgMan.exe icon found in RealLPC installation folder (by default: C:\Program
Files\MusicLab\RealLPC 5).
Mac: Run RealLPC standalone version and select Sound Bank Manager in RealLPC Application
menu.
PC/Mac: Click MusicLab logo and select Open Bank Manager in popup menu.
In the opened Bank Manager window check the appropriate sample rate box(es) and click Apply
button to start sound bank creating.
Close Bank Manager when sound bank installation is completed. Note, that higher sample rate
value will install larger target sound bank.
Page 10
10
VIRTUAL FRETBOARD
In RealLPC we have realized the Floating Fret Position principle, which imitates change of fret
position of a guitarist's hand on the neck. This gives a unique possibility of playing on up to 140
guitar frets using just 46 keys of a standard keyboard! This, along with the fact that we have
sampled 22 frets of all six strings for all of our RealLPC sounds, allows you to emulate a guitar
performance with maximum sonic accuracy.
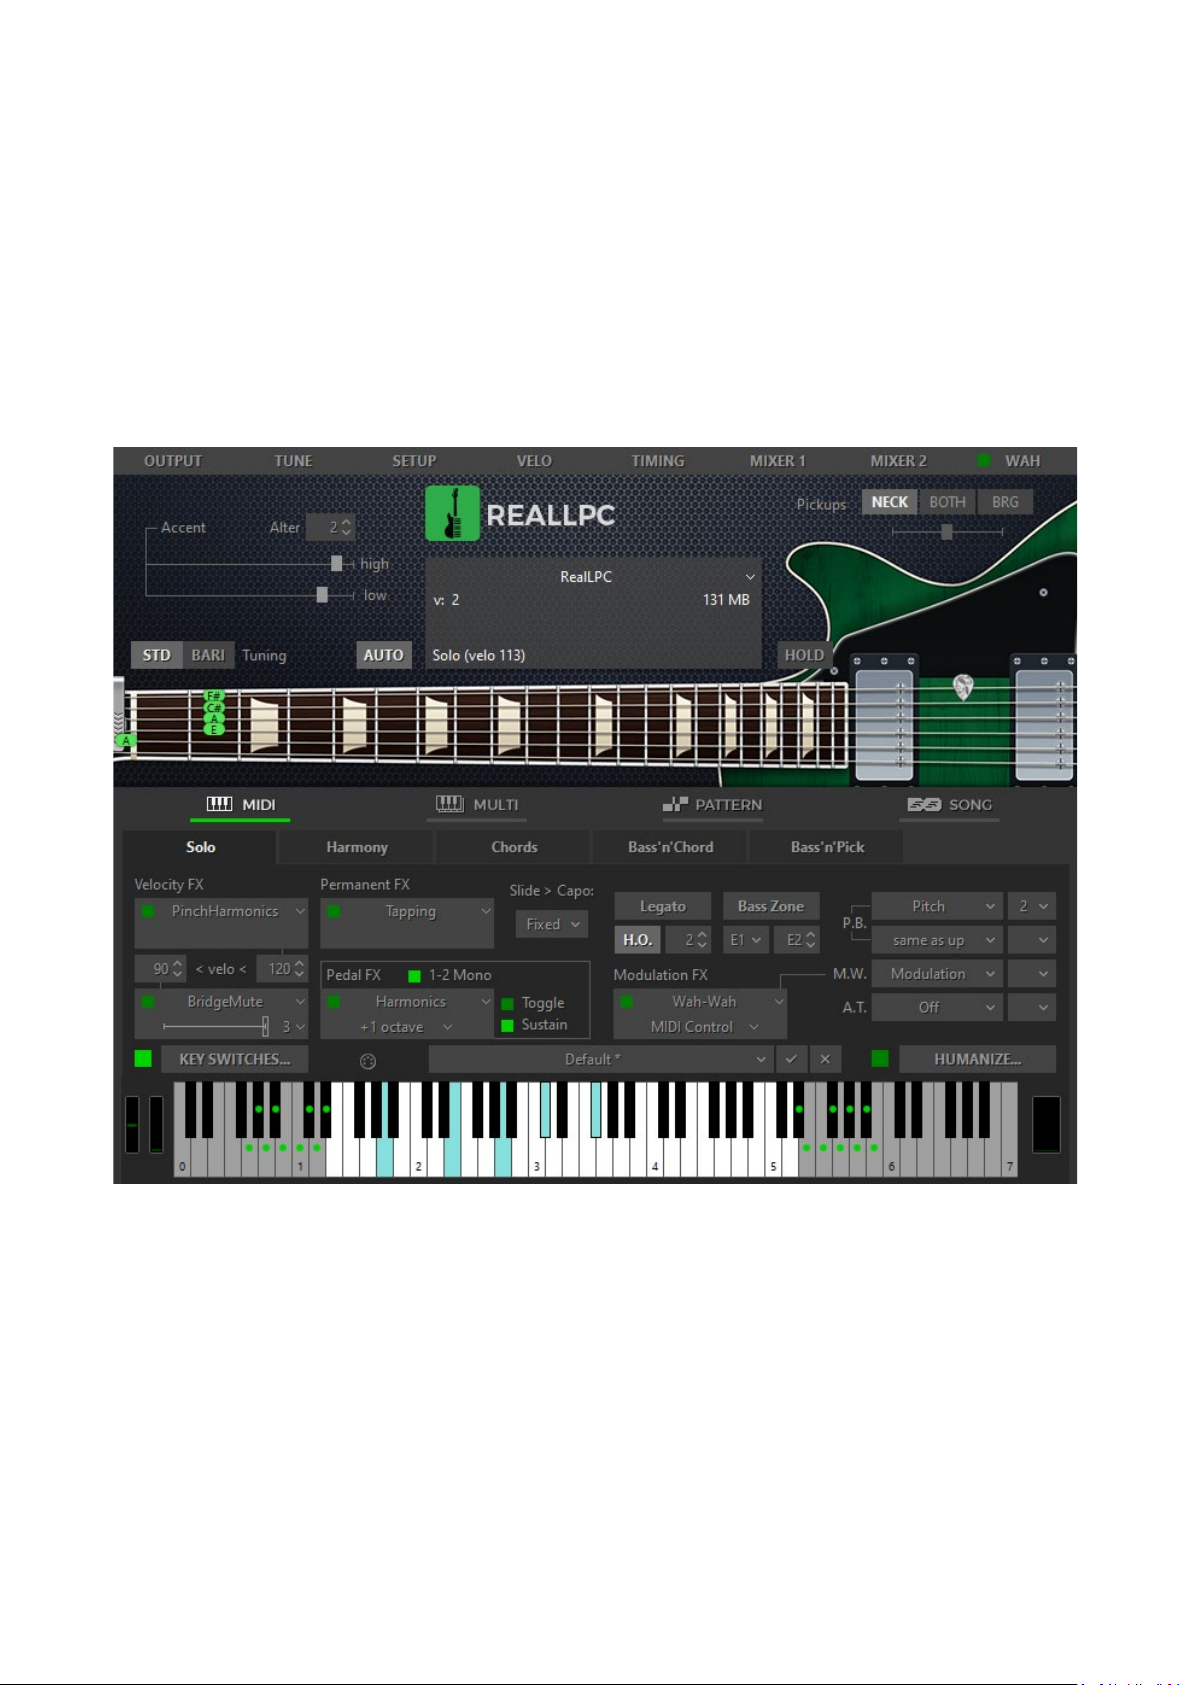
In the center of the RealLPC window is the virtual Fretboard, one of the important elements of the
plug-in, which allows you to visualize and control the Floating Fret Position while playing the guitar
part.
The
Fretboard has a number of functions:
1. Preview - allows audio previewing the loaded guitar patch by simply clicking on strings.
2. Display notes - shows the performed notes (with names) in accordance with visual
representation on the fretboard and real sound (you see the notes displayed on string and
fret of exactly the same sound samples currently playing).
3. Fret Position Auto control (the Auto button is pressed) - realizes automatic fret position
change in Solo and Harmony modes, which moves the ‘Capo’ strip along the Fretboard
depending on the sequence of performed notes.
4. Fret Position Manual control (the Auto button is released) - allows manually changing fret
position by right clicking on any fret. A ‘Capo’ strip will appear on the fretboard, which will
prevent playing samples from any fret lower on the neck than the ‘Capo’ position (except
for the 6th string).
VIRTUAL KEYBOARD
In the lower part of RealLPC window you see a virtual keyboard that visualizes RealLPC keyboard
layout (Main and Repeat zones), indicates activated Key Switches in Solo mode, and shows all MIDI
notes incoming to RealLPC or played on virtual fretboard with a mouse:
Additionally, virtual keyboard duplicates the external MIDI keyboard input, so everything you can
play by MIDI can be produced on virtual keyboard with a mouse. Shift-clicking will hold down the
pressed key allowing to preview chords/Key Switch FX.
Hold Pedal button at the right visualizes Hold Pedal controller (CC#64) MIDI activity, as well as
serves as toggle for switching Hold Pedal on/off Hold Pedal.
Page 11
11
Pitch Wheel and Modulation Wheel indicators at the left visualize Pitch Bender and Modulation
controllers MIDI activity.
REALLPC GUITAR PATCHES
RealLPC installs three versions of RealLPC soft instrument: RealLPC, RealLPC (2 mono), RealLPC (2
stereo). RealLPC is normal plugin with single stereo output, RealLPC (2 mono) provides 2 mono
outputs in your DAW, while RealLPC (2 stereo) provides 2 stereo outputs respectively. Choosing
between them depends on what guitar patch you are going to use.
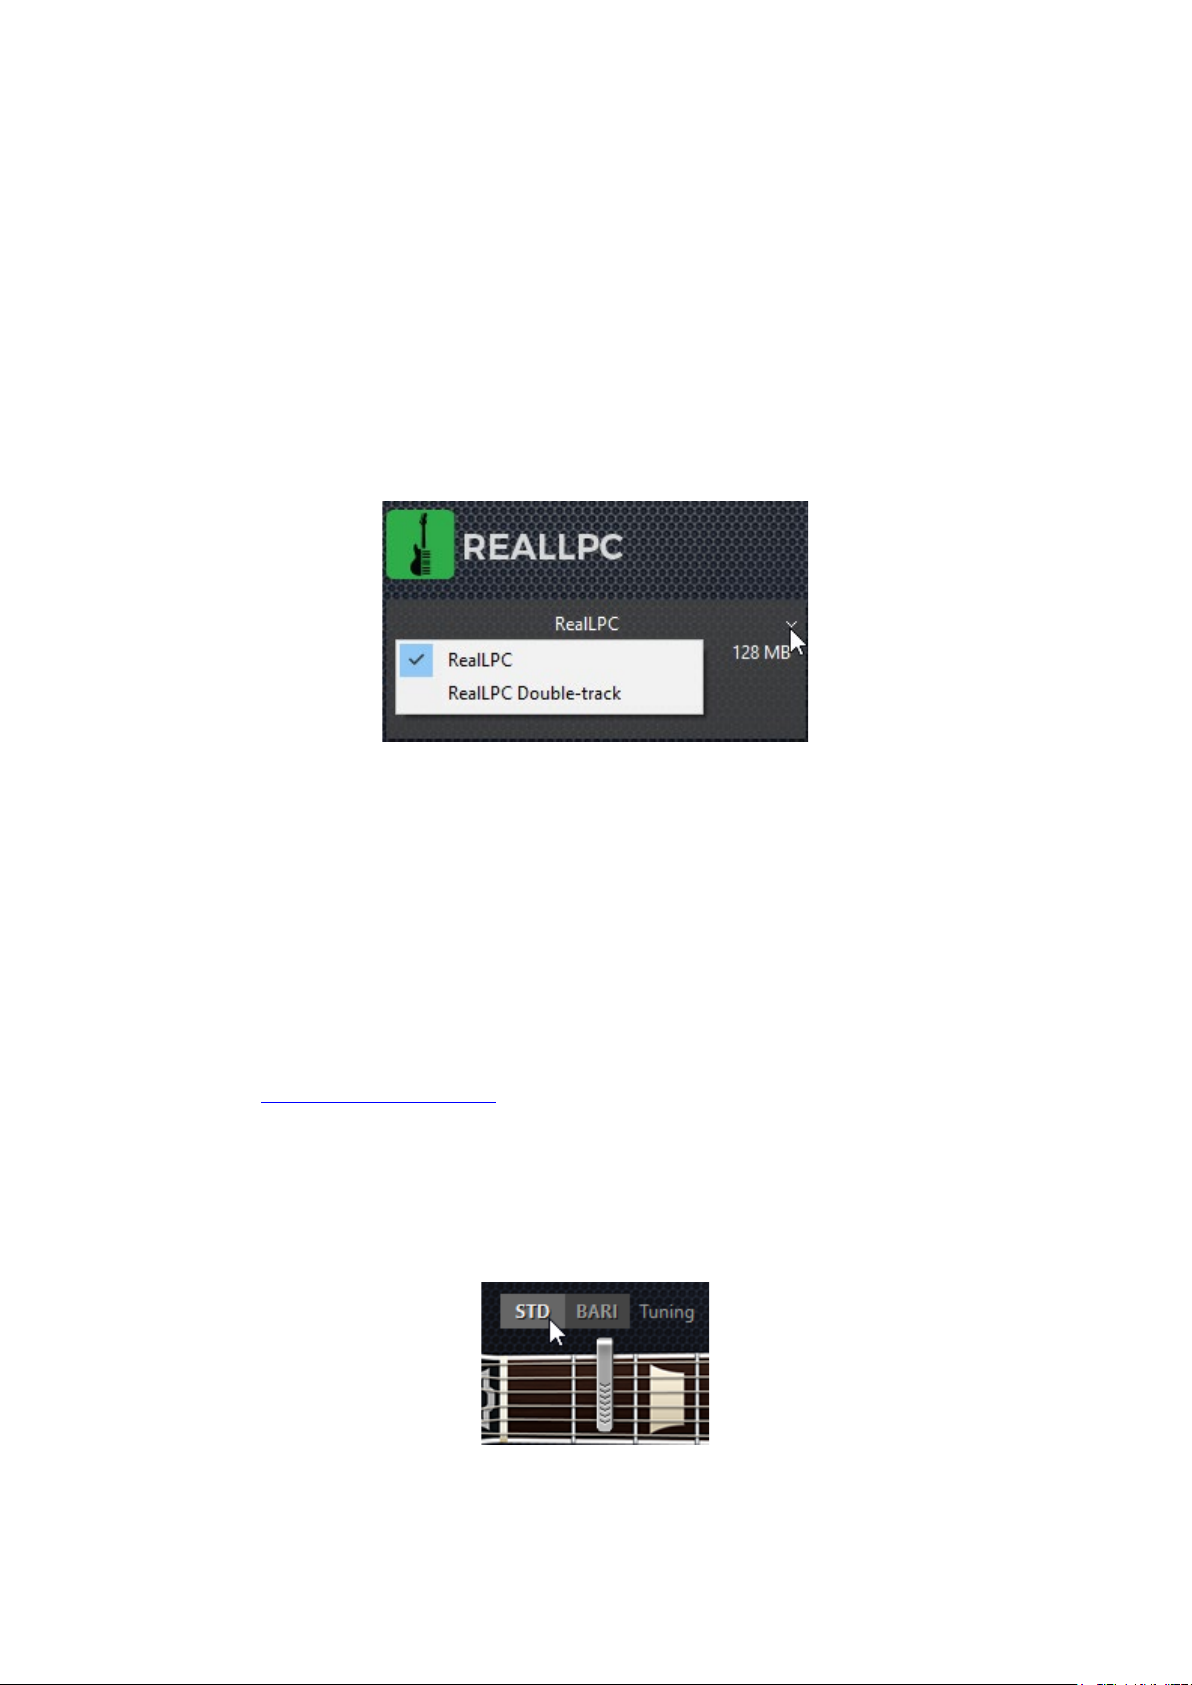
RealLPC has two guitar patches: RealLPC and RealLPC Double-track.
Click the black screen combo box in the upper part of RealLPC window to load the guitar patch:
On launching RealLPC will automatically load RealLPC guitar patch, which is mono guitar sample
set and can be used in any version of RealLPC plugin.
RealLPC Double-track when loaded in RealLPC single output plugin or in the standalone version is
actually a stereo guitar patch, panned hard left and hard right.
If you want to emulate double-tracking technique you must run RealLPC (2 mono) or RealLPC (2
stereo) plugin in your DAW, and load RealLPC Double-track patch into it. In the DAW’s mixer, pan
each output being used hard left and hard right, then add the amps + FX of your choice. For best
results, we recommend different amps/settings for each output. Play or sequence notes on the
single MIDI track assigned to RealLPC, and enjoy a wide, double-tracked sound!
Please refer to Double-Tracking section for more details.
GUITAR TUNINGS
RealLPC has two tuning selections: Standard and Baritone, available by clicking the appropriate
Tuning button.
STD - 6-string standard tuning: E-A-D-G-B-e, with 6th string expandable to C (Drop C).
BARI - 6-string Baritone guitar tuning: B-E-A-D-F#-b.
Page 12
12
Baritone tuning will change Main zone range to A0 - A4.
Standard and Baritone tunings are available with both RealLPC guitar patches, so loading guitar
patch and selecting this or that tuning for any of them allow you to gain up to four differently
sounding guitars at a mouse click.
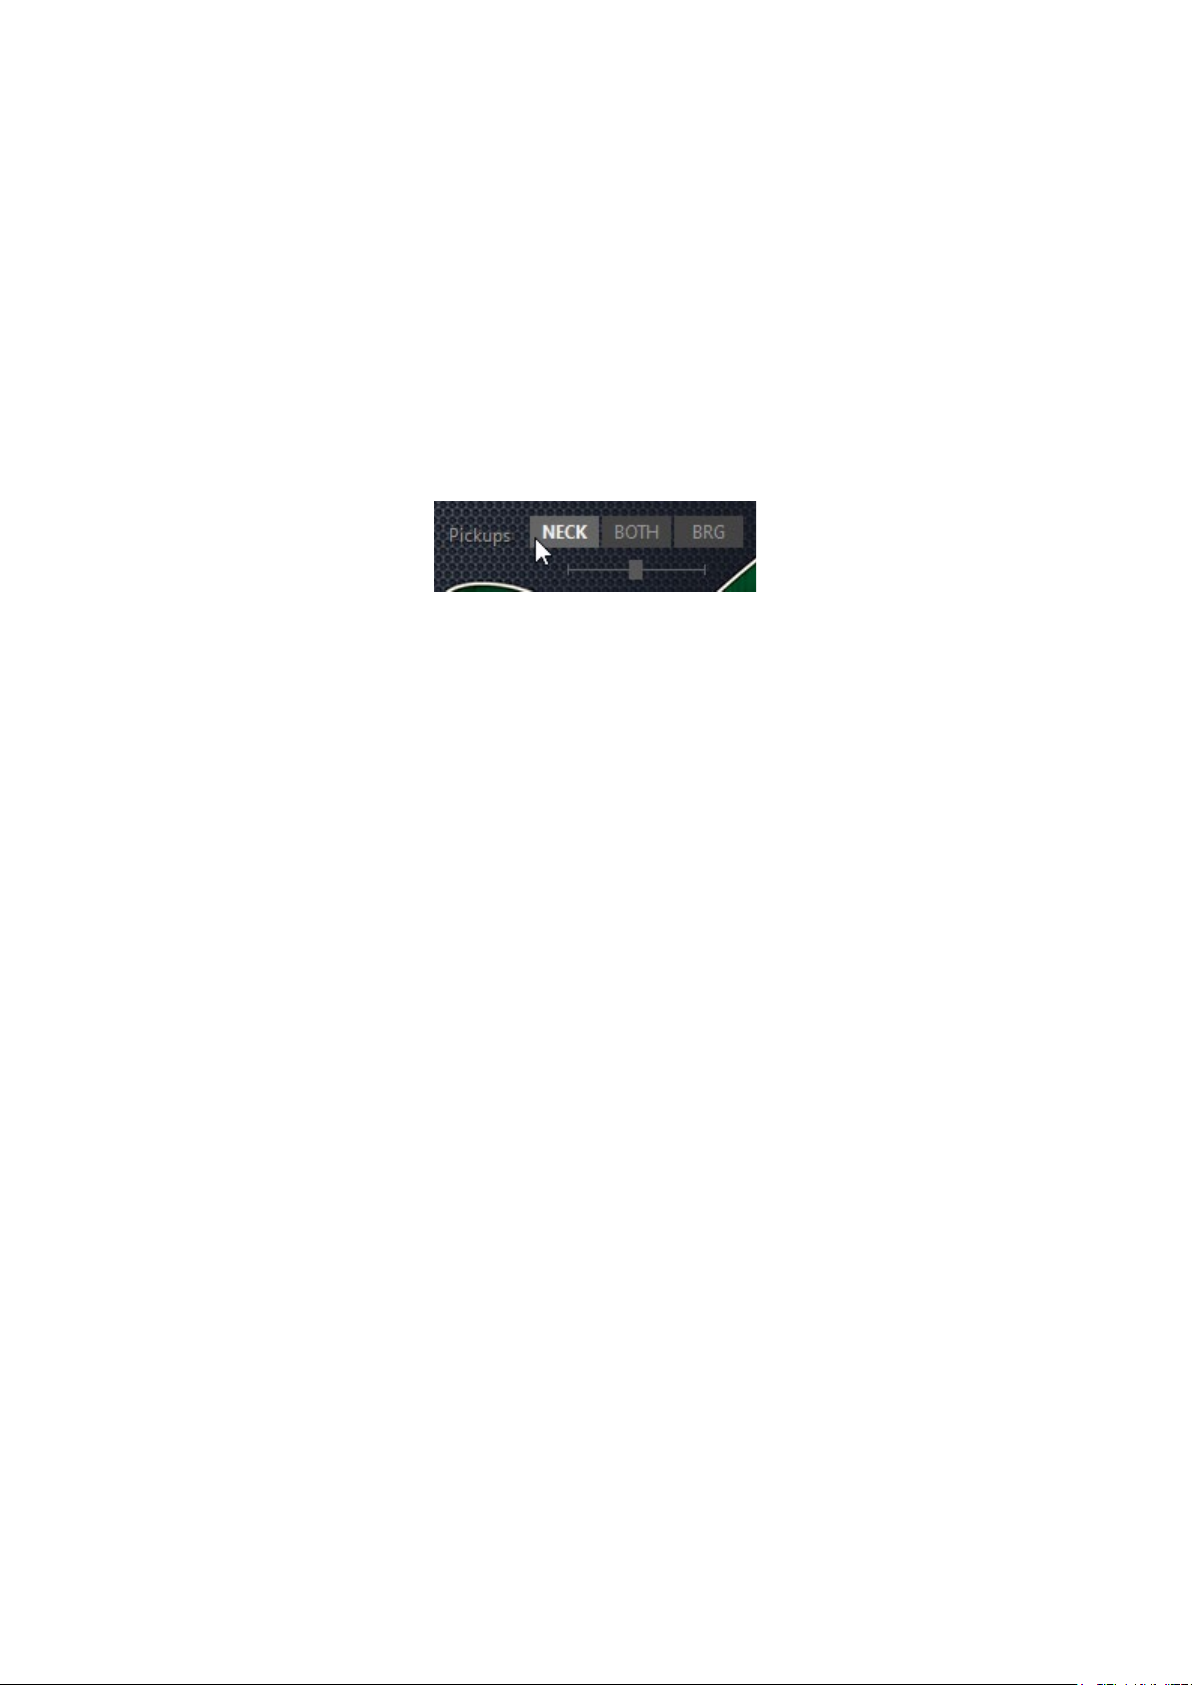
PICKUP SELECTIONS
RealLPC samples were recorded directly from each of two pickups of Les Paul Custom guitar,
providing you three tonal selections by simply switching between individual pickups and their
combination: Neck alone, Bridge alone, and Neck + Bridge (Both).
To switch between pickups simply click the appropriate pickup button.
Selecting Both activates slider below letting you control volume balance between pickups.
Also, you can assign Pickup FX on any key/note you want in Key Switches panel, and use it for selecting the needed
pickup or pickup combination from MIDI keyboard or MIDI track.
Page 13

13
REALLPC GLOBAL MODES
RealLPC 5 provides 4 Global Modes, each of which is a separate performance tool meant for
imitating special guitar performance style:
1. MIDI Keyboard - MIDI keyboard/MIDI track input
2. Multi - a universal mode allowing you to perform various guitar accompaniment
techniques that use chords, such as Strumming, Bass and Strum, Bass and String picking,
and much more.
3. Pattern - automatic accompaniment using rhythm patterns from MusicLab Guitar Pattern
Library
4. Song - songwriting tool featuring the built-in Song track where you can insert chords and
patterns to construct the complete guitar accompaniment part
Page 14
14
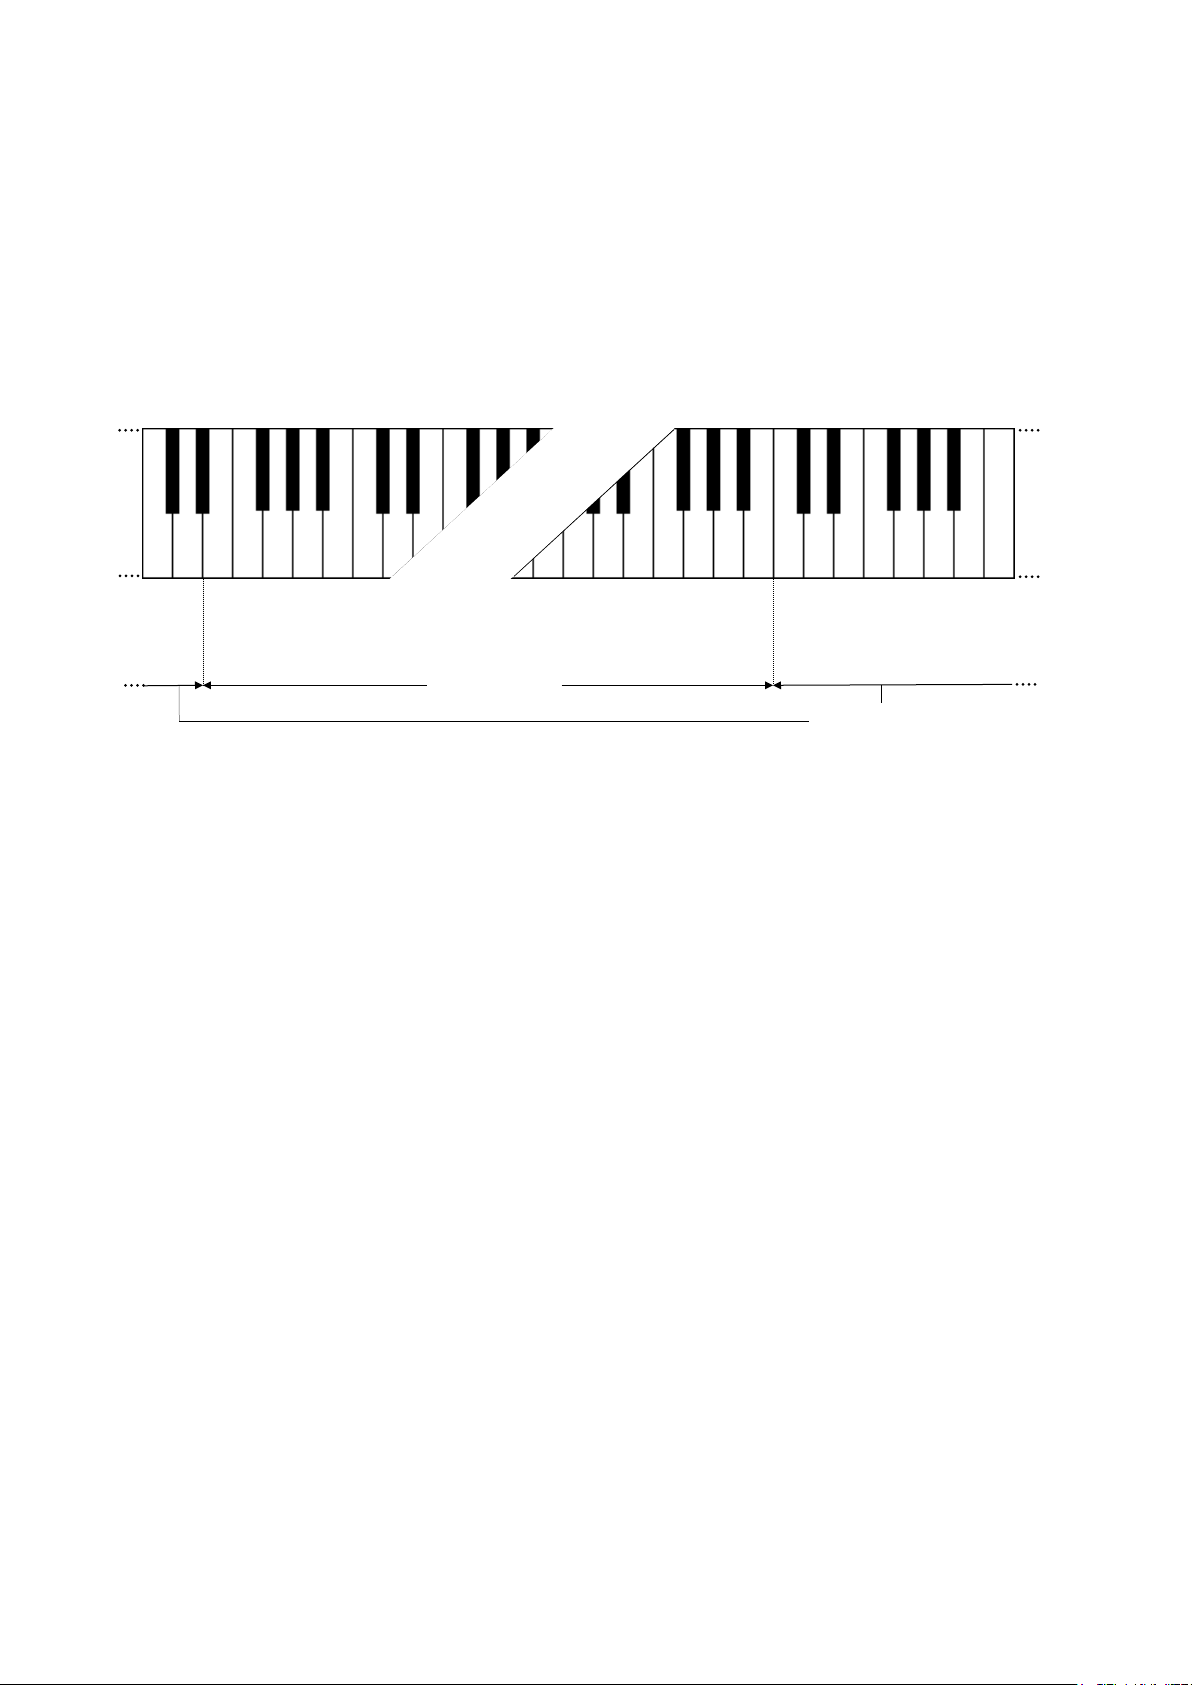
MIDI KEYBOARD GLOBAL MODE
Repeat zone
Main zone
USER KEYBOARD LAYOUT
When connected to RealLPC MIDI input the external keyboard is divided into 3 zones: Main zone
(E1 - B4), left (C0 - D#1) and right (C5 – C7) Repeat zones.
In Solo mode Main zone extends to C1-D5.
Main zone serves for playing melodic parts (Solo and Harmony modes) and entering chords (Multi,
Chords, Bass & Chord, Bass & Pick modes).
Any key of the Repeat zone repeats notes and chords played in the Main zone.
This way of keyboard mapping allows you to play guitar parts with 2 hands – you play various
notes or chords in the Main zone with one hand and repeat them by pressing the pre-mapped
keys in Repeat zone with the other hand without changing its position. This is very important for
carefully preserving rhythm pattern accuracy and groove feel.
Using such a performance technique you can easily imitate the most characteristic details of guitar
performance, such as tremolo, strumming, bass and strum, picking on your keyboard making them
sound naturally as if they were played on a real guitar.
Repeat Key zone functions:
• In Solo, Multi, Harmony, Chords, and Bass & Chord modes you can repeat notes and
chords played in the Main zone (any white key repeats the full sound, while black key
repeats the muted sound). Also with the keys of Repeat zone you can alternate
up/down/muted strokes to produce strumming and tremolo techniques (C, E, G –
trigger up stroke; D, F, A - down stroke; C#, F#, A# - muted up stroke; D#, G# - muted
down stroke) with both single notes and intervals/chords.
• In Bass & Chord and Multi/Bass modes you can trigger Bass I (Root) and Bass II (alternative
bass) notes as well as upper strings strums
• In Bass & Pick and Multi/Strings modes Repeat keys trigger individual voices (strings) of a
chord taken in the Main zone.
Page 15
15
• In Solo and Multi modes Repeat keys, when activated in Key Switch panel, can also be used
as Key Switches to switch on various FX.
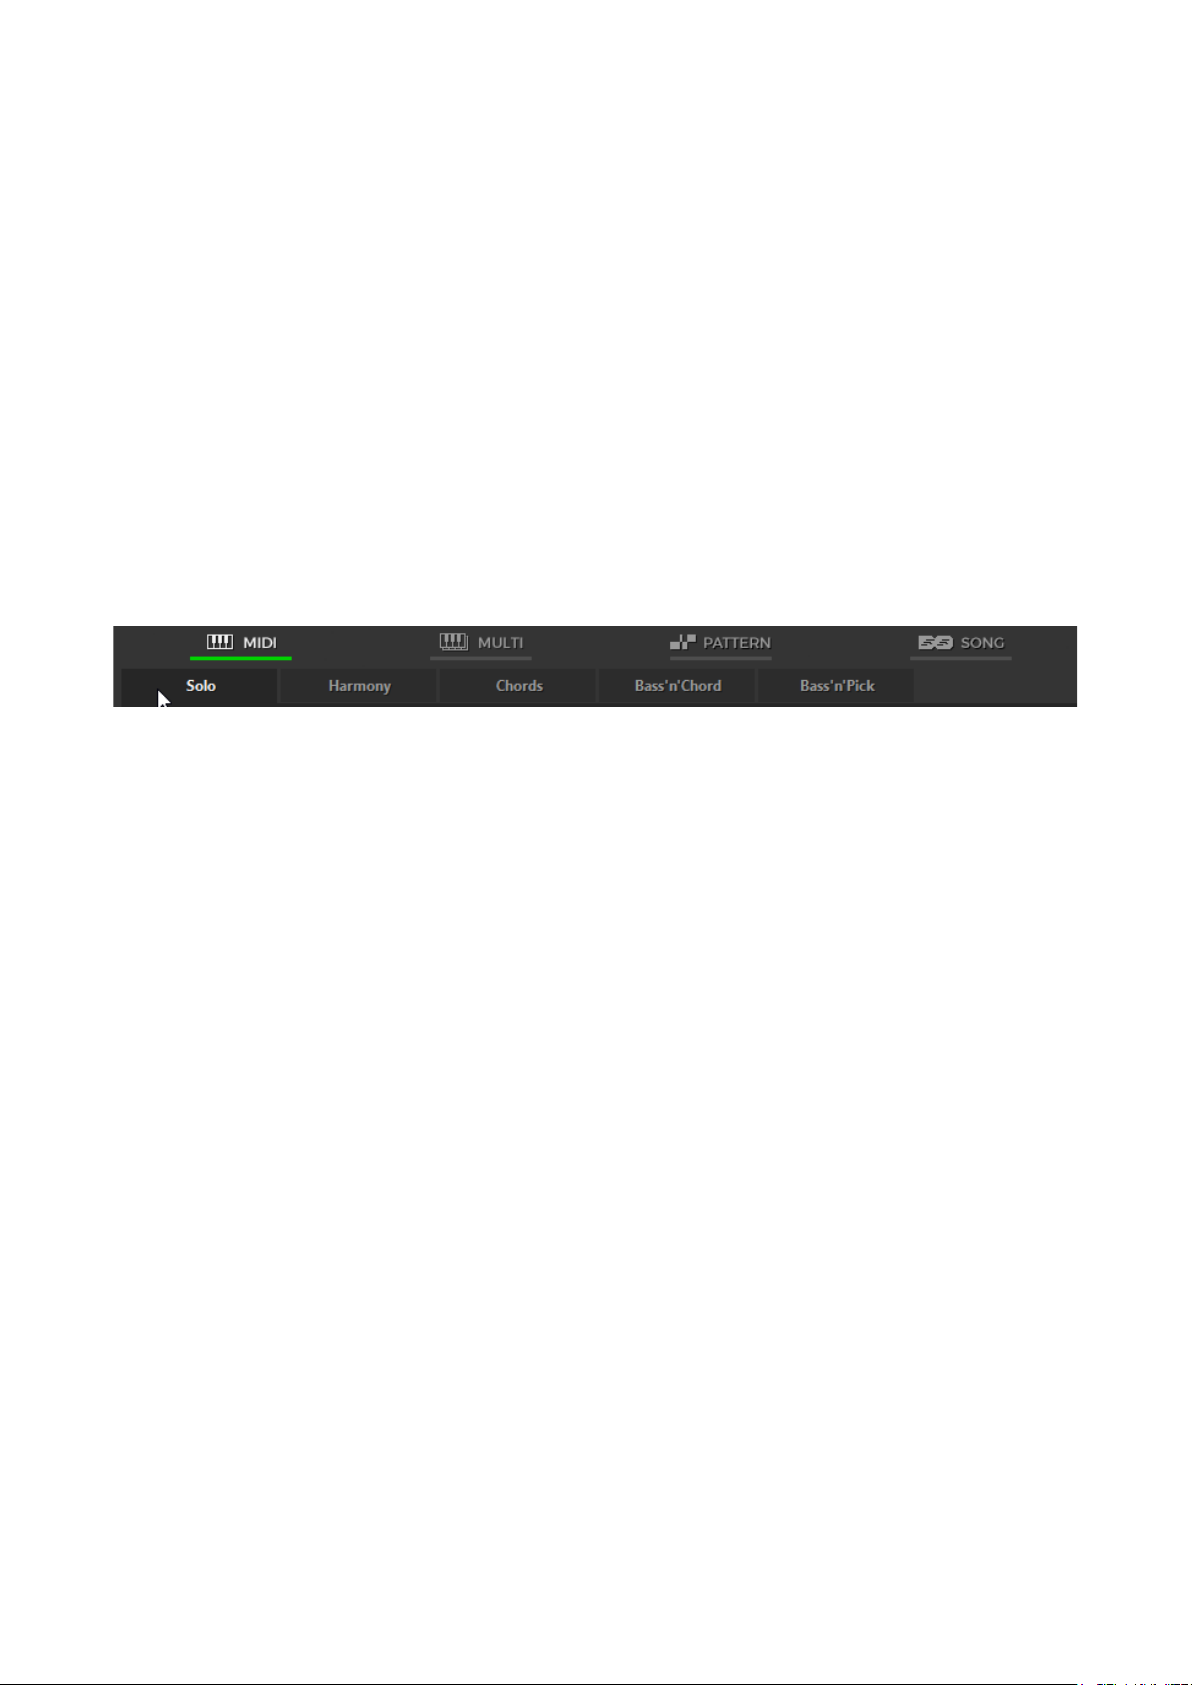
PERFORMANCE MODES
RealLPC MIDI Keyboard Global Mode includes 5 separate guitar performance modes, each of
which is a separate performance tool meant for imitating special guitar performance style:
1. Solo - polyphonic mode for performing melodic parts.
2. Harmony - monophonic mode for performing parallel interval melodic parts.
3. Chords - chord mode for performing accompaniment strumming parts.
4. Bass & Chord - chord mode for performing bass and strum parts.
5. Bass & Pick - chord mode for performing picking/plucking parts.
The performance modes are selected by clicking on a respective tab:
Page 16
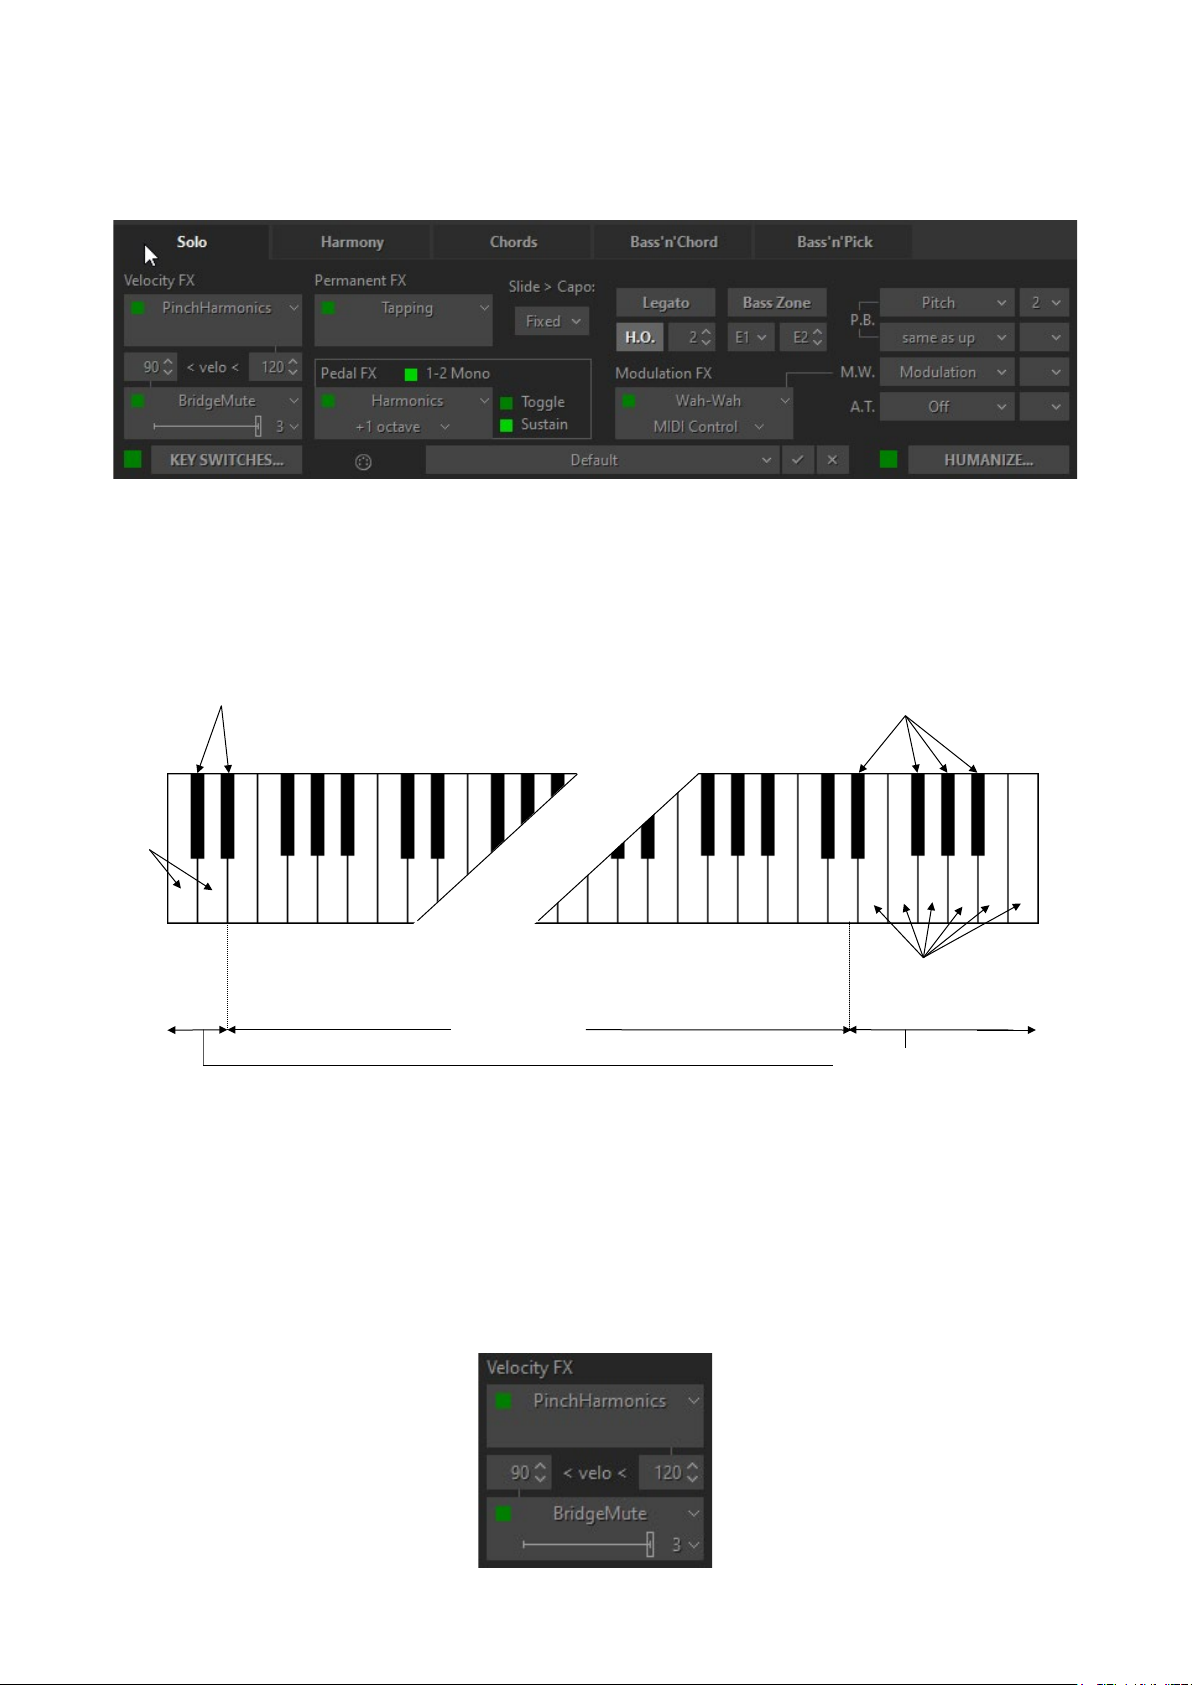
16
SOLO MODE
Muted sound
Full sound
Repeat keys
Melody zone
Muted sound
Full sound
C1
Click Solo tab to switch on the Solo performance mode.
Solo mode window
In this mode the Main zone (E1 – D5) of the keyboard works as a normal polyphonic keyboard,
while both Repeat Key zones (left (C0 - D#1) and right (D#5 – C7)) allow you to repeat notes taken
on the Main zone (white keys repeat full sound; black keys repeat muted sound of the same
notes).
CONTROLS
RealLPC Solo mode provides you with multiple permanent and switchable controls allowing you to
easily add various specific guitar articulations and effects to your performance.
VELOCITY SWITCH EFFECTS
On the left lower part of Solo window, you see Velocity Switch FX section including two FX boxes:
Page 17

17
Using the Velocity Switch FX controls, two FX can be dynamically engaged depending on the
velocity of the MIDI notes played. For low velocity notes, set the numeric box on the left side to
the threshold at which notes played at a lower velocity will trigger the FX selected in the lower FX
selector. For high velocity notes, set the numeric box on the right side to the threshold at which
notes played at a higher velocity will trigger the FX selected in the upper FX selector. As notes are
played below or above the two thresholds, the two FX selector boxes will change to a light grey
color to indicate they are being engaged. As with all FX selectors, each of the two Velocity Switch
FX selector boxes have a FX Enable LED button so you can enable one, both or neither.
PERMANENT EFFECTS
Permanent FX Box - allows selection of Effect in the pull-down menu and activate it by clicking on
FX Enable LED button in the upper left corner.
Slide > Capo - controls the movement of the capo along the fretboard while performing either a
Slide or Hammer-On effect. You can select any of 3 modes in a Slide>Capo combo box:
• Fixed - Capo is not affected. All notes will be played to the right of Capo position moving
from string to string (except for the notes on the 6th string which the capo does not affect).
• Ignore - Capo is not affected. Slides ignore Capo position; notes will be performed along
the string moving to another string only in case of reaching first or last fret.
• Move - Capo moves with Slide or H.O. (Hammer-on) notes along the fretboard.
Legato - enables producing notes played legato within semi-tone or whole-tone from each other
without triggering attacks and being in mono mode (next will mute previous). The effect is as if
the notes were played on the same guitar string when only the first note is picked and the
following notes are played by the left hand alone.
H.O. - enables Hammer-On Effect with automatic Pull-Off on key release, affected note range is
specified (in semi-tones) in numeric box.
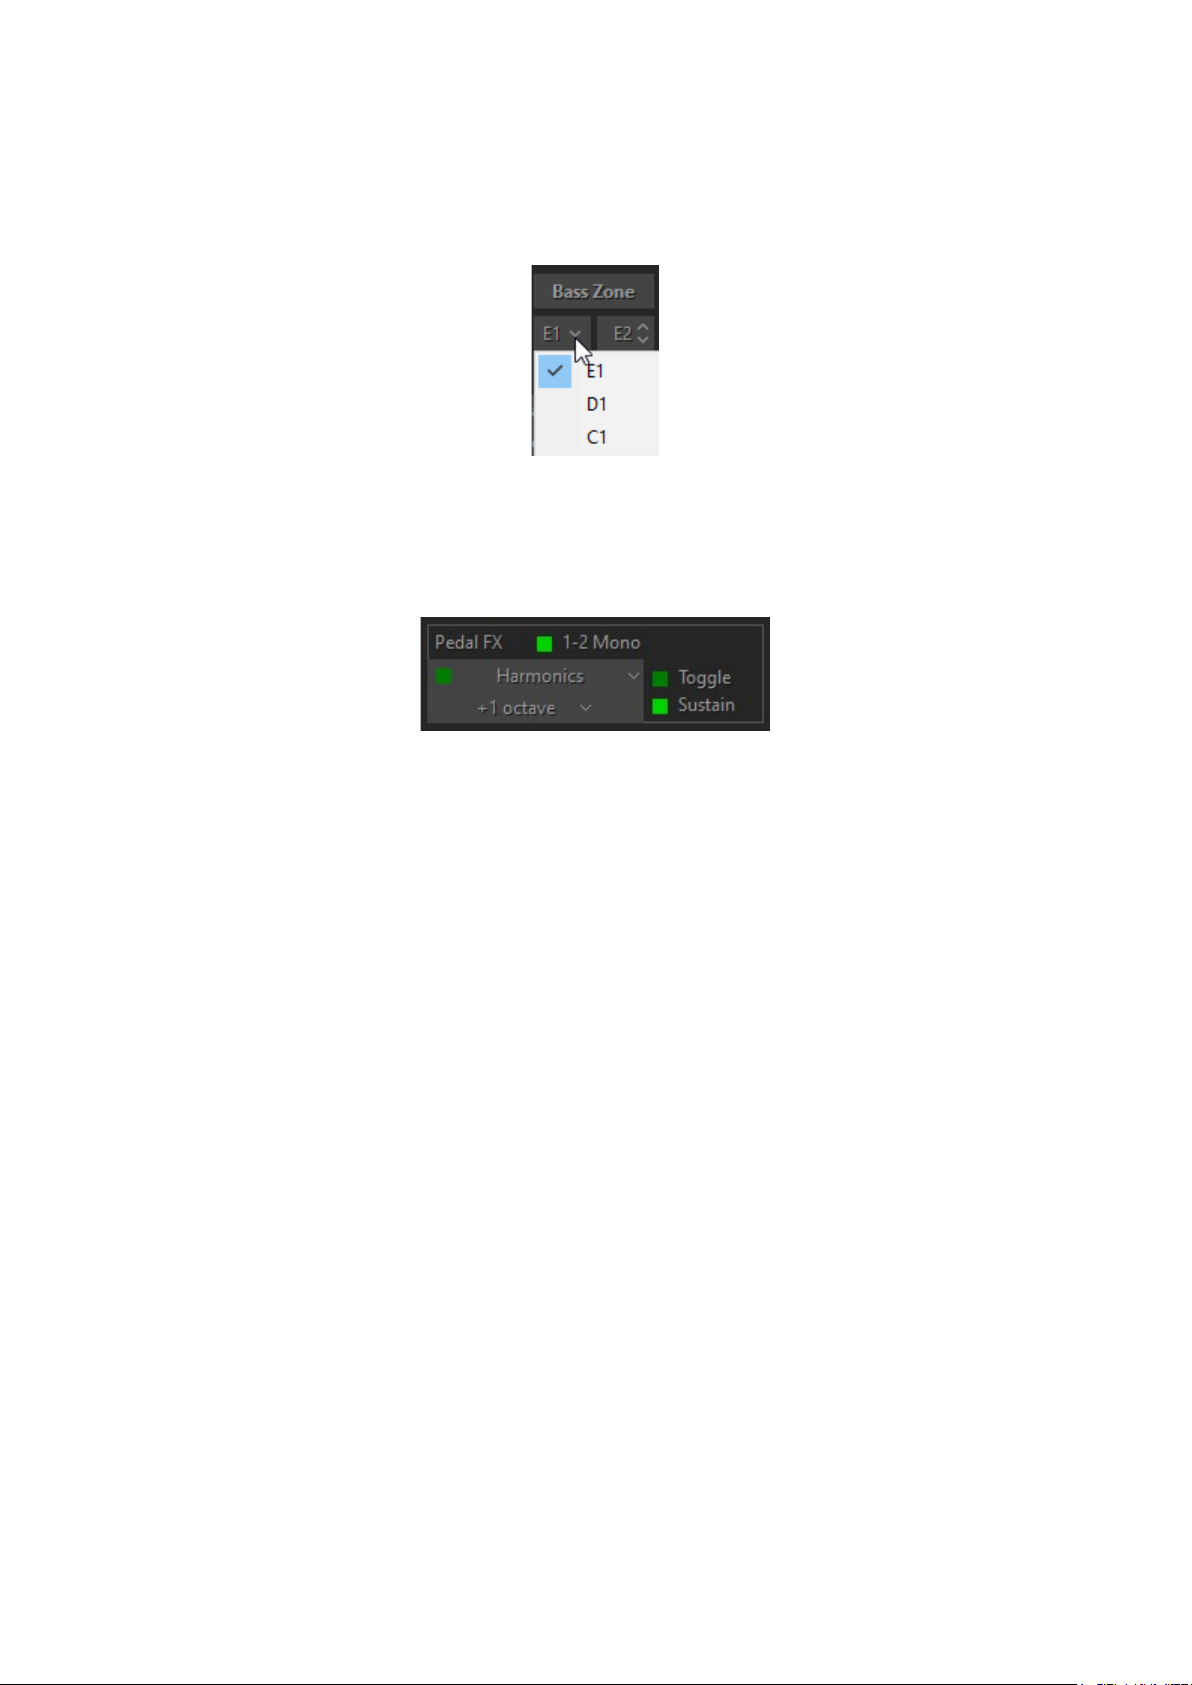
Bass Zone - splits the Main Zone of keyboard into two parts to allow individual performance
techniques for each part. The Bass Zone button is toggled on and off. There are two additional
combo boxes to set the lower note (E1, D1 or C1) and the upper note (ranging from E1 to E4) of
the zone. Bass zone notes have a stronger velocity curve and are NOT affected by:
• Mute keys - this allows performing mutes and repetitions on the notes played outside Bass
zone without cutting bass notes.
Page 18
18
• Velocity Switch FX - this allows applying velocity switches only to notes played outside Bass
zone while playing bass notes without the velocity switch.
Left combo box works independently of Bass zone button and allows Drop D and Drop C tuning in
Solo mode by selecting the D1 or C1 as the lower note for the 6th string.
PEDAL SWITCH EFFECTS
You can trigger various RealLPC Effects selected in Pedal Switch FX box by pressing normal Sustain
Pedal controller.
Pedal Switch FX box has five different controls:
• 1-2 Mono LED (On/Off)
• FX Enable LED (On/Off)
• FX Selection pull-down menu
• Toggle LED (On/Off)
• Sustain LED (On/Off)
Page 19

19
1-2 Mono:
On - sustains all notes except for the notes played at a semi-tone or whole-tone interval (step-wise
melodic run): the next note 1-2 steps apart mutes the previous one as if played on the same guitar
string, while the thirds and larger intervals are being sustained.
Off - pedal sustains all notes played non-legato, and legato (in the case Hammer-On and Legato FX
are off).
FX Enable LED indicates if the Pedal FX is enabled or not. When LED is On, the FX is enabled when
the Sustain Pedal is pressed.
FX Selection pull-down menu selects which FX is controlled by the Sustain Pedal.
Toggle:
On - indicates that the FX is toggled on and off each time the Sustain Pedal is pressed.
Off - indicates that the FX is only enabled when the Sustain Pedal is kept pressed. When the
Sustain Pedal is not pressed, the FX is not enabled.
Sustain:
On - indicates that the Sustain Pedal both turns on the FX as well as sustains notes.
Off - indicates that the Sustain Pedal controls only the FX, and no notes are sustained.
MODULATION SWITCH EFFECTS
You can switch on various RealLPC Effects selected in Modulation Switch FX box by simply moving
normal Modulation Wheel of your MIDI keyboard. Releasing Modulation Wheel to ‘0’ position
turns the Effect off.
Note, when Modulation FX box is activated effect assigned in M.W. box at the right will not work.
Page 20
20
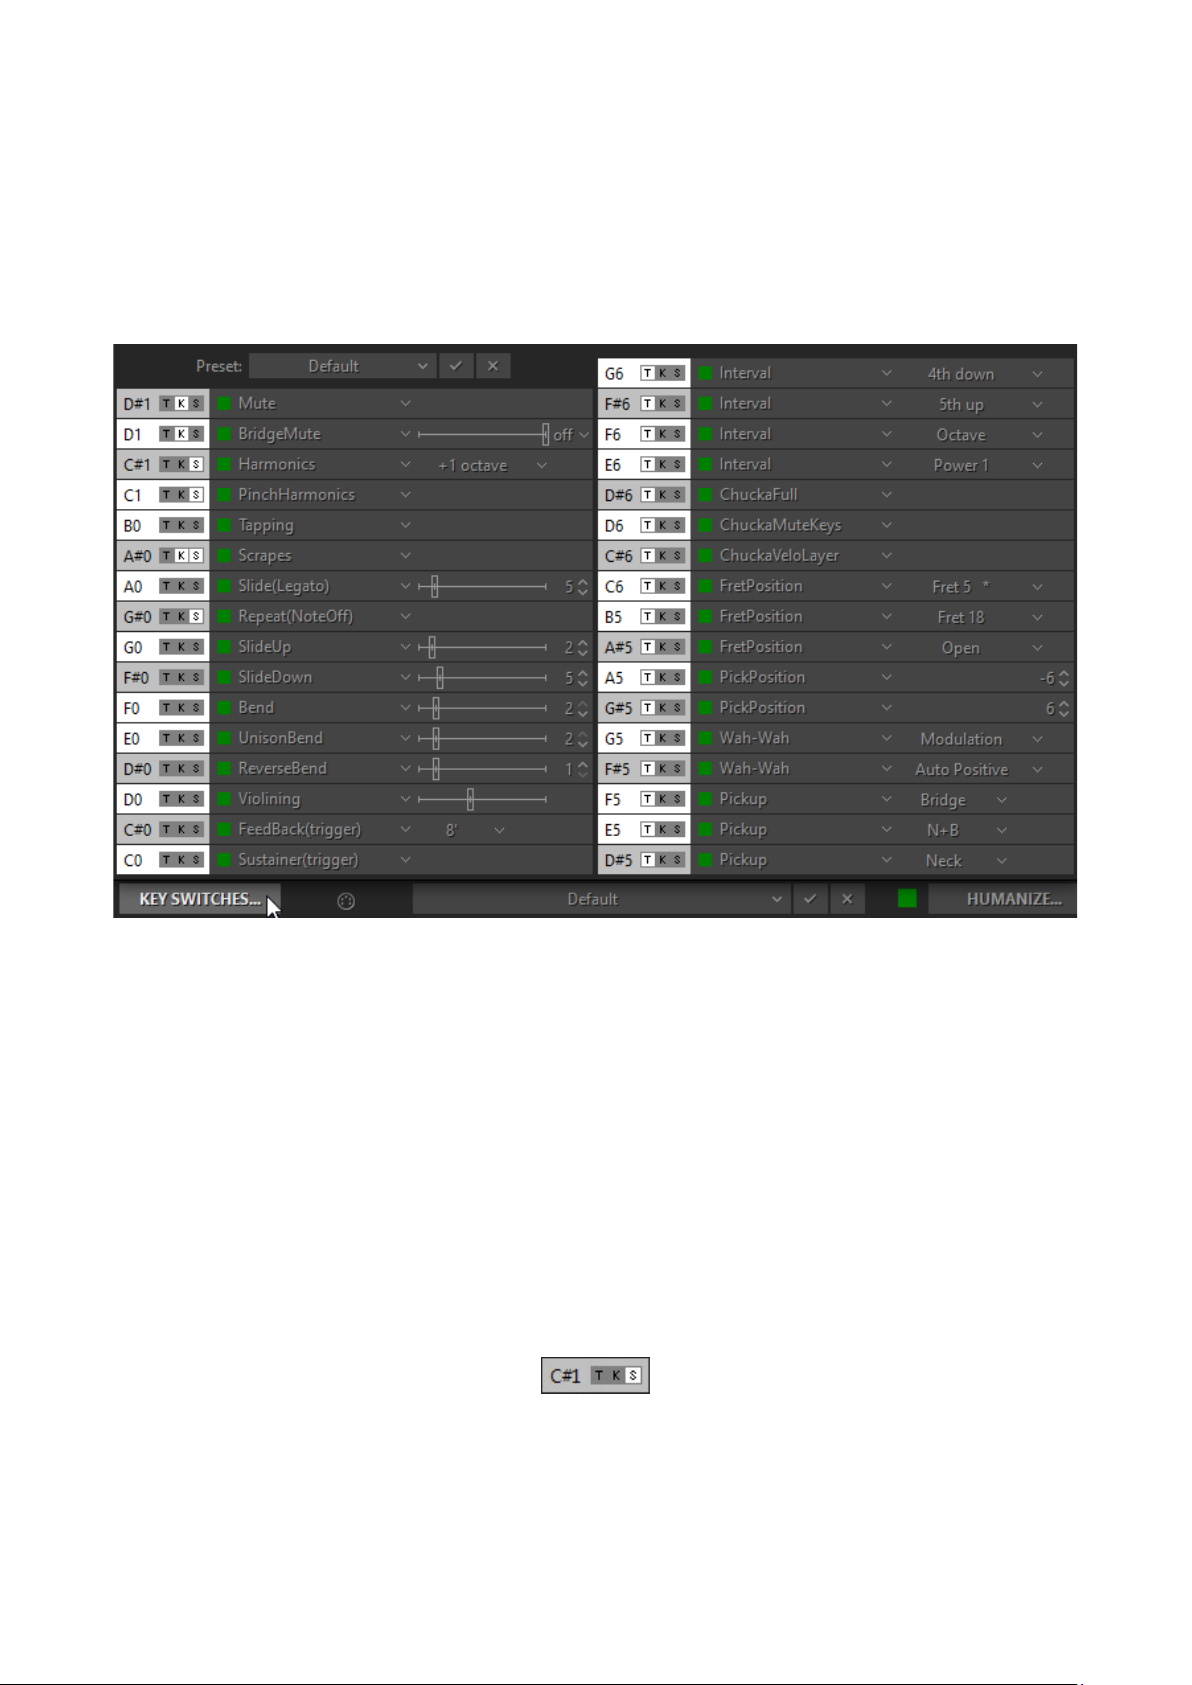
KEY SWITCH EFFECTS
RealLPC numerous guitar Effects can be triggered in Solo mode using the advanced Key Switch
system allowing to assign various FX on Repeat Zone keys as well as easily create and use custom
presets in RealLPC Key Switch panel.
To open Key Switch panel, click on Key Switches button on the left lower part of Solo mode
window:
Key Switch panel
You see two columns of FX boxes corresponding to Left and Right Repeat Zone keys (C0-D#1 for
the Left zone, D#5-G6 for the Right zone).
Select Effect for a key in pull-down menu and click FX Enable LED button in the left part of FX box
to activate it. Now pressing the correspondent key of Repeat zone will turn on selected FX, and
change the box color to a light grey to indicate that FX is turned on.
Note, that activating FX Enable LED of any key switch will also be displayed on the RealLPC virtual
keyboard. Moreover, triggering FX will also change color of a virtual keyboard key to a light blue,
giving you full visual control.
Three small buttons (clickable on/off) at the left of each FX box allow additional control of the Key
Switch and FX:
‘T’ button (‘toggle’):
On - indicates that the FX is toggled on and off each time the key switch is pressed (releasing the
key is ignored).
Page 21

21
Off - indicates that the FX is only enabled while the key is kept pressed (releasing the key turns the
FX off).
‘K’ button (‘key through’) - when activated allows to switch FX and let the key switch
simultaneously function as normal Repeat key (white for Full sound, black for Muted sound).
‘S’ button (‘sustain’) adds sustain function to FX, similar using the Sustain Pedal.
Note, Right Key Switches (Right Repeat zone) are ‘toggles’ by default, while Left Key Switches (Left
Repeat zone) are not.
You can save all settings made in Key Switch panel as user presets for future use.
To create a preset, click on Preset combo box to activate Edit mode, type in the preset name, and
press Enter on computer keyboard. Preset will be saved within RealLPC and added to Preset list.
To delete preset simply click on Delete icon at the right.
MIDI CONTROLLER PANE (SOLO MODE)
You can assign various guitar effects to standard MIDI controllers:
• P.B. Up (Pitch Bender, upper combo box) - Off, Pitch, Slide, VeloAdd, MonoBend, Sustainer
(triggers Sustainer FX simultaneously with pitch shifting).
• P.B. Down (Pitch Bender, lower combo box) - ‘same as Up’, Pitch, Slide, VeloAdd,
MonoBend, Sustainer (triggers Sustainer FX simultaneously with pitch shifting).
• M.W. (Modulation Wheel) - Pitch, Slide, Modulation.
• A.T. (After Touch) - Pitch, Modulation, Sustainer, FeedBacker.
In the combo box to the right adjust the maximum range of pitch shifting/sliding (in semi-tones).
Modulation envelope is adjusted in Tune panel (Left Menu bar in the upper left corner of RealLPC
window).
HOLD BUTTON IN SOLO MODE
In Solo mode the Hold button works differently from the other modes, where it actually sustains
the sound while holding down Repeat zone keys. In Solo mode when Hold button is on, any
pressed and held key can be used for sustaining the following notes.
Page 22

22
MIDI GUITAR MODE
If you prefer to use normal guitar via MIDI interface instead of MIDI keyboard you can switch to
MIDI Guitar mode by activating Guitar button in Solo performance mode.
MIDI Guitar mode has multi-channel MIDI input: 1-6 MIDI channels for 1-6 guitar strings
accordingly, with each string/channel having independent pitch bend control, though Modulation,
Aftertouch MIDI controllers, and all other FX are common for all strings.
MIDI Guitar mode allows you to step record the guitar part with a pencil tool in your DAW on
individual track/MIDI channel for each string. Note, that notes in a track going out of the
appropriate string range will be played on the nearest string.
Page 23

23
HARMONY MODE
Muted sound
Full sound
Repeat keys
Melody zone
Muted sound
Full sound
C1
Harmony mode window
In this monophonic mode any key of the Main zone triggers an interval/chord based on the played
note, previously chosen from following options: 4th down, 5th up, Octave (up), Power Chord 1
(5th + 4th up), Power Chord 2 (4th + 5th up), 2 octaves (up).
The keys of both Repeat zones (left and right) allow you to repeat the interval taken in the Main
zone (white keys repeat full sound, while black keys repeat muted sound of the same notes).
Page 24
24
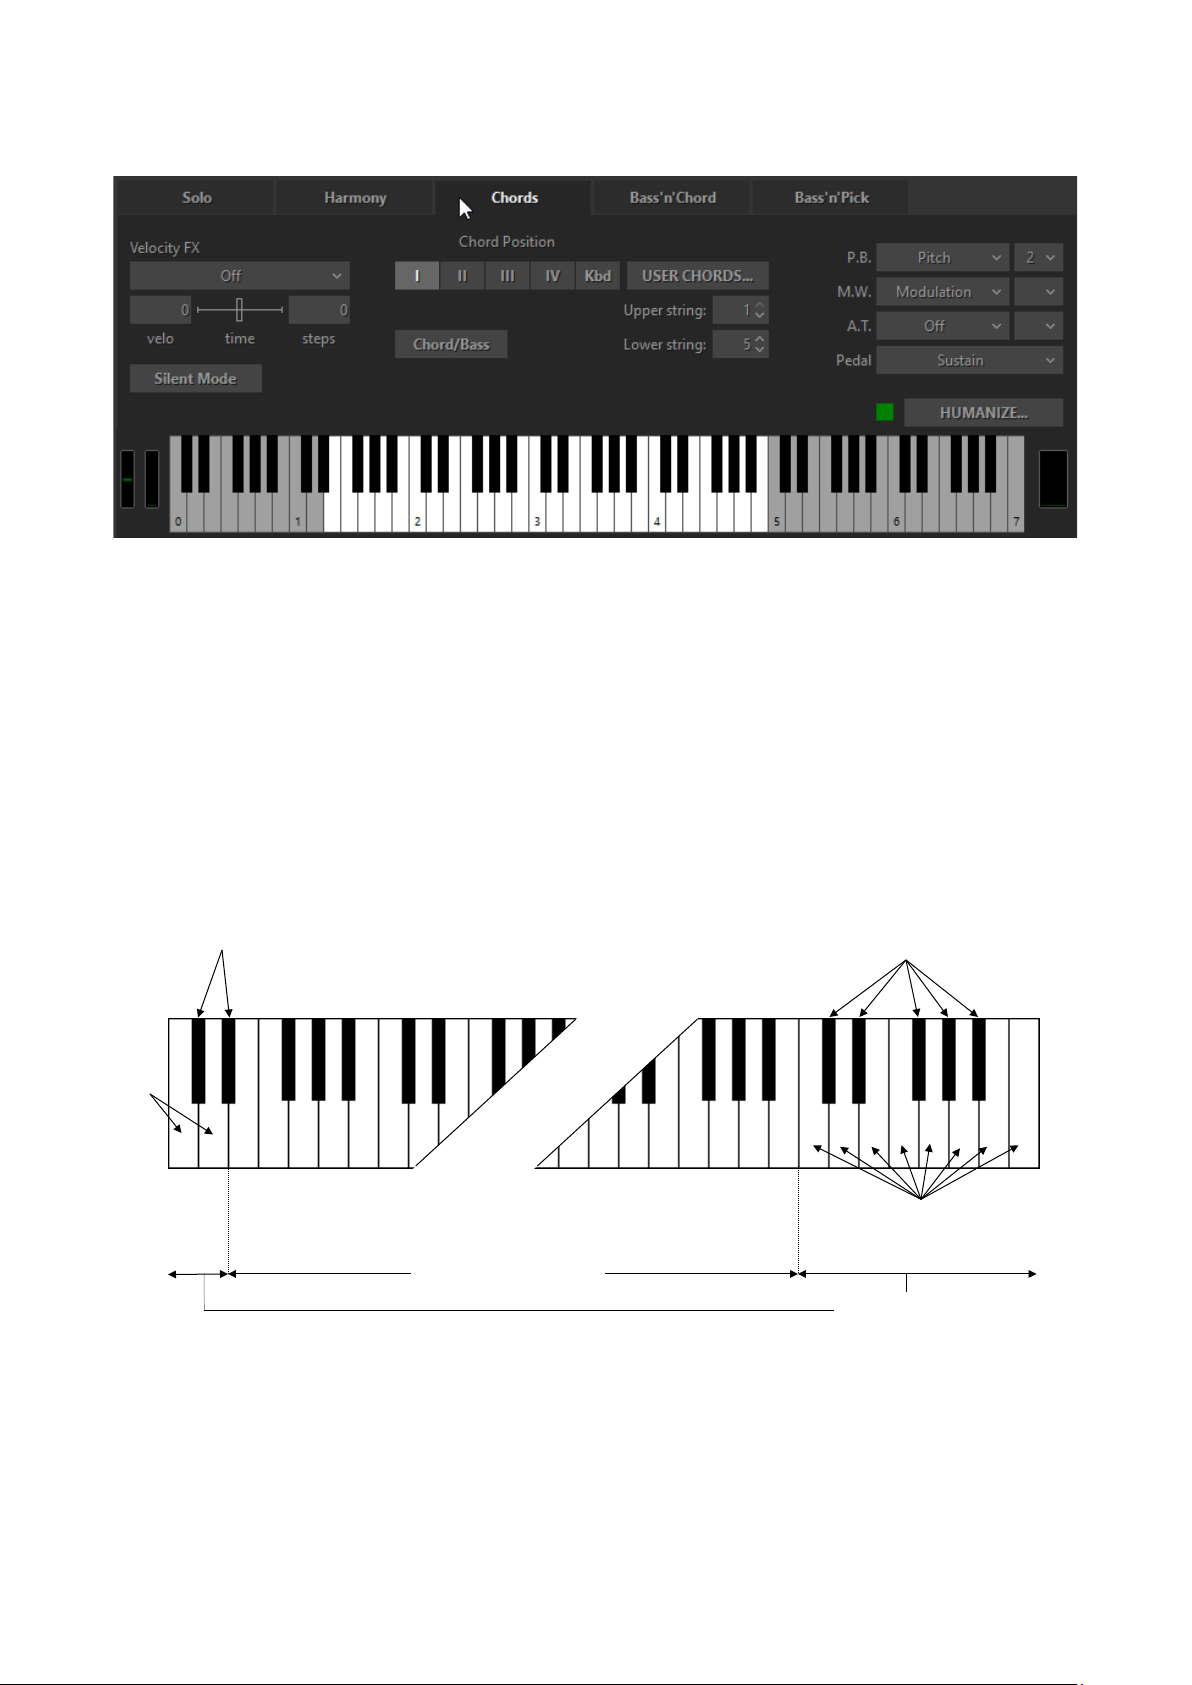
CHORDS MODE
Muted strum
Repeat keys
Chord detect (down
Muted strum
Strum
Strum
C1
Chords mode window
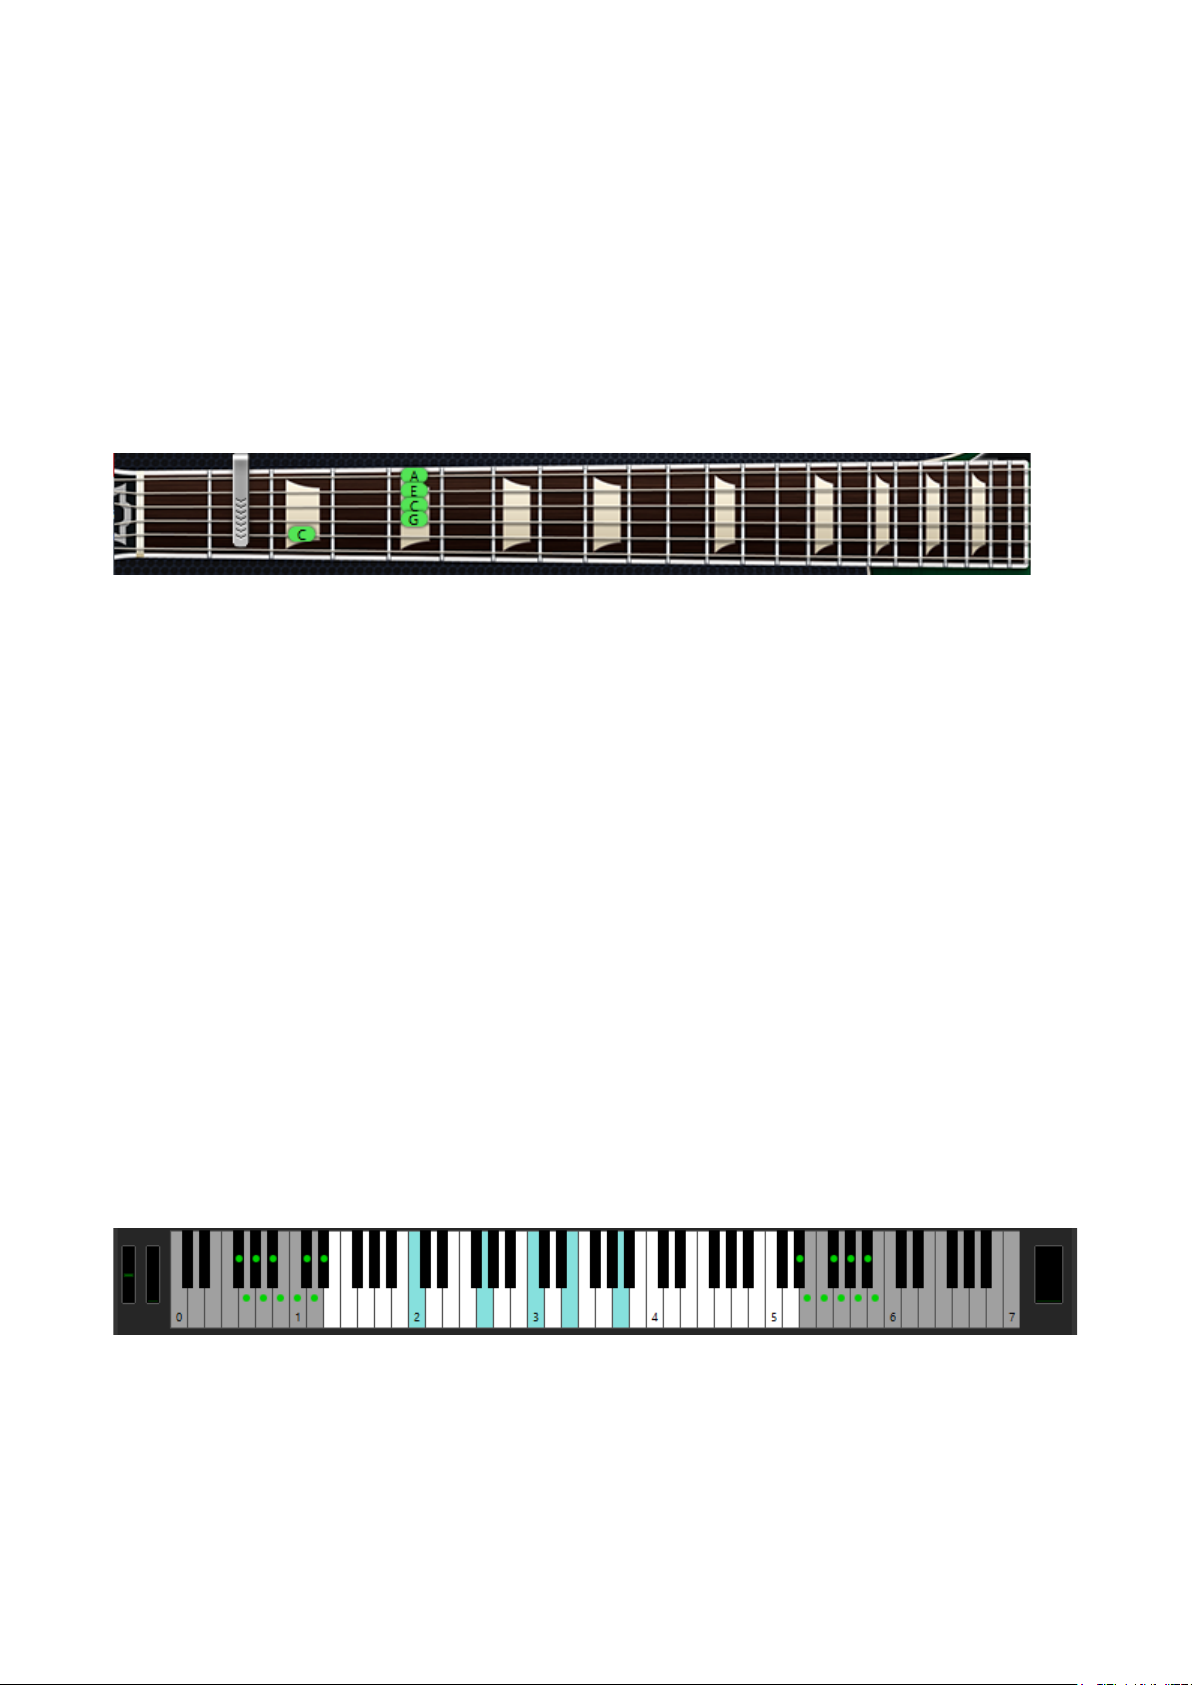
In this mode RealLPC detects the chord played in the Main zone of the keyboard (the root note
and the name of the chord appear on the black info screen), builds a guitar version of the chord
considering the selected Chord position and current position of a ‘Capo’ strip on the Fretboard,
and finally plays it using a down strum technique.
Any key of Repeat zone repeats the whole chord played in the Main zone: black keys play muted
strums, while white keys play strums when the chord is still held and muted strums when the keys
in the Main zone are released. Up and down strums are triggered by neighboring keys for both
white and black keys of the Repeat zones, like C1 - up strum, D1 - down strum, C6 – down strum,
B5 - up strum and so on.
strum play)
Page 25

25
CONTROLS
Chord position - selects the melodic position range for the built chords.
I - the highest note is between E3 and G#3
II - the highest note is between G3 and B3
III - the highest note is between A#3 and D4
IV - the highest note is between C#4 and F4
Kbd - the melodic position range of the built chord depends on the octave position of the
chord taken in the Main zone of the keyboard (with borders between E and E of the next
octave).
User Chords - opens Chord Editor.
Upper/Lower Strings - allow disabling upper and/or lower strings in chords, so you can pare your
strums down to any five, four, three, two or just a single string by selecting the first available
string# in upper/lower numeric boxes (e.g. selecting 2/5 will disable the 1st and 6th strings in the
strums).
Chord/Bass - switches on the X/Y chord detect mode letting you construct major/minor triad
chords with any desirable note in the Bass, e.g. A/G (A major chord over G bass) for G-A-C#-E
voicing, D/F# (D major chord inversion with F# bass note) for F#-A-D voicing, F/G (F major chord
over G bass) for G-A-C-F voicing, etc…
Page 26
26
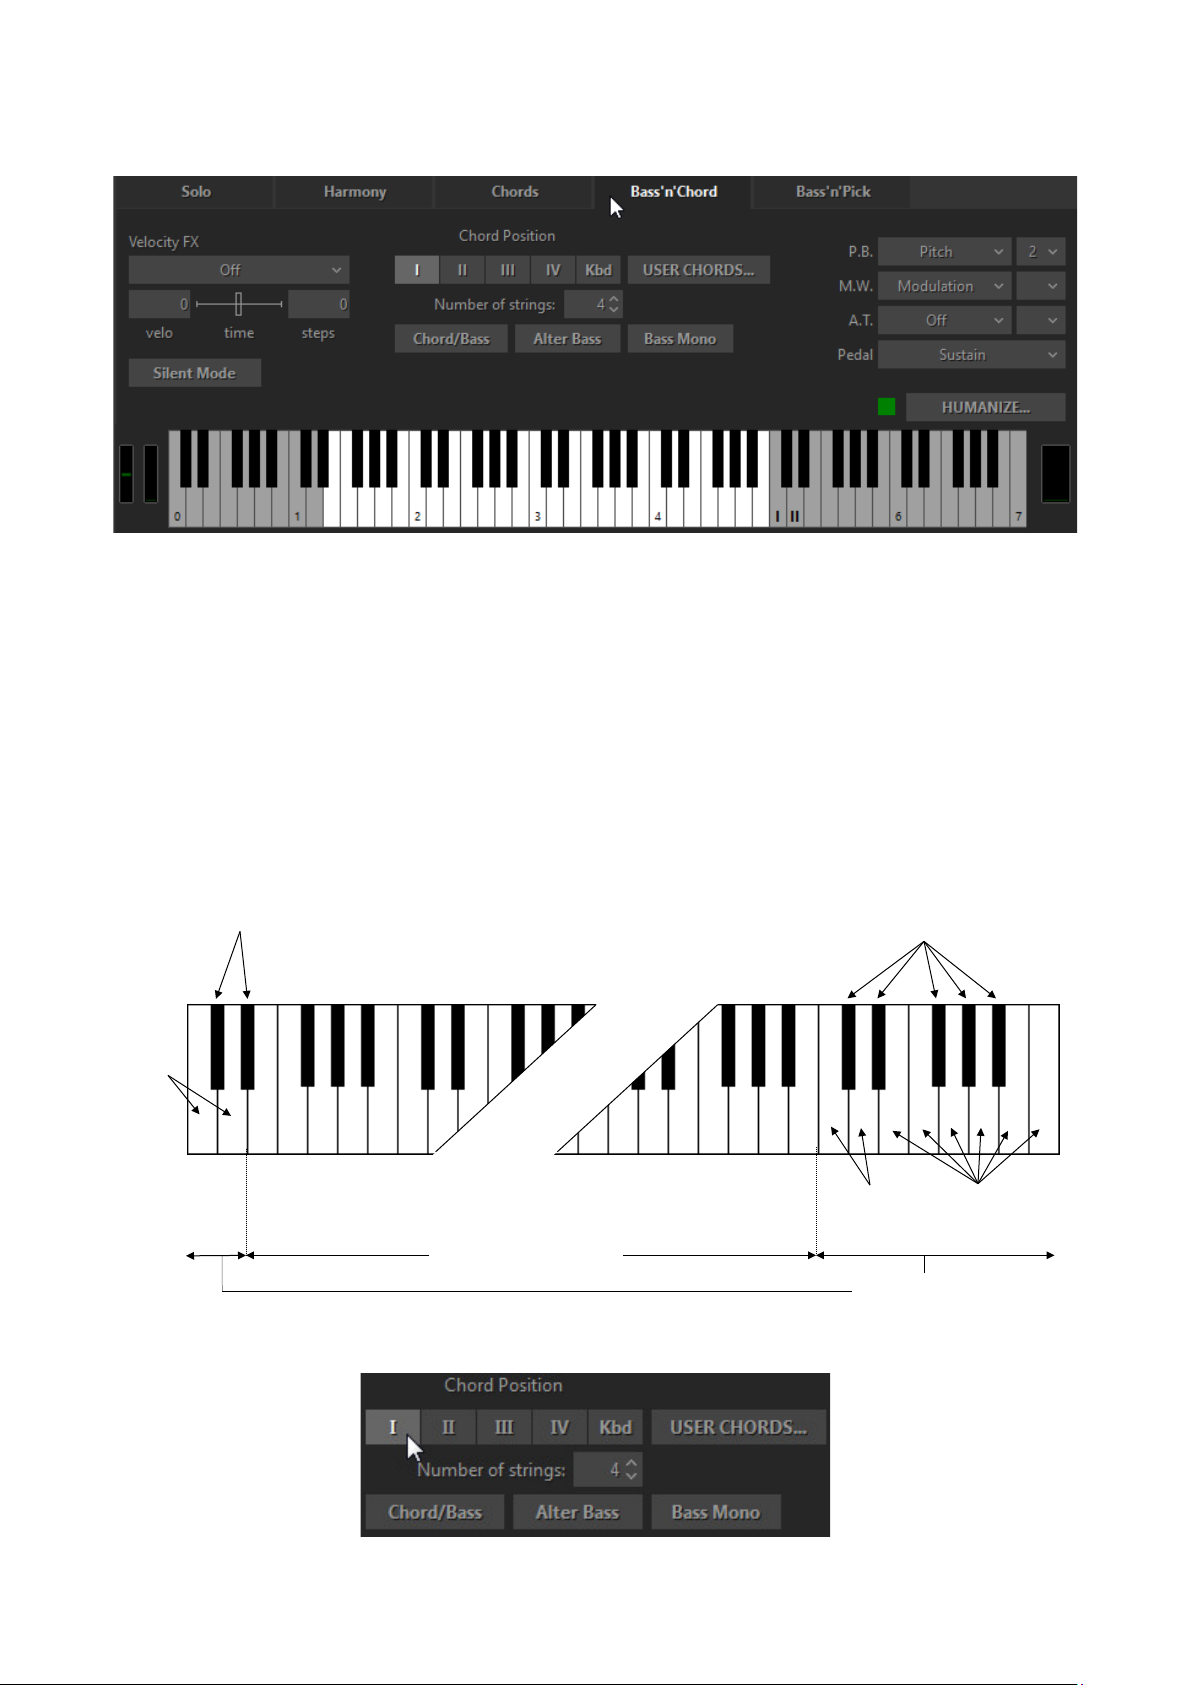
BASS & CHORD MODE
Muted strum
Strum
Repeat keys
Chord detect
Muted strum
Strum
Bass
I
II
C1
Bass & Chord mode window
In this mode RealLPC detects the chord taken in the Main zone of the keyboard, builds its guitar
version and plays its Root note (Bass I) only. The Repeat zone keys now have the following
functions:
• C5 triggers Bass I (Root note).
• D5 triggers Bass II (Alternative bass, usually the 5th degree of the chord).
The rest of the keys in both right and left Repeat zones trigger up and down strums of the upper
strings of the chord, black keys perform muted strums of the same strings).
(bass play)
CONTROLS
Page 27
27
Chord position - selects the melodic position range for the built chords.
User Chords - opens Chord Editor.
Number of Strings - specifies the number of sounding strings in chords triggered by Repeat zone
keys.
Chord/Bass - switches on the X/Y chord detect mode letting you construct major/minor triad
chords with any desirable note in the Bass.
Alter Bass - automatically alternates between Bass I and Bass II when the same chord is taken in
the Main zone.
Bass Mono - mutes Bass I note when the next Bass II is played.
BASS & PICK MODE
Bass & Pick mode window
In this mode RealLPC identifies the chord taken in the Main zone, builds its guitar version and
plays only its Root note (Bass I).
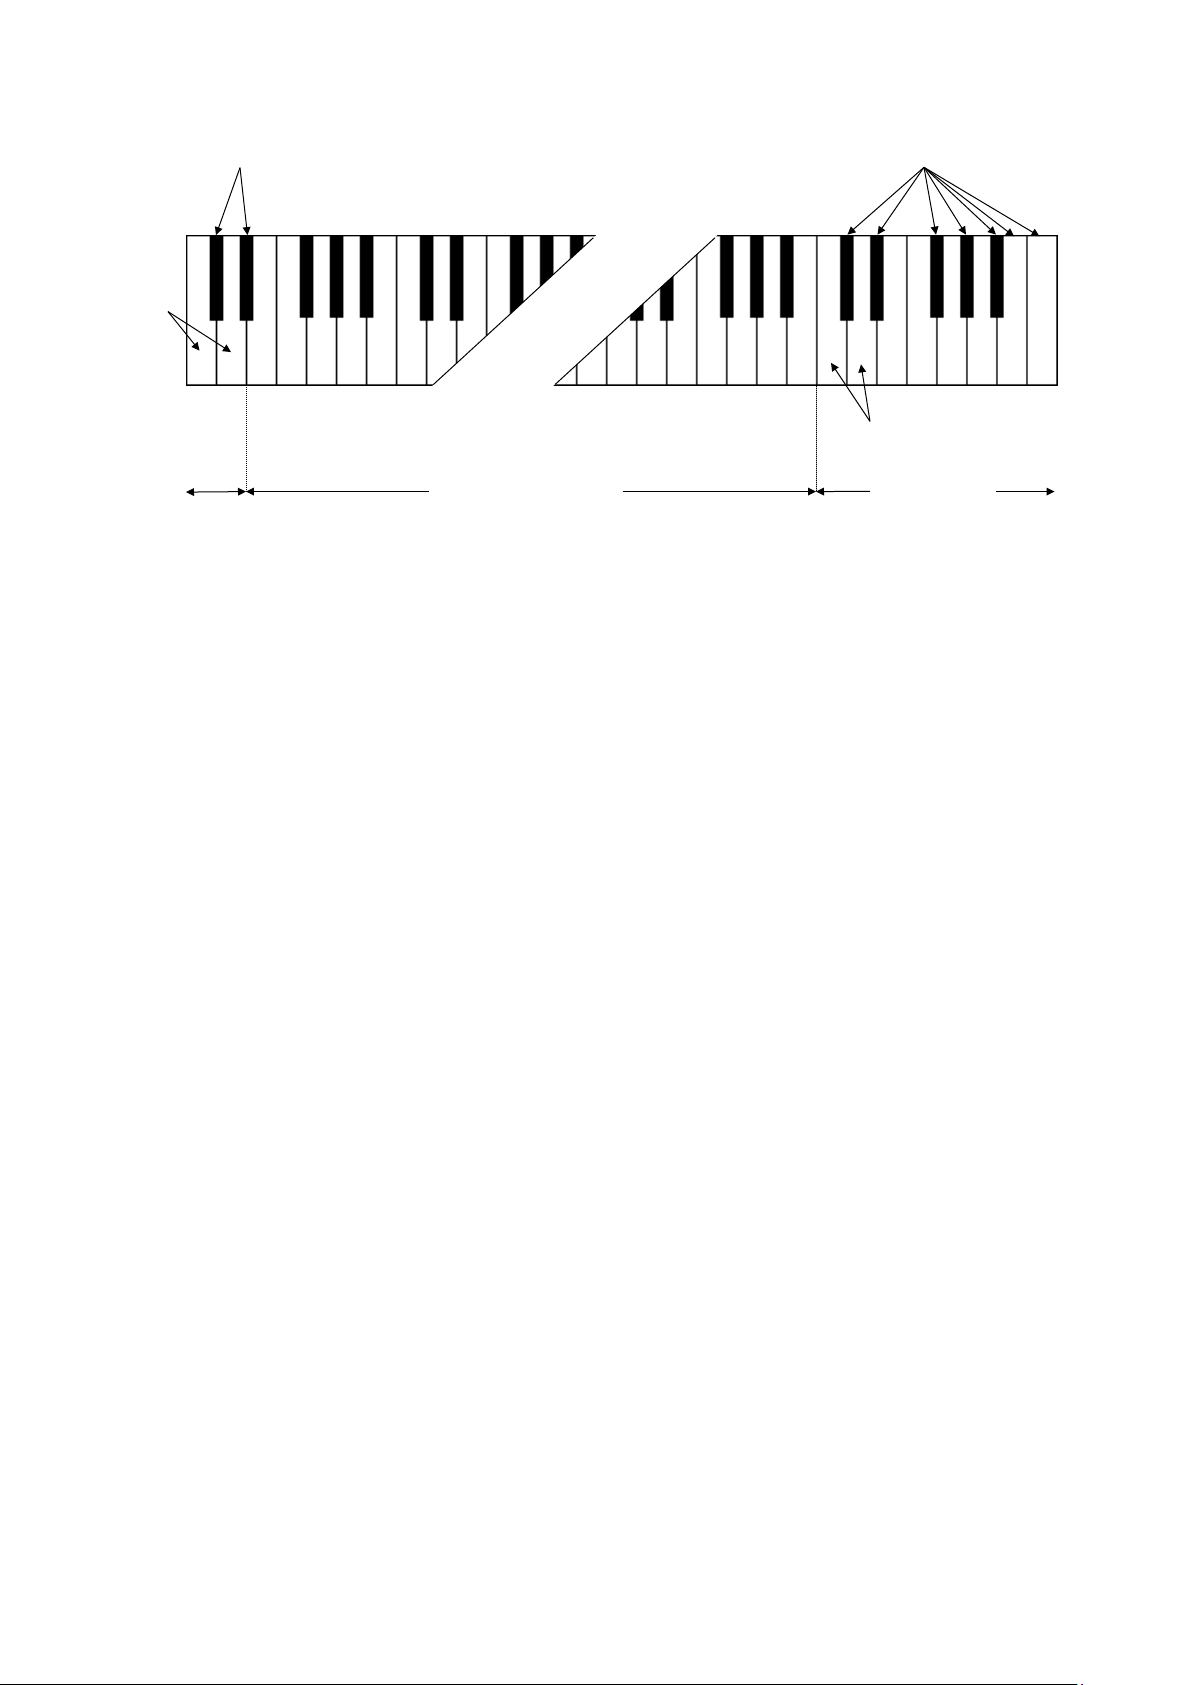
The Repeat zone keys trigger each voice of the chord separately, just as if you'd play it string-bystring on real guitar in the following way:
• C5 triggers Bass I (Root note)
• D5 triggers Bass II (alternative bass)
• E5 triggers 4th string
• F5 triggers 3rd string
• G5 triggers 2nd string
• A5 triggers 1st string
The other keys function as chosen in the Add-on string keys combo box.
The keys of the left Repeat zone strum 4 upper voices of the chord (black keys perform muted
strums).
Page 28
28
Add-on keys
String keys
Chord detect
(bass play)
Muted strum
Strum
Bass
I
II
4
3
2
1
C1
Page 29

29
CONTROLS
Chord position - selects the melodic position range for the built chords.
User Chords - opens Chord Editor.
Add-on string keys:
• Unison - doubles some strings for making single-string tremolo performance easy: C#5 Bass II, D# 5 - 4th string, F#5 - 2nd string, G#5, A#5, B5, C6 - 1st string.
• Chromatic - sets the Add-on string keys to play notes one semi-tone down from their
respective string voices: C#5 - a semi-tone down from Bass II, D#5 – a semi-tone down from
4th string, F#5 - a semi-tone down from 2nd string, G#5 - a semi-tone down from 1st string;
however A#5 - C6 add a semi-tone each to the sound of 1st string.
• Mute - all add-on keys trigger Muted chord.
• Harmonics - Add-on black keys (C#5 through A#5) trigger Harmonics for current chord
notes.
• Pinch Harm - Add-on black keys (C#5 through A#5) trigger Pinch Harmonics for current
chord notes.
Chord/Bass - switches on the X/Y chord detect mode letting you construct major/minor triad
chords with any desirable note in the Bass.
Alter Bass - automatically alternates between Bass I and Bass II when the same chord is taken in
the Main zone.
Bass Mono - mutes Bass I note when the next Bass II is played.
Page 30
30
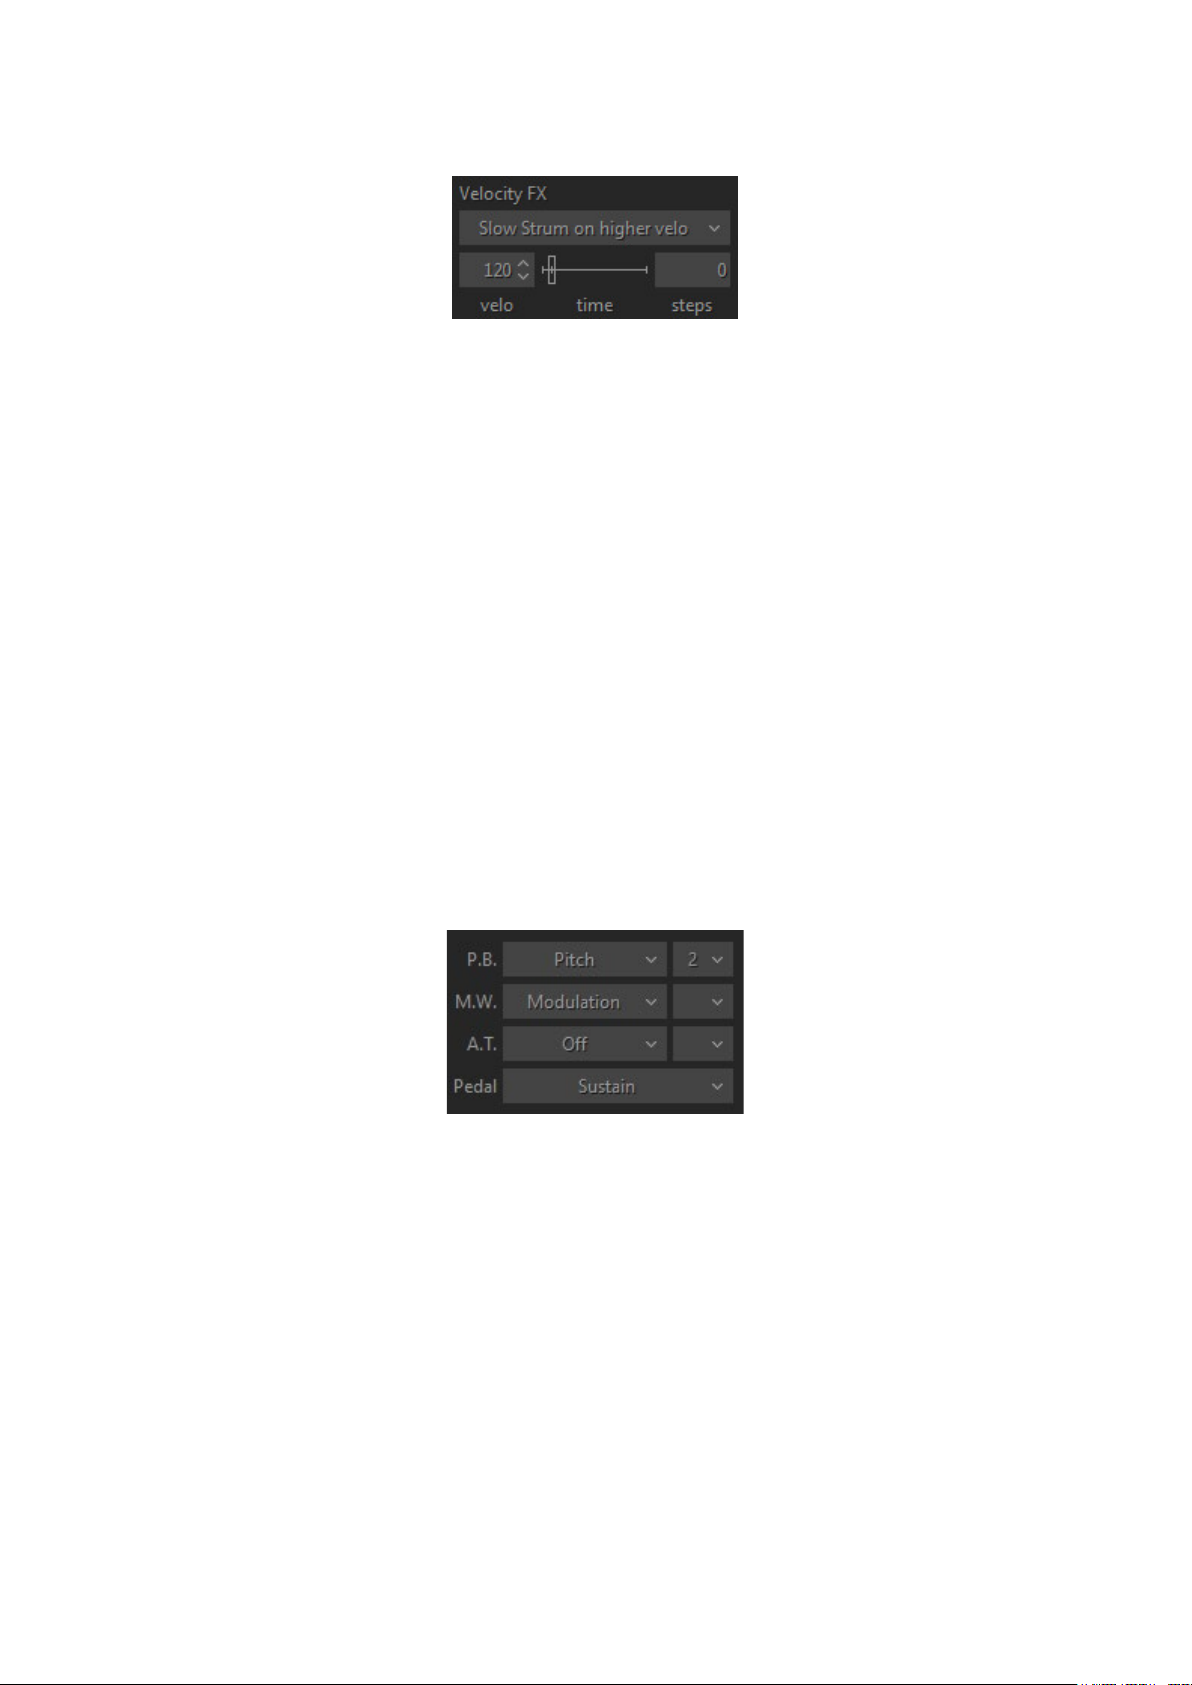
VELOCITY SWITCH FX (HARMONY, CHORDS, BASS&CHORD, BASS&PICK)
There are a number of guitar effects automatically triggered by note velocity values employed in
RealLPC:
• Slow Strum on Higher Velo - in all chordal modes you can set a velocity value, after which
the program will perform slow strum when playing a chord in the Main zone.
• Slow Strum on Lower Velo - in the same way you can set a velocity value below which the
program will perform slow strum when playing a chord in the Main zone.
• Slide up - slides up to taken note(s).
• Slide down (Fall) - slides down from taken note(s).
You can set the following independent parameters for each effect:
• Velo (input velocity threshold).
• Time (effect duration).
• Steps (range in semi-tones).
MIDI CONTROLLERS PANE (CHORDS, BASS&CHORD, BASS&PICK)
You can assign various guitar effects to standard MIDI controllers:
• P.B. (Pitch Bender) - Pitch, Slide, VeloAdd.
• M.W. (Modulation Wheel) - Pitch, Slide, Modulation.
• A.T. (After Touch) - Pitch, Modulation.
In the combo box to the right adjust the range of the effect (in semi-tones).
Modulation envelope is adjusted in Tune panel (Left Menu bar in the upper left corner of RealLPC
window).
• Pedal - you can use Sustain Pedal to switch various effects on:
o Sustain - normal sustain mode.
o ChuckaFull - switches on ChuckaFull FX.
Page 31

31
o ChuckaMutes - switches on ChuckaMutes FX.
o ChuckaMute Sust - switches on ChuckaMutes FX, simultaneously sustains the
sound.
o Open Strings Lock - switches on Open Strings Lock FX (open strings used in the
current chord will stay in voicings of the next chords, until the FX is Off).
SILENT MODE (CHORDS, BASS&CHORD, BASS&PICK)
All chordal modes allow to use ‘silent’ mode by activating Silent mode button. When Silent mode
is on, the keys in the Main zone don’t make any sound, they just define the chords; all strumming
and picking is done with keys in the Repeat and Pattern zones. You can use this option any time
you want to control chord definition and strumming/picking independently.
Page 32

32
MULTI GLOBAL MODE
Multi mode is a universal mode allowing you to easily assign various guitar techniques you want to
produce on the keys of Main and Repeat keyboard zones, such as strumming, muting, and
individual string picking. You can also create custom performance modes by combining different
techniques in a single set and adding many specific guitar effects, articulations, and additional
sounds to the performance.
Click Multi tab to open Multi mode window.
PERFORMANCE PRESETS
On the lower central part of Multi mode window you see the Preset combo box
The most popular guitar accompaniment techniques that use chords are Strumming, Bass and
Strum, and Picking ones. You can find the appropriate presets in Multi mode Preset combo box.
Chords - refer to Chords Mode for details.
Bass’n’Chord - refer to Bass&Chord Mode for details.
Bass’n’Pick - refer to Bass&Pick Mode for details.
Preset combo box also allows you to save all settings made in Multi mode window and create your
custom performance presets for future use.
Simply click the combo box, type in the name, and press Enter.
Upper part of Multi mode window presents four parameter sections: Velocity FX, Layout, Chord,
and Controllers.
Most important is Layout section, including main performance setups and controls.
LAYOUT SECTION
Layout section includes four combo boxes titled Strum, Melody, Strings, and Black.
Note, selecting an item in any section will give you access to its additional options at the right.
Page 33

33
STRUM
Strum combo box features Chord, Bass, and Silent selections.
CHORD
With Chord setup, RealLPC detects the chord played in the Main zone of the keyboard (the root
note and the name of the chord appear on the black info screen), builds a guitar version of the
chord, and plays it using a down strum technique.
Chord options:
• Upper/Lower String - allow disabling upper and/or lower strings in played chords.
• Chord/Bass - switches on the X/Y chord detect mode letting you construct major/minor
triad chords with any desirable note in the Bass.
BASS
With Bass setup, RealLPC detects the chord taken in the Main zone of the keyboard, builds its
guitar version, and plays its Root note (Bass I) only.
Bass options:
• Top Strum Voices - specifies number of strings in chords triggered by Repeat zone keys.
• Chord/Bass - switches on X/Y chord detect mode letting you construct major/minor triad
chords with any desirable note in the Bass.
• Bass Mono - mutes Bass I note when next Bass II is played.
• Alter Bass - automatically alternates between Bass I and Bass II when same chord is played
in the Main zone.
Page 34

34
• Drop Bass - lowers Bass I (Root) note by octave to be played on the lowest string possible
for current chord position.
Drop Bass option has four selections - Off, On, Kbd, and Root.
With Drop Bass (Kbd) and Drop Bass (Root) options dropping Bass I note depends on the position
of the chord notes played in Main zone or its Root note pitch:
• Drop Bass (Kbd) - Drop Bass will be applied if the majority of chord notes are lower in pitch
than E3.
• Drop Bass (Root) - Drop Bass will be applied if the Root note of the chord is lower in pitch
than E note.
SILENT
With Silent setup, the keys in the Main zone do not make any sound - they just define the chords;
all strumming and picking is done with keys in the Repeat zone. You can use the option any time
you want to control chord definition and strumming/picking independently.
MELODY
Melody setup allows you to play solo licks or bass lines in Main zone without switching from Chord
mode or jumping to different position on keyboard, and even move individual voices within the
played chord.
Melody combo box features four selections: Off, Melody, Voice Leading, and Melody + Voice
Leading.
Melody
When in Chord setup, you can easily alternate between chord strums and melody licks in Main
zone by changing the velocity of the played notes. Higher velocity will produce chord strums, while
lower velocity will produce individual notes (i.e. real pitches you press on the keyboard). The
velocity is completely user definable.
Page 35

35
Melody options:
• Velo – input velocity threshold.
• Velo+ - add velocity value to melody notes if they are too soft.
• Octave - transpose Melody by octave.
• Hammer-On - On/Off Hammer-On effect when playing Melody.
Voice Leading
With this setup, you can change individual voices of the chord after it is played. Release any chord
note while holding any other and then press another note with lower velocity. This will produce
new note over the sustaining chord.
Voice Leading options:
• Velo - velocity threshold.
• Velo+ - add velocity value to new voice notes if they are too soft.
• Bass Only - will trigger the lowest notes possible.
Melody + Voice Leading
This setup is a combination of Melody and Voice Leading setups.
STRINGS
Strings setup lets you assign String keys of various ranges to Left or Right Repeat zones.
Strings combo box includes four selections: Off, Right Hand (C-C’), Right Hand (C-A#), Left Hand (C-
A#), and Left Hand (E-A):
The selected key range will be greyed out on the virtual keyboard in the appropriate Repeat zone.
Page 36

36
Key to string layouts:
• Right Hand (C-C’) - C, D, E, F, G, A keys trigger Bass I, Bass II, 4th, 3rd, 2nd strings, while A,
A#, B and C’ trigger the 1st string.
• Right Hand (C-A#) - C, D, E, F, G, A keys trigger Bass I, Bass II, 4th, 3rd, 2nd, 1st strings,
while B and C’ trigger Up Strum and Down Strum.
• Left Hand (C-A#) - C, D, E, F, G, A keys trigger Bass I, Bass II, 4th, 3rd, 2nd, 1st strings.
BLACK
Black setup allows you to assign individual sounds and effects on black keys of the string group.
Black combo box features six selections: Unison, Chromatic, Harmonics, Strum, Mute, and ‘Do Hi
velo FX’:
• Unison - doubles some strings for making single-string tremolo performance easy.
• Chromatic - sets the black string keys to play notes one semi-tone down from their
respective string voices.
• Harmonics - black keys trigger Harmonics for current chord notes.
• Strum - C#, D#, and A# trigger Full Strum chords, while F# and G# trigger Muted Strums.
• Mute - all black keys trigger Muted Strums.
• Do Hi velo FX - black keys produce velocity free Hammer-On or Slider effect selected in Hi
velo combo box of Velocity FX section.
CHORD SECTION
Chord section allows you to assign various velocity controlled strumming techniques, change
chord position/inversion, and gain access to User Chord Editor window and Options panel.
DYN
Clicking Dyn (Dynamics) combo box gives you four selections: Full Strum, Velo Strum 1, Velo Strum
2, and Velo Strum 3.
Page 37

37
FULL STRUM
Full Strum setup works similar strumming layout for both Main and Repeat zones used in Chords
performance mode of the previous RealLPC versions.
VELO STRUM
Velo Strum 1, 2, and 3 FX allow triggering fewer strings in a strummed chord controlled by velocity
of pressed keys (lower velocities will proportionally omit one by one the upper strings in a chord,
up to the single Bass I note produced with lowest velocity value).
Velo Strum options:
• Velo - low and high velocity threshold numeric boxes.
• Voices - minimum number of voices (strings) in the chord played with lower velocity
threshold value.
Repeat keys work differently with Velo Strum 1, 2 and 3:
• Velo Strum 1 - Repeat keys are not affected and work similar Repeat keys with Full Strum.
• Velo Strum 2 - Repeat keys follow velocity options and work similar Main zone keys.
• Velo Strum 3 - Repeat keys are not affected, but simply reproduce the number of strings of
the last chord played in Main zone.
CHORD POSITION CONTROL
Chord position buttons - select the melodic position range for the built chords.
I - highest note is between E3 and G#3
II - highest note is between G3 and B3
III - highest note is between A#3 and D4
IV - highest note is between C#4 and F4
Kbd - melodic position range of the built chord depends on the octave position of the chord
taken in the Main zone of the keyboard (with borders between E and E of the next octave).
Chord Position/Inversion can be as well changed (up&down) via Key Switches during “live” performance.
Page 38

38
Page 39

39
USER CHORDS
Click User Chords button to open Chord Editor window.
Refer to User Chords chapter for details.
OPTIONS
Click ‘Options…’ button to get access to additional options of CHORD section.
WIDE FINGERINGS
When Wide Fingerings button is activated, a number of chords with Bass I note on the 4th string
(such as D major/minor/seventh, Eb major/minor/seventh, etc.) will be optimized to six voice
fingerings for better use with String keys setup.
REPEAT STRINGS
With Repeat Strings activated repeating a chord note in Main zone will repeat only the voice(s)
previously played with String key(s). With Repeat Strings Off the whole chord will be retriggered.
USE CHORD CHANNEL
With Use Chord Channel activated Melody will play via Chords audio channel.
VELOCITY FX SECTION
Velocity FX section features two groups of effects triggered with higher velocity (Hi Velo) and/or
lower velocity (Lo Velo) than the threshold value set in the appropriate numeric boxes.
Page 40

40
HI VELO FX
Hi Velo (high velocity) combo box features seven selections: Off, Slow Strum, Slide Up, Slide Down,
Hammer-On, Pre-Hammer, and Slider.
SLOW STRUM FX
With Slow Strum setup, playing chord in Main zone with high velocity value will perform Slow
Strum.
Slow Strum FX options:
Velo - input velocity threshold.
Time - controls slow strum speed.
SLIDE UP FX
The effect performs automatic slide up TO the played chord.
Slide Up FX options:
• Velo - input velocity threshold.
• Time - controls effect duration in milliseconds.
• Steps - effect range in semitones.
Page 41

41
SLIDE DOWN FX
The effect performs automatic Slide down (Fall) FROM the played chord.
Slide Down FX options:
• Velo - input velocity threshold.
• Time - controls effect duration in milliseconds.
• Steps - effect range in semitones.
HAMMER-ON FX
This FX performs automatic Hammer-On on some strings inside the chord. Actually, the engine
constructs so-called Pre-Hammer chord, which is Barre chord on the lowest fret of initial chord,
and automatically plays Hammer-On to the fret(s) of initial chord.
Hammer-On options:
• Velo - input velocity threshold.
• Mode 1 - full chord is played with Hammer-on(s) inside the chord.
• Mode 2 - string(s) above the Hammer-ons are disabled in chords played in Main zone, but
can be triggered with Repeat zone strums or String keys.
• Duration - controls Hammer-on speed in note duration units (4th, 8th, 16th, etc.) synced
with host’s Tempo setting.
• Strum LED - when activated will produce the FX with chords played in the Main zone.
• Strings LED - when activated will produce the FX with white String keys.
To produce velocity free Hammer-on with black String keys select ‘Do Hi velo FX’ setup in Black combo box of LAYOUT
section.
PRE-HAMMER FX
This FX performs the Pre-Hammer chord, i.e. one finger Barre chord on the lowest fret of initial
chord. To complete the Hammer-on effect you must repeat the chord with Repeat zone key
and/or String keys, which will move pre-hammered fret(s) to the initial chord.
Page 42

42
Pre-Hammer FX options:
• Velo - input velocity threshold.
• Mode 1 - full chord is played with the pre-hammered frets inside the chord.
• Mode 2 - strings above the pre-hammered frets are disabled.
SLIDER FX
Slider FX emulates Slider (Bottleneck) guitar technique. The FX performs automatic bend from the
pre-hammer chord frets (single fret Barre chord, constructed on the lowest fret of the initial
chord) to the initial chord fingering.
Slider FX options:
• Velo - input velocity threshold.
• Mode 1 - full chord is played with bending notes inside.
• Mode 2 - strings above the bending notes are disabled.
• Duration - controls Slider FX speed in note duration units (4th, 8th, 16th, etc.) synced with
host’s Tempo.
• Modulation - enables automatic pitch modulation (vibrato) and has four selections: Off,
Auto, Pedal, and Atch:
Page 43

43
o Off - no modulation.
o Auto - automatically switches on the Modulation FX at the end of the note bend, and
switches it off with the next note played.
o Pedal - switch auto Modulation on/off by pressing/releasing Sustain pedal.
o Atch - switch auto Modulation on/off by sending Channel Aftertouch MIDI CC data.
Modulation frequency and depth are controlled in Tune panel (Left menu bar on the upper left part of RealLPC
window).
• Strum, Strings LEDs - activate the LED to assign the FX to the needed performance
technique(s).
To produce velocity free Slider FX with black String keys select ‘Do Hi velo FX’ setup in Black combo box of LAYOUT
section.
LO VELO FX
Lo Velo (low velocity) combo box features five selections: Off, Slow Strum, Mute, Bridge Mute,
and Harmonics:
SLOW STRUM FX
With Slow Strum setup, playing chord in Main zone with low velocity value will perform Slow
Strum chord.
Slow Strum options:
• Velo - input velocity threshold.
• Time - controls slow strum speed.
Page 44

44
MUTE FX
Mute FX lets you produce Mute sound on lower velocity with different performance techniques.
Mute FX options:
• Velo - input velocity threshold.
• Strings, Bass, Melody, and Strum LEDs - activate the LED to assign the FX to the needed
performance technique(s).
BRIDGE MUTE FX
Bridge Mute FX lets you produce Bridge (Palm) Mute sound on lower velocity with different
performance techniques.
Bridge Mute FX options:
• Velo - input velocity threshold.
• Strings, Bass, Melody, and Strum LEDs - activate the LED to assign the FX to the needed
performance technique(s).
HARMONICS FX
Harmonics FX lets you produce Harmonics sound on lower velocity with different performance
techniques.
Harmonics FX options:
• Velo - input velocity threshold.
• Strings, Bass, and Melody LEDs - activate the LED to assign the FX to the needed
performance technique(s).
Page 45

45
KEY SWITCH FX
In the lower part of MULTI mode window you can find additional controls and options: Key
Switches, Preset, and Humanize.
RealLPC’s numerous guitar Effects can now be triggered in chordal modes within the MULTI mode
using our advanced Key Switch system. Key Switch option allows to assign various FX on Repeat
Zone keys as well as easily create and use custom presets in RealLPC Key Switch panel.
Click ‘Key Switches…’ button to open the Key Switch panel:
Key Switch panel gives you access to 33 keys FX boxes of Left and Right Repeat zones, including 25
assignable FX in each box.
Click FX box and select the needed FX in the popup list:
• Slow Strum - slow strum is performed when playing a chord in the Main zone.
• Slide Up - automatic slide up TO the played chord is produced.
• Slide Down - automatic slide down (Fall) FROM the played chord is produced.
• Slide Down (trigger) - triggers automatic Slide Down FROM the played chord /Velocity of
trigger key affects slide dynamics/.
• Hold - provides sustain effect similar to the Sustain Pedal.
• Chucka Full - provides muted chords in 4ths on the keys of the Main zone.
• ChuckaMuteKeys - provides muted chords in 4ths on Black Repeat (Mute) keys.
Page 46

46
• ChuckaVeloLayer - provides velocity controlled muted chords in 4ths on the keys in the
Main zone.
• Pull Off (trigger) - producing Pull-Offs on some strings inside the previously strummed
chord on lower velocity, while producing full Pre-Hammer chord on higher velocity.
• Chord Position - changes chord position up or down.
• Melody (Octave) - Melody transpose.
• String Keys - switches on/off the String keys in Repeat zone.
• Bass - switches on/off Bass function in Main Zone
• Melody - switches on/off velocity free Melody function in Main zone range.
• Chords - when activated turns Main zone to velocity free Melody function, and switches
between Chords and Melody.
• Harmonics (Melody) - switches on/off the Harmonics sound with Melody function in Main
zone range.
• Mute - switches on/off the Mute sound.
• Bridge Mute - switches on/off the Bridge Mute sound.
• Harmonics - switches on/off the Harmonics sound.
• Scrapes - switches Main zone keys to Scrapes mode.
• Solo mode - switches to Solo Global mode.
• PickUp* – pickups and their combination selection.
Page 47

47
MAIN CONTROLS
LEFT MENU BAR
In the Left Menu bar you can get access to 4 panels to make global settings: Output panel, Tune
panel, Setup panel and Velo panel.
OUTPUT PANEL
Volume (+10/-30db) - adjust output volume.
EQ - adjust internal equalizer parameters:
• High (+/- 10db).
•
Low (+/- 10db).
TUNE PANEL
Pitch - adjust the master pitch:
• Coarse (+/-12 semitones).
• Fine (+/-100 cents).
Modulation - adjust the modulation envelope affected by Modulation controller (MIDI CC#1):
• Depth (0-100%).
• Freq (0.2 - 8.0 Hz).
• Sync LED button (on/off) - when activated the modulation rate will be synched with host’s
tempo.
Page 48

48
• Duration combo box - select note duration value in pull-down menu to match modulation
rate you need.
SETUP PANEL
Keyboard range (C0-C7) - set the range of your keyboard.
Chord Detect time (0-50ms) - set the suitable delay for detecting chords taken in chord modes.
Display chords (#/b) - select sharps or flats for the chord names.
P.B. and M.W. on pressed keys - when activated allows to polyphonically use Pitch Bend,
Modulation Wheel, and Aftertouch controllers with Sustain Pedal, i.e. the controllers will affect
only on actually pressed note(s), while other note(s) being sustained with a Pedal but physically
released will stay untouched. When turned off all controllers work normally.
MIDI CC Automation – switch on/off MIDI CC Automation input.
UI Scaling (80%-200%) – resize RealLPC UI in popup menu.
Q.Load - pressing Quick Load button allows to quickly load samples and drastically save RAM.
Reset - resets all modified parameters in all modes to their factory values.
Output mode – select between Audio, MIDI, Both options.
Using MIDI Out functionality, the actual MIDI output, including arpeggios, patterns, and strums
generated by notes you play in the "Repeat Zones", can be played back through any other synth or
sampler. Most (but not all) DAWs that support MIDI input from a virtual synth support recording
its MIDI output as well.
Here are a few reasons you might want to take advantage of MIDI Output functionality:
1. To double the RealLPC sound with another synth/sampler
2. To replace your guitar part with another sound altogether
3. To generate a MIDI file that's readable by your notation program
The "Audio/MIDI/Both" options are important, and as follows:
• Audio: You'll hear the RealLPC samples only, just as you would if you weren't sending MIDI
Out to your synth.
• MIDI: You'll hear only the synth being driven by the MIDI output from RealLPC. The
RealLPC samples will not sound.
Page 49

49
• Both: You'll hear both the RealLPC samples and the synth being driven by the MIDI output
from RealLPC.
Select "MIDI" or "Both" to take advantage of MIDI Out functionality.
VELO PANEL
Click Velo button in Left menu bar to open the Velocity panel.
Velocity panel provides Preset, Velocity curve buttons, Velocity curve graph, Velocity thresholds
control.
Select the output velocity curve for your performance by pressing one of 4 buttons.
Create custom velocity curves with Dynamics slider and save them in Velocity combo box as
presets for future use.
Page 50

50
RIGHT MENU BAR
In the Right Menu bar you can get access to Timing panel, 2 Mixer panels, and Wah-Wah Effect
settings.
TIMING PANEL
Strum time (20-200ms) - adjusts the time between the notes played in the strumming chords
(Harmony, Chords, and Bass & Chord modes) as well as delay for more than one note played
simultaneously in Solo and Bass & Pick modes.
Slow Strum time (45-300ms) - adjusts the strum time for Slow Strum strokes.
Attack time (0-100%) - allows shortening/lengthening the attack of a sound. The shortest (0%)
gives smaller latency, but sounds less natural.
Release time (50-200%) - adjusts how long the note sounds after releasing the key (MIDI note
end).
Double-Trk Delay (0-400%) - controls proportional delay between tracks in Double-track patch for
wider panning.
MIXER 1 PANEL
Mixer 1 panel allows adjusting the volume of various noise effects:
Noises:
• Fret - volume and on/off of a fret noise.
• Release - volume and on/off of a release noise.
• Pick - volume and on/off of additional pick noise.
• Scrapes – volume of Scrapes sound.
• Feedback – volume of Feedback sound
Page 51

51
MIXER 2 PANEL
Mixer 2 panel lets you adjust volume of additional sounds that form the modeled guitar sound.
Sounds:
• Slow Strum - volume of Slow Strum sound (Velocity switch FX in chordal modes).
• Solo/Strings - volume of sustain sound produced in Solo mode and with String keys.
• Mute, Bridge Mute, Harmonics, Pinch Harmonics- volume of all FX sounds individually.
WAH-WAH PANEL
Wah-Wah panel allows switching on Wah-Wah Effect, as well as selecting any of 4 Wah-Wah
modes available in RealLPC and adjust parameters for each mode.
Press FX Enable LED in the upper left corner to switch on the Wah-Wah Effect.
Select Wah-Wah mode in a combo box:
MIDI CC - Wah frequency center is controlled by MIDI CC (set the needed CC# in numeric box),
adjust Filter quality (Qual), lowest frequency (Freq), highest frequency (Freq (max)).
Auto Positive - Automatic Wah effect with positive filter envelope, adjust effect Depth, Frequency
and filter Quality.
Auto Negative - Automatic Wah effect with negative filter envelope, adjust effect Depth,
Frequency and filter Quality.
Modulation - you can adjust filter Quality (db), lower Frequency (Hz), modulation Depth (%),
modulation Phase (°), modulation Rate (Hz, as well as sync the rate to host’s tempo and select
note duration in pull-down menu), select Trigger mode with on/off clickable LED.
Page 52

52
COMMON CONTROLS
Hold (on/off) – allows to sustain the sound by holding Repeat zone keys in all modes, except for
the Solo.
In Solo mode when Hold button is on, any pressed and held key in the Main zone can be used for
sustaining the following notes.
Auto (on/off) - toggles between Auto and Manual mode of Floating Fret Position. Auto works only
in melodic modes (Solo, Harmony). Manual mode allows changing the fret position by rightclicking on the Fretboard.
Accent High (0-127) - adjusts the velocity threshold between hard and hardest performance
dynamics.
Accent Low (0-127) - adjusts the velocity threshold between soft and hard performance dynamics.
Alter samples (1-5) - provides 5 positions of randomly alternating samples while performing
repetitive notes (position 1 provides up to 3 different samples, while position 5 provides up to 10
different samples).
Page 53

53
REALLPC EFFECT TABLE AND DESCRIPTION
Mute
Effect, Key/Pedal/Mod.Wheel/Velocity Switch
Bridge Mute
Effect, Key/Pedal/Mod.Wheel/Velocity Switch
Harmonics
Effect, Key/Pedal/Mod.Wheel/Velocity Switch
Pinch Harmonics
Effect, Key/Pedal/Mod.Wheel/Velocity Switch
Scrapes
Effect, Key/Pedal/Mod.Wheel/Velocity Switch
Legato (1-2 Steps)
Effect, Key/Pedal/Mod.Wheel Switch
HammerOn (Legato)
Effect, Key/Pedal/Mod.Wheel/Velocity Switch
Slide (Legato)
Effect, Key/Pedal/Velocity Switch
Repetition (NoteOff)
Key/Pedal/Velocity Switch
Tremolo
Effect, Key/Pedal/Velocity Switch
Tremolo 1-beat
Effect, Key/Pedal/Velocity Switch
Trill
Effect, Key/Pedal/Velocity Switch
Trill 1-shot
Effect, Key/Pedal/Velocity Switch
Slide Up
Key/Pedal/Mod.Wheel/Velocity Switch*, P.Bender
SlideUp (trigger)
Key Switch
Slide Down (Fall)
Key/Pedal/Mod.Wheel/Velocity Switch*, P.Bender
SlideDown (trigger)
Key Switch
Bend
Key/Pedal/Velocity Switch
Reverse Bend
Key/Pedal/Velocity Switch
Unison Bend
Key/Pedal/Mod.Wheel/Velocity Switch
Hold (1-2 Steps Mono)
Effect, Key Switch
Interval
Effect, Key/Pedal/ Mod.Wheel/Velocity Switch
Fret Position
Mouse*, Key/Pedal Switch
PickPosition
Mouse*, Key/Pedal Switch
String select
Key Switch
Wah-Wah
Effect*, Key/Pedal*/Mod.Wheel Switch
Violining
Effect, Key/Pedal/Mod.Wheel Switch
Sustainer (trigger)
Key/Pedal Switch, P.Bender
FeedBacker (trigger)
Key/Pedal/Mod.Wheel Switch, P.Bender, AfterTouch
Chucka FullRange
Effect, Key/Pedal* Switch
Chucka MuteKeys
Effect, Key/Pedal* Switch
Chucka VeloLayers
Effect, Key/Pedal/Mod.Wheel/Velocity Switch
Mode Toggle
Key/Pedal/Mod.Wheel Switch
velo>
Key/Pedal/Velocity Switch
velo<
Key/Pedal/Velocity Switch
Transpose
Effect, Key/Pedal/Mod.Wheel/Velocity Switch
Fret Noise (trigger)
Key/Pedal/Mod.Wheel/Velocity Switch
MonoBend (lower note bend)
P.Bender, Mod.Wheel
VeloAdd (velo +/- control)
P.Bender
Open Strings Lock**
Pedal Switch
Slow Strum**
Velocity Switch
Multi mode
Key Switch
Page 54

54
Melody octave***
Key Switch
Melody***
Key/Velocity Switch
Bass***
Key Switch
String keys***
Key Switch
Chords***
Key Switch
Hammer-on in chords***
Velocity Switch
Pre-Hammer in chords***
Velocity Switch
Pull-Off (trigger) chords***
Key Switch
Harmonics (Melody)***
Key Switch
Harmonics chords***
Key/Velocity Switch
Mute chords***
Key/Velocity Switch
Bridge Mute chords***
Key/Velocity Switch
Slider in chords***
Key/Velocity Switch
Pick Up select**
Effect/Key Switch
Strum***
Key Switch
Floating Strings***
Key Switch
All FX are available in Solo mode except for the marked:
* - available in Chords, Bass&Chord, Bass&Pick modes as well.
** - available only in Chords, Bass&Chord, Bass&Pick modes.
*** -.available only in Multi mode.
Tapping FX reduces initial sound attack and allows to produce legato Hammer-Ons/Pull-Offs both
lower and higher the held note within 24 semitone range. Works in monophonic mode with initial
note and Hammer-Ons/Pull-Offs played on the same string.
Mute FX - left-hand muted sound for notes in the Main zone. Note that the volume of the Mute FX
is controlled by Mixer > Sounds > Mute slider.
BridgeMute FX - sound muted near the guitar bridge for notes in the Main zone. It is a similar
effect to Mute FX, however produces a slightly different sound. The tightness of Bridge Mute
sound is controlled manually with the slider, or by velocity value of playing notes in case 1-3
position is selected in the numeric box. With ‘off’ selection velocity of playing notes will not
change the length of Bridge Mute sound. Note that the volume of the BridgeMute FX is controlled
by FxMixer > Bridge Mute slider.
Harmonics FX - chromatic Artificial Harmonic sound for notes in the Main zone. Note that the
volume of the Harmonics FX is controlled by FxMixer > Hrmnx slider.
PinchHarmonics FX - non-chromatic Pinch Harmonic sound for notes in the Main zone. Note that
the volume of the PinchHarmonics FX is controlled by FxMixer > Pinch Hrmnx slider.
Scrapes FX - 46 different string scrapes, each controlled by the different notes in the Main zone
ranging from E1 to C#5. Note that the volume of the Scrapes FX is controlled by FxMixer > Scrapes
slider.
HammerOn (Legato) FX produces Hammer-On/Pull-Off articulation. Hammer-On and Pull-Off
guitar effects enable the playing of grace notes, mordents, trills with a single pick (and single initial
Page 55

55
attack). With Hammer-On enabled, press and hold a single key. When a second key is played, it
plays without the initial attack and stops the first note. While continuing to hold the first key,
release the second key and the first note is played again without the initial attack. When the
second key is played higher than the second key, this is typically called a hammer-on. If the second
key is lower than the first key, this is typically called a pull-off. The Hammer-On effect has a
numeric box allowing the user to select in semi-tones the greatest distance between the first and
second note played to be triggered with the Hammer-On/Pull-Off effect.
Slide (Legato) FX produces sliding articulation between two notes played legato (glissando with
initial attack on the first note only). The Slide FX numeric box controls the maximum number of
semi-tones between two notes that the slide FX will occur. The Slide FX slider controls the speed
of the slide.
Repetition (NoteOff) FX automatically plays additional same note(s) on key(s) release allowing to
produce semi-automatic tremolo with easy dynamics control.
Tremolo FX plays the note(s) repeatedly with the base speed provided by the Tempo setting (is
synched with host’s tempo). Multiples above the Tempo setting are controlled by the Tremolo FX
pull-down menu with choices of 4th, 4T (triplet), 8th, 8T, 16th, 16T, 32nd, 32T, 64th, and 64T note
durations. Note that while Tremolo FX is enabled any secondary notes played are sustained for as
long as the first note is played.
Tremolo 1-beat FX works similar Tremolo FX but plays number of notes fitting in one beat of a
measure before sustaining. The speed is controlled by the Tempo setting (is synched with host’s
tempo).
Trill FX plays a continuous trill for as long as the note(s) is held. The Trill FX numeric box specifies
(in semi-tones above the note(s) played) the interval of the trill. The speed of the trill is controlled
by the Tempo setting and the Trill FX pull-down menu with choices of 4th, 4T (triplet), 8th, 8T,
16th, 16T, 32nd, 32T, 64th, and 64T note durations.
Trill 1-shot FX plays a mordent ahead of the note(s) played. The Trill 1-shot FX numeric box
specifies (in semi-tones above the note(s) played) the interval of the mordent. The speed of the
mordent is controlled by the Tempo setting and the Trill 1-shot FX pull-down menu with choices of
4th, 4T (triplet), 8th, 8T, 16th, 16T, 32nd, 32T, 64th, and 64T note durations.
SlideUp FX articulates automatic slide up TO the note(s) played. The SlideUp FX numeric box
specifies (in semi-tones) the interval to start the slide from. The SlideUp FX slider controls the
speed of the slide.
SlideUp (trigger) FX triggers automatic slide up FROM the sustaining note(s). Velocity of trigger
key affects slide dynamics.
SlideDown FX articulates automatic slide down FROM the note(s) played. The SlideDown FX
numeric box specifies (in semi-tones) the destination interval for the slide. The SlideDown FX slider
controls the speed of the slide.
SlideDown (trigger) FX triggers automatic slide down FROM the sustaining note(s). Velocity of
trigger key affects slide dynamics.
Page 56

56
Bend FX articulates automatic bend up TO the note(s) played. The Bend FX numeric box specifies
(in either 1 or 2 semi-tones) the interval to start the bend from. The Bend FX slider controls the
speed of the bend.
ReverseBend FX articulates automatic ‘pre-bend and release’ down to the note(s) played. The
ReverseBend FX numeric box specifies (in either 1 or 2 semi-tones) the interval to start reverse
bend from. The ReverseBend FX slider controls the speed of the bend.
UnisonBend FX articulates two notes played, one being the played on the Main zone, and the
second one starting from one or two semi-tones below is bent up to the note played. The
UnisonBend FX numeric box controls if the second bent note starts from one or two semi-tones
below. The UnisonBend FX slider controls the speed of the bend.
Hold FX provides sustain effect similar to the Sustain Pedal.
Interval FX plays additional note(s) to the one played in the Main zone. Interval FX pull-down
menu options are: mono, 4th down, 5th up, Octave up, Power (5th + 4th up), Power2 (5th + 4th
up), 2 Octaves up, Power Oct (two power chords in octave) and Power 2 Oct (two power chords 2
in octave). Note that when Interval FX is enabled, the keyboard is in monophonic mode and only a
single key can be played at a time.
FretPosition FX controls the Capo along the fretboard. The FretPosition FX pull-down menu option
of “D#5 … C6” allows the Capo to be controlled by the 10 Right Repeat keys starting from D#5, up
to C6 selecting the 18th fret. The FretPosition FX pull-down menu option of “Open" forces the
Capo to remain open. The remaining pull-down menu options select one of the 18 frets (frets
numbers marked with *, or ** correspond to the frets marked on the RealLPC fretboard).
PickPosition FX controls the position of the pick on the strings to provide different sound (farther
or closer to the bridge). The PickPosition numeric box ranges from -7 to +7. The Pick Position can
also be changed via the main RealLPC window by clicking and dragging the pick to the left or right
on the high E-string.
String Select FX allows to manually select the needed string, which lets you play as many notes on
the selected string as possible for the string range.
Wah-Wah FX provides a traditional guitar wah-wah pedal effect. The Wah-Wah FX pull-down
menu options for control are: MIDI-Control, Auto Positive, Auto Negative and Modulation. WahWah FX parameters can be modified in the Wah-Wah panel accessible from Right Menu bar in the
upper right corner of the RealLPC window.
Violining FX provides a volume swell with a smooth attack. The Violining FX slider controls the
swell time.
Sustainer (trigger) FX triggers a ‘sustainer’ effect for any notes currently being played in the Main
zone. The sound swells with every key press and can sustain as long as you trigger the effect.
FeedBacker (trigger) FX triggers a harmonic feedback for the note(s) being played in the Main
zone (for the last in time pressed note in case of a chord). The FeedBacker FX pull-down menu
provides the following harmonic selections: 8 (octave), 5’ (octave and a fifth), 8’ (two octaves), 5’’
(2 two octaves and a fifth), 8'' (three octaves), and 5’’’ (three octaves and a fifth).
ChuckaFull FX provides muted chords in 4ths (so called, chucks) played in the Main zone which
emulates ‘chucka-chucka’ guitar technique. Main zone is in mono mode with each key triggering
Page 57

57
individual chord/fret. With notes played from E3 and higher, ChuckaFull FX chords will move
higher with each increased semi-tone along the fretboard. Right Repeat zone keys repeat the
chords played in Main zone and can alternate between two string groups: D#5 through F#5 trigger
lower strings (5-4-3 strings), and G5 and higher trigger upper strings (3-2-1 strings). Left Repeat
keys (D#1 and lower) repeat the last layer produced in Right Repeat zone.
ChuckaMuteKeys FX provides muted chords in 4ths with Black Repeat (Mute) keys (Main zone and
white keys of Repeat zone continue to work normally). Right Repeat zone Mute keys can alternate
between two string groups: D#5 through F#5 trigger lower strings (5-4-3 strings), A#5 and higher
trigger upper strings (3-2-1 strings), and Left Mute keys (D#1, C#1, etc..) repeat the last layer
produced in Right Repeat zone.
ChuckaVeloLayers FX provides muted chords in 4ths played in the Main zone similar to ChuckaFull
FX, however can produce 3 velocity controlled string groups by any key of the whole range. Low
velocity strokes trigger 5-4-3 string layer, middle velocity strokes trigger 4-3-2 strings layer, while
high velocity strokes trigger 3-2-1 string layer (the higher velocity value - the higher string group is
triggered).
Mode Toggle FX toggles from Solo mode to Chords, Bass&Chord, or Bass&Pick mode and back to
Solo mode.
Velo > FX activates higher Velocity Switch FX selected in Higher Velocity Switch box.
Velo < FX activates lower Velocity Switch FX selected in Lower Velocity Switch box.
Transpose FX - transposes all notes by the selected interval (+/- 3 octaves)
Fret Noise (trigger) FX triggers Fret Noise sound. Enabling the FX will switch off the
automatic Fret Noise generating on note-offs.
Multi mode FX- switches from Solo to Multi mode.
Melody (octave) FX – transposes Melody notes.
Melody FX – switches from chord to Melody setup.
Bass FX - switches from chord to Bass setup.
String Keys FX – switches on String Keys.
Chords FX - switches on Chords setup (when activated Main zone keys are in Melody mode).
Hammer-On FX - produces automatic Hammer-On in chords.
Pre-Hammer FX – produces pre-hammered chord.
Pull-Off (trigger) FX - produces pull-off in chord.
Harmonics (Melody) FX – switches from chords to Melody with Harmonics sound.
Harmonics FX – switches on Harmonics sound for chords.
Mute chords - switches on Muted sound for chords.
Bridge Mute chords - switches on Bridge Muted sound for chords.
Slider FX - produces automatic pitch bends from pre-hammer notes to initial chord notes in
chords.
Page 58

58
Pick Up select FX - switches between pick ups and their combinations (Neck, Bridge, Neck+Bridge).
Strum - allows to assign Up/Down strum, or Up/Down Muted strum on any key of Repeat zone.
Example: if you use String keys you can assign any desired Strum and Muted Strum combination
on Black keys of Strings zone and play strums without moving your hand to Strum keys section.
Floating Strings FX - switches on String keys (white keys) in Main zone starting from Root or
Lowest note of the played chord. That allows you to pick String keys without moving hand to
Repeat zone section. In case of #/b Root or Lowest note of the chord (Bb, F#, etc..), String keys will
start on the lower neighbor white key.
MIDI CONTROLLER ADDITIONAL FX
MonoBend FX (Pitch Bender and Modulation Wheel) applies pitch bending: a) only to the lowest
of simultaneously played notes, b) only to the first bent and held note, allowing to emulate guitar
specific single-string bending techniques: Unison Bend, Bend/Release combined with sustained
note(s), etc…
Example 1 - assign MonoBend to P.Bender, press and hold 2-3 notes in Main zone, then move
P.Bender - only the lower note will be bent (if you then move P.Bender back while holding all
played notes only the first note will be affected).
Example 2 - assign MonoBend to P.Bender, play a note, move P.Bender to bend the note, then
holding the first note bent play the second note higher or lower the first one - next note(s) will
play their real pitch (if you then move P.Bender back while holding all played notes, only the first
previously bent note will be affected).
VeloAdd FX (Pitch Bender) allows continuous adding/reducing velocity value (+/-) to the played
notes.
Slide FX (Pitch Bender and Modulation Wheel) allows manual articulation of Up/Down slides
from/to played note(s).
ADDITIONAL FX FOUND IN CHORDAL MODES
Slow Strum on Higher Velo (Velocity Switch FX) - in all chordal modes you can set a velocity value,
after which slow strum will be performed when playing a chord in the Main zone.
Slow Strum on Lower Velo (Velocity Switch FX) - in the same way you can set a velocity value
below which slow strum will be perform when playing a chord in the Main zone.
Slide up on Higher Velo (Velocity Switch FX) produces automatic slide up TO the played
note/chord.
Slide down on Higher Velo (Velocity Switch FX) produces automatic slide down (Fall) FROM the
played chord.
Open Strings Lock (Pedal Switch FX) - in case open strings are used in a chord (such as A Open, E
Open) they will be engaged (locked) while other strings will play the notes of the further chords.
When Open Strings Lock FX is turned on the further chords played with upper note higher than E3
will automatically move chord position up along the fretboard.
Note, that if Modulation FX box is activated, the effect selected in M.W. (Modulation Wheel) box
will not work.
Page 59

59
CHORD MAP
RealLPC can detect 30 chord types.
The following chart lists the available chord types and the degrees unnecessary for chord
detection that you can omit while entering chords.
Chord type Can be omitted
ma V, III
6 -
add9 -
sus4 -
sus2 -
6/9 V
maj7 V, V+III
maj9 V
maj7(b5) -
maj7(#5) -
m V
m6 -
m(add9) -
m7 V
m(maj7) V
m7(b5) III,
m9 V
m7(11) VII, V
7 V, III+V
7sus4 -
7(b5) -
7(#5) -
9 V
9sus4 V
7(b9) V
7(#9) V
9(b5) -
7(add13) V
dim7 III, VII, III+VII
aug -
All chords except ma6, min6, min7(11), ma6/9 are detected in all inversions and note
combinations.
Page 60

60
C6
Cadd9
Csus4
Cmaj9
Cmaj7(b5)
Cmaj7(#5)
Cm
Cm6
Cm(add9)
Cm7
Cm(maj7)
Cm7(b5)
Cm9
C7
C7sus4
C7(b5)
C7(#5)
C9
C9sus4
C
Csus2
C6/9
Cmaj7
Cm7(11)
C7(b9)
C7(#9)
C9(b5)
C7(add13)
Cdim7
Caug
C7
Cm
Cm7
1-note chord detect system also included:
- obligatory
- can be omitted
Page 61

61
USER CHORDS
Chord Editor implemented in version 3 allows to easily change any factory chord to any fingering
you want, and save edited chords within User Chord banks for future use.
Being in any chordal mode click User Chords button to open Chord Editor window:
Chord Editor window
CHORD EDITOR
Select chord you want to edit by pressing keys on external MIDI keyboard, or by selecting
Root/Type/Bass/Position in chord select boxes
EDITING CHORDS
• Click on fret to change/insert a note
• Click Compare button to compare edited and initial chord
• Click Add/Apply button to add edited chord to current bank
Page 62

62
• Click Delete button to remove the selected chord from current Bank.
Note, that any User Chord lowest note will be used as Bass I Stroke for Pattern, Bass&Pick, and Bass&Chord layouts,
regardless of Root note in the chord name.
AUDITIONING CHORDS
a) Press button with speaker icon
Small button at the right with a dot symbol activates Auto audition mode (any loaded or selected chord will be played
automatically)
b) Right-click fretboard and strum strings with a mouse.
SAVING USER CHORD BANK
Press Save button, or rename bank and press Enter to save chord bank to Chord Library.
Delete Bank from Library by pressing ‘Delete icon’.
All user chord names will be displayed with ‘*’ symbol in the Info bar.
USER CHORDS VIEW
In the right part of Editor window you see the list of all user chords of all Banks you've created
(except for current Bank selected in Bank view at the left), which allows you to compare edited
chord fingerings from different Banks, as well as copy any user chord from one Bank to another by
simply selecting chord in User Chord view list and pressing Add button.
Note, the Bank you select in User Chord Bank combo box will be used for all modes working with chords.
EXPORTING/IMPORTING USER CHORD BANKS
You can export/import single Chord Banks as well as the whole User Chord Library by clicking
button with triangle icon and selecting the appropriate item in pop up menu:
If you want any Bank to load as default every time you run the plug-in, load the bank and check
‘Set as default’ item in popup menu.
Page 63

63
PATTERN GLOBAL MODE
USING MUSICLAB RHYTHM PATTERN LIBRARY AND PATTERN MANAGER
MusicLab Rhythm Pattern Library is a unique collection of 1250 guitar accompaniment rhythm
patterns classified by various musical categories, such as meter, music style, guitar technique,
rhythmic feel, tempo range.
Using the pre-recorded rhythm patterns of MusicLab Pattern Library you can quickly create
professionally sounding guitar accompaniment tracks for your songs. Then all you have to do is to
choose the appropriate pattern(s) in RealLPC Pattern Manager, copy them to your host
sequencer's MIDI track, start sequencer and play chord changes on a MIDI keyboard, or
alternatively enter chords to a MIDI track using sequencer's editor.
PATTERN MANAGER
RealLPC is equipped with powerful multi-functional built-in Pattern Manager allowing to easily
audition rhythm patterns of MusicLab Pattern Library, quickly find the ones matching your musical
needs, as well as drag'n'drop/export the chosen patterns directly to the host's MIDI track to use
with your song.
PATTERN MANAGER WINDOW
Click Pattern button to switch on the Pattern Global mode and get access to Rhythm Pattern
Library and Pattern Manager.
Pattern mode window
Within Pattern Global mode you can select any of Performance modes (Solo, Harmony, Chords,
Bass&Chord, or Bass&Pick) by pressing the appropriate performance mode button. Note, that you
can use rhythm patterns with all performance modes, the mode selection depends on what
harmonic part you want to play with the rhythm patterns:
• Select Chords, Bass&Chord, Bass&Pick modes for automatically constructed guitar chords
• Select Harmony mode to perform intervals with strumming patterns
• Select Solo mode to perform your own chords with strumming or picking patterns
Page 64

64
Click the arrow button in the upper left corner to open Pattern Library tree view.
FINDING PATTERN IN MUSICLAB PATTERN LIBRARY
Rhythm patterns are organized within Pattern Library tree view by Category folders and Style
subfolders including sets of MIDI patterns. The name of each folder/subfolder contains short
musical information helping you to quickly find patterns matching your song.
For instance:
Category name Basic Strumming includes a number of guitar strumming Styles.
Style name 4'4_Basic_S_8th_90-250 contains Basic style rhythm patterns in 4'4 meter (4'4_Basic),
featuring strumming technique (S), and 8th note rhythm feel (8th), usable within the 90-250 bpm
tempo range (90-250).
Library Tree view. Style folder
To read the details about ML Pattern library right-click on Pattern Library root folder, and select
Show Info item in popup menu.
Page 65

65
To read the additional information about Styles included with the Category right-click on Category
folder and select Show Info item in popup menu:
SELECTING CATEGORY AND STYLE
To find the appropriate pattern set in Pattern Library tree view choose Category folder and
double-click the folder name to get access to the included Styles. Click the appropriate Style name
to load the available pattern set to Pattern List pane.
Pattern List
All patterns of ML Pattern Library have unique names containing brief information as well, so you
can easily identify them when using outside the Style folder.
For instance:
Pattern name S13_Basic_4'4 indicates strumming technique used (S), pattern number (13), and
Style name (Basic 4'4).
SELECTING PATTERN
Click on pattern name in the list to select it - pattern rhythmic contents will appear in Pattern view
and it is ready to play.
Pattern view graphically presents measures/beats as well as guitar 'Strokes' used in the current
rhythm pattern. Differently colored 'Piano Roll' type bars and their vertical position allow to easily
identify the stroke types: green bars present Full strums, red ones present Muted strums, blue
Page 66

66
ones present Slow strums, light green bars present Top strums, brown ones present individual
'string' picks (up strums bars of the same stroke type are in higher position than down strums):
Strumming Pattern
Picking Pattern
AUDITIONING PATTERN
HOST SEQUENCER IN STOP MODE (OR REALLPC IN STANDALONE RUN)
Press chord on your MIDI keyboard to trigger pattern playback that will be visualized by position
cursor moving along the Pattern view. Pattern will perform your chord(s) until you release the
keys. Pattern stops when you release the keys and starts from the beginning when you press chord
again. Pattern will continue playing if you change chords legato way (if at least one key is
constantly pressed).
Press Latch button or MIDI Sustain Pedal to turn pattern playback to 'Latch' mode - in that case
pattern will continue playing the last chord even if you release all chord keys.
HOST SEQUENCER IN PLAYBACK MODE
Start your host sequencer. Now pattern will 'silently' follow host's playback until you press chord
on a MIDI keyboard (or alternatively insert chord changes to MIDI track). Releasing chord keys
mutes the performance. Pressing chord again will continue pattern playing in synch with your
host’s tempo/beats.
Press Latch button or Sustain Pedal to turn pattern playback to 'Latch' mode - in that case pattern
will continue playing the last chord even if you release all chord keys.
Note, that using sequencer in playback mode allows you to easily choose pattern(s) for your song
by previously entering chords to a MIDI track and selecting patterns in Pattern Manager 'on the fly'
along with the song.
CONTROLLING PATTERN PLAYBACK
DYNAMICS CONTROL
Pattern Manager has powerful real time velocity control options allowing to drastically change
pattern performance:
Page 67

67
• Velo add - add/reduce velocity
• Chord - check to apply velocity of trigger chord to pattern dynamics (+/- velocity)
• P.B. - check to assign +/- velocity to Pitch Bender controller for continuous dynamics
changes
• Random (velocity) - check to switch randomization on
Click Pattern Settings button (the one at the right w/three dots picture) to adjust randomization
parameters:
• min box - minimum deviation range
• max box - maximum deviation range
• strength (%) - sensitivity of randomization, at 100% all pattern notes will be randomized
TEMPO CONTROL
Pattern Manager takes tempo value from the host sequencer, but you can make it twice lower or
higher by simply selecting the appropriate item in Tempo combo box:
TRANSFERRING PATTERN TO HOST'S MIDI TRACK
If you want to use more than one rhythm pattern for your song you have to copy the chosen
patterns from Pattern Manager to MIDI track of your host sequencer. There are two ways to do
that:
DRAG'N'DROP PATTERN
The simplest way to copy pattern to MIDI track is to drag'n'drop the selected pattern directly from
Pattern view. To do this click on Pattern view and drag the pattern to the needed measure of a
MIDI track.
You can automatically multiply pattern by the appropriate number of cycles if you previously set
the desired number of repetitions in D’n’D Repeat box found on Pattern Settings panel:
Page 68

68
Note. Velo add and Random parameters will be also applied to the exported pattern (MIDI file).
IMPORT PATTERN TO MIDI TRACK
If your host doesn't support drag'n'drop MIDI data you can previously drag out pattern from
Pattern view directly to Windows – it will be exported as a Standard MIDI file, and then import it
to your sequencer. In Mac version: right-click on Pattern view and select 'Export to Desktop' in pop
up menu. Alternatively you can import pattern right from RealLPC installation folder (by default:
C:/Program Files/MusicLab/RealLPC 5/Loops/ Pattern Library), but in that case you get single
original pattern and you have to multiply it manually in a MIDI track of your host.
USING RHYTHM PATTERNS IN A MIDI TRACK
When the appropriate rhythm patterns for your song parts are successfully found in Pattern
Manager and copied to the host's MIDI track, press Track button to cancel pattern loaded in
Pattern Manager (it will be grayed out) and work with pattern on MIDI track only.
There are two ways of creating guitar part with the help of rhythm patterns playing from MIDI
track to RealLPC: real-time and non-real-time methods.
NON REAL-TIME METHOD
• Create MIDI track for chords, output it to RealLPC, and enter chord changes for you guitar
part (step record chords from your MIDI keyboard or manually enter notes via sequencer’s
editor)
• Start your sequencer to listen to the ready part.
REAL-TIME METHOD
• Create MIDI track for chords, output it to RealLPC
• Start sequencer and play/record chord changes to RealLPC from your MIDI keyboard
Real-time method is more intuitive and allows to control pattern playback adding various
expressive adjustments to the performance.
Page 69

69
CONTROLLING PATTERN PLAYBACK
You can control pattern playing from MIDI track with the help of chords played on a MIDI
keyboard by pressing and releasing keys, using Latch button (or Sustain Pedal), and also by
triggering Slow Strum (Velocity Switch FX).
LATCH MODE (SUSTAIN PEDAL)
With Latch button disabled pattern will play only while you are holding the chord on your MIDI
keyboard, and it will be muted when you release the keys. This allows you to play guitar pattern
here and there along with the song. With Latch button (or Sustain Pedal) pressed pattern will
continue playing even if you release the keys.
SLOW STRUM
Use Slow Strum velocity switch FX to add syncopes and accents to pattern playback:
• Temporarily mute pattern by triggering Slow Strum (the time window can be adjusted by
'SlowZone' Automation parameter)
• Completely stop pattern by triggering Slow Strum and quickly releasing the keys (to stop
Slow Strum sound press the Mute key (Black) of the left Repeat zone). To continue pattern
playback press the chord again.
Note, with Latch button (Sustain Pedal) pressed you can't completely stop pattern by triggering Slow Strum and
releasing the keys.
CREATING CUSTOM STYLES FOR PATTERN LIBRARY
ORGANIZING EXISTING PATTERNS IN CUSTOM STYLES
You can create your own pattern sets by copying the favorite patterns taken from the ML Pattern
Library and organizing them as custom Styles within Library tree view for future use:
• Select pattern you are going to copy to your new Style - it will appear in Pattern view
• Right-click on a Category folder or Style subfolder of the Tree view and select Add Style in
pop up menu. Name the newly created empty folder (the Pattern List pane will be empty)
• Press 'Add' button under Pattern List pane to copy the current pattern to your new Style
folder
Page 70

70
• Find and audition other patterns, and copy them one by one to the new Style using the
same method
You can also delete/rename Style folders by right-clicking on it and selecting the appropriate item
in popup menu.
CREATING CUSTOM PATTERNS
RealLPC rhythm patterns are single track Standard MIDI files (SMF format 0) recorded with special
Stroke Map notes, so advanced users can edit the existing patterns or create their own patterns
from scratch in the host's MIDI track, and then save/export them as SMF directly to Pattern Library
folder for future use (C:\Program Files\MusicLab\RealLPC\Loops).
Guitar Stroke Map incorporated in RealLPC allows to use up to 22 MIDI notes in the lowest octave
range (from C#-2 to A#-1) for emulating a number of guitar techniques (Strokes) within a MIDI
rhythm pattern. So you can use the Stroke Map notes for creating your own rhythm patterns
including various guitar 'Strokes', such as chord strums (up/down), slow strums (up/down),
individual string picks, bass note pick, muted strums (up/down), chord slides (using chromatic
strums), etc.
Strumming Pattern in MIDI track
Page 71

71
REALLPC STROKE MAP
Note # Note name Stroke name
22 A#-1 "Slow Upstrum"
21 A -1 "Slow Downstrum"
20 G#-1 "Muted Upstrum"
19 G -1 "Muted Downstrum"
18 F#-1 "Full Upstrum"
17 F -1 "Full Downstrum"
16 E -1 "Full Downstrum 1 semi-tone lower"
15 D#-1 "Full Downstrum 2 semi-tones lower"
14 D -1 "Full Downstrum 3 semi-tones lower"
13 C#-1 "1st string"
12 C -1 "2nd string"
11 B -2 "3rd string"
10 A#-2 "4th string"
09 A -2 "Bass I"
08 G#-2 "Bass II"
07 G -2 "Muted Top Upstrum"
06 F#-2 "Muted Top Downstrum"
05 F -2 "Top Upstrum"
04 E -2 "Top Downstrum"
03 D#-2 "Top Downstrum 1 semi-tone lower"
02 D -2 "Top Downstrum 2 semi-tones lower"
01 C#-2 "Top Downstrum 3 semi-tones lower"
Top strum - strum on the 3-4 higher strings (Bass strings omitted)
Page 72

72
PARAMETER AUTOMATION MAP
Volume
7
Volume
EQ, High
29
EQ-High
EQ, Low
30
EQ-Low
MIDI Out, select
Outmode
Pitch, Coarse
12
PtchCrse
Pitch, Fine Tune
13
PtchFine
Modulation, Depth
14
ModDepth
Modulation, Freq
15
ModFreq
Mixer_Muted_sound, Volume
20
MxMuted
Mixer_Slow_Strum, Volume
21
MxSlStrm
Mixer_Switch_FX, Volume
22
MxKeyFx
Mixer_FretNoise, on/off,
23
MxFrtN_
Mixer_FretNoise, Volume
24
MxFrtNse
Mixer_ReleaseNoise, on/off
25
MxRelN_
Mixer_ReleaseNoise, Volume
26
MxRelNse
Mixer_Pick/Noise, on/off
27
MxPckN_
Mixer_Pick/Noise, Volume
28
MxPckNse
Wah-Wah, On/Off
47
WahOnOff
Wah-Wah_mode, select
46
WahMode
Alter_sample, mode
52
AltSmple
Accent_High_Threshold
51
VelTrshH
Accent_Low_Threshold
53
VelTrshL
Release_Time
55
RlseTime
Attack_Time
49
AtckTime
Strum_Time
56
StrmTime
Pick_Position, select
43
PickPos
Fret_Position, select
78
FretPos
Auto_Fret_Position, on/off
79
AutoFret
Hold, on/off
64
Hold
Pitch_BenderUp, Mode
57
PBupMode
Pitch_BenderDown, Mode
48
PBdnMode
PBenderUp_to_Slide, Range
58
PBSldRng
PBenderDown_to_Slide, Range
63
PBdnSlRn
PBender_to_Pitch, Range
59
PBPtcRng
REALLPC MIDI CC # VST NAME
OUTPUT
TUNE
MIXER
WAH-WAH
COMMON
CONTROLLERS
Page 73

73
Modulation_Wheel, Mode
60
WhMode
ModWheel_to_Slide, Range
61
WhSldRng
ModWheel_to_Pitch, Range
62
WhPtcRng
Aftertouch, Mode
75
AtchMode
Aftertouch_to_Pitch, Range
76
AtchRng
Velocity_Curve, select
77
VelCurve
VELOCITY SWITCH FX (NON-SOLO)
Velo_Switch_Slide_mode, select
85
VelSlide
VelSw_SlideUp, Velo
86
SldUpVel
VelSw_SlideUp, Steps
87
SldUpStp
VelSw_SlideUp, Time
88
SldUpTim
VelSw_SlideDown, Velo
89
SldDnVel
VelSw_SlideDown, Steps
90
SldDnStp
VelSw_SlideDown, Time
102
SldDnTim
Slow_Strum_on_high_velo, select
112
SlStrmHi
Slow_Strum_HighVel, Velo
113
SlStrHVe
Slow_Strum_HighVel, Speed
114
SlStrHSp
Slow_Strum_on_low_velo, select
115
SlStrLow
Slow_Strum_LowVel, Velo
116
SlStrLVe
Slow_Strum_LowVel, Speed
117
SlStrLSp
Performance_Mode, select
54
Mode
Silent Mode, on/off
110
Silent
Chord Position, select
111
ChordPos
Chords/Bass, on/off
80
ChrdBass
Alter_Bass, on/off
118
ChdAltBs
Bass_Mono, on/off
119
ChdMnoBs
Chords_Strings, Upper, select
6
ChdStrU
Chords_Strings, Lower, select
3
ChdStrL
Bass&Chord_mode_Strings#, select
9
BnCStr#
Harmony_Mode_Interval, select
31
HrmIntr1
Solo_FX_HammerOn, select
35
SolFxHO
Solo_FX_HammerOn, Steps
36
HOSteps
Solo_Legato, on/off
18
Legato
Solo_BassZone, on/off
40
BassZone
Solo_BassZone, rangeHigh
41
BasRngUp
Solo_BassZone, rangeLow
44
BasRngDn
Slow Strum time zone (Pattern)
120
Slowzone
Pattern mode on/off
16
PattrnOn
Pattern, Track mode on/off
17
TrackMod
Song_Mode_Velo+
122
SongVelo
MODE CONTROLS
Page 74

74
MIDI CC AUTOMATION, VALUE TO PARAMETER MAP
CC#3, ChdStrL
CC#12, PtchCrse
CC#41, BassRang
0-13 -->
1
0-2 -->
-12
0-1 -->
E1
13-38 -->
2
3-7 -->
-11
2-5 -->
F1
39-63 -->
3
8-13 -->
-10
6-8 -->
F#1
64-88 -->
4
14-18 -->
-9
9-12 -->
G1
89-114 -->
5
19-23 -->
-8
13-15 -->
G#1
115-127 -->
6
24-29 -->
-7
16-19 -->
A1
CC#6, ChdStrU
30-34 -->
-6
20-22 -->
A#1
0-13 -->
1
35-39 -->
-5
23-26 -->
B1
13-38 -->
2
40-44 -->
-4
27-29 -->
C2
39-63 -->
3
45-50 -->
-3
30-33 -->
C#2
64-88 -->
4
51-55 -->
-2
34-37 -->
D2
89-114 -->
5
56-60 -->
-1
38-40 -->
D#2
115-127 -->
6
61-66 -->
0
41-44 -->
E2
CC#9, BnCStr#
67-71 -->
1
45-47 -->
F2
0-21 -->
2
72-76 -->
2
48-51 -->
F#2
22-63 -->
3
77-82 -->
3
52-54 -->
G2
64-105 -->
4
83-87 -->
4
55-58 -->
G#2
106-127 -->
5
88-92 -->
5
59-61 -->
A2
CC#19, Pickups
93-97 -->
6
62-65 -->
A#2
0-17 -->
Neck
98-103 -->
7
66-68 -->
B2
18-35 -->
Neck+Middle
104-108 -->
8
69-72 -->
C3
36-53 -->
Middle
109-113 -->
9
73-75 -->
C#3
54-71 -->
Middle+Bridge
114-119 -->
10
76-79 -->
D3
72-90 -->
Bridge
120-124 -->
11
80-82 -->
D#3
91-108 -->
Neck+Bridge
125-127 -->
12
83-86 -->
E3
109-127 -->
All
CC#13, PtchFine
87-89 -->
F3
CC#31, HrmIntrl
64-127 -->
0-(+100c)
90-93 -->
F#3
0-9 -->
4th down
64 -->
0
94-97 -->
G3
10-27 -->
5th up
0-64 -->
0-(-100c)
98-100 -->
G#3
28-45 -->
Octave
CC#46, WahMode
101-104 -->
A3
46-63 -->
Power1
0-22 -->
MidiCC
105-107 -->
A#
64-81 -->
Power2
23-63 -->
Auto(Pos)
108-111 -->
B3
82-127 -->
2 Octave
64-86 -->
Auto(Neg)
112-114 -->
C4
CC#36, HOSteps
87-127 -->
Modulation
115-118 -->
C#4
0-5 -->
1
CC#52, AltSmple
119-121 -->
D4
6-17 -->
2
0-15 -->
1
122-125 -->
D#4
18-28 -->
3
16-47 -->
2
126-127 -->
E4
29-40 -->
4
48-79 --> 3
41-51 -->
5
80-111 --> 4
52-63 -->
6
112-127 --> 5
64-75 -->
7
CC#58, PBSldRng
CC#60, WhMode
76-86 -->
8
0-5 -->
1
0-15 -->
Off
87-98 -->
9
6-17 -->
2
16-47 -->
Slide
99-109 -->
10
18-28 -->
3
48-79 -->
Pitch
110-121 -->
11
29-40 -->
4
80-111 -->
Modulation
122-127 -->
12
41-51 -->
5
112-127 -->
MonoBend
CC#48, PBdnMode
52-63 -->
6
CC#62, WhPtcRng
0-10 -->
As up
64-75 -->
7
0-4 -->
12
11-31 -->
OFF
76-86 -->
8
5-13 -->
11
32-52 -->
Slide
87-98 -->
9
14-22 -->
10
53-74 -->
Pitch
99-109 -->
10
23-31 -->
9
75-95 -->
VeloAdd
110-121 -->
11
32-40 -->
8
96-116 -->
MonoBend
122-127 -->
12
41-49 -->
7
117-127 -->
Sustainer
CC#59, PBPtcRng
50-58 -->
6
Page 75

75
CC#50, PickPos
0-4 -->
12
59-68 -->
5
0-4 -->
-7
5-13 -->
11
69-77 -->
4
5-13 -->
-6
14-22 -->
10
78-86 -->
3
14-22 -->
-5
23-31 -->
9
87-95 -->
2
23-31 -->
-4
32-40 -->
8
96-104 -->
1
32-40 -->
-3
41-49 -->
7
105-113 -->
1/2
41-49 -->
-2
50-58 -->
6
114-122 -->
1/4
50-58 -->
-1
59-68 -->
5
123-127 -->
1/8
59-68 -->
0
69-77 -->
4
CC#75, AtchMode
69-77 -->
1
78-86 -->
3
0-15 -->
Off
78-86 -->
2
87-95 -->
2
16-47 -->
Pitch
87-95 -->
3
96-104 -->
1
48-79 -->
Modulation
96-104 -->
4
105-113 -->
1/2
80-111 -->
Sustainer
105-113 -->
5
114-122 -->
1/4
112-127 -->
Feedbacker
114-122 -->
6
123-127 -->
1/8
CC#76, AtchRng
123-127 -->
7
CC#61, WhSldRng
0-15 -->
2
CC#54, Mode
0-5 -->
1
16-47 -->
1
0-9 -->
SOLO
6-17 -->
2
48-79 -->
1/2
10-26 -->
Harmony
18-28 -->
3
80-11 -->
1/4
27-49 -->
Chords
29-40 -->
4
112-127 -->
1/8
50-70 -->
BassChord
41-51 -->
5
CC#77, VelCurve
71-89 -->
BassPick
52-63 -->
6
0-21 -->
1
90-127 -->
Direct
64-75 -->
7
22-63 -->
2
CC#57, PBupMode
76-86 -->
8
64-105 -->
3
0-12 -->
Off
87-98 -->
9
106-127 -->
4
13-38 -->
Slide
99-109 -->
10
39-63 -->
Pitch
110-121 -->
11
64-88 -->
VeloAdd
122-127 -->
12
89-114 -->
MONOBEND
CC#85, VelSlide
CC#90, SldDnStp
115-127 -->
Sustainer
0-31 -->
off
0-5 -->
1
CC#78, FretPos
32-95 -->
up
6-17 -->
2
0-3 -->
0
96-127 -->
down
18-28 -->
3
4-10 -->
1
CC#87, SldUpStp
29-40 -->
4
11-17 -->
2
0-5 -->
1
41-51 -->
5
18-24 -->
3
6-17 -->
2
52-63 -->
6
25-31 -->
4
18-28 -->
3
64-75 -->
7
32-38 -->
5
29-40 -->
4
76-86 -->
8
39-45 -->
6
41-51 -->
5
87-98 -->
9
46-52 -->
7
52-63 -->
6
99-109 -->
10
53-59 -->
8
64-75 -->
7
110-121 -->
11
60-67 -->
9
76-86 -->
8
122-127 -->
12
68-74 -->
10
87-98 -->
9
CC#111, ChordPos
75-81 -->
11
99-109 -->
10
0-15 -->
I
82-88 -->
12
110-121 -->
11
16-47 -->
II
89-95 -->
13
122-127 -->
12
48-79 -->
III
96-102 -->
14
80-111 -->
IV
103-109 -->
15
112-127 -->
Kbrd
110-116 -->
16
117-123 -->
17
124-127 -->
18
Page 76

76
SONG GLOBAL MODE
Song mode window
Song mode turns RealLPC 5 into a powerful and easy-to-use songwriting tool allowing you in no
time create perfect guitar backing tracks for your songs. Insert chord symbols in the needed
measures of the built-in Song Track, browse and drag and drop patterns into it - and your guitar
part is ready!
At the bottom is the Song track section where you can insert chords and patterns to construct
your guitar part.
Page 77

77
WORKING WITH PATTERNS
PATTERN LIBRARY BROWSER
Click the ‘Library’ button to open Pattern Library browser.
STYLE FILTER
Pattern Library includes 1250 guitar rhythm patterns organized in various musical categories and
styles (folders and subfolders). To let you easily find the suitable patterns for your song we have
developed the powerful Style Filter allowing to automatically select pattern sets by musical
criteria: tempo range, meter, playing technique, and rhythm feel.
Simply press Filter button to switch it on, select the needed item in popup menu of the
appropriate Filter combo boxes, and the Filter will hide folders and patterns not matching the
required criteria.
Page 78

78
Selecting the folder or subfolder of the Pattern Library tree view will load the available set of
patterns into Pattern list pane at the right.
Select pattern name in the list to load pattern to Pattern view strip and press Play button at the
left of Pattern view to audition the selected pattern. Navigate through the pattern list by clicking
arrow buttons at the right of Pattern view or alternatively use Up/Down Arrow keys of the
computer keyboard.
To the left of Pattern view is the Tempo combo box allowing you to make pattern tempo twice
lower or higher by simply selecting the appropriate item in popup menu. Note, that pattern
inserted into the Song Track will play in the current tempo selection.
In case you find pattern that you want to keep for future use, drag it from the Pattern list to the
‘Favorites’ section, or alternatively right click the pattern and select ‘Add to favorites’ in popup
menu.
Once you find the needed pattern simply drag and drop it into the Pattern track located in the
lower part of the Song track. You can drag patterns from Pattern view, Pattern list, ‘Favorites’, and
‘Used in the track’ sections.
PATTERN TRACK
Pattern inserted into the Song track will automatically appear in ‘Used in the track’ section, which
allows you to easily use it in other places of the song by dragging it directly from ‘Used in the track’
section.
You can shorten or multiply pattern in the Song track by simply dragging its right boundary.
Right-click the song pattern to open a context menu allowing you to copy/paste/delete pattern(s),
or split and chop the multiplied pattern, as well as get access to Pattern Properties panel.
Page 79

79
Properties panel displays the pattern name and allows modifying the dynamics of the pattern by
adding/reducing the output velocity of pattern notes.
Double-clicking song pattern will reveal it in Pattern Library, alternatively you may right-click the
pattern and select ‘Find in Library’ item in popup menu.
INSERTING SINGLE STRUM
It is possible to insert a single strum directly into the Pattern track rather than finding it in the
Library. Right-click the Pattern track in the needed place and select Insert Strum or Insert Slow
Strum in popup menu.
WORKING WITH CHORDS
CHORD SELECTOR
Double-click the chord track to open the Chord Selector based on the Circle of Fifths (alternatively
right-click and select ‘Insert chord’ in popup menu, or press Enter on computer keyboard). Chord
Circle provides all major and minor chords and displays a Key Center including six relative chords
at the top. To change the Key Center simply right-click the appropriate major or minor chord name
in the circle.
Page 80

80
Click chord name button to select minor or major chord. Buttons on the upper panel allow
selecting other chord types and/or extensions.
You can change Chord Position (inversion) of the chord by clicking the upper segment of inner
circle and selecting the needed position number in popup list.
If you want to create slash bass chord you can add alternative bass note to the chord by clicking
the lower segment of the inner circle and selecting the needed note in popup list.
To insert the selected chord into the chord track press Enter key on computer keyboard, or
alternatively click the center part of Chord Selector. To cancel inserting press Esc key.
EDITING CHORDS
Select the chord and press Enter, or simply double-click it, or alternatively right-click the chord and
select Edit Chord in popup menu to bring up the Chord Selector. When the edits are done press
Enter to confirm the changes. To cancel edits press Esc key.
Page 81

81
Right-clicking the chord will bring up a menu for copying and pasting of chord(s), deleting selected
chord(s), bringing up Chord Selector to edit a chord, as well as getting access to Chord Properties
panel.
Clicking on Up/Down buttons will transpose chord(s) by semitones (alternatively use +/- computer
keys), as well as change chord position (alternatively use Ctrl + ’+/-‘ computer keys).
You can also change ‘#’ (sharp) to ‘b’ (flat) and vice versa in the chord name by right-clicking the
chord and selecting ‘Enharmonic shift’ item in popup menu, or alternatively press ‘*’ computer
key.
‘FAVORITES’ SECTION
This section allows you to reserve the chord set you are going to further use in a song and then
simply drag them to the needed measures of the Chord track.
There are three ways to put chords into the ‘Favorites’ section:
1. Import the chord set from the WEB page by simply dragging the selected text directly to
‘Favorites’ section
2. Import the chord set from any standard chords/lyrics Text Document file containing chord
names.
3. Insert chords one-by-one using Chord Selector (double-click to open Chord Selector, or
alternatively right-click and select ‘Add chord’ in popup menu)
IMPORTING CHORDS FROM THE WEB PAGE
Find chords/lyrics content of the needed song on any site, such as Ultimate Guitar
http://www.ultimate-guitar.com, Chordie http://www.chordie.com, Heartwood Guitar Instruction
http://www.heartwoodguitar.com, Guitar Chords and Lyrics http://www.guitarsongs.info to name
a few.
Page 82

82
Select the text with a mouse,
drag and drop it directly into ‘Favorites’ section,
and instantly get ready to use chord set for your song!
Page 83

83
IMPORTING THE CHORD SET FROM A TEXT DOCUMENT
La Belle Dame Sans Regrets
Cm7 D7b9 Gm9 Gm
1. Dansons tu dis et moi, je suis
Ebmaj7 D7b9 G7sus G/F
Mes pas sont gauches mes pieds tu fauches
Gm/E Cm/Eb Gm/D Gm
Je crains les sots je cherche en vain les mots
Gm/E Eb/Gb Bmaj7 G7sus
Pour m'expliquer ta vie alors...
You may simply drag *.txt file directly into ‘Favorites’ section, or alternatively right-click the
section and select ‘Import from *.txt file’ item in popup menu, and then browse the needed file in
the opened dialog.
Example:
Import the Sting song lyrics/chords file.
Page 84

84
Or simply drag and drop the file into the ‘Favorites section and instantly get ready to use chord
set:
Once you insert chord into the Song track it will appear in ‘Used in the track’ section on the left
side of Library window, which allows you to easily use it in other places of the song by dragging it
directly from ‘Used in the track’ section.
TIME LINE
Time line area allows you to navigate along the song with a mouse click or Left/Right Arrow keys,
as well as start/stop playback with a double-click.
Right clicking on the time line will open settings panel, where you can set the number of measures
you need for the song in Song Length numeric box, as well as set triplet beat division (grid) if
needed for the track by activating Triplets LED.
To change time signature display from the default 4/4 to any other available in the Library, click
the Meter combo box of Filter section and select the needed item in the popup menu.
Page 85

85
MOVING SONG EVENTS TO MIDI TRACK
When the song or its part is finished you can export it to your DAW’s MIDI track, edit and play back
it directly to Song mode window. To do that simply drag song events (chord and pattern tracks)
from Drag Song button to MIDI track,
and activate Track button in the lower part of Song mode window.
Note, that with this scenario RealLPC is not synched with your DAW’s time line, which allows you
to put/copy and playback the dragged MIDI clip(s) at any place of your project.
CONTROLS
Below the Song track are various Edit, Transport, and Performance controls.
Play/Pause - click to start/pause playback (alternatively press Space bar, or double-click
Time line).
Stop - click to stop playback and return to start position, second click will return to zero
position.
Activate to audition chord changes on playback.
Add/Reduce output velocity (can be automated by MIDI CC#122).
Switch on/off the Humanize engine. Open Humanize settings window.
Undo/Redo edits done in the Song Track.
Page 86

86
Drag out Song events to MIDI track.
Activate ‘Play Song events from MIDI track’ mode.
Save/Export the Song track.
Load the Song track (*.rgtrack file).
Open Settings panel.
Page 87

87
SETTINGS PANEL
Clicking the Settings button will bring up the Settings panel.
Upper string - disables upper strings for strumming patterns.
Lower string - disables lower strings for strumming patterns.
B&C strings# - specifies the number of sounding strings for Bass&Chord patterns.
Chord audition velo - specifies velocity value for chord audition.
Chord audition strum time - specifies strum time for chord audition.
Velo curve - select the output velocity curve.
Velo+ from P.B. - assign +/- velocity control to Pitch Bender controller.
Legato - click to allow the last note of shortened pattern continue sustaining its full length in the
close next pattern.
Page 88

88
KEYBOARD SHORTCUTS
Play/Pause
Spacebar
Double-click on Time line
Stop
Ctrl+Spacebar
Navigate Track vertically
Up/Down arrows
Navigate Track horiz. by beats
Left/Right arrows
Navigate Track horiz. by grid
Ctrl+Left/Right arrows
Navigate between chords
Left/Right arrows
Navigate Chord track, beats
Tab, Shift+Tab
Navigate Chord track, grid
Ctrl+Tab, Shift+Ctrl+Tab
Select all chords and patterns
Ctrl+A
Insert Strum
S Insert Slow Strum
Shift+S
Find pattern in Library
Enter
Double-click Pattern
Open Pattern Properties
Ctrl+Enter
Right-click Pattern
Copy Pattern(s)
Ctrl+C/Ctrl+V
Ctrl+Drag
Move/Resize Pattern without grid
Alt+Drag
Add/reduce Pattern velocity
+/- Zoom in/out horizontally
Mouse Wheel
Open Track Properties
Ctrl+Enter
Right-click on Time line
Open Chord Properties
Ctrl+Enter
Right-click the Chord
Open Chord Selector
Enter
Double-click the Chord
Move Chord(s) without grid
Alt+Drag
Copy Chord(s)
Ctrl+C/Ctrl+V
Ctrl+Drag
Select major chord
C/D/E/F/G/A/B
Select minor chord
C/D/E/F/G/A/B+M
Select ‘#’ chord
Shift+C/D/F/G/A
Select ‘b’ chord
Ctrl+D/E/G/A/B
Navigate through the circle
Arrow keys
Insert chord
Enter
Click outside the circle
Cancel chord edits
Esc Transpose chord
+/- Change chord position
Ctrl+Plus (+)/Minus (-)
Enharmonic shift (#/b)
* Change Key Center
Right-click Chord name
SONG TRACK
COMMAND SHORTCUT MOUSE
CHORD SELECTOR
COMMAND SHORTCUT MOUSE
Note, Mac users should use CMD key instead of Ctrl.
Page 89

89
HUMANIZE
You can easily add more realism to the performance (both live played or step-recorded, or
automatic) using RealLPC advanced Humanize option.
Humanize panel
Click the Humanize button in the lower right corner of RealLPC window to open the Humanize
panel. Activate the option by clicking on LED in the upper left corner (the LED is duplicated at the
left of Humanize button, so you can switch it on/off even when Humanize panel is closed).
Humanize Panel has 9 parameters grouped under functional headings: Sound, Timing, Velocity,
and Pitch. Each parameter has individual switch LED and two sliders. The upper slider controls the
maximum range of parameter being applied (steps, milliseconds, velocity, cents), while the lower
one controls the sensitivity of randomization in percentage (at 100% all playing notes will be
affected).
SOUND
Pick Position - randomly changes Pick Position parameter value.
• Set maximum range with the ‘steps’ slider.
Resonance - randomly triggers open string adjacent to the current played (works for 5 upper
strings). This simulates the effect of a guitarist accidentally striking or resonating strings.
• Click on Harm or Pinch name to select Harmonics or Pinch Harmonics sound for resonance.
• Reduce the volume of resonance sound with ‘velo-’ slider.
Page 90

90
Random Mutes - randomly changes Sustain sound to Mute or Bridge Mute. This simulates the
effect of a guitarist accidentally not pressing the string hard enough.
• Click on Mute or Bridge Mute name to select the sound.
• Reduce the volume of mute sound with ‘velo-’ slider.
TIMING
Attack Time - randomly changes the Attack Time parameter value.
• Set maximum value with 'ms' slider (0-50 msec. range)
Stroke Time - randomly delays the note-on time of all playing notes.
• Set maximum value with 'ms' slider (0-100 msec. range)
Strum Time - changes the time window between simultaneously played notes (interval, chord).
• Set maximum value with 'ms' slider (0-200 msec. range)
Tremolo/Trill - randomizes automatic tremolo or trill notes timing.
• Set maximum value with 'ms' slider (0-100 msec. range)
VELOCITY
All Strokes - changes velocity values of all playing strokes.
PITCH
All Sounds - sharpens the pitch of all sounds.
• Set maximum value with 'cents' slider (0-50 cents range)
Mute and Bridge Mute - sharpens the pitch of Mute, Bridge Mute sounds.
• Set maximum value with 'cents' slider (0-50 cents range)
MASTER SECTION
Big LED - switch on or off the Humanize option.
Strength (Master) - add/reduce sensitivity for all parameters proportionally.
Preset - save all settings made in Humanize window as user presets for future use.
To create a preset, click on Preset combo box to activate Edit mode, type in the preset name, and
press Enter on computer keyboard. Preset will be saved within RealLPC and added to preset list.
To delete preset simply click on Delete icon at the right.
Reset - click to reset all settings to factory default values.
Page 91

91
DOUBLE-TRACKING
‘Double-Tracking’ is a technique that is frequently used in recording guitar tracks. The guitarist
plays the same part twice (one for Left channel, and one for Right channel), that gives the guitar
track a nice, wide-spread stereo images and a thickness.
You can easily reproduce these technique by just running RealLPC multi output version (RealLPC (2
mono), or RealLPC (2 stereo) – these plugins provide 2 outs in your DAW’s mixer), loading RealLPC
Double-track patch, and then panning channels in your DAW’s mixer hard left and hard right, and
adding amps/effects on each channel.
With RealLPC 2 output version you don’t need to create copies of MIDI tracks and tweak them, but
simply use the single track for MIDI data (played or step recorded), and RealLPC sampler engine
will process it to true double-tracked guitar parts with no identical samples playing simultaneously
in different channels!
For wider sound you can add some additional delay between channels with Double-Trk Delay
slider found in Right menu bar->Timing panel.
Page 92

92
To correctly configure RealLPC 2 output plugin in your DAW, please refer to the DAW’s User
Manual for details.
Page 93

93
IMPORTING/EXPORTING GLOBAL SETTINGS
You can save all modifications you’ve made to Global Preset (external *.rgsong file) containing
overall settings, which allows to easily export all changed data as a single file and import it when
needed. Click on MusicLab logo to save/load the Global Settings:
Note, all current settings are saved within a project doc of your DAW as well.
If you want the current settings load every time you run RealLPC, select ‘Save As Default’ item in
the popup menu. To return factory default settings press Reset button in SetUp panel and select
‘Save As Default’.
Page 94

94
APPENDIX A. NRPN MAP
Format: (<NRPN MSB>, <NRPN LSB>, <Data Entry MSB>[, <DataEntry LSB>]) - <Description>.
{<Comment>.}
(0, key, msb, lsb) - Set Pitch Bend for the key to ((msb<<7) | lsb)-8192.
(1, key, fx) - Select FX for the key, sustain pedal or velocity of a stroke.
key - key id, see Key Map below.
fx-5 - fx id, see FX Map below.
(2, key, on) - Switch the key fx.
key - key id, see Key Map below.
on - 0/1 for Off/On.
(3, key, opt) - Set options of the key fx.
key - key id, see Key Map below.
opt - bit field: <toggle> | (<do sustain> << 1) | (<play stroke> << 2)
(4, key, msb, lsb) - Set first parameter of the key fx if any, ignored otherwise.
key - key id, see Key Map below.
((msb<<7) | lsb)-8192 - value of the parameter 1.
For specific parameter ranges and meanings see FX Map below.
(5, key, msb, lsb) - Set second parameter of the key fx if any, ignored otherwise.
key - key id, see Key Map below.
((msb<<7) | lsb)-8192 - value of the parameter 2.
For specific parameter ranges and meanings see FX Map below.
KEY MAP
Format: <key id> - <Description>. {<Comment>.}
Solo Mode key ids
0 - Sustain Pedal. Available fxes -5..59.
1 - Upper velocity zone. Available fxes 0..59.
2 - Lower velocity zone. Available fxes 0..59.
3..18 - C0..D#1 Key switches. Available fxes -2..59.
19..35 - C5..E6 Key Switches. Available fxes -2..59.
36 - Modulation. Available fxes -2..59.
Multi Mode key ids
40..55 - C0..D#1 Key switches. Available fxes -2..59.
56..72 - C5..E6 Key Switches. Available fxes -2..59.
FX MAP
Format: <fx id>, <name> [, <par1 range>[, <par2 range>] - <parameters' names>]
-2, velo upper
-1, velo lower
1, Mute
2, BridgeMute, 0..128, 0..3 - ctrl val, velo sensitivity
3, Harmonics
6, Scrapes
7, HammerOn(Legato), 0..48 - range
Page 95

95
8, Slide(Legato), 0..48, 30..150 - range, time
10, Repeat(NoteOff)
11, ChuckaFull
12, ChuckaMuteKeys
13, Tremolo, 0..9 - duration id (see Duration Map)
14, Tremolo 1 beat, 0..9 - duration id (see Duration Map)
15, Trill, 1..12, 0..9 - interval, duration id (see Duration Map)
16, Trill 1 shot, 1..12, 0..9 - interval, duration id (see Duration Map)
17, SlideUp, 1..12, 40..500 - range, time (ms)
18, SlideUpTrig, 1..12, 40..500 - range, time (ms)
19, SlideDown, 1..12, 40..500 - range, time (ms)
20, SlideDownTrig, 1..12, 40..500 - range, time (ms)
21, Bend, 1..2, 100..800 - interval, time (ms)
22, ReverseBend, 1..2, 100..800 - interval, time (ms)
23, UnisonBend, 1..2, 100..800 - interval, time (ms)
25, Hold
26, Modulation
29, Interval, 0..8 - interval id (see Interval Map)
30, FretPosition, -1..20 - fret position id (see Fret Position Map)
31, PickPosition, -7..+7 - pickup position
34, ChuckaVeloLayer
35, VeloMute 1..127 - velocity
36, Legato
37, String 0..7 - 0..6 - string 1..7, 7 - auto
38, ChangeMode, 0..4 - Chord/Bass&Chord/Bass&Pick/Multi
39, FretNoise
40, Transpose, -3..+3 -12..+12 - octaves, semitones
41, TransposeToggle, -3..+3 -12..+12 - octaves, semitone 1..127 - velocity
45, SlowStrum, 30..500 - time (ms)
46, StopSlap,
48, PullOff,
49, ChordPos, -1..8 - action/postion (see Chord Pos Map)
50, Melody, 0..2 - octave+ (Chords to Melody)
51, Chords, 0..2 - octave+ (Melody to Chords)
53, ScrapesTrig, 0..2 - Scrapes sound group
54, Strings, 0..2 - string keys position preset
55, Bass,
57, MelHarmonics, 0..1 - octave+
58, MelodyOct, 0..4 - up/down/lo/med/hi
59, SoloMode,
DURATION MAP
Format: <duration id>, <description>
0, 4th
1, 4T
Page 96

96
2, 8th
3, 8T
4, 16th
5, 16T
6, 32nd
7, 32T
8, 64th
9, 64T
INTERVAL MAP
Format: <interval id>, <description>
0, mono
1, 4th down
2, 5th up
3, Octave
4, Power
5, Power2
6, 2 Octaves
7, Pwr Oct
8, Pwr 2 Oct
FRET POSITION MAP
Format: <fret position id>, <description>
-1, D#5..C6
0, Open
1, Fret 1
2, Fret 2
3, Fret 3 *
4, Fret 4
5, Fret 5 *
6, Fret 6
7, Fret 7 *
8, Fret 8
9, Fret 9 *
10, Fret 10
11, Fret 11
12, Fret 12 * *
13, Fret 13
14, Fret 14
15, Fret 15 *
16, Fret 16
17, Fret 17 *
18, Fret 18
19, Fret 19 *
Page 97

97
CHORD POSITION MAP
Format: <chord position id>, <description>
-1, Up
0, Down
1, I
2, II
3, III
4, IV
5, Kbd fix
6, Kbd fix I-II
7, Kbd fix I-III
8, Kbd fix I-IV
Page 98

98
CONTACTING MUSICLAB
Web site: http://www.musiclab.com
Technical support: supportbox@musiclab.com
Distribution by Best Service Germany
www.bestservice.com
support@bestservice.de
 Loading...