

Page 1

Page 1
Copyright © Musical Paradise 2012
User Manual
MP-D1 24Bit USB Asynchronous Digital-to-Analog Converter (DAC)
Version: 1.0
Oct 21, 2012
Page 2

Page 2
Copyright © Musical Paradise 2012
Thanks for choosing Musical Paradise MP-D1 digital to analog converter
(DAC). Before enjoying the fabulous sound produced by the MP-D1, please
spend a couple minutes to read this guide.
Functions Overview
1. “Coax Out” outputs SPDIF digital signal from the USB audio.
2. “USB” port connects to a computer running Mac OSX 10.6 or above,
Windows 7/8 and the latest Linux distributions.
3. SW1 switches between the PC and SPDIF section. If you use USB input,
SW1 should be switched to the PC side. If you use Coax or TOS optical
inputs, SW1 should be switched to the SPDIF side.
4. SW2 determines whether the Coax input or TOS optical input is selected.
5. Analog outputs are connected to an amplifier inputs by a pair of RCA
cables.
6. MP-D1 supports both AC 100-120V and 220-240V input voltages. The
input voltage is controlled by a voltage selector switch inside the case. When
you are moving to a new country, please make sure you select the
appropriate voltage first.
7. The fuse box is beside the voltage selector. If the led indicator on the
front panel does not light up, you need to check the fuse first.
Page 3
Page 3
Copyright © Musical Paradise 2012
Computer USB Driver Installation
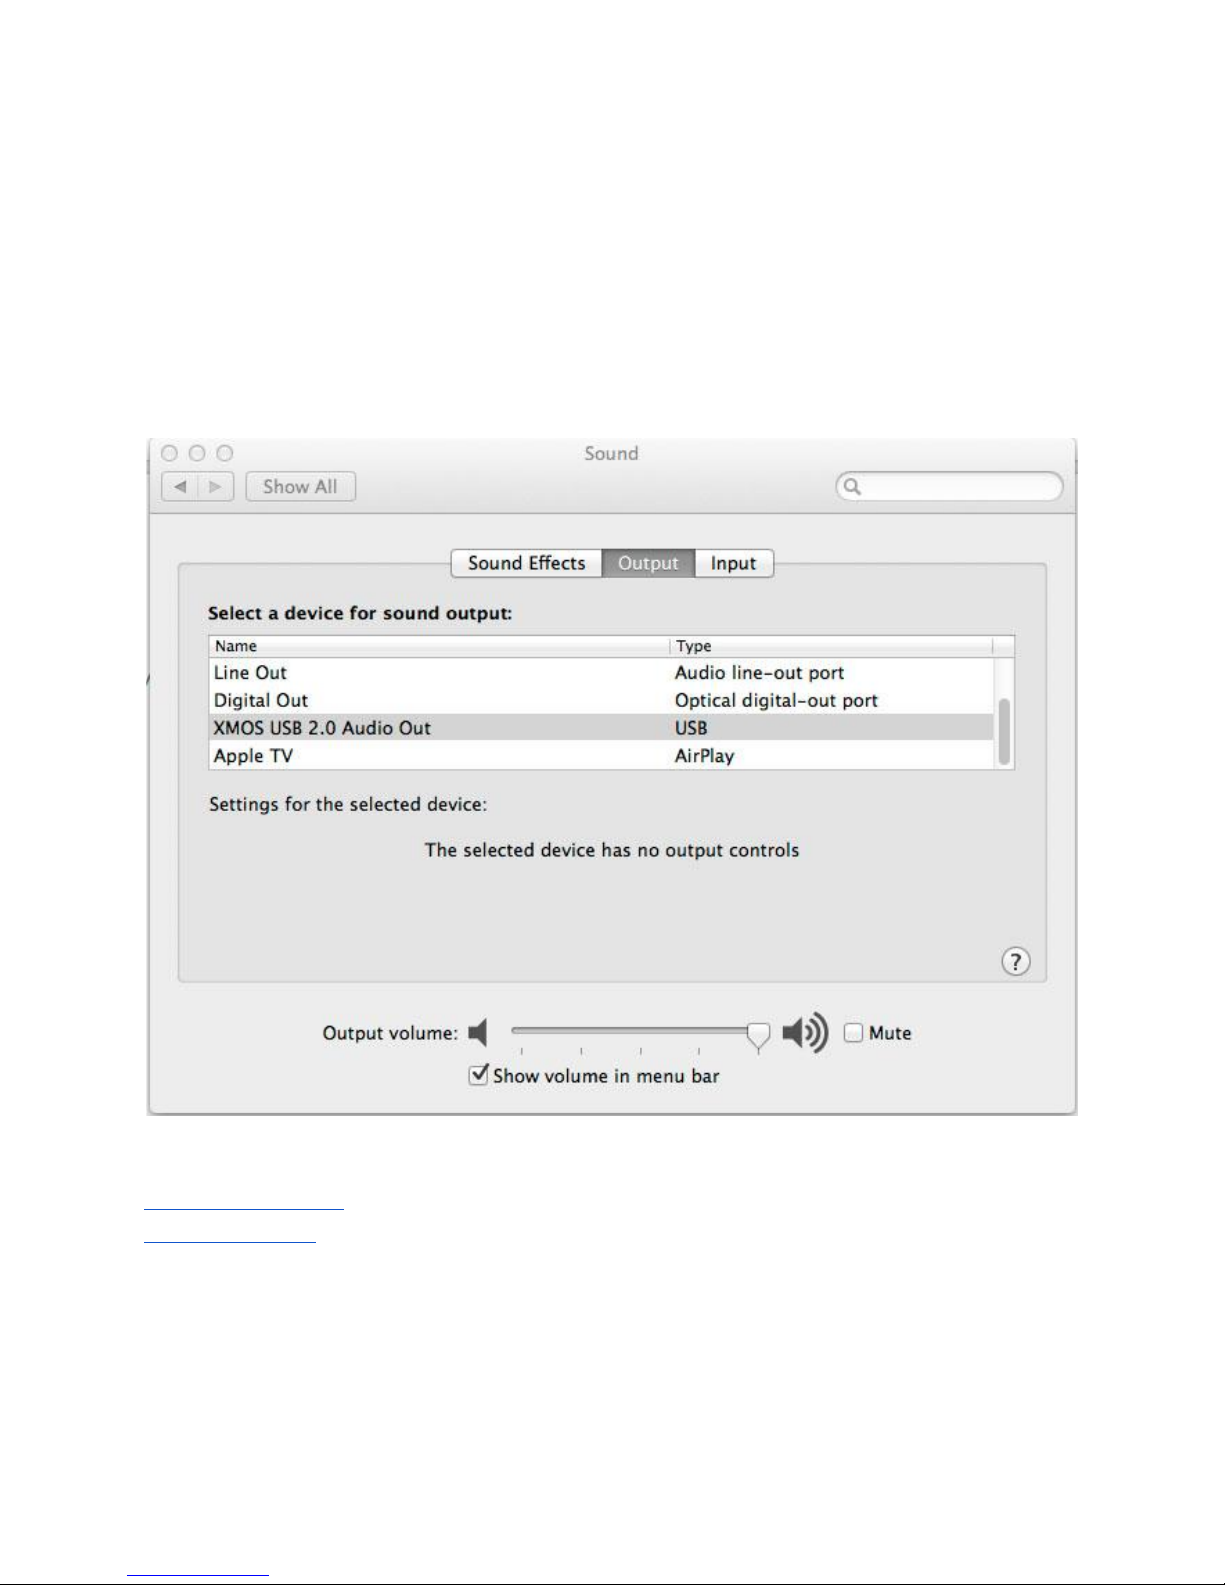
1. Mac OSX 10.6.4 or above supports MP-D1 natively. The built-in usb audio
2.0 driver detects the MP-D1 automatically. You just need to select XMOS
USB 2.0 Audio Out under “System Preferences” -> “Sound” for the first time.
iTunes and Cogx are the recommended music players under Mac OSX.
www.itunes.com
www.cogx.org
2. Similar to Mac OSX, most of the latest Linux distributions support MP-D1
natively. Ubuntu 12.10 or above are recommended.
Page 4

Page 4
Copyright © Musical Paradise 2012
3. Windows 7 does not have built-in driver for USB 2.0 audio. The Windows
driver can be downloaded from our website at
http://www.musicalparadise.ca/files/MP-D1-1.56.zip
After downloading the driver file, unzip it first. Before running the setup.exe
inside the driver package, please turn on the MP-D1 and connect it to a
Windows 7 PC with the supplied USB cable.
Once the driver installation is completed, click the Windows “Start” button,
search for “TUSBAudio Control Panel”. Open “TUSBAudio Control Panel”.
Click “Device 0”; On the right hand side, under “Streaming Mode”, select
“Always On”. Close “TUSBAudio Control Panel”.
Go to Windows “Control Pannel” -> “Hardware and Sound” -> “Sound”.
Select “XMOS XS1-L1 Audio”, Click “Set Default”. Double click “XMOS XS1L1 Audio”; Go to “Advance” tab; change the “default format” to “24bit
96000Hz (Studio Quality)”. Click “OK”->”OK” to close the sound setting.
Page 5

Page 5
Copyright © Musical Paradise 2012
Page 6

Page 6
Copyright © Musical Paradise 2012
Visit http://www.foobar2000.org, download and install the latest foobar2000
player.
Visit http://www.foobar2000.org again, click Components, download “ASIO
support X.X.X”. In foobar2000, click “File”, select “Preferences”. Under
“Components”, click “Install...”. Browse and select the downloaded file
“foo_out_asio”. Click “Apply”. Foobar2000 will be restarted.
Open foobar2000 “Preferences” again. Click “DSP Manager”. Under
“Available DSPs”, double click “Resampler (PPHS)”. Under “Active DSPs”,
you should see “Resampler (PPHS)”. Click “Configure selected”. Change the
“Target sampling rate:” to “96000” Hz. Click “OK”.
Page 7

Page 7
Copyright © Musical Paradise 2012
Click “Output” on the left. Under “Device”, select “ASIO: TUSBAudio ASIO
Driver”. Click “OK” to finish the setup.
Page 8

Page 8
Copyright © Musical Paradise 2012
That is the end of the Windows setup.
For technical support, please email to info@musicalparadise.ca.
 Loading...