

Page 1
Page 2
2
Contents
Safety Information ................................................................................. 3
Precautions & User Information ........................................................... 3
Installation .............................................................................................. 4
Facilities & Connections ........................................................................ 5
Operation ................................................................................................ 6
Remote Control Handset ....................................................................... 8
Digital Filters…….. .................................................................................. 9
Troubleshooting….. .............................................................................. 10
Technical Specifications ...................................................................... 11
Item Disposal Information for Europe ................................................ 12
Page 3
3
Note: Unauthorized opening of the equipment
will invalidate any warranty claim.
Safety Information
This unit is supplied with a mains lead fitted with
a moulded 13-amp plug. If, for any reason, it is
necessary to remove the plug, please remove the
fuse holder and dispose of the plug safely, out of
reach of children. It must not be plugged into a
mains outlet.
The wires in the mains lead supplied with this
appliance are coloured in accordance with the
following code
WARNING - This appliance MUST be earthed.
The colours of the wires of the mains lead of this
appliance, may not correspond with the coloured
markings identifying the terminals in the plug,
proceed as follows:
• The wire which is coloured green and yellow
must be connected to the terminal in the plug
which is marked with the letter E or coloured
green or green-and-yellow, or by the earth
symbol:
• The wire which is coloured brown must be
connected to the terminal which is marked
with the letter L or coloured red.
• The wire which is coloured blue must be
connected to the terminal which is marked
with the letter N or coloured black.
• If connecting to a BS1363 plug, a 13-amp
fuse must be used.
Precautions & User Information
WARNING: Any modifications to this product,
not expressly approved by Musical Fidelity,
who is the party responsible for standards
compliance could void the user’s authority to
operate this equipment.
This new M8x DAC is designed and built to
provide trouble-free performance. As with all
electronic devices it is necessary to observe a few
precautions:
• Heed all warnings shown on the back of the
product.
• Only connect the M8x DAC to a mains outlet
having the same voltage as marked at the
back of the unit.
• Always ensure that when disconnectin g
and reconnecting your audio equipment the
mains supply is switched off.
• Posi tio n the mains lead and si g na l
interconnects where they are not likely to
be walked on or trapped by items placed on
them.
• Do not use near water, or place water-filled
containers on the M8x DAC, for example, a
flower vase or potted plants. If water does
spill inside, immediately pull out the mains
plug from the wall socket and inform the
dealer, who should then check the unit before
further use. Entry of liquid into the M8x DAC is
dangerous and may cause electric shock or
fire hazard.
• Do not place the unit near direct heat sources
such as radiators, direct sunlight or other
equipment.
• Do not remove any covers or try to gain access
to the inside. There are no user adjustments
or fuses to change without qualification. Refer
all service work to an authorized Musical
Fidelity agent.
The electronics in modern hi-fi equipment are
complex and may, therefore, be adversely
affected or damaged by lightning. For
protection of the audio system during electrical
storms, remove the mains plugs
. If
after-sales
service is required, to help the dealer identify the
M8x DAC please quote the serial number
located on the rear panel of the unit.
Green and yellow .................................... Earth
Blue ...................................................... Neutral
Brown ............................................................ Live
Page 4

4
Installation
Introduction
This unit will deliver the ultimate performance
possible from any digital source. It is designed to
upgrade CD players, TVs, set-top-boxes, DAB
tuners, USB Streamers and PCs and Laptops and
any other source providing a variety of digital
outputs.
Note: In normal operation, the unit dissipates a
small quantity of power at all times, and it is
important that it is adequately ventilated. The
M8x DAC must be protected from humidity – if the
unit is moved from a cold place to a warm room,
leave the unit for an hour or so to allow sufficient
time for the moisture to evaporate.
Cleaning
Before cleaning the unit, switch off power at the
mains switch and remove the mains plug from the
wall socket. Clean the cabinet and remote-control
unit using a moist cloth. Using solvents, white
spirit or thinners is not advised, as they could
damage the surface finish.
Installation
Position the M8x DAC on a stable, horizontal
surface where there is no risk of it be i ng
knocked or subjected to vibration such as from
loudspeakers.
Power Connections
The M8x DAC is supplied with a standard IEC
mains cable which plugs into the IEC socket at the
back of the unit.
Audio Output Connections
RCA audio outputs: Use good quality RCA phono
audio cables (fully connected signal and ground),
for optimum signal transfer.
XLR audio outputs: Use good quality XLR audio
cables (fully connected hot and cold signals and
ground), for absolute optimum signal transfer.
Digital Input connections
COAXIAL input: Connect RCA digital source to
digital input RCA socket. Use a good quality fully
connected (signal and ground) coaxial digital
cable, for optimum signal transfer.
OPTICAL inputs: Connect optical digital source to
optical input socket. Use a good quality “Toslink”
cable, for optimum signal transfer.
USB input: Connect computer or similar USB
“host” source to USB input socket. Use a good
quality USB 2.0 type cable (not supplied), for
optimum signal transfer. Try to keep USB cable
length to a minimum for best reliability. The USB
standard maximum for a single cable is 5M, after
which repeaters (normally mains-powered USB
hubs) are required. We do however; recommend
avoiding such a setup if at all possible.
AES/EBU input: Connect a balanced AES/EBU
source to digital input XLR socket. Use a good
quality XLR cable, specifically designed to carry
digital signals and not XLR cables for analogue
audio transmission!
Interconnects
Note: Musical Fidelity currently do not make any
interconnecting cables other than those supplied
with the unit. Musical Fidelity does not endorse
any other manufacturer’s cables.
If necessary, please refer to the dealer who can
advise on quality cables for any particular setup.
Page 5
5
Facilities & Connections
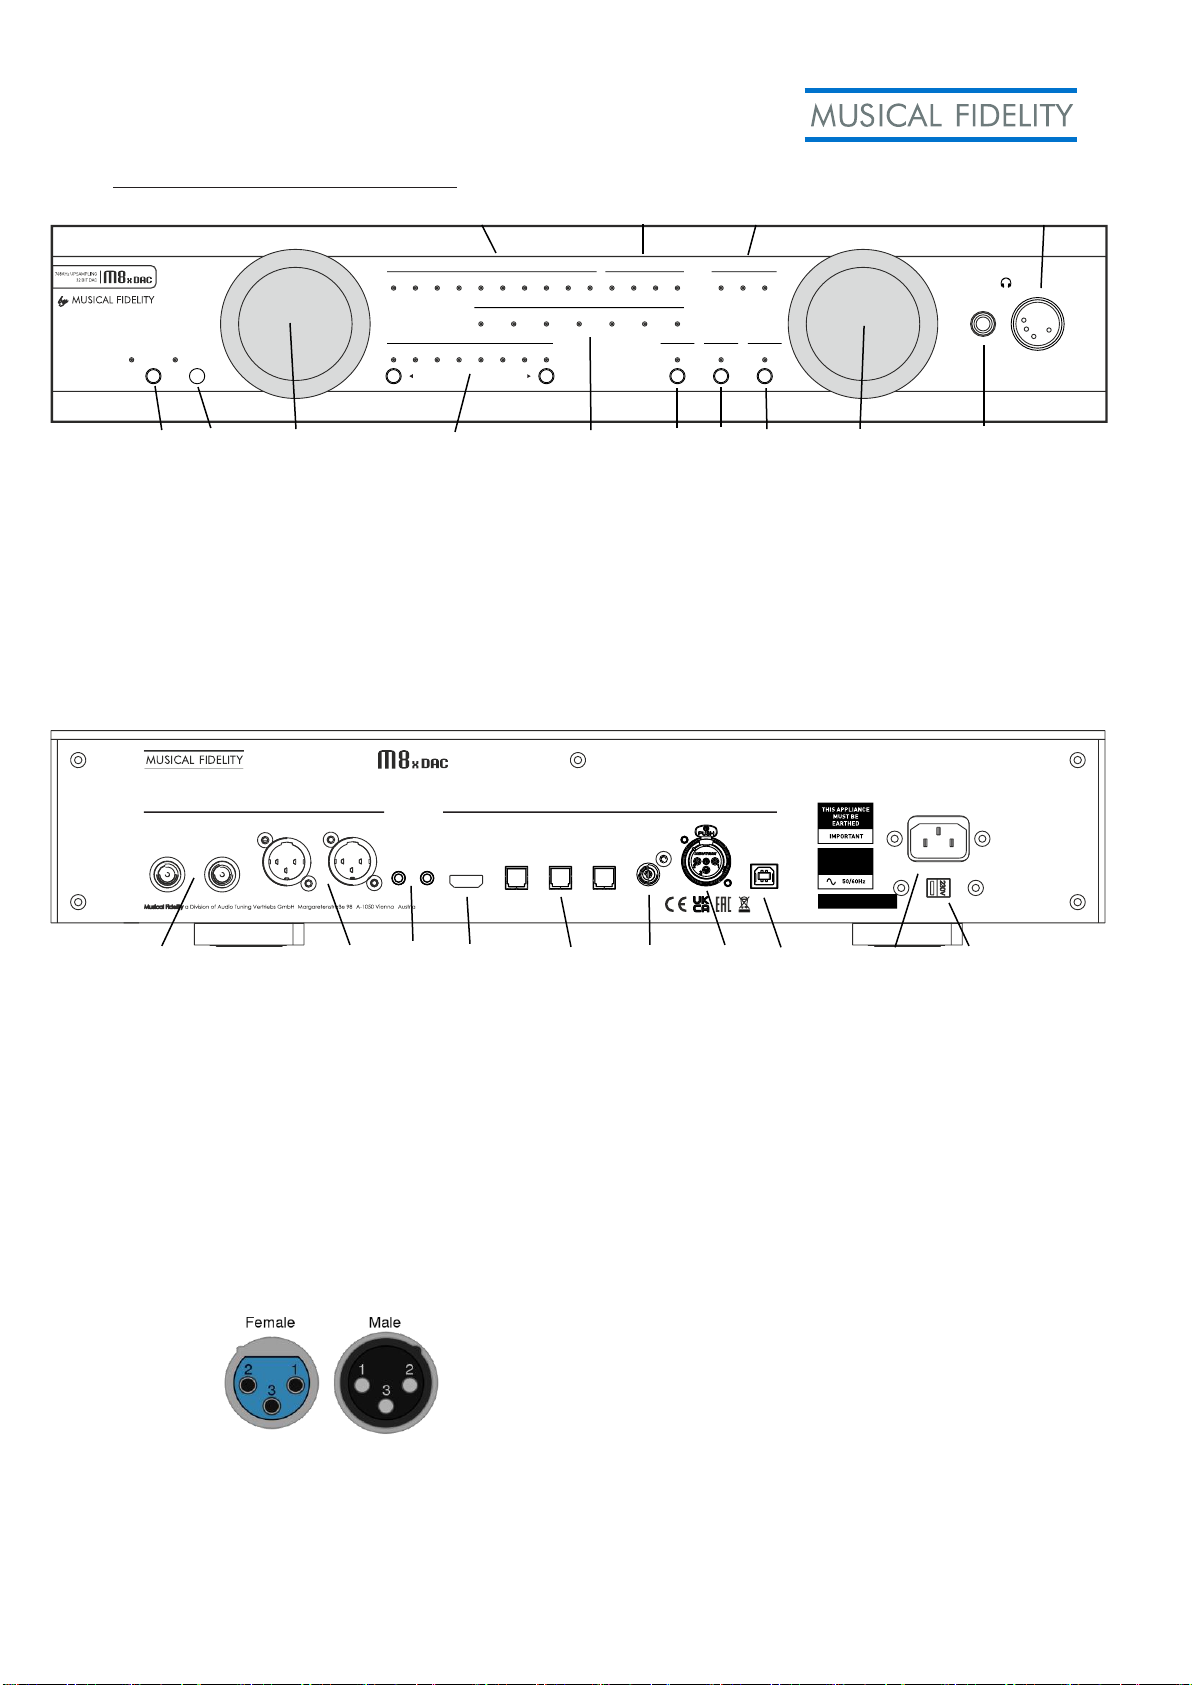
5 7 10 14
1 2 3
4
6 8 9 11
12 13
1 Power/Standby/Mute button and LED’s
2 IR Receiver
3 Input selection
4 Filter selection
5 PCM Sample rate LED’s
6 Selected input LED’s
7 DSD Rate LED’s
8 Reclock selector
9 Upsample selector
10 MQA LED’s
11 Variable/fix output selector
12 Volume Control
13 6,35mm TRS headphone socket
14 Balanced XLR headphone socket
15 16 17 18
19 20 21 22 23 24
15 RCA Analogue output L/R
16 XLR Balanced output L/R
17 Trigger In/Output
18 I2S Digital input
19 OPTICAL Digital inputs 1,2,3
20 COAXIAL Digital input
21 AES/EBU Balanced digital input
22 USB Digital input
23 Mains IEC socket
24 230/110 V switch
Standard XLR Balanced input/output
lead connections:
(for reference only, no XLR signal leads supplied)
Pin functions:
1 Ground, 0V
2 Normal polarity (“hot” or “+”)
3 Inverted polarity (“cold” or “-”)
Page 6

6
Operation
Once the M8x DAC unit is correctly wired up, and
plugged into mains, the orange STBY led should be
lit.
In this mode the M8x DAC is consuming a minimal
amount of power.
To switch the unit on, press the Power button (1) on
the front of the unit. The blue PWR indicator will light
along with the red MUTE indicator. After a few
seconds, when it has stabilised, the MUTE function
will switch off and the unit is ready for use
.
Input selection
The M8x DAC has a total of seven inputs available.
These are I2S, Optical 1, 2 and 3, Coaxial, AES/EBU
and also USB.
When the power cable is inserted into the Mains IEC
socket 23 the USB input is selected by default.
When the M8x DAC is taken out of sleep mode, it will
default to the last input selected.
From the front panel you can cycle through the inputs
by rotating the input/source selector (3).
The remote control has direct access buttons for
each input. Simply press the appropriate button to
move directly to that input.
When a valid signal is received on the selected input,
an indicator in either group 5, 7 or 10 will light to
show you the incoming sample rate.
Optical and coaxial inputs
All optical and coaxial inputs are capable of
accepting up to 24 bit 192 kHz PCM stereo data
streams and MQA data streams. The incoming data
sample rate is displayed on the front panel LED’s for
reference.
Note: The indicators 5, 7 and 10 show the actual
sample rate of the digital data received by the M8x
DAC. Some playback software may have altered this
compared to the original file.
USB Input
The USB input is capable of accepting up to 24 bit
768 kHz PCM, DSD 256 (native DSD 512) data
streams and MQA data streams.
I2S Input
The I2S input is reserved for soon to be released
Musical Fidelity CD-players.
Computer settings for USB
A good quality USB 2.0 cable is required to connect
the unit to the computer. Normal USB standards
stipulate that this should be 5M or less; and we
recommend keeping it as short as possible.
WARNING: Older USB cables are often heavy and
bulky and must be supported to avoid damage to
the USB socket. Any physical damage caused to this
socket will not be covered by warranty.
The computer should now detect the M8x DAC. A
driver installation is only required on Windows.
• Linux kernel 2.6.33 or later (no driver required)
• Apple OS X® 10.6.4 or later (no driver required)
• Windows 10 Creators Edition or later (driver
found on included CD or on Musical Fidelity
website)
For playing native DSD on Windows a driver
installation is required.
Any device that is compliant to the USB Audio Class
2.0 standard should also operate with the M8x
DAC. However Musical Fidelity are unable to
provide support for operation with anything other
than the system listed above.
CD, MP3, WAV, AAC/+, OGG, FLAC, and any other
audio file types played on suitable playback
software will now play through the unit.
Note: This USB input has a high-speed serial data
processor, and by its nature, requires a very high
volume of USB bandwidth. It will benefit greatly
from being the only device connected on its USB
‘bus’. Sharing the same bus with other devices
could cause unwanted artifacts such as dropouts or
temporary loss of signal. This especially includes
the use of the unit on a USB hub/splitter whether
alongside other USB components or not. A direct
connection to the host computer by shortest USB
2.0 lead possible is very much recommended.
Page 7

7
Digital Oversampling FIR Filters
The digital oversampling FIR filters can be set with
the buttons 4 on the front panel or the
corresponding button on the remote. For a detailed
description of each filter see page 10.
Note: When playing MQA files, the user’s filter
setting is not active, the MQA filter is always used.
The MQA filter is a proprietary custom-made filter by
MQA for our DAC to ensure the best possible MQA
experience.
During DSD playback, the the DAC's internal DSD
filter is turned on and the digital filters have no
effect.
Filter 8 – Oversampling Bypass
Using filter setting 8, the oversampling FIR filter is
bypassed, the source data is upsampled to
352,8kHz/384kHz on the XMOS chip and sourced
directly into the ESS 9038’s IIR filter.
Upsampling is automatically switched on when
using filter 8 and it is not possible to change the
volume. Therefore, only filters 1-7 can be used when
VAR output is used. If you want to use upsampling,
switch to FIX output beforehand.
When filter 8 is set and you switch from FIX to VAR
output, or when headphones are connected, filter 8
is automatically switched to filter 1 so that the
output volume can be changed.
When playing a PCM format with a sampling
frequency of 705.6 / 768kHz, filter 8 is
automatically turned on (NOTE: without
up/downsampling to 352,8/384kHz), which turns
off all remaining filtering, improving audio
parameters and the frequency spectrum by yet
another step.
Reclock
Reclocking synchronizes digital audio signals with
the master clock in the M8x DAC. Reclocking can be
turned on and off with button 8 on the frontpanel.
Upsampling
For incoming PCM signals, upsampling can be
turned on or off with button 9 on the front panel or
the corresponding button on the remote. When
turned on, incoming PCM data up to 192kHz sample
rate is resampled to the sampling frequency of
352,8kHz or 384kHz according to the original
multiple of the sampling frequency.
Note: Upsampling is automatically turned on
for filter 8 for sample rates between 44.1 and
192 kHz.
MQA (Master Quality Authenticated)
The M8x DAC includes MQA technology which
enables you to play MQA audio files and deliver the
sound of the original master recording. Visit
mqa.co.uk for more information.
MQA Indicators:
MQA - Green LED - indicates that the product is
decoding and playing an MQA stream or file, and
denotes provenance to ensure that the sound is
identical to that of the source material.
MQA Studio - Blue LED - indicates it is playing an
MQA Studio file, which has either been approved in
the studio by the artist/producer or has been
verified by the copyright owner.
OFS - Magenta LED - (Original Frequency Spectrum)
confirms that the product is receiving an MQA
stream or file which is already decoded. This
delivers the final unfold of the MQA file delivered by
services like TIDAL or media players like Roon.
Outputs
On the rear of the unit are 2 sets of outputs
.
RCA (single ended) and XLR (balanced). You
can connect the M8x DAC to your amplifier
using whichever is more convenient.
Variable/Fix Switching
The outputs can operate as either fixed or
variable mode. Fixed mode is suitable for
connection to other equipment which offers a
volume control. Variable mode allows
connection directly to power amplifiers or
active speakers where the M8x DAC provides
the volume control.
Choosing between these settings is done by
using the button 11 on the front panel. Keep
the button pressed for 2 seconds to switch
between “Fixed” and “Variable” output. The
LED lights up when “Variable” is selected.
Page 8
8
Headphones
The M8x DAC includes a high power, fully
balanced & discrete headphone amplifier. A
6,35mm TRS connector 13 for use with
unbalanced headphones and a 4-pin XLR
connector 14 for use with balanced
headphones are located on the front panel.
4-pin XLR balanced headphone connector:
Pin 1: Left, normal polarity (“hot” or “+”)
Pin 2: Left, inverted polarity (“cold” or “-”)
Pin 3: Right, normal polarity (“hot” or “+”)
Pin 4: Right, inverted polarity (“cold” or “-”)
When using multiple headphones at the same
time, make sure the total load impedance does
not fall below 8 ohms.
Connecting headphones to socket 13 or 14 will
automatically mute the main outputs. The
volume control on the front panel 12 or the
remote control now adjust the volume sent to
the headphones.
Note: When headphones are connected with the
output set to FIX, the output automatically
switches to VAR and the volume level is set to 40dB.
When headphones are connected with the
output set to VAR and the volume level is
greater than -40dB, the -40dB level is
automatically set for a safe volume in the
headphones. The volume level on the VAR
output without headphones connected is
remembered by the device even after it has
been switched off. With headphones connected,
the device will remember the volume level if it
is less than -40dB and only until it is switched
off.
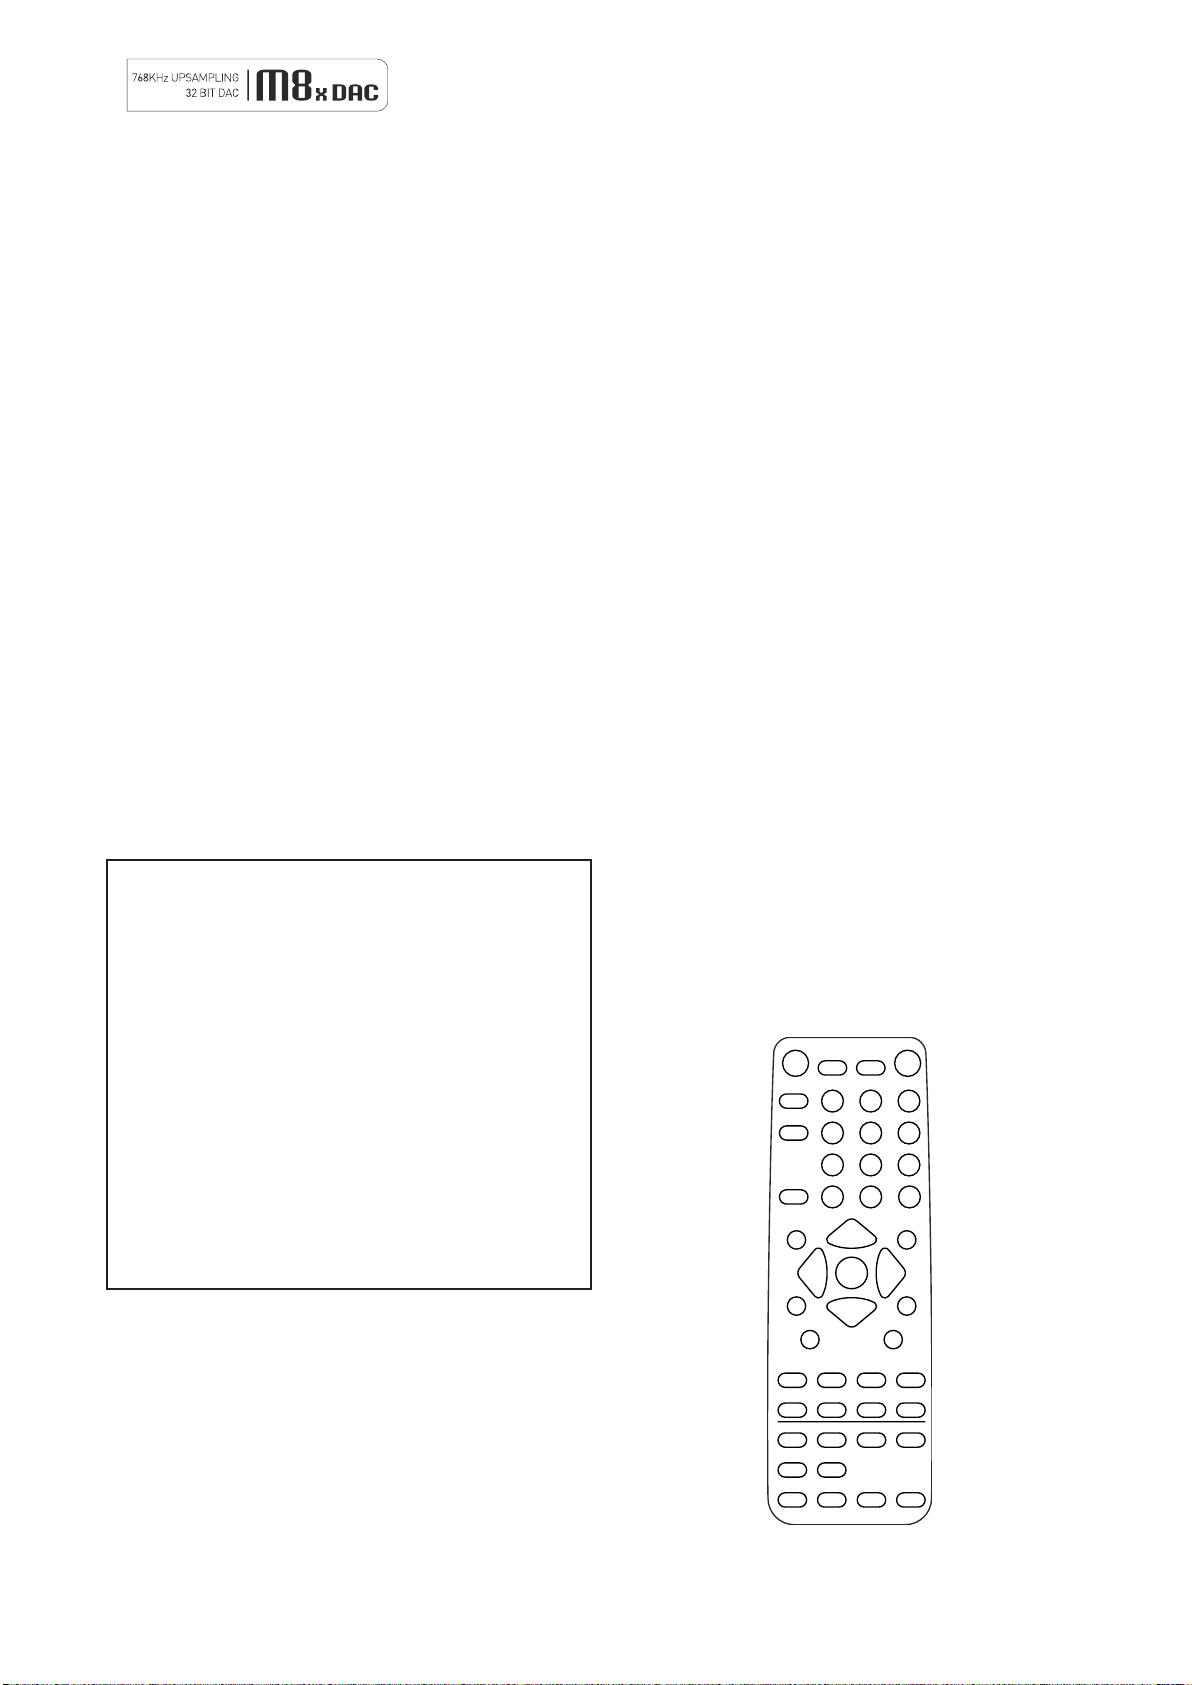
Remote Control Handset
The remote control shown below enables functions
from this and other units from the M3, M5 and M6
ranges to be operated from a convenient distance.
The remote control buttons are split into 3 distinct
areas.
The three rows of grey buttons at the bottom are used
to control the M8x DAC and are detailed below.
The blue buttons control an amplifier such as the
M6si or M8xi. Consult the amplifier manual for
more information.
The remaining grey buttons located in the upper
section control a CD player such as M6scd.
Consult the CD player manual for more
information.
As the handset uses an invisible infra-red light
beam, the front edge must be pointed directly
towards the receiver window at the front of the
player, without visual obstruction between
them. If the range of the remote control greatly
decreases, replace the batteries with new ones.
Do not mix old and new batteries – two are
required, size AAA, LR03 or SUM-4.
Please dispose of used batteries in accordance
to local battery disposal regulations.
OPTICAL cycles between OPTICAL inputs
I2S selects I2S input
COAX selects COAXIAL input
AES/EBU selects balanced AES/EBU input
USB selects USB input
STBY switch the M6SRDAC between standby and
operating mode
UPSAMPLE enables or disables upsampling
FILTER selects digital filter
VOLUME ▼▲ controls main output of M8x DAC
in variable mode or headphone level when
connected.
Page 9

9
Digital Filters
The M8x DAC allows for detailed tuning of the audio experience. It comes with multiple preset
reconstruction filters built-in. Musical purists can simply unpack the M8x DAC, carefully cable it up, just
leave it at its standard settings and feel the immediate musical integration: the whole sound is sweet and
clear; the treble is completely grain free and extended. The bottom end sounds endless with tactile bass
dynamics.
As you get reintroduced to your music library, you might, at some point, want to discover what else is
possible and hear it from different stages. It is then, when the customizability and settings turn the M8x
DAC into a powerful tool for experts, which elevates it into a league of its own. Explore the sound stage
with upsampling or without and see if you are drawn in deeper.
Choose between the different digital filters and tailor the sound reproduction to your specific liking or to
your specific setup. In a way the M8x DAC can be used like a professional tool for the experienced user:
1. Linear phase fast roll off - Most common filter with clean overall suppression and excellent rejection,
best for music with large transients. Provides crisp clean highs.
2. Linear phase slow roll off - Low group delay - and symmetrical input response. Less ringing than
linear-phase fast roll-off. Punchier bass than LPFR, with clean highs.
3. Minimum phase fast roll off - Minimal pre-ringing, preferred for imaging and soundstage. No aliasing
in frequency domain. Stronger bass than linear-phase, clean highs.
4. Minimum phase slow roll off - Non-symmetrical filter designed to minimize pre-ringing. Strong punchy
bass with good transient attacks.
5. Apodizing fast roll off – A version of the linear-phase fast roll off filter optimized to improve pre-
ringing.
6. Hybrid fast roll off – A combination of linear-phase and minimum-phase. Fast transient attack, strong
punchy bass, crisp highs.
7. Brick wall - One of the earliest designs, intended for highest suppression possible, with high delay and
pre-ringing. Linear-phase, crisp clean highs.
8. Oversampling bypass - The oversampling FIR filter, used for the 7 above mentioned presets, is
bypassed and source data is upsampled to 352,8kHz/384kHz on the XMOS chip and sourced directly
into the ES9038Q2M IIR filter. Bypassing the oversampling filter reduces the on chip PSU / ground noise
and consequently reducing signal correlated clock modulation on the ESS DAC’s silicon die. When the
source data is 705.6 / 768kHz, filter 8 is automatically turned on (NOTE: without up/downsampling to
352,8/384kHz), which turns off all remaining filtering, improving audio parameters and the frequency
spectrum by yet another step.
Page 10
10
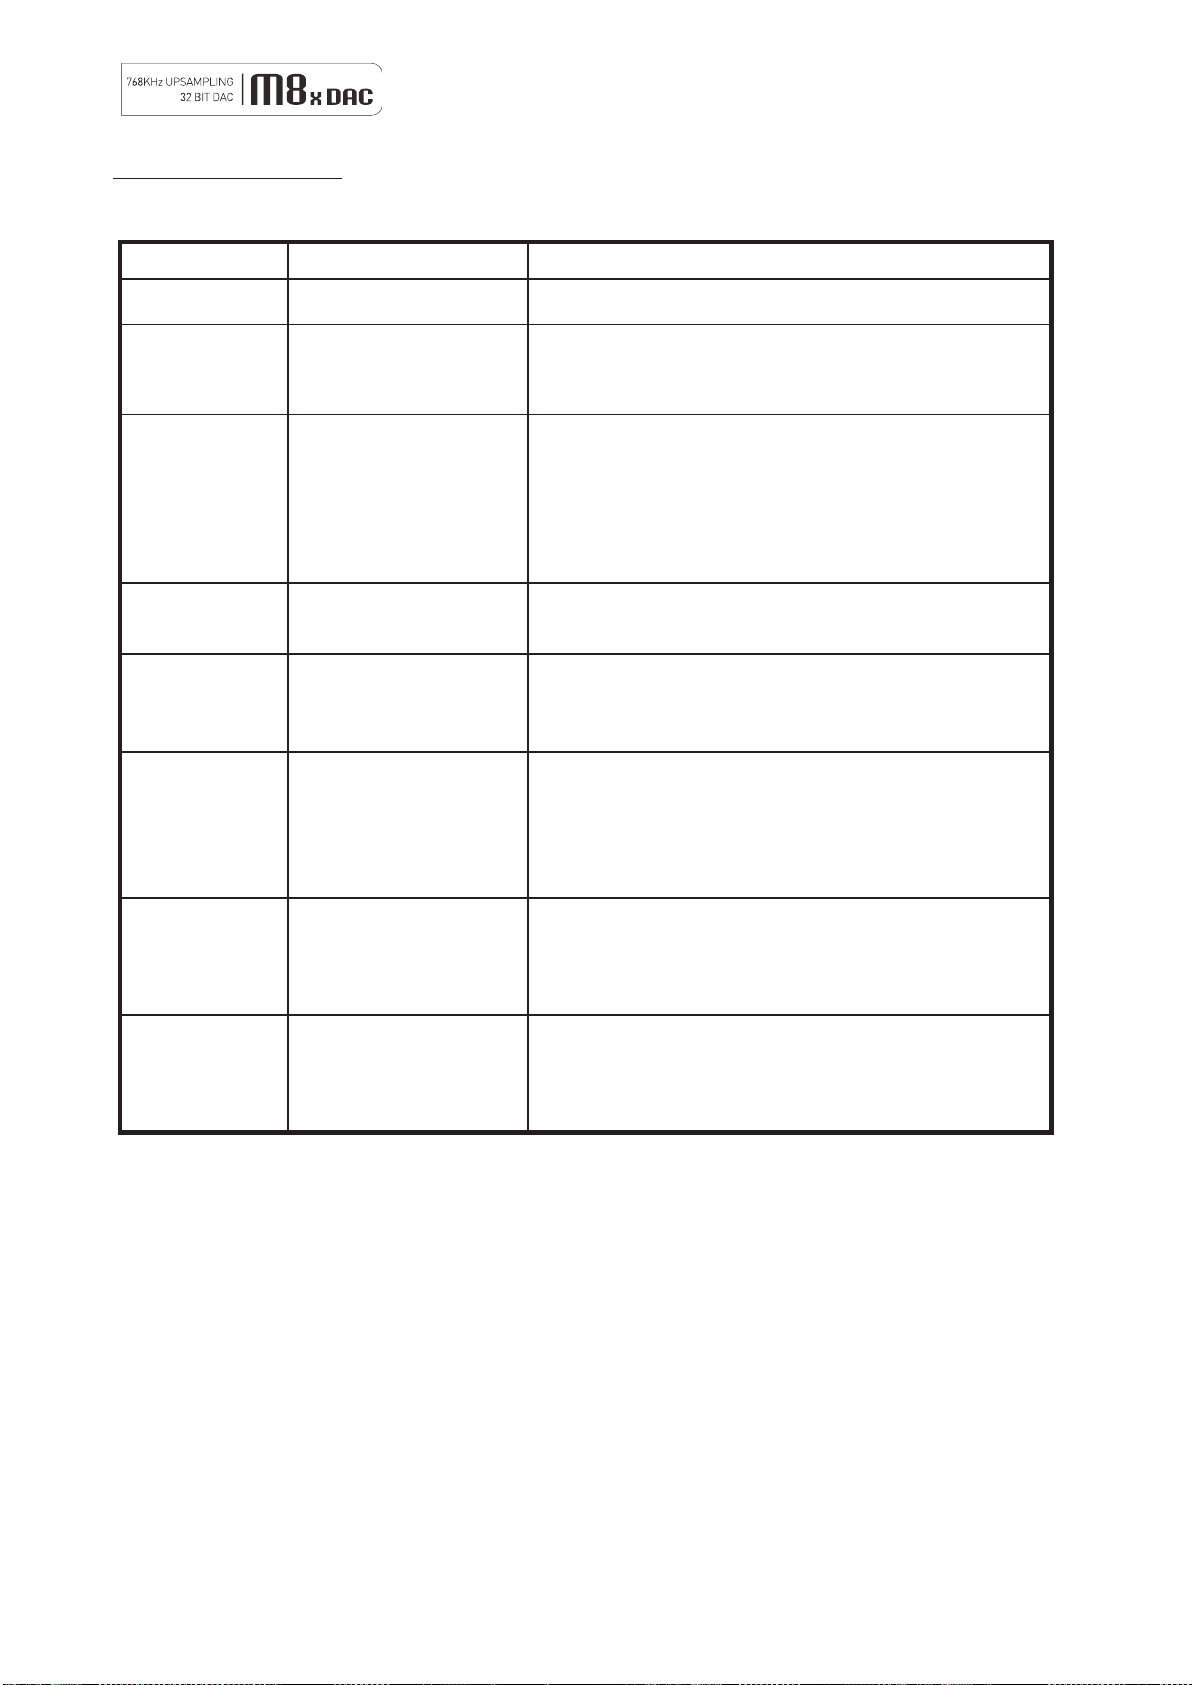
Troubleshooting
Problem
Probable Cause
Remedy
No power.
Power plug is not inserted into
socket correctly.
Plug in securely into unit’s IEC socket.
Excessive hum from
system speakers.
Audio connector plug not fully
pushed in. Cable Fault.
Unsuitable Cable (e.g. cable
grounds not connected).
Insert plug securely. Check cable is connected at both ends. Some
“esoteric” cables have internal wiring intentionally disconnected/modified.
For best results on all inputs, please use good quality screened coax; signal
and screen directly connected both ends.
Digital input not
working.
No connection to that
input. Incorrect input
selected. Wrong data
type sent to DAC.
Check connection and cable. Select
correct input. Check source digital
output is set for “16 bit stereo PCM”
or similar. This particularly applies to
some TVs, most DVD players, and
other home theatre type devices that
may give a multichannel digital
output. Refer to the source’s manual
for further information.
No audio output, or
too low level output.
Incorrect or missing
connections. USB Driver not
selected.
Check connections and make sure they are secure. See
the Musical Fidelity website for relevant OS setup
information.
Dropouts in sound.
Digital input lead not
properly connected.
Faulty digital input lead.
Faulty optical lead.
Check input lead is fully secured. Change lead. Please use a good quality
straight-through signal-and-ground phono to phono lead. Optical lead
breakage. This can occur if the optical lead is bent into a radius too small.
Avoid tight corners in routing optical leads.
No audio output from
USB input.
USB Cable not
connected. M6 USB
Driver not selected.
Check connections and make sure they are secure.
See software section for relevant OS setup information.
Please check device is listed in device manager (Windows®) or in Sound,
audio devices for MAC OS X.
Make sure the Musical Fidelity USB audio device is selected as the default
OUTPUT device.
Check USB port functions with another device.
Not detected when
connected to USB.
USB Cable faulty. USB not
working/ enabled on computer.
Correct USB drivers not installed.
Check and replace cable.
Check USB port functions with another device.
Download and install the device driver from the software downloads section
on the Musical Fidelity website.
Dropouts in sound
(USB input).
Shared USB port with another
device. Computer busy with
another application.
Computer low on resources.
Avoid sharing the USB port with other devices, if possible.
At times an application (program) may intervene, sometimes invisibly e.g. a
virus scanner. When this happens, computer resources are temporarily
used up, and playback may suffer. This is not a fault. Try running fewer
applications if possible.
Page 11
11
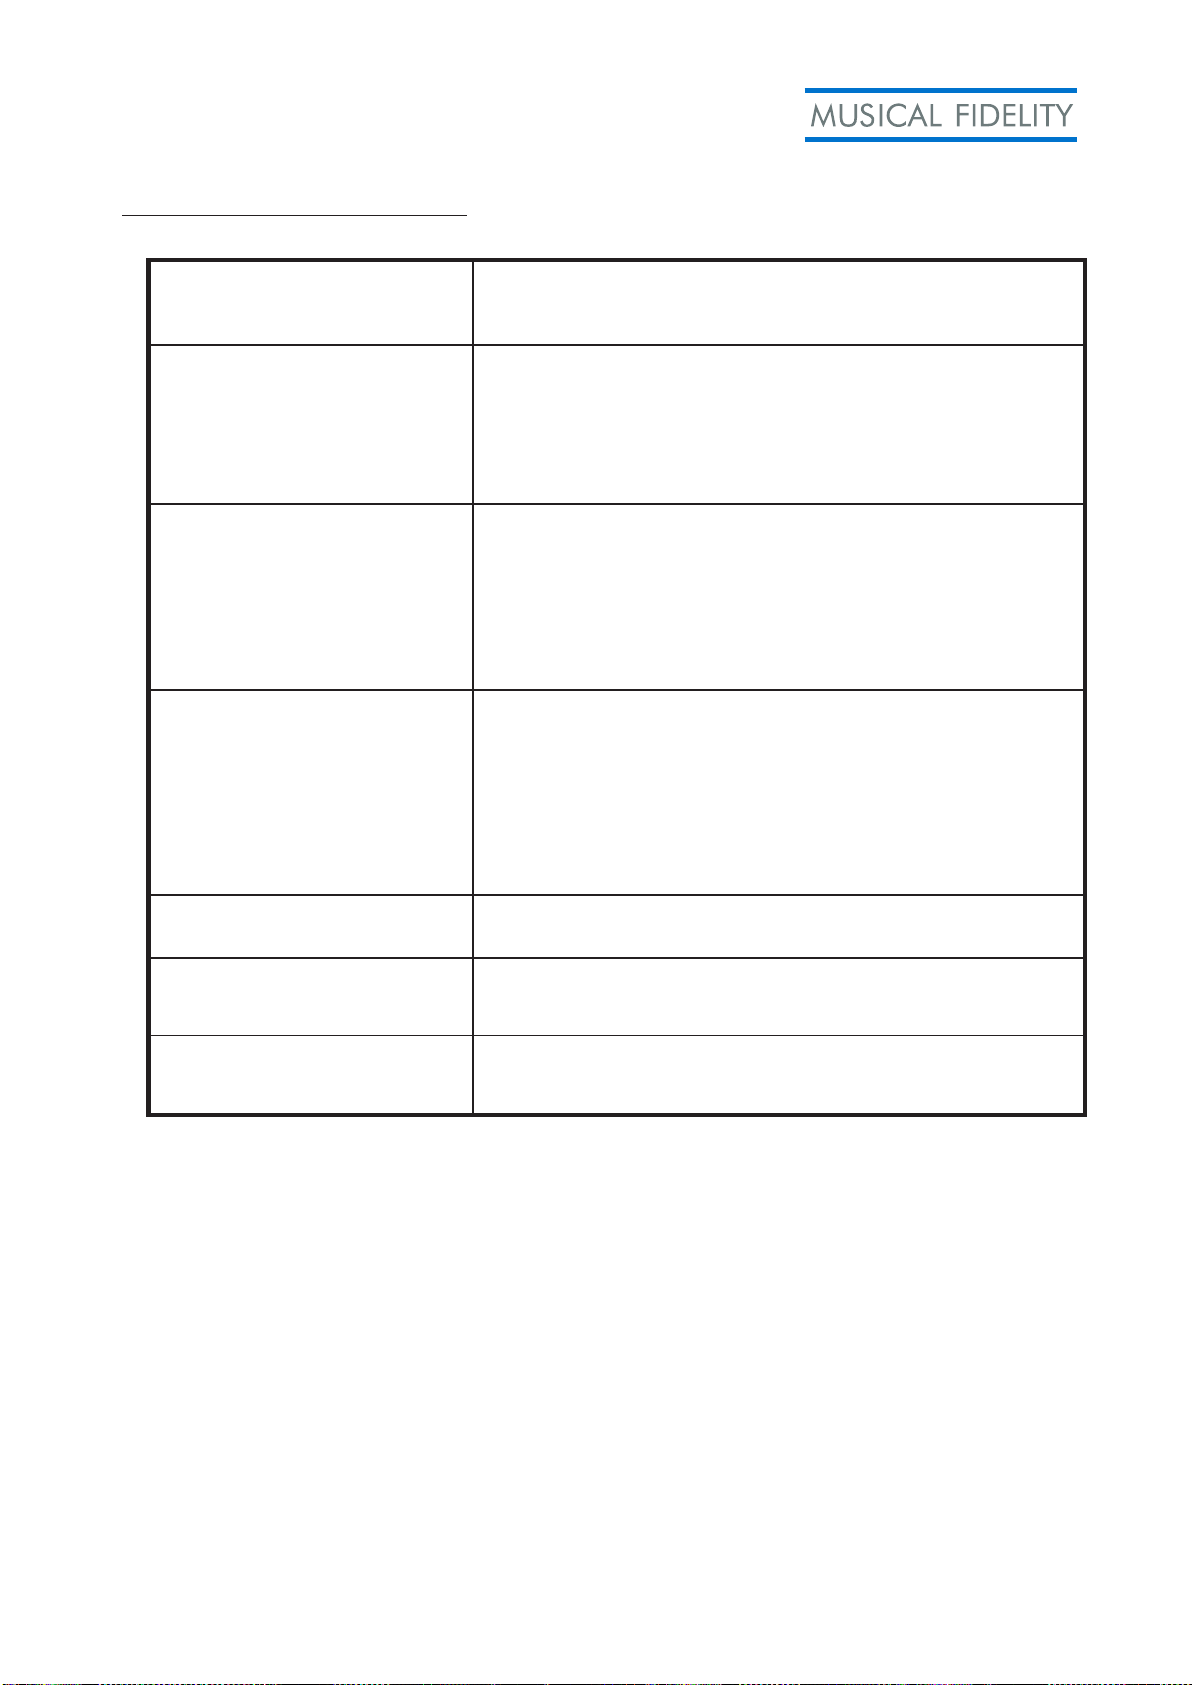
Technical Specifications
Output (RCA/XLR)
Output impedance
Output, digital 0dB level
< 100 ohms
RCA 2V RMS, XLR 4V RMS
Headphones
Power
Output impedance
THD
Signal/Noise ratio
Frequency response
6.3mm stereo JACK unbalanced; 4 pin XLR connector balanced
3.9W / 8 ohms; 3.2W / 32 ohms; 400mW / 300 ohms
< 5 ohms
< 0,005% at 1kHz @ -6dBFS
> 96dB „A“-wt. at 1kHz @ 0dBFS
< ±0,1dB at 20Hz-20kHz
DAC
DAC circuit
Total correlated jitter
Analogue Output
Linearity
Frequency response
Channel separation
Signal to noise
Total harmonic distortion
Output impedance
2x ES9038Q2M (dual mono) with 8x digital filter
32 bit Hyperstream II
<12 picoseconds peak to peak
< 0.1dB down to -130dB
< -0,1dB at (10Hz -20kHz)
< -114dB at 10kHz @ 0dBFS
> 100dB „A“-wt. at 1kHz @ 0dBFS
< 0,001% at 1kHz @ 0dBFS
100 ohms
Connections
Line level outputs
Digital inputs
1 pair line level RCA (phono), left and right
1 pair line level XLR (balanced), left and right
1 RCA coaxial SPDIF in (up to 24bit/192kHz stereo PCM)
3 TOSLINK optical in (up to 24bit/192kHz stereo PCM)
1 AES/EBU balanced digital in (up to 24bit/192kHz stereo PCM)
1 CD I2S (MCLK out 16,9344MHz)
1 USB 2.0 in for computer/PDA/other “host” (up to 24bit/768kHz stereo PCM, DSD256
DoP, DSD512 native), fully asynchronous
(Actual data determined by source file/computer software settings)
Power requirement
Mains voltages
Consumption
110 – 230 V
max. 70W, <0,5W in standby
Weight
Unit only, unboxed
In shipping carton & inc. accessories
10.6 kg
ca. 14 kg
Unit dimensions
Wide
High, including feet
Deep (front to back) including terminals
483 mm
102 mm
381 mm
Musical Fidelity reserves the right to make improvements which may result in specification or feature changes without notice. E&OE. Microsoft and Windows®
are either registered trademarks or trademarks of Microsoft Corporation in the United States and/or o ther countries. Mac and Mac OS are trademarks of Apple
Inc., registered in the U.S. and other countries All other trademarks used herein are the property of their respective owners.
MQA and the Sound Wave Device are registered trade marks of MQA Limited © 2016
Page 12

12
Item Disposal Information for Europe
DISPOSAL
The crossed out wheeled bin label that appears on the
back panel of the product indicates that the product must
not be disposed of as normal household waste. To prevent possible
harm to the environment please separate the product from other
waste to ensure that it can be recycled in an environmentally safe
manner. Please contact your local government office or your
retailer for available collection facilities.
DISPOSITION
La poubelle sur roulettes barrées X, qui apparaît en logo
sur le panneau arrière du produit, indique que celui-ci ne doit
pas être traité comme un déchet domestique commun. Afin de
ce produit électronique devra être géré
séparément et donc recyclé selon les nouvelles normes Européennes
Rohs concernant les
contacter les services concernés gouvernementaux ou votre point de
vente pour et de déchets électroniques
équipés de composants électroniques.
DISPOSAL
La etiqueta cruzada hacia fuera del compartimiento que
aparece en el panel trasero del producto indica que el
producto no se debe reciclarse como basura normal de la casa. Para
prevenir daños posible al ambiente separe por favor el producto de
otras basura para asegurarse de que puede ser reciclada de una
manera ambientalmente segura. Entre en contacto por favor a su
oficina gubernamental local o a su minorista para las instalaciones
disponibles de la colección.
RIFIUTI
retro
smaltito tramite la procedura normale di smaltimento dei rifiuti
questo prodotto da altri rifiuti domestici in modo che possa venire
riciclato in base alle procedure di rispetto ambientale. Per
maggiori dettagli sulle aree di raccolta disponibili, contattate
prodotto.
FACHGERECHTE ENTSORGUNG:
Das auf der Geräterückseite angebrachte Label deutet
darauf hin, dass das Produkt nicht mit konventionellem
Hauskehricht entsorgt werden darf. Um Schäden und
Verschmutzungen an Umwelt und Mensch zu vermeiden, muss
das Produkt fachgerecht entsorgt und von anderem Abfall getrennt
werden. Wenden Sie sich bei Fragen hierzu an Ihren Fachhändler
oder an eine öffentliche Informationsstelle.
AFVAL
Het label op de achterzijde van dit apparaat, een
afvalbak op wielen met een kruis doorgehaald, geeft aan
dat dit apparaat niet samen met gewoon huishoudafval mag
worden weggegooid. Om mogelijke schade aan onze
leefomgeving te voorkomen dient dit apparaat, gescheiden van
gewoon huishoudelijk afval, te worden afgevoerd zodat het op
een milieuvriendelijke manier kan worden gerecycled. Neem voor
beschikbare inzamelplaatsen contact op met uw gemeentelijke
reinigingsdienst of met uw elektronica leverancier.
HÄVITTÄMINEN
Yliruksattua jäteastiaa kuvaava tarra tuotteen
takalevyssä kertoo, että tuotetta ei saa käsitellä
normaalina talousjätteenä. Ympäristön suojelemiseksi on tuote
pidettävä erillään muusta jätteestä ja se on kierrätettävä
ekologisesti kestävällä tavalla. Ota yhteyttä laitteen myyjään tai
Pirkanmaan Ympäristökeskukseen lähimmän kierrätyskeskuksen
löytämiseksi.
AFSKAFNING
Logoet med en skraldespand med kryds over på
bagsiden af apparatet indikerer at dette produkt ikke må
kasseres som normal husholdningsaffald. For at forebygge mulig
skade på miljøet, bedes De separere dette produkt fra andet
affald, og sikre at det bliver genbrugt på en miljørigtig måde.
Kontakt venligst de lokale myndigheder eller din forhandler for
oplysning om nærmeste tilgængelige opsamlingssted for
elektronikaffald.
ΔΙΑΔΙΚΑΣΙΑ ΑΠΟΡΡΙΨΗΣ
.
,
.
.
a Division of Audio Tuning
Vertriebs GmbH
Margaretenstrasse 98
A-1050 Vienna
AUSTRIA
+43 1 544 858 0400
http://www.musicalfidelity.com
 Loading...