

Page 1
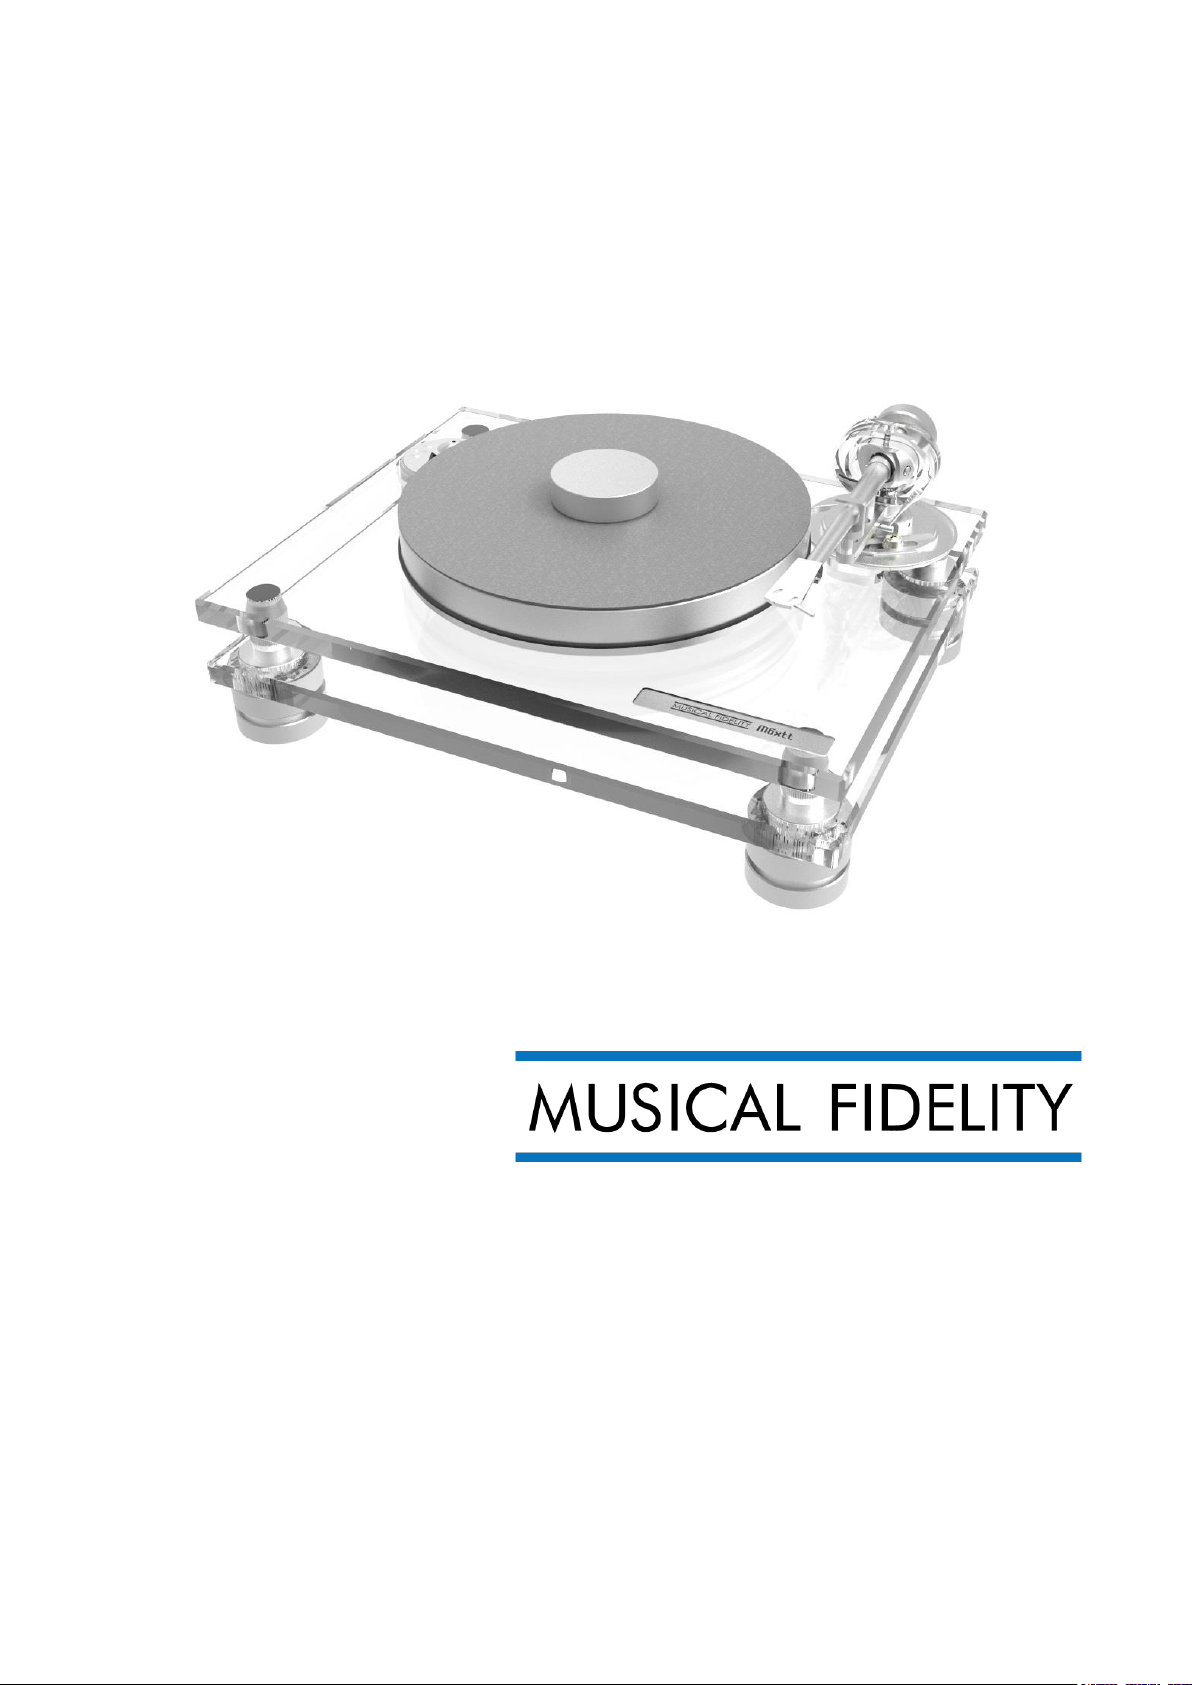
INSTRUCTIONS FOR USE
M6xTT
Page 2
© Musical Fidelity · M6xTT · Revision 30.09.2024
2
Page 3

© Musical Fidelity · M6xTT · Revision 30.09.2024
3
M6xTT
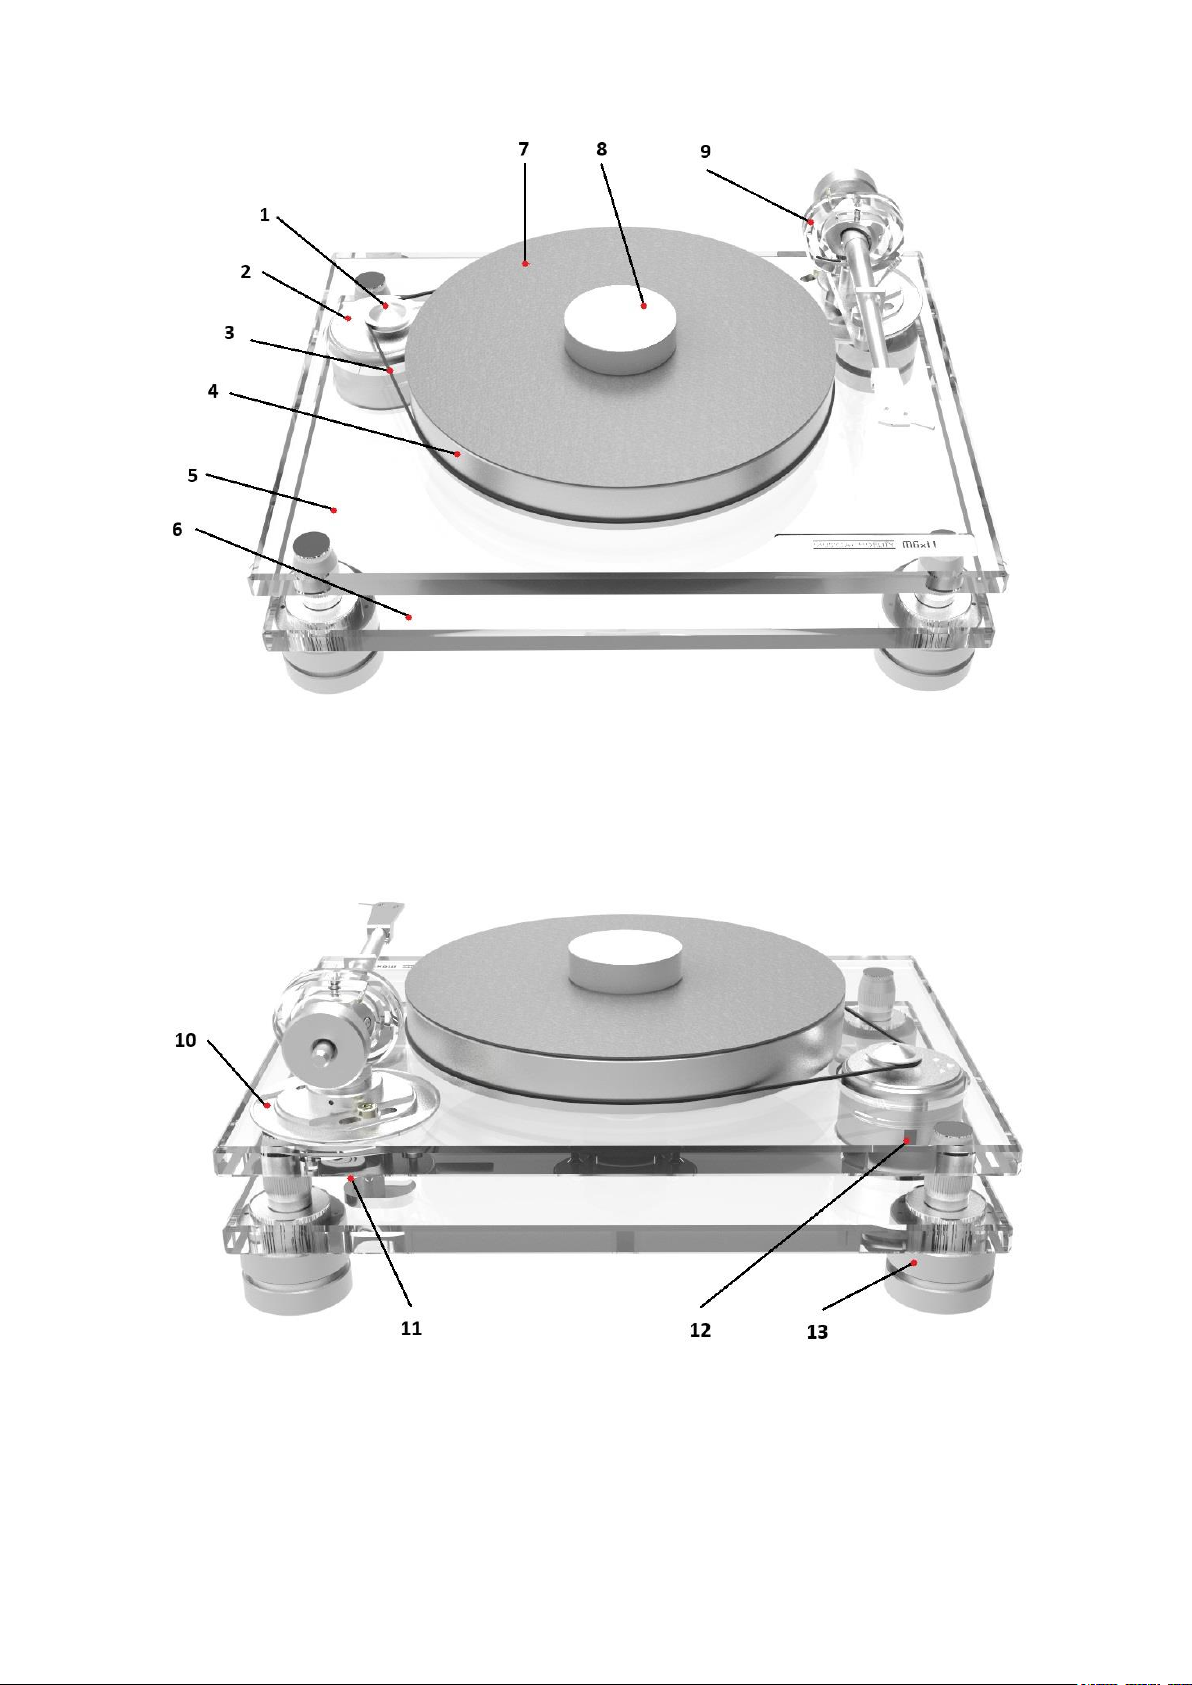
Controls, features and connections
(1) Motor with motor pulley
(2) Electronic speed control
(3) Drive belt
(4) Platter
(5) Top acrylic chassis
(6) Bottom acrylic chassis
(7) Leather mat
(8) Record puck
(9) Musical Fidelity 9’’ tonearm
(10) Universal tonearm base flange
(11) Tonearm output with 5-Pole DIN connector
(12) Power supply socket
(13) Heigh adjustable magnetic feet
Turntable accessories
(1) Instruction for use
(2) Cartridge alignment protractor
(3) Anti-skating weight
(4) Allen key 1.5mm, 2mm, 5mm
(5) Counterweight no. 12 (6 – 14g) and no. 15 (11.5 – 20.5g)
(6) Single adaptor
(7) Connect IT E RCA 1,23m
(8) Power supply
(9) White cotton gloves
(10) Cloth
(11) Record puck
(12) Leather mat
(13) Tonearm flange LINN standard
(14) Grease for inverted platter bearing
Page 4

© Musical Fidelity · M6xTT · Revision 30.09.2024
4
CONTENTS
TURNTABLE OVERVIEW 2 - 3
ACCESSORIES OVERVIEW 3
SETUP AND INSTALLATION
1. UPACKING 6-7
2. CHASSIS ASSEMBLY 7-8
3. MOTOR ASSEMBLY 8
4. TURNTABLE DRIVE ASSEMBLY 8-9
5. CONNECTION TO THE AMPLIFIER 9
6. MAINS POWER CONNECTION 10
7. SWITCHING ON AND OFF / CHANGING REPLAY SPEED 10
8. TONEARM SETTINGS 11
a) CARTRIDGE INSTALLATION 11-12
b) CARTRIDGE DOWNFORCE ADJUSTMENT 12
c) VERTICAL TRACKING ANGLE ADJUSTMENT 12-13
d) AZIMUTH ADJUSTMENT 13
e) ANTI-SKATING FORCE ADJUSTMENT 13-14
TECHNICAL SPECIFICATIONS 14
WARRANTY, SERVICE 15
PACKAGING 16
Page 5

© Musical Fidelity · M6xTT · Revision 30.09.2024
5
Dear music lover,
Thank you for purchasing a Musical Fidelity record player.
In order to achieve maximum performance and reliability, please study these instructions carefully.
Warning of a hazard for the user, the unit or possible misuse
Important notice
The following instructions for adjusting the cartridge are provided in case the cartridge is replaced by a different
model at a later date.
During assembling and adjustment small parts could be lost if they are not carefully placed in a suitable
receptacle. Before starting assembly make yourself acquainted with the parts listed above which are
correspondingly numbered in the technical drawings above.
Safety instructions
The power supply is used to connect and disconnect the unit from the mains. Make sure that the plug
is easily accessible at all times. Hold the plug when unplugging the power cord. Never handle the
power cord while your hands are wet or damp.
Avoid letting liquids enter the device. Never place any item containing liquid, like a flower vase, on or
near the device. Never spill any liquid on the device. Never place any naked flame sources, like lighted
candles, on or near the device. The product shall not be used in damp or wet locations, next to a
bathtub, sink, swimming pool or any other similar conditions.
Keep plastic bags away from children to prevent any risk of suffocation.
The turntable was shipped partially disassembled in order to avoid damage to sensitive parts.
Please check immediately to make sure that neither the packaging nor the device was damaged in transit.
Page 6
© Musical Fidelity · M6xTT · Revision 30.09.2024
6
SETUP AND INSTALLATION
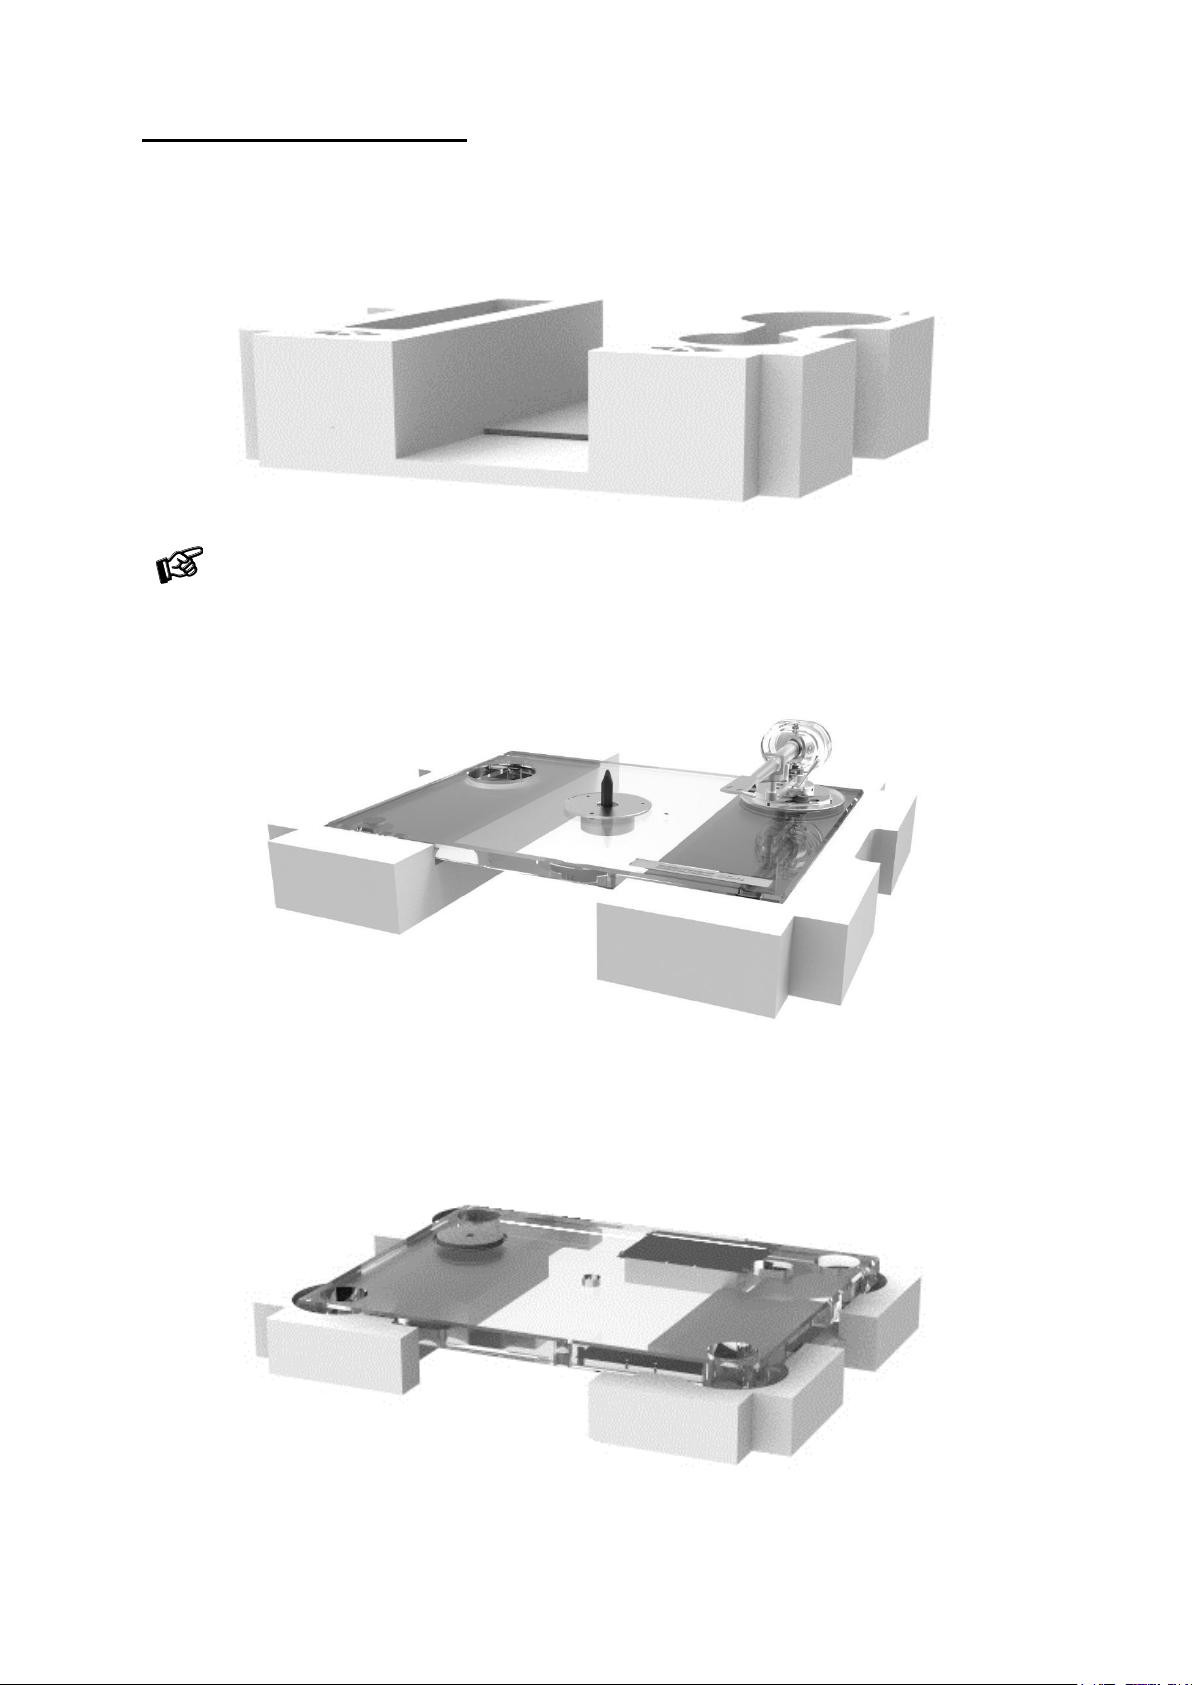
1. UNPACKING
a) Please remove carefully top foam insert which secures the tonearm during the transport (if mounted)
and where accessories find its place including two supplied counterweights.
Before the next steps, please put on the cotton gloves supplied as an accessory.
b) Remove carefully top acrylic part of the chassis from the box and place it on the save place.
c) Remove the other set of white foams that held the top acrylic chassis and set them aside - you will
place the bottom acrylic chassis on top of them which is in the next layer of packaging.
d) Remove the bottom acrylic chassis and place it on top of the foam inserts you just removed.
e) Remove another set of white foam inserts to get to the feet and main platter
Page 7
© Musical Fidelity · M6xTT · Revision 30.09.2024
7
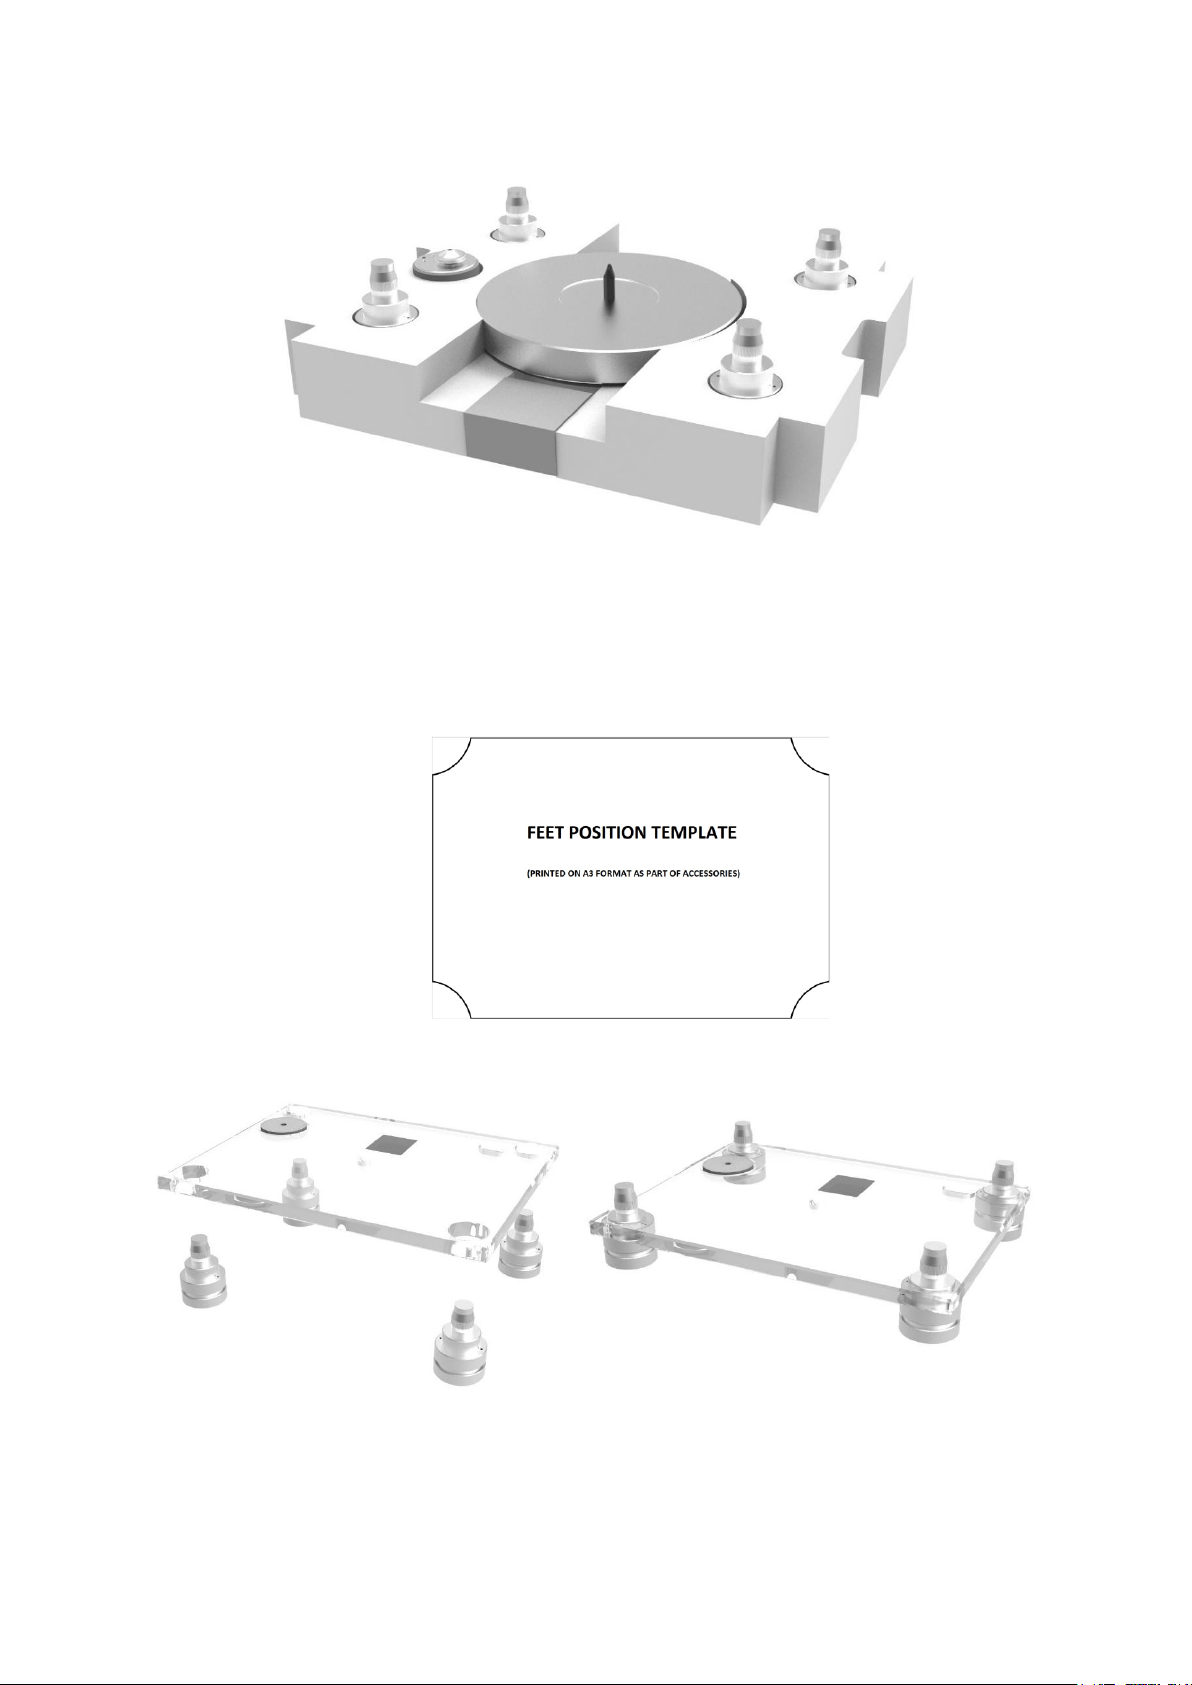
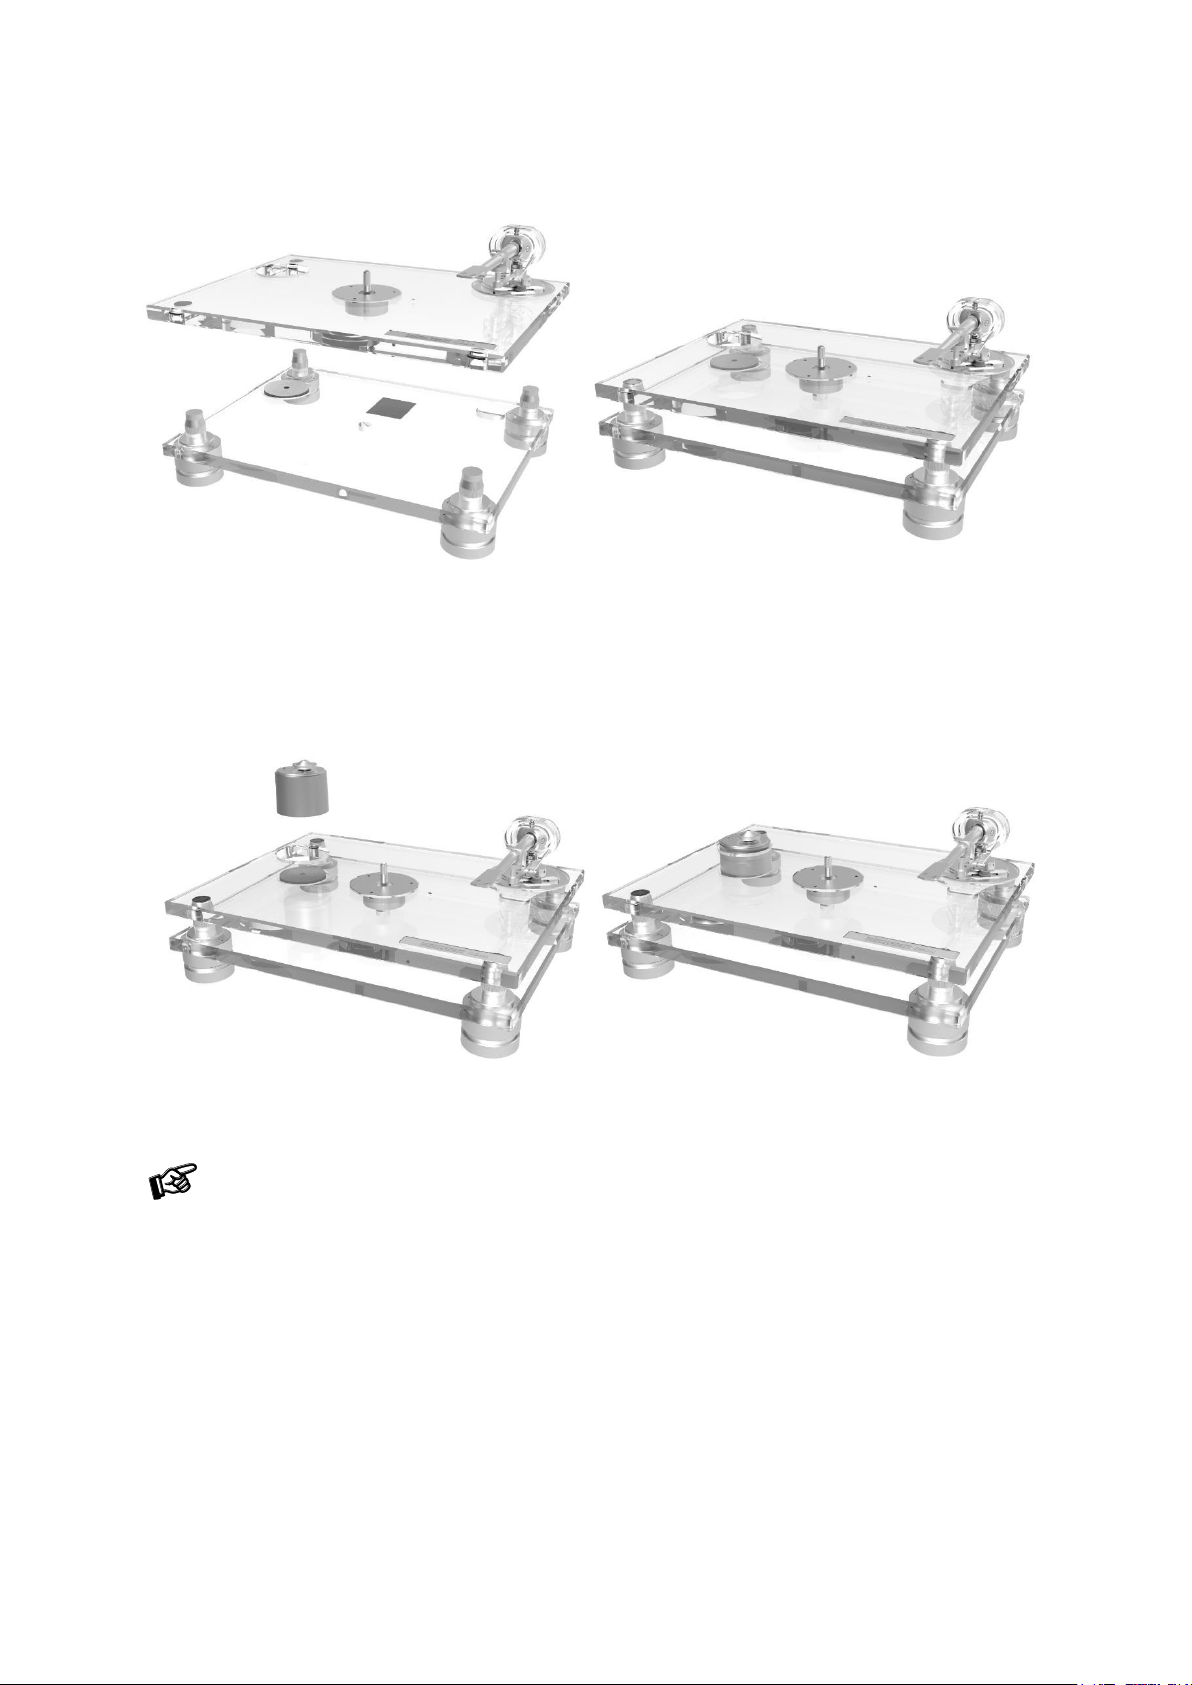
2. CHASSIS ASSEMBLY
a) Remove the 4 turntable feet from the bottom foam insert and place them in the final location where
you will assemble and use the turntable.
Use the provided A3 template to precisely position the turntable feet so that you can comfortably fit
the lower part of the acrylic chassis over them.
Page 8
© Musical Fidelity · M6xTT · Revision 30.09.2024
8
b) Take the top acrylic chassis and place it on the turntable feet.
3. MOTOR ASSEMBLY
Remove the motor from bottom foam insert and place it on the foam support in the bottom acrylic chassis as
shown on the pictures below.
Turn the power supply connector to the rear side of the turntable for easy power input connection.
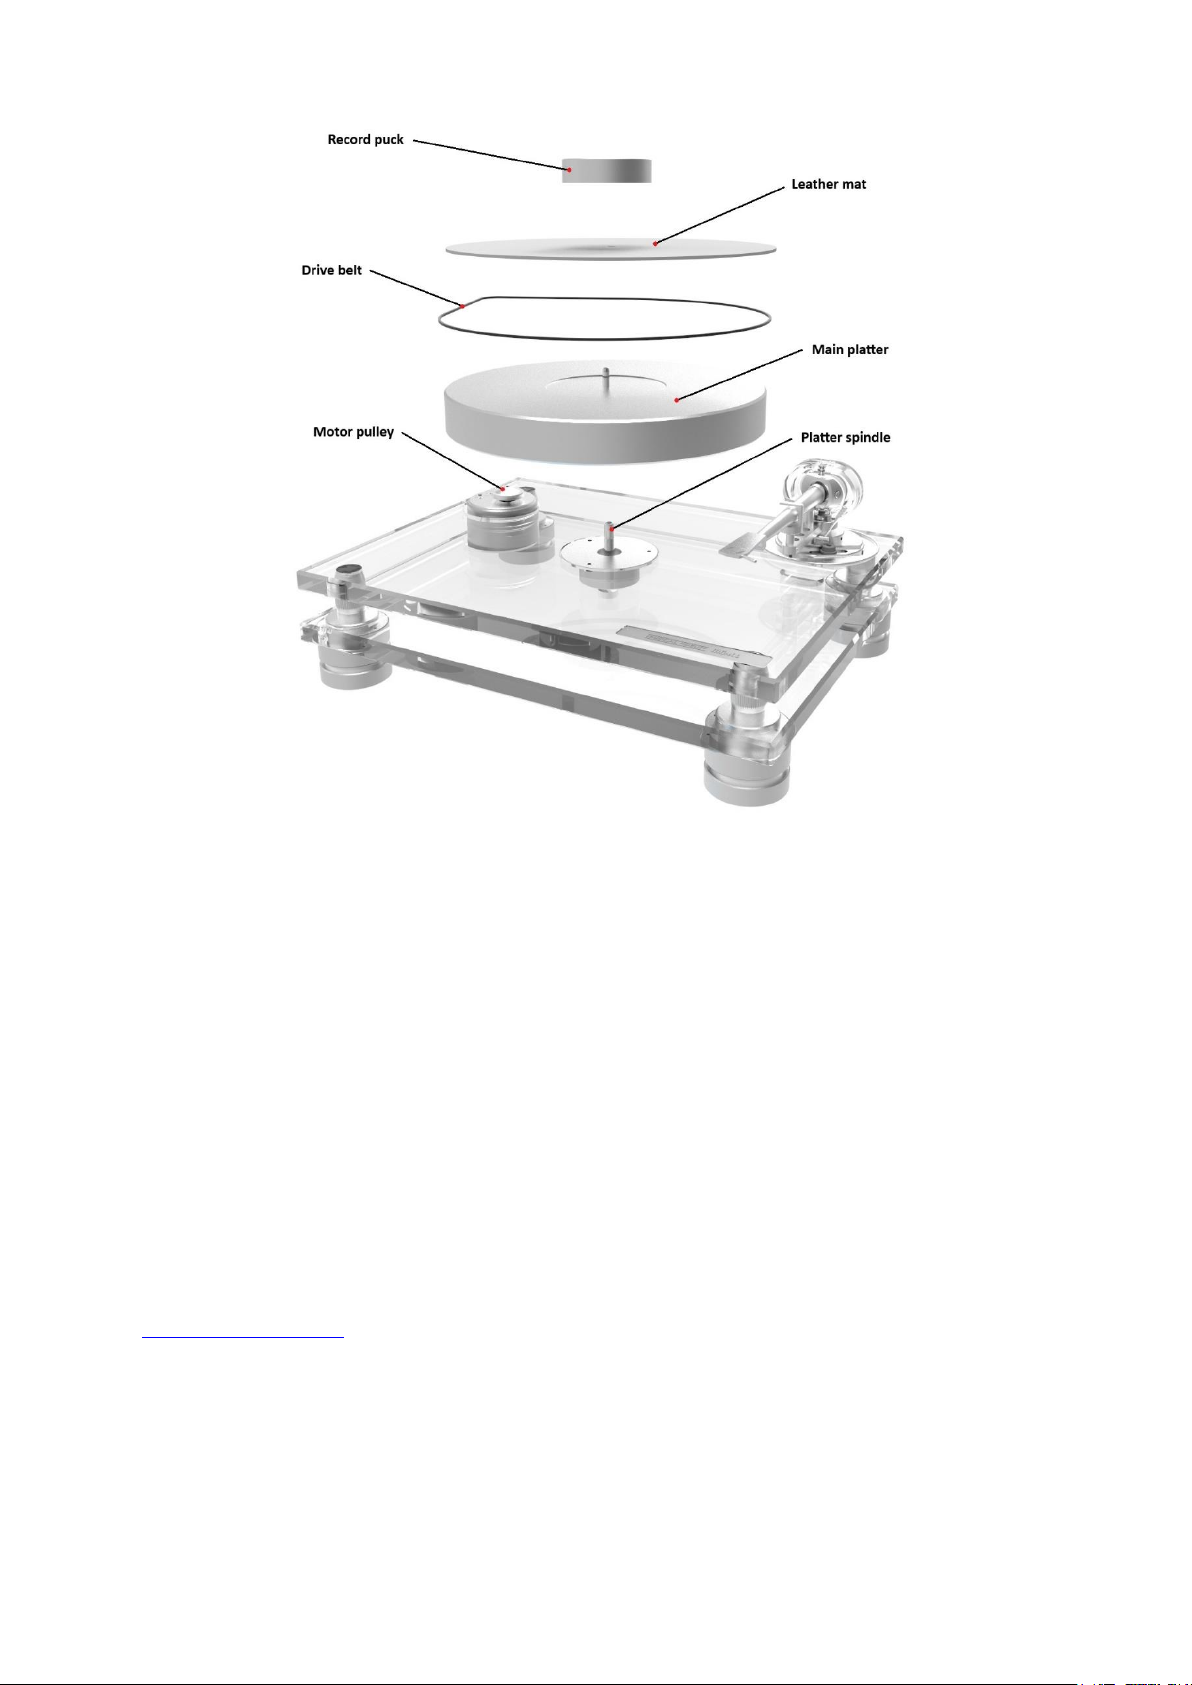
4. TURNTABLE DRIVE ASSEMBLY
Remove the protective cap from the platter spindle in the top acrylic chassis and protective cap from the
main platter housing.
Carefully place the main platter over the spindle.
Fit the drive belt around the platter and the motor pulley. Avoid getting sweat or grease on the belt as these
will deteriorate the performance and reduce the belt's lifespan. Use absorbent kitchen paper to remove any oil or
grease from the outer edge of the platter and the belt.
Page 9
© Musical Fidelity · M6xTT · Revision 30.09.2024
9
5. CONNECTION TO THE AMPLIFIER
5-POLE DIN OUTPUT: with 5-Pole DIN connector in the tonearm and supplier 5P to RCA cable. Use the Phono
input (sometimes labelled gram, disc or RIAA) on your amplifier. Make sure that the phono input offers correct
matching and amplification for the type of cartridge used. Line inputs (like CD, Tuner, Tape or Video) are not
suitable. Take care about connecting the left and right channel correctly. The RIGHT CHANNEL is usually
marked RED, the LEFT CHANNEL BLACK or WHITE. Check the manual of your amplifier for relevant
information. An earthing wire may be connected to the screw terminal between the sockets if you encounter
humming problems.
If your amplifier does not have an input suitable for phono cartridges, a separate phono amplifier stage for
MM or MC cartridges is required.
For detailed product information regarding Musical Fidelity phono amplifiers please visit our website:
www.musicalfidelity.com
Page 10
© Musical Fidelity · M6xTT · Revision 30.09.2024
10
6. MAINS POWER CONNECTION
The turntable is supplied with the universal power supply with 3 exchangeable sockets adapters suitable for all
countries. Select the correct adapter for your country and insert the adapter to the exchangeable part of the
power supply.
Connect the low voltage plug from the power supply to the socket on the rear of the record player
before connecting the power supply to the mains.
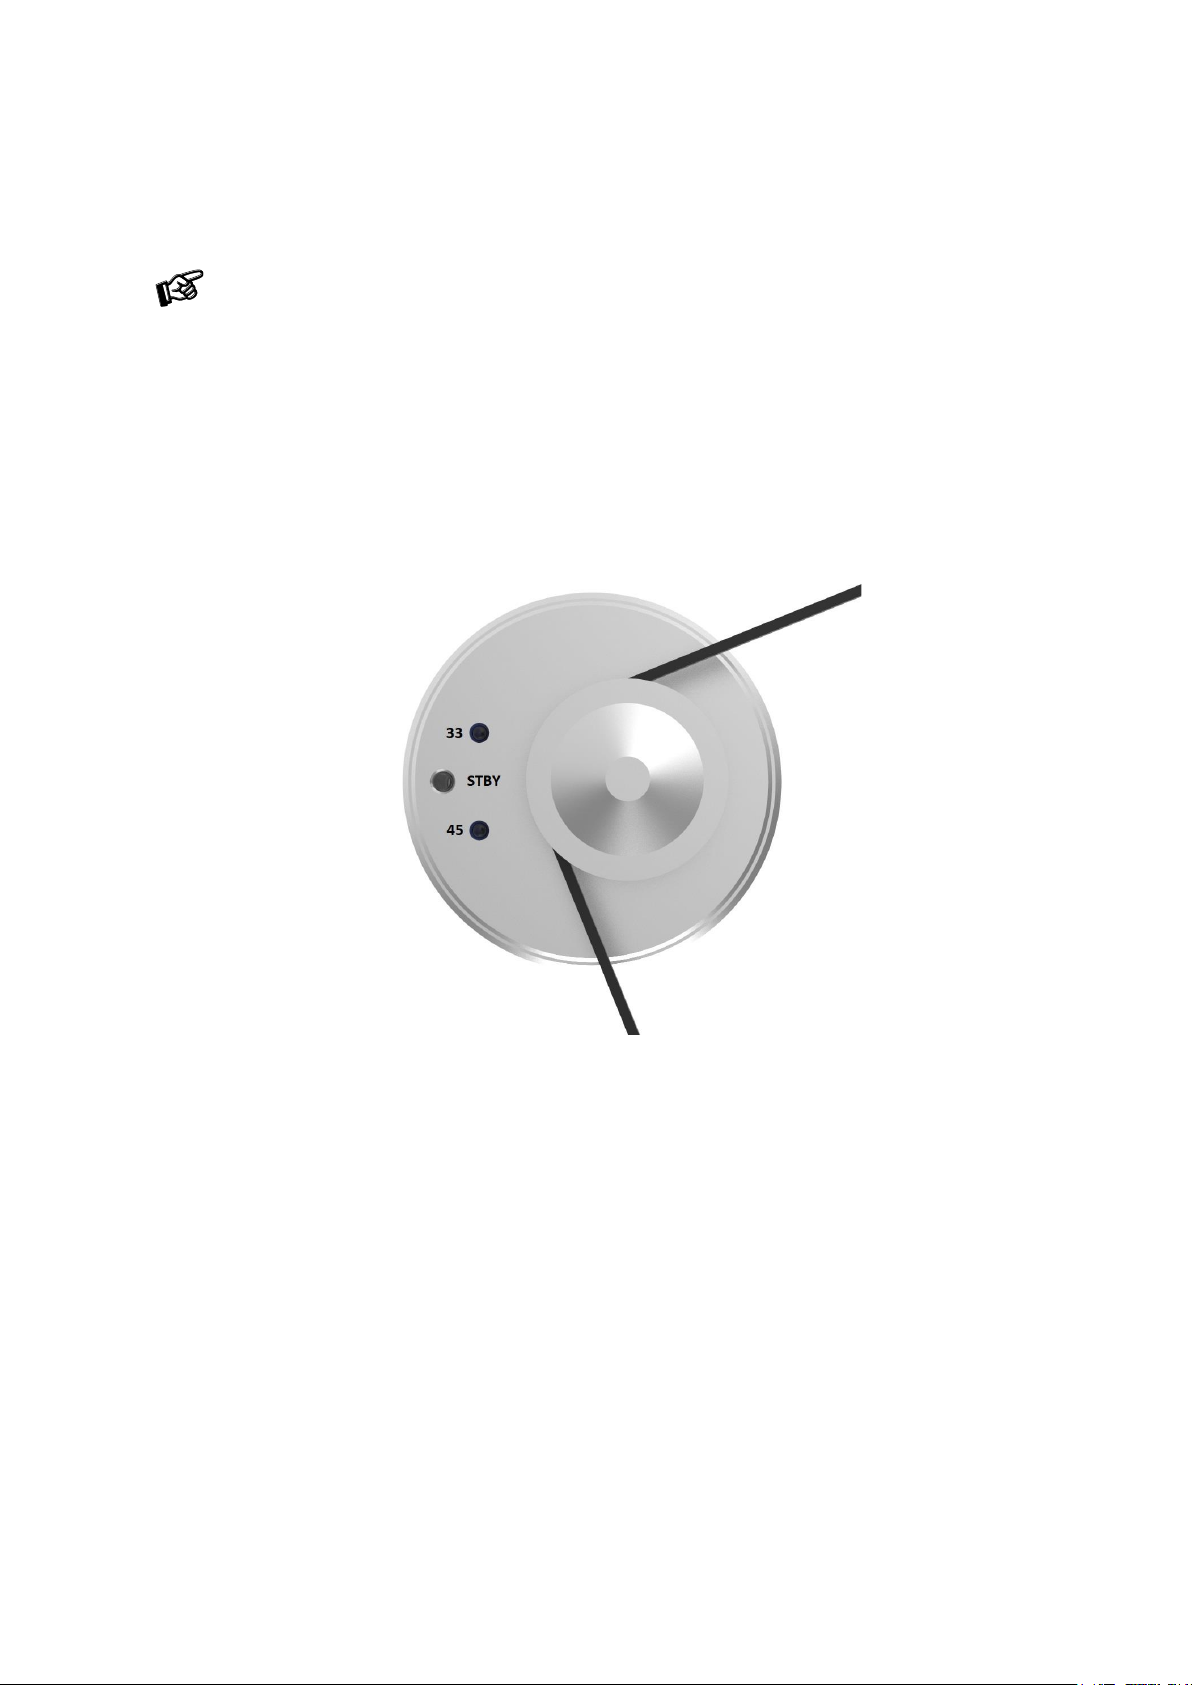
7. SWITCHING ON AND OFF / CHANGING REPLAY SPEED
To play records at 33 r.p.m. press the ‘’standby’’ button (STBY). Pressing the ‘’standby’’ button one more time
selects 45 r.p.m. The selected speed is shown respectively by the flashing LED. When the platter has attained full
speed, the LEDs stop flashing. To stop the turntable, hold the STBY button for 3 seconds.
Page 11
© Musical Fidelity · M6xTT · Revision 30.09.2024
11
8. TONEARM SETTING
a) CARTRIDGE INSTALLATION
All cartridges with half inch mounting holes can be mounted. Leave the needle's protection cover on, fit the
cartridge to the headshell by using the supplied screws by passing one screw through each slot in the headshell.
Do not tighten the nuts yet.
Connect the tonearm wires with the cartridge pins as follows:
white left channel positive (L+)
red right channel positive (R+)
green right channel return (R-)
blue left channel return (L-)
The full sound quality of the record player can only be achieved if the cartridge is adjusted correctly. Particular
tools like the Pro-Ject Audio Systems alignment tools are required to accomplish this job properly. If you are not well
acquainted with the adjustment of cartridges, please call for the willing help of your Pro-Ject Audio Systems
dealer.
Please note: adjusting a cartridge and tonearm calls for the greatest care in order to avoid damaging
the cartridge or tonearm bearings. Ask your local dealer for help if you are unsure in any of the
necessary steps and precautions which must be taken.
Page 12
© Musical Fidelity · M6xTT · Revision 30.09.2024
12
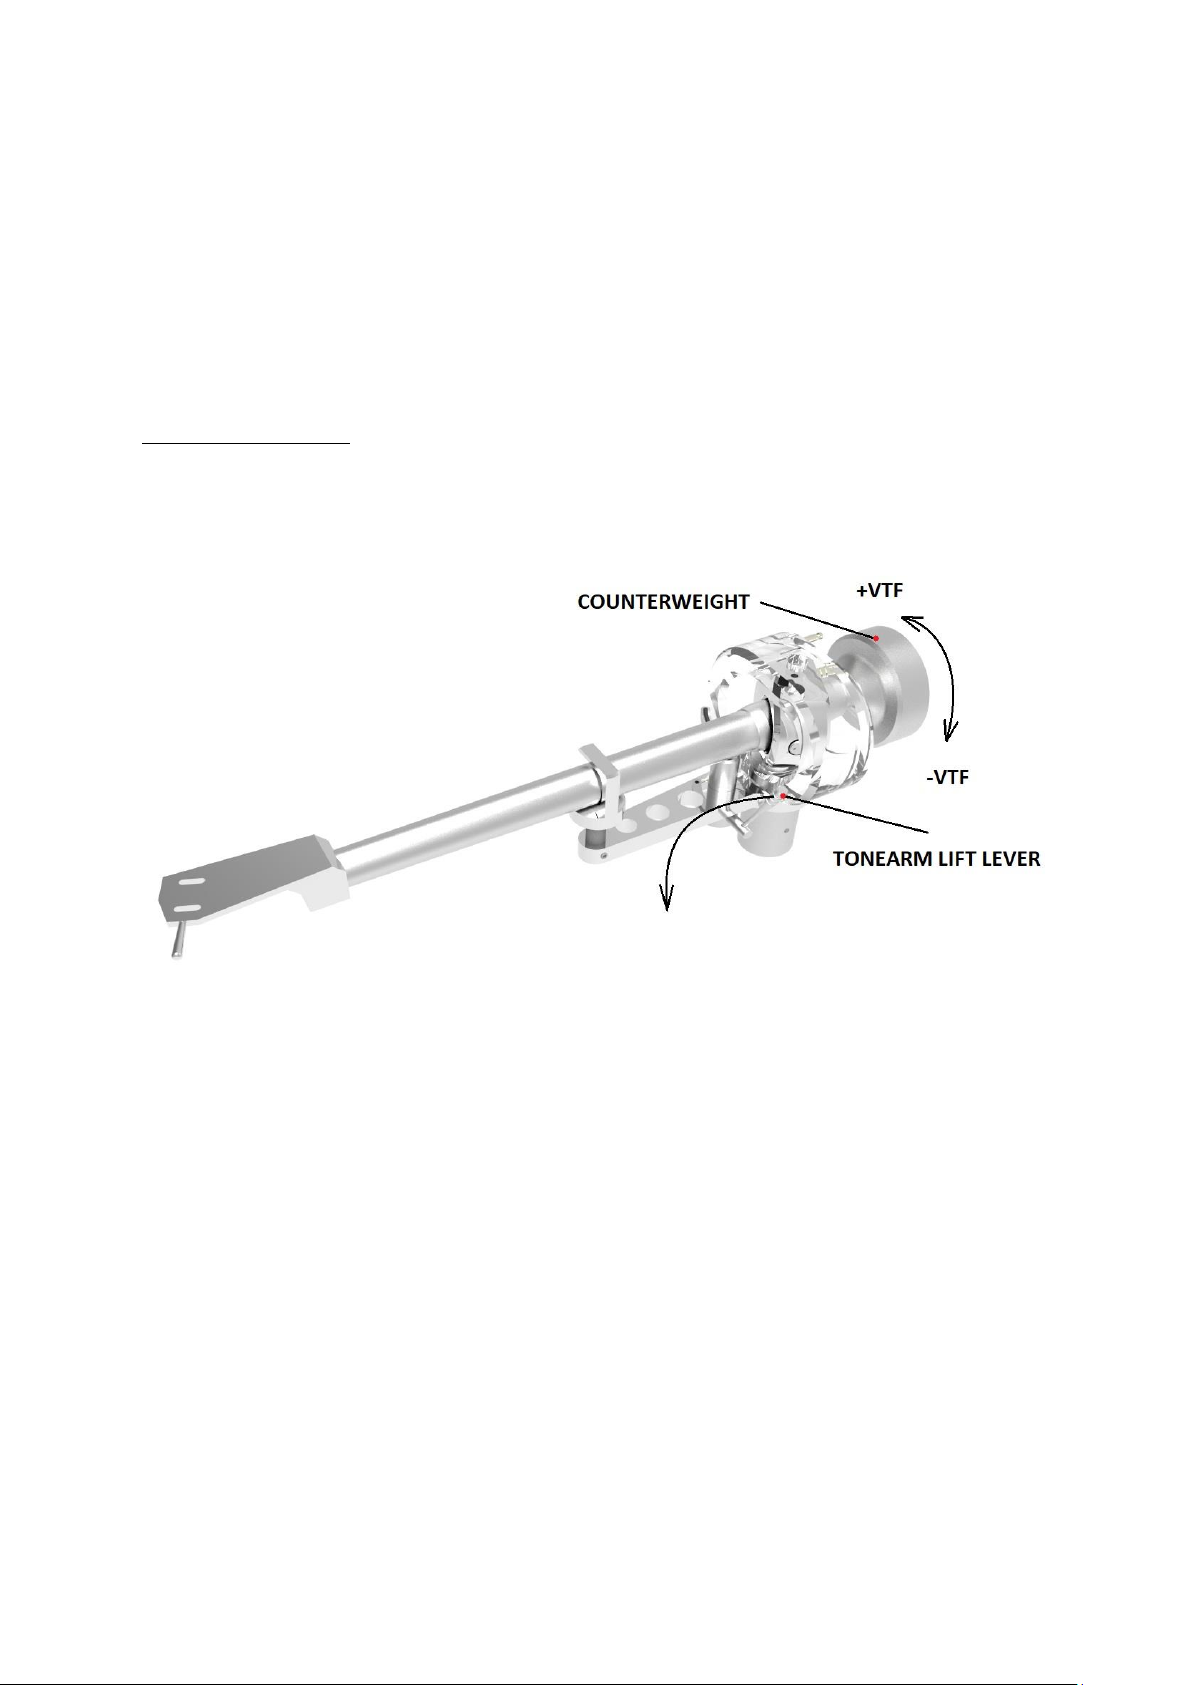
b) CARTRIDGE DOWNFORCE ADJUSTMENT
Before adjusting the downforce, confirm the exact weight of your cartridge.
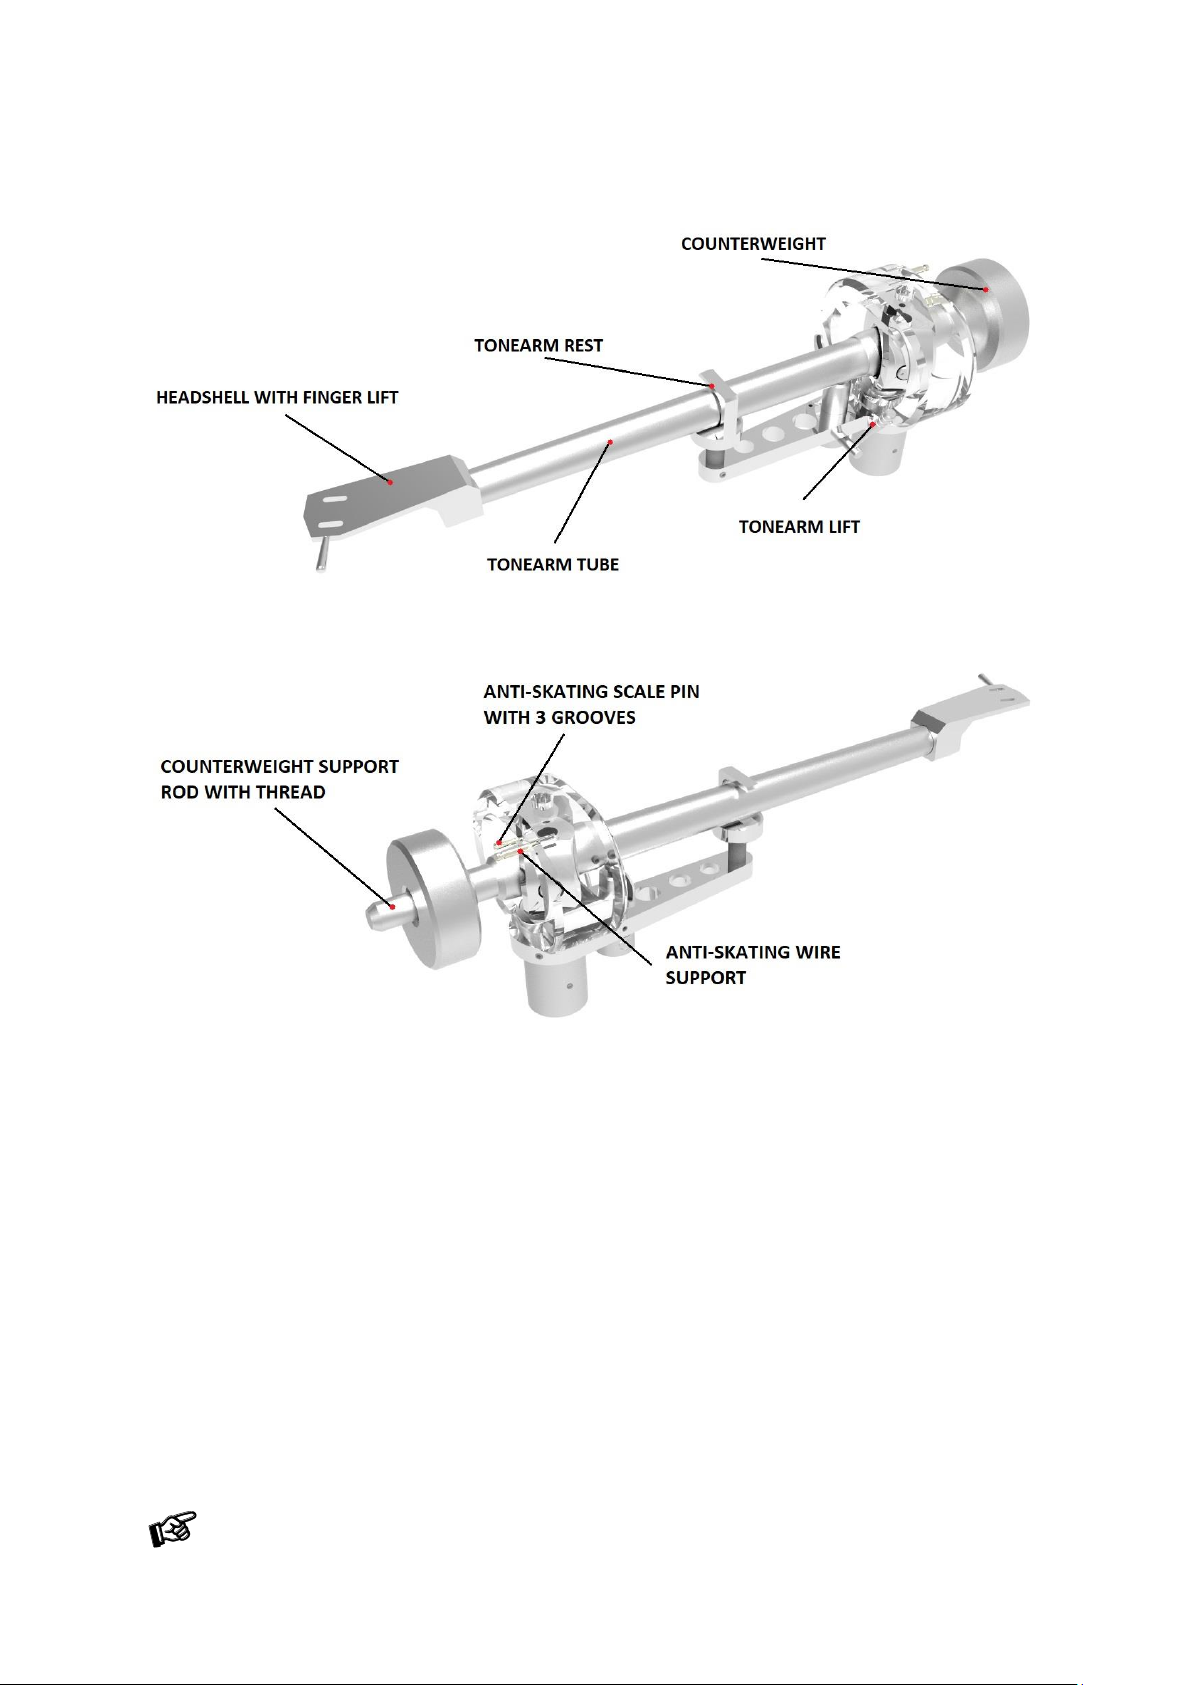
Pushing carefully, move the counterweight onto the counterweight support rod with precise thread as shown
in the illustration below. Place the stylus pressure gauge (not supplied) on the platter. To set the required
VTF, lower the tonearm lift lever as indicated in the illustration and place the tip of the stylus on the pressure
gauge.
As viewed from the headshell, moving the counterweight closer toward the tonearm increases the VTF,
moving away from the tonearm reduces the VTF. Move the counterweight appropriately until the VTF shown
on the pressure gauge matches your cartridge’s recommended vertical tracking force specifications.
Supplied counterweights:
No. 12 for cartridge weight from 12 6 – 14g
No. 15 for cartridge weight from 11.5 – 20.5g
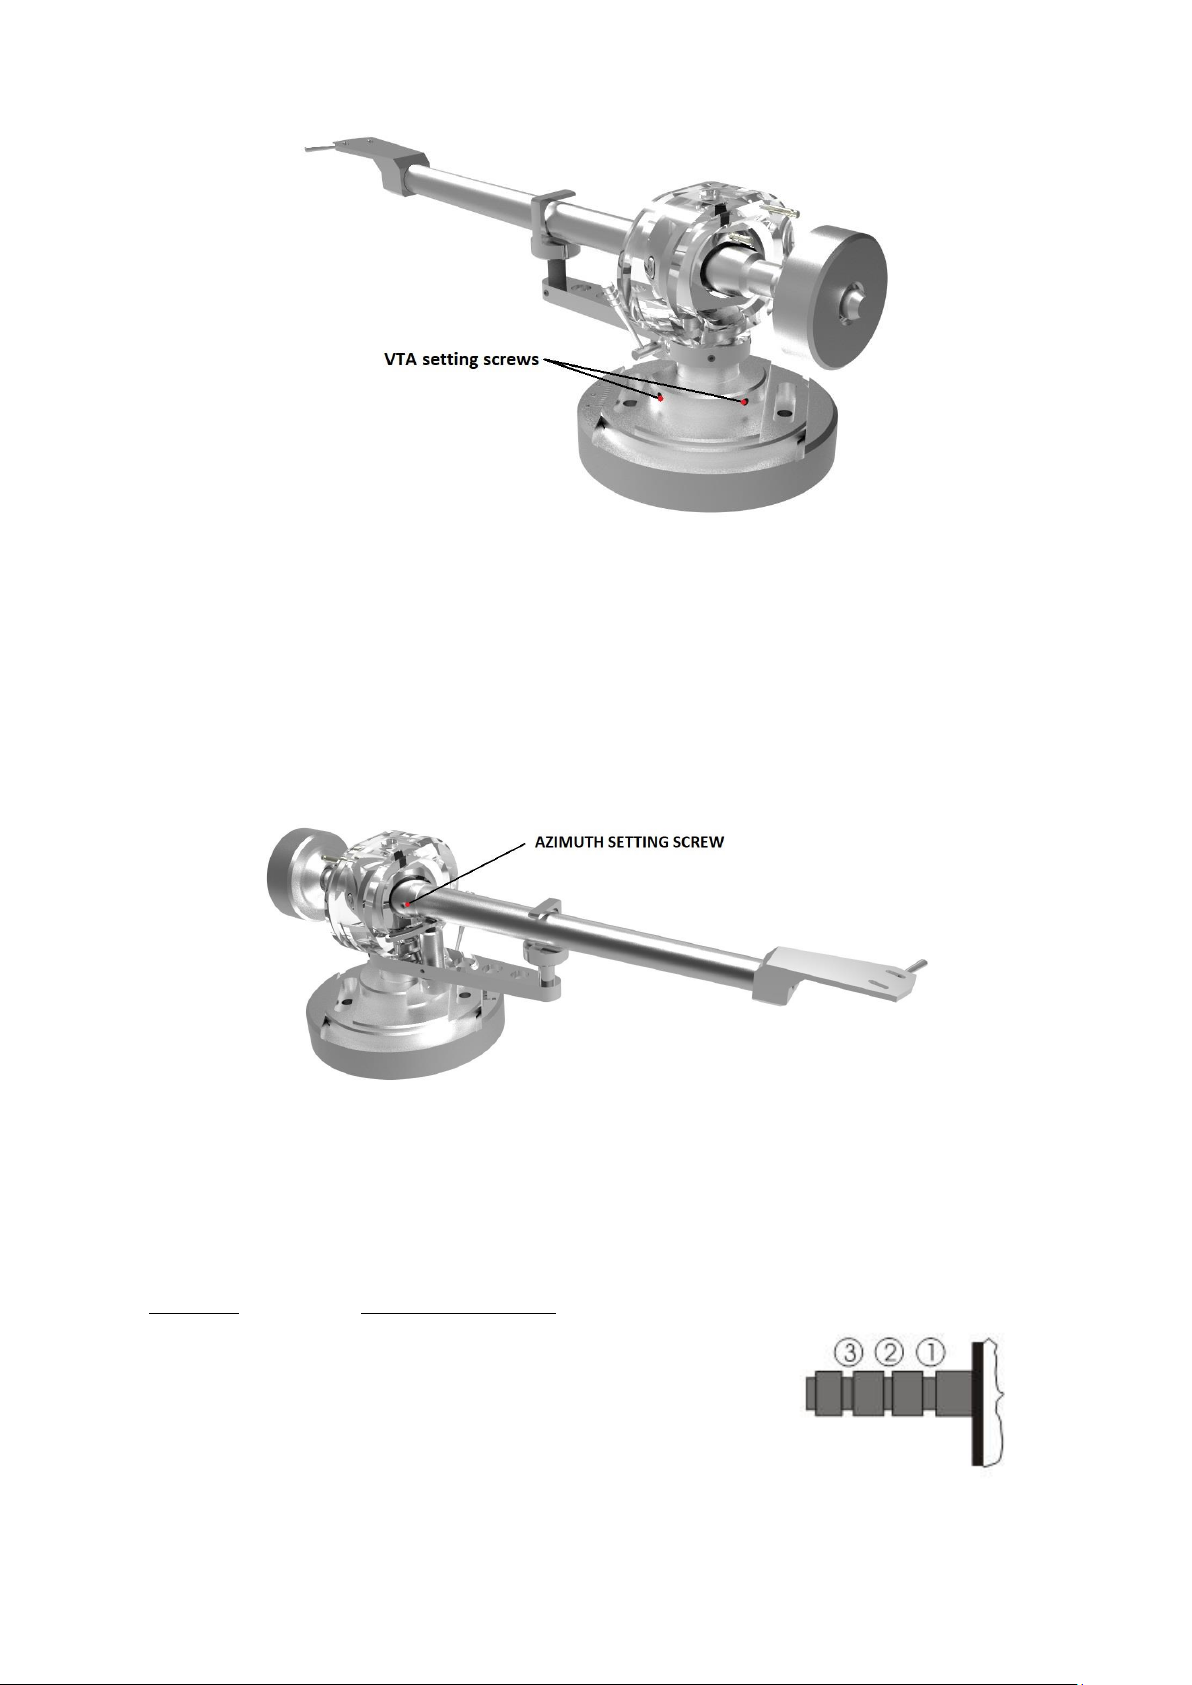
c) VERTICAL TRACKING ANGLE ADJUSTMENT
Put a record on the platter. When the needle is lowered into the record groove and the tonearm is not resting on
the lift arm, the tube of the tonearm should be parallel to the surface of the record.
If it is not, loosen both hexagon screws in the tonearm base just enough to allow vertical movement of the arm
pillar without force and slide the arm up or down until it is parallel.
Retighten the hexagon screws without applying excessive force (which would deform the arm pillar) – finger tight
is quite sufficient.
Page 13
© Musical Fidelity · M6xTT · Revision 30.09.2024
13
d) AZIMUTH ADJUSTMENT
The cartridge needle must be vertical in the record groove in order to trace the groove wall modulations
correctly.
A small screw at the bearing end of the arm allows incorrect azimuth to be corrected.
Slacken off the screw just enough to be able to revolve the arm tube without applying force. Note! Do not
remove this screw completely!
e) ANTI-SKATING FORCE ADJUSTMENT
Put the anti-skating thread hook over the anti-skating adjustment scale.
The anti-skating force must be adjusted corresponding to the downforce as follows:
Downforce Groove in the stub (15)
10 - 14mN 1st from bearing rings
15 - 19mN 2nd " " "
20mN and bigger 3rd " " "
Page 14

© Musical Fidelity · M6xTT · Revision 30.09.2024
14
TECHNICAL SPECIFICATIONS
Musical Fidelity M6xtt/ Musical Fidelity 9’’ tonearm
Nominal speeds
33/45 r.p.m.
Speed variance
33: ±0.11 % 45: ±0.11 %
Wow and flutter
33: ±0.08 % 45: ±0.07 %
Signal to noise
-75dB
Effective tonearm mass
14g
Effective tonearm length
9 " (230mm)
Overhang
18mm
Power consumption
5W/ 0.3W standby mode
Outboard power supply
15V/ 0.8 A DC, universal power supply
Dimensions (W x H x D)
480 x 210 x 370mm
Weight
19.1 kg
Page 15

© Musical Fidelity · M6xTT · Revision 30.09.2024
15
Potential incorrect use and fault conditions
Musical Fidelity turntables are manufactured to the highest standards and undergo strict quality controls before
leaving the factory. Faults that may possibly occur are not necessarily due to material or production faults but
can sometimes be caused by incorrect use or unfortunate circumstances. Therefore, the following list of common
fault symptoms is included.
The platter doesn't turn although the unit is switched on:
The unit is not connected to the mains power supply.
No mains at the socket.
Drive belt is not fitted or has slipped off.
No signal through one or other channel or both channels:
No signal contact from the cartridge to the internal tonearm wiring or from that to the arm lead or
from that to the phono box or between that and the amplifier. This could be due to a faulty plug,
broken wire or solder joint or simply loose plug/socket connection.
Phono input not selected at amplifier.
Amplifier is not switched on.
Amplifier or speakers are defective or muted.
No connection to the loudspeakers.
Strong hum on phono input:
No earth connection from cartridge or arm or arm cable to amplifier, or earth loop.
Distorted or inconsistent sound from one or both channels:
Record player is connected to wrong input of amplifier, or MM/MC switch incorrectly set.
Needle or cantilever damaged.
Wrong r.p.m., drive belt overstretched or dirty, platter bearing without oil, dirty or damaged.
Service
Should you encounter a problem which you are not able to alleviate or identify despite the above information,
please contact your dealer for further advice. Only when the problem cannot be resolved there should the unit
be sent to the responsible distributor in your country.
Guarantee repairs will only be affected if the unit is returned correctly packaged. For this reason, we recommend
keeping the original packaging.
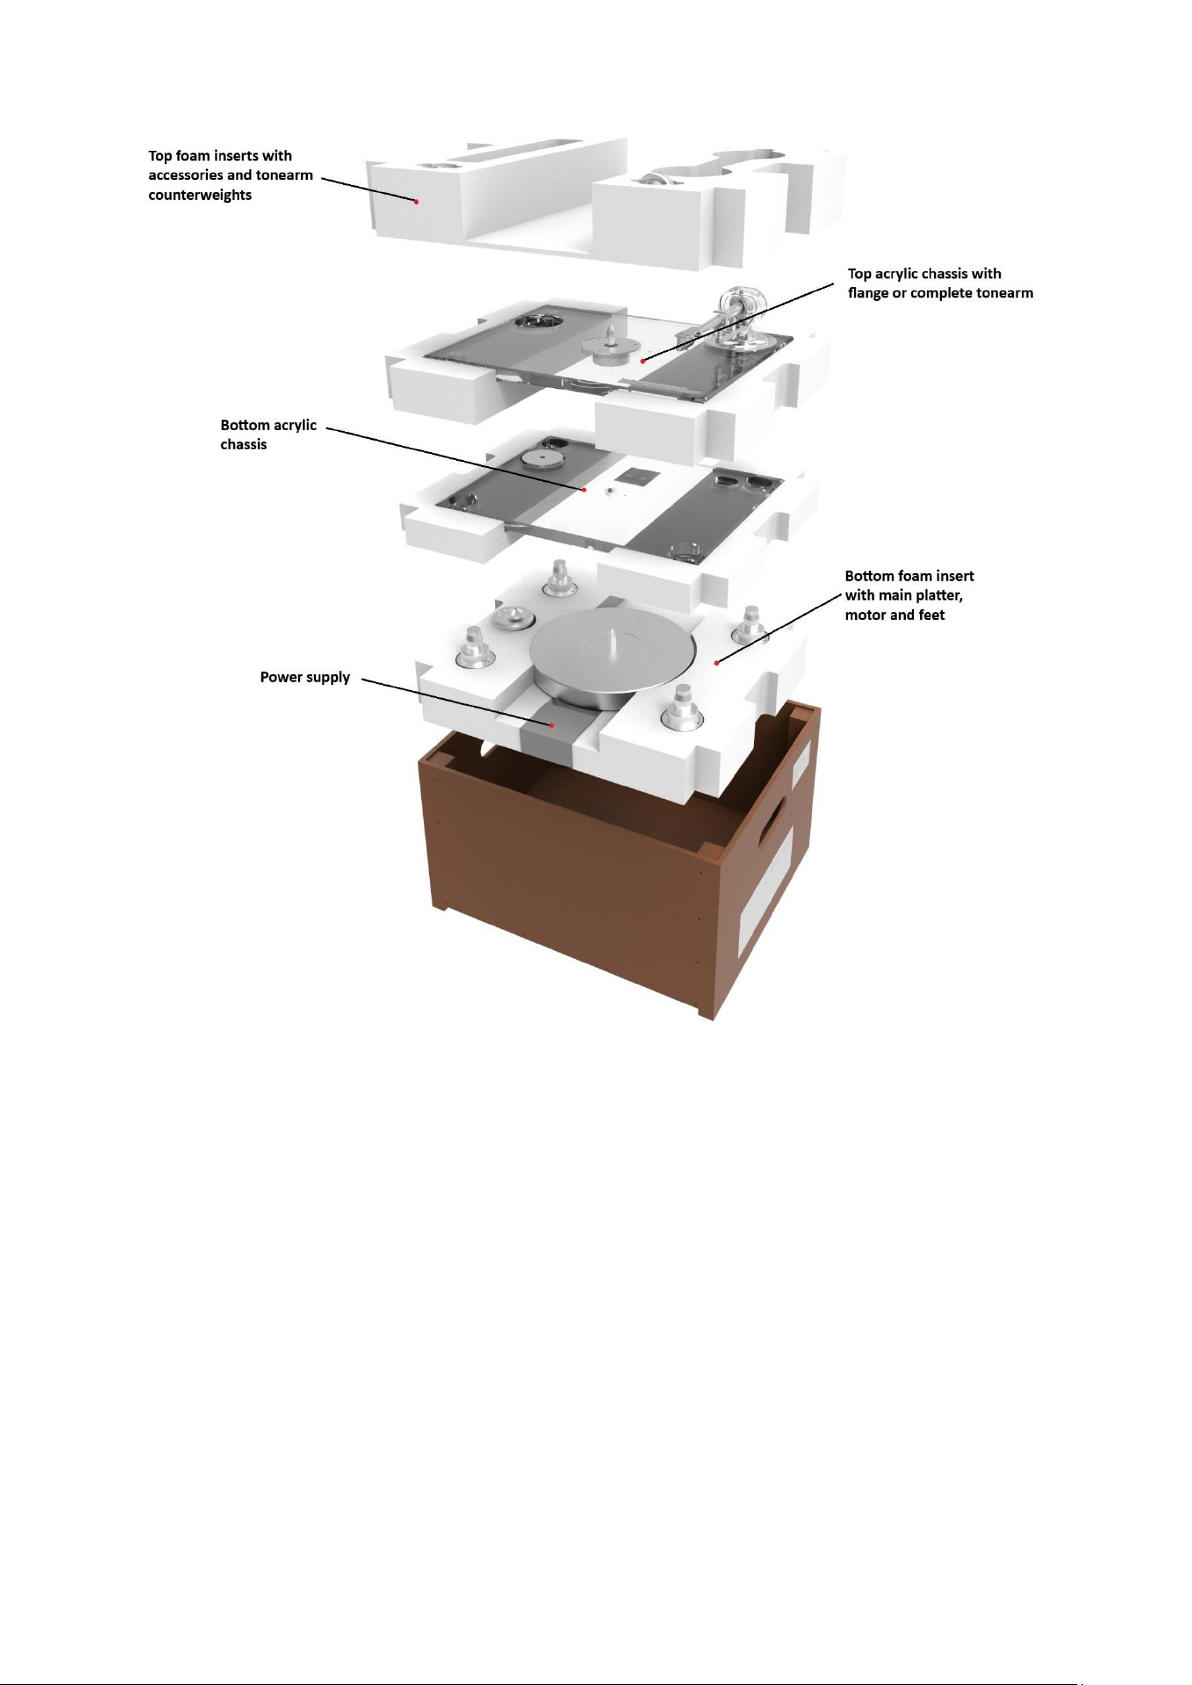
Never return a record player without making sure that is it safely disassembled and correctly packaged in the
original packaging according to the diagrams on the last page of this user guide. Please remove these parts and
pack them separately: lid, counterweight, anti-skating weight, platter and belt. Fit the cartridge protection cap.
Insert the transport screws for the sub-chassis, the transport lock for the tonearm prior to carefully packaging the
record player.
Warranty
The manufacturer accepts no responsibility for damage caused by not adhering to these instructions
for use and/or by transportation without the original packaging. Modification or change to any part of
the product by unauthorized persons, release the manufacturer from any liability over and above the
lawful rights of the customer.
Musical Fidelity is a Registered Trademark of H.
Lichtenegger.
This guide was produced by: Musical Fidelity Copyright ©
2024. All rights reserved.
The information was correct at the time of going to press. The
manufacturer reserves the right to make changes to the
technical specification without prior notice as deemed
necessary to uphold the ongoing process of technical
development.
Page 16
© Musical Fidelity · M6xTT · Revision 30.09.2024
16
 Loading...