

Page 1
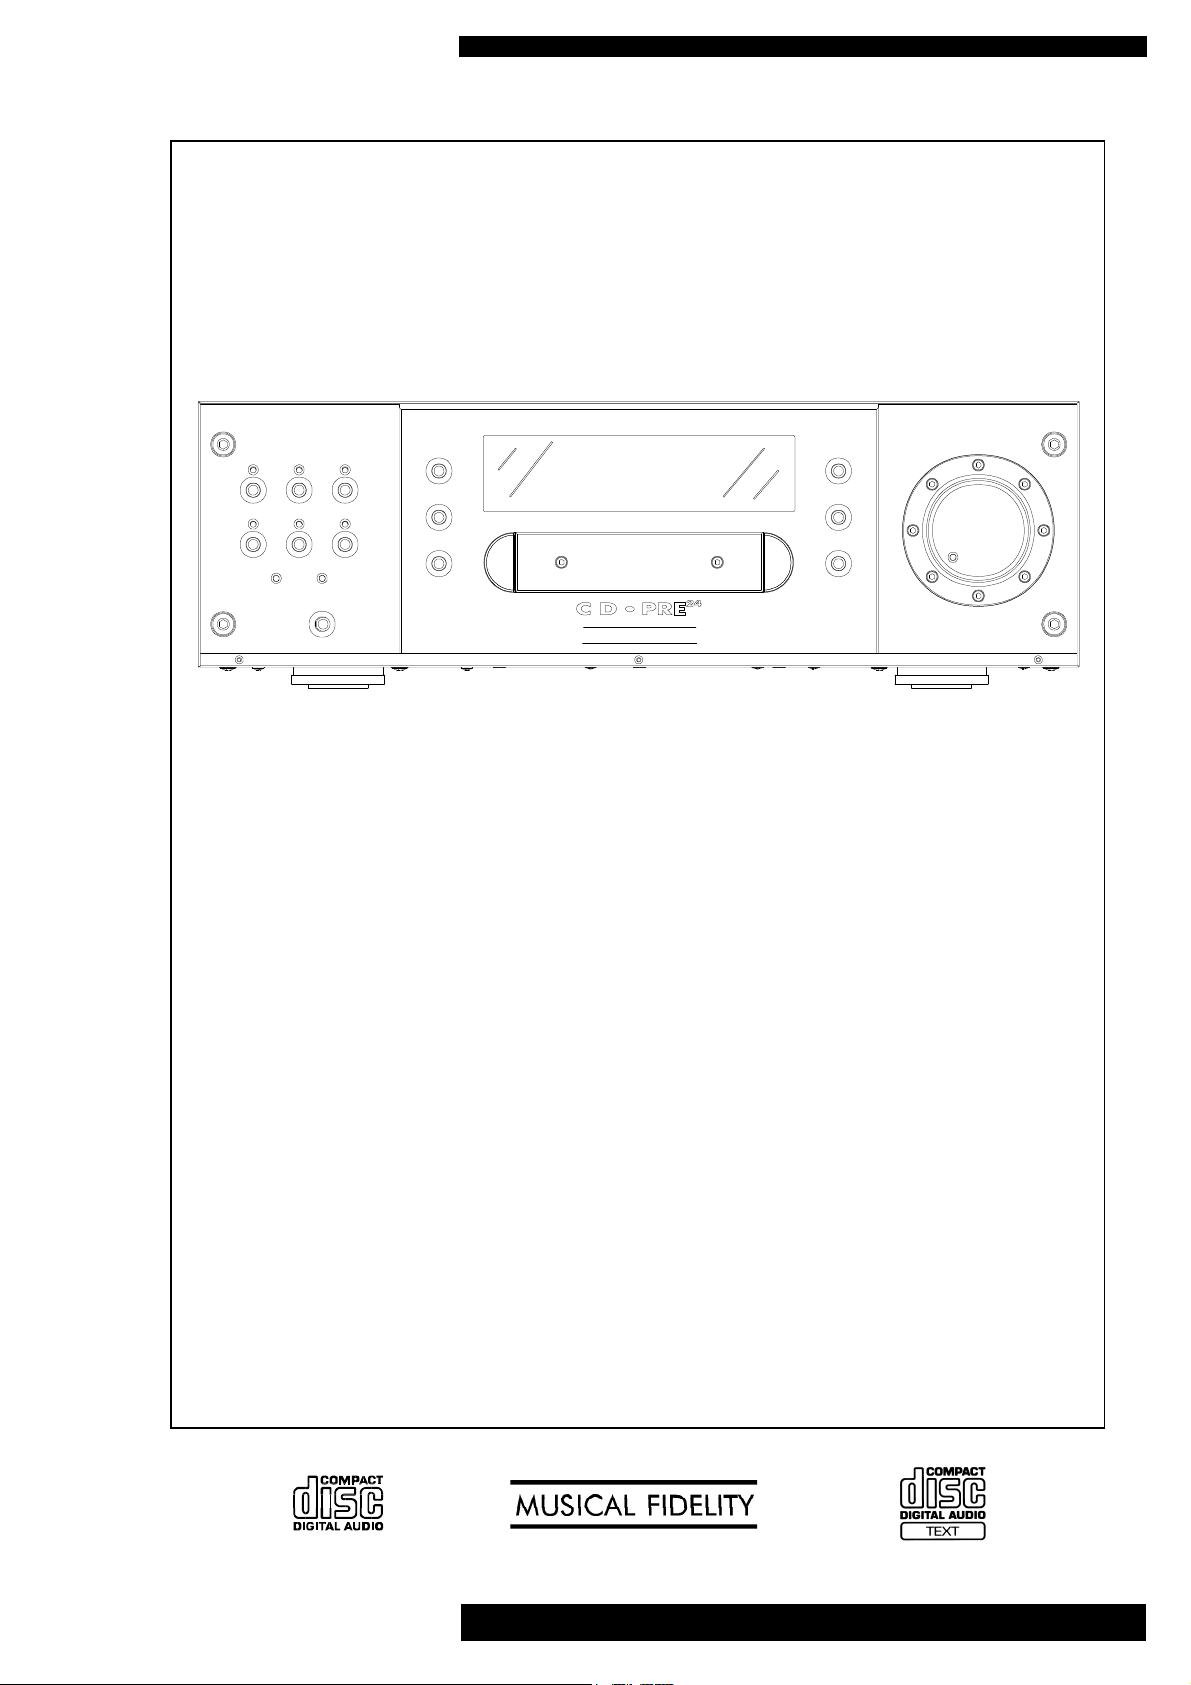
CD Pre
24
COMBINATION CD PLAYER AND
DIGITAL / ANALOGUE PRE-AMPLIFIER
LINE 1 LINE 2 LINE 3
DIGITAL 1 DIGITAL 2 CD
DIGITAL
TAPE
MONITOR
MONITOR
POWER
NEXT
PREVIOUS
LANGUAGE
PLAY/PAUSE
STOP
OPEN/CLOSE
INSTRUCTIONS FOR USE
Thank you for purchasing the Musical Fidelity CD Pre24.
Used properly and carefully, it should give many years of outstanding
musical reproduction.
The CD Pre24uses the latest 24 Bit DAC technology and jitter reduction
techniques to achieve both an excellent technical specification and
unparalleled sound quality.
Æsthetically, the CD Pre24is a perfect match for the
A3.2 FM tuner and A3.2 amplifier.
Together these components form one of the finest hi-fi systems available.
Dust regularly with a soft duster or soft brush but be careful when using
cleaning or polishing agents - they may harm the surface finish.
If you have any questions about your audio system,
please consult your dealer who is there to help and advise.
Issue 4: May 2002
CD Pre
24
Instructions for Use. Page 1 of 19
Page 2

PAGE
3 Safety Information: - Mains plug (U.K. only)
- Modification warning
4 Safety Information: - Warnings
(continued)
5 User Information: - Radio-frequency interference
6 General Advice: - Installation precautions
- User information
7 Remote Control: - Use and illustration
8 Facilities and - Front and rear panel illustrations
Connections:
9 Interconnection and - Interconnection procedure
Pre-amp operation: - Switching on
- Input source selection
CONTENTS
10 Pre-amplifier, - Mute function
Operation: - Line input monitoring
- Tape recording
11 CD Player, - Loading and playing discs
Basic Operation: - Pause
- Index points
12 CD Player, - Track selection
Basic Operation: - Search
- Displaying playback time
13 CD Player, - Repeat playback
Special Features: - A-B repeat playback
- Shuffle playback
14 CD Player, - Introduction search
Special Features: - Programmed play
- Random Music Selection
15 CD Player, - Programmed play - continued
Special Features: - Autospace
- Display on / off
16 CD Text: - CD text discs
17 CD Text: - Other languages
18 Troubleshooting: - Basic problem solving
19 Specifications
Issue 4: May 2002
CD Pre
24
Instructions for Use. Page 2 of 19
Page 3
SAFETY INFORMATION
IMPORTANT! (U.K. only)
This unit is supplied in the U.K. with a mains lead fitted with a moulded 13 amp plug.
If, for any reason, you need to cut off the plug, please remove the fuse holder and dispose of
the plug safely, out of reach of children. It must not be plugged into a mains outlet.
The wires in the mains lead supplied with this appliance are coloured in accordance
with the following code:
Green and yellow..............Earth
Blue................................Neutral
Brown................................Live
WARNING - This appliance must be earthed
As the colours of the wires of the mains lead of this appliance may not correspond with the
coloured markings identifying the terminals in your plug, proceed as follows:
The wire which is coloured green-and-yellow must be connected to the terminal in the plug
which is marked with the letter E or coloured green or green-and-yellow, or by the earth
symbol:
The wire which is coloured brown must be connected to the terminal which is marked with the
letter L or coloured red.
The wire which is coloured blue must be connected to the terminal which is marked with the
letter N or coloured black.
If connecting to a BS1363 plug, a 13 amp fuse must be used.
WARNING:
ANY MODIFICATIONS TO THIS PRODUCT NOT EXPRESSLY
APPROVED BY MUSICAL FIDELITY WHO IS THE PARTY
RESPONSIBLE FOR STANDARDS COMPLIANCE COULD VOID
THE USER'S AUTHORITY TO OPERATE THIS EQUIPMENT.
Issue 4: May 2002
CD Pre
24
Instructions for Use. Page 3 of 19
Page 4
WARNINGS
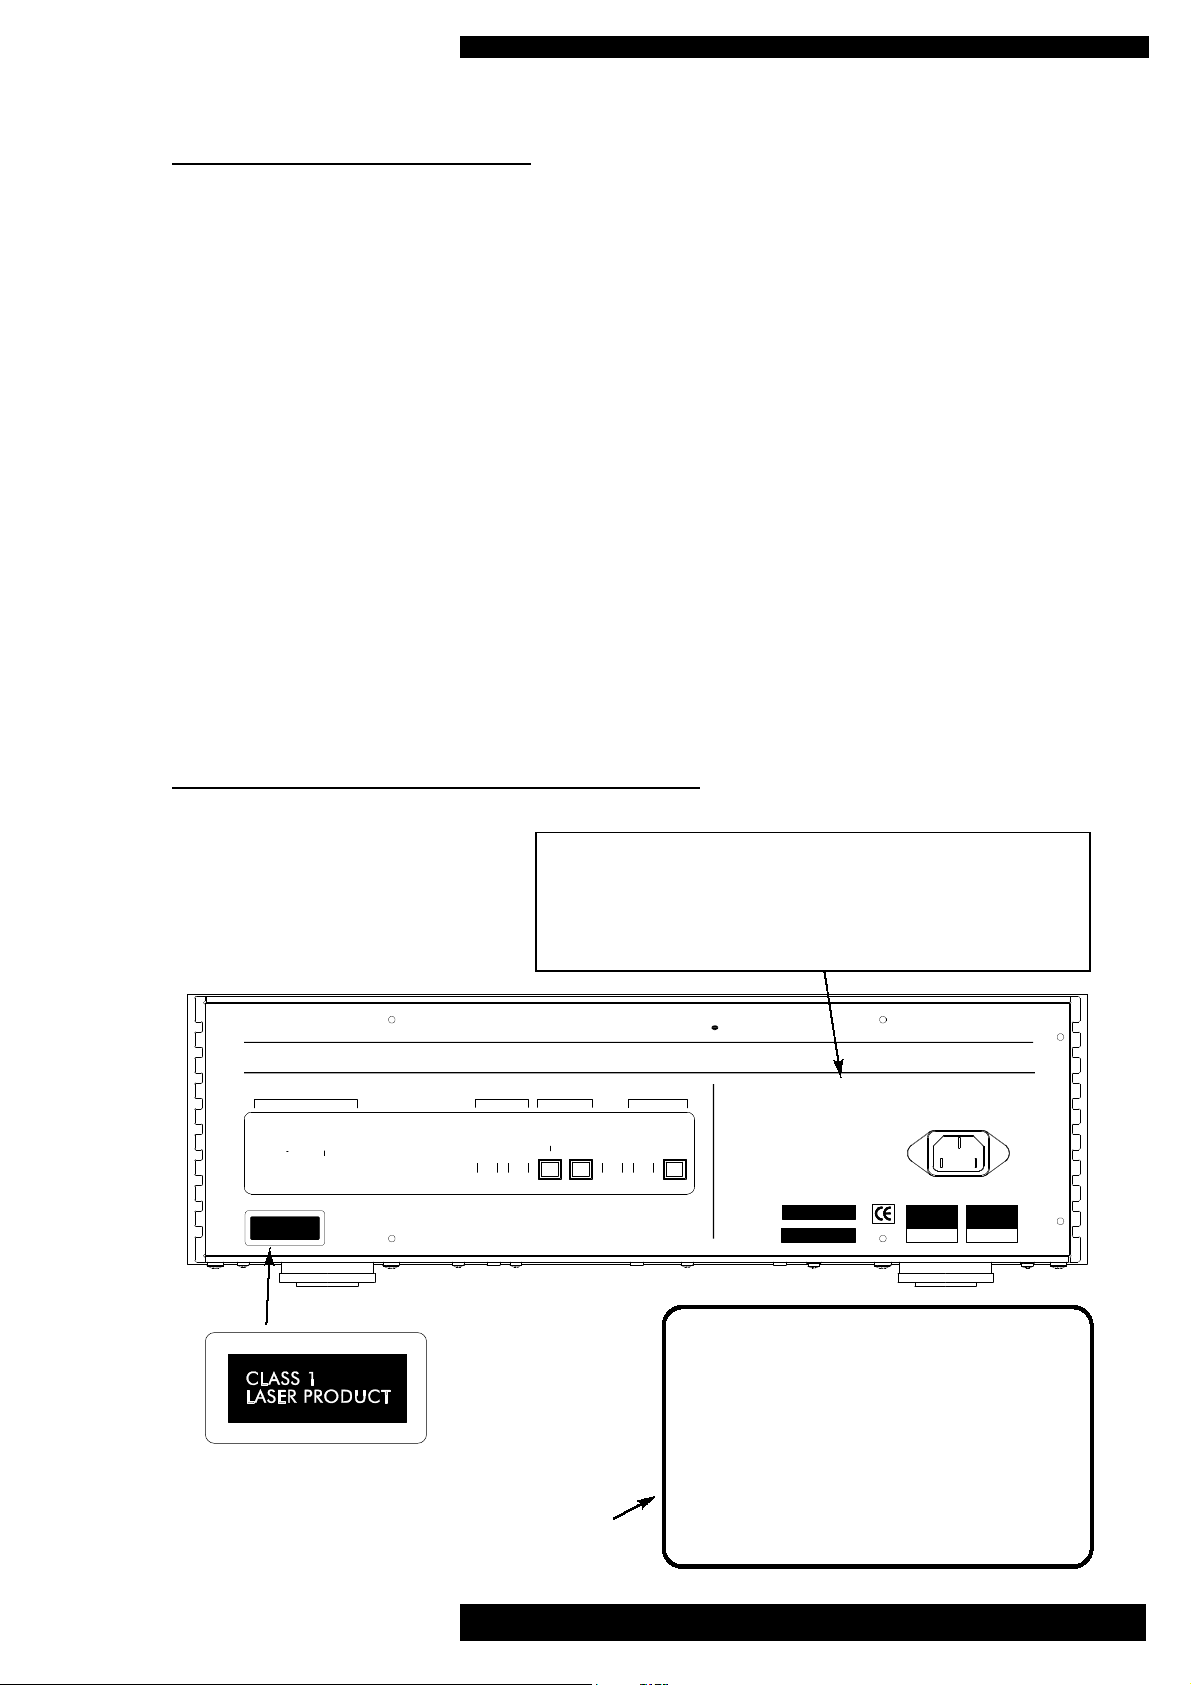
CLASS 1 LASER PRODUCT
This CD player has been designed and manufactured according to FDA regulations "title 21,
CFR, chapter 1, subchapter J, based on the Radiation Control for Health and Safety Act of
1968", and is classified as a Class 1 laser product. There is no hazardous radiation during normal use because invisible radiation emitted inside this product is completely confined within
the protective housing. However you must observe the following important warnings:
CAUTION !
• THIS CD PLAYER USES INVISIBLE LASER LIGHT. WHEN THE PLAYER
OPERATES, LASER LIGHT IS RADIATED INTERNALLY.
DO NOT REMOVE THE PROTECTIVE HOUSINGS.
• USE OF CONTROLS OR ADJUSTMENTS OR PERFORMANCE OF PROCEDURES
OTHER THAN THOSE SPECIFIED HEREIN MAY RESULT IN HAZARDOUS
RADIATION EXPOSURE CAUSING EYE INJURY.
• IF THIS PRODUCT DEVELOPS A FAULT, PLEASE CONTACT YOUR AUTHORISED
MUSICAL FIDELITY SERVICE AGENT. DO NOT ATTEMPT TO SERVICE IT YOURSELF AND DO NOT CONTINUE TO USE THIS PRODUCT IN A FAULTY STATE.
WARNING AND INFORMATION LABELS:
THIS PRODUCT COMPLIES WITH DHHS RULES 21 CFR,
CHAPTER 1, SUBCHAPTER J, PART 1040 AT DATE OF MANUFACTURE.
THIS PRODUCT COMPLIES WITH PART 15 OF THE FCC RULES.
OPERATION IS SUBJECT TO TWO CONDITIONS:
1 THIS DEVICE MAY NOT CAUSE HARMFUL INTERFERENCE, AND
2 THIS DEVICE MUST ACCEPT ANY INTERFERENCE RECEIVED, INCLUDING
INTERFERENCE THAT MAY CAUSE UNDESIRED OPERATION.
MUSICAL FIDELITY CD PRE
ANALOGUE
INPUTS
LINE1 LINE 2 LINE 3
CLASS 1
LASER PRODUCT
MANUFACTURED BY MUSICAL FIDELITY LTD. 15-17 OLYMPIC TRADING ESTATE, FULTON ROAD,
DIGITAL INPUTS
TAPE
MONITOR
TAPE OUT
PRE OUT
COAXIAL
1
2
FITTED INTERNALLY
TO BASE OF CHASSIS
WEMBLEY, MIDDLESEX, HA9 OTF, ENGLAND
DIGITAL INPUTS
OPTICAL
DIGITAL
MONITOR
DIGITAL
OUTPUTS
COAXIAL OPTICAL
2 4
THIS PRODUCT COMPLIES WITH DHHS RULES 21CFR, CHAPTER 1, SUBCHAPTER J, PART 1040 AT DATE OF MANUFACTURE.
THIS PRODUCT COMPLIES WITH PART 15 OF THE FFC RULES. OPERATION IS SUBJECT TO TWO CONDITIONS: 1 THIS DEVICE MAY NOT CAUSE HARMFUL INTERFERENCE, AND
2 THIS DEVICE MUST ACCEPT ANY INTERFERENCE RECEIVED, INCLUDING INTERFERENCE THAT MAY CAUSE UNDESIRED OPERATION.
CAUTION
MOUNT UNIT ON SOLID SURFACE. DO NOT REMOVE SCREWS OR
COVERS UNDER ANY CIRCUMSTANCES. NO USER SERVICEABLE
COMPONENTS INSIDE. REFER SERVICING TO QUALIFIED ENGINEER.
SEE OWNERS MANUAL FOR FURTHER INFORMATION.
SERIAL
NUMBER:
DATE OF
MANUFACTURE
CAUTION - INVISIBLE LASER RADIATION WHEN OPEN AND
VORSICHT! - UNSICHTBARE LASERSTRAHLUNG TRITT AUS,
VARNING - SYNLIG LASERSTRALNING NÄR DENNA DEL
ADVARSEL - USYNLIG LASERSTRALING VED ABNING, NAR
VAROITUS! - SUOJAKOTELOA EI SAA AVATA. LAITE SISÄLTÄÄ
INTERLOCKS DEFEATED. AVOID EXPOSURE TO BEAM.
WENN DECKEL GEÖFFNET UND WENN
SICHERHEITSVERRIEGELUNG ÜBERBRÜCKT IST
NICHT DEM STRAHL AUSSETZEN!
ÄR ÖPPNAD OCH SPÄRR AR URKOPPLAD.
STRALEN AR FARLIG.
SIKKERHEDSAFBRYDERE ER UDE AF FUNKTION.
UNDGA UDSÆTTELSE FOR STRALING.
LASERDIODIN, JOKA LÄHETTÄÄ (NÄKYMÄTONTÄ)
SILMILLE VAARALLISTA LASERSÄTEILYÄ.
POWER COMSUMPTION 22W
THIS APPLIANCE
BE EARTHED
MUST
Issue 4: May 2002
CD Pre
24
Instructions for Use. Page 4 of 19
Page 5

USER INFORMATION
RADIO - FREQUENCY INTERFERENCE (RFI)
This equipment uses and can radiate radio frequency energy, and if not installed and operated in
accordance with the instructions, may cause interference to radio communications and other
electronic equipment.
However, it is designed to minimise RFI, and accordingly been tested to North American standards (FCC regulations - limits for a class B digital device persuant to part 15 of the rules).
These requirements are intended to provide reasonable protection against excessive interference
in a residential installation.
Conversely, the product has also been checked to ensure that its own operation is not adversely
affected by normal background levels of RFI received externally.
However, if interference is experienced, for instance to radio or TV broadcasts, the user is recommended to try one or more of the following measures:
• Identify the source of interference by turning off power to the CD Pre or other
equipment individually, and checking whether the problem then disappears.
• Re-orientate or relocate the receiving aerial.
• Move the CD Pre24away from the receiver.
• Connect the CD Pre24to a mains outlet on a different circuit from the receiver.
• Consult a dealer or experienced TV/radio technician for help.
If a problem persists, please contact Musical Fidelity's service department.
Issue 4: May 2002
CD Pre
24
Instructions for Use. Page 5 of 19
Page 6

GENERAL ADVICE
INSTALLATION PRECAUTIONS AND USER INFORMATION
Your CD Pre24is designed and built to provide trouble-free performance, but as with all
electronic devices it is necessary to observe a few precautions:
* Note all warnings shown on the back of the unit.
* Only connect the CD Pre24to a mains outlet having the same voltage as marked on the back
of
the unit.
* Always switch off the mains supply before before connecting or disconnecting your audio
equipment.
* Position the mains lead and signal interconnects where they are not likely to be walked on or
trapped by items placed on them.
* Do not use near water, or place water-filled containers on the pre-amplifier, for example
flower vases or potted plants. If water does spill into the equipment, immediately pull out
the mains plug from the wall socket and inform your dealer, who should then check the
unit before further use. Entry of liquid into the pre-amplifier is dangerous, and may cause
electric shock or fire hazard.
* Do not place the unit near heat sources such as radiators, direct sunlight or above other
equipment which becomes warm with use. Do not obstruct ventilation slots.
* Do not remove any covers or try to gain access - refer all service work to an authorised
Musical Fidelity agent. There are no internal user adjustments.
NOTE: Unauthorised opening of the equipment will invalidate any warranty claims.
* There are fuses inside this product. In the unlikely event that one blows, refer the unit to
your audio dealer.
Do NOT try to replace the fuse yourself as this will invalidate the warranty.
* Dust regularly with a soft duster or soft brush. For more thorough cleaning of the cabinet and
remote control, use a moist cloth. We do not recommend the use of solvents such as white
spirit or thinners, as they could damage the surface finish.
* The electronics in modern hi-fi equipment is complex and may, therefore, be adversely
affected or damaged by lightning. For protection of of your audio system during electrical
storms, remove the mains plugs and disconnect any aerial lead.
* If after-sales service is required, to help your dealer identify the CD Pre24, please quote the
serial number located on the rear panel of the unit.
Issue 4: May 2002
CD Pre
24
Instructions for Use. Page 6 of 19
Page 7
REMOTE CONTROL
REMOTE CONTROL
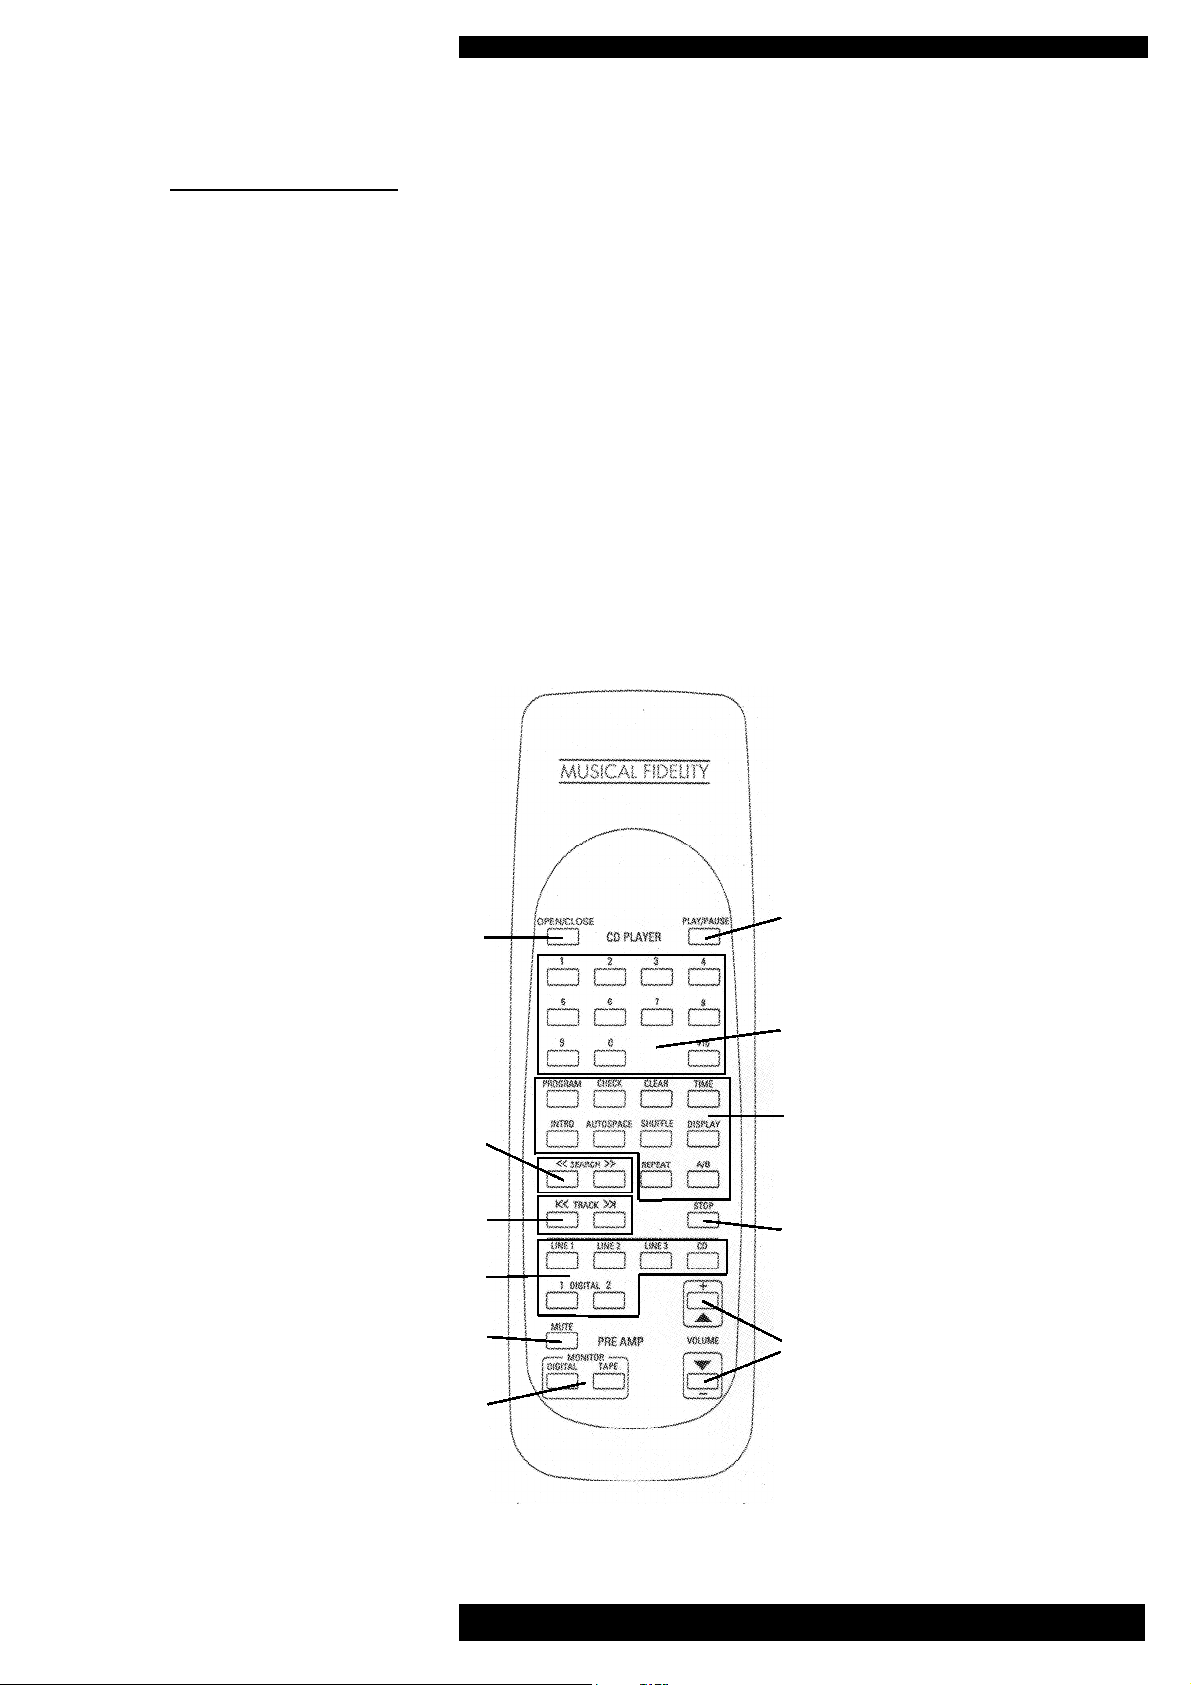
The remote control enables most functions of the CD pre-amplifier to be operated from a convenient distance.
Equivalent buttons on the remote handset have the same functions as the those on the front
panel of the unit.
Some operations are only available via the handset.
As the remote control uses an invisible infra-red light beam, the transmitter must be pointed
directly towards the receiver window on the front of the pre-amplifier, without visual obstruction between them.
If the range of the remote control greatly decreases, replace the batteries with new ones.
Do not mix old and new batteries - four are required, type SUM-4, AAA or LR03.
OPEN / CLOSE CD tray
SEARCH buttons to scan
CD forwards or backwards
TRACK back/forwards buttons
Input source selector buttons
MUTE button
MONITOR buttons
- see page 10
PLAY / PAUSE
to start, pause or
resume CD playback.
CD direct track access buttons.
CD special feature buttons
- see pages 13 to 15.
STOP to stop CD playback.
VOLUME up / down
Issue 4: May 2002
CD Pre
24
Instructions for Use. Page 7 of 19
Page 8
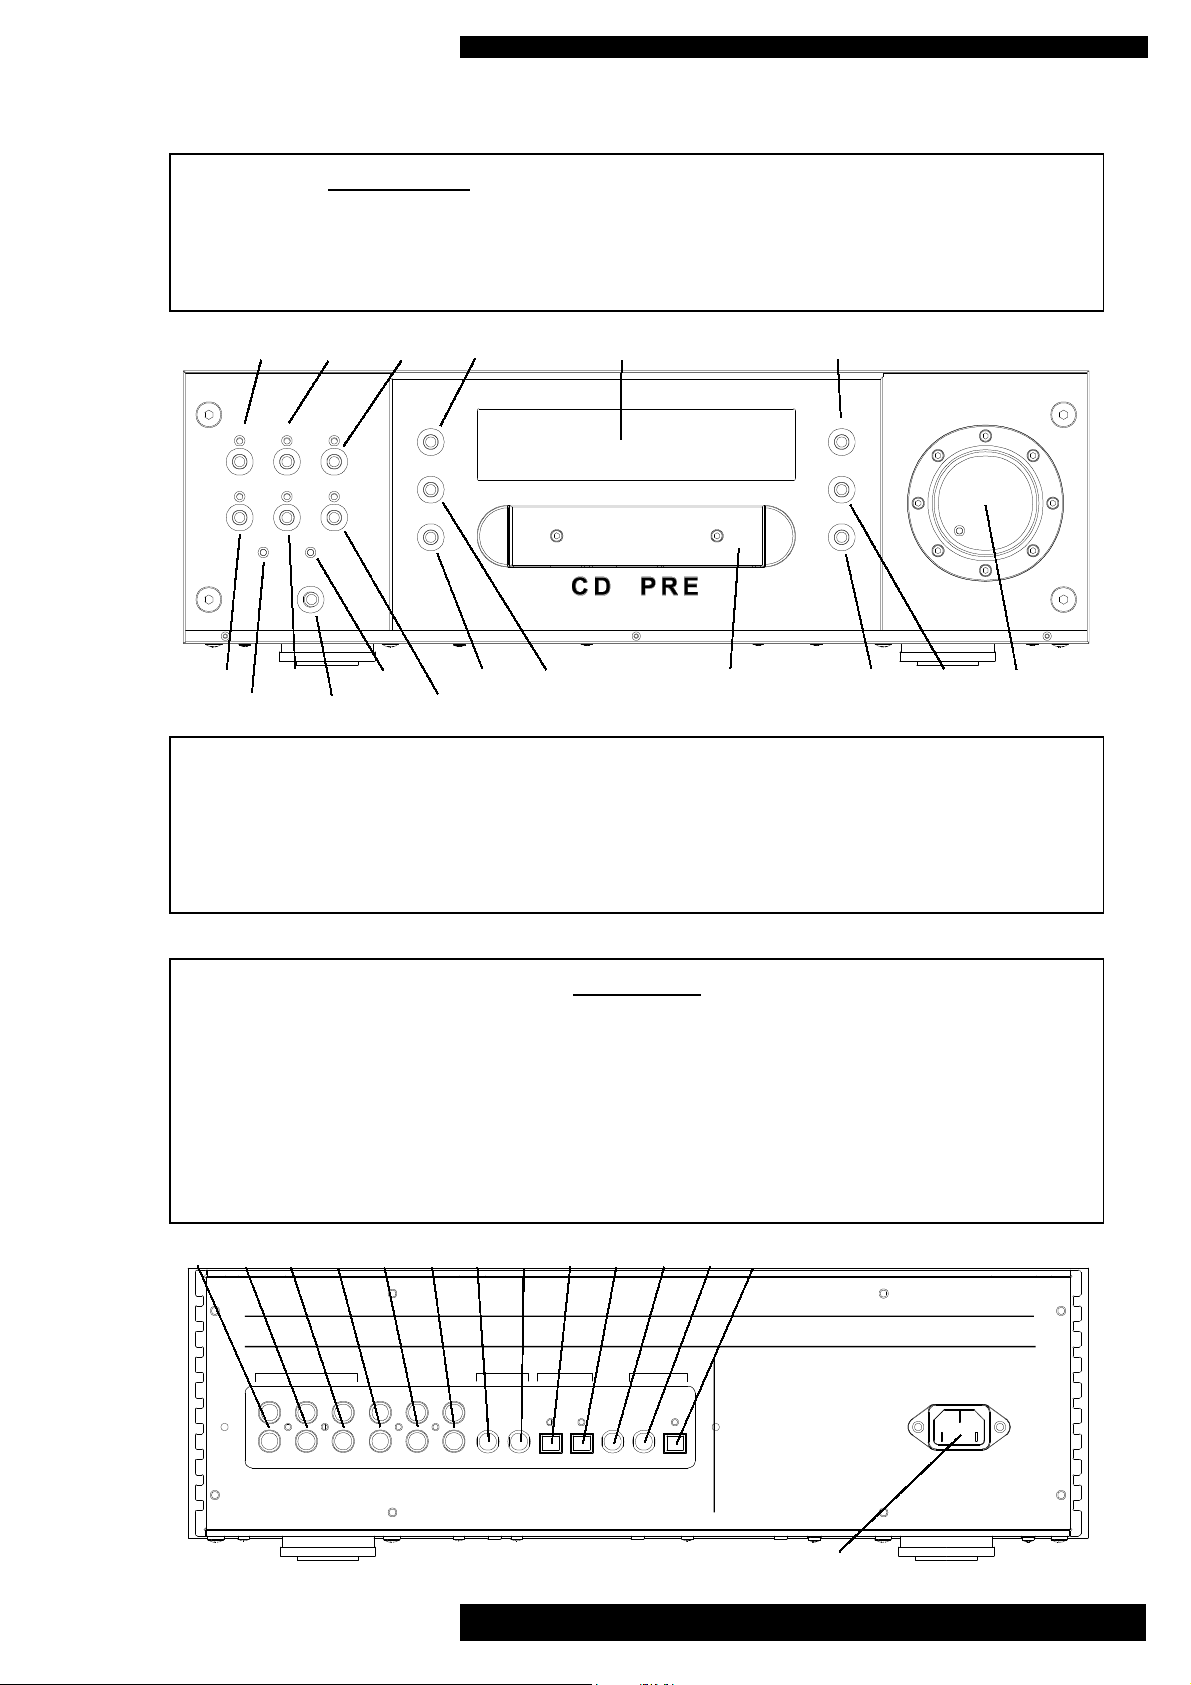
FACILITIES AND CONNECTIONS
FRONT PANEL
1 LINE 1 input selector button and LED
2 LINE 2 input selector button and LED
3 LINE 3 input selector button and LED
1 2 3 4 5 6
4 NEXT CD track button
5 Display (incorporates infra-red
remote control receiver)
6 CD PLAY / PAUSE button
LINE 1 LINE 2 LINE 3
DIGITAL 1 DIGITAL 2 CD
DIGITAL
TAPE
MONITOR
MONITOR
POWER
NEXT
PREVIOUS
LANGUAGE
24
MUSICAL FIDELITY
PLAY/PAUSE
STOP
OPEN/CLOSE
7 9 11 13 14 15 16 17 18
8 10 12
7 DIGITAL 1 input selector button and LED
8 Digital monitor LED (see page 10)
9 DIGITAL 2 input selector button and LED
10 POWER mains on/off switch
11 Tape monitor LED (see page10)
12 CD input selector button and LED
13 CD LANGUAGE button (see page 17)
14 PREVIOUS CD track button
15 CD drawer
16 CD drawer OPEN / CLOSE button
17 CD STOP button
18 Volume control knob with LED
REAR PANEL
19 LINE INPUT 1 - analogue
- left and right
20 LINE INPUT 2 - analogue
- left and right
21 LINE INPUT 3 - analogue
- left and right
23 TAPE OUTPUT - analogue
- left and right (see page 10)
24 LINE OUTPUT - analogue
left and right (to amplifier)
25 INPUT 1 - digital co-axial
26 INPUT 2 - digital co-axial
22 TAPE MONITOR
- analogue, left and right
19 20 21 22 23 24 25 26 27 28 29 30 31
2 4
ANALOGUE
INPUTS
LINE1 LINE 2 LINE 3
TAPE
MONITOR
TAPE OUT
PRE OUT
MUSICAL FIDELITY CD PRE
MANUFACTURED BY MUSICAL FIDELITY LTD. 15-17 OLYMPIC TRADING ESTATE, FULTON ROAD,
DIGITAL INPUTS
COAXIAL
1
2
WEMBLEY, MIDDLESEX, HA9 OTF, ENGLAND
DIGITAL INPUTS
OPTICAL
DIGITAL
MONITOR
DIGITAL
OUTPUTS
COAXIAL OPTICAL
IEC type mains inlet socket
27 INPUT 1 - optical
28 INPUT 2 - optical
29 DIGITAL MONITOR
- digital co-axial
30 LINE OUTPUT
- digital co-axial
31 LINE OUTPUT
- optical
Issue 4: May 2002
CD Pre
24
Instructions for Use. Page 8 of 19
Page 9

CONNECTIONS & PRE-AMPLIFIER OPERATION
BEFORE CONNECTING . . . . . . .
Ensure that mains power to the various
components of your audio system is
switched off. Please note that audio connecting leads are not supplied with this
product.
OUTPUT CONNECTION
The CD Pre24should be connected to an
analogue amplifier input by audio cables
with RCA/phono type plugs. These link the
left and right PRE OUT sockets on the rear
panel of the CD Pre to corresponding line
input sockets on the amplifier. Do not use
any sockets on the amplifier intended for
“vinyl” phono cartridge input, as the sensitive circuit will overload, producing a
severely distorted sound.
Alternatively, the DIGITAL OUTPUTS
(coaxial or optical) can be used for connection to suitable digital equipment.
The internal D-to-A convertor will also handle digital data from an external CD or
DVD audio source.
MAINS POWER CONNECTION
Insert the accessory IEC mains lead plug
into the rear panel socket, and then the other
end into a convenient wall outlet.
SWITCHING ON
Before applying mains power to other audio
components, check that the volume control
setting on the CD Pre24is low (knob turned
anticlockwise).
Press the power switch, and the front panel
display will light to confirm that the unit is
ready for use.
INPUT SOURCE SELECTION
All three types of output can be used for
feeding different equipment at the same
time, if required.
Note that the volume control only affects
analogue audio line output to the amplifier,
not digital or tape outputs.
INPUT CONNECTION
Analogue inputs are provided for three analogue line sources, and two digital (optical
or co-axial).
Do not connect both co-axial and optical
leads to the same input.
Connect digital or optical input leads from
the other audio sources in your system as
required.
Choose the required input source either by
pressing the front panel function buttons or
corresponding buttons on the remote control
marked LINE 1, 2 or 3, or DIGITAL 1 or 2.
The appropriate front panel LED will then
light to confirm your selection.
In the case of digital inputs, if no digital
data is being received at the selected input
socket, the associated LED will flash instead
of remaining constant.
Turn the volume control to obtain the preferred level of sound.
Issue 4: May 2002
CD Pre
24
Instructions for Use. Page 9 of 19
Page 10

PRE-AMPLIFIER OPERATION
MUTE (Remote Control Only)
Pressing the MUTE button once on the
remote control will interrupt analogue output to the amplifier. Pressing MUTE again
will restore audio output. The LED in the
volume control knob then goes off to indicate that the outputs are muted.
This function does not affect tape monitor
or digital outputs.
If the CD Pre24is powered off while still
muted, the effect will be cancelled when
next switched on.
DIGITAL MONITORING
(Remote Control Only)
Any selected input source can be monitored
with suitable external equipment from the
digital co-axial and/or optical output sockets.
TAPE MONITOR (Remote Control Only)
The CD Pre24can be used in analogue mode
for off-tape monitoring from 3-head tape
decks.
This allows the user to compare the original
sound with the recorded version while the
recording is being made.
In this case, the recorder’s left- and righthand line output sockets should be connected to the CD Pre’s tape input, and the
recorder’s line input sockets to the CD Pre’s
tape output sockets.
To record, simply select the required source
with the appropriate button on the CD Pre’s
front panel or from the remote control.
Pressing TAPE MONITOR on the remote
control will allow you to monitor what is
being recorded, and the matching blue LED
on the front panel will light to confirm operation. Press TAPE MONITOR again to
cancel this mode.
A digital input source (co-axial only) can be
monitored by pressing DIGITAL MONI-
TOR on the remote control. This does not
affect the selected input source, which will
still be available from the tape or digital
outputs.
This feature may be used together with a
digital output to connect to a computer
sound card or CD recorder, providing it has
digital inputs and outputs.
If the selected input source is digital (CD or
DVD audio formats only) a converted analogue signal will also be available at the
tape output sockets.
Note that with this arrangement the CD
Pre’s volume control has no effect.
On some 3-head tape decks, there is an additional “tape / source” switch which should
be in the “tape” position for this arrangement to function. If in doubt, refer to the
recorder’s user manual, or consult your
dealer.
Issue 4: May 2002
CD Pre
24
Instructions for Use. Page 10 of 19
Page 11
CD - BASIC OPERATION
LOADING AND PLAYING
COMPACT DISCS
If mains power to the CD Pre24is switched
on with a disc already loaded, it will automatically search for the disc and begin
playing from the first track. However,
playback will not be audible if the input
has previously been set to another source
before being switched off. The CD button
must therefore be pressed first.
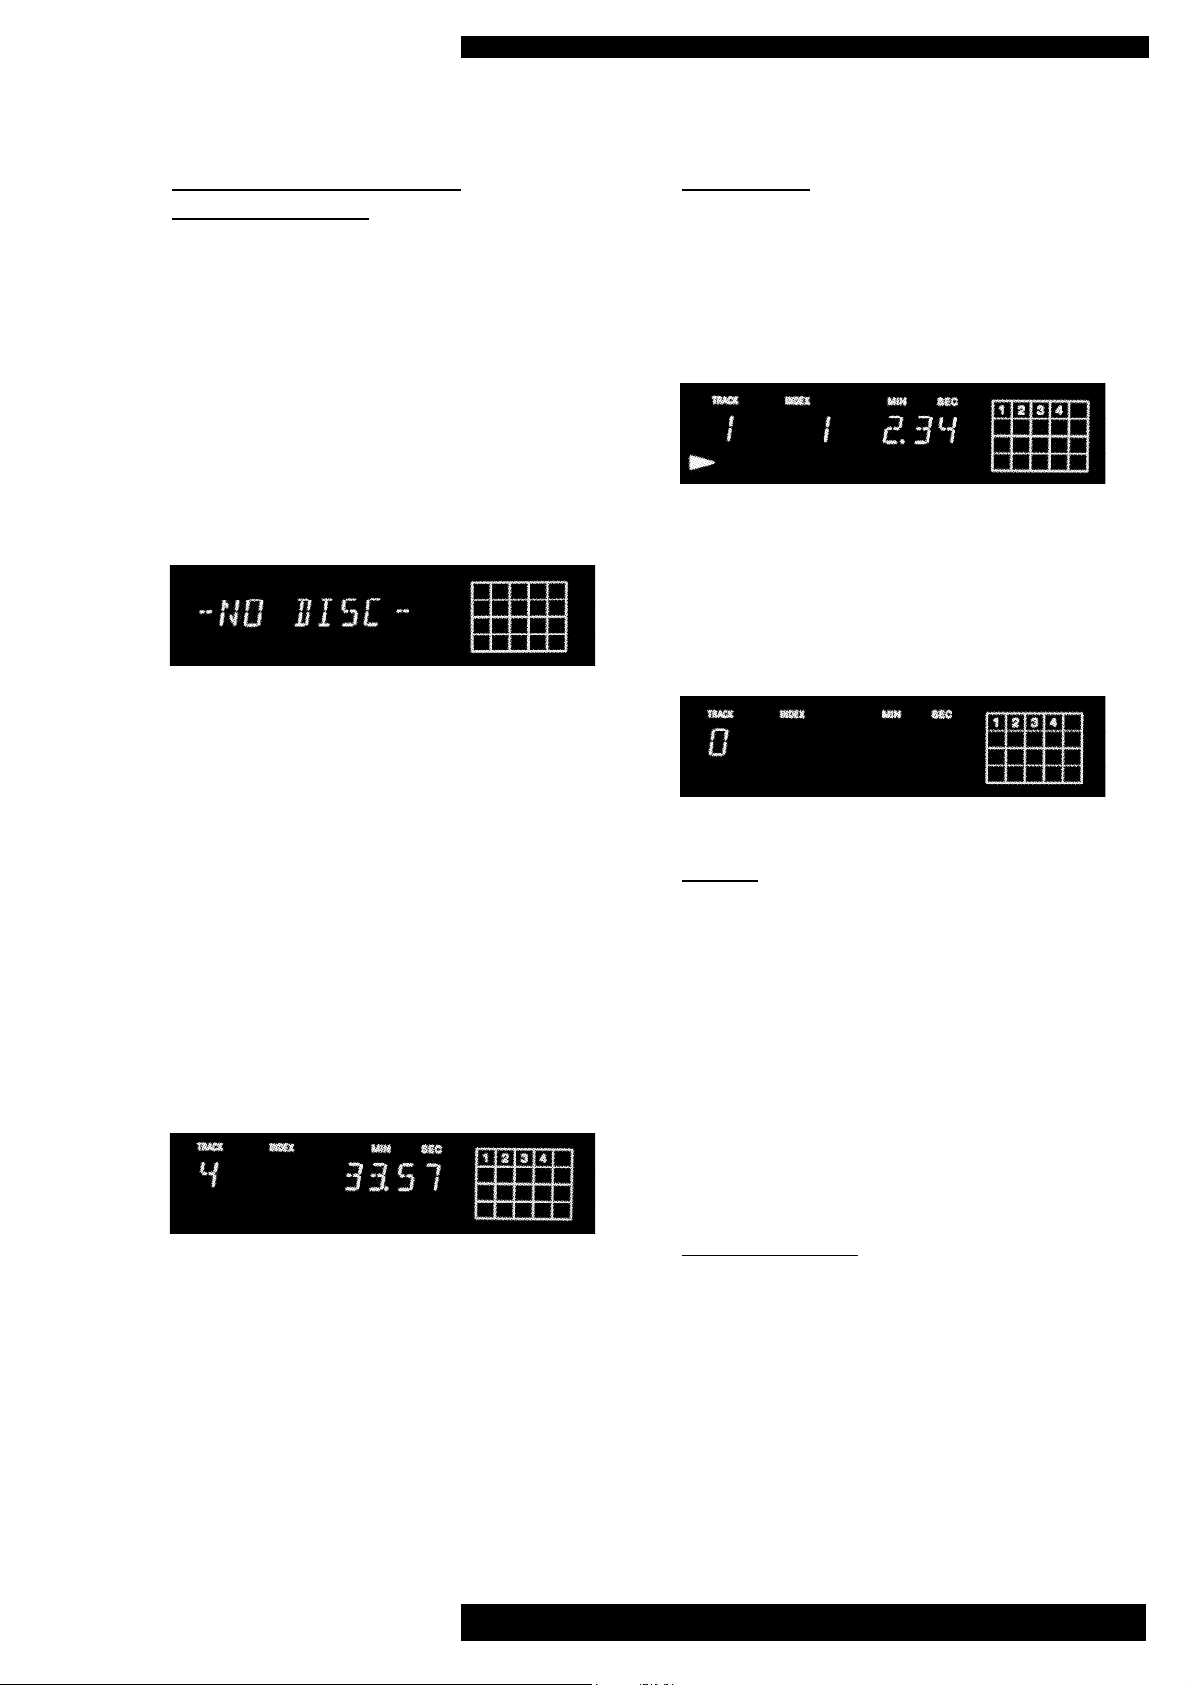
If no disc is loaded, after about 3 or 4 seconds the unit will display the following:
To play a disc, press the OPEN/CLOSE
button to open the transport drawer.
When the drawer is fully extended, insert
the required disc with the label facing
upwards and then press either the
OPEN/CLOSE or PLAY/PAUSE button
to close the transport drawer again.
DISC PLAY
If PLAY/PAUSE is pressed, the CD player
will go into play mode, an arrow confirming playback will appear on the left, and
the current track and index point will be
displayed similar to the following example:
Again, the calendar grid shows playback
progress of the first 20 tracks only.
When all tracks on the CD have been
played, playback stops and the display
reverts to:
PAUSE
If OPEN/CLOSE is pressed, the disc
drawer closes and the CD player scans the
contents of the disc. After a short delay,
the display window then shows for approximately 4 seconds the total number of
tracks available on the CD, and total playing time, for example:
Display time 0 on the left then replaces
the temporary track and time information,
indicating that a disc is loaded but not yet
playing.
The “calendar” grid pattern at the righthand end of the display also confirms
tracks available for playing up to the first
20, but remains displayed. In the above
example there are 4 tracks on the disc.
Pressing the PLAY/PAUSE button whilst a
disc is playing pauses playback of the disc.
A pause symbol ( ll ) appears in the display window next to the play arrow.
The disc will continue spinning but the
track does not advance and the CD Pre’s
output is muted.
Pressing PLAY/PAUSE again resumes
playback from the same place.
INDEX POINTS
Some CDs contain index points within a
track to separate a musical piece into different movements. If used, these index
point numbers (one or two digits, up to 99)
will appear in the display under the INDEX
graphic. Otherwise, index number 1 will
be displayed.
Issue 4: May 2002
CD Pre
24
Instructions for Use. Page 11 of 19
Page 12
STOP
Playback can be stopped at any time by
pressing the STOP button once.
TRACK SELECTION
CD - BASIC OPERATION
track time remaining display (far right digits) will be seen to advance rapidly in the
required direction. For both directions the
unit will return to normal playback when
the button is released.
To change track, the track skip buttons
NEXT and PREVIOUS can be pressed
to jump forwards or backwards one track
in either direction. Note that a single press
of the PREVIOUS button restarts playback at the beginning of the current track.
A double-press is needed to jump back to
the previous track. Corresponding
TRACK buttons on the remote control are
also marked |<< and >>|. If either button
is held down, the CD Pre24will quickly
step through the available tracks in the
required direction.
TRACK SELECTION (Remote control)
A specific track can be selected directly by
pressing the required track number button
on the remote control. The chosen track
then plays immediately.
To play a track number with two digits,
press the 10+ button on the remote control
followed by the first digit, then the second
digit. For example, to obtain track 27,
press 10+ , then 2, then 7.
SEARCH
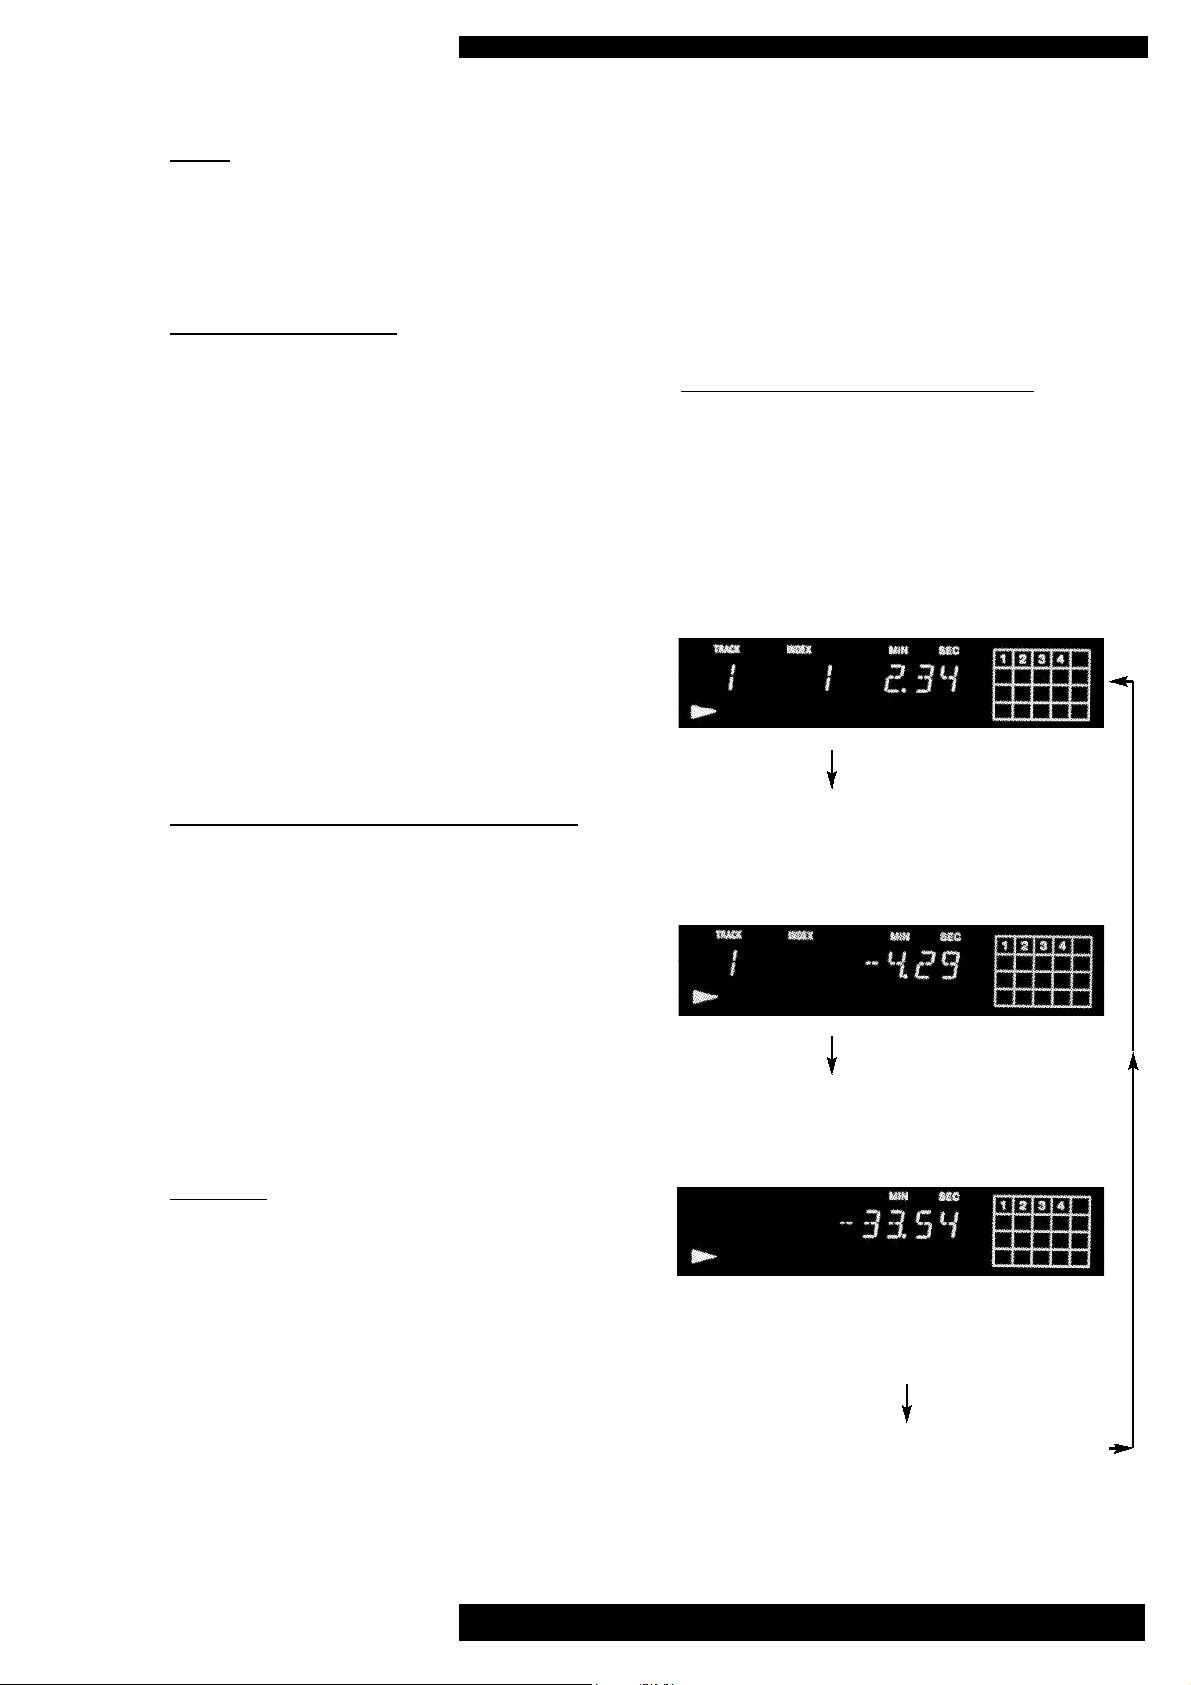
DISPLAYING PLAYBACK TIME
There are three playback time display
modes accessed progressively by pushing
the TIME button on the remote control.
The default mode (e.g. after switch on)
shown below indicates the elapsed time for
the currently playing track (2 minutes
34 seconds in this example):
Pushing the TIME button once changes
the display to show the remaining time for
the current track (4 minutes 29 seconds in
this example):
Pushing the TIME button again changes
the display to show the remaining time for
the whole disc (33 mins 54 secs) below:
The SEARCH buttons can be used to fastforward or fast-rewind during playback in
a similar way to a video or tape cassette
player. This permits location of particular
passages at high speed with the audio playback of the CD still active.
Pressing the forward-search button (>>)
fast winds forwards whilst the search backwards button (<<) fast winds backwards.
As the unit searches through a track, the
Issue 4: May 2002
CD Pre
(Note: Track and Index displays are not
shown in this mode).
A third press of the TIME button will now
bring the display back to the original
(elapsed track time) mode.
24
Instructions for Use. Page 12 of 19
Page 13

CD - SPECIAL FEATURES
REPEAT PLAYBACK
The REPEAT button on the remote control
allows the repeated playback of either one
track or all tracks on the disc.
By pressing the REPEAT button once, you
can repeat the entire disc (or the programmed selections - see page 14) over and
over again. Large letters REPEAT briefly
replace track, index and time information
followed by a smaller, permanent REPEAT
legend underneath.
If the REPEAT button is pressed a second
time, only the current track is repeated.
Large letters REPEAT 1 briefly replace
track, index and time information followed
by a REPEAT 1 legend underneath.
Pressing REPEAT a third time cancels
repeat mode. Graphics REPEAT OFF then
briefly replace track, index and time information before reverting to a normal disc
play display.
A-B REPEAT PLAYBACK
“A-B repeat” provides the option of playing
just a certain section of the disc over and
over again.
Find the beginning of the required section
either by listening, or using the display time
as a guide. When the desired starting point
is reached, press button A/B on the remote
control. The display will show REPEAT and
the flashing letter A.
When the disc has reached the end of the
required section, press the A-B button
again. Letters A-B will now be illuminated
in the display, and the unit continuously
plays the selected part of the disc.
To cancel A-B repeat mode, press REPEAT
on the remote control. Graphics
REPEAT OFF then briefly replace track,
index and time information in the display.
SHUFFLE PLAYBACK
The SHUFFLE feature allows tracks on the
discs to be played in random sequence
rather than the normal consecutive order.
Tracks are also played in a different order
each time the disc is restarted, or another
disc loaded.
This function is obtained by pressing
SHUFFLE on the remote control with the
unit either stopped or playing.
If playing, the word SHUFFLE in large letters briefly replaces track, index and time
display information, before a permanent red
indication provides a reminder that the function has been activated.
From stop mode, pressing PLAY/PAUSE
also begins shuffle play.
If the CD Pre24is already playing, play will
continue until either the current track has
finished, or either the track >>| button on
the remote control or NEXT on the unit is
pressed. Shuffle play is then further confirmed by the track number display digits
briefly changing into segments revolving in
a box formation.
If the SHUFFLE button is now pressed for
a second time, the word CONTINUE briefly
replaces track, index and time display information. The unit then resumes normal play
function, except that it now only plays previously unplayed tracks of the current disc,
unless others are then manually selected.
Shuffle play is cancelled by pressing the
STOP button.
Issue 4: May 2002
CD Pre
24
Instructions for Use. Page 13 of 19
Page 14
INTRODUCTION SEARCH
CD - SPECIAL FEATURES
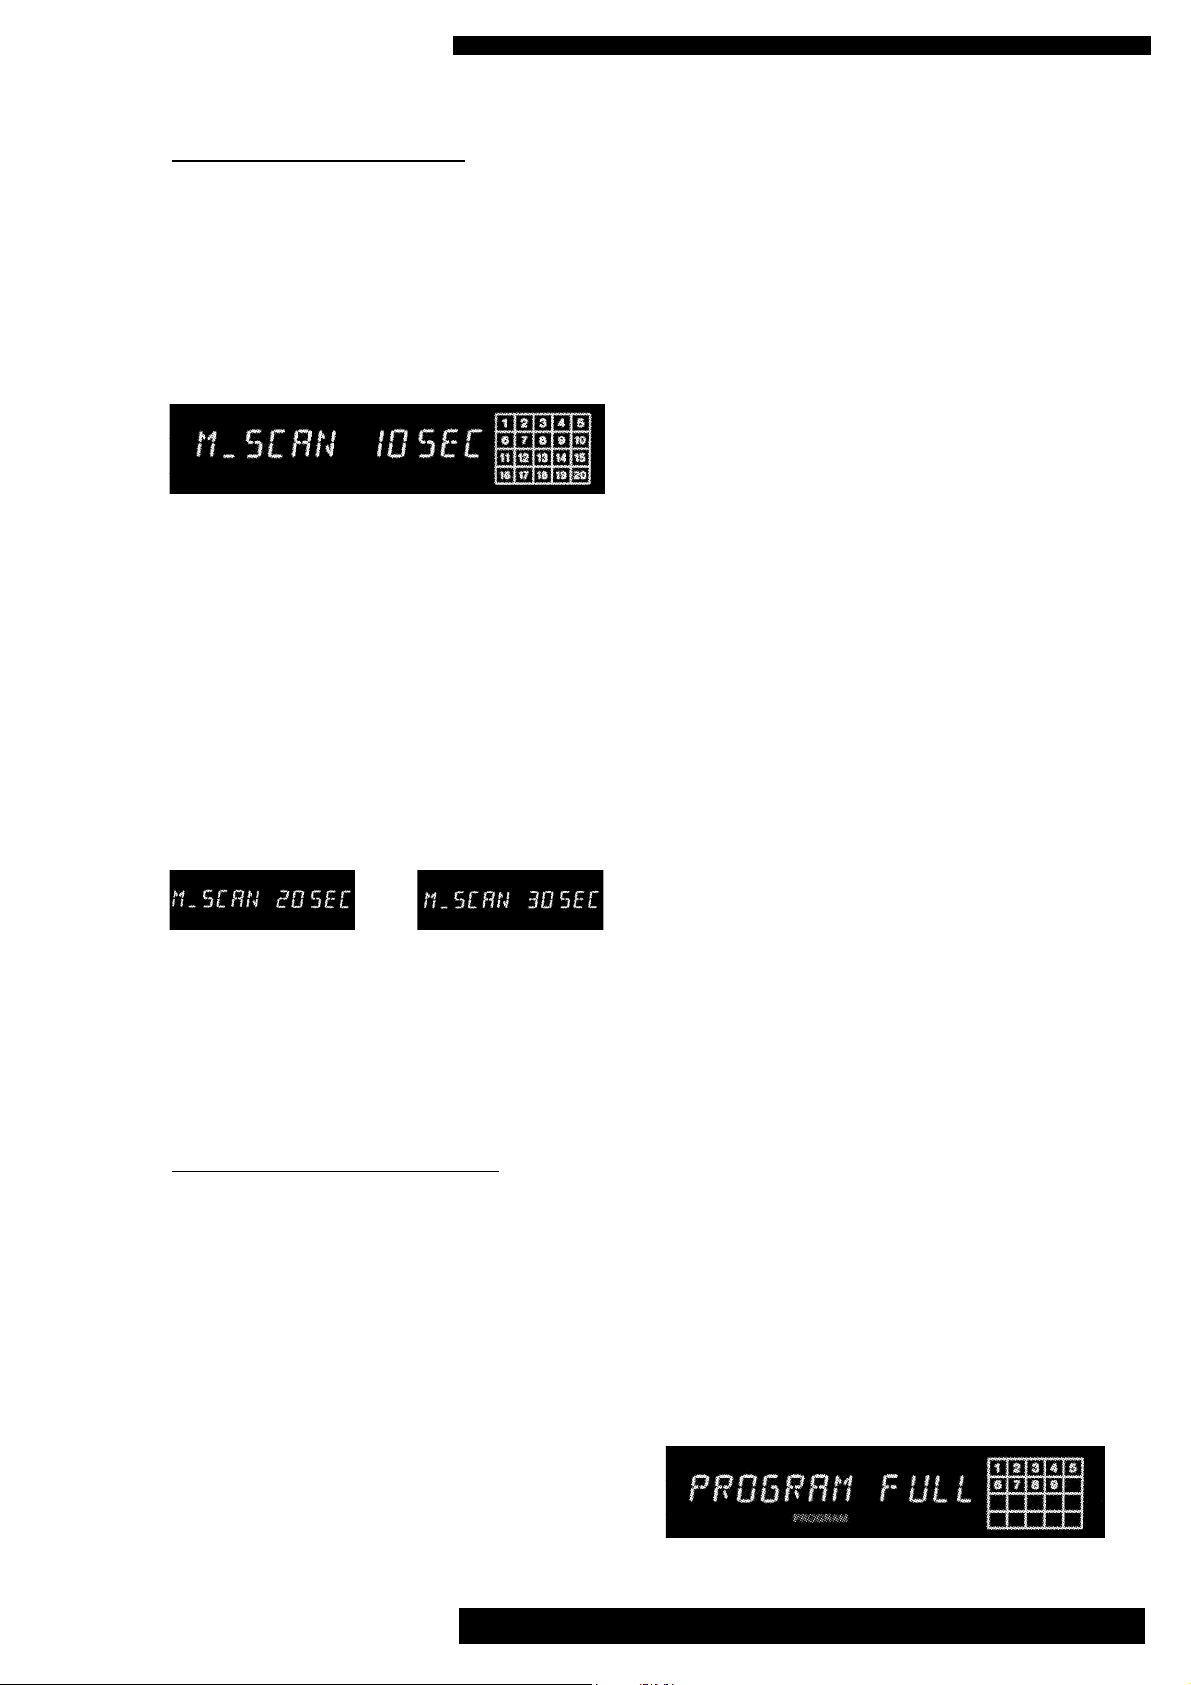
The introduction-search function allows
play back of just the start of each track on
the disc, for instance to locate a preferred
track by ear.
Press INTRO on the remote control, and
the display will briefly show:
The first ten seconds (approximately) of
each title on the CD are then played (or the
first 10 seconds of any programmed titles,
see below). The playback arrow in the display window flashes to indicate that this
mode is activated.
Track playing time can be changed to
approximately 20 or 30 seconds at any time
during introduction mode. Press INTRO
twice or three times in quick succession
instead of once, and the revised time will be
indicated on the display as:
or
track, index and time information, before a
permanent red display provides a reminder
that the function has been activated.
Press the numeric button of the track number corresponding to the first track you wish
to store (14 in our example is +10, then 4).
That track number will now appear in the
display under TRACK, number 1 (being the
first entry) will appear under STEP, and track
playing time appears under MIN SEC.
Alternatively, the track number can be
selected by using the track skip buttons
( |<< or >>| ).
The calendar grid to the right of the display
also confirms this track selection.
Next the second track to be programmed can
be selected (7 in our example) either by
entering the required number with the
numeric buttons or again by using the track
skip buttons. As the second track number is
selected the step number will be seen to
change to a 2 indicating the program step
being filled.
Press STOP to cancel introduction mode.
Note: Intro scan time will be memorised as
long as the unit is powered on, even when
another disc is loaded.
PROGRAMMED PLAY / R.M.S.
The built-in program memory (Random
Music Selection function) allows you to
store up to 24 tracks and then play them
back in the stored order. Each track is
stored as a 'STEP' in the program.
It is possible to store a track more than once
in the same program if required.
Example:- You wish to listen to tracks
14, 7, 9, 9 and 12 in that order on a disc.
With the disc loaded and the player stopped,
first press PROGRAM on the remote control. The word PROGRAM briefly replaces
If you want to save a track twice in succession (for example 9 followed by 9), then
simply press button 9 twice.
Repeat the above procedure by pressing
remaining track numbers required (9, 9
again and 12 in our example). Note that as
tracks are added, the total playing time indicated increases by a corresponding amount
plus one second per track. This is to allow
access time for the CD mechanism during
the program play sequence.
If entry of more than 24 tracks is attempted
accidently, the memory will not accept the
extra ones. The following is then briefly
displayed:
Issue 4: May 2002
CD Pre
24
Instructions for Use. Page 14 of 19
Page 15
CD - SPECIAL FEATURES
If at any time you make a mistake or wish
to delete a track from the list, press the
CLEAR button to erase the last step.
Repeated pressing of CLEAR will then
erase each step in reverse order.
If you wish to check the selection before
playing back your program, the CHECK
button can be pressed to step through each
track in turn. At the end of the check
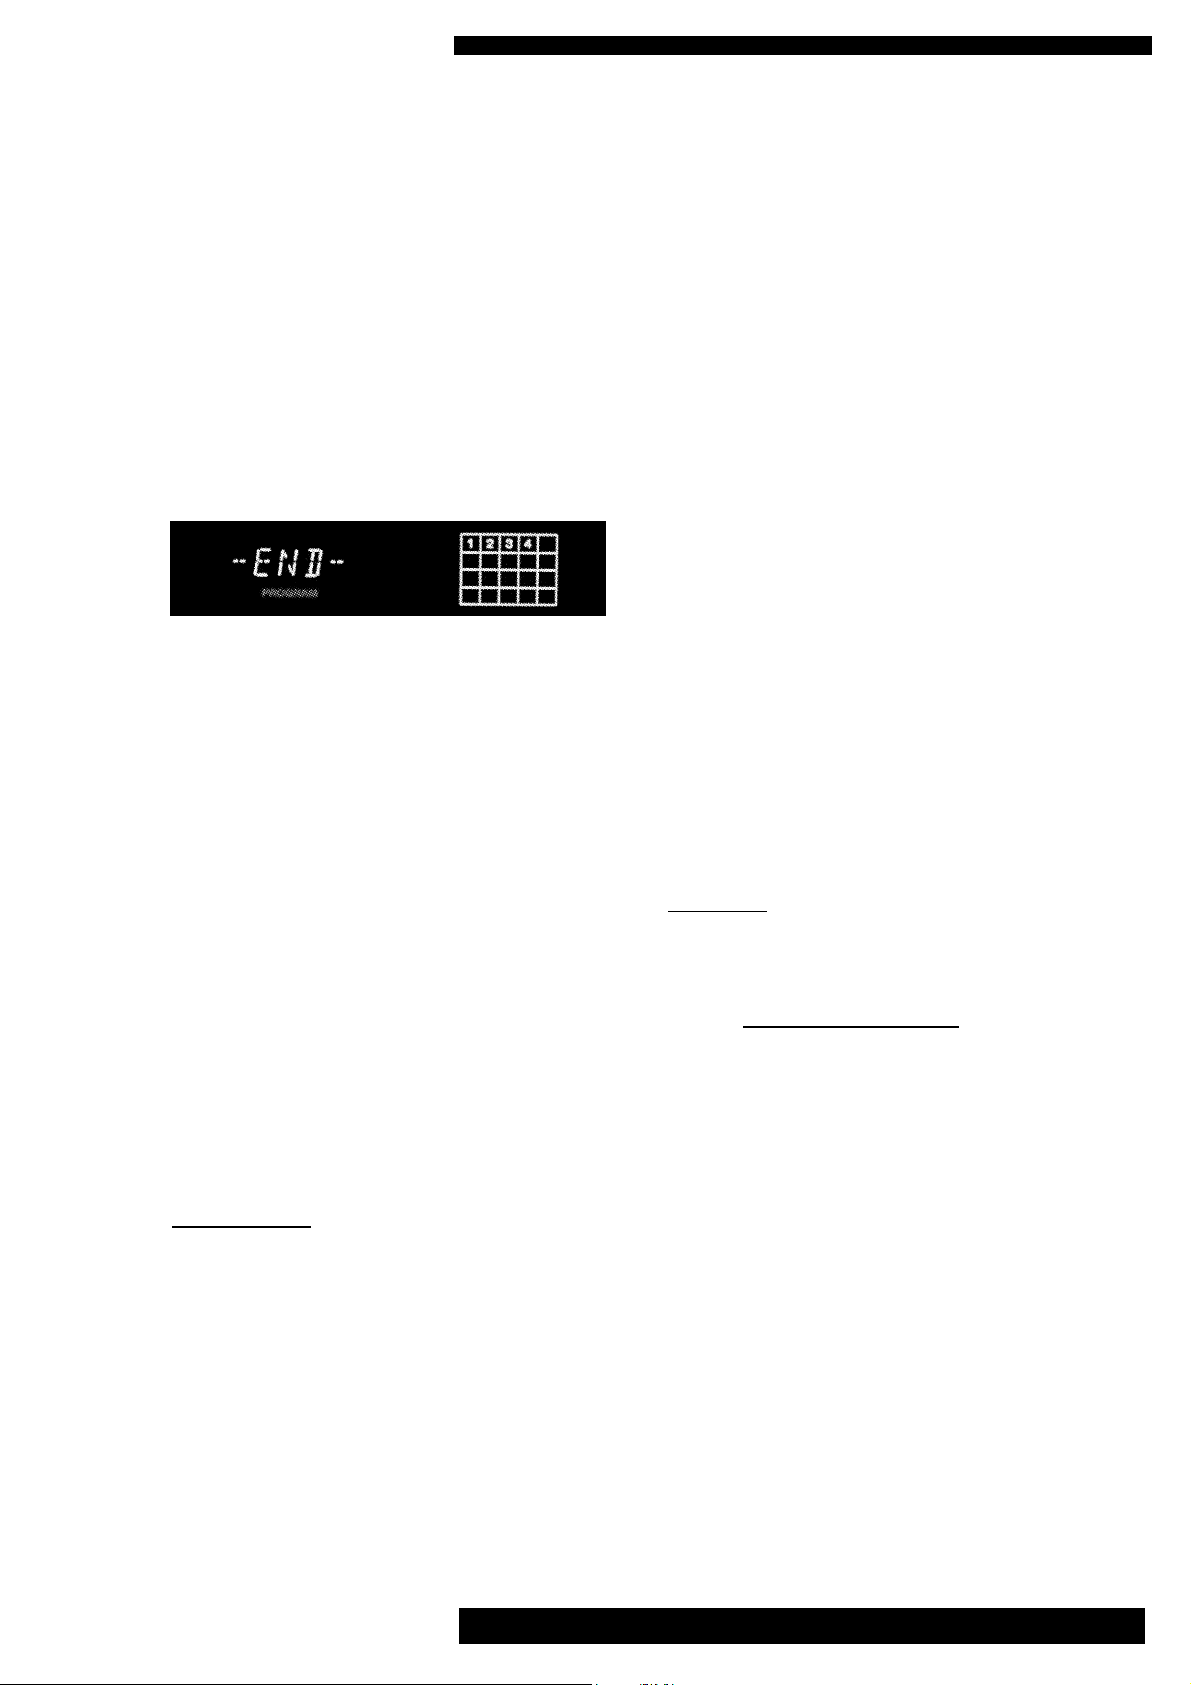
sequence, the display briefly shows:
To play the programmed tracks press
PLAY/PAUSE (or INTRO if required,
see page 14).
When all programmed tracks have been
played, the CD player stops. The same
track selection can then be played again by
pressing the PLAY/PAUSE button.
To cancel this mode, press PROGRAM.
The word CONTINUE then briefly replaces
track, index and time display.
Note: The entire program contents will be
cleared if you open the disc compartment to
load another disc, but this does not cancel
program mode itself.
AUTOSPACE
The CD Pre’s AUTOSPACE function can
be used to insert 4-second silent spaces in
between each track as it is played back.
This can be useful when making cassette
recordings of CDs. Some cassette
recorders feature a track skip or search
function which uses the silent gap between
tracks to locate each one individually.
However, some CDs do not have long
enough gaps between tracks for this function
to operate properly.
AUTOSPACE can solve this problem.
Pressing the AUTOSPACE button once
activates the function. The legend AUTOSPACE
will appear in the display. In this mode,
once the CD Pre24has reached the end of a
track the AUTO SPACE graphic will begin to
flash and the elapsed time part of the display
will change to count down from four seconds to zero before play of the next track
begins.
When zero is reached the AUTO SPACE legend
stops flashing and play continues at the start
of the next track.
Press AUTOSPACE again to cancel this
mode.
DISPLAY
The CD Pre’s display can be switched off
with the DISPLAY button on the remote
control when a disc is playing.
However, if the button is pressed without a
CD being loaded, or with a disc stopped,
track, index and time displays are briefly
replaced by the word DISPLAY OFF to confirm this mode has been engaged, but the
display remains lit until play is selected.
Pushing the button a second time briefly
shows DISPLAY ON to confirm that the
function has been cancelled.
When in display-off mode, pressing any button will cause the display to return briefly to
confirm the new status before again switching off.
Issue 4: May 2002
CD Pre
24
Instructions for Use. Page 15 of 19
Page 16
CD TEXT DISCS
CD TEXT
A small number of CDs released for sale
more recently have additional text information contained in the recorded digital data.
The CD Pre24can individually display
either the disc title, artist’s name or track
title with appropriate control commands.
Only CDs which are identified as having
this text feature, either on the
disc’s label or the library case,
will have text function on the
CD Pre24.
When a text disc is first loaded, a red
CD TEXT legend appears in the display
window.
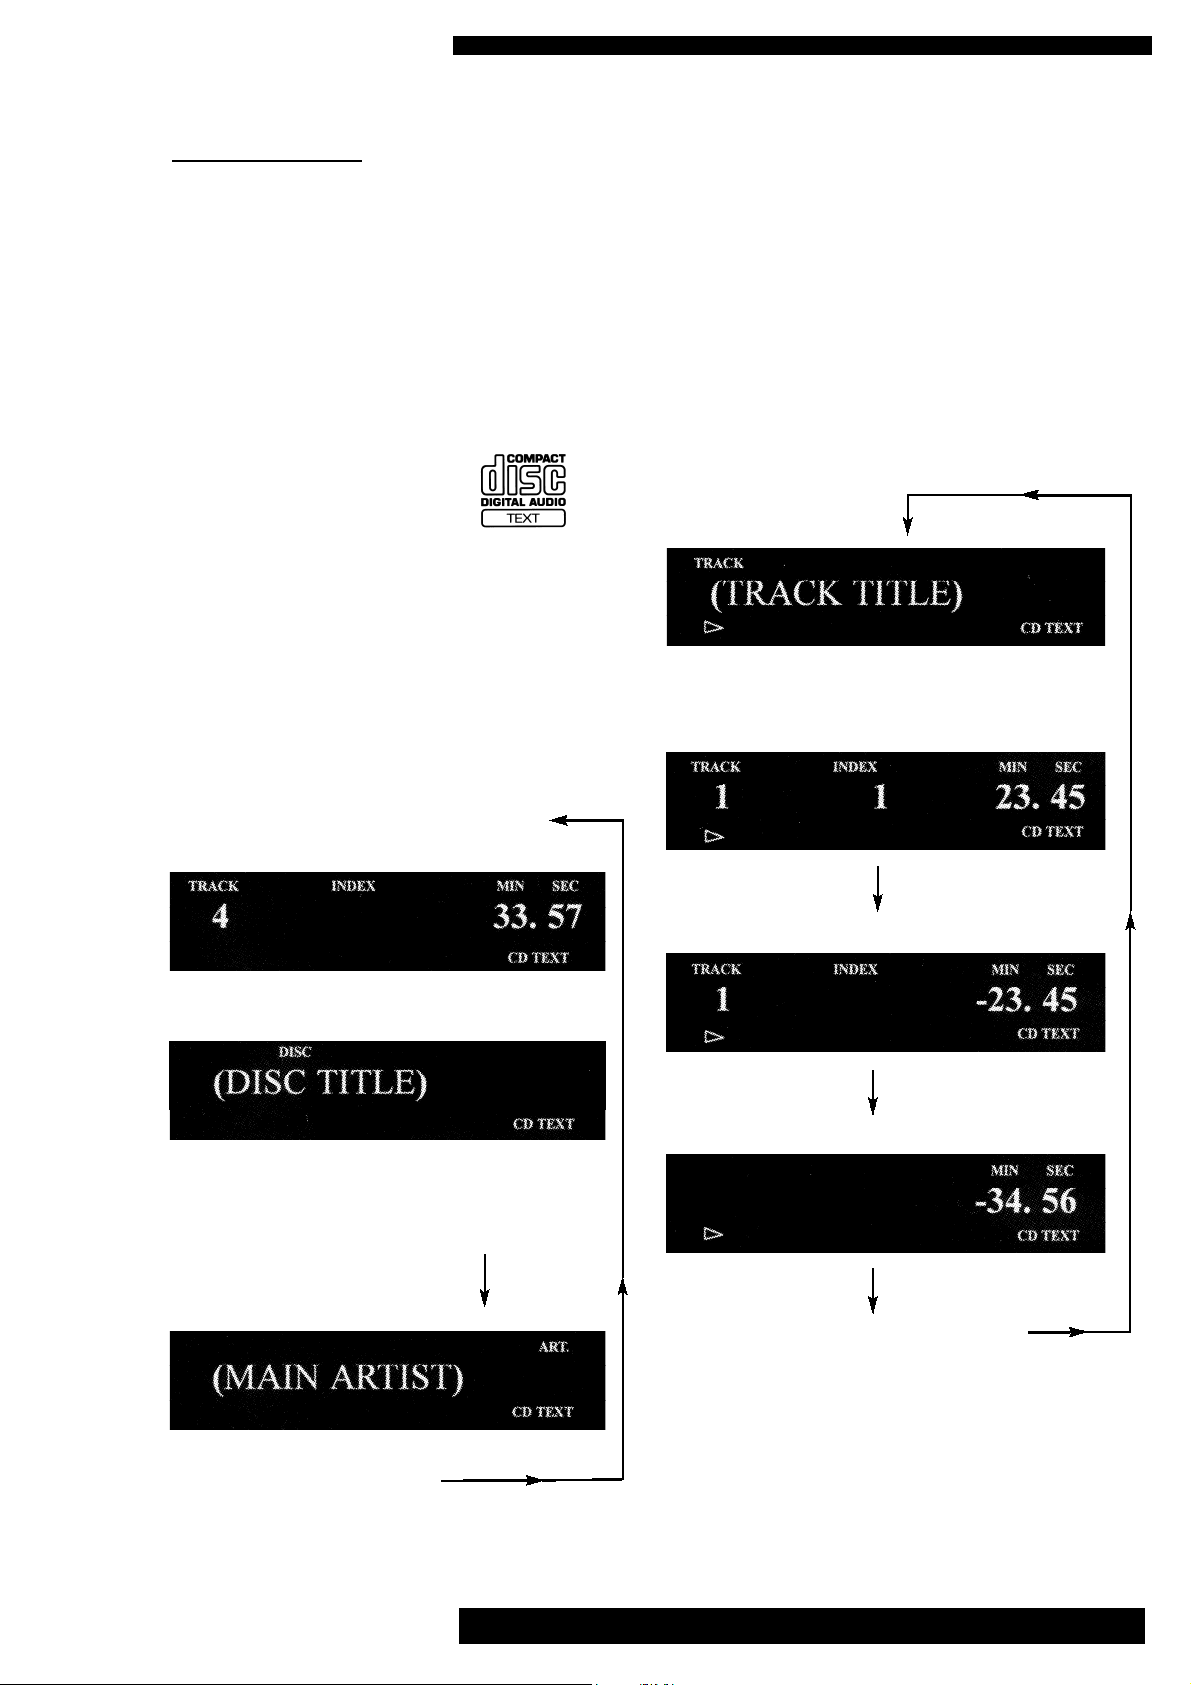
Text is shown on the front display as
follows:
If a title or name has more than twelve characters, the first 12 only will be diplayed
after the title or name has finished scrolling.
With disc playing:
Each press of the TIME button, the display
will cycle between four states:
Original state:
1a: Track title
then, after a few seconds:
1b: Track elapsed time:
When the disc is first loaded:
Initially (1a): Total tracks and total time
then, after a few seconds, (1b):
Then, with each press of the TIME button,
the display will cycle between the two text
states:
2: Main artist’s name:
2: Track remaining time:
3: Disc remaining time:
4: Track title: (original play mode)
1: Return to 1a then 1b,
Issue 4: May 2002
CD Pre
24
Instructions for Use. Page 16 of 19
Page 17

Other Languages:
A limited number of CD text discs also
have an “other-language” option.
In this case, after loading the disc, the display shows the current or default language
after MULTI has been appeared underneath
the TEXT legend.
If the player cannot read one of the languages identified in the disc’s digital data,
the display will show “(OTHER LANG)”
after loading the text CD.
To change language with a suitable text
disc, before playing the text CD:
CD TEXT - OTHER LANGUAGES
Press the LANGUAGE button on the front
panel. The current operating language will
then appear in the display.
Press NEXT or PREVIOUS on the front
panel, or |<< or >>| on the remote control to find the required language.
Press the LANGUAGE button again to
store the setting.
Notes:
* If a non-text disc is loaded, pressing the
LANGUAGE button has no effect.
* If a text disc which does not have other
languages available is loaded but not play-
ing, when the LANGUAGE button is
pressed “CAN’T SELECT” is displayed
* If the LANGUAGE button is pressed
while playing a multi-language text disc,
the current language is displayed momentarily.
Issue 4: May 2002
CD Pre
24
Instructions for Use. Page 17 of 19
Page 18
TROUBLESHOOTING
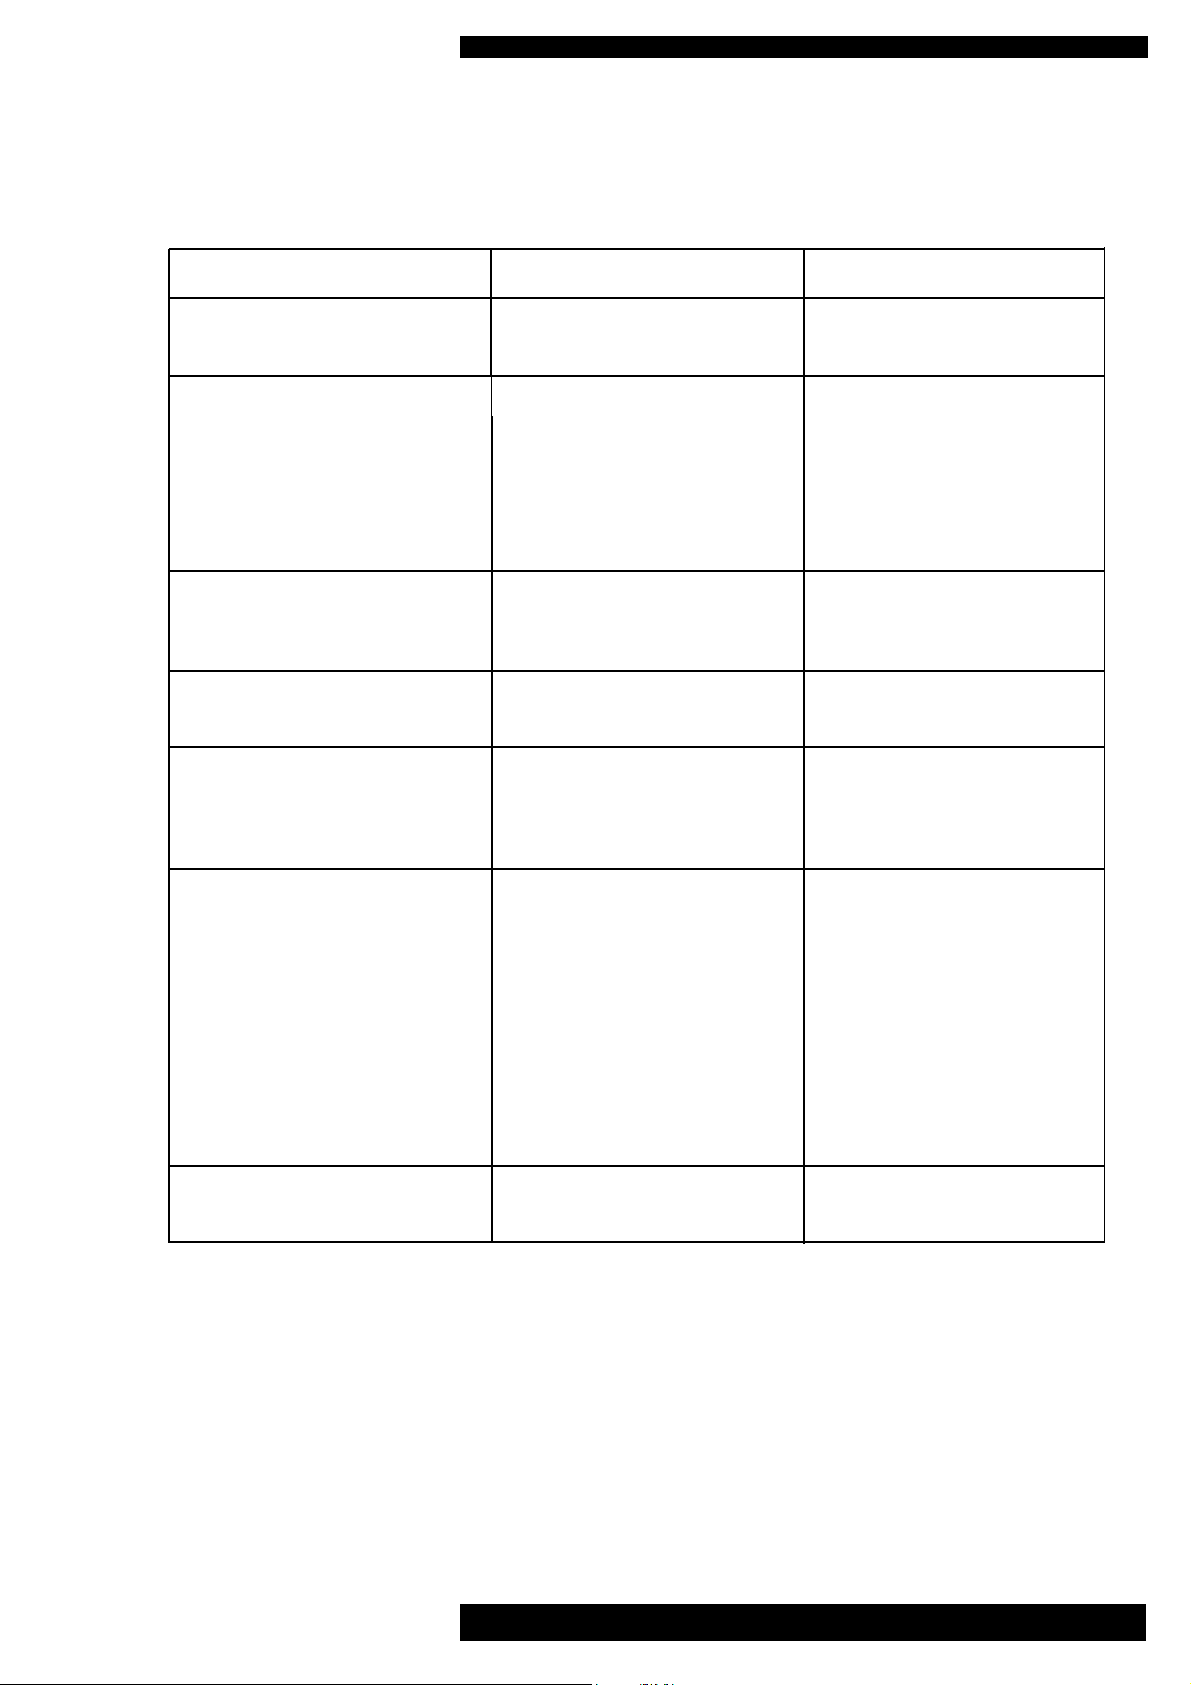
Basic problem-solving with the CD Pre24is similar to troubleshooting other electrical or electronic equipment. Always check the most obvious possible causes first, such as the following
examples:
Problem Possible Cause Remedy
No power when POWER Power plug is not inserted Plug in securely.
button is pressed fully into rear socket
No sound TAPE MONITOR button has Press TAPE MONITOR
been pressed button again to cancel.
MUTE button has been Press MUTE button again
pressed to cancel.
Wrong input selected Select correct input.
Sound is severely distorted, and Line output lead is connected Re-connect lead to auxilliary
the volume control needs to be to phono pickup input sockets sockets or other “line level”
turned down very low of the amplifier amplifier input.
No playback when CD is load- Disc has been loaded with Re-load with label side up.
ed, and “NO DISC” displayed the label side down
Mistracking (sound jumping) Player receiving vibration Change position of player
or shock away from speakers.
Disc is dirty Clean disc surface
Remote control does not work POWER switch is off Set switch to on.
One or more batteries inserted Insert batteries correctly.
the wrong way round
Batteries are flat Change batteries - do not
mix old and new ones.
Remote control is not pointed Ensure there is no obstrucdirectly towards the front tion between the remote
panel of the pre-amplifier control and front panel.
Remote control range has Batteries are running out Change batteries - do not
greatly reduced mix old and new ones.
If none of the above actions effect a cure, please contact your dealer or Musical Fidelity service
agent. Do not open the case of the CD Pre24yourself, as this will invalidate the guarantee.
Issue 4: May 2002
CD Pre
24
Instructions for Use. Page 18 of 19
Page 19
SPECIFICATIONS :
CD Pre
24
Combination CD player / digital & analogue pre-amplifier
CD SECTION:
DAC architecture 24 bit Delta-Sigma (Bitstream)
Dual differential
8 times oversampling
(CD or DVD-audio conversion only)
Frequency response 20Hz to 20kHz: < 0.02dB
Channel balance 20Hz to 20kHz: < 0.02dB
Stereo separation 20Hz to 20kHz: > 98dB
Total harmonic 0dB digital level: 0.002%
distortion at 1kHz: -10dB digital level: 0.004%
-70dB digital level: 0.050%
Signal / noise ratio 20Hz to 20kHz: 114dB A-weighted
Audio output at digital 0dB level, 1kHz: 2.14VRMS nominal
Total correlated jitter: < 189pS
PRE-AMPLIFIER SECTION:
Direct Analogue A to D / D to A *
Maximum output for 2.2 Volts RMS input: 8.4VRMS 8.2VRMS
Distortion 20Hz to 20kHz: < 0.002% < 0.004%
Frequency response 20Hz to 20kHz: + 0, - 0.02dB + 0, - 0.37dB
Crosstalk, typical: 85dB 90dB
Channel balance: 20Hz to 20kHz: < 0.01dB < 0.02dB
Signal / noise ratio, “A”-weighted 20Hz to 20kHz: 109dB 104dB
Output impedance 50 Ohms
* These measurements made by linking the co-axial digital output back to the digital monitor, and using
DIGITAL MONITOR function. This is converting an analogue signal to digital and then back to analogue,
as when linking to a computer or CD recorder.
Power requirements 100 / 115 / 230V AC 50 / 60Hz (Voltage factory preset for country)
22 Watts
Dimensions (approximate) 440mm, 17.3 inches wide
140mm, 5.5 inches high (including feet)
380mm, 14.9 inches deep (including terminals)
Weight 13.5Kg, 29.7lbs unit only, unboxed
17Kg, 37.4lbs in shipping carton
Standard accessories: Remote control handset,
IEC mains lead,
4 batteries (type SUM-4, AAA, LR03)
Musical Fidelity reserves the right to make improvements which may result in specification or feature changes without notice.
Issue 4: May 2002
CD Pre
24
Instructions for Use. Page 19 of 19
 Loading...