

Page 1
Instruction Manual
Manual in different languages available from www.musicalfidelity.com
Page 2

2
Contents
Safety Information ................................................................................. 3
Installation .............................................................................................. 4
BPC Compatibility Chart ..................................................................... 5-6
Facilities & Connections .................................................................. 7-10
Troubleshooting .............................................................................. 11
Technical Specifications ................................................................ 11-12
Statement of Conformity13
Item Disposal Information for Europe ................................................ 14
Page 3

3
Note: Unauthorized opening of the
equipment will invalidate any warranty claim.
Safety Information
This unit is designed and built to provide
trouble-free performance. As with all
electronic devices it is necessary to observe a few
precautions:
Heed all warnings shown on the back of the
product.
Only connect the unit to a mains outlet
having the same voltage as marked at the
back of the unit.
Always ensure that when disconnecting
and reconnecting your audio equipment the
mains supply is switched off.
Posi ti o n the mai ns le ad and si gn a l
interconnects where they are not likely to
be walked on or trapped by items placed on
them.
Do not use near water, or place water-filled
containers on the device, for example, a
flower vase or potted plants. If water does
spill inside, immediately pull out the mains
plug from the wall socket and inform the
dealer, who should then check the unit
before further use. Entry of liquid into the
device is dangerous and may cause electric
shock or fire hazard.
Do not place the unit near direct heat
sources such as radiators, direct sunlight
or other equipment.
Do not remove any covers or try to gain
access to the inside. There are no user
adjustments or fuses to change without
qualification. Refer all service work to an
authorized Musical Fidelity agent.
The electronics in modern hi-fi equipment are
complex and may, therefore, be adversely
affected or damaged by lightning. For
protection of the system during electrical
storms, remove the mains plugs
. If
after-sales
service is required, to help the dealer identify
the product please quote the serial number
located on the rear panel of the unit
.
WARNING - This appliance MUST be earthed
.
Precautions & User Information
WARNING: Any modifications to this product,
not expressly approved by Musical Fidelity,
who is the party responsible for standards
Page 4

4
Installation
Introduction
This unit has been designed for maximum
performance. It easily powers your speakers at high
levels and allows you to fully enjoy audio and video
sources with great dynamics.
Note: In normal operation, the unit dissipates a
small quantity of power at all times, and it is
important that it is adequately ventilated. The device
must be protected from humidity if the unit is
moved from a cold place to a warm room, leave the
unit for an hour or so to allow sufficient time for the
moisture to evaporate.
Cleaning
Before cleaning the unit, switch off power at the
mains switch and remove the mains plug from the wall
socket. Clean the cabinet and remote-control unit
using a moist cloth. Using solvents, white spirit or
thinners is not advised, as they could damage the
surface finish.
Installation
Position the unit on a stable, horizontal surface
where there is no risk of it be ing knocked or
subjected to vibration such as from loudspeakers.
Power Input Connections
The unit is supplied with a standard IEC mains cable
which plugs into the IEC socket at the back of the unit.
Power Output Connections
Connect your analogue and digital sources, power
amps and integrated amps to the power outputs
on the back panel. Use good quality power cables
or the cables your source or amplifier units were
shipped with.
You can use the zones on the backpanel to split
up your amplifier, digital and analogue source
components. Amplifiers have the biggest power
draw, so make sure to connect them to the zone
with the most VA on your BPC. Additionally,
confirm with your amplif
draw does not exceed the maximum power output
of that zone. Use the chart on the next to pages to
see which Musical Fidelity devices are best paired
with which BPC and which zone.
Digital and analogue sources usually have much
almost all cases and all zones.
We recommend to split up digital and analogue
source units. Use one zone exclusively for digital
sources, like streamers, DACs and CD players. And
connect analogue sources like preamplifiers or
turntables to a different zone.
It's OK to mix and match analogue preamps with
power amps, as long as the power amp leaves
enough power for the preamp in the zone its
connected to.
Page 5

5
BPC Compatibility Chart
BPC3
BPC5
product
type
300W
300W
200W
800W
A1
power amplifier
MA
MA
MA
MA
M2s/M3si
power amplifier
1
1 -
MA
M2/M3/M6s CD
digital source
MD
MD
MD
MD
M3/M6/M8xVinyl
analogue source
MA
MA
MA
MA
M3/M6/M8x DAC
digital source
MD
MD
MD
MD
M5/M6si
power amplifier
-
- -
1
M6si500
power amplifier
-
- -
-
M6s PRE
analogue source
MA
MA
MA
MA
M6s PRX
power amplifier
-
- -
1
M8xi
power amplifier
-
- -
-
M8s PRE
analogue source
MA
MA
MA
MA
M8s-700m
power amplifier
-
- -
-
M8s-500s
power amplifier
-
- -
-
V90-Blu5 HD
digital source
MD
MD
MD
MD
MX-Stream/DAC
digital source
MD
MD
MD
MD
Nu-Vista Vinyl
analogue source
MA
MA
MA
MA
Nu-Vista Vinyl 2
analogue source
MA
MA
MA
MA
Nu-Vista 600
power amplifier
-
- -
1
Nu-Vista 600.2
power amplifier
-
- -
1
Nu-Vista 800
power amplifier
-
- -
-
Nu-Vista 800.2
power amplifier
-
- -
-
Nu-Vista PAM
power amplifier
-
- -
-
Nu-Vista PAS
power amplifier
-
- -
-
Nu-Vista PRE
analogue source
MA
MA
MA
MA
Nu-Vista DAC/CD
digital source
MD
MD
MD
MD
MD: multiple digital sources. Connected more products from "digital sources" up to maximum output
power of the zone.
MA: multiple analogue sources. Connected more products from "analogue sources" up to maximum
output power of the zone.
1: single product in zone. Power consumption of the product is already close to maximum output power
of the zone.
- : means that power consumption of the product exceeds the output power of the zone.
Don't mix analogue and digital sources in one zone.
Don‘t mix switch mode PSUs with toroidal/linear PSUs!
Don't mix power amplifiers with digital or analogue sources.
Page 6

6
BPC10
BPC16
product
type
200W
200W
1550W
2000W
600W
600W
A1
power amplifier
MA
MA
MA
MA
MA
MA
M2s/M3si
power amplifier
- -
MA
MA
1
1
M2/M3/M6s CD
digital source
MD
MD
MD
MD
MD
MD
M3/M6/M8xVinyl
analogue source
MA
MA
MA
MA
MA
MA
M3/M6/M8x DAC
digital source
MD
MD
MD
MD
MD
MD
M5/M6si
power amplifier
- -
MA
MA
1
1
M6si500
power amplifier
- -
-
1 -
-
M6s PRE
analogue source
MA
MA
MA
MA
MA
MA
M6s PRX
power amplifier
- -
MA
MA
-
-
M8xi
power amplifier
- -
-
1 -
-
M8s PRE
analogue source
MA
MA
MA
MA
MA
MA
M8s-700m
power amplifier
- -
-
1 -
-
M8s-500s
power amplifier
- -
1
1 -
-
V90-Blu5 HD
digital source
MD
MD
MD
MD
MD
MD
MX-Stream/DAC
digital source
MD
MD
MD
MD
MD
MD
Nu-Vista Vinyl
analogue source
MA
MA
MA
MA
MA
MA
Nu-Vista Vinyl 2
analogue source
MA
MA
MA
MA
MA
MA
Nu-Vista 600
power amplifier
- -
MA
MA
1
1
Nu-Vista 600.2
power amplifier
- -
MA
MA
1
1
Nu-Vista 800
power amplifier
- -
1
MA
-
-
Nu-Vista 800.2
power amplifier
- -
1
MA
-
-
Nu-Vista PAM
power amplifier
- -
-
1 -
-
Nu-Vista PAS
power amplifier
- -
-
1 -
-
Nu-Vista PRE
analogue source
MA
MA
MA
MA
MA
MA
Nu-Vista DAC/CD
digital source
MD
MD
MD
MD
MD
MD
MD: multiple digital sources. Connect more products from "digital sources" up to maximum output
power of the zone.
MA: multiple analogue sources. Connect more products from "analogue sources" up to maximum
output power of the zone.
1: single product in zone. Power consumption of the product is already close to maximum output power
of the zone.
- : means that power consumption of the product exceeds the output power of the zone.
Don't mix analogue and digital sources in one zone.
Don‘t mix switch mode PSUs with toroidal/linear PSUs!
Don't mix power amplifiers with digital or analogue sources.
Page 7
7
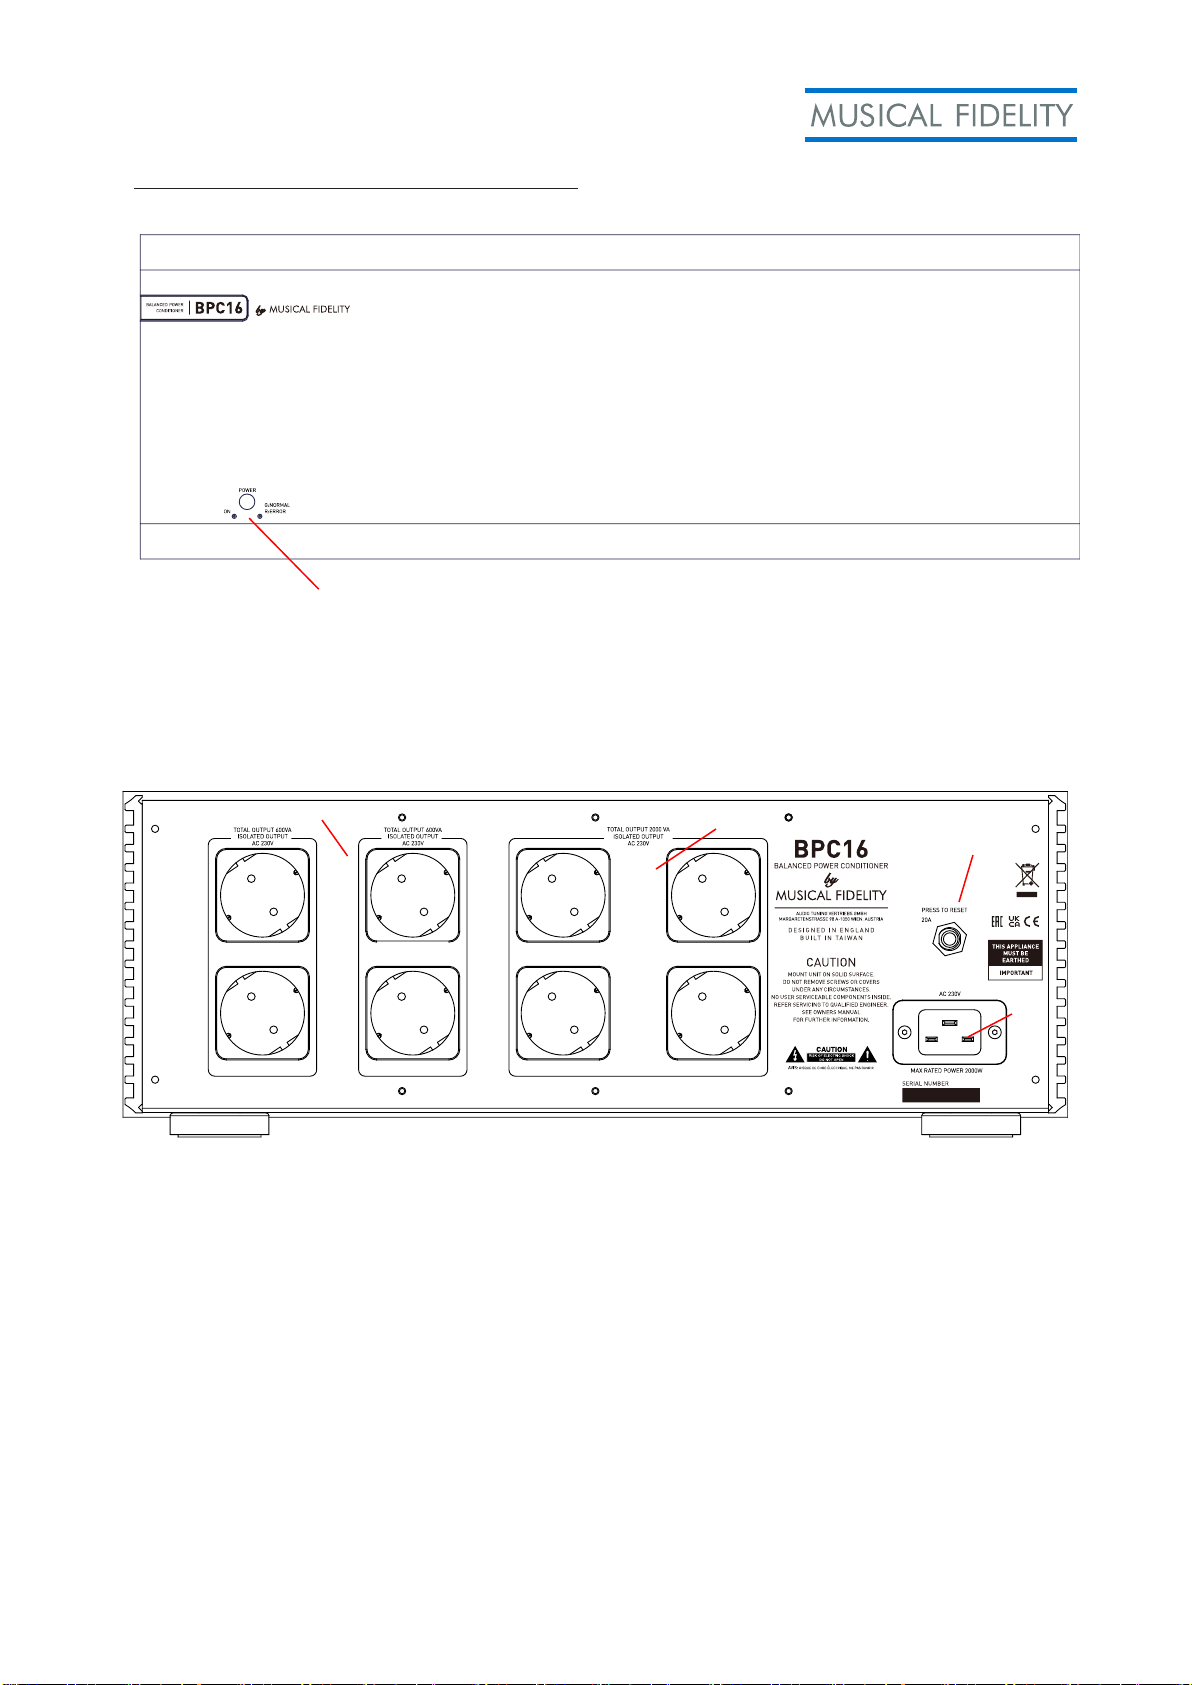
Facilities & Connections BPC16
1
1 Power/Standby button and
The Power button turns the unit on or off. When turned on the left LED will light up blue.
The right LED lights up green if the BPC is in regular working status. Should the right LED
light up red, please check if your input voltage is correct (between 100V and 130V or
210V and 250V depending on which country you are in).
1 Isolated 600VA Output Zones
2 Isolated 2000VA Output Zone
3 Power Reset Switch
4 Mains IEC socket
Power Reset Switch
When the BPC detects an overload, the built in safety mechanism will prevent any
damage to the BPC or the connected devices and turn off the BPC. If needed and an
overload should have occurred, press the reset switch. Disconnect and connect all
devices one by one in case you need to troubleshoot what is causing the overload.
1
2
3
4
Page 8
8
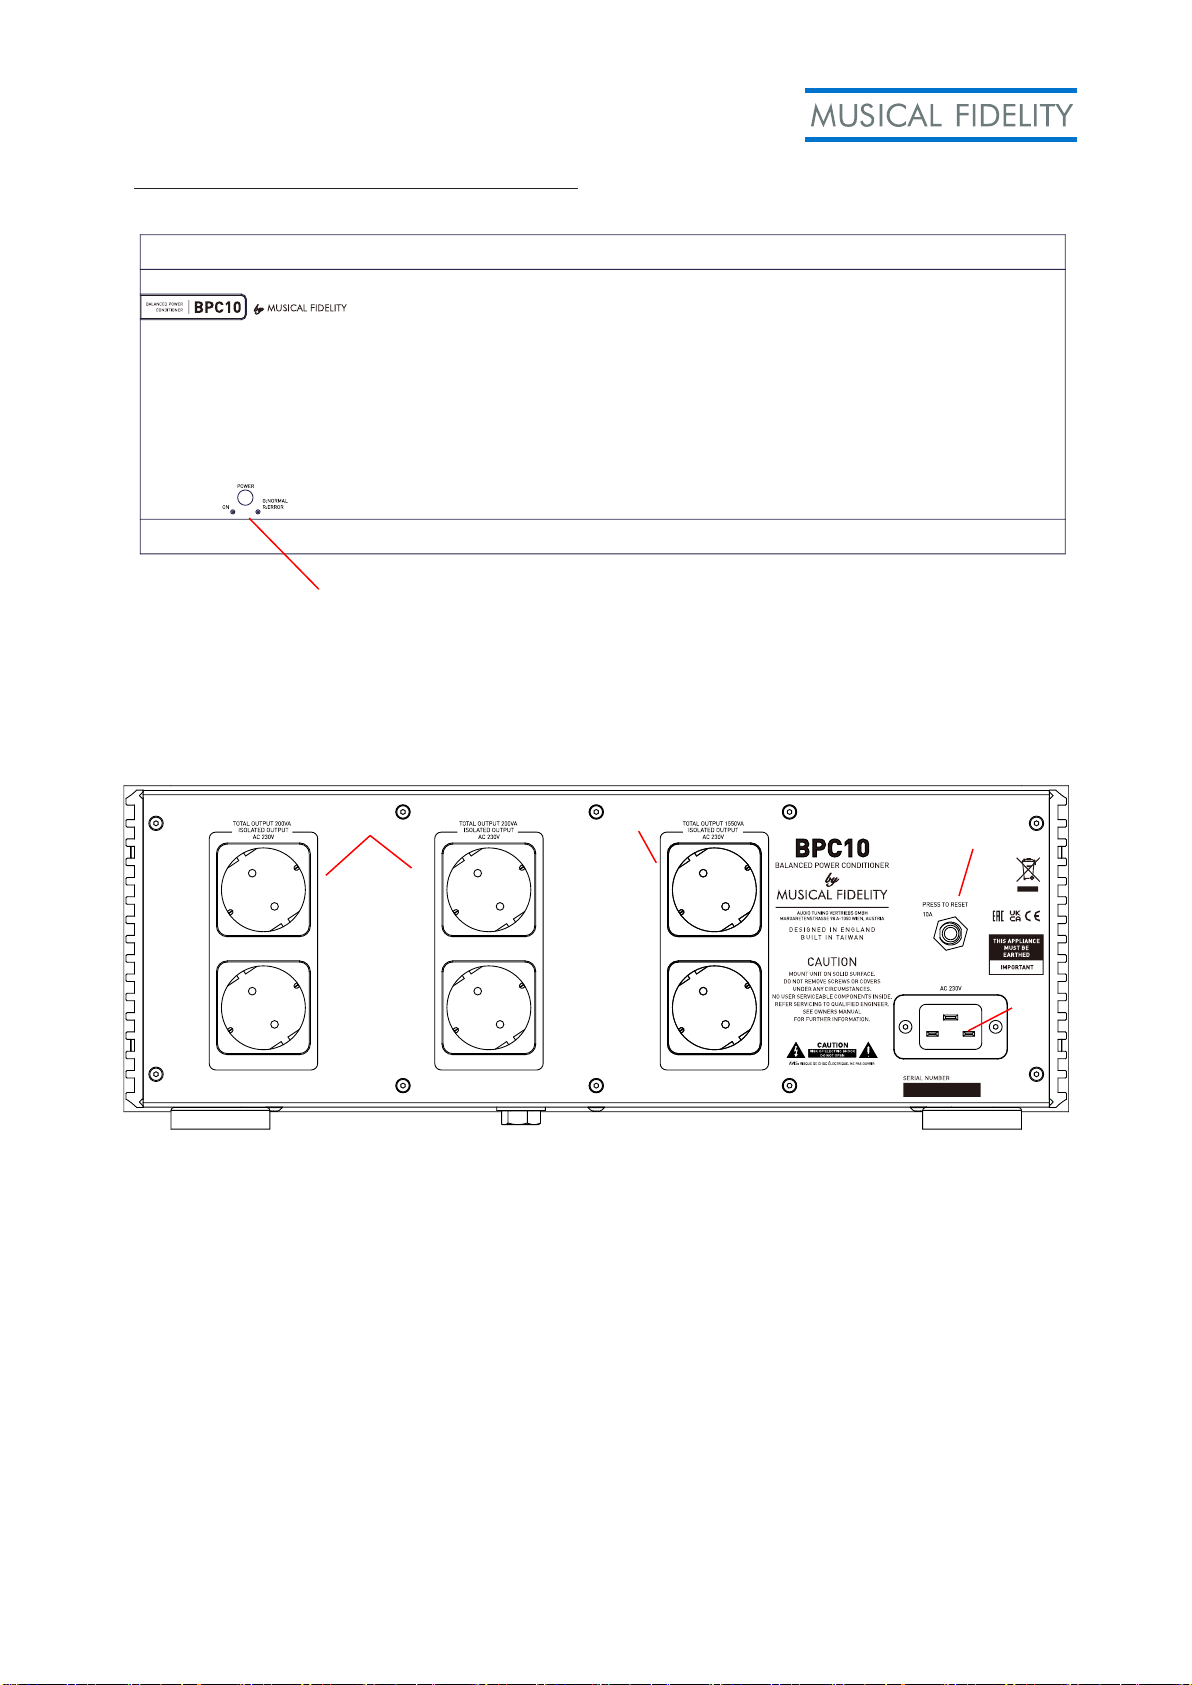
Facilities & Connections BPC10
1
1 Power/Standby button and
The Power button turns the unit on or off. When turned on the left LED will light up blue.
The right LED lights up green if the BPC is in regular working status. Should the right LED
light up red, please check if your input voltage is correct (between 100V and 130V or
210V and 250V depending on which country you are in).
1 Isolated 200VA Output Zones
2 Isolated 1550VA Output Zone
3 Power Reset Switch
4 Mains IEC socket
Power Reset Switch
When the BPC detects an overload, the built in safety mechanism will prevent any
damage to the BPC or the connected devices and turn off the BPC. If needed and an
overload should have occurred, press the reset switch. Disconnect and connect all
devices one by one in case you need to troubleshoot what is causing the overload.
1 2 3
4
Page 9
9
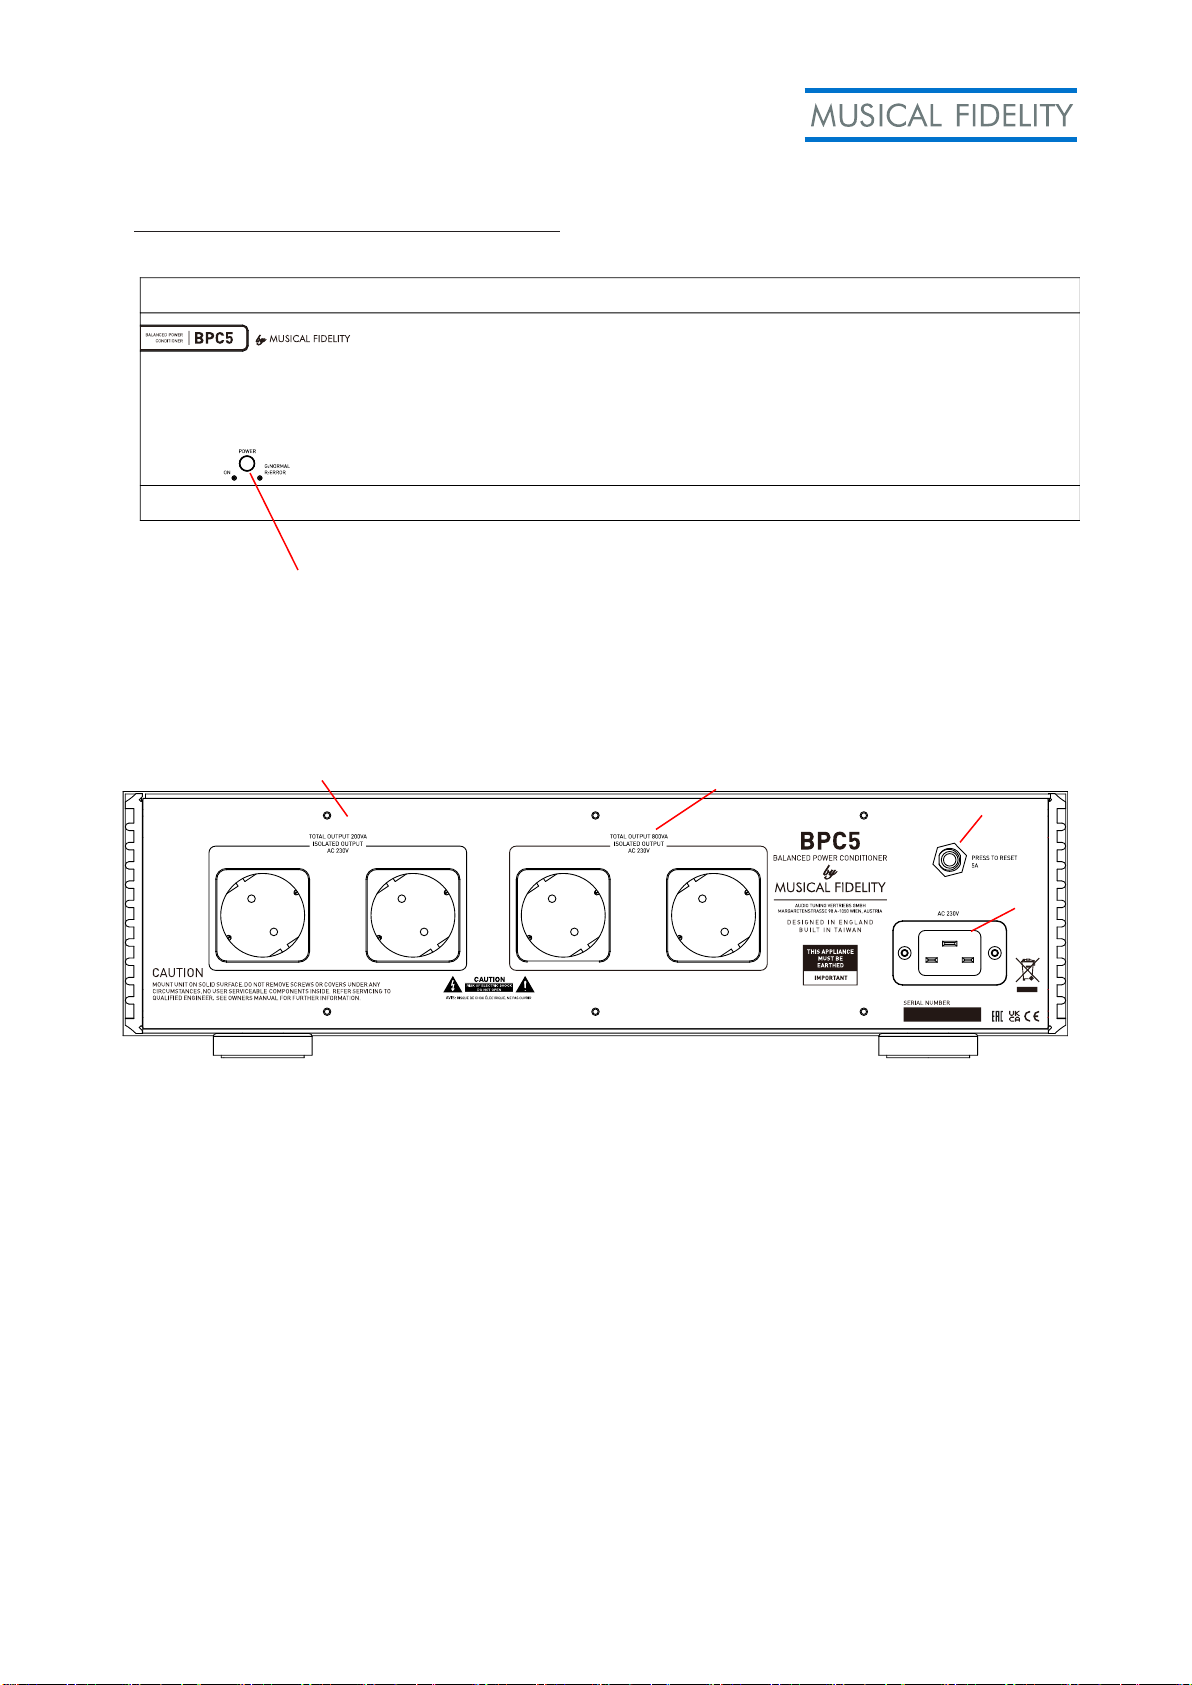
Facilities & Connections BPC5
1
1 Power/Standby button and
The Power button turns the unit on or off. When turned on the left LED will light up blue.
The right LED lights up green if the BPC is in regular working status. Should the right LED
light up red, please check if your input voltage is correct (between 100V and 130V or
210V and 250V depending on which country you are in).
1 Isolated 200VA Output Zone
2 Isolated 800VA Output Zone
3 Power Reset Switch
4 Mains IEC socket
Power Reset Switch
When the BPC detects an overload, the built in safety mechanism will prevent any
damage to the BPC or the connected devices and turn off the BPC. If needed and an
overload should have occurred, press the reset switch. Disconnect and connect all
devices one by one in case you need to troubleshoot what is causing the overload.
1
2
3
4
Page 10
10
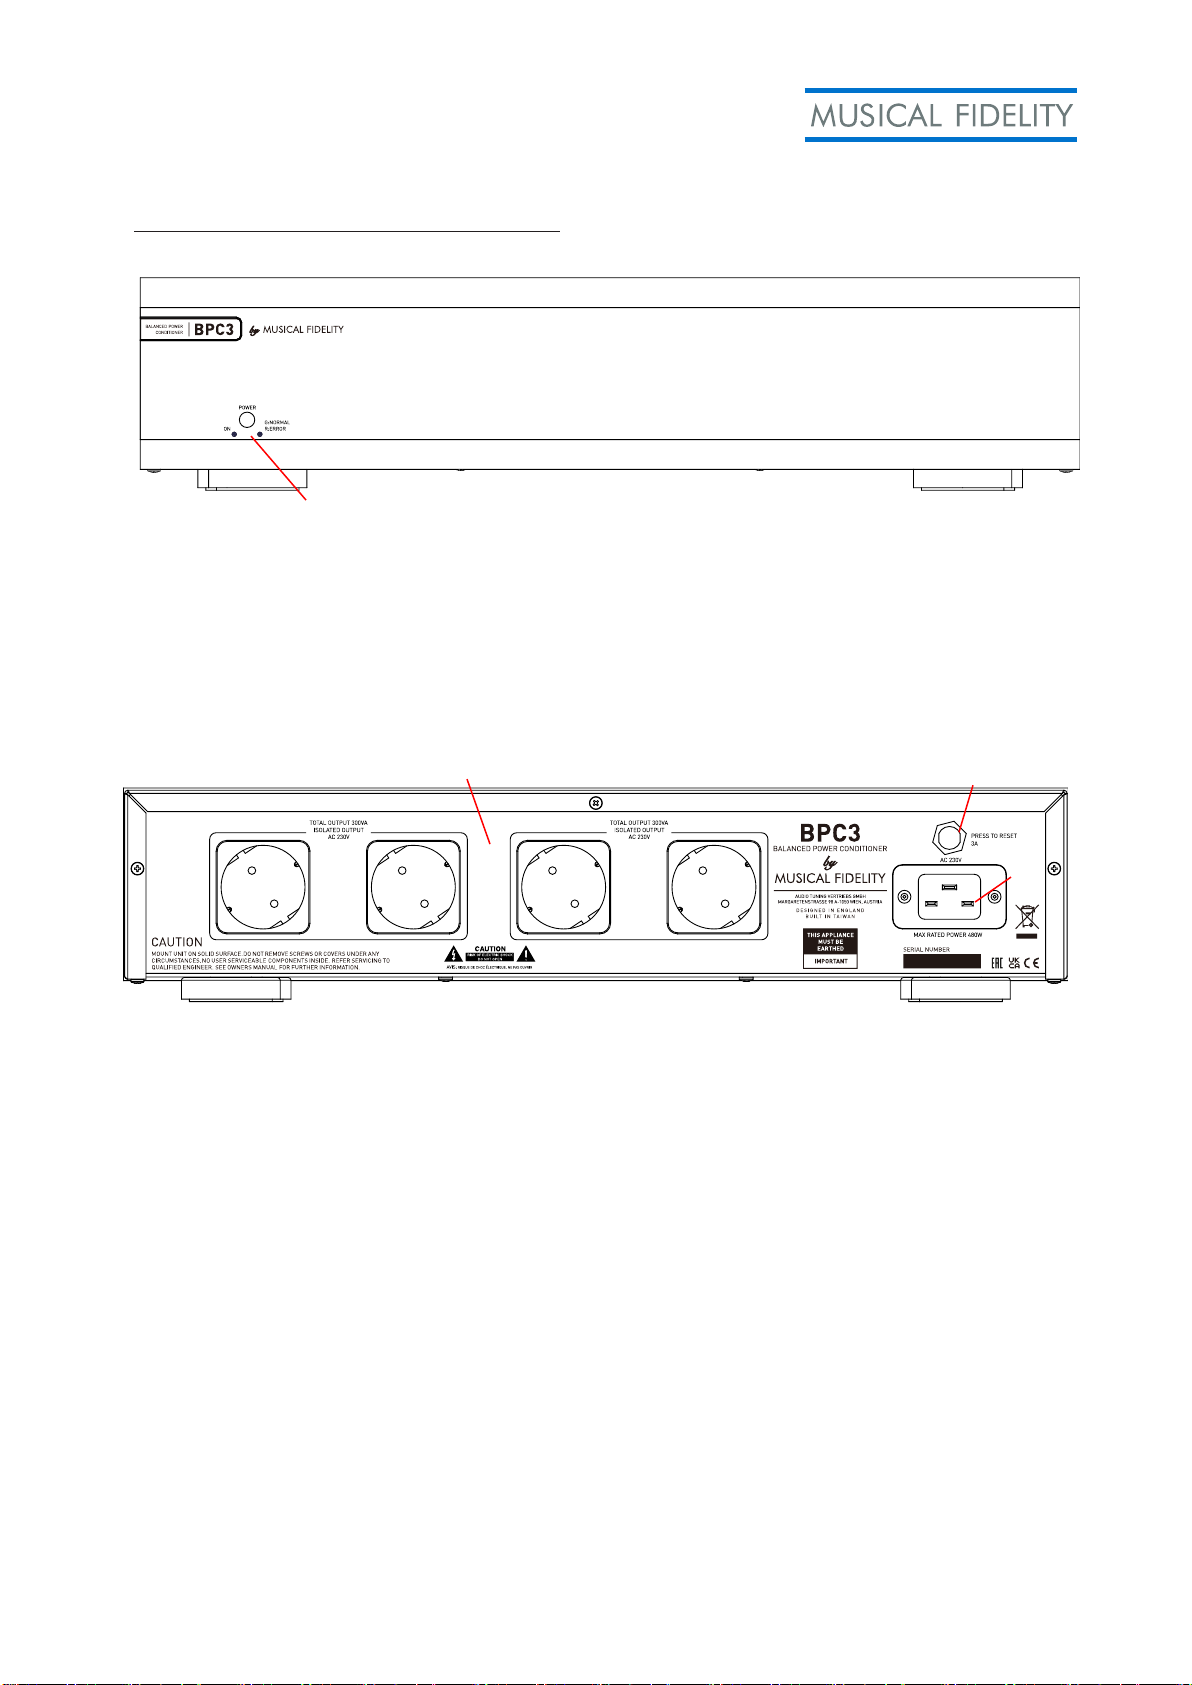
Facilities & Connections BPC3
1
1 Power/Standby button and
The Power button turns the unit on or off. When turned on the left LED will light up blue.
The right LED lights up green if the BPC is in regular working status. Should the right LED
light up red, please check if your input voltage is correct (between 100V and 130V or
210V and 250V depending on which country you are in).
1 Isolated 300VA Output Zones
2 Power Reset Switch
3 Mains IEC socket
Power Reset Switch
When the BPC detects an overload, the built in safety mechanism will prevent any damage
to the BPC or the connected devices and turn off the BPC. If needed and an overload
should have occurred, press the reset switch. Disconnect and connect all devices one by
one in case you need to troubleshoot what is causing the overload.
1
2
3
Page 11

11
Troubleshooting
Problem
Probable Cause
Remedy
No power
Power plug is not inserted into
socket correctly.
.
Power LED lights up
red
Wrong input voltage.
Check your mains voltage and make sure you have the correct BPC for your
country.
BPC does not turn
on.
BPC went into overload
protection mode.
Press Reset Button on back panel and make sure connected devices are
not causing power overload on BPC. If necessary, disconnect all devices
and reconnect them one by one.
Technical Specifications BPC16
Output Voltage
RFI attenuation
100-130V/210-250V
> 57dB @ 235kHz, > 40dB @ up 1MHz
Connections
Power Outlets
Isolated Power Zones
Peak Combined Power
Output
Maximum Rated Power
Output
8 Outlets
2x 600VA zones, 1x 2000VA zone
5000VA / 20A
2000VA / 16A
Power requirement
Mains voltages
Max. power consumption
100-130V/210-250V. AC 50/60Hz
2000W
Weight
Unit only, unboxed
In shipping carton & inc. accessories
38,9 kg
ca. 44,5 kg
Unit dimensions
Wide
High, including feet
Deep (front to back) including terminals
440 mm
162 mm
400 mm
Technical Specifications BPC10
Output Voltage
RFI attenuation
100-130V/210-250V
> 57dB @ 235kHz, > 40dB @ up 1MHz
Connections
Power Outlets
Isolated Power Zones
Peak Combined Power
Output
Maximum Rated Power
Output
6 Outlets
2x 200VA zones, 1x 1550VA zone
2400VA / 10A
1550VA / 10A
Power requirement
Mains voltages
Max. power consumption
100-130V/210-250V. AC 50/60Hz
1550W
Page 12

12
Weight
Unit only, unboxed
In shipping carton & inc. accessories
33 kg
ca. 39,5 kg
Unit dimensions
Wide
High, including feet
Deep (front to back) including terminals
440 mm
162 mm
400 mm
Technical Specifications BPC5
Output Voltage
RFI attenuation
100-130V/210-250V
> 57dB @ 235kHz, > 40dB @ up 1MHz
Connections
Power Outlets
Isolated Power Zones
Peak Combined Power
Output
Maximum Rated Power
Output
4 Outlets
1x 200VA zone, 1x 800VA zone
1200VA / 5A
800VA / 5A
Power requirement
Mains voltages
Max. power consumption
100-130V/210-250V. AC 50/60Hz
800W
Weight
Unit only, unboxed
In shipping carton & inc. accessories
20,6 kg
ca. 25 kg
Unit dimensions
Wide
High, including feet
Deep (front to back) including terminals
440 mm
125 mm
400 mm
Technical Specifications BPC3
Output Voltage
RFI attenuation
100-130V/210-250V
> 57dB @ 235kHz, > 40dB @ up 1MHz
Connections
Power Outlets
Isolated Power Zones
Peak Combined Power
Output
Maximum Rated Power
Output
4 Outlets
2x 300VA zones
600VA / 3A
480VA / 3A
Power requirement
Mains voltages
Max. power consumption
100-130V/210-250V. AC 50/60Hz
480W
Weight
Unit only, unboxed
In shipping carton & inc. accessories
11,7 kg
ca. 15,5 kg
Unit dimensions
Wide
High, including feet
Deep (front to back) including terminals
440 mm
100 mm
400 mm
Musical Fidelity reserves the right to make improvements which may result in specification or feature changes without notice.
Page 13

13
Statement of Conformity
Musical Fidelity Balanced Power Conditioners comply with the following regulations:
EN 55032:2015 + A1:2020 Measurement of Conducted Emission, Measurement of
Radiated Field
EN IEC 61000-3-2:2019 + A1:2021 Measuring of Harmonic Current Emissions
EN 61000-3-3:2013+A1:2019+A2:2021 Measuring of Voltage Variation Reduction and Flickering
Reduction in the Mains
EN 55035:2017 + A11:2020 EMC IMMUNITY
EN 61000-4-2:2009 Electrostatic Discharge
EN IEC 61000-4-3:2020 Radiated Electromagnetic Field
EN 61000-4-4:2012 Electrical Fast Transients/Burst Immunity
EN 61000-4-5:2014 +A1:2017 Surge Immunity
EN 61000-4-6:2014 Conducted Disturbances Induced by RF Fields
EN IEC 61000-4-11:2020 Short-time Breaks and Drop-outs of Supply Voltage
EN IEC 62368-1: 2020 + A11: 2020 Electrical Safety Test of Audio/Video, Information and
Communication Technology Equipment
They are therefore in conformity with relevant union harmonisation legislation directives:
2014/35/EU
2014/30/EU
The entire BPC family was rigorously tested to ensure it complies with highest industry standards for
electrical safety and electromagnetic interference mitigation. Tested by an accredited institute, adhering
to strict international guidelines, no corners have been cut to guarantee performance and reliability.
Test Institute
Institute for Testing and Certification, a.s., Testing Laboratory No. 1004.3
Sokolovska 573
686 01 Uherske Hradiste
Czech Republic
Test Report No: 414105221AE1, 414105255AL1
The electrical safety protocols test the device's insulation, grounding, and fault protection mechanisms.
They ensure that Musical Fidelity Balanced Power Conditioners operate within safe parameters, reducing
the risk of electrical hazards to an absolute minimum. Exhaustive electromagnetic interference tests
gauge the effective shielding against unwanted interference from external sources, guaranteeing pristine
audio quality without any disruptive artifacts. Musical Fidelity Balanced Power Conditioners successfully
meet and surpass all criteria, providing you with the peace of mind that your valuable HiFi equipment is
in the best possible hands.
As this is the first time that Musical Fidelity releases Power Conditioners to the market, we have been
quite surprised by our market research and product analysis. There is a constant lack of documentation
and safety documents when it comes to these types of products. With Musical Fidelity Balanced Power
Conditioners, you can trust that your HiFi system is in the care of a device that has been extensively and
independently validated by a reputable accredited test institute. This dedication to quality ensures that
you'll enjoy the highest standard of sound performance, free from the compromises often seen in lesser
quality power solutions.
Page 14

Item Disposal Information for Europe
DISPOSAL
The crossed out wheeled bin label that appears on the
back panel of the product indicates that the product must
not be disposed of as normal household waste. To prevent possible
harm to the environment please separate the product from other
waste to ensure that it can be recycled in an environmentally safe
manner. Please contact your local government office or your
retailer for available collection facilities.
DISPOSITION
La poubelle sur roulettes barrées X, qui apparaît en logo
sur le panneau arrière du produit, indique que celui-ci ne doit
pas être traité comme un déchet domestique commun. Afin de
protéger l’environnement, ce produit électronique devra être géré
séparément et donc recyclé selon les nouvelles normes Européennes
Rohs concernant les déchets d’appareils électroniques. Prière de
contacter les services concernés gouvernementaux ou votre point de
vente pour l’élimination et l’enlèvement de déchets électroniques
équipés de composants électroniques.
DISPOSAL
La etiqueta cruzada hacia fuera del compartimiento que
aparece en el panel trasero del producto indica que el
producto no se debe reciclarse como basura normal de la casa. Para
prevenir daños posible al ambiente separe por favor el producto de
otras basura para asegurarse de que puede ser reciclada de una
manera ambientalmente segura. Entre en contacto por favor a su
oficina gubernamental local o a su minorista para las instalaciones
disponibles de la colección.
RIFIUTI
L’etichetta del cassonetto barrato riportato sul retro
dell’apparecchio indica che il prodotto non deve essere
smaltito tramite la procedura normale di smaltimento dei rifiuti
domestici. Per evitare eventuali danni all’ambiente, separare
questo prodotto da altri rifiuti domestici in modo che possa venire
riciclato in base alle procedure di rispetto ambientale. Per
maggiori dettagli sulle aree di raccolta disponibili, contattate
l’ufficio govenativo locale od il rivenditore del prodotto.
FACHGERECHTE ENTSORGUNG:
Das auf der Geräterückseite angebrachte Label deutet
darauf hin, dass das Produkt nicht mit konventionellem
Hauskehricht entsorgt werden darf. Um Schäden und
Verschmutzungen an Umwelt und Mensch zu vermeiden, muss
das Produkt fachgerecht entsorgt und von anderem Abfall getrennt
werden. Wenden Sie sich bei Fragen hierzu an Ihren Fachhändler
oder an eine öffentliche Informationsstelle.
AFVAL
Het label op de achterzijde van dit apparaat, een
afvalbak op wielen met een kruis doorgehaald, geeft aan
dat dit apparaat niet samen met gewoon huishoudafval mag
worden weggegooid. Om mogelijke schade aan onze
leefomgeving te voorkomen dient dit apparaat, gescheiden van
gewoon huishoudelijk afval, te worden afgevoerd zodat het op
een milieuvriendelijke manier kan worden gerecycled. Neem voor
beschikbare inzamelplaatsen contact op met uw gemeentelijke
reinigingsdienst of met uw elektronica leverancier.
HÄVITTÄMINEN
Yliruksattua jäteastiaa kuvaava tarra tuotteen
takalevyssä kertoo, että tuotetta ei saa käsitellä
normaalina talousjätteenä. Ympäristön suojelemiseksi on tuote
pidettävä erillään muusta jätteestä ja se on kierrätettävä
ekologisesti kestävällä tavalla. Ota yhteyttä laitteen myyjään tai
Pirkanmaan Ympäristökeskukseen lähimmän kierrätyskeskuksen
löytämiseksi.
AFSKAFNING
Logoet med en skraldespand med kryds over på
bagsiden af apparatet indikerer at dette produkt ikke må
kasseres som normal husholdningsaffald. For at forebygge mulig
skade på miljøet, bedes De separere dette produkt fra andet
affald, og sikre at det bliver genbrugt på en miljørigtig måde.
Kontakt venligst de lokale myndigheder eller din forhandler for
oplysning om nærmeste tilgængelige opsamlingssted for
elektronikaffald.
ΔΙΑΔΙΚΑΣΙΑ ΑΠΟΡΡΙΨΗΣ
ΤΟ ΣΗΜΑ ΜΕ ΤΟΝ ΔΙΑΓΕΓΡΑΜΜΕΝΟ ΤΡΟΧΗΛΑΤΟ
ΚΑΔΟ ΑΠΟΡΡΙΜΑΤΩΝ ΣΤΗΝ ΠΙΣΩ ΟΨΗ ΤΟΥ
ΜΗΧΑΝΗΜΑΤΟΣ ΔΗΛΩΝΕΙ ΟΤΙ ΤΟ ΠΡΟΙΟΝ ΑΥΤΟΔΕΝ ΠΡΕΠΕΙ
ΝΑ ΔΙΑΧΕΙΡΙΣΘΕΙ ΣΑΝ ΣΥΝΗΘΙΣΜΕΝΟ ΟΙΚΙΑΚΟ ΑΠΟΒΛΗΤΟ.
ΠΡΟΣ ΑΠΟΦΥΓΗ ΕΝΔΕΧΟΜΕΝΗΣ ΕΠΙΒΑΡΥΝΣΗΣ ΤΟΥ
ΠΕΡΙΒΑΛΛΟΝΤΟΣ, ΞΕΧΩΡΙΣΤΕ ΤΟ ΠΡΟΙΟΝ ΑΠΟ ΤΑ ΑΛΛΑ
ΑΠΟΡΡΙΜΑΤΑ ΩΣΤΕ ΝΑ ΕΞΑΣΦΑΛΙΣΘΕΙ Η ΑΝΑΚΥΚΛΩΣΗ ΤΟΥ
ΜΕ ΤΟΝ ΠΡΕΠΟΝΤΑ ΤΡΟΠΟ.
ΠΑΡΑΚΑΛΟΥΜΕ ΝΑ ΕΠΙΚΟΙΝΩΝΗΣΕΤΕ ΜΕ
ΤΗΝ ΤΟΠΙΚΗ ΥΠΗΡΕΣΙΑΑΝΑΚΥΚΛΩΣΗΣ Η ΜΕ
ΤΟ ΚΑΤΑΣΤΗΜΑ ΑΓΟΡΑΣ ΓΙΑ ΠΕΡΙΣΣΟΤΕΡΕΣ
ΛΕΠΤΟΜΕΡΕΙΕΣ.
a Division of Audio Tuning
Vertriebs GmbH
Margaretenstrasse 98
A-1050 Vienna
AUSTRIA
+43 1 544 858 0400
http://www.musicalfidelity.com
 Loading...