


1
MuseLab WiFi IoT Robotic Shield for
BBC Micro:Bit
Quick Start Guide
Contents
Introduction ..................................................................................................................................... 2
Structure diagram ........................................................................................................................... 2
How to program MuseIoT on micro:bit ............................................................................................ 4
1. Print “Hello World” on the screen ................................................................................................ 5
2. How to use Input/Output pin? ...................................................................................................... 7
2.1 Read input value ................................................................................................................... 7
2.2 Turn on the output ................................................................................................................. 8
2.3 Control 180° servo ................................................................................................................. 9
2.4 Control 360° servo ................................................................................................................. 9
3. Basic WIFI function ................................................................................................................... 10
3.1 Initialization of Muse IoT Shield ........................................................................................... 10
3.2 Get the response from the WIFI module .............................................................................. 10
5. Send email via IFTTT ................................................................................................................ 14
Introduction to the cloud - ThingSpeak .......................................................................................... 16
1. What is ThingSpeak .............................................................................................................. 16
2. ThingSpeak registration ......................................................................................................... 16
3. ThingSpeak API .................................................................................................................... 17
1. Send testing command to Micro:Bit ........................................................................................... 18
2. Get battery level from WiFi IoT Robotic Shield .......................................................................... 18
2
Introduction
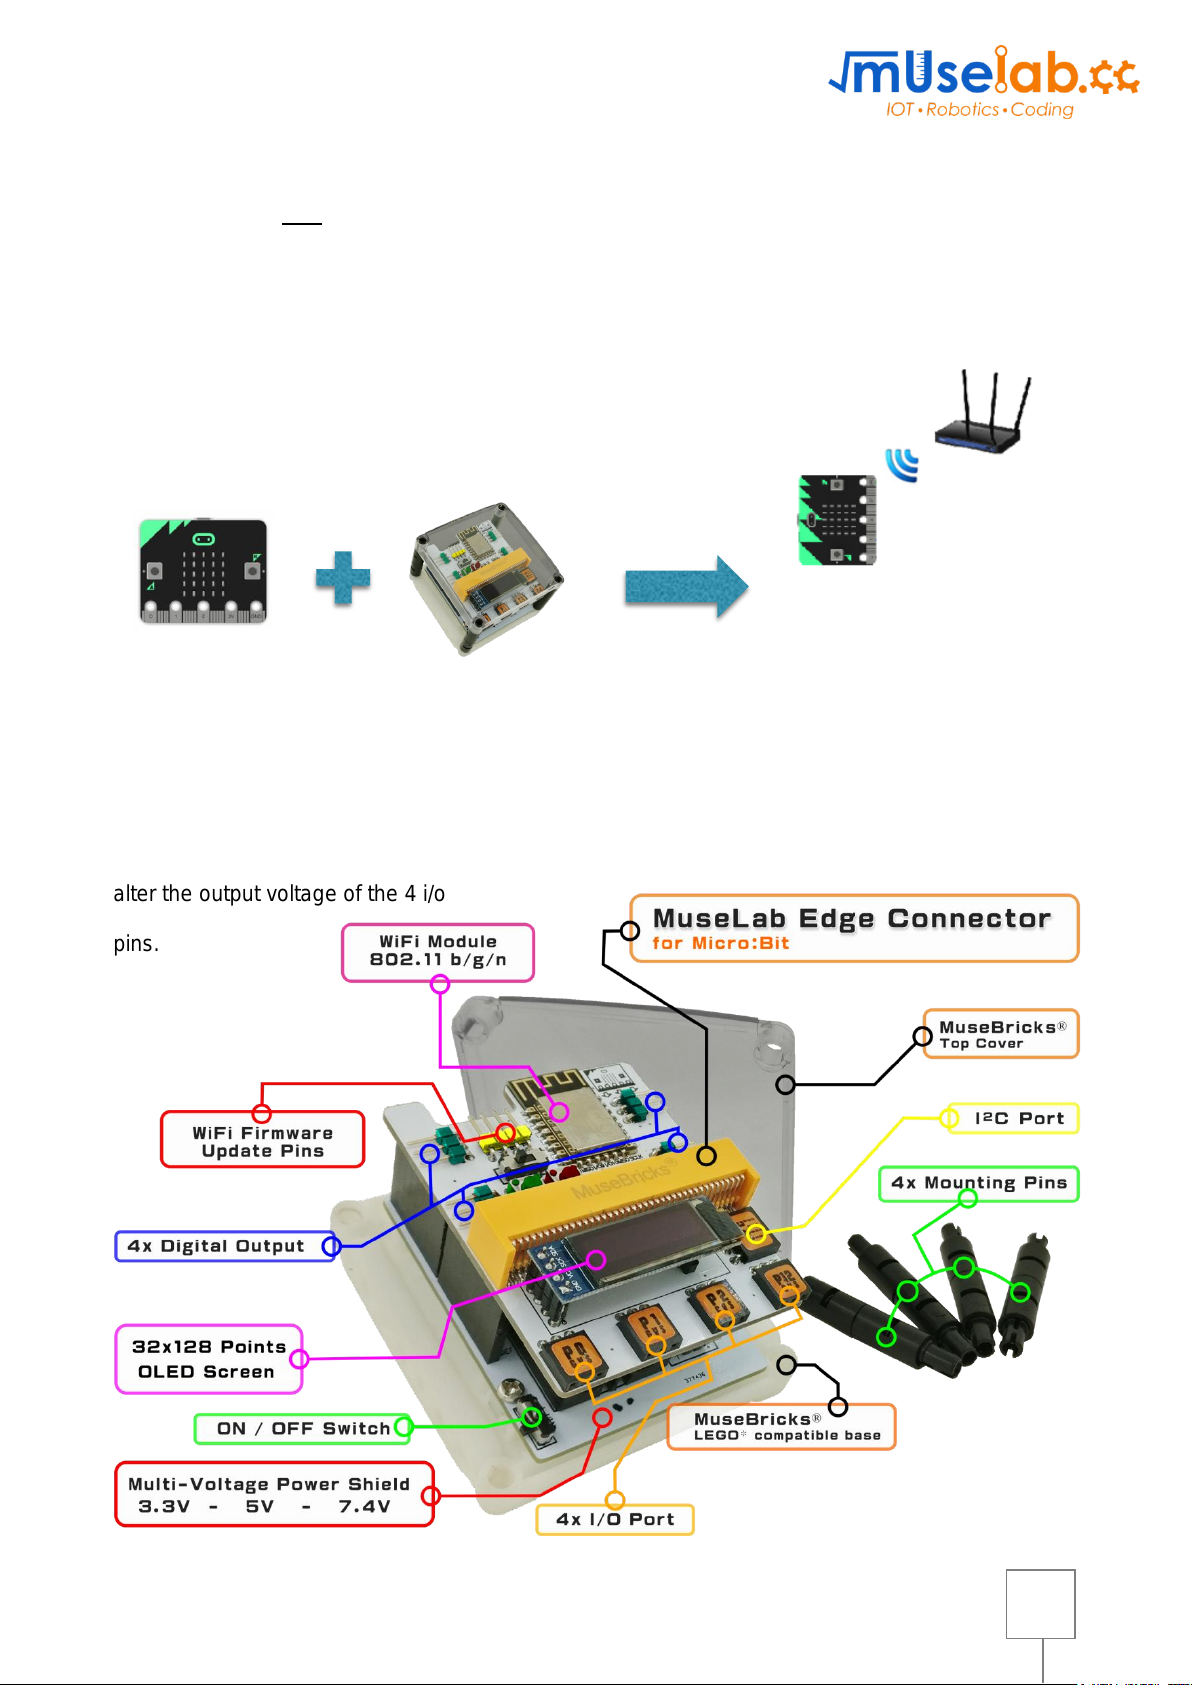
“Muselab WIFI IoT Shield” is one of the latest and most powerful IoT shields that is
presently available in the market. The shield (with the Muselab edge connector) is developed by
MuseLab. When you insert your Micro bit into the edge connector, your Microbit will be WIFI
enabled . In other words, Microbit is able to access the Internet
using our MuseLab shield.
Structure diagram
There is a screen, 3v/5v switch and a WIFI module on the shield. The screen is indeed very
useful - it shows the information like IP address and the battery status. For the switch, you can
alter the output voltage of the 4 i/o
pins.
3
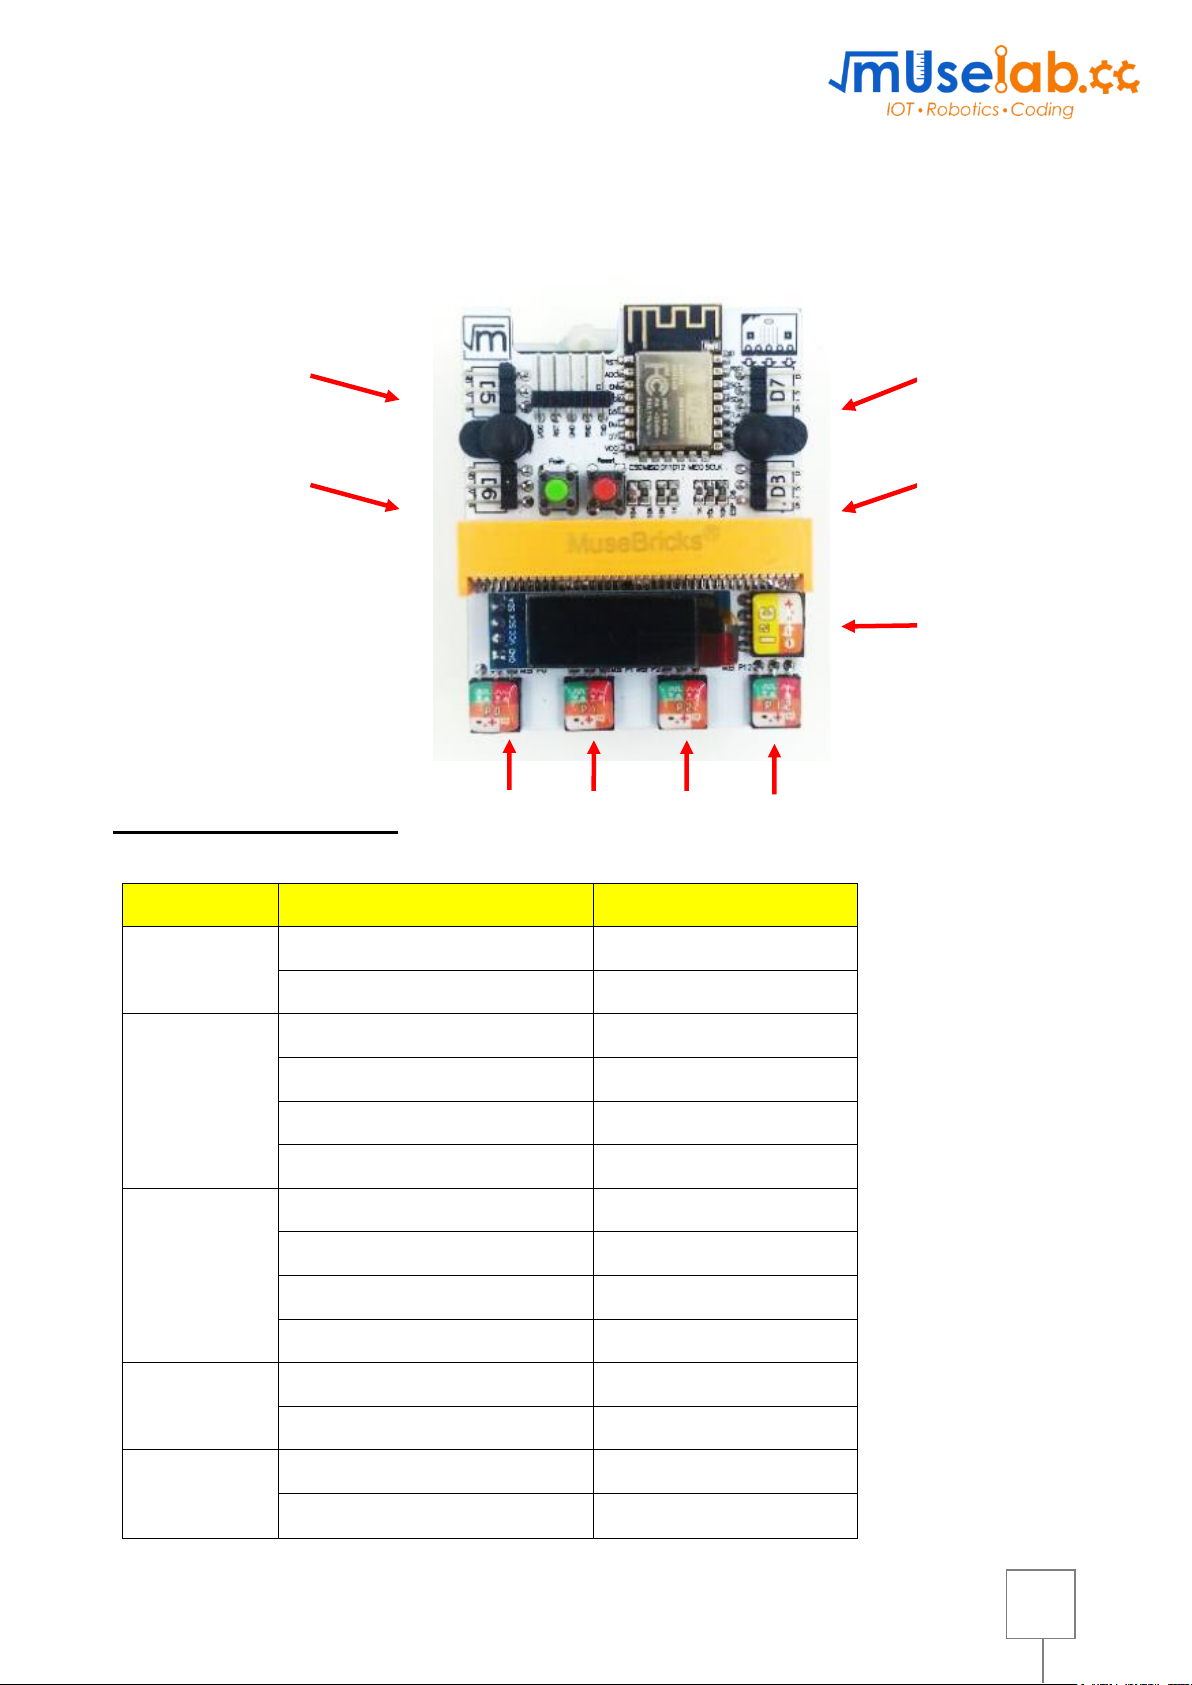
There are 4 input/output pins, 1 I2C pin for you to do the project! You can insert different
input like light and sound sensors. For output, you can use LED, buzzer, servo and so on.
Detailed pinout table:
Module
Pin
Remarks
General
3V/5V
GND
I/O
P0
P1
P2
P12
Write only
Servo
D5
D6
D7
D8
WIFI
P16 (RX)
P8 (TX)
I2C
P19 (SCK)
P20 (SDA)
D5
D6
D7
I2C
P12
P2
P1
P0
D8
4
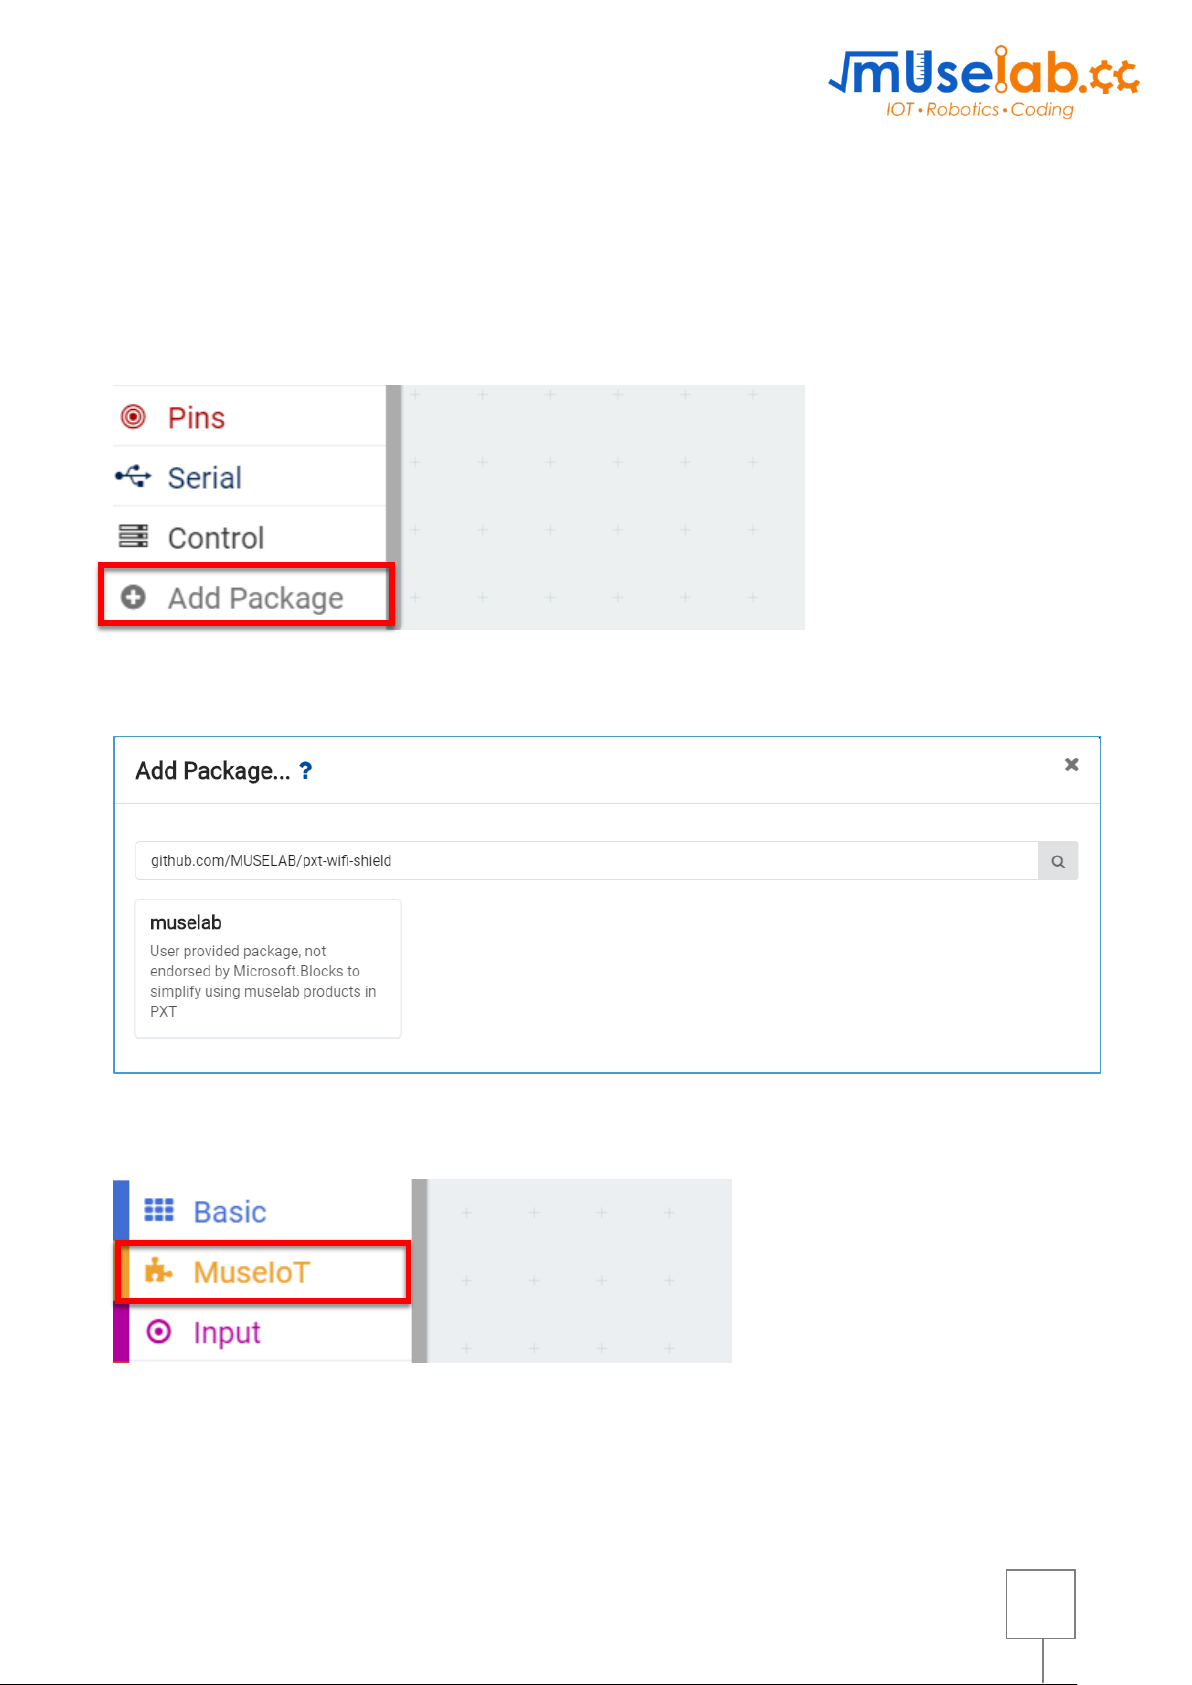
How to program MuseIoT on micro:bit
➢ To program Muselab modules with micro:bit, you will need to add the Muselab PXT
packages to your makecode environment.
STEP 1: Find the “Add Package” option at the bottom.
STEP 2. Enter the project URL: github.com/MUSELAB/pxt-wifi-shield
STEP 3. You can find “MuseIoT” under Basic!
5
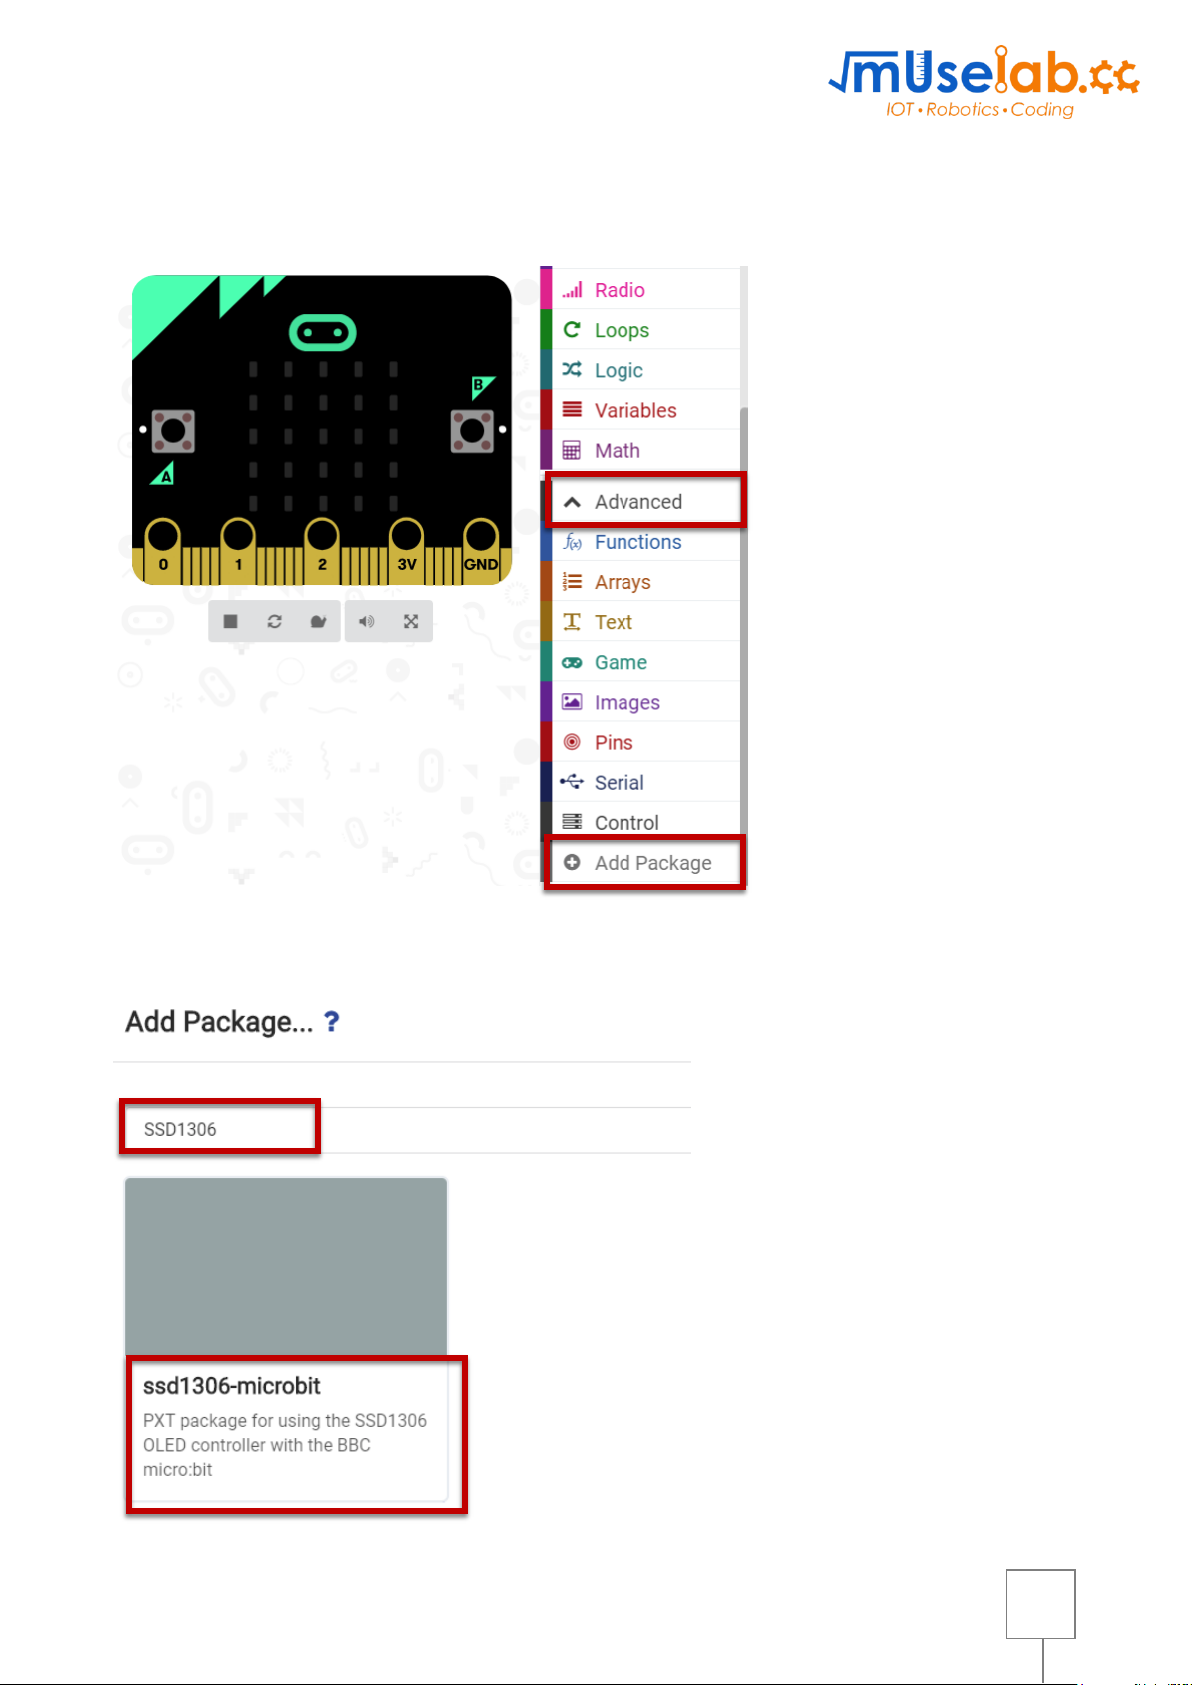
1. Print “Hello World” on the screen
STEP 1: Go to Advanced -> Add Package
STEP 2: Search “SSD1306” and click that.
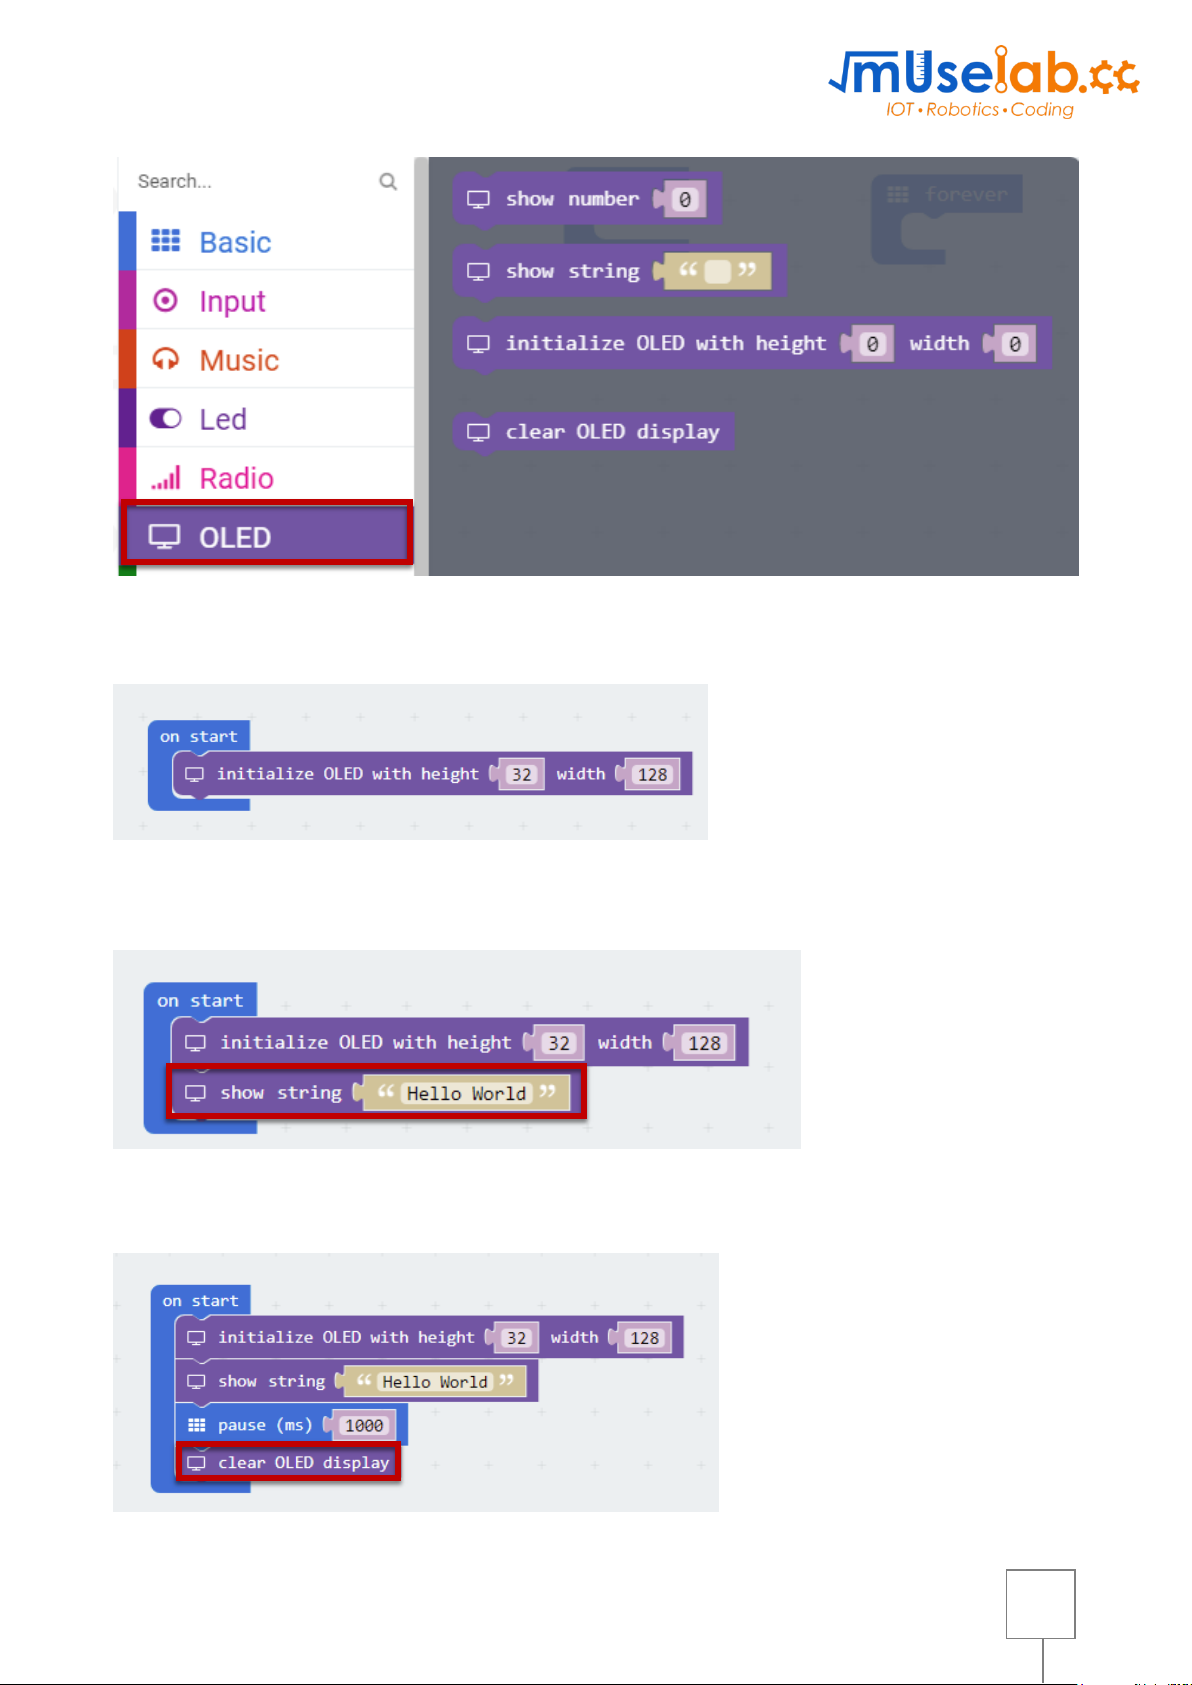
6
STEP 3: After you have added it, you can see the OLED in the menu.
STEP 4: Initialize the OLED first. The height is 32 and width is 128.
STEP 5: Show the string “Hello World”
STEP 6: To clear the screen, add the “clear OLED display” command.

7
2. How to use Input/Output pin?
2.1 Read input value
STEP 1: Insert the input sensor on P0.
Please note that there is label SVG on the pin.
STEP 2: Pins -> analog read pin P0

8
2.2 Turn on the output
STEP 1: Insert the output on P1.
Please note that there is label SVG on the pin.
STEP 2: Pins -> analog write pin P1 to 1023 and 0 every 1 second repeatedly.

9
2.3 Control 180° servo
STEP 1: Insert the 180° servo to the D5.
STEP 2: MuseIoT -> More -> control 180° servo pin 5 to degree 0 and 180 repeatedly.
2.4 Control 360° servo
STEP 1: Insert the output on P1.
STEP 2: MuseIoT -> More -> control 360° servo pin 6 to speed 100% or 50% on start.

10
3. Basic WIFI function
▪ Before you use the wifi module, you have to do the following 2 steps first.
1. Initialization of WIFI module
2. Get the response from the wifi module
3.1 Initialization of Muse IoT Shield
STEP 1: Go to MuseIoT -> Initialize WiFi IoT Shield
3.2 Get the response from the WIFI module
STEP 2: Let’s see what happened when WIFI module receive the command.
Initialization

11
STEP 3: Let’s see what happened when WIFI module is initialized.
STEP 4: Add the screen function to show the response from WIFI module.
If you open the shield, the screen will show shield information after “Initialize OK”. The
information contains the version number firmware version number and the battery level.
Shield information

12
3.3 Connect Micro:Bit to the Internet
STEP 1: Send the connect wifi command by pressing button
STEP 2: find the Set wifi from “MuseIoT” tab.
STEP 3: Input ssid and pwd where muselab is wifi ssid and 12345678 is the wifi password.
Result:
➢ When it is connected, the IP address will be shown.

13
4. Upload data to ThingSpeak
STEP 1: Send the ThingSpeak command by pressing B button.
STEP 2: Find the “Send ThingSpeak” from “MuseIoT” tab.
STEP 3: Find the Key from ThingSpeak, you need to use your own API key.
STEP 4:
Input the key where “QPATAJ6QA4S83WSI “is the ThingSpeak API key and field1 is the value you
want to upload.
Result:
➢ If data is uploaded successfully, “Uploaded OK” will be shown.
1. Choose API Keys
2. Copy the key

14
5. Send email via IFTTT
STEP 1: Send the IFTTT command by pressing A+B button.
STEP 2: find the “Send IFTTT” from “MuseIoT” tab.
STEP 3:
Find the IFTTT API key and event name, go to IFTTT page.
Select documentation
This the the key

15
STEP 4:
Input the information, example
1. IFTTT API key: dlJ0cMtOPkAddxCTPKCxgE“.
2. value 1 or value 2: the value you want to send with.
3. event_name: the event you want to trigger.
Result:
➢ If data is uploaded successfully, “Uploaded OK” will be shown.

16
Introduction to the cloud - ThingSpeak
1. What is ThingSpeak
• It is the platform for you to upload data to the cloud.
2. ThingSpeak registration
1. Go to https://thingspeak.com/, and signup.
2. In the Channels tab, click “My Channels” -> New Channel.
3. Input the Name, Field1 and Field2 as shown below. And click “Save Channel”.

17
3. ThingSpeak API
• What is ThingSpeak API? It is the URL link for your quickly upload data to ThingSpeak.
• You can just type the URL link (ThingSpeak API) in the browser, then it’s done!
STEP 1: Find the API link from “Data Import/Export” tab
STEP 2: Enter the API link in the browser.

18
1. Send testing command to Micro:Bit
STEP 1: Send the “send AT test” command by shaking it!
STEP 2: Send the command by shaking it!
If you open the shield, the screen as shown below “AT+OK” will be returned.
2. Get battery level from WiFi IoT Robotic Shield
STEP 1: Send the “send AT test” command by shaking it!
STEP 2: Send the command by shaking it!
If you open the shield, the screen as shown below. “AT+OK” will be returned.
Send AT test
AT OK
Send AT test
62.3%
 Loading...