

Page 1
en
Not for
Reproduction
Operator’s Manual
hu
Használati útmutató
da
de
et
fi
fr
Betjeningsvejledning
Bedienungsanleitung
Kasutajajuhend
Käyttöohje
Manuel d’utilisation
Manuale dell’operatore
it
Vartotojo vadovas
lt
lv
Operātora Rokasgrāmatā
nl
pl
Gebruikershandleiding
Instrukcja Obsługi Dla
Użytkownika
LT-200 Series Hydro Tractors
Tr ac t or s
Mfg. No. Description
2690842 EMT175460, 17.5HP, Mower Deck 46” (117 cm) (CE)
2690843 EMT20460, 20HP, Mower Deck 46” (117 cm) (CE)
Mower Deck
Mfg. No. Description
1695809 Mower Deck 46” (117cm) (CE)
1739199
Revision C
Page 2

Not for
Reproduction
Page 3

Table of Contents
Not for
Reproduction
Safety Rules & Information.................................2
Identification Numbers.......................................7
Safety Decals.......................................................8
Safety Icons.........................................................8
Features & Controls..........................................10
Control Functions ..................................................10
Parking Brake Function .........................................12
Cruise Control Operation.......................................12
Hourmeter .............................................................12
Operating the Tractor........................................13
Safety Interlock System Tests ...............................13
General Operating Safety......................................13
Adding Fuel...........................................................13
Starting the Engine................................................13
Stopping the Tractor & Engine...............................14
Driving the Tractor.................................................14
Mowing..................................................................14
Mowing in Reverse................................................14
Attachment Operation in Reverse .........................14
Pushing the Tractor by Hand.................................14
Adjusting Mower Cutting Height ............................15
Attaching a Trailer .................................................15
Storage..................................................................15
Regular Maintenance........................................16
Maintenance Schedule..........................................16
Check Tire Pressure..............................................16
Safety Interlock System Check..............................17
Check Mower Blade Stopping Time ......................17
Battery Maintenance .............................................17
Engine Maintenance..............................................17
Troubleshooting, Adjustment & Service.........18
Troubleshooting the Tractor ..................................18.
Troubleshooting the Mower...................................19
Seat Adjustment....................................................20
Battery Charging ...................................................20
Mower Adjustment ................................................20
Specifications....................................................21
Parts & Accessories..........................................21
NOTE: In this manual, “left” and “right” are referred to as
seen from the operating position.
1
Page 4
Safety Rules & Information
Not for
Reproduction
Operating Safety
Congratulations on purchasing a superior-quality piece of lawn and
garden equipment. Our products are designed and manufactured to
meet or exceed all industry standards for safety.
Power equipment is only as safe as the operator. If it is misused, or
not properly maintained, it can be dangerous! Remember, you are
responsible for your safety and that of those around you.
Use common sense, and think through what you are doing. If you
are not sure that the task you are about to perform can be safely
done with the equipment you have chosen, ask a
professional: contact your local authorized dealer.
Read the Manual
The operator’s manual contains important safety information you need to be aware
of BEFORE you operate your unit as well as DURING operation.
Safe operating techniques, an explanation of the product’s features and
controls, and maintenance information is included to help you get the
most out of your equipment investment.
Be sure to completely read the Safety Rules and Information found on
the following pages. Also completely read the Operation section.
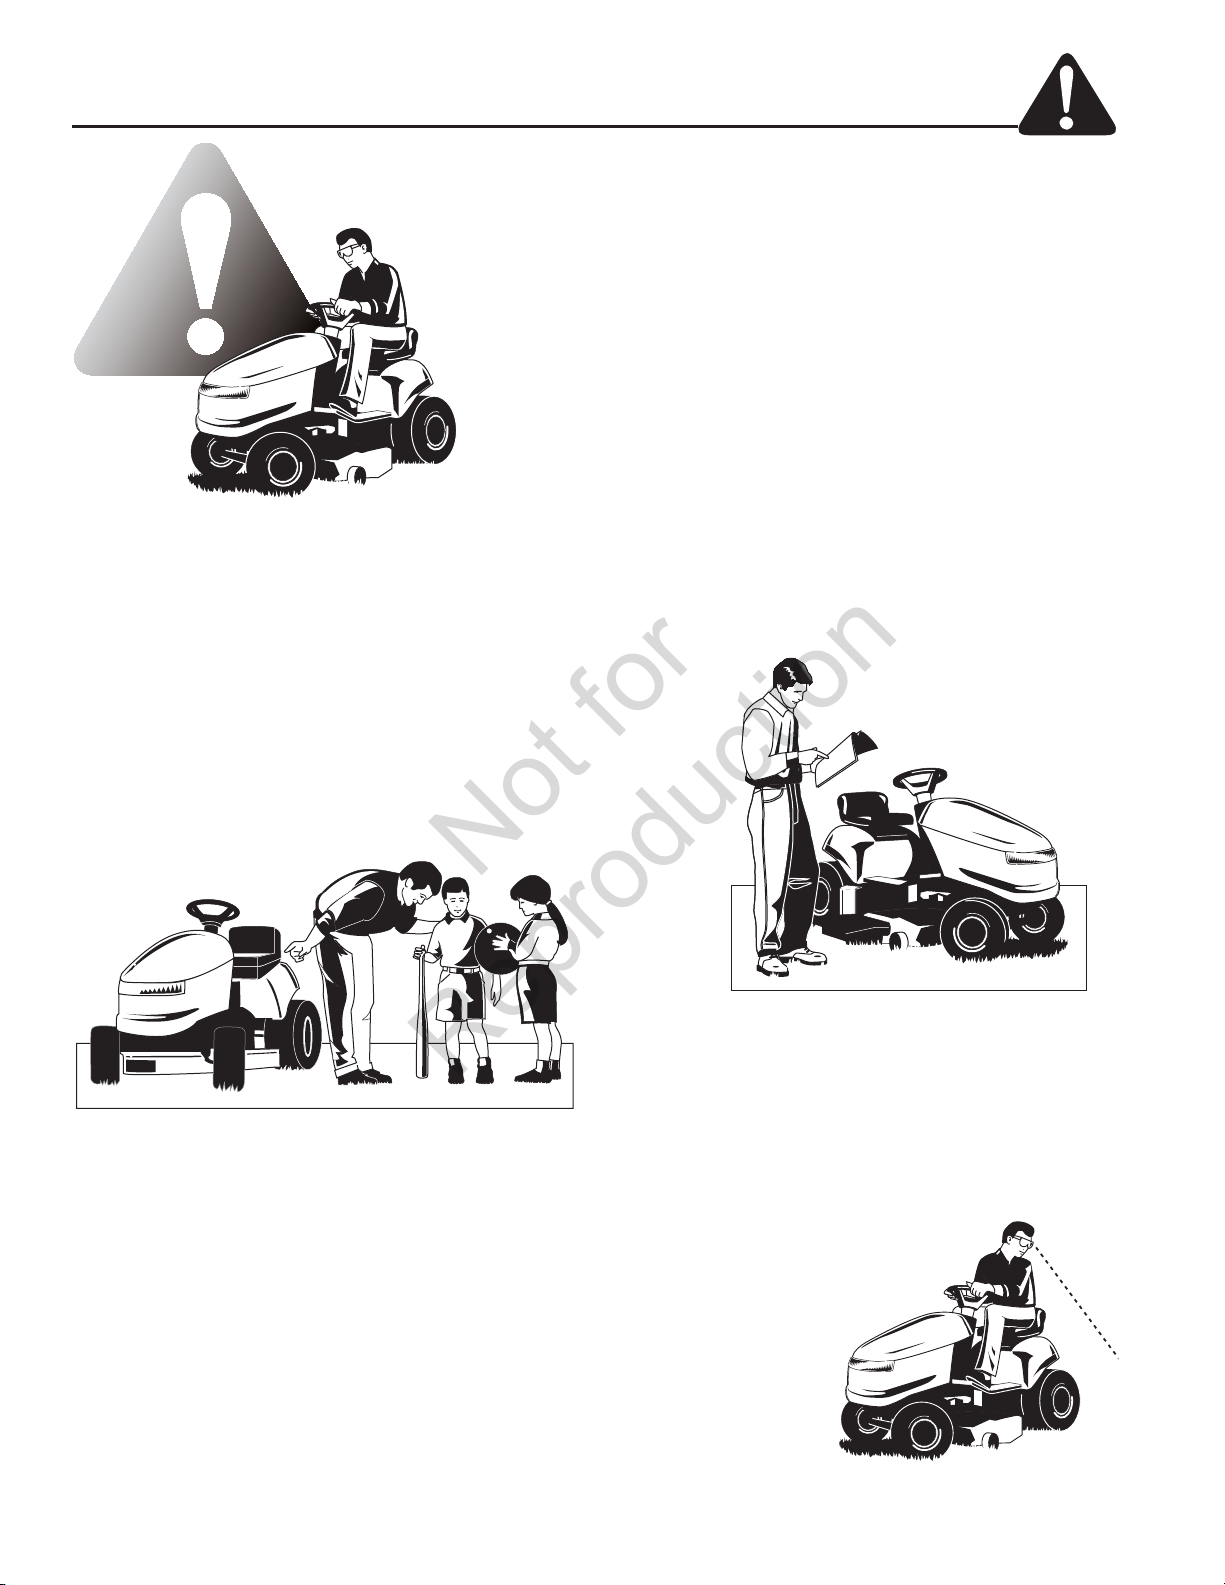
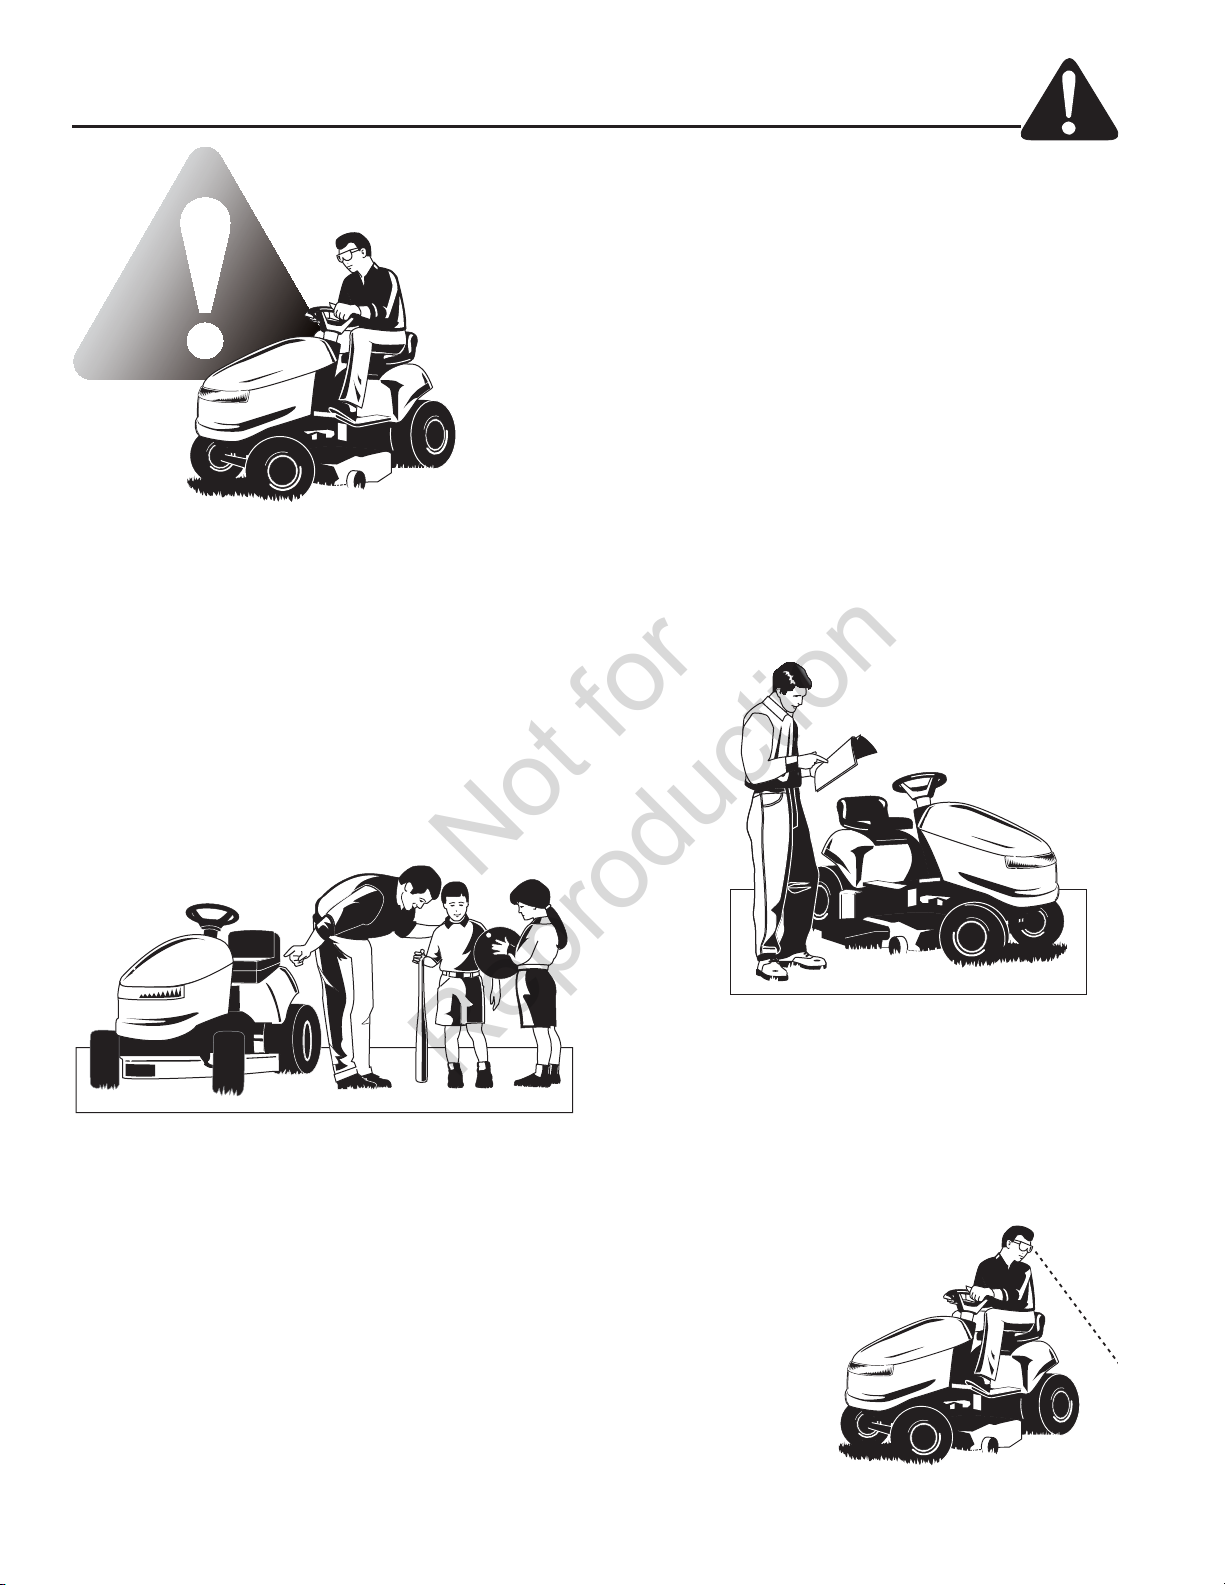
Children
Tragic accidents can occur with children. Do not allow them
anywhere near the area of operation. Children are often
attracted to the unit and mowing activity. Never assume that
children will remain where you last saw them. If there is a
risk that children may enter the area where you are mowing,
have another responsible adult watch them.
DO NOT GIVE CHILDREN RIDES ON THIS UNIT! This
encourages them to come near the unit in the future while it
is running, and they could be seriously hurt. They may then
approach the unit for a ride when you are not expecting it,
and you may run over them.
Reverse
Do not mow in reverse unless
absolutely necessary. Always look
down and behind before and
while traveling in reverse
even with the mower
blades disengaged.
2
Page 5

Safety Rules and Information
Not for
Reproduction
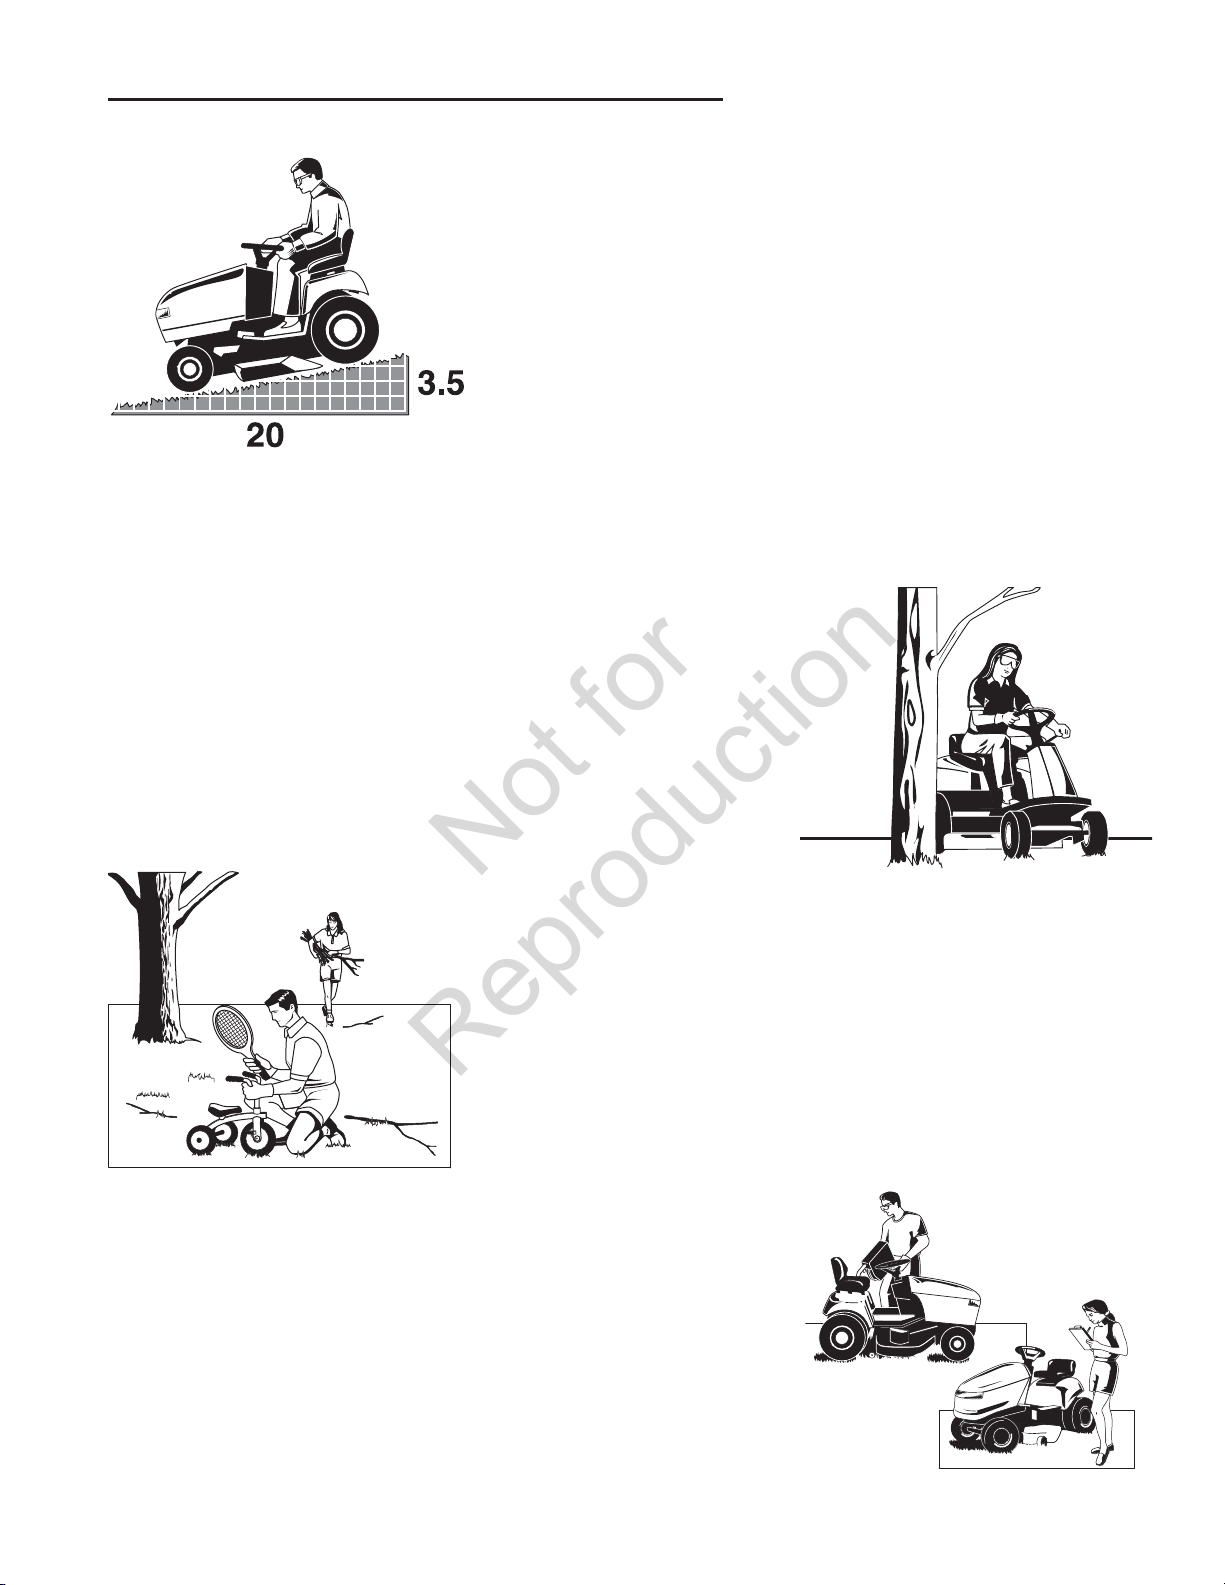
Slope Operation
You could be seriously injured or even killed if you use this unit on too
steep an incline. Using the unit on a slope that is too steep or where you
don’t have adequate traction can cause you to lose control or roll over.
A good rule of thumb is to not operate on any slope you cannot back up
(in 2-wheel drive mode). You should not operate on inclines with a slope
greater than a 3.5 foot rise over a 20 foot length. Always drive up and
down slopes: never cross the face.
Also note that the surface you are driving on can greatly impact stability
and control. Wet grass or icy pavement can seriously affect your ability
to control the unit.
If you feel unsure about operating the unit on an incline, don’t do it. It’s
not worth the risk.
Moving Parts
This equipment has many moving parts that can injure you or someone else.
However, if you are seated in the seat properly, and follow all the rules in this book,
the unit is safe to operate.
The mower deck has spinning mower blades that can amputate hands and feet.
Do not allow anyone near the equipment while it is running!
To help you, the operator, use this equipment safely, it is equipped with an
operator-present safety system. Do NOT attempt to alter or bypass the system.
See your dealer immediately if the system does not pass all the safety interlock
system tests found in this manual.
Thrown Objects
This unit has spinning mower blades. These blades can pick up and throw
debris that could seriously injure a bystander. Be sure to clean up the area to
be mowed BEFORE you start mowing.
Do not operate this unit without the entire grass catcher or discharge guard
(deflector) in place.
Also, do not allow anyone in the area while the unit is running! If someone
does enter the area, shut the unit off immediately until they leave.
Fuel and Maintenance
Gasoline is extremely flammable. Its vapors are also extremely flammable
and can travel to distant ignition sources. Gasoline must only be used as a
fuel, not as a solvent or cleaner. It should never be stored any place where
its vapors can build up or travel to an ignition source like a pilot light. Fuel
belongs in an approved, plastic, sealed gas can, or in the tractor fuel tank
with the cap securely closed. Spilled fuel needs to be cleaned up
immediately.
Proper maintenance is critical to the safety and performance of your unit. Be
sure to perform the maintenance procedures listed in this manual, especially
periodically testing the safety system.
3
Page 6

Safety Rules & Information
Not for
Reproduction
Read these safety rules and follow them closely. Failure to obey these rules could result in loss of control
of unit, severe personal injury or death to you, or bystanders, or damage to property or equipment.
This mowing deck is capable of amputating hands and feet and throwing objects.
The triangle in text signifies important cautions or warnings which must be followed.
GENERAL OPERATION
1. Read, understand, and follow all instructions in the
manual and on the unit before starting.
2. Do not put hands or feet near rotating parts or under
the machine. Keep clear of the discharge opening at
all times.
3. Only allow responsible adults, who are familiar with
the instructions, to operate the unit (local regulations
can restrict operator age).
4. Clear the area of objects such as rocks, toys, wire,
etc., which could be picked up and thrown by the
blade(s).
5. Be sure the area is clear of other people before
mowing. Stop the unit if anyone enters the area.
6. Never carry passengers.
7. Do not mow in reverse unless absolutely necessary.
Always look down and behind before and while
travelling in reverse.
8. Never direct discharge material toward anyone. Avoid
discharging material against a wall or obstruction.
Material may ricochet back toward the operator. Stop
the blade(s) when crossing gravel surfaces.
9. Do not operate the machine without the entire grass
catcher, discharge guard (deflector), or other safety
devices in place.
10. Slow down before turning.
11. Never leave a running unit unattended. Always
disengage the PTO, set parking brake, stop engine,
and remove keys before dismounting.
12. Disengage blades (PTO) when not mowing. Shut off
engine and wait for all parts to come to a complete
stop before cleaning the machine, removing the grass
catcher, or unclogging the discharge guard.
13. Operate the machine only in daylight or good artificial
light.
14. Do not operate the unit while under the influence of
alcohol or drugs.
15 Watch for traffic when operating near or crossing
roadways.
16. Use extra care when loading or unloading the unit into
a trailer or truck.
17. Always wear eye protection when operating this unit.
18. Data indicates that operators, age 60 years and
above, are involved in a large percentage of power
equipment-related injuries. These operators should
evaluate their ability to operate the equipment safely
enough to protect themselves and others from injury.
19. Follow the manufacturer’s recommendations for wheel
weights or counterweights.
20. Keep in mind the operator is responsible for accidents
occurring to other people or property.
21. All drivers should seek and obtain professional and
practical instruction.
22. Always wear substantial footwear and trousers. Never
operate when barefoot or wearing sandals.
23. Before using, always visually check that the blades
and blade hardware are present, intact, and secure.
Replace worn or damaged parts.
24. Disengage attachments before: refueling, removing an
attachment, making adjustments (unless the
adjustment can be made from the operator’s position).
25. When the machine is parked, stored, or left
unattended, lower the cutting means unless a positive
mechanical lock is used.
26. Before leaving the operator’s position for any reason,
engage the parking brake (if equipped), disengage the
PTO, stop the engine, and remove the key.
27. To reduce fire hazard, keep the unit free of grass,
leaves, & excess oil. Do not stop or park over dry
leaves, grass, or combustible materials.
TRANSPORTING AND STORAGE
1. When transporting the unit on an open trailer, make
sure it is facing forward, in the direction of travel. If
the unit is facing backwards, wind lift could damage
the unit.
2. Always observe safe refueling and fuel handling
practices when refueling the unit after transportation
or storage.
3. Never store the unit (with fuel) in an enclosed poorly
ventilated structure. Fuel vapors can travel to an
ignition source (such as a furnace, water heater, etc.)
and cause an explosion. Fuel vapor is also toxic to
humans and animals.
4. Always follow the engine manual instructions for
storage preparations before storing the unit for both
short and long term periods.
5. Always follow the engine manual instructions for
proper start-up procedures when returning the unit to
service.
6. Never store the unit or fuel container inside where
there is an open flame or pilot light, such as in a water
heater. Allow unit to cool before storing.
4
Page 7

Safety Rules and Information
Not for
Reproduction
SLOPE OPERATION
Slopes are a major factor related to loss-of-control and tipover accidents, which can result in severe injury or death.
Operation on all slopes requires extra caution. If you cannot
back up the slope or if you feel uneasy on it, do not operate
on it.
Control of a walk-behind or ride-on machine sliding on a
slope will not be regained by the application of the brake.
The main reasons for loss of control are: insufficient tire grip
on the ground, speed too fast, inadequate braking, the type
of machine is unsuitable for its task, lack of awareness of
the ground conditions, incorrect hitching and load
distribution.
1. Mow up and down slopes, not across.
2. Watch for holes, ruts, or bumps. Uneven terrain could
overturn the unit. Tall grass can hide obstacles.
3. Choose a slow speed so that you will not have to stop
or change speeds while on the slope.
4. Do not mow on wet grass. Tires may loose traction.
5. Always keep unit in gear especially when traveling
down slopes. Do not shift to neutral and coast
downhill.
6. Avoid starting, stopping, or turning on a slope. If tires
lose traction, disengage the blade(s) and proceed
slowly straight down the slope.
7. Keep all movement on slopes slow and gradual. Do
not make sudden changes in speed or direction,
which could cause the machine to rollover.
8. Use extra care while operating machines with grass
catchers or other attachments; they can affect the
stability of the unit. Do not use on steep slopes.
9. Do not try to stabilize the machine by putting your foot
on the ground (ride-on units).
10. Do not mow near drop-offs, ditches, or embankments.
The mower could suddenly turn over if a wheel is over
the edge of a cliff or ditch, or if an edge caves in.
11. Do not use grass catchers on steep slopes.
12. Do not mow slopes you cannot back up them.
13. See your authorized dealer/retailer for
recommendations of wheel weights or counterweights
to improve stability.
14. Remove obstacles such as rocks, tree limbs, etc.
15. Use slow speed. Tires may lose traction on slopes
even through the brakes are functioning properly.
16. Do not turn on slopes unless necessary, and then,
turn slowly and gradually downhill, if possible.
WARNING
Never operate on slopes greater than 17.6 percent
(10°) which is a rise of 3-1/2 feet (106 cm) vertically in
20 feet (607 cm) horizontally.
When operating on slopes use additional wheel
weights or counterweights. See your dealer/retailer
to determine which weights are available and
appropriate for your unit.
Select slow ground speed before driving onto slope.
In addition to front weights, use extra caution when
operating on slopes with rear-mounted grass
catchers.
Mow UP and DOWN the slope, never across the
face, use caution when changing directions and DO
NOT START OR STOP ON SLOPE.
CHILDREN
Tragic accidents can occur if the operator is not alert to the
presence of children. Children are often attracted to the unit
and the mowing activity. Never assume that children will
remain where you last saw them.
1. Keep children out of the mowing area and under the
watchful care of another responsible adult.
2. Be alert and turn unit off if children enter the area.
3. Before and during reverse operation, look behind and
down for small children.
4. Never carry children, even with the blade(s) off. They
may fall off and be seriously injured or interfere with
safe unit operation. Children who have been given
rides in the past may suddenly appear in the mowing
area for another ride and be run over or backed over
by the machine.
5. Never allow children to operate the unit.
6. Use extra care when approaching blind corners,
shrubs, trees, or other objects that may obscure
vision.
EMISSIONS
1. Engine exhaust from this product contains chemicals
known, in certain quantities, to cause cancer, birth
defects, or other reproductive harm.
2. Look for the relevant Emissions Durability Period and
Air Index information on the engine emissions label.
TOWED EQUIPMENT (RIDE-ON UNITS)
1. Tow only with a machine that has a hitch designed for
towing. Do not attach towed equipment except at the
hitch point.
2. Follow the manufacturer’s recommendations for
weight limit for towed equipment and towing on
slopes.
3. Never allow children or others in or on towed
equipment.
4. On slopes, the weight of the towed equipment may
cause loss of traction and loss of control.
5. Travel slowly and allow extra distance to stop.
6. Do not shift to neutral and coast down hill.
IGNITION SYSTEM
1. This spark ignition system complies with Canadian
ICES-002.
5
Page 8

Safety Rules & Information
Not for
Reproduction
SERVICE AND MAINTENANCE
Safe Handling of Gasoline
1. Extinguish all cigarettes, cigars, pipes, and other
sources of ignition.
2. Use only approved gasoline containers.
3. Never remove the gas cap or add fuel with the engine
running. Allow the engine to cool before refueling.
4. Never fuel the machine indoors.
5. Never store the machine or fuel container where there
is an open flame, spark, or pilot light such as near a
water heater or other appliance.
6. Never fill containers inside a vehicle or on a truck bed
with a plastic bed liner. Always place containers on
the ground away from your vehicle before filling.
7. Remove gas-powered equipment from the truck or
trailer and refuel it on the ground. If this is not
possible, then refuel such equipment on a trailer with a
portable container, rather than from a gasoline
dispenser nozzle.
8. Keep nozzle in contact with the rim of the fuel tank or
container opening at all times until fueling is complete.
Do not use a nozzle lock-open device.
9. If fuel is spilled on clothing, change clothing
immediately.
10. Never over-fill the fuel tank. Replace gas cap and
tighten securely.
11. Use extra care in handling gasoline and other fuels.
They are flammable and vapors are explosive.
12. If fuel is spilled, do not attempt to start the engine but
move the machine away from the area of spillage and
avoid creating any source of ignition until fuel vapors
have dissipated.
13. Replace all fuel tank caps and fuel container caps
securely.
Service & Maintenance
1. Never run the unit in an enclosed area where carbon
monoxide fumes may collect.
2. Keep nuts and bolts, especially blade attachment
bolts, tight and keep equipment in good condition.
3. Never tamper with safety devices. Check their proper
operation regularly and make necessary repairs if they
are not functioning properly.
4. Keep unit free of grass, leaves, or other debris buildup. Clean up oil or fuel spillage. and remove any fuelsoaked debris. Allow machine to cool before storage.
5. If you strike an object, stop and inspect the machine.
Repair, if necessary, before restarting.
6. Never make adjustments or repairs with the engine
running.
7. Check grass catcher components and the discharge
guard frequently and replace with manufacturer’s
recommended parts, when necessary.
8. Mower blades are sharp. Wrap the blade or wear
gloves, and use extra caution when servicing them.
9. Check brake operation frequently. Adjust and service
as required.
10. Maintain or replace safety and instructions labels, as
necessary.
11. Do not remove the fuel filter when the engine is hot as
spilled gasoline may ignite. Do not spread fuel line
clamps further than necessary. Ensure clamps grip
hoses firmly over the filter after installation.
12. Do not use gasoline containing METHANOL, gasohol
containing more than 10% ETHANOL, gasoline
additives, or white gas because engine/fuel system
damage could result.
13. If the fuel tank must be drained, it should be drained
outdoors.
14. Replace faulty silencers/mufflers.
15. Use only factory authorized replacement parts when
making repairs.
16. Always comply with factory specifications on all
settings and adjustments.
17. Only authorized service locations should be utilized for
major service and repair requirements.
18. Never attempt to make major repairs on this unit
unless you have been properly trained. Improper
service procedures can result in hazardous operation,
equipment damage and voiding of manufacturer’s
warranty.
19. On multiple blade mowers, take care as rotating one
blade can cause other blades to rotate.
20. Do not change engine governor settings or overspeed the engine. Operating the engine at excessive
speed can increase the hazard of personal injury.
21. Disengage drive attachments, stop the engine,
remove the key, and disconnect the spark plug wire(s)
before: clearing attachment blockages and chutes,
performing service work, striking an object, or if the
unit vibrates abnormally. After striking an object,
inspect the machine for damage and make repairs
before restarting and operating the equipment.
22. Never place hands near the moving parts, such as a
hydro pump cooling fan, when the tractor is running.
(Hydro pump cooling fans are typically located on top
of the transaxle).
23. Units with hydraulic pumps, hoses, or motors:
WARNING: Hydraulic fluid escaping under pressure
may have sufficient force to penetrate skin and cause
serious injury. If foreign fluid is injected into the skin it
must be surgically removed within a few hours by a
doctor familiar with this form of injury or gangrene may
result. Keep body and hands away from pin holes or
nozzles that eject hydraulic fluid under high pressure.
Use paper or cardboard, and not hands, to search for
leaks. Make sure all hydraulic fluid connections are
tight and all hydraulic hoses and lines are in good
condition before applying pressure to the system. If
leaks occur, have the unit serviced immediately by
your authorized dealer.
24. WARNING: Stored energy device. Improper release
of springs can result in serious personal injury.
Springs should be removed by an authorized
technician.
25. Models equipped with an engine radiator: WARNING:
Stored energy device. To prevent serious bodily injury
from hot coolant or steam blow-out, never attempt to
remove the radiator cap while the engine is running.
Stop the engine and wait until it is cool. Even then,
use extreme care when removing the cap.
6
Page 9
S
A
M
P
L
E
Identification Numbers
Not for
Reproduction
Part No. xxxxxxx
S
A
xxxxxxxxxxxxxxx
Serial No. xxxxxxxxxx
xxxxxxxxxxxxxxxxxxxxxxx
xxxxxxxxxxxxxxxxxxxxxxx
xxxxxxxxxxxxxxxxxxxxxxx
xxxxxxxxxxxxxxxxxxxxxxx
M
P
L
xxx dB
E
20xx
kg: xxx
kW: x.xx
xxxx max
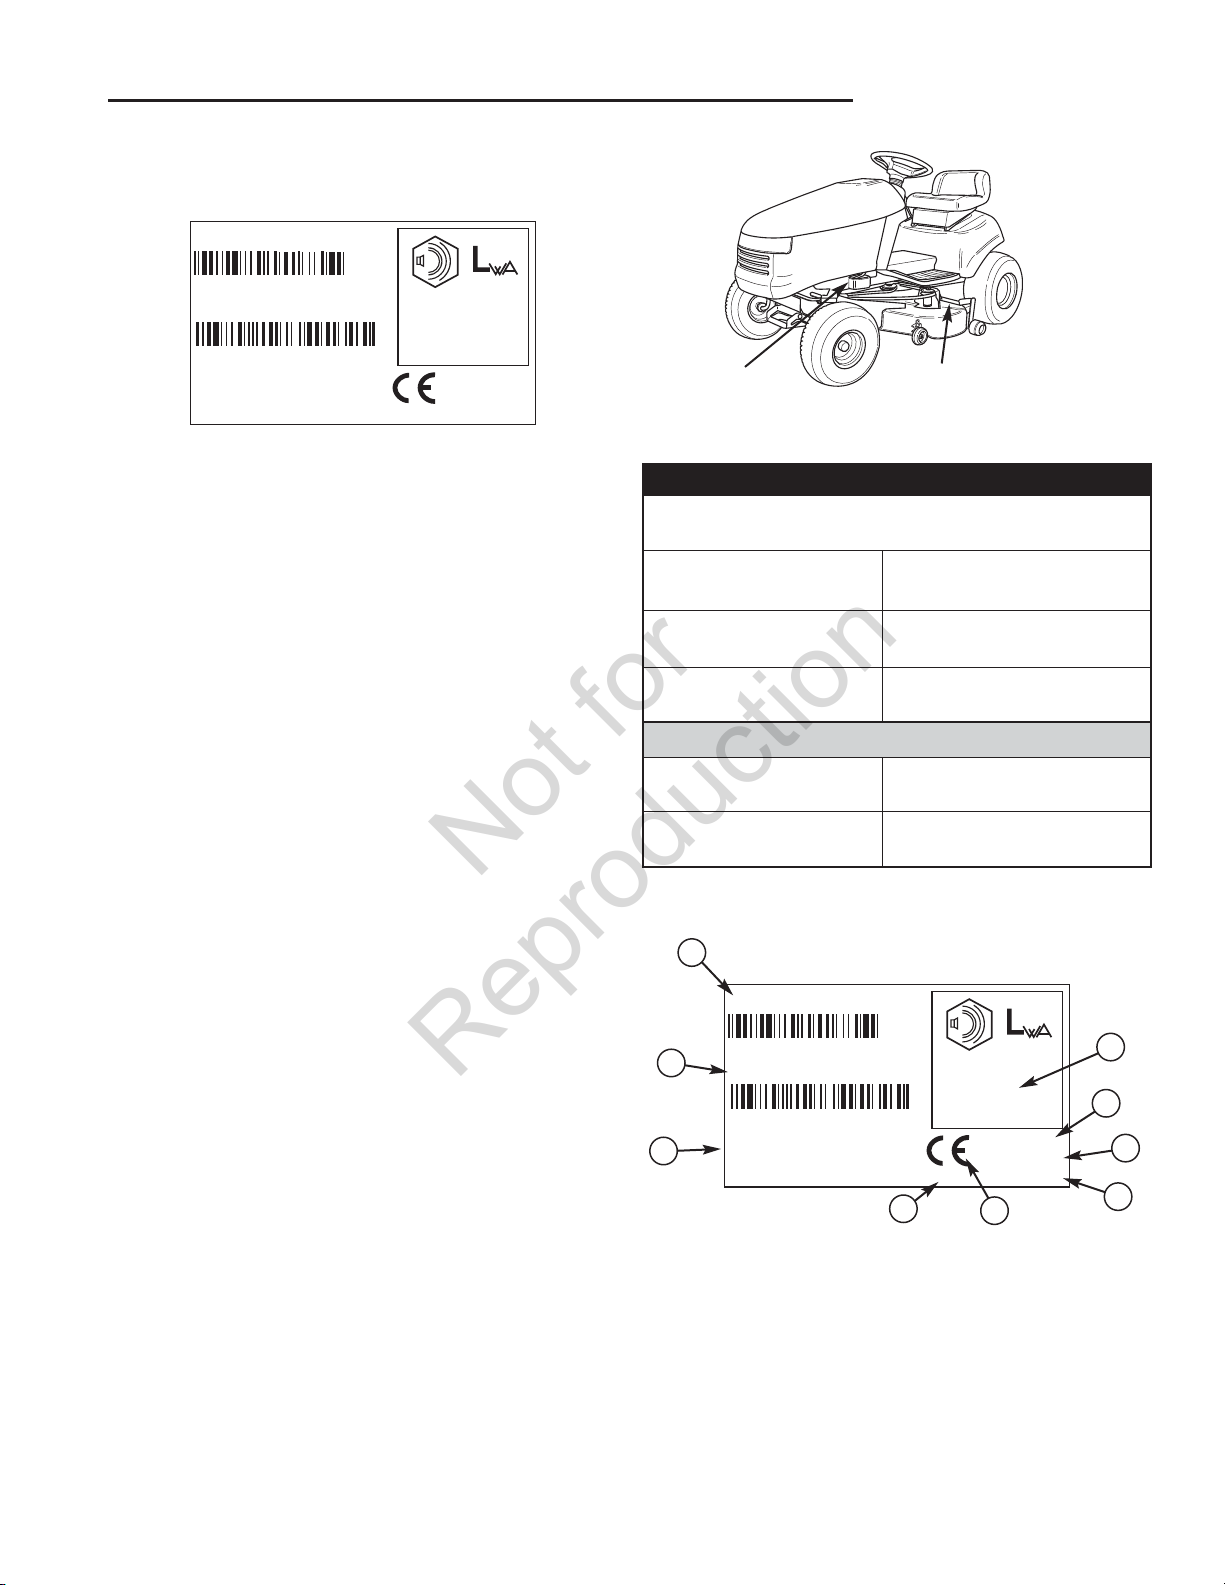
Tractor ID Tag
Identification Numbers
Mower ID Tag
When contacting your authorized dealer for
replacement parts, service, or information you MUST
have these numbers.
Record your model name/number, manufacturer’s
identification numbers, and engine serial numbers in the
space provided for easy access. These numbers can be
found in the locations shown.
NOTE: For location of engine identification numbers, refer
to the engine owner’s manual.
CE Identification Tag
A. Manufacturer’s Identification Number
B. Manufacturer’s Serial Number
C. Power Rating in Kilowatts
D. Maximum Engine Speed in Rotations per Minute
E. Manufacturer’s Name and Address
F. Year of Manufacture
G. CE Compliance Logo
H. Mass of Unit in Kilograms
I. Guaranteed Sound Power in Decibels
PRODUCT REFERENCE DATA
Model Description Name/Number
Unit Mfg Number
Mower Deck Mfg Number
Dealer Name
ENGINE REFERENCE DATA
Engine Make
Engine Type/Spec
A
Part No. xxxxxxx
B
E
xxxxxxxxxxxxxxx
Serial No. xxxxxxxxxx
xxxxxxxxxxxxxxxxxxxxxxx
xxxxxxxxxxxxxxxxxxxxxxx
xxxxxxxxxxxxxxxxxxxxxxx
xxxxxxxxxxxxxxxxxxxxxxx
Unit Serial Number
Mower Deck Serial Number
Date Purchased
Engine Model
Engine Code/Serial Number
xxx dB
kg: xxx
kW: x.xx
xxxx max
20xx
F
G
I
H
C
D
7
Page 10
Safety Decals
Not for
Reproduction
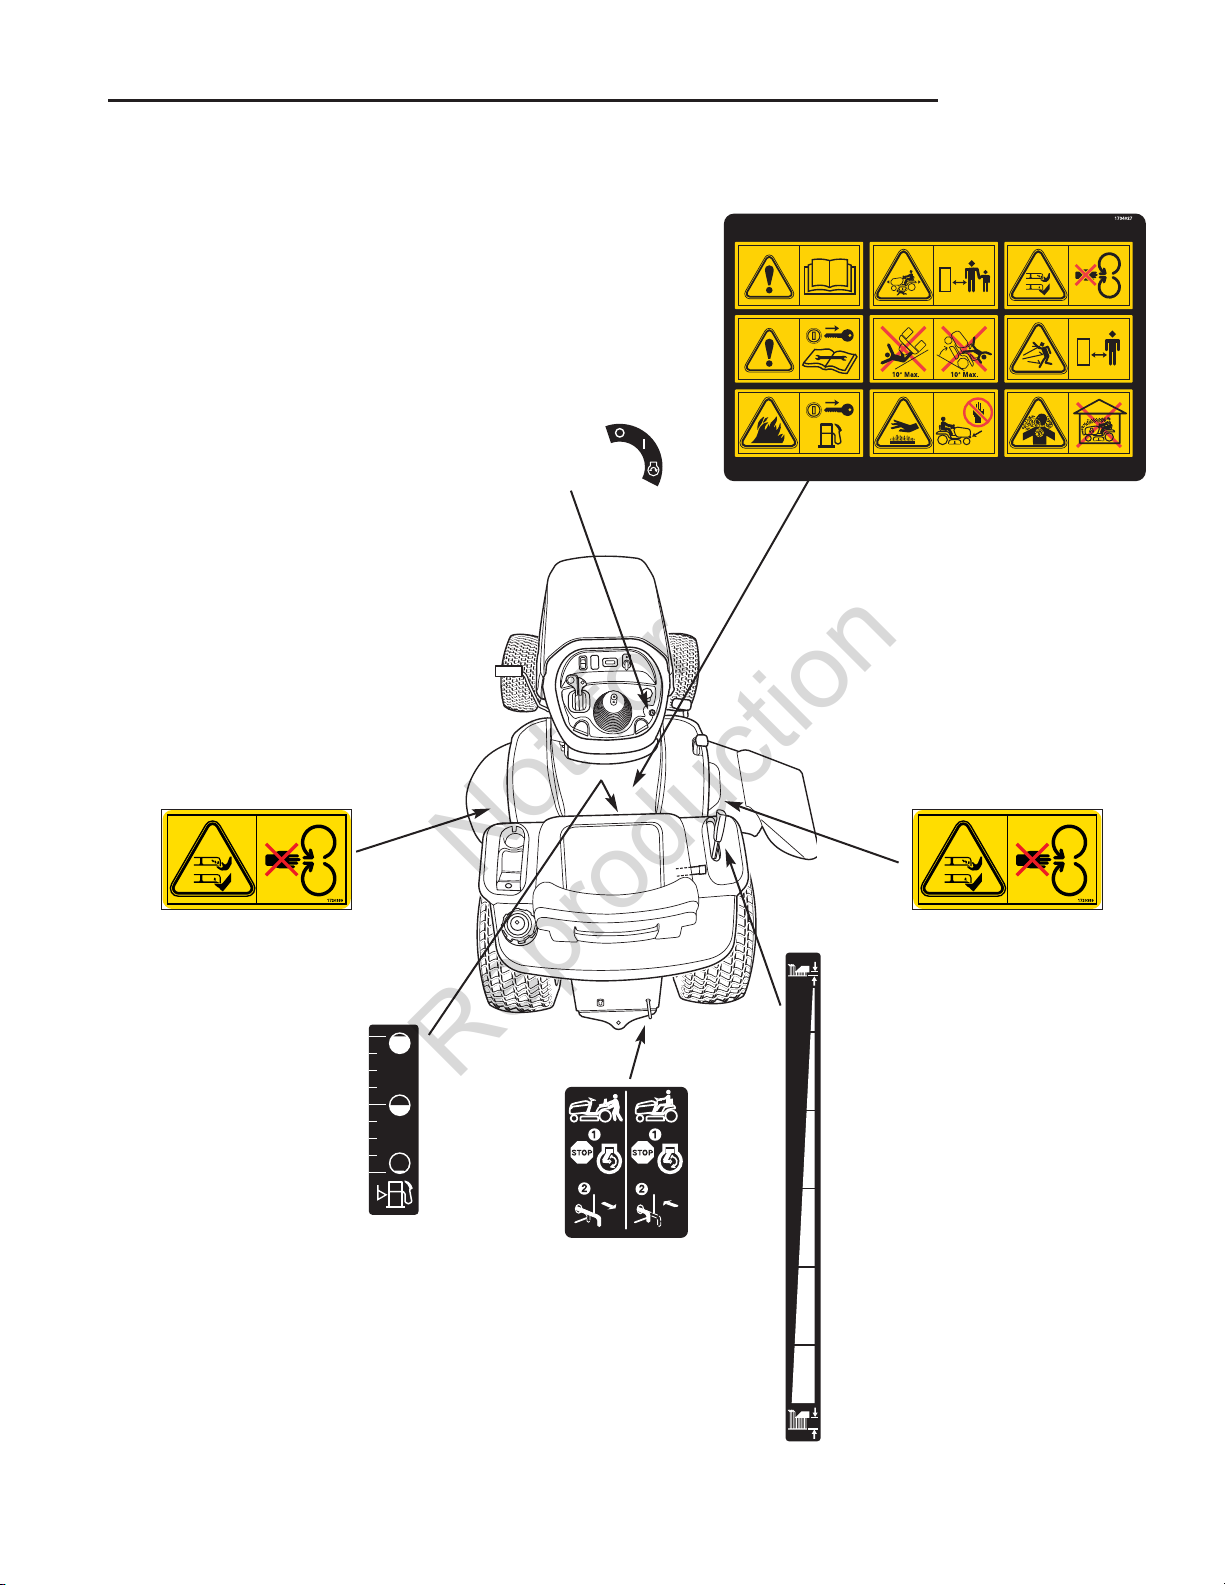
Safety Decals
All DANGER, WARNING, CAUTION and instructional
messages on your rider and mower should be carefully
read and obeyed. Personal bodily injury can result when
these instructions are not followed. The information is for
your safety and it is important! The safety decals below
are on your rider and mower.
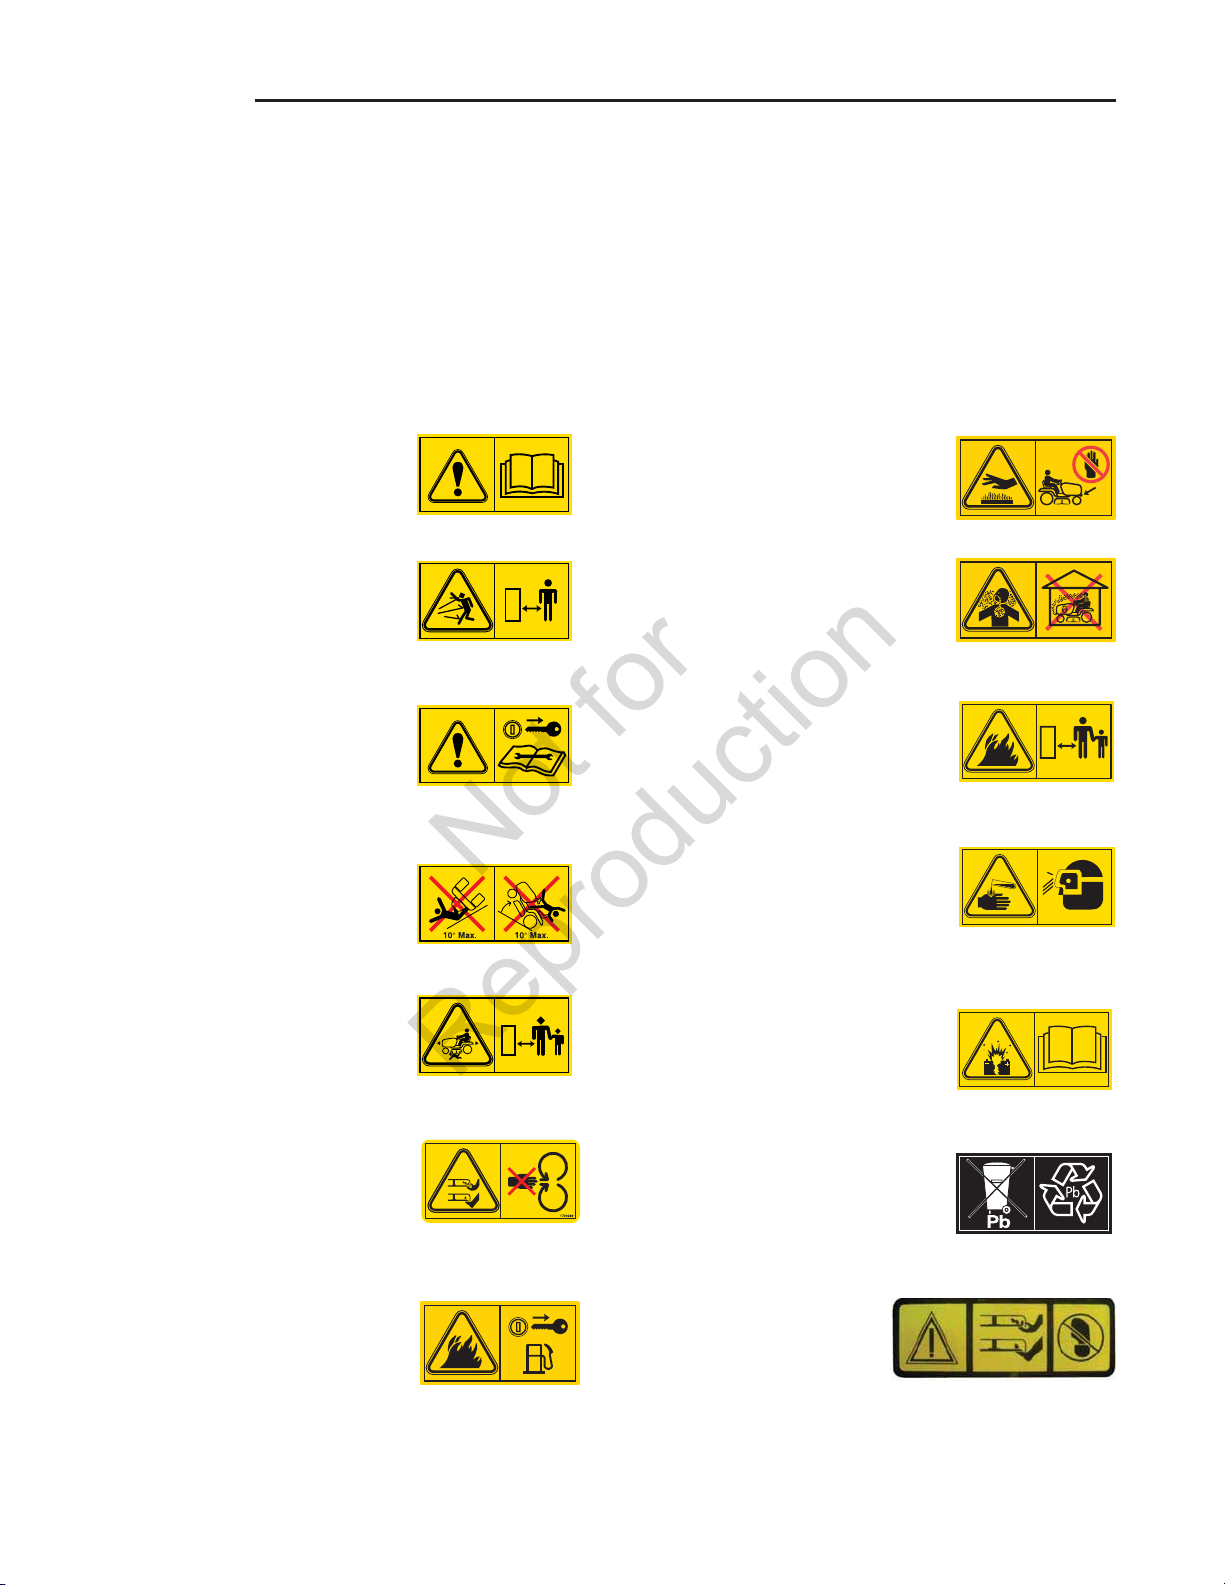
Safety Icons
Warning: Read Operator’s Manual.
Read and understand the Operator’s
Manual before using this machine.
Danger: Thrown Objects.
This machine is capable of throwing
objects and debris. Keep bystanders
away.
Warning: Remove Key Before
Servicing.
Remove the key and consult technical
literature before performing repairs or
maintenance.
If any of these decals are lost or damaged, replace them
at once. See your local dealer for replacements.
These labels are easily applied and will act as a constant
visual reminder to you, and others who may use the
equipment, to follow the safety instructions necessary for
safe, effective operation.
Danger: Hot Surface.
Allow machine to cool before
touching this area.
Danger: Carbon Monoxide
Poisoning.
Do not operate the engine in an
unventilated area.
Warning : Fire hazard
Keep children, open flames and
sparks away from the battery, which
could ignite explosive gases.
Danger: Machine Rollover.
Do not use this machine on slopes
greater than 10°.
Danger: Dismemberment.
This machine can amputate limbs.
Keep bystanders and children away
when engine is running.
Danger: Dismemberment.
This mower deck can amputate limbs.
Keep hands and feet away from
blades.
Danger: Fire Hazard.
Do not add fuel while engine is hot or
running. Stop engine and allow to
cool for 3 minutes prior to adding fuel.
Warning: Sulfuric acid can cause
blindness or severe burns
Always wear safety goggles or a face
shield when working on or near a
battery.
Warning: Batteries produce
explosive gases
Read and understand the Operator’s
Manual before using this machine.
Important: Do not discard a
battery in the trash
Contact local authorities for disposal
and/or recycling of batteries.
Danger: Dismemberment.
This mower deck can amputate limbs. Keep hands
and feet away from blades.
8
Page 11
CE Safety Icons
Not for
Reproduction
Decals Locations
Operating Instructions,
CE Models, Part No. 1734027
Ignition Switch
Positions
Part No. 1722806
CE-Danger, Rotating Blades,
Part No. 1720389
Fuel Level
Part No. 1730172
CE-Danger, Rotating Blades,
1730264
1730172
173xxxx
Transmission
Release
Part No. 1730202
Part No. 1720389
Attachment Lift
Part No. 1730264
9
Page 12
Features & Controls
Not for
Reproduction
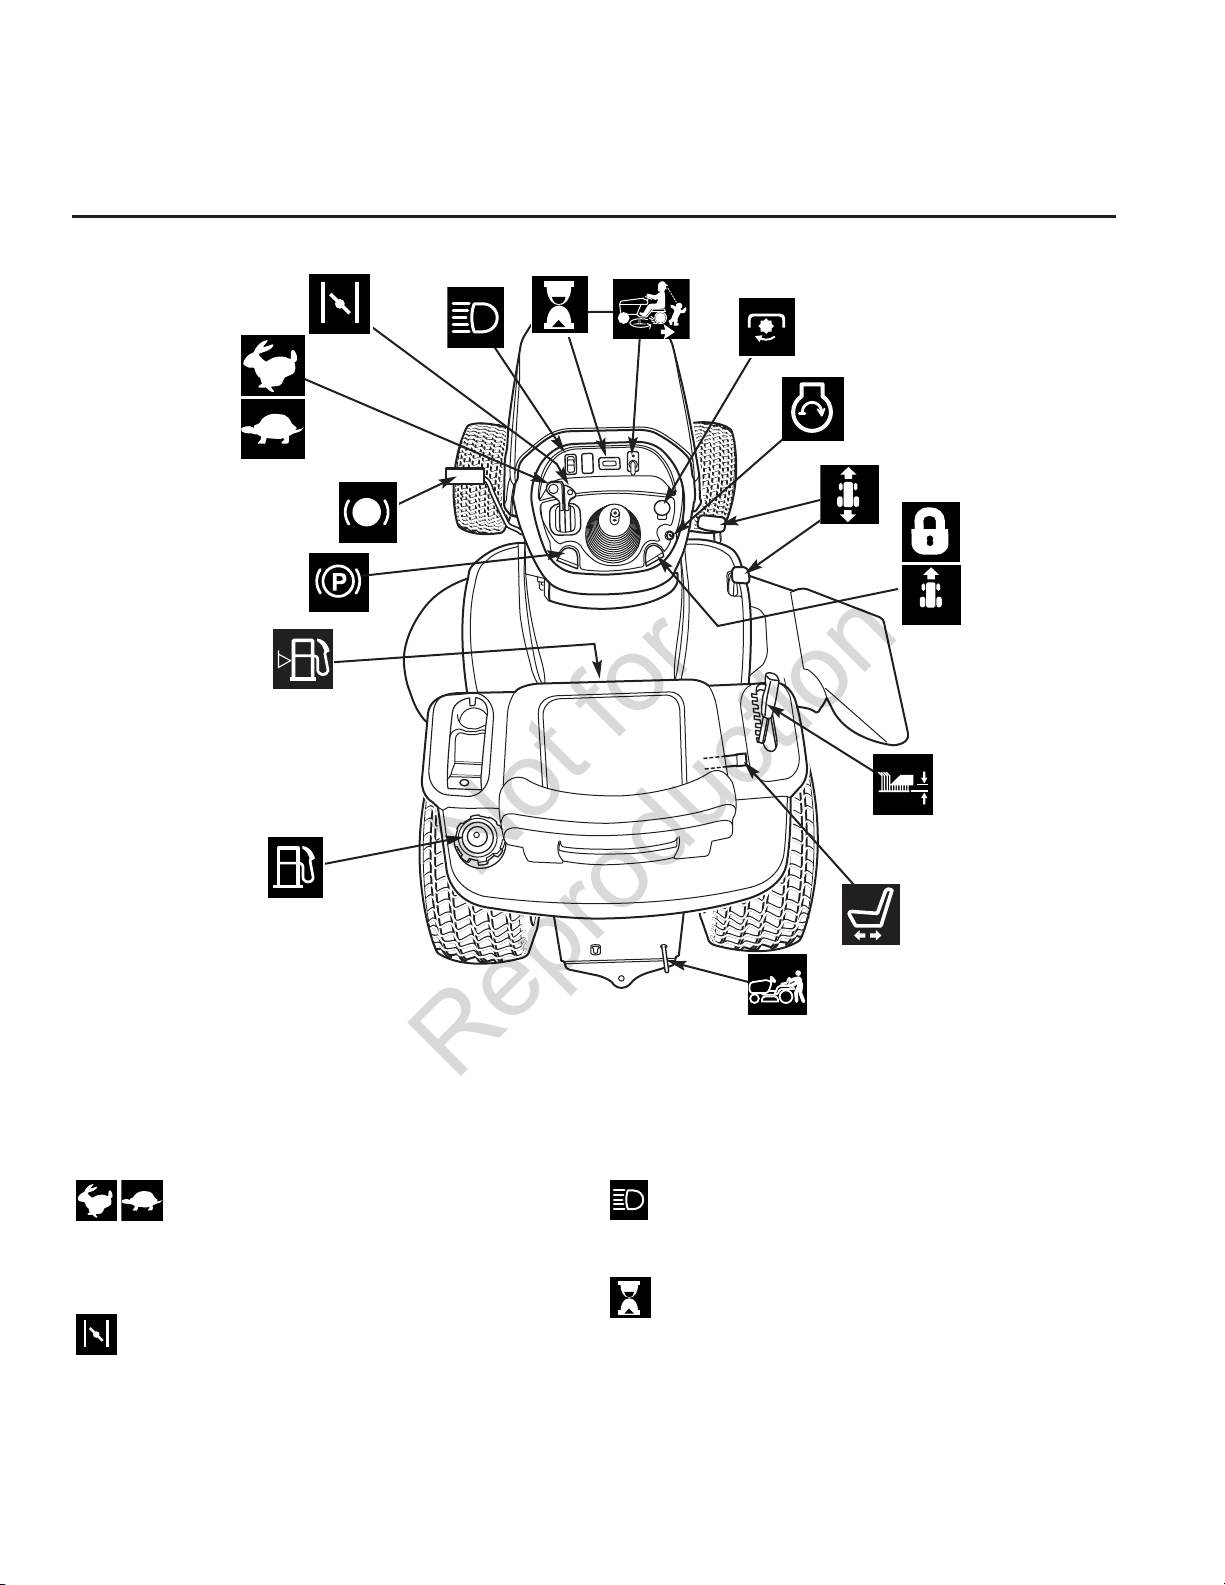
Figure 1. Controls
Control Functions
The information below briefly describes the function of individual controls. Starting, stopping, driving, and mowing
require the combined use of several controls applied in specific sequences. To learn what combination and sequence
of controls to use for various tasks see the OPERATION section.
Throttle Control
The throttle controls engine speed. Move the throttle
forward to increase engine speed and back to decrease
engine speed. Always operate at FULL throttle.
Choke
Close the choke for cold starting. Open the choke once
the engine starts. A warm engine may not require
choking. Move the lever forward to close the choke.
10
Headlights
The light switch turns the tractor headlights on and off.
Hour Meter
The hour meter measures the number of hours the key
has been in the RUN position.
Page 13
Features & Controls
Not for
Reproduction
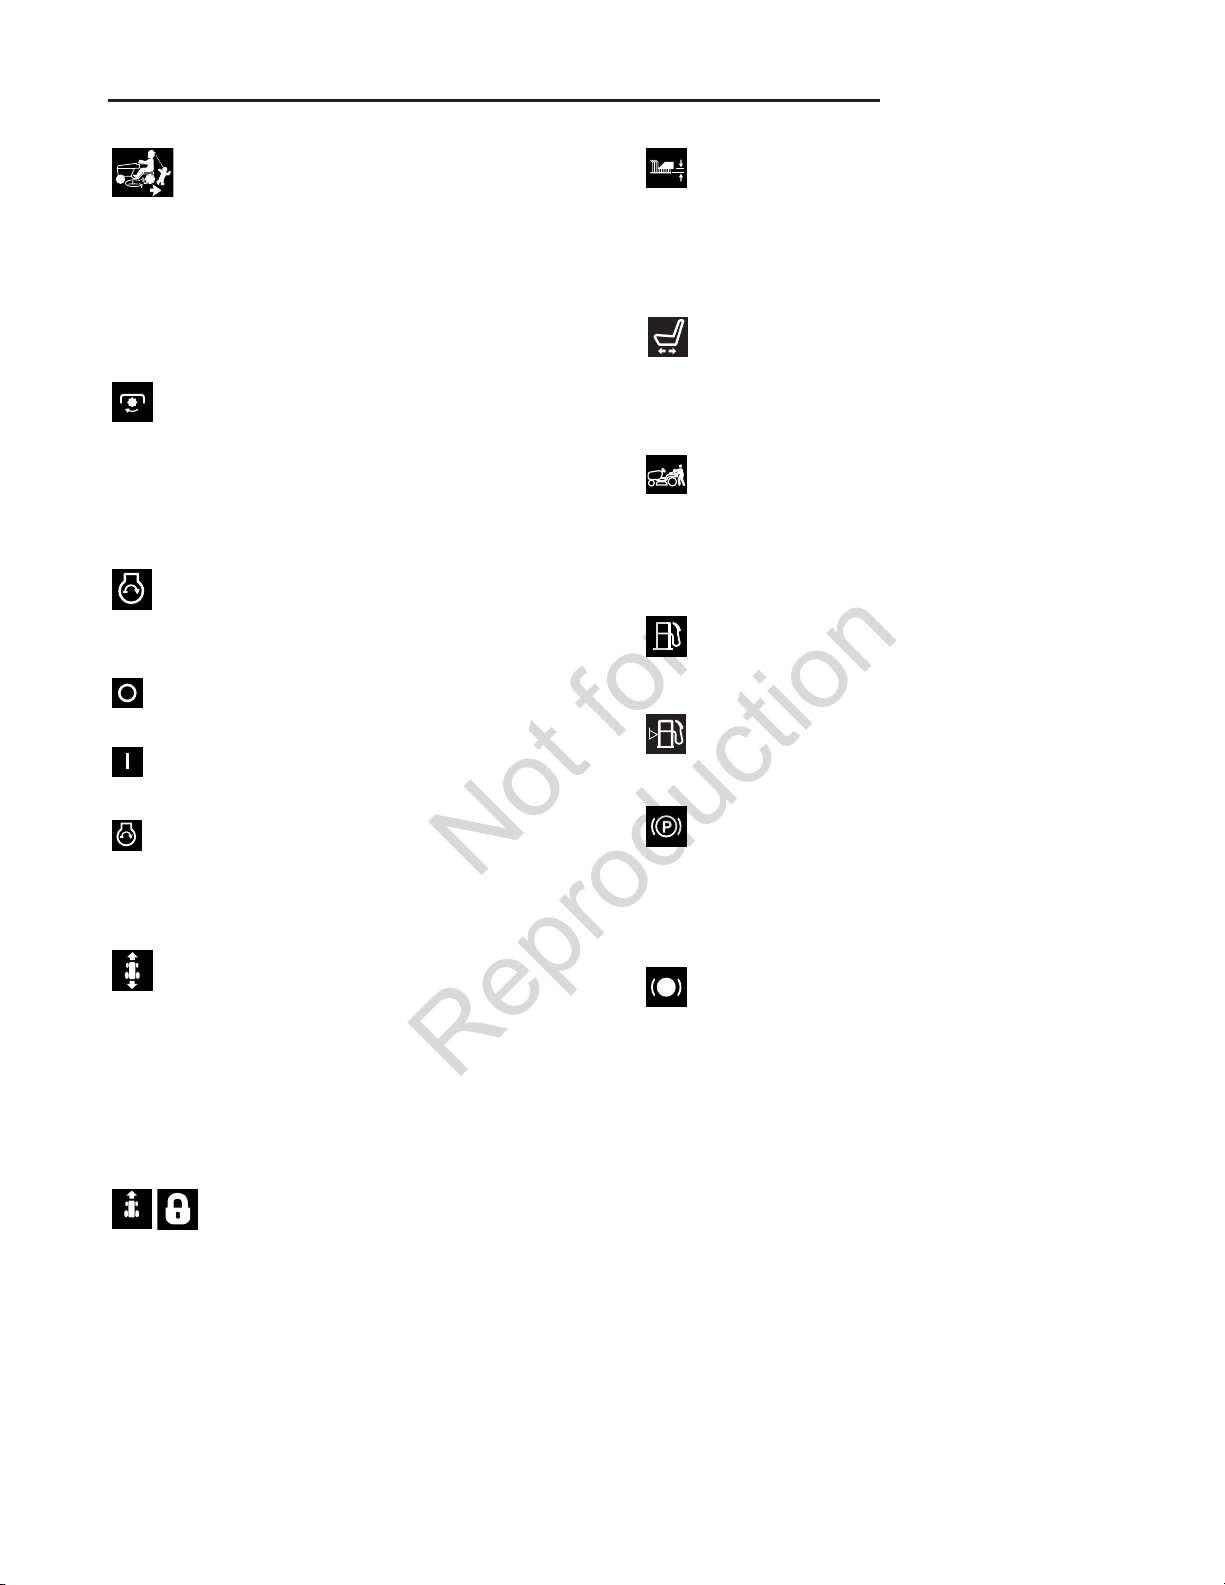
Reverse Mowing Option (RMO)
The Reverse Mowing Option allows for mowing (or use of
other PTO driven attachments) while traveling in reverse.
If you choose to mow in reverse, turn the RMO key after
the PTO is engaged. The L.E.D. light will illuminate, and
the operator can then mow in reverse. Each time the
PTO is engaged the RMO needs to be reactivated if
desired.
PTO Switch
The PTO (Power Take-Off) switch engages and
disengages attachments that use the PTO. To engage
the PTO, pull UP on the switch. Push DOWN to
disengage. Note that the operator must be seated firmly
in the tractor seat for the PTO to function.
Ignition Switch
The ignition switch starts and stops the engine, it has
three positions:
OFF Stops the engine and shuts off the
electrical system.
RUN Allows the engine to run and powers the
electrical system.
Mower Height of Cut Adjustment
The mower cutting height adjustment lever controls the
mower cutting height. The mower cutting height can be
set to one of seven positions between 1.0” and 4.0” (2,5
and 10,2 cm).
Seat Adjustment Lever
The seat can be adjusted forward and back. Move the
lever, position the seat as desired, and release the lever
to lock the seat into position.
Transmission Release Valve Lever
The transmission release valve lever deactivates the
transmission so that the tractor can be pushed by hand.
See PUSHING THE TRACTOR BY HAND for operational
information.
Fuel Tank
To remove the cap, turn counterclockwise.
Fuel Level Gauge
Displays the fuel level in the tank.
START Cranks the engine for starting.
NOTE: Never leave the ignition switch in the RUN
position with the engine stopped–this drains the battery.
Ground Speed Pedals
The tractor’s forward ground speed is controlled by the
forward ground speed control pedal. The tractor’s
reverse ground speed is controlled by the reverse ground
speed control pedal.
Depressing either pedal will increase ground speed.
Note that the further down the pedal is depressed, the
faster the tractor will travel.
Cruise Control
The cruise control is used to lock the ground speed
control in forward. The cruise control has five lock
positions.
Parking Brake
The parking brake knob is used to lock the parking brake
when the tractor is stopped. Fully depressing the brake
pedal and pulling up on the knob engages the parking
brake.
Brake Pedal
Depressing the brake pedal applies the tractor brake.
11
Page 14
Features & Controls
Not for
Reproduction
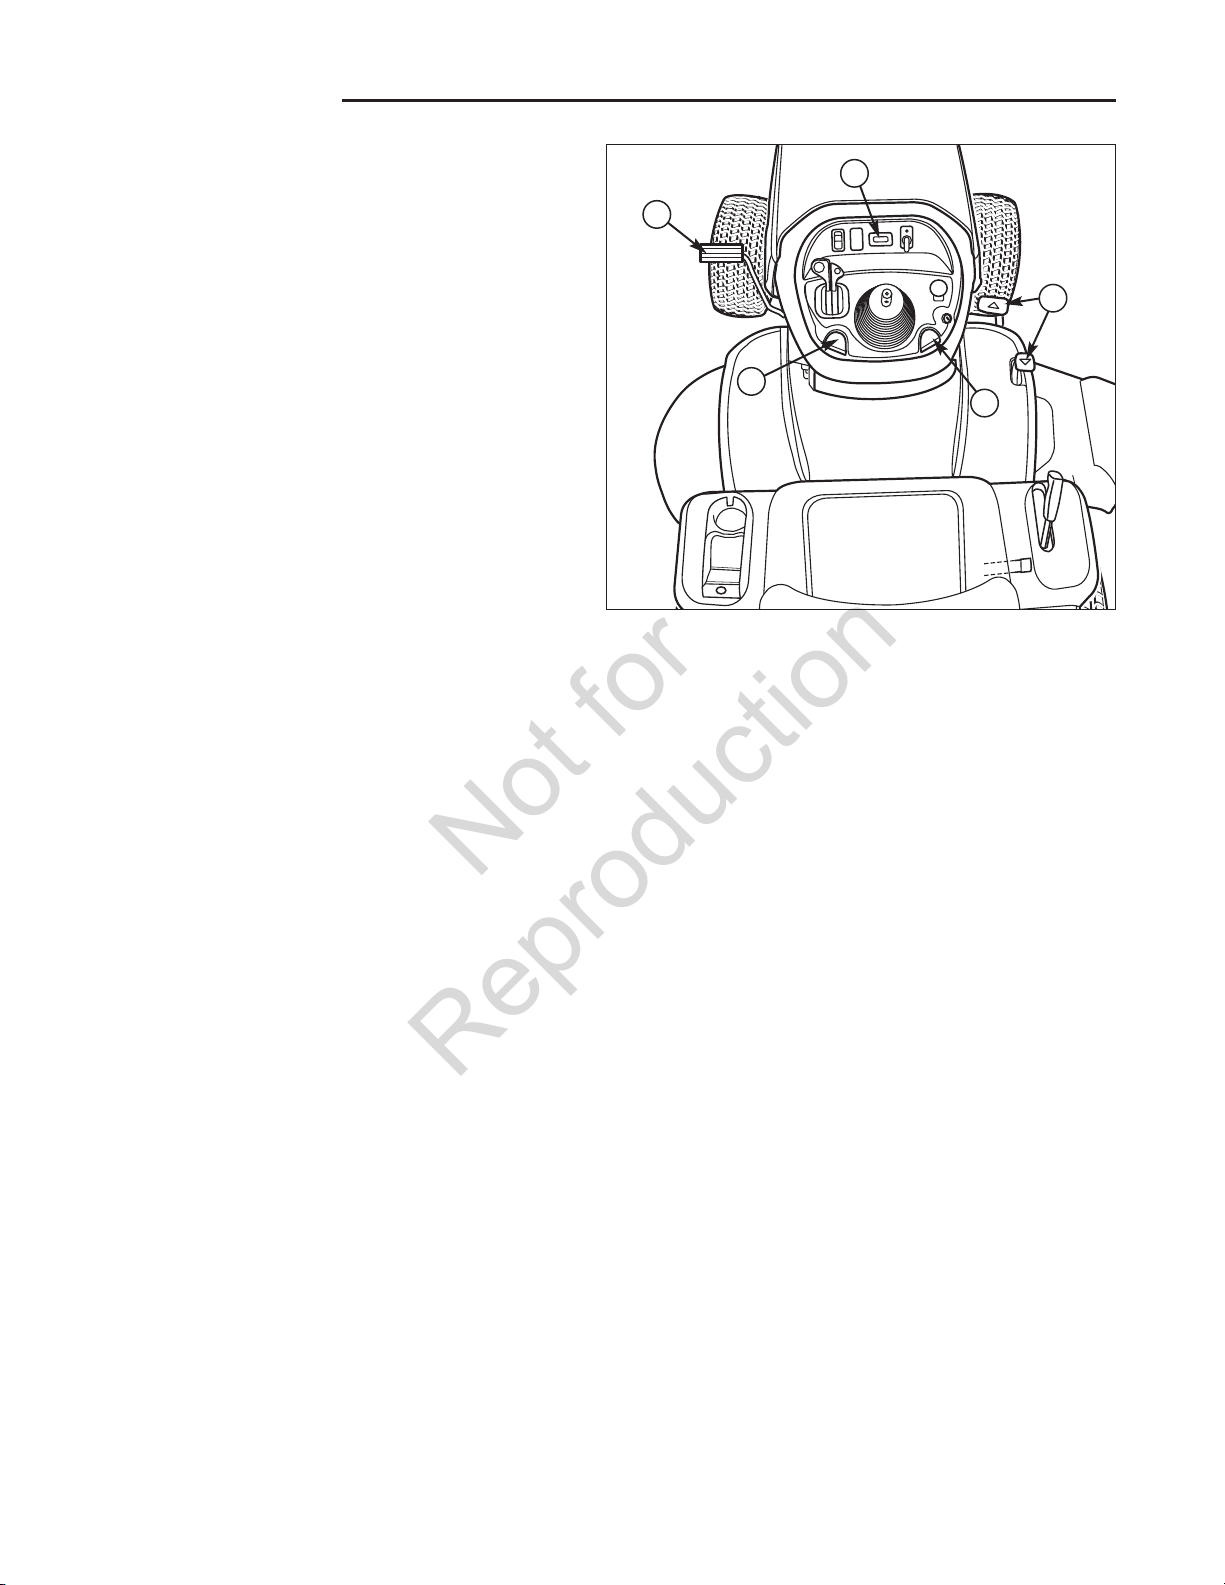
Parking Brake Function
Applying the Parking Brake - See Figure 2. To lock the
parking brake, release the ground speed pedals (A), fully
depress the brake pedal (B), pull UP on the parking brake
knob (C), and then release brake pedal.
Releasing the Parking Brake - See Figure 2. To
release the parking brake, depress the brake pedal (B).
Cruise Control Operation
TO ENGAGE:
1. Pull up on the cruise control knob (D, Figure 2).
2. Depress the forward ground speed pedal (A).
3. Lift up the Cruise control knob (D) when desired
speed is reached. The Cruise will lock in one of its
five locking positions.
TO DISENGAGE:
1. Depress the brake pedal (B).
OR
2. Depress the forward ground speed pedal (A).
E
B
A
C
D
Figure 2. Engaging the Parking Brake
A. Ground Speed Pedals
B. Brake Pedal
C. Parking Brake Knob
D. Cruise Control Knob
E. Hourmeter
Hourmeter
The hour meter (E, Figure 2) measures the number of
hours the key has been in the RUN position.
12
Page 15
Operating the Tractor
Not for
Reproduction
SAFETY INTERLOCK
SYSTEM TESTS
This unit is equipped with safety interlock switches and
other safety devices. These safety systems are present
for your safety: do not attempt to bypass safety
switches, and never tamper with safety devices. Check
their operation regularly.
Operational SAFETY Checks
Your unit is equipped with a seat switch safety system.
Check the seat switch operation every fall and spring
with the following tests.
Test 1 — Engine should NOT crank if:
• PTO switch is ON, OR
• Brake pedal is NOT fully depressed (parking brake
OFF), OR
• The cruise control lever is NOT in NEUTRAL.
Test 2 — Engine SHOULD crank and start if:
• Operator is sitting in seat, AND.
• PTO switch is OFF, AND
• Brake pedal is fully depressed (parking brake ON),
AND
• The cruise control lever is in NEUTRAL
Test 3 — Engine should SHUT OFF if:
• Operator rises off seat.
Test 4 — Check Mower Blade Stopping Time
Mower blades and mower drive belt should come to a
complete stop within five seconds after electric PTO
switch is turned OFF (or operator rises off seat). If mower
drive belt does not stop within five seconds, see your
dealer.
Test 5 — Reverse Mow Option (RMO) Check
• Engine should shut off if reverse travel is attempted if the
PTO has been switched on and RMO has not been
activated.
• RMO light should illuminate when RMO has been
activated.
WARNING
If the unit does not pass a safety test, do not
operate it. See your authorized dealer.
General Operating Safety
Be sure to read all information in the Safety and
Operation sections before attempting to operate this unit.
Become familiar with all of the controls and how to stop
the unit.
Adding Fuel
WARNING
Gasoline is highly flammable and must be
handled with care. Never fill the tank when the
engine is still hot from recent operation. Do not
allow open flame, smoking or matches in the
area. Avoid over-filling and wipe up any spills.
Do not use gasoline containing METHANOL,
gasohol containing more than
10% ETHANOL, gasoline additives, or white
gas because engine/fuel system damage
could result.
To add fuel:
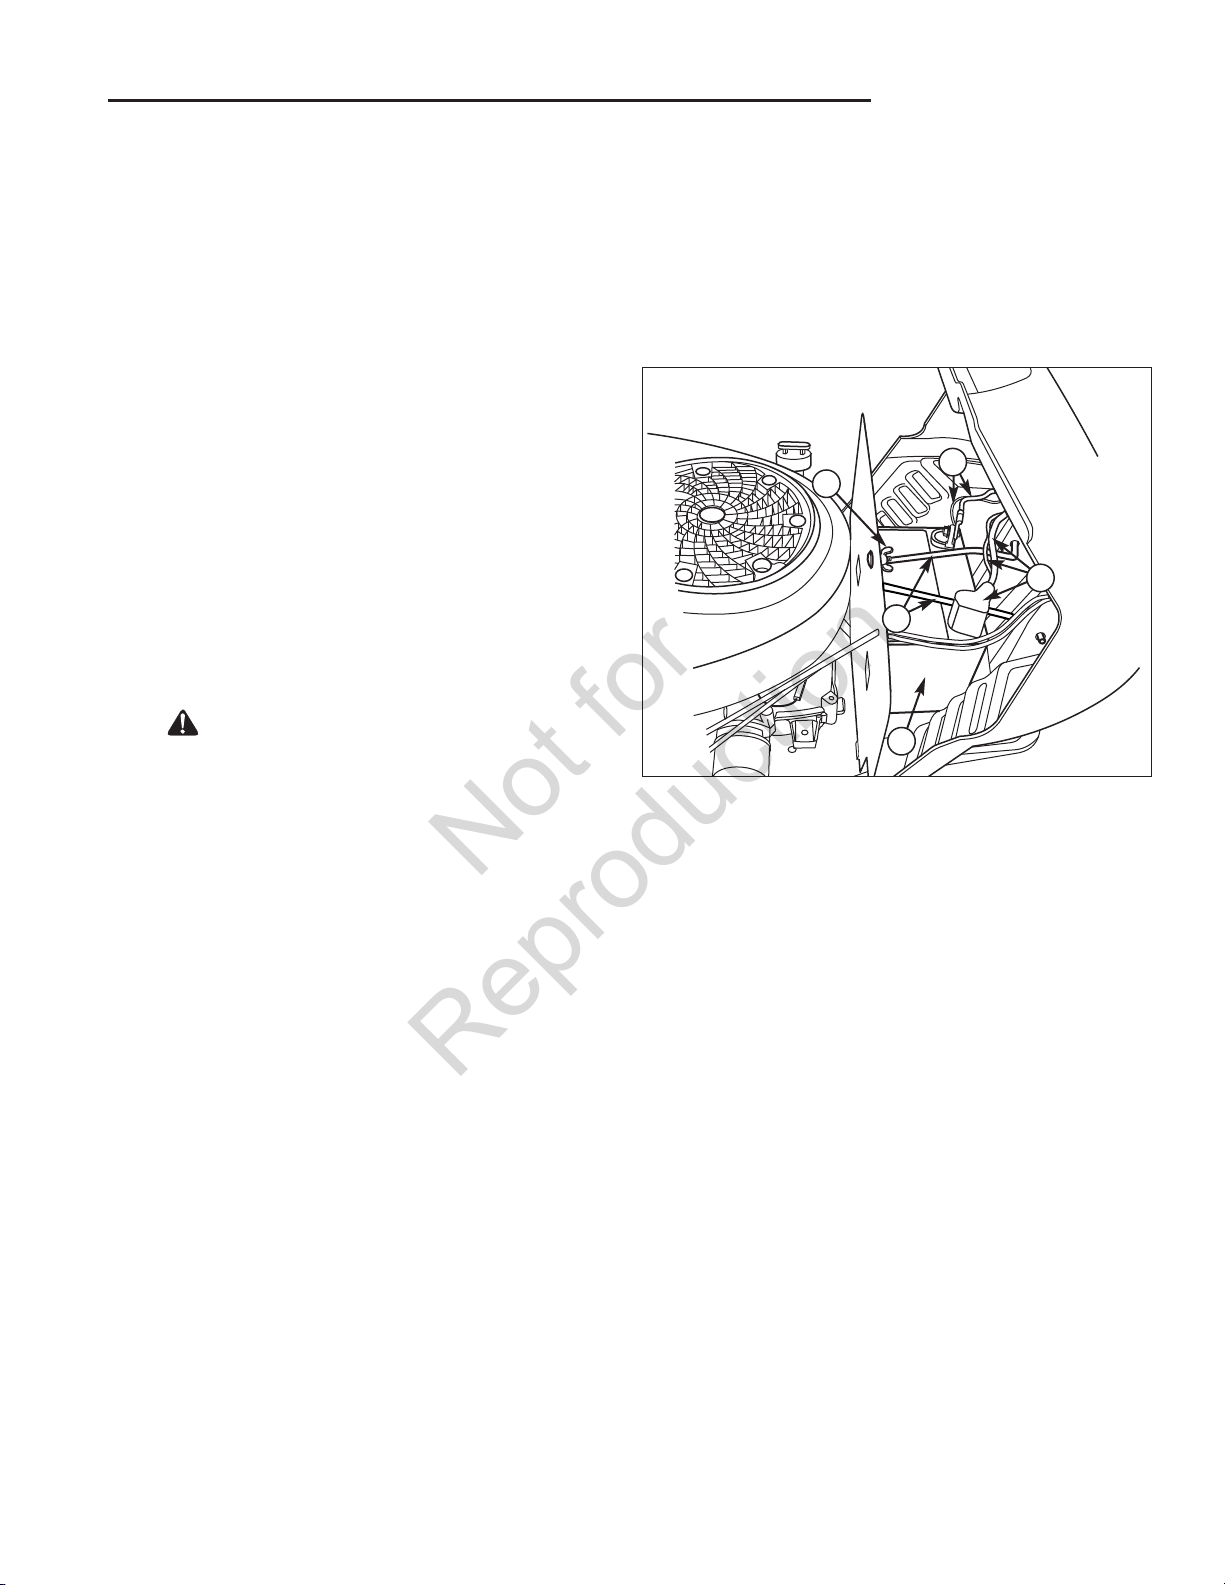
1. Remove the fuel cap (A, Figure 3).
2. Fill the tank. Do not overfill. Leave room in the tank for
fuel expansion. Refer to your engine manual for
specific fuel recommendations.
3. Install and hand tighten the fuel cap.
Starting The Engine
1. While sitting in the operator’s seat, fully depress the
brake pedal or set the parking brake.
2. Make sure that your feet are not depressing the
ground speed control pedals and that the cruise
control lever is in neutral.
3. Disengage the PTO clutch.
4. Set the throttle to FULL.
5. Close the choke.
NOTE: A warm engine may not require choking.
6. Insert the ignition key and turn it to START.
7. After the engine starts, move the engine throttle
control to half speed. Warm up the engine by running
it for at least 30 seconds.
8. Set throttle to FULL.
NOTE: In the event of an emergency the engine can be
stopped by simply turning the ignition switch to STOP.
Use this method only in emergency situations. For
normal engine shut down follow the procedure given in
STOPPING THE TRACTOR.
13
Page 16
Operating the Tractor
Not for
Reproduction
Stopping The Tractor & Engine
1. Return the ground speed control(s) to neutral.
2. Disengage the PTO and wait for all moving parts to stop.
3. Move the throttle control to SLOW position and turn the
ignition key to OFF. Remove the key.
Driving The Tractor
1. Sit in the seat and adjust the seat so that you can
comfortably reach all the controls and see the dashboard
display.
2. Engage the parking brake.
3. Make sure the PTO switch is disengaged.
4. Start the engine (see STARTING THE ENGINE).
5. Disengage the parking brake and release the brake
pedal.
6. Depress the forward ground speed control pedal to travel
forward. Release the pedal to stop. Note that the further
down the pedal is depressed the faster the tractor will
travel.
7. Stop the tractor by releasing the ground speed control
pedals, setting the parking brake, and stopping the
engine (see STOPPING THE TRACTOR AND ENGINE).
Mowing
1. Set the mower cutting height to the desired level and set
the gauge wheels to the appropriate position (if
equipped).
2. Engage the parking brake. Make sure the PTO switch is
disengaged.
3. Start the engine (see STARTING THE ENGINE).
4. Fully lower the mower using the attachment lift lever and
set cutting height.
5. Set the throttle to FULL.
6. Engage the PTO (Mower Deck).
7. Begin mowing.
8. When finished, shut off the PTO and raise the mower
using the attachment lift control lever.
9. Stop the engine (see STOPPING THE TRACTOR AND
ENGINE).
Mowing in Reverse
If an operator chooses to mow in reverse, the RMO
system can be used. To use the Reverse Mowing Option
(RMO) turn the RMO key after the PTO is engaged. The
L.E.D. light will illuminate, and the operator can then mow
in reverse. Each time the PTO is engaged the RMO
needs to be reactivated if desired. The key should be
removed to restrict access to the RMO feature.
Attachment Operation in Reverse
If an operator chooses to operate a PTO driven
attachment in reverse, the RMO system can be used. To
use the Reverse Mowing Option (RMO) turn the RMO key
after the PTO is engaged. The L.E.D. light will illuminate,
and the operator can then operate the attachment in
reverse. Each time the PTO is disengaged the RMO
needs to be reactivated if desired. The key should be
removed to restrict access to the RMO feature.
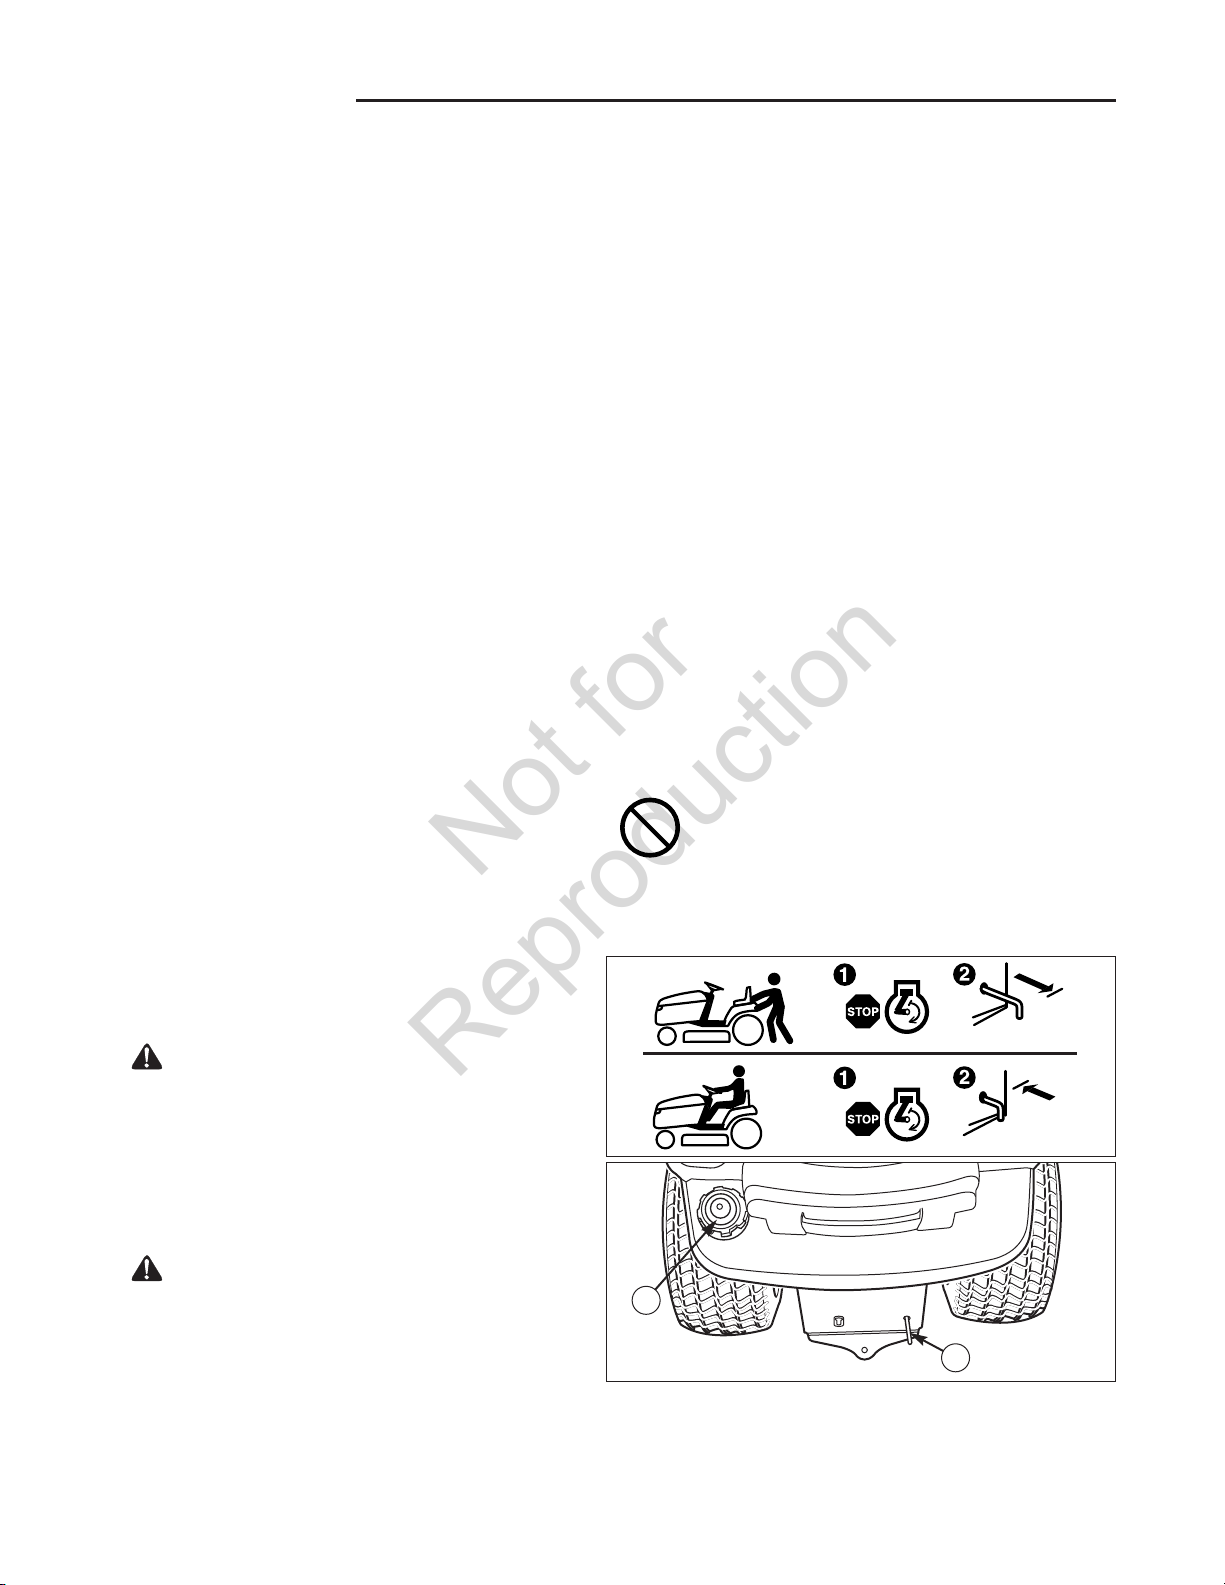
Pushing the Tractor by Hand
1. Disengage the PTO and turn the engine off.
2. Pull the transmission release (B, Figure 3) back
approximately 2-3/8” (6 cm) to lock into released
position.
3. The tractor can now be pushed by hand.
DO NOT TOW TRACTOR
Towing the unit will cause transmission
damage. • Do not use another vehicle to
push or pull this unit. • Do not actuate the
transmission release valve lever while the
engine is running.
WARNING
The engine will shut off if the reverse ground
speed pedal is depressed while the PTO is on
and the RMO has not been activated. The
operator should always turn the PTO off prior to
driving across on roads, paths or any area that
maybe used by other vehicles. Sudden loss of
drive could create a hazard.
WARNING
Mowing in reverse can be hazardous to
bystanders. Tragic accidents can occur if the
operator is not alert to the presence of children.
Never activate RMO if children are present.
Children are often attracted to the unit and the
mowing activity.
A
B
Figure 3. Transmission Release Lever & Fuel Tank
A. Fuel Tank Cap
B. Transmission Release Lever
14
Page 17
Operating the Tractor
Not for
Reproduction
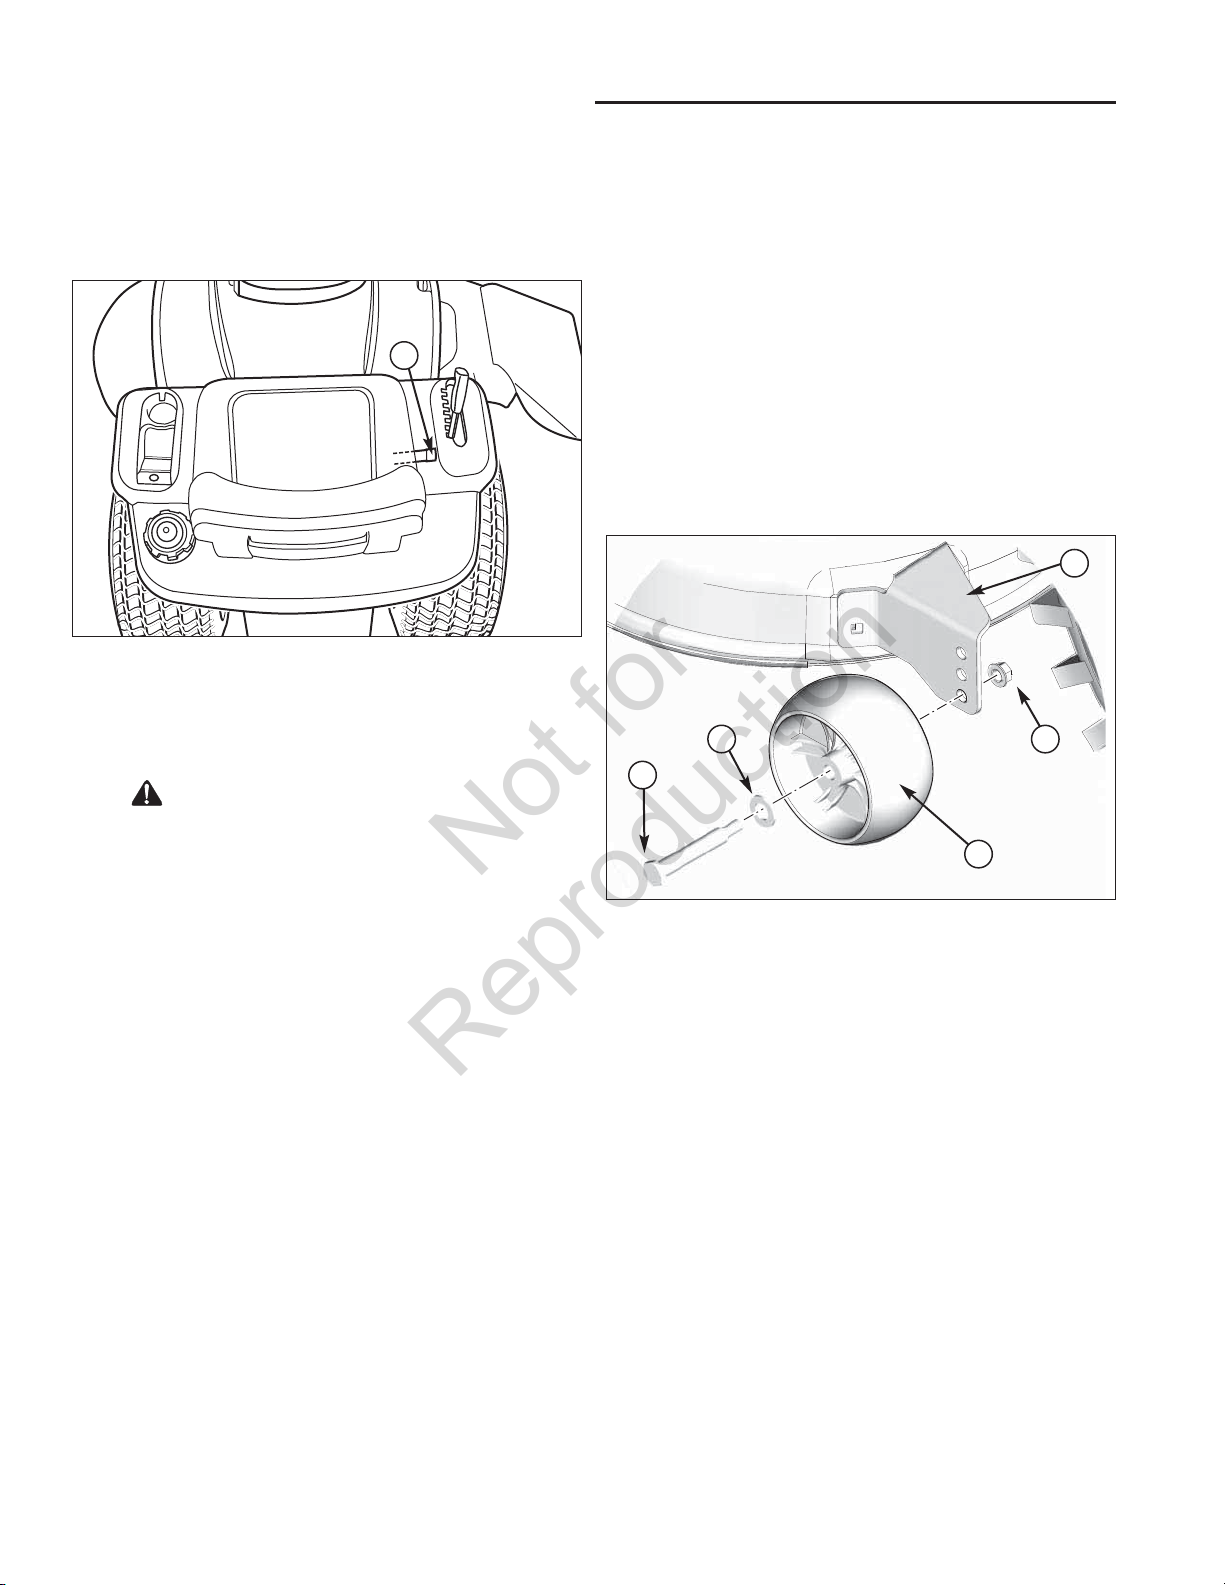
Adjusting Mower Cutting Height
The cutting height lift lever (A, Figure 4) controls the mower
cutting height. The cutting height is has seven positions
between approximately 1.0” and 4.0” (2,5 and 10,2 cm).
A
Figure 4. Raising & Lowering Mower
A. Mower Lift Lever
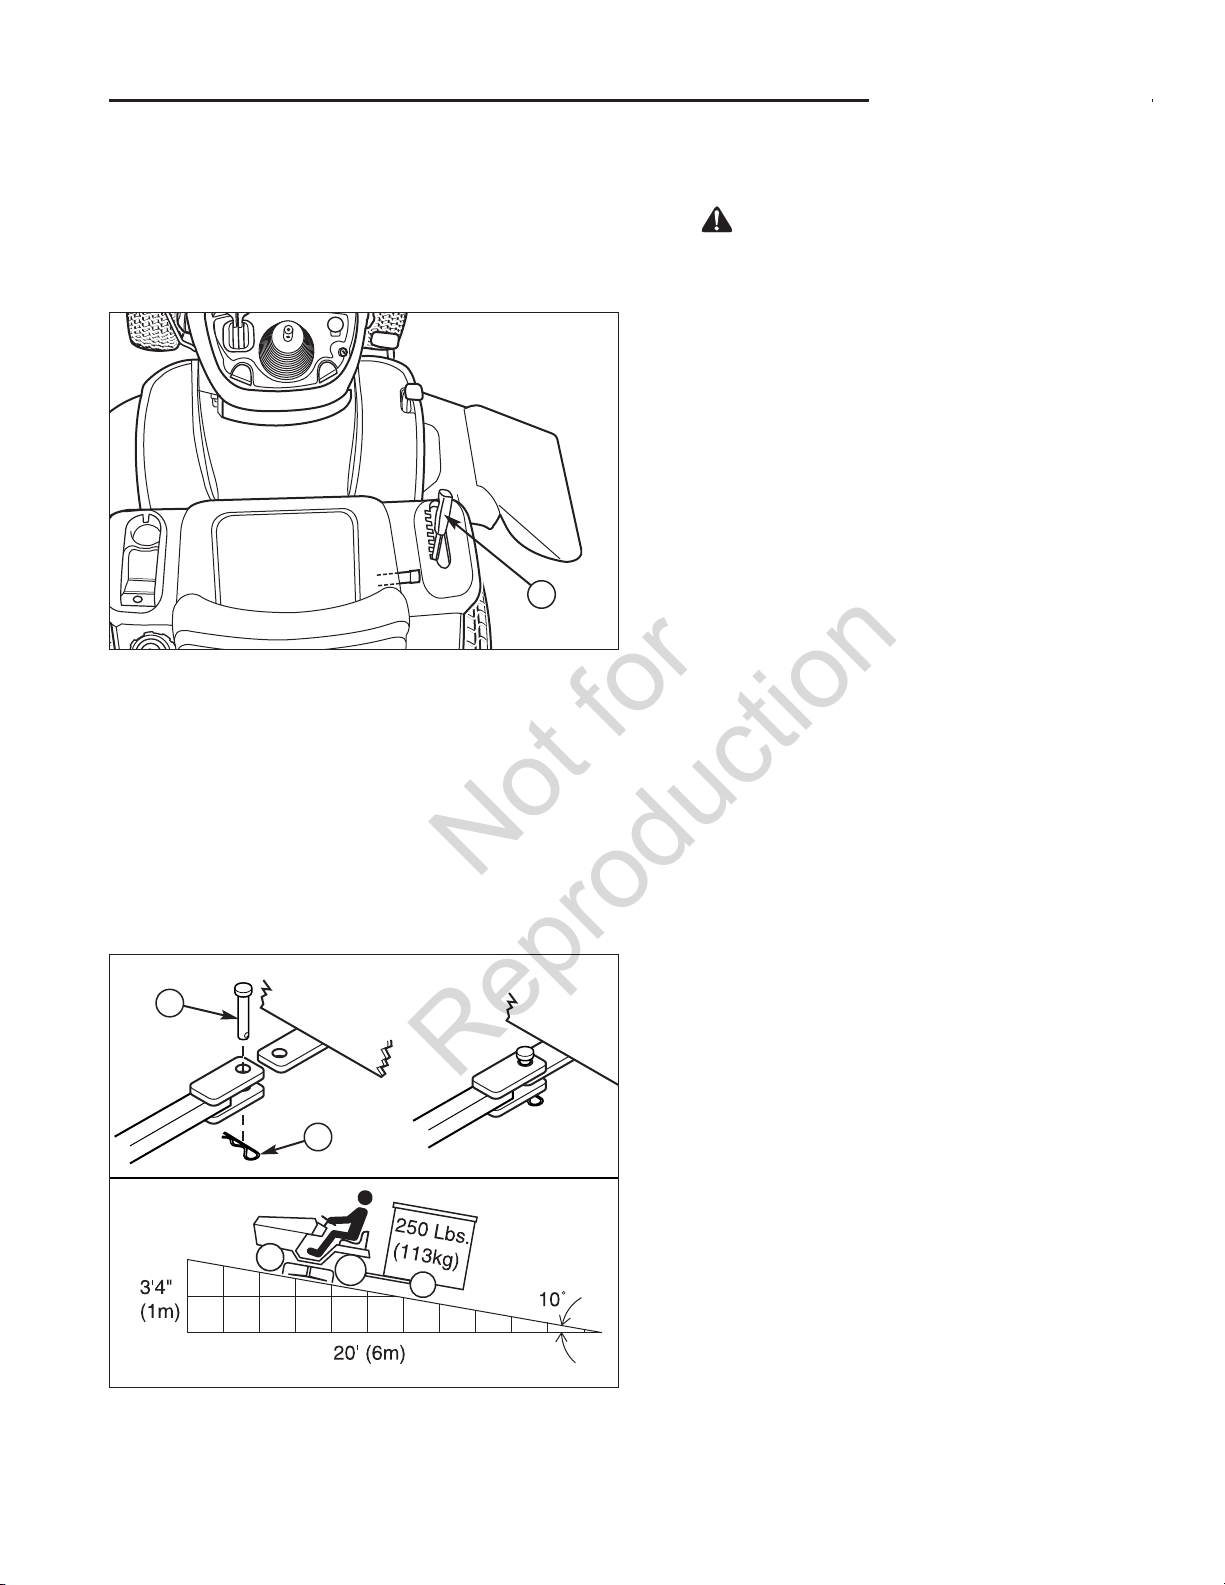
Attaching a Trailer
The maximum horizontal drawbar force allowed is
280 Newton. The maximum vertical drawbar force is
160 Newton. This equates to a 250 lbs (113 kg) trailer on
a 10 degree hill. Secure the trailer with an appropriately
sized clevis pin (A, Figure 5) and clip (B).
Storage
WARNING
Never store the unit (with fuel) in an enclosed,
poorly ventilated structure. Fuel vapors can
travel to an ignition source (such as a furnace,
water heater, etc.) and cause an explosion.
Fuel vapor is also toxic to humans and animals.
Before you store your unit for the off-season, read the
Maintenance and Storage instructions in the Safety Rules
section, then perform the following steps:
• Disengage the PTO, set the parking brake, & remove
the key.
• Perform engine maintenance and storage measures
listed in the engine owner’s manual. This includes
draining the fuel system, or adding stabilizer to the
fuel (do not store a fueled unit in an enclosed structure
- see warning).
• Battery life will be increased if it is removed, put in a
cool, dry place and fully charged about once a month.
If the battery is left in the unit, disconnect the negative
cable.
Before starting the unit after it has been stored:
• Check all fluid levels. Check all maintenance items.
• Perform all recommended checks and procedures
found in the engine owner’s manual.
• Allow the engine to warm up for several minutes
before use.
A
B
Figure 5. Trailer Weight Recommendations
A. Clevis Pin
B. Clip
15
Page 18
Regular
Not for
Reproduction
Maintenance
MAINTENANCE SCHEDULE & PROCEDURES
The following schedule should be followed for normal care of your tractor and mower.
TRACTOR AND MOWER
Every 8 Hours or Daily
Check safety interlock system
Clean debris off tractor and mower deck
Clean debris from engine compartment
Every 25 Hours or Annually *
Check mower blade stopping time
Check tractor and mower for loose hardware
Check tire pressure
Every 50 Hours or Annually *
Check tractor brakes
Clean battery and cables
See Dealer Annually to
Lubricate tractor and mower
Check mower blades **
* Whichever comes first
** Check blades more often in regions with sandy soils or
high dust conditions.
ENGINE
First 5 Hours
Change engine oil
Every 8 Hours or Daily
Check engine oil level
Every 25 Hours or Annually *
Clean engine air filter and pre-cleaner **
Every 50 Hours or Annually *
Change engine oil
Replace oil filter
Annually
Replace air filter
Replace pre-cleaner
See Dealer Annually to
Inspect muffler and spark arrester
Replace spark plug
Replace fuel filter
Clean engine air cooling system
* Whichever comes first
** Clean more often in dusty conditions or when airborne
debris is present.
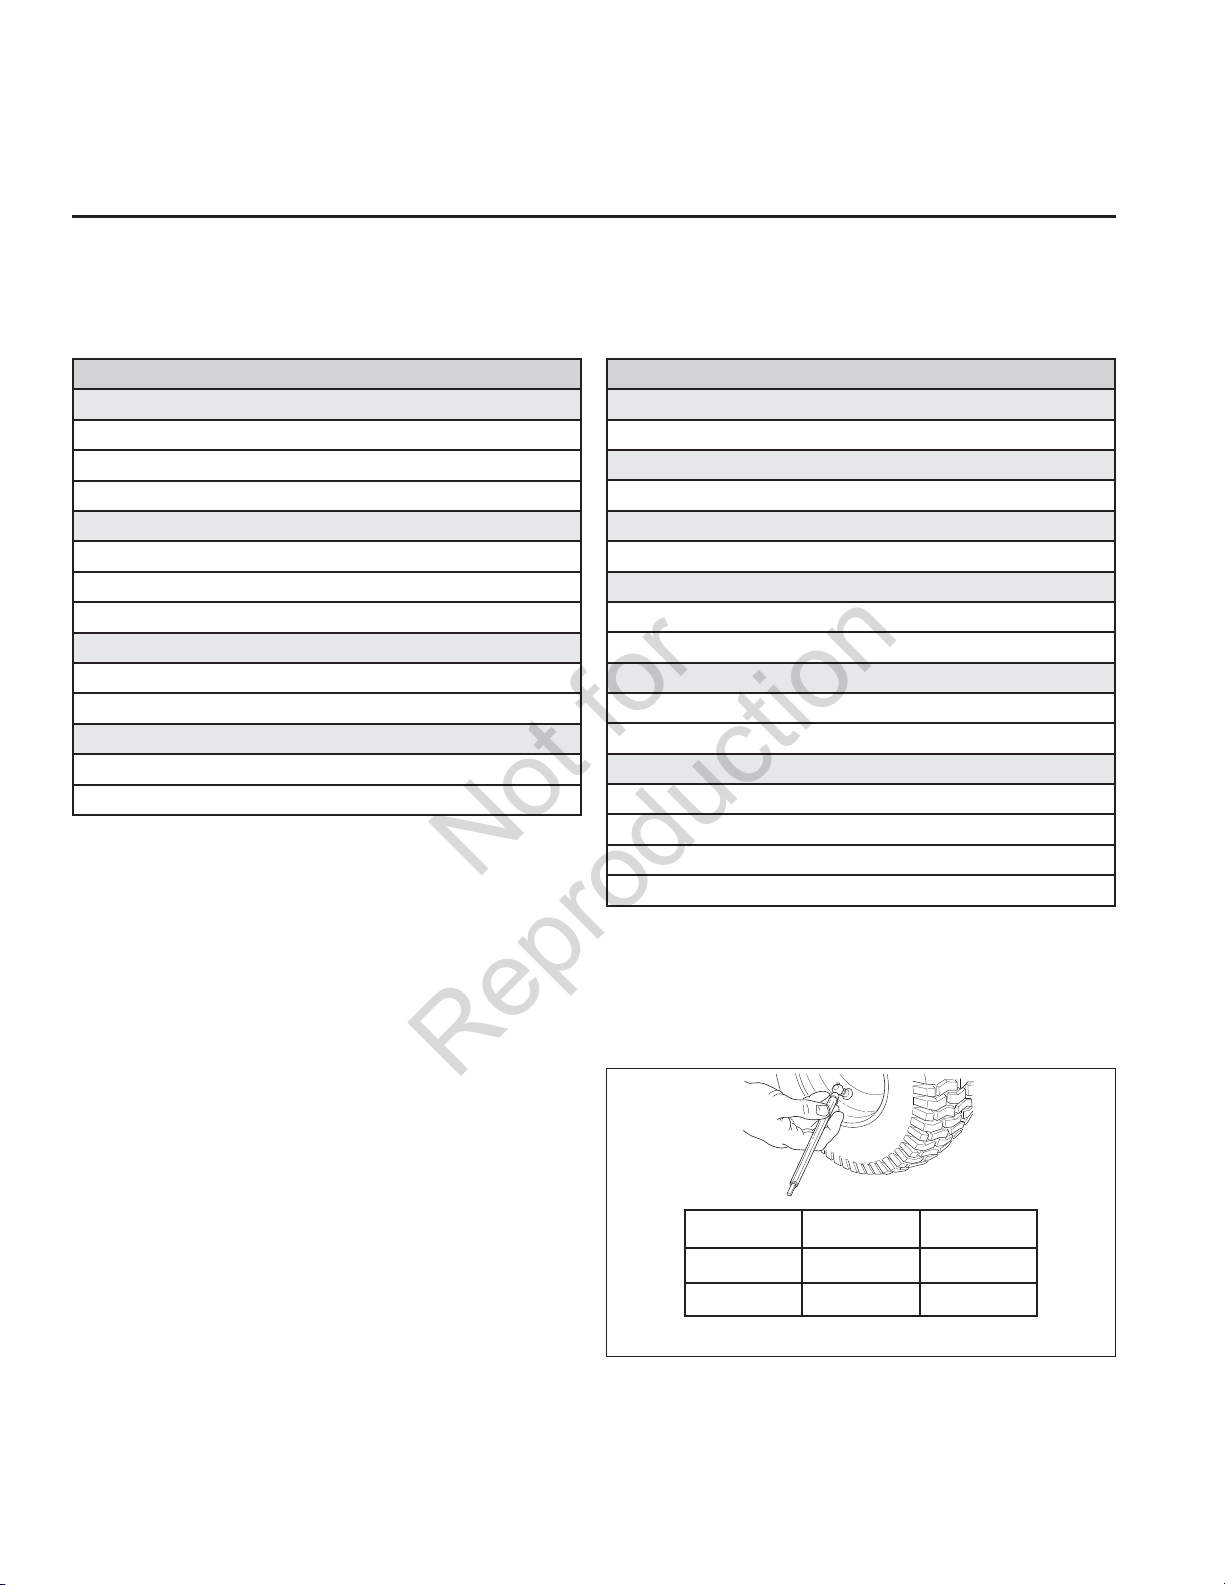
Check Tire Pressure
Tire Pressure should be checked periodically, and
maintained at the levels shown in the chart (Figure 6).
Note that these pressures may differ slightly from the
“Max Inflation” stamped on the side-wall of the tires. The
pressures shown provide proper traction, improve cut
quality, and extend tire life.
Size PSI bar
20 x 10,0-8 10 0,68
15 x 6,0-6 12-14 0,82-0,96
Figure 6. Tire Pressure
16
Page 19
Regular Maintenance
Not for
Reproduction
Safety Interlock System Check
Check the function of the safety interlock system using
the test procedure in Operating the Tractor. If the tractor
fails any of the tests, see your dealer.
Check Mower Blade Stopping Time
Mower blades and mower drive belt should come to a
complete stop within five seconds after the electric PTO
switch is turned off.
1. With tractor in neutral, PTO disengaged and operator
in seat, start the engine.
2. Look over the left-hand footrest at the mower drive
belt. Engage the PTO and wait several seconds.
Disengage the PTO and check the amount of time it
takes for the mower drive belt to stop.
3. If mower drive belt does not stop within five seconds,
see your dealer.
Battery Maintenance
Cleaning the Battery and Cables
WARNING
When removing or installing battery cables,
disconnect the negative cable FIRST and reconnect
it LAST. If not done in this order, the positive
terminal can be shorted to the frame by a tool.
1. Disconnect the cables from the battery, negative
cables first (A, Figure 7) then the cover & positive
cables (B).
2. Loosen the wingnut & washer (D).
3. Pivot the hold-down rod (C) up and away from battery.
Secure to steering tower.
4. Remove the battery (E).
5. Clean the battery compartment with a solution of
baking soda and water.
6. Clean the battery terminals and cable ends with a wire
brush and battery terminal cleaner until shiny.
7. Reinstall the battery (E) in the battery compartment.
Secure with the battery hold-down rod (C) and
wingnut & washer (D).
8. Re-attach the battery cables, positive cables and
cover first (B) then the negative cables (A).
9. Coat the cable ends and battery terminals with
petroleum jelly or non-conducting grease.
A
D
B
C
E
Figure 7. Battery Maintenance
A. Negative Cables
B. Positive Cables & Cover
C. Hold-Down Rod
D. Wingnut & Washer
E. Battery
Engine Maintenance
NOTE: See the Engine Manual for maintenance
procedures.
17
Page 20

Troubleshooting,
Not for
Reproduction
Adjustment, & Service
Troubleshooting
While normal care and regular maintenance will extend
the life of your equipment, prolonged or constant use may
eventually require that service be performed to allow it to
continue operating properly.
The troubleshooting guide below lists the most common
problems, their causes, and remedies.
Troubleshooting the Tractor
PROBLEM LOOK FOR REMEDY
Brake pedal not depressed. Fully depress brake pedal.
PTO (electric clutch) switch is in ON position. Place in OFF position.
Cruise control engaged. Move knob to NEUTRAL/OFF position.
Out of fuel.
Engine flooded. Disengage the choke.
Engine will not
turnover or start.
Engine starts hard or
runs poorly.
Engine knocks.
Excessive oil
consumption.
Fuse is blown. See authorized dealer.
Battery terminals require cleaning. See Cleaning the Battery and Cables.
Battery discharged or dead. Recharge or replace battery.
Wiring loose or broken.
Solenoid or starter motor faulty. See authorized dealer.
Safety interlock switch faulty. See authorized dealer.
Water in fuel. See authorized dealer.
Gas is old or stale. See authorized dealer.
Fuel mixture too rich. Clean air filter.
Engine has other problem. See authorized dealer.
Low oil level. Check/add oil as required.
Using wrong grade oil. See Oil Recommendations Chart.
Engine running too hot. See authorized dealer.
Using wrong grade oil. See Oil Recommendations Chart.
Too much oil in crankcase. Drain excess oil.
WARNING
To avoid serious injury, perform maintenance on
the tractor or mower only when the engine is
stopped and the parking brake engaged.
Always remove the ignition key, disconnect the
spark plug wire and fasten it away from the plug
before beginning the maintenance, to prevent
accidental starting of the engine.
If engine is hot, allow it to cool, then refill
the fuel tank.
Visually check wiring. If wires are frayed or
broken, see authorized dealer.
18
Page 21

Troubleshooting, Adjustment, & Service
Not for
Reproduction
Troubleshooting the Tractor (Continued)
PROBLEM LOOK FOR REMEDY
Brake will not hold. Internal brake worn. See authorized dealer.
Tractor steers hard or
handles poorly.
Engine exhaust is
black.
Engine runs, but
tractor will not drive.
Troubleshooting the Mower
PROBLEM LOOK FOR REMEDY
Mower will not raise. Lift linkage not properly attached or damaged. See authorized dealer.
Mower cut is uneven.
Mower cut is rough
looking.
Engine stalls easily
with mower engaged.
Excessive mower
vibration.
Engine runs and
tractor drives, but
mower will not drive.
Steering linkage is loose. See authorized dealer.
Improper tire inflation. See Check Tire Pressure section.
Front wheel spindle bearings dry. See authorized dealer.
Dirty air filter. See Servicing the Air Filter.
Choke closed. Open choke.
Ground speed control pedals not depressed. Depress pedals.
Transmission release lever in PUSH position. Move into DRIVE position.
Parking brake is engaged. Disengage parking brake.
Traction drive belt is broken or slipping. See authorized dealer.
Mower not leveled properly. See authorized dealer.
Tractor tires not properly inflated. See Check Tire Pressure.
Engine speed too slow. Set to full throttle.
Ground speed too fast. Slow down.
Mower has other problem. See authorized dealer.
Engine speed too slow. Set to full throttle.
Ground speed to fast. Slow down.
Dirty or clogged air filter. See Servicing Air Filter.
Cutting height set too low.
Discharge chute jamming.
Engine not up to operating temperature. Run engine for several minutes to warm-up.
Starting mower in tall grass. Start the mower in a cleared area.
Mower has other problem. See authorized dealer.
PTO not engaged. Engage the PTO.
Mower has other problem. See authorized dealer.
Cut tall grass at maximum cutting height
during first pass.
Cut grass with discharge pointing toward
previously cut area.
19
Page 22
Troubleshooting, Adjustment, & Service
Not for
Reproduction
Seat Adjustment
The seat can be adjusted forward and back. Move the
lever (A, Figure 8), position the seat as desired, and
release the lever to lock the seat into position.
A
Figure 8. Seat Adjustment
A. Seat Adjustment Lever
Battery Charging
WARNING
Keep open flames and sparks away from the
battery; the gasses coming from it are highly
explosive. Ventilate the battery well during
charging.
A dead battery or one too weak to start the engine may be
the result of a defect in the charging system or other
electrical component. If there is any doubt about the
cause of the problem, see your dealer. If you need to
replace the battery, follow the steps under Cleaning the
Battery & Cables.
To charge the battery, follow the instructions provided by
the battery charger manufacturer as well as all warnings
included in the safety rules sections of this book. Charge
the battery until fully charged. Do not charge at a rate
higher than 10 amps.
Mower Adjustment
Gauge Wheels
The mower gauge wheels can be placed in three
positions depending on the height of cut. When using
higher cutting heights, set the wheels in the lower
position. When using lower cutting heights, set the
wheels in the upper position. Do not allow wheels to
remain on the ground constantly while mowing. To adjust:
1. Remove the locknut (B, Figure 9), gauge wheel (C),
washers (D), and shoulder bolt (E). Change position
of gauge wheel to desired height.
2. Insert shoulder bolt (E) through washers (D) gauge
wheel (C), and gauge wheel bracket (A). Secure with
locknut (B). Repeat steps 1 & 2 for all gauge wheels.
A
D
E
C
Figure 9. Fixed Bracket Gauge Wheel Adjustment
A. Gauge Wheel Bracket
B. Locknut
C. Gauge Wheel
D. Washer
E. Shoulder Bolt
B
20
Page 23

Specifications
Not for
Reproduction
NOTE: Specifications are correct at time of printing and are subject to change without notice.
ENGINE:
17.5 HP* Briggs & Stratton
Make Briggs & Stratton
Model Intek
Horsepower 17.5 @ 3600 rpm
Displacement 30.5 cu in. (500 cc)
Electrical System 12 Volt, 9 amp Alternator, Battery: 230 CCA
Oil Capacity 48 oz (1,4 L)
20 HP* Briggs & Stratton
Make Briggs & Stratton
Model Intek
Horsepower 20 @ 3600 rpm
Displacement 40.0 cu in. (656 cc)
Electrical System 12 Volt, 9 amp Alternator, Battery: 230 CCA
Oil Capacity 64 oz (1,9 L)
CHASSIS:
LT Se ries
Fuel Tank Capacity Capacity: 4.0 Gallons (15,1 L)
Rear Wheels Tire Size: 20 x 10 -8
Inflation Pressure: 10 psi (0,68 bar)
Front Wheels Tire Size: 15 x 6.0-6
Inflation Pressure: 12-14 psi (0,82-0,96 bar)
*Briggs & Stratton Models: The gross power rating for individual gas engine models is labeled in accordance with SAE
(Society of Automotive Engineers) code J1940 (Small Engine Power & Torque Rating Procedure), and rating
performance has been obtained and corrected in accordance with SAE J1995 (Revision 2002-05). Torque values are
derived at 3060 RPM; horsepower values are derived at 3600 RPM. Actual gross engine power will be lower and is
affected by, among other things, ambient operating conditions and engine-to-engine variability. Given both the wide
array of products on which engines are placed and the variety of environmental issues applicable to operating the
equipment, the gas engine will not develop the rated gross power when used in a given piece of power equipment
(actual "on-site" or net horsepower). This difference is due to a variety of factors including, but not limited to,
accessories (air cleaner, exhaust, charging, cooling, carburetor, fuel pump, etc.), application limitations, ambient
operating conditions (temperature, humidity, altitude), and engine-to-engine variability. Due to manufacturing and
capacity limitations, Briggs & Stratton may substitute an engine of higher rated power for this Series engine.
TRANSMISSION:
K46
Type Hydrostatic Tuff Torq K46
Hydraulic Fluid 10w 30 Premium Engine Oil
Speeds Forward: 0-5.5 MPH (0-8,9 km/h)
@ 3400 rpm Reverse: 0-3.0 MPH (0-4,8 km/h)
Continuous Torque 170 ft-lbs
Output
Drawbar Rating 227 lbs (103 kg)
Maximum Weight 675 lbs (306 kg)
on Axle
DIMENSIONS:
LT Se ries
Overall Length 70.9” (180 cm)
Overall Width 48” (122 cm)
Height 44.9” (114 cm)
Replacement Parts
Replacement parts are available from your authorized
dealer.
Accessories
Engine Oil
Touch-Up Paint
Grease Gun Kit
8 oz. Grease Tube
21
Parts &
Accessories
Tire Sealant
Degrimer/Degreaser
Gas Stabilizer
Page 24
Not for
Reproduction
Page 25

Indhold
Not for
Reproduction
Sikkerhedsregler og Information.......................2
Identifikationsnumre...........................................7
Sikkerhedsmærkater...........................................8
Sikkerhedsikoner ................................................9
Egenskaber og styr...........................................10
Styrefunktioner ......................................................10
Parkeringsbremsens funktion................................12
Betjening af cruise-control.....................................12
Timetæller .............................................................12
Betjening af traktoren.......................................13
Sikkerhedsblokering..............................................13
Almindelig driftssikkerhed .....................................13
Påhældning af brændstof......................................13
Sådan startes motoren ..........................................13
Sådan standses traktor og motor ..........................14
Kørsel af traktoren .................................................14
Sådan slår man græs ............................................14
Græsslåning i bakgear ..........................................14
Drift af tilbehør i bakgear........................................14
Traktoren skubbes ved håndkraft..........................14
Justering af slåmaskinens klippehøjde..................15
Tilkobling af påhængsvogn ...................................15
Opbevaring............................................................15
Regelmæssig vedligeholdelse.........................16
Vedligeholdelsesplan ............................................16
Kontrol af trykket i dækkene ..................................16
Kontrol af sikkerhedsblokeringssystemet..............17
Kontroller stoptiden af plæneklipperens knive.......17
Batterivedligeholdelse ..........................................17
Vedligeholdelse af motor.......................................17
Fejlfinding, justering og service......................18
Fejlfinding ved traktoren ........................................18
Fejlfinding ved slåmaskinen ..................................19
Sædejustering.......................................................20
Batteriopladning ....................................................20
Slåmaskinejusteringer...........................................20
Specifikationer ..................................................21
Dele og tilbehør.................................................21
BEMÆRK: I denne håndbog henviser “venstre” og “højre”
til synsretningen set fra førerens stilling.
1
Page 26
Sikkerhedsregler og information
Not for
Reproduction
Betjenings sikkerhed
Tillykke med købet af dette meget høj- kvalitets stykke plæne- og
haveudstyr! Vore produkter er formgivet og fremstillet til at
imødekomme eller overgå alle industriens sikkerhedsstandarder.
Et elektrisk redskab er kun sikkert, hvis den der betjener det er
sikker. Hvis redskabet misbruges, eller ikke bliver rigtigt vedligeholdt,
kan det være farligt! Husk, at du er ansvarlig for din egen såvel som
for andres sikkerhed.
Brug fornuften og gennemtænk hvad det er, du vil gøre. Hvis du ikke
er sikker på, at den opgave, du planlægger at udføre, kan foretages
sikkert med det valgte udstyr, så spørg en professionel: kontakt den
lokale, autoriserede forhandler.
Læs håndbogen
Betjenings håndbogen indeholder vigtige sikkerhedsoplysninger, som det er
nødvendigt at være opmærksom på både FØR og UNDER betjening af
enheden.
Sikre betjenings teknikker, en gennemgang af produktets funktioner og
kontrolinstallationer samt vedligeholdelses information er inkluderet for
at hjælpe dig med at få mest muligt ud af din investering i udstyret.
Vær sikker på at læse Sikkerhedsreglerne og Oplysningerne på de
følgende sider godt igennem. Læs også afsnittet om Betjening helt
igennem.
Børn
Tragiske ulykker kan forekomme med børn. Lad dem ikke
komme i nærheden af betjeningsområdet. Børn er tit tiltrukket af
enheden og græsslånings aktiviteterne. Du bør aldrig antage, at
børn forbliver på det sted, du sidst så dem. Hvis der er en risiko
for, at børn kommer ind på området, hvor græsslåning foregår,
skal man få en ansvarlig voksen til at holde øje med dem.
MAN MÅ IKKE LÅDE BØRN KØRE PÅ DENNE ENHED! Det
giver dem lyst til at komme nær enheden i fremtiden, mens den
kører med det resultat, at de kan komme alvorligt til skade. De
løber måske hen til enheden for at få en tur, når du mindst
venter det, og du kan komme til at køre dem over.
2
Baglæns
Slå ikke græs baglæns, undtagen
hvis det er absolut nødvendigt. Se
altid ned og bagved før, og
mens maskinen kører
baglæns, også selvom
græsslåningsbladene
ikke er engageret.
Page 27
Sikkerhedsregler og information
Not for
Reproduction
Betjening på skråninger
Man kan komme alvorligt, endog dødeligt til skade, hvis denne enhed
anvendes på en for stejl skråning. Ved at bruge enheden på en skråning,
der er for stejl, eller hvor man ikke har tilstrækkelig trækkraft, kan man
miste kontrollen eller rulle over.
En god tommelfingerregel er, at man ikke bør køre på en skråning, som
man ikke kan bakke op ad (i 2-hjuls kørsels måde). Man bør ikke køre på
skråninger, der hæver sig mere end 3.5 meter over en 20 meter længde.
Man skal altid køre lige op og ned af skråninger: aldrig krydse tværs over.
Man skal også være opmærksom på, at overfladen man kører på, kan have
stor indvirkning på stabilitet og kontrol. Vådt græs eller isslag på
fortov/havesti kan have alvorlige konsekvenser for evnen til at kontrollere
enheden.
Hvis man er usikker på, om man kan køre enheden på en skråning, bør
man ikke gøre det. Det er ikke risikoen værd.
Bevægelige dele
Dette redskab har mange bevægelige dele, der kan beskadige dig selv eller en anden.
Hvis man imidlertid sidder korrekt i sædet, og følger alle regler i denne håndbog, er det
sikkert at betjene enheden.
Græsslånings dækket har roterende blade, der kan amputere hænder eller fødder. Lad
ikke nogen komme nær maskinen, mens den kører!
For at hjælpe operatøren med at bruge dette udstyr på en sikker made, er det udstyret
med et operatør-tilstede sikkerhedssystem. Man må IKKE forsøge at ændre eller
forbigå dette system. Kontakt straks forhandleren, hvis systemet ikke passerer alle de
kombinerede sikkerheds systemprøver, der findes i denne håndbog.
Pludseligt kastede objekter
Denne enhed har roterende græsslåningsblade. Disse blade kan opsamle og
kaste genstande gennem luften og således alvorligt skade en
omkringstående. Vær sikker på at rense området, der skal slås, FØR
slåningen begynder.
Man må ikke betjene denne enhed, uden at hele græsopfangeren eller
udtømnings skærmen (deflektoren) er på plads.
Lad heller ikke nogen komme ind på området, mens enheden kører! Hvis
nogen kommer ind på området, skal man slukke for enheden, indtil personen
går igen.
Brændstof og vedligehold
Benzin er ekstremt brandbart. Dets dampe er også ekstremt brandbare og kan
bevæge sig hen til fjerntliggende antændelseskilder. Benzin må kun anvendes
som brændstof, ikke som et opløsnings- eller rensemiddel. Det bør aldrig
opbevares på et sted, hvor dets dampe kan fortættes eller bevæge sig hen til
en antændelseskilde, som for eksempel en tændflamme. Brændstof skal
opbevares i en godkendt forseglet plastik benzindunk, eller i traktorens
brændstoftank med låget sikkert lukket. Spildt brændstof skal straks tørres op.
Korrekt vedligehold er kritisk for sikkerheden og præstationen af enheden. Vær sikker på at
udføre vedligeholdelses procedurerne, der er opført i denne håndbog, særligt den periodiske
afprøvning af sikkerhedssystemet.
3
Page 28

Sikkerhedsregler og information
Not for
Reproduction
Læs alle sikkerhedsregler og følg dem nøje. Undlader man at følge disse regler kan det medføre tab af kontrol
over traktoren, alvorlige personskader eller dødsfald for Dem selv eller andre tilstedeværende samt beskadigelse
af ejendom eller udstyr. Klipperen er i stand til at amputere arme og ben samt slynge genstande afsted
Advarsels trekanten i teksten markerer vigtige forsigtighedsregler eller advarsler, som skal følges.
.
ALMINDELIG BETJENING
1. Læs, forstå og følg alle anvisninger i manualen og på
traktoren før start.
2. Hold ikke hænder eller fødder nær de roterende dele eller
under maskinen. Hold Dem altid på afstand af
udkaståbningen.
3. Lad kun ansvarsbevidste voksne, der er bekendt med
instruktionerne, betjene traktoren (lokale bestemmelser kan
fastsætte aldersgrænser for føreren).
4. Ryd området for genstande som fx. sten, kviste, hegnstråd
osv., der kan opsamles og udslynges af kniven(e).
5. Sørg for, at området er frit for andre personer, før arbejdet
påbegyndes. Stop arbejdet, hvis andre kommer ind på
området.
6. Medtag aldrig passagerer.
7. Klip aldrig i bakgear, medmindre det er absolut nødvendigt.
Se altid nedad og bagud - både før og imens der køres i
bakgear.
8. Vend aldrig udkastmaterialet efter nogen. Undgå at udkaste
materiale imod en mur eller nogen anden forhindring.
Materialet kan slynges tilbage mod føreren. Stop kniven(e)
mens De kører over grusbelagte overflader.
9. Brug ikke maskinen medmindre hele græsopsamleren,
udkastskærmen (deflektor) eller andet nødvendigt
sikkerhedsudstyr er installeret.
10. Sæt farten ned, før der vendes.
11. Efterlad aldrig en kørende traktor uden opsyn. Slå altid
kraftudtaget (PTO) fra, slå parkeringsbremsen til, stop
motoren og fjern tændingsnøglen før De stiger af traktoren.
12. Kobl knivene (PTO) fra, når De ikke umiddelbart er i færd med
at klippe. Sluk for motoren og vent, indtil alle maskinens dele
er standset helt, før rengøring af maskinen, aftagning af
græsopsamleren eller udrensning af udkastskærmen.
13. Brug kun maskinen i dagslys eller ved godt kunstigt lys.
14. Brug ikke maskinen, mens De er under indflydelse af alkohol,
medicin eller narkotika. Hold øje med trafikken, når De bruger
maskinen nær ved eller kører over veje.
16. Vær særligt forsigtig, når traktoren af- og pålæsses en trailer
eller ladvogn.
17. Brug altid sikkerhedsbriller under kørsel med maskinen.
18. Der findes data, der viser, at førere på 60 år og derover er
indblandet i en høj procentdel af de skader, der skyldes
traktorklippere (riders). Sådanne førere bør vurdere deres
evne til at betjene traktorklipperen tilstrækkeligt betryggende
til at beskytte sig selv og andre mod at blive kvæstede.
19. Følg fabrikantens anbefalinger for brug af hjulvægte eller
kontravægte.
20. Husk at føreren er erstatningsansvarlig for skader, der
påføres andre mennesker eller ejendele.
21. Alle førere bør søge professionel vejledning og erhverve sig
praktisk erfaring.
22. Sørg altid for at være iført kraftigt fodtøj og bukser. Betjen
aldrig traktoren med bare fødder eller iført sandaler.
23. Før brug, skal man altid se efter, at knivene og deres
fastspændingsdele er på plads og uden defekter og gjort fast.
Udskift slidte og beskadigede dele.
24. Sørg for at udkoble tilbehør før brændstofpåfyldning,
afmontering af tilbehøret, eller før der foretages justeringer
(medmindre justering kan foretages fra førersædet).
25. Når maskinen parkeres, stilles til opbevaring eller forlades,
skal klipperen sænkes medmindre en decideret mekanisk
blokering benyttes.
26. Før De forlader førersædet, uanset grunden dertil, skal De
sætte parkeringsbremsen til, slå PTO fra, standse motoren og
fjerne nøglen.
27. For at mindske brandfaren, skal traktoren holdes fri for græs,
blade og overskydende olie. Parkér eller stop ikke oven over
tørre blade, græs eller andet brændbart materiale.
TRANSPORT OG OPBEVARING
1. Når maskinen transporteres på åben ladvogn eller trailer, skal
man sørge for at forenden vender frem mod kørselsretningen.
Ellers vil vindpåvirkningen ved høje hastigheder kunne
forårsage beskadigelse af motorhjelmen.
2. Sørg altid for at anvende sikre metoder ved påfyldning og
håndtering af brændstof efter transport eller opbevaring af
traktoren.
3. Anbring aldrig traktoren (med brændstof) i indelukkede,
dårligt udluftede rum. Brændstofdampe kan finde vej til en
antændelseskilde (såsom fyr, vandvarmere osv.) og
forårsage eksplosion. Brændstofdampe er desuden giftige for
mennesker og dyr.
4. Følg altid instruktionerne i motormanualen om
opbevaringsforberedelser, før henstillen for kortere eller
længere perioder.
5. Følg altid instruktionerne i motormanualen om de korrekte
klargøringsprocedurer, inden traktoren tages i brug igen.
6. Opbevar aldrig maskine og brændstofdunke i rum, hvor der
er åben ild eller vågeblus, som fx i en gasvandvarmer. Lad
motoren køle af, før traktoren stilles til opbevaring.
4
Page 29

Sikkerhedsregler og information
Not for
Reproduction
KØRSEL PÅ SKRÅNINGER
Skråninger er ofte årsag til tab af kontrol med traktoren eller
væltning, hvilket kan medføre alvorlig tilskadekomst eller død.
Kørsel på skråninger kræver ekstra påpasselighed. Hvis De ikke er i
stand til at bakke op ad en skråning eller ikke føler Dem godt tilpas
ved at køre der, bør De ikke gøre det.
Kontrol over en traktor, som glider ned ad en skråning, kan ikke
genvindes ved brug af bremsen. De væsentligste årsager til tab af
kontrol med maskinen er utilstrækkelig kontakt mellem dækkene og
jorden, for høj hastighed, utilstrækkelig bremsning, forkert
anvendelse af maskinen til et givent stykke arbejde, manglende
overblik over jordbundsborholdene, forkert tilkobling af udstyr eller
forkert vægtfordeling.
1. Klip op og ned ad skråninger, ikke på tværs.
2. Hold øjnene åbne for huller, hjulspor og ujævnheder. Ujævnt
terræn kan vælte traktoren. Højt græs kan gemme
forhindringer.
3. Vælg et lavt gear, så det ikke vil være nødvendigt at standse
eller skifte gear under kørsel på skråningen.
4. Klip ikke græs, når det er vådt. Hjulene kan miste deres
traktion.
5. Hold altid traktoren i gear, især ved kørsel ned ad skråninger.
Skift aldrig til frigear og rul ned ad bakken.
6. Undgå at starte, standse eller vende på en skråning. Hvis
hjulene mister traktion, skal man koble knivene fra og
fortsætte langsomt lige ned ad skråningen.
7. Hold al kørsel på skråninger i et langsomt og gradvist tempo.
Foretag ingen pludselige ændringer i fart eller retning, som
kunne få traktoren til at vælte.
8. Vær ekstra forsigtig, mens De bruger maskinen med
græsopsamlere eller andet tilbehør, idet de kan påvirke
maskinens stabilitet.
9. Prøv aldrig at stabilisere masakinen ved at sætte en fod på
jorden.
10. Klip ikke tæt på stejle skrænter, grøfter eller andre stejle
terrænændringer. Traktoren kan pludeselig vælte, hvis et hjul
kommer ud over kanten af en grøft eller skrænt, eller hvis en
kant skrider sammen.
11. Brug ikke græsopsamlere på stejle skråninger.
12. Klip ikke græs på skråninger, der er for stejle til at bakke op
ad.
13. Henvend Dem til den autoriserede forhandler for anbefalinger
vedrørende hjulvægte eller kontravægte, som kan forbedre
maskinens stabilitet.
14. Fjern forhindringer såsom sten, og grene.
15. Kør langsomt. Hjulene kan miste deres traktion på skråninger,
selv om bremserne fungerer, som de skal.
16. Drej ikke på skråninger medmindre det er nødvendigt, og i så
fald drej langsomt og gradvist ned ad bakke, hvis det er
muligt.
BUGSERET UDSTYR
1. Udstyret må kun bugseres med en maskine, der har en
trækkrog, beregnet til bugsering. Bugseret udstyr må kun
fastgøres til trækkrogen.
2. Følg fabrikantens anvisninger vedr. vægtgrænser for
bugseret udstyr og bugsering på skråninger.
3. Lad aldrig børn eller andre sidde i eller på det bugserede
udstyr.
4. På skråninger kan vægten af det bugserede udstyr forårsage
tab af traktion og tab af kontrollen.
5. Kør langsomt, og tillad ekstra plads til at standse på.
6. Skift aldrig til frigear og rul ned ad bakken.
ADVARSEL
Arbejd aldrig på skråninger, der hælder mere end 17,6%
(10 grader), svarende til 1,06 meters stigning for hver
6,07 meter i vandret retning.
Anvend ekstra hjulvægte eller kontravægte, når der køres
på skråninger. Lad forhandleren afgøre, hvilke vægte, der
kan leveres og som passer til enheden.
Sæt farten helt ned, før der køres ud på en skråning.
Foruden at benytte vægte for og bag, skal der anvendes
ekstra forsigtighed på skråninger, når en græsopsamler er
monteret bagpå.
Klip ret OP og NED ad skråninger, aldrig på tværs, vær
forsigtig når kørselsretningen ændres og UNDLAD AT
STARTE OG STOPPE PÅ SKRÅNINGER.
BØRN
Meget alvorlige ulykker kan finde sted, hvis føreren ikke er
opmærksom på tilstedeværelsen af børn. Børn bliver ofte tiltrukket
af traktoren og klippearbejdet. Gå aldrig ud fra, at børn bliver dér,
hvor De så dem sidst.
1. Hold børn borte fra arbejdsområdet, og under vågent opsyn
af en anden ansvarsbevidst voksen.
2. Vær agtpågivende, og sluk traktoren, hvis børn kommer ind
på arbejdsområdet.
3. Før og under bakning skal man se nedad og bagud efter små
børn.
4. Lad aldrig børn køre med på maskinen, selv med kniven(e)
standset. De kan falde af og komme alvorligt til skade, eller
de kan være til hinder for sikker kørsel med maskinen. Børn,
som man har ladt køre med på et tidligere tidspunkt, kan
pludselig dukke op, hvor man klipper, for at køre med igen, og
kan blive påkørt, for-eller baglæns, af maskinen.
5. Tillad aldrig børn at føre traktoren.
6. Vær særligt forsigtig på vej hen mod hushjørner, buskadser,
træer eller andre genstande, som kan spærre for udsynet.
UDLEDNINGER
1. Udstødningen fra denne maskine indeholder kemikalier, som
i visse mængder kan medføre kræft, fødselsskader eller
andre forplantningsmæssige skader.
2. Find oplysninger om den relevante varighed af udledninger
og om luftindeks på mærkaten for motorudledninger.
TÆND IN GSSYSTEM
1. Dette tændingssystem er i overensstemmelse med
Canadiske ICES-002.
5
Page 30

Sikkerhedsregler og information
Not for
Reproduction
SERVICE OG VEDLIGEHOLDELSE
Sikker håndtering af benzin
1. Sluk alle cigaretter, cigarer, piber og alle andre
antændelseskilder.
2. Brug kun godkendte benzindunke.
3. Tag aldrig benzindækslet af eller fyld brændstof på med
motoren gående. Lad motoren køle af før påfyldning af
brændstof.
4. Fyld aldrig brændstof på inden døre.
5. Opbevar aldrig maskinen eller brændstoftanke hvor der
forefindes åben flamme, gnister eller et vågeblus som i f.eks.
en varmtvandsbeholder eller anden husholdningsmaskine.
6. Fyld aldrig beholdere indeni et køretøj eller på ladet af en
lastbil med en plastikindsats. Placer altid beholdere på jorden
i nogen afstand fra køretøjer før påfyldning.
7. Fjern benzindrevet udstyr fra ladet på en lastbil eller
anhænger og påfyld brændstof på jorden. Hvis dette ikke er
muligt, skal sådant udstyr som sidder på en anhænger fyldes
op med en dunk i stedet for med benzinstationens slange.
8. Hold slangens mundstykke i kontakt med kanten af
benzintankens eller dunkens åbning hele tiden, indtil De er
færdig med at fylde brændstof på. Brug ikke anordninger, der
holder mundstykket åbent.
9. Hvis De spilder benzin på tøjet, skal de omgående skifte tøj.
10. Overfyld aldrig benzintanken. Sæt benzindækslet på og stram
det forsvarligt igen.
11. Vær ekstra forsigtig under håndtering af benzin og andet
brændstof. De er brandfarlige, og dampene kan eksplodere.
12. Hvis De spilder brændstof, må De ikke forsøge at starte
motoren, men skal flytte maskinen bort fra det område, hvor
der blev spildt, og undgå at skabe antændelseskilder, indtil
brændstofdampene er afluftet.
13. Sæt dækslerne forsvarligt på benzintanke og -dunke igen.
Service og vedligeholdelse
1. Lad aldrig traktoren køre i et lukket rum, hvor kuliltedampe
kan samles.
2. Se efter, at bolte og møtrikker, især dem, der holder knivene
på plads, sidder godt fast, og hold maskinen i god stand.
3. Sæt aldrig sikkerhedsudstyr ud af kraft. Efterse dets funktion
regelmæssigt og foretag nødvendige reparationer, hvis det
ikke fungerer, som det skal.
4. Hold maskinen ren for græs, blade og andet ophobet
materiale. Visk spildt olie eller brændstof op.
5. Stands og efterse maskinen, hvis De rammer nogen
genstand. Foretag nødvendige reparationer, før De starter
maskinen igen.
6. Foretag aldrig justeringer eller reparationer af maskinen med
motoren gående, med undtagelse af dem, hvor det
udtrykkeligt siges, man skal, i motorfabrikantens manual.
7. Græsopsamlerens enkeltdele er udsat for slitage,
beskadigelse og nedbrydning, hvilket kan blotte arbejdende
maskindele eller føre til at genstande udslynges. Undersøg
alle enkeltdele jævnligt og udskift dem om nødvendigt med
reservedele godkendt af producenten.
8. Klipperknive er skarpe og kan skære. Pak kniven(e) ind eller
brug handsker, og vær ekstra forsigtig når knivene skal slibes.
9. Kontrollér bremsefunktionen regelmæssigt. Udfør justeringer
og service, når det er påkrævet.
10. Vedligehold sikkerheds- og anvisningsmærkater, og udskift
dem, hvis det er nødvendigt.
11. Fjern ikke benzinfilteret, mens motoren er varm, idet spildt
benzin kan antændes. Spred ikke benzinslangeklemmerne
mere end nødvendigt. Vær sikker på, at klemmerne holder
slangerne godt fast på filteret efter installation.
12. Brug ikke benzin, som indeholder METANOL, eller benzin
som indeholder mere end 10 % ETANOL, benzinadditiver
eller hvid benzin, idet det kan resultere i beskadigelse at
motoren/brændstofsystemet.
13. Hvis brændstoftanken skal tømmes, bør det gøres udendørs.
14. Udskift lydpotter, som er i dårlig stand.
15. Brug kun fabriksgodkendte reservedele, når der udføres
reparationer.
16. Følg altid fabrikkens specifikationer om indstillinger og
justeringer.
17. Større service- og reparationsarbejder bør kun udføres af
autoriserede reparationsværksteder.
18. Forsøg aldrig at udføre større reparationer på denne maskine,
medmindre De er uddannet dertil. Ukorrekte servicemetoder
kan medføre, at traktoren bliver farlig at arbejde med, at
udstyret beskadiges, og at fabrikkens garantiforpligtelser
bortfalder.
19. På klippere med flere knive skal man være opmærksom på, at
bevægelse af én kniv kan få de andre knive til at dreje rundt.
20. Undlad at ændre indstillingen af motorregulatoren og undlad
at overgasse motoren. Kørsel med traktoren i for høj fart øger
risikoen for personskade.
21. Kørende udstyr udkobles, motoren stoppes, tændingsnøglen
fjernes og tændkablerne afmonteres før man renser blokering
i udstyr og kanaler, før man udfører servicearbejde, hvis
traktoren vibrerer unormalt, og efter man har ramt en
genstand. Når man har ramt en genstand, skal traktoren
undersøges for beskadigelser og reparationer foretages, før
den startes igen og udstyret anvendes.
22. Anbring aldrig hænderne nær ved køleviften til hydropumpen,
når motoren kører. Køleviften er placeret oven over
transmissionsakslen.
23. Enheder med hydrauliske pumper, slanger eller motorer:
ADVARSEL: Hydraulisk væske, som slippes ud under tryk
kan ramme hårdt nok til at gennemtrænge huden og
forårsage alvorlig skade. Hvis fremmedartet væske skydes
ind i huden, skal den fjernes operativt indenfor nogle få timer
af en doktor, som er bekendt med denne form for skade.
Ellers kan det forårsage gangræn. Hold krop og fingre væk
fra huller og dyser, som udsender hydraulisk væske under
højt tryk. Brug papir eller pap - ikke hænderne for at søge
efter lækager. Vær sikker på, at alle tilslutninger, der fører
hydraulisk væske, sidder stramt, og at alle hydrauliske
slanger og rør er i god stand, før der sættes tryk på systemet.
Hvis der forekommer lækager, skal enheden omgående til
service hos den autoriserede forhandler.
24. ADVARSEL: Dele og væsker kan være under tryk. Forkert
udløsning af fjedre kan forårsage alvorlig personskade.
Fjedre bør kun fjernes af en autoriseret forhandler.
25. Modeller, som er udstyret med en motorkøler: ADVARSEL:
Dele og væsker kan være under tryk. For at undgå alvorlig
legemsbeskadigelse fra varm kølervæske eller udløst damp,
må man aldrig forsøge at fjerne kølerdækslet, mens motoren
går. Stands motoren, og vent indtil den er kølet af. Så skal
man endda stadig udvise forsigtighed.
6
Page 31

ID-numre
E
K
S
E
M
P
E
L
Not for
Reproduction
Identifikationsnumre
Part No. xxxxxxx
xxxxxxxxxxxxxxx
Serial No. xxxxxxxxxx
xxxxxxxxxxxxxxxxxxxxxxx
xxxxxxxxxxxxxxxxxxxxxxx
xxxxxxxxxxxxxxxxxxxxxxx
xxxxxxxxxxxxxxxxxxxxxxx
Når De kontakter Deres autoriserede forhandler
angående reservedele, service eller information, SKAL
DE OPLYSE disse numre.
Notér modellens navn/nummer, fabrikantens ID-numre og
motorens serienumre i det afsatte felt, så de er lette at finde
frem igen. Numrene kan findes på de viste positioner.
Bemærk:Vedrørende placeringen af motorens ID-numre
henvises til motormanualen.
E
K
S
E
M
P
xxx dB
E
20xx
L
kg: xxx
kW: x.xx
xxxx max
Traktorens
ID-skilt
PRODUKTETS REFERENCEDATA
Modellens navn/nummer
Traktorens Fabrikants Nummer
Klipperens Fabrikants Nummer
Forhandlerens navn
MOTORENS REFERENCEDATA
Motorfabrikat
Klipperens ID-skilt
Traktorens Serienummer
Klipperens Serienummer
Købsdato
Motormodel
CE-identifikationsmærkat
A. Producentens Identifikationsnummer
B. Producentens Serienummer
C. Motoreffekt i Kilowatt
D. Højeste Motorhastighed i Omdrejninger per Minut
E. Producentens navn og adresse
F. Fabrikationsår
G. CE-Mærke
H. Maskinens Vægt i Kilogram
I. Garanteret lydstyrke i decibel
Motortype/specifikationer
A
Part No. xxxxxxx
B
E
xxxxxxxxxxxxxxx
Serial No. xxxxxxxxxx
xxxxxxxxxxxxxxxxxxxxxxx
xxxxxxxxxxxxxxxxxxxxxxx
xxxxxxxxxxxxxxxxxxxxxxx
xxxxxxxxxxxxxxxxxxxxxxx
Motorkode/Serienr.
xxx dB
20xx
F
G
kg: xxx
kW: x.xx
xxxx max
I
H
C
D
7
Page 32

Sikkerhedsmærkater
Not for
Reproduction
SIKKERHEDSMÆRKATER
Alle advarende mærkater (FARE, ADVARSEL og FORSIGTIG)
og alle instruktive mærkater på traktor og klipper bør læses
omhyggeligt og efterleves. Det kan føre til personskader,
hvis disse instruktioner ikke følges. De gives af hensyn til
Deres sikkerhed, og de er vigtige! De nedenstående
sikkerhedsmærkater er at finde på traktoren og klipperen.
Sikkerhedssymboler
Advarsel: Se
Betjeningsvejledningen.
Læs og forstå betjeningsvejledningen
før brug af maskinen.
Fare: Udslyngende genstande.
Denne maskine er i stand til at kaste
genstande og andet materiale. Hold
omkringstående væk.
Advarsel: Fjern startnøglen før
servicearbejde.
Fjern nøglen og gennemlæs den
tekniske vejledning, før du udfører
reparationer eller
vedligeholdelsesarbejde.
Fare: Fare for at vælte.
Brug ikke denne maskine på
skråninger over 10°.
Fare: Fare for amputering.
Denne maskine kan amputere
lemmer. Hold omkringstående,
deriblandt børn borte, når motoren går.
Fare: Fare for amputering.
Denne maskine kan amputere
lemmer. Hold hænder og fødder
borte fra knivene.
Fare: Brandfare.
Brændstof må ikke påfyldes, mens
motoren er varm eller går. Stands
motoren og lad den køle af i 3
minutter, før du fylder brændstof på.
Hvis en mærkat ryger af eller beskadiges, skal den omgående
erstattes med en ny, som fås hos Deres forhandler.
Disse mærkater er nemme at montere, og de fungerer som
en stadig og synlig påmindelse til Dem selv og andre, som
måtte betjene udstyret, om at følge alle de sikkerheds instruktioner, som er af betydning for betryggende og
hensigtsmæssig betjening.
Fare: Varme komponenter.
Lad motoren køle af, før du berører
området.
Fare: Kulilteforgiftning.
Lad ikke motoren gå i et dårligt
ventileret område.
Advarsel: Brandfare.
Hold børn, åben ild og gnister væk
fra batteriet, for at undgå
antændelse af eksplosive gasser.
Advarsel: Svovlsyre kan
forårsage blindhed og alvorlige
forbrændinger.
Bær altid sikkerhedsbriller eller
ansigtsskærm, når der arbejdes med
eller i nærheden af batteriet.
Advarsel: Batterier udvikler
eksplosive gasser.
Læs og forstå Brugermanualen
inden denne maskine tages i brug.
Vigtigt: Må ikke bortskaffes med
almindeligt affald.
Kontakt de lokale myndigheder mht.
bortskaffelse og/eller genbrug af
batterier.
Fare: Fare for amputering.
Denne maskine kan amputere
lemmer. Hold hænder og
fødder borte fra knivene.
8
Page 33

CE sikkerhedsikoner
Not for
Reproduction
Placering af mærkater
Tændingslåsstilli
nger, delnr.
1722806
Brugsanvisninger, CE
modeller, delnr. 1734027
Forsigtig, klemmepunkt,
delnr. 1720389
1730172
Brændstofniveau,
delnr. 1730172
173xxxx
Transmissionsu
dløser, delnr.
1730202
1730264
Forsigtig, klemmepunkt,
delnr. 1720389
Løftestang til tilbehør,
delnr. 1730264
9
Page 34

Egenskaber og styr
Not for
Reproduction
Figur 1. Styr
Styrefunktioner
Nedenstående oplysninger giver en kort beskrivelse af de enkelte styrs funktioner. At starte, standse, køre og slå græs
kræver, at man kombinerer brugen af flere styr, som anvendes i særlige rækkefølger. Slå op i afsnittet BETJENING for
at lære den kombination og rækkefølge, styrene skal bruges i til de forskellige opgaver.
Gasspjældsregulering
Gasspjældet styrer motorhastigheden. Flyt gasspjældet
fremad for at øge motorhastigheden, og tilbage for at
sænke den. Maskinen skal altid betjenes for FULL/
FULDT åbent gasspjæld.
Choke
Luk chokeren til kold start. Åbn chokeren, så snart
motoren starter. En varm motor har næppe behov for
chokeren. Flyt grebet fremad for at lukke for chokeren.
10
Forlygter
Lyskontakten tænder og slukker for traktorens forlygter.
Timetæller
Timetælleren tæller det antal timer, som nøglen har stået
på RUN/KØR.
Page 35

Græsslåning i bakgear (RMO/GVB)
Not for
Reproduction
Valgmuligheden for at slå græs i bakgear gør det muligt at
slå græs (eller at bruge andet PTO-drevet tilbehør), mens
man bakker op. Hvis man vælger at slå græs i bakgear,
skal man dreje RMO/GVB-nøglen, efter PTO er tilkoblet.
LED lampen lyser, og så kan føreren slå græs, mens
vedkommende kører baglæns. Hver gang PTO tilkobles,
skal RMO/GVB aktiveres igen efter ønske.
PTO kontakt
PTO (“Power Take-Off”) kontakten tilkobler og afkobler
tilbehør, der benytter PTO. PTO tilkobles ved at skubbe
UP/OP på kontakten. Skub DOWN/NED på kontakten for
at afkoble. Bemærk, at føreren skal sidde godt fast i
traktorsædet, for at PTO kan fungere.
Tæ n d i ng
Tændingen starter og standser motoren, den har tre
stillinger:
OFF/SLUK standser motoren og slukker for el-
systemet
RUN/KØR lader motoren køre og forsyner el-
systemet med strøm
START forkrøpper motoren, så den starter
Egenskaber og styr
Slåmaskinens
græshøjdeklippejustering
Grebet til justering af klippehøjden regulerer
slåmaskinens klippehøjde. Slåmaskinens klippehøjde kan
indstilles på én af syv stillinger mellem 2,5 cm og
10,2 cm.
Greb til justering af sædet
Sædet kan justeres fremad eller tilbage. Flyt grebet,
anbring sædet i den ønskede stilling, og slip grebet for at
låse sædet på plads.
Greb til transmissionens udløserventil
Transmissionens udløserventil sætter transmissionen ud
af funktion, således at traktoren kan skubbes ved
håndkraft. Se TRAKTOREN SKUBBES VED
HÅNDKRAFT for betjeningsoplysninger.
Brændstoftank
Tag dækslet af ved at dreje det mod uret (til venstre).
Brændstofmåler
Viser hvor meget brændstof, der er i tanken.
BEMÆRK: Man må aldrig lade tændingen blive stående
på RUN/KØR, mens motoren er standset - det dræner
batteriet.
Speederpedaler
Traktorens hastighed i fremadgående retning reguleres af
speederpedalen til fremadgående kørsel. Traktorens
baglæns hastighed reguleres af speederpedalen til
opbakning.
Når man trykker ned på enten den ene eller den anden
pedal øges hastigheden. Bemærk, at jo længere man
trykker pedalen ned, jo hurtigere vil traktoren køre.
Cruise Control
Cruise-control bruges til at fastlåse den fremadgående
hastighed. Cruise-control kan låses i seks forskellige
stillinger.
Parkeringsbremse
Parkeringsbremsegrebet bruges til at fastlåse
parkeringsbremsen, når traktoren er standset. Når man
trykker bremsepedalen helt i bund og samtidig trækker op
i grebet, tilkobles parkeringsbremsen.
Bremsepedal
Når man trykker på bremsepedalen, aktiverer det
traktorbremsen.
11
Page 36

Egenskaber og styr
Not for
Reproduction
Parkeringsbremse funktion
Sådan trykker man på parkeringsbremsen - se
figur 2. Parkeringsbremsen sættes ved at slippe
speederpedalerne (A), trykke bremsepedalen (B) helt i
bund, trække UP/OP i parkeringsbremsegrebet (C) og
derefter slippe bremsepedalen.
Sådan udløses parkeringsbremsen - se figur 2.
Parkeringsbremsen udløses ved at trykke på
bremsepedalen (B).
Betjening af cruise-control
TILKOBLING:
1. Træk op i cruise-control-grebet (D, figur 2).
2. Tryk på speederpedalen til kørsel i fremadgående
retning (A).
3. Løft op i cruise-control grebet (D), når man når op på
den ønskede hastighed. Cruise-control fastlåses i en
af de seks mulige stillinger.
FRAKOBLING:
1. Tryk på bremsepedalen (B).
ELLER
2. Tryk på speederpedalen til fremadgående kørsel (A).
E
B
A
C
D
Figur 2. Tilkobling af parkeringsbremsen
A. Speederpedaler
B. Bremsepedal
C. Greb til parkeringsbremsen
D. Cruise-control greb
E. Timetæller
Timetæller
Timetælleren (E, figur 2) tæller det antal timer, nøglen har
stået på RUN/KØR.
12
Page 37

KONTROL AF DET
Not for
Reproduction
BLOKERENDE
SIKKERHEDSSYSTEM
Deres traktor er udstyret med et blokerende
sikkerhedssystem, samt andre sikkerhedsanordninger.
Sikkerhedsudstyret er til for Deres skyld; prøv ikke at
sætte det ud af drift og pil aldrig ved sikkerhedsudstyret.
Afprøv jævnligt, at det virker.
Betjeningsmæssig SIKKERHEDSKONTROL
Deres traktor er udstyret med et sikkerhedssystem med
sædeafbryder. Kontrollér sædeafbryderens funktion hvert
efterår og forår ved hjælp af følgende afprøvninger:
1. Prøve - Motoren bør IKKE starte, hvis:
• PTO-kontakten er slået TIL, ELLER
• Bremsepedalen IKKE er trykket helt ned (parkerings bremsen FRA), ELLER
• Håndtaget til Cruise Control IKKE står i neutral.
2. Prøve - Motor SKULLE dreje og starte hvis:
• Føreren sidder i sædet OG
• PTO-kontakten er FRA, OG
• Bremsepedalen er trykket helt ned (parkerings bremsen
TIL), OG
• Håndtaget til Cruise Control står i neutral.
3. Prøve - Motoren bør STOPPE, hvis:
• Føreren rejser sig fra sædet.
4. Kontroller stoptiden af plæneklipperens knive
Klipperens knive og drivrem bør være helt standset
indenfor 5 sekunder efter, at PTO er slået fra (eller
føreren rejser sig fra sædet). Hvis klipperens drivrem ikke
står stille inden 5 sekunder, forhandleren opsøges.
5. Kontrol af bakgear:
• Motoren skal slukke, hvis maskinen forsøger at bakke
når den er tændt men ikke er sat i bakgear.
• Bakgearets lys skal tænde, når maskinen er sat i
bakgear.
Bemærk: Når motoren er stoppet, skal PTO slås fra, efter
at føreren er vendt tilbage til sædet, for at motoren kan
startes.
ADVARSEL
Hvis traktoren ikke består disse prøver, så lad
være med at benytte den, men opsøg den
autoriserede forhandler.
Betjening af traktoren
Almindelig driftssikkerhed
Sørg for at læse alle oplysninger i afsnittene Sikkerhed og
Betjening, inden man prøver på at betjene maskinen. Man
skal gøre sig fortrolig med styrene samt med, hvordan
man standser maskinen.
Påhældning af brændstof
ADVARSEL
Benzin er meget brændbart og skal håndteres
forsigtigt. Man må aldrig fylde tanken, når
motoren stadig er varm efter at være brugt for
nyligt. Åben ild, tobaksrygning eller tændstikker
er forbudt i området. Undgå at fylde for meget på
tanken, og tør op efter alle spild.
Man må ikke bruge benzin, der indeholder
METANOL, “gasohol” med over 10%
ETANOL, benzintilsætningsmidler eller
“white” benzin, da det kan beskadige
motoren/brændstofsystemet.
Påhældning af brændstof:
1. Tag kapslen af tanken (A, figur 3).
2. Fyld tanken. Lad være at fylde den for meget. Sørg
for, at der er plads til, at brændstoffet udvider sig. Der
henvises til motorhåndbogen vedrørende særlige
brændstofanbefalinger.
3. Sæt kapslen på tanken igen, og stram den ved
håndkraft.
Sådan startes motoren
1. Mens man sidder i førersædet, skal man trykke
bremsepedalen helt i bund eller sætte
parkeringsbremsen.
2. Sørg for, at fødderne ikke trykker på speederpedalerne,
og at cruise-control-grebet står i frigear.
3. PTO koblingen frakobles.
4. Gasspjældet sættes på FULL/FULD.
5. Chokeren lukkes.
BEMÆRK: En varm motor har næppe behov for chokeren.
6. Startnøglen sættes i og drejes til START.
7. Efter motoren starter, skal motorens
gasspjældsregulering flyttes til halv hastighed. Motoren
varmes op ved at lade den køre i mindst 30 sekunder.
8. Gasspjældet sættes på FULL/FULD.
BEMÆRK: I tilfælde af en nødsituation kan motoren
standses ved simpelthen at dreje nøglen om til STOP.
Denne metode må kun bruges i en nødsituation. Motoren
standses normalt ved at følge den procedure, der er
beskrevet i afsnittet SÅDAN STANDSES TRAKTOREN.
13
Page 38

Betjening af traktoren
Not for
Reproduction
Sådan standses traktor og motor
1. Sæt hastighedsgearene i frigear igen.
2. Frakobl PTO, og vent til alle de dele, der bevæger sig,
standser.
3. Flyt gasspjældskontrollen hen på SLOW/LANGSOM, og
drej OM for tændingsnøglen (OFF). Tag nøglen ud.
Kørsel af traktoren
1. Sid i sædet, og juster sædet således, at du mageligt kan
nå alle styr og samtidigt se instrumentbrættet.
2. Sæt parkeringsbremsen.
3. Sørg for, at PTO kontakten er frakoblet.
4. Start motoren (se SÅDAN STARTES MOTOREN).
5. Frakobl parkeringsbremsen, og slip bremsepedalen.
6. Tryk på speederen til fremadgående kørsel for at køre
fremad. Slip pedalen for at standse. Bemærk, at jo
længere ned man trykker pedalen, jo hurtigere vil
traktoren køre.
7. Stands traktoren ved at slippe speederpedalerne, sætte
parkeringsbremsen og standse motoren (se SÅDAN
STANDSES TRAKTOR OG MOTOR).
Sådan slår man græs
1. Indstil slåmaskinens klippehøjde til det ønskede niveau,
og indstil målerhjulene i den hensigtsmæssige stilling
(hvis maskinen er udstyret dermed).
2. Sæt parkeringsbremsen. Sørg for, at PTO kontakten er
frakoblet.
3. Start motoren (se SÅDAN STARTES MOTOREN).
4. Sænk slåmaskinen fuldstændigt vha.
tilbehørsløftestangen, og indstil klippehøjden.
5. Indstil gasspjældet på FULL/FULD.
6. Tilkobl PTO (slåmaskinedæksel).
7. Begynd at slå græs.
8. Når man er færdig, skal der slukkes for PTO, og
slåmaskinen skal løftes vha. tilbehørsløftestangen.
9. Stands motoren (se SÅDAN STANDSES TRAKTOR OG
MOTOR).
Klipning i bakgear
Hvis føreren ønsker at klippe græs i bakgear kan RMOsystemet anvendes. For at anvende RMO-systemet
drejes RMO-nøglen efter PTOen er tilkoblet. LED lampen
lyser og føreren kan derefter klippe i bakgear. Hver gang
PTOen slås fra skal RMO-systemet genaktiveres hvis det
påkræves. Nøglen bør fjernes for at begrænse adgangen
til RMO-systemet.
Anvendelse af reskaber i bakgear
Hvis føreren ønsker at anvende et PTO-drevet redskab i
bakgear kan RMO-systemet anvendes. For at anvende
RMO-systemet drejes RMO-nøglen efter PTOen er
tilkoblet. LED lampen lyser og føreren kan derefter
arbejde i bakgear. Hver gang PTOen slås fra skal RMOsystemet genaktiveres hvis det påkræves. Nøglen bør
fjernes for at begrænse adgangen til RMO-systemet.
Skubning af traktoren ved håndkraft
1. Slå PTO fra og sluk motoren.
2. Træk udløserhåndtaget til transmissionen cirka 6,4 cm
bagud for at låse det fast i udløst stilling (fig. 3).
3. Traktoren kan nu skubbes ved håndkraft.
UNDLAD AT BUGSERE TRAKTOREN
Bugsering vil skade transmisionen. • Benyt ikke et
andet køretøj til at skubbe eller trække traktoren.
• Undlad at anvende udløserhåndtaget til
transmissionen, mens motoren kører.
ADVARSEL
Motoren går i stå hvis bakpedalen trædes ned
mens PTOen er tilkoblet og RMO-systemet ikke er
aktiveret. Føreren bør altid slå PTOen fra før der
køres over veje, stier eller andre områder hvor der
befinder isg andre køretøjer. Pludselig mangel på
trækkraft kan udgøre en sikkerhedsrisiko.
ADVARSEL
Klipning i bakgear kan udgøre en sikkerhedsrisiko
for omkringstående personer. Der kan ske tragiske
ulykker hvis føreren ikke er opmærksom på
tilstedeværelsen af børn. Sæt aldrig maskinen i
bakgear, når der er børn i nærheden. Børn
tiltrækkes ofte af maskinen og arbejdet.
A
Figur 3. Transmissionsudløsergreb og
brændstoftank
A. Dæksel til brændstoftanken
B. Transmissionsudløsergreb
14
B
Page 39

Betjening af traktoren
Not for
Reproduction
Justering af slåmaskinens klippehøjde
Løftestangen til klippehøjden (A, figur 4) styrer
slåmaskinens klippehøjde. Klippehøjden har syv
forskellige indstillinger mellem ca. 2,5 cm og 10,2 cm
(1.0 tommer og 4 tommer).
A
Figur 4. Slåmaskinen løftes og sænkes
A. Slåmaskineløftestang
Tilkobling af påhængsvogn
Den maksimalt tilladte vandrette trækbomkraft er
280 Newton. Den maksimale lodrette trækbomkraft er
160 Newton. Dette svarer til en påhængsvogn på 113 kg
(250 pund) på en 10 graders bakke. Sæt
påhængsvognen fast med en hensigtsmæssig stor
gaffelbolt (A, figur 5) og klip (B).
A
Opbevaring
ADVARSEL
Traktoren må aldrig opbevares (med brændstof) i
et indelukket, dårligt udluftet rum.
Brændstofdampe kan finde vej til en
antændelseskilde (f.eks. et fyr, en vandvarmer
osv.) og afstedkomme en eksplosion.
Dampe fra brændstof er også giftige for
mennesker og dyr.
Inden man opbevarer maskinen for vintersæsonen, skal
man læse instruktionerne vedrørende vedligeholdelse og
opbevaring i afsnittet Sikkerhedsregler, derefter skal man
udføre følgende trin:
• Frakobl PTO, sæt parkeringsbremsen og tag nøglen
ud.
• Udfør de vedligholdelses- og
opbevaringsforanstaltninger, der står opført i
motorejerhåndbogen. Dette omfatter at dræne
brændstofsystemet eller at tilsætte
stabiliseringsmiddel til brændstoffet (undlad at
opbevare en maskine, der er fyldt med brændstof, i et
indelukket rum - se advarslen).
• Batteriets holdbarhed forbedres, hvis det afmonteres
og anbringes et køligt, tørt sted, samt når man oplader
det fuldstændigt ca. en gang om måneden. Hvis
batteriet bliver siddende i traktoren, skal det negative
kabel afbrydes.
Inden man starter maskinen, efter den har været
opbevaret:
• Kontroller alle væskeniveauer. Kontroller alle
vedligeholdelsesemner.
• Udfør alle de anbefalede eftersyn og procedurer, der
findes i maskinejerens manual.
• Lad motoren varme op i flere minutter inden brug.
B
Figur 5. Anbefalinger mht. påhængsvognens vægt
A. Gaffelbolt
B. Klips
15
Page 40

Regelmæssig
Not for
Reproduction
vedligeholdelse
VEDLIGEHOLDELSESPLAN OG PROCEDURER
Man skal følge nedenstående plan til normal vedligeholdelse af traktoren og slåmaskinen.
TRAKTOR OG PLÆNEKLIPPER
Hver 8.time eller dagligt
Kontroller sikkerhedslåsesystemet
Rengør traktor og plæneklipper
Fjern synlige rester fra motorrummet
Hver 25 time eller årligt *
Kontroller stoptiden af plæneklipperens knive
Kontroller om der findes løse dele i
traktoren/plæneklipperen
Kontroller dæktrykket
Hver 50 time eller årligt *
Kontroller traktorens bremser
Rens batteri og kabler
Besøg en forhandler en gang om året for at
Smør traktor og plæneklipper
Kontroller plæneklipper knive **
* Hvad der end kommer først
** Kontroller skærene oftere i tilfælde af meget sandet
jord eller høje forekomster af støv.
MOTOR
Første 5 timer
Skift motorolie
Hver 8.time eller dagligt
Kontroller motorens olieniveau
Hver 25 time eller årligt *
Luftfilter og luft-forfilter **
Hver 50 time eller årligt *
Skift motorolie
Udskift oliefilteret
Årlight
Udskift luftfilter
Udskift forfilter
Besøg en forhandler en gang om året for at
Kontroller lydpotten
Udskift tændrør
Udskift brændstoffilter
Rengør motorens luftkølingssystem
* Hvad der end kommer først
** Hyppigere rengøring er påkrævet i støvede omgivelser
eller hvis der findes urenheder i luften.
Kontroller dæktryk
Dæktrykket skal kontrolleres regelmæssigt og
vedligeholdes på de niveauer, der vises i tabellen
(figur 6). Bemærk, at disse tryk kan variere lidt fra den
“Max Inflation”, der er trykt på dækkenes sidevæg. De
viste tryk giver hensigtsmæssig traktion, forbedrer
klippekvaliteten og forlænger dækholdbarheden.
Størrelse PSI bar
20 x 10,0-8 10 0,68
15 x 6,0-6 12-14 0,82-0,96
Figur 6. Dæktryk
16
Page 41

Regelmæssig vedligeholdelse
Not for
Reproduction
Kontrol af
sikkerhedsblokeringssystemet
Kontroller sikkerhedsblokeringssystemets funktion vha.
test-proceduren. Gå til forhandleren, hvis der er tester,
som traktoren ikke klarer.
Kontroller stoptiden af
plæneklipperens knive
Slåmaskineblade og slåmaskinedrivremme skal være
fuldstændigt standset indenfor fem sekunder af, at der
drejes om for den elektriske PTO kontakt.
1. Start motoren med traktoren i frigear, PTO frakoblet
og føreren i sædet.
2. Se over den venstre fodstøtte på slåmaskinens
drivrem. Tilkobl PTO og vent i flere sekunder. Frakobl
PTO, og kontroller hvor lang tid,
slåmaskinedrivremmen er om at standse.
3. Hvis slåmaskinens drivrem ikke standser indenfor fem
sekunder, besøg forhandleren.
Batterivedligeholdelse
Rengøring af batteri og kabler
7. Monter batteriet (E) i batterirummet igen. Sæt batteriet
fast med holdestangen (C) samt vingemøtrikken og
spændskiven (D).
8. Forbind batterikablerne igen, først de positive kabler
og dæksel (B), dernæst de negative kabler (A).
9. Dæk enderne på kablerne og batteriets polklemmer
med vaseline eller ikke-ledende fedt.
A
D
B
C
E
ADVARSEL
Når man fjerner eller monterer batterikabler, skal
man afbryde det negative kabel FØRST og tilslutte
det igen SIDST. Hvis det ikke gøres i denne
rækkefølge, risikerer man, at den positive pol
kortsluttes til rammen med et stykke værktøj.
1. Afbryd kalberne fra batteriet, de negative kabler først
(A, figur 7), dernæst dækslet og de positive kabler (B).
2. Løsn vingemøtrikken og spændskiven (D).
3. Drej holdestangen (C) op og væk fra batteriet. Sæt
den fast på styrestammen.
4. Tag batteriet ud (E).
5. Rens batterirummet med en opløsning af tvekulsurt
natron og vand.
6. Rens batteriets polklemmer og enderne af kablerne
med en stålbørste og rensevæske til batteripoler, indtil
de skinner.
Figur 7. Batterivedligeholdelse
A. Negative kabler
B. Positive kabler og dæksel
C. Holdestang
D. Vingemøtrik og spændskive
E. Batteri
Vedligeholdelse af motor
BEMÆRK: Henvis til motorens brugervejledninger for alle
vedligeholdelsesprocedurer.
17
Page 42

Fejlfinding, justering
Not for
Reproduction
og service
Fejlfinding
Selv om normal pleje og regelmæssig vedligeholdelse vil
forlænge udstyrets holdbarhed, vil langvarig eller
konstant brug eventuelt kræve, at der udføres service, for
at det kan fortsætte med at fungere ordentligt.
Nedenstående fejlfindingsvejledning beskriver de fleste
almindelige problemer, deres årsager og afhjælpning.
Se oplysningerne på de følgende sider, som indeholder
anvisninger mht. hvordan man selv kan udføre de fleste af
disse mindre justeringer og servicereparationer. Hvis man
foretrækker det, kan alle disse procedurer udføres af den
lokale autoriserede forhandler.
For at undgå at komme alvorligt til skade må man
kun udføre vedligeholdelse af traktoren eller
slåmaskinen, når motoren er standset og
parkeringsbremsen tilkoblet.
Sørg altid for at tage nøglen ud af tændingen,
afbryd ledningen til tændrøret og fastgør den på
god afstand af tændrøret, inden vedligeholdelsen
påbegyndes, for at undgå at starte motoren ved
en fejltagelse.
ADVARSEL
Fejlfinding af traktoren
PROBLEM SE EFTER AFHJÆLPNING
Motor vil ikke dreje
eller starte.
Motor svær at starte
eller kører ujævnt.
Motor banker.
For højt olieforbrug.
Sort udstødningsrøg.
Der er ikke trykket på
bremsepedalen.
PTO (elektrisk kobling)
kontakten er i TÆND position.
Cruisekontrol er aktiveret. Skift knappen til NEUTRAL/SLUK position.
Løbet tør for brændstof. Hvis motoren er varm, lad den køle ned, fyld så
Motoren er druknet. Deaktiver chokeren.
Sikringen er sprunget. Henvend dig til din autoriserede forhandler.
Batteriterminaler skal renses. Se Rengøring af batteri og kabler afsnittet.
Batteri er afladt eller fladt. Genoplad eller udskift.
Løse eller afbrudte
forbindelser.
Magnetspole eller selvstarter
defekt.
Sikkerhedsaflåsningskontakt
defekt.
Der er vand i brændstoffet. Henvend dig til din autoriserede forhandler.
Brændstoffet er gammelt eller
forurenet.
Brændstofblandingen er for fed. Rens luftfilteret.
Motoren har et andet problem. Henvend dig til din autoriserede forhandler.
Lavt olieniveau. Kontrollér/påfyld olie efter behov.
Brug af forkert oliekvalitet. Se Olie anbefalinger diagram.
Motoren bliver overophedet. Henvend dig til din autoriserede forhandler.
Brug af forkert oliekvalitet. Se Olie anbefalinger diagram.
For meget olie i krumtaphuset. Aftap overskydende olie.
Snavset luftfilter. Se Servicering af luftfilter afsnittet.
Choker lukket. Åbn chokeren.
Tryk bremsepedalen helt i bund.
Sæt den i SLUK position.
brændstoftanken op.
Undersøg manuelt ledningerne. Hvis ledninger er flosset
eller ødelagte så besøg en autoriseret forhandler.
Henvend dig til din autoriserede forhandler.
Henvend dig til din autoriserede forhandler.
Henvend dig til din autoriserede forhandler.
18
Page 43

Fejlfinding, justering og service
Not for
Reproduction
Fejlfinding af traktoren (fortsat)
PROBLEM SE EFTER AFHJÆLPNING
Der er ikke trykket på
speederen.
Motoren kører men
traktoren vil ikke
bevæge sig.
Bremsen kan ikke
holde.
Traktoren styrer
hårdt eller er svær at
håndtere.
Håndtagene til gearudløsning i
SKUB position.
Håndbremsen er ikke trukket. Slå håndbremsen fra.
Drivremmen er knækket eller
den glider.
Indvendig bremse er slidt. Henvend dig til din autoriserede forhandler.
Styretilkoblingen er løs. Henvend dig til din autoriserede forhandler.
Forkert dæktryk. Se Kontroller dæktryk afsnittet.
Forhjuls spindellejer er tørre. Henvend dig til din autoriserede forhandler.
Fejlfinding af plæneklipperen
Tryk på pedalerne.
Gå til KØR position.
Henvend dig til din autoriserede forhandler.
PROBLEM SE EFTER AFHJÆLPNING
Plæneklipperen løfter
sig ikke.
Plæneklipperen klipper
uensartet.
Græsklippet ser
groft ud.
Motoren går nemt i stå
med klipperen tilkoblet.
For kraftig
klippervibration.
Motoren er i gang og
traktoren kører men
plæneklipperen vil
ikke køre.
Løftetilkoblingen er ikke
fastgjort korrekt eller er defekt.
Klippeaggregatet er ikke
parallelt med jordoverfladen.
Dækkene er ikke korrekt
pumpet.
Motorhastighed for lav. Sæt den på fuld gas.
For høj kørselshastighed. Sæt farten ned.
Plæneklipperen har et andet
problem.
Motorhastighed for lav. Sæt den på fuld gas.
For høj kørselshastighed. Sæt farten ned.
Snavset eller tilstoppet luftfilter. Se Servicering af luftfilter afsnittet.
Klippehøjden er indstillet for
lavt.
Affaldsudkastet er blokeret. Klip græs med udkastet vendt mod et område der
Motoren har ikke nået
driftstemperatur.
Start af plæneklipperen i højt
græs.
Plæneklipperen har et andet
problem.
PTO’en er ikke aktiveret. Aktiver PTO’en.
Plæneklipperen har et andet
problem.
Henvend dig til din autoriserede forhandler.
Henvend dig til din autoriserede forhandler.
Se Kontroller dæktryk afsnittet.
Henvend dig til din autoriserede forhandler.
Klip højt græs med maksimal klippehøjde i første
omgang.
allerede er blevet klippet.
Lad motoren køre i adskillige minutter for at varme op.
Start græsslåning i et ryddet område.
Henvend dig til din autoriserede forhandler.
Henvend dig til din autoriserede forhandler.
19
Page 44

Fejlfinding, justering og service
Not for
Reproduction
Sædejustering
Sædet kan justeres frem eller tilbage. Flyt grebet
(A, figur 8), anbring sædet efter ønske, og slip grebet for
at fastlåse sædet i stillingen.
A
Figur 8. Sædejustering
A. Sædejusteringsgreb
Slåmaskinejusteringer
Målehjul
Slåmaskinens målehjul kan indstilles i to stillinger
afhængigt af klippehøjden. Når man bruger højere
klippehøjder, skal hjulene stilles i laveste stilling. Når man
bruger lavere klippehøjder, skal hjulene stilles i øverste
stilling. Pas på at hjulene ikke bliver på jorden hele tiden,
mens man klipper plæne. Sådan justeres de:
1. Afmonter kontramøtrikken (B, figur 9), målehjul (C),
spændskiver (D) og ansatsbolt (E). Skift
målehjulstillingen til den ønskede højde.
2. Sæt ansatsbolten (E) gennem spændskiverne (D),
målehjulet (C) og målehjulkonsollen (A). Stram
kontramøtrikken (B). Gentag trin 1 og 2 for alle
målehjul.
A
Batteriopladning
ADVARSEL
Hold åben ild og gnister væk fra batteriet, da gas,
som kommer fra batteriet, er meget eksplosiv.
Sørg for udluftning omkring batteriet, mens det
oplades.
Et dødt batteri eller et batteri, der er for svagt til at starte
motoren, kan være forårsaget af en defekt i
opladningssystemet eller i andre elektriske dele. Hvis der
er tvivl om årsagen til problemet, skal man se
forhandleren. Hvis man bliver nødt til at udskifte batteriet,
skal man følge trinnene under Rengøring af batteri og
kabler i afsnittet Almindelig vedligeholdelse.
Når batteriet skal oplades, skal man følge de anvisninger,
der kom fra producenten af batteriopladeren så vel som
alle de advarsler, der er inkluderet i afsnittet om
sikkerhedsregler i denne bog. Oplad batteriet indtil det er
fuldt opladet. Må ikke oplades med højere mærkeeffekt
end 10 A
D
E
C
Figur 9. Justering af målehjul med fast konsol
A. Målehjulkonsol
B. Kontramøtrik
C. Målehjul
D. Spændskive
E. Ansatsbolt
B
20
Page 45

Specifikationer
Not for
Reproduction
BEMÆRK: Specifikationerne er korrekte på det tidspunkt, de gik i trykken, de kan ændres uden varsel.
MOTOR:
17,5 HK* Briggs & Stratton
Mærke Briggs & Stratton
Model Intek
Hestekraft 17.5 HK @ 3600 rpm
Slagvolumen 500 cc (30,5 kubiktommer)
Elektrisk system 12 Volt, 9 A. Alternator, Batteri: 230 CCA
Oliekapacitet 1,4 l (48 oz)
20 HK* Briggs & Stratton
Mærke Briggs & Stratton
Model Intek
Hestekraft 20 HK @ 3600 rpm
Slagvolumen 656 cc (40,0 kubiktommer)
Elektrisk system 12 Volt, 9 A. Alternator, Batteri: 230 CCA
Oliekapacitet 1,9 l (64 oz)
UNDERSTEL:
LT Se rien
Brændstoftankens
kapacitet Kapacitet: 15,1 l (4,0 gallons)
Baghjul Dækstørrelse: 20 x 10 -8
Oppumpningstryk: 0,68 bar (10 psi)
Forhjul Dækstørrelse: 15 x 6,0-6
Oppumpningstryk: 0,82-0,96 bar (12-14 psi)
TRANSMISSIONER:
K46
Type Hydrostatisk Tuff Torq K46
Hydraulikvæske 10w 30 Premium Engine Oil
Hastigheder Fremadgående: 8-9,0 km/t (0-5,5 MPH)
@ 3400 rpm Bagudgående: 0-4,8 km/t (0-3,0 MPH)
Kontinuerligt
drejningsmoment 232 Nm (170 fod/pund)
Præstation trækbom
mærkedata 103 kg (227 pund)
Maksimum vægt
på akslen 306 kg (675 pund)
DIMENSIONER:
LT Se rien
Totallængde 180 cm (70.9")
Totalbredde 122 cm (48")
Højde 114 cm (44.9")
* Nominel effekt
Den nominelle effekt for en motormodel fastsættes indledningsvis ved hjælp af SAE-kode J1940 (revision 2002-05).
Vores motorer anvendes på en lang række produkter og i mange forskellige miljøer. Du kan derfor ikke være sikker på,
at motoren frembringer de opgivne nominelle hestekræfter, når den anvendes på et motorredskab (den “effektive”
effekt). Denne afvigelse kan skyldes en lang række faktorer, herunder bl.a. forskelle i anvendelseshøjde, temperatur,
barometertryk, luftfugtighed, brændstof, motorsmøring, det maksimale regulerede omdrejningstal, individuelle
motorvariationer, det enkelte motorværktøjs konstruktion, driften af motoren, motorindkøring i forbindelse med
reduktion af friktion og rensning af forbrændingskamre, ventil- og karburatorjusteringer samt andre faktorer. Effekten
kan også tilpasses på grundlag af sammenligninger med andre lignende motorer, der anvendes til tilsvarende formål,
og hvis effekt derfor ikke nødvendigvis svarer til de værdier, der fremkommer ved brug af de førnævnte koder.
Dele og tilbehør
Reservedele
Reservedelene er på lager hos den autoriserede
forhandler.
Tilbehør
Maskinolie
Pletreparationsmaling
Fedtpistol kit
Tube med fedt, 240 ml (8 oz.)
Tætningsmasse til dæk
Rensemiddel/affedter
Benzinstabiliseringsmiddel
21
Page 46

Not for
Reproduction
Page 47

Inhaltsverzeichnis
Not for
Reproduction
Sicherheitsvorschriften ......................................2
Identifizierungsnummern...................................7
Sicherheitsaufkleber...........................................8
Sicherheitssymbole ............................................9
Merkmale und Steuerungen.............................10
Steuerungsfunktionen ...........................................10
Parkbremsfunktion ................................................12
Automatische Geschwindigkeitsregelung .............12
Betriebsstundenzähler ..........................................12
Betrieb des Traktors..........................................13
Sicherheitsverriegelungssystem ...........................13
Allgemeine Betriebssicherheit...............................13
Kraftstoff einfüllen..................................................13
Motor starten .........................................................13
Traktor und Motor anhalten ...................................14
Traktor fahren........................................................14
Mähen ...................................................................14
Mähen beim Rückwärtsfahren...............................14
Anbaugerätbetrieb beim Rückwärtsfahren ............14
Traktor von Hand schieben ...................................14
Mähwerkhöhe einstellen........................................15
Einen Anhänger anbringen....................................15
Unterstellen...........................................................15
Regelmäßige Wartung ......................................16
Wartungsplan........................................................16
Reifendruck prüfen................................................16
Sicherheitsverriegelungssystem prüfen ................17
Stoppzeit der Mäher-Klinge überpüfen..................17
Batteriewartung.....................................................17
Wartung des Motors..............................................17
Fehlersuche, Einstellungen und Wartung ......18
Fehlersuche beim Traktor......................................18
Fehlersuche beim Mähwerk ..................................19
Sitzeinstellung.......................................................20
Batterieladung.......................................................20
Mähwerkseinstellungen.........................................20
Technische Daten..............................................21
Ersatzteile und Zubehör...................................21
HINWEIS: In diesem Handbuch beziehen sich „links“ und
„rechts“ auf die Sicht aus dem Fahrersitz.
1
Page 48

Sicherheitsvorschriften
Not for
Reproduction
Sichere Bedienung
Herzlichen Glückwunsch zum Kauf eines qualitativ hochwertigen Rasenund Gartengeräts. Unsere Produkte sind so konstruiert und hergestellt,
dass sie alle Sicherheitsstandards der Branche erfüllen oder übertreffen
Der Bediener ist für die Sicherheit von Geräten mit Kraftantrieb
verantwortlich. Falscher Gebrauch und mangelhafte Wartung können zu
Gefahren führen! Denken Sie stets daran, dass Sie nicht nur für Ihre
eigene Sicherheit, sondern auch für die von umstehenden Personen
verantwortlich sind.
Lassen Sie gesunden Menschenverstand walten und durchdenken Sie
Ihre Vorgehensweise. Wenn Sie sich nicht sicher sind, ob eine geplante
Aufgabe mit dem Gerät sicher ausgeführt werden kann, fragen Sie einen
Fachmann: Wenden Sie sich an Ihren Vertragshändler..
Handbuch sorgfältig lesen
Das Bedienungshandbuch enthält wichtige Sicherheitsinformationen, mit denen Sie
sich VOR dem Betrieb des Geräts vertraut machen sollten und die WÄHREND
des Betriebs einzuhalten sind.
Das Handbuch enthält sichere Bedienungsverfahren, eine Erläuterung
der Merkmale und Bedienungselemente sowie Wartungsinformationen,
um Ihnen zu helfen, Ihr Gerät optimal einzusetzen.
Lesen Sie die Sicherheitsvorschriften und -informationen auf den
folgenden Seiten gründlich durch. Lesen Sie außerdem den
gesamten Abschnitt zum Betrieb.
Kinder
Vermeiden Sie tragische Unfälle mit Kindern! Halten Sie Kinder
aus dem Mähbereich fern. Kinder interessieren sich für das
Gerät und den Mähvorgang. Gehen Sie niemals davon aus,
dass Kinder dort bleiben, wo sie zuletzt gesehen wurden. Wenn
sich Kinder in der Nähe des Mähbereichs aufhalten, müssen
sie von einem anderen verantwortungsbewussten
Erwachsenen beaufsichtigt werden.
LASSEN SIE KINDER NICHT AUF DEM GERÄT MITFAHREN!
Dies kann Kinder dazu ermutigen, sich auch bei anderen
Gelegenheiten dem laufenden Gerät zu nähern, wodurch sie
schwer verletzt werden können. Wenn ein Kind mitfahren darf,
kann es sich dem Gerät auch einmal nähern, wenn Sie es nicht
erwarten, und dadurch überfahren werden.
2
Rückwärtsfahren
Mähen Sie nur dann beim
Rückwärtsfahren, wenn dies
unbedingt notwendig ist. Schauen Sie
vor und während des
Rückwärtsfahrens stets
nach unten und hinten,
auch wenn die
Mähmesser
ausgekuppelt sind.
Page 49

Sicherheitsvorschriften
Not for
Reproduction
Betrieb am Hang
Der Betrieb dieses Geräts an einem Hang mit zu großer Steigung kann zu
schweren oder sogar tödlichen Verletzungen führen. Wenn Sie das Gerät an
einem Hang mit zu großer Steigung oder unzureichender Bodenhaftung
benutzen, können Sie die Kontrolle über das Gerät verlieren und umkippen.
Als Faustregel gilt, dass Sie das Gerät nicht an einem Hang benutzen sollten,
den Sie nicht (im Zweirad-Antriebsmodus) rückwärts hinauffahren können.
Sie sollten das Gerät außerdem nicht an einem Hang benutzen, dessen
Steigung 1 Meter auf einer Länge von 6 Metern überschreitet. Fahren Sie an
Hängen stets auf- und abwärts, niemals schräg.
Beachten Sie außerdem, dass die Bodenoberfläche die Stabilität und
Kontrolle beeinflusst. Nasses Gras oder ein vereister Fahrweg kann Ihre
Fähigkeit zur Kontrolle des Geräts stark beeinträchtigen.
Wenn Sie sich vor oder während der Benutzung des Geräts an einem Hang nicht sicher fühlen, sollten
Sie kein Risiko eingehen und das Gerät nicht am Hang benutzen.
Bewegliche Teile
Dieses Gerät ist mit zahlreichen beweglichen Teilen ausgestattet, die Sie und andere
Personen verletzen können. Die Sicherheit bei der Bedienung des Geräts ist jedoch
gewährleistet, wenn Sie ordnungsgemäß auf dem Fahrersitz sitzen und alle
Sicherheitsvorschriften in diesem Handbuch beachten.
Das Mähwerk verfügt über rotierende Mähmesser, die Hände und Füße abtrennen
können. Halten Sie sich selbst und andere Personen von diesen Teilen fern, während
das Mähwerk läuft!
Dieses Gerät ist mit einem Fahreranwesenheits-Sicherheitssystem ausgestattet, um die
sichere Bedienung durch den Fahrer zu gewährleisten. Das System darf NICHT
modifiziert oder umgangen werden. Wenn die in diesem Handbuch beschriebenen
Prüfungen des Sicherheits-Verblockungssystems nicht wie angegeben ausgeführt
werden, wenden Sie sich sofort an Ihren Vertragshändler.
Herausgeschleuderte Objekte
Dieses Gerät verfügt über rotierende Mähmesser. Die Messer können
Gegenstände und Geröll aufnehmen und herausschleudern, was zu schweren
Verletzungen von umstehenden Personen führen kann. Beräumen Sie den
Mähbereich, BEVOR Sie mit den Mäharbeiten beginnen.
Benutzen Sie dieses Gerät nur, wenn der vollständige Grasfangbehälter bzw.
Auswurfschutz (Prallblech) installiert ist.
Halten Sie außerdem andere Personen aus dem Mähbereich fern, wenn das
Mähwerk läuft. Wenn sich jemand dem Mähbereich nähert, stellen Sie das
Mähwerk sofort ab, bis die Personen den Mähbereich wieder verlassen haben.
Kraftstoff und Wartung
Benzin ist äußerst leicht entflammbar. Benzindämpfe sind ebenfalls äußerst
leicht entflammbar und können an eine weit entfernte Zündquelle gelangen.
Benzin darf nur als Kraftstoff und nicht als Lösungs- oder Reinigungsmittel
verwendet werden. Kraftstoff nicht an einem Ort lagern, an dem sich Dämpfe
sammeln oder an eine Zündquelle, wie z. B. eine Zündflamme, gelangen
können. Kraftstoff muss in einem genehmigten, abgedichteten
Kunststoffkanister oder im Kraftstofftank des Traktors mit fest verschlossenem
Deckel gelagert werden. Verschütteten Kraftstoff sofort aufwischen.
Die ordnungsgemäße Wartung ist kritisch für die Sicherheit und Funktion Ihres
Geräts. Stellen Sie sicher, dass die in diesem Handbuch enthaltenen
Wartungsverfahren, besonders die regelmäßige Prüfung des
Sicherheitssystems, ordnungsgemäß durchgeführt werden.
3
Page 50

Sicherheitsvorschriften
Not for
Reproduction
Lesen Sie bitte diese Sicherheitsvorschriften und befolgen Sie sie genau. Die Nichtbeachtung dieser Vorschriften kann
dazu führen, dass Sie die Kontrolle über das Gerät verlieren, sowie zu schweren Personenschäden oder Tod des
Bedieners oder von in der Nähe befindlichen Dritten oder Sachbeschädigung oder Beschädigung des Geräts.
Mähwerk kann Hände und Füße abtrennen und Gegenstände schleudern. Dreiecke im Text weisen auf wichtige
Vorsichts- oder Achtungshinweise hin, die befolgt werden müssen.
Dieses
ALLGEMEINER BETRIEB
1. Vor der Inbetriebnahme müssen Sie die in diesem Handbuch
und auf dem Gerät befindlichen Anweisungen lesen,
verstehen und befolgen.
2. Hände und Füße dürfen keinesfalls in die Nähe von
Rotationsteilen oder unterhalb des Gerätebereichs geraten.
Halten Sie sich stets von den Auswurföffnungen fern.
3. Gestatten Sie nur verantwortungsbewussten Erwachsenen,
die die Anweisungen kennen, den Betrieb des Geräts (das
Alter des Bedieners kann auf Grund örtlicher Bestimmungen
Begrenzungen unterliegen).
4. Entfernen Sie Gegenstände, wie Steine, Spielzeug, Draht
usw., die von den Messern bzw. dem Messer aufgenommen
und geschleudert werden können, aus dem Mähbereich.
5. Vergewissern Sie sich vor dem Mähen, dass sich im
Mähbereich keine Personen befinden. Halten Sie das Gerät
an, wenn jemand den Mähbereich betritt.
6. Lassen Sie niemals andere Personen mitfahren.
7. Mähen Sie nicht während des Rückwärtsfahren, außer, es ist
absolut notwendig. Schauen Sie beim Rückwärtsfahren
immer nach unten und nach hinten.
8. Achten Sie darauf, dass der Auswurf des Schnittguts nicht auf
Personen erfolgt. Vermeiden Sie es, das Schnittgut auf eine
Wand oder dergleichen auszuwerfen. Das Schnittgut könnte
auf den Bediener zurückprallen. Halten Sie das/die Messer
an, wenn Sie über Schotterflächen fahren.
9. Benutzen Sie das Gerät nur, wenn das Grasfanggerät, der
Auswurfschutz (Prallblech) und andere
Sicherheitsvorrichtungen angebracht sind.
10. Verlangsamen Sie vor dem Wenden die Geschwindigkeit.
11. Lassen Sie ein laufendes Gerät nie unbeaufsichtigt. Kuppeln
Sie vor dem Absteigen die Zapfwellenkupplung immer aus,
ziehen Sie die Parkbremse an, stellen Sie den Motor ab und
ziehen Sie den Schlüssel ab.
12. Wenn der Mäher nicht eingesetzt wird, müssen die Messer
(Zapfwellenkupplung) ausgekuppelt werden. Schalten Sie
den Motor ab und warten Sie, bis alle Teile zum Stillstand
gekommen sind, bevor Sie das Gerät reinigen, den
Grasfangbehälter entfernen und den Auswurfschutz von
Schnittgut reinigen.
13. Setzen Sie das Gerät nur in Tageslicht oder in gutem
künstlichen Licht ein.
14. Benutzen Sie das Gerät nicht, wenn Sie sich unter dem
Einfluss von Alkohol oder Medikamenten befinden.
15. Achten Sie auf den Verkehr, wenn Sie das Gerät in der Nähe
von Straßen benutzen oder eine Straße überqueren.
16. Seien Sie beim Auf- oder Abladen des Geräts auf einen
Anhänger oder Lastwagen besonders vorsichtig.
17. Tragen Sie stets Augenschutz, wenn Sie dieses Gerät
benutzen.
18. Aus Erfahrungswerten geht hervor, dass Bediener, die 60
Jahre alt oder älter sind, einen hohen Prozentsatz der mit
Aufsitzmähern zusammenhängenden Verletzungen
darstellen. Diese Altersgruppe sollte ihre Fähigkeiten für die
sichere Bedienung eines Aufsitzmähers zum eigenen Schutz
und dem Schutz anderer vor Verletzungen prüfen.
19. Befolgen Sie die Empfehlungen des Herstellers hinsichtlich
Radgewichten und Gegengewichten.
20. Denken Sie daran, dass der Bediener für Unfälle mit anderen
Personen oder Sachschäden verantwortlich ist.
21. Fachliche und praktische Anweisungen sind für alle Fahrer
ratsam.
22. Es müssen immer feste Schuhe und lange Hosen getragen
werden. Das Gerät darf nicht barfuß oder mit Sandalen
bedient werden.
23. Vergewissern Sie sich vor dem Einsatz stets durch
Sichtprüfung, ob die Messer und die Messerbefestigungsteile
vorhanden, intakt und sicher sind. Tauschen Sie abgenutzte
oder beschädigte Teile aus.
24. Kuppeln Sie vor der Durchführung folgender Tätigkeiten
Zubehörteile aus: Auftanken, Demontage eines Zusatzes,
Durchführung von Einstellungen (es sei denn, die Einstellung
kann vom Fahrersitz aus vorgenommen werden).
25. Wenn das Gerät geparkt, untergestellt oder unbeaufsichtigt
ist, muss, wenn keine zwangsläufige mechanische Sperre
benutzt wird, die Mähvorrichtung abgesenkt werden.
26. Wenn Sie den Bedienerplatz aus welchem Grunde auch
immer verlassen, ziehen Sie vor dem Absteigen die
Parkbremse an, kuppeln Sie die Zapfwellenkupplung ein,
stellen Sie den Motor ab und ziehen Sie den Schlüssel ab.
27. Halten Sie das Gerät zur Verminderung der Feuergefahr
immer von Gras, Blättern und überschüssigem Öl frei.
Stoppen oder parken Sie nicht über trockenen Blättern, Gras
oder brennbaren Materialien.
TRANSPORT UND UNTERSTELLEN
1. Wenn dieser Traktor auf einem offenen Anhänger
transportiert wird, muss das Gerät unbedingt nach vorne in
die Fahrtrichtung ausgerichtet sein. Wenn der Traktor nach
hinten ausgerichtet ist, könnte die Haube durch
Windeinwirkung beschädigt werden.
2. Beachten Sie immer die Vorschriften für das sichere
Betanken des Geräts und den sicheren Umgang mit
Kraftstoff, wenn Sie das Gerät nach dem Transport und dem
Unterstellen betanken.
3. Stellen Sie das Gerät (mit Kraftstoff) nie in einem schlecht
belüfteten, geschlossenen Raum unter. Benzindämpfe
könnten zu einer Zündquelle (wie z.B. Ofen,
Warmwasserbereiter, usw.) gelangen und eine Explosion
verursachen. Benzindämpfe sind für Menschen und Tiere
giftig.
4. Befolgen Sie stets die Anweisungen im Motorhandbuch
hinsichtlich der Vorbereitungen für ein Unterstellen des
Geräts, bevor Sie das Gerät für kurze oder lange Zeiträume
unterstellen.
5. Befolgen Sie stets die Anweisungen im Motorhandbuch
hinsichtlich des ordnungsgemäßen Vorgehens bei der
Wiederinbetriebnahme des Geräts.
6. Stellen Sie das Gerät oder den Kraftstoffbehälter nie in einem
Raum ab, in dem sich eine offene Flamme oder eine
Zündflamme, wie z.B. von einem Warmwasserbereiter,
befindet. Lassen Sie das Gerät vor dem Unterstellen
abkühlen.
4
Page 51

Sicherheitsvorschriften
Not for
Reproduction
BETRIEB AM HANG
Abhänge spielen eine Hauptrolle bei Unfällen, die durch einen Verlust der
Kontrolle über das Gerät oder das Umkippen des Geräts verursacht
werden und schwere Verletzungen oder Tod zur Folge haben können. Die
Arbeit an Abhängen bedarf besonderer Vorsicht.
Wenn Sie den Abhang nicht rückwärts hinauffahren können oder Sie sich
unsicher fühlen, sollten Sie den Abhang nicht befahren.
Durch den Einsatz der Bremse können Sie über einen auf einem Abhang
rutschenden Aufsitzmäher nicht die Kontrolle wiedererlangen. Die
Hauptgründe für den Verlust der Kontrolle sind: Unzureichender Griff der
Reifen, zu hohe Geschwindigkeit, ungenügende Bremstätigkeit, die
Geräteart ist für den Einsatz ungeeignet, mangelnde Kenntnis der
Bodenbeschaffenheit, unrichtige Anhänge- und Lastverteilung.
1. Mähen Sie an Hängen vertikal, nicht diagonal.
2. Achten Sie auf Löcher, Furchen oder Erhebungen. Das Gerät
könnte sich auf unebenem Gelände überschlagen. In hohem Gras
könnten Hindernisse verborgen sein.
3. Wählen Sie einen niedrigen Gang, so dass Sie auf dem Hang nicht
stoppen oder schalten müssen.
4. Mähen Sie nicht auf nassem Gras. Die Reifen könnten nicht greifen.
5. Nehmen Sie nie den Gang heraus, insbesondere nicht, wenn Sie
bergab fahren. Legen Sie nicht den Leerlauf ein, da die Bremskraft
des Motors dadurch nicht genutzt werden kann.
6. Vermeiden Sie es, an einem Hang anzufahren, anzuhalten oder zu
wenden. Sollten die Räder nicht mehr greifen, kuppeln Sie das/die
Messer aus und fahren Sie langsam weiter den Hang hinunter.
7. Achten Sie darauf, dass die Bewegungen am Hang langsam und
gleichmäßig ausgeführt werden. Nehmen Sie keine plötzlichen
Geschwindigkeits- oder Richtungsänderungen vor, wodurch sich
das Gerät überschlagen könnte.
8. Seien Sie besonders vorsichtig, wenn Sie das Gerät mit
Grasfanggeräten oder anderem Zubehör verwenden, da die
Stabilität dadurch beeinträchtigt werden könnte.
9. Versuchen Sie nicht, das Gerät zu stabilisieren, indem Sie Ihren
Fuß auf den Boden geben.
10. Mähen Sie nicht in der Nähe von steilen Abhängen, Gräben oder
Aufschüttungen. Der Mäher könnte sich plötzlich überschlagen,
wenn ein Rad über die Kante eines steilen Abhangs oder eines
Grabens gerät oder wenn eine Aufschüttung einbricht.
11. Verwenden Sie auf steilen Abhängen keine Grasfanggeräte.
12. Führen Sie keine Mäharbeiten an einem Hang durch, den Sie nicht
rückwärts hinauffahren können.
13. Lassen Sie sich von Ihrem Vertragshändler wegen Radgewichten
oder Gegengewichten zur Verbesserung der Stabilität beraten.
14. Entfernen Sie Hindernisse, wie Steine, Baumstämme, usw.
15. Fahren Sie langsam. Am Hang kann es vorkommen, dass die
Reifen trotz ordnungsgemäß funktionierender Bremsen nicht
greifen.
16. Wenden Sie nicht an Hängen. Wenn dies unvermeidlich ist,
wenden Sie, wenn möglich, langsam und gleichmäßig bergab.
ANHÄNGER
1. Zusatzgeräte dürfen nur mit einem Fahrzeug mit
Anhängevorrichtung gezogen werden. Zum Ziehen darf nur die
Anhängevorrichtung verwendet werden.
2. Befolgen Sie die Empfehlungen des Herstellers hinsichtlich
Gewichtsbeschränkungen des angehängten Geräts und zum
Ziehen an Hängen.
3. Auf angehängten Zusatzgeräten dürfen keine Personen,
insbesondere keine Kinder, mitgenommen werden.
4. An Hängen kann das Gewicht des angehängten Geräts zu einem
Traktionsverlust führen, oder Sie können die Gewalt über das
Fahrzeug verlieren.
5. Fahren Sie langsam und kalkulieren Sie eine längere Bremsstrecke
ein.
6. Legen Sie nicht den Leerlauf ein, da die Bremskraft des Motors
dadurch nicht genutzt werden kann.
ACHTUNG
Benutzen Sie das Gerät nie an Abhängen, deren horizontales
Gefälle mehr als 17,6% (10 Grad) beträgt, was einem
vertikalen Gefälle von einem 106 cm auf 607 cm horizontal
entspricht.
Benutzen Sie beim Einsatz an Abhängen zusätzliche
Radgewichte oder Gegengewichte. Lassen Sie sich von
Ihrem Vertragshändler beraten, welche Gewichte ggf. für
Ihr Gerät verfügbar und geeignet sind.
Wählen Sie eine niedrige Grundgeschwindigkeit, bevor Sie
auf den Abhang fahren. Lassen Sie bei der Arbeit an
Abhängen mit einem hinten montierten Grasfanggerät
zusätzlich zu den vorderen und hinteren Gewichten
besondere Vorsicht walten.
Mähen Sie am Abhang in VERTIKALER Richtung, niemals
diagonal. Seien Sie bei einem Richtungs wechsel
besonders vorsichtig und STOPPEN ODER STARTEN
SIE NIE AM HANG.
KINDER
Wenn sich der Bediener nicht der Anwesenheit von Kindern bewusst ist,
können tragische Unfälle passieren. Kinder werden vom Gerät und dem
Mähvorgang oft angezogen. Gehen Sie nie davon aus, dass Kinder dort
verweilen, wo Sie sie zum letzten Mal gesehen haben.
1. Halten Sie Kinder vom Mähbereich fern und unter Aufsicht eines
anderen verantwortungsbewussten Erwachsenen.
2. Seien Sie auf der Hut und stellen Sie das Gerät ab, wenn Kinder
den Mähbereich betreten.
3. Schauen Sie vor und während des Rückwärtsfahrens nach hinten
und unten und halten Sie nach kleinen Kindern Ausschau.
4. Nehmen Sie niemals Kinder mit, selbst dann nicht, wenn das/die
Messer nicht in Betrieb sind. Kinder können herunterfallen und sich
schwer verletzen oder den sicheren Betrieb des Geräts stören.
Kinder, die bereits mitfahren durften, können plötzlich im
Mähbereich auftauchen, weil sie wieder mitfahren möchten und
vom Gerät überfahren werden, insbesondere beim
Rückwärtsfahren.
5. Erlauben Sie Kindern niemals, das Gerät zu bedienen.
6. Seien Sie besonders vorsichtig, wenn Sie sich toten Winkeln,
Buschwerk, Bäumen oder anderen Gegenständen nähern, die die
Sicht versperren könnten.
SCHADSTOFFEMISSION
1. In den Motorabgasen dieses Produkts sind Chemikalien enthalten,
die in bestimmten Mengen bekanntermaßen Krebs erregend sind,
zu bei der Geburt vorhandenen Schäden oder anderen negativen
Einflüssen auf die Fortpflanzung führen.
2. Achten Sie auf die entsprechenden Emissionsbeständigkeits- und
Luftindexangaben auf dem Motorabgasschild.
ZÜNDSYSTEM
1. Dieser Ottomotor entspricht Canadian ICES-002 [kanadische
Vorschriften ICES-002].
5
Page 52

Sicherheitsvorschriften
Not for
Reproduction
SERVICE UND WARTUNG
Sicherer Umgang mit Kraftstoff.
1. Brennende Zigaretten, Zigarren, Pfeifen und andere
Brandquellen dürfen sich nicht in der Nähe von Kraftstoff
befinden.
2. Verwenden Sie nur zugelassene Kraftstoffbehälter.
3. Nehmen Sie nie den Deckel des Kraftstoffbehälters ab oder
betanken Sie das Gerät nicht, wenn der Motor läuft. Motor vor
dem Nachtanken abkühlen lassen.
4. Das Gerät darf nie in Innenräumen betankt werden.
5. Stellen Sie das Gerät oder den Kraftstoffbehälter nie in einem
Bereich unter, in dem sich eine offene Flamme, Funken oder
Zündflamme befinden, wie z. B. in der Nähe eines Boilers
oder anderer Geräte.
6. Behälter dürfen niemals im Fahrzeuginnern oder auf einer
Ladefläche mit Kunststoffauskleidung gefüllt werden. Stellen
Sie Behälter vor dem Füllen immer auf den Boden, vom
Fahrzeug entfernt.
7. Entfernen Sie benzinbetriebene Geräte vom Lastwagen oder
Anhänger und nehmen Sie das Auftanken auf dem Boden
vor. Falls dies nicht möglich ist, tanken Sie diese Geräte mit
einem tragbaren Behälter auf einem Anhänger auf; benutzen
Sie keinen Benzineinfüllstutzen einer Tanksäule.
8. Achten Sie darauf, dass die Tülle stets mit dem Rand des
Benzintanks oder der Behälteröffnung in Kontakt ist, bis das
Betanken abgeschlossen ist. Benutzen Sie keine Vorrichtung
zum Offenhalten der Tülle.
9. Falls Benzin auf die Kleidung verschüttet wird, muss die
Kleidung sofort gewechselt werden.
10. Der Tank darf nie überfüllt werden. Bringen Sie den Deckel
des Kraftstoffbehälters wieder sicher an.
11. Seien Sie beim Umfang mit Benzin oder anderen Kraftstoffen
besonders vorsichtig. Sie sind entflammbar und die Dämpfe
sind explosionsgefährdet.
12. Wenn Kraftstoff verschüttet wurde, dürfen Sie nicht den
Versuch unternehmen, den Motor zu starten. Bringen Sie das
Gerät aus dem Bereich, in dem der Kraftstoff verschüttet
wurde und vermeiden Sie es, eine Zündquelle herzustellen,
bis die Kraftstoffdämpfe verflogen sind.
13. Bringen Sie den Tankdeckel und den Deckel des
Kraftstoffbehälters wieder sicher an.
Service und Wartung
1. Lassen Sie das Gerät nie in einem geschlossenen Raum
laufen, in dem sich Kohlenmonoxiddämpfe ansammeln
könnten.
2. Schrauben und Muttern, insbesondere die Schrauben des
Mähwerks, müssen immer fest angezogen und in gutem
Zustand sein.
3. Sicherheitsvorrichtungen dürfen niemals verändert werden.
Überprüfen Sie die Sicherheitsvorrichtungen regelmäßig auf
ordnungsgemäße Funktion und nehmen Sie bei Bedarf die
notwendigen Reparaturen vor.
4. Halten Sie das Gerät frei von Gras, Blättern, usw. Wischen
Sie verschüttetes Öl oder Kraftstoff auf.
5. Halten Sie an und untersuchen Sie das Gerät, wenn Sie einen
Gegenstand berühren. Nehmen Sie eventuell notwendige
Reparaturen vor, bevor Sie das Gerät wieder einsetzen.
6. Nehmen Sie nie Einstellungen oder Reparaturen vor, wenn
das Gerät läuft, es sei denn, dies ist im Handbuch des
Motorherstellers angegeben.
7. Die Bauteile des Grasfangbehälters unterliegen Abnutzung,
Beschädigung und Verschleiß, wodurch die sich
bewegenden Teile freigelegt oder Gegenstände
weggeschleudert werden könnten. Überprüfen Sie die
Bauteile häufig und ersetzen Sie sie, wenn nötig, mit den vom
Hersteller empfohlenen Teilen.
8. Mähmesser sind scharf und man kann sich daran schneiden.
Umwickeln Sie die (das) Messer, wenn Sie daran
Servicearbeiten durchführen, oder tragen Sie Handschuhe.
Gehen Sie dabei besonders vorsichtig vor.
9. Überprüfen Sie häufig die Funktion der Bremse. Stellen Sie
die Bremse ein und warten Sie sie nach Vorschrift.
10. Halten Sie Sicherheits- und Anweisungsaufkleber instand
oder ersetzen Sie sie ggf.
11. Ölfilter nicht bei heißem Motor entfernen, da sich das
verschüttete Benzin entzünden könnte. Öffnen Sie die
Schellen der Kraftstoffleitungen nicht mehr als nötig.
Vergewissern Sie sich, dass die Schellen nach dem Einbau
des Filters fest auf dem Schlauch sitzen.
12. Benutzen Sie kein Benzin, das METHANOL, Gasohol oder
mehr als 10 % ETHANOL, Benzinzusätze oder
tetraethylbleifreies Benzin enthält, da dies zu Schäden am
Motor oder am Kraftstoffsystem führen kann.
13. Wenn der Benzintank entleert werden muss, muss dies im
Freien durchgeführt werden.
14. Defekte Auspuffanlagen müssen ausgetauscht werden.
15. Verwenden Sie für Reparaturarbeiten nur werkseitig
genehmigte Ersatzteile.
16. Beachten Sie bei allen Ein- und Nachstellungen immer die
technischen Angaben des Herstellers.
17. Benutzen Sie für umfangreiche Service- und
Reparaturarbeiten nur zugelassene ServiceNiederlassungen.
18. Unternehmen Sie nie den Versuch, an diesem Gerät
umfangreiche Reparaturen durchzuführen, wenn Sie dafür
keine ordnungsgemäße Ausbildung haben. Nicht fachgerecht
durchgeführte Servicearbeiten können zu Betriebsgefahren,
Beschädigungen des Geräts und der Nichtigkeit der
Herstellergarantie führen.
19. Seien Sie im Umgang mit Mähern mit mehreren Messern
vorsichtig, da durch die Rotation eines Messers die Rotation
der anderen Messer verursacht werden kann.
20. Ändern Sie nicht die Einstellungen des Drehzahlmessers und
überdrehen Sie den Motor nicht. Durch überhöhte Drehzahlen
erhöht sich die Verletzungsgefahr.
21. Trennen Sie vor der Durchführung folgender Arbeiten die
Antriebszubehörteile, halten Sie den Motor an, ziehen Sie
den Zündschlüssel ab und trennen Sie das/die Zündkabel:
Reinigung verstopfter Zusatzgeräte und Auswurfschächte,
Wartungsarbeiten, wenn der Aufprall mit einem Gegenstand
vorgekommen ist oder wenn das Gerät abnormal vibriert.
Untersuchen Sie nach einem Aufprall das Gerät auf Schäden
und führen Sie vor dem Neustart und dem Einsatz des Geräts
die notwendigen Reparaturen durch.
22. Halten Sie Ihre Hände stets vom hydrostatischen
Pumpenventilator fern, wenn der Traktor läuft. Der Ventilator
befindet sich oberhalb der Transachseleinheit.
23. Geräte mit Hydraulikpumpen, -schläuchen oder -motoren:
ACHTUNG: Unter Druck austretende Hydraulikflüssigkeit
kann u. U. so stark spritzen, dass die Haut durchdrungen wird
und ernsthafte Verletzungen entstehen. Wenn
Fremdflüssigkeit in die Haut eindringt, muss sie innerhalb
einiger weniger Stunden von einem Arzt, der mit dieser Art
von Verletzung vertraut ist, chirurgisch entfernt werden, da
ansonsten eine Gewebsnekrose eintreten kann. Körper und
Hände von Nadellöchern oder Düsen, die Hydraulikflüssigkeit
unter hohem Druck spritzen, fern halten. Bei der Suche nach
Leckagen Papier oder Pappe verwenden, nicht die Hände.
Sicherstellen, dass alle Hydraulikflüssigkeitsanschlüsse fest
sitzen und dass alle Hydraulikschläuche und -leitungen sich
in gutem Zustand befinden, bevor das System unter Druck
gesetzt wird. Wenn Leckagen auftreten, muss das Gerät
sofort von Ihrem Vertragshändler repariert werden.
24. ACHTUNG: Energiespeichervorrichtung. Das
unsachgemäße Lösen von Federn kann zu ernsthaften
Verletzungen führen. Federn sollten nur von einem
Vertragshändler ausgebaut werden.
25. Modelle mit einem Motorkühler: ACHTUNG:
Energiespeichervorrichtung. Um ernsthafte
Körperverletzungen durch heißes Kühlmittel oder
austretenden Dampf zu vermeiden, darf auf keinen Fall
versucht werden, den Kühlerdeckel bei laufendem Motor
abzunehmen. Den Motor stoppen und warten, bis er
abgekühlt ist. Selbst dann muss beim Abnehmen des
Deckels äußerst vorsichtig vorgegangen werden.
6
Page 53

Identifizierungsnummern
B
E
I
S
P
I
E
L
Part No. xxxxxxx
xxxxxxxxxxxxxxx
Serial No. xxxxxxxxxx
20xx
kW: x.xx
xxxx max
xxxxxxxxxxxxxxxxxxxxxxx
xxxxxxxxxxxxxxxxxxxxxxx
xxxxxxxxxxxxxxxxxxxxxxx
xxxxxxxxxxxxxxxxxxxxxxx
xxx
dB
kg: xxx
Part No. xxxxxxx
xxxxxxxxxxxxxxx
Serial No. xxxxxxxxxx
20xx
kW: x.xx
xxxx max
xxxxxxxxxxxxxxxxxxxxxxx
xxxxxxxxxxxxxxxxxxxxxxx
xxxxxxxxxxxxxxxxxxxxxxx
xxxxxxxxxxxxxxxxxxxxxxx
xxx
dB
kg: xxx
Not for
Reproduction
B
E
I
S
P
I
E
L
Identifizierungsnummern
Identifizierungsschild
des Traktors
Identifizierungsschild
des Mähwerks
Wenn Sie sich mit Ihrem Vertragshändler wegen
Ersatzteilen, Service oder Informationen in Verbindung
setzen, MÜSSEN Sie Identifizierungsnummern bereit
haben.
Notieren Sie Modellbezeichnung und -nummer, die
Hersteller-ID-Nummer und die Motor-Seriennummer in dem
dafür vorgesehenen Raum, damit Sie sie immer griffbereit
haben. Diese Nummern finden Sie an den angegebenen
Stellen.
HINWEIS: Der Anbringungsort der Motor-Seriennummer ist
im Motorhandbuch vermerkt.
CE Identifikationsetikett
A. Indentifikationsnummer des Herstellers
B. Seriennummer des Herstellers
C. Nutzleistung in Kilowatt
D. Maximale Motorendrehzahl in Umdrehung pro Minute
E. Name und Adresse des Herstellers
F. Herstellungsjahr
G. CE-Qualitätslogo
H. Masseneinheit in Kilogramm
I. Gwährte Schalleistung in Dezibel
PRODUKT-BEZUGSDATEN
Modell-Bezeichnung/Nummer
Herstellernummer Traktor
Herstellernummer Mähwerk
Name des Händlers
MOTOR-BEZUGSDATEN
Motorhersteller
Motortyp/Spez.
A
B
E
Seriennummer Traktor
Seriennummer Mähwerk
Tag des Erwerbs
Motormodell
Motorcode/Seriennummer
F
G
I
H
C
D
7
Page 54

Sicherheitsaufkleber
Not for
Reproduction
SICHERHEITSAUFKLEBER
Lesen und befolgen Sie sämtliche Hinweise auf
GEFAHREN, WARNUNGEN und
VORSICHTSMASSNAHMEN und die auf Ihrem
Aufsitzmäher und Mähwerk befindlichen Anweisungen
genau. Eine Nichtbefolgung dieser Anweisungen kann
Personenschäden zur Folge haben. Diese Informationen
dienen Ihrer Sicherheit und sind von größter Wichtigkeit!
Auf Ihrem Aufsitzmäher und Mähwerk befinden sich die
unten abgebildeten Sicherheitsaufkleber.
Sicherheitssymbole
Achtung: Benutzerhandbuch lesen.
Vor dem Gebrauch dieser Maschine
das Benutzerhandbuch lesen und
verstehen.
Gefahr: Umherschleudern von
Gegenständen.
Diese Maschine kann Gegenstände
und Schmutzteile umherschleudern.
Umstehende Personen fern halten.
Achtung: Vor der Wartung
Schlüssel abziehen.
Vor der Durchführung von Reparaturen
oder Wartungsarbeiten den Schlüssel
abziehen und die technischen
Handbücher konsultieren.
Falls einer dieser Aufkleber verloren geht oder
beschädigt wird, müssen Sie ihn umgehend ersetzen.
Setzen Sie sich hierfür mit Ihrem Vertragshändler in
Verbindung.
Diese Aufkleber sind leicht anzubringen und dienen als
ständige visuelle Erinnerung für Sie und andere, die das
Gerät benutzen, die für einen sicheren und effektiven
Betrieb notwendigen Sicherheitsanweisungen zu
befolgen.
Gefahr: Heiße Oberfläche.
Vor Berühren dieses Bereichs
Maschine abkühlen lassen.
Gefahr: Kohlenmonoxidvergiftung.
Den Motor nicht in einem
unbelüfteten Bereich laufen lassen.
Warnung: Feuergefahr.
Batterien für Kinder unzugänglich
lagern. Offene Flammen und Funken
von der Batterie fernhalten, da sich
anderenfalls explosive Gase
entzünden könnten.
Gefahr: Umkippen der Maschine.
Diese Maschine nicht auf Gefällen von
mehr als 10 Grad verwenden.
Gefahr: Abtrennen von
Gliedmaßen.
Diese Maschine kann Gliedmaßen
abtrennen. Bei laufendem Motor
umstehende Personen und Kinder fern
halten.
Gefahr: Abtrennen von
Gliedmaßen.
Dieses Mähwerk kann Gliedmaßen
abtrennen. Hände und Füße von
Messern entfernt halten.
Gefahr: Brandgefahr.
Wenn der Motor heiß ist oder läuft,
keinen Kraftstoff nachfüllen. Den Motor
anhalten und 3 Minuten abkühlen
lassen, bevor Sie ihn betanken.
Warnung: Schwefelsäure kann zu
Blindheit oder schweren
Verbrennungen führen.
Beim Arbeiten an oder in der Nähe
von Batterien immer eine Schutzbrille
tragen.
Warnung: Batterien entwickeln
explosive Gase.
Bitte lesen und verstehen Sie die
Bedienungsanleitung, bevor Sie
diese Maschine benutzen.
Wichtig: Batterien nicht im
Hausmüll entsorgen.
Kontakt de lokale myndigheder mht.
Wenden Sie sich zur Entsorgung
und/oder zum Recyceln von Batterien
an die Behörden vor Ort.
Gefahr: Abtrennen von
Gliedmaßen.
Dieses Mähwerk kann
Gliedmaßen abtrennen. Hände
und Füße von Messern entfernt
halten.
8
Page 55

CE-Sicherheitssymbole
Not for
Reproduction
Lage der Aufkleber
Betriebsanleitung, CEModelle, Teilenr. 1734027
Zündschalterstellungen,
Teilenr. 1722806
Vorsicht, Klemmstelle,
Teilenr. 1720389
Fuel Level
Part No. 1730172
Vorsicht, Klemmstelle,
1730264
1730172
173xxxx
Kraftstoffanzeige,
Teilenr. 1730202
Teilenr.1720389
Anbaugeräthub,
Teilenr. 1730264
9
Page 56

Merkmale und Steuerungen
Not for
Reproduction
Abbildung 1. Steuerungsfunktionen
Steuerungsfunktionen
Die nachstehenden Informationen beschreiben kurz die Funktion der einzelnen Steuerungen. Starten, Stoppen, Fahren
und Mähen verlangen die Benutzungen mehrerer Steuerungen in einer bestimmten Reihenfolge. Die Kombinationen
und Reihenfolge der Bedienungsaufgaben für verschiedene Arbeiten werden im Abschnitt BETRIEB erläutert.
Gashebel
Der Gashebel regelt die Motordrehzahl. Den Gashebel
nach vorne schieben, um die Motordrehzahl zu erhöhen,
und nach hinten bewegen, um die Motordrehzahl zu
verringern. Immer mit „Vollgas“ fahren.
Choke
Den Choke für den Kaltstart schließen. Den Choke nach
Anlassen des Motors öffnen. Bei warmem Motor ist die
Anwendung des Chokes ggf. nicht notwendig. Den Hebel
nach vorne bewegen, um den Choke zu schließen.
10
Scheinwerfer
Mit dem Scheinwerferschalter werden die
Traktorscheinwerfer ein- und ausgeschaltet.
Betriebsstundenzähler
Der Betriebsstundenzähler zählt die Zeit in
Stunden, in denen der Zündschalter in der Stellung LAUF
ist.
Page 57

Merkmale und Steuerungen
Not for
Reproduction
Mähen beim Rückwärtsfahren (RMO)
Die Rückwärtsmähoption (RMO) ermöglicht das Mähen
(oder die Verwendung anderer zapfwellenbetriebener
Zusatzgeräte) beim Rückwärtsfahren. Zum Mähen beim
Rückwärtsfahren den RMO-Schlüssel drehen, nachdem
die Zapfwelle eingekuppelt wurde. Die LED-Leuchte
leuchtet auf und der Fahrer kann nun beim
Rückwärtsfahren mähen. Wenn die die Zapfwelle
eingekuppelt wird, muss RMO auf Wunsch erneut
aktiviert werden.
Zapfwellenschalter
Der Zapfwellenschalter kuppelt über die Zapfwelle
betriebene Zusatzgeräte ein und aus. Zum Einkuppeln
der Zapfwelle den Schalter nach OBEN ziehen. Um die
Zapfwelle auszukuppeln, den Schalter nach UNTEN
drücken. Es ist zu beachten, dass der Fahrer am
Traktorsitz sitzen muss, damit die Zapfwelle benutzt
werden kann.
Zündschalter
Mit dem Zündschalter wird der Motor angelassen und
abgestellt. Der Schalter hat drei Stellungen:
AUS Stellt den Motor und die Elektrik ab.
Schnitthöheneinstellung
Mit dem Schnitthöheneinstellhebel wird die Schnitthöhe
des Mähwerks eingestellt. Die Schnitthöhe kann
zwischen 2,5 cm und 10,2 cm ( 1,0 zoll und 4,0 zoll) in
sieben Stufen verstellt werden.
Sitzeinstellhebel
Der Sitz lässt sich nach vorne und hinten verstellen. Den
Hebel betätigen, den Sitz wunschgemäß einstellen und
den Hebel loslassen, um den Sitz in seiner Stellung zu
arretieren.
Getriebeausrückhebel
Der Getriebeausrückhebel deaktiviert das Getriebe, damit
der Traktor von Hand geschoben werden kann. Unter
TRAKTOR VON HAND SCHIEBEN sind diesbezügliche
Anleitungen zu finden.
Kraftstofftank
Die Kappe nach links drehen, um sie zu entfernen.
Kraftstoffstandanzeige
Zeigt den Kraftstoffstand im Tank an.
LAUF Erlaubt dem Motor zu laufen und macht
die Elektrik stromführend.
START Kurbelt den Motor zum Anlassen an.
HINWEIS: Den Zündschalter bei abgestelltem Motor nicht
in der Stellung LAUF lassen, da dies die Batterie entleert.
Fahrgeschwindigkeitspedale
Die Vorwärts-Fahrgeschwindigkeit des Traktors wird
durch das Vorwärts-Fahrgeschwindigkeitspedal reguliert.
Die Rückwärts-Fahrgeschwindigkeit des Traktors wird
durch das Rückwärts-Fahrgeschwindigkeitspedal
reguliert.
Wenn eines der Pedale betätigt wird, erhöht dies die
Fahrgeschwindigkeit. Je weiter das Pedal nach unten
gedrückt wird, desto schneller fährt der Traktor.
Automatische
Geschwindigkeitsregelung
Die autmatische Geschwindigkeitsregelung wird zur
Einstellung einer gleich bleibenden VorwärtsFahrgeschwindigkeit benutzt. Sie verfügt über fünf
Arretierungspositionen.
Parkbremse
Der Parkbremsenknopf dient zum Anziehen der
Parkbremse, wenn der Traktor angehalten ist. Die
Parkbremse wird gelöst, wenn das Bremspedal
vollständig durchgetreten und am Knopf nach oben
gezogen wird.
Bremspedal
Durch Drücken des Bremspedals wird die Traktorbremse
betätigt.
11
Page 58

Merkmale und Steuerungen
Not for
Reproduction
Parkbremsfunktion
Parkbremse einsetzen - siehe Abbildung 2. Um die
Parkbremse zu arretieren, die Fahrgeschwindigkeitspedale (A) loslassen, das Bremspedal (B) vollständig
durchtreten, am Parkbremsenknopf (C) nach oben ziehen
und anschließend das Bremspedal loslassen.
Lösen der Parkbremse - siehe Abbildung 2. Die
Parkbremse wird gelöst, indem das Bremspedal (B) nach
unten gedrückt wird.
E
B
A
Automatische
Geschwindigkeitsregelung
AKTIVIEREN:
1. Den Geschwindigkeitsregelungsknopf (D, Abbildung
2) nach oben ziehen.
2. Das Vorwärts-Fahrgeschwindigkeitspedal (A) drücken.
3. Den Geschwindigkeitsregelungsknopf (D) hoch
ziehen, wenn die gewünschte Geschwindigkeit
erreicht ist. Die Geschwindigkeitsregelung arretiert
sich in einer von fünf Stellungen.
DEAKTIVIEREN:
1. Das Bremspedal (B) drücken.
ODER
2. Das Vorwärts-Fahrgeschwindigkeitspedal (A) drücken.
Betriebsstundenzähler
Der Betriebsstundenzähler (E, Abbildung 2) zählt die Zeit
in Stunden, in denen der Zündschalter in der Stellung
LAUF ist.
C
D
Abbildung 2. Parkbremse einkuppeln
A. Fahrgeschwindigkeitspedale
B. Bremspedal
C. Parkbremsknopf
D. Geschwindigkeitsregelungsknopf
E. Betriebsstundenzähler
12
Page 59

SICHERHEITS-
Not for
Reproduction
VERBLOCKUNGSSYSTEM
Das Gerät ist mit Sicherheits-Verblockungs schaltern und anderen
Sicherungen ausgestattet. Diese Sicherheits systeme sind für Ihre
Sicherheit vorhanden. Versuchen Sie nicht, Sicherheitsschalter zu
umgehen, und machen Sie sich nie an Sicherungsvorrichtungen zu
schaffen. Überprüfen Sie deren Funktionsfähigkeit regelmäßig.
Betriebs-SICHERHEITSprüfung
Das Gerät ist mit einem Sitzschalter-Sicherheitssystem
ausgestattet. Prüfen Sie die Schalterfunktion jeden Herbst und
jedes Frühjahr, indem Sie folgende Tests durchführen.
Test 1 - Motor DARF NICHT starten, wenn:
• die Zapfwellenkupplung eingekuppelt ist ODER
• das Bremspedal NICHT vollständig niedergedrückt ist (oder
die Parkbremse nicht eingekuppelt ist), ODER
• die automatische Geschwindigkeitsregelung NICHT in NullStellung ist.
Test 2 - Motor MUSS durchdrehen und starten, wenn:
• der Fahrer auf dem Sitz sitzt UND
• die Zapfwellenkupplung NICHT eingekuppelt ist UND
• das Bremspedal vollständig niedergedrückt ist (oder die
Parkbremse eingekuppelt ist) UND
• die automatische Geschwindigkeitsregelung in Null-Stellung
ist.
Test 3 - Motor muss STOPPEN, wenn:
• der Bediener von seinem Sitz aufsteht.
Test 4 - Stoppzeit der Mäher-Klinge überpüfen
Die Mähwerkmesser und der Antriebsriemen des Mähwerks
müssen innerhalb von fünf Sekunden, nachdem der Zapf wellenkupplungsschalter in die Stellung „Aus“ gebracht wurde
(oder der Bediener aus seinem Sitz aufgestanden ist), zu einem
vollkommenen Stillstand kommen. Wenn der Antriebsriemen
des Mähwerks nicht innerhalb von fünf Sekunden zum Stillstand
kommt, setzen Sie sich bitte mit Ihrem Vertragshändler in
Verbindung.
Test 5 - Prüfung der RMO-Funktion (Mähen beim
Rückwärtsfahren)
• Der Motor muss ausgehen, wenn der Bediener bei
eingekuppelter Zapfwelle und nicht aktivierter RMO-Funktion
versucht, rückwärts zu fahren.
• Die RMO-Leuchte muss aufleuchten, wenn die RMO-Funktion
aktiviert ist.
HINWEIS: Sobald der Motor anhält, muß der Zapfwellen kupplungs schalter abgeschaltet werden, nachdem der Bediener
wieder in seinem Sitz Platz nimmt, damit der Motor gestartet
werden kann.
ACHTUNG
Wenn das Gerät den Sicherheitstest nicht besteht,
dürfen Sie es nicht in Betrieb nehmen.
Betrieb des Traktors
Allgemeine Betriebssicherheit
Vor der ersten Inbetriebnahme des Traktors müssen alle
Abschnitte über Sicherheit und Betrieb durchgelesen
werden. Machen Sie sich mit den Bedienungselementen
vertraut und lernen Sie, wie der Traktor angehalten wird.
Kraftstoff einfüllen
ACHTUNG
Bezin ist leicht entzündlich und muss vorsichtig
gehandhabt werden. Den Tank nicht füllen, wenn
der Motor noch heiß ist. Im Bereich, in dem
aufgetankt wird, keine offenen Flammen,
Streichhölzer verwenden und nicht rauchen. Nicht
zuviel Kraftstoff nachfüllen und Verschüttungen
sofort aufwischen.
Keinen Benzin verwenden, der METHANOL,
Gasohol oder mehr als 10% ETHANOL,
Benzinzusätze oder verbleiten Benzin enthält,
da dies zu Schäden am Motor bzw.
Kraftstoffsystem führen kann.
Kraftstoff einfüllen:
1. Kraftstofftankdeckel abnehmen (A, Abbildung 3).
2. Tank füllen. Nicht überfüllen. Im Tank Platz für
Ausdehnung des Benzins lassen. BenzinsortenEmpfehlungen sind im Motorhandbuch zu finden.
3. Kraftstofftankdeckel anbringen und mit der Hand
anziehen.
Motor starten
1. Im Fahrersitz sitzen, das Bremspedal ganz durch
drücken oder die Parkbremse anziehen.
2. Sicherstellen, dass die Fahrgeschwindigkeitspedale
nicht nieder gedrückt werden und dass der Hebel für
die automatische Geschwindigkeitsregelung in der
Neutralstellung ist.
3. Die Zapfwellenkupplung auskuppeln.
4. Den Gashebel auf VOLLGAS stellen.
5. Den Choke schließen.
HINWEIS: Bei warmem Motor ist die Anwendung des
Chokes ggf. nicht notwendig.
6. Den Schlüssel in den Zündschalter stecken und auf
START drehen.
7. Nach dem Anlassen des Motors den Gashebel auf
halbe Motornenndrehzahl einstellen. Den Motor
mindestens 30 Sekunden lang warm laufen lassen.
8. Den Gashebel auf VOLLGAS stellen.
HINWEIS: Bei einem Notfall kann der Motor gestoppt
werden, indem der Zündschalter in die Stellung STOP
gedreht wird. Diese Methode darf jedoch nur in
Notsituationen angewendet werden. Zum normalen
Abstellen des Motors die Anleitungen im Abschnitt
TRAKTOR UND MOTOR ANHALTEN befolgen.
13
Page 60

Betrieb des Traktors
Not for
Reproduction
Traktor und Motor anhalten
1. Die Fahrgeschwindigkeit-Bedienelemente auf Neutral
stellen.
2. Die Zapfwelle auskuppeln und warten, bis alle bewegten
Teilen zum Stillstand gekommen sind.
3. Den Gashebel auf LANGSAM stellen und den
Zündschalter auf AUS drehen. Den Zündschlüssel
abziehen.
Traktor fahren
1. Auf dem Sitz Platz nehmen und diesen so einstellen,
dass alle Bedienelemente bequem erreicht werden
können und die Armaturenbrettanzeige gut sichtbar ist.
2. Die Parkbremse anziehen.
3. Sicherstellen, dass die Zapfwelle ausgekuppelt ist.
4. Den Motor anlassen (siehe MOTOR STARTEN).
5. Parkbremse lösen und Bremspedal freigeben.
6. Für Vorwärtsfahrt das VorwärtsFahrgeschwindigkeitspedal drücken. Das Pedal zum
Stoppen freigeben. Je weiter das Pedal nach unten
gedrückt wird, desto schneller fährt der Traktor.
7. Den Traktor durch Loslassen der
Fahrgeschwindigkeitspedale anhalten, die Parkbremse
betätigen und den Motor abstellen (siehe TRAKTOR
UND MOTOR ANHALTEN).
Mähen
1. Das Mähwerk auf die gewünschte Schnitthöhe einstellen
und die Führungsräder (sofern vorhanden) in die
entsprechende Stellung bringen.
2. Die Parkbremse einkuppeln. Sicherstellen, dass die
Zapfwelle ausgekuppelt ist.
3. Den Motor anlassen (siehe MOTOR STARTEN).
4. Das Mähwerk mittels Zusatzgeräthubhebel vollständig
absenken.
5. Den Gashebel auf VOLLGAS stellen.
6. Die Zapfwelle einkuppeln (Mähwerk).
7. Mit dem Mähen beginnen. Im Abschnitt LC sind
Hinweise zu Mähmustern, Rasenpflege und
Informationen zur Fehlerbehebung zu finden.
8. Nach Beendigung des Mähvorgangs die Zapfwelle
auskuppeln und das Mähwerk mit dem
Zusatzgeräthubhebel anheben.
9. Den Motor abstellen (siehe TRAKTOR UND MOTOR
ANHALTEN).
Mähen beim Rückwärtsfahren
Zum Mähen beim Rückwärtsfahren kann der Bediener das
RMO-System verwenden. Diese Option wird durch Drehen des
RMO-Schlüssels aktiviert, nachdem die Zapfwelle eingekuppelt
wurde. Die LED-Leuchte leuchtet auf und der Bediener kann
nun beim Rückwärtsfahren mähen. Wenn die Zapfwelle
ausgekuppelt wird, muss die RMO-Funktion erneut aktiviert
werden (falls gewünscht). Der Schlüssel kann abgezogen
werden, um die Aktivierung der RMO-Funktion zu verhindern.
Betrieb von Anbaugeräten beim
Rückwärtsfahren
Zum Betreiben eines zapfwellenbetriebenen Anbaugeräts beim
Rückwärtsfahren kann der Bediener das RMO-System verwenden.
Diese Option wird durch Drehen des RMO-Schlüssels aktiviert,
nachdem die Zapfwelle eingekuppelt wurde. Die LED-Leuchte
leuchtet auf und der Bediener kann nun das Anbaugerät beim
Rückwärtsfahren verwenden. Wenn die Zapfwelle ausgekuppelt
wird, muss die RMO-Funktion erneut aktiviert werden (falls
gewünscht). Der Schlüssel kann abgezogen werden, um die
Aktivierung der RMO-Funktion zu verhindern.
Traktor von Hand Schieben
1. Zapfwellenkupplung auskuppeln und Motor abstellen.
2. Den Getriebeausrückhebel ca. 6,4 cm zurückziehen, um den
Hebel in der freigegebenen Position zu arretieren (Abb. 4).
3. Der Traktor kann nun mit der Hand geschoben werden.
Traktor nicht abschleppen
Abschleppen des Traktors führt zu Getriebeschäden. •
Benutzen Sie zum Schieben oder Abschleppen des
Traktors kein anderes Fahrzeug. • Betätigen Sie den
Getriebeausrückhebel nie bei laufendem Motor.
ACHTUNG
Wenn das Rückwärtsfahrpedal betätigt wird, während
die Zapfwelle eingekuppelt ist, die RMO-Funktion jedoch
nicht aktiviert wurde, wird der Motor abgestellt. Der
Bediener sollte die Zapfwelle stets auskuppeln, bevor
Straßen, Wege oder anderes Gelände, die/das von
anderen Fahrzeugen benutzt werden/wird, überquert
oder befahren werden. Ein plötzlicher Verlust des
Antriebs kann zu einer Gefahrensituation führen.
ACHTUNG
Mähen beim Rückwärtsfahren erhöht die Gefahr für
andere Personen. Unzureichende Aufmerksamkeit des
Bedieners in der Nähe von Kindern kann zu tragischen
Unfällen führen. Die RMO-Funktion nicht aktivieren,
wenn sich Kinder in der Nähe befinden. Kinder
interessieren sich für den Traktor und Mäharbeiten.
A
B
Abbildung 3. Getriebeausrückhebel und
Kraftstofftank
A. Kraftstofftankdeckel
B. Getriebeausrückhebel
14
Page 61

Betrieb des Traktors
Not for
Reproduction
Mähwerkhöhe einstellen
Mit der Schnitthöheneinstellung (A, Abbildung 4) wird die
Schnitthöhe des Mähwerks eingestellt. Sie kann
zwischen 2,5 cm und 10,2 cm( 1,0 zoll und 4,0 zoll) in
sieben Stellungen verstellt werden.
A
Abbildung 4. Mähwerk anheben bzw. absenken
A. Mähwerk-Höheneinstellung
Einen Anhänger anbringen
Die maximale horizontale Lastbegrenzung der Zugstange
beträgt 280 N. Die maximale vertikale Lastbegrenzung
der Zugstange beträgt 160 N. Das entspricht einem
Anhänger mit 113 kg Gewicht auf einem Geländeanstieg
von 10 Grad. Den Anhänger mit einem ausreichend
bemessenen Lastbolzen (A, Abbildung 5) und Splint (B)
befestigen.
A
Unterstellen
ACHTUNG
Die Maschine (mit Kraftstoff) nie in einem
schlecht belüfteten, geschlossenen Raum
unterstellen. Kraftstoffdämpfe könnten zu einer
Zündquelle (wie z. B. einem Ofen, Warmwasserbereiter usw.) gelangen und eine Explosion
verursachen.
Kraftstoffdämpfe sind für Menschen und Tiere
giftig.
Vor dem Unterstellen des Traktors am Ende der
Arbeitssaison die Wartungs- und Unterstellungsanleitungen im Abschnitt „Sicherheitsvorschriften“
durchlesen und dann folgende Schritte durchführen:
• Zapfwelle auskuppen, Parkbremse einkuppeln und
Zündschlüssel abziehen.
• Die Motorwartungs- und Unterstellungsaufgaben
durchführen, die im Motorenhandbuch angeführt sind.
Dazu gehört das Entleeren der Kraftstoffanlage, bzw.
das Zugeben von Kraftstoffstabilisator (die
aufgetankte Maschine nicht in einem geschlossenen
Raum unterstellen - siehe Achtungshinweis).
• Die Batterienutzungsdauer wird verlängert, wenn die
Batterie ausgebaut, an einem kühlen, trockenen Ort
aufbewahrt und einmal monatlich voll geladen wird.
Wenn die Batterie im Traktor eingebaut bleibt, das
Minuskabel abtrennen.
Bevor die Maschine nach dem Unterstellen in Betrieb
genommen wird:
• Flüssigkeitsstände prüfen. Sämtliche
Wartungsmaßnahmen durchführen.
• Alle Motorwartungs- und Unterstellungsaufgaben
durchführen, die im Motorenhandbuch empfohlen
werden.
• Motor vor dem Einsatz einige Minuten lang warm
laufen lassen.
B
Abbildung 5. Empfehlungen für das Anhängergewicht
A. Lastbolzen
B. Splint
15
Page 62

Regelmäßige
Not for
Reproduction
Wartung
WARTUNGSPLAN UND -VORGEHEN
Der folgende Wartungsplan muss bei der normalen Pflege von Traktor und Mähwerk befolgt werden.
ZUGMASCHINE UND MÄHER
Alle 8 stunden oder täglich
Sicherheitsverriegelungssystem überprüfen
Zugmaschie und Mähergehäuse reinigen
Sichtbare Ablagerungen von der Motorkammer entfernen
Alle 25 stunden oder jährlich *
Stoppzeit der Mäher-Klinge überpüfen
Überprüfung der Zugmaschine/des Mähers auf
lose Gegenstände
Reifendruck prüfen
Alle 50 stunden oder jährlich *
Bremsen der Zugmaschine überprüfen
Batterie und Kabel säubern
Suchen Sie Ihren Händler einmal jährlich auf, um
Zugmaschine und Mäher schmieren
Mäherklingen überprüfen **
* Je nachdem, was zuerst eintritt
** Überprüfen Sie die Klingen in Gegenden mit sandigen
Böden oder starkem Staub öfter
MOTOR
Erste 5 Stunden
Wechseln Sie das Motoröl
Alle 8 Stunden oder täglich
Prüfen Sie den Ölstand des Motors
Alle 25 Stunden oder jährlich *
Reinigen Sie den Motorluftfilter und Vorreiniger **
Alle 50 Stunden oder jährlich *
Wechseln Sie das Motoröl
Wechseln Sie den Ölfilter
Jährlich
Wechseln Sie den Luftfilter aus
Wechseln Sie den Vorreiniger aus
Suchen Sie Ihren Händler einmal jährlich auf, um
Untersuchen Sie Schalldämpfer und Funkenfänger
Wechseln Sie die Zündkerze aus
Wechseln Sie den Kraftstofffilter aus
Reinigen Sie das Luftkühlsystem
Reifendruck prüfen
Der Reifendruck muss regelmäßig geprüft werden. Er
sollte stets den in der Tabelle angegebenen Werten
entsprechen (Abb. 6). Es ist zu beachten, dass diese
Druckwerte etwas von den auf den Seitenwänden der
Reifen angebrachten Angaben für „Max. Luftdruck“
abweichen können. Die hier angeführten Druckwerte
liefern optimale Bodenhaftung, verbessern die
Schnittqualität und verlängern die Reifenstandzeit.
* Je nachdem, was zuerst eintritt
** Bei staubigen Umwelbedigungen oder wenn in der Luft
schwebende feste Teilchen vorhanden sind, häufiger
reinigen.
Reifengröße PSI bar
20 x 10,0-8 10 0,68
15 x 6,0-6 12-14 0,82-0,96
Abbildung 6. Reifenluftdruck
16
Page 63

Regelmäßige Wartung
Not for
Reproduction
Sicherheitsverriegelungssystem
prüfen
Die Funktion des Sicherheitsverriegelungssystems
anhand des Prüfverfahrens. Falls der Traktor eine dieser
Prüfungen nicht besteht, den Händler aufsuchen.
Stoppzeit der Mäher-Klinge
überpüfen
Die Mährwerksmesser und der Antriebsriemen des
Mähwerks müssen innerhalb von fünf Sekunden,
nachdem der elektrische Zapfwellenschalter in die
Stellung AUS geschaltet wurde, vollständig zum Stillstand
kommen.
1. Den Traktor in den Leerlauf schalten, die Zapfwelle
auskuppeln und im Fahrersitz sitzend den Motor
anlassen.
2. Über die linke Fußraste auf den Mähwerksantriebsriemen blicken. Die Zapfwelle einkuppeln und einige
Sekunden lang warten. Die Zapfwelle auskuppeln und
prüfen, wie lange es dauert, bis der Antriebsriemen
zum Stillstand kommt.
3. Wenn der Antriebsriemen nicht innerhalb von fünf
Sekunden zum Stillstand kommt, Vertragshändler
aufgesucht werden.
7. Batterie (E) wieder im Batteriefach einbauen. Mit
Niederhalter (C) und Flügelmutter und Unterlegscheibe (D) befestigen.
8. Batteriekabel wieder anbringen: erst Pluskabel und
Abdeckung (B), danach Minuskabel (A).
9. Kabelenden und Batteriepole mit Vaseline oder nicht
leitendem Schmiermittel überziehen.
A
D
B
C
E
Batteriewartung
Batterie und Kabel reinigen
ACHTUNG
Beim Anbringen bzw. Abtrennen der Batteriekabeln
das Minuskabel immer ZUERST abtrennen bzw.
ZULETZT anschließen. Andernfalls kann der
Pluspol durch ein Werkzeug am Fahrzeugrahmen
kurzgeschlossen werden.
1. Kabel von der Batterie abtrennen, Minuskabel zuerst
(A, Abbildung 7), anschließend Abdeckung und
Pluskabel (B).
2. Flügelmutter und Unterlegscheibe (D) lockern.
3. Niederhalter (C) nach oben und von der Batterie weg
schwenken. Am Lenkturm sichern.
4. Batterie (E) ausbauen.
5. Batteriefach mit einer Lösung aus Natriumbikarbonat
und Wasser reinigen.
6. Batteriepole und Kabelenden mit Drahtbürste und
Polklemmenreiniger reinigen, bis sie glänzen.
Abbildung 7. Batteriewartung
A. Minuskabel
B. Pluskabel und Abdeckung
C. Niederhalter
D. Flügelmutter und Unterlegscheibe
E. Batterie
Wartung des Motors
HINWEIS: Zu Wartungsverfahren lesen Sie bitte n der
Bedienungsanleitung des Motors nach.
17
Page 64

Fehlersuche,
Not for
Reproduction
Einstellungen und Wartung
Fehlersuche
Während eine normale Pflege und regelmäßige Wartung
die Benutzungsdauer des Traktors verlängern, wird es
durch fortgesetzte oder ständige Benutzung notwendig,
einen Service durchzuführen, auf Grund dessen die
Maschine wieder ordnungsgemäß eingesetzt werden kann.
In den nachstehenden Richtlinien zur Fehlerbehandlung
werden die üblichsten Probleme sowie Ursachen und
Abhilfen angeführt.
Um ernsthafte Verletzungen zu vermeiden, dürfen
Wartungsarbeiten am Traktor oder Mähwerk nur
dann durchgeführt werden, wenn der Motor
abgestellt und die Parkbremse eingekuppelt ist.
Immer den Zündschlüssel abziehen, das
Zündkabel abziehen und von der Zündkerze
entfernt befestigen, bevor mit Wartungsarbeiten
begonnen wird, damit ein versehentliches Starten
des Motors unmöglich ist.
ACHTUNG
Fehlersuche und-behebung bei der Zugmaschine
PROBLEM ÜBERPRÜFEN PROBLEMLÖSUNG
Bremspedal nicht durchgedrückt. Bremspedal vollständig durchdrücken.
Der Motor überträgt
oder startet nicht.
Antriebswellenkupplungsschalter
(elektrische Kupplung) steht in der
Position EIN.
Fahrkontrolle ist eingekuppelt. Bewegen Sie den Knopf in die Stellung NEUTRAL/AUS.
Kraftstoff ist alle. Lassen Sie den Motor abkühlen, wenn er heiß ist, und
Motor abgesoffen. Kuppeln Sie die Klingen aus.
Sicherung durchgebrannt. Suchen Sie einen autorisierten Händler auf.
Batterieanschlüsse müssen
gereinigt werden.
Batterien sind leer oder tot. Laden Sie die Batterie neu auf oder ersetzten Sie sie.
Kabel lose oder gebrochen. Sichtinspektion der Kabel durchführen. Falls die Kabel
Stellen Sie ihn auf die Position AUS.
dann füllen Sie den Kraftstofftank wieder auf.
Sieh hierzu im Abschnitt Reinigen der Batterie und
Kabel.
gebrochen oder ausgefranst sind, wenden Sie sich an
einen autorisierten Händler.
Der Motor startet
schwer oder läuft
schlecht.
Motor klopft.
Zylinderspule oder
Startermotorschaden.
Sicherheitsverriegelungsschalter
defekt.
Wasser im Kraftstoff. Suchen Sie einen autorisierten Händler auf.
Kraftstoff ist alt oder abgestanden. Suchen Sie einen autorisierten Händler auf.
Kraftstoffgemisch zu stark. Den Luftfilter reinigen.
Der Motor hat ein anderes
Problem.
Niedriger Ölstand. Überprüfen Sie das Öl/füllen Sie gegebenenfalls etwas
Es wurde Öl mit dem falschen Grad
verwendet.
Suchen Sie einen autorisierten Händler auf.
Suchen Sie einen autorisierten Händler auf.
Suchen Sie einen autorisierten Händler auf.
nach.
Siehe hierzu die Tabelle Empfehlungen zum Öl.
18
Page 65

Fehlersuche, Einstellungen und Wartung
Not for
Reproduction
Fehlersuche und-behebung bei der Zugmaschine (Fortsetzung)
PROBLEM ÜBERPRÜFEN PROBLEMLÖSUNG
Motor läuft zu heiß. Suchen Sie einen autorisierten Händler auf.
Zu hoher Ölverbrauch.
Motorauspuff ist
schwarz.
Motor läuft aber die
Zugmaschine fährt
nicht.
Parkbremse lässt sich
nicht feststellen.
Zugmaschine lenkt
schlecht oder lässt
sich nicht gut
handhaben.
Es wurde Öl mit dem falschen
Grad verwendet.
Zuviel Öl im Motorgehäuse. Lassen Sie überschüssiges Öl ab.
Den schmutzigen Luftfilter reinigen. Siehe hierzu im Abschnitt Wartung des Luftfilters.
Choke geschlossen. Den Choke öffnen.
Die Grundgeschwindigkeitspedale
sind nicht durchgedrückt.
Die Übertragungs-Lösehebel
stehen in der Position SCHIEBEN.
Parkbremse ist eingerastet. Lösen Sie die Parkbremse.
Der Fahrantriebsriemen ist
gerissen oder rutscht.
Bremse abgenutzt. Suchen Sie einen autorisierten Händler auf.
Lenkstange ist locker. Suchen Sie einen autorisierten Händler auf.
Reifendruck stimmt nicht. Siehe hierzu im Abschnitt Überprüfen des
Achslager der Vorderräder sind
trocken.
Fehlersuche beim Mäher
PROBLEM ÜBERPRÜFEN PROBLEMLÖSUNG
Mäher lässt sich nicht
anheben.
Der Schnitt ist
uneben.
Der Schnitt sieht grob
aus.
Hebegestänge ist nicht richtig
befestigt oder beschädigt.
Der Mäher ist nicht richtig nivelliert. Suchen Sie einen autorisierten Händler auf.
Die Reifen der Zugmaschine sind
nicht richtig aufgepumpt.
Motorgeschwindigkeit zu niedrig. Setzen Sie die Geschwindigkeit auf Vollgas.
Grundgeschwindigkeit zu schnell. Verlangsamen.
Der Mäher hat ein anderes Problem. Suchen Sie einen autorisierten Händler auf.
Motorgeschwindigkeit zu niedrig. Setzen Sie die Geschwindigkeit auf Vollgas.
Grundgeschwindigkeit zu schnell. Verlangsamen.
Schmutziger oder verstopfter Luftfilter.
Siehe hierzu die Tabelle Empfehlungen zum Öl.
Pedale durchdrücken.
Hebel in die Position FAHRE bringen.
Suchen Sie einen autorisierten Händler auf.
Reifendrucks.
Suchen Sie einen autorisierten Händler auf.
Suchen Sie einen autorisierten Händler auf.
Siehe hierzu im Abschnitt Überprüfen des
Reifendrucks.
Siehe hierzu im Abschnitt Wartung des Luftfilters.
Motor stirbt leicht ab
wenn der Mäher
angestellt ist.
Übermäßige Vibration
des Mähers.
Notor läuft und
Zugmaschine fährt,
der Mäher fährt
jedoch nicht.
Schnitthöhe ist zu niedrig eingestellt. Schneiden Sie hohes Gras während des ersten
Schnitts bei maximaler Schnitthöhe.
Auswurfkanal verstopft. Geschnittenes Gras mit Ausstoß zeigt in Richtung
des vorher geschnittenen Bereiches.
Motor hat keine Betriebstemperatur. Lassen Sie den Motor einige Minuten lang warm laufen.
Starten des Mähers in hohem Gras. Starten Sie den Mäher in einem bereinigten Bereich.
Der Mäher hat ein anderes Problem. Suchen Sie einen autorisierten Händler auf.
PTO nicht eingekuppelt. PTO einkuppeln.
Der Mäher hat ein anderes Problem. Suchen Sie einen autorisierten Händler auf.
19
Page 66

Fehlersuche, Einstellungen und Wartung
Not for
Reproduction
Sitzeinstellung
Der Sitz lässt sich nach vorne und hinten verstellen. Den
Hebel (A, Abbildung 8) betätigen, den Sitz wunschgemäß
einstellen und den Hebel loslassen, um den Sitz in seiner
Stellung zu arretieren.
A
Abbildung 8. Sitzeinstellung
A. Sitzeinstellhebel
Mähwerkseinstellungen
Führungsräder
Die Mähwerkführungsräder können je nach Schnitthöhe
in zwei Stellungen gebracht werden. Bei höheren
Schnitteinstellungen die Räder in die untere Stellung
bringen. Bei niedrigeren Schnitteinstellungen die Räder in
die obere Stellung bringen. Die Führungsräder dürfen
beim Mähen nicht konstant auf dem Boden aufliegen.
Einstellen:
1. Sicherungsmutter (B, Abbildung 9), Führungsrad (C),
Unterlegscheiben (D) Ansatzschraube (E) ausbauen.
Das Führungsrad auf die gewünschte Höhe
einstellen.
2. Ansatzschraube (E) durch Unterlegscheiben (D),
Führungsrad (C) und Führungsradhalterung (A)
einsetzen. Mit Sicherungsmutter (B) befestigen.
Schritte 1 und 2 für alle Führungsräder wiederholen.
A
Batterieladung
ACHTUNG
Offene Flammen und Funken von der Batterie
fern halten. Die der Batterie entweichenden Gase
sind hoch explosiv. Die Batterie während des
Aufladens gut lüften.
Eine leere Batterie oder eine Batterie, die zu schwach ist
um den Motor zu starten, kann für Fehler im Ladesystem
oder in anderen elektrischen Bauteilen verantwortlich
sein. Sollten Zweifel an der Ursache des Problems
bestehen, den Händler verständigen. Falls die Batterie
ersetzt werden muss, die Schritte unter Batterie und
Kabel reinigen.
Zum Laden der Batterie die Anleitungen befolgen, die
vom Hersteller des Ladegeräts bereit gestellt werden;
außerdem alle Warnhinweise im Abschnitt mit den
Sicherheitsvorschriften dieses Handbuchs beachten. Die
Batterie vollständig aufladen. Keine Ladestromstärke von
mehr als 10 A verwenden.
D
E
C
Abbildung 9. Führungsradeinstellung bei fest
montierter Halterung
A. Führungsradhalterung
B. Sicherungsmutter
C. Führungsrad
D. Unterlegscheibe
E. Ansatzschraube
B
20
Page 67

Technische Daten
Not for
Reproduction
HINWEIS: Die technischen Daten sind zum Zeitpunkt der Drucklegung korrekt. Änderungen vorbehalten.
MOTOR:
17,5 PS* Briggs & Stratton
Hersteller Briggs & Stratton
Modell Intek
Leistung 17,5 PS bei 3600 U/min
Hubraum 500 cc (30,5 Kubikzoll)
Elektrik 12 V, 9 A Generator, Batterie: 230 A Kaltstart
Ölfassungsvermögen 1,4 L (48 Unzen)
20 PS* Briggs & Stratton
Hersteller Briggs & Stratton
Modell Intek
Leistung 20 PS bei 3600 U/min
Hubraum 656 cc (40,0 Kubikzoll)
Elektrik 12 V, 9 A Generator, Batterie: 230 A Kaltstart
Ölfassungsvermögen 1,9 L (64 Unzen)
FAHRGESTELL:
GETRIEBE:
K46
Typ Tuff Torq K46 (Hydro)
Hydraulikflüssigkeit 10W30-Super-Motoröl
Geschwindigkeiten Vorwärts: 0 - 8,9 km/h (0-5,5 MPH)
bei 3400 U/min Rückwärts: 0 - 4,8 km/h (0-3,0 MPH)
Ständige DrehmomentAusgangsleistung 232 Nm (170 Fuß / Pfunde)
Zugstangenauslegung 103 kg (227 Pfunde)
Max. Achsgewicht 306 kg (675 Pfunde)
ABMESSUNGEN:
Serie LT
Gesamtlänge 180 cm (70.9”)
Gesamtbreite 122 cm (48”)
Höhe 114 cm (44.9”)
Serie LT
KraftstofftankFassungsvermögen Fassungsvermögen: 15,1 L (4,0 Gallonen)
Hinterräder Reifengröße: 20 x 10 -8
Vorderräder Reifengröße: 15 x 6,0 -6
* Nennleistungsangaben
Zur Bestimmung der Nennleistung für ein individuelles Motormodell beginnen wir mit der SAE-Richtlinie (SAE: amerikanische
Vereinigung von Kfz-Ingenieuren) J1940 (Bestimmung von Leistung & Drehmoment kleiner Motoren) (überarbeitete Fassung
2002–05). Aufgrund der breiten Palette von Produkten, an denen unsere Motoren eingesetzt werden, und der Vielzahl von
Umweltanforderungen zum Betrieb der Geräte, ist es möglich, dass der von Ihnen erworbene Motor bei Einsatz an einem Gerät
nicht die angegebene Nennleistung entwickelt (tatsächliche “Einsatzleistung”). Zu diesen Leistungsabweichungen kommt es durch
eine Reihe von Faktoren wie zum Beispiel: andere Höhenlage, Temperatur, Luftdruck, Feuchtigkeit, Kraftstoff, Motorschmierung,
geregelte Höchstdrehzahl, individueller Motor, Konstruktion des jeweiligen Geräts, Einsatzart des Motors, Einstellungen an Ventilen
und Vergaser sowie eine Vielzahl anderer Faktoren. Die Leistungswerte können auch anhand von Vergleichen mit anderen
ähnlichen Motoren, die bei ähnlichen Anwendungen eingesetzt werden, angepasst werden, und stimmen daher nicht
notwendigerweise genau mit den durch Anwendung der oben aufgeführten Richtlinie ermittelten Werten überein.
Reifendruck: 0,68 bar (10 psi)
Reifendruck: 0,82-,0,96 bar (12-14 psi)
Ersatzteile
Ersatzteile sind bei Ihrem Vertragshändler erhältlich.
Zubehör
Motoröl
Ausbesserungslack
Fettpressensatz
240 ml Fetttube
21
Ersatzteile und
Zubehör
Reifendichtmittel
Entfetter/Fettlösungsmittel
Gasdruckstoßdämpfer
Page 68

Not for
Reproduction
Page 69

Sisukord
Not for
Reproduction
Ohutusnõuded ja -teave .............................................2
Tunnusnumbrid...........................................................7
Ohutusmärgised..........................................................8
Ohutusikoonid.............................................................8
Funktsioonid ja juhtseadmed ..................................10
Juhtfunktsioonid ....................................................10
Seisupiduri funktsioon ...........................................12
Püsikiiruse regulaatori kasutamine........................12
Tunniarvesti...........................................................12
Traktori kasutamine..................................................13
Blokeeruva ohutussüsteemi testid.........................13
Üldine tööohutus ...................................................13
Kütuse lisamine.....................................................13
Mootori käivitamine ...............................................13
Traktori ja mootori seiskamine...............................14
Traktoriga sõitmine................................................14
Niitmine .................................................................14
Niitmine tagurpidikäigul .........................................14
Lisaseadmete kasutamine tagurpidikäigul.............14
Traktori käsitsi lükkamine ......................................14
Niiduki lõikekõrguse reguleerimine........................15
Järelkäru ühendamine...........................................15
Hoiustamine ..........................................................15
Regulaarne hooldus..................................................16
Hooldusgraafik ......................................................16
Rehvirõhu kontroll .................................................16
Blokeeruva ohutussüsteemi kontroll......................17
Niiduki terade peatumisaja kontroll........................17
Aku hooldus ..........................................................17
Mootori hooldus.....................................................17
Tõrkeotsing, seadistamine ja hooldus....................18
Traktori tõrkeotsing................................................18
Tõrkeotsingu teostamine niidukil ...........................19
Istme reguleerimine...............................................20
Aku laadimine........................................................20
Niiduki seadistamine .............................................20
Spetsifikatsioonid .....................................................21
Osad ja lisaseadmed ................................................21
MÄRKUS: käesolevas juhendis viidatakse „vasakule“ ja
„paremale“ juhtimiskohalt vaadatuna.
1
Page 70

Ohutusnõuded ja -teave
Not for
Reproduction
Operaatori ohutus
Õnnitleme teid kõrgkvaliteetse muru- ja aiatööriista ostu puhul. Meie
tooted on kavandatud ja toodetud vastavalt valdkonna
ohutusstandarditele ja ka ületavad neid.
Masinate ohutus sõltub siiski operaatori käitumisest. Väära
kasutamise või vale hoolduse korral võib see muutuda ohtlikuks!
Arvestage, et vastutate nii enda kui teid ümbritsevate inimeste
turvalisuse eest.
Kasutage tervet mõistust ja mõelge läbi, mida teete. Kui te ei ole
kindel, et ette võetud toimingut on võimalik valitud seadmetega
turvaliselt läbi viia, siis küsige nõu professionaalilt: pöörduge kohaliku
volitatud edasimüüja poole.
Lugege juhendit
Kasutusjuhend sisaldab tähtsat ohutusalast teavet, mida peate teadma ENNE masina
kasutamist ja ka selle kasutamisel AJAL.
Juhend sisaldab ohutuid juhtimisvõtteid, toote funktsioonide ja juhtseadmete
selgitusi ning hooldusalast teavet, et oma investeeringust maksimaalset
kasu saada.
Lugege kindlasti täielikult läbi Ohutusreeglid ja järgmistel lehekülgedel
leiduv teave. Lisaks lugege täielikult ka kasutamist puudutavat osa.
Lapsed
Lastega võib juhtuda traagilisi õnnetusi. Ärge lubage neid
tööpiirkonna lähedalegi. Masin ja niitmistegevus võivad tihti
lapsi köita. Ärge kunagi eeldage, et lapsed püsivad kohas,
kus te neid viimati nägite. Kui on oht, et lapsed on sisenenud
niidetavale ala, siis laske mõnel teisel vastutustundlikul
täiskasvanul neid jälgida.
ÄRGE SÕIDUTAGE LAPSI SELLEL MASINAL! See
julgustab neid tulevikuski töötavale masinale lähenema ja
nad võivad tõsiselt viga saada. Nad võivad sõidu saamiseks
masinale läheneda teile ootamatult ja te võite neist üle sõita.
Tagurpidikäik
Ärge niitke tagurpidikäigul ilma äärmise
vajaduseta. Vaadake tagurdamise
eel ja vältel alati masina alla
ning selja taha isegi siis,
kui niiduki terad on
rakendamata.
2
Page 71

Kasutamine kalletel
Not for
Reproduction
Te võite tõsiselt viga saada või isegi hukkuda, kui kasutate seda masinat
liiga järsul kaldel. Seadme kasutamine liiga järsul või piisava
haarduvuseta kaldel võib põhjustada juhitavuse kaotamise või masina
ümberpaiskumise.
Rusikareegliks on mitte töötada kallakul, millel te ei saa tagurpidi liikuda
(2 vedava ratta reþiimis). Ärge töötage kallakutel, mille tõus on suurem
kui 106 cm (3,5 jalga) üle 607 cm (20 jalga) pikkuse kohta. Sõitke
kallakutel alati üles- ja allasuunas, mitte risti üle kallaku.
Arvestage ka sellega, et pind, millel sõidate, võib märkimisväärselt
mõjutada stabiilsust ja juhitavust. Märg muru või jäine teekate võib
tõsiselt mõjutada teie kontrolli seadme üle.
Kui tunnete ebakindlust masina kallakul juhtimise suhtes, siis ärge seda
tehke. See ei ole riski väärt.
Liikuvad osad
Sel seadmel on palju liikuvaid osi, mis võivad teid või kedagi teist vigastada.
Sellegipoolest, kui te püsite kindalt istekohal ja järgite selles raamatus toodud
reegleid, siis on seadme kasutamine ohutu.
Lõikekorpusel on pöörlevad niitmisterad, mis võivad lõigata otsast käsi ja jalgu.
Ärge lubage kedagi töötava masina lähedusse!
Aitamaks teil kui operaatoril seadmestikku turvaliselt kasutada, on see varustatud
juhi kohalolu tajuva ohutussüsteemiga. ÄRGE üritage seda süsteemi muuta või
deaktiveerida. Kui süsteem ei läbi selles juhendis leiduvaid blokeeriva
ohutussüsteemi teste, siis pöörduge kohe edasimüüja poole.
Ohutusnõuded ja -teave
Esemete paiskumine
Sel seadmel on pöörlevad niiduki terad. Need terad võivad korjata ja paisata
esemeid, mis võivad kõrvalseisjaid tõsiselt vigastada. Puhastage niidetav ala
kindlasti ENNE niitmise alustamist.
Ärge kasutage masinat ilma paigaldatud ja töökorras rohupüüduri ning
tühjenduskaitsmeta (deflektorita).
Ärge lubage kedagi töötava masina lähedusse! Kui keegi siseneb tööalale, siis
seisake masin kohe nende lahkumiseni.
Kütus ja hooldamine
Bensiin on väga tuleohtlik. Ka selle aurud on väga süttivad ja võivad liikuda
eemalasetseva süüteallikani. Bensiini võib kasutada ainult kütusena, mitte
lahusti või puhastusainena. Seda ei tohiks kunagi säilitada kohas, kus selle
aurud võivad koguneda või liikuda süüteallikani (nt juhtlambini). Kütust
hoitakse nõuetekohases suletud plastikust kanistris või traktori korralikult
suletud korgiga kütusepaagis. Maha loksunud kütus tuleb kohe ära koristada.
Nõuetekohane hooldus on esmatähtis teie seadme ohutuse ja jõudluse
seisukohast. Viige kindlasti läbi kõik selles juhendis loetletud
hooldusprotseduurid, eriti ohutusüsteemi perioodiline testimine.
3
Page 72

Ohutusnõuded ja -teave
Not for
Reproduction
Lugege ning järgige antud ohutusreegleid hoolikalt. Nende reeglite eiramine võib kaasa tuua kontrolli
kaotamise masina üle, põhjustada kasutaja või kõrvalseisjate kehalisi vigastusi või surma või tekitada kahju
varale või seadmetele. Käesolev niitmisseade võib ära lõigata käsi ja jalgu ning paisata eemale
esemeid. Kolmnurk tähistab tähtsaid hoiatusi tekstis, mida peab kindlasti järgima.
ÜLDINE KASUTAMINE
1. Enne masina käivitamist lugege, mõistke ning järgige
kõiki masinal ning kasutusjuhendis toodud juhiseid.
2. Ärge pange käsi või jalgu pöörlevate osade lähedale või
alla. Hoidke alati tühjendusavaustest eemale.
3. Lubage seadet kasutada ainult vastutustundlikel
täiskasvanutel, kes on tuttavad seadme
kasutusjuhendiga (kohalik seadusandlus võib piirata
kasutajate vanust).
4. Puhastage niidetav ala võõrkehadest nagu kivid,
mänguasjad, traadid jms, mis võivad tera(de)sse
takerduda või eemale paiskuda.
5. Veenduge niitmise eel, et alal ei ole teisi inimesi. Peatage
masin, kui keegi satub selle tööpiirkonda.
6. Ärge kunagi transportige inimesi.
7. Ärge niitke tagurpidikäigul ilma äärmise vajaduseta.
Vaadake tagurdamise eel ja vältel alati masina alla ning
selja taha.
8. Ärge kunagi suunake eemale paisatavat materjali kellegi
poole. Vältige niidetud muru väljutamist vastu seina või
takistusi. Materjal võib lennata tagasi masina kasutaja
suunas. Peatage tera(d) kruusapindade ületamise ajaks.
9. Ärge kasutage masinat ilma paigaldatud ja töökorras
rohupüüduri, tühjenduskaitsme (deflektori) ja muude
ohutusseadmeteta.
10. Aeglustage enne pööramist.
11. Ärge jätke töötavat seadet kunagi järelevalveta. Masinalt
lahkumise eel lahutage alati terade ülekanne (PTO sidur),
rakendage seisupidur, seisake mootor ja eemaldage
võtmed.
12. Lahutage terade ülekanne (PTO sidur), kui te ei niida.
Enne masina puhastamist, rohupüüduri eemaldamist või
tühjenduskaitsme ummistusest vabastamist lülitage
mootor välja ja oodake kõigi osade täieliku seiskumiseni.
13. Töötage masinaga ainult päevavalguses või hea
kunstliku valgustusega.
14. Masinat ei tohi kasutada olles alkoholi või narkootikumide
mõju all.
15 Olge teede ületamisel või nende läheduses liikluse
suhtes ettevaatlik.
16. Olge eriti ettevaatlik masina haagisele või veokile
pealelaadimisel või nendelt mahalaadimisel.
17. Kandke seda masinat kasutades alati silmakaitset.
18. Statistika järgi toimub suur osa masinatega seotud
õnnetustest just 60-aastaste ning vanemate
kasutajatega. Kirjeldatud kasutajad peaksid hindama
enda võimet kasutada masinat piisavalt ohutult, et kaitsta
ennast ja teisi vigastuste eest.
19. Järgige tootjapoolseid soovitusi ratase raskustele või
vastukaaludele.
20. Pidage meeles, et masina kasutaja on vastutav teiste
inimeste või varaga juhtuvate õnnetuste eest.
21. Kõik juhid peavad läbima erialase ja praktilise
ettevalmistuse.
22. Kandke alati kaitset tagavaid jalanõusid ja pükse. Ärge
kunagi kasutage masinat paljajalu või sandaalides.
23. Veenduge kasutamise eel alati visuaalselt, et terad ja
terasid hoidvad osad on oma kohal, komplektsed ja
kinnitatud. Asendage kõik kulunud või kahjustatud osad.
24. Katkestage lisaseadmete töö enne: kütuse lisamist,
lisaseadme eemaldamist, seadistuste tegemist (kui neid
ei saa teha juhiistmelt).
25. Masina parkimisel, hoiustamisel või selle juurest
lahkumisel langetage lõikamisvahendid, kui te ei kasuta
positiivset mehhaanilist lukustust.
26. Enne juhikohalt mistahes põhjusel lahkumist rakendage
seisupidur (selle olemasolul), lahutage terade ülekanne
(PTO sidur), peatage mootor ja eemaldage võti.
27. Tuleohu vähendamiseks säilitage seadet puhtana
murust, lehtedest ja üleliigsest õlist. Ärge peatuge ega
parkige kuivade lehtede, muru või süttivate materjalide
kohal.
HOOLDUS JA HOIUSTAMINE
1. Masina transportimisel avatud treileril veenduge, et see
jääb suunaga ettepoole, s.t. sõidusuunas. Kui masin on
suunaga tahapoole, võib tuulest tekkiv tõstejõud seda
kahjustada.
2. Järgige alati ohutu tankimise ning kütuse käsitsemise
tavasid, kui te masinat transportimise või hoiustamise
järel uuesti tangite.
3. Ärge kunagi hoidke masinat (koos kütusega) kinnises
kehva ventilatsiooniga varjualuses. Kütuseaurud võivad
jõuda süüteallikani (nt ahi, boiler vms) ja põhjustada
plahvatuse. Lisaks on kütuseaurud inimestele ja
loomadele mürgised.
4. Järgige alati mootori kasutusjuhendi instruktsioone, kui
teete ettevalmistusi nii pikema kui ka lühema perioodiga
hoiustamiseks.
5. Järgige masina uuesti kasutuselevõtul alati mootori
kasutusjuhendi instruktsioone õigete
käivitamisprotseduuride osas.
6. Ärge kunagi hoidke masinat ega kütusemahutit
sisetingimustes avatud leegi või signaallambiga (näiteks
boileri lähedal). Laske masinal hoiustamise eel jahtuda.
4
Page 73

Ohutusnõuded ja -teave
Not for
Reproduction
KASUTAMINE KALLETEL
Kallakud on peamisteks raskete vigastuste või surmaga
lõppeda võivate kontrolli kadumise ja ümberkaldumisega
seotud õnnetuste põhjustajateks. Masina kasutamine
kallakutel eeldab erilist hoolt. Kui te ei saa kallakult üles
tagurdada või te ei tunne end kallakul kindlalt, siis ärge
töötage sellel.
Kontrolli nõlvalt libiseva muruniiduki või -traktori juhtimise üle
ei saa piduri rakendamisega taastada. Peamised juhitavuse
kaotamise põhjused on järgmised: rehvide ebapiisav
haakumine pinnasega, liialt suur kiirus, vale pidurdamine,
masina sobimatus valitud ülesandeks, teadmatus
pinnaseoludest, vale järelvedamisviis ja kaalujaotus.
1. Niitke kallakul üles- ja allasuunas, mitte risti.
2. Olge ettevaatlik aukude, vagude ja kühmude suhtes.
Ebatasane pind võib masina ümber paisata. Pikas rohus
võivad peituda takistused.
3. Valige madal kiirus, et te ei peaks nõlval olemise ajal
peatuma ega kiirust muutma.
4. Ärge niitke märjal murul. Rehvid võivad kaotada haarde.
5. Hoidke masina käik alati sees, eriti kallakutelt alla sõites.
Ärge rakendage vabakäiku ega veerege allamäge.
6. Vältige kallakutel käivitamist, peatumist ja pööramist. Kui
rehvid kaotavad pidamise, siis rakendage tera(d) lahti ja
liikuge vaikselt kallakult alla.
7. Jälgige, et kõik liikumised kallakutel oleksid aeglased ja
astmelised. Ärge muutke järsult kiirust ega suunda, sest
see võib põhjustada masina ümberpaiskumise.
8. Olge eriti ettevaatlik, kui kasutate murupüüdurite või
muude lisaseadmetega masinaid - lisad võivad mõjutada
seadme stabiilsust. Ärge kasutage järskudel kallakutel.
9. Ärge üritage masina tasakaalu taastada jalga maha
pannes (murutraktorid).
10. Ärge niitke järsakute, kraavide või vallide lähedal. Niiduk
võib äkitselt ümber paiskuda, kui ratas satub üle järsaku
või kraavi serva või serv vajub sisse.
11. Ärge kasutage murupüüdureid järskudel kallakutel.
12. Ärge niitke kallakuid, kui te ei saa nendel tagurdada.
13. Tutvuge volitatud tarnija/edasimüüja soovitustega
stabiilsust parandavate rataste lisaraskuste või
vastukaalude osas.
14. Eemaldage takistused nagu kivid, juurikad jms.
15. Sõitke aeglaselt. Rehvid võivad kallakul haarduvuse
kaotada isegi siis, kui pidurid töötavad korralikult.
16. Ärge pöörake kallakutel äärmise vajaduseta. Kui seda ei
saa vältida, siis pöörake, võimalusel, aeglaselt ülesmäge.
JÄRELVEETAV VARUSTUS
(MURUTRAKTORID)
1. Pukseerige ainult sellise masinaga, millel on
pukseerimiseks ettenähtud haakeseade. Ärge kinnitage
pukseeritavat seadet kuhugi mujale, kui ainult
haakepunkti külge.
2. Järgige tootja soovitusi pukseeritava seadme
kaalupiirangute ja kallakutel pukseerimise kohta.
3. Ärge kunagi lubage lapsi ega teisi järelveetavatele
seadmetele.
4. Kallakutel võib järelveetava seadme kaal põhjustada
haardumise ja kontrolli kadumist.
5. Sõitke aeglaselt ja arvestage peatumiseks lisamaaga.
6. Ärge rakendage vabakäiku ega veerege allamäge.
HOIATUS
Ärge kunagi kasutage üle 17,6-protsendise (10°)
tõusuga kallakutel (s.t. 106 cm [3-1/2 ft] vertikaalne
tõus 607 cm [20 ft] pikkusel horisontaalsel
vahemaal).
Kasutage kallakutel töötamisel rataste lisaraskusi või
vastukaale. Pöörduge edasimüüja poole, et teha
kindlaks teie seadmele saadaolevad ja sobivad
raskused.
Vähendage kallakule sõitmise eel kiirust. Olge
kallakutel töötamisel eriti ettevaatlik, kui kasutate taha
kinnituvaid murupüüdureid.
Niitke kallakuid ÜLES ja ALLA, mitte kunagi risti, olge
sõidusuundade vahetamisel ettevaatlik ja ÄRGE
KÄIVITAGE EGA PEATUGE KALLAKUL.
LAPSED
Kui kasutaja on tähelepanematu lähedalviibivate laste
suhtes, võib juhtuda traagilisi õnnetusi. Masin ja
niitmistegevus võivad tihti lapsi köita. Ärge kunagi eeldage, et
lapsed püsivad kohas, kus te neid viimati nägite.
1. Hoidke lapsed niitmisalalt eemal ning teise vastutava
täiskasvanu hoolika järelevalve all.
2. Olge valvas ning lülitage masin välja, kui lapsed peaksid
tööalasse sisenema.
3. Enne tagurdamist vaadake taha ja alla, veendumaks, et
seal ei ole väikelapsi.
4. Ärge kunagi kandke lapsi, isegi juhul, kui tera(d) on välja
lülitatud. Nad võivad maha kukkuda ja tõsiselt viga saada
või häirida masina ohutut kasutamist. Lapsed, kellel on
kunagi lubatud masinal sõita, võivad ootamatult ilmuda
niitmispiirkonda, et veel masina peale tulla, ning masin
võib neile otsa sõita või tagurdada.
5. Ärge kunagi laske lastel masinat kasutada.
6. Olge eriti tähelepanelik, kui lähenete pimedatele
nurkadele, põõsastele, puudele või teistele objektidele,
mis võivad nähtavust takistada.
HEITGAASID
1. Antud toote mootori heitgaas sisaldab kemikaale, mis
teatud kogustes põhjustavad teadaolevalt vähki,
sünnidefekte või muid kahjustusi paljunemisvõimele.
2. Võimaluse korral otsige mootori heitgaasisildilt teavet
heitme püsimisaja (EDP) ning õhuindeksi kohta.
SÜÜTESÜSTEEM
1. Käesolev sädesüütega süsteem vastab Kanada määruse
ICES-002 nõuetele.
5
Page 74

Ohutusnõuded ja -teave
Not for
Reproduction
REMONT JA HOOLDUS
Bensiini ohutu käsitsemine
1. Kustutage kõik sigaretid, sigarid, piibud ja muud
süüteallikad.
2. Kasutage ainult heakskiidetud mahuteid.
3. Ärge eemaldage kütusekorki ega lisage kütust, kui
mootor töötab. Laske mootoril enne tankimist jahtuda.
4. Ärge kunagi tankige masinat siseruumides.
5. Ärge hoidke masinat ega kütusemahutit siseruumides,
kus on lahtine leek, sädemed või juhtlambid, nt
veesoojendil või teistel seadmetel.
6. Ärge kunagi täitke mahuteid, kui asute veoki sees või
veokikasti või järelhaagise plastmassist vooderdisel.
Asetage mahutid alati enne täitmist maha, eemale
tangitavast sõidukist.
7. Eemaldage sõidukist või haagiselt bensiinitoitega seade
ja tankige seda maapinnal. Kui see ei ole võimalik, siis
tankige seda järelhaagises pigem kaasaskantavast
anumast kui kütusetankuri otsikust.
8. Hoidke pihustusotsikut alati kuni tankimise lõpetamiseni
vastu kütusepaagi või mahuti suuet. Ärge kasutage otsiku
sulgurseadet.
9. Kütuse loksumisel rõivaste peale vahetage need kohe
ära.
10. Ärge kunagi täitke kütusepaaki üle lubatud piiri. Asetage
kütusekork tagasi kohale ja keerake kinni.
11. Olge bensiini ja muude kütuste käsitsemisel eriti
ettevaatlik. Kütused on tuleohtlikud ja nende aurud
plahvatusohtlikud.
12. Ärge püüdke kütuse mahaloksumisel mootorit käivitada,
vaid viige masin sellest alast eemale ning püüdke ära
hoida süttimisallika teket, kuni kütuseaurud on hajunud.
13. Pange kõik bensiinipaagid ja kanistrikorgid kindlalt tagasi.
Remont ja hooldus
1. Ärge kunagi laske masinal töötada umbses kohas, kus
võib koguneda vingugaas.
2. Hoidke mutrid ja poldid, eriti terade omad, korralikult
pinguldatuna ning varustus heas seisukorras.
3. Ärge kunagi muutke omavoliliselt turvaseadiseid.
Kontrollige regulaarselt nende korrasolekut ning teostage
vajadusel nõutavad parandustööd.
4. Hoidke masinat vabana murust, lehtedest ja muu sodi
kogumitest. Koguge kokku õli- ja kütusereostused ning
eemaldage kõik kütusest imubunud jäägid. Laske
masinal hoiustamise eel jahtuda.
5. Kui riivate mõnda võõrkeha, peatage masin ja kontrollige
seda. Vajaduse korral viige taaskäivitamise eel läbi
parandustööd.
6. Ärge kunagi seadistage ega parandage masinat töötava
mootoriga.
7. Kontrollige rohupüüduri detaile ja tühjendamiskaitset
sageli ning asendage need vajaduse korral tootja poolt
soovitatud osadega.
8. Niiduki terad on teravad. Lõiketerade käsitsemisel
mähkige need sisse või kandke tugevaid kindaid ning
olge eriti ettevaatlik.
9. Kontrollige pidurite tööd sageli. Reguleerige ja hooldage
vastavalt nõuetele.
10. Hoidke ohutus- ja infosildid korras ning vajadusel
asendage need.
11. Ärge eemaldage kütusefiltrit, kui mootor on kuum, kuna
maha valgunud bensiin võib süttida. Ärge lükake
kütusevoolikute klambreid rohkem laiali, kui vaja.
Paigaldamise järel veenduge, et klambrid haaravad
voolikuid kindlalt üle filtri serva.
12. Ärge kasutage METANOOLI sisaldavat bensiini ning üle
10% ETANOOLI, kütuselisandeid või valget gaasi
sisaldavat gasoholi, kuna tulemuseks võib olla mootori-/
kütusesüsteemi kahjustumine.
13. Kui kütusepaak tuleb tühjendada, peaks seda tegema
väljas.
14. Vahetage välja vigased summutid.
15. Kasutage parandustöödel ainult tootja poolt lubatud või
heaks kiidetud varuosi.
16. Kõikide seadistuste ja kohanduste teostamisel järgige
alati tootja poolt määratud tehnilisi nõudeid.
17. Olulisemate hooldus- ja parandustööde korral tuleb
kasutada ainult selleks volitatud hooldusfirmasid.
18. Ärge püüdke kunagi vastava koolituseta ise teostada
masinal olulisemaid parandustöid. Ebaõiged
hooldusprotseduurid võivad tekitada ohte töötamisel,
kahjustusi seadmele ning tühistada tootjapoolse garantii.
19. Olge ettevaatlik mitme lõiketeraga masinate puhul, sest
ühe tera pöörlemine võib kutsuda esile ka teiste
pöörlemise.
20. Ärge muutke kunagi mootori regulaatori seadeid ega
koormake mootorit üle. Mootori liiga kiire töö võib
suurendada inimvigastuste ohtu.
21. Lahutage lisavarustuse ajam, seisake mootor,
eemaldage võti ja ühendage lahti küünlajuhe/-juhtmed
juhul, kui: puhastate lisaseadmete ummistusi, viite läbi
hooldustöid, tabate niitmise käigus võõrkeha või masin
vibreerib ebatavaliselt. Esemete tabamise järel
kontrollige, kas niidukil on vigastusi ning viige enne
masina taaskäivitust ja kasutamist läbi vajalikud
parandustööd.
22. Ärge kunagi pange käsi liikuvate osade, näiteks
hüdropumba jahutustiiviku, lähedale, kui traktor töötab.
(Hüdropumba jahutustiivikud asuvad tavaliselt
peaülekande peal).
23. Hüdrauliliste pumpade, voolikute või mootoritega
seadmed: HOIATUS: rõhu all olev hüdrauliline vedelik
võib väljuda piisava jõuga, et läbistada nahka ja
põhjustada tõsiseid vigastusi. Võõrvedelike sattumisel
naha alla peab sedalaadi vigastustega tuttav arst need
mõne tunni jooksul kirurgiliselt eemaldama, et vältida
gangreeni tekkimist. Hoidke keha ja käsi eemal tihvtide
avadest või otsikutest, millest hüdrauliline vedelik võib
kõrge surve all väljuda. Kasutage lekete otsimiseks käte
asemel paberit või pappi. Enne süsteemi survestamist
veenduge, et kõik hüdrauliliste vedelike ühendused on
tihedad ja kõik hüdraulikavoolikud ja -liinid heas
seisukorras. Lekete esinemisel toimetage masin koheselt
remondiks volitatud edasimüüja juurde.
24. HOIATUS: salvestatud energiaga seade. Vedrude
sobimatu vabastamine võib kaasa tuua tõsiseid vigastusi.
Vedrud peaks eemaldama volitatud tehnik.
25. Mootori radiaatoriga varustatud mudelid: HOIATUS:
salvestatud energiaga seade. Ärge kunagi üritage
eemaldada radiaatori korki töötava mootoriga masinal,
kuna väljuv kuum jahutusvedelik või aur võib põhjustada
tõsiseid vigastusi. Peatage mootor ja laske sel jahtuda.
Olge ka siis korgi eemaldamisel äärmiselt ettevaatlik.
6
Page 75

NÄIDIS
Tunnusnumbrid
Part No. xxxxxxx
xxxxxxxxxxxxxxx
Serial No. xxxxxxxxxx
20xx
kW: x.xx
xxxx max
xxxxxxxxxxxxxxxxxxxxxxx
xxxxxxxxxxxxxxxxxxxxxxx
xxxxxxxxxxxxxxxxxxxxxxx
xxxxxxxxxxxxxxxxxxxxxxx
xxx dB
kg: xxx
Not for
Reproduction
Tunnusnumbrid
Võttes teenindusega ühendust asendusosade,
teeninduse või teabe asjus, PEAVAD teil olema need
numbrid.
Märkige mudeli nimetus/number, tootja tunnuskoodid ja
mootori seerianumbrid selleks ettenähtud tühja kohta, et
tagada lihtne ligipääs vajalikele andmetele. Need numbrid
leiate näidatud kohtadest.
MÄRKUS: Mootori seerianumbrite asukohad leiate
mootori kasutusjuhendist.
CE märgistuse silt
Traktori ID-silt
TOOTE VIITEANDMED
Mudel Kirjeldus Nimi/number
Seadme tootja tunnuskood
Lõikekorpuse tootja tunnuskood Lõikekorpuse seerianumber
Edasimüüja nimi Ostukuupäev
MOOTORI VIITEANDMED
Mootori mark
Mootori tüüp/spets.
A
Niiduki ID-silt
Seadme seerianumber
Mootori mudel
Mootori kood/seerianumber
A. Tootja tuvastusnumber
B. Tootja seerianumber
C. Võimsuse nimiväärtus kilovattides
D. Mootori maksimaalne pöörlemiskiirus minutis
E. Tootja nimi ja aadress
F. Valmistamisaasta
G. CE-vastavusmärgis
H. Mass kilogrammides
I. Garanteeritud helivõimsuse tase detsibellides
Part No. xxxxxxx
B
E
7
xxxxxxxxxxxxxxx
Serial No. xxxxxxxxxx
xxxxxxxxxxxxxxxxxxxxxxx
xxxxxxxxxxxxxxxxxxxxxxx
xxxxxxxxxxxxxxxxxxxxxxx
xxxxxxxxxxxxxxxxxxxxxxx
xxx dB
20xx
F
kg: xxx
kW: x.xx
xxxx max
G
I
H
C
D
Page 76

Ohutusmärgised
Not for
Reproduction
Ohutusmärgised
Kõiki teie muruniidukil või -traktoril leiduvaid infosilte ja
teateid märkega OHTLIK, HOIATUS, ETTEVAATUST
tuleks hoolikalt lugeda ja järgida. Nende juhiste
mittejärgimise tagajärjeks võivad olla kehavigastused.
Teave on teie ohutuse tagamiseks ja tähtis! Teie
murutraktoril ja -niidukil on alljärgnevad sildid.
Ohutusikoonid
Hoiatus: lugege kasutusjuhendit.
Lugege ja mõistke kasutusjuhendit
enne selle masina kasutamist.
Oht: esemete paiskumine.
See lõikemasin võib paisata eemale
erinevaid esemeid ja sodi. Hoidke
kõrvalised inimesed eemal.
Hoiatus: eemaldage võti enne
hooldamist.
Eemaldage enne remondi- ja
hooldustööde läbiviimist võti ja
tutvuge tehnilise kirjandusega.
Oht: masin võib ümber paiskuda.
Ärge kasutage seda masinat
kallakutel, mille kalle on suurem kui
10 kraadi.
Oht: jäsemete kaotus.
See masin võib jäsemeid otsast
lõigata. Hoidke kõrvalseisjad ja
lapsed eemal, kui mootor töötab.
Oht: jäsemete kaotus.
See lõikekorpus võib jäsemeid otsast
lõigata. Hoidke käed ja jalad teradest
eemal.
Kui mõni neist siltidest on kadunud või vigastatud,
asendage need koheselt. Asendussiltide saamiseks võtke
ühendust tarnijaga.
Nende siltide paigaldamine on lihtne ning need on teile ja
teistele masina kasutajatele pidevaks meeldetuletuseks
ohutuks ja efektiivseks tööks vajalikest ohutusjuhistest.
Oht: kuum pind.
Laske masinal selle piirkonna
katsumise eel jahtuda.
Oht: vingugaasimürgitus.
Ärge kasutage mootorit ventileerimata
alal.
Hoiatus: tuleoht.
Hoidke plahvatusohtlikke gaase
süütada võivaid leeke ja sädemeid
akust eemal.
Hoiatus: väävelhape võib
põhjustada pimedust või
raskekujulisi põletusi.
Kandke akul või selle läheduses
töötamisel kaitseprille või näokatet.
Hoiatus: akud tekitavad
plahvatusohtlikke gaase.
Lugege ja mõistke kasutusjuhendit
enne selle masina kasutamist.
NB! Ärge visake akut olmeprügi
hulka.
Võtke akude kõrvaldamise ja/või
ümbertöötlemise osas ühendust
kohaliku omavalitsuse esindajaga.
Oht: tuleoht.
Ärge lisage kütust, kui mootor töötab
või on kuum. Seisake mootor ja laske
sel kütuse lisamise eel 3 minutit
jahtuda.
Oht: jäsemete kaotus.
See lõikekorpus võib
jäsemeid otsast lõigata.
Hoidke käed ja jalad teradest
eemal.
8
Page 77

CE ohutusikoonid
Not for
Reproduction
Siltide asukohad
Kasutusjuhised,
CE-mudelid, Osa nr 1734027
Süütelüliti asendid
Osa nr 1722806
CE-Oht, pöörlevad terad,
Osa nr 1720389
Kütusetase
Osa nr 1730172
CE-Oht, pöörlevad terad,
1730264
1730172
173xxxx
Ülekande vabasti
Osa nr 1730202
Osa nr 1720389
Lisaseadme tõstuk
Osa nr 1730264
9
Page 78

Funktsioonid ja juhtseadmed
Not for
Reproduction
Joonis 1. Juhtseadmed
Juhtfunktsioonid
Alltoodud teave kirjeldab lühidalt eraldiseisvate juhtseadmete funktsioone. Käivitamine, peatamine, sõitmine ja niitmine
eeldab mitme juhtseadme kombineeritud kasutamist kindlas järjekorras. Õppimaks, milline juhtseadmete
kombinatsioon ja kasutusjärjestus on erinevateks ülesanneteks parim, lugege tervet KASUTAMISE peatükki.
Drosseli asend
Drossel juhib mootori kiirust. Viige mootori kiiruse
juhtkang edasi mootori kiiruse tõstmiseks ja tagasi, et
vähendada mootori kiirust. Töötage alati täisgaasil (TÄIS).
Õhuklapp
Sulgege õhuklapp külmkäivituseks. Avage õhuklapp, kui
mootor käivitub. Soe mootor võib mitte vajada õhuklapi
reguleerimist. Viige hoob ettepoole, et õhuklapp sulgeda.
10
Esituled
Tulede lüliti lülitab traktori esituled sisse ja välja.
Tunniarvesti
Tunniarvesti mõõdab mitu tundi on võti olnud asendis
TOIDE.
Page 79

Funktsioonid ja juhtseadmed
Not for
Reproduction
Tagurdades niitmise võimalus (RMO)
Tagurpidi niitmise valik (RMO) võimaldab rakendada
niiduki kopruse (või muu PTO-ga töötava lisaseadme)
tagurpidi sõites. Kui soovite tagurpidi niita, siis pöörake
RMO võtit PTO siduri rakendamise järel. Süttib
valgusdiood, mis osutab tagurpidi niitmise võimalikkusele.
Igal PTO siduri rakendamise korral tuleb RMO
kasutamiseks uuesti aktiveerida.
PTO lüliti
PTO (jõusiirdevõlliga) siduri lüliti rakendab ja vabastab
lisaseadmed, mis kasutavad PTO sidurit. PTO siduri
rakendamiseks tõmmake lülitit ÜLES. Lahti
rakendamiseks vajuta ALLA. Arvestage, et PTO siduri
töötamiseks peab operaator istuma kindlalt traktori
juhiistmel.
Süütelüliti
Süütelüliti käivitab ja seiskab mootori. Sel on kolm
asendit:
VÄLJA Peatab mootori ja lülitab välja
elektrisüsteemi.
Niiduki lõikekõrguse reguleerimine
Niiduki lõikekõrguse seadistamise juhtkangidega saab
muuta niiduki lõikekõrgust. Niiduki lõikekõrguse saab
seada ühele seitsmest asendist vahemikus 2,5 ja 10,2 cm
(1,0 ja 4,0 tolli).
Istme reguleerimise hoob
Istet on võimalik reguleerida ette- ja tahapoole. Liigutage
hooba, seadke iste soovitud asendisse ja vabastage
hoob, et lukustada iste soovitud asendisse.
Ülekande vabastusklapi kang
Ülekande vabastusklapi kang deaktiveerib ülekande, et
masinat oleks võimalik lükata käsitsi. Vt lisainfot peatükis
MURUTRAKTORI KÄSITSI LÜKKAMINE.
Kütusepaak
Kütusepaagi korgi eemaldamiseks keerake seda
vastupäeva.
Kütusetaseme näidik
Kuvab paagi kütusetaseme.
TOIDE Võimaldab mootoril töötada ja
toidab elektrisüsteemi.
START Pöörab mootorit käivitamiseks.
MÄRKUS: ärge kunagi jätke süütelülitit seisatud
mootoriga asendisse TOIDE - see tõmbab aku tühjaks.
Sõidukiiruse pedaalid
Traktori liikumiskiirust ja -suunda kontrollitakse
sõidukiiruse juhtpedaaliga. Traktori liikumiskiirust
tagurpidikäigul kontrollitakse tagurpidisõidu kiiruse
juhtpedaaliga.
Mõlema pedaali puhul kaasneb vajutamisega suurem
sõidukiirus. Arvestage, et pedaalile avalduva surve
suurendamisega kasvab ka traktori liikumiskiirus.
Püsikiiruse regulaator
Püsikiiruse regulaatorit kasutatakse sõidukiiruse
juhtseadme lukustamiseks. Püsikiirushoidjal on viis
lukustusasendit.
Seisupidur
Seisupiduri nuppu kasutatakse seisupiduri lukustamiseks,
kui traktor on seisma jäänud. Piduripedaali täielik
allavajutamine ja nupu ülestõmbamine rakendab
seisupiduri.
Piduripedaal
Piduripedaali vajutamine rakendab traktori piduri.
11
Page 80

Funktsioonid ja juhtseadmed
Not for
Reproduction
Seisupiduri funktsioon
Seisupiduri rakendamine - Vt joonist 2. Seisupiduri
lukustamiseks vabastage sõidukiiruse pedaalid (A),
vajutage piduripedaal täielikult alla (B), tõmmake
seisupiduri nupp täielikult ÜLES (C), seejärel vabastage
piduripedaal.
Seisupiduri vabastamine - Vt joonist 2. Seisupiduri
vabastamiseks vajutage piduripedaali (B).
Püsikiiruse regulaatori kasutamine
RAKENDAMISEKS:
1. Tõmmake püsikiirushoidja nupp üles (D, joonis 2).
2. Vajutage ettepoole liikumise pedaal alla (A).
3. Tõmmake püsikiirushoidja nupp (D) üles, kui olete
saavutanud soovitud kiiruse. Püsikiirushoidja lukustub
ühte viiest asendist.
VABASTAMISEKS:
1. Vajutage piduripedaali (B).
VÕI
2. Vajutage ettepoole liikumise pedaal alla (A).
E
B
A
C
D
Joonis 2. Rakendage seisupidur.
A. Sõidukiiruse pedaalid
B. Piduripedaal
C. Seisupiduri nupp
D. Püsikiiruse regulaatori nupp
E. Tunniarvesti
Tunniarvesti
Tunniarvesti (E, joonis 2) mõõdab mitu tundi on võti olnud
asendis TOIDE.
12
Page 81

Traktori kasutamine
Not for
Reproduction
BLOKEERUVA
OHUTUSSÜSTEEMI
TESTID
See seade on varustatud blokeeruvate turvalülitite ja
muude kaitseseadmetega. Need turvasüsteemid on
paigaldatud teie ohutuse tagamiseks: ärge üritage
ohutuslüliteid deaktiveerida ega neid muul viisil
kuritarvitada. Kontrollige nende tööd regulaarselt.
OHUTUSKONTOLL töö ajal
See seade on varustatud blokeeruvate turvalülititega.
Kontrollige istmelüliti tööd igal sügisel ja kevadel
järgmiste katsetega.
Katse 1 — Mootor EI TOHIKS käivituda, kui:
• PTO lüliti on asendis ON või
• Piduripedaal EI OLE täielikult alla vajutatud
(seisupidur MAAS) või
• Püsikiiruse regulaatori kang EI OLE
NEUTRAALASENDIS.
Katse 2 — Mootor PEAKS käivituma, kui:
• Operaator istub juhikohal JA
• PTO lüliti on asendis VÄLJA JA
• Piduripedaal on täielikult alla vajutatud (seisupidur
PEAL) JA
• Püsikiiruse regulaatori kang on
NEUTRAALASENDIS.
Katse 3 — Mootor peaks SEISKUMA, kui:
• Kasutaja tõuseb juhikohalt.
Katse 4 — Niiduki terade peatumisaja kontroll
Niiduki terad ja niiduki ülekanderihm peaksid elektrilise
PTO lüliti VÄLJA lülitamise (või juhi istekohalt tõusmise)
järel täielikult peatuma viie sekundi jooksul. Kui niiduki
ülekanderihm ei peatu viie sekundi jooksul, võtke
ühendust edasimüüjaga.
Katse 5 — Tagurdades niitmise võimalus (RMO)
• Mootor peaks seiskuma, kui sisselülitatud PTO-ga
üritatakse tagurpidi liikuda ja RMO-d ei ole aktiveeritud.
• RMO aktiveerimisel peaks RMO tuli süttima.
HOIATUS
Kui seade ei läbi ohutustesti, ärge kasutage
seda. Pöörduge volitatud edasimüüja poole.
Üldine tööohutus
Veenduge, et olete lugenud kogu teavet peatükkides
Ohutusreeglid ja Kasutamine, enne kui üritate seda
seadet kasutada. Tutvuge kõigi juhtseadmete ja masina
peatamisega;
Kütuse lisamine
HOIATUS
Bensiin on äärmiselt tuleohtlik ja seda tuleb
käsistseda ettevaatusega. Ärge kunagi täitke
paaki, kui mootor on hiljutisest kasutamiseks
kuum. Ärge lubage lahtist leeki, suitsetamist või
tikke täidetava paagi lähedale. Vältige ületäitmist
ja pühkige kõik jäägid.
Ärge kasutage METANOOLI sisaldavat
bensiini ning üle 10% ETANOOLI,
kütuselisandeid või valget gaasi sisaldavat
gasoholi, kuna tulemuseks võib olla mootori-/
kütusesüsteemi kahjustumine.
Kütuse lisamiseks:
1. eemaldage kütusekork (A, joon. 3);
2. täitke paak. Ärge täitke üle; Jätke paaki ruumi kütuse
paisumiseks. Tutvuge mootori juhendis toodud
spetsiifiliste kütust puudutavate soovitustega.
3. Pange kork tagasi ja keerake käsitsi kinni.
Mootori käivitamine
1. Vajutage piduripedaal juhiistmel istudes täielikult alla
või rakendage seisupidur.
2. Veenduge, et te ei vajuta jalgadega sõidukiiruse
pedaale ja püsikiiruse regulaatori kang on
neutraalasendis.
3. Vabastage PTO sidur.
4. Seadke drossel asendisse TÄIS.
5. Sulgege õhuklapp.
MÄRKUS: Soe mootor võib mitte vajada õhuklapi
reguleerimist.
6. Sisestage süütevõti ja keerakse see asendisse
START.
7. Viige drossel mootori käivitumise järel keskmise
kiiruse asendisse. Soojendage mootorit, lastes sel
töötada vähemalt 30 sekundit.
8. Seadke drossel asendisse TÄIS.
MÄRKUS: Hädaolukorras saab mootori peatada keerates
lihtsalt süütelüliti asendisse VÄLJA. Kasutage seda
meetodit ainult hädaolukordades. Normaalseks mootori
väljalülitamiseks järgige protseduuri, mida on kirjeldatud
peatükis NIIDUKI JA MOOTORI SEISKAMINE.
13
Page 82

Traktor i kasutam ine
Not for
Reproduction
Traktori ja mootori seiskamine
1. Vabastage sõidukiiruse pedaal(id).
2. Rakendage PTO lahti ja oodake kõigi liikuvate osade
seiskumiseni.
3. Lükake mootori kiiruse juhtkang asendisse AEGLANE ja
keerake süütelüliti asendisse VÄLJA. Eemaldage võti.
Traktoriga sõitmine
1. Istuge juhikohale ja seadke iste asendisse, milles ulatute
mugavalt kõigi juhtseadmeteni ja näete näidikuplokki.
2. Rakendage seisupidur.
3. Veenduge, et PTO siduri lüliti on vabastatud.
4. Käivitage mootor (vt MOOTORI KÄIVITAMINE).
5. Vabastage seisupidur, seejärel piduripedaal.
6. Vajutage ettepoole liikumise pedaal alla, et liikuda edasi.
Seiskumist vabastage pedaal. Arvestage, et pedaalile
avalduva surve suurendamisega kasvab ka traktori
liikumiskiirus.
7. Peatage traktor, vabastades sõidukiiruse pedaalid,
rakendades seisupiduri ja seisates mootori (vt
TRAKTORI JA MOOTORI SEISKAMINE).
Niitmine
1. Seadke niiduki lõikekõrgus soovitud tasemele ja
mõõterattad sobivasse asendisse (kui sisalduvad
varustuses).
2. Rakendage seisupidur; Veenduge, et PTO siduri lüliti on
vabastatud.
3. Käivitage mootor (vt MOOTORI KÄIVITAMINE).
4. Laske niiduk täielikult alla, kasutades lisaseadme
tõstmise kangi ja seadke lõikekõrgus.
5. Seadke drossel asendisse TÄIS.
6. Rakendage PTO (niiduki korpus).
7. Alustage niitmist.
8. Lõpetamisel lülitage PTO välja ja tõstke niiduk
lisaseadme tõstmise kangi abil üles.
9. Peatage mootor (vt TRAKTORI JA MOOTORI
SEISKAMINE).
Niitmine tagurpidikäigul
Kui operaator otsustab niita tagurpidikäigul, võite
kasutada RMO süsteemi. Tagurpidi niitmise funktsiooni
(RMO) kasutamiseks pöörake RMO võtit PTO siduri
rakendamise järel. Süttib valgusdiood, mis osutab
tagurpidi niitmise võimalikkusele. Igal PTO siduri
rakendamise korral tuleb RMO kasutamiseks uuesti
aktiveerida. Eemaldage võti, et takistada RMO-funktsiooni
kasutamise võimalust.
Lisaseadmete kasutamine
tagurpidikäigul
Kui operaator otsustab niita tagurpidikäigul, võite
kasutada RMO süsteemi. Tagurpidi niitmise funktsiooni
(RMO) kasutamiseks pöörake RMO võtit PTO siduri
rakendamise järel. Süttib valgusdiood, mis osutab
lisaseadme tagurpidikäigul kasutamise võimalikkusele.
Igal PTO siduri lahti rakendamise korral tuleb RMO
kasutamiseks uuesti aktiveerida. Võti tuleks eemaldada,
et takistada RMO-funktsiooni kasutamise võimalust.
Traktori käsitsi lükkamine
1. Rakendage PTO lahti ja lülitage mootor välja.
2. Tõmmake ülekande vabasti (B, joonis 3) ligikaudu
6 cm (2-3/8 tolli) tagasi, et lukustada see vabastatud
asendisse.
3. Traktorit on nüüd võimalik käsitsi lükata.
ÄRGE PUKSEERIGE TRAKTORIT
Masina pukseerimine kahjustab ülakannet. •
Ärge kasutage selle masina lükkamiseks või
tõmbamiseks teist seadet. • Ärge rakendage
ülekande vabastit, kui mootor töötab.
HOIATUS
Mootor seiskub, kui gaasipedaal viiakse
tagurdamisasendisse ajal, mil PTO sidur on
rakendatud ja RMO ei ole aktiveeritud. Operaator
peaks PTO siduri alati enne teede, radade või
teiste sõidukite poolt kasutatavate alade
ületamist välja lülitama. Veojõu ootamatu
kadumine võib tekitada ohtliku olukorra.
HOIATUS
Tagurdades niitmine võib olla ohtlik
kõrvalseisvatele inimestele. Kui kasutaja on
tähelepanematu lähedalviibivate laste suhtes,
võib juhtuda traagilisi õnnetusi. Ärge kunagi
aktiveerige RMO-d, kui lapsed viibivad läheduses.
Masin ja niitmistegevus võivad tihti lapsi köita.
A
B
Joonis 3. Ülekande vabastuskang ja kütusepaak
A. Kütusepaagi kork
B. Ülekande vabastuskangid
14
Page 83

Traktor i kasutam ine
1 m
(3,3 jalga)
6 m
(20 jalga)
113 kg
(250-naelaese)
Not for
Reproduction
Niiduki lõikekõrguse reguleerimine
Niiduki lõikekõrguse seadistamise juhtkangiga (A, joonis 4)
saab muuta niiduki lõikekõrgust. Niiduki lõikekõrguse saab
seada ühele seitsmest asendist ligikaudses vahemikus
2,5 ja 10,2 cm (1,0 ja 4,0 tolli).
A
Joonis 4. Niiduki tõstmine ja langetamine
A. Niiduki tõstehoob
Järelkäru ühendamine
Maksimaalne lubatud horisontaalsele haakerauale
avalduv jõud on 280 N. Maksimaalne lubatud vertikaalsele
haakerauale avalduv jõud on 160 N. See on võrdne
113 kg (250-naelase) järelkäruga 10-kraadisel mäel.
Kinnitage järelkäru sobiva suurusega kahveltihvti (A,
joonis 5) ja klambriga (B).
Hoiustamine
HOIATUS
Ärge kunagi hoidke masinat (koos kütusega)
kinnises kehva ventilatsiooniga varjualuses.
Kütuseaurud võivad jõuda süüteallikani (nt ahi,
boiler vms) ja põhjustada plahvatuse.
Lisaks on kütuseaurud inimestele ja loomadele
mürgised.
Enne, kui te hoiustate enda seadme hooajaväliseks ajaks,
lugege Ohutusreeglite peatüki lõiku, mis sisaldab
hooldus- ja hoiustamisjuhiseid ning seejärel viige läbi
järgmised sammud:
• Rakendage PTO sidur lahti, rakendage seisupidur ja
eemaldage võti.
• Viige läbi mootori kasutusjuhendis loetletud hooldusja hoiustamismeetmed. Muuhulgas hõlmab see
kütusesüsteemi tühjendamist või kütuse stabilisaatori
lisamist (ärge hoidke täidetud paagiga masinat suletud
hoones - vt hoiatust).
• Aku tööiga pikeneb, kui see eemaldada ja paigutada
jahedasse kuiva kohta ning laadida umbes kord kuus.
Kui aku jäetakse masinasse, ühendage negatiivne
kaabel lahti.
Enne masina käivitamist hoiustamise järel:
• Kontrollige kõiki vedelike tasemeid. Kontrollige kõiki
hooldatavaid detaile.
• Viige läbi kõik käesolevas juhendis soovitatud
kontrollimised ja protseduurid.
• Enne kasutamist laske mootoril mitu minutit
soojeneda.
A
B
Joonis 5. Soovitused järelkäru kaalule
A. Kahveltihvt
B. Klamber
15
Page 84

Regulaarne hooldus
Not for
Reproduction
HOOLDUSGRAAFIK ja PROTSEDUURID
Teie traktori ja niiduki normaalsel hooldamisel tuleks järgida alljärgnevat graafikut.
TRAKTOR JA NIIDUK
Iga 8 tunni järel või igapäevaselt
Blokeeruva turvasüsteemi kontroll
Puhastage prügi traktorilt ja lõikekorpuselt
Puhastage prügi mootoriruumist
Iga 25 tunni järel või iga-aastaselt *
Kontrollige niiduki terade peatumisaega
Veenduge, et traktori ja niiduki riistvara on korralikult
kinnitatud
Kontrollige rehvirõhku
Iga 50 tunni järel või iga-aastaselt *
Kontrollige traktori pidureid
Puhastage aku ja juhtmestik
Pöörduge volitatud edasimüüja poole, et:
määrida traktorit ja niidukit
kontrollida niiduki terasid **
* Sõltuvalt sellest kumb täitub varem.
** Kontrollige terasid sagedamini, kui masin töötab
liivapinnasel või tolmuses keskkonnas.
MOOTOR
Esimese 5 tunni jooksul
Vahetage mootoriõli
Iga 8 tunni järel või igapäevaselt
Kontrollige mootori õlitaset
Iga 25 tunni järel või iga-aastaselt *
Puhastage mootori õhufilter ja eelpuhasti **
Iga 50 tunni järel või iga-aastaselt *
Vahetage mootoriõli
Asendage kütusefilter
Iga-aastaselt
Asendage õhufilter
Asendage eelpuhasti
Pöörduge volitatud edasimüüja poole, et:
kontrollida summutit ja sädemekustutit
asendada süüteküünal
asendada kütusefilter
kontrollida mootori õhkjahutussüsteemi
* Sõltuvalt sellest kumb täitub varem.
** Puhastage sagedamini tolmuste tingimuste korral või
kui õhu saasteosakeste hulk on kõrge.
Rehvirõhu kontroll
Rehvirõhku tuleks kontrollida regulaarselt ning säilitada
tabelis toodud tasemetel (joonis 6). Pange tähele, et need
rõhud võivad veidi erineda rehvide külgedele märgitud
„Max Inflation” (maks. rõhu) väärtustest. Siintoodud rõhud
tagavad õige pidamise, parandavad lõikekvaliteeti ja
pikendavad rehvide eluiga.
Suurus PSI bar
20 x 10,0-8 10 0,68
15 x 6,0-6 12-14 0,82-0,96
Joonis 6. Rehvirõhud
16
Page 85

Regulaarne hooldus
Not for
Reproduction
Blokeeruva ohutussüsteemi kontroll
Kontrollige blokeeruva turvasüsteemi tööd kasutades
selleks peatükis Traktori kasutamine toodud meetmeid.
Kui traktor ei läbi mõnda neist testidest, pöörduge
edasimüüja poole.
Niiduki terade peatumisaja kontroll
Niiduki terad ja niiduki ülekanderihm peaksid elektrilise
PTO lüliti väljalülitamise järel täielikult peatuma viie
sekundi jooksul.
1. Veenduge, et traktor on neutraalkäigul, PTO on lahti
rakendatud, juht oma kohal, ja käivitage mootor.
2. Vaadake niiduki veorihma üle vasakpoolse jalatoe.
Rakendage PTO ja oodake mõned sekundid.
Rakendage PTO lahti ja kontrollige kui kaua kulub
niiduki veorihma seiskumiseks.
3. Kui niiduki ülekanderihm ei peatu viie sekundi jooksul,
võtke ühendust edasimüüjaga.
Aku hooldus
Aku ja juhtmestiku puhastamine
7. Paigaldage aku (E) tagasi akukambrisse. Kinnitage
aku kinnitusvarda (C) ning tiibmutri ja seibi (D) abil.
8. Ühendage akukaablid tagasi, positiivsed kaablid ja
kate enne (B), seejärel negatiivsed kaablid (A).
9. Katke kaabliotsad ja akuklemmid vaseliini või
juhtimatu määrdega.
A
D
B
C
E
HOIATUS
Aku kaablite eemaldamisel või paigaldamisel
eemaldage negatiivne kaabel ESIMESENA ja
paigaldage see tagasi VIIMASENA. Kui kaableid ei
eemaldata selles järjekorras, võib positiivne klemm
tööriista vahendusel raamiga lühisesse sattuda.
1. Ühendage juhtmed akult lahti, alustades negatiivse
kaabliga (A, joon. 7), jätkates katte ja positiivsete
kaablitega (B).
2. Keerake tiibmutter ja seib (D) lahti.
3. Tõmmake kinnitusvarras (C) üles ja akust eemale.
Kinnitage roolilatt.
4. Eemaldage aku (E).
5. Puhastage akut ja akukambrit söögisooda ja vee
lahusega.
6. Puhastage akuklemme ja kaabliotsi traatharja ja
pistikupuhastiga, kuni need läigivad.
Joonis 7. Aku hooldus
A. Negatiivsed kaablid
B. Positiivsed kaablid ja kate
C. Kinnitusvarras
D. Tiibmutter ja seib
E. Aku
Mootori hooldus
MÄRKUS: Vt hooldusprotseduure mootori
kasutusjuhendist.
17
Page 86

Tõrkeotsing,
Not for
Reproduction
seadistamine ja hooldus
Tõrkeotsing
Kuigi normaalne ja regulaarne hooldamine pikendab
seadmete eluiga, võib pikaajaline ja pidev kasutamine
teatud hetkel nõuda edasiseks nõuetekohaseks
kasutamiseks põhjaliku hoolduse läbimist.
Alljärgnevas tõrkeotsingu juhendis on toodud levinuimad
probleemid, nende põhjused ja võimalikud lahendused.
Tõsiste vigastuste vältimiseks viige traktoril või
niidukil hooldustöid läbi vaid peatatud mootori ja
rakendatud seisupiduriga.
Eemaldage hooldustööde alustamise eel alati
süütevõti, ühendage lahti küünlajuhtmed ja
kinnitage see küünlast eemale, et vältida mootori
juhuslikku käivitumist.
HOIATUS
Traktori tõrkeotsing
VEA KIRJELDUS MIDA OTSIDA LAHENDUS
Piduripedaali ei vajutatud. Vajutage täielikult piduripedaali.
PTO (elektrilise siduri) lüliti on asendis SEES. Viige see asendisse VÄLJAS.
Püsikiiruse regulaator on rakendunud. Seadke nupp asendisse VABA
KÄIK/VÄLJAS.
Kütus on otsas. Kui mootor on kuum, siis laske sel jahtuda,
seejärel täitke kütusepaak.
Mootor on üleujutatud. Vabastage õhuklapp.
Mootor ei pöörle või ei
käivitu.
Mootor käivitub
raskelt või töötab
kehvalt.
Mootor kolksub.
Ülemäärane õlikulu.
Kaitse on läbi põlenud. Pöörduge volitatud edasimüüja poole.
Akuklemme tuleks puhastada. Vt jaotist Aku ja kaablite puhastamine.
Aku tühjenenud või kõlbmatu. Laadige aku või vahetage see välja.
Juhtmed lahti või katki. Kontrollige juhtmestikku visuaalselt. Kui
juhtmed on katkised või väändunud, siis
pöörduge volitatud edasimüüja poole.
Solenoid või käivitusmootor vigane. Pöörduge volitatud edasimüüja poole.
Blokeeruv ohutuslüliti on vigane. Pöörduge volitatud edasimüüja poole.
Kütuses on vett. Pöörduge volitatud edasimüüja poole.
Bensiin on vana või riknenud. Pöörduge volitatud edasimüüja poole.
Küttesegu on liiga rikas. Puhastage õhufilter.
Esineb mõni muu mootoriga seotud probleem. Pöörduge volitatud edasimüüja poole.
Õlitase on madal. Kontrollige/lisage õli vastavalt vajadusele.
Kasutatakse vale tüüpi õli. Vt jaotist Õlisoovituste tabel.
Mootor töötab liiga kuumalt. Pöörduge volitatud edasimüüja poole.
Kasutatakse vale tüüpi õli. Vt jaotist Õlisoovituste tabel.
Liiga palju õli karteris. Laske üleliigne õli välja.
18
Page 87

Tõrkeotsing, seadistamine ja hooldus
Not for
Reproduction
Traktori tõrkeotsing (jätk)
VEA KIRJELDUS MIDA OTSIDA LAHENDUS
Seisupidur ei pea.
Traktori juhitavus on
kehv.
Eralduv heitgaas on
must.
Mootor töötab, kuid
traktor ei sõida.
Tõrkeotsingu teostamine niidukil
VEA KIRJELDUS MIDA OTSIDA LAHENDUS
Niidukit ei saa
kergitada.
Niiduki lõige on
ebatasane.
Niiduki lõige näib
korrapäratu.
Mootor aeglustub
kergelt, kui niiduk
töötab.
Ülemäärane
vibratsioon.
Mootor töötab ja
traktor sõidab, kuid
niiduk ei liigu.
Seisupidur on kulunud. Pöörduge volitatud edasimüüja poole.
Roolihoovastik on lahti. Pöörduge volitatud edasimüüja poole.
Vale rehvirõhk. Vt jaotist Kontrollige rehvirõhku.
Esiratta spindli laagrid on kuivad. Pöörduge volitatud edasimüüja poole.
Puhastage õhufilter. Vt jaotist Õhufiltri hooldus.
Õhuklapp suletud. Avage õhuklapp.
Ei vajutata gaasipedaale. Vajutage pedaale.
Ülekande vabastuskang on asendis VAJUTA. Viige see asendisse VEDU.
Seisupidur on rakendunud. Vabastage seisupidur.
Ülekanderihm on purunenud või libiseb. Pöörduge volitatud edasimüüja poole.
Tõstemehhanismi liigend ei ole korralikult
kinnitatud või on kahjustatud.
Niiduk ei ole korralikult tasakaalus. Pöörduge volitatud edasimüüja poole.
Traktori rehvid ei ole korralikult täidetud. Vt jaotist Kontrollige rehvirõhku.
Mootori kiirus liialt madal. Seadke seguklapp täiskiirusele.
Sõidukiirus liiga suur. Vähendage sõidukiirust.
Niidukil esineb mõni muu probleem. Pöörduge volitatud edasimüüja poole.
Mootori kiirus liialt madal. Seadke seguklapp täiskiirusele.
Sõidukiirus liiga suur. Vähendage sõidukiirust.
Määrdunud või ummistunud õhufilter. Vt jaotist Õhufiltri hooldus.
Lõikekõrgus on seatud liialt madalaks. Niitke kõrget muru esimesel ülesõidul
Tühjenduskanal on ummistunud. Niitke nii, et väljalaskeava on suunatud
Mootor ei ole töötemperatuuril. Laske mootoril mitu minutit töötada, et see
Niiduki käivitamine pikas rohus. Käivitage niiduk lühikeseks lõigatud alal.
Niidukil esineb mõni muu probleem. Pöörduge volitatud edasimüüja poole.
PTO pole rakendatud. Rakendage PTO.
Niidukil esineb mõni muu probleem. Pöörduge volitatud edasimüüja poole.
Pöörduge volitatud edasimüüja poole.
alati kõrgeimas lõikeseades.
eelnevalt niidetud ala poole.
soojeneks.
19
Page 88

Tõrkeotsing, seadistamine ja hooldus
Not for
Reproduction
Istme reguleerimine
Istet on võimalik reguleerida ette- ja tahapoole. Liigutage
hooba (A, joonis), seadke iste soovitud asendisse ja
vabastage hoob, et lukustada iste soovitud asendisse.
A
Joonis 8. Istme reguleerimine
A. Istme reguleerimise hoob
Niiduki seadistamine
Mõõterattad
Niiduki mõõterattad saab paigutada kolme asendisse
vastavalt lõikekõrgusele. Kõrgemate lõikekõrguste puhul
seadke rattad madalamasse asendisse. Madalamate
lõikekõrguste puhul seadke rattad ülemisse asendisse.
Ärge laske ratastel liikumise ajal täielikult maas püsida.
Reguleerimiseks:
1. Eemaldage lukustusmutter (B, joonis 9), mõõteratas
(C), seibid (D) ja fikseerimispolt (E). Muutke mõtteratta
asend soovitud kõrgusele.
2. Sisestage fikseerimispolt (E) läbi seibide (D),
mõõteratta (C) ja mõõteratta ploki (A). Kinnitage
lukustusmutriga (B). Korrake samme 1 ja 2 kõigi
mõõterataste puhul.
A
Aku laadimine
HOIATUS
Hoidke plahvatusohtlikke gaase süütada võivaid
leeke ja sädemeid akust eemal. Õhutage aku
ümbrust laadimise ajal hoolikalt.
Kõlbmatu või mootori käivitamiseks liialt nõrga aku madal
jõudlus võib olla tingitud laadimissüsteemi või muu
elektrilise komponendi veast. Kui probleemi põhjuse osas
on kahtlusi, võtke ühendust kohaliku edasimüüjaga. Kui te
peate aku asendama, järgige peatükis Aku ja kaablite
puhastamine toodud samme.
Aku laadimiseks järgige akulaadija tootja juhiseid ja
käesoleva juhendi ohutusreeglites sisalduvaid hoiatusi.
Laadige aku täielikult täis. Ärge laadige voolutugevusel,
mis ületab 10 amprit.
D
E
C
Joonis 9. Fikseeritud plokiga mõõteratta
reguleerimine
A. Mõõteratta plokk
B. Lukustusmutter
C. Mõõteratas
D. Seib
E. Fikseerimispolt
B
20
Page 89

Spetsifikatsioonid
Not for
Reproduction
MÄRKUS: tehnilised andmed vastavad tõele trükkimise hetkel ja võivad ilma etteteatamata muutuda.
MOOTOR:
17,5 hj* Briggs & Stratton
Mark Briggs & Stratton
Mudel Intek
Hobujõude 17,5 @ 3600 p/min
Töömaht 500 cm
Elektrisüsteem 12 volti, 9 A Generaator, aku: 230 CCA
Õlipaak 1,4 L (48 untsi)
3
(30,5 kuuptolli)
20 hj* Briggs & Stratton
Mark Briggs & Stratton
Mudel Intek
Hobujõude 20 @ 3600 p/min
Töömaht 656 cm
Elektrisüsteem 12 volti, 9 A Generaator, aku: 230 CCA
Õlipaak 1,9 L (64 untsi)
3
(40,0 kuuptolli)
ÐASSII:
ÜLEKANNE:
K46
Tüüp Hüdrostaatiline Tuff Torq K46
Hüdrauliline vedelik 10W30 Premium mootoriõli
Kiirused @ 3400 p/min Edasi: 0-8,9 km/h (0-5,5 miili/h)
Tagurpidi: 0-4,8 km/h (0-3,0 miili/h)
Pidev pöördemoment 230,5 Nm (170 naeljalga)
Haakeraua vas
tupidavus 103 kg (227 naela)
Maks. kaal telje kohta 306 kg (675 naela)
MÕÕTMED:
LT-seeria
Üldpikkus 180 cm (70,9 tolli)
Üldlaius 122 cm (48 tolli)
Kõrgus 114 cm (44,9 tolli)
LT-seeria
Kütusepaagi maht Maht: 15,1 L (4,0 gallonit)
Tagarattad Rehvimõõt: 20 x 10-8
Esirattad Rehvimõõt: 15 x 6,0-6
*Briggs & Strattoni mudelid: Erinevate bensiinimootoriga mudelite nimiväärtused on märgitud siltidel vastavalt SAE
(Society of Automotive Engineers) koodeksile J1940 (mootori väikese võimsuse ja pöördemomendi näitajate
protseduur) ja nimiväärtuste andmed on saadud ning korrigeeritud vastavalt SAE koodeksile J1995 (redaktsioon
2002-05). Pöördemomendi väärtused on tuletatud pöörlemiskiirusel 3060 pööret minutis; hobujõuväärtused on saadud
pöörlemiskiirusel 3600 pööret minutis. Mootori tegelik koguvõimsus on väiksem ja seda mõjutavad muuhulgas
ümbritseva keskkonna tingimused ja erinevused mootorite vahel. Arvestades nii toodete laia valikut, millele mootorid on
paigaldatud, kui ka seadme kasutamisele kohaldatavaid erinevaid keskkonnatingimusi, ei saavuta bensiinimootor
nimetatud koguvõimsust, kui seda kasutatakse võimsusseadme osana (tegelik väljund- või netovõimsus). Seda
erinevust põhjustavad mitmed tegurid, s.h, kuid mitte ainult, lisaseadmed (õhupuhasti, väljalaskesüsteem, laadimine,
jahutamine, karburaator, kütusepump jne), rakenduse piirangud, keskkonnatingimused (temperatuur, niiskus, kõrgus
merepinnast) ja erinevused mootorite vahel. Tootmis- ja mahtuvuspiirangute tõttu võib Briggs & Stratton asendada
mootori suuremate võimsuse nimiväärtustega mootori vastu antud seeriaga mootorite raames.
Rehvirõhk: 0,68 bar (10 psi)
Rehvirõhk: 0,82-0,96 bar (12-14 psi)
Asendusosad
Asendusosad on saadaval teie volitatud edasimüüjalt.
Lisaseadmed
mootoriõli
parandusvärv
määrdepüstoli komplekt
8-untsine määrdetuub
rehvitihendaja
rasvatustaja
kütusestabiliseerija
21
Osad ja lisaseadmed
Page 90

Not for
Reproduction
Page 91

Sisällysluettelo
Not for
Reproduction
Turvallisuusohjeet ja -tiedot ......................................2
Tunnistusnumerot.......................................................7
Turvallisuustarrat........................................................8
Turvamerkit..................................................................8
Toiminnot ja hallintalaitteet .....................................10
Hallintalaitteet........................................................10
Seisontajarrutoiminto ............................................12
Vakionopeussäätimen käyttö ................................12
Tuntimittari ............................................................12
Traktorin käyttö.........................................................13
Turvakytkinjärjestelmän testit ................................13
Yleinen käyttöturvallisuus......................................13
Polttoaineen lisääminen ........................................13
Moottorin käynnistäminen .....................................13
Traktorin pysäyttäminen ja moottorin
sammuttaminen.....................................................14
Traktorilla ajaminen ...............................................14
Ruohonleikkuu ......................................................14
Ruohonleikkuu peruuttamalla................................14
Lisä- ja apulaitteiden käyttö peruutettaessa ..........14
Traktorin työntäminen käsin ..................................14
Leikkurin leikkuukorkeuden säätö .........................15
Perävaunun kytkeminen........................................15
Varastointi .............................................................15
Määräaikainen kunnossapito...................................16
Kunnossapidon huoltoaikataulu ............................16
Rengaspaineiden tarkastus...................................16
Turvakytkinjärjestelmän tarkistus ..........................17
Tarkista leikuuterän pysähtymisaika......................17
Akun kunnossapito................................................17
Moottorin kunnossapito.........................................17
Vianmääritys, säätäminen ja huolto........................18
Traktorin vianmääritys ...........................................18
Leikkuriosan vianmääritys .....................................19
Istuimen säätäminen .............................................20
Akun lataus............................................................20
Leikkuriosan säätäminen.......................................20
Tekniset tiedot...........................................................21
Osat ja lisälaitteet......................................................21
HUOMIO: Tässä ohjekirjassa ”vasemmalla” ja ”oikealla”
tarkoitetaan suuntia käyttöasennosta katsottuna.
1
Page 92

Turvallisuusohjeet ja -tiedot
Not for
Reproduction
Käytön turvallisuus
Onnittelut! Olet hankkinut laadukkaan nurmikko- ja puutarhakoneen.
Tuotteemme on suunniteltu ja valmistettu täyttämään tai ylittämään
kaikki alan turvallisuusstandardit.
Moottoroitu laite on yhtä turvallinen kuin käyttäjänsä. Väärin
käytettynä tai virheellisesti huollettuna se voi olla vaarallinen! Muista,
että olet vastuussa omasta ja muiden turvallisuudesta.
Käytä maalaisjärkeä ja mieti loppuun asti, mitä olet tekemässä. Jollet
ole varma, miten suunnittelemasi työ tehdään turvallisesti
valitsemillasi laitteilla, kysy neuvoa ammattilaiselta: ota yhteys
paikalliseen valtuutettuun jälleenmyyjään.
Lue ohjekirja
Käyttöohjekirja sisältää tärkeää turvallisuustietoa, joka sinun on opittava ENNEN
laitteiston käyttöä ja laitteiston käytön AIKANA.
Ohjekirja sisältää turvallisen käytön tekniikat, selvitykset tuotteen
ominaisuuksista ja hallintalaitteista sekä kunnossapitotiedot, joiden avulla
saat parhaan hyödyn koneinvestoinnistasi.
Lue seuraavilla sivuilla esitetyt Turvallisuusohjeet ja -tiedot
ehdottomasti kokonaisuudessaan. Lue kokonaan myös käyttöä
käsittelevä osio.
Lapset
Lasten läsnä ollessa voi tapahtua järkyttäviä onnettomuuksia.
Älä anna lasten tulla lähellekään työskentelyaluetta. Lapset
ovat usein kiinnostuneita laitteesta ja sen leikkurista. Älä
koskaan oleta, että lapset pysyvät siinä, missä viimeksi näit
heidät. Jos vaarana on, että lapset pääsevät leikkuualueelle,
järjestä vastuullinen aikuinen valvomaan heitä.
ÄLÄ KULJETA LAPSIA TÄLLÄ LAITTEELLA! Se rohkaisee
heitä lähestymään laitetta sen käydessä, jolloin he voivat
loukkaantua vakavasti. Lapset voivat lähestyä laitetta yllättäen
ajaessasi sillä, jolloin he saattavat jäädä laitteen alle.
2
Peruutus
Älä leikkaa peruutussuuntaan, ellei ole
ehdottoman pakko. Katso aina
maahan ja taaksesi, ennen
kuin ryhdyt peruuttamaan
ja koko peruutuksen
ajan – myös silloin,
kun leikkuuterät on
kytketty pois
toiminnasta.
Page 93

Turvallisuusohjeet ja -tiedot
Not for
Reproduction
Käyttö rinteessä
Voit loukkaantua vakavasti tai jopa kuolla, jos käytät laitetta liian jyrkässä
rinteessä. Jos käytät laitetta liian jyrkässä rinteessä tai paikassa, jossa
veto ei ole riittävä, voit menettää laitteen hallinnan tai se voi kaatua.
Hyvä sääntö on, ettet käytä rinteessä, jossa et pysty peruuttamaan
(2-pyörävedolla). Älä käytä rinteissä, joiden jyrkkyys on suurempi kuin
106 cm (3,5 jalkaa) 607 cm:n (20 jalan) matkalla. Aja mäkeä ylös- tai
alaspäin: älä koskaan poikittain.
Muista myös, että ajoalusta voi vaikuttaa huomattavasti laitteen
tasapainoon ja hallintaan. Märkä ruoho tai jäinen katukiveys voi
heikentää vaarallisesti mahdollisuuksia hallita laitetta.
Jos epäröit laitteen käyttöä rinteessä, älä yritäkään sitä. Se ei ole riskin
arvoista.
Liikkuvat osat
Tässä laitteessa on paljon liikkuvia osia, jotka voivat vahingoittaa sinua tai jotakuta
muuta. Jos istut istuimella kunnollisesti ja noudatat tämän ohjekirjan sääntöjä, laite
on turvallinen käyttää.
Leikkuukannessa on nopeasti pyörivät leikkuuterät, jotka voivat aiheuttaa käsien ja
jalkojen irtoamisen. Älä päästä ketään laitteen lähelle, kun laite on käynnissä!
Tämä laite on varustettu käyttäjän laitteessa oloa tarkkailevalla turvajärjestelmällä,
jotta voit käyttää sitä turvallisesti. ÄLÄ yritä hämätä tai ohittaa järjestelmää. Käänny
välittömästi valtuutetun jälleenmyyjän puoleen, jollei järjestelmä läpäise kaikkia
tässä ohjekirjassa mainittuja turvakytkinjärjestelmän testejä.
Sinkoutuvia esineitä
Laitteessa on nopeasti pyörivät leikkuuterät. Teriin voi tarttua roskia, jotka
voivat sinkoutua ja vahingoittaa vakavasti vieressä olevia henkilöitä. Puhdista
leikattava alue ehdottomasti ENNEN leikkuun aloittamista.
Älä käytä laitetta, jos koko ruohonkeräin tai heittosuoja (ohjain) ei ole
paikallaan.
Älä päästä ketään alueelle, jos laite on käynnissä! Jos alueelle tulee ihmisiä,
sammuta laite välittömästi, kunnes he poistuvat paikalta.
Polttoaine ja kunnossapito
Bensiini on tulenarkaa. Bensiinihöyry on erityisen tulenarkaa, ja se voi
kulkeutua kaukaisiinkin sytytyslähteisiin. Bensiiniä saa käyttää ainoastaan
polttoaineena – ei liuottimena tai puhdistusaineena. Sitä ei saa koskaan
säilyttää paikassa, johon voi kertyä höyryä tai jossa höyryt voi koskettaa
sytytyslähteeseen, esimerkiksi sytytysliekkiin. Polttoaine on pidettävä
tarkoitukseen hyväksytyssä muovisessa, tiivistetyssä astiassa tai traktorin
polttoainesäiliössä korkki tiukasti suljettuna. Roiskunut polttoaine on
puhdistettava välittömästi.
Asianmukainen kunnossapito on ratkaisevan tärkeää laitteen turvallisuudelle ja
suorituskyvylle. Tee ehdottomasti tässä ohjekirjassa mainitut kunnossapidon
työvaiheet, erityisesti turvajärjestelmän määräaikainen testaus.
3
Page 94

Turvallisuusohjeet ja -tiedot
Not for
Reproduction
Lue nämä turvallisuusohjeet ja noudata niitä tarkasti. Jollet noudata näitä ohjeita, voit menettää laitteen
hallinnan, aiheuttaa vakavia henkilövahinkoja tai kuoleman itsellesi tai sivullisille tai vahingoittaa omaisuutta
ja laitetta. Tämä leikkuritaso voi aiheuttaa käsien ja jalkojen katkeamisen sekä singota esineitä.
Kolmio tekstissä merkitsee tärkeää huomautusta tai varoitusta, jota on noudatettava.
YLEINEN KÄYTTÖ
1. Lue ennen laitteen käyttöä kaikki käyttöohjeessa ja
laitteessa olevat ohjeet siten, että ymmärrät ne. Noudata
näitä ohjeita.
2. Älä pane käsiä tai jalkoja pyörivien osien lähelle tai koneen
alle. Pysy koko ajan poissa poistoaukolta.
3. Laitetta saavat käyttää ainoastaan vastuulliset aikuiset, jotka
ovat perehtyneet käyttöohjeisiin (paikallisissa määräyksissä
ajajalle voidaan asettaa alaikäraja).
4. Puhdista leikkuualueelta esineet, kuten kivet, lelut, kaapelit
jne., jotka voivat tarttua terään/teriin ja sinkoutua edelleen.
5. Varmista, ettei leikkuualueella ole muita ihmisiä. Pysäytä
laite, jos joku tulee leikkuualueelle.
6. Älä kuljeta matkustajia.
7. Älä leikkaa peruutussuuntaan, ellei ole ehdottoman pakko.
Katso aina maahan ja taaksesi, ennen kuin ryhdyt
peruuttamaan ja koko peruutuksen ajan.
8. Älä koskaan suuntaa poistoputken suihkua ketään kohti.
Vältä poistoputken suuntaamista seinään tai esteeseen.
Esineet voivat sinkoutua takaisin kohti ajajaa. Pysäytä
terä(t), kun ylität sorapintaisia kohteita.
9. Älä käytä konetta, jos ruohonkeräin kokonaisuudessaan,
poistosuoja (suihkun ohjain) tai muut turvalaitteet eivät ole
paikallaan.
10. Hidasta ennen kääntymistä.
11. Älä koskaan jätä käyvää laitetta ilman valvontaa. Ennen kuin
purat laitetta osiin, vapauta aina voimanoton kytkin, kytke
seisontajarru, sammuta moottori ja poista avaimet
virtalukosta.
12. Vapauta terät (voimanoton kytkin), kun et leikkaa ruohoa.
Sammuta moottori ja odota, että kaikki liikkuvat osat
pysähtyvät, ennen kuin puhdistat konetta, irrotat
ruohonkeräimen tai irrotat tukkeumaa heittosuojasta.
13. Käytä konetta ainoastaan päivänvalossa tai voimakkaassa
keinovalossa.
14. Älä käytä laitetta alkoholin tai lääkkeiden vaikutuksen
alaisena.
15 Varo muuta liikennettä, kun käytät laitetta lähellä tai ylität
teitä.
16. Ole erityisen varovainen, kun ajat laitteen perävaunuun tai
kuorma-autoon tai pois siitä.
17. Käytä aina silmäsuojuksia, kun käytät laitetta.
18. Tiedetään, että 60-vuotiaat ja sitä vanhemmat käyttäjät
saavat prosentuaalisesti paljon voimalaitteisiin liittyviä
vammoja. Näiden käyttäjien tulisi arvioida kykynsä käyttää
laitetta tarpeeksi turvallisesti suojellakseen itseään ja muita
onnettomuuksilta.
19. Noudata valmistajan suosituksia pyörien painoiksi ja
vastapainoiksi.
20. Muista, että käyttäjä on vastuussa muille ihmisille tai
omaisuudelle sattuvista onnettomuuksista.
21. Kaikkien kuljettajien on hankittava ammattimaista ja
käytännön opetusta laitteen käyttöön.
22. Käytä aina kunnollisia jalkineita ja housuja. Älä koskaan
käytä laitetta paljasjaloin tai esim. sandaaleissa.
23. Ennen kuin käytät laitetta, tarkista aina ensin
silmämääräisesti, että terät ja niiden kiinnittimet ovat
koneessa, vahingoittumattomat ja kiinni. Vaihda kuluneet tai
vahingoittuneet osat.
24. Kytke lisä- ja apulaitteet irti aina ennen tankkausta, lisä- tai
apulaitteen irrotusta sekä säätöä (paitsi jos säätö voidaan
tehdä ajajan paikalta).
25. Kun laite pysäköidään paikalleen, varastoidaan tai jätetään
ilman valvontaa, laske leikkuri alas, jollet pysty lukitsemaan
sitä mekaanisesti paikalleen.
26. Muista aina ennen ohjaajan paikalta poistumista kytkeä
seisontajarru (jos varusteena), vapauttaa voimanoton kytkin,
sammuttaa moottori ja irrottaa avain.
27. Huolehdi paloturvallisuudesta pitämällä laite puhtaana
ruohosta, lehdistä ja liiasta öljystä. Älä pysäytä tai seisota
laitetta kuivien lehtien, ruohon tai palavien materiaalin päällä.
KULJETUS JA VARASTOINTI
1. Kun kuljetat laitetta avoperävaunussa, varmista, että se
osoittaa eteenpäin ajosuuntaan. Jos se osoittaa taaksepäin,
tuulen nostovaikutus voi vahingoittaa sitä.
2. Huolehdi aina, että polttoaineen täyttäminen ja käsittely
tapahtuvat turvallisesti, kun laitteeseen lisätään polttoainetta
kuljetuksen tai varastoinnin jälkeen.
3. Älä koskaan säilytä laitetta (jossa on polttoainetta) suljetussa
tilassa, jossa on huono ilmanvaihto. Polttoainehöyryt voivat
päätyä sytytyslähteeseen (uuniin, lämmityskattilan tms.) ja
aiheuttaa räjähdyksen. Polttoainehöyryt ovat lisäksi
myrkyllisiä ihmisille ja eläimille.
4. Noudata aina moottorin käyttöohjeita varastoinnin
valmistelussa ennen laitteen varastoimista niin lyhyeksi kuin
pitkäksikin aikaa.
5. Noudata aina moottorin käyttöohjeita käynnistäessäsi
laitteen, kun otat sen uudelleen käyttöön.
6. Älä koskaan säilytä laitetta tai polttoainesäiliötä tilassa, jossa
on avotuli tai sytytysliekki, kuten lämmityskattilan sisällä.
Anna laitteen jäähtyä ennen varastoon vientiä.
4
Page 95

Turvallisuusohjeet ja -tiedot
Not for
Reproduction
KÄYTTÖ RINTEESSÄ
Rinteet ovat merkittävä riskitekijä hallinnan menetyksestä ja
kaatumisista johtuvissa onnettomuuksissa, jotka voivat johtaa
vakavaan loukkaantumiseen tai kuolemaan. Rinteessä
työskentely edellyttää aina erityistä varovaisuutta. Jos et pääse
rinteestä pois tai tunnet olosi epävarmaksi rinteessä, älä käytä
laitetta.
Aisaohjattua tai ajettavaa laitetta, joka liukuu rinteessä, ei saa
hallintaan jarrua käyttämällä. Hallinnan menetyksen pääsyitä
ovat: riittämätön renkaan pito maapohjalla, liian suuri nopeus,
väärä jarrutus, tehtävään soveltumaton koneen tyyppi,
perehtymättömyys maan pinnan olosuhteisiin, väärä kiinnitys ja
kuorman jako.
1. Leikkaa ylä- ja alamäkeen, älä koskaan poikittain.
2. Varo reikiä, uria ja telanjälkiä. Epätasainen maasto voi
aiheuttaa laitteen ympärimenon. Pitkä ruoho voi peittää
esteitä.
3. Valitse hidas nopeus, jotta sinun ei tarvitse pysähtyä tai
vaihtaa nopeutta rinteessä ollessasi.
4. Älä leikkaa märkää ruohoa. Pyörät voivat menettää pitonsa.
5. Pidä vaihda aina kytkettynä, erityisesti kun ajat mäkeä alas.
Älä vaihda vapaalle alamäessä.
6. Vältä käynnistystä, pysähtymistä ja kääntymistä rinteessä.
Jos renkaat menettävät pitonsa, kytke irti terä(t) ja aja
hitaasti rinnettä suoraan alas.
7. Tee kaikki ajoliikkeet rinteessä hitaasti ja vähitellen. Älä
muuta äkkiä nopeutta tai suuntaa, koska kone voi kaatua.
8. Ole erityisen varovainen käyttäessäsi koneita, joissa on
ruohonkeräimiä tai muita lisä- tai apulaitteita: ne voivat
vaikuttaa koko yksikön tasapainoon. Älä käytä laitetta
jyrkissä rinteissä.
9. Älä yritä tasapainottaa konetta panemalla jalkaa maahan
(ajettavat laitteet).
10. Älä leikkaa lähellä jyrkänteitä, ojia tai rantapenkereitä.
Leikkuri voi kaatua äkkiä, jos yksikin pyörä ajautuu reunan yli
tai ojaan tai jos reuna pettää.
11. Älä käytä ruohonkeräimiä jyrkissä rinteissä.
12. Älä leikkaa rinteissä, jos et pääse niistä pois.
13. Kysy valtuutetulta myyjältäsi suosituksia rengaspainoiksi tai
vastapainoiksi, jotka lisäävät laitteen vakavuutta.
14. Poista esteet, kuten kivet, oksat jne.
15. Aja hitaasti. Renkaiden pito voi irrota mäissä, vaikka jarrut
toimisivatkin kunnolla.
16. Älä käänny rinteessä, ellei se ole ehdottoman välttämätöntä.
Käänny silloinkin hitaasti ja asteittain, mieluiten alamäkeen.
VARUSTEIDEN VETÄMINEN (AJETTAVAT
LAITTEET)
1. Vedä ainoastaan sellaisella laitteella, jossa on vetämisen
soveltuva tanko. Älä kiinnitä vedettävää varustetta muualle
kuin vetokohtaan.
2. Noudata valmistajan suosituksia vedettävän varusteen
painorajoitusten ja rinteessä vetämisen suhteen.
3. Älä anna lasten tai muiden nousta vedettävään
varusteeseen tai vaunuun.
4. Vedettävän varusteen paino voi rinteessä aiheuttaa pyörien
pidon irtoamisen ja hallinnan menetyksen.
5. Aja hitaasti ja varaa tavanomaista pitempi pysäytys- ja
jarrutusmatka.
6. Älä vaihda vapaalle alamäessä.
VAROITUS
Älä koskaan käytä mäissä, joiden kulma on yli 17,6 %
(10°) eli joissa maan pinta nousee enemmän kuin
106 cm (3,5 jalkaa) pystysuunnassa 607 cm:n
(20 jalan) matkalla.
Kun käytät laitetta mäissä, käytä lisävarusteena
saatavia pyöräpainoja tai vastapainoja. Tiedustele
myyjältäsi/jälleenmyyjältä, mitä painoja on saatavissa
omaan laitteeseesi.
Valitse hidas ajonopeus, ennen kuin ajat mäkeen.
Vaikka käytät etupainoja, ole erityisen varovainen
käyttäessäsi rinteessä taakse asennettuja
ruohonkeräimiä.
Leikkaa mäkeä YLÖS ja ALAS, älä koskaan leikkaa
poikittain, ole varovainen muuttaessasi suuntaa
ÄLÄKÄ LÄHDE LIIKKEELLE MÄESTÄ ÄLÄKÄ
PYSÄYTÄ MÄKEEN.
LAPSET
Järkyttäviä onnettomuuksia voi tapahtua, jos käyttäjä ei ole
varautunut lasten läsnäoloon. Lapset ovat usein kiinnostuneita
laitteesta ja sen leikkurista. Älä koskaan oleta, että lapset
pysyvät siinä, missä viimeksi näit heidät.
1. Jätä lapset leikkuualueen ulkopuolelle toisen vastuullisen
aikuisen valvontaan.
2. Ole varuillasi ja muuta suuntaa, jos lapsia tulee alueelle.
3. Katso aina taaksesi ja maahan ja varo lapsia, ennen kuin
ryhdyt peruuttamaan ja koko peruutuksen ajan.
4. Älä koskaan kuljeta lapsia laitteella, edes terä(t)
pysäytettynä. Lapset voivat pudota ja loukkaantua vakavasti.
He voivat myös haitata laitteen turvallista käyttöä. Lapset,
joita on kyyditetty laitteella, voivat tulla äkkiä leikkuualueelle
päästäkseen kyytiin ja jäädä koneen alle joko eteen- tai
taaksepäin ajettaessa.
5. Älä koskaan anna lasten käyttää laitetta.
6. Ole erityisen huolellinen, jos lähestyt kuolleita kulmia,
pensaita, puita tai muita kohteita, jotka saattavat peittää
näkyvyyden.
PÄÄSTÖT
1. Moottorin poistokaasu sisältää kemikaaleja, joiden tiedetään
tiettyinä määrinä aiheuttavan syöpää, syntymävikoja tai
muita hedelmällisyyteen liittyviä ongelmia.
2. Katso moottorin päästötiedoista päästöjen kesto ja
ilmakerroin, mikäli ne on annettu.
SYTYTYSJÄRJESTELMÄ
1. Tämä sytytysjärjestelmä täyttää ICES-002 -standardin
(Kanada).
5
Page 96

Turvallisuusohjeet ja -tiedot
Not for
Reproduction
HUOLTO JA KUNNOSSAPITO
Bensiinin turvallinen käsittely
1. Sammuta savukkeet, sikarit, piiput ja kaikki muut
sytytyslähteet.
2. Käytä ainoastaan virallisesti hyväksyttyjä bensiinisäiliöitä.
3. Älä koskaan irrota bensiinikorkkia tai lisää polttoainetta
moottorin käydessä. Anna moottorin jäähtyä ennen
tankkaamista.
4. Älä koskaan tankkaa konetta sisätiloissa.
5. Älä koskaan säilytä laitetta tai polttoainesäiliötä tilassa, jossa
on avotuli, kipinävaara tai sytytysliekki, kuten
lämmityskattilan tai muun laitteen lähellä.
6. Älä koskaan täytä säiliöitä ajoneuvon sisällä tai kuormaauton lavalla, jossa on muovinen peite. Sijoita säiliöt aina
ennen täyttämistä maahan, kauas ajoneuvostasi.
7. Jos mahdollista, poista bensiinikäyttöinen laite kuormaautosta tai perävaunusta ja tankkaa se maassa. Jos tämä ei
ole mahdollista, tankkaa se perävaunussa mieluummin
irtosäiliöstä kuin bensiiniletkun suuttimesta.
8. Pidä suutin kiinni polttoainetankin reunassa tai säiliön
aukossa koko täytön ajan. Älä käytä suuttimen
aukilukitustoimintoa.
9. Jos polttoainetta on läikkynyt vaatteille, vaihda vaatteet heti.
10. Älä koskaan täytä polttoainesäiliötä liian täyteen. Aseta
bensiinikorkki paikalleen ja kiristä huolellisesti.
11. Ole erittäin varovainen käsitellessäsi bensiiniä ja muita
polttoaineita. Ne syttyvät helposti, ja niiden höyryt ovat
räjähdysarkoja.
12. Jos polttoainetta on läikkynyt, älä yritä käynnistää moottoria,
vaan siirrä laite pois roiskealueelta ja vältä syttymislähteitä,
kunnes polttoainehöyryt ovat haihtuneet.
13. Sulje kaikki polttoainesäiliöiden ja tankkien korkit
huolellisesti.
Huolto ja kunnossapito
1. Älä koskaan aja laitteella suljetussa tilassa, johon häkää voi
kerääntyä.
2. Pidä mutterit ja pultit, erityisesti terän kiinnityspultit, tiukalla ja
pidä laite hyvässä kunnossa.
3. Älä koskaan kajoa turvalaitteisiin. Tarkista säännöllisesti,
että turvalaitteet toimivat oikein ja tee tarvittavat korjaukset,
jos ne eivät toimi oikein.
4. Pidä laite puhtaana ruohosta, lehdistä ja muusta
kerääntyvästä liasta. Puhdista öljy- ja polttoaineroiskeet ja
poista polttoaineesta kostunut lika. Anna laitteen jäähtyä
ennen varastoon vientiä.
5. Jos osut kohteeseen, pysäytä ja tarkasta kone. Korjaa
tarvittaessa, ennen kuin käynnistät sen uudelleen.
6. Älä koskaan säädä tai korjaa konetta, kun moottori käy.
7. Tarkasta ruohonkeräimet osat ja heittosuoja usein ja vaihda
tarvittaessa valmistajan suosittelemiin osiin, kun se on
tarpeen.
8. Leikkurin terät ovat terävät. Kiedo terä suojamateriaaliin tai
käytä käsineitä ja ole erityisen varovainen huoltaessasi teriä.
9. Tarkasta jarrun toiminta usein. Säädä ja huolla tarvittavalla
tavalla.
10. Pidä turva- ja ohjemerkinnät kunnossa tai vaihda ne
tarvittaessa uusiin.
11. Älä irrota polttoainesuodatinta, kun moottori on lämmin,
koska roiskuva bensiini voi syttyä palamaan. Älä löysää
polttoaineputken kiinnittimiä enempää kuin on tarpeen.
Varmista, että kiinnittimet tarttuvat suodattimen letkuihin
tiiviisti asennuksen jälkeen.
12. ÄLÄ käytä bensiiniä, joka sisältää METANOLIA, gasoholia,
joka sisältää yli 10 % ETANOLIA, bensiinin lisäaineita tai
puhdistettua bensiiniä, koska ne voivat vahingoittaa
moottoria/polttoainejärjestelmää.
13. Jos polttoainesäiliö on tyhjennettävä, sen saa tehdä
ainoastaan ulkotiloissa.
14. Vaihda vialliset äänenvaimentimet/katalysaattorit.
15. Käytä korjauksiin ainoastaan tehtaan hyväksymiä varaosia.
16. Noudata aina kaikissa asetuksissa ja säädöissä tehtaan
ohjearvoja.
17. Päähuoltoihin ja korjauksiin tulee käyttää vain valtuutettuja
huoltopaikkoja.
18. Älä koskaan yritä tehdä laitteelle isoja korjauksia, ellet ole
saanut siihen koulutusta. Vääränlaiset huoltotoimenpiteet
voivat aiheuttaa vaaroja laitteen toimintaan sekä
laitevaurioita, ja voit menettää valmistajan takuun.
19. Jos leikkurissa on useita teräyksiköitä, ole varovainen, sillä
yhden terän pyörittäminen voi saada muutkin terät
liikkeeseen.
20. Älä muuta moottorin kierroslukurajoittimen säätöä äläkä
käytä moottoria ylikierroksilla. Moottorin käyttäminen liian
suurella käyntinopeudella voi lisätä henkilövahingon vaaraa.
21. Irrota vetävät lisä- ja apulaitteet, sammuta moottori, poista
avain ja irrota sytytystulpan johto/johdot ennen lisä- ja
apulaitteiden tukosten ja suihkunohjainten puhdistusta sekä
huoltoa tai jos olet osunut johonkin esineeseen tai laite
värähtelee poikkeavasti. Jos olet osunut esineeseen,
tarkasta koneen vahingot ja korjaa se, ennen kuin käynnistät
moottorin uudelleen ja käytät laitetta.
22. Älä koskaan laite käsiä lähelle liikkuvia osia, esimerkiksi
nestepumpun jäähdytyspuhallinta, kun traktori käy.
(Nestepumpun jäähdytyspuhaltimet sijaitsevat yleensä
voimansiirtoakselin päällä).
23. Laitteet, joissa on hydraulipumppu, -letkuja tai -moottoreita:
VAROITUS: Paineistettuna purkautuvan hydraulinesteen
voima voi riittää tunkeutumaan ihon alle ja aiheuttaa
vaarallisia vammoja. Jos ihon sisään joutuu vierasta
nestettä, iho on poistettava kirurgisesti muutaman tunnin
kuluessa. Leikkauksen saa tehdä lääkäri, jolla on kokemusta
tällaisista vammoista. Muuten kohtaan voi tulla kuolio. Pidä
vartalosi ja kätesi poissa reikien ja suuttimien luota, joista voi
suihkuta suuripaineista hydraulinestettä. Kun etsit vuotoja,
käytä paperia tai pahvia - älä omia käsiäsi. Varmista, että
kaikki hydraulinesteen liitokset ovat tiiviitä ja että kaikki
hydrauliletkut ja -putket ovat hyvässä kunnossa, ennen kuin
kytket paineen järjestelmään. Jos vuotoja ilmenee, vie laite
välittömästi huollettavaksi valtuutetulle jälleenmyyjälle.
24. VAROITUS: Laitteeseen on varastoitunut energiaa. Jousien
väärä vapauttaminen voi aiheuttaa vakavia henkilövammoja.
Jouset saa irrottaa vain valtuutettu huoltoteknikko.
25. Moottorin jäähdyttimellä varustetut mallit: VAROITUS:
Laitteeseen on varastoitunut energiaa. Älä koskaan yritä
irrottaa jäähdyttimen korkkia, kun moottori käy, niin estät
vakavasti ruumiinvammat, joita syntyy kuuman
jäähdytysnesteen tai höyryn purkautuessa. Sammuta
moottori ja odota sen jäähtymistä. Irrota korkki silloinkin
erityisen varovasti.
6
Page 97

ESIMERKKI
Tunnistusnumerot
Part No. xxxxxxx
xxxxxxxxxxxxxxx
Serial No. xxxxxxxxxx
20xx
kW: x.xx
xxxx max
xxxxxxxxxxxxxxxxxxxxxxx
xxxxxxxxxxxxxxxxxxxxxxx
xxxxxxxxxxxxxxxxxxxxxxx
xxxxxxxxxxxxxxxxxxxxxxx
xxx dB
kg: xxx
Not for
Reproduction
Tunnistusnumerot
Kun otat yhteyttä valtuutettuun jälleenmyyjän
varaosien, huollon tai kysymyksen merkeissä, Sinun
on PAKKO ilmoittaa nämä numerot.
Kirjoita mallin nimi/numero, valmistajan tunnistenumerot
sekä moottorin sarjanumerot niille varattuun tilaan, jotta
löydät ne nopeasti. Numerot löytyvät osoitetuista
paikoista.
HUOMIO: Katso moottorin käyttöohjeesta moottorin
sarjanumeroiden sijainti.
EY:n tunnistemerkinnät
Traktorin
tunniste
TUOTTEEN VIITETIEDOT
Mallia kuvaava nimi/numero
Laitteen valmistenumero
Leikkurikannen valmistenumero Leikkurikannen sarjanumero
Myyjän nimi Ostopäivä
MOOTTORIN VIITETIEDOT
Moottorin merkki
Moottorin tyyppi/eritelmä
A
Leikkurin tunniste
Laitteen sarjanro
Moottorin malli
Moottorin koodi/sarjanro
A. Valmistajan tunnistenumero
B. Valmistajan sarjanumero
C. Tehoilmoitus kilowatteina
D. Moottorin suurin käyntinopeus kierroksina minuutissa
E. Valmistajan nimi ja osoite
F. Valmistusvuosi
G. EY-vaatimustenmukaisuustunnus
H. Laitteen paino kilogrammoina
I. Taattu äänitehotaso desibeleinä
Part No. xxxxxxx
B
E
7
xxxxxxxxxxxxxxx
Serial No. xxxxxxxxxx
xxxxxxxxxxxxxxxxxxxxxxx
xxxxxxxxxxxxxxxxxxxxxxx
xxxxxxxxxxxxxxxxxxxxxxx
xxxxxxxxxxxxxxxxxxxxxxx
xxx dB
20xx
F
kg: xxx
kW: x.xx
xxxx max
G
I
H
C
D
Page 98

Turvallisuustarrat
Not for
Reproduction
Turvallisuustarrat
Kaikki ruohonleikkurissa ja leikkuuyksikössä olevat
VAARA-, VAROITUS- JA HUOMAUTUS-tarrat sekä
käyttöohjeet on luettava huolellisesti. Niitä on myös
noudatettava. Jollei näitä ohjeita noudateta,
henkilövahinkoja voi sattua. Tiedot vaikuttavat omaan
turvallisuuteesi, ja ne ovat tärkeitä! Koneessa ja
leikkurissa on seuraavat turvallisuustarrat.
Turvamerkit
Varoitus: Lue käyttöohje.
Lue käyttöohje ennen koneen käyttöä
ja varmista, että olet ymmärtänyt sen
ohjeet.
Vaara: Sinkoutuvia esineitä.
Tämä laite voi singota esineitä ja
roskia. Pidä ihmiset kaukana.
Varoitus: Poista avain ennen
huoltoa.
Irrota avain ja tutustu tekniseen
kirjallisuuteen, ennen kuin ryhdyt
korjaamaan tai huoltamaan laitetta.
Vaara: Koneen kaatuminen.
Älä käytä tätä laitetta mäissä, joiden
kulma on yli 10°.
Vaara: Jäsenten irtoaminen.
Tämä laite pystyy katkaisemaan
raajoja. Pidä ihmiset, varsinkin lapset,
kaukana, kun moottori käy.
Vaara: Jäsenten irtoaminen.
Tämä leikkuukansi pystyy
katkaisemaan raajoja. Pidä kädet ja
jalat kaukana teristä.
Vaara: Palovaara.
Älä lisää polttoainetta, kun moottori on
lämmin tai käynnissä. Pysäytä
moottori ja anna sen jäähtyä 3
minuuttia, ennen kuin tankkaat.
Jos yksikin tarroista irtoaa tai vahingoittuu, vaihda se heti
uuteen. Tiedustele varatarroja paikalliselta
jälleenmyyjältäsi.
Tarrat on helppo kiinnittää, ja ne muistuttavat katsojaansa
säännöllisesti siitä, että turvaohjeita on noudatettava
turvallisen ja tehokkaan leikkurinkäytön varmistamiseksi.
Vaara: Kuuma pinta.
Anna laitteen jäähtyä, ennen kuin
kosketat tähän.
Vaara: Häkämyrkytys.
Älä käytä laitetta tiloissa, joissa ei ole
ilmanvaihtoa.
Varoitus: Palovaara.
Pidä lapset, avotuli ja kipinät kaukana
akusta, sillä räjähtävät kaasut voivat
syttyä.
Varoitus: Rikkihappo voi aiheuttaa
sokeuden tai vakavia
palovammoja.
Käytä suojalaseja tai kasvonsuojusta
aina, kun käsittelet akkua tai
työskentelevät sellaisen lähellä.
Varoitus: Akut muodostavat
räjähtäviä kaasuja.
Lue käyttöohje ennen koneen käyttöä
ja varmista, että olet ymmärtänyt sen
ohjeet.
Tärkeää: Älä heitä akkua roskiin.
Tiedustele paikallisilta viranomaisilta
ohjeita akkujen hävittämistä tai
kierrätystä varten.
Vaara: Jäsenten
irtoaminen.
Tämä leikkuukansi pystyy
katkaisemaan raajoja. Pidä
kädet ja jalat kaukana teristä.
8
Page 99

EY:n turvamerkit
Not for
Reproduction
Tarrojen sijainti
Käyttöohjeet, EY-mallit,
Osa nro 1734027
Virtalukon asennot
Osa nro 1722806
EY-vaara, pyörivät terät,
Osa nro 1720389
1730172
Polttoainetaso
Osa nro 1730172
173xxxx
Voimansiirron
vapautus
Osa nro 1730202
EY-vaara, pyörivät terät,
1730264
Osa nro 1720389
Nostimen kiinnitys
Osa nro 1730264
9
Page 100

Toiminnot ja hallintalaitteet
Not for
Reproduction
Kuva 1. Hallintalaitteet
Hallintalaitteet
Alla on kuvattu lyhyesti yksittäisten hallintalaitteiden toiminta. Käynnistämiseen, pysäyttämiseen, ajamiseen ja
leikkaamiseen on käytettävä useita hallintalaitteita peräkkäin tietyssä järjestyksessä. Lue KÄYTTÖÄ käsittelevä osio
kokonaisuudessaan, niin tiedät, mikä hallintalaiteyhdistelmä ja -järjestys mihinkin tehtävään sopii.
Kaasuvipu
Kaasuvipu vaikuttaa moottorin käyntinopeuteen.
Siirtämällä kaasuvipua eteenpäin moottorin nopeus
kasvaa, ja siirtämällä taaksepäin pienenee. Käytä laitetta
aina kaasu maksimiasennossa.
Rikastin
Sulje rikastin kylmäkäynnistystä varten. Avaa rikastin, kun
moottori käynnistyy. Lämmin moottori ei välttämättä
tarvitse rikastinta. Sulje rikastin siirtämällä vipua
eteenpäin.
10
Ajovalot
Valokytkin kytkee traktorin ajovalot päälle ja pois.
Tuntimittari
Tuntimittari mittaa käyttötunteja, jolloin avain on
AJO-asennossa.
 Loading...