

Murray 621450x4NB, 621450x4NC Instruction Manual
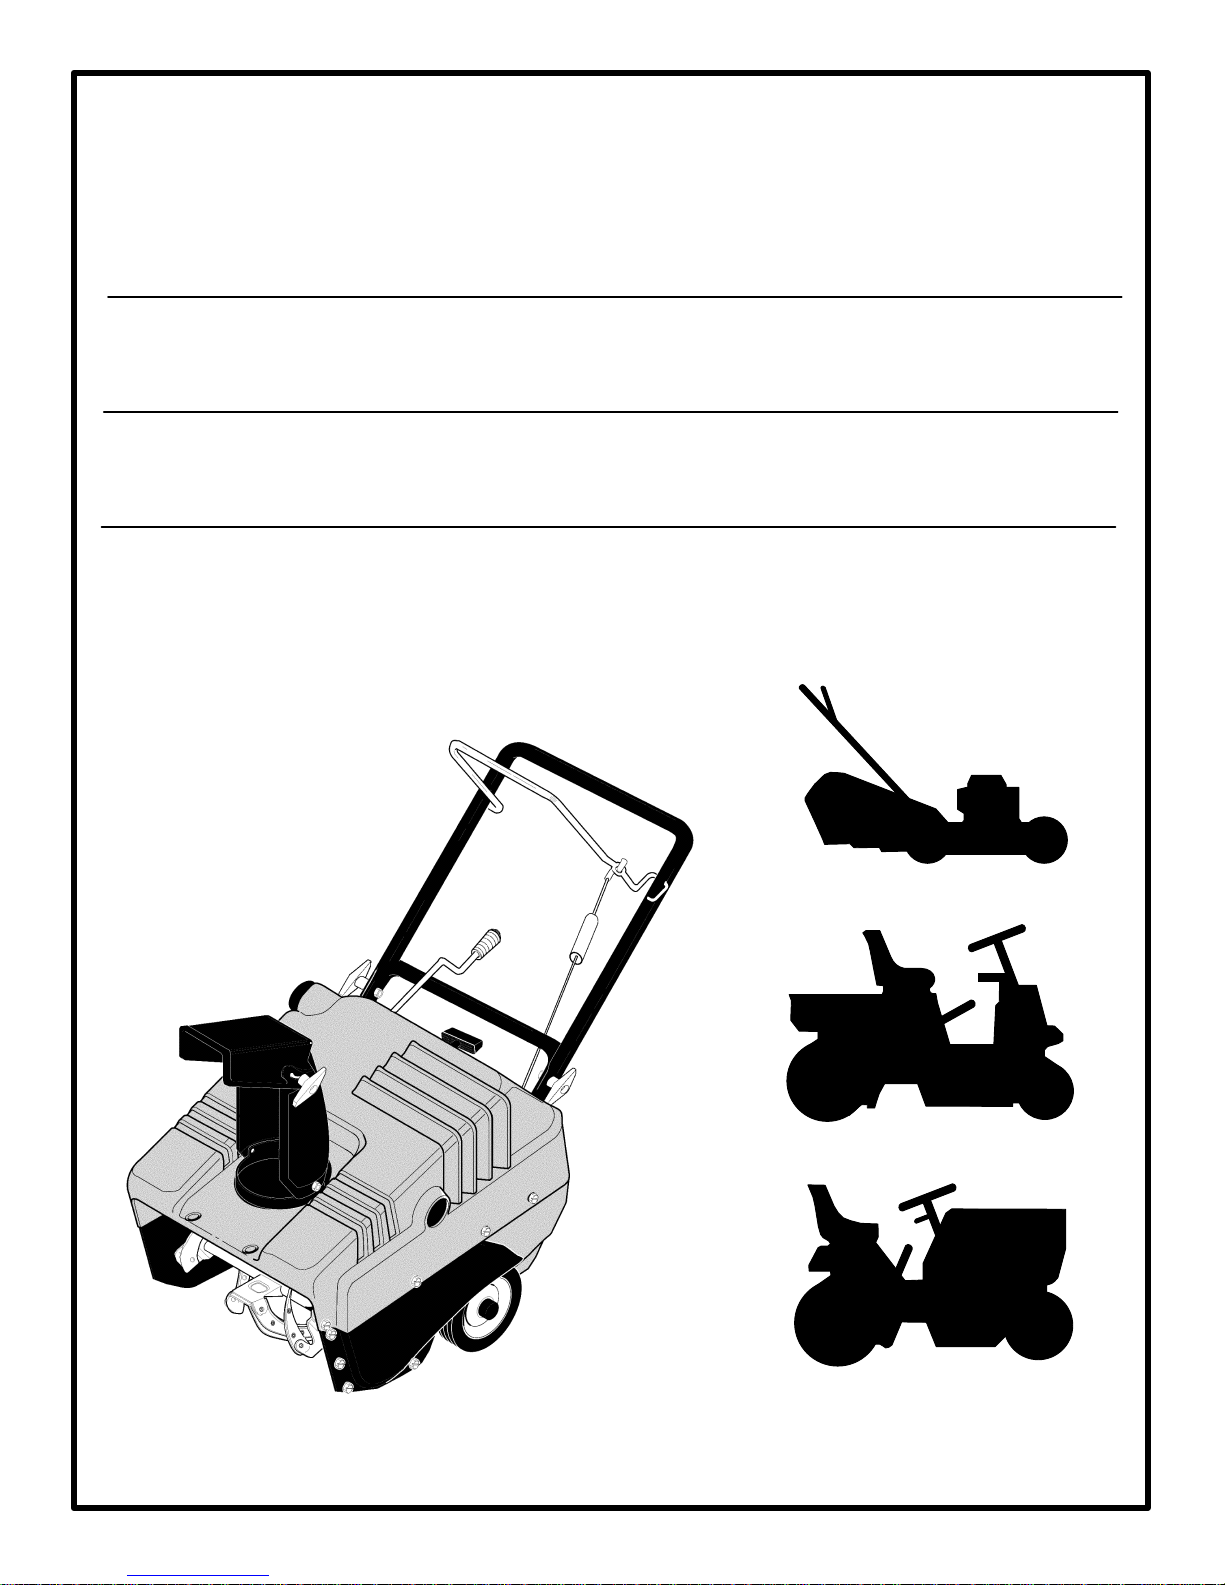
Instruction Book Snow Thrower Model 621450x4NB
Manuel d’instructions chasse−neige modèle 621450x4NB
Read and keep this book for future reference. This book contains important information on SAFETY,
ASSEMBLY, OPERATION, AND MAINTENANCE.
Lisez et conservez ce manuel pour référence. Ce manuel contient des informations importantes
concernant la SECURITE, LE MONTAGE, L’UTILISATION ET L’ENTRETIEN.
F-031023C
NOTE: This unit is equipped with an internal combustion engine
and must not be used on or near any unimproved
forest-covered, brush-covered or grass-covered land unless
the engine’s exhaust system is equipped with a spark arrester
meeting applicable local or state laws (if any). If a spark arrester
is used, it must be maintained in effective working order by the
operator.
In the State of California, the above is required by law (Section
4442 of the California Public Resources Code). Other states
may have similar laws. Federal laws apply on federal lands. See
an Authorized Service Center for a spark arrester for the
muffler.
Engine Exhaust, some of its constituents, and
certain vehicle components contain or emit
chemicals known to the State of California to
cause cancer and birth defects or other reproductive harm.
Battery posts, terminals and related accessories contain lead and lead compounds, chemicals known to the State of California to cause
cancer and birth defects or other reproductive
harm. WASH HANDS AFTER HANDLING.
REMARQUE : cette machine est équipée d’un moteur à
combustion interne et ne doit pas être utilisée sur un terrain
forestier, buissonnant ou herbeux non préparé, à moins que le
dispositif d’échappement soit pourvu d’un pare-étincelles
conforme à la législation locale ou de l’état (le cas échéant). Si
un pare-étincelles est utilisé, celui-ci doit être maintenu en
parfait état de fonctionnement par l’utilisateur.
Au sein de l’état de Californie, la loi exige la prise en compte
des précautions mentionnées ci-dessus (clause 4442 du
California Public Resources Code). D’autres états peuvent
présenter des lois similaires. Les lois fédérales s’appliquent sur
les terres fédérales. S’adresser à un centre de maintenance
agréé pour l’achat d’un pare-étincelles pour l’échappement.
Les gaz d’échappement du moteur, certains
éléments de leur composition, ainsi que
certains organes du véhicule contiennent ou
émettent des substances chimiques qui, selon
l’État de Californie, peuvent causer le cancer,
des malformations à la naissance, ou
représentent un danger pour la reproduction.
Les bornes et pôles de batterie et autres
accessoires de ce type contiennent du plomb et
des composés de plomb, substances
chimiques qui, selon l’État de Californie,
peuvent causer le cancer, des malformations à
la naissance, ou représentent un danger pour la
reproduction.
F-031023C
2
1
5
2
3
1
2
1
3
2
2
2
12
8
12
9
15
10
14
2
5
3
11
4
1
3
2
2
4
1
7
1
1
6
5
5
16
17
14
14
14
14
6
17
17
15
F-031023C
3
7
2
1
8
4
3
1/8” (3mm)
2
5
9
3
5
1
10
4
2
1
3
F-031023C
4
4
1
5
6
4
11 12
3
3
6
4
2
5
4
1
13 14
1
F-031023C
5

CONTENTS
PRODUCT INFORMATION 6
OWNER’S INFORMATION 6
INTERNATIONAL PICTORIALS 7
ASSEMBLY 9
OPERATION 10
MAINTENANCE 12
MAINTENANCE CHART 12
TROUBLE SHOOTING CHART 14
TWO YEAR LIMITED WARRANTY
Murray, Inc. warrants to the original purchaser
that this unit shall be free from defects in
material and workmanship under normal use
and service for a period of Two (2) Year from
the date of purchase; however, this warranty
does not cover engines, accessories (such as
electric starters) and Normal Wear Parts (except
as noted below) as the companies that
manufacture these items furnish their own
warranties and provide service through their
authorized field service facilities. For additional
information, see the warranties covering these
particular parts. If you are uncertain whether
your unit contains or is equipped with one or
more of these parts, consult your dealer prior to
purchase. Subject to the terms and conditions
noted in this Limited Warranty, we shall, at our
option, repair or replace at no cost to the original
purchaser any part covered by this Limited
Warranty during the applicable warranty period.
Normal Wear Parts are defined as drive belts,
augers, shear pins, tires and headlights. These
parts are warranted to be free from defects in
material and workmanship as delivered with the
product. Any claim for repair or replacement of
Normal Wear Parts must be made within thirty
(30) days of the date of purchase. No claims
involving damage caused from material use,
abuse or misuse will be honored.
This Murray, Inc. Two (2) Year Limited
Warranty is your exclusive remedy; however,
this warranty is void or does not apply to any
unit that has been tampered with, altered,
misused, abused or used for rental or other
commercial and/or professional
(non-homeowner) uses. Your warranty does not
cover minor mechanical adjustments which are
not due to any defect in material or
workmanship. For assistance in making such
adjustments, consult your Instruction Book.
To make a claim under this Murray, Inc. Two (2)
Year Limited Warranty, return the unit (or if
authorized in advance, the defective part) along
with your proof of purchase to an Authorized
Service Center near you. To locate the nearest
ENGLISH
Authorized Service Center, call the Central Parts
Distributor for your area shown in the list
provided with your unit or check the Yellow Page
listings in your local telephone directory. If you
return the entire unit, we will repair the unit. If we
authorize the return of the defective part only, we
will either replace or repair the part.This Murray,
Inc. Two (2) Year Limited Warranty gives you
specific legal rights, and you may also have
other rights which vary from state to state.
Limited Warranty is given in lieu of all other
expressed and implied warranties including
the implied warranty of merchantability and
warranty of fitness for a particular purpose. If
you need additional information on this written
warranty or assistance in obtaining service,
write:
USA - MURRAY, INC.
Outdoor Power Equipment
Customer Service Department
P.O. Box 268
Brentwood, Tennessee 37027
1-800-251-8007
CANADA - MURRAY CANADA, INC.
Factory Customer Service
1195 Coutneypark Drive East
Mississauga, Ont. L5T-1R1
1-800-661-6662
This
PRODUCT INFORMATION
The owner must be certain that all the product
information is included with the unit. This
information includes the INSTRUCTION
BOOKS, the REPLACEMENT PARTS and the
WARRANTIES. This information must be
included to make sure state laws and other laws
are followed.
OWNER’S INFORMATION
This instruction book is written for a person with
some mechanical ability. Like most service
books, not all the steps are described. Steps on
how to loosen or tighten fasteners are steps
anyone can follow with some mechanical ability.
Read and follow these instructions before you
use the unit.
Know your product: If you understand the unit
and how the unit operates, you will get the best
performance. As you read this manual, compare
the illustrations to the unit. Learn the location
and the function of the controls. To help prevent
an accident, follow the operating instructions
and the safety rules. Keep this manual for future
reference.
IMPORTANT: Many units are not assembled
and are sold in cartons. It is the responsibility of
the owner to make sure the assembly instructions in this manual are exactly followed. Other
units are purchased in an assembled condition.
On assembled units, it is the responsibility of the
owner to make sure the unit is correctly assembled. The owner must carefully check the
unit according to the instructions in this manual
before it is first used.
WARNING: Look for this symbol to indicate
important safety precautions. This symbol
indicates: “Attention! Become Alert! Your
Safety Is At Risk.”
Responsibility Of The Owner
The responsibility of the owner is to
follow the instructions below.
1. Carefully read and follow the rules for safe
operation.
2. Follow all the assembly and preparation
instructions.
3. Inspect the unit.
4. Make sure that the operator of the unit
knows how to correctly use all standard
and accessory equipment.
5. Operate the unit only with guards, shields,
and other safety items in place and working
correctly.
6. Correctly adjust the unit.
7. Service the unit only with authorized or approved replacement parts.
8. Complete all maintenance on the unit.
Environmental Awareness
D Do not fill the engine’s fuel tank completely
full.
D Drain fuel for off-season storage.
D Use only unleaded gasoline.
D Service the air cleaner regularly.
D Tune-up the engine regularly.
D Keep equipment in efficient operating
condition.
D Dispose of used engine oil properly.
F-031023C
6
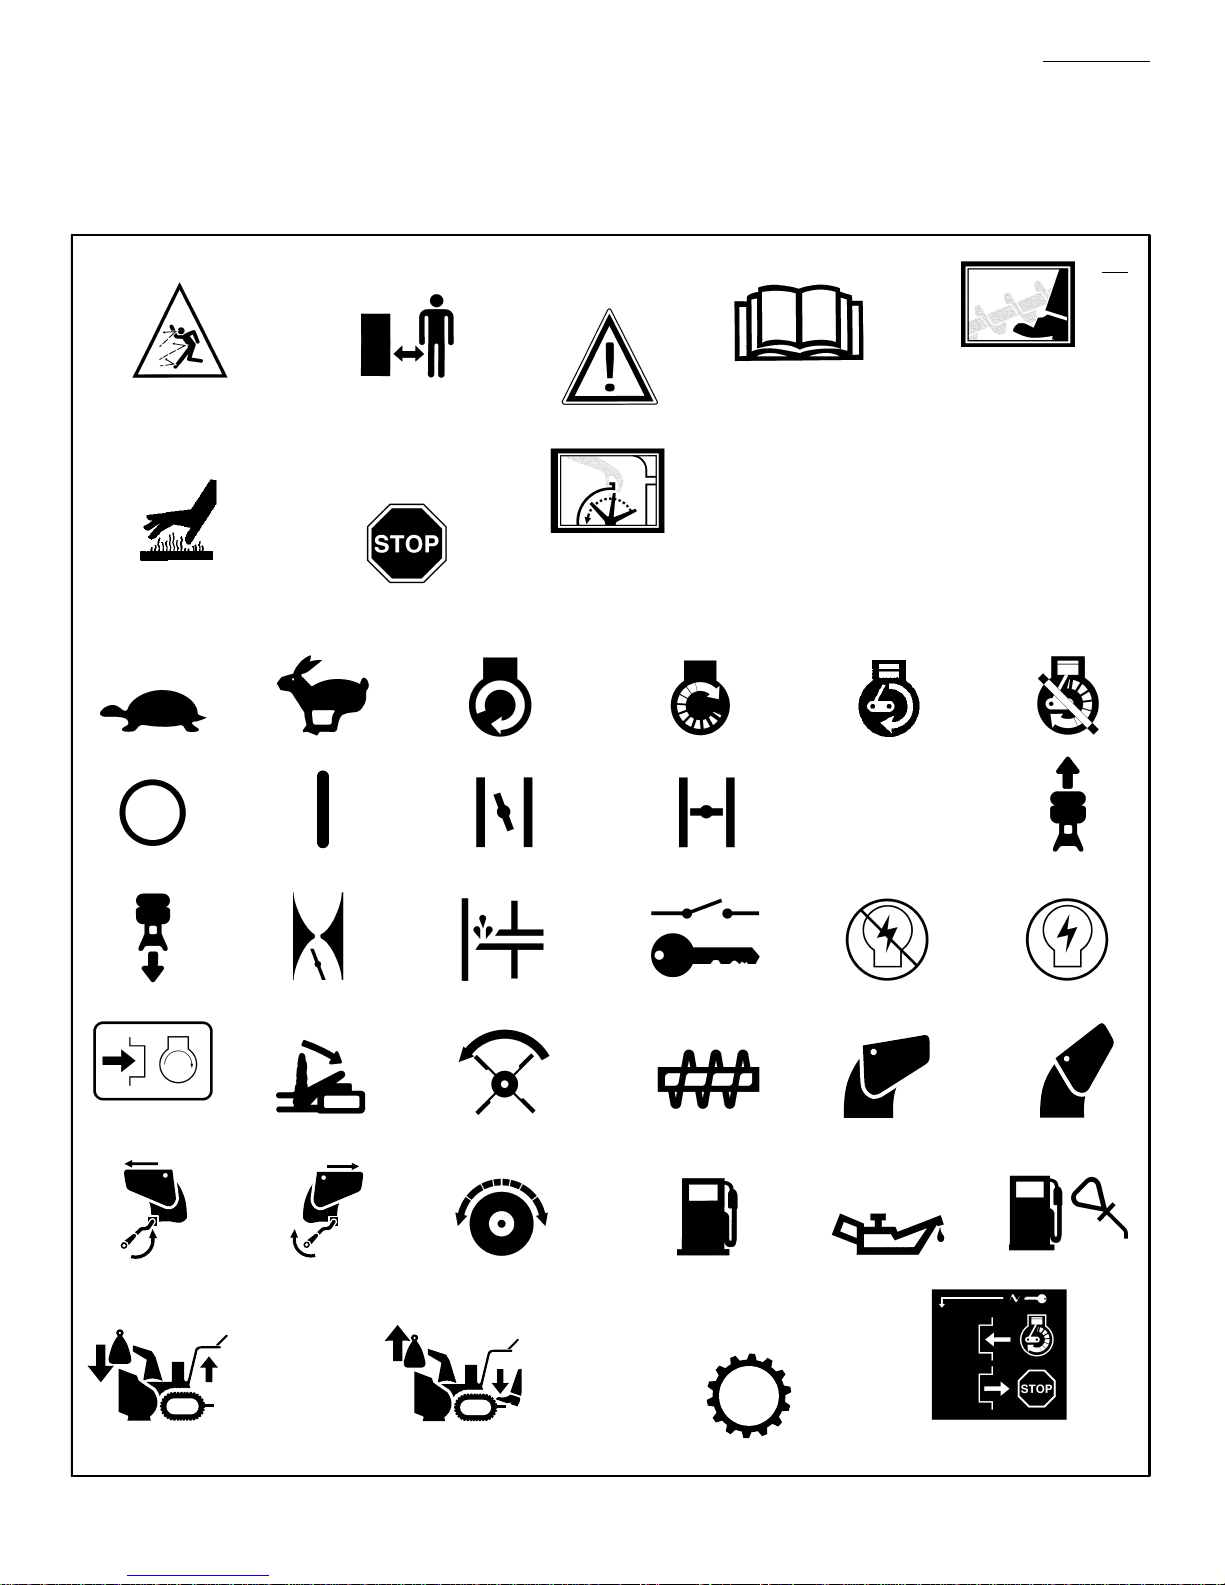
INTERNATIONAL PICTORIALS
IMPORTANT: The following pictorials are located on your unit or on literature supplied
with the product. Before you operate the
unit, learn and understand the purpose for
each pictorial.
ENGLISH
Safety Warning Symbols
DANGER
Thrown Objects.
Keep Bystanders Away.
WARNING
Hot Surface
DANGER
Thrown Objects.
Keep Bystanders Away.
STOP
WARNING
DANGER
Stop The Engine
Before Unclogging
Discharge Chute!
IMPORTANT
Read Owner’s Manual
Before Operating
This Machine.
Control And Operating Symbols
Slow Fast Electric Start Engine Start Engine Run
DANGER
Avoid Injury From
Rotating Auger. Keep
Hands, Feet And
Clothing Away.
Engine Off
15
Engine Stop On Choke Off Choke On
Reverse
Push To Engage
Electric Starter
Discharge LEFT Discharge RIGHT
KGS
Throttle Primer Button Ignition Key Ignition Off Ignition On
Engage
Auger Clutch
Drive Clutch
KGS
Auger Collector
Fuel Oil Fuel Oil Mixture
N
Neutral
Discharge DOWN Discharge UP
Forward
Weight Transfer
Lift Handle To Engage
F-031023C
Weight Transfer
Depress Pedal To Disengage
Transmission
Insert To Run, Pull Out To Stop.
Ignition Key
7

Safe Operation Practices for Snow Throwers
As Recommended By: American National Standards Institute.
ENGLISH
IMPORTANT: Safety standards require operator
presence controls to minimize the risk of injury.
Your snow thrower is equipped with such controls. Do not attempt to defeat the function of the
operator presence control under any circumstances.
Training
1. Read the operating and service instruction
manual carefully. Be thoroughly familiar with
the controls and the proper use of the equipment. Know how to stop the unit and disengage the controls quickly.
2. Never allow children to operate the equipment. Never allow adults to operate the
equipment without proper instruction.
3. Keep the area of operation clear of all persons, particularly small children and pets.
4. Exercise caution to avoid slipping or falling
especially when operating in reverse.
Preparation
1. Thoroughly inspect the area where the equipment is to be used and remove all doormats,
sleds, boards, wires, and other foreign objects.
2. Disengage all clutches before starting the engine (motor).
3. Do not operate the equipment without wearing adequate winter outer garments. Wear
footwear that will improve footing on slippery
surfaces.
4. Handle fuel with care; it is highly flammable.
a. Use an approved fuel container.
b. Never remove fuel tank cap or add fuel to
a running engine (motor) or hot engine
(motor).
c. Fill fuel tank outdoors with extreme care.
Never fill fuel tank indoors.
d. Replace fuel cap securely and wipe up
spilled fuel.
e. Never store fuel or snow thrower with fuel
in the tank inside of a building where
fumes may reach an open flame or spark.
f. Check fuel supply before each use, allow-
ing space for expansion as the heat of the
engine (motor) and/or sun can cause fuel
to expand.
5. For all units with electric starting motors use
electric starting extension cords certified
CSA/UL. Use only with a receptacle that has
been installed in accordance with local inspection authorities.
6. Adjust the snow thrower height to clear gravel
or crushed rock surface.
7. Never attempt to make any adjustments
while the engine (motor) is running (except
when specifically recommended by manufacturer).
8. Let engine (motor) and snow thrower adjust
to outdoor temperatures before starting to
clear snow.
9. Always wear safety glasses or eye shields
during operation or while performing an adjustment or repair to protect eyes from foreign
objects that may be thrown from the snow
thrower.
Operation
1. Do not operate this machine if you are taking
drugs or other medication which can cause
drowsiness or affect your ability to operate
this machine.
2. Do not use this machine if you are mentally
or physically unable to operate this machine
safely.
3. Do not put hands or feet near or under rotating parts. Keep clear of the discharge opening at all times.
4. Exercise extreme caution when operating on
or crossing gravel drives, walks or roads.
Stay alert for hidden hazards or traffic.
5. After striking a foreign object, stop the engine
(motor), remove the wire from the spark plug,
thoroughly inspect snow thrower for any
damage, and repair the damage before restarting and operating the snow thrower.
6. If the unit should start to vibrate abnormally,
stop the engine (motor) and check immediately for the cause. Vibration is generally a
warning of trouble.
7. Stop the engine (motor) whenever you leave
the operating position, before unclogging the
auger/impeller housing or discharge chute
and when making any repairs, adjustments,
or inspections.
8. When cleaning, repairing, or inspecting, make
certain the auger/impeller and all moving
parts have stopped and all controls are disengaged. Disconnect the spark plug wire and
keep the wire away from the spark plug to
prevent accidental starting.
9. Take all possible precautions when leaving
the snow thrower unattended. Disengage the
auger/ impeller, stop engine (motor), and remove key.
10. Do not run the engine (motor) indoors, except
when starting the engine (motor) and for
transporting the snow thrower in or out of the
building. Open the outside doors; exhaust
fumes are dangerous (containing CARBON
MONOXIDE, an ODORLESS and DEADLY
GAS).
11. Do not clear snow across the face of slopes.
Exercise extreme caution when changing
direction on slopes. Do not attempt to clear
steep slopes.
12. Never operate the snow thrower without
proper guards, plates or other safety protective devices in place.
13. Never operate the snow thrower near enclosures, automobiles, window wells, drop- offs,
and the like without proper adjustment of the
snow discharge angle. Keep children and
pets away.
14. Do not overload the machine capacity by attempting to clear snow at too fast a rate.
15. Never operate the machine at high transport
speeds on slippery surfaces. Look behind
and use care when backing up.
16. Never direct discharge at bystanders or allow
anyone in front of the unit.
17. Disengage power to the collector/impeller
when snow thrower is transported or not in
use.
18. Use only attachments and accessories approved by the manufacturer of the snow
thrower (such as tire chains, electric start kits,
ect.).
19. Never operate the snow thrower without good
visibility or light. Always be sure of your footing and keep a firm hold on the handles.
Walk;never run.
20. Do not over- reach. Keep proper footing and
balance at all times.
21. Exercise caution if operating on steep sloping surfaces.
22. This snow thrower is for use on sidewalks,
driveways and other ground level surfaces.
23. Do not use the snow thrower on surfaces
above ground level such as roofs of residences, garages, porches or other such
structures or buildings.
Maintenance And Storage
1. Check shear bolts and other bolts at frequent
intervals for proper tightness to be sure the
equipment is in safe working condition.
2. Never store the snow thrower with fuel in the
tank inside a building where ignition sources
are present such as hot water and space
heaters, clothes dryers, and the like. Allow
the engine (motor) to cool before storing in
any enclosure.
3. Always refer to operator’s guide instructions
for important details if the snow thrower is to
be stored for an extended period.
4. Maintain or replace safety and instruction labels, as necessary.
5. Run the snow thrower a few minutes after
throwing snow to prevent freeze- up of the
auger/impeller.
F-031023C
8
ASSEMBLY
Read and follow the assembly and adjustment
instructions for your snow thrower. All fasteners
are in the parts bag. Do not discard any parts or
material until the unit is assembled.
WARNING: Before doing any
assembly or maintenance to the
snow thrower, remove the wire
from the spark plug.
NOTE: In this instruction book, left and right
describe the location of a part from the operator’s position behind the unit.
NOTE: Torque is measured in foot pounds
(metric N.m). This measurement describes
how tight a nut or bolt must be. The torque is
measured with a torque wrench.
NOTE: Illustrations begin on page 3.
Tools Required
1 Knife
1 Pliers
1 1/2 inch adjustable open end wrenches
1 9/16 inch adjustable open end wrenches
1 3/4 inch adjustable open end wrenches
1 Measuring tape or ruler
1 Screwdriver
How To Remove The Snow Thrower
From The Carton
1. Locate all parts that are packed separately
and remove from the carton.
2. Remove and discard the packing material
from around the snow thrower.
3. Cut down all four corners of the carton and
lay the side panels flat.
4. Hold onto the lower handle and pull the snow
thrower off the carton.
CAUTION: DO NOT back over cables.
5. Remove the packing material from the handle assembly.
How To Assemble The Handle
1. Remove the packing material from the upper
and lower handles.
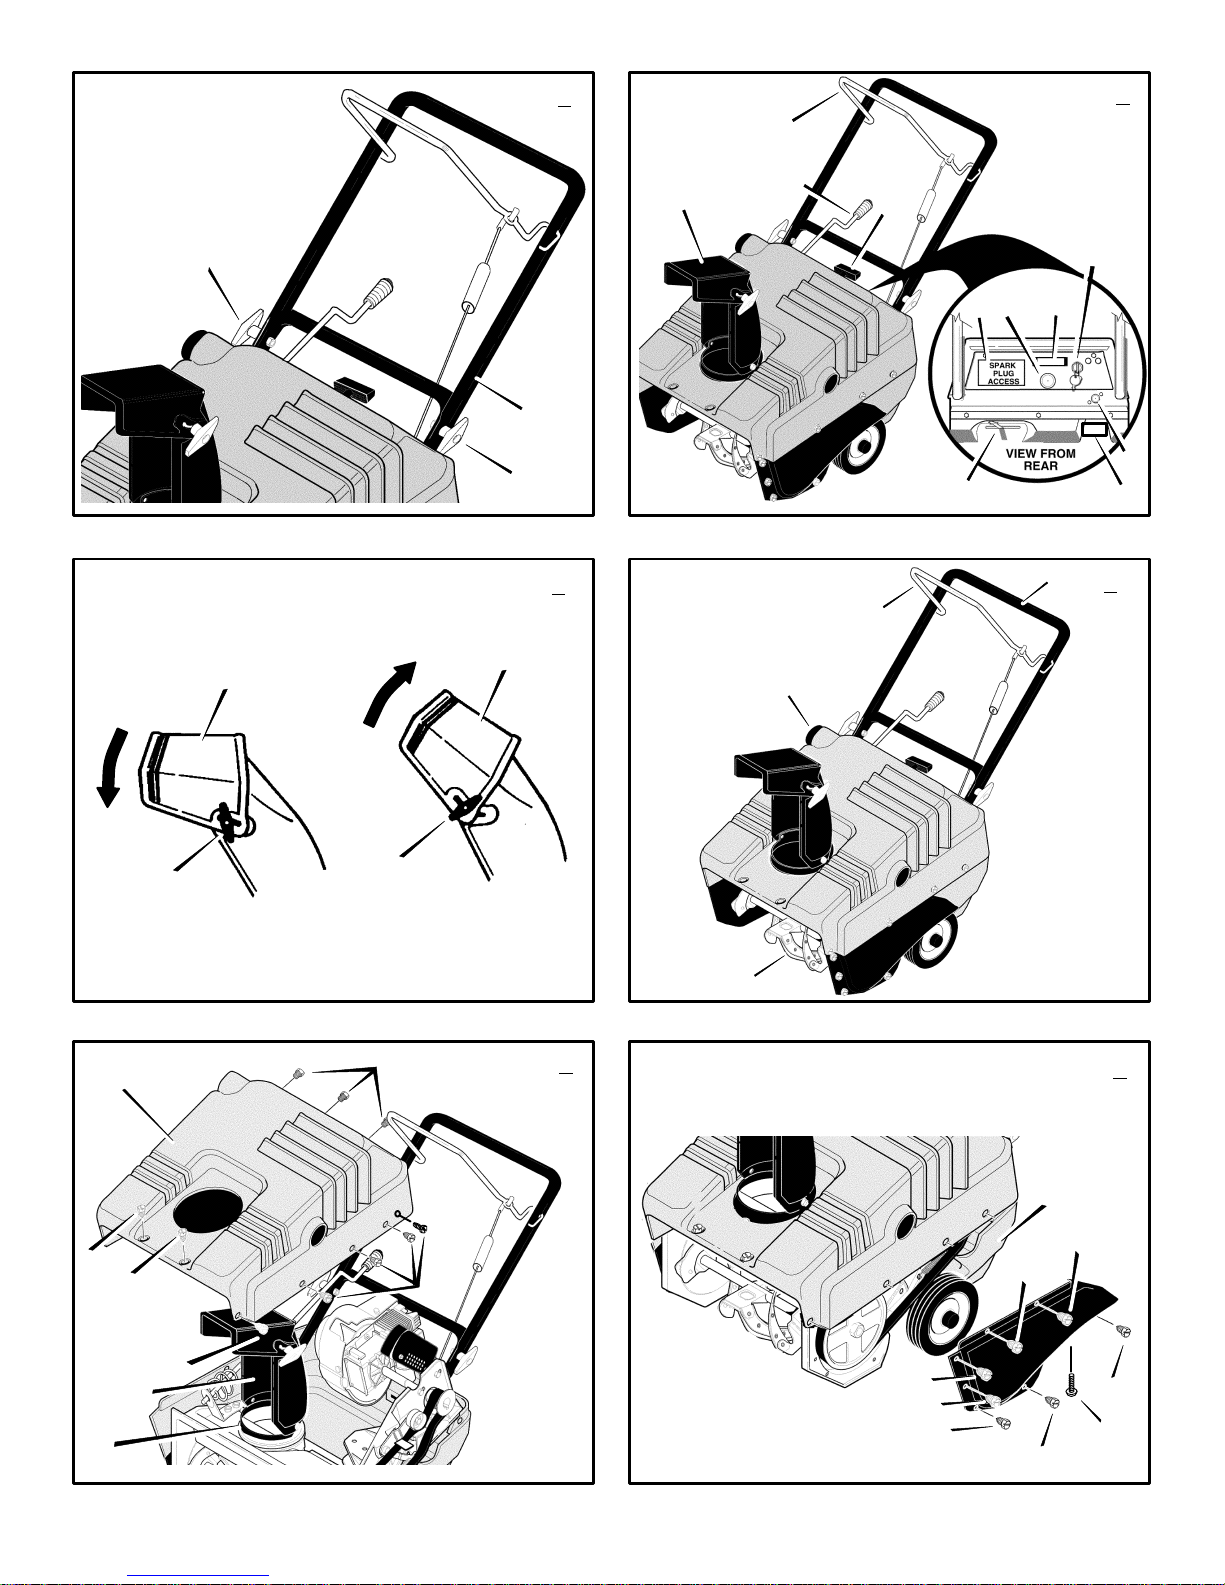
2. (Figure 1) Loosen the knobs (1) on each
side of the handle (2).
3. Raise the upper handle (2) to the operating
position.. Hold the upper handle (2) apart to
prevent scratching the lower handle.
NOTE: Make sure the cables are not
caught between the upper and lower handle.
4. Tighten the knobs (1).
How To Prepare The Engine
WARNING: Follow the engine
manufacturer’s instructions for the
type of fuel and oil to use. Always
use a safety fuel container. Do not smoke
when adding the fuel mixture to the engine.
When inside an enclosure, do not fill the
fuel tank. Before you add the fuel mixture,
stop the engine. Let the engine cool for
several minutes.
See the engine manufacturer’s instructions for
the type of fuel and oil to use. Before you use
the unit, read the information on safety, operation, maintenance, and storage.
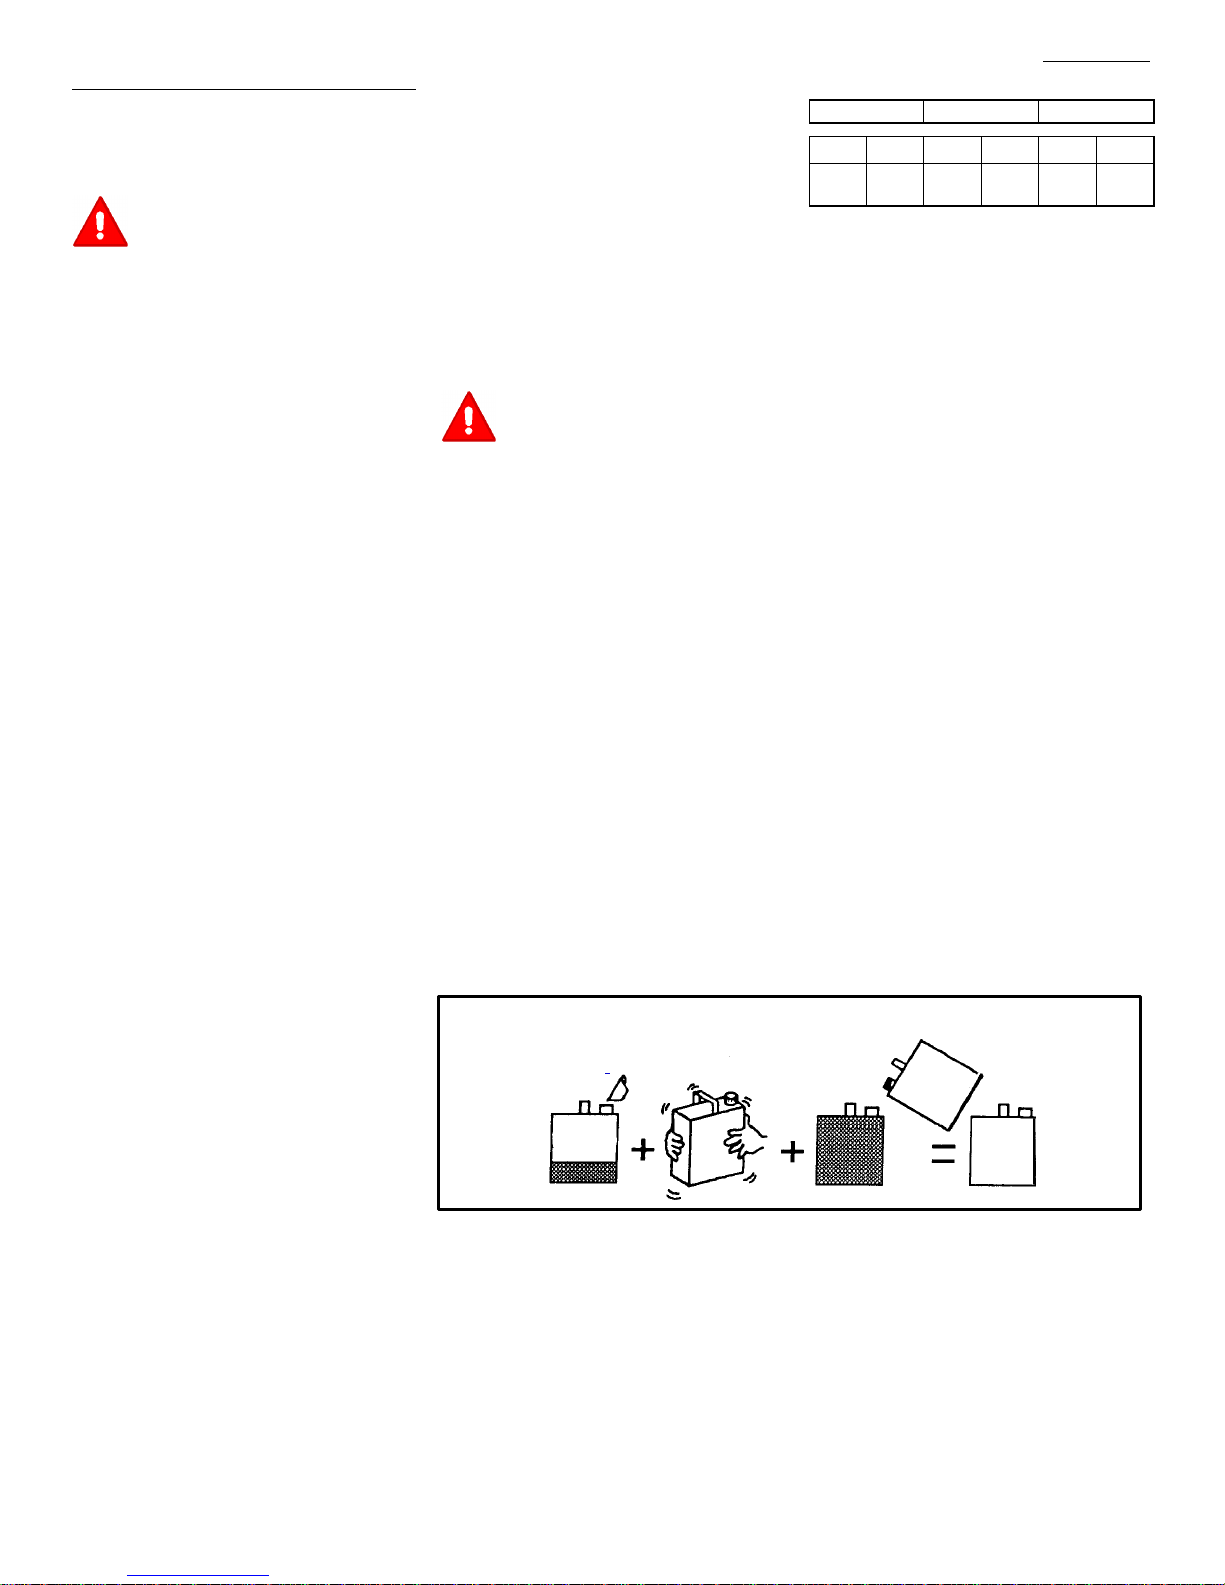
How To Mix The Fuel Mixture
The two cycle engine, used on this snow thrower, requires a mixture of gasoline and oil for lubrication of the bearings and other moving parts.
The correct fuel mixture ratio is 50:1 (2.6 oz. oil
per one gallon of gas - see the Fuel Mixture
Chart). Gasoline and oil must be pre-mixed in a
clean gasoline container. Always use fresh,
clean, unleaded gasoline.
NOTE: Engine horsepower ratings may vary
by engine adjustments, manufacturing variances, altitude, atmospheric conditions, fuel
and maintenance.
ENGLISH
FUEL MIXTURE CHART (mixture 50:1)
U.S. IMPERIAL SI. (Metric
GAS OIL GAS OIL GAS OIL
1
2.6
Gal.
Mix gasoline and oil as follows:
1. Pour one (1) U.S. quart of fresh, clean, un-
2. Add 2.6 ounces of clean, high quality, two-
3. Install the fuel cap onto the gasoline contain-
4. Add an additional three (3) U.S. quarts of
oz1Gal.
leaded automotive gasoline into a one gallon
size gasoline container.
cycle oil to the gasoline container.
IMPORTANT: Do not use outboard motor
oil or multi-viscosity oils,such as 10W-30
or 10W-40.
er. Vigorously shake the gasoline container
to mix the oil with the gasoline.
gasoline to the gallon container. Again shake
the gasoline container.
3.1oz1
liter20ML
Before You Operate
Before you operate your new snow thrower,
please review the following checklist:
G Make sure all assembly instructions have
been completed.
G Make sure the discharge chute rotates freely.
G Make sure that no loose parts remain in the
carton.
As you learn how to properly use the snow
thrower, pay extra attention to the following important items.
G Make sure the fuel tank is filled with the
correct mixture of gasoline and oil.
G Become familiar with the location of all
controls and understand their function.
G Before starting the engine, make sure all
controls operate corrently.
F-031023C
Do not fill the fuel tank with gasoline that does not have oil mixed in it. Shake the
gasoline container before each filling of the fuel tank.
OIl
(2.6 oz)
Gasoline
1U.S.
Quart
1 U.S. Gallon container
Shake Can
Add more gas
(3 U. S. Quarts)
1 U.S.
Gallon
Special
Gasoline
9
OPERATION
NOTE: Illustrations begin on page 3.
Know Your Snow Thrower (Figure 2)
Read this Instruction Book and safety rules before operation the snow thrower. Compare the
illustration with your snow thrower to familiarize
yourself with the location of various controls and
adjustments.
Crank Assembly (2) - Changes the direction of
the discharge chute.
Discharge Chute (3) - Changes the distance the
snow is thrown.
Auger Drive Lever (5) - Starts and stops the auger which propels the snow thrower.
Ignition Key (8) - Must be inserted and turned to
the on position to start the engine.
Primer Button (9) - Injects fuel directly into the
carburetor for fast starts in cold weather.
Electric Start Button (10) - On electric start models, used to start the engine.
Switch Box (11) - On electric start models, used
to attach a 120 volt electric power cord.
Recoil Starter Handle (12) - Use to manually
start the engine.
Choke Control (14) - Use to start a cold engine.
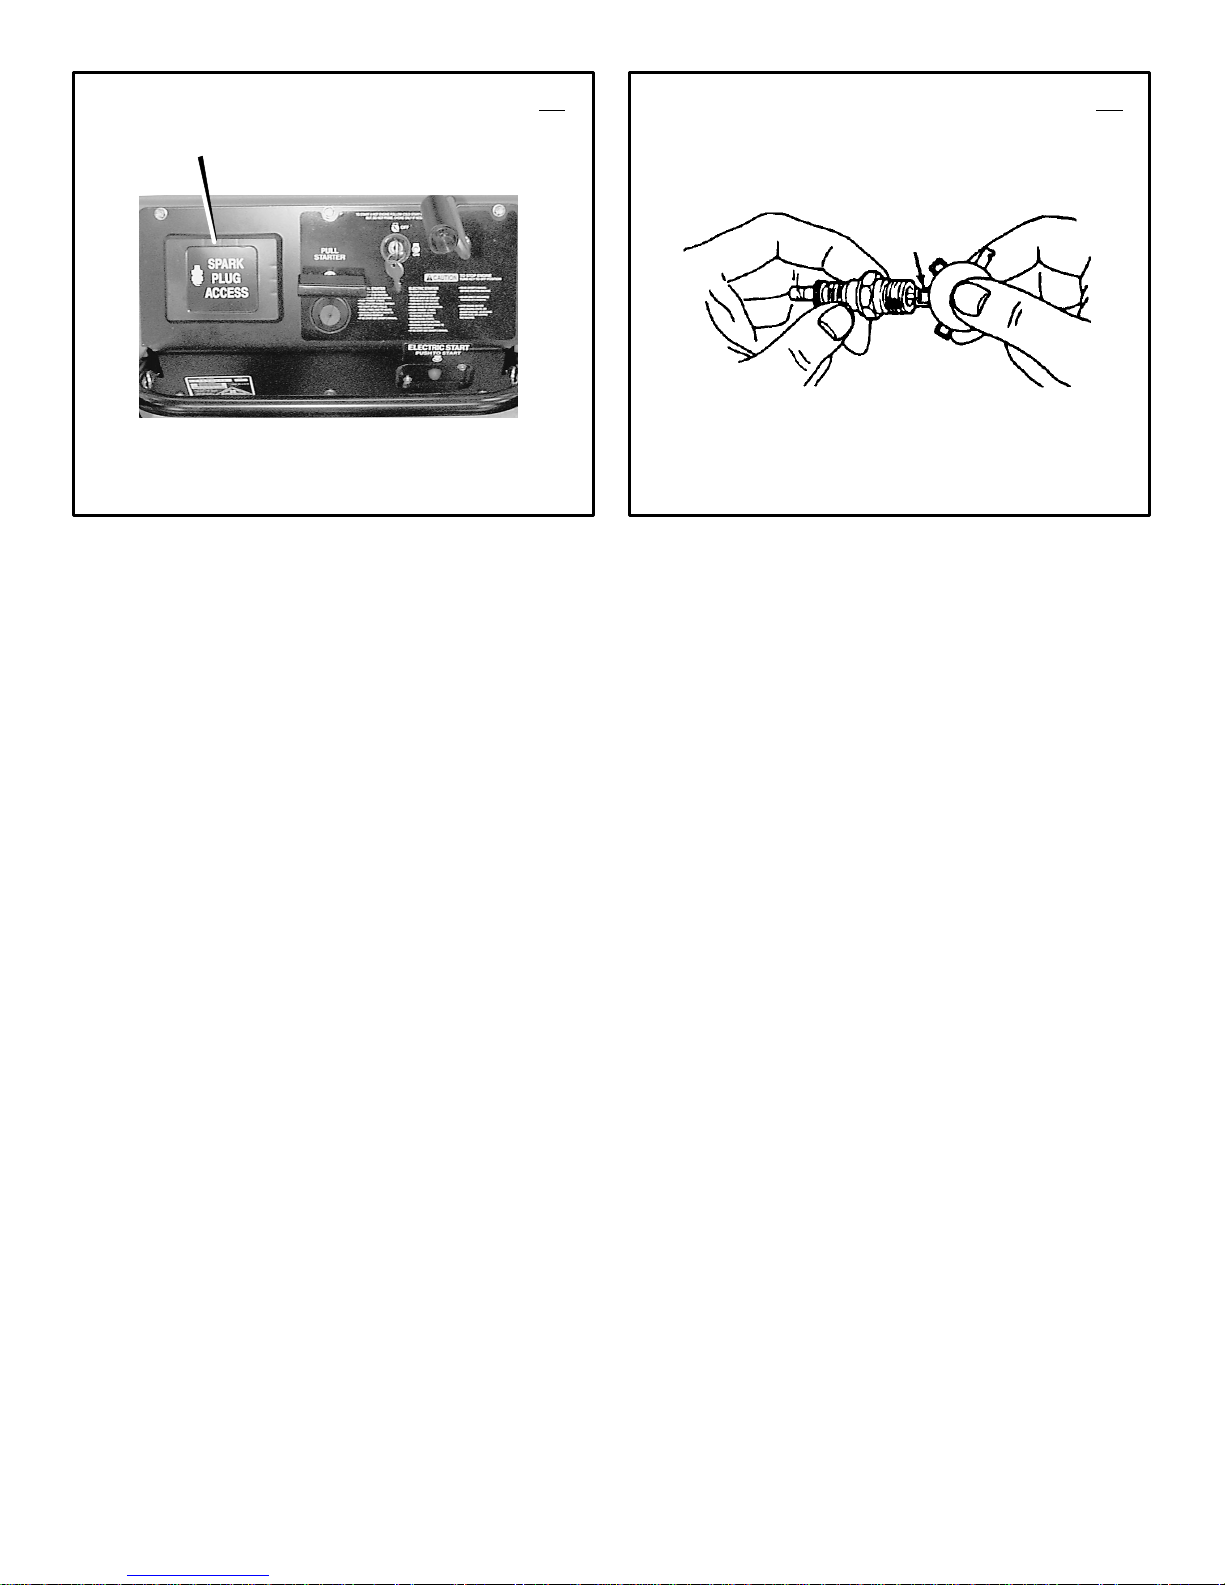
Spark Plug Access Panel (15) - Remove to ac-
cess the spark plug.
How To Control
The Discharge Of The Snow
WARNING: Never direct the discharge of snow toward bystanders.
WARNING: Always stop the engine
before unclogging the discharge
chute or the auger housing and be-
fore leaving the snow thrower.
1. (Figure 2) Turn the crank assembly (2) to
change the discharge direction of the snow.
2. (Figure 3) Loosen the wing knob (1) on the
chute deflector (2).
3. Move the chute deflector (2) up for more
distance or down for less distance.
4. Tighten the wing knob (1).
How To Throw Snow (Figure 2)
1. Engage the auger drive lever (5).
2. To stop throwing snow, release the auger
drive lever (5).
WARNING: The operation of any
snow thrower can result in foreign
objects being thrown into the eyes,
which can result in severe eye damage.
Always wear safety glasses or eye shields
while operating the snow thrower. We recommend standard safety glasses or use a
wide vision safety mask over your glasses.
F-031023C
How To Stop Discharging Snow
(Figure 2)
1. To stop discharging snow, release the auger
drive lever (5).
2. To stop the engine, turn the ignition key (8)
to the off position.
How To Move Forward (Figure 4)
1. Hold the auger drive lever (5) against the
handle (2). The auger will begin rotating.
2. To go forward, raise the handle (2) to allow
the rubber auger blades (1) to contact the
ground. Maintain a firm hold on the handle
(2) as the snow thrower starts to move forward. Guide the snow thrower by moving the
handle (2) either left or right. Do not attempt
to push the snow thrower.
3. To stop, release the auger drive lever (5).
NOTE: If the auger continues to rotate, see
“How To Adjust The Auger Control Cable” in
the Service and Adjustments section.
Before Starting The Engine
1. Before you service or start the engine, familiarize yourself with the snow thrower. Be
sure you understand the function and location of all controls.
2. Make sure that all fasteners are tight.
3. Make sure the fuel tank is filled with the correct mixture of gasoline and oil.
4. Become familiar with the location of all controls and understand their function.
5. Before starting the engine, make sure all
controls operate corrently.
Add The Fuel Mixture
WARNING: Follow the engine
manufacturer’s instructions for the
type of fuel and oil to use. Always
use a safety fuel container. Do not smoke
when adding the fuel mixture to the engine.
When inside an enclosure, do not fill the
fuel tank. Before you add the fuel mixture,
stop the engine. Let the engine cool for
several minutes.
(Figure 4) Fill the fuel tank (3) to the full posi-
tion with a fresh, clean fuel mixture. See “How
To Mix The Fuel Mixture” in the Assembly section.
How To Stop The Engine (Figure 2)
To stop the engine, turn the ignition key (8) to
the off position. Keep the ignition key (8) in a
safe place. The engine will not start without the
ignition key (8).
How To Start The Engine (Figure 2)
Models equipped with an Electric Starter
NOTE: An electric starter kit can be added to
recoil start engines. Electric starter kits are
available from your nearest authorized service center.
10
ENGLISH
WARNING: The starter is equipped
with a three- wire power cord and
plug and is designed to operate on
120 volt A.C. household current. The power
cord must be properly grounded at all times
to avoid the possibility of electrical shock
which can injure the operator. Carefully follow all instructions in the “How To Start The
Engine” section. Make sure that your house
wiring is a three- wire grounded system. If
you are not sure, ask a licensed electrician.
If your house wire system is not a
three- wire grounded system, do not use
this electric starter under any conditions. If
your system is grounded but a three- hole
grounded receptacle is not available to start
the engine, have a three- hole grounded receptacle installed by a licensed electrician.
To connect a 120 volt A.C. power cord, always connect the power cord to the switch
box (11) on the engine first. Then, plug the
other end into the three- hole grounded receptacle. When disconnecting the power
cord, always unplug the end from the
three- hole grounded receptacle first.
How To Start A Cold Engine (Figure 2)
1. Fill the fuel tank with a fresh, clean fuel misture. See “How To Mix The Fuel Mixture” in
the Assembly section.
2. Move the choke control to FULL position.
3. Make sure the auger drive lever (5) is in the
disengaged (released) position.
4. Insert the ignition key (8) and turn to the on
position.
5. Move the choke control (14) to the full
choke position.
6. (Electric Start) Connect the power cord to
the switch box (11) located on the engine.
7. (Electric Start) Plug the other end of the
power cord into a three-hole, grounded 120
VOLT, A.C. receptacle. (See the WARNING
in this section).
8. Push the primer button (9). Every time you
push the primer button (9), wait two seconds. For the number of times required to
push the primer button (9), see the engine
manufacturer’s instructions.
9. (Electric Start) Push on the electric start
button (10) until the engine starts. Do not
crank for more than 10 seconds at a time.
The electric starter is thermally protected. If
the electric starter overheates, it will automatically stop and can only be restarted
when it has cooled to a safe temperature. A
wait of about 5 to 10 minutes is required to
allow the electric starter to cool.
10.(Recoil Start) Rapidly pull the recoil starter
handle (12). Do not allow the recoil starter
handle (12) to snap back. Slowly return the
recoil starter handle (12).
11.If the engine does not start in 5 or 6 tries,
See the “Trouble Shooting Chart” Instructions.
12.(Electric Start) When the engine starts, release the electric start button (10) and
move the choke control (14) to 1/2 choke
position. When the engine runs smoothly,
move the choke control (14) to the off position.
13.(Electric Start) First disconnect the power
cord from the three-hole receptacle. Then,
disconnect the power cord from the switch
box (11).

NOTE: In temperatures below 05F, allow the
engine to warm up for several minutes before blowing snow.
WARNING: Never run the engine
indoors or in enclosed, poorly ven-
tilated areas. Engine exhaust contains carbon monoxide, an odorless and
deadly gas. Keep hands, feet, hair and
loose clothing away from any moving parts
located on the engine or the snow thrower.
The temperature of muffler and nearby
areas may exceed 150°F. Avoid these
areas.
How To Start A Warm Engine (Figure 2)
If an engine has been running and is still warm,
leave the choke control (14) in the off position
and do not push the primer button (9). If the
engine fails to start, follow the instructions “How
To Start A Cold Engine”.
NOTE: Do not use the primer button (9) to
start a warm engine.
How To Start An Engine With A Frozen Electric
Starter (Figure 2)
If the electric starter is frozen and will not turn
the engine, follow the instructions below.
1. Pull out the recoil starter handle (12) as far
as possible.
2. Quickly release the recoil starter handle
(12). Allow the recoil starter handle (12) to
snap back against the recoil starter.
If the engine still fails to start, repeat the two previous steps until the engine starts. Then, continue with the directions “How To Start A Cold
Engine”.
To help prevent the possible freeze-up of the
recoil starter and of the engine controls, proceed
as follows after each snow removal job.
1. With the engine running, quickly pull the re-
coil starter handle (12) three or four times
with a continuous full arm stroke. This will
produce a loud clattering sound that is not
harmful to the engine or starter.
2. Stop the engine. Wipe all snow and moisture
from the carburetor cover, control levers and
cables. Also move the choke control (14)
and recoil starter handle (12) several times.
How To Remove Snow or Debris From
The Auger Housing
WARNING: Do not attempt to remove snow or debris that may become lodged in auger housing
without taking the following precautions.
1. Release the auger drive lever (5).
2. Remove the ignition key (8).
3. Disconnect the spark plug wire.
4. Do not place your hands in the auger hous-
ing (4) or the discharge chute (3). Use a
pry bar to remove any snow or debris.
(Figure 2)
Snow Throwing Tips
1. This snow thrower will propel itself forward
when the handle is raised enough to cause
the auger blades to contact the ground. The
auger should stop when auger control bar is
released. If it does not stop, see “How To Adjust The Auger Control Cable” in the adjustment section.
2. Most efficient snow throwing is accomplished
when the snow is removed immediately after
if falls.
3. For complete snow removal, slightly overlap
each previous path.
4. Whenever possible, discharge the snow
down wind.
5. The distance the snow will be discharged
can be adjusted by moving the discharge
chute deflector. Raise the deflector for more
distance or lower the deflector for less distance.
6. In windy conditions, lower the chute deflector
to direct the discharged snow close to the
ground where it is less likely to blow into unwanted areas.
7. For safety and to prevent damage to the
snow thrower, keep the area to be cleared
free of stones, toys and other foreign objects.
ENGLISH
8. Do not use the auger propelling feature when
clearing gravel or crushed rock driveways.
Move the handle down to slightly raise the
auger.
9. The forward speed of the snow thrower is
dependent on the depth and weight of the
snow. Experience will establish the most effective method of using the snow thrower under different conditions.
10.After each snow throwing job, allow the engine to run for a few minutes. The snow and
accumulated ice will melt off the engine.
11.Clean the snow thrower after each use.
12.Remove ice, snow and debris from the entire
snow thrower. Flush with water to remove all
salt or other chemicals. Wipe snow thrower
dry.
Dry And Average Snow
1. Snow up to eight inches deep can be removed rapidly and easily by walking at a
moderate rate. For snow or drifts of a greater
depth,slow your pace to allow the discharge
chute to dispose of the snow as rapidly as
the auger receives the snow.
2. Plan to have the snow discharged in the direction the wind is blowing.
Wet Packed Snow
Move slowly into wet, packed snow. If the wet,
packed snow causes the auger to slow down or
the discharge chute begins to clog, back off and
begin a series of short back and forth jabs into
the snow. These short back and forth jabs, four
to six inches, will “belch” the snow from the
chute.
Snow Banks And Drifts
In snow of greater depth than the unit, use the
same “jabbing” technique described above. Turn
the discharge chute away from the snow bank.
More time will be required to remove snow of
this type than level snow.
F-031023C
11
 Loading...