

Page 1
Instruction Book − Snowthrower Model 621403x61NB
Betriebsanleitung − Schneefräse Modell 621403x61NB
Navodila za uporabo − SneĤna freza Model 621403x61NB
D
GB
1740265
SK
Page 2
2
1740265
2
3
5
8
12
9
4
14
1
22
Page 3
3
1740265
2
1
1
2
3
x
1
4
1
x
5
1
2
Page 4
4
1740265
1
2
2
6
1
7
5
2
1
7
8
9
1
1
1
1
1
2
2
2
2
2
4
3
10
2
3
1
44
5
11
3
4
Page 5
5
1740265
1
2
12
13
1
2
3
4
4
1
3
14
2
4
5
6
15
1
16
1
7
9
8
17
Page 6
6
1740265
1
7
6
18
3
4
4
5
2
2
2
2
8
9
9
10
10
11
19
11
6
20
1
2
Page 7
CONTENTS
HAZARD SYMBOLS AND THE MEANINGS 8. . . . . . . . . .
OPERATING SYMBOLS AND THEIR MEANINGS 8. . . . .
RULES FOR SAFE OPERATION 9. . . . . . . . . . . . . . . . . . . .
ASSEMBLY 11. . . . . . . . . . . . . . . . . . . . . . . . . . . . . . . . . . . . . .
OPERATION 11. . . . . . . . . . . . . . . . . . . . . . . . . . . . . . . . . . . . .
MAINTENANCE 13. . . . . . . . . . . . . . . . . . . . . . . . . . . . . . . . . .
MAINTENANCE CHART 13. . . . . . . . . . . . . . . . . . . . . . . . . . .
TROUBLE SHOOTING CHART 15. . . . . . . . . . . . . . . . . . . . .
LIMITED WARRANTY 16. . . . . . . . . . . . . . . . . . . . . . . . . . . . .
General Information
This instruction book is written for a person with some mechanical ability.
Like most service books, not all the steps are described. Steps on how to
loosen or tighten fasteners are steps anyone can follow with some
mechanical ability. Read and follow these instructions before you use the
unit.
Know your product: If you understand the unit and how the unit
operates, you will get the best performance. As you read this manual,
compare the illustrations to the unit. Learn the location and the function of
the controls. To help prevent an accident, follow the operating instructions
and the safety rules. Keep this manual for future reference.
IMPORTANT: Many units are not assembled and are sold in cartons. It is
the responsibility of the owner to make sure the assembly instructions in
this manual are exactly followed. Other units are purchased in an
assembled condition. On assembled units, it is the responsibility of the
owner to make sure the unit is correctly assembled. The owner must
carefully check the unit according to the instructions in this manual before
it is first used.
GB
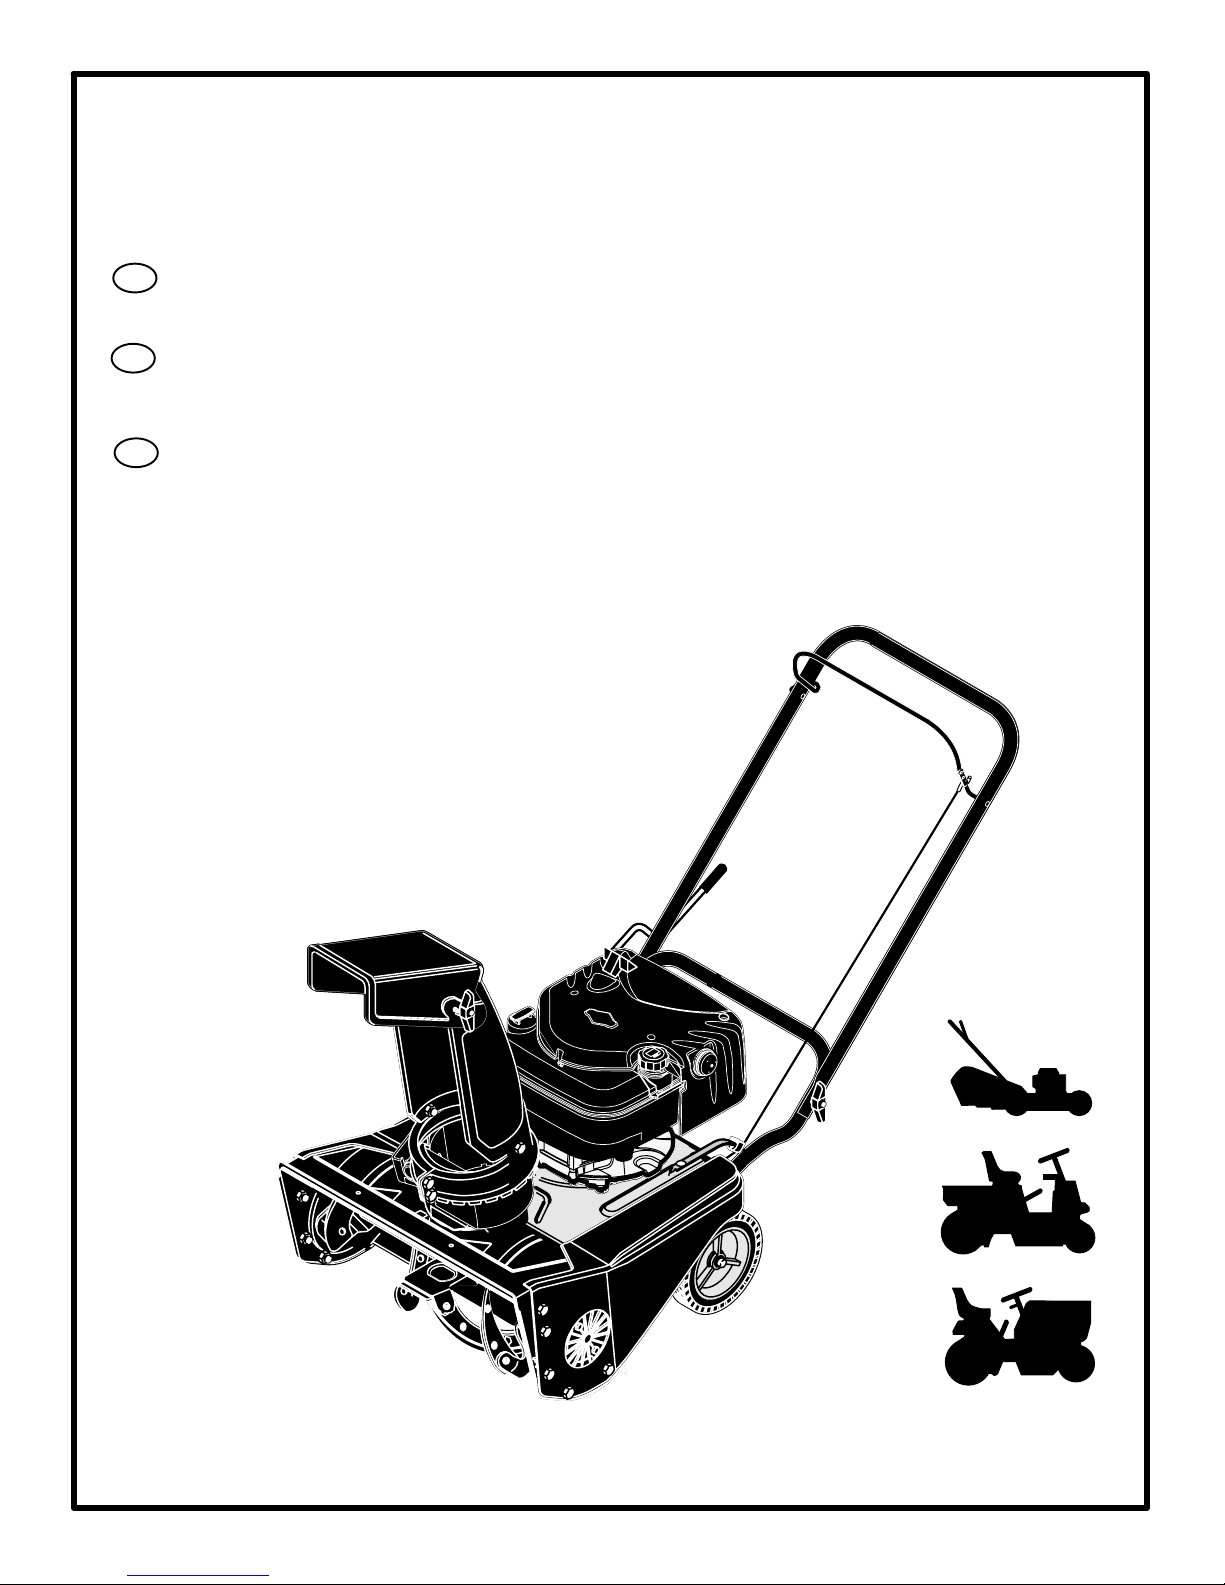
Controls & Equipment Features (see Figure 1)
Crank Assembly (2) − Changes the direction of the discharge chute.
Chute Deflector (3) − Changes the distance the snow is thrown.
Discharge Chute (4) − Changes the direction the snow is thrown.
Auger Drive Lever (5) − Starts and stops the auger (snow gathering and
throwing) which also propels the snowthrower..
Engine Features
Stop Switch (8) − If equipped, move to the ON position to start the
engine.
Primer Button (9) − Injects fuel directly into the carburetor for fast starts
in cold weather.
Recoil Starter Handle (12) − Use to manually start the engine.
Choke Control (14) − Use to start a cold engine.
www.briggsandstratton.com
MODEL NO.: 621403x61NB
SKU No.:
YYYY MM DD:
SERIAL NO.:
3500 min-1
Assembled in Suzhou, China 215218
by Limac for Briggs & Stratton Corporation
30 kg
Declared vibration emission values in accordance with Directive 98/37/EC.
Vibration Emission according to EN 1033;1996: 7,1 m/s2.
Values determined at the handle when the machine was operated stationary on a
concrete surface at 3500 min−1.
Declared airborne noise emissions of LwA 104 dB is in accordance with Directive
2000/14/EC, Annex V.
Sound Pressure Level at operator position 84 dB.
Values determined at ear according to the specifications of EN ISO 11201.
Declared airborne sound
power level of 104 dB(A) is in
accordance with Directive
2000/14/EC.
1740265
7
Page 8
GB
8
1740265
This manual contains safety information to make you
aware of the hazards and risks associated with snow
throwers, and how to avoid them. The snow thrower is designed and
intended for removal of snow, and should not be used for any other
purpose. It is important that you read and understand these
instructions, and anyone operating the equipment read and understand
these instructions.
The engine exhaust from this product contains chemicals known to the
State of California to cause cancer, birth defects, or other reproductive
harm.
WARNING
A signal word (DANGER, WARNING, or CAUTION) is used with the alert
symbol to indicate the likelihood and the potential severity of injury. In
addition, a hazard symbol may be used to represent the type of hazard.
DANGER indicates a hazard which, if not avoided, will result in
death or serious injury.
WARNING indicates a hazard which, if not avoided, could result
in death or serious injury.
CAUTION indicates a hazard which, if not avoided, might result
in minor or moderate injury.
CAUTION, when used without the alert symbol, indicates a
situation that could result in damage to the equipment.
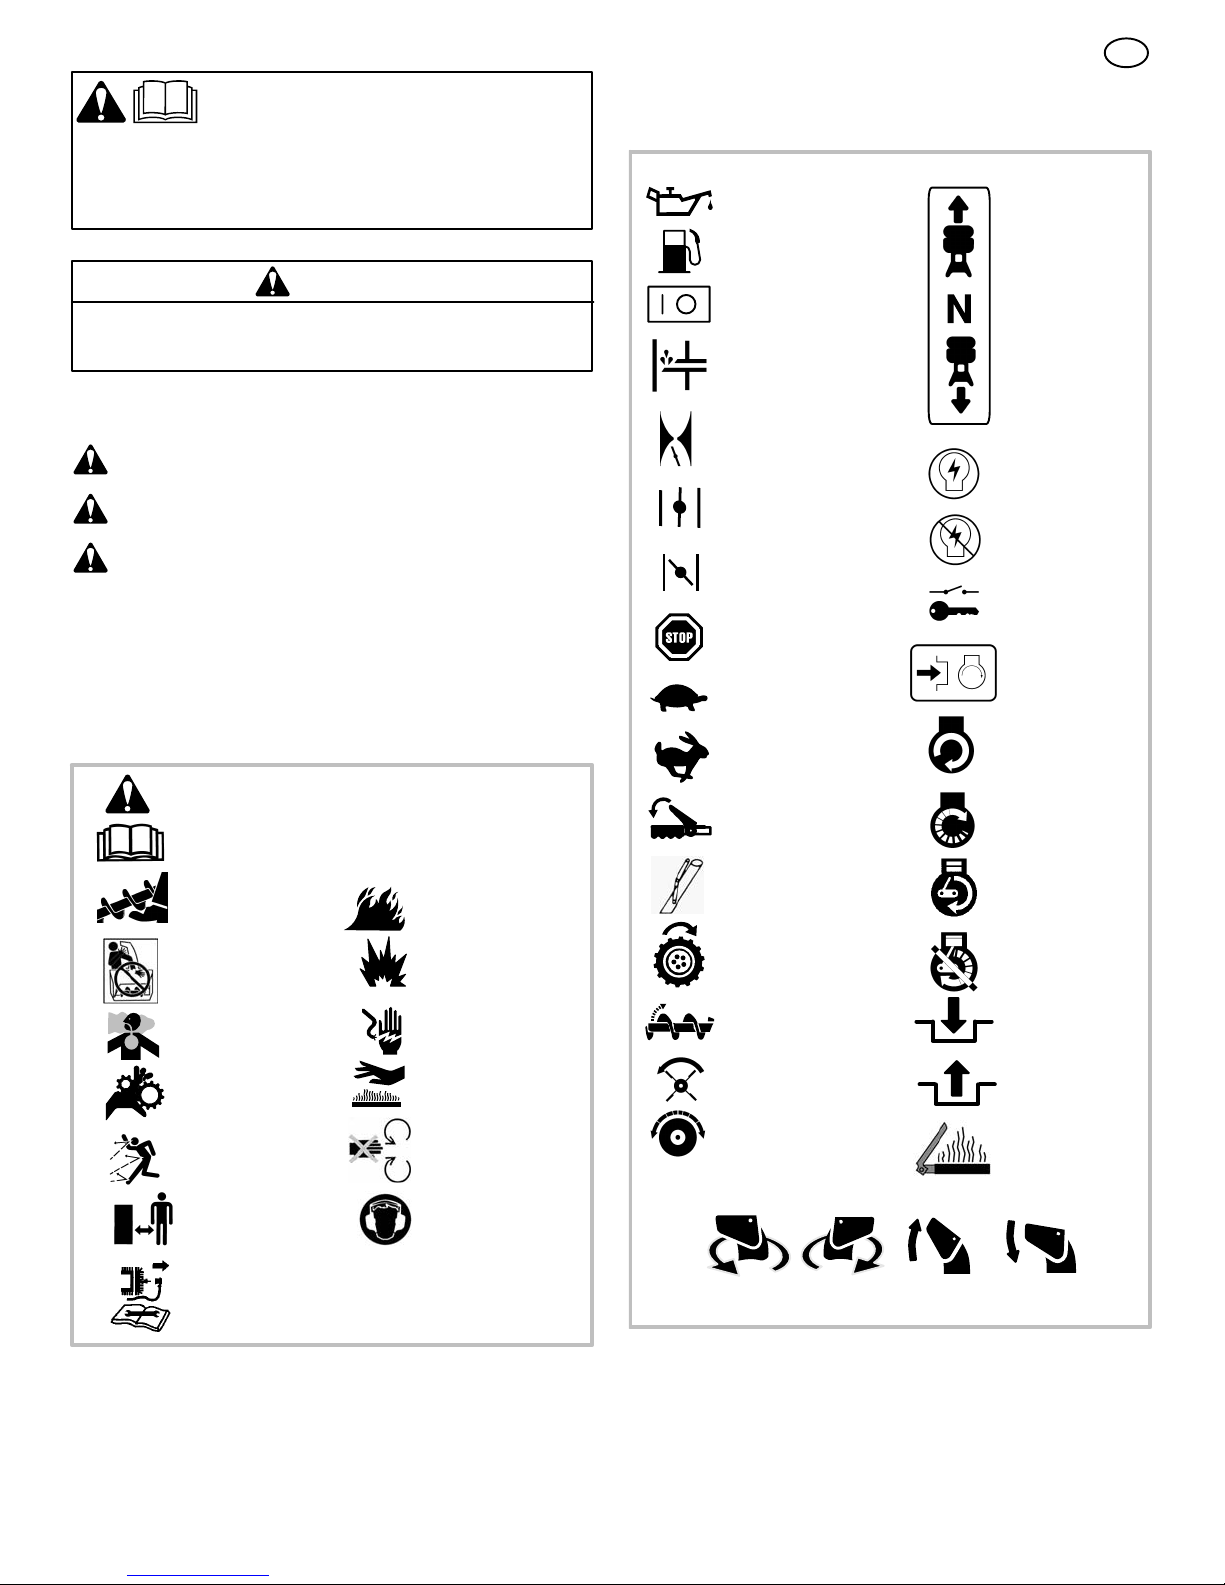
Hazard Symbols and the meanings
These symbols are used on your equipment and defined in your operating
manual. Review and understand the meanings. The use of one of these
symbols combined with a signal word will alert you to potential hazards
and how to avoid them.
Explosion
Toxic fumes
Shock
Hot Surface
Fire
Operator’s Manual − Read and understand before
performing any activity or running equipment.
Safety Alert − Identifies safety information about
hazards that can result in personal injury.
Rotating auger
Rotating impeller
Rotating gears
Thrown objects
Keep a safe distance
from the equipment.
Shut off engine and remove spark plug connector
before performing maintenance or repair work.
Never reach into
rotating parts.
Recommended ear
protection for extended
use.
Operating Symbols and their meanings
These symbols are used on your equipment and defined in your operating
manual. It is important that you review and understand the meanings.
Failure to understand the symbols might result in harm to you.
Stop
Fuel
Choke off
Oil
Choke on
Slow
Fast
On Off
Ignition Key
Ignition Off
Ignition On
Primer bulb
Throttle
Drive Clutch
Auger Clutch
Engage
RIGHT
Auger Collector
Traction
Discharge Chute
LEFT UP
DOWN
Foward
Neutral
Reverse
Push to engage
electric start
Electric
Start
Engine
Start
Engine Run
Engine Off
Chute Deflector
Engage
Disengage
Heated Grips
Engage
Page 9

GB
9
1740265
WARNING: This machine is capable ofto amputating hands and feet and throwing objects. Read these safety rules
and follow them closely. Failure to obey these rules could result in loss of control of unit, severe personal injury or
death to you, or bystanders, or damage to property or equipment. The triangle in text signifies important cautions or warnings which must be followed.
Safe Operation Practices for Snowthrowers
IMPORTANT: Safety standards require operator presence controls to
minimize the risk of injury. Your snowthrower is equipped with such controls. Do not attempt to defeat the function of the operator presence control under any circumstances.
Training
1. Read, understand, and follow all instructions on the machine and in the
manuals before operating this unit. Be thoroughly familiar with the controls and the proper use of the equipment. Know how to stop the unit
and disengage the controls quickly.
2. Never allow children to operate the equipment. Never allow adults to
operate the equipment without proper instruction.
3. Keep the area of operation clear of all persons, particularly small
children and pets.
4. Exercise caution to avoid slipping or falling especially when operating in
reverse.
Preparation
1. Thoroughly inspect the area where the equipment is to be used and
remove all doormats, sleds, boards, wires, and other foreign objects.
2. Disengage all clutches and shift into neutral before starting the engine
(motor).
3. Do not operate the equipment without wearing adequate winter outer
garments. Wear footwear that will improve footing on slippery surfaces.
Avoid loose fitting clothing that can get caught in moving parts.
4. Handle fuel with care; it is highly flammable.
a. Use an approved fuel container.
b. Never add fuel to a running engine or hot engine.
c. Fill fuel tank outdoors with extreme care. Never fill fuel tank indoors.
Replace fuel cap securely and wipe up spilled fuel.
d. Never fill containers inside a vehicle or on a truck or trailer bed with
a plastic liner. Always place containers on the ground, away from
your vehicle, before filling.
e. When practical, remove gas−powered equipment from the truck or
trailer and refuel it on the ground. If this is not possible, then refuel
such on a trailer with a portable container, rather than from a gasoline dispenser nozzle.
f. Keep nozzle in contact with the rim of the fuel tank or container
opening at all times, until refueling is complete. Do not use a nozzle
lock−open device.
g. Replace gasoline cap securely and wipe up spilled fuel.
h. If fuel is spilled on clothing, change clothing immediately.
5. Use extension cords and receptacles as specified by the manufacturer for all units with electric drive motors or electric starting motors.
6. Adjust the collector housing height to clear gravel or crushed rock
surfaces.
7. Never attempt to make any adjustments while the engine (motor) is
running (except when specifically recommended by manufacturer).
8. Let engine (motor) and snowthrower adjust to outdoor temperatures
before starting to clear snow.
9. Always wear safety glasses or eye shields during operation or while
performing an adjustment or repair to protect eyes from foreign objects
that may be thrown from the machine.
Operation
1. Do not put hands or feet near or under rotating parts. Keep clear of the
discharge opening at all times.
2. Exercise extreme caution when operating on or crossing gravel drives,
walks or roads. Stay alert for hidden hazards or traffic.
3. After striking a foreign object, stop the engine (motor), remove the wire
from the spark plug, disconnect the cord on electric motors, thoroughly
inspect snowthrower for any damage, and repair the damage before
restarting and operating the snowthrower.
4. If the unit should start to vibrate abnormally, stop the engine (motor)
and check immediately for the cause. Vibration is generally a warning
of trouble.
5. Stop the engine (motor) whenever you leave the operating position,
before unclogging the collector/impeller housing or discharge chute and
when making any repairs, adjustments, or inspections.
6. When cleaning, repairing, or inspecting, make certain the collector/impeller and all moving parts have stopped. Disconnect the spark plug
wire and keep the wire away from the spark plug to prevent accidental
starting.
7. Do not run the engine indoors, except when starting the engine and for
transporting the snowthrower in or out of the building. Open the outside
doors; exhaust fumes are dangerous (containing CARBON MONOXIDE, an ODORLESS and DEADLY GAS).
8. Exercise extreme caution when operating on slopes. Do not attempt to
clear steep slopes.
9. Never operate the snowthrower without proper guards, plates, or other
safety protective devices in place and working.
10. Never direct the discharge toward people or areas where property
damage can occur. Keep children and others away.
11. Do not overload the machine capacity by attempting to clear snow at
too fast a rate.
12. Never operate the machine at high transport speeds on slippery surfaces. Look behind and use care when operating in reverse.
13. Disengage power to the collector/impeller when snowthrower is transported or not in use.
14. Use only attachments and accessories approved by the manufacturer
of the snowthrower (such as cabs, tire chains, etc..).
15. Never operate the snowthrower without good visibility or light. Always
be sure of your footing and keep a firm hold on the handles. Walk,
never run.
16. Never touch a hot engine or muffler.
17. Never operate the snowthrower near glass enclosures, automobiles,
window wells, drop−offs, and the like without proper adjustment of the
snow discharge angle.
18. Never direct discharge at bystanders or allow anyone in front of the
unit.
19. Never leave a running unit unattended. Always disengage the auger
and traction controls, stop engine, and remove keys.
20. Do not operate the unit while under the influence of alcohol or drugs.
21. Keep in mind the operator is responsible for accidents occurring to
other people or property.
22. Data indicates that operators, age 60 years and above, are involved
in a large percentage of power equipment−related injuries. These
operators should evaluate their ability to operate the unit safely
enough to protect themselves and others from injury.
23. DO NOT wear long scarves or loose clothing that could become
entangled in moving parts.
24. Snow can hide obstacles. Make sure to remove all obstacles from
the area to be cleared.
Page 10

GB
10
1740265
Children
Tragic accidents can occur if the operator is not alert to the presence of children. Children are often attracted to the unit and the operating activity. Never
assume that children will remain where you last saw them.
1. Keep children out of the area and under the watchful care of another
responsible adult.
2. Be alert and turn off if children enter the area.
3. Never allow children to operate the unit.
4. Use extra care when approaching blind corners, shrubs, trees, or
other objects that may obscure vision.
Clearing A Clogged Discharge Chute
Hand contact with the rotating impeller inside the discharge chute is the
most common cause of injury associated with snowthrowers. Never use
your hand to clean out the discharge chute.
To clear the chute:
1. SHUT OFF THE ENGINE.
2. Wait 10 seconds to be sure the impeller blades have stopped rotating.
3. Always use a clean out tool, not your hands.
Service, Maintenance And Storage
1. Check shear bolts and other bolts at frequent intervals for proper tightness to be sure the equipment is in safe working condition.
2. Never store the machine with fuel in the tank inside a building where
ignition sources are present such as hot water and space heaters, or
clothes dryers. Allow the engine to cool before storing in any enclosure.
3. Always refer to operator’s manual for important details if the snowthrower is to be stored for an extended period.
4. Maintain or replace safety and instruction labels as necessary.
5. Run the machine a few minutes after throwing snow to prevent freeze−
up of the collector/impeller.
6. If fuel is spilled, do not attempt to start the engine but move the machine away from the area of spillage and avoid creating any source of
ignition until fuel vapors have dissipated.
7. Always observe safe refueling and fuel handling practices when refueling the unit after transportation or storage.
8. Always follow the engine’s manual instructions for storage preparations
before storing the unit for both short and long term periods,
9. Always follow the engine manual instructions for proper start-up procedures when returning the unit to service.
10. Maintain or replace safety and instruction labels as necessary.
11. Keep nuts and bolts tight and keep equipment in good condition.
12. Never tamper with safety devices. Check their proper operation regularly and make necessary repairs if they are not functioning properly.
13. Components are subject to wear, damage, and deterioration. Frequently check components and replace with manufacturer’s recommended
parts, when necessary.
14. Check control operation frequently. Adjust and service as required.
15. Use only factory authorized replacement parts when making repairs.
16. Always comply with factory specifications on all settings and adjustments.
17. Only authorized service locations should be utilized for major service
and repair requirements.
18. Never attempt to make major repairs on this unit unless you have been
properly trained. Improper service procedures can result in hazardous
operation, equipment damage and voiding of manufacturer’s warranty.
19. Check shear bolts (pins) and other bolts at frequent intervals for proper
tightness to be sure the equipment is in safe working condition.
Emissions
1. Engine exhaust from this product contains chemicals known, in certain
quantities, to cause cancer, birth defects, or reproductive harm.
2. If available, look for the relevant Emissions Durability Period and Air
Index information on the engine emissions label.
Ignition System
1. This spark ignition system complies with Canadian ICES-002.
Page 11
ASSEMBLY
Read and follow the assembly and adjustment
instructions for your snow thrower. All fasteners
are in the parts bag. Do not discard any parts or
material until the unit is assembled.
WARNING: Before doing any assembly or maintenance to the snow
thrower, remove the wire from the
spark plug.
NOTE: In this instruction book, left and right
describe the location of a part from the operator’s position behind the unit.
NOTE: Torque is measured in foot pounds
(metric N.m). This measurement describes
how tight a nut or bolt must be. The torque is
measured with a torque wrench.
NOTE: Illustrations are located on page 2
and on pages 3 through 6.
Tools Required
1Knife
1 Pliers
How To Remove The Snow Thrower
From The Carton
1. Locate and remove the container of oil.
2. Locate all parts that are packed separately
and remove from the carton.
3. Remove and discard the packing material
from around the snow thrower.
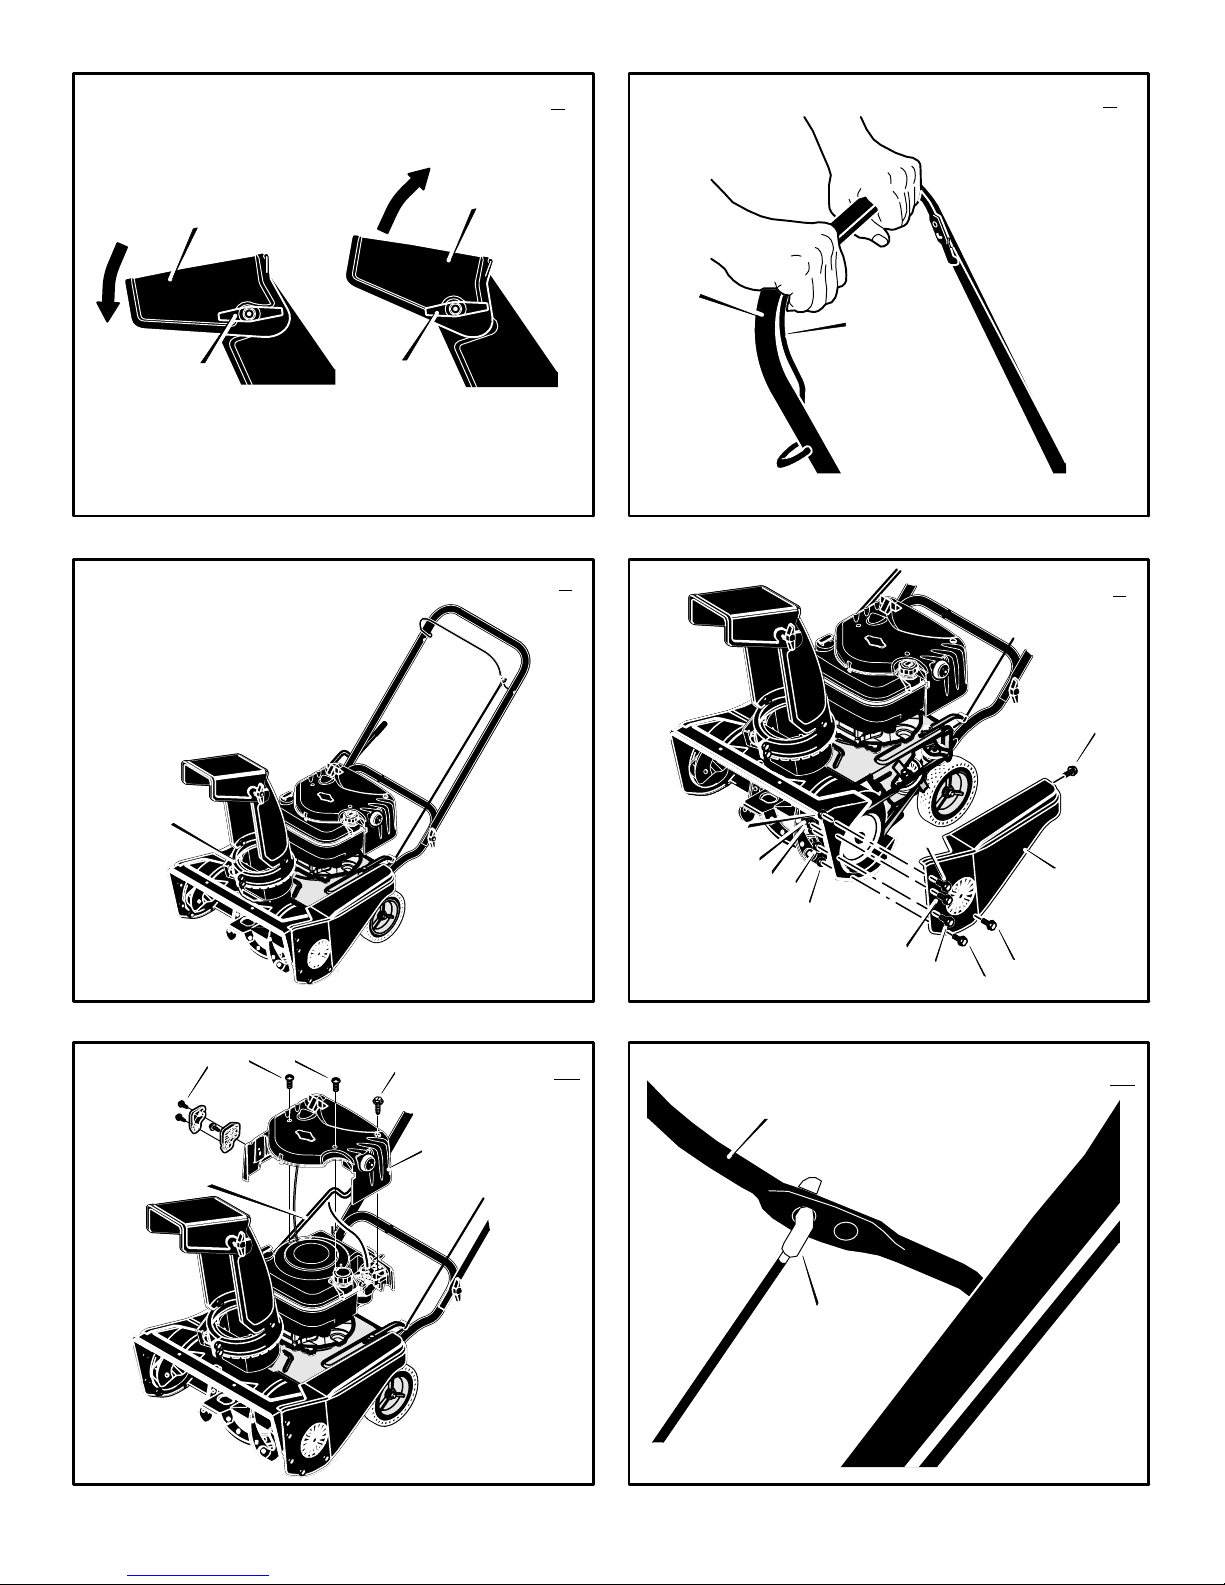
4. Cut down all four corners of the carton and
lay the side panels flat.
5. Hold onto the lower handle and pull the snow
thrower off the carton.
CAUTION: DO NOT back over cables.
6. Remove the packing material from handle
assembly. Remove the lower insert from the
axle.
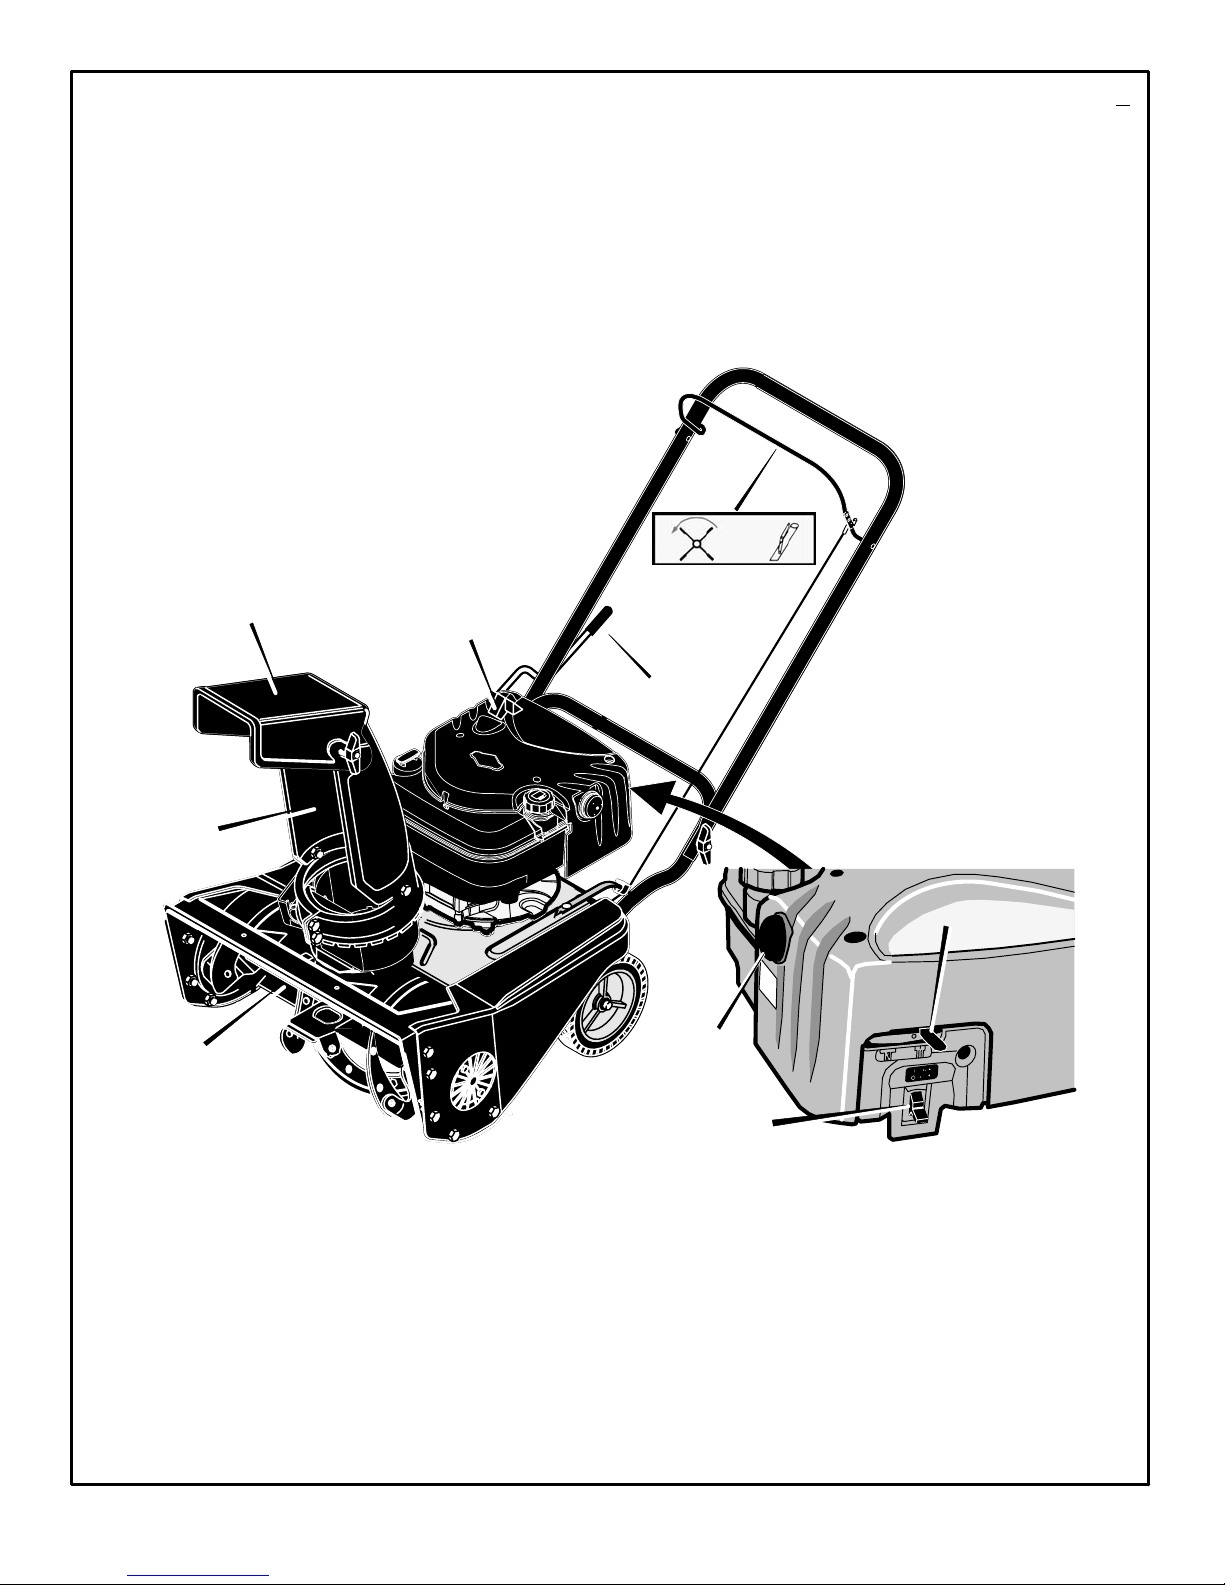
How To Assemble The Handle
1. Remove the packing material from the upper
and lower handles.
2. (Figure 2) Loosen the knobs (1) on each
side of the handle (2).
3. Raise the upper handle (2) to the operating
position. Hold the upper handle (2) apart to
prevent scratching the lower handle.
NOTE: Make sure the auger drive cable is
not caught between the upper and lower
handle.
4. Tighten the knobs (1).
How To Prepare The Engine
WARNING: Follow the engine
manufacturer’s instructions for the
type of fuel and oil to use. Always
use a safety fuel container. Do not smoke
when adding fuel to the fuel tank. When
inside an enclosure, do not fill the fuel
tank. Before you add the fuel, stop the engine. Let the engine cool for several minutes.
See the engine manufacturer’s instructions for
the type of fuel and oil to use. Before you use
the unit, read the information on safety, operation, maintenance, and storage.
1740265
NOTE: Engine horsepower ratings may vary
by engine adjustments, manufacturing variances, altitude, atmospheric conditions, fuel
and maintenance.
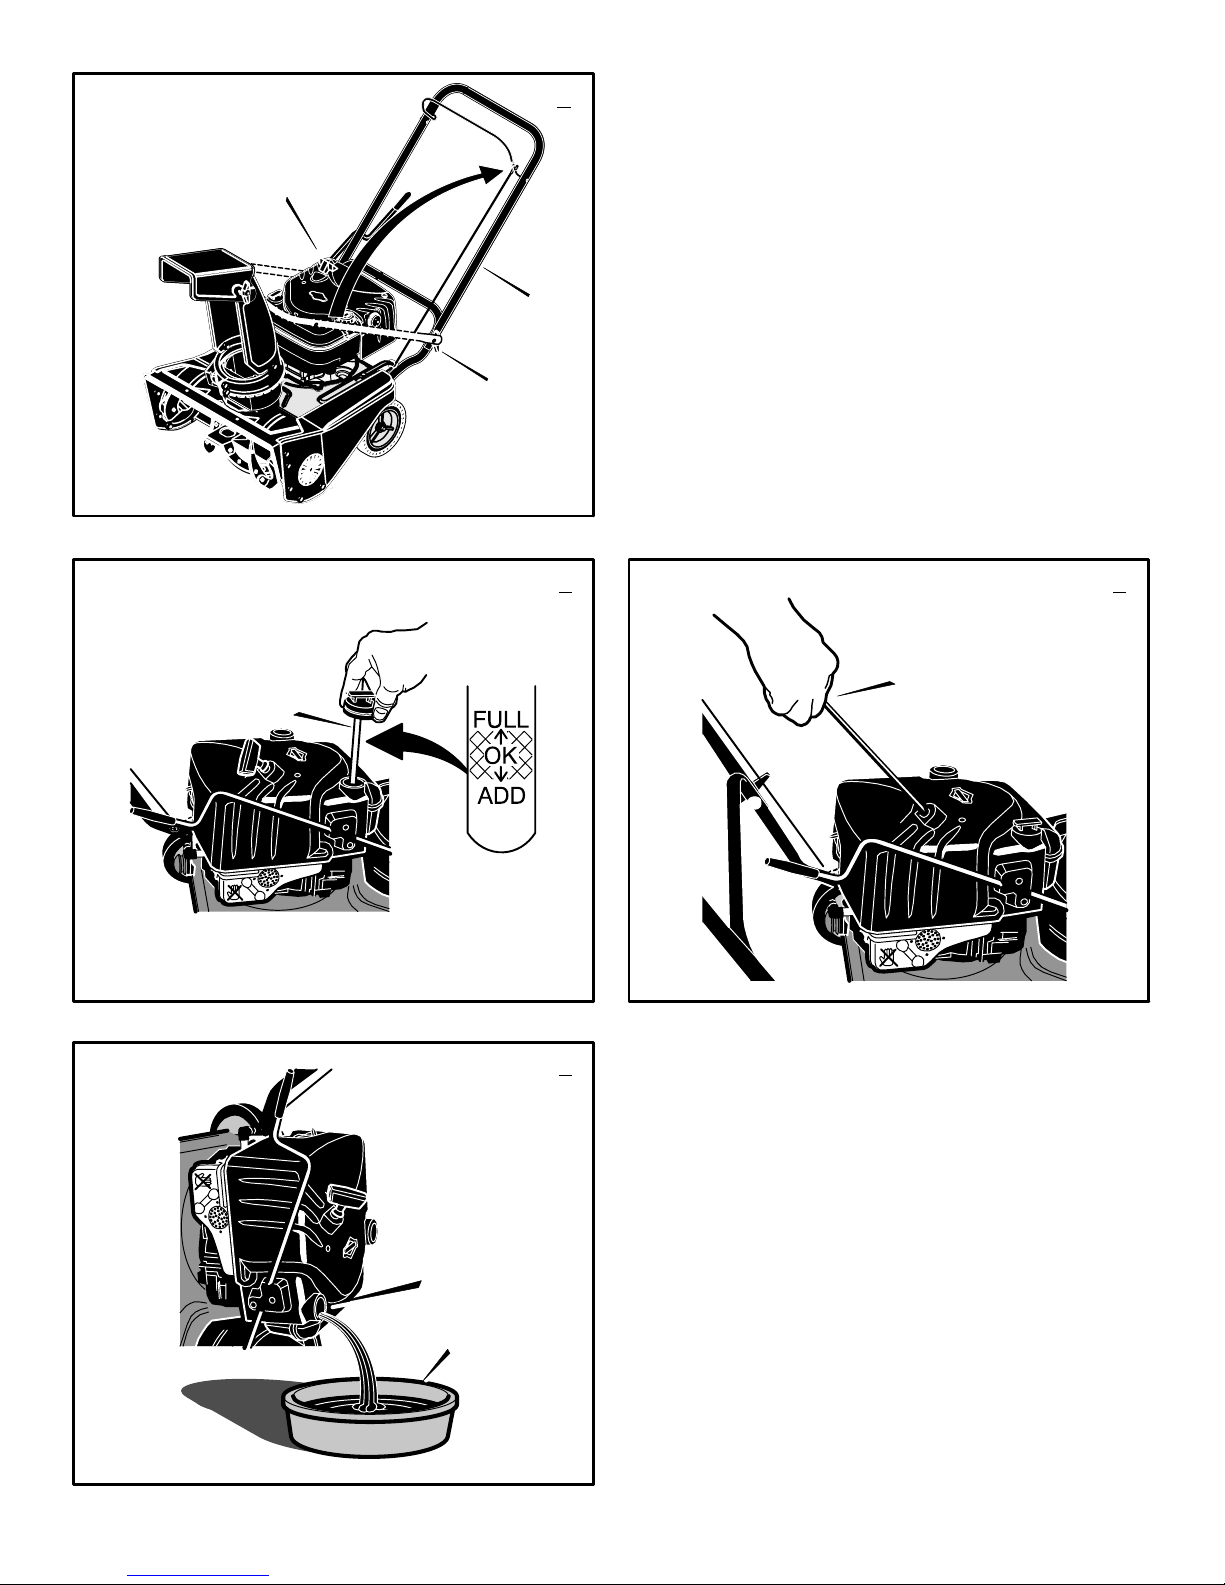
Add Oil To The Engine (Figure 3)
NOTE: Engine may already contain some
residual oil. Check frequently when filling
the crankcase. DO NOT overfill.
The snow thrower was shipped with a container
of 5W30 motor oil. This oil must be added to the
engine before operating.
1. Make sure the unit is level.
2. Remove the oil fill cap/dipstick (1) and fill
the crankcase to “FULL” line on dipstick. DO
NOT overfill.
3. Tighten the oil fill cap/dipstick (1) securely
each time you check the oil level.
NOTE: Synthetic oil can assist with starting
in extreme cold temperatures. Synthetic
5W30 is acceptable for all temperatures. DO
NOT mix oil with petrol.
Add Petrol To The Engine
This engine is certified to operate on petrol. Exhaust Emission Control System: EM (Engine
Modifications).
WARNING: Alcohol blended fuels
(called gasohol or those using
ethanol or methanol) can attract
moisture which leads to separation and
formation of acids during storage. Acidic
gas can damage the fuel system of an engine while in storage.
NOTE: To avoid engine problems, the fuel
system must be emptied before storage for
30 days or longer. Start the engine and let it
run until the fuel lines and carburetor are
empty. Use fresh fuel next season. See the
Storage section in this manual for additional
information.
Fill the fuel tank only with a fresh, clean, unleaded regular, unleaded premium, or reformulated automotive petrol with a minimum of 85
octane. DO NOT use leaded petrol. Make sure
that the container you pour the petrol from is
clean and free from rust or other foreign particles. Never use petrol that may be stale from
long periods of storage in the container.
Before You Operate
Before you operate your new snow thrower,
please review the following checklist:
G Make sure all assembly instructions have
been completed.
G Make sure the discharge chute rotates freely.
G Make sure that no loose parts remain in the
carton.
As you learn how to properly use the snow
thrower, pay extra attention to the following important items.
G Make sure the engine oil is at the proper
level. For the type engine oil to use, see the
Engine Manufacturer’s manual.
11
GB
G Make sure gas tank is filled properly with
clean, fresh, unleaded petrol with a minimum
of 85 octane.
G Become familiar with the location of all
controls and understand their function.
G Before starting the engine, make sure all
controls operate correctly.
OPERATION
NOTE: Illustrations are located on page 2
and on pages 3 through 6.
CAUTION: Use only attachments and accessories approved by the manufacturer of the
snow thrower (such as tire chains, electric
start kits, etc.).
Know Your Snow Thrower (Figure 1)
Read this Instruction Book and safety rules before operation the snow thrower. Compare the
illustration with your snow thrower to familiarize
yourself with the location of various controls and
adjustments.
How To Control
The Discharge Of The Snow
WARNING: Never direct the discharge of snow toward bystanders.
WARNING: Always stop the engine
before unclogging the discharge
chute or the auger housing and be-
fore leaving the snow thrower.
1. (Figure 1) Turn the crank assembly (2) to
change the discharge direction of the snow.
2. (Figure 6) Loosen the wing knob (1) on the
chute deflector (2).
3. Move the chute deflector (2) up for more
distance or down for less distance.
4. Tighten the wing knob (1).
How To Throw Snow (Figure 1)
1. Engage the auger drive lever (5).
2. To stop throwing snow, release the auger
drive lever (5).
WARNING: The operation of any
snow thrower can result in foreign
objects being thrown into the eyes,
which can result in severe eye damage.
Always wear safety glasses or eye shields
while operating the snow thrower. We recommend standard safety glasses or use a
wide vision safety mask over your glasses.
How To Stop Discharging Snow
(Figure 1)
1. To stop discharging snow, release the auger
drive lever (5).
NOTE: If the snow thrower continues to
slowly move forward, see “How To Adjust
The Auger Control Cable” in the Maintenance Section.
2. To stop the engine, push the stop switch (8)
to the off position.
CAUTION: To stop the engine, do not move
the choke control to CHOKE position. Backfire or engine damage can occur.
Page 12

GB
12
1740265
2. To go forward, raise the handle (2) to allow
the rubber auger blades to contact the
ground. Maintain a firm hold on the handle
(2) as the snow thrower starts to move forward. Guide the snow thrower by moving the
handle (2) either left or right. Do not attempt
to push the snow thrower.
3. To stop, release the auger drive lever (5).
NOTE: If the auger continues to rotate, see
“How To Adjust The Auger Control Cable” in
the Maintenance section.
Before Starting The Engine
1. Before you service or start the engine, familiarize yourself with the snow thrower. Be
sure you understand the function and location of all controls.
2. Make sure that all fasteners are tight.
3. Make sure the fuel tank is filled with the correct mixture of gasoline and oil.
4. Become familiar with the location of all controls and understand their function.
5. Before starting the engine, make sure all
controls operate corrently.
How To Stop The Engine (Figure 1)
To stop the engine, push the stop switch (8) to
the off position.
CAUTION: To stop the engine, do not move
the choke control to CHOKE position. Backfire or engine damage can occur.
How To Start The Engine (Figure 1)
Make sure that the engine oil is at FULL mark on
dipstick. The engine is equipped with a recoil
starter. Before starting the engine, make certain
that you have read the following information.
If engine floods, set the choke to the OPEN/
RUN position and crank until the engine starts.
WARNING: Rapid retraction of the
starter cord (kickback) will pull
your hand or arm toward the engine faster than you can let go of the starter cord.
S When starting the engine, slowly pull
the starter cord until resistance is felt.
Then, rapidly pull the starter cord.
S Make sure components; such as impel-
lors, pulleys or sprockets, are securely
attached.
How To Start A Cold Engine (Figure 1)
1. (Figure 1) Push the stop switch (8) to the
ON position.
2. When starting the engine, do not engage the
auger drive lever.
3. Move the choke control (14) to the FULL
choke position.
4. Push the primer button (9) as specified below. Remove finger from the primer button
(9) between primes.
S Push two times if temperature is 15° F
(−9° C) or higher.
S Push four times if temperature is below
15° F (−9° C).
5. (Figure 4) Slowly pull the recoil starter han-
dle (1) until resistance is felt and then pull
rapidly to start the engine. Do not allow the
recoil starter handle (1) to snap back. Slowly return the recoil starter handle (1).
NOTE: In temperatures below 0F, allow
the engine to warm up for several minutes
before blowing snow.
WARNING: Never run the engine
indoors or in enclosed, poorly ven-
tilated areas. Engine exhaust contains carbon monoxide, an odorless and
deadly gas. Keep hands, feet, hair and
loose clothing away from any moving parts
located on the engine or the snow thrower.
The temperature of muffler and nearby
areas may exceed 150°F. Avoid these
areas.
How To Start A Warm Engine (Figure 1)
If an engine has been running and is still warm,
leave the choke control (14) in the off position
and do not push the primer button (9). If the
engine fails to start, follow the instructions “How
To Start A Cold Engine”.
NOTE: Do not use the primer button (9) to
start a warm engine.
How To Start An Engine With A Frozen Electric
Starter (Figure 1)
If the starter is frozen and will not turn the engine, follow the instructions below.
1. Pull out the recoil starter handle (12) as far
as possible.
2. Quickly release the recoil starter handle
(12). Allow the recoil starter handle (12) to
snap back against the recoil starter.
If the engine still fails to start, repeat the two previous steps until the engine starts. Then, continue with the directions “How To Start A Cold
Engine”.
To help prevent the possible freeze−up of the
recoil starter and of the engine controls, proceed
as follows after each snow removal job.
1. Before storing, run the snow thrower a few
minutes to prevent freeze−up of the auger/
impeller.
2. With engine off, allow engine to cool for several minutes.
3. Pull starter rope very slowly until resistance
is felt, then stop. Allow the starter rope to recoil. Repeat three times.
4. With the engine not running, wipe all snow
and moisture from the carburetor cover in
area of controls and levers. Also, move the
choke control and starter handle several
times.
How To Remove Snow or Debris From
The Auger Housing
(Figure 1)
WARNING: Do not attempt to remove snow or debris that may become lodged in auger housing
without taking the following precautions.
1. Release the auger drive lever (5).
2. To stop the engine, move the stop switch
(8) to the stop position.
3. Disconnect the spark plug wire.
4. Do not place your hands in the auger hous-
ing (22) or the discharge chute (4). Use a
pry bar to remove any snow or debris.
Snow Throwing Tips
1. This snow thrower will propel itself forward
when the handle is raised enough to cause
the auger blades to contact the ground. The
auger should stop when auger control bar is
released. If it does not stop, see “How To Adjust The Auger Control Cable” in the adjustment section.
2. Most efficient snow throwing is accomplished
when the snow is removed immediately after
if falls.
CAUTION: Do not overload the machine capacity by attempting to clear snow at too fast
a rate.
3. For complete snow removal, slightly overlap
each previous path.
4. Whenever possible, discharge the snow
down wind.
5. The distance the snow will be discharged
can be adjusted by moving the discharge
chute deflector. Raise the deflector for more
distance or lower the deflector for less distance.
6. In windy conditions, lower the chute deflector
to direct the discharged snow close to the
ground where it is less likely to blow into unwanted areas.
7. For safety and to prevent damage to the
snow thrower, keep the area to be cleared
free of stones, toys and other foreign objects.
8. Do not use the auger propelling feature when
clearing gravel or crushed rock driveways.
Move the handle down to slightly raise the
auger.
9. The forward speed of the snow thrower is
dependent on the depth and weight of the
snow. Experience will establish the most effective method of using the snow thrower under different conditions.
10.After each snow throwing job, allow the engine to run for a few minutes. The snow and
accumulated ice will melt off the engine.
11.Clean the snow thrower after each use.
12.Remove ice, snow and debris from the entire
snow thrower. Flush with water to remove all
salt or other chemicals. Wipe snow thrower
dry.
Dry And Average Snow
1. Snow up to eight inches deep can be removed rapidly and easily by walking at a
moderate rate. For snow or drifts of a greater
depth,slow your pace to allow the discharge
chute to dispose of the snow as rapidly as
the auger receives the snow.
2. Plan to have the snow discharged in the direction the wind is blowing.
Wet Packed Snow
Move slowly into wet, packed snow. If the wet,
packed snow causes the auger to slow down or
the discharge chute begins to clog, back off and
begin a series of short back and forth jabs into
the snow. These short back and forth jabs, four
to six inches, will “belch” the snow from the
chute.
Snow Banks And Drifts
In snow of greater depth than the unit, use the
same “jabbing” technique described above. Turn
the discharge chute away from the snow bank.
More time will be required to remove snow of
this type than level snow.
Page 13
GB
13
1740265
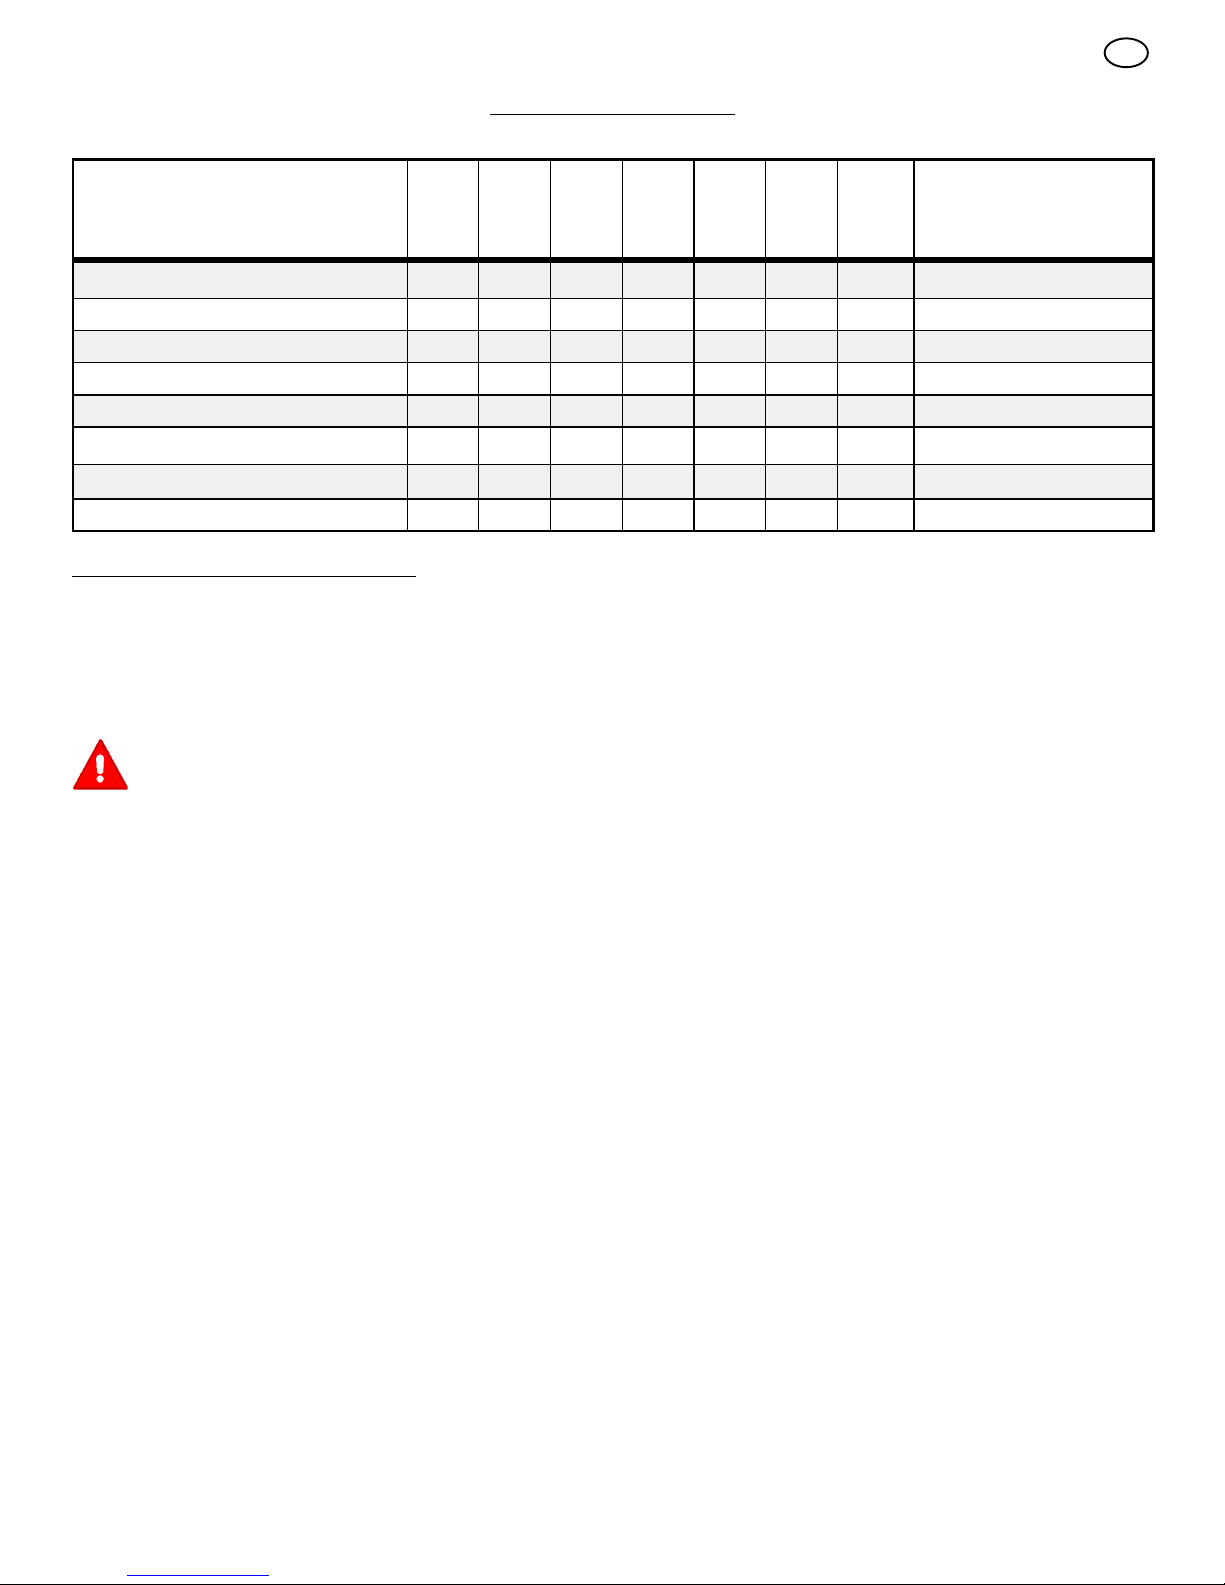
MAINTENANCE CHART
CUSTOMER RESPONSIBILITIES
SERVICE RECORDS
Fill in dates as you
complete regular
service.
Before
Each
Use
First
2
Hours
Every
5
Hours
Every
10
Hours
Every
25
Hours
Each
Season
Before
Storage
SERVICE DATES
Check And Tighten All Screws and Nuts
√ √
Check Spark Plug
√ √
Check Drive Belt
√
Check Fuel
√
Drain Fuel
√
Lubricate Chute Control Flange
√
Check Adjustment of Auger Control Cable
√
Auger Drive Belt
√
MAINTENANCE
NOTE: Illustrations are located on page 2
and on pages 3 through 6.
Use the following maintenance section to keep
your unit in good operating condition. All the
maintenance information for the engine is in the
engine manufacturer’s instructions. Before you
start the engine, read this book.
WARNING: Before you make an inspection, adjustment (except
carburettor), or repair, disconnect
the wire from the spark plug.
General Recommendations
The warranty on this snow thrower does not cover items that have been subjected to operator
abuse or negligence. To receive full value from
the warranty, the operator must maintain the
snow thrower as instructed in this manual.
Some adjustments must be made periodically to
properly maintain the snow thrower.
After Each Use
G Check for any loose or damaged parts.
G Tighten any loose fasteners.
G Check and maintain the auger.
G Check controls to make sure they are
functioning properly.
G If any parts are worn or damaged, replace
immediately.
G Check all safety and instruction decals and
labels. Replace any decals or labels that are
missing or cannot be clearly read.
All adjustments in the Maintenance section of
this manual should be checked at least once
each season.
How To Remove The Top Cover
(Figure 8)
1. Remove the five screws (1) from the top
cover (2).
2. Remove the top cover (2).
3. To install the top cover (4), reverse the
above steps.
Lubrication
Before Storage (Figure 8)
1. Lubricate the clute control flange (7). Apply
a clinging type of grease such as Lubriplate.
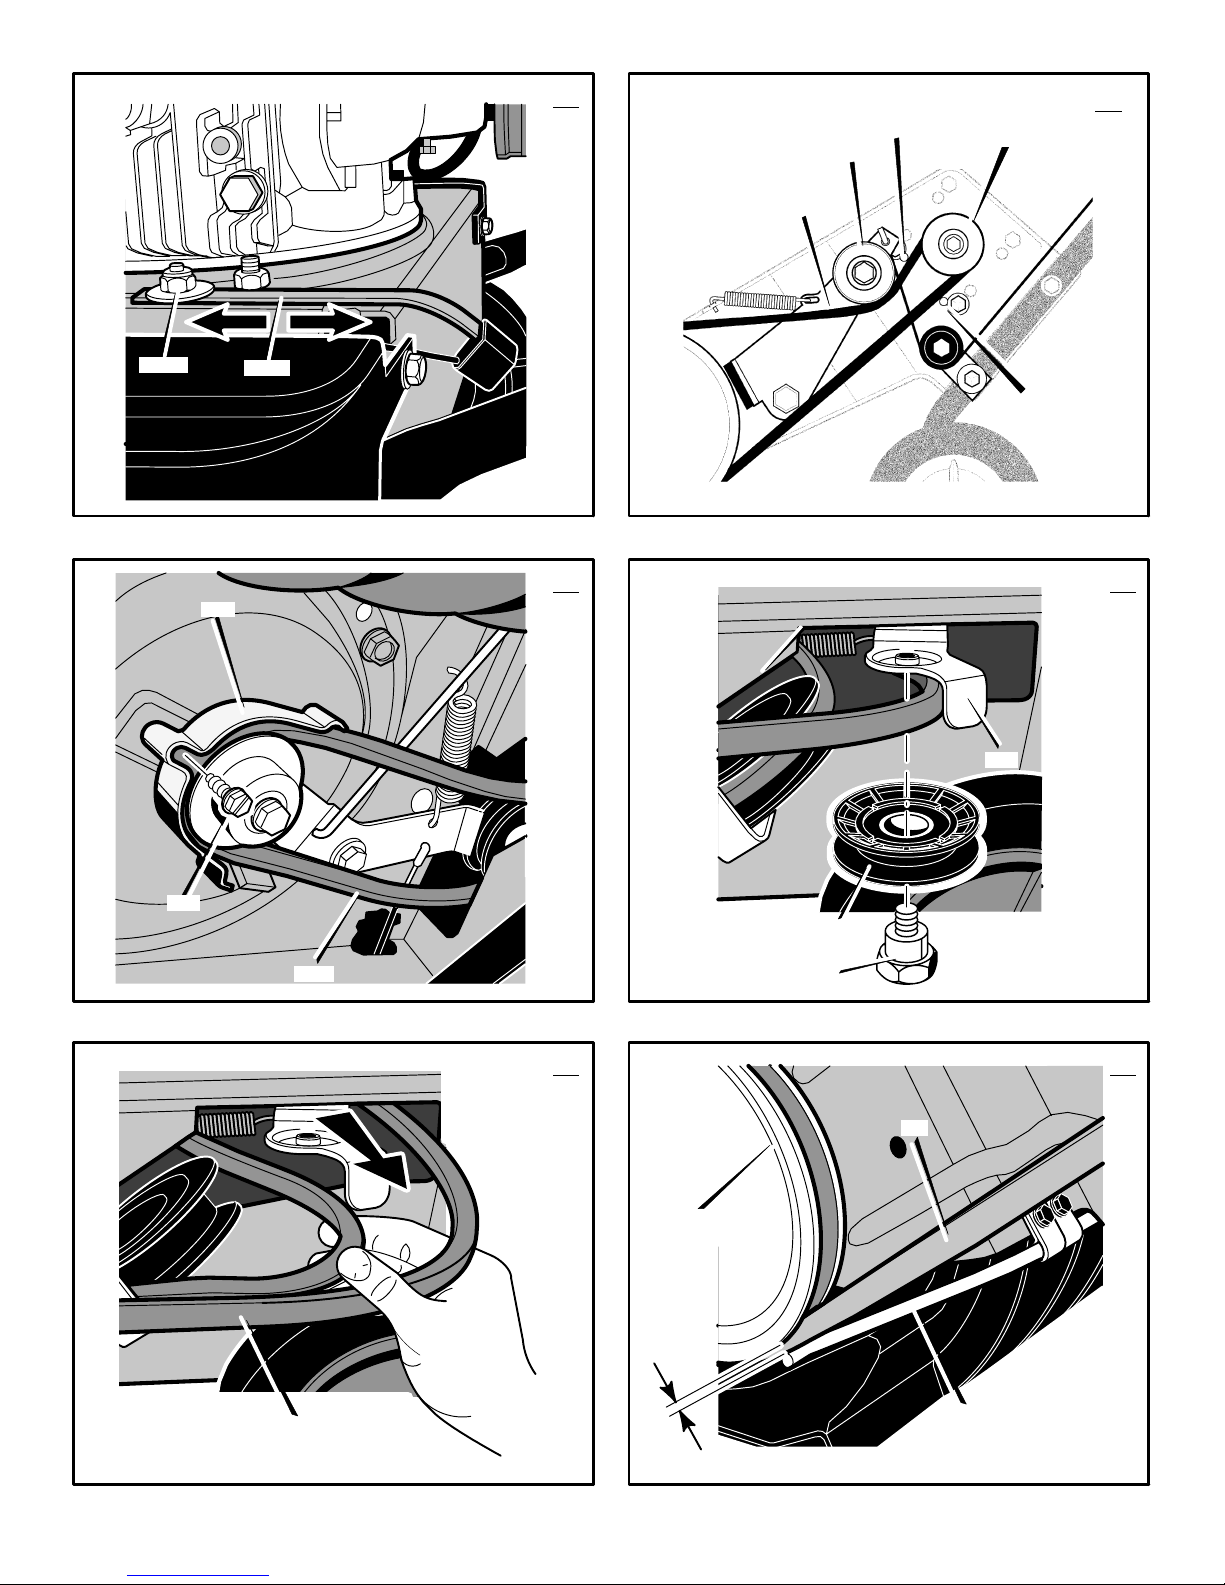
How To Adjust The Auger Control Cable
The auger control cable is adjusted at the factory. During normal use, the auger control cable
can become stretched and the auger drive lever
will not properly engage or disengage the auger.
1. (Figure 12) Loosen the nut (1) that holds the
cable tension spring (2).
2. Slide the cable tension spring (2) toward
the rear of the unit until all cable slack is removed.
NOTE: The auger control cable is properly
adjusted when the free cable slack is removed and there is no tension on the
idler arm.
3. Tighten the nut (1) that holds the cable ten-
sion spring (2).
If belt stretch has occured, move the end the
auger control cable to the outside hole as follows:
1. (Figure 12) Loosen the nut (1) that holds the
cable tension spring (2).
2. Move the cable tension spring (2) toward
the front of the unit to achieve maximum
cable slack.
3. (Figure 11) Remove the upper end of the
auger control cable (3) from the auger
drive lever (4).
4. Install the auger control cable (3) in the
hole shown in Figure 11.
5. (Figure 12) Slide the cable tension spring
(2) toward the rear of the unit until all cable
slack is removed.
NOTE: The auger control cable (3) is
properly adjusted when the free cable
slack is removed and there is no tension
on the idler arm.
6. Tighten the nut (1) that holds the cable ten-
sion spring (2).
7. To check the adjustment, start the snow
thrower. Make sure the auger does not rotate
when the auger drive lever is released.
How To Remove The Top Cover
(Figure 10)
There are no adjustments under the top cover
(1). To clean the engine cooling system, follow
the steps below to remove the top cover (1).
1. Remove screws (2) that attach the rod support clamp the the top cover (1). Pivot the
crank assembly rod (3) up and lay on unit.
2. Remove screws (4).
3. Remove attachment screws (5).
4. Remove the top cover (1).
5. To install the top cover (1), reverse the
above steps.
How To Remove The Belt Cover
(Figure 9)
1. Remove the screws (1) and nuts (2) from
the belt cover (3).
2. Remove attachment screw (4) from the rear
of the belt cover (3).
3. Remove the belt cover (3) from the unit.
4. To install the belt cover (3), reverse the
above steps.
NOTE: The belt cover (3) has belt guides
moulded onto the inside of the belt cover (3).
When you install the belt cover (3), engage
the auger drive lever to tighten the belt
against the pulley. This will provide adequate
clearance for the belt guides when installing
the belt cover (3).
How To Replace The Auger Drive Belt
The drive belt is of special construction and
must be replaced with an original factory replacement belt available from your nearest authorized service center.
If the auger drive belt is damaged, the snowthrower will not discharge snow and will not
move forward. Replace the damaged belt as
follows:
1. Disconnect the spark plug wire.
Page 14
GB
14
1740265
2. Remove the belt cover. See “How To Remove The Belt Cover”.
3. Note the path of the auger drive belt (1). For
assistance, a diagram decal is provided.
4. (Figure 14) Remove the belt guide screw
(2) and the belt guide (3). To remove the
belt guide (3), rotate the belt guide (3)
down.
5. (Figure 15) Remove the idler screw (4) and
idler pulley (5) from the idler arm (6).
6. (Figure 16) Remove the auger drive belt (1)
from the engine pulley and pull through side
of motor box.
7. (Figure 17) To remove the auger drive belt
(1) from the impeller pulley (7), move the
idler arm to the engaged position. This will
provide clearance (8) between the impeller
pulley (7) and the brake arm (9) to remove
the auger drive belt.
8. To install a new auger drive belt (1), reverse
the above steps.
9. Check the adjustment of the auger drive
cable. See “Adjust Auger Control Cable”.
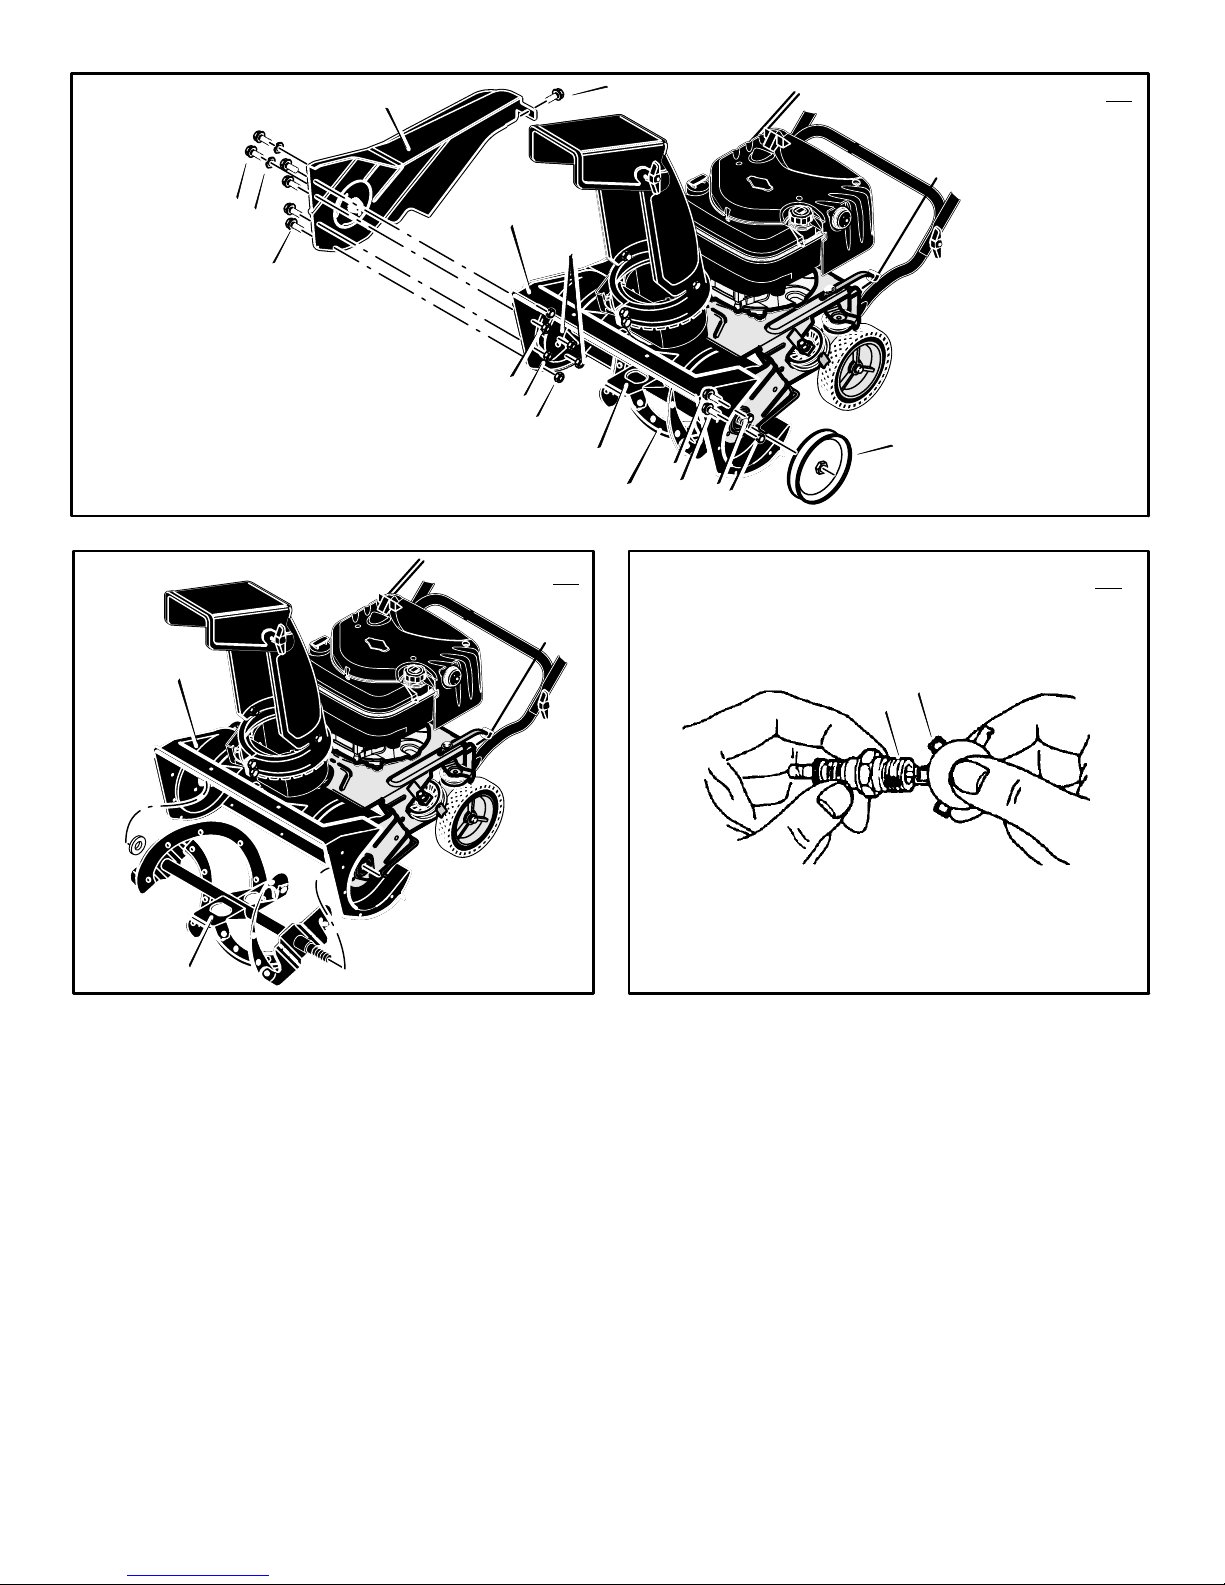
How To Remove The Auger
1. Remove the belt cover. See “How To Remove The Belt Cover”.
2. Remove the auger drive belt. See “How To
Replace The Auger Drive Belt”.
3. (Figure 18) Remove the auger pulley (1)
from the auger shaft (threads are left hand;
turn clockwise to remove).
4. To keep the auger (6) from rotating, set a
2”x4” piece of wood on the center paddle
(3) to secure auger (6).
5. Remove bolts (4), washer (5), and nuts (2)
from front of right cover (7).
6. Remove screw (8) from back of right cover
(7).
7. Remove bolts (9) and nuts (10).
8. (Figure 19) Slide the auger (6) out of the
right side of the auger housing (11).
9. Slide the auger (6) out of the bearing on the
left side of the auger housing (11).
10.To install auger (6), reverse the above steps.
Lubrication
How To Check The Engine Oil (Figure 3)
Check the oil level before starting the engine
and after each eight (8) hours of continuous use.
1. Make sure the unit is level.
2. Remove the oil fill cap/dipstick (1) and fill
the crankcase to “FULL” line on dipstick. DO
NOT overfill.
3. Tighten the oil fill cap/dipstick (1) securely
each time you check the oil level.
NOTE: Synthetic oil can assist with starting
in extreme cold temperatures. Synthetic
5W30 is acceptable for all temperatures. DO
NOT mix oil with petrol.
How To Change The Engine Oil
Change the engine oil every fifty (50) hours or at
least once a year if the snow thrower is not used
for fifty (50) hours.
To change the engine oil, the engine must be
tilted forward and the oil drained from the oil fill
tube. Change oil when the engine is warm.
1. (Figure 5) Lift the rear of the snowthrower
and tilt the unit forward. In the correct position, the snowthrower will be setting on the
front of the auger housing.
2. Put an oil drain pan (1) under the oil fill
tube (2).
3. Carefully remove the oil fill cap/dipstick. Oil
will begin to flow into the oil drain pan (2).
4. After all the oil has drained from the engine,
set the snowthrower in the upright operating
position.
5. (Figure 3) Fill the engine with S.A.E. 5W30
oil. Make sure the oil reaches the FULL mark
on the oil fill cap/dipstick. DO NOT OVERFILL.
NOTE: Synthetic oil can assist with starting
in extreme cold temperatures. Synthetic
5W30 is acceptable for all temperatures. DO
NOT mix oil with petrol.
How To Replace The Spark Plug
(Figure 20)
NOTE: This spark ignition system meets all
requirements of the Canadian Interference−
Causing Equipment Regulations.
NOTE: This engine complies with all current
Australian and New Zealand limitations electromagnetic interference.
Check the spark plug (1) every twenty-five (25)
hours. Replace the spark plug (1) if the electrodes are pitted or burned, if the porcelain is
cracked, or every 100 hours of use.
1. Make sure the spark plug (1) is clean. Clean
the spark plug (1) by carefully scraping the
electrodes (do not sand blast or use a wire
brush).
2. Check the spark plug (1) gap with a feeler
gauge (2) and reset gap to 0.030” if necessary..
3. Before installing the spark plug (1), coat the
threads lightly with oil for easy removal.
Tighten the spark plug (1) to a torque of 15
foot-pounds.
How To Prepare The Snow Thrower For
Storage
WARNING: Do not remove petrol
while inside a building, near a fire,
or while you smoke. Petrol fumes
can cause an explosion or a fire.
If the snow thrower is to be stored for an extended period, refer to the engine manufacturer’s operating manual (included with some
models) for important maintenance or storage
details.
1. Drain the fuel tank.
2. Let the engine run until it is out of gasoline.
3. Never store the snow thrower with fuel in the
tank inside a building where ignition sources
are present such as hot water and space
heaters, clothes dryers, and the like. Allow
the engine (motor) to cool before storing in
any enclosure.
4. Drain the oil from the warm engine. Fill the
engine crankcase with new oil.
5. Remove the spark plug from the cylinder.
Pour one ounce of oil into the cylinder. Slowly pull the recoil−start grip so that the oil will
protect the cylinder. Install a new spark plug
in the cylinder.
6. Thoroughly clean the snow thrower.
7. Lubricate all lubrication points. See the Main-
tenance section.
8. Be sure that all nuts, bolts and screws are
securely fastened. Inspect all visible moving
parts for damage, breakage and wear. Replace if necessary.
9. Cover the bare metal parts of the blower
housing and auger with spray rust preventative lubricant.
10.Put the unit in a building that has good ven-
tilation.
11.If the machine must be stored outdoors,
block up the snow thrower to be sure the entire machine is off the ground.
12.Cover the snow thrower with a suitable pro-
tective cover that does not retain moisture.
Do not use plastic.
How To Order Replacement Parts
The replacement parts are shown either on the
back pages of this Instruction Book or in a
separate Parts List Book.
Use only manufacturer’s authorized or approved
replacement parts. The letter placed on the end
of the part number denotes the type of finish for
the part, C for chrome, Z for zinc, a PA for
purchased assembly. It is important that you
include this when ordering a part. Do not use
attachments or accessories not specifically
recommended for this unit. In order to obtain
proper replacement parts you must supply the
model number (see nameplate).
Replacement parts, except for the engine, transmission, transaxle or differential, are available
from the store where the mower was purchased
or a service shop recommended by the store.
Warranty service is available only through Authorized Service Dealers. Locate your nearest dealer
in our locator map at www.murray.com.
Replacement parts for the engine, transaxle, or
transmission, are available from the
manufacturer’s authorized service center found
in the yellow pages of the telephone directory.
Also, see the individual engine or transmission
warranties to order replacement parts.
When ordering the following information is
required:
(1) The Model Number
(2) Serial Number
(3) Part Number
(4) Quantity
Page 15

GB
15
1740265
TROUBLE SHOOTING CHART
TROUBLE CAUSE CORRECTION
Difficult starting Defective spark plug. Replace spark plug.
Water or dirt in fuel system. Use carburetor bowl drain to flush and refill with
fresh fuel.
Engine runs erratic Blocked fuel line, empty gas tank, or stale
gasoline
Clean fuel line; check fuel supply; add fresh
gasoline
Engine stalls Unit running on CHOKE. Set choke lever to RUN position.
Engine runs erratic;
Loss of power
Water or dirt in fuel system. Use carburetor bowl drain to flush and refill with
fresh fuel.
Excessive vibration Loose parts: damaged impeller Stop engine immediately and disconnect spark
plug wire. Tighten all bolts and make all
necessary repairs. If vibration continues, have
the unit serviced by a competent repairman.
Unit fails to propel itself Drive belt loose or damaged. Replace drive belt.
Unit fails to discharge snow Auger drive belt loose or damaged. Adjust auger drive belt; replace if damaged.
Auger control cable not adjusted correctly. Adjust auger control cable.
Discharge chute clogged. Stop engine immediately and disconnect spark
plug wire. Clean discharge chute and inside of
auger housing.
Foreign object lodged in auger Stop engine immediately and disconnect spark
plug wire. Remove object from auger.
Page 16

GB
BRIGGS & STRATTON CORPORATION OWNER WARRANTY POLICY
Effective January 1, 2006 replaces all undated Warranties and all Warranties dated before January 1, 2006
LIMITED WARRANTY
Briggs & Stratton Corporation will repair or replace, free of charge, any part(s) of the product that is defective in material or workmanship or both.
Transportation charges on product submitted for repair or replacement under this warranty must be borne by purchaser. This warranty is effective
for the time periods and subject to the conditions stated below. For warranty service, find the nearest Authorized Service Dealer in your area. For
warranty service, find the nearest Authorized Service Dealer in our dealer locator map at www.murray.com.
THERE IS NO OTHER EXPRESS WARRANTY. IMPLIED WARRANTIES, INCLUDING THOSE OF MERCHANTABILITY AND FITNESS FOR A
PARTICULAR PURPOSE, ARE LIMITED TO ONE YEAR FROM PURCHASE, OR TO THE EXTENT PERMITTED BY LAW ANY AND ALL
IMPLIED WARRANTIES ARE EXCLUDED. LIABILITY FOR INCIDENTAL OR CONSEQUENTIAL DAMAGES ARE EXCLUDED TO THE
EXTENT EXCLUSION IS PERMITTED BY LAW. Some states or countries do not allow limitations on how long an implied warranty lasts, and
some states or countries do not allow the exclusion or limitation of incidental or consequential damages, so the above limitation and exclusion
may not apply to you. This warranty gives you specific legal rights and you may also have other rights which vary from state to state or country to
country.
WARRANTY TERMS
Brand / Unit Use Use Warranty Term
Single Stage Snowthrower 1 year 90 days. . . . . . . . . . . . . . . . . . . . . .
Dual Stage Snowthrower 2 year 90 days. . . . . . . . . . . . . . . . . . . . . . .
The warranty period begins on the date of purchase by the first retail consumer or commercial end user, and continues for the period of
time stated in the table above. “Consumer use” means personal residential household use by a retail consumer. “Commercial use” means
all other uses, including use for commercial, income producing or rental purposes. Once product has experienced commercial use, it shall
thereafter be considered as commercial use for purposes of this warranty.
No warranty registration is necessary to obtain warranty on Murray branded products. Save your proof of purchase receipt. If you do not
provide proof of the initial purchase date at the time warranty service is requested, the manufacturing date of the product will be used to
determine the warranty.
Consumer Commercial Condition of
ABOUT YOUR WARRANTY
We welcome warranty repair and apologize to you for being inconvenienced. Any Authorized Service Dealer may perform warranty
repairs. Most warranty repairs are handled routinely, but sometimes requests for warranty service may not be appropriate. For example,
warranty service would not apply to the product if damage occurred because of misuse, lack of routine maintenance, shipping, handling,
warehousing or improper installation. Similarly, the warranty is void if the serial number on the product has been removed or the product
has been altered or modified.
This warranty covers product related defective material and/or workmanship only. To avoid misunderstanding which might occur between the customer and the Dealer, listed below are some of the causes of product failure that the warranty does not cover.
• Normal Wear: Small Engine Powered Equipment, like all mechanical devices, needs periodic parts and service to perform well. Warranty does not
cover repair when normal use has exhausted the life of the product or part.
• Installation: This warranty does not apply to product that has been subjected to improper or unauthorized installation, alteration or modification. Nor
installations that prevent starting, cause unsatisfactory engine performance.
• Improper Maintenance: The life of this product depends upon the conditions under which it operates, and the care it receives. Recommended
maintenance and adjustment intervals are stated in the Operator’s Manual. Often product, such as tillers, edgers, rotary mowers, are used in dusty
or dirty conditions, which can cause what appears to be premature wear. Such wear, when caused by dirt, dust, or other abrasive material entering
the product because of improper maintenance is not covered by warranty. The warranty will not cover repairs due to problems caused by replacement parts that are not original manufactured part(s).
• Incorrect and/or insufficient fuel or lubrication: This warranty does not cover damage caused by the use of stale fuel, or altered gasolines. Dam-
age to engine or engine components ie, combustion chamber, valves, valve seats, valve guides, burned starter motor windings caused by use of
alternate fuels such as liquified petroleum, natural gas, are not covered unless engine is certified for this operation. Parts which are scored or broken because product was operated with insufficient, contaminated or incorrect grade of lubricating oil as well as product components damaged due
to lack of lubrication are not covered.
• Operational Misuse: Proper operation of the product is stated in the Operator’s Manual. Product damaged by overspeeding, overheating, or opera-
tion in a confined area without sufficient ventilation. Product broken by excessive vibration caused by a loose engine mounting, loose or unbalanced
blades, impellers, overspeeding, or bent crankshaft due to striking of solid object. Damage or malfunctions resulting from accidents, abuse, or improper servicing or freezing or chemical deterioration, as well as operating in excess of recommended capacities as outlined in the Operator’s
Manual are not covered.
• Routine tune-up, wear items or adjustments: This warranty excludes wear items such as oil, belts, blades, o-rings, filters, etc.
• Other exclusions: Repair or adjustments for part(s) that are not manufactured by Briggs & Stratton Corporation, are not covered, see warranty for
respective manufacturers. This warranty excludes failures due to acts of God and other force majeure events beyond the manufacturers control. Also excluded are used, reconditioned, and demonstration products.
Warranty service is available only through Authorized Service Dealers. Locate your nearest dealer in our locator map at www.murray.com.
1740265
16
Page 17

INHALT
GEFAHRENSYMBOLE UND IHRE BEDEUTUNGEN 18. .
BETRIEBSSYMBOLE UND IHRE BEDEUTUNGEN 18. . .
REGELN FÜR DEN SICHEREN BETRIEB 19. . . . . . . . . . .
ZUSAMMENBAU 21. . . . . . . . . . . . . . . . . . . . . . . . . . . . . . . . .
BEDIENUNG 21. . . . . . . . . . . . . . . . . . . . . . . . . . . . . . . . . . . . .
WARTUNG 24. . . . . . . . . . . . . . . . . . . . . . . . . . . . . . . . . . . . . . .
WARTUNGSTABELLE 24. . . . . . . . . . . . . . . . . . . . . . . . . . . .
FEHLERSUCHE 26. . . . . . . . . . . . . . . . . . . . . . . . . . . . . . . . . .
EINGESCHRÄNKTE GEWÄHRLEISTUNG 27. . . . . . . . . . .
Allgemeines
Bei dieser Bedienungsanleitung werden einige handwerkliche
Grundkenntnisse vorausgesetzt. Wie in den meisten
Wartungshandbüchern werden nicht alle Schritte beschrieben. Das
Lösen und Anziehen von Schrauben kann jeder ohne große
handwerkliche Fähigkeiten bewältigen. Lesen und befolgen Sie diese
Anweisungen, bevor Sie das Gerät benutzen.
Informieren Sie sich über Ihr Produkt: Sie erzielen die beste Leistung,
wenn Sie das Gerät und dessen Funktionen verstehen. Beim Lesen
dieser Bedienungsanleitung vergleichen Sie die Abbildungen mit dem
Gerät. Machen Sie sich mit der Anordnung und Funktion der
Bedienelemente vertraut. Befolgen Sie die Anweisungen zum Betrieb
und die Sicherheitshinweise, um einen Unfall zu verhindern. Bewahren
Sie diese Bedienungsanleitung auf, um später darauf zurückgreifen zu
können.
WICHTIG: Viele Geräte sind nicht vollständig zusammengebaut und
werden in Kartons verpackt verkauft. Der Eigentümer muss die
D
Montageanweisungen in dieser Bedienungsanleitung genau befolgen.
Andere Geräte werden im vor−montierten Zustand verkauft. Bei
montierten Geräten ist der Eigentümer dafür verantwortlich zu prüfen, ob
das Gerät korrekt montiert ist. Der Eigentümer muss das Gerät vor dem
ersten Gebrauch entsprechend der Anweisungen in dieser
Bedienungsanleitung sorgfältig prüfen.
Bedienelement & Gerätefunktionen (siehe Abbildung 1)
Auswurfkurbel (2) − Ändert die Richtung des Aeuswurfkamins.
Auswurfumlenkvorrichtung (3) − Ändert den Abstand, in dem der
Schnee ausgeworfen wird.
Auswurfkamin (4) − Ändert die Richtung, in die der Schnee
ausgeworfen wird.
Räumwerkhebel (5) − Startet und hält die Frässchnecke und die
Wurfeinrichtung an (Sammeln und Auswerfen des Schnees).
Motorfunktionen
Stoppschalter (8) − Muss in die Position AN geschoben werden, um
Motor zu starten.
Initialzündungsknopf (9) − Spritzt Benzin direkt in den Vergaser ein,
damit Motor bei kaltem Wetter schnell anspringt.
Rückstarterhebel (12) − Zum manuellen Anlassen des Motors.
Choke (14) − Zum Anlassen eines kalten Motors.
www.briggsandstratton.com
MODEL NO.: 621403x61NB
SKU No.:
YYYY MM DD:
SERIAL NO.:
3500 min-1
Assembled in Suzhou, China 215218
by Limac for Briggs & Stratton Corporation
30 kg
Angegebene Vibrationsemissionswerte gemäß Richtlinie 98/37/EC.
Vibrationsemission gemäß EN 1033;1996: 7,1 m/s2.
Werte ermittelt am Griff während Gerät stationär auf einer Betonfläche mit 3500
min−1 betrieben wurde.
Angegebene Geräuschemissionen von LwA 104 dB erfüllen Richtlinie 2000/14/EC,
Anhang V.
Schalldruckpegel an Bedienerposition: 84 dB.
Werte am Ohr gemäß den Spezifikationen in EN ISO 11201 ermittelt.
Angegebener
Geräuschemissions−Schalld
ruckpegel von 104 dB(A)
erfüllt Richtlinie 2000/14/EC.
1740265
17
Page 18

D
18
1740265
Dieses Handbuch beinhaltet
Sicherheitsinformationen, um Ihnen die Gefahren
und Risiken im Zusammenhang mit Schneefräsen
bewusst zu machen, und Ihnen zu vermitteln, wie man sie
vermeidet. Die Schneefräse wurde zur Räumung von Schnee
entwickelt und sollte zu keinem anderen Zweck verwendet werden.
Es ist wichtig, dass Sie sich diese Anleitung gut durchlesen und sie
verstehen, und ebenso sollte jeder, der mit dem Gerät arbeitet,
diese Anleitung lesen und verstehen.
Die Motorabgase dieses Produkts enthalten Chemikalien, von denen im
Staat Kalifornien bekannt ist, dass sie Krebs, Geburtsfehler hervorraufen
und andere negative Auswirkungen auf die Fortpflanzung haben können.
WARNUNG
Ein Signalwort (GEFAHR, WARNUNG oder VORSICHT) wird zusammen mit
dem Warnsymbol verwendet, um die Wahrscheinlichkeit und die potentielle
Schwere von Verletzungen anzuzeigen. Außerdem kann ein Gefahrensymbol
verwendet werden, um den Gefahrentyp darzustellen
GEFAHR weist auf eine Gefährdung hin, deren
Nichtbeachtungzum Tod oder zu schweren Verletzungen
führen kann.
WARNUNG weist auf eine Gefährdung hin, deren
Nichtbeachtung zum Tod oder zu schweren Verletzungen
führen könnte.
VORSICHT weist auf eine Gefährdung hin, deren
Nichtbeachtung zum Tod oder zu leichten bis mittelschweren
Verletzungen führen könnte.
Wird VORSICHT ohne das Warnsymbol verwendet, weist dies
auf eine Situation hin, die zu Schäden am Gerät führen
könnte.
Gefahrensymbole und ihre Bedeutungen
Diese Symbole werden an Ihrem Gerät verwendet und sind in Ihrer
Bedienungsanleitung definiert. Lesen Sie zu ihren Bedeutungen nach und
merken Sie sich diese. Die Verwendung dieser Symbole in Verbindung mit
einem Signalwort wird Sie auf potentielle Gefahren und deren Vermeidung
hinweisen.
Explosion
Toxische Gase
Schock
Heiße
Oberfläche
Feuer
Bedienungsanleitung – Lesen Sie diese bevor Sie
jegliche Aktivitäten durchführen oder das Gerät
betreiben.
Sicherheitswarnung – identifiziert
Sicherheitsinformationen zu Gefahren, die zu
Verletzungen an Personen führen können.
Rotierende
Schnecke
Rotierendes
Gebläserad
Rotierende
Getriebe
Hochfliegende
Objekte
Sicherheitsabstand
zum Gerät einhalten.
Schalten Die den Motor ab und entfernen Sie den
Zündkerzenstecker, bevor Sie Wartungs− oder
Reparaturarbeiten durchführen.
Nicht in rotierende
Teile greifen.
Empfohlener
Gehörschutz für die
längere Verwendung.
Betriebssymbole und ihre Bedeutungen
Diese Symbole werden an Ihrem Gerät verwendet und sind in Ihrer
Bedienungsanleitung definiert. Es ist wichtig, dass Sie die Bedeutungen lesen
und verstehen. Ein Nichtverstehen der Symbole kann zu Verletzungen führen.
Stop
Kraftstoff
Choke auf
Öl
Choke ein
Langsam
Schnell
Ein Aus
Zündschlüssel
Zündung aus
Zündung ein
Primerkopf
Gashebel
Antriebskupplung
Schneckenkupplung
Einkuppeln
RECHTS
Schneckensammler
Antrieb
Auswurfkanal
LINKS HINAUF
HERUNTER
Vorwärts
Neutral
Rückwärts
Drücken, um den
elektrischen Start
einzukuppeln
Elektrischer
Start
Motorstart
Betrieb des
Motors
Motor aus
Kanalleitblech
Einkuppeln
Auskuppeln
Beheizte Griffe
Einkuppeln
Page 19

D
19
1740265
WARNUNG: Diese Maschine kann Hände und Füße abschneiden und Objekte schleudern. Lesen Sie sich
diese Regeln durch und befolgen Sie sie strikt. Eine Nichteinhaltung dieser Regeln kann dazu führen, dass
Sie die Kontrolle über das Gerät verlieren, was zu schweren Verletzungen an Ihrer Person und anderen
Personen oder zum Tod führen kann und Sachschäden verursachen kann. Das Dreieck im Text stellt
wichtige Warnungen dar, die unbedingt befolgt werden müssen.
REGELN FÜR DEN SICHEREN BETRIEB
Sichere Betriebspraktiken für Schneefräsen
WICHTIG: Die Sicherheitsstandards erfordern
Bediener−Anwesenheitskontrollen, um das Verletzungsrisiko zu
minimieren. Ihre Schneefräse ist mit solchen Kontrollen ausgestattet.
Versuchen Sie unter keinen Umständen die Funktion der
Bediener−Anwesenheitskontrolle zu unterdrücken.
Übung
1. Lesen, verstehen und befolgen Sie alle Anweisungen an der Maschine
und in den Handbüchern, bevor Sie dieses Gerät betreiben. Seien Sie
sehr sorgfältig mit den Kontrollen und der ordnungsgemäßen
Verwendung des Gerätes. Sie müssen wissen wie Sie die Einheit
schnell stoppen und die Kontrollen schnell auskuppeln können.
2. Lassen Sie das Gerät nie von Kindern betreiben. Lassen Sie nie
Erwachsene dieses Gerät betreiben, ohne sie ordnungsgemäß
einzuweisen.
3. Halten Sie den Betriebsbereich frei von Personen, insbesondere von
kleinen Kindern und Haustieren.
4. Gehen Sie vorsichtig vor, um ein Ausrutschen oder Fallen zu
vermeiden, wenn Sie das Gerät im Rückwärtsgang betreiben.
Vorbereitung
1. Untersuchen Sie den Bereich, in dem das Gerät verwendet werden soll,
sorgfältig und entfernen Sie alle Fußabtreter, Schlitten, Bretter, Drähte
und andere Fremdkörper.
2. Kuppeln Sie alle Kupplungen aus und schalten Sie auf Neutral, bevor
Sie den Motor starten.
3. Betreiben Sie das Gerät nicht ohne geeignete Winterkleidung. Tragen
Sie Schuhwerk, das die Trittfestigkeit auf glatten Oberflächen erhöht.
Vermeiden Sie lockere Kleidung, die zwischen die sich bewegenden
Teile geraten könnten.
4. Gehen Sie sorgfältig mit dem Kraftstoff um, er ist hochentzündlich.
a. Verwenden Sie einen zulässigen Kraftstoffbehälter.
b. Füllen Sie niemals Kraftstoff in einen laufenden oder heißen Motor
nach.
c. Befüllen Sie den Kraftstofftank sehr vorsichtig. Befüllen Sie den
Kraftstofftank nie im Haus. Schrauben Sie den Tankdeckel wieder fest
und wischen Sie verschütteten Kraftstoff ab.
d. Befüllen Sie Behälter nie innerhalb eines Fahrzeugs oder auf einem
LKW oder Anhänger mit Kunststoffdichtung. Stellen Sie den Behälter
immer auf den Boden, von Ihrem Fahrzeug entfernt, bevor Sie ihn
befüllen.
e. Wenn praktikabel, entfernen Sie gasgetriebene Geräte vom LKW
oder Anhänger und betanken Sie diese auf dem Boden. Falls das
nicht möglich ist, tanken Sie es lieber auf einem Anhänger auf als von
einer Kraftstoffdispenserdüse.
f. Achten Sie darauf, dass die Düse bis zum Ende des Auftankens
immer mit dem Rand des Kraftstofftank oder Behälters im Kontakt
bleibt. Verwenden Sie kein Gerät mit Düsenverriegelung.
g. Schrauben Sie den Tankdeckel wieder fest und wischen Sie
verschütteten Kraftstoff ab.
h. Falls Kraftstoff auf Ihre Kleidung gelangt, wechseln Sie diese bitte
sofort.
5. Verwenden Sie Verlängerungskabel und Anschlüsse wie vom
Hersteller angegeben für alle Einheiten mit Antriebsmotoren oder
elektrischen Startmotoren.
6. Stellen Sie die Höhe des Sammler−Gehäuses auf Schotter oder
Kiesoberflächen ein.
7. Versuchen Sie nie irgendwelche Einstellungen bei laufendem Motor
vorzunehmen (es sei denn dies wird speziell durch den Hersteller
empfohlen).
8. Warten Sie, bis sich Motor und Schneefräse an die Außentemperaturen
angepasst haben, bevor Sie mit dem Schneeräumen beginnen.
9. Tragen Sie beim Betrieb der Schneefräse sowie bei Einstellungen und
Reparaturen immer eine Sicherheitsbrille oder einen Augenschutz, um
Ihre Augen vor Fremdkörpern zu schützen, welche die Maschine
schleudert.
Betrieb
1. Halten Sie Hände und Füße von rotierenden Teilen fern. Halten Sie sich
immer von der Entladeöffnung fern.
2. Gehen Sie äußerst vorsichtig vor, wenn Sie auf Schotterwegen oder
Schotterstraßen arbeiten oder diese überqueren. Achten Sie auf
verborgene Gefahren und Verkehr.
3. Stoppen Sie den Motor, wenn Sie einen Fremdkörper berührt haben,
schalten Sie den Motor ab, ziehen Sie Zündkabel ab, entfernen Sie das
Kabel an Elektromotoren, untersuchen Sie die Schneefräse auf jegliche
Schäden, und reparieren Sie den Schaden, bevor Sie die Schneefräse
erneut starten und betreiben.
4. Falls die Einheit beim Start abnormal vibriert, stoppen Sie den Motor
und suchen Sie sofort nach der Ursache. Vibration ist in der Regel ein
Warnhinweis für Probleme.
5. Stoppen Sie den Motor, wann immer Sie die Betriebsposition verlassen,
bevor Sie den Sammler/das Gebläserad−Gehäuse oder den
Auswurfkanal von der Verstopfung befreien und wenn Sie irgendwelche
Reparaturen, Einstellungen oder Untersuchungen vornehmen.
6. Stellen Sie beim Reinigen, Reparieren oder Untersuchen sicher, dass
der Sammler/das Gebläserad und alle beweglichen Teile gestoppt
haben. Ziehen Sie das Zündkabel ab und halten Sie das Kabel von der
Zündkerze fern, um ein zufälliges Starten zu vermeiden.
7. Lassen Sie den Motor nicht im Haus laufen, außer beim Start des
Motors und zum Transport der Schneefräse in das Gebäude hinein
oder aus dem Gebäude heraus. Öffnen Sie die Außentüren; Abgase
sind gefährlich (sie enthalten KOHLENMONOXID, ein GERUCHLOSES
und TÖDLICHES GAS).
8. Gehen Sie besonders vorsichtig vor, wenn Sie an Abhängen arbeiten.
Versuchen Sie nicht, Schnee an steilen Abhängen zu beräumen.
9. Betreiben Sie die Schneefräse nie ohne geeignete Schutzgitter, Platten
oder andere Sicherheitsvorrichtungen am Gerät.
10. Richten Sie den Auswurfkanal niemals auf Menschen oder Bereichewo
Sachschäden entstehen können. Halten Sie Kinder un andere
Personen fern.
11. Überlasten Sie die Maschinenkapazität nicht, indem Sie versuchen den
Schnee zu schnell zu beräumen.
12. Betreiben Sie die Maschine nie bei hohen Transportgeschwindigkeiten
auf glatten Oberflächen. Sehen Sie nach hinten und gehen Sie
vorsichtig vor, wenn Sie im Rückwärtsgang arbeiten.
13. Schalten Sie die Stromzufuhr zum Sammler/Gebläserad aus, wenn die
Schneefräse transportiert oder nicht betrieben wird.
14. Verwenden Sie nur vom Hersteller der Schneefräse zugelassenes
Zubehör und Ersatzteile (wie Kabinen, Radketten etc.).
Page 20

D
20
1740265
15. Betreiben Sie die Schneefräse nie ohne gute Sichtbarkeit oder Licht.
Stellen Sie immer sicher, dass Sie trittfestes Schuhwerk anhaben und
die Griffe richtig festhalten. Gehen Sie, nicht rennen.
16. Berühren Sie niemals einen heißen Motor oder Schalldämpfer.
17. Betreiben Sie die Schneefräse nie in der Nähe von Glaswänden,
Fahrzeugen, Fensterschutzvorrichtungen, Abfalltonnen usw. ohne den
Schneewurfwinkel entsprechend einzustellen.
18. Richten Sie den Schneewurf nie auf Zuschauende und erlauben Sie
niemandem sich vor der Einheit aufzuhalten.
19. Belassen Sie eine laufende Einheit nie ohne Aufsicht. Kuppeln Sie
immer die Schnecke und die Zugsteuerungen aus, schalten Sie den
Motor ab und entfernen Sie die Schlüssel.
20. Betreiben Sie die Einheit nie unter Einfluss von Alkohol oder Drogen.
21. Denken Sie immer daran, dass die Bedienperson für alle Unfälle an
Personen und Sachwerten verantwortlich ist.
22. Daten weisen darauf hin, dass an einem großen Anteil aller
Stromgerät−bezogenen Verletzungen Personen ab einem alter von 60
Jahren beteiligt sind. Diese Bedienpersonen sollten ihre Fähigkeit die
Einheit sicher genug zu bedienen, um sich und andere vor
Verletzungen zu schützen, einschätzen, bevor sie das Gerät betreiben.
23. TRAGEN SIE KEINE langen Schals oder lockere Kleidung, die sich in
den beweglichen Teilen verfangen könnte.
24. Schnee kann Hindernisse verbergen. Stellen sie sicher, dass Sie alle
Hindernisse aus dem zu beräumenden Bereich entfernen.
Kinder
Tragische Unfälle können die Folge sein, wenn die Bedienperson nicht auf die
Anwesenheit von Kindern achtet. Kinder werden oft durch die Einheit und ihren Betrieb
angezogen. Nehmen Sie nie an, dass Kinder dort bleiben, wo Sie sie zuletzt gesehen
haben.
1. Halten Sie Kinder außerhalb des Bereiches und unter der sorgfältigen
Obhut eines anderen verantwortlichen Erwachsenen.
2. Seien Sie gewarnt und schalten Sie die Einheit ab, wenn Kinder den zu
beräumenden Bereich betreten.
3. Lassen Sie das Gerät nie von Kindern betreiben.
4. Seien Sie besonders vorsichtig, wenn Sie sich blinden Ecken, Büschen,
Bäumen oder anderen Objekten nähern, die den Blick behindern.
Freiräumen eines verstopften Auswurfkanal
Handkontakt mit dem rotierenden Gebläserad im Inneren des Auswurfkanal ist
die häufigste Ursache von Verletzungen im Zusammenhang mit Schneefräsen.
Reinigen Sie den Auswurfkanal niemals mit der Hand.
Um den Kanal zu reinigen:
1. SCHALTEN SIE DEN MOTOR AB.
2. Warten Sie 10 Sekunden, um sicher zu gehen, dass die Gebläseblätter
zu rotieren aufgehört haben.
3. Verwenden Sie immer ein Reinigungswerkzeug, nicht die Hände.
Service, Wartung und Lagerung
1. Überprüfen Sie die Schneidebolzen in häufigen Intervallen auf
Festigkeit, um sicher zu stellen, dass das Gerät in einem sicheren
Arbeitszustand ist.
2. Lagern Sie die Maschine niemals innerhalb eines Gebäudes, in dem
sich Zündquellen wie heißes Wasser und Heizkörper oder
Bekleidungstrockner befinden, wenn sich Kraftstoff im Tank befindet.
Lassen Sie den Motor abkühlen, bevor Sie das Gerät in irgendeiner
Einfriedung lagern.
3. Lesen Sie wichtige Details immer in der Bedienungsanleitung nach,
wenn die Schneefräse über einen längeren Zeitraum gelagert werden
soll.
4. Belassen Sie Sicherheits− und Anleitungsetiketten an ihrem Platz oder
ersetzen Sie sie falls erforderlich.
5. Lassen Sie die Maschine nach der Schneeräumung einige Minuten
laufen, um ein Einfrieren des Sammlers/Gebläserades zu verhindern.
6. Falls Kraftstoff verschüttet wird, versuchen Sie nicht den Motor zu
starten, sondern bringen Sie die Maschine aus dem Bereich weg, in
dem der Kraftstoff verschüttet wurde, und vermeiden Sie die Schaffung
jeder Art von Zündquelle zu vermeiden, bis die Kraftstoffdämpfe sich
verzogen haben.
7. Verwenden Sie immer sichere Praktiken beim Auftanken und bei der
Handhabung von Kraftstoff , wenn Sie die Einheit nach Transport oder
Lagerung auftanken.
8. Befolgen Sie immer die Bedienungsanleitung, um das Gerät auf die
Lagerung sowohl für kurze als auch für längere Zeiträume
vorzubereiten.
9. Befolgen Sie immer die Anweisungen im Motor−Handbuch für
ordnungsgemäße Start-verfahren, wenn Sie die Einheit erneut
einsetzen.
10. Belassen Sie Sicherheits− und Anleitungsetiketten an ihrem Platz oder
ersetzen Sie sie falls erforderlich.
11. Halten Sie Muttern und Schrauben fest angezogen und achten Sie
darauf, dass die Einheit im guten Zustand bleibt.
12. Manipulieren Sie nie an den Sicherheitsvorrichtungen herum.
Überprüfen Sie deren ordnungsgemäßen Betrieb regelmäßig und
nehmen Sie die nötigen Reparaturen vor, wenn sie nicht
ordnungsgemäß funktionieren.
13. Die Komponenten unterliegen Abnutzung, Schäden und Alterung.
Überprüfen Sie die Komponenten häufig und ersetzen Sie sie wenn
nötig durch vom Hersteller empfohlene Teile.
14. Überprüfen Sie den Kontrollbetrieb häufig. Nehmen Sie Einstellungen
und Wartungsarbeiten wie erforderlich vor.
15. Verwenden Sie nur vom Hersteller genehmigte Ersatzteile, wenn Sie
Reparaturen vornehmen.
16. Halten Sie sich bei allen Einstellungen und Korrekturen immer an die
Herstellerspezifikation.
17. Nur autorisierte Wartungsdienste sollten für größere Wartungsarbeiten
und Reparaturen genutzt werden.
18. Versuchen Sie nie größere Reparaturen an dieser Einheit
vorzunehmen, es sei denn Sie wurden entsprechend ausgebildet.
Unsachgemäße Wartungsprozeduren können zu gefährlichem Betrieb,
Schäden an der Einheit und zum Erlöschen der Herstellergarantie
führen.
19. Überprüfen Sie die Schneidebolzen in häufigen Intervallen auf
Festigkeit, um sicher zu stellen, dass das Gerät in einem sicheren
Arbeitszustand ist.
Abgase
1. Die Motorenabgase von diesem Produkt enthalten Chemikalien, von
denen bekannt ist, dass sie in bestimmter Menge Krebs, Geburtsfehler
oder negative Auswirkung auf die Fortpflanzung haben können.
2. Falls verfügbar, suchen Sie nach den relevanten Informationen zu
Emissionsgrenzwerten auf dem Motorenetikett.
Zündsystem
1. Dieses Zündkerzensystem entspricht der kanadischen Richtlinie
ICES-002.
Page 21

D
21
1740265
ZUSAMMENBAU
Lesen und befolgen Sie die Anweisungen zum
Zusammenbau und zur Einstellung für Ihre
Schneefräse. Alle Befestigungselemente
befinden sich in dem Teilebeutel. Werfen Sie
keine Teile oder Materialien fort, bis die
Maschine zusammengebaut ist.
WARNUNG: Entfernen Sie das
Kabel von der Zündkerze, bevor Sie
die Schneefräse zusammenbauen
oder Wartungsarbeiten daran vornehmen.
Hinweis: In dieser Anleitung beschreiben die
Begriffe „links“ und „rechts“ den Lageort
eines Teils aus der Sicht des Bedieners, der
hinter der Maschine steht.
Hinweis: Drehmomente werden in Nm
gemessen. Dieser Messwert beschreibt, wie
fest eine Mutter oder Schraube angezogen
werden muss. Das Drehmoment wird mit
einem Drehmomentschlüssel gemessen.
Hinweis: Abbildungen sind auf Seite 2 und
auf den Seiten 3 bis 6 enthalten.
Erforderliche Werkzeuge
1 Messer
1 Zange
Herausnehmen der Schneefräse aus
dem Karton
1. Den Ölbehälter lokalisieren und entfernen.
2. Alle separat verpackten Teile lokalisieren und
aus dem Karton herausnehmen.
3. Das äußere Verpackungsmaterial der
Schneefräse entfernen und entsorgen.
4. Alle vier Ecken des Kartons abschneiden
und die Seitenwände flach legen.
5. Die Schneefräse am unteren Griff halten und
aus dem Karton ziehen.
VORSICHT: NICHT über Kabel ziehen.
6. Das Verpackungsmaterial von der
Griffbaugruppe entfernen. Den unteren
Einsatz von der Achse entfernen.
Zusammenbau der Griffstange
1. Das Verpackungsmaterial von den oberen
und unteren Griffstangen entfernen.
2. (Abbildung 2) Den Knauf (1) an jeder Seite
der Griffstange (2) entfernen.
3. Die obere Griffstange (2) in die
Betriebsstellung anheben. Die obere
Griffstange (2) getrennt halten, um ein
Verkratzen der unteren Griffstange zu
verhindern.
Hinweis: Darauf achten, dass der Seilzug
der Einzugschnecke nicht zwischen der
oberen und unteren Griffstange
eingeklemmt wird.
4. Die Knäufe (1) festziehen.
Vorbereitung des Motors
WARNUNG: Befolgen Sie die
Anweisungen des Herstellers für
den Typ des zu verwendenden
Kraftstoffs und Öls. Stets einen
Sicherheitskraftstoffkanister verwenden.
Beim Einfüllen von Kraftstoff in den Tank
nicht rauchen. Kraftstoff nicht in
Innenräumen einfüllen. Vor dem Einfüllen
von Kraftstoff Motor anhalten und mehrere
Minuten abkühlen lassen.
Die Anweisungen des Herstellers für den Typ
des zu verwendenden Kraftstoffs und Öls
befolgen. Vor Inbetriebnahme der Maschine die
Informationen zu Sicherheit, Bedienung,
Wartung und Lagerung durchlesen.
Hinweis: Die angegebene PS−Leistung des
Motors kann je nach Motoreinstellung,
Fertigungstoleranzen, Höhenlage,
atmosphärischen Bedingungen, Kraftstoff
und Wartung variieren.
Motoröl einfüllen (Abbildung 3)
Hinweis: Der Motor kann noch eine restliche
Ölmenge enthalten. Beim Einfüllen in das
Kurbelgehäuse häufig den Füllstand
überprüfen. NICHT überfüllen.
Die Schneefräse wurde mit einer Dose 5W30
Motoröl versandt. Dieses Öl muss vor dem
Betrieb in den Motor eingefüllt werden.
1. Sicherstellen, dass die Maschine eben steht.
2. Die Öleinfüllkappe mit dem Messstab (1)
entfernen und das Kurbelgehäuse bis zur
„VOLL“−Markierung auf dem Messstab
füllen. NICHT überfüllen.
3. Öleinfüllkappe mit Messstab (1) nach jeder
Überprüfung des Ölstands sicher wieder
festschrauben.
Hinweis: Bei extrem tiefen Temperaturen
kann das Startverhalten des Motors durch
Synthetiköl verbessert werden. Synthetiköl
5W30 ist für alle Temperaturen geeignet. Öl
NICHT mit Benzin vermischen.
Benzin einfüllen
Der Motor ist für den Betrieb mit Benzin
vorgesehen. Abgasemissionskontrollsystem: EM
(Motormodifikationen).
WARNUNG:
Alkoholgemischkraftstoffe (unter
Zusatz von Ethanol oder
Methanol) können Feuchtigkeit anziehen,
die zur Abspaltung und Bildung von Säuren
während der Lagerung führt. Saures
Benzin kann das Kraftstoffsystem eines
Motors während der Lagerung beschädigen.
Hinweis: Um Motorprobleme zu vermeiden,
muss das Kraftstoffsystem entleert werden,
wenn die Maschine für 30 Tage oder länger
gelagert wird. Motor starten und laufen
lassen, bis die Kraftstoffleitungen und der
Vergaser leer sind. In der nächsten Saison
frischen Kraftstoff verwenden. Weitere
Informationen sind im Abschnitt „Lagerung“
enthalten.
Den Tank nur mit frischem, sauberem,
unverbleitem Normalbenzin, unverbleitem
Superbenzin oder neu formuliertem Autobenzin
mit mindestens 85 Oktan auffüllen. KEIN
verbleites Benzin verwenden. Sicherstellen,
dass der Kanister, aus dem das Benzin
eingefüllt wird, sauber und frei von Rost oder
anderen Fremdstoffen ist. Niemals Benzin
verwenden, das durch lange Lagerung im
Kanister abgestanden ist.
Vor dem Betrieb
Beachten Sie vor Inbetriebnahme Ihrer neuen
Schneefräse bitte die folgende Checkliste:
G Sicherstellen, dass alle Montagearbeiten
ausgeführt wurden.
G Sicherstellen, dass der Auswurfkamin frei
drehbar ist.
G Sicherstellen, dass keine losen Teile im
Karton verbleiben.
Während Sie den sachgemäßen Umgang mit
der Schneefräse kennen lernen, achten Sie
besonders sorgsam auf die folgenden wichtigen
Punkte.
G Sicherstellen, dass Motoröl bis zur
Füllstandsmarke eingefüllt ist. Welcher Öltyp
zu verwenden ist, kann dem Handbuch des
Motorherstellers entnommen werden.
G Sicherstellen, dass der Benzintank
einwandfrei mit sauberem, frischem,
unverbleitem Benzin mit mindestens 85
Oktan gefüllt ist.
G Machen Sie sich mit der Position aller
Bedienungselemente vertraut und verstehen
Sie deren Funktion.
G Vergewissern Sie sich vor dem Starten des
Motors, dass alle Bedienungselemente
richtig funktionieren.
BEDIENUNG
Hinweis: Abbildungen sind auf Seite 2 und
auf den Seiten 3 bis 6 enthalten.
VORSICHT: Nur Anbauvorrichtungen und
Zubehör verwenden, die vom Hersteller der
Schneefräse zugelassen sind (z. B.
Schneeketten, elektrische Startkits usw.).
Kennen Sie Ihre Schneefräse
(Abbildung 1)
Lesen Sie diese Bedienungsanleitung und
Sicherheitsregeln, bevor Sie die Schneefräse in
Betrieb nehmen. Vergleichen Sie die Abbildung
mit Ihrer Schneefräse, um sich mit der Position
der verschiedenen Bedienungs− und
Einstellelemente vertraut zu machen.
Steuerung des
Schneeauswurfs
WARNUNG: Den Schneeauswurf
niemals auf Zuschauer richten.
WARNUNG: Stets den Motor
anhalten, bevor der Auswurfkamin
oder das Einzugschneckengehäuse
freigeräumt oder die Schneefräse
unbeaufsichtigt gelassen wird.
1. (Abbildung 1) Die Auswurfrichtung des
Schnees durch Drehen der Kurbel (2)
ändern.
2. (Abbildung 6) Den Flügelknauf (1) am
Kaminablenkblech (2) entfernen.
Page 22

D
22
1740265
3. Das Kaminablenkblech (2) für höhere
Auswurfentfernung nach oben oder für
geringere Entfernung nach unten bewegen.
4. Den Flügelknauf (1) festziehen.
Räumen von Schnee (Abbildung 1)
1. Den Betätigungshebel der
Einzugschnecke (5) einrücken.
2. Um den Schneeauswurf zu stoppen, den
Betätigungshebel der Einzugschnecke (5)
wieder loslassen.
WARNUNG: Beim Betrieb jeder
Schneefräse können fremde
Objekte in die Augen geschleudert
werden, wodurch schwere
Augenverletzungen die Folge sind. Tragen
Sie beim Betrieb der Schneefräse daher
immer eine Sicherheitsbrille oder einen
Augenschild. Empfohlen wird eine
Standardsicherheitsbrille oder die
Verwendung einer
Panorama−Sicherheitsmaske über Ihrer
Brille.
Stoppen des Schneeauswurfs
(Abbildung 1)
1. Um den Schneeauswurf zu stoppen, den
Betätigungshebel der Einzugschnecke (5)
loslassen.
Hinweis: Falls die Schneefräse sich weiter
vorwärts bewegt, siehe „Einstellung des
Einzugschnecken−Seilzugs“ im Abschnitt
„Wartung“.
2. Zum Stoppen des Motors den
Stoppschalter (8) auf Aus stellen.
VORSICHT: Um den Motor zu stoppen, den
Chokeregler nicht auf CHOKE stellen.
Hierdurch können Fehlzündungen oder
Motorschäden auftreten.
Vorwärtsbewegen der Schneefräse
(Abbildung 7)
1. Den Betätigungshebel der
Einzugschnecke (5) gegen die Griffstange
(2) ziehen. Die Einzugschnecke beginnt zu
rotieren.
2. Zum Vorwärtsbewegen die Griffstange (2)
anheben, sodass die Gummiblätter der
Einzugschnecke den Boden berühren. Die
Griffstange (2) sicher festhalten, während
sich die Schneefräse vorwärts zu bewegen
beginnt. Lenken Sie die Schneefräse, indem
Sie die Griffstange (2) nach links oder
rechts bewegen. Die Schneefräse nicht zu
schieben versuchen.
3. Zum Anhalten den Betätigungshebel der
Einzugschnecke (5) loslassen.
Hinweis: Falls die Einzugschnecke weiterhin
rotiert, siehe „Einstellung des
Einzugschnecken−Seilzugs“ im Abschnitt
„Wartung“.
Vor dem Starten des Motors
1. Machen Sie sich mit der Schneefräse
vertraut, bevor Sie den Motor warten oder
starten. Vergewissern Sie sich, dass Sie die
Funktion und Position aller
Bedienungselemente kennen.
2. Stellen Sie sicher, dass alle
Befestigungselemente festgezogen sind.
3. Stellen Sie sicher, dass der Kraftstofftank mit
dem richtigen Kraftstoff gefüllt ist.
4. Machen Sie sich mit der Position aller
Bedienungselemente vertraut und verstehen
Sie deren Funktion.
5. Vergewissern Sie sich vor dem Starten des
Motors, dass alle Bedienungselemente
richtig funktionieren.
Stoppen des Motors (Abbildung 1)
Zum Stoppen des Motors den Stoppschalter
(8) auf Aus stellen.
VORSICHT: Um den Motor zu stoppen, den
Chokeregler nicht auf CHOKE stellen.
Hierdurch können Fehlzündungen oder
Motorschäden auftreten.
Starten des Motors (Abbildung 1)
Sicherstellen, dass das Motoröl bis zur
VOLL−Markierung am Messstab eingefüllt ist.
Der Motor ist mit einem Handstarter
ausgestattet. Lesen Sie vor dem Starten des
Motors unbedingt die folgenden Informationen.
Bei überflutetem Motor den Choke auf
OPEN/RUN stellen und den Motor ankurbeln,
bis er anspringt.
WARNUNG: Durch Rückschnellen
des Startseils (Kickback) wird Ihre
Hand oder Ihr Arm schneller zum
Motor hin gezogen, als Sie das Seil
loslassen können.
S Beim Starten des Motors das Startseil
langsam ziehen, bis Widerstand zu
spüren ist. Das Startseil jetzt schnell
hervorziehen.
S Sicherstellen, dass alle Komponenten,
wie Laufräder, Riemenscheiben oder
Kettenräder sicher montiert sind.
Starten eines kalten Motors (Abbildung 1)
1. (Abbildung 1) Den Stoppschalter (8) auf
EIN drücken.
2. Beim Starten des Motors nicht den
Betätigungshebel der Einzugschnecke
betätigen.
3. Den Chokeregler (14) ganz auf FULL
stellen.
4. Die Voreinspritztaste (9) wie unten
angegeben drücken. Den Finger zwischen
den Einspritzvorgängen von der
Voreinspritztaste (9) nehmen.
S Zweimal drücken, wenn die Temperatur
−9 °C oder mehr beträgt.
S Viermal drücken, wenn die Temperatur
weniger als −9 °C beträgt.
5. (Abbildung 4) Langsam am
Handstartergriff (1) ziehen, bis Widerstand
zu spüren ist, und dann schnell ziehen, um
den Motor zu starten. Den Handstartergriff
(1) nicht zurückschnellen lassen, sondern
langsam zurückkehren lassen.
Hinweis: Bei Temperaturen unter −18 C
den Motor erst einige Minuten warmlaufen
lassen, bevor die Schneefräse benutzt
wird.
WARNUNG: Den Motor niemals in
Innenräumen oder in
geschlossenen, schlecht belüfteten
Bereichen laufen lassen. Die Motorabgase
enthalten Kohlenmonoxid, ein geruchloses
und tödliches Gas. Hände, Füße, Haare
und weite Kleidung von allen beweglichen
Teilen des Motors oder der Schneefräse
fern halten. Die Temperatur des
Schalldämpfers und der umliegenden Teile
kann 65 °C übersteigen. Meiden Sie diese
Bereiche.
Starten eines warmen Motors (Abbildung 1)
Wenn der Motor bereits betrieben wurde und
noch warm ist, lassen Sie den Chokeregler (14)
auf Aus und drücken Sie nicht die
Voreinspritztaste (9). Wenn der Motor nicht
anspringt, befolgen Sie die Anweisungen in
„Starten eines kalten Motors“.
Hinweis: Betätigen Sie nicht die
Voreinspritztaste (9), um einen warmen
Motor zu starten.
Starten eines Motors mit eingefrorenem
elektrischen Starter (Abbildung 1)
Wenn der Starter eingefroren ist und nicht den
Motor ankurbeln kann, befolgen Sie die
nachfolgenden Anweisungen.
1. Den Handstartergriff (12) so weit wie
möglich herausziehen.
2. Den Handstartergriff (12) schnell wieder
loslassen. Den Handstartergriff (12) zum
Handstarter zurückschnellen lassen.
Wenn der Motor auch jetzt nicht anspringt, die
beiden obigen Schritte wiederholen, bis der
Motor anspringt. Anschließend mit den
Anweisungen in „Starten eines kalten Motors“
fortfahren.
Um ein mögliches Einfrieren des Handstarters
und der Motorbedienungselemente zu
verhindern, gehen Sie nach jeder
Schneeräumung folgendermaßen vor.
1. Vor dem Einlagern die Schneefräse einige
Minuten laufen lassen, um ein Einfrieren der
Einzugschnecke und des Laufrads zu
verhindern.
2. Den Motor im ausgeschalteten Zustand
einige Minuten abkühlen lassen.
3. Das Startseil sehr langsam ziehen, bis
Widerstand zu spüren ist. Das Startseil
zurückrollen lassen. Dreimal wiederholen.
4. Bei stillstehendem Motor Schnee und
Feuchtigkeit restlos im Bereich der
Bedienungselemente und Hebel vom
Vergaserdeckel abwischen. Außerdem den
Chokeregler und Startergriff mehrere Male
betätigen.
Entfernen von Schnee oder Schmutz
aus dem Gehäuse der Einzugschnecke
(Abbildung 1)
WARNUNG: Versuchen Sie nicht,
Schnee oder Schmutz zu entfernen,
das sich im Gehäuse der
Einzugschnecke festgesetzt hat, ohne die
folgenden Sicherheitsmaßnahmen zu
ergreifen.
1. Den Betätigungshebel der
Einzugschnecke (5) loslassen.
2. Zum Stoppen des Motors den
Stoppschalter (8) in die Stopp−Position
stellen.
Page 23

D
23
1740265
3. Das Zündkerzenkabel abziehen.
4. Nicht die Hände in das
Einzugschneckengehäuse (22) oder den
Auswurfkamin (4) halten. Schnee oder
Schmutz mit einer Stange entfernen.
Tipps zum Schneeräumen
1. Die Schneefräse bewegt sich selbst
vorwärts, wenn die Griffstange genügend
angehoben wird, sodass die Blätter der
Einzugschnecke den Boden berühren. Die
Einzugschnecke sollte zum Stillstand
kommen, wenn der Betätigungshebel der
Einzugschnecke losgelassen wird. Falls dies
nicht der Fall ist, siehe „Einstellung des
Einzugschnecken−Seilzugs“ im Abschnitt
„Wartung“.
2. Der Schnee wird am besten geräumt, wenn
er frisch gefallen ist.
VORSICHT: Die Maschine nicht überlasten,
indem versucht wird, den Schnee zu schnell
zu räumen.
3. Zur kompletten Schneeräumung den
vorherigen Pfad jeweils leicht überlappen.
4. Den Schnee möglichst in Windrichtung
auswerfen.
5. Die Auswurfentfernung des Schnees kann
durch Verstellen des
Auswurfkaminablenkblechs eingestellt
werden. Durch Heben des Ablenkblechs wird
die Entfernung erhöht und durch Senken
verringert.
6. Senken Sie das Ablenkblech bei windigem
Wetter, um den geräumten Schnee dicht am
Boden auszuwerfen, wo er weniger Gefahr
läuft, in unerwünschte Bereiche geblasen zu
werden.
7. Aus Sicherheitsgründen und um Schäden an
der Schneefräse zu verhindern, halten Sie
den zu räumenden Bereich frei von Steinen,
Spielsachen und anderen fremden Objekten.
8. Die Antriebsfunktion der Einzugschnecke
nicht verwenden, wenn Kies− oder
Sandfahrwege geräumt werden. Die
Griffstange leicht senken, um die
Einzugschnecke etwas anzuheben.
9. Die Vorwärtsgeschwindigkeit der
Schneefräse hängt von der Tiefe und dem
Gewicht des Schnees ab. Durch Erfahrung
lässt sich die effektivste Bedienungsweise
der Schneefräse unter verschiedenen
Bedingungen ermitteln.
10.Den Motor nach jedem Schneeräumen
einige Minuten laufen lassen, damit Schnee
und angesammeltes Eis abschmelzen kann.
11.Die Schneefräse nach jedem Gebrauch
säubern.
12.Eis, Schnee und Schmutz vollständig von der
Schneefräse entfernen. Salz und andere
Chemikalien mit Wasser abspülen. Die
Schneefräse trocken wischen.
Trockener und normaler Schnee
1. Schnee bis zu einer Höhe von 20 cm kann
schnell und einfach durch Vorwärtsbewegen
mit mittlerer Geschwindigkeit geräumt
werden. Für Schnee oder Schneewehen mit
größerer Tiefe die Geschwindigkeit
verringern, sodass der Auswurfkamin den
Schnee sofort nach Erfassen des Schnees
auswerfen kann.
2. Den Schnee in Windrichtung auswerfen
lassen.
Feuchter Schnee
Langsam in den feuchten Schnee einfahren.
Wenn der Feuchtschnee die Einzugschnecke
verlangsamt oder den Auswurfkamin zu
verstopfen beginnt, zurückfahren und mehrmals
wieder vor und zurück in den Schnee fahren.
Durch diese Vor− und Zurückbewegungen von
jeweils 10 bis 15 cm fällt der Schnee vom
Auswurfkamin ab.
Schneebänke und Schneewehen
Bei Schneetiefen, die größer als die Maschine
sind, die gleiche Vor− und Zurückbewegung wie
oben beschrieben verwenden. Den
Auswurfkamin von der Schneebank weg richten.
Zum Räumen dieses Schnees wird mehr Zeit
benötigt als für ebenen Schnee.
Page 24

D
24
1740265
WARTUNGSTABELLE
VOM KUNDEN AUSZUFÜHREN
SERVICENACHWEIS
Datum der regelmäßigen
Wartungsarbeiten
eintragen.
Bei je-
dem
Ge-
brauch
Erste
2
Stunden
Alle
5
Stun-
den
Alle
10
Stun-
den
Alle
25
Stun-
den
Jede
Saison
Vor der
Lage-
rung
WARTUNGSTERMINE
Alle Schrauben und Muttern überprüfen und
festziehen
√ √
Zündkerze überprüfen
√ √
Antriebsriemen überprüfen
√
Kraftstoff überprüfen
√
Kraftstoff ablassen
√
Kaminkontrollflansch schmieren
√
Einstellung des Einzugschnecken−Seilzugs
überprüfen
√
Antriebsriemen der Einzugschnecke überprüfen
√
WARTUNG
Hinweis: Abbildungen sind auf Seite 2 und
auf den Seiten 3 bis 6 enthalten.
Die folgenden Wartungsanweisungen befolgen,
um die Maschine in einwandfreiem Zustand zu
halten. Sämtliche Wartungsinformationen für
den Motor befinden sich in der Anleitung des
Motorherstellers. Lesen Sie dieses Handbuch,
bevor Sie den Motor starten.
WARNUNG: Das Kabel von der
Zündkerze abziehen, bevor Sie eine
Inspektion, Einstellung (außer am
Vergaser) oder Reparatur vornehmen.
Allgemeine Empfehlungen
Die Garantie für die Schneefräse erstreckt sich
nicht auf Teile, die vom Bediener falsch
behandelt oder fahrlässig verwendet wurden.
Um vollen Nutzen aus der Garantie zu ziehen,
muss der Bediener die Schneefräse wie in
diesem Handbuch vorgeschrieben behandeln.
Um die Schneefräse ordnungsgemäß zu warten,
müssen regelmäßig einige Einstellungen
vorgenommen werden.
Bei jedem Gebrauch
G Auf lose oder beschädigte Teile überprüfen.
G Alle lockeren Befestigungselemente
anziehen.
G Die Einzugschnecke überprüfen und warten.
G Die Bedienungselemente auf einwandfreie
Funktion überprüfen.
G Verschlissene oder beschädigte Teile sofort
ersetzen.
G Alle Sicherheits− und Anleitungsschilder und
−etiketten überprüfen. Fehlende oder
unleserliche Schilder oder Etiketten ersetzen.
Alle Einstellungen im Abschnitt Wartung dieses
Handbuchs sollten mindestens einmal pro
Saison überprüft werden.
Entfernen der oberen Abdeckung
(Abbildung 8)
1. Die fünf Schrauben (1) von der oberen
Abdeckung (2) entfernen.
2. Die obere Abdeckung (2) entfernen.
3. Um die obere Abdeckung (4) wieder
anzubringen, werden die obigen Schritte in
umgekehrter Reihenfolge ausgeführt.
Schmierung
Vor der Lagerung (Abbildung 8)
1. Den Kaminkontrollflansch (7) schmieren.
Ein haftendes Schmierfett wie beispielsweise
Lubriplate auftragen.
Einstellen des
Einzugschnecken−Seilzugs
Der Einzugschnecken−Seilzug wird im Werk
eingestellt. Bei normalem Gebrauch kann der
Einzugschnecken−Seilzug gedehnt werden,
wodurch der
Einzugschnecken−Betätigungshebel die
Einzugschnecke nicht einwandfrei ein− oder
auskuppeln kann.
1. (Abbildung 12) Die Mutter (1) lösen, die die
Seilspannfeder (2) hält.
2. Die Seilspannfeder (2) nach hinten
schieben, bis kein Seildurchhang mehr
vorhanden ist.
Hinweis: Der Einzugschnecken−Seilzug
ist richtig eingestellt, wenn kein
Durchhang mehr vorhanden ist und keine
Spannung am Zwischenarm vorliegt.
3. Die Mutter (1) festziehen, die die
Seilspannfeder (2) hält.
Wenn sich der Riemen gedehnt hat, das Ende
des Einzugschnecken−Seilzugs wie folgt zum
äußeren Loch verschieben:
1. (Abbildung 12) Die Mutter (1) lösen, die die
Seilspannfeder (2) hält.
2. Die Seilspannfeder (2) nach vorne
schieben, bis das Seil maximal durchhängt.
3. (Abbildung 11) Das obere Ende des
Einzugschnecken−Seilzugs (3) vom
Einzugschnecken−Betätigungshebel (4)
entfernen.
4. Den Einzugschnecken−Seilzug (3) in dem
Loch wie in Abbildung 11 gezeigt befestigen.
5. (Abbildung 12) Die Seilspannfeder (2)
nach hinten schieben, bis kein Durchhang
mehr vorhanden ist.
Hinweis: Der Einzugschnecken−Seilzug
(3) ist richtig eingestellt, wenn kein
Durchhang mehr vorhanden ist und keine
Spannung am Zwischenarm vorliegt.
6. Die Mutter (1) festziehen, die die
Seilspannfeder (2) hält.
7. Die Schneefräse starten, um die Einstellung
zu überprüfen. Darauf achten, dass die
Einzugschnecke nicht rotiert, wenn der
Betätigungshebel losgelassen wird.
Entfernen der oberen Abdeckung
(Abbildung 10)
Unter der oberen Abdeckung (1) werden keine
Einstellungen vorgenommen. Zum Reinigen des
Motorkühlsystems die folgenden Schritte
ausführen, um die obere Abdeckung (1) zu
entfernen.
1. Die Schrauben (2) entfernen, die die
Stangenhalteklammer an der oberen
Abdeckung (1) befestigen. Die
Kurbelstange (3) nach oben schwenken und
auf die Maschine legen.
2. Die Schrauben (4) entfernen.
3. Die Anbauschrauben (5) entfernen.
4. Die obere Abdeckung (1) entfernen.
5. Um die obere Abdeckung (1) wieder
anzubringen, werden die obigen Schritte in
umgekehrter Reihenfolge ausgeführt.
Entfernen der Riemenabdeckung
(Abbildung 9)
1. Die Schrauben (1) und Muttern (2) von der
Riemenabdeckung (3) entfernen.
2. Die Anbauschrauben (4) von der Rückseite
der Riemenabdeckung (3) entfernen.
Page 25

D
25
1740265
3. Die Riemenabdeckung (3) von der
Maschine entfernen.
4. Um die Riemenabdeckung (3) wieder
anzubringen, werden die obigen Schritte in
umgekehrter Reihenfolge ausgeführt.
Hinweis: An der Innenseite der
Riemenabdeckung (3) befinden sich
eingegossene Riemenführungen. Beim
Anbringen der Riemenabdeckung (3) den
Einzugschnecken−Betätigungshebel
einrücken, um den Riemen an die
Riemenscheibe zu drücken. Hierdurch
entsteht genügend Freiraum für die
Riemenführungen, wenn die
Riemenabdeckung (3) angebracht wird.
Auswechseln des
Einzugschnecken−Antriebriemens
Der Antriebsriemen ist eine Spezialanfertigung
und muss durch einen originalen
Werksersatzriemen ausgewechselt werden, der
von Ihrem nächsten autorisierten
Servicezentrum erhältlich ist.
Wenn der Einzugschnecken−Antriebsriemen
beschädigt ist, wirft die Schneefräse keinen
Schnee aus und bewegt sich nicht vorwärts.
Wechseln Sie den beschädigten Riemen wie
folgt aus:
1. Das Zündkerzenkabel abziehen.
2. Die Riemenabdeckung entfernen. Entfernen
der Riemenabdeckung
3. Den Verlauf des
Einzugschnecken−Antriebsriemens (1)
notieren. Als Hilfe ist ein Diagrammschild
vorhanden.
4. (Abbildung 14) Die
Riemenführungsschraube (2) und die
Riemenführung (3) entfernen. Um die
Riemenführung (3) zu entfernen, die
Riemenführung (3) nach unten drehen.
5. (Abbildung 15) Die
Zwischenhebelschraube (4) und die
Zwischenhebelscheibe (5) vom
Zwischenhebel (6) entfernen.
6. (Abbildung 16) Den
Einzugschnecken−Antriebsriemen (1) von
der Motorscheibe entfernen und seitlich
durch das Motorgehäuse ziehen.
7. (Abbildung 17) Um den
Einzugschnecken−Antriebsriemen (1) von
der Laufradscheibe (7) zu entfernen, den
Zwischenhebel in die eingekuppelte Position
bewegen. Hierdurch entsteht genügend
Abstand (8) zwischen der Laufradscheibe
(7) und dem Bremshebel (9), um den
Einzugschnecken−Antriebsriemen
entfernen zu können.
8. Um einen neuen
Einzugschnecken−Antriebsriemen (1) zu
installieren, werden die obigen Schritte in
umgekehrter Reihenfolge ausgeführt.
9. Die Einstellung des
Einzugschnecken−Seilzugs überprüfen.
Siehe „Einstellung des
Einzugschnecken−Seilzugs“.
Entfernen der Einzugschnecke
1. Die Riemenabdeckung entfernen. Siehe
„Entfernen der Riemenabdeckung“.
2. Den Einzugschnecken−Antriebsriemen
entfernen. Siehe „Auswechseln des
Einzugschnecken−Antriebsriemens“.
3. (Abbildung 18) Die
Einzugschneckenscheibe (1) von der
Einzugschneckenwelle entfernen
(linksgängiges Gewinde; im
Gegenuhrzeigersinn abdrehen).
4. Damit sich die Einzugschnecke (6) nicht
drehen kann, ein 5 x 10 cm großes Stück
Holz (2) auf die Mittelschaufel (3) legen, um
die Einzugschnecke (6) zu sichern.
5. Die Schrauben (4), Unterlegscheiben (5)
und Muttern (2) an der Vorderseite der
rechten Abdeckung (7) entfernen.
6. Die Schraube (8) an der Rückseite der
rechten Abdeckung (7) entfernen.
7. Die Schrauben (9) und Muttern (10)
entfernen.
8. (Abbildung 19) Die Einzugschnecke (6)
rechts aus dem Einzugschneckengehäuse
(11) herausziehen.
9. Die Einzugschnecke (6) aus dem Lager an
der linken Seite des
Einzugschneckengehäuses (11)
herausziehen.
10.Um die Einzugschnecke (6) wieder zu
installieren, werden die obigen Schritte in
umgekehrter Reihenfolge ausgeführt.
Schmierung
Überprüfen des Motorölstands (Abbildung 3)
Überprüfen Sie den Ölstand vor dem Starten
des Motors und nach acht (8) Stunden
ununterbrochenen Betriebs.
1. Sicherstellen, dass die Maschine eben steht.
2. Die Öleinfüllkappe und den Messstab (1)
entfernen und das Kurbelgehäuse bis zur
„VOLL“−Markierung auf dem Messstab
füllen. NICHT überfüllen.
3. Öleinfüllkappe mit Messstab (1) nach jeder
Überprüfung des Ölstands sicher wieder
festschrauben.
Hinweis: Bei extrem tiefen Temperaturen
kann das Startverhalten des Motors durch
Synthetiköl verbessert werden. Synthetiköl
5W30 ist für alle Temperaturen geeignet. Öl
NICHT mit Benzin vermischen.
Ölwechsel
Wechseln Sie das Motoröl alle fünfzig (50)
Stunden oder zumindest einmal jährlich aus,
wenn die Schneefräse nicht fünfzig (50) Stunden
lang betrieben wird.
Um das Motoröl zu wechseln, muss der Motor
nach vorne gekippt und das Öl aus dem
Öleinfüllschlauch abgelassen werden. Den
Ölwechsel bei warmem Motor vornehmen.
1. (Abbildung 5) Die Rückseite der
Schneefräse anheben und die Maschine
nach vorne neigen. In der richtigen Position
ruht die Schneefräse auf der Vorderseite des
Einzugschneckengehäuses.
2. Eine Ölauffangschale (1) unter den
Öleinfüllschlauch (2) stellen.
3. Vorsichtig die Öleinfüllkappe mit dem
Messstab entfernen. Das Öl fließt in die
Ölauffangschale (2).
4. Nachdem das Öl vollständig aus dem Motor
abgelassen wurde, die Schneefräse in die
aufrechte Betriebsstellung bringen.
5. (Abbildung 3) Den Motor mit SAE 5W30 Öl
füllen. Sicherstellen, dass das Öl die
VOLL−Markierung am Messstab erreicht.
NICHT ÜBERFÜLLEN.
Hinweis: Bei extrem tiefen Temperaturen
kann das Startverhalten des Motors durch
Synthetiköl verbessert werden. Synthetiköl
5W30 ist für alle Temperaturen geeignet. Öl
NICHT mit Benzin vermischen.
Auswechseln der Zündkerze
(Abbildung 20)
Hinweis: Das Zündsystem entspricht allen
Anforderungen der kanadischen Richtlinien
für Interferenz erzeugende Geräte.
Hinweis: Der Motor entspricht sämtlichen
aktuellen Grenzwerten für
elektromagnetische Störungen in Australien
und Neuseeland.
Die Zündkerze (1) alle fünfundzwanzig (25)
Stunden überprüfen. Die Zündkerze (1)
auswechseln, wenn die Elektroden angefressen
oder abgebrannt sind, das Porzellan beschädigt
ist oder jeweils 100 Betriebsstunden erreicht
sind.
1. Sicherstellen, dass die Zündkerze (1)
sauber ist. Die Zündkerze (1) vorsichtig
durch Abkratzen der Elektroden reinigen
(nicht sandstrahlen oder eine Drahtbürste
verwenden).
2. Den Elektrodenabstand der Zündkerze (1)
mit einer Fühlerlehre (2) überprüfen und bei
Bedarf auf 0,76 mm korrigieren.
3. Vor dem Einschrauben der Zündkerze (1)
das Gewinde leicht ölen, damit es sich leicht
wieder herausdrehen lässt. Die Zündkerze
(1) bis auf ein Drehmoment von 20 Nm
festziehen.
Vorbereiten der Schneefräse für die
Lagerung
WARNUNG: Das Benzin nicht in
einem Innenraum, nahe an einem
Feuer oder beim Rauchen
ablassen. Die Benzindämpfe können eine
Explosion oder einen Brand verursachen.
Wenn die Schneefräse längere Zeit eingelagert
werden soll, sind dem Bedienungshandbuch des
Motorherstellers (einigen Modellen beigefügt)
wichtige Einzelheiten zur Wartung oder
Lagerung zu entnehmen.
1. Den Kraftstofftank entleeren.
2. Den Motor laufen lassen, bis der Kraftstoff
aufgebraucht ist.
3. Die Schneefräse niemals mit Kraftstoff im
Tank in Innenräumen lagern, in denen
Zündquellen, wie Heißwasserboiler und
Raumheizkörper, Wäschetrockner u.ä.
vorhanden sind. Den Motor abkühlen lassen,
bevor er in einem Gehäuse gelagert wird.
4. Das Öl aus dem warmen Motor ablassen.
Das Motorkurbelgehäuse mit neuem Öl
füllen.
5. Die Zündkerze aus dem Zylinder entfernen.
30 cm
Öl in den Zylinder füllen. Langsam
am Handstartergriff ziehen, sodass das Öl
den Zylinder schützt. Eine neue Zündkerze in
den Zylinder einsetzen.
6. Die Schneefräse gründlich reinigen.
7. Alle Schmierpunkte schmieren. Siehe
Abschnitt „Wartung“.
8. Sicherstellen, dass alle Muttern und
Schrauben sicher festgezogen sind. Alle
sichtbaren beweglichen Teile auf
Beschädigung, Bruch und Verschleiß
überprüfen. Bei Bedarf ersetzen.
Page 26

D
26
1740265
9. Die blanken Metallteile des Gehäuses und
der Einzugschnecke mit Rostschutzmittel
einsprühen.
10.Die Maschine in einem gut belüfteten
Gebäude lagern.
11.Bei Lagerung im Freien die Schneefräse
aufbocken, um sicherzustellen, dass die
gesamte Maschine nicht auf dem Boden
steht.
12.Die Schneefräse mit einer geeigneten
Schutzplane abdecken, die keine
Feuchtigkeit zurückhält. Keine
Kunststoffplane verwenden.
Bestellung von Ersatzteilen
Die Ersatzteile sind entweder auf den
Rückseiten dieser Anleitung oder in einer
separaten Ersatzteilliste abgebildet.
Verwenden Sie nur vom Hersteller autorisierte
oder zugelassene Ersatzteile. Der Buchstabe
am Ende der Ersatzteilnummer gibt den
Oberflächenfinish des Teils an: C für verchromt,
Z für verzinkt und PA für Kaufbaugruppe. Es ist
wichtig, dass Sie dies bei der Bestellung von
Ersatzteilen mit angeben. Verwenden Sie keine
Anbauten oder Zubehörteile, die nicht speziell
für diese Maschine empfohlen sind. Um die
richtigen Ersatzteile zu erhalten, muss die
Modellnummer (siehe Namensplakette)
angegeben werden.
Ersatzteile, mit Ausnahme von Motor, Getriebe,
Hinterachsen mit Kardanwellen und
Differentialgetrieben, können im Geschäft, in
dem Sie Ihren Mäher gekauft haben, oder in
einer von diesem Geschäft empfohlenen
Werkstatt erworben werden.
Garantiearbeiten sind nur bei Vertragshändlern
erhältlich. Den nächsten Händler finden Sie auf
unserem Händlerverzeichnis unter
www.murray.com.
Ersatzteile für den Motor, die Transaxle oder das
Getriebe sind von dem autorisierten
Servicezentrum des Herstellers erhältlich, der
den Gelben Seiten des Telefonbuchs
entnommen werden kann. Beachten Sie auch
die jeweiligen Garantiebedingungen für Motor
und Getriebe, wenn Sie Ersatzteile bestellen.
Bei der Bestellung von Ersatzteilen sind
folgende Angaben erforderlich:
(1) Modellnummer
(2) Seriennummer
(3) Teilnummer
(4) Menge
FEHLERSUCHE
STÖRUNG URSACHE ABHILFE
Schweres Starten Defekte Zündkerze. Zündkerze auswechseln.
Wasser oder Schmutz im Kraftstoffsystem. Vergaserschale zum Ablassen des Kraftstoffs
verwenden und mit frischem Kraftstoff auffüllen.
Unregelmäßiger Motorlauf Kraftstoffleitung verstopft, Benzintank leer oder
Benzin abgestanden
Kraftstoffleitung reinigen; Kraftstoffzufuhr
überprüfen; frisches Benzin einfüllen
Motor wird abgewürgt Maschine arbeitet mit CHOKE. Chokehebel auf RUN stellen.
Unregelmäßiger Motorlauf;
Leistungsverlust
Wasser oder Schmutz im Kraftstoffsystem. Vergaserschale zum Ablassen des Kraftstoffs
verwenden und mit frischem Kraftstoff auffüllen.
Übermäßige Vibration Lose Teile: beschädigtes Laufrad Motor sofort stoppen und Zündkerzenkabel
abziehen. Alle Schrauben festziehen und
notwendige Reparaturen vornehmen. Wenn die
Vibration weiter anhält, die Maschine von einem
qualifizierten Mechaniker warten lassen.
Die Maschine bewegt sich nicht selbst fort. Antriebsriemen lose oder beschädigt. Antriebsriemen ersetzen.
Kein Schneeauswurf Einzugschnecken−Antriebsriemen lose oder
beschädigt.
Einzugschnecken−Antriebsriemen einstellen; bei
Bedarf auswechseln.
Einzugschnecken−Seilzug nicht richtig
eingestellt.
Einzugschnecken−Seilzug einstellen.
Auswurfkamin verstopft. Motor sofort stoppen und Zündkerzenkabel
abziehen. Auswurfkamin und Innenseite des
Einzugschneckengehäuses reinigen.
Fremdes Objekt sitzt in Einzugschnecke fest Motor sofort stoppen und Zündkerzenkabel
abziehen. Objekt von der Einzugschnecke
entfernen.
Page 27

D
BRIGGS & STRATTON CORPORATION, GARANTIERICHTLINIE FÜR EIGENTÜMER
Gültig ab 1. 1. 2006, ersetzt alle nicht datierten Garantien und alle Garantien mit Datum vor dem 1. 1. 2006
EINGESCHRÄNKTE GEWÄHRLEISTUNG
Briggs & Stratton Corporation repariert oder ersetzt kostenlos jedes Teil oder Teile des Produkts, die Material- oder Verarbeitungsschäden oder
beides aufweisen. Die Kosten für den Transport des Produkts, das unter dieser Garantie für Reparatur oder Austausch eingeschickt wird, sind
vom Käufer zu tragen. Diese Garantie ist für die nachstehend angegebenen Zeiträume gültig und den hier aufgeführten Bedingungen
unterworfen. Für Garantiearbeiten finden Sie den nächsten Vertragshändler in Ihrer Gegend auf unserem Händlerverzeichnis unter
www.murray.com.
ES GIBT KEINE ANDERE AUSDRÜCKLICHE GARANTIELEISTUNG. INBEGRIFFENE GARANTIELEISTUNGEN, EINSCHLIESSLICH
SOLCHER FÜR MARKTGÄNGIGE QUALITÄT UND EIGNUNG FÜR EINEN BESTIMMTEN ZWECK, SIND AUF EIN JAHR AB KAUFDATUM
BESCHRÄNKT, ODER ALLE INBEGRIFFENEN GARANTIELEISTUNGEN SIND, SOWEIT VON DER GESETZGEBUNG ERLAUBT,
AUSGESCHLOSSEN. HAFTUNG FÜR NEBEN- UND FOLGESCHÄDEN IST UNTER ALLEN GARANTIELEISTUNGEN AUSGESCHLOSSEN,
SOWEIT EIN DERARTIGER AUSSCHLUSS VOM GESETZ ERLAUBT IST. In manchen Ländern sind Einschränkungen hinsichtlich der Dauer
einer konkludenten Garantieleistung nicht zulässig, und in manchen Ländern sind Ausschluss oder Einschränkung von Neben- oder
Folgeschäden nicht zulässig, weswegen die oben aufgeführten Einschränkungen und Ausschlüsse u. U. in Ihrem Fall nicht zutreffen. Diese
Garantieleistung verleiht Ihnen bestimmte Rechte, neben denen Sie noch andere Rechte haben können, die von Land zu Land abweichen.
GARANTIEFRISTEN
Marke/Gerät Gebrauch Garantiefrist
Single Stage Schneefräse 1 Jahr 90 Tage. . . . . . . . . . . . . . . . . . . . . . .
Dual Stage Schneefräse 2 Jahr 90 Tage. . . . . . . . . . . . . . . . . . . . . . .
Die Garantiezeit beginnt am Datum des Kaufs durch den ersten Einzelhandelskunden bzw. gewerblichen Endbenutzer und dauert entsprechend den Angaben in oben stehender Tabelle. ”Private Nutzung” bezieht sich auf die Nutzung in privaten Haushalten durch Einzelhandelsverbraucher. ”Gewerbliche Nutzung” bezieht sich auf alle anderen Arten der Nutzung, einschließlich der Nutzung zu gewerblichen,
gewinnbringenden oder Ausleihzwecken. Nachdem das Produkt einmal für gewerbliche Zwecke genutzt wurde, gilt es für den Zweck dieser Garantie als gewerblich genutztes Produkt.
Zum Erhalt von Garantieleistungen an Murray-Produkten ist keine Registrierung erforderlich. Bewahren Sie die Kaufquittung auf. Wenn Sie
bei Garantieforderungen keinen Nachweis des Kaufdatums vorlegen können, wird die Garantiefrist anhand des Herstellungsdatums des
Produkts ermittelt.
Privatgebrauch Gewerblicher Bedingung für
ZUR GARANTIE
Wir führen gern Garantiereparaturen für Sie durch und entschuldigen uns für etwaige Unannehmlichkeiten. Garantiereparaturen können von allen
Vertragshändlern durchgeführt werden. Bei den meisten Garantiereparaturen handelt es sich um Routinearbeiten; mitunter ist jedoch der Anspruch auf
die Garantieleistung nicht gerechtfertigt. Beispielsweise wird keine Garantieleistung erbracht, wenn das Produkt durch falschen Gebrauch, durch
mangelhafte Wartung, unsachgemäßen Transport, unsachgemäße Handhabung oder Lagerung oder durch falsche Anwendung beschädigt wurde.
Ebenso besteht kein Garantieanspruch, wenn die Seriennummer am Produkt entfernt wurde oder Änderungen am Produkt vorgenommen wurden.
Diese Garantie deckt nur produktbezogene Material- und Verarbeitungsschäden ab. Um Missverständnisse zwischen dem Kunden und dem Händler
zu vermeiden, sind nachstehend einige der Ursachen für Produktschäden aufgeführt, die von der Garantie nicht abgedeckt werden.
• Normaler Verschleiß: An Geräten, die von kleinen Motoren angetrieben werden, müssen - wie bei allen mechanischen Geräten - regelmäßig
Wartungsarbeiten durchgeführt und Teile erneuert werden, damit das Gerät einwandfrei funktioniert. Die Garantie bietet keinen Anspruch auf Reparatur, wenn das Produkt oder ein Teil durch normalen Gebrauch verschlissen ist.
• Installation: Diese Garantie gilt nicht für Produkte, die falsch oder unzulässig installiert oder modifiziert worden sind, noch für Installationen, bei
denen Starts verhindert oder ungenügende Motorleistung verursacht wird.
• Unzureichende Wartung: Die Lebensdauer dieses Produkts hängt von den Betriebsbedingungen und der Pflege ab, die es erhält. Die empfohle-
nen Wartungs- und Einstellungsintervalle sind in der Bedienungsanleitung aufgeführt. Oft werden Produkte wie Gartenfräsen, Kantenschneider oder
Kreiselmäher unter staubigen oder schmutzigen Bedingungen eingesetzt, bei denen ein Zustand verursacht werden kann, der wie vorzeitiger Verschleiß aussieht. Derartiger Verschleiß, der durch Schmutz, Staub oder andere scheuernde Materialien verursacht wurde, die aufgrund unzureichender Wartung in das Produkt eingedrungen sind, wird nicht von der Garantie abgedeckt. Die Garantie deckt keine Reparaturen bei Problemen
ab, die durch Ersatzteile anderer Hersteller verursacht worden sind.
• Falscher und/oder unzureichender Kraftstoff oder Schmierung: Diese Garantie deckt keine Schäden ab, die durch Verwendung von altem oder
modifiziertem Kraftstoff verursacht wurden. Schäden an Motor oder Motorkomponenten wie Brennraum, Ventilen, Ventilsitzen, Ventilführungen oder
durchgebrannte Anlasserwicklungen, zu denen es durch Verwendung von alternativen Kraftstoffen wie Flüssiggas oder Erdgas gekommen ist, werden nur von der Garantie abgedeckt, wenn der Motor ausdrücklich für deren Verwendung zugelassen ist. Teile, die wegen Betrieb des Produkts mit
unzureichendem oder verunreinigtem Kraftstoff oder Schmieröl oder Kraftstoff mit falscher Oktanzahl verschleißen oder kaputt gehen, sowie Produktkomponenten, die durch unzureichende Schmierung beschädigt werden, werden nicht von der Garantie abgedeckt.
• Missbräuchlicher Betrieb: Der richtige Betrieb des Produkts wird in der Bedienungsanleitung beschrieben. Produktschäden durch Überdrehen,
Überhitzen oder Einsatz in geschlossenen Bereichen ohne ausreichende Belüftung, Produktschäden durch übermäßige Vibrationen aufgrund loser
Motormontage, loser oder unausgewuchteter Schnittmesser, Impeller, Überdrehen oder verbogene Kurbelwelle durch Auftreffen auf einen festen
Gegenstand, Schäden oder Fehlfunktionen durch Unfälle, falsche Wartung, Frost, chemische Zersetzung oder Betrieb oberhalb der empfohlenen
Nennwerte entsprechend der Bedienungsanleitung werden nicht abgedeckt.
• Routinewartungen, Verschleißteile oder Einstellungen: Diese Garantie schließt Verschleißteile wie Öl, Riemen, Schnittmesser, O-Ringe, Filter
usw. aus.
• Andere Ausschlüsse: Reparatur oder Einstellung von Teilen, die nicht von Briggs & Stratton Corporation hergestellt wurden, werden nicht von der
Garantie abgedeckt − siehe die Gewährleistung der jeweiligen Hersteller. Diese Garantie schließt Schäden durch höhere Gewalt und Naturereignisse aus, die sich der Kontrolle des Herstellers entziehen. Gebrauchte, instandgesetzte und Demonstrationsprodukte sind ebenfalls ausgeschlossen.
Garantiearbeiten sind nur bei Vertragshändlern erhältlich. Den nächsten Händler finden Sie auf unserem Händlerverzeichnis unter
www.murray.com.
1740265
27
Page 28

OBSAH
SYMBOLY OZNAÈUJÚCE NEBEZPEÈENSTVO A
ICH VÝZNAM 29. . . . . . . . . . . . . . . . . . . . . . . . . . . . . . . . . .
PREVÁDZKOVÉ SYMBOLY A ICH VÝZNAM 29. . . . . . . .
SLOVAKIAN 29. . . . . . . . . . . . . . . . . . . . . . . . . . . . . . . . . . . . .
PRAVIDLÁ BEZPEÈNEJ PREVÁDZKY 30. . . . . . . . . . . . .
SLOVAKIAN 30. . . . . . . . . . . . . . . . . . . . . . . . . . . . . . . . . . . . .
MONTÁĈ 32. . . . . . . . . . . . . . . . . . . . . . . . . . . . . . . . . . . . . . . .
PREVÁDZKA 32. . . . . . . . . . . . . . . . . . . . . . . . . . . . . . . . . . . . .
GRAF ÚDRĈBY 35. . . . . . . . . . . . . . . . . . . . . . . . . . . . . . . . . .
GRAF RIEĆENIA PROBLÉMOV 37. . . . . . . . . . . . . . . . . . . .
SLOVAKIAN 32. . . . . . . . . . . . . . . . . . . . . . . . . . . . . . . . . . . . .
OBMEDZENÁ ZÁRUKA 38. . . . . . . . . . . . . . . . . . . . . . . . . . .
SLOVAKIAN 38. . . . . . . . . . . . . . . . . . . . . . . . . . . . . . . . . . . . .
SK
DÔLEĈITÉ: Mnoho jednotiek sa predáva v nie zmontovanom stave a predávajú sa
v čkatuliach. Majite¾ je zodpovedný uistiĎ sa, ďe pokyny pre montáď uvedené v
tomto návode boli presne dodrďané. Ostatné jednotky sa predávajú v zmontovanom
stave. V prípade zmontovaných jednotiek je majite¾ zodpovedný uistiĎ sa, ďe
jednotky boli správne zmontované. Majite¾ musí pred prvým pouďitím dôkladne
skontrolovaĎ jednotku, a to v súlade s pokynmi uvedenými v tomto návode.
Ovládaèe a funkcie zariadenia (pozrite si obrázok 1)
Zostava k¾uky (2) – Vykonáva zmenu smeru ď¾abu pre vyprázdòovanie.
Vychy¾ovaè ď¾abu (3) – Mení vzdialenosĎ, do akej sa sneh odhadzuje.
Ĉ¾ab pre vyprázdòovanie (4) – Mení smer, akým sa sneh odhadzuje.
Páka pohonu závitovky (5) – SpúčĎa a zastavuje závitovku (zbieranie a
odhadzovanie snehu), ktorá taktieď poháòa sneďnú frézu dopredu.
Včeobecné informácie
Tento návod je napísaný pre osobu s urèitými technickým zruènosĎami. Ak v
prípade väèčiny servisných príruèiek, ani v tejto nie sú popísané včetky kroky.
Kroky ako uvo¾niĎ alebo utiahnuĎ upínadlá predstavujú kroky, ktoré zvládne
ktoko¾vek s urèitými technickými skúsenosĎami. Pred pouďívaním jednotky si
preèítajte tento návod a postupujte pod¾a neho.
Spoznajte svoj výrobok: Ak porozumiete jednotke a pochopíte jej èinnosĎ,
dosiahnete tak najvyččí výkon. Poèas èítania tohto návodu porovnávajte nákresy s
jednotkou. Nauète sa umiestnenie a funkciu ovládaèov. Aby ste predičli nehode,
postupujte pod¾a návodu na obsluhu a bezpeènostných zásad. Tento návod pre
moďnú budúcu potrebu uschovajte.
Deklarované hodnoty vibraèných emisií v súlade so Smernicou 98/37/EC.
Vibraèné emisie v súlade s EN 1033;1996: 7,1 m/s2.
www.briggsandstratton.com
MODEL NO.: 621403x61NB
SKU No.:
YYYY MM DD:
SERIAL NO.:
3500 min-1
Assembled in Suzhou, China 215218
by Limac for Briggs & Stratton Corporation
30 kg
Hodnoty stanovené pri rukoväti, a to keï bol stroj prevádzkovaný
stacionárne na betónovom povrchu pri 3500 min−1.
Deklarované vzduchom prenáčané emisie hluku Lw
Smernicou 2000/14/EC, Príloha V.
Úroveò akustického tlaku na úrovni obsluhy 84 dB.
Hodnoty stanovené na úrovni ucha v súlade so čpecifikáciami EN ISO 11201.
Funkcie motora
Spínaè pre zastavenie (8) − Za úèelom spustenia motora je potrebné presunúĎ ho
do polohy ON.
Tlaèidlo spúčĎaèa motora (9) – Vstrekuje palivo priamo do karburátora, a to za
úèelom rýchleho načtartovania v chladnom poèasí.
RukoväĎ reakèného čtartéra (12) – Pouďite v prípade manuálneho spustenia
motora.
Ovládanie sýtièa (14) – Pouďite pri spúčĎaní studeného motora.
A 104 dB sú v súlade so
1740265
Deklarovaná úroveò vzduchom prenáčaným
akustickým zvukom 104 dB(A) je v súlade s
Smernicou 2000/14/EC.
28
Page 29

SK
29
1740265
Tento návod obsahuje bezpeènostné informácie, ktoré vás
upozornia na nebezpeèenstvá a riziká týkajúce sa
sneďných fréz, a informácie o tom, ako sa im vyhnúĎ.
Sneďná fréza je navrhnutá a pouďíva sa na odstraòovanie snehu a nemala by
sa pouďívaĎ na iný ako tento úèel. Je dôleďité, aby ste si preèítali a pochopili
tento návod a aby aj ktoko¾vek, kto bude prevádzkovaĎ toto zariadenie si tento
návod preèítal a porozumel mu.
Výfukové splodiny motora tohto výrobku obsahujú chemikálie, ktoré sú Ćtátom Kalifornia
urèené ako látky spôsobujúce rakovinu, vrodené chyby alebo iné reprodukèné
počkodenia.
VÝSTRAHA
Slovo oznaèenia (NEBEZPEÈENSTVO, VÝSTRAHA alebo VAROVANIE) sa pouďívajú v
spojení s výstraďnými symbolmi na oznaèenie pravdepodobnosti a moďnej váďnosti
poranenia. Na dôvaďok sa môďe symbol nebezpeèenstva pouďívaĎ na vyjadrenie typu
nebezpeèenstva.
NEBEZPEÈENSTVO oznaèuje riziko, ktorému je potrebné predísĎ, inak
bude jeho následkom smrĎ alebo váďne poranenie.
VÝSTRAHA oznaèuje riziko, ktorému je potrebné predísĎ, inak by mohla
byĎ jeho následkom smrĎ alebo váďne poranenie.
VAROVANIE oznaèuje riziko, ktorému je potrebné predísĎ, inak by
mohlo byĎ jeho následkom malé alebo stredne váďne poranenie.
VAROVANIE, ktoré sa pouďíva bez výstraďného symbolu oznaèuje
situáciu, ktorej výsledkom by mohlo byĎ počkodenie zariadenia.
Symboly oznaèujúce nebezpeèenstvo a ich význam
Tieto symboly sú pouďité na vačom zariadení a sú zadefinované v návode na obsluhu.
Prezrite si a pochopte význam týchto symbolov. Pouďitie týchto symbolov v kombinácii s
signálnym slovom vás upozorní na moďné riziká a na to, ako sa im vyhnúĎ.
Výbuch
Toxické plyny a
výpary
Elektrický čok
Horúci povrch
Oheò
Návod na obsluhu – Preèítajte si ho a pochopte ho pred
vykonávaním akejko¾vek èinnosti alebo pred pouďívaním
zariadenia.
Bezpeènostné upozornenie – Oznaèuje bezpeènostnú informáciu
týkajúcu sa rizík, ktoré môďu spôsobiĎ poranenie osôb.
Rotaèná závitovka
Rotaèný obeh
Rotaèné prevody
Odhadzované
predmety
Dodrďiavajte bezpeènú
vzdialenosĎ od zariadenia.
Pred vykonávaním údrďby alebo opravy vypnite motor a
odpojte konektor zapa¾ovacej svieèky.
Nikdy sa nedotýkajte
rotujúcich èastí.
Odporúèaná ochrana
sluchu poèas predåďenej
doby pouďívania.
Prevádzkové symboly a ich význam
Tieto symboly sú pouďité na vačom zariadení a sú zadefinované v návode na obsluhu. Je
dôleďité, aby ste si prezreli a pochopili významy. Chyba v pochopení symbolov môďe
spôsobiĎ vače poranenie.
Zastavenie
Palivo
Sýtiè je vypnutý
Olej
Sýtiè je vypnutý
Pomaly
Rýchlo
Zapnuté Vypnuté
K¾úè zapa¾ovania
Zapa¾ovanie
motora je vypnuté
Zapa¾ovanie motora
je zapnuté
Ĉiarovka spúčĎaèa
motora
Ćkrtiaci
ventil
Spojka pohonu
Spojka závitovky
ZapojiĎ
DOPRAVA
Zberaè závitovky
Pohon
Ĉ¾ab pre vyprázdòovanie
DO¼AVA NAHOR
NADOL
Dopredu
Neutrál
Dozadu
Stlaète aby ste zapli
elektrické
načtartovanie
Elektrický čtart
Spustenie
motora
Motor beďí
Motor je
vypnutý
Vychy¾ovaè ď¾abu
ZapojiĎ
RozpojiĎ
Vyhrievané
draďdlá
ZapojiĎ
Page 30

SK
30
1740265
VÝSTRAHA: Tento stroj je schopný amputovaĎ ruky a chodidlá a odhadzovaĎ predmety. Preèítajte si
bezpeènostné pravidlá a presne ich dodrďiavajte. Opomenutie dodrďiavaĎ tieto pravidlá môďe maĎ za
následok stratu nad kontrolou jednotky, váďne osobné poranenia alebo smrĎ vás alebo okolostojacich osôb
alebo počkodenie majetku alebo zariadenia. Trojuholník v rámci textu znamená dôleďité varovanie alebo
výstrahu a je potrebné sa týmto riadiĎ.
PRAVIDLÁ BEZPEÈNEJ PREVÁDZKY
DÔLEĈITÉ: Bezpeènostné normy poďadujú za úèelom zníďenia rizika
vybavenie zariadeniami kontroly prítomnosti obsluhy. Vača sneďná fréza
je takýmito zariadeniami vybavená. nesnaďte sa v ďiadnom prípade zručiĎ
funkciu zariadení kontroly prítomnosti obsluhy.
Začkolenie
1. Pred prevádzkovaním tejto jednotky si preèítajte si, pochopte a
postupujte pod¾a pokynov uvedených na stroji a v návodoch.
Dôkladne sa oboznámte s ovládaèmi a správnym pouďívaním
zariadenia. Je potrebné, aby ste vedeli ako rýchlo zastaviĎ jednotku a
vyradiĎ ovládaèe.
2. Nikdy nedovo¾te, aby zariadenie obsluhovali deti. Nikdy nedovo¾te
aby zariadenie obsluhovali dospelí, ktorí pre túto èinnosĎ nezískali
správne pokyny.
3. Zabezpeète, aby sa v mieste prevádzkovania nenachádzali iné osoby,
obzvláčĎ malé deti a zvieratá.
4. Dávajte si pozor aby ste sa nepočmykli alebo nespadli, a to obzvláčĎ
pri prevádzke smerom dozadu.
Príprava
1. Dôkladne skontrolujte plochu, kde sa bude zariadenie pouďívaĎ a
odstráòte včetky rohoďky, sánky, dosky, drôty a akéko¾vek iné cudzie
predmety.
2. Pre spustením zariadenia (motora) rozpojte včetky spojky a presuòte
ich do neutrálnej polohy.
3. Zariadenie neprevádzkujte bez aby ste mali obleèené adekvátne
zimné obleèenie pre prácu vonku. Noste obuv ktorá zlepčí pri¾navosĎ
na čmyk¾avých povrchoch. Nenoste vo¾né obleèenie ktoré sa môďe
zachytiĎ pohybujúcimi èasĎami.
4. S palivom zaobchádzajte opatrne; je vysoko zápalné.
a. Pouďívajte schválenú palivovú nádrď.
b. Palivo nikdy nenapåòajte do beďiaceho motora alebo do horúceho
motora.
c. Palivo napåòajte vonku a s èo najväèčou opatrnosĎou. Palivo nikdy
nedopåòajte vo vnútri. Uzáver palivovej nádrďe otvárajte opatrne a
rozliate palivo utrite.
d. Nikdy nenapåòajte nádrďe vo vnútri vozidla, na nákladnom vozidle
alebo korbe prívesu s plastovým chránièom blatníka. Pred plnením
nádrďe vďdy poloďte na zem, v dostatoènej vzdialenosti od vozidla.
e. Ak sa dá, odmontujte z nákladného automobilu alebo prívesu
plynom poháòané zariadenie a naplòte ho na zemi. Ak to nie je
moďné, naplòte ho na prívese pomocou prenosnej nádrďe, èo je
lepčie ako naplniĎ ho pomocou trysky benzínového èerpacieho
automatu.
f. Trysku ponechajte poèas celej doby otvorenú a v styku s hranou
palivovej nádrďe alebo nádoby, a to aď dokia¾ sa plnenie neukonèí.
Nepouďívajte uzamykacie zariadenie trysky.
g. Uzáver palivovej nádrďe osaïte opatrne naspäĎ a rozliate palivo
utrite.
h. Ak sa palivo rozlialo na obleèenie, obleèenie okamďite vymeòte.
5. Pouďívajte predlďovacie čnúry a objímky stanovené výrobcom, a to
pre včetky jednotky s poháòané elektrickým motorom alebo
elektrickými čtartovacími motormi.
6. Nastavte výčku schránky zberaèa, a to za úèelom èistenia čtrkových
povrchov alebo povrchov z drveného kameniva.
7. Nikdy sa nepokúčajte vykonávaĎ akéko¾vek zariadenia poèas chodu
motora (okrem prípadov kedy to čpeciálne odporúèa výrobca).
8. Pred zaèatím èistenia snehu nechajte motor a sneďnú frézu beďaĎ,
aby sa prispôsobila vonkajčím teplotám.
9. Poèas prevádzky alebo poèas vykonávania nastavenia alebo opravy
noste ochranné okuliare alebo čtít na ochranu oèí aby ste oèi chránili
pre cudzími predmetmi, ktoré môďe stroj vyhodiĎ.
Prevádzka
1. Ruky ani chodidlá nestrkajte do blízkosti alebo pod rotujúce èasti.
Poèas celej doby zabezpeète aby sa vyprázdòovací otvor nezanáčal.
2. Maximálnu pozornosĎ venujte prevádzke na alebo pri prechode cez
čtrkové cesty, chodníky alebo cesty. Dávajte pozor na skryté riziká
alebo dopravu.
3. Po nabehnutí na cudzorodý predmet zastavte motor, odpojte drôt od
zapa¾ovacej svieèky, odpojte káble na elektrických motoroch,
dôkladne skontrolujte počkodenia sneďnej frézy a pred opätovným
spustením a prevádzkovaním sneďnej frázy počkodenia opravte.
4. Ak jednotka načtartuje a bude nezvyèajne vibrovaĎ, zastavte motor a
okamďite skontrolujte príèinu. Vibrácia je včeobecnou výstrahou
problému.
5. Motor zastavte vďdy keï opúčĎate prevádzkovú polohu, a to pre
odstránení zanesenia zberaèa / skrinky pohonu alebo ď¾abu pre
vyprázdòovanie a ak vykonávate akéko¾vek opravy, nastavenia alebo
prehliadky.
6. Poèas èistenia, opravy alebo prehliadky sa uistite, ďe sa zberaè /
pohon a včetky pohybujúce èasti sa zastavili. Odpojte drôt
zapa¾ovacej svieèky a drôt umiestnite v dostatoènej vzdialenosti od
zapa¾ovacej svieèky, èím zabránite náhodnému načtartovaniu.
7. Motor neprevádzkujte vo vnútri, okrem načtartovania motora pre úèel
prepravy sneďnej frézy do alebo von z budovy. Otvorte vonkajčie
dvere; výfukové plyny sú nebezpeèné (obsahujú KYSLIÈNÍK
UHOăNATÝ, SMRTEăNÝ PLYN BEZ ZÁPACHU).
8. Výnimoènú pozornosĎ venujte pri prevádzkovaní na svahoch.
Nesnaďte sa èistiĎ strmé svahy.
9. Sneďnú frézu nikdy neprevádzkujte bez osadenia a fungovania
správnych chránièov alebo iných ochranných zariadení.
10. Vyprázdòovanie nikdy nesmerujte na ¾udí alebo na miesta, kde by
mohlo dôjsĎ k počkodeniu majetku. Zabráòte prístupu detí a
ostatných.
11. NezaĎaďujte výkon motora tým, ďe sa budete snaďiĎ odstraòovaĎ sneh
ve¾kou rýchlosĎou.
12. Stroj na čmyk¾avých povrchoch nikdy neprevádzkujte pri vysokých
dopravných rýchlostiach. Ak prevádzkujte zariadenie v smere dozadu,
pozerajte sa dozadu a dávajte pozor.
13. Prívod do zberaèa / pohonu odpojte poèas prepravy frézy alebo ak sa
fréza nepouďíva.
14. Pouďívajte iba príslučenstvo a doplnky schválené výrobcom sneďnej
frézy (ako sú kabíny, pneumatiky, reĎaze atï.).
15. Frézu nikdy neprevádzkujte poèas zlej vidite¾nosti alebo pri slabom
svetle. Pri chôdzi si buïte istý a rukoväte drďte pevne. Pouďívajte
chôdzu, nie beh.
Page 31

SK
31
1740265
16. Nikdy sa nedotýkajte motora alebo tlmièa výfuku.
17. Sneďnú frézu nikdy neprevádzkujte bez správneho nastavenia uhla
vyprázdòovania snehu v blízkosti sklenených obvodových stien,
automobilov, osvet¾ovacích čachiet, odkvapov a im podobným
končtrukciám.
18. Nikdy nevyprázdòujte smerom na okolostojacich a nikdy nedovo¾te
aby pre jednotkou niekto stál.
19. Beďiacu jednotku nikdy nenechávajte bez dozoru. Vďdy rozpojte
závitovku a ovládaèe pohonu, zastavte motor a vyberte k¾úèe.
20. Jednotku neobsluhujte pod vplyvom alkoholu alebo liekov.
21. Uvedomte si, ďe obsluha je zodpovedná za nehody spôsobené
ostatným ¾uïom alebo za čkody na majetku.
22. Údaje dokazujú ďe obsluhujúci vo veku nad 60 rokov sú úèastníkmi
ve¾kého percenta úrazov, ktoré boli spôsobené silnoprúdovými
elektrickými zariadeniami. Títo obsluhujúci by si mali prehodnotiĎ
vlastnú schopnosĎ bezpeèného prevádzkovania jednotky tak, aby
ochránili seba a ostatných pred úrazom.
23. NENOSTE dlhé čály alebo vo¾né obleèenie, ktoré by sa mohlo
zachytiĎ do pohybujúcich sa èastí.
24. Sneh môďe zakrývaĎ prekáďky. Z plochy, ktorú budete èistiĎ odstráòte
včetky prekáďky.
Deti
Ak obsluha nevenuje pozornosĎ prítomnosti detí, môďe dôjsĎ k tragickým
nehodám. Deti sa èasto zaujímajú o jednotku a prevádzkovú èinnosĎ. Nikdy
sa nespoliehajte na to, ďe deti zostanú tam, kde ste ich naposledy videli.
1. Zabezpeète, aby sa deti nedostali do plochy èistenia a zabezpeète
aby boli pod doh¾adom inej dospelej zodpovednej osoby.
2. Dávajte pozor a ak deti vstúpia do plochy vypnite zariadenia.
3. Nikdy nedovo¾te, aby jednotku obsluhovali deti.
4. Maximálnu pozornosĎ venujte pribliďovaniu sa k slepým rohom,
kríkom, stromom alebo ostatným objektom ktoré môďu prekáďaĎ
rozh¾adu.
Èistenie zaneseného ď¾abu pre vyprázdòovanie
Kontakt rúk s rotaèným pohonom vo vnútri ď¾abu pre vyprázdòovanie je
najbeďnejčou príèinou poranení súvisiacimi so sneďnými frézami. Ĉ¾ab pre
vyprázdòovanie nikdy neèistite rukami.
Aby ste vyèistili ď¾ab:
1. VYPNITE MOTOR.
2. Poèkajte 10 minút a uistite sa, ďe obeďné èepele sa prestali otáèaĎ.
3. Vďdy pouďívajte nástroj na èistenie a nie ruky.
Servis, údrďba a skladovanie
1. Vďdy v èastých intervaloch skontrolujte skrutky s maticami noďov a
ostatné skrutky s maticami, skontrolujte ich utiahnutosĎ, aby ste sa
takto presvedèili, ďe zariadenie je bezpeènom pracovnom stave.
2. Sneďnú frézu nikdy neuskladòujte s palivom v palivovej nádrďi v
budove, v ktorej sa nachádzajú zápalné zdroje, akými sú ohrievaèe
vody, ohrievaèe vzduchu alebo sučièky odevov. Pred uskladnením na
akomko¾vek ohradenom mieste nechajte motor vychladnúĎ.
3. Ak mienite sneďnú frézu uskladniĎ poèas dlhčej doby, vďdy si pozrite
dôleďité podrobnosti uvedené v návode na obsluhu.
4. Pod¾a potreby vykonajte údrďbu alebo výmenu bezpeènostných
nálepiek a nálepiek s pokynmi.
5. Po odhadzovaní snehu nechajte stroj poèas nieko¾kých minút beďaĎ,
èím zabránite zamrznutiu zberaèa / pohonu.
6. Ak dočlo k rozliatiu paliva, nesnaďte sa načtartovaĎ motor ale stroj
premiestnite z miesta rozliatia paliva a zabráòte vzniku akéhoko¾vek
zdroja zapálenia, a to aď dokia¾ sa palivové výpary nerozptýlia.
7. Vďdy dodrďujte bezpeèné postupy pri plnení a narábaní s palivom, a
to poèas plnenia jednotky palivom po jej preprave alebo uskladnení.
8. Pred uskladnením jednotky na krátku alebo dlhú dobu vďdy
postupujte pod¾a návodu na obsluhu motora a postupujte pod¾a
pokynov pre prípravu na uskladnenie.
9. Pri opätovnom sprevádzkovaní jednotky vďdy postupujte pod¾a
pokynov uvedených v návode na obsluhu motora týkajúcich sa
správnych postupov -pri spúčĎaní.
10. Pod¾a potreby vykonajte údrďbu alebo výmenu bezpeènostných
nálepiek a nálepiek s pokynmi.
11. Matice a skrutky s maticami udrďiavajte utiahnuté a zariadenie
udrďiavajte v dobrom stave.
12. Nikdy svojvo¾ne nezasahujte do bezpeènostných zariadení.
Pravidelne kontrolujte ich správnu èinnosĎ a vykonajte potrebné
opravy v prípade ich nesprávnej èinnosti.
13. Prvky podliehajú opotrebovaniu, počkodeniu a znehodnocovaniu.
Prvky pravidelne kontrolujte a v prípade potreby vymeòte za
výrobcom odporúèané súèiastky.
14. Èasto kontrolujte èinnosĎ ovládania. V prípade potreby nastavte a
vykonajte servis.
15. V prípade opráv pouďívajte jedine výrobcom schválené náhradné
súèiastky.
16. Včetky nastavenia a úpravy musia byĎ v súlade s výrobnými
technickým čpecifikáciami.
17. V prípade poďiadavky na vykonanie hlavného servisu a opravy je
potrebné vyuďiĎ iba oprávnené servisné strediská.
18. Nikdy sa nepokúčajte vykonávaĎ hlavné opravy na tejto jednotky
dokia¾ ste na to neboli dôkladne začkolený. Nesprávne servisné
postupy môďu maĎ za následok rizikovú prevádzku, počkodenie
zariadenia a ukonèenie platnosti záruky poskytnutej výrobcom.
19. Vďdy v èastých intervaloch skontrolujte skrutky s maticami noďov
(hrotov) a ostatné skrutky s maticami; skontrolujte ich utiahnutosĎ, aby
ste sa takto presvedèili, ďe zariadenie je bezpeènom pracovnom
stave.
Výfukové spolodiny
1. Výfukové splodiny motora tohto výrobku obsahujú chemikálie známe
tým, ďe v urèitých mnoďstvách spôsobujú rakovinu, vrodené chyby
alebo iné reprodukèné počkodenia.
2. V prípade dostupnosti poh¾adajte relevantné informácie o dobe
ďivotnosti emisií a indexe vzduchu, ktoré sa nachádzajú na nálepke s
údajmi o emisiách motora.
Systém zapa¾ovania
1. Systém zapa¾ovania pomocou zapa¾ovacej svieèky je v súlade s
kanadskou ICES-002.
Page 32

SK
32
1740265
MONTÁĈ
Preèítajte si a postupujte pod¾a pokynov pre
montáď a nastavenie urèených pre vaču sneďnú
frézu. Včetky upínadlá nájdete vo vrecku so
súèiastkami. Ĉiadnu zo súèastí ani ďiadny z
materiálov neznehodnocujte, a to aď dokia¾
úplne nezmontujete jednotku.
VÝSTRAHA: Pred vykonávaním
akejko¾vek èinnosti nastavenia
alebo drďby týkajúcej sa sneďnej
frézy vďdy odpojte od zapa¾ovacej svieèky
drôt.
POZNÁMKA: V rámci tohto návodu výraz
na¾avo a napravo znamená polohu súèiastky
od obsluhy, ktorá je za jednotkou.
POZNÁMKA: Krútiaci moment sa meria v
ft/lbs (N.m). Táto miera udáva akou silou
musí byĎ matica alebo skrutka s maticou
utiahnutá. Krútiaci moment sa meria
momentovým k¾úèom.
POZNÁMKA: Ilustrácie sa nachádzajú na
strane 2 a na stranách 3 aď 6.
Potrebné nástroje
1 Nôď
1 Kliečte
Ako vybraĎ sneďnú frézu zo čkatule
1. Nájdite a vyberte olejovú nádrď.
2. Nájdite včetky súèiastky, ktoré sú zabalené
samostatne a vyberte ich zo čkatule.
3. Odstráòte a znečkodnite obalový materiál,
ktorým je sneďná fréza obalená.
4. Zreďte včetky čtyri rohy čkatule a boèné
steny čkatule uloďte naleďato.
5. Uchopte za spodnú rukoväĎ a sneďnú frézu
vytiahnite zo čkatule.
VAROVANIE: Káble NEOHÝBAJTE.
6. Odstráòte obalová materiál zo zostavy
rukoväte. Odstráòte spodnú vloďku z
nápravy.
Ako zmontovaĎ rukoväĎ
1. Odstráòte obalový materiál z horných a
dolných rukovätí.
2. (Obrázok 2) Uvo¾nite gombíky (1) na kaďdej
zo strán rukoväte (2).
3. Zodvihnite hornú rukoväĎ (2) do jej
prevádzkovej polohy. Pridrďiavajte hornú
rukoväĎ (2) stranou, aby ste zabránili
počkriabaniu spodnej rukoväte.
POZNÁMKA: Presvedète sa, ďe kábel
pohonu závitovky nie je zachytený medzi
hornou a spodnou rukoväĎou.
4. Utiahnite gombíky (1).
Ako pripraviĎ motor
VÝSTRAHA: V prípade typu
pouďívaného paliva a oleja
postupujte pod¾a pokynov výrobcu
motora. Vďdy pouďívajte bezpeènostnú
palivovú nádrď. Poèas pridávania paliva do
palivovej nádrďe nefajèite. Ak sa
nachádzate na ohradenom priestranstve,
palivovú nádrď nenapåòajte. Pred plnením
paliva zastavte motor. Motor nechajte
poèas doby nieko¾kých minút vychladnúĎ.
Typ pouďívaného paliva a oleja si pozrite v
pokynoch výrobcu motora. Pred pouďívaním
jednotky si preèítajte informácie o bezpeènosti,
prevádzke, údrďbe a skladovaní.
POZNÁMKA: Menovitý výkon motora môďe
byĎ rozdielny v závislosti na nastaveniach,
výrobných odchýlkach, nadmorskej výčke,
atmosférických podmienkach, palive a
údrďbe.
Pridanie oleja do motora (Obrázok 3)
POZNÁMKA: Motor môďe obsahovaĎ
zvyčkový olej. Pri plnení k¾ukovej skrine toto
èasto kontrolujte. NEPREPLÒUJTE.
Sneďná fréza bola dodaná s zásobníkom
motorového oleja 5W30. Tento olej je potrebné
pridaĎ pred prevádzkou do motora.
1. Presvedète sa, ďe jednotka je vo vodorovnej
polohe.
2. Odmontujte uzáver pre plnenie
oleja/odmerku (1) a naplòte k¾ukovú skriòu
po èiaru FULL (PLNÁ), ktorá sa nachádza
na odmerke. NEPREPLÒUJTE.
3. Vďdy keï kontrolujte hladinu oleja, pevne
utiahnite uzáver pre plnenie oleja /
odmerku (1).
POZNÁMKA: Syntetický olej môďe pomôcĎ
poèas čtartovania pri extrémne nízkych
teplotách. Syntetický olej 5W30 je prijate¾ný
pre včetky teploty. NEMIEĆAJTE olej s
benzínom.
Pridávanie benzínu do motora
Motor je certifikovaný pre prevádzku za
prítomnosti benzínu. Systém kontroly
výfukových emisií: EM (úpravy motora).
VÝSTRAHA: Palivá s podielom
alkoholu (nazývané ako palivové
zmesi, alebo tie, v ktorých sa
pouďíva etanol alebo metylalkohol) môďu
priĎahovaĎ vlhkosĎ, ktorá v èase
uskladnenia môďe spôsobiĎ vyluèovanie
alebo tvorbu kyselín. Kyslé plyny môďu
poèas uskladnenia spôsobiĎ počkodenie
palivového systému motora.
POZNÁMKA: Aby ste sa vyhli problémom s
motorom, je potrebné palivový systém v
prípade uskladnenia poèas doby dlhčej ako
30 dní vyprázdniĎ. Spustite motor a nechajte
ho beďaĎ dokia¾ nebudú palivové vedenia a
karburátor prázdne. V nasledujúcej sezóne
pouďite èerstvé palivo. Ïalčie informácie
týkajúce sa uskladnenia nájdete v èasti o
uskladnení, ktorá sa nachádza v tomto
návode.
Palivovú nádrď plòte iba èerstvým, èistým,
beďným bezolovnatým, vysoko kvalitným
bezolovnatým alebo preformulovaným
automobilovým benzínom minimálne 85
oktánovým. NE pouďívajte olovnatý benzín.
Presvedète sa, ďe nádoba, z ktorej prelievate
benzín je èistá, zbavená hrdze a iných
cudzorodých súèastí. Nikdy nepouďívajte
benzín, ktorý je zvetraný od dlhodobého
uskladnenia v nádobe.
Pre prevádzkou
Pred prevádzkou vačej novej sneďnej frézy si
prezrite nasledujúci kontrolný zoznam:
G Uistite sa, ďe včetky pokyny týkajúce sa
montáďe boli uskutoènené.
G Uistite sa ďe ď¾ab pre vyprázdòovanie sa
pohybuje vo¾ne.
G Uistite sa, ďe v čkatuli nezostali ďiadne
uvo¾nené súèiastky.
Poèas toho ako sa budete uèiĎ správne pouďívaĎ
sneďnú frézu, zvláčtnu pozornosĎ venujte
nasledujúcim dôleďitým poloďkám.
G Presvedète sa ďe hladina motorového oleja
je na správnej úrovni. Typ motorového oleja
urèeného na pouďívanie nájdete v návode
výrobcu motora.
G Presvedète sa, ďe nádrď na benzín je
správne naplnená èerstvým bezolovnatým
benzínom, a to minimálne 85 oktánovým.
G Oboznámte sa s umiestnením ovládaèov a
pochopte ich funkciu.
G Pred spustením motora sa presvedète, ďe
včetky ovládaèe fungujú správne.
PREVÁDZKA
POZNÁMKA: Ilustrácie sa nachádzajú na
strane 2 a na stranách 3 aď 6.
VAROVANIE: Pouďívajte iba príslučenstvo a
doplnky schválené výrobcom sneďnej frézy
(ako napríklad reĎaze na pneumatiky, sady
pre elektrický čtart, atï.).
Spoznajte svoju sneďnú frézu
(Obrázok 1)
Pred prevádzkovaním sneďnej frézy si preèítajte
tento návod na obsluhu a bezpeènostné
predpisy. Porovnajte ilustrácie s vačou sneďnou
frézou, a to aby ste sa sami oboznámili s
umiestnením rôznych ovládaèov a nastavení.
Ako ovládaĎ odstraòovanie snehu
VÝSTRAHA: Odstraòovaè snehu
nikdy nesmerujte v smere
okolostojacich osôb.
VÝSTRAHA: Pred odstránením
zanesenia ď¾abu pre
vyprázdòovanie alebo krytu
závitovky, ako aj pred opustením sneďnej
frézy vďdy zastavte motor.
1. (Obrázok 1) Otoète zostavu k¾ukového
hriade¾a (2) aby ste takto zmenili smer pre
odstraòovanie snehu.
2. (Obrázok 6) Uvo¾nite gombík s krídelkami
(1) na vychy¾ovaèi ď¾abu (2).
3. Posuòte vychy¾ovaè ď¾abu (2) hore, ak si
ďeláte dosiahnuĎ väèčiu vzdialenosĎ, alebo
dolu, ak si ďeláte dosiahnuĎ menčiu
vzdialenosĎ.
4. Utiahnite gombík s krídelkami (1).
Ako frézovaĎ sneh (Obrázok 1)
1. Zapojte páku pohonu závitovky (5).
2. Aby ste zastavili frézovanie snehu, uvo¾nite
páku pohonu závitovky (5).
Page 33

SK
33
1740265
VÝSTRAHA: Prevádzka akejko¾vek
sneďnej frézy môďe spôsobiĎ
odhodenie cudzorodých predmetov
do oèí, èoho následkom môďe byĎ
počkodenie oka. Vďdy poèas prevádzky
sneďnej frézy pouďívajte ochranné okuliare
alebo ochranný čtít. Odporúèame pouďívaĎ
beďné ochranné okuliare alebo pouďívaĎ
ochrannú masku so čirokým priezorom
pouďívanú v spojení s vačimi okuliarmi.
Ako zastaviĎ odstraòovanie snehu
(Obrázok 1)
1. Aby ste zastavili odstraòovanie snehu,
uvo¾nite páku pohonu závitovky (5).
POZNÁMKA: Ak sa sneďná fréza naïalej
pomaly pohybuje smerom dopredu,
pozrite si èasĎ Ako nastaviĎ ovládací
kábel závitovky nachádzajúcu sa èasti o
údrďbe.
2. Aby ste zastavili motor, stlaète spínaè pre
zastavenie (8) do polohy pre vypnutie
(OFF).
VAROVANIE: Aby ste zastavili motor,
nepresúvajte ovládaè sýtièa do polohy
CHOKE (SÝTIÈ). Môďe dôjsĎ k poruche
zapa¾ovania alebo počkodeniu motora.
Ako sa pohybovaĎ dopredu (Obrázok 7)
1. Uchopte páku pohonu závitovky (5) v
smere k rukoväti (2). Závitovka sa zaène
otáèaĎ.
2. Aby ste sa zaèali pohybovaĎ dopredu,
zodvihnite rukoväĎ (2), èím umoďníte
gumeným èepeliam závitovky dotknúĎ sa
zeme. Naïalej pevne drďte rukoväĎ (2)
pretoďe sneďná fréza sa zaèína pohybovaĎ
smerom dopredu. Sneďnú frézu navádzajte
pohybovaním rukoväte (2) do¾ava alebo
doprava. Na sneďnú frézu sa nesnaďte
vyvíjaĎ tlak.
3. Aby ste zastavili, uvo¾nite páku pohonu
závitovky (5).
POZNÁMKA: Ak sa závitovka naïalej otáèa,
pozrite si èasĎ Ako nastaviĎ ovládací kábel
závitovky nachádzajúcu sa èasti o údrďbe.
Pred spustením motora
1. Pred vykonávaním servisu alebo spustením
motora sa vy sami oboznámte so sneďnou
frézou. Uistite sa ďe chápete funkcie a
poznáte umiestnenie včetkých ovládaèov.
2. Presvedète sa, ďe včetky upínadla sú
náleďite utiahnuté.
3. Presvedète sa, ďe palivová nádrď je
naplnená správnou zmesou benzínu a oleja.
4. Oboznámte sa s umiestnením ovládaèov a
pochopte ich funkciu.
5. Pred spustením motora sa presvedète, ďe
včetky ovládaèe fungujú správne.
Ako zastaviĎ motor (Obrázok 1)
Aby ste zastavili motor, stlaète spínaè pre
zastavenie (8) do polohy pre vypnutie (OFF).
VAROVANIE: Aby ste zastavili motor,
nepresúvajte ovládaè sýtièa do polohy
CHOKE (SÝTIÈ). Môďe dôjsĎ k poruche
zapa¾ovania alebo počkodeniu motora.
Ako načtartovaĎ motor (Obrázok 1)
Uistite sa, ďe úroveò hladiny motorového oleja je
na znaèke FULL (PLNÁ), ktorá je na odmerke.
Motor je vybavený reakèným čtartérom. Pred
spustením motora sa uistite, ďe ste si preèítali
nasledujúce informácie.
Ak dôjde k zahlteniu karburátora motora,
nastavte sýtiè do polohy OPEN/RUN
(OTVORITć/CHOD) a motor natáèajte dokia¾
nenačtartuje.
VÝSTRAHA: Znaèné zatiahnutie
káblu čtartéra (spätné kopnutie)
zatiahne vaču ruku alebo rameno
smerom k motoru, a to rýchlejčie ako by
ste kábel čtartéra dokázali chytiĎ.
S Poèas spúčĎania motora pomaly
zatiahnite za kábel čtartéra, a to aď
dokia¾ nepocítite odpor. Následne
prudko zatiahnite za kábel čtratéra.
S Presvedète sa, ďe včetky prvky ako
hnacie kolesá, remenice alebo ozubené
kolesá sú pevne namontované.
Ako načtartovaĎ studený motor (Obrázok 1)
1. (Obrázok 1) Stlaète spínaè pre zastavenie
(8) do polohy zapnutia (ON).
2. Poèas spúčĎania motora nezapojujte páku
pohonu závitovky.
3. Posuòte páku sýtièa (14) do polohy sýtièa
FULL (NAPLNO).
4. Stlaète tlaèidlo spúčĎaèa motora (9) tak,
ako je to dolu uvedené. Prst z tlaèidla
spúčĎaèa motora (9) dajte medzi
preplaveniami karburátora preè.
S Zatlaète dvakrát ak je teplota −9° C
(15° F) alebo vyččia.
S Zatlaète čtyrikrát ak je teplota pod −9° C
(15° F).
5. (Obrázok 4) Pomaly zatiahnite za rukoväĎ
reakèného čtartéra (1) a to aď dokia¾
nepocítite odpor; následne prudko zatiahnite
a načtartujte motor. Nedovo¾te, aby sa
rukoväĎ reakèného čtartéra (1) preklopila
napäĎ. Pomaly vráĎte rukoväĎ reakèného
čtartéra (1) do jej polohy.
POZNÁMKA: V ráamci teplôt pod −17 C
(−0 F), nechajte motor nahrievaĎ poèas
doby nieko¾kých minút pred týým, ako
zaènete odstraòovaĎ sneh.
VÝSTRAHA: Motor nikdy
nespúčĎajte vo vnútri alebo na
uzatvorených a málo vetraných
miestach. Výfukové splodiny motora
obsahujú kyslièník uho¾natý, smrte¾ný plyn
bez zápachu. Dávajte si pozor aby vače
ruky, chodidlá a uvo¾nené obleèenie
nepričlo do styku s pohybujúcimi èasĎami
na motore a sneďnej fréze. Teplota na tlmièi
výfuku a jeho blízkosti môďe prekroèiĎ
hodnotu 65°C (150°F). Týmto miestamsa
vyhýbajte.
Ako načtartovaĎ teplý motor (Obrázok 1)
Ak motor beďal a je stále teplý ponechajte
ovládaè sýtièa (14) v jeho vypnutej (off) polohe
a nestláèajte tlaèidlo spúčĎaèa motora (9). Ak
motor odmietne načtartovaĎ, pokraèujte pod¾a
pokynov uvedených v èasti Ako načtartovaĎ
studený motor.
POZNÁMKA: Pre načtartovanie teplého
motora nepouďívajte tlaèidlo spúčĎaèa
motora (9).
Ako načtartovaĎ motor so zamrznutým
elektrickým čtartérom (Obrázok 1)
Ak je čtartér zamrznutý a nedokáďe roztoèiĎ
motor, postupujte pod¾a dolu uvedených
pokynov.
1. Potiahnite za rukoväĎ rekaèného čtartéra
(12), a to èo najviac.
2. Rýchlo uvo¾nite rukoväĎ reakèného
čtartéra (12). Umoďnite, aby sa rukoväĎ
reakèného čtartéra (12) vrátila naspäĎ v
smere k reakènému čtartéru.
Ak motor aj napriek tomu odmietne načtartovaĎ,
zopakujte predchádzajúce kroky, a to aď do
načtartovania motora. Následne postupujte
pod¾a pokynov uvedených v èasti Ako
načtartovaĎ studený motor.
Aby zabránili zamrznutiu reakèného čtartéra
ovládaèov motora, po kaďdej èinnosti súvisiacej
s odstraòovaním snehu vykonajte nasledujúce.
1. Pred uskladnením nechajte chví¾u sneďnú
frézu beďaĎ, èím zabránite zamrznutiu
závitovky / pohonu.
2. Ak je motor vypnutý, nechajte ho poèas
nieko¾kých minút vychladnúĎ.
3. Ve¾mi pomaly potiahnite za kábel čtartéra, a
to aď dokia¾ nepocítite odpor, následne
zastavte. Umoďnite aby sa kábel čtartéra
navil naspäĎ. Opakujte to 3 krát.
4. Ak motor nebeďí, utrite včetok sneh a vlhkosĎ
z krytu karburátora v oblasti ovládaèov a pák.
Taktieď nieko¾ko krát pohnite ovládaèom
sýtièa a rukoväĎou čtartéra.
Ako odstrániĎ sneh alebo úlomky z
krytu závitovky (Obrázok 1)
VÝSTRAHA: Nesnaďte sa
odstraòovaĎ sneh alebo úlomky,
ktoré sa mohli dostaĎ do krytu
závitovky bez toho, aby ste vykonali
nasledujúce bezpeènostné opatrenia.
1. Uvo¾nite páku pohonu závitovky (5).
2. Aby ste zastavili motor, presuòte spínaè pre
zastavenie (8) do polohy pre vypnutie
(OFF).
3. Odpojte drôt svieèky zapa¾ovania.
4. Ruky nestrkajte do krytu závitovky (22)
alebo ď¾abu pre vyprázdòovanie (4). Aby
ste odstránili sneh a úlomky, pouďite pákovú
tyè.
Tipy pre odhadzovanie snehu
1. Táto sneďná fréza sa bude sama poháòaĎ v
prípade ak je rukoväĎ zodvihnutá do
dostatoènej výčky, aby sa tak mohli èepele
závitovky dotknúĎ zeme. Závitovky by sa
mala zastaviĎ po uvo¾není ovládacej tyèe
závitovky. Ak sa závitovka naïalej otáèa,
pozrite si èasĎ Ako nastaviĎ ovládací kábel
závitovky nachádzajúcu sa v èasti o údrďbe.
2. Najefektívnejčie je odhadzovanie snehu
ihneï po jeho napadnutí.
VAROVANIE: NezaĎaďujte výkon motora
tým, ďe sa budete snaďiĎ odstraòovaĎ sneh
ve¾kou rýchlosĎou.
3. Aby ste sneh odstránili úplne,
predchádzajúcu stopu z¾ahka prekryte
novou.
Page 34

SK
34
1740265
4. Kedyko¾vek je to moďné, sneh odstraòujte v
smere vetra.
5. VzdialenosĎ, do ktorej má byĎ sneh
odhadzovaný je moďné nastaviĎ
vychy¾ovaèom ď¾abu pre vyprázdòovanie.
Vychy¾ovaè zodvihnite pre prípad väèčích
vzdialenosti alebo spustite v prípade
menčích vzdialeností.
6. V rámci veterných podmienok spustite
vychy¾ovaè ď¾abu, tak aby ste sneh
nasmerovali èo najbliďčie k zemi, a tak aby
nebol fúkaný na neďiadané plochy.
7. Kvôli bezpeènosti a aby ste zabránili
počkodeniu sneďnej frézy, zabezpeète, aby
oblasĎ, ktorá bude èistená bola oèistená od
kameòov, hraèiek a iných cudzích
predmetov.
8. Nepouďívajte funkciu pohonu závitovky ak
èistíte cesty s čtrkovým povrchom alebo s
povrchom z drveného kameòa. RukoväĎ
posuòte nadol a jemne zodvihnite závtovku.
9. RýchlosĎ pohybu sneďnej frézy dopredu je
závislá na håbke a váhe snehu. Iba praxou
vytvoríte najúèinnejčí spôsob pouďívania
sneďnej frézy v rámci rôznych podmienok.
10.Po kaďdej èinnosti odhadzovania snehu
nechajte motor poèas nieko¾kých minút
beďaĎ. Sneh a nahromadený ¾ad sa roztopí.
11.Po kaďdom pouďití sneďnú frézu vyèistite.
12.Z celej sneďnej frézy odstráòte ¾ad, sneh a
úlomky. Aby ste odstránili so¾ a iné
chemikálie, opláchnite frézu vodou. Sneďnú
frézu utrite dosucha.
Suchý sneh a sneh priemernej hrúbky
1. Sneh do hrúbky 8 palcov (asi 20 cm) je
moďné rýchlo a jednoducho odstrániĎ
prechádzaním pri nie prílič ve¾kej rýchlosti.
V prípade snehových závejov väèčej výčky
spoma¾te váč pohyb aby ste tak umoďnili
ď¾abu pre vyprázdòovania odstrániĎ sneh tak
rýchlo, ako rýchlo naberá sneh závitovka.
2. Naplánujte si odstraòovanie snehu v smere,
v ktorom fúka vietor.
Mokrý Ďaďký sneh
Do mokrého Ďaďkého snehu vojdite pomaly. Ak
mokrý Ďaďký sneh spôsobí spomalenie pohybu
závitovky alebo v prípade ak sa ď¾ab pre
vyprázdòovanie zaène zanáčaĎ, vráĎte sa a
následne zaènite vykonávaĎ sériu krátkych
záberov do snehu v smere dopredu a dozadu
Tieto krátke zábery dopredu a dozadu, v
rozmedzí 4 – 6 palcov (10 – 15 cm) vyvrhnú
sneh zo ď¾abu.
Snehové násypy a záveje
V snehu, ktorého výčka je vyččia ako samotná
jednotky pouďite ten istý spôsob záberov, ako
bol popísaný hore. Ĉ¾ab pre vyprázdòovanie
otoète v smere od snehového násypu. Na
odstránenie snehu takéhoto druhu bude treba
viac èasu.
Page 35

SK
35
1740265
GRAF ÚDRĈBY
ZODPOVEDNOSTI ZÁKAZNÍKA
SERVISNÉ ZÁZNAMY
Vyplòte dátum vykonania
pravidelného servisu.
Pred
kaďdým
pouďitím
Prvé 2
hodiny
Kaďdých
5 hodín
Kaďdých
10 hodín
Kaďdých
25 hodín
Kaďdú
sezónu
Pred
uskladnením
DÁTUMY SERVISU
Skontrolujte a utiahnite včetky
skrutky a matice
√ √
Skontrolujte zapa¾ovaciu svieèku
√ √
Skontrolujte hnací remeò
√
Skontrolujte palivo
√
Vypustite palivo
√
Namaďte ovládací lem ď¾abu
√
Skontrolujte nastavenie
ovládacieho kábla závitovky
√
Hnací remeò závitovky
√
ÚDRĈBA
POZNÁMKA: Ilustrácie sa nachádzajú na
strane 2 a na stranách 3 aď 6.
Pod¾a nasledujúcej èasti o údrďbe dokáďete
svoju jednotku udrďiavaĎ v dobrom
prevádzkovom stave. Včetky informácie
týkajúce sa údrďby motora nájdete v pokynoch
výrobcu motora. Pred spustením motora si túto
príruèku prečtudujte.
VÝSTRAHA: Pred vykonávaním
prehliadky, nastavenia (okrem
karburátora), alebo opravy odpojte
drôt od zapa¾ovacej svieèky.
Včeobecné odporúèania
Záruka týkajúca sa tejto sneďnej frézy sa
nevzĎahuje na poloďky, ktoré boli dôsledkom
nesprávneho zaobchádzania alebo
nedbanlivosti obsluhy. Aby ste mohli vyuďiĎ plnú
záruku, obsluha musí udrďiavaĎ sneďnú frézu v
súlade s pokynmi uvedenými v tomto návode.
Niektoré nastavenia je potrebné vykonávaĎ
pravidelne, èím sa dosiahne správne
udrďiavanie sneďnej frézy.
Po kaďdom pouďití
G Skontrolujte včetky uvo¾nené a počkodené
èasti
G Akéko¾vek uvo¾nené upínadla utiahnite.
G Skontrolujte a vykonajte údrďbu závitovky.
G Skontrolujte ovládaèe a presvedète sa, ďe ich
èinnosĎ je správna.
G Ak sú niektoré súèasti opotrebované alebo
počkodené, okamďite ich vymeòte.
G Skontrolujte včetky bezpeènostné a
inčtruktáďne čtítky a nílepky. Včetky
chýbajúce alebo neèitate¾né čtítky alebo
nálepky vymeòte.
Včetky nastavenia uvedené v èasti Údrďba,
ktorá je súèasĎou tohto návodu, je potrebné
preveriĎ aspoò raz za sezónu.
Ako odmontovaĎ horný kryt (Obrázok 8)
1. Odmontujte päĎ skrutiek (1) nachádzajúcich
sa na hornom kryte (2).
2. Odstráòte horný kryt (2).
3. Pre opätovné osadenie horného krytu (4),
postupujte pod¾a hore uvedených krokov,
avčak v opaènom poradí.
Mazanie
Pred uskladnením (Obrázok 8)
1. Namaďte ovládací lem ď¾abu (7). Pouďite
pri¾navý typ maziva, akým je Lubriplate.
Ako nastaviĎ ovládací kábel závitovky
Ovládací kábel závitovky je nastavený vo
výrobni. Poèas beďnej prevádzky môďe dôjsĎ
natiahnutiu ovládacieho kábla závitovky a páka
pohonu závitovky nebude správne zapájaĎ alebo
rozpájaĎ závitovku.
1. (Obrázok 12) Uvo¾nite skrutku s maticou
(1) ktorá pridrďiava napínaciu pruďinu kábla
(2).
2. Posuòte napínaciu pruďinu kábla (2)
smerom k zadnej strane jednotky, a to aď
dokia¾ nevyberiete celý vo¾ný koniec kábla.
POZNÁMKA: Ovládací kábel závitovky je
správne nastavený po odstránení
vo¾ného konca kábla a vtedy, ak na
ramene napínacej remenice neexistuje
ďiadne napätie.
3. Utiahnite skrutku s maticou (1) ktorá
pridrďiava napínaciu pruďinu kábla (2).
Ak dôjde k uvo¾neniu remeòa, posuòte koniec
ovládacieho kábla závitovky do vonkajčieho
otvoru tak ako je to v ïalčom uvedené:
1. (Obrázok 12) Uvo¾nite skrutku s maticou
(1) ktorá pridrďiava napínaciu pruďinu kábla
(2).
2. Posuòte napínaciu pruďinu kábla (2)
smerom k prednej èasti jednotky, aby ste
dosiahli maximálne uvo¾nenie kábla.
3. (Obrázok 11) Vyberte horný koniec
ovládacieho kábla závitovky (3) z páky
pohonu závitovky (4).
4. Zasuòte ovládací kábel závitovky (3) do
otvoru znázornenom na Obrázku 11.
5. (Obrázok 12) Posuòte napínaciu pruďinu
kábla (2) smerom k zadnej strane jednotky,
a to aď dokia¾ nevyberiete celý vo¾ný koniec
kábla.
POZNÁMKA: Ovládací kábel závitovky (3)
je správne nastavený po odstránení
vo¾ného konca kábla a vtedy, ak na
ramene napínacej remenice neexistuje
ďiadne napätie.
6. Utiahnite skrutku s maticou (1) ktorá
pridrďiava napínaciu pruďinu kábla (2).
7. Aby ste skontrolovali nastavenie, spustite
sneďnú frézu. Uistite sa, ďe závitovka pri
uvo¾není páky pohonu závitovky nerotuje.
Ako odmontovaĎ horný kryt
(Obrázok 10)
Nie je potrebné vykonávaĎ ďiadne nastavenia
pod horným krytom (1). Aby ste vyèistili
chladiaci systém motora, postupujte pod¾a dolu
uvedených krokov a odmontujte horný kryt (1).
1. Odmontujte skrutky (2) ktoré pridrďiavajú
podpornú príchytku tyèe ku hornému krytu
(1). Preklopte tyè zostavy hriade¾a (3)
smerom nahor poloďte nan jednotku.
2. Odmontujte skrutky (4).
3. Odmontujte upevòovacie skrutky (5).
4. Odstráòte horný kryt (1).
5. Pre opätovné osadenie horného krytu (1),
postupujte pod¾a hore uvedených krokov,
avčak v opaènom poradí.
Ako odmontovaĎ kryt remeòa
(Obrázok 9)
1. Odmontujte skrutky (1) a a matice (2) z
krytu remeòa (3).
2. Odmontujte upevòovaciu skrutku (4) zo
zadnej èasti krytu remeòa (3).
3. Odstráòte kryt remeòa (3) z jednotky.
4. Pre opätovné osadenie krytu remeòa (3),
postupujte pod¾a hore uvedených krokov,
avčak v opaènom poradí.
Page 36

SK
36
1740265
POZNÁMKA: Kryt remeòa (3) obsahuje
vodiace ličty, ktoré sú vytvarované na
vnútornej strane krytu remeòa (3). Poèas
osadenia krytu remeòa (3), zapojte páku
pohonu závitovky aby ste natiahli remeò v
smere proti remenici. Týmto zabezpeèíte
adekvátnu svetlosĎ vodiacich líčt remeòa
poèas osadenia krytu remeòa (3).
Ako vymeniĎ hnací remeò závitovky
Hnací remeò ma zvláčtnu končtrukciu a je
potrebné, aby bol nahradený pôvodným,
továrensky vyrábaným náhradným remeòom
ktorý zoďeniete u svojho najbliďčieho
autorizovaného predajcu.
Ak dôjde k počkodeniu hnacieho remeòa
závitovky, sneďná fréza nebude odstraòovaĎ
sneh a nebude sa pohybovaĎ smerom dopredu.
Počkodený remeò vymeòte pod¾a
nasledujúceho postupu:
1. Odpojte drôt svieèky zapa¾ovania.
2. Odstráòte kryt remeòa. Pozrite si èasĎ Ako
odmontovaĎ kryt remeòa.
3. Poznaète si trasu remeòa pohonu
závitovky (1). Ak pomôcka slúďi
poskytovaný čtítok s diagramom.
4. (Obrázok 14) Odmontujte skrutku vodiacej
ličty remeòa (2) a vodiacu ličtu remeòa
(3). Aby ste odmontovali vodiacu ličtu
remeòa (3), otoète vodiacu ličtu remeòa (3)
smerom nadol.
5. (Obrázok 15) Odmontujte skrutku
napínacej remenice (4) a napínaciu
remenicu (5) z ramena napínacej
remenice (6).
6. (Obrázok 16) Odmontujte hnací remeò
závitovky (1) z remenice motora a vytiahnite
cez bok motorovej skrine.
7. (Obrázok 17) Aby ste odmontovali hnací
remeò závitovky (1) z hnacej remenice (7),
posuòte rameno napínacej remenice do
zapojenej polohy. Tým dosiahnte svetlosĎ
(8) medzi hnacou remenicou (7) a
ramenom brzdy (9), a to pre vybratie
hnaciho remeòa závitovky.
8. Pre osadenie nového hnacieho remeòa
závitovky (1), postupujte pod¾a hore
uvedených krokov, avčak v opaènom poradí.
9. Skontrolujte nastavenie kábla pohonu
závitovky. Pozrite si èasĎ Ako nastaviĎ
ovládací kábel závitovky.
Ako odmontovaĎ závitovku
1. Odstráòte kryt remeòa. Pozrite si èasĎ Ako
odmontovaĎ kryt remeòa.
2. Odmontujte hnací remeò závitovky. Pozrite si
èasĎ Ako vymeniĎ hnací remeò závitovky.
3. (Obrázok 18) Odmontujte remenicu
závitovky (1) z tyèe závitovky (závity sú
¾avotoèivé; za úèelom odmontovania otáèajte
v smere hodinových ruèièiek).
4. Aby ste zabránili tomu, aby sa závitovka (6)
otáèala, umiestnite kúsok dreva 2"x4" (5 x 10
cm) na strednú lopatku (3), èím zaistíte
závitovku (6).
5. Odmontujte skrutky s maticami (4),
podloďku (5), a matice (2) z prednej èasti
pravého krytu (7).
6. Odmontujte skrutku (8) zo zadnej èasti
pravého krytu (7).
7. Odmontujte skrutky s maticami (9) a
matice (10).
8. (Obrázok 19) Posuòte závitovku (6) zo
zadnej strany krytu závitovky (11).
9. Posuòte závitovku (6) z loďiska na ¾avej
strane krytu závitovky (11).
10.Pre opätovné osadenie závitovky (6),
postupujte pod¾a hore uvedených krokov,
avčak v opaènom poradí.
Mazanie
Ako skontrolovaĎ motorový olej (Obrázok 3)
Pred spustením motora a po kaďdých ôsmich (8)
hodinách nepretrďitého pouďívania skontrolujte
úroveò hladiny oleja.
1. Presvedète sa, ďe jednotka je vo vodorovnej
polohe.
2. Odmontujte uzáver pre plnenie
oleja/odmerku (1) a naplòte k¾ukovú skriòu
po èiaru FULL (PLNÁ), ktorá sa nachádza
na odmerke. NEpreplòujte.
3. Vďdy keï kontrolujte hladinu oleja,
pevne utiahnite uzáver pre plnenie
oleja / odmerku (1).
POZNÁMKA: Syntetický olej môďe pomôcĎ
poèas čtartovania pri extrémne nízkych
teplotách. Syntetický olej 5W30 je prijate¾ný
pre včetky teploty. NEMIEĆAJTE olej s
benzínom.
Ako vymeniĎ motorový olej
Motorový olej vymieòajte kaďdých päĎdesiat (50)
hodín alebo aspoò raz za sezónu v prípade, ak
sneďnú frézu nepouďívate dlhčie ako päĎdesiat
(50) hodín.
Za úèelom výmeny motorového oleja je
potrebné motor preklopiĎ smerom dopredu a je
potrebné vypustiĎ olej z rúrky pre plnenie oleja.
Olej vymieòajte keï je motor teplý.
1. (Obrázok 5) Zodvihnite zadnú èasĎ sneďnej
frézy a preklopte jednotku dopredu. V
správnej polohe bude sneďná fréza stáĎ na
prednej èasti krytu závitovky.
2. Podloďte misku na zachytávanie
vypúčĎaného oleja (1) pod rúrku pre
plnenie oleja (2).
3. Opatrne odmontujte uzáver pre plnenie
oleja / odmerku. Olej zaène vytekaĎ do
misky na zachytávane vypúčĎaného
oleja (2).
4. Po vypustení oleja z motora postavte sneďnú
frézu do jej prevádzkovej polohy.
5. (Obrázok 3) Motor naplòte olejom S.A.E.
5W30. Presvedète sa, ďe olej dosahuje
znaèku FULL (PLNÁ), ktorá je na uzávere
pre plnenie oleja / odmerke.
NEPREPLÒUJTE.
POZNÁMKA: Syntetický olej môďe pomôcĎ
poèas čtartovania pri extrémne nízkych
teplotách. Syntetický olej 5W30 je prijate¾ný
pre včetky teploty. NEMIEĆAJTE olej s
benzínom.
Ako vymeniĎ zapa¾ovaciu svieèku
(Obrázok 20)
POZNÁMKA: Systém zapa¾ovania pomocou
iskry spåòa včetky poďiadavky Kanadských
nariadení o zariadeniach spôsobujúcich
ručenie.
POZNÁMKA: Tento motor je v súlade so
včetkými austrálskymi a novozélandskými
obmedzeniami týkajúcimi sa
elektromagnetického ručenia.
Kontrolujte zapa¾ovaciu svieèku (1) kaďdých
dvadsaĎ-päĎ (25) hodín. Uskutoènite výmenu
zapa¾ovacej svieèky (1) v prípade, ak sú
elektródy vypálené alebo vyhorené, ak je
porcelán prasknutý alebo po kaďdých 100
hodinách pouďívania.
1. Presvedète sa, ďe zapa¾ovacia svieèka (1)
je èistá. Vyèistite zapa¾ovaciu svieèku (1)
jemným očkrabaním elektród (nepouďívajte
opieskovanie alebo drôtenú kefu).
2. Skontrolujte iskričte zapa¾ovacej svieèky
(1) pomocou čpáromera (2) a iskričte v
prípade poteby nastavte na hodnotu 0.030"
(0,08 mm).
3. Pred osadením zapa¾ovacej svieèky (1),
natrite jemne pomocou oleja jemne závity, a
to z dôvodu jednoduchčieho odmontovania v
budúcnosti. Utiahnite zapa¾ovaciu svieèku
(1) tna hodnotu krútiaceho momentu 15 ft-lb
(20,337 Nm).
Ako pripraviĎ sneďnú frézu na
uskladnenie
VÝSTRAHA: Benzín nevypúčĎajte
ak ste vo vnútri budovy, v blízkosti
ohòa alebo ak fajèíte. Benzínové
výpary môďu spôsobiĎ výbuch alebo
poďiar.
Ak sa chystáte sneďnú frézu uskladniĎ na dlhčiu
dobu, pozrite si návod na obsluhu vydaný
výrobcom (niektoré modely ho obsahujú), aby
ste zistili dôleďité podrobnosti týkajúce sa údrďby
a uskladnenia.
1. Palivovú nádrď vypusĎte.
2. Motor nechajte beďaĎ aď do vyprázdnenia
paliva.
3. Sneďnú frézu nikdy neuskladòujte s palivom v
palivovej nádrďi v budove, v ktorej sa
nachádzajú zápalné zdroje, akými sú
ohrievaèe vody, ohrievaèe vzduchu, sučièky
odevov a podobné zariadenia. Pred
uskladnením na akomko¾vek ohradenom
mieste nechajte motor vychladnúĎ.
4. Olej vypúčĎajte z teplého motora. K¾ukovú
skriòu motora naplòte novým olejom.
5. Z valca odmontujte zapa¾ovaciu svieèku. Do
valca nalejte jednu uncu (0,03 l) oleja.
Pomaly zatiahnite za svorku reakèného
čtartéra a tak bude môcĎ olej ochraòovaĎ
valec. Do valca namontujte novú zapa¾ovaciu
svieèku.
6. Sneďnú frézu poriadne oèistite.
7. Namaďte včetky mazacie miesta. Pozrite si
èasĎ o údrďbe.
8. Uistite sa, ďe včetky skrutky, matice a matice
so skrutkami sú pevne utiahnuté. Vizuálne
skontrolujte èi pohyblivé èasti nie sú
počkodené, zlomené alebo opotrebované. V
prípade potreby vymeòte.
9. Èasti z èistého kovu krytu dúchadla a
závitovky očetrite pomocou sprejového
maziva s ochrannými antikoróznymi
vlastnosĎami.
10.Jednotku umiestnite do dobre vetranej
budovy.
11.Ak je nutné stroj uskladniĎ vonku, zablokujte
sneďnú frézu tak, aby celý stroj mimo styku
so zemou.
12.Sneďnú frézu zakryte vhodným ochranným
krytom, ktorý nezachytáva vlhkosĎ.
Nepouďívajte plastickú hmotu.
Page 37

SK
37
1740265
Ako objednávaĎ náhradné súèiastky
Náhradné súèiastky sú zobrazené na zadných
stránkach návodu na obsluhu alebo v
samostatnej príruèke náhradných súèiastok.
Pouďívajte iba náhradné súèiastky autorizované
alebo schválené výrobcom. Písmeno
nachádzajúce sa na konci èísla súèiastky
znamená typ povrchovej úpravy súèiastky, C je
oznaèenie pre chróm, Z pre zinok a PA pre
nakupovanú zostavu. Je dôleďité aby ste túto
skutoènosĎ uviedli pri objednávaní súèiastky.
Nepouďívajte príslučenstvo alebo doplnky, ktoré
nie sú zvláčĎ urèené pre túto jednotku. Aby ste
dostali správne náhradné súèiastky je potrebné
zadaĎ èíslo modelu (pozrite si tabu¾ku s
názvom).
Náhradné súèiastky pre motor, prevodovku s
rozvodovkou alebo prevodovku je moďné získaĎ
vo výrobcom autorizovanom servisnom
stredisku, ktoré nájdete v zlatých stránkach
alebo v telefónnom zozname. Za úèelom
objednávania náhradných súèiastok si taktieď
pozrite samostatné záruky pre motor a
prevodovku.
Pri objednávaní je potrebné uviesĎ nasledujúce
informácie:
(1) Èíslo modelu
(2) Výrobné èíslo
(3) Èíslo súèiastky
(4) Mnoďstvo
GRAF RIEĆENIA PROBLÉMOV
PROBLÉM PRĂÈINA NÁPRAVA
ćaďké čtartovanie Chybná zapa¾ovacia svieèka. Vymeòte zapa¾ovaciu svieèku.
V palivovom systéme sa nachádza voda alebo
neèistota.
Pomocou miskového odtoku karburátora
prepláchnite a naplòte èerstvým palivom.
Motor beďí nepravidelne Zablokované palivové vedenie, prázdna
palivová nádrď alebo opotrebovaný benzín.
Vyèistite palivové vedenie; skontrolujte prívod
paliva; doplòte èerstvé palivo.
Motor sa zastavuje Jednotka beďí so zapojeným SÝTIÈOM. Páku sýtièa presuòte do polohy RUN (CHOD).
Motor beďí nepravidelne; zníďený výkon V palivovom systéme sa nachádza voda alebo
neèistota.
Pomocou miskového odtoku karburátora
prepláchnite a naplòte èerstvým palivom.
Nadmerné vibrácie Uvo¾nené súèasti: počkodený pohon. Okamďite zastavte motor a odpojte drôt
zapa¾ovacej svieèky. Dotiahnite včetky skrutky s
maticami a vykonajte včetky potrebné opravy.
Ak vibrácie pokraèujú, nechajte jednotku opraviĎ
kompetentným opravárom.
Jednotka sa odmieta pohybovaĎ Hnací remeò je uvo¾nený alebo počkodený. Vymeòte hnací remeò.
Jednotka odmieta odstraòovaĎ sneh Hnací remeò závitovky je uvo¾nený alebo
počkodený.
Nastavte hnací remeò závitovky; v prípade
potreby vymeòte.
Ovládací kábel závitovky nie je nastavený
správne.
Nastavte ovládací kábel závitovky.
Ĉ¾ab pre vyprázdòovanie je zanesený. Okamďite zastavte motor a odpojte drôt
zapa¾ovacej svieèky. Vyèistite ď¾ab pre
vyprázdòovanie a vnútro krytu závitovky.
V závitovke uviazli cudzorodé predmety. Okamďite zastavte motor a odpojte drôt
zapa¾ovacej svieèky. Odstráòte predmet zo
závitovky.
Page 38

SK
POLITIKA ZÁKAZNĂCKEJ ZÁRUKY SPOLOÈNOSTI BRIGGS & STRATTON CORPORATION
Platná od 1. januára 2006 a nahradzujúca včetky záruky bez uvedenia dátumu a záruky s dátumom pred 1. januárom 2006.
OBMEDZENÁ ZÁRUKA
SpoloènosĎ Briggs & Stratton Corporation bezplatne opraví alebo vymení akúko¾vek súèiastku (y) na výrobku, ktorá je chybná z dôvodu chyby
materiálu, výroby alebo oboch dôvodov. Poplatky za prepravu výrobku urèeného na opravu alebo výmenu v súlade s touto zárukou musí znáčaĎ
kupujúci. Táto záruka je úèinná poèas èasových období a podlieha podmienkam uvedeným dolu. Za úèelom záruèného servisu vyh¾adajte vo
svojej oblasti najbliďčieho autorizovaného servisného predajcu. Za úèelom vykonania záruèného servisu vyh¾adajte najbliďčieho autorizovaného
servisného predajcu, a to na načej mape pre vyh¾adanie predajcov na internetovej stránke www.murray.com.
NEEXISTUJE ĈIADNA VÝSLOVNÁ ZÁRUKA ZAHRNUTÉ ZÁRUKY VRÁTANE TÝCH, TÝKAJÚCICH SA PREDAJNOSTI A USPOKOJIVEJ
KVALITY PRE PRÍSLUĆNÝ ÚÈEL SÚ OBMEDZENÉ NA DOBU JEDNÉHO ROKA OD ZAKÚPENIA, ALEBO NA PREDÅĈENIE UMOĈNENÉ
ZÁKONOM, PRIÈOM VĆETKY ZAHRNUTÉ ZÁRUKY SÚ VYÒATÉ. ZODPOVEDNOSTI ZA NÁHODNÉ ALEBO ZÁVISLÉ POĆKODENIA SÚ
VYÒATÉ Z ROZSAHU VYLÚÈENIA ZÁKONNE DOVOLENÉHO. Niektoré čtáty alebo krajiny neumoďòujú obmedzenia alebo to, ako má dlho
záruka platiĎ a niektoré čtáty alebo krajiny neumoďòujú vylúèenie alebo obmedzenie náhodných alebo závislých počkodení, a tak sa hore
uvedené obmedzenie nemusí na vás vzĎahovaĎ. Táto záruka vám poskytuje čpecifické legislatívne ustanovené práve a taktieď môďete maĎ iné
práva, ktoré môďu byĎ v kaďdom čtáte alebo krajine rozdielne.
ZÁRUÈNÉ DOBY
Znaèka/jednotka Spotrebite¾ské Komerèné pouďívanie
Jednostupòová sneďná fréza 1 rok 90 dní. . . . . . . . . . . . . . . . . . . . . . . . . . . . . . .
Dvojstupòová sneďná fréza 2 roky 90 dní. . . . . . . . . . . . . . . . . . . . . . . . . . . . . . .
Záruèná doba zaèína dòom zakúpenia prvým maloobchodným spotrebite¾om alebo komerèným koncovým uďívate¾om a trvá poèas doby
uvedenej v tabu¾ke hore. Spotrebite¾ské pouďívanie znamená pouďívanie maloobchodným spotrebite¾om v rámci osobného, domáceho
pouďitia. Komerèné pouďívanie znamená včetky ostatné pouďitia, vrátanie pouďívania pre komerèné úèely, zárobkovú èinnosĎ alebo pre
úèely prenajímania. Akonáhle sa zistí, ďe výrobok sa pouďíva na komerèné pouďívanie, bude v prípade tejto záruky povaďovaný ako
výrobok pre komerèné vyuďívanie.
Na získanie záruky na výrobky znaèky Muray nie je potrebná ďiadna registrácia záruky. Uschovajte si doklad o nákupe. Ak poèas
vykonávania záruèného servisu neposkytnete doklad o prvotnom nákupe s uvedeným dátumom, pre úèel stanovenia záruky sa pouďije
dátum výroby výrobku.
pouďívanie Podmienka záruènej doby
O VAĆEJ ZÁRUKE
Vítame záruènú opravu a ospravedlòujeme sa vám za vzniknuté problémy. Záruèné opravy môďe vykonaĎ ktorýko¾vek autorizovaný
servisný predajca. Väèčina záruèných opráv sa vykonáva rutinne, avčak v niektorých prípadoch záruèného servisu sa opravy nemusia
v ráamci záruky vykonaĎ. Napríklad sa záruèný servis nemusí uplatniĎ v prípade výrobku, kedy k počkodeniu dočlo nesprávnym
pouďívaním, nedostatoènou rutinnou údrďbou, prepravou, skladovaním alebo nesprávnou inčtaláciou. Podobne sa záruka neuplatní ani
v prípade, ak bolo z výrobku odstránené výrobné èíslo alebo ak bol výrobok upravovaný alebo pozmeneý.
Táto záruka pokrýva iba chyby spôsobené chybným materiálom a/alebo výrobou. Aby ste sa vyhli nedorozumeniam ktoré môďu
vzniknúĎ medzi zákazníkom a predajcom, v ïalčom uvádzame niektoré prípady chyby výrobku na ktoré sa záruka nevzĎahuje.
• Beďné opotrebovanie: Zariadenia poháòané malým motorom, ako napríklad včetky mechanické prístroje vyďadujú pravidelnú a kvalitnú výmenu
súèiastok a vykonanie servisnej èinnosti. Záruka nepokrýva opravu v prípade ak beďné pouďívanie zníďilo ďivotnosĎ výrobku alebo súèiastky.
• Inčtalácia: Táto záruka sa neuplatní v prípade výrobku, ktorý bol nesprávne nainčtalovaný, alebo ktorého inčtalácia, úprava alebo zmena bola
vykonaná neoprávnene. Taktieď aj inčtalácie, ktoré bránia načtartovaniu spôsobujú neuspokojivý výkon motora.
• Nesprávna údrďba: ĈivotnosĎ tohto výrobku závisí na podmienkach v rámci ktorých sa prevádzkuje a na starostlivosti aká mu je poskytované.
Odporúèané intervaly pre údrďbu a nastavenie sú uvedené v návode na obsluhu. Výrobky ako kultivátory, hob¾ovaèky, rotaèné kosaèky, ktoré sa
èasto pouďívajú v pračných a čpinavých podmienkach môďu vykazovaĎ predèasné opotrebovanie. Záruka nepokrýva takéto opotrebovanie,
spôsobené čpinou, prachom alebo iným brúsnym materiálom, ktorý sa dostane výrobku kvôli nesprávnej údrďbe. Záruka nebude pokrývaĎ opravy
problémov spôsobených náhradnými súèiastkami, ktoré nie sú pôvodnými súèiastkami výrobcu.
• Nesprávne a/alebo nevhodné palivo alebo mazanie: Táto záruka nepokrýva počkodenie spôsobené pouďívaním zvetraného paliva alebo starých
benzínov. Počkodenie motora alebo prvkov motora, t.j. spa¾ovacia komora, ventily, lôďka ventilov, vodiace ličty ventilov, vinutie motora, čtartéra
spôsobené pouďívaním náhradných palív, akým je kvapalný petrolej, zemný plyn, nie sú tou zárukou pokrytý a to aj napriek tomu, ďe motor je na
takúto prevádzku certifikovaný. Záruka sa nevzĎahuje na súèiastky, u ktorých dočlo k vytvoreniu vrúbkov alebo k zlomeniu, a to z dôvodu, ďe
výrobok bol prevádzkovaný pri pouďití nevhodného, začpineného oleja, alebo oleja nesprávneho stupòa, ako aj prvky výrobkov počkodené
dôsledkom nedostatoèného mazania.
• Nesprávne prevádzkovanie: Správna prevádzka výrobku je uvedená v návode na obsluhu. Výrobok počkodený nadmernou rýchlosĎou, prehriatím
alebo prevádzkovaním na stiesnenej ploche bez vhodného vetrania. Výrobok počkodený nadmernými vibráciami spôsobenými uvo¾nenými
zostavami motora, uvo¾nenými alebo nevyváďenými èepe¾ami, pohonmi, nadmernou rýchlosĎou alebo ohnutým k¾ukovým hriade¾om z dôvodu
narazenia na tvrdý predmet. Nie sú pokryté počkodenia a poruchy spôsobené nehodami, zlým zaobchádzaním, nesprávnym servisom, zamrznutím
alebo chemickým počkodením, ako aj prevádzkovaním nad rozsah odporúèaných kapacít, ktoré sú uvedené v návode na obsluhu.
• Rutinné naladenie-, opotrebované prvky alebo nastavenia Táto záruka nezahàòa opotrebované prvky ako je olej, remene, èepele, tesniace
o-krúďky, filtre, atï.
• Ostatné vylúèenia: Oprava alebo nastavenie súèiastky (ok), ktoré nie sú vyrábané spoloènosĎou Briggs & Stratton Corporation, nie sú zárukou
pokryté; pozrite si záruky patrièných výrobcov.Táto záruka vyluèuje počkodenia spôsobené boďou mocou a inými vyččími mocami, ktoré
výrobca nedokáďe ovládaĎ. Taktieď vyluèuje pouďívané, opravované a predvádzacie výrobky.
Záruèný servis je k dispozícii iba prostredníctvom autorizovaných servisných zástupcov. Svojho najbliďčieho predajcu nájdete na
vyh¾adávacej mape na internetovej stránke www.murray.com.
1740265
38
Page 39

39
1740265
EK atbilstĘbas sertifikts
Eī vastavustunnistus
Рйуфпрпйзфйкь Ухммьсцщузт ЕК
D
EG−Konformitätserklärung
GB
EC Certificate of Conformity
FR Déclaration de conformité pour la CEE
I Certificato di conformita’ comunitario
ES Declaración de Conformidad
NL
EG−Conformiteitsverklaring
S
EU−konformitetsintyg
N
EU−konformitetserklæring
DK
EU−overensstemmelseserklæring
SF EY:n vaatimustenmukaisuustodistus
conforming to Directive 98/37/EC
conforming to Directive 89/336/EEC
conforming to Directive 2000/14/EC
conforming to Directive 2002/88/EC
entsprechend der Richtlinie 98/37/EG
entsprechend der Richtlinie 89/336/EWG
entsprechend der Richtlinie 2000/14/EG
entsprechend der Richtlinie 2002/88/EG
conforme à la directive 98/37/CE
conforme à la directive 89/336/CEE
conforme à la directive 2000/14/CE
conforme à la directive 2002/88/CE
conforme alla Direttiva 98/37/CE
conforme alla Direttiva 89/336/CEE
conforme alla Direttiva 2000/14/CE
conforme alla Direttiva 2002/88/CE
según la directiva 98/37/CE
según la directiva 89/336/CEE
según la directiva 2000/14/CE
según la directiva 2002/88/CE
overeen komstig de Richtlijn 98/37/EG
overeen komstig de Richtlijn 89/336/EEG
overeen komstig de Richtlijn 2000/14/EG
overeen komstig de Richtlijn 2002/88/EG
överensstämmande med direktiv 98/37/EG
överensstämmande med direktiv 89/336/EEG
överensstämmande med direktiv 2000/14/EG
överensstämmande med direktiv 2002/88/EG
overholder direktiv 98/37/EF
overholder direktiv 89/336/EØS
overholder direktiv 2000/14/EF
overholder direktiv 2002/88/EF
overholder direktiv 98/37/EF
overholder direktiv 89/336/EØF
overholder direktiv 2000/14/EF
overholder direktiv 2002/88/EF
naudattaa direktiiviä 98/37/EY
naudattaa direktiiviä 89/336/ETY
naudattaa direktiiviä 2000/14/EY
naudattaa direktiiviä 2002/88/EY
Certyfikat zgodnoœci EC
zgodnoœæ z dyrektyw¹ 98/37/EC
zgodnoœæ z dyrektyw¹ 89/336/EEC
zgodnoœæ z dyrektyw¹ 2000/14/EC
zgodnoœæ z dyrektyw¹ 2002/88/EC
PL
LT
atitinka direktyv 98/37/EC
atitinka direktyv 89/336/EEC
atitinka direktyv 2000/14/EC
atitinka direktyv 2002/88/EC
EC atitikties sertifikatas
H
a 98/37/EC Direktívának megfelelõen
a 89/336/EEC Direktívának megfelelõen
a 2000/14/EC Direktívának megfelelõen
a 2002/88/EC Direktívának megfelelõen
EC Megfelelõségi Nyilatkozat
EE
Koosklas direktiiviga 98/37/Eī
Koosklas direktiiviga 89/336/EMī
Koosklas direktiiviga 2000/14/Eī
Koosklas direktiiviga 2002/88/Eī
GR
уэмцщнб ме фзн ПдзгЯб 98/37/ЕК
уэмцщнб ме фзн ПдзгЯб 89/336/ЕПК
уэмцщнб ме фзн ПдзгЯб 2000/14/ЕК
уэмцщнб ме фзн ПдзгЯб 2002/88/ЕК
LV
atbilstĘba direktĘvai 98/37/EK
atbilstĘba direktĘvai 89/336/EEK
atbilstĘba direktĘvai 2000/14/EK
atbilstĘba direktĘvai 2002/88/EK
CZ
v souladu se smìrnicí 98/37/ES
v souladu se smìrnicí 89/336/EHS
v souladu se smìrnicí 2000/14/ES
v souladu se smìrnicí 2002/88/ES
ES prohláčení o shodì
SK
v skladu z direktivo 98/37/ES
v skladu z direktivo 89/336/EGS
v skladu z direktivo 2000/14/ES
v skladu z direktivo 2002/88/ES
ES izjava o skladnosti
Page 40

40
1740265
erklären in alleiniger Verantwortung, daß das Produkt
declare in sole responsibility, that the product
déclarons sous notre seule responsabilité que le produit
dichiariamo sotto la nostra piena responsabilità che il prodotto
declaramos bajo responsabilidad propia que el producto
verklaren enig in verantwoording, dat het produkt
intygar med ensamansvar att nedanstående produkt
erklærer som eneansvarlig at produktet
erklærer som eneansvarlig, at produktet
ilmoitamme yksin vastaavamme, että tuote
Kinnitame omal vastutusel, et antud toode
Эчпнфбт рлЮсз ехиэнз, ьфй фп рспъьн
Saját kizárólagos felelõsségünkre kijelentjük, hogy a termék
paziĞojam ar pilnu atbildĘbu, ka Ġis produkts
PareiĠkiame kad gaminys
niniejszy oœwiadczamy, ¿e produkt
prohlačuje na svou výluènou odpovìdnost, ďe produkt
v izkljuèni odgovornosti izjavlja, da je proizvod
Wir / We / Nous / Noi / Nosotros / Wij / Vi / Vi / Vi / Me / Meie
/ Дзлюнпхме / Mi / MĔs / Mes / My / Výrobce/ Mi
621403x61NB
(Fabrikat, Typ) (Make, model) (Marque, modèle) (Marca, tipo) (Marca,
modelo) (Fabricant, type) (Fabrikat, typ) (Fabrikat, type) (Mærke, type)
(Merkki, malli) (Mark, mudel) (МЬскб, мпнфЭлп) (Gyártmány, modell)
(Izstrdjums, modelis) (MarkĴ, modelis) (marka, model) (Druh, model)
(fabrikat, tip)
Briggs & Stratton Corporation
Yard Power Products Group
Port Washington, WI 53074
auf das sich diese Erklärung bezieht, den einschlägigen Anforderungen der Richtlinie 98/37/EG, der Richtlinie 2000/14/EG
(Konformitätsbewertungsverfahren gemäß Anhang VI), Richtlinie 2002/88/EG und der Richtlinie 89/336/EWG und aktuellen
Ergänzungen entspricht
to which this certificate applies, conforms to the requirements of Directive 98/37/EC, Directive 2000/14/EC (conformity assessment
procedure according to Annex VI), 2002/88/EC and Directive 89/336/EEC and current amendments
faisant l’objet de la déclaration est conforme aux prescriptions stipulées dans la Directive 98/37/CE, la directive 2000/14/CE (procédure
d’évaluation de conformité selon l’annexe VI), la directive 2002/88/CE et la directive 89/336/CEE et ses modifications courantes
cui la presente dichiarazione si riferisce, è conforme ai requisiti de Direttiva 98/37/CE,
della Direttiva 2000/14/CE (procedura di
valutazione della conformità secondo l’Allegato VI), della Direttiva 2002/88/CE e della Direttiva 89/336/CEE e correnti emendamenti
al cual se refiere la presente declaración corresponde a las exigencias de la directiva 98/37/CE, de la directiva 2000/14/CE (los
procedimientos de evaluación de conformidad según el Anexo VI), de la directiva 2002/88/CE y de la directiva 89/336/CEE y
enmiendas vigentes
waarop deze verklaring betrekking heeft, overeenkomt met de eisen van de richtlijn 98/37/EG, de richtlijn 2000/14/EG
(conformiteitsbeoordelingsprocedure volgens bijlage VI), de richtlijn 2002/88/EG en de richtlijn 89/336/EEG en huidige wijzigingen
för vilket detta intyg gäller, uppfyller kraven enligt direktiv 98/37/EG,
direktiv 2000/14/EG (procedur för bedömning av överensstämmelse
enligt tillägg VI)
, direktiv 2002/88/EG och direktiv 89/336/EEG samt allmäna tillägg
som denne erklæring vedrører, oppfyller krav i direktiv 98/37/EF, direktiv 2000/14/EF (konformitetsvurderingsprosedyre i henhold til
anneks VI), direktiv 2002/88/EF og direktiv 89/336/EØS og aktuelle vedlegg
som denne erklæring vedrører, overholder krav i direktiv 98/37/EF, direktiv 2000/14/EF (konformitetsvurderingsprocedure iflg. Annex
VI), direktiv 2002/88/EF og direktiv 89/336/EØF og ændringer
johon tämä ilmoitus liittyy, vastaa direktiivissä 98/37/EY, direktiivissä 2000/14/EY (Liitteen VI mukaisten yhdenmukaisuuden
arviointitoimien), direktiivissä 2002/88/EY, direktiivissä 89/336/ETY ja nykyisissä muutoksissa mainittuja vaatimuksia
mille kohta tunnistus kehtib, on koosklas direktiiviga 98/37/Eī
, direktiiviga 2000/14/Eī (vastavushindamismenetlus vastavalt lisale VI),
2002/88/Eī ja direktiiviga 89/336/EMī koos jooksvate muudatustega
уфп прпЯп бцпсЬ фп рбсьн рйуфпрпйзфйкь, рлзспЯ фйт брбйфЮуейт фзт ПдзгЯбт 98/37/ЕК
, фзт ПдзгЯбт 2000/14/ЕК (дйбдйкбуЯб
бойпльгзузт фзт ухммьсцщузт уэмцщнб ме фп РбсЬсфзмб VI), 2002/88/ЕК кбй фзт ПдзгЯбт 89/336/ЕПК кбй фйт
фспрпрпйЮуейт фпхт
amelyre ezen nyilatkozat vonatkozik, megfelel a 98/37/EC Direktíva, 2000/14/EC Direktíva (a VI Függeléknek megfelelõ megfelelõség
felbecsülési eljárás), 2002/88/EC valamint 89/336/EEC Direktívák és legújabb módosításaik elõírásainak.
Uz kuru attiecas Ġis sertifikts, atbilst DirektĘvas 98/37/EK, un DirektĘvas 2000/14/EK prasĘbm (atbilstĘbas novĔrtĔĠanas procedĢra
saskaĞ ar Pielikumu VI), 2002/88/EK un DirektĘvu 89/336/EEK un krtĔjiem grozĘjumiem
Kuriam priklauso Ġis sertifikatas, atitinka direktyvos 98/37/EC
, direktyvos 2000/14/EC (atitikties atestavimo procedĢra pagal Annex
(pried) Nr.VI), 2002/88/EC ir direktyvos 89/336/EEC reikalavimus ir j esamus pataisymus
którego dotyczy ten certyfikat, jest zgodny z wymaganiami dyrektywy 98/37/EC
, dyrektywy 2000/14/EC (procedura oceny zgodnoœci
zgodnie z za³¹cznikiem VI), 2002/88/EC i dyrektyw¹ 89/336/EEC oraz bie¿¹cymi poprawkami.
k nìmuď se vydává toto potvrzení, splòuje poďadavky smìrnice 98/37/ES, smìrnice 2000/14/ES (postup posouzení shody dle pøílohy
VI), 2002/88/ES a smìrnice 89/336/EHS v platném znìní
na katerega se nanaša ta izjava, v skladu z zahtevami direktive 98/37/ES, direktive 2000/14/E, direktive 2002/88/ES in direktive
89/336/EGS ter aktualnimi dopolnili.
Page 41

41
1740265
Zursachgerechten Umsetzung der EG−Richtlinien wurde(n) folgende Norm(en) und/oder technische Spezifikation(en) herangezogen:
ISO 8437, BS EN 1033:1996, EN ISO 3744:1994
To effect correct application of the EEC Directives, the following standards and/or technical specifications were consulted: ISO 8437,
BS EN 1033:1996 and/or ISO 3744:1994
Pour mettre en pratique les Directives de la CEE, il a été tenu compte de la/des norme(s) et/ou de la/des spécification(s) technique(s)
suivante(s): ISO 8437, BS EN 1033:1996, EN ISO 3744:1994
Per un’appropriato riscontro della normativa CEE, è (sono) stata(e) consultata(e) la(e) seguente(i) norma(e) e/o specifica(che)
tecnica(che): ISO 8437, BS EN 1033:1996, EN ISO 3744:1994
Con el fin de realizar de forma adecuada las exigencias en las normativas de la CEE (fué(ron) consultada(s) la(s) siguiente(s)
normativa(s) y especificación(es) técnica(s): ISO 8437, BS EN 1033:1996, EN ISO 3744:1994
Om de EG−richtlijnen in juiste vorm om te zetten, is/zijn van volgende norm(en) en/of technische specificatie(s) gebruik gemaakt: ISO
8437, BS EN 1033:1996, EN ISO 3744:1994
Följande norm(er) och/eller teknisk(a) specifikation(er) har legat till grund för ett fackmässigt införande av de i EU−normerna: ISO 8437,
BS EN 1033:1996, EN ISO 3744:1994
Følgende normer og/eller tekniske spesifikasjoner er lagt til grunn for gjennomførelse av EU−retningslinjenes: ISO 8437, BS EN
1033:1996, EN ISO 3744:1994
Til gennemførelse af de EF−direktivet er følgende standard(er) og/eller tekniske specifikation(er) anvendt: ISO 8437, BS EN 1033:1996,
EN ISO 3744:1994
ETY−direktiivien oikean soveltamisen varmistamiseksi on käytetty seuraavia standardeja ja/tai teknisiä erittelyjä: ISO 8437, BS EN
1033:1996, EN ISO 3744:1994
EMī direktiivide iguspĨraseks kohaldamiseks arvestati allpool nimetatud standardite ja/vi tehniliste spetsifikatsioonidega: ISO 8437,
BS EN 1033:1996 ja/vi ISO 3744:1994
Гйб льгпхт псиЮт ецбсмпгЮт фщн Пдзгйюн ЕПК, елЮцизубн хрьшз фб рбсбкЬфщ рсьфхрб кбй/Ю фечнйкЭт рспдйбгсбцЭт: ISO
8437, BS EN 1033:1996 кбй/Ю ISO 3744:1994
Az EEC Direktívák megfelelõ alkalmazása céljából a következõ szabványokat és/vagy mûszaki elõírásokat vizsgálták meg: ISO 8437,
BS EN 1033:1996 és/vagy a ISO 3744:1994
Lai panktu pareizu EEK DirektĘvu piemĔroĠanu, ievĔroti sekojoĠi standarti un/vai tehniskie noteikumi: ISO 8437, BS EN 1033:1996
un/vai ISO 3744:1994
Tam kad pritaikyti atitinkamas Europos Sjungos direktyvas, buvo atsiĤvelgta Ķ sekanĒius standartus ir/arba techninius reikalavimus:
ISO 8437, BS EN 1033:1996 ir/arba ISO 3744:1994
Aby zapewniæ w³aœciwe zastosowanie dyrektyw EEC, sprawdzono nastêpuj¹ce standardy i/lub specyfikacje techniczne: ISO 8437, BS
EN 1033:1996 i/lub ISO 3744:1994
Pro správnou aplikaci smìrnic EHS bylo postupováno podle následujících norem a/nebo technických specifikací: ISO 8437, BS EN
1033:1996 a/nebo ISO 3744:1994
Za strokovno uresnièevanje direktiv ES smo sledili naslednjim standardom in/ali tehniènim specifikacijam: ISO 8437, BS EN 1033:1996,
EN ISO 3744;1994
Bauart
Category
Categorie
Categoria
Categoría
Categorie
Kategori
Kategori
Kategori
Kategoria
Kategooria
КбфзгпсЯб
Kategória
Kategorija
Kategorija
Kategoria
Kategorie
Kategorija
SCHNEEFRÄSE
SNOW THROWER
CHASSE−NEIGE
SPAZZANEVE
QUITANIEVES
SNEEUWRUIMER
SNÖSLUNGA
SNØFRESER
SNEBLÆSER
LUMILINKO
LUMEKAHUR
ЦuузфЮсбт ЧЙпнЙпэ
HÓMARÓ
SNIEGA METĒJS
SNIEGO VALYMO MAŠINA
ODŒNIEĈARKA
SNĚHOVÁ FRÉZA
SNEģNA FREZA
Fabrikmarke / Make / Marque / Marca / Marca / Merk / Fabriksmärke /
Merke / Mærke / Merkki / Mark / МЬскб / Gyártmány / Izstrdjums / MarkĴ / Model / Druh /
Fabrikat
MURRAY
Typ / Type / Type / Tipo / Tipo / Model / Typ / Type / Type /
Tyyppi / TĬĬp / Фэрпт / Típus / Tips / Tipas / Typ / Typ / Tip
4 HP / 21
Page 42

42
1740265
Erklärter Schalleistungspegel
Declared sound power level
Niveau de puissance acoustique déclaré
Livello di potenza acustica dichiarato
Nivel declarado de potencia acústica
Erkend geluidsvermogensniveau
Angiven ljudnivå
Deklarert lydnivå
Deklareret lydniveau
Ilmoitettu äänen tehotaso
Deklareeritud helitase
ДзлщиеЯуб уфЬимз ипсэвпх
Névleges hangerõszint
DeklarĔtais skaĞas jaudas lĘmenis
Deklaruojamas triukĠmo lygis
Deklarowany poziom g³oœnoœci dwiêku
Deklarovaná hladina akustického výkonu
Deklarirana raven zvoène moèi
104 dB (A)
Gemessener Schalleistungspegel
Measured sound power level
Niveau de puissance acoustique mesuré
Livello di potenza acustica misurato
Nivel medido de potencia acústica
Gemeten niveau van geluidssterkte
Uppmätt ljudstyrksnivå
Målt lydnivå
Målt lydniveau
Mitattu äänentehotaso
Mdetud helitase
МефсзиеЯуб уфЬимз ипсэвпх
Mért hangerõszint
IzmĔrĘtais skaĞas jaudas lĘmenis
Pamatuotas triukĠmo lygis
Zmierzony poziom g³oœnoœci dwiêku
Zmìøená hladina akustického výkonu
Izmerjena raven zvoène moèi
99 dB (A)
Art des Räumwerks
Type of cutting device
Genre du dispositif de déneigement
Tipo di dispositivo di rimozione della neve
Tipo de dispositivo de remoción de nieve
Type sneeuwverwijderingsapparaat
Typ av snöavlägsningsanordning
Type freserredskap
Type snefjernelsesanordning
Lumenpoistovälineen tyyppi
Likeseadme tĬĬp
Фэрпт дйЬфбозт кпрЮт
Vágószerkezet típusa
GriezĔj ierĘces tips
Pjovimo prietaiso tipas
Typ urz¹dzenia tn¹cego
Typ øezného mechanismu
Naèin odstranjevanja snega
ROTIERENDE SCHNEESCHRAUBE
ROTATING AUGER
FRAISE ROTATIVE
TRIVELLA RUOTANTE
CUCHILLA GIRATORIA
ROTEREND BOORBLAD
ROTERANDE SKRUV
ROTERENDE SKRUE
ROTERENDE SKRUE
PYÖRIVÄ SYÖTTÖKIERUKKA
PINNASEPUUR
Ресйуфспцйкь фсхффЬнй
FORGÓ CSIGA
ROTēJOğAIS URBIS
BESISUKANTIS SRAIGTAS
OBROTOWA ŒRUBA ODŒNIEĈAJ¥CA
ROTUJÍCÍ ğNEK
ROTAÈNÁ ZÁVITOVKA
Schnittbreite / Width of cut / Largeur de coupe / Ampiezza di taglio /
Ancho de corte / Snijbreedte / Skärbredd /
Snittbredde / Skærebrede / Leikkuujäljen leveys / Like laius / Еэспт кпрЮт /
Vágásszélesség / GrieĠanas platums / Pjovimo plotis / Szerokoœæ ciêcia / Ćíøka øezu /
ğirina reza
53 cm
Page 43

43
1740265
YYYY MM DD
Port Washington, WI USA
2006.06.02
President
(Ort und Datum der Ausstellung) (Name, Funktion und Unterschrift des Befugten)
(Place and date of issue) (Name and job function of authorized person)
(Lieu et date) (Nom, fonction et signature de la personne autorisée)
(Luogo e data del rilascio) (Nome, qualifica e firma dell’incaricato)
(Lugar y fecha de expedición) (Nombre, función y firma del encargado)
(Plaats en datum van de verklaring) (Naam, functie en handtekening van bevoegd persoon)
(Utfärdat ort/datum) (Namn, befattning och underskrift av behörig medarbetare)
(Sted og datum) (Bemyndigtes navn, funksjon og underskrift)
(Sted og dato) (Bemyndigedes navn, funktion og underskrift)
(Ilmoitus annettu paikka ja päiväys) (Valtuutetun henkilön nimi ja tehtävä)
(VĨljaandmise koht ja kuupĨev) (Volitatud isiku nimi ja ametikoht)
(Фьрпт кбй змеспмзнЯб Экдпузт) (Пнпмбферюнхмп кбй йдйьфзфб фпх еопхуйпдпфпэменпх бфьмпх)
(Kiadás helye és dátuma) (A meghatalmazott személy neve és munkahelyi beosztása)
(Izlaides vieta un datums) (Pilnvarots personas vrds un darba funkcijas)
(Vieta ir data) (ĵgalioto atstovo vardas ir pareigos)
(Data i miejsce wystawienia) (Nazwa i stanowisko uprawnionej osoby)
(Místo a datum vydání) (Jméno a funkce autorizované osoby)
(Kraj in datum izdaje) (Ime, funkcija in podpis upravièene osebe)
Page 44

44
1740265 TP_199_4367_00_SW_R.pdf
 Loading...