

Page 1

Instruction Book Push Mower
Model 20408x34A
Manuel de l'utilisateur Tondeuse poussée
modèle 20408x34A
Read and keep this book for future reference.
This book contains important information on
SAFETY, ASSEMBLY, OPERATION, AND
MAINTENANCE.
PRODUCT INFORMATION
The owner must be certain that all the product
information is included with the unit. This
information includes the INSTRUCTION
BOOKS, the REPLACEMENT PARTS and the
WARRANTIES.This information must be
included to make sure state laws and other
laws are followed.
Lisez-le et conservez-le comme futur ouvrage
de référence. Ce manuel contient d'importantes
données sur LA SECURITE, LA PRÉPARATION,
LE FONCTIONNEMENT ET L'ENTRETIEN de ce
modèle.
RENSEIGNEMENTS À L'USAGE DU PROPRIÉTAIRE
Le propriétaire doit être certain que tous les
renseignements sur le produit sont inclus avec
la tondeuse. Ces renseignements comprennent
les livres d'instructions, le livre de pièces de
rechange, les garanties et les certificats de
conformité. Ces renseignements doivent être
inclus pour être certain que les lois nationales et
autres lois sont observées.
F–99415
Page 2
34
1
2
5
1
3
2
4
2
6
1
10
1
5
3
4
1
5
3
4
7 8
11
5
4
2
1
2
5
1
9
1
2
1
12
13
5
F–99415
1
2
2
4
3
1
1
2
4
3
1
14
2
3
2
Page 3

CONTENTS
OWNER’S INFORMA TION 3
SAFE MOWING GUIDE 5
STEPS TO FOLLOW 7
ASSEMBLY 8
OPERATION 8
MAINTENANCE 8
TROUBLE SHOOTING CHART 10
SLOPE GUIDE 11
TWO YEAR LIMITED WARRANTY
Murray, Inc. warrants to the original purchaser
that this unit shall be free from defects in
material and workmanship under normal use
and service for a period of Two (2) Years from
the date of purchase; however, this warranty
does not cover engines, accessories (such as
snow blowers, snow blades, grass baggers and
ploughs), transmissions, batteries and Normal
Wear Parts (except as noted below) or
transaxles as the companies that manufacture
these items furnish their own warranties and
provide service through their authorized field
service facilities. For additional information, see
the warranties covering these particular parts. If
you are uncertain whether your unit contains or
is equipped with one or more of these parts,
consult your dealer prior to purchase. Subject to
the terms and conditions noted in this Limited
Warranty, we shall, at our option, repair or
replace at no cost to the original purchaser any
part covered by this Limited Warranty during the
applicable warranty period.
In the event the battery proves defective within
ninety (90) days from the date of purchase, we
will replace it without charge. If the battery
proves defective after (90) days but within one
hundred twenty (120) days from the date of
purchase, we will replace it for a charge of one
half (1/2) of the retail price of the battery in effect
at the time of return.
Normal Wear Parts are defined as belts, blades,
blade adapters, pneumatic tires, headlights and
seat covers. These parts are warranted to be
free from defects in material and workmanship
as delivered with the product. Any claim for
repair or replacement of Normal Wear Parts
must be made within thirty (30) days of the date
of purchase. No claims involving damage
caused from material use, abuse or misuse will
be honored.
This Murray, Inc. Two (2) Year Limited
Warranty is your exclusive remedy; however,
this warranty is void or does not apply to any
unit that has been tampered with, altered,
misused, abused or used for rental or other
commercial and/or professional
(non–homeowner) uses. Your warranty does not
cover minor mechanical adjustments which are
not due to any defect in material or
workmanship. For assistance in making such
adjustments, consult your Instruction Book.
To make a claim under this Murray, Inc. Two (2)
Year Limited Warranty, return the unit (or if
authorized in advance, the defective part) along
with your proof of purchase to an Authorized
Service Center near you. To locate the nearest
Authorized Service Center, call the Central Parts
Distributor for your area shown in the list
provided with your unit or check the Yellow Page
listings in your local telephone directory. If you
return the entire unit, we will repair the unit. If we
authorize the return of the defective part only, we
will either replace or repair the part. In the case
of a defect in a transmission or differential (as
distinguished from a transaxle), the entire
transmission or differential must be returned
since they do not include user serviceable parts.
This Murray, Inc. Two (2) Year Limited
Warranty gives you specific legal rights, and
you may also have other rights which vary from
state to state. This Limited Warranty is given
in lieu of all other expressed and implied
warranties including the implied warranty of
merchantability and warranty of fitness for a
particular purpose. If you need additional
information on this written warranty or
assistance in obtaining service, write:
MURRAY CANADA, INC., Factory Customer
Service, 1195 Coutneypark Drive East, Mississauga, Ont. L5T–1R1 (1–800–661–6662)
OWNER’S INFORMATION
This instruction book is written for a person with
some mechanical ability. Like most service
books, not all the steps are described. Steps on
how to loosen or tighten fasteners are steps
anyone can follow with some mechanical ability.
Read and follow these instructions before you
use the unit.
Know your product: If you understand the unit
and how the unit operates, you will get the best
performance. As you read this manual, compare
the illustrations to the unit. Learn the location
and the function of the controls. To help prevent
an accident, follow the operating instructions
and the safety rules. Keep this manual for future
reference.
IMPORTANT: Many units are not assembled
and are sold in cartons. It is the responsibility of
the owner to make sure the assembly instructions in this manual are exactly followed. Other
units are purchased in an assembled condition.
On assembled units, it is the responsibility of the
owner to make sure the unit is correctly assembled. The owner must carefully check the
unit according to the instructions in this manual
before it is first used.
WARNING: Look for this symbol to indicate
important safety precautions. This symbol
indicates: “Attention! Become Alert! Your
Safety Is At Risk.”
Responsibility Of The Owner
The responsibility of the owner is to
follow the instructions below.
1. Carefully read and follow the rules for safe
operation.
2. Follow all the assembly and preparation
instructions.
3. Inspect the unit.
4. Make sure that the operator of the unit
knows how to correctly use all standard
and accessory equipment.
5. Operate the unit only with guards, shields,
and other safety items in place and working
correctly.
6. Correctly adjust the unit.
7. Service the unit only with authorized or approved replacement parts.
8. Complete all maintenance on the unit.
F–99415
3
Page 4

Safe Operation Practices for Walk–Behind Mowers.
This cutting machine is capable of amputating hands and feet and throwing objects. Failure to observe the following safety instructions could result in serious
injury or death.
I. General Operation
1. Read, understand, and follow all instructions
on the machine and in the manual(s). Be
thoroughly familiar with the controls and the
proper use of the mower before starting.
2. Do not put hands or feet near or under rotating parts. Keep clear of the discharge opening at all times.
3. Only allow responsible individuals, who are
familiar with the instructions, to operate the
mower.
4. Thoroughly inspect the mower and area
where the equipment is to be used. Clear the
area of objects such as rocks, toys, wire,
bones, sticks etc., which could be picked up
and thrown by the blade.
5. Be sure the area is clear of other people before mowing. Stop mower if anyone enters
the area.
6. Do not operate the mower when barefoot or
wearing open sandals. Always wear substantial foot wear.
7. Do not pull mower backwards unless absolutely necessary. Look down and behind before and while moving backwards.
8. Do not operate the mower without proper
guards, plates, grass catcher or other safety
protective devices in place.
9. See manufacturer’s instructions for proper
operation and installation of accessories.
Only use accessories approved by the
manufacturer.
10. Stop the blade(s) when crossing gravel
drives, walks, or roads.
11. Stop the engine (motor) whenever you leave
the equipment, before cleaning the mower or
unclogging the chute.
12. Shut the engine (motor) off and wait until the
blade comes to complete stop before removing grass catcher.
13. Mow only in daylight or good artificial light.
14. Do not operate the mower while under the
influence of alcohol, drugs or other medication which can cause drowsiness or affect
your ability to operate this machine safely.
15. Never operate mower in wet grass. Always
be sure of your footing; keep a firm hold on
the handle and walk; never run.
16. Disengage the self–propelled mechanism or
drive clutch on mowers so equipped before
starting the engine (motor).
17. If the equipment should start to vibrate abnormally, stop the engine (motor) and check
immediately for the cause. Vibration is generally a warning of trouble such as a blade that
is damaged, a loose blade, or the engine
mounting bolts are loose.
18. Always wear safety goggles or safety
glasses with side shields when operating
mower to protect your eyes from foreign objects which can be thrown from the unit.
19. Plan your mowing pattern to avoid discharge
of material toward roads, sidewalks, bystanders and the like.
20. After striking a foreign object, stop the engine. Remove the wire from the spark plug.
Inspect the blade and mower for damage. If
damaged, repair before starting and operating the mower.
21. Keep any washout ports and other mower
housing service openings closed when mowing.
II. Slope Operation
Slopes are a major factor related to slip and fall
accidents which can result in severe injury. All
slopes require extra caution. If you feel uneasy
on a slope, do not mow it.
DO:
Mow across the face of slopes; never up and
down. Do not mow excessively steep slopes
(maximum 15 degrees) or areas where the
ground is very rough. See the “Guide” in the
back of this manual to check a slope. Exercise
extreme caution when changing direction on
slopes.
Remove objects such as rocks, tree limbs, etc.
Watch for holes, ruts, or bumps. T all grass can
hide obstacles.
DO NOT:
Do not
mow near drop–offs, ditches, or embankments. The operator could lose footing or
balance.
Do not
mow excessively steep slopes.
Do not
mow on wet grass. Reduced footing
could cause slipping.
III. Children
Tragic accidents can occur if the operator is not
alert to the presence of children. Children are
often attracted to the mower and the mowing
activity.
Never
where you last saw them.
1. Keep children out of the mowing area and
under the watchful care of a responsible
adult.
2. Be alert and turn mower oft if children enter
the area.
3. Before and while moving backwards, look
behind and down for small children.
4. Never allow children to operate the mower.
5. Use extra care when approaching blind corners, shrubs, trees, or other objects that may
obscure vision.
* Asterisked items do not apply to electric mowers.
assume that children will remain
IV. Service
*1. Use extra care in handling gasoline and oth-
er fuels. They are flammable and vapors are
explosive.
a. Use only an approved container.
b. Never remove gas cap or add fuel with the
engine running. Allow engine to cool before
refueling. Do not smoke.
c. Never refuel the machine indoors.
d. Never store the machine or fuel container
inside where there is an open flame, such
as a water heater.
*2. Never run an engine indoors or inside a
closed area.
3. Never make adjustments or repairs to items
such as the height adjusters or grass catcher
with the engine (motor) running. Disconnect
the spark plug wire, and keep the wire away
from the plug to prevent accidental starting.
Always wear eye protection when you make
adjustments or repairs.
4. Keep all nuts and bolts, especially blade attachment bolts, tight and keep equipment in
good condition.
5. Never tamper with safety devices. Check
their proper operation regularly.
6. To reduce fire hazard, keep mower free of
grass, leaves, or other debris build–up.
Clean up oil or fuel spillage. Allow mower to
cool before storing.
7. Stop and inspect the equipment if you strike
an object. Repair, if necessary, before restarting.
8. Never attempt to make wheel height adjustments while the engine (motor) is running.
9. Always disconnect electric mowers (live operated) before cleaning, repairing, or adjusting.
10. Grass catcher components are subject to
wear, damage, and deterioration, which
could expose moving parts or allow objects
to be thrown. Frequently check components
and replace with manufacturer’s recommended parts, when necessary. For storage,
always make sure grass catcher is empty.
11. Mower blades are sharp and can cut. Wrap
the blade(s) or wear gloves, and use extra
caution when servicing them.
12. Do not change the engine governor setting or
over–speed the engine.
13. Frequently check the blade for wear or damages such as cracks and nicks. A blade that
is bent or damaged must be immediately replaced with a factory replacement blade. For
safety and good cutting performance, replace
the blade every two years. Frequently check
the blade bolt and the engine mounting bolts.
Replace damaged bolts and tighten loose
bolts.
14. Use only original equipment or authorized
replacement parts.
F–99415
4
Page 5
SAFE MOWING GUIDE
Every person who uses power equipment must
learn the difference between proper and
improper use, safe and unsafe mowing
practices. Read the next few pages carefully.
They can help you learn. Too often the mower
user is inexperienced, not properly instructed, or
has not read the Instruction Book and
instructions on the unit before using it for the first
time. This can result in unsafe use endangering
the operator, bystanders, and the equipment.
Another result can be a poor appearance of the
area mowed.
Read this Instruction Book. Read the
instructions on the unit. Operate the mower
according to the Safe Mowing Guide and other
safety rules and recommendations in this
Instruction Book and on the unit. Make sure
anyone who uses the unit has read the
instructions and has been told how to operate
the mower safely.
Your mower is designed to provide good service
and durability in normal residential cutting. If the
mower is not properly serviced and maintained
or used on unsuitable terrain or in conditions not
suitable for mowing, product performance and
safety will be reduced.
Proper attire is an important part of safe
mowing. Safety glasses protect the eyes from
thrown objects. Safety shoes with steel toes can
protect a foot from being cut by the blade. Shirts
and pants that cover the arms and legs can stop
or deflect a thrown object.
Practice using the mower before you actually
begin cutting grass. Select a large open level
area. Learn the location and function of the
controls and how they work. It is important that
the blade can be stopped quickly in an
emergency. Learn how to cut and how to keep
control of the mower at all times.
Many mowers are started manually. When using
a pull start or rope start, place your feet firmly
and away from the blade. Hold the rope handle
securely, but never wrap the rope around your
arm or fingers for a “better grip”.
The mower is designed for use by one person.
Always mow alone. Never carry passengers.
Carrying a passenger is dangerous for the
F–99415
passenger and the operator. A mower is not for
amusement or for carrying objects.
Is the area you are planning to mow wet? Never
cut a wet lawn. Cutting wet grass can cause an
accident. It can affect mower performance and
also cause problems with future lawn growth
and appearance. Wet grass is slippery and
might cause the operator to fall or the mower to
slip. Someone could be hurt by touching the
blade. Wet grass tends to clog the mower,
causing poor discharge. Wet clippings bunch up
on the lawn retarding the growth of grass. A wet
mower can cause parts to rust and reduce the
useful life of the unit.
When you look over the lawn, refresh your
memory about hard, immovable obstacles such
as pipes, stumps, and rocks and avoid them.
They can cause damage to the mower or an
accident injuring the operator or a bystander.
Take a litter bag along and walk over the area to
be cut. Pick up any stones, toys, wire, bones, or
other loose objects. These items can damage
the mower or they can become dangerous flying
objects if the mower blade hits them. The blade
of a power mower travels very fast. It can throw
rocks and other objects with force over long
distances. Objects thrown by mowers can break
windows, cause bruises, or even put out an eye.
Often the person hurt by a thrown object is a
bystander such as a child, another family
member or a neighbor. Keep people and pets
completely away from the mowing area. Direct
the mower’s discharge away from areas where
people can be. Planning your mowing pattern
has a double benefit. It can reduce chances of
an injury and make the clean up after mowing
easier.
Are there ditches, walls,
or major inclines in the
area to be cut? Plan the
mowing pattern to avoid
such danger areas.
Inclines and rough
terrain must be mowed
carefully and some
areas must not be cut
with a mower at all. With
walk behind equipment,
mow across the incline
so that if you or the
mower slip, you won’t
run into each other.
5
Never mow slopes greater than 15 degrees. See
the “Guide” in the back of this Instruction Book
to check any slopes.
Ready to start cutting? Not yet. Be sure the
mower has been fully assembled according to
directions in the Instruction Book. Even if
assembly was done by a lawn and garden shop
or the store where the unit was purchased, it
must be checked. Are all nuts, bolts and screws
tight? Does the engine have oil? These items
must be checked periodically throughout the life
of the mower.
Your mower has a gasoline engine. Gas is
dangerous. Store fuel only in a approved gas
container. Do not store large amounts of gas.
Put out all cigarettes, pipes and cigars before
working with gasoline. Store fuel and the mower
itself in a well ventilated area away from any
possible source of ignition such a pilot light on a
furnace. If the mower is to be stored for an
extended time, remove the gas from the tank.
This minimizes the chance of a fire and keeps
the tank clear of deposits and old gasoline, thus
improving mower performance. Move the mower
outside before adding gasoline. Use a funnel
and wipe up any spilled fuel before starting.
Remember, gasoline expands when heated so
leave some expansion room. Also, most mower
gas caps are vented to allow for expansion.
Always use the proper cap. People are
needlessly burned by fires, hurt in explosions,
mowers and other property are damaged
because of failure to follow basic safety rules
related to gasoline and fueling.
Never add gasoline to an engine that is running
or that is hot from recent use, this can cause an
accident. Remove dry grass and other debris
from the mower. Keeping the mower clean will
improve the performance, help the engine stay
cooler, extend the life of moving parts, and
minimize the danger of fire. People get burned
working with and around their mowers for other
reasons than fire and explosions. It takes only a
few seconds of operation for the engine and the
muffler to become hot. Do not touch these parts
when the mower is running. Stop the engine and
let it cool down before servicing the mower.
Remember, exhaust fumes can be dangerous.
Never operate the engine indoors or in an
enclosed area.
Getting a new mower can be a big event for a
family. Let family members satisfy their curiosity
about the mower and at the same time, tell them
about its dangers. Remember, a mower is not a
toy and is not for use by children or anyone
lacking in age, strength or experience.
As with any power equipment, a mower can be
dangerous if not assembled, misused, or not
properly maintained. The most important rule is
to always use good judgement and common
sense.
Your mower will cut thick grass and heavy plant
stems with ease. Fingers and toes are no more
resistant to the mower’s blade. Many people are
Page 6
injured because they “forgot” and reached into
the discharge chute. Always treat your lawn
mower as if the blade is rotating. Never perform
any service or try to make any
adjustment,except carburetor, while the engine
is running.
Use only accessories suited for your mower.
Use of improper accessories can reduce the
safety designed into both the mower and the
accessory, it can even damage the unit. Read
and follow the instructions which come with the
accessory and the mower.
Use only original equipment or approved
substitutions as service parts. If you need
professional service, select a shop that is an
Authorized Service Center for your brand of
mower. If you plan to service the unit yourself,
follow directions in the Instruction Book.
As you mow, remember children and pets are
sometimes attracted to the activity. Be especially
careful when trimming around shrubbery or
when backing up. If at all possible, don’t mow
when moving backwards. It is dangerous
because vision is restricted. Also, blades are
designed to cut while the unit is moving forward
so cutting performance is reduced when mowing
in reverse.
Never leave the mower running and unattended.
Shut off the engine. Put the mower in a position
so that it can not roll. If the unit is self–propelled,
make sure the drive control is disengaged.
When mowing, be aware of your condition and
the weather conditions. After mowing a long
time, you will be tired. This is the time when
reactions slow down, your attention wanders;
the time when you are wide open for an
F–99415
accident. Take a short break. If temperatures are
high, take precautions to avoid becoming
dehydrated. If you are angry, tired, or unable to
give your full attention to mowing, if you have
been consuming alcohol, medicines, or drugs,
do not use your mower or any type of power
equipment.
If weather conditions become worse while you
are cutting, stop and finish later. Cutting grass in
the rain is no fun and it is dangerous. Always
seek shelter in an electrical storm. In extremely
dry mowing conditions, your safety glasses can
serve a dual purpose by protecting your eyes
from dust and thrown objects, also a dust or
pollen mask can be helpful.
Your mower is equipped with a number of safety
features which are important to the safety of the
operator and bystanders and must never be
altered or removed. If a safety feature becomes
inoperable, lost, or damaged, it must be repaired
or replaced before the mower is used.
Engine speed is a key to safe mowing and a
nice looking lawn. The maximum speed of the
engine on your mower has been set at the
factory. Do not change the engine governor in
any way.
Select the maximum engine and ground speed
that is right for the terrain and the height of
grass. You get the best cutting and bagging
performance when using a grass catcher by
operating the engine at maximum speed. Never
walk fast or run just to get the job done sooner.
On inclines, reduce ground speed and exercise
extreme care.
It is best to mow only during daylight hours;
however, if you must mow in the late afternoon
or evening, make sure there is good artificial
light.
Your mower will require maintenance including
service and adjustments before and after use as
with any machine. The frequency of the
maintenance is generally based on hours of use,
however, the frequency can vary because of
mowing conditions. Check the Instruction Book
for more detailed instructions. Proper
maintenance protects your investment in the
mower and helps insure that it will function
safely and reliably.
Never attempt any
service (with the
possible exception of
carburetor adjustment)
with the engine running.
After turning the engine
off, always disconnect
the spark plug wire to
prevent accidental
restarting while the unit
is being serviced.
While mowing, if you hit a foreign object, stop
the engine. Remove the spark plug wire.
6
Carefully and thoroughly inspect the mower for
damage. Make necessary repairs before
restarting. If the unit starts to vibrate abnormally,
stop the engine immediately and check for the
cause. Vibration is generally a warning of
trouble. Keep all nuts, bolts, and screws tight.
The blade is the most dangerous part of the
mower and also the most important part in
obtaining a nice lawn appearance. Check the
blade and the blade mounting hardware
frequently. Keep it tight. If the blade hits a solid
object, check it thoroughly for deformation or
cracks and replace if damaged. For
safety,replace the blade every two years. A
sharp blade reduces the work load on the
engine and cuts grass more cleanly, for a better
looking cut with less work. The blade is always
close to the outside of the mower housing. For
best trimming on side discharge mowers, cut
with the left side of the housing toward the area
that needs trimming.
A useful accessory for your mower is a grass
catcher. There are grass catchers available for
most models. For best performance and safety,
be sure the grass catcher is approved for use
with your mower. Assemble as directed and
follow operating and safety instructions with the
catcher and in the Instruction Book.
Before mounting, checking or emptying the
grass catcher, always turn the engine off.
Remember to check the grass catcher before
each use for cracks, wear, or deterioration.
Replace any part that is damaged with the
manufacturer’s recommended replacement part
before using the grass catcher again.
Proper cutting technique is important if you want
your lawn to look good. Avoid the temptation to
cut grass too short. Cutting grass too short can
kill the plant, cause grass to turn yellow, or make
the lawn look brown and thatchy. Use the lower
cutting heights in cool months when the grass is
lush. Use the higher cutting heights in extremely
dry periods. Cutting with a dull blade or low
engine speed bruises, shreds, and can uproot
some grass making the lawn look dull and brown
a few days after cutting. Always put the throttle
control in FAST position when mowing and
bagging. When bagging, slower ground speed
will provide the best results.
Change the mowing pattern slightly each time
you cut. If you always cut the same way, the
grass will develop a “set” and clippings will
accumulate more heavily in some areas more
than in others causing grass to get thinner in
those areas. Do not service your mower over the
grass. Spilled oil and gas can kill the grass. In
tall grass or very heavy grass, do not try to cut it
all at once. Raise the height of cut on the first
cutting and lower it for the next cutting the same
day or within a few days. Another way is to cut
only part of the width of the mower and adjust
your ground speed (not the engine) to move
Page 7

more slowly so the mower can clear itself as it
moves forward.
When cutting with a walk behind mower, always
push the unit. Do not pull it. Pushing the unit
keeps the operator behind the mower in the
“operator’s zone” for better control. Pushing the
unit also gives you a chance to see exactly
where and what you are mowing. There will be
times while you are mowing that you will have to
pull the mower backwards (such as when the
front of the mower has come up against a wall or
fence). If you must back up, make sure your feet
are in the clear. Stand well back from the mower ,
plant your feet firmly with each step and back up
being careful to look behind you. Resume
normal mowing as soon as possible.
If your unit is self–propelled, remember that the
drive mechanism is not designed to do all the
work, but the unit can move without your help.
Always keep your hands on the handle near the
controls when the engine is running. Remember
too that the self–propelled mechanism can be
dangerous. Keep hands and feet away from
belts and chains. Always turn off the engine
before attempting to remove anything that
becomes entangled in the self–propelled
system.
Remember, your mower is a useful tool, but it
can be dangerous. Follow the instructions in this
Instruction Book. Use the mower properly and
carefully and it will give you many hours of
trouble free, accident free operations.
STEPS TO FOLLOW
Before Mowing
D Be sure to dress correctly. Wear hard shoes,
not sandals or tennis shoes.
D Examine the blade. A blade that is bent,
cracked, or damaged must be replaced with
a factory replacement blade.
D Fill the fuel tank outside. Clean off spilled
fuel.
D Read and follow the Owner’s Manual, the
instructions with the engine, and the instructions with any attachments. Owner’s Manual
instructions are for your safety and the safety
of others.
D Exhaust fumes are dangerous. Start the en-
gine outside.
D Make sure all safety devices are in place and
working correctly.
D Operation of the mower is only for a person
that has experience.
D Wet grass can be dangerous. Let the grass
dry.
D Instruct children and others to keep away
from the work area.
D Never cut the grass without good light.
D Pick up loose objects. Remove them from
the mowing area.
While Mowing
D Watch for fixed objects and avoid them. They
can damage the mower or cause injury.
D A hot engine and muffler will cause a burn.
Do not touch.
D Inclines and slopes must be carefully
mowed. See the “Guide” in the back of this
book to check a slope.
D Lack of daylight or good artificial light is
cause to stop mowing.
D Examine the mower, the blade, and other
parts for damage after hitting a foreign object
or if the unit vibrates excessively.
D Do not make adjustments or repairs without
stopping the engine (except for carburetor).
Disconnect the spark plug wire.
D On or near roads, watch out for traffic. Direct
discharge away from roads.
D When mowing, avoid areas where traction is
unsure. Before and while moving backwards, look behind and down for small children.
D In heavy grass, raise the cutting height. Cut
slower. Stop the engine to remove clogged
grass from the mower.
D Never remove any safety related parts.
D Do not pour gasoline into a engine that is hot
or running.
After Mowing
D Always let the mower cool before storing in
an enclosed area.
D Foreign material on the mower is dangerous.
Clean off grass, leaves, grease and oil before storing.
D Tighten all loose nuts, bolts and screws be-
fore you use the unit.
D Empty and clean any grass catcher or other
accessory.
D Remove the key or disconnect the spark plug
wire to prevent unauthorized use.
D Make sure the mower is not kept near a
source of ignition. Gas fumes can cause an
explosion.
D Only original parts or factory approved sub-
stitutes can be used to service the mower.
D When storing the mower for an extended pe-
riod, remove the fuel from the fuel tank.
D Instruct children to leave the mower alone. It
is not a toy.
D Never keep gasoline near a source of igni-
tion. Always use an approved container.
Keep gasoline away from children.
D Lubricate according to the Instruction Book.
See “Lubrication”.
IMPORTANT––Read the Instruction
Book. Keep this book for future use and
reference.
F–99415
7
Page 8

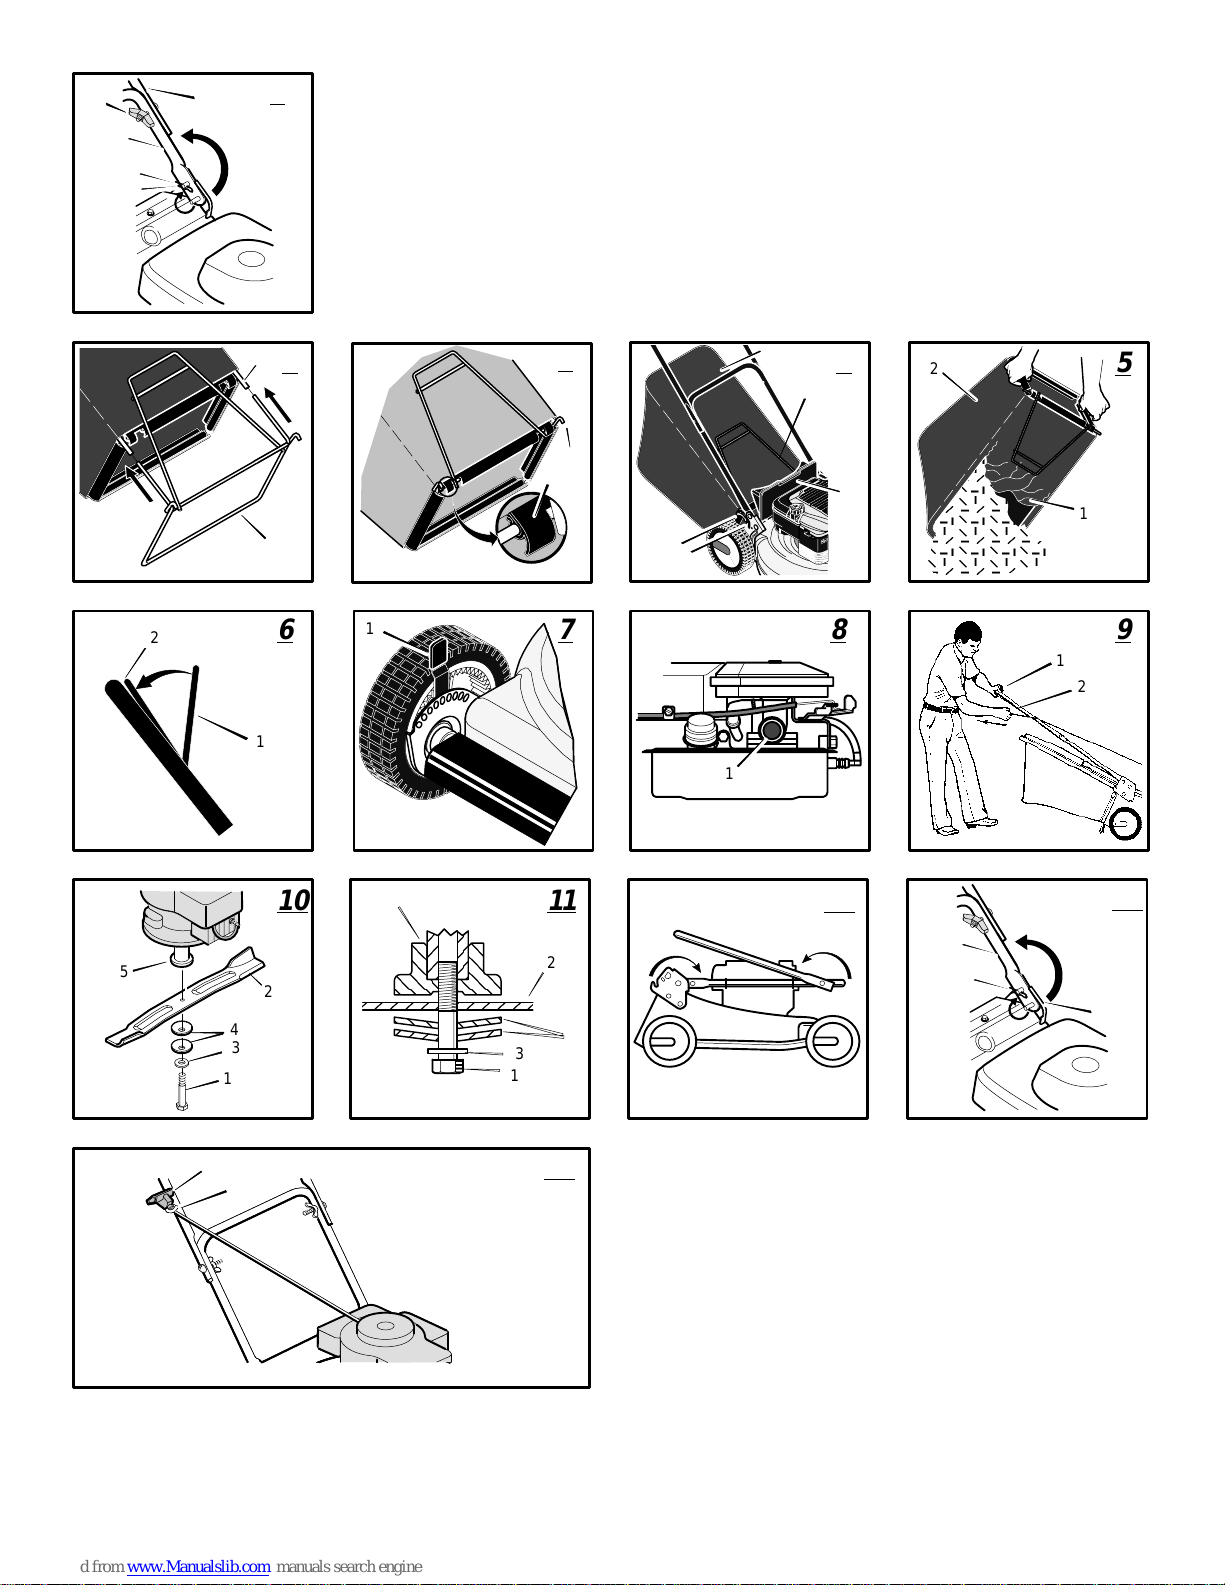
ASSEMBLY
NOTE: Illustrations and pictorials begin on
page 2.
Unpacking instructions
The mower was fully assembled at the factory.
When the mower was put in the carton, the
handle was put in the storage position. To put
the handle in the operating position, follow the
steps below.
1. Remove the mower from the carton.
2. Put the lower handle (1) in the operating
position.
3. Remove the hair pins (2) from the lower pin.
Attach the hair pins (2) to the upper pins
(5).
4. Put the upper handle (3) in the operating
position. Tighten the knobs (4).
5.
(Figure 14)
(1) to the rope guide (2), twist the rope
through the rope guide (2) mounted on the
right side of the handle.
NOTE: If you cannot attach the
recoil–start grip because the rope is too
short, hold the engine stop lever against
the handle. Slowly pull the recoil–start
grip.
CAUTION: Be careful when you fold or raise
the handle. Do not damage the cables. A
cable that is bent will not work correctly. Before you use the unit, replace a bent or damaged cable.
To attach the recoil–start grip
How To Assemble The Grass Bag
1. Slide the frame assembly (4) into the ends
of the support tube (3).
2.
(Figure 3)
assembly (4).
3.
(Figure 4)
operating the mower with the grass bag, the
top cover (6) must be in the closed operating position.
Attach the clips (5) to the frame
Close the top cover (6). When
How To Mount The Grass Bag
1. To mount the grass bag on the mower, raise
the rear door (1). Hold the handle (2) of the
grass bag. Put the grass bag in the operating
position. Lower the rear door (1).
IMPORTANT: Make sure the rods, on each
side of the frame assembly, are mounted in
the notches (3) of the handle brackets (4).
How To Prepare The Engine
Note: Engine does not contain OIL or PETROL.
WARNING: Follow the engine
manufacturer’s instructions for the
type of petrol and oil to use. Always use a safety petrol container. Do not
smoke when adding petrol to the engine.
When inside an enclosure, do not fill with
petrol. Before you add petrol, stop the engine. Let the engine cool for several minutes.
See the engine manufacturer’s instructions for
the type of petrol and oil to use. Before you use
the unit, read the information on safety,
operation, maintenance, and storage.
F–99415
(Figure 1)
(Figure 4)
Mulching finely cuts the grass so that the grass
can be easily recycled. Because the nutrients
are returned to the soil, the lawn will need less
fertilizer. To correctly mulch the lawn, follow the
tips below.
S The grass must be dry. If the grass is wet, it will
be difficult to cut and cause heavy clumps of
grass.
S The grass must not be too tall. The maximum
height to effectively cut is 4 1/2 inches. Set the
height adjusters so that only the top third of the
grass is cut.
S If the grass is more than 4 1/2 inches high, two
mowings will be necessary. For the first mowing, set the height adjusters in the highest position. Then, lower the height adjusters for the
second mowing.
S Keep a sharp edge on the blade. A blade that
is not sharp will cause the ends of the grass to
become brown.
S Clean the underside of the mower housing.
Grass and other debris can keep the mower
from working correctly.
If the quality of cut is marginal, try the following:
S Set the height adjusters at a higher cutting
height.
S Cut the grass more frequently.
S Operate the mower at a slower ground speed.
S Overlap the cutting swaths instead of cutting a
full swath with each pass.
S Mow across the marginal areas a second time.
OPERA TION
NOTE: Illustrations and pictorials begin on
page 2.
Engine Stop Lever
Release the engine stop lever (1) and the
engine and the blade will automatically stop. To
run the engine, hold the engine stop lever (1) in
the Operating position (2)
Before you start the engine, operate the engine
stop lever (1) several times. Make sure the
cable moves easily.
How To Stop The Engine
To stop the engine, release the engine stop
lever (1). Disconnect the wire from the spark
plug to prevent the engine from starting.
If the engine will not stop, hold a screwdriver
against the spark plug and against the engine
cooling fins. The spark will go to ground and the
engine will stop. Before you start the engine,
check the engine stop cable. Make sure the
engine stop cable is assembled correctly. Before
you operate the unit, replace a bent or damaged
engine stop cable.
How To Start The Engine
WARNING: The blade will rotate
when the engine runs.
1. Check the oil.
2. Fill the fuel tank with regular unleaded petrol.
See “How To Prepare The Engine”.
3. Make sure the spark plug wire is connected
to the spark plug.
(Figure 6)
(Figure 6)
8
4.
(Figure 8)
ton (1) on the front or side of the engine.
Push the primer button (1).. Every time you
push the primer button (1), wait two seconds. For the number of times required to
push the primer button (1), see the engine
manufacturer’s instructions.
NOTE: Do not use the primer button to
start a warm engine.
5.
(Figure 9)
hand to hold the engine stop lever (1) in the
operating position as shown. Use the other
hand to hold the recoil–start grip (2).
6. Rapidly pull the recoil–start grip (2). Slowly
return the recoil–start grip (2).
7. If the engine does not start in 5 or 6 tries,
See the “Trouble Shooting Chart” Instructions.
Some models have a primer but-
Stand behind the mower. Use one
How To Operate The Mower
WARNING: Check the condition of
the grass bag for wear or deteriora-
tion. If worn or damaged, replace
the parts only with approved factory replacement parts. For replacement parts,
see the parts list in this book.
To completely fill the grass bag, operate the
engine with the throttle control in the FAST
position.
How To Empty The Grass Bag
WARNING: Before you remove the
grass bag, stop the engine. Before
you remove any grass from the
mower housing, disconnect the wire from
the spark plug.
1.
(Figure 4)
position.
2. Lift the frame assembly (2) over the two
handle notches (3).
3.
(Figure 5)
the grass from the bag.
4.
(Figure 4)
mower, raise the door (1). Put the two rods
of the frame assembly into the two notches
(3).
5. Lower the door (1).
Raise the door (1) to a vertical
Open the top cover (5). Empty
To mount the grass bag on the
(Figure 4)
MAINTENANCE
NOTE: Illustrations and pictorials begin on
page 2.
Use the following maintenance section to keep
your unit in good operating condition. All the
maintenance information for the engine is in the
engine manufacturer’s instructions. Before you
start the engine, read this book.
WARNING: Before you make an in-
spection, adjustment (except
carburettor), or repair, disconnect
the wire from the spark plug.
Lubrication
1. For maximum performance, lubricate the
wheels and all pivot points with engine oil
every 25 hours.
2. To lubricate the engine, refer to the engine
manufacturer’s instructions.
NOTE: Do not lubricate the engine stop
cable. Lubricants will damage the cable and
prevent the cable from moving freely. Replace the cable if bent or damaged.
Page 9

How To Clean The Mower Housing
WARNING: The blade will rotate
when the engine runs. Before you
clean the mower housing, stop the
engine and disconnect the wire from the
spark plug.
Grass and other debris can keep the mower
from working correctly. After you mow, clean the
mower housing as follows.
1. Stop the engine.
2. Disconnect the wire from the spark plug.
3. Clean the top and the bottom of the mower
housing.
How To Adjust The Height Of Cut
WARNING: The blade will rotate
when the engine runs. Before you
change the height of cut, discon-
nect the wire to the spark plug.
Models With Quick Type Adjusters
(Figure 7)
To change the height of cut, move the position of
the adjuster arm (1) at each wheel. Make sure
each adjuster arm (1) is in the same position so
that the mower will cut level.
1. Disengage the adjuster arm (1).
2. Move the adjuster arm (1) to another position.
Mulching Blade Replacement
A mulching mower is equipped with a special
mulching blade. If the mulching blade becomes
worn or damaged, replace with an original
equipment mulching blade. A standard blade will
not cut correctly and could cause an accident.
Blade Service
WARNING: Before you inspect the
blade or the blade adapter, discon-
nect the wire to the spark plug. If
the blade hits an object, stop the engine.
Disconnect the wire to the spark plug.
Check the unit for damage.
Frequently check the blade for wear or damage
such as cracks. Frequently check the bolt that
holds the blade. Keep the bolt tight. If the blade
hits an object, stop the engine. Disconnect the
wire to the spark plug. Check the blade adapter
for damage. Check for a bent or damaged blade,
a badly worn blade, or other damage. Before
you operate the unit, damaged parts must be
replaced with factory replacement parts. For
safety, replace the blade every two years. Keep
a sharp edge on the blade. A blade that is not
sharp will cause the ends of the grass to
become brown. Remove the blade as follows.
How To Remove The Blade
(Figure 10
and Figure 11)
WARNING: Before you remove the
blade, disconnect the wire to the
spark plug. The blade has sharp
edges. When you hold the blade, use
gloves or cloth material to protect your
hands.
1. Drain the fuel tank.
2. Lift the side of the mower that has the muffler
or spark plug.
3. Use a piece of wood to keep the blade from
rotating.
4. Remove the bolt (1) that holds the blade (2).
5. Check the blade according to the “Blade Service” instructions. Replace a badly worn or
damaged blade with a factory replacement
blade.
6. Mount the blade with the curved edges toward the housing. If the blade is upside
down, the blade will not cut correctly and can
cause an accident.
7. Fasten the blade 2) with the original wash-
ers (3 and 4) and bolt (1). Make sure the
outside rims of the Belleville washers (4)
are toward the blade (2).
8. Tighten the bolt (1) that holds the blade (2)
to a torque of 30 foot pounds.
WARNING: Always keep the bolt
(1) that holds the blade (2) tight. A
loose bolt (1) or blade (2) can
cause an accident.
Check The Level Of Cut
Test the unit in a small area. If the height of cut
is not level or if the cut grass is not discharged,
the cause can be: (1) the blade is bent or
damaged, (2) the blade is not sharp, (3) a worn
blade, (4) or a broken blade adapter. Before you
use the unit, correct the problem.
Folding Handle Storage
(Figure 12 and
Figure 13)
CAUTION: Be careful when you fold or raise
the handle. Do not damage the cables. A
cable that is bent will not work correctly. Before you use the unit, replace a bent or damaged cable.
How To Fold The Handle
1.
(Figure 12)
the upper part of the handle to the lower part
of the handle. As you fold the handle, make
sure the cables are not around the loose fasteners and do not become damaged. Rotate
the upper part of the handle toward the back
of the unit.
2.
(Figure 13)
the lower handle (1). Push in on the ends of
the lower handle (1). Move the ends of the
lower handle (1) past the locking pins (2)
or locking tabs (2).
3. Rotate the handle forward over the engine.
Make sure the cables are not damaged.
Loosen the fasteners that hold
Remove the hair pins (3) from
How To Raise The Handle
1. Pull the handle back until the ends of the
lower handle (1) lock into position.
2. Lift the upper part of the handle into the operator’s position. Tighten the fasteners that
hold the handle.
How To Prepare The Mower For Storage
WARNING: Do not remove petrol
while inside a building, near a fire,
or while you smoke. Petrol fumes
can cause an explosion or a fire.
1. Drain the fuel tank.
2. Let the engine run until it is out of petrol.
3. Drain the oil from the warm engine. Fill the
engine crankcase with new oil.
4. Remove the spark plug from the cylinder.
Pour one ounce of oil into the cylinder. Slowly pull the recoil–start grip so that the oil will
protect the cylinder. Install a new spark plug
in the cylinder.
5. Clean the dirt and debris from the cylinder
cooling fins and the engine housing.
6. Clean the bottom of the mower housing.
7. Completely clean the mower to protect the
paint.
8. Put the unit in a building that has good ventilation.
9. Make sure the grass bag is empty of grass.
Grass remaining in the bag during storage
will damage the bag.
How To Order Replacement Parts
The replacement parts are shown either on the
back pages of this Instruction Book or in a
separate Parts List Book.
Use only manufacturer’s authorized or approved
replacement parts. The letter placed on the end
of the part number denotes the type of finish for
the part, C for chrome, Z for zinc, a PA for
purchased assembly. It is important that you
include this when ordering a part. Do not use
attachments or accessories not specifically
recommended for this unit. In order to obtain
proper replacement parts you must supply the
model number of your mower (see nameplate).
Replacement parts, except for the engine,
transmission, transaxle or differential, are
available from the store where the mower was
purchased or a service shop recommended by
the store.
If you are unable to obtain parts or service in the
manner outlined above, then contact:
MURRAY CANADA, INC., Factory Customer
Service, 1195 Coutneypark Drive East,
Mississauga, Ont. L5T–1R1 (1–800–661–6662)
Replacement parts for the engine, transaxle, or
transmission, are available from the
manufacturer’s authorized service centre found
in the commercial pages of the telephone
directory. Also, see the individual engine or
transmission warranties to order replacement
parts.
When ordering the following information is
required:
(1) The Model Number
(2) Serial Number
(3) Part Number
(4) Quantity
F–99415
9
Page 10

TROUBLE SHOOTING CHART
The Engine will not start.
1. Make sure the fuel tank is filled with clean
petrol. Do not use old petrol.
2. On a cold engine, push the primer button
(optional on some models) five times.
3. Make sure the wire for the spark plug is connected to the spark plug.
4. Adjust the carburettor. See the engine
manufacturer’s instructions.
5. There is too much petrol in the engine cylinder. Remove and dry the spark plug. Pull the
recoil–start grip several times. Install the
spark plug. Connect the wire to the spark
plug. Start the engine.
6. The engine is difficult to start in heavy or high
grass. Move the mower to a clean dry surface.
7. Make sure the engine stop lever is in the operating position.
8. Make sure the fuel valve is in the ON position. See the engine manufacturer’s instructions.
The Engine will not stop.
1. Release the engine stop lever.
2. Check the engine stop cable. Replace the
cable if bent or damaged.
The Engine performance is bad.
1. Check the height of cut settings. Raise the
height of cut if the grass is high.
2. Check the bottom of the blade housing.
Clean the blade housing of grass and other
debris.
3. Check the wire to the spark plug. Make sure
the wire is connected.
4. Clean the engine cooling fins of grass and
other debris.
5. Check the carburettor adjustments. See the
engine manufacturer’s instructions.
6. Check the spark plug gap. Set the spark plug
gap at 0.030”.
7. Check the amount of oil in the engine. Fill
with oil if necessary.
8. Check the engine air cleaner. See the engine
manufacturer’s instructions.
9. The petrol is bad. Drain and clean the fuel
tank. Fill the fuel tank with clean petrol.
Excessive Vibration.
1. Remove the blade. Check the blade and balance if necessary. See the blade maintenance instructions.
2. Check for a bent or broken blade. A DAMAGED BLADE IS DANGEROUS AND MUST
BE REPLACED.
3. Check the blade adapter. REPLACE A BROKEN BLADE ADAPTER.
4. If the vibration continues, take the mower to
an Authorized Service Centre.
The grass will not discharge correctly.
1. Clean the bottom of the mower housing.
2. Check for a badly worn blade. Remove and
sharpen the blade. For safety, replace the
blade every two years with a factory replacement blade.
The grass is not cut even.
1. Check the height adjustment at each wheel.
The height adjustment must be the same for
each wheel.
2. Make sure the blade is sharp.
3. Check for a bent or broken blade. A DAMAGED BLADE IS DANGEROUS AND MUST
BE REPLACED.
4. Check for a broken blade adapter. REPLACE
A BROKEN BLADE ADAPTER.
F–99415
10
Page 11

F–99415
11
Page 12

TABLE DES MATIÈRES
INFORMATIONS GÉNÉRALES 12
CONSIGNES DE SÉCURITÉ POUR
TONDRE SANS DANGER 15
RÈGLES À OBSERVER 17
MONTAGE 19
FONCTIONNEMENT 19
ENTRETIEN 19
TABLE DES DEPANNAGES 22
PENTE GUIDE 23
GARANTIE DE MURRAY, INC.
LIMITÉE DE DEUX ANS
Murray, Inc., garantit au premier acheteur que
cet appareil ne présentera pas de défauts de
matière et de fabrication dans les conditions normales d’utilisation et d’entretien pendant une
période de deux (2) ans à compter de la date de
l’achat; toutefois, la présente garantie ne couvre
pas les moteurs, les accessoires (tels que les
chasse-neige rotatifs, les lames chasse-neige,
les bacs à herbe et les charrues à neige), les
transmissions, les batteries et les pièces d’usure
normale (sauf celles notées ci-dessous) ou les
boîtes-ponts puisque les fabricants de ces
pièces fournissent leurs propres garanties ainsi
que le service après-vente dans leurs centres de
réparation agréés. Pour de plus amples renseignements, consultez les garanties couvrant
ces pièces. Dans le cas où vous ne sauriez pas
si votre appareil contient ou est équipé d’une ou
plusieurs de ces pièces, consultez votre concessionnaire avant l’achat. C’est parce que nous
sommes liés aux modalités et conditions notées
dans la présente garantie limitée, que nous réparerons ou remplacerons, à notre guise, sans
frais pour le premier acheteur, toute pièce couverte par la présente garantie limitée pendant la
période de garantie applicable.
Au cas où la batterie s’avérerait défectueuse
dans les quatre-vingt-dix (90) jours qui suivent la
date de l’achat, nous la remplacerons sans frais.
Si la batterie s’avère défectueuse après (90)
jours mais dans les cent vingt (120) jours à
compter de la date de l’achat, nous la remplacerons jusqu’à concurrence de la moitié (1/2) du
prix de détail de la batterie en vigueur au moment du retour.
Les pièces d’usure normale sont les suivantes :
courroies, lames, adaptateurs de lames, pneus,
phares et housses de siège. Ces pièces sont
garanties comme étant exemptes de défauts de
matière et de main d’oeuvre telles qu’elles sont
livrées avec le produit. Toute réclamation relative à une réparation ou un remplacement de
pièces d’usure normale doit être faite dans les
trente (30) jours de la date de l’achat. Aucune
réclamation mettant en jeu des dommages-intérêts causés par l’usure, l’abus et le mauvais
usage ne sera prise en considération.
La présente garantie de Murray limitée de
deux (2) ans est votre seul recours; toutefois, la
présente garantie ne sera pas valide et ne s’appliquera à aucun appareil qui a été altéré,
abîmé, dont il a été fait un mauvais usage, un
abus ou utilisé pour la location ou autres usages
commerciaux et/ou professionnels (autres que
domestiques). Votre garantie ne couvre pas les
petits réglages mécaniques qui ne sont pas dus
à un défaut quelconque de matière ou de fabrication. Pour de tels ajustements, consultez
votre manuel de l’utilisateur.
Pour présenter une réclamation en vertu de la
présente garantie de Murray limitée de deux
(2) ans, retournez l’appareil (ou la pièce défec-
tueuse, si vous avez été autorisé au préalable)
avec la preuve de votre achat au centre de réparations après-vente agréé le plus proche de
chez vous. Pour trouver votre centre de service
après-vente agréé le plus proche, téléphonez au
distributeur central de pièces de rechange de
votre zone indiqué dans la liste fournie avec
votre appareil ou consultez les Pages Jaunes de
votre annuaire téléphonique local. Si vous retournez l’appareil tout entier, nous réparerons
l’appareil. Si nous autorisons le retour de la
pièce défectueuse seulement, nous remplacerons ou réparerons la pièce. En cas de défaut de
la transmission ou du différentiel (à distinguer de
la boîte-pont), la transmission ou le différentiel
tout entier doit être retourné étant donné qu’ils
ne contiennent pas de pièces réparables par
l’utilisateur.
La présente garantie de Murray limitée de
deux (2) ans vous donne des droits spécifiques,
et vous pourriez également en disposer
d’autres. Cette garantie limitée est promul-
guée expressément à la place de toute autre
forme de garantie explicite ou implicite, notamment de garantie implicite de valeur marchande et d’aptitude à un usage particulier
que vous en feriez. Pour de plus amples
informations au sujet de la présente garantie
limitée, ou pour le service après-vente, écrivez
à:
MURRAY CANADA, INC., Factory Customer
Service, 1195 Coutneypark Drive East, Mississauga, Ont. L5T–1R1 (1–800–661–6662)
INFORMATIONS GÉNÉRALES
Ce manuel se dirige aux personnes familiarisées
avec ce genre de manipulations mécaniques. La
plupart des ouvrages de maintenance ne mentionnent pas toutes les étapes, et cet ouvrage ne
fait pas exception. Serrer ou déserrer des attaches sont des manipulations que tout le
monde peut effectuer avec une certaine pratique. Lisez et suivez ces instructions avant d’utiliser la tondeuse.
Apprenez à maîtriser l’appareil : si vous comprenez le fonctionnement de ce modèle, vous en
obtiendrez les meilleures performances. Au fur
et à mesure que vous lisez le manuel, reportez–
vous aux illustrations. Sachez repérer l’emplacement des commandes et leur fonction. Afin de
prévenir tout risque d’accident, observez les instructions de fonctionnement et les règles de
sécurité. Conservez ce manuel pour future référence.
F–99415
REMARQUE IMPORTANTE : la plupart des
modèles sont vendus désassemblés et sont
vendus dans un emballage carton. Il est de la
responsabilité de l’utilisateur de s’assurer que
les instructions de montage données dans ce
manuel sont exactement suivies. D’autres
modèles peuvent être achetés déjà montés. Là
aussi, il est de la responsabilité de l’utilisateur
de s’assurer que la tondeuse est correctement
montée. L’utilisateur doit inspecter l’appareil
avec soin, toujours selon les instructions, avant
sa première utilisation.
AVERTISSEMENT : repérez ce symbole qui
vous indiquera les précautions de sécurité
importantes. Ce symbole signifie : “Attention! Soyez prudent! Vous encourrez des
risques.”
12
Responsabilité de l’utilisateur
La responsabilité de l’utilisateur est de
suivre les instructions ci–dessous.
1. Lire soigneusement ce manuel et suivre les
règles présentées pour un usage de la tondeuse en toute sécurité.
2. Suivre les instructions de montage et de
préparation.
3. Inspecter la tondeuse.
4. S’assurer que l’utilisateur de la tondeuse
sait bien utiliser les équipements standard
et accessoires.
5. N’utiliser la tondeuse qu’avec des éléments
de protection, des écrans et autres dispositifs de sécurité bien en place et en bon état
de marche.
6. Procéder aux réglages nécessaires.
7. Entretenir la tondeuse avec les pièces de
rechange autorisées ou approuvées.
8. Veiller à ce qu’un entretien complet soit ef-
fectué sur la tondeuse.
Page 13

Règles de sécurité à respecter pour les tondeuses poussées.
Cette machine à lame coupante peut projeter des débris et amputer une main ou un pied. Respectez les règles de sécurité suivantes pour éviter des
blessures graves ou mortelles.
I. Utilisation courante
1. Lisez, assimilez et suivez toutes les instructions données sur la tondeuse ou dans se(s)
manuel(s). Avant toute utilisation, familiarisez–vous avec les commandes et le fonctionnement de la machine.
2. Ne placez pas vos mains ou vos pieds sous
les pièces tournantes ou à proximité de ces
dernières. Tenez vous toujours à distance de
l’ouverture de décharge.
3. N’autorisez que des adultes responsables et
connaissant les instructions du manuel à utiliser la machine.
4. Inspectez soigneusement la machine et la
zone à tondre avant de commencer votre
travail. Dégagez le terrain de tout objet traînant sur le sol tels que pierres, jouets, câbles, os et bâtons, qui pourraient être
accrochés et projetés par la lame.
5. Avant de commencer à tondre, assurez–
vous que personne ne soit situé dans votre
zone de travail. Arrêtez la machine si quiconque pénètre dans cette zone.
6. N’utilisez pas la tondeuse si vous êtes pieds
nus ou si vous avez des sandales. Portez au
contraire des chaussures protégeant bien
vos pieds.
7. Ne tirez pas la tondeuse vers l’arrière à
moins d’y être vraiment obligé. Avant et durant une telle manœuvre, regardez le sol et
derrière vous.
8. Ne vous servez pas de la tondeuse si tous
ses accessoires protecteurs et son sac à
herbe ne sont pas en place..
9. Reportez–vous aux instructions fournies par
le fabriquant des accessoires pour savoir
comment les installer et les utiliser correctement. N’utilisez que des accessoires homologués par le constructeur.
10. Stoppez la rotation de la lame au moment de
la traversée d’allées en gravier, de chemins
ou de routes.
11. Coupez le moteur dès que vous quittez la
machine ou quand vous voulez la nettoyer
ou déboucher le déversoir d’herbe.
12. Avant de retirer le sac à herbe, coupez le
moteur et attendez que la lame de coupe soit
immobilisée.
13. Ne tondez jamais qu’à la lumière du jour ou
avec une lumière artificielle suffisante.
14. N’utilisez pas la machine quand vous êtes
très fatigué ou si vous êtes sous l’effet de
boissons alcoolisées, de médicaments ou de
drogues ayant un effet somnolent et diminuant votre capacité à opérer la tondeuse en
toute sécurité.
15. Ne vous servez jamais de la tondeuse si
l’herbe est mouillée. Ayez toujours une bonne prise au sol, gardez la poignée de la machine bien en main et ne courez jamais
quand vous tondez.
F–99415
16. Sur les tondeuses équipées d’un système
d’entraînement des roues, désembrayez ce
mécanisme avant de démarrer le moteur.
17. Si la machine se met à vibrer de manière
anormale, coupez le moteur et recherchez
immédiatement la cause du problème. Le
plus souvent, une vibration anormale correspond à une lame endommagée ou à une
mauvaise fixation de la lame ou du moteur
dont les boulons sont desserrés.
18. Quand vous utilisez la machine, portez toujours des lunettes masques ou des lunettes
avec coques latérales pour protéger vos
yeux d’une possible projection de corps
étrangers par la lame.
19. Faites attention au côté duquel l’herbe se
décharge. Ne la projetez pas en direction de
la chaussée, d’allées ou vers un endroit où
des personnes pourraient se trouver.
20. Stoppez le moteur dès que vous avez heurté
un objet. Débranchez le câble de la bougie.
Inspectez la lame et la tondeuse. Si nécessaire, effectuez la réparation avant de redémarrer et de vous servir à nouveau de la
machine.
21. Quand vous tondez, assurez–vous que toutes les points de vidange ainsi que les autres
ouvertures et orifices utilisés pour la maintenance soient bien obturés.
II. Conduite en pente
Les terrains en pente sont une des causes
majeures de glissades ou de chutes pouvant
s’accompagner de graves blessures. Tous les
types de pente doivent être abordés avec une
précaution particulière. Si vous vous sentez mal
assuré, ne tondez pas le terrain.
PRATIQUES RECOMMANDÉES:
Tondez toujours en descendant ou en remontant directement une pente, jamais perpendiculairement à celle–ci. Ne tondez pas
les terrains accidentés ou trop inclinés (pente
de 15 degrés au maximum). Reportez–vous
au guide situé en fin de ce manuel pour savoir comment évaluer l’inclinaison d’un terrain. Soyez particulièrement prudent quand
vous changez de direction.
Dégagez le terrain de tout obstacle comme
les cailloux, les branches, etc....
Faites attention aux trous, aux ornières et
aux bosses. Une herbe haute peut dissimuler
des obstacles.
PRATIQUES INTERDITES:
Ne tondez pas
fossés ou de surélévations, qui peuvent faire
perdre à l’utilisateur sa prise au sol ou son
équilibre.
Ne tondez pas
Ne tondez pas
faire déraper l’utilisateur.
près de défoncements, de
un terrain trop incliné.
une herbe mouillée. Elle peut
13
III. Précautions vis–à–vis des enfants
De tragiques accidents peuvent survenir si
l’utilisateur n’a pas conscience de la présence
possible d’enfants, qui sont souvent attirés par
la machine et par son fonctionnement.
N’imaginez jamais que les enfants resteront
immobiles dans la position où vous venez de les
voir.
1. Maintenez les enfants éloignés de votre zone
de travail et confiez–les à la vigilance d’un
adulte responsable.
2. Restez sur vos gardes et coupez le moteur si
des enfants entrent dans votre zone de travail.
3. Avant et pendant une marche arrière, regardez bien le sol derrière vous pour être sûr
que le terrain soit libre de jeunes enfants.
4. N’autorisez jamais un enfant à se servir de la
machine.
5. Soyez particulièrement prudent quand vous
approchez un angle aveugle, un buisson, un
arbre ou tout autre obstacle pouvant gêner
votre visibilité.
IV. Entretien
*1. Soyez très prudent quand vous manipulez de
l’essence ou d’autres carburants. Ceux–ci
peuvent s’enflammer et leurs vapeurs sont
explosives.
a. N’employez qu’un jerrycan homologué.
b. Ne retirez jamais le bouchon du réservoir et
ne versez jamais le carburant quand le moteur tourne. Laissez celui–ci refroidir avant
de commencer le remplissage. Ne fumez
pas.
c. Ne remplissez jamais le réservoir à l’inté-
rieur d’un local.
d. Ne stockez jamais la machine ou un jerry-
can rempli de carburant dans un local dans
lequel il existe une source d’inflammation,
comme par exemple la flamme vive d’un
chauffe–eau.
*2. Ne démarrez pas et ne laissez pas tourner
un moteur dans un endroit clos.
3. Tant que le moteur tourne, n’effectuez ni réparation ni réglage, comme celui de la hauteur de coupe ou du sac à herbe.
Débranchez le câble de la bougie et maintenez ce câble éloigné de la bougie pour éviter
tout démarrage accidentel. Portez toujours
des lunettes de protection avant de réparer
ou de régler la machine.
4. Assurez–vous que tous les écrous et les
boulons, notamment ceux de fixation de la
lame de coupe, soient bien serrés. Maintenez la machine en bon état.
5. Ne tentez jamais d’altérer les dispositifs de
sécurité. Vérifiez régulièrement leur bon
fonctionnement.
6. Pour réduire le risque d’incendie, débarrassez la machine de toute accumulation d’herbe, de feuilles ou d’autres débris. Essuyez
les coulures d’huile et de carburant. Laissez
la machine refroidir avant de la ranger.
Page 14

7. Stoppez et inspectez le matériel dès que
vous avez heurté un objet. Si nécessaire,
effectuez la réparation avant de redémarrer.
8. Ne tentez jamais de régler les ajusteurs de
hauteur de coupe des roues tant que le moteur tourne.
9. Si votre tondeuse est électrique, débranchez
toujours son alimentation avant de nettoyer,
de réparer ou de régler la machine.
10. Les composants du bac à herbe sont sujets
à l’usure et à la détérioration, ce qui peut entraîner la mise à découvert de parties mobi-
les de la machine ou la projection de débris.
Vérifiez fréquemment l’état de ces composants et, si besoin est, remplacez–les avec
des pièces homologuées par le constructeur.
Au moment du rangement, assurez–vous
que le sac soit bien vidé de son herbe.
11. Les lames de tondeuse sont tranchantes.
Quand vous les manipulez, enveloppez–les
ou protégez–vous avec des gants et soyez
particulièrement prudent.
12. Ne modifiez pas les réglages du régulateur
du moteur et ne forcez pas le régime de ce
dernier.
* Ces points ne concernent pas les tondeuses électriques.
13. Inspectez fréquemment la lame pour voir si
elle est usée ou endommagée (fissures ou
ébréchures par exemple). Une lame faussée
ou endommagée doit être remplacée immédiatement avec une pièce d’origine. Par précaution ou pour garantir l’efficacité de la
coupe, changez la lame tous les deux ans.
Vérifiez souvent le boulon de fixation de la
lame ainsi que ceux du moteur. Remplacez
tout boulon endommagé et revissez ceux qui
sont desserrés.
14. N’utilisez que des pièces d’origine ou homologuées par le constructeur.
F–99415
14
Page 15

CONSIGNES DE SÉCURITÉ
POUR TONDRE SANS DANGER
Toute personne utilisant un équipement motorisé
doit apprendre à discerner la bonne et la
mauvaise façon de s’en servir, les méthodes
sûres et celles qui sont dangereuses. Lisez
attentivement les quelques pages qui
suivent. Elles pourront vous aider à
discerner ces différences. Trop souvent
l’usager manque d’expérience, n’a pas été bien
informé, ou encore n’a pas lu le Manuel
d’utilisation et les indications se trouvant sur
l’appareil avant de s’en servir la première fois.
Ceci peut entraîner des dangers pour l’usager,
les personnes à proximité et l’endommagement
du matériel. Cela peut également entraîner une
coupe d’aspect médiocre.
Lisez ce Manuel d’utilisation. Lisez les
indications concernant l’appareil. Lorsque vous
vous servez de la tondeuse, suivez les
consignes de sécurité ainsi que les règles et
recommandations se trouvant sur l’appareil
même. Assurez–vous que tout autre personne
utilisant la tondeuse a préalablement lu les
indications et a été informé de la méthode
d’utilisation sûre.
Votre tondeuse est concue afin de vous apporter
satisfaction pendant longtemps, dans des
conditions normales d’emploi domestique. Si
votre tondeuse n’est pas entretenue ou si elle
ne reçoit pas les réparations adéquates, ou si
elle est utilisée sur des terrains inappropriés ou
dans des conditions défavorables, sa
performance et sa sécurité d’emploi en seront
réduites.
Il est important de s’habiller de manière
adéquate lors de l’utilisation de la tondeuse. Il
est recommandé de porter des lunettes de
sécurité afin de se protéger les yeux des objets
éjectés. Le port de souliers à bout métallique
permet d’éviter les coupures aux pieds dues à
la lame. Les jambes de pantalon et les manches
de chemise peuvent également stopper ou faire
dévier un projectile.
Faites un essai de la tondeuse avant de
commencer à tondre pour de bon. La première
fois, choisissez une grande surface plane sans
obstacle. Familiarisez–vous avec les
commandes, leur emplacement, leur
fonctionnement et leur action. La rapidité avec
laquelle vous pouvez arrêter la lame sera
importante en cas d’urgence. Apprenez à tondre
et à bien contrôler la tondeuse à tout moment.
F–99415
La plupart des tondeuses sont mises en marche
manuellement. Dans le cas d’un démarreur à fil
ou à levier, placez–vous solidement, les pieds à
l’écart de la lame. Sur les tondeuses
automotrices, on indique d’habitude un
emplacement pour le pied pendant le
démarrage. Tenez bien la poignée au bout du fil
mais n’enroulez jamais le fil autour du bras ou
des doigts pour “l’avoir mieux en main”.
La tondeuse est concue pour être employée par
une seule personne. Il faut toujours tondre seul.
Ne transportez jamais de personnes sur votre
tondeuse. Le transport de personnes est
dangereux pour la personne transportée et le
conducteur. Une tondeuse n’est pas un jouet et
ne doit pas être utilisée pour transporter quoi
que ce soit.
Le terrain est–il mouillé? Ne coupez jamais un
gazon mouillé. Couper de l’herbe mouillée peut
causer un accident, diminuer les performances
de la tondeuse, entraîner des problèmes de
pousse et altérer la qualité de la pelouse.
L’herbe mouillée est glissante: le conducteur
pourrait tomber et la tondeuse déraper ; on peut
se blesser au contact de la lame. L’herbe
mouillée a tendance à bloquer la décharge de la
tondeuse. Les brins d’herbe mouillée
s’accumulent sur le gazon en petits tas, ce qui
empêche l’herbe de pousser. En outre,
I’humidité peut faire rouiller certaines pièces de
la tondeuse, ce qui réduit sa durée de vie.
Connaissez bien votre terrain, les obstacles
fixes et durs, tels les tuyaux, les souches et les
grosses pierres. Evitez–les, car ils peuvent
provoquer des accidents entraînant des
blessures au conducteur ou aux personnes à
proximité. Parcourez à pied le terrain à tondre
et, à l’aide d’un sac en plastique, ramassez les
pierres, les jouets, les fils de fer, les os et tout
autre objet se trouvant sur le passage. Ces
objets peuvent endommager la tondeuse et
même devenir de dangereux projectiles, si la
lame de la tondeuse les heurte. La lame d’une
tondeuse à moteur tournant très vite, elle peut
projeter des pierres ou autres objets avec force
et à de grandes distances. Les objets ainsi
éjectés peuvent casser des vitres, blesser et
même crever un oeil. Il arrive souvent que la
personne blessée par un tel projectile soit un
enfant, un membre de la famille ou un voisin.
Dégagez donc le terrain à tondre. Assurez–vous
que les gens et les animaux sont bien à l’écart
de la surface à tondre. Dirigez la décharge de la
tondeuse du côté où il ne se trouve personne.
La planification de la coupe est doublement
15
salutaire du fait qu’elle peut réduire les risques
d’accident et faciliter le nettoyage après la
coupe.
Est–ce que il y a des fossés, des murs, ou des pentes abruptes dans la zone à
tondre? Etablissez un plan
de coupe afin d’éviter les
endroits dangereux. Les
pentes abruptes et terrains
inégaux doivent être tondus
prudemment et certains endroits ne devraient jamais
être tondus avec une tondeuse. Si vous utilisez une
tondeuse poussée, tondez
en travers de la pente de
sorte à éviter un accident si
vous, ou la tondeuse, glissez.
Ne tondez jamais une pente de plus de 15
degrés. Consultez le Guide à la fin de ce
manuel, afin d’évaluer la pente du terrain à
tondre.
Etes–vous prêt à tondre? Pas encore.
Assurez–vous que la tondeuse a été
entièrement montée selon les indications
contenues dans le Manuel d’utilisation. Même si
elle a été montée dans un centre de jardinage
ou dans le magasin où la tondeuse a été
achetée, il faut néanmoins faire cette
vérification. Les boulons, les vis et les écrous
sont–ils bien serrés? Le niveau d’huile est–il
adéquat? La batterie est–elle chargée? Tout
cela est à vérifier régulièrement.
Votre tondeuse est munie d’un moteur à
essence. L’essence est un produit dangereux.
Rangez votre réserve de carburant dans un
bidon conçu à cet effet. Ne conservez jamais de
l’essence en grande quantité. Eteignez toute
cigarette, pipe et cigare avant de verser ou
transvaser de l’essence. Entreposez le
carburant et la tondeuse dans un endroit bien
aéré, à l’écart de tout danger de combustion tel
la veilleuse d’une fournaise. Si la tondeuse doit
être entreposée pour un certain temps, videz le
réservoir d’essence. Cela permet de réduire les
risques d’incendie et d’empêcher l’accumulation
de dépôts d’essence dans le réservoir,
permettant ainsi d’améliorer le fonctionnement
de la tondeuse. Sortez la tondeuse avant
d’ajouter de l’essence. Servez–vous d’un
entonnoir et essuyez l’essence répandue avant
de mettre le moteur en marche. N’oubliez pas
que l’essence se dilate à la chaleur; par
conséquent, ne remplissez pas le réservoir
jusqu’au bord. En outre, les bouchons de
réservoir de la plupart des tondeuses sont munis
d’un trou d’aération. Employez toujours un
bouchon adéquat. Si ces consignes
fondamentales de sécurité concernant l’essence
et l’alimentation en combustible ne sont pas
suivies, vous risquez d’être brûlé lors d’un
incendie ou blessé lors d’une explosion, ou
risquez d’endommager la tondeuse et autres
objets.
N’ajoutez jamais d’essence à un moteur qui
tourne ou est encore chaud après usage, cela
pourrait déclencher un feu ou une explosion.
Nettoyez la tondeuse de toute accumulation
d’herbe et autres débris. La propreté de la
tondeuse améliorera son rendement,
empêchera le moteur de surchauffer, retardera
l’usure de ses parties mécaniques et réduira les
risques d’incendie. Le feu et les explosions ne
sont pas les seules causes de brûlures lorsque
Page 16

l’on travaille avec, ou à proximité d’une
tondeuse. Il suffit que le moteur tourne quelques
secondes pour qu’il devienne très chaud ; il en
est de même pour le pot d’échappement. Ne
touchez jamais ces éléments lorsque la
tondeuse est en marche. Coupez le moteur et
laissez–le refroidir avant de procéder à son
entretien. N’oubliez pas que les gaz
d’échappement peuvent être dangereux. Ne
faites jamais tourner le moteur à l’intérieur d’un
bâtiment ou dans tout autre endroit clos.
L’achat d’une nouvelle tondeuse peut
représenter un grand événement pour une
famille. Laissez les membres de la famille
satisfaire leur curiosité au sujet de la tondeuse
et, en même temps, avertissez–les des dangers
qu’elle représente. N’oubliez pas qu’une
tondeuse n’est pas un jouet et qu’elle n’est pas
conçue à l’usage des enfants, ni de toute
personne dont la force physique ou l’expérience
est insuffisante.
Une tondeuse, comme tout appareil à moteur,
peut être dangereuse si elle n’est pas montée
ou entretenue comme il faut ou si elle est mal
employée. Lorsqu’il s’agit de l’entretien de votre
tondeuse, la raison et le bon sens sont les
règles les plus importantes.
Votre tondeuse coupe aisément l’herbe épaisse
et les grosses tiges de plantes. Les doigts et les
orteils ne résisteront pas davantage à la lame de
la tondeuse, cela est évident. Néanmoins, bien
des gens se sont retrouvés dans un salle
d’urgences d’un hôpital parce qu’ils ont “oublié”
et mis la main dans le déflecteur afin de
débloquer le passage. Traitez toujours votre
tondeuse comme si la lame tournait. Ne
procédez à aucun entretien, et ne tentez de faire
aucun réglage, sauf au carburateur, tant que le
moteur tourne.
Ne vous servez que d’accessoires adaptés à
votre tondeuse. L’usage de tout autre accessoire
risque de réduire la sécurité d’emploi de la
tondeuse et des accessoires ; cela peut même
endommager l’appareil. Lisez et suivez les
consignes fournies avec la tondeuse et
l’accessoire.
Ne vous servez que de matériel d’origine ou de
pièces approuvées comme pièces de rechange.
Si vous devez avoir recours à un professionnel
pour la réparation ou l’ajustement de votre
tondeuse, adressez–vous à un Centre de
Service après–vente agréé pour votre tondeuse.
Si vous avez l’intention de réparer vous–même
votre appareil, suivez les indications du Manuel
d’utilisation et d’entretien.
F–99415
Lors de l’utilisation de votre tondeuse,
souvenez–vous que les enfants et les animaux
sont souvent attirés par cette activité. Soyez
attentif, surtout lorsque vous tondez autour des
arbustes, ou lorsque vous reculez. Regardez
toujours bien autour des arbustes avant de
tondre. Regardez derrière vous avant de passer
en marche arrière. Evitez le plus possible de
tondre en marche arrière. Cette méthode est
dangereuse puisque la vue est limitée. En outre,
la lame est concue pour couper quand la
tondeuse se déplace vers l’avant, la lame
coupe donc moins bien en marche arrière.
Ne laissez jamais sans surveillance une
tondeuse en marche. Coupez le moteur. Placez
la tondeuse dans une position telle qu’elle ne
puisse pas rouler. Si la tondeuse est
automotrice, assurez–vous que la commande de
la transmission est en position désengagée.
Lorsque vous tondez, soyez conscient de votre
état physique et des conditions atmosphériques.
Après avoir tondu longtemps, vous serez
fatigué. C’est le moment où les réflexes
ralentissent, où vous êtes moins attentif, où
vous vous exposez aux accidents. Faites une
courte pause. S’il fait chaud, faites attention de
ne pas vous déshydrater. Si vous êtes fatigué,
mais que vous ne pouvez pas vous arrêter,
redoublez de prudence. Si vous êtes fâché,
fatigué ou incapable d’accorder toute votre
attention à la tâche, si vous avez consommé
une boisson alcoolique, si vous avez pris des
médicaments ou des drogues, ne vous servez ni
de votre tondeuse ni d’aucun appareil à moteur.
Si les conditions atmosphériques se détériorent
pendant que vous tondez, arrêtez–vous et
terminez plus tard. Tondre le gazon sous la pluie
n’est pas amusant et c’est dangereux.
Abritez–vous toujours pendant un orage.
Lorsqu’il fait très sec, vos lunettes de sûreté
vous seront doublement utiles; elles protègeront
vos yeux de la poussière et des projectiles; un
masque peut aussi servir contre la poussière et
le pollen.
16
Votre tondeuse est munie d’un certain nombre
d’éléments de sécurité importants pour la
protection de l’usager et des personnes
présentes; ils ne devraient jamais être enlevés
ni modifiés. Si l’un de ces éléments est perdu,
endommagé ou s’il devient inefficace,
remplacez–le ou réparez–le avant de vous servir
de la tondeuse.
La sécurité de la coupe et l’aspect du gazon
sont fonctions du régime du moteur de votre
tondeuse qui est réglé par le fabricant. Ne
modifiez en aucune façon le régulateur du
moteur.
Choisissez un régime qui convient au terrain et
à la hauteur du gazon. Souvenez–vous que l’on
obtient les meilleurs résultats à plein régime,
avec un bac à herbe. Ne jamais marcher très
vite ou courir pour achever la tâche plus tôt. En
pente, ralentissez et soyez très prudent.
Il vaut mieux tondre à la lumière du jour;
cependant, si vous devez tondre en fin
d’après–midi ou le soir, assurez–vous que
l’éclairage artificiel est d’intensité suffisante.
Votre tondeuse, comme toute autre machine,
nécessitera un certain entretien et des réglages
avant et après usage. La fréquence de
l’entretien dépend du nombre d’heures pendant
lesquelles la tondeuse a servi; cependant, elle
peut aussi varier selon les conditions de la
coupe. Consultez le Manuel d’utilisation pour de
plus amples informations à ce sujet. Un
entretien adéquat protège votre tondeuse et
permet d’assurer un fonctionnement sûr et
efficace.
Ne tentez jamais d’effectuer l’entretien de votre
tondeuse (à l’exception du réglage du
carburateur) tant que le moteur tourne. Après
avoir coupé le contact, débranchez toujours la
bougie pour éviter que le moteur se remette en
marche spontanément pendant l’entretien. Si
vous heurtez un objet quelconque en tondant,
coupez le contact.
Débranchez la bougie. Examinez soigneusement la
tondeuse pour vérifier s’il y
a des dégâts. Faites les réparations nécessaires avant
de redémarrer. Si l’appareil
vibre de façon anormale,
coupez immédiatement le
moteur et vérifiez la cause.
Les vibrations signalent généralement des ennuis. Vérifiez bien le serrage des
boulons, vis et écrous.
La lame est l’élément le plus dangereux de la
tondeuse et aussi celui dont dépend le plus
directement l’aspect de votre pelouse. Vérifiez
souvent les pièces de montage de la lame.
Assurez–vous qu’elles soient toujours bien
serrées. Si la lame heurte un objet dur,
assurez–vous qu’elle n’est pas tordue, ébréchée
ou fêlée et remplacez–la si elle est
endommagée. Pour votre sécurité, remplacez la
lame tous les deux ans. Une lame bien aiguisée
Page 17

facilite le travail du moteur et coupe l’herbe plus
nettement. La lame est toujours proche des
côtés du carter. Pour tondre dans les recoins
avec une tondeuse à décharge latérale, tondez
toujours le côté gauche de la tondeuse vers
l’endroit à tondre.
Le receveur à herbe est un accessoire utile. Il en
existe pour presque tous les modèles de
tondeuses. Pour une qualité de coupe
supérieure et en toute sécurité, lors de
l’utilisation d’un receveur à herbe, assurez–vous
qu’il est approuvé pour l’utilisation avec votre
tondeuse. Montez–le selon les indications et
suivez les consignes de sécurité et d’emploi
fournies avec le receveur ainsi que celles du
Manuel d’utilisation.
Avant de monter, d’examiner ou de vider le
receveur à herbe, coupez toujours le moteur.
N’oubliez pas de vérifier si le receveur à herbe
est endommagé ou usé et ce, avant chaque
usage. Si besoin est, remplacez toute pièce
endommagée par une pièce de rechange
recommandée par le fabricant avant d’utiliser à
nouveau le receveur à herbe.
couleur brunâtre. Coupez plus court pendant la
saison fraîche quand l’herbe est luxuriante,
coupez plus haut pendant les périodes sèches.
Une lame émoussée et un régime réduit du
moteur blesse et déchire l’herbe et peut même
la déraciner, ce qui brunit et ternit le gazon
quelques jours après la coupe. Placez toujours
la commande de la manette des gaz en position
RAPIDE ou “FAST”. Lorsque vous tondez et
mettez en sac, vous obtiendrez de meilleurs
résultats si vous poussez la tondeuse plus
lentement.
Changez un peu le tracé de la coupe chaque
fois que vous tondez. Si vous tondez toujours de
la même façon, l’herbe poussera toujours de la
même façon et des brins d’herbe coupés
s’accumuleront à certains endroits, pas à
d’autres, créant des zones où l’herbe sera plus
clairsemée. Ne procédez à aucun entretien de la
tondeuse sur l’herbe. L’huile et l’essence
répandues peuvent tuer l’herbe. Si l’herbe est
haute ou très épaisse, n’essayer pas de la
couper en une seule fois. Relevez la lame pour
le premier passage et baissez–la au passage
suivant le même jour ou quelques jours tard. Un
autre moyen est de couper seulement sur une
portion de la largeur de la tondeuse à la fois et
d’ajuster votre vitesse (pas celle de la lame)
pour aller plus lentement de sorte que la
tondeuse puisse se dégager à mesure qu’elle
avance.
Lors de l’utilisation d’une tondeuse poussée, il
faut toujours aller de l’avant, et ne jamais la tirer.
Lorsque la tondeuse est poussée, le conducteur
se trouve derrière la tondeuse pour mieux la
contrôler. En poussant la tondeuse le
conducteur peut voir exactement ce qu’il fait et
où il va. Cependant, il est possible que vous
deviez tirer la tondeuse vers l’arrière (comme
par exemple lorsque l’avant de la tondeuse se
trouve devant un mur ou une clôture). Dans ce
cas, assurez–vous que vos pieds sont à l’écart
de la tondeuse. Tenez vos distances à l’arrière
de la tondeuse, reculez d’un pied sûr et en
regardant prudemment derrière vous.
Si votre tondeuse est tractée, n’oubliez pas que
le mécanisme de transmission n’est pas conçu
pour faire tout le travail, même si la tondeuse
peut se déplacer sans votre aide. Gardez
toujours vos mains sur la poignée près des
commandes quand le moteur est en marche.
Souvenez–vous aussi que le mécanisme
automoteur peut être dangereux. Tenez vos
mains et vos pieds à l’écart des courroies et des
chaînes. Coupez toujours le moteur avant
d’enlever tout élément enchevêtré dans le
mécanisme automoteur.
Votre tondeuse est un instrument utile, mais
n’oubliez pas qu’elle peut être dangereuse. Si
vous suivez les indications de ce Manuel
d’utilisation et si vous utilisez la tondeuse
prudemment, elle vous servira longtemps, et ne
causera aucun ennui ni aucun accident.
Si vous désirez soigner l’aspect de votre
pelouse, il est important que vous adoptiez une
bonne technique pour tondre. Ne succombez
pas à la tentation de couper l’herbe trop courte.
Une coupe trop courte peut tuer la plante, faire
jaunir votre pelouse, ou la faire tourner à la
RÈGLES À OBSERVER
AVANT DE TONDRE
D Habillez–vous de façon appropriée. Portez
des chaussures épaisses et évitez les sandales ou les chaussures de tennis.
D Examinez la lame. Une lame faussée, fissu-
rée ou endommagée devra être remplacée
par une pièce d’origine.
D Faites le plein à l’extérieur. Essuyez toute
trace de carburant sur la machine.
D Lisez et respectez les consignes données
dans le Manuel de l’Usager ainsi que celles
que vous trouverez dans celui du moteur ou
des blocs accessoires. Ces consignes sont
destinées à garantir votre sécurité et celle de
votre entourage.
D Les gaz d’échappement sont dangereux. Dé-
marrez le moteur à l’extérieur.
D Assurez–vous que tous les dispositifs de
protection sont bien en place et en état de
fonctionnement.
D Ne confiez l’utilisation de la tondeuse qu’à
une personne expérimentée.
D Une herbe humide peut se révéler dangereu-
se. Attendez qu’elle sèche avant de tondre.
D Dites aux enfants et aux autres personnes
de se tenir éloignés de votre zone de travail.
F–99415
D Ne tondez jamais sans une lumière suffisan-
te.
D Ramassez tous les objets qui traînent et net-
toyez le terrain à tondre avant de commencer.
DURANT LA COUPE
D Faites attention aux obstacles fixes et évi-
tez–les. Ils pourraient endommager la tondeuse ou provoquer un accident.
D Attention à ne pas vous brûler avec le mo-
teur, le pot d’échappement ou la transmission quand ces parties sont chaudes. Evitez
tout contact avec la peau.
D Les dépressions et les pentes doivent être
tondues avec prudence. Reportez–vous au
“Guide“ situé en fin de ce manuel pour apprendre à évaluer l’inclinaison d’un terrain.
D Si la lumière naturelle ou artificielle est insuf-
fisante, arrêtez–vous de tondre.
D Si vous heurtez un obstacle ou si la machine
vibre de façon excessive, examinez la tondeuse, sa lame et les autres éléments pour
évaluer les dommages éventuels.
D N’effectuez pas de réglages ou de réparation
sur une machine dont le moteur tourne. Déconnectez le câble de la bougie.
17
D Quand vous travaillez près d’une route,
soyez attentif au trafic. Ne projetez pas l’herbe coupée en direction de la chaussée.
D Evitez de tondre dans les parties n’offrant
que peu de prise de roues. Regardez derrière vous quand vous changez de sens de
marche.
D Si l’herbe est épaisse, augmentez votre hau-
teur de coupe. Travaillez plus lentement.
Stoppez de temps à autre le moteur pour
pouvoir retirer les bouchons d’herbe.
D Ne retirez jamais les éléments ayant une
fonction de protection.
D Ne remplissez jamais le réservoir d’essence
d’une tondeuse dont le moteur tourne ou si
ce dernier est encore trop chaud.
APRES LA COUPE
D Laissez toujours la tondeuse se refroidir
avant de la ranger.
D Nettoyez la machine de tous les débris qui
peuvent la recouvrir, et retirez notamment
l’herbe, les feuilles ainsi que les traces d’huile et de graisse avant de l’entreposer.
D Resserrez toutes les pièces de fixation qui
ont du jeu avant toute utilisation.
D Videz et nettoyez tout receveur à herbe et
tout autre accessoire.
Page 18

D Retirez la clé de contact ou déconnectez le
câble de la bougie pour prévenir tout usage
non autorisé.
D Assurez–vous que la tondeuse n’est pas
entreposée près d’une source de chaleur.
Les vapeurs d’essence peuvent être à l’origine d’une explosion.
D N’utilisez que des pièces de rechange d’ori-
gine ou homologuées pour l’entretien de vo-
tre machine.
D En cas d’entreposage prolongé, vidangez le
réservoir d’essence.
D Apprenez aux enfants à ne pas toucher à la
tondeuse. Ce n’est pas un jouet.
D Ne stockez jamais l’essence près d’une
source de feu. Conservez–la dans un jerrycan spécialement prévu pour cela. Gardez–
la hors de portée des enfants.
D Lubrifiez votre tondeuse en respectant les
instructions du manuel. Voyez la partie intitulée “Lubrification“.
REMARQUE IMPORTANTE––Il est important que vous lisiez ce Manuel et
que vous le conserviez pour de futures
consultations.
F–99415
18
Page 19

MONTAGE
REMARQUE : les illustrations et
pictogrammes commencent à la page 2.
Instructions de déballage
La tondeuse a été assemblée entièrement à
l’usine. Lorsque la tondeuse a été mise dans le
carton, les bras ont été mis en position
entreposage. Afin de mettre la tondeuse en
position de fonctionnement, suivre les étapes
ci–dessous :
1. Enlever la tondeuse de son carton.
2. Placer les bras inférieurs (1) en position de
fonctionnement.
3. Retirer les goupilles (2) du pivot inférieur et
les attacher aux pivots supérieurs (5).
4. Mettre les bras supérieurs (1) en position
de fonctionnement. Visser les écrous papil-
lon (4).
5.
(Figure 14)
rage manuel (1) au guide de corde (2), en-
tortillez la corde au travers du guide de
corde (2) situé sur la droite du bras.
ATTENTION : prêter attention lorsque l’on
plie ou élève les bras de la tondeuse. Ne pas
endommager les câbles. Un câble plié ne
fonctionne pas correctement. Avant d’utiliser
la tondeuse, remplacer tout câble plié ou endommagé.
Pour fixer la poignée à démar-
Montage du bac à herbe
1. Insérer l’armature (4) dans les extrémités du
tube (3).
2.
(Figure 3)
(5).
3.
(Figure 4)
Quand la tondeuse est utilisée avec le bac à
herbe, la partie supérieure (6) doit être bien
fermée.
Fixer l’armature (4) avec les clips
Fermer la partie supérieure (6).
Montage du bac à herbe
1. Pour monter le bac à herbe sur la tondeuse,
lever le volet arrière (1). Tenir les bras (2)
du bac à herbe et les mettre en position de
fonctionnement. Rabaisser le volet arrière
(1).
REMARQUE IMPORTANTE : s’assurer que
les tringles situées de chaque côté du cadre
soient montées dans les encoches (3) des
supports des bras (4).
Préparation du moteur
Remarque : le moteur ne contient pas d’HUILE ou d’ESSENCE.
AVERTISSEMENT : suivre les instructions du fabricant de ce moteur
au sujet de l’utilisation de l’essence et de l’huile. Se munir toujours d’un jerricane prévu à cet effet. Ne pas fumer lorsque l’on verse du carburant dans le moteur. Verser le carburant à l’air libre, après
avoir coupé le moteur. Laisser le moteur
refroidir pendant un moment.
Consulter les instructions données pas le
fabricant du moteur pour déterminer l’essence et
l’huile à utiliser. Avant toute utilisation, lire les
instructions de sécurité, d’utilisation, d’entretien,
et de rangement.
F–99415
(Figure 1)
(Figure 4)
Quelques conseils...
Le broyage est une coupe très fine de l’herbe
afin que l’herbe puisse être facilement recyclée.
Grâce aux éléments nutritifs qui retournent au
sol, la pelouse a moins besoin de fertilisant.
Pour un broyage satisfaisant, suivre ces petits
conseils :
S L’herbe doit être sèche. Sinon, la tonte sera dif-
ficile et entraînera la formation de petits tas
d’herbe.
S L’herbe ne doit pas être trop haute. La hauteur
maximale est de 4,5 pouces. Régler les bras
de réglage de hauteur de coupe de manière à
ce que soit coupé seulement le tiers haut de
l’herbe.
S Si la hauteur de l’herbe est supérieure à 4,5
pouces, il vous faudra tondre deux fois. Pour la
première tonte, régler les bras de réglage de
hauteur de coupe à la position la plus haute.
Puis, rabaisser les bras pour la seconde tonte.
S Veiller à ce que la lame soit toujours coupante.
Une lame non coupante rendra les bouts des
brins d’herbe marrons.
S Nettoyer l’intérieur du bloc de coupe. L’herbe
et autre débris peuvent empêcher le bon fonctionnement de la tondeuse.
Si la qualité de coupe est médiocre, suivre
ces conseils :
S Régler les bras de réglage de hauteur de cou-
pe à une position plus haute.
S Tondre plus fréquemment.
S Faire fonctionner la tondeuse à une vitesse
plus réduite.
S Tondre par dessus les extrémités de chaque
bande tondue afin de ne pas laisser de marques d’herbe prises entre deux bandes.
S Tondre une deuxième fois, en diagonal, les
mauvais espaces tondus.
FONCTIONNEMENT
REMARQUE : les illustrations et
pictogrammes commencent à la page 2.
Manette d’arrêt du moteur
Relâcher la manette d’arrêt du moteur (1) et le
moteur ainsi que la lame s’arrêteront
automatiquement. Pour faire marcher le moteur,
maintenir la manette d’arrêt du moteur (1) en
position fonctionnement (2)
Avant de mettre le moteur en marche, faire
fonctionner la manette d’arrêt du moteur (1)
plusieurs fois. S’assurer que le câble bouge
facilement.
Arrêt du moteur
Pour arrêter le moteur, relâcher la manette
d’arrêt du moteur (1). Débrancher le câble de
la bougie afin de prévenir tout démarrage
accidentel du moteur.
Si le moteur ne s’arrête pas, tenir un tournevis
contre la bougie et contre les ailettes de
refroidissement. La bougie ira à la masse et le
moteur s’arrêtera. Avant le démarrage du
moteur, vérifier le câble d’arrêt après s’être
assuré que ce dernier soit bien assemblé. Avant
de faire fonctionner la tondeuse, remplacer tout
câble d’arrêt du moteur plié ou endommagé.
(Figure 6)
19
(Figure 6)
Démarrage du moteur
AVERTISSEMENT : La lame tournera lorsque le moteur sera mis en
marche.
1. Vérifier l’huile.
2. Remplir le réservoir d’essence avec de l’essence sans plomb. Cf. “Préparation du moteur”.
3. S’assurer que le câble de la bougie soit branché à la bougie.
4.
(Figure 8)
d’un bouton d’amorçage (1) situé à l’avant
ou sur le côté du moteur. Appuyer dessus.
Entre deux pressions, attendre deux secondes. Pour savoir combien de fois il faut appuyer sur le bouton d’amorçage (1), se
reporter aux consignes du fabricant du moteur.
REMARQUE : ne pas utiliser le bouton
d’amorçage pour démarrer un moteur
chaud.
5.
(Figure 9)
D’une main, tenir la manette d’arrêt du moteur (1) dans la position de fonctionnement
indiquée. De l’autre main, tenir la poignée à
démarrage manuel (2).
6. Tirer rapidement la poignée à démarrage
manuel (2). Retourner lentement la poignée
à démarrage manuel (2).
7. Si le moteur ne démarre pas après 5 ou 6
essais, consulter les instructions de la Table
de dépannages”.
Certains modèles sont équipés
Rester derrière la tondeuse.
Fonctionnement de la tondeuse
AVERTISSEMENT : inspecter le bac
receveur d’herbe et voir s’il est usé
ou endommagé. Si tel est le cas,
remplacer les pièces nécessaires par des
pièces Murray, dont la liste se trouve dans
ce livre.
Pour remplir complètement le bac receveur
d’herbe, mettre le moteur en route avec la
commande des gaz en position FAST (rapide).
Vider le bac receveur d’herbe
AVERTISSEMENT : avant de retirer
le bac receveur d’herbe, arrêter le
moteur. Avant de retirer l’herbe du
bloc de coupe, débrancher le câble de la
bougie.
1.
(Figure 4)
le.
2. Soulever le cadre (2) par dessus les deux
encoches de la poignée (3).
3.
(Figure 5)
Vider l’herbe du bac receveur d’herbe.
4.
(Figure 4)
d’herbe sur la tondeuse, soulever le volet
(1). Placer les deux tringles du cadre dans
les deux encoches (3).
5. Rabaisser le volet (1).
Soulever le volet (1) à la vertica-
Ouvrir la partie supérieure (5).
Afin de monter le bac receveur
(Figure 4)
ENTRETIEN
REMARQUE : les illustrations et
pictogrammes commencent à la page 2.
Entretien du moteur
Suivre bien les instructions de la section
Entretien pour garder votre tondeuse en de
bonnes conditions d’utilisation. Toute
l’information relative au moteur se trouve dans le
Page 20

livre d’instructions relatives au moteur. Avant de
démarrer le moteur, il est fort conseillé de lire ce
livre.
AVERTISSEMENT : avant toute inspection, réglage, ou réparation de
la tondeuse, débrancher le câble de
la bougie et l’enlever afin de prévenir tout
démarrage de la tondeuse accidentel.
Lubrification
1. Pour de meilleurs résultats, lubrifier les roues
et et les points de pivotement avec de l’huile
pour moteur toutes les 25 heures.
2. Pour lubrifier le moteur, consulter le livre
d’instructions relatives au moteur.
REMARQUE : ne pas lubrifier le câble de blocage du moteur. Les lubrifiants l’endommageront et l’empêcheront de bouger librement.
Remplacer tout câble plié ou endommagé.
Nettoyage du bloc de coupe
AVERTISSEMENT : La lame tournera quand le moteur sera mis en
route. Avant de nettoyer le bloc de
coupe, arrêter le moteur et débrancher le
câble de la bougie.
L’herbe et autres débris peuvent entraver le bon
fonctionnement de la machine. Après avoir
tondu, nettoyer le bloc de coupe comme suit :
1. Arrêter le moteur.
2. Débrancher le câble de la bougie.
3. Nettoyer le haut et le bas du bloc de coupe.
Réglage de la hauteur de coupe
AVERTISSEMENT : la lame tourne-
ra quand le moteur sera mis en
route. Avant de changer la hauteur
de coupe, débrancher le câble de la bougie.
Modèles munis d’un mécanisme de
réglage rapide
Pour changer la hauteur de coupe, changer la
position des bras de réglage rapide (1) à
chaque roue. S’assurer que les bras de réglage
rapide (1) soient dans la même position de
manière à ce que la tondeuse soit à niveau.
1. Désengager les bras de réglage (1).
2. Changer la position des bras de réglage (1).
(Figure 7)
Remplacement de la lame de broyage
Une tondeuse à dispositif de broyage est
équipée d’une lame de broyage spécifique. Si
celle–ci est usée ou endommagée, la remplacer
par une lame de broyage Murray. Une lame
standard ne donnera pas entière satisfaction et
peut causer un accident.
Révisions de la lame
AVERTISSEMENT : avant d’inspec-
ter la lame ou l’adaptateur de lame,
débrancher le câble de la bougie.
Si la lame heurte un objet, arrêter le moteur. Débrancher le câble de la bougie. Voir
si la tondeuse n’a pas été endommagée.
Vérifier fréquemment la lame en veillant à ce
qu’elle ne soit pas usée ou endommagée
(fissures). Vérifier fréquemment le boulon qui
retient la lame. Le maintenir bien serré. Si la
lame heurte un objet, couper le moteur.
Débrancher le câble de la bougie. Vérifier la
lame, en veillant à ce qu’elle ne soit pas pliée,
endommagée, usée etc. Avant de faire
fonctionner la tondeuse, les pièces
endommagées doivent être remplacées par des
pièces Murray. Par mesure de sécurité,
remplacer la lame tous les deux ans. La garder
bien coupante. Une lame usée rendra les bouts
de brins d’herbe marrons. Retirer la lame
comme suit :
Retrait de la lame
(Figure 10 et Figure
11)
AVERTISSEMENT : avant de retirer
la lame, débrancher le câble de la
bougie. La lame a des bords tranchants. Il est donc conseillé de porter des
gants ou tout autre accessoire qui peut
protéger les mains lorsque l’on manipule la
lame.
1. Vider le réservoir d’essence.
2. Soulever la partie de la tondeuse qui dispose
du pot d’échappement ou de la bougie.
3. A l’aide d’un morceau de bois, empêcher la
lame de tourner.
4. Retirer le boulon (1) qui maintient la lame
(2).
5. Inspecter la lame selon les instructions présentes dans “Révision de la lame”. Les pièces endommagées ou usées doivent être
remplacées par des pièces Murray.
6. Monter la lame de manière à ce que les
bords relevés soient en hauteur. Si la lame
est à l’envers, elle ne coupera pas correctement et risquera de provoquer un accident.
7. Attacher la lame (2) à l’aide des rondelles (3
et 4) et du boulon (1). S’assurer que le rebord extérieur des rondelles Belleville (4)
soient contre la lame (2).
8. Serrer le boulon (1) qui maintient la lame (2)
à un couple de torsion de 30 pieds–livres.
AVERTISSEMENT : veiller à ce que
le boulon (1) soit bien serré et qu’il
retienne la lame (2). Sinon, vous
pourriez risquer un accident.
Inspection du niveau de coupe
Tester la tondeus e sur un petit espace. Si la
hauteur de coupe n’est pas à niv eau ou l’herbe
tondue n’est pas rejetée, les rais ons peuv ent être
les suivantes : (1) lame endommagée ou pliée
(2), lame pas as sez coupante, (3) lame usée, (4)
adapteur de lame cassé. Avant de faire
fonctionner la tondeuse, rem édier à tout
problème.
Position des bras pour l’entreposage
(Figure 12 et Figure 13)
ATTENTION : rabattre les bras avec soin, en
évitant d’endommager les câbles. Un câble
ayant été plié ne fonctionnera pas correctement. Avant de vous servir de la tondeuse,
remplacer tout câble plié ou endommagé.
Rabattre les bras
1.
(Figure 12)
tiennent les bras à leurs supports. Avant de
rabattre les bras, prendre garde à ne pas
laisser les câbles se coincer, car ils pourraient sinon être endommagés. Rabattre les
bras vers l’arrière de la machine.
Desserrer les attaches qui main-
2.
(Figure 13)
bras inférieurs (1). Les placer sur les extré-
mités des bras inférieurs (1). Ensuite, déplacer les extrémités des bras inférieurs (1)
au delà des goupilles de blocage (2) ou
des pattes de serrage (2).
3. Rabattre les bras vers l’avant et par dessus
le moteur. S’assurer que les câbles ne soient
pas endommagés.
Retirer les goupilles (3) des
Soulever les bras
1. Tirer en arrière sur les bras jusqu’à ce que
les extrémités des bras inférieurs (1) soient
fixés.
2. Soulever la partie supérieure des bras et la
placer en position d’utilisation. Serrer à l’aide
d’attaches afin de maintenir les bras.
Préparation de la tondeuse pour
entreposage
AVERTISSEMENT : ne pas vider
l’essence de la tondeuse à l’inté-
rieur d’un bâtiment, près d’un feu,
ou lorsque l’on fume. Des vapeurs d’essence peuvent entraîner une explosion ou un
incendie.
1. Vider le réservoir d’essence.
2. Faire fonctionner le moteur jusqu’à ce qu’il
n’y ait plus d’essence.
3. Vider l’huile du moteur chaud. Remplir le carter du moteur de nouvelle huile.
4. Retirer la bougie du cylindre. Verser une
once d’huile dans le cylindre. Puis, tirer lentement sur la poignée à démarrage manuel
de manière à ce que l’huile protège le cylindre. Installer une nouvelle bougie dans le cylindre.
5. Nettoyer les ailettes de refroidissement du
cylindre ainsi que le carter du moteur de toute la saleté et débris.
6. Nettoyer le dessous du bloc de coupe.
7. Nettoyer la tondeuse en entier afin de protéger la peinture.
8. Mettre la tondeuse dans un bâtiment bien
ventilé.
9. Vérifier que le sac à herbe soit bien vide. Le
sac serait endommagé s’il contenait toujours
de l’herbe durant le stockage.
F–99415
20
Page 21

Remplacement des pièces détachées
Le remplacement de pièces détachées est
montré soit au dos de ce manuel, soit dans un
manuel séparé de pièces de rechange.
Il est vivement recommandé de n’utiliser que
des pièces autorisées par le fabricant ou
approuvées. La lettre placée à la fin du numéro
de la pièce vous signale le type d’affinage pour
la pièce, C pour le chrome, Z pour le zinc, PA
pour une pièce achetée. Il est important de le
joindre lors de la commande d’une pièce. Ne
pas utiliser de pièces tractées ou d’accessoires
non spécifiquement prévus pour la tondeuse.
Pour obtenir la pièce de remplacement
adéquate, il vous faut fournir le numéro du
modèle de la tondeuse (Cf. plaque indicatrice).
Les pièces de rechange, à l’exception faite du
moteur, des transmissions, de la boîte–pont ou
du différentiel, sont disponibles depuis le
magasin d’où la tondeuse a été achetée, ou bien
dans un atelier de service recommendé.
Si vous ne pouvez vous procurer les pièces ou
ne connaissez personne pour dépanner ou
veiller à l’entretien de la tondeuse, veuillez
contacter : MURRAY CANADA, INC., Factory
Customer Service, 1195 Coutneypark Drive
East, Mississauga, Ont. L5T–1R1
(1–800–661–6662)
Le remplacement des pièces comme le moteur,
les transmissions, la boîte–pont ou le différentiel,
sont disponibles depuis un service autorisé par
le fabricant, dont l’adresse peut être trouvée
dans les Pages jaunes. Par ailleurs, vous
pouvez vous appuyer sur les garanties
s’appliquant au moteur ou aux transmissions
pour commander les pièces de rechange.
Lors de la commande, vous devrez fournir les
informations suivantes :
(1) Le numéro du modèle
(2) Le numéro de série
(3) Le numéro de la pièce
(4) La quantité
F–99415
21
Page 22

TABLE DES DEPANNAGES
Le moteur ne démarre pas.
1. S’assurer que le réservoir d’essence soit
rempli d’essence propre.
2. Sur un moteur froid, enfoncer le bouton
d’amorçage (en option sur certains modèles)
cinq fois.
3. s’assurer que le câble de la bougie soit
connecté à la bougie.
4. Ajuster le carburateur. Cf. le livre d’instructions relatives au moteur.
5. Il y a trop d’essence dans le cylindre du moteur. Retirer la bougie et la sécher. Tirer plusieurs fois sur la poignée à démarrage
manuel. Installer la bougie. Brancher le câble
à la bougie. Mettre le moteur en marche.
6. Le moteur a du mal à démarrer sur de l’herbe
épaisse ou haute. Placer la tondeuse sur une
surface propre et sèche.
7. S’assurer que la manette d’arrêt du moteur
soit en position de fonctionnement.
8. S’assurer que la valve d’essence soit en position ON. Cf. le livre d’instructions relatives
au moteur.
Le moteur ne s’arrête pas.
1. Relâcher la manette d’arrêt du moteur.
2. Vérifier le câble d’arrêt du moteur. Remplacer tout câble plié ou endommagé.
Les performances du moteur sont
médiocres.
1. Vérifier les réglages de hauteur de coupe.
Elever la hauteur de coupe si l’herbe est
haute.
2. Inspecter le dessous du carter de la lame.
Nettoyer la tondeuse de l’herbe et autre débris.
3. Inspecter le câble de la bougie et voir s’il est
bien branché.
4. Nettoyer les ailettes de refroidissement du
moteur et autres débris.
5. Vérifier les réglages du carburateur. Cf. le
livre d’instructions relatives au moteur.
6. Vérifier la fente au niveau de la bougie. La
régler à 0,030 pouces.
7. Vérifier le niveau d’huile du moteur. En rajouter si nécessaire.
8. Vérifier l’épurateur d’air. Cf. le livre d’instructions relatives au moteur.
9. L’essence n’est pas bonne. La vider et nettoyer le réservoir. Remplir le réservoir d’essence propre.
Vibration excessive.
1. Enlever la lame, l’inspecter et procéder à un
test d’équilibrage, si nécessaire. Cf. les instructions sur l’entretien de la lame.
2. Veiller à ce que la lame ne soit ni pliée, ni
cassée. UNE LAME ENDOMMAGEE EST
DANGEREUSE ET DOIT ETRE REMPLACEE.
3. Vérifier l’adaptateur de lame. REMPLACER
UN ADAPTATEUR DE LAME CASSE.
4. Si les vibrations continuent, porter votre tondeuse à un centre de service agréé.
L’herbe n’est pas rejetée normalement.
1. Nettoyer le dessous du bloc de coupe.
2. Voir si la lame est usée. La retirer et l’aiguiser. Par mesure de sécurité, remplacer la
lame tous les deux ans par une lame Murray.
L’herbe n’est pas coupée de manière
égale.
1. Vérifier les réglages de hauteur à chaque
roue qui doivent être les mêmes partout.
2. S’assurer que la lame soit coupante.
3. Inspecter la lame. UNE LAME ENDOMMAGEE EST DANGEREUSE ET DOIT ETRE
REMPLACEE.
4. Vérifier l’adaptateur de lame. REMPLACER
UN ADAPTATEUR DE LAME CASSE.
F–99415
22
Page 23

T outefois, si vous ne vous sentez pas rassuré, ou si vous êtes incertain, servez–vous de ce guide et ne tondez pas une pente do nt l’angle
dépasserait 15 degrés. Si la tondeuse autoportée doit fonctionner avec un accessoire tracté ou monté à l’arrière, n’utilisez pas la machine sur
arrière, et (3) essayez de remonter la pente directement. Si vous pouvez le faire, il est alors géneralement possible d’opérer en toute sécurité.
un terrain de plus de 10 degrés de dénivellation.
Une pente de 15 degrés correspond à une dénivellation d’environ 25 cm par mètre.
Une pente de 10 degrés correspond à une dénivellation d’environ 17 cm par mètre.
Soyez extrêmement prudent dans tous les cas de figure, et évitez les manoeuvres ou les virages brusques. Suivez les autres
instructions données dans ce manuel au sujet de l’utilisation de la machine en terrain incliné. Ne la conduisez jamais
perpendiculairement à la pente, mais remontez ou descendez directement celle–ci. Il faut pousser les autres tondeuses en travers
des pentes, et jamais en montant ou en descendant. Soyez particulièrement vigilant quand vous opérez sur une pente, ou près
d’une pente ou d’un obstacle.
Sur une tondeuse autoportée, pour savoir si une pente peut être tondue en toute sécurité: (1) désengagez la (les) lame(s), (2) passez en marche
ALIGNEZ LE BORD DE CETTE FEUILLE SUR LE TRONC D’UN ARBRE, SUR L’ANGLE D’UN BATIMENT,
10 DEGRES
15 DEGRES
Il faut pousser les autres tondeuses
en travers des pentes, et jamais en
montant ou en descendant.
SUR LA VERTICALE D’UN POTEAU ELECTRIQUE OU D’UN PIQUET DE CLOTURE.
GUIDE DE CONDUITE EN PENTE
F–99415
Conduisez toujours la machine
en descendant ou en remontant
une pente, jamals
perpendiculairement à celle–ci.
23
Page 24

20408x34A
2
30
12
10
11
12
31
13
28
27
29
5
9
26
23
24
25
22
8
20
5
6
1
8
28
13
4
7
12
12
1 Housing 776038
2 Engine * *
4 Adjuster, Left Rear Height 672605
5 Push On Cap 28x49
6 Bracket, Left Handle 672591
7 Adjuster, Left Front Height 672601
8 Nut, Flange 15x68
9 Nut, Hex 15x102
10 Washer 17x38
11 Screw 4x21
F–99415
13
18
19
28
14
15
16
12 Hub Cap - Optional 43615
13 Nut, Flange 15x84
14 Washer, Belleville 17x137
15 Washer 17x124
16 Bolt 1x153
17 Blade 672763E701
18 Adapter, Blade 672503
19 Adjuster, Right Front Height 672600
20 Bolt, Engine 25x6
22 Washer 17x146
24
13
17
28
23 Nut, Flange 15x88
24 Rod, Pivot 215x17 Z
25 Door, Rear 672611
26 Spring 166x44
27 Guard, Rear 671970
28 Wheel 672060
29 Bracket, Right Handle 672590
30 Adjuster, Right Rear Height 672604
31 Screw 26x259
-- Instruction Book F-99415
Page 25

20408x34A
21
4
3
7
6
8
10
1
22
9
5
23
2
11
1 Handle, Upper 672665E701
2 Handle, Lower 671917E701
3 Bolt 2x77
4 Knob, Plastic 71294
7 Locknut 15x116
F–99415
12 Guide, Rope 71530
13 Engine Stop Lever 671924E700
14 Bracket, Stop Lever 43628 BC
15 Fastener, Cable 71372
16 Engine Stop Cable 672554
25
17 Hair Pin 31x10
21 Frame, Top 71592
22 Frame Assembly 672614
23 Bag, Cloth 672199
Page 26

F–99415
26
Page 27

F–99415
27
Page 28

F–99415
28
 Loading...