

Page 1
1750284
Revision -
en
Operator’s Manual
cs
Bedienungsanleitung
de
Käyttäjän käsikirja
fi
Manuale dell’Operatore
fr
Brukerhåndbok
hu
Használati útmutató
it
Návod k obsluze
lt
Instrukcja obsługi
no
pl
Manuel d’utilisation
sl
Uporabniški priročnik
sv
Instruktionsbok
Vartotojo vadovas
Walkbehind Snowthrower
Mfg. No. Description
1695859 Dual Stage Snowthrower, 14.5 TP, 29 Inch (73,6 cm)
Page 2

2
Page 3
B
1
2
A B
C
4
E
A
B
D
C
3
4
A
3
5
A B
Page 4
3
1
1/2˝ (x 2) 7/16˝
6
7
5B
5A
2
17 lb-ft
23 Nm
4
8
12
13
15 lb-ft
(20 Nm)
11
10
9
4
6
Page 5
5
8
B
FULL
10
A
A
11
A
1
2
Free-Hand
TM
C
ontrol
7
B
A D
C
9
A
Page 6
16
A
Full
17
A
6
12
A
B
C
13
14
15
A
A
B
A
B
Page 7
7
20
B
A
19
A
B
C
18
A
B
C
1/32”
(0.8mm)
21
D
E
A
C
B
F
22
A
23
Page 8

8
Page 9
9
Record your model name/number, manufacturer’s
identification numbers, and engine serial numbers in the
space provided for easy access. These numbers can be
found in the locations shown.
When contacting your authorized dealer for
replacement parts, service, or information you MUST
have these numbers.
A. Manufacturer’s Identification Number
B. Manufacturer’s Serial Number
C. Power Rating in Kilowatts
D. Maximum Engine Speed in Rotations per Minute
E. Manufacturer’s Name and Address
F. Year of Manufacture
G. CE Compliance Logo
H. Mass of Unit in Kilograms
I. Guaranteed Sound Power in Decibels
Part No. xxxxxxx
xxxxxxxxxxxxxxx
Serial No. xxxxxxxxxx
20xx
kW: x.xx
xxxx max
xxxxxxxxxxxxxxxxxxxxxxx
xxxxxxxxxxxxxxxxxxxxxxx
xxxxxxxxxxxxxxxxxxxxxxx
xxxxxxxxxxxxxxxxxxxxxxx
xxx
dB
kg: xxx
A
B
C
D
E
F
G
H
I
PRO DUCT REFER ENCE DATA
Model Description Name/Number
Unit MFG Number Unit SERIAL Number
Mower Deck MFG Number Mower Deck SERIAL Number
Dealer Name Date Purchased
ENGINE REFERENCE DATA
Engine Make Engine Model
Engine Type/Spec Engine Code/Serial Number
CE Identification Tag
Product Reference Data
The Illustrated Parts List for this machine can be downloaded from www.murray.com. Please provide model and serial number
when ordering replacement parts.
Copyright © 2010 Briggs & Stratton Power Products Group, LLC
Milwaukee, WI, All rights reserved.
MURRAY is a trademark of Briggs & Stratton Power Products
Group, LLC Milwaukee, WI USA.
General Information
Thank you for purchasing this quality-built MURRAY snowthrower. We’re pleased that you’ve placed your confidence in the
MURRAY brand. When operated and maintained according to the instructions in this manual, your MURRAY product will provide
many years of dependable service.
This manual contains safety information to make you aware of the hazards and risks associated with snowthrowers and how to
avoid them. This snowthrower is designed and intended only for snow throwing and is not intended for any other purpose. It is
important that you read and understand these instructions thoroughly before attempting to start or operate this equipment. Save
these instructions for future reference.
CONTENTS
Illustrations .................................................................................................................3
Operator Safety.........................................................................................................10
Assembly...................................................................................................................16
Features and Controls .............................................................................................17
Operation...................................................................................................................19
Maintenance..............................................................................................................24
Troubleshooting........................................................................................................27
Warranty ....................................................................................................................28
Specifications ...........................................................................................................29
Page 10
10
OPERATOR SAFETY
www.murray.com
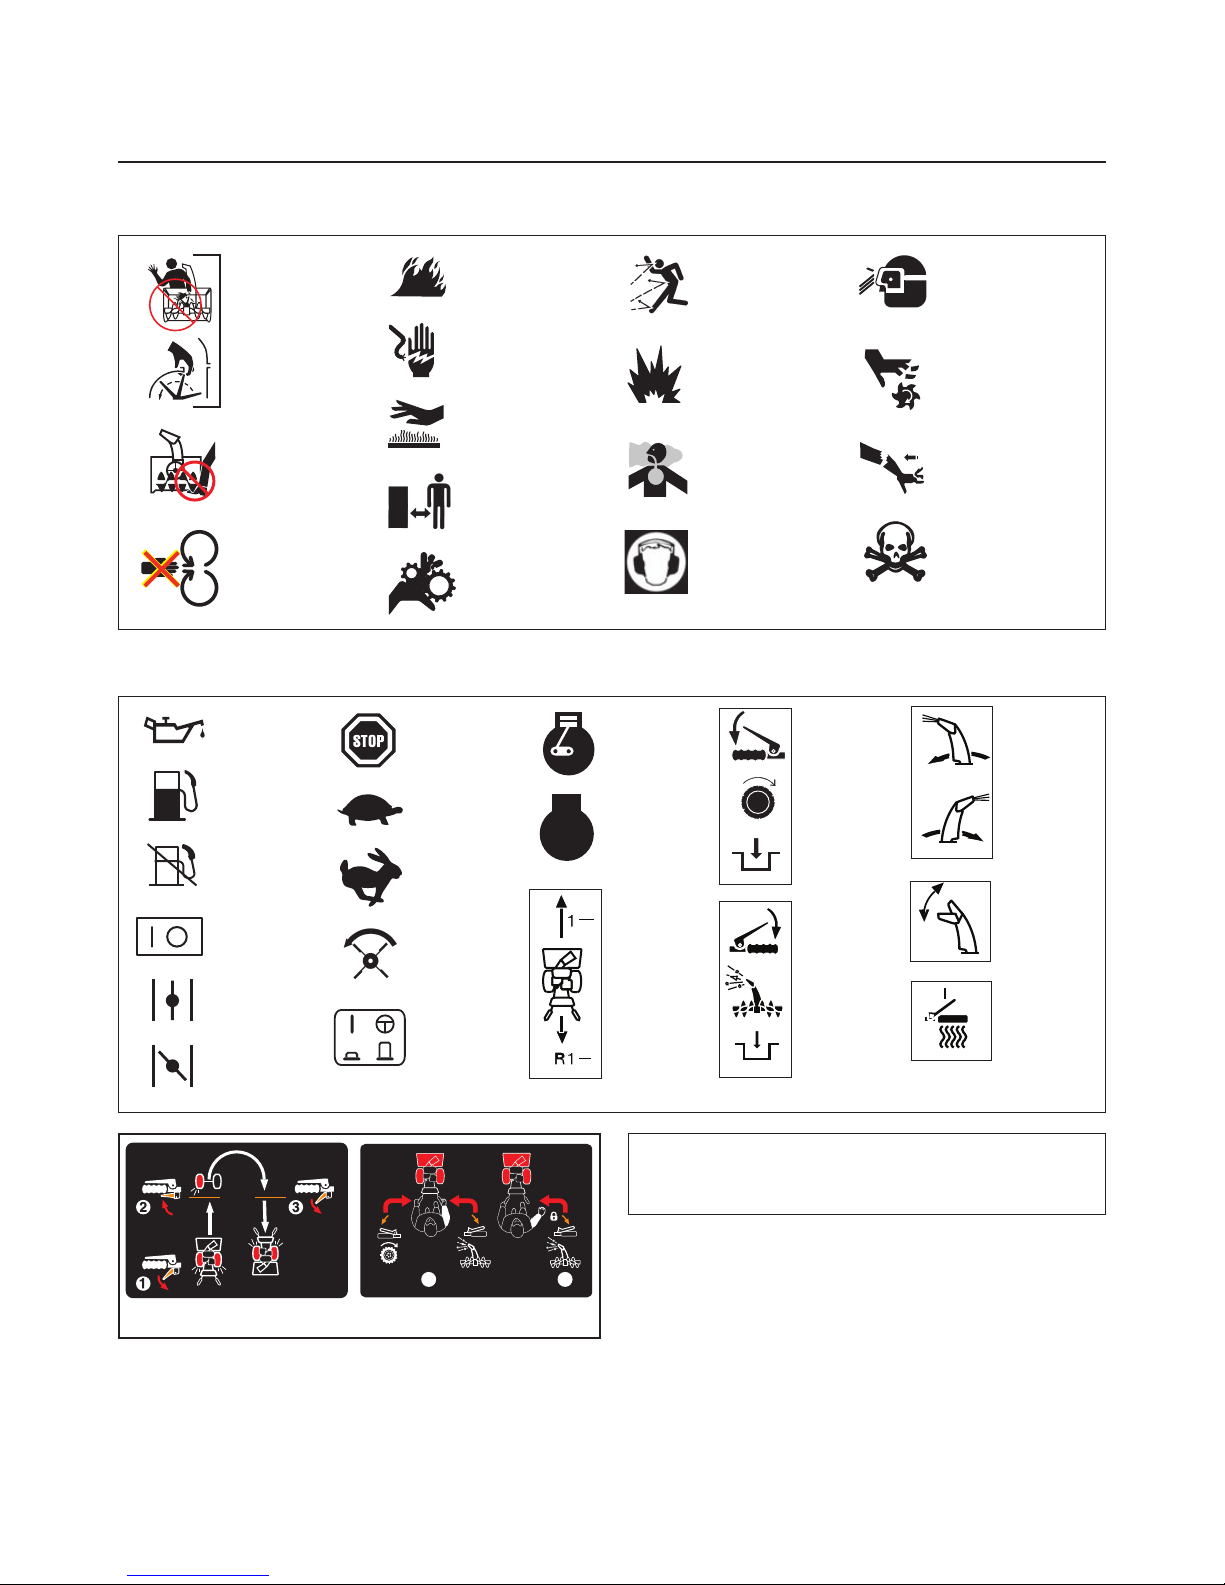
Hazard Symbols and Meanings
Rotating
Impeller
Control Symbols on Equipment
1
2
Free-Hand™ Control
Easy-Turn™ Traction Control
NOTE: Not all control symbols shown on this page will
appear on your snowthrower. See Features and Controls
section for the applicable symbols.
STOP
Oil
Fuel
Fuel
Shutoff
Choke
Off
Choke
On
On Off
Stop
Slow
Fast
Auger
Clutch
Electric
Start
Engine
Run
Engine
Stop
Traction
Control
Auger
Control
Discharge
Chute
Chute
Deflector
Heated
Hand
Grips
Rotating
Auger
Rotating
Parts
Fire
Shock
Hot
Surface
Safe
Distance
Rotating
Gears
Thrown
Objects
Explosion
Toxic
Fumes
Ear
Protection
Eye
Protection
Moving
Parts
Kickback
Hazardous
Chemical
Forward
Neutral
Reverse
Page 11
OPERATOR SAFETY
11
The safety alert symbol and signal word (DANGER,
WARNING, CAUTION, or NOTICE) is used to indicate the likelihood
and potential severity of personal injury and/or damage to the
product. In addition, a hazard symbol may be used to represent the
type of hazard.
Safety Alert Symbol and Signal Words
DANGER indicates a hazard which, if not avoided, will result
in death or serious injury.
WARNING indicates a hazard which, if not avoided, could
result in death or serious injury.
CAUTION indicates a hazard which, if not avoided, could
result in minor or moderate injury.
NOTICE indicates a situation that could result in damage
to the product.
DANGER
• Hand contact with the rotating impeller inside the discharge
chute is the most common cause of injury associated with
snowthrowers.
• This snowthrower is capable of amputating hands and feet,
and throwing objects. Read and observe all the safety
instructions in this manual. Failure to do so will result in
death or serious injury.
WARNING
Certain components in this product and its related accessories
contain chemicals known to the state of California to cause
cancer, birth defects, or other reproductive harm. Wash hands
after handling.
WARNING
The engine exhaust from this product contains chemicals
known to the State of California to cause cancer, birth defects,
or other reproductive harm.
• Be thoroughly familiar with the controls and the proper use of the
snow thrower.
• Make sure you are properly trained before operating the
snowthrower.
• Know how to stop the unit and disengage the controls quickly.
• Never allow anyone to operate the snowthrower without proper
instruction.
• Always follow the instructions in the operator’s manual, if the
snowthrower will be stored for an extende d period.
• Maintain or replace safety and instruction labels as necessary.
• Never attempt to make major repairs on the snowthrower unless
you have been properly trained. Improper servicing of the
snowthrower can result in hazardous operation, equipment
damage, and voiding of the product warranty.
DANGER
Read, understand, and follow all the
instructions on the snowthrower and in the
operator’s manual before operating this unit.
Failure to observe the safet y instructions in
this manual will result in death or serious
injury.
Read the Manual
TO SAFELY CLEAR A CLOGGED DISCHARGE CHUTE
DANGER: Hand contact with the rotating impeller inside
the discharge chute is the most common cause of
injury associated with snow throwers. Never use your
hands to clean out the discharge chute.
FOLLOW THESE INSTRUCTIONS:
1. Shut OFF the engine.
2. Wait 10 seconds to be sure the impeller blades have stopped
rotating.
3. Always use a clean-out tool, not your hands.
DANGER
Discharge chute contains rotating impeller to
throw snow. Never clear or unclog the
discharge chute with your hands. Fingers can
quickly become caught in the impeller. Always
use a clean-out tool.
Failure to observe these safety instructions
will result in traumatic amputation or severe
laceration.
Discharge Chute
Page 12
OPERATOR SAFETY
12
www.murray.com
WHEN ADDING FUEL
• Turn off engine and let cool at least 3 minutes before removing
the fuel cap and adding fuel.
• Fill fuel tank outdoors or in a well ventilated area.
• Do not overfill the fuel tank. To allow for the expansion of gasoline,
do not fill above the bottom of the fuel tank neck.
• Keep fuel away from sparks, open flames, pilot lights, heat, and
other ignition sources.
• Check fuel lines, cap, and fittings frequently for cracks or leaks.
Replace if necessary.
• Use an approved fuel container.
• If fuel spills, wait until it evaporates before starting engine.
WHEN STARTING ENGINE
• Ensure that spark plug, muffler, fuel cap, and air cleaner (if
equipped) are in place and secured.
• Do not crank the engine with the spark plug removed.
• If fuel is spilled, do not attempt to start the engine, but move the
snow thrower away from the area of the spill, and avoid creating
any source of ignition, until the fuel vapors have dissipated.
• Do not over-prime the engine. Follow the engine starting
instructions in this manual.
• If the engine floods, set choke (if equipped) to OPEN/RUN
position, move throttle (if equipped) to FAST position and crank
until engine starts.
WHEN OPERATING EQUIPMENT
• Do not tip the snowthrower at an angle which causes the fuel to
spill.
• Do not choke the carburetor to stop the engine.
• Never run the engine with the air cleaner assembly (if equipped)
or the air filter (if equipped) removed.
WHEN CHANGING OIL
• If you drain the oil from the top oil fill tube, the fuel tank must be
empty or fuel can leak out and result in a fire or explosion.
WHEN TRANSPORTING EQUIPMENT
• Transport with fuel tank EMPTY, or with fuel shut-off valve OFF.
WHEN STORING GASOLINE OR EQUIPMENT WITH FUEL
IN TANK
• Store away from furnaces, stoves, water heaters, or other
appliances that have pilot light or other ignition source because
they can ignite fuel vapors.
DANGER
Fuel and its vapors are extremely flammable
and explosive. Always handle fuel with extreme
care.
Failure to observe these safety instructions can
cause a fire or explosion which will result in
severe burns or death.
Fuel Handling
• Keep the area of operation clear of all persons, particularly small
children and pets.
• Thoroughly inspect the area where the snowthrower will be used
and remove all doormats, sleds, boards, wires, and other foreign
objects.
• Do not operate the snowthrower without wearing adequate winter
clothing.
• Wear footwear that will improve footing on slippery surfaces.
• Use caution to avoid slipping or falling especially when operating
the snowthrower in reverse.
• Never operate the snowthrower without good visibility or light.
Always be sure of your footing, and keep a firm hold on the
handles.
• Do not clear snow across the face of slopes. Use extreme caution
when changing direction on slopes. Do not attempt to clear steep
slopes.
• Do not overload the machine capacity by attempting to clear
snow too quickly.
• Never operate the snowthrower at high transport speeds on
slippery surfaces. Look behind the snowthrower and use care
when operating in reverse.
• Do not use the snowthrower on surfaces above ground level such
as roofs of residences, garages, porches, or other such structures
or buildings.
• Operators should evaluate their ability to operate the snowthrower
safely enough to protect themselves and others from injury.
• The snowthrower is intended to remove snow only. Do not use the
snow thrower for any other purpose.
• Do not carry passengers.
• After striking a foreign object, shut OFF the engine, disconnect
the cord on electric motors, thoroughly inspect the snowthrower
for any damage, and repair the damage before restarting and
operating the snowthrower.
• If the snowthrower vibrates abnormally, shut OFF the engine.
Vibration is generally a warning of trouble. See an authorized
dealer if necessary for repairs.
• For models equipped with electric starting motors, disconnect the
power cord after the engine starts.
DANGER
This snowthrower is only as safe as the
operator. If it is misused, or not properly
maintained, it can be dangerous. Remember
you are responsible for your safety and that of
those around you.
Operation and Equipment Safety
Page 13
OPERATOR SAFETY
13
• Keep children out of the area during operation. Children are often
attracted to the equipment. Be mindful of all persons present.
• Be alert and turn unit off if children enter the area.
• Never allow children to operate the unit.
• Use extra care when approaching blind corners, shrubs, trees, or
other objects that may obscure vision. Children may be present.
DANGER
Tragic accidents can occur if the operator is
not alert to the presence of children. Children
are often attracted to the unit and the
operating activity. Never assume that children
will remain where you last saw them.
Children
• Start and run engine outdoors.
• Do not run the engine in an enclosed area, even if doors or
windows are open.
DANGER
Engines give off carbon monoxide, an odorless,
colorless, poison gas.
Breathing carbon monoxide can cause nausea,
fainting, or death.
Engine Safety
• Disengage all clutches and shift into neutral before starting the
engine.
• Let the engine adjust to outdoor temperatures before starting to
clear snow.
• Use a grounded three-wire plug-in for all snowthrowers equipped
with electric drive motors or electric starting motors.
DANGER
Safe operation of the snowthrower requires the
proper care and maintenance of the engine.
Failure to observe the safety instructions in this
manual will result in death or serious injury.
• Always wear safety glasses or eye shields during operation, and
while performing an adjustment or repair.
• Always be aware of the direction the snow is being thrown.
Nearby pedestrians, pets, or property may be harmed by objects
being thrown.
• Be aware of your environment while operating the snowthrower.
Don’t run over items such as gravel, doormats, newspapers, toys,
and rocks hidden under snow, as they can all be thrown from the
chute or jam in the auger.
• Use extreme caution when operating on or crossing gravel drives,
walks, or roads.
• Adjust the collector housing height to clear gravel or crushed rock
surface.
• Never operate the snowthrower near glass enclosures,
automobiles, window wells, drop-offs, and the like without proper
adjustment of the discharge chute angle.
• Familiarize yourself with the area in which you plan to operate the
snow thrower. Mark off boundaries of walkways and driveways.
DANGER
Objects can be picked up by auger and thrown
from chute. Never discharge snow toward
bystanders or allow anyone in front of the
snowthrower. Failure to observe these safety
instructions will result in death or serious
injury.
Thrown Objects
• Whenever cleaning, repairing, or inspecting the snowthrower,
make sure the engine is OFF, spark plug wire is disconnected,
and all moving parts have stopped.
• Do not put hands or feet near or under rotating parts. Keep clear
of the discharge opening at all times.
• Never operate the snowthrower without proper guards, and other
safety devices in place and working.
• Never leave the snowthrower unattended while engine is running.
Always disengage the auger and traction controls, stop engine,
and remove keys.
• Keep all loose clothing away from the front of the snowthrower
and auger. Scarves, mittens, dangling drawstrings, loose clothes,
and pants can quickly become caught in the rotating device and
amputation will occur. Tie up long hair and remove jewelry.
• Run the machine a few minutes after discharging snow to prevent
freeze-up of the collector/impeller.
• Disengage power to the collector/impeller when snowthrower is
transported or not in use.
DANGER
Keep hands, feet, and clothing away from
rotating parts. Rotating parts can contact or
entangle hands, feet, hair, clothing, or
accessories.
Failure to observe these safety instructions will
result in traumatic amputation or severe
laceration.
Moving Parts
Page 14
OPERATOR SAFETY
14
www.murray.com
DANGER: READ OPERATOR’S
MANUAL.
Read the Operator’s Manual for
operating and safety instructions.
DANGER: THROWN OBJECTS
HAZARD.
Never direct discharge chute towards
persons or property. Keep bystanders
away.
DANGER: REMOVE KEY BEFORE
SERVICING.
Shut off engine and remove key before
performing maintenance or repair work.
DANGER: AMPUTATION HAZARD.
Contact with auger will cause serious
injury. Keep hands, feet, and clothing
away. Keep bystanders away.
DANGER: AMPUTATION HAZARD.
Contact with moving parts inside chute
will cause serious injury. Shut off engine
before unclogging discharge chute. Use
clean-out tool, not hands!
SAFETY ICONS
• When performing any maintenance or repairs on the
snowthrower, shut OFF the engine, disconnect spark plug wire,
and keep the wire away from the plug to prevent someone from
accidently starting the engine.
• Check shear bolts and other hardware at frequent intervals for
proper tightness to be sure the snowthrower is in safe working
condition.
• Keep nuts and bolts tight and keep snowthrower in good
condition.
• Never tamper with safety devices. Check their proper operation
regularly and make necessary repairs if they are not functioning
properly.
• Components are subject to wear, damage, and deterioration.
Frequently check components and replace with recommended
parts, when necessary.
• Check control operation frequently. Adjust and service as
required.
• Use only factory authorized replacement parts when making
repairs.
• Always comply with factory specifications on all settings and
adjustments.
• Only authorized service locations should be utilized for major
service and repair requirements.
• Use only attachments and accessories approved by the factory
(such as wheel weights, counterweights, or cabs).
• Never attempt to make any adjustments while the engine is
running (except when specifically recommended by the factory).
WARNING
This snowthrower must be properly maintained
to ensure safe operation and performance.
Failure to observe the safety instructions in this
manual could result in death or serious injury.
Maintenance and Storage
• If there is natural or LP gas leakage in area, do not start engine.
• Do not use pressurized starting fluids because vapors are
flammable.
WARNING
Starting engine creates sparking.
Sparking can ignite nearby flammable gases.
Explosion and fire could result.
• Never touch a hot engine or muffler. Allow muffler, engine
cylinder, and fins to cool before touching.
• Remove debris from muffler area and cylinder area.
• Install and maintain in working order a spark arrester before using
equipment on forest-covered, grass-covered, or brush-covered
unimproved land.
• It is a violation of California Public Resource Code, Section 4442,
to use or operate the engine on any forest-covered, brushcovered, or grass-covered land unless the exhaust system is
equipped with a spark arrester, as defined in Section 4442,
maintained in effective working order. Other states or federal
jurisdictions may have similar laws. Contact the original
equipment manufacturer, retailer, or dealer to obtain a spark
arrester designed for the exhaust system installed on this engine.
WARNING
Running the engine produces heat. Engine
parts, especially muffler, become extremely hot.
Failure to observe these safety instructions
could result in severe thermal burns on contact.
Engine Safety (Continued)
Page 15
15
OPERATOR SAFETY
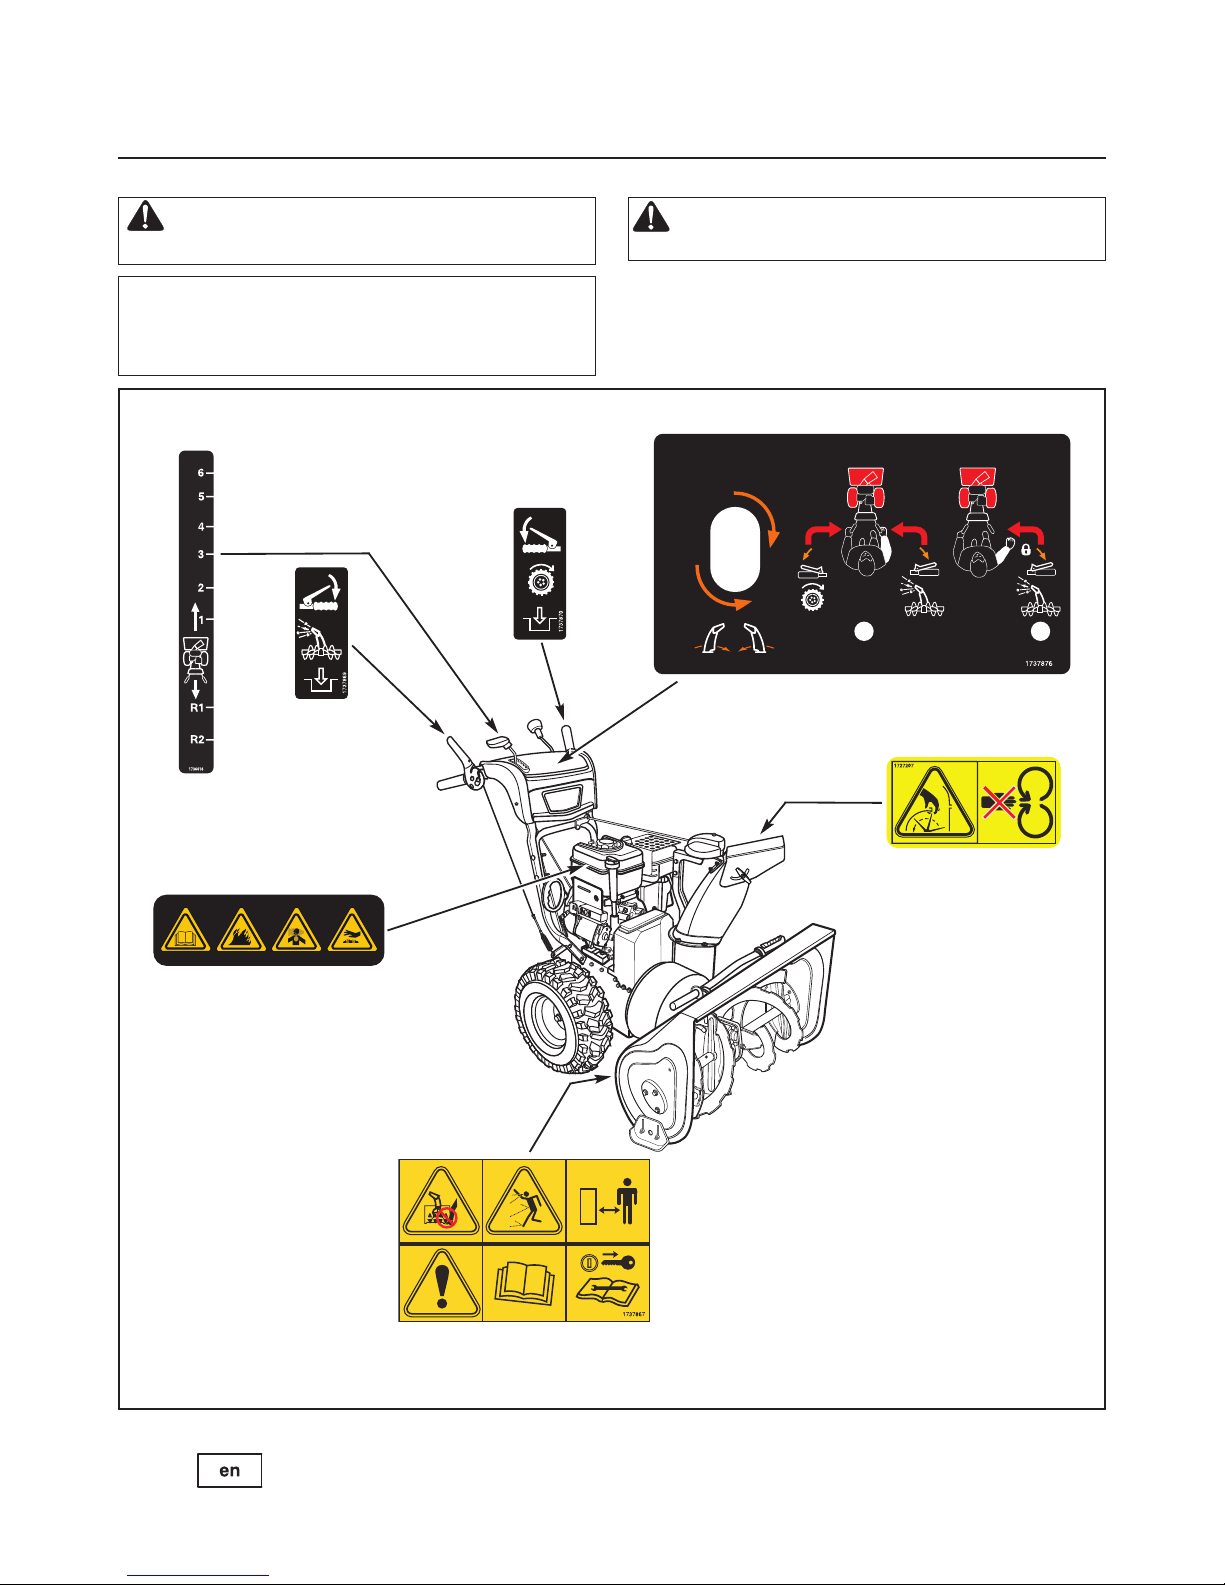
Safety Decals
Look for this symbol to indicate important safety
precautions. This symbol indicates: “Attention!
Become Alert! Your Safety Is At Risk.”
WARNING: If any safety decals become worn or
damaged and cannot be read, order replacement
decals from your local dealer.
Before operating your snow thrower, read the safety decals
as shown on your snow thrower. The cautions and
warnings are for your safety. To avoid a personal injury or
damage to your snow thrower, understand and follow all
the safety decals.
Part No. 1727207
Chute Control Icons
Part No. 1736616
Shift Decal
Part No. 1737867
Auger Control Icons
Product ID Number &
Serial Number Decal
(Rear of Motor Box)
Part No. 276925
Engine Icons
Part No. 1737869
Auger Control Decal
Part No. 1737870
Traction Control Decal
1
2
Part No. 1737876
Main Dash Decal
Page 16
16
www.murray.com
ASSEMBLY
CHECK THE TIRES
Check tires for damage. Check the air pressure in the tires with an
accurate gauge. See the sidewall of the tire for the proper
inflation.
CAUTION: Avoid Injury! Explosive separation of tire and
rim parts is possible when they are serviced
incorrectly.
• Do not attempt to mount a tire without the proper
equipment and experience to perform the job.
• Do not inflate the tires above the recommended
pressure.
• Do not weld or heat a wheel and tire assembly. Heat can
cause an increase in air pressure resulting in an
explosion. Welding can structurally weaken or deform the
wheel.
• Do not stand in front or over the tire assembly when
inflating. Use appropriate tool that allows you to stand to
one side.
NOTICE: Check side of tire for maximum tire pressure. DO
NOT exceed maximum.
TOOLS REQUIRED FOR ASSEMBLY
1 – Knife
2 – 1/2" Wrenches (or adjustable wrenches)
1 – 7/16” Wrenches (or adjustable wrenches)
1 – Wrench (or adjustable wrench)
1 – Pair pliers or screw driver (to spread cotter pin)
1 – Hammer
1 – Pry Bar
CHECK CABLE CONNECTION AND
ADJUSTMENT
The traction control cable (A, Figure 5) and auger control cable
(B) are adjusted at the factory and no adjustment should be
necessary.
If the cables become stretched, unattached or begin to sag,
adjustment will be necessary. See Maintenance section of this
manual.
INSTALL THE SPEED CONTROL ROD
Attach the ball joint (A, Figure 4), located on the bottom end of
the speed control rod (B), to the shift yoke assembly (C) with
5/16" lock washer (D) and 5/16" nut (E).
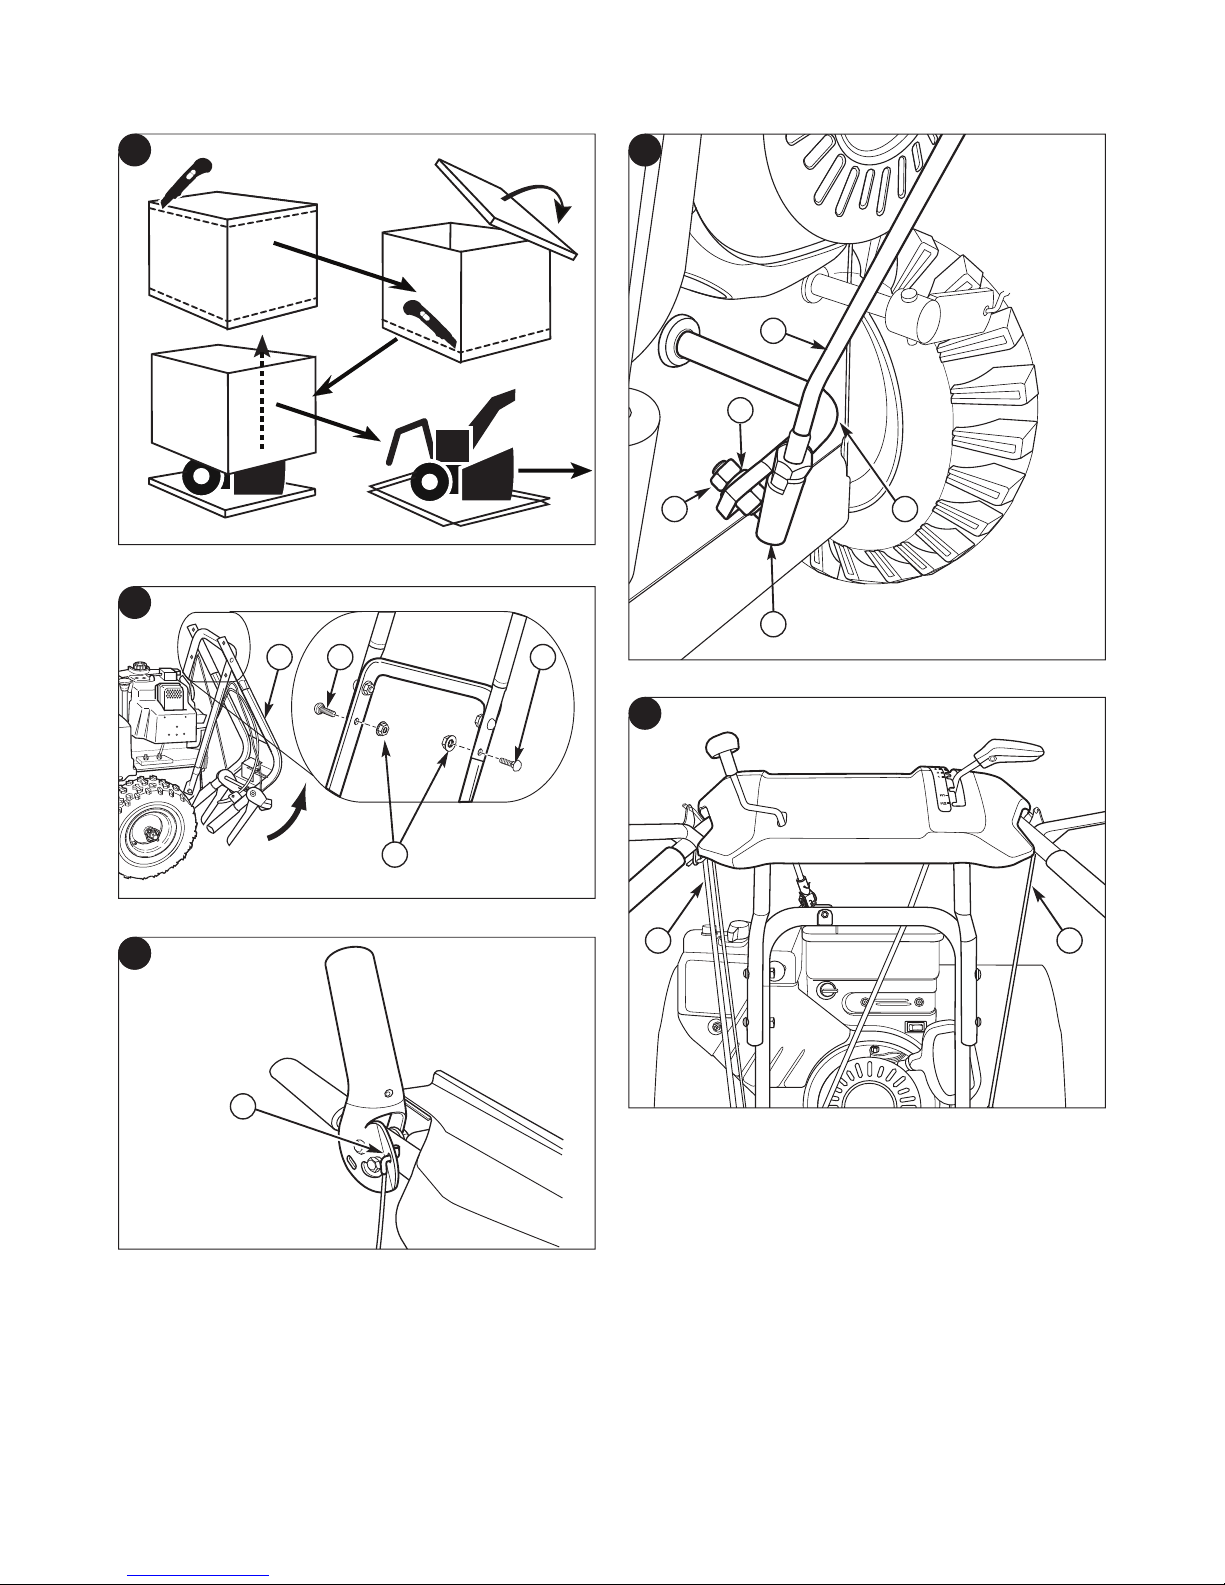
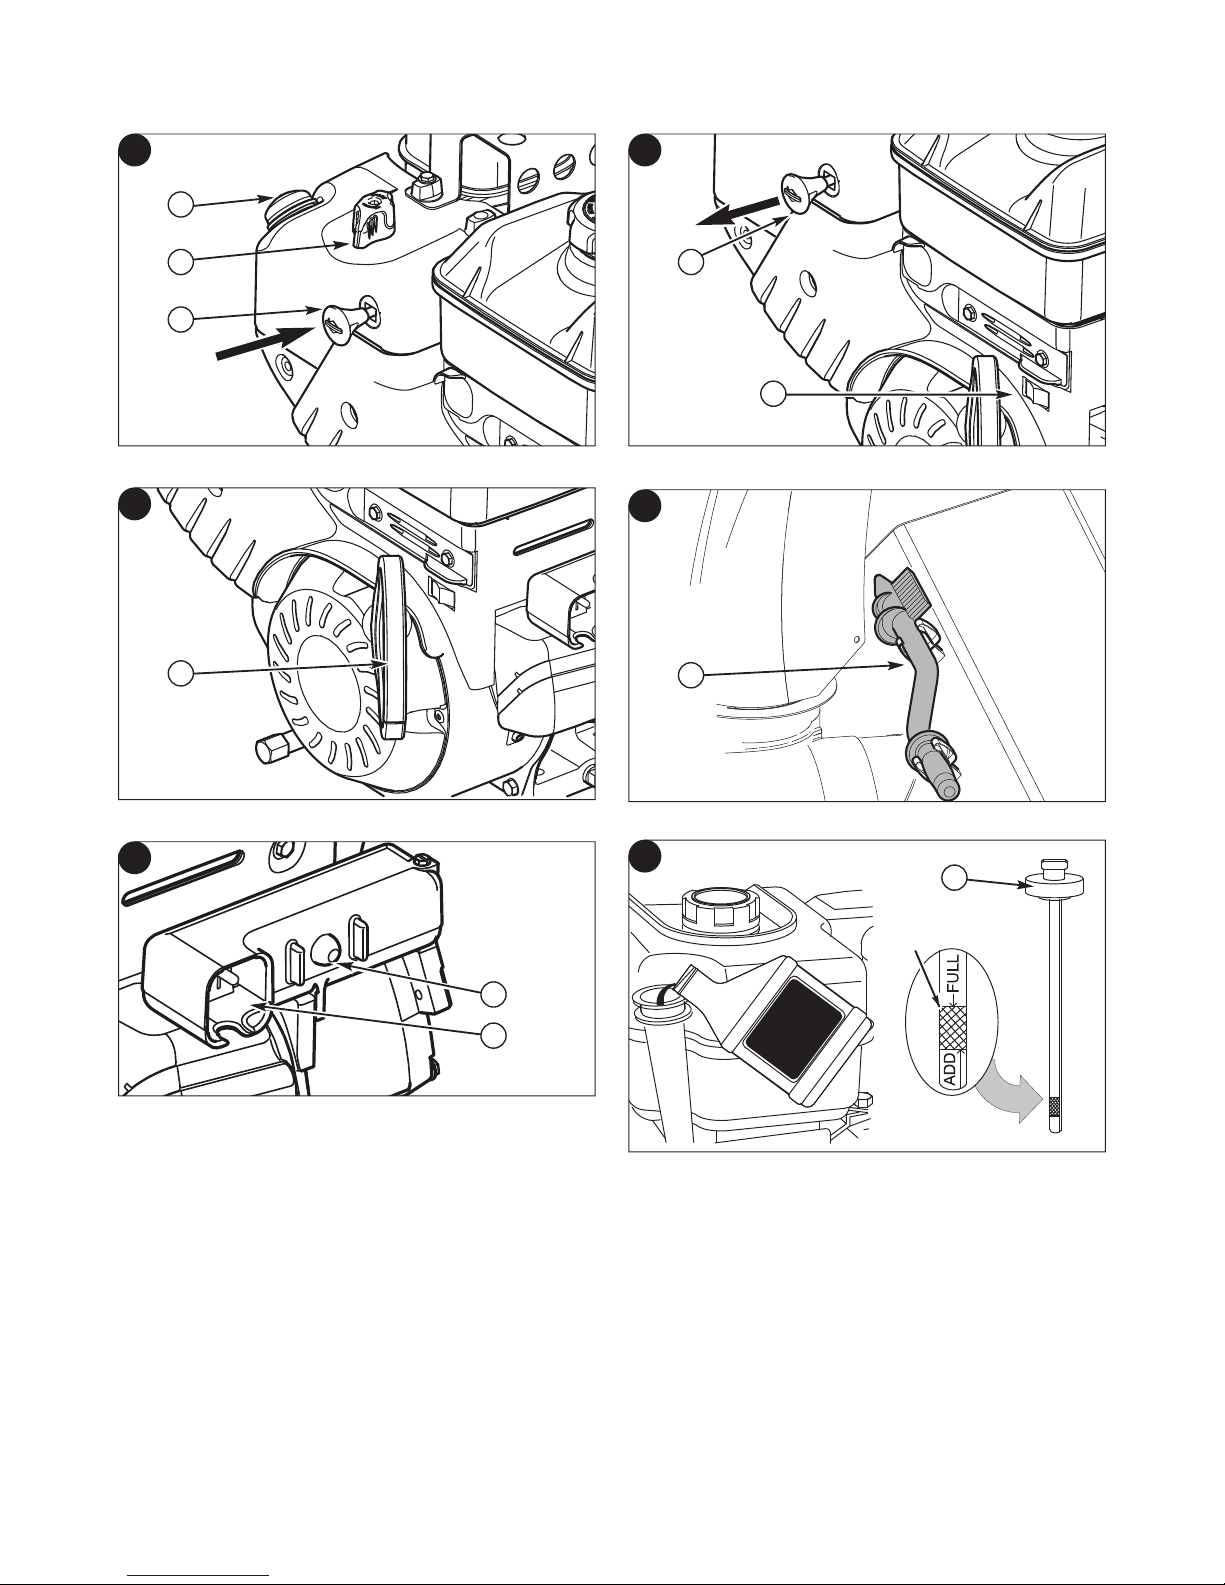
ASSEMBLE THE CHUTE AND CRANK
See Figure 6 for instructions.
WARNING: Always wear safety glasses or eye shields
when assembling the snow thrower.
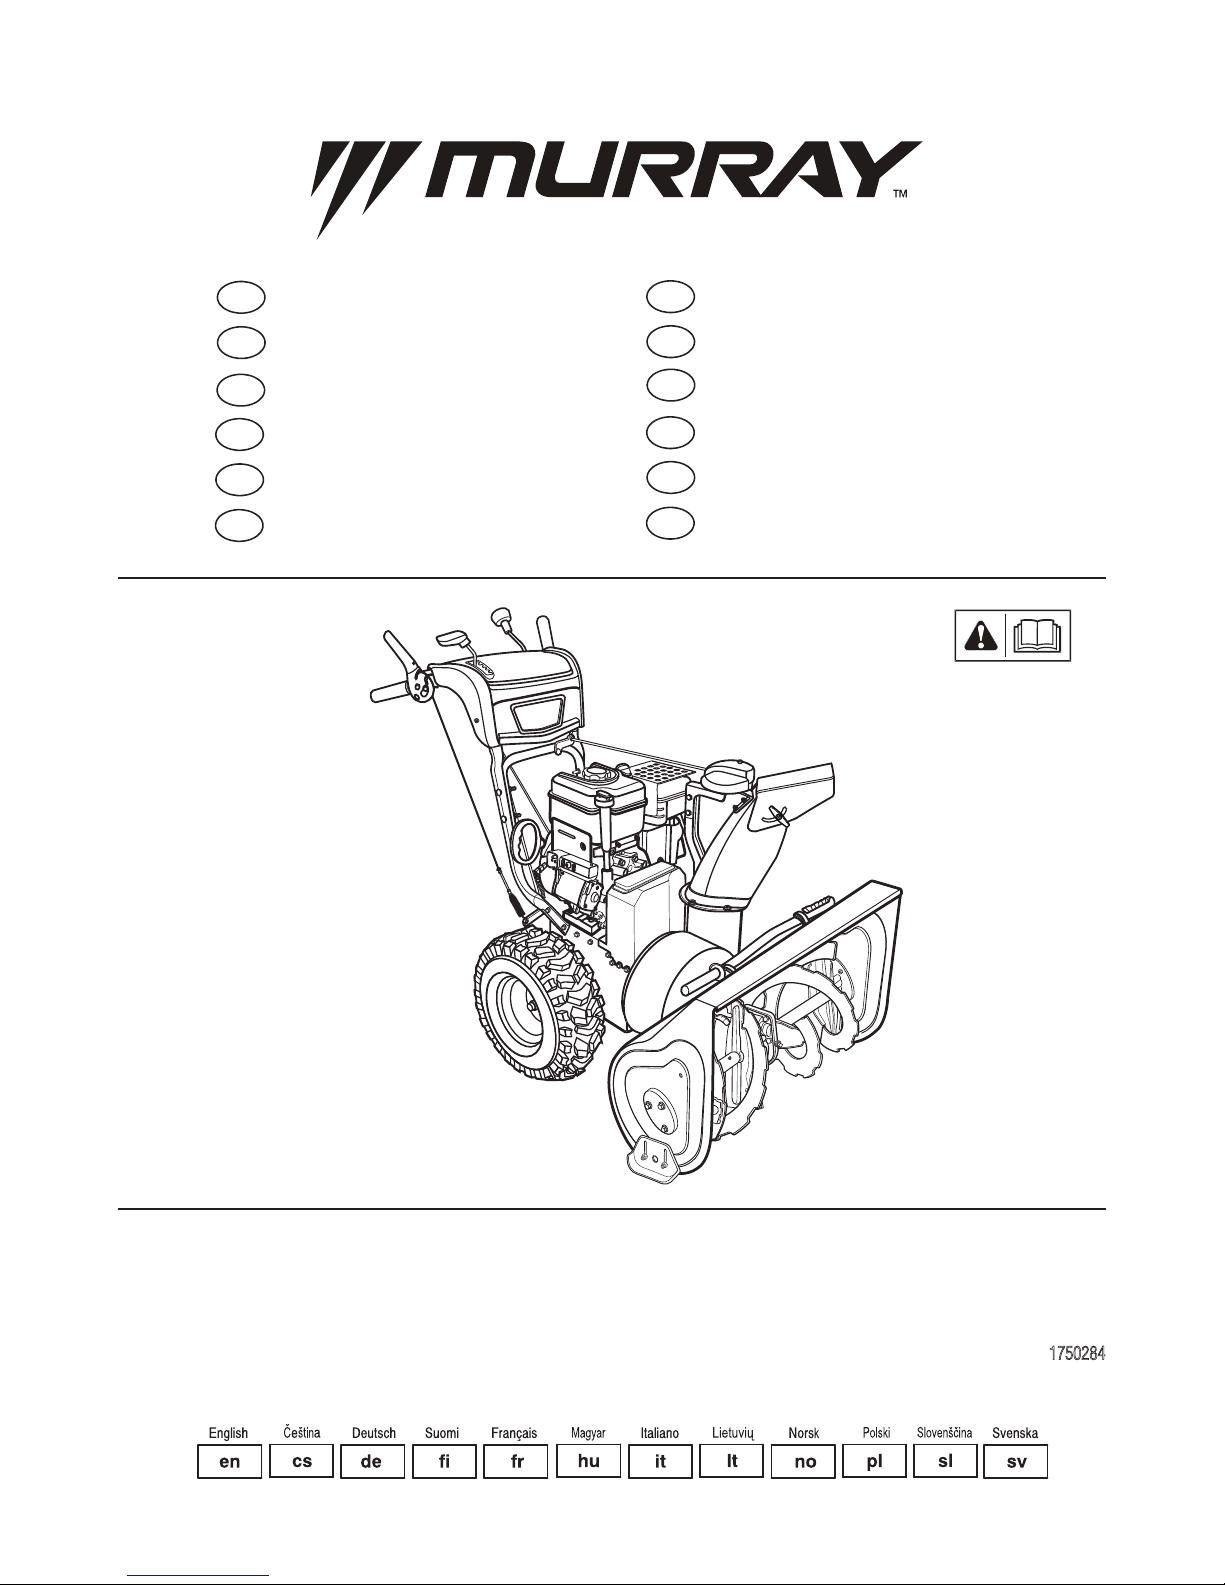
UNPACK THE SNOWTHROWER
1. Using knife, cut along the dotted lines around the top of the
carton. Then remove top of carton as shown in Figure 1.
2. Using knife, cut along the dotted lines around the bottom of
the carton.
3. Push snow thrower off the bottom of the carton to proceed
with assembly.
PARTS BAG CONTENTS
1 – Shear Bolt Kit, 1/4-20 x 1-3/4 in.
1 – Bag of Shear Bolts
1 – Screw, 1/4-20 x 1-3/4 in.
1 – Spacer, Sleeve, 1/4 in.
1 – Hex Locknut, 1/4-20
NOTE: “Right” and “Left” are from the Operating Position.
ASSEMBLE THE HANDLES
1. Raise the upper handle (A, Figure 2) to the operating position.
2. Guide speed control rod over wheel.
3. Remove blue shipping tape from cables and cut orange zip
ties that secure control cables to handle assembly and chute
rotation parts.
NOTE: Make sure the “Z bend ends of the control lever
cables are secured in the holes on the control levers (A,
Figure 3). Be careful not to cut or damage the control
cables. Make sure the cables are not caught between the
upper and lower handle.
4. Slide two carriage bolts (B, Figure 2) into lower holes and
fasten with two 5/16" lock nuts (C). Tighten all four carriage
bolts and nuts with a 1/2" wrench or deep socket.
Page 17
17
FEATURES AND CONTROLS
SNOWTHROWER CONTROLS
A. Speed Select Lever — Allows the operator to use one of six
(6) forward and two (2) reverse speeds. To shift, move speed
select lever to desired position.
NOTICE: Do not move speed select lever while Traction
Control is engaged. This may result in severe damage to
drive system.
B. Auger Control Lever — Used to engage and disengage the
auger and impeller. To engage push down, to disengage
release.
C. Chute Rotation Crank — Used to rotate the discharge chute
to the left or right.
D. Chute Deflector Wing Nut — Used to control the angle of
the chute deflector (up or down).
E. Free-Hand
TM
Control — After engaging the traction control
(left hand) and auger control (right hand), allows the operator
to release the auger control lever to use the other controls.
F. Traction Control Lever — Used to propel snowthrower
forward or reverse. Push down to engage, release to
disengage.
G. Skid Shoe — Used to adjust ground clearance of auger
housing.
H. Clean-Out Tool — Used to remove snow and debris from the
discharge chute and the auger housing.
I. Headlight — Used to operate the snowthrower in poor
lighting conditions.
Snowthrower Controls
B
A
C
F
1
2
E
G
H
D
I
Page 18
www.murray.com18
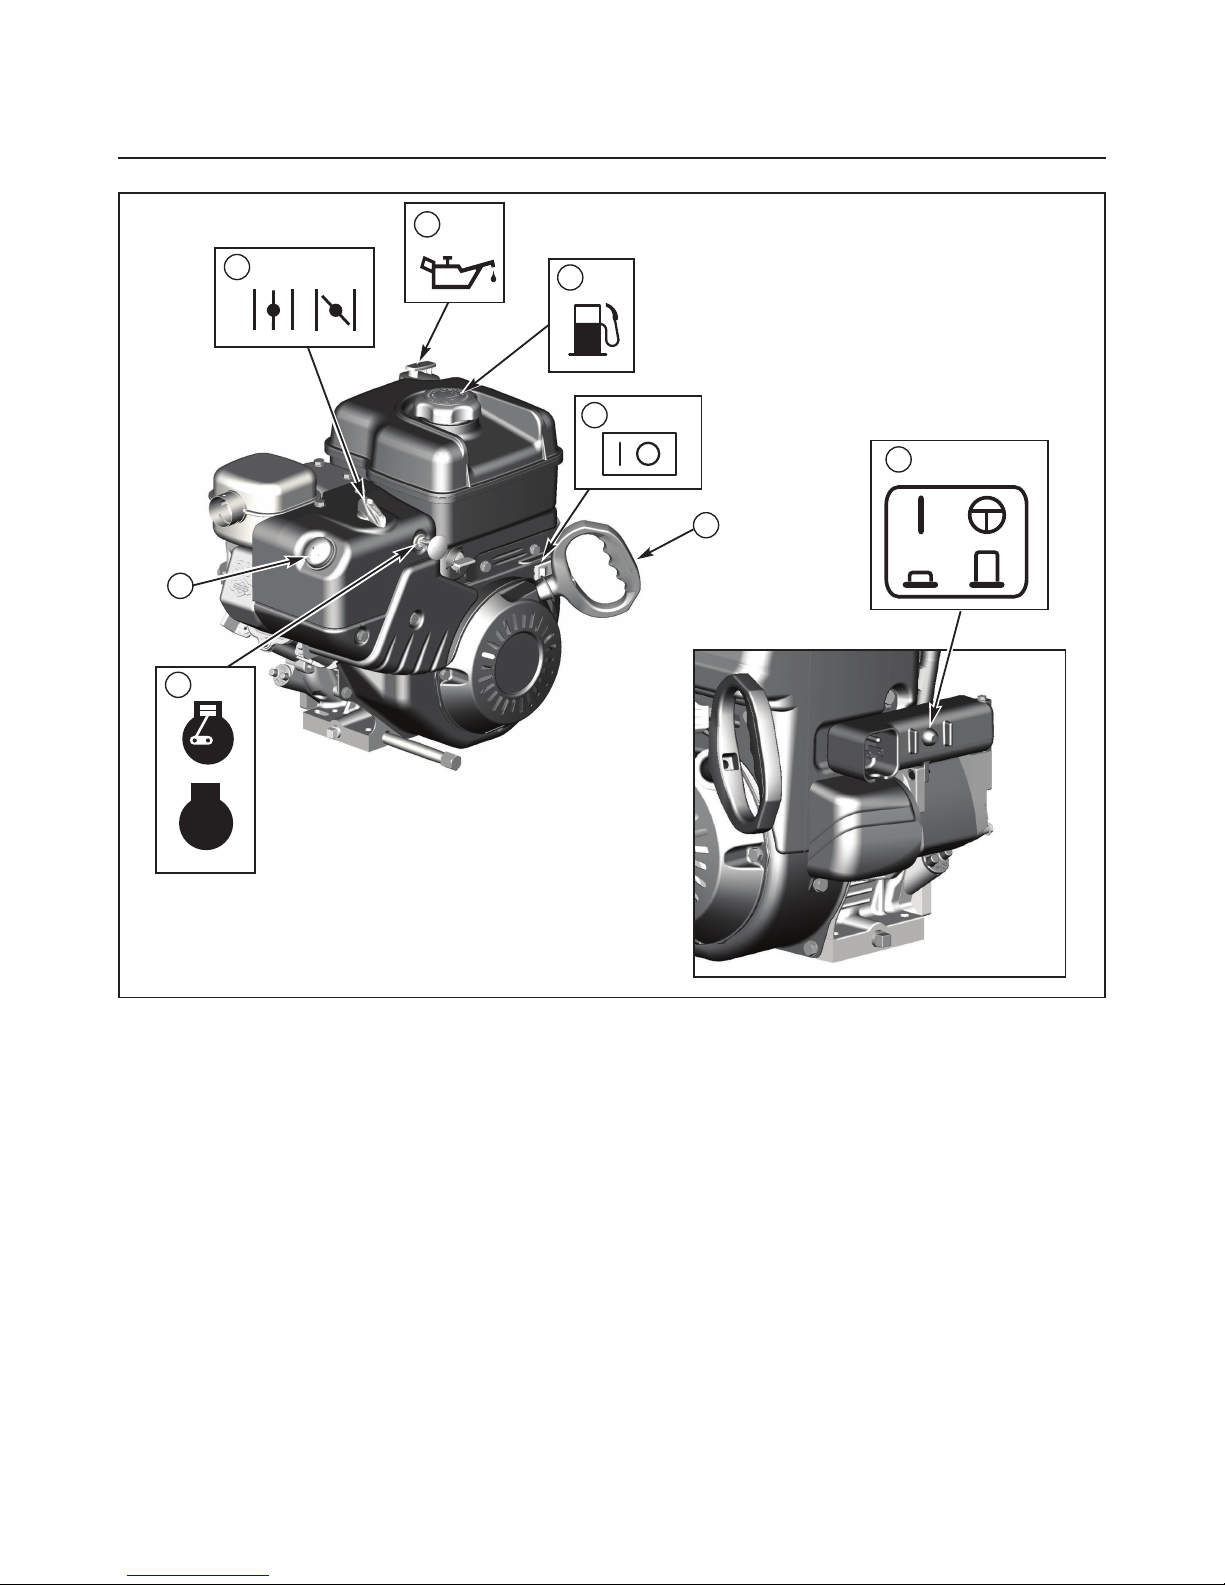
FEATURES AND CONTROLS
ENGINE CONTROLS
A. Choke Control Knob — Used to start a cold engine.
B. Electric Start Button — Used to start the engine using the
electric starter.
C. Primer Button — Used to inject fuel directly into the
carburetor manifold to ensure fast starts in cool weather.
D. Safety Key — Must be inserted to start engine. Pull out to
stop. Do not turn safety key.
E. Starter Cord Handle — Used to start the engine manually.
F. ON/OFF Switch (if equipped) — Used to start and stop the
engine.
G. Fuel Tank and Cap — Fill the fuel tank to approximately 1-1/2
in. (38 mm) below the top of the neck to allow for fuel
expansion.
H. Oil Fill Cap (Extended Dipstick)
Engine Controls
C
H
A
F
E
B
G
STOP
D
Page 19
OPERATION
19
BEFORE OPERATING SNOWTHROWER
Check the fasteners. Make sure all fasteners are tight.
On electric start models, the unit was shipped with the
starter cord plugged into the engine. Before operating,
unplug the starter cord from the engine.
NOTE: This snowthrower was shipped WITH OIL in the
engine. See Check the Oil (Before Starting Engine)
instructions in this section before starting engine.
DANGER: The discharge chute contains a rotating
impeller to throw snow. Never clear or unclog the
discharge chute with your hands. Fingers can quickly
become caught and traumatic amputation or severe
laceration will result. Always use a clean-out tool to
clear or unclog the discharge chute.
SNOWTHROWER SAFETY TESTS
Test 1 - Auger/Impeller
• Release auger control (right-hand).
• Auger/impeller stops in less than 5 seconds.
Test 2 - Traction Drive
• Release traction control (left-hand).
• Snowthrower forward/reverse motion stops.
Test 3 - Free-Hand Control (if equipped)
• Engage auger control and traction control.
• Release auger control immediately followed by the traction
control (a) stops auger/impeller in less than 5 seconds, and (b)
stops forward/reverse motion of snowthrower.
WARNING:
• Hand contact with the rotating impeller inside the
discharge chute is the most common cause of
injury associated with snowthrowers.
• This snowthrower is capable of amputating hands
and feet, and throwing objects. Read and observe
all the safety instructions in this manual. Failure to
do so will result in death or serious injury.
OPERATE THE SNOWTHROWER
CAUTION: Operation with a Snow Cab. Wind may blow
exhaust gasses back towards the operator. If you notice
the smell of exhaust, change direction of operation.
NOTE: Always release the traction control lever before moving the speed select lever.
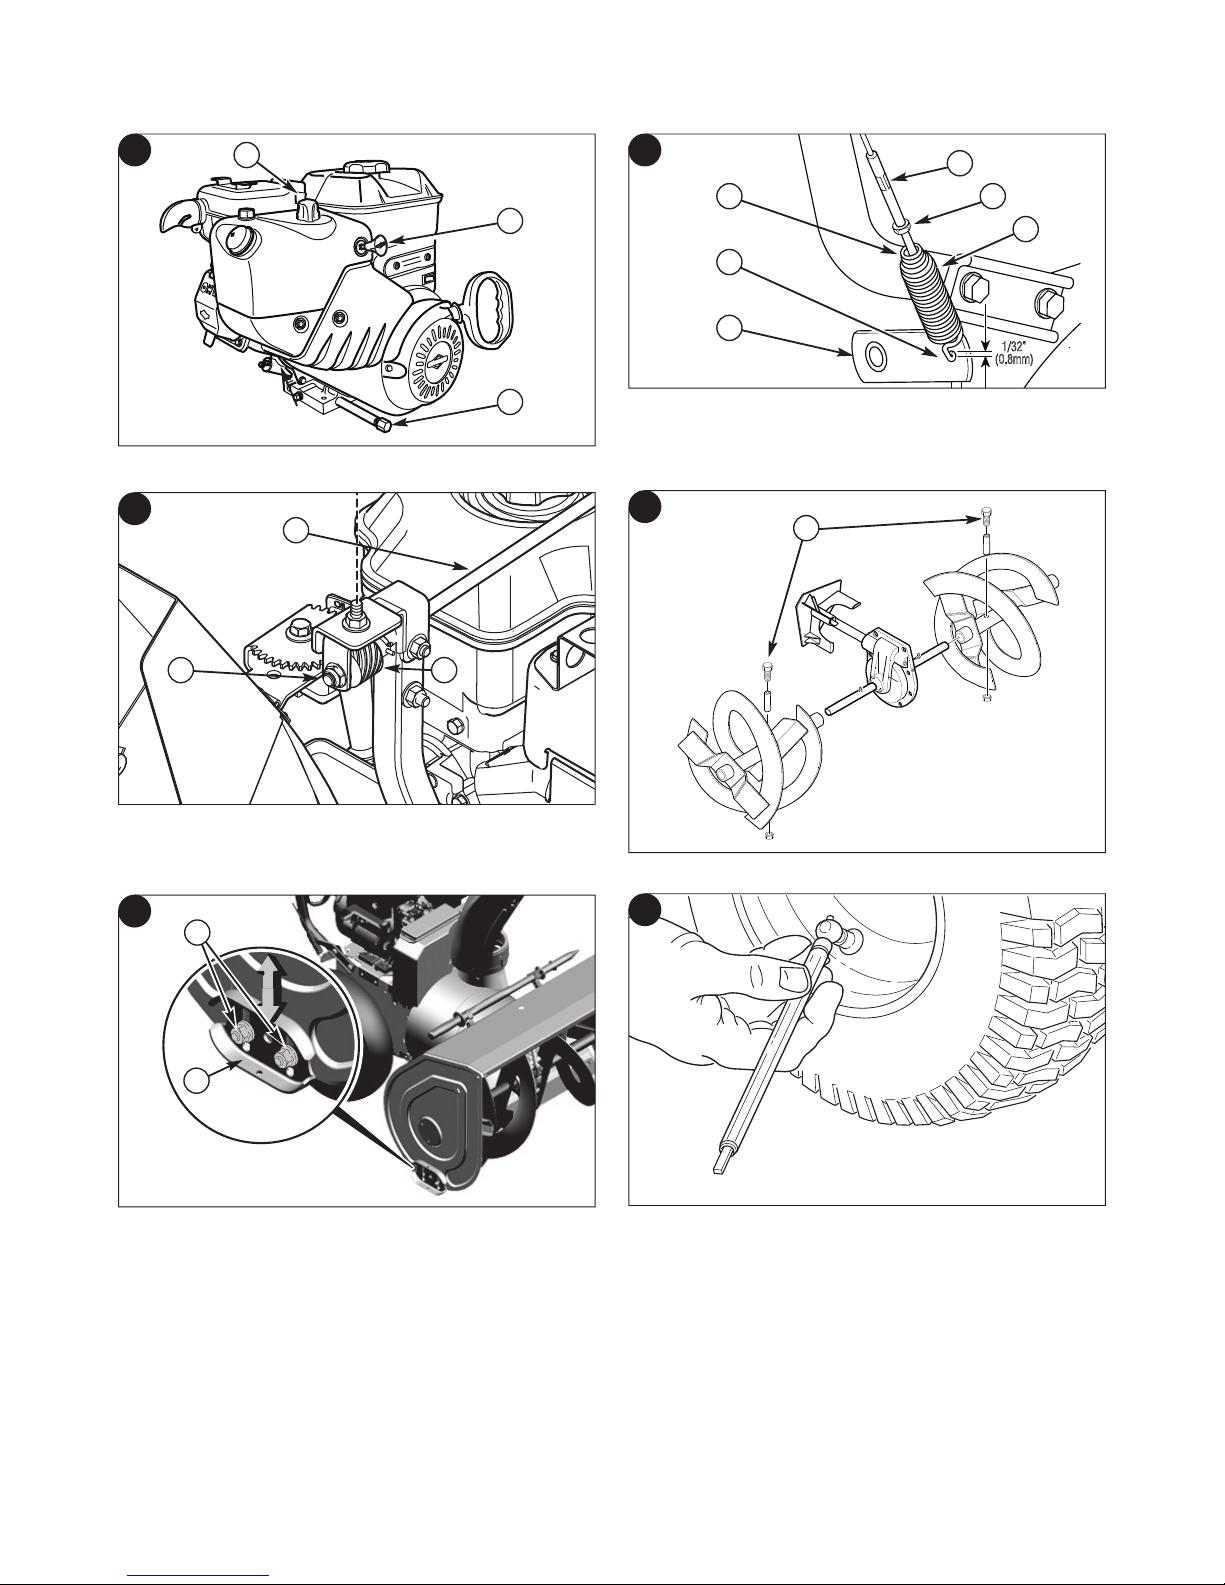
4. Fully press and hold the auger control lever (B, Figure 7) to
engage the auger rotation. Releasing the auger control lever
will disengage the auger - unless the Free-Hand™ control is
activated.
5. Fully press and hold the traction/Free-Hand™ control lever
(C) to engage the traction drive and begin moving the snow
thrower. To disengage the traction drive, completely release
the lever.
6. When BOTH levers are pressed, the Free-Hand™ control is
activated. This allows you to release the auger control lever to
use the other controls. The auger will continue to rotate until
the traction/Free-Hand™ control lever is released.
NOTICE: Do not throw snow toward a building as hidden
objects could be thrown with sufficient force to cause
damage.
1. Start the engine. Start the Engine in this section.
2. Turn the chute rotation crank (A, Figure 7) to set the direction
(left or right) of the discharge chute. See Discharge Chute
and Deflector in this section.
3. Loosen the wing nut (A, Figure 8) on the side of the discharge
chute to set angle (up or down) the snow is thrown. See Dis-
charge Chute and Deflector in this section.
CAUTION: Before operating, make sure the area in
front of the snowthrower is clear of bystanders or
obstacles.
Page 20
OPERATION
www.murray.com20
STOP THE SNOWTHROWER
1. Release the auger control lever (B, Figure 7).
2. Release the traction control lever (C).
3. Push the ON/OFF switch (A, Figure 15), if equipped, to the
OFF position and pull out the safety key (B).
WARNING: Never run engine indoors or in an enclosed,
poor ventilated area. Engine exhaust contains CARBON
MONOXIDE, an ODORLESS and DEADLY GAS.
• Keep hands, feet, hair, and loose clothing away from any
moving parts on engine and snow thrower.
• Temperature of muffler and nearby areas can exceed
150°F (66°C). Avoid these areas.
• DO NOT allow children or young teenagers to operate or
be near snow thrower while it is operating.
WARNING: Read Operator’s Manual before operating
machine. This machine can be dangerous if used
carelessly.
• Never operate the snowthrower without all guards, covers,
shields in place.
• Never direct discharge towards windows or allow
bystanders near machine while engine is running.
• Stop the engine whenever leaving the operating
position.
• Disconnect spark plug before unclogging the impeller
housing or the discharge chute and before making
repairs or adjustments.
• When leaving the machine, remove the safety key. To
reduce the risk of fire, keep the machine clean and free
from spilled gas, oil, and debris.
DISCHARGE CHUTE AND DEFLECTOR
Discharge Chute Rotation (Left/Right)
1. Turn the chute rotation crank (A, Figure 7) clockwise to rotate
the chute to the right (see Figure 8).
2. Turn crank counterclockwise to rotate the chute to the left.
3. After the desired position is obtained, release the crank.
Chute Deflector (Up/ Down)
1. Loosen the wing nut (A, Figure 8) on the side of the discharge
chute (B).
2. Raise the deflector to provide a higher stream and greater distance. Or, lower the deflector to provide a lower stream and
less distance.
3. After the desired angle is obtained, tighten the wing nut.
TRACTION LOCK PINS
The right traction wheel can be completely released using the
locking pin (A, Figure 9). This allows the unit to be easily moved
with the engine off.
7. Use the speed select lever (D) to select the forward drive
speed. Set the speed select lever to one of the following
positions as determined by snow conditions:
1-2 Wet, Heavy, Slushy, Extra Deep
3 Moderate
4-5 Very Light
6 Transport
NOTE: When clearing wet, heavy, snow, it is recommended
that the ground speed of the unit be reduced, maintained
full throttle and do not attempt to clear the full width of the
unit.
8. To stop moving forward, release the traction control lever (C).
9. To move the snowthrower backwards, move the speed select
lever into either first or second reverse position and engage
the traction control lever.
Page 21
OPERATION
21
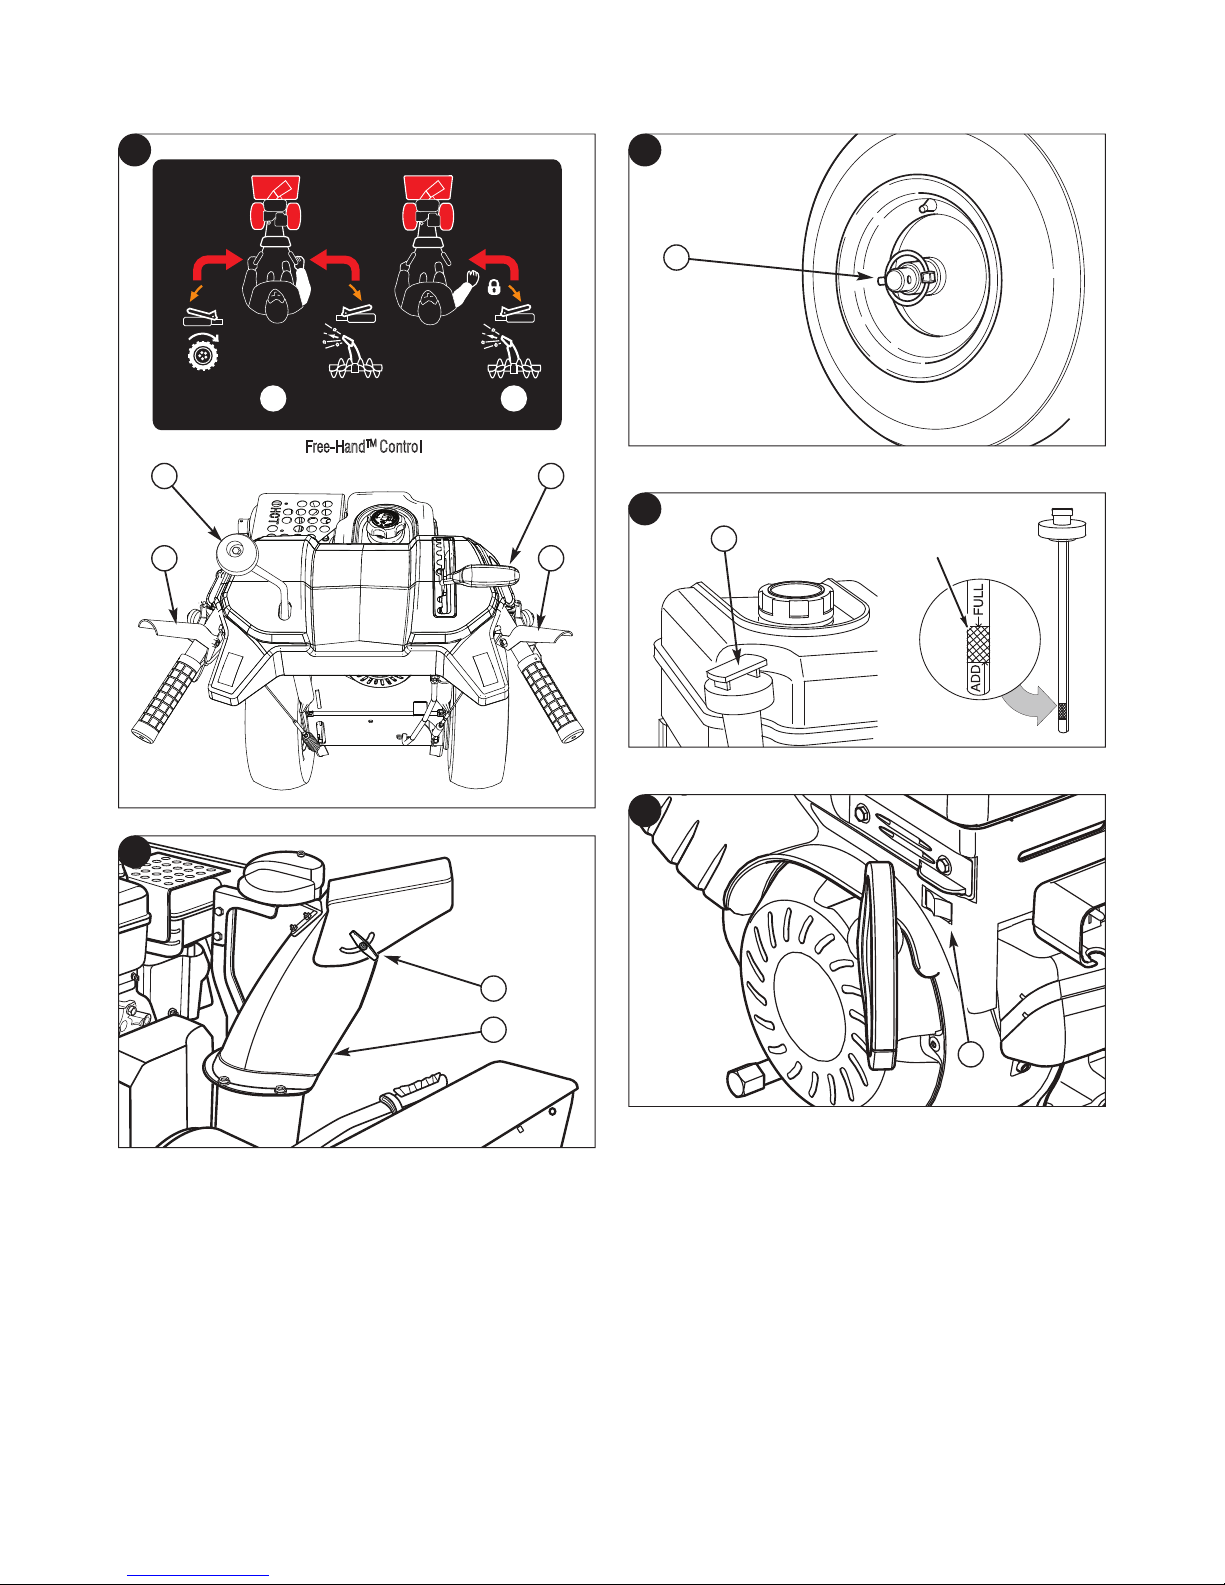
CHECK THE OIL (BEFORE STARTING ENGINE)
NOTE: The engine was shipped from the factory filled with
oil. Check the level of the oil. Add oil as needed.
1. Make sure the unit is level. Use a high quality detergent oil
classified “For Service SG, SH, SJ, SL, or higher”.
2. Remove the oil fill cap/dipstick (A, Figure 10) and wipe with a
clean cloth.
3. Insert the oil fill cap/dipstick and turn clockwise to tighten.
4. Remove the oil fill cap/dipstick and check the oil.
NOTE: Do not check the level of the oil while the engine
runs.
5. If necessary, add oil until the oil reaches the FULL mark on the
oil fill cap/dipstick. Do not add too much oil.
6. Tighten the oil fill cap/dipstick securely each time you check
the oil level.
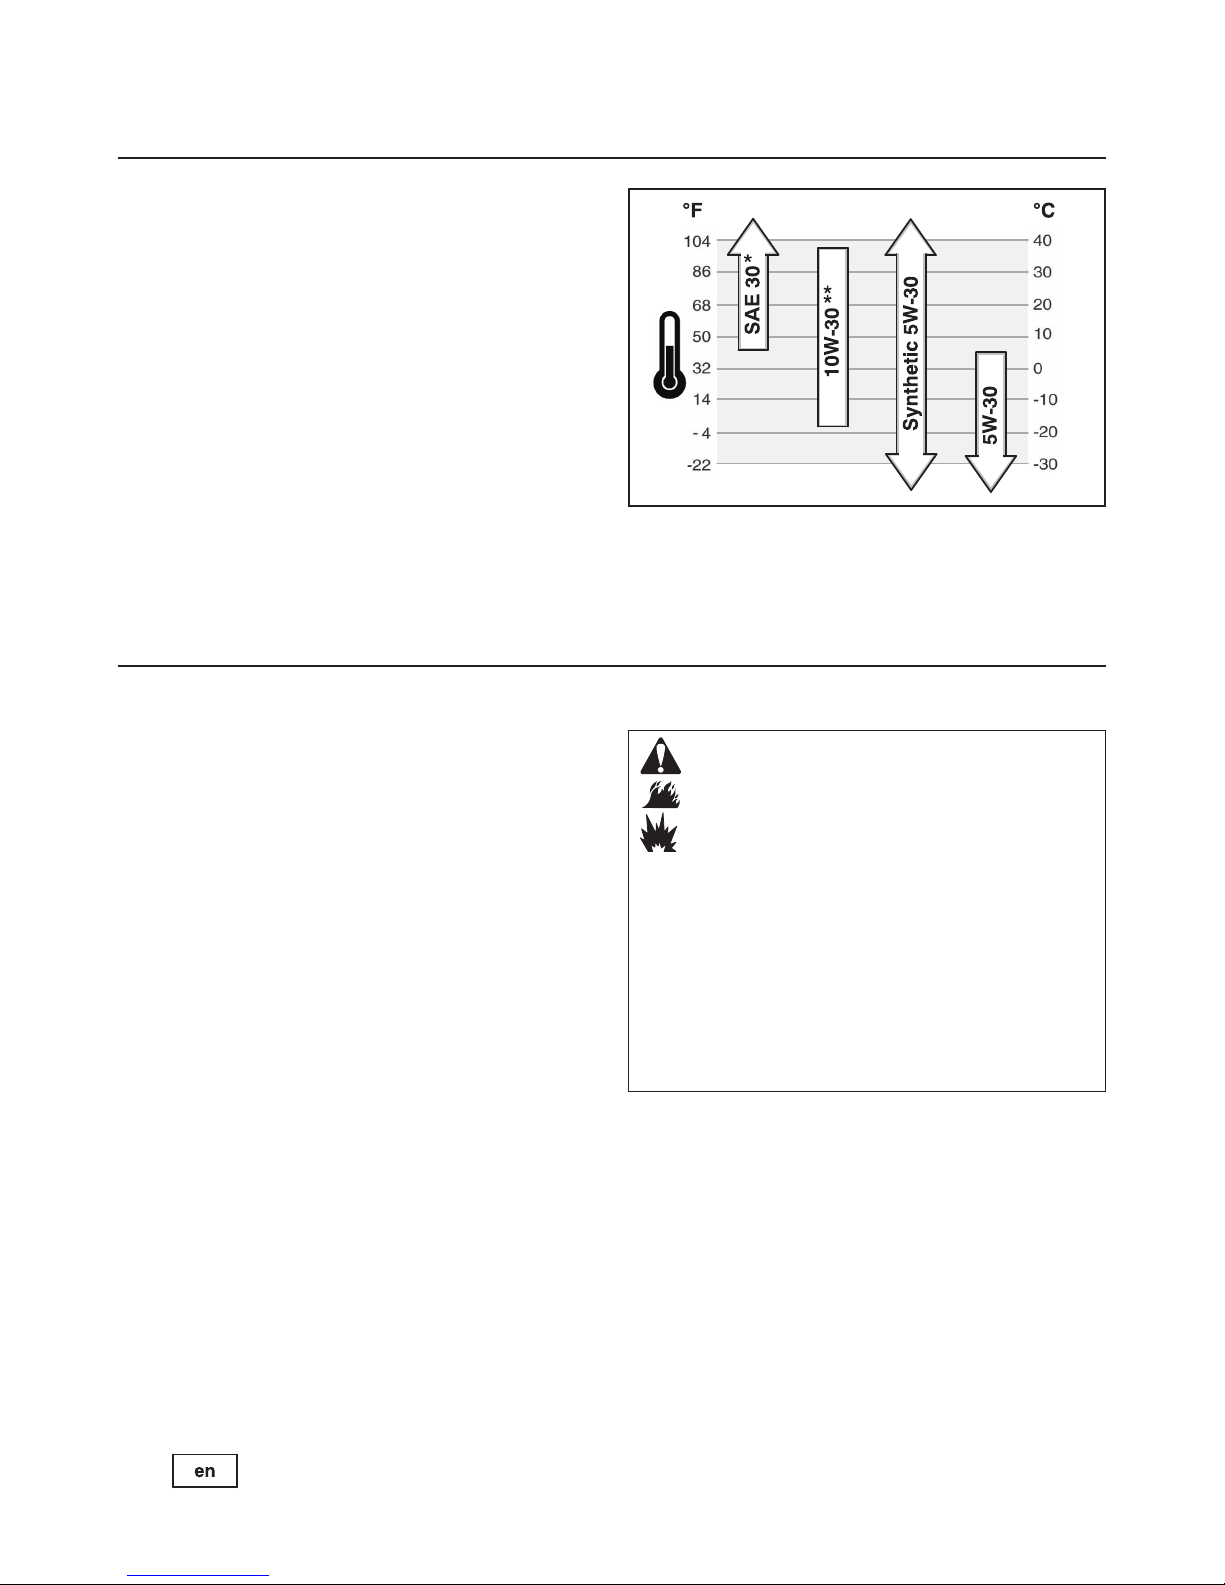
NOTE: Synthetic 5W30 motor oil is acceptable for all
temperatures. DO NOT mix oil with gasoline. See Chart for
oil recommendations.
* Below 40°F (4°C) the use of SAE 30 will result in hard starting.
** Above 80°F (27°C) the use of 10W-30 may cause increased oil
consumption. Check oil level more frequently.
1. Clean the fuel cap area of dirt and debris. Remove the fuel
cap (G, Engine Controls).
2. Fill the fuel tank with fuel. To allow for expansion of the fuel,
do not fill above the bottom of the fuel tank neck.
3. Reinstall the fuel cap.
FUEL RECOMMENDATIONS
Fuel must meet these requirements:
• Clean, fresh, unleaded gasoline.
• A minimum of 87 octane/87 AKI (91 RON). High altitude use,
see below.
• Gasoline with up to 10% ethanol (gasohol) or up to 15% MTBE
(methyl tertiary butyl ether) is acceptable.
NOTICE: Do not use unapproved gasolines, such as E85. Do
not mix oil in gasoline or modify the engine to run on
alternate fuels. This will damage the engine components
and void the engine warranty.
To protect the fuel system from gum formation, mix a fuel stabilizer
into the fuel. All fuel is not the same. If starting or performance
problems occur, change fuel providers or change brands. This
engine is certified to operate on gasoline. The emissions control
system for this engine is EM (Engine Modifications).
High Altitude
At altitudes over 5,000 feet (1524 meters), a minimum
85 octane/85 AKI (89 RON) gasoline is acceptable. To remain
emissions compliant, high altitude adjustment is required.
Operation without this adjustment will cause decreased
performance, increased fuel consumption, and increased
emissions. See a Briggs & Stratton Authorized Dealer for high
altitude adjustment information.
Operation of the engine at altitudes below 2,500 feet (762 meters)
with the high altitude kit is not recommended.
ADDING FUEL
WARNING:
Fuel and its vapors are extremely flammable and
explosive.
Fire or explosion can cause severe burns or death.
When Adding Fuel
• Turn engine off and let engine cool at least 3 minutes before
removing the fuel cap.
• Fill fuel tank outdoors or in well-ventilated area.
• Do not overfill fuel tank. To allow for expansion of the fuel, do not
fill above the bottom of the fuel tank neck.
• Keep fuel away from sparks, open flames, pilot lights, heat, and
other ignition sources.
• Check fuel lines, tank, cap, and fittings frequently for cracks or
leaks. Replace if necessary.
• If fuel spills, wait until it evaporates before starting engine.
Page 22
OPERATION
www.murray.com22
7. Rewind Start: Firmly hold the starter cord handle (A, Figure
13). Pull the starter cord handle slowly until resistance is felt,
then pull rapidly.
WARNING: Rapid retraction of the starter cord (kickback)
will pull your hand and arm toward the engine faster
than you can let go. Broken bones, fractures, bruises, or
sprains could result. When starting engine, pull the
starter cord slowly until resistance is felt and then pull
rapidly to avoid kickback.
NOTE: If the engine does not start after three attempts, see
the Troubleshooting section in the Engine Manual.
8. Electric Start: First connect the extension cord to the power
cord receptacle and then into a wall receptacle. If additional
extension cord is required, make sure it is three-wire.
WARNING: If the extension cord is damaged, it must be
replaced by the manufacturer (or its service agent) or a
similarly qualified person to avoid a hazard.
9. Electric Start: Depress the starter push button (A, Figure
14). After you start the engine, first disconnect the extension
cord from the wall receptacle and then from the power cord
receptacle (B).
IMPORTANT: To extend the life of the starter, use short
starting cycles (five seconds maximum). Wait one minute
between starting cycles.
NOTE: If the engine does not start after three attempts, see
the Troubleshooting section in the Engine Manual.
STOP THE ENGINE
Before stopping the engine, allow it to run for a few minutes to
help dry off any moisture on the engine.
WARNING: Gasoline and vapors are extremely
flammable and explosive. Fire or explosion can
cause severe burns or death. DO NOT choke the
carburetor to stop the engine.
1. Push the ON/OFF switch (A, Figure 15), if equipped, to the
OFF position.
2. Remove the safety key (B). Keep the safety key out of the
reach of children.
NOTE: Do not lose the safety key. Keep the safety key in a
safe place. The engine will not start without the
safety/ignition key.
START THE ENGINE
Be sure that engine oil is at FULL mark on the oil fill cap/dipstick.
The snowthrower engine is equipped with an AC electric starter
and recoil starter. Before starting the engine, be certain that you
have read the following information.
If engine floods, set the choke to the OPEN/RUN position and
crank until the engine starts.
WARNING: The electric starter is equipped with a threewire power cord and plug designed to operate on AC
household current. The power cord must be properly
grounded at all times to avoid the possibility of electric shock
which can cause injury to the operator. Follow all instructions
carefully as set forth:
Make sure your house has a three-wire grounded system.
If you are not sure, ask a licensed electrician. If your house
does not have a three-wire grounded system, do not use this
electric starter under any condition.
If your house has a three-wire grounded system but a threehole receptacle is not available to connect the electric starter,
have a three-hole receptacle installed by a licensed electrician.
WARNING: To connect power cord, always connect the
power cord first to the switch box located on the
engine and then plug the other end into a three-hole
grounded receptacle.
WARNING: To disconnect the power cord, always
unplug the end connected to the three-hole grounded
receptacle first.
Start the engine as follows:
1. Check the oil level.
2. Make sure equipment drive controls are disengaged.
3. Push the ON /OFF switch (A, Figure 11), if equipped, to the
ON position.
4. Insert the safety key (A, Figure 12) into the safety key slot and
push fully in to the RUN position.
5. Turn the choke knob (B) fully clockwise if engine is cold.
NOTE: Do not use the choke to start a warm engine.
6. Push the primer button (C) two times.
NOTE: Do not use the primer to start a warm engine.
NOTE: Ensure that electric extension cord is removed from
the power receptacle.
Page 23

MAINTENANCE
23
CLEAR A CLOGGED DISCHARGE CHUTE
DANGER: Hand contact with the rotating impeller inside
the discharge chute is the most common cause of injury
associated with snowthrowers. Never clear or unclog
discharge chute with your hands, or while engine is
running. Fingers can quickly become caught and
traumatic amputation or severe laceration can result.
OPERATING TIPS
1. Most efficient snowthrowing is accomplished when snow is
removed immediately after it falls.
2. For complete snow removal, slightly overlap each swath
previously taken.
3. Snow should be discharged downwind whenever possible.
4. For normal usage, set the skids 1/8 inch (3 mm) below the
scraper bar. For extremely hard-packed snow surfaces, the
skids may be adjusted upward to ensure cleaning efficiency.
5. On gravel or crushed rock surfaces, the skids should be set at
1-1/4 inch (32 mm) below the scraper bar (see Adjust Skid
Height in the Maintenance section of this manual). Rocks
and gravel must not be picked up and thrown by the machine.
6. After the snowthrowing job has been completed, allow the
engine to idle for a few minutes, to melt snow and ice
accumulated on the engine.
7. Clean the snowthrower thoroughly after each use.
8. Remove ice and snow accumulation and all debris from the
entire snowthrower, and flush with water (if possible) to remove
all salt or other chemicals. Wipe snowthrower dry.
9. Before starting snowthrower, always inspect augers and
impeller for ice accumulation and/or debris, which could result
in snowthrower damage.
10. Check oil level before every start. Make sure the oil is at the
FULL mark on the oil fill cap/dipstick.
• SHUT OFF THE ENGINE!
• Wait 10 seconds to be sure that the impeller blades have
stopped rotating.
• Always use a clean-out tool, not your hands.
A clean-out tool (A, Figure 16) is attached to either the handle or
the top of the auger housing. Use the clean-out tool to remove
snow from the auger housing.
Page 24

MAINTENANCE
www.murray.com24
ADJUST THE DRAG ON THE CHUTE ROTATION
NOTE: After repeated use, the chute rotation gear may
loosen, causing the chute to move back to the center
position.
Adjust the drag by tightening the nut (A, Figure 19). Tightening the
nut will limit the chute from moving without the operator turning
the chute rotation crank.
ENGINE MAINTENANCE
Check Crankcase Oil Level - Before starting engine and after
each 8 hours of continuous use. Add the recommended motor oil
as required.
NOTE: Over filling the engine can affect performance.
Tighten the oil fill cap securely to prevent leakage.
Change Oil - Every 50 hours of operation or at least once a year,
even if the snowthrower is not used for fifty hours. Use a clean, high
quality detergent oil. Fill the crankcase to FULL line on dipstick (A,
Figure 17). Be sure original container is marked: A.P.I. service “SG”
or higher. Do not use SAE10W40 oil (as it may not provide proper
lubrication). See Chart for oil recommendations.
Drain Oil - Position snowthrower so that the oil drain plug (A,
Figure 18) is lowest point on engine. When the engine is warm,
remove oil drain plug and oil fill cap and drain oil into a suitable
container.
Replace oil drain plug and tighten securely. Refill crankcase with
the recommended motor oil.
* Below 40°F (4°C) the use of SAE 30 will result in hard starting.
** Above 80°F (27°C) the use of 10W-30 may cause increased oil
consumption. Check oil level more frequently.
EMISSIONS CONTROL STATEMENT
Maintenance, replacement, or repair of the emissions control
devices and systems may be performed by any non-road engine
repair establishment or individual. However, to obtain “no charge”
emissions control service, the work must be performed by a factory
authorized dealer.
MAINTENANCE CHART
SNOWTHROWER
After Each Use
Remove the snow and slush off snowthrower to prevent
freezing of controls
Every 8 Hours or Daily
Perform snowthrower safety tests
Every 25 Hours or Annually *
Check tire pressure
Check snowthrower for loose hardware
See Dealer Annually to
Lubricate control levers and linkages
Lubricate deflector hinge
Lubricate deflector motor (if equipped)
Lubricate chute rotation gear (if equipped)
ENGINE
First 5 Hours
Change engine oil
Every 8 Hours or Daily
Check engine oil level
Every 50 Hours or Annually *
Change engine oil
Check muffler and muffler guard.
See Dealer Annually to
Replace spark plug
Check valve clearance
* Not required unless there are problems with engine
performance.
Page 25

MAINTENANCE
25
WARNING: Always turn unit off, remove ignition key, and
disconnect the spark plug wire before making any
repairs or adjustments.
This snowthrower is equipped with two height adjust skids, secured
to the outside of the auger housing. These elevate the front of the
snowthrower.
When removing snow from a hard surface area such as a paved
driveway or walk, adjust the skids up to bring the front of the
snowthrower down.
When removing snow from rock or uneven construction, raise the
front of the snowthrower by moving the skids down. This will help to
prevent rocks and other debris from being picked up and thrown by
the augers.
ADJUST SKID HEIGHT
To adjust skids, proceed as follows:
1. Place a block (equal to height from ground desired) under
scraper bar near but not under skid.
2. Loosen skid mounting nuts (A, Figure 20) and push the skid
down (B) until it touches the ground. Retighten mounting nuts.
3. Set skid on other side at same height.
NOTE: Make sure that snowthrower is set at same height on
both sides.
WARNING: Be certain to maintain proper ground
clearance for your particular area to be cleared.
Objects such as gravel, rocks, or other debris, if struck
by the impeller, may be thrown with sufficient force to
cause personal injury, property damage, or damage to
the snowthrower.
1. With the auger control lever released, the hook (A, Figure 21)
should barely touch the lever (B) without raising it. There can
be a maximum of 1/32 in. (0.8 mm) clearance.
2. To adjust, loosen the nut (C) by holding the adjusting flats (D)
and turning the nut. Then, turn the adjusting flats and hold the
adjustment screw (E). The adjustment screw is a phillips screw
and the head can be held or turned by inserting a screwdriver
through the spring (F).
WARNING: Do not over-tighten, as this may lift the
lever and cause the auger drive to be engaged
without depressing the auger drive control.
AUGER CONTROL CABLE ADJUSTMENT
WARNING: The auger must stop within 5 seconds. If it
does not, see an authorized dealer.
6. Release the auger control lever.
7. If the auger does not operate properly, stop the engine and
recheck the auger control cable adjustment.
8. If the drive linkage is properly adjusted, the tension of the
auger drive belt may require an adjustment (see authorized
dealer).
AUGER SHEAR PIN REPLACEMENT
The augers are secured to the auger shaft with special shear pins
that are designed to break if an object becomes lodged in the
auger housing. Use of a harder grade shear pin will reduce the
protection provided by the shear pin.
WARNING: Do not go near the discharge chute or
auger when the engine is running. Do not run the
engine if any cover or guard is removed.
Under most circumstances, if the auger strikes an object which
could cause damage to the unit, the shear pin will break. This protects the gear box and other parts from damage.
The shear pins (A, Figure 22) are located on the auger shaft. Replace a broken shear pin as follows.
1. Tap out the broken shear pin with a pin punch.
2. Install a new shear pin and cotter pin. Bend the ends of the
cotter pin down.
IMPORTANT: Do not replace shear pins with anything
other than the correct grade replacement shear pin. Use
of bolts, screws, or harder grade shear pins can result in
equipment damage.
3. Hold the adjusting flats and tighten the nut.
4. Start the engine and check the auger. The auger must not be
engaged unless the auger control lever is depressed.
5. With the engine running, fully depress the auger drive control
lever. The auger should engage and run normally.
Page 26

MAINTENANCE
www.murray.com26
CHECK THE TIRES
Check tires for damage. Check the air pressure in the tires with an
accurate gauge (see Figure 23).
CAUTION: Avoid Injury! Explosive separation of tire and
rim parts is possible when they are serviced incorrectly.
• Do not attempt to mount a tire without the proper equipment
and experience to perform the job.
• Do not inflate the tires above the recommended pressure.
• Do not weld or heat a wheel and tire assembly. Heat can
cause an increase in air pressure resulting in an explosion.
Welding can structurally weaken or deform the wheel.
• Do not stand in front or over the tire assembly when
inflating. Use appropriate tool that allows you to stand to
one side.
NOTICE: Check side of tire for maximum tire pressure. DO NOT
exceed maximum.
3. Lubricate the piston/cylinder area. This can be done by first
removing the spark plug and squirting clean engine oil into the
spark plug hole. Then cover the spark plug hole with a rag to
absorb oil spray. Next, rotate the engine by pulling the starter
two or three times. Finally, reinstall spark plug and attach spark
plug wire.
4. Thoroughly clean the snowthrower.
5. Lubricate all lubrication points (see authorized dealer).
6. Make sure all nuts, bolts, and screws are securely fastened.
Inspect all visible moving parts for damage, breakage, and
wear. Replace if necessary.
7. Touch up all rusted or chipped paint surfaces; sand lightly
before painting.
8. Cover the bare metal parts of the snowthrower housing auger,
and the impeller with rust preventative.
9. If possible, store your snowthrower indoors and cover it to give
protection from dust and dirt.
10. On models with folding handles, loosen the knobs that secure
the upper handle. Rotate the upper handle back.
11. If the machine must be stored outdoors, block up the
snowthrower and ensure the entire machine is off the ground.
Cover the snowthrower with a heavy tarpaulin.
STORAGE
WARNING: Never store the engine, with fuel in the tank,
indoors or in a poor ventilated enclosure where fuel
fumes could reach an open flame, spark or pilot light
as on a furnace, water heater, clothes dryer, etc.
Handle gasoline carefully. It is highly flammable and
careless use could result in serious fire damage to
your person and/or property.
Drain fuel into approved containers outdoors, away
from open flame.
If the snowthrower will be stored for thirty (30) days or more at the
end of the snow season, the following steps are recommended to
prepare your snowthrower for storage.
NOTE: Gasoline must be removed or treated to prevent gum
deposits from forming in the tank, filter, hose, and
carburetor during storage.
1. Remove gasoline, by running engine until tank is empty and
engine stops. If you do not want to remove the gasoline, add
fuel stabilizer to any gasoline left in the tank to minimize gum
deposits and acids. If the tank is almost empty, mix stabilizer
with fresh gasoline in a separate container and add some of
the mixture to the tank. Always follow instructions on stabilizer
container. Then run engine at least 10 minutes after stabilizer
is added to allow mixture to reach carburetor. Store
snowthrower in safe place.
2. You can help keep your engine (4-cycles only) in good
operating condition by changing oil before storage.
REMOVE FROM STORAGE
1. Put the upper handle in the operating position, tighten the
knobs that secure the upper handle.
2. Fill the fuel tank with a fresh fuel.
3. Check the spark plug. Make sure the gap is correct. If the
spark plug is worn or damaged, replace before using.
4. Make sure all fasteners are tight.
5. Make sure all guards, shields, and covers are in place.
6. Make sure all adjustments are correct.
Page 27

TROUBLESHOOTING
27
PROBLEM LOOK FOR REMEDY
Auger does not stop
within 5 seconds after
right control lever is
released.
Free-Hand™ control is
ACTIVE.
Release both auger control and traction/Free-Hand™ control
levers to stop auger.
Free-Hand™ control is
not working correctly (fails
Safety Test 3).
See authorized dealer.
Auger control cable out of
adjustment (fails Safety
Test 1).
Adjust auger control cable. Refer to “Cable Adjustment” in the
Maintenance section of this manual. Make sure auger control
passes Safety Test 1.
Auger belt guide out of
adjustment.
See authorized dealer.
Discharge chute or
deflector does not work
(electric).
Electrical failure. See authorized dealer.
Discharge chute or
deflector does not work
(remote-manual).
Discharge chute or
deflector out of
adjustment or needs
lubrication.
See authorized dealer.
Engine fails to start. Key is off. Push key in to the ON position.
Failure to prime a cold
engine.
Press primer button twice and start.
Fuel shut-off valve is
CLOSED position (if
equipped).
Turn valve to OPEN position.
Out of fuel. Fill fuel tank.
Choke OFF - cold engine. Turn choke ON, set throttle to FAST.
Engine flooded. Turn choke to OFF; try starting.
No spark. See authorized dealer.
Water in fuel, or old fuel. Drain tank. (Dispose of fuel at an authorized hazardous waste
facility.) Fill with fresh fuel.
Cord not plugged in or
malfunctions (Electric
Start models).
Plug in cord or replace defective cord.
Engine starts hard or
runs poorly.
Fuel mixture too rich. Move choke to OFF position.
Spark plug faulty, fouled,
or gapped incorrectly.
See authorized dealer.
Fuel cap vent is blocked. Clear vent.
Excessive vibration. Loose parts or damaged
impeller/auger.
Stop engine immediately. See authorized dealer.
Page 28

28
PROBLEM LOOK FOR REMEDY
Snowthrower forward
and reverse motion
does not stop when
traction control lever is
released.
Traction control out of
adjustment (fails Safety
Test 2).
See authorized dealer.
Snowthrower veers to
one side.
Tire pressure not equal. Check tire pressure.
One wheel is set in freewheeling mode. (Traction
lock pin is in the OUTER
hole.) Models with wheel
pins or locks.
Make sure the left traction lock pin is in the INNER holes (to
engage the traction drive).
Scraper bar does not
clean hard surface.
Skid shoes improperly
adjusted.
Adjust skid shoes as needed.
Snowthrower fails to
move at slow speeds.
Traction control out of
adjustment.
Move speed select lever one speed faster. If that doesn’t work, see
authorized dealer.
Snowthrower fails to
move forward or
reverse at any speed.
Drive belt loose or
damaged.
See authorized dealer.
Traction control out of
adjustment.
See authorized dealer.
Worn or damaged friction
disc.
See authorized dealer.
Unit fails to discharge
snow.
Auger control cable out of
adjustment.
Adjust auger control cable. Refer to “Cable Adjustment” in the
Maintenance section of this manual.
Auger drive belt loose or
damaged.
See authorized dealer.
Broken shear pin. Replace shear pin. Refer to “Auger Shear Pin Replacement” in the
Maintenance section of this manual.
Discharge chute clogged
with snow.
Stop engine immediately. Always use the clean-out tool to clear a
clogged discharge chute, not your hands. Clean discharge chute
and inside of auger housing. Refer to “Warnings” in Operator
Safety section.
Foreign object lodged in
auger.
Stop engine immediately. Always use the clean-out tool to clear a
clogged chute, not your hands. Remove object from auger. Refer to
“Warnings” in Operator Safety section.
See your local dealer or distributor for warranty information.
MAINTENANCE
WARRANTY
Page 29

29
ENGINE:
Brand Briggs & Stratton
Model Series Snow Series™
Gross Torque* 14.5 T.P. @ 3060 rpm
Type 4-Cycle - OHV
Displacement 18.6 cu in. (305 cc)
Starting System Recoil, 230V Electric without Cord
Alternator 60W AC Only
Oil Capacity 28 oz (0,83 liter)
Engine Oil Synthetic 5W30
Fuel Tank Volume 3.0 qts (2,8 liters)
Spark Plug Gap 0.030 in. (0,76 mm)
Resistor Spark Plug 481055
Long Life Platinium Spark Plug 5066
Ignition System This spark plug ignition system complies with Canadian standard ICES-002.
AUGER/IMPELLER:
Clearing Width 29 in. (73,6 cm)
Intake Height 21 in. (53,3 cm)
Auger/Impeller Diameter 12 in. (30,5 cm)
Number of Impeller Blades 3
CHUTE:
Chute Deflector Manual
Chute Rotation Remote - Dash Mounted Crank 190° (3.5 Turns)
DRIVE SYSTEM:
Drive Type Friction Disc - Traction Lock Pin
Drive Speeds 6 Forward Speeds, 2 Reverse
Tire Size 16 x 4.8 in. (40,6 x 12,2 cm)
Tire Inflation See the sidewall of the tire for the proper inflation.
ENGINE POWER RATING INFORMATION
*The gross power rating for individual gas engine models is labeled in accordance with SAE (Society of Automotive Engineers) code
J1940 (Small Engine Power & Torque Rating Procedure), and rating performance has been obtained and corrected in accordance with
SAE J1995 (Revision 2002-05). Torque values are derived at 3060 RPM; horsepower values are derived at 3600 RPM. Actual gross
engine power will be lower and is affected by, among other things, ambient operating conditions and engine-to-engine variability. Given
both the wide array of products on which engines are placed and the variety of environmental issues applicable to operating the
equipment, the gas engine will not develop the rated gross power when used in a given piece of power equipment (actual
“
on-site” or
net power). This difference is due to a variety of factors including, but not limited to, accessories (air cleaner, exhaust, charging,
cooling, carburetor, fuel pump, etc.), application limitations, ambient operating conditions (temperature, humidity, altitude), and engineto-engine variability. Due to manufacturing and capacity limitations, Briggs & Stratton may substitute an engine of higher rated power
for this Series engine.
SPECIFICATIONS
Page 30

www.murray.com30
Page 31

9
OBSAH
Ilustrace.............................................................................................................................................3
Bezpečnost obsluhy ......................................................................................................................10
Montáž .............................................................................................................................................16
Funkce a ovladače .........................................................................................................................17
Ovládání ..........................................................................................................................................19
Údržba .............................................................................................................................................24
Řešení problémů ............................................................................................................................27
Záruka..............................................................................................................................................28
Technické údaje..............................................................................................................................29
Obecné informace
Děkujeme vám za zakoupení této kvalitní sněhové frézy od firmy MURRAY. Jsme rádi, že věříte značce MURRAY. Když se se zařízením zachází v
souladu s pokyny v tomto návodu, váš výrobek vám nabídne spoustu roků spolehlivé služby.
Tento návod obsahuje bezpečnostní informace, které vás seznamují s riziky a nebezpečími spojenými se sněhovými frézami a jak se jim můžete
vyvarovat. Tato sněhová fréza je postavena a určena pouze k odhazování sněhu a není určena k žádným jiným účelům. Je důležité, abyste si před
pokusem o startování a provoz tohoto zařízení přečetli tyto pokyny a důkladně jim porozuměli. Tyto pokyny si uložte pro pozdější použití.
Identifikační značka Referenční údaje výrobku
Zapište si název/číslo vašeho modelu, identifikační čísla výrobce a
sériová čísla motoru do poskytnutého prostoru pro snadný přístup.
Tato čísla je možno nalézt v zobrazených místech.
Při kontaktování vašeho autorizovaného prodejce kvůli
náhradním dílům, servisu či informacím MUSÍTE mít tato čísla.
REFERE NČNÍ ÚDAJE V ÝROBKU
Název/Číslo popisu modelu
Výrobní číslo jednotky SÉRIOVÉ číslo jednotky
Výrobní číslo plošiny frézy SÉRIOVÉ číslo plošiny frézy
Jméno prodejce Datum zakoupení
REFERE NČNÍ ÚDAJE M OTORU
Značka motoru Model motoru
Typ/Spec motoru Kód/Sériové číslo motoru
Seznam součástek s ilustracemi pro toto zařízení je možno stáhnout z webových stránek www.murray.com. Při objednávce náhradních součástek
prosím zadejte model a sériové číslo.
Copyright © 2010 Briggs & Stratton Power Products Group, LLC
Milwaukee, WI, Všechna práva vyhrazena
MURRAY je ochranná známka společnosti Briggs & Stratton Power Products
A. Identifikační číslo výrobce
B. Sériové číslo výrobce
C. Výkon v kilowattech
D. Maximální rychlost motoru v otáčkách za minutu
E. Název a adresa výrobce
F. Rok výroby
G. Logo shody CE
H. Hmotnost jednotky v kilogramech
I. Zaručený zvukový výkon v decibelech
Part No. xxxxxxx
xxxxxxxxxxxxxxx
Serial No. xxxxxxxxxx
20xx
kW: x.xx
xxxx max
xxxxxxxxxxxxxxxxxxxxxxx
xxxxxxxxxxxxxxxxxxxxxxx
xxxxxxxxxxxxxxxxxxxxxxx
xxxxxxxxxxxxxxxxxxxxxxx
xxx
dB
kg: xxx
A
B
C
D
E
F
G
H
I
Page 32

BEZPEČNOST OBSLUHY
www.murray.com10
Varovné značky a jejich význam
Rotující
poháněč
Kontrolní značky na zařízení
1
2
Řízení Free-Hand™
Řízení trakce Easy-Turn™
POZNÁMKA: Ne všechny kontrolní značky zobrazené na
této stránce budou na vaší sněhové fréze. Příslušné
značky viz část Vlastnost: a ovládání.
STOP
Olej
Palivo
Vypnutí
paliva
Vypnutý
sytič
Zapnutý
sytič
Zapnuto
Vypnuto
Zastavit
Pomalu
Rychle
Spojka
šneka
Elektrické
startování
Běh
motoru
Zastavení
motoru
Řízení
trakce
Řízení
šneka
Výsypný
žlábek
Odklaněč
žlabu
Ohřívaná
držadla
Rotující
šnek
Rotující
součástky
Oheň
Šok
Horký
povrch
Bezpečná
vzdálenost
Rotující
rychlosti
Odhazované
předměty
Exploze
Toxické
výpary
Ochrana
uší
Ochrana
očí
Pohyblivé
části
Zpětný vrh
Nebezpečná
chemická látka
Vpřed
Neutrál
Zpátečka
Page 33

Bezpečnostní varovné značky a signální slova (NEBEZPEČÍ,
VAROVÁNÍ, POZOR, nebo UPOZORNĚNÍ) se používají k indikaci
pravděpodobnosti či možné závažnosti poranění a/nebo poškození
výrobku. Značka rizika může být navíc použita k reprezentaci typu
rizika.
Bezpečností varovné značky a signální slova
NEBEZPEČÍ ukazuje na riziko, které, jestliže se mu
nevyvarujete, povede ke smrti nebo vážnému poranění.
VAROVÁNÍ ukazuje na riziko, které, jestliže se mu
nevyvarujete, může vést ke smrti nebo vážnému poranění.
POZOR ukazuje na riziko, které, jestliže se ho nevyvarujete,
může vést k malému či střednímu poranění.
UPOZORNĚNÍ ukazuje na situaci, která by mohla vést k
poškození výrobku.
NEBEZPEČÍ
• Nejčastější poranění při použití sněhové frézy vznikají při
kontaktu rukou s poháněčem odpadového nosníku.
• Tato sněhová fréza je schopna amputovat ruce a nohy a
odhazovat předměty. Přečtěte si a dodržujte všechny
bezpečnostní pokyny v tomto návodu. Jestliže tak neučiníte,
může to vést ke smrti či vážným poraněním.
VAROVÁNÍ
Určité součáastky tohoto výrobku a příslušné doplňky obsahují
chemické látky, o kterých je ve státu Kalifornie známo, že
způsobují rakoviny, vrozené vady a jiné rozmnožovací problémy.
Po zacházení si myjte ruce.
•
Důkladně se seznamte s ovládáním a řádným použitím sněhové frézy.
•
Ujistěte se, že před použitím sněhové frézy jste řádně vyškoleni.
• Ujistěte se, že víte, jak rychle přístroj zastavit a deaktivovat.
•
Nikdy nedovolte, aby s přístrojem zacházely osoby bez řádných pokynů.
•
Jestliže má být fréza uložena po delší dobu, vždy postupujte podle
pokynů v návodu k obsluze.
•
Udržujte bezpečnostní nálepky a, jestliže je to nutné, vyměňte je.
•
Jestliže jste k tomu nebyli řádně vyškoleni, pak se nikdy sami
nepokoušejte provést žádné větší opravy sněhové frézy. Nesprávný servis
sněhové frézy může vést k nebezpečnému provozu, poškození zařízení a
porušení záruky.
NEBEZPEČÍ
Před spuštěním této jednotky si přečtěte,
porozumějte a dodržujte všechny pokyny na
sněhové fréze a v manuálu.
Nedodržení bezpečnostních pokynů v tomto návodu
může vést ke smrti či vážnému poranění.
Přečtěte si návod
K BEZPEČNÉMU VYČIŠTĚNÍ VÝSYPNÉHO ŽLÁBKU
NEBEZPEČÍ: Nejčastější poranění při použití sněhové frézy
vznikají při kontaktu rukou s poháněčem odpadového nosníku.
K čištění odpadového nosníku nikdy nepoužívejte holé ruce.
POSTUPUJTE PODLE TĚCHTO POKYNŮ:
1. VYPNĚTE motor.
2. Vyčkejte 10 sekund, abyste si byli jistí, že poháněč se zcela zastavil.
3. Vždy používejte nářadí k vyčištění, nikdy nepoužívejte ruce.
NEBEZPEČÍ
Odpadový žlab má rotující šnek k odhazování sněhu.
Odpadový žlab nikdy nečistěte rukama. V rotoru
může snadno dojít k zachycení prstů. Vždy používejte
čistící nástroj.
Nedodržení těchto bezpečnostních pokynů může vést
k amputacím či vážným laceracím.
Výsypný žlábek
BEZPEČNOST OBSLUHY
VAROVÁNÍ
Výfukové plyny z frézy obsahují chemické látky, o kterých je ve
státu Kalifornie známo, že způsobují rakoviny, vrozené vady a
jiné rozmnožovací problémy.
11
Page 34

PŘI TANKOVÁNÍ
• Vypněte motor a před sundáním krytu nádrže a přidáním paliva ho nechte
nejméně 3 minuty chladnout.
• Tankujte venku nebo v dobře ventilovaném prostoru.
• Nádrž nepřeplňujte. Aby se umožnila expanze benzínu, netankujte nad
spodní část hrdla nádrže.
• Palivo udržujte mimo otevřený oheň, jiskry, pilotní světla, teplo nebo jiné
zdroje vzplanutí.
• Palivové trubičky, uzávěr a příslušenství často kontrolujte pro známky
poškození či úniků. Jestliže je to nutné, nahraďte je novými.
• Používejte schválenou nádobu na palivo.
• Jestliže dojde k rozlití paliva, před dalším startováním vyčkejte, než znovu
vyschne.
PŘI SPUŠTĚNÍ MOTORU
• Ujistěte se, že svíčky, dusítko, uzávěr nádrže a filtr (kde existují) jsou na
svém místě a bezpečné.
• Nestartuje s odstraněnými svíčkami.
• Jestliže dojde k rozlití paliva, nepokoušejte se nastartovat motor,
sněhovou frézu namísto toho přeneste z místa rozlití a vyvarujte se tvorbě
jakýchkoli zdrojů ohně do té doby, než dojde k odchodu par paliva.
• Motor nepřesycujte. Postupujte podle pokynů pro startování motoru v
tomto návodu.
• Jestliže dojde k přeplnění motoru palivem, nastavte sytič, kde existuje, do
polohy OTEVŘÍT/SPUSTIT, plyn, kde existuje, přeneste do polohy
RYCHLE a startujte, až se motor nastartuje.
PŘI POUŽITÍ ZAŘÍZENÍ
• Sněhovou frézu nenaklánějte na úhel, který vede k rozlití paliva.
• Nehaste karburátor k zastavení motoru.
• Motor nikdy nenechávejte běžet s vyndaným čističem vzducu nebo
vzduchovým filtrem (kde existují).
PŘI ZMĚNĚ OLEJE
• Jestliže vypouštíte olej z horní plnící trubice, musí být prázdná nádrž,
protože jinak může dojít k úniku paliva, což může vést k požáru či explozi.
PŘI PŘEPRAVĚ ZAŘÍZENÍ
• Přepravujte s PRÁZDNOU nádrží či s ventilem paliva v poloze
VYPNUTO.
PŘI SKLADOVÁNÍ BENZÍNU ČI S PALIVEM V NÁDRŽI
• Skladujte odděleně od kamen, trub, ohřívačů vody či jiných zařízení, která
mají pilotní světlo nebo jiný zdroj vznětu, protože by mohlo dojít ke
vznícení palivových plynů.
NEBEZPEČÍ
Palivo a jeho páry jsou velice hořlavé a výbušné. S
palivem vždy zacházejte velice opatrně.
Nedodržení těchto bezpečnostních pokynů může vést
k požáru či explozi, které způsobí vážné popáleniny
nebo smrt.
Zacházení s palivem
• Udržujte pracovní oblast bez osob, zvláště pak malých dětí, a zvířat.
• Důkladně prohlédněte oblast, kde sněhovou frézu budete používat, a
odstraňte všechny rohožky, saně, prkna, dráty a jiné cizí předměty.
• Sněhovou frézu nepoužívejte bez toho, abyste na sobě měli vhodné zimní
oblečení.
• Používejte boty, které vám poskytnou oporu i na kluzkém povrchu.
• Dávejte pozor, abyste předešli uklouznutí nebo pádu, zvláště pak při
zpětném pohybu sněhové frézy.
• Frézu nikdy nepoužívejte za špatné viditelnosti nebo bez světla. Vždy se
ujistěte o dobrém podkladu a udržujte si pevné uchycení držadel.
• Neodstraňujte s ní sníh napříč svahů. Buďte zvláště opatrní při změně
směru na svahu. Nepokoušejte se odstraňovat sníh na příkrých svazích.
• Nepřekračujte kapacitu zařízení tím, že se budete sníh snažit čistit příliš
rychle.
• Sněhovou frézu nikdy nepoužívejte za velké rychlosti na kluzkém
povrchu. Při zpátečním pohybu sněhové frézy kontrolujte, co je za vámi, a
dávejte pozor.
• Sněhovou frézu nepoužívejte na površích nad zemí, jako například na
střechách obytných budov, garáží, verand nebo na jiných takových
budovách.
• Obsluha musí zhodnotit své schopnosti bezpečně ovládat zařízení tak,
aby ochránila sebe i ostatní před poraněním.
• Sněhová fréza je určena pouze pro odstraňování sněhy. Nepoužívejte ji
pro žádné jiné účely.
• Nevozte pasažéry.
• Po zasažení cizího předmětu zastavte motor, odpojte kabel elektrických
motorů, frézu důkladně prohlédněte pro známky jakéhokoli poškození, a
před nastartováním a dalším použitím sněhové frézy opravte jakákoli
poškození.
• Jestliže se sněhová fréza neobvykle třese, vypněte motor. Vibrace jsou
normálně známkou problému. Jestliže je to nutné, vyhledejte
autorizovaného zástupce pro opravu.
• U modelů s elektrickým startérem po nastartování motoru odpojte
napájecí kabel.
NEBEZPEČÍ
Bezpečnost této sněhové frézy závisí na obsluze.
Jestliže není použita správně nebo není správně
udržována, může být nebezpečná. Pamatujte si, že jste
zodpovědní za vaši bezpečnost a za bezpečnost osob
kolem vás.
Bezpečnost obsluhy a zařízení
BEZPEČNOST OBSLUHY
www.murray.com12
Page 35

• Při provozu udržujte děti mimo pracovní oblast. Zařízení často přitahuje
děti. Mějte na paměti všechny přítomné osoby.
• Dávejte pozor a jednotku vypněte, jestliže se poblíž objeví děti.
• Nikdy nedovolte, aby s přístrojem zacházely děti.
• Jestliže se blížíte do zatáček, kde nevidíte, ke keřům, stromům nebo
jiným předmětům, které omezují vaši viditelnost, dávejte prosím zvýšený
pozor. Mohou tam být děti.
NEBEZPEČÍ
Jestliže si obsluha neuvědomí přítomnost dětí, může
dojít k tragickým nehodám. Děti jsou často
přitahované k jednotce a k její činnosti. Nikdy se
nedomnívejte, že děti zůstanou tam, kde jste je
naposledy viděli.
Děti
•
Startujte a provozujte venku.
•
Motor nespouštějte uvnitř, i když jsou otevřená okna nebo dveře.
NEBEZPEČÍ
Z motoru vychází oxid uhelnatý (bezbarvý
nezapáchající otravný plyn).
Vdechování oxidu uhelnatého může vést k
nevolnostem, mdlobám nebo smrti.
Bezpečnost motoru
• Před nastartováním motoru vyřaďte rychlosti a přejděte do neutrálu.
• Před začátkem odklízení sněhu vyčkejte, než se motor přizpůsobí
venkovní teplotě.
• Pro všechny sněhové frézy s elektrickými motory či elektrickými startéry
používejte uzemněnou zástrčku se třemi vidlicemi.
NEBEZPEČÍ
Bezpečný provoz sněhové frézy si vyžaduje řádnou
péči a údržbu motoru. Nedodržení bezpečnostních
pokynů v tomto návodu může vést ke smrti či
vážnému poranění.
--
• Při provozu či úpravách a opravách vždy používejte bezpečnostní brýle
nebo chrániče očí.
• Vždy dbejte na směr odhazování sněhu. Může dojít k poškození blízkých
chodců, zvířat a budov odhozenými předměty.
• Při práci se sněhovou frézou dávejte pozor na okolí. Přejezd přes
předměty jako kameny, rohožky, noviny, hračky ukryté pod sněhem může
vést k jejich vyhození nebo k ucpání šneka.
• Dávejte si velký pozor při překračování vjezdů, chodníků či silnic.
• Umístění sběrače nastavte tak, aby se nedotýkal štěrku nebo povrchu z
rozbitých kamenů.
• Se sněhovou frézou nikdy nepracujte poblíž sklem ohrazených prostor,
automobilů, oken a podobných bez toho, abyste nejdříve upravili úhel
odpadového nosníku.
• Seznamte se s místem, kde sněhovou frézu plánujete používat. Označte
hranice chodníků a vjezdů.
NEBEZPEČÍ
Šnek může sebrat předměty a vyhodit je ze žlábku.
Sníh nikdy neodhazujte ve směru chodců, nikomu
nedovolujte pohyb před sněhovou frézou. Nedodržení
těchto bezpečnostních pokynů může vést ke smrti či
vážnému poranění.
Odhazované předměty
• Při čištění, opravách či kontrolách sněhové frézy se ujistěte, že motor je v
poloze OFF, svíčky jsou odpojené a všechny pohyblivé části se zastavily.
• Pod rotující části či do jejich blízkosti nedávejte ruce nebo nohy. Nikdy
neblokujte výstup.
• Frézu nikdy nepoužívejte bez řádných krytů a jiných ochranných
pomůcek.
• Jestliže běží motor, nikdy neponechávejte sněhovou frézu bez dozoru.
Vždy deaktivujte šneka a kontrolu trakce, vypněte motor a vyndejte klíčky.
• Udržujte všechny volné oděvy z dosahu přední části frézy a šneku. Šály,
rukavice, šňůrky a volné oděvy se mohou rychle zachytit v rotujícím
zařízení a může dojít k amputacím. Svažte si dlouhé vlasy a sundejte
šperky.
• Po ukončení odstraňování sněhu frézu nechte několik minut běžet, aby se
předešlo zamrznutí sběrače a rotoru.
• Jestliže se fréza nepoužívá nebo je převážená, deaktivujte pohon
sběrače/rotoru.
NEBEZPEČÍ
Nohy a ruce udržujte z dosahu rotujících částí. Rotující
části mohou přijít do kontaktu s rukama, nohama,
vlasy, oděvy či doplňky.
Nedodržení těchto bezpečnostních pokynů může vést k
amputacím či vážným laceracím.
Pohyblivé části
BEZPEČNOST OBSLUHY
13
Page 36

• Při provádění jakékoli údržby nebo oprav sněhové frézy vypněte motor,
odpojte svíčky a drát svíček udržujte od nich, aby se předešlo
náhodnému startování motoru.
• Pravidelně kontrolujte všechny šrouby a jiné části, zda jsou správně
utažené, abyste se ujistili, že sněhová fréza je v bezpečném pracovním
stavu.
• Udržujte matice a šrouby utažené a sněhovou frézu udržujte v dobrém
stavu.
• Nikdy neměňte bezpečnostní zařízení. Jejich řádnou funkci pravidelně
kontrolujte a, jestliže řádně nefunguje, proveďte nutné opravy.
• Součástky jsou předmětem opotřebování, poškození nebo zhoršení
časem. Součástky často kontrolujte a nahrad´te je doporučenými
součástkami, jestliže je to nutné.
• Pravidelně kontrolujte funkci ovládání. Jestliže je to nutné, opravte a
proveďte servis.
• Při provádění oprav používejte pouze náhradní díly schválené výrobcem.
• Při všech nastaveních a úpravách vždy dodržujte výrobní specifikace.
• Pro větší servis a opravy by měla být používána pouze schválená servisní
centra.
• Používejte pouze nástavce a doplňky schválené výrobcem (jako závaží
na kola, protiváhu nebo kabiny).
• Nikdy se nepokoušejte provést žádné změny, zatímco běží motor (kromě
těch případů, kdy to doporučil výrobce).
• Nepovolte, aby olej či mazadla přišla do kontaktu s gumovým kolem či
disky pohonu. Jestliže se disky pohonu nebo frikční kolo dostanou do
kontaktu s mazadlem či olejem, dojde k jejich poškození.
VAROVÁNÍ
Tuto sněhovou frézu je nutno řádně udržovat, aby se
zajistil bezpečný provoz a výkon. Nedodržení
bezpečnostních pokynů v tomto návodu může vést ke
smrti či vážnému poranění.
Údržba a skladování
-
•
Jestliže je v oblasti únik zemního plynu nebo LPG, nespouštějte motor.
•
Nepoužívejte stlačené startovací tekutiny, protože jejich páry jsou hořlavé.
VAROVÁNÍ
Startování motoru vede k jiskrám.
Jiskry mohou zapálit blízké hořlavé plyny.
Může dojít k požáru nebo explozi.
• Nedotýkejte se horkého motoru nebo tlumiče. Před dotykem vyčkejte, až
tlumič, cylindry motoru a lopatky motoru vychladnou.
• Odpad odstraňte z tlumiče a oblasti cylindru.
• Namontujte zachycovač jisker a udržujte ho v dobrém stavu, jestliže frézu
budete používat na povrchu pokrytém stromy, trávou nebo křovím.
• Je porušením zákona státu Kalifornie o veřejných zdrojích (California Public
Resource Code), paragraf 4442, používat nebo provozovat motor na
jakýchkoli lesních, křovinatých nebo travnatých pozemcích, pokud výfukový
systém motoru není vybaven lapačem jisker podle definice v paragrafu
4442, udržovaným v dobrém provozním stavu. Jiné státy nebo federální
jurisdikce mohou mít podobné zákony. Kontaktujte originálního výrobce
zařízení, prodejce nebo dealera pro získání lapače jisker, navrženého pro
výfukový systém, který je instalován na tomto motoru.
VAROVÁNÍ
Provoz motoru vede ke tvorbě tepla. Části motoru,
zvláště tlumič, budou velice horké.
Nedodržení těchto bezpečnostních pokynů může vést
k vážným popáleninám při kontaktu.
Bezpečnost motoru (pokračování)
BEZPEČNOST OBSLUHY
NEBEZPEČÍ: PŘEČTĚTE SI NÁVOD K
OBSLUZE.
Přečtěte si provozní a bezpečnostní
pokyny v Návodu k obsluze.
NEBEZPEČÍ: NEBEZPEČÍ
ODHAZOVANÝCH PŘEDMĚTŮ.
Odpadový žlab nikdy nesměrujte na
osoby či věci. Osoby udržujte mimo
dosah.
NEBEZPEČÍ: PŘED SERVISEM
VYNDEJTE KLÍČ.
Před jakoukoli údržbou nebo
opravami vypněte motor a vyndejte
klíč.
NEBEZPEČÍ: NEBEZPEČÍ
AMPUTACE.
Kontakt se šnekem způsobí vážná
poranění. Uchovejte ruce, nohy a
oděv z dosahu. Osoby udržujte
mimo dosah.
NEBEZPEČÍ: NEBEZPEČÍ
AMPUTACE.
Kontakt s pohyblivými částmi uvnitř
žlabu povede k vážnému poranění.
Před čištěním žlabu vypněte motor.
Používejte čistící nástroje a ne holé
ruce!
BEZPEČNOSTNÍ IKONY
www.murray.com14
Page 37

Bezpečnostní obtisky
Tento symbol ukazuje na důležitá bezpečnostní varování.
Tento symbol ukazuje: „Pozor! Dávejte pozor! Riziko vaší
bezpečnosti.“
VAROVÁNÍ: Jestliže budou jakékoli bezpečnostní nálepky
opotřebované, poškozené či nečitelné, od vašeho místního
prodejce si objednejte náhradní.
BEZPEČNOST OBSLUHY
Před použitím sněhové frézy si přečtěte bezpečnostní nálepky,
které jsou na vaší sněhové fréze. Upozornění a varování jsou
pro vaši bezpečnost. Aby se předešlo poranění či poškození
sněhové frézy, porozumějte těmto bezpečnostním nálepkám a
dodržujte je.
15
Část č. 1736616
Nálepka řadící páky
Část č. 1737867
Nálepka řízení šneka
Část č. 276925
Varovné ikony motoru
Nálepka čísla ID výrobku a
sériového čísla
(zadní část krabice motoru)
Část č. 1737876
Nálepka hlavní palubní desky
Část č. 1727207
Ikony řízení žlabu
Část č. 1737867
Ikony řízení šneka
Část č. 1737870
Nálepka řízení trakce
1
2
Page 38

www.murray.com16
ZKONTROLUJTE PNEUMATIKY
Zkontrolujte známky poškození na pneumatikách. Tlak pneumatik
překontrolujte s pomočí přesného měřícího nástroje. Pro řádné
nafukování viz strana pneumatiky.
POZOR: Vyvarujte se poranění! Při nesprávném servisu
může dojít k explozivnímu oddělení pneumatiky od
okrajů.
• Pneumatiku se nepokoušejte nasazovat bez řádného
zařízení a bez zkušeností s prováděním úkonu.
• Pneumatiky nenafukujte nad doporučený tlak.
• Kola a pneumatiky nesvářejte a nezahřívejte. Teplo může
zvýšit tlak, což může vést k explozi. Sváření může zeslabit
či zdeformovat strukturu kola.
• Při nafukování se nestavějte před pneumatikou či nad ní.
Používejte příslušné nástroje, které vám umožní stát na
jedné straně.
UPOZORNĚNÍ: Překontrolujte maximální tlak na straně
pneumatiky. Maximum NEPŘEKRAČUJTE.
MONTÁŽ
NÁSTROJE POŽADOVANÉ K MONTÁŽI
1 – Nůž
2 – Klíče 1/2 palce (či nastavitelné klíče)
1 – Klíč 7/16 palce (či nastavitelné klíče)
1 – Frauncouzský klíč (nebo nastavitelný klíč)
1 – Kleště nebo šroubovák (k otevření závlačky)
1 – Kladivo
1 – Páka
PŘEKONTROLUJTE PŘIPOJENÍ KABELŮ A ÚPRAVY
Kabel ovládání trakce (A, Obrázek 5) a kabel ovládání šneka (B) jsou
upraveny v továrně a nevyžadují si úpravy.
Jestliže se kabely vytáhnou, odpojíči začnou prověšovat, bude
nezbytné upravit je. Viz část ÚDRŽBA tohoto návodu.
NAMONTUJTE TYČ OVLÁDÁNÍ RYCHLOSTI
Připojte kulový kloub (A, Obrázek 4) umístěný na spodním konci tyče
ovládání rychlosti (B) k řadící vidlici (C) s pomocí 5/16 palce pružné
podložky (D) a 5/16 palce matice (E).
VAROVÁNÍ: Při montáži frézy vždy používejte
ochranné brýle nebo chránič očí.
SNĚHOVOU FRÉZU ROZBALTE
1. S použitím nože řežte podél čárek na horní straně krabice. Pak
sundejte horní stranu krabice, jak je to zobrazeno na Obrázku 1.
2. S použitím nože řežte podél čárek kolem spodní strany krabice.
3. Než budete pokračovat s montáží, frézu vytlačte ze spodní strany
krabice.
OBSAH BALÍČKU SOUČÁSTEK
1 – Sada střížného šroubu, 1/4-20 x 1-3/4 palce
1 – Sáček střižných šroubů
1 – Šroub, 1/4-20 x 1-3/4 palce
1 – Rozpěrka, návlačka, 1/4 palce
1 – Uzamykací matice, 1/4-20
POZNÁMKA: „Levá“ a „Pravá“ jsou polohy obsluhy.
MONTÁŽ DRŽADEL
1. Zvedněte horní držadlo (A, Obrázek 2) do provozní polohy.
2. Tyč ovládání rychlosti přeneste přes kolo.
3. Z kabelů sundejte modrou přepravní pásku a přeřízněte oranžové
spojky, které drží kabely ovládání u držadla a částí otáčení žlabu.
POZNÁMKA: Ujistěte se, že konce kolena Z kabelů páky
ovládání jsou bezpečně v otvorech na pákách ovladačů (A,
Obrázek 3). Dávejte pozor, abyste kabely nepoškodili či
nepřeřízli. Ujistěte se, že kabely nejsou zachyceny mezi
horním a spodním držadlem.
4. Dva vratové šrouby vložte (B, Obrázek 2) do spodních otvorů a
upevněte je s pomocí dvou 5/16 palce pojistných matic (C).
Všechny čtyři vratové šrouby a matice utáhněte s pomocí 1/2 palce
klíče či hluboké nástrčky.
SMONTUJTE ŽLAB A HŘÍDEL
Pokyny naleznete na Obrázku 6.
Page 39

17
FUNKCE A OVLADAČE
OVLADAČE SNĚHOVÉ FRÉZY
A. Páka výběru rychlosti — Obsluze umožní vybrat jednu ze šesti
(6) rychlostí vpřed a dvou (2) zpátečních rychlostí. K změně
rychlosti přeneste páku výběru rychlosti do požadované polohy.
UPOZORNĚNÍ: Pákou rychlostí nepohybujte, když je aktivní
spojka trakčního pohonu. Mohlo by to vést k vážnému
poškození systému pohonu.
B. Páka řízení šneka — Používá se k aktivaci a deaktivaci šneka a
rotoru. K aktivaci stiskněte dolů, k deaktivaci uvolněte.
C. Hřídel rotace žlabu — Používá se k rotaci odpadového žlabu
doleva či doprava.
D. Křídlová matice deflektoru žlabu — Používá se ke změně úhlu
deflektoru žlabu (nahoru a dolů).
E. Free-Hand
TM
ovladač — Po aktivaci řízení trakce (levá ruka) a
řízení šneka (pravá ruka) obsluze umožní uvolnění páky šneka k
použití jiných ovladačů.
F. Páka řízení trakce — Používá se k posunu sněhové frézy vpřed či
zpět. Stiskněte k aktivaci, uvolněte k deaktivaci.
G. Smyková patka — Používá se k nastavení vzdálenosti krabice
šneka od země.
H. Čistící nástroj — Používá se k odstranění sněhu a odpadu z
odpadového žlabu a krabice šneka.
I. Světlomet — Používá se při provozu sněhové frézy za snížené
viditelnosti.
Ovladače sněhové frézy
B
A
C
F
1
2
E
G
H
D
I
Page 40

www.murray.com18
FUNKCE A OVLADAČE
OVLADAČE MOTORU
A. Knoflík sytiče — Používá se při startování studeného motoru.
B. Tlačítko elektrického startéru — Používá se k nastartování
motoru s pomocí elektrického startéru.
C. Tlačítko přípravy — Používá se k injekci paliva přímo do
karburátoru, aby se zajistilo rychlé startování za chladného počasí.
D. Bezpečnostní klíč — Musí být vložen při startování motoru.
Vytáhněte ho k zastavení. Bezpečnostním klíčem neotáčejte.
E. Držák startovacího kabelu — Používá se k manuálnímu
nastartování motoru.
F. Spínač ZAPNUTO/VYPNUTO (je-li jim zaoizeni vybaveno) —
Používá se k nastartování a vypnutí motoru.
G. Nádrž a víčko — Nádrž naplňte přibližně 38 mm (1-1/2 palce) pod
vrchol hrdla, aby se umožnila expanze paliva.
H. Víčko k plnění oleje (Rožšířená měrka)
Ovladače motoru
C
H
A
F
E
B
G
STOP
D
Page 41

19
OVLÁDÁNÍ
PROVOZ SNĚHOVÉ FRÉZY
POZOR: Provoz se sněhovou kabinou. Vítr může vát
výfukové plyny zpět na obsluhu. Jestliže si povšimnete
zápachu výfukových plynů, změňte směr provozu.
POZNÁMKA: Před pohybem řadící páky vždy uvolněte páku
ovládání trakce.
4. Plně stiskněte a držte páku ovládání šneka (B, Obrázek 7) k
aktivaci rotace šneka. Uvolnění páky ovládání šneka ho deaktivuje
- kromě případů, kdy je aktivní ovládání Free-Hand™.
5. Plně stiskněte a držte páku ovladače trakce/Free-Hand™ (C) k
aktivaci trakce a spuštění pohybu frézy. K deaktivaci trakce páku
zcela uvolněte.
6. Když jsou stisknuty OBĚ páky, ovládání Free-Hand™ je aktivní. To
umožní uvolnění páky ovládání šneka k použití jiných ovladačů.
Šnek se bude nadále otáčet až do uvolnění pák ovládání
trakce/Free-Hand™.
POZOR: Před provozem překontrolujte, že v dosahu
sněhové frézy nejsou žádné osoby či překážky.
UPOZORNĚNÍ: Sníh neodhazujte směrem k budovám, protože
může dojít k odhození ukrytých předmětů s dostatečnou silou na
to, aby došlo k poškození.
1. Nastartujte motor. Viz Startování motoru v této části.
2. Otočte hřídel rotace žlabu (A, Obrázek 7) k nastavení směru
(doleva či doprava) odpadového žlabu. Viz „Odpadový žlab a
odchylovač“ v této části.
3. Uvolněte křídlovou matici (A, Obrázek 8) na straně odpadového
žlabu k nastavení úhlu (nahoru a dolů) odhazování sněhu. Viz
„Odpadový žlab a odchylovač“ v této části.
VAROVÁNÍ
BEZPEČNOSTNÍ TESTY SNĚHOVÉ FRÉZY
Test 1 – Šnek/Rotor
• Uvolněte ovladač šneka (pravá ruka).
• Šnek/rotor se zastaví během méně než 5 sekund.
Test 2 – Trakční pohon
• Uvolněte trakční pohon (levá ruka).
• Pohyb sněhové frézy vpřed/zpět se zastaví.
Test 3 – Volné ovládání (kde je)
• Aktivujte ovladač šneka a trakce.
• Uvolněte ovladač šneka a pak okamžitě uvolněte ovladač trakce, (a)
šnek/rotor se zastaví během méně než 5 sekund a (b) dojde k
zastavení pohybu sněhové frézy vpřed/zpět.
NEBEZPEČÍ
Odpadový žlab zahrnuje rotujícího šneka k odhazování
sněhu. Odpadový žlab nikdy nečistěte rukama. Velice rychle
může dojít k zachycení prstů a jejich amputacím či vážným
poraněním. K čištění či uvolnění odpadového žlabu vždy
používejte čistící nástroje.
• Nejčastější poranění při použití sněhové frézy vznikají při
kontaktu rukou s poháněčem odpadového nosníku.
• Tato sněhová fréza je schopna amputovat ruce a nohy a
odhazovat předměty. Přečtěte si a dodržujte všechny
bezpečnostní pokyny v tomto návodu. Jestliže tak neučiníte,
může to vést ke smrti či vážným poraněním.
PŘED ZAHÁJENÍM PROVOZU SNĚHOVÉ FRÉZY
■ Zkontrolujte upevnění. Zkontrolujte, že všechna upevnění jsou
utažená.
■ Modely s elektrickým startérem jsou dodávány s kabelem
startéru zapojeným v motoru. Před použitím odpojte kabel
startéru z motoru.
POZNÁMKA: Tato sněhová fréza je dodávána S OLEJEM v motoru.
Před nastartování motoru viz pokyny Kontrola oleje (Před
nastartováním motoru) v této části.
Page 42

VAROVÁNÍ: Před obsluhou stroje či přečtěte
Uživatelskou příručku. Jestliže je používán nedbale,tento
stroj může být nebezpečný.
• Sněhovou frézu nikdy nepoužívejte bez všech
chráničů a krytů.
• Odpad nikdy nesměřujte na okna, nedovolte jiným
osobám, aby za chodu motoru stály poblíž stroje.
• Při odchodu z provozní pozice vždy vypněte motor.
• Před čištěním rotoru či odpadového žlabu či před
opravami a úpravami vždy odpojte svíčky.
• Při odchodu od stroje odpojte bezpečnostní klíč. Ke
snížení rizika požáru stroj udržujte čistý a bez rozlitého
paliva, oleje či odpadu.
SPONKY UZAMČENÍ TRAKCE
Pravé trakční kolo může být zcela uvolněno s pomocí zamykací
sponky (A, Obrázek 9). To umožní snadný pohyb jednotky s vypnutým
motorem.
ODPADOVÝ ŽLAB A ODCHYLOVAČ
Otáčení odpadového žlabu (doleva a doprava)
1. Jřídel rotace žlabu (A, Obrázek 7) otočte ve směru hodinových
ručiček k rotaci žlabu doprava (viz Obrázek 8).
2. Hřídel otočte proti směru hodinových ručiček k rotaci žlabu doleva.
3. Po získání požadované polohy hřídel uvolněte.
Odchylovač žlabu (nahoru a dolů)
1. Uvolněte křídlovou matici (A, Obrázek 8) na straně odpadového
žlabu (B).
2. Zvedněte odchylovač, aby poskytl větší průtok a větší vzdálenost.
Nebo odchylovač snižte k získání menšího proudu a menší
vzdálenosti.
3. Po získání požadovaného úhlu utáhněte křídlovou matici.
www.murray.com20
OVLÁDÁNÍ
ZASTAVENÍ SNĚHOVÉ FRÉZY
1. Uvolněte páku ovladače šneka (B, Obrázek 7).
2. Uvolněte páku ovladače trakce (C).
3. Stiskněte spínač ZAPNUTO/VYPNUTO (A, Obrázek 15), je-li jim
zaoizeni vybaveno, do vypnuté polohy VAPNUTO a vytáhněte
bezpečnostní klíč (B).
VAROVÁNÍ: Motor nikdy nespouštějte uvnitř nebo v
uzavřených špatně větraných prostorech. Výfukové plyny
obsahují OXID UHELNATÝ, BEZBARVÝ OTRAVNÝ plyn.
• Udržujte ruce, nohy, vlasy a volné oděvy z dosahu
pohyblivých součástek motoru či frézy.
• Teplota tlumiče a okolních oblastní může překročit
66 °C (150 °F). Vyvarujte se těmto místům.
• Dětem a mládeži nedovolujte, aby frézu
obsluhovaly či se kolem ní pohybovaly za provozu.
7. Řadící páku (D) použijte k volbě rychlosti vpřed. Řadící páku
nastavted o jedné z následujících poloh podle sněhových
podmínek:
1-2 Mokrý, těžký sníh, sníh s vodou, extra hluboký
3 Normální
4-5 Velmi lehký
6 Přeprava
POZNÁMKA: Při čištění vlhkého a těžkého sněhu se doporučuje
snížení pozemní rychlosti a udržování plného plynu. Nepokoušejte
se čistit celou šířku jednotky.
8. Aby se zastavil posun dopředu, uvolněte páku ovládání trakce (C).
9. K posunu sněhové frézy zpět přeneste řadící páku do první či
druhé zpětné rychlosti a aktivujte páku ovládání trakce.
Page 43

OVLÁDÁNÍ
KONTROLA OLEJE (PŘED STARTOVÁNÍM MOTORU)
POZNÁMKA: Motor byl vyexpedován z továrny naplněný olejem.
Zkontrolujte množství oleje. Přidejte olej podle potřeby.
1. Ujistěte se, že jednotka je na rovině. Používejte kvalitní čistící olej
s klasifikací „Pro servis SG, SH, SJ, SL, či vyšší“.
2. Vyndejte zátku oleje/měrku (A, Obrázek 10) a otřete je s pomocí
čistého hadříku.
3. Zátku oleje/měrku vložte zpět a otočte ve směru hodinových
ručiček.
4. Vyndejte zátku oleje/měrku a překontrolujte olej.
POZNÁMKA: Množství oleje nekontrolujte, když běží motor.
5. Jestliže je to nutné, přidejte olej, až dosáhne na FULL (plnou)
polohu měrky. Nepřidávejte příliš mnoho oleje.
6. Upevněte uzávěr oleje/měrku po každé kontrole množství oleje.
POZNÁMKA: Syntetický olej 5W30 je vhodný do všech teplot.
NEMÍCHEJTE olej s benzínem. Doporučení oleje, viz Tabulka.
Syntetický 5W-30
* Při teplotách pod 4 °C (40 °F) povede použití SAE 30 k obtížnému startování.
** Při teplotách nad 27 °C (80 °F) povede použití 10W-30 ke zvýšené spotřebě oleje.
Množství oleje pravidelně kontrolujte.
21
1. Vyčistěte oblast uzávěru nádrže od špíny a smetí. Sejměte uzávěr
paliva (G, Ovladače motoru).
2. Palivovou nádrž natankujte palivem. Pro umožnění tepelného
roztahování paliva neplňte nádrž výše než po spodní část hrdla
palivové nádrže.
3. Nasaďte zpět uzávěr palivové nádrže.
DOPORUÈENÍ TÝKAJÍCÍ SE BENZÍNU
Palivo musí splòovat následující požadavky:
• Používejte èistý, èerstvý bezolovnatý benzín.
• Minimálnì 87 oktanù/87 AKI (91 RON). V pøípadì, že používáte stroj
ve vyšších nadmoøských výškách, viz níže.
• Pøijatelný je benzín obsahující do 10 % ethanolu (smìsi benzínu s
alkoholem) nebo do 15 % MTBE (methyl-tercio-butyl-ether).
POZNÁMKA: Nepoužívejte neschválené benzíny, jako napøíklad
E85. Nepøidávejte do benzínu olej ani neupravujte motor pro
provoz s alternativními palivy. Došlo by k poškození souèástí
motoru a ztrátì záruky na motor.
Do paliva pøidávejte stabilizátor paliva, abyste zabránili tvorbì gumy v
palivové soustavì. Viz Skladování. Všechna paliva nejsou stejná. Pokud
se objeví problémy se spouštìním nebo výkonností motoru, zmìòte
dodavatele paliva nebo znaèku. Tento motor je úøednì schválen jako
benzínový motor. Systém øízení emisí tohoto motoru je EM (Engine
Modifications).
Vìtší nadmoøské výšky
Ve výškách nad 1 524 m (5 000 stop) je pøípustný minimálnì
85oktanový/85 AKI (89 RON) benzín. Aby byly dodrženy emisní limity,
musí být motor pro vyšší nadmoøské výšky seøízen. Provoz bez tohoto
seøízení zpùsobí sníženou výkonnost, zvýšenou spotøebu paliva a
zvýšené emise. Informace o seøízení pro vyšší nadmoøské výšky
získáte u autorizovaného prodejce znaèky Briggs & Stratton.
Provoz motoru pøí nadmoøských výškách pod 762 m (2 500 stop) s
pøestavbou pro vyšší nadmoøské výšky se nedoporuèuje.
DOPLNÌNÍ PALIVA
VAROVÁNÍ:
Palivo a jeho páry jsou vysoce hoølavé a výbušné.
Požár nebo výbuch mùže zpùsobit vážné popáleniny
nebo i smrt.
Když doplòujete palivo
• Vypnìte motor a pøed sejmutím uzávìru palivové nádrže jej nechte
nejménì 3 minuty chladnout.
• Nádrž plòte venku nebo v dobøe vìtraném prostoru.
• Palivovou nádrž nepøeplòujte. Kvùli tepelné roztažnosti paliva
naplòte nádrž jen po spodní okraj hrdla.
• Chraòte palivo pøed jiskrami, otevøeným ohnìm, vìèným
plamínkem, teplem a jinými zdroji zapálení.
• Kontrolujte palivové potrubí, nádrž a uzávìr a všechny spoje na
tìsnost a praskliny. V pøípadì potøeby proveïte výmìnu.
• Jestliže rozlijete palivo, poèkejte, až se odpaøí a teprve potom
spust’te motor.
Page 44

7. Manuální startování: Pevně držte držák kabelu startéru (A,
Obrázek 13). Pomalu zatáhněte za kabel startéru, až pocítíte
odpor, pak zatáhněte rychle.
VAROVÁNÍ: Rychlé stažení startovacího kabelu zatáhne
vaši ruku nebo paži směrem k motoru rychleji, než můžete
spustit držení kabelu. Může to vést k zlomeninám,
pohmožděninám či odředinám. Při startování motoru za
startovací kabel táhněte pomalu, až ucítíte odpor, aby se
předešlo zpětnému tlaku, pak zatáhněte rychle.
POZNÁMKA: Jestliže motor nenastartuje po třech pokusech,
prostudujte si část příručky k motoru Řešení problémů.
8. Elektrické startování: Nejdříve připojte prodlužovací kabel do
zásuvky zařízení a pak do zásuvky ve stěně. Jestliže se vyžaduje
další prodlužovací kabel, ujistěte se, že je tříkabelový.
VAROVÁNÍ: Jestliže dojde k poškození prodlužovacího
kabelu, aby se předešlo rizikům, musí být vyměněn
výrobcem či zástupcem servisu či podobně
kvalifikovanou osobou.
9. Elektrické startování: Stiskněte tlačítko startéru (A, Obrázek 14).
Po nastartování motoru nejdříve odpojte prodlužovací kabel ze
zásuvky ve zdi a pak kabel ze zásuvky zařízení (B).
DŮLEŽITÉ: Aby se prodloužila životnost startéru, používejte
krátké startovací cyklu, maximálně pět sekund. Mezi
startovacími cykly čekejte jednu minutu.
POZNÁMKA: Jestliže motor nenastartuje po třech pokusech,
prostudujte si část příručky k motoru Řešení problémů.
ZASTAVENÍ MOTORU
Než motor zastavíte, nechte ho několik minut běžet, aby se vysušila
jakákoli vlhkost na motoru.
VAROVÁNÍ: Benzín a jeho páry jsou velice hořlavé a
výbušné. Oheň či exploze mohou způsobit vážné
popáleniny nebo smrt. NEHASTE karburátor k
zastavení motoru.
1. Spínač ZAPNUTO/VYPNUTO stiskněte do polohy (A,
Obrázek 15), je-li jim zaoizeni vybaveno, VYPNUTO.
2. Vyndejte bezpečnostní klíč (B). Bezpečnostní klíč uchovávejte
mimo dosah dětí.
POZNÁMKA: Bezpečnostní klíč neztrácejte. Bezpečnostní klíč
udržujte na bezpečném místě. Motor není bez
bezpečnostního/startovacího klíče možno nastartovat.
Motor nastartujte následujícím způsobem:
1. Zkontrolujte množství oleje.
2. Ujistěte se, že ovladače pohonu zařízení jsou neaktivní.
3. Spínač ZAPNUTO/VYPNUTO stiskněte do polohy (A,
Obrázek 11), je-li jim zaoizeni vybaveno, ZAPNUTO.
4. Do otvoru pro bezpečnostní klíč vložte bezpečnostní klíč (A,
Obrázek 12) a zcela ho stiskněte do polohy FUNKCE.
5. Jestliže je motor studený, sytič (B) otočte plně ve směru
hodinovýh ručiček.
POZNÁMKA: Sytič nepoužívejte s teplým motorem.
6. Dvakrát stiskněte tlačítko vstřikování (C).
POZNÁMKA: Vstřikování nepoužívejte s teplým motorem.
POZNÁMKA: Ujistěte se, že prodlužovací kabel je vyndán ze
zásuvky.
STARTOVÁNÍ MOTORU
Ujistěte se, že motorový olej je až na značce FULL (plný) na zátce
plnění oleje/měrce. Sněhová frézy má elektrický startér na střídavý
proud a manuální startér. Před startováním motoru si přečtěte
následující informace.
Jestliže je motor zahlcený, nastavte sytič do polohy
OTEVŘÍT/SPUSTIT a natáčejte do té doby, než motor nastartuje.
VAROVÁNÍ: Elektrický startér má třídrátový kabel a
zástrčku určenou k provozu se střídavým proudem pro
domácnosti. Zdrojový kabel musí být vždy řádně
uzemněný, aby se předešlo možnosti elektrického šoku nebo
poranění obsluhy. Dodržujte všechny následující pokyny:
Zkontrolujte, že vaše domácí elektrická sít´ je třídrátová a
uzemněná.
Jestliže si nejste jistí, zeptejte se kvalifikovaného elektrikáře.
Jestliže vaše elektrická síť není uzemněná a se třemi dráty, v
žádném případě nepoužívejte elektrický startér.
Jestliže máte elektrickou síť, která je třídrátová a uzemněná,
ale do vašich zásuvek není možno připojit elektrický startér,
nechte si kvalifikovaným elektrikářem namontovat zásuvku se
třemi otvory.
VAROVÁNÍ: K připojení napájecího kabelu vždy nejdříve
připojte napájecí kabel ke krabici spínače na motoru a
teprve pak vložte druhý konec kabelu do uzemněné
zásuvky.
VAROVÁNÍ: Při odpojování elekrického kabelu vždy
nejdříve odpojte konec z uzemněné zásuvky na tři kolíky.
OVLÁDÁNÍ
www.murray.com22
Page 45

OVLÁDÁNÍ
ČIŠTĚNÍ UCPANÉHO ODPADOVÉHO ŽLABU
NEBEZPEČÍ: Nejčastější poranění při použití sněhové
frézy vznikají při kontaktu rukou s poháněčem
odpadového nosníku. Žlab se nikdy nesnažte vyprázdnit
či uvolnit holýma rukama nebo když přístroj běží. Velice
rychle může dojít k zachycení prstů a jejich amputacím či
vážným poraněním.
• VYPNĚTE MOTOR!
• Vyčkejte 10 sekund, abyste si byli jistí, že rotor se zcela
zastavil.
• Vždy používejte nářadí k vyčištění, nikdy nepoužívejte ruce.
Čistící nástroj (A, Obrázek 16) je připojen k držadlu nebo k horní části
krabice šneka. K odstranění sněhu z uložení šneka používejte čistící
nástroj.
PROVOZNÍ TIPY
1. Nejúčinnějšího odklízení sněhu se dosáhne, jestliže je sníh
odstraněn okamžitě potom, co napadne.
2. Pro úplné odstranění sněhu by se měly jednotlivé pruhy překrývat.
3. Jestliže je to možné, sníh by se měl odhazovat ve směru větru.
4. Pro normální použití nastavte smyky 3 mm (1/8 palce) nad
škrabací lištou. Pro velice hutný sníh je ke zvýšení účinnosti
možno upravit smyky směrem nahoru.
5. Na kamenitých podkladech musí být smyky nastaveny 32 mm
(1-1/4 palce) pod škrabací lištou (viz Úprava výšky pluhů v části
této příručky věnované Údržbě). Stroj nesmí sbírat a odhazovat
kameny a štěrk.
6. Po dokončení odklízení sněhu motor ponechte na několik minut
ve volnoběhu, aby roztál sníh a led na motoru.
7. Po každém použití frézu důkladně vyčistěte.
8. Z celé frézy odstraňte nahromaděný sníh a led a všechen odpad,
jestliže je to možné, frézu opláchněte vodou a odstraňte jakékoli
soli či jiné chemické látky. Frézu osušte.
9. Před startováním frézy vždy překontrolujte šneka a rotor pro
akumulaci ledu či odpadu, které by mohly vést k poškození
sněhové frézy.
10. Před každým nastartováním překontrolujte množství oleje.
Zkontrolujte, že olej dosáhl značky FULL (plná) na měrce.
23
Page 46

UPRAVTE ODPOR PŘI ROTACI ŽLABU
POZNÁMKA: Po opakovaném použití se rotace žlabu může
uvolnit, což způsobí pohyb žlabu zpět do centrální polohy.
Odpor upravte utažením matice (A, Obrázek 19). Utažení matice
omezí pohyb žlabu bez toho, aby obsluha otáčela rotační páku žlabu.
ÚDRŽBA MOTORU
Překontrolujte množství oleje v klikové hřídeli – Před nastarováním
motoru a každých 8 hodin souvislého používání. Přidejte doporučený
motorový olej podle potřeby.
POZNÁMKA: Nadměrné plnění motoru může ovlivnit výkon.
Bezpečně utáhněte zátku oleje, aby se předešlo únikům.
Výměna oleje – Každých padesát (50) hodin nebo alespoň jednou za
rok, jestliže je fréza používaná po dobu kratší 50 hodin. Používejte
čistý, velice kvalitní čistící olej. Klikovou hřídel naplňte na značku FULL
(plná) na měrce (A, Obrázek 17). Ujistěte se, že je původní nádoba
označena: A.P.I. service „SG“ nebo vyšší. Nepoužívejte olej
SAE10W40, protože nemusí poskytnout řádné mazání. Doporučení
oleje, viz Tabulka.
Vypusťte olej – Sněhovou frézu umístěte tak, aby byla zátka pro
vypouštění oleje (A, Obrázek 18) na nejnižším bodu motoru. Když je
motor teplý, vyndejte zátku k vypouštění oleje a zátku plnění oleje a
vypusťte ho do vhodné nádoby.
Znovu zandejte zátku k vypouštění oleje a utáhněte ji. Klikovou hřídel
znovu naplňte doporučeným motorovým olejem.
Syntetický 5W-30
* Při teplotách pod 4 °C (40 °F) povede použití SAE 30 k obtížnému startování.
** Při teplotách nad 27 °C (80 °F) povede použití 10W-30 ke zvýšené spotřebě oleje.
Množství oleje pravidelně kontrolujte.
ÚDRŽBA
PLÁN ÚDRŽBY
SNĚHOVÁ FRÉZA
Po každém použití
Ze sněhové frézy odstraňte sníh, aby se předešlo námraze ovládání
Každých 8 hodin či denně
Proveďte bezpečnostní testy sněhové frézy
Každých 25 hodin či ročně *
Překontrolujte tlak pneumatik
Překontrolujte, že sněhová fréza nemá uvolněné
součástky
Každý rok navštivte prodejce pro následující
Namazání kontrolní páky a spojení
Namazání závěsu odhrnovače
Namazání motoru odhrnovače (kde je použit)
Namazání rotačních rychlostí žlabu (kde jsou použity)
MOTOR
Prvních 5 hodin
Vyměňte motorový olej
Každých 8 hodin či denně
Zkontrolujte množství oleje
Každých 50 hodin či ročně *
Vyměňte motorový olej
Překontrolujte tlumič a chránič tlumiče
Každý rok navštivte prodejce pro následující
Výměnu svíčky
Kontrolu vůle ventilu
* Nevyžaduje se kromě případů, kdy jsou problémy s
výkonem motoru.
PROHLÁŠENÍ O KONTROLE EMISÍ
Údržba, výměna nebo oprava zařízení a systémů na kontrolu emisí
může být provedena kterýmkoli zařízením pro opravu motorů
nepoužívaných na silnicích nebo jednotlivcem. Pokud však chcete
„bezplatný“ servis kontroly emisí, práce musí být provedena továrnou
autorizovaným dealerem.
www.murray.com24
Page 47

ÚDRŽBA
Tato sněhová fréza má pluhy s dvěmi různými výškami, tyto jsou
připevněny na vnější straně krabice šneka. Tyto zvedají přední stranu
frézy.
Při odstraňování sněhu z tvrdých podkladů, jako jsou dlažbové vjezdy
či chodníky, upravte pluhy tak, že je na přední straně frézy přenesete
dolů.
Při odstraňování sněhu z kamenitých či nerovných podkladů zvedněte
přední část sněhové frézy posunem pluhů směrem dolů. Toto pomůže
zabránit sbíraní kamenů a jiného odpadu a jeho odhazováním šnekem.
K úpravě smyků postupujte následovně:
1. Pod škrabací lištu umístěte špalek (výškou rovný požadovanému
základu), nevkládejte ho pod pluh.
2. Uvolněte matice upevnění pluhu (A, Obrázek 20) a pluh zatlačte
dolů (B), až se dotkne země. Znovu utáhněte matice.
3. Pluh na druhé straně nastavte na stejnou výšku.
POZNÁMKA: Ujistěte se, že sněhová fréza je na obou stránách
nastavená na stejnou výšku.
VAROVÁNÍ: Ujistěte se, že v oblasti, kde pracujete, máte
dostatečnou vzdálenost od země. Předmity jako kameny,
štěrk nebo jiný odpad mohou po odhození šnekem letět
takovou silou, že způsobí poranění, škody na majetku
nebo poškození sněhové frézy.
VAROVÁNÍ: Před prováděním jakýchkoli oprav či
úprav vždy vypněte jednotku, vyndejte klíč zapalování
a odpojte drát svíčky.
ÚPRAVA VÝŠKY PLUHŮ
25
3. Upravovací plochy držte dolů a utáhněte matici.
4. Nastartujte motor a překontrolujte šneka. Šnek nesmí být aktivní
kromě situace, kdy je stisknuta páka šneka.
5. Se spuštěným motorem plně stiskněte páku šneka. Šnek by se
měl aktivovat a normálně běžet.
VAROVÁNÍ: Nepřetahujte, jelikož to může vést ke
zvednutí páky a způsobit aktivaci pohonu šneka bez
stisku páky šneka.
ÚPRAVA KABELU ŘÍZENÍ ŠNEKA
1. Při uvolněné páce ovládání šneka by se měl hák (A, Obrázek 21)
sotva dotýkat páky (B) bez jejího zvedání. Maximální prostor je
0,8 mm (1/32 palce).
2. K úpravě uvolněte matici (C) držením upravovacích ploch (D) a
otočením matice. Upravovací plochy pak otočte a držte
upravovací šroub (E). Upravovací šroub je určený pro křížový
šroubovák, lze ho držet či otočit vložením šroubováku skrze
pružinu (F).
VAROVÁNÍ: Šnek se musí zastavit do 5 sekund.
Jestliže se tomu tak nestane, kontaktujte
autorizovaného prodejce.
6. Uvolněte páku ovládání šneku.
7. Jestliže šnek řádně nefunguje, zastavte motor a překontrolujte
úpravu kabelu šneka.
8. Jestliže je spojení pohonu řádně upraveno, napětí řemenu šneka
si může vyžadovat úpravu (
kontaktujte autorizovaného dealera).
NÁHRADA SPONKY ŠNEKA
Šnek je k hřídeli šneka připevněn s pomocí speciálních sponek, které
jsou vyrobeny tak, aby se zlomily, jestliže v krabici šneka uvázne
předmět. Použití jiných sponek povede ke snížení ochrany nabízené
těmito sponkami.
VAROVÁNÍ: Když běží motor, nepohybujte se poblíž
odpadového žlabu či šneka. Jestliže je sundán kryt či
chránič, nespoštějte motor.
Ve většině případů, jestliže šnek narazí na předmět, který by jednotku
mohl poškodit, sponka se rozbije. Toto chrání převodovku a jiné části
od poškození.
Sponky (A, Obrázek 22) se nacházejí na hřídeli šneka. Rozbitou
sponku nahraďte následujícím způsobem.
1. Rozbitou sponku vyklepejte ven.
2. Nainstalujte novou sponku. Konce sponky ohněte směrem dolů.
DŮLEŽITÉ: Sponky nenahrazujte ničím jiným, než jsou
správné náhradní sponky. Použití šroubů či jiných sponek
může vést k poškození zařízení.
Page 48

SKLADOVÁNÍ
VAROVÁNÍ: Motor nikdy neskladujte s palivem v nádrži,
uvnitř či ve špatně větraném uzavřeném prostoru, kde by
palivo mohlo dosáhnou na otevřený plamen, jiskry nebo
pilotní světlo hořáku, sušičky prádla, etc.
S benzínem zacházejte opatrně. Je vysoce hořlavý a
nepozornost může spůsobit vážné poranění vám či jiné
osode nebo majetku.
Palivo vyprázdněte do schválené venkovní nádoby mimo
dosah plamenů.
Jestliže bude sněhová fréza skladována po dobu třiceti (30) dnů či déle
po sezóně, pro přípravu sněhové frézy ke skladování se doporučují
následující kroky.
POZNÁMKA: Benzín je nutno vypustit či ošetřit, aby se při
skladování předešlo tvorbě depozitů v nádrži, filtru, hadicích a
karburátoru.
1. Vyprázdněte benzín tím, že necháte běžet motor do té doby, než
se zastaví. Jestliže benzín nechcete vyndávat, přidejte do benzínu
ponechaného v nádrži stabilizátor paliva, aby se minimalizovala
tvorba depozitů a kyselin. Jestliže je nádrž téměř prázdná,
stabilizátor smíchejte s čerstvým benzínem v oddělené nádobě a
tuto směs přidejte do nádrže. Vždy dodržujte pokyny na obalu
stabilizátoru. Po přidání stabilizátoru nechte motor běžet po dobu
nejméně 10 minut, aby směs pronikla do karburátoru. Sněhovou
frézu ukládejte na bezpečném místě.
2. Váš motor (pouze 4 fázový) můžete uchovat v dobrém stavu
výměnou oleje před uložením.
VYNDÁNÍ ZE SKLADOVÁNÍ
1. Horní držadlo dejte do provozní polohy, utáhněte knoflíky, které
drží horní držadlo a připojte přepínač a hřídel žlabu.
2. Nádrž naplňte čerstvým palivem.
3. Překontrolujte svíčku. Ujistěte se, že prostor je správný. Jestliže je
svíčka opotřebovaná či poškozená, vyměňte ji.
4. Zkontrolujte, že všechna upevnění jsou utažená.
5. Ujistěte se, že všechny vodiče, kryty a chrániče jsou na místě.
6. Zkontrolujte, že všechny úpravy jsou správné.
ZKONTROLUJTE PNEUMATIKY
Zkontrolujte známky poškození na pneumatikách. Tlak pneumatik
překontrolujte s pomočí přesného měřícího nástroje (viz Obrázek 23).
POZOR: Vyvarujte se poranění! Při nesprávném servisu
může dojít k explozivnímu oddělení pneumatiky od okrajů.
• Pneumatiku se nepokoušejte nasazovat bez řádného
zařízení a bez zkušeností s prováděním úkonu.
• Pneumatiky nenafukujte nad doporučený tlak.
• Kola a pneumatiky nesvářejte a nezahřívejte. Teplo může
zvýšit tlak, což může vést k explozi. Sváření může zeslabit
či zdeformovat strukturu kola.
• Při nafukování se nestavějte před pneumatikou či nad ní.
Používejte příslušné nástroje, které vám umožní stát na
jedné straně.
ÚDRŽBA
3. Namažte oblast válců. Toto může být provedeno odstraněním
svíčky a nastříkáním čistého motorového oleje do otvoru pro
svíčku. Otvor pro svíčku pak přikryjte materiálem, aby došlo ke
vstřebání látky. Pak motor otočte tím, že dvakrát či třikrát
zatáhnete za startér. Nakonec namontujte zpět svíčku a připojte
drát svíčky.
4. Frézu důkladně vyčistěte.
5. Namažte všechny mazací body (kontaktujte autorizovaného
dealera)
.
6. Prověřte, že všechny šrouby a matice jsou bezpečně utažené.
Prohlédněte všechny pohyblivé části pro známky poškození a
opotřebování. Jestliže je to nutné, nahraďte je novými.
7. Přemalujte všechny povrchy s rezem či prasklinami; před
malováním je jemně odřete skelným papírem.
8. Pokryjte otevřené kovové části krabice šneku a rotoru s
mazadlem proti rezu.
9. Jestliže je to možné, sněhovou frézu ukládejte uvnitř a přikryjte ji k
ochraně před prachem a nečistotami.
10. U modelů se skládacími držadly odpojte posunovač a držadlo
žlabu a uvolněte knoflíky, které drží horní držadlo. Horní držadlo
otočte zpět.
11. Jestliže přístroj musí být uložen venku, zablokujte sněhovou frézu
tak, abyste se ujistili, že se žádná část přístroje nedotýká země.
Sněhovou frézu přikryjte silnou plachtou.
UPOZORNĚNÍ: Překontrolujte maximální tlak na straně
pneumatiky. Maximum NEPŘEKRAČUJTE.
www.murray.com26
Page 49

27
ŘEŠENÍ PROBLÉMŮ
PROBLÉM ZKONTROLUJTE ŘEŠENÍ
Šnek nezastaví do 5
pěti sekund po
uvolnění pravé páky.
Free-Hand™ ovladač je v
AKTIVNÍ poloze.
Uvolněte ovladač šneka i ovladač trakce/Free-Hand™ k zastavení
šneka.
Free-Hand™ ovladač
správně nefunguje (dojde
k selhání při
bezpečnostním testu č. 3).
Kontaktujte oprávněného prodejce.
Kontrolní kabel šneka je
uvolněný (došlo k selhání
bezpečnostního testu 1).
Upravte kontrolní kabel šneka. Postupujte podle Úpravy kabelů v
části Údržba tohoto manuálu. Ujistěte se, že ovládání šneka
projde bezpečnostním testem č. 1.
Vodič řemenu šneka je
mmimo polohu.
Kontaktujte oprávněného prodejce.
Odpadový žlab či
odchylovač nepracuje
(elektrický).
Elektrické selhání. Kontaktujte oprávněného prodejce.
Odpadový žlab či
odchylovač nepracuje
(dálkový, manuální).
Odpadový žlab či
odchylovač je mimo
polohu nebo potřebuje
mazání.
Kontaktujte oprávněného prodejce.
Motor nestartuje.
Klíč je vypnutý. Klíč zatlačte do ZAPNUTÉ polohy.
Selhání při přípravě
studeného motoru.
Tlačítko přípravy stiskněte dvakrát a znovu startujte.
Palivový ventil je v
ZAVŘENÉ poloze.
Ventil přeneste do OTEVŘENÉ polohy.
Došlo palivo. Naplňte palivovou nádrž.
Sytič je ve VYPNUTÉ
poloze se studeným
motorem.
Sytič zapněte, plyn nastavte na RYCHLE.
Motor je zalitý. Vypněte sytič, zkuste startovat.
Nedochází k jiskře. Kontaktujte oprávněného prodejce.
Voda v palivu či staré
palivo.
Vyprázdněte nádrž. (Palivo zlikvidujte na schválené skládce pro
nebezpečný odpad.) Natankujte čerstvé palivo.
Není připojeno či
nefunguje lanko (modely
s elektrickým startérem).
Lanko připojte či vyměňte.
Obtížné startování
motoru či problémy s
funkcí motoru.
Směs paliva je příliš
bohatá.
Sytič přeneste do VYPNUTÉ polohy.
Rozbitá svíčka či
nesprávná mezera.
Kontaktujte oprávněného prodejce.
Otvor palivové zátky je
zablokovaný.
Otvor vyčistěte.
Nadměrné vibrace.
Volné části nebo
poškozený šnek či pohon.
Okamžitě zastavte motor. Kontaktujte oprávněného prodejce.
Page 50

ŘEŠENÍ PROBLÉMŮ
www.murray.com28
PROBLÉM ZKONTROLUJTE ŘEŠENÍ
Pohyb sněhové frézy
dopředu a zpět se
nezastaví po uvolnění
páky ovládání trakce.
Trakční řízení je uvolněné
(došlo k selhání
bezpečnostního testu 2).
Kontaktujte oprávněného prodejce.
Sněhové fréza jede k
jedné straně.
Tlak pneumatik není
rovnoměrný.
Překontrolujte tlak pneumatik.
Jedno kolo je nastaveno
do polohy volného kola.
(Sponka uzamčení trakce
je ve VNĚJŠÍM otvoru.)
Modely se závlačkami kol
či zámky.
Ujistěte se, že levá trakční sponka je ve VNITŘNÍCH otvorech, aby
se aktivoval pohon trakce.
Škrabací lišta nečistí
tvrdé povrchy.
Kryty pluhu nejsou řádně
upraveny.
Upravte pluh podle potřeby.
Sněhová fréza se
nepohybuje při nízkých
rychlostech.
Ovladač trakce je mimo
polohu.
Páčku rychlosti posuňte o rychlost nahoru. Jestliže to nefunguje,
kontaktujte autorizovaného prodejce.
Sněhová fréza se při
žádné rychlosti
nepohybuje dopředu
ani dozadu.
Hnací řemen je uvolněný
nebo poškozený.
Kontaktujte oprávněného prodejce.
Ovladač trakce je mimo
polohu.
Kontaktujte oprávněného prodejce.
Opotřebované či
poškozené frikční
kolečko.
Kontaktujte oprávněného prodejce.
Jednotka neodhazuje
sníh.
Řídící kabely šneka
nejsou řádně nastaveny.
Upravte kontrolní kabel šneka. Postupujte podle Úpravy kabelů v
části Údržba tohoto manuálu.
Řemen pohonu šneka je
uvolněn nebo poškozen.
Kontaktujte autorizovaného prodejce.
Rozbitá sponka. Vyměňte sponku. Viz Náhrady sponky šneka v části Údržba v
tomto manuálu.
Odhazovací žlab je plný
sněhu.
Okamžitě zastavte motor. K čištění ucpaného žlabu vždy
používejte čistící nástroj, nepoužívejte holé ruce. Vyčistěte
odpadový nosník a vnitřek šneka. Prostudujte si Varování v části
Bezpečnost obsluhy.
Ve šneku se zachytil cizí
předmět.
Okamžitě zastavte motor. K čištění ucpaného žlabu vždy
používejte čistící nástroj, nepoužívejte holé ruce. Odstraňte
předmět ze šneka. Prostudujte si Varování v části Bezpečnost
obsluhy.
K obdržení informací o záruce kontaktujte vašeho místního prodejce či distributora.
ZÁRUKA
Page 51

29
MOTOR:
Značka Briggs & Stratton
Série modelu Snow Series
TM
Celkový točivý moment* 14,5 T.P. při 3060 otáčkách za minutu
Typ 4taktní - OHV
Obsah válců 305 cc (18,6 krychlový palce)
Startér Ruční, elektrický 230 V bez šňůry
Alternátor Pouze střídavý proud 60W
Kapacita na olej 0,83 litrů (28 oz)
Motorový olej Syntetický 5W30
Objem nádrže 2,8 litrů (3,0 čtvrtiny gallonu)
Mezera svíček 0,76 mm (0,030 palce)
Svíčka rezistoru 481055
Platinová svíčka s dlouhou životností 5066
Systém zapalování Tento systém svíček zapalování splňuje podmínky kanadské normy ICES-002.
ŠNEK/ROTOR:
Šířka čištění 73,6 cm (29 palce)
Vstupní výška 53,3 cm (21 palce)
Průměr šneka/rotoru 30,5 cm (12 palce)
Počet nožů rotoru 3
ŽLAB:
Deflektor žlabu Manuální
Rotace žlabu Dálková - Hřídel upevněná na panelu 190° (3,5 otoček)
SYSTÉM POHONU:
Typ pohonu Frikční disky - Závěs uzamčení trakce
Rychlosti 6 vpřed, 2 zpět
Velikost pneumatik 40,6 x 12,2 cm (16 x 4,8 palce)
Nafukování pneumatik Pro řádné nafukování viz strana pneumatiky.
INFORMACE O VÝKONU MOTORU
*Hodnocení výkonu jednotlivých modelů motorů je v souladu s kodexem SAE (Society of Automotive Engineers) J1940 (Postupy pro hodnocení
výkonu malých motorů) a hodnocení bylo obdrženo a upraveno v souladu s SAE J1995 (Revize 2002-05). Hodnoty napětí jsou získané při 3060
otáčkách za minutu, hodnoty v koních jsou získané při 3600 otáčkách za minutu. Skutečný výkon motoru bude nižší, mimo jiné na něj budou mít
vliv okolní podmínky a drobné rozdíly mezi jednotlivými motory. Vzhledem k širokému množství výrobků, se kterými motory používají, a množství
prostředí, kde fungují, motor při použití s určitým zařízením nedosáhne hrubý výkon, ke kterému byl klasifikován (skutečný
„
na pracovišti“ nebo
čistý výkon). Tento rozdíl je výsledkem celé řady faktorů včetně, ale bez omezení na, dalších částí (čistič vzduchu, výfuk, nabíjení, chlazení,
karburátor, palivová pumpa, atd.), aplikace omezení, okolních podmínek (teplota, vlhkost, nadmořská výška) a rozdílů mezi jednotlivými motory.
Vzhledem k omezením výroby a kapacity může společnost Briggs & Stratton motor nahradit silnějším motorem stejné série.
TECHNICKÉ ÚDAJE
Page 52

www.murray.com30
Page 53

9
INHALT
Abbildungen...........................................................................................3
Arbeitsschutz ........................................................................................10
Montage ..............................................................................................16
Funktionen und Steuerungen .....................................................................17
Bedienung............................................................................................19
Wartung ..............................................................................................24
Fehlersuche und -behebung ......................................................................27
Warranty..............................................................................................28
Technische Daten ...................................................................................29
Allgemeine Informationen
Vielen Dank, dass Sie sich für den Kauf dieser qualitativ hochwertigen Schneefräse von MURRAY entschieden haben und Ihr Vertrauen
auf unsere Marke gesetzt haben. Bedienen und warten Sie das Produkt gemäß den Angaben dieser Bedienungsanleitung, damit ein
zuverlässiger und jahrelanger Betrieb gewährleistet ist.
Dieses Handbuch beinhaltet Sicherheitsinformationen, um Ihnen die Gefahren und Risiken im Zusammenhang mit Schneefräsen
bewusst zu machen, und Ihnen zu vermitteln, wie man sie vermeidet. Diese Schneefräse wurde zur Räumung von Schnee entwickelt
und sollte zu keinem anderen Zweck verwendet werden. Es ist wichtig, dass Sie sich diese Bedienungsanleitung durchlesen und sie
verstehen, bevor Sie die Maschine in Betrieb nehmen oder nutzen. Bewahren Sie diese Anleitungen für späteres Nachschlagen auf.
CE Identifikationsetikett Produktdaten
Geben Sie den Namen und die Nummer des Modells, die
Identifikationsnummern des Herstellers und die Seriennummern
des Motors in den entsprechenden Feldern an. Diese Nummern
stehen auf den jeweiligen abgebildeten Teilen.
Sie MÜSSEN über diese Angaben verfügen, um Ersatzteile,
Serviceleistungen oder Informationen vom zugelassenen
Fachhändler zu erhalten.
A. Indentifikationsnummer des Herstellers
B. Seriennummer des Herstellers
C. Nutzleistung in Kilowatt
D. Maximale Motorendrehzahl in Umdrehung pro Minute
E. Name und Adresse des Herstellers
F. Herstellungsjahr
G. CE-Qualitätslogo
H. Masseneinheit in Kilogramm
I. Gwährte Schalleistung in Dezibel
Part No. xxxxxxx
xxxxxxxxxxxxxxx
Serial No. xxxxxxxxxx
20xx
kW: x.xx
xxxx max
xxxxxxxxxxxxxxxxxxxxxxx
xxxxxxxxxxxxxxxxxxxxxxx
xxxxxxxxxxxxxxxxxxxxxxx
xxxxxxxxxxxxxxxxxxxxxxx
xxx
dB
kg: xxx
A
B
C
D
E
F
G
H
I
PRO DUKTDATEN
Modellbezeichnung, Name/Nummer
Nummer der Baueinheit Seriennummer
Baugruppennummer der
Schneidwerkabdeckung
Seriennummer der Schneidwerkabdeckung
Händlername Kaufdatum
MOTO RANGABE N
Motorbezeichnung Motormodell
Motortyp/Spezif. Motorkennzeichen/Seriennummer
Die Liste der abgebildeten Bauteile für diese Maschine kann unter diesem Link runtergeladen werden: www.murray.com. Bitte geben Sie
das Modell und die Seriennummer bei der Bestellung von Ersatzteilen an.
Copyright © 2010 Briggs & Stratton Power Products Group, LLC
Milwaukee, WI, USA, Alle Rechte vorbehalten.
MURRAY ist eine Handelsmarke der Gruppe Briggs & Stratton Power Products
Group, LLC Milwaukee, WI USA.
Page 54

ARBEITSSCHUTZ
www.murray.com10
Gefahrensymbole und deren Bedeutung
Rotierendes
Wurfgebäse
Steuerungssymbole auf dem Gerät
1
2
Free Hand™ Steuerung
Easy Turn™
Antriebssteuerung
HINWEIS: Nicht alle Steuerungssymbole, die auf dieser
Seite verzeichnet sind, befinden sich auf der Schneefräse.
Siehe Abschnitt FUNKTIONEN UND STEUERUNGEN
bezüglich der verwendeten Symbole.
STOP
Öl
Kraftstoff
Kraftstoffabsperrung
Choke
Aus
Choke
Ein
Ein/Aus
Stopp
Langsam
Schnell
Schneckenkupplung
Elektrischer
Start
Betrieb des
Motors
Motorstopp
Antriebssteuerung
Schneckensteuerung
Auswurfkanal
Aufwurfklappe
Beheizte
Griffe
Rotierende
Schnecke
Rotierende
Teile
Feuer
Stromschlag
Heiße
Oberfläche
Sicherheitsabstand
Rotierende
Zahnräder
Schleudernde
Gegenstände
Explosion
Toxische
Gase
Gehörschutz
Augenschutz
Bewegliche
Teile
Rückschlag
Gefährliche
Chemikalie
Vorwärts
Neutral
Rückwärts
Page 55

ARBEITSSCHUTZ
11
Das Sicherheitshinweissymbol und das Schlüsselwort
(GEFAHR, WARNUNG, ACHTUNG oder NOTIZ) werden verwendet,
um auf die potentielle und wahrscheinliche Gefahr einer
physischen Verletzung und/oder eines Schadens am Produkt
aufmerksam zu machen. Außerdem kann ein Gefahrensymbol
verwendet werden, um den Gefahrentyp darzustellen.
Sicherheitshinweissymbol und Schlüsselwörter
GEFAHR weist auf eine Gefahr hin, deren Nichtbeachtung
zum Tod oder zu schweren Verletzungen führen kann.
WARNUNG weist auf eine Gefahr hin, deren
Nichtbeachtung zum Tod oder zu schweren Verletzungen
führen könnte.
ACHTUNG weist auf eine Gefahr hin, deren
Nichtbeachtung zu leichten bis mittelschweren
Verletzungen führen könnte.
NOTIZ weist auf eine Situation hin, in der das Produkt
beschädigt werden könnte.
GEFAHR
• Direkter Kontakt mit dem rotierenden Wurfgebläse
innerhalb des Auswurfkanals ist die Hauptursache für
Verletzungen bei Schneefräsen.
• Die Schneefräse kann Gliedmaßen abtrennen und wirft
Gegenstände aus. Lesen und befolgen Sie strikt alle
Sicherheitshinweise dieses Handbuchs. Das
Nichtbeachtung dieser Hinweise kann tödliche oder
ernsthafte Verletzungen zur Folge haben.
WARNUNG
Gemäß den Erkenntnissen des Staates Kalifornien enthalten
bestimmte Bestandteile und Zubehörteile des Produkts
Chemikalien, die Krebs oder Geburtsfehler verursachen oder
die Fortpflanzungsfähigkeit beeinträchtigen können. Waschen
Sie sich nach der Handhabung die Hände.
WARNUNG
Gemäß den Erkenntnissen des Staates Kalifornien enthalten
die Motorabgase dieses Produkts Chemikalien, die Krebs
oder Geburtsfehler verursachen oder die
Fortpflanzungsfähigkeit beeinträchtigen können.
• Sie sollten bei der Nutzung der Schneefräse mit den Steuerungen vertraut
sein.
• Sorgen Sie dafür, dass Sie vor Nutzung der Schneefräse entsprechend
geschult wurden.
• Sie müssen wissen wie Sie die Einheit und die Steuerungen schnell
ausschalten können.
• Lassen Sie niemals die Schneefräse ohne entsprechende Einweisung
betreiben.
• Folgen Sie bei längerer Lagerung der Schneefräse den Anweisungen des
Handbuchs.
• Behalten oder ersetzen Sie bei Notwendigkeit die Sicherheitshinweise und
Beschriftungen.
• Versuchen Sie niemals größere Reparaturen an der Schneefräse
vorzunehmen, es sei denn Sie wurden entsprechend ausgebildet. Der
unsachgemäße Gebrauch der Schneefräse kann zu gefährlichen Situationen,
zur Schädigung der Anlage und zum Verlust der Gewährleistung führen.
GEFAHR
L
esen und befolgen Sie alle Anweisungen auf der
Schneefräse und im Handbuch vor Bedienung dieser
Maschine.
Die Nichtbeachtung der Sicherheitshinweise dieses
Handbuchs kann zum Tod oder zu schweren Verletzungen
führen.
Lesen Sie das Handbuch
REINIGEN EINES VERSTOPFTEN AUSWURFKANALS
G
EFAHR: Direkter Kontakt mit dem rotierenden Wurfgebläse innerhalb
des Auswurfkanals ist die Hauptursache für Verletzungen bei
Schneefräsen. Reinigen Sie den Auswurfkanal niemals mit der Hand.
FOLGEN SIE DIESEN ANWEISUNGEN:
1. Stellen Sie den Motor AUS.
2. Warten Sie 10 Sekunden, damit sichergestellt ist, dass die Gebläseblätter
nicht mehr rotieren.
3. Verwenden Sie immer ein Reinigungswerkzeug, nicht die Hände.
GEFAHR
D
er Auswurfkanal verfügt über einen rotierendes
Wurfgebläse um Schnee auszuwerfen. Reinigen oder
beseitigen Sie den Schmutz nie direkt mit Ihren Händen im
Auswurfkanal. Ihre Finger könnten schnell im Gebläse
eingequetscht werden. Verwenden Sie immer ein
Reinigungswerkzeug.
D
ie Nichteinhaltung dieser Sicherheitshinweise kann dazu
führen, dass Gliedmaßen abgeschnitten oder schwer verletzt
werden.
Auswurfkanal
Page 56

BEI DER TANKFÜLLUNG
• Stellen Sie den Motor aus und lassen Sie diesen für mindestens 3 Minuten
abkühlen, bevor Sie den Tankdeckel entfernen und Kraftstoff einfüllen.
• Füllen Sie den Tank an einem gut ventilierten Ort oder draußen auf.
• Überfüllen Sie den Kraftstofftank nicht. Füllen Sie den Kraftstoff nicht
überhalb der Markierung am Tankstutzen auf, damit sich das Benzin
ausdehnen kann.
• Halten Sie den Kraftstoff von Zündquellen, offenem Feuer, Zündflammen,
Hitze oder anderen Glühherden fern.
• Überprüfen Sie die Kraftstoffleitungen, den Deckel und Dichtungen
regelmäßig auf Brüchigkeit und Durchlässiglkeit. Wechseln Sie die Teile
gegebenenfalls aus.
• Verwenden Sie einen zugelassenen Kraftstoffbehälter.
• Sollte der Kraftstoff auslaufen, warten Sie ab bis dieser verdunstet ist und
starten Sie erst dann den Motor.
BEIM STARTEN DES MOTORS
• Stellen Sie sicher, dass die Zündkerze, der Schalldämpfer, der Tankdeckel
und der Luftfilter (je nach Ausstattung) fest eingesetzt sind.
• Machen Sie den Motor ohne Zündkerze nicht an.
• Sollte der Kraftstoff auslaufen, so starten Sie die Maschine nicht, sondern
entfernen die Schneefräse aus dem Bereich und vermeiden Sie jegliche
Zündquelle bis der Kraftstoff verdunstet ist.
• Der Motor sollte nicht zu stark ansaugen. Folgen Sie den Anweisungen
dieses Handbuchs bezüglich des Motorstarts.
• Sollte der Motor abwürgen, stellen Sie den Choke (falls vorhanden) auf die
Position OFFEN/START, bewegen Sie den Hebel (falls vorhanden) in die
Position SCHNELL und lassen Sie den Motor an.
BEIM BEDIENEN DER MASCHINE
• Stellen Sie die Schneefräse so ab, dass kein Kraftstoff auslaufen kann.
• Drosseln Sie nicht den Vergaser ab, um den Motor abzustellen.
• Starten Sie niemals den Motor wenn der Luftreiniger (falls vorhanden) oder
der Luftfilter (falls vorhanden) entfernt worden sind.
BEIM ÖLWECHSEL
• Sollten Sie über die obere Ölleitung das Öl ableiten lassen, so muss der
Kraftstofftank leer sein, da ansonsten Kraftstoff auslaufen kann und somit
Feuer- und Explosionsgefahr besteht.
BEIM TRANSPORT DER MASCHINE
• Transportieren Sie die Maschine mit einem LEEREN Tank oder mit dem
Tankventil auf AUS.
BEIM LAGERN VON BENZIN ODER DER MASCHINE MIT KRAFTSTOFF
IM TANK
• Die Lagerung findet immer außerhalb der Reichweite von Brennöfen,
Heuzöfen, Wasserkochern oder anderen Geräten, die über eine Zündflamme
oder andere Glühquellen verfügen die die Kraftstoffdämpfe anzünden
könnten.
GEFAHR
D
er Kraftstoff und die Dämpfe sind leicht entzündbar und es
besteht Exposionsgefahr. Gehen Sie besonders sorgfältig mit
dem Kraftstoff um.
Die Nichtbeachtung dieser Sicherheitshinweise kann Ursache
eines Feuer oder einer Explosion sein, die Branndschäden
und Todesfälle mit sich führen könnten.
Handhabung des Kraftstoffs
• Im Betriebsbereich sollten sich keine Personen, besonders keine Kleinkinder
und Tiere aufhalten.
• Überprüfen Sie, dass sich im Arbeitsbereich der Schneefräse keine
Fußabtreter, Schlitten, Bretter, Kabel oder andere Fremdkörper befinden und
entfernen Sie diese gegebenfalls.
• Verwenden Sie die Schneefräse nicht ohne entsprechende Winterkleidung zu
tragen.
• Tragen Sie festes Schuhwerk, das für eine sichere Trittfestigkeit auf glatten
Oberflächen sorgt.
• Arbeiten Sie vorsichtig und vermeiden Sie somit, dass Sie ausrutschen oder
fallen, besonders wenn Sie die Schneefräse im Rückwärtsgang betätigen.
• Verwenden Sie niemals die Schneefräse bei schlechten Sichtverhältnissen.
Ziehen Sie immer festes Schuhwerk an und halten Sie die Griffe fest.
• Entfernen Sie mit der Schneefräse keinen Schnee an einer Böschung. Seien
Sie sehr vorsichtig beim Richtungswechsel an Abhängen. Räumen Sie keinen
Schnee an steilen Abhängen.
• Überlasten Sie die Maschinenleistung nicht indem Sie zu schnell den Schnee
räumen.
• Betreiben Sie die Maschine auf glatten Oberflächen niemals bei hoher
Geschwindigkeit. Bei Betätigung des Rückwärtsganges ist es wichtig, dass
Sie in Fahrtrichtung schauen.
• Verwenden Sie die Schneefräse auf Flächen, die sich unterhalb von Dächern,
Garagendächern oder ähnlichen Gebäuden befinden.
• Die Nutzer der Schneefräse sollten das Gerät sicher handhaben, um somit
sich und andere nicht zu verletzten.
• Die Schneefräse dient lediglich der Räumung von Schnee. Verwenden Sie
daher die Schneefräse nicht für andere Zwecke.
• Transportieren Sie damit keine Personen.
• Bei Kontakt mit einem Fremdkörper, schalten Sie den Motor sofot AUS,
ziehen Sie den Stecker, untersuchen Sie die Maschine auf Schäden und
beheben Sie Schäden bevor Sie die Schneefräse erneut in Betrieb nehmen.
• Schalten Sie den Motor AUS, wenn die Schneefräse ungewöhnlich vibriert.
Die Vibration ist in der Regel ein Warnhinweis. Setzen Sie sich für die
Reparatur mit einem Vertragshändler in Verbindung.
• Bei Modellen, die über einen elektrischen Startmotor verfügen, ziehen Sie
nach dem Anschalten das Stromkabel.
GEFAHR
Beachten Sie die Sicherheitshinweise genau. Wird die
Schneefräse nicht gemäß den Angaben genutzt oder nicht
ordnungsgemäß gewartet, so kann dies zu gefährlichen
Situationen führen. Denken Sie daran, dass Sie für Ihre
Sicherheit und die Ihres Umfelds verantwortlich sind.
Arbeitsschutz und Sicherheitsausrüstung
ARBEITSSCHUTZ
www.murray.com12
Page 57

• Während des Betriebs sollten keine Kinder in der Nähe sein. Kinder sind
häufig an Maschinen interessiert. Seien Sie sich der anwesenden Personen
bewußt.
• Seien Sie vorsichtig und schalten Sie die Maschine ab, wenn Kinder in der
Nähe sind.
• Lassen Sie das Gerät nie von Kindern betreiben.
• Seien Sie besonders vorsichtig, wenn Sie sich unübersichtlichen Ecken,
Büschen, Bäumen oder anderen Gegenständen nähern, die den Blick
behindern. Es könnten Kinder anwesend sein.
GEFAHR
D
er Nutzer sollte auf die Anwesenheit von Kindern achten,
um tragische Unfälle zu vermeiden. Kinder sind häufig an
Maschinen und deren Betrieb interessiert. Nehmen Sie
niemals an, dass Kinder dort bleiben, wo Sie sie zuletzt
gesehen haben.
Kinder
• Starten und Bedienen der Maschine im Freien.
• Verwenden Sie die Maschine nicht in geschlossenen Räumen, auch wenn
Türen und Fenster geöffnet sind.
GEFAHR
D
er Motor stößt Kohlenmonoxid aus, ein geruchloses,
farbloses und giftiges Gas.
W
ird Kohlenmonoxid eingeatmet, kann dies zu Übelkeit,
Ohnmacht oder dem Tod führen.
Sicherheitshinweise beim Motor
• Stellen Sie die Kupplung auf Leerlauf bevor Sie den Motor starten.
• Warten Sie bis sich der Motor an die Außentemperaturen angepasst hat,
bevor Sie den Schnee räumen.
• Verwenden Sie einen geerdeten Dreiphasenstecker für alle Schneefräsen, die
mit einem elektrischen Antriebsmotor oder einem elektrischen Starter
ausgestattet sind.
GEFAHR
D
ie sichere Handhabung von Schneefräsen benötigen eine
entsprechende Wartung des Motors. Die Nichtbeachtung
der Sicherheitshinweise dieses Handbuchs kann zum Tod
oder zu schweren Verletzungen führen.
• Ziehen Sie immer eine Schutz- oder Sicherheitsbrille während der
Handhabung und während der Einstellungs- oder Wartungsarbeiten an.
• Beachten Sie immer die Richtung in die der Schnee ausgeworfen wird.
Passanten, Tiere oder Eigentum können durch schleudernde Gegenstände
verletzt bzw. beschädigt werden.
• Beachten Sie immer Ihre Umgebung bei der Benutzung der Schneefräse.
Wenn Sie über Gegenstände die im Schnee versteckt liegen fahren, wie z.B.
Schotter, Fußabtreter, Zeitungen, Spielsachen und Steine, dann können diese
durch den Auswurfkanal geschleudert werden oder die Schnecke blockieren.
• Gehen Sie äußerst vorsichtig vor, wenn Sie auf Wegen, Pfade oder Straßen
aus Schotter arbeiten oder diese überqueren.
• Stellen Sie die Höhe des Sammlgehäuses auf Räumung von Schotter oder
Kiesoberflächen ein.
• Betreiben Sie die Schneefräse niemals in der Nähe von Wintergärten aus
Glas, Fahrzeugen, Schaugläser, Abfalltonnen und ähnliches ohne vorher den
Auswurf entsprechend einzustellen.
• Machen Sie sich mit dem Gebiet vertraut in dem Sie die Schneefräse
verwenden werden. Entfernen Sie Umzäunungen von Geh- und Fahrwege.
GEFAHR
Gegenstände können sich in der Schnecke verfangen und
vom Auswurf weggeschleudert werden. Werfen Sie den
Schnee niemals auf Passanten auf und sorgen Sie dafür,
dass niemand vor der Schneefräse steht. Die
Nichtbeachtung der Sicherheitshinweise dieses Handbuchs
kann zum Tod oder zu schweren Verletzungen führen.
Schleudernde Gegenstände
• Versichern Sie sich beim Reinigen, Reparieren oder Überprüfen der
Schneefräse, dass der Motor AUSGESCHALTET ist, das Zündkerzenkabel
nicht angeschlossen ist und kein Teil sich bewegt.
• Halten Sie sich von rotierenden Teilen fern. Halten Sie sich immer von der
Auswurföffnung fern.
• Betreiben Sie die Schneefräse niemals ohne geeignete Schutzgitter oder
weiteren Sicherheitsvorkehrungen an der Maschine und im Arbeitsbereich.
• Lassen Sie niemals die Schneefräse unbeaufsichtig, wenn der Motor
angestellt ist. Kuppeln Sie immer die Schnecke und die Zugsteuerungen aus,
schalten Sie den Motor ab und entfernen Sie die Schlüssel.
• Halten Sie alle lockeren Kleidungsstücke vom vorderen Bereich der
Schneefräse und der Schnecke fern. Lockere Kleidungsstücke, Schals,
Handschuhe, Schnüre und Hosen können sich schnell in rotierende Teile
verfangen und somit ernsthafte Verletzungen zur Folge haben. Lange Haare
sollten hochgesteckt und Schmuck ausgezogen werden.
• Lassen Sie die Maschine nach der Schneeräumung einige Minuten
weiterlaufen, um ein Einfrieren des Sammlers/Gebläserades zu verhindern.
• Schalten Sie die Stromzufuhr zum Sammler/Gebläserad aus, wenn die
Schneefräse transportiert oder nicht betrieben wird.
GEFAHR
H
alten Sie Körperteile und Kleidungsstücke von den
rotierenden Teilen fern. Die rotierenden Teile können mit den
Händen, Füßen, dem Haar, den Kleidungsstücken oder
ähnlichem in Kontakt kommen oder diese einklemmen.
D
ie Nichteinhaltung dieser Sicherheitshinweise kann dazu
führen, dass Gliedmaßen abgeschnitten oder schwer verletzt
werden.
Bewegliche Teile
ARBEITSSCHUTZ
13
Page 58

ARBEITSSCHUTZ
www.murray.com14
• Bei Wartung oder Reparatur der Schneefräse, schalten Sie den Motor AUS,
ziehen Sie den Stecker heraus und sorgen Sie dafür, dass es keine Möglickeit
gibt den Stecker versehentlich einzustecken und somit den Motor zu starten.
• Überprüfen Sie regelmäßig die Scherbolzen und weitere Bestandteile auf
Undurchlässigkeit, damit das Gerät sicher in Betrieb genommen werden kann.
• Halten Sie Muttern und Schrauben fest angezogen und achten Sie auf den
guten Zustand der Schneefräse.
• Hantieren Sie niemals an den Sicherheitsvorrichtungen. Überprüfen Sie deren
einwandfreien Betrieb regelmäßig und nehmen Sie die nötigen Reparaturen
vor, wenn sie nicht ordnungsgemäß funktionieren.
• Die Bestandteile unterliegen Abnutzung, Schäden und Alterung. Überprüfen
Sie die Bestandteile regelmäßig und ersetzen Sie sie wenn nötig durch vom
Hersteller empfohlene Teile.
• Überprüfen Sie den Betrieb häufig. Nehmen Sie Einstellungen und
Wartungsarbeiten wie vorgeschrieben vor.
• Verwenden Sie nur vom Hersteller genehmigte Ersatzteile, wenn Sie
Reparaturen vornehmen.
• Halten Sie sich bei allen Einstellungen und Ausrichtungen immer an die
Herstellerangaben.
• Es sollten nur zugelassene Dienstleister für größere Wartungsarbeiten und
Reparaturen hinzugezogen werden.
• Verwenden Sie nur die vom Hersteller zugelassenes Ersatzteile (wie
Radgewichte, Ausgleichsgewichte oder Führerhäuser).
• Versuchen Sie niemals jegliche Einstellungen bei laufendem Motor
vorzunehmen (es sei denn dies wird speziell durch den Hersteller empfohlen).
• Lassen Sie kein Fett oder Öl auf den Fahrantrieb oder die Friktionsscheibe
tropfen. Wenn Fett oder Öl auf den Fahrantrieb oder die Friktionsscheibe
tropfen, kann dies zu Schäden an der Friktionsscheibe führen.
WARNUNG
D
iese Schneefräse muss einwandfrei gewartet werden, um so
die Sicherheit bei Betrieb zu gewährleisten. Die
Nichtbeachtung der Sicherheitshinweise dieses Handbuchs
kann zum Tod oder zu schweren Verletzungen führen.
Wartung und Lagerung
-
• Besteht die Gefahr der Ausströmung von Flüssig- oder Naturgas, so sollte
der Motor nicht gestartet werden.
• Verwenden Sie keine Starthilfe-Sprays, da deren Dämpfe leicht entzündbar sind.
WARNUNG
B
eim Starten des Motors entstehen Funken.
Die Funken können entflammbare Gase anzünden.
Es können Explosionen oder Feuer entstehen.
• Berühren Sie niemals einen heißen Motor oder Schalldämpfer. Lassen Sie
den Schalldämpfer, die Zylindern und die Rippen des Kühlers abkühlen,
bevor Sie sie anfassen.
• Entfernen Sie die Ablagerungen am Schalldämpfer und am Zylinder.
• Installieren und verwenden Sie einen Funkenfänger bevor Sie das Gerät in
Gelände wie Wald, Wiese oder Dickicht verwenden.
• Der Einsatz des Motors auf Wald-, Busch- oder Grasland verstößt gegen das
kalifornische Gesetz (public resource code, section 4442), wenn die
Auspuffanlage nicht mit einem vorgeschriebenen betriebsfähigen
Funkenfänger ausgestattet ist. In anderen Bundesstaaten können ähnliche
Gesetze gelten. Einen passenden Funkenfänger für die an diesem Motor
installierte Auspuffanlage finden Sie beim Gerätehersteller oder Händler.
WARNUNG
D
er Betrieb des Motors verursacht Wärme. Teile des Motors,
besonders der Schalldämpfer, können sehr heiß werden.
D
ie Nichteinhaltung dieser Sicherheitshinweise kann zu
Brandwunden bei direktem Kontakt führen.
Sicherheitshinweise beim Motor (fortgesetzt)
GEFAHR: BEDIENUNGSANLEITUNG
LESEN.
Lesen Sie zur Inbetriebnahme
das Handbuch und die
Sicherheitshinweise.
GEFAHR: GEFAHR DURCH
SCHLEUDERNDE GEGENSTÄNDE.
Drehen Sie den Aufwurfkanal
niemals in Richtung von Personen
oder Eigentum. Halten Sie sicheren
Abstand zu Passanten.
GEFAHR: VOR WARTUNGSARBEITEN
SCHLÜSSEL ENTFERNEN.
Schalten Sie den Motor ab und
entfernen Sie den Schlüssel,
bevor Sie Wartungs- oder
Reparaturarbeiten durchführen.
GEFAHR: GEFAHR DER
AMPUTATION.
Der direkte Kontakt mit der
Schnecke kann zu schweren
Verletzungen führen. Halten Sie
Körperteile und Kleidung fern.
Halten Sie sicheren Abstand zu
Passanten.
GEFAHR: GEFAHR DER
AMPUTATION.
Der Kontakt mit den beweglichen
Teilen im Inneren des Auswurfkanals
führt zu schweren Verletzungen.
Schalten Sie den Motor ab, bevor
Sie den Auswurfkanal reinigen.
Verwenden Sie dafür ein spezielles
Reinigungswerkzeug, niemals mit
den Händen direkt arbeiten!
SICHERHEITSYMBOLE
Page 59

Sicherheitsschilder
Beachten Sie dieses Symbol, dass wichtige
Sicherheitsmaßnahmen anzeigt. Dieses Symbol
bedeutet: „Hinweis! Warnung! Ihre Sicherheit ist nicht
mehr gewährleistet.“
WARNUNG: Sollte ein Sicherheitsschild abgenutzt oder
beschädigt werden und somit nicht lesbar, sollten Sie
Ersatzschilder von Ihrem Händler vor Ort anfordern.
ARBEITSSCHUTZ
Bevor Sie die Schneefräse nutzen, lesen Sie die
Sicherheitsschilder auf Ihrem Gerät. Die Warnungen und
Hinweise dienen Ihrer Sicherheit. Um Verletzungen oder
Schäden durch oder an Ihrer Schneefräse zu vermeiden,
folgen Sie alle Sicherheitshinweise auf den Schildern.
15
Artikelnr. 1736616
Schaltschild
Artikelnr. 1737870
Schild: Schlupfregelung
Artikelnr. 1727207
Symbole zur Steuerung
des Auswurfs
Artikelnr. 1737867
Symbole zur Steuerung der Schnecke
Aufkleber mit der
Produkt- Kennnummer und Seriennumer
(Hinterer Teil des
Motorblocks)
Motorwarnsymbole
Artikel-Nr. 276925
1
2
Artikelnr. 1737876
Hauptaufkleber
Page 60

ÜBERPRÜFUNG DER REIFEN
Überprüfen Sie die Reifen auf Schäden. Überprüfen Sie den Reifendruck
mit einem entsprechendem Druckmesser. Entnehmen Sie an der Seite des
Reifens den richtigen Druckwert.
VORSICHT: Vermeiden Sie Verletzungen! Bei der
Trennung von Reifen und Felge kann es zur Explosion
kommen, wenn die Arbeiten nicht richtig
vorgenommen werden.
• Versuchen Sie nicht ohne entsprechender Ausrüstung
und Erfahrung einen Reifen aufzuziehen.
• Pumpen Sie die Reifen nicht unter dem empfohlenen
Druckwert auf.
• Schweißen oder erhitzen Sie nicht das Rad oder die
Zubehörteile. Hitze kann den Luftdruck erhöhen und
hierduch kann eine Explosion hervorgerufen werden.
Das Schweißen kann das Rad verbiegen oder verformen.
• Stellen Sie sich beim Aufpumpen nicht vor oder auf das
Rad. Verwenden Sie zugehörige Werkzeige, die es
Ihnen ermöglichen an einer Seite zu stehen.
HINWEIS: Überprüfen Sie an der Seite auf maximalen
Reifendruck. Überschreiten Sie diesen Maximalwert NICHT.
MONTAGE
ZUR MONTAGE BENÖTIGTE WERKZEUGE
1 – Messer
2 – 1/2 Zoll Schlüssel (oder Verstellschlüssel)
1 – 7/16 Zoll Schlüssel (oder Verstellschlüssel)
1 – Schlüssel (oder Verstellschlüssel)
1 – Biegezange oder Schraubenzieher (zum Spannen mit dem Splint)
1 – Hammer
1 – Montiereisen
ÜBERPRÜFUNG DER KABELVERBINDUNGEN UND
EINSTELLUNG
Der Seilzug des Fahrantriebs (A, Abbildung 5) und der Seilzug zum
Fräswekantrieb (B
) sind vom Werk her eingestellt und es ist keine weitere
Einstellung nötig.
Sollten sich die Seilzüge überdehnen, lösen oder durchbiegen, ist eine
Einstellung notwendig. Siehe den Abschnitt WARTUNG dieses Handbuchs.
EINBAU DER REGELSTANGE FÜR GESCHWINDIGKEIT
Befestigen Sie das Kugelgelenk (A, Abbildung 4), dass sich am unteren
Ende der Regelstange für Geschwindigkeit (B
) befindet, an das Bauteil
Gabelschaltung (C
) mit einem 5/16 Zoll Sicherungsring (D) und einer
5/16 Zoll Mutter (E
).
WARNUNG: Ziehen Sie immer eine Schutz- oder
Sicherheitsbrille während der Montage der
Schneefräse an.
AUSPACKEN DER SCHNEEFRÄSE
1. Verwenden Sie ein Messer, schneiden Sie entlang der gepunkteten
Linien auf der oberen Seite des Kartons. Entfernen Sie dann den
oberen Teil des Kartons gemäß der Abbildung 1.
2. Verwenden Sie ein Messer und schneiden Sie entlang der gepunkteten
Linien auf der unteren Seite des Kartons.
3. Drücken Sie die Schneefräse aus dem Karton raus und beginnen Sie
mit der Montage.
INHALT DES ERSATZTEILBEUTELS
1 – Satz Scherbolzen, 1/4-20 x 1-3/4 Zoll
1 – Beutel mit Scherbolzen
1 – Schraube, 1/4-20 x 1-3/4 Zoll
1 – Unterlegscheibe, Muffe, 1/4 Zoll
1 – Sechskantstellmutter, 1/4-20
HINWEIS: „Rechts“ und „Links“ gilt von der
Benutzerposition aus.
MONTAGE DER GRIFFE
1. Heben Sie die oberen Griffe (A, Abbildung 2) in Bedienungsposition.
2. Führen Sie die Regelstange für Geschwindigkeit über das Rad.
3. Entfernen Sie das blaue Versandtband von den Kabeln und schneiden
Sie schneiden Sie die orangenen Kabelbinder auf, die dazu dienen die
Steuerungskabel zur Handhabung der Montage und der rotierenden
Teile des Auswurfs sichern.
HINWEIS: Sicherstellen, dass die „Z“-förmig gebogenen
Schalthebel-Kabel in den Bohrungen an den Schalthebeln
gesichert sind (A, Abbildung 3). Beschädigen oder schneiden
Sie hierbei nicht in die Steuerungskabel. Stellen Sie sicher,
dass die Kabel nicht zwischen dem oberen und den unteren
Griff eingeklemmt werden.
4. Führen Sie zwei Flachrundschrauben (B
, Abbildung 2) in die unteren
Öffnungen ein und ziehen Sie diese mit zwei 5/16 Zoll
Sicherungsmuttern (C
). Ziehen Sie alle vier Flachrundschrauben und
Muttern mit einem 1/2 Zoll Schlüssel oder einem langem
Steckschlüsseleinsatz an.
16 www.murray.com
MONTAGE DES AUSWURFKANALS UND DER
DREHKURBEL
Anleitungen dafür entnehmen Sie der Abbildung 6.
Page 61

FUNKTIONEN UND STEUERUNGEN
STEUERUNG DER SCHNEEFRÄSE
A. Geschwindigkeitshebel — Ermöglicht dem Nutzer die Auswahl
zwischen sechs (6) Vorwärts- und zwei (2) Rückwärtgeschwindigkeiten.
Zum Schalten, bewegen Sie den Geschwindigkeitshebel in die
gewünschte Position.
HINWEIS: Bewegen Sie den Geschwindigkeitshebel nicht,
wenn das Kupplung eingerastet ist. Dies kann das
Antriebssystem schwer beschädigen.
B. Hebel der Schneckensteuerung — Er wird verwendet um die
Schnecke und das Gebläse ein- und auszuschalten. Zum Einschalten
runterdrücken, zum Ausschalten zurückschalten.
C. Drehkurbel des Auswurfschachts — Sie wird verwendet, um den
Auswurfschacht nach rechts oder links zu drehen.
D. Flügelmutter des Kanalleitblechs — Sie wird verwendet, um
den Winkel des Kanalleitblechs zu bestimmen (herauf oder runter).
E. Free-Hand™ Steuerung — Nach dem Anschalten der
Antriebssteuerung (linke Hand) und der Schneckensteuerung (rechte
Hand), kann der Nutzer den Hebel der Schneckensteuerung loslassen
und andere Steuerungen vornehmen.
F. Hebel des Anstriebssteuerung — Er wird verwendet, um den
Auswurf vorwärts oder rückwärts zu betätigen. Zum Einschalten
runterdrücken, zum Ausschalten zurückschalten.
G. Gleitkufe — Sie wird verwendet um die Gängigkeit des
Schneckengehäuses einzustellen.
H. Reinigungswerkzeug — Es wird verwendet, um Schnee und
andere Rückstände vom Auswurfkanal und dem Schneckengehäuse zu
entfernen.
I. Frontscheinwerfer — Er wird verwendet, um die Schneefräser auch
bei schlechten Lichtverhältnissen zu nutzen.
Steuerungen der Schneefräse
17
B
A
C
F
1
2
E
G
H
D
I
Page 62

FUNKTIONEN UND STEUERUNGEN
MOTORSTEUERUNGEN
A. Chokeregelung — Sie wird genutzt um einen kalten Motor zu
starten.
B. Elektrischer Startknopf — Er wird verwendet, um die Maschine mit
einem elektrischen Anlasser zu starten.
C. Primer — Er wird verwendet, um direkt Startkraftstoff an den
Ansaugstutzen zu liefern und einen schnellen Start bei kaltem Wetter
ermöglicht.
D. Sicherheitsschlüssel — Er muss eingeführt werden, um den
Motor zu starten. Zum stoppen ziehen. Drehen Sie den
Sicherheitsschlüssel nicht.
E. Starter Schnur — Sie wird verwendet, um den Motor manuell zu
starten.
F. AN/ AUS Schalter (falls vorhanden) — Er wird verwendet, um
den Motor an- und auszuschalten.
G. Kraftstofftank und Deckel — Füllen Sie den Tank bis ungefähr
38 mm (1-1/2 Zoll) unterhalb des Stutzens, um eine Ausdehnung zu
ermöglichen.
H. Öleinfüllung Deckel (verlängerter Messstab)
Motorsteuerungen
C
H
A
F
E
B
G
STOP
D
18 www.murray.com
Page 63

19
BEDIENUNG
HANDHABUNG DER SCHNEEFRÄSE
VORSICHT: Nutzung mit einem Führersitz. Der Wind kann
eventuell Abgase zum Nutzer wehen. Sollten Sie Abgase
riechen, nehmen Sie einen Richtungswechsel vor.
HINWEIS: Lassen Sie immer zuerst den Hebel der
Antriebssteuerung los, bevor Sie den
Geschwindigkeitsauswahlhebel betätigen.
3. Lockern Sie die Flügelmutter (A, Abbildung 8) an der Seite des
Auswurfkanals, um den Winkel (hoch und runter) des Auswurfs zu
bestimmen. Siehe
Auswurfkanal und Lenkblech
in diesem Abschnitt.
4. Drücken Sie den Frässchnecken-Steuerhebel bis zu Anschlag durch
und halten Sie ihn gedrückt (B
, Abbildung 7), um die drehende
Schnecke anzuhalten. Durch das Loslassen des FrässchneckenSteuerhebels rastet die Schnecke nicht aus - es sei denn, die
Free-Hand™ Steuerung ist aktiviert.
5. Drücken und halten Sie bis zum Anschlag den Hebel des
Fahrantriebes/Free-Hand™ Steuerung (C
), um den Fahrantrieb
einzukuppeln. Anschließend bewegen Sie die Schneefräse. Um den
Fahrantrieb auszukuppeln, lassen Sie den Hebel ganz los.
6. Werden BEIDE Hebel heruntergedrückt, ist die Free-Hand™ Steuerung
aktiviert. Dadurch können Sie den Frässchnecken-Steuerhebel
loslassen, um andere Steuerungen zu betätigen. Die Schnecke
dreht sich so lange weiter, bis Sie den Hebel des Fahrantriebes/
Free-Hand™ Steuerung losgelassen haben.
VORSICHT: Versichern Sie sich vor Inbetriebnahme,
dass vor der Schneefräse keine Hindernisse oder
Personen stehen.
HINWEIS: Werfen Sie keinen Schnee in die Richtung eines
Gebäudes, da sich Gegenstände im Schnee befinden könne,
die Schaden verursachen könnten.
1. Starten Sie den Motor. Siehe
Starten Sie den Motor
in diesem
Abschnitt.
2. Wenden Sie die Drehkurbel des Auswurfschachts (A
, Abbildung 7)
um die Richtung (links oder rechts) des Aufwurfkanals festzusetzen.
Siehe
Auswurfkanal und Lenkblech
in diesem Abschnitt.
WARNUNG
SICHERHEITSTESTS AN DER SCHNEEFRÄSE
Test 1 – Schnecke/Gebläserad
• Die Steuerung des Fräswerks (rechts) loslassen.
• Schnecke/Gebläserad stoppt in weniger als 5 Sekunden.
Test 2 – Fahrantrieb
• Die Antriebssteuerung (links) loslassen.
• Die Vorwärts-/Rückwärtsbewegung stoppt.
Test 3 – Freihand-Steuerung (falls vorhanden)
• Die Steuerung des Fräswerks und die antriebssteuerung einrasten.
• Das Loslassen der Steuerung des Fräswerks und anschließend der
Antriebssteuerung (a) stoppt Schnecke/Gebläserad in weniger als 5
Sekunden und (b) stoppt die Vorwärts-/Rückwärtsbewegung der
Schneefräse.
GEFAHR
Der Auswurfkanal verfügt über ein rotierendes
Wurfgebäse um Schnee auszuwerfen. Reinigen oder
beseitigen Sie den Schmutz nie direkt mit Ihren
Händen im Auswurfkanal. Ihre Finger könnten schnell
eingequetscht werden und diese könnten abgeschnitten oder
ernsthaft verletzt werden. Verwenden Sie also immer ein
entsprechendes Werkzeug, um den Auswurfkanal zu reinigen
oder Schmutz zu beseitigen.
• Handkontakt mit dem rotierenden Gebläserad im Inneren
des Auswurfkanals ist die häufigste Ursache von
Verletzungen im Zusammenhang mit Schneefräsen.
• Diese Schneefräse kann Gliedmaßen abtrennen und wirft
Gegenstände aus. Lesen und befolgen Sie strikt alle
Sicherheitshinweise dieses Handbuchs. Das
Nichtbeachtung dieser Hinweise kann tödliche oder
ernsthafte Verletzungen zur Folge haben.
VOR INBETRIEBNAHME DER SCHNEEFRÄSE
Prüfen Sie die Befestigungen. Stellen Sie sicher, dass diese
fest sind.
Bei Modellen mit elektrischem Start, wird das Gerät mit dem
Starterkabel, das an der Maschine angeschlossen ist,
geliefert. Bevor die Inbetriebnahme erfolgt, nehmen Sie den
Stecker des Starterkabels raus.
HINWEIS: Diese Schneefräse wurde MIT ÖL im Motor verschickt.
Siehe die Anleitung im Abschnitt Ölstand überprüfen (Vor
Starten des Motors) vor dem Starten des Motors.
Page 64

BEDIENUNG
20 www.murray.com
7. Verwenden Sie den Geschwindigkeitshebel (D) um die
Vorwärtsgeschwindigkeit auszuwählen. Stellen Sie den
Geschwindigkeitshebel auf eine der folgenden Positionen ein, je nach
Schneebedinungen:
1-2 Feucht, schwer, matschig, extratief
3 Mäßig
4-5 Sehr leicht
6 Transport
HINWEIS: Sollte es sich bei der Räumung um nassen und
schweren Schnee handeln, dann empfehlen wir die
Geschwindigkeit zu reduzieren, das Fahrzeug nicht zu drossel
und nicht die volle Breite des Fahrzeugs zu räumen.
8. Um nicht weiter nach vorne zu fahren, schalten Sie die Antriebssteuerung
aus (C
).
9. Um die Schneefräse rückwärts zu bewegen, stellen Sie den
Geschwindigkeitshebel in den ersten oder zweiten Rückwärtsgang ein
und schalten Sie die Antriebssteuerung ein.
AUSSCHALTEN DER SCHNEEFRÄSE
1. Lassen Sie den Frässchnecken-Steuerhebel los (B, Abbildung 7).
2. Lassen Sie den Hebel der Anstriebssteuerung los (C
).
3. Stellen Sie den EIN/AUS Schalter (A
, Abbildung 15), falls vorhanden,
auf die AUS-Position und ziehen Sie den Sicherheitsschlüssel heraus
(B
).
WARNUNG: Der Motor darf niemals in Innenräumen
oder in geschlossenen und schlecht belüfteten Räumen
angeschaltet werden. Motorabgase enthalten
KOHLENMONOXID, ein GERUCHLOSES und TÖDLICHES
Gas.
• Halten Sie Hände, Füsse, Haare und lose
Kleidungsstücke von beweglichen Teilen im
Motorantrieb und von der Schneefräse in
sicherer Entfernung.
• Die Temperatou des Schalldämpfers und des
unmittelbaren Umfeldes kann auf über 66°C
(150°F) steigen. Berührungen vermeiden.
• Kinder oder Jugendliche dürfen die Schneefräse
NICHT bedienen oder sich während ihres
Betriebes in ihrer Nähe aufhalten.
WARNUNG: Lesen Sie sich vor der Inbetriebnahme die
Gebrauchanleitung aufmerksam durch. Die Maschine
kann bei nicht ordnungsgemäßen Gebrauch gefährlich
sein.
• Bedienen Sie die Schneefräse niemals ohne
Schutzgitter oder -abdeckungen.
• Die Entladungsöffnung darf während des Betriebs
niemals auf Fenster oder umstehende Personen
gerichtet werden.
• Stellen Sie den Motor ab, wenn Sie die
Betriebsposition verlassen.
• Trennen Sie die Zündkerzen bevor Sie das
Gehäuse des Gebläserads oder den
Auswurfkanal von Verstopfungen befreien und
wenn Sie irgendwelche Reparaturen oder
Einstellungen vornehmen.
• Wenn Sie die Maschine unbeaufsichtig lassen,
entfernen Sie den Sicherheitsschlüssel. Um das
Feuerrisiko zu reduzieren, halten Sie die Maschine
sauber und frei von Gas, Öl oder Schmutz.
KRAFTSCHLUSSVERRIEGELUNGSSTIFTE
Das rechte Antriebrad kann mithilfe des Verriegelungsstiftes (A,
Abbildung 9) vollständig ausgeklinkt werden. Dadurch kann die Einheit
bei ausgeschaltetem Motor leicht bewegt werden.
AUSWURFKANAL UND LENKBLECH
Auswurfkanal Rotierung (links/rechts)
1. Drehen Sie die Drehkurbel des Auswurfkanals (A
, Abbildung 7) im
Uhrzeigersinn, um den Kanal nach rechts zu drehen (siehe Abbildung
8).
2. Drehen Sie die Kurbel entgegen den Uhrzeigersinn, um den Kanal
nach links zu drehen.
3. Nachdem die gewünschte Position erreicht wurde, lassen Sie die
Kurbel los.
Lenkblech (oben/ unten)
1. Lockern Sie die Flügelmutter (A
, Abbildung 8) seitlich vom
Auswurfkanal (B
).
2. Heben Sie das Lenkblech an, um ein höheren Schneewurf und eine
größere Entfernung zu erhalten. Oder senken Sie das Blech für einen
niedrigeren Schneewurf und eine geringere Entfernung.
3. Nachdem der gewünschte Winkel eingestellt wurde, ziehen Sie die
Flügelmutter wieder an.
Page 65

21
BEDIENUNG
ÖLSTAND ÜBERPRÜFEN (VOR ANLASSEN DES
MOTORS)
HINWEIS: Der Motor wurde vom Hersteller mit Öl gefüllt
geliefert. Prüfen Sie den Ölstand. Fügen Sie Öl hinzu, wenn
erforderlich.
1. Stellen Sie sicher, dass die Einheit in Waage ist. Benutzen Sie
Qualitätsöl Für Service SG, SH, SJ, SL oder höher.
2. Enfernen Sie die Kappe der Motoröleinfüllung/Ölmessstab (A, Abbildung
10) und gehen Sie mit einem sauberen Lappen drüber.
3. Führen Sie den Messstab/Verschlußkappe wieder ein und drehen Sie
sie im Uhrzeigersinn fest zu.
4. Entfernen Sie die Verschlußkappe/Messstab und prüfen Sie den
Ölstand.
HINWEIS: Prüfen Sie den Ölstand nicht bei laufendem Motor.
5. Fügen Sie, falls erforderlich, Öl hinzu, bis der Ölstand die
Markierung FULL (VOLL) an Verschlußkappe/Ölmessstab erreicht.
Füllen Sie nicht zu viel Öl ein.
6. Verschließen Sie die Verschlußkappe/Ölmessstab jedes Mal wieder
sorgfältig, wenn Sie den Ölstand überprüft haben.
HINWEIS: Das synthetische Motoröl 5W30 kann für alle
Temperaturen verwendet werden. NICHT Öl mit Kraftstoff
mischen. Siehe Tabelle für Öl-Empfehlungen.
Kunststoff 5W-30
* Unter 4°C (40°F) führt der Nutzen von SAE 30 zu einem schweren Start.
** Über 27°C (80°F) kann die Verwendung von 10W-30 zu einem höheren Ölverbrauch
führen. Überprüfen Sie den Ölstand öfter.
1. Den Bereich um den Tankdeckel von Schmutz und Fremdkörpern
reinigen. Den Tankdeckel (G
,
Motorsteuerungen
) abnehmen.
2. Den Kraftstofftank mit Kraftstoff füllen. Um dem Kraftstoff Platz zum
Aus-dehnen zu lassen, nicht über die Unterkante des Kraftstofftankstutzens hinaus füllen.
3. Den Tankdeckel wieder anbringen.
KRAFTSTOFFEMPFEHLUNGEN
Kraftstoff muss diese Anforderungen erfüllen:
• Sauberes, frisches, bleifreies Benzin.
• Mindestens 87 Oktan/87 AKI (91 RON). Bei Einsatz in großen Höhen
siehe unten.
• Benzin mit bis zu 10% Ethanol oder bis zu 15% MTBE ist akzeptabel.
ANMERKUNG: Kein nicht zugelassenes Benzin wie E85
verwenden. Kein Öl mit dem Benzin mischen. Den Motor nicht
so modifizieren, dass er mit alternativen Kraftstoffen laufen
kann. Bei Nichtbeachtung dieser Punkte werden
Motorkomponenten beschädigt und die Motorgarantie wird
aufgehoben.
Zum Schutz der Kraftstoffanlage vor Kraftstoffrückständen sollte dem
Kraftstoff ein Kraftstoffstabilisator beigemischt werden. Nicht jeder Kraftstoff
ist gleich. Wenn es zu Start- oder Leistungsproblemen kommt, sollte der
Kraftstoff anderswo gekauft oder die Marke gewechselt werden. Dieser Motor
ist für den Betrieb mit Benzin zugelassen. Der Motor hat das Abgassystem
EM (Engine Modifications).
Einsatz in großen Höhen
In Höhen über 1500 m ist Benzin mit mindestens 85 Oktan/85 AKI (89 RON)
akzeptabel. Damit die Emissionsbestimmungen weiterhin erfüllt werden, ist
eine Einstellung für große Höhen erforderlich. Wenn der Motor ohne diese
Einstellung läuft, kommt es zu Leistungsabfall, erhöhtem Kraftstoffverbrauch
und mehr Emissionen. Informationen zur Einstellung für große Höhen
bekommen Sie bei einem Briggs & Stratton-Vertragshändler.
Es wird nicht empfohlen, den Motor in Höhen unter 760 m einzusetzen,
wenn der Satz für große Höhen installiert ist.
NACHFÜLLEN VON KRAFTSTOFF
ACHTUNG
Kraftstoff und Kraftstoffdämpfe sind extrem leicht
entflammbar und
explosiv.
Feuer oder Explosionen können zu schweren
Verbrennungen oder Tod führen.
Beim Nachfüllen von Kraftstoff
• Den Motor ausschalten und mindestens 3 Minuten lang abkühlen
lassen, bevor der Tankdeckel abgenommen wird.
• Den Kraftstofftank im Freien oder in einem gut belüfteten Bereich
füllen.
• Den Kraftstofftank nicht überfüllen. Um dem Kraftstoff Platz zum
Ausdehnen zu lassen, nicht über die Unterkante des
Kraftstofftankstutzens hinaus füllen.
• Kraftstoff von Funken, offenen Flammen, Dauerflammen,
Wärmequellen und anderen Entzündungsherden fernhalten.
• Kraftstoffleitungen, Tank, Deckel und Anschlüsse regelmäßig auf
Sprünge und undichte Stellen untersuchen und bei Bedarf
austauschen.
• Wenn Kraftstoff verschüttet wurde, warten, bis sich die Dämpfe
verflüchtigt haben, bevor der Motor gestartet wird.
Page 66

22 www.murray.com
7. Startkabel zurücklaufen: Halten Sie den Startkabel-Griff fest (A,
Abbildung 13). Ziehen Sie langsam am Kabel bis der Widerstand
gelöst wird, dann ziehen Sie einmal schnell.
WARNUNG: Der schnelle Rücklauf des Startkabels
(Kickback) zieht Ihre Hand oder Arm schneller in
Richtung Motor, als Sie loslassen können. Letzteres
kann zu Knochenbrüchen, Prellungen oder
Verstauchungen führen. Beim Starten des Motors,
ziehen Sie langsam am Kabel bis der Widerstand gelöst
wird, dann ziehen Sie einmal schnell, um den Kickback
zu vermeiden.
HINWEIS: Sollte nach drei Versuchen der Motor nicht starten,
lesen Sie bitte den Abschnitt Fehlersuche und -behebung im
Motorhandbuch.
8. Elektrischer Start: Schließen Sie zuerst das Stromkabel in den
Stromkabelstecker und dann erst in die Wandsteckdose. Wenn Sie
ein Verlängerungskabel benötigen, vergewissern Sie sich, dass
dieses für ein Dreikabelsystem geeignet ist.
WARNUNG: Ist das Verlängerungskabel beschädigt,
muss es vom Hersteller (oder Kundendienst) oder
anderen entsprechenden Fachpersonal ersetzt werden,
um eventuelle Risiken zu vermeiden.
BEDIENUNG
9. Elektrischer Start: Drücken Sie den Start-Schalter (A,
Abbildung 14) durch. Nachdem Sie den Motor angelassen haben,
ziehen Sie zuerst das Verlängerungskabel aus der Wandsteckdose
und dann aus der Stromkabelbuchse (B
).
WICHTIG: Um die Lebenserwartung des Starters zu
verlängern, benutzen Sie ihn in kurzen Start-Zyklen
(höchsten 5 Sekunden). Warten Sie eine Minute zwischen
jedem Start-Zyklus.
HINWEIS: Sollte nach drei Versuchen der Motor nicht starten,
lesen Sie bitte den Abschnitt Fehlersuche und -behebung im
Motorhandbuch.
ABSCHALTEN DES MOTORS
Bevor Sie den Motor abstellen, lassen Sie ihn einige Minuten laufen ohne
zu arbeiten, damit eventuelle Feuchtigkeit auf dem Motor trocknen kann.
WARNUNG: Kraftstoff und seine Dämpfe sind
hochgradig entflammbar und explosiv. Feuer oder
Explosionen können schlimme Verbrennungen oder
sogar Tod zur Folge haben. Verstopfen Sie NICHT den
Kraftstofftank, um den Motor anzuhalten.
1. Stellen Sie den EIN/AUS Schalter (A
, Abbildung 15), falls vorhanden,
auf die Position AUS.
2. Entfernen Sie den Sicherheitsschlüssel (B
). Bewahren Sie den
Sicherheitsschlüssel außerhalb der Reichweite von Kindern auf.
HINWEIS: Verlieren Sie den Sicherheitsschlüssel nicht.
Bewahren Sie den Schlüssel an einem sicheren Ort auf. Der
Moter lässt sich ohne Sicherheitsschlüssel/Zündschlüssel nicht
starten.
Starten Sie den Motor wie folgt:
1. Prüfen Sie den Ölstand.
2. Vergewissern Sie sich, dass die Antriebssteuerungen ausgerastet
sind.
3. Stellen Sie den EIN/AUS Schalter (A
, Abbildung 11), falls vorhanden,
auf die Position EIN.
4. Stecken Sie den Sicherheitsschlüssel (A
, Abbildung 12) in den
entsprechenden Schlitz und schieben Sie ihn vollständig in die
Position AN.
5. Drehen Sie den Choke (B) im Uhrzeigersinn vollständig herum, wenn
der Motor kalt ist.
HINWEIS: Benutzen Sie den Choke nicht mit warmen Motor.
6. Drücken Sie den Primer (C
) zweimal.
HINWEIS: Benutzen Sie den Primer nicht, um mit warmen
Motor zu starten.
HINWEIS: Vergewissern Sie sich, dass das Stromkabel aus der
Anschlußbuchse ausgestöpselt ist.
STARTEN DES MOTORS
Vergewissern Sie sich, dass der Ölstand die Markierung FULL (VOLL) an
Verschlußkappe/Ölmessstab erreicht. Der Motor der Schneefräse ist mit
einem A.C. elektrischen Starter und Rückzug-Starter ausgestattet. Bevor
Sie den Motor anlassen, lesen Sie sich folgende Informationen sorgfältig
durch.
Sollte der Motor absaufen, stellen Sie den Choke auf die Position
OFFEN/AN und kurbeln Sie, bis der Motor startet.
WARNUNG: Der elektrische Starter ist mit einem
Dreistromkabel und mit einem entsprechenden Stecker
ausgestattet, der für einen Gebrauch mit
gewöhnlichem Hausstrom entworfen wurde. Das Stromkabel
muss jeder Zeit ordnungsgemäß geerdet sein, um einen
eventuellen Stromschlag, der den Betreiber der Maschine
verletzen könnte, zu vermeiden. Führen Sie sorgfältig
folgende Arbeitsschritte aus:
Vergewissern Sie sich, dass Sie zuhause über ein
geerdetes Dreikabelsystem verfügen.
Falls Sie diesbezüglich unsicher sind, ziehen Sie einen
Fachmann zu Rat. Sollten Sie zuhause kein
Dreikabelsystem haben, dürfen Sie unter keinen
Umständen den elektrischen Starter benutzen.
Haben Sie zuhause ein geerdetes Dreikabelsystem, aber
keinen Dreilochstecker, um den elektrischen Starter
anzuschließen, lassen Sie diesen von einem Fachmann
einbauen.
WARNUNG: Bei Anschluß des Stromkabels schließen
Sie immer zuerst das Stromkabel an die Schalterbox
am Motor an und anschließend stecken Sie das andere
Ende in den Dreilochstecker.
WARNUNG: Zum Ausstöpseln des Stromkabels, ziehen
Sie immer zuerst das Ende des Stromkabels aus dem
Dreilochstecker heraus.
Page 67

FREIRÄUMEN DES VERSTOPFTEN AUSWURFKANALS
GEFAHR: Direkter Kontakt mit dem rotierenden
Wurfgebläse innerhalb des Auswurfkanals ist die
Hauptursache für Verletzungen bei Schneefräsen.
Reinigen oder entleeren Sie den Auswurfkanal niemals
mit bloßen Händen oder bei angelassenen Motor. Finger
können schnell erfasst werden, was zu Amputationen
oder schweren Verletzungen führen kann.
• STELLEN SIE DEN MOTOR AB!
• Warten Sie 10 Sekunden, um sicher zu gehen, dass die Gebläseblätter
nicht mehr rotieren.
• Verwenden Sie immer ein Reinigungswerkzeug, nicht die Hände.
Das Reinigungswerkzeug (A, Abbildung 16) befindet sich entweder neben
dem Griff oder auf dem Fräswerkgehäuse. Benutzen Sie das
Reinigungswerkzeug, um Schnee vom Fräswerkgehäuse zu entfernen.
HINWEISE ZUR HANDHABUNG
1. Der Schnee lässt sich leicher werfen, wenn er direkt, nachdem er
gefallen ist, entfernt wird.
2. Um Schnee vollständig zu entfernen, überlappen Sie im Vorfeld leicht
die jeweiligen Schneidmesser.
3. Schnee sollte immer in Windrichtung geworfen werden.
4. Für normalen Nutzen stellen Sie die Gleitkufen auf 3 mm (1/8 Zoll)
unterhalb des Räumschilds ein. Für extrem harte Schneeoberflächen,
können die Gleitkufen für eine bessere Leistung höher gestellt
werden.
5. Auf Schotter oder Kiesoberflächen sollten sich die Gleitkufen etwa
32 mm (1-1/4 Zoll) unterhalb des Räumschildes befinden (siehe
Höhe der Gleitkufen anpassen
im Abschnitt
Wartung
im vorliegenden
Handbuch). Steine und Schotter dürfen von der Maschine nicht
aufgenommen und geworfen werden.
6. Nachdem der Schnee entfernt wurde, lassen Sie die Maschine einige
Minuten ruhen, damit Schnee und Eis, die sich eventuell auf dem
Motor gesammelt haben, schmelzen können.
7. Reinigen Sie die Schneefräse sorgfältig nach ihrer Benutzung.
8. Entfernen Sie Eis- und Schneereste, sowie alle Reste aus dem
Auswurfkanal. (Wenn möglich) Mit Wasser auspülen, damit Salzund andere chemische Überreste entfernt werden. Reiben Sie die
Schneefräse trocken.
9. Bevor Sie die Schneefräse anlassen, überprüfen Sie immer erst die
Schnecke und Gebläserad auf Schneereste und/oder Geröll, die
während des Schneewurfes Schaden anrichten könnten.
10. Überprüfen Sie vor dem Start den Ölstand. Vergewissern Sie sich,
dass der Ölstand die Markierung FULL (VOLL) an Verschlußkappe/
Ölmessstab erreicht.
23
BEDIENUNG
Page 68

24 www.murray.com
WARTUNG
EINSTELLEN DES WIDERSTANDES AN DER
DREHVORRICHTUNG DES AUSWURFKANALS
HINWEIS: Nach wiederholter Verwendung kann sich das
Drehgetriebe lösen, was dazu führt, dass der Auswurfkanal in
die mittlere Position zurückkehrt.
Den Widerstand durch Festziehen der Mutter (C, Abbildung 19) einstellen.
Durch das Festziehen der Mutter wird verhindert, dass sich der Kanal
bewegt, ohne dass der Bediener die Drehkurbel des Auswurfkanals dreht.
SCHNEEFRÄSE
Nach jeder Verwendung
Den Schnee entfernen und die Schneefräse vom Matsch
befreien, um ein Einfrieren der Steuerungen zu
vermeiden
Alle 8 Stunden oder täglich
Sicherheitstest an der Schneefräse durchführen
Alle 25 Stunden oder jährlich*
Den Reifendruck überprüfen
Die Schneefräse auf lockere Teile überprüfen
Suchen Sie Ihren Händler einmal jährlich auf, um
Die Kontrollhebel und Steuerungen schmieren zu lassen
Die Aufhängung der Auswurfklappe schmieren zu lassen
Den Motor der Auswurfklappe (falls vorhanden)
schmieren zu lassen
Das Drehgetriebe (falls vorhanden) schmieren zu lassen
MOTOR
Erste 5 Stunden
Motoröl wechseln
Alle 8 Stunden oder täglich
Den Ölstand des Motors prüfen
Alle 50 Stunden oder jährlich*
Das Motoröl wechseln
Den Schalldämpfer und die Schalldämperblende
überprüfen
Suchen Sie Ihren Händler einmal jährlich auf, um
Die Zündkerze auszuwechseln
Das Ventilspiel zu überprüfen
* Nicht erforderlich, sofern es keine Probleme mit der
Motorleistung gibt.
ABGASBEGRENZUNG
Wartung, Austausch oder Reparatur von Komponenten des Abgassystems
bzw. kompletter Systeme können von jeder Reparaturwerkstatt bzw. jedem
Mechaniker durchgeführt werden. Um jedoch kostenlosen Service am
Abgassystem zu erhalten, muss die Arbeit von einem vom Werk autorisierten
Fachhändler durchgeführt werden. Siehe die Gewährleistung auf das
Abgasbegrenzungssystem.
WARTUNG DES MOTORS
Ölstand im Motorgehäuse überprüfen – Vor der Inbetriebnahme der
Maschine und nach jeweils 8 Stunden kontinuierlichen Gebrauchs. Füllen
Sie das Motoröl laut den Anweisungen auf.
HINWEIS: Zuviel Motoröl kann die Leistung der Schneefräse
beeinträchtigen. Schließen Sie den Verschluß sorgfältig, damit
kein Öl entweichen kann.
Ölwechsel – Nach jeweils 50 Gebrauchsstunden oder mindestens einmal
pro Jahr, selbst wenn die Schneefräse weniger als 50 Stunden gebraucht
wurde. Benutzen Sie sauberes Qualitätsöl. Füllen Sie den Tank bis zur
Markierung VOLL auf dem Messstab (A
, Abbildung 17). Vergewissern Sie
sich, dass der Originaltank folgende Aufschrift vorweist: A.P.I. Service SG
oder höher. Benutzen Sie kein SAE10W40 Öl (da die Schmierung fehlerhaft
sein kann). Siehe Tabelle für Öl-Empfehlungen.
Öl auffangen – Positionieren Sie die Schneefräse so, dass die
Ölablassschraube (A
, Abbildung 18) sich am untersten Punkt des Motors
befindet. Wenn der Motor warm gelaufen ist, entfernen Sie die Schraube
und die Verschlußkappe und lassen Sie das Öl in einen angemessenen
Behälter abfließen.
Setzen Sie die Ablassschraube wieder auf und ziehen Sie sie fest an.
Füllen Sie den Tank mit einem empfohlenden Motoröl.
Kunststoff 5W-30
* Unter 4°C (40°F) führt der Nutzen von SAE 30 zu einem schweren Start.
** Über 27°C (80°F) kann die Verwendung von 10W-30 zu einem höheren Ölverbrauch
führen. Überprüfen Sie den Ölstand öfter.
Page 69

25
WARTUNG
Die Schneefräse verfügt über zwei höhenverstellbare Gleitkufen, die sich
an der Außenseite des Fräswerkgehäuses befinden. Die Gleitkufen heben
den vorderen Teil der Schneefräse an.
Beim Entfernen von Schnee von harten Oberflächen, wie z.B. Strassen
oder Fußgängerwegen, stellen Sie die Gleitkufen so ein, dass der vordere
Teil der Schneefräse nach untern zeigt.
Beim Entfernen von Schnee auf steinigen und unebenen Untergrund,
heben Sie den vorderen Teil der Schneefräse an, indem Sie die Kufen
absenken. Dadurch wird vermieden, dass Steine oder andere Gegenstände
von der Fräse aufgenommen und ausgeworfen werden.
Um die Gufen anzupassen, gehen Sie wie folgt vor:
1. Plazieren Sie einen Block (mit dem gewünschten Abstand vom
Boden) unter das Räumschild, neben, aber nicht unter die Gleitkufen.
2. Lösen Sie die Befestigungsschrauben (A
, Abbildung 20) und drücken
Sie die Gufen nach unten (B
), bis sie den Boden berühren. Ziehen
Sie die Befestigungsschrauben wieder an.
3. Stellen Sie die andere Gleitkufe auf die gleiche Höhe ein.
HINWEIS: Vergewissern Sie sich, dass beide Gufen sich im
gleichen Abstand zum Boden befinden.
WARNUNG: Vergewissern Sie sich, die jeweiligen
Freiraumabstände einzuhalten, um so Ihren eigenen
Bewegungsraum frei von Gegenständen zu halten.
Gegenstände wie Schotter, Steine oder Geröll können
im Wurfgebläse stecken bleiben und mit
entsprechender Kraft herausgeschleuert werden, was
zu Verletzungen, Sachschäden oder Schaden der
Schneefräse führen kann.
WARNUNG: Stellen Sie Einheit immer aus, entfernen
Sie den Zündschlüssel und ziehen Sie das Zündkabel
ab, bevor Sie Reparaturen oder Anpassungen
vornehmen.
HÖHE DER GLEITKUFEN ANPASSEN
3. Halten Sie die Einstellflächen und ziehen Sie die Mutter an.
4. Lassen Sie den Motor an und überprüfen Sie die Schnecke. Die
Frässchnecke darf erst einrasten, wenn die FrässchneckenSteuerhebel gedrückt wird.
5. Drücken Sie den Frässchnecken-Steuerhebel bei laufendem Motor
vollständig herunter. Die Frässchnecke sollte einrasten und normal
laufen.
1. Bei losgelassenem Antriebshebel sollte der Haken (A
, Abbildung 21)
den Hebel (B) gerade so berühren, ohne ihn anzuheben. Der
Freiraum kann maximal 0,8 mm (1/32 Zoll) betragen.
2. Lösen Sie zum Einstellen die Mutter (C), indem Sie die
Einstellflächen (D
) festhalten und die Mutter drehen. Anschließend
drehen Sie die Einstellflächen und halten die Einstellschraube (E
).
Die Einstellschraube ist eine Kreuzschlitzschraube, und der Kopf der
Schraube kann durch Einführen eines Schraubendrehers in die Feder
(F
) festgehalten oder gedreht werden.
WARNUNG: Überziehen Sie die Schrauben nicht, da
dies den Hebel anheben und dazu führen könnte, dass
der Fräswerkantrieb einrastet, ohne dass der
Frässchnecken-Steuerhebel herunter gedrückt wird.
ANPASSUNG DES
FRÄSWERKSTEUERUNGSSEILZUGES
6. Lassen Sie den Frässchnecken-Steuerhebel los.
7. Sollte die Schnecke nicht ordnungsgemäß arbeiten, halten Sie den
Motor an und überprüfen Sie den Seilzug noch einmal.
8. Ist der Seilzug richtig eingestellt, muss eventuell die Spannung des
Fräswerkantriebsriemens neu eingestellt werden Siehe autorisierten
Händler.
WARNUNG: Die Schnecke muss innerhalb von 5
Sekunden stoppen. Falls dies nicht erfolgt, suchen
Sie einen autorisierten Händler auf.
AUSWECHSELN DES SCHERBOLZENS DER
SCHNECKE
Die Schnecken sind mit besonderen Scherbolzen an der
Frässchneckenachse befestigt. Diese brechen, wenn ein Gegenstand in
das Fräswerkgehäuse gerät. Die Verwendung eines härteren Ersatzbolzens
reduziert den Schutz, der vom Scherbolzen geboten wird.
WARNUNG: Gehen Sie nicht nahe an den
Auswurfkanal oder die Frässchnecke heran, wenn der
Motor läuft. Betreiben Sie den Motor nicht, wenn
irgendwelche Abdeckungen oder Schutzeinrichtungen
entfernt sind.
Unter den meisten Umständen bricht der Scherbolzen, wenn die
Frässchnecke einen Gegenstand streift, der die Einheit beschädigen
könnte. Dadurch werden das Getriebe und andere Teile vor Schäden
geschützt.
Die Scherbolzen (A, Abbildung 22) befinden sich an der
Frässchneckenachse. Ersetzen Sie einen gebrochenen Scherbolzen wie folgt:
1. Schlagen Sie den gebrochenen Scherbolzen mit einem Austreiber
heraus.
2. Setzen Sie einen neuen Scherbolzen und Splint ein. Biegen Sie die
Enden des Splints nach unten.
WICHTIG: Ersetzen Sie die Scherbolzen ausschließlich durch
die korrekten Ersatzbolzen. Die Verwendung von Bolzen,
Schrauben oder stärkeren Scherbolzen führt zu Schäden am
Gerät.
Page 70

26 www.murray.com
WARTUNG
LAGERUNG
WARNUNG: Lagern Sie das Gerät niemals mit gefülltem
Tank Drinnen oder in schlecht gelüfteten Räumen, in
denen die Dämpfe eine offene Flamme, Funken oder
eine Anzeigeleuchte (wie an einem Wasserboiler in
einem Ofen, an einem Wäschetrockner oder an
gasbetriebenen Geräten) erreichen könnten.
Gehen Sie sorgfältig mit Benzin um. Es ist leicht
entflammbar, und ein unsachgemäßer Umgang damit
könnte bei Ihnen zu schweren Verbrennungen und/oder
außerdem zu Sachschäden führen.
Lassen Sie den Treibstoff in entsprechende Behälter im
Freien ablaufen; entfernt von offenen Feuerstellen.
Soll die Schneefräse für länger als 30 Tage am Ende der Schneesaison
gelagert werden, richten Sie sich nach folgenden Empfehlungen, um die
Schneefräse für die Lagerung vorzubereiten.
HINWEIS: Kraftstoff muss entfernt oder entsprechend
vorbereitet werden, damit es nicht zu Ablagerungen im Tank,
Filter, Schlauch oder Vergaser während der Lagerung kommt.
1. Entfernen Sie den Kraftstoff, indem Sie den Motor laufen lassen, bis
der Tank leer ist und Motor ausgeht. Wenn Sie den Kraftstoff nicht
entfernen möchten, fügen Sie Kraftstoff-Stabilisierer in das im Tank
verbleibene Benzin, um die Bildung von Ablagerungen und Säuren zu
vermeiden. Sollte der Tank fast leer sein, mischen Sie den Stabilisierer
mit frischen Benzin in einem separanten Behälter und geben Sie diese
Mischung in den Tank.
Beachten sie immer die gebrauchanleitung auf
der verpackung des stabilisieres. Nachdem sie den stabilisieres
hinzugefügt haben, lassen sie den motor mindestens 10 minuten
laufen, damit die mischung in den vergaser gelangt. Bewahren sie die
schneefräse an einem sicheren ort auf.
INBETRIEBNAHME NACH DER LAGERUNG
1. Bringen Sie den oberen Griff in die Betriebsposition, ziehen Sie die
Knaufe, die die oberen Griffe halten, fest, und schalten Sie die
Schaltung und die Kurbel des Auswurfkanals aus.
2. Befüllen Sie den Tank mit frischem Kraftstoff.
3. Überprüfen Sie den Zündkerzenstecker. Vergewissern Sie sich, dass
die Spalte richtig eingestellt ist. Ist die Zündkerze abgenutzt oder
beschädigt, ersetzen Sie sie.
4. Stellen Sie sicher, dass diese fest sind.
5. Vergewissern Sie sich, dass alle Schutzgitter, Schilder und
Abdeckungen angebracht sind.
6. Vergewissern Sie sich, dass alle Einstellungen richtig sind.
2. Durch einen Ölwechsel vor der Lagerung, bewahren Sie die
optimalen Leistungsverhältnisse für Ihr Gerät (nur 4-Zyklen).
3. Schmieren Sie den Bereich um die Kolbenspitze/Zylinder. Dafür
entfernen Sie zuerst die Zündkerzen und spritzen anschließend
sauberes Motoröl in die Öffnung. Dann bedecken Sie die Öffnung mit
einem Lappen, um das gesprühte Öl aufzusaugen. Als Nächstes
rotieren Sie den Motor, indem Sie den Start-Schalter zwei- oder
dreimal ziehen. Zum Schluß setzen Sie die Zündkerze wieder ein und
schließen das Zündkabel an.
4. Reinigen Sie die Schneefräse sorgfältig.
5. Schmieren Sie alle entsprechenden Stellen (siehe autorisierten
Händler).
6. Vergewissern Sie sich, dass alle Muttern, Bolzen und Schrauben fest
angezogen sind. Untersuchen Sie alle sichtbaren Teile auf Schäden,
Brüche und Abnutzung. Wechseln Sie die Teile gegebenenfalls aus.
7. Bessern Sie alle verrosteten oder abgeplättern Lackstellen mit Farbe
aus; vor dem Streichen abschmirgeln.
8. Bedecken Sie alle Metallteile der Schneefräse mit einer Abdeckhaube
und das Wurftgebläse mit einem Rostschutz.
9. Am Besten lagern Sie Ihre Schneefräse Drinnen und decken sie ab,
um sie vor Staub und Dreck zu schützen.
10. Bei Modellen mit beweglichen Griffen, schalten Sie bitte die Schaltung
und die Kurbel des Auswurfkanals aus und lösen Sie dann die Knöpfe,
die den oberen Griff sicherstellen. Drehen Sie die oberen Griffe nach
hinten zurück.
11. Muss die Maschine im Freien gelagert werden, dann legen Sie die
Schneefräse auf Blöcke und vergewissern Sie sich, dass sie den
Boden nicht berührt. Bedecken Sie die Schneefräse mit einer
schweren Abdeckplane.
ÜBERPRÜFUNG DER REIFEN
Überprüfen Sie die Reifen auf Schäden. Überprüfen Sie den Reifendruck mit
einem angemessenen Messgerät (siehe Abbildung 23).
VORSICHT: Vermeiden Sie Verletzungen! Bei der
Trennung von Reifen und Felge kann es zur Explosion
kommen, wenn die Arbeiten nicht richtig vorgenommen
werden.
• Versuchen Sie nicht ohne entsprechender Ausrüstung
und Erfahrung einen Reifen aufzuziehen.
• Pumpen Sie die Reifen nicht unter dem empfohlenen
Druckwert auf.
• Schweißen oder erhitzen Sie nicht das Rad oder die
Zubehörteile. Hitze kann den Luftdruck erhöhen und
hierduch kann eine Explosion hervorgerufen werden. Das
Schweißen kann das Rad verbiegen oder verformen.
• Stellen Sie sich beim Aufpumpen nicht vor oder auf das
Rad. Verwenden Sie zugehörige Werkzeige, die es Ihnen
ermöglichen an einer Seite zu stehen.
HINWEIS: Überprüfen Sie an der Seite auf maximalen
Reifendruck. Überschreiten Sie diesen Maximalwert
NICHT.
Page 71

27
FEHLERSUCHE UND -BEHEBUNG
PROBLEM ÜBERPRÜFEN PROBLEMLÖSUNG
Die Schnecke stoppt nicht
innerhalb von 5 Sekunden
nach dem Loslassen des
rechten Kontrollhebels.
Free-Hand™ Steuerung ist
AKTIV.
Lassen Sie sowohl Fräswerkkupplung als auch die Free-Hand™ Steuerung los, um
die Schnecke zu stoppen.
Fräswerkantriebsriemen nicht
eingestellt.
Stellen Sie den Fräswerkantriebsriemen ein.
Riemenführung des
Fräswerkantriebs nicht
eingestellt.
Stellen Sie die Riemenführung des Fräswerkantriebs ein.
Auswurfkanal und Klappe
funktionieren nicht
(elektrisch).
Elektroschaden. Siehe zugelassene Händler.
Auswurfkanal und Klappe
funktionieren nicht
(Remote-Manuell).
Auswurfkanal und Klappe sind
nicht richtig eingestellt oder
müssen geschmiert werden.
Anpassen und/oder schmieren des Kontrollgestänges.
Antrieb bewegt die
Schneefräse bei niedrigen
Geschwindigkeiten nicht.
Fahrantriebsteuerung ist nicht
eingestellt.
Stellen Sie den Fahrantrieb wieder neu ein oder schieben Sie den
Geschwindigkeitswähler auf eine schnellere Geschwindigkeit.
Motor startet nicht.
Schlüssel ist in Position AUS. Schieben Sie den Schlüssel in die Position EIN.
Primen des kalten Motors
fehlgeschlagen.
Drücken Sie den Primer zweimal und starten Sie erneut.
Kraftstoffventil ist in Stellung
GESCHLOSSEN.
Drehen Sie das Ventil in die Stellung OFFEN.
Kraftstoff ist alle. Tanken Sie den Kraftstoffbehälter auf.
Choke is AUS - kalter Motor. Drehen Sie den Choke auf EIN, stellen Sie den Gasgriff auf SCHNELL.
Motor ist abgesoffen. Schalten Sie den Choke auf AUS und versuchen Sie erneut zu starten.
Kein Zündfunke. Abstand überprüfen. Stellen Sie den Abstand ein, reinigen Sie die Elektrode oder
ersetzen Sie den Zündkerzenstecker.
Wasser im Kraftstoff oder alter
Kraftstoff.
Entleeren Sie den Tank. (Entsorgen Sie den Kraftstoff in einer autorisierten
Sondermüllanlage). Tanken Sie frischen Kraftstoff auf.
Der Motor startet schwer
oder läuft schlecht.
Kraftstoffgemisch zu stark. Bewegen Sie den Choke in die Stellung AUS.
Zündkerzenstecker defekt, kein
Abstand vorhanden oder
falscher Abstand.
Reinigen und Abstand einstellen oder auswechseln.
Tankdeckelöffnung blockiert. Reinigen Sie die Öffnung.
Zu starke Vibration.
Teile locker oder
Gebläserad/Schnecke
beschädigt.
Stoppen Sie den Motor sofort. Ziehen Sie alle Teile fest. Besteht die Vibration
weiterhin, lassen Sie das Gerät von einem zugelassenen Händler warten.
Schneefräse stoppt nicht,
wenn der Hebel der
Anstriebssteuerung
losgelassen wird.
Fahrantriebsteuerung ist nicht
eingestellt.
Anpassen des Kontrollgestänges des Fahrantriebes.
Schneefräse dreht zu einer
Seite ab.
Reifendruck ist nicht
gleichmäßig.
Überprüfen Sie den Reifendruck.
Ein Rad ist im Freilaufmodus.
(Kraftschlussverriegelungsstift
ist im ÄUßEREN LOCH.)
Vergewissern Sie sich, dass der rechte Kraftschlussverriegelungsstift im INNEREN
Loch steckt (damit der Fahrantrieb einrastet).
Page 72

28 www.murray.com
FEHLERSUCHE UND -BEHEBUNG
PROBLEM ÜBERPRÜFEN PROBLEMLÖSUNG
Räumschild reinigt keine
harten Oberflächen.
Gleitkufen falsch eingestellt. Heben oder senken Sie die Gleitkufen.
Der Antrieb des Geräts
versagt.
Antriebsriemen sind lose oder
beschädigt.
Ersetzen Sie den Antriebsriemen. Siehe zugelassene Händler.
Falsche Einstellung des
Seilzuges des Fahrantriebes.
Antriebssteuerungsseilzug anpasen Siehe „Prüfen und Einstellen der Seilzüge“ im
Abschnitt WARTUNG des vorliegenden Handbuches.
Abgenutzte oder beschädigte
Friktionsscheibe.
Friktionsscheibe austauschen. Siehe zugelassene Händler.
Es wird kein Schnee
ausgeworfen.
Fräswerkantriebsriemen sind
lose oder beschädigt.
Fräswerkantriebsriemen ersetzen oder anpassen. Siehe „Einstellen des Riemens“
im Abschnitt WARTUNG des vorliegenden Handbuches oder wenden Sie sich an
einen zugelassenen Händler.
Fräswerksteuerungsseilzug ist
nicht richtig angepasst.
Fräswerksteuerungsseilzug anpassen. Siehe „Prüfen und Einstellen der Seilzüge“
im Abschnitt WARTUNG des vorliegenden Handbuches.
Gebrochener Scherbolzen. Ersetzen Sie den Scherbolzen. Siehe Auswechseln des Scherbolzens der Schnecke
im Abschnitt WARTUNG des vorliegenden Handbuches.
Auswurfkanal verstopft. Stoppen Sie den Motor sofort. Verwenden Sie immer ein entsprechendes Werkzeug
um den Auswurfkanal zu reinigen, niemals mit der Hand reinigen. Reinigen Sie den
Auswurfkanal und das Innere des Antriebsgehäuses. Siehe WARNHINWEISE im
Abschnitt ARBEITSSCHUTZ.
Fremdkörper im Getriebe. Stoppen Sie den Motor sofort. Verwenden Sie immer ein entsprechendes Werkzeug
um den Auswurfkanal zu reinigen, niemals mit der Hand reinigen. Entfernen Sie
den Fremdkörper aus dem Gehäuse. Siehe WARNHINWEISE im Abschnitt
ARBEITSSCHUTZ.
Informationen zur Garantie erhalten Sie von Ihrem örtlichen Händler.
GARANTIE
Page 73

29
TECHNISCHE DATEN
MOTOR:
Marke Briggs & Stratton
Modell-Serien Snow Series™
Nennleistung Drehmoment* 14,5 T.P. @ 3060 rpm
Typ 4 Zyklen - OHV
Schwenkbereich 305 cc (18,6 cu in.)
Starter-System Rücklauf, 230V Elektrisch ohne Kabel
Generator 60W nur AC
Ölinhalt 0.83 Liter (28 oz)
Motoröl Synthetisch 5W30
Volumen Kraftstofftank 2,8 liter (3,0 qts)
Zündkerzenspalt 0,76 mm (0,030 Zoll)
Zündkerze Entstörwiderstand 481055
Zündkerze „Long Life Platinium“ 5066
Zündsystem Dieses Zündkerzen-Zündsystem entspricht dem kanadischen Standard ICES-002.
SCHNECKE/GEBLÄSERAD:
Freiraum Breite 73,6 cm (29 Zoll)
Einlauf Höhe 53,3 cm (21 Zoll)
Durchmesser Schnecke/Gebläserad 30,5 cm (12 Zoll)
Anzahl Gebläseblätter 3
KANAL:
Kanalleitblech Manuell
Kanal Rotierung Fernantrieb - Auf dem Armaturenbrett befestigte Kurbel
190° (3,5 Drehung)
ANTRIEBSSYSTEM:
Antriebstyp Friktionsscheibe - Kraftschlussverriegelungsstift
Antriebsgeschwindigkeit 6 Vorwärtsgänge, 2 Rückwärtsgänge
Reifengröße 40,6 x 12,2 cm (16 x 4,8 Zoll)
Reifendruck Siehe Reifenrand für entsprechende Reifendruckwerte.
INFORMATIONEN ZUR MOTORLEISTUNG
*Die Nennleistung für einzelne Modelle mit gasbetriebenem Motor ist in Übereinstimmung mit dem SAE (Society of Automotive
Engineers) - Code J1940 (Small Engine Power & Torque Rating Procedure) angegeben, und die Bewertung der Leistung wurde in
Übereinstimmung mit SAE J1995 (Revision 2002-05) vorgenommen und korrigiert. Die Drehmoment-Werte wurden bei 3060 U/min
gemessen; die PS-Werte wurden bei 3600 U/min ermittelt. Die tatsächliche Motorleistung wird geringer sein und wird zum einen durch
die Betriebsbedingungen und Abweichungen von einem Motor zum anderen bestimmt. In Anbetracht der breiten Vielfalt an Produkten,
in die unsere Motoren eingebaut werden, und der Vielfalt der für den Betrieb des Equipments anwendbaren Umweltbedingungen, kann
es sein, dass der Motor, den Sie gekauft haben, nicht die bewertete Leistung entwickelt, wenn er in einem Gerät mit Kraftantrieb
verwendet wird (wirkliche
vor Ort
oder Stromleistung). Dieser Unterschied lässt sich auf eine Vielfalt von Faktoren zurückführen,
einschließlich u.a. Zubehör (Luftreiniger, Auspuff, Ladung, Kühlung, Vergaser, Kraftstoffpumpe etc.), Einschränkungen bezüglich der
Anwendung, Betriebsbedingungen (Temperatur, Luftfeuchtigkeit, Einsatzhöhe) und Abweichungen von einem Motor. Auf Grund von
Herstellungs- und Leitungsbegrenzungen kann Briggs & Stratton den Motor dieser Serie durch einen Motor mit einer höheren Leistung
auswechseln.
Page 74

30 www.murray.com
 Loading...