

Page 1
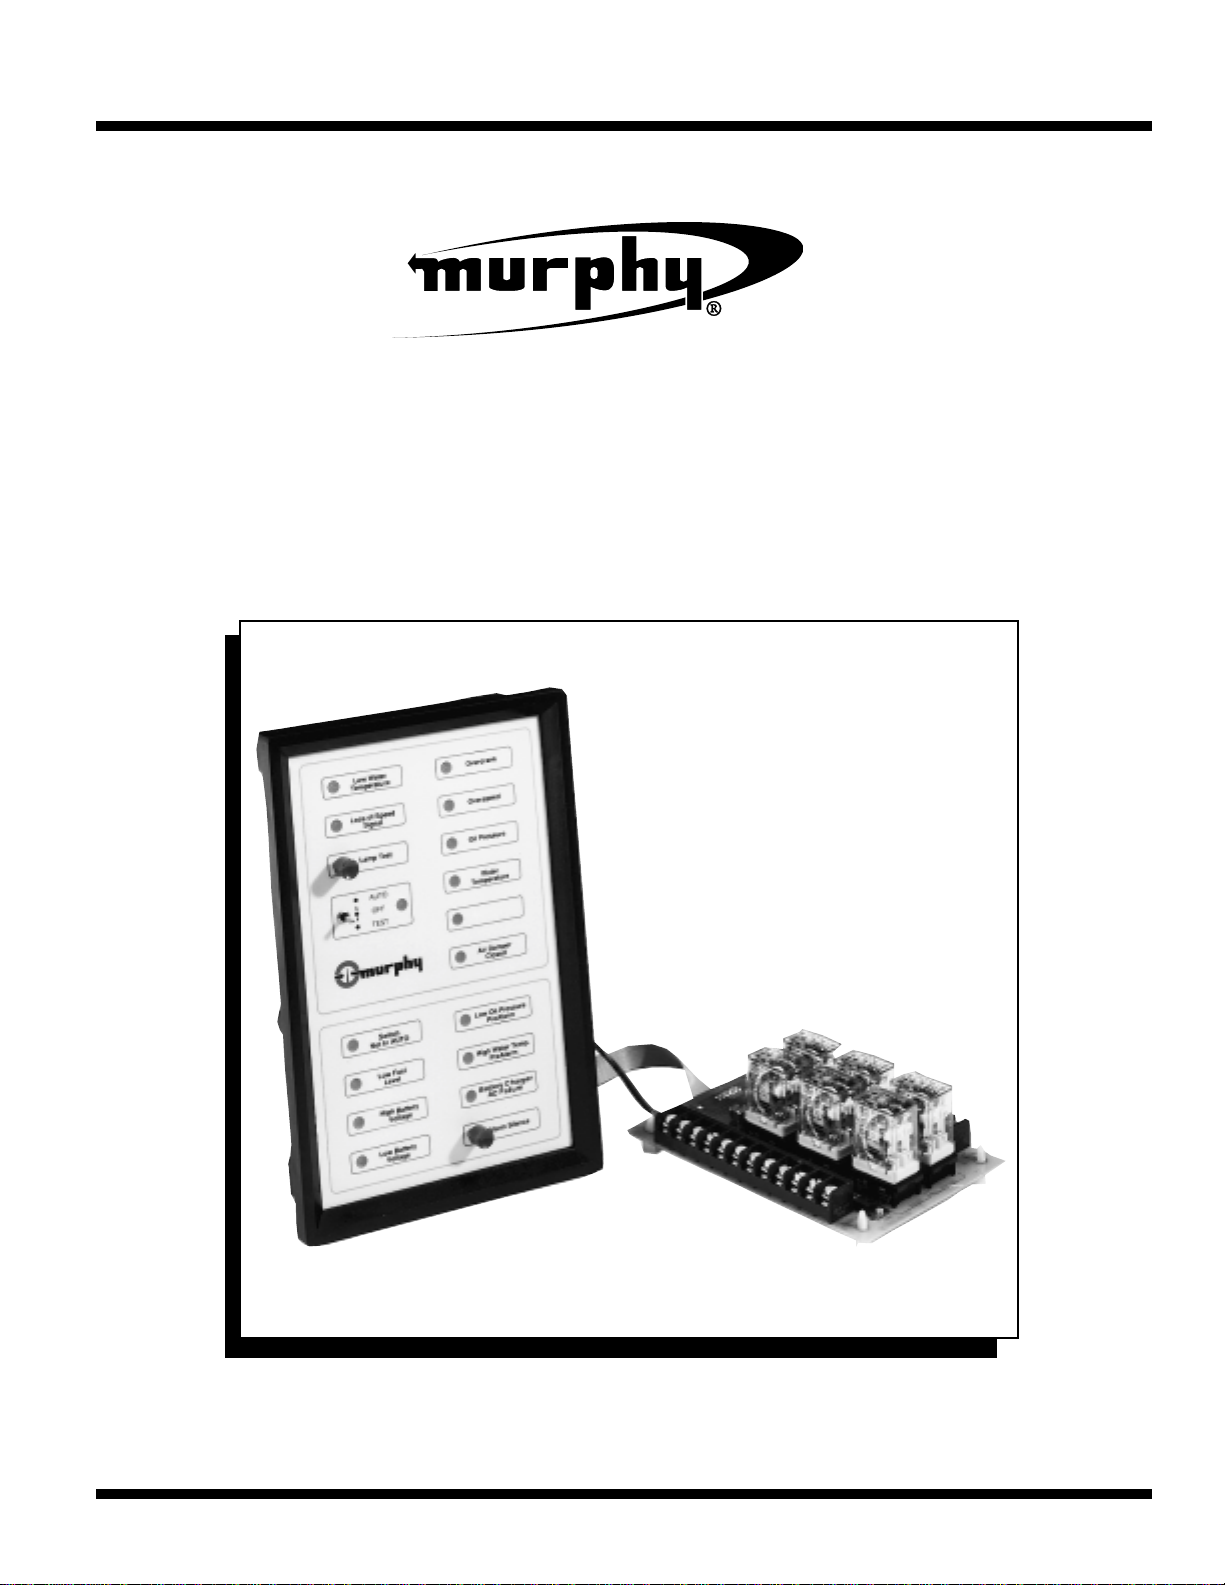
SERIES A900
MURPHYMATIC
®
GENERATOR
ENGINE CONTROL SYSTEM
DESIGN, INSTALLATION
AND OPERATING MANUAL
A900-9025N
Revised 10-99
Section 40
(00-02-0197)
Page 2
BEFORE BEGINNING
INSTALLATION OF THIS
MURPHY PRODUCT
✔ Disconnect all electrical
power to the machine.
✔ Make sure the machine
cannot operate during
installation.
✔ Follow all safety warnings of
the machine manufacturer.
✔ Read and follow all
installation instructions.
Certain danger to human safety and to equipment
may occur if some equipment is stopped without prewarning. It is recommended that monitored functions
be limited to alarm-only or to alarm before shutdown.
WARNING
Page 3

Table of Contents
Section 1: Introduction page 1
1-1 System 1
1-2 Models 1
1-3 Purpose 1
1-4 Definitions 1
1-5 How To Use This Manual 1
Section 2: Specifications 1
2-1 Enclosure Type 1
2-2 Power Requirements 1
2-3 Input Ratings 1
2-4 Output Ratings 1
2-5 Field Wiring Connections 1
2-6 Operating Temperature 1
Section 3: Model Identification 1
3-1 Model Numbers 1
3-2 A901 2
3-3 A901-2 5
3-4 A902 7
3-5 A902-2 8
3-6 A903 10
3-7 A903-2 12
Section 4: Installation 14
4-1 Location 14
4-2 Wiring 14
4-3 Crank Disconnect 19
4-4 Pre-Operational Check-Out 19
Section 5: Operation 21
5-1 Operator Controls 21
5-2 Operating Modes 21
Section 6: Routine Maintenance and Operational Tests 21
6-1 Routine Maintenance 21
6-2 Operational Tests 21
Section 7: Troubleshooting and Repair 21
7-1 Tools Required 21
7-2 A900 SELECTRONIC®Control Operation and Shutdown 21
7-3 A900 SELECTRONIC®Control Alarm Circuit Operation 23
Section 8: Service Parts 24
8-1 Table 8-1: Replacement Components of the A900 Series Generator Controls 24
8-2 Table 8-2: Replacement Components of the A900 Controls for Detroit Diesel 24
Page 4

Section 1: Introduction
1-1 System.
1-1.1 The MURPHYMATIC®Generator Engine Control System,
Series A900 is designed to meet the requirements of the engine
control, shutdown and alarm section of NFPA-110 “Emergency
And Standby Power Systems” specification. The controller also
meets the minimum requirements of NFPA99 “Health Care
Facilities” and the Canadian standard CAN/CSA-C282-M89
“Emergency Electrical Power Supply for Buildings” for engine
control, shutdown and alarm systems. By combining one of the
A900 series controls with generator instruments, a complete engine
generator control panel meeting the above specifications can be
provided.
1-2 Models.
1-2.1 The Series A900 is available in three basic configurations:
1-2.1.1 Model A901 for automatic start and stop generator sets
which includes the minimum shutdowns and alarms per NFPA110 Level 1.
1-2.1.2 Model A902 for automatic start and stop generator sets
which includes the minimum shutdowns and alarms per NFPA110 Level 2.
1-2.1.3 Model A903 for automatic start and stop generator sets
which includes the minimum shutdowns and alarms per NFPA110 Level 2 and seven unlabeled alarm lights for additional
customer specified alarms.
1-2.2 All models are available for 12 or 24 V DC operation.
1-2.3 All models are available for use on either two cycle or four
cycle engines. Models for two cycle engines include an alarm
light for “Air Damper Closed” and an “Overspeed Relay” to
operate the air shutoff solenoid for overspeed shutdown.
1-2.4 Each model is made up of two parts, a Control/Display
module and a Relay module.
1-3 Purpose.
1-3.1 This manual is directed to the installation, maintenance and
operating personnel who will be in day to day contact with the
A900 system. However the basic knowledge gained with this
material will allow those personnel to easily adjust to special
circumstances.
1-4 Definitions.
1-4.1 Throughout this manual, reference is made to organi-
zations, trade names and trademarks which may not be familiar to
the reader. Some of these are:
1-4.1.1 CSA: Canadian Standards Association.
1-4.1.2 CAN/CSA-C282-M89: The standard for Emergency
Electrical Power Supply for Buildings, 1989 Edition.
1-4.1.3 NFPA: National Fire Protection Association.
1-4.1.4 NFPA-70: The National Electrical Code.
1-4.1.5 NFPA-99-1990: The standard for Health Care Facilities,
1990 Edition.
1-4.1.6 NFPA-110-1988: The standard for Emergency And
Standby Power Systems, 1988 Edition.
1-4.1.7 Several terms used in this manual are registered
trademarks of Frank W. Murphy Mfr .
(a) MURPHYMATIC®: Refers to all Murphy automatic controls.
(b) SELECTRONIC®: A name that is applied to all electronic
controls manufactured by Murphy.
(c) SWICHGAGE®: A combination indicating gauge and switch.
(d) T ATTLET ALE®: A term that refers to a shutdown indicating
device or circuit in the control panel.
1-5 How to use this manual.
1-5.1 Section 1, 2, 4, 5, 6 and 7 contain general information that
applies to all A900 models.
1-5.2 Section 3, Model Identification, is broken into seven sub
sections. Section 3-1 allows you to chose the model that best
fits your requirements and Section 3-2 through 3-7 explain each
models features in detail.
Section 2: Specifications
2-1 Enclosure Type.
2-1.1 The A900 Series enclosure is designed to be mounted in a
standard electrical enclosure for indoor use.
2-2 Power Requirements.
2-2.1 The engine controls, shutdown circuits, alarm and shut-
down indicators are powered from the engine starting battery.
The A900 series is available in either 12 or 24 V, negative ground.
2-2.2 The A900 is fused for 3 A maximum current.
2-3 Input Ratings.
2-3.1 All input switches should be dry contact type, maximum
current is 2 mA, 8 V DC or less.
2-3.2 Frequency signal for the speed sensing circuit requires a
minimum input of 2 V rms from a magnetic pickup (preferred) or
from the tachometer terminal of the battery charging alternator .
2-3.2.1 Frequency range of the speed sensing circuits is 25 Hz to
10,000 Hz.
2-4 Output Ratings.
2-4.1 The A900 Control / Display Module has outputs for remote
indication of alarm and shutdowns. These outputs are transistors
that close to the negative supply (sink) and are rated at 1 amp, 30
V DC maximum.
2-4.2 The Control / Display Module also has an output for an
auxiliary starter contactor which is rated 1 A, 30 V DC maximum.
This is a transistor that closes to the positive supply (source).
2-4.3 The Relay Module includes 3 engine control relays with
contact ratings of 7 A, 30 V DC inductive. These powered
contacts must be supplied from an 8 A fuse or circuit breaker
(customer supplied). The 3 alarm relays have dry contacts, also
rated at 7 A, 30 V DC maximum.
2-5 Field Wiring Connections.
2-5.1 All field wiring connections are barrier terminal blocks, UL
rated for 15 A, 300 V.
2-6 Operating Temperature.
2-6.1 The operating temperature range of the A900 is -4°F to
158°F (-20°C to 70°C.)
Section 3: Model Identification
3-1 Model Numbers.
3-1.1 A901-12 and A901-24: These models are designed for an
automatic start four cycle engine driven generator, and
include the shutdown and alarm points recommended in NFPA110-1988 “Emergency and Standby Generator Systems” for Level
1 installations. These controllers also meet or exceed the
minimum requirements of NFPA99-1990 “Health Care Facilities”
and with the addition of a Low Water Level alarm, the Canadian
standard CAN/CSA-C282-M89 “Emergency Electrical Power
Supply for Buildings”. The suffix numbers -12 and -24 indicate
the engine starting battery voltage.
3-1.2 A901-2-12 and A901-2-24: These models are designed for
1
Page 5
an automatic-start, two-cycle, engine-driven generator, and
include the shutdown and alarm points recommended in NFPA110-1988 “Emergency and Standby Generator Systems” for
Level 1 installations. These controllers also meet or exceed the
minimum requirements of NFPA-99-1990 “Health Care
Facilities” and with the addition of a Low Water Level alarm,
the Canadian standard CAN/CSA-C282-M89 “Emergency
Electrical Power Supply for Buildings”. The suffix numbers -12
and -24 indicate the engine starting battery voltage.
3-1.2.1 The A901-2 series control includes an “Air Damper
Closed” light and “Overspeed Relay” to trip the air shut-off
solenoid on overspeed of a two-cycle engine.
3-1.3 A902-12 and A902-24: These models are designed for an
automatic-start, four-cycle, engine-driven generator, and include
the shutdown and alarm points recommended in NFPA-1101988 “Emergency and Standby Generator Systems” for Level 2
installations. The suffix numbers -12 and -24 indicate the
engine starting battery voltage.
3-1.4 A902-2-12 and A902-2-24: These models are designed
for an automatic-start, two-cycle, engine-driven generator, and
include the shutdown and alarm points recommended in NFPA110-1988 “Emergency and Standby Generator Systems” for
Level 2 installations. The suffix numbers -12 and -24 indicate
the engine starting battery voltage.
3-1.4.1 The A902-2 series control includes an “Air Damper
Closed” light and “Overspeed Relay” to trip the air shut-off
solenoid on overspeed of a two-cycle engine.
3-1.5 A903-12 and A903-24: These models are designed for an
automatic-start, four-cycle, engine-driven generator, and include
the shutdown and alarm points recommended in NFPA-1101988 “Emergency and Standby Generator Systems” for Level 2
installations plus seven unlabeled alarms that the user may
specify and an “Alarm Silence Switch”. The suffix numbers -12
and -24 indicate the engine starting battery voltage.
3-1.6 A903-2-12 and A903-2-24: These models are designed for
an automatic-start, two-cycle, engine driven generator, and
include the shutdown and alarm points recommended in NFPA110-1988 “Emergency and Standby Generator Systems” for
Level 2 installations plus seven unlabeled alarms that the user
may specify and an “Alarm Silence Switch”. The suffix numbers
-12 and -24 indicate the engine starting battery voltage.
3-1.6.1 The A903-2 series control includes an “Air Damper
Closed” light and “Overspeed Relay” to trip the air shut-off
solenoid on overspeed of a two-cycle engine.
3-1.7 Table 3-1.7 illustrates the alarm and shutdown requirements of NFPA-110, NFPA99 and CAN/CSA-C282-M89 and
compares the features of the A900 series controls to those
requirements.
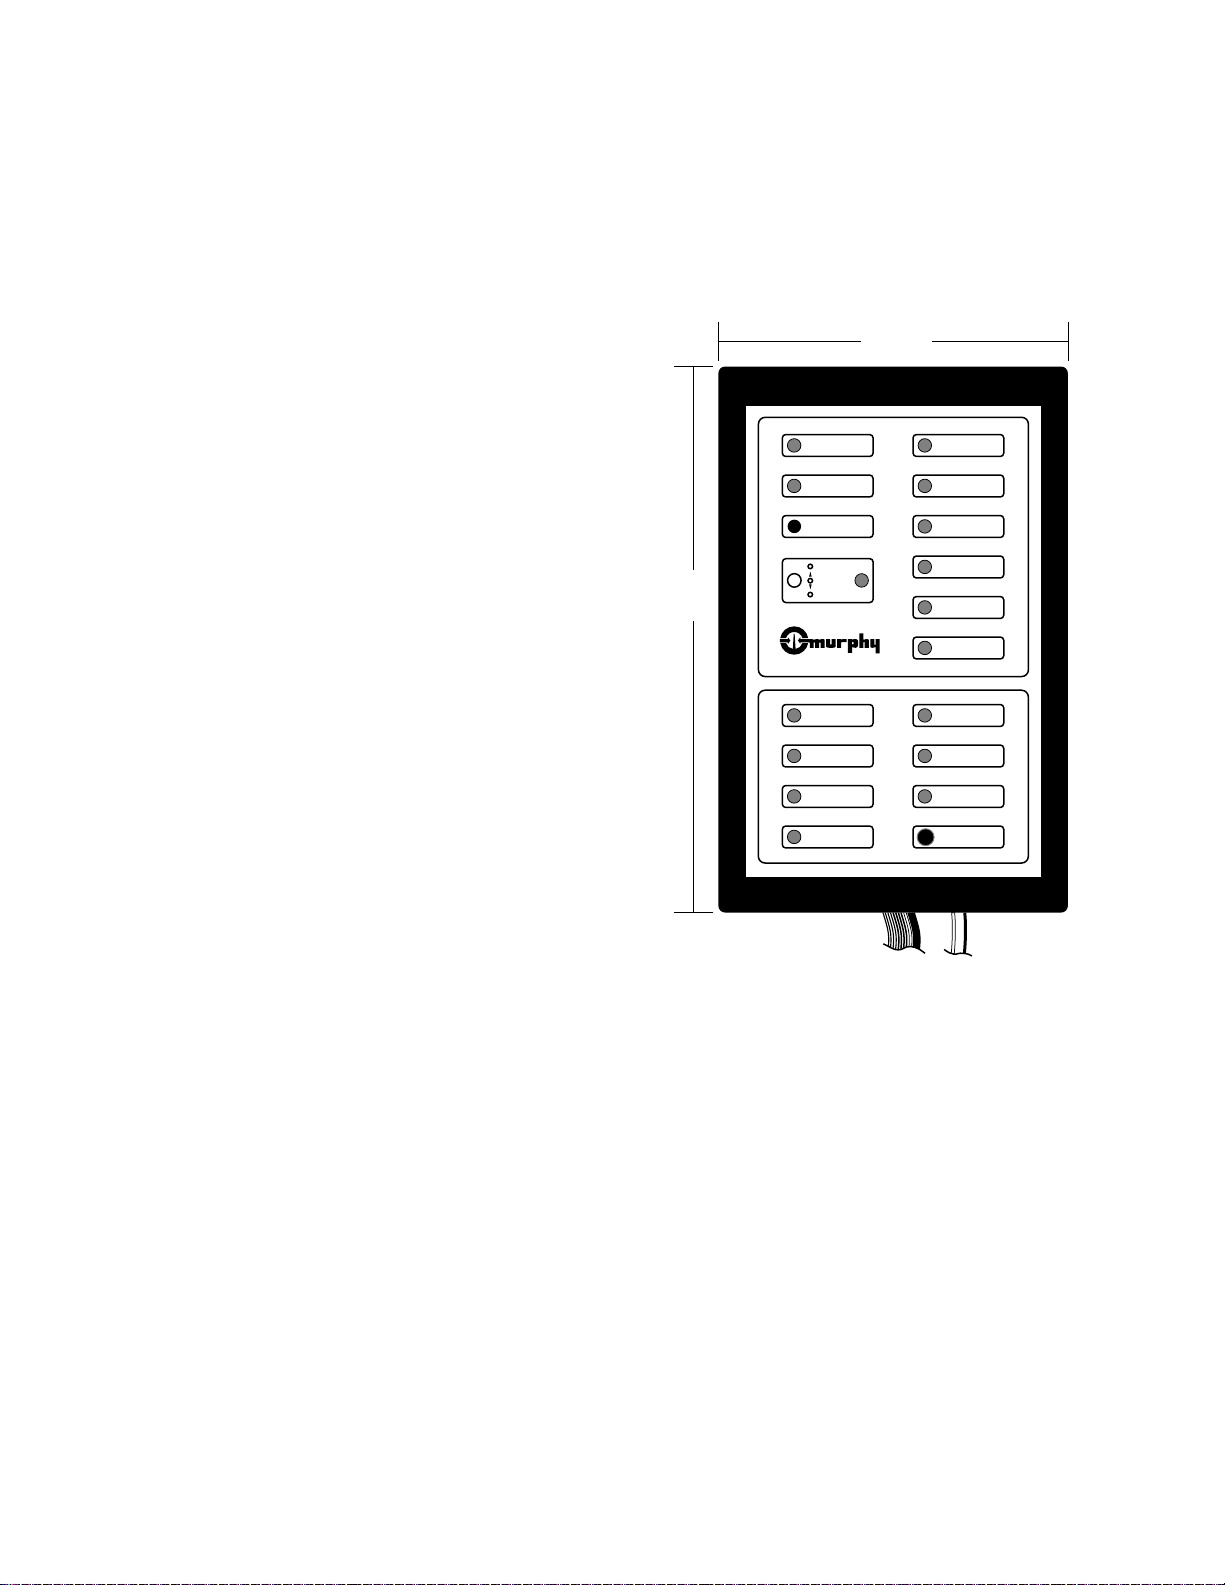
3-2 A901.
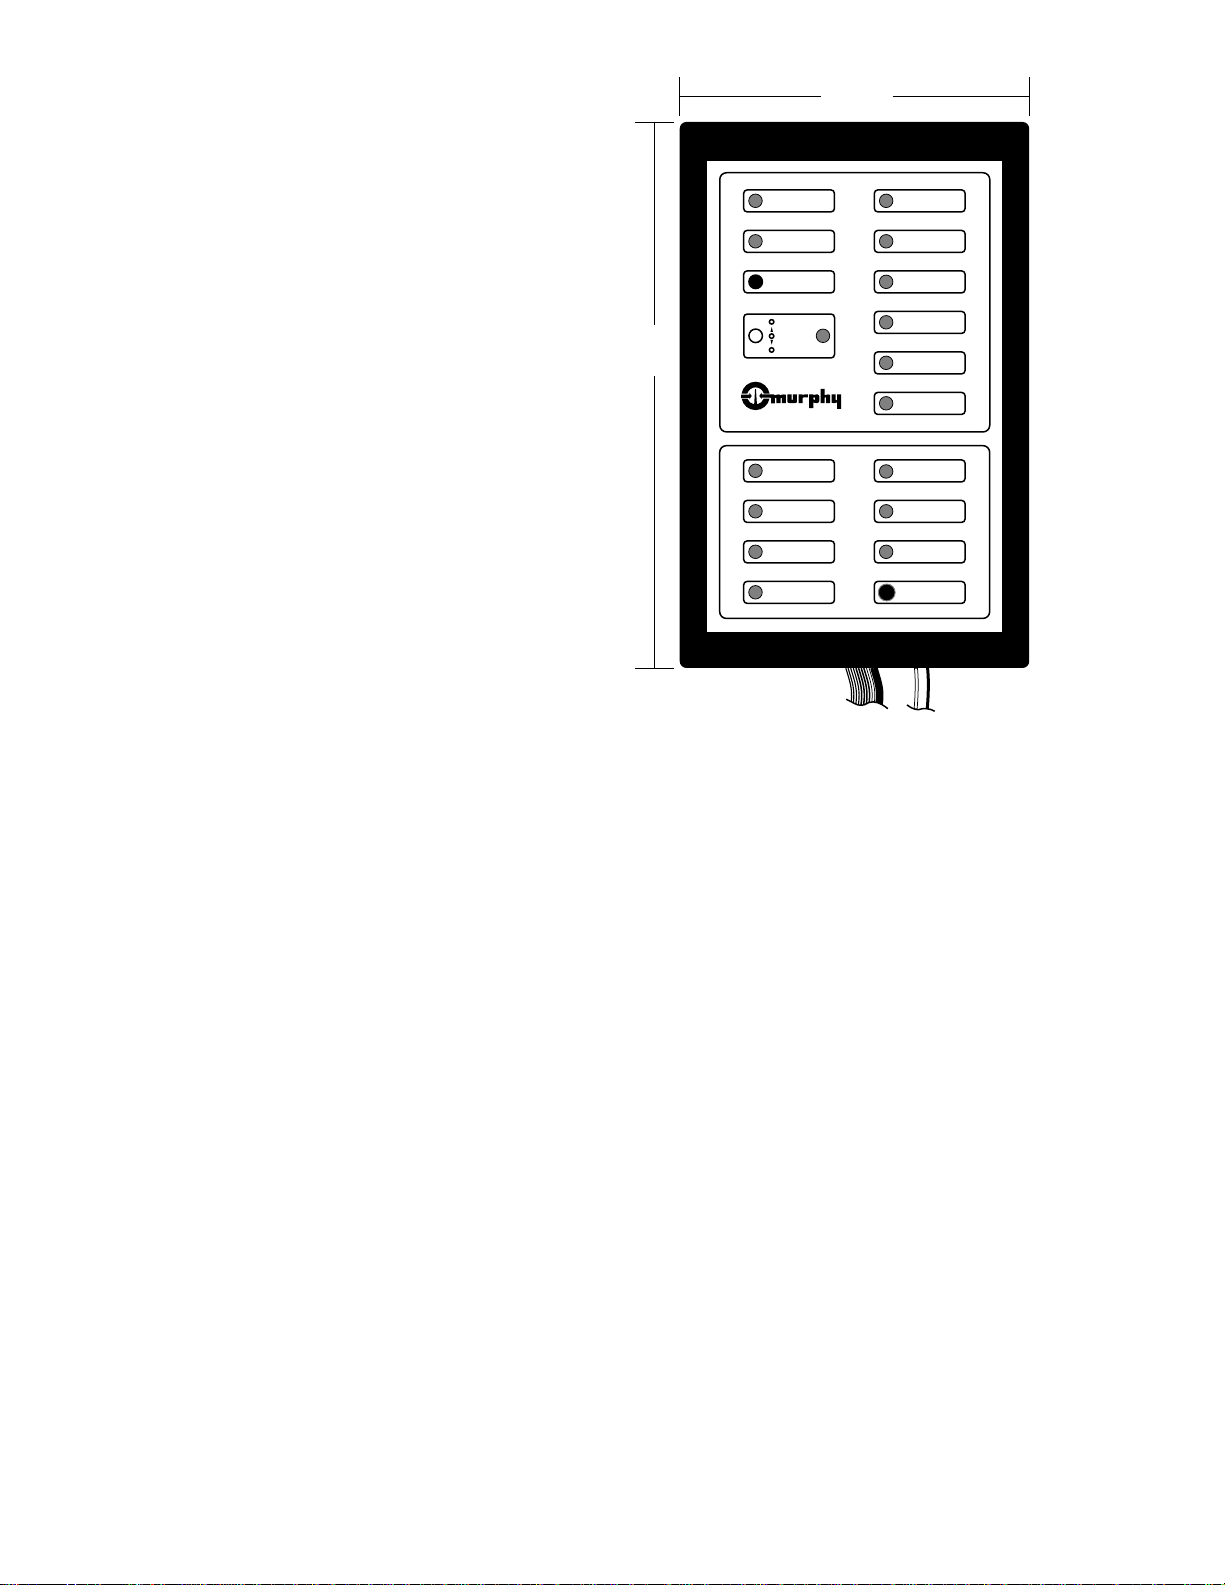
3-2.1 Control / Display Module. The Control / Display Module,
figure 3-2.1, includes the control and test switches, the solid state
logic elements, shutdown and alarm TATTLETALE®lights that
make up the generator engine control for a four-cycle engine.
3-2.1.1 Mode Selector Switch, OFF-AUTO-TEST :
(a) OFF; turns off the control system and resets any shutdown
circuits.
(b) AUTO; turns on the engine controls and shutdown circuits.
System is on standby waiting for a contact closure to start
engine.
(c) TEST; turns on the engine controls and shutdown circuits.
A start signal is applied to the automatic control and the
engine start sequence begins.
3-2.1.2 Lamp Test Pushbutton: Tests the lights on the A901
module.
3-2.1.3 Alarm Silence Pushbutton: Turns off any audible alarm
that is connected to the Local or Remote Audible Alarm Relays.
The indicating light will remain on as long as the condition
exists. If the Alarm Silence pushbutton is not operated, the
audible alarm will turn off when the alarm contact clears.
3-2.1.4 The A901 SELECTRONIC®Control Module includes
the following engine control features:
(a) Cycle crank circuit; will crank the engine for 15 seconds
then rest for 15 seconds until the engine starts. The
crank/rest time can be selected for either 10, 15, 20, 25 or
30 seconds. If the engine false starts, goes above crank
disconnect speed then drops below that speed, the control
will rest for a fixed 10 second period before cranking again.
(b) Crank Disconnect Speed Switch; this circuit detects
engine speed and terminates cranking when engine speed
rises above the speed switch setting. The speed switch is
adjustable, 25 Hz to 2000 Hz, and is factory set at 1180
Hz. This would be 600 RPM on an engine with 118 teeth
on the flywheel ring gear.
(c) Auxiliary Crank Disconnect Circuit; this circuit, required by
NFPA-110, is provided as a back up for the Crank
Disconnect Speed Switch. It is operated by an external
switch sensing either speed, generator voltage or some other
variable that could be used to terminate cranking. Either
circuit will disconnect the starter when the engine starts.
Low Water
Temperature
AUTO
OFF
TEST
Loss of Speed
Signal
Lamp Test
Water
Temperature
Low Battery
Voltage
Alarm Silence
High Battery
Voltage
Low Fuel
Level
High Water Temp.
PreAlarm
Battery Charger
AC Failure
Switch
Not In AUTO
Low Oil Pressure
PreAlarm
Oil Pressure
Overspeed
Overcrank
6-1/2 in.
(165 mm)
9-3/4 in.
(248 mm)
Figure 3-2.1
2
Page 6
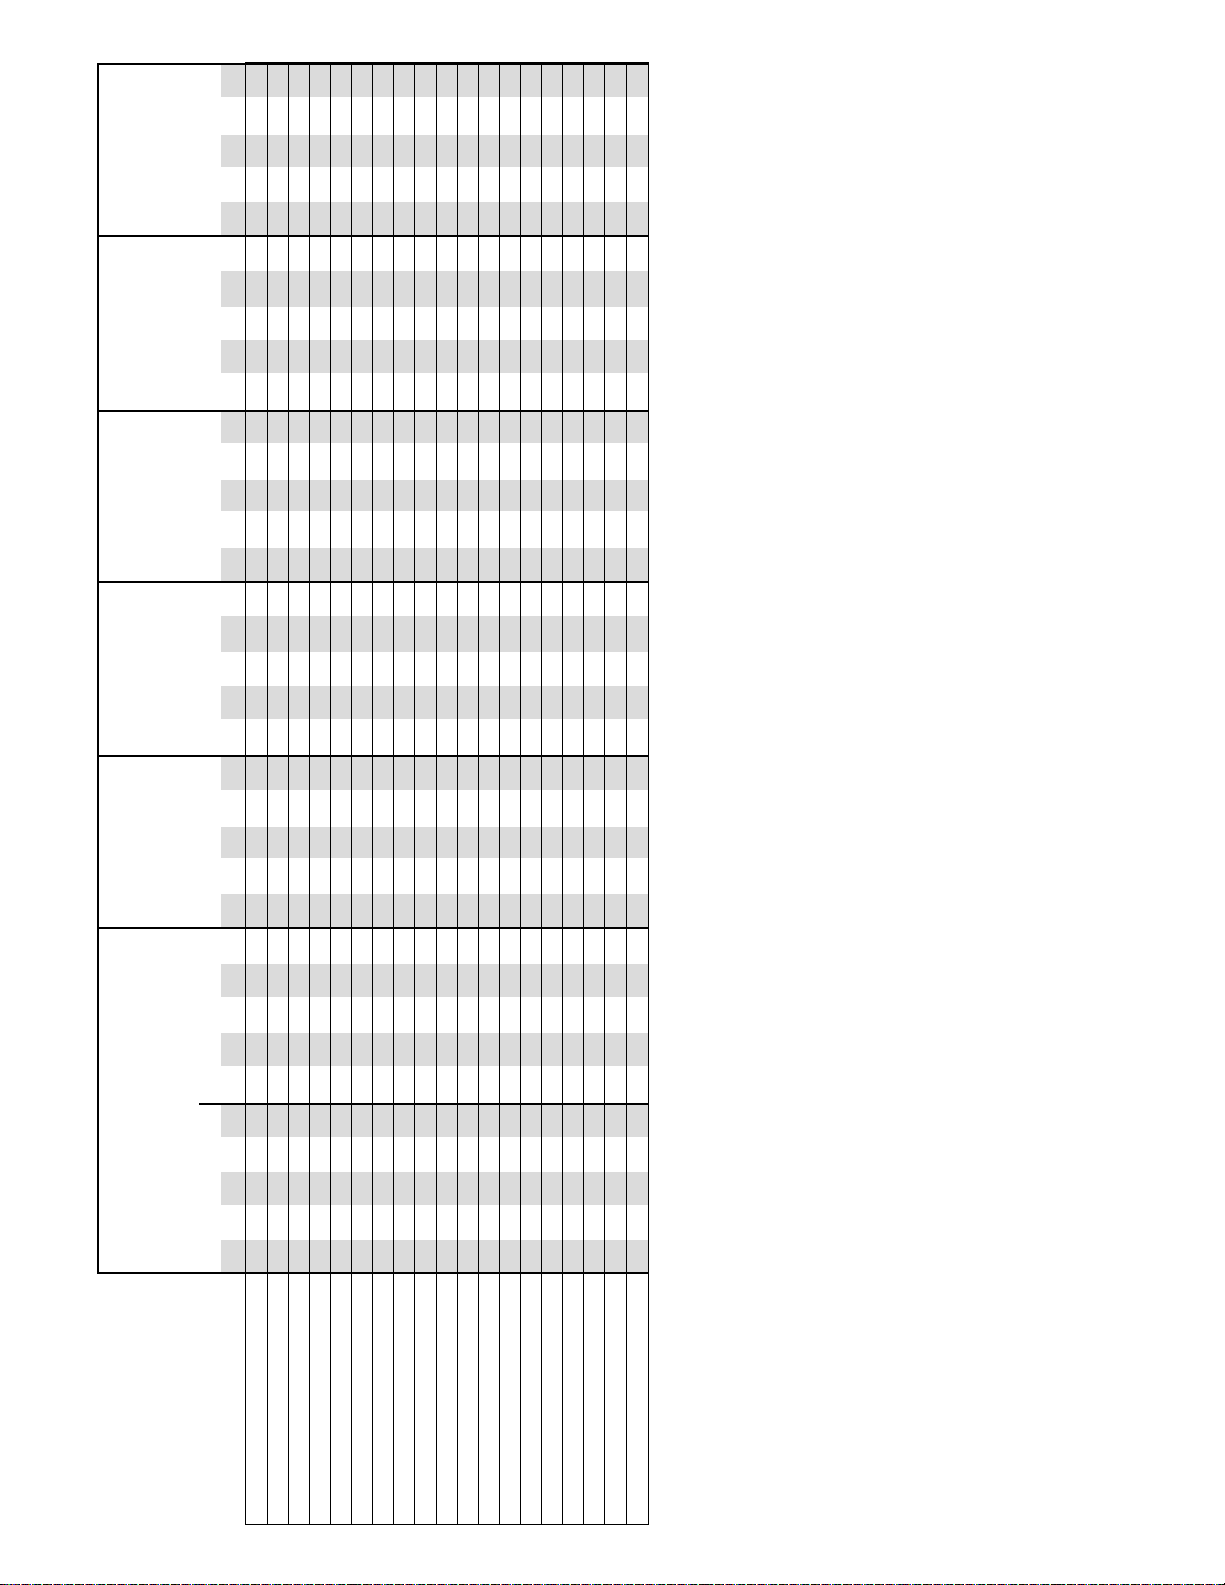
Table 3-1.7
3
Level 1
C.V.
S
L.A.
R.A.
R.V.
Level 2
C.V.
S
L.A.
R.A.
R.V.
NFPA-110
NFPA99
C.V.
S
L.A.
R.A.
R.V.
②
CAN/CSA
C282-M89
C.V. S L.A. R.A. R.V.
A901
C.V.
S L.A. R.A. R.V.
A902
C.V. S L.A.
R.A.
R.V.
④ ④
A903
C.V.
S
L.A.
R.A. R.V.
④ ④
a. Overcrank X X X X X X X X O O X X X X X X X X X X X X X X X X X X O O X X X O O
b. Low Water Temperature X — X X X X — X O O X — X X X X — X X X X — X X X X — X O O X — X O O
c. High Engine Temp. Prealarm X — X X X O — O — O X — X X X O — O O O X — X X X — — — — — — X O O
d. High Engine Temperature X X X X X X X X O O X X X X X X X X X X X X X X X X X X O O X X X O O
e. Low Lube Oil Pressure Prealarm X — X X X X X O — O X — X X X O — O O O X — X X X — — — — — — X O O
f. Low Lube Oil Pressure X X X X X X X X O O X X X X X X X X X X X X X X X X X X O O X X X O O
g. Overpeed X X X X X X X X O O X X X X X X X X X X X X X X X X X X O O X X X O O
h. Low Fuel Main Tank X — X X X O — O O O X — X X X X — X X X X — X X X — — — — — — X O O
i. Control Switch not set in Auto X — X X X O — O — O — — — — — X — X X X X — X X X — — O — O — — — —
j. High Battery Voltage X — X — X O — O — O — — — — — — — — — — X — X — X — — O — O — — — —
k. Low VoltageBattery X — X — X O — O — O — — — — — X — X X X X — X — X — — O — O — — — —
l. Lamp Test X — — — X X — — — — — — — — — X — — — — X — — — — X — — — — X — — — —
m. Audible Alarm Silencing switch — — X X — — — — O — — — — — — — — X X — — — — X — — — — O — — — X O —
n. Low Starting Air Pressure X — X — X O — O — O — — — — — X — X X X — — — — — — — — — — — — — — —
o. Low Starting Hydraulic Pressure X — X — X O — O — O — — — — — X — X X X — — — — — — — — — — — — — — —
q. Remote Emergency Stop — X — — — — X — — — — — — — — — O — — — — X — — — — X — — — — X — — —
r. Low Coolant Level — — — — — — — — — — — — — — — X — X X X — — — — — — — — — — — — — — —
s. Battery Charger AC Failure X — X — X O — O — O — — — — — — — — — — X — X — X — — O — O — — — —
③③ ③③ ③
③
③
⑤
⑤
⑤
⑤
⑤
⑤
①
①
KEY
C.V.: Control panel-mounted Visual indication.
S: Shutdown of EPS
L.A.: Local Audible contacts.
R.A.: Remote Audible contacts.
R.V.: Remote Visual contacts.
X: Required
O: Optional
①: Items “N” or “O” apply only when applicable as
a starting method.
②: NFPA99 requires an audible alarm for all alarm and
shutdown functions. May be connected to L.A. contacts.
③: Air Damper Closed and is available on -2 models only.
④: R.A. and R.V. relays not supplied in model A902 or
A903, optional.
⑤: Circuits and indicators supplied without labels.
p. Air shutdown dampner when used X X X X X X X X O O — — — — — X X X — X X X X X O O X O O
Page 7

(d) Overcrank circuit; will stop automatic cranking and
indicate overcrank if engine fails to start after 3 attempts.
The number of cranks are selectable for 1, 2, 3, 4 or 5
cycles before shutdown. The overcrank circuit may also
be turned off so no overcrank shutdown occurs.
(e) Shutdown Time Delay Bypass; this delay prevents the oil
pressure, water temperature and loss of speed signal
shutdown circuits from operating for 15 seconds after the
engine starts as detected by the crank disconnect circuit.
This same delay also locks out the Low Oil Pressure Pre-
alarm and High Water Temperature Pre-alarm circuits
when the engine is not running.
(f) Overspeed Speed Switch;
1. Provides a signal to the overspeed shutdown circuit if
the engine exceeds the preset speed. The factory
setting is approximately 3894 Hz, or 1980 RPM on an
engine with 118 teeth on the flywheel ring gear. The
adjustment range is 300 Hz to 10,000 Hz.
2. A push-to-test switch is provided to allow testing of the
overspeed circuit without overspeeding the engine.
When switch is depressed, the set point of the speed
switch is lowered approximately 10%.
3. The push-to-test switch can also be used to set the
overspeed switch at approximately 110% of running
speed. Hold the switch depressed while adjusting the
setting until the overspeed trips. When switch is
released, the set point will be 10% above normal running
speed. This is the method used to make the factory
setting. With engine speed at 1800 RPM or 3540 Hz.
(g) Cooldown circuit; this circuit keeps the engine running
for five minutes after the transfer switch has removed
the load from the generator and signaled the A901 to
stop the engine. This feature may be selected (turned
On, standard setting is Off) with a switch on the back of
the Control / Display Module.
3-2.1.5 Seven (7) First-out Shutdown Circuits; provide first-out
indication of cause of shutdown. These circuits deactivate the
fuel relay and lockout the A901 until reset. Shutdown circuits
are activated by the crank disconnect circuit and are not active
when the engine is stopped. Six (6) Red Shutdown Indicating
Lights are provided. The Remote Shutdown circuit does not
have an indicator light.
(a) Overcrank; tripped by the overcrank sensing circuit which
counts the number of cranking attempts.
(b) Overspeed; tripped by overspeed switch when engine
exceeds a preset speed.
(c) Oil Pressure; tripped by the oil pressure SWICHGAGE
®
if pressure drops below preset point while the engine is
running.
(d) Water Temperature; tripped by the water temperature
SWICHGAGE®if engine coolant temperature exceeds the
switch setting.
(e) Spare Shutdown; tripped by an external switch. This
circuit is provided for an additional shutdown that may be
recommended by the engine supplier.
(f) Loss of Speed Signal; tripped by an internal sensing
circuit that detects the loss of the Magnetic Pickup
frequency signal for the speed switches while the engine
is still running. Since the Overspeed shutdown circuit is
activated by the frequency input, it prevents the engine
from running without overspeed protection.
(g) Remote Shutdown; this circuit is provided to shutdown
the engine generator from a remote location. No
indicating light is provided.
3-2.1.6 Nine (9) Alarm Indicating Circuits; provide indication of
cause of alarm. These circuits activate the alarm relays. Alarm
circuits are active as long as power is applied to the A901. All are
active when the engine is running, shutdown or on standby except
Low Oil Pressure Pre- alarm and High Water Temperature Prealarm. Nine (9) Amber Alarm Indicating Lights are provided.
(a) Low Water Temperature; operated by low water temp-
erature SWICHGAGE®.
(b) Spare Alarm; operated by an external switch. This circuit
is provided for an additional alarm that may be required by
the user.
(c) Switch Not In Automatic; operated by the OFF-AUTO-
TEST mode selector switch.
(d) Low Fuel Level; operated by level switch on fuel tank.
(e) High Battery Voltage; operated by relay contact in
battery charger.
(f) Low Battery Voltage; operated by low voltage sensing
device in battery charger .
(g) Low Oil Pressure Pre-alarm; operated by pre-alarm
switch in oil pressure SWICHGAGE®.
(h) High Water Temperature Pre-alarm; operated by pre
alarm switch in water temperature SWICHGAGE®.
(i) Battery Charger AC Failure: operated by a relay contact in
the Battery Charger .
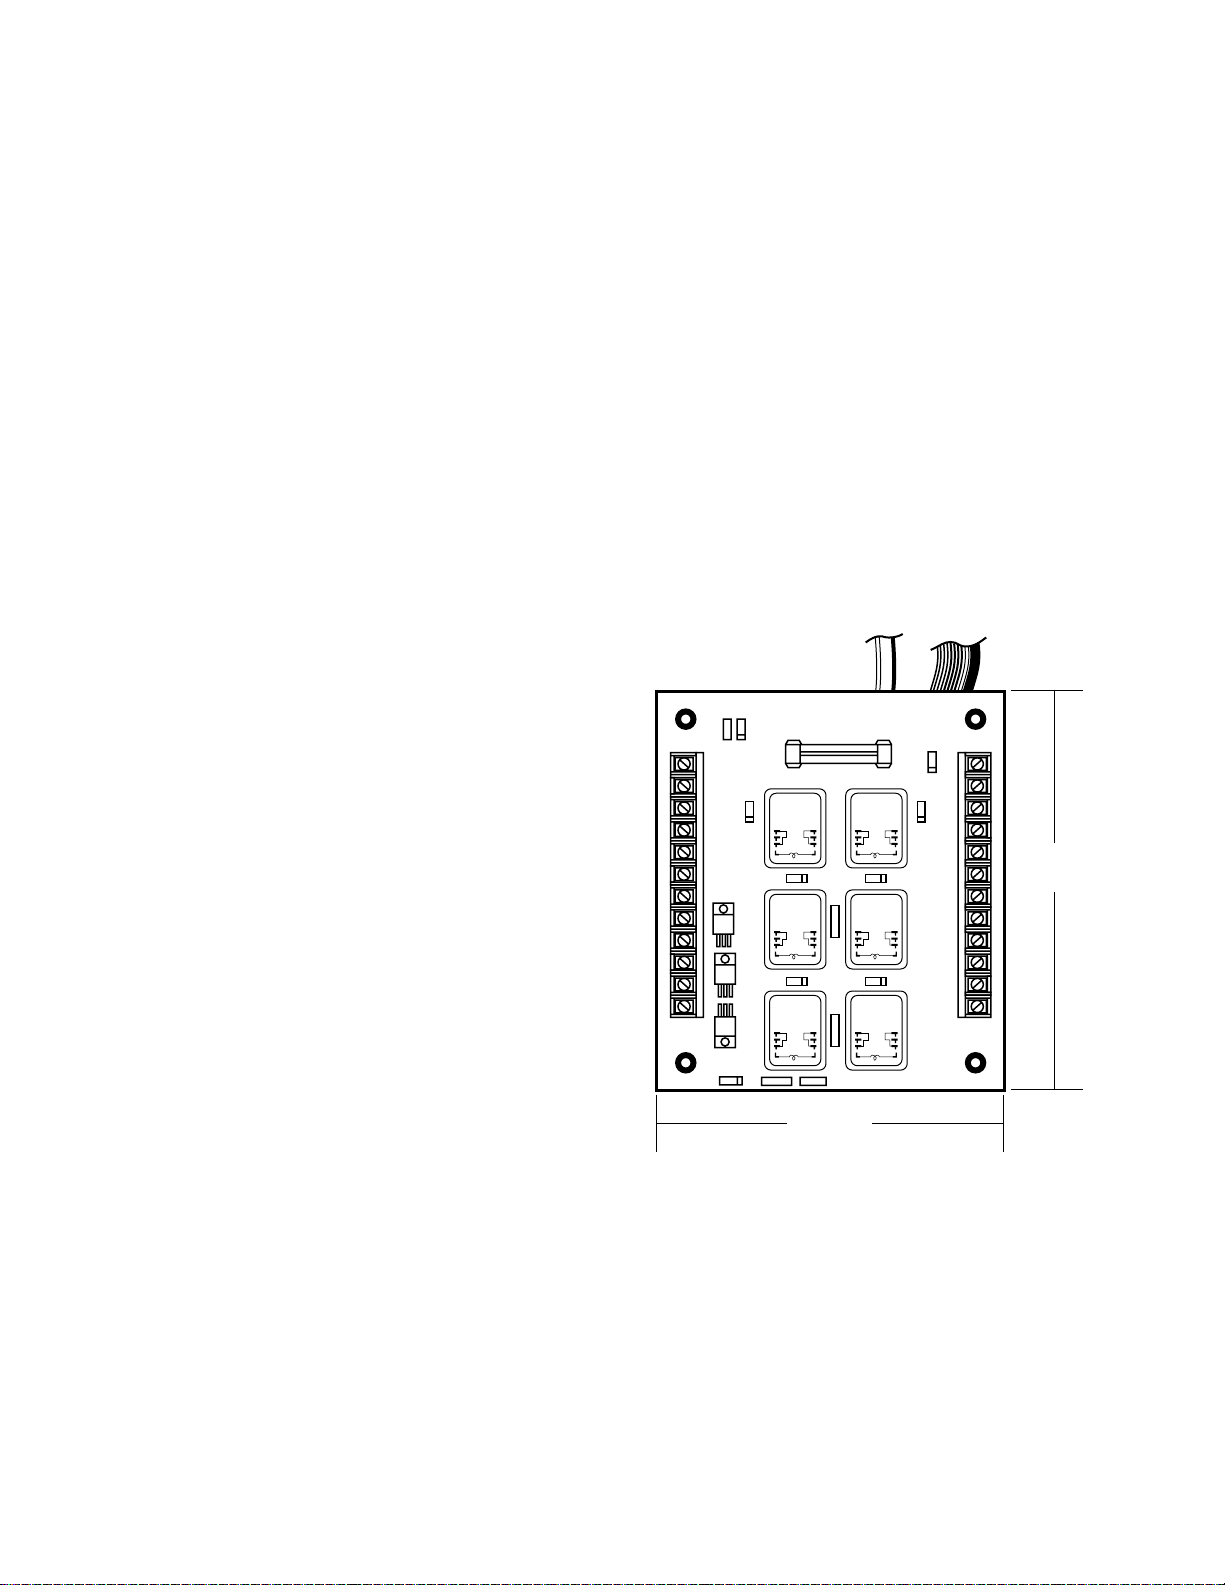
3-2.2 Relay Module. The Relay Module, figure 3-2.2, includes
all of the control, alarm and shutdown relays that are required to
make up the generator engine control. Relays are available for
operation on either 12 or 24 volt battery systems. Five (5) relays
are included for:
3-2.2.1 Fuel Relay; this relay provides two outputs, one to
energize the engine fuel solenoid and a separate circuit to
4
DC12V
3A Fuse
1A
4
5
6
7
8
9
16
17
18
19
20
21
22
23
24
25
RH2V2
-U
DC12V
RH2V2
-U
DC12V
RH2V2
-U
DC12V
RH2V2
-U
DC12V
RH2V2
-U
6-1/4 in.
(159 mm)
4-1/2 in.
(114 mm)
Figure 3-2.2
Page 8
energize the battery charging alternator field.
3-2.2.2 Shutdown Relay; this relay is operated by the shutdown
circuits of the Control / Display Module and provides an output
that can be used to trip the generator circuit breaker on an
emergency shutdown.
3-2.2.3 Local Audible Alarm Relay; provides a contact closure
to operate a local audible alarm as required by NFPA-110, Level
1 and Level 2.
3-2.2.4 Remote Audible Alarm Relay; provides a contact
closure to operate a remote audible alarm as required by NFPA110, Level 1.
3-2.2.5 Remote Visual Alarm Relay; provides a contact closure
to operate a remote visual alarm as required by NFPA- 110,
Level 1.
3-2.3 Status Signals. The relay module also includes three
outputs that can be used with external circuits for signaling or
control functions.
3-2.3.1 The Control On function at terminal 12 is on (closed
to negative) as long as the Mode Selector Switch is in either
Auto or Test. When the Mode Selector is turned Off, the
Control On signal is open. This can be used to signal switch
position or to reset an external circuit when the Mode Selector
is turned Off.
3-2.3.2 The System Ready signal at terminal 13 is on (closed
to negative) as long as the Mode Selector Switch is in either
Auto or Test and no shutdown Tattletale circuit is latched on.
This can be used to signal that the generator engine is ready to
automatically start or is running in Test.
3-2.3.3 The Control On function at terminal 14 is on (closed
to positive) as long as the Mode Selector Switch is in either
Auto or Test. When the Mode Selector is turned Off, the
Control On signal is open. This can be used to signal switch
position or to reset an external circuit when the Mode Selector
is turned Off.
3-3 A901-2.
3-3.1 Control / Display Module. The Control / Display Module,
figure 3-3.1, includes the control and test switches, the solid state
logic elements, shutdown and alarm TATTLETALE®lights that
make up the generator engine control for a two-cycle engine.
3-3.1.1 Mode Selector Switch, OFF-AUTO-TEST :
(a) OFF; turns off the control system and resets any shutdown
circuits.
(b) AUTO; turns on the engine controls and shutdown
circuits. System is on standby waiting for a contact
closure to start engine.
(c) TEST; turns on the engine controls and shutdown circuits.
A start signal is applied to the automatic control and the
engine start sequence begins.
3-3.1.2 Lamp Test Pushbutton: Tests the lights on the A- 901-2
module.
3-3.1.3 Alarm Silence Pushbutton: Turns off any audible alarm
that is connected to the Local or Remote Audible Alarm Relays.
The indicating light will remain on as long as the condition
exists. If the Alarm Silence pushbutton is not operated, the
audible alarm will turn off when the alarm contact clears.
3-3.1.4 The A901-2 SELECTRONIC
®
Control Module includes
the following engine control features:
(a) Cycle crank circuit; will crank the engine for 15 seconds
then rest for 15 seconds until the engine starts. The
crank/rest time is selectable for either 10, 15, 20, 25 or 30
seconds. If the engine false starts, goes above crank
disconnect speed then drops below that speed, the control
will rest for a fixed 10 second period before cranking again.
(b) Crank Disconnect Speed Switch; this circuit detects
engine speed and terminates cranking when engine speed
rises above the speed switch setting. The speed switch is
adjustable, 25 Hz to 2000 Hz, and is factory set at 1180
Hz. This would be 600 RPM on an engine with 118 teeth
on the flywheel ring gear.
(c) Auxiliary Crank Disconnect Circuit; this circuit, required by
NFPA-110, is provided as a back up for the Crank Disconnect Speed Switch. It is operated by an external switch
sensing either speed, generator voltage or some other
variable that could be used to terminate cranking. Either
circuit will disconnect the starter when the engine starts.
(d) Overcrank circuit; will stop automatic cranking and
indicate overcrank if engine fails to start after 3 attempts.
The number of cranks are selectable for 1, 2, 3, 4 or 5
cycles before shutdown. The overcrank circuit may also
be turned off so no overcrank shutdown occurs.
(e) Shutdown Time Delay Bypass; this delay prevents the oil
pressure, water temperature and loss of speed signal
shutdown circuits from operating for 15 seconds after the
engine starts as detected by the crank disconnect circuit.
This same delay also locks out the Low Oil Pressure Prealarm and High Water Temperature Pre-alarm circuits
when the engine is not running.
Low Water
Temperature
AUTO
OFF
TEST
Loss of Speed
Signal
Lamp Test
Water
Temperature
Air Damper
Closed
Low Battery
Voltage
Alarm Silence
Battery Charger
AC Failure
High Battery
Voltage
Low Fuel
Level
High Water Temp.
PreAlarm
Switch
Not In AUTO
Low Oil Pressure
PreAlarm
Oil Pressure
Overspeed
Overcrank
6-1/2 in.
(165 mm)
9-3/4 in.
(248 mm)
Figure 3-3.1
5
Page 9
(f) Overspeed Speed Switch;
1. Provides a signal to the overspeed shutdown circuit if
the engine exceeds the preset speed. The factory
setting is approximately 3894 Hz, or 1980 RPM on an
engine with 118 teeth on the flywheel ring gear. The
adjustment range is 300 Hz to 10,000 Hz.
2. A push to test switch is provided to allow testing of the
overspeed circuit without overspeeding the engine.
When switch is depressed, the set point of the speed
switch is lowered approximately 10%.
3. The push to test switch can also be used to set the
overspeed switch at approximately 110% of running
speed. Hold the switch depressed while adjusting the
setting until the overspeed trips. When switch is
released, the set point will be 10% above normal running
speed. This is the method used to make the factory
setting. With engine speed at 1800 RPM or 3540 Hz.
(g) Cooldown circuit; this circuit keeps the engine running
for five minutes after the transfer switch has removed
the load from the generator and signaled the A901-2 to
stop the engine. This feature may be selected (turned
On, standard setting is Off) with a switch on the back of
the Control / Display Module.
3-3.1.5 Seven (7) First-out Shutdown Circuits; provide first-out
indication of cause of shutdown. These circuits deactivate the
fuel relay and lockout the A901-2 until reset. Shutdown circuits
are activated by the crank disconnect circuit and are not active
when the engine is stopped. Six (6) Red Shutdown Indicating
Lights are provided. The Remote Shutdown circuit does not
have an indicator light.
(a) Overcrank; tripped by the overcrank sensing circuit which
counts the number of cranking attempts.
(b) Overspeed; tripped by overspeed switch when engine
exceeds a preset speed.
(c) Oil Pressure; tripped by the oil pressure SWICHGAGE®if
pressure drops below preset point while the engine is running.
(d) Water T emperature; tripped by the water temperature
SWICHGAGE®if engine coolant temperature exceeds the
switch setting.
(e) Spare Shutdown; tripped by an external switch. This
circuit is provided for an additional shutdown that may be
recommended by the engine supplier.
(f) Loss of Speed Signal; tripped by an internal sensing
circuit that detects the loss of the Magnetic Pickup
frequency signal for the speed switches while the engine
is still running. Since the Overspeed shutdown circuit is
activated by the frequency input, it prevents the engine
from running without overspeed protection.
(g) Remote Shutdown; this circuit is provided to shutdown
the engine generator from a remote location. No
indicating light is provided.
3-3.1.6 Nine (9) Alarm Indicating Circuits; provide indication
of cause of alarm. These circuits activate the alarm relays.
Alarm circuits are active as long as power is applied to the
A901-2. All are active when the engine is running, shutdown or
on standby except Low Oil Pressure Pre- alarm and High Water
Temperature Pre-alarm. Nine (9) Amber Alarm Indicating
Lights are provided.
(a) Low Water Temperature; operated by low water temp-
erature SWICHGAGE®.
(b) Air Damper Closed; operated by an external switch or by
the Overspeed Relay circuit. This circuit is provided with
a selector switch to allow the user to determine the source
of the signal.
(c) Switch Not In Automatic; operated by the OFF-AUTO-
TEST mode selector switch.
(d) Low Fuel Level; operated by level switch on fuel tank.
(e) High Battery Voltage; operated by relay contact in battery
charger .
(f) Low Battery Voltage; operated by low voltage sensing
device in battery charger .
(g) Low Oil Pressure Pre-alarm; operated by pre-alarm
switch in oil pressure SWICHGAGE®.
(h) High Water Temperature Pre-alarm; operated by pre-
alarm switch in water temperature SWICHGAGE®.
(i) Battery Charger AC Failure; operated by relay contact in
Battery Charger .
3-3.2 Relay Module. The Relay Module, figure 3-3.2, includes
all of the control, alarm and shutdown relays that are required to
make up the generator engine control. Relays are available for
operation on either 12 or 24 volt battery systems. Six (6) relays
are included for:
3-3.2.1 Fuel Relay; this relay provides two outputs, one to
energize the engine fuel solenoid and a separate circuit to
energize the battery charging alternator field.
3-3.2.2 Shutdown Relay; this relay is operated by the shutdown
circuits of the Control / Display Module and provides an output
that can be used to trip the generator circuit breaker on an
emergency shutdown.
3-3.2.3 Overspeed Relay; operates only on an Overspeed
shutdown. This relay provides an output to trip an air shut off
solenoid to close the air damper on a two-cycle engine.
3-3.2.4 Local Audible Alarm Relay; provides a contact closure
DC12V
3A Fuse
1A
4
5
6
7
8
9
16
17
18
19
20
21
22
23
24
25
DC12V
DC12V DC12V
DC12V DC12V
6-1/4 in.
(159 mm)
4-1/2 in.
(114 mm)
Figure 3-3.2
6
Page 10

7
to operate a local audible alarm as required by NFPA- 110,
Level 1 and Level 2.
3-3.2.5 Remote Audible Alarm Relay; provides a contact
closure to operate a remote audible alarm as required by NFPA110, Level 1.
3-3.2.6 Remote Visual Alarm Relay; provides a contact closure
to operate a remote visual alarm as required by NFPA- 110,
Level 1.
3-3.3 Status Signals. The relay module also includes three
outputs that can be used with external circuits for signaling or
control functions.
3-3.3.1 The Control On function at terminal 12 is on (closed
to negative) as long as the Mode Selector Switch is in either
Auto or Test. When the Mode Selector is turned Off, the
Control On signal is open. This can be used to signal switch
position or to reset an external circuit when the Mode Selector
is turned Off.
3-3.3.2 The System Ready signal at terminal 13 is on (closed
to negative) as long as the Mode Selector Switch is in either
Auto or Test and no shutdown Tattletale circuit is latched on.
This can be used to signal that the generator engine is ready to
automatically start or is running in Test.
3-3.3.3 The Control On function at terminal 14 is on (closed
to positive) as long as the Mode Selector Switch is in either
Auto or Test. When the Mode Selector is turned Off, the
Control On signal is open. This can be used to signal switch
position or to reset an external circuit when the Mode Selector
is turned Off.
3-4 A902.
3-4.1 Control / Display Module. The Control / Display
Module, figure 3-4.1, includes the control and test switches, the
solid state logic elements, shutdown and alarm TATTLETALE
®
lights that make up the generator engine control for a four-cycle
engine.
3-4.1.1 Mode Selector Switch, OFF-AUTO-TEST :
(a) OFF; turns off the control system and resets any shutdown
circuits.
(b) AUTO; turns on the engine controls and shutdown
circuits. System is on standby waiting for a contact
closure to start engine.
(c) TEST; turns on the engine controls and shutdown circuits.
A start signal is applied to the automatic control and the
engine start sequence begins.
3-4.1.2 Lamp Test Pushbutton: Tests the lights on the A902
module.
3-4.1.3 The A902 SELECTRONIC®Control Module includes
the following engine control features:
(a) Cycle crank circuit; will crank the engine for 15 seconds
then rest for 15 seconds until the engine starts. The
crank/rest time is selectable for either 10, 15, 20, 25 or 30
seconds. If the engine false starts, goes above crank
disconnect speed then drops below that speed, the control
will rest for a fixed 10 second period before cranking
again.
(b) Crank Disconnect Speed Switch; this circuit detects
engine speed and terminates cranking when engine speed
rises above the speed switch setting. The speed switch is
adjustable, 25 Hz to 2000 Hz, and is factory set at 1180
Hz. This would be 600 RPM on an engine with 118 teeth
on the flywheel ring gear.
(c) Auxiliary Crank Disconnect Circuit; this circuit, required
by NFPA-110, is provided as a back up for the Crank
Disconnect Speed Switch. It is operated by an external
switch sensing either speed, generator voltage or some
other variable that could be used to terminate cranking.
Either circuit will disconnect the starter when the engine
starts.
(d) Overcrank circuit; will stop automatic cranking and
indicate overcrank if engine fails to start after 3 attempts.
The number of cranks are selectable for 1, 2, 3, 4 or 5
cycles before shutdown. The overcrank circuit may also
be turned off so no overcrank shutdown occurs.
(e) Shutdown Time Delay Bypass; this delay prevents the oil
pressure, water temperature and loss of speed signal
shutdown circuits from operating for 15 seconds after the
engine starts as detected by the crank disconnect circuit.
(f) Overspeed Speed Switch;
1. Provides a signal to the overspeed shutdown circuit if
the engine exceeds the preset speed. The factory
setting is approximately 3894 Hz, or 1980 RPM on an
engine with 118 teeth on the flywheel ring gear. The
adjustment range is 300 Hz to 10,000 Hz.
2. A push to test switch is provided to allow testing of the
overspeed circuit without overspeeding the engine.
When switch is depressed, the set point of the speed
switch is lowered approximately 10%.
3. The push to test switch can also be used to set the
overspeed switch at approximately 110% of running
speed. Hold the switch depressed while adjusting the
Low Water
Temperature
AUTO
OFF
TEST
Loss of Speed
Signal
Lamp Test
Water
Temperature
Oil Pressure
Overspeed
Overcrank
6-1/2 in.
(165 mm)
9-3/4 in.
(248 mm)
Figure 3-4.1
Page 11

8
setting until the overspeed trips. When switch is
released, the set point will be 10% above normal
running speed. This is the method used to make the
factory setting. With engine speed at 1800 RPM or
3540 Hz.
(g) Cooldown circuit; this circuit keeps the engine running
for five minutes after the transfer switch has removed the
load from the generator and signaled the A902 to stop
the engine. This feature may be selected (turned On,
standard setting is Off) with a switch on the back of the
Control / Display Module.
3-4.1.4 Seven (7) First-out Shutdown Circuits; provide first-out
indication of cause of shutdown. These circuits deactivate the
fuel relay and lockout the A902 until reset. Shutdown circuits
are activated by the crank disconnect circuit and are not active
when the engine is stopped. Six (6) Red Shutdown Indicating
Lights are provided. The Remote Shutdown circuit does not
have an indicator light.
(a) Overcrank; tripped by the overcrank sensing circuit which
counts the number of cranking attempts.
(b) Overspeed; tripped by overspeed switch when engine
exceeds a preset speed.
(c) Oil Pressure; tripped by the oil pressure SWICHGAGE®if
pressure drops below preset point while the engine is
running.
(d) Water Temperature; tripped by the water temperature
SWICHGAGE®if engine coolant temperature exceeds the
switch setting.
(e) Spare Shutdown; tripped by an external switch. This
circuit is provided for an additional shutdown that may be
recommended by the engine supplier.
(f) Loss of Speed Signal; tripped by an internal sensing
circuit that detects the loss of the Magnetic Pickup
frequency signal for the speed switches while the engine
is still running. Since the Overspeed shutdown circuit is
activated by the frequency input, it prevents the engine
from running without overspeed protection.
(g) Remote Shutdown; this circuit is provided to shutdown
the engine generator from a remote location. No
indicating light is provided.
3-4.1.5 Two (2) Alarm Indicating Circuits; provide indication
of cause of alarm. These circuits activate the alarm relay. Alarm
circuits are active as long as power is applied to the A902. All
are active when the engine is running, shutdown or on standby.
T wo (2) Amber Alarm Indicating Lights are provided.
(a) Low Water Temperature; operated by low water
temperature SWICHGAGE®.
(b) Spare Alarm; operated by an external switch. This circuit
is provided for an additional alarm that may be required
by the user.
3-4.2 Relay Module. The Relay Module, figure 3-4.2, includes
all of the control, alarm and shutdown relays that are required to
make up the generator engine control. Relays are available for
operation on either 12 or 24 volt battery systems. Three (3)
relays are included for:
3-4.2.1 Fuel Relay; this relay provides two outputs, one to
energize the engine fuel solenoid and a separate circuit to
energize the battery charging alternator field.
3-4.2.2 Shutdown Relay; this relay is operated by the shutdown
circuits of the Control / Display Module and provides an output
that can be used to trip the generator circuit breaker on an
emergency shutdown.
3-4.2.3 Local Audible Alarm Relay; provides a contact closure
to operate a local audible alarm as required by NFPA- 110, Level
1 and Level 2.
3-4.3 Status Signals. The relay module also includes three
outputs that can be used with external circuits for signaling or
control functions.
3-4.3.1 The Control On function at terminal 12 is on (closed to
negative) as long as the Mode Selector Switch is in either Auto
or Test. When the Mode Selector is turned Off, the Control On
signal is open. This can be used to signal switch position or to
reset an external circuit when the Mode Selector is turned Off.
3-4.3.2 The System Ready signal at terminal 13 is on (closed
to negative) as long as the Mode Selector Switch is in either
Auto or Test and no shutdown TATTLETALE
®
circuit is
latched on. This can be used to signal that the generator engine
is ready to automatically start or is running in Test.
3-4.3.3 The Control On function at terminal 14 is on (closed to
positive) as long as the Mode Selector Switch is in either Auto
or Test. When the Mode Selector is turned Off, the Control On
signal is open. This can be used to signal switch position or to
reset an external circuit when the Mode Selector is turned Off.
3-5 A902-2.
3-5.1 Control / Display Module. The Control / Display Module,
figure 3-5.1, includes the control and test switches, the solid state
logic elements, shutdown and alarm TATTLETALE
®
lights that
make up the generator engine control for a two-cycle engine.
3-5.1.1 Mode Selector Switch, OFF-AUTO-TEST :
(a) OFF; turns off the control system and resets any shutdown
circuits.
(b) AUTO; turns on the engine controls and shutdown circuits.
System is on standby waiting for a contact closure to start
engine.
DC12V
3A Fuse
1A
4
5
6
7
8
9
16
17
18
19
20
21
22
23
24
25
DC12V
DC12V
6-1/4 in.
(159 mm)
4-1/2 in.
(114 mm)
Figure 3-4.2
Page 12

9
(c) TEST; turns on the engine controls and shutdown circuits.
A start signal is applied to the automatic control and the
engine start sequence begins.
3-5.1.2 Lamp Test Pushbutton: Tests the lights on the A- 902-2
module.
3-5.1.3 The A902-2 SELECTRONIC®Control Module includes
the following engine control features:
(a) Cycle crank circuit; will crank the engine for 15 seconds
then rest for 15 seconds until the engine starts. The
crank/rest time is selectable for either 10, 15, 20, 25 or 30
seconds. If the engine false starts, goes above crank
disconnect speed then drops below that speed, the control
will rest for a fixed 10 second period before cranking
again.
(b) Crank Disconnect Speed Switch; this circuit detects
engine speed and terminates cranking when engine speed
rise above the speed switch setting. The speed switch is
adjustable, 25 Hz to 2000 Hz, and is factory set at 1180
Hz. This would be 600 RPM on an engine with 118 teeth
on the flywheel ring gear.
(c) Auxiliary Crank Disconnect Circuit; this circuit, required
by NFPA-110, is provided as a back up for the Crank
Disconnect Speed Switch. It is operated by an external
switch sensing either speed, generator voltage or some
other variable that could be used to terminate cranking.
Either circuit will disconnect the starter when the engine
starts.
(d) Overcrank circuit; will stop automatic cranking and
indicate overcrank if engine fails to start after 3 attempts.
The number of cranks are selectable for 1, 2, 3, 4 or 5
cycles before shutdown. The overcrank circuit may also
be turned off so no overcrank shutdown occurs.
(e) Shutdown Time Delay Bypass; this delay prevents the oil
pressure, water temperature and loss of speed signal
shutdown circuits from operating for 15 seconds after the
engine starts as detected by the crank disconnect circuit.
(f) Overspeed Speed Switch;
1. Provides a signal to the overspeed shutdown circuit if
the engine exceeds the preset speed. The factory
setting is approximately 3894 Hz, or 1980 RPM on an
engine with 118 teeth on the flywheel ring gear. The
adjustment range is 300 Hz to 10,000 Hz.
2. A push to test switch is provided to allow testing of the
overspeed circuit without overspeeding the engine.
When switch is depressed, the set point of the speed
switch is lowered approximately 10%.
3. The push to test switch can also be used to set the
overspeed switch at approximately 110% of running
speed. Hold the switch depressed while adjusting the
setting until the overspeed trips. When switch is
released, the set point will be 10% above normal
running speed. This is the method used to make the
factory setting. With engine speed at 1800 RPM or
3540 Hz.
(g) Cooldown circuit; this circuit keeps the engine running
for five minutes after the transfer switch has removed
the load from the generator and signaled the A902-2 to
stop the engine. This feature may be selected (turned
On, standard setting is Off) with a switch on the back of
the Control / Display Module.
3-5.1.4 Seven (7) First-out Shutdown Circuits; provide first-out
indication of cause of shutdown. These circuits deactivate the
fuel relay and lockout the A902-2 until reset. Shutdown circuits
are activated by the crank disconnect circuit and are not active
when the engine is stopped. Six (6) Red Shutdown Indicating
Lights are provided. The Remote Shutdown circuit does not
have an indicator light.
(a) Overcrank; tripped by the overcrank sensing circuit which
counts the number of cranking attempts.
(b) Overspeed; tripped by overspeed switch when engine
exceeds a preset speed.
(c) Oil Pressure; tripped by the oil pressure SWICHGAGE
®
if pressure drops below preset point while the engine is
running.
(d) Water Temperature; tripped by the water temperature
SWICHGAGE®if engine coolant temperature exceeds the
switch setting.
(e) Spare Shutdown; tripped by an external switch. This
circuit is provided for an additional shutdown that may be
recommended by the engine supplier.
(f) Loss of Speed Signal; tripped by an internal sensing
circuit that detects the loss of the Magnetic Pickup
frequency signal for the speed switches while the engine
is still running. Since the Overspeed shutdown circuit is
activated by the frequency input, it prevents the engine
from running without overspeed protection.
(g) Remote Shutdown; this circuit is provided to shutdown
the engine generator from a remote location. No
indicating light is provided.
3-5.1.5 Two (2) Alarm Indicating Circuits; provide indication
Low Water
Temperature
AUTO
OFF
TEST
Loss of Speed
Signal
Lamp Test
Water
Temperature
Air Damper
Closed
Oil Pressure
Overspeed
Overcrank
6-1/2 in.
(165 mm)
9-3/4 in.
(248 mm)
Figure 3-5.1
Page 13

of cause of alarm. These circuits activate the alarm relay.
Alarm circuits are active as long as power is applied to the
A902-2. All are active when the engine is running, shutdown or
on standby. Two (2) Amber Alarm Indicating Lights are
provided.
(a) Low Water Temperature; operated by low water
temperature SWICHGAGE®.
(b) Air Damper Closed; operated by an external switch or by
the Overspeed Relay circuit. This circuit is provided with
a selector switch to allow the user to determine the source
of the signal.
3-5.2 Relay Module. The Relay Module, figure 3-5.2, includes
all of the control, alarm and shutdown relays that are required to
make up the generator engine control. Relays are available for
operation on either 12 or 24 volt battery systems. Four (4)
relays are included for:
3-5.2.1 Fuel Relay; this relay provides two outputs, one to
energize the engine fuel solenoid and a separate circuit to
energize the battery charging alternator field.
3-5.2.2 Shutdown Relay; this relay is operated by the shutdown
circuits of the Control / Display Module and provides an output
that can be used to trip the generator circuit breaker on an
emergency shutdown.
3-5.2.3 Overspeed Relay; operates only on an Overspeed
shutdown. This relay provides an output to trip an air shut off
solenoid to close the air damper on a two-cycle engine.
3-5.2.4 Local Audible Alarm Relay; provides a contact closure
to operate a local audible alarm as required by NFPA- 110, Level
1 and Level 2.
3-5.3 Status Signals. The relay module also includes three
outputs that can be used with external circuits for signaling or
control functions.
3-5.3.1 The Control On function at terminal 12 is on (closed to
negative) as long as the Mode Selector Switch is in either Auto
or Test. When the Mode Selector is turned Off, the Control On
signal is open. This can be used to signal switch position or to
reset an external circuit when the Mode Selector is turned Off.
3-5.3.2 The System Ready signal at terminal 13 is on (closed
to negative) as long as the Mode Selector Switch is in either
Auto or Test and no shutdown TATTLETALE®circuit is
latched on. This can be used to signal that the generator
engine is ready to automatically start or is running in Test.
3-5.3.3 The Control On function at terminal 14 is on (closed to
positive) as long as the Mode Selector Switch is in either Auto
or Test. When the Mode Selector is turned Off, the Control On
signal is open. This can be used to signal switch position or to
reset an external circuit when the Mode Selector is turned Off.
3-6 A903.
3-6.1 Control / Display Module. The Control / Display Module,
figure 3-6.1, includes the control and test switches, the solid
state logic elements, shutdown and alarm TATTLETALE®lights
that make up the generator engine control for a four cycle
engine. This module is the same as Model A- 901 except 7 of
the alarm circuits are un-labeled. This allows the customer to
specify labels other than those recommended in NFPA-110.
This model has shutdown and alarm circuits labeled to meet the
requirements of NFPA-110, Level 2.
3-6.1.1 Mode Selector Switch, OFF-AUTO-TEST:
(a) OFF; turns off the control system and resets any shutdown
circuits.
(b) AUTO; turns on the engine controls and shutdown circuits.
System is on standby waiting for a contact closure to start
engine.
(c) TEST; turns on the engine controls and shutdown circuits.
A start signal is applied to the automatic control and the
engine start sequence begins.
Figure 3-6.1
10
DC12V
3A Fuse
1A
4
5
6
7
8
9
16
17
18
19
20
21
22
23
24
25
DC12V
DC12V
DC12V
6-1/4 in.
(159 mm)
4-1/2 in.
(114 mm)
Figure 3-5.2
Page 14

3-6.1.2 Lamp Test Pushbutton: Tests the lights on the A903
module.
3-6.1.3 Alarm Silence Pushbutton: Turns off any audible alarm
that is connected to the Local or Remote Audible Alarm Relays.
The indicating light will remain on as long as the condition
exists. If the Alarm Silence pushbutton is not operated, the
audible alarm will turn off when the alarm contact clears.
3-6.1.4 The A903 SELECTRONIC®Control Module includes
the following engine control features:
(a) Cycle crank circuit; will crank the engine for 15 seconds
then rest for 15 seconds until the engine starts. The
crank/rest time is selectable for either 10, 15, 20, 25 or 30
seconds. If the engine false starts, goes above crank
disconnect speed then drops below that speed, the control
will rest for a fixed 10 second period before cranking
again.
(b) Crank Disconnect Speed Switch; this circuit detects
engine speed and terminates cranking when engine speed
rises above the speed switch setting. The speed switch is
adjustable, 25 Hz to 2000 Hz, and is factory set at 1180
Hz. This would be 600 RPM on an engine with 118 teeth
on the flywheel ring gear.
(c) Auxiliary Crank Disconnect Circuit; this circuit, required
by NFPA-110, is provided as a back up for the Crank
Disconnect Speed Switch. It is operated by an external
switch sensing either speed, generator voltage or some
other variable that could be used to terminate cranking.
Either circuit will disconnect the starter when the engine
starts.
(d) Overcrank circuit; will stop automatic cranking and
indicate overcrank if engine fails to start after 3 attempts.
The number of cranks are selectable for 1, 2, 3, 4 or 5
cycles before shutdown. The overcrank circuit may also
be turned off so no overcrank shutdown occurs.
(e) Shutdown Time Delay Bypass; this delay prevents the oil
pressure, water temperature and loss of speed signal
shutdown circuits from operating for 15 seconds after the
engine starts as detected by the crank disconnect circuit.
This same delay also locks out alarm circuit #7 and #8
when the engine is not running.
(f) Overspeed Speed Switch;
1. Provides a signal to the overspeed shutdown circuit if
the engine exceeds the preset speed. The factory
setting is approximately 3894 Hz, or 1980 RPM on an
engine with 118 teeth on the flywheel ring gear. The
adjustment range is 300 Hz to 10,000 Hz.
2. A push to test switch is provided to allow testing of
the overspeed circuit without overspeeding the
engine. When switch is depressed, the set point of the
speed switch is lowered approximately 10%.
3. The push to test switch can also be used to set the
overspeed switch at approximately 110% of running
speed. Hold the switch depressed while adjusting the
setting until the overspeed trips. When switch is
released, the set point will be 10% above normal
running speed. This is the method used to make the
factory setting. With engine speed at 1800 RPM or
3540 Hz.
(g) Cooldown circuit; this circuit keeps the engine running
for five minutes after the transfer switch has removed
the load from the generator and signaled the A903 to
stop the engine. This feature may be selected (turned
On, standard setting is Off) with a switch on the back of
the Control / Display Module.
3-6.1.5 Seven (7) First-out Shutdown Circuits; provide firstout indication of cause of shutdown. These circuits deactivate
the fuel relay and lockout the A903 until reset. Shutdown
circuits are activated by the crank disconnect circuit and are not
active when the engine is stopped. Six (6) Red Shutdown
Indicating Lights are provided. The Remote Shutdown circuit
does not have an indicator light.
(a) Overcrank; tripped by the overcrank sensing circuit
which counts the number of cranking attempts.
(b) Overspeed; tripped by overspeed switch when engine
exceeds a preset speed.
(c) Oil Pressure; tripped by the oil pressure SWICHGAGE
®
if pressure drops below preset point while the engine is
running.
(d) Water Temperature; tripped by the water temperature
SWICHGAGE®if engine coolant temperature exceeds
the switch setting.
(e) Spare Shutdown; tripped by an external switch. This
circuit is provided for an additional shutdown that may
be recommended by the engine supplier.
(f) Loss of Speed Signal; tripped by an internal sensing
circuit that detects the loss of the Magnetic Pickup
frequency signal for the speed switches while the engine
is still running. Since the Overspeed shutdown circuit is
activated by the frequency input, it prevents the engine
from running without overspeed protection.
(g) Remote Shutdown; this circuit is provided to shutdown
the engine generator from a remote location. No
indicating light is provided.
3-6.1.6 Nine (9) Alarm Indicating Circuits; provide indication
of cause of alarm. These circuits activate the alarm relays.
Alarm circuits are active as long as power is applied to the
A903. All are active when the engine is running, shutdown or
on standby except alarm circuit #7 and #8 which are locked out
until the engine is running. Nine (9) Amber Alarm Indicating
Lights are provided however only two circuits are labeled. The
other 7 are for customer specified alarms.
(a) Low Water Temperature; operated by low water
temperature SWICHGAGE
®
.
(b) #2 Spare Alarm; operated by an external switch. This
circuit is provided for an additional alarm that may be
required by the user.
(c) Switch Not In Automatic; operated by the OFF-AUTO-
TEST mode selector switch.
(d) #4 Spare Alarm; operated by an external switch. This
circuit is provided for an additional alarm that may be
required by the user.
(e) #5 Spare Alarm; operated by an external switch. This
circuit is provided for an additional alarm that may be
required by the user.
(f) #6 Spare Alarm; operated by an external switch. This
circuit is provided for an additional alarm that may be
required by the user.
(g) #7 Spare Alarm; operated by an external switch. This
circuit is provided for an additional alarm that may be
required by the user.
11
Page 15

(h) #8 Spare Alarm; operated by an external switch. This
circuit is provided for an additional alarm that may be
required by the user.
(i) #9 Spare Alarm; operated by an external switch. This
circuit is provided for an additional alarm that may be
required by the user.
3-6.2 Relay Module. The Relay Module, figure 3-6.2, includes
all of the control, alarm and shutdown relays that are required to
make up the generator engine control. Relays are available for
operation on either 12 or 24 volt battery systems. Three (3)
relays are included for:
3-6.2.1 Fuel Relay; this relay provides two outputs, one to
energize the engine fuel solenoid and a separate circuit to
energize the battery charging alternator field.
3-6.2.2 Shutdown Relay; this relay is operated by the shutdown
circuits of the Control / Display Module and provides an output
that can be used to trip the generator circuit breaker on an
emergency shutdown.
3-6.2.3 Local Audible Alarm Relay; provides a contact closure
to operate a local audible alarm as required by NFPA- 110, Level
1 and Level 2.
3-6.3 Status Signals. The relay module also includes three
outputs that can be used with external circuits for signaling or
control functions.
3-6.3.1 The Control On function at terminal 12 is on (closed to
negative) as long as the Mode Selector Switch is in either Auto
or Test. When the Mode Selector is turned Off, the Control On
signal is open. This can be used to signal switch position or to
reset an external circuit when the Mode Selector is turned Off.
3-6.3.2 The System Ready signal at terminal 13 is on (closed
to negative) as long as the Mode Selector Switch is in either
Auto or Test and no shutdown TATTLETALE
®
circuit is
latched on. This can be used to signal that the generator
engine is ready to automatically start or is running in Test.
3-6.3.3 The Control On function at terminal 14 is on (closed to
positive) as long as the Mode Selector Switch is in either Auto
or Test. When the Mode Selector is turned Off, the Control On
signal is open. This can be used to signal switch position or to
reset an external circuit when the Mode Selector is turned Off.
3-7 A903-2.
3-7.1 Control / Display Module. The Control / Display Module,
figure 3-7.1, includes the control and test switches, the solid
state logic elements, shutdown and alarm TATTLETALE
®
lights
that make up the generator engine control for a two-cycle
engine. This module is the same as Model A901-2 except 6 of
the alarm circuits are un-labeled. This allows the customer to
specify labels other than those recommended in NFPA-110.
This model has shutdown and alarm circuits labeled to meet the
requirements of NFPA-110, Level 2.
3-7.1.1 Mode Selector Switch, OFF-AUTO-TEST:
(a) OFF; turns off the control system and resets any shutdown
circuits.
(b) AUTO; turns on the engine controls and shutdown
circuits. System is on standby waiting for a contact
closure to start engine.
(c) TEST; turns on the engine controls and shutdown circuits.
A start signal is applied to the automatic control and the
engine start sequence begins.
3-7.1.2 Lamp Test Pushbutton: Tests the lights on the A- 903-2
module.
3-7.1.3 Alarm Silence Pushbutton: Turns off any audible alarm
that is connected to the Local or Remote Audible Alarm Relays.
The indicating light will remain on as long as the condition
exists. If the Alarm Silence pushbutton is not operated, the
Figure 3-7.1
12
DC24V
3A Fuse
1A
4
5
6
7
8
9
16
17
18
19
20
21
22
23
24
25
DC24V
DC24V
6-1/4 in.
(159 mm)
4-1/2 in.
(114 mm)
Figure 3-6.2
Page 16

audible alarm will turn off when the alarm contact clears.
3-7.1.4 The A903-2 SELECTRONIC®Control Module includes
the following engine control features:
(a) Cycle crank circuit; will crank the engine for 15 seconds
then rest for 15 seconds until the engine starts. The
crank/rest time is selectable for either 10, 15, 20, 25 or 30
seconds. If the engine false starts, goes above crank
disconnect speed then drops below that speed, the control
will rest for a fixed 10 second period before cranking again.
(b) Crank Disconnect Speed Switch; this circuit detects
engine speed and terminates cranking when engine speed
rises above the speed switch setting. The speed switch is
adjustable, 25 Hz to 2000 Hz, and is factory set at 1180
Hz. This would be 600 RPM on an engine with 118 teeth
on the flywheel ring gear.
(c) Auxiliary Crank Disconnect Circuit; this circuit, required by
NFPA-110, is provided as a back up for the Crank
Disconnect Speed Switch. It is operated by an external
switch sensing either speed, generator voltage or some other
variable that could be used to terminate cranking. Either
circuit will disconnect the starter when the engine starts.
(d) Overcrank circuit; will stop automatic cranking and
indicate overcrank if engine fails to start after 3 attempts.
The number of cranks are selectable for 1, 2, 3, 4 or 5
cycles before shutdown. The overcrank circuit may also
be turned off so no overcrank shutdown occurs.
(e) Shutdown Time Delay Bypass; this delay prevents the oil
pressure, water temperature and loss of speed signal
shutdown circuits from operating for 15 seconds after the
engine starts as detected by the crank disconnect circuit.
This same delay also locks out alarm circuit #7 and #8
when the engine is not running.
(f) Overspeed Speed Switch;
1. Provides a signal to the overspeed shutdown circuit if
the engine exceeds the preset speed. The factory
setting is approximately 3894 Hz, or 1980 RPM on an
engine with 118 teeth on the flywheel ring gear. The
adjustment range is 300 Hz to 10,000 Hz.
2. A push to test switch is provided to allow testing of the
overspeed circuit without overspeeding the engine.
When switch is depressed, the set point of the speed
switch is lowered approximately 10%.
3. The push to test switch can also be used to set the
overspeed switch at approximately 110% of running
speed. Hold the switch depressed while adjusting the
setting until the overspeed trips. When switch is
released, the set point will be 10% above normal running
speed. This is the method used to make the factory
setting. With engine speed at 1800 RPM or 3540 Hz.
(g) Cooldown circuit; this circuit keeps the engine running
for five minutes after the transfer switch has removed the
load from the generator and signaled the A903-2 to stop
the engine. This feature may be selected (turned On,
standard setting is Off) with a switch on the back of the
Control / Display Module.
3-7.1.5 Seven (7) First-out Shutdown Circuits; provide first-out
indication of cause of shutdown. These circuits deactivate the
fuel relay and lockout the A903 until reset. Shutdown circuits are
activated by the crank disconnect circuit and are not active when
the engine is stopped. Six (6) Red Shutdown Indicating Lights
are provided. The Remote Shutdown circuit does not have an
indicator light.
(a) Overcrank; tripped by the overcrank sensing circuit which
counts the number of cranking attempts.
(b) Overspeed; tripped by overspeed switch when engine
exceeds a preset speed.
(c) Oil Pressure; tripped by the oil pressure SWICHGAGE®if
pressure drops below preset point while the engine is
running.
(d) Water Temperature; tripped by the water temperature
SWICHGAGE®if engine coolant temperature exceeds the
switch setting.
(e) Spare Shutdown; tripped by an external switch. This
circuit is provided for an additional shutdown that may be
recommended by the engine supplier.
(f) Loss of Speed Signal; tripped by an internal sensing
circuit that detects the loss of the Magnetic Pickup
frequency signal for the speed switches while the engine is
still running. Since the Overspeed shutdown circuit is
activated by the frequency input, it prevents the engine
from running without overspeed protection.
(g) Remote Shutdown; this circuit is provided to shutdown
the engine generator from a remote location. No
indicating light is provided.
3-7.1.6 Nine (9) Alarm Indicating Circuits; provide indication
of cause of alarm. These circuits activate the alarm relays.
Alarm circuits are active as long as power is applied to the
A903-2. All are active when the engine is running, shutdown or
on standby except alarm circuit #7 and #8 which are locked out
until the engine is running. Nine (9) Amber Alarm Indicating
Lights are provided however only three circuits is labeled. The
other 6 are for customer specified alarms.
(a) Low Water Temperature; operated by low water
temperature SWICHGAGE®.
(b) Air Damper Closed; operated by an external switch or by
the Overspeed Relay circuit. This circuit is provided with
a selector switch to allow the user to determine the source
of the signal.
(c) Switch Not In Automatic; operated by the OFF-AUTO-
TEST mode selector switch.
(d) #4 Spare Alarm; operated by an external switch. This
circuit is provided for an additional alarm that may be
required by the user.
(e) #5 Spare Alarm; operated by an external switch. This
circuit is provided for an additional alarm that may be
required by the user.
(f) #6 Spare Alarm; operated by an external switch. This
circuit is provided for an additional alarm that may be
required by the user.
(g) #7 Spare Alarm; operated by an external switch. This
circuit is provided for an additional alarm that may be
required by the user.
(h) #8 Spare Alarm; operated by an external switch. This
circuit is provided for an additional alarm that may be
required by the user.
(i) #9 Spare Alarm; operated by an external switch. This
circuit is provided for an additional alarm that may be
required by the user.
3-7.2 Relay Module. The Relay Module, figure 3-7.2, includes
all of the control, alarm and shutdown relays that are required to
13
Page 17

make up the generator engine control. Relays are available for
operation on either 12 or 24 volt battery systems. Four (4)
relays are included for:
3-7.2.1 Fuel Relay; this relay provides two outputs, one to
energize the engine fuel solenoid and a separate circuit to
energize the battery charging alternator field.
3-7.2.2 Shutdown Relay; this relay is operated by the shutdown
circuits of the Control / Display Module and provides an output
that can be used to trip the generator circuit breaker on an
emergency shutdown.
3-7.2.3 Overspeed Relay; operates only on an Overspeed
shutdown. This relay provides an output to trip an air shut off
solenoid to close the air damper on a two-cycle engine.
3-7.2.4 Local Audible Alarm Relay; provides a contact closure
to operate a local audible alarm as required by NFPA- 110, Level
1 and Level 2.
3-7.3 Status Signals. The relay module also includes three
outputs that can be used with external circuits for signaling or
control functions.
3-7.3.1 The Control On function at terminal 12 is on (closed to
negative) as long as the Mode Selector Switch is in either Auto
or Test. When the Mode Selector is turned Off, the Control On
signal is open. This can be used to signal switch position or to
reset an external circuit when the Mode Selector is turned Off.
3-7.3.2 The System Ready signal at terminal 13 is on (closed
to negative) as long as the Mode Selector Switch is in either
Auto or Test and no shutdown TATTLETALE®circuit is
latched on. This can be used to signal that the generator
engine is ready to automatically start or is running in Test.
3-7.3.3 The Control On function at terminal 14 is on (closed to
positive) as long as the Mode Selector Switch is in either Auto
or Test. When the Mode Selector is turned Off, the Control On
signal is open. This can be used to signal switch position or to
reset an external circuit when the Mode Selector is turned Off.
Section 4: Installation
4-1 Location.
4-1.1 The A900 series is designed to mount in a
MURPHYMATIC®Generator Control panel with the Control /
Display module on the front panel and the Relay module on the
inside bottom surface. Other types of installation is possible as
long as the relationship of the two modules are maintained.
4-1.2 Clearance for Installation and Service; The modules must
be accessible for wiring to the terminal blocks and adjustment of
the user controls on the back of the Control / Display module.
Figure 4-1.2 shows the mounting dimensions and the minimum
clearances recommended for installation.
4-1.3 Wiring Terminals; Terminal blocks are provided on both
sides of the Control / Display enclosure and the Relay Module.
T orque all terminal screws to 12 inch pound maximum.
4-2 Wiring.
4-2.1 After the A900 has been located and installed, the wiring
connections can be made. This work should be done with all
electrical power disconnected from the engine. BE SURE THAT
THE BATTERY IS DISCONNECTED.
4-2.2 All electrical installation work should be done in
accordance with the National Electrical Code, NFPA-70, and all
applicable local codes.
4-2.3 In general, the following connections will be made:
(a) Battery positive and negative. An 8 A fuse or circuit
breaker must be provided to protect powered relay contact
circuits.
(b) Engine run device, such as a fuel shutoff solenoid.
(c) Engine speed sensor, such as a magnetic pickup or the
tachometer output of a battery charging alternator .
(d) Auxiliary crank disconnect device, such as a voltage
sensing relay contact wired to the generator output.
(e) Engine starter circuit; an auxiliary starter solenoid is
required to handle most starter solenoid requirements.
(f) Remote start contact. This is normally from the automatic
transfer switch but other sources are possible.
(g) Alarm and shutdown sensing switches as required.
4-2.3.1 The complete wiring of a Model A901 control is shown
in figure 4-2.3.1. Provision is made in the A900 series to
operate remote lights for all of the alarm and shutdown circuits
however these circuits do not have to be wired for the A900 to
function. Alarm input switches are not required but the alarm
circuits will not work without them.
4-2.3.2 Figure 4-2.3.2 is for wiring of the A902 control. The
same provisions as for the A901 are made.
4-2.3.3 The A903 wiring is shown in figure 4-2.3.3.
4-2.3.4 Wire Termination; the terminal blocks that are supplied
requires that all wires be terminated with #6 stud size forked
spade solderless wire connectors or stripped and inserted under
the captive terminal plates. Torque all terminal screws to 12
inch pound maximum.
4-2.3.5 All inductive loads (relays-soleniods-coils-etc.) that are
connected to the A900 must have reverse diodes wired across
the coil to supress reverse voltage that is generated whenever the
inductive load is de-energized. This will protect the electronic
components in the A900 and should prevent operating
malfunction due to noise. The “rule of thumb” for sizing the
reverse diode is to use one with a PIV (Peak Inverse Voltage)
rating equal to the operating voltage, or at least 100 volts and a
14
DC12V
3A Fuse
1A
4
5
6
7
8
9
16
17
18
19
20
21
22
23
24
25
DC12V
DC12V
DC12V
6-1/4 in.
(159 mm)
4-1/2 in.
(114 mm)
Figure 3-7.2
Page 18

5-1/2 in.
(140 mm)
3-3/4 in.
(95 mm)
3/16 in.
(5 mm) dia.
4 places
5-5/8 in.
(143 mm)
2-13/16 in.
(71 mm)
3 in.
(76 mm)
3-3/8 in.
(86 mm)
6-3/4 in.
(171 mm)
9-3/8 in.
(238 mm)
6 in.
(152 mm)
4-15/32 in.
(114 mm)
Mounting
Holes
1/8 in.
(3 mm)
diameter
1-1/2 in.
(38 mm)
clearance
5 in. (127 mm) maximum
between A-900 Series module
& relay module when mounting
1-7/8 in. (48 mm)
clearance
1-7/8 in. (48 mm)
clearance
Figure 4-1.2.5: Mounting Dimensions
A900 Series
Module
Relay Module
15
Page 19

15
26
4
27
28
4
29
30
31
32
33
34
47
48
49
50
51
52
B+ OUT
HOURMETER
BMANUAL START
START
PICKUP
PICKUP
OIL PRESSURE
LO WATER TEMP.
HI WATER TEMP.
REMOTE S.D.
SPARE ALARM
35
36
37
38
39
40
41
42
43
44
45
46
ALARM SILENCE
AUDIBLE ALARM
OVERCRANK
OVERSPEED
OIL PRESSURE
HI WATER TEMP.
REMOTE SHUTDOWN
SPARE SHUTDOWN
LOSS OF SPEED
LO WATER TEMP.
SPARE ALARM
SWITCH NOT IN AUTO
53
54
55
56
57
58
LOW FUEL LEVEL
HIGH BATTERY VOLTAGE
LOW BATTERY VOLTAGE
LOW OIL PRESSURE PREALARM
HI WATER TEMP. PREALARM
BATTERY CHARGER AC FAILURE
Hourmeter Voltmeter
Remove jumper from
4 and 27 to use
manual start switch
B+
1A
A B C D E F G H I J K L M N
4
5
6
7
8
9
10
11
12
13
14
15
4
16
17
18
19
20
21
22
23
24
25
+ -
B
Remote
Visual
Alarm
G
Over
Speed
Relay
C
Remote
Audible
Alarm
H
Shut
Down
Relay
D
Local
Audible
Alarm
I
Fuel
Relay
J1 J2
Q2
Q1
J1G
Red Blk
LOW WATER LEVEL
REMOTE VISUAL
REMOTE AUDIBLE
LOCAL AUDIBLE
N.C.
N.C.
OVERSPEED RELAY
SHUTDOWN RELAY
FUEL RELAY
CRANK RELAY
AUX. CRANK DISCONNECT
N.C.
CONTROL ON
SYSTEM READY
FUSED B+
B-
Energize to Stop solenoid
Energize to Run solenoid
Breaker Shunt trip coil
To Battery +
To Battery +
Control on sink 200 mA MAX
System ready sink 200 mA MAX
Auxiliary crank
disconnect
relay
B+
B-
Crank relay
Optional Run relay and Remote signal
Local audible alarm
Remote audible alarm
Power supply
Power supply
Power supply
Remote visual alarm
AUTO START
MODULE
LEVEL 1 ALARM
Output
Barrier
Terminal
Blocks
Input
Barrier
Terminal
Blocks
Spare shutdown
Battery
Starter
Alternator
Alternator Excitor
Auxiliary Starter
Solenoid
Drawing Revision C
Optional
Air Damper
Solenoid
*
Fuel Pressure Switch
*
Air damper closed
on a 2-cycle engine
NOTE 1: Fuel Pressure Switch and Air Damper Solenoid
are used on a 2-cycle engine
NOTE 2: Place Reverse Bias Diodes across inductive loads.
NOTE 2
NOTE 1
NOTE 2
NOTE 2
NOTE 2
NOTE 2
8A
Circuit
Breaker
Çontrol on source 200 mA MAX
3A Fuse
MDQ3
100K
D9
Q3
D8
Figure 4-2.3.1: A901 wiring
16
Page 20

Figure 4-2.3.2: A902 wiring
15
26
4
27
28
4
29
30
31
32
33
34
B+ OUT
HOURMETER
BMANUAL START
START
PICKUP
PICKUP
OIL PRESSURE
LO WATER TEMP.
HI WATER TEMP.
REMOTE S.D.
SPARE ALARM
35
36
37
38
39
40
41
42
43
44
45
46
ALARM SILENCE
AUDIBLE ALARM
OVERCRANK
OVERSPEED
OIL PRESSURE
HI WATER TEMP.
REMOTE SHUTDOWN
SPARE SHUTDOWN
LOSS OF SPEED
LO WATER TEMP.
SPARE ALARM
Hourmeter Voltmeter
Remove jumper from
4 and 27 to use
manual start switch
B+
AUTO START
MODULE
LEVEL 2 ALARM
Output
Barrier
Terminal
Blocks
Input
Barrier
Terminal
Blocks
Optional
*
Air damper closed
on a 2-cycle engine
*
1A
A B C D E F G H I J K L M N
4
5
6
7
8
9
10
11
12
13
14
15
4
16
17
18
19
20
21
22
23
24
25
+ -
B
Remote
Visual
Alarm
G
Over
Speed
Relay
C
Remote
Audible
Alarm
H
Shut
Down
Relay
D
Local
Audible
Alarm
I
Fuel
Relay
J1 J2
Q2
Q1
J1G
Red Blk
LOW WATER LEVEL
REMOTE VISUAL
REMOTE AUDIBLE
LOCAL AUDIBLE
N.C.
N.C.
OVERSPEED RELAY
SHUTDOWN RELAY
FUEL RELAY
CRANK RELAY
AUX. CRANK DISCONNECT
N.C.
CONTROL ON
SYSTEM READY
FUSED B+
B-
Energize to Stop solenoid
Energize to Run solenoid
Breaker Shunt trip coil
To Battery +
To Battery +
Control on sink 200 mA MAX
System ready sink 200 mA MAX
Auxiliary crank
disconnect
relay
B+
B-
Crank relay
Optional Run relay and Remote signal
Local audible alarm
Remote audible alarm
Power supply
Power supply
Power supply
Remote visual alarm
Spare shutdown
Battery
Starter
Alternator
Alternator Excitor
Auxiliary Starter
Solenoid
Drawing Revision C
Air Damper
Solenoid
Fuel Pressure Switch
8A
Circuit
Breaker
Çontrol on source 200 mA MAX
3A Fuse
MDQ3
100K
D9
Q3
D8
NOTE 1: Fuel Pressure Switch and Air Damper Solenoid
are used on a 2-cycle engine
NOTE 2: Place Reverse Bias Diodes across inductive loads.
NOTE 1
NOTE 2
NOTE 2
NOTE 2
NOTE 2
NOTE 2
17
Page 21

Figure 4-2.3.3: A903 wiring
15
26
4
27
28
4
29
30
31
32
33
34
47
48
49
50
51
52
B+ OUT
HOURMETER
BMANUAL START
START
PICKUP
PICKUP
OIL PRESSURE
LO WATER TEMP.
HI WATER TEMP.
REMOTE S.D.
SPARE ALARM
35
36
37
38
39
40
41
42
43
44
45
46
ALARM SILENCE
AUDIBLE ALARM
OVERCRANK
OVERSPEED
OIL PRESSURE
HI WATER TEMP.
REMOTE SHUTDOWN
SPARE SHUTDOWN
LOSS OF SPEED
LO WATER TEMP.
SPARE ALARM
SWITCH NOT IN AUTO
53
54
55
56
57
58
SPARE
Hourmeter Voltmeter
Remove jumper from
4 and 27 to use
manual start switch
B+
AUTO START
MODULE
LEVEL 2 ALARM
Output
Barrier
Terminal
Blocks
Input
Barrier
Terminal
Blocks
SPARE
SPARE
SPARE
SPARE
SPARE
Optional
*
Air damper closed
on a 2-cycle engine
*
1A
A B C D E F G H I J K L M N
4
5
6
7
8
9
10
11
12
13
14
15
4
16
17
18
19
20
21
22
23
24
25
+ -
B
Remote
Visual
Alarm
G
Over
Speed
Relay
C
Remote
Audible
Alarm
H
Shut
Down
Relay
D
Local
Audible
Alarm
I
Fuel
Relay
J1 J2
Q2
Q1
J1G
Red Blk
LOW WATER LEVEL
REMOTE VISUAL
REMOTE AUDIBLE
LOCAL AUDIBLE
N.C.
N.C.
OVERSPEED RELAY
SHUTDOWN RELAY
FUEL RELAY
CRANK RELAY
AUX. CRANK DISCONNECT
N.C.
CONTROL ON
SYSTEM READY
FUSED B+
B-
Energize to Stop solenoid
Energize to Run solenoid
Breaker Shunt trip coil
To Battery +
To Battery +
Control on sink 200 mA MAX
System ready sink 200 mA MAX
Auxiliary crank
disconnect
relay
B+
B-
Crank relay
Optional Run relay and Remote signal
Local audible alarm
Remote audible alarm
Power supply
Power supply
Power supply
Remote visual alarm
Spare shutdown
Battery
Starter
Alternator
Alternator Excitor
Auxiliary Starter
Solenoid
Drawing Revision C
Air Damper
Solenoid
Fuel Pressure Switch
8A
Circuit
Breaker
Çontrol on source 200 mA MAX
3A Fuse
MDQ3
100K
D9
Q3
D8
NOTE 1: Fuel Pressure Switch and Air Damper Solenoid
are used on a 2-cycle engine
NOTE 1
NOTE 2
NOTE 2
NOTE 2
NOTE 2
NOTE 2
NOTE 2: Place Reverse Bias Diodes across inductive loads.
18
Page 22

current rating that is equal to or greater than the forward current
that the coil draws to operate. For example, a relay less than 1 A,
use a 1 A diode since they are readily available. The wiring
shown in Figures 4-2.3.1, 4-2.3.2 and 4-2.3.3 have examples of
the places that a reverse diode is required.
4-3 Crank Disconnect.
4-3.1 A magnetic pickup is recommended to supply the speed
signal for the A900 series primary crank termination circuit and
for the overspeed switch. This pickup will be mounted in the
flywheel housing in line with the ring gear on the flywheel and
wired to the A900 using either a twisted pair or a shielded cable
to reduce the possibility of electrical noise pickup in the wiring.
4-3.1.1 The tachometer terminal, of the battery charging
alternator, may be used for the speed signal but a broken drive
belt will disable this source and some alternators have electrical
noise which will cause the speed switches to operate at speeds
well below the desired RPM.
4-3.2 An auxiliary crank disconnect circuit, required by
NFPA-110, is provided in the A900. Any signal that detects
when the engine is running and provides a contact closure
between Terminals 4 and 16 can be used. This circuit
terminates cranking even if the speed signal fails. The “Loss
Of Speed” shutdown / alarm on the A900 will indicate if the
speed signal is lost while the engine is running by either
shutdown of the engine or operation of the alarm circuit.
“Loss Of Speed” alarm will only operate if the auxiliary crank
disconnect circuit is used. Provision is also made for a second
N.C. contact between Terminals 17 and 18 to interrupt the
output to the auxiliary starter solenoid. This would disconnect
cranking even if both crank disconnect circuits in the A900
should fail. If this contact is not provided, you must jumper
Terminals 17 and 18 for the start signal to reach the auxiliary
starter solenoid. A voltage sensing relay wired to one output
phase of the generator is one way to provide both of these
contacts.
4-4 Pre-operational Check-out.
4-4.1 After installation is complete, it is necessary to make
some adjustments to the A900 SELECTRONIC®Control before
the system is operational. All shutdown and alarm circuits also
should be tested. Table 4-4.1 lists the standard factory setting of
the adjustable functions on the A900 series control. To
determine if the frequency of the speed switches must be
changed, calculate the required setting using the following
formulas:
Refer to Table 4-4.1 to determine if the speed switch settings are
below the factory settings listed. If required frequency will be
higher than the standard, increase the setting before proceeding.
Turn The Crank Disconnect Set and Overspeed Set pots
clockwise to increase setting. The adjustments are 20 turn
controls without stops at either end.
4-4.1.1 Be sure to have a fully charged battery to do these tests.
Low battery voltage can cause improper results during the tests.
4-4.1.2 The “Air Damper Closed” alarm on A900 series for 2
cycle engines can be actuated by either an internal circuit that
senses the output to the overspeed relay, from the “Overspeed”
shutdown circuit or by an external switch wired to terminal 34
of the Control / Display Module. The “Air Damper Closed”
switch, Table 4-4.1 must be turned On for internal sensing and
Off for external switch. This circuit is a Spare alarm on A900
for 4 cycle engines and the switch must be turned Off to
prevent this circuit from operating with the “Overspeed”
shutdown.
4-4.1.3 All of the adjustments and controls shown in Table 4-4.1
are located on the rear of the control/display module. See Figure
4-4.1.3. Each light and switch is labeled for ease of
identification. The LED's are supplied as an aid in installation
and troubleshooting of the A900.
4-4.2 Crank Disconnect Speed Setting; to set this speed switch,
proceed as follows:
(a) Disconnect the run solenoid wire from terminal 6 on the
Relay Module.
(b) Check engine to be sure it is safe to crank.
(c) Be sure Mode Selector switch is in OFF position.
(d) Connect battery cables to a fully charged cranking battery.
(e) Turn Mode Selector switch to TEST position and watch
the lights on the A900 control module back panel.
1. The engine should start cranking and the “Fuel Relay”,
“Crank Relay”, and “Pickup Present” lights turn on.
2. If engine does not crank, check the lights. If green
light next to Mode Selector Switch on front panel is
not on, check the DC power input wiring and fuse.
3. If green light, “Fuel Relay” and “Crank Relay” lights
are on, check wiring from A900 Terminal 18 to
auxiliary start solenoid and than on to the starter on
engine.
4. With engine cranking, check “Pickup Present” light. It
must be on. If off, check the wiring to magnetic
pickup and check gap between pickup face and ring
gear.
5. If “Crank Disconnect Speed” light comes on and
cranking stops, setting of Crank Disconnect Switch is
still to low. Turn Mode Selector switch OFF and turn
crank disconnect adjustment clockwise 1 or 2 turns
and repeat test.
19
No. of Gear Teeth x RPM set points
60
Set point
frequency in HZ
Pulley ratio x No. of Alternator Poles x RPM set points
60
Set point
frequency in HZ
=
=
Function
Standard
Setting
Adjustment
Range
Adjustment
Type
Crank/Rest
Time
15
seconds
10, 15, 20, 25
and 30 Seconds
Switch
Overcrank 3 cranks
1, 2, 3, 4, 5, 6 and
No overcrank
Switch
Crank
Disconnect
1180 Hz
Turn CW
to increase
25 to 2 KHz
Overspeed
3894 Hz
Turn CW
to increase
300 to 10 KHz
Cooldown
OFF
Fixed 5 minute ON-OFF switch
Loss of speed
Signal
Shutdown
Shutdown or
Alarm
Switch
ON with
Overspeed
shutdown
Internal switch ON
External switch OFF
Switch
Table 4-4.1
OR
Air Damper Closed
Alarm on 2 Cycle
Engines only
Page 23

6. While engine is cranking, turn crank disconnect
adjustment counter clockwise slowly until “Crank
Disconnect Speed” light turns on and cranking stops.
7. Turn crank disconnect adjustment clockwise 1/4 turn.
This sets crank disconnect speed at approximately 125
RPM above cranking speed.
8. Turn Mode Selector switch OFF.
(f) Reconnect the run solenoid wire at terminal 6 on Relay
Module.
4-4.3 Start and Stop Engine; to test the start and stop function,
proceed as follows:
(a) Double check all wiring to be sure it is connected.
(b) Turn Mode Selector switch to the TEST position. This
gives the A900 Controller a start signal.
(c) Engine should crank, start and come up to governor speed.
1. Check “Crank Disconnect Speed” light; it should be on
and “Crank Relay” light should be off.
2. If lights are not correct, turn Mode Selector switch
OFF and review paragraph 4-4.2.
(d) When engine has come up to speed and governor has been
adjusted for proper running speed, turn Mode Selector
switch OFF. This gives the A900 Controller a stop signal.
(e) All lights on the back of the A900 should go off and the
engine stop. If engine does not stop, check run solenoid
to be sure it has returned to the stop position.
4-4.4 Automatic Start and Stop; to test the automatic-start and
stop function, proceed as follows:
(a) Turn Mode Selector switch to the AUTO position. Short
terminal 28 to 4 on the Control / Display module. This
gives the A900 Controller a start signal.
(b) Engine will crank, start and come up to governor speed.
(c) When engine has come up to speed, open the circuit
between terminal 28 and 4. This gives the A900
Controller a stop signal.
(d) All lights on the back of the A900 should go off and the
engine stop.
4-4.5 Overspeed Switch Setting; To set the speed switch,
proceed as follows:
(a) Turn Mode Selector switch to the TEST position.
(b) Engine will crank, start and come up to governor speed.
(c) With engine running, adjust governor to bring engine speed
to normal RPM.
(d) Depress and hold the Overspeed T est pushbutton.
(e) Slowly turn the Overspeed Set adjustment counter-
clockwise until the “Overspeed” and “Overspeed Relay”
lights on the A900 come on and the engine shuts down.
(f) Release pushbutton; check “Overspeed” light on front
panel to be sure it is on.
(g) Turn Mode Selector switch OFF to reset shutdown circuits;
then back to TEST .
(h) When engine starts, increase governor speed setting slowly
until engine shuts down on overspeed. This should occur
about 10% above governor speed.
(i) Turn Mode Selector switch OFF.
4-4.6 Overcrank setting; to test number of cranks before system
shuts down on overcrank;
(a) Disconnect the run solenoid wire from terminal 6 of the
Relay Module.
(b) Check number set on the “Number Of Cranks” switch on
A900 back panel. It is factory set at 3.
(c) Turn Mode Selector switch to TEST.
1. Engine will crank for 15 seconds.
2. Then rest for 15 seconds
3. This should repeat 3 times and then the “Overcrank”
light on the A900 will come on and engine will not
crank again.
(d) Turn Mode Selector switch OFF.
(e) Reconnect the run solenoid wire at terminal 6 of the Relay
Module.
4-4.7 Oil Pressure; to test oil pressure shutdown circuit:
(a) Turn Mode Selector switch to TEST. When engine starts,
wait 30 seconds then,
(b) Use a jumper wire and short from terminal 30 to 4.
(c) “Oil Pressure” light will come on and engine will stop.
(d) Turn Mode Selector switch OFF.
4-4.8 Water Temperature; to test the water temperature
shutdown circuit:
(a) Turn Mode Selector switch to TEST. When engine starts,
wait 30 seconds then,
(b) Use a jumper wire and short from terminal 32 to 4.
20
Fuel Relay
Crank Relay
Crank/Rest
Time
Number
of Cranks
Close Only One Switch Close Only One Switch
Pickup
Present
Crank
Disconnect
Set
Crank
Disconnect
Speed
SW1 = 10 s.
SW2 = 15 s.
SW3 = 20 s.
SW4 = 25 s.
SW5 = 30 s.
Torque
Scews to
12 In./lb.
15
26
04
27
28
04
29
30
31
32
33
34
35
36
37
38
39
40
41
42
43
44
45
46
53
54
55
56
57
58
47
48
49
50
51
52
Overspeed Overspeed
Test
Overspeed
Set
Overspeed
Relay
Shutdown
Relay
Local Audible Alarm
Relay
Remote Visual Alarm
Relay
Remote Audible Alarm
Relay
Miscellaneous Program Switches
5 min. Cooldown
Unused Switches
SW1 = Open
SW2
Alarm
SW3 = Closed
SW4 = Open
SW5 = Open
SW6 = Closed
Shutdown
SW3 = Open
SW4 = Closed
SW5 = Closed
SW6 = Open
Air Damper Closed
Light ON With
Overspeed Shutdown
SW7= Closed
Loss of Speed Circuit
Torque
Scews to
12 In./lb.
40-05-0400
SW1 = 1
SW2 = 2
SW3 = 3
SW4 = 4
SW5 = 5
SW6
SW7 = None
Unused
Switch
SW6
1234567
123456712345
Figure 4-4.1.3
Page 24

(c) “Water Temperature” light will come on and engine will
stop.
(d) Turn Mode Selector switch OFF.
4-4.9 Low Water Temperature; to test the low water temperature
alarm circuit:
(a) Engine does not have to be running.
(b) Use a jumper wire and short from terminal 31 to 4.
(c) “Low Water Temperature” alarm light will come on as long
as the jumper maintains the circuit.
4-4.10 Other Alarm and/or Shutdowns; all other alarms and
shutdowns would be tested in the same manner.
(a) For shutdown circuits, the engine must be running for test.
(b) Most alarm only circuits can be tested without starting the
engine. Low Oil Pressure Pre-alarm and High Water
T emperature Pre-alarm are exceptions.
(c) To test other shutdowns or alarms, a jumper wire can be
used to short out the switch contacts at the switch or if this
is not possible, the test can be run by shorting the input
terminal for that circuit, to ground, terminal 4.
(d) T o test Low Oil Pressure Pre-alarm;
1. Turn Mode Selector switch to TEST. When engine
starts, wait 30 seconds then,
2. Use a jumper wire and short from terminal 50 to 4;
“Low Oil Pressure Pre-alarm” light will come on as
long as the jumper maintains the circuit.
(e) T o test High Water Temperature Pre-alarm;
1. Turn Mode Selector switch to TEST. When engine
starts, wait 30 seconds then,
2. Use a jumper wire and short from terminal 51 to 4;
“High Water Temperature Pre-alarm” light will come
on as long as the jumper maintains the circuit.
Section 5: Operation
5-1 Operator Controls.
5-1.1 Mode Selector Switch; allows the operator to select either
manual (TEST), automatic operation (AUTO), or no operation
(OFF).
5-1.2 The OFF position on the mode selector also provides a
reset function for the shutdown circuits. If the engine is shut
down by the automatic control, the operator must turn selector
off and back on to reactivate the system.
5-1.3 Push to Test Lamps; this pushbutton tests the alarm and
shutdown indicator lights.
5-1.4 Alarm Silence Pushbutton; if so equipped, silences the
local and remote audible alarm. Visual indicator remains on
until reset or sensor switch contacts clear.
5-2 Operating Modes.
5-2.1 The A900 Generator Engine Control has two operating
modes: manual and automatic.
5-2.2 Manual Operation is provided for testing of the generator
set.
5-2.2.1 To initiate Manual Control, place the Mode Selector
switch in the TEST position. This provides the automatic
control a start signal.
5-2.2.2 To stop, turn selector switch to OFF. This removes start
signal and the engine will stop.
5-2.3 Automatic operation is the normal mode.
5-2.3.1 To initiate Automatic Control, place the Mode Selector
switch in the AUTOMATIC position. When a start signal is
received, the engine will start.
5-2.3.2 When the start signal is removed, the engine will stop.
It is now ready to restart.
5-2.4 OFF or Not Operating; to prevent operation of the engine,
turn selector switch OFF.
Section 6: Routine Maintenance
and Operational Tests
6-1 Routine Maintenance.
6-1.1 Due to the design and types of components used, very
little maintenance is required to the A900 Control.
6-1.2 Visual inspection of the internal wiring of the control
panel, along with checking wire connections for tightness,
should be done on a semiannual schedule for stand-by systems
or quarterly for prime power. Check wire bundles for chafing
and wear to the insulation of the wires where they contact the
panel or engine.
6-1.4 Shutdown and Alarm Circuits should be tested on a
monthly basis for prime power and quarterly for stand-by sets.
The same tests run during pre-operation check out, Section 4-4,
should be included.
6-2 Operational Tests.
6-2.1 No special operational tests are required. The routine
operational tests for the generator set will exercise the control.
Section 7: Troubleshooting and Repair
7-1 Tools Required.
7-1.1 Some of the tools necessary for troubleshooting are built
into the A900 Series controls.
7-1.1.1 By observing the lights on the front and rear of the control
panel, clues to a problem and the possible source can be seen.
7-1.1.2 Operational problems with the automatic engine control
will show up by looking at the input and output lights on the rear
of the A900 SELECTRONIC®Control / Display Module.
7-1.2 Other tools which may be required are:
7-1.2.l AC/DC Voltmeter for taking voltage readings and an
Ohmmeter for testing resistance of wires and connections.
7-1.2.2 Jumper wires with alligator clips to bypass or simulate
circuit closures.
DO NOT USE THESE JUMPER WIRES TO CHECK IF
VOLTAGE IS PRESENT AT A TERMINAL BY DRAWING
AN ARC TO GROUND. THIS WILL DAMAGE OR
DESTROY EQUIPMENT IN THE A900 CONTROL PANEL.
7-2 A900 SELECTRONIC Control Operation And
Shutdown.
7-2.1 The first step in troubleshooting any equipment is to
understand its normal operation. Table 7-2.1 contains normal
voltage readings taken at the terminals of the A901 with all
equipment shown on the standard drawing, connected.
(a) All voltage readings are DC, except at terminal 29, and
were taken with the negative lead of the meter connected
to ground at terminal 4. Voltage reading at terminal 29
was taken with negative lead grounded and the meter on
AC scale.
(b) The battery voltage, at the time readings were recorded,
was 13.8 V and 27.6 V. All readings will vary depending
on battery voltage, equipment supplied in the panel and
external devices connected to the A900 control. See notes
21
Page 25

Table 7-2.1
22
Mode
Selector
OFF
Mode Selector
AUTO
Stand-by
Mode Selector
AUTO
Cranking
Mode Selector
AUTO
Running
Mode Selector
AUTO
Shutdown
Input
Voltage
Input
Voltage
Input
Voltage
Input Voltage Input
Voltage
13.8 27.6 13.8 27.6 13.8 27.6 13.8 27.6 13.8 27.6
1 13.8 27.6 13.8 27.6 13.8 27.6 13.8 27.6 13.8 27.6
4 0000000000
5 13.8 27.6 13.8 27.6 0 0 0 0 13.8 27.6
6 0 0 0 0 13.8 27.6 13.8 27.6 0 0
7 13.8 27.6 13.8 27.6 0 0 0 0 13.8 27.6
8 0 0 0 0 13.8 27.6 13.8 27.6 0 0
9 0 0 0 0 0 0 0 0 13.8 27.6
10 0 0 0 0 0 0 0 0 13.8 27.6
11 13.8 27.6 13.8 27.6 13.8 27.6 13.8 27.6 13.8 27.6
12 13.8 27.6 0 0 0 0 0 0 0 0
13 13.8 27.6 0 0 0 0 0 0 13.8 27.6
14 0000000000
15 13.8 27.6 13.8 27.6 13.8 27.6 13.8 27.6 13.8 27.6
16 6666660066
17 .3 .3 .3 .3 13.8 27.6 .3 .3 .3 .3
18 0 0 0 0 13.8 27.6 0 0 0 0
19 13.8 27.6 13.8 27.6 1.5 1.5 1.5 1.5 13.8 27.6
20 0 0 13.8 27.6 13.8 27.6 13.8 27.6 0 0
21 0000000000
22 0 0 13.8 27.6 13.8 27.6 13.8 27.6 0 0
23 0000000000
24 0 0 13.8 27.6 13.8 27.6 13.8 27.6 0 0
25 0000000000
26 13.8 27.6 13.8 27.6 0 0 0 0 13.8 27.6
27 0000000000
28 0 0 5.5 5.5 .5 .5 0 0 0 0
29 (1) 0 0 0 0 4 4 4 4 0 0
30 (2) 0 0 0 0 0 0 6 6 0 0
Terminal
Number
Mode
Selector
OFF
Mode Selector
AUTO
Stand-by
Mode Selector
AUTO
Cranking
Mode Selector
AUTO
Running
Mode Selector
AUTO
Shutdown
Input Voltage
Input
Voltage
Input
Voltage
Input Voltage Input Voltage
13.8 27.6 13.8 27.6 13.8 27.6 13.8 27.6 13.8 27.6
31 6666666666
32 6666666666
33 6666666666
34 6666666666
35 6666666666
36 1.4 1.4 13.8 27.6 1.4 1.4 1.4 1.4 1.4 1.4
37 13.8 27.6 13.8 27.6 13.8 27.6 13.8 27.6 13.8 27.6
38 13.8 27.6 13.8 27.6 13.8 27.6 13.8 27.6 13.8 27.6
39 (2) 13.8 27.6 13.8 27.6 13.8 27.6 13.8 27.6 0 0
40 13.8 27.6 13.8 27.6 13.8 27.6 13.8 27.6 13.8 27.6
41 13.8 27.6 13.8 27.6 13.8 27.6 13.8 27.6 13.8 27.6
42 13.8 27.6 13.8 27.6 13.8 27.6 13.8 27.6 13.8 27.6
43 13.8 27.6 13.8 27.6 13.8 27.6 13.8 27.6 13.8 27.6
44 13.8 27.6 13.8 27.6 13.8 27.6 13.8 27.6 13.8 27.6
45 13.8 27.6 13.8 27.6 13.8 27.6 13.8 27.6 13.8 27.6
46 1 1 13.8 27.6 13.8 27.6 13.8 27.6 13.8 27.6
47 6666666666
48 6666666666
49 6666666666
50 (3) 0 0 0 0 0 0 6 6 0 0
51 6666666666
52 6666666666
53 13.8 27.6 13.8 27.6 13.8 27.6 13.8 27.6 13.8 27.6
54 13.8 27.6 13.8 27.6 13.8 27.6 13.8 27.6 13.8 27.6
55 13.8 27.6 13.8 27.6 13.8 27.6 13.8 27.6 13.8 27.6
56 (3) 13.8 27.6 13.8 27.6 13.8 27.6 13.8 27.6 0 0
57 13.8 27.6 13.8 27.6 13.8 27.6 13.8 27.6 13.8 27.6
58 13.8 27.6 13.8 27.6 13.8 27.6 13.8 27.6 13.8 27.6
Terminal
Number
NOTES
Note 1: AC voltage measured on AC scale of volt-ohmmeter.
Note 2: Low Oil Pressure shut-down circuit. Oil pressure was the cause of shutdown on column 5.
Note 3: Low Oil Pressure pre-alarm circuit. This circuit turned on before the Low Oil Pressure
shutdown occured in column 5.
Page 26

to the table for examples.
(c) Voltages less than battery also may vary due to tolerances
of the electronic components in the A900. Minor
variations, 1 or 2 volts, normally will have no effect on the
A900 operation.
(d) The AC voltage at terminal 29 must be a minimum of 2
VAC to drive the speed sensing circuits of the A900.
7-2.2 With power applied and the Mode Selector switch in
AUTO, the following occurs when a switch is closed from
terminal 28 to ground.
7-2.2.1 The fuel relay is energized, which opens the circuits at
terminal 5 and 7, and closes the circuits at terminal 6 and 8. This
applies battery power to the run solenoid and to the exciter
terminal of the alternator.
7-2.2.2 At the same time, the crank relay driver provides battery
voltage at terminal 17, thru the auxiliary crank disconnect relay
contact to the auxiliary starter solenoid. This output is controlled
by the crank and rest timer but it can be overridden by the crank
disconnect speed switch and / or the auxiliary crank disconnect
circuit. The output will remain on until the crank time expires or
the crank disconnect circuits detect that the engine has started.
7-2.2.3 If the engine does not start during the crank time, the
rest timer will prevent cranking until it has timed out. After the
rest time, the engine will begin cranking again. This sequence
will repeat until the engine starts or the overcrank shutdown
circuit trips.
7-2.2.4 Engine speed is detected by an AC signal from a
magnetic pickup wired to terminal 29. When this frequency
exceeds the setting of the crank disconnect speed switch,
(a) Cranking is terminated.
(b) A time delay starts timing during which the oil pressure
and water temperature shutdown circuits are locked out.
(c) The overcrank counter is reset to zero.
(d) The overspeed shutdown circuit is activated.
7-2.2.5 An engine run signal closes to ground at terminal 19
when the engine starts.
7-2.3 With the engine running, the six shutdown TATTLETALE
®
circuits are activated and will operate anytime a switch closes
from ground to their inputs.
Circuit Input Output
(a) Remote Stop Terminal 33 Terminal 41
(b) Oil Pressure Terminal 30 Terminal 39
(c) Water Temp Terminal 32 Terminal 40
(d) Overspeed Int. Speed Switch Terminal 38
(e) Loss of Speed Signal Int. Circuit Terminal 43
(f) Spare Shutdown Terminal 11 Terminal 42
7-2.3.1 Each circuit has a indicating light and a transistor output that
closes to ground to operate an individual remote indicating light.
7-2.3.2 When any of the six shutdown functions trip, the
shutdown relay K-2, pulls in and applies battery power to
terminal 9. At the same time, the fuel relay, K-1 drops out and if
the shutdown was due to overspeed, the overspeed relay, K-3
pulls in to signal an air shut off solenoid, terminal 10 to close.
7-2.3.3 The six shutdown circuits, paragraph 7-2.3, are first out
latching type TATTLETALE®. That is, only one of the six may
trip at one time and it must be reset before the A900 will operate
again.
7-2.3.4 If one of the TATTLETALE®circuits trip, the following
occurs to shutdown the engine and generator.
(a) The TATTLETALE®light for that function turns on.
(b) Shutdown relay K-2 is energized, closing its contacts at
terminal 9. These contacts can be wired to a shunt trip
solenoid in the generator circuit breaker if required.
(c) The fuel relay drops out, removing battery voltage from
the run solenoid, terminal 6, and from the alternator
exciter, terminal 8. The circuits at terminal 5 and 7 will
close to reconnect the battery positive to these terminals.
(d) The run signal, terminal 19 turns off.
(e) If the shutdown is due to overspeed, the overspeed relay
operates and applies battery positive to terminal 10 to
close an air shutoff solenoid if the engine is so equipped.
7-2.3.5 If the engine is shutdown by the remote stop circuit, no
TATTLETALE®light is provided. Otherwise a TATTLETALE
®
light will show the cause of shutdown.
7-2.3.6 In the A900, the Loss of Speed signal TATTLETALE
®
can be either a shutdown or an alarm. It is connected to a circuit
that monitors the magnetic pickup input at terminal 29. If the
input from the pickup fails, drops below the minimum voltage,
or is disconnected while the engine is running, the Loss of Speed
Signal TATTLETALE®circuit will activate and shutdown the
engine or operate the alarm circuit. It is recommended that the
shutdown circuit is used since this prevents the generator set
from running without overspeed protection. If this circuit is
used as an alarm, the auxiliary crank disconnect input MUST be
supplied to prevent malfunction of the shutdown circuits.
7-2.3.7 To reset the circuits, the Mode Selector switch must be
turned OFF and back on to either the AUTO or TEST position.
7-2.4 Normally, the engine will run until the start signal is
removed from terminal 28.
7-2.4.1 When the signal is removed, the following occurs to
stop the engine;
(a) The fuel relay drops out, removing battery voltage from
the run solenoid, terminal 6, and from the alternator
exciter, terminal 8. The circuits at terminal 5 and 7 will
close to reconnect the battery positive to these terminals.
(b) The run signal, terminal 19 turns off.
(c) The four engine function TATTLETALE®circuits are
locked out as soon as the fuel relay drops out. This
prevents any TATTLETALE®from tripping while the
engine coasts to a stop.
7-3 A900 SELECTRONIC®Control Alarm Circuit
Operation.
7-3.1 The A900 alarm circuits perform the following functions;
(a) Turns on individual alarm lights based on input switch
closures.
(b) Provides lamp test function for all alarm and shutdown lights.
(c) Activates either the local audible alarm relay, K-4, and
remote visual alarm relay, K-6, or the local audible alarm
relay, K-4, the remote audible alarm relay, K-5, and the
remote visual alarm relay, K-6, depending on the
requirements of NFPA-110 1988 paragraph 3-5.5.1 (d).
(d) Provides the audible alarm silence circuit.
7-3.2 A contact closure to ground, at the alarm circuit
input terminal, will cause the associated TATTLETALE®light to
turn on and an output transistor to close to ground and turn on a
remote indicating light.
7-3.2.1 The alarm circuits also operate the three relays for local
audible alarm, remote audible alarm and remote visual alarm as
required by NFPA-110. The normally open dry relay contacts,
23
Page 27

local audible (K-4) terminal 20 and 21, remote audible (K-5)
terminal 22 and 23 and remote visual (K- 6) terminal 24 and 25
close to operate the alarm devices wired to them.
7-3.3 An alarm silence pushbutton is wired between terminal 35
and ground. This switch is provided on the A901 and can be
externally connected on the A902 series. When this switch is
closed, the audible alarm relays K-4 and K-5 will drop out if they
are closed. This turns off the audible alarms but does not affect the
individual alarm lights on the panel. The lights will remain on
until the input switches open. If no alarm silence switch is
provided, the alarm relays will reset when the alarm and / or
shutdown lights reset.
Section 8: Service Parts
8-1 Table 8-1 covers all of the replaceable components of the
A900 Series Generator Engine Controls. The part numbers that are
shown are Frank W. Murphy Mfr. numbers, and may not appear on
the individual parts.
8-1.1 Each complete control is made up of a Control/Display
Module, a Relay Module and a number of Relays.
8-1.2 There are no field replacement parts in the Control/Display
Module. The complete module must be replaced if it fails. All
relays are individually replaceable in the Relay Module but the
module must be replaced if a failure of the circuit board occurs.
8-2 T able 8-2 displays replaceable components for the A900 series
controls manufactured for Detroit Diesel Corporation.
These components have Murphy part numbers. In addition, they
are OEM parts and are available only to Detroit Diesel and their
distributors.
8-2.1 The A900-DDC parts are the same as the Murphy A900
series that has been covered throughout the A900 manual except
the “Spare Shutdown” circuit is labeled “Low Water Level” and
the DDC logo is printed on the face plate.
Table 8-1: Replacement Components for A900 Series Generator Engine Controls
Model Number Part Number Control/Display Module Relay Module Relay Part Number Relay Qty
A901-12 40-02-0132 40-00-0077 40-00-0064 00-00-2952 5
A901-24 40-02-0137 40-00-0077 40-00-0064 00-00-2953 5
A901-2-12 40-02-0134 40-00-0078 40-00-0064 00-00-2952 6
A901-2-24 40-02-0140 40-00-0078 40-00-0064 00-00-2953 6
A902-12 40-02-0133 40-00-0079 40-00-0064 00-00-2952 3
A902-24 40-02-0145 40-00-0079 40-00-0064 00-00-2953 3
A902-2-12 40-02-0135 40-00-0080 40-00-0064 00-00-2952 4
A902-2-24 40-02-0148 40-00-0080 40-00-0064 00-00-2953 4
A903-12 40-02-0151 40-00-0081 40-00-0064 00-00-2952 3
A903-24 40-02-0152 40-00-0081 40-00-0064 00-00-2953 3
A903-2-12 40-02-0155 40-00-0082 40-00-0064 00-00-2952 4
A903-2-24 40-02-0156 40-00-0082 40-00-0064 00-00-2953 4
Table 8-2: Replacement Components for A900 Series Controls for Detroit Diesel Corporation
Model Number Part Number Control/Display Module Relay Module Relay Part Number Relay Qty
A901-12-DDC 40-35-0020 40-00-0083 40-00-0064 00-00-2952 5
A901-2-24-DDC 40-35-0029 40-00-0084 40-00-0064 00-00-2953 6
A902-12-DDC 40-35-0022 40-00-0085 40-00-0064 00-00-2952 3
A902-2-24-DDC 40-35-0037 40-00-0086 40-00-0064 00-00-2953 4
A903-12-DDC 40-35-0024 40-00-0087 40-00-0064 00-00-2952 3
A903-2-24-DDC 40-35-0043 40-00-0088 40-00-0064 00-00-2953 4
24
Page 28

0690040
CONTROL SYSTEMS & SERVICES DIVISION
P.O. Box 1819; Rosenberg, Texas 77471; USA
(281) 342-0297
fax (281) 341-6006
e-mail sales@fwmurphy.com
MURPHY DE MEXICO, S.A. DE C.V.
Blvd. Antonio Rocha Cordero 300, Fracción del Aguaje
San Luis Potosí, S.L.P.; México 78384
+52-48-206264
fax +52-48-206336
e-mail ventasmex@murphymex.com.mx
FRANK W. MURPHY, LTD.
Church Rd.; Laverstock, Salisbury SP1 1QZ; U.K.
+44 1722 410055
fax +44 1722 410088
e-mail sales@fwmurphy.co.uk
www.fwmurphy.co.uk
For Service in French:
Pour service en francais:
+44 1722 410697 fax +44 1722 410088
e-mail france@fwmurphy.co.uk
www.fwmurphy.co.uk/francais.htm
In order to consistently bring you the highest quality, full featured products, we reserve the right to change our specifications and designs at any time.
MURPHY SWITCH OF CALIFORNIA
41343 12th Street West
Palmdale, California 93551-1442; USA
(661) 272-4700
fax (661) 947-7570
e-mail sales@murphyswitch.com
www.murphyswitch.com
MACQUARRIE CORPORATION
1620 Hume Highway;
Campbellfield, Vic 3061; Australia
+61 3 9358-5555
fax +61 3 9358-5558
e-mail murphy@macquarrie.com.au
FWMurphy
P.O. Box 470248
Tulsa, Oklahoma 74147 USA
(918) 627-3550
fax (918) 664-6146
e-mail sales@fwmurphy.com
www.fwmurphy.com
R
E
G
I
S
T
E
R
E
D
Printed in U.S.A.
 Loading...