

Page 1
Series 41500E
MFX-1500E Operating Instructions
Plain-paper fax machines
Page 2

MML item number: D71-90430-60
MAI order number: OMMFX1500E
One-Touch Keys
Press To:
Program A 1 Enter
Enter a one-touch key
“ “ 2 Enter
Erase a one-touch key
“ “ 3 Enter
Print a list of one-touch keys
Speed-Dial Numbers
Program B 1 Enter
Enter a speed dial number
“ “ 2 Enter
Erase a speed dial number
“ “ 3 Enter
Print a list of speed dial numbers
Programmable One-Touch Keys
Program C 1 Enter
Enter a programmable key
“ “ 2 Enter
Erase a programmable key
“ “ 3 Enter
Print a list of programmable keys
Polling Documents
Program D 1 Enter
Store a polling document
“ “ 2 Enter
Erase a polling document
“ “ 3 Enter
Print a polling document
Soft Key Features
Program E Enter
Set a Soft Key
Delayed Commands
Program F 1 Enter
Print a list of delayed commands
“ “ 2 Enter
Print a stored document
Activity Journal and Reports
Program G 1 Enter
Turn the journal printout on or off
“ “ 2 Enter
Print a activity journal
“ “ 3 Enter
Set the type of report
“ “ 4 Enter
Set the order for the reports
Print a List of Groups
Program H Enter
Print a list of groups
EasyStart Settings
Program I Enter
Enter EasyStart settings
User Settings
Program J 01 Enter
Review / change your scan settings
“ “ 02 Enter
Review / change your print settings
“ “ 03 Enter
Set copy protection
“ “ 04 Enter
Set the dialing pause
“ “ 05 Enter
Set # of rings before auto answer
“ “ 06 Enter
Set the redial
“ “ 07 Enter
Select ECM mode
“ “ 08 Enter
Set a passcode
“ “ 09 Enter
Create a closed network
“ “ 10 Enter
Set security transmission
“ “ 11 Enter
Block junk fax
“ “ 12 Enter
Set the service mode
“ “ 13 Enter
Select memory transmission
“ “ 14 Enter
Set confirmation stamp
“ “ 15 Enter
Set PIN mode
“ “ 16 Enter
Protect passcode
“ “ 17 Enter
Set Quick Transmission
“ “ 18 Enter
Set Image Rotation
“ “ 19 Enter
Select silent mode
Press
To:
Program J 20 Enter
Set DRD
“ “ 21 Enter
Print machine settings
Cover Page
Program K 1 Enter
Select the cover page option
“ “ 2 Enter
Enter cover page information
“ “ 3 Enter
Print cover page
Numbering Pages
Program L Enter
Set the number of pages
Department Codes
Program M 1 Enter
Set the department protection
“ “ 2 Enter
Set the department code
“ “ 3 Enter
Turn department code setting on/off
“ “ 4 Enter
Print department time list
“ “ 5 Enter
Clear department time list
Batch Transmission
Program N 1 Enter
Create or modify batch box
“ “ 2 Enter
Print list of batch boxes
“ “ 3 Enter
Print list of batch documents
“ “ 4 Enter
Print batch document
“ “ 5 Enter
Erase batch box
“ “ 6 Enter
Erase batch document
Security Operations
Program O 1 Enter
Set security reception
“ “ 2 Enter
Print security reception document
F-Code Feature
Program P 1 Enter
Set F-Code box
“ “ 2 Enter
Print list of F-Code boxes
“ “ 3 Enter
Print list of F-Code documents
“ “ 4 Enter
Print F-Code document
“ “ 5 Enter
Erase F-Code box
“ “ 6 Enter
Erase F-Code document
“ “ 7 Enter
Store F-Code document
Fax Forward
Program Q 1 Enter
Set Fax forward
“ “ 2 Enter
Print a list of transfer pattern
Reset Printer Option
Program R Enter
Reset printer option
(Printer function requires optional equipment.)
PC-to-Fax Operations
Program S 1 Enter
Begin a PC-to-Fax scan
“ “ 2 Enter
Set RS-232C
“ “ 3 Enter
PC-Fax Initialization
(PC-to-fax functions require optional equipment.
See your authorized Muratec dealer for details.)
MFX-1500E Quick Reference
Muratec America, Inc.
6400 International Parkway
Suite 1500
Plano, Texas 75093
http://www.muratec.com
© Muratec Americ,Inc.1999 Printed in Japan.
Page 3

Welcome …
Thank you!
Thanks for selecting a Muratec fax machine for your
business.
Before you begin, please note that before your fax can be
used and before you can turn on power to the unit for the
first time, there are important precautions to take. Please
see page 1.7 for more information.
Page 4

Trademarks
Muratec, the Muratec logo and all Muratec fax product names contained herein are
trademarks of Muratec America,Inc.
E
NERGYSTAR
is a registered mark of the United States Environmental Protection
Agency.
Copyright
Copyright © 1999 by Muratec Americ,Inc,All rights reserved.
As an Energy Star®partner ,Muratec America, Inc., has determined that this product meets the Energy Star guidelines for
energy efficiency.
Super G3 is an extension of Group 3 fax technology standards,
allowing the use of high-speed
ITU-TV
.34 bis modems for 33.6
Kbps transmission and high-speed protocols for rapid handshaking.
JBIG
— Joint Bi-level Image experts Group,the new
ITU-T
stan-
dard image data compression method.As
JBIG
compresses the
data more efficiently than
MMR
, it is especially effective when
transmitting halftone (grayscale) image document.
This manual and any updates to it can be found online at www.muratec.com
Go to the “Products”section of this site, then click on “MFX-1500E”
Page 5
Where to set up your fax machine
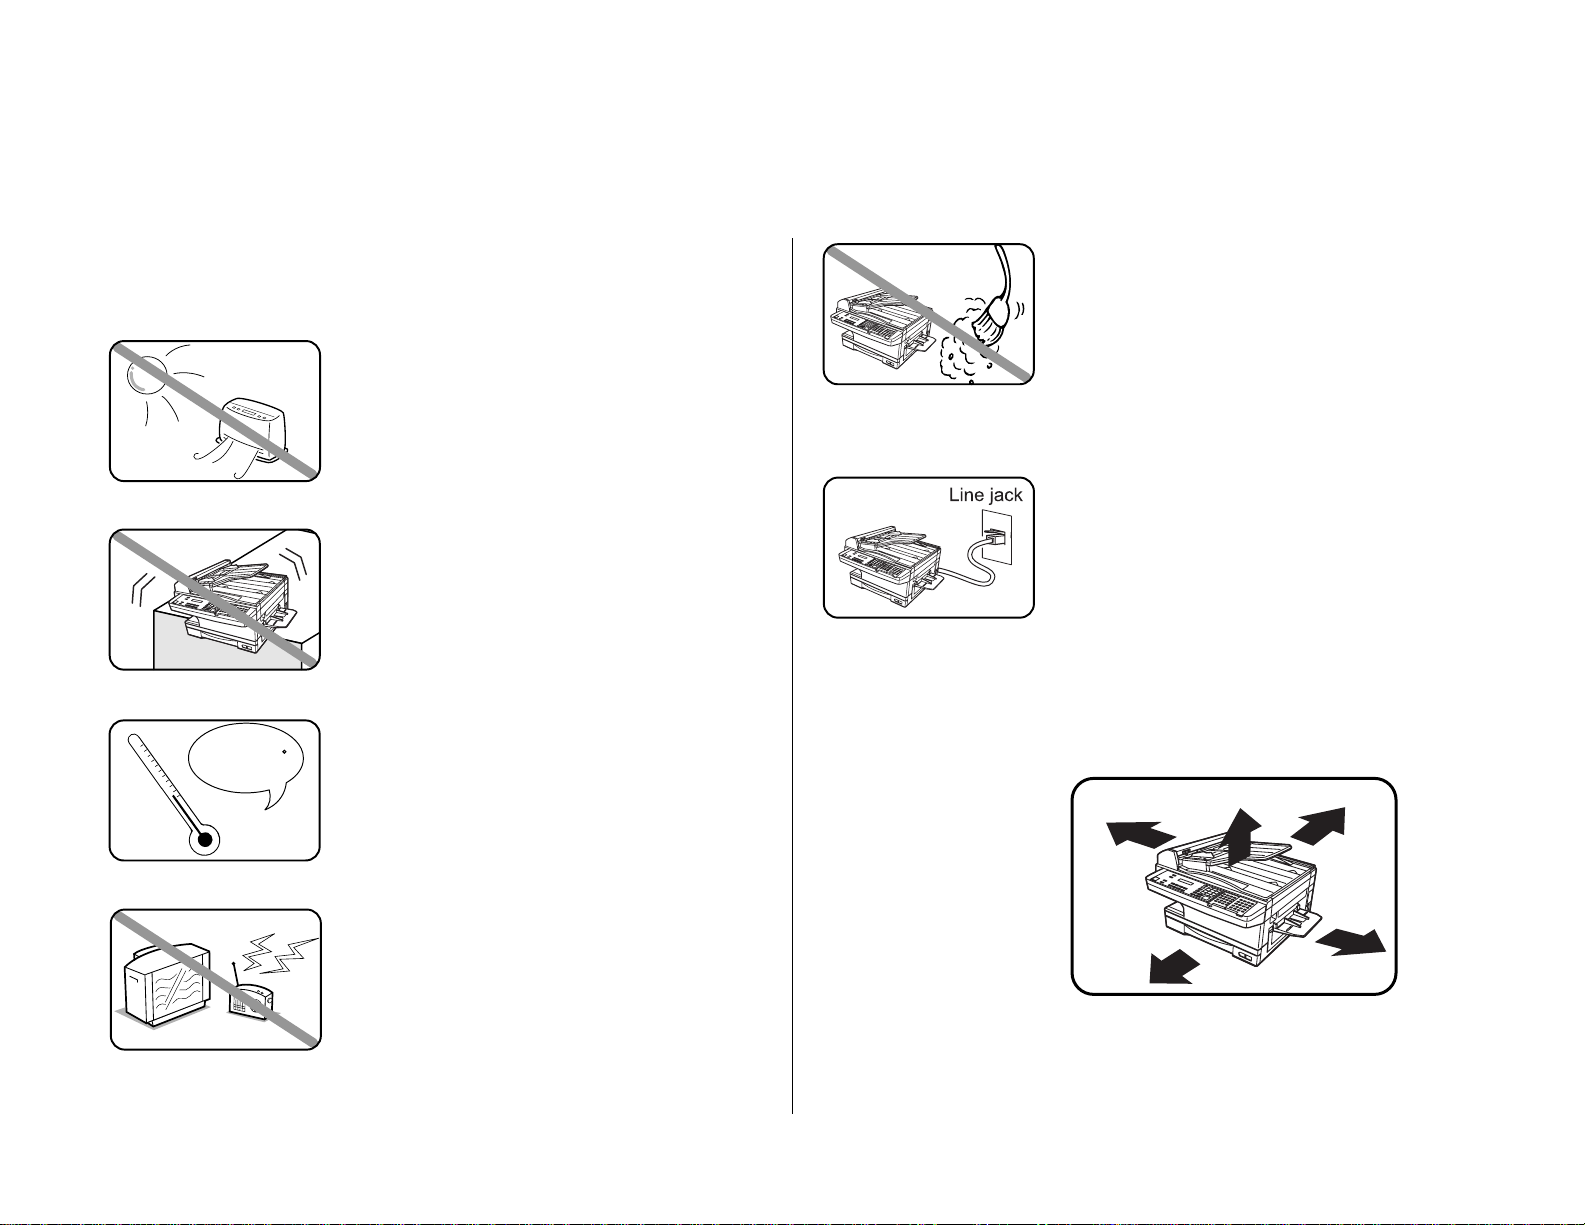
Follow these guidelines when setting up your fax machine:
Away from direct sunlight
To avoid overheating, set up your fax machine away
from direct sunlight or a heater.
Level, and vibration-free
To avoid damage to the mac hine or injuries, set the
fax machine up in a level, vibration-free location.
Avoid extreme high / low temperature
Use your fax machine within the temperature range
of 50º F to 89.6º F (10º C to 32º C).
Away from a television or radio
Many appliances and office equipment, including
televisions, radios, copy machines, air conditioners
and computers, can generate electronic noise that
can interfere with the operation of your fax
machine.
Clean
Dust buildup can damage your fax. Periodically
clean your fax machine as described in the operating
instructions. Do not use a dust cover, which can
cause damaging overheating.
Near a phone jack
Your fax machine uses a standard (modular) telephone jack, also known as an RJ-11.
Space around the fax machine
To ensure proper ventilation and easy operation,set
up the machine in an area that meets the minimum
requirements for clearance as illustrated below.
Before using your Muratec fax machine
20 cm
(7.9 inches)
20 cm
(7.9 inches)
20 cm
(7.9 inches)
60 cm
(23.6 inches)
60 cm
(23.6 inches)
50 - 89.6 F
Page 6
Power requirements
Plug in the power cord
Plug the power cord carefully and completely into a
wall outlet. Do not leave any portion of the electrical
cord’s metal plugs exposed. Doing so could cause a
fire and poses a risk of electrical shock.
Do not share an extension cord
connector with other plugs
It can cause electrical shock.
Do not share an outlet with a large
appliance
High-consumption appliances such as a refrigerator
or air conditioner can cause “draw-downs”which
could damage your fax machine.
120 VAC outlet
Use a standard three-pronged 120 V electrical outlet
to power your fax machine. Using any other electrical outlet will cause damage to your fax.
For domestic use only
Never use your fax machine outside the country in
which you purchased it. Doing so may violate
telecommunication and safety regulations of that
country,and variations in electrical and telephone
standards can cause poor performance and damage
to your fax.
General Precautions
Never disassemble your fax machine!
Disassembling your fax machine can cause serious
injury to you and damage to your fax. If service is
required, call your authorized Muratec dealer.
Keep away from liquids
Keep liquids and metal pins or other objects away
from your fax machine. If something falls into the
fax machine, remove the plug from the outlet, and
call your authorized Muratec dealer.
Never handle your fax machine or
power cord with wet hands
Never touch your fax machine or power cord if your
hands are wet.
During electrical storms, disconnect
the plug from the outlet
Electrical storms can cause electrical shock or
damage to the fax machine.
AC 120V
Page 7
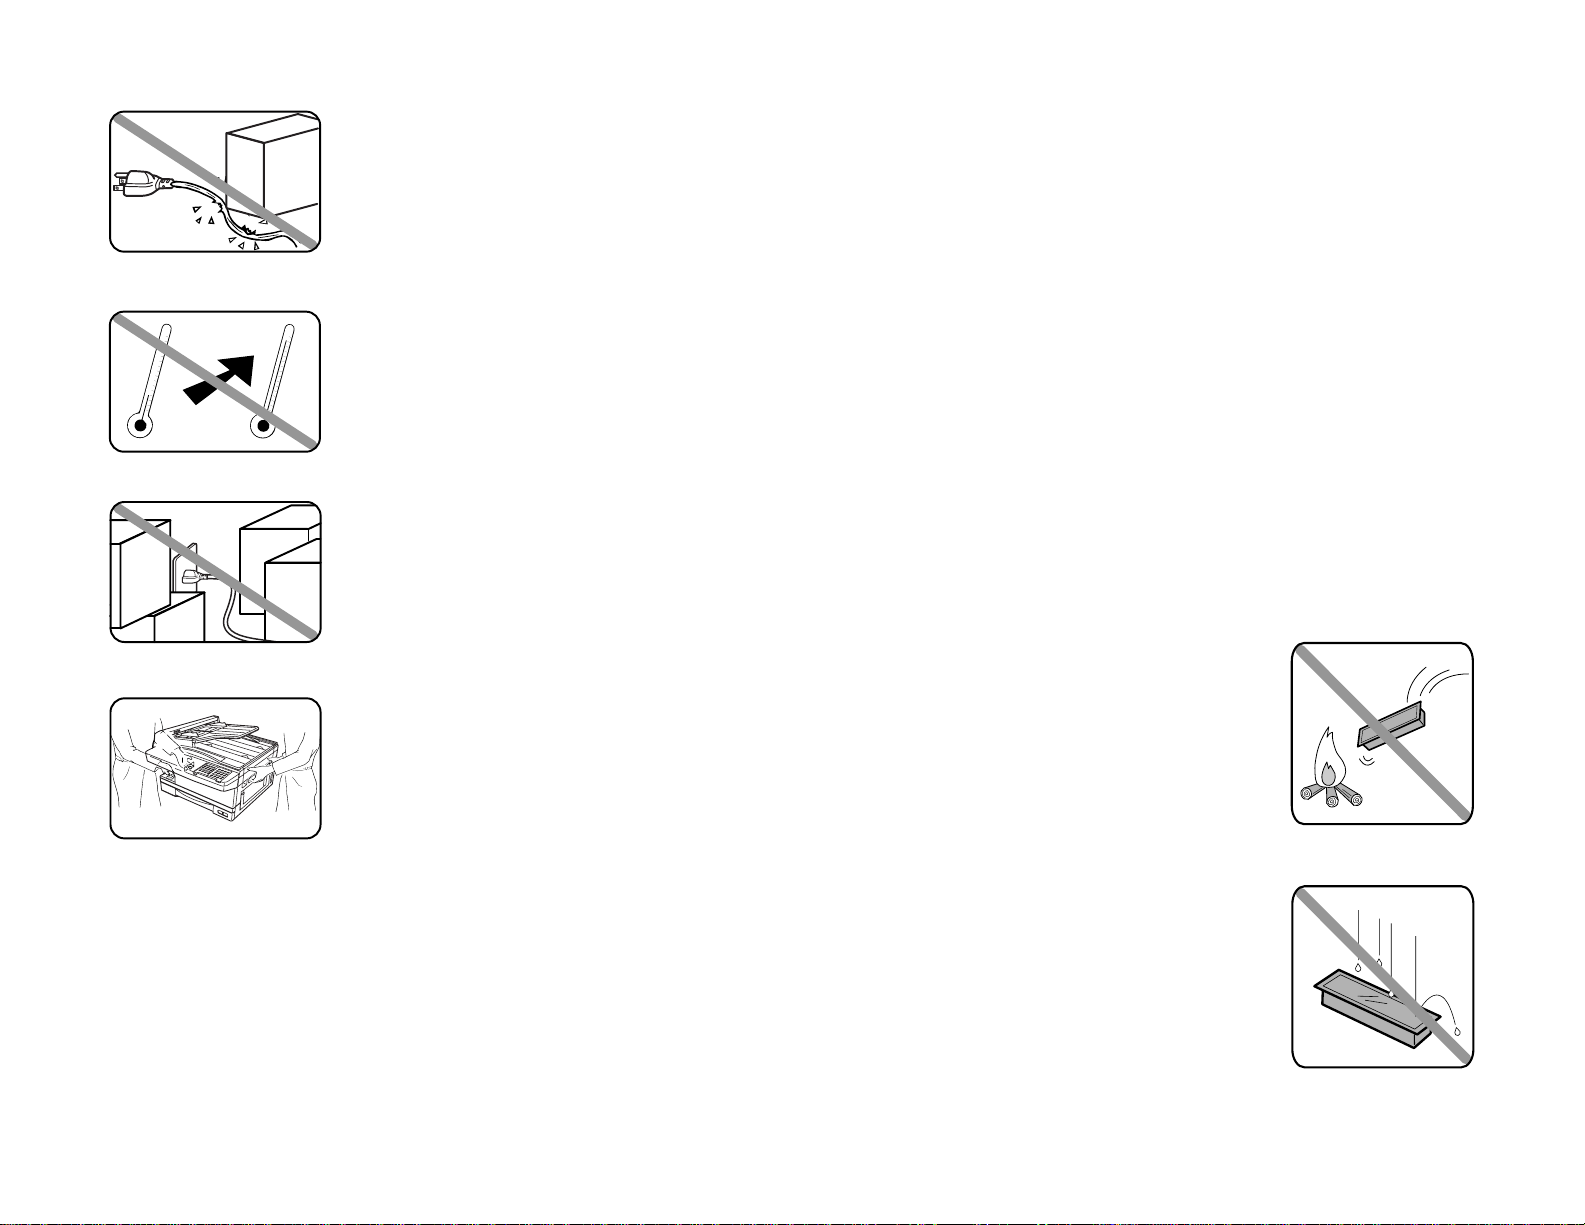
Do not put furniture or equipment on
the power cord
Do not put anything on or over the electrical power
cord, and do not route the power cord under rugs or
carpets. Doing so can damage the power cord or fax,
and can cause fire or electrical shock.
Avoid temperature fluctuations
Sudden changes in temperature can cause damaging condensation to form inside your fax machine.
Allow clearance around the outlet
Don’t stack boxes or furniture around the outlet.
Use caution when carrying the fax
Lift and carry the fax machine as described in your
operating instructions.Some fax machines require
two people to safely and properly carry.
Use supplies manufactured
specifically for Muratec fax machines
Using toner cartridges and other supplies that are
not manufactured specifically for Muratec machines
may affect the operation of your unit.
Storing and handling toner cartridges
To avoid damage to your fax mac hine and to assure the best performance possible,
follow these guidelines when storing and handling toner cartridges:
Store the cartridge
Store toner cartridge at a constant temperature within a range of 50º F to 89.6º F
(10º C to 32º C). Do not store cartridges in locations subject to extreme fluctuation of
temperature and humidity.
Do not stand the cartridge on its end and do not store it
upside down.
Do not open the protective bag of the cartridge until you are
ready to install the cartridge.
Do not store cartridges in areas of:
• Direct sunlight
• Dusty conditions
• Near floppy disks or other computer media, computer screens, or any other materials sensitive to magnetic fields.
Do not burn toner cartridges!
The toner powder is extremely flammable. Exposure to
flame can cause toner cartridges to burn or explode, causing
serious injury.
Be careful not to get the toner powder in
your eyes.
If the toner powder gets in your eyes,wash your eyes well
and see a doctor.
Keep cartridges away from water or oil.
Do not expose cartridges to direct sunlight.
Do not expose toner cartridges to static or
other electrical shock.
Page 8

This page intentionally blank.
Page 9
These instructions are divided into three sections.
•
“Getting started” (page 1.1) covers only what you must know to
use your machine immediately.
•
“Beyond the basics” (page 2.1) provides more details.When you
have time,look through it to learn more about your machine’s
many features.
•
Finally, “Just in case … ” (page 3.1) helps you if you ever have a
problem with your machine. It also tells you how to give your
machine the kind of easy, sensible care that should keep troubles to
a minimum.
Thanks for choosing Muratec.
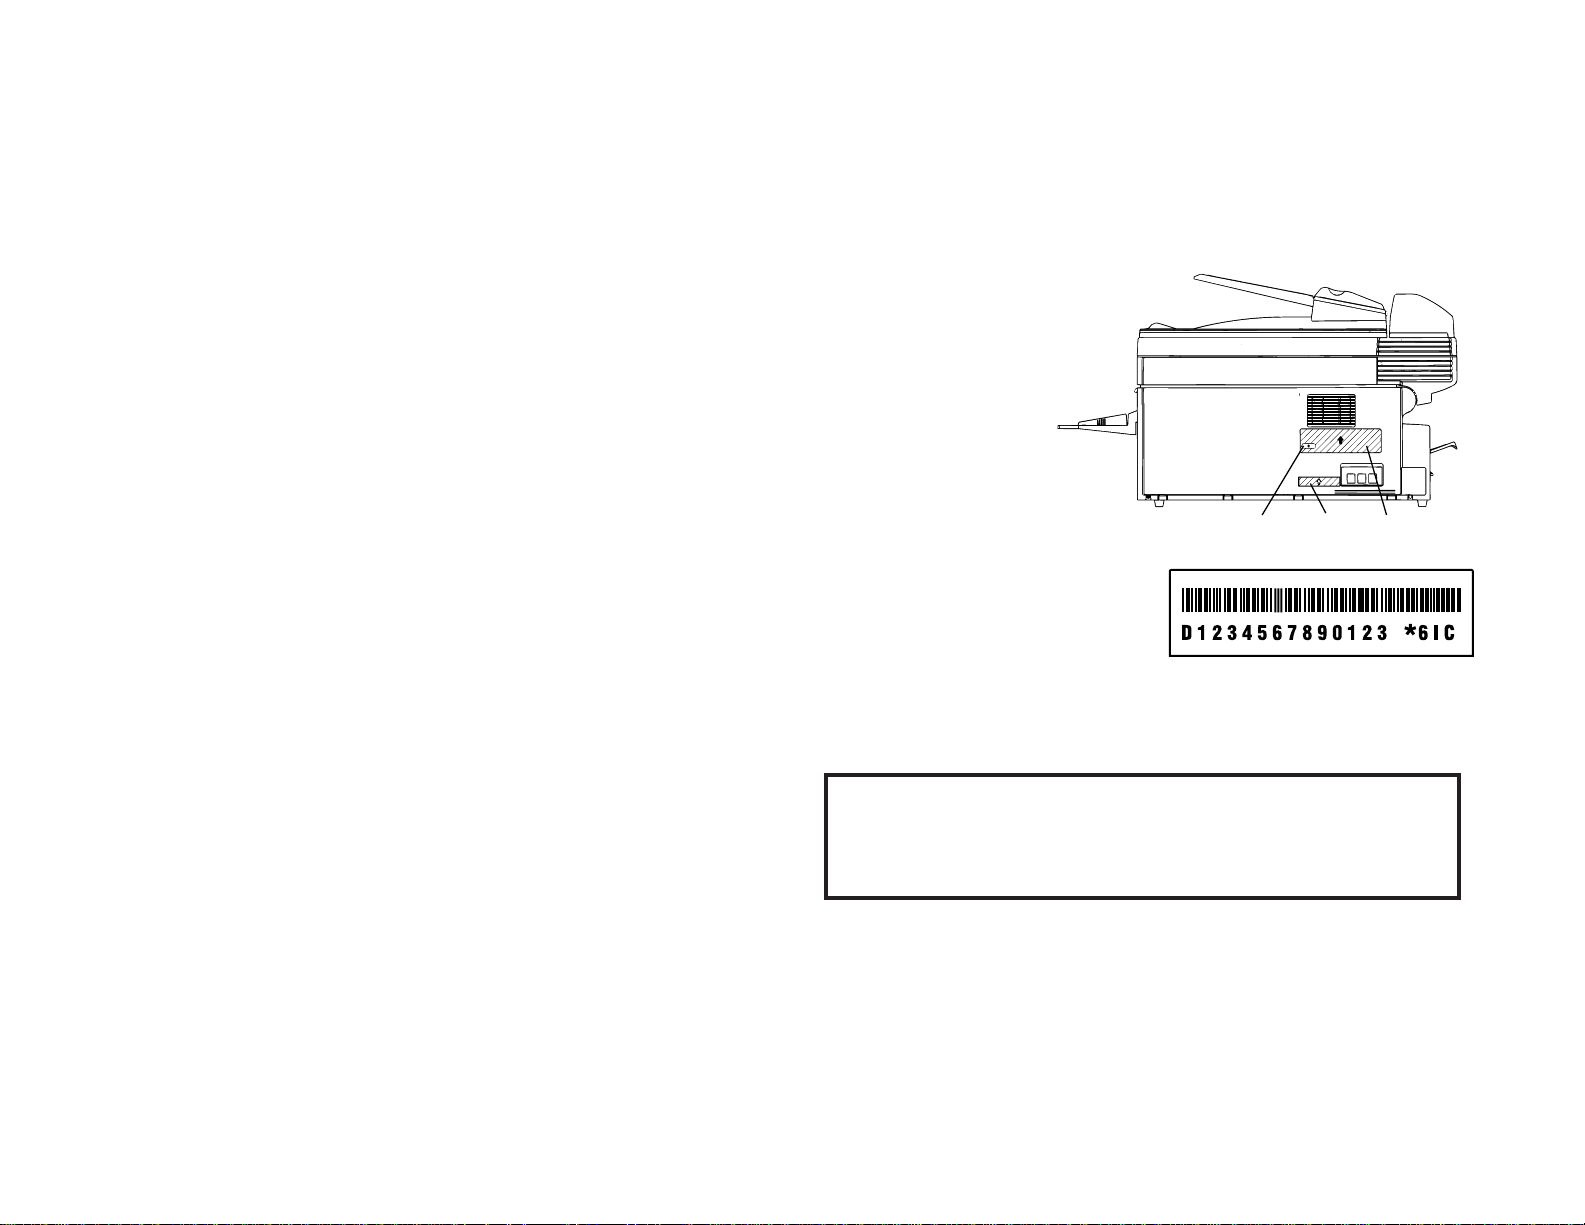
Find your serial number and write it down
Please note that your
machine’s serial number is
located on the bar code
label as shown on the
drawing at right. Use the
blank at the bottom of this
column to copy this down
before you set up your
machine.
Note: The IClabel and
ID
label do not contain
serial number information.
Close up, the bar code label looks something like this,but with a different set of
numbers:
Please copy down your machine’s serial number below for future reference,and note
the machine’s model number:
My machine’s serial number: ________________________________________
My machine’s model number: Muratec MFX-1500E
Bar code labelIC label ID label
Welcome to your Muratec fax machine!
Page 10

Getting started
A quick introduction to fax . . . . . . . . . . . . . . . . . . . . . . . . . . . . . . . . . . . . . . . 1.1
Packaging contents . . . . . . . . . . . . . . . . . . . . . . . . . . . . . . . . . . . . . . . . . . . . . 1.2
Parts of the Fax . . . . . . . . . . . . . . . . . . . . . . . . . . . . . . . . . . . . . . . . . . . . . . . . 1.2
The keys and their functions . . . . . . . . . . . . . . . . . . . . . . . . . . . . . . . . . . . . . . 1.4
Operating tips . . . . . . . . . . . . . . . . . . . . . . . . . . . . . . . . . . . . . . . . . . . . . . . 1.6
Setting up . . . . . . . . . . . . . . . . . . . . . . . . . . . . . . . . . . . . . . . . . . . . . . . . . . . . . 1.7
Pick an installation spot . . . . . . . . . . . . . . . . . . . . . . . . . . . . . . . . . . . . . . . 1.7
Power tips . . . . . . . . . . . . . . . . . . . . . . . . . . . . . . . . . . . . . . . . . . . . . . . . . . 1.7
Removing the transport screws . . . . . . . . . . . . . . . . . . . . . . . . . . . . . . . . . 1.7
Installing the printing supplies . . . . . . . . . . . . . . . . . . . . . . . . . . . . . . . . . 1.8
Attach the paper-handling parts . . . . . . . . . . . . . . . . . . . . . . . . . . . . . . . . 1.9
Loading paper . . . . . . . . . . . . . . . . . . . . . . . . . . . . . . . . . . . . . . . . . . . . . . 1.10
Plug in and power up . . . . . . . . . . . . . . . . . . . . . . . . . . . . . . . . . . . . . . . . 1.12
Turn off the transport mode . . . . . . . . . . . . . . . . . . . . . . . . . . . . . . . . . . . 1.12
Adjust the monitor speaker’s volume . . . . . . . . . . . . . . . . . . . . . . . . . . . 1.13
Attaching an optional handset . . . . . . . . . . . . . . . . . . . . . . . . . . . . . . . . . 1.13
Attaching a second phone . . . . . . . . . . . . . . . . . . . . . . . . . . . . . . . . . . . . . 1.14
EasyStart . . . . . . . . . . . . . . . . . . . . . . . . . . . . . . . . . . . . . . . . . . . . . . . . . . . . 1.15
Getting started . . . . . . . . . . . . . . . . . . . . . . . . . . . . . . . . . . . . . . . . . . . . . 1.15
Clearing stored settings . . . . . . . . . . . . . . . . . . . . . . . . . . . . . . . . . . . . . . 1.15
Entering initial settings . . . . . . . . . . . . . . . . . . . . . . . . . . . . . . . . . . . . . . 1.15
Sending faxes . . . . . . . . . . . . . . . . . . . . . . . . . . . . . . . . . . . . . . . . . . . . . . . . . 1.17
Guidelines . . . . . . . . . . . . . . . . . . . . . . . . . . . . . . . . . . . . . . . . . . . . . . . . . 1.17
Sending a fax using the
ADF
. . . . . . . . . . . . . . . . . . . . . . . . . . . . . . . . . . . 1.19
Sending a fax using the
FBS
. . . . . . . . . . . . . . . . . . . . . . . . . . . . . . . . . . . 1.20
Sending a fax using monitor/call or a handset . . . . . . . . . . . . . . . . . . . . 1.21
Redialing . . . . . . . . . . . . . . . . . . . . . . . . . . . . . . . . . . . . . . . . . . . . . . . . . . 1.22
Review Commands, an introduction . . . . . . . . . . . . . . . . . . . . . . . . . . . . 1.23
Receiving faxes . . . . . . . . . . . . . . . . . . . . . . . . . . . . . . . . . . . . . . . . . . . . . . . . 1.24
Reception modes . . . . . . . . . . . . . . . . . . . . . . . . . . . . . . . . . . . . . . . . . . . . 1.24
Tel Ready mode . . . . . . . . . . . . . . . . . . . . . . . . . . . . . . . . . . . . . . . . . . . . . 1.24
Fax Ready mode . . . . . . . . . . . . . . . . . . . . . . . . . . . . . . . . . . . . . . . . . . . . 1.25
Fax/Tel Ready mode . . . . . . . . . . . . . . . . . . . . . . . . . . . . . . . . . . . . . . . . . 1.25
Tel/Fax Ready mode . . . . . . . . . . . . . . . . . . . . . . . . . . . . . . . . . . . . . . . . . 1.26
Ans/Fax Ready mode . . . . . . . . . . . . . . . . . . . . . . . . . . . . . . . . . . . . . . . . . 1.26
If the paper runs out . . . . . . . . . . . . . . . . . . . . . . . . . . . . . . . . . . . . . . . . . 1.27
Making copies . . . . . . . . . . . . . . . . . . . . . . . . . . . . . . . . . . . . . . . . . . . . . . . . . 1.28
Making copy settings . . . . . . . . . . . . . . . . . . . . . . . . . . . . . . . . . . . . . . . . 1.28
How to copy . . . . . . . . . . . . . . . . . . . . . . . . . . . . . . . . . . . . . . . . . . . . . . . . 1.29
Setting of enlargement or reduction for copying . . . . . . . . . . . . . . . . . . 1.31
Copy protection . . . . . . . . . . . . . . . . . . . . . . . . . . . . . . . . . . . . . . . . . . . . . 1.31
Using your fax machine as a phone . . . . . . . . . . . . . . . . . . . . . . . . . . . . . . . 1.32
Redial . . . . . . . . . . . . . . . . . . . . . . . . . . . . . . . . . . . . . . . . . . . . . . . . . . . . . 1.32
Dialing with the monitor speaker . . . . . . . . . . . . . . . . . . . . . . . . . . . . . . 1.32
EasyDial directory dialing . . . . . . . . . . . . . . . . . . . . . . . . . . . . . . . . . . . . 1.32
Checking the fax reception mode . . . . . . . . . . . . . . . . . . . . . . . . . . . . . . . 1.32
Dialing in the event of a power failure . . . . . . . . . . . . . . . . . . . . . . . . . . 1.32
Beyond the basics
Entering settings for your fax machine . . . . . . . . . . . . . . . . . . . . . . . . . . . . . 2.1
Scan settings . . . . . . . . . . . . . . . . . . . . . . . . . . . . . . . . . . . . . . . . . . . . . . . . 2.1
Using code to enter characters . . . . . . . . . . . . . . . . . . . . . . . . . . . . . . . . . . 2.2
Print settings . . . . . . . . . . . . . . . . . . . . . . . . . . . . . . . . . . . . . . . . . . . . . . . . 2.2
Image Rotation . . . . . . . . . . . . . . . . . . . . . . . . . . . . . . . . . . . . . . . . . . . . . . 2.3
Setting the number of rings . . . . . . . . . . . . . . . . . . . . . . . . . . . . . . . . . . . . 2.4
Setting ecm . . . . . . . . . . . . . . . . . . . . . . . . . . . . . . . . . . . . . . . . . . . . . . . . . 2.4
Setting silent mode . . . . . . . . . . . . . . . . . . . . . . . . . . . . . . . . . . . . . . . . . . . 2.4
Setting the confirmation stamp . . . . . . . . . . . . . . . . . . . . . . . . . . . . . . . . . 2.5
Language settings . . . . . . . . . . . . . . . . . . . . . . . . . . . . . . . . . . . . . . . . . . . . 2.6
Printing your settings . . . . . . . . . . . . . . . . . . . . . . . . . . . . . . . . . . . . . . . . . 2.6
Printing a program list . . . . . . . . . . . . . . . . . . . . . . . . . . . . . . . . . . . . . . . . 2.6
Autodialer . . . . . . . . . . . . . . . . . . . . . . . . . . . . . . . . . . . . . . . . . . . . . . . . . . . . . 2.7
Autodialer basics . . . . . . . . . . . . . . . . . . . . . . . . . . . . . . . . . . . . . . . . . . . . . 2.7
Call groups . . . . . . . . . . . . . . . . . . . . . . . . . . . . . . . . . . . . . . . . . . . . . . . . . 2.8
Using one-touch numbers . . . . . . . . . . . . . . . . . . . . . . . . . . . . . . . . . . . . . . 2.8
Using speed-dial numbers . . . . . . . . . . . . . . . . . . . . . . . . . . . . . . . . . . . . 2.11
Printing a call group directory . . . . . . . . . . . . . . . . . . . . . . . . . . . . . . . . . 2.14
EasyDial directory dialing . . . . . . . . . . . . . . . . . . . . . . . . . . . . . . . . . . . . 2.15
Broadcasting . . . . . . . . . . . . . . . . . . . . . . . . . . . . . . . . . . . . . . . . . . . . . . . . . . 2.16
Broadcasting basics . . . . . . . . . . . . . . . . . . . . . . . . . . . . . . . . . . . . . . . . . 2.16
Delayed broadcasting . . . . . . . . . . . . . . . . . . . . . . . . . . . . . . . . . . . . . . . . 2.16
Making changes to broadcasts . . . . . . . . . . . . . . . . . . . . . . . . . . . . . . . . . 2.16
Delayed transmission . . . . . . . . . . . . . . . . . . . . . . . . . . . . . . . . . . . . . . . . . . 2.17
Setting up a delayed transmission . . . . . . . . . . . . . . . . . . . . . . . . . . . . . 2.17
Reviewing or canceling delayed commands . . . . . . . . . . . . . . . . . . . . . . 2.18
Printing a delayed command list . . . . . . . . . . . . . . . . . . . . . . . . . . . . . . . 2.19
Printing a stored document . . . . . . . . . . . . . . . . . . . . . . . . . . . . . . . . . . . 2.19
Table of Contents
Page 11

Batch transmission . . . . . . . . . . . . . . . . . . . . . . . . . . . . . . . . . . . . . . . . . . . . 2.20
Creating or modifying a batch box . . . . . . . . . . . . . . . . . . . . . . . . . . . . . . 2.20
Printing a list of batch boxes . . . . . . . . . . . . . . . . . . . . . . . . . . . . . . . . . . 2.21
Storing a document for batch transmission . . . . . . . . . . . . . . . . . . . . . . 2.21
Printing a list of stored batch documents . . . . . . . . . . . . . . . . . . . . . . . . 2.21
Printing a document stored in a batch box . . . . . . . . . . . . . . . . . . . . . . . 2.22
Erasing a document stored in a batch box . . . . . . . . . . . . . . . . . . . . . . . 2.22
Erasing an empty batch box . . . . . . . . . . . . . . . . . . . . . . . . . . . . . . . . . . . 2.23
Special features . . . . . . . . . . . . . . . . . . . . . . . . . . . . . . . . . . . . . . . . . . . . . . . 2.24
Soft Keys . . . . . . . . . . . . . . . . . . . . . . . . . . . . . . . . . . . . . . . . . . . . . . . . . . 2.24
Macros . . . . . . . . . . . . . . . . . . . . . . . . . . . . . . . . . . . . . . . . . . . . . . . . . . . . 2.25
Cover page . . . . . . . . . . . . . . . . . . . . . . . . . . . . . . . . . . . . . . . . . . . . . . . . . 2.28
Setting the activity journal . . . . . . . . . . . . . . . . . . . . . . . . . . . . . . . . . . . 2.29
Setting the reports:
TCR
s and
RCR
s . . . . . . . . . . . . . . . . . . . . . . . . . . . . . . 2.30
Quick Memory transmission . . . . . . . . . . . . . . . . . . . . . . . . . . . . . . . . . . 2.31
Polling . . . . . . . . . . . . . . . . . . . . . . . . . . . . . . . . . . . . . . . . . . . . . . . . . . . . 2.31
OneLine + distinctive ring detection . . . . . . . . . . . . . . . . . . . . . . . . . . . . 2.33
Call request . . . . . . . . . . . . . . . . . . . . . . . . . . . . . . . . . . . . . . . . . . . . . . . . 2.34
Numbering pages . . . . . . . . . . . . . . . . . . . . . . . . . . . . . . . . . . . . . . . . . . . 2.35
Transferring documents (Fax Forward) . . . . . . . . . . . . . . . . . . . . . . . . . 2.35
The power of QuadAccess®. . . . . . . . . . . . . . . . . . . . . . . . . . . . . . . . . . . . 2.37
F-Code communication . . . . . . . . . . . . . . . . . . . . . . . . . . . . . . . . . . . . . . . . . 2.38
F-Code: an introduction . . . . . . . . . . . . . . . . . . . . . . . . . . . . . . . . . . . . . . 2.38
Creating or modifying an F-Code box . . . . . . . . . . . . . . . . . . . . . . . . . . . 2.38
Printing a list of F-Code boxes . . . . . . . . . . . . . . . . . . . . . . . . . . . . . . . . . 2.42
Printing a list of documents stored in your F-Code boxes . . . . . . . . . . . 2.42
Using a bulletin box . . . . . . . . . . . . . . . . . . . . . . . . . . . . . . . . . . . . . . . . . 2.42
Using a security box . . . . . . . . . . . . . . . . . . . . . . . . . . . . . . . . . . . . . . . . . 2.44
Using a relay box . . . . . . . . . . . . . . . . . . . . . . . . . . . . . . . . . . . . . . . . . . . 2.45
Erasing an empty F-Code box . . . . . . . . . . . . . . . . . . . . . . . . . . . . . . . . . 2.45
F-Code transmission and polling . . . . . . . . . . . . . . . . . . . . . . . . . . . . . . . 2.46
Programmable one-touch keys . . . . . . . . . . . . . . . . . . . . . . . . . . . . . . . . . . . 2.48
Using the power of programmable one-touch keys . . . . . . . . . . . . . . . . . 2.48
Programming a delayed transmission . . . . . . . . . . . . . . . . . . . . . . . . . . . 2.48
Programming a broadcast / group . . . . . . . . . . . . . . . . . . . . . . . . . . . . . . 2.49
Programming regular polling . . . . . . . . . . . . . . . . . . . . . . . . . . . . . . . . . . 2.50
Programming a batch transmission . . . . . . . . . . . . . . . . . . . . . . . . . . . . 2.51
Programming an F-Code transmission . . . . . . . . . . . . . . . . . . . . . . . . . . 2.52
Programming F-Code polling . . . . . . . . . . . . . . . . . . . . . . . . . . . . . . . . . . 2.53
Fax dialing with programmable one-touc h . . . . . . . . . . . . . . . . . . . . . . . 2.54
Erasing a programmable one-touch key . . . . . . . . . . . . . . . . . . . . . . . . . 2.54
Printing a list of your programmable one-touch keys . . . . . . . . . . . . . . 2.55
Security features . . . . . . . . . . . . . . . . . . . . . . . . . . . . . . . . . . . . . . . . . . . . . . 2.56
The passcode . . . . . . . . . . . . . . . . . . . . . . . . . . . . . . . . . . . . . . . . . . . . . . . 2.56
Security reception . . . . . . . . . . . . . . . . . . . . . . . . . . . . . . . . . . . . . . . . . . . 2.56
Masking the
PIN
. . . . . . . . . . . . . . . . . . . . . . . . . . . . . . . . . . . . . . . . . . . . . 2.57
Setting security transmission . . . . . . . . . . . . . . . . . . . . . . . . . . . . . . . . . 2.59
Setting for use with a closed network . . . . . . . . . . . . . . . . . . . . . . . . . . . 2.60
Setting Block Junk Fax . . . . . . . . . . . . . . . . . . . . . . . . . . . . . . . . . . . . . . 2.60
Using department codes . . . . . . . . . . . . . . . . . . . . . . . . . . . . . . . . . . . . . . 2.62
Just in case …
Clearing paper jams . . . . . . . . . . . . . . . . . . . . . . . . . . . . . . . . . . . . . . . . . . . . . 3.1
If an original document jams . . . . . . . . . . . . . . . . . . . . . . . . . . . . . . . . . . . 3.1
Print quality problems . . . . . . . . . . . . . . . . . . . . . . . . . . . . . . . . . . . . . . . . . . . 3.4
Troubleshooting . . . . . . . . . . . . . . . . . . . . . . . . . . . . . . . . . . . . . . . . . . . . . . . . 3.6
Alarm . . . . . . . . . . . . . . . . . . . . . . . . . . . . . . . . . . . . . . . . . . . . . . . . . . . . . . 3.6
LCD
error messages . . . . . . . . . . . . . . . . . . . . . . . . . . . . . . . . . . . . . . . . . . . 3.6
Errors . . . . . . . . . . . . . . . . . . . . . . . . . . . . . . . . . . . . . . . . . . . . . . . . . . . . . . 3.9
Caring for your fax machine . . . . . . . . . . . . . . . . . . . . . . . . . . . . . . . . . . . . . 3.12
Cleaning tips . . . . . . . . . . . . . . . . . . . . . . . . . . . . . . . . . . . . . . . . . . . . . . . 3.12
Corrective cleaning . . . . . . . . . . . . . . . . . . . . . . . . . . . . . . . . . . . . . . . . . . 3.12
Cleaning the
FBS
. . . . . . . . . . . . . . . . . . . . . . . . . . . . . . . . . . . . . . . . . . . . 3.13
If you have unsatisfactory printout quality . . . . . . . . . . . . . . . . . . . . . . 3.13
Cleaning the
LED
print head . . . . . . . . . . . . . . . . . . . . . . . . . . . . . . . . . . . 3.13
Storing the toner and drum cartridge(s) . . . . . . . . . . . . . . . . . . . . . . . . . 3.13
Common questions . . . . . . . . . . . . . . . . . . . . . . . . . . . . . . . . . . . . . . . . . . . . . 3.14
General questions . . . . . . . . . . . . . . . . . . . . . . . . . . . . . . . . . . . . . . . . . . . 3.14
Sending faxes . . . . . . . . . . . . . . . . . . . . . . . . . . . . . . . . . . . . . . . . . . . . . . 3.14
We’re here to help you! . . . . . . . . . . . . . . . . . . . . . . . . . . . . . . . . . . . . . . . 3.14
Reports . . . . . . . . . . . . . . . . . . . . . . . . . . . . . . . . . . . . . . . . . . . . . . . . . . . . 3.15
Receiving faxes . . . . . . . . . . . . . . . . . . . . . . . . . . . . . . . . . . . . . . . . . . . . . 3.16
Working with your answering machine . . . . . . . . . . . . . . . . . . . . . . . . . . 3.16
Polling . . . . . . . . . . . . . . . . . . . . . . . . . . . . . . . . . . . . . . . . . . . . . . . . . . . . 3.16
How your fax machine works . . . . . . . . . . . . . . . . . . . . . . . . . . . . . . . . . . 3.16
Glossary . . . . . . . . . . . . . . . . . . . . . . . . . . . . . . . . . . . . . . . . . . . . . . . . . . . . . 3.17
Specifications . . . . . . . . . . . . . . . . . . . . . . . . . . . . . . . . . . . . . . . . . . . . . . . . . .
AI
.1
Regulatory information . . . . . . . . . . . . . . . . . . . . . . . . . . . . . . . . . . . . . . . . .
AI
.3
Limited warranty . . . . . . . . . . . . . . . . . . . . . . . . . . . . . . . . . . . . . . . . . . . . . .
AI
.4
Index . . . . . . . . . . . . . . . . . . . . . . . . . . . . . . . . . . . . . . . . . . . . . . . . . . . . . . . .
AI
.5
Page 12

Getting started
A quick trip
through the basics
of your Muratec fax machine
A quick introduction to fax . . . . . . . . . . . . . . . . . . . . . . . . . . . . . . . . . . . . . . . . . . . . 1.1
Packaging contents . . . . . . . . . . . . . . . . . . . . . . . . . . . . . . . . . . . . . . . . . . . . . . . . . . . 1.2
Parts of the Fax . . . . . . . . . . . . . . . . . . . . . . . . . . . . . . . . . . . . . . . . . . . . . . . . . . . . . . 1.2
The keys and their functions . . . . . . . . . . . . . . . . . . . . . . . . . . . . . . . . . . . . . . . . . . . 1.4
Setting up . . . . . . . . . . . . . . . . . . . . . . . . . . . . . . . . . . . . . . . . . . . . . . . . . . . . . . . . . . 1.7
EasyStart . . . . . . . . . . . . . . . . . . . . . . . . . . . . . . . . . . . . . . . . . . . . . . . . . . . . . . . . . 1.15
Sending faxes . . . . . . . . . . . . . . . . . . . . . . . . . . . . . . . . . . . . . . . . . . . . . . . . . . . . . . 1.17
Receiving faxes . . . . . . . . . . . . . . . . . . . . . . . . . . . . . . . . . . . . . . . . . . . . . . . . . . . . . 1.24
Making copies . . . . . . . . . . . . . . . . . . . . . . . . . . . . . . . . . . . . . . . . . . . . . . . . . . . . . . 1.28
Using your fax machine as a phone . . . . . . . . . . . . . . . . . . . . . . . . . . . . . . . . . . . . 1.32
Page 13

1.1
Getting started
What’s a fax document?
A fax document is anything a fax user wants to fax to someone else.It can be one or
more pages, and it can be text, a drawing or even a copy of a photograph.
What’s a fax number?
Because your fax operates on standard phone lines,a fax number is just a regular
phone number. And because your fax is also a high-quality,full-featured telephone,
your fax number can be your regular phone number.
What are resolution and grayscale?
Just as cars are measured by engine size,fax machines are measured by resolution
and grayscale.
Resolution refers to the sharpness of a fax transmission. It’s expressed in lines per
inch (lpi). There are at least three levels of resolution for most fax machines:
• Normal (203 horizontal × 98 vertical lpi)
• Fine (203 × 196 lpi)
• Superfine (406 × 392 lpi).
Grayscale levels, or shades of gray — refers to the many shades of gray your fax
machine sees on a document it’s sending.It’s likely most of your fax documents will
be dark text on white paper. However, when you want to send photographs and
other shaded items, you can send your fax documents with 256-level grayscale.
Why not always set your fax machine for superfine ,
or for grayscale?
Setting your fax machine for superfine resolution and grayscale mode makes your
machine send more information, making transmissions last longer and potentially
driving up your phone bills on long-distance calls.You’ll find that we’ve made it
easy for you to set your fax machine for the most efficient and truest transmission
for the types of documents you send.
A quick introduction to fax
Page 14

1.2
Getting started
Packaging contents
Included in your machine’s packaging:
❑ Main unit with 400-sheet paper cassette installed
❑ Document hopper ❑ Paper size stickers
❑ Paper tray ❑ One-touch labels
❑ Multi paper tray ❑ Soft Key labels
❑ Telephone line cord ❑ Operating instructions
❑ AC power cord ❑ Protection seals (This seal may actually be
❑ Drum cartridge used when your authorized dealer installs
❑ Toner cartridge your fax machine.)
❑ Fuser cleaner
Note: Be sure to save the box (or boxes) and packing materials for reshipment.
Parts of the Fax
Note: Any terms used here that are unclear to you right now will be explained in
detail in the coming pages.
1
Liquid crystal display (
LCD
) — Shows the machine’s status and lets you
see what you’re programming into the machine.The display shows 2 lines,20
characters per line. If the
LCD
is blank, the machine is off.
2
Control Panel — The keys you use to operate your fax machine.(See pages
1.4–1.6 for more details.)
3
Paper cassette — One of two locations where you put the recording paper
(the Multi paper tray is the other). Holds up to 400 sheets, either letter or
legal-sized paper.
4
Recording paper level indicator — Shows the level of the current paper
supply without requiring you to open the paper cassette.
5
Original document exit — Where your original document comes out after
being scanned.
1
2
3
4
5
6
7
9
10
8
11
12
13
15
14
16
10
Main unit Document hopper
AC power cord
Paper tray
Telephone line cord
Paper size stickers
Drum cartridge
Soft key labels
Toner cartridge
Multi paper tray
Operating instructions
Protection seals
Fuser cleaner One-touch labels
Stamp
Report
Memory Tx
TTI Tx
Cover page
Flash
Stamp
Report
Memory Tx
TTI Tx
Cover page
Flash
Soft Key
Page 15
1.3
Getting started
6
Side cover — Open to fix a printout jam.
7
Multi paper tray — One of two locations where you put the recording paper
(the paper cassette is the other). Holds only one sheet, either letter, legal or
half-letter size paper.
8
Top cover release — Pull up on this to open the top cover.
9
Top cover — Opens to provide access for changing the toner and drum car-
tridge (or, occasionally, fixing printout jams).
10
Book-cover — Opens to scan an original document using the flatbed scanner
(
FBS
).
11
Document tray — Holds original documents placed for scanning into the
machine for faxing/copying.
12
Document guides — Adjust these to fit the width of the original document
so it will feed properly into the machine.
13
Automatic document feeder (
ADF
) — The slot into whic h you place your
original document for faxing or copying.It holds up to 50 sheets of letter-sized
paper, 25 pages of legal-sized paper or 15 pages of 11″ × 17″ (ledger or
tabloid)-sized paper.
14
Scanner cover — Opens this by using the scanner cover release to remove
original document paper jams.
15
Scanner cover release — Pull up on this to open the scanner cover.
16
Flatbed scanner (
FBS
) — Makes it possible for you to fax or copy objects and
even irregularly shaped sheets,just as on a conventional copier.
17
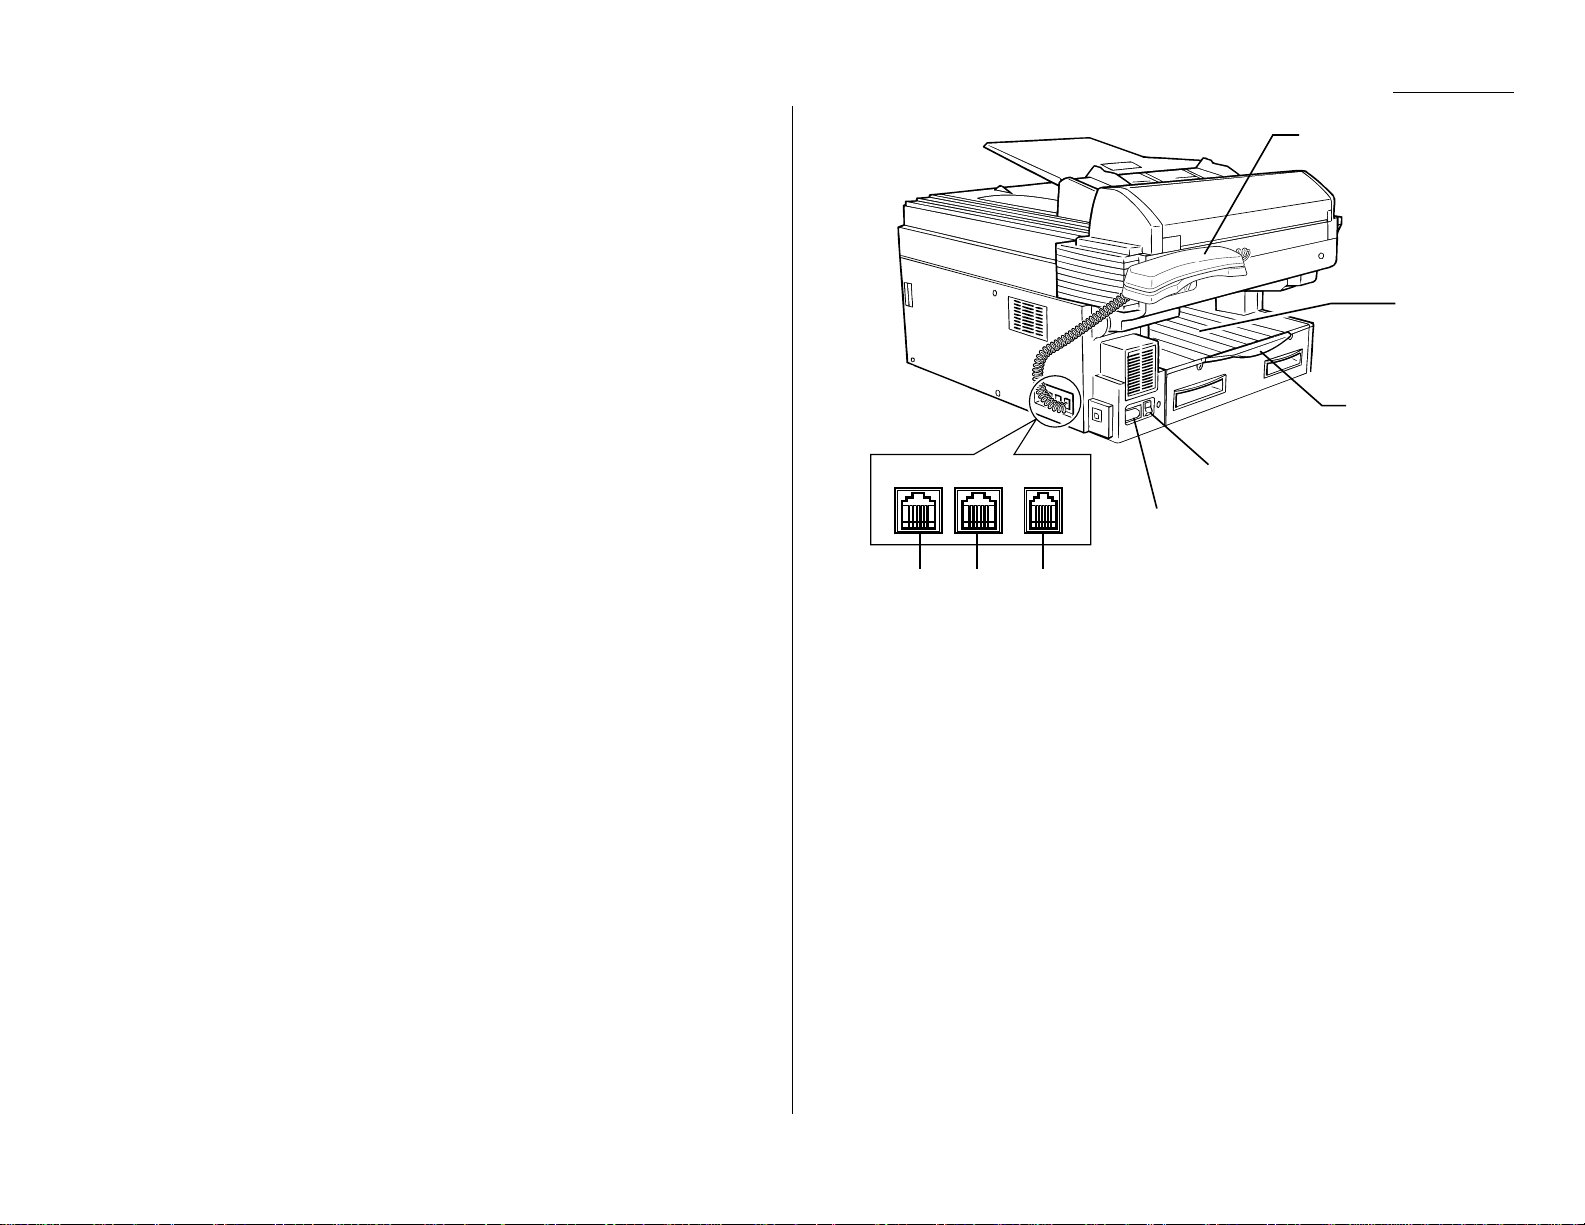
LINE
jack — Where you plug in the telephone line cord.The other end of the
cord plugs into a wall telephone jack.
18
PHONE
2 jack — If you connect a second telephone to your machine, this is
where you plug in the cord.
19
PHONE
1 jack — Where you plug in the optional handset.
20
AC
power jack — Where you plug in the ac power cord.
21
AC
power switch — Turns your fax machine on and off.
22
Paper tray — Holds up the printout after it emerges.
23
Printed document exit — Where the printout emerges.
24
Optional handset — Used for voice communication.This handset is avail-
able from your authorized Muratec dealer, and can be added when you
purcahse the MFX-1500E or as an upgrade afterward.
17 18 19
LINE
PHONE1PHONE2
24
23
20
21
22
Page 16

1.4
Getting started
Important: Some of the functions mentioned here are covered in the “Beyond the
basics” section.
1
AUTO ANSWER
light — Glows when auto-answer mode is active.In this mode,
the machine answers automatically as a fax machine.
2
MEMORY RECEIVE
light — Glows when the machine is receiving an incoming
fax document into its electronic memory.
3
COMMUNICATION
light — Glows when the fax machine is communicating with
another machine.
4
REVIEW COMMANDS
— Press to review pending fax commands or to view a
brief description of delayed commands.
5
MONITOR/CALL
— Turns the monitor speaker off or on.When it’s on,it allows
you to hear the call you’re making.When using this feature,you can only hear
the communication taking place.You cannot be heard unless you use a handset (optional).When sending a fax, this key also activates the call request
feature.
6
ALARM
light — Glows when a problem occurs during fax communication,
printing or scanning.The light stays on until the machine prints a Check
Message report.
7
PAPER JAM
light — Glows when a printed page jams in your fax machine.
8
REPLACE P APER
light — Glows when the paper cassette is empty. See pages
1.10–1.11 for details on replacing paper.
9
Soft Keys — Shortcut keys.Any function that can be turned on or off can be
programmed into these three keys.If the light above one of these keys glows,
this indicates the setting that’s been programmed into it (see page 2.24) is
turned on.These keys are programmed at the factory to turn the following
functions on or off:
Soft key 1:
STAMP
— Press this key to set the machine to stamp each original
document or page automatically when the machine scans it successfully.
Soft key 2:
REPORT
— Press to turn the confirmation report feature on or off
for the next fax transmission.
Soft key 3:
MEMORY TRANSMISSION
— Selects which transmission mode your
fax machine uses,whether from memory or from the document feeder.
10
Numeric keypad — Just like the numeric keys on a regular tone-dialing
phone. Use these to dial phone and fax numbers and to enter numbers when
you’re setting up the machine.
The keys and their functions
Page 17

1.5
Getting started
11
START
— Press to begin a fax transmission or reception.
12
CLEAR ALL
— Resets copying settings to their defaults.
13
STOP
— An all-purpose “Whoa!”key. Stops the current operation and ejects a
document from the document feeder.
14
BROADCAST
— Press to send a broadcast fax (sending the same document to
more than one location).
15
BOOK DOC SIZE
— Instructs the fax to scan either letter- or legal-sized docu-
ments when you use the flatbed scanner.
16
SPEED DIAL/TEL INDEX
— Starts a speed-dialing operation, which you finish by
pushing three of the keys on the numeric keypad. Also displays one-touch and
speed-dial entries sorted alphanumerically, as in a telephone directory.
17
CANCEL
— Press to delete characters on the
LCD
and cancel commands you
have entered into the machine.
18
In Fax mode:
REDIAL/PA USE
— Redials the last number you dialed. In certain operations, it
also produces a special pause character which can be useful when dialing
long-distance numbers.
Or, in Copy mode:
PAPER SIZE
? — Selects the printout paper you want to use.
19
ENTER
— Much as
STOP
is a “Whoa!”key,
ENTER
is a “Go!”key. It confirms user
settings, begins operations and moves through command levels.
20
In Fax mode:
DIALING OPTIONS
— Press this to insert special symbols into telephone num-
bers (see page 2.7).
Or, in Copy mode:
SORT COPY
— Press this key to toggle the sorting of printed copies.
21
In Fax mode:
/
PROGRAM
— Scrolls (moves) through features and command options as dis-
played on the
LCD
.
Or, in Copy mode:
Press to increase the reduction or enlargement rate at 1% intervals.
22
In Fax mode:
GROUP DIAL
— Press this to set up a fax transmission to a call group, a set of
fax numbers which will receive the same document in one fax operation.
Or, in Copy mode:
ENLARGE
% — Press this key to choose one of several fixed copy enlargement
rates. (See page 1.31 for more information.)
23
In Fax mode:
— Scrolls (moves) through features and command options as displayed on
the
LCD
.
Or, in Copy mode:
Press to decrease the reduction or enlargement rate at 1% interval.
While scanning a document:
NEXT
— Press to tell your machine to scan one or more additional documents
after the current scanning ends.
24
In Fax mode:
COMMUNICATION OPTIONS
— Chooses from among several fax options: delayed
transmission, SecureMail transmission, relay broadcast,polling, batch transmission or F-Code communication.
Or, in Copy mode:
REDUCE
% — Press this key to choose one of several preset copy reduction
rates. (See page 1.31 for more information.)
25
RESOLUTION
— Press to toggle among the three resolution modes and
grayscale.
26
CONTRAST
— Press to enter the contrast setting mode.T o c hange the contrast
level, press or keys.
27
COPY/FAX
— Press this key to toggle between Fax mode or Copy mode.
Page 18
1.6
Getting started
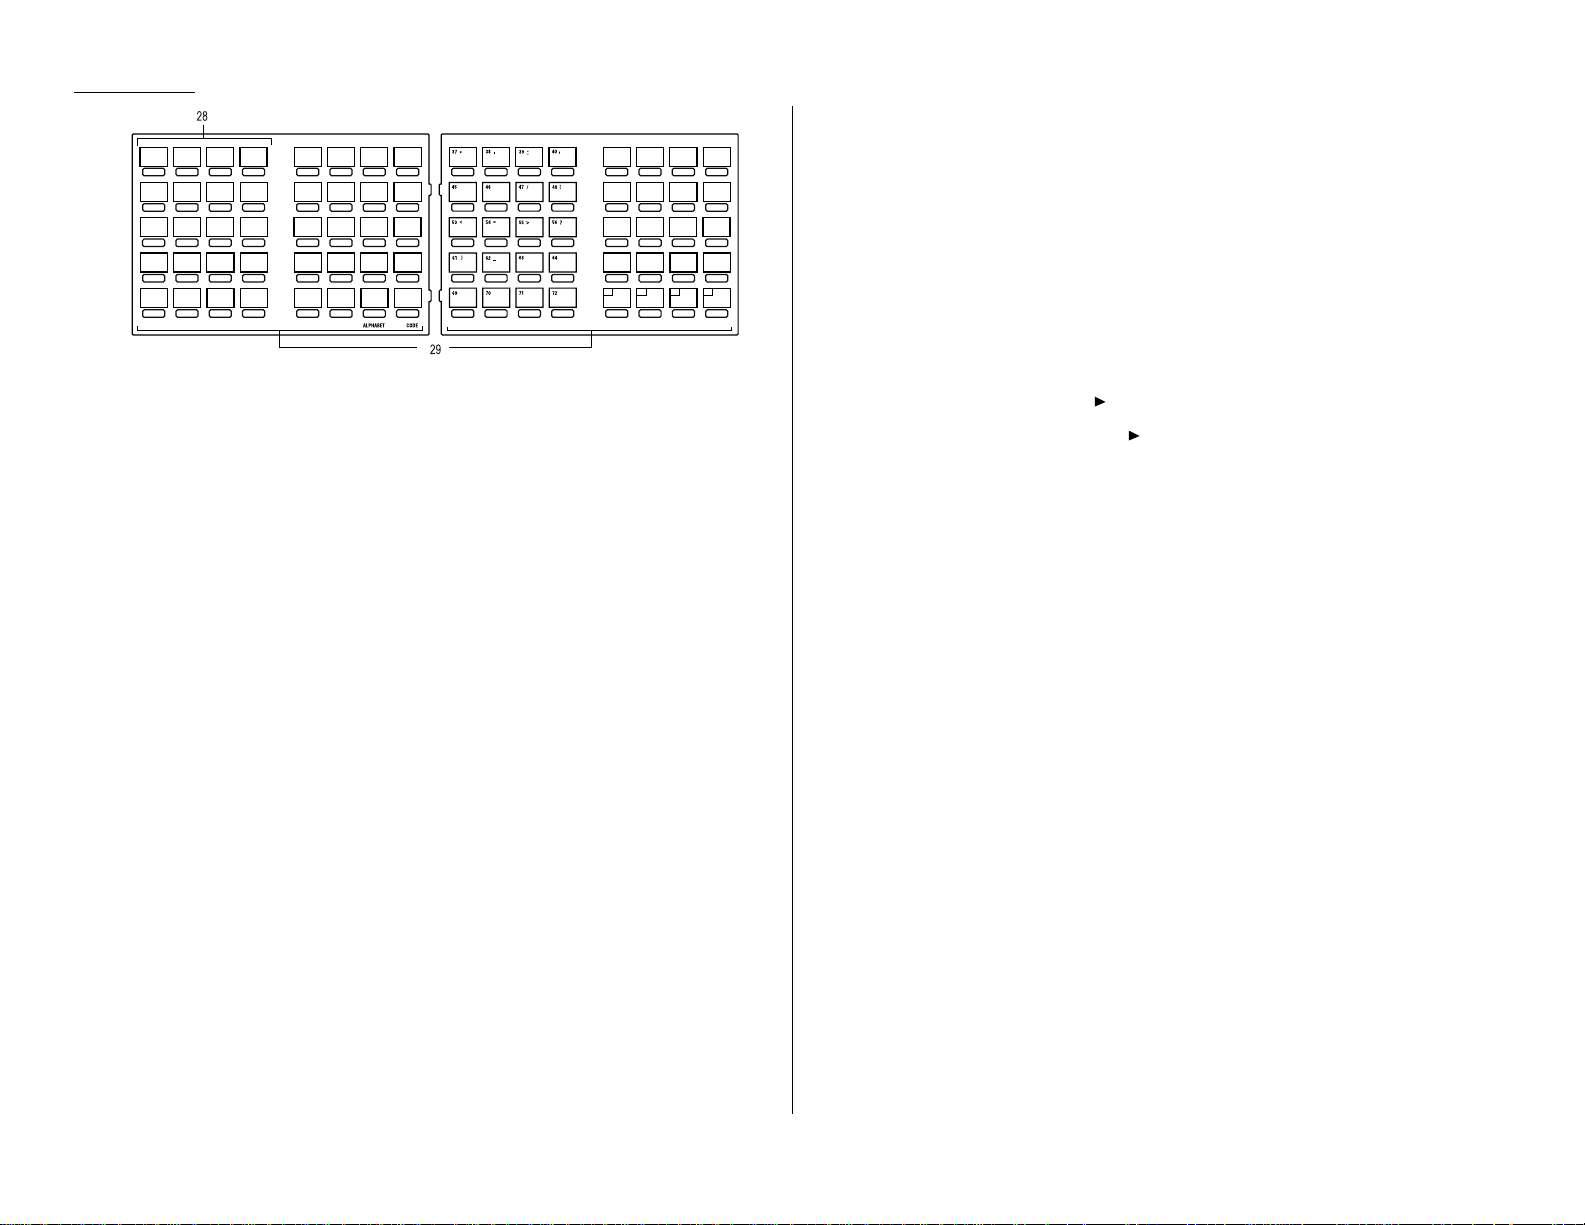
28
Macro Keys — Programming the Macro keys (
MACRO
1 –
MACRO
3) can
reduce many steps of the operation to a simple press of a key. You can “teach”
the Macro keys to carry out one of the several operations (see pages
2.25–2.27).
29
One-Touch Keys — The keys labeled 01-36 (or 37-72, if you’re using fliptab
B) offer one-touch dialing convenience.You also can use the keys labeled 7376, if you’re using fliptab B, for programmable functions: this lets you teach
your machine an advanced multi-step function just once, then recall the function at any time by pressing one of these keys.
Operating tips
To press: 0 (zero),1,2,3,4,5,6,7,8,9,#or *
Use: The numeric keypad.
Tip: At no other time within this manual will we refer to the letters printed
below the numeric keys and their uses (such as accessing abc by pressing
the 2 key.) These letters are there only for your convenience in using your
fax machine as a telephone.
To press:A,B,C,Dor any other letter key
Use: The one-touch key labeled with that letter.
Tip: Please don’t confuse the zero (0) with the letter O.
Here’s an example.If we say “press /
PROGRAM
,7,
ENTER
,0,8,
ENTER
”…
… you’d press /
PROGRAM
… then 7
… then
ENTER
… then 0 (the numeric key zero)
… then 8
… and then
ENTER
Important: Even though our example above includes commas,do not enter them
into the fax machine.Those characters appear in our instructions to
separate one number from the other. They do not need to be entered
into your fax machine.
There is a function (broadcasting) which requires commas to be
entered, but there is a special way to enter them.We’ll explain this
process later.
fliptab b
fliptab a
MACRO
PROGRAM
MACRO 1 MACRO 2 MACRO 3
05 E 06 F 07 G 08 H
13 M 14 N 15 O 16 P
21 U 22 V 23 W 24 X
29 30 31 32
01 A 02 B 03 C 04 D
09 I 10 J 11 K 12 L
17 Q 18 R 19 S 20 T
25 Y 26 Z 27 28
33 34 35 36
41 & 42 SPACE 43 ( 44 )
49 " 50 $ 51 % 52 ;
57 @ 58 [ 59
] 60 {
65 66 67 68
73 74 75 76
Page 19
1.7
Getting started
Pick an installation spot
Where should you install your fax machine? The location should be:
• Clean — Dust buildup can damage your machine.(However, do not use a cover!)
• In the open — Allow at least 12 inc hes of c learance around your mac hine. Be
sure that you never cover the machine. Its vents must be able to “breathe.”
• Away from direct sunlight — This helps avoid overheating.
• Dry — Avoid any location where splatters or sprays (such as from a water foun-
tain) could reach your fax machine.
• Level, and vibration-free.
• Near a phone jack — Your fax machine uses a standard (modular) telephone
jack, also known as an RJ-11.
• Near an ac power outlet — The ac power cord is about 5 feet long when
stretched to its limit, and the power cord should never be stretched to its limit.
Power tips
• Use a standard three-pronged 120
VAC
outlet.
• Make sure the outlet isn’t controlled by a wall switch.
If it is, you’ll risk occasional shutoffs to the machine, causing you
to lose fax messages.
• Don’t use an outlet which also is supplying power to a
large appliance, such as a refrigerator or air conditioner.
Such high-consumption appliances can cause “draw-downs”
(temporary drops in the power available for other equipment on
the circuit) which could damage your fax machine.
• Use an electrical surge suppressor, preferably one which guards both tele-
phone and electrical lines.This device helps to shield your fax machine from
damaging high-voltage electrical surges.
Voltage requirements: 120
VAC
± 10%, 50–60% Hz.
Power consumption: Standby Transmission Reception Copying Maximum*
19
W
51
W
830
W
840
W
1180
W
* ; simultaneous copying,communicating and scanning
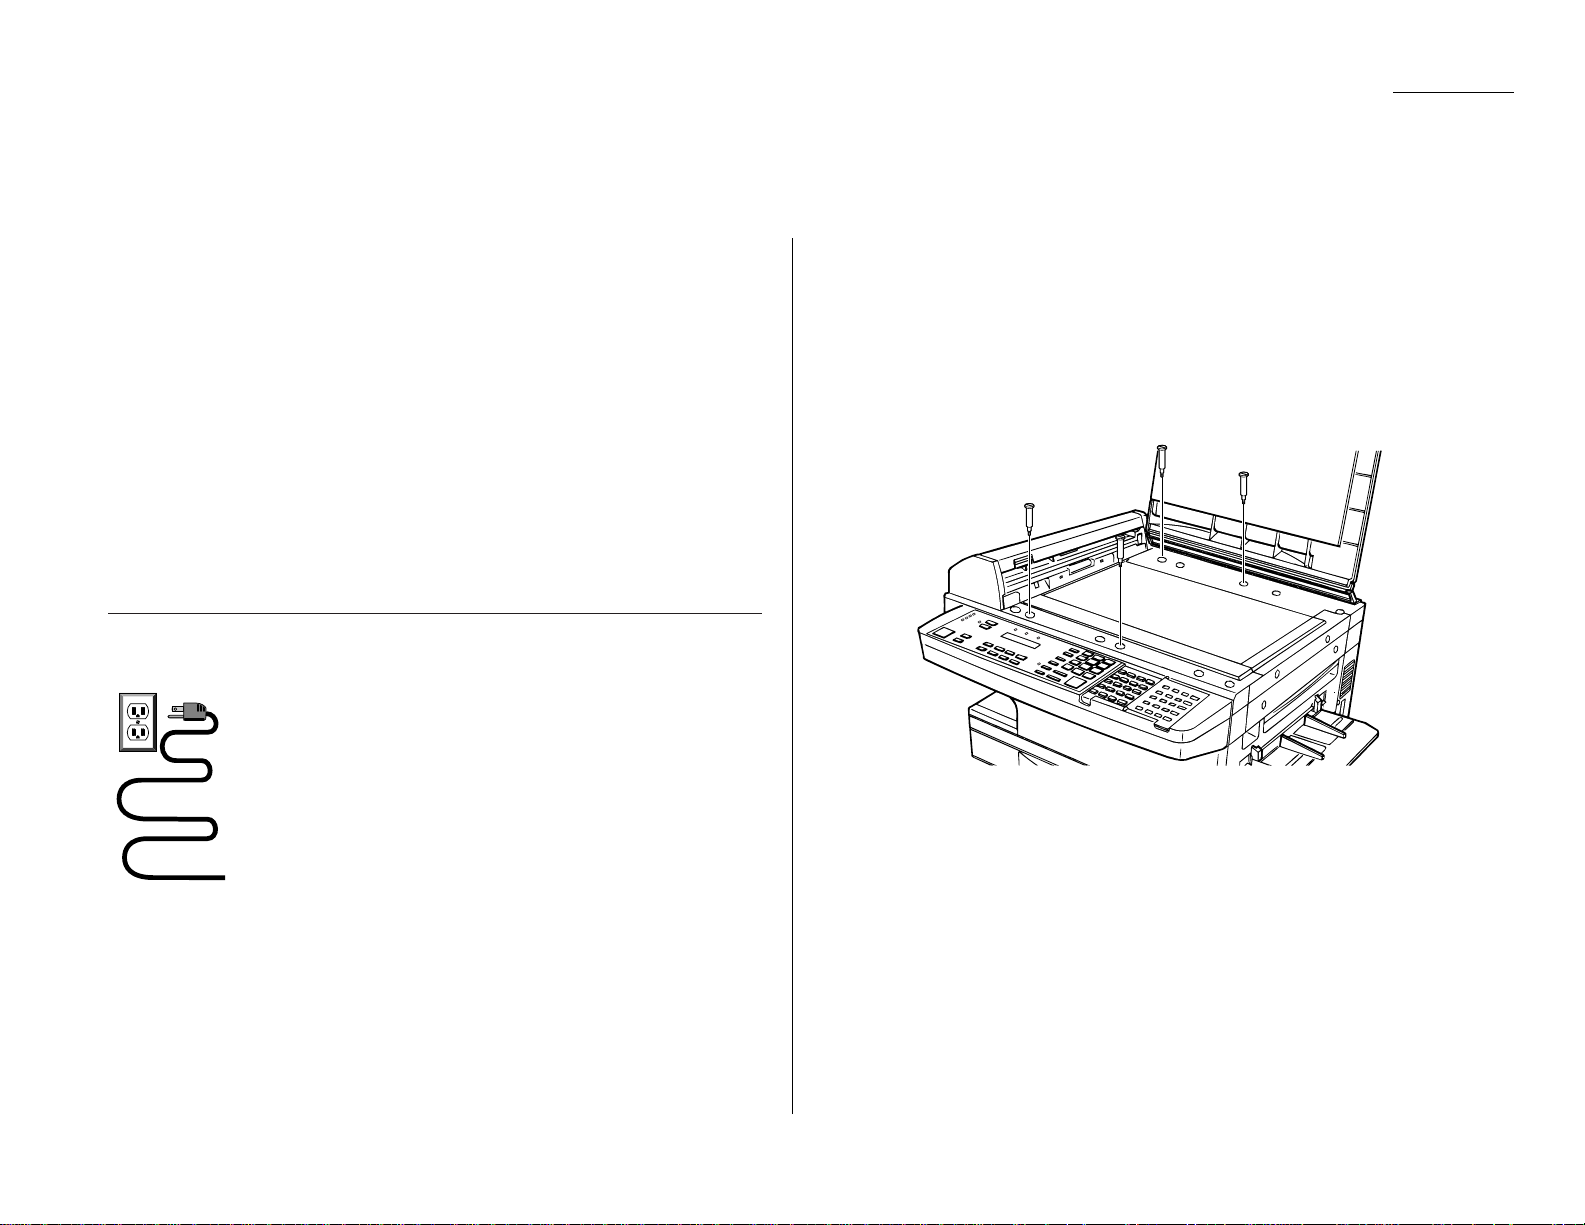
Removing the transport screws
Your fax machine is shipped with transport screws for protecting your fax machine’s
mirror carriage during shipping.
Important: Be sure that you do not turn the power on until after you have
removed the transport screws.Otherwise, damage could result.
1
Remove the four transport screws,as shown.
2
Get the protection seals from your manual kit, and attach one protection seal
on each transport screw’s now-open hole.This shields the hole while you are
using the machine.
IMPORTANT: BEFORE YOU USE THE MACHINE, YOU MUST
TURN OFF THE TRANSPORT MODE (see page 1.12).
Note: Be sure to save the screws for reshipment. If you must ship your machine
for some reason, turn on the transport mode, turn the power off and then
undo the above procedure as follows:
— Remove the seals (reversing step 2);
— Reinstall the screws (reversing step 1).
Setting up
Page 20
1.8
Getting started
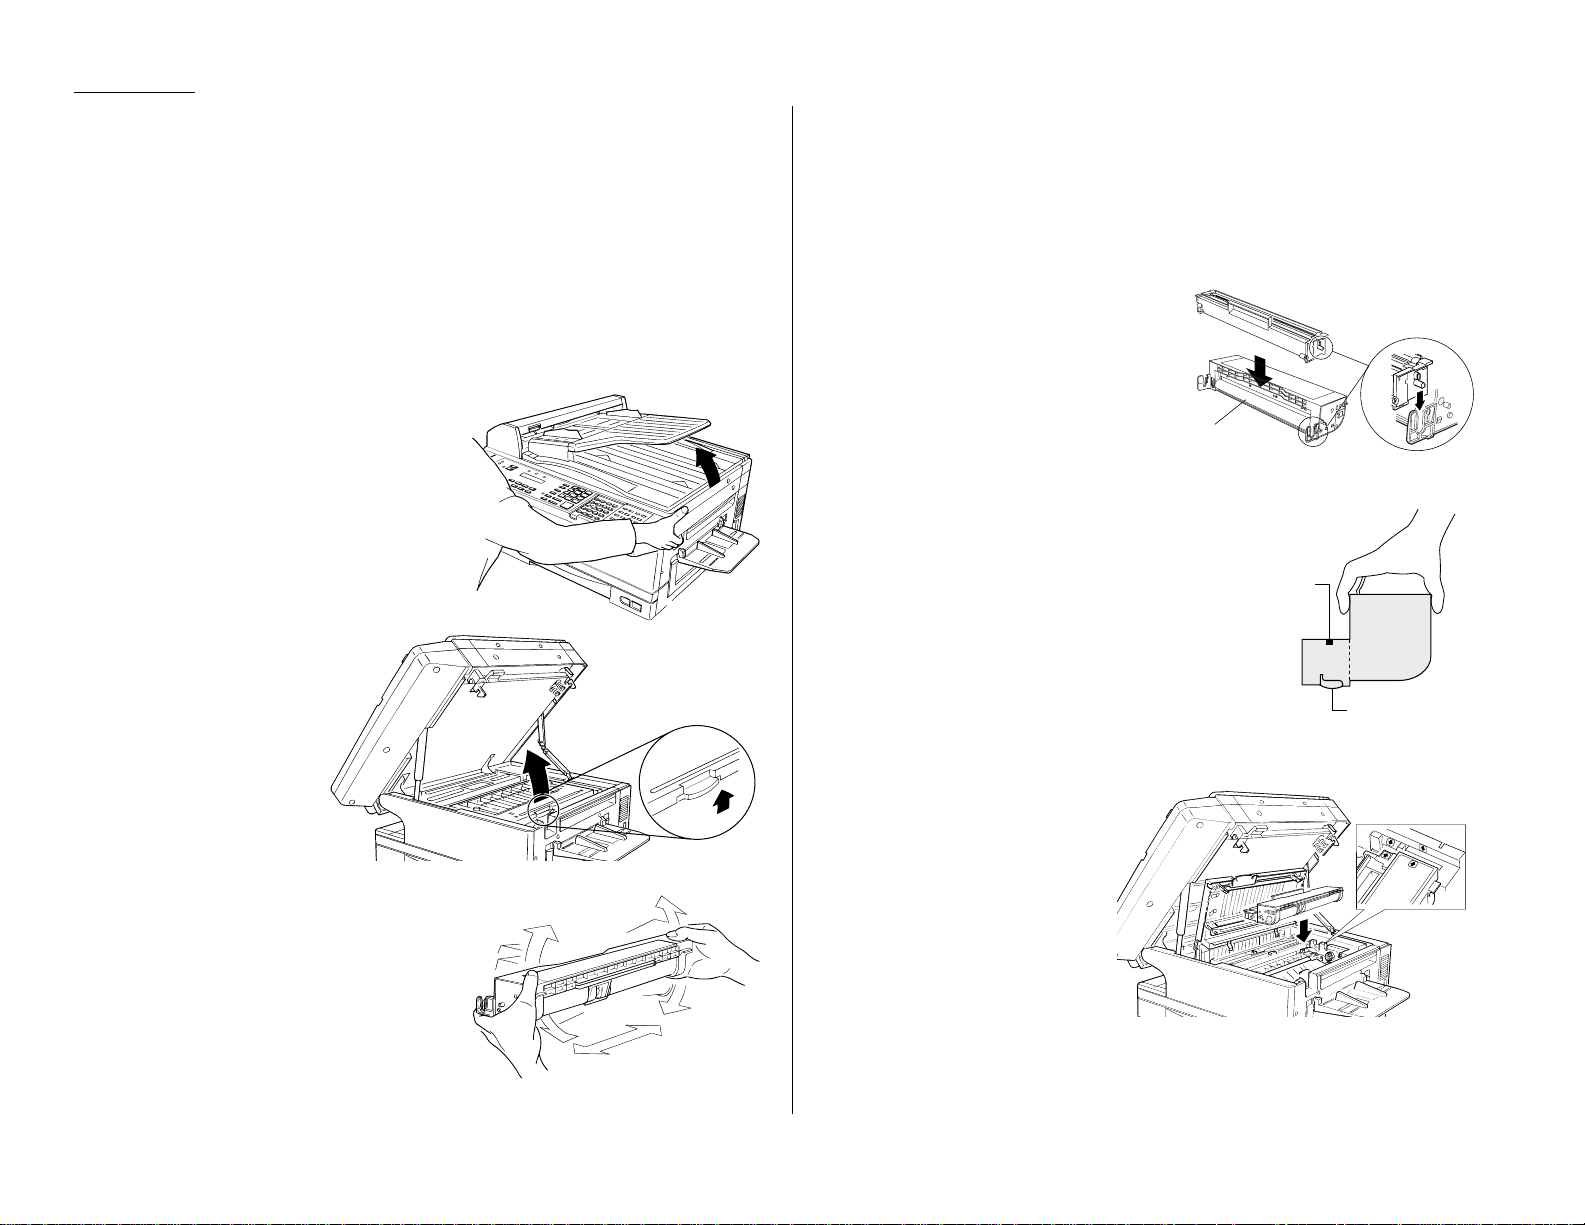
Installing the printing supplies
Your fax prints incoming faxes and copies with a reliable 400 dpi print engine. Your
fax requires two types of printing supplies (sometimes also called consumables):
• The drum cartridge — It yields 20,000 normal letter-sized printouts (see
“Specifications,”page AI.1). By “normal,”we’re referring to the amount of text
and/or graphics on each page.This is based on an industry-standard test document.
• The toner cartridge — It yields 10,000 “normal”,letter-sized printouts (see
“Specifications,”page AI.1).
To install these supplies:
1
Pull up the top cover release and open
the top cover.
2
Pull up the printer
cover release and
open the printer
cover.
3
Unpack a new toner cartridge from its
carton.Then, holding the toner cartridge with both hands,slowly shake it
as shown (note the arrows).
Note: Do not throw the toner cartridge
into the fire; this will avoid any
possibility of ignition and/or
injury.
4
Place the new toner cartridge on a flat, clean surface.
5
Unpack the drum cartridge from its carton.
Note: Shield the drum cartridge from light, especially strong light. Later, if
you have to remove the cartridge from the fax, immediately wrap it in
a thick cloth to protect it from light.
6
Set the drum cartridge on the toner cartridge, making sure that the drum
cartridge’s two pins fit in the slits inside
the toner cartridge frame.
Note: Do not touch the developing
roller.
7
Grip toner cartridge as shown, to avoid
pinching your fingers between the toner
cartridge and the printer frame. Keep
the drum slot free of dust and other foreign materials.
8
Gently install the toner cartridge in the printer, making
sure the toner cartridge's four
pins fit in the slits inside the
printer frame.
Keep the drum slot
free of dust and
other foreign materials.
Do not touch the
drum surface on
the cartridge’s bottom.
Developing roller
Page 21
1.9
Getting started
9
Insert the fuser cleaner into the slot in
the fuser unit.The fuser cleaner cleans
the fuser unit roller.
You should replace the fuser cleaner
every time you change the new toner
cartridge.
10
Gently clean the LED print head using
the cleaning paper.
11
Close the printer cover.
12
Close the top cover. Be sure to push on a portion of the cover to lock it into its
original (closed) position.
Note: The fax machine will not work if the cover isn’t closed properly.
Attach the paper -handling parts
1
Attach the document tray by inserting it
into the appropriate holes,as shown.
2
Attach the Multi paper tray by inserting
its two pegs at a slightly upward angle
into the appropriate holes,as shown.
3
Attach the paper tray by inserting its
two pegs at a slightly upward angle into
the appropriate holes,as shown.
Page 22

1.10
Getting started
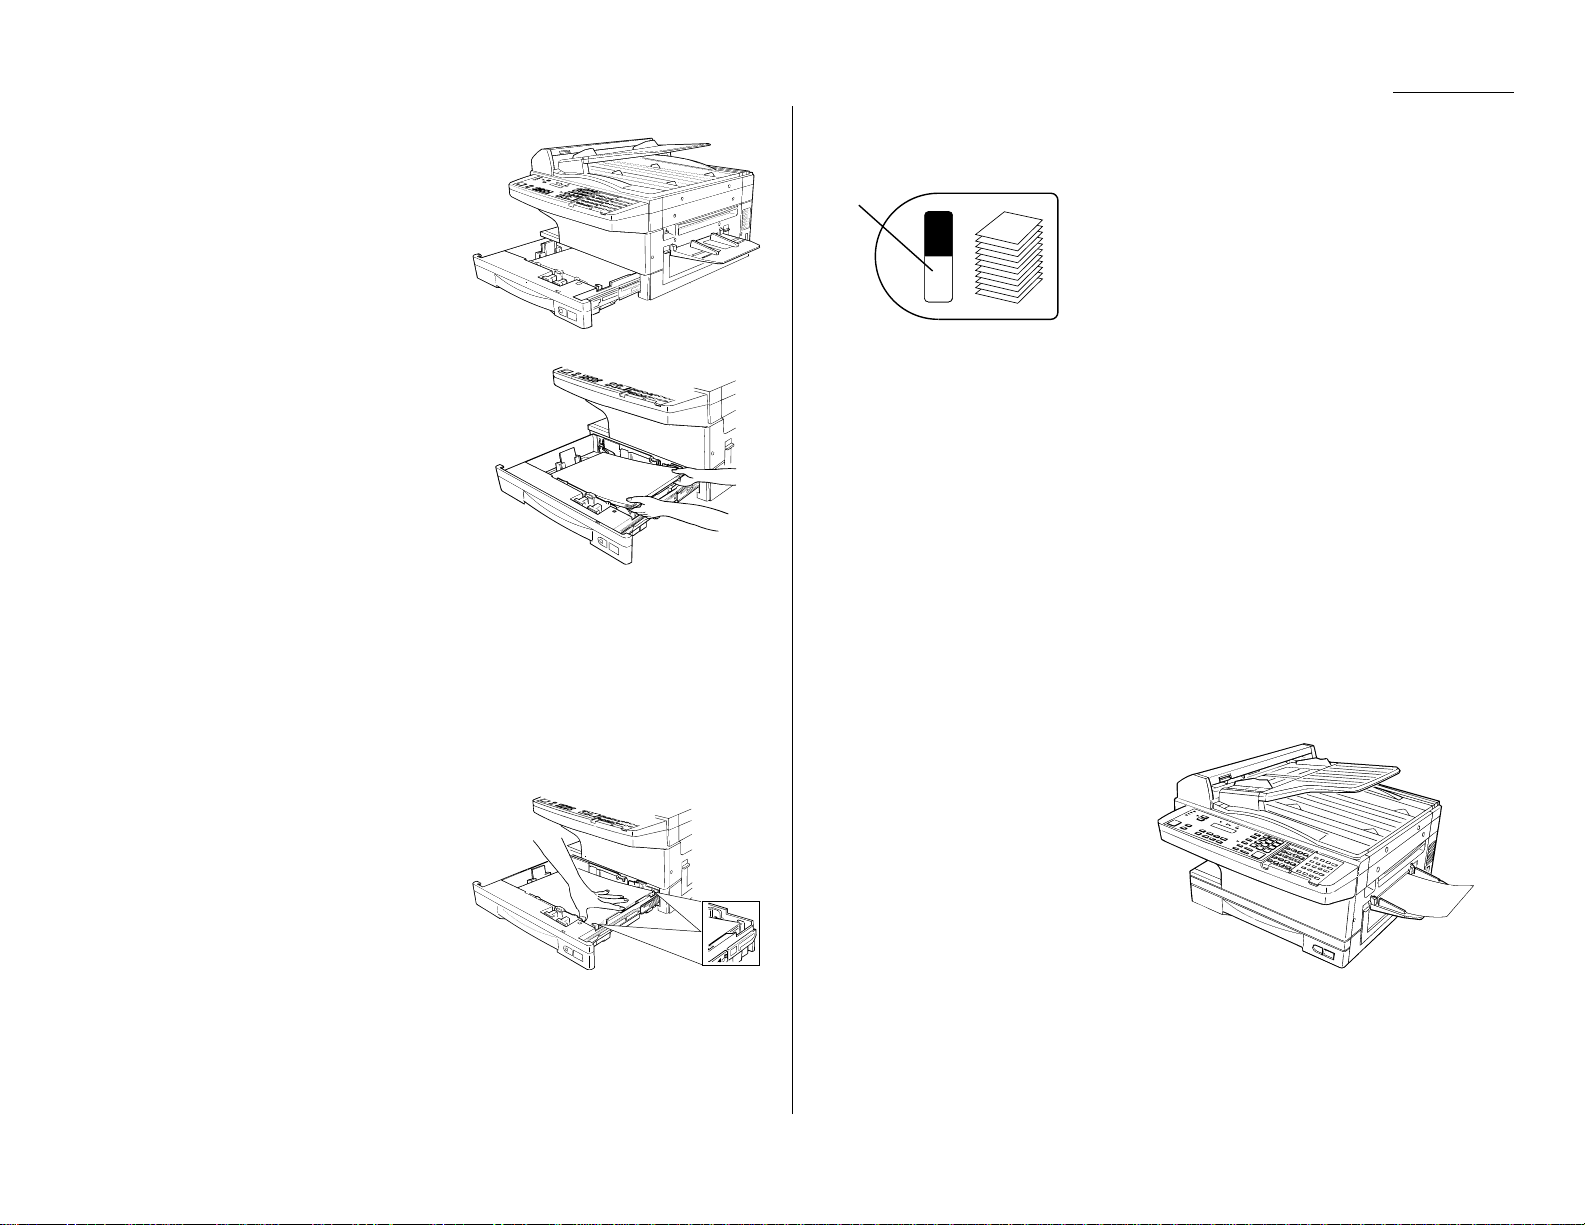
Loading paper
Your machine’s standard paper cassette can hold up to 400 sheets at a time. Each
optional cassette, available from your Muratec dealer at the time of purchase or as
an upgrade, can hold an extra 200 sheets.In addition to boosting your total paper
supply, adding an extra paper cassette allows your fax machine to use two types of
paper, letter and legal, for example, at the same time.
Loading the paper cassette
Before you load paper, note the following:
• The paper cassette can be adjusted to accept letter- or legal-sized paper.
• Before you load the cassette, you will need to “tell” your fax machine which size
of paper, letter- or legal-sized,you will be loading.You can do this by setting a pin
located on the rear side of the paper cassette.
Note:If you will be using letter-sized paper, there’s no need to adjust the cas-
sette; your fax is initially set for this paper size. Simply attach the LTR
sticker to the outside of the paper cassette.
1
Pull the paper cassette completely out of your fax.
2
On the rear side of the cassette, you will see the pin and three sets of holes.
Note the drawing below. If the pin is in the upper and lower set of holes, your
fax “thinks”the cassette holds letter-sized paper. If the pin is in the middle
and lower holes, your fax thinks the cassette has legal-sized paper.
Setting for legal-sized paper
Your fax comes set for letter-sized paper.To set it to use legal-sized paper:
1
Unlock the pin from the upper set of
holes by reaching inside of the paper
cassette and pressing the nib, as shown.
2
Remove the pin.
3
Insert the pin into the middle
set of holes.You will hear a click
when it is locked into place.
4
Install the paper guide into the
holes corresponding to the paper
size you are installing.
Important: Remember,you’ve now told your fax that the paper cassette
holds legal-sized paper. If you now try to use letter-sized paper
without returning the pin to the upper holes (the setting for letter-sized),your fax will sound an alarm tone and display the
following message when you try to print:
5
Be sure to attach the LGL sticker to the outside of the cassette to remind you
which paper size it contains.
Check Rx Paper Size
Open&Close Top Cover
Letter size Legal size
Spare pin
Press here to
release the cassette
Page 23
1.11
Getting started
Installing paper
1
Open the paper cassette from the front
of your fax by gently pulling it toward
you.
2
Insert the paper into the cassette.
Note: Before you insert paper in the
cassette, stack it so the leading
edge and sides of the paper are
even.
• Make sure the stack of paper isn’t
higher than the limit mark on the
side of the cassette.
• Place the edges of the top sheet under the metal tabs on the cassette’s left
and right side (as viewed from its front, as shown).
• The paper cassette can hold about 400 sheets of paper.
Note: Each of the two optional additional cassettes can hold about 200
sheets of paper. Thus, you can have as many as 800 sheets of paper
“on-line.”F or more details on these and other options for your fax
machine, please contact your authorized Muratec dealer.
3
Check the front corners of the paper
stack and make sure they are below the
tabs.
4
Push the paper cassette back into its original (closed) position.You’ll feel a
click when it’s properly in place.
5
Attach the paper size sticker on the cassette’s front.
The paper level indicator on the front paper cassette lets you see how much paper is in the
cassette without your having to open the cassette.
When you see the paper level indicator drop (i. e.,
show more dark area), make sure you have a supply of paper nearby. Then, when you see the
“Please Supply Paper”message on the display,
you’ll be ready to refill the cassette.
Important: To avoid paper jams,do not refill this tray without first removing all
of any paper which may remain in it. In other words, do not just add
sheets to an already-loaded stack.
Loading the multi paper tray for copying
You may use letter-, legal- and half-letter sized paper in the multi paper tray, which
the machine uses for copying only, not for faxing.
Important: If loading transparency (OHP) film into the multi paper tray, be sure
that the sheet is designed for laser printers and not for copiers.Also,
be sure that the film does not have a paper backing and/or a leading
strip. If it does, remove the paper backing and/or strip before inserting. Only film should go in, not film with any backing or strip.
1
Adjust the multi paper tray for the width of paper you plan to load, by sliding
the guide to the slot for the paper size you’ll be loading.
2
Insert a sheet into the multi paper
tray until it won’t go in any farther.
Note: The multi-purpose tray can
hold only one sheet of paper
at a time.
Paper level
indicator
Page 24

1.12
Getting started
Plug in and power up
Important: Be sure you do not turn the power on until after you remove the
transport screws.(See “Removing the transport screws,” page 1.7.)
1
Plug one end of the telephone line
cord into the
LINE
jack on the
machine’s rear side.Plug the other
end of the cord into a standard telephone wall jack, just as you would
plug in a phone.
Note: If you have purchased an
optional handset, do not confuse its curled handset cord
with the uncurled telephone
line cord.
2
Plug the non-pronged end of the AC
power cord into the AC power cord jack on the left side of the machine.
3
Plug the pronged end of the AC power cord into a 120 V electrical outlet
(preferably on a surge suppressor, as mentioned on page 1.7).
Important: Be sure that you do not turn the power on (next step) until after
you have removed the transport screws (see page 1.7).
4
Use the AC power switch to turn on your machine.The markings are international standards: I means on, O means off.
It will take a few seconds for the machine to warm up.The display will show:
When the machine is ready to use (standby mode), you will see either . ..
or
Fax mode Copy mode
If the machine beeps,its
ALARM
light glows and the display shows an error message,
this means there is a problem of some sort. Please consult “Just in case...,” beginning on page 3.1.
Turn off the transport mode
Important: Be sure you do not turn the power on until after you remove the
transport screws.(See “Removing the transport screws,” page 1.7.)
To turn off the transport mode:
1
Power up the machine.
If the machine is already in F ax mode, skip to step 3.
If the machine is in Copy mode, proceed to step 2.
2
Press
COPY/FAX
to switch the machine to Fax mode.
3
Press
PROGRAM
,*,E.
4
Select Off by pressing
PROGRAM
.Then press
ENTER
to turn off the transport
mode.The mirror carriage will move to the home position.
Important: If you must reship the machine to any other location, turn on this
mode to move the mirror carriage to the transport position (in step 4,
above, press program to set the transport mode to On), then power off
and mount the mirror carriage using the four transport screws.
Mirror Locked :Off
Program/Enter
Mirror Locked :On
Program/Enter
Fax Ready
Jan 1 2000 0:00
** Please Wait **
Page 25
1.13
Getting started
Adjust the monitor speaker’s volume
You can set the volume of the monitor speaker,assuring that on-hook dialing will be
as loud (or as soft) as you require.
1
Press
MONITOR/CALL
on the control panel.You now should hear a dial tone,
and the display will show:
Important: If you don’t hear a dial tone, make sure your fax machine is
plugged into a working phone line.
2
If the volume you hear is satisfactory, skip to step 4.
Otherwise, proceed to step 3.
3
Adjust the volume as you wish:
To turn the volume up ,press .
To turns the volume down,press .
The LCD indicates the volume. Here are the possible settings:
= Loudest setting.
= Medium setting.
= Low setting.
= V olume off.
4
Press
MONITOR/CALL
again to hang up.
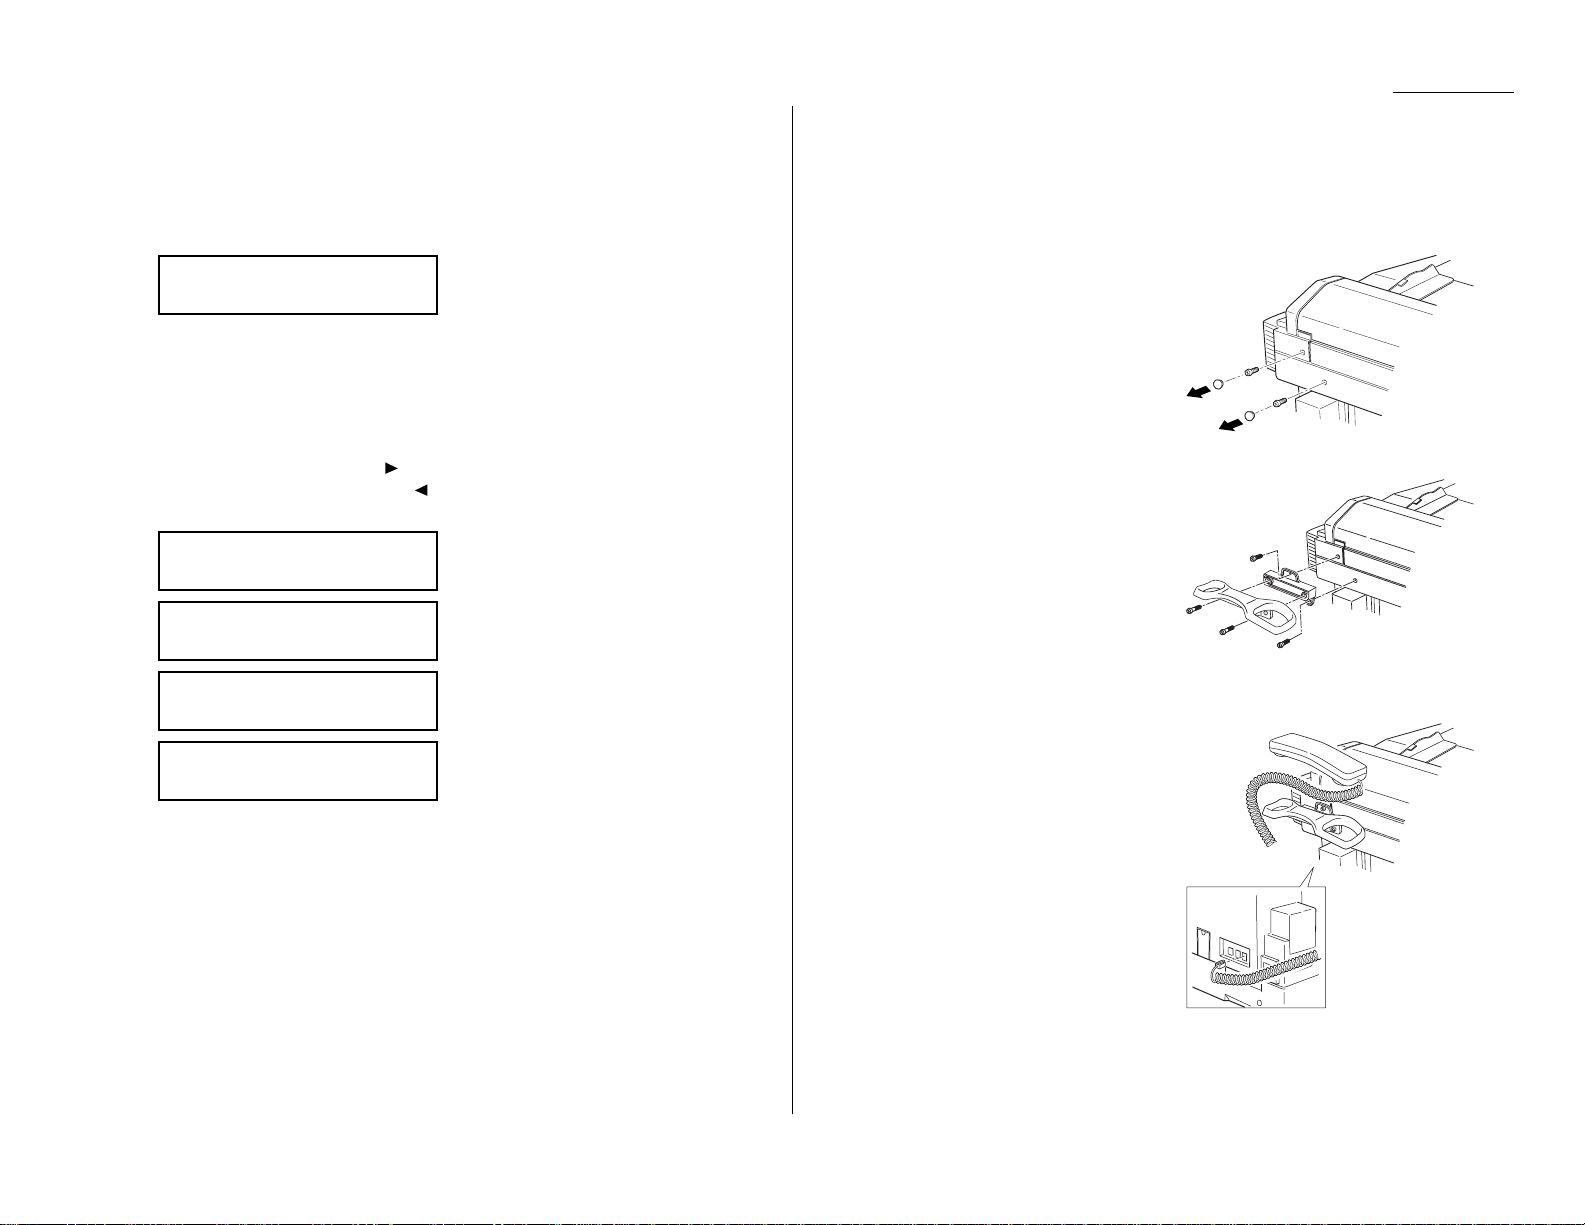
Attaching an optional handset
You may purchase an optional handset for your fax machine. Here is how to attach
the handset.
Important: Do not connect the handset directly to a telephone wall jack. Instead,
connect it only to your fax, as these instructions describe.
1
Remove the two screw caps and screws.
2
Using a Phillips-head screwdriver,
attach the handset cradle to the rear
side of your machine, using the screws
included with the cradle.
3
Plug one end of the handset cord (it’s
curled) into the
PHONE
1 jack on the left
of your machine.
4
Plug the other end of the handset cord
into the jack on the handset. If connected to a phone line, your fax machine
is now “off-hook. ”
Note: The handset has a small “flash”
button which you can press
while holding the handset,
putting the fax machine back
“on-hook” until you can hang up
the handset properly in step 5.
** Tel Mode **
Volume:
** Tel Mode **
Volume:
■■■■
** Tel Mode **
Volume:
■■■■
■■■■
** Tel Mode **
Volume:
■■■■
■■■■
■■■■
** Tel Mode **
Page 26

1.14
Getting started
5
Place the telephone handset onto the handset cradle.The cradle will press the
handset’s “flash”button, hanging up the handset.
Attaching a second phone
Want to attach a second phone (even a cordless model!) to your fax machine, so they
can share the same phone jack? No problem.
Before we go further, let’s explain the idea.You’re plugging the second phone’s
phone line into your fax machine’s PHONE2 jack,not the wall phone jack. In such a
setup, only your fax machine connects to the wall.The second phone receives phone
signals through your fax machine.
Now, let’s proceed…
1
If your second phone is already plugged
into a wall phone jack, disconnect it
from that jack, at the jack. Hold onto
the phone plug; you’ll need it in step 2.
Note: Of course, if your second phone
is a model which also requires
AC power, as is true for the base
of a cordless phone, don’t unplug
it from its AC power jack!
2
Using the plug mentioned in step 1,
plug the phone cable from your second
phone into the
PHONE
2 jack on the left
side of your fax machine.
For information on how to use a connected second telephone with your fax machine,
see “Receiving faxes,” beginning on page 1.24.
Installation complete!
Now, see how our EasyStart feature will have
you up and running within minutes.
Page 27

1.15
Getting started
EasyStart software is already installed on your Muratec fax machine.It guides you
through the process of entering your machine’s settings.
Remember that the settings you make here can always be changed later. We’ll
explain more in “Beyond the basics,” beginning on page 2.1.
Getting started
Determine the following before you go any further:
1
The type of dialing your telephone system requires — Choose either tone or
pulse (rotary) dialing.
2
The name and fax number you want to appear on your faxes —
Every fax page you send arrives at the receiving machine with a single line of
text at the very top of the page.This text lists a name,called the Transmit
Terminal Identifier (
TTI
), and a fax number. The
TTI
cannot be longer than 22
characters.
Clearing stored settings
Before using EasyStart, clear your machine’s built-in user data memory. This
ensures the memory will hold only your settings.
Important: After you use EasyStart, do not clear the memory again unless an
authorized technician asks you to do so.
To clear the machine’s memory:
1
Press /
PROGRAM
,*,2.The
LCD
now asks if you want to clear the memory:
Note: If you don’t want to clear the memory, just press /
PROGRAM
.
2
If you do want to clear the memory, press
ENTER
.
Entering initial settings
Important: If you press
STOP
during EasyStart, your fax machine returns to
standby mode (its normal condition). But it will keep the settings you
saved by pressing
ENTER
as described in these instructions.
1
Press /
PROGRAM,I,ENTER
.
The
LCD
shows the current calendar/clock setting,with a cursor appearing
under the first digit.
2
Use the numeric keypad to enter the correct date and time, using a
YYMMDD
format for the date and 24-hour (“military”) format for the time. For instance,
to set 8:30 PMon January 11,2000, press 0 0 0 1 1 1 2 0 3 0, which results in:
Note: Your fax machine automatically inserts the spaces and date-slash.All
you have to do is enter the digits.
To change a digit, press to move the cursor left,or /
PROGRAM
to move it
right.Then enter the correct digit.
3
Press
ENTER
to save the clock setting and continue EasyStart.
4
The
LCD
now asks if you want to set the calendar/clock to automatically
recognize daylight saving time (
DST
).
When the setting is On, your machine automatically recognizes
DST
at 2 AMon
the appropriate switchover Sundays each year.
When the setting is Off, no automatic change will occur.
Daylight Saving:Off
Program/Enter
Enter Time
’00 01/11 20:30
Enter Time
’01 01/01 00:00
Clear User Settings
Check Program/Enter
EasyStart
Page 28

1.16
Getting started
5
Press or /
PROGRAM
until the mode you want appears.
Here, we’ve changed the setting to On:
6
Press
ENTER
to save the setting and continue.
7
The
LCD
now asks you to enter your fax number as you want it to appear on
other fax machines’ displays or printouts.The fax industry term for this
number is Subscriber ID.
8
Use the numeric keypad to enter the fax number. To insert a dash, as shown
here, press
DIALING OPTIONS
once.The number may contain up to 20
characters (numbers and dashes).
Note: If you make a mistake, press
CANCEL
to erase to the left.
To c hange just one number, press to move left, or /
PROGRAM
to
move right. Press
CANCEL
to erase the number. Then re-enter the fax
number correctly.
9
Press
ENTER
to save the number.
10
The
LCD
now asks you to enter the name you want to appear at the top of
faxes you send.The name may be up to 22 characters in length.
Use the one-touch keys to enter letters and other non-numeric characters.
The word “Upper”means the machine will enter only upper-case letters.If
you press
R
, the machine will see it as an R(not an r).
To type a lower-case letter, press
ALPHABET
. The display changes to:
This means pressing one-touch keys will enter lower-case letters:pressing
R
will produce an r (not an R) on the display.
To switch back for upper-case entries, press
ALPHABET
.
To enter spaces, punctuation and symbols, use the one-touch keys.
In “Beyond the Basics,” we’ll show you how to use the
CODE
function to enter
even more characters (see page 2.2).
Note: If you make a mistake, press
CANCEL
to erase to the left.
To change just one c haracter in the name, press to move left, or
/
PROGRAM
, to move right.Press
CANCEL
to erase the character. Then
re-enter the character correctly.
11
Press
ENTER
to save the setting and continue.
12
The
LCD
now asks you to enter the type of dialing needed for the fax machine,
either tone or pulse:
13
Press or /
PROGRAM
until the mode you want appears.
Here, we’ve changed the setting to Pulse mode:
14
Press
ENTER
to save the setting and continue.
15
The
LCD
now shows the machine’s current reception mode.
16
For now, press or /
PROGRAM
until the setting Fax Ready appears. (This
setting can always be changed.We’ll discuss reception modes further on pages
1.24–1.27.)
17
Press
ENTER
to save the setting.Your machine will return to standby mode.
EasyStart is complete!
Fax Ready
Program/Enter
Phone Type :Pulse
Program/Enter
Phone Type :Tone
Program/Enter
Your Name ;Lower
_
Your Name ;Upper
_
Your Fax Number
972-555-5525
Your Fax Number
Daylight Saving:On
Program/Enter
Page 29
1.17
Getting started
Guidelines
Page sizes
While you’ll probably send letter- and legal-sized documents most of the time,it’s
possible to fax a piece of paper as small as a notepad sheet or one nearly three feet
long.
The acceptable dimensions (width × length) are:
Automatic document feeder (
ADF
)
S
INGLE-SHEET
M
ULTIPLE-SHEET
Maximum:12.0″ × 35.4″ Maximum:11.7″ × 16.5″
Minimum: 4.7″ × 3.9″ Minimum: 5.8″ × 4.1″
Flatbed scanner (
FBS
)
Maximum:10.1″ × 14.3″
Things not to put in your fax
To avoid paper jams and damage to your mac hine, don’t insert:
• Folded,curled, torn, wrinkled or very thin pages
• Documents with staples,glue, tape, paper clips or still-wet correction fluid
• “Sticky notes” (or documents with “sticky notes” attached)
• Cardboard, newspaper or fabric
• Pages with duplicating carbon on either side
• Credit cards or any small, thick items
Resolution, grayscale and contrast
Reviewing resolution and grayscale:
• Normal resolution (“
NORM
” on the control panel) is suitable for most typed
documents and simple drawings.
• Fine resolution (“
FINE
” on the control panel) is ideal for maps, moderately compli-
cated drawings,floorplans or handwritten documents.
• Superfine resolution (“S-
FINE
” on the control panel, “S Fine” on the
LCD
)
reproduces the detail of extremely complicated drawings or line art.
• Grayscale mode (“
HALFTONE
” on the control panel; “Gray” on the
LCD
) captures
shades in photos and drawings.
Note: If you send a fax in superfine, certain fax models (especially older,non-
Muratec models) receive it only in fine mode. However, you can send a fax in
grayscale mode to virtually any fax machine currently in use.
To change the resolution setting, press
RESOLUTION
repeatedly. As
noted above, if neither the
FINE,S-FINE
nor
HALFTONE LED
(lightemitting diode; in this case, a small green light) is glowing, your fax
is set for normal resolution. Otherwise, a glowing
LED
indicates the
fax is using the setting named by that
LED
. For example,in the
drawing (left), the machine is set for
FINE
resolution.
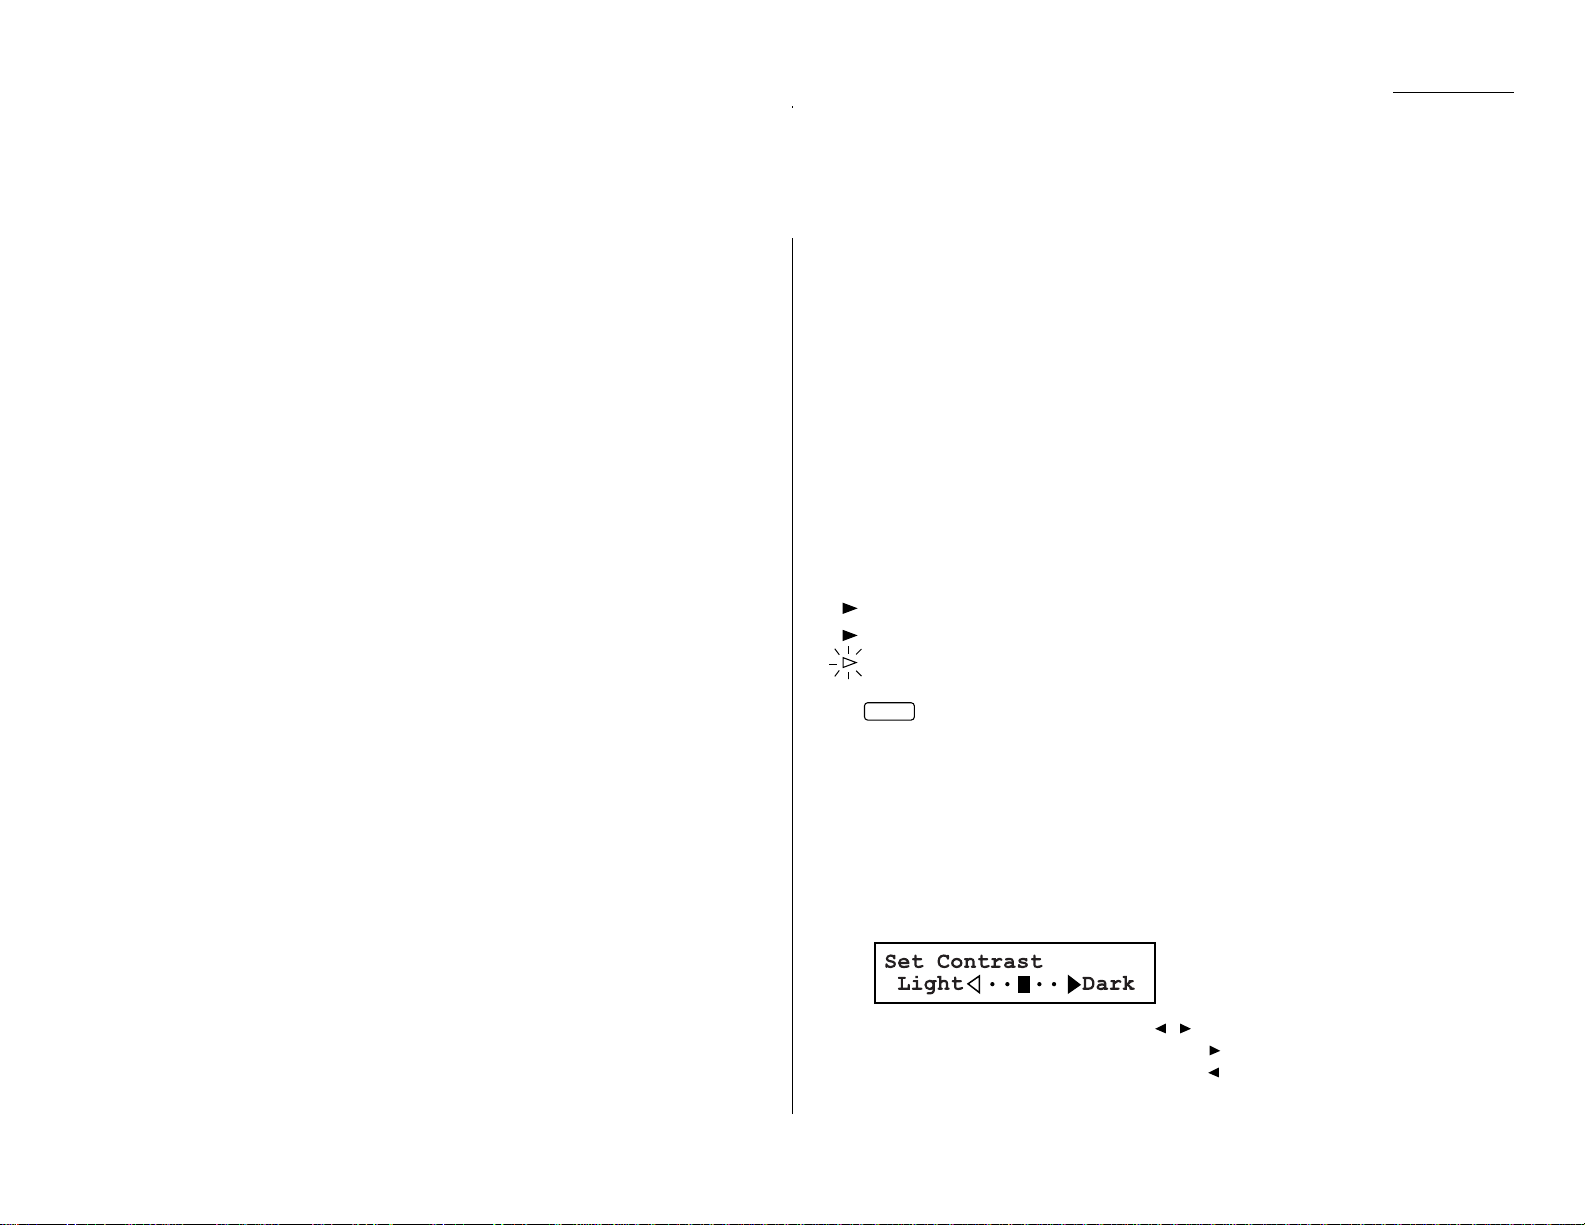
Contrast
Setting the contrast allows you to compensate for any excessive lightness or darkness, as the case may be, of document pages you are sending or copying.
To change the contrast setting:
1
Press
CONTRAST
on the control panel.The display, or
LCD
(liquid crystal dis-
play), indicates the current contrast setting.
2
To adjust the contrast setting, press , or
CONTRAST
.
To light up an overly dark document,press .
To darken an overly weak document,press .
HALFTONE
RESOLUTION
S-FINE
FINE
Sending faxes
Page 30
1.18
Getting started
Note: To avoid confusing the Light and Dark settings,just remember —
“Light lightens” and “Dark darkens” — to keep it straight.
Entering a pause character when dialing
Some long-distance systems require dialing pauses,and pauses can also be useful
when you’re dialing through special telephone exchanges.
To insert a pause character, just press
REDIAL/PA USE
after you’ve dialed at least one
other character.-/(the pause character) will appear on the display.
Each pause entered lasts for a factory-set two seconds (see “Changing the pause
length,”below, for instructions to change this setting).
For example ,if the pause is at the factory setting,pressing 9,
REDIAL/PA USE
,
19725552009 dials 9 [2-second pause] 1 9 7 2 5 5 5 2 0 0 9.
Important: Each pause uses two of the characters you’re allowed in a number .
Changing the pause length
The pause is set by the factory to last two seconds,but you can set it to last as long
as ten seconds if necessary. To change the pause length:
1
Press
PROGRAM,J
,0,4,
ENTER
.
2
Use the numeric keypad to enter the length you want for the dialing pause.
Here, we’ve chosen nine seconds.
Note: The length setting requires two digits.Always enter a leading zero for
lengths less than 10 seconds.
3
Press
ENTER
to save the setting.
Potential problems with call-w aiting and voice mail
Telephone call-w aiting signals can stop fax transmission and reception.And any
service — such as voice mail — which may intercept your calls can keep your fax
machine from receiving fax calls.
If you use only one line for both phone and fax, consult your telephone company to
see how you can temporarily disable call-waiting or voice mail while using the fax
machine.
Using memory transmission
Your fax machine has a great memory! Take advantage of it,and you could:
Save Time. By using your fax machine’s memory, you won’t have to wait for your
machine while it completes the transmission. Simply scan your document into your
fax machine’s memory, and you can walk away with your original in hand.
Save Money. If you’re transmitting to another memory-equipped fax machine, your
machine will send the document directly into the other machine’s memory and hang
up. (The receiving machine then prints out your message from its memory after the
call has ended.) This cuts your actual on-line time to a minimum.
Save Even More Money. Set up a delayed command (see pages 2.17–2.19) to send
your document after hours,and you can save more money, because the line charges
will be cheaper.
You can set your fax to transmit from memory as the default.
Note: Whether you decide to send your documents from memory or manually, you
can override that choice one transmission at a time by pressing
MEMORY TRANSMIT
before you send your document.After completing the
communication, your fax will return to the default setting.
Note: Some documents use up memory more quickly than others.They include
documents with many pages and those with many dark areas.When the
machine’s memory is full,it can transmit only through the document feeder.
Note: When you use the flatbed scanner, the machine always uses memory trans-
mission.
To make memory transmission the default:
1
Press /
PROGRAM,J
,1,3,
ENTER
.
2
Press or /
PROGRAM
until the mode you want appears.
In this example, we’ve chosen Off.
3
Press
ENTER
to save the setting.
If the
MEMORY TRANSMIT
light glows, memory transmission is on.
If the
MEMORY TRANSMIT
light doesn’t glow, memory transmission is off.
Memory Tx :Off
Program/Enter
Memory Tx :On
Program/Enter
Set Dialing Pause
Time (02-10):09
Set Dialing Pause
Time (02-10):02
Page 31

1.19
Getting started
Sending a fax using the ADF
1
If the machine is already in F ax mode, skip to step 2.
If the machine is in Copy mode, press
COPY/FAX
to change to F ax mode.
2
Adjust the document guides — by sliding either of them to the left or right —
to fit the page(s) you’ll be faxing.Your fax machine’s automatic document
feeder will hold up to 50 pages of letter-sized paper, 25 pages of legal-sized
paper or 15 pages of 11″ × 17″ (ledger)-sized paper.
3
Insert the document face up.When a document is in the feeder, the
LCD
shows the current scanning width (see “A4,B4,A3” in the Glossary beginning
on page 3.17) and the amount of memory available:
4
Adjust resolution and contrast if necessary.
Press
RESOLUTION
to change the resolution.
Press
CONTRAST
to change the contrast.
5
Adjust memory transmission if necessary.
Press
MEMORY TRANSMIT
to toggle memory transmission on and off.
6
Enter the fax number.
Also, enter any access codes necessary, just as you would for a regular phone
call. (Example: Enter 9 to “dial out”from an office telephone system, or 1 for
long-distance.)
7
Press
START
.
By pressing
START
, you’ve just given your machine a command. In turn,your
machine gives this action a command number as it scans the fax document.
This command number appears on the first line of the
LCD
for a few seconds:
You’ll need to know this command number if you later wish to cancel the
transmission or to print a stored document (see pages 1.23).
8
Now, everything is up to the machines — yours and the one you’re dialing.
• If the fax has been set for Quick Memory transmit, your machine scans the
first page of your document into memory, then dials the other fax.When it
makes contact, your machine transmits the stored document from memory
while at the same time scanning the remaining pages of your document
into memory. (To set Quick Memory transmission, see pages 2.31.)
• If the fax has been set for the normal memory transmit, your fax scans the
entire document into memory, then dials the other fax.When it makes contact, your machine transmits the entire stored document from memory.
• If the fax is set for non-memory transmission, your machine simply dials
the other fax.When it makes contact, your machine feeds the document
through, scanning and transmitting it as it goes.
Note: The more “stuff” (called black coverage) your machine “sees” on a
page, the more slowly the page feeds through as the fax scans it. And
even if the page is relatively clean, sending it in grayscale mode or at
certain resolutions makes your machine “see”more “stuff.”
The same is true if you set the contrast to Dark.
Important: If you want to cancel a transmission while scanning the docu-
ment, press the
STOP
key.
If you want to cancel a transmission in progress, use the Review
Commands function. See “Review Commands,an introduction”
page 1.23.
9
At the end of the operation, your fax machine beeps and displays:
Important: Whenever you transmit a document, what actually appears on
the top line of the display depends on information stored in the
remote fax.The line may even be blank.
Note: If the call fails, see “Redialing,”page 1.22.
972-555-2009
** Complete **
== Command:01 ==
Press Start
919725552009_
Document Ready
A4 Mem100%
Page 32
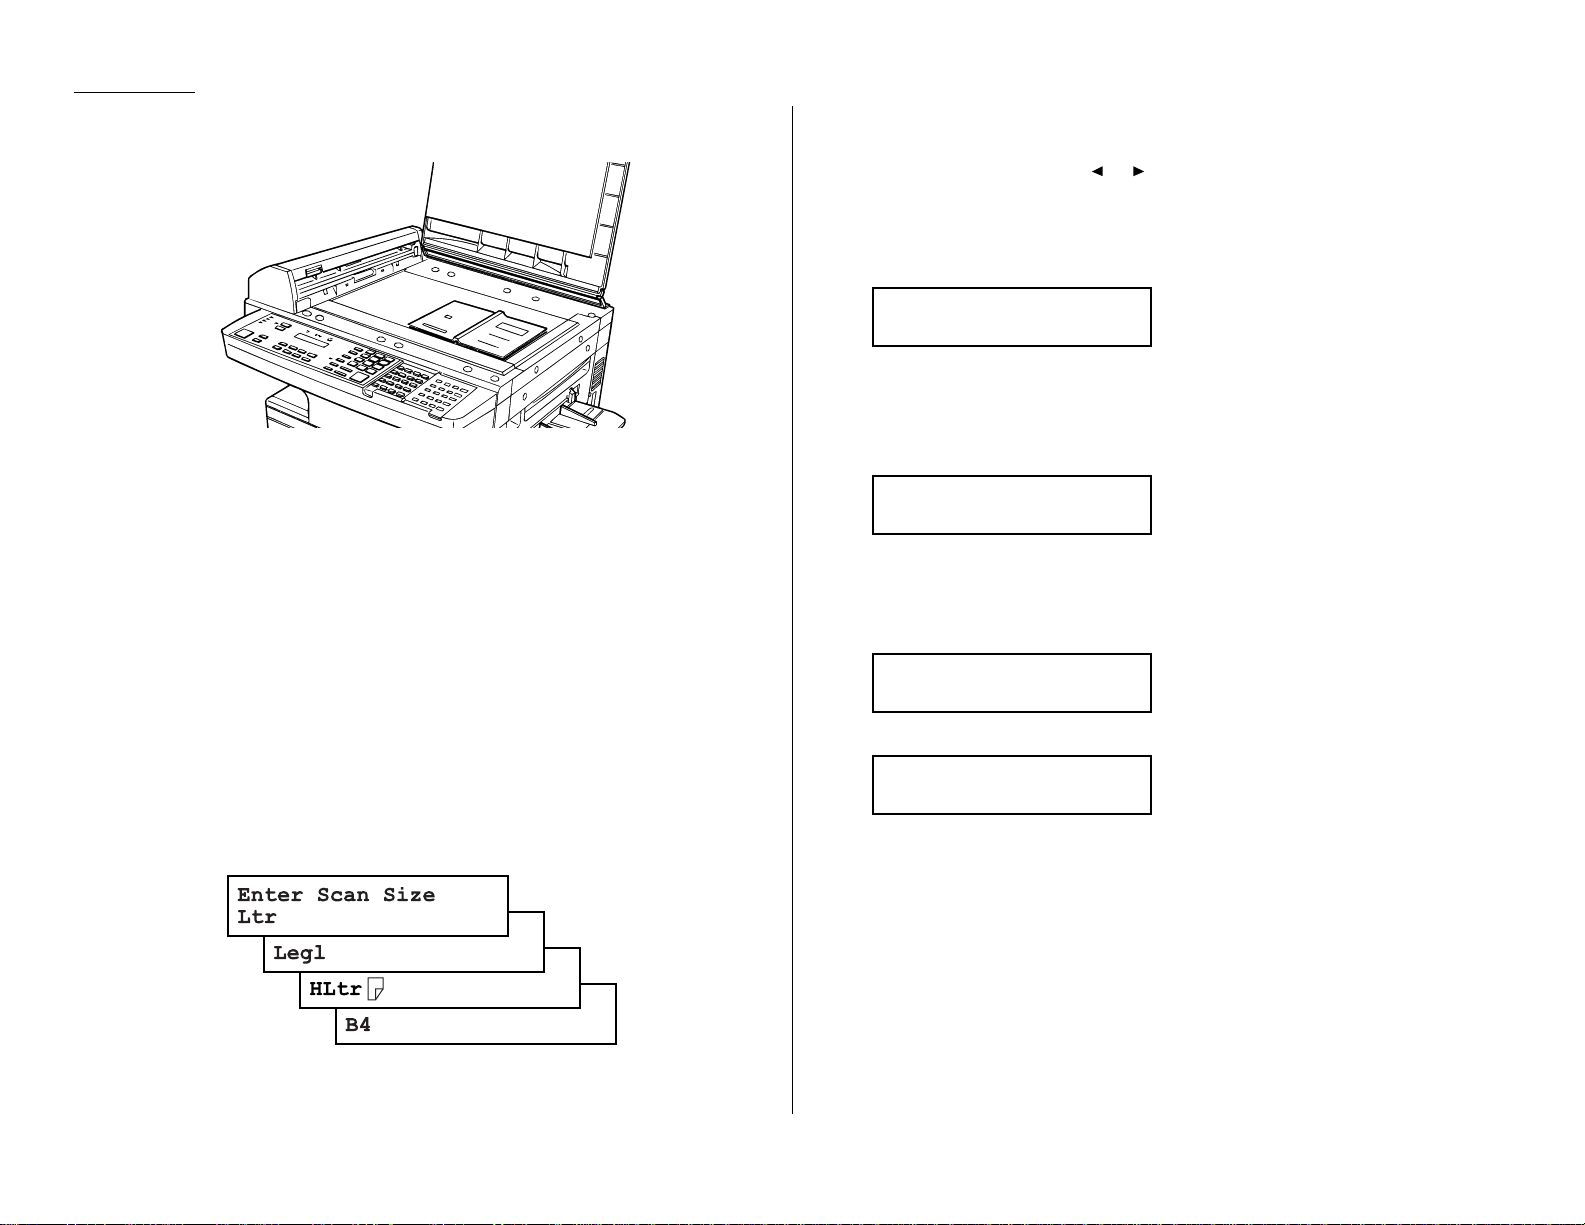
1.20
Getting started
Sending a fax using the FBS
1
If the machine is already in F ax mode, skip to step 2.
If the machine is in Copy mode, press
COPY/FAX
to change to F ax mode.
2
If there isn’t a document in the feeder, skip to step 3.
If there’s a document in the feeder, remove it.
3
Open the book-cover.
4
Place the document face down on the
FBS
and align it with the document
scale on the right, then gently close the book-cover.
Make sure the document is set beyond the right front corner.
Important: Gently close the book-cover so that you don’t catch your hands,
possibly injuring them.
When a thick document, such as a book, is on the
FBS
, do not
press strongly from the top of the book-cover.This may break
the contact glass and cause an injury.
5
Press
BOOK DOC SIZE
to select the document size, letter (displayed as Ltr),
legal (Legl), half-letter (HLtr) or B4. (Half-letter is 8.5″ wide × 5.5″ tall; B4,
widely used internationally, is 10.1″ × 14.3″.)
6
Adjust resolution and contrast if necessary.
Press
RESOLUTION
to change the resolution.
Press
CONTRAST
, then press or to change the contrast.
7
Enter the fax number.
Also, enter any access codes necessary, just as you would for a regular phone
call. (Example: Enter 9 to “dial out”from an office telephone system, or 1 for
long-distance.)
8
Press
START
.
By pressing
START
, you’ve just given your machine a command. In turn,your
machine gives this action a command number as it scans the fax document.
This command number appears on the first line of the LCD for a few seconds:
You’ll need this command number to cancel the transmission or to print a
stored document (see pages 1.23).
Then your machine will scan the document into the memory.
While your machine scans the document, the
LCD
will show:
9
When the scanning is done, the
LCD
will show:
If you want to send more pages,proceed to step 10.
Otherwise, press
START
to start the transmission, and skip to step 11.
10
Place the next page, then press
NEXT
to start scanning.
Note: If necessary, select the document size (see step 5).
To send any more pages, repeat steps 9-10.
Otherwise, press
START
to start the transmission, and skip to step 11.
Start Scan
→→
Next
Tx Start
→→
Start
919725552009
Ltr NextDoc Mem100%
== Command:01 ==
Press Start
919725552009_
Page 33

1.21
Getting started
11
Now, everything is up to the machines — yours and the one you’re dialing.
When it makes contact, your machine transmits the stored document from
memory.
Important: If you want to cancel a transmission while scanning the docu-
ment, press the
STOP
key.
If you want to cancel a transmission in progress, use the Review
Commands function. See “Review Commands,an introduction”
page 1.23.
12
At the end of the operation, your fax machine beeps and displays:
Important: Whenever you transmit a document, what actually appears on
the top line of the display depends on information stored in the
remote fax.The line may even be blank.
Note: If the call fails, see “Redialing,”page 1.22.
Sending a fax using monitor/call or a handset
You also can fax a document using either the monitor speaker or the optional
handset to dial the call.
Note: Faxing this way disables “V .34”mode and sends the fax in normal
ITU-T
Group 3 fashion.This may slow transmission for this document. See page
3.20 for more information.
1
Insert the document to the
ADF
.
2
Adjust resolution and contrast if necessary.
Press
RESOLUTION
to change the resolution.
Press
CONTRAST
to change the contrast.
3
Obtain a dial tone,either by:
• Pressing
MONITOR/CALL
… or …
• Lifting the optional handset.
In either case, the
LCD
shows:
4
Enter the fax number by using the numeric keypad.
Also, enter access codes with the number, just as for a regular phone call.
Note: For information on one-touch and speed-dial numbers,see 2.8–2.14.
5
When you hear fax tones from the remote unit, press
START
.
Note: If a person answers the phone, use the optional handset to tell that
person that you’re trying to send a fax.When you hear fax tones,
press
START
.
6
If you’re using an optional handset, hang up after pressing
START
.
7
At the end of the operation, your fax machine beeps and displays:
Note: If the call fails and you used
MONITOR/CALL
to dial, press
MONITOR/CALL
to hang up. Or if you’ve pressed
START
to begin the fax
transmission, press
STOP
to end it.
Also see “Redialing manually,”next page, if the call fails.
972-555-2009
** Complete **
** Tel Mode **
919725552009_
** Tel Mode **
_
972-555-2009
** Complete **
Page 34

1.22
Getting started
Redialing
If your fax call fails,your machine automatically redials it. In this Auto Redial
mode, your fax automatically redials the number every few minutes (see “Changing
redial settings,”right column) until one of the following happens:
• It reaches the remote fax machine.
• It has attempted the number of redials programmed and has still not connected
(see “Changing redial settings,” right column).
While in the Auto Redial mode, the machine can continue to receive faxes and can
make as many as 99 fax transmissions.
Note: If you used either the speaker or a handset to dial the call, you must redial
manually (see below).
Note: If the last redial attempt fails, your machine may print (and/or display) error
messages.F o rmore information,see pages 3.11.
Redialing manually
You can always redial calls manually. And you must redial manually if you used
either the monitor speaker or an optional handset to dial the failed call.
To redial a fax call manually without using the monitor speaker or an optional
handset:
1
Make sure the document is in the feeder and that the resolution and
contrast are set.
2
Press
REDIAL/PA USE,START
.
To redial a fax call manually with the monitor speaker or an optional handset:
1
Make sure the document is in the feeder and that the resolution and
contrast are set.
2
Press
MONITOR/CALL
or lift the optional handset to get a dial tone.
3
Press
REDIAL/PA USE
.
4
When you hear fax tones from the remote unit, press
START
.
Note: If a person answers the phone, use the optional handset to tell that
person you’re sending a fax.When you hear fax tones, press
START
.
To redial a voice call manually using the optional handset:
1
Lift the optional handset to get a dial tone.
2
Press
REDIAL/PA USE
. When the other person answers, use the optional
handset to speak to that person.
Changing redial settings
It’s up to you how many times the fax redials a number and how long it waits
between redials (that length of time between calls is the redial interval). To program
the redial settings:
1
Press /
PROGRAM,J
,0,6,
ENTER
.
2
Use the numeric keypad to enter the number of redials you want. Choose
from 2 to 15 redials.In this example, we’ve entered 03.
Important: Enter a leading zero when entering a quantity less than 10.
3
Press
ENTER
to save the setting.
4
The
LCD
now shows:
5
Use the numeric keypad to enter the length you want between redial
attempts. Choose from 1 to 5 minutes. In this example, we’ve chosen 4.
6
Press
ENTER
to save the setting.
Set Redial Interval
Inter. (1-5):4
Set Redial Interval
Inter. (1-5):1
Set # Of Redials
# (02-15):03
Set # Of Redials
# (02-15):02
Page 35

1.23
Getting started
Review Commands, an introduction
Your fax machine can store many “jobs” in its memory.And it keeps track of each one
by assigning it a command number, like “C01.”
Delayed commands,redial attempts and current fax transmissions are all stored in
your fax machine’s memory and given a command number.
The Review Commands function gives you the power to check on each job (or
command) in your machine’s memory. It also lets you cancel a command if you
decide not to send the document.
To cancel a command:
1
Press
REVIEW COMMANDS
.
The
LCD
shows the first command,indicated by its command number and the
phone number it will dial. If a command is in progress, that will be the first
command the
LCD
shows:
2
Press or /
PROGRAM
until the command you want to cancel appears.
3
Press
CANCEL
. The
LCD
shows:
4
If you want to cancel this command, press
CANCEL
again.
5
The
LCD
now shows the next command.
If you want to cancel it, too, go back to step 4.
If you don’t want to cancel this command but do want to review other
commands, press /
PROGRAM
until the command you want appears.Then go
back to step 4.
If you want to stop reviewing the stored commands,press
STOP
to return the
machine to standby mode.
For more information on the Review Commands function,see page 2.18.
C01:5552009
Check Program/Cancel
C01:5552009
Program/Cancel
Page 36

1.24
Getting started
Answering calls manually
In any reception mode, you can always answer calls manually if you have an
optional handset installed. Just pick it up,as you would if using a normal phone.
If you hear someone speaking to you, use your
optional handset to speak back.
If you hear fax tones (“beep — beep — beep”),
press
START
and hang up the optional handset.
The fax machine will begin receiving a fax.
Note: Receiving this way disables “V.34” mode
so that the machine receives the fax in
normal
ITU-T
Group 3 fashion. (See
page 3.20.)
Note: Don’t try to answer a call by pressing
MONITOR/CALL
. The monitor function
is for dialing only.
Answering fax calls using another phone, not the fax machine
If you have one phone line ringing to several phones in your office and you have an
optional handset attached to your fax, there’s no need to run to the fax machine to
answer every call. If you happen to answer a fax call while you’re at another
extension, put the handset down, but don’t hang up.Walk to the fax machine and
pick up the optional handset.Then press
START
.
After you press
START
, hang up both the fax machine’s handset and the second
telephone’s handset. Because remote fax machines will wait several seconds to hear
reception tones from your unit, you have about 30 seconds to walk to your fax, pick
up the handset, and press
START
.
Reception modes
Your fax machine has five different reception modes — Tel Ready, Fax Ready,
Fax/Tel Ready, Tel/Fax Ready and Ans/Fax Ready.We’ll explain each of these in
this section.
Tel Ready mode
Use it if: • You want to use the same line for both fax and phone calls
and
• On that line, you’re using at least one other phone which is not
connected to your fax machine
or
• You have an optional handset installed on your fax machine
In this mode: Your fax machine never answers calls automatically.You must
answer each call as described in “Answering calls manually” (this
page, left column).
To select Tel Ready:
1
Press
COPY/FAX
to change to the fax mode, if the machine isn’t the fax mode.
2
Press /
PROGRAM,I
, and then press
ENTER
six times.The
LCD
shows your
current default reception mode:
3
Press or /
PROGRAM
until the
LCD
shows:
4
Press
ENTER
to save the setting.
In the Tel ready mode, the
AUTO ANSWER
light is not lit.
Tel Ready
Program/Enter
Fax Ready
Program/Enter
Receiving faxes
Page 37

1.25
Getting started
Fax Ready mode
Use it if: Your fax machine uses its own phone line and doesn’t share it with a
phone or an answering machine.
In this mode: Your fax machine answers each call and attempts to receive a fax.
To select Fax Ready:
1
Press
COPY/FAX
to change to the fax mode, if the machine isn’t the fax mode.
2
Press /
PROGRAM,I
, and then press
ENTER
six times.The
LCD
shows your
current default reception mode:
3
Press or /
PROGRAM
until the
LCD
shows:
4
Press
ENTER
to save the setting.
5
Press
STOP
to return the machine to standby mode.
In the Fax ready mode, the
AUTO ANSWER
light is lit.
Fax/Tel Ready mode
The Fax/Tel Ready mode is a combination of the Fax Ready and Tel Ready modes.
Use it if: An optional handset is installed on your fax mac hine
and
You’re using the machine as both a fax machine and a telephone
In this mode: Your fax machine answers each call without ringing. If you receive a
voice call, it alerts you with a special ring.
To select Fax/Tel Ready:
1
Press
COPY/FAX
to change to the fax mode, if the machine isn’t the fax mode.
2
Press /
PROGRAM,I
, and then press
ENTER
six times.The
LCD
shows your
current default reception mode:
3
Press or /
PROGRAM
until the
LCD
shows:
4
Press
ENTER
to save the setting.
5
Press
STOP
to return the machine to standby mode.
Now your fax machine receives faxes silently but also alerts you when a regular
voice call comes in. (Your fax machine also beeps once at the end of each reception.)
If a voice call comes in, your fax machine detects it and sounds a special ring. If you
hear it, answer using your optional handset.
Note: This Fax/Tel Ready mode won’t turn off ringers on other telephones in your
house or office. Other phones won’t distinguish between fax and voice calls.
In the Fax/Tel ready mode, the
AUTO ANSWER
light is lit.
Fax/Tel Ready
Program/Enter
Fax Ready
Program/Enter
Fax Ready
Program/Enter
Fax Ready
Program/Enter
Page 38

1.26
Getting started
Tel/Fax Ready mode
The Tel/F ax Ready mode is a combination of the Tel Ready and Fax Ready modes.
Use it if: An optional handset is installed on your fax mac hine
and
You’re using the machine as both a telephone and a fax machine
In this mode: Your fax machine rings the number of times you’ve identified in the
user settings. If you don’t use the optional handset to answer the
call, your fax machine answers the call. If a caller sends a fax,your
machine begins receiving it. If a voice call comes in, your machine
detects it and sounds a special ring,telling you to answer using the
optional handset.
To select Tel/Fax Ready:
1
Press
COPY/FAX
to change to the fax mode, if the machine isn’t the fax mode.
2
Press /
PROGRAM,I
, and then press
ENTER
six times.The
LCD
shows your
current default reception mode:
3
Press or /
PROGRAM
until the
LCD
shows:
4
Press
ENTER
to save the setting.
5
Press
STOP
to return the machine to standby mode.
In the Tel/F ax ready mode, the
AUTO ANSWER
light is lit.
Ans/Fax Ready mode
Use it if: You’re using an answering machine that’s connected directly to your
fax machine.
In this mode: An answering machine connected to your fax machine answers each
call. If a voice call comes in, the answering machine begins to record
the incoming message. If your fax machine hears a fax tone, it
begins receiving the fax message.
To select Ans/F ax Ready:
1
Press
COPY/FAX
to change to the fax mode, if the machine isn’t the fax mode.
2
Press /
PROGRAM,I
, and then press
ENTER
six times.The
LCD
shows your
current default reception mode:
3
Press or /
PROGRAM
until the
LCD
shows:
4
Press
ENTER
to save the setting.
5
Press
STOP
to return the machine to standby mode.
In the Ans/Fax ready mode, the
AUTO ANSWER
light is lit.
Ans/Fax Ready
Program/Enter
Fax Ready
Program/Enter
Tel/Fax Ready
Program/Enter
Fax Ready
Program/Enter
Page 39

1.27
Getting started
Using an answering machine with your fax machine
To connect your answering machine to your fax machine:
1
Set the fax machine for Ans/Fax Ready, as described on page 1.26.
2
Set your answering machine to answer calls after no more than two rings.
(See the answering machine’s instructions if necessary.)
3
Create a new outgoing message on your answering machine.
Here’s a suggested message:
Hello! You’ve reached [your name or telephone number].T o leave a voice
message,please wait for the beep.To send a fax, press
START
on your fax
machine.Thanks for calling!
Important: Your answering machine’ s outgoing message must be no longer
than 10 seconds.
Detection of “silent”fax machines
Some older fax machines don’t send fax tones when transmitting,which can cause
problems when using an answering machine with your fax.
But your fax machine can accommodate these “silent”machines without disrupting
your answering machine operation. For more information, call your authorized
Muratec dealer.
If the paper runs out
Getting the word from your machine
When your fax machine runs out of paper, the machine beeps,the
REPLACE P APER
light glows and the
LCD
indicates which source has run out of paper, either the
cassette or the multipurpose tray.
In this example, the cassette is empty:
Your fax machine cannot print fax messages or copies without paper.But it can still
receive documents into its memory, as described in the section below.
Receiving when out of paper
If your machine runs out of paper, it stores up to 100 fax receptions in its memory.
This is called out-of-paper reception. Once you refill the paper supply, the fax
machine prints the stored messages automatically.
Note: The number of pages (not receptions) your fax machine can store for
out-of-paper reception will vary. It depends on:
• Your machine’s memory capacity
• Types of documents being sent to your machine
• Resolution of documents being sent to your machine
(See Specifications,page AI.1.)
Fax Ready
Check Rx Paper
Page 40
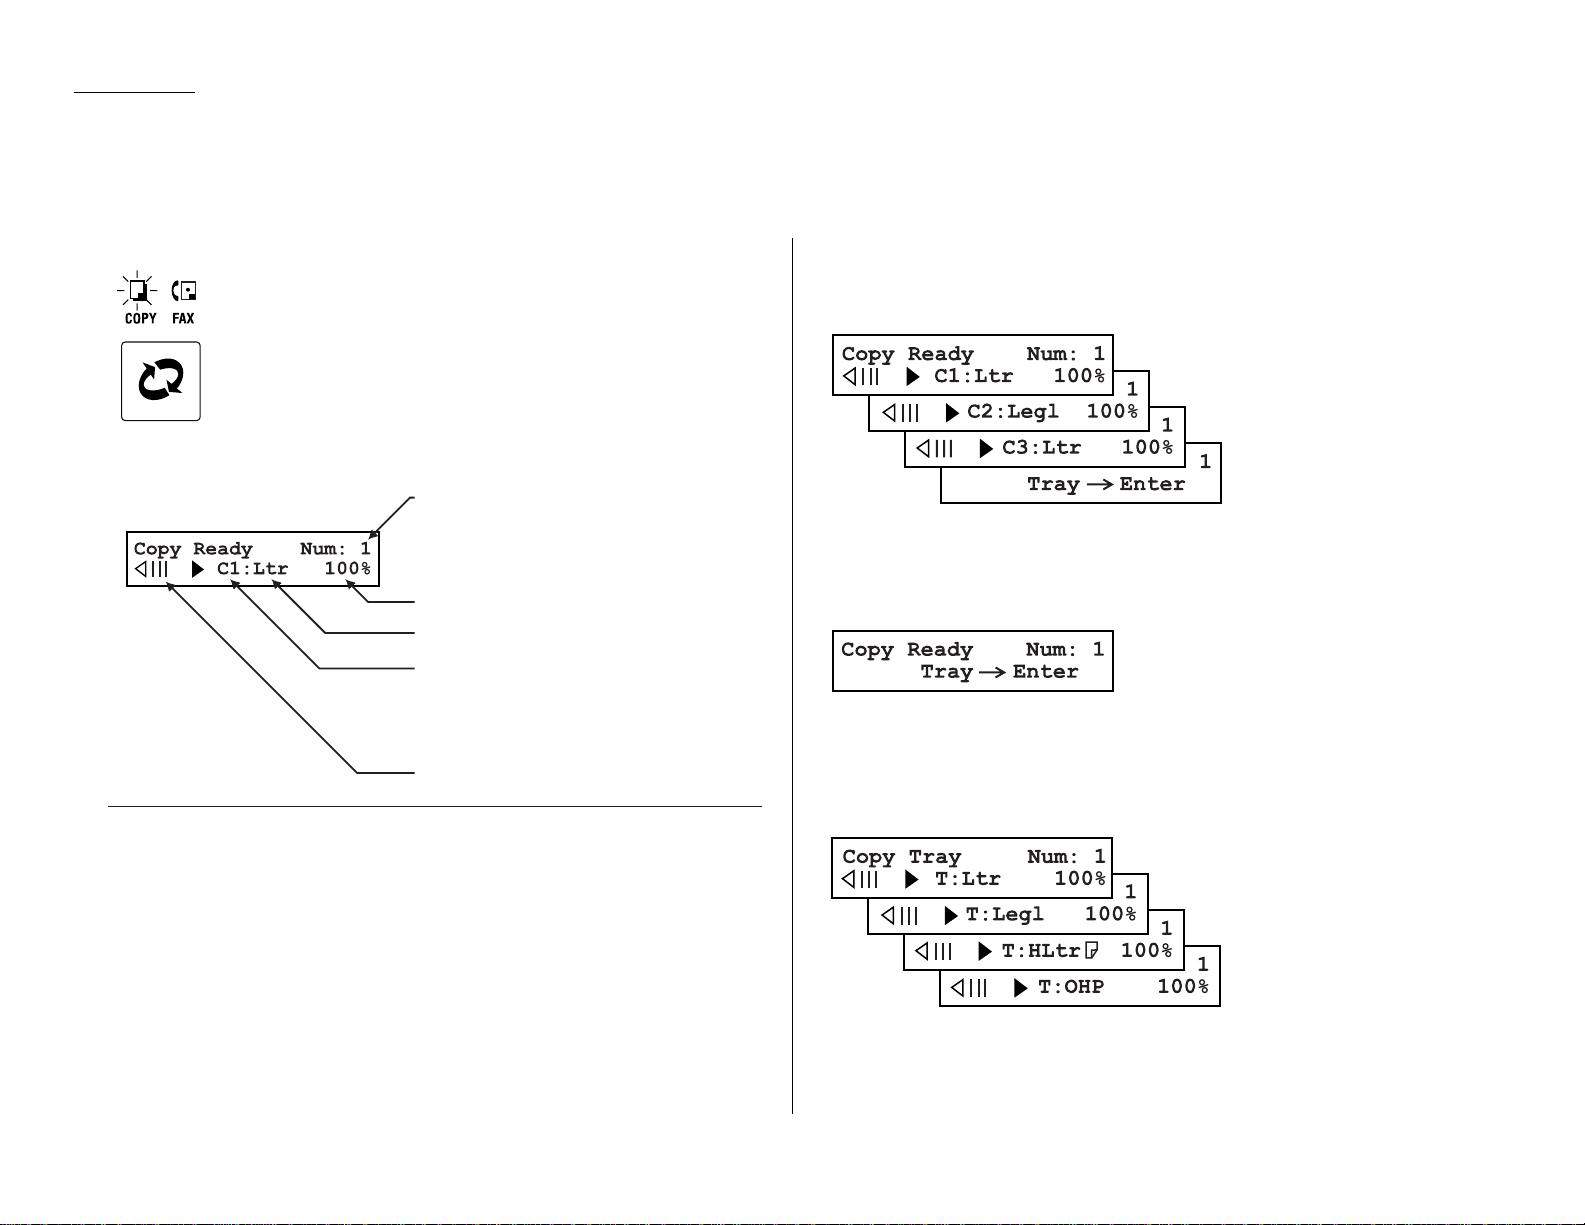
1.28
Getting started
Your fax machine also doubles as a convenience copier.
To make copies with your fax machine, press
COPY/FAX
to change to
the Copy mode.
When the machine is in the Copy ready mode, the
LCD
will show:
Making copy settings
Number of pages
Use the numeric keypad to enter the desired number of copies for the document.
Copy reduction or enlargement rate
Your fax machine can make enlarged and reduced copies. For more information, see
“Setting of enlargement or reduction for copying,”page 1.31.
Note: The copy enlargement and reduction rate setting affects only copying. It
doesn’t affect the fax reception reduction rate (see pages 2.3–2.3).
Paper source and paper size
If you wish to select the paper supply source manually, press
PAPER SIZE
? repeat-
edly until your desired paper source appears:
You may also choose from either the standard paper cassette (C1) or the Multi
paper tray (T). If your machine also has either or both of the two optional cassettes,
you may also choose (C2) or (C3).T o use the Multi paper tra y,press
ENTER
while the
display shows:
Then, press
PAPER SIZE
? to set paper size.This is the size of the paper in either the
paper cassette (or cassettes,if you have one or both of the optional cassettes) or
Multi paper tray. You can set letter- or legal-sized paper in the paper cassette(s),
and letter-,legal- or half-letter-sized paper in the Multi paper tray.When you set
transparency film on the multi paper tray, please select “OHP” mode.
Contrast level
See “Contrast”(pages 1.17–1.18) for more information.
Number of copies
Copy reduction and enlargement rate
Recording paper size
Paper source
C1:First paper cassette
C2:Second paper cassette (Option)
C3:Third paper cassette (Option)
T :Muliti paper tray
Contrast level
Making copies
Page 41
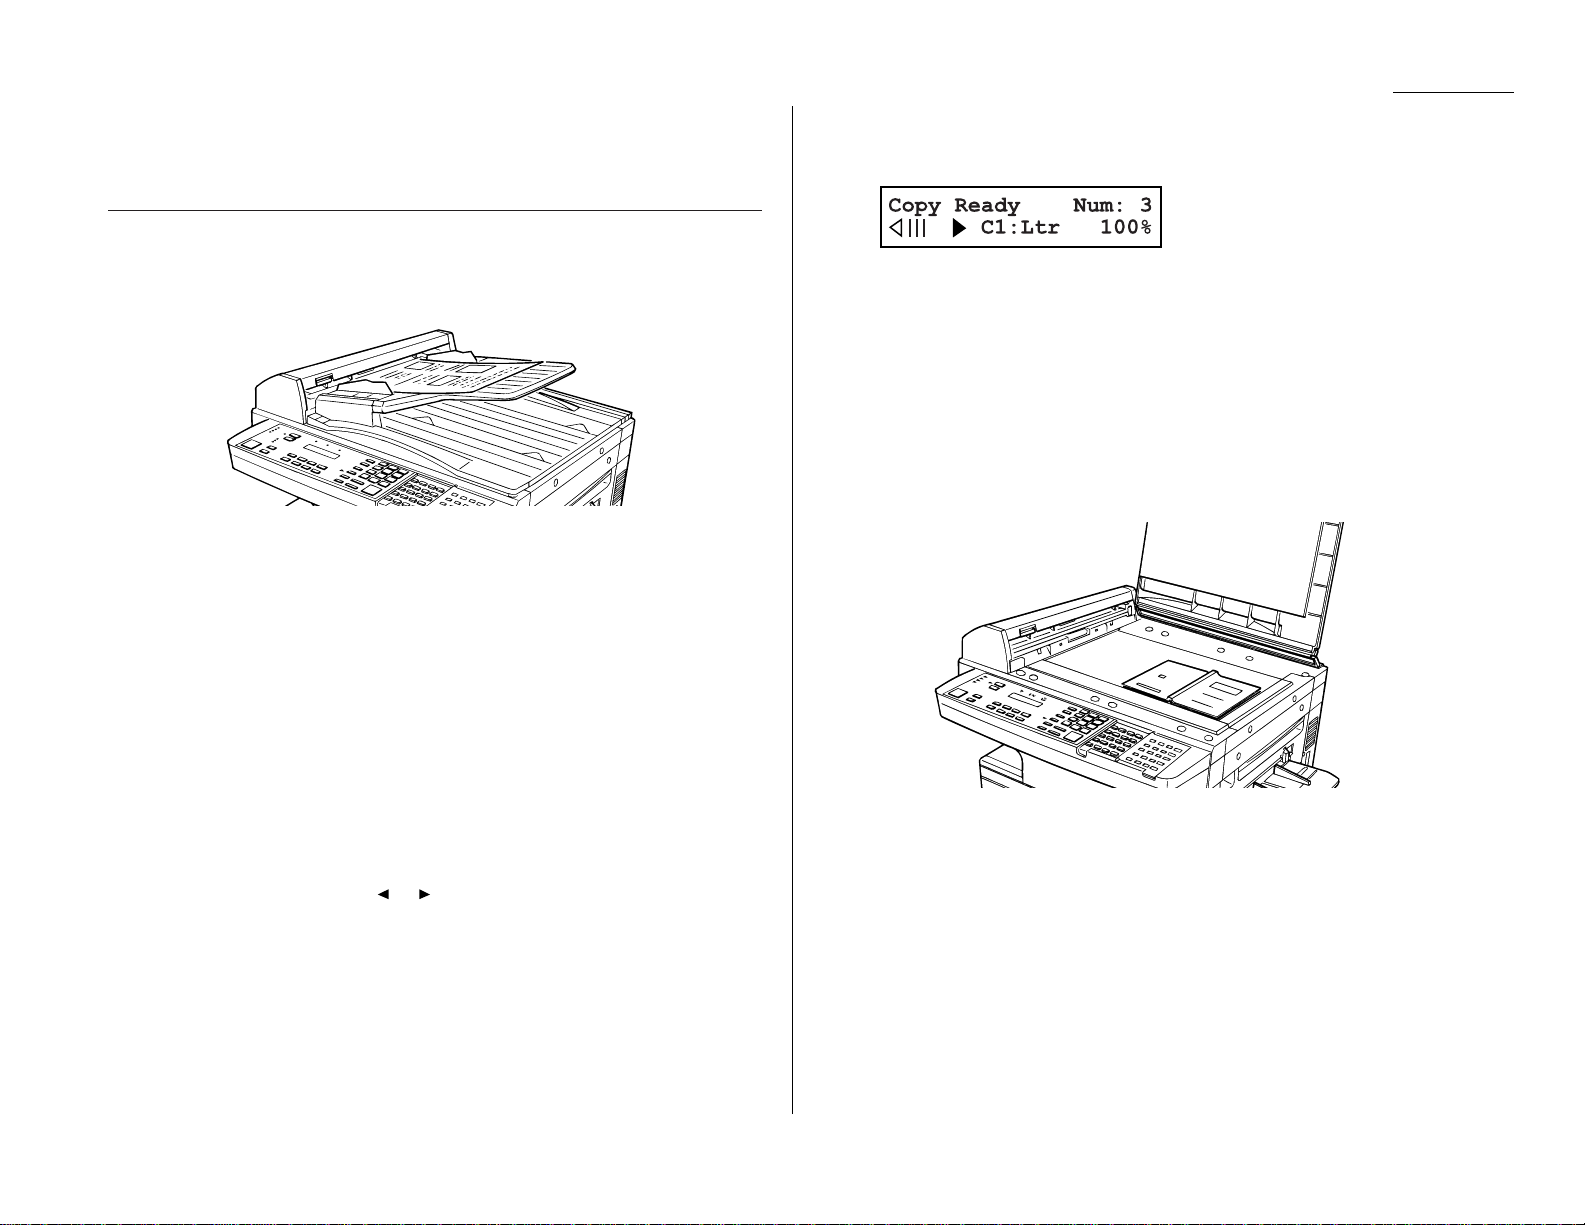
1.29
Getting started
Sort copy
Press
SORT COPY
to toggle (switch on or off) sorting copy if necessary. The initial set-
ting is Off.
How to copy
Copying using the
ADF
1
If necessary, press
COPY/FAX
to change to Copy mode.
Otherwise, proceed to step 2.
2
Prepare the document just as you would to send a fax.
Note: There are certain types of documents you never should insert into
your fax machine. (You might wish to review “Things
NOT
to put in
your fax,”page 1.17.)
3
Insert your document face up.Adjust the document guides for a correct fit.
When the document is correctly inserted, you’ll hear a short beep.
Note: Make sure that all the pages are the same size and thickness.
Do not attempt to feed documents of different size and thickness in
the same stack.
4
Adjust resolution and contrast if necessary.
Press
RESOLUTION
to change the resolution.
Press
CONTRAST
, then press or to change the contrast.
5
Set the reduction rate, if you want. (See “Setting of enlargement or reduction
for copying,”page 1.31.)
6
If you want to make only one copy of each page of the document, skip to step
9. Otherwise, proceed to step 7.
7
Use the numeric keypad to enter the desired number of copies for each page
in the document.You may choose one to 99 copies. Here, we’ve entered “3”to
choose a setting of three copies.
8
Press
SORT COPY
once or twice to “toggle”(switch on or off) the sorting of
copies, as desired.
9
Press
START
to begin the copying process.
Note: To stop the copying before it is through,press
STOP
.
Note: Thanks to your machine’s QuardAccess®feature (see page 2.37 for more),
copying doesn’t keep you incommunicado while in progress: you can start a
fax or voice call and even receive a voice call during copying.
When using the
FBS
1
If necessary, press
COPY/FAX
to change to Copy mode.
Otherwise, proceed to step 2.
2
Open the book-cover, place your document face down on the
FBS
and align it
with the scale on the right.
Note: Be sure that you place the original document on the
FBS
in the same
orientation as the paper in the paper source (which you’ll select in
step 4).
3
Gently close the book-cover.
4
Press
PAPER SIZE
? to select recording paper (see page 1.28).
Page 42

1.30
Getting started
5
Adjust resolution and contrast if necessary.
Press
RESOLUTION
to change the resolution.
Press
CONTRAST
, then press or to change the contrast.
6
Set the reduction or enlargement rate, if you want. (See “Setting of enlargement or reduction for copying,”page 1.31.)
7
If you want to make only one copy of each page of the document, skip to step
10. Otherwise, proceed to step 8.
8
Use the numeric keypad to enter the desired number of copies for each page
in the document.You may choose one to 99 copies. Here, we’ve entered “3” to
choose a setting of three copies.
9
Press
SORT COPY
once or twice to “Toggle” (switch on or off) the sorting of
copies, as desired.
10
Press
START
to begin the copying process.
Note: To stop the copying before it is through,press
STOP
.
Note: Thanks to your machine’s QuadAccess®feature (see page 2.37 for more),
copying doesn’t keep you incommunicado while in progress: you can start a
fax or voice call and even receive a voice call during copying.
Using the Multi paper tray
When you need to use a size of paper not currently loaded in your machine’s paper
cassette(s), or when you want to use a special type of paper (such as transparency
film), use the Multi paper tray.
Important: If loading transparency (OHP) film into the multi paper tray, be sure
that the sheet is designed for laser printers and not for copiers.Also,
be sure that the film does not have a paper backing and/or a leading
strip. If it does, remove the paper backing and/or strip before inserting. Only film should go in, not film with any backing or strip.
1
Either insert the document in the
ADF
or place it on the
FBS
.
2
Place a sheet of printout
paper on the Multi paper
tray. Then align the paper
guides to the sheet’s edges
and insert the sheet until
it comes to a stop.
Note: Place the original
document in the
same orientation
as the paper in the
paper source
(which you’ll select
in step 5, below).
• If you are going to make more than one copy, you should insert the printout paper only one page at a time.
• You may use letter-, legal- or half-letter sized paper.(Half-letter is 8.5″
wide × 5.5″ tall.)
3
Press
PAPER SIZE
? repeatedly until the following display appears:
4
Press
ENTER
.
5
Then, if necessary, press
PAPER SIZE
? again to select a same size of recording
paper you placed document on the
ADF
or
FBS
.You can select either letter-,
legal- or half-letter-sized paper.
Note: When you use transparency film, please select “OHP” mode.
You can use letter-sized transparency film.
6
If necessary, select desired resolution,contrast, reduction/enlargement rate.
(See “Setting of enlargement or reduction for copying,” next page.)
7
Press
START
to begin the copying process.
Page 43

1.31
Getting started
Setting of enlargement or reduction for copying
Your fax machine is capable of enlargement and reduction when copying.
Note: The copy enlargement and reduction rate setting is available only for copy-
ing, not for faxing.
Important: Copy enlargement is available only for copying using the
FBS
; it is not
available for copying using the
ADF
.
To change the reduction or enlargement rate for copying, either select a preset rate
or directly enter a rate.
Selecting a preset rate
Either . . .
• Press
ENLARGE
to select one of the following fixed enlargement rates.
200%
129% : Half-letter (5.5″ × 8.5″) → Letter (8.5″ × 11″)
100%
...or ...
• Press
REDUCE
to select one of the following fixed reduction rates.
78%: Legal → Letter
64%: Ledger (11″ × 17″) → Letter (8.5″ × 11″)
Directly entering a rate
Using the numeric keypad, directly enter the reduction or enlargement rate by
doing one of the following.
Either . . .
1
Press #.
2
Enter your desired rate using the numeric keypad.You can set any rate from
50% reduction through 200% enlargement.
3
Press # again.
...or ...
Press or to adjust the rate, at 1% intervals, from/including 50% reduction
through 200% enlargement.
Copy protection
With such a versatile copier built right into your fax machine,you might want to
make sure it doesn’t become too tempting to some people whose unauthorized copying could deplete your machine’s supplies more rapidly. So, to limit the use of your
fax machine to only sending and receiving faxes — in other words,to activate copy
protection:
1
If the machine is in F ax mode, skip to step 2.
Otherwise, press
COPY/FAX
to change to F ax mode.
2
Press
PROGRAM,J
,0,3,
ENTER
.
3
Press
PROGRAM
to turn on copy protection.
4
Press
ENTER
While this setting is active, whenever someone tries to change the machine to Copy
mode, the machine will sound a brief alarm tone and display:
Important: To turn off copy protection off so that you can again use the machine’s
copying function, repeat steps 2-4, above (step 1 is unnecessary since
the machine will be in F ax mode) except that,in step 3,you press
PROGRAM
so that the display shows:
Copy Protect :Off
Program/Enter
Fax Ready
Copy Off
Copy Protect
** Complete **
Copy Protect :On
Program/Enter
Copy Protect :Off
Program/Enter
Page 44

1.32
Getting started
Your fax machine can also be used as a phone, if you have an optional handset
installed.The following is a brief look at the machine’s telephone features.
Redial
Press
REDIAL/PA USE
to redial the last number dialed on your machine.
Dialing with the monitor speaker
Because your machine has a monitor speaker, you can dial without picking up the
handset. For hands-free dialing:
1
Press
MONITOR/CALL
. Y ou’ll hear a dial tone (unless you ha ve set your speaker
volume to Off; see page 1.13), and the
LCD
shows:
2
Dial the number you want. Use either the numeric keypad, a one-touch key or
a speed-dial number to dial.
Note: Remember, your fax machine’s monitor speaker is not a speakerphone. If a
person answers the call, pick up the handset to speak.
Note: If the call fails, press
MONITOR/CALL
to hang up.
EasyDial directory dialing
The EasyDial directory feature is available for regular phone calls as well as fax calls.
Review the EasyDial instructions on page 2.15 for more information.
Checking the fax reception mode
While using an optional handset for your call, if you press
CLEAR ALL
, the
LCD
shows
the current fax reception mode. Press
CLEAR ALL
again to return to the
TEL
mode.
Dialing in the event of a power failure
Your fax machine can receive telephone calls even in the event of a power failure if
an optional handset is attached. But it cannot send or receive a fax document.
** Tel Mode **
_
Using your fax machine as a phone
Page 45

1.33
Getting started
This page intentionally blank.
Page 46

Beyond the basics
We’ve covered
the “musts . ”
Now, let’s explore
the goodies.
Entering settings for your fax machine . . . . . . . . . . . . . . . . . . . . . . . . . . . . . . . . . . 2.1
Autodialer . . . . . . . . . . . . . . . . . . . . . . . . . . . . . . . . . . . . . . . . . . . . . . . . . . . . . . . . . . 2.7
Broadcasting . . . . . . . . . . . . . . . . . . . . . . . . . . . . . . . . . . . . . . . . . . . . . . . . . . . . . . . 2.16
Delayed transmission . . . . . . . . . . . . . . . . . . . . . . . . . . . . . . . . . . . . . . . . . . . . . . . . 2.17
Batch transmission . . . . . . . . . . . . . . . . . . . . . . . . . . . . . . . . . . . . . . . . . . . . . . . . . . 2.20
Special features . . . . . . . . . . . . . . . . . . . . . . . . . . . . . . . . . . . . . . . . . . . . . . . . . . . . 2.24
F-Code communication . . . . . . . . . . . . . . . . . . . . . . . . . . . . . . . . . . . . . . . . . . . . . . . 2.38
Programmable one-touch keys . . . . . . . . . . . . . . . . . . . . . . . . . . . . . . . . . . . . . . . . 2.48
Security features . . . . . . . . . . . . . . . . . . . . . . . . . . . . . . . . . . . . . . . . . . . . . . . . . . . 2.56
Page 47

Beyond the Basics
2.1
The EasyStart feature guided you through the “just-gotta”settings on your machine.
In the next few pages,we’ll cover additional settings.
Scan settings
Four different settings tell your machine how to scan documents.The initial factory
settings are probably right for most applications,so try using them before changing
any of these settings:
• Primary resolution mode — Sets the resolution for your documents. Choose
either normal, fine, superfine (“S Fine” on the
LCD
) or grayscale mode (“Gray”).
• Primary contrast mode — Sets how light or dark you want faxed documents
to be when they arrive at their destinations.
• Scanning width — Sets how wide an area your machine scans for each page.
Note: The primary settings you choose effect your fax activity only.
To set these modes:
1
Press /
PROGRAM,J
,0,1,
ENTER
. The
LCD
asks you to select a resolution:
2
Press or /
PROGRAM
until the mode you want appears.In this example,
we’ve chosen fine resolution.
3
Press
ENTER
to save the setting.The
LCD
asks you to select a contrast setting:
4
Press or /
PROGRAM
until the mode you want appears.In this example,
we’ve chosen light contrast.
5
Press
ENTER
to save the setting.The
LCD
asks you to select a scanning width:
For most uses,“A4” is the proper setting. It scans the central 8.2″ of each page.
But for documents with an unusual width, you may want to use the “B4” and
“A3” settings, which scans the central 9.9″ and 11.6″ of each page. (See “A4,B4,
A
3” in the Glossary on page 3.17.)
6
Press or /
PROGRAM
until the mode you want appears.In this example,
we’ve chosen “A4”.
7
Press
ENTER
to save the setting.
By following the steps above, you’ve set your defaults for scanning. Before sending
documents, you can “override” these default scan settings for that transmission.
To override the default resolution and contrast settings before sending a document:
• Press
RESOLUTION
to change the resolution.
• Press
CONTRAST
to change the contrast.
Once your document is transmitted, your machine returns to its default settings.
Scan Width :A4
Program/Enter
Scan Width :A3
Program/Enter
Contrast :Light
Program/Enter
Contrast :Normal
Program/Enter
Primary :Fine
Program/Enter
Primary :Normal
Program/Enter
Entering settings for your fax machine
Page 48
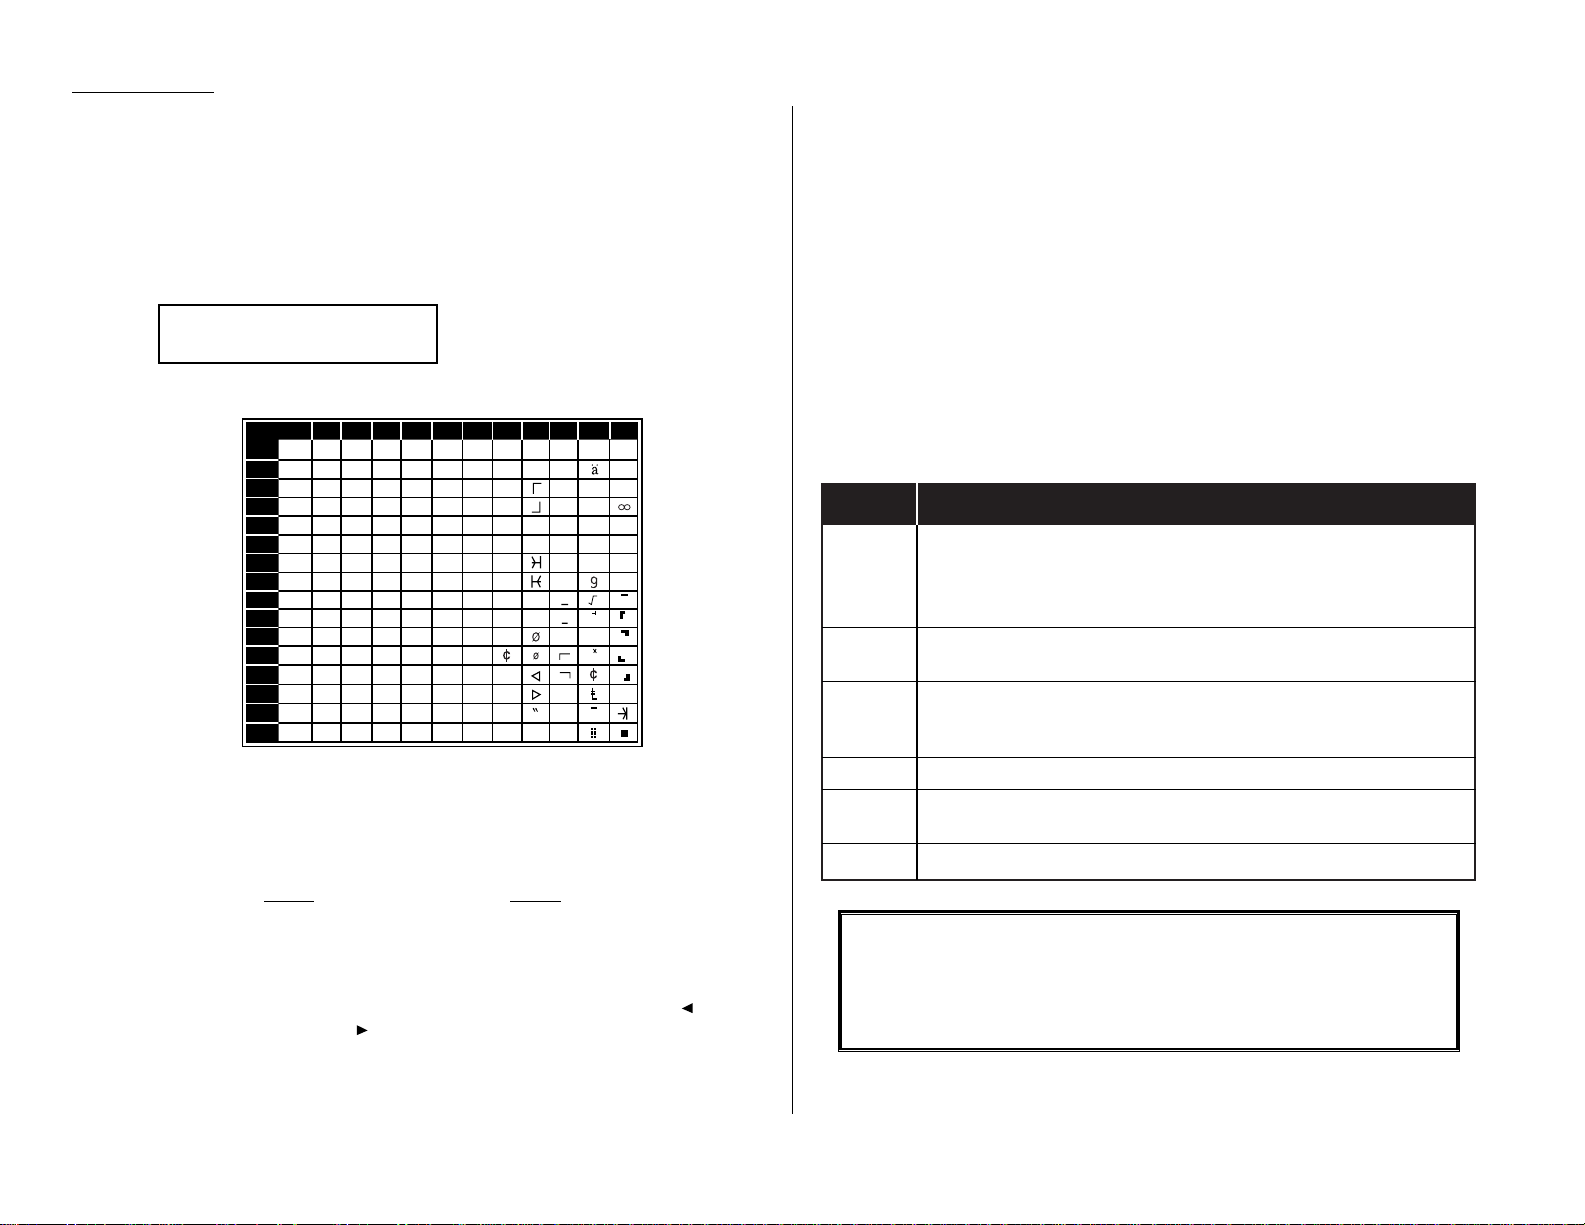
Using CODE to enter characters
Some settings give you a chance to enter an identifying name (see EasyStart, page
1.15–1.16).You can do this with the one-touch key ,and you can also use the
CODE
key.
To use the
CODE
key to enter characters:
1
When the machine prompts you to enter a name, press
CODE
. The display
changes to:
2
Find the character you want to enter in the chart below.
The legends in the black border indicate which key you press,and in which
order, to get a given character. For example, to get a back-slash (\) character,
you’d press C, 8. (The blank areas for 2, 0 and C, 0 indicate spaces.)
3
To enter each character, press the key combination listed on the chart.
Important: Remember,there are three ways to enter characters:
Enter Using
Numbers Numeric keypad
Letters/characters One-touch keys
Letters/characters/numbers
CODE
chart for key combinations
Note: If you want to erase characters, press
CANCEL
to erase to the left.
If you want to change just one character in the name,press to move
the cursor left, or /
PROGRAM
to move it right. Press
CANCEL
to erase
the character. Then re-enter the character correctly.
4
Press
ENTER
to save the name.
Print settings
You can set three parameters for printing received fax messages:
• Print reduction rate
• Reduction margin
• Half-page reception
You set all three in the same procedure, discussed on page 2.3. Following is a short
explanation for each:
Print reduction rate
Print reduction lets you set the machine to reduce large incoming documents to a
size which fits on the paper in your machine.This setting doesn’t affect copies you
may make with your machine.Fortunately, however, it also has copy reduction (see
“Setting of enlargement and reduction for copying” on page 1.31).
Below are the options for both the print reduction and copy reduction settings:
Setting What it does
Automatically reduces printouts at variable rates down to a
Auto
minimum of 50%.Tries to reduce printout to fit on one sheet of
your selected paper size. If it can’t, prints the image at 100% size
on two or more pages.
100%
Does not reduce document. (Due to the sender’s
TTI
, this may print
two pages when receiving a one-page fax document. See 97%, below.)
Reduces an original so that the final printout of a one-page-
97% document (if the original isn’t larger than the paper in your
machine) will only be one page long, even with the
TTI
.
91% Reduces documents slightly more.
81%
Reduces documents even more. Helpful for some international
stationery sizes,as well as special applications.
75%
Turns legal-sized originals into letter-sized printed copies.
F or best results …
Whenever possible, load the correct size of paper before receiving a
fax (or making a copy) of that size. Although it’s convenient,the reduction feature can’t be used for every situation.
0
1
2
3
4
5
6
7
8
9
A
B
C
D
E
F
234567ABCDEF
0@P` pÇÉ
↑
α p
!1AQaqüæ
↓
q
"2BRbréÆ
á βθ
#3CScsâô í ε
$4DTd täö`ó µΩ
%5EUe uàò.ú σ ü
&6FVf våû ñρΣ
’7GWgwçù Ñ π
(8HXhxêÿ\
a
)9IYiyë
Ö ″
o
*:JZjzèÜ
¿
j
+;K[k{ï
,<L¥l|î£
-=M]m}ì
¡
÷
.>N^n→ Ä
P
t
«
/?O_o ← Å
ƒ
»
n
x
Second keypress
First keypress
˚
˚
¥
Your Name ;Code
_
Beyond the Basics
2.2
Page 49

Beyond the Basics
Reduction margin
Your fax machine’s reduction margin is measured in millimeters (mm).We’ll define
reduction margin by explaining how it’s used:
When a fax message enters your machine’s electronic brain,the machine measures
the message’s length and compares it to (a) the length of your selected paper plus
(b) the reduction margin you set.If the length of the incoming message is shorter
than (a) and (b) put together, your machine prints the message on just one sheet.
If it’s longer, your machine prints the message on more than one sheet.
Note: An Auto reduction setting and a reduction margin setting of 40mm will
print most incoming faxes as single pages.Try this combination first and
then, only if you have problems with it, select different settings.
Half-page reception
Half-page reception can conserve paper if some of the faxes you receive are halfpage,“memo-sized” messages.When activated, this feature tells the machine to
combine two of these half-page receptions onto a single sheet. Half-page reception
only combines half-page messages sent back-to-back during the same transmission.
It won’t combine two half-page faxes from separate transmissions.
Adjusting the print settings
1
Press /
PROGRAM,J
,0,2,
ENTER
. The
LCD
shows the current print
reduction rate:
2
Press or /
PROGRAM
until the reduction setting you want appears.
In this example, we’ve chosen 91%.
3
Press
ENTER
to save the setting.The
LCD
shows the current reduction margin:
4
Use the numeric keypad to enter the reduction margin you want. If
necessary, press or /
PROGRAM
to move the cursor. In this example,
we’ve chosen 38mm.
5
Press
ENTER
to save the setting.The
LCD
shows the current setting for
half-page reception:
6
Press or /
PROGRAM
until the setting you want appears.In this example,
we’ve chosen On.
7
Press
ENTER
to save the setting.
Image Rotation
When this feature is activated, incoming fax messages will be rotated automatically
to fit on the paper.
1
Press /
PROGRAM,J
,1,8,
ENTER
. The
LCD
shows:
2
Press or /
PROGRAM
until the setting you want appears.In this example,
we’ve chosen On.
3
Press
ENTER
to save the setting.
Rotate Rx :On
Program/Enter
Rotate Rx :Off
Program/Enter
Your
Fax
Machine
A
11"
8.5"
A
11"
8.5"
Half Page Recpt:On
Program/Enter
Half Page Recpt:Off
Program/Enter
Prnt Reduc Rate: 91%
Margin (00-85mm):38
Prnt Reduc Rate: 91%
Margin (00-85mm):40
Prnt Reduc Rate: 91%
Program/Enter
Prnt Reduc Rate:Auto
Program/Enter
2.3
Page 50
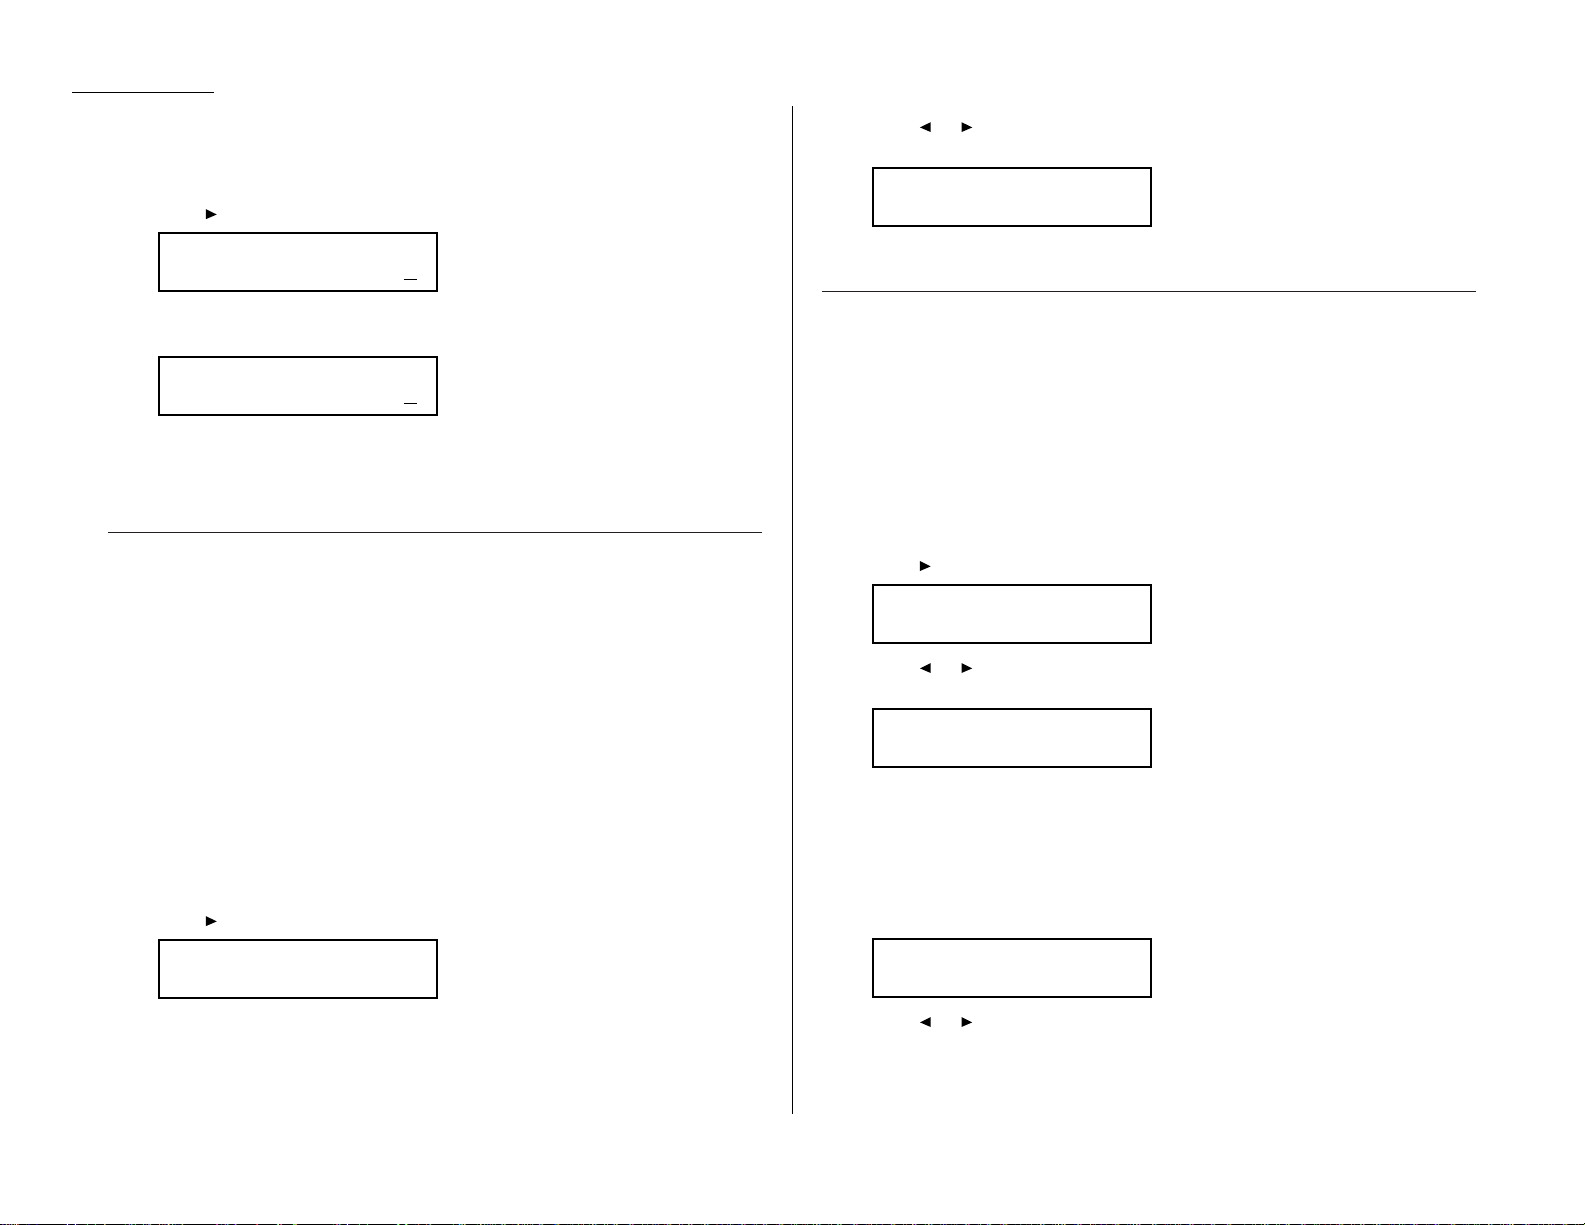
Beyond the Basics
Setting the number of rings
You can set how many times your fax machine will ring before answering a call.
Choose from 1 to 10 rings.
1
Press /
PROGRAM,J
,0,5,
ENTER
. The
LCD
shows:
2
Use the numeric keypad to enter the number of rings you want, from 1 to 10.
Here, we’ve chosen 4 rings.
Note: If you enter 00 (zero), the machine will beep briefly to warn you that it
can’t accept that setting.
3
Press
ENTER
to save the setting.
Setting ECM
“Line noise,” or static on the line during a call, can easily disrupt the flow of data
from one fax machine to another.
That’s why your fax machine gives you the option of using Error Correction Mode
(
ECM
). When two fax machines communicate while running in
ECM
, the sending
machine automatically checks the data as it sends. If the receiving fax machine can’t
verify the transmission, the first machine will re-send it as necessary.
Note:
ECM
gives you a better chance of transmitting a fax document over a bad
phone line, but it could also slow down the transmission time.And the worse
the line is, the slower the transmission. That’s why the machine lets you
turn
ECM
on or off as needed.
Note: Not all fax machines have
ECM
. If you’ve activated
ECM
and then transmit to
a fax machine not currently using
ECM
, there will be no change in the fax
transmission from a usual, non-
ECM
transmission.
1
Press /
PROGRAM,J
,0,7,
ENTER
. The
LCD
shows the current
ECM
setting:
2
Press or /
PROGRAM
until the mode you want appears.
In this example, we’ve chosen Off.
3
Press
ENTER
to save the setting.
Setting silent mode
Silent mode allows you to mute the ringer, the alarm and the key tones.
• Ringer — If you turn the ringer off in silent mode,a ring alerts you when you
receive fax or voice call and a call request.
• Alarm — If you disable the alarm in silent mode,the sound your machine
makes when an error occurs and the beep your machine makes after sending or
receiving a fax or making a copy cannot be heard.
• Key tone — If you mute the key tone,your machine will not make a sound when
you press the buttons on the control panel.
1
Press /
PROGRAM,J
,1,9,
ENTER
. The
LCD
shows your fax’s current setting:
2
Press or /
PROGRAM
until the mode you want appears.
In this example, we’ve chosen On.
Note: If you chose On, the silent mode of Ringer, Alarm or Key tone can be
set to be avilable. If you chose Off, the machine will ring and beep as
usual.
If you chose Off, skip to step 10.
3
Press
ENTER
to save the setting.The
LCD
now asks if you want the ringer to be
on or off:
4
Press or /
PROGRAM
until the mode you want appears.
If you want to turn off the ringer, select “On”and the machine will be quiet.
Otherwise, the machine will ring.
Ringer Silent :Off
Program/Enter
Silent Mode :On
Program/Enter
Silent Mode :Off
Program/Enter
ECM Mode :Off
Program/Enter
ECM Mode :On
Program/Enter
Set # Of Rings
# (01-10):04
Set # Of Rings
# (01-10):02
2.4
Page 51

Beyond the Basics
5
Press
ENTER
to save the setting.The
LCD
now asks if you want the alarm turned
on or off:
6
Press or /
PROGRAM
until the mode you want appears.
If you want to turn off the alarm, select “On” and the machine will be quiet.
Otherwise, the machine will beep.
7
Press
ENTER
to save the setting.The
LCD
now asks if you want the key tones on
or off:
8
Press or /
PROGRAM
until the mode you want appears.
If you want to turn off the tones,select “On”and the machine will be quiet.
Otherwise, the machine will beep when the keys are pressed.
9
Press
ENTER
to save the setting.
If you turned off the alarm or the key tones in the steps above,your machine
gives you the option of setting the volume for the alarm and key tones.If this
option appears,skip to step 10.
If you didn’t turn any of these off,your fax machine returns to standby mode.
10
The
LCD
shows your fax’s current setting:
11
Press or /
PROGRAM
until the mode you want appears.
Below are the possible settings:
= Loudest setting.
= Medium setting.
= Low setting.
12
Press
ENTER
to save the setting.
Setting the confirmation stamp
You can set your fax machine so that it will automatically place a smallblue ink
stamp mark on the front of each original document that it successfully scans.
Important: Turn off this feature if you’re sending documents you don’t want the
fax to stamp.
1
Press /
PROGRAM,J
,1,4,
ENTER
. The
LCD
shows your fax’s current setting:
2
Press or /
PROGRAM
until the mode you want appears.
In this example, we’ve chosen On.
3
Press
ENTER
to save the setting.
Stamp :On
Program/Enter
Stamp :Off
Program/Enter
Alarm&Key Vol. :Min
Program/Enter
Alarm&Key Vol. :Mid
Program/Enter
Alarm&Key Vol. :Max
Program/Enter
Alarm&Key Vol. :Mid
Program/Enter
Key Buz.Silent :Off
Program/Enter
Alarm Silent :Off
Program/Enter
2.5
Page 52
Beyond the Basics
Language settings
English is the language your machine initially displays on the
LCD
and uses to print
reports.But you can set it to “speak”French, Spanish or German, too.
As you give the order for the machine to change languages,it “rolls”from English to
French to Spanish to German, and then back to English.
To make the change from one language to the next,press /
PROGRAM
,#.
Checking the language
If,after making a language change, you’re not sure which language is showing,
press /
PROGRAM
once and decide based on what you see on the
LCD
:
is French.
is Spanish.
is German.
If the language you see is the one you want, press
STOP
to return to standby mode.
If you want to change languages,press
STOP
to return to standby mode.
Then press /
PROGRAM
,#again to go to the next language in the cycle.
Printing your settings
After you’ve programmed settings into your machine, print a settings list. We
recommend this, particularly if you’re sharing the machine with other users, who
might change the settings.
With this list, you can quickly confirm that all of your settings are correct, without
having to go back and check them on the machine.Or, if you do need to undo
someone else’s changes,this list guides you in returning the machine to your
preferred settings.
Note: Please refer to the index at the end of these instructions to locate any
settings you don’t recognize or understand.
To print the settings list:
1
If the machine is in F ax mode, proceed to step 2.
If it is in Copy mode, press
COPY/FAX
to change to F ax mode.
2
Press
PROGRAM,J
,2,1,
ENTER
.The display will show the following as the list
prints:
Printing a program list
Your machine can also print a program list. This lists the functions available on your
fax machine and the keystrokes needed to complete them.
Note: Please refer to the index at the end of these instructions to locate any
settings you don’t recognize or understand.
To print a program list,press /
PROGRAM
,*,8.
Print Settings
** Printing **
A Zielwahl
Programm/Eing.
A Núm. Una-Tecla
Program./Sel.
A Num. Une-Touche
Program./Val.
2.6
Page 53

Beyond the Basics
Your fax machine’s autodialer stores your most frequently called phone and fax
numbers for instant recall so you don’t have to remember them. It’s something like
an electronic phone book.
Autodialer basics
How do you autodial?
There are two kinds of autodialer numbers.The difference between the two is how
you dial them:
Type How to dial Amount stored
One-touch Press one of the keys, marked 01–72 72
on the right side of the control panel
Speed-dial Press
SPEED DIAL/TEL INDEX
followed by a 128
three-digit identifier, from 001 to 128
Total amount of numbers stored 200
Autodialing fax and phone numbers
Your fax machine’s autodialer will hold more than just fax numbers.You can store
phone numbers, too.
This is because when you use the autodialer to dial a number, the fax checks to see
if there’s a document in its feeder. If there is,the machine dials as a fax machine.If
there isn’t, it dials as a phone.
Location IDs and the EasyDial directory
When you store numbers in your autodialer, you can give these numbers descriptive
names,such as “Chicago office”or “Billing department”.Your machine calls this
name a Location ID.
Your machine’s autodialer sorts these location IDs alphabetically. Using your
EasyDial directory, you can look up these numbers by their descriptive names, just
as if you were using a phone book.
We’ll explain how to store the numbers and location
ID
s in the next few pages.The
EasyDial directory is discussed in detail on page 2.15.
Special Dialing Characters
Your fax machine allows you to enter special dialing characters when programming
the autodialer. These characters include hyphens and dashes, which make phone
numbers easier to read, and special characters needed for international calls.
The chart below briefly describes each of these characters.It also tells you what
keys to press on your fax machine to store those characters in your autodialer:
Char. What it does Keystroke(s)
–
Makes long numbers easier to read.
DIALING OPTIONS
(once)
Doesn’t change fax machine operation.
/
(Has no effect in the United States.)
DIALING OPTIONS
(twice)
!
Tells your fax machine to pause until it
DIALING OPTIONS
(3 times)
“hears” a dial tone.
Enters a pause. Each pause lasts two
seconds (or whatever length you set; see
REDIAL/PA USE
[after you enter
–/
page 1.18). Each pause uses two of the
at least one other character]
characters you can store in one phone
number.
If your fax machine is on a pulse (not
tone-dialing) line, switches from pulsedialing to tone (“
DTMF
”)-dialing. Use after
DIALING OPTIONS
(4 times)
–!
the actual phone number but before any
characters (such as a long-distance
carrier’s access code) which must be in
DTMF
tone. Do not use on a tone line.
2.7
Autodialer
Page 54

Beyond the Basics
Call groups
As you set up your autodialer, you may also want to set up call groups. These are sets
of phone numbers that make it easy to send the same fax to many different locations. For example,one call group may include all of your clients in one city, another
group may include all of your employees and another may include all your vendors.
Your fax machine can:
• Store as many as 200 numbers in up to 32 call groups
• Store one number in as many as 32 different groups
• Print a directory of your call groups (see page 2.14)
Using one-touch numbers
Your fax machine stores up to 72 one-touch numbers using the keys marked 01–72.
Entering or changing a one-touch number
1
Press /
PROGRAM,A
,1,
ENTER
. The
LCD
shows the empty one-touch number.
Note: If a one-touch number other than 01 appears on the
LCD
, it means
that you have already entered a number for 01.
2
Press the one-touch key in which you want to store a number or change a
previously stored number. Here, we’ve selected 02 and the
LCD
shows either:
or
3
If you want to select a different one-touch key, press that key now.
4
Press
ENTER
. Depending on whether you already have a number entered for
this one-touch number, the
LCD
now shows either:
or
5
Use the numeric keypad to enter the number exactly as your machine should
dial it, including whatever access codes your phone system requires. (You may
want to review “Special dialing characters,”page 2.7.) The number can be up
to 40 characters in length:
Your display can show only 20 characters at a time. To view characters beyond
those 20, press to scroll to the left or /
PROGRAM
to scroll to the right.
Note: If want to erase characters, press
CANCEL
to erase to the left.
If you want to change just one character in the number, press to
move the cursor left, or /
PROGRAM
to move it right. Press
CANCEL
to
erase the character. Then re-enter the character correctly.
6
When the number is as you want it, press
ENTER
to store it.
7
The
LCD
now displays either:
or
You now have the option to enter (or change) an alternative number.Your fax
machine will dial this alternative number during a transmission or polling
operation (see pages 2.31–2.33) after all redial attempts to the regular number fail (see page 1.22). If the alternative number also fails, the fax alarm
beeps to alert you to a problem.
Note: You can enter one alternative number for one speed-dial or one-touch
number you entered.Your fax holds a maximum of 10 alternative
numbers in all, that is, only 10 speed-dials or one-touch numbers can
have the alternative number. After you have entered the alternative
numbers for 10 speed-dials or one-touch numbers,the fax will no
longer show this display.
If you want to enter (or change) an alternative number, enter it now.
The number can be up to 40 characters long.
If you do not want to enter or change an alternative number, go on to step 8.
8
Press
ENTER
.
02:Alt. No.
9-1-555-987-6553_
02:Alt. No.
_
02:Fax Number
9-1-5559292039_
02:Fax Number
9-1-555-987-6543_
02:Fax Number
_
Select One-Touch
02:9-1-555-987-6543
Select One-Touch
02:No Number Stored
Select One-Touch
01:No Number Stored
2.8
Page 55
Beyond the Basics
9
The
LCD
now displays:
or
The machine is now prompting you for a name — a Location
ID
— so you’ll be
able to find it in the EasyDial directory (see page 2.15).
If you do not want to enter or change this Location ID, skip to step 11.
If you do want to enter or change this Location ID, go on to step 10.
10
Enter the Location IDthe same way you entered your fax name during
EasyStart.A number’s Location IDmay be up to 24 characters in length.
Important: As in EasyStart, enter letters and other non-numeric characters
by using the one-touch keys.
The word “Upper”means the machine is currently set for entering only uppercase letters. If you press R, the machine will see it as an R(not an r).
To enter a lower-case letter, press
ALPHABET
. The display changes to:
This means pressing one-touch keys will enter lower-case letters:pressing
R
will produce an r (not an R) on the display.
To switch back for upper-case entries, press
ALPHABET
.
To enter spaces, punctuation and symbols, use the one-touch keys.
You can also use the
CODE
function to enter characters.Please review the
explanation on page 2.2.
Note: To erase characters,press
CANCEL
to erase to the left.
To c hange just one c haracter in the name, press to move the cursor
left, or /
PROGRAM
to move it right. Press
CANCEL
to erase the
character. Then re-enter it correctly .
11
Press
ENTER
to save the setting and continue.
12
The
LCD
now displays:
or
You may now assign this number to up to 32 call groups. (If necessary,review
“Call groups,”page 2.8.)
If you do not want to change this number’ s call group, go to step 14.
If you do want to change this number’ s call group, go on to step 13.
13
Use the numeric keypad to enter the call groups for this number. There are 32
possible call groups,numbered 1–32.
Here, we’ve entered 3 to assign this one-touch number to Call Group 3:
If you want to assign the number to more than one call group,insert a
comma after each number (except the last one) by pressing
GROUP DIAL
. For
example, if you enter 3,
GROUP DIAL
,1,6,
GROUP DIAL
,2,7to assign this one-
touch number to Call Groups 3,16 and 27, the
LCD
shows:
Note: To assign this number to all 32 call groups,enter 0 (zero).
Note: To erase characters,press
CANCEL
to erase to the left.
To c hange just one characterin the setting, press to move the cursor
left, or /
PROGRAM
to move it right. Press
CANCEL
to erase the
character. Then re-enter it correctly .
14
Press
ENTER
.
The
LCD
will display the next empty one-touch number.
If you do want to enter this one-touch number, go back to step 4.
If you do not want to enter any more one-touch numbers ,press
STOP
to finish.
If you do not want to enter the currently displayed one-touch number but do
want to enter another one-touch number,go back to step 2.
Use the autodialer labels in your fax’s packaging to write down the stored numbers
for easy reference.You can also print out a directory of your call groups.
See page 2.14.
02:Group No.
3,16,27_
02:Group No.
3_
02:Group No.
2,6_
02:Group No.
_
02:Name ;Lower
_
02:Name ;Upper
_
02:Name ;Upper
S. W. Region Office_
02:Name ;Upper
_
2.9
Page 56

Beyond the Basics
One-touch fax dialing
To dial a fax call using a one-touch number:
1
Insert the document.
2
Adjust resolution and contrast if necessary.
3
Toggle between transmission from the feeder or from memory if necessary, by
pressing
MEMORY TRANSMIT
.
4
Press the one-touch key in which you’ve stored the number.
What happens next depends on whether you specified transmission from memory or
transmission from the feeder:
If you specified Quick Memory transmission:
• Your fax machine scans the first page of your document into memory, then dials
the other fax machine.
• While dialing, your machine scans the other documents into memory.
• The
LCD
shows the Location IDand the document’s width and resolution settings:
Note: If the entry doesn’t have a Location ID, the number appears.
• When the other machine answers,your fax transmits the scanned document
directly from memory. (To review Quick Memory transmission, see page 2.31.)
If you specified normal transmission from memory:
• Your fax machine scans your entire document into memory first, then dials the
other fax machine.
• The
LCD
shows the Location IDand the document’s width and resolution settings:
Note: If the entry doesn’t have a Location ID, the number appears.
• When the other machine answers,your fax transmits the document directly from
memory. (To review memory transmission, see page 1.18.)
If you specified transmission from the feeder:
• Your fax machine dials the other fax machine.
• When the other machine answers,your fax feeds the document through its scanner, transmitting as it goes.
• The
LCD
shows the Location IDand the document’s width and resolution settings:
Note: If the entry doesn’t have a Location ID, the number appears.
One-touch phone dialing
To dial a phone call using a one-touch number, you must have an optional handset
attached to your machine.(Contact your authorized Muratec dealer to order an
optional handset.)
To make the call:
1
Obtain a dial tone by doing one of the following:
• Lift the handset
• Press
MONITOR/CALL
to use the monitor speaker
2
Press the one-touch key in which you’ve stored the number. As the machine
dials, it shows the number on the
LCD
:
Note: Remember that your fax machine’s monitor speaker is not a speakerphone.
If you dialed by using the monitor speaker, pick up the handset to speak to
the person that answers.
Note: If the call fails, and you used
MONITOR/CALL
to dial, press
MONITOR/CALL
to
hang up.
Erasing a one-touch number
1
Press /
PROGRAM,A
,2,
ENTER
. The
LCD
shows the one-touch number you
have already entered:
Note: If the one-touch number that appears is other than 01, it means that
01 is empty.
Select One-Touch
01:9-1-555-345-6789
** Tel Mode **
9-555-2842_
Katz’s Cat Care
A4 Normal
Katz’s Cat Care
A4 Normal
Katz’s Cat Care
A4 Normal
2.10
Page 57

Beyond the Basics
2
Press the key for the one-touch number you want to erase.
Here, we’ve selected 02:
3
If you want to erase a number stored in a different one-touch key than what
appears on the
LCD
, press that key now.
4
Press
ENTER
. The
LCD
shows:
Important: If you want to quit without erasing the one-touch number
you’ve selected, press /
PROGRAM
. The fax will return to step 2.
5
Press
ENTER
to erase the number.
To erase another one-touch number, repeat steps 2–5. Or press
STOP
to return to
standby mode.
Printing a list of one-touch numbers
Forgot which number is stored in which one-touc h key? Just print a list of your onetouch numbers. The list includes each key’s number, the Location ID(if any),
fax/telephone number and group number(s) you’ve stored in the key.
To print a list of one-touch numbers, press /
PROGRAM,A
,3,
ENTER
.
Using speed-dial numbers
Your fax machine will store up to 128 speed-dial numbers, designated by three-digit
identifier codes from 001 through 128.
Entering or changing a speed-dial number
1
Press /
PROGRAM,B
,1,
ENTER
. The
LCD
shows an empty speed-dial number:
Note: If a speed-dial number other than 001 appears on the
LCD
, it means
you have already entered a number for 001.
2
Use the numeric keypad to enter the desired speed-dial number’s three-digit
identifier code.Here, we’ve entered 005 and the
LCD
shows either:
or
3
If you want to select a different speed-dial number, press that number’s threedigit identifier code now. That number appears on the
LCD
.
Important: When entering the identifier code for speed-dial numbers less
than 100, you must enter leading zeros to make three digits. For
example,001-099.
4
Press
ENTER
. Depending on whether you already have a number entered for
this speed-dial number, the
LCD
now shows either:
or
5
Use the numeric keypad to enter the speed-dial number exactly as your
machine should dial it, including whatever access codes your phone system
requires. (You may want to review “Special dialing c haracters,”page 2.7.) The
number can be up to 40 characters in length:
Your display can show only 20 characters at a time. To view characters beyond
those 20, press to scroll to the left or /
PROGRAM
to scroll to the right.
Note: To erase characters,press
CANCEL
to erase to the left.
To c hange one c haracter in the number, press to move the cursor
left, or /
PROGRAM
to move it right. Press
CANCEL
to erase the charac-
ter. Then re-enter the number correctly.
6
When the number appears as you want it, press
ENTER
to store it.
005:Fax Number
9-1-555-567-1234_
005:Fax Number
9-555-397-0123_
005:Fax Number
_
Enter Speed-Dial No.
005:9-555-397-0123
Enter Speed-Dial No.
005:No Number Stored
Enter Speed-Dial No.
001:No Number Stored
Erase One-Touch
** Complete **
Erase One-Touch
Check Program/Enter
Select One-Touch
02:9-1-555-987-6543
2.11
Page 58

Beyond the Basics
7
The
LCD
now displays either:
or
You now have the option to enter (or change) an alternative number.Your fax
machine will dial this alternative number during a transmission or polling
operation (see pages 2.31–2.33) only after redials to the regular number have
failed. If the alternative number also fails, the fax alarm beeps to alert you to
a problem.
Note: You can enter one alternative number for one speed-dial or one-touch
number you entered.Your fax holds a maximum of 10 alternative
numbers in all, that is, only 10 speed-dials or one-touch numbers can
have the alternative number. After you have entered the alternative
numbers for 10 speed-dials or one-touch numbers,the fax will no
longer show this display.
If you do not want to enter or change an alternative number, skip to step 8.
If you do want to enter or change an alternative number, use the numeric
keypad to do so the same way you did in step 5.This number can be up to 40
characters long
8
Press
ENTER
.
9
The
LCD
now displays:
or
The machine is now prompting you for a name — a Location
ID
— so you’ll be
able to find it in the EasyDial directory (see page 2.15).
If you don’t want to enter or change this number’s Location ID, skip to step 11.
If you do want to enter or change this number’s Location ID, go on to step 10.
10
Enter the Location IDthe same way you entered your fax name during
EasyStart.A number’s Location IDmay be up to 24 characters in length.
Important: As in EasyStart, enter letters and other non-numeric characters
by using the one-touch keys.
The word “Upper”means the machine is currently set for entering only uppercase letters. If you press R, the machine will see it as an R(not an r).
To enter a lower-case letter, press
ALPHABET
. The display changes to:
This means pressing one-touch keys will enter lower-case letters:pressing
R
will produce an r (not an R) on the display.
To switch back for upper-case entries, press
ALPHABET
.
Use the one-touch keypad to enter spaces,punctuation and symbols.
You can also use the
CODE
function to enter characters.Please review the
explanation on page 2.2.
Note: To erase characters,press
CANCEL
to erase to the left.
To c hange one c haracter in the name, press to move the cursor left,
or /
PROGRAM
to move it right. Press
CANCEL
to erase the character.
Then re-enter the name correctly.
11
Press
ENTER
to save the setting and continue.
12
The
LCD
now displays:
or
You may now assign this number to up to 32 call groups. (If necessary,review
“Call groups,”page 2.8.)
If you do not want to change this number’ s call group, skip to step 14.
If you do want to change this number’ s call group, go on to step 13.
13
Use the numeric keypad to enter the call groups for this number. There are 32
possible call groups,numbered 1–32.
Here, we’ve entered 6 to assign this speed-dial number to Call Group 6:
Note: You do not have to insert a leading zero for the call group number.
If you want to assign the number to more than one call group,insert a comma
after each number (except the last one) by pressing
GROUP DIAL
.
Here, we’ve entered 6,
GROUP DIAL
, 1,7,
GROUP DIAL
,3,0to assign this speed-
dial number to Call Groups 6, 17 and 30:
Note: To assign this number to all 32 call groups,enter 0 (zero).
005:Group No.
6,17,30_
005:Group No.
6_
005:Group No.
1,4,12_
005:Group No.
_
005:Name ;Lower
_
005:Name ;Upper
_
005:Name ;Upper
West Coast Sales_
005:Name ;Upper
_
005:Alt. No.
9-1-555-789-3556_
005:Alt. No.
_
2.12
Page 59
Beyond the Basics
Note: To erase characters,press
CANCEL
to erase to the left.
To c hange just one c haracter, press to move the cursor to the left, or
/
PROGRAM
to move it to the right. Press
CANCEL
to erase the charac-
ter. Then re-enter the setting correctly.
14
Press
ENTER
.
The
LCD
will display the next empty speed-dial number.
If you want to enter this speed-dial number, go back to step 4.
If you do not want to enter any more speed-dial numbers,press
STOP
to finish.
If you do not want to enter the currently displayed speed-dial number but do
want to enter another speed-dial number,go back to step 2.
Fax dialing via speed-dial
To dial a fax call using a speed-dial number:
1
Insert the document.
2
Adjust resolution and contrast if necessary.
3
Toggle between transmission from the feeder or from memory if necessary, by
pressing
MEMORY TRANSMIT
.
4
Press
SPEED DIAL/TEL INDEX
. The
LCD
shows:
5
Use the numeric keypad to enter the three-digit identifier (such as 018, in this
example) for the speed-dial number you want to dial. The
LCD
shows:
6
Press
START
.
What happens next depends on whether you specified transmission from memory or
transmission from the feeder:
If you specified quick memory transmission:
• Your fax machine scans the first page of your document into memory, then dials
the other fax machine.
• While dialing, your machine scans the other documents into memory.
• The
LCD
shows the Location IDand the document’s width and resolution settings:
Note: If the entry doesn’t have a Location ID, the number appears.
• When the other machine answers,your fax transmits the scanned document
directly from memory. (To review quick memory transmission, see page 2.31.)
If you specified normal transmission from memory:
• Your fax machine scans your entire document into memory, then dials the other
fax machine.
• The
LCD
shows the Location IDand the document’s width and resolution settings:
Note: If the speed-dial entry doesn’t have a Location ID, the number appears.
• When the other machine answers,your fax will transmit the document directly
from memory. (To review memory transmission, see page 1.18.)
If you specified transmission from the feeder:
• Your fax machine dials the other fax machine.
• When the other machine answers,your fax feeds the document through its
scanner, transmitting as it goes.
• The
LCD
shows the Location IDand the document’s width and resolution settings:
Note: If the speed-dial number doesn’t have a Location ID, the number appears.
Phoning via speed-dial
To dial a phone call using a speed-dial number, you must have an optional handset
attached to your machine.To make the call:
1
Obtain a dial tone by doing one of the following:
• Lift the handset
• Press
MONITOR/CALL
to use the monitor speaker
2
Press
SPEED DIAL/TEL INDEX
. The
LCD
shows:
3
Use the numeric keypad to enter the three-digit identifier (such as 018, in this
example) for the speed-dial number you want to dial. The
LCD
shows:
** Tel Mode **
9-555-5783_
** Tel Mode **
S_
Shipping & Receiving
A4 Normal
Shipping & Receiving
A4 Normal
Shipping & Receiving
A4 Normal
Shipping & Receiving
S018_
Enter Speed-Dial No.
S_
2.13
Page 60

Beyond the Basics
Note: Remember that your fax machine’s monitor speaker is not a speakerphone.
If you dialed using the monitor speaker, pick up the handset to speak to the
person that answers!
Note: If the call fails, and you used
MONITOR/CALL
to dial, press
MONITOR/CALL
to
hang up.
Erasing a speed-dial number
1
Press /
PROGRAM,B
,2,
ENTER
. The
LCD
shows the speed-dial number you
have already entered:
Note: If the speed-dial number that appears is other than 001, it means
that 001 is empty.
2
Use the numeric keypad to enter the three-digit identifier for the speed-dial
number you want to erase.Here, we’ve selected 005:
3
If you want to erase a different speed-dial number than the one that appears
on the
LCD
, enter that number now.
4
Press
ENTER
. The
LCD
shows:
Important: If you want to quit without erasing the speed-dial number
you’ve selected, press /
PROGRAM
. The fax will return to step 2.
5
Press
ENTER
to erase the number.
To erase another speed-dial number, repeat steps 2–5. Or press
STOP
to return to
standby mode.
Printing a list of speed-dial numbers
You can easily print a list of your speed-dial numbers. The list includes each number’s
three-digit identifier, the Location ID(if any), number and any group numbers
you’ve stored for that speed-dial number.
To print a list of speed-dial numbers, press /
PROGRAM,B
,3,
ENTER
.
Printing a call group directory
Your machine can also print a call group directory. (If necessary ,review “Call groups ,”
page 2.8.) This lists all your stored autodialer numbers by Location
ID
and lists the
groups to which these numbers belong.
The directory divides the call groups into four banks,01–09 (the list shows 00), 10–19
(the list shows 10), 20–29 (the list shows 20) and 30–32 (the list shows 30). If you specify call group 0 (which puts the number in all call groups), the directory shows all
numbers (see below).
For example ,the directory might show:
In this list, speed-dial number 001 (S001) is in call groups 2 and 4; speed-dial number 002 (S002) is in groups 7, 10 and 21; speed-dial number 003 (S003) is in groups
20 and 32; one-touch number 01 ([01]) is in groups 4, 10 and 14; one-touch number
02 ([02]) is in group 1; and one-touch number 03 ([03]) is in all groups,1 to 32.
To print a call group directory, press /
PROGRAM,H,ENTER
.
S001 And Sew I 2 4
S002 KC Enterp 7 0 1
S003 Katz Cat 0 2
[01] Carson Co 4 0 4
[02] Tex. Ofc. 1
[03] e.e.gummi 12345678901234567890123456789012
00 10 20 30No. Location
Erase Speed-Dial
** Complete **
Erase Speed-Dial
Check Program/Enter
Enter Speed-Dial No.
005:9-1-555-987-6543
Enter Speed-Dial No.
001:9-555-584-6950
2.14
Page 61

Beyond the Basics
EasyDial directory dialing
EasyDial directory dialing makes your autodialer even more like an electronic
phone book. EasyDial sorts and displays numbers alphabetically according to their
Location IDs,so you can find them and dial them easily.
To dial using EasyDial:
1
For a regular phone call:Make sure there’s no document in the feeder, then
skip to step 4.
For a fax call:Insert the document.
2
Adjust resolution and contrast if necessary.
3
If you want to toggle between transmission from memory and transmission
from the feeder, press
MEMORY TRANSMIT
.
4
Press
SPEED DIAL/TEL INDEX
twice.The
LCD
shows the first listing in your fax
machine’s EasyDial directory:
The EasyDial directory sorts entries alphabetically in the following order:
(1) by alphabet, (2) by number and (3) by symbol.
If the listing that appears is the one you want to dial, skip to step 6.
5
Scroll through the listings to find the one you want.You do this by pressing
the following keys on the numeric keypad:
• 2 or 8 to select the character set — alphabet, number or symbol — for the
first character of the Location ID.
• 4 or 6 to check different listings within that character set.
Note: The scrolling is “open-ended.” For example,when you run out of
listings beginning with alphabet “A”, pressing 4 or 6 automatically
moves you into listings beginning with other characters.
6
When the
LCD
displays the name you want to dial,press
START
.
• If there is a document in the feeder, your machine will dial a fax call.
• If there isn’t a document in the feeder, your machine will activate the monitor speaker and dial a regular phone call. At this point, you may either:
— Lift the handset now
or
— Listen to the monitor speaker until you hear the other person answer,
and then lift the handset.
To make a regular phone call from your machine, you must have an
optional handset attached.
If an EasyDial call fails
If an EasyDial call fails,what happens next depends upon the kind of call it was.
If it was a fax call …
… Your fax machine automatically redials the number according to the redial inter-
val you’ve set (see page 1.22). It keeps trying until either of the following occurs:
• It successfully reaches the other number
• It has attempted the number of redials programmed and has still not connected
(see “Changing redial settings,” page 1.22).
If it was a regular phone call …
… You’ll have to redial manually:
1
Obtain a dial tone by either lifting the handset or pressing
MONITOR/CALL
.
2
Press
REDIAL/PA USE
.
Note: If the call fails and you used
MONITOR/CALL
to dial, press
MONITOR/CALL
to
hang up. Or if you’ve pressed
START
to begin the transmission, press
STOP
to
end it.
Telephone Index [A]
ABC Company :[01]
2.15
Page 62

Beyond the Basics
Broadcasting basics
The fastest way to fax one document to many recipients is to broadcast it.
In an ordinary broadcast, you send the fax as you normally would, except you just
add more fax numbers.You can enter up to 230 numbers:
•30 manually-dialed numbers AND
•200 autodialer numbers OR 1 call group with all 200 autodialer numbers
You can broadcast using any function that requires a fax number to be
entered. That means you can send a delayed broadcast, program a polling broad-
cast and even broadcast to “hub”units for F-Code relay broadcast initiation. All of
these are explained in this chapter.
To send a broadcast fax:
1
Insert the document and make any necessary adjustments as you would for a
regular fax transmission.
2
Press
BROADCAST
.
3
Enter the first fax number,as usual. Use either a one-touch number, a speeddial number, a call group or a regular number dialed from the numeric keypad.
4
To add more fax numbers ,press
BROADCAST
between each one to insert a
comma.Then enter the number as described in step 3 (
GROUP DIAL
inserts its own
comma).Y ou can send to up to 230 numbers for a broadcast.
Important: Do not insert a comma after the last fax number.
Note: If you enter characters by mistake, press
CANCEL
to erase them.
5
Press
START
.Your fax machine scans the document into memory and then
sends it to each number or call group you’ve entered.
Delayed broadcasting
What if you want the broadcast to take place later? That’s the purpose of setting up
a delayed broadcast.
Note: Delayed commands are discussed in detail later.You may want to read
“Delayed transmission” on page 2.17 before proceeding.
1
Follow steps 1–4 of “Broadcasting basics” (left column).
2
Press
COM-OPTIONS,ENTER
.
3
Use the numeric keypad to enter the day of the month and time (in 24-hour
format) when you want the broadcast to occur.
Here, we’ve scheduled it for 10:15 PMon the 30th.
When finished, press
ENTER
to save the setting.
4
Press
START
. Y our mac hine will return to standby mode, while showing this on
the
LCD
:
This means your fax machine is “reserved”for the delayed broadcast you
just programmed, but it can still be used to send and receive faxes if your
broadcast document is stored in memory.
Making changes to broadcasts
If you need to make changes in a broadcast after setting it up, use the
REVIEW
COMMANDS
function. See “Reviewing or cancelling parts of a broadcast,” page 2.18.
** Reserved **
Jan 29 2000 17:17
Delayed
Enter Time: 30/22:15
Press Start
[03],S098,[10],9-555
2.16
Broadcasting
Page 63

Beyond the Basics
Take advantage of lower evening and weekend long-distance rates with delayed
transmission. Your fax machine can store up to 99 delayed commands, each of which
you can program up to 31 days in advance.
Important: If you program all 99 delayed transmission commands, no further
memory transmission is possible until one or more of the commands is
completed. (To review memory transmission,see page 1.18.) However,
if all 99 delayed commands are programmed, you can always transmit
manually using monitor/speaker dialing or an optional handset (see
page 1.21).
Setting up a delayed transmission
Important: Your machine only remembers the day of the month that it’s supposed
to send a delayed transmission. It does not remember the month
itself.So if you want to send a transmission at 5:05PMon June 26,
don’t program the transmission sooner than 5:06PMon May 26.
To set up a delayed transmission:
1
Insert the document and make any necessary adjustments.
2
Press
COM-OPTIONS
. The
LCD
shows:
3
Press
ENTER
.The
LCD
shows the current day of the month, followed by the
current time (in 24-hour format):
4
Use the numeric keypad to enter the day of the month and the time when you
want the fax to send the delayed transmission.
Note: Press to move the cursor left, or /
PROGRAM
to move it right.
Here, we’ve set the transmission to occur on the 11th at 11:05
PM
:
5
When the date and time are entered, press
ENTER
to save the delayed trans-
mission.The
LCD
shows:
6
Enter the fax number for the delayed transmission document.You can either
press a one-touch key, enter a speed-dial number or use the numeric keypad
to enter the fax number.
Note: If you want to erase characters, press
CANCEL
to erase to the left.
If you want to change just one character in the number, press to
move the cursor left, or /
PROGRAM
to move it right. Press
CANCEL
to
erase it.Then re-enter the number correctly.
7
Press
START
. Y our mac hine returns to standby mode, while showing this on
the
LCD
:
This means your fax machine is “reserved”for the delayed transmission you
just programmed.
• If you set the machine for memory transmission, it will scan the document
into memory, after which you can use the machine normally.
• If you set the machine for manual transmission, the machine can receive
faxes but can’t transmit until your delayed command has been performed.
Important: If you’ve stored too much information in your machine’s memory, a
“Memory Overflow” message may appear on the
LCD
.This appears
because (1) too many pages have been stored in the memory, or (2)
the pages that are stored have too much information on them for your
fax machine to remember.
If this message appears,press
START
to tell your fax to keep as many
pages in memory as possible, or press
CANCEL
to delete from memory
all pages stored during the current operation (but not previous operations).
** Reserved **
Jan 29 2000 17:17
Enter Fax Number
_
Delayed
Enter Time: 1
1/23:05
Delayed
Enter Time: 06/17:16
1.Delayed
Program/Enter
2.17
Delayed transmission
Page 64

Beyond the Basics
Reviewing or canceling delayed commands
If you’ve stored a delayed command in your fax machine,it will hold it in memory
until it either completes the command successfully or reaches its maximum number
of redial attempts (see page 1.22).Your machine can store up to 99 delayed commands.It identifies each by a two-digit command number ranging from 01 to 99.
To see your machine’s stored commands or to cancel them:
1
Press
REVIEW COMMANDS
.
• If there are no stored commands in your machine — It beeps briefly
and displays “No Command”on the
LCD
. It then returns to standby mode.
• If there are commands in your machine’s memory, the
LCD
shows:
Here, you see command 01, followed by the number it’s set to dial. If the command is to send a broadcast, “Broadcast” appears instead of the phone
number .(See “Broadcasting, ”page 2.16.)
If the command is to send a batch transmission, the
LCD
shows its batch box
number (such as “B01”) rather than the command number. (See “Batch transmission,”pages 2.20–2.23.)
If the command is for a continuous polling operation, the
LCD
shows its contin-
uous polling operation number (such as “P01”) rather than the command
number. (See “Polling,”on pages 2.31–2.33.)
Note: If your machine is attempting to perform a command now, it appears
on the display.
2
Press /
PROGRAM
or to scroll through currently stored commands.
3
If you want to cancel the command shown, press
CANCEL
. The
LCD
shows:
4
To keep this command but to continue reviewing stored commands, press
/
PROGRAM
. Go back to step 2.
To keep this command and stop reviewing commands, press
STOP
to return
your machine to standby mode.
To go ahead with cancelling the command,press
CANCEL
again. Go back to
step 2 to view other delayed commands.
Note: See also “Reviewing or cancelling parts of a broadcast,”next column.
Reviewing or cancelling parts of a broadcast
You also can review or cancel certain numbers within a broadcast:
1
Press
REVIEW COMMANDS
.
2
Press /
PROGRAM
or to scroll through currently stored commands.
Note: Stop this operation at any time by pressing
STOP
.
3
If you want to cancel the command shown, press
CANCEL,CANCEL
.
If you want to review individual numbers within this broadcast,go on to
step 4 without pressing
CANCEL
.
4
To review individual numbers within this broadcast, press
BROADCAST
to see
the first number. The
LCD
shows:
5
Press /
PROGRAM
or until you find the number you want to cancel.
6
Press
CANCEL,CANCEL
. The next number will appear.
If you want to cancel this number, also,repeat this step.
If you want to cancel a different number, go back to step 5.
If you don’t want to cancel any more numbers,press
STOP
.The machine
returns to standby mode.
9-5550388
Program/Cancel
C01:9-5552311
Check Program/Cancel
C01:9-5552311
Program/Cancel
2.18
Page 65

Beyond the Basics
Printing a delayed command list
Your machine can print a command list which tells you:
• The command’s identification number
• The phone number, or “remote location”
• The start time (this appears in a DD,HH:MMformat)
• A “note”telling if the command is a polling or F-Code operation (see pages
2.31–2.33 for more on polling and 2.38–2.47 for more on F-Code communication).
To print a delayed command list,press /
PROGRAM,F
,1,
ENTER
.
Printing a stored document
Your fax machine can print out each document stored for delayed transmission. To
print a stored document, you’ll need to know the document’s command number,
which you can get by either reviewing the commands (see page 2.18) or printing a
delayed command list (see above).
1
Press /
PROGRAM,F
,2,
ENTER
. The
LCD
shows:
2
Use the numeric keypad to enter the command’s identification number, 01–99.
For example ,we could enter the following for the very first command,01:
3
Press
ENTER
. Y our fax mac hine will print a copy of the stored document.
Print Stored Doc.
Command No. :01_
Print Stored Doc.
Command No. :_
2.19
Page 66

Beyond the Basics
Batch transmission allows you to store multiple documents in an electronic “basket”
throughout the day and then fax that entire basket to one location.
To do this, just tell the machine when and where the transmission should go. When
that date and time arrives,your machine will transmit each document in the batch
box to the remote fax machine.You can store up to 40 documents (each document
can include one page or many pages) into your machine’s five electronic batch boxes.
Creating or modifying a batch box
Before sending a batch transmission, you have to create batch boxes in your fax
machine.The steps below also let you modify existing batch boxes.
To create or modify a batch box:
1
Press /
PROGRAM,N
,1,
ENTER
. Depending on whether you already have a
number entered for batch box 1, the
LCD
shows:
or
2
Use the numeric keypad to enter the number (1–5) of the batch box you want
to create or modify. Here,we’ve pressed 3 and see either:
or
3
If you want to select a different batch box than the one displayed on the
LCD
,
use the numeric keypad to enter the batch box number now.
4
Press
ENTER
. The
LCD
now shows either:
or
5
Use the numeric keypad to enter the fax number exactly as your machine
should dial it, including whatever access codes your phone system requires.
(You may want to review “Special dialing characters, ”page 2.7.) The number
can be up to 40 characters in length:
Your display can show only 20 characters at a time. To view characters beyond
those 20, press to scroll to the left or /
PROGRAM
to scroll to the right.
Note: To erase characters,press
CANCEL
to erase to the left.
To c hange just one number, press to move the cursor left, or
/
PROGRAM
to move it right. Press
CANCEL
to erase it.Then re-enter
the number correctly.
6
When the number appears as you want it, press
ENTER
. The
LCD
now displays:
7
Instruct your fax to send from this batch box in one of the following ways:
Option 1: Onceat a certain time on a certain day of the month (For exam-
ple: “Do this at 5:05 PMon the 30th.”) — Use the numeric keypad
to enter the date and time (24-hour format) the machine should
send the documents from the batch box:
Option 2: At a certain time each day you press the key (For example: “Do
this at 5:05 PMtoday.”) — Use the numeric keypad to enter 0, 0
(00),and then the time when the fax should send the documents
from the batch box:
Note: To change a digit in the date or the time,press to move the cursor
left or /
PROGRAM
to move it right.Then enter the correct number.
8
When the date and time are set, press
ENTER
.
9
The
LCD
now displays:
or
The machine now asks you to name this batch box.
If you do not want to enter or change this batch box’s name,skip to step 11.
3:Name ;Upper
Bookkeeping_
3:Name ;Upper
_
3:Transmit Time
Enter Time: 00/17:05
3:Transmit Time
Enter Time: 30/17:05
3:Transmit Time
Enter Time: 26/14:00
3:Fax Number
9-1-555-871-9052_
3:Fax Number
9-555-2110_
3:Fax Number
_
Select Batch Box
3:9-555-2110
Select Batch Box
3:No Number Stored
Select Batch Box
1:9-1-555-345-6789
Select Batch Box
1:No Number Stored
2.20
Batch transmission
Page 67
Beyond the Basics
10
Enter the name the same way you entered your fax name during EasyStart.
A batch box’s name may be up to 24 characters in length.
Important: As in EasyStart, enter letters and other non-numeric characters
by using the one-touch keys.
The word “Upper”means the machine is currently set for entering only uppercase letters. If you press R, the machine will see it as an R(not an r).
To enter a lower-case letter, press
ALPHABET
. The display will change to:
This means pressing one-touch keys will enter lower-case letters:pressing
R
will produce an r (not an R) on the display.
To switch back for upper-case entries, press
ALPHABET
.
Use the one-touch keypad to enter spaces,punctuation and symbols.
You can also use the
CODE
function to enter characters.Please review the
explanation on page 2.2, if necessary.
Note: To erase characters,press
CANCEL
to erase to the left.
To c hange just one c haracter in the name, press to move the cursor
left, or /
PROGRAM
to move it right. Press
CANCEL
to erase it.Then re-
enter the name correctly.
11
Press
ENTER
to save the batch box information.
To create or modify another batch box,repeat steps 2–11.To finish, press
STOP
.
Printing a list of batch boxes
You can easily print a list of your batch boxes. The list includes each box’s identifier
number, the Location ID, fax number and date/time the transmission should start.
To print the list,press /
PROGRAM,N
,2,
ENTER
.
Storing a document for batch transmission
Your fax machine can store up to 40 documents (each document can include one
page or many pages) in each batch box until the date and time you designate the
batch transmission to take place. Once the batch documents are transmitted, they
are automatically erased from the machine’s memory.
Note: For this operation to work,two things must be true:
• The batch box must exist on your fax machine.
• You must know the batch box’s one-digit number (1–5).
To store a document in a batch box for batch transmission:
1
Insert the document and make any necessary adjustments.
2
Press
COM-OPTIONS
three times and then press
ENTER
. The
LCD
shows:
3
Use the numeric keypad to enter the one-digit number for the batch box you
want to use.Here,we’ve entered 5 to indicate batch box 5.
Note: Tx is a common abbreviation for transmission.
4
Press
ENTER
. The
LCD
shows:
Important: Your machine gives each document in a batch box a file number,
shown as 01 above.You will need to know this file number
should you later wish to erase or print the stored document.
Each batch box holds up to 40 files (01-40).
5
Press
START
.The machine displays “Reserved”on the top line of the
LCD
.This
means the document is stored in memory.
Printing a list of stored batch documents
You can print a list of the documents stored in your machine’s batch boxes.This list
provides you with the documents’ file numbers so you can erase or print them as
needed.
To print the list,press /
PROGRAM,N
,3,
ENTER
.
Press Start
Box: 5 File: 01
Batch Tx
Enter Box No. 5_
Batch Tx
Enter Box No. _
3:Name ;Lower
_
3:Name ;Upper
_
2.21
Page 68

Beyond the Basics
Printing a document stored in a batch box
To print a document stored in a batch box:
1
Press /
PROGRAM,N
,4,
ENTER
. The
LCD
shows:
2
Use the numeric keypad to enter the number (1–5) of the batch box storing the
document you want to print.
3
Press
ENTER
. The
LCD
shows:
4
Use the numeric keypad to enter the document’s two-digit file number (01–40).
If the file number is 01–09, be sure to enter the leading zero.
5
Press
ENTER
.
Your fax machine prints the document, then returns to standby mode.
Erasing a document stored in a batch box
To erase a document stored in a batch box on your fax machine:
1
Press /
PROGRAM,N
,6,
ENTER
. The
LCD
shows:
2
Use the numeric keypad to enter the number (1–5) of the batch box storing the
document you want to erase.
3
Press
ENTER
. The
LCD
shows:
4
Use the numeric keypad to enter the document’s two-digit file number (01–40).
If the file number is 01–09, be sure to enter the leading zero.
5
Press
ENTER
. The fax machine now gives you one last chance to change your
mind before erasing the document.
Important: To quit the operation without erasing this or any document,
press
STOP
. The machine returns to standby mode.
6
Press
ENTER
. The fax machine erases the document you’ve chosen, then
returns to standby mode.
Erase Batch Doc.
Check Enter/Stop
Erase Batch Doc.
Enter File No. _
Erase Batch Doc.
Enter Box No. _
Print Batch Doc.
Enter File No. _
Print Batch Doc.
Enter Box No. _
2.22
Page 69

Beyond the Basics
Erasing an empty batch box
Batch boxes must be empty to be erased. If a box has documents stored in it, then
you first have to erase those documents.See page 2.22.
To erase an empty batch box:
1
Press /
PROGRAM,N
,5,
ENTER
. The
LCD
shows:
or
2
Use the numeric keypad to enter the number (1–5) of the batch box you want
to erase. Here, we’ve pressed 2 and see:
3
If you want to erase a different batch box than what appears on the
LCD
, enter
that batch box’s number now.
4
Press
ENTER
. If the batch box is empty, the
LCD
shows:
Important: If you select a batch box which is not empty, the machine beeps
and briefly displays:
Erase any documents stored in the batch box (see page 2.22),
then go back to step 3.
Important: If you want to quit without erasing the batch box you’ve
selected, press /
PROGRAM
. The fax will return to step 2.
Important: If you want to quit without erasing any batch box, press
STOP
.
The machine returns to standby mode.
5
Press
ENTER
to erase the batch box.
To erase another batch box,repeat steps 2–5.To finish, press
STOP
.
Erase Batch Box
** Complete **
Select Batch Box
Document Stored
Erase Batch Box
Check Program/Enter
Select Batch Box
2:9-1-972-5559900
Select Batch Box
1:9-5551023
Select Batch Box
1:No Number Stored
2.23
Page 70
Beyond the Basics
Your fax machine has numerous special features to make your communication easier.
We’ll cover them here.
Soft Keys
Soft Keys are shortcut keys.You can program the soft keys on the control panel to
turn on or off any function with just the touch of a button.Your machine has three
Soft Keys. If the light above any one of these keys glows, that means the setting
programmed into that key is active.
These keys are programmed at the factory to turn the following functions on or off:
• Confirmation stamp (see page 2.5)
• Confirmation report (see page 2.30)
• Memory transmission (see pages 1.18)
Note: The keys that are programmed at the factory turn the functions above them
on and off,but only for the next transmission that you send from your fax
machine. Once that transmission is complete, your machine returns to its
default setting.
But instead of using the Soft Keys to control the functions above, you can program
them to turn other functions on or off.These functions are:
• Send TTI (see “Getting Started,” page 1.15)
• Cover page (see page 2.28)
• Flash — Lets you quickly disconnect a call and go right to the next one without
having to hang up the handset.
Note: And instead of just turning the function on or off for the next transmission,
as the factory-set keys do, changing the Soft Key settings actually sets the
default for your fax machine. (These default settings can be changed, if
necessary. They are not permanent.)
Setting the Soft Key
1
Press /
PROGRAM,E,ENTER
. The
LCD
shows:
. . . or indicates another function you’ve stored into this key.
2
Press or /
PROGRAM
until the Soft Key (1-3) you want to change appears.
In this example, we’ve chosen 3.
3
Press
ENTER
.The
LCD
shows:
4
Press or /
PROGRAM
until the function appears that you want to program
into the key. In this example,we’ve chosen Cover page.
5
Press
ENTER
to save the setting.
The
LCD
will display the next Soft Key.
If you do want to set this Soft Key, go back step 3.
If you do not want to set the currently displayed Soft Key but do want to set
another Soft Key, go back to step 2.
If you do not want to set any more Soft Keys,press
STOP
to finish.
Now you can use the labels included in your machine’s original packaging to label
the Soft Key function you just set.
3:Cover page
Program/Enter
3:Memory Tx
Program/Enter
Select Soft Key No.
1:Stamp
2.24
Special features
Page 71

Beyond the Basics
Macros
In order to complete some operations on your machine, you may have to follow several steps and press several different buttons.But programming your machine’s
Macro keys (
MACRO
1 –
MACRO
3) can reduce those many steps to a simple press of a
key. You can “teach” the Macro keys to carry out any of the following jobs:
Note: One Macro key can hold only one job. It cannot combine two or more jobs.
Copy:
• Copy settings (Number of copies,Paper size,Sort on/off,Resolution, Contrast and
Enlargement/Reduction) (pages 1.28–1.29)
Printouts:
• One-touch numbers list (pages 2.11)
• Speed-dial numbers list (pages 2.14)
• Programmable one-touch numbers list (pages 2.55)
• Delayed commands list (pages 2.19)
• Activity journal (pages 2.29)
• Call group directory (pages 2.14)
• Machine settings list (pages 2.6)
• Sample cover page (pages 2.28)
• Department time list (pages 2.63)
• Batch box list (pages 2.21)
• List of stored batch documents (pages 2.21)
• List of transfer pattern (pages 2.37)
• List of F-Code boxes (pages 2.42)
• List of documents stored in F-Code boxes (pages 2.42)
• Stored polling documents (pages 2.33)
• Delayed commands documents (pages 2.19)
• Security receive documents (pages 2.57)
• Batch transmission documents (pages 2.21)
• F-Code Box (bulletin box) documents (pages 2.43)
Document storage:
• Regular polling documents (pages 2.31)
• F-Code polling documents (pages 2.42)
Communications functions:
• Delayed transmission (explained on pages 2.17–2.19)
• Regular polling (page 2.31)
• Continuous polling (pages 2.32)
• Batch transmission (pages 2.20–2.23)
• F-Code transmission (pages 2.46–2.47)
• F-Code polling (page 2.47)
Programming the Macro key
1
Press
MACRO PROGRAM,ENTER
. The
LCD
shows:
2
Press the Macro key (
MACRO
1 –
MACRO
3) you want to program or change.In
this example, we’ve chosen
MACRO
2.
3
Press
ENTER
. If you chose the key already programmed, proceed to step 4.
Otherwise, skip to step 5.
4
The
LCD
shows:
If you want to overwrite the operation already programmed, press
ENTER
.
If you want to overwrite only the job’s name,press
PROGRAM
and go to step 9.
If you do not want to overwrite the key you have choiced,press
STOP
.
5
The
LCD
of stand-by mode appears,which means the machine is ready to reg-
ister the steps into the Macro key.
Note: It keeps beeping during the job registration in order to make notice of
the registration mode.
Fax Ready
Jan 11 2000 13:30
Overwrite?
Check Program/Enter
Select Macro Key
M2:No Number Stored
Select Macro Key
M1:No Number Stored
2.25
Page 72
Beyond the Basics
6
Press the keys exactly as you operate the job you want to program into the
Macro key.
Note: You can program up to 60 steps.When it comes over 60 steps,your fax
machine asks if you register the operations you have entered. If you
want to register them, press
ENTER
. If not,press
STOP
.
Note: If you want to cancel the operations you have set, press
MACRO PROGRAM,STOP
and then go back to step 1.
Example 1: To program some operations for copy: Press
COPY/FAX
, and set
number of the copies,paper size, contrast, resolution,reduction/enlargement
rate and sort setting as you want.
Note: See “Making copies” (pages 1.28–1.31) for detail operations.
Example 2: To program the operations for printing the one-touch numbers
list: Press /
PROGRAM,A
,3,
ENTER
.
7
If you programmed
ENTER
or
START
into the operation, proceed to step 8.
Otherwise, press
MACRO PROGRAM
and skip to step 9.
8
If you want to start immediately after pressing the Macro key when you use
it, press
ENTER
. If not, press /
PROGRAM
.
Note: If you want to confirm the settings or operations in the Macro key
before you start it, press /
PROGRAM
here.
9
The
LCD
now displays:
or
The machine now asks you to name this job.
If you do not want to enter or change this job’s name, skip to step 11.
10
Enter the name the same way you entered your fax name during EasyStart.
A job’s name may be up to 130 characters in length.
Important: As in EasyStart, enter letters and other non-numeric characters
by using the one-touch keys.
The word “Upper”means the machine is currently set for entering only uppercase letters. If you press R, the machine will see it as an R(not an r).
To enter a lower-case letter, press
ALPHABET
. The display will change to:
This means pressing one-touch keys will enter lower-case letters:pressing
R
will produce an r (not an R) on the display.
To switch back for upper-case entries, press
ALPHABET
.
Use the one-touch keypad to enter spaces,punctuation and symbols.
You can also use the
CODE
function to enter characters.Please review the
explanation on page 2.2, if necessary.
Note: To erase characters,press
CANCEL
to erase to the left.
To c hange just one c haracter in the name, press to move the cursor
left, or /
PROGRAM
to move it right. Press
CANCEL
to erase it.Then re-
enter the name correctly.
11
Press
ENTER
to save the setting.
To program or modify another job ,repeat steps 2–11.To finish, press
STOP
.
Copying with the Macro key
To copy using a Macro key:
1
Insert the document.
2
Press the Macro key in which you’ve stored the copy command.
3
Press
START
, if you have not registered
START
in the Macro key.
Printing lists using the Macro key
To print a list using a Macro key:
Press the Macro key in which you’ve stored the list operation you want to print.
Storing fax documents with the Macro key
To store a fax document for either polling or F-Code polling using a Macro key:
1
Insert the document.
2
Press the Macro key which is programmed for the storing operation you want
to use.
3
Press
ENTER
, if you have not registered
ENTER
in the Macro key.
M2:Macro Name ;Lower
_
M2:Macro Name ;Upper
_
M2:Macro Name ;Upper
Delayed_
M2:Macro Name ;Upper
_
Include Start/Enter
Check Program/Enter
2.26
Page 73

Beyond the Basics
Fax dialing with the Macro key
To dial a fax call using a Macro key:
1
Insert the document.
2
Press the Macro key in which you’ve stored the fax communication command.
3
Press
START
, if you have not registered
START
in the Macro key.
Your fax will perform the operation now ,or at whatever time you programmed.
If you programmed this key to delay its operation, the
LCD
shows:
If you programmed this key to perform the operation immediately after you press it,
the
LCD
shows the number:
Erasing a Macro key
1
Press
MACRO PROGRAM
twice,
ENTER
. The
LCD
shows:
2
Press the Macro key (
MACRO
1 –
MACRO
3) you want to erase.Here, we’ve cho-
sen
MACRO
2.
3
Press
ENTER
. The
LCD
shows:
Important: If you want to quit without erasing the Macro key you’ve
selected, press /
PROGRAM
. The fax will return to step 2.
4
Press
ENTER
to erase the job.
To erase another Macro key, repeat steps 2–4. Or press
STOP
to return to standby
mode.
Printing a list of your Macro keys
Your fax machine can print a list of the Macro keys.
The list includes:
(1) each key’s Macro key number
(2) the name of the job stored in the Macro key
To print a list of Macro keys, press
MACRO PROGRAM
three times,
ENTER
.
Setting the speed for Macros
You can adjust the speed of one step in the Macro key .
1
Press
MACRO KEY
four times,
ENTER
. The
LCD
shows:
2
Press or /
PROGRAM
until the mode you want appears.The possible set-
tings are:
3
Press
ENTER
to save the setting.
Macro Speed :Fast
Program/Enter
Macro Speed :Slow
Program/Enter
Macro Speed :Norm
Program/Enter
Macro Speed :Norm
Program/Enter
Erase Macro
** Complete **
Erase Macro
Check Program/Enter
Select Macro Key
M2:Batch box list
Select Macro Key
M1:Activity journal
9-1-972-555-4335
A4 Normal
** Reserved **
Jan 29 2000 17:17
2.27
Page 74

Beyond the Basics
Cover page
Your fax machine can store a cover page to send at the beginning of each outgoing
fax.This page includes the current date and time, your Location IDand your fax
number (as stored in the
TTI
) and a message of up to 40 characters in length.The
information appears in a box similar to this:
Turning the cover page on
1
Press /
PROGRAM,K
,1,
ENTER
. The
LCD
shows:
2
To tell the fax machine it should send a cover page before each document you
transmit, press or /
PROGRAM
until “On”appears on the
LCD
.
Note: To tell the machine not to send a cover page,press or /
PROGRAM
until “Off” appears on the
LCD
and press
STOP
.
3
Press
ENTER
to save the setting.
Now the cover page feature is working but your message line (shown in the example
as “We appreciate your business. Thank you!”) is blank. To enter that message,see
“Entering the cover page message,”next column.
Entering the cover page message
1
Press /
PROGRAM,K
,2,
ENTER
.
2
Use the one-touch keypad to enter a message for the cover page. Enter the
message the same way you entered your fax name during EasyStart.The
message can be up to 40 characters in length.
Important: As in EasyStart, enter letters and other non-numeric characters
by using the one-touch keys.
The word “Upper”means the machine is currently set for entering only uppercase letters. If you press R, the machine will see it as an R(not an r).
To enter a lower-case letter, press
ALPHABET
. The display will change to:
This means pressing one-touch keys will enter lower-case letters:pressing
R
will produce an r (not an R) on the display.
To switch back for upper-case entries, press
ALPHABET
.
Use the one-touch keypad to enter spaces,punctuation and symbols.
You can also use the
CODE
function to enter characters.Please review the
explanation on page 2.2.
Note: To erase characters,press
CANCEL
to erase to the left.
To change just one character in the message,press to move the
cursor left, or /
PROGRAM
to move it right. Press
CANCEL
to erase it.
Then re-enter the message correctly.
3
When the message appears as you want it, press
ENTER
to save it.
Printing the cover page
To confirm that the cover page is set correctly, print a sample cover page from your
fax machine. Press /
PROGRAM,K
,3,
ENTER
.
Cover Page ;Lower
_
Cover Page ;Upper
_
Cover Page :On
Program/Enter
Cover Page :Off
Program/Enter
Fax Message From:
Jan 11 2000 14:00
Name: And Sew It Goes Co.
Fax Number: 972-555-2009
[We appreciate your business. Thank you!]
2.28
Page 75
Beyond the Basics
Setting the activity journal
Just as a checkbook records your daily financial transactions,your fax machine
keeps an activity journal which records its 100 most recent fax transactions.The
activity journal lists the following information for each transaction:
• Assigned number, starting each day at 001
• Remote location called
• Resolution mode
• Starting date and time
• Duration, in minutes and seconds
• Length, in number of pages
• Department code (see pages 2.62–2.63)
• Result of the call — If preceded by an asterisk (*), this signifies an
ECM
communication (see page 2.4)
• Any special operations — For example, a fax call made using an optional handset
will appear as “Manual”
Your fax machine will print the activity journal automatically after 100 transactions.To toggle this automatic printing on or off:
1
Press /
PROGRAM,G
,1,
ENTER
. The
LCD
shows:
2
Press or /
PROGRAM
until the mode you want appears.
Here, we’ve chosen On.
3
Press
ENTER
to save the setting.
Printing an activity journal manually
To print an activity journal immediately without waiting for 100 transmissions to be
completed, press /
PROGRAM,G
,2,
ENTER
.
Setting the printing order of the activity journal
Your fax machine prints the activity journal for every fax transaction. For example,
if your machine has to redial a call, it will list those redials on the journal.
If you want to list those activities in the order of their assigned numbers,you can
change the printing order of the activity journal.To change the printing order:
1
Press /
PROGRAM,G
,4,
ENTER
. The
LCD
shows:
2
Press or /
PROGRAM
until the mode you want appears.
If you want the activity journal to print in the order of assigned number,
choose “On”.
Otherwise, the machine will list every fax transaction of the same command
and same location.
Here, we’ve chosen On.
3
Press
ENTER
to save the setting.
Line Up :On
Program/Enter
Line Up :Off
Program/Enter
Auto Print :On
Program/Enter
Auto Print :Off
Program/Enter
2.29
Page 76

Beyond the Basics
Setting the reports: TCRs and RCRs
Your fax machine can print reports of transmissions and receptions.
There are two different reports: a transmit confirmation report (
TCR
) and a receive
confirmation report (
RCR
).You can receive a
TCR
after sending a fax to any Group 3 fax
machine,but the
RCR
function works only when you send a fax to a compatible Muratec
machine. (Consult your authorized Muratec dealer with any questions about such
compatibility.) Choose the type of report you want, based on the fax machines to
which you’re transmitting.
What the reports tell you
TCR
The
TCR
lists the following information for each communication:
• Date and time of the
TCR
’s printout
• Remote location called
• Resolution mode
• Starting date and time
• Duration, in minutes and seconds
• Length, in number of pages
• Result of the call
• Any special operations — For example, a fax call made using an optional handset
will appear as “Manual”
• Sample of the document — An image of the first page of the document
If an error occurs,the
TCR
tells you the remote location which was called, the error
code and error message (see pages 3.9–3.11).
RCR
The
RCR
lists the following information for each communication:
• Date and time
• Remote location called
• Assigned number, starting each day at 001
• Resolution mode
• Duration, in minutes and seconds
• Length, in number of pages
• Result of the call — Either “OK” or an error code (see pages 3.9–3.11)
To set the printing one of these reports:
1
Press /
PROGRAM,G
,3,
ENTER
. The
LCD
shows:
2
Press or /
PROGRAM
until the setting you want appears.
Here, we’ve chosen
RCR
.
3
Press
ENTER
to save the setting.The
LCD
shows:
Your machine is asking if it should print the selected report automatically
after every fax you send.
4
Press or /
PROGRAM
until the setting you want appears.
Here, we’ve chosen On.
5
Press
ENTER
to save the setting.
To turn the confirmation report feature on or off for only the next fax transmission,
press
REPORT
.
What happens next depends on the setting you chose:
• If the light next to the
REPORT
key glows, the fax machine will print the
confirmation report automatically.
• If the light next to the
REPORT
key doesn’t glow, the fax machine will not print a
confirmation report.
After you send this transmission, your machine returns to the setting you chose in
step 2, above.
Auto Print :On
Program/Enter
Auto Print :Off
Program/Enter
RCR Selected
Program/Enter
TCR Selected
Program/Enter
2.30
Page 77

Beyond the Basics
Quick Memory transmission
Using Quick Memory transmission can save you time over standard
memory transmissions.
For a normal memory transmission,your fax: (1) scans your entire document into
memory, (2) dials the other fax machine, then (3) transmits the document.
But with Quick Memory transmission, your machine doesn’t wait to scan all pages
into memory before dialing.After it scans the first page of your document, your
machine dials the call.While dialing,connecting and transmitting, your fax
machine continues to scan in the remaining pages of the document.
You can set your fax to always use Quick Memory transmission as the default.
Important: Your fax machine’ s memory transmission feature must be turned on
to use Quick Memory transmission (see page 1.18).
To make Quick Memory transmission the default:
1
Press /
PROGRAM,J
,1,7,
ENTER
. The
LCD
shows:
2
Press or /
PROGRAM
until the mode you want appears.
Here, we’ve chosen Off.
3
Press
ENTER
to save the setting.
Polling
Polling allows someone to fax a document to you without having to make the call or
pay for it.There are several kinds of polling:
• Regular polling — Your fax retrieves a document from a remote fax machine.
• F-Code polling — Your fax retrieves a document stored as a file in the remote fax
machine.T o do this,you must be communicating with another F-code-compatible
fax machine.For more information on F-Code polling ,see “F-Code communication,”
pages 2.46–2.47.
• Continuous polling — Your fax continuously retrieves a document from any
remote fax machine at a designated time. For example,a hospital pharmacy can
use this to check on orders waiting in fax machines throughout the hospital.
For polling to work,the remote machine must also be set up to be polled. See the
remote machine’s operating instructions,if necessary.
Regular polling
To set up your machine for regular polling:
1
Make sure the document is inserted in the remote fax machine.
2
Press
COM-OPTIONS
twice and then press
ENTER
. The
LCD
shows:
3
Enter the remote fax machine’s number by either pressing a one-touch key,
entering a speed-dial number or using the numeric keypad.
4
To perform the regular polling now, skip to step 8.
To perform delayed regular polling, go on to step 5.
5
Press
COM-OPTIONS,ENTER
. The
LCD
shows:
6
Use the numeric keypad to enter the date and time (use the 24-hour format)
when your machine should perform the delayed regular polling.
7
Press
ENTER
.
8
Press
START
.
When your machine polls for documents,it dials the number and, upon making contact with the other machine, begins receiving the document as if the other machine
had placed the call.
Delayed
Enter Time: 15/17:05
Enter Fax Number
_
Quick Tx :Off
Program/Enter
Quick Tx :On
Program/Enter
2.31
Page 78

Beyond the Basics
Continuous polling
To set up your machine for continuous polling:
1
Press
COM-OPTIONS
six times and then press
ENTER
. The
LCD
shows the
current time:
2
Use the numeric keypad to enter the time your machine should begin the continuous polling.(Use the 24-hour format.) Here, we’ve set it for 7:00 AM.
Note: Press to move the cursor left, or /
PROGRAM
to move it right.
3
When the start time is set, press
ENTER
to save it.The
LCD
shows:
4
Use the numeric keypad to enter the time when your machine should finish
the continuous polling.(Use the 24-hour format.)Here, we’ve set it for 3:00 PM.
Note: If you set the end time earlier than the start time, the polling operation
will continue until the selected end time tomorrow.
Note: Press to move the cursor left, or /
PROGRAM
to move it right.
5
When the end time is set, press
ENTER
to save it.The
LCD
shows:
6
Enter the remote fax machine’s number by either pressing a one-touch key,
entering a speed-dial number or using the numeric keypad.
If you are entering only one number for continuous polling,skip to step 8.
To add additional fax numbers for this operation,go on to step 7.
7
To add additional fax numbers ,press
BROADCAST
between each one to insert a
comma then enter the number as in step 6. You can specify up to 30 numbers
(and/or call groups) for continuous polling.
Important: Do not insert a comma after the last fax number.
Note: If you enter characters by mistake, press
CANCEL
to clear them.
8
Press
START
.
When your machine polls for documents,it dials each number and, upon making
contact with the other machine, begins receiving the document as if the other
machine had placed the call. It will continue the process throughout the time period
you selected in steps 2–5.
Note: When you want to end a continuous polling operation, you must delete it
using the Review Commands feature (see page 2.18).
Being polled
Not only can you poll, but you can also be polled. To set up a document for regular
polling:
1
If your fax machine is set for Tel Ready reception, press
AUTO ANSWER
to
change it to the Auto Answer mode.The Auto Answer light will glow.
Important: Your machine can’t be polled if it’s in Tel Ready mode.
2
Insert the document.
3
Adjust resolution and contrast if necessary. (Your fax machine will be transmitting to the machine doing the polling.)
4
Press /
PROGRAM,D
,1,
ENTER
.
Your fax will scan the document into memory and return to standby mode.
Note: If you want to return to the “Tel Ready” mode after the remote machine has
polled your document, press
AUTO ANSWER
.The Auto Answer light on the
control panel will turn off.But do this only after you’re sure the remote
machine has polled your document.
Once the remote fax machine polls the document you stored, your fax machine automatically erases the document from memory.
Press Start
[03],9-5551204,S118,
Enter Fax Number
_
Cont Polling
End Time : 15:00
Cont Polling
End Time : 07:00
Cont Polling
Start Time : 07:00
Cont Polling
Start Time : 18:30
2.32
Page 79
Beyond the Basics
Printing a stored polling document
To print a document you’ve stored for regular polling without erasing it,
press /
PROGRAM,D
,3,
ENTER
.
Erasing a stored polling document
To erase a document you’ve stored for regular polling from your machine’s memory,
press /
PROGRAM,D
,2,
ENTER
.
Limiting polling access to your fax machine
Your machine’s closed network setting (see page 2.60) works for polling,also. If a
calling fax doesn’t “present”the proper passcode, it cannot poll from your fax.
Note: If you’re using the Block Junk Fax feature (see pages 2.60–2.61), even
incoming calls which meet the passcode test must come from phone
numbers you’ve approved.
OneLine + distinctive ring detection
Many phone companies now offer their customers a special service which makes it
possible for one phone line to do the work of two.
With this service,you physically still have one phone line, but, electronically ,you
have two phone numbers.Your phone recognizes these different numbers and rings
differently for each one.
For example ,this makes it easy for you to have both a business number and a home
number on one phone line, so you can answer one with “Jane Doe Consulting,” and
the other with “Hello.”This works because you can tell the difference between the
distinctive patterns of the two rings.
Your fax machine is also smart enough to tell the difference between two different
numbers that are ringing it. All you have to do is set up your machine for the
OneLine + distinctive ring detection (
DRD
) feature.
In order to use OneLine +
DRD
, your phone company must set up your distinctive
ring service.When it does,it will assign a ring pattern. For example, the standard
telephone ring is 2 seconds “on”(ringing) and 4 seconds “off” (silent), after which it
repeats itself.
Your fax has eight possible distinctive ring patterns for use with OneLine +
DRD
.
One of them should work with your phone company’s
DRD
service.This chart lists
the patterns:
Pattern One complete ring pattern (seconds)
A
0.8 on, 0.4 off, 0.8 on, 4.0 off
B
0.4 on, 0.2 off, 0.4 on, 0.2 off,0.8 on, 4.0 off
C
0.3 on, 0.2 off, 1.0 on, 0.2 off,0.3 on, 4.0 off
D
1.0 on, 0.5 off, 1.0 on, 3.5 off
E
0.5 on, 0.5 off, 0.5 on, 0.5 off, 1.0 on, 3.0 off
F
0.5 on, 0.5 off, 1.0 on, 0.5 off,0.5 on, 3.0 off
G
0.4 on, 0.6 off, 0.4 on, 4.6 off
H
1.5 on, 0.5 off, 0.5 on, 3.5 off
For example:pattern Cis 0.3 seconds ringing,0.2 seconds silent, 1 second ringing,
0.2 seconds silent, 0.3 seconds ringing and 4 seconds silent. Then it goes back to the
first 0.3-second ring and starts over.
2.33
Page 80

Beyond the Basics
To use
DRD
on your fax machine:
1
Contact your phone company to make sure it has set up
DRD
service for you. If
possible, also find out which distinctive ring pattern the phone company has
assigned you.
2
Press /
PROGRAM,J
,2,0,
ENTER
. The
LCD
shows:
3
Press or /
PROGRAM
until the mode you want appears.
Here, we’ve chosen On.
4
Press
ENTER
.
5
Press or /
PROGRAM
until the pattern you want appears.
Here, we’ve chosen “C”.
6
Press
ENTER
to set your machine to the displayed ring pattern.
Important: If your telephone company gives you only very general ring pattern
specifications, or if you encounter a problem while using your
machine’s
DRD
feature, please try
ALL
of the listed ring patterns.
If you still have a problem after trying all of the patterns,please call
the Muratec Customer Support Center. (From the United States,call
972-364-3350. For the number to call from Canada, check the
documentation found inside your fax machine’s box).
Important: With your machine set for using
DRD
, it won’t respond to any ring pattern other than the one you selected above.T o reset the fax so it will
respond once again to normal rings,repeat steps 2–4, above — except,
in step 3, toggle it to “Off.”Your fax will now respond normally.
Call request
You can send or receive a fax message and have a regular phone conversation on the
same call (although, not at the same time). This is called a call request. It doesn’t
matter whether you’re sending the fax or receiving it.You may fax first and then
talk, or talk first and then fax.
Important: For this feature to work, the remote fax machine must have a similar
call-request capability. Your mac hine must also have an optional
handset attached.
Note: Communicating this way disables “V.34” mode, causing the fax machine to
handle the call in normal
ITU-T
Group 3 fashion. See page 3.20 for more
information.
Faxing/receiving first, then talking
To send or receive a fax first and then talk:
1
While your fax machine is sending or receiving the fax, press
MONITOR/CALL
.
2
At the remote fax machine, the ringer will sound after that machine receives
each page.
3
If someone answers at the remote fax machine, your fax machine will ring
several times. If so, pick up the optional handset. In a few seconds,the line
will open and you can begin your conversation.
T alking first,then sending a fax
To talk first and then send a fax:
1
When you’ve finished your phone conversation, don’t hang up.
2
Insert the document you want to fax.
3
Adjust the resolution and contrast if necessary.
4
Tell the person at the other fax machine to press
START
and to hang up
his/her handset. Don’t hang up your handset yet!
5
When you hear fax tones,press
START
and hang up your fax machine’s
optional handset.Your fax machine will send the document.
Ring Pattern :C
Program/Enter
Ring Pattern :A
Program/Enter
DRD :On
Program/Enter
DRD :Off
Program/Enter
2.34
Page 81

Beyond the Basics
T alking first,then receiving a fax
To talk first and then receive a fax:
1
When you’ve finished your phone conversation, don’t hang up.
2
Tell the person at the other fax machine to press
START
and to hang up
his/her handset. Don’t hang up your handset yet!
3
When you hear fax tones,press
START
and hang up your machine’s optional
handset.Your machine will receive the document and print it out.
Responding to a call request
If someone requests a call from you during a fax communication, you’ll hear a long
ring after the receiving machine has received each page.To answer the call request:
1
Lift your machine’s optional handset,and listen for a few seconds.You may
hear a brief series of fax tones.
2
Shortly, the line will open and the person at the other end of the line will
answer. You and the other person now can have a normal phone conversation.
Numbering pages
Just before sending a fax,you can set your fax machine to number each page.This
will help the person receiving the fax to keep track of all the pages.
To set up page numbering:
1
Count the number of pages in your document.
2
Insert the document.
3
Adjust the resolution and contrast, if necessary.
4
If you want to toggle between a manual transmission or memory
transmission, press
MEMORY TRANSMIT
.
5
Press /
PROGRAM,L,ENTER
. The
LCD
shows:
6
Use the numeric keypad to enter the number of pages in your document. If
there are fewer than 10 pages,enter a leading zero and then the number (For
example: 04 for four pages).
7
Press
ENTER
.
From here,continue sending the document using whatever type of transmission you
need (broadcast, group dial, etc.).When the remote fax machine prints the
document, a note on the right side of your
TTI
will indicate the number of the page
— such as “P.02” for page two.
Transferring documents (Fax Forward)
This feature tells your fax machine to receive documents and then transfer them
automatically to another fax machine.You can set the time period for which the fax
machine will continue this process.
Note: Fax Forward will not transfer these types of received documents:
• SecureMail reception
• Polling reception
• Relay broadcast reception
• F-Code reception
Create the transfer pattern
Note: You can create up to five transfer patterns.
To set up transfer pattern:
1
Press /
PROGRAM,Q,ENTER
.
2
If you set up a transfer pattern at your first time, skip to step 4.
If you have already set up any transfer pattern, proceed to step 3.
3
Press
ENTER
.The
LCD
shows:
Press or /
PROGRAM
until the number you want to set up or change
appears.
Select Fax Forward #
1:1234
Q1 Enter Fax Forward
Program/Enter
Enter Fax Number
_
Enter # Of Pages
(01-50):01
2.35
Page 82

Beyond the Basics
4
Press
ENTER
.The
LCD
shows:
5
Enter the fax number for the remote fax to which you want documents to be
transferred. Use either a one-touch number,a speed-dial number, a call group
or regular number dialed from the numeric keypad.
If you are entering only one number for transferring,skip to step 7.
To add any additional fax numbers for this operation,proceed to step 6.
6
To add more fax numbers, press
BROADCAST
between each one to insert a
comma, then enter the number as described in step 3.
You can specify up to 201 numbers for transferring.
Note: You can enter only 1 location by using numeric keypad.
Important: Do not insert a comma after the last fax number.
Note: If you enter characters by mistake, press
CANCEL
to clear them.
7
Press
ENTER
to save the setting.The
LCD
will show:
If you want to set to off,press or /program until the mode you want
appears.
8
Press
ENTER
.The
LCD
will show:
9
Use the numeric keypad to enter the day and time.The machine asks time
period that the machine will transfer documents.
How to enter the day and time:
• To enter the day,press following numeric keypad.
Numeric keypad 0: Sunday
Numeric keypad 1: Monday
Numeric keypad 2: Tuesday
Numeric keypad 3: Wednesday
Numeric keypad 4: Thursday
Numeric keypad 5: Friday
Numeric keypad 6: Saturday
• To enter the time ,using numeric keypad.
• If you do not wish to set up the day and time,enter *.
Note: To change only one digit,press to move the cursor leftward, or
/
PROGRAM
to move it rightward, to that digit. Then, enter the correct
digit.
Example 1: When you set the start transferring time for 7:00 at Tuesday,
and set the end transferring time for 19:00 at Friday, press 2 0 7 0 0 5 1 9 0 0,
which results in:
Example 2: When you set the start transferring time for 7:00 and set the end
transferring time for 19:00 everyday, press * 0 7 0 0 * 1 9 0 0, which results
in:
Example 3: When you set the start day for Tuesday,and set the end day for
Friday, press 2 * * * * 5 * * * *, which results in:
10
Press
ENTER
to save the setting.The
LCD
will show:
1:Auto Print :Off
Program/Enter
1:Enter Time
Tue **:**--Fri **:**
1:Enter Time
* 07:00-- * 19:00
1:Enter Time
Tue 07:00--Fri 19:00
Start transferring
day and time
End transferring
day and time
1:Fax Forward :On
Program/Enter
1:Forwarding Number
14567,[01],S002,G3_
1:Forwarding Number
_
2.36
Page 83

Beyond the Basics
Automatic printing determines whether the machine will print a document
automatically upon receiving it:
On: A copy of every document received and transferred is printed at your
machine.
Off: Received and transferred documents are not printed at your machine.
Note: If the security reception (pages 2.56–2.57) is activating, the machine
dose not print received document regardless of this setting.
11
Press
ENTER
to save the setting.
To setup or modify another transfer pattern,repeat steps 2-7.T o finish,press
STOP
.
Printing a list of your transfer patterns
You can easily print a list of your transfer patterns. The list includes each pattern’s
identifier number, remote fax’s number where you want documents to be transferred, On/Off setting, time period and Auto print setting.
To print the list,press /
PROGRAM,Q
,2,
ENTER
.
The power of QuadAccess
®
Your fax machine’s QuadAccess feature sharply reduces the time you might spend
waiting for the machine to finish its work. QuadAccess is a more powerful version of
what already is a pretty powerful feature, called dual access.While a fax with normal
dual access allows you to do two things at once,QuadAccess allows you to do four
operations at once. For example, even if the machine is (1) printing a copy, (2) transmitting from memory and (3) scanning documents for a different memory
transmission, you can still (4) program the machine.
2.37
Page 84

Beyond the Basics
F-Code: an introduction
The
ITU-T
, the United Nations agency that standardizes international telecommunications, has created a fax industry standard for using sub-addressing and
password-based communication. One name for this standard is F-Code, and that’s
what we’ll call it in these instructions and on your machine’s display.
How sub-addressing works
To help understand sub-addressing, think about how someone in a large company
receives mail. For example,mail for the Accounting department is first delivered to
the company’s main mailroom.Then the mailroom routes the mail to Accounting.
That’s the idea behind sub-addressing.Your fax and another F-Code-compatible fax
exchange special signals to indicate just where the fax really should go. It’s as if the
sending fax is saying,“Deliver this to room 48, ”and the receiving fax does just that.
Your machine has up to 50 mailboxes for these special deliveries. When someone
sends an F-Code fax to you, your machine receives it into one of those 50 mailboxes
— whichever box the sender chooses.
Sending F-Code securely
For greater security, you can set up a password with each F-Code sub-address,
which lets you use secure transmission, polling and relay broadcasting when communicating with any other F-Code compatible fax machine.
Guidelines for using F-Code
(1) To use
ITU-T
sub-addressing, you must create F-Code boxes in your machine
(2) Your mac hine holds up to 50 of these boxes
(3) Your mac hine stores up to 30 documents into eac h F-Code box (eac h document
can include one or more pages)
Creating or modifying an F-Code box
Choosing the F-Code box type
Before you set up an F-Code box, first decide how your callers will use it — as a
bulletin box, a security box or a relay box.
• Bulletin box — Stores documents that people in remote locations retrieve by
polling the box. For example,your sales branches could call in at any time to get
a printout of your latest prices that you’ve stored in a bulletin box.
A bulletin box stores both scanned and retrieved documents,and it holds its
contents indefinitely (as long as the unit has ACpower).
• Security box — Receives and stores F-Code secure communications.
• Relay box — Receives documents,then relays them to other machines.The
machine that relays the document is called a “hub”.Your fax machine can either
send to a hub or it can be a hub.
4 elements of an F-Code box
Each F-Code box has the following four elements:
(1) F-Code box number (01-50)
(2) F-Code box name (up to 16 characters)
(3) F-Code sub-address (up to 20 characters - can include numbers and the * and #
characters only)
(4)I.D. Code (4 digits)
You will choose the information for each of these elements, and enter it into your
machine.The following steps will walk you through entering and changing that
information.
2.38
F-Code communication
Page 85

Beyond the Basics
T o create or modify an F-Code box:
1
Keep pen and paper with you as you follow these steps.As you decide on a
sub-address and enter it into your machine, write it down. Remember to: (1)
write down which box goes with which sub-address, (2) write down any passwords or I.D. codes you enter, (3) keep these printed records in a safe place.
2
Press /
PROGRAM,P
,1,
ENTER
. Depending on whether you already have a
name entered for F-Code box 01, the
LCD
shows:
or
3
Use the numeric keypad to enter the two-digit number (01-50) of the F-Code
box you want to create or modify. Here, we’ve entered 0, 3 and see either:
or
4
If want to select a different F-Code box than the one that appears on the
LCD
,
use the numeric keypad to enter the two-digit F-Code box number now.
5
Press
ENTER
.What you do next depends on whether you’re creating or
modifying the F-Code box:
If creating — skip to step 7.
If modifying — the
LCD
asks you to enter the proper I.D. code. The
LCD
shows:
6
Use the numeric keypad to enter the 4-digit
I.D
. code (not the
ITU-T
sub-
address and not the
ITU-T
password) and then press
ENTER
.
Note: If you enter an invalid I.D. code, the fax machine rejects the attempt
and aborts this operation.
7
The machine is now asking you to name this F-Code box.The
LCD
shows:
or
If you do not want to enter or change this F-Code box’s name,skip to step 9.
If you do want to enter or change this F-Code box’s name,go on to step 8.
8
Enter the name the same way you entered your fax name during EasyStart.
An F-Code box’s name can be up to 16 characters in length.
Important: As in EasyStart, enter letters and other non-numeric characters
through the one-touch keys.
The word “Upper”means the machine is currently set for entering only uppercase letters. If you press R, the machine will see it as an R(not an r).
To enter a lower-case letter, press
ALPHABET
.The display changes to:
This means pressing one-touch keys will enter lower-case letters.For example, pressing R, will produce an r (not an R) on the display.
To switch back for upper-case entries, press
ALPHABET
.
Use the one-touch keypad to enter spaces,punctuation and symbols.
You can also use the
CODE
function to enter characters.Please review the
explanation on page 2.2.
Note: To erase characters,press
CANCEL
to erase to the left.
To change just one character in the name, press to move the cursor
left, or /
PROGRAM
to move it right. Press
CANCEL
to erase the
character. Then re-enter the name correctly .
9
Press
ENTER
to save the box’s name and continue.The
LCD
shows:
or
The fax machine now asks for this F-Code box’s sub-address.This is the
numerical identifier you must enter in order to communicate with any remote
F-Code compatible fax.
If you do not want to change an existing sub-address,skip to step 11.
10
Use the numeric keypad to enter the sub-address to identify this F-Code box.
The sub-address can be up to 20 characters in length and include any
combination of numbers and the * and # characters (but no other nonnumeric characters).
03:Sub-Address No.
654321_
03:Sub-Address No.
123456_
03:Sub-Address No.
_
03:Box Name;Lower
_
03:Box Name;Upper
_
03:Box Name;Upper
Muratec America_
03:Box Name;Upper
_
03:Set F-Code Box
Enter I.D. Code:****
Select F-Code Box
03:Muratec America
Select F-Code Box
03:No Number Stored
Select F-Code Box
01:NY Branch Office
Select F-Code Box
01:No Number Stored
2.39
Page 86

Beyond the Basics
Note: No other F-Code box in this machine can have the same sub-address
as the one you enter here.
Note: To erase characters,press
CANCEL
to erase to the left.
To change just one number, press to move the cursor left, or
/
PROGRAM
to move it right. Press
CANCEL
to erase the character.
Then re-enter the number correctly.
11
Press
ENTER
to save the sub-address.
Note: If you entered a sub-address already being used by another F-Code
box, the machine beeps and briefly displays:
The machine now returns you to step 10. Please enter a different
number for your F-Code box’s sub-address.
12
Next, the machine asks for your F-Code box’s password.This is the password
for
ITU-T
-compatible F-Code fax transactions.The
LCD
shows:
or
Note: You don’t need to have a password for the F-Code box. However,using
a password will make your F-Code communication much more secure.
If you do not want to enter or change this box’ s password,skip to step 14.
13
Use the numeric keypad to enter this box’s
ITU-T
-compatible password.This
password can be up to 20 characters in length and include any combination of
numbers and the * and # characters (but no other non-numerical characters).
Here, we’ve entered 135*7#9.
Note: To erase characters,press
CANCEL
to erase to the left.
To change just one character in the password,press to move the
cursor left, or /
PROGRAM
to move it right. Press
CANCEL
to erase the
character. Then re-enter the password correctly .
Note: You cannot change the type of an existing F-Code box. If you’re modi-
fying an existing F-Code box and want to change the box type, you
first must erase the old box, then create a new one.
14
Press
ENTER
to save the password.The
LCD
now shows:
The fax machine is asking which box type you want to assign to this box —
bulletin, security or relay.
Press or /
PROGRAM
until the type of box you want appears.
15
Press
ENTER
.
If you chose Bulletin, go on to step 16.
If you chose Security, skip to step 17.
If you chose Relay, skip to step 20.
If you chose Bulletin:
16
The bulletin box has four additional settings:
• Reception protection (“Rx Protect” on the
LCD
)
• Automatic printing of received documents (“Auto Print”)
• Overwriting documents (“Overwrite Doc.”)
• Erasure of transmitted documents (“Erase Tx Doc.”)
Rx Protect — Reception protection tells this box if it’s okay to receive
documents from remote locations.Callers can then poll these documents.
On: Open this box to receive documents from callers.
Off: Do not open this box to receive documents from callers.
Press or /
PROGRAM
until the mode you want appears.
Then press
ENTER
to save the setting and go on to the next one.
Auto Print — Automatic printing of received documents tells the fax machine
if it should print a document automatically upon receiving it into this box.
Note: This setting is available only when the reception protection (Rx pro-
tect) setting is set to off (see above).
On: Print the document automatically when the box receives it.
Off: Print the document manually, when you want to print it.
Press or /
PROGRAM
until the mode you want appears.
Then press
ENTER
to save the setting and go on to the next one.
Auto Print :Off
Program/Enter
Rx Protect :Off
Program/Enter
Box Type :Bulletin
Program/Enter
03:Password
135*7#9_
03:Password
123456789*#_
03:Password
_
03:Enter Sub-Address
Sub-Address In Use
2.40
Page 87

Beyond the Basics
Overwrite Doc — Overwriting documents tells your machine if it should
overwrite (erase) existing documents when it receives a new one.
Note: This setting is available only when the reception protection setting is
set to off (see Rx Protect on page 2.40).
On: When your mac hine receives a new document into this box,it will erase
any documents currently stored in it.
Off: When your machine receives a new document into this box, it will not
erase the documents stored in it.Your machine can store up to 30
documents (each document can include one or more pages) in each box.
Press or /
PROGRAM
until the mode you want appears.
Then press
ENTER
to save the setting and go on to the next one.
Erase Tx Doc — Erasure of transmitted documents tells your machine if it
should erase a document from the box after a caller retrieves (polls) the
document.
On: Your machine erases the document from the box as soon as it sends it. If
you choose “On”,this box can be polled only once per document.
Off: Your machine does not erase a document from the box when it’s polled.
As long as your machine holds ACpower and you do not erase the document from the box, the document is available indefinitely for polling.
Press or /
PROGRAM
until the mode you want appears.
Press
ENTER
to save the setting.Then skip to step 24.
If you chose Security:
17
The machine asks how long you want to keep a document stored in your
machine’s F-Code box.The
LCD
shows:
18
Use the numeric keypad to enter a two-digit number indicating how many
days (00-31), you want your fax machine to keep received documents in this
F-Code box. Here, we’ve entered 09, for nine days:
Note: Your fax machine can store incoming documents in F-Code boxes (up
to 30 documents) as long as 31 days,after which it automatically
erases the documents.But if your machine has plenty of memory, you
may want to override the 31-day limit in order to keep the documents
indefinitely. If so,enter 00. If you choose this, you will have to delete
documents manually. (You may want to contact your authorized
Muratec dealer regarding optional memory expansion.)
19
Press
ENTER
to save the settings.Skip to step 24.
If you chose Relay:
20
The machine asks for the fax number for the remote unit.
The
LCD
shows:
21
Enter the fax number using a one-touch key, a speed-dial number or a call
group number. You cannot use the numeric keypad to enter these numbers.
To add each fax number, press
BROADCAST
between each one to insert a
comma, then enter the number.You can specify up to 200 numbers for a
remote unit.
22
Press
ENTER
to save the settings.The
LCD
shows:
The machine asks for the type of
TTI
you want to appear on the faxes that are
relayed to other callers.
• Sender — Relay the document with sender unit’s
TTI
(don’t send your
TTI
).
• Both — Relay the document with both the sender unit’s
TTI
and your
TTI
.
• Yours — Relay the document with your
TTI
instead of the sender unit’s.
Press or /
PROGRAM
until the mode you want appears.
Select TTI :Sender
Program/Enter
Enter Relay Number
S001,G12_
Enter Relay Number
_
F-Code Doc Hold Time
Hold Time (00-31):09
F-Code Doc Hold Time
Hold Time (00-31):00
Erase Tx Doc. :Off
Program/Enter
Overwrite Doc. :Off
Program/Enter
2.41
Page 88

Beyond the Basics
23
Press
ENTER
to save the settings.The
LCD
shows:
On: Print the document automatically when it’s received.
Off: The machine does not print it, but only relays it to the other machine.
Press or /
PROGRAM
until the mode you want appears.
Then press
ENTER
to save the settings and go on to step 24.
24
The machine asks for your F-Code box’s four -digit security I.D. code. This is
the I.D. code for the box’s security, which you use to (1) print a document any
remote F-Code-compatible fax sends to this F-Code box or (2) you enter before
you can make any changes to this F-Code box.
If you do not want to change the I.D. code, skip to step 27.
25
Decide on a four-digit I.D. code (0001-9999) for this F-Code box.
Write it down, and put it in a safe place.
Important: Do not use 0000 as an I.D. code.
26
Use the numeric keypad to enter the four-digit I.D. code for this F-Code box.
Important: After completing this step, you must know this code to print
documents sent to this F-Code box. Be sure to write it down.
27
Press
ENTER
to save the F-Code box information.
To create or modify another F-Code box,repeat steps 3-27.
To finish,press
STOP
.
Printing a list of F-Code boxes
The list of F-Code boxes includes:
(1) Each box’s identifier number
(2) Box name (if any)
(3) Sub-address
(4) Password
(5) Box type
(6) Each box’s settings
To print a list of your F-Code boxes, press /
PROGRAM,P
,2,
ENTER
.
Printing a list of documents stored in
your F-Code boxes
The list of documents stored in your machine’s F-Code boxes includes:
(1) Each box’s identifier number
(2) Box name (if any)
(3) Box type
(4) Each file number (or document number) that is stored
To print a list of documents stored in F-Code boxes, press /
PROGRAM,P
,3,
ENTER
.
Using a bulletin box
Storing a document
Your fax machine can store up to 30 documents in each bulletin box.
Note: For this operation to work,two things must be true:
• The bulletin box must exist on your fax machine.
• You must know the bulletin box’s two-digit number (01-50) and four-digit
I.D
. code.(See “Creating or Modifying an F-Code box,” pages 2.38–2.42, if
necessary.)
To store a document in a bulletin box for polling.
1
Insert the document and make any necessary adjustments.
2
Press /
PROGRAM,P
, 7,
ENTER
The
LCD
shows:
or
3
Use the numeric keypad to enter the two-digit identifier number (01-50) of
the F-Code box where you want to store the document.
Here, we’ve entered 0, 3:
4
If you want to use a different F-Code box than the one that appears on the
LCD
, enter the box number now.
5
Press
ENTER
.The
LCD
shows:
03:Set F-Code Doc.
Enter I.D. Code:****
Select F-Code Box
03:Muratec America
Select F-Code Box
01:Murata Machinery
Select F-Code Box
01:No Number Stored
03:Set F-Code Box
Enter I.D. Code:0000
Auto Print :Off
Program/Enter
2.42
Page 89
Beyond the Basics
6
Use the numeric keypad to enter the four-digit I.D. code.
Here, we’ve entered 2345:
7
Press
ENTER
.
If you’ve entered an incorrect I.D. code, your fax machine rejects the attempt
and returns to standby mode.
If you’ve entered the correct I.D. code, the display shows:
If you choose:
On: Your bulletin box erases the currently stored document when a new
document is stored in it
Off: Your bulletin box keeps both the currently stored document and the new
document, up to 30 documents in each box.
8
Press or /
PROGRAM
until the mode you want appears.
9
Press
ENTER
to save the setting.Your machine starts scanning the document
into the selected bulletin box:
Important: The file number (shown above as 1) tells you how many docu-
ments are in this bulletin box.Your machine numbers files 1-30.
You need to know the file’s number to erase or print it.
Printing a document stored in a bulletin box
You can print a document stored in your machine’s F-Code bulletin boxes without
erasing the document from memory.
To print a stored document:
1
Press /
PROGRAM,P
, 4,
ENTER
The
LCD
shows:
2
Use the numeric keypad to enter the two-digit number (01-50) of the F-Code
bulletin box that stores the document you want to print.We’ve entered 03:
3
Press
ENTER
.The
LCD
shows:
4
Use the numeric keypad to enter your F-Code box’s four-digit I.D. code.
Here we’ve entered 2345:
5
Press
ENTER
.
If you’ve entered an incorrect I.D. code,your fax machine rejects the attempt
and aborts this operation.
If you’ve entered the correct I.D. code,the display shows:
6
Use the numeric keypad to enter the file number (1-30) of the document you
want to print. Here we’ve entered 3.
Note: If you want to print all documents stored in the bulletin box, simply
enter 0 (zero).
7
Press
ENTER
.
Your fax machine prints the chosen document(s), then returns to standby
mode.
Note: If the F-Code box is not storing any documents, the machine briefly
displays the following before returning to standby mode:
03:Print F-Code Doc.
No Document Stored
03:Print F-Code Doc.
File No. 3_
03:Print F-Code Doc.
File No. _
03:Print F-Code Doc.
Enter I.D. Code:2345
03:Print F-Code Doc.
Enter I.D. Code:****
Select F-Code Box
03:Muratec America
Select F-Code Box
01:Murata Machinery
F-Code Doc. File: 1
A4 Mem 100%
Overwrite Doc. :Off
Program/Enter
03:Set F-Code Doc.
Enter I.D. Code:2345
2.43
Page 90
Beyond the Basics
Erasing a document stored in a bulletin box
To erase a stored document:
1
Press /
PROGRAM,P
, 6,
ENTER
The
LCD
shows:
2
Use the numeric keypad to enter the two-digit number (01-50) of the F-Code
bulletin box that stores the document you want to erase.We’ve entered 03:
3
Press
ENTER
.The
LCD
shows:
Note: If the F-Code box is not storing any documents, the machine briefly
displays the following before returning to step 2:
4
Use the numeric keypad to enter your F-Code box’s four-digit I.D. code.
Here we’ve entered 2345:
5
Press
ENTER
.
If you’ve entered an incorrect I.D. code,your fax machine rejects the attempt
and aborts this operation.
If you’ve entered the correct I.D. code,the display shows:
6
Use the numeric keypad to enter the file number (1-30) of the document you
want to erase.Here we’ve entered 3.
Note: If you want to erase all documents stored in the bulletin box, enter 0
(zero).
7
Press
ENTER
.The
LCD
shows:
Note: If you want to quit without erasing any document in the bulletin box,
press
STOP
.The machine will return to standby mode.
Note: If the F-Code box is not storing any documents, the machine briefly
displays the following and then returns to standby mode:
8
Press
ENTER
to erase the document(s) and to return to standby mode.
Using a security box
Printing a document you receive
When your fax machine receives a document via
ITU-T
sub-addressing to an F-Code
security box, your machine prints a message to let you know. The message lists: (1)
the F-Code box number that received the document, (2) the Box name, (3) the
remote machine’s
TTI
(if any), and (4) the file numbers stored in the F-Code box.
You then have a certain number of days (see step 17 and 18 on page 2.41) in which
to print out the document before your machine automatically erases it.
Note: For this operation to work,two things must be true:
• You must know the F-Code security box’s two-digit number .
• You must know the F-Code security box’s four-digit I.D. code.
To print a received message:
1
Press /
PROGRAM,P
, 4,
ENTER
The
LCD
shows:
Select F-Code Box
01:Murata Machinery
Erase F-Code Doc.
** Complete **
03:Erase F-Code Doc.
No Document Stored
03:Erase F-Code Doc.
Check Enter/Stop
03:Erase F-Code Doc.
File No. 3_
03:Erase F-Code Doc.
File No. _
03:Erase F-Code Doc.
Enter I.D. Code:2345
Select F-Code Box
No Document Stored
03:Erase F-Code Doc.
Enter I.D. Code:****
Select F-Code Box
03:Muratec America
Select F-Code Box
01:Murata Machinery
2.44
Page 91
Beyond the Basics
2
Use the numeric keypad to enter the two-digit number (01-50) of the F-Code
security box that holds the documents you want to print.We’ve entered 03:
3
Press
ENTER
.The
LCD
shows:
Note: If the F-Code security box is not storing any documents, the machine
briefly displays the following before returning to step 2:
4
Use the numeric keypad to enter your F-Code box’s four-digit I.D. code.
Here we’ve entered 2345:
5
Press
ENTER
.
• If you’ve entered the correct I.D. code, your fax machine prints all documents in the F-Code security box and then erases them.
• If you’ve entered an incorrect I.D. code, your fax machine aborts the operation and returns to standby mode.
Using a relay box
Once your fax machine receives a document via
ITU-T
sub-addressing to one of its FCode relay boxes,it sends it to the other fax machines that you’ve set up on your
relay box. (See “Creating or Modifying an F-Code box”, page 2.38–2.42)
If you set the Auto print mode to on when you created the relay box, your machine
will print the received document, then relay it to the other machine. Otherwise,
your machine will only relay it to the other machines,not print it. See “If you chose
Relay,” pages 2.41–2.42 for more details on this setting.
Also, you can send (relay broadcast initiation) the document to another hub
machine’s F-Code box and get that machine to relay it to others .See “F-Code transmission” on page 2.46 for more detail.
The hub performs a relay broadcast, and the machine which sends the original document to the hub has performed a relay broadcast initiation.
Erasing an empty F-Code box
An F-Code box must be empty in order to erase it. (If you select an F-Code box in
these steps which is not empty, the machine beeps. If this happens,print all documents in that box before erasing it.)
To erase an empty F-Code box:
1
Press /
PROGRAM,P
,5,
ENTER
.The
LCD
shows:
or
2
Use the numeric keypad to enter the two-digit identifier number (01-50) of
the F-Code box you want to erase.Here, we’ve entered 0, 3 and see:
3
If you want to erase a different F-Code box than the one that appears on the
LCD
, enter the box number now.
4
Press
ENTER
. If the F-Code box is empty, the
LCD
shows:
Important: If you select an F-Code box which is not empty, the machine
beeps and, before returning to step 3, briefly displays:
Print any documents received in the F-Code box, then repeat
this procedure from the beginning to erase the box.
Otherwise, select another F-Code box.
5
Use the numeric keypad to enter the four-digit I.D. code.
Here, we’ve entered 2345:
03:Erase F-Code Box
Enter I.D. Code:2345
Select F-Code Box
Box In Use
03:Erase F-Code Box
Enter I.D. Code:****
Select F-Code Box
03:Muratec America
Select F-Code Box
01:Murata Machinery
Select F-Code Box
01:No Number Stored
03:Print F-Code Doc.
Enter I.D. Code:2345
03:Print F-Code Doc.
No Document Stored
03:Print F-Code Doc.
Enter I.D. Code:****
Select F-Code Box
03:Muratec America
2.45
Page 92

Beyond the Basics
6
Press
ENTER
.
If you’ve entered an incorrect I.D. code, your fax machine rejects the attempt
and returns to standby mode.
If you’ve entered the correct I.D. code, the display shows:
Note: If you want to quit without erasing the F-Code box you’ve selected,
press /
PROGRAM
.The fax will return to step 2.
Note: If you want to quit without erasing any F-Code box, press
STOP
.
The machine returns to standby mode.
7
Press
ENTER
to erase the F-Code box.
To erase another F-Code box,repeat steps 2-7.
To finish,press
STOP
.
F-Code transmission and polling
With F-Code,your machine can send secure transmissions,perform relay broadcast
initiations and even poll from other
ITU-T
-equipped machines,regardless of manufacturer.
You can do this two ways:
• Using the programmable one-touch key (see pages 2.52-2.54)
• Entering the
ITU-T
sub-address and password directly, which is what we’ll
describe here.
Note: For F-Code communication to work,three things must be true:
• The remote fax machine must support
ITU-T
sub-addressing
• The remote fax must have a mailbox with an
ITU-T
sub-address created
on it
• You must know the
ITU-T
sub-address and password (if any) for the
remote machine’s mailbox
F-Code transmission
1
Insert the document.
2
Adjust the resolution and contrast if necessary.
3
If you want to toggle between manual transmission and memory transmission, press
MEMORY TRANSMIT
.
4
Press
COM-OPTIONS
four times and then press
ENTER
.
5
Use the numeric keypad to enter the appropriate sub-address in the remote
machine. In this example, we’ve entered 123456.
Note: If you make a mistake, press
CANCEL
to erase the character, then
enter the correct number.
6
Press
ENTER
.The
LCD
shows:
Note: If this sub-address does not have a password, skip to step 8.
7
Use the numeric keypad to enter the password. In this example, we’ve
entered 654321.
8
Press
ENTER
.The
LCD
shows:
9
Enter the fax number either by pressing a one-touch key, entering a speeddial number or dialing from the numeric keypad. Do not press
START
.
10
What you do now depends on when you want the transmission to begin.
• To have it begin now,skip to step 13.
• To delay it,go on to step 11.
11
Press
COM-OPTIONS,ENTER
.The
LCD
shows:
12
Use the numeric keypad to enter the day and time when the transmission
should begin, then press
ENTER
.
Delayed
Enter Time: 15/17:05
Enter Fax Number
_
Enter Password
654321_
Enter Password
_
Enter Sub-Address
123456_
Enter Sub-Address
_
Erase F-Code Box
** Complete **
03:Erase F-Code Box
Check Program/Enter
2.46
Page 93

Beyond the Basics
13
Press
START
.
If in step 10 you chose an immediate transmission, your fax machine begins dialing.
If you chose a delayed command, the machine shows “Reserved” on the
LCD
, indicat-
ing that it has stored the command in memory and will complete it later.
F-Code polling
1
Press
COM-OPTIONS
five times and then press
ENTER
.
2
Use the numeric keypad to enter the appropriate sub-address.
In this example, we’ve entered 123456.
Note: If you make a mistake, press
CANCEL
to erase the character, then
enter the correct number.
3
Press
ENTER
.The
LCD
shows:
Note: If this sub-address does not have a password, skip to step 5.
4
Use the numeric keypad to enter the password. In this example, we’ve
entered 654321.
5
Press
ENTER
.The
LCD
shows:
6
Enter the fax number either by pressing a one-touch key, entering a speeddial number or dialing from the numeric keypad. Do not press
START
.
7
What you do now depends upon when you want the polling to begin.
• To have it begin now,skip to step 10.
• To delay it,go on to step 8.
8
Press
COM-OPTIONS,ENTER
.The
LCD
shows:
9
Use the numeric keypad to enter the day and time when the polling should
begin, then press
ENTER
.
10
Press
START
.
If in step 7 you chose an immediate polling,your fax machine begins dialing. If you
chose a delayed command, the machine shows “Reserved” on the
LCD
, indicating that
it has stored the command in memory and will complete it later.
Delayed
Enter Time: 15/17:05
Enter Fax Number
_
Enter Password
654321_
Enter Password
_
Enter Sub-Address
123456_
Enter Sub-Address
_
2.47
Page 94
Beyond the Basics
Using the power of programmable one-touch keys
In order to complete some operations on your machine, you may have to follow several steps and press several different buttons.But programming your machine’s
one-touch keys (73–76) can reduce those many steps to a simple press of a key .
You can “teach” the one-touch keys to carry out any of the following operations:
Communications functions:
• Delayed transmission (explained on pages 2.17–2.19)
• Broadcasting (pages 2.16)
• Regular polling (not continuous) (pages 2.31–2.32)
• Batch transmission (pages 2.20–2.23)
• F-Code transmission (pages 2.46–2.47)
• F-Code polling (page 2.47)
Programming a delayed transmission
To program a delayed transmission into a programmable one-touc h key:
1
Press /
PROGRAM,C
,1,
ENTER
. The
LCD
shows the first empty programmable
one-touch number available:
Note: If a programmable one-touch number other than 73 appears on the
LCD
, it means that you have already entered a number for 73.
Note: To erase a programmable one-touch key, see pages 2.54–2.55.
2
Press the key that you want to program or change.Here, we’ve selected 75.
Note: If you’re changing a previously stored command: If your previous com-
mand for this key was a for a delayed operation,and you want to keep
this key programmed for a delayed operation, use these instructions
to make changes.But if you want to assign this key to a completely
different operation (to Broadcast, for example), then you must first
erase the stored command before programming the new one.
3
If you want to select a different programmable one-touch key than what
appears on the
LCD
, press that key now.
4
Press
ENTER
. The
LCD
now shows either:
or
5
Use the numeric keypad to enter the number exactly as your machine should
dial it, including whatever codes your phone system requires.The number can
be up to 40 characters in length:
Your display can show only 20 characters at a time. To view characters beyond
those 20, press to scroll to the left or /
PROGRAM
to scroll to the right.
Important: Do not press
ENTER
.
Note: To erase characters,press
CANCEL
to erase to the left.
If you want to change just one character in the number, press to
move the cursor left, or /
PROGRAM
to move it right. Press
CANCEL
to
erase it.Then re-enter the number correctly.
6
Now, while you can still see the fax number on the
LCD
, press
COM-OPTIONS
,
ENTER
.The
LCD
shows:
Delayed
Enter Time: 11/20:30
75:Fax#/Com-Options
9-5550629_
75:Fax#/Com-Options
9-5558743_
75:Fax#/Com-Options
_
Select Program No.
75:No Number Stored
Select Program No.
73:No Number Stored
2.48
Programmable one-touch keys
Page 95
Beyond the Basics
7
Next, tell your fax to carry out this delayed command one of these ways:
Option 1: Perform the command once at a certain time on a certain day of
the month. (For example,“Do this at 5:05 PMon the 30th.”)
To select this option,use the numeric keypad to enter the date
and time when the fax should perform the command:
Option 2: Perform the command at a certain time each day you press the
key. (F or example,“Do this at 5:05 PMtoday.”)
To select this option,use the numeric keypad to enter 0, 0 and
then the time the fax should perform the command:
8
Press
ENTER,ENTER
.
9
The
LCD
now displays the next programmable one-touch key.
If you do not want to enter or change any otherkey’s programming,press
STOP
.
Your machine returns to standby mode.
If you do want to enter or change this key’ s programming, go back to step 4.
If you want to enter or change another key’s programming, go back to step 2.
Programming a broadcast / group
Programming a broadcast is very similar to programming a delayed transmission.
But instead of sending to just one phone number, you set up multiple numbers for
the transmission.
To program a broadcast / group into a programmable one-touch key:
1
Press /
PROGRAM,C
,1,
ENTER
. The
LCD
shows the first empty programmable
one-touch number available:
Note: If a programmable one-touch number other than 73 appears on the
LCD
, it means that you have already entered a number for 73.
Note: To erase a programmable one-touch key, see pages 2.54–2.55.
2
Press the key you want to program or change.Here, we’ve selected 75.
Note: If your previous command for this key was for a broadcast / group
transmission and you want to keep this key programmed for a broadcast / group transmission, use these instructions to make changes. But
if you want to assign this key to a completely different operation (for a
delayed transmission, for example), then you first must erase the
stored command before programming the new one.
3
If you want to select a different programmable one-touch key than the one
that appears on the
LCD
, press that key now.
4
Press
ENTER
. The
LCD
now shows either
or
5
Use the numeric keypad to enter up to 230 fax numbers — you can use any
combination of call groups,one-touch keys, speed-dial numbers and manuallydialed numbers.
Important: Do not press
ENTER
.
Press
BROADCAST
to enter a comma between each number or call group.
Important: Do not insert a comma after the last number.
To enter a speed-dial number,press
SPEED DIAL/TEL INDEX
and the number’s
three-digit identifier.
To enter a call group,press
GROUP DIAL
and the group’s identifier number.
Your display can show only 20 characters at a time. To view characters beyond
those 20, press to scroll to the left or /
PROGRAM
to scroll to the right.
Note: To erase characters,press
CANCEL
to erase to the left.
To change just one c haracter in the number, press to move the cursor left, or /
PROGRAM
to move it right. Press
CANCEL
to erase it.
Then re-enter until the number correctly.
6
If you want the broadcast to begin immediately every time you press the key,
press
ENTER
and skip to step 9.
If you want to delay the broadcast, press
COM-OPTIONS,ENTER
.
75:Fax#/Com-Options
G5,G7,[01],S006,9-55
75:Fax#/Com-Options
9-5558743_
75:Fax#/Com-Options
_
Select Program No.
75:No Number Stored
Select Program No.
73:No Number Stored
Delayed
Enter Time: 00/17:05
Delayed
Enter Time: 30/17:05
2.49
Page 96

Beyond the Basics
7
Next, tell your fax to carry out this delayed command one of these ways:
Option 1: Perform the command once at a certain time on a certain day of
the month. (For example,“Do this at 5:05 PMon the 30th.”)
To select this option,use the numeric keypad to enter the date
and time when the fax should perform the command:
Option 2: Perform the command at a certain time each day you press the
key. (F or example,“Do this at 5:05 PMtoday.”)
To select this option,use the numeric keypad to enter 0, 0 and
then the time the fax should perform the command:
8
Press
ENTER,ENTER
.
9
The
LCD
now displays the next programmable one-touch key.
If you do not want to enter or change any otherkey’s programming,press
STOP
.
Your machine returns to standby mode.
If you do want to enter or change this key’ s programming, go back to step 4.
If you want to enter or change another key’s programming, go back to step 2.
Programming regular polling
Note: You cannot program continuous polling into a programmable one-touch key.
For more information on continuous polling, see page 2.32.
To program a regular polling operation into a programmable one-touch key:
1
Press /
PROGRAM,C
,1,
ENTER
. The
LCD
shows an empty programmable one-
touch number:
Note: If a programmable one-touch number other than 73 appears on the
LCD
, it means that you have already entered a number for 73.
Note: To erase a programmable one-touch key, see pages 2.54–2.55.
2
Press the key that you want to program or change.Here, we’ve selected 75.
Note: If your previous command for this key was for a polling transmission
and you want to keep this key programmed for a polling transmission,
use these instructions to make changes.But if you want to assign this
key to a completely different operation (for a delayed transmission, for
example), then you first must erase the stored command before programming the new one.
3
If you want to select a different programmable one-touch key than the one
that appears on the
LCD
, press that key now.
4
Press
ENTER
. The
LCD
now shows either:
or
5
Use the numeric keypad to enter the number exactly as your machine should
dial it, including whatever codes your phone system requires.The number can
be up to 40 characters in length:
Your display shows only 20 characters at a time. To view characters beyond
those 20, press to scroll to the left or /
PROGRAM
to scroll to the right.
Important: Do not press
ENTER
.
Note: To erase characters,press
CANCEL
to erase to the left.
To change just one c haracter in the number, press to move the cursor left, or /
PROGRAM
to move it right. Press
CANCEL
to erase it.
Then re-enter the number correctly.
6
Next, while you can still see the fax number on the
LCD
, press
COM-OPTIONS
twice and then press
ENTER
.
7
If you want the polling to begin immediately every time you press the key,
press
ENTER
and skip to step 10.
If you want to delay the polling, press
COM-OPTIONS,ENTER
.
75:Fax#/Com-Options
9-5550696_
75:Fax#/Com-Options
9-5558743_
75:Fax#/Com-Options
_
Select Program No.
75:No Number Stored
Select Program No.
73:No Number Stored
Delayed
Enter Time: 00/17:05
Delayed
Enter Time: 30/17:05
2.50
Page 97

Beyond the Basics
8
Next, tell your fax to carry out this delayed command one of these ways:
Option 1: Perform the command once at a certain time on a certain day of
the month. (For example,“Do this at 5:05 PMon the 30th.”)
To select this option,use the numeric keypad to enter the date
and time when the fax should perform the command:
Option 2: Perform the command at a certain time each day you press the
key. (F or example,“Do this at 5:05 PMtoday.”)
To select this option,use the numeric keypad to enter 0, 0 and
then the time the fax should perform the command:
9
Press
ENTER,ENTER
.
10
The
LCD
now displays the next programmable one-touch key.
If you do not want to enter or change any otherkey’s programming,press
STOP
.
Your machine returns to standby mode.
If you do want to enter or change this key’ s programming, go back to step 4.
If you want to enter or change another key’s programming, go back to step 2.
Programming a batch transmission
For this operation to work,two things must be true:
• The batch box you’re using must exist on your fax machine.
• You must know the batch box’s identifier number (1–5).
To program a batch transmission into a programmable one-touc h key:
1
Press /
PROGRAM,C
,1,
ENTER
. The
LCD
shows the first empty programmable
one-touch number available:
Note: If a programmable one-touch number other than 73 appears on the
LCD
, it means that you have already entered a number for 73.
Note: To erase a programmable one-touch key, refer to pages 2.54–2.55
2
Press the key that you want to program or change.Here, we’ve selected 75.
If your previous command for this key was for a different operation (for a
delayed transmission, for example), you must erase the stored command
before you go to step 4 (refer to pages 2.54–2.55).
If this key was for a batch transmission, press
ENTER
, then skip to step 5.
3
If you want to select a different programmable one-touch key than the one
that appears on the
LCD
, press that key now.
4
Press
ENTER,COM-OPTIONS
three times and then press
ENTER
. The
LCD
shows:
5
Use the numeric keypad to enter the one-digit identifier for the batch box you
want to assign to this one-touch key. Here, we’ve entered 5:
Note: To change an identifier already entered,press
CANCEL
to erase it.
Then re-enter the correct identifier.
6
Press
ENTER
.
7
The
LCD
now displays the next programmable one-touch key.
If you do not want to enter or change any otherkey’s programming,press
STOP
to return your machine to standby mode.
If you do want to enter or change this key’ s programming, go back to step 4.
If you want to enter or change another key’s programming, go back to step 2.
Batch Tx
Enter Box No. 5_
Batch Tx
Enter Box No. _
Select Program No.
75:No Number Stored
Select Program No.
73:No Number Stored
Delayed
Enter Time: 00/17:05
Delayed
Enter Time: 30/17:05
2.51
Page 98

Beyond the Basics
Programming an F-Code transmission
For this operation to work,two things must be true:
• You must know how the remote fax is using each F-Code box to which you’re
transmitting — for example, as a security box or a relay box. Different fax manufacturers may use slightly different terms,but the concepts are the same.
• You must know the remote fax’s
ITU-T
sub-address and password for each box to
which you want to transmit.
To program an F-Code transmission into a programmable one-touch key:
1
Press /
PROGRAM,C
,1,
ENTER
. The
LCD
shows the first empty programmable
one-touch number available:
Note: If a programmable one-touch number other than 73 appears on the
LCD
, it means that you have already entered a number for 73.
Note: To erase a programmable one-touch key, see pages 2.54–2.55.
2
Press the key you want to program or change.Here, we’ve selected 75.
Note: If your previous command for this key was for an F-Code transmis-
sion and you want to keep this key programmed for an F-Code
transmission, use these instructions to make changes. But if you want
to assign this key to a completely different operation (for a delayed
transmission, for example), then you first must erase the stored command before programming the new one.
3
If you want to select a different programmable one-touch key than the one
that appears on the
LCD
, press that key now.
4
Press
ENTER
. The
LCD
now shows either:
or
5
Use the numeric keypad to enter the number exactly as your machine should
dial it, including whatever codes your phone system requires.The number can
be up to 40 characters in length:
Your display shows only 20 characters at a time. To view characters beyond
those 20, press to scroll to the left or /
PROGRAM
to scroll to the right.
Important: Do not press
ENTER
.
Note: To erase characters,press
CANCEL
to erase to the left.
To c hange just one number, press to move the cursor left, or
/
PROGRAM
to move it right. Press
CANCEL
to erase it.Then re-enter
the number correctly.
6
Now, while you still can see the fax number on the
LCD
, press
COM-OPTIONS
three times and then press
ENTER
. The
LCD
shows:
7
Use the numeric keypad to enter the
ITU-T
sub-address for the box to which
you want to send the document. Here, we’ve entered 123456:
8
Press
ENTER
.The
LCD
shows:
Note: If there isn’t a password for this box, press
ENTER
, then skip to step 12.
9
Use the numeric keypad to enter the appropriate
ITU-T
password for the box.
Here, we’ve entered 654321:
When finished, press
ENTER
.
10
If you want the transmission to begin immediately every time you press the
key, press
ENTER
and skip to step 13.
If you want to delay the transmission, press
COM-OPTIONS,ENTER
.
Enter Password
654321_
Enter Password
_
Enter Sub-Address
123456_
Enter Sub-Address
_
75:Fax#/Com-Options
9-5558422_
75:Fax#/Com-Options
9-5558743_
75:Fax#/Com-Options
_
Select Program No.
75:No Number Stored
Select Program No.
73:No Number Stored
2.52
Page 99

Beyond the Basics
11
Next, tell your fax to carry out this delayed command one of these ways:
Option 1: Perform the command once at a certain time on a certain day of
the month. (For example,“Do this at 5:05 PMon the 30th.”)
To select this option,use the numeric keypad to enter the date
and time when the fax should perform the command:
Option 2: Perform the command at a certain time each day you press the
key. (F or example,“Do this at 5:05 PMtoday.”)
To select this option,use the numeric keypad to enter 0, 0 and
then the time when the fax should perform the command:
12
Press
ENTER,ENTER
.
13
The
LCD
now displays the next programmable one-touch key.
If you do not want to enter or change any otherkey’s programming,press
STOP
to return your machine to standby mode.
If you do want to enter or change this key’ s programming, go back to step 4.
If you want to enter or change another key’s programming, go back to step 2.
Programming F-Code polling
For this operation to work,three things must be true:
• The document which you’re polling must exist in the remote fax’s F-Code box (
ITU-T
standard sub-addressing/password box).
• You must know the remote fax’s
ITU-T
sub-address and password (if any) for each
box you want to poll.
To program an F-Code polling operating into a programmable one-touch key:
1
Press /
PROGRAM,C
,1,
ENTER
. The
LCD
shows the first empty programmable
one-touch number available:
Note: If a programmable one-touch number other than 73 appears on the
LCD
, it means that you have already entered a number for 73.
Note: To erase a programmable one-touch key, refer to pages 2.54–2.55.
2
Press the key you want to program or change.Here, we’ve selected 75.
Note: If your previous command for this key was for an F-Code polling oper-
ation and you want to keep this key programmed for an F-Code
polling operation, use these instructions to make changes. But if you
want to assign this key to a completely different operation (for a
delayed transmission, for example), then you first must erase the
stored command before programming the new one.
3
To select a different programmable one-touch key than the one that appears
on the
LCD
, press that key now.
4
Press
ENTER
. The
LCD
now shows either:
or
5
Use the numeric keypad to enter the number exactly as your machine should
dial it, including whatever codes your phone system requires.The number can
be up to 40 characters in length:
Your display shows only 20 characters at a time. To view characters beyond
those 20, press to scroll to the left or /
PROGRAM
to scroll to the right.
Important: Do not press
ENTER
.
Note: To erase characters,press
CANCEL
to erase to the left.
To change just one c haracter in the number, press to move the cursor left, or /
PROGRAM
to move it right. Press
CANCEL
to erase it.
Then re-enter the number correctly.
6
Now, while you can still see the fax number on the
LCD
, press
COM-OPTIONS
four times and then press
ENTER
. The
LCD
shows:
7
Use the numeric keypad to enter the
ITU-T
sub-address for the box you want
to poll. Here, we’ve entered 123456:
Enter Sub-Address
123456_
Enter Sub-Address
_
75:Fax#/Com-Options
9-5558422_
75:Fax#/Com-Options
9-5558743_
75:Fax#/Com-Options
_
Select Program No.
75:No Number Stored
Select Program No.
73:No Number Stored
Delayed
Enter Time: 00/17:05
Delayed
Enter Time: 30/17:05
2.53
Page 100
Beyond the Basics
8
Press
ENTER
.The
LCD
shows:
Note: If this box doesn’t have a password, press
ENTER
. Then skip to step 12.
9
Use the numeric keypad to enter the
ITU-T
password for the box. Here, we’ve
entered 654321:
When finished, press
ENTER
.
10
If you want the transmission to begin immediately every time you press the
key, press
ENTER
and skip to step 13.
If you want to delay the transmission (perhaps to take advantage of lower
phone rates), press
COM-OPTIONS,ENTER
.
11
Next, tell your fax to carry out this delayed command one of these ways:
Option 1: Perform the command once at a certain time on a certain day of
the month. (For example,“Do this at 5:05 PMon the 30th.”)
To select this option,use the numeric keypad to enter the date
and time when the fax should perform the command:
Option 2: Perform the command at a certain time each day you press the
key. (F or example,“Do this at 5:05 PMtoday.”)
To select this option,use the numeric keypad to enter 0, 0 and
then the time when the fax could perform the command:
12
Press
ENTER,ENTER
.
13
The
LCD
now displays the next programmable one-touch key.
If you do not want to enter or change any otherkey’s programming,press
STOP
to return your machine to its usual standby mode.
If you do want to enter or change this key’ s programming, go back to step 4.
If you want to enter or change another key’s programming, go back to step 2.
Fax dialing with programmable one-touch
To dial a fax call using a programmable one-touch number:
1
Insert the document.
2
Make any necessary adjustments as usual.
3
Press the programmable one-touch key in which you’ve stored the fax communication command.
Your fax will perform the operation now ,or at whatever time you programmed.
Note: To review the details of each operation,review the instructions for that
operation. See page 2.48 for a list of each operation and where to find it.
If you programmed this key to delay its operation, the
LCD
shows:
If you programmed this key to perform the operation immediately after you press it,
the
LCD
shows the number:
Erasing a programmable one-touch key
1
Press /
PROGRAM,C
,2,
ENTER
. The
LCD
shows the first programmable one-
touch number that has been programmed:
Note: If a one-touch number other than 73 appears, it means 73 is empty.
2
Press the programmable one-touch key you want to erase.Here, we’ve
selected 75:
3
To erase a different programmable one-touch key than the one that appears
on the
LCD
, press that key now.
Select Program No.
75:Polling
Select Program No.
73:Delayed
9-1-972-555-4335
A4 Normal
** Reserved **
Jan 29 2000 17:17
Delayed
Enter Time: 00/17:05
Delayed
Enter Time: 30/17:05
Enter Password
654321_
Enter Password
_
2.54
 Loading...