

Page 1
ZMN2405/ZMN2405HP/
ZMN2430/ZMN2430HP
ZMN2430A/ZMN2430HPA
Module Series
ZigBee® Module
Developer’s Kit
User’s Manual
3079 Premiere Pkwy Ste 140
Duluth, Georgia 30097
www.RFM.com
+1 (678) 684-2000
Page 2

Important Regulatory Information
RFM Zigbee Series Regulatory Identification
ZigBee Module FCC ID IC ID Type of Grant
ZMN2405 HSW-Z MN2400 4492A -ZMN2400 Mobile
ZMN2405HP HSW-Z2400HP 4492A -Z2400 Mobile
ZMN2430 HSW-Z2430 4492A -Z2430 Mobile
ZMN2430HP HSW-Z2430HP 4492A -Z2430HP Mobile
ZMN2430A HSW-Z2430A 4492A -Z2430A Portable
ZMN2430HPA HSW-Z2430HPA 4492A -Z2430HPA Portable
THIS DEVICE COMPLIES WITH PART 15 OF THE FCC RULES. OPERATION IS SUBJECT
TO THE FOLLOWING TWO CONDITIONS. (1) THIS DEVICE MAY NOT CAUSE HARMFUL
INTERFERENCE, AND (2) THIS DEVICE MUST ACCEPT ANY INTERFERENCE RECEIVED,
INCLUDING INTERFERENCE THAT MAY CAUS E UNDESIRED OPERATION.
FCC User Information
NOTE: This equipment has been tested and found to comply with the limits for a Class
B digital device, pursuant to Part 15 of the FCC Rules. These limits are designed to
provide reasonable protection against harmful interference in a residential installation.
This equipment generates, uses, and can radiate radio frequency energy and, if not
installed and used in accordance with the instructions, may cause harmful interference
to radio communications. However, there is no guarantee that interference will not occur
in a particular installation. If this equipment does cause harmful interference to radio or
television reception, which can be determined by turning the equipment off and on, the
user is encouraged to try to correct the interference by one or more of the following
measures:
• Reorient or relocate the receiving antenna.
• Increase the separation between the equipment and receiver.
• Connect the equipment into an outlet on a circuit different from that to which the
receiver is connected.
• Consult the dealer or an experienced radio/TV technician for help.”
W arning:
Changes or modifications to this device not expressly approved by RFM Inc. could void the
user’s authority to operate the equipment.
These devices can not be co -located with another transmitter without re-evaluation and
separate FCC authorization.
Page 3

RF Exposure
For ZigBee products with “Mobile Grants”. In accordance with FCC requirements of human
exposure to radiofrequency fields, the radiating element shall be installed such that a minimum
separation distance of 20 cm shall be maintained from the user and/or general population.
Only antennas approved by the FCC for these modules may be used. Contact RFM for details.
For ZigBee products with “Portable Grants”. In accordance with FCC requirements of human
exposure to radiofrequency fields, the radiating element of there devices can be installed such
that a separation distance of 2.5 cm or less can be maintained from the user and/or general
population. (See Appendix 1 at the end of this document) These products have an intergraded
antenna on the module which must not be removed.
Industry Canada
This Class B digital apparatus meets all requirements of the Canadian Interference Causing
Equipment Regulations. Operation is subject to the following two conditions:
(1)this device may not cause harmful interference, and (2) this device must accept any
interference received, including interference that may cause undesired operation.
Cet appareilla ge numérique de la classe B répond à toutes les exigences de
l'interférence canadienne causant des règlements d'équipement. L'opération est sujette
aux deux conditions suivantes: (1) ce dispositif peut ne pas causer l'interférence nocive,
et (2) ce disposi tif doit accepter n'importe quelle interférence reçue, y compris
l'interférence qui peut causer l'opération peu désirée.
Suggested End Product Labeling
The final end product must be labeled in a visible area on the exterior of the enclosure with the
following or similar text: “Contains TX FCC ID: (use correct ID from table above)”
European Union
All ZigBee modules conform to the requirements of ETSI EN 300 328 standard for radiated
emissions.
Page 4

Table of Contents
Regulatory Information ……………………………………………………………………………………
1. Introduction ..............................................................................................................................1
2. ZigBee Networking...................................................................................................................2
2.1 Forming a Network...................................................................................................................3
2.2 Sleeping End Devices..............................................................................................................4
2.3 ZigBee Addressing...................................................................................................................4
2.4 Discovery..................................................................................................................................5
2.5 Network Topology and Size.....................................................................................................5
2.6 Static Network Addresses and Link Announcements.............................................................7
3. Getting Started.........................................................................................................................9
3.1 Installing ZBDemo....................................................................................................................9
3.2 Installing USB Drivers .............................................................................................................. 9
3.3 Running ZBDemo....................................................................................................................9
3.4 Communicating without ZBDemo..........................................................................................19
4. The Development Board........................................................................................................20
5. ZBDemo.................................................................................................................................23
5.1 Discover Radios.....................................................................................................................26
5.2 Refresh Delay........................................................................................................................26
5.3 Switches.................................................................................................................................26
5.4 GPIO LEDs............................................................................................................................27
5.5 Thermistor, Potentiometer and Analog to Digital Inputs .......................................................27
5.6 Digital to Analog Outputs.......................................................................................................27
5.7 Children’s Network List..........................................................................................................27
5.8 Show ZigBee Tree.................................................................................................................28
5.9 Config.....................................................................................................................................28
5.9.1 Config Tab..................................................................................................................29
5.9.2 Config Enable Options...............................................................................................30
5.9.3 Module I/O Tab ..........................................................................................................31
5.9.4 Network Tab...............................................................................................................32
5.9.5 RF Tab.......................................................................................................................33
5.9.6 End Device Tab..........................................................................................................34
5.10 Serial Comm..........................................................................................................................35
6. Programming the Module Firmware......................................................................................37
6.1 In Circuit Module Programming.............................................................................................39
7. Module & Development Board Hardware Specifications......................................................41
7.1 Module Pin Descriptions........................................................................................................41
Page 5

7.2 Electrical Specifications.........................................................................................................42
7.3 CC2430..................................................................................................................................43
7.4 Schematics.............................................................................................................................44
8. RFM Standard Module (CSM) Profile API..............................Error! Bookmark not defined.
8.1 Module I/O Cluster (ID 0x01)..................................................Error! Bookmark not defined.
8.2 Configuration Cluster (ID 0x02)..............................................Error! Bookmark not defined.
8.3 Reset Cluster (ID 0x03)..........................................................Error! Bookmark not defined.
8.4 Network Cluster (ID 0x07) ......................................................Error! Bookmark not defined.
8.5 RF Cluster (ID 0x08)...............................................................Error! Bookmark not defined.
8.6 Security Cluster (ID 0x09).......................................................Error! Bookmark not defined.
8.7 Serial Interface ........................................................................Error! Bookmark not defined.
8.7.1 Set Field......................................................................Error! Bookmark not defined.
8.7.2 Set Reply.....................................................................Error! Bookmark not defined.
8.7.3 Get Field......................................................................Error! Bookmark not defined.
8.7.4 Get Reply ....................................................................Error! Bookmark not defined.
8.7.5 Send String .................................................................Error! Bookmark not defined.
8.7.6 Send String Reply.......................................................Error! Bookmark not defined.
8.7.7 Receive String.............................................................Error! Bookmark not defined.
8.7.8 Send SPI.....................................................................Error! Bookmark not defined.
8.7.9 Send SPI Reply...........................................................Error! Bookmark not defined.
8.7.10 Get IEEE Address .......................................................Error! Bookmark not defined.
8.7.11 Get IEEE Address Reply ............................................Error! Bookmark not defined.
8.7.12 Get NWK Address.......................................................Error! Bookmark not defined.
8.7.13 Get NWK Address Reply............................................Error! Bookmark not defined.
8.7.14 Discovery Request ......................................................Error! Bookmark not defined.
8.7.15 Discovery Reply..........................................................Error! Bookmark not defined.
8.7.16 Discovery End.............................................................Error! Bookmark not defined.
8.7.17 Receive Field Event....................................................Error! Bookmark not defined.
8.7.18 Link Announce............................................................Error! Bookmark not defined.
8.7.19 Device Registration.....................................................Error! Bookmark not defined.
8.7.20 Error............................................................................Error! Bookmark not defined.
8.8 CSM Sleep Modes..................................................................Error! Bookmark not defined.
8.8.1 Timer Sleep Mode.......................................................Error! Bookmark not defined.
8.8.2 Interrupt Sleep Mode ..................................................Error! Bookmark not defined.
8.8.3 Configuring Sleep Mode .............................................Error! Bookmark not defined.
8.8.4 Timer Sleep Example..................................................Error! Bookmark not defined.
8.8.5 Interrupt Sleep Example.............................................Error! Bookmark not defined.
8.9 Network Discovery..................................................................Error! Bookmark not defined.
8.9.1 Device Registration Packets.......................................Error! Bookmark not defined.
8.9.2 Discovery Command ...................................................Error! Bookmark not defined.
8.9.3 Hierarchical Discovery................................................Error! Bookmark not def ined.
8.10 Sample Packets......................................................................Error! Bookmark not defined.
8.10.1 RF Channel List Example...........................................Error! Bookmark not defined.
8.10.2 GP I/O Direction Example...........................................Error! Bookmark not defined.
8.10.3 Microcontroller Reset..................................................Error! Bookmark not defined.
Page 6

8.10.4 UART Port/Send ASCII Data Example: ......................Error! Bookmark not defined.
8.10.5 ADC Z Example: - Get Field.......................................Error! Bookmark not defined.
8.10.6 ADC Z Example: - Get Reply......................................Error! Bookmark not defined.
8.10.7 Discovery Request ......................................................Error! Bookmark not defined.
8.10.8 Discovery Reply..........................................................Error! Bookmark not defined .
8.10.9 Discovery End.............................................................Error! Bookmark not defined.
8.10.10 Get IEEE Address .......................................................Error! Bookmark not defined.
8.10.11 Get IEEE Address Reply ............................................Error! Bookmark not defined.
9. Custom Profiles.......................................................................Error! Bookmark not defined.
10. Layout Guidelines ..................................................................................................................49
10.1 50 Ohm Trace........................................................................................................................49
10.2 Reflow Profile for ZigBee Adapter Panel...............................................................................50
11. WARRANTY...........................................................................................................................51
Appendix I...........................................................................................................................511
Page 7

ZMN2405/ZMN2405HP Dev Kit
1. Introduction
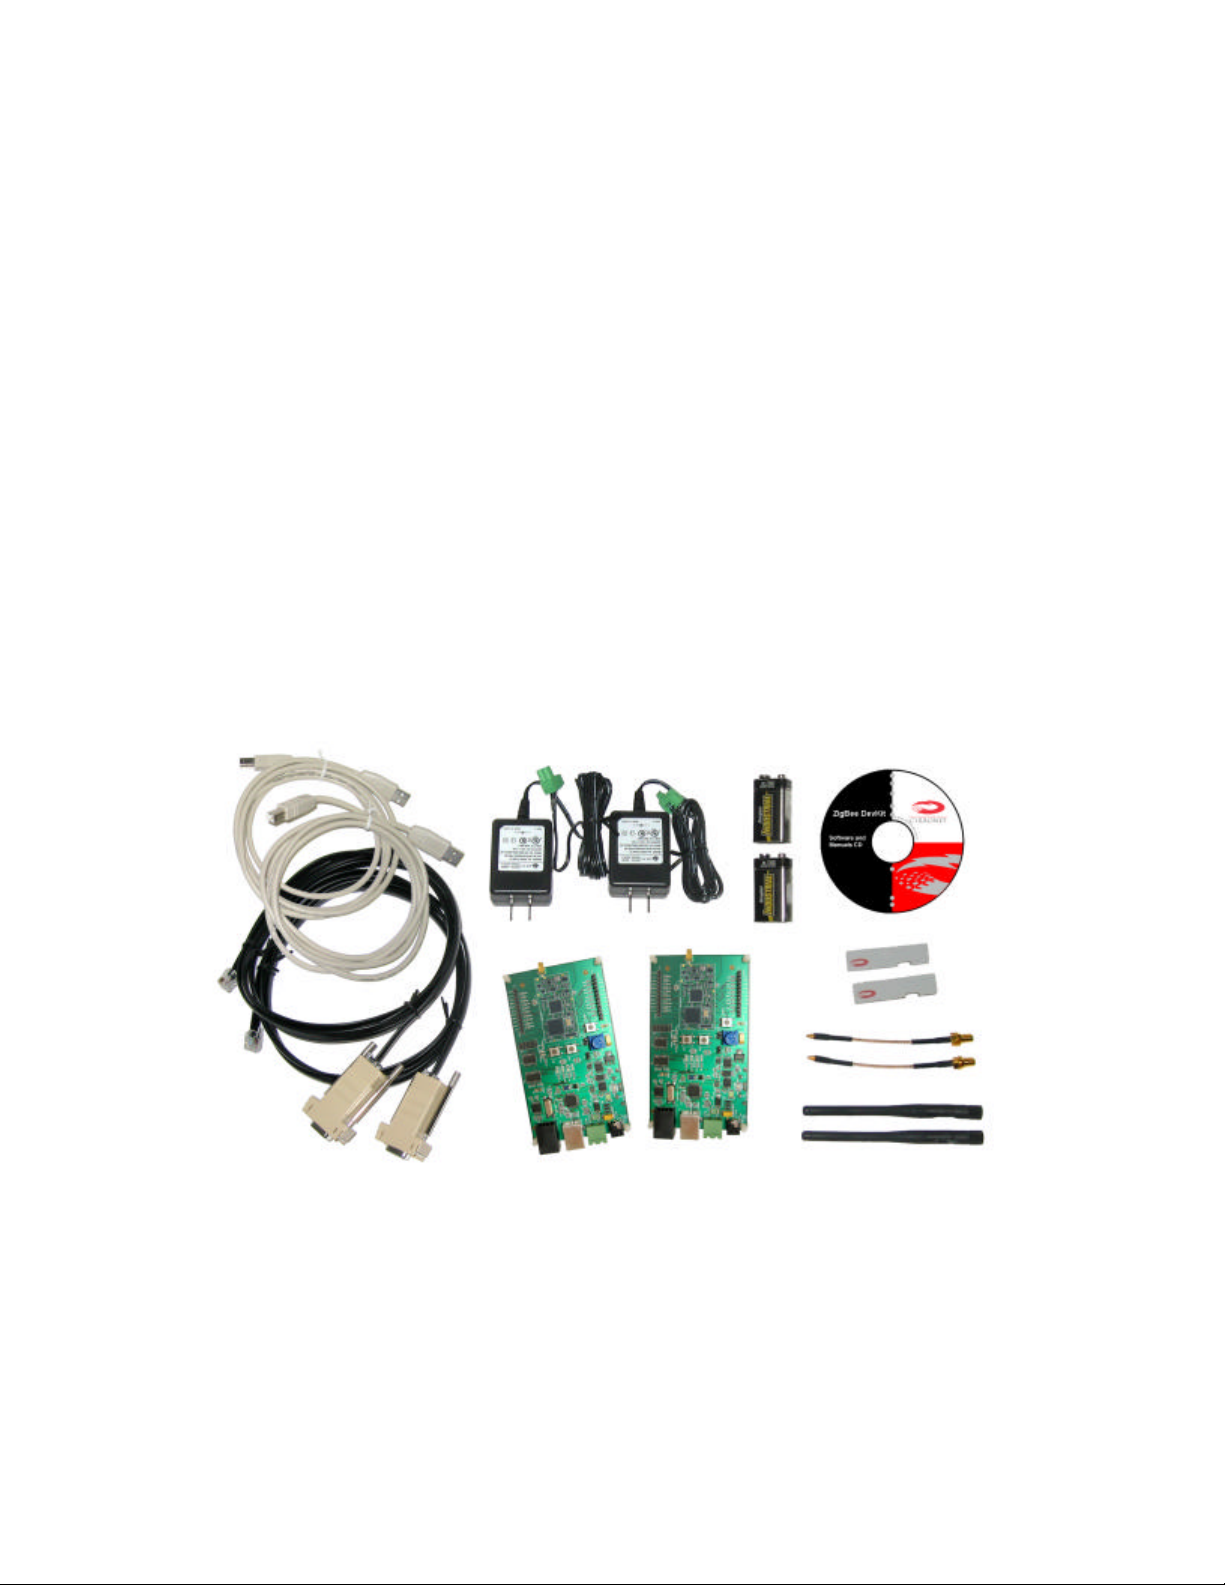
Congratulations on your purchase of RFM’s ZigBee Developer’s Kit. The developer’s kit
contains everything needed to get a two node ZigBee network up and running. Refer to Figure 1
for the contents of your kit.
Figure 1. Developer’s Kit Contents
The modules in this kit have been designed by RFM Engineers and embody the accumulated
expertise gained over 20 years of RF design and implementation experience. Experience
gained designing and implementing some of the most difficult RF networks around including
nuclear power plant monitoring, me dical patient vital signs telemetry and industrial asset
tracking. This manual covers both the ZMN2405DK and the ZMN2405HPDK. The only
difference between the two kits is the output power of the modules included. The ZMN2405
module provides 1mW of RF power while the ZMN2405HP provides 65mW of RF power (when
coupled with a 2dB dipole antenna, the ZMN2405HP provides 100mW EIRP).
RFM has six base module versions: ZMN2405, ZMN2405HP, ZMN2430, ZMN2430HP,
ZMN2430A and ZMN2430HPA. All four modules use the same firmware and thus operate the
same. The difference with the two HP versions is that they provide 65mW (100mW with the 2dB
dipole antenna) of transmit power instead of the 1mW of the non-HP modules. The 2405
modules are solder bump while the 2430 modules are castellated. All versions are based on the
CC2430 single chip module. Refer to the data sheets on the dev kit CD for details of the
mechanical differences of the modules. In addition to being available as Coordinator, Router,
and End Device versions, there are “A” versions that include a chip antenna.
There are various flavors of ZigBee devices that this module must support, the Coordinator, the
Router and the End Device . How these devices work and what their functions are in a Zigbee
network are explained in detail is Section 2, Zigbee Networking. The development board can
also be configured as an End Device by downloading the End Device code load provided as
part of the kit. Programming the module is explained in Section 6.
© 2007-2008 RFM Inc. 1 M-2405-0000 Rev. C-
Page 8

ZMN2405/ZMN2405HP Dev Kit
2. ZigBee Networking
ZigBee is a mesh networking and security stack that sits on top of an 802.15.4 MAC layer radio.
802.15.4 specifies the frequency bands, the number of channels, the spreading technique and
the modulation method. ZigBee controls how data is routed between 802.15.4 physical layer
radios, adding mesh and encryption capability along the way.
There are three types of devices specified in ZigBee: a Coordinator; a Router and an End
Device. The Coordinator and Router are sometimes referred to as Full Function Devices or
FFDs. The End Device is sometimes referred to as a Reduced Function Device or RFD. Since
an FFD can be a Coordinator or a Router, this manual will use the Coordinator, Router and End
Device names.
The Coordinator is responsible for setting the channel for the network to use, making its
presence known to Routers and End Device s, assigning network addresses to Routers and End
Devices and keeping the routing tables for the network that are necessary to route data from
one ZigBee device to another in the same ZigBee network. Each network must have one and
only one Coordinator. Without a Coordinator, a network cannot form. Typically, although it is not
a requirement, the Coordinator will function as the gateway or takeout point for applications
where data from the ZigBee network will be sent off the network and will be received from
devices off the network.
The Router, as its name implies, is responsible for routing data from other Routers or End
Devices to the Coordinator or to other Routers closer to the Coordinator. The Router can also
be a data input device, either serially or through the I/O pins of the module.
The End Device can only communicate with the Coordinator or a Router. An End Device cannot
communicate directly with another End Device . Communication between one End Device and
another End Device must go through the Coordinator or a Router and may go through one or
more Routers.
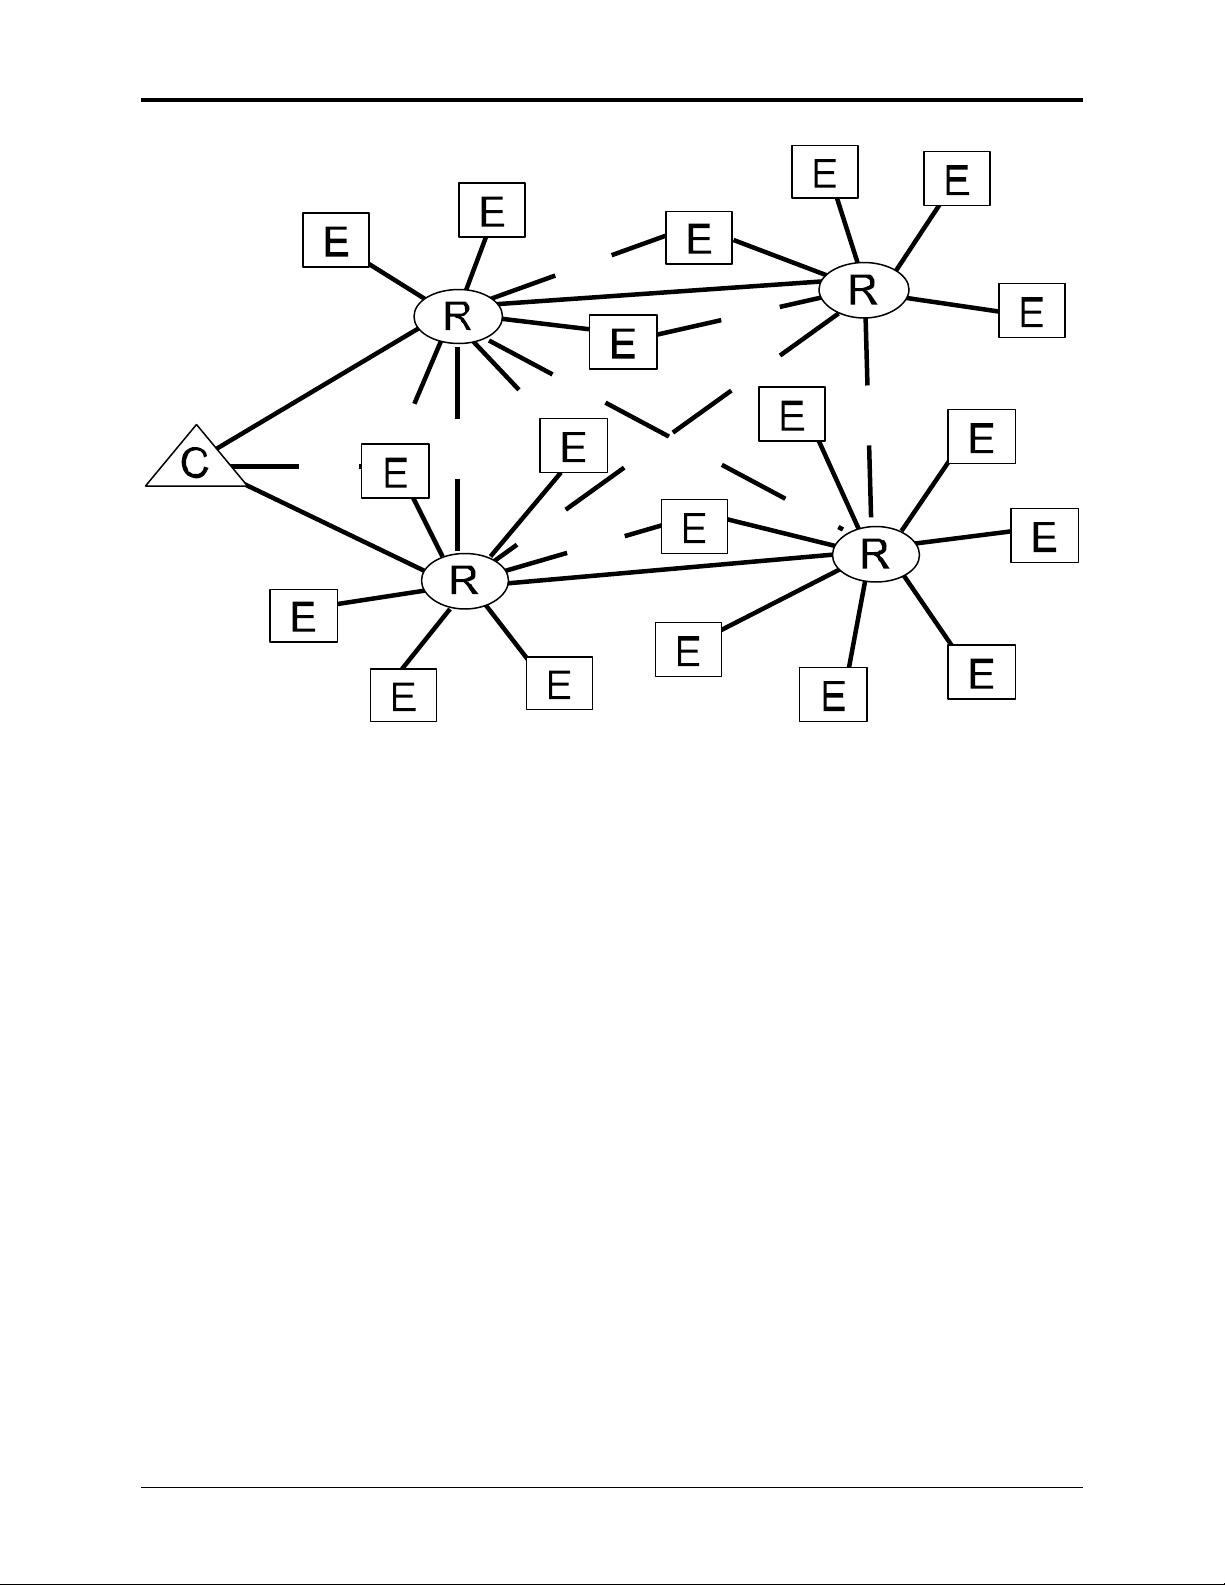
Figure 2 depicts a typical ZigBee network with two levels of Routers. The box labeled C
represents the Coordinator, the boxes labeled R represent Routers and the boxes labeled E
represent End Device s. As can be seen from the diagram, each End Device has multiple
potential communication paths. The most likely path is a solid line with backup paths indicated
with dashed lines. From this Figure it is seen how End Device s only communicate with Routers
and the Coordinator while Routers can communicate with End Device s, other Routers or the
Coordinator. The Coordinator can communicate with Routers and End Device s.
© 2007-2008 RFM Inc. 2 M-2405-0000 Rev. C-
Page 9
ZMN2405/ZMN2405HP Dev Kit
Figure 2. Typical ZigBee Network
2.1 Forming a Network
The Coordinator is typically the first element powered up. The Coordinator will listen on the first
channel of the set of channels that has been specified for it to use in forming a network. If the
Coordinator detects RF energy on that channel, it will move to the next channel in the channel
set until it finds a clear channel. If a clear channel cannot be found, the Coordinator will indicate
an error.
If a PAN ID has been specified, the Routers and End Device s will look for a Coordinator with the
specified PAN ID. If a Coordinator is not found on a channel, or one is found, but has the wrong
PAN ID, the ZigBee device will go to the next channel on its channel list until a satisfactory
Coordinator is found. The Coordinator will assign each device that identifies itself to the
Coordinator a 16-bit network address. This 16-bit network address is used to route data within
the network . Each ZigBee device has a unique 8-byte MAC address just as in an Ethernet
network. The 16-bit network address can and will change every time the Coordinator is power
cycled unless the Static Network mode is enabled. (Refer to Section 2.6 for details).
The network is now formed. If the Routers and End Device s have been configured to transmit
data on their own, they will begin doing as they have been told. If the Coordinator is to be used
as a gateway too, it is typically necessary to let the application communicating with the gateway
to know what devices are on the network. ZigBee provides a discovery command which returns
from the Coordinator/gateway, the 16-bit network addresses of all devices associated in the
network. The application then must request the 8-byte MAC address and optionally the “Friendly
Name” of each device associated with the network. Once the devices associated with the
network have been discovered and the MAC addresses obtained, the application can address
data and commands to individual devices on the network.
© 2007-2008 RFM Inc. 3 M-2405-0000 Rev. C-
Page 10

ZMN2405/ZMN2405HP Dev Kit
2.2 Sleeping End Devices
ZigBee envisions that Routers and Coordinators will always be powered and never put to sleep
as they must always be awake since they do not know when another device may attempt to
communicate. End devices on the other hand, are expected to send data for a brief period of
time and then go to sleep for the majority of the time. When the End Device is asleep, any data
addressed to it will be held by the Router (or Coordinator) with which it is associated. When the
End Device wakes up, it will send a request for the Router (or Coordinator) to send any data it
may be holding. End Devices do not have to go to sleep. They can be configured as mains
powered and always be awake.
ZigBee provides that sleeping End Devices will do two things: 1) wake up periodically and see if
their parent device is holding data for them; and 2) wake up periodically and perform some
operation. It is possible to have an application poll sleeping End Devices. However, since the
End Device will not respond until it wakes, the amount of time the application must wait to
receive a response will be related to how often the End Device awakens.
The rest of the details of sleeping End Device modes are dependent on the application profile
used. Details of the sleep modes implemented in RFM’s CSM profile are provided in Section 8.9
of this manual.
2.3 ZigBee Addressing
The ZigBee standard provides for two means of addressing ZigBee devices, whether they are
Coordinators, Routers or End Device s: MAC Addresses and Network Addresses. MAC
addresses are just like MAC addresses in Ethernet network s. The MAC address is 8 bytes long,
is unique to each device and permanently stays with the device. Network addresses are 2 bytes
long and are assigned to ZigBee devices as they associate with the network. As such, the
network address is not known before the network forms and can change when a ZigBee device
re-associates with the network.
Much like an Ethernet device, RFM’s ZigBee modules have their MAC addresses programmed
into them at the factory as part of the manufacturing process. RFM ’s prefix of 00:30:66 is used
in the MAC address and thus can be used to identify RFM products. While the MAC address
uniquely identifies each ZigBee device - regardless of manufacturer or position in the network it contains no routing information and thus can be used only to communicate with devices that
© 2007-2008 RFM Inc. 4 M-2405-0000 Rev. C-
Page 11

ZMN2405/ZMN2405HP Dev Kit
are directly connected to a ZigBee device. That is, if a Router wants to talk to an End Device or
Router to which it has a direct connection (the data does not have to be routed through another
device), it can use the MAC address. However, if it wants to talk to a ZigBee device but needs
to have the data routed through another ZigBee device, it must use the network address.
The network address is assigned to ZigBee devices as they associate with the network. The
Coordinator always has network address 0x0000. The network addresses are assigned in such
a way that the address contains routing information. As a 2-byte value, the network address
can handle 65,535 potential devices in a single ZigBee network. For a ZigBee device to send
data to a device on the network which is not directly connected to it, the network address must
be used. Based on the address, the ZigBee Routers can determine the next ZigBee device to
send the data to until it reaches the intended device.
If an application needs to send data to specific devices on a network, the application must
maintain a table that links device -specific MAC addresses with their assigned Network
addresses. The application also must be aware that the network address of a specific device
can change due to power cycling, loss of connection, etc. Network and MAC addresses can be
determined through the Discovery and Get IEEE Address commands. Refer to the next section
on Discovery and Section 8 for details on these commands.
2.4 Discovery
While it is possible for ZigBee devices to only communicate among other devices on the ZigBee
network, typically it is a requirement that the devices on the network be known to either
applications or other devices that are not part of the ZigBee network. ZigBee supports this need
through a Discovery process. The Discovery process reports back all of the ZigBee devices on
the network that have joined the network. All devices respond whether directly connected or not.
In a network of several layers of depth, it will take a series of steps to discover all of the devices
on the network. It is not necessary for sleeping End Devices to be awake to learn of their
presence in the network. The parent device of the sleeping End Device will report its presence.
2.5 Network Topology and Size
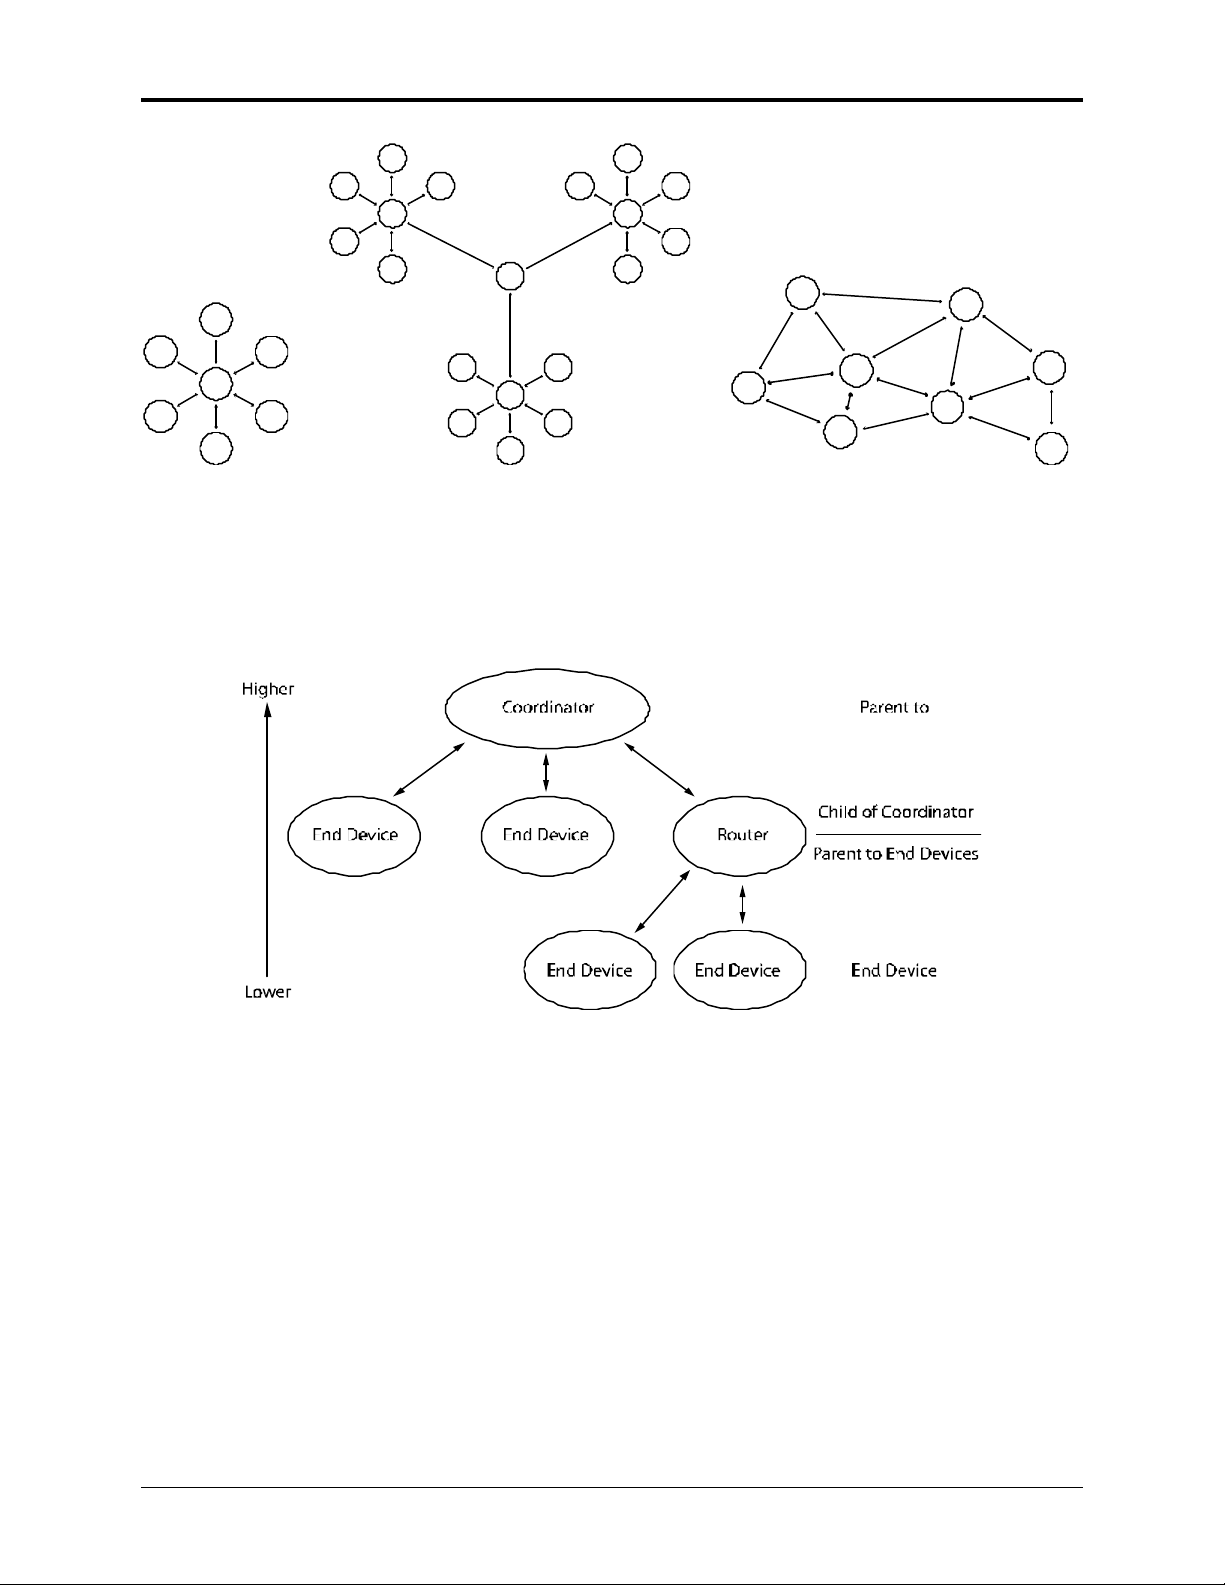
ZigBee can support three primary network topologies: Star, Cluster Tree and Mesh. Depending
on the configuration, the number of nodes the network can support will change. ZigBee uses
three parameters that effectively control the network topology and the number of potential
nodes. These three parameters are Max Number of Children, Max Number of Routers and Max
Network Depth. These parameters are determined by the stack profile being used (this is
different than the application profile) and cannot be configured after compilation of the code.
© 2007-2008 RFM Inc. 5 M-2405-0000 Rev. C-
Page 12
ZMN2405/ZMN2405HP Dev Kit
Star Cluster Tree Mesh
Parents and Children. In ZigBee parlance, devices higher and lower in the network hierarchy
are referred to as Parents and Children respectively. The Coordinator in a network is the parent
to all devices directly associated with the Coordinator, regardless of whether they are Routers or
End Devices. Routers which are children to the Coordinator are parents to devices that directly
associate with them, also regardless of whether they are Routers or End Devices. End Devices
cannot be parents and are always children of either the Coordinator or a Router.
Max Number of Children (MNC). This parameter specifies the maximum number of devices for
which a ZigBee device can act as a parent or upstream connection. For example, in a star
network, MNC will determine the maximum number of devices that can associate with the
Coordinator. For a cluster tree or mesh network topology, the MNC specifies the number of
children the Coordinator and Routers can each have associated with them. In the only ZigBee
approved stack profile (Home Control Lighting) MNC is twenty. This means that a star network
can have 21 nodes in it, 1 Coordinator and 20 children. For cluster tree and mesh topologies
MNC is not sufficient to determine the maximum number of network devices.
Max Number of Routers (MNR). This parameter specifies how many out of the MNC devices
can be Routers. In the Home Control Lighting stack profile, MNR is set to 6. This means that the
Coordinator can have 6 Routers directly associated with it and each Router can have 6 Routers
associated directly with them. The other 14 devices directly associated with the Coordinator and
Routers must be End Device s. If there are fewer than 6 routers associated with the Coordinator
or a Router, the maximum number of end devices that can associate with either the Coordinator
or a Router is still 14.
© 2007-2008 RFM Inc. 6 M-2405-0000 Rev. C-
Page 13

ZMN2405/ZMN2405HP Dev Kit
Max Network Depth (MND). This parameter specifies how many levels of Routers ma y be
present in a ZigBee network. For a star network, while there can be Routers associated with the
Coordinator, the Routers cannot have any children. For cluster tree and mesh networks multiple
levels of Routers can be implemented. The Home Control Lighting stack profile set MND to 5.
This means a network could be constructed with the Coordinator at the top and 5 levels of
Routers beneath the Coordinator.
From these three parameters, the number of nodes that can be supported in a given network
configuration can be computed. In the simple case of the star network, it is simply the
Coordinator plus MNC. For cluster tree and mesh networks, the calculations are a little more
complicated. The Coordinator can support 20 devices of which 6 can be Routers and 14 End
Devices. If we assume that there are 2 Routers, and that both Routers have a full complement
of 14 End Device s - then this network can support the Coordinator, two Routers and 42 End
Devices. In practice, it is hard to know exactly how a network will form. While devices will
attempt to associate with the highest level of the network, if they are unable to establish a
connection, they will associate with a lower level of the network. So in the simple example
above, if some of the 14 End Device s that are assumed to be directly associated with the
Coordinator cannot establish a connection with the Coordinator but can establish a connection
with one of the two Routers, then some number less than 42 End Devices, 2 Routers and the
Coordinator will be supported by this network.
Because the Home Control Lighting profile is the only public stack profile, RFM has
implemented our ZigBee modules using that stack profile and thus are constrained by the limits
of 20 children per device, 6 Routers per device and 5 levels of Routers. Please contact RFM
Tech Support if your application requires different parameter values.
2.6 Static Network Addresses and Link Announcements
When a ZigBee network forms, nodes are assigned their 2-byte network addresses according to
how the network forms. For example, the first router that associates with the coordinator is
assigned the network address 0x0001. The second router to associate is assigned the network
address 0x143E. If the network is powered down and then powered up again, if the router
originally assigned network address 0x14FE associates with the coordinator before the router
originally assigned network address 0x0001, it will be assigned network address 0x0001.
Applications that send data over the ZigBee network must keep track of the network addresses
assigned to the nodes on the network. If the network loses power, the application must detect
that and rediscover the network. This can be a cumbersome process for the application
especially during application development or system testing.
To alleviate the problems caused by these situations, RFM has implemented two features:
Static Network Addresses and Link Announcements. Each is described in detail below.
Static Network Addresses
When enabled through a configuration parameter, Static Network Addresses causes the ZigBee
modules to save their network address in non-volatile memory. If power is subsequently lost to
the network or just the node, the module will request its original network address when power is
restored. If the entire network lost power, this will cause the network to be formed with each
ZigBee device having its original network address. If the original parent is no longer available,
© 2007-2008 RFM Inc. 7 M-2405-0000 Rev. C-
Page 14

ZMN2405/ZMN2405HP Dev Kit
the ZigBee device will stop trying to re-associate with its original network address and reassociate with the network as if it had never belonged.
Static Network Addresses cannot be used in a mobile environment as it is expected and desired
that nodes will associate and re-associate using different parents. In the event when Static
Network Addresses are being used, if a parent is no longer available, the node device will
associate and receive a new network address.
Link Announcements
To prevent the application from periodically rediscovering the network again to learn the network
addresses - most of which will not have changed - RFM has implemented Link Announcements.
Link Announcements are always enabled. Any time a node associates with a network whether it
is the first time or the fifth time, and regardless of with which parent device it associates, a Link
Announcement message is sent to the coordinator. The Link Announcement message includes
the network address of the node joining the network. The GET IEEE command can be used to
determine the MAC address of the joining device.
© 2007-2008 RFM Inc. 8 M-2405-0000 Rev. C-
Page 15

ZMN2405/ZMN2405HP Dev Kit
3. Getting Started
Once you have identified all the components of your kit, connect either the 6dBi patch antenna
directly to the RF connector on the development boards or the RF cable and 2dBi dipole
antenna. It is not necessary to use the same antenna on both boards.
3.1 Installing ZBDemo
The next step is to copy the ZBDemo program onto a computer. The ZBDemo program is on the
Software and Manuals CD in the Software directory included with the kit. Copy the file
zbdemo.exe onto the hard drive of the computer and remember into which directory it was
copied.
3.2 Installing USB Drivers
If a USB port is to be used to communicate with the development board, the drivers for the USB
adapters must be installed on the PC. The USB drivers are on the Documentation and Software
CD under the Drivers folder. When the computer detects the presence of the hardware, the
“Add New Hardware Wizard” box will appear. Click on “Next” and follow the prompts. Refer to
Section 5 for step-by-step instructions.
3.3 Running ZBDemo
One development board is setup as the Coordinator and the other development board is setup
as a Router. Connect the Coordinator to either the USB or RS-232 serial port of the computer.
Use either the wall-mount power supply or a 9V alkaline battery. It is not necessary to use the
same power type for each radio. Apply power to the Coordinator first and verify the Power LED
is on.
When the Coordinator has found that the channel is clear, the Link LED on the Coordinator will
glow green. Once the Coordinator has turned on the Link LED, the Router can attempt to
associate with the Coordinator. Once it has associated with the Coordinator, the Link LED will
glow green. Wait until the Link LEDs on all radios are glowing green before continuing. Start the
ZBDemo program by double-clicking the ZBDemo icon on the computers’ desktop.
© 2007-2008 RFM Inc. 9 M-2405-0000 Rev. C-
Page 16
ZMN2405/ZMN2405HP Dev Kit
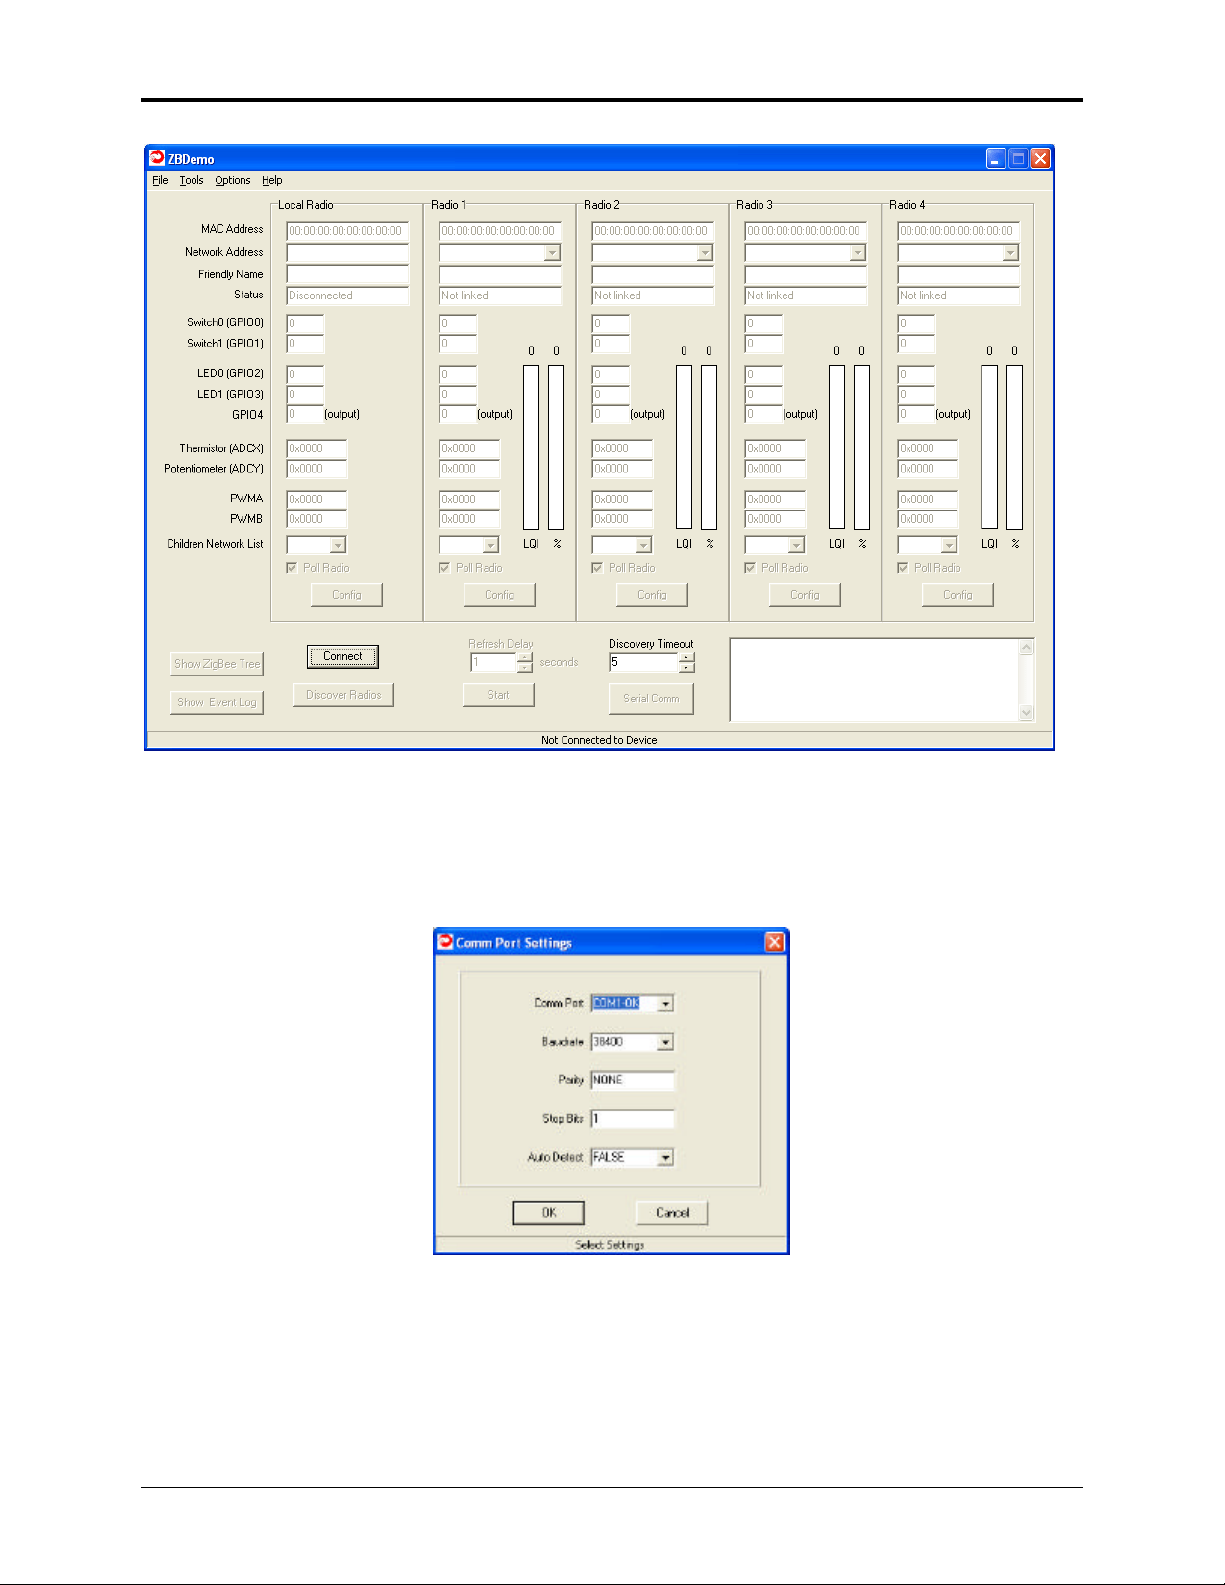
Click the Connect button on the ZBDemo screen. A window will open showing the
communications parameters to be used to communicate with the Coordinator. Select a serial
port from the drop down menu. Selections that are available will be marked as “OK”, those
unavailable will be marked as “N/A”. 38,400 is the Default baud rate. This window changes the
PC Comm Port parameters but not the development board.
The Comm Port Settings dialog is pre-loaded with default settings. In most instances, simply
clicking OK will allow Z BDemo to find the radio and load the main program window. If, however,
the default settings are incorrect, the radio will not be found. This screen allows you to connect
to the radio using two methods.
© 2007-2008 RFM Inc. 10 M-2405-0000 Rev. C-
Page 17
ZMN2405/ZMN2405HP Dev Kit
The first is to use the drop down menus to change the default settings for Comm Port, Baudrate,
Parity and Stop Bits to the correct values. Obviously, this assumes you know which settings the
radio is using. If, however, those parameters may have been changed and are not known, a
second method is available.
The Auto Detect function works this way. If set to FALSE, once OK is selected, the program
uses the default settings to try to communicate with the radio. If set to TRUE, the program will
begin a systematic process beginning with the first valid port (COM 1 in most cases) then will
cycle through each baud rate, then each parity setting, then each stop bit setting finally
changing to the next available COM port and repeating the process until a radio is found.
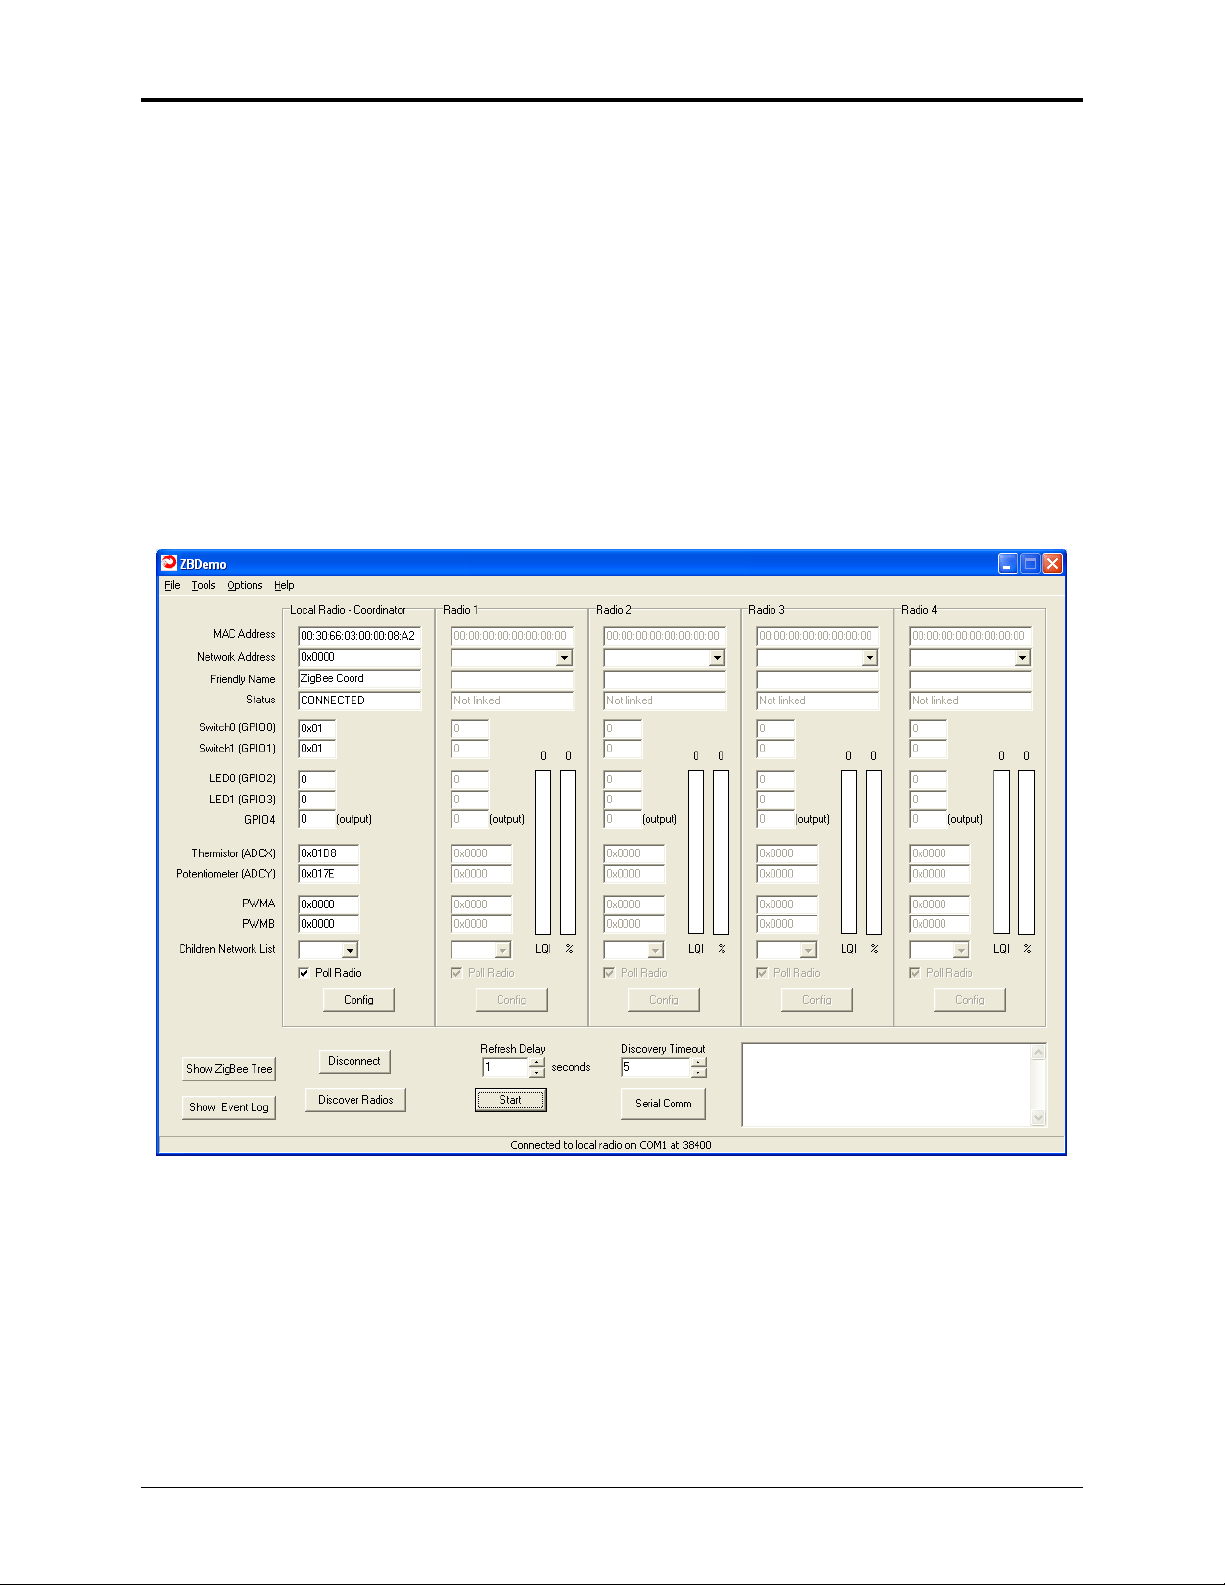
Once the radio has been found, click OK and after a few seconds, information about the ZigBee
module in the Coordinator will be displayed in the Local Radio column along with its 8-byte MAC
address. The Status condition of CONNECTED indicates the computer has detected the
development board as shown below.
Click on the Discover Radios button. This will cause the Coordinator to request information
about the Router development board.
© 2007-2008 RFM Inc. 11 M-2405-0000 Rev. C-
Page 18
ZMN2405/ZMN2405HP Dev Kit
Router
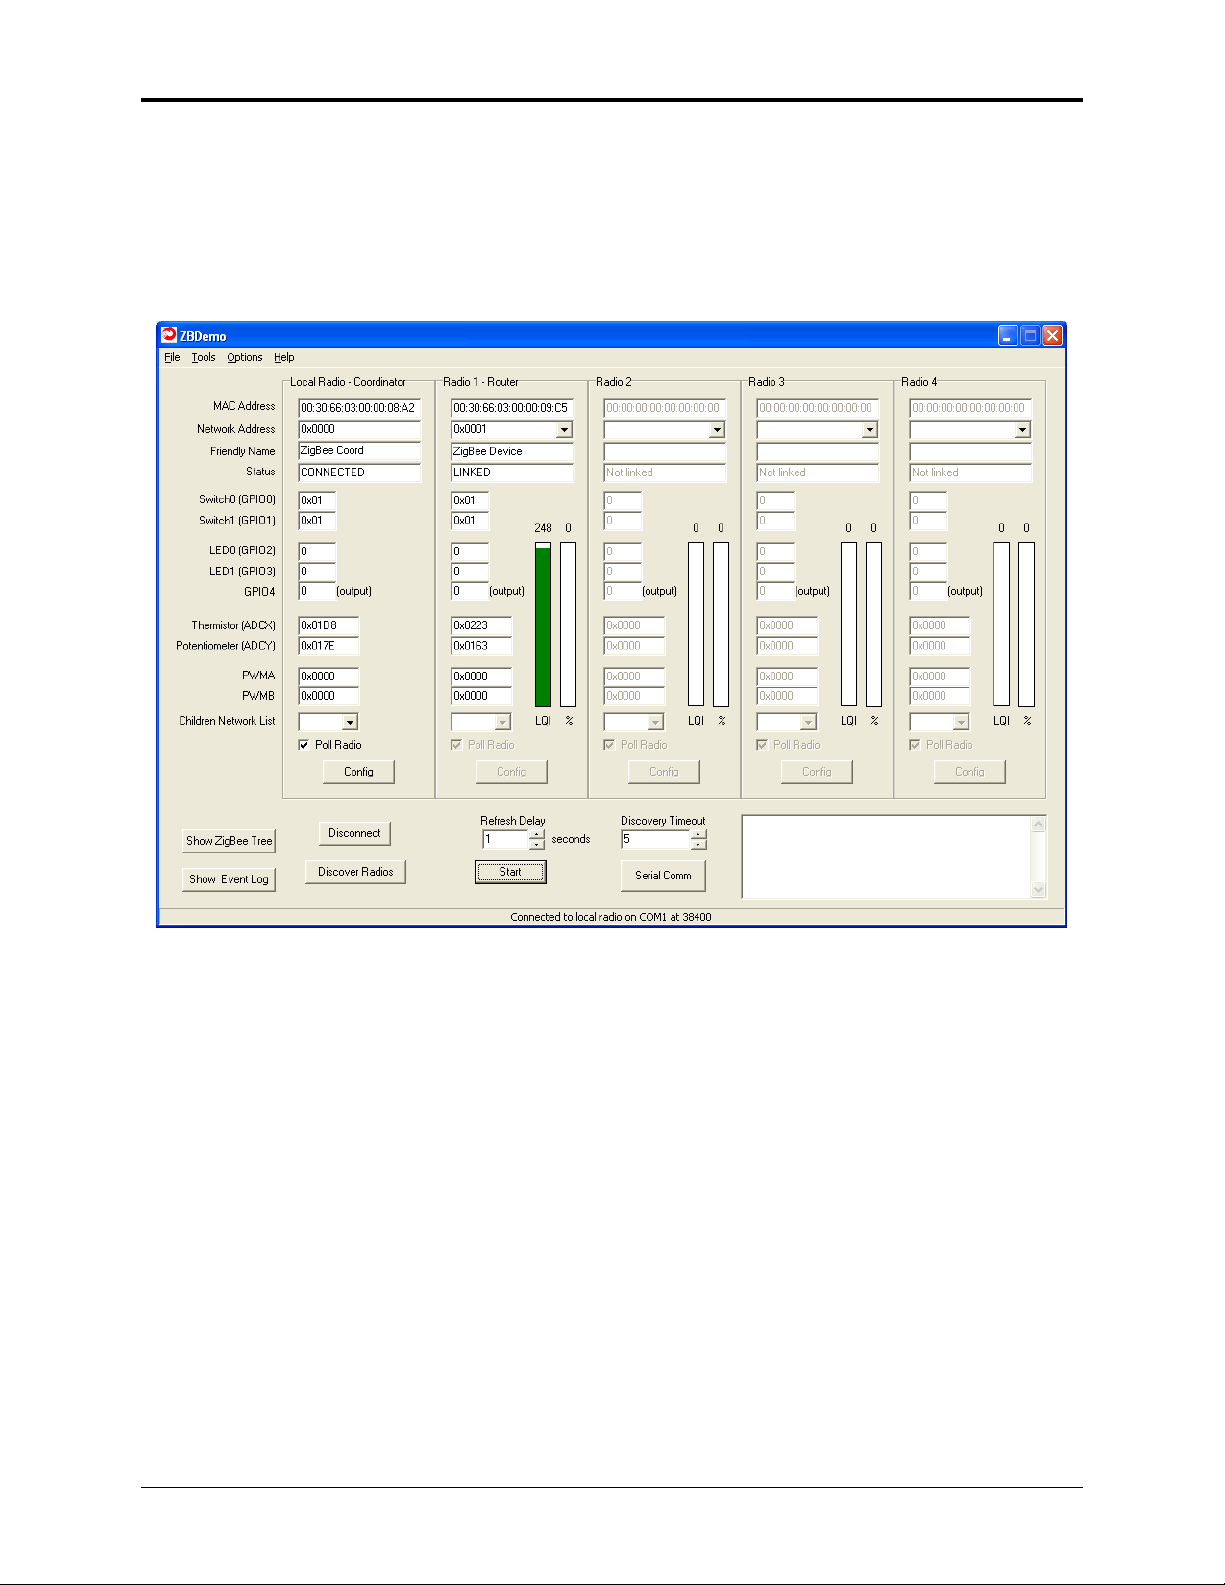
This information will be di splayed in the Radio 1 column of the ZBDemo program and the type
listed as “Router” as shown below.
Note: This assumes the development board is configured as a Router. If the development
board has been reprogrammed as an End Device, refer to the next section.
The Status for Radio 1 will be LINKED and the LQI (Link Quality Indicator) will show the relative
strength of the link. The columns for Radios 2, 3 and 4 will be grayed out with a Status of Not
Linked. Repeat the above steps on the other computer for the development board.
© 2007-2008 RFM Inc. 12 M-2405-0000 Rev. C-
Page 19

ZMN2405/ZMN2405HP Dev Kit
After completing the steps, the Router information will be displayed in the Local Radio column
and the Coordinator information will be displayed in the Radio 1 column as shown below.
There are Poll Radio checkboxes at the bottom of each Radio column that enable periodic
polling of the radio’s parameters. In order to see changes made to the state-change devices on
the development board, turn on continuous polling by clicking the Start button under the Refresh
Delay field . A setting of 0 seconds in the Refresh Delay field will continuously poll the Radios
with the Poll Radio box checked. Longer Refresh Delay settings can be set using the up and
down arrows to the right of the Refresh Delay field, or the number can be highlighted and a
value entered. Once the Start button is pressed, it changes to a Stop button. Clicking on the
Stop button will end the polling process.
© 2007-2008 RFM Inc. 13 M-2405-0000 Rev. C-
Page 20

ZMN2405/ZMN2405HP Dev Kit
End Device
If you have configured the development board as an End Device, this information will be
displayed in the Radio 1 column of the ZBDemo program and the type listed as “End Device” as
shown below.
The Status for Radio 1 will be LINKED and the LQI (Link Quality Indicator) will show the relative
strength of the link. The columns for Radios 2, 3 and 4 will be grayed out with a Status of Not
Linked. Repeat the above steps on the other computer for the End Device.
© 2007-2008 RFM Inc. 14 M-2405-0000 Rev. C-
Page 21

ZMN2405/ZMN2405HP Dev Kit
After completing the steps, the End Device information will be displayed in the Local Radio
column and the Coordinator information will be displayed in the Radio 1 column as shown
below.
There are Poll Radio checkboxes at the bottom of each Radio column that enable periodic
polling of the radio’s parameters. In order to see changes made to the state-change devices on
the board, turn on continuous polling by clicking the Start button under the Refresh Delay field.
A setting of 0 seconds in the Refresh Delay field will continuously poll the Radios with the Poll
Radio box checked. Longer Refresh Delay settings can be set using the up and down arrows to
the right of the Refresh Delay field, or the number can be highlighted and a value entered. Once
the Start button is pressed, it changes to a Stop button. Clicking on the Stop button will end the
polling process.
© 2007-2008 RFM Inc. 15 M-2405-0000 Rev. C-
Page 22

ZMN2405/ZMN2405HP Dev Kit
In the lower left portion of the main ZBDemo window, there are two additional buttons, Show
ZigBee Tree and Show Event Log. The Event Log is a chronological listing of the events that
have occurred on the Zigbee network as shown below.
As you can see, the log shows the date and time of the event, along with the network address of
device the event was received from, the Cluster, Offset and Length (in bytes) of the event and
finally, the data received. The Clear button allows you to remove all recorded events from the
window and have the logging start again.
The Zigbee Tree button opens the Childform window which is an expandable representation of
the devices that makeup the Zigbee network as shown below.
© 2007-2008 RFM Inc. 16 M-2405-0000 Rev. C-
Page 23

ZMN2405/ZMN2405HP Dev Kit
There are checkboxes at the bottom of the window (Show MAC Address, Show Friendly Name,
Show Device Type) that allow you to choose the items listed for each device in the network. You
can check all or not check any.
There is also a Poll Rate field that allows you to enter a polling time period, this number is in
milliseconds, i.e. 1000 would equal 1 second. The Poll Devices button on this window can be
used in conjunction with the main ZBDemo screen to automatically and sequentially poll ALL
current network devices without having to individually select devices to load into the Radio 1 – 4
columns. This can be useful on networks were there are substantially more radios in the
network than can be displayed in the four available Radio columns.
Notice there is a + sign to the left of the Coordinator line. Clicking on that sign will expand the
tree so that all the network devices connected to the Coordinator will display as shown above.
Double click on any line to open the configuration screens for that device. Clicking on the
Rescan button will go out and scan the network for any changes, then display those changes in
the Childform window.
© 2007-2008 RFM Inc. 17 M-2405-0000 Rev. C-
Page 24

ZMN2405/ZMN2405HP Dev Kit
If you want to send text messages back and forth between radios, a second serial port – either
RS232 or USB – is needed on the computer or a second computer is needed. Two Zigbee USB
devices cannot be attached to the same PC. This is due to the USB drivers. Click on the Serial
Comm button in the lower right hand corner of the ZBDemo main screen and the String
Messaging Demo box will open.
There are four fields/windows in this box: the Destination Address window top left of the box, the
Incoming Data field top right of the box, the M essaging Display window in the middle of the box;
and the Text to Send window at the bottom of the box. The Clear button allows you to clear the
contents of the messaging display window.
To send a text string to the other radio, simply click on the Send button which will send the text
entered in the Text to Send field to the other radio. Data sent by the local radio will appear in the
messaging display window indicating what the Local radio transmitted as shown below.
© 2007-2008 RFM Inc. 18 M-2405-0000 Rev. C-
Page 25

ZMN2405/ZMN2405HP Dev Kit
Data received from the other radio will be displayed in the messaging window and labeled
according to the Incoming Data field selection. Incoming Data can be labeled using the Friendly
Name, the MAC Address or the Network Address as shown below.
The String Messaging Demo functionality works the same on the other computer connected to
the Router board.
3.4 Communicating without ZBDemo
Packets are used to send and receive data thus unformatted data packets cannot be sent to the
UART Port without first putting the module in Transparent Mode. Details on packet format and
structure can be found in Section 8.8, Serial Protocol. For details on using Transparent Mode,
see Section 8.2.
© 2007-2008 RFM Inc. 19 M-2405-0000 Rev. C-
Page 26

ZMN2405/ZMN2405HP Dev Kit
4. The Development Board
This section describes in detail all the features and functions of the development board that
makes up the developer’s kit. The development board as it come s from the factory is labeled as
a Router on the bottom of the board. Additional Router or End Device development boards can
be ordered from RFM .
A block diagram of the development board is shown below:
Figure 3. Development Board Block Diagram
The USB and RS-232 interface circuits convert standard level signals into 3.3V transmit and
receive data signals. Only one input can be used at a time. If a USB connection is present, the
RS-232 input will be electrically locked out. Note that there is no hardware flow control
implemented on the RS-232 input. A standard RJ-11 connector is provided for the RS-232
connection.
The development board can run off either a 9Vdc power source or a 9V alkaline battery. The
supplied wall-mount DC power supply connects to the DC power connector located next to the
USB connector. The 9V alkaline battery connectors are located on the bottom of the board
underneath the Power LED.
A JTAG header is provided for situations where custom profiles or module code is being
developed and the module will be programmed without using the bootloader code resident in
the module.
All of the ZMN2405HP module pins, except Reset, are brought out to connectors on the board.
This facilitates connecting the module to other devices without having to integrate the module
into another circuit. The pinouts of the connectors are listed below and are included in the board
silk screen for JP1 and JP2.
© 2007-2008 RFM Inc. 20 M-2405-0000 Rev. C-
Page 27

ZMN2405/ZMN2405HP Dev Kit
JP2
JP1
Connector
Pin
Signal
1 Ground 2
2 +3.3V 1
3 PWMA 3
4 PWMB 4
5 GPIO0 5
6 GPOI1 6
7 GPIO2 7
8 GPIO3 8
9 GPIO4 9
10 GPIO5 10
11 Link/TDO
12 Ground 2
Module
Pin
12
Connector
Pin
1 Ground 2
2 +5V NC
3 SPI_/MISO
4 SPI_MOSI 31
5 SPI_SCLK 30
6 SPI_EN 29
7 ADCZ 27
8 ADCY 26
9 ADCX 25
10 UTX 22
11 URX 21
12 Ground 2
Signal
Module
Pin
32
Refer to the Section 7.1 for details on each module pin and its function.
The GPIO LEDs, Switches, Potentiometer and Thermistor are provided for demonstration
purposes. These components can be read and written to using the ZBDemo program. The
switches are momentary SPST switches and close to ground when pressed. The thermistor is
used to vary an input voltage to the ADC X input with a maximum input voltage of 3.0 volts.
Similarly, the potentiometer is connected in a resistor divider network to vary an input voltage to
ADC Y input which can vary between ground and Vcc (~3.3V). Refer to the board schematics at
the back of this manual for more details. To connect ADC X or ADC Y to off-board signals,
disconnect the thermistor and potentiometer from the module inputs by removing JP3 for the
potentiometer and JP4 for the thermistor.
A group of four status LEDs are provided to allow board activity to be monitored. The LED
functions are provided in the table below.
LED Function
Link On the Coordinator, illuminates when a clear channel has been detected and the
Coordinator is ready for other devices to associate with it.
On Routers and End Devices, illuminates when they have associated with a
Coordinator.
Activity Indicates RF data activity.
The figure below indicates where the various components of the board are located:
© 2007-2008 RFM Inc. 21 M-2405-0000 Rev. C-
Page 28

ZMN2405/ZMN2405HP Dev Kit
Figure 4. Devel opment Board Component Locations
© 2007-2008 RFM Inc. 22 M-2405-0000 Rev. C-
Page 29

ZMN2405/ZMN2405HP Dev Kit
5. ZBDemo
This sections details the features and functions of ZBDemo and provides some information on
what is going on behind the GUI. ZBDemo does not need to be installed, only copied onto the
computer to be connected to the developer board. The opening screen is shown below:
ZBDemo can display up to 5 devices including the Coordinator. Regardless of whether or not a
radio is set up as a Coordinator or not, the information for a radio connected to the computer
running ZBDemo will always be displayed in the Local Radio column. The Coordinator to which
the local radio is associated will have its information displayed in one of the Radio columns. To
identify the Coordinator, it is necessary to look for the MAC address on the label on the bottom
of the PCB. Routers have their MAC address in the same location.
© 2007-2008 RFM Inc. 23 M-2405-0000 Rev. C-
Page 30

ZMN2405/ZMN2405HP Dev Kit
When the Connect button is clicked, the Comm Port Settings box opens.
Note: Be sure to close all resident programs that use the Serial port such as any portable
digital assistant syncing software (ex: Palm’s HotSync) prior to running ZB Demo.
The Comm Port Settings dialog is pre-loaded with default settings. In most instances, simply
clicking OK will allow Z BDemo to find the radio and load the main program window. If, however,
the default settings are incorrect, the radio will not be found. This screen allows you to connect
to the radio using two methods.
The first is to use the drop down menus to change the default settings for Comm Port, Baudrate,
Parity and Stop Bits to the correct values. Obviously, this assumes you know which settings the
radio is using. The Comm Port drop down menu will display a list of Comm port selections from
1 to 16. Selections that are valid will be marked as OK. If an invalid selection is chosen, when
the OK button is clicked, an error message will be displayed indicating that the selected Comm
Port is not valid.
If a valid Comm port is selected, but the radio is not connected to that port, a baud rate error
message will be displayed sa ying a radio could not be detected at the proper baudrate. If this
message is received, select another Comm Port and try to connect again.
If, however, the default parameters have been changed and are not known, a second method,
Auto Detect, is available.
The Auto Detect function works this way. If set to FALSE, once OK is selected, the program
uses the default settings to try to communicate with the radio. If set to TRUE, the program will
begin a systematic process beginning with the first valid port (COM 1 in most cases) then will
cycle through each baud rate, then each parity setting, then each stop bit setting finally
changing to the next available COM port and repeating the process until a radio is found.
Once the radio has been found, click OK and after a few seconds, information about the ZigBee
module in the radio will be displayed in the Local Radio column along with its 8-byte MAC
address. The Status condition of CONNECTED indicates the computer has detected the radio
as shown below.
© 2007-2008 RFM Inc. 24 M-2405-0000 Rev. C-
Page 31

ZMN2405/ZMN2405HP Dev Kit
ZBDemo works the same whether connecting to an RS-232 serial port or a USB port. On most
computers, the USB Comm Ports have higher port numbers than RS-232 ports. Even on
computers without an RS-232 serial port, the USB Comm Ports are numbered something other
than 1 or 2. If a USB port is to be used, the drivers for the USB adapters must be installed on
the PC.
The USB drivers are on the Documentation and Software CD under the Drivers folder. When
the computer detects the presence of the hardware, the “Add New Hardware Wizard” box will
appear. Click on “Next.” The next dialog box will ask what Windows should do. Click on the
“Search for the best driver for your device” button and then click on “Next.” The next dialog box
will ask where Windows should search for the driver. Put the included software CD in the
computer and enter the drive letter for your CD drive. Click on the “Browse” button to the right of
the window. A window will pop up displaying the contents of the CD. Double-click on the folder
named “Drivers.” Click the “Next Button.”
Windows will indicate it has found the driver FTDIBUS.INF on the diskette. Click on the “Next”
button to begin the driver installation. When Windows has finished the installation the messages
“USB High Speed Serial Converter” and “Windows has finished installing the software that your
new hardware device requires” will be displayed. Click on the “Finished” button to close the
Wizard.
When ZBDemo has established a connection with a radio, the information for that radio will be
displayed in the Local Radio column as shown below.
© 2007-2008 RFM Inc. 25 M-2405-0000 Rev. C-
Page 32

ZMN2405/ZMN2405HP Dev Kit
The Status of CONNECTED indicates the radio is communicating with ZBDemo and has
nothing to do with whether or not the radio is part of a ZigBee network. Even when the radio is
configured as a Router or End Device , the Status will indicate CONNECTED.
Each radio will have a different Network Address. As radios are discovered, they will be made
available in the Network Address drop down menus. This allows you to selectively display any
individual radio’s parameters using the Network Address drop down menu. For situations in
which more than 5 radios are being used, this feature allows you to view and/or reorganize how
the parameters are displayed.
There are Poll Radio checkboxes at the bottom of each Ra dio column that allow the radio to be
periodically polled for information when the Start button is pressed under the Refresh Delay
field. A setting of 0 seconds in the Refresh Delay field will continuously poll the Radios that have
Poll Radio checked. Longer Refresh Delay settings can be set using the up and down arrows to
the right of the Refresh Delay field, or the number can be highlighted and a value entered. Once
the Start button is pressed, it changes to a Stop button. Clicking on the Stop button will end the
polling process.
5.1 Discover Radios
Once the ZBDemo has connected to the board, if the Link LED is illuminated, ZBDemo can
discover the nodes that are part of the network. The Discover Radio button causes up to four
radios that are part of the same ZigBee network as the Coordinator to be displayed at any one
time and will read the status of the various components of each radio. Using the Network
Address drop down menu, additional radios can be selected and their parameters displayed
and/or changed. The status of each Radio will be LINKED. The MAC Address window will
display the actual MAC address of each radio and the Switch, LED, Thermistor and
Potentiometer windows will display the status of each component on the development board.
The values that were present when the Discover Radios button was clicked will be displayed but
the values will not be Refreshed until the Start button has been clicked. The Discover command
can be issued from a Coordinator, Router, or End Device.
5.2 Refresh Delay
The Refresh Delay sets the frequency with which information from all radios, local and remote,
is updated. The frequency can be adjusted in one second increments. A value of zero
corresponds to a continuous updating. Since an updating of each radio requires a number of
individual read and write commands, it may take a second to update each radio even if the
Refresh Delay is set to zero. This time is a function of Windows and ZBDemo and not the
ZigBee module.
Once the Refresh Delay has been chosen, click on the Start button to begin the updating. The
status bar on the bottom left corner of the ZBDemo screen will indicate the progress being made
by the program. When ZBDemo is updating the radio data, the Start button will change to a Stop
button. When ZBDemo is idle, the Stop button will return to the Start button. If the Poll Radio
box is unchecked for a radio, that radio will not have its information updated.
5.3 Switches
The Switch0 and Switch1 windows display the state of the two momentary push button switches
on the development board. When the switches are open, the window will display 0x01. When
© 2007-2008 RFM Inc. 26 M-2405-0000 Rev. C-
Page 33

ZMN2405/ZMN2405HP Dev Kit
the switches are closed, the window will display 0x00. Note that ZBDemo will not update
changes in either the Local Radio or the remote Radios until the Refresh is started by clicking
on the Start button under the Refresh Delay window.
5.4 GPIO LEDs
The LED0 and LED1 windows allow the GPIO2 and GPIO3 module lines to be driven high or
low to turn the LEDs on or off respectively. The LEDs are turned on by entering 1 in the window
and turned off by entering a 0 in the window. As before, ZBDemo will not update changes in
either the Local Radio or the remote Radios until the Refresh is started by clicking on the Start
button under the Refresh Delay window.
5.5 Thermistor, Potentiometer and Analog to Digital Inputs
The Thermistor window displays the 10-bit ADC reading of the ADC X channel. Changes in
temperature will cause the value displayed to change if ZBDemo has been put into update
mode by clicking on the Start button under the Refresh Delay window. Similarly, the
Potentiometer window displays the resultant 10-bit ADC value of the voltage divider created by
the pot. Changing the voltage by adjusting the pot will change the value displayed in the window
if ZBDemo is refreshing the data as above. The potentiometer and thermistor can be removed
from the circuit by removing the headers from JP3 and JP4 respectively.
5.6 Digital to Analog Outputs
The PWMA and PWMB windows allow adjusting the duty cycle of the PWM outputs. These
outputs are fed into an RC network for low pass filtering to generate an analog voltage. The
allowable values are 0x0000 to 0xFFFF .
5.7 Children’s Network List
Coordinators and Routers can be parents to other devices in the network. The Coordinator will
always have children as long as there is at least a second device in the network. Routers may
or may not have any children and End Devices cannot have children. The drop down menu will
display the network address of all children associated with the radio in that column.
© 2007-2008 RFM Inc. 27 M-2405-0000 Rev. C-
Page 34

ZMN2405/ZMN2405HP Dev Kit
5.8 Show ZigBee Tree
The Show ZigBee Tree button displays a hierarchical view of the network. The Coordinator is
displayed at the top. When there are other devices in the network, a plus sign will be displayed
under the Coordinator. Clicking on the plus sign will expand the ZigBee Tree displaying the
Routers and End Devices directly associated with the Coordinator. Any Routers with children
will also have a plus sign. Clicking on the plus sign will expand the children list of that Router.
This will continue until the entire network is displayed. The default is to display the MAC address
of the network nodes but you can have the network addresses and friendly names displayed by
checking the corresponding boxes.
5.9 Config
The Config button brings up the Module Clusters dialog which allows configuration parameters
of each radio to be modified. There are seven possible tabs across the top of the dialog window
that correspond to the Zigbee clusters; Config, Config Enable Options, Module I/O, Network,
Diag, RF and End Device . However, the End Device tab will only appear if the applicable radio
is configured as an End Device . It is shown in the screens below for informational purposes. A
Broadcast Mode checkbox appears in the lower left hand side of each Cluster’s tab that sends
the applicable Cluster’s information to all radios.
Once values have been modified, click on the Apply button to write the new values in the
module. If a reset of the module is required for the changes to take effect, the Radio Reset
dialog will be displayed as shown below. Click on Yes to reset the radio, Click on No to have the
changes take affect on the next power cycle.
Note: See individual Cluster tables to determine if a Radio Reset is required.
© 2007-2008 RFM Inc. 28 M-2405-0000 Rev. C-
Page 35

5.9.1 Config Tab
ZMN2405/ZMN2405HP Dev Kit
The Serial Baudrate sets the communication rate for the UART port of the module. Changes
take effect immediately upon clicking Apply.
The Model Number field shows whether the device is a Coordinator, Router or End Device.
Friendly Name is a 16-byte field that allows user-defined names to be assigned to modules for
easier identification in the field. It allows the user to assign applicable names to each radio in
the system, i.e. Main Office for the Coordinator and Pump Well 1 for the Router out on the site
and so on.
Sleep Mode This is used on End Devices Only. Checking this box will configure the module as
a battery -powered sleeping node. The default sleep mode is Timer Sleep. If Interrupt Sleep
mode is desired, it can be selected under the Confg Enable Options tab. This setting should be
configured before the device joins the network. If it is changed after the device has joined the
network, all devices in the network must be power cycled or reset, starting with the coordinator,
to insure the network functions properly.
Device Mode This is currently Read Only. On read back it will be 0x00 for a Coordinator, 0x01
for a Router, and 0x02 for an End Device.
Transparent Mode A check is this box implements Transparent Mode and allows data without
the CSM packetization to be transmitted. Any data appearing on the serial input will be
transmitted to the coordinator. Data received by the device will also be output by the module
without the CSM packetization. Once you enter Transparent Mode, ZBDemo will no longer work
since it is expecting data to be in CSM packets. See Section 8.2 for details on protocol mode.
Transparent Mode is only for a Router or End Device.
© 2007-2008 RFM Inc. 29 M-2405-0000 Rev. C-
Page 36

ZMN2405/ZMN2405HP Dev Kit
Reporting Mode Checking this box enables the device to send the module I/O cluster in an
EVENT packet to the coordinator at an interval determined by the Reporting Rate. This mode
works for all device types.
Reporting Rate This is a 32-bit value that sets the reporting interval of the reporting mode. The
resolution is in 1ms increments but with the accuracy of the smaller of the Check Parent Rate
and 500ms. The value may vary anywhere from 1000ms (0x000003E8) to 49.7 days
(0xFFFFFFFF). If an attempt to set it less than 1000ms is made, an INVALID_RANGE error
packet will be returned.
Firmware Version is a read-only register that identifies the firmware revision level .
5.9.2 Config Enable Options
This page allows you to enable Device Message Options for the various GPIOs (general
purpose inputs/outputs).
Putting a check in the Enabled box allows the device to issue various messages when GPIOs 0
through 3 are set as interruptible inputs. When the input changes from high to low, one
message (defined by the radio buttons under Device Message Options) will be transmitted to
the gateway (default is the Coordinator)
Device Message Options allow you to individually set what types of messages are initiated by
the GPIOs 0 through 3. The options are:
• Button Message - This message is simply an Event message that describes the
particular GPIO input state. It should always be 0b0 since the interrupts are falling edge
triggered.
• Module I/O Message - This message is an Event containing the current data from the
entire Module I/O cluster. This is the same data that is sent when the Reporting Mode is
enabled.
• Device Announcement - This message will force the device to re-register with the
gateway (coordinator) by sending a device announce packet.
© 2007-2008 RFM Inc. 30 M-2405-0000 Rev. C-
Page 37

ZMN2405/ZMN2405HP Dev Kit
Device Options Settings allow you to check or uncheck the following settings:
• Device Registration - By checking this box, the device will output a Device Registration
packet for every device that joins its network. The box is checked by default.
• Interrupt Sleep - If the device is an End Device, checking this box when the Mains
Powered box is not checked under Power Source on the Configi tab, puts the module
into Interrupt Sleep where the module can only be awakened by an interrupt on one of
the GPIO lines. In this mode, the module will not perform a Check Parent operation until
it is awakened by an interrupt.
• Link Announcement - By checking this box, the device will output a Link Announce
packet when it has registered (Routers and End Devices) or formed a network
(Coordinators). The Link Announce packet is output on the module’s UART port. The bit
is enabled by default.
• I/O Sleep State Enable – Checking this box causes the module to set the module GPIO
pins to the state selected for each GPIO on the End Device tab. This feature is intended
to be used for sleeping End Devices to avoid conflicts with attached circuits when the
module goes to sleep. Improperly setting the I/O Sleep State of a GPIO can cause a
significant increase in sleep mode current consumption due to sneak paths from the
module pin through other circuits to ground or power.
5.9.3 Module I/O Tab
The GPIO Direction allows you to individually set GPIO0-5 as either inputs or outputs.
The GPIO Init is a non-volatile setting for the power up value of all the GPIO pins set as
outputs. If a pin is set as an input this setting has no effect . Each time a reboot occurs (power
cycle, command, etc.) this will be the default output level.
The GPIO Interruptible register allows GPIO0..GPIO3 to be used as interrupts to wake a
module not configured for Mains Powered. If Interrupt Sleep Mode is enabled but no GPIO line
is set as interruptible, the ZigBee module will return an error.
© 2007-2008 RFM Inc. 31 M-2405-0000 Rev. C-
Page 38

ZMN2405/ZMN2405HP Dev Kit
DAC A Init and DAC B Init initialization registers are non-volatile settings for the analog output
values after a reset command or power cycling. Each time a reboot occurs this will be the
default output level for either DAC A or DAC B.
5.9.4 Network Tab
The MAC Address is the unique IEEE address of the device and is set at the factory.
The Network Address is a read-only register that contains the network address assigned to the
device by its parent. It cannot be changed by a user or pre-configured in any way. If the module
is not linked, its value will be FFFF .
A check in the Static Network box allows the user to force the device to remain in the same
network configuration from power-up to power-up. Uncheck the Static Network box and the
device can join (or configure) the network in a different manner every time it restarts and thus,
Network Addresses will change. Refer to Section 2.6 for details on Static Network Addresses.
Gateway Address This is the destination network address for data sent to a module through its
UART port in Transparent Mode. Currently, this is set for the Coordinator and cannot be
changed.
A PAN ID is required for the Coordinator and can be any 14 bit number, i.e. 0x0000 to 0x3FFF.
In order for the Router to link to the Coordinator, its PAN ID must match the PAN ID on the
Coordinator. Setting a the PAN ID of a Router to 0xFFFF will allow a Router to connect to any
Coordinator on the same RF Channel. Setting 0xFFFF on the Coordinator causes it to pick a
random value.
© 2007-2008 RFM Inc. 32 M-2405-0000 Rev. C-
Page 39

ZMN2405/ZMN2405HP Dev Kit
Link Status is a read-only register that provides information about the device’s link status.
(Update button refreshes Link Status.)
LinkStatus Value Description
0x01 Device is initialized, but not connected
0x02 Device is discovering PANs to join
0x03 Device is joining a PAN
0x04 Device has joined but is not yet authenticated by the Trust Center
0x05 Device has been authenticated and has joined the network as an End Device
0x06 Device has been authenticated and has joined the network as a Router
0x07 Device is starting a network
0x08 Device has started a network as the coordinator
0x09 Device has been orphaned
5.9.5 RF Tab
The Channel Set selects the RF channel(s) the module can use. Any number can be checked
or unchecked as long as at least one channel is selected. If no channels are selected, when you
click on Apply, an error message will display. Simply click in a box to add a check mark. Clicking
on a box that already has a checkmark will remove it. The Coordinator listens on the first
channel of the channel(s) that have been specified in the Channel Set field. If it detects RF
energy on that channel above the Network Formation Threshold level , it moves to the next
channel in the channel set list until it finds a clear channel. Once a ch annel has been found, text
will display in the Status text window in the lower right part of the main ZBDemo window
indicating that a network has been formed. If a clear channel cannot be found, the Link LED will
not be lit and no text will display in the Status text window. Once a clear channel has been
found, the Coordinator will listen for other devices seeking to associate. See Section 8 for a
more detailed explanation.
© 2007-2008 RFM Inc. 33 M-2405-0000 Rev. C-
Page 40

ZMN2405/ZMN2405HP Dev Kit
Transmit Power can be set to the following levels; Nominal or -1dB, -3dB, -5dB, -7dB, -10dB,
-15dB or -25dB from the nominal. Nominal transmit power for the ZMN2405HP module is
+18dBm at the RF connector thus setting transmit power to -10dBm will result in +18dBm –
10dBm = +8dBm at the RF connector. Nominal level for the ZMN2405 module is 0dBm at the
RF connector. The user may find it necessary to change the level if for instance, regulations
require lower output power and/or when using a high gain antenna.
The Network Formation Threshold variable is a signed 8-bit value(0xFF = -1) in dBm which is
used to vary the threshold around a default of -40dBm. Energy detected above the
corresponding power level will stop the Coordinator from starting a PAN in the tested channel.
This is helpful in forcing a network in an area with a lot of RF noise. The equation is:
Threshold = -40dBm + Network Formation Threshold
5.9.6 End Device Tab
The GPIO Sleep Direction allows you to control the direction of the GPIOs during a device's
sleep period if the I/O Sleep State was enabled on the Config Enable Options tab. This enables
the user to provide alternate configurations during sleep that will help minimize current
consumption.
Sleep I/O State is used to set the output state of the GPIOs during a device's sleep period if the
I/O Sleep State was enabled on the Config Enable Options tab. This also enables the user to
provide alternate configurations during sleep that will help minimize current consumption.
Check Parent Rate - This setting controls the rate at which a Timer Sleep Mode End Device
will awa ken and ask its parent for any queued messages. Because an Interrupt Sleep End
Device must request stored messages while it is awake, this setting controls that rate while the
device has been externally awakened. The setting resolution is in milliseconds and 0x0000 is
an invalid setting.
© 2007-2008 RFM Inc. 34 M-2405-0000 Rev. C-
Page 41

ZMN2405/ZMN2405HP Dev Kit
Wake Duration - This setting controls the length of time a module will remain awake when it
wakes due to Check Parent timer. The default setting is 100 milliseconds. The minimum length
of time is 30 milliseconds and the maximum duration is 65.5 seconds.
5.10 Serial Comm
Click on the Serial Com button to bring up the text messaging window as shown below.
There are four fields/windows in this box: the Destination Address window top left of the box, the
Incoming Data field top right of the box, the Messaging Display window in the middle of the box;
and the Text to Send window at the bottom of the box. The Clear button allows you to clear the
contents of the Messaging Display window.
The Destination Address window is used to select the ZigBee device to which to send a text
string. The drop down menu will display the Long Network Addresses of the devices that were
found to be part of the network through the Discover command. The Long Network Address is
the two bytes displayed in the Network Address field preceded by 80:00:00:00:00:00.
Example: If the Network Address is 0x0001, the Long Network Address will be
80:00:00:00:00:00:00:01. Select the Long Network Address of the desired device.
ZigBee uses a packet format to send data. Rather than waiting for a long pause between
keystrokes to determine the end of the data, ZBDemo requires the text be entered in the Text to
Send window and the Send button clicked. ZBDemo can send a maximum of 68 bytes per
packet thus the maximum number of characters that can be sent in a single packet is 64. When
the String Messaging window is open, the radio information will not be refreshed.
© 2007-2008 RFM Inc. 35 M-2405-0000 Rev. C-
Page 42

ZMN2405/ZMN2405HP Dev Kit
When the Send button is clicked, the text in the Text to send window will appear in the chat
window after a LOCAL> prompt.
When data is received by the local board from a remote ZigBee device, that string will be
displayed in the chat window after a > prompt. The > prompt is labeled according to the
selection designated in the Incoming Data drop down menu as shown below. In addition to
Friendly Name, MAC Address or Network Address can be selected.
© 2007-2008 RFM Inc. 36 M-2405-0000 Rev. C-
Page 43

ZMN2405/ZMN2405HP Dev Kit
6. Programming the Module Firmware
The ZMN2405HP developer’s kit includes three code loads which can be programmed into the
ZMN2405HP module. All the modules come programmed from the factory, but RFM provides
the capability to change the code in the module. The ZMN2405HP has bootloader code which
allows the module firmware to be programmed through one of the two serial connections to the
development board. The bootloader code removes the need for a JTAG programming device.
Three files are provided in the Code Loads directory of the Software and Manuals CD included
with this kit. The files all start with “CSM” followed by “-C” for the coordinator, “-R” for the router,
and “-E” for the end device. After the node type designation is the firmware version indicated by
“vxxxxx” where xxxxx represents the version number.
The modules are programmed using the ZProg.exe Windows utility program found the in the
same Code Loads directory on the CD. The program can be run from the CD or copied to your
computer. When ZProg starts, the following window will appear.
Select the serial port to which the dev kit board is connected from the drop down menu and click
on Connect. If the serial port does not show up in the list, check to make sure no other program
is open using that port, such as ZBDemo.
A Detecting Radio screen will appear and you will be prompted to cycle power to the dev kit.
Simply unplug and the reconnect the power supply cord from the dev kit board. Once the
module has been detected, the Detecting Radio window will close and the Connect button on
the ZProg will change to disconnect.
Click on the Select File button to choose the code load to use. If you know the complete path to
the code load you want to use, you can type it in the Program Filename field. When you click on
the Select File button the following screen will open.
© 2007-2008 RFM Inc. 37 M-2405-0000 Rev. C-
Page 44

ZMN2405/ZMN2405HP Dev Kit
Select the desired file from the list of .bin files listed. Either double-click on the file name or click
once on the filename and then click on the Open button. The file select window will close and
the ZProg window will now have the file you selected in the Program Filename window as
shown below.
Click on the Program Device button to begin the programming process. The Progress bar will
indicate the programming progress.
When the ZProg has completed programming the module, it will verify the image in the module
matches the selected program file. The following window will display during the verification
© 2007-2008 RFM Inc. 38 M-2405-0000 Rev. C-
Page 45

ZMN2405/ZMN2405HP Dev Kit
process. If the images agree, the verification window will close the success window will open.
The module is now ready for use.
Z Prog can also verify the firmware that is in a module by comparing it to a program file selected.
Once the file has been selected using the procedure above, click on the Verify Firmware button.
The progress bar at the bottom of the ZProg screen will indicate the progress of the verification.
If the image in the module matches the selected filename , the following success window will
open.
If the images do not match, a Verification Failed window will open with the message Images
Differ across the top.
6.1 In Circuit Module Programming
Due to the early nature of ZigBee and the number of profiles currently being developed by the
ZigBee Alliance, it is advisable to provide a means for reprogramming the module in the end
product. If the end product has a serial port, either RS-232 or USB, nothing further is required. If
the end product does not have a serial port then one must be added. The diagrams below show
how one can be easily and inexpensively added.
There has been some information about over the air reprogramming of modules. While that will
be the case in the future, the current size of the code and the memory resources available on
the module do not allow that at this time.
© 2007-2008 RFM Inc. 39 M-2405-0000 Rev. C-
Page 46

ZMN2405/ZMN2405HP Dev Kit
Reference Circuit for Serial In-System Programming of the ZMN2405 module
© 2007-2008 RFM Inc. 40 M-2405-0000 Rev. C-
Page 47

ZMN2405/ZMN2405HP Dev Kit
7. Module & Development Board Hardware Specifications
7.1 Module Pin Descriptions
Pin No. Name Description
1 Vcc +3.3Vdc to +5.5Vdc
2,11,
17 – 20,
28, 33,
34, 36,
37, 39
3, 4 PWMA - B Two pulse width modulated outputs that can be used to create an
5 - 10 GPIO0 - 5 Six general purpose input/output pins. Software configurable as
12 LINK /TDO Output status signal indicating module link status in default mode.
13 /RST Active Low reset input. Tied to pin 24
14 ACT/DC LED indicates RF data activity/JTAG data clock input. Leave
15 NC No Connection
16 ADC REF Module’s +3.3V supply, for use in ratiometric ADC readings. Load
21 UART_RX Receive data input signal of module UART. Data to be sent to the
22 UART_TX Transmit data output signal of module UART. Data received by the
23 NC No Connection. Leave disconnected.
24 /RESET Active Low module hardware reset input. Must be held low when
25 – 27 ADCX – Z Three 10 -bit Analog to Digital inputs. Inputs limited to 0Vdc to
29 SPI_EN Active Low chip enable output for SPI bus devices
30 SPI_SCLK SPI port clock signal
31 SPI_MOSI SPI port data output.
32 SPI_MISO SPI port data input
35 NC No Connection. Leave disconnected.
38 RF RF signal output pin. Connect to antenna or antenna connector
GND Power supply grounds. All ground pins must be connected to circuit
ground.
analog output with the addition of simple RC filters.
inputs or outputs. When configured as an output, power up state is
software configurable.
When JTAG port is enabled, serves as JTAG Test Data Output.
disconnected if JTAG port will not be used.
on this pin must be less than 5mA.
module is transmitted on this pin.
module will be transmitted to the local host on this pin.
supply voltage is between +1.5Vdc and +2.7Vdc.
+2.5Vdc.
using a 50 ohm microstrip line.
© 2007-2008 RFM Inc. 41 M-2405-0000 Rev. C-
Page 48

ZMN2405/ZMN2405HP Dev Kit
7.2 Electrical Specifications
Parameter Min. Typ. Max. Units Condition
Radio Characteristics
Frequency Range 2.405 2.480 GHz
Spreading Method Direct Sequence
Modulation O-QPSK
RF Channels ZMN2405 – 16; ZMN2405HP – 15
RF Data Rate 250Kbps
Channel Spacing 5 MHz
Spurious Emissions -60 dBm TX 30-1000MHz
Harmonics -43 dBm TX 1-12.75GHz
2nd Harmonic -43 dBm
3rd Harmonic -55 dBm
Optimum load impedance 50 ? Using ext. antenna
Adjacent channel rejection 46 dB +5MHz
39 dB -5MHz
Alternate Channel Rejection 58 dB +10MHz
55 dB -10MHz
Frequency error tolerance -300 300 KHz
Symbol rate error tolerance 120 ppm
Transmit Power - Software Adjustable
ZMN2405 -25 0 dBm At RF Pin
ZMN2405HP -7 +18 dBm At RF Pin
Receive Sensitivity
ZMN2405 -91 dBm for 10-5 BER
ZMN2405HP -95 dBm for 10-5 BER
I/O
Quantity and Designation
1 — SPI Port
6 — General purpose I/O lines
3 — 10-bit ADCs
2 — PWMs
1 — UART
Environmental
Operating temperature range -40 25 85 °C Ambient
© 2007-2008 RFM Inc. 42 M-2405-0000 Rev. C-
Page 49

ZMN2405/ZMN2405HP Dev Kit
7.3 CC2430
The signal lines on the ZMN2405HP module are directly connected to the input pins of the
CC2430. See the TI documentation below for details of those signals.
The signal lines brought out to the connectors on the development boards have 330 ohm
resistors in series. The RF output on the module and the development board is designed for 50ohm loads. Refer to the schematics on the next pages for details of the development board.
For complete details, please refer the documentation on the CC2430 available on the Texas
Instruments’ website, www.ti.com.
© 2007-2008 RFM Inc. 43 M-2405-0000 Rev. C-
Page 50

7.4 Schematics
Confidential Information Removed
ZMN2405/ZMN2405HP Dev Kit
© 2007-2008 RFM Inc. 44 M-2405-0000 Rev. C-
Page 51

Confidential Information Removed
ZMN2405/ZMN2405HP Dev Kit
© 2007-2008 RFM Inc. 45 M-2405-0000 Rev. C-
Page 52

Confidential Information Removed
ZMN2405/ZMN2405HP Dev Kit
© 2007-2008 RFM Inc. 46 M-2405-0000 Rev. C-
Page 53

Confidential Information Removed
ZMN2405/ZMN2405HP Dev Kit
© 2007-2008 RFM Inc. 47 M-2405-0000 Rev. C-
Page 54

Confidential Information Removed
ZMN2405/ZMN2405HP Dev Kit
© 2007-2008 RFM Inc. 48 M-2405-0000 Rev. C-
Page 55

ZMN2405/ZMN2405HP Dev Kit
8. Layout Guidelines
• Place either bare PWB material or copper ground plane underneath the module. No traces should
be run underneath the module.
• The connection between the RF output from the module (pin 38) and the customer’s
antenna/connector should be made with 50 ohm microstrip. A 10pF 0402 capacitor must be
placed in series with this microstrip line for DC blocking purposes.
• Good grounding of the module is paramount. Place ground as close as possible to the support
board ground pads.
• Follow the temperature profile shown on the next page for proper placement of the module onto
your support board.
• Keep all interconnects between the support board circuitry and the module pins as short as
possible.
• Place at least 1 bypass capacitor (0.1uF minimum) as close as possible to the power supply pin
(pin 1) off the module.
• Pin 35 is the RF output on the ZMN2405 but is a no-connect on the ZMN2405HP.
• Refer to the Data Sheets on the CD for spec ific pin outs and mechanical dimensions for the
various module versions (ZMN2405HP, ZMN2430, ZMN2430HP, etc.)
8.1 50 Ohm Trace
The PCB trace that connects the RF output of the module to the MMCX connector must have a
50 ohm impedance. When laying out the PCB, make sure there is a 50 ohm trace that connects
the output of the module to the antenna. The image below describes how to construct the trace
in such a way as to meet the requirement.
The image below is a general example of how the trace can appear on the PCB and shows not
only the trace, but the “KEEP AWAY” area as well.
© 2007-2008 RFM Inc. 49 M-2405-0000 Rev. C-
Page 56

ZMN2405/ZMN2405HP Dev Kit
Make as many traces with vias to ground as possible. In the defined “KEEP AWAY” area, traces
are limited to prevent signal coupling. Traces are limited in length by the proximity to the 50 ohm
microstrip trace as follows:
Separation of trace and 50 ohm microstrip Maximum length of parallel run
100 mil 125 mil
150 mil 200 mil
200 mil 290 mil
250 mil 450 mil
300 mil 650 mil
8.2 Reflow Profile for ZigBee Adapter Panel
TCs Max Rising Slope Max Falling Slope Soak Time 140 -170C Reflow Time /183C Peak Temp
2 1.6 12% -2.0 48% 52.8 -86% 59.5 12% 227.1 21%
3 1.5 4% -1.8 60% 53.6 -82% 60.9 20% 222.2 -28%
4 1.6 15% -2.0 51% 59.2 -54% 60.4 16% 229.1 41%
Delta 0.05 0.24 6.45 1.39 6.89
P.2 1.6 18% -2.1 47% 60.6 -47% 61.5 23% 228.9 39%
P.3 1.5 9% -1.8 59% 60.5 -47% 63.4 34% 224.0 -10%
P.4 1.6 22% -2.0 50% 66.3 -18% 62.2 27% 230.8 58%
Delta 0.06 0.24 5.79 1.95 6.78
© 2007-2008 RFM Inc. 50 M-2405-0000 Rev. C-
Page 57

9. WARRANTY
Seller warrants solely to Buyer that the goods delivered hereunder shall be free
from defects in materials and workmanship, when given normal, proper and
intended usage, for twelve (12) months from the date of delivery to Buyer. Seller
agrees to repair or replace at its option and without cost to Buyer all defective
goods sold hereunder, provided that Buyer has given Seller written notice of such
warranty claim within such warranty period. All goods returned to Seller for repair
or replacement must be sent freight prepaid to Seller’s plant, provided that Buyer
first obtain from Seller a Return Goods Authorization before any such return.
Seller shall have no obligation to make repairs or replacements which are
required by normal wear and tear, or which result, in whole or in part, from
catastrophe, fault or negligence of Buyer, or from improper or unauthorized use of
the goods, or use of the goods in a manner for which they are not designed, or by
causes external to the goods such as, but not limited to, power failure. No suit or
action shall be brought against Seller more than twelve (12) months after the
related cause of action has occurred. Buyer has not relied and shall not rely on
any oral representation regarding the goods sold hereunder, and any oral
representation shall not bind Seller and shall not be a part of any warranty.
THE PROVISIONS OF THE FOREGOING WARRANTY ARE IN LIEU OF ANY
OTHER WARRANTY, WHETHER EXPRESS OR IMPLIED, WRITTEN OR ORAL
(INCLUDING ANY WARRANTY OR MERCHANT ABILITY OR FITNESS FOR A
PARTICULAR PURPOSE). SELLER’S LIABILITY ARISING OUT OF THE
MANUFACTURE, SALE OR SUPPLYING OF THE GOODS OR THEIR USE OR
DISPOSITION, WHETHER BASED UPON WARRANTY, CONTRACT, TORT OR
OTHERWISE, SHALL NOT EXCEED THE ACTUAL PURCHASE PRICE PAID
BY BUYER FOR THE GOODS. IN NO EVENT SHALL SELLER BE LIABLE TO
BUYER OR ANY OTHER PERSON OR ENTITY FOR SPECIAL, INCIDENTAL
OR CONSEQUENTIAL DAMAGES, INCLUDING, BUT NOT LIMITED TO, LOSS
OF PROFITS, LOSS OF DATA OR LOSS OF USE DAMAGES ARISING OUT
OF THE MANUFACTURE, SALE OR SUPPLYING OF THE GOODS. THE
FOREGOING WARRANTY EXTENDS TO BUYER ONLY AND SHALL NOT BE
APPLICABLE TO ANY OTHER PERSON OR ENTITY INCLUDING, WITHOUT
LIMITATION, CUSTOMERS OF BUYERS.
ZMN2405/ZMN2405HP Dev Kit
© 2007-2008 RFM Inc. 51 M-2405-0000 Rev. C-
Page 58

ZMN2405/ZMN2405HP Dev Kit
Appendix I
Operating Scenario for ZMN2430A and ZMN2430HPA
The ZMN2430A/HPA is used in a portable network application using Direct Sequence Spread Spectrum
(DSSS) technology. The ZMN2430A/HPA is a ZigBee device utilizing IEEE 802.15.4 physical layer
with propriety software to create network infrastructure that is decentralized and inexpensive, as each
node need transmit only as far as the next node. Nodes act as repeaters to transmit data from nearby nodes
to peers that are too far away to reach, resulting in a network that can span a large distance, especially
over rough or dif ficult terrain. These products may be used as a portable, fixed or mobile device.
Maximum Transmit Duty Cycle
Each ZMN2430A/HPA can transmit a maximum of 4.2 ms per 50 ms. This is set by design and cannot
be adjusted by the user. This equals 0.084 ms
Therefore, our source-averaged transmit duty cycle becomes 0.0.84
Calculated Average Power
The Power Threshold for ‘General Population’ portable designation without SAR testing is: (based
on Oct 2005 TCB workshop PPT slide)
(60 / F
For the 2.4 GHz frequency band, this results in a limit of 25 mW.
Note that we use the more restrictive “General Population” limit in this case even though the individuals
using this product will certainly be aware of its function and wou ld qualify under the ‘occupational’
category.
Given the maximum transmit duty cycle specified above, the average transmitted power of a
ZMN2430HPA and a ZMN2430A remote can be calculated as:
Maximum Pout = 135 mW (21.31 dBm nominal)
Maximum Antenna Gain = 0 dBi (for portable use)
Maximum Transmit Duty cycle (per above) = 0.084
Pave (Source-based average) = 0.135 * 0.084 = 11.3 mW
Maximum Pout = 1 mW (-1.3 dBm nominal)
Maximum Antenna Gain = 0 dBi (for portable use) integrated antenna
Maximum Transmit Duty cycle (per above) = 0.084
Pave (Source-based average) = 0.001 * 0.084 = 0.084 mW
Conclusion:
The ZMN2430A and ZMN2430HPA meets the FCC MPE limits for a ‘Portable’ device operating in the
‘General Population’.
) mW for distances < 2.5 cm
GHz
© 2007-2008 RFM Inc. 52 M-2405-0000 Rev. C-
 Loading...