

Page 1
Type1GC/1PS Evaluation Board Quick Start Guide
Type1GC/1PS Evaluation Board
Quick Start Guide
Document No. N1-5002
Document Number: N1-5002
Version: 2.0
Release Date: 2021/2/26
Murata Manufacturing Co., Ltd.
Page 1
Page 2
Type1GC/1PS Evaluation Board Quick Start Guide
Page 2
Revision History
Revision Number
Release Date
Comments
Revision 1.0
2018/4/16
Initial
Revision 1.1
2018/5/16
EVB Revised
Revision 2.0
2021/2/26
Update for .patch platform file
Page 3

Type1GC/1PS Evaluation Board Quick Start Guide
Page 3
Contents
1. About this Document ................................................................................................................. 4
1.1. Purpose and Scope .................................................................................................................. 4
1.2. Document Conventions ............................................................................................................ 4
2. Evaluation Board ....................................................................................................................... 4
3. Setting up the WICED Studio and Building a Demo Application ..................................................... 5
4. Running scan Application ........................................................................................................... 9
Page 4
Type1GC/1PS Evaluation Board Quick Start Guide
Page 4
1. About this Document
1.1. Purpose and Scope
This document provides instructions to set up Murata Type1GC EVB. Although Type1GC is supported by
WICED-SDK, some modifications will be required when using our EVB. We provide the modification as a
“platform file”.
Note: Type1GC and 1PS is pin-to-pin compatible module.
For example, in the case of Type1PS, please use Type1PS platform files and module name 1PS instead of
1GC.
1.2. Document Conventions
Platform file – the source code to configure each platform.
2. Evaluation Board
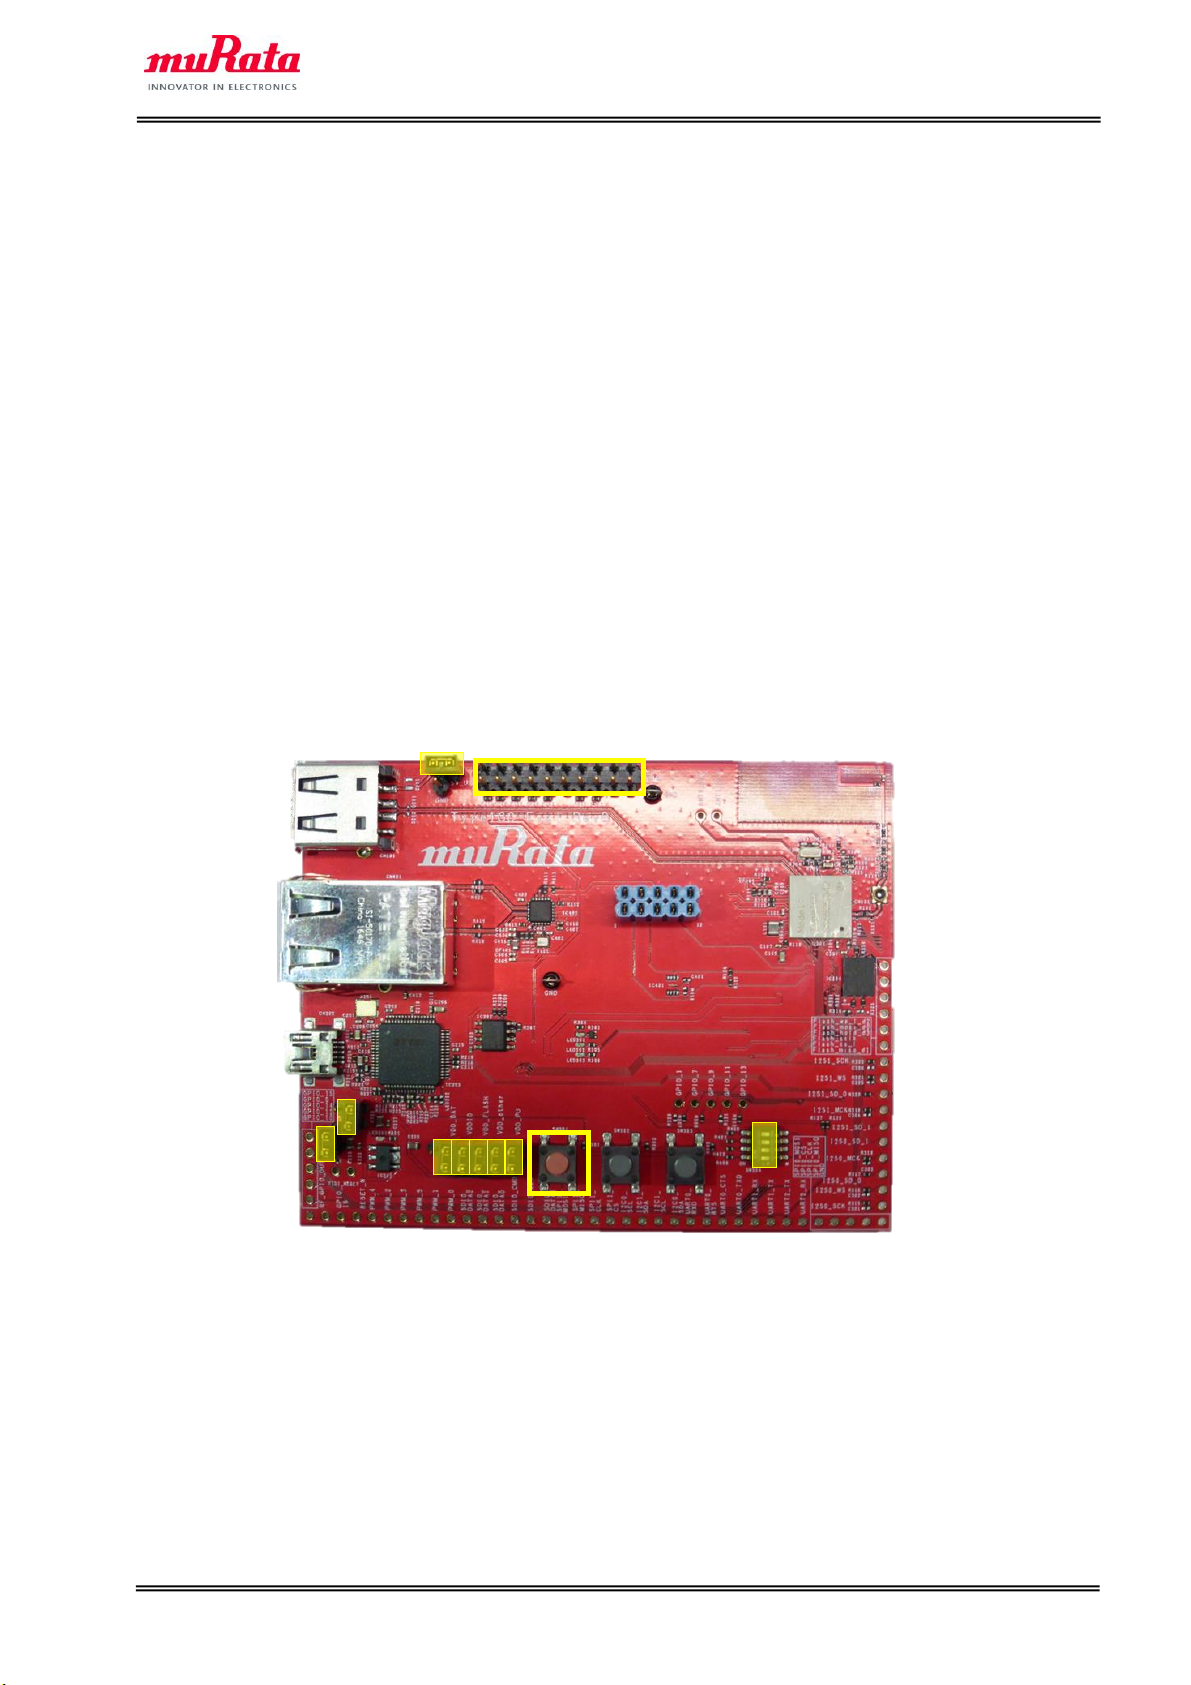
The Murata Type1GC Evaluation Board supports both Ethernet and USB interfaces. To allow proper
operation with WICED Studio, please verify that the mini-switch SW304 is set with the correct pin settings
✓ SW304: pin1 and 2 ON, pin3 and 4 OFF
Reset Switch
SW304
JTAG
Page 5
Type1GC/1PS Evaluation Board Quick Start Guide
Page 5
3. Setting up the WICED Studio and Building a Demo Application
The WICED SDK is available for download from the Cypress WICED website.
To use the SDK, the following steps must be performed:
A) Download WICED-SDK from the WICED website.
https://www.cypress.com/products/wiced-software
B) Install the WICED-SDK.
Note: WICED directory is at “C:\Users\<user name>\Documents\WICED-Studio-<VERSION>” with
default installation.
C) Connect the Evaluation board to your PC via the mini USB cable.
Type1GC should be detected as “WICED USB Serial Port (COMXX)”. (“XX” is the serial port number.) If
Type1GC cannot be detected, you may manually install the driver from
<WICED-Studio>\Drivers\Windows\
D) Start the WICED-SDK.
Start the WICED Studio by selecting START > Cypress > WICED-Studio.
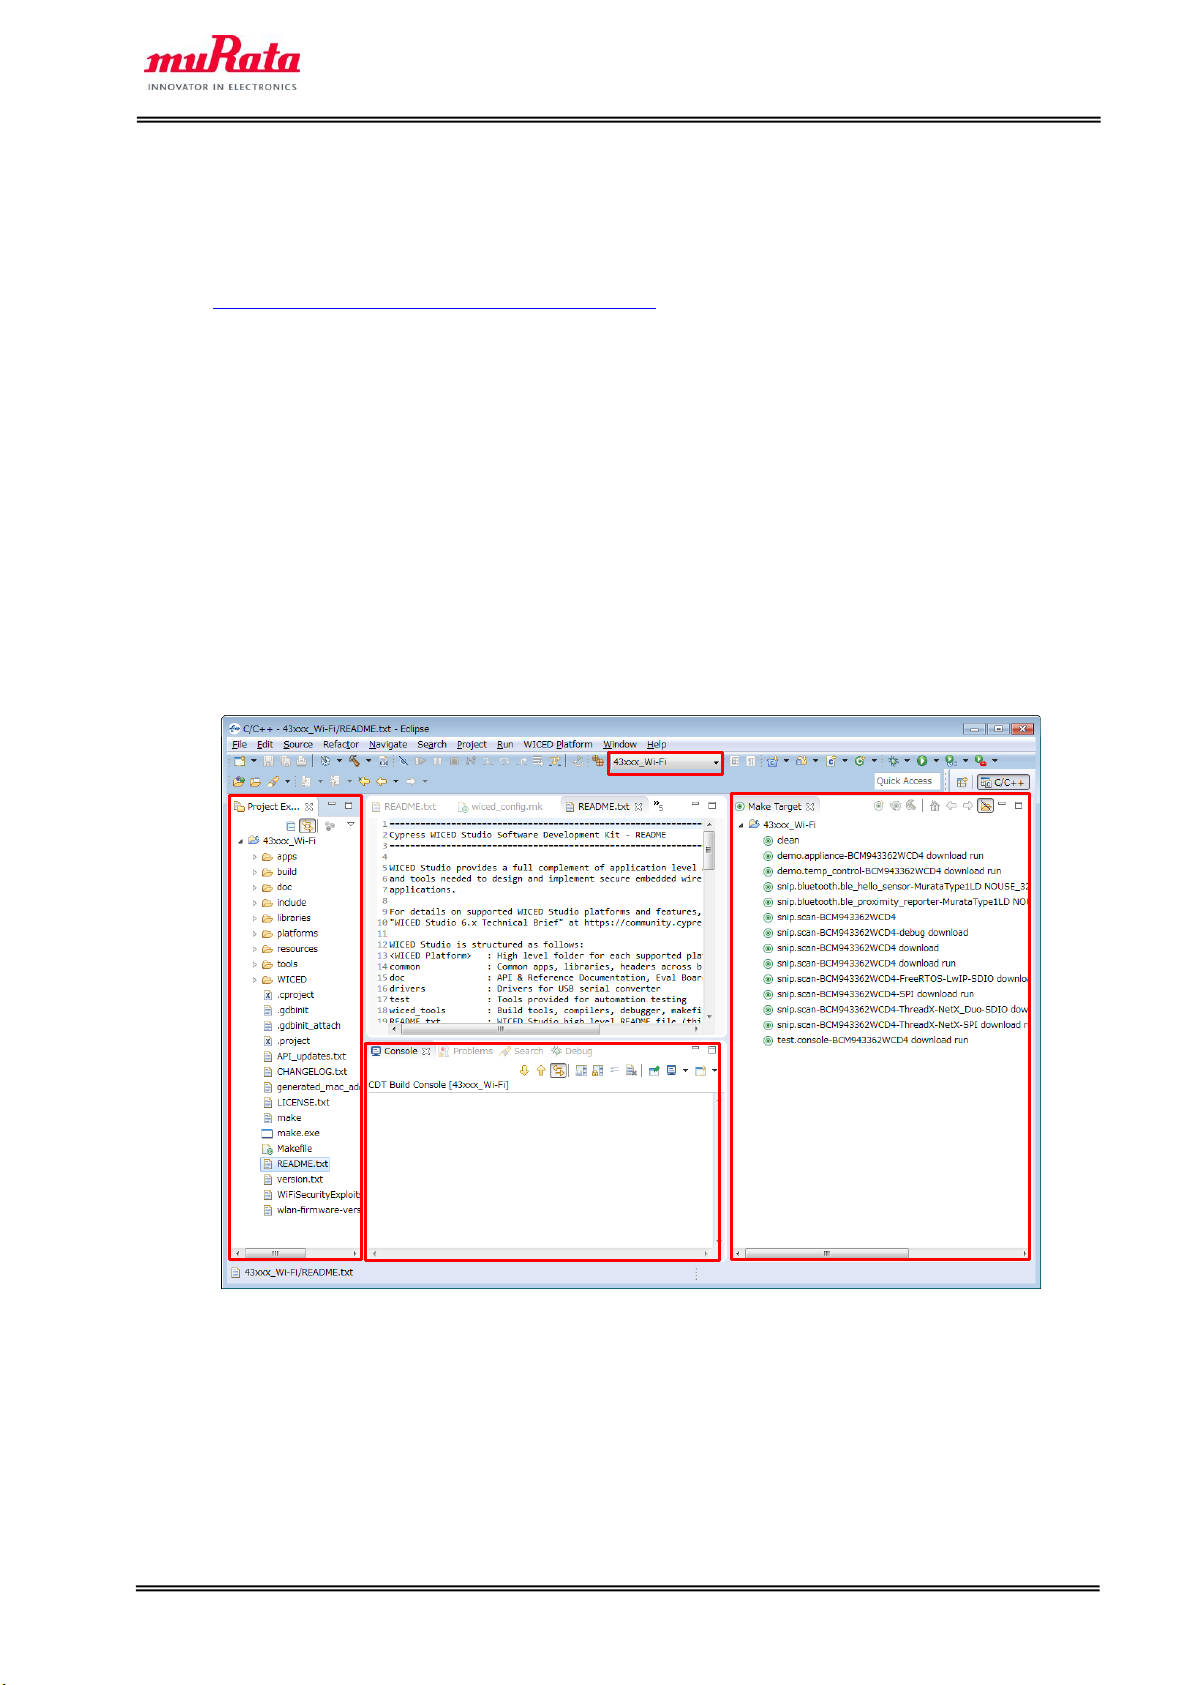
Select target “43xxx_Wi-Fi” or “WICED Filters off”.
Project
Code Editor
Console Window
Make Target Window
Explorer
Page 6
Type1GC/1PS Evaluation Board Quick Start Guide
Page 6
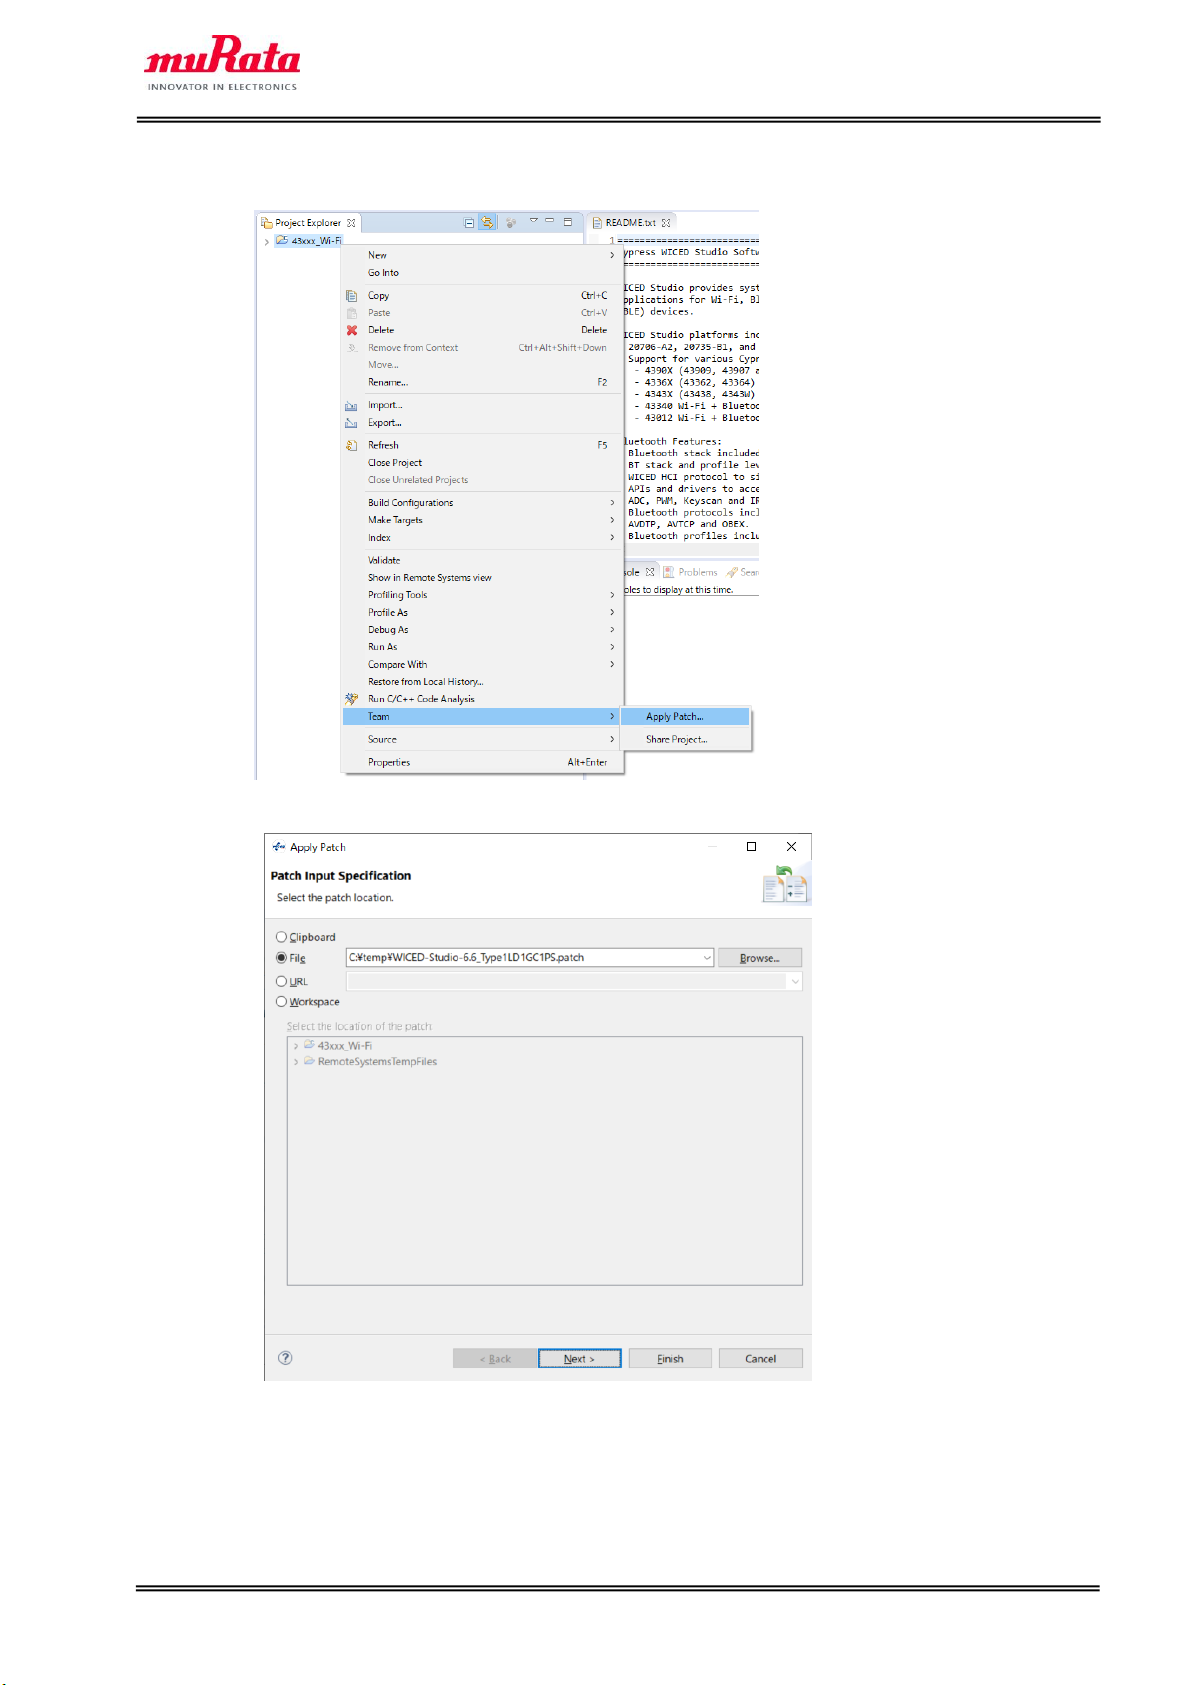
E) Apply the patch file provided by Murata.
a) Right click on 43xxx_Wi-Fi in Project Explorer, then select Team – Apply Patch…
b) Click Browse button and select the patch file, then click Finish button.
Page 7
Type1GC/1PS Evaluation Board Quick Start Guide
Page 7
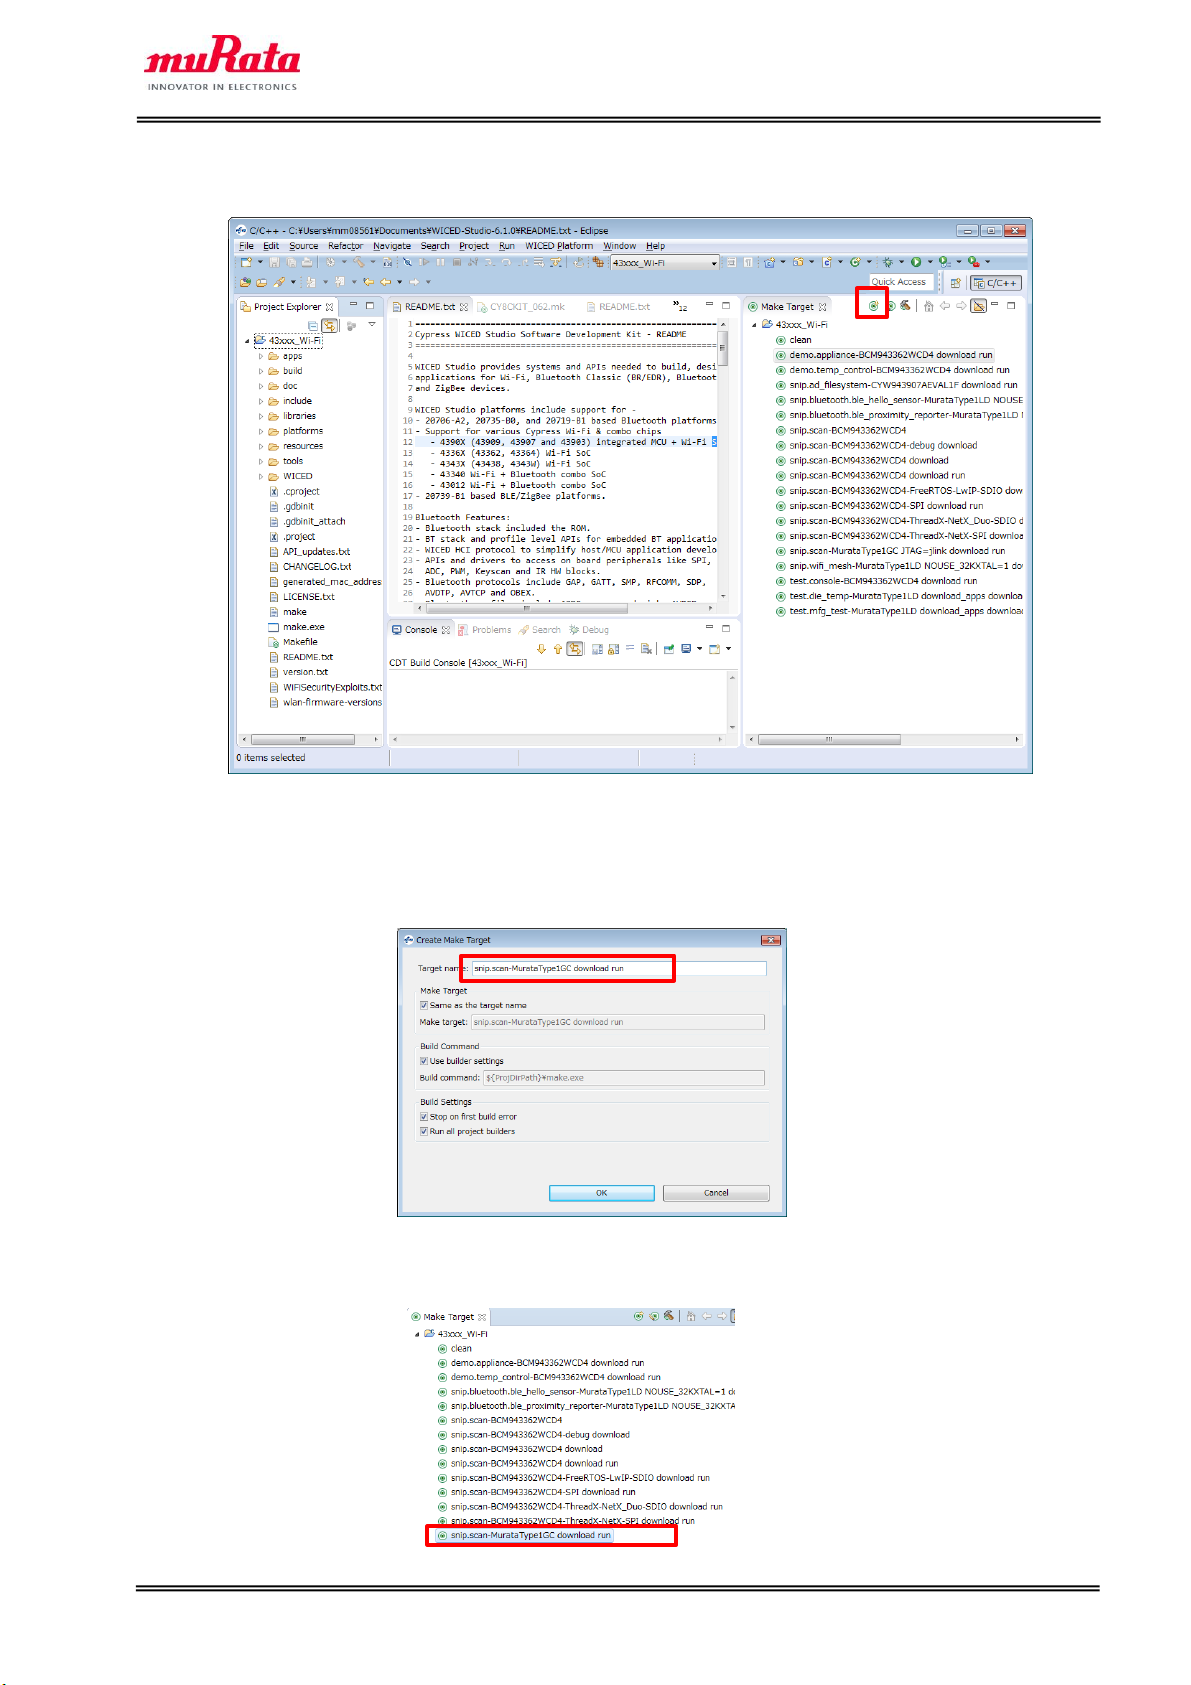
F) Build and download the application.
a) Click “New Make Target” button. (If you cannot click this button, click “clean” in below list)
“Create Make Target” window will appear.
b) Input the following text to the “Target name” field.
snip.scan-MurataType1GC download run
c) Select “OK” and confirm that the new target have been added in the “Make Target” area.
Page 8
Type1GC/1PS Evaluation Board Quick Start Guide
Page 8
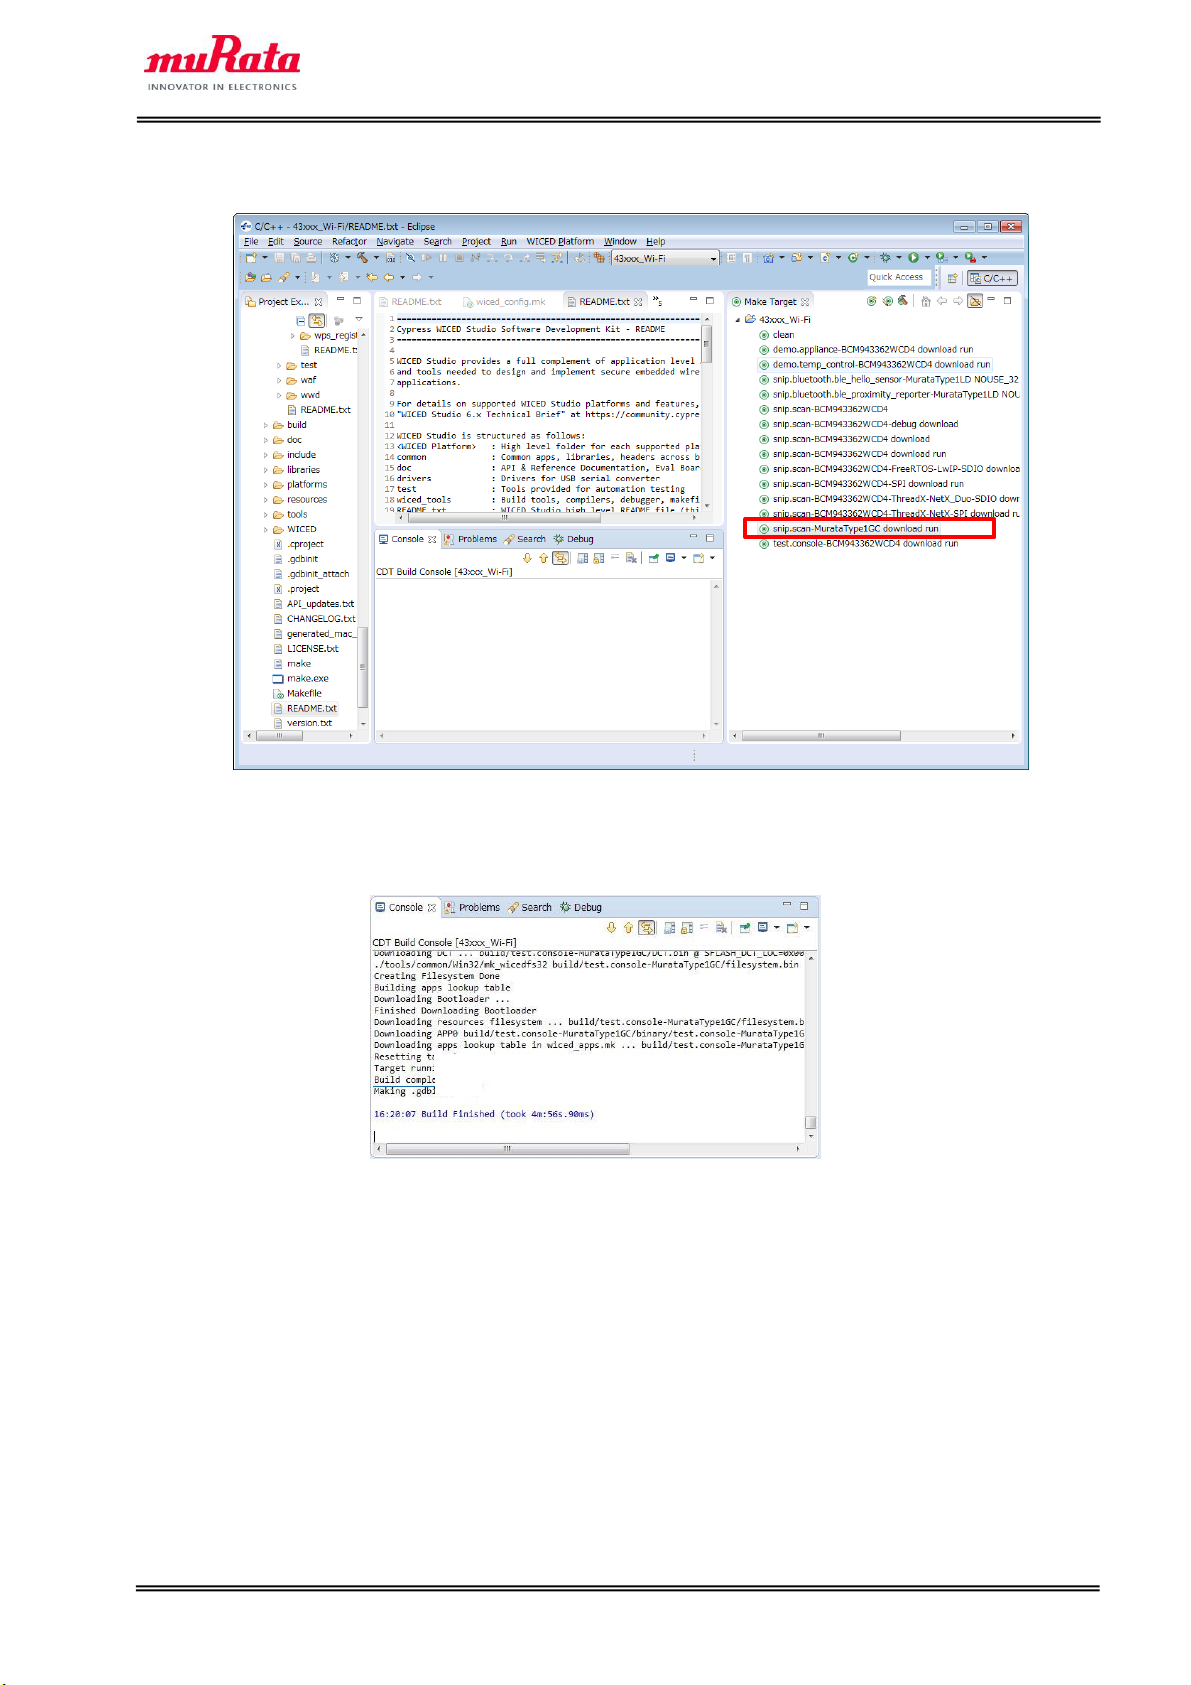
G) Double-click on the Make Target “snip.scan-MurataType1GC download run” to build the application.
Note: It will take some minutes for first building.
H) Building progress will be displayed on the window of the “Studio Console”.
I) “Build complete” indicates that the building and downloading of the application has been successful.
Page 9
Type1GC/1PS Evaluation Board Quick Start Guide
Page 9
4. Running scan Application
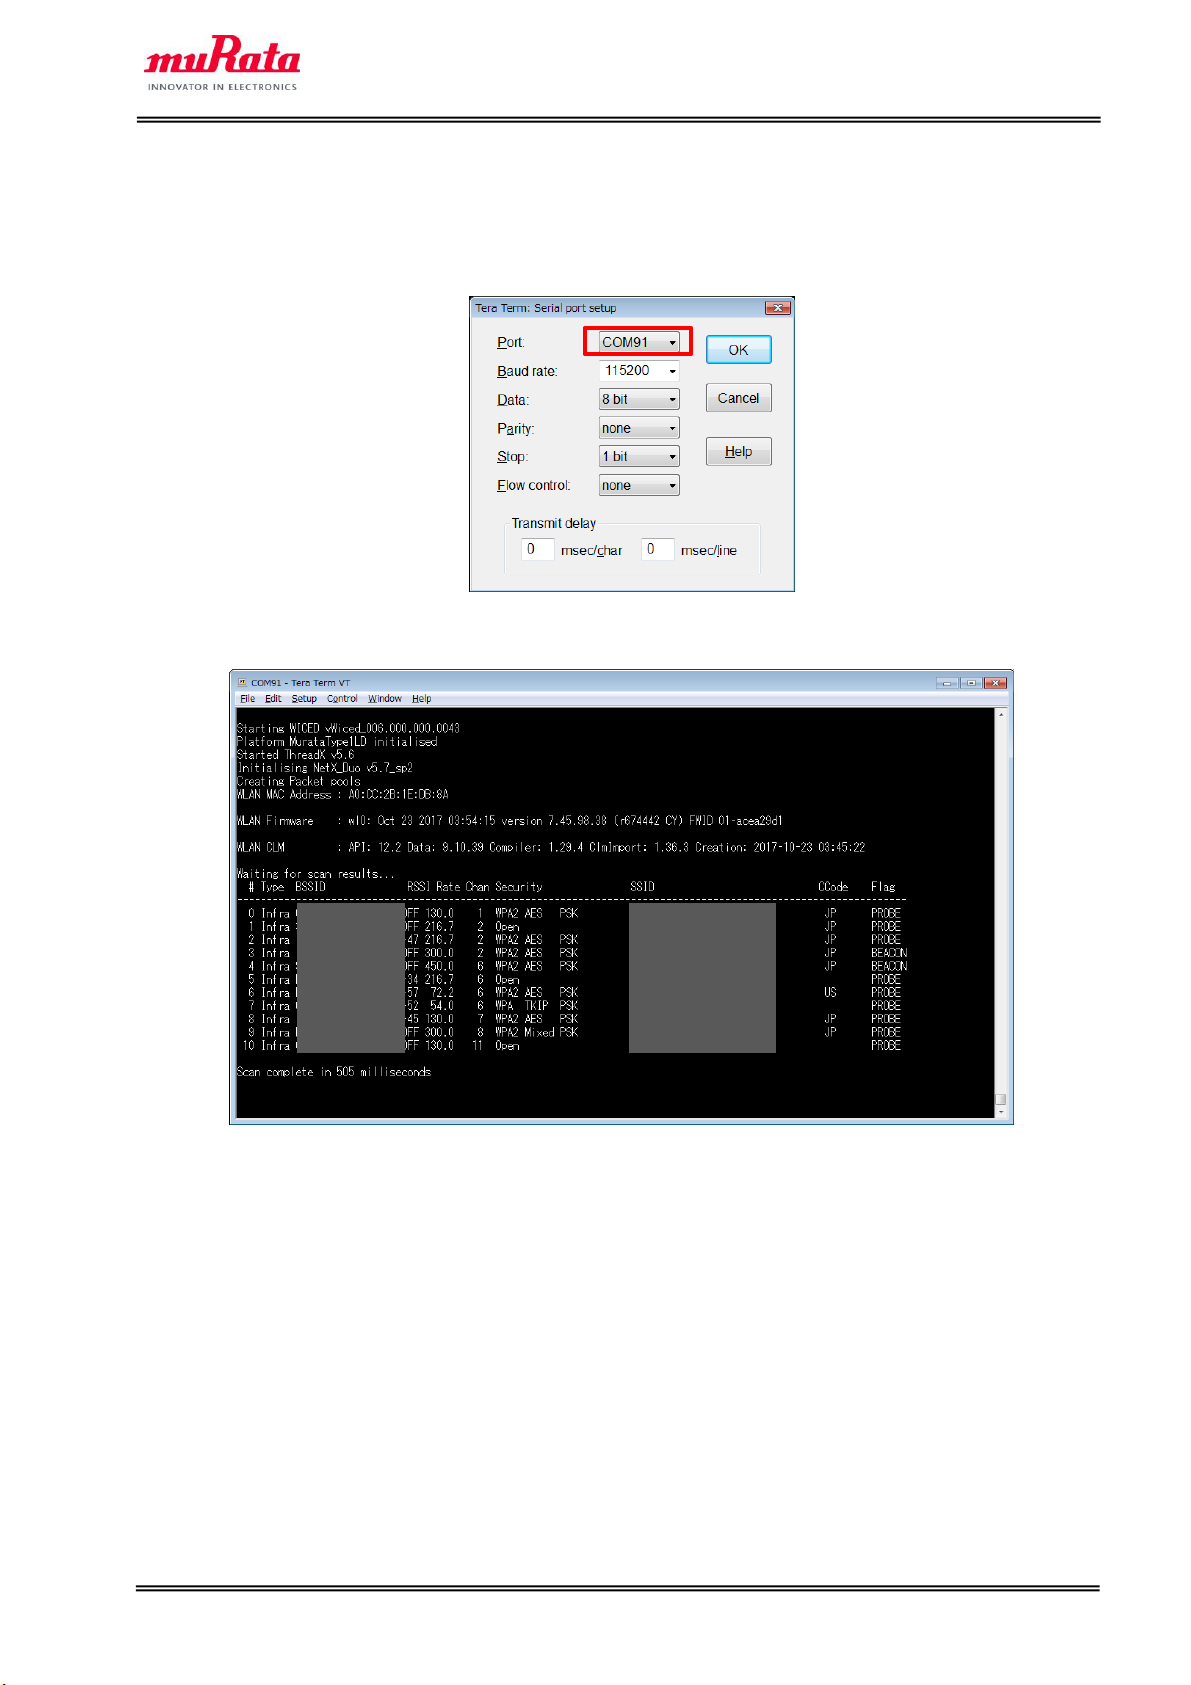
To verify the application which is downloaded in section 3, you need to launch a terminal software such as
Tera Term. Please select [Setup] > [Serial Port…] in the menu bar to setup serial port. Please use the
following settings for the COM port connection.
The following texts will appear on Tera Term
(END)
 Loading...