

Munchkin Shine Owner's Manual
Owner’s Manual
Manual del usuario
Notice d’utilisation
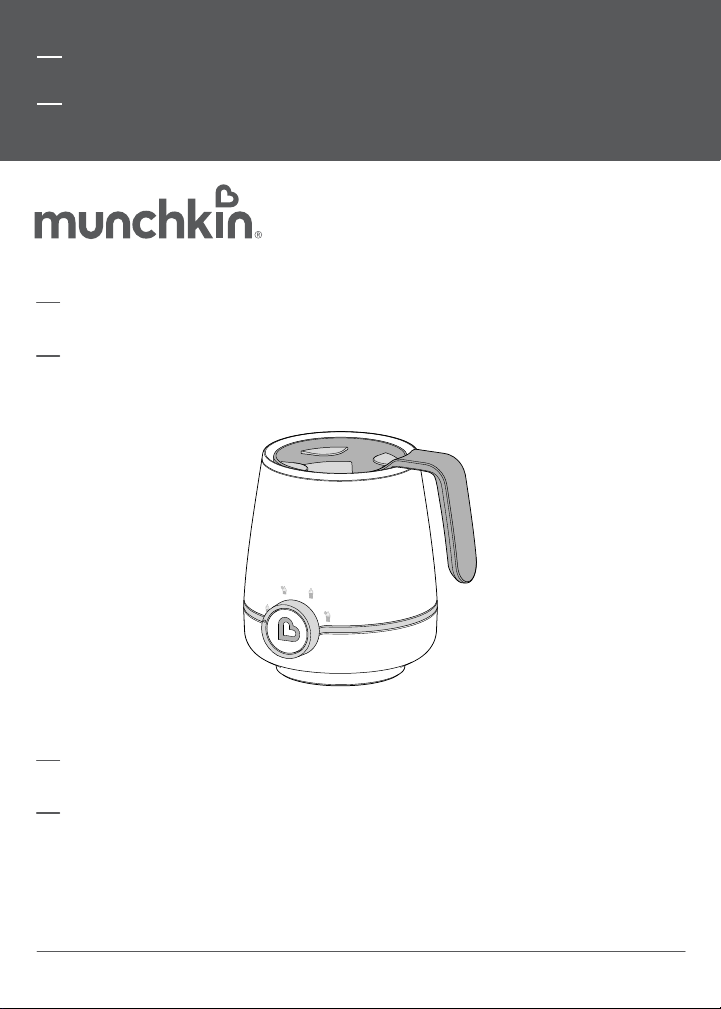
Shine™ Bottle Warmer
With Stainless Steel Warming Chamber
Calentador de biberones Shine™
Con cámara de calentamiento de acero inoxidablet
Chaue-biberon Shine™
Avec chambre chauante en acier inoxydable
Warms milk or formula for comfortable feeding
Accommodates most large and small baby bottles
Calienta la leche o la fórmula para una cómoda alimentación
Puede usarse con la mayoría de los biberones grandes y pequeños para bebés
Réchauffe le lait ou la préparation lactée pour une alimentation confortable
Accepte la plupart des petits et gros biberons
KEEP FOR FUTURE REFERENCE
CONSERVAR PARA FUTURA REFERENCIA
À CONSERVER POUR CONSULTATION FUTURE
CCD-0221-000 Rev 2
Contents | Contenido | Contenu
IMPORTANT INFORMATION..............................................................................................4
Warning .................................................................................................................................................. 4
Parts ........................................................................................................................................................ 5
HOW TO USE ............................................................................................................................6
Warming Modes ................................................................................................................................... 7
Warming a 2nd Bottle.......................................................................................................................10
Cleaning Your Bottle Warmer ......................................................................................................... 10
FCC STATEMENT .................................................................................................................... 11
SALVAGUARDAS IMPORTANTES ....................................................................................13
Advertencia ..........................................................................................................................................13
Piezas .....................................................................................................................................................14
PARA UTILIZAR ......................................................................................................................15
Modos de calentamiento ................................................................................................................. 16
Cómo calentar un segundo biberón .............................................................................................. 19
Limpieza ............................................................................................................................................... 19
DECLARACIÓN DE LA FCC ................................................................................................20
CONSIGNES IMPORTANTES ............................................................................................22
Avertissement ....................................................................................................................................22
Pièces ....................................................................................................................................................23
UTILISATION ..........................................................................................................................24
Mode de chauage ............................................................................................................................24
Réchauer un deuxième biberon ...................................................................................................28
Nettoyage ............................................................................................................................................28
ÉNONCÉ DE LA FCC .............................................................................................................29
LIMITED WARRANTY | GARANTÍA LIMITADA | GARANTIE LIMITÉE ................30
3
Important Information
Installing Batteries
Parts
IMPORTANT SAFEGUARDS
WARNING: STRANGULATION HAZARD!
KEEP OUT OF REACH OF CHILDREN. DO NOT USE WITH EXTENSION CORDS.
When using electrical appliances, basic safety precautions should always be
followed, including the following:
1. Read all instructions carefully before using your bottle warmer.
2. To protect against electrical shock, do not immerse the appliance, cord or plug in
water or any liquid. Clean with damp cloth only.
3. For use by adults for intended purposes only. Any other use is inappropriate and
dangerous. Keep out of the reach of children.
4. This appliance is not intended for use by persons (including children) with reduced
physical, sensory or mental capabilities, or lack of experience and knowledge,
unless they have been given supervision or instruction concerning use of the
appliance by a person responsible for their safety.
5. Do not operate any appliance with a damaged cord or plug, after the appliance
has malfunctioned or has been damaged in any manner. If there is any visible
damage to the appliance, disconnect immediately and do not use. The appliance
does not contain any user serviceable parts—repair should be done by qualified
personnel. Do not dismantle. Return appliance to Munchkin, Inc. for examination,
repair or adjustment.
6. For household use only. Do not use outdoors.
7. Appliance should be placed on a flat and stable area away from hot surfaces. Do
not let cord hang over edge of table or counter, or touch a hot surface.
8. Do not move appliance when in use or if it contains hot water or liquid.
9. The stainless steel warming chamber may become hot. Do not touch while in use
and let cool before handling.
10. Pour out excess water and unplug appliance when not in use or before cleaning
or storing.
11. Ensure that the bottle's contents are at a safe temperature before feeding.
12. Use plastic bottles approved for boiling or glass thermo-resistant bottles/
containers with this appliance.
13. Do not use this appliance to heat frozen milk or formula. Frozen liquids must be
thawed before they are heated in this unit.
14. Use of some wide-mouth bottles may result in too much water displacement. If
water touches the basket retention tabs, water level must be reduced so that it is
at least 1/2" below tabs. Failure to do so before starting heating process may
result in serious injury.
15. Unplug the appliance when not in use, before putting on or taking off parts and
before cleaning. Allow warmer to cool before cleaning.
16. The use of accessory attachments not recommended by Munchkin may
cause injuries.
4
17. Do not place on or near a hot gas or electric burner, or in a heated oven.
18. Turn off appliance before unplugging. To turn off, press and hold the power
button or wait for the unit to power down automatically.
19. Before serving, unplug cord from warmer. Do not leave cord within child's reach.
20. Close supervision is necessary when any appliance is used by or near children.
21. a. A short power supply cord is provided to reduce the risk of becoming
entangled in or tripping over a longer cord.
b. Longer detachable power-supply cords or extension cords are available and
may be used if care is exercised in their use.
c. If a longer detachable power-supply cord or extension cord is used.
1. The marked electrical rating of the cord set or extension cord should
be at least as great as the electrical rating of the appliance, and
2. The cord should be arranged so that it will not drape over the
countertop or tabletop where it can be pulled on by children or tripped
over unintentionally.
3. If the appliance is of the grounded type, the cord set or extension cord
should be a grounding-type 3-wire cord.
22. This appliance has a polarized plug (one blade is wider than the other). To
reduce the risk of electric shock, this plug is intended to fit into a polarized outlet
only one way. If the plug does not fit fully into the outlet, reverse the plug. If it still
does not fit, contact a qualified electrician. Do not attempt to modify the plug in
any way.
23. To be used with baby bottles only. May cause serious injury if used with any
other vessel.
SAVE THESE INSTRUCTIONS
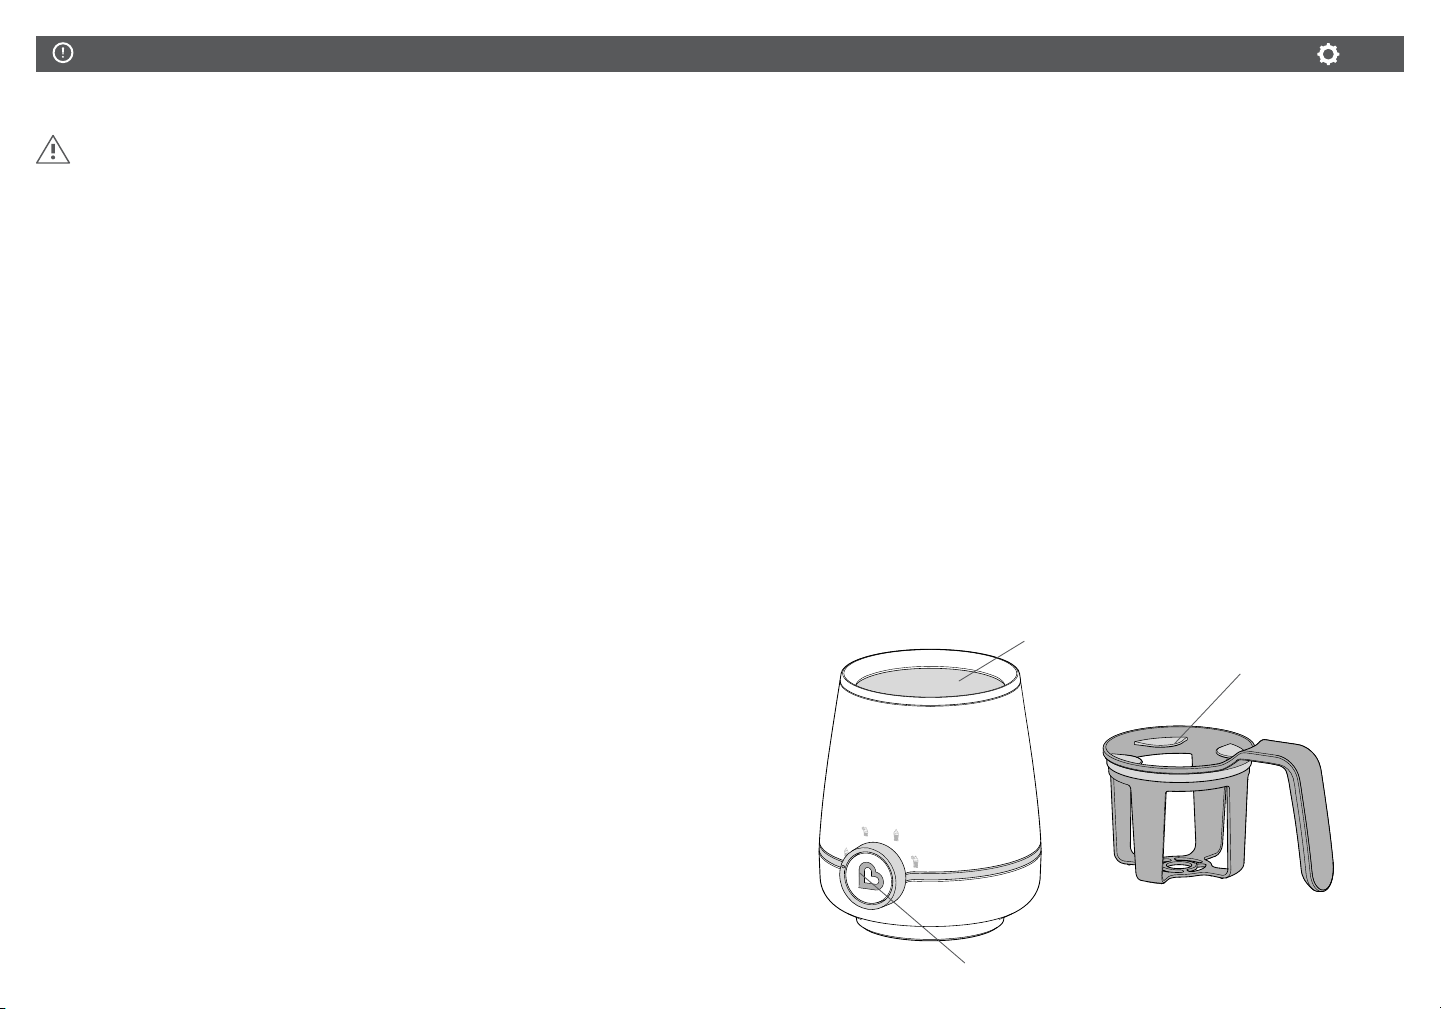
PARTS
Stainless Steel
Warming Chamber
Control Dial
Basket
Retention Tabs
Lift-Out Basket
5
How to Use
How to Use
TO USE
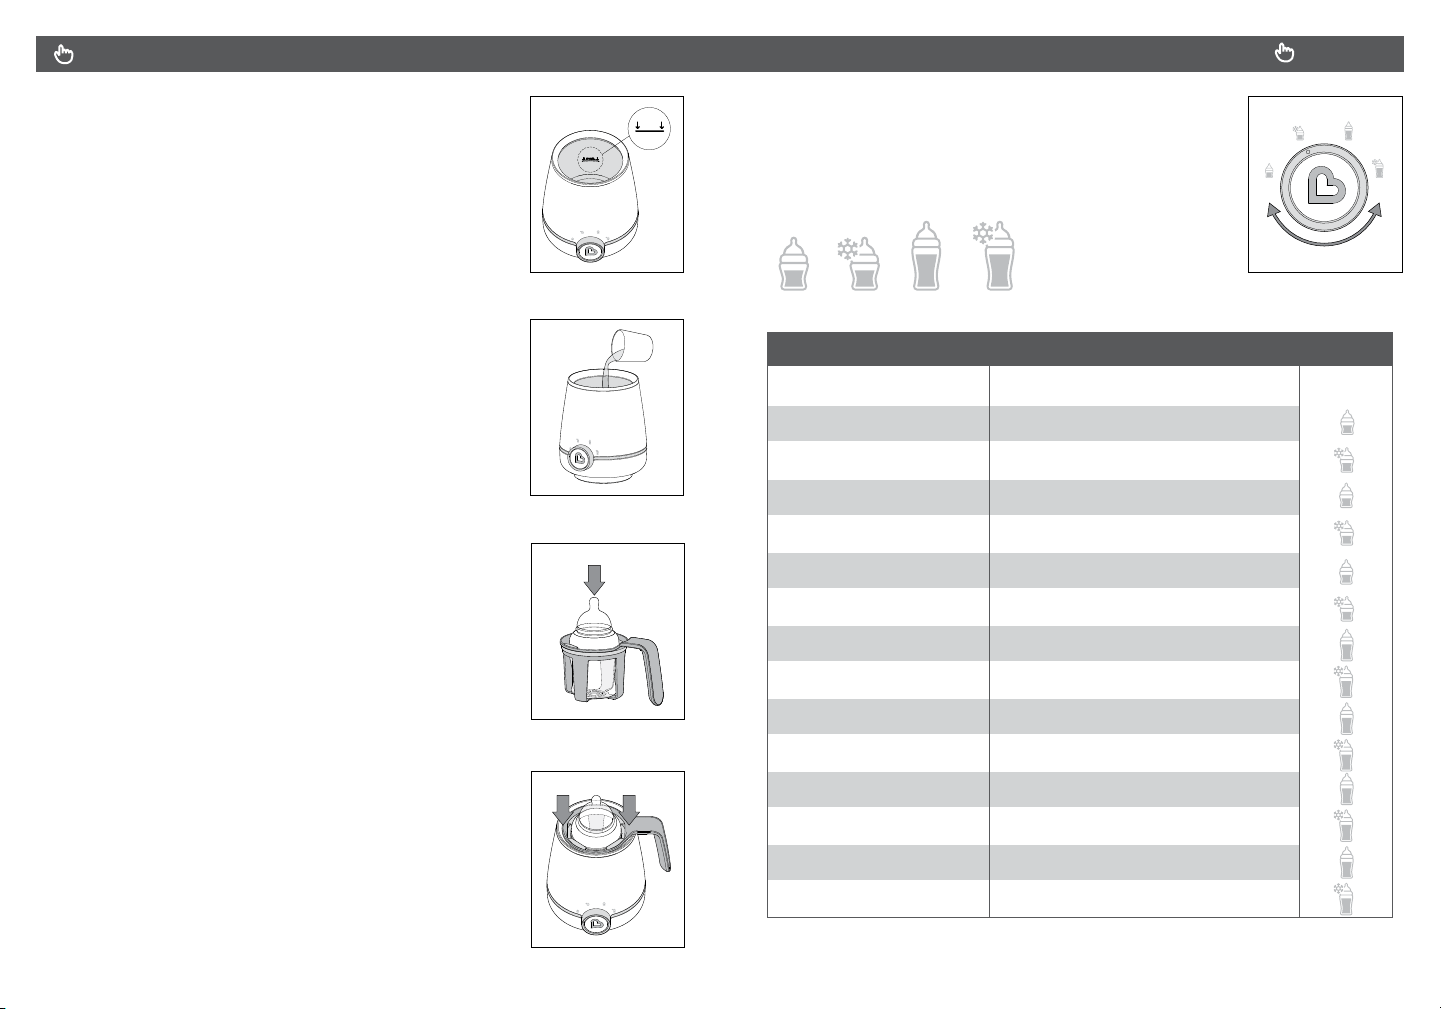
1. Place the appliance on a flat surface, then fill
the warming chamber with COOL/COLD
water to the fill line. (Fig. A).
NOTE: Take care not to add too much or
too little water, which could affect the final
temperature of the bottle. DO NOT use the
appliance without adding water. (Fig. B).
NOTE: It is important that starting water
temperature is below 70°F. If water is too warm,
the unit will beep twice upon attempting to
start warming cycle, indicating an error. If this
happens, pour water out and replace with
cooler water, wait 10 seconds and try again.
2. Place the pre-made bottle into the lift-out
basket. Be sure to push the bottle all the way
to the bottom. (Fig. C).
NOTE: Never place a bottle into the warming
chamber without the lift-out basket.
3. Place the lift-out basket into the warming
chamber. (Fig. D).
NOTE: Use of some wide-mouth bottles
may result in too much water displacement.
If water touches the basket retention tabs,
water level must be reduced so that it is
at least 1/2" below tabs. Failure to do so
before starting heating process may result
in serious injury.
(Fig. A)
(Fig. B)
(Fig. B)
(Fig. C)
max.
4. Insert the plug into an electrical outlet. Choose a
warming mode from the chart below, then turn the
control dial to the desired warming mode (refer to
WARMING MODES chart).
(Fig. E).
(Fig. E)
WARMING MODES
Bottle Size Starting Tempurature
4 oz. Standard Bottle
4 oz. Standard Bottle
4 oz. Wide Bottle
4 oz. Wide Bottle
Room Temperature
Refrigerated
Room Temperature
Refrigerated
Mode
5 oz. Standard Bottle Room Temperature
5 oz. Standard Bottle
8 oz. Standard Bottle
8 oz. Standard Bottle
8 oz. Wide Bottle
8 oz. Wide Bottle
9 oz. Standard Bottle
9 oz. Standard Bottle
9 oz. Wide Bottle
9 oz. Wide Bottle
Refrigerated
Room Temperature
Refrigerated
Room Temperature
Refrigerated
Room Temperature
Refrigerated
Room Temperature
Refrigerated
6
(Fig. D)
7
Contents | Contenido | Contenu
How to Use
How to Use
FOR USE WITH ROOM-TEMPERATURE OR REFRIGERATED LIQUIDS
ONLY. FROZEN MILK OR FORMULA MUST BE THAWED BEFORE USING
THIS APPLIANCE.
NOTE: The warming modes on page 7 are to be used as a guide only. There are many
factors that can impact warming speed and final temperature, such as ambient temperature,
water temperature, formula/milk starting temperature, etc. Adjustments to these instructions
may be necessary. Always test temperature of bottle contents with a thermometer before
feeding baby. The ideal target temperature is 98
bottle contents should not be heated for an extended amount of time.
5. Press the control dial to turn the appliance on. Press it a
second time to begin the selected warming mode. The
warming cycle will begin and the control dial will pulse
gently to indicate that warming is in process. (Fig. A).
NOTE: If the control dial is not pressed to begin the warming cycle within 5 seconds of
powering on the appliance, the preselected warming cycle will begin automatically.
WARMING TIMES
Warming
Mode
Estimated
Warming Time
2.5 minutes 4 minutes
o
F (37oC), which is body temperature. The
4 minutes
9 minutes
(Fig. A)
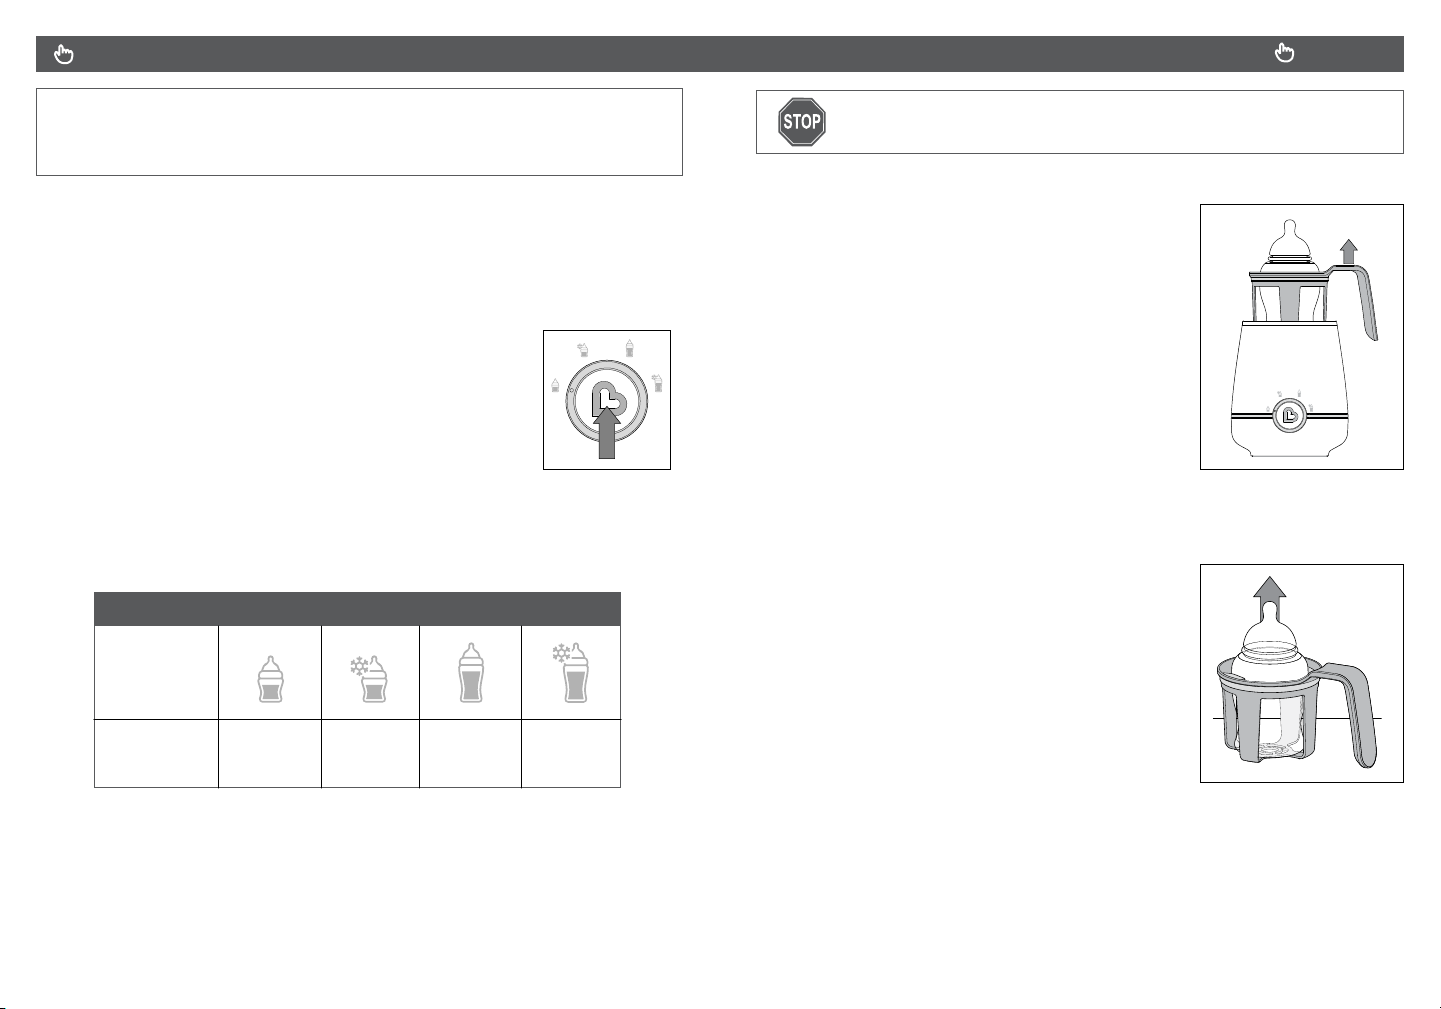
To turn off the appliance at any time during the warming cycle,
press and hold the control dial for two seconds.
6. Once warming is complete, the unit will beep three
times. Remove the lift-out basket from the warming
chamber immediately. Place the basket
onto a flat surface. (Fig. B).
NOTE: After 15 seconds have passed, the unit will beep
five times as a final reminder that warming is complete
then turn off automatically. Do not leave the bottle in
the warming chamber after warming is complete—the
bottle may overheat.
7. While grasping the handle of the lift-out basket
with one hand, remove the bottle with your free
hand by lifting it upward until it passes through the
basket’s rubber retaining tabs. (Fig. C).
8. Gently shake the bottle and test the temperature of
the bottle's contents using a thermometer. This can
also be done by tasting the contents or by placing it
on the inside of your wrist to ensure that it is the
appropriate temperature for your baby. The ideal
target temperature is 98oF (37oC), which is body
temperature. If the bottle is not warm enough,
leave it in the warming chamber slightly longer
next time. If the bottle is too warm, remove it sooner.
(Fig. B)
NOTE: It is possible to switch to a different mode after warming has already started.
Simply turn the control dial to select the new mode and the appliance will override the
current mode and adjust the warming time. (See “ADDITIONAL NOTES” section for
more information).
8
NOTE: The water in the warming chamber may stay hot
for a long time after the unit is turned off. Use caution
when emptying the chamber.
(Fig. C)
9

How to Use | Cleaning
WARMING A SECOND BOTTLE
The appliance is equipped with a safety feature, designed to prevent bottle contents from
overheating, that will not allow an additional warming cycle to begin until the unit has cooled
to a safe operating temperature.
If you wish to warm a second bottle immediately after warming the first one, there are two options:
Option 1: With the appliance OFF and the hot water still in the warming chamber, place the
second bottle into the chamber using the basket. Keep the bottle in the appliance for the
same duration as the first bottle (refer to WARMING TIMES chart).
Option 2: Pour the hot water out of the warming chamber and fill it with cold water, allowing
2-3 minutes for the appliance to cool down. Then pour the water out and restart the warming
process, starting from step 1. Repeat this step if the warmer is not starting.
ADDITIONAL NOTES
To switch to a different mode after warming has already started, turn the control dial to select
the new mode. The appliance will override the current mode and adjust the warming time.
If you switch from a higher warming mode to a lower one and the target warming time has
already been exceeded, the unit will beep twice and shut off. Always check the temperature
of the bottle's contents before feeding.
TO CLEAN
Always unplug the appliance and allow it to cool before cleaning. Do not use scouring pads,
abrasives or solvents. Do not submerge the unit in water.
Main unit: Clean with white vinegar and wipe with a damp cloth.
Lift-out basket: Wash with warm soapy water. Top-rack dishwasher safe.
FCC Statement
This device complies with part 15 of the FCC Rules. Operation is subject to the following
two conditions: (1) This device may not cause harmful interference, and (2) this device must
accept any interference received, including interference that may cause undesired operation.
WARNING: Changes or modifications not expressly approved by the party responsible for
compliance could void the user's authority to operate the equipment.
NOTE: This equipment has been tested and complies with the specifications for a Class
B digital device, pursuant to Part 15 of the FCC Rules. These limits are designed to
provide reasonable protection against harmful interference in a residential installation. This
equipment generates, uses, and can radiate radio frequency energy and, if not installed and
used according to the instructions, may cause harmful interference to radio communications.
However, there is no guarantee that interference will not occur in a particular installation.
If this equipment does cause harmful interference to radio or television reception, which
is found by turning the equipment off and on, the user is encouraged to try to correct the
interference by one or more of the following measures:
• Reorient or relocate the receiving antenna.
• Increase the separation between the equipment and the receiver.
• Connect the equipment into an outlet on a circuit different from that to which the receiver
is connected.
• Consult Munchkin, Inc. or a qualified technician for help.
This Class [B] digital apparatus complies with Canadian CAN ICES-3 (B)/NMB-3(B).
10 11
 Loading...