

Munchkin MK0094-011 Owner's Manual
MK0094-011 Rev 3
Owner’s Manual
Manual del Usuario
Notice d’utilisation
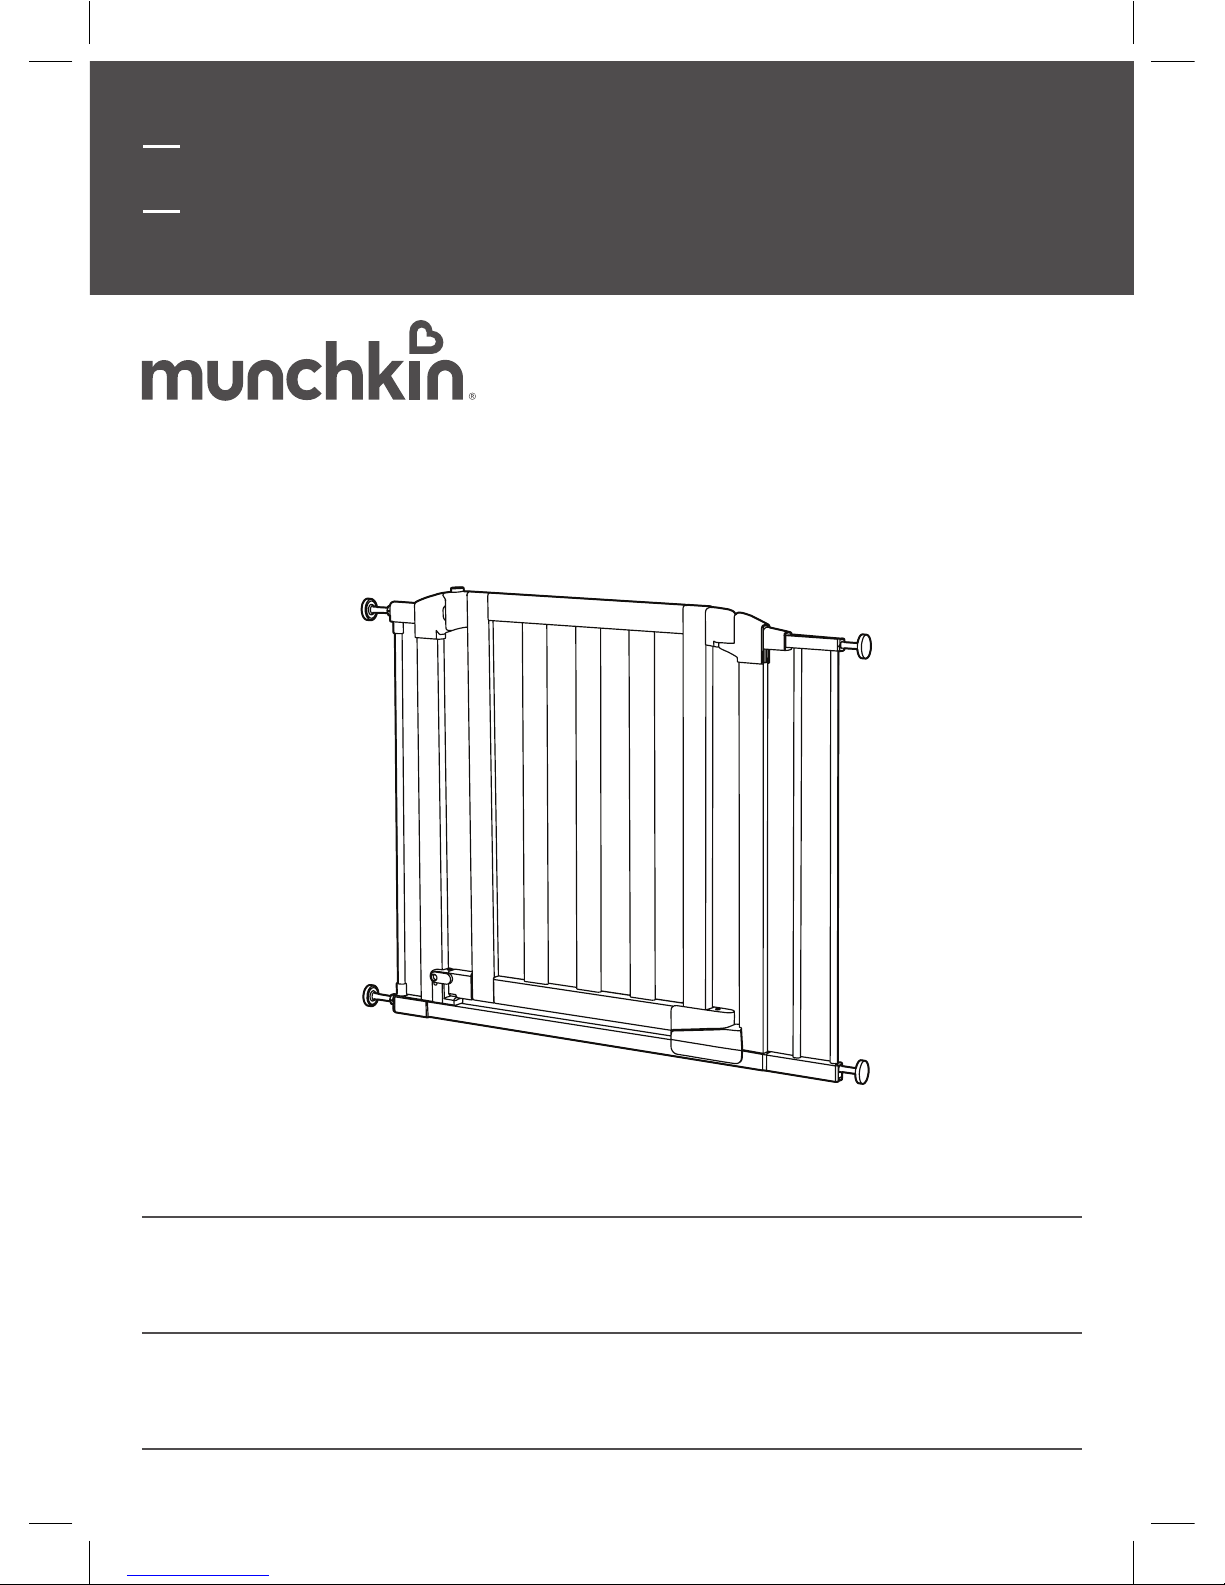
Auto Close Modern™ Gate
Barrera de Seguridad Auto Close Modern™
Barrière Auto Close Modern
™
KEEP FOR FUTURE REFERENCE
Please read the instructions carefully before installing this gate. For additional help, installation videos are
available at www.munchkin.com
GUARDE PARA FUTURA REFERENCIA
Lea las instrucciones detenidamente antes de instalar esta barrera de seguridad. Si necesita más ayuda,
vea los videos de instalación disponibles en www.munchkin.com
À CONSERVER POUR CONSULTATION FUTURE
Veuillez lire attentivement ces instructions avant d’installer la barrière. Si vous avez besoin d'aide
supplémentaire, consultez nos vidéos d’installation: www.munchkin.com
CCD-0237-011 REV 1
Contents | Contenido | Contenu Contents | Contenido | Contenu
2 3
IMPORTANT INFORMATION
Introduction ........................................................................................................................................... 4
Disclaimers ........................................................................................................................................... 4
Warnings ................................................................................................................................................4
GETTING STARTED
Included Parts ....................................................................................................................................... 5
Step 1: Identify Gate Placement ....................................................................................................... 6
HOW TO INSTALL
Step 2: Verify Proper Width ............................................................................................................... 7
Step 3: Remove Extension .................................................................................................................8
Step 4: Install Wall Cups .....................................................................................................................9
Step 5: Mount Your Gate ................................................................................................................... 11
Extension Congurations ..................................................................................................................15
HOW TO USE
Opening Your Gate .............................................................................................................................13
Closing Your Gate ................................................................................................................................13
Adjusting The Swing Guard ..............................................................................................................14
Cleaning Your Gate .............................................................................................................................14
CUSTOMER SERVICE
One Year Limited Warranty ............................................................................................................. 16
Contact Us ............................................................................................................................................17
INFORMACIÓN IMPORTANTE
Introducción ........................................................................................................................................ 19
Aviso Legal .......................................................................................................................................... 19
Advertencias ...................................................................................................................................... 19
INICIO
Piezas incluidas ..................................................................................................................................20
Paso 1: Identicar la ubicación de la barrera de seguridad .......................................................21
INSTALACIÓN
Paso 2: Vericar el ancho apropiado .............................................................................................22
Paso 3: Quitar extensiones ..............................................................................................................23
Paso 4: Instalar los topes para pared ...........................................................................................24
Paso 5: Montar la barrera de seguridad .......................................................................................26
Conguraciones de extensión .........................................................................................................30
MODO DE USO
Cómo abrir la barrera de seguridad...............................................................................................28
Cómo cerrar la barrera de seguridad ............................................................................................28
Cómo ajustar el dispositivo de seguridad ...................................................................................29
Cómo limpiar la barrera de seguridad ..........................................................................................29
SERVICIO AL CLIENTE
Garantía Limitada de Un Año. ..........................................................................................................31
Contáctenos ........................................................................................................................................32
RENSEIGNEMENTS IMPORTANTS
Introduction .........................................................................................................................................34
Avis de non responsabilité ..............................................................................................................34
Mises en garde ...................................................................................................................................34
DÉMARRAGE
Pièces comprises ...............................................................................................................................35
Étape 1: Choix de l’emplacement de la barrière ........................................................................36
INSTALLATION
Étape 2: Vérication de la largeur de l'ouvertur ........................................................................37
Étape 3: Retrait des rallonges ........................................................................................................38
Étape 4: Installation des ventouses murales .............................................................................39
Étape 5: Montage de la barrière .....................................................................................................41
Congurations des rallonges ..........................................................................................................45
MODE D’EMPLOI
Ouverture de la barrière ..................................................................................................................43
Fermeture de la barrière ..................................................................................................................43
Réglage de la protection battante .................................................................................................44
Nettoyage de la barrière ..................................................................................................................44
SERVICE À LA CLIENTÈLE
Garantie limitée d’un an...................................................................................................................46
Nous contacter ................................................................................................................................... 47
Getting Started
5
Important Information
4
INTRODUCTION
Thank you for choosing a Munchkin safety gate to help protect your family. Your gate stays
in place by creating pressure between two opposing surfaces.
For maximum security, DO NOT use this gate in any location without installing all 4 wall
cups, sticky pads, and screws provided. In some openings only 2 top wall cups can
be tted.
Please inspect your gate immediately. If you see any damage, do not attempt installation.
Check page 16 of this manual for information on damaged products.
Assemble the gate away from small children. Some of the parts may present a choking
hazard when loose.
PLEASE NOTE: There is a gap between your gate frame and
handle. This is not a defect. This gap will close once your gate
is properly installed. Please check the gate on a regular basis to
ensure that all parts are in proper working condition.
DISCLAIMERS
Any misuse, abuse, abnormal use, excessive wear and tear, improper assembly,
negligence, environmental exposure, accident or alteration of the gate, as well as removal
or alteration of its serial number, invalidates any and all claims against the manufacturer.
Any damage to property during installation is the sole responsibility of the end user.
WARNING:
• Children have died or been seriously injured when gates are not
securely installed.
• ALWAYS install and use gates as directed using all required parts.
• STOP using when a child can climb over or dislodge the gate.
• Use only with the locking mechanism securely engaged.
• NEVER use to keep child away from pool.
• Install according to manufacturer’s instructions.
• Intend for use with children from 6 months through 24 months.
• This product will not necessarily prevent all accidents. Never leave
child unattended.
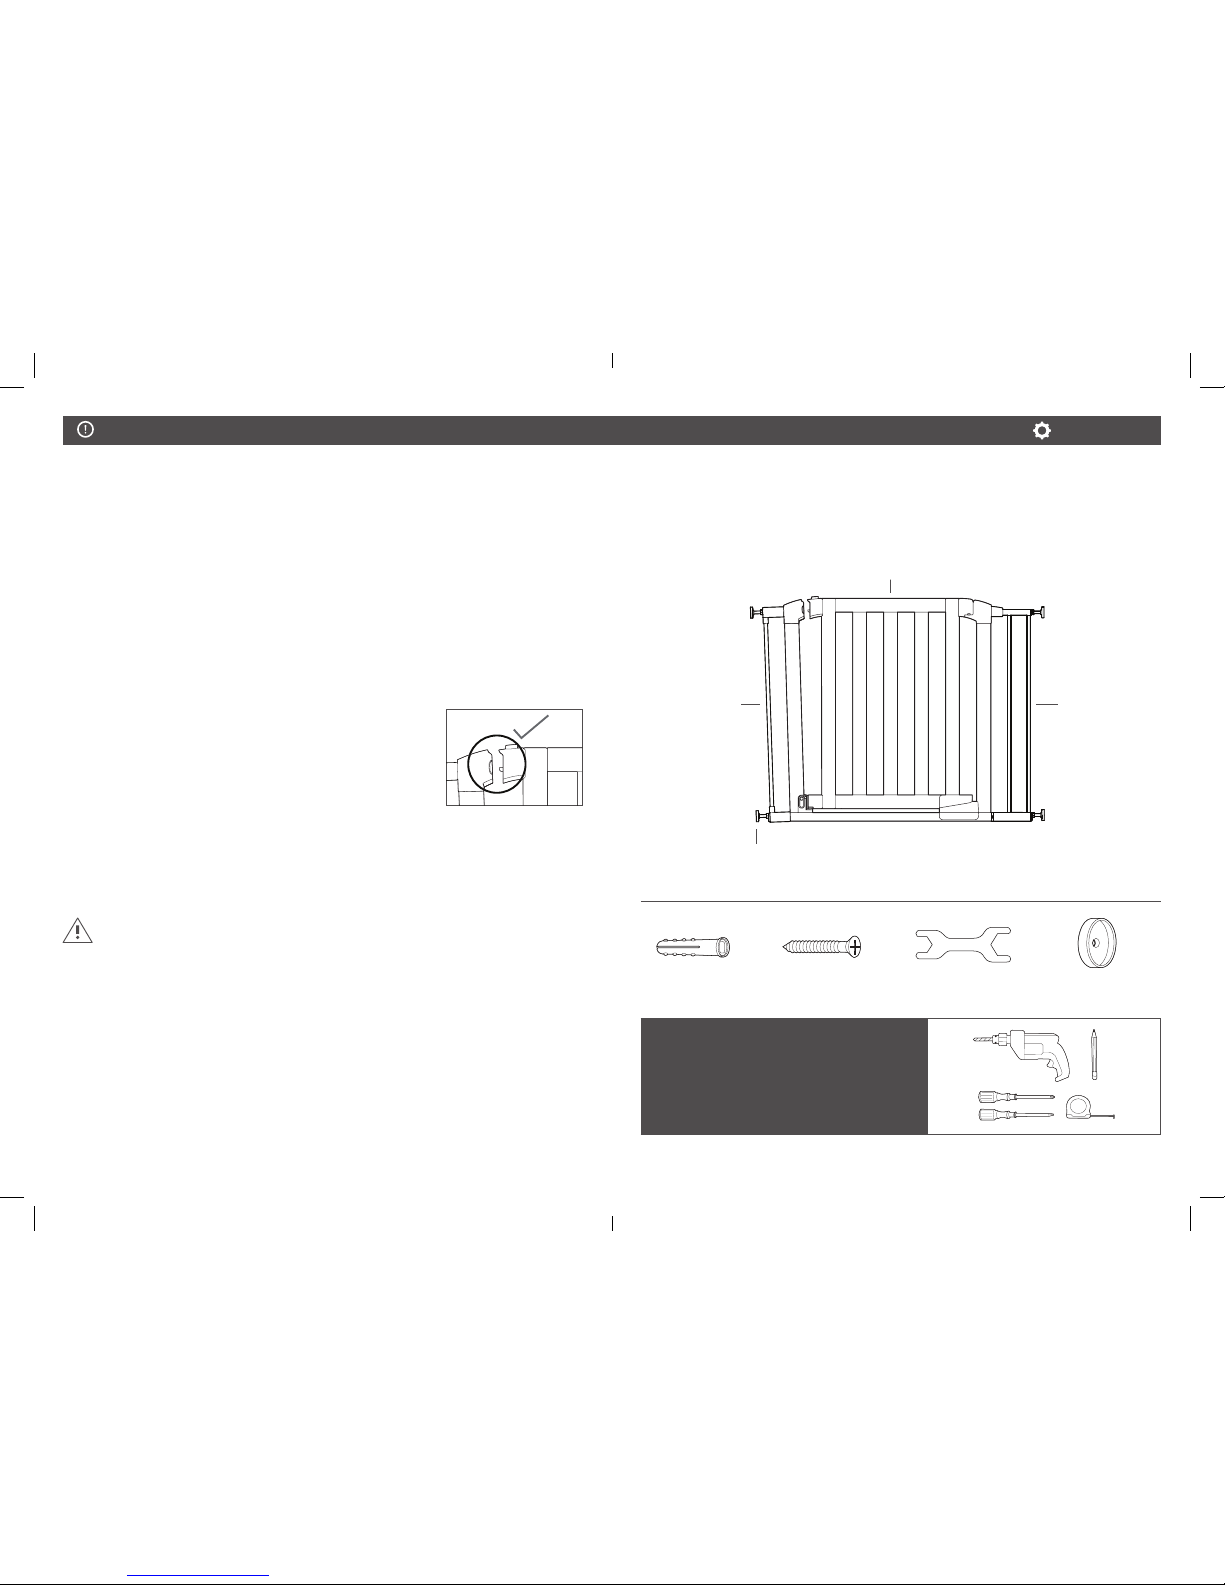
INCLUDED PARTS
If any parts are missing or damaged, please contact our Customer Satisfaction Team
at 1-800-344 -2229.
TOOLS NEEDED:
• Drill
• Phillips screwdriver
• Flathead screwdriver
• Pencil
• Tape measure
Wall anchor (x4) Wall screw (x4)
Gate (x1)
Wrench Wall cup & round
sticky pad (x4)
5.5" (14cm) medium
extension (x1)
(Pre-installed)
2.75" (7cm) small
extension (x1)
(Pre-installed)
Adjustment rod with threaded
nut (x4) (Pre-installed)
How To Install How To Install
7
Getting Started
6
STEP 1: IDENTIFY GATE PLACEMENT
For maximum security, DO NOT use this gate in any location without installing all 4 wall
cups, sticky pads and screws provided. In some openings only 2 top wall cups can be
fi tted. The gate must be installed between two structurally sound surfaces.
GATE IS SUITABLE FOR:
TOP OF STAIRS
If installing the gate at the top of stairs, it MUST be
placed on the top landing and only swing away from
the stairs.
BOTTOM OF STAIRS
If installing the gate at the bottom of stairs, we
recommend placing it on the fl oor. If the gate must
be placed on the lowest stair, position it toward the
front of the step.
HALLWAYS AND DOORWAYS
Be sure that the gate is resting on the fl oor. The gate
should NOT be raised above the fl oor.
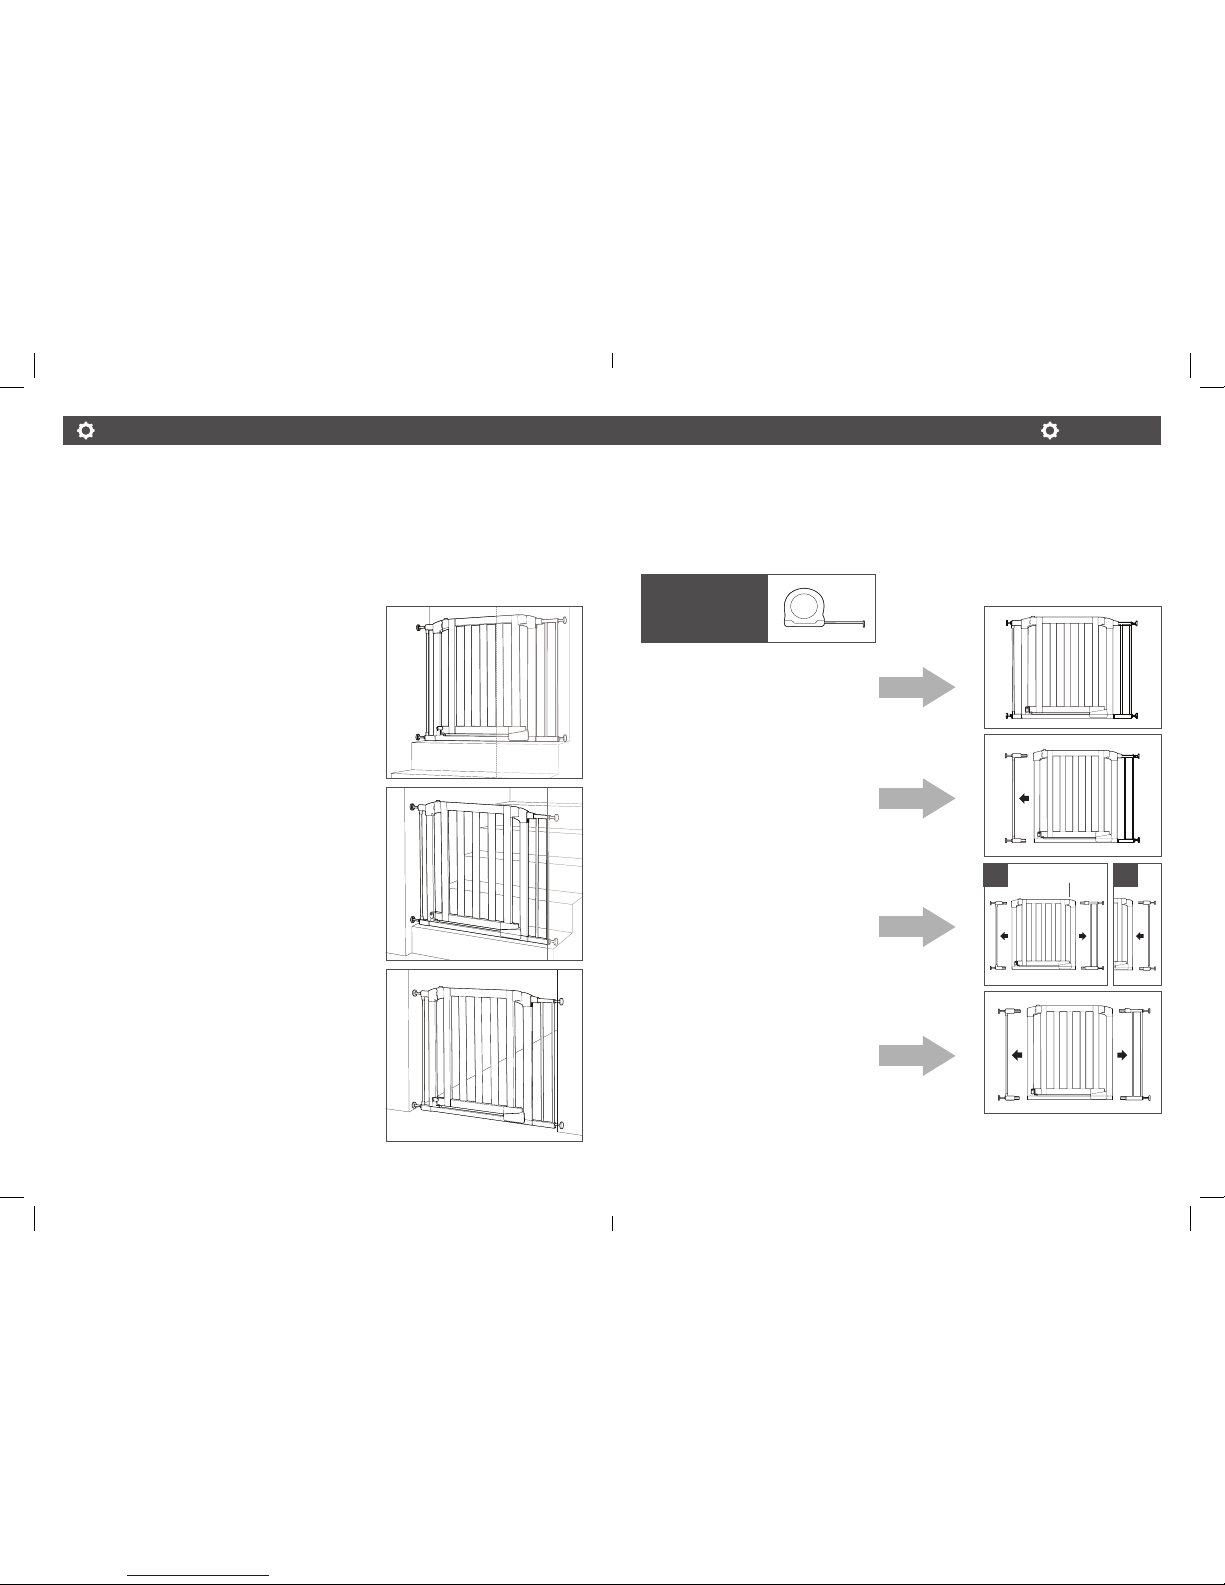
STEP 2: VERIFY PROPER WIDTH
Measure the width of the opening where the gate will be installed. Be sure to measure
at the narrowest point between the walls. For example, include any baseboards in your
measurement. Then, see below for the proper gate confi guration for your opening.
37.8" 40.6" 96CM 103.1CM
Skip to page 9.
35.4" - 37.8" (89.9CM - 96CM)
Remove one 2.75" (7cm) extension
(Proceed to page 8.)
33" 35" 83.8CM 88.9CM
1. Remove one 2.75" (7cm) extension
& one 5.5" (14cm) extension
2. Reinsert one 2.75" (7cm) extension
to the hinge side of the gate
(Proceed to page 8.)
29.5" - 32.5" (75CM - 82.5CM)
Remove one 2.75" (7cm)
& one 5.5" (14cm) extension
(Proceed to page 8.)
PLEASE NOTE: See page 15 for additional
extension confi gurations.
TOOLS NEEDED:
Tape measure
Hinge Side
1 2
How To Install How To Install
8 9
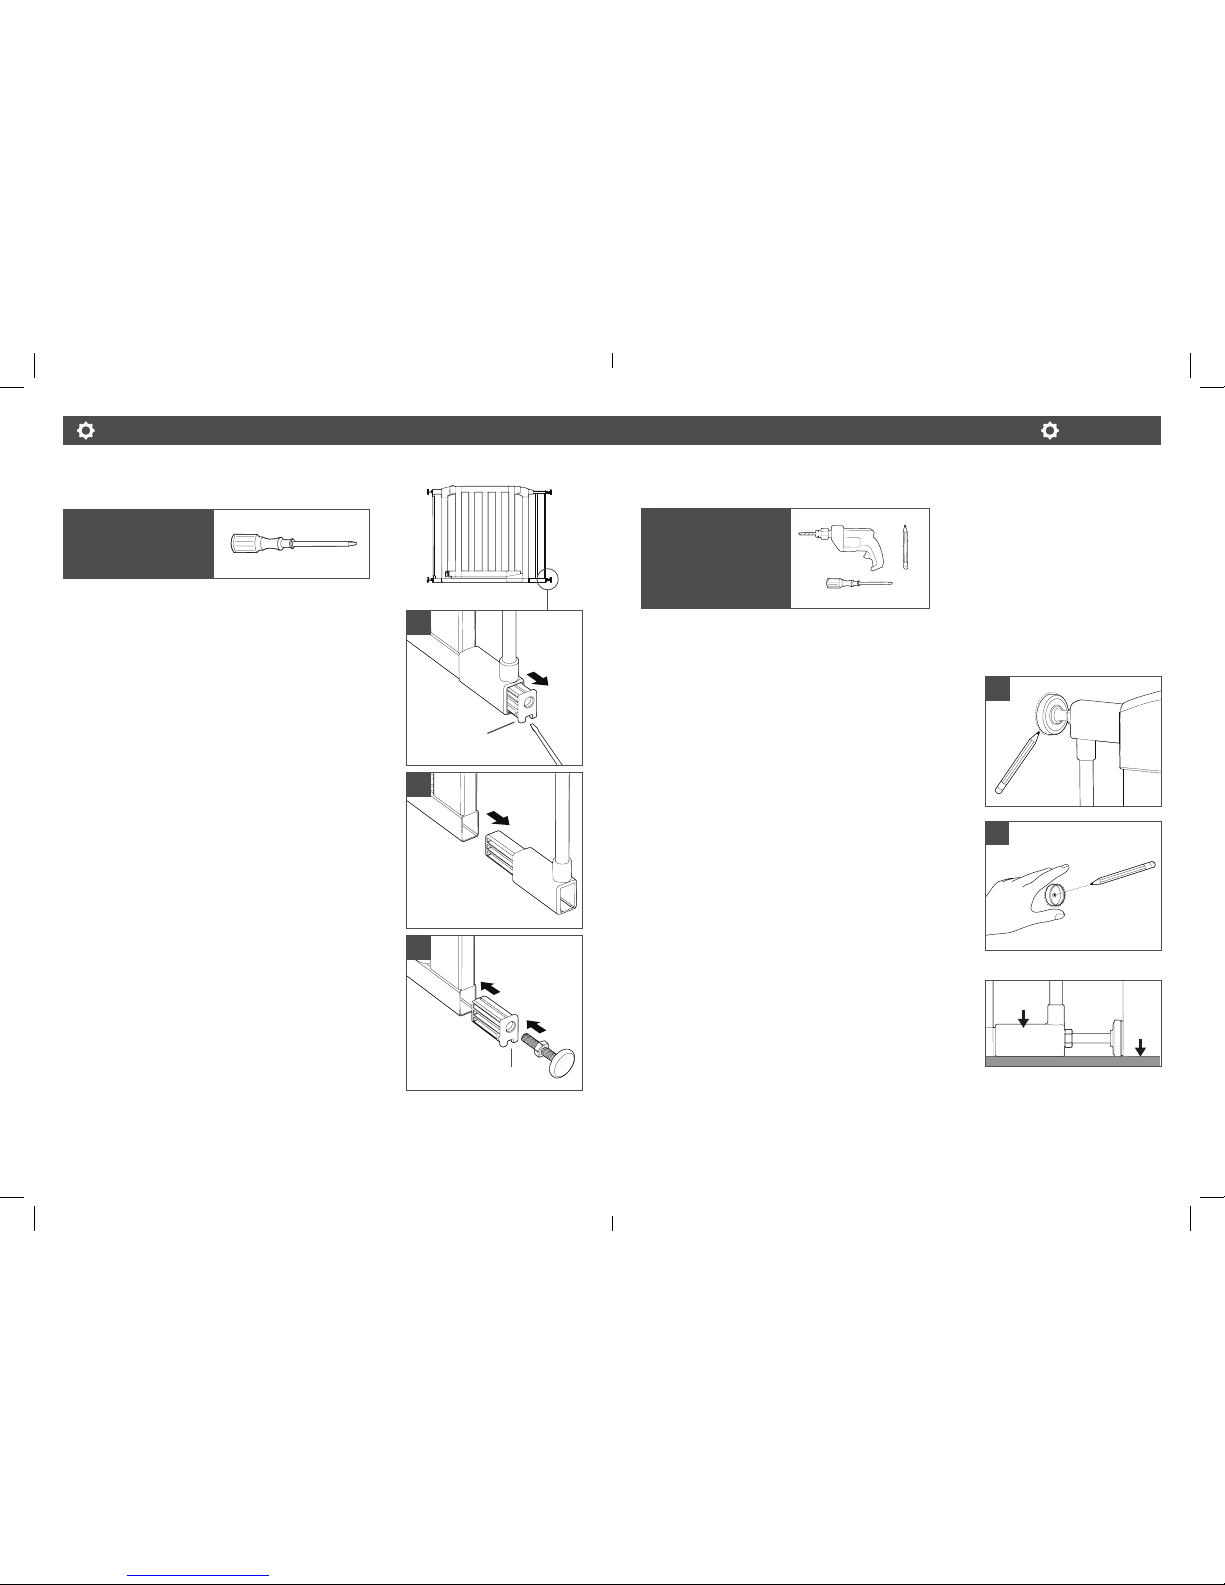
STEP 3: REMOVE EXTENSION
1. Remove the adjustment rods and plugs from the
upper and lower side of the gate you are removing
the pre-installed extension from. You may need to use
a flathead screwdriver to remove the plugs.
2. Remove the pre-installed extension by pulling out the
upper and lower extension adapters away from the
gate. Store the extension in a safe place in case you
move the gate to a wider opening in the future.
3. Reinsert the plugs and adjustment rods you removed
earlier back into the gate. Please be sure the slot on
the plug is facing down towards the floor. Adjustment
rods slide into the plug holes. They DO NOT screw.
PLEASE NOTE: For openings 29.5”-32.5” (75cm-82.5cm)
and 33”-35” (83.8cm-88.9cm), repeat these steps on the
other side of the gate to remove the second extension.
To add an extension, simply reverse the instructions.
3
2
1
TOOLS NEEDED:
Flathead screwdriver
Bottom plug
Slot
STEP 4: INSTALL WALL CUPS
1. Ensure the wall cups are on the end of 4 adjustment rods.
2. Temporarily place the gate where you want to install
it, flush against the floor. Pull the adjustment rods out
until they reach the walls and trace the position of
each wall cup with a pencil.
3. Retract the adjustment rods and set the gate aside
for now.
4. Hold the wall cup in position and mark the center with
a pencil. Then put the cup aside.
5. Determine whether there is a stud behind the drywall
where you will install each wall cup. Proceed to either
6a or 6b.
PLEASE NOTE: The gate should be resting on the floor. If
there is a gap, it must be less than 0.196” (5mm) between
the gate and the floor.
TOOLS NEEDED:
• Drill
• Phillips Screwdriver
• Pencil
2
4
Gate
Floor
How To Install How To Install
10 11
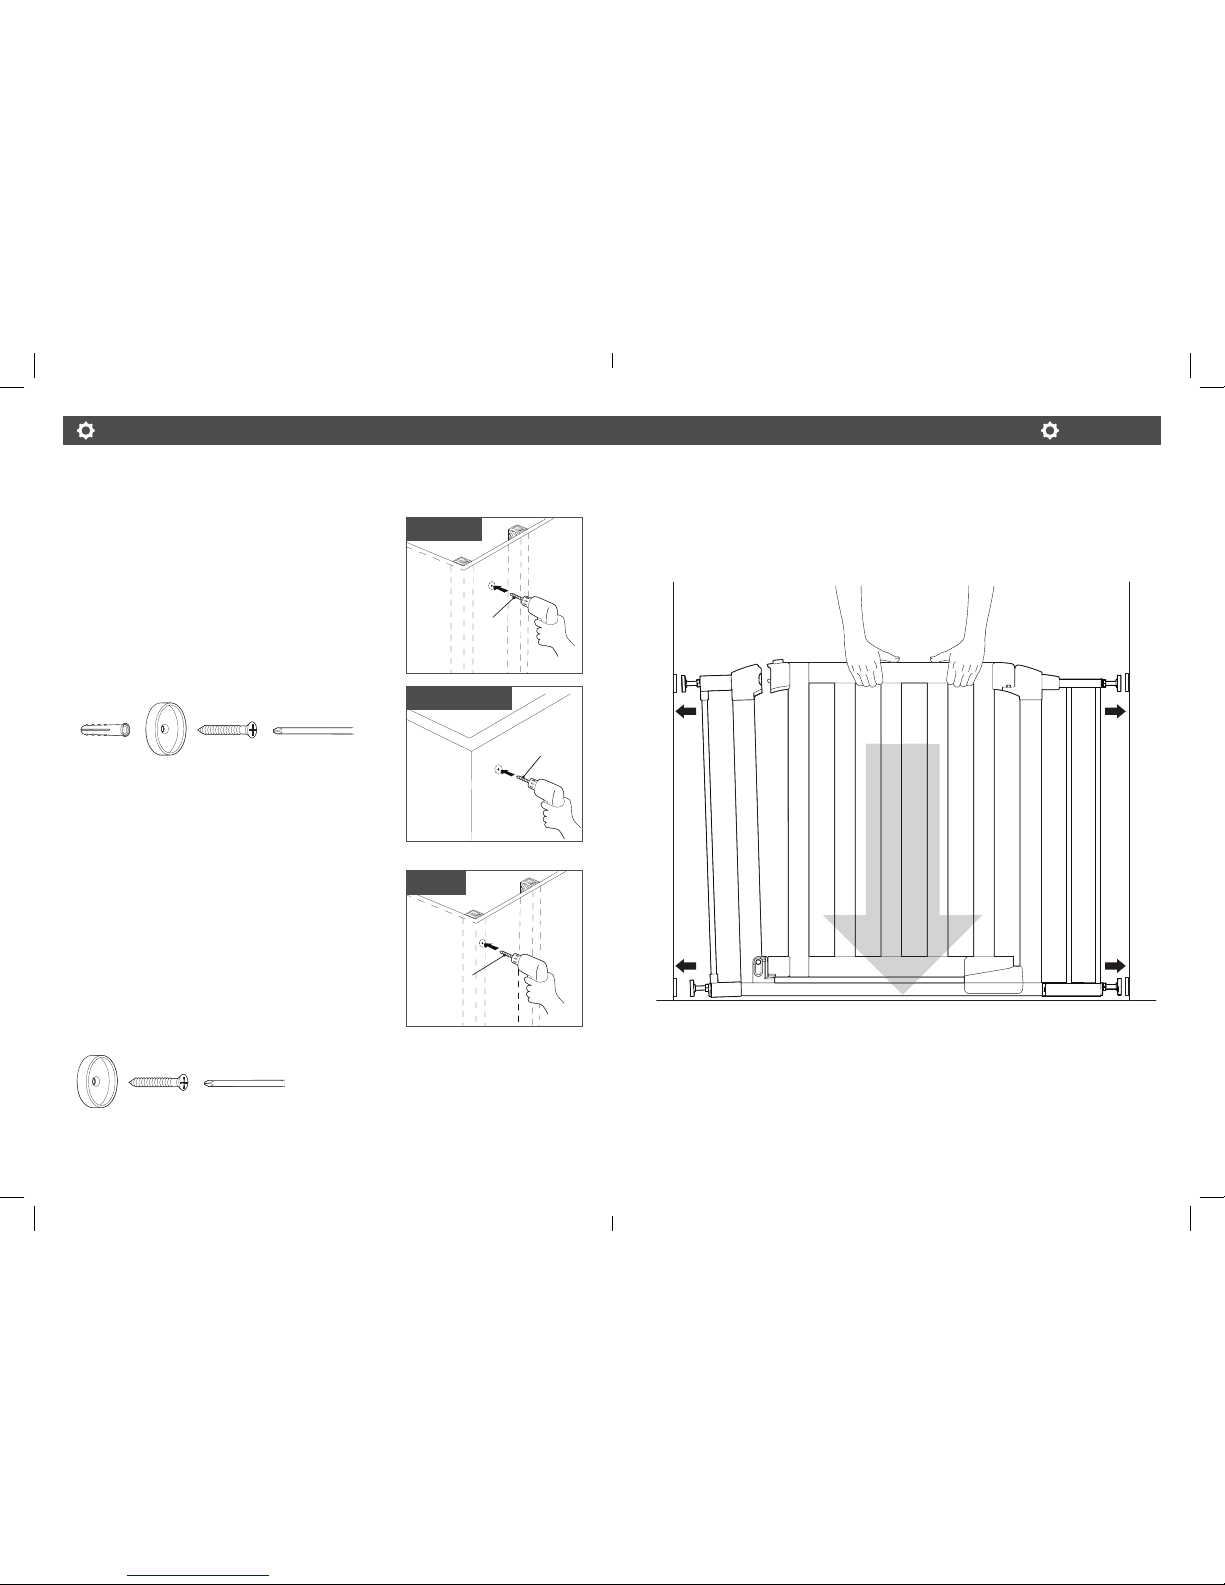
6a. For Drywall Without Stud / Plasterboard:
Drill a 7/32”(5.5mm) hole into the drywall at the
center mark. Insert a drywall anchor.
Peel the back off the sticky pad that is attached to
the wall cup. Then stick the wall cup onto the wall to
fi t your pencil marks.
Use a screwdriver or drill to insert the screw through
the center of wall cup into the drywall anchor.
6b. For Drywall with Stud:
Drill a 5/64”(2mm) pilot hole into the stud
(no anchor needed).
Peel the back off the sticky pad that is attached to
the wall cup. Then stick the wall cup onto the wall to
fi t your pencil marks.
Use a screwdriver or drill to insert the screw through
the center of the wall cup into the stud.
Drywall
Anchor
7/32"
5.5mm
7/32"
5.5mm
5/64"
2.0mm
6a. Drywall
6a. Plasterboard
6b. Stud
STEP 5: MOUNT YOUR GATE
1. Place the gate where you want to install it, then extend all 4 adjustment rods until they
reach the walls. Ensure that the ends of the adjustment rods are seated
inside the cups.

How to Use How to Use
13
How To Install
12
2. Use the wrench to tighten the nuts on all 4 threaded
adjustment rods until the gate is secure. Tighten each
nut a little at a time, starting at the bottom of the
gate, then move to the upper hinge-side, and lastly
the upper handle side.
3. The nuts should be tightened until the handle latch
locks into frame and the red indicator near the handle
is no longer visible.
PLEASE NOTE: DO NOT overextend
the adjustment rods. If the gate is more
than 2.5” (63.5 mm) from the wall, you
must add an extension. See page 15
for additional extension configurations.
3
Red indicator
<2.5" (<63.5mm) <2.5" (<63.5mm)
2
TOOLS NEEDED:
Wrench
1/16" (1.5mm)
OPENING YOUR GATE
Using your thumb, squeeze the button on the top of the handle. Pull the handle upward
to swing the gate open.
CLOSING YOUR GATE
Your gate has an auto close feature. The hinge will automatically slide the gate door back
to the closed and locked position. If you want the door to remain open for easy access,
open as wide as possible and the door will rest in a notch on the hinge until you nudge it
back towards the closed position.
PLEASE NOTE: Always check the handle to make sure that the gate is securely locked and
never leave your child unattended.

How To Install How To Install
15
How to Use
14
ADJUSTING THE SWING GUARD
If the gate is placed at the top or bottom of stairs,
always rotate the swing guard located on the side of
the gate facing the stairs into its locked position. This
prevents the gate from opening into the stairway.
In other locations, be sure to rotate swing guard into its
locked position on the opposite side of the gate that
the child occupies.
To fully lock, rotate the swing guard to the locked
position on both sides of the gate.
CLEANING YOUR GATE
Use mild soap and wipe with a damp cloth. Be careful
NOT to wash or wipe the stickers on the base of
the gate.
Removing or damaging the stickers will void
the warranty.
Locked position
EXTENSION CONFIGURATIONS
Additional extensions can be purchased at www.munchkin.com
Small
2.75 in (7cm)
Medium
5.5 in (14cm)
Large
11 in (28cm)
33 to 35 in
(83.8 to 88.9 cm)
35.4 to 37.8 in
(89.9 to 96 cm)
35.4 to 37.8 in
(89.9 to 96 cm)
43.3 to 46.1 in
(110 to 117.1 cm)
49.4 to 51.6 in
(125.5 to 131 cm)
51.6 to 54 in
(131 to 137 cm)
46.1 to 48.8 in
(117.1 to 124 cm)
37.8 to 40.6 in
(96 to 103.1 cm)
41 to 43.3 in
(104.1 to 110 cm)
 Loading...