

Page 1
Steam Guard™
Rapid Electric Steriliser
Stérilisateur électrique rapide
Snelle elektrische sterilisator
Dampf-Schnellsterilisator
Esterilizador eléctrico rápido
MK0040-002
CCD-0053-002 REV 1-11248-IB01-1
Page 2
2
g
f
1
PLEASE RETAIN THESE INSTRUCTIONS FOR FUTURE REFERENCE
IMPORTANT! Please read these instructions fully before you use your steriliser.
WARNING! STRANGULATION HAZARD! Keep out of reach of children. Do not use with extension cord.
CONTENTS
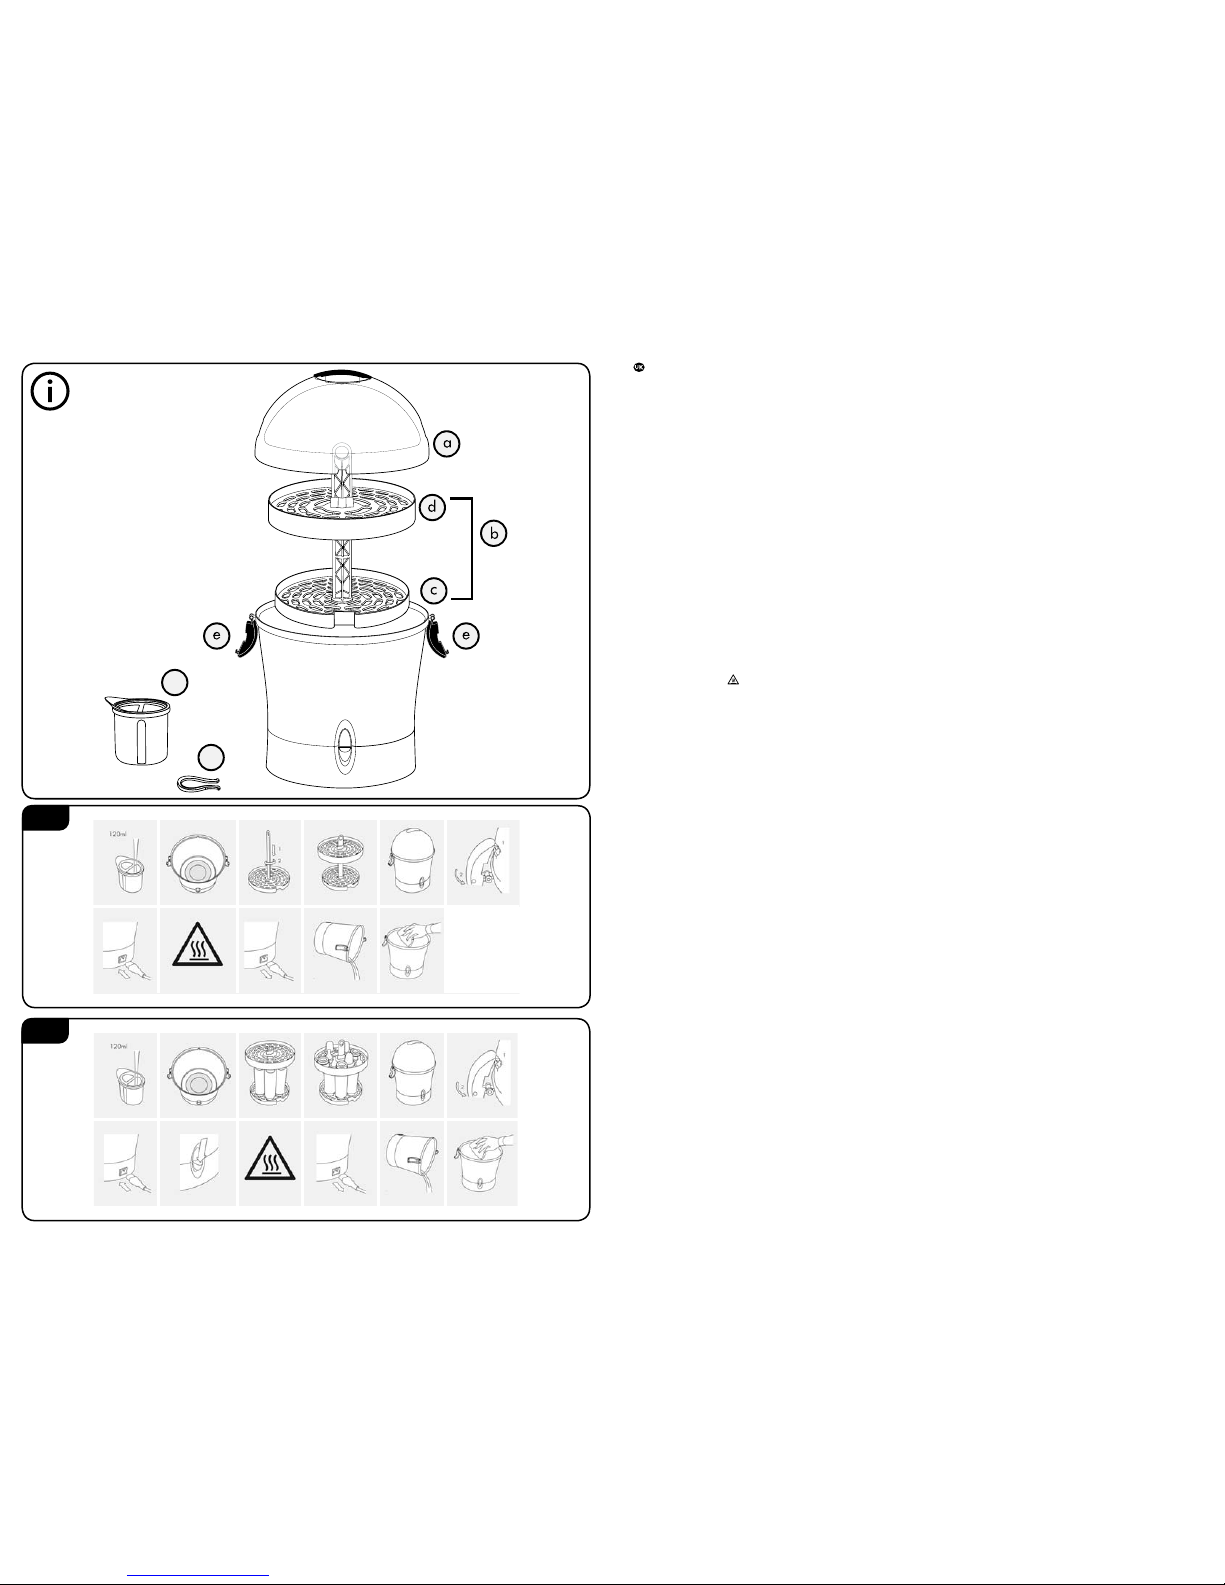
a Transparent lid
b Bottle holder
c Accessory tray 1
d Accessory tray 2
e Side Handles
f Water measuring cup with filter
g Bottle tongs
SPEED
The Munchkin Rapid Electric Steriliser is a fast and efficient steriliser completing a full cycle in just 6 minutes.
It destroys harmful bacteria by surrounding your bottles and accessories with steam. Your steriliser will hold
up to 9 standard or 6 wide neck bottles along with their accessories.
SAFETY
The Munchkin Rapid Electric Steriliser comes with several safety features. The heat sensitive safety handle changes
colour and displays
symbol to show that the lid is hot during use. The power switch will also illuminate when
the unit is in operation. As with all Munchkin products the Rapid Electric Steriliser has been tested to ensure strict
compliance with harmonised safety standards. The Munchkin Rapid Electric Steriliser will keep bottles sterile for
up to 6 hours providing that the lid is not removed and the handles remain locked.
LIME SCALE BUILD UP
To combat problems with hard water and lime scale build up we have added a water measuring cup with a lime scale
filter. A new easy clean stainless steel heating element ensures that the steriliser will continue to work efficiently for longer.
TRAVEL & STORAGE
A lockable lid and removable power cord are included for easy storage and convenient portability.
WARNING!
• The steriliser contains boiling water when in use.
• Steam escaping from the vents can burn.
• WARNING! The body and lid surface may be hot.
• WARNING! Take care when opening the lid, as the lid,
items and the steam will be hot.
• Do not attempt to open the unit when in use.
• If you do ever need to stop the steriliser mid-cyle,
switch it off at the mains (contents will not be sterile).
• This appliance is not intended for use by persons
(including children) with reduced physical, sensory or lack
of experience and knowledge unless they have been given
supervision or induction concerning the use of the appliance
by a person responsible for their safety. Children should
be supervised to ensure they do not play with the appliance.
BEFORE USING YOUR STERILISER FOR THE FIRST TIME (sterilising the steriliser) (See fig.1)
1. Remove all items from the steriliser
2. Fill the measuring cup (A) up to the water level mark (120 ml / 4 fl. oz.) with fresh cold water and pour into the base
of the steriliser making sure the water is concentrated over the element in the centre of the unit (B).
NB If you splash too much water up the sides etc you will affect performance.
3. Assemble the 3 pieces that make up the bottle holder. The central rod fits into the Accessory tray 1 and twists
to lock into position (C). The Accessory tray 2 then slides down over the central rod (D).
4. Place the bottle holder in the unit, replace the lid (E) and lock closed using the side handles (F).
5. Plug the power cord into the rear of the steriliser before plugging it into your wall socket (G).
PLEASE ENSURE THAT THE CORD AND UNIT ARE OUT OF REACH OF CHILDREN.
6. The power light will come on automatically and the steriliser will begin its first cycle. The unit will switch itself off after
completing its cycle - approximately 6 minutes.
2 3
• Please make sure your steriliser is placed on a rm
and even surface when in use.
• Please ensure that the power cord and unit are
out of reach of children.
• Always unplug from the mains when not in use.
• Never place items on top of the steriliser.
• Never immerse the steriliser in water.
• Only use the power cord supplied.
• Please contact your retailer or suitably qualied
person if the power cord shows signs of damage.
• WARNING! To reduce the risk of electric shock
keep power cord dry and off the ground.
• This appliance is intended to be used in the
house hold only.
A
G H I J K
B C D E F
L
R
M
S
N
T
O
U
P
V
Q
W
Page 3

7. During use the lid handle will change colour and show the hot hazard symbol when hot (H). Always allow your
steriliser to cool down for at least 10 minutes between cycles. As a safety mechanism the unit will not allow you
to switch it on again until it is ready for use.
WARNING: Beware of hot steam escaping from the steam vent during use.
8. When your steriliser has cooled, switch off, unplug at the mains and disconnect the lead (I).
9. Remove the bottle holder, pour away any remaining water (J) and wipe the inside of the steriliser dry (K).
STERILISING BOTTLES (See fig. 2)
1. Wash your bottles and accessories thoroughly in warm soapy water before sterilisation.
2. Remove all items from the steriliser.
3. Fill the measuring cup up to the water level mark (120 ml / 4 fl. oz.) with fresh cold water (L) and pour into the base
of the steriliser (M).
4. Arrange your bottles upside down on the Accessory tray 1 of your bottle holder. The Accessory tray 2 then slides
down over the central rod to hold the bottles in place (N).
5. Insert the bottle holder into the steriliser, arrange your bottle accessories on the Accessory tray 2 (O) and bottle
tongs into central rod.
6. Replace the lid (P) and lock closed using the side handles (Q).
7. Plug the power cord into the rear of the steriliser before plugging it into your wall socket (R).
PLEASE ENSURE THAT THE CORD AND UNIT ARE OUT OF REACH OF CHILDREN!
8. Press the ‘power on’ switch to start the sterilisation cycle (S). The unit will switch itself off after completing its cycle -
approximately 6 minutes. (6 minutes is the sterilisation time for a full unit containing 8 bottles. For lighter loads the
sterilisation time will increase).
9. During use the lid handle will change colour and display
symbol to indicate unit is hot (T). Always allow your
steriliser to cool down for at least 10 minutes between cycles. As a safety mechanism the unit will not allow you
to switch it on again until it is ready for use.
WARNING: Take care when opening the lid as the handle will be hot. Beware of hot steam escaping from the steam
vent during use.
10. When your steriliser has cooled, switch off and unplug at the mains and disconnect the lead (U).
REMOVING STERILISED ITEMS
11. Always allow at least 10 mins cooling time before removing sterilised items.
12. Use caution when removing the lid as steam escapes.
13. When removing sterilised items from the steriliser use caution - the steriliser will still be hot.
14. Always wash your hands before handling sterilised items and make all possible efforts to avoid contamination.
15. To keep small components such as teats as sterile as possible, we would suggest using the tongs. The tongs
themselves may be sterilised in the unit and should be placed at the top for easy access after sterilisation.
16. After each use pour away any excess water (V) then rinse and wipe dry the steriliser (W).
CLEANING YOUR STERILISER
IT IS VERY IMPORTANT THAT YOU CLEAN YOUR STERILISER AT LEAST ONCE A WEEK. REGULAR CLEANING
WILL MAINTAIN THE PRODUCTS PERFORMANCE. FAILURE TO OBSERVE THE CLEANING INSTRUCTIONS
OR MISUSE OF THE PRODUCT WILL INVALIDATE YOUR GUARANTEE.
Your measuring cup has a filter which will remove some but not all mineral deposits present in our water supply. Without
regular cleaning these will eventually build up on the heating element. Sterilising using preboiled water should reduce
the quantity of minerals present further.
WARNING: Before cleaning ensure you have disconnected your steriliser from the mains. Allow 20 - 30 minutes
for the unit to cool following your last use. Take care when removing lid.
1. Clean the exterior of the unit with a soft damp cloth. Do not immerse in water!
2. Remove the bottle holder from the steriliser and wash it separately in warm soapy water.
3. To remove any lime scale deposits use one of the methods below.
CITRIC ACID (available at most chemists)
1. Mix 1 sachet of Citric Acid with water as directed on the manufacturers instructions and pour into the unit.
Do not put the lid on!
2. Switch on the unit for 1-2 minutes.
3. Switch off at the mains then unplug and disconnect. Allow the unit to stand for 30 minutes.
4. Drain the steriliser and then rinse fully.
5. Run a full empty cycle with the LID ON using 120 ml / 4 fl. oz. of water measured with your measuring cup.
6. Allow your steriliser to cool and wipe dry.
WHITE HOUSEHOLD VINEGAR
1. Fill the measuring cup with half water and half white household vinegar and pour into the steriliser.
2. Replace the lid and switch on the unit for one complete cycle. Ensure you allow adequate ventilation
for the strong vinegar odour!
3. Allow the unit to cool for at least 10 minutes.
4. Drain the steriliser and rinse fully.
5. Run a full empty cycle with the LID ON using 120 ml / 4 fl. oz. of water measured with your measuring cup.
6. Allow your steriliser to cool. Pour out any excess water and wipe dry.
TROUBLE SHOOTING GUIDE
Steriliser will not work • Check that the mains lead is connected and switched on.
Steriliser takes a long time to complete its cycle • Remove all remaining water after each cycle. Any excess
water (beyond 120 ml / 4 fl. oz.) will increase cycle time.
• Ensure that you use the measuring cup to measure exactly
120 ml / 4 fl. oz. of water (any excess water will increase the cycle time).
• If your steriliser is partially loaded (e.g. only 2 bottles) the cycle
time will increase slightly.
Steriliser is switching off too soon • Not enough water is being used. Ensure you use the measuring
cup to measure exactly 120 ml / 4 fl. oz. of water.
• Ensure the steriliser is empty and the water is poured directly
onto the element (i.e. not splashed around the surrounding plastic).
How long will the bottles stay sterile • Providing the lid is not opened, the contents of the steriliser will
after sterilisation? remain sterile for up to 6 hours.
Water will not pass through • Run the mesh under water to break the surface tension
the measuring cup filter before refilling.
TECHNICAL DATA
Voltage: 220V-240V
~
50Hz Rating: 915 - 1089W
VEUILLEZ CONSERVER CE MODE D’EMPLOI POUR POUVOIR
VOUS Y RÉFÉRER ULTÉRIEUREMENT
IMPORTANT ! Veuillez lire l’intégralité de ce mode d’emploi avant d’utiliser votre stérilisateur.
AVERTISSEMENT ! RISQUE DE STRANGULATION ! Ne pas laisser l’appareil à la portée des enfants. Ne pas utiliser
l’appareil avec des rallonges électriques.
CONTENU
a Couvercle transparent
b Porte-biberons
c Plateau à accessoires 1
d Plateau à accessoires 2
e Poignées latérales
f Gobelet mesureur d’eau avec filtre
g Pince pour biberons
VITESSE
Le stérilisateur électrique rapide de Munchkin est un stérilisateur rapide et efcace réalisant un cycle complet en à peine
6 minutes. Il détruit les bactéries nocives en entourant vos biberons et accessoires de vapeur. Votre stérilisateur peut
contenir un maximum de 9 biberons classiques ou 6 biberons à ouverture large ainsi que leurs accessoires.
4 5
Page 4

SÉCURITÉ
Le stérilisateur rapide de Munchkin est doté de plusieurs fonctions de sécurité. La poignée de sécurité sensible
à la chaleur change de couleur et affiche le symbole
pour indiquer que le couvercle est chaud pendant l’utilisation.
L’interrupteur marche-arrêt s’allume également lorsque l’appareil est en fonctionnement. Comme tous les produits
Munchkin, le stérilisateur électrique rapide a été testé pour être en stricte conformité avec les normes de sécurité
harmonisées. Le stérilisateur électrique rapide de Munchkin permet de conserver les biberons stériles pendant une
durée maximum de 6 heures à condition que le couvercle ne soit pas retiré et que les poignées restent verrouillées.
ACCUMULATION DE TARTRE
Pour lutter contre les problèmes d’eau calcaire et d’accumulation de tartre, nous avons ajouté un gobelet mesureur d’eau
avec ltre anti-tartre. Un nouvel élément de chauffage en acier inoxydable facile à nettoyer permet au stérilisateur de
continuer à fonctionner efficacement pendant plus longtemps.
DÉPLACEMENT ET RANGEMENT
Un couvercle qui se verrouille et un cordon électrique amovible sont fournis pour un rangement facile et des
déplacements pratiques.
AVERTISSEMENT !
• Le stérilisateur contient de l’eau bouillante lorsqu’il
est en fonctionnement.
• La vapeur qui s’échappe des aérations peut brûler.
• AVERTISSEMENT ! Le corps de l’appareil et la surface
de l’appareil peuvent être chauds.
• AVERTISSEMENT ! Faites attention au moment
de l’ouverture du couvercle, car le couvercle, les objets
et la vapeur sont chauds.
• N’essayez pas d’ouvrir l’appareil lorsqu’il est
en cours d’utilisation.
• Si vous êtes contraint d’arrêter le stérilisateur au milieu
d’un cycle, débranchez-le du secteur (le contenu
de l’appareil ne sera pas stérile).
• Cet appareil n’est pas destiné à être utilisé par
des personnes (y compris des enfants) aux aptitudes
physiques ou sensorielles réduites, ou manquant
d’expérience et de connaissances, sauf si elles sont
supervisées ou si elles ont reçu des instructions concernant
l’utilisation de l’appareil par une personne responsable
de leur sécurité. Les enfants doivent être supervisés pour
veiller à ce qu’ils ne jouent pas avec l’appareil.
AVANT D’UTILISER VOTRE STÉRILISATEUR POUR LA PREMIÈRE FOIS (stérilisation du stérilisateur) (voir fig. 1)
1. Retirez tous les objets du stérilisateur.
2. Remplissez le gobelet mesureur (A) jusqu’au repère du niveau d’eau (120 ml) avec de l’eau froide et versez
dans le socle du stérilisateur en veillant à que l’eau soit concentrée sur l’élément situé au centre de l’appareil (B).
Remarque : si vous projetez trop d’eau sur les côtés, etc., la performance s’en trouvera réduite.
3. Assemblez les 3 pièces qui constituent le porte-biberons. La tige centrale rentre dans le plateau à accessoires 1
et se tourne pour être verrouillée en position (C). Le plateau à accessoires 2 coulisse ensuite sur la tige centrale (D).
4. Placez le porte-biberons dans l’appareil, replacez le couvercle (E) et verrouillez-le à l’aide des poignées latérales (F).
5. Branchez le cordon à l’arrière du stérilisateur avant de le brancher à votre prise murale (G).
VEILLEZ À CE QUE LE CORDON ET L’APPAREIL SOIENT HORS DE LA PORTÉE DES ENFANTS.
6. Le voyant de mise sous tension s’allumera automatiquement et le stérilisateur commencera son premier cycle.
L’appareil s’arrêtera automatiquement après avoir terminé son cycle - environ 6 minutes.
7. Pendant l’utilisation, la poignée du couvercle changera de couleur et affichera le symbole de danger signifiant
qu’elle est chaude (H). Laissez toujours refroidir votre stérilisateur pendant au moins 10 minutes entre les cycles.
L’appareil est doté d’un mécanisme de sécurité qui ne vous permet pas de le rallumer tant qu’il n’est pas prêt à être utilisé.
AVERTISSEMENT : Faites attention à la vapeur chaude qui s’échappe des aérations pendant l’utilisation.
8. Une fois que votre stérilisateur a refroidi, éteignez-le, débranchez-le du secteur et déconnectez le câble (I).
9. Retirez le porte-biberons, videz l’eau restante (J) et essuyez l’intérieur du stérilisateur (K).
STÉRILISATION DES BIBERONS (voir fig. 2)
1. Lavez soigneusement vos biberons et accessoires à l’eau chaude savonneuse avant la stérilisation.
2. Retirez tous les objets du stérilisateur.
3.
Remplissez le gobelet jusqu’au repère du niveau d’eau (120 ml) avec de l’eau froide (L) et versez dans le socle du stérilisateur (M).
4. Positionnez vos biberons la tête en bas sur le plateau à accessoires 1 de votre porte-biberons. Le plateau à
accessoires 2 coulisse ensuite sur la tige centrale (D) pour maintenir les biberons en place (N).
5. Insérez le porte-biberons dans le stérilisateur, disposez les accessoires de vos biberons sur le plateau à accessoires 2
(O) ainsi que la pince dans la tige centrale.
6. Replacez le couvercle (P) et verrouillez-le à l’aide des poignées latérales (Q).
7. Branchez le cordon à l’arrière du stérilisateur avant de le brancher à votre prise murale (R).
VEILLEZ À CE QUE LE CORDON ET L’APPAREIL SOIENT HORS DE LA PORTÉE DES ENFANTS !
8. Appuyez sur l’interrupteur marche-arrêt pour démarrer le cycle de stérilisation (S). L’appareil s’arrêtera
automatiquement après avoir terminé son cycle - environ 6 minutes. (6 minutes est la durée de stérilisation pour un
appareil plein contenant 8 biberons. Pour les charges plus légères, la durée de stérilisation augmentera).
9. Pendant l’utilisation, la poignée du couvercle change de couleur et affiche le symbole
pour indiquer que l’appareil
est chaud (T). Laissez toujours refroidir votre stérilisateur pendant au moins 10 minutes entre les cycles. L’appareil est
doté d’un mécanisme de sécurité qui ne vous permet pas de le rallumer tant qu’il n’est pas prêt à être utilisé.
AVERTISSEMENT : Faites attention au moment de l’ouverture du couvercle car la poignée est chaude. Faites attention
à la vapeur chaude qui s’échappe des aérations pendant l’utilisation.
10. Une fois que votre stérilisateur a refroidi, éteignez-le, débranchez-le du secteur et déconnectez le câble (U).
RETRAIT DES OBJETS STÉRILISÉS
11. Prévoyez une durée de refroidissement d’au moins 10 minutes avant de retirer les objets stérilisés.
12. Faites attention lors du retrait du couvercle car de la vapeur s’échappe.
13. Faites attention lorsque vous retirez les objets stérilisés du stérilisateur car l’appareil sera encore chaud.
14. Lavez-vous toujours les mains avant de manipuler les objets stérilisés et efforcez-vous d’éviter toute contamination.
15. Pour que les petits éléments tels que les tétines restent aussi stériles que possible, nous vous suggérons d’utiliser
la pince. La pince elle-même peut être stérilisée dans l’appareil et doit être placée en haut pour pouvoir y accéder
facilement après la stérilisation.
16. Après chaque utilisation, videz l’eau restante (V), puis rincez et essuyez le stérilisateur (W).
NETTOYAGE DE VOTRE STÉRILISATEUR
IL EST TRÈS IMPORTANT DE NETTOYER VOTRE STÉRILISATEUR AU MOINS UNE FOIS PAR SEMAINE.
UN NETTOYAGE RÉGULIER MAINTIENDRA LA PERFORMANCE DU PRODUIT. LE NON-RESPECT DES
INSTRUCTIONS DE NETTOYAGE OU UNE MAUVAISE UTILISATION DU PRODUIT RENDRA VOTRE GARANTIE
NON VALIDE.
Votre gobelet mesureur est doté d’un ltre qui retirera une partie des dépôts minéraux présents dans l’eau, mais pas
tous. Sans un nettoyage régulier, ces dépôts niront par s’accumuler sur l’élément chauffant. La stérilisation avec
de l’eau bouillie au préalable devrait réduire la quantité de minéraux présents par la suite.
AVERTISSEMENT : Avant de nettoyer votre stérilisateur, assurez-vous de l’avoir débranché du secteur. Laissez l’appareil
refroidir pendant 20 à 30 minutes suivant votre dernière utilisation. Faites attention lorsque vous retirez le couvercle.
1. Nettoyez l’extérieur de l’appareil à l’aide d’un chiffon doux humide. Ne l’immergez pas dans l’eau !
2. Retirez le porte-biberons du stérilisateur et lavez-le séparément à l’eau chaude savonneuse.
3. Pour retirer les éventuels dépôts de tartre, utilisez l’une des méthodes ci-dessous.
ACIDE CITRIQUE (disponible dans la plupart des pharmacies)
1. Mélangez 1 sachet d’acide citrique avec de l’eau en respectant les instructions du fabricant et versez dans l’appareil.
Ne mettez pas le couvercle !
2. Mettez l’appareil sous tension pendant 1 à 2 minutes.
3. Débranchez l’appareil du secteur et déconnectez-le. Laissez reposer l’appareil pendant 30 minutes.
4. Vidangez le stérilisateur, puis rincez-le soigneusement.
5.
Effectuez un cycle à vide complet avec le COUVERCLE en utilisant 120 ml d’eau mesurés avec votre gobelet mesureur.
6. Laissez refroidir votre stérilisateur et essuyez-le.
VINAIGRE BLANC DOMESTIQUE
1.
Remplissez le gobelet mesureur à moitié d’eau et à moitié de vinaigre blanc domestique, et versez dans le stérilisateur.
2. Replacez le couvercle et mettez l’appareil sous tension pour un cycle complet. Veillez à prévoir une ventilation
adéquate pour la forte odeur de vinaigre !
3. Laissez refroidir l’appareil pendant au moins 10 minutes.
4. Vidangez le stérilisateur et rincez-le soigneusement.
5.
Effectuez un cycle à vide complet avec le COUVERCLE en utilisant 120 ml d’eau mesurés avec votre gobelet mesureur.
6. Laissez refroidir votre stérilisateur. Videz l’excédent d’eau et essuyez.
• Veillez à placer votre stérilisateur sur une surface
ferme et régulière pour l’utiliser.
• Veillez à ce que le cordon électrique et l’appareil
soient hors de la portée des enfants.
• Débranchez toujours l’appareil du secteur lorsqu’il
n’est pas utilisé.
• Ne placez jamais d’objets sur le dessus
du stérilisateur.
• N’immergez jamais le stérilisateur dans l’eau.
• Utilisez uniquement le cordon électrique fourni.
• Veuillez contacter votre revendeur ou une personne
qualiée si le cordon électrique présente des signes
de détérioration.
• AVERTISSEMENT ! Pour réduire le risque de choc
électrique, veillez à ce que le cordon électrique soit
sec et ne repose pas sur le sol.
• Cet appareil est uniquement destiné
à une utilisation domestique.
6 7
Page 5

GUIDE DE DÉPANNAGE
Le stérilisateur ne fonctionne pas • Vériez que l’appareil est branché au secteur et mis sous tension.
Le stérilisateur met longtemps • Enlevez toute l’eau restante après chaque cycle. Les éventuels
à effectuer son cycle
excédents d’eau (supérieurs à 120 ml) augmentent la durée du cycle.
• Veillez à utiliser le gobelet mesureur pour mesurer exactement
120 ml d’eau (tout excédent d’eau augmentera la durée du cycle).
• Si votre stérilisateur est partiellement chargé (par exemple,
seulement 2 biberons), la durée du cycle augmentera légèrement.
Le stérilisateur s’éteint trop tôt • Une quantité d’eau insufsante est utilisée. Veillez à utiliser
le gobelet mesureur pour mesurer exactement 120 ml d’eau.
• Vériez que le stérilisateur est vide et que l’eau est versée
directement sur l’élément (et non pas projetée sur le plastique
qui est autour).
Pendant combien de temps les biberons • Le contenu du stérilisateur reste stérile pendant un maximum
restent-ils stériles après la stérilisation ? de 6 heures, à condition de ne pas ouvrir le couvercle.
L’eau ne passe pas dans le ltre • Passez le ltre en maille sous l’eau pour rompre la tension
du gobelet mesureur de surface avant de le remplir à nouveau.
DONNÉES TECHNIQUES
Tension : 220 V-240 V~ 50Hz Capacité nominale : 915 - 1089 W
BEWAAR DEZE INSTRUCTIES VOOR LATER
BELANGRIJK! Lees deze instructies volledig voor u de sterilisator gebruikt
WAARSCHUWING! WURGINGSGEVAAR! Uit de buurt van kinderen houden. Niet gebruiken met verlengsnoer.
INHOUD
a Doorzichtig deksel
b Fleshouder
c Lade voor toebehoren 1
d Lade voor toebehoren 2
e Handgrepen zijkant
f Maatbeker met filter
g Flestang
SNELHEID
De Rapid Electric Steriliser van Munchkin is een snelle en efficiënte sterilisator die een volledige cyclus afwerkt in slechts
6 minuten. Het toestel vernietigt schadelijke bacteriën door uw flessen en toebehoren te omgeven met stoom. Uw
sterilisator is geschikt voor 9 gewone flessen of 6 flessen met brede hals samen met hun toebehoren.
VEILIGHEID
De Rapid Electric Steriliser van Munchkin is uitgerust met diverse veiligheidsvoorzieningen. De warmtegevoelige
veiligheidsgreep verandert van kleur en toont het symbool om aan te geven dat het deksel warm is tijdens het
gebruik. De stroomschakelaar zal ook oplichten wanneer het toestel in werking is. De Rapid Electric Steriliser werd net
als alle andere producten van Munchkin getest om te voldoen aan strikte vereisten opgelegd door geharmoniseerde
veiligheidsnormen. De Rapid Electric Steriliser van Munchkin zal de flessen tot 6 uur steriel houden, op voorwaarde dat
het deksel niet wordt verwijderd en de handgrepen geblokkeerd blijven.
VORMING VAN KALKAANSLAG
Om problemen met hard water en kalkaanslag te voorkomen, hebben we een maatbeker met kalkaanslagfilter toegevoegd. Een
nieuw gemakkelijk te reinigen verwarmingselement in roestvrij staal garandeert dat de sterilisator langer efficiënt zal werken.
MEENEMEN EN OPBERGEN
Een blokkeerbaar deksel en verwijderbaar netsnoer zijn inbegrepen voor het gemakkelijk opbergen en comfortabel
meenemen van het toestel.
WAARSCHUWING!
• De sterilisator bevat kokend water wanneer
hij in werking is.
• Stoom die door de ventilatieopeningen ontsnapt
kan brandwonden veroorzaken.
• OPGELET! De behuizing en het deksel kunnen warm zijn.
• OPGELET! Let op bij het openen van het deksel,
omdat deksel, items en stoom heet zullen zijn.
• Probeer het toestel niet te openen wanneer het
in werking is.
• Het toestel in cyclus stoppen: koppel de netstroom af
(inhoud zal niet steriel zijn)
• Dit toestel is niet bedoeld voor gebruik door personen
(waaronder kinderen) met beperkte fysieke of motorische
vaardigheden, onervaren personen en personen zonder
kennis, door een persoon die voor hun veiligheid instaat.
Kinderen moeten het toestel altijd onder toezicht
gebruiken om te garanderen dat ze er niet mee spelen.
VOOR U DE STERILISATOR VOOR HET EERST GEBRUIKT (de sterilisator steriliseren) (zie afb. 1)
1. Verwijder alle items van de sterilisator
2. Vul de maatbeker (A) tot de watermarkering (120 ml) met zuiver koud water en giet het in de basis van de sterilisator
om ervoor te zorgen dat het water geconcentreerd wordt over het element in het midden van het toestel (B).
NB Te veel waterspatten op de zijkanten zullen de prestaties beïnvloeden.
3. Monteer de 3 onderdelen van de fleshouder. De middenstang past in de Lade voor toebehoren 1 en klikt vast
in positie (C). De Lade voor toebehoren 2 schuift dan over de middenstang (D).
4. Plaats de fleshouder in het toestel, plaats het deksel (E) terug en vergrendel met de grepen (F) aan de zijkant.
5. Plaats het netsnoer in het contact achteraan de sterilisator voor u het op het wandcontact (G) aansluit.
ZORG ERVOOR DAT HET SNOER EN HET TOESTEL ZICH UIT DE BUURT VAN KINDEREN BEVINDEN
6. Het Aan-/Uitlampje gaat automatisch branden en de sterilisator begint de eerste cyclus. Het toestel schakelt zichzelf
uit nadat de eerste cyclus - na ca. 6 minuten - is voltooid.
7. Tijdens het gebruik zal de handgreep van het deksel veranderen van kleur en een symbool
(H) aangeven
om te wijzen op het gevaar op hitte. Laat uw sterilisator ten minste 10 minuten afkoelen tussen de cycli. Een
veiligheidsmechanisme zorgt ervoor dat u het toestel pas terug kunt inschakelen als het gebruiksklaar is.
WAARSCHUWING: Let op voor hete stoom die uit de stoomventilatie komt wanneer het toestel in werking is.
8. Wanneer uw sterilisator is afgekoeld, moet u het toestel uitschakelen, het netsnoer van het wandcontact afkoppelen
en het snoer (I) dan verwijderen.
9. Verwijder de flessenhouder, giet het restwater (J) weg en veeg de binnenkant van de sterilisator droog (K).
FLESSEN STERILISEREN (zie afb. 2)
1. Was uw flessen en toebehoren grondig in warm zeepwater vóór u gaat steriliseren.
2. Verwijder alle items van de sterilisator.
3.
Vul de maatbeker tot de watermarkering (120 ml) met zuiver koud water (L) en giet het in de basis van de sterilisator (M).
4. Plaats uw flessen ondersteboven in de Lade voor toebehoren 1 van uw flessenhouder. De Lade voor toebehoren 2
schuift dan over de middenstang naar beneden om de flessen op hun plaats te houden (N).
5. Plaats de flessenhouder in de sterilisator, plaats uw flessenaccessoires op de Lade voor toebehoren 2 (O)
en de flessentang in de middenstang.
6. Plaats het deksel (P) terug en sluit het met de grepen (Q) aan de zijkant.
7. Plaats het netsnoer in het contact achteraan de sterilisator voor u het op het wandcontact (R) aansluit.
ZORG ERVOOR DAT HET SNOER EN HET TOESTEL ZICH UIT DE BUURT VAN KINDEREN BEVINDEN!
8. Druk op de “Aan”-knop om de sterilisatiecyclus (S) te starten. Het toestel schakelt zichzelf uit nadat de eerste cyclus
- na ca. 6 minuten - is voltooid. (6 minuten is de sterilisatieduur voor een volledige eenheid met 8 essen.
Voor lichtere lasten zal de sterilisatie langer duren).
9. Tijdens het gebruik zal de handgreep van het deksel veranderen van kleur en het symbool verschijnt om
aan te geven dat de handgreep heet is (T). Laat uw sterilisator ten minste 10 minuten afkoelen tussen de cycli.
Een veiligheidsmechanisme zorgt ervoor dat u het toestel pas terug kunt inschakelen als het gebruiksklaar is.
WAARSCHUWING: Let op bij het openen van het deksel, de handgreep is namelijk heet. Let op voor hete stoom
die uit de stoomventilatie komt wanneer het toestel in werking is.
10. Wanneer uw sterilisator is afgekoeld, moet u het toestel uitschakelen, het netsnoer van het wandcontact afkoppelen
en het snoer (U) dan verwijderen.
• De sterilisator op een stevige en effen ondergrond
plaatsen wanneer hij in gebruik is.
• Het netsnoer en het toestel uit de buurt
van kinderen houden.
• Altijd afkoppelen van de netstroom wanneer
het toestel in gebruik is.
• Nooit voorwerpen op de sterilisator plaatsen.
• De sterilisator nooit in water onderdompelen.
• Alleen het meegeleverde netsnoer gebruiken.
• Bij tekenen van schade aan het netsnoer: contact
opnemen met uw verkoper of een ander
gekwalificeerd persoon.
• WAARSCHUWING! Het netsnoer drooghouden
en niet op de vloer plaatsen om het risico op een
elektrische schok te vermijden.
• Dit toestel is uitsluitend bedoeld voor
gebruik binnenshuis.
8 9
Page 6

GESTERILISEERDE ITEMS VERWIJDEREN
11. Laat ten minste 10 minuten afkoelen voor u de gesteriliseerde items verwijderd.
12. Let op wanneer u het deksel verwijdert, er zal stoom ontsnappen.
13. Let op bij het verwijderen van gesteriliseerde items uit de sterilisator - het toestel is nog steeds heet.
14. Was uw handen altijd voor u gesteriliseerde items aanraakt en doe al het mogelijke om verontreiniging te vermijden.
15. Om kleine onderdelen, zoals spenen, zo steriel mogelijk te houden, raden we aan om de flessentang te gebruiken.
De tang zelf kan in het toestel worden gesteriliseerd en moet bovenaan worden geplaatst zodat u ze gemakkelijk
kunt vastnemen na sterilisatie.
16. Na elk gebruik moet u al het restwater (V) weggieten en vervolgens de sterilisator (W) spoelen en droogmaken.
UW STERILISATOR REINIGEN
HET IS ERG BELANGRIJK DAT U UW STERILISATOR TEN MINSTE EEN KEER PER WEEK REINIGT.
REGELMATIG REINIGEN ZAL DE TOESTELPRESTATIES BEHOUDEN. UW GARANTIE VERVALT WANNEER
U DE REINIGINGSINSTRUCTIES NIET NALEEFT OF HET TOESTEL MISBRUIKT.
Uw maatbeker heeft een filter die sommige, maar niet alle, minerale materialen uit uw leidingwater filtert. U moet het
filter regelmatig reinigen om aanslag op uw verwarmingselement te voorkomen. Steriliseren met vooraf gekookt water
moet de hoeveelheid aanwezige materialen nog verder verminderen.
WAARSCHUWING: Voor het reinigen moet u ervoor zorgen dat uw sterilisator niet op de netstroom is aangesloten.
Laat het toestel 20 - 30 minuten afkoelen na het laatste gebruik. Let op bij het verwijderen van het deksel.
1. Reinig de buitenkant met een zachte, vochtige doek. Dompel het toestel niet in water onder!
2. Verwijder de flessenhouder van de sterilisator en reinig hem afzonderlijk in warm zeepwater.
3. Gebruik een van onderstaande methoden om kalkaanslag te verwijderen.
CITROENZUUR (verkrijgbaar bij de meeste drogisten)
1. Meng 1 zakje citroenzuur met water overeenkomstig de instructies van de fabrikant. Giet het mengsel in het toestel.
Plaats het deksel niet terug!
2. Schakel het toestel gedurende 1 à 2 minuten in.
3. Schakel het uit en koppel de netstroomtoevoer af. Laat het toestel nu 30 minuten staan.
4. Giet de sterilisator leeg en spoel grondig.
5.
Voer een volledig lege cyclus uit MET DEKSEL. Gebruik hiervoor 120 ml water, meet deze hoeveelheid met uw maatbeker.
6. Laat uw sterilisator afkoelen en maak hem droog.
WITTE HUISHOUDAZIJN
1. Vul de maatbeker half met water en half met huishoudazijn. Giet het mengsel in de sterilisator.
2. Plaats het deksel terug en schakel het toestel voor een cyclus terug in. Zorg voor voldoende ventilatie omwille
van de sterke azijngeur!
3. Laat het toestel nu 10 minuten afkoelen.
4. Giet de sterilisator leeg en spoel grondig.
5. Voer een volledig lege cyclus uit MET DEKSEL. Gebruik hiervoor 120 ml water, meet deze hoeveelheid
met uw maatbeker.
6. Laat uw sterilisator afkoelen. Giet het restwater weg en maak het toestel droog.
PROBLEMEN OPLOSSEN
De sterilisator werkt niet • Controleer de netstroomtoevoer.
De sterilisator doet er lang over om • Verwijder alle restwater na elke cyclus. Te veel water
de cyclus te voltooien (meer dan 120 ml) zal de cyclusduur verlengen.
• Zorg ervoor dat u met de maatbeker exact 120 ml water afmeet
(meer water zal de cyclusduur verlengen).
• Wanneer uw sterilisator gedeeltelijk is geladen
(bijv. slechts 2 flessen), zal de cyclusduur licht toenemen.
De sterilisator wordt te vroeg uitgeschakeld • U gebruikt te weinig water. Zorg ervoor dat u met de maatbeker
exact 120 ml water afmeet.
• Zorg ervoor dat de sterilisator leeg is en het water rechtstreeks
in het element wordt gegoten (i.e. niet morsen
op de omliggende kunststof).
Hoe lang blijven essen steriel • Flessen blijven tot 6 uur steriel op voorwaarde dat het
na het steriliseren? deksel gesloten blijft.
Water stroomt niet door het maatbekerlter • Houd het maas onder water om de oppervlaktespanning
te breken voor u opnieuw gaat vullen.
TECHNISCHE GEGEVENS
Spanning: 220V-240V~ 50Hz Vermogen: 915 - 1089W
BEWAHREN SIE DIESE ANWEISUNGEN FÜR SPÄTEREN BEZUG AUF
WICHTIG! Bitte lesen Sie diese Anweisungen vor Verwendung des Sterilisators aufmerksam durch.
ACHTUNG! STRANGULIERUNGSGEFAHR! Außer Reichweite von Kindern aufbewahren. Nicht mit
Verlängerungskabel nutzen.
INHALT
a Transparenter Deckel
b Flaschenhalter
c Zubehöreinsatz 1
d Zubehöreinsatz 2
e Seitengriffe
f Messbecher mit Filter
g Flaschenzange
GESCHWINDIGKEIT
Der Munchkin Dampf-Schnellsterilisator ist ein schneller, efzienter Sterilisator, der eine Komplettsterilisierung
in nur 6 Minuten vornimmt. Er zerstört gesundheitsschädliche Bakterien durch Bedampfen von Flaschen und Zubehör.
Der Sterilisator nimmt bis zu 9 Standard- oder 6 Weithalsaschen sowie Zubehör auf.
SICHERHEIT
Der Munchkin Dampf-Schnellsterilisator ist mit verschiedenen Sicherheitsmerkmalen ausgestattet. Der hitzeempndliche
Sicherheitsgriff ändert seine Farbe und zeigt das Symbol an, wenn der Deckel heiß ist. Der Hauptschalter leuchtet
ebenfalls im laufenden Betrieb. Wie alle Munchkin Produkte wurde auch der Dampf-Schnellsterilisator gemäß den
höchsten Sicherheitsstandards geprüft. Der Munchkin Dampf-Schnellsterilisator hält Flaschen bei geschlossenem Deckel
und verriegelten Griffen bis zu 6 Stunden lang steril.
KALKABLAGERUNGEN
Um Probleme mit hartem Wasser und damit verbundenen Kalkablagerungen zu vermeiden, enthält der mitgelieferte
Messbecher einen Kalklter. Der neue einfach zu reinigende Edelstahl-Heizstab stellt einen noch längeren efzienten
Betrieb des Sterilisators sicher.
REISE & AUFBEWAHRUNG
Verriegelbarer Deckel und abnehmbares Netzkabel sorgen für einfache Aufbewahrung und Mitnahme.
ACHTUNG!
• Der Sterilisator enthält im Betrieb kochendes Wasser.
• Dampf aus den Auslässen kann Verbrennungen verursachen.
• ACHTUNG! Behälter und Deckel können heiß sein.
• ACHTUNG! Seien Sie vorsichtig beim Öffnen des Deckels,
da dieser, die darunter befindlichen Gegenstände und
der Dampf heiß sind.
• Öffnen Sie den Behälter nicht während des Betriebs.
• Wenn Sie den Sterilisator im laufenden Betrieb anhalten
müssen, schalten Sie zuerst den Hauptschalter aus
(Inhalt ist nicht steril!)
• Dieses Gerät eignet sich nicht für Personen (einschließlich
Kinder) mit physischen oder sensorischen Einschränkungen,
mangelnden Erfahrungen oder Wissen, sofern sie keine
Einweisung in die Nutzung durch eine für ihre Sicherheit
verantwortliche Person erhalten haben oder entsprechend
beaufsichtigt werden. Kinder sind zu beaufsichtigen,
um Spielen mit dem Gerät zu verhindern.
• Stellen Sie sicher, dass der Sterilisator im Betrieb
auf einer stabilen, ebenen Oberfläche steht.
• Bewahren Sie Netzkabel und Gerät außer Reichweite
von Kindern auf.
• Ziehen Sie den Netzstecker, wenn das Gerät
nicht benutzt wird.
• Legen Sie keine Gegenstände auf dem Sterilisator ab..
• Tauchen Sie den Sterilisator nicht in Wasser.
• Verwenden Sie nur das mitgelieferte Netzkabel.
• Bitte wenden Sie sich an Ihren Händler oder
einen anderen Fachbetrieb, wenn das Netzkabel
Beschädigungen aufweist.
• ACHTUNG! Um einen elektrischen Schlag zu
vermeiden, sorgen Sie dafür, dass das Netzkabel
trocken ist und nicht direkt am Boden liegt.
• Dieses Gerät ist ausschließlich für den privaten
Hausgebrauch geeignet.
10 11
Page 7

VOR DEM ERSTGEBRAUCH DES STERILISATORS (Sterilisator sterilisieren) (siehe Abb.1)
1. Entnehmen Sie alle Gegenstände aus dem Sterilisator
2. Füllen Sie den Messbecher (A) bis zur Füllstandsmarke (120 ml / 4 fl. oz.) mit kaltem, frischem Wasser und gießen Sie
es in den Fuß des Sterilisators, sodass das Wasser das Heizelement in der Mitte bedeckt (B).
Hinweis: Wenn Sie zu viel Wasser seitlich u. ä. verschütten, kann die Leistung beeinträchtigt werden.
3. Setzen Sie die drei Elemente des Flaschenhalters zusammen. Das Mittelstück lässt sich in den Zubehöreinsatz 1 setzen
und durch Drehen einrasten (C). Der Zubehöreinsatz 2 wird dann über das Mittelstück geschoben (D).
4. Setzen Sie den Flaschenhalter ein, legen Sie den Deckel (E) auf und verschließen Sie den Behälter über
die seitlichen Griffe (F).
5.
Stecken Sie das Netzkabel erst an der Rückseite des Sterilisators ein, bevor Sie es in die Netzsteckdose einstecken (G).
BEWAHRENS SIE KABEL UND GERÄT AUSSER REICHWEITE VON KINDERN AUF.
6. Die Netzleuchte leuchtet automatisch auf und der Sterilisator beginnt zu arbeiten. Nach Beendigung des
Sterilisierungsvorgangs schaltet sich das Gerät selbsttätig nach nur 6 Minuten aus.
7. Während des laufenden Betriebs verändert der Deckelgriff seine Farbe und das Warnsymbol für Hitze
wird angezeigt (H). Lassen Sie den Sterilisator stets mindestens 10 Minuten abkühlen, bevor Sie den nächsten
Sterilisierungsvorgang starten. Ein Sicherheitsmechanismus blockiert das Einschalten, solange das Gerät noch nicht
betriebsbereit ist.
ACHTUNG: Vorsicht vor dem heißen Dampf, der während des Betriebs aus den Auslässen entweichen kann.
8. Wenn der Sterilisator abgekühlt ist, schalten Sie ihn aus, ziehen Sie den Netzstecker und entfernen Sie das Kabel (I).
9. Entnehmen Sie den Flaschenhalter, gießen Sie evtl. übriges Wasser ab (J) und wischen Sie den Sterilisator auf der
Innenseite trocken (K).
STERILISIEREN VON FLASCHEN (siehe Abb. 2)
1. Reinigen Sie Flaschen und Zubehör vor dem Sterilisieren mit warmem Seifenwasser.
2. Entnehmen Sie alle Gegenstände aus dem Sterilisator.
3. Füllen Sie den Messbecher bis zur Füllstandsmarke (120 ml / 4 fl. oz.) mit kaltem, frischem Wasser (L) und gießen Sie
es in den Fuß des Sterilisators (M).
4. Stellen Sie die Flaschen mit der Öffnung nach unten in den Zubehöreinsatz 1 des Flaschenhalters. Der Zubehöreinsatz
2 wird dann über das Mittelstück geschoben, um so die Flaschen zu halten (N).
5. Setzen Sie den Flaschenhalter in den Sterilisator ein, legen Sie Ihr Flaschenzubehör in den Zubehörhalter 2 (O) und
befestigen Sie die Flaschenzange am Mittelstück.
6. Setzen Sie den Deckel auf (P) und verschließen Sie den Behälter über die seitlichen Griffe (Q).
7. Stecken Sie das Netzkabel erst an der Rückseite des Sterilisators ein, bevor Sie es in die Netzsteckdose einstecken (R).
BEWAHREN SIE KABEL UND GERÄT AUSSER REICHWEITE VON KINDERN AUF.
8. Drücken Sie den Hauptschalter, um den Sterilisierungsvorgang zu starten (S). Nach Beendigung des
Sterilisierungsvorgangs schaltet sich das Gerät selbsttätig nach nur 6 Minuten aus. (Die Sterilisierungsdauer für eine
volle Beladung mit 8 Flaschen beträgt 6 Minuten. Bei weniger Flaschen verkürzt sich die Sterilisierungsdauer.)
9. Während des laufenden Betriebs verändert der Deckelgriff seine Farbe und das Warnsymbol für Hitze
wird angezeigt (T). Lassen Sie den Sterilisator stets mindestens 10 Minuten abkühlen, bevor Sie den nächsten
Sterilisierungsvorgang starten. Ein Sicherheitsmechanismus blockiert das Einschalten, solange das Gerät noch nicht
betriebsbereit ist.
ACHTUNG: Seien Sie vorsichtig beim Öffnen, da der Griff heiß ist. Vorsicht mit dem heißen Dampf, der während des
Betriebs aus den Auslässen entweichen kann.
10. Wenn der Sterilisator abgekühlt ist, schalten Sie ihn aus, ziehen Sie den Netzstecker und entfernen Sie das Kabel (U).
ENTNAHME VON STERILISIERTEN GEGENSTÄNDEN
11. Warten Sie stets mindestens 10 Minuten, bevor Sie die sterilisierten Gegenstände entnehmen, damit diese und das
Gerät zunächst abkühlen können.
12. Seien Sie vorsichtig beim Abheben des Deckels, da heißer Dampf austritt.
13. Seien Sie vorsichtig, wenn Sie sterilisierte Gegenstände aus dem Sterilisator entnehmen, da dieser noch heiß ist.
14. Waschen Sie stets Ihre Hände, bevor Sie sterilisierte Gegenstände berühren, und achten Sie auf besondere
Sauberkeit, um Verunreinigungen zu vermeiden.
15. Um kleine Gegenstände, wie Sauger, so steril wie möglich zu halten, empfehlen wir die Nutzung der Zange. Die
Zange selbst wird im Gerät sterilisiert und sollte im oberen Bereich platziert werden, um Sie nach der Sterilisation
leicht im Zugriff zu haben.
16. Gießen Sie nach jedem Vorgang das überschüssige Wasser ab (V), spülen Sie den Sterilisator aus und wischen Sie
ihn trocken (W).
REINIGUNG DES STERILISATORS
DER STERILISATOR MUSS UNBEDINGT EIN MAL PRO WOCHE GEREINIGT WERDEN. REGELMÄSSIGE
REINIGUNG SORGT F‹R LANGFRISTIG GUTE BETRIEBSLEISTUNG. BEI NICHTEINHALTUNG DER
REINIGUNGSHINWEISE ODER BEI PRODUKTMISSBRAUCH VERLIERT DIE GARANTIE IHRE GÜLTIGKEIT.
Der Messbecher ist mit einem Filter ausgestattet, der einen Teil der mineralischen Ablagerungen im Wasser auffängt,
aber nicht alle. Ohne regelmäßige Reinigung können sich diese ggf. am Heizstab ansammeln. Die Sterilisation mit
abgekochten Wasser reduziert in der Regel die Menge der Mineralien weiter.
ACHTUNG: Stellen Sie sicher, dass Sie den Sterilisator vor der Reinigung vom Stromnetz getrennt haben. Lassen Sie
das Gerät nach dem letzten Gebrauch 20 - 30 Minuten lang abkühlen. Seien Sie vorsichtig beim Öffnen des Deckels.
1. Reinigen Sie die Außenseite des Geräts mit einem feuchten weichen Tuch. Tauchen Sie es nicht in Wasser!
2. Entnehmen Sie den Flaschenhalter und reinigen Sie ihn separat in warmen Seifenwasser.
3. Zum Entfernen von Kalkablagerungen nutzen Sie eines der unten beschriebenen Verfahren.
ZITRONENSÄURE (in den meisten Drogerien erhältlich)
1. Vermischen Sie einen Beutel Zitronensäure gemäß den Herstelleranweisungen mit Wasser und geben Sie alles ins
Gerät. Setzen Sie nicht den Deckel auf!
2. Schalten Sie das Gerät 1 - 2 Minuten lang ein.
3. Schalten Sie den Hauptschalter dann aus und trennen Sie das Gerät vom Stromnetz. Lassen Sie das Gerät 30 Minuten
lang stehen.
4. Gießen Sie den Sterilisator dann aus und spülen Sie ihn gut aus.
5. Führen Sie einen ganzen Sterilisierungsvorgang mit GESCHLOSSENEM Deckel, aber ohne Inhalt, mit 120 ml /4 fl. oz
Wasser durch, das Sie mit dem Messbecher abgemessen haben.
6. Lassen Sie den Sterilisator wieder abkühlen und wischen Sie ihn anschließend trocken.
HELLER HAUSHALTSESSIG
1.
Füllen Sie den Messbecher halb mit Wasser und halb mit hellem Haushaltsessig und gießen Sie alles in den Sterilisator.
2. Setzen Sie den Deckel auf und schalten Sie das Gerät für einen kompletten Sterilisierungsvorgang ein. Stellen Sie
sicher, dass der Raum ausreichend belüftet ist, damit der Essiggeruch entweichen kann.
3. Lassen Sie das Gerät danach 10 Minuten lang abkühlen.
4. Gießen Sie den Sterilisator dann aus und spülen Sie ihn gut aus.
5. Führen Sie einen ganzen Sterilisierungsvorgang mit GESCHLOSSENEM Deckel, aber ohne Inhalt, mit 120 ml /4 fl. oz
Wasser durch, das Sie mit dem Messbecher abgemessen haben.
6. Lassen Sie den Sterilisator abkühlen. Gießen Sie überschüssiges Wasser ab und wischen Sie den Behälter trocken.
HINWEISE ZUR FEHLERBEHEBUNG
Sterilisator funktioniert nicht • Prüfen Sie, dass das Netzkabel eingesteckt und das Gerät
eingeschaltet ist.
Der Sterilisierungsvorgang dauert sehr lange. • Entfernen Sie nach jedem Vorgang alles überschüssige Wasser.
Alles überschüssige Wasser (mehr als 120 ml / 4 fl. oz.) verlängert
den Sterilisierungsvorgang.
• Achten Sie darauf, mit dem Messbecher genau 120 ml / 4 . oz.
Wasser abzumessen (mehr Wasser verlängert die Sterilisierungsdauer).
• Wenn der Sterilisator nur teilweise befüllt ist (z. B. nur zwei
Flaschen) verlängert sich die Sterilisierungsdauer ebenfalls leicht.
Sterilisator schaltet sich frühzeitig ab • Es wird nicht ausreichend Wasser verwendet. Stellen Sie sicher,
dass Sie im Messbecher genau 120 ml/4 fl. oz. abmessen.
• Der Sterilisator sollte leer sein und das Wasser direkt ins
Heizelement gegossen werden (d. h. nicht um
das umgebende Plastik herum).
Wie lange bleiben die Flaschen nach • Sofern der Deckel nicht geöffnet wird, bleibt der Inhalt
der Sterilisierung steril? im Sterilisator bis zu 6 Stunden steril.
Der Filter im Messbecher lässt kein Wasser durch • Spülen Sie das Netzgeecht unter ießendem Wasser ab,
um die Oberflächenspannung vor dem Befüllen zu lösen.
TECHNISCHE ANGABEN
Spannung: 220 V - 240 V~ 50Hz Leistung: 915 - 1089 W
12 13
Page 8

POR FAVOR GUARDE ESTAS REFERENCIAS PARA FUTURA REFERENCIA
¡IMPORTANTE! Lea todas las instrucciones antes de utilizar el esterilizador
¡ADVERTENCIA! ¡PELIGRO DE ESTRANGULACIÓN! Mantener lejos del alcance de los niños.
No utilizarlo con cables de extensión.
CONTENIDOS
a Tapa transparente
b Soporte para biberones
c Bandeja para accesorios 1
d Bandeja para accesorios 2
e Asas laterales
f Recipiente para medir el agua con filtro
g Pinzas para biberones
RAPIDEZ
El esterilizador eléctrico rápido de Munchkin es un instrumento rápido y ecaz que completa el ciclo de esterilización
en tan solo 6 minutos. Destruye todas las bacterias nocivas, envolviendo los biberones y los accesorios con
vapor. El esterilizador tiene capacidad para 9 biberones normales o 6 biberones de boca ancha y los accesorios
correspondientes.
SEGURIDAD
El esterilizador eléctrico rápido de Munchkin incluye varias características de seguridad. El asa sensible al calor cambia
de color y muestra el símbolo
lo que indica que la tapa está caliente durante el uso. El botón de encendido también
se ilumina cuando la unidad está funcionando. Al igual que con todos los productos Munchkin el esterilizador eléctrico
rápido ha sido probado para asegurar que cumple estrictamente todas las normas armonizadas de seguridad.
El esterilizador eléctrico rápido de Munchkin mantiene los biberones estériles durante 6 horas siempre y cuando
no se abra la tapa y las asas permanezcan cerradas.
ACUMULACIÓN DE DEPÓSITOS DE CAL
Para combatir los problemas asociados con el agua dura y los depósitos de cal hemos incluido un recipiente para medir
el agua con ltro contra la cal. El nuevo elemento de acero inoxidable fácil de limpiar garantiza que el esterilizador
seguirá funcionando eficazmente durante más tiempo.
VIAJES Y ALMACENAMIENTO
El esterilizador incluye también una tapa hermética y cable de alimentación separable para facilitar su transporte
y almacenamiento.
¡ADVERTENCIA!
• Durante el uso el esterilizador contiene
agua hirviendo.
• El vapor que sale por las rejillas de ventilación
puede ocasionar quemaduras.
• ¡ADVERTENCIA! El cuerpo y la superficie de la tapa
pueden estar calientes.
• ¡ADVERTENCIA! Tenga cuidado al abrir la tapa, ya que
la tapa, los artículos y el vapor estarán calientes.
• No intente abrir la unidad mientras está funcionando.
• Si necesita parar el esterilizador a mitad de ciclo,
desenchúfelo de la toma (el contenido no estará esterilizado).
• Este aparato no está indicado para ser utilizado
por personas (incluidos niños) con capacidades físicas,
sensoriales o mentales disminuidas o falta de experiencia
y conocimientos, a menos que hayan recibido supervisión
o instrucciones sobre el uso del aparato por parte
de una persona responsable de su seguridad.
Los niños deben de estar supervisados al objeto
de asegurar que no jueguen con el aparato.
ANTES DE UTILIZAR EL ESTERILIZADOR POR PRIMERA VEZ (esterilizar el esterilizador) (véase la fig. 1)
1. Retire todos los artículos del esterilizador
2. Llene el recipiente para medir el agua (A) hasta la marca de nivel de agua (120 ml) con agua corriente fresca y fría
y vierta el agua en la base del esterilizador comprobando que el agua se concentra sobre el elemento en el centro
de la unidad (B).
NB Si salpica mucha agua en los costados, etc., afectará el rendimiento del esterilizador.
3. Monte las 3 piezas que componen el soporte para biberones. La varilla central se ajusta en la bandeja para accesorios
1 y hay que girarla para acoplarla en la posición correcta (C). La bandeja de accesorios 2 se desliza sobre la varilla
central (D).
4. Coloque el soporte para biberones en la unidad, coloque la tapa (E) y ciérrela herméticamente por medio
de las asas laterales (F).
5. Enchufe el cable de alimentación en la parte de atrás del esterilizador antes de enchufarlo en la toma (G).
POR FAVOR COMPRUEBE QUE EL CABLE Y LA UNIDAD ESTÁN LEJOS DEL ALCANCE DE LOS NIÑOS.
6. La luz de encendido se encenderá automáticamente y el esterilizador iniciará el primer ciclo. La unidad se apagará
después de completar el ciclo, aproximadamente 6 minutos.
7. Durante el uso el asa de la tapa cambiará de color y mostrará el símbolo de peligro cuando esté caliente
(H).
Deje siempre que el esterilizador se enfríe durante al menos 10 minutos entre ciclos. La unidad incluye un mecanismo
de seguridad que no deja que la unidad vuelva a encenderse hasta que está lista.
ADVERTENCIA: Tenga cuidado con el vapor que sale por las rejillas de ventilación mientras está utilizando la unidad.
8. Cuando el esterilizador se haya enfriado, apáguelo, desenchúfelo de la toma y quite el cable (I).
9. Retire el soporte para biberones, vierta el agua sobrante en la base (J) y seque el interior del esterilizador (K).
ESTERILIZAR LOS BIBERONES (Véase la fig. 2)
1. Friegue los biberones y los accesorios bien con agua templada y un detergente suave antes de esterilizarlos.
2. Retire todos los artículos del esterilizador.
3. Llene el recipiente para medir el agua hasta la marca de nivel de agua (120 ml) con agua corriente fresca y fría (L) y
vierta el agua en la base del esterilizador (M).
4. Coloque los biberones boca abajo en la bandeja de accesorios 1 del soporte para biberones. La bandeja de
accesorios 2 se desliza sobre la varilla central para sujetar los biberones en posición (N).
5. Inserte el soporte para biberones en el esterilizador, ordene los accesorios del biberón en la bandeja
de accesorios 2 (O) y las pinzas en la varilla central.
6. Coloque la tapa (P) y ciérrela herméticamente por medio de las asas laterales (Q).
7. Enchufe el cable de alimentación en la parte de atrás del esterilizador antes de enchufarlo en la toma (R).
¡POR FAVOR COMPRUEBE QUE EL CABLE Y LA UNIDAD ESTÁN LEJOS DEL ALCANCE DE LOS NIÑOS!
8. Pulse el botón de encendido para iniciar el ciclo de esterilización (S). La unidad se apagará después de completar
el ciclo, aproximadamente 6 minutos. (6 minutos es el tiempo de esterilización para una unidad llena con 8
biberones. Cuando se introducen menos biberones el tiempo de esterilización se incrementa).
9. Mientras se está utilizando el asa de la tapa cambia de color y muestra el símbolo que indica que la unidad está
caliente (T). Deje siempre que el esterilizador se enfríe durante al menos 10 minutos entre ciclos. La unidad incluye
un mecanismo de seguridad que no deja que la unidad vuelva a encenderse hasta que está lista.
ADVERTENCIA: Tenga cuidado al abrir la tapa ya que las asas estarán calientes. Tenga cuidado con el vapor que sale
por las rejillas de ventilación mientras está utilizando la unidad.
10. Cuando el esterilizador se haya enfriado, apáguelo, desenchúfelo de la toma y quite el cable (U).
RETIRAR DEL ESTERILIZADOR LOS ARTÍCULOS ESTERILIZADOS
11. Deje al menos 10 minutos para que la unidad se enfría antes de retirar del esterilizador los artículos esterilizados.
12. Tenga cuidado al abrir la tapa ya que saldrá vapor.
13. Cuando retire los artículos del esterilizador tenga cuidado ya que el esterilizador estará caliente.
14. Lávese siempre las manos antes de manipular los artículos esterilizados y evite que se contaminen en la medida
de lo posible.
15. Para mantener los componentes pequeños, por ejemplo las tetinas, esterilizados durante el mayor tiempo posible
sugerimos que utilice las pinzas. Las pinzas pueden esterilizarse en la unidad y deberían colocarse en la parte de
arriba para acceder fácilmente a ellas después de la esterilización.
16. Después de cada uso vierta el agua sobrante (V) aclare y seque el esterilizador (W).
LIMPIAR EL ESTERILIZADOR
ES MUY IMPORTANTE LIMPIAR EL ESTERILIZADOR AL MENOS UNA VEZ A LA SEMANA. LA LIMPIEZA
REGULAR AYUDARÁ A MANTENER EL RENDIMIENTO DEL PRODUCTO. LA FALTA DE INCUMPLIMIENTO DE
LAS INSTRUCCIONES DE LIMPIEZA O EL MAL USO DEL PRODUCTO INVALIDARÁ LA GARANTÍA.
El recipiente para medir el agua lleva acoplado un ltro que eliminará la mayor parte, si bien no todos los depósitos
minerales presentes en el agua. Sin una limpieza regular llegará un momento en el que los minerales se depositarán
en el elemento. Utilizar agua hervida de antemano reducirá aún más la presencia de minerales.
• Compruebe que el esterilizador está apoyado
sobre una superficie firme y nivelada mientras
lo está utilizando.
• Compruebe que el cable de alimentación
y la unidad están lejos del alcance de los niños.
• Desenchúfelo siempre de la toma mientras
no lo está utilizando.
• Nunca coloque objetos encima del esterilizador.
• Nunca sumerja el esterilizador en agua.
• Utilice solamente el cable de alimentación
que se incluye con el producto.
• Por favor, si observa que el cable de alimentación está
defectuoso póngase en contacto con el comercio o
con una persona debidamente cualificada.
• ¡ADVERTENCIA! Para reducir el riesgo de descargas
eléctricas mantenga el cable de alimentación seco y
lejos del suelo.
• Este aparato solamente es apto para uso doméstico.
14 15
Page 9

Model Number: MK0040-002 REV 1 Item Number: 011248
*MON-FRI, 10AM - 4PM, UK ONLY. CALLS COST 10 PENCE PER MINUTE FROM A BT LANDLINE.
CALLS FROM OTHER NETWORKS AND MOBILES MAY COST MORE.
PRODUCT DESIGN IS TM & ©2012 MUNCHKIN, INC. CA 91343. IMPORTED BY LINDAM LTD (THE EUROPEAN DIVISION OF MUNCHKIN INC),
UNIT 760, THORP ARCH TRADING ESTATE, WETHERBY, WEST YORKSHIRE, LS23 7FW, ENGLAND. MADE IN CHINA. MUNCHKIN, STEAMGUARD
AND IT’S THE LITTLE THINGS ARE TRADEMARKS OF MUNCHKIN, INC.
*
ADVERTENCIA: Antes de limpiar compruebe que ha desenchufado el esterilizador de la toma.
Deje que la unidad se enfríe de 20 a 30 minutos después del último uso. Tenga cuidado al quitar la tapa.
1. Limpie el exterior de la unidad con un paño suave humedecido. ¡No sumerja el aparato en agua!
2. Retire el soporte para biberones del esterilizador y lávelo por separado con agua templada y un detergente suave.
3. Para eliminar los depósitos de cal, utilice uno de los dos métodos descritos más abajo.
ÁCIDO CÍTRICO (puede comprarse en la mayoría de las farmacias)
1. Mezcle 1 bolsita de ácido cítrico en agua según las instrucciones del fabricante y vierta el contenido en la unidad.
¡No coloque la tapa!
2. Encienda la unidad durante 1 a 2 minutos.
3. Desenchúfela de la toma y apague el botón. Deje que la unidad repose durante 30 minutos.
4. Vacíe el esterilizador y aclárelo completamente.
5. Haga un ciclo completo con el esterilizador vacío con la TAPA CERRADA utilizando 120 ml de agua medida
en el recipiente para medir.
6. Deje que el esterilizador se enfríe y séquelo.
VINAGRE BLANCO DOMÉSTICO
1. Llene el recipiente para medir mitad y mitad con agua y vinagre blanco doméstico y vierta el contenido
en el esterilizador.
2. Coloque la tapa, enchufe la unidad y deje que complete un ciclo. ¡Procure hacer esto en un lugar bien ventilado
ya que el vinagre desprende un olor fuerte!
3. Deje que la unidad se enfríe durante al menos 10 minutos.
4. Vacíe el esterilizador y aclárelo completamente.
5. Haga un ciclo completo con el esterilizador vacío con la TAPA CERRADA utilizando 120 ml de agua medida
en el recipiente para medir.
6. Deje que el esterilizador se enfríe. Vierta el agua sobrante y séquelo.
GUÍA DE RESOLUCIÓN DE PROBLEMAS
El esterilizador no funciona •
Compruebe que el cable de alimentación está conectado y enchufado.
El esterilizador tarda mucho tiempo • Vierta el agua sobrante después de cada ciclo. El exceso de agua
en completar el ciclo (más de 120 ml) incrementará la duración del ciclo.
• Asegúrese de utilizar el recipiente para medir y mida 120 ml
de agua exactamente (el exceso de agua incrementará
la duración del ciclo).
• Si el esterilizador está parcialmente cargado (p.ej. solo con
2 biberones) la duración del ciclo se incrementará ligeramente.
El esterilizador se apaga demasiado pronto • No está utilizando suciente cantidad de agua. Compruebe que
mide exactamente 120 ml de agua en el recipiente para medir.
• Compruebe que el esterilizador está vacío y que vierte el agua
directamente sobre el elemento (es decir, no se ha salpicado
el plástico de alrededor).
¿Cuánto tiempo duran esterilizados los biberones?
• Siempre que no abra la tapa, los contenidos del esterilizador
permanecerán esterilizados hasta 6 horas.
El agua no pasa a través del ltro • Aclare la malla en agua para descomponer la tensión supercial
del recipiente para medir antes de volver a llenar.
DATOS TÉCNICOS
Voltaje: 220 V-240 V~ 50Hz Nominal: 915 - 1089 W
 Loading...