

Page 1
Owner’s Manual
Manual del Usuario
Notice d’utilisation
Extending XL™ Gate
Barrera de Seguridad Extending XL™
Barrière Extending XL™
MK0004 Rev 3
KEEP FOR FUTURE REFERENCE
Please read the instructions carefully before installing this gate. For additional help, installation videos are
available at www.munchkin.com
GUARDE PARA FUTURA REFERENCIA
Lea las instrucciones detenidamente antes de instalar esta barrera de seguridad. Si necesita más ayuda,
vea los videos de instalación disponibles en www.munchkin.com
À CONSERVER POUR CONSULTATION FUTURE
Veuillez lire attentivement ces instructions avant d’installer la barrière. Si vous avez besoin d'aide
supplémentaire, consultez nos vidéos d’installation: www.munchkin.com
CCD-0004-000 REV 9
Page 2
Contents | Contenido | Contenu Contents | Contenido | Contenu
IMPORTANT INFORMATION
Introduction ........................................................................................................................................... 4
Regulación del perno de ajuste ...................................................................................................... 33
Disclaimers ........................................................................................................................................... 4
Warnings ................................................................................................................................................ 4
MODO DE USO
Cómo abrir la barrera de seguridad...............................................................................................34
GETTING STARTED
Included Parts ....................................................................................................................................... 5
Cómo cerrar la barrera de seguridad ............................................................................................34
Cómo limpiar la barrera de seguridad ..........................................................................................34
Step 1: Identify Gate Placement ....................................................................................................... 6
SERVICIO AL CLIENTE
HOW TO INSTALL
Step 2: Assembling Gate Panels ...................................................................................................... 7
Garantía Limitada de Un Año. .........................................................................................................35
Contáctenos ........................................................................................................................................36
Step 3: Install Upper and Lower Hinge (Wall Bracket) ................................................................9
Step 4: Install Lower Catch (Wall Bracket) .................................................................................... 11
Step 5: Setting Your Gate ..................................................................................................................13
Step 6: Install Upper Catch (Wall Bracket) ....................................................................................14
Adjusting Bolt Adjuster .................................................................................................................... 16
RENSEIGNEMENTS IMPORTANTS
Introduction .........................................................................................................................................38
Avis de non responsabilité ..............................................................................................................38
Mises en garde ...................................................................................................................................38
HOW TO USE
Opening Your Gate .............................................................................................................................17
Closing Your Gate ................................................................................................................................17
Cleaning Your Gate .............................................................................................................................17
DÉMARRAGE
Pièces comprises ...............................................................................................................................39
Étape 1: Choix de l’emplacement de la barrière ........................................................................40
CUSTOMER SERVICE
One Year Limited Warranty ............................................................................................................. 18
Contact Us ........................................................................................................................................... 19
INSTALLATION
Étape 2: Assemblage des portillons ..............................................................................................41
Étape 3: Installation de la charnière supérieure et inférieure (Fixation murale) ...............43
Étape 4: Installation de la fermeture inférieure (Fixation murale) ....................................... 45
Étape 5: Placement de la barrière .................................................................................................47
INFORMACIÓN IMPORTANTE
Introducción .........................................................................................................................................21
Étape 6: Installation de la fermeture supérieure (Fixation murale) .....................................48
Réglage du boulon d’ajustement ..................................................................................................50
Aviso Legal ...........................................................................................................................................21
Advertencias .......................................................................................................................................21
MODE D’EMPLOI
Ouverture de la barrière ...................................................................................................................51
INICIO
Piezas incluidas ..................................................................................................................................22
Fermeture de la barrière ...................................................................................................................51
Nettoyage de la barrière ...................................................................................................................51
Paso 1: Identicar la ubicación de la barrera de seguridad ......................................................23
SERVICE À LA CLIENTÈLE
INSTALACIÓN
Paso 2: Ensamblaje de los paneles de la barrera ......................................................................24
Garantie limitée d’un an...................................................................................................................52
Nous contacter ................................................................................................................................... 53
Paso 3: Instalación de la bisagra superior & inferior (Soporte de Pared).............................26
Paso 4: Instalación del cierre inferior (Soporte de Pared) ........................................................28
Paso 5: Ajuste de su barrera de seguridad ..................................................................................30
Paso 6: Instalación del cierre superior (Soporte de Pared) .......................................................31
2 3
Page 3

Important Information
A
B
Getting Started
INTRODUCTION
Thank you for choosing a Munchkin safety gate to help protect your family.
Please inspect your gate immediately. If you see any damage, do not attempt installation.
Check page 18 of this manual for information on damaged products.
Assemble the gate away from small children. Some of the parts may present a choking
hazard when loose.
DISCLAIMERS
Any misuse, abuse, abnormal use, excessive wear and tear, improper assembly,
negligence, environmental exposure, accident or alteration of the gate, as well as removal
or alteration of its serial number, invalidates any and all claims against the manufacturer.
Any damage to property during installation is the sole responsibility of the end user.
WARNING:
• Children have died or been seriously injured when gates are not
securely installed.
• ALWAYS install and use gates as directed using all required parts.
• STOP using when a child can climb over or dislodge the gate.
• Use only with locking mechanism securely engaged.
• NEVER use a gate to keep child away from pool.
• Install according to manufacturer’s instructions.
• Intend for use with children from 6 months through 24 months.
• This product will not necessarily prevent all accidents. Never leave
child unattended.
INCLUDED PARTS
If any parts are missing or damaged, please contact our Customer Satisfaction Team
at 1-800-344 -2229.
J
I
Mounting
Template (x2)
Upper Clamp (x1)
Small
Screw (x4)
Wall Anchor
(x9)
TOOLS NEEDED:
• Drill
• Phillips Screwdriver
• Tape Measure
Catch Panel
(x1)
Lower Clamp (x1)
Medium
Screw (x7)
• Pencil
• Adhesive Tape
Hinge Panel
(x1)
1 Way Lower Catch
Wall Bracket (x1)
Large Screw
(x2)
Upper Catch
Wall Bracket
(x1)
2 Way Lower
Catch Bracket
(x1)
Hex Key Wrench
Upper Hinge
Wall Bracket
(x1)
Lower Hinge Wall
Bracket (x1)
4
5
Page 4
How To Install How To Install
Getting Started
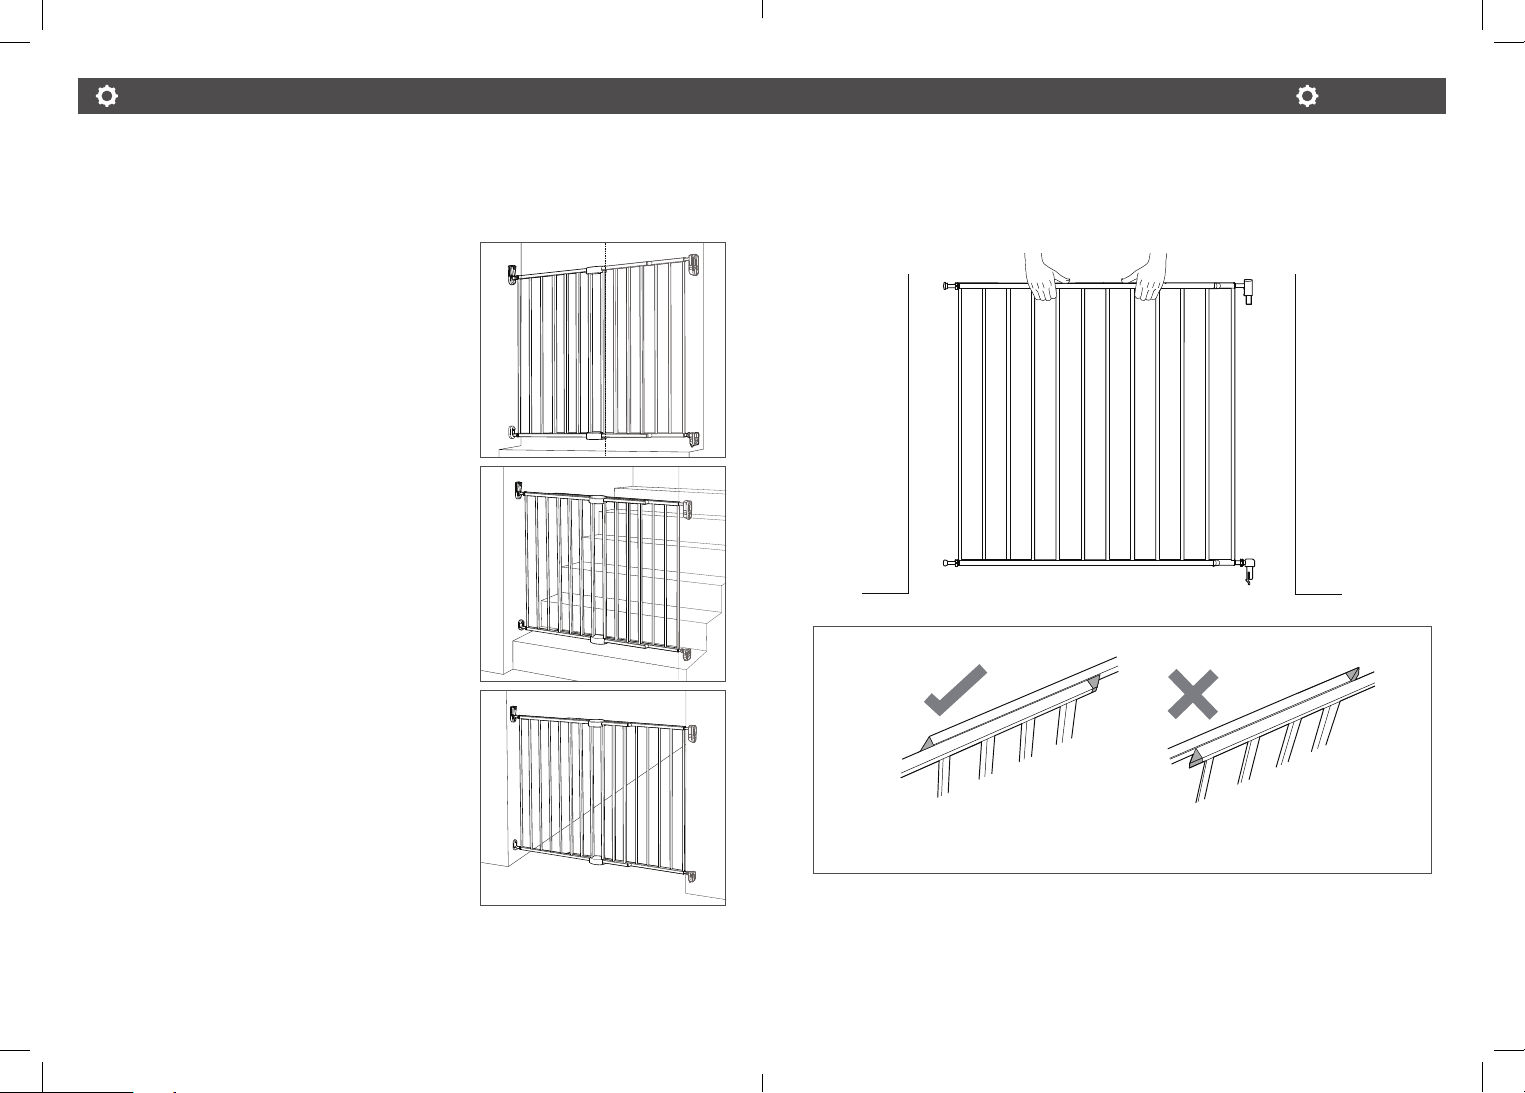
STEP 1: IDENTIFY GATE PLACEMENT
GATE IS SUITABLE FOR:
TOP OF STAIRS
If installing the gate at the top of stairs, it MUST be
placed on the top landing and only swing away from
the stairs.
BOTTOM OF STAIRS
If installing the gate at the bottom of stairs, we
recommend placing it on the fl oor. If the gate must
be placed on the lowest stair, position it toward the
front of the step.
HALLWAYS AND DOORWAYS
STEP 2: ASSEMBLING GATE PANELS
1. Place both hinge panel and catch panel side by side where you intend to install your
gate. This gate fi ts opening 33" to 56" (83.8cm to 142.2cm)
PLEASE NOTE: For correct orientation, make sure the text on the panels is
upright, and the tapered ends of each panel should slope inward.
6
7
Page 5

How To Install How To Install
2. Size the gate to your opening by sliding the hinge panel and catch panel outward
towards the wall. For ease of gate installment later, please keep between a 1.5” and 2”
(38mm and 50mm) gap from the gate panel to the wall.
1.5" - 2.0"
(38mm-50mm)
of gap
3. Secure the hinge panel and catch panel together
using the upper and lower clamps. If the bars are
not lined up, shorten the gate width by sliding
panels inwards away from walls to allow room for
the clamps.
Use the small screws to attach the top and
bottom halves of each clamp together.
Upper Clamp
Lower Clamp
1.5" - 2.0"
(38mm-50mm)
of gap
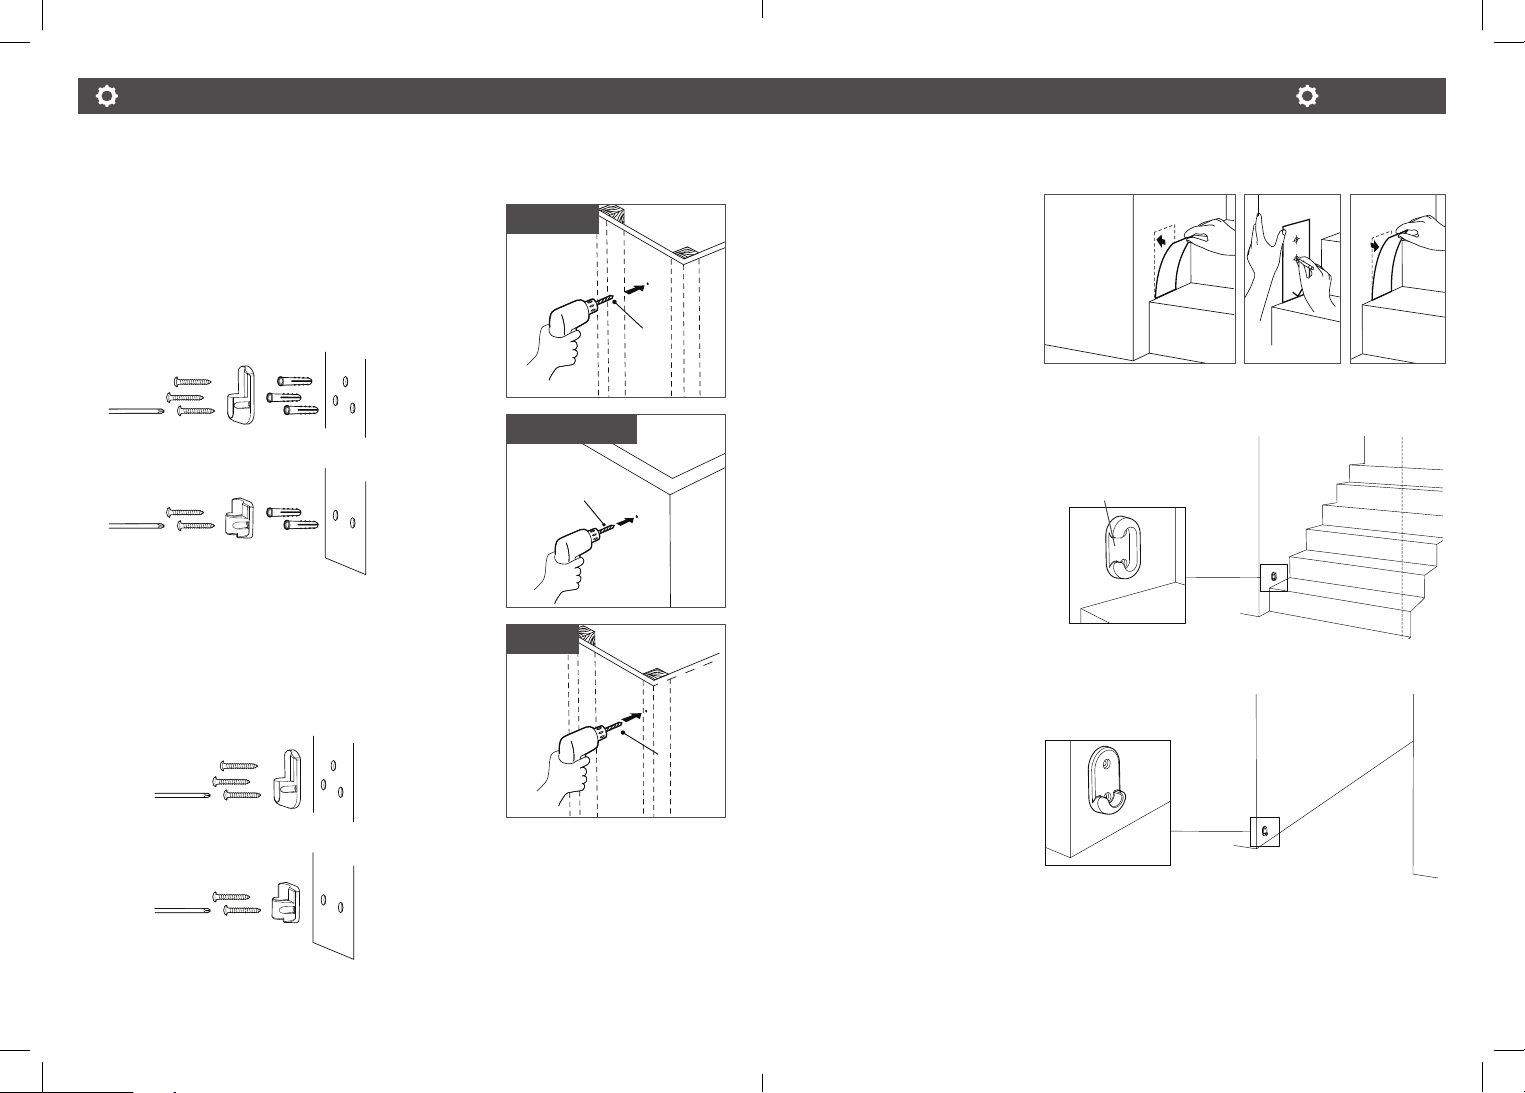
STEP 3: INSTALL UPPER AND LOWER HINGE WALL BRACKET
TOOLS NEEDED:
• Drill
• Phillips Screwdriver
• Adhesive Tape
• Hex Key
• Pencil
1. Cut template “I” and “J” along the dotted line to get the correct space from the gate
to the floor.
2. Decide which side of your opening will be the hinge side
(i.e. the side that does NOT open). Next, place template
“J” against the wall using tape. The template should be
flush to the floor/step.
3. Mark the screw hole with a pencil to
create indentation on for both upper and
lower hinge wall bracket. Then, remove
template “J” from the wall.
4. Determine whether there is a stud behind the drywall where you will install the upper
and lower hinge wall bracket. Proceed to either 5a or 5b.
Upper Hinge
Lower Hinge
8 9
Small Screw
Page 6
How To Install How To Install
STEP 4: INSTALL LOWER CATCH WALL BRACKET
5a. For Drywall Without Stud / Plasterboard:
Drill a 7/32"(5.5mm) hole into the drywall at each
pencil mark. Insert a drywall anchor into each hole.
Then, use a screwdriver or drill to insert the screws
through the upper and lower hinge wall bracket into
the drywall anchors.
Medium
screw
Drywall
anchor
Medium
screw
Drywall
anchor
5b. For Drywall with Stud:
Drill a 5/64"(2mm) pilot hole into the stud at each
pencil mark (no anchor needed). Then, use a
screwdriver or drill to insert the screws through the
upper and lower hinge wall bracket into the stud.
Medium
screw
Medium
screw
5a. Drywall
5a. Plasterboard
7/32"
5.5mm
5b. Stud
7/32"
5.5mm
5/64"
2.0mm
1. Place template “I” against
the wall with tape, flush to
the floor. Mark the screw
holes with a pencil to create
indentation, then remove
the template.
2. Identify which lower catch
wall bracket to use:
For Top and bottom of stairs:
Choose the 1 way lower
catch wall bracket. The
opening on the edge of the
bracket should always be
facing towards you (away
from the stairs), so the gate
only swings away from
the stairs.
For Hallway and Doorways:
Choose the 2 way lower
catch wall bracket so that
the gate swings in either
direction.
Temp. I
(Catch Side)
Open edge
1 Way Lower Catch
Wall Bracket
2 Way Lower Catch
Wall Bracket
10 11
Page 7
How To Install How To Install
STEP 5: SETTING YOUR GATE
3. After selecting the wall bracket, determine whether or not there is a stud behind the
drywall at the locations you plan to install the lower catch wall bracket.
Proceed to either 4a or 4b.
4a. For Drywall Without Stud / Plasterboard:
Drill a 7/32”(5.5mm) hole into the drywall at each
4a. Drywall
pencil mark. Insert a drywall anchor into each hole.
Use a screwdriver or drill to insert the screws through
the lower catch wall bracket into the drywall anchor.
7/32"
5.5mm
4a. Plasterboard
Drywall
anchor
Medium
screw
7/32"
5.5mm
4b. For Drywall with Stud:
Drill a 5/64”(2mm) pilot hole into the stud at each
pencil mark (no anchor needed).
Use a screwdriver or drill to insert the screws through
4b. Stud
the lower catch wall bracket into the stud.
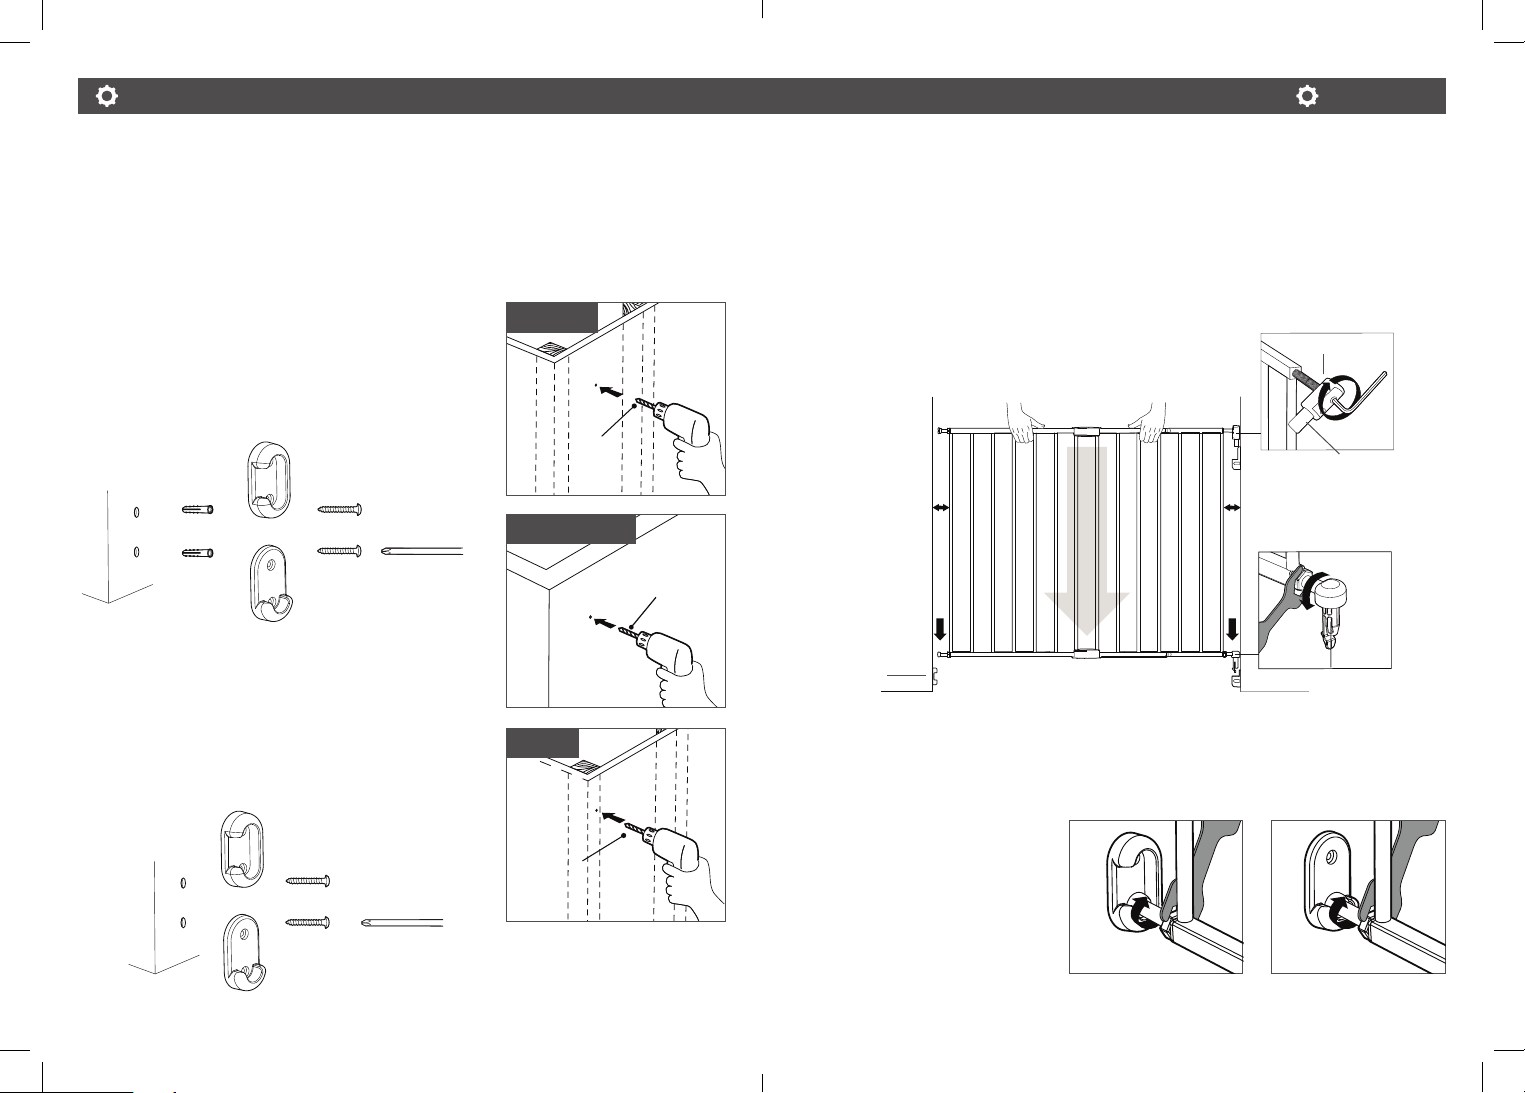
1. The gap between the gate to the wall should be less than 2.25" (57mm). If necessary,
adjust the upper and lower hinge adjustment rods using the wrench and hex key to its
appropriate lengths. Then tighten the nut against the tube by using the wrench.
Next, Install the gate into the opening by simultaneously inserting the gate’s upper
and lower hinge pins down into the hinge wall brackets until it clicks.
Adjustment
Rod
Upper hinge pin
<2.25" (<57mm)
Lower catch
bracket
<2.25" (<57mm)
Lower hinge pin
2. On the catch side of the gate, loosen the nut around the lower adjustment rod using
the wrench. Extend the adjustment rod by turning it clockwise until it is seated in the
lower catch bracket on the wall. Then, tighten the nut against the tube by using
the wrench.
5/64"
2.0mm
OR
Medium
screw
12 13
1 way Lower
catch bracket
2 way Lower
catch bracket
Page 8
How To Install How To Install
STEP 6: INSTALL UPPER CATCH WALL BRACKET
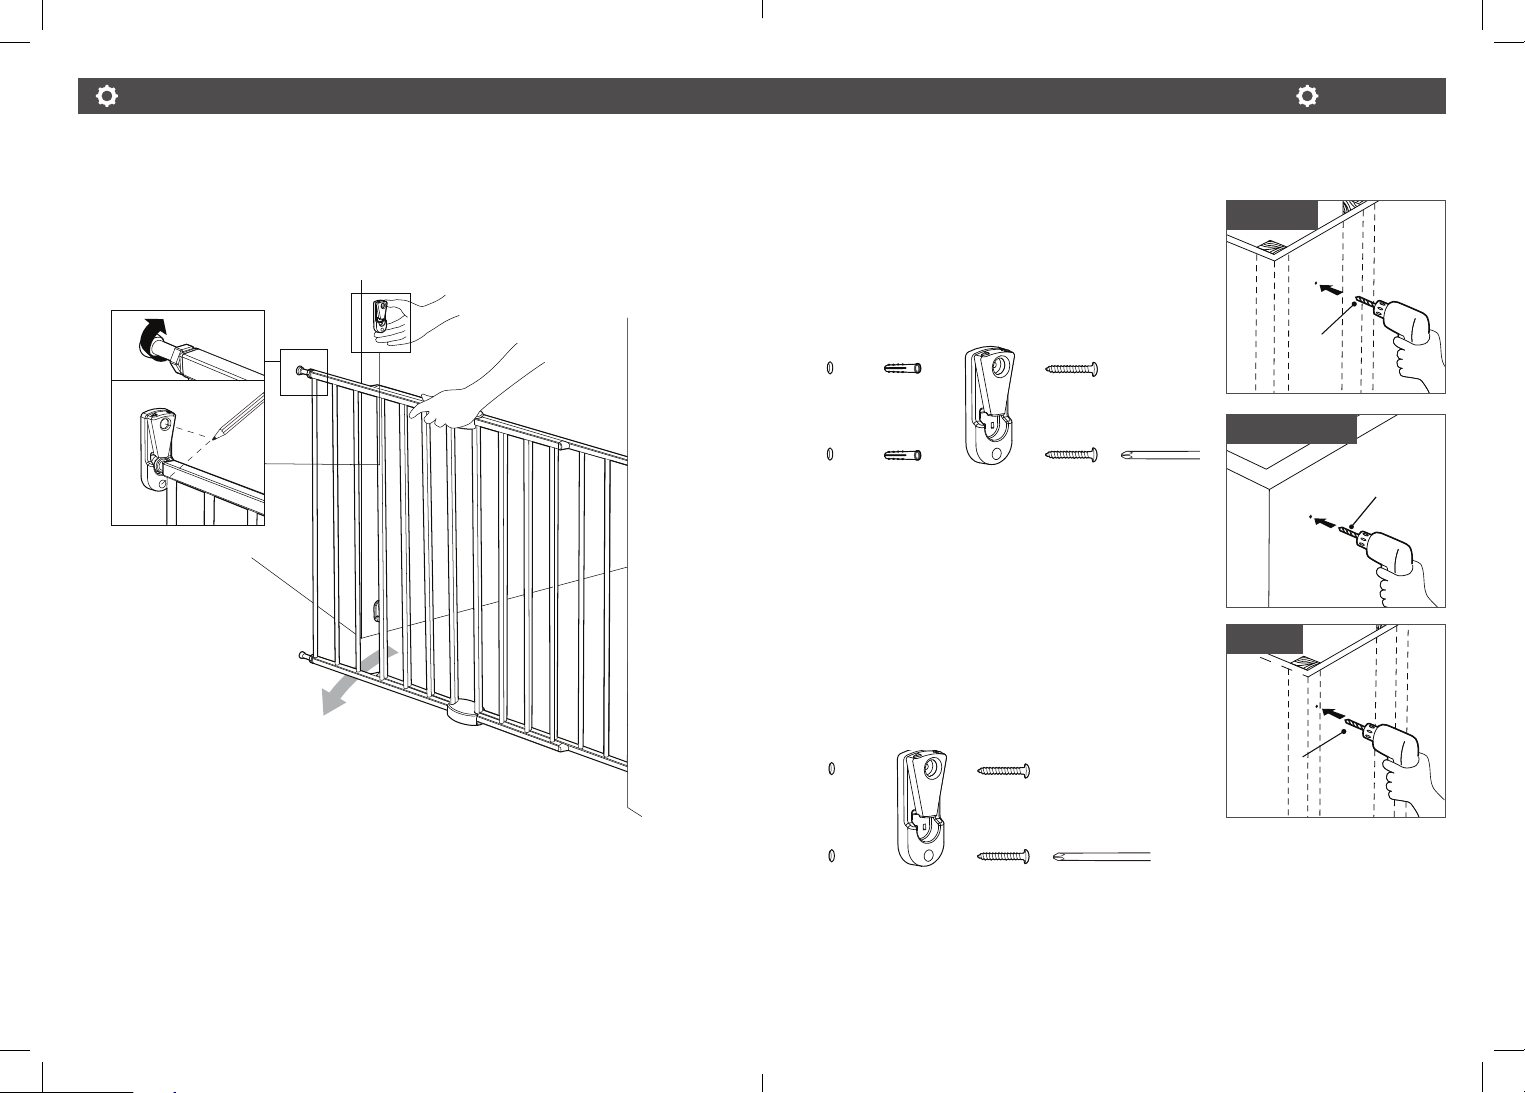
1. Place the upper catch bracket against the wall. If necessary, loosen the nut and extend
the adjustment rod on the upper catch side until it is seated in the bracket. Then, mark
the screw holes with a pencil to create an indentation.
3a. For Drywall Without Stud / Plasterboard:
Drill a 7/32”(5.5mm) hole into the drywall at each
pencil center mark. Insert a drywall anchor into each
hole. Then, use a screwdriver or drill to insert the
screws through the upper catch wall bracket into the
drywall anchor.
Drywall
anchor
Large
screw
3b. For Drywall with Stud:
Drill a 5/64”(2mm) pilot hole into the stud at each
pencil mark (no anchor needed). Then, use a
screwdriver or drill to insert the screws through the
upper catch wall bracket into the stud.
3a. Drywall
7/32"
5.5mm
3a. Plasterboard
7/32"
5.5mm
3b. Stud
5/64"
2.0mm
2. Determine whether there is a stud behind the drywall where you will install the upper
catch wall bracket. Proceed to either 3a or 3b.
Large
screw
14 15
Page 9

How To Install
How to Use How to Use
ADJUSTING BOLT ADJUSTER
TOOLS NEEDED:
• Wrench
• Hex Key
Check again that the bolt adjusters are fully seated in the
upper and lower catch wall brackets. If so, use the wrench
to firmly tighten the nuts.
PLEASE NOTE: The gap between the gate to the wall should be less than 2.25" (57mm).
<2.25" (<57mm)
1 way Lower
catch bracket
Upper catch
bracket
OR
2 way Lower
catch bracket
<2.25" (<57mm)
OPENING YOUR GATE
Push the lever down on the upper catch bracket using your thumb, then lift the gate out.
CLOSING YOUR GATE
Swing and lift the gate back to its closed position.
PLEASE NOTE: Always check that the gate is securely locked on the top and bottom
brackets, and never leave your child unattended.
CLEANING YOUR GATE
Use mild soap and wipe with a damp cloth. Be careful NOT to wash or wipe the stickers
on the base of the gate.
16
Removing or damaging the stickers will void the warranty.
17
Page 10

Customer Service Customer Service
ONEYEAR LIMITED WARRANTY
A. Munchkin, Inc.’s safety gates include a one-year limited warranty from the
date of purchase.
POLICY: In the event of a malfunction or defect during the in-warranty period, Munchkin,
Inc., at its option, will replace or repair a gate under warranty. Munchkin, Inc.’s limited
warranty extends only to the gate’s original purchaser.
PROCEDURE: We ask that you contact Munchkin, Inc. to provide all pertinent information
relating to any issues you are experiencing with your safety gate. Munchkin, Inc.’s
Customer Satisfaction Team can be reached at 1-800-344-2229 Monday through Friday
from 8am to 5pm (Pacific Time) or by email at cserv@munchkin.com. The following
information, when applicable, is required for all warranty claims:
• Gate Name
• Model Number
• Date Code
• Receipt Copy
This may be faxed, emailed, or sent via mail to Munchkin, Inc. to the attention of
Customer Satisfaction.
ATYPICAL ISSUES: For atypical issues that require physical review, Munchkin, Inc. will
request that you return your gate to its Quality Assurance department. Munchkin, Inc. will
compensate you for shipping costs by providing a complimentary gift equal in value to the
expense incurred in shipping the product. Alternatively, Munchkin, Inc. at its option, may
issue a UPS call tag in order to expedite receipt of the defective product for review.
B. Conditions that void Munchkin, Inc.’s one-year limited warranty.
POLICY: Munchkin, Inc.’s one-year limited warranty does not cover a defect that has been
caused by misuse, abuse, abnormal use, excessive wear and tear, improper assembly,
negligence, environmental exposure, alteration or accident. Important Note: A safety gate
that has had its batch code altered or removed invalidates any and all claims against
the manufacturer.
C. CONSUMER REIMBURSEMENT: Munchkin, Inc. does not provide refunds as a remedy
for defective or nonconforming safety gates. Nor does Munchkin, Inc. offer cash back
for returned product purchased through any of Munchkin, Inc’s safety gate websites.
Exception: Munchkin, Inc. will provide cash back refund on purchases made through any
of Munchkin, Inc.’s safety gate websites ONLY if there was a processing or shipping error
made by Munchkin, Inc. Contact Customer Satisfaction Team with any questions
at 1-800-344-2229.
CONTACT US
If you have any questions about installing your gate, or if you wish to provide comments
about this product, feel free to contact our Customer Satisfaction Team at 1-800-344-2229
(M-F from 8:00am-5:00pm PST) or visit our website at www.munchkin.com
18 19
Page 11

Información Importante
SPANISH
ESPAÑOL
ESPAGNOL
INTRODUCCIÓN
Gracias por elegir una barrera de seguridad de Munchkin para proteger a su familia.
Inspeccione su barrera de seguridad de inmediato. Si detecta algún daño, no intente
instalarla. Consulte la página 35 de este manual para obtener información sobre
productos dañados.
Ensamble la barrera de seguridad lejos de niños pequeños. Algunas de las piezas podrían
presentar un riesgo de asfixia cuando están sueltas.
AVISO LEGAL
Todo uso inapropiado, mal uso, uso anormal, desgaste excesivo, ensamble inapropiado,
negligencia, exposición a la intemperie, accidente o alteración de la barrera de seguridad,
así como también la alteración o remoción de su número de serie, invalidará todos y cada
uno de los reclamos que pudiesen presentarse contra el fabricante. Todo daño material
producido durante la instalación es responsabilidad absoluta del usuario final.
ADVERTENCIA:
• Niños han muerto o sufrido graves accidentes a causa de barreras de
seguridad que no estaban firmemente instaladas.
• SIEMPRE instale y use la barrera de seguridad según las instrucciones
usando todas las piezas requeridas.
• Instale la barrera de acuerdo con las instrucciones del fabricante.
• Este producto no necesariamente evitará todo tipo de accidentes. Nunca
deje al niño solo.
• NUNCA use la barrera de seguridad para mantener al niño alejado de
una piscina.
• Use únicamente si el mecanismo de bloqueo está firmemente asegurado.
• DEJE de usar este producto cuando el niño sea capaz de quitar o trepar
sobre la barrera.
• Apto para usar con niños de 6 a 24 meses de edad.
Información Importante
21
Page 12

Inicio Inicio
A
B
PIEZAS INCLUIDAS
Si alguna pieza falta o está dañada, comuníquese con nuestro Equipo de Satisfacción al
Cliente llamando al 1-800-344 -2229.
J
I
Plantilla para
montaje (2)
Abrazadera
superior (1)
Panel de cierre (1)
Abrazadera
inferior (1)
Panel de bisagra (1)
Soporte del cierre
inferior de 1 sola
dirección (1)
Soporte de
pared para
el cierre
superior (1)
Soporte de pared
para el cierre
inferior de 2
dirrecciones (1)
Soporte de
pared para
la bisagra
superior (1)
Soporte de pared
para la bisagra
inferior (1)
PASO 1: IDENTIFICAR LA UBICACIÓN DE LA BARRERA
DE SEGURIDAD
LA BARRERA DE SEGURIDAD ES APROPIADA PARA:
PARTE SUPERIOR DE ESCALERAS
Si desea instalar la barrera en la parte superior de la
escalera, DEBE colocarla en el descanso superior y
sólo deberá abrir hacia el lado contrario a la escalera.
PARTE INFERIOR DE ESCALERAS
Si desea instalar la barrera en la parte inferior de la
escalera, le recomendamos que la coloque en el piso.
Si la barrera debe colocarse en el último escalón (el
más bajo), posiciónela mirando hacia el frente
del escalón.
PASILLOS Y PUERTAS
Tornillos
pequeños (4)
Anclajes para
pared (9)
Tornillos
medianos (7)
Tornillos
grandes (2)
Llave
hexagonal
Llave inglesa
HERRAMIENTAS REQUERIDAS:
• Taladradora
• Destornillador Phillips
• Lápiz
• Cinta adhesiva
• Cinta métrica
22 23
Page 13

Instalación Instalación
PASO 2: ENSAMBLAJE DE LOS PANELES DE LA BARRERA
1. 1. Coloque el panel de cierre y el panel de bisagra, uno al lado del otro, en el lugar
donde desea instalar su barrera de seguridad. Esta barrera de seguridad sirve para
aberturas de 33 a 56 pulg. (83.8 a 142.2 cm)
PARA TENER EN CUENTA: Para instalarla con la orientación correcta, asegúrese
de que el texto en los paneles esté derecho, y que la punta de los extremos
estrechos de cada panel se inclinen hacia dentro.
2. Ajuste la medida de la barrera al tamaño de su abertura deslizando el panel de bisagra
y el panel de cierre hacia fuera en dirección a las paredes. Para facilitar la instalación de
la barrera más adelante, deje un espacio de 1.5 a 2 pulg. (38mm and 50mm) entre cada
panel y la pared correspondiente.
1.5 – 2.0 pulg.
de espacio
(38mm a 50mm)
3. Sujete el panel de bisagra al panel de cierre
Abrazadera superior
1.5 – 2.0 pulg.
de espacio
(38mm a 50mm)
usando la abrazadera inferior y la abrazadera
superior. Si las barras no están alineadas, reduzca
el ancho de la barrera deslizando los paneles
hacia dentro, en dirección contraria a las paredes,
para dejar suficiente espacio para
las abrazaderas.
Use los tornillos pequeños para unir la mitad
superior y la mitad inferior de cada abrazadera.
Abrazadera inferior
Tornillo
pequeño
24 25
Page 14

Instalación Instalación
PASO 3: INSTALACIÓN DE LA BISAGRA SUPERIOR & INFERIOR
SOPORTE DE PARED
HERRAMIENTAS REQUERIDAS:
• Taladradora
• Destornillador Phillips
• Cinta adhesiva
• Llave hexagonal
• Lápiz
1. Corte la plantilla “I” y “J” a lo largo de la línea de puntos para obtener el espacio
correcto desde la barrera hasta el suelo.
2. Decida cuál de los lados de la abertura será el lado de las
bisagras (es decir, el lado que NO abre). Luego, coloque
la plantilla “J” sobre la pared usando cinta adhesiva. La
plantilla debe quedar a ras del suelo/escalón.
3. Marque los orificios para los tornillos
en el recorte con un lápiz para crear la
hendidura, luego quite el recorte de la
parte inferior de la plantilla “J”.
4. Determine si hay un montante detrás de la pared de yeso donde instalará el soporte de
pared para la bisagra inferior. Continúe con 5a o 5b.
Bisagra
superior
Bisagra
inferior
5a. Para paredes de yeso sin montantes / Placas de yeso:
Taladre un orificio de 7/32 pulg. (5.5mm) en la pared
de yeso sobre la marca que hizo con el lápiz. Inserte
un anclaje de pared en cada orificio. Use un
destornillador o una taladradora para insertar el
tornillo en el anclaje de pared, pasando por el
soporte de pared de la bisagra superior y inferior.
5b. Para paredes de yeso con montantes:
Tornillo
mediano
Tornillo
mediano
Taladre un orificio pequeño de 5/64 pulg. (2mm) en
el montante (no se necesita anclaje). Use un
destornillador o una taladradora para insertar los
tornillos en el montante, pasando por el soporte de
pared de la bisagra superior y inferior.
Tornillo
mediano
Anclaje de
pared
Anclaje de
pared
5a. Pared de yeso
5a. Placa de yeso
7/32"
5.5mm
5b. Montante
7/32"
5.5mm
5/64"
2.0mm
Tornillo
26 27
mediano
Page 15

Instalación Instalación
PASO 4: INSTALACIÓN DEL CIERRE INFERIOR
SOPORTE DE PARED
1. Coloque la plantilla “I”
sobre la pared con cinta
adhesiva, a ras del suelo.
Marque los orificios para los
tornillos con un lápiz para
crear la hendidura, luego
quite la plantilla.
Plantilla I
(Lado del
cierre de la
barrera)
3. Después de seleccionar el soporte de pared, determine si hay o no un montante
detrás de la pared de yeso en los lugares donde desea instalar el soporte de pared del
cierre inferior. Continúe con 4a o 4b.
4a. Para paredes de yeso sin montantes / Placas de
yeso:
4a: Pared de yeso
Taladre un orificio de 7/32 pulg. (5.5mm) en la pared
de yeso sobre cada marca que hizo con el lápiz.
Inserte un anclaje de pared en cada orificio. Use
un destornillador o una taladradora para insertar
los tornillos en el anclaje de pared, pasando por el
2. Identique el soporte de
pared que utilizará para el
cierre inferior:
Para la parte superior e
inferior de las escaleras:
Escoja el soporte de pared
de 1 sola dirección. La
abertura en el borde del
soporte siempre debe estar
mirando hacia usted (es
decir, el lado contrario a las
escaleras), de modo que la
barrera solo pueda abrirse
en dirección contraria a las
escaleras.
Para pasillos y puertas:
Borde abierto
Soporte de pared
del cierre inferior
de 1 sola dirección
soporte de pared del cierre inferior.
Anclaje de
pared
Tornillo
mediano
4b. Para paredes de yeso con montantes:
Taladre un orificio pequeño de 5/64 pulg. (2mm)
en el montante en cada marca que hizo con el lápiz
(no se necesita anclaje). Use un destornillador o una
taladradora para insertar los tornillos en el montante,
pasando por el soporte de pared del cierre inferior.
4a: Placa de yeso
4a: Montante
7/32
pulg.
5.5mm
7/32 pulg.
5.5mm
Escoja el soporte de pared
de 2 direcciones, de modo
que la barrera pueda abrirse
en cualquier dirección.
Soporte de pared
del cierre inferior
de 2 direcciones
Tornillo
7/32
pulg.
2.0mm
mediano
28 29
Page 16

Instalación Instalación
PASO 5: AJUSTE DE SU BARRERA DE SEGURIDAD
1. El espacio entre la barrera y la pared debe ser inferior a 2.25 in. (57 mm). De ser
necesario, ajustar el inferior y superior de pie de la bisagra de ajuste usando la llave
inglesa y la llave hexagonal hasta llegar a la longitud apropiada. Luego, ajuste la
tuerca al tubo utilizando la llave inglesa.
Ahora, inserte la clavija de la bisagra superior y inferior de la barrera en el soporte de
la bisagra ubicado en la pared hasta que oiga un clic.
Varilla de Ajuste
Clavija de bisagra superior
<2.25 pulg (<57mm)<2.25 pulg (<57mm)
Soporte para
cierre inferior
Clavija de bisagra inferior
PASO 6: INSTALACIÓN DEL CIERRE SUPERIOR
SOPORTE DE PARED
1. Coloque el soporte del cierre superior contra la pared. De ser necesario, afloje la
tuerca y extienda la varilla de ajuste del lado del seguro superior hasta que quede
apoyada en el soporte. Luego, marque los orificios de los tornillos con un lápiz para
crear la hendidura.
2. Del lado del cierre de la barrera,
afloje la tuerca de la varilla de
ajuste inferior usando la llave
inglesa. Extienda la varilla de
O
ajuste girándola en el sentido
de las agujas del reloj hasta que
quede apoyada en el soporte
del cierre inferior colocado en la
pared. Luego, ajuste la tuerca al
tubo usando la llave inglesa.
30 31
Soporte del cierre
inferior de 1 sola
dirección
Soporte del cierre
inferior de 2
direcciones
2. Determine si hay un montante detrás de la pared de yeso donde instalará el soporte de
pared para el cierre superior. Continúe con 3a o 3b.
Page 17

Instalación Instalación
3a. Para paredes de yeso sin montantes / Placas de yeso:
Taladre un orificio de 7/32 pulg. (5.5mm) en la pared
de yeso en la marca del centro. Inserte un anclaje de
pared. Use un destornillador o una taladradora para
insertar el tornillo en el anclaje de pared, pasando
por el soporte de pared del cierre superior.
Anclaje de
pared
Tornillo
grande
3b. Para paredes de yeso con montantes:
Taladre un orificio pequeño de 5/64 pulg. (2mm)
en el montante (no se necesita anclaje). Use un
destornillador o una taladradora para insertar el
tornillo en el montante, pasando por el soporte de
pared del cierre superior.
3a. Pared de yeso
7/32 pulg.
5.5mm
3a. Placa de yeso
3b. Montante
5/64 pulg.
2.0mm
7/32 pulg.
5.5mm
REGULACIÓN DEL PERNO DE AJUSTE
HERRAMIENTAS
REQUERIDAS:
• Llave inglesa
• Llave hexagonal
Vuelva a verificar que el perno
de ajuste esté que quede
apoyada completamente en el
soporte del cierre inferior y
superior colocado en la pared.
Si es así, use la llave inglesa
para ajustar la tuerca
firmemente.
Soporte del
cierre inferior de
1 sola dirección
PARA TENER EN CUENTA: El espacio entre la barrera y la pared debe ser inferior a 2.25
pulg. (57mm).
<2.25 plug.
<57mm
Soporte del
cierre superior
O
Soporte de pared
del cierre inferior
de 2 direcciones
<2.25 plug.
<57mm
Tornillo
grande
32 33
Page 18

Servicio Al Cliente
Modo De Uso
Servicio Al Cliente
CÓMO ABRIR LA BARRERA DE SEGURIDAD
Empuje la palanca ubicada en el soporte del cierre superior hacia el costado con su dedo
pulgar, luego levante la barrera hacia fuera.
CÓMO CERRAR LA BARRERA DE SEGURIDAD
Vuelva a colocar y levantar la barrera en la posición cerrada.
PARA TENER EN CUENTA: Siempre verifique que la barrera este firmemente bloqueada
del cierra superior y inferior, y nunca deje a su nino solo.
CÓMO LIMPIAR LA BARRERA DE SEGURIDAD
Use un jabón suave y pase un paño húmedo. Asegúrese de NO lavar o limpiar con paño
los adhesivos ubicados en la base de la barrera.
GARANTÍA LIMITADA DE UN AÑO
A. Las barreras de seguridad de Munchkin, Inc. incluyen una garantía limitada de un año a
partir de la fecha de compra.
POLÍTICA: En el caso de una falla o defecto durante el período de garantía, Munchkin,
Inc., a su entera discreción, reemplazará o reparará la barrera cubierta por la garantía. La
garantía limitada de Munchkin, Inc. sólo se extiende al comprador original de la barrera.
PROCEDIMIENTO: Le solicitamos que se contacte con Munchkin, Inc. para que
proporcione toda la información pertinente relacionada con cualquier problema que tenga
con su barrera de seguridad. Puede comunicarse con el Equipo de Satisfacción del Cliente
de Munchkin, Inc. llamando al 1-800-344-2229 de lunes a viernes de 8am a 5pm (Hora
del Pacífico) o por email a cserv@munchkin.com. Se requiere la siguiente información,
cuando corresponda, para todos los reclamos de garantía:
• Nombre de la barrera
• Número de modelo
• Código de fecha
• Copia del recibo
Esta información puede enviarse por fax, correo electrónico o correo postal a Munchkin,
Inc., a la atención del departamento de Customer Satisfaction (Satisfacción del Cliente).
PROBLEMAS ATÍPICOS: En caso de problemas atípicos que requieran una evaluación
física, Munchkin, Inc le pedirá que devuelva su barrera al departamento de Aseguramiento
de Calidad. Munchkin, Inc. lo compensará por los costos de envío con un regalo de
cortesía por un valor equivalente al gasto incurrido por enviar el producto. Por otro lado,
Munchkin, Inc., a su entera discreción, podrá emitir una etiqueta de retorno de UPS para
acelerar el recibo del producto defectuoso para su evaluación.
B. Condiciones que anulan la garantía limitada de un año de Munchkin, Inc.
POLÍTICA: La garantía limitada de un año de Munchkin, Inc. no cubre defectos causados
por uso indebido, mal uso, uso anormal, desgaste excesivo, ensamble inapropiado,
negligencia, exposición a la intemperie, alteración o accidente. Nota importante: Si el
código de lote de la barrera de seguridad fue alterado o removido, todos y cada uno de
los reclamos que pudiesen presentarse contra el fabricante serán nulos.
Si retira o daña los adhesivos su garantía quedará nula.
34
35
Page 19

Servicio Al Cliente
C. REEMBOLSO AL CONSUMIDOR: Munchkin, Inc. no otorga reintegros en concepto
de resarcimiento por barreras de seguridad defectuosas o no conformes. Asimismo,
Munchkin, Inc. no ofrece dinero en efectivo a cambio de productos devueltos que hayan
sido comprados a través de cualquiera de los sitios web de barreras de seguridad de
Munchkin, Inc. Excepción: Munchkin, Inc. otorgará reintegros en efectivo por compras
realizadas a través de cualquiera de los sitios web de barreras de seguridad de Munchkin,
Inc. SOLO en caso de un error de envío o procesamiento por parte de Munchkin, Inc. Si
tiene preguntas, comuníquese con el Equipo de Satisfacción del Cliente
al 1-800-344-2229.
CONTÁCTENOS
Si tiene preguntas sobre la instalación de su barrera de seguridad, o desea enviar
comentarios sobre este producto, comuníquese con nuestro Equipo de Satisfacción del
Cliente llamando al 1-800-344-2229 (Lu a Vi 8:00am-5:00pm PST) o visite nuestro sitio web
en www.munchkin.com
36
FRENCH
FRANCÉS
FRANÇAIS
Page 20

A
B
Renseignements importants
Démarrage Démarrage
INTRODUCTION
Nous vous remercions d’avoir fait l’acquisition d’une barrière de sécurité Munchkin conçue
pour protéger votre famille.
Veuillez vérifier immédiatement l'état de votre barrière. Si vous remarquez qu’elle est
abîmée, ne procédez pas à l'installation. Reportez-vous à la page 52 de ce livret si votre
produit est endommagé.
Montez la barrière loin de jeunes enfants. Certaines pièces détachées présentent un risque
de suffocation.
AVIS DE NONRESPONSABILITÉ
La garantie du fabricant sera nulle pour tout produit ayant fait l’objet d’une mauvaise
utilisation, d’une utilisation abusive ou anormale, d’une usure anormale, d’un mauvais
assemblage, de négligence, d’une exposition aux éléments, d’altération ou d’accident.
Tout dommage matériel au cours de l’installation de la barrière de sécurité relève de
l’entière responsabilité de l’utilisateur.
MISE EN GARDE :
• Des enfants sont décédés ou ont été gravement blessés suite à des
barrières non correctement installées.
• TOUJOURS installer et utiliser les barrières avec toutes les pièces
requises et selon le mode d'emploi.
• CESSER d’utiliser la barrière si l’enfant est capable de l’escalader ou
de la déloger.
• N’utiliser qu’avec le mécanisme de verrouillage bien en place.
• NE JAMAIS utiliser comme barrière de piscine.
• Installer selon les consignes du fabricant.
• Prévu pour une utilisation pour des enfants de 6 à 24 mois.
• Ce produit ne saurait empêcher tous les accidents. Ne jamais laisser
l’enfant sans surveillance.
PIÈCES COMPRISES
S’il manque une pièce ou si une pièce est abîmée, veuillez communiquer avec notre Service à la clientèle au 1-800-344 -2229.
J
I
Gabarit de
montage (2)
Pince supérieure
(1)
Petite vis (4) Cheville (9) Vis moyenne (7) Vis longue (2) Clé Allen Clé
OUTILS NÉCESSAIRES :
• Perceuse
• Tournevis cruciforme
Portillon de
fermeture (1)
Pince inférieure
(1)
• Crayon de papier
• Ruban adhésif
Portillon
charnière (1)
Fixation murale de
fermeture inférieure à
sens unique (1)
Fixation
murale de
fermeture
supérieure (1)
Fixation murale
de fermeture
inférieure à deux
sens (1)
• Ruban à mesurer
Fixation
murale de
charnière
supérieure (1)
Fixation murale
de charnière
inférieure (1)
38
39
Page 21

Installation Installation
Démarrage
ÉTAPE 1: CHOIX DE L'EMPLACEMENT DE LA BARRIÈRE
BARRIÈRE CONÇUE POUR UNE INSTALLATION :
EN HAUT DES ESCALIERS
Si vous installez la barrière en haut des marches d’escalier, elle DOIT être placée sur le pallier supérieur et
s’ouvrir dans le sens opposé aux escaliers.
EN BAS DES ESCALIERS
Si vous installez la barrière en bas des escaliers, nous
recommandons de la placer sur le sol. Si vous devez
installer la barrière sur la première marche en bas des
escaliers, installez-la vers le bord de la marche.
COULOIRS ET ENCADREMENTS DE PORTES
ÉTAPE 2: ASSEMBLAGE DES PORTILLONS
1. Placez le portillon charnière et le portillon de fermeture l'un à côté de l'autre, là où
vous désirez installer la barrière. La barrière clôture des ouvertures de 83.8 a 142.2 cm
REMARQUE : Vérifi ez que le texte sur les portillons est à l'endroit et que les
bouts de chaque portillon sont diminués vers l'intérieur.
40
41
Page 22

Installation Installation
2. Repérez la taille de l’ouverture en déployant le portillon charnière et le portillon de
fermeture vers les cloisons. Pour faciliter l’installation de la barrière par la suite, réservez
un espace de 38mm à 50mm de chaque côté entre les portillons et la cloison.
Espace de 38 à
50 mm
3. Attachez le portillon charnière au portillon de
fermeture avec les pinces supérieure et inférieure.
Si les barreaux ne sont pas en face les uns des
autres, raccourcissez la longueur de la barrière en
ramenant les portillons vers l’intérieur de manière
à ce qu’il y ait assez de place pour fixer
les pinces.
Utilisez les petites vis pour attacher les moitiés
supérieure et inférieure de chaque pince.
Pince supérieure
Pince inférieure
Espace de 38 à
50 mm
ÉTAPE 3: INSTALLATION DE LA CHARNIÈRE SUPÉRIEURE ET
INFÉRIEURE FIXATION MURALE
OUTILS NÉCESSAIRES :
• Perceuse
• Tournevis cruciforme
• Ruban adhésif
• Clé Allen
• Crayon
1. Coupez le gabarit le long des pointillés du modèle "I" et "J".
2. Décidez de quel côté de l'ouverture vous voulez installer
le portillon charnière (le côté duquel la barrière ne n'ouvre
pas). Puis collez le gabarit “J” contre le mur avec le ruban
adhésif. Le gabarit doit être placé au ras du sol ou de
la marche.
3. Marquez les trous pour les vis dans la
pièce découpée avec un crayon puis
retirez la pièce découpée en bas du
gabarit “J”.
4. Déterminez s’il y a un montant derrière la cloison sèche où vous allez installer la fixation
murale de charnière inférieure. Procédez à l’étape 5a ou 5b.
Charnière
supérieure
Charnière
Inférieure
42 43
Petite vis
Page 23

Installation Installation
ÉTAPE 4: INSTALLATION DE LA FERMETURE INFÉRIEURE
FIXATION MURALE
5a. Pour les cloisons sèches sans montant / placoplâtre:
Percez un trou de 5,5m dans la cloison sèche sur la
marque de crayon. Enfoncez une cheville dans
chaque trou. Avec un tournevis ou une perceuse,
enfoncez la vis par la fixation murale de la charnière
inférieure à l’intérieur des chevilles sur la
cloison sèche.
Vis moyenne
Cheville
Vis moyenne
Cheville
5b. Pour les cloisons sèches avec montant:
Percez un avant-trou de 2 mm dans le montant (pas
besoin de cheville). Avec un tournevis ou une
perceuse, enfoncez les vis par la fixation murale de la
charnière inférieure à l’intérieur du montant.
Vis moyenne
Vis moyenne
5a. Cloison sèche
5a. Placoplâtre
5,5mm
5b. Montant
5.5mm
2mm
1. Collez le gabarit « I » contre
le mur au ras du sol avec le
ruban adhésif. Marquez les
trous de vis au crayon puis
retirez le gabarit.
2. Choisissez la xation murale
de fermeture inférieure
à utiliser :
Pour une installation en bas
ou en haut des escaliers:
Choisissez la fixation murale
de fermeture inférieure à
sens unique. L’ouverture
au bord de la fixation doit
être toujours face à soi (sens
contraire aux escaliers) de
manière à ce que la barrière
ne s'ouvre pas du côté
des escaliers.
Pour les couloirs et
embrasures de portes :
Choisissez la fixation murale
de fermeture inférieure
à deux sens pour que la
barrière puisse s’ouvrir dans
les deux sens.
Gabarit I
(Côté
fermeture)
Bord ouvert
Fixation murale de
fermeture inférieure à
sens unique
Fixation murale de
fermeture inférieure à
deux sens
44 45
Page 24

Installation Installation
ÉTAPE 5: PLACEMENT DE LA BARRIÈRE
3. Après avoir choisi la fixation murale, déterminez s’il y a un montant derrière la cloison
sèche là où vous désirez installer la fermeture inférieure. Procédez à l’étape 4a ou 4b.
1. L’espace entre la barrière et le mur doit être inférieur à 57mm. Au besoin, ajustez la
broche de charnière tige de réglage supérieure et inférieure tige de réglage avec la
clé et clé Allen à la longueur appropriée. Puis serrez l’écrou contre le tube à l'aide de
4a. Pour les cloisons sèches sans montant / placoplâtre:
Percez un trou de 5,5 mm dans la cloison sèche sur
chaque marque de crayon. Enfoncez une cheville
dans chaque trou.
4a. Cloison sèche
la clé.
Insérez la barrière dans l’ouverture en insérant simultanément la broche de charnière
supérieure et inférieure de la barrière dans la fixation de charnière supérieure et
inférieure sur le mur jusqu'à ce qu'elle s'encliquète.
Avec un tournevis ou une perceuse, enfoncez les
vis par la fixation murale de fermeture inférieure à
l’intérieur de la cheville.
5,5 mm
La tige de réglage
4a. Placoplâtre
Cheville
Vis moyenne
5,5 mm
< 57mm
Broche de charnière
supérieure
< 57mm
4b. Pour les cloisons sèches avec montant:
Percez un avant-trou de 2 mm dans le montant sur
chaque marque de crayon (pas besoin de cheville).
Avec un tournevis ou une perceuse, enfoncez les
vis par la fixation murale de fermeture inférieure à
4b. Montant
Fixation de
fermeture
inférieure
Broche de charnière
inférieure
l’intérieur du montant.
2. Sur le côté ouvrant de la
2 mm
barrière, desserrez l’écrou
autour de la tige de réglage
inférieure à l’aide de la clé.
Étendez la tige de réglage en
OU
la tournant dans le sens horaire
jusqu’à ce qu’elle repose
Vis moyenne
46 47
dans la fixation de fermeture
inférieure sur le mur. Puis serrez
l’écrou contre le tube à l'aide
de la clé.
Fixation murale de
fermeture inférieure à
sens unique
Fixation murale de
fermeture inférieure à
deux sens
Page 25

Installation Installation
ÉTAPE 6: INSTALLATION DE LA FERMETURE SUPÉRIEURE
FIXATION MURALE
1. Placez la fixation de fermeture supérieure contre le mur. Au besoin, desserrez l’écrou
et allongez la tige de réglage sur le côté du loquet supérieur jusqu’à ce qu’elle repose
dans la fixation. Marquez ensuite les emplacements pour les trous de vis au crayon.
3a. Pour les cloisons sèches sans montant / placoplâtre:
Percez un trou de 5,5 mm dans la cloison sèche sur
la marque de crayon. Enfoncez une cheville. Avec un
tournevis ou une perceuse, enfoncez la vis par la
fixation murale de fermeture supérieure à l’intérieur
de la cheville.
Cheville Vis longue
3b. Pour les cloisons sèches avec montant:
Percez un avant-trou de 2 mm dans le montant
(pas besoin de cheville). Avec un tournevis ou une
perceuse, enfoncez la vis par la fixation murale de
fermeture supérieure à l’intérieur du montant.
3a. Cloison sèche
5,5mm
3a. Placoplâtre
5,5mm
3b. Montant
2 mm
2. Déterminez s’il y a un montant derrière la cloison sèche où vous allez installer la fixation
murale de fermeture inférieure. Procédez à l’étape 3a ou 3b.
48 49
Vis longue
Page 26

Installation
Mode d’emploi
Mode d’emploi
RÉGLAGE DU BOULON D’AJUSTEMENT
OUTILS NÉCESSAIRES :
• Clé
• Clé Allen
Vérifier à nouveau que le
boulon d'ajustement jusqu'à ce
qu’elle repose complètement
dans la fixation supérieure et
inférieure. Si nécessaire, utilisez
la clé pour serrer fermement
le boulon.
Fixation
murale de fermeture
inférieure à sens unique
REMARQUE : L’espace entre la barrière et le mur doit être inférieur à 57 mm.
Fixation de
fermeture
supérieure
OU
Fixation murale
de fermeture
inférieure à deux sens
OUVERTURE DE LA BARRIÈRE
Appuyez sur le levier de la fixation de fermeture supérieur vers l’avant puis soulevez
la barrière.
FERMETURE DE LA BARRIÈRE
< 57 mm< 57 mm
Refermez la barrière en rabattant et levage le portillon.
REMARQUE :
fixation supérieure et inférieure, et ne laissez jamais votre enfant sans surveillance.
Assurez-vous toujours que la barrière est correctement verrouillée dans la
NETTOYAGE DE LA BARRIÈRE
Utilisez un savon doux et essuyez avec un chiffon humide. Faites attention de ne pas
laver ou essuyer les autocollants en bas de la barrière.
50
La garantie sera annulée si les autocollants ont été retirés ou sont abîmés.
51
Page 27

Service à la clientèle
GARANTIE LIMITÉE D’UN AN
Service à la clientèle
A. Les barrières de sécurité de Munchkin, Inc. comprennent une garantie limitée d'un an à
compter de la date d’achat.
MODALITÉS : En cas de défectuosité pendant la période de garantie, Munchkin, Inc.
remplacera ou réparera, à son gré, le produit sous garantie. La garantie limitée de
Munchkin, Inc. n’est offerte qu'à la personne ayant fait l'achat initial de la barrière.
PROCÉDURE : Communiquez-nous toutes les informations pertinentes concernant le
problème. Communiquez avec le service après-vente de Munchkin Inc. en appelant le
1-800-344-2229 u lundi au vendredi 8 h à 17 h (heure du Pacifique) ou par courriel
cserv@munchkin.com. Les renseignements suivants, si applicables, sont nécessaires pour
toute réclamation :
• Nom de la barrière
• Numéro de modèle
• Code date
• Copie de ticket de caisse
Ces renseignements peuvent être faxés, envoyés par courrier ou par courriel à l’attention
de : Munchkin. Inc Consumer Satisfaction.
PROBLÈMES ATYPIQUES : Pour les problèmes atypiques nécessitant l'évaluation visuelle
du produit par Munchkin Inc. renvoyez votre barrière à l'attention du service Quality
Assurance. Munchkin Inc. vous dédommagera pour les frais d’expédition encourus en vous
offrant un cadeau de valeur égale aux frais d'envoi. Munchkin pourra également choisir
de vous fournir une étiquette de port préaffranchi par UPS pour expédier rapidement le
produit défectueux à examiner.
B. Conditions causant l’annulation de la garantie limitée d’un an de Munchkin, Inc.
C. REMBOURSEMENT : Munchkin ne fournit pas de remboursement si les barrières de
sécurité sont défectueuses ou non conformes. Munchkin, Inc. ne rembourse pas en
espèces le produit renvoyé et acheté sur un des sites Internet vendant les barrières
de sécurité de Munchkin, Inc. Exception : Munchkin Inc. fournira un remboursement
en espèces pour les achats faits en ligne sur les sites vendant les barrières de sécurité
de Munchkin, Inc., UNIQUEMENT s’il y eu erreur de la part de Munchkin, Inc dans le
traitement de la commande ou la livraison. Pour toutes questions, veuillez communiquer
avec notre service après-vente au 1-800-344-2229.
NOUS CONTACTER
Si vous avez des questions ou désirez nous faire part de vos suggestions concernant ce
produit, veuillez communiquer avec notre Service après-vente au 1-800-344-2229 (du lundi
au vendredi de 8 h à 5 h, heure du Pacifique) ou visitez note site Web : www.munchkin.com
MODALITÉS : La garantie limitée d’un an de Munchkin, Inc.ne couvre par les défauts suite
à une mauvaise utilisation, une utilisation abusive ou anormale, une usure anormale, un
mauvais assemblage, la négligence, l’exposition aux intempéries, une modification du
produit ou un accident. Note importante : Si le numéro de lot de la barrière a été modifié
ou éliminé, il ne pourra être fait aucune réclamation auprès du fabricant.
52 53
Page 28

Page 29

PRODUCT AND DESIGN ARE TM & ©2007-2016 MUNCHKIN, INC. MUNCHKIN, THE HEART LOGO, AND IT’S THE
LITTLE THINGS ARE TRADEMARKS OR REGISTERED TRADEMARKS OF MUNCHKIN, INC. 7835 GLORIA AVE. VAN
NUYS, CA 91406. MUNCHKIN BABY CANADA LTD., 50 PRECIDIO CT., UNIT A. BRAMPTON, ON L6S 6E3. PATENT:
HTTP://WWW.MUNCHKIN.COM/PATENTS. MADE IN CHINA/HECHO EN CHINA/FABRIQUÉ EN CHINE.
 Loading...