

Page 1
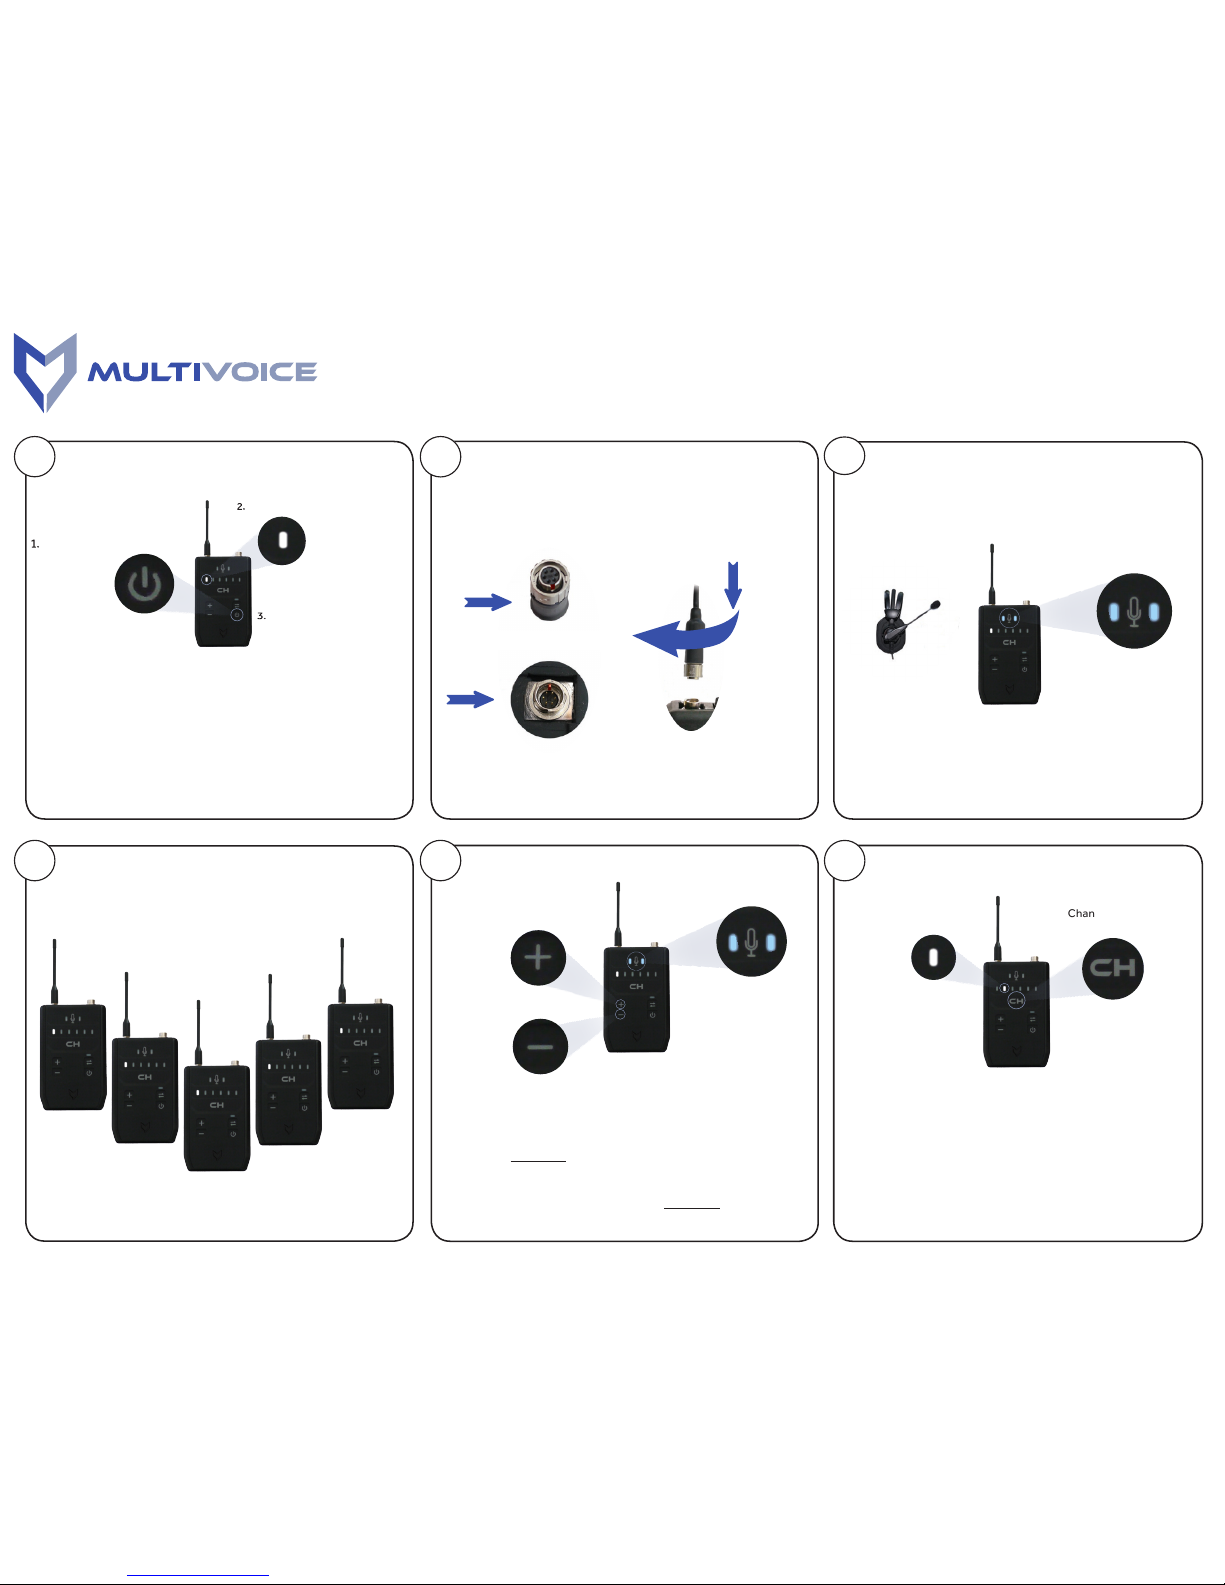
Add more sound
Changing channels
Connect headset
Turn me on
…Twist 1/4—turn to
Lock into place.
NOTE: You must h ave eight (8) or fewe r Intercoms syn chronized in a
MULTIVOICE n etwork for eac h unit to have a “live” m icrophone. I f you
are usin g 8 or fewer Intercom s, you can acti vate the mic by A) f lipping
the swit ch on the Switch-to -Talk™ box between yo ur Headset an d
Intercom , or B) by pushing t he microphon e button on the f ront of the
Intercom , or C) by lowering t he boom microp hone on your Hea dset.
Repeat Steps 1—3 above to add more MULTIVOICE Intercoms to your
network system.
Press to
Increase
Volume
Channel Button
Press to
Decrease
Volume
…with the Pin inside the Male Connector
on the Intercom.
1
2
3
Activate mic
4 5
6
NOTE #1: Af ter you releas e the Power Butt on, the LED Lig ht will
begin to ash again. T his is normal .
NOTE #2: To TURN OF F a MULTIVOICE Int ercom, press a nd hold the
Power Butt on until all L ights on the I ntercom turn o . Your Intercom is
now turn ed o.
NOTE #3 FOR FOOT BALL USE: I
f you plan to u se 1 or more MV-AUDIB LE
Intercom s in a Press Box duri ng a game or prac tice, you must e nsure
that A) You tur n on these Inter coms first , and B) that you onl y use them
in the Pres s Box during sai d game/pract ice. Failure to do so m ay cause
temporary loss of communication.
NOTE: Ea ch additio nal MULTIVOICE I ntercom will b e connecte d
to the oth er units in yo ur system as soo n as you complet e the
steps in Se ction #1 above.
NOTE: If on e of the Chann el LED Light s are lit on your M ULTIVOICE
Intercom, you will hear everyone speaking on that particular Channel.
If you want t o BE HEARDTM by others o n that same Ch annel, th e 2 Blue
LED Light s on the fron t of your Interco m must also be li t. To enter Talk
Mode, pl ease push th e mic button, ip the switc h on the
Switch-to-Talk
box, or low er your boom mi c so it is positio ned in front of yo ur mouth;
the Blu e LEDs will lig ht-up and you can n ow BE HEARD. To deactivate
your mic a nd return to Lis ten Mode, pus h the mic butto n or lift you r
boom mic ; the Blue LED L ights wil l now turn o.
NOTE: MULTIVOICE Intercoms come standard with 4-6
Channels, (4 channels for MV-AUDIBLE and 6 channels for
MV-NEX US and MV-PROTECTOR) w ith each Chan nel LED Light
signif ying the res pective Cha nnel, star ting (from Le ft to Right)
with Channel #1 and ending with Channel #4 for MV-AUDIBLE
and Channel #6 for MV-NEXUS and MV-PROTECTOR. To change
from one C hannel to the n ext, simpl y push the Chan nel Button
once. (Se e section #7 on the b ack page for mo re info.)
Example: Channel 2
Connec t one cable h eadset to a MULTIVOIC E Intercom as show n below.
Choose 1 Intercom and . . .
Light wi ll fla sh, then t urn soli d.
After Li ght turn s solid,
release Po wer Butto n.
Push & Hol d the Power Bu tton.
Then push the cable Connector
Down and…
Align the Female Connector on the
Cable Slot…
QuickStart Guide
multivoice™ Intercoms
MV-AUDIBLE™, MV-NEXUS™ and MV-PROTECTOR™
Once a cab le headset is con nected to a MU LTIVOICE I ntercom, the
defaul t setting is for t he micropho ne to be turned on . You will know
your mic is “l ive” because th e Blue LED lig hts on the fron t of your
Intercom a re lit.
Page 2
9
troubleshooting
7
Everyday use
8
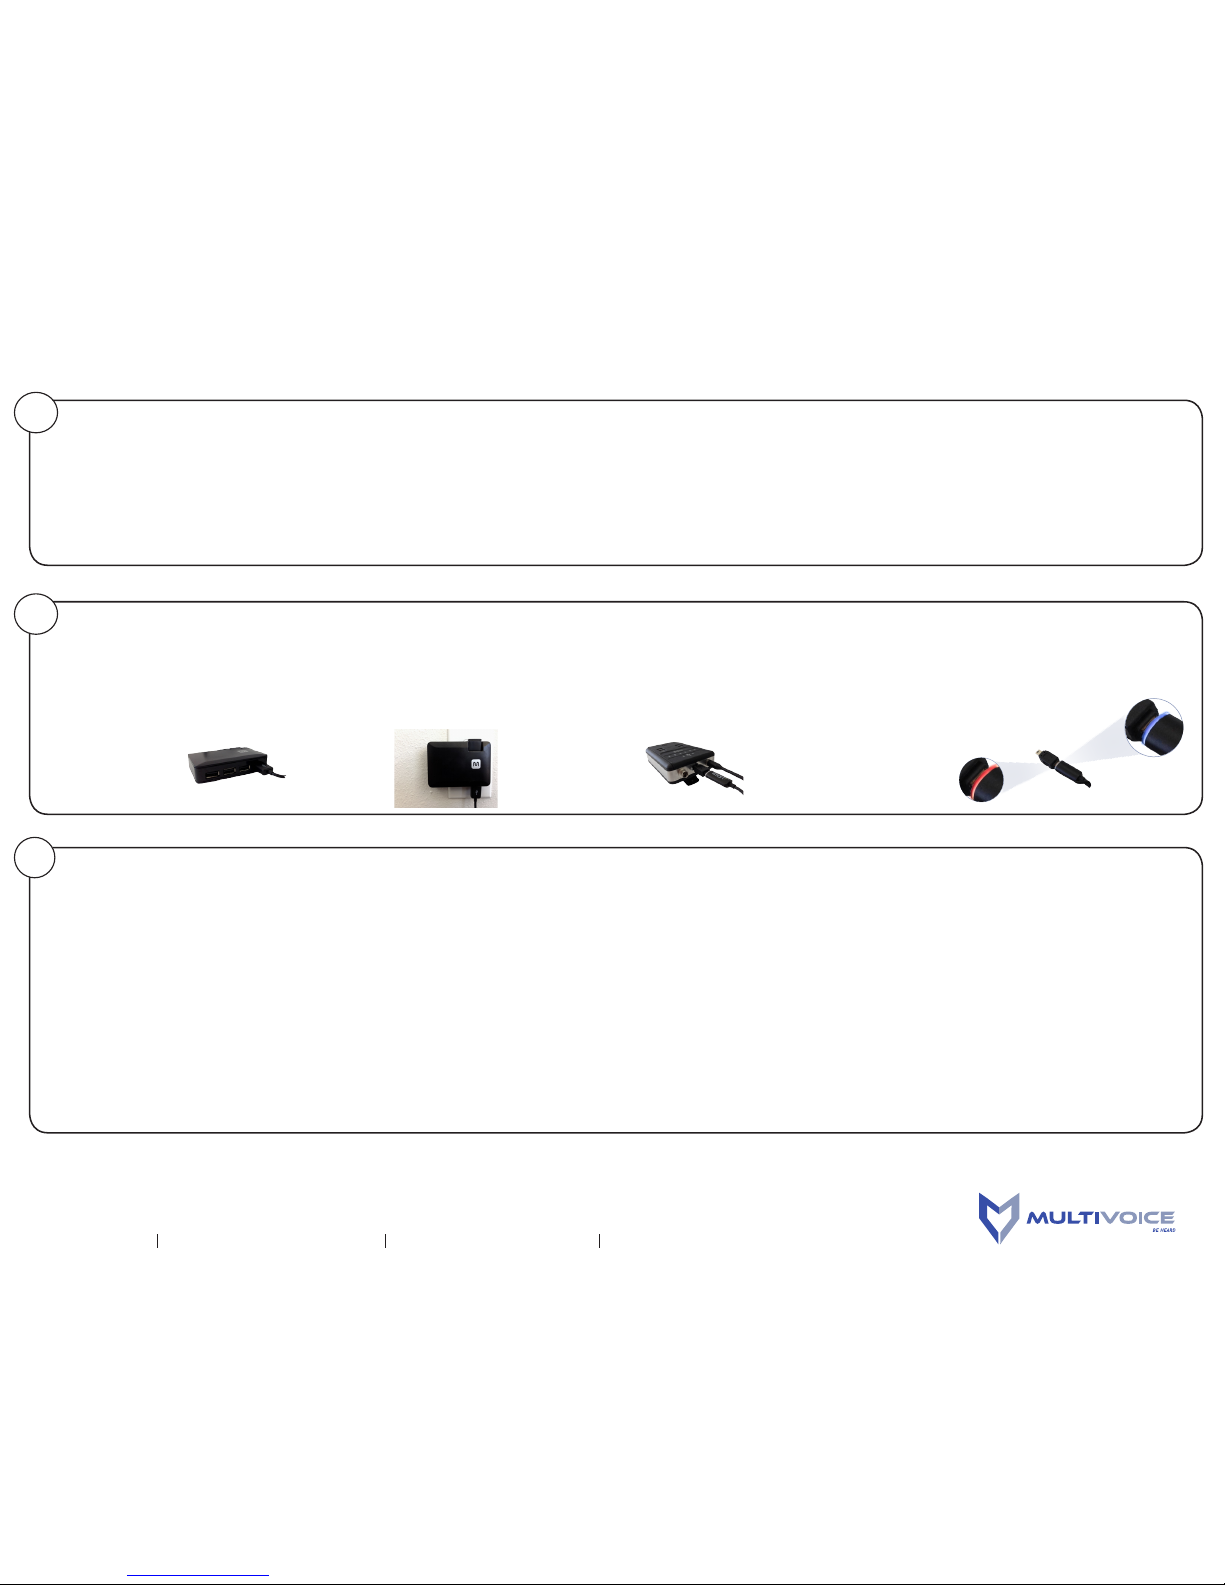
recharging
MULTIVOICE , MV-AUDIBLE , MV-NEXUS , MV-PROTECTOR, BE H EARD and t he MULTIVOICE ma rks and log os are each tra demarks of M ULTIVOICE.
TM
MULTIVOICE Intercoms o perate without a Bas e Station, so setup takes me re seconds. MULTIVOICE Intercom s also support an un limited number of u sers, with up to 8 Talk Slots on a
single gro up system. And mili tarygrade MULTIVOICE I ntercoms deliver up to 18 hour s of Talk Time in any weat her at up to 4,000 f eet.
MULTIVOICE Intercoms co me standard with 4- 6 channels, with e ach Channel LED Ligh t signifying th e respective Chann el, startin g (from Left to Right) with C hannel #1 and ending
with Chan nel #4 for MV-AUDIBLE and Chann el #6 for MV-NEXUS and MV-PROTECTOR In tercoms. By default, e ach user start s on Channel #1. Each tim e you push the Channel b utton,
you will switc h to a new Channel and hea r 1 or more tones in your head set signifying w hat Channel you have join ed: for example, 2 tone s for Channel 2; 3 tones for Ch annel 3; etc.
Additionally, the corresponding Channel LED Light will also be lit.
A. If your head set cable is properl y connected to your MULTIVOICE I ntercom and the Channe l LED Lights are not lit , your intercom has been in advertently turn ed o. Please restart
your intercom by fo llowing the steps in Se ctions 1, 2 and 3 on the fro nt page. This shoul d rectify the pro blem.
B. If you ca n no longer hear anyon e in your headset, rs t verify that your he adset is properly conn ected to your MULTIVOICE Intercom . If not, reconnect t he headset cable. T his
should rectify the problem.
C. If your headset ca ble is properly conn ected to your MULTIVOICE Intercom b ut the Channel LED Li ghts are ickering , turn o your intercoms out lined in Note #2 in sectio n 1. Then
restar t your intercom by following t he steps in Section s 1, 2 and 3 on the front page. T his should recti fy the problem.
D. If you can hear peopl e speaking in your he adset but they cannot h ear you, rst verify t hat the 2 Blue LED Lig hts on the front of your In tercom are lit. If not, p lease follow the steps
in Sectio n 3 to activate your microp hone. If this does n ot rectify the pro blem, please conta ct MULTIVOICE at 385-236-5111.
E. If (1) your mi crophone button is pus hed and (2) your microphon e is lowered and proper ly adjusted in front of you r mouth and (3) you can hear p eople speaking i n your headset
but they can not hear you, please ver ify that the Blu e LED Lights on the fron t of your MULTIVOICE Intercom are lit . If not, please turn o your Intercom by pressing an d holding the Power
Button unti l all LED Lights turn o . Then rest art your Intercom as out lined in Section s 1, 2 and 3 on the front page. T his should recti fy the problem.
F. If you are stil l experiencing di culties, pleas e contact your autho rized MULTIVOICE De aler. Or contact MULTIVOICE at 385-236-5111.
To recharge your MULTIVOICE
Intercom, rst connect the large
end of a USB charging cable to one
of the four (4) USB slots on the
USB charging plug that shipped
with your Intercoms
(as shown to the right ).
Then insert the USB
charging plug into a
standard electrical outlet
(as shown below).
Next connect the small end
of the USB charging cable
into the mini USB port on
top of the MULTIVOICE
Intercom (as shown below).
After all connections are made, the
MULTIVOICE Intercom will begin
charging, with the LED light on the mini
USB connector glowing Red until the
MULTIVOICE Intercom battery is fully
charged, at which point the
LED light will glow Blue (as
shown to the right).
QuickStart Guide
multivoice™ Intercoms
MV-AUDIBLE™, MV-NEXUS™ and MV-PROTECTOR™
385 -236 -5111
[v1.2; 11-2015]
www.MULTIVOICE.com © MULTIVOICE 2 015
 Loading...